

Page 1
Refrigerator
RF4287HA
user manual
Imagine the possibilities
English
Thank you for purchasing a Samsung product.
To receive more complete service or accessory parts,
please register your product at or contact
www.samsung.com/register
1-800-SAMSUNG (726-7864)
Free Standing Appliance
DA68-01922A.indb 01DA68-01922A.indb 01 2013.3.4 1:32:30 PM2013.3.4 1:32:30 PM
Page 2
Safety Information
SAFETY INFORMATION
Before using your new Samsung French Door
Refrigerator, please read this manual thoroughly to
ensure that you know how to operate the features and
functions that your new appliance offers safely and
effi ciently.
This appliance is not intended for use by persons
(including children) with reduced physical, sensory, or
mental capabilities, or those who lack experience and
knowledge, unless they have been given supervision
or instruction concerning the use of the appliance by a
person responsible for their safety.
Because the following instructions cover various
models, the characteristics of your refrigerator may
differ slightly from the refrigerator described in this
manual. If you have any question, contact us at
1-800-SAMSUNG or fi nd help and information online
at www.samsung.com.
Important safety symbols and precautions:
Hazards or unsafe practices that may result
WARNING
CAUTION
in severe personal injury or death.
Hazards or unsafe practices that may result in
minor personal injury or property damage.
Do NOT attempt.
Do NOT disassemble.
Do NOT touch.
Follow directions carefully.
SEVERE WARNING SIGNS
WARNING
- Deteriorated insulation of electrical parts may
• Do not place this refrigerator in direct sunlight or
• Do not plug several appliances into the same
- This provides the best performance and also
• If the wall socket is loose, do not insert the power
- There is a risk of electric shock of fi re.
• Do not use a cord that shows cracks or abrasion
• Do not bend the power cord excessively or place
• Never unplug your refrigerator by pulling on the
- Damage to the cord may cause a short-circuit, fi re
• Do not use aerosols near the refrigerator.
- Aerosols used near the refrigerator may cause an
FOR INSTALLATION
• Do not install the refrigerator in a damp place
or place where it may come in contact with
water.
cause an electric shock or fi re.
expose to the heat from stoves, room heaters or
other appliance.
multiple power strip. The refrigerator should
always be plugged into its own individual electrical
outlet which has a voltage rating that matches the
voltage listed on the refrigerator's rating plate.
prevents overloading house wiring circuits, which
could cause a fi re hazard from overheated wires.
plug.
damage along its length or at either end.
heavy articles on it.
power cord. Always grip plug fi rmly and pull
straight out from the outlet.
and/or electric shock.
explosion or fi re.
Unplug the power plug from the wall socket.
Make sure the refrigerator is grounded to
prevent electric shock.
Call the contact center for help.
Note.
These warning signs are here to prevent injury to
you and others.
Please follow them carefully.
After reading this section, keep it in a safe place
for future reference.
02_ Safety information
DA68-01922A.indb 02DA68-01922A.indb 02 2013.3.4 1:32:31 PM2013.3.4 1:32:31 PM
• Connect the power plug in proper position with
-
• When moving the refrigerator, be careful not to roll
- This constitutes a fi re hazard.
• Make sure that the power plug is not squashed or
• Keep the packing materials out of reach of
• This refrigerator must be properly installed
and located in accordance with the manual
before it is used.
the cord hanging down.
If you connect the power plug upside down, the wire
can get cut off and cause a fi re or electric shock.
over or damage the power cord.
damaged by the back of the refrigerator.
children.
Page 3
- There is a risk of death from suffocation if a child
puts the packing materials on his or her head.
• The appliance must be positioned so that the plug
is accessible after installation.
• You need to remove all the protective plastic fi lm
before you initially plug the product in.
• The refrigerator must be safely grounded
-
Always make sure that you have grounded the
refrigerator before attempting to investigate
or repair any part of the appliance. Power
leakages can cause severe electric shock.
•
Never use gas pipes, telephone lines or other
potential lightning attractors as an electrical ground.
-
Improper use of the grounding plug can result in a risk
of electric shock. If it is necessary to use an extension
cord, use only a 3-wire extension cord that has a
3-blade grounding plug and a 3-slot receptacle that
will accept the plug on the appliance. The marked
rating of the extension cord should be AC115-120 V,
10 A, or more. If a grounding adapter is used, make
sure the receptacle box is fully grounded.
• If the power cord is damaged, have it
replaced immediately by the manufacturer or
its service agent.
CAUTION SIGNS FOR
CAUTION
- If your refrigerator is not level, the internal cooling
•
• Allow the appliance to stand for 2 hours after
INSTALLATION
• Allow suffi cient space to install the
refrigerator on a fl at surface.
system may not work correctly.
Keep the ventilation space in the appliance
enclosure or mounting structure clear of obstruction.
installation.
SEVERE WARNING SIGNS
WARNING
-
• Do not put a container fi lled with water on the
- If spilled, there is a risk of fi re or electric shock.
• Children should be supervised to ensure that they
- Keep fi ngers out of "pinch point" areas; clearances
FOR USING
• Do not insert the power plug with wet hands.
•
Do not store articles on the top of the appliance.
When you open or close the door, the articles may fall
and cause personal injury and/or material damage.
refrigerator.
do not play with the appliance.
between the doors and cabinet are necessarily
small. Be careful when you open the doors when
children are in the area.
• Do not let children hang on the door. A serious
injury may occur.
• Do not let children enter inside of the refrigerator.
There is a risk of children entrapment.
• Do not insert your hands into the bottom area
under the appliance.
- Any sharp edges may cause personal injury.
• Do not let children step on a drawer’s cover.
- The drawer may break and cause them to slip.
• Do not overfi ll the refrigerator with food.
- When you open the door, an item may fall out and
cause personal injury or material damage.
• Do not touch the inside walls of the freezer or
products stored in the freezer with wet hands.
- This may cause frostbite.
• Never put fi ngers or other objects into the water
dispenser hole, ice chute, or ice maker bucket.
- It may cause personal injury or material damage.
• Do not spray fl ammable gas near the refrigerator.
- There is a risk of explosion or fi re.
• Do not store volatile or fl ammable substances in
the refrigerator.
- The storage of benzene, thinner, alcohol, ether,
LP gas and other such products may cause
explosions.
• Do not store pharmaceuticals products, scientifi c
materials, or temperature sensitive products in the
refrigerator.
- Products that require strict temperature controls
must not be stored in the refrigerator.
• Do not place or use an electrical appliance inside
the refrigerator, unless it is of a type recommended
by the manufacturer.
• Do not use mechanical devices or any other
means to accelerate the defrosting process, other
than those recommended by the manufacturer.
• Do not damage the refrigerant circuit.
• Do not disassemble or repair the refrigerator
by yourself.
- You run risk of causing a fi re, malfunction and/or
personal injury.
- When the interior or exterior LED lamp has gone
out, please contact your service agents.
• Children should be supervised to ensure that
they do not play with the appliance.
• Bottles should be stored tightly together so that
they do not fall out.
Safety information _03
DA68-01922A.indb 03DA68-01922A.indb 03 2013.3.4 1:32:31 PM2013.3.4 1:32:31 PM
Page 4
• This product is intended only for the storage of
food in a domestic environment.
•
If a gas leak is detected, avoid any naked fl ames
or potential sources of ignition and air the room in
which the appliance is standing for several minutes.
• Use only the LED Lamps provided by
manufacturer or service agents.
• If there are burning smells or smoke, pull out
power plug immediately and contact your
Samsung Electronics service center.
• If you experience diffi culty when changing the
light, contact a service agent.
• If the product is equipped with LED Lamps, do
not disassemble the Lamp Cover and LED Lamp
by yourself.
- Please contact your service agents.
• If any dust or water is in refrigerator, pull out the
power plug and contact your Samsung Electronics
service center.
- Otherwise there is a risk of fi re.
CAUTION
- When the contents freeze, the glass may break
• Do not block air holes.
- If the air holes are blocked, especially with a
• If the refrigerator is disconnected from the power
•
- Letting the refrigerator run for a long time without
- Wipe excess moisture from the inside and leave
CAUTION SIGNS FOR USING
•
Do not re-freeze frozen foods that have thawed
completely. Do not place carbonated or fi zzy
drinks in the freezer compartment. Do not put
bottles or glass containers in the freezer.
and cause personal injury.
• Service warranty and Modifi cation.
-
Any changes or modifi cations performed by
a 3rd party on this fi nished appliance are not
covered under Samsung warranty service, nor
can Samsung be responsible for safety issues
that result from 3rd party modifi cations.
plastic bag, the refrigerator can be over cooled. If
this cooling period lasts too long, the water fi lter
may break and cause water leakage.
supply, you should wait for at least fi ve minutes
before plugging it back.
If you have a long vacation planned or the refrigerator
is not to be used for a long period of time, you must
empty the refrigerator and pull out the power plug.
using it can cause the insulation to deriorate and
may cause a fi re.
the doors open. Otherwise, odor and mold may
develop.
• To get the best performance from the product:
- Do not place foods too close to the vents at the
rear of the appliance as it can obstruct free air
circulation in the refrigerator compartment.
- Wrap food up properly or place it in airtight
containers before putting it into the refrigerator.
• Fill the water tank, ice tray, and water cubes only
with potable water.
• If the product is fl ooded, make sure to
contact your nearest service center.
- There is a risk of electric shock or fi re.
CAUTION SIGNS FOR
CAUTION
- There is a risk of fi re or electric shock.
- Otherwise, there is a risk of fi re or electric shock.
WARNING
The California Safe Drinking Water and Toxic
Enforcement Act requires the Governor of California
to publish a list of substances known to the State
of California to cause cancer, birth defects, or other
reproductive harm, and requires businesses to warn of
potential exposure to such substances.
This product contains a chemical known to the State
of California to cause cancer, birth defects, or other
reproductive harm. This appliance can cause low-level
exposure to some of the substances listed, including
benzene, formaldehyde, and carbon monoxide.
CLEANING
• Do not directly spray water on the inside or
outside the refrigerator.
• Remove any foreign matter or dust from the
power plug pins. Do not use a wet or damp
cloth when cleaning the plug.
• Unplug the refrigerator before cleaning or
making repairs.
State of California Proposition 65
Warnings:
SEVERE WARNING SIGNS
WARNING
- Take off the doors.
- Leave the shelves in place so that children can not
FOR DISPOSAL
• Risk of child entrapment. Before you throw
away your old refrigerator or freezer:
easily climb inside.
04_ Safety information
DA68-01922A.indb 04DA68-01922A.indb 04 2013.3.4 1:32:31 PM2013.3.4 1:32:31 PM
Page 5

• Please dispose of the packaging material from this
E
C
A
B
D
product in an environmentally friendly manner.
• Leave the shelves in place so that children can not
easily climb inside. Ensure that none of the pipes
on the back of the appliance are damaged prior to
disposal.
• When disposing of this refrigerator, remove the
door/door seals and door latch so that small
children or animals cannot become trapped inside.
Children should be supervised to ensure that they
do not play with the appliance.
• Cyclopentane is used as in the insulation. The
gases in the insulation material require a special
disposal procedure. Please contact your local
authorities in regard to the environmentally safe
disposal of this product. Ensure that none of the
pipes on the back of the refrigerator are damaged
prior to disposal.
contents
SETTING UP YOUR FRENCH DOOR REFRIGERATOR ……………………………………………………… 05
OPERATING YOUR FRENCH DOOR REFRIGERATOR ………………………………………………………… 12
TROUBLESHOOTING …………………………………………………………………………………………… 25
WARRANTY ………………………………………………………………………………………………………… 26
Setting up your French Door Refrigerator
01 SETTING UP
GETTING READY TO INSTALL THE
REFRIGERATOR
Congratulations on your purchase of the Samsung
French Door Refrigerator.
We hope you enjoy the state-of-art features and
effi ciencies that this new appliance offers.
Selecting the best location for the
refrigerator
• A location with easy access to the water supply.
• A location without direct exposure to sunlight.
• A location with a leveled fl oor.
• A location with enough space for the refrigerator
doors to open easily.
• Allow suffi cient space to the right, left, back and
top for air circulation.
• Plaease ensure that appliance can be moved
freely in the event of maintenance & service.
2 inches
3/4
2 inches
3 inches
If the refrigerator does not have enough space, the
internal cooling system may not work properly.
If your refrigerator has an ice maker, allow extra space
at the back for the water line connections.
When you install the refrigerator next to a fi xed wall,
you need a minimum clearance of 3 ¾” (95mm)
between the refrigerator and wall to allow the door to
swing open.
First thing! Make sure that you can easily move your
refrigerator to its fi nal location by measuring doorways
(both width and height), thresholds, ceilings, stairways,
etc.
The following chart details the exact height and depth
of this Samsung French Door Refrigerator.
Model
RF4287HA
Depth
“A”
33 6/8"
(858 mm)
Width
“B”
35 6/8"
(908 mm)
Height
“C”
68 1/2"
(1740 mm)
Overall
Height “D”
69 6/8"
(1774 mm)
Depth
“E”
36 2/8"
(920 mm)
• Allow clearance to the
right, left, back and top
when installing. This
will help reduce power
consumption and keep
B
A
E
C
D
your energy bills lower.
DA68-01922A.indb 05DA68-01922A.indb 05 2013.3.4 1:32:31 PM2013.3.4 1:32:31 PM
setting up _05
Page 6
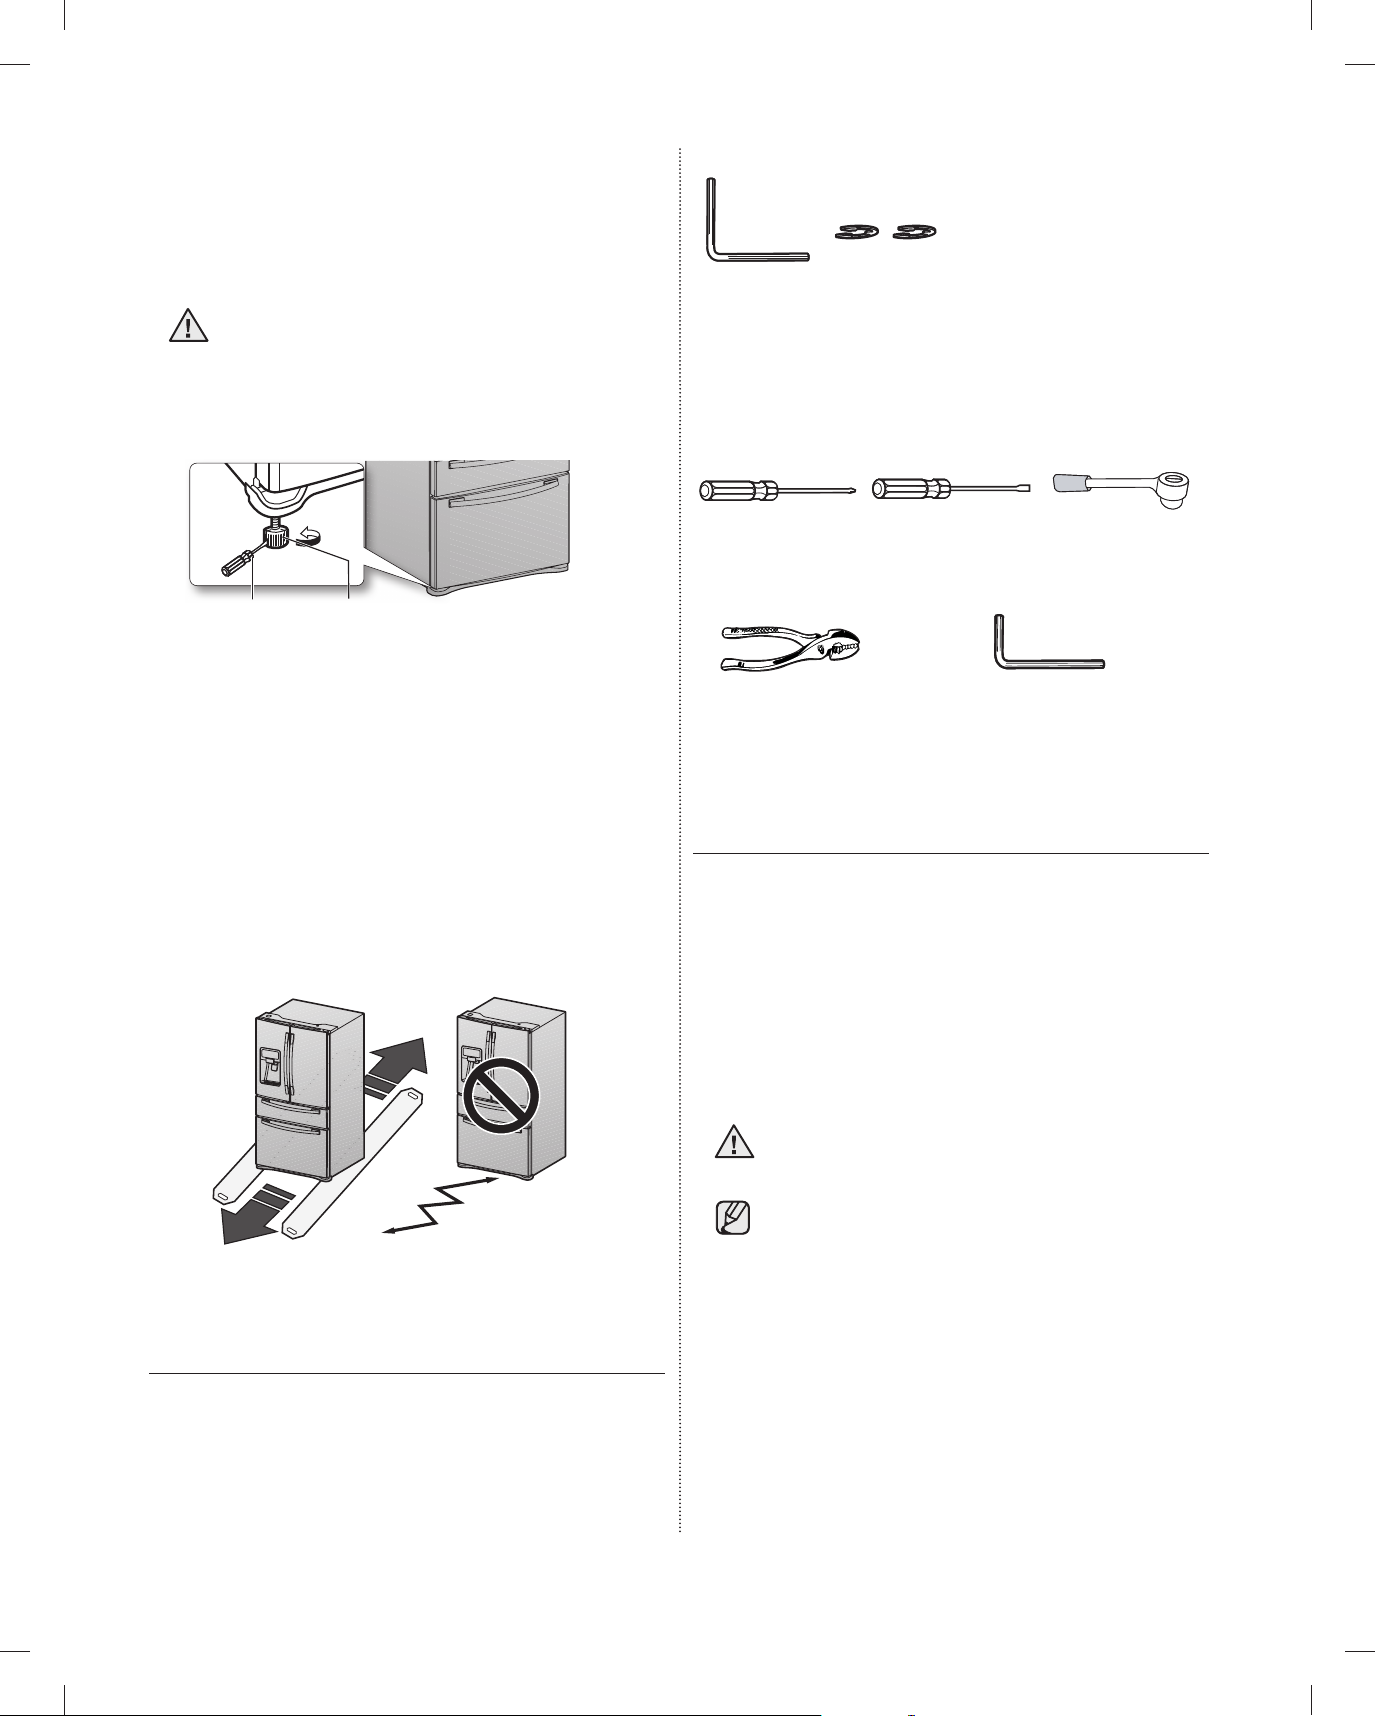
• Do not install the refrigerator where the
Hex wrench
Fastener
Philips screwdriver
(+)
Flat-blade
screwdriver (-)
Socket wrench
(10mm)
Pliers
Allen wrench (3/16”) (5mm)
Flat-blade
screw driver(-)
Control Lever
temperature will go below 50ºF (10ºC).
• Do not locate the refrigerator where it may
become wet.
When moving your refrigerator
To prevent fl oor damage, be sure the front
CAUTION
adjusting legs are in the up position (above
the fl oor).
Refer to ‘Adjusting the doors’ in the manual
(on page 9).
Hex wrench
Required Tools (Not provided)
Fastener
You need the following tools to complete the
installation of your refi rgerator:
Flat-blade
screw driver(-)
FLOORING
Control Lever
For proper installation, this refrigerator must be placed
on a leveled surface of hard material that is the same
height as the rest of the fl ooring. This surface should
be strong enough to support a fully loaded refrigerator,
or approximately 359lbs (165kg). To protect the fi nish
of the fl ooring, cut a large section of the cardboard
carton and place it under the refrigerator where you
are working. When moving a refrigerator, you need
to pull and push it straight forwards or back. Do not
wiggle it from side to side.
Philips screwdriver
(+)
Pliers
Flat-blade
screwdriver (-)
Allen wrench (3/16”) (5mm)
Socket wrench
(10mm)
REMOVING THE REFRIGERATOR
DOORS
Some installations require door removal to transport
the refrigerator to its fi nal location. Do not remove the
door/drawer if you don't need to. If you do not need
to remove the refrigerator doors, go to Adjusting the
Level on page 8. If you need to remove the doors.
continue below.
Before removing the door/drawer, make sure you read
the following items:
Disconnect power to the refrigerator before
WARNING
removing the door or drawer.
• Be careful not to drop, damage or scratch
the door/drawer while removing them.
• Be careful not to get injured while removing the
door/drawer.
ACCESSORIES AND REQUIRED
TOOLS
• Reattach the door/drawer properly to avoid:
- Moisture from air leakage.
- Uneven door alignment.
- Wasting energy due to improper door seal.
The following accessories are included with your
refi gerator:
06_ setting up
DA68-01922A.indb 06DA68-01922A.indb 06 2013.3.4 1:32:32 PM2013.3.4 1:32:32 PM
Page 7
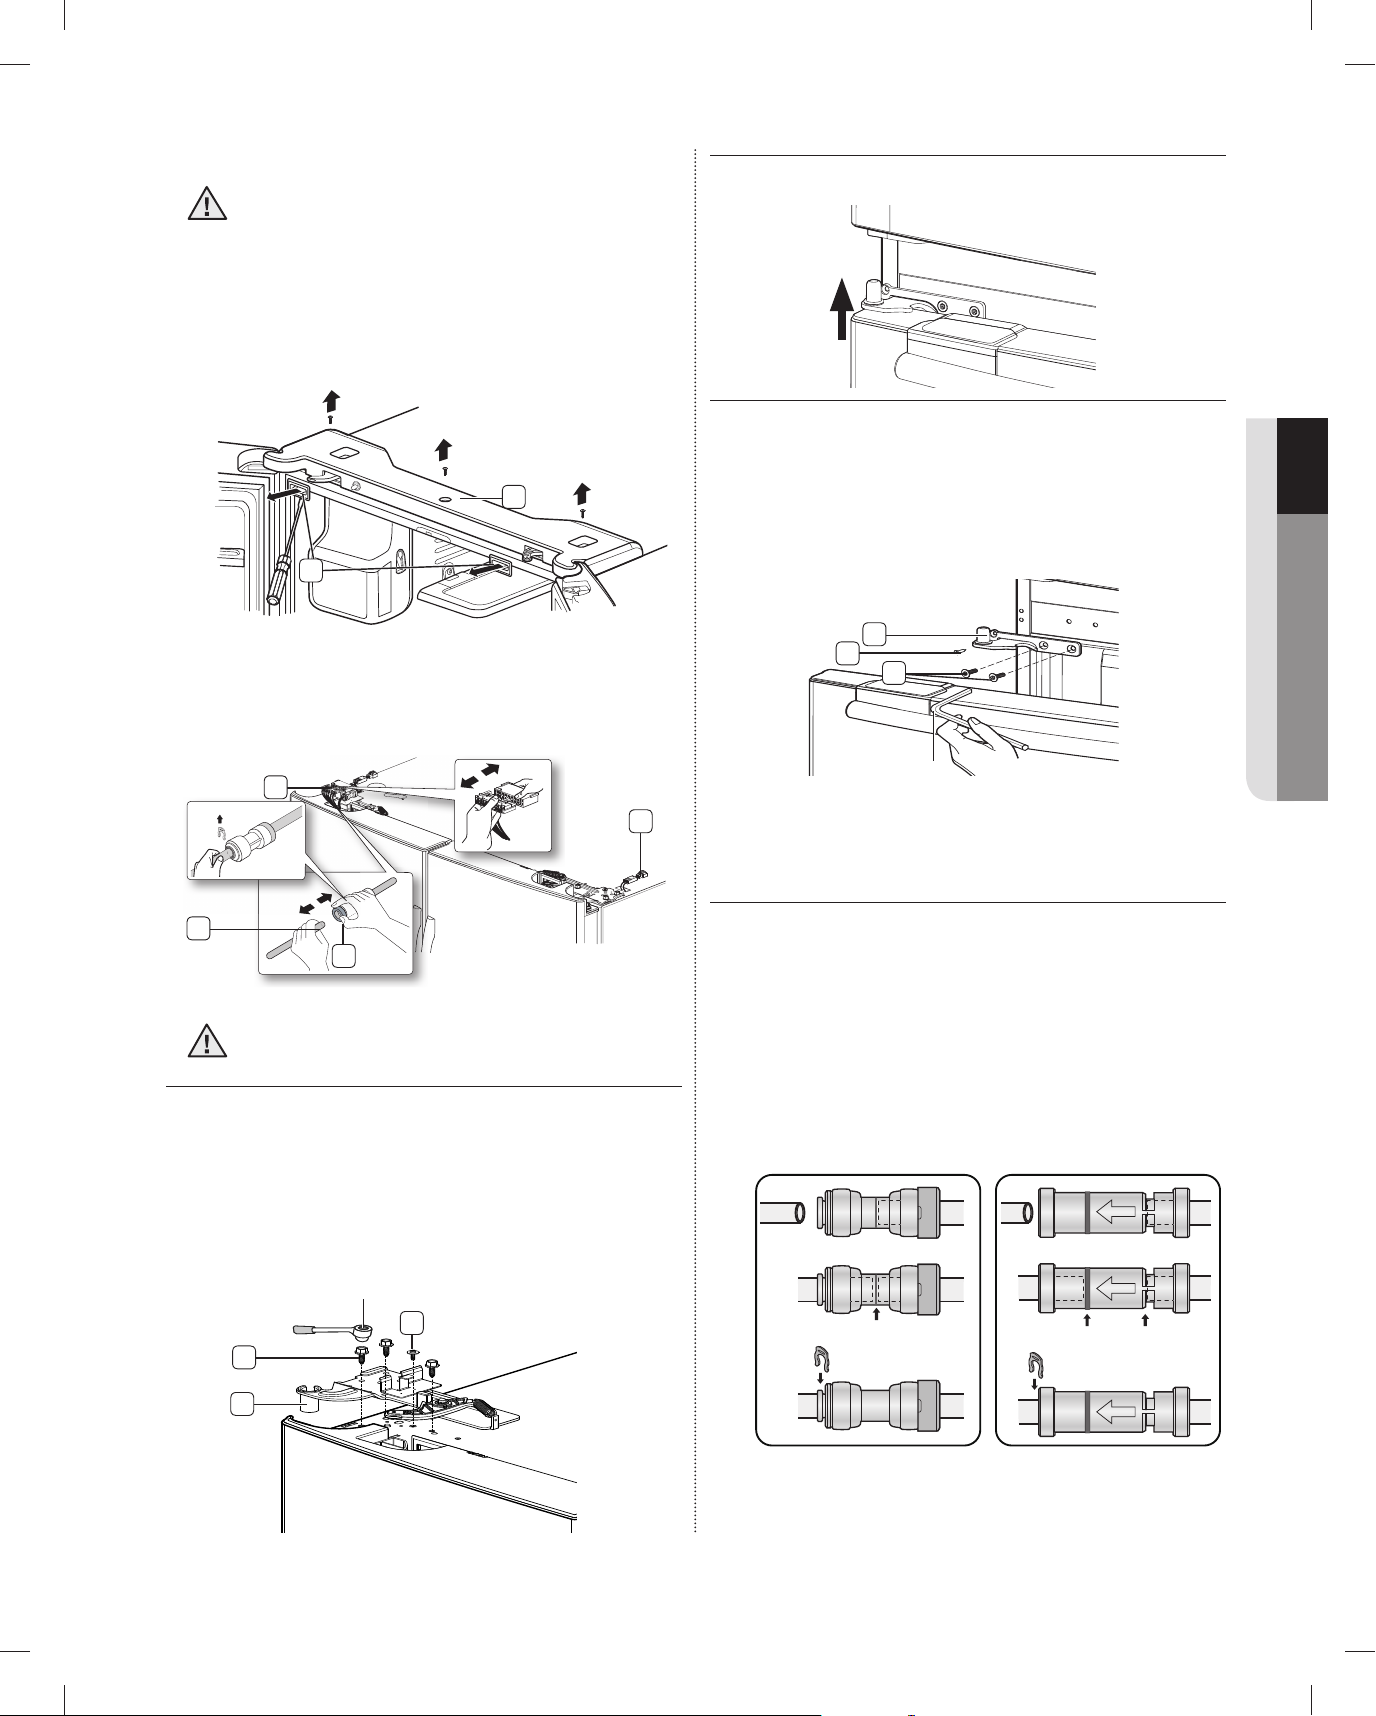
Disassemble the refrigerator doors
Red Clip
(1/4")
Socket wrench
Allen wrench
Center of Transparent coupler
The Guide Lines
Dispenser
clip A (1/4”)
(6.35mm)
clip A (1/4”)
(6.35mm)
Type A
Type B
Be careful not to drop and scratch the doors
WARNING
while removing the doors.
Disassemble the refrigerator doors
1. With the door opened, remove the cap top table
( 1 ) with a fl at-blade screwdriver (-), and close the
door. Remove the 3 screws holding down the top
table ( 2 ) and turn it with several wires connected.
4. Lift the door straight up to remove.
2
1
2. Disconnect one connector ( 3 ) on the right side
door and one connector ( 4 ) on the left side door.
Remove the water line ( 5 ) while pressing the dark
gray color part ( 6 ) of the water line coupler.
4
5
Red Clip
(1/4")
6
3
If a red clip is on the coupler, it must be
CAUTION
removed before removing the tube.
3. Remove the 3 hex head bolts ( 7 ) attached to
the upper left and right door hinges with a socket
wrench (10mm). Remove the ground screw ( 8 )
attached to the upper left and right door hinges
with a philips screwdriver (+). Remove the upper
left and right door hinges ( 9 ).
5. Remove the screw ( 10 ) attached to the lower left
and right door hinges with a philips screwdriver (+).
Remove the 2 hex head bolts ( 11 ) attached to
the lower left and right door hinges with an allen
wrench (3/16”). Remove the lower left and right
door hinges ( 12 ).
12
10
11
Allen wrench
REATTACHING THE REFRIGERATOR
DOORS
To reattach the fridge doors, assemble parts in reverse
order.
1. The Water Line must be fully inserted to the center
of transparent coupler (Type A) or the Guide
Lines (Type B) to prevent water leakage from the
dispenser.
2. Insert the clip in the install pack and check that it
holds the line fi rmly.
Type A
Type B
Dispenser
01 SETTING UP
Socket wrench
7
9
8
Center of Transparent coupler
clip A (1/4”)
(6.35mm)
The Guide Lines
clip A (1/4”)
(6.35mm)
setting up _07
DA68-01922A.indb 07DA68-01922A.indb 07 2013.3.4 1:32:33 PM2013.3.4 1:32:33 PM
Page 8
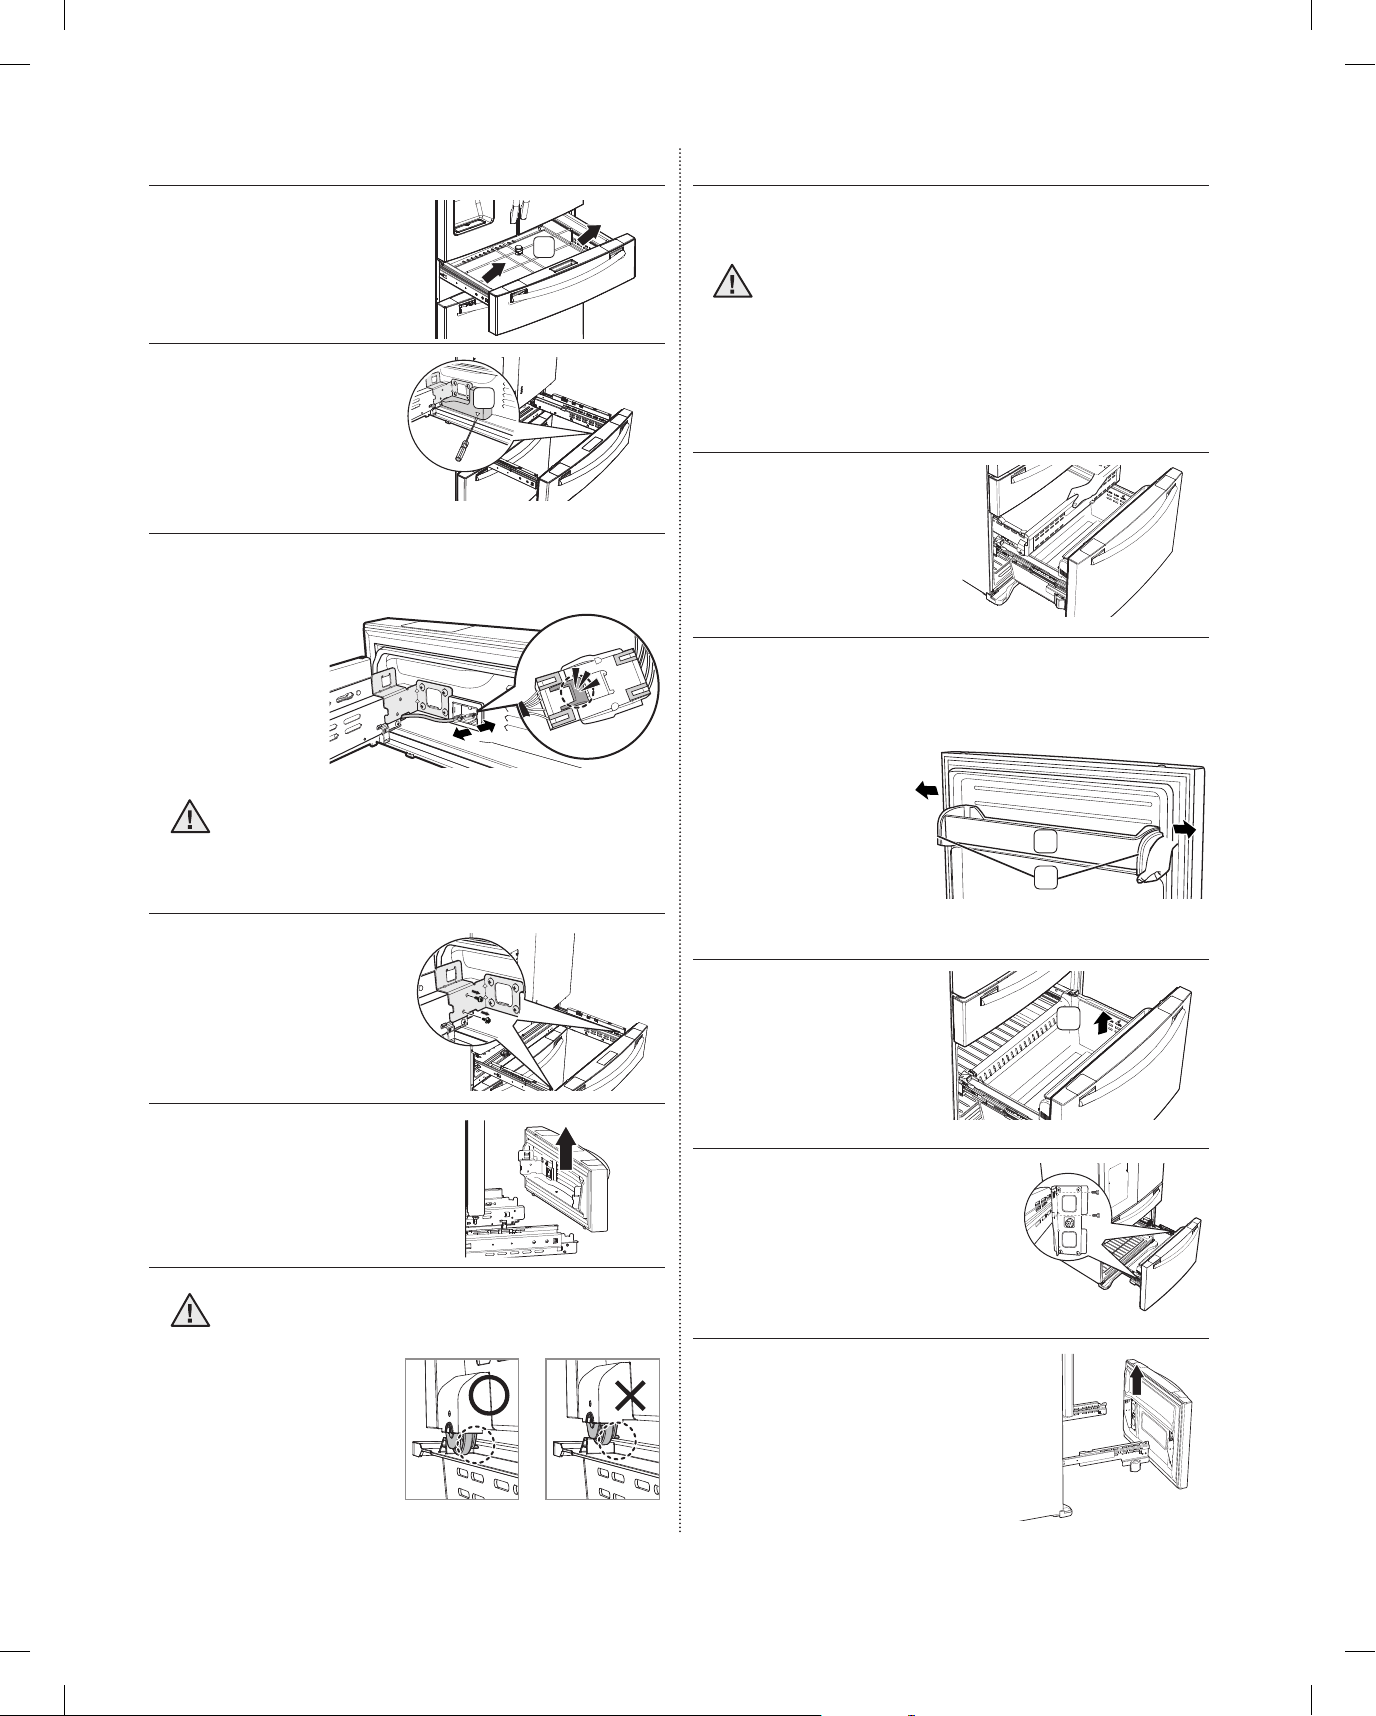
DISASSEMBLE THE FLEX DOOR
ASSEMBLE THE FLEX DOOR
1. Take out the Flex
Zone ( 1 ) by lifting it
up.
1
2. Take off the cover
( 2 ) w/harness with a
2
fl at-blade screwdriver
(-).
3. Press the locking tab and separate the Wire
Connector.
To reattach the fl ex doors, assemble parts in reverse
order.
Be sure to connect the Flex Door Wire
CAUTION
Connector.
If it is not connected, the Flex Room does not
work.
DISASSEMBLE THE FREEZER
DRAWER
1. Take out the upper
drawer by lifting it up.
2. Remove the tilting pocket ( 1 ) by pulling both
support guards ( 2 ) aside. And take out both
support guards by pulling them aside.
When reassembling it, be sure to connect the
CAUTION
wire harness.
If it is not connected, the Flex Room does not
work.
4. Remove 2 hex head
bolts from sides with
a socket wrench
(10mm).
5. Lift up the Flex door from
the rails.
Putting too much food into the freezer
CAUTION
drawers can prevent the freezer from closing
completely and
can cause frost
build-up.
3. Take out the lower
basket ( 3 ) by lifting
the basket up from
the rail system.
4. Remove 4 hex head bolts
from both sides with a
socket wrench (10mm).
5. Lift up the freezer door from
the rails.
1
2
3
08_ setting up
DA68-01922A.indb 08DA68-01922A.indb 08 2013.3.4 1:32:38 PM2013.3.4 1:32:38 PM
Page 9
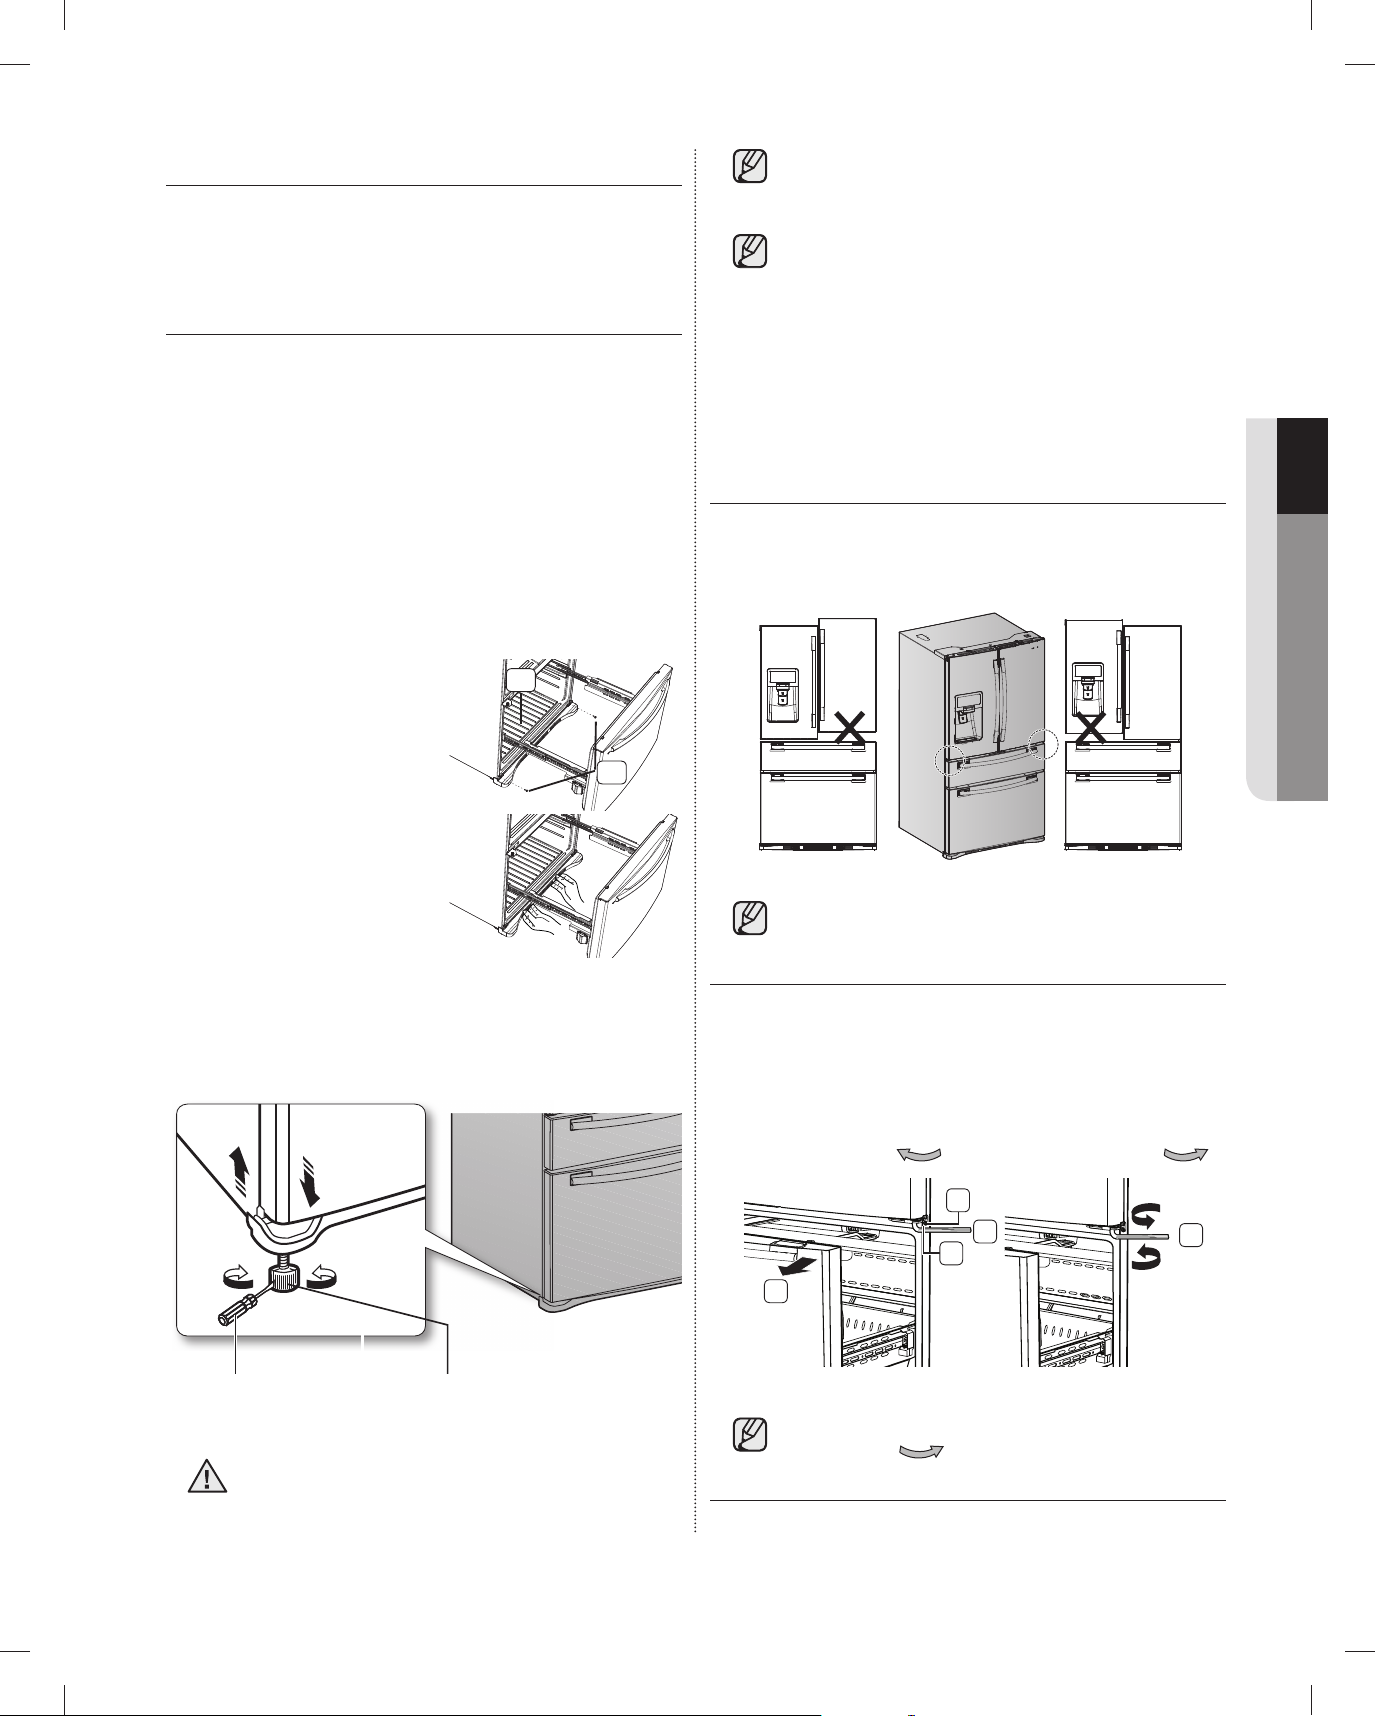
ASSEMBLE THE FREEZER DRAWER
DOWN
UP
fl at-blade
screwdriver(-)
Control Lever
Adjustment
part
Fixed part
To reattach the freezer drawer, assemble parts in
reverse order.
ADJUSTING THE LEVEL
Make sure the refrigerator is level so that you can
make fi nal adjustments. Use a level to test if the
refi gerator is level both side to side and back to front.
If the refrigerator is not level, it will not be possible
to get the doors perfectly even, which may cause
moisture condensation and increased energy bills.
Below is an example of how to level the refrigerator if
the left side of the refrigerator is lower than the right
side.
How to adjust the level
1. Open the freezer drawer and remove the lower
basket. (See to page 8)
2. Remove the two screws
( 1 ) attached to the cover
leg front ( 2 ) with a Philips
screwdriver (+).
3. Remove the cover leg
front ( 2 ) by lifting the
bottom part of the cover
leg front up and pulling it
out.
4. Insert a fl at-blade screwdriver (-) into a notch on
the left control lever, and turn it count clockwise to
level the refrigerator. (You turn the lever clockwise
to lower the refrigerator and counterclockwise to
raise it.)
2
1
If the right side is lower, perform the same
procedure, but with the right control lever.
It is diffi cult to remove the cover leg front from
the refrigerator, so we do not recommend
making small adjustments wIth the control
lever. Instead, refer to the next page for the
best way to make minor adjustments to the
doors.
MAKING MINOR ADJUSTMENTS
BETWEEN DOORS
Remember, a leveled refrigerator is necessary for
getting the doors perfectly even. If you need help,
review the previous section on leveling the refrigerator.
Fixed part
The left door is fi xed. To make minor
adjustments between doors, adjust only the
right door.
1. Pull out the Convertible door ( 1 ) to expose the
lower hinge ( 2 ).
2. Insert the supplied allen wrench (3/16”) ( 3 ) into
the shaft ( 4 ) of the lower hinge.
3. Please adjust the height by turning the hex wrench
( 3 ) clockwise (
DOWN
) or counter-clockwise (
Adjustment
part
UP
).
01 SETTING UP
1
fl at-blade
screwdriver(-)
CAUTION
DA68-01922A.indb 09DA68-01922A.indb 09 2013.3.4 1:32:38 PM2013.3.4 1:32:38 PM
Both control levers must be touching the fl oor
to avoid possible personal injury or property
damage because of tipping.
Control Lever
When you turn the hex wrench counterclockwise (
2
3
4
), the door will move up.
3
setting up _09
Page 10
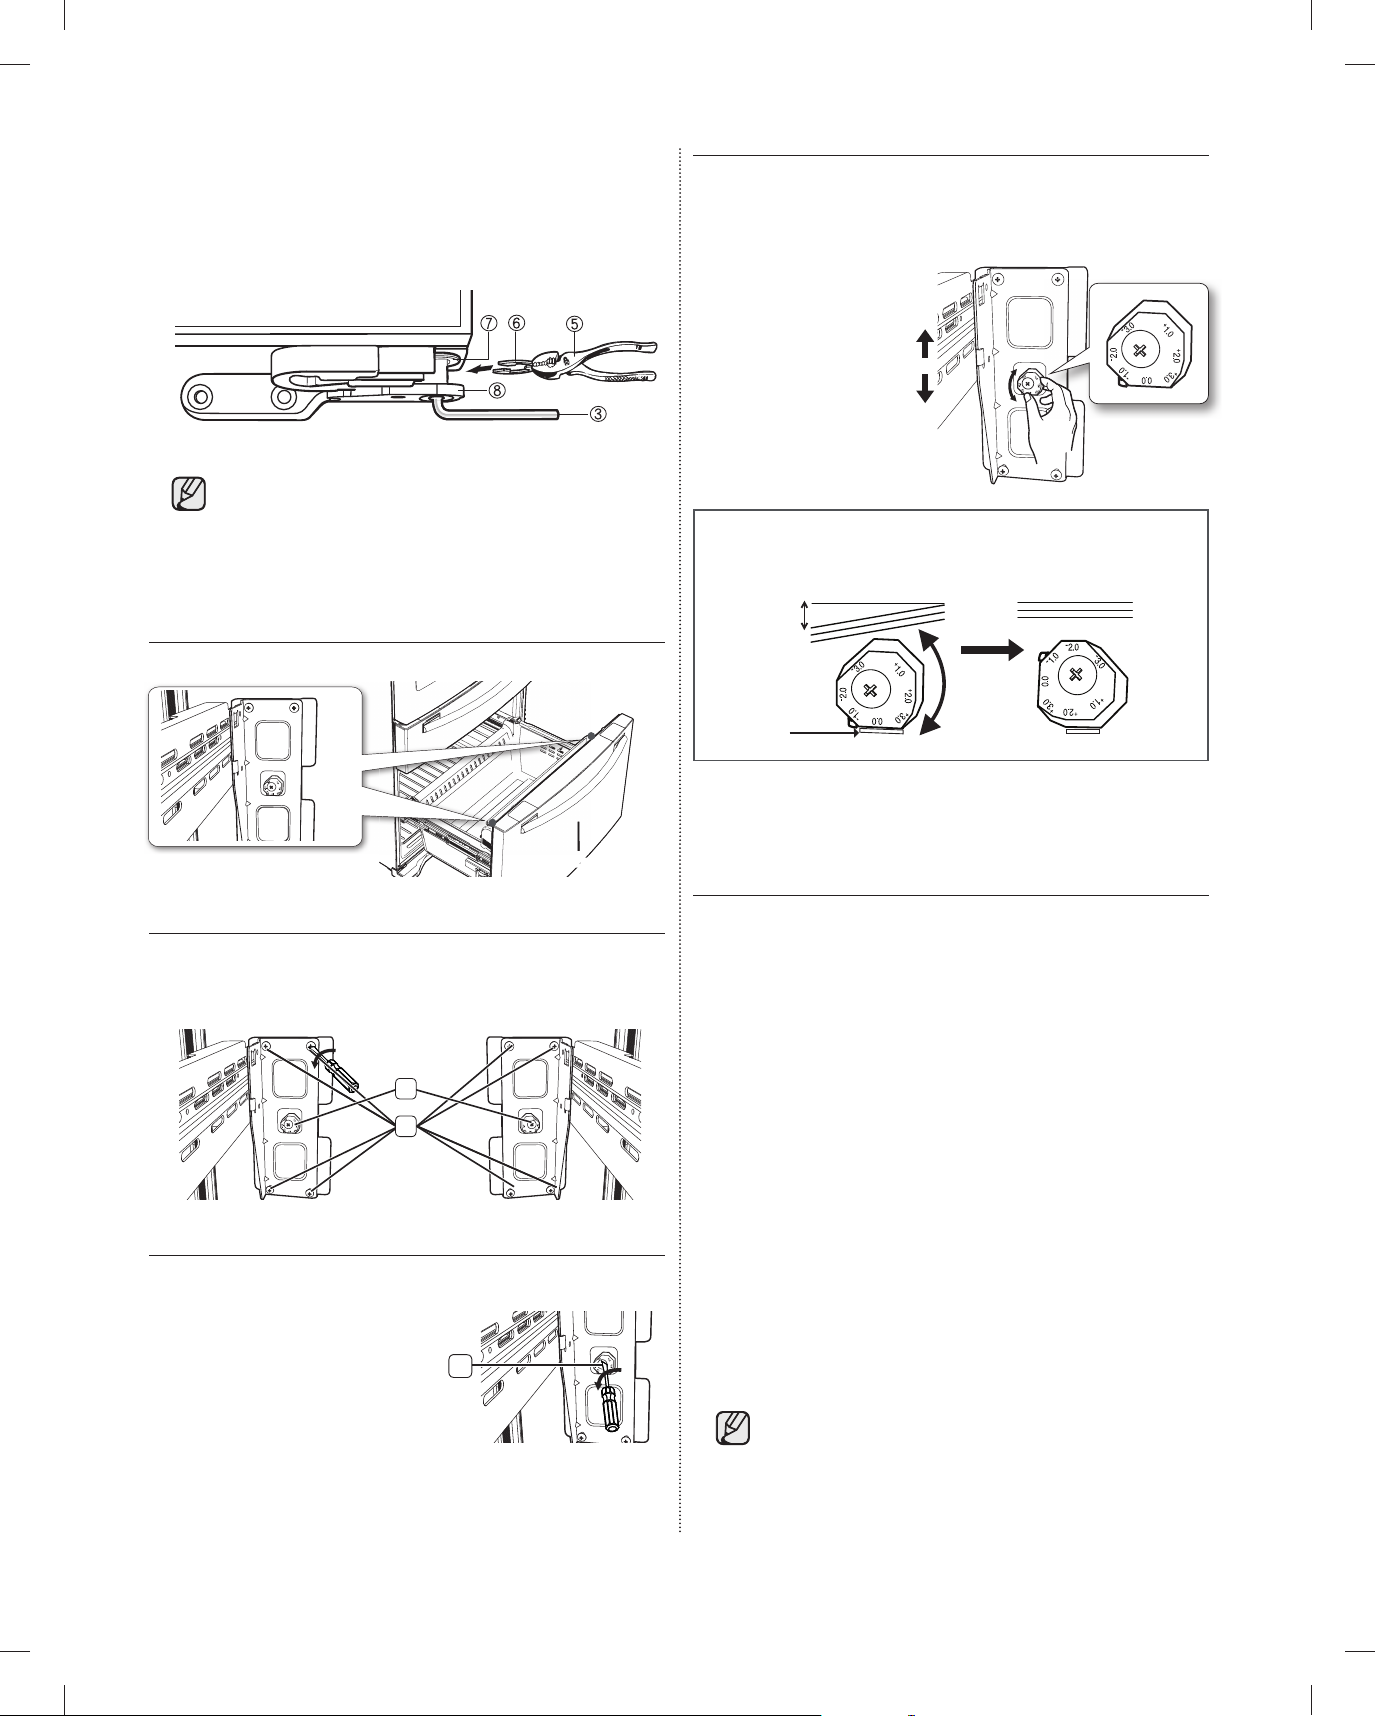
1. After adjusting the doors, please insert the
Adjustment part
Example) The slope is about 0.08inch (2mm) as shown below.
- Rotate the height adjuster to -2.0 to reduce the door slope.
Slope
Reference
plane
supplied fastener ( 6 ) using a pliers ( 5 ) in the gap
between the hinge-grommet ( 7 ) and the lower
hinge ( 8 ). The number of fastener you’ll need to
insert depends on the gap.
2 fastener are enclosed with the refrigerator.
The thickness of each fastener is 0.04”.
ADJUSTING THE FREEZER DRAWER
LEVEL
3. Find the best level to align the door slope.
• After adjustment, tighten the controller screw ( 3 )
and then philips screws.
Example) The slope is about 0.08inch (2mm) as shown below.
- Rotate the height adjuster to -2.0 to reduce the door slope.
Slope
Adjustment part
Freezer Drawer
1. Locate the height-adjuster ( 1 ) in the freezer
drawer. Unscrew the 8 Phillips screws ( 2 ) slightly
to loosen the door.
1
2
2. Loosen the controller screw ( 3 ) with a Phillips
screwdriver(+).
3
Reference
plane
CHECKING THE WATER DISPENSER
LINE
A water dispenser with a fi lter is one of the helpful
features on your new refrigerator. To help promote
better health, the water fi lter removes unwanted
particles from your water. However, it does not
sterilize or destroy microorganisms. You may need to
purchase a water purifying system to do that.
In order for the ice maker to operate properly, a water
pressure of 20~125 psi is required.
Under normal conditions, a 170 cc (5.75 oz.) cup can
be fi lled in about 10 seconds.
If the refrigerator is installed in an area with low water
pressure (below 20psi), you can install a booster pump
to compensate for the low pressure.
After you have connected the water line, make
sure the water storage tank inside the refrigerator is
properly fi lled. To do this, press the water dispenser
lever until the water runs from the water outlet.
Water line installation kits are available at
extra cost from your dealer. We recommend
using a water line installation kit that contains
copper tubing and ¼” compression nut.
10_ setting up
DA68-01922A.indb 10DA68-01922A.indb 10 2013.3.4 1:32:39 PM2013.3.4 1:32:39 PM
Page 11
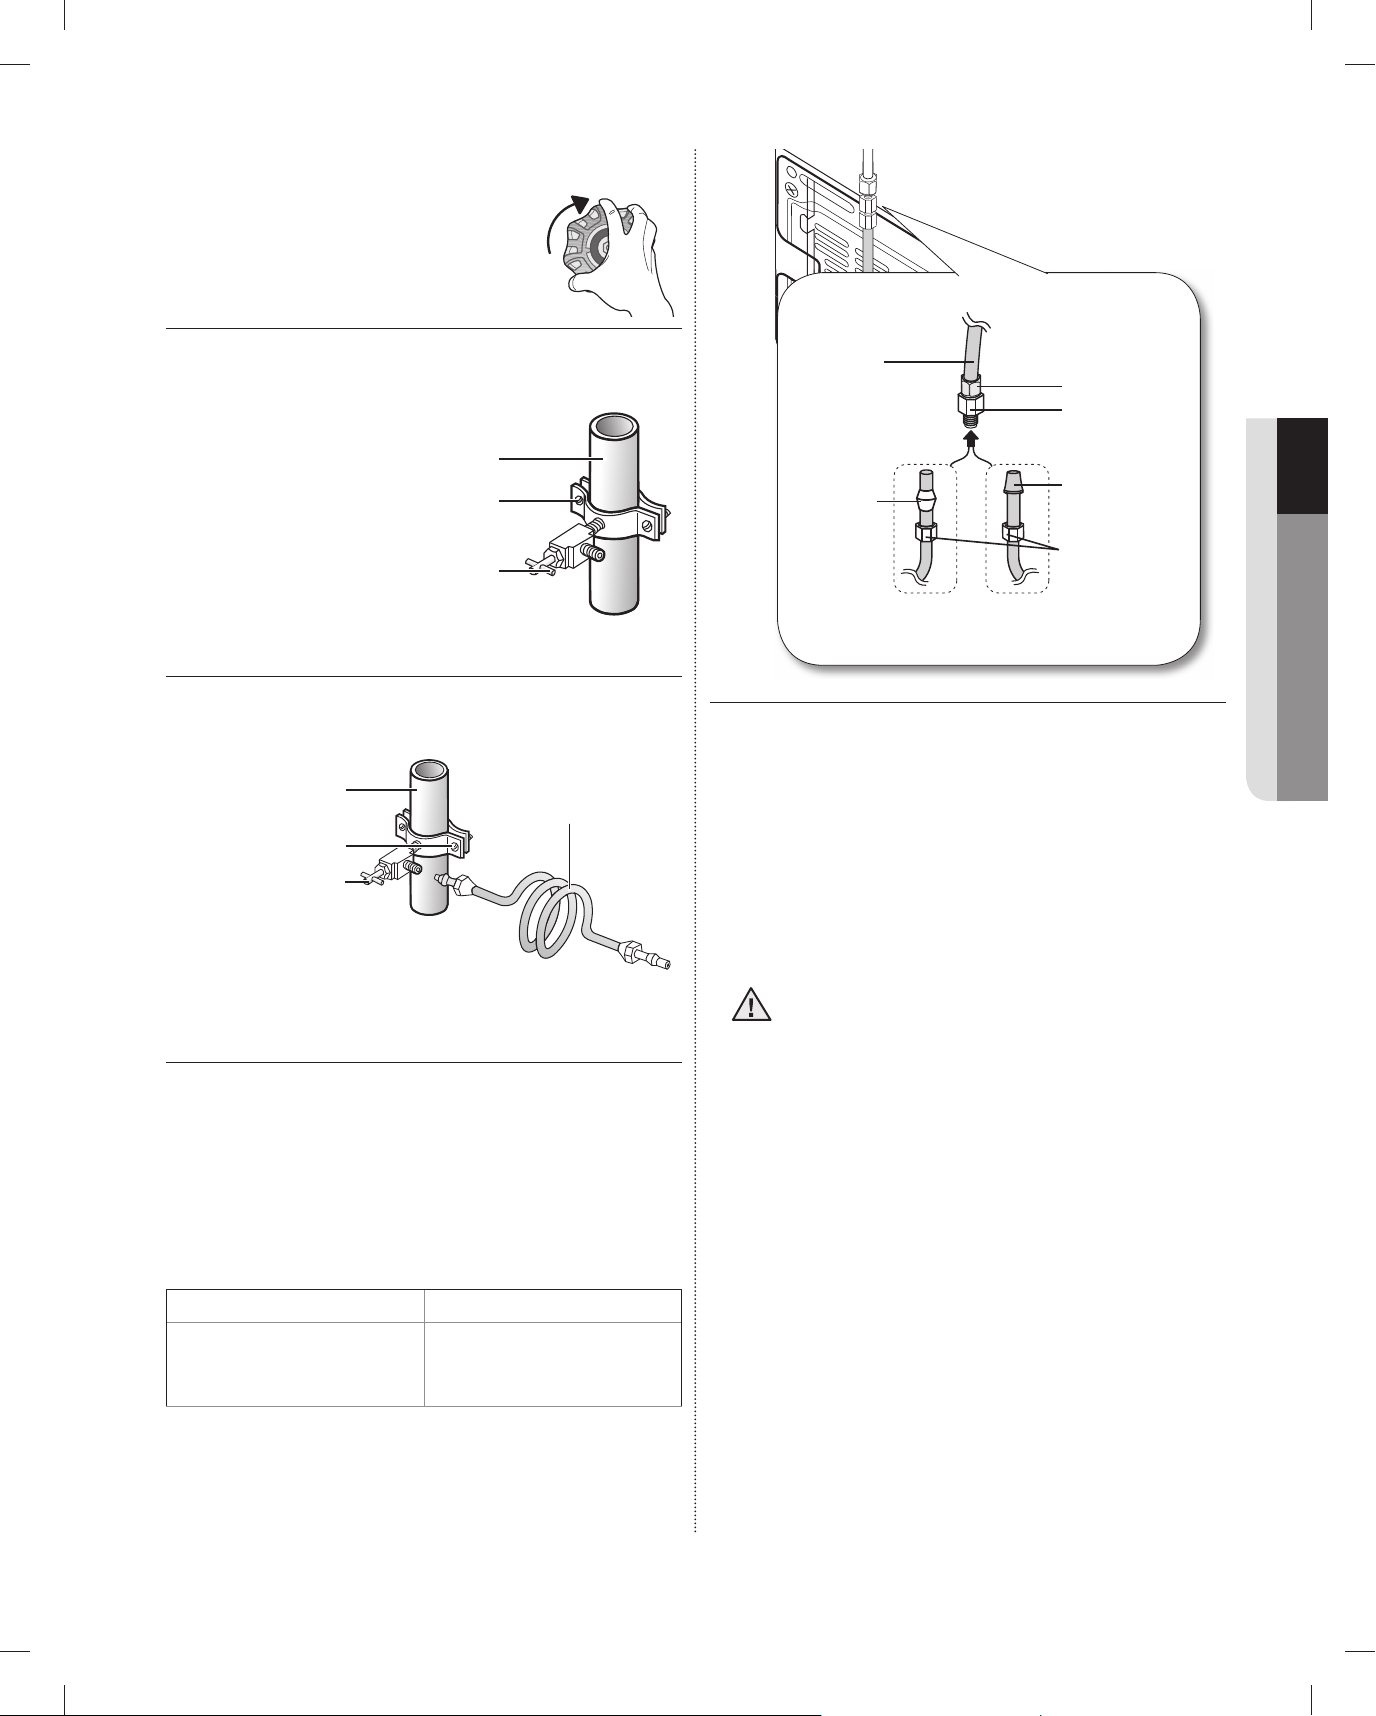
Connecting to the water supply line
Pipe clamp
Cold water line
Shut off valve
Shut off valve
Pipe clamp
Cold water line
Water line installation kit
Plastic tubing
(Assembled)
Ferrule (Not
supplied)
Compression nut
(1/4”) (Assembled)
Compression
fi tting
(Assembled)
Molded
end(Bulb)
Compression nut
(B) (1/4”) (Not
supplied)
Copper tubing
(Not supplied)
Plastic tubing (B)
(Not supplied)
1. First, shut off the main water
supply.
Refrigerator
2. Locate the nearest cold water drinking line and
install the pipe clamp and shut off valve.
Cold water line
Pipe clamp
Shut off valve
3. Connect the water line installation kit to shut off
valve.
Cold water line
Water line installation kit
Pipe clamp
Shut off valve
Compression nut
Plastic tubing
(Assembled)
Ferrule (Not
supplied)
Copper tubing
(Not supplied)
Household water supply line
Plastic tubing (B)
or
(Not supplied)
(1/4”) (Assembled)
Compression
fi tting
(Assembled)
Molded
end(Bulb)
Compression nut
(B) (1/4”) (Not
supplied)
1. Connect the household water line to the
assembled compression fi tting.
- If you are using copper tubing, slip the
compression nut ( B ) (not supplied) and ferrule
(not supplied) on copper tubing (not supplied) as
shown.
- If you are using plastic tubing ( B ) , insert the
molded end (Bulb) of the plastic tubing ( B ) into
the compression fi tting.
01 SETTING UP
INSTALLING THE WATER LINE
Connecting the water supply line to the
refrigerator.
There are several items that you need to purchase to
complete this connection.
You may fi nd these items sold as a kit at your local
hardware store.
Use Copper Tubing Use Plastic Tubing
• ¼” copper tubing
• ¼” compression nut (1pc)
• Ferrule (2pc)
• ¼” plastic tubing
→ Molded end(Bulb)
• ¼” compression nut (1pc)
Do not use without the molded end(Bulb) of
CAUTION
the plastic tubing ( B ).
2. Tighten the compression nut ( B ) onto the
compression fi tting.
Do not over-tighten the compression nut ( B ) .
3. Turn water on and check for any leakage. If you
fi nd water drops or leakage in the connection
areas, turn off the main water supply. Check the
connections and, if nescessary, tighten.
4. Flush 1 gallon of water through the fi lter before
drinking or using the water from the refrigerator.
(Flush approximately 6 minutes.) To fl ush, press
a large glass or cup against the water dispenser
lever. Fill the glass, empty it into the kitchen sink
after it is fi lled, and then repeat.
setting up _11
DA68-01922A.indb 11DA68-01922A.indb 11 2013.3.4 1:32:45 PM2013.3.4 1:32:45 PM
Page 12
5. After you turn on the refrigerator, let the ice maker
( 1 ) Energy
Saver
( 2 ) Power
Freeze
make ice for 1 to 2 days. Over that period of time,
throw out the fi rst 1 or 2 buckets of ice the freezer
makes to ensure all impurities have been removed
from the water line.
Only connect the water line to a drinkable
water source.
If you have to repair or disassemble the water
line, cut off 1/4“ of the plastic tubing to make
sure you get a snug, leak-free connection.
COMPLETING THE SET UP
Now that you have your new refrigerator installed in
place, you are ready to set up and enjoy the features
and functions of the appliance. By completing the
following steps, your refrigerator should be fully
operational.
1. Make sure your refrigerator is in an appropriate
location with reasonable clearance between it and
the wall. Refer to installation instructions in this
manual.
2. Once the refrigerator is plugged in, make sure the
interior light comes on when you open the doors.
3. Set the Temperature control to the coldest
temperature and wait for an hour. The freezer
will get slightly chilled and the motor will run
smoothly. Reset the refrigerator and freezer to the
temperatures you want.
4. After you plug the refrigerator in, it will take a few
hours to reach the appropriate temperature. You
can store food and drinks in the refrigerator after
the temperature is suffi ciently cool.
Operating your French Door Refrigerator
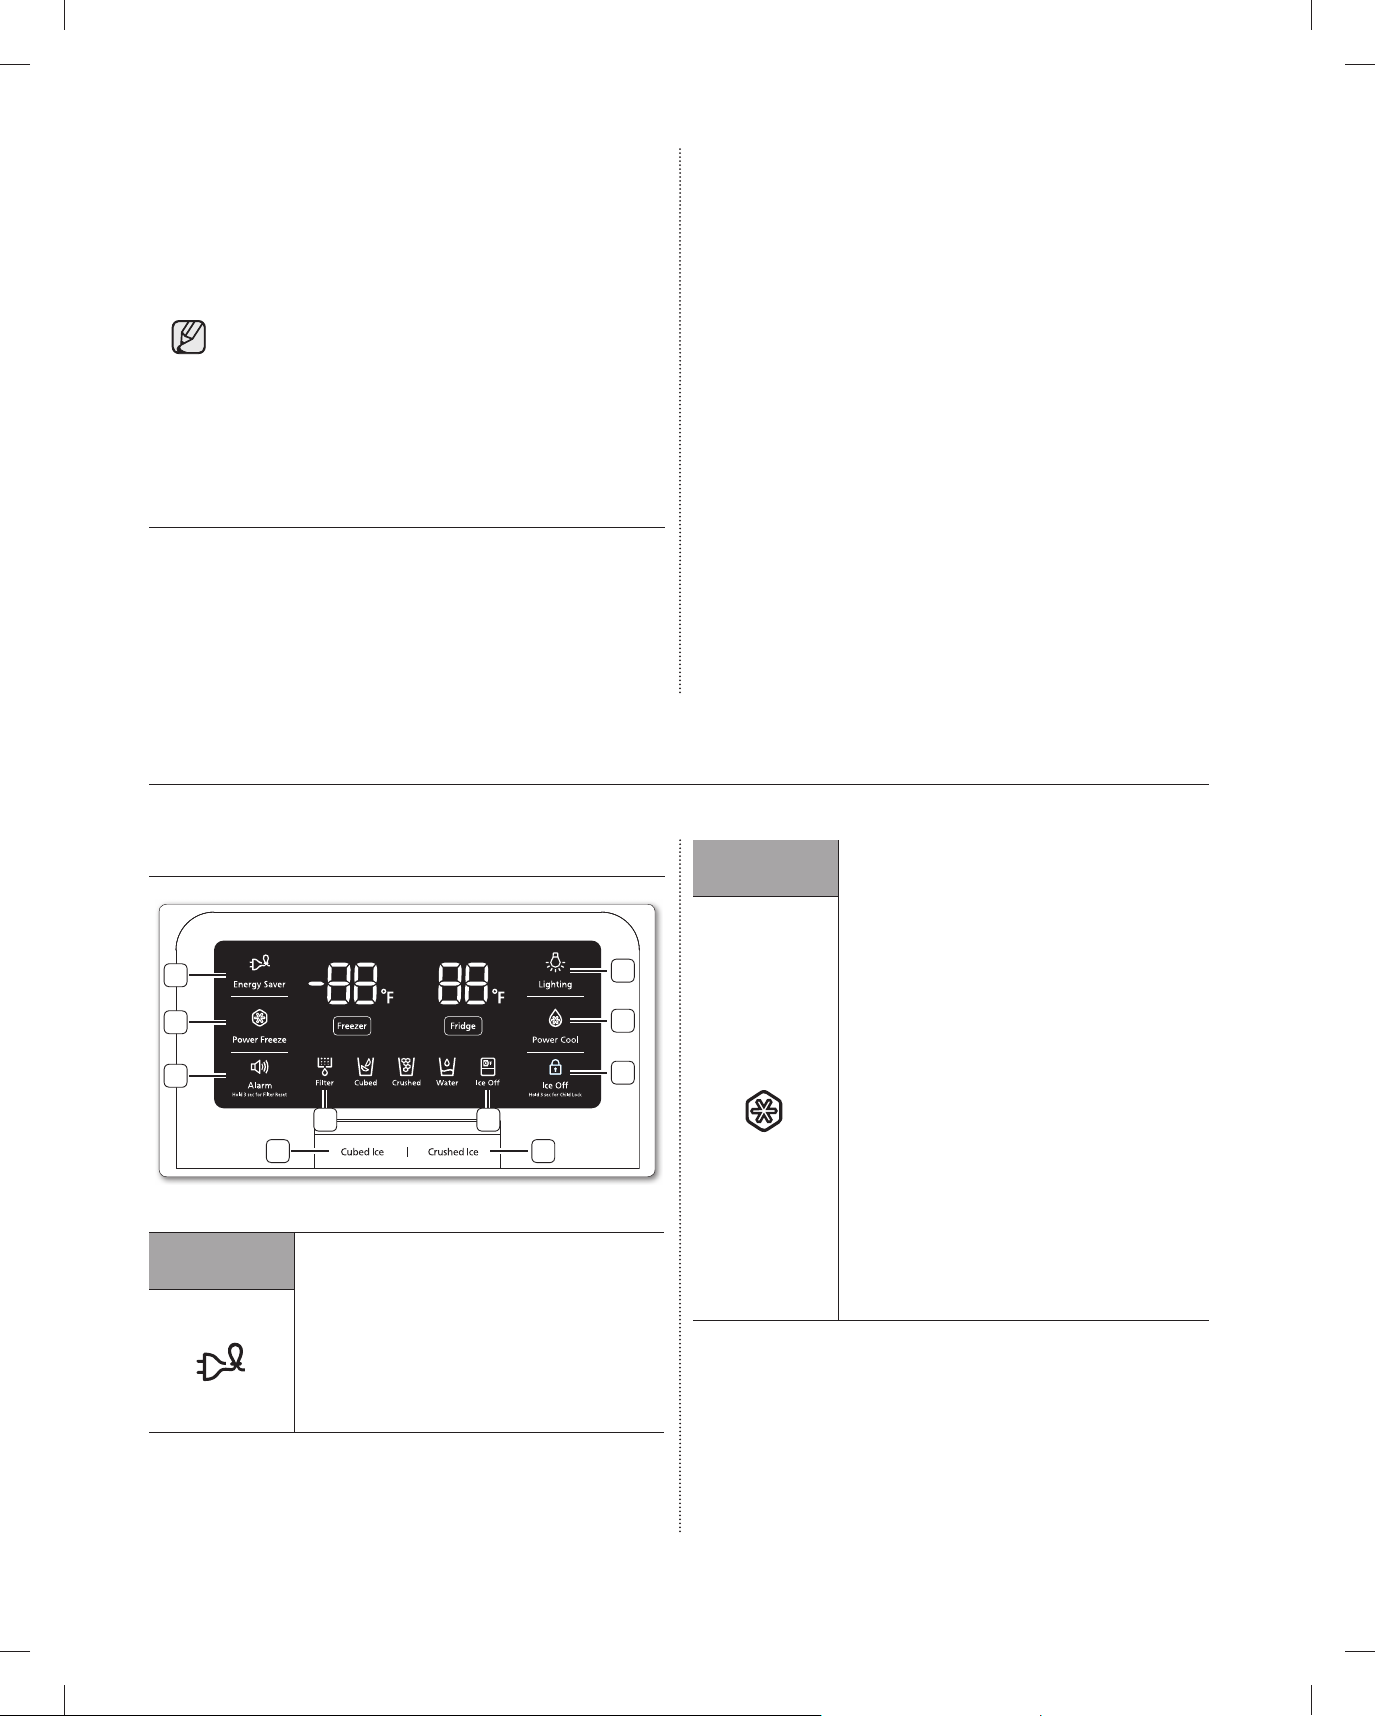
USING THE CONTROL PANEL
1
2
3
7
( 1 ) Energy
Saver
Press the Energy Saver button for better
energy effi ciency.
The Energy Saver icon lights up when you
press the Energy Saver button.
The Energy Saver function is automatically
set to “ON” when power is supplied to the
refrigerator.
If condensation or water drops appear on
the doors, turn the Energy Saver mode off.
( 2 ) Power
Freeze
4
5
6
910
8
The Power Freeze function substantially
speeds up the freezer compressor, causing
the freezer to cool down rapidly to a
temperature you choose. When you press
the Power Freeze button, the Power Freeze
icon lights up.
Power Freeze is useful if you need to quick
freeze an item, to make a large quantity of
ice, or to cool the freezer rapidly if it has
warmed dramatically (for example, if the
door was left open).
To turn off Power Freeze, press the Power
Freeze button again. Power Freeze turns
off automatically after 72hours to decrease
energy consumption.
When you use this function the energy
consumption of the refrigerator will increase.
Remember to turn it off when you don’t
need it and return the freezer to your original
temperature setting. If you need to freeze
large amount of food stuff, activate Power
Freeze function at least 24 hours before.
12_ operating
DA68-01922A.indb 12DA68-01922A.indb 12 2013.3.4 1:32:47 PM2013.3.4 1:32:47 PM
Page 13
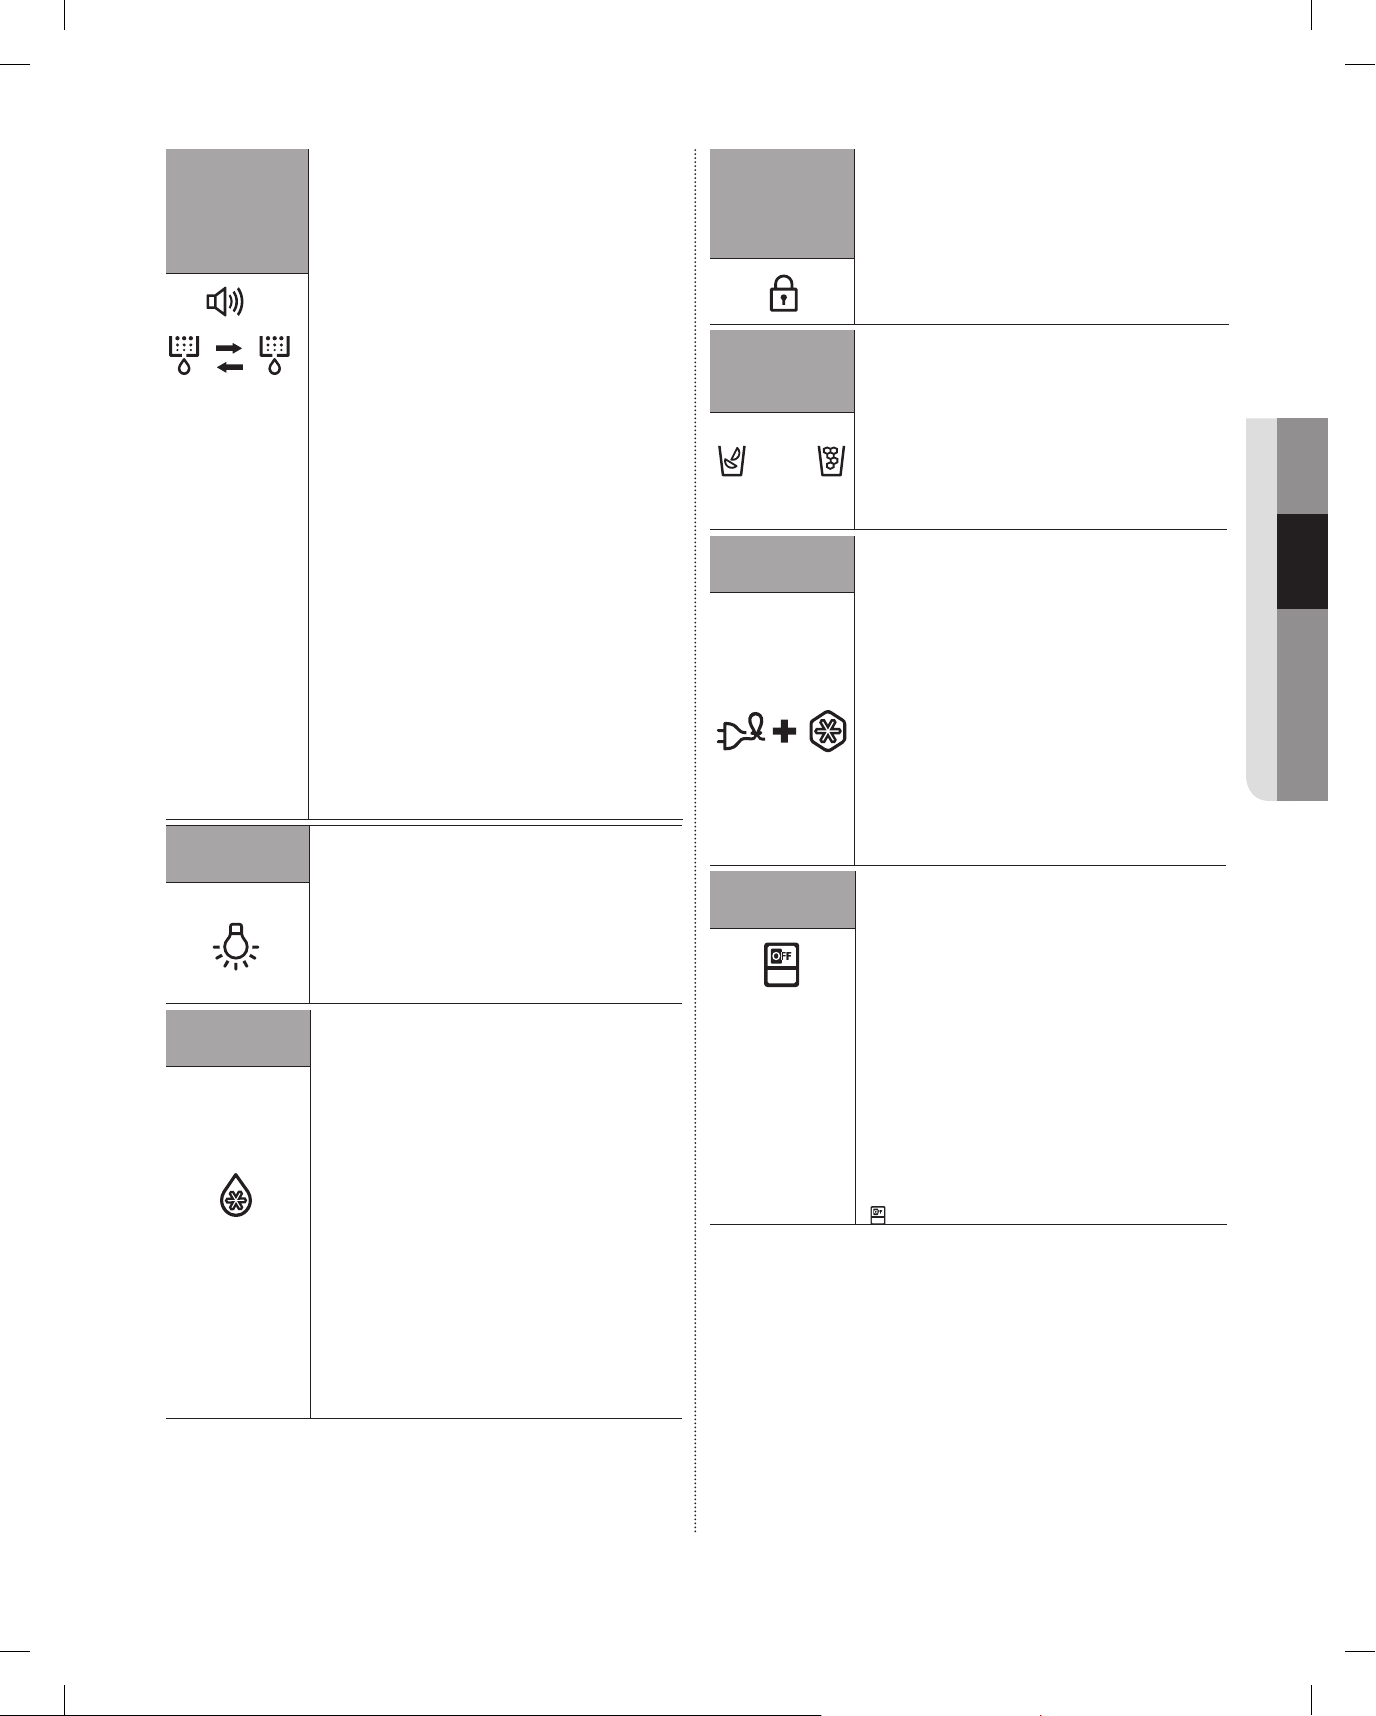
( 3 ) Alarm /
( 3 ) Alarm /
hold 3
sec for
Filter
Reset
(Blue)
(Filter Reset)
(Red)
( 4 ) Lighting
( 5 ) Power
Cool
( 6 ) Ice Off
(Hold 3
sec for
child lock)
(7) Cubed Ice
(8) Crushed
Ice
(Cubed)
(Crushed)
Cooling Off
Mode
( 9 ) Ice Off
hold 3
sec for
Filter
Reset
(Filter Reset)
(Blue)
( 4 ) Lighting
( 5 ) Power
Cool
(Red)
The Alarm/Hold 3 sec for Filter Reset button
serves two purposes:
- To turn the door open alarm on and off
- To reset the water fi lter life indicator.
1) Door Alarm Function
If the door alarm is set to On, an alarm
beeps if any refrigerator door is left open
for more than three minutes.
The beeping stops when you close the
door. The door alarm function is pre-set
to On in the factory. You can turn it off by
pressing and then releasing the Alarm/
Hold button. You can turn it back on
in the same fashion. The icon lights up
when the function is on.
2) Water Filter Life Indicator Function
After you replace the water fi lter, press
and hold the Alarm/Hold 3 sec for Filter
Reset button to re-set the water fi lter life
indicator. When you re-set the water fi lter
life indicator, the Filter icon on the panel
turns blue, green, or yellow.
The Filter icon will turn red to let you
know it is time to change the water fi lter
after six months (about 300 gallons).
Some areas have large amounts of lime in
their water, which causes the water fi lter to
clog more quickly. If this is the case in your
area, you will have to change the fi lter more
frequently than every six months.
Pressing the Lighting button turns on the
Dispenser LED lamp (under the display)
in continuous mode so that it stays on
continuously. The button also lights up. If you
want the Dispenser lamp to come on only
when some one uses the dispenser, press
the Lighting button to turn the continuous
mode off.
The Power Cool function substantially
speeds up the refrigerator compressor,
causing the refrigerator to cool down rapidly
to a temperature you choose. When you
press the Power Cool button, the Power
Cool icon lights up.
Power Cool is useful if you need to quickly
cool items or need to cool the refrigerator
rapidly if it has warmed dramatically (for
example, if the door was left open).
To turn off Power Cool, press the Power
Cool button again. Power Cool turns off
automatically after 2 1/2 hours to decrease
energy consumption.
When you turn on Power Cool,
the refrigerator's compressor
speeds up and is louder than
during normal operation.
( 6 ) Ice Off
(Hold 3
sec for
child lock)
(7) Cubed Ice
(8) Crushed
Ice
(Cubed)
Cooling Off
Mode
( 9 ) Ice Off
(Crushed)
If you don’t want to make more ice, press the
Ice Off button. Pressing this button 3 second
locks the display panel and dispenser
buttons so the buttons can not be used.The
Child Lock icon lights up to indicate you’ve
activated the Child Lock function.
Press the Cubed Ice or Crushed Ice button
to select the type of ice you want dispensed.
Each time you press the button, the cubed
and crushed ice modes alternate and
the Cubed or Crushed ice icon lights up,
indicating your selection.
If you don’t need ice, turn the function off to
save on water and energy consumption (See
Ice Off below).
Cooling Off mode (also called Shop mode),
is designed for use by retailers when they
are displaying refrigerators on the shop
fl oor. In Cooling Off mode, the refrigerator's
fan motor and lights work normally, but the
compressors do not run, and the refrigerator
and freezer do not get cold.
To start Cooling Off mode, press and hold
the Energy Saver button and the Power
Freeze button for 3 seconds during normal
operation. The refrigerator chime sounds and
the temperature display fl ashes OF OF.
To cancel Cooling Off mode, press and hold
the Energy Saver and the Power Freeze
buttons again for 3 seconds.
If you don’t want to make more ice, press
the Ice Off button.
The icon will light up and the Ice-Maker
stops making ice.
We recommend you stop ice making if
the following occur:
- There is enough ice in the ice bucket.
- You want to save water and energy.
- Water is not being supplied to the
refrigerator.
If the ice maker function is ON, and the water
line is not connected, there will be a water
valve noise from back of the unit. Press the
Ice Off ( 6 ) button until the Ice Off indicator (
) illuminates.
02 OPERATING
operating _13
DA68-01922A.indb 13DA68-01922A.indb 13 2013.3.4 1:32:47 PM2013.3.4 1:32:47 PM
Page 14
USING THE CONTROL PANEL
( 10 ) Filter
(Blue)
(Reset the indicator)
(Red)
(Filter Reset)
(Red)
If you do not press any button(letters not ICON), the
display turns off in a few seconds.
If you press any button(letters not ICON) , the display
lights up again.
The Function key will operate only when you touch
the letters.
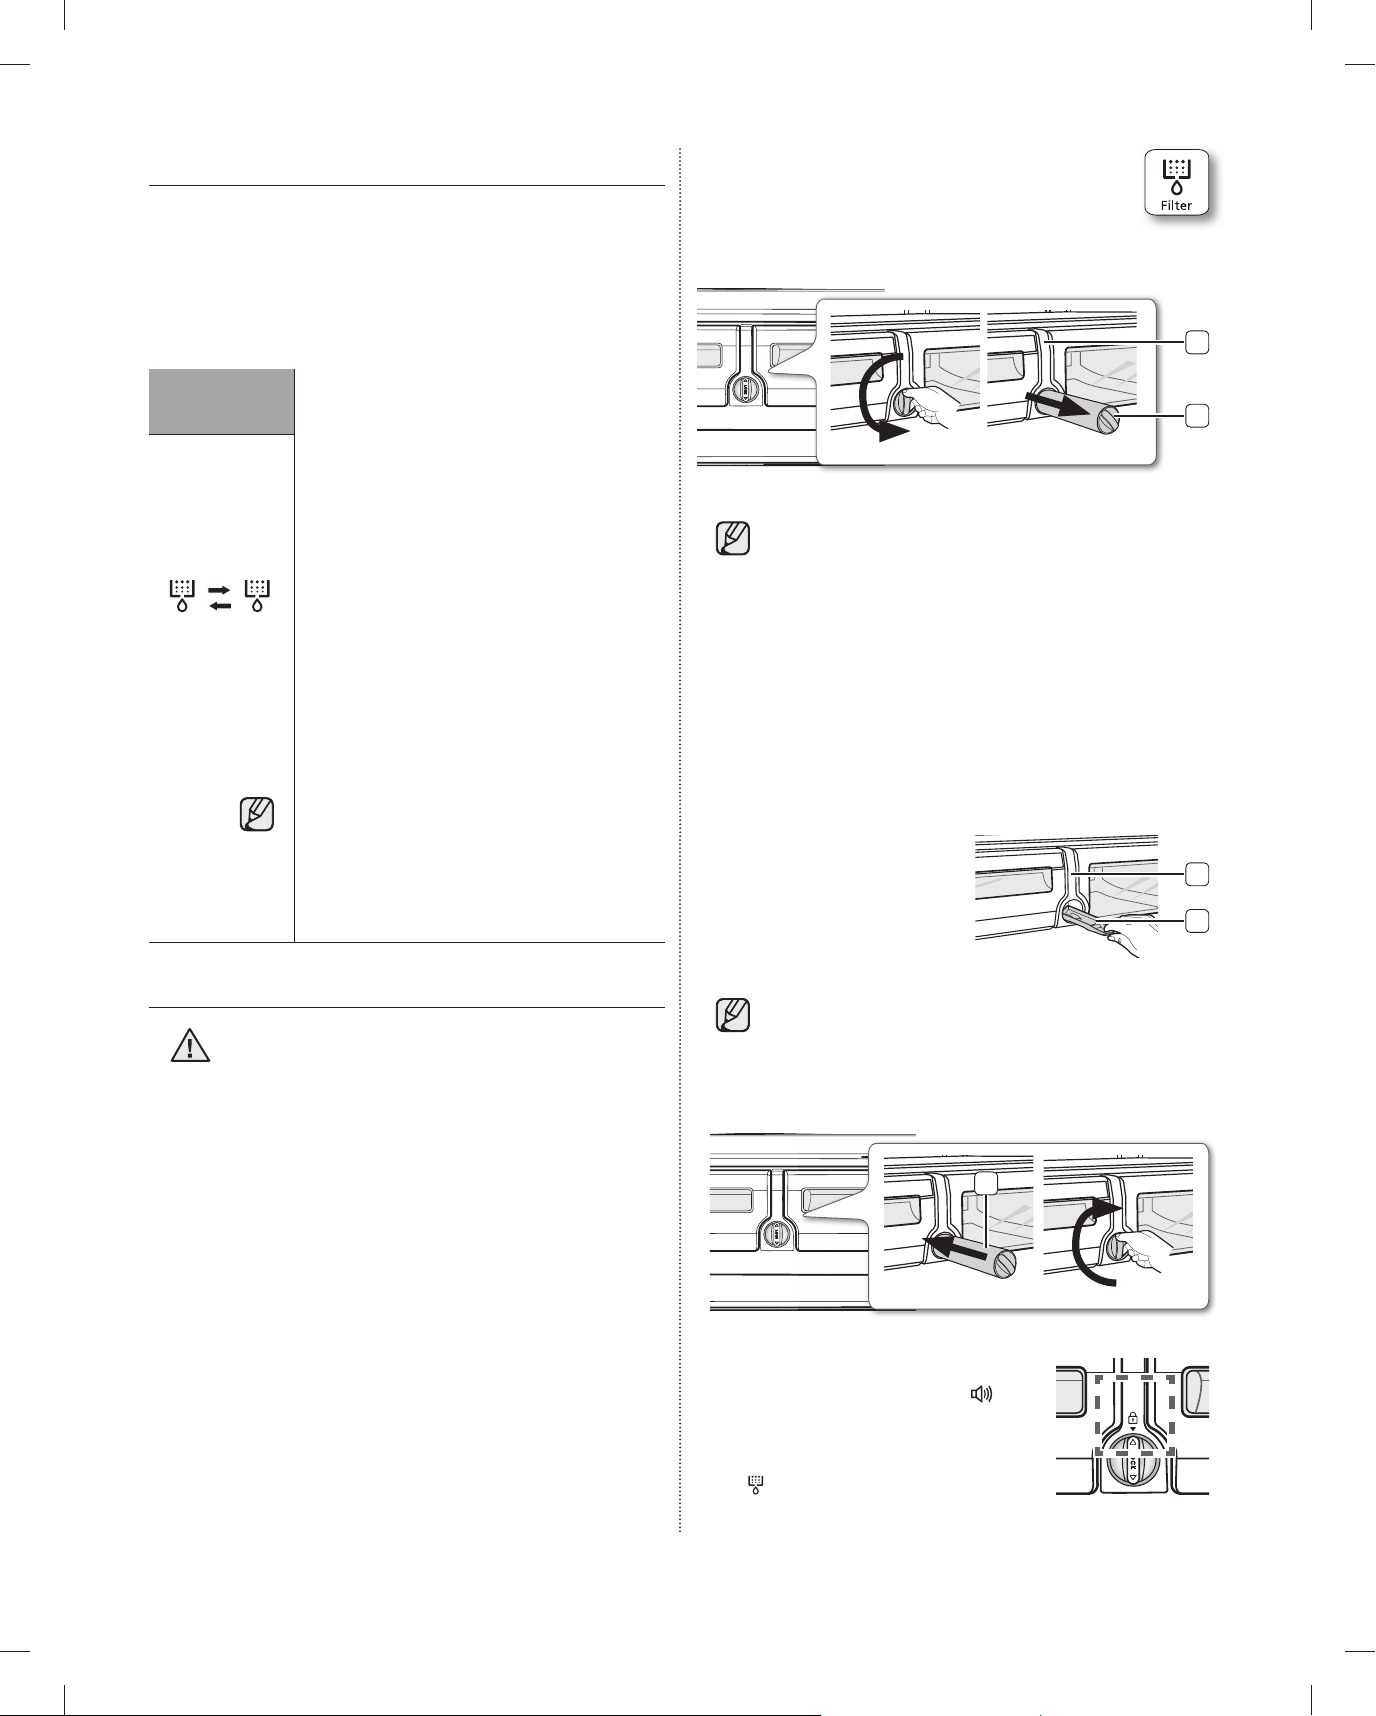
1. Shut off the water supply. Then, turn the
water fi lter ( 1 ) about 1/4 turn, counterclockwise.
2. Pull the water fi lter ( 1 ) from the case fi lter
( 2 ).
(Red)
2
( 10 ) Filter
(Blue)
(Reset the indicator)
(Red)
Water fi lter usage
1. Normally the fi lter indicator is blue,
yellow, or green when you purchase or
install your refrigerator, depending on
your model.
2. After you use about 270 gallons of water,
the fi lter indicator turns Light Pink. (about
5 months)
3. After you use about 300 gallons of water,
the fi lter indicator turns Red. (about 6
months)
4. Remove the old water fi lter and install
a new one when the fi lter indicator is
red. Reset the fi lter indicator by pressing
Alam/Hold 3 sec for Filter Reset button
for 3sec. The fi lter indicator turns blue,
yellow, or green when you reset the
indicator.
• If water is not dispensing or dispensing
slowly, you need to replace the water
fi lter because the water fi lter is clogged.
• Some areas have large amounts of lime
in their water, which causes the water
fi lter to clog more quickly.
1
• To change the water fi lter more easily, shut
off the water supply valve.
• Sometimes, it is hard to disassemble the water
fi lter because impurities in the water cause it to
stick. If you are having diffi culties, grip the water
fi lter fi rmly and pull it hard.
• When you pull the water fi lter, a little water can
leak from the opening. This is normal. To minimize
the water leaks, keep the fi lter cartridge horizontal
when you pull it.
• To prevent overfl ow, empty the water tray fi lter ( 3 )
and dry around of case fi lter ( 2 ).
3. Insert the new fi lter into
the fi lter case ( 4 )
2
4. Push the fi lter, and then
turn it clockwise until it
3
locks.
CHANGING THE WATER FILTER
To reduce risk of water damage to your
WARNING
The Filter light turns red to let you know when it is time
to change your water fi lter cartridge.
To give you time to get a new fi lter, the red light comes
on just before the capacity of the current fi lter runs
out.
Changing the fi lter on time provides you with the
freshest, cleanest water from your refrigerator.
property DO NOT use generic brands of
water fi lters in your SAMSUNG Refrigerator.
USE ONLY SAMSUNG BRAND WATER
FILTER. SAMSUNG will not be legally
responsible for any damage, including, but
not limited to property damage caused by
water leakage from use of a generic water
fi lter. SAMSUNG Refrigerators are designed
to work ONLY WITH SAMSUNG Water Filter.
• If you are in trouble of inserting the water
fi lter as high pressure of water, shut off the
water supply valve.
• The locked symbol should be lined up with the
indicator line.
4
5. press the "Alarm/hold 3 sec for
Filter Reset" button (
(Filter Reset)
)
for about 3 seconds to reset the
water fi lter. The color of indicator
) changes from red to blue,
(
green, or yellow.
14_ operating
DA68-01922A.indb 14DA68-01922A.indb 14 2013.3.4 1:32:47 PM2013.3.4 1:32:47 PM
Page 15
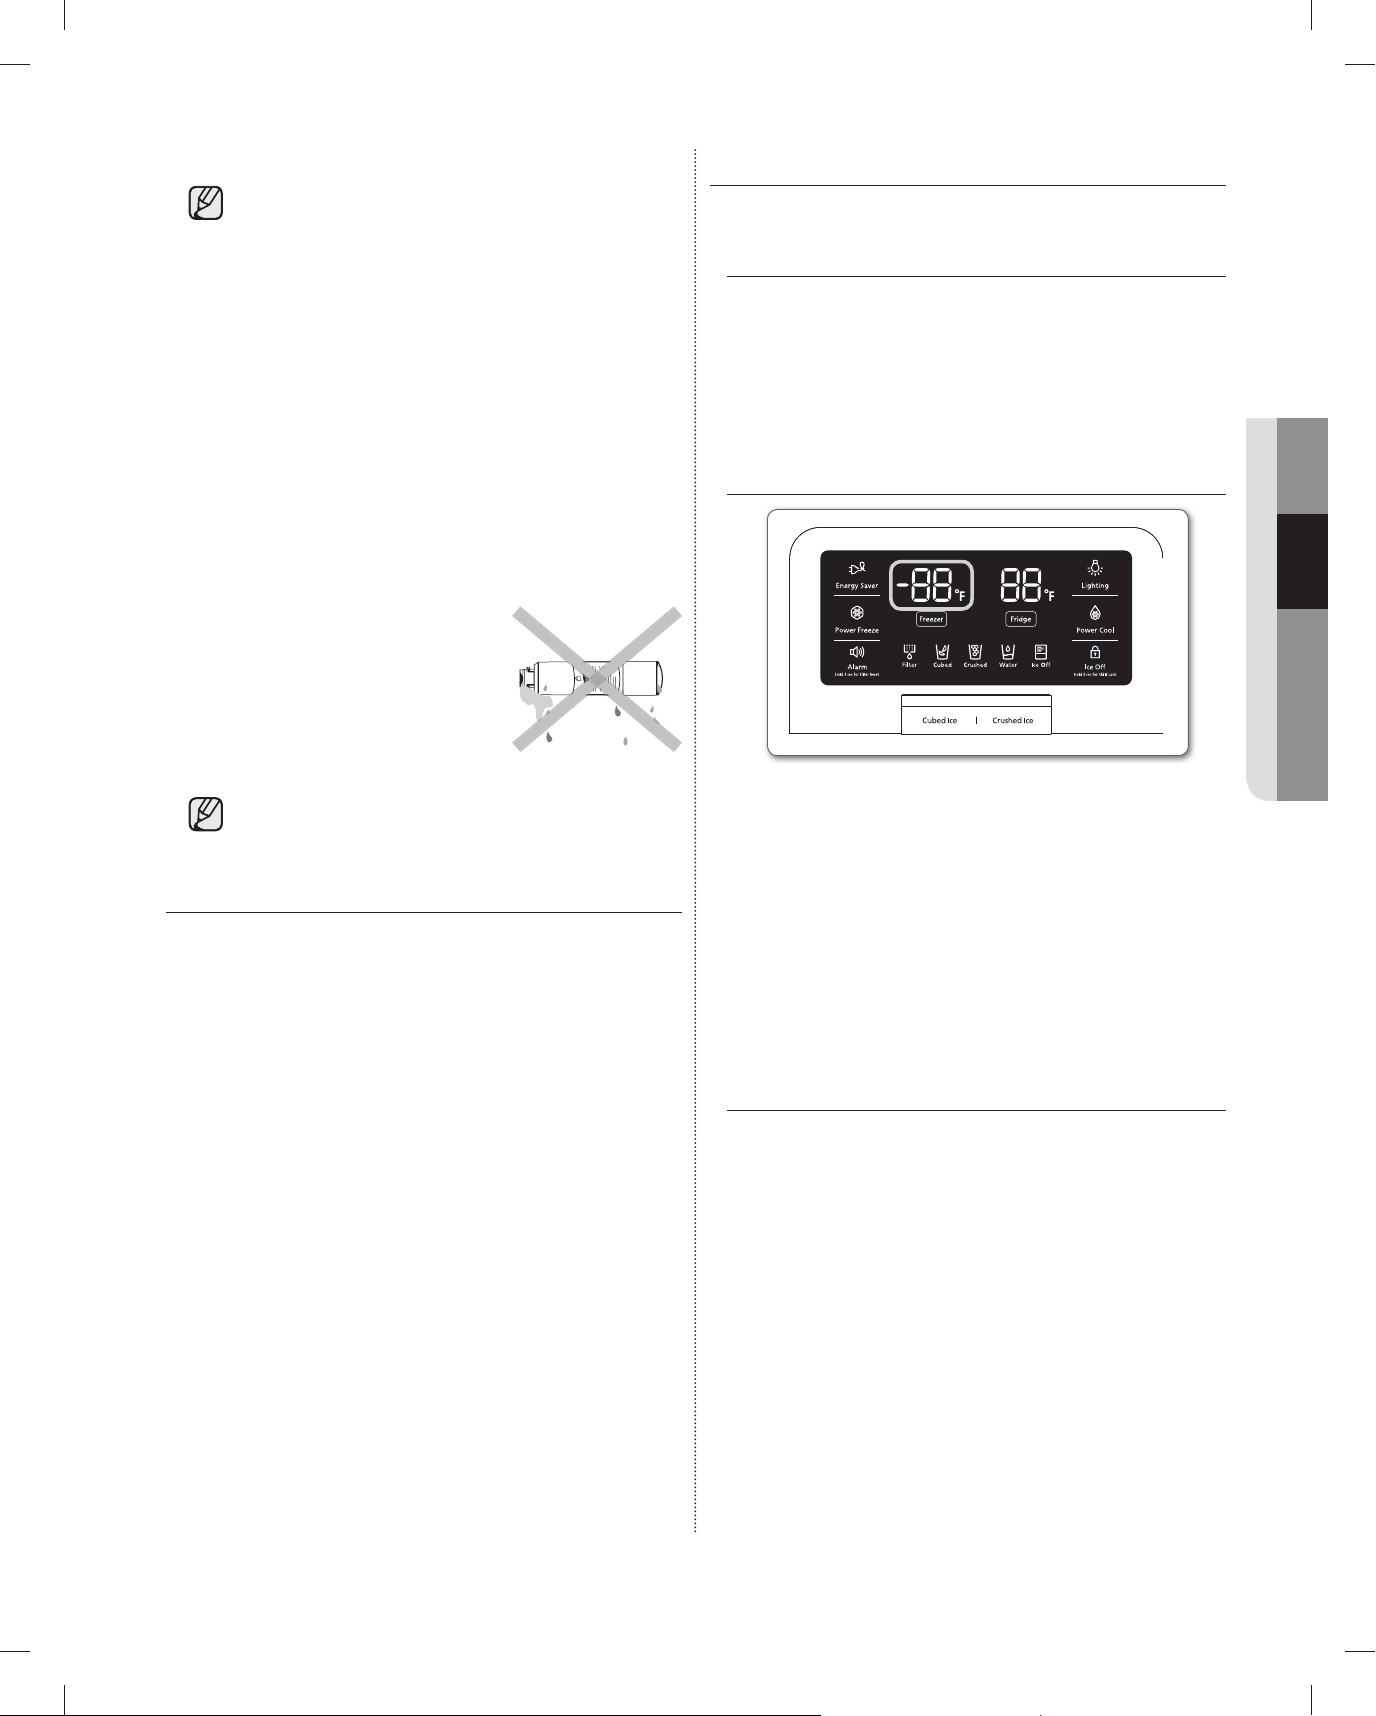
6. If you turned off the water supply, turn it back on.
Recommend Temp (Freezer) : -2F
For a replacement water fi lter, you can visit
your local home Improvement center or
contact the Samsung Parts distributor.
Be sure the replacement water fi lter has the
SAMSUNG logo on the box and on the water
fi lter.
Link : http://www.samsungparts.com
Removing any residual matter inside the
water supply line after installing the water
fi lter.
1. Turn ON the main water supply and supply water
from water supply line.
2. Run water through the dispenser until the water
runs clear (approx. 6 to 7 minutes). This will clean
the water supply system and remove air from the
lines.
3. Additional fl ushing may be
required in some households.
4. Open the Refrigerator door and
make sure there are no water
leaks coming from the water
fi lter.
Be sure to fl ush the dispenser thoroughly,
otherwise water may drip from the dispenser.
This means that there is still air in the line.
Reverse Osmosis Water Supply
IMPORTANT : The pressure of the water supply
coming out of a reverse osmosis system going to
the water inlet valve of the refrigerator needs to be
between 35 and 120 psi (241 and 827 kPa).
If a reverse osmosis water fi ltration system is
connected to your cold water supply, the water
pressure to the reverse osmosis system needs to be a
minimum of 40 to 60 psi (276 to 414 kPa.)
If the water pressure to the reverse osmosis system is
less than 40 to 60 psi (276 to 414 kPa):
• Check to see whether the sediment fi lter in the
reverse osmosis system is blocked. Replace the
fi lter if necessary.
• Allow the storage tank on the reverse osmosis
system to refi ll after heavy usage.
• If your refrigerator has a water fi lter, it may
further reduce the water pressure when used
in conjunction with a reverse osmosis system.
Remove the water fi lter.
If you have questions about your water pressure, call a
licensed, qualifi ed plumber.
CONTROLLING THE TEMPERATURE
Basic temperature of Freezer and
Refrigerator Compartments
The basic temperature and/or recommended
temperatures of the Freezer and Refrigerator
Compartments are -2°F and 38°F respectively.
If the temperature of Freezer and Refrigerator
Compartments are too high or low, adjust the
temperature manually.
Controlling the Freezer temperature
Recommend Temp (Freezer) : -2F
The Freezer temperature can be set between -8°F and
8°F to suit your particular needs. Press the Freezer
button repeatedly until the desired temperature is
shown in the temperature display. The temperature
will move 2°F degrees with each press (-2°F → -4°F
→ -6°F → -8°F → 8°F → 6°F → 4°F → 2°F → 0°F →
-2°F). Keep in mind that foods like ice cream may melt
at 4°F. The temperature display will move sequentially
from -8°F to 8°F.
Controlling the fridge temperature
The fridge temperature can be set between 46°F and
34°F to suit your particular needs. Press the Fridge
button repeatedly until the desired temperature is
shown in the temperature display. The temperature
will move 2°F degrees with each press (38°F → 36°F
→ 34°F → 46°F → 44°F → 42°F → 40°F → 38°F). The
temperature control process for the Fridge works just
like the Freezer process. Press the Fridge button to
set your desired temperature. After a few seconds,
the Fridge will begin adjusting towards the newly set
temperature. This will be refl ected in the digital display.
02 OPERATING
operating _15
DA68-01922A.indb 15DA68-01922A.indb 15 2013.3.4 1:33:10 PM2013.3.4 1:33:10 PM
Page 16
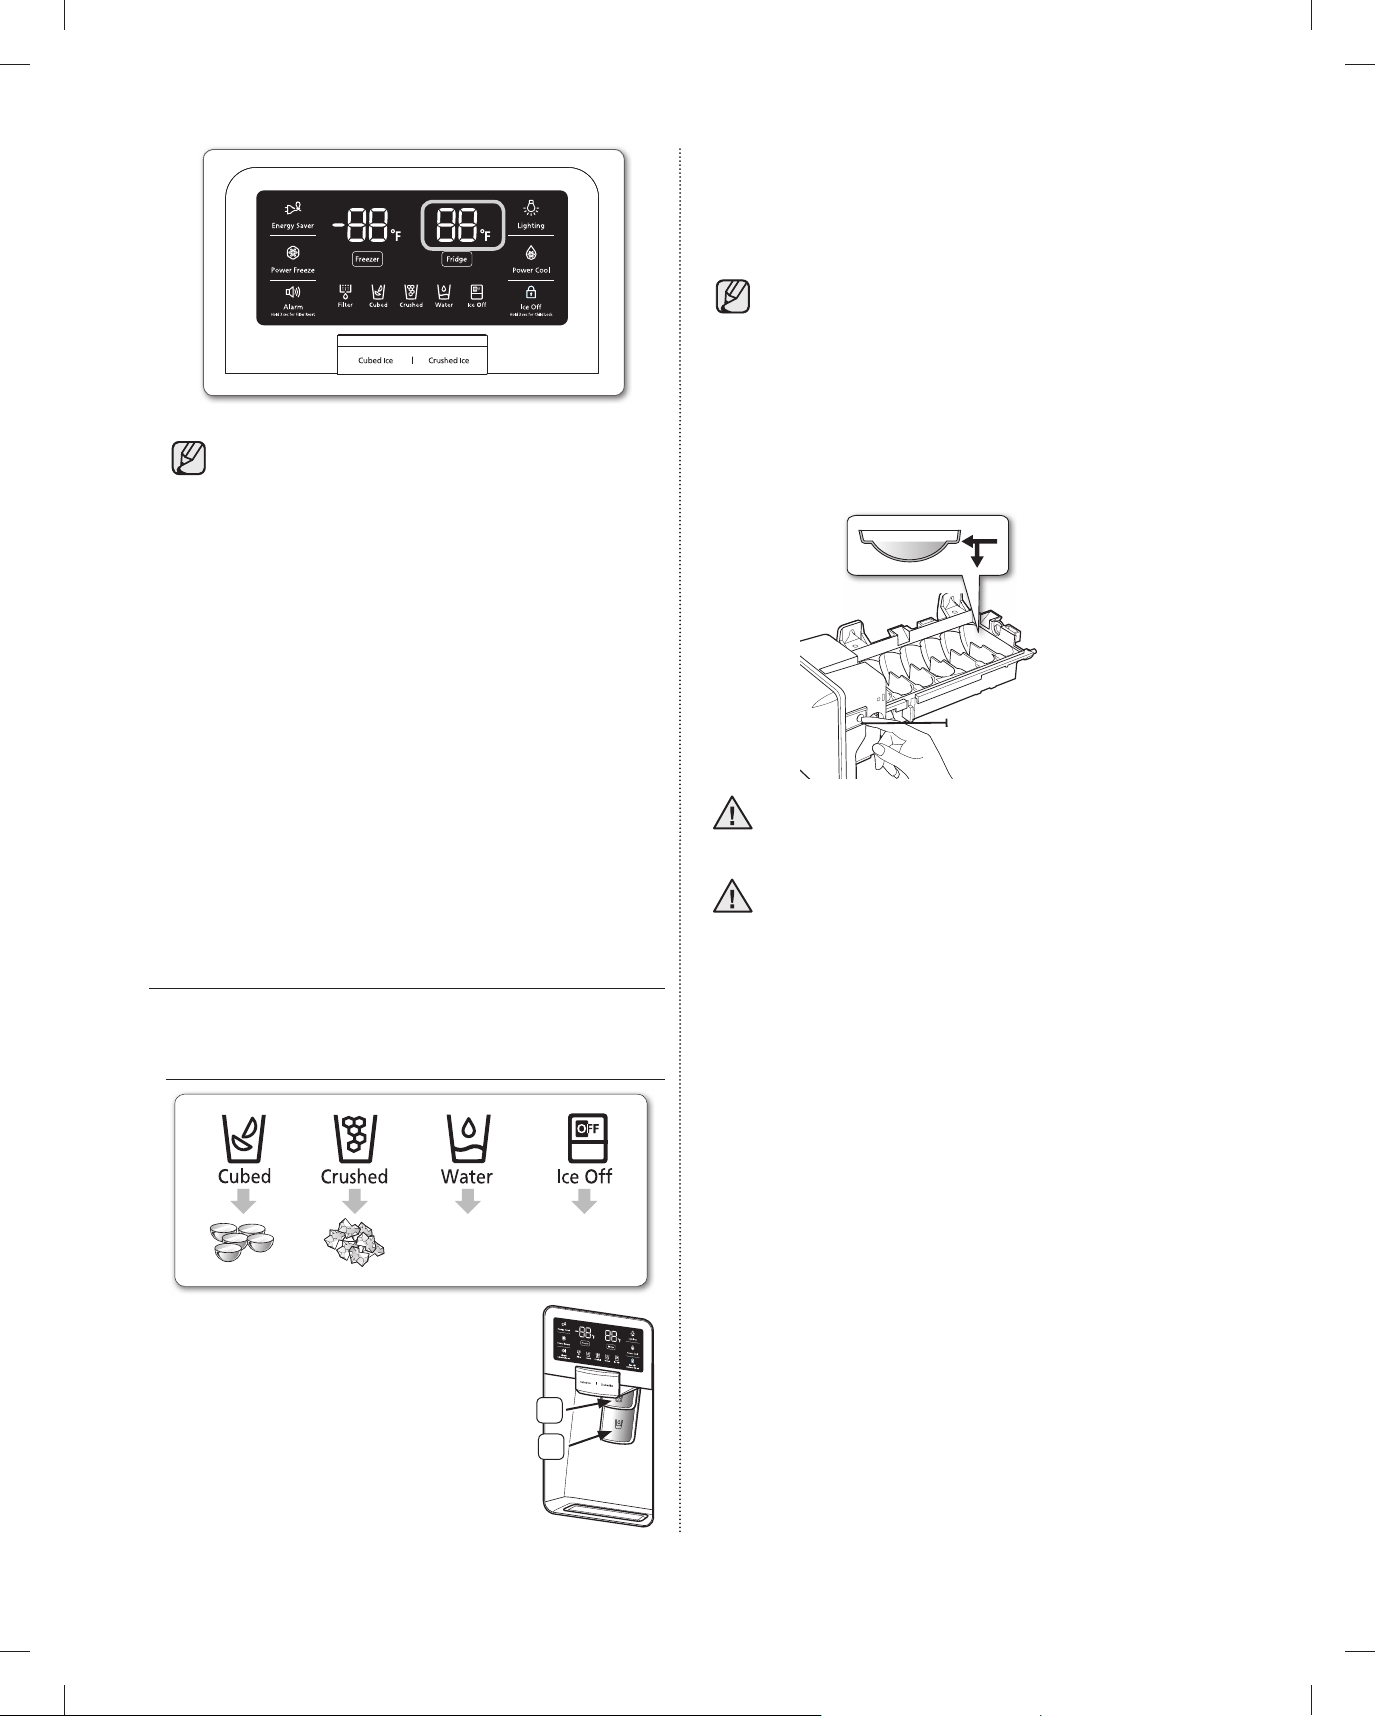
Using the Water lever ( 2 )
Recommend Temp (Fridge) : 38F
NO ICE
Select this if you want to
turn ice maker off
check the
water level
Test button
Push the Water lever dispenser ( 2 ) gently with your
glass. Water will be released from the dispenser.
Even if you push the water and Ice lever
simultaneously, the dispenser operates only
the option you selected or pushed fi rst.
Recommend Temp (Fridge) : 38F
- The temperature of the Freezer, fridge or
Convertible Room may rise when you open
the doors too frequently, or if a large amount
of warm or hot food is placed inside.
- This may cause the digital display to blink. Once
the Freezer and fridge temperature return to their
normal set temperatures, the blinking will stop.
- If the blinking continues, you may need to “reset”
the Refrigerator. Try unplugging the appliance, wait
for around 10 minutes and then plug the power
cord back in.
- If there is an communication error between the
Display and Main Controller, the Convertible
Display light may blink. Once the normal set
temperatures are reached, the blinking will stop.
If the blinking continues for a long period of time,
please contact a Samsung Electronics Service
Center.
USING THE TWO LEVER DISPENSER
Push the appropriate ice type button to
select what you want dispensed.
Select this if you want to
Using the ice lever ( 1 )
Push the Ice lever dispenser ( 1 )
gently with your glass. Ice will be
released from the dispenser.
You can choose the type of ice by
pushing the cubed or crushed button
fi rst.
NO ICE
turn ice maker off
1
2
Using the Ice & Water Dispenser together
To get Ice and water, push the Ice lever ( 1 ) fi rst for
ice, then move your glass down and press the water
dispenser lever ( 2 ) for water.
check the
water level
Test button
Do not pull the lever out. You could damage
CAUTION
CAUTION
• When you select Cubed Ice after using the
• In case ice doesn’t come out, pull out the ice
• Do not press the test button continuously when
• Normal Use
To fi ll the ice bucket to maximum capacity after
installation, follow these steps:
1. Allow your refrigerator to operate and cool down
- Waiting 24 hours will allow your ice maker to cool
2. Dispense 4 to 6 ice cubes into the glass.
3. After 8, and then 16 hours, dispense a full glass of
or break the lever's spring.
• To clean the ice bin/bucket, wash with
a mild detergent, rinse well, and dry
thoroughly it. Do not use harsh or abrasive
cleaners or solvents.
Crushed Ice mode, a small amount of residual
crushed ice might be produced.
bucket and press the test button located on the
right side of ice maker.
the tray is fi lled with ice or water. Water may
overfl ow or ice may jam the bucket.
for 24 hours (or 1 full day).
properly.
ice.
16_ operating
DA68-01922A.indb 16DA68-01922A.indb 16 2013.3.4 1:33:11 PM2013.3.4 1:33:11 PM
Page 17
• When you press the Test button, you will
PULL
PUSH
hear the refrigerator chime (ding-dong).
When the chime sounds, release the Test
button.
• The chime sounds automatically again to let you
know the ice maker is working well.
If a power failure occurs, ice cubes may melt
CAUTION
then freeze together when the power comes
back on, causing the dispenser to be out of
order.
To prevent this problem, after a power failure,
CAUTION
pull out the ice bucket and discard the
residual ice or water.
After you dump the ice from the ice bucket,
you should press the dispenser lever once
with the ‘ICE CUBED’ or ‘CRUSHED’
function ON. The ice maker will make new ice
faster after you return the ice bucket in the
refrigerator.
potable water supply only.
To operate the ice maker properly, water pressure of
138 ~ 862Kpa is required.
If you have a long vacation or business trip and won’t
use the water or ice dispensers for a long time:
- Close the water valve. Otherwise, water leakage
may occur.
- Remove all food.
- Unplug the refrigerator.
- Wipe excess moisture from inside and leave
the doors open. Otherwise, odor and mold may
develop.
Do not put your fi ngers, hands or any other unsuitable
objects in the chute or ice-maker bucket.
- It may result in personal injury or material damage.
Never put your fi nger or any other objects in the
dispenser opening.
- It may cause injury.
Do not try to disassemble the ice maker.
Do not wash or spray the ice bucket with water while
it is in the refrigerator. Remove it to clean it.
02 OPERATING
If you use all the ice at once, you must
repeat Steps 2 and 3 on the previous page.
However, only wait 8 hours before dispensing
the fi rst 4 to 6 ice cubes. This will replenish
the ice cubes and ensure maximum ice
production.
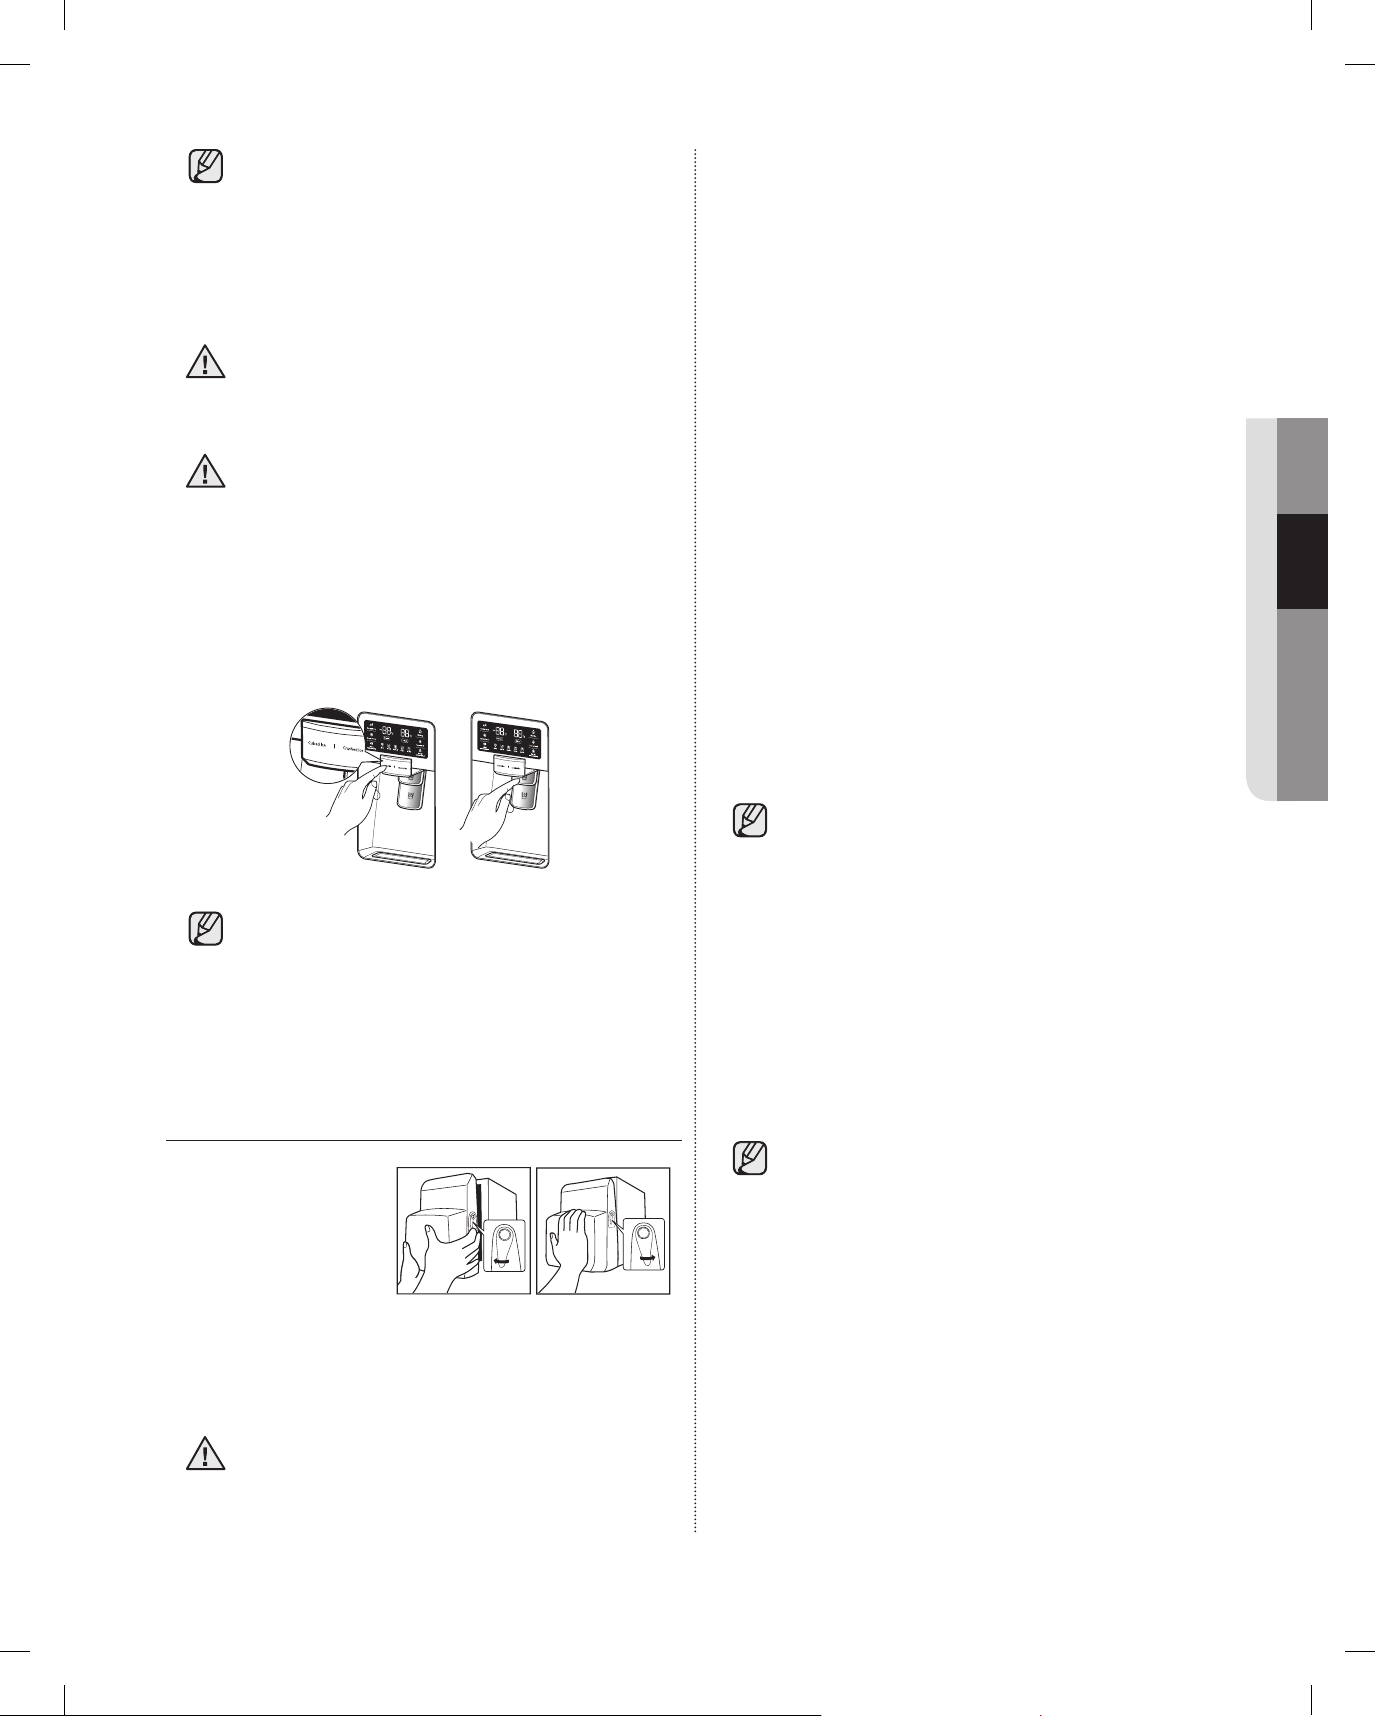
USING THE ICE OFF FUNCTION
When you select the
Ice Off mode, remove
all ice cubes from
the bucket. If you
are not using the ice
dispenser, the ice
cubes may clump together. Pull the lock lever forward
to remove the bucket. Throw away the ice cubes or
clumped ice. Push the bucket back until you hear a
click.
Use only the ice maker provided with
CAUTION
the refrigerator. The water supply to this
refrigerator must only be installed/connected
by a suitably qualifi ed person. Connect to a
PULL
PUSH
Water clouding phenomenon
All water provided to the refrigerator fl ows
through the core fi lter which is an alkaline
water fi lter. In the fi ltering process, the
pressure of the water that has fl owed out of
the fi lter is increased, and the water becomes
saturated with oxygen and nitrogen When
this water fl ows out into the air, the pressure
plummets and the oxygen and nitrogen get
supersaturated, which results in gas bubbles.
The water may temporarily look misty or
cloudy due to these oxygen bubbles. After a
few seconds, the water will look clear.
Please wait 1 second before removing
the cup after dispensing water to prevent
spills. Do not pull out the lever dispenser
after dispensing ice or water. It comes back
automatically. Ice is made in cubes. When
you select “Crushed”, the ice maker grinds
the ice cubes into crushed ice.
operating _17
DA68-01922A.indb 17DA68-01922A.indb 17 2013.3.4 1:33:12 PM2013.3.4 1:33:12 PM
Page 18
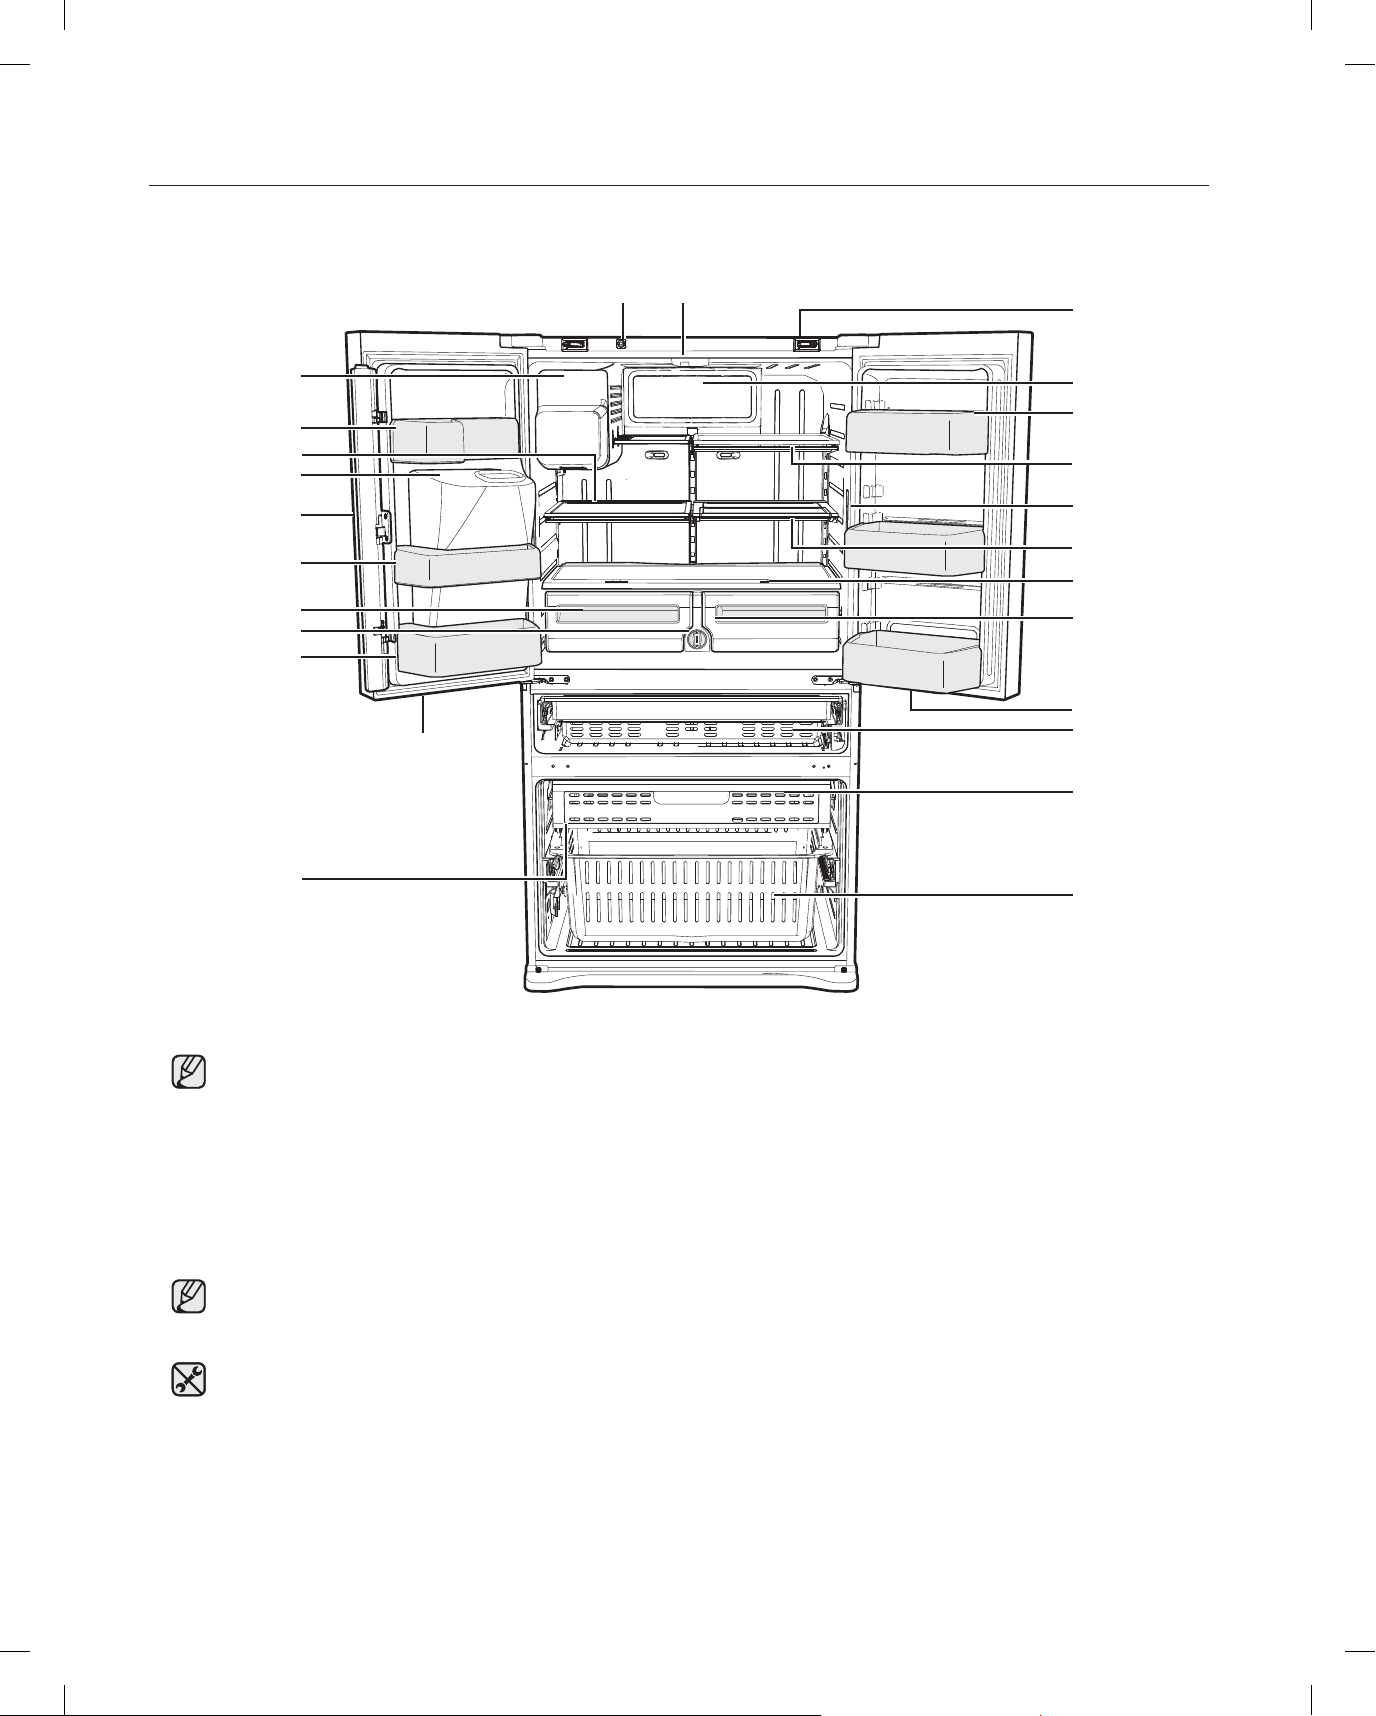
PARTS AND FEATURES
FF Ice-Maker
Light
Interlocking switch
Door Closer
Cover Eva (Light)
Right Door Bins
Tempered glass
shelves
Light
Quick-Space
Glass Shelf
Cover Veg
Light
Light
Convertible
Room
Auto Pull Out
Drawer
Freezer Drawer
Bin
Dis Door Bins
Slide-Shelf
Cap Chute
Vertical Hinged
Section
Mid Door Bins
Vegetable & Fruit
Drawers
Water Filter
Left Door Bins
Tilting Pocket
Light
Use this page to become more familiar with the parts and features of the refrigerator.
FF Ice-Maker
Dis Door Bins
Slide-Shelf
Cap Chute
Vertical Hinged
Vegetable & Fruit
Section
Mid Door Bins
Drawers
Water Filter
Left Door Bins
Tilting Pocket
Interlocking switch
Light
Light
Door Closer
Cover Eva (Light)
Right Door Bins
Tempered glass
shelves
Light
Quick-Space
Glass Shelf
Cover Veg
Light
Light
Convertible
Room
Auto Pull Out
Drawer
Freezer Drawer
Bin
When closing the door, make sure the Vertical Hinged Section is in the correct position to avoid
scratching the other door.
If the Vertical Hinged Section is reversed, put it back to the right position and close the door.
Moisture may appear at times on the Vertical Hinged Section.
The door handle may become loose over time. If this happens, tighten the bolts found on the inside of
the door.
If you close one door with a lot of force, the other door may open.
When the door opens, the interlock switch automatically turns off the auger motor in the ice maker for
safety reasons.
When the interior or exterior LED lamp has gone out, please contact your service agents.
18_ operating
DA68-01922A.indb 18DA68-01922A.indb 18 2013.3.4 1:33:12 PM2013.3.4 1:33:12 PM
Page 19
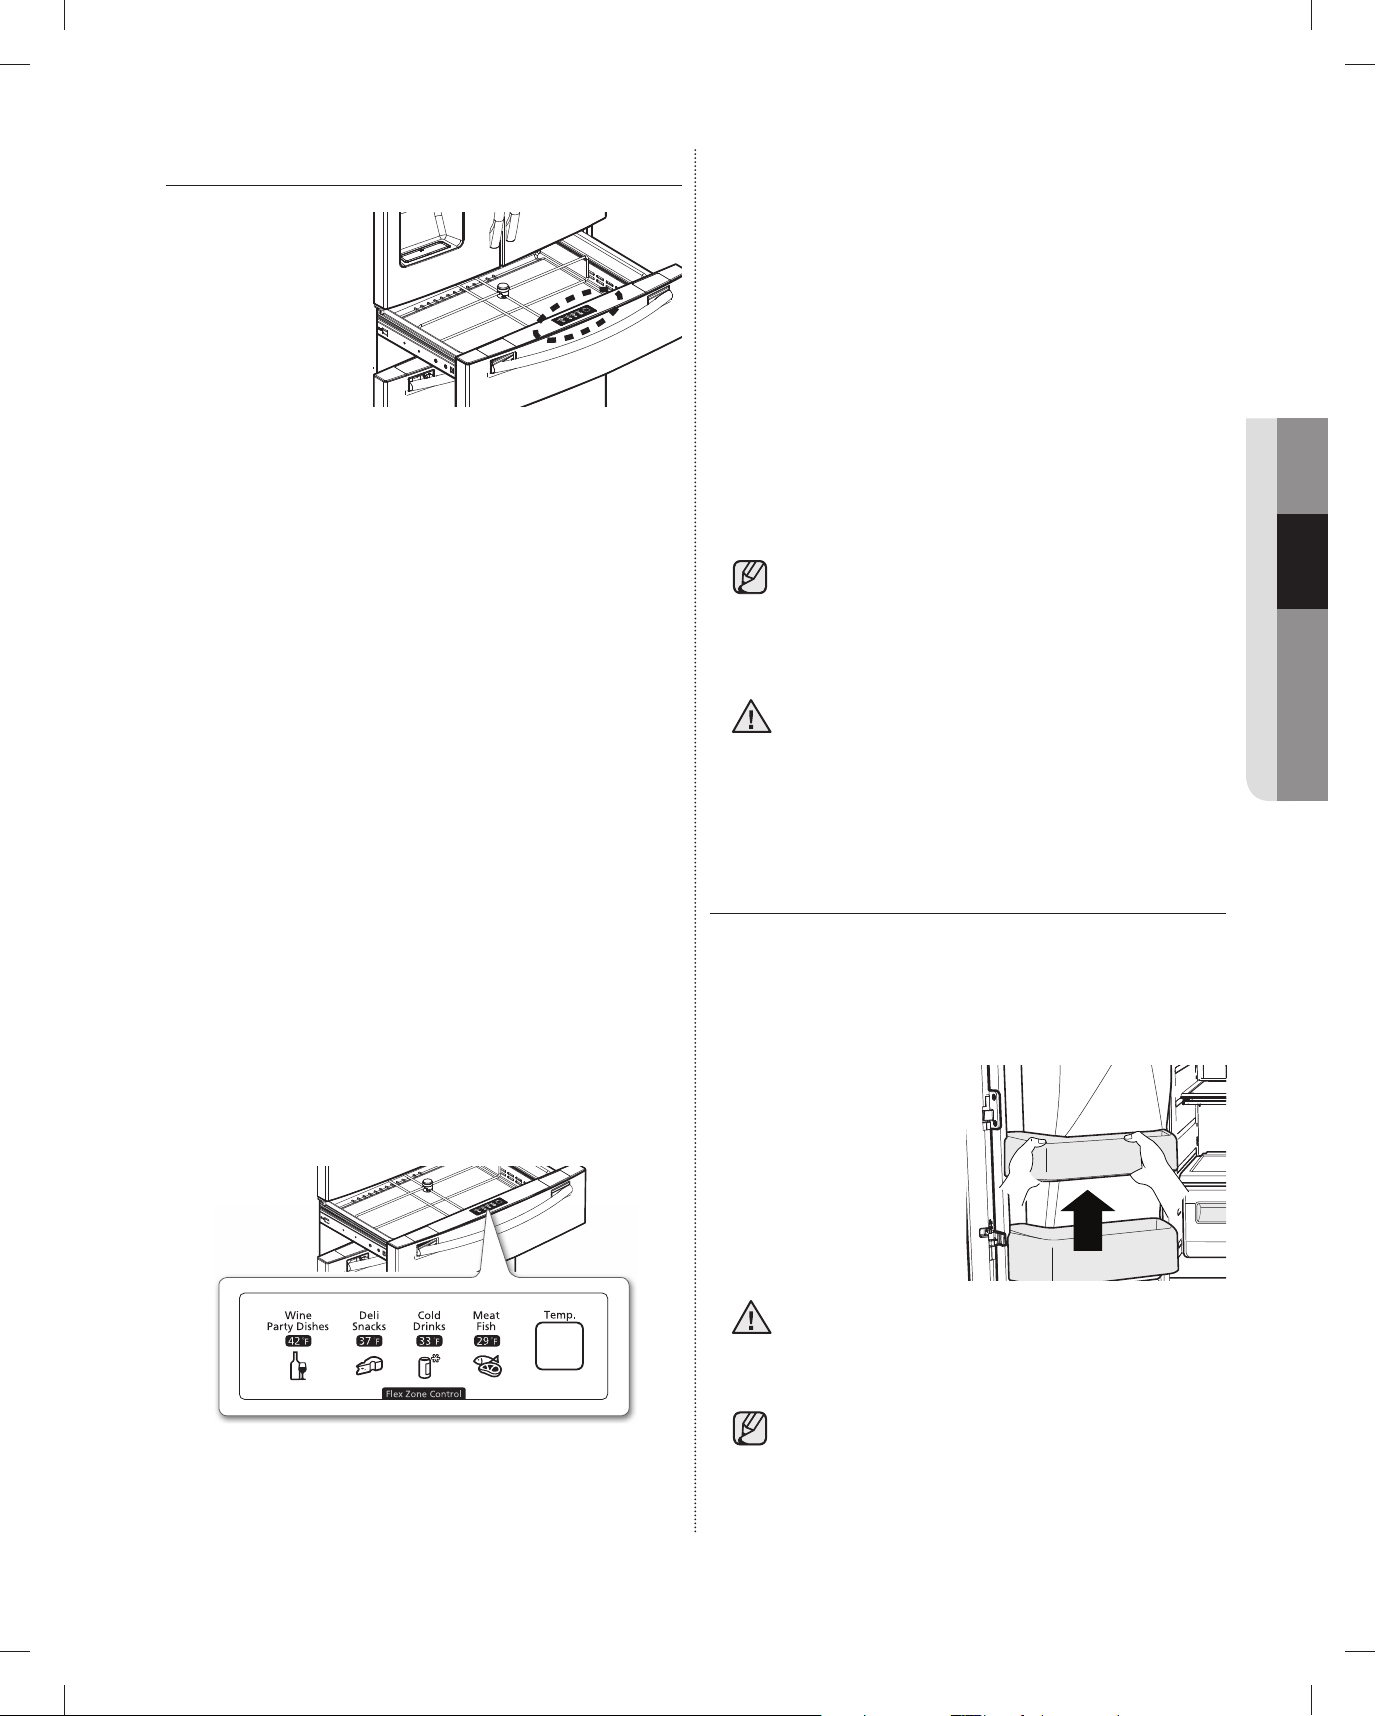
USING FLEX ZONE
Wine
Party Dishes
Deli
Snacks
Cold
Drinks
Meat
Fish
The Flex Zone is a
full-width drawer
with an adjustable
temperature control.
You can use the
Flex Zone for large
party trays, deli
items, wines, pizzas,
beverages, or
miscellaneous items. There is a temperature sensor
which lets you adjust the amount of cold air allowed
into the Zone. The control buttons are located on the
cap door center.
• Press the Temp button repeatedly until your
desired mode is lit.
• Each time you press the Temp button, you change
the mode in this order: Meat/Fish mode (29°F),
Cold Drinks mode (33°F), Deli/Snack (37°F), Wine/
Party Dishes (42°F) mode. Initially, the Cold Drinks
mode is selected. The refrigerator will adjust the
temperature in the Flex Zone automatically to the
temperature you selected.
• The Flex Zone Temp. Display may change
depending on the number of items inside, where
they are located, the ambient temperature, and
how often the door is opened.
Temperature
3. When “Cold Drink” is selected, the temperature
of Flex Zone will be kept around 33°F (1°C). This
feature also helps keep drinks cold and refreshing.
4. When “Meat/Fish” is selected, the temperature
of Flex Zone will be kept around 29°F (-1°C). This
feature also helps keep meat or fi sh fresh for a
longer time.
Wine
Party Dishes
• wine • pineapples • bottled
• cocktails • lemons • juice • cold cuts
• cakes • biscuits • soft drinks • bacon
• cheeses • potatoes • beer • chili dogs
Deli
Snacks
Cold
Drinks
water
Meat
Fish
• steaks
Fruit and vegetables may be damaged under
the “Meat Fish” setting.
Do not store lettuce or other leafy produce in
the Flex Zone.
Do not store glass bottles in the Flex Zone
CAUTION
under the "Cold Drinks" or "Meat/Fish"
setting. If they are frozen, they can break and
cause personal injury.
REMOVING THE REFRIGERATOR
ACCESSORIES
02 OPERATING
You can select your Flex Zone temperature from Meat/
Fish mode (29°F), Cold Drinks mode (33°F), Deli/
Snack (37°F), or Wine/Party Dishes (42°F) mode.
Selection Button
1. When “Wine/Party Dishes” is selected, the
temperature of Flex Zone will be kept around 42°F
(5°C). This feature helps keep food fresh for a long
time.
2. When “Deli/Snack” is selected, the temperature
of Flex Zone will be kept around 37°F (3°C). This
feature helps keep food fresh for a longer time.
1. Door Bins & Dairy Compartment
To remove - Simply lift the bin up and pull straight out.
To relocate - Slide it in above the desired location and
push down until it stops.
Injury may occur if the door bins are not fi rmly
CAUTION
Dust removal method - Remove the guard and wash
in water.
assembled.
Do not allow children to play with bins. Sharp
corners of the bins may cause injury.
Do not adjust a bin full of food. Remove the
food fi rst.
operating _19
DA68-01922A.indb 19DA68-01922A.indb 19 2013.3.4 1:33:13 PM2013.3.4 1:33:13 PM
Page 20
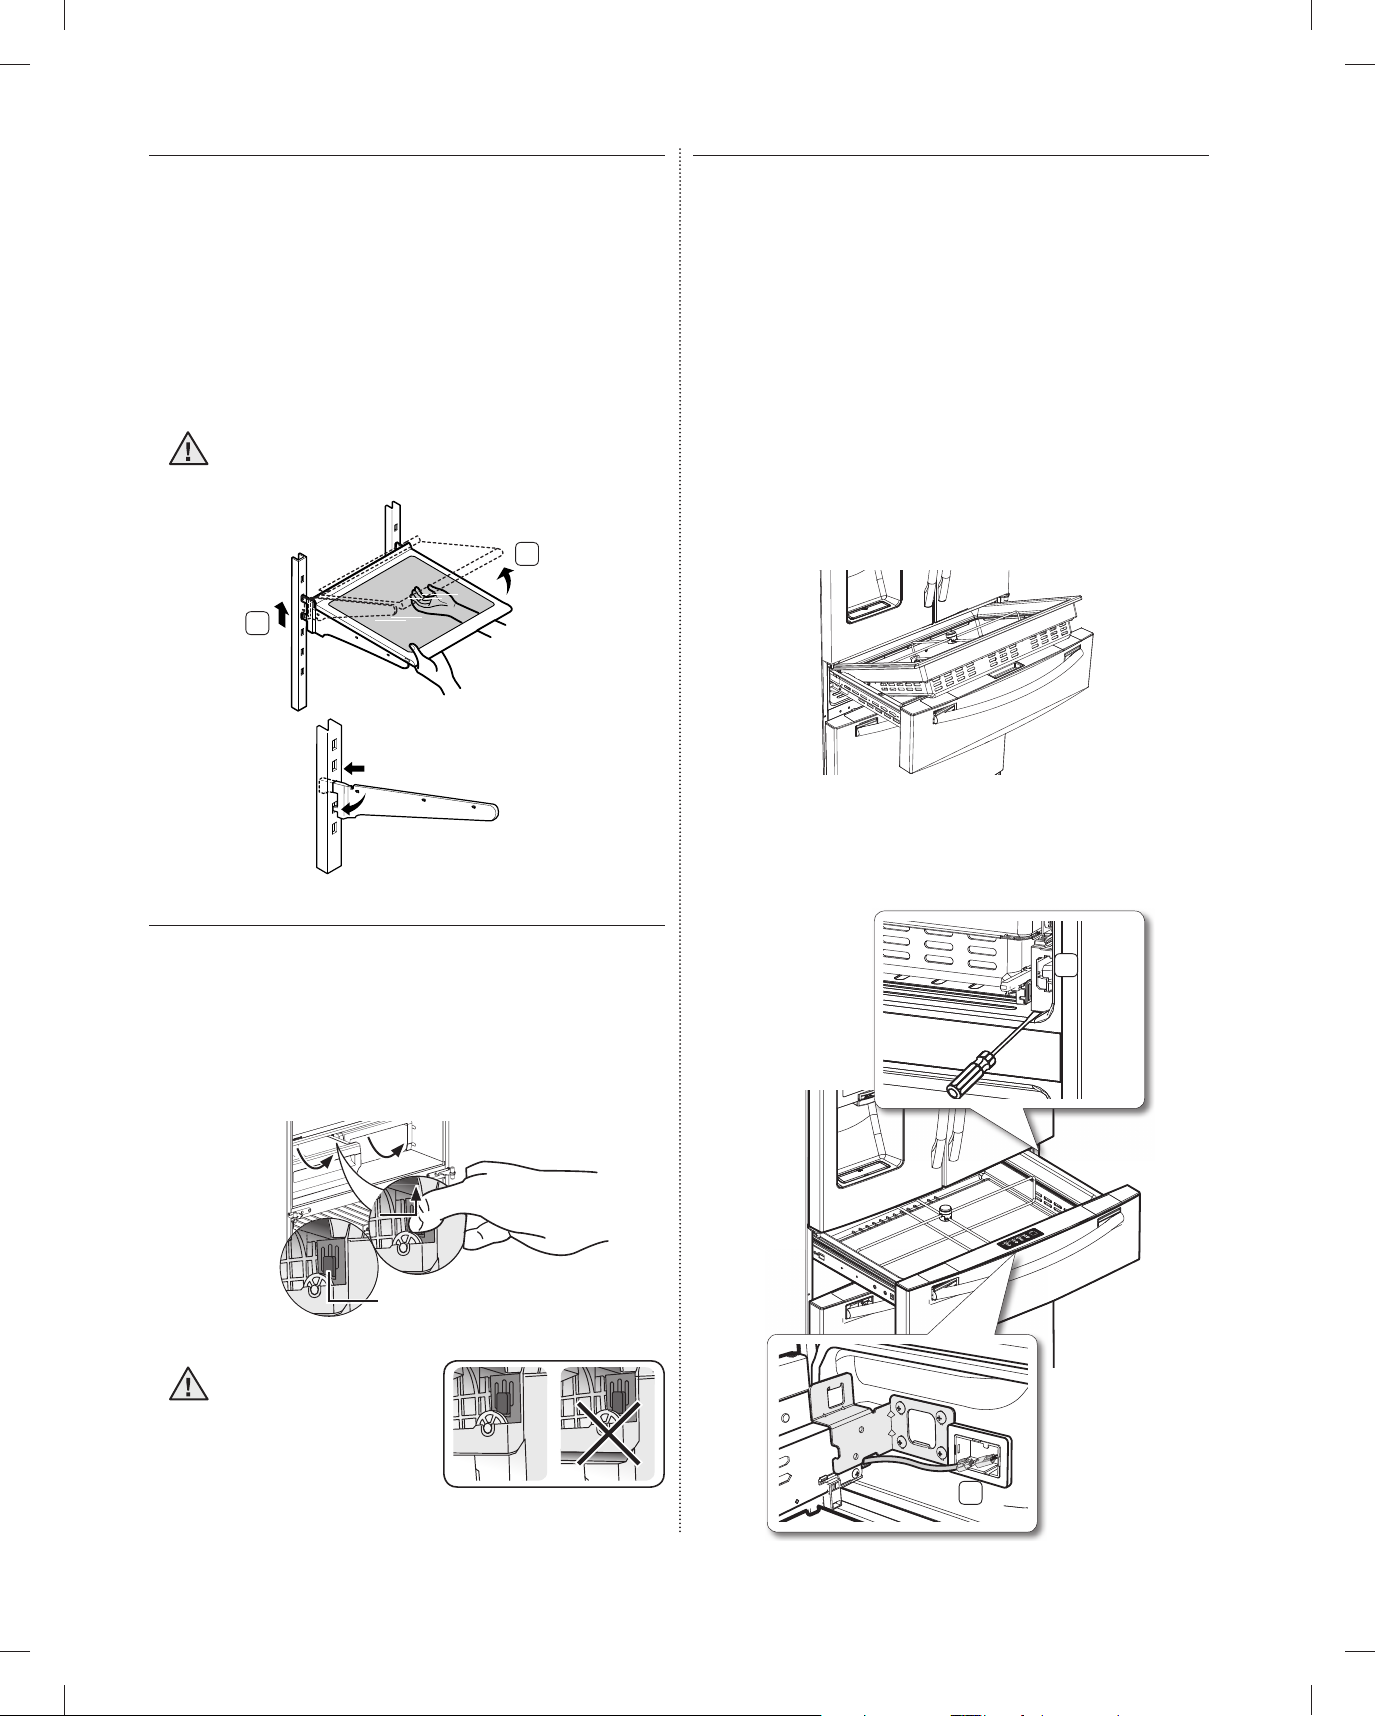
2. Tempered Glass shelves
Button
Rounded up while
pressing the button
To remove - Tilt up the front of the shelf in the direction
shown ( 1 ) and lift it up vertically ( 2 ). Pull
the shelf out.
To relocate - Tilt the front of the shelf up and guide
the shelf hooks into the slots at a desired
height. Then lower the front of the shelf
so that the hooks can drop into the slots.
The Tempered Glass shelves are heavy.
CAUTION
Use special care when removing them.
1
2
4. Flex Zone
To remove the Flex Zone – Pull the Flex door out to
full extension. Lift the Flex
Zone up, pulling it to your
body with both hands.
To relocate the Flex Zone – Open the Flex door to full
extension. Tilt the front of
the Flex Zone up, place
the back of the Flex Zone
onto the rails, and then
lower the front until the
whole Zone rests on the
rails.
3. Vegetable & Fruit Drawers
• After pulling out completely the vegetable pan,
take it out by lifting up the front and pull it forward.
• To remove the shelf of the vegetable pan, press
the button on the left side of the shelf while you
are lifting it. Pull it out slowly.
Rounded up while
pressing the button
Button
Reassemble in the
CAUTION
inverse order of
the disassembly.
The assembly is
completed when you
hear a "Click".
When the Flex Zone or LED lighting are not
working, check the connectors [ ( 1 ), ( 2 )
shown below] for cracks or leaks.
2
1
20_ operating
DA68-01922A.indb 20DA68-01922A.indb 20 2013.3.4 1:33:26 PM2013.3.4 1:33:26 PM
Page 21
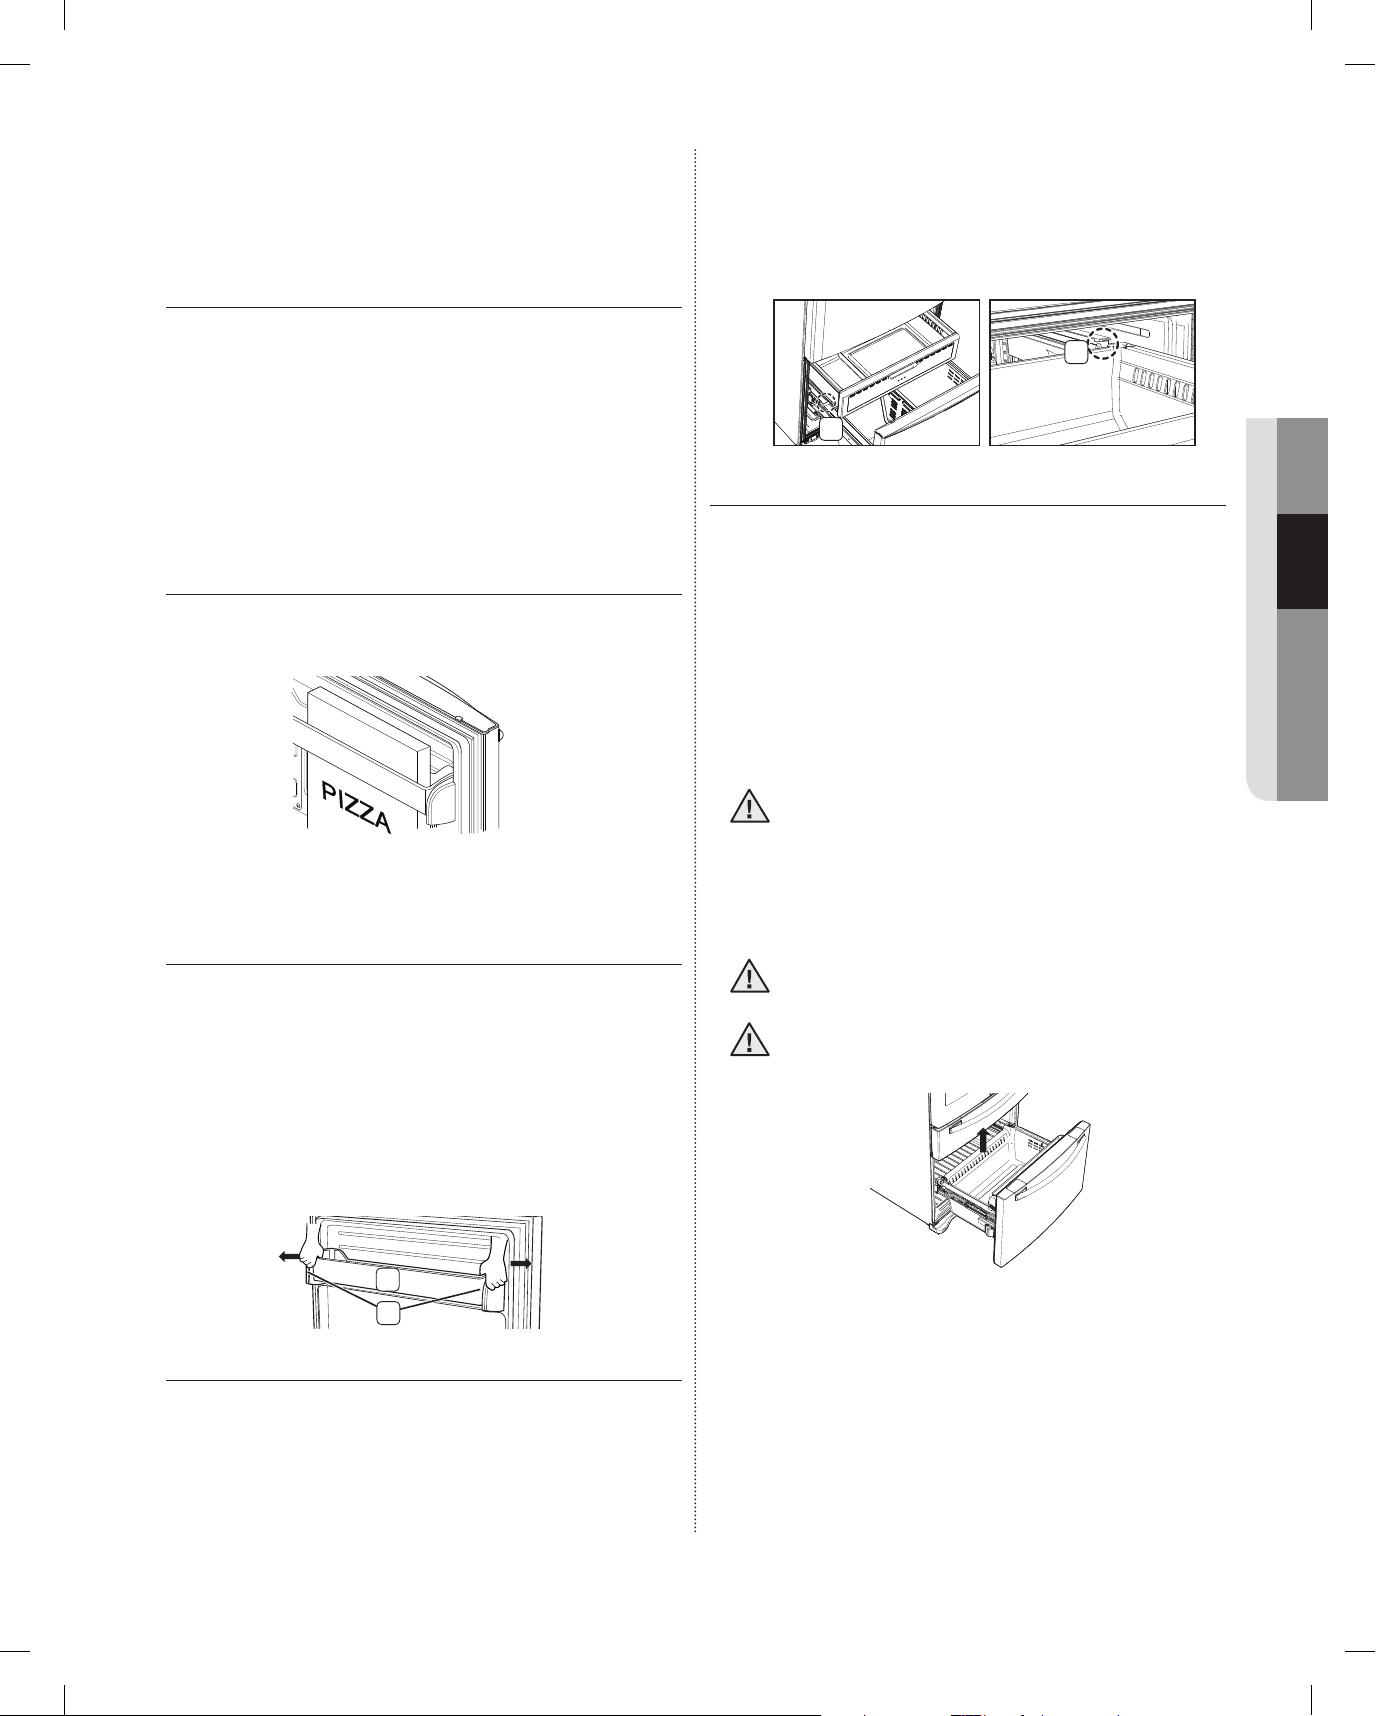
1. Refer to page 7 for disassembly instructions.
2. Open the cover housing with a fl at-blade
screwdriver.
USING THE DOORS
straight out.
To relocate - Place the drawer onto the rails ( 4 ) by
tilting it up. Lower the drawer into place
until it is horizontal and slide the drawer (
3 ) in.
Ensure that the doors close all the way and are
securely sealed.
When the refrigerator door is only partially open, it will
automatically close. But, the door will stay open when
opened more than the auto close range and you must
close it manually.
USING THE TILTING POCKET
The Tilting Pocket can be used to store up to a 16”
pizza if you place it as shown in the illustration.
REMOVING THE FREEZER
ACCESSORIES
4
3
3. Freezer Drawer
To remove the freezer drawer - Pull the freezer drawer
out fully. Tilt up the
rear of the bin and lift it
out to remove.
To relocate the freezer drawer - Place the bin into the
rail assembly.
Do not allow babies or children go inside
CAUTION
the freezer drawer. They could damage the
refrigerator and seriously injure themselves.
Do not sit on the freezer door. The door may
break. Do not allow children to climb into the
freezer drawer.
02 OPERATING
1. Tilting Pocket
To remove - Remove the tilting pocket ( 1 ) by pulling
both support guards ( 2 ) aside. Take
out both support guards by pulling them
aside.
To replace - Hook the ends of the tilting pocket ( 1 )
onto the support guards ( 2 ) and push
down until they lock into place.
1
2
2. Super Extended Drawer
To remove - Pull the drawer out to full extension.
Tilt up the rear of the drawer and lift
CAUTION
WARNING
Do not remove the divider.
• If trapped inside, children may become injury
and suffocate to death.
operating _21
DA68-01922A.indb 21DA68-01922A.indb 21 2013.3.4 1:33:32 PM2013.3.4 1:33:32 PM
Page 22
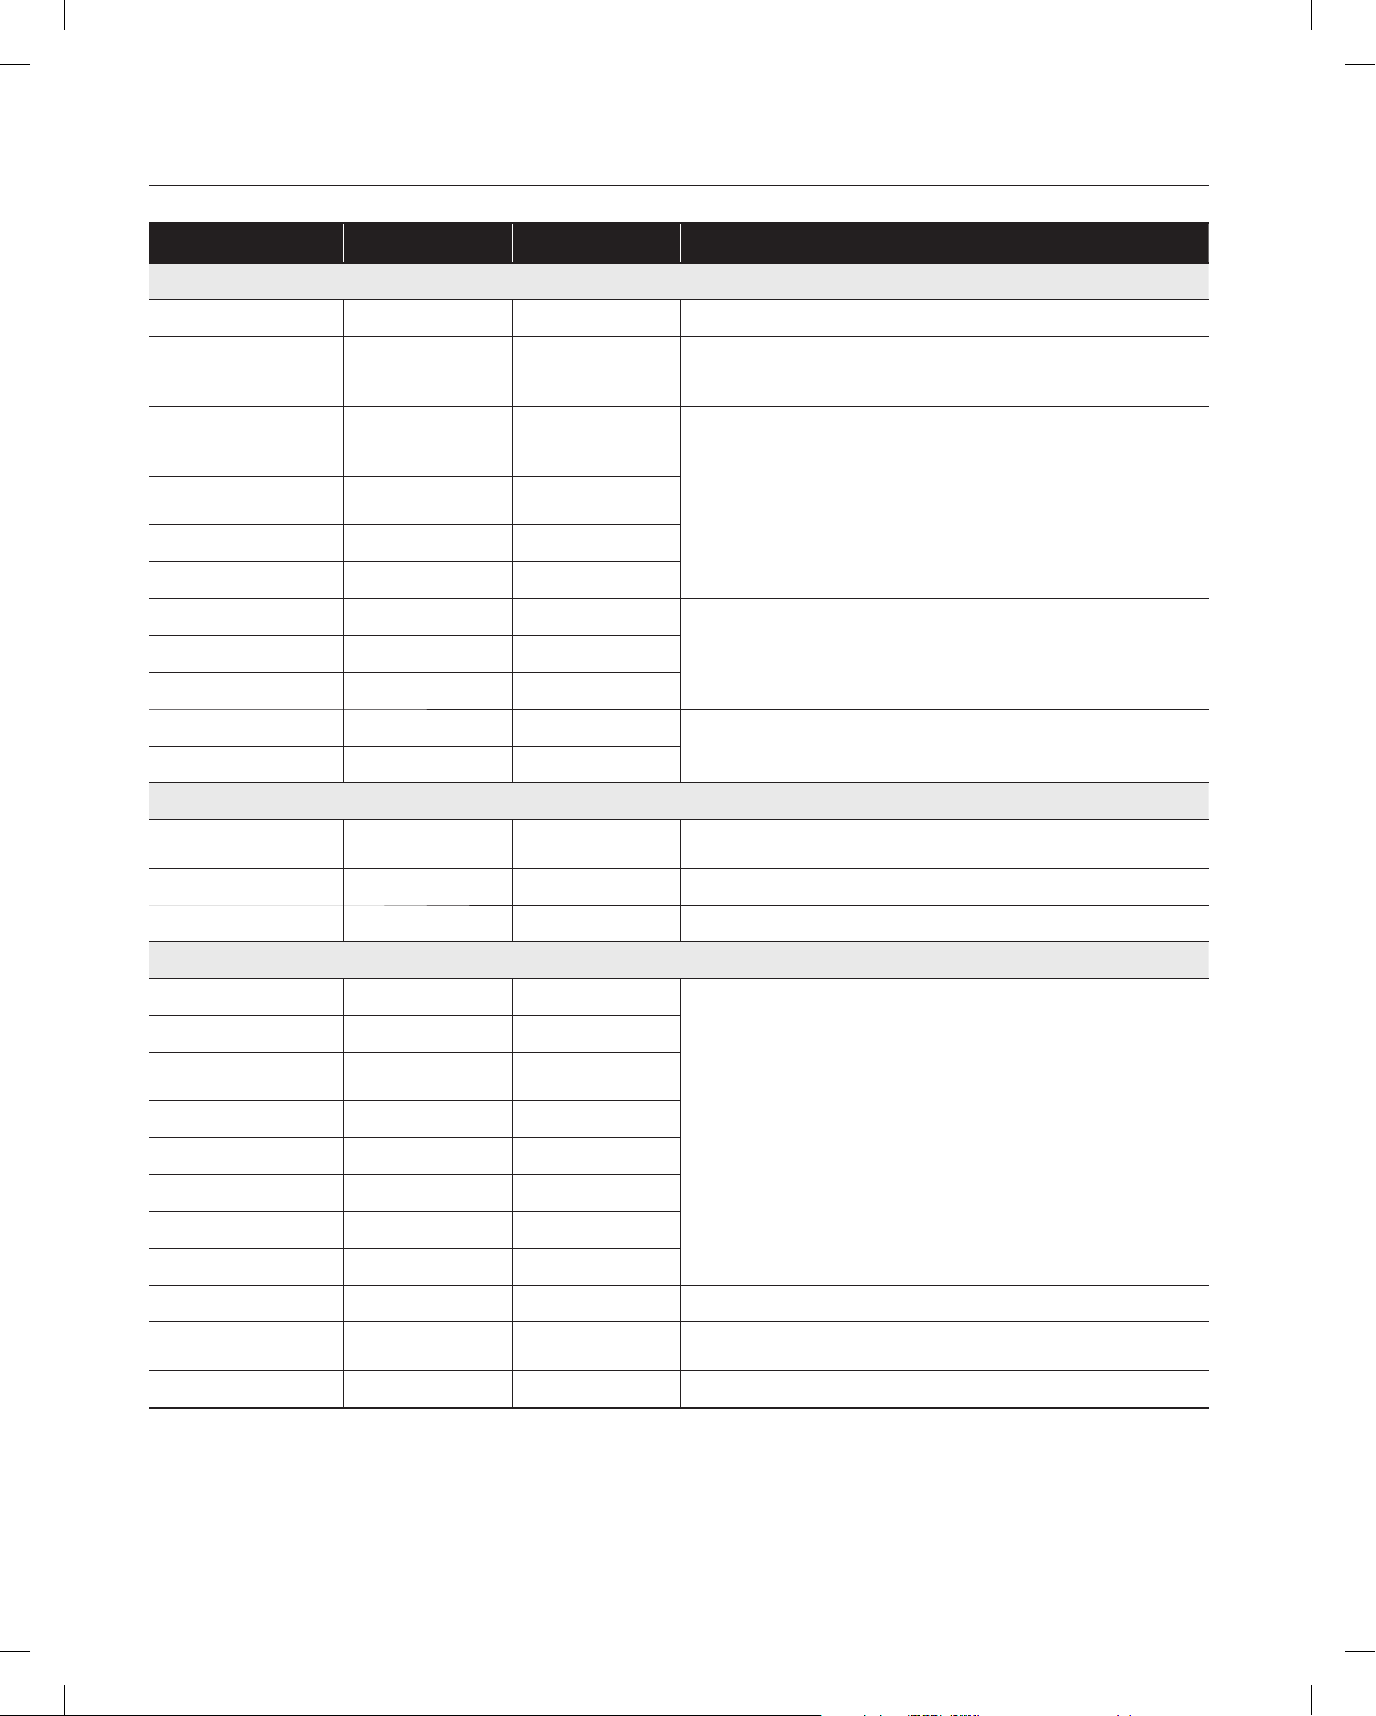
FOOD STORAGE TIPS
Foods Refrigerator Freezer Storage Tips
DAIRY PRODUCTS
Butter 2-3 Weeks 6-9 Months Wrap or cover tightly.
Check date code. Most milk and similar products are sold in date-coded
Milk 1-2 Weeks Not recommended
Cream Cheese, cheese
food, and cheese
spread
Hard Cheese (unopened)
Hard Cheese (opened) 2 Months Not recommended
Cottage Cheese 10-15 Days Not recommended
2-4 Weeks Not recommended
3-4 Months 6 Months
cartons that indicate a products’s peak freshness. Re-seal with cap or
wrap tightly. Do not return unused protions to oroginal container.
Check date code. Keep all cheese tightly packed in moisture proof wrap
Cream 7-10 Days 2 Months
Sour Cream 2 Weeks Not recommended
Cream Dips (opened) 1 Week Not recommended
Yogurt 10-14 Days Not recommended
Frozen Yogurt na 2 Months
EGGS
Eggs (uncooked) 3-4 Weeks Not recommended
Eggs (cooked) 1 Week Not recommended Store in covered container
Leftover egg dishes 3-4 Days Not recommended Store in covered container
FRESH FRUITS
Apples 1 Month Not recommended
Bananas 2-4 Days Not recommended
Peaches, Melons,
Pears, Avocados
Berries and Cherries 2-3 Days 12 Months
Apricots 3-5 Days Not recommended
Grapes 2-5 Days na
3-5 Days Not recommended
Check date code. Most yogurt, creams, and similar products are sold in
date-coded cartons that indicate a product’s peak freshness. Re-seal or
cover tightly. Do not return unused portions to original container.
Check date code. Keep covered.
Check date code. Store eggs in coldest part of refrigerator and in their
original container.
If storing in refrigerator, do not wash fruit before storing. Store in moisture resistant bags or containers. Wrap cut fruits. Some fruits darken
when refrigerated.
Pineapple (un-cut) 2-3 Days Not recommended
Pineapple (cut) 5-7 Days 6-12 Months
Citrus 1-2 Weeks Not recommended Store uncovered.
Juice 6 Days Not recommended
Frozen Juice Thawing only 12 Months Check date code. Do not re-freeze.
Check date code and re-seal in original container. Do not return unused
portions to original container.
22_ operating
DA68-01922A.indb 22DA68-01922A.indb 22 2013.3.4 1:33:32 PM2013.3.4 1:33:32 PM
Page 23
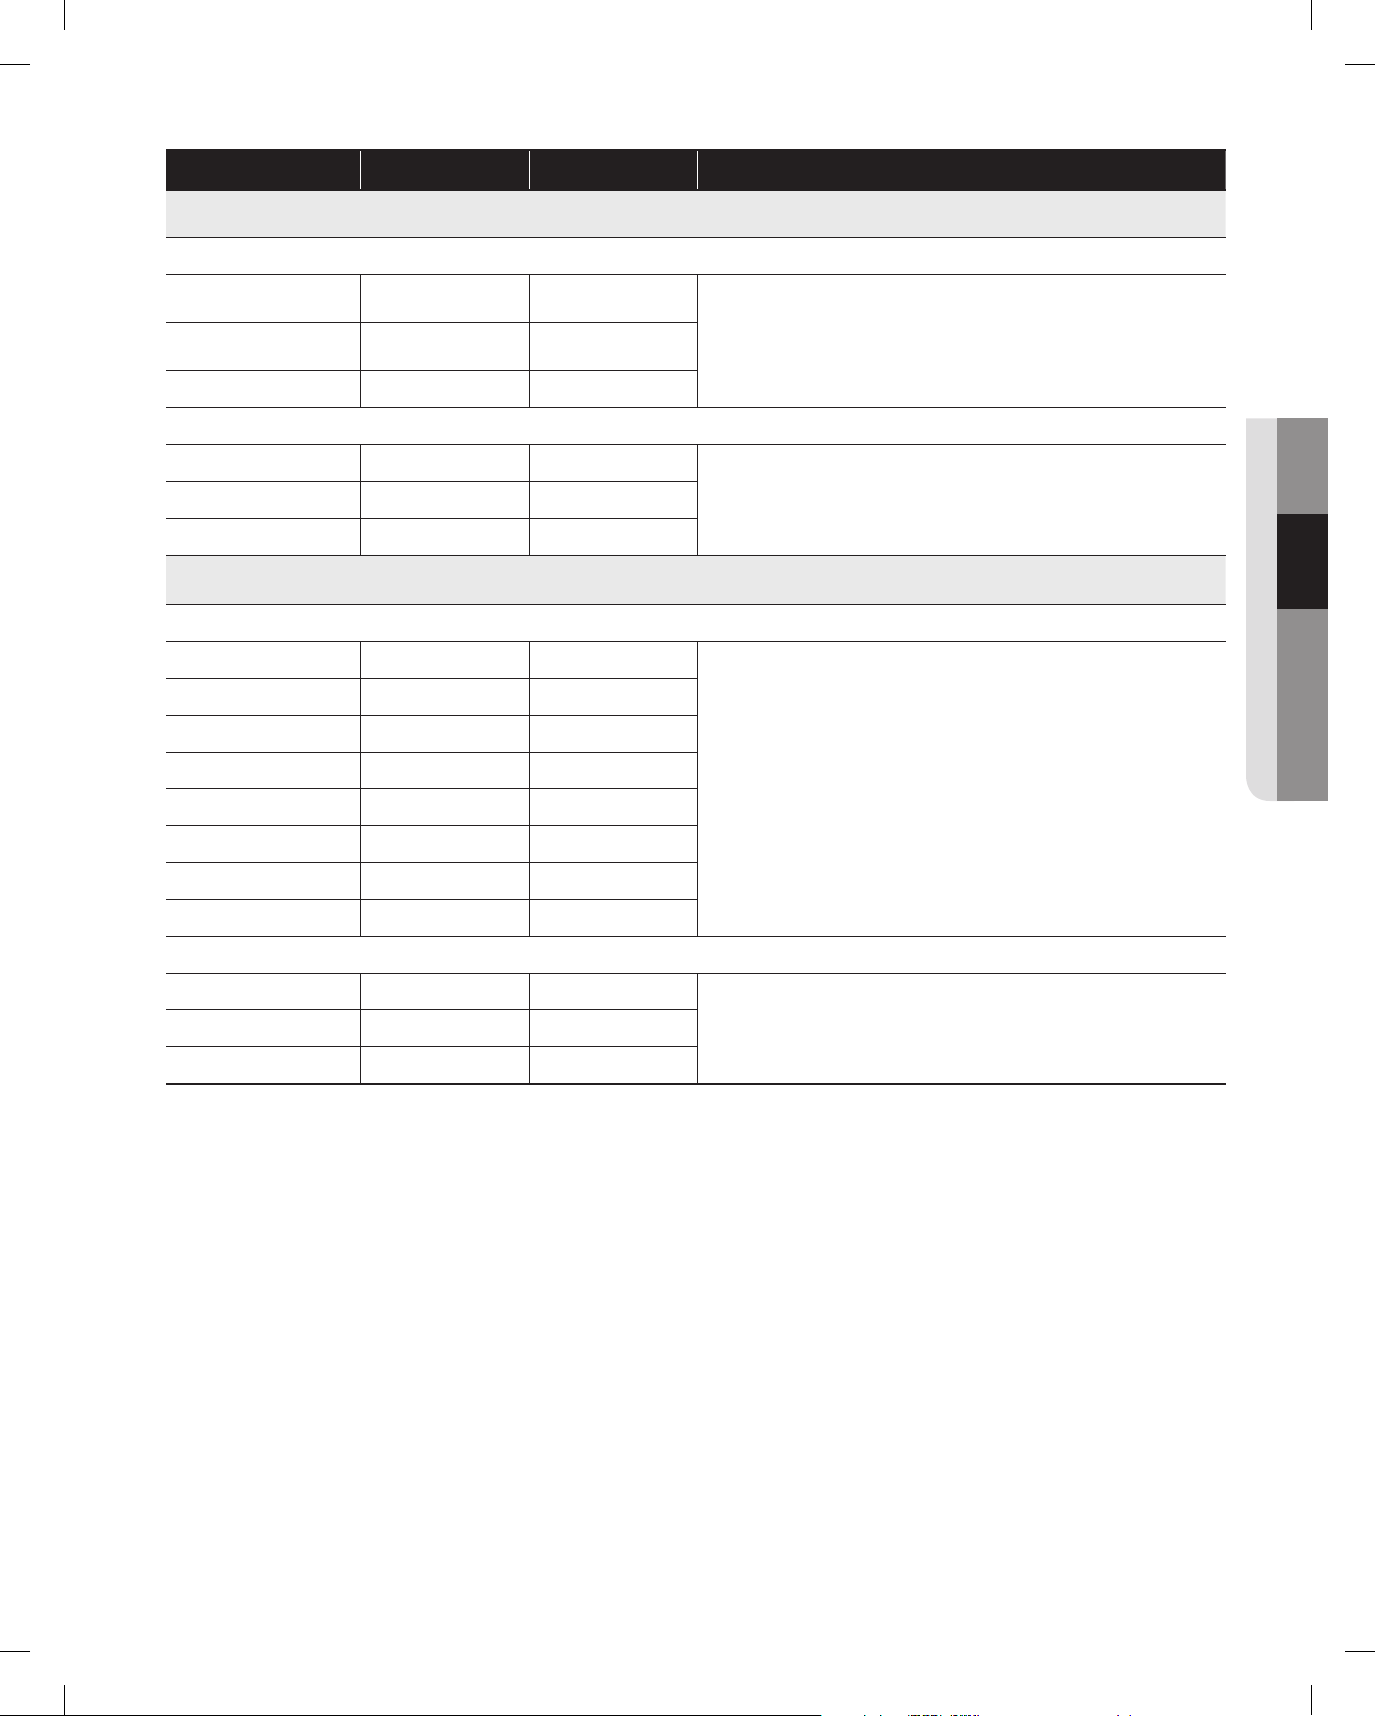
Foods Refrigerator Freezer Storage Tips
FISH AND SHELLFISH
Fish
Fatty Fish (mackerel,
trout, salmon)
Lean Fish (cod, fl ounder,
etc)
Frozen or Breaded na 3 Months
Shellfi sh
Shrimp (uncooked) 1-2 Days 12 Months
Cooked Fish or Shellfi sh 2-3 Days 3 Months
MEAT
Fresh, Uncooked
Chops 2-4 Days 6-12 Months
Ground 1 Day 3-4 Months
Roast 2-4 Days 6-12 Months
Bacon 1-2 Weeks 1-2 Months
Sausage 1-2 Days 1-2 Months
Steak 2-4 Days 6-9 Months
1-2 Days 2-3 Months
1-2 Days 6 Months
Keep in original wrapper and store in coldest part of refrigerator. Package in vapor-proof and moisture proof wrap for freezer. Freeze at 0ºF.
Thaw in refrigerator or check date code. Freeze in original packaging.
To freeze, package in vapor-proof and moisture-proof container.Crab 3-5 Days 10 Months
Check date code for use. Store in coldest part of refrigerator in original
packaging. Package in moisture-proof and vapor-proof container for
freezing. Recommended refrigerator temperature 33ºF to 36ºF and
freezer temperature 0ºF to 2ºF
02 OPERATING
Poultry 1 Day 12 Months
Lunch meat 3-5 Days 1 Month
Cooked
Meat 2-3 Days 2-3 Months
Poultry 2-3 Days 4-5 Months
Ham 1-2 weeks 1-2 Months
Check date code for use. Store in coldest part of regrigerator in original
packaging. Package in moisture-proof and vapor-proof container for
freezing.
Sources:
American Meat Institute Foundation. 1994. Yellow pages: answers to predictable questions consumers ask
about meat and poultry. American Meat Institute Food Marketing Institute. 1999. The food keeper. Food
Marketing Institute, Washington, D.C. Freeland-Graves, J.H. and G.C. Peckham. 1996. Foundations of
food preparation, 6th ed. Prentice-Hall, Inc. Englewood Cliffs, NJ. Hillers, V.N. 1993. Storing foods at home.
Washington State University Cooperative Extension, Pullman, WA. Publ. EB 1205.
National Restaurant Association. 2001. Be cool-chill out! Refrigerate promptly. National Restaurant Association
Education Foundation¼s International Food Safety Council, Washington, D.C. USDA. 1997. Basics for handling
food safely. U.S. Department of Agriculture, Food Safety and Inspection Service, Washington, D.C.
operating _23
DA68-01922A.indb 23DA68-01922A.indb 23 2013.3.4 1:33:33 PM2013.3.4 1:33:33 PM
Page 24
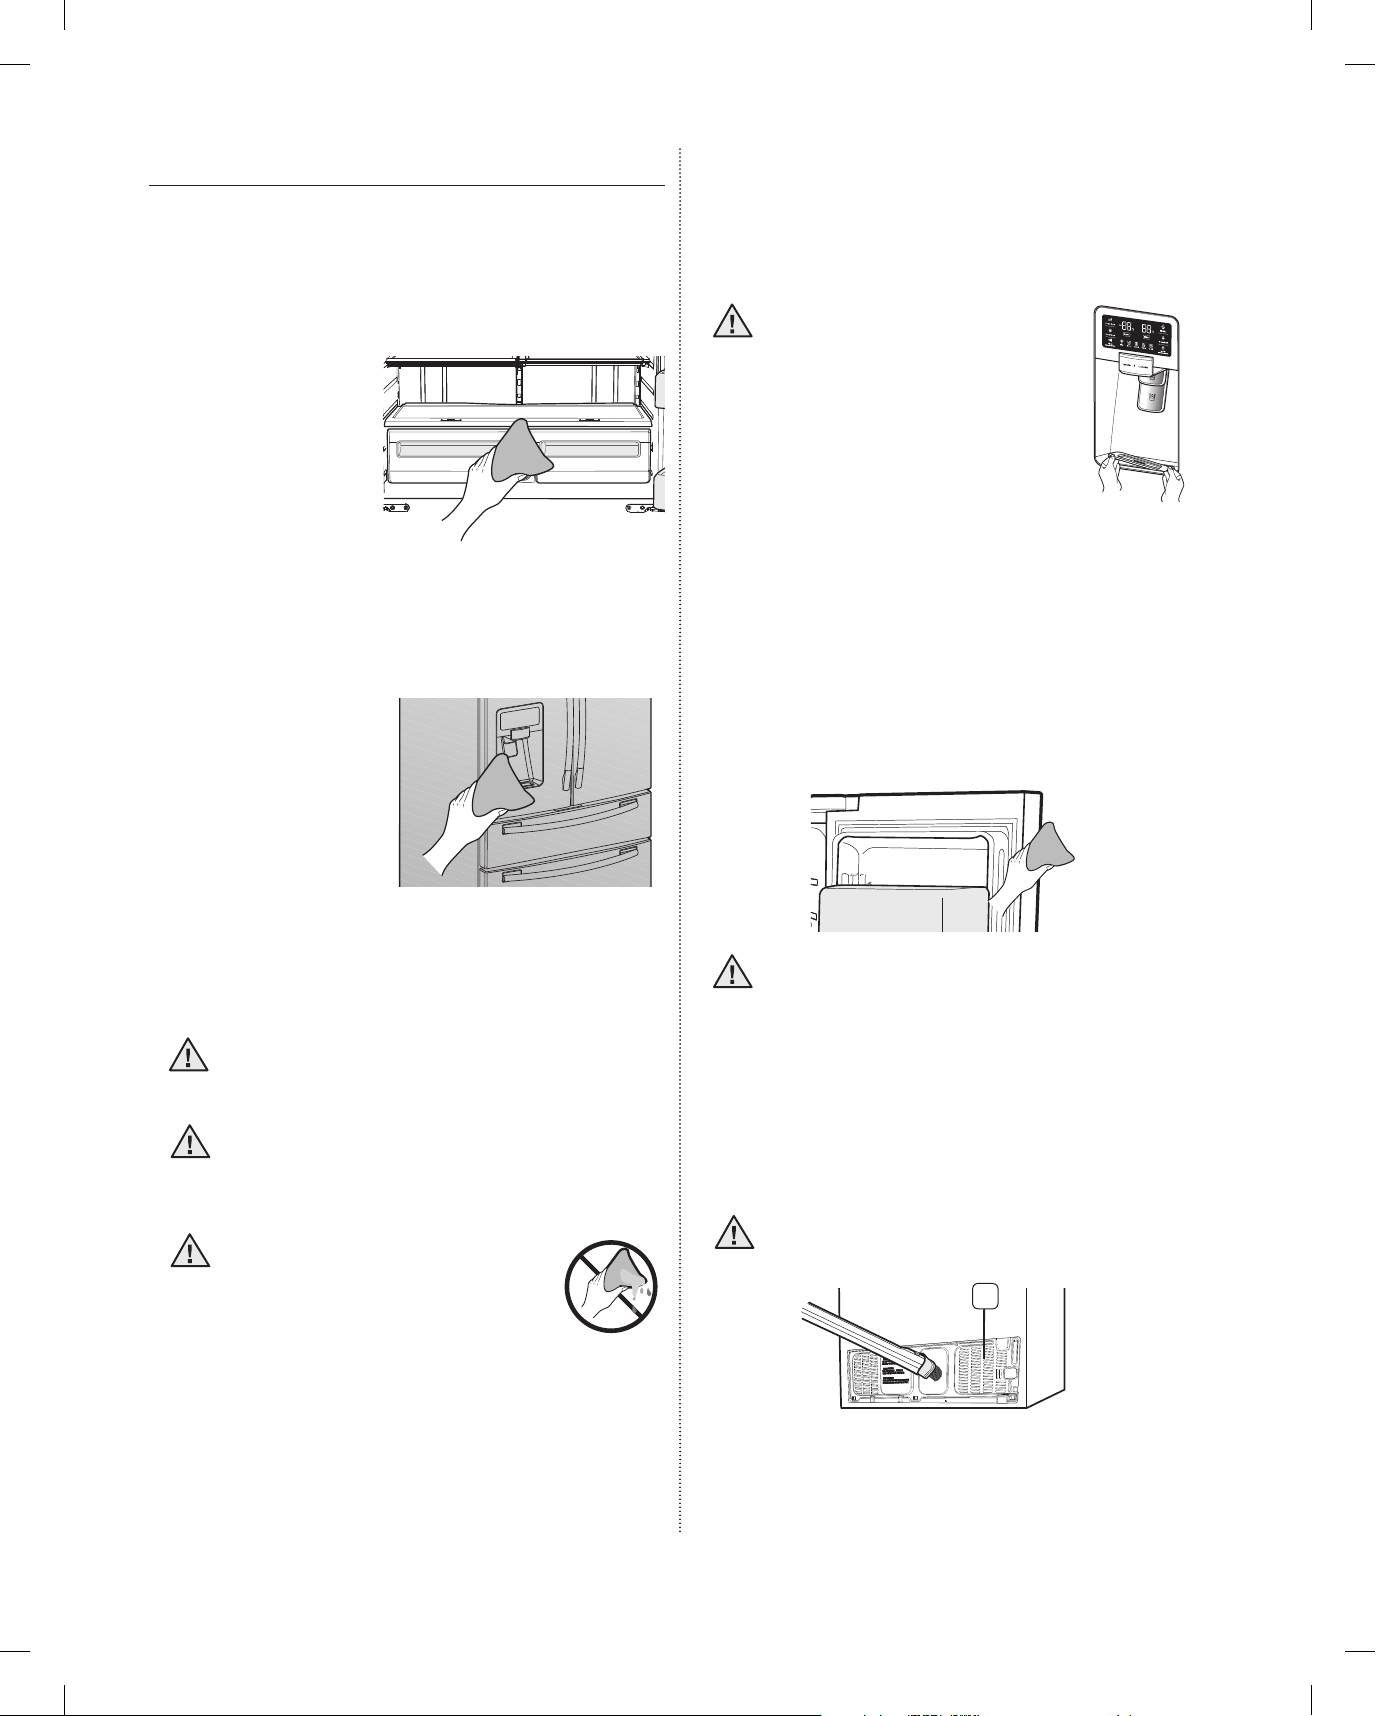
CLEANING THE REFRIGERATOR
Caring for your Samsung French Door Refrigerator
prolongs the life of your appliance and helps keep the
refrigerator free of odor and germs.
Cleaning the Ice / Water Dispenser
Push down one end of the tray dispenser and remove
it. Wipe the Ice / Water Dispenser with a clean and
soft cloth.
Cleaning the Interior
Clean the inside walls
and accessories with
a mild detergent and
then wipe dry with a soft
cloth. You can remove
the drawers and shelves
for a more thorough
cleaning. Just make sure
to dry drawers and shelves before putting them back
into place.
Cleaning the Exterior
Wipe the control panel
and digital display
with a damp, clean,
soft cloth. Do not
spray water directly
on the surface of the
refrigerator.
The doors, handles
and cabinet surfaces should be cleaned with a mild
detergent and then wiped dry with a soft cloth. To
keep your appliance looking its best, polish the
exterior once or twice a year.
When using the crushed ice
CAUTION
selection from the dispenser
some residual ice chips may
start to collect in the ice
chute. In order to prevent that
residual ice from melting and
running out of the chute you
should clean out the residual
ice when you see it start to
collect in the ice chute.
Cleaning the Rubber door seals
If the rubber door seals are dirty, the doors may not
close properly, and the refrigerator will not operate
effi ciently. Keep the door seals free of dust or stain by
cleaning the doors with a mild detergent and damp
cloth. Wipe dry with a clean, soft cloth.
Do not clean the refrigerator with benzene,
CAUTION
thinner, or car detergent due to risk of fi re.
Do not spray water directly or not use a wet
CAUTION
or damp cloth.
Do not use benzene, thinner, or Clorox for
CAUTION
cleaning. They may damage the surface of
the appliance and may cause a fi re.
Printed letters on the display may
CAUTION
be erased if the stainless cleaner
is applied directly to the area
where the letters are printed.
24_ operating
Cleaning the rear side of the refrigerator
To keep cords and exposed parts free of dust and dirt
accumulation.
Vacuum the rear side of the appliance once or twice a
year.
Do not remove the back cover ( 1 ). You
CAUTION
could suffer an electric shock.
1
DA68-01922A.indb 24DA68-01922A.indb 24 2013.3.4 1:33:33 PM2013.3.4 1:33:33 PM
Page 25
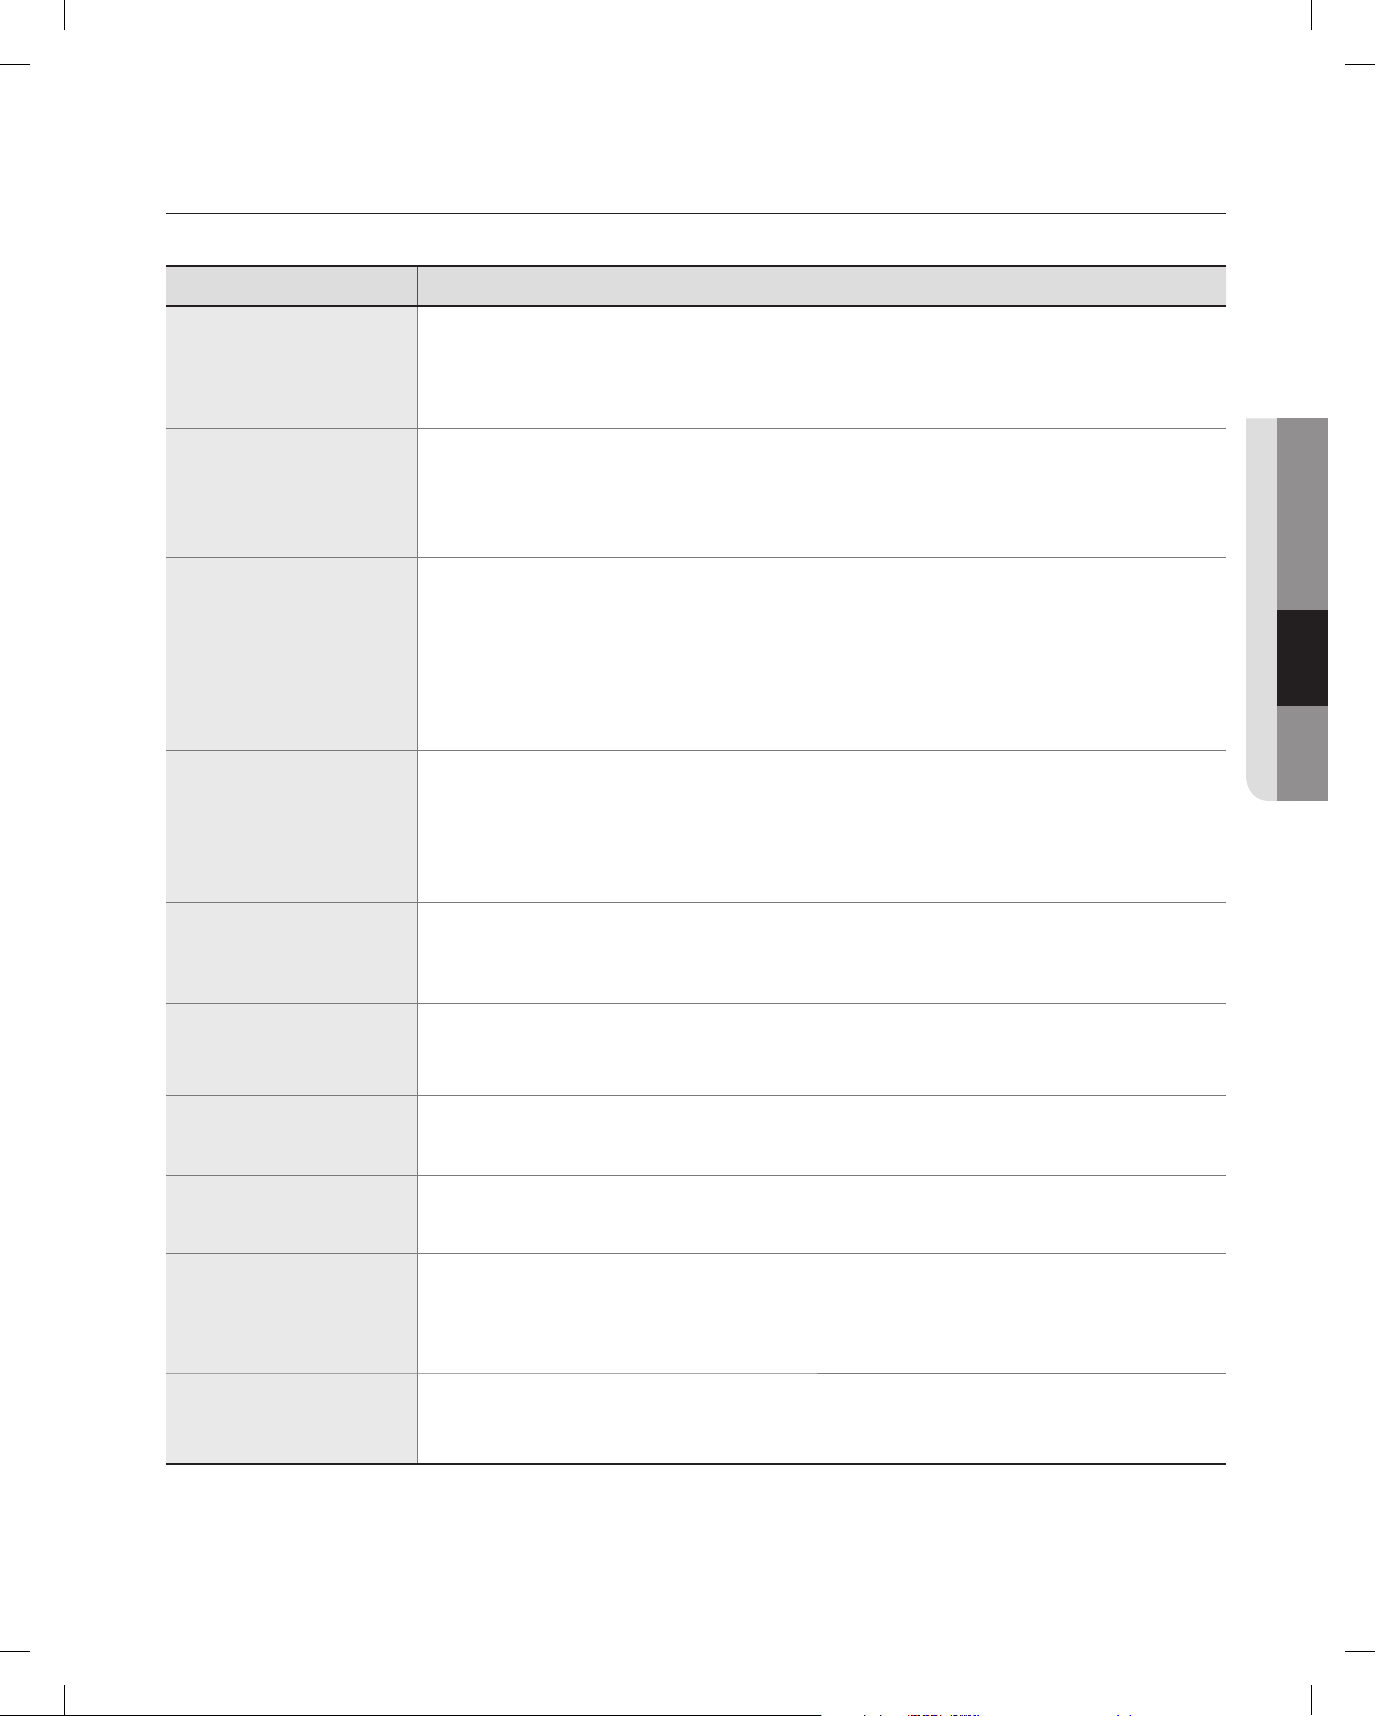
Troubleshooting
PROBLEM SOLUTION
The refrigerator
does not work at all
or it does not chill
suffi ciently.
The food in the fridge
is frozen.
• Check that the power plug is properly connected.
• Check if the set temperature on the digital display is warmer than the freezer or fridge inner
temperature. If it is, set the refrigerator colder.
• Is the refrigerator in direct sunlight or located near a heat source?
• Is the back of the refrigerator too close to the wall, preventing proper ventilation?
• Check if the set temperature on the digital display is too low.
• Try setting the refrigerator to a warmer temperature.
• Is the temperature in the room too low? Set the refrigerator warmer.
• Did you store the food which is juicy in the coldest part of the refrigerator? Try moving those items
to the other shelves in fridge instead of keeping them in the colder areas or bins.
03 TROUBLESHOOTING
You hear unusual
noise or sounds.
The cabinet-door
sealing area of the
appliance is hot
and condensation is
occurring.
Ice Maker is not
producing ice.
You can hear water
bubbling in the
refrigerator.
There is a bad smell in
the refrigerator.
• Check that the refrigerator is level and stable.
• Is the back of the refrigerator too close to the wall, preventing proper ventilation?
Try moving the back of the refrigerator at least 2 inches from the wall.
• Was anything dropped behind or under the refrigerator?
• A “ticking” sound is heard from inside the refrigerator. It is normal and occurs because various
accessories are contracting or expanding according to the temperature of the refrigerator interior.
• If it sounds as if something is hitting something else inside the refrigerator, this is normal. The
sound is caused by the compressor operating at high capacity.
• Some heat is normal as anti-condensators are installed in the vertical hinged section of the
refrigerator to prevent condensation.
• Is the refrigerator door ajar? Condensation can occur when you leave the door open for a long
time.
• Did you wait for 12 hours after installation of the water supply line before making ice?
• Is the water line connected and the shut-off valve opened?
• Did you manually stop the ice making function?
• Is the freezer temperature too warm? Try setting the freezer temperature lower.
• This is normal. The bubbling comes from refrigerant circulating through the refrigerator.
• Check for spoiled food.
• Foods with strong odors (for example, fi sh) should be tightly covered.
• Clean out your freezer periodically and throw away any spoiled or suspicious food.
Frost forms on the
walls of the freezer.
Water dispenser is not
functioning.
Auto close system
does not work with
the freezer door.
DA68-01922A.indb 25DA68-01922A.indb 25 2013.3.4 1:33:33 PM2013.3.4 1:33:33 PM
• Is the air vent blocked? Remove any obstructions so air can circulate freely.
• Allow suffi cient space between the stored foods for effi cient air circulation.
• Is the freezer drawer closed properly?
• Is the water line connected and the shut-off valve opened?
• Has the water supply line tubing been crushed or kinked?
• Make sure the tubing is free and clear of any obstruction.
• Is the water tank frozen because the fridge temperature is too low?
Try selecting a warmer setting on the Digital display.
• Is there an imbalance between the right and left parts of the door?
• Open and close the door smoothly 1~2 times. After you do this, the auto close system usually
works properly again.
• Try opening the door smoothly to avoid unbalancing the right part and the left part of the door.
troubleshooting _25
Page 26
Warranty
WARRANTY ON SAMSUNG REFRIGERATOR
LIMITED WARRANTY TO ORIGINAL PURCHASER
This Samsung brand product, as supplied and distributed by Samsung Electronics America, Inc. (Samsung)
and delivered new, in the original carton to the original consumer purchaser, is warranted by Samsung against
manufacturing defects in materials and workmanship for a limited warranty period of:
One (1) year Parts and Labor on Refrigerator
Five (5) years Parts and Labor on sealed Refrigeration system only*
(*Compressor, evaporator, condenser, drier, connecting tubing)
This limited warranty begins on the original date of purchase, and is valid only on products purchased and
used in the United States. To receive warranty service, the purchaser must contact Samsung for problem
determination and service procedures. Warranty service can only be performed by a Samsung authorized
service center. The original dated bill of sale must be presented upon request as proof of purchase to Samsung
or Samsung authorized service center.
Samsung will repair or replace any part found to be defective, at our option and at no charge as stipulatedX
herein, with new or reconditioned parts during the limited warranty period specifi ed above. All replaced parts
and products become the property of Samsung and must be returned to Samsung. Replacement parts and
products assume the remaining original warranty, or ninety (90) days, whichever is longer.
In-home service will be provided during the warranty labor period subject to availability within the contiguous
United States. In-home service is not available in all areas. To receive in-home service, the product must be
unobstructed and accessible from fl oor level to service personnel. If during in-home service repair cannot be
completed, it may be necessary to remove, repair and return the product. If in-home service is unavailable,
Samsung may elect, at our option, to provide for transportation of our choice to and from a Samsung authorized
service center. Otherwise, transportation to and from the Samsung authorized service center is the responsibility
of the purchaser.
This limited warranty covers manufacturing defects in materials and workmanship encountered in normal,
noncommercial use of this product, and shall not apply to the following, including, but not limited to: damage
which occurs in shipment; delivery and installation; applications and uses for which this product was not
intended; altered product or serial numbers; cosmetic damage or exterior fi nish; accidents, abuse, neglect, fi re,
water, lightning or other acts of nature; use of products, equipment, systems, utilities, services, parts, supplies,
accessories, applications, installations, repairs, external plumbing and leaks, external wiring, circuit breakers,
fuses or connectors not supplied and authorized by Samsung, or which damage this product or result in service
problems; incorrect electrical line voltage, fl uctuations and surges; customer adjustments and failure to follow
operating instructions, cleaning, maintenance and environmental instructions that are covered and prescribed in
the instruction book; loss of food due to spoilage; consumable items including fi lters and light.
26_ warranty
DA68-01922A.indb 26DA68-01922A.indb 26 2013.3.4 1:33:33 PM2013.3.4 1:33:33 PM
Page 27
THERE ARE NO EXPRESS WARRANTIES OTHER THAN THOSE LISTED AND DESCRIBED ABOVE, AND
NO WARRANTIES WHETHER EXPRESS OR IMPLIED, INCLUDING, BUT NOT LIMITED TO, ANY IMPLIED
WARRANTIES OF MERCHANTABILITY OR FITNESS FOR A PARTICULAR PURPOSE, SHALL APPLY
AFTER THE EXPRESS WARRANTY PERIODS STATED ABOVE, AND NO OTHER EXPRESS WARRANTY
OR GUARANTY GIVEN BY ANY PERSON, FIRM OR CORPORATION WITH RESPECT TO THIS PRODUCT
SHALL BE BINDING ON SAMSUNG. SAMSUNG SHALL NOT BE LIABLE FOR LOSS OF REVENUE OR
PROFITS, FAILURE TO REALIZE SAVINGS OR OTHER BENEFITS, OR ANY OTHER SPECIAL, INCIDENTAL
OR CONSEQUENTIAL DAMAGES CAUSED BY THE USE, MISUSE OR INABILITY TO USE THIS PRODUCT,
REGARDLESS OF THE LEGAL THEORY ON WHICH THE CLAIM IS BASED, AND EVEN IF SAMSUNG
HAS BEEN ADVISED OF THE POSSIBILITY OF SUCH DAMAGES. NOR SHALL RECOVERY OF ANY KIND
AGAINST SAMSUNG BE GREATER IN AMOUNT THAN THE PURCHASE PRICE OF THE PRODUCT SOLD BY
SAMSUNG AND CAUSING THE ALLEGED DAMAGE. WITHOUT LIMITING THE FOREGOING, PURCHASER
ASSUMES ALL RISK AND LIABILITY FOR LOSS, DAMAGE OR INJURY TO PURCHASER AND PURCHASER’S
PROPERTY AND TO OTHERS AND THEIR PROPERTY ARISING OUT OF THE USE, MISUSE OR INABILITY TO
USE THIS PRODUCT SOLD BY SAMSUNG NOT CAUSED DIRECTLY BY THE NEGLIGENCE OF SAMSUNG.
THIS LIMITED WARRANTY SHALL NOT EXTEND TO ANYONE OTHER THAN THE ORIGINAL PURCHASER OF
THIS PRODUCT, IS NONTRANSFERABLE AND STATES YOUR EXCLUSIVE REMEDY.
Some states do not allow limitations on how long an implied warranty lasts, or the exclusion or limitation of
incidental or consequential damages, so the above limitations or exclusions may not apply to you. This warranty
gives you specifi c legal rights, and you may also have other rights, which vary from state to state.
To obtain warranty service, please contact Samsung at:
04 WARRANTY
SAMSUNG CUSTOMER CARE CENTER
Samsung Electronics America, Inc. 85 Challenger Road Ridgefi eld Park, NJ 07660
1-800-SAMSUNG (1-800-726-7864) and www.samsung.com
warranty _27
DA68-01922A.indb 27DA68-01922A.indb 27 2013.3.4 1:33:33 PM2013.3.4 1:33:33 PM
Page 28
Scan the QR code* or visit
www.samsung.com/spsn
to view our helpful
How-to Videos and Live Shows
Requires reader to be installed on your
*
smartphone
In an effort to promote recycling this user manual is printed on recycled paper.
DA68-01922A.indb 28DA68-01922A.indb 28 2013.3.4 1:33:33 PM2013.3.4 1:33:33 PM
Page 29
Refrigerador
RF4287HA
manual del usuario
Imagine las posibilidades
Español
Gracias por adquirir este producto Samsung.
Para recibir un servicio más completo o accesorios,
registre su producto o comuníquese con
www.samsung.com/register
1-800-SAMSUNG (726-7864)
Electrodoméstico independiente
DA68-01922A.indb 01DA68-01922A.indb 01 2013.3.4 1:33:34 PM2013.3.4 1:33:34 PM
Page 30
Información sobre seguridad
INFORMACIÓN SOBRE SEGURIDAD
Antes de utilizar su nuevo refrigerador de puerta francesa Samsung,
lea detenidamente este manual a fi n de aprender a usar las
funciones que ofrece de manera segura y efi ciente.
Este refrigerador no debe ser utilizado por personas (incluidos
niños) con capacidades mentales, sensoriales o físicas reducidas
o por personas que carezcan de experiencia y conocimientos, a
menos que se encuentren bajo la supervisión o hayan recibido
instrucciones por parte un responsable de su seguridad sobre el
uso del refrigerador.
Debido a que las siguientes instrucciones corresponden a diversos
modelos, es posible que las características de su refrigerador
difi eran ligeramente de las que se describen en este manual. Si
tiene alguna duda, comuníquese al 1-800-SAMSUNG o encuentre
ayuda e información en línea en www.samsung.com.
Símbolos y advertencias de seguridad importantes:
Riesgos o prácticas inseguras que pueden causar
ADVERTENCIA
PRECAUCIÓN
graves lesiones personales o incluso la muerte.
Riesgos o prácticas inseguras que pueden causar
leves lesiones personales o daños materiales.
NO lo intente.
NO lo desarme.
NO lo toque.
Siga atentamente las instrucciones.
ADVERTENCIA
-
•
•
-
•
- Existe el riesgo de que se produzca una descarga
• No utilice un cable que esté dañando o gastado a
• No doble excesivamente el cable de alimentación
• Nunca desenchufe el refrigerador tirando del cable
- Los daños al cable pueden provocar un corto
• No utilice aerosoles cerca del refrigerador.
- Si se utilizan aerosoles cerca del refrigerador
SEÑALES DE ADVERTENCIA
IMPORTANTES PARA LA INSTALACIÓN
• No instale el refrigerador en un lugar húmedo
o que se encuentre en contacto con agua.
Un aislamiento deteriorado de piezas eléctricas puede
provocar una descarga eléctrica o un incendio.
No exponga este refrigerador a la luz solar directa ni
al calor de cocinas, calefactores u otros artefactos.
No enchufe varios artefactos en el mismo toma múltiple.
El refrigerador debe conectarse siempre a una toma de
corriente individual cuyo voltaje nominal coincida con el que se
especifi ca en la placa de voltaje del refrigerador.
Este procedimiento brinda el mejor rendimiento y
también impide que se sobrecarguen los circuitos
de cables del hogar, lo que podría provocar un
riesgo de incendio a causa de cables recalentados.
Si el enchufe de pared está fl ojo, no conecte el cable.
eléctrica y causar un incendio.
lo largo o en sus extremos.
ni coloque elementos pesados sobre él.
de alimentación. Siempre sostenga el enchufe con
fi rmeza y tire para extraerlo del toma de corriente.
circuito, incendio o una descarga eléctrica.
puede provocarse una explosión o un incendio.
Desconecte el enchufe de la pared.
Asegúrese de que el refrigerador esté conectado a
tierra para evitar una descarga eléctrica.
Comuníquese con el centro de contacto para
obtener ayuda.
Nota.
Estas señales de advertencia se incluyen aquí
para evitar que se produzcan lesiones.
Sígalas atentamente.
Después de leer esta sección, consérvela en un
lugar seguro para referencia futura.
02_ Información sobre seguridad
DA68-01922A.indb 02DA68-01922A.indb 02 2013.3.4 1:33:34 PM2013.3.4 1:33:34 PM
• Conecte el enchufe en la posición correcta con el
-
• Al mover el refrigerador, tenga cuidado de no
- Esto representa un riesgo de incendio.
• Asegúrese de que el enchufe no esté aplastado o
• Mantenga los materiales de embalaje fuera del
- Existe el riesgo de muerte por asfi xia si un niño se
• Este refrigerador debe instalarse de manera
apropiada y ubicarse de acuerdo con las
instrucciones del manual antes de usarse.
cable colgando hacia abajo.
Si conecta el enchufe al revés, el cable puede cortarse
y provocar un incendio o una descarga eléctrica.
rodar sobre el cable de alimentación o dañarlo.
dañado en la parte posterior del refrigerador.
alcance de los niños.
coloca los materiales de embalaje en la cabeza.
Page 31
•
El refrigerador debe colocarse de manera tal que se
pueda acceder al enchufe después de la instalación.
•
Es necesario quitar toda la película plástica protectora
antes de enchufar el producto por primera vez.
• El refrigerador debe estar conectado a tierra
de manera segura
- Siempre asegúrese de haber conectado el
refrigerador a tierra antes de intentar examinar o
reparar alguna pieza. Las fugas de energía pueden
provocar una descarga eléctrica grave.
•
Nunca utilice tubos de gas, líneas telefónicas o potenciales
fuentes de atracción de rayos como conexión a tierra.
-
El uso inapropiado de la conexión a tierra puede traer como
consecuencia un riesgo de descarga eléctrica. Si necesita
usar un cable de extensión, use sólo uno de tres hilos con un
enchufe que tenga una tercera punta para el polo a tierra; el
toma de corriente deberá tener 3 ranuras para adaptarse al
enchufe del refrigerador. La potencia indicada en el cable de
extensión debe ser CA115-120 V, 10 A o superior. Si se utiliza
un adaptador de tierra, asegúrese de que el receptáculo esté
conectado correctamente a tierra.
•
Si el cable de alimentación está dañado, solicite su
reemplazo inmediato al fabricante o al agente de servicios.
SEÑALES DE PRECAUCIÓN
PRECAUCIÓN
- Si su refrigerador no está nivelado, es posible que
•
•
PARA LA INSTALACIÓN
• Deje espacio sufi ciente para instalar el
refrigerador sobre una superfi cie plana.
el sistema de enfriamiento interno no funcione
correctamente.
Mantenga el espacio de ventilación en el gabinete o
estructura de montaje del refrigerador libre de obstáculos.
El refrigerador debe permanecer en posición vertical
durante dos horas después de la instalación.
SEÑALES DE ADVERTENCIA
ADVERTENCIA
•
-
•
- Si se derrama, existe el riesgo de que se produzca
• Se deberá vigilar a los niños para asegurarse de
-
IMPORTANTES PARA EL USO
• No conecte el enchufe con las manos
mojadas.
No coloque elementos en la parte superior del refrigerador.
Cada vez que abra o cierre la puerta, éstos pueden
caerse y provocar lesiones personales o daños materiales.
No coloque un recipiente con agua sobre el refrigerador.
un incendio o una descarga eléctrica.
que nojueguen con el refrigerador.
Tenga cuidado de no pillarse los dedos en los puntos
donde existe este riesgo; la holgura entre las puertas
y el armario es necesariamente pequeña. Tenga
cuidado cuando abra la puerta si hay niños cerca.
• No permita que se cuelguen de la puerta. Es
posible que se produzca una lesión grave.
• No permita que los niños ingresen al refrigerador.
Existe el riesgo de que se queden encerrados.
• No coloque las manos debajo del refrigerador.
- Es posible que algunas puntas fi losas le
provoquen lesiones.
• No permita que los niños se paren sobre la
cubierta de un cajón.
-
El cajón se puede romper y los niños pueden caerse.
• No sobrecargue el refrigerador con comida.
-
Cuando abra la puerta, algún elemento puede caerse
y provocar lesiones personales o daños materiales.
•
No toque las paredes internas del congelador ni los
productos almacenados en éste con las manos mojadas.
- Puede provocar congelación.
• Nunca coloque los dedos u otros objetos en el
hueco del dispensador de agua, en el recipiente
de hielo o en la cubeta de la fábrica de hielo.
- Es posible que provoque lesiones personales o
daños materiales.
•
No pulverice con gas infl amable cerca del refrigerador.
- Existe el riesgo de que se produzca una explosión
o un incendio.
• No almacene sustancias volátiles o infl amables
dentro del refrigerador.
-
Si se almacena benzina, solvente, alcohol, éter, gas licuado y
otros productos similares, se pueden provocar explosiones.
• No almacene en el refrigerador productos
farmacéuticos, materiales científi cos ni productos
sensibles a la temperatura.
- No se deben almacenar productos que requieran
controles de temperatura rigurosos.
• No coloque ni utilice aparatos eléctricos dentro
del refrigerador, a menos que sean del tipo
recomendado por el fabricante.
•
No utilice dispositivos mecánicos ni cualquier otro
medio para acelerar el proceso de descongelamiento,
que no sean aquellos recomendados por el fabricante.
• No dañe el circuito refrigerante.
• No desarme ni repare el refrigerador usted
mismo.
- Corre el riesgo de provocar un incendio, el
funcionamiento incorrecto o lesiones personales.
- Si el LED interior o exterior se ha apagado,
comuníquese con los agentes de servicio técnico.
• Se deberá vigilar a los niños para asegurarse
de que no jueguen con el refrigerador.
• Las botellas se debe almacenar una junto a otra
Información sobre seguridad _03
DA68-01922A.indb 03DA68-01922A.indb 03 2013.3.4 1:33:34 PM2013.3.4 1:33:34 PM
Page 32
de manera tal que no se caigan.
• Este producto se debe utilizar sólo para almacenar
alimentos en un entorno doméstico.
•
Si se detecta una fuga de gas, evite llamas o posibles
fuentes de infl amación y ventile el ambiente en el que se
encuentra el refrigerador durante varios minutos.
•
Utilice solamente lámparas de LED proporcionadas por
el fabricante o agentes de servicios.
•
En caso de sentir olor a quemado o a humo,
desenchufe el refrigerador de inmediato y comuníquese
con el Centro de Servicio de Samsung Electronics.
• Si le resulta difícil cambiar la luz, comuníquese con
un agente de servicio.
•
Si el producto cuenta con lámparas de LED, no desarme la
cubierta de la lámpara y la lámpara de LED usted mismo.
- Comuníquese con su agente de servicio.
•
Si el refrigerador tiene polvo o agua, desenchúfelo y
comuníquese con el Centro de Servicio de Samsung Electronics.
-
Si no lo hace, existe el riesgo de que se produzca un incendio.
-
No coloque alimentos muy cerca de las rejillas de ventilación
de la parte posterior del refrigerador ya que pueden obstruir
la libre circulación del aire en el refrigerador.
-
Envuelva los alimentos adecuadamente o colóquelos en
recipientes herméticos antes de almacenarlos en el refrigerador.
• Llene el tanque de agua, la charola para el hielo y
los cubos de agua solamente con agua potable.
•
Si el producto está lleno de agua, comuníquese
con el Centro de Servicio más cercano.
- Existe el riesgo de que se produzca una descarga
eléctrica o un incendio.
SEÑALES DE PRECAUCIÓN
PRECAUCIÓN
- Existe el riesgo de que se produzca un incendio o
PARA LA LIMPIEZA
• No pulverice con agua directamente dentro
o fuera del refrigerador.
una descarga eléctrica.
PRECAUCIÓN
- Cuando el contenido se congela, el vidrio puede
• No obstruya las tomas de aire.
-
•
•
- Si se deja el refrigerador encendido por mucho
- Retire el exceso de humedad del interior del
• Para obtener el mejor rendimiento del producto:
SEÑALES DE PRECAUCIÓN PARA EL USO
•
No vuelva a congelar alimentos que se hayan
descongelado completamente. No coloque
bebidas carbonatadas o con gas en el
compartimento del congelador. No coloque
botellas ni recipientes de vidrio en el congelador.
romperse y provocar lesiones personales.
• Garantía de servicio y modifi cación.
-
El servicio de garantía de Samsung no cubre los cambios
o modifi caciones realizados por un tercero a este
refrigerador; Samsung tampoco es responsable de los
problemas relacionados con la seguridad que puedan
surgir a causa de modifi caciones hechas por terceros.
Si las tomas de aire están bloqueadas, en particular con una
bolsa de plástico, el refrigerador se puede sobrecongelar.
Si el período de enfriamiento es muy prolongado, el fi ltro del
agua puede romperse y provocar fugas de agua.
Si se desconecta el refrigerador del suministro de energía,
espere al menos cinco minutos antes de volver a enchufarlo.
Si tiene planifi cado tomarse unas largas vacaciones o
siel refrigerador no se utilizará durante mucho tiempo,
debe vaciarlo y desenchufarlo.
tiempo sin utilizarlo, se puede deteriorar el
aislamiento y provocar un incendio.
refrigerador y deje las puertas abiertas. Si no lo
hace, pueden aparecer olores y moho.
• Retire cualquier sustancia extraña o polvo de
las clavijas del enchufe. No utilice un paño
mojado ni húmedo para limpiar el enchufe.
- De lo contrario, existe el riesgo de que se
produzca un incendio o una descarga eléctrica.
• Desenchufe el refrigerador antes de limpiarlo
o repararlo.
65 Advertencias propuestas por el
ADVERTENCIA
La Ley californiana sobre Agua Potable Segura y
Aplicaciones Tóxicas requieren del Gobernador
de California que publique una lista de sustancias
conocidas por el Estado de California por ser causa
de cáncer, defectos de nacimiento, u otro daño
reproductivo, y requiere de los negocios que avisen
acerca de la exposición potencial a dichas sustancias.
Este producto contiene una sustancia química conocida
del Estado de California por ser causa de cáncer,
defectos de nacimiento, u otro daño reproductivo. Este
aparato puede generar una exposición de bajo nivel
a ciertas de las sustancias rubricadas, incluyendo el
benceno, y el monóxido de carbono.
Estado de California:
SEÑALES DE ADVERTENCIA
ADVERTENCIA
- Retire las puertas.
MPORTANTES PARA LA ELIMINACIÓN
•
Riesgo de que los niños se queden encerrados. Antes
de eliminar su antiguo refrigerador o congelador:
04_ Información sobre seguridad
DA68-01922A.indb 04DA68-01922A.indb 04 2013.3.4 1:33:34 PM2013.3.4 1:33:34 PM
Page 33
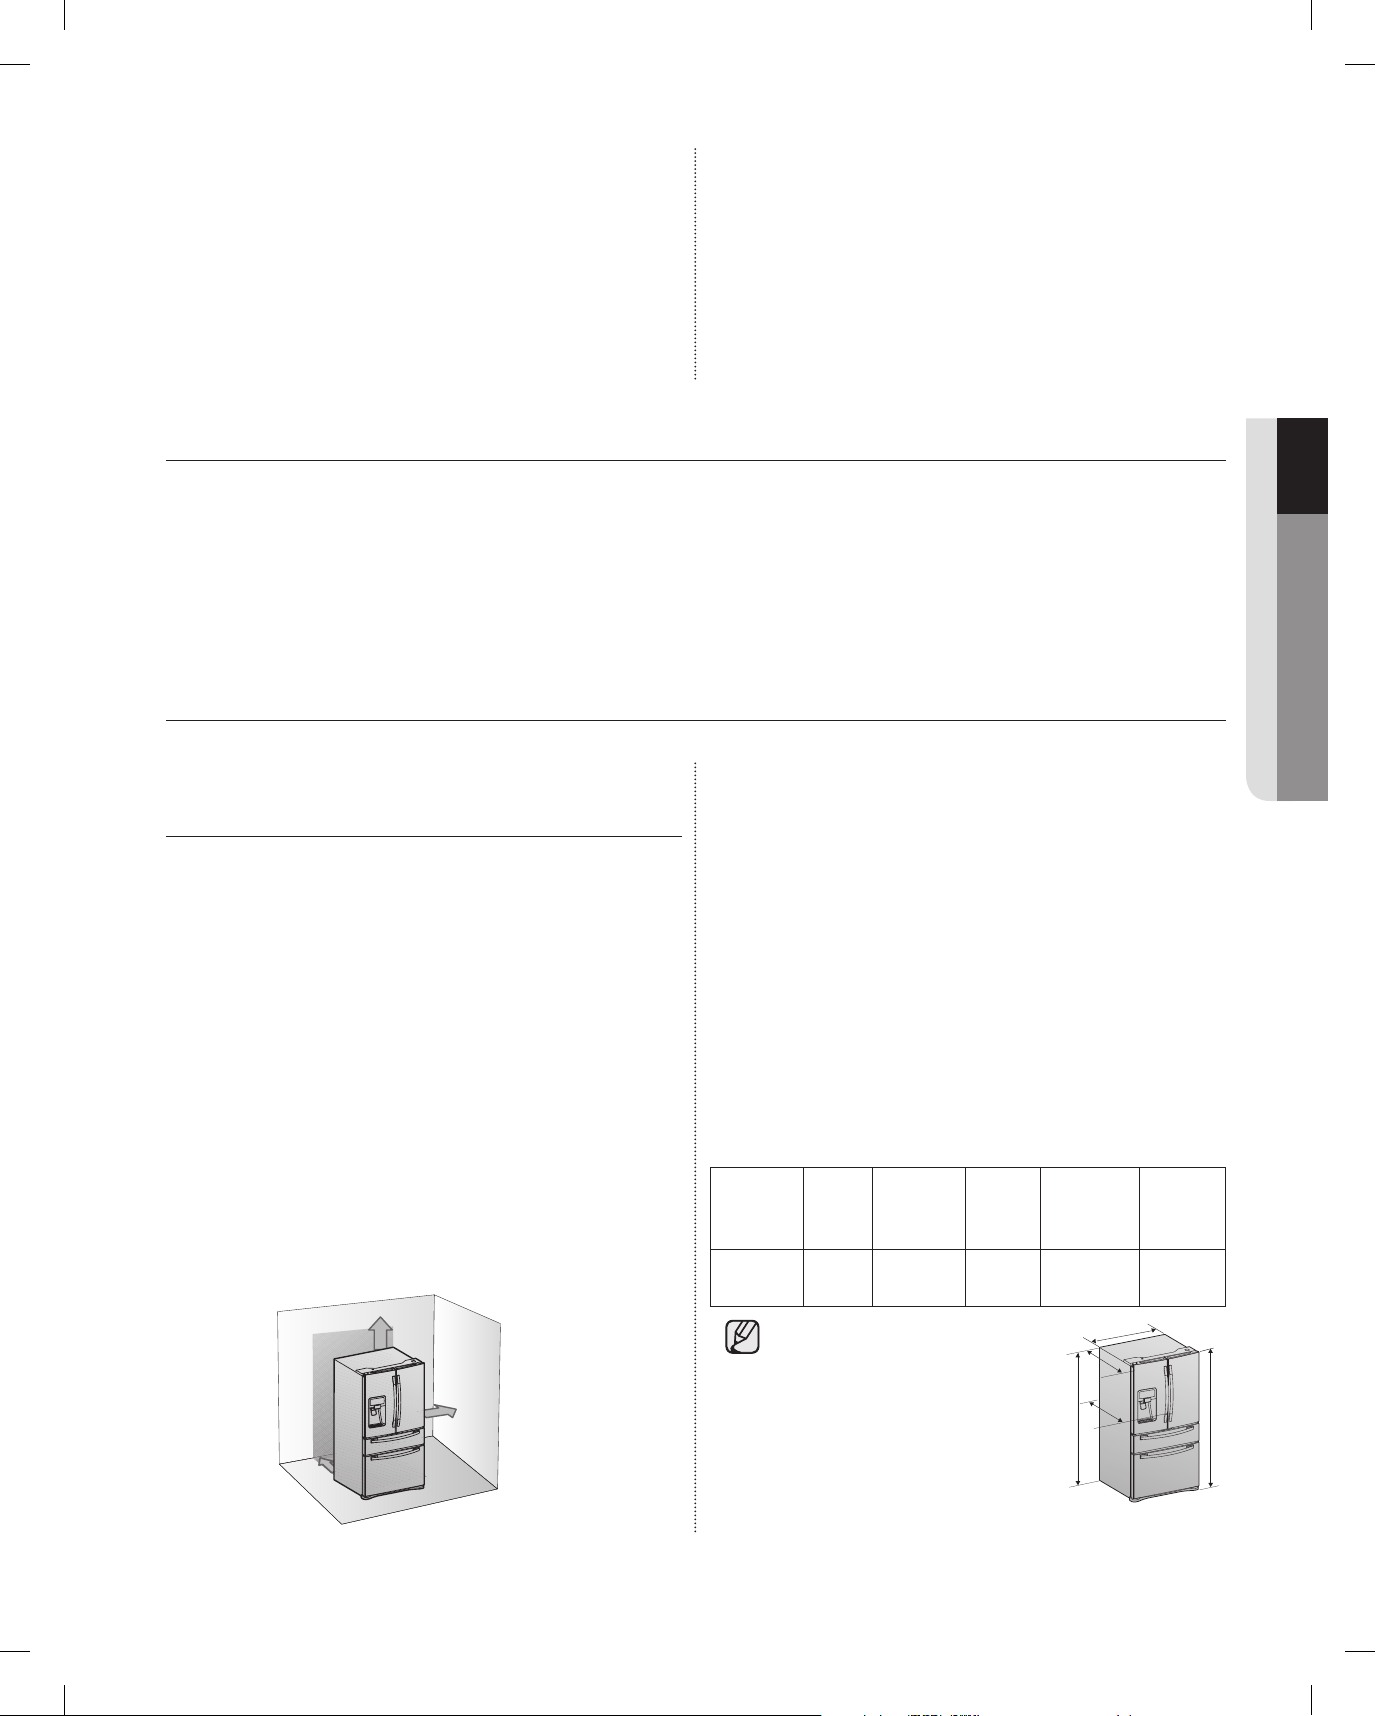
-
E
C
A
B
D
Deje los estantes en su lugar de manera tal que los niños no
puedan trepar dentro del refrigerador fácilmente.
•
Deseche el material de embalaje de este producto de forma
que no resulte nociva para el medio ambiente.
•
Deje los estantes en su lugar de manera tal que los niños no
puedan trepar dentro del refrigerador fácilmente. Asegúrese
de que ninguno de los tubos que se encuentran detrás del
refrigerador estén dañados antes de desecharlo.
•
Cuando deseche este refrigerador, retire los burletes y los
pestillos de las puertas de manera tal que los niños pequeños
o los animales no puedan quedarse atrapados en el interior. Se
deberá vigilar a los niños para asegurarse de que no jueguen
con el refrigerador.
•
Se utiliza ciclopentano como aislante. Los gases del material
de aislamiento requieren un procedimiento especial de
eliminación. Comuníquese con las autoridades locales para
desechar este producto de manera que no resulte nocivo para
el medio ambiente. Asegúrese de que ninguno de los tubos
que se encuentran en la parte trasera del refrigerador estén
dañados antes de desecharlos.
01 PUESTA A PUNTO
contenido
PUESTA A PUNTO DEL REFRIGERADOR DE PUERTA FRANCESA ………………………………………… 05
FUNCIONAMIENTO DEL REFRIGERADOR DE PUERTA FRANCESA ……………………………………… 12
SOLUCIÓN DE PROBLEMAS …………………………………………………………………………………… 25
GARANTÍA …………………………………………………………………………………………………………… 26
Puesta a punto del refrigerador de puerta francesa
PREPARACIÓN PARA LA
INSTALACIÓN DEL REFRIGERADOR
Felicitaciones por haber adquirido el refrigerador de
puerta francesa Samsung.
Esperamos que disfrute las funciones y ventajas de
vanguardia que ofrece este nuevo refrigerador.
Selección de la mejor ubicación para el refrigerador
• Una ubicación con fácil acceso al suministro de
agua.
• Una ubicación sin exposición directa a la luz solar.
• Una ubicación en la que el piso esté nivelado.
• Una ubicación con sufi ciente espacio para que las
puertas del refrigerador se abran fácilmente.
• Deje espacio sufi ciente a la derecha, izquierda y
por arriba para la circulación del aire.
• Asegúrese de que el aparato pueda moverse
libremente para los trabajos de mantenimiento y
servicio
2 inches
3/4
2 inches
3 inches
Si el refrigerador no cuenta con espacio sufi ciente,
es posible que el sistema de enfriamiento interno no
funcione correctamente. Si su refrigerador cuenta
con una fábrica de hielo, deje un espacio adicional
en la parte posterior para las conexiones de tuberías
deagua.
Cuando instale el refrigerador junto a una pared fi ja,
se necesita una distancia mínima de 3 ¾” (95mm)
entre el refrigerador y la pared para poder abrir la
puerta. En primer lugar: asegúrese de que pueda
mover el refrigerador fácilmente hasta su ubicación
fi nal midiendo las entradas (ancho y alto), umbrales,
techos, escaleras, etc.
La siguiente tabla describe la altura y la profundidad
exactas del refrigerador de puerta francesa Samsung.
profun-
Modelo
RF4287HA
didad
“A”
33 6/8"
(858 mm)
• Cuando realice la
instalación, deje un
Ancho
“B”
35 6/8"
(908 mm)
Altura
“C”
68 1/2"
(1740 mm)
Altura
total “D”
69 6/8"
(1774 mm)
profundi-
dad
“E”
36 2/8"
(920 mm)
B
A
espacio libre a la derecha,
izquierda, atrás y arriba del
E
C
refrigerador. Esto ayudará
a reducir tanto el consumo
como los gastos de energía.
D
DA68-01922A.indb 05DA68-01922A.indb 05 2013.3.4 1:33:35 PM2013.3.4 1:33:35 PM
puesta a punto _05
Page 34
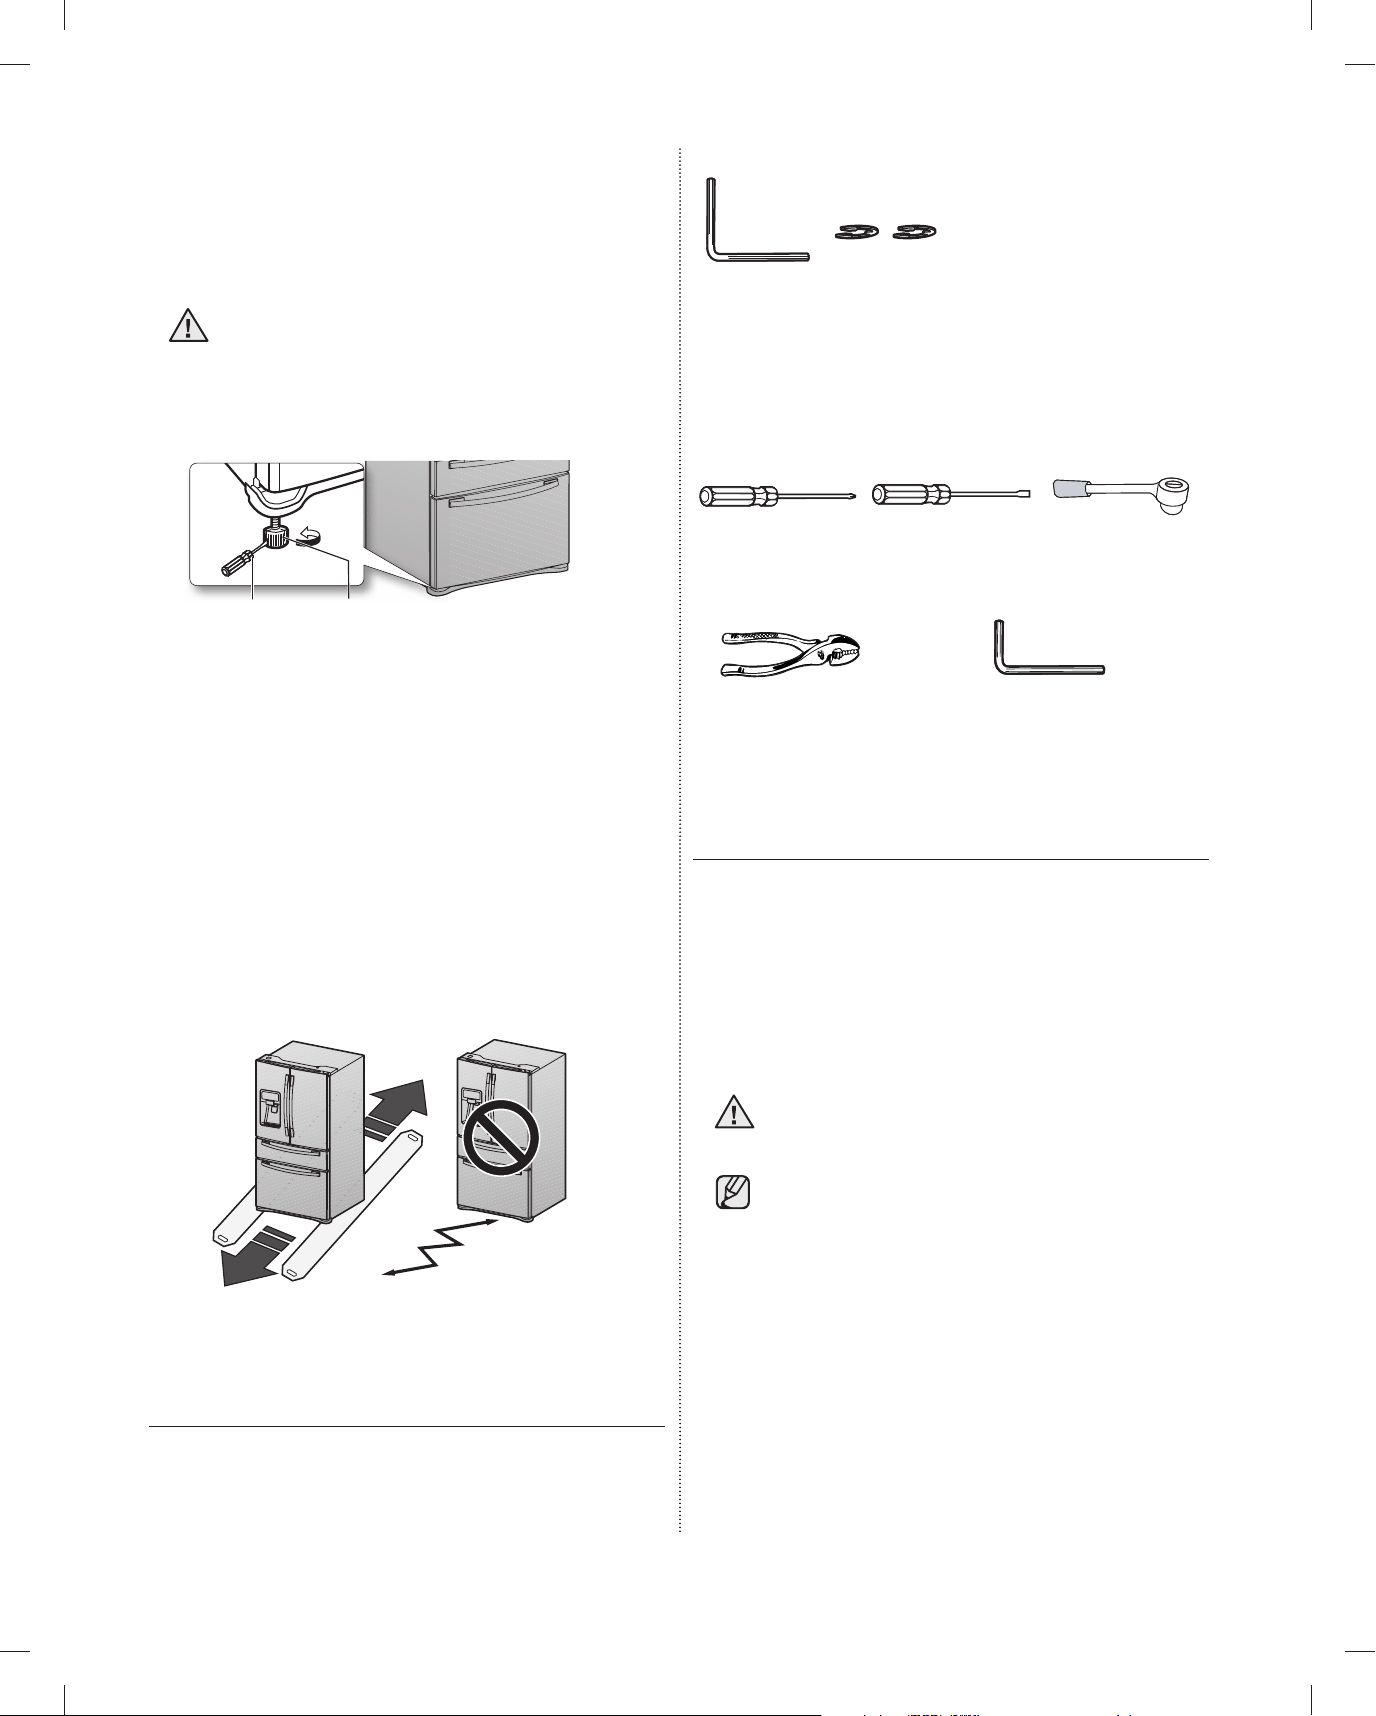
• No instale el refrigerador en un sitio donde la
Llave
hexagonal
Sujetador
Destornillador
Philips (+)
Destornillador de
punta chata (-)
Llave de tubo
(10mm)
Pinzas
Llave allen (3/16”) (5mm)
Destornillador de
punta chata (-)
palanca de control
temperatura sea inferior a 50ºF (10ºC).
• No coloque el refrigerador en un lugar en el que
pueda mojarse.
Cuando mueva el refrigerador
Para evitar que se dañe el piso, asegúrese
PRECAUCIÓN
de que las patas de ajuste delanteras estén
eposición vertical (sobre el piso).
Consulte ‘Ajuste de las puertas’ en el manual
(página 9).
Llave
hexagonal
Herramientas necesarias (No suministrada)
Sujetador
Se necesitan las siguientes herramientas para fi nalizar
la instalación del refrigerador:
Destornillador de
punta chata (-)
PISO
palanca de control
Para realizar una instalación adecuada, se debe
colocar el refrigerador sobre una superfi cie nivelada
de material rígido que tenga la misma altura que
la del resto del piso. Esta superfi cie debe ser lo
sufi cientemente resistente para resistir el peso
de un refrigerador completamente cargado o
aproximadamente 359lbs (165kg). Para proteger el
acabado del piso, corte una hoja grande del cartón
y colóquela debajo del refrigerador mientras trabaja.
Cuando mueva el refrigerador, tire y empuje en forma
recta hacia adelante o hacia atrás. No lo mueva de
lado a lado.
Destornillador
Philips (+)
Pinzas
Destornillador de
punta chata (-)
Llave allen (3/16”) (5mm)
Llave de tubo
(10mm)
CÓMO RETIRAR LAS PUERTAS DEL
REFRIGERADOR
Para algunas instalaciones, es necesario retirar las
puertas para poder transportar el refrigerador hasta
su ubicación fi nal. Si no necesita retirar las puertas del
refrigerador, diríjase a la sección Ajuste del nivel en la
página 8. Si debe retirar las puertas, continúe leyendo.
Antes de retirar la puerta/cajón, asegúrese de leer lo
siguiente:
Desenchufe el refrigerador antes de retirar la
ADVERTENCIA
puerta o el cajón.
• tenga cuidado de no dejar caer la puerta, ni
dañar o rayar la puerta/cajón al retirarlos.
• tenga cuidado de no lesionarse cuando retira la
puerta/cajón.
• Vuelva a colocar la puerta/cajón correctamente
para evitar:
- Humedad por fuga de aire.
ACCESORIOS Y HERRAMIENTAS
- Alineación incorrecta de la puerta.
- Pérdida de energía a causa de una puerta mal
NECESARIAS
cerrada.
El refrigerador incluye los siguientes accesorios:
06_ puesta a punto
DA68-01922A.indb 06DA68-01922A.indb 06 2013.3.4 1:33:35 PM2013.3.4 1:33:35 PM
Page 35
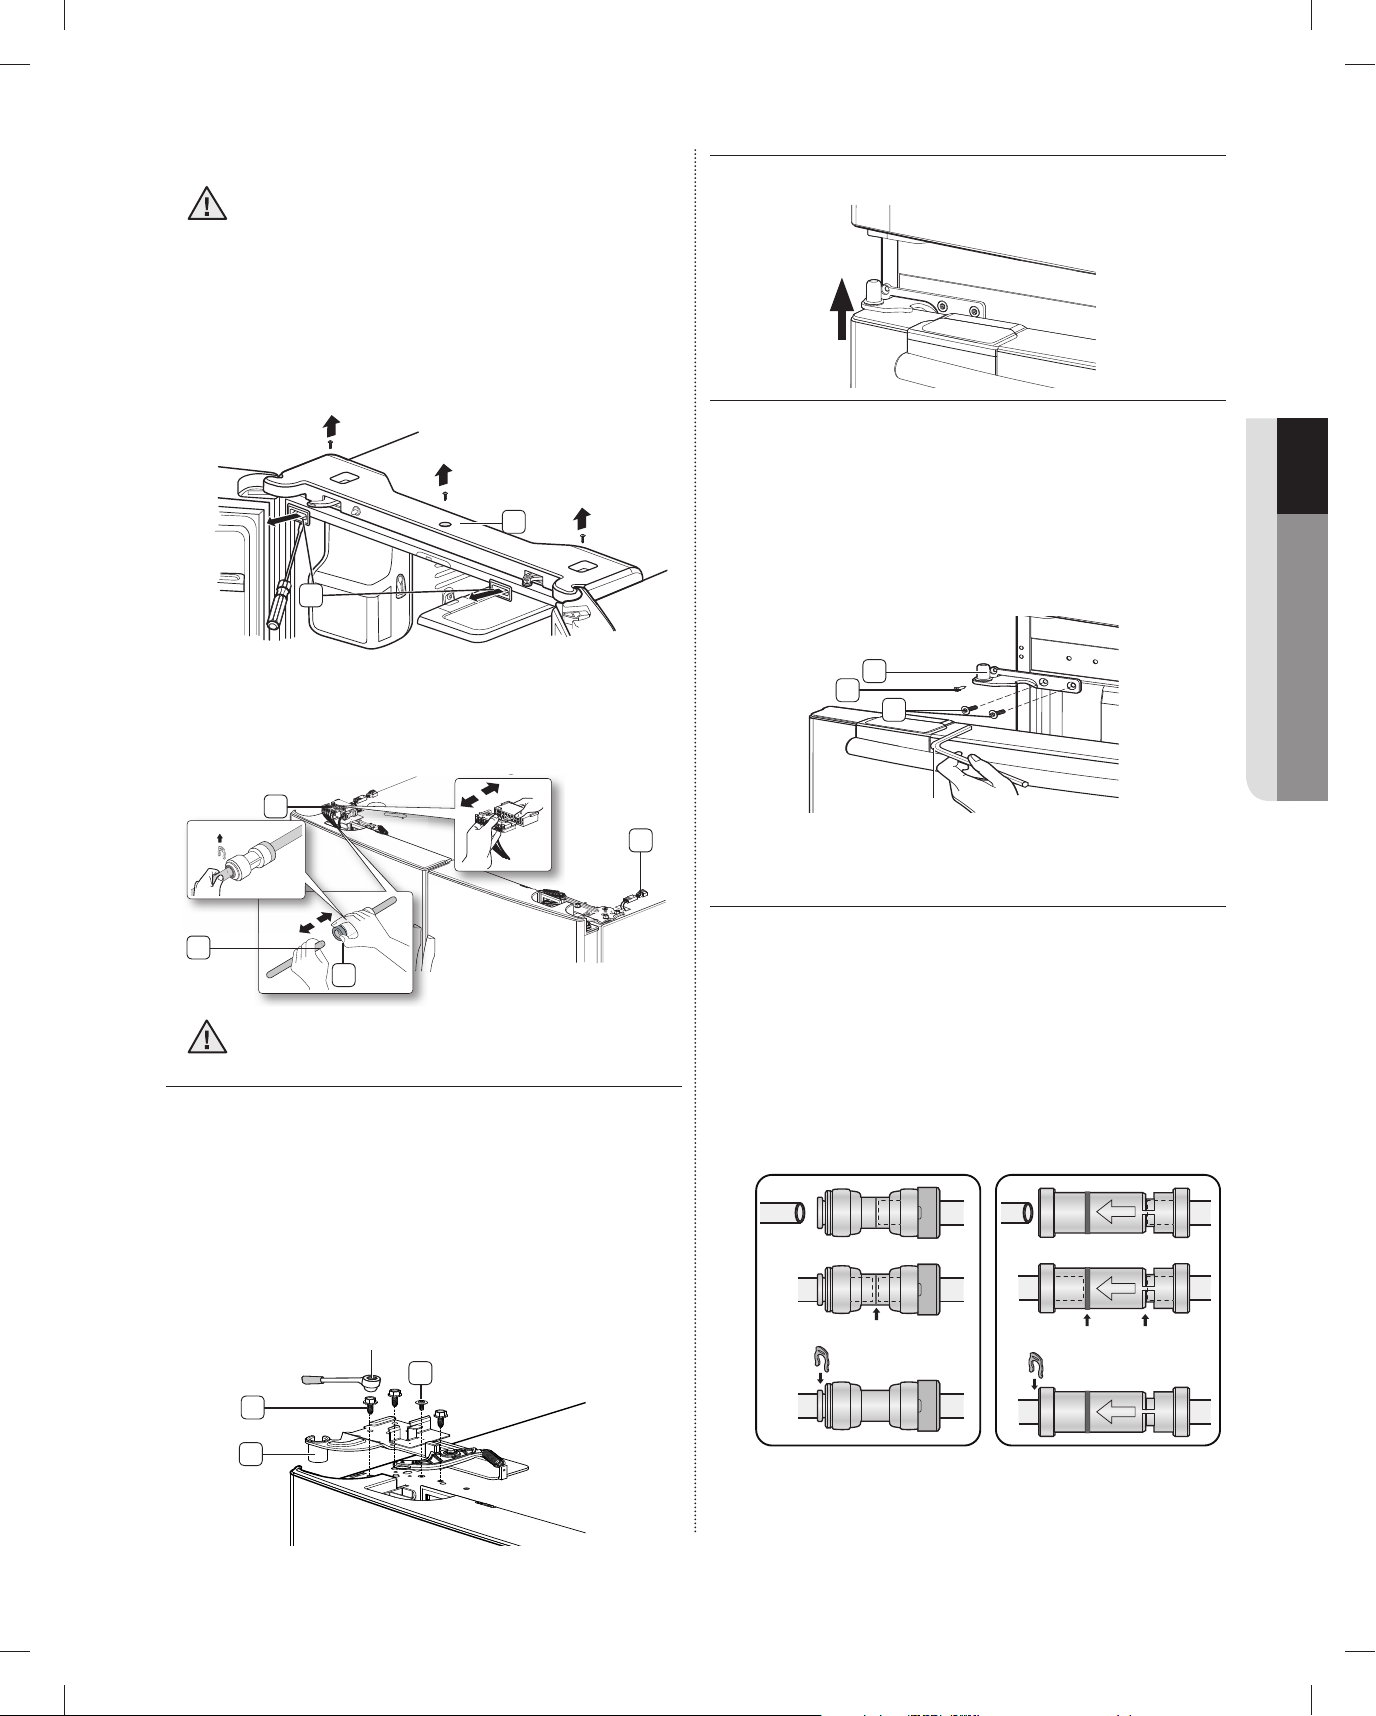
Desarmado de las puertas del refrigerador
g
Grapa roja
(1/4")
Llave de tubo
Llave allen
Centro del acoplador transparente
Marcas de guía
Dispensador
grapa A (1/4”)
(6,35 mm)
grapa A (1/4”)
(6,35 mm)
Tipo A
Tipo B
tenga cuidado de no dejar caer o rayar las
ADVERTENCIA
puertas cuando las retira.
Desarmado de las puertas del refrigerador
1. Con la puerta abierta, retire la placa superior
de la tapa ( 1 ) con un destornillador de punta
chata (-), y cierre la puerta. Retire los 3 tornillos
manteniendo la placa superior hacia abajo ( 2 ) y
gírela con varios cables conectados.
2
1
4. Levante la puerta para retirarla.
Retire el tornillo ( 10 ) conectado a las bisagras
5.
inferiores de las puertas izquierda y derecha con
un destornillador philips(+). Retire los 2 tornillos de
cabezal hexagonal ( 11 ) conectados a las bisagras
inferiores de las puertas izquierda y derecha con
una llave allen (3/16”). Retire las bisagras inferiores
de las puertas izquierda y derecha ( 12 ).
01 PUESTA A PUNTO
2. Desconecte un conector ( 3 ) de la puerta derecha
y uno ( 4 ) de la izquierda. Retire la tubería de agua
( 5 ) presionando la pieza de color gris oscuro ( 6 )
del acoplador de la tubería de agua.
4
5
Grapa roja
(1/4")
6
3
Antes de retirar el tubo, quite la grapa roja del
PRECAUCIÓN
acoplador, si está instalada.
3. Retire los 3 tornillos de cabeza hexagonal ( 7 )
conectados a las bisagras superiores de las
puertas izquierda y derecha con una llave de tubo
(10mm). Retire el tornillo de conexión a tierra ( 8 )
de las bisagras superiores de las puertas izquierda
y derecha con un destornillador philips (+). Retire
las bisagras superiores de las puertas izquierda y
derecha ( 9 ).
Llave de tubo
7
9
8
12
10
11
Llave allen
MONTAJE DE LAS PUERTAS DEL
REFRIGERADOR
Para volver a montar las puertas del refrigerador,
monte las piezas en orden inverso.
1. La tubería de agua debe estar totalmente
insertada hasta el centro del acoplador
transparente (tipo A) o las marcas de guía (Tipo B)
para evitar fugas del dispensador.
2. Inserte la grapa en el conjunto y compruebe que
sujeta fi rmemente la tubería.
Tipo A
Centro del acoplador transparente
grapa A (1/4”)
(6,35 mm)
Tipo B
Dispensador
Marcas de guía
grapa A (1/4”)
(6,35 mm)
puesta a punto _07
DA68-01922A.indb 07DA68-01922A.indb 07 2013.3.4 1:33:37 PM2013.3.4 1:33:37 PM
Page 36
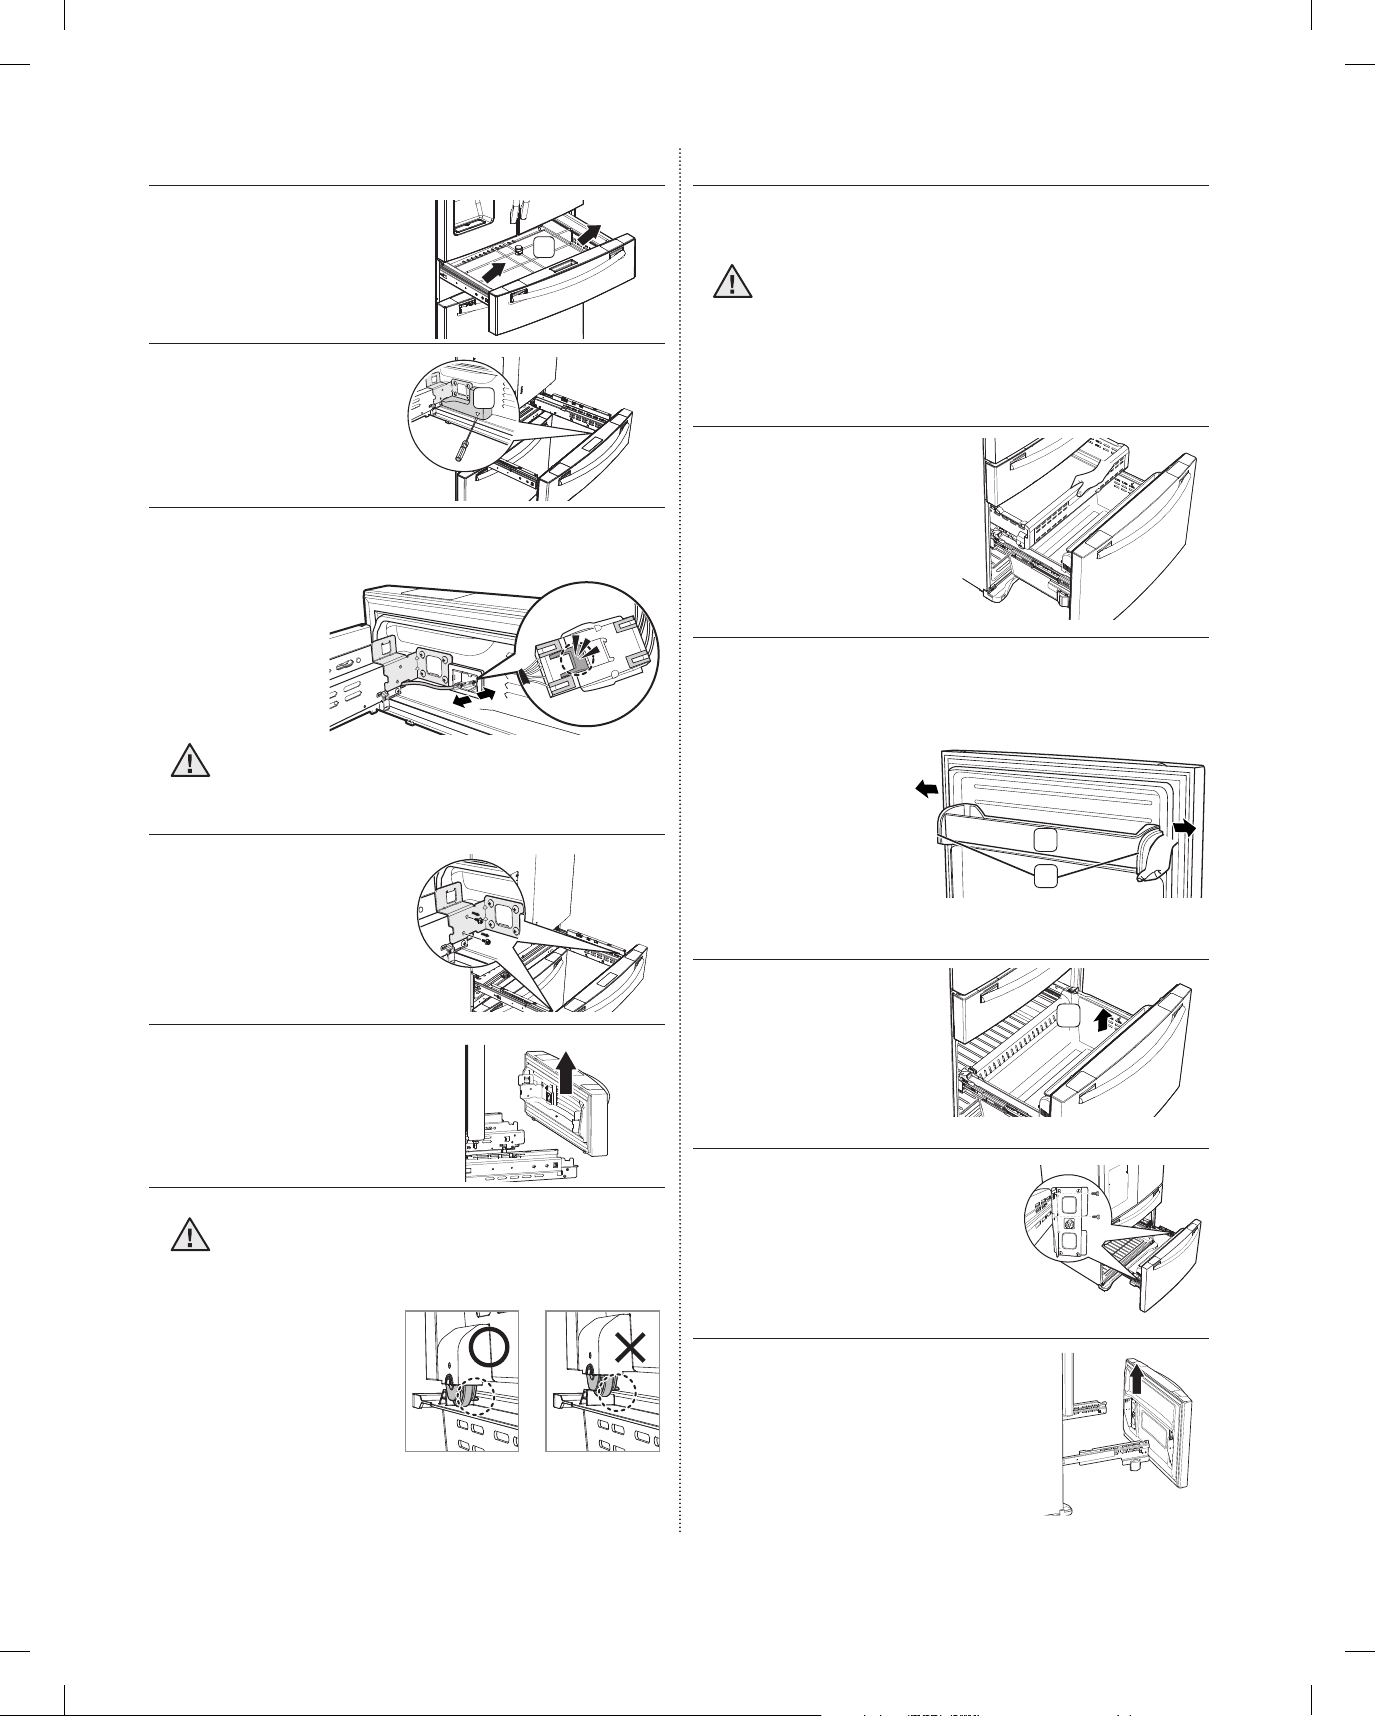
DESARMADO DE LA TAPA DEL CAJÓN FLEX
MONTAJE DE LA TAPA DEL CAJÓN FLEX
1. Retire el Flex Zone
( 1 ) levantándolo.
1
2. Retire la cubierta
con arnés ( 2 ) con
2
un destornillador de
punta chata (-).
3. Presione las lengüetas de cierre y separe el
conector del cable.
Cuando lo rearme, asegúrese de conectar el
PRECAUCIÓN
haz de cables.
Si no lo hace, el cajón Flex no funcionará.
4. Retire los 2 tornillos
de cabeza hexagonal
de los laterales con
una llave de tubo
(10mm)
5. Levante la tapa del cajón
Flex de los rieles.
Para volver a montar la tapa del cajón fl ex, monte las
piezas en orden inverso.
Asegúrese de conectar el conector del cable
PRECAUCIÓN
de la puerta del cajón Flex.
Si no lo hace, el cajón Flex no funcionará.
DESARMADO DEL CAJÓN DEL
CONGELADOR
1. Retire el cajón superior
levantándolo.
2. Retire el compartimento basculante de la puerta
( 1 ) tirando de ambos soportes ( 2 ). Luego, retire
ambos soportes tirando de ellos.
1
2
3. Extraiga la cesta
inferior ( 3 )
levantándola de los
rieles.
3
4. Retire los 4 tornillos de
cabeza hexagonal de ambos
Si se ponen demasiados alimentos en los
PRECAUCIÓN
cajones del congelador quizás la puerta no
cierre completamente, lo que daría lugar a
laterales con una llave de
tubo (10mm).
la creación de
escarcha.
5. Levante la puerta del
congelador de los rieles.
08_ puesta a punto
DA68-01922A.indb 08DA68-01922A.indb 08 2013.3.4 1:33:41 PM2013.3.4 1:33:41 PM
Page 37
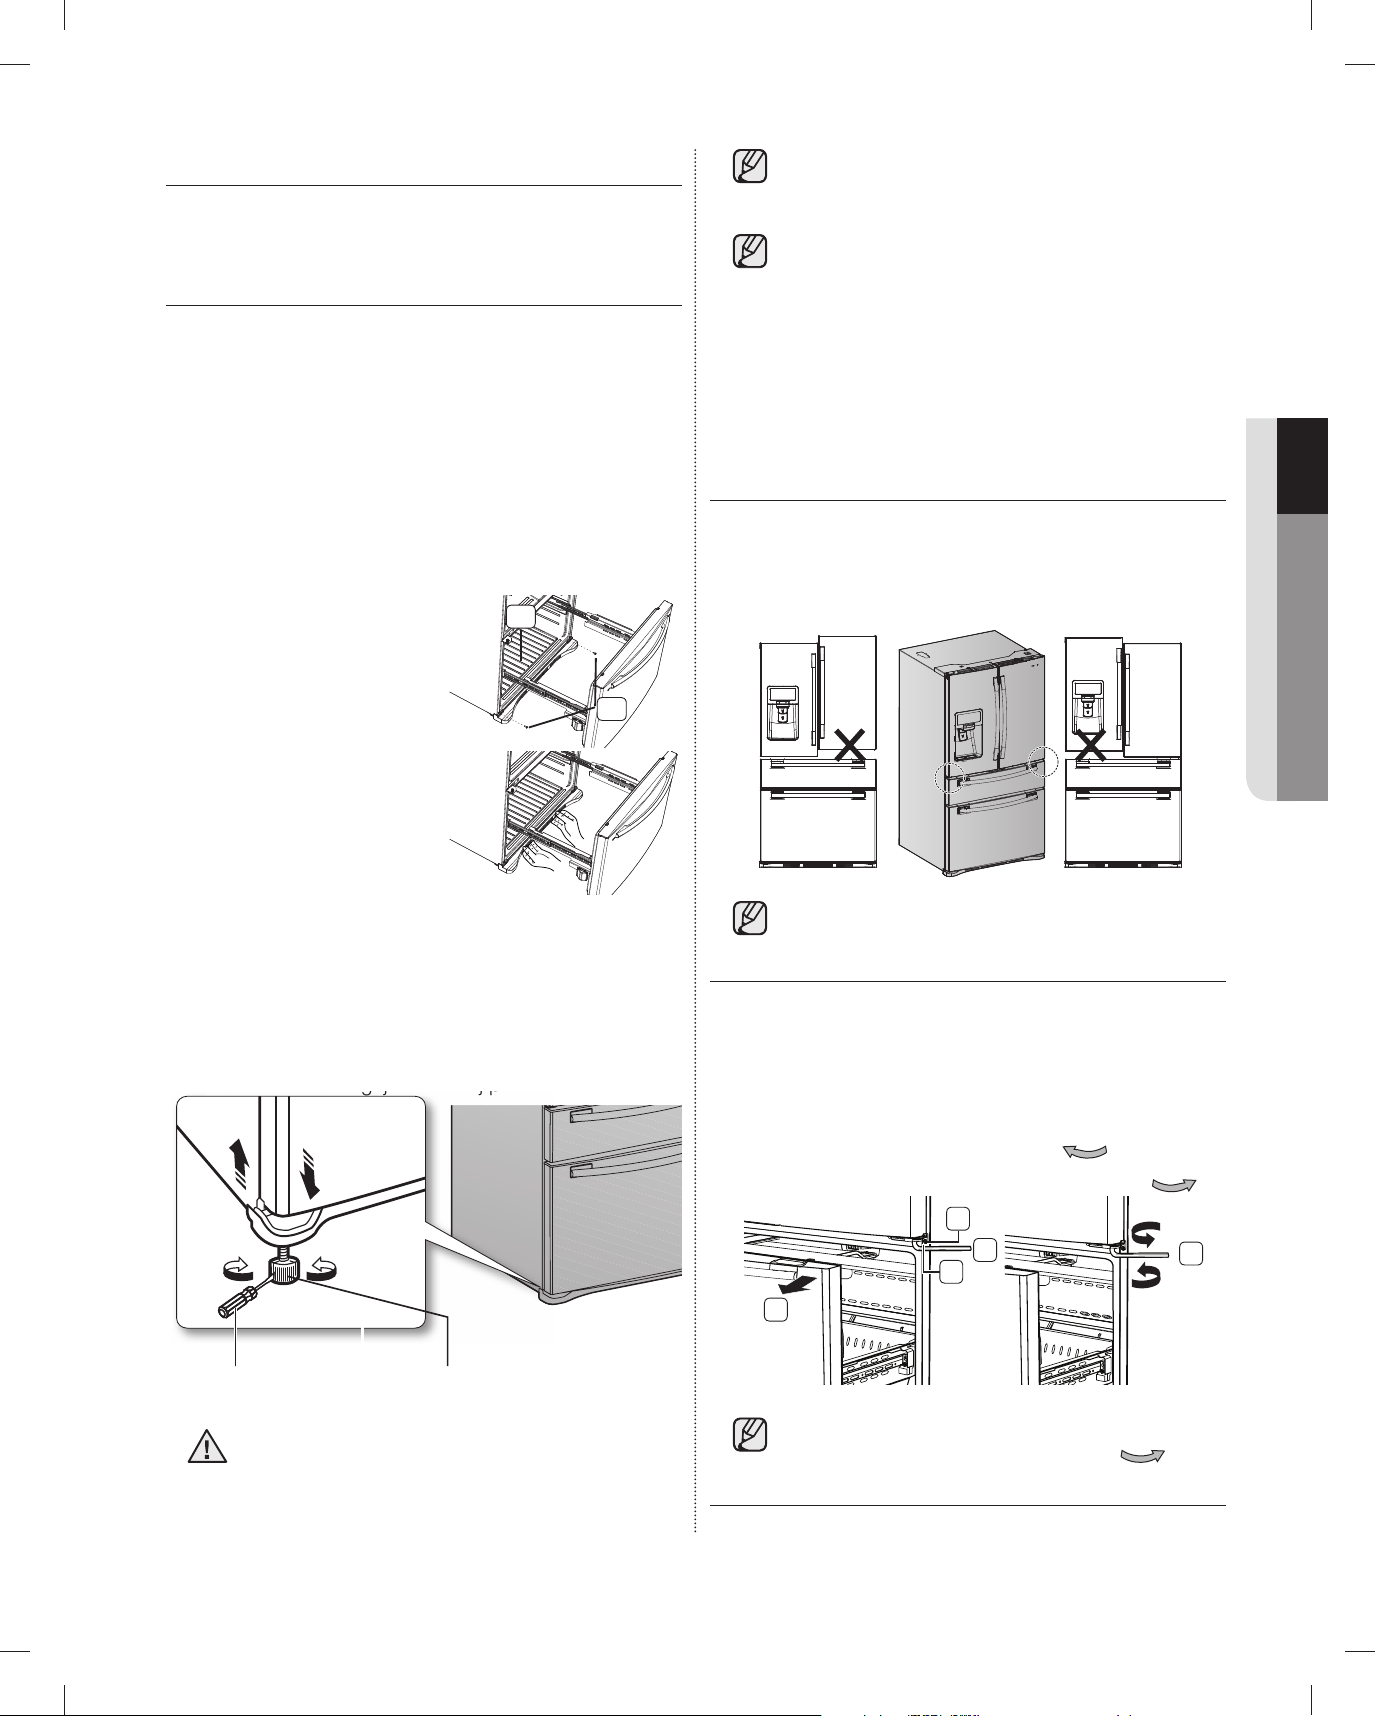
MONTAJE DEL CAJÓN DEL CONGELADOR
ABAJO
ARRIBA
gj jp
destornillador de
punta chata (-)
palanca de control
pieza de
ajuste
pieza fi ja
Para volver a montar el cajón del congelador, monte
las piezas en orden inverso.
AJUSTE DEL NIVEL
Asegúrese de que el refrigerador esté nivelado antes
de realizar los ajustes fi nales. Utilice un nivelador para
evaluar si el refrigerador se encuentra nivelado tanto
en los laterales como en la parte trasera y delantera.
Si el refrigerador no está nivelado, las puertas no
estarán perfectamente alineadas, lo que podría
provocar condensación de humedad y costosas
facturas de energía. A continuación se explica cómo
nivelar el refrigerador si el lado izquierdo está a un
nivel inferior del lado derecho.
Cómo ajustar el nivel
1.
Abra el cajón del congelador
2
y extraiga la cesta inferior.
(Véase la página 8)
2. Retire los dos tornillos ( 1 )
1
conectados al frente de
la cubierta de las patas
( 2 ) con un destornillador
Philips(+).
3. Retire el frente de la
cubierta de las patas
( 2 ) levantando la parte
inferior y extrayéndola hacia afuera.
4.
Inserte un destornillador de punta chata (-) en una
muesca dentro de la palanca de control izquierda y
gírelo en el sentido de las agujas del reloj para nivelar
el refrigerador. Se debe girar en sentido de las agujas
del reloj para bajar el refrigerador y en el sentido
contrario de las agujas del reloj para elevarlo.
CÓMO HACER PEQUEÑOS AJUSTES
ENTRE LAS PUERTAS
Recuerde que se necesita que el refrigerador esté
nivelado para que las puertas estén perfectamente
alineadas. Si necesita ayuda, revise la sección anterior
sobre la nivelación del refrigerador.
1. Extraiga la puerta convertible ( 1 ) para que se vea
2. Inserte la llave allen (3/16”) ( 3 ) en el eje ( 4 ) de la
3. Ajuste la altura girando la llave hexagonal ( 3 ) en
Si el lado derecho está más bajo, realice
el mismo proceso, pero con la palanca de
control derecha.
Es complicado quitar el frente de la cubierta
de las patas del refrigerador, por lo tanto, no
recomendamos realizar pequeños ajustes
con la palanca de control. Consulte en la
página siguiente la mejor manera de realizar
pequeños ajustes en las puertas.
pieza fi ja
pieza de
ajuste
La puerta izquierda está fi ja. Para realizar
pequeños ajustes entre las puertas, ajuste
solamente la puerta derecha.
la bisagra inferior ( 2 ).
bisagra inferior.
ABAJO
el sentido de las agujas del reloj (
sentido contrario al de las agujas del reloj (
2
4
3
) o en el
ARRIBA
01 PUESTA A PUNTO
).
3
1
destornillador de
punta chata (-)
PRECAUCIÓN
Ambas palancas de control deben tocar
el piso para impedir posibles lesiones
personales o daños materiales a causa de la
palanca de control
Cuando gira la llave hexagonal en el sentido
contrario al de las agujas del reloj (
), la
puerta se moverá hacia arriba.
inclinación.
puesta a punto _09
DA68-01922A.indb 09DA68-01922A.indb 09 2013.3.4 1:33:42 PM2013.3.4 1:33:42 PM
Page 38
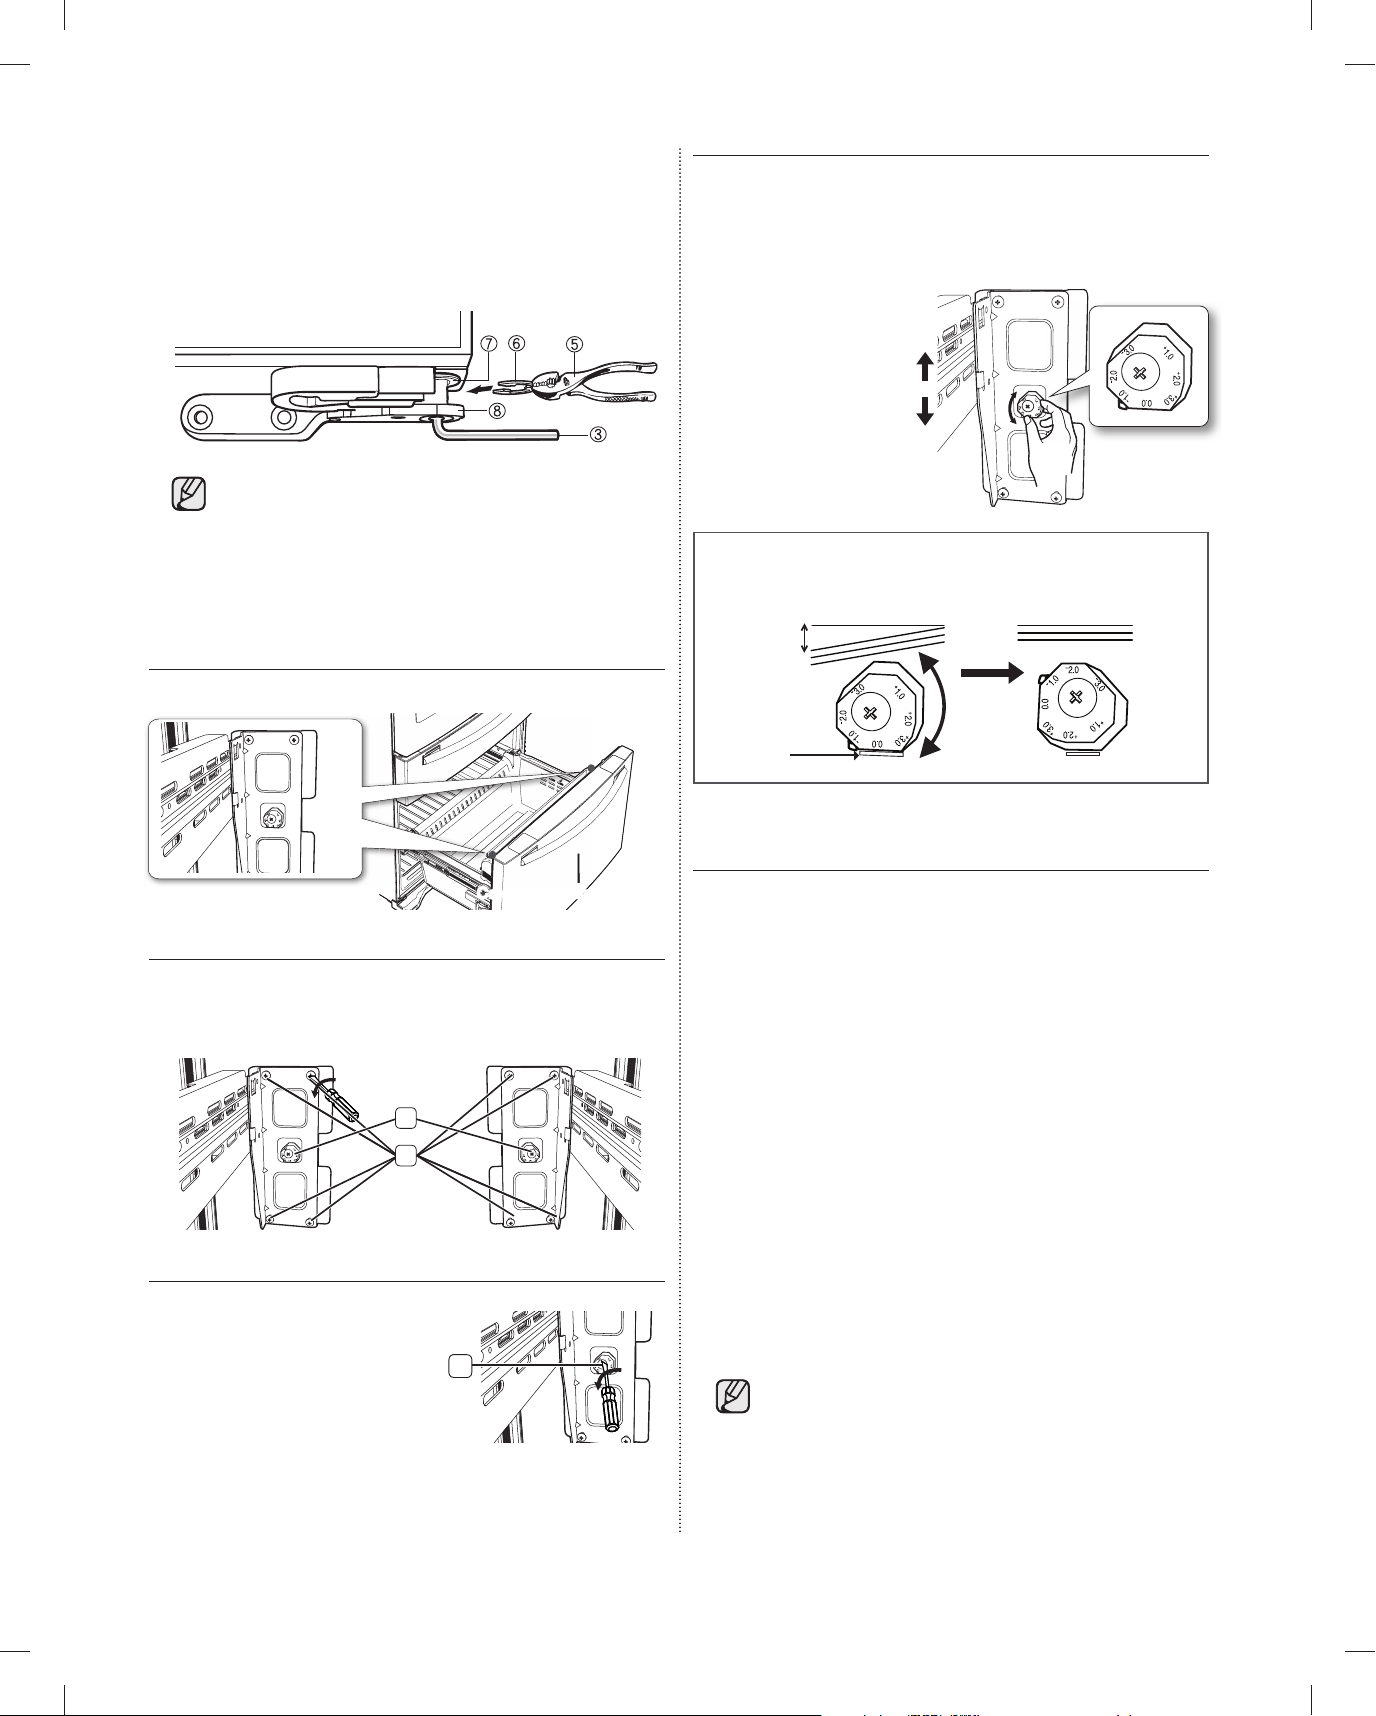
1. Después de ajustar las puertas, inserte el
pieza de ajuste
Ejemplo) La inclinación es de aproximadamente 0,08 pulgadas
(2mm) como se muestra a continuación.
- Gire el regulador de altura hasta llegar a -2,0 para reducir la
inclinación de la puerta.
Inclinación
plano de
referencia
sujetador suministrado ( 6 ) con ayuda de unas
pinzas ( 5 ) en el espacio entre el anillo de caucho
de la bisagra ( 7 ) y la bisagra inferior ( 8 ). La
cantidad de sujetadores que se deben insertar
depende del espacio.
El refrigerador incluye 2 sujetadores.
Cada uno de los sujetadores tiene un
espesor de 0,04”.
AJUSTE DEL NIVEL DEL CAJÓN DEL
CONGELADOR
3. Seleccione el mejor nivel para alinear la pendiente
de la puerta.
• Después, ajuste el tornillo regulador ( 3 ) y luego
los dos tornillos philips.
Ejemplo) La inclinación es de aproximadamente 0,08 pulgadas
(2mm) como se muestra a continuación.
- Gire el regulador de altura hasta llegar a -2,0 para reducir la
inclinación de la puerta.
Inclinación
pieza de ajuste
Cajón del congelador
1. Ubique el regulador de altura ( 1 ) en el cajón del
congelador. Desatornille los 8 tornillos Phillips ( 2 )
lentamente para afl ojar la puerta.
1
2
2. Afl oje el tornillo regulador
( 3 ) con un destornillador
Phillips(+).
3
plano de
referencia
COMPROBACIÓN DE LA TUBERÍA
DEL DISPENSADOR DE AGUA
El dispensador de agua con fi ltro es una de las
funciones útiles de su nuevo refrigerador. Para que
el agua que ingerimos sea más saludable, el fi ltro
elimina las partículas no deseadas. No obstante, no
la esteriliza ni destruye microorganismos. Para eso,
necesita adquirir un sistema de purifi cación de agua.
A fi n de que la fábrica de hielo funcione
correctamente, se necesita una presión de agua de
20~125 psi. En condiciones normales, un vaso de
170 cc (5,75 oz.) puede llenarse en 10 segundos.
Si el refrigerador se instala en una zona de presión de
agua baja (debajo de los 20psi), puede instalar una
bomba cebadora para compensar la falta de presión.
Una vez conectada la tubería de agua, asegúrese de
que el tanque de almacenamiento de agua dentro
del refrigerador esté lleno. Para hacerlo, presione la
palanca del dispensador hasta que salga el agua.
Su distribuidor le podrá ofrecer los kits de
instalación de tuberías de agua disponibles
a un costo adicional. Recomendamos utilizar
un kit de instalación de tubería de agua que
contenga tubería de cobre y una tuerca de
compresión de ¼”.
10_ puesta a punto
DA68-01922A.indb 10DA68-01922A.indb 10 2013.3.4 1:33:43 PM2013.3.4 1:33:43 PM
Page 39
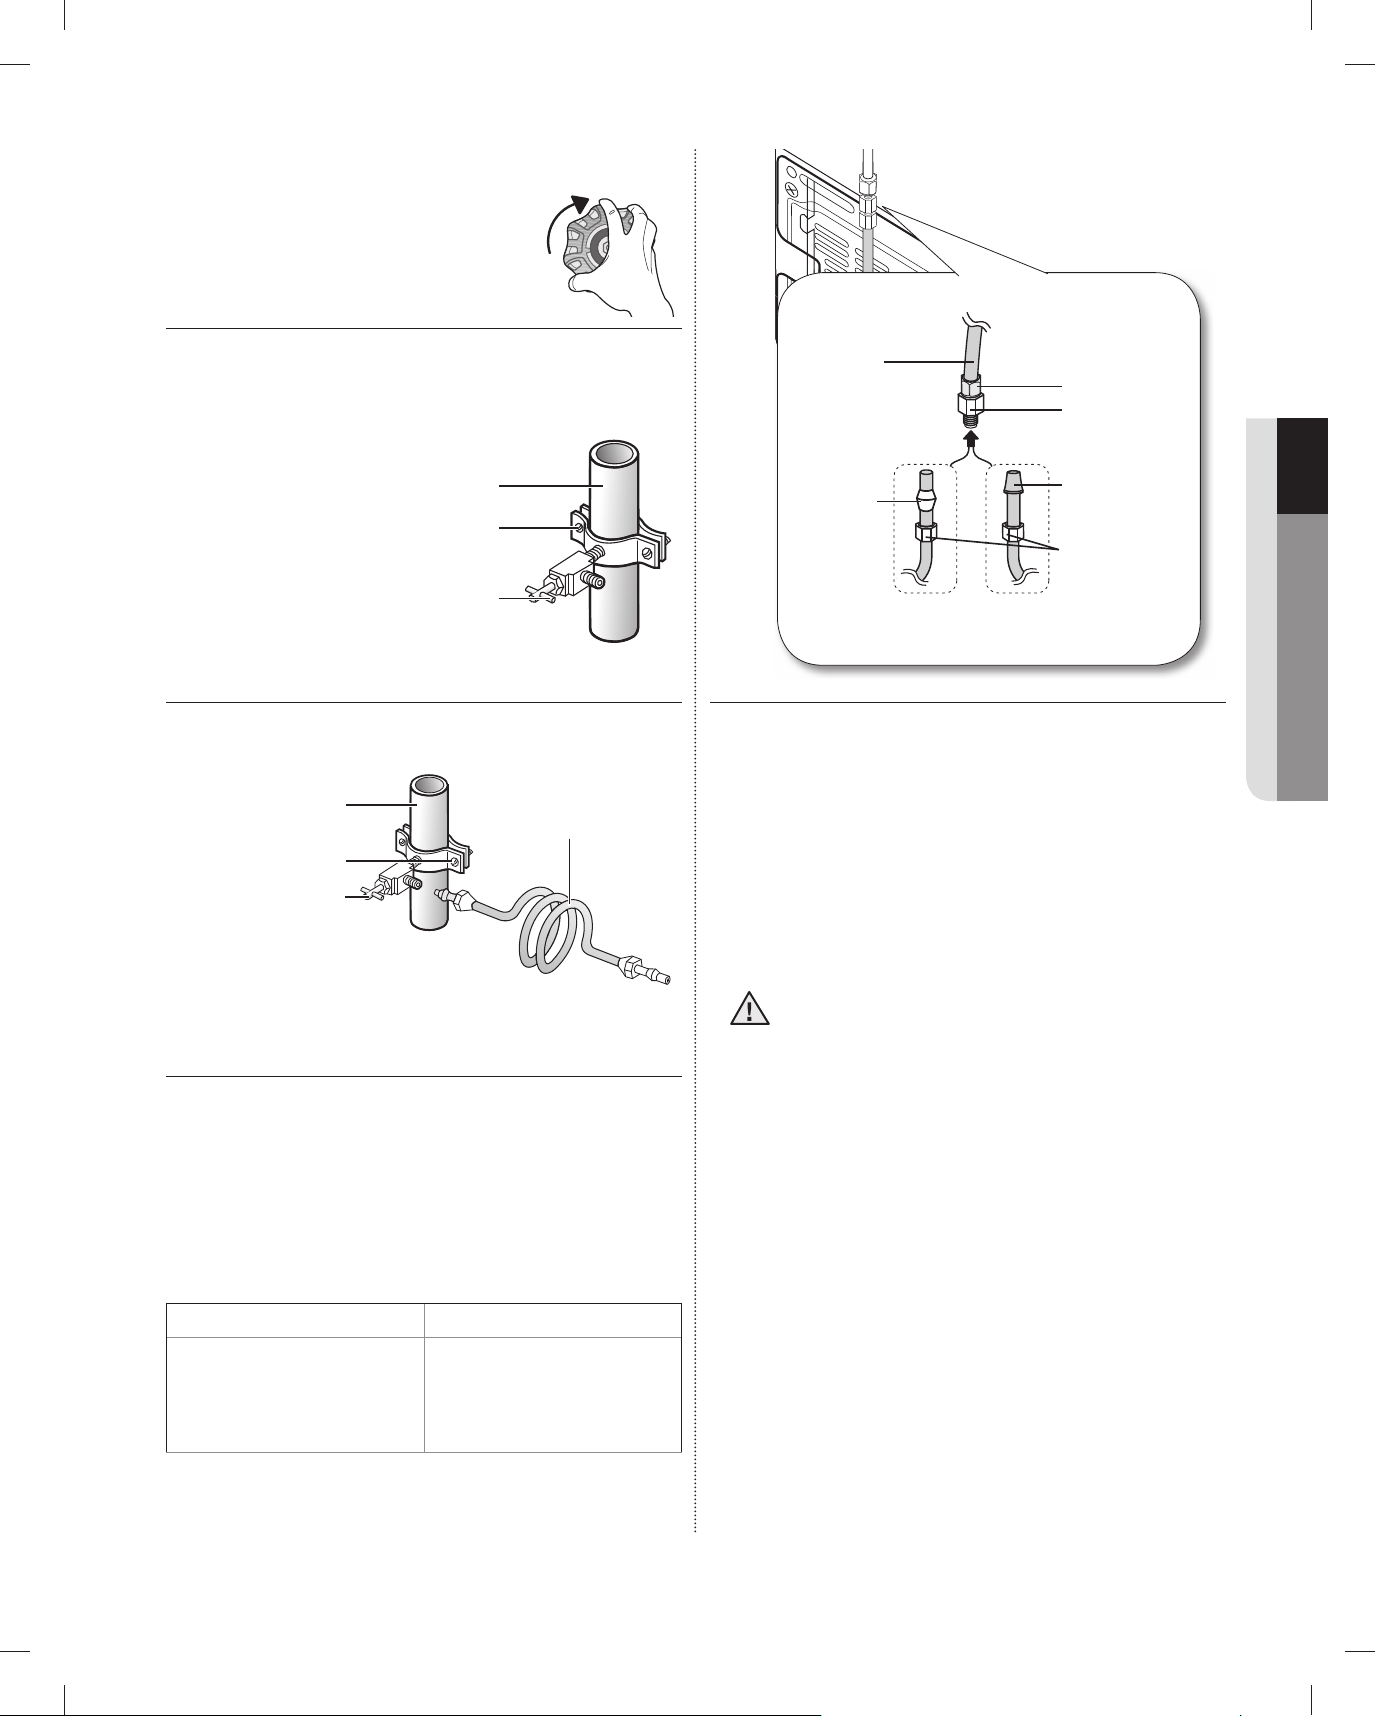
Conexión al suministro del agua
Abrazadera para
sujetar tubos
Tubería de
agua fría
Válvula de cierre
Válvula de cierre
Abrazadera para
sujetar tubos
Tubería de agua
fría
Kit de instalación de
tubería de agua
Tubería de
plástico
(Montado)
Férula (no
suministrada)
Tuerca de
compresión (1/4”)
(Montado)
Acople de
compresión
(Montado)
Extremo
moldeado(válvula)
Tuerca de
compresión (B) (1/4”)
(no suministrada)
Tubería de cobre
(no suministrada)
Tubería de plástico (B)
(no suministrada)
1. En primer lugar, cierre el suministro
de agua principal.
Refrigerador
2. Ubique la tubería de agua potable fría más
cercana e instale la abrazadera y la válvula de
cierre.
Tubería de
agua fría
Abrazadera para
sujetar tubos
Válvula de cierre
3. Conecte el kit de instalación de tubería de agua a
la válvula de cierre.
Tubería de agua
Abrazadera para
sujetar tubos
Válvula de cierre
fría
Kit de instalación de
tubería de agua
Tuerca de
Tubería de
(Montado)
Férula (no
suministrada)
plástico
Tubería de cobre
(no suministrada)
Tubería de suministro del agua corriente
Tubería de plástico (B)
o
(no suministrada)
compresión (1/4”)
(Montado)
Acople de
compresión
(Montado)
Extremo
moldeado(válvula)
Tuerca de
compresión (B) (1/4”)
(no suministrada)
1. Conecte la tubería del agua corriente al acople de
compresión ensamblado.
- Si utiliza una tubería de cobre, deslice la tuerca
de compresión ( B ) (no suministrada) y la férula
(no suministrada) por la tubería de cobre (no
suministrada) como se muestra en el gráfi co.
- Si utiliza una tubería de plástico ( B ), inserte
el extremo moldeado (válvula) de la tubería de
plástico ( B ) en el acople de compresión.
01 PUESTA A PUNTO
INSTALACIÓN DE LA TUBERÍA DE
AGUA
Conexión de la tubería de suministro de
agua al refrigerador.
Para llevar a cabo la conexión, necesita adquirir varios
elementos.
Posiblemente su ferretería local los venda todos juntos
en un kit.
Uso de la tubería de cobre
• Tubería de cobre de ¼”
• Tuerca de compresión de
¼” (1)
• Férula (2)
Uso de la tubería de plástico
• Tubería de plástico de ¼”
Extremo moldeado
→
(válvula)
• Tuerca de compresión de
¼” (1)
No la utilice sin el extremo moldeado (válvula)
PRECAUCIÓN
de la tubería de plástico ( B ).
2. Ajuste la tuerca de compresión ( B ) sobre el
acople de compresión. No ajuste demasiado la
tuerca de compresión ( B ).
3. Abra el agua y verifi que si hay alguna fuga. Si
encuentra gotas o fugas de agua en las zonas
de las conexiones, cierre el suministro de agua
principal. Compruebe la conexiones y, de ser
necesario, ajústelas.
4. Haga correr 1 galón de agua a través del
fi ltro antes de beber o de utilizar el agua del
refrigerador. (El agua debe correr unos 6 minutos.)
Para hacer correr el agua, presione la palanca
del dispensador de agua con un vaso o una taza
grandes. Llene el vaso, vacíelo en el fregadero de
la cocina y repita el proceso.
puesta a punto _11
DA68-01922A.indb 11DA68-01922A.indb 11 2013.3.4 1:33:49 PM2013.3.4 1:33:49 PM
Page 40
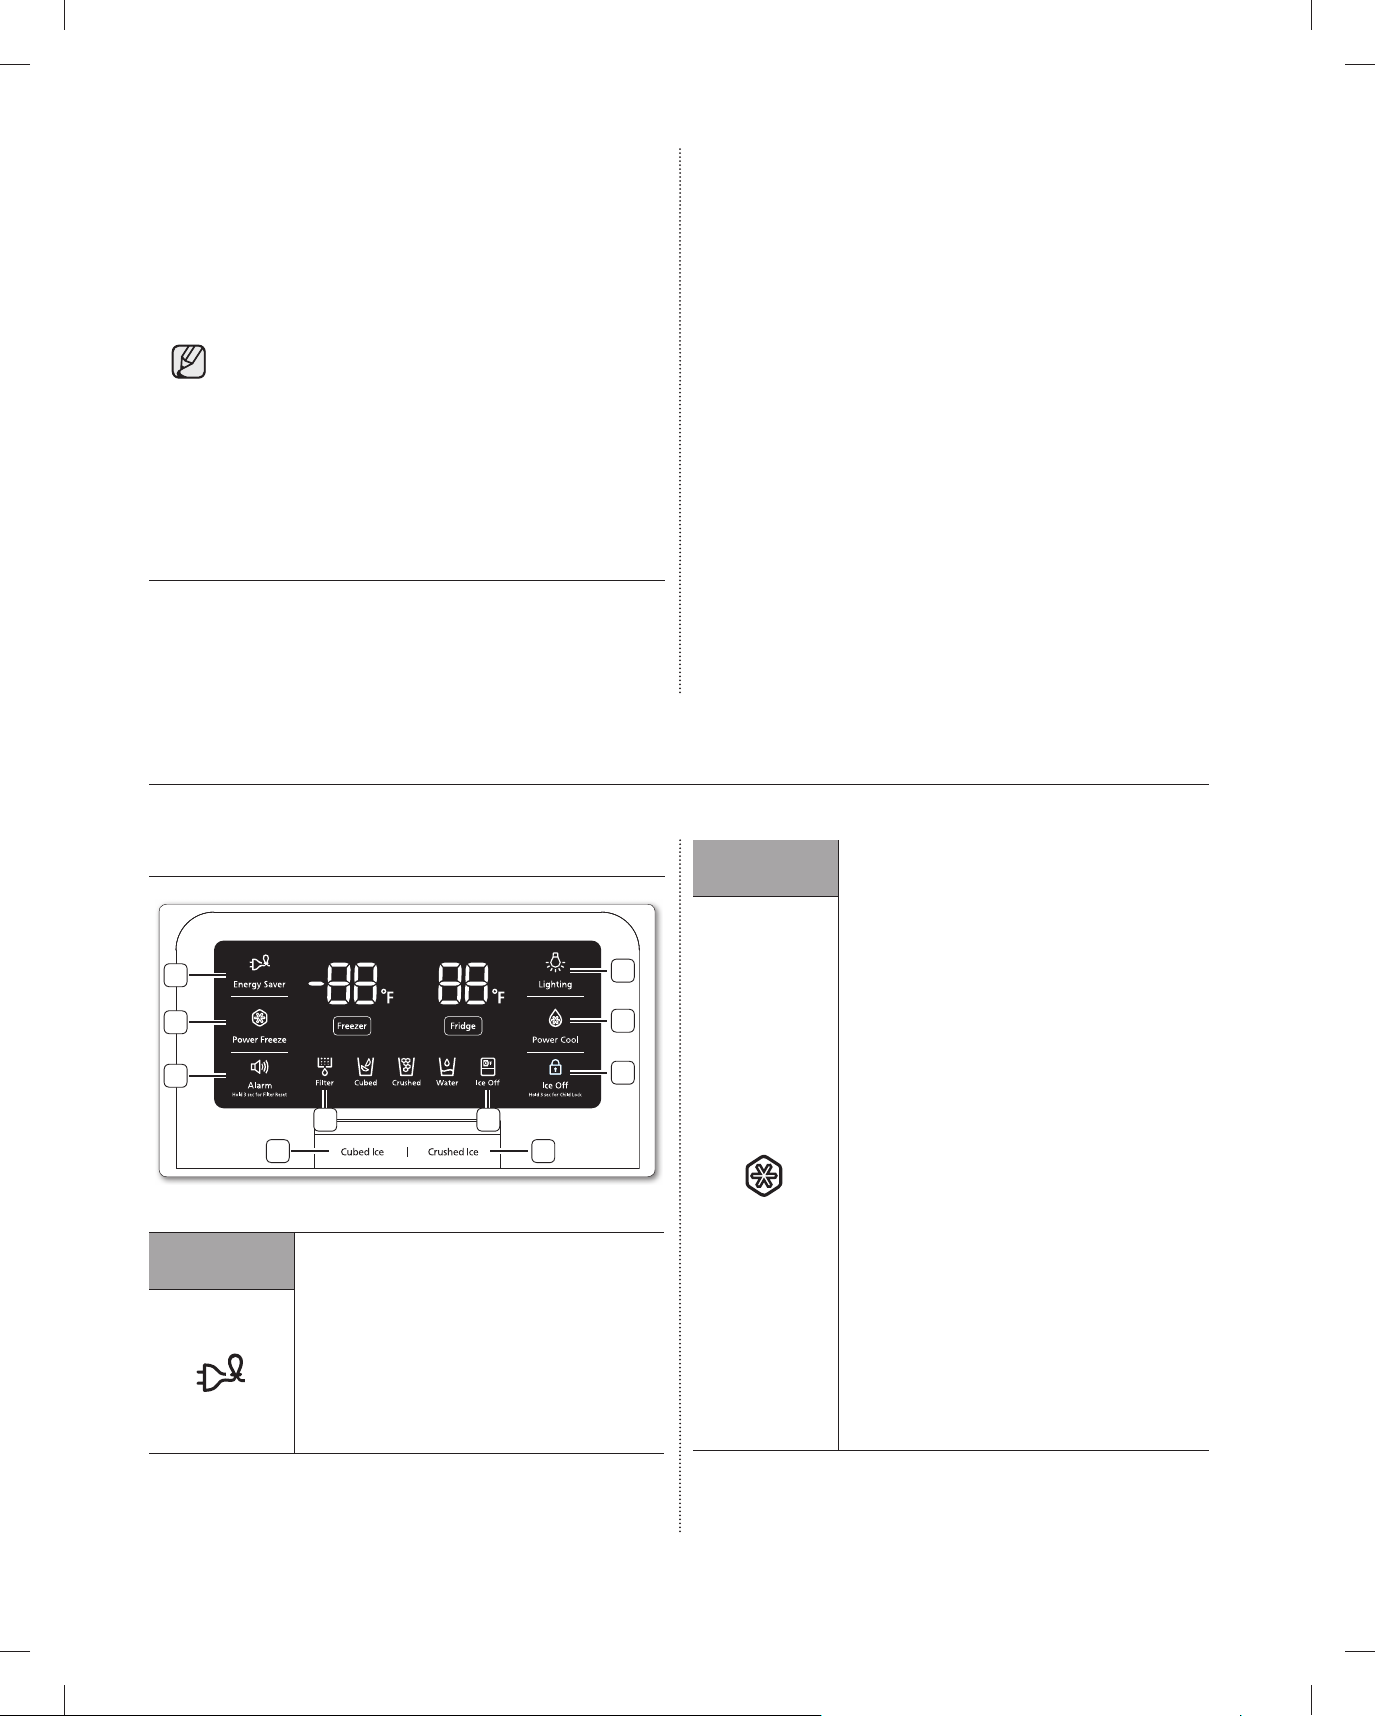
5. Tras poner en funcionamiento el refrigerador, deje
( 1 ) Energy
Saver
( 2 ) Power
Freeze
que la fábrica de hielo haga durante 1 o 2 días.
Pasado este tiempo, deseche las 1 o 2 primeras
cubetas de hielo para asegurarse de que se hayan
eliminado todas las impurezas de la tubería de
agua.
Solamente lconecte a tubería de agua a una
fuente de agua potable.
Si debe reparar o desarmar la tubería de
agua, recorte 1/4“ de la tubería de plástico
para asegurarse de que la conexión sea
perfecta y libre de pérdidas.
FINALIZACIÓN DE LA INSTALACIÓN
Ahora que ya tiene el nuevo refrigerador instalado
en su lugar, puede confi gurarlo y disfrutar de sus
funciones. Complete los siguientes pasos para poner
el refrigerador en funcionamiento.
1. Asegúrese de que el refrigerador se encuentre
en una ubicación apropiada a una distancia
razonable de la pared. Consulte las instrucciones
de instalación de este manual.
2. Una vez enchufado, asegúrese de que la luz
interior se encienda cuando se abran las puertas.
3. Coloque el control de temperatura en la marca
más fría y espere una hora. Restablezca la
temperatura del refrigerador y del congelador que
desee.
4. Después de enchufar el refrigerador, tardará
algunas horas en alcanzar la temperatura
adecuada. Podrá almacenar alimentos y bebidas
en el refrigerador una vez que la temperatura sea
lo sufi cientemente baja.
Funcionamiento del refrigerador de puerta francesa
USO DEL PANEL DE CONTROL
1
2
3
910
7
( 1 ) Energy
Saver
Pulse el botón "Energy Saver" para ahorrar
energía.
El icono de Energy Saver se ilumina cuando
pulsa el botón Energy Saver.
La función Energy Saver se “ENCIENDE”
automáticamente cuando se enchufa el
refrigerador.
Si aparece condensación o gotas de agua
en las puertas, apague el modo Energy
Saver.
( 2 ) Power
Freeze
4
5
6
8
La función Power Freeze (Poder de
congelación) acelera considerablemente el
compresor del congelador, haciendo que
el congelador se enfríe rápidamente hasta
la temperatura que haya seleccionado.
Cuando pulsa el botón Power Freeze (Poder
de congelación), se enciende el icono
correspondiente.
Power Freeze (Poder de congelación) es
útil si necesita congelar rápidamente algún
alimento, para hacer gran cantidad de hielo
o para enfriar rápidamente el congelador si
su temperatura ha aumentado (por ejemplo,
si la puerta se dejó abierta).
Para apagar la función de Power
Freeze(Poder de congelación), pulse el
botón Power Freeze (Poder de congelación)
nuevamente. Power Freeze (Poder de
congelación) se apaga automáticamente
después de 72 horas para reducir el
consumo de energía. Cuando utiliza
esta función, el consumo de energía del
refrigerador aumenta. Recuerde apagarlo
cuando no lo necesite y vuelva el congelador
a su temperatura original. Si tiene que
congelar gran cantidad de materia del
alimento, activar la función de congelación
de energía por lo menos 24 horas antes.
12_ funcionamiento
DA68-01922A.indb 12DA68-01922A.indb 12 2013.3.4 1:33:51 PM2013.3.4 1:33:51 PM
Page 41
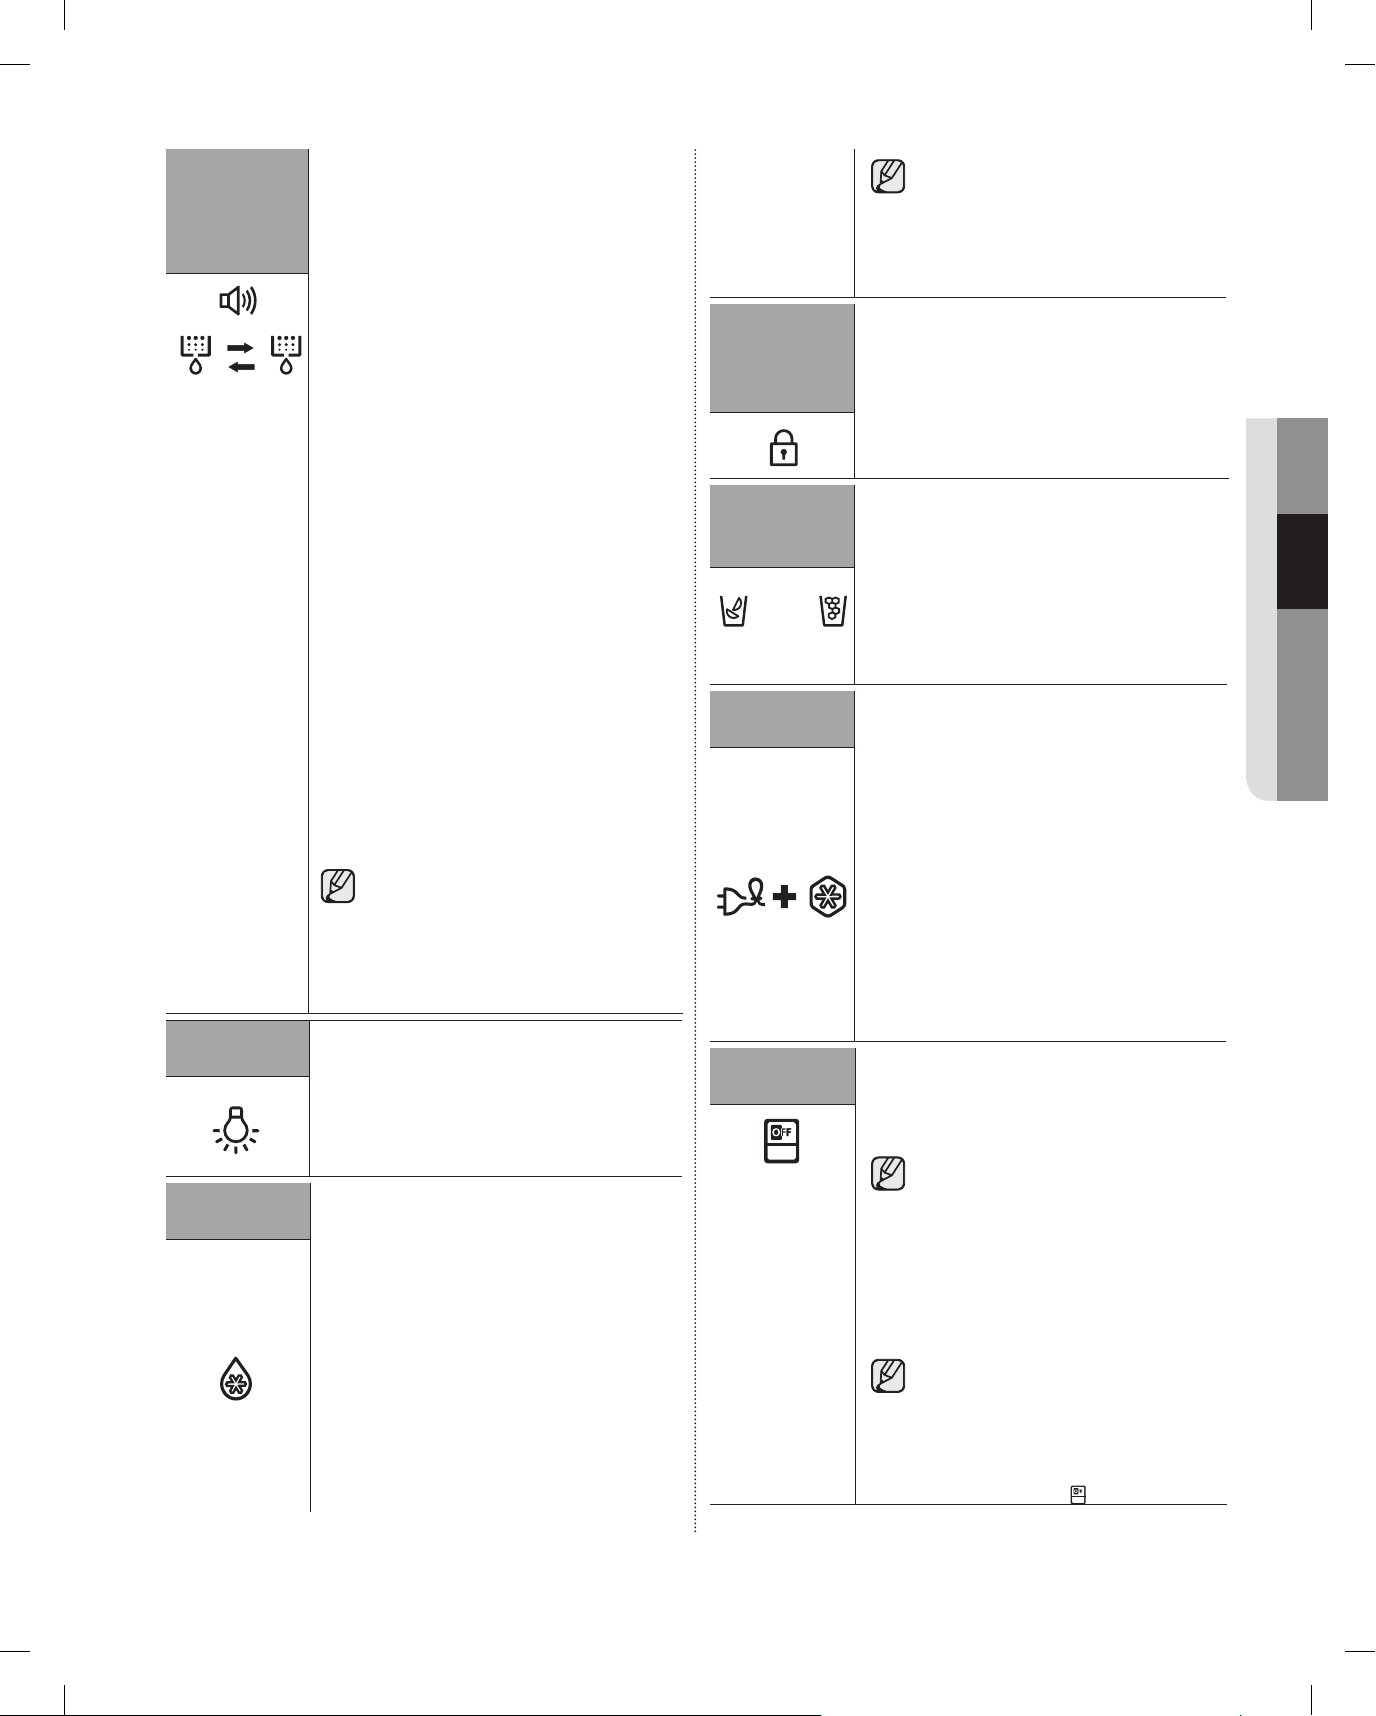
( 3 ) Alarm /
( 3 ) Alarm /
hold 3
sec for
Filter
Reset
(Azul)
(Filter Reset)
(Rojo)
( 4 ) Lighting
( 5 ) Power
Cool
( 6 ) Ice Off
(Hold 3
sec for
child lock)
(7) Cubed Ice
(8) Crushed
Ice
(Cubed)
(En cubos)
(Crushed)
(Triturado)
Cooling Off
Mode
( 9 ) Ice Off
hold 3
sec for
Filter
Reset
(Filter Reset)
(Azul)
( 4 ) Lighting
( 5 ) Power
Cool
(Rojo)
El botón Alarm/Hold 3 sec for Filter Reset
cumple dos propósitos:
- Encender y apagar la alarma cuando la
puerta queda abierta
- Restablecer el indicador de vida útil del
fi ltro de agua
1) Función de alarma de la puerta
Si la alarma de la puerta está activada,
sonará una alarma si cualquiera de las
puertas del refrigerador se dejan abiertas
durante más de tres minutos.
El sonido se detiene cuando se cierra
la puerta. La función de alarma de la
puerta se activa en la fábrica. Se puede
desactivar pulsando y liberando el botón
Alarm/Hold. Se puede volver a activar
con el mismo procedimiento. El icono se
enciende cuando la función se activa.
2) Función del indicador de vida útil del fi ltro
de agua
Cuando se haya reemplazado el fi ltro
de agua, pulse y mantenga presionado
el botón Alarm/Hold 3 sec for Filter
Reset para restablecer el indicador de
vida útil del fi ltro de agua. Cuando se
restablece el indicador de vida útil del
fi ltro de agua, el icono del fi ltro que se
encuentra en el panel se torna azul, verde
o amarillo. El icono Filter se tornará rojo
para indicar cuándo debe cambiar el
fi ltro de agua viejo después de 6 meses
(aproximadamente 300 galones).
Algunas zonas tienen grandes
cantidades de cal en el agua, lo
que provoca que el fi ltro de agua
se obstruya más rápidamente. Si
este es el caso en su zona, deberá
cambiar el fi ltro con una frecuencia
superior a seis meses.
Al presionar el botón Lighting, la luz LED del
dispensador (debajo del visor) se enciende
en forma permanente. El botón también se
ilumina. Si desea que la luz del dispensador
se encienda solamente cuando se usa, pulse
el botón Lighting para desactivar el modo de
encendido permanente.
La función Power Cool acelera
considerablemente el compresor del
refrigerador, haciendo que el refrigerador se
enfríe rápidamente a la temperatura que haya
seleccionado. Cuando pulsa el botón Power
Cool, se enciende el icono correspondiente.
Power Cool es útil si necesita enfriar
rápidamente algún alimento, o para enfriar
rápidamente el refrigerador si su temperatura
ha aumentado (por ejemplo, si la puerta se
dejó abierta).
Para apagar la función Power Cool, pulse el
botón Power Cool nuevamente. Power Cool
se apaga automáticamente después de 2 ½
horas para reducir el consumo de energía.
( 6 ) Ice Off
(Hold 3
sec for
child lock)
(7) Cubed Ice
(8) Crushed
Ice
(Cubed)
(En cubos)
Cooling Off
Mode
( 9 ) Ice Off
(Crushed)
(Triturado)
Cuando se enciende Power
Cool, el compresor del
refrigerador se acelera y se
escucha un sonido más fuerte
que durante el funcionamiento
normal.
Si no desea hacer más hielo pulse el botón Ice
Off (Hielo desactivado). Al pulsar este botón
durante 3 segundos se bloquea el panel de
control y los botones del dispensador para
inutilizarlos. Se ilumina el icono Child Lock
(Bloqueo para niños) para indicar que se ha
activado la función de bloqueo para niños.
Pulse el botón Cubed Ice o Crushed Ice para
seleccionar el tipo de hielo que desea obtener.
Cada vez que pulsa el botón, los modos de
hielo en cubos o triturado alternan y el icono
de hielo Cubed o Crushed se enciende,
indicando su selección.
Si no necesita hielo, apague la función para
ahorrar consumo de agua y de energía
(consulte "Ice Off" a continuación).
El modo Cooling Off (también llamado modo Shop)
está diseñado para que lo usen los distribuidores
cuando exhiben los refrigeradores en las tiendas.
En el modo Cooling Off, el motor del ventilador
del refrigerador funciona normalmente, pero
los compresores no lo hacen, por lo tanto el
refrigerador y el congelador no se enfrían.
Para activar el modo Cooling Off, pulse y
mantenga presionado el botón Energy Saver
y el botón Power Freeze durante 3 segundos
durante el funcionamiento normal. Se escuchará
un zumbido en el refrigerador y el indicador de
temperatura parpadea OF OF. Para cancelar el
modo Cooling Off, pulse y mantenga presionado
nuevamente el botón Energy Saver y el botón
Power Freeze durante 3 segundos.
Si no desea hacer más hielo pulse el botón
Ice Off (Hielo desactivado).
El icono se encenderá y la fábrica de hielo se
detendrá.
Recomendamos que detenga la
fábrica de hielo si sucede lo
siguiente:
- Hay sufi cientes cubos de
hielo en la cubeta.
- Desea ahorrar agua y energía.
- El refrigerador no está
recibiendo agua.
Si la función de fábrica de hielo está
ENCENDIDA, y la tubería de agua
no está conectada, se escuchará un
sonido de válvula de agua desde la
parte posterior de la unidad. Pulse
el botón Ice Off ( 6 ) hasta que el
indicador Ice Off ( ) se ilumine.
02 FUNCIONAMIENTO
funcionamiento _13
DA68-01922A.indb 13DA68-01922A.indb 13 2013.3.4 1:33:51 PM2013.3.4 1:33:51 PM
Page 42
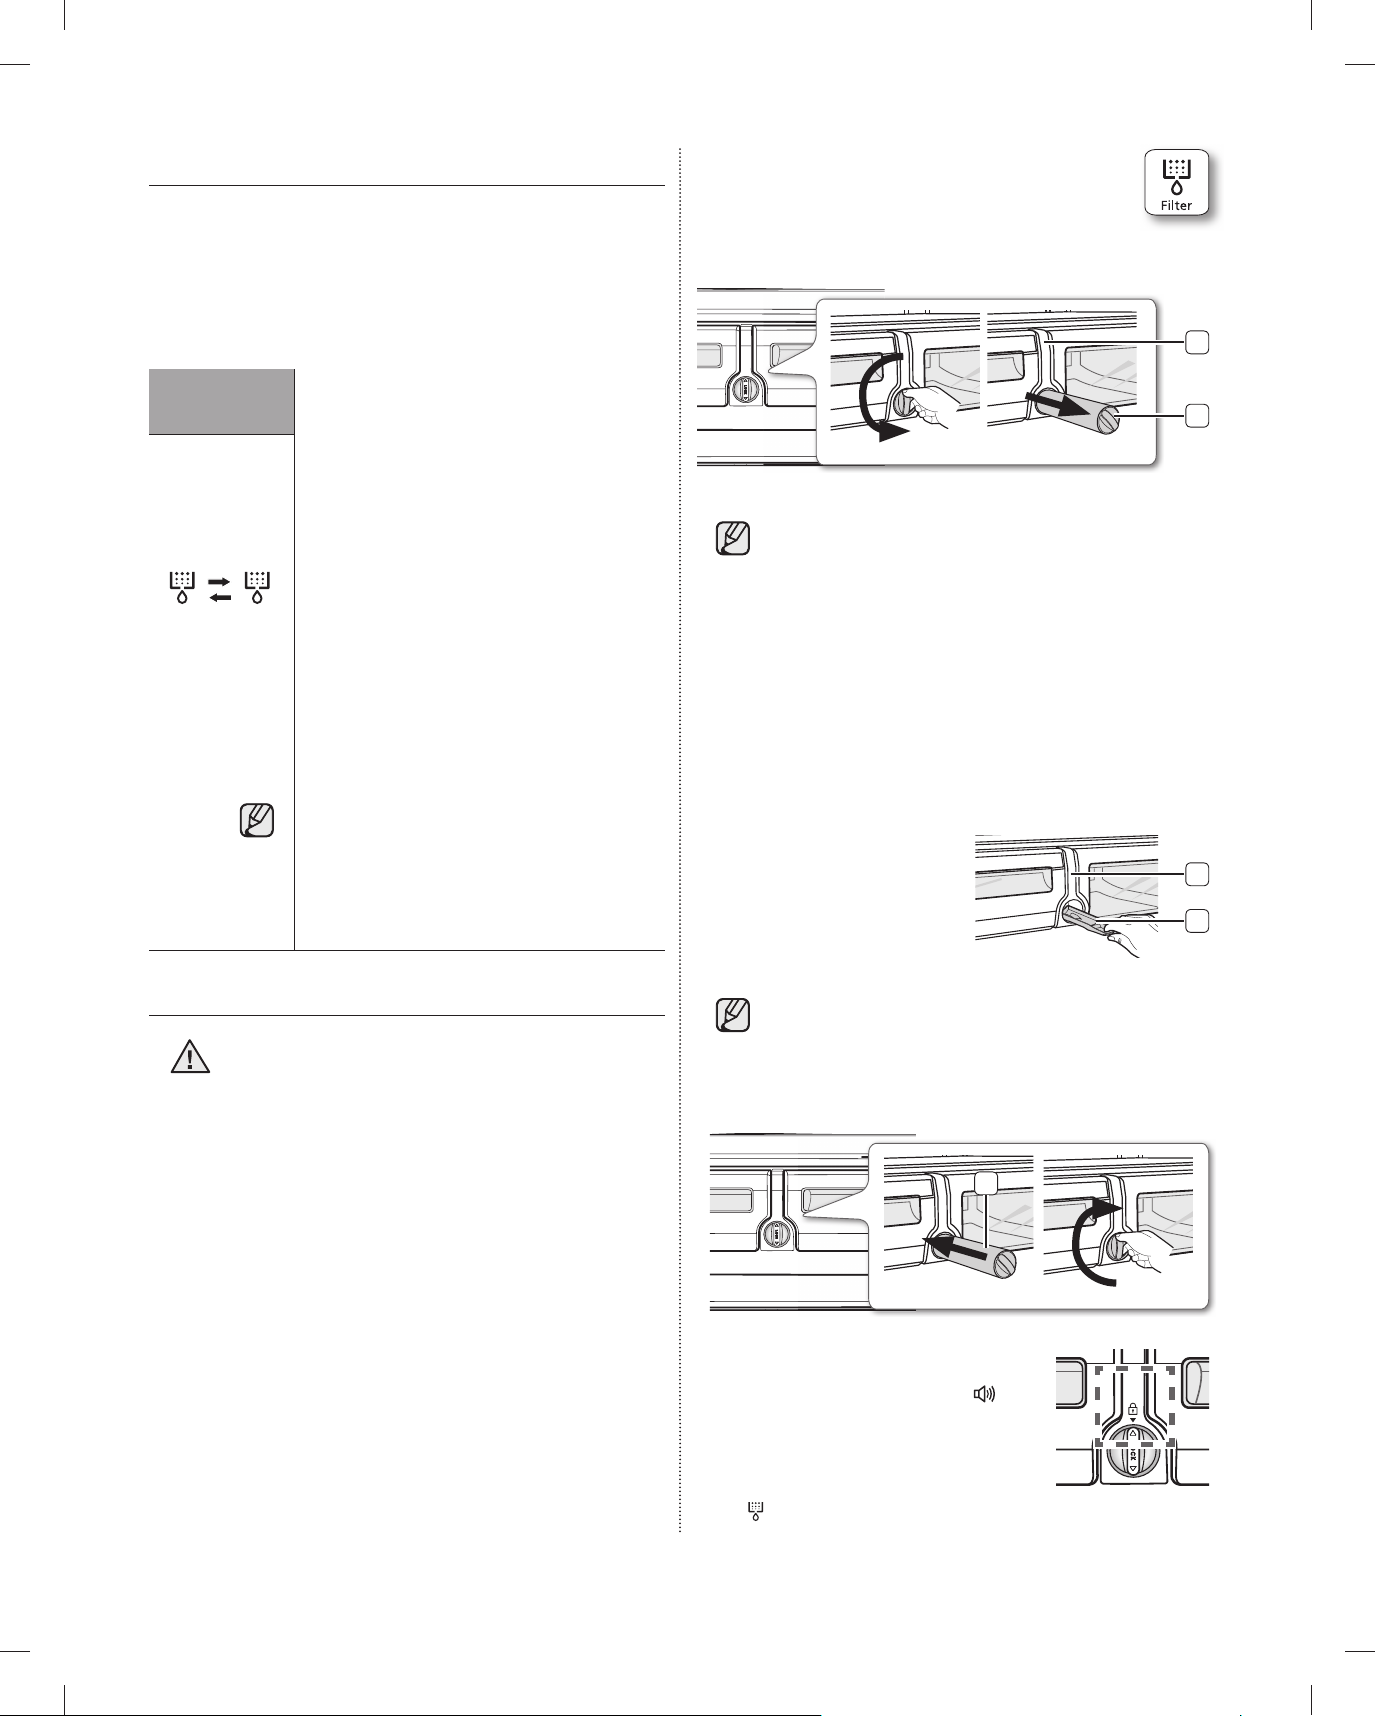
USO DEL PANEL DE CONTROL
( 10 ) Filter
(Azul)
(Restablecer el
indicador)
(Rojo)
(Restablecimiento del fi ltro)
(Rojo)
Si no pulsa ningún botón (letra, no ICONO), la
pantalla se apaga al cabo de unos segundos.
Si pulsa cualquier botón (letra, no ICONO), la
pantalla se vuelve a encender.
La tecla de función funciona solamente cuando
toca las letras.
1. Cierre el suministro de agua. Luego, gire
el fi ltro de agua ( 1 ) aproximadamente 1/4
de vuelta, en el sentido contrario de las
agujas del reloj.
2.
Extraiga el fi ltro del agua ( 1 ) del compartimento ( 2 ).
(Rojo)
2
( 10 ) Filter
(Azul)
(Restablecer el
indicador)
(Rojo)
Uso del fi ltro de agua
1. Generalmente el indicador del fi ltro es
azul, amarillo o verde cuando adquiere o
instala el refrigerador, según el modelo.
2. Después de consumir aproximadamente
270 galones de agua, el indicador
del fi ltro cambia a rosa claro.
(aproximadamente 5 meses)
3. Después de consumir aproximadamente
300 galones de agua, el indicador del
fi ltro cambia a rojo. (aproximadamente 6
meses)
4. Retire el fi ltro de agua viejo e instale el
nuevo cuando el indicador del fi ltro esté
en rojo. Restablezca el indicador del fi ltro
presionando el botón Alam/Hold 3 sec
for Filter Reset durante 3 segundos. El
indicador del fi ltro cambia a azul, amarillo
o verde cuando se restablece.
• Si el agua no sale del dispensador o lo
hace lentamente, se necesita reemplazar
el fi ltro porque está obturado.
• Algunas zonas tienen grandes cantidades
de cal en el agua, lo que provoca
que el fi ltro de agua se obstruya más
rápidamente.
CAMBIO DEL FILTRO DE AGUA
Para reducir el riesgo de daños materiales, NO
ADVERTENCIA
La luz de Filter cambia a rojo para indicar que se debe
cambiar el cartucho del fi ltro de agua.
A fi n de que tenga tiempo sufi ciente para adquirir un
fi ltro nuevo, la luz roja se enciende justo antes de que
la capacidad del fi ltro actual se acabe.
Cambiar el fi ltro a tiempo le permite obtener agua más
fresca y limpia de su refrigerador.
utilice fi ltros de agua de marcas genéricas en su
frigorífi co SAMSUNG. UTILICE SÓLO FILTROS
DE LA MARCA SAMSUNG. SAMSUNG no
aceptará ninguna responsabilidad legal por los
daños materiales incluidos, pero no limitado a ellos,
aquellos causados por fugas de agua debidas al
uso de un fi ltro de agua genérico. Los frigorífi cos
SAMSUNG están diseñados para funcionar SÓLO
CON FILTROS DE AGUA SAMSUNG.
1
•
Para cambiar el fi ltro del agua más fácilmente,
cierre la válvula del suministro del agua.
• A veces, no es sencillo desarmar el fi ltro del
agua ya que las impurezas del agua hacen que
se atasque. Si tiene difi cultades para retirarlo,
sostenga el fi ltro con fi rmeza y tire con fuerza.
• Cuando retira el fi ltro de agua, puede caer algo de
agua de la abertura. Esto es normal. Para reducir
las fugas de agua, mantenga el cartucho del fi ltro
en posición horizontal cuando tira de él.
• Para impedir derrames, vacíe el fi ltro de agua de la
charola ( 3 ) y seque alrededor del compartimento
del fi ltro ( 2 ).
3. Inserte el nuevo fi ltro en
2
el compartimento ( 4 )
4. Empuje el fi ltro y luego
3
gírelo en el sentido de
las agujas del reloj hasta que cierre.
• Si tiene difi cultades para insertar el fi ltro del
agua debido a la alta presión de ésta, cierre
la válvula de suministro del agua.
• El símbolo de cierre debe estar alineado con la
línea del indicador.
4
5. Pulse el botón Alarm/hold 3
sec for Filter Reset (
(Restablecimiento del fi ltro)
)
durante aproximadamente 3
segundos para restablecer el fi ltro
del agua. El color del indicador
) cambia de rojo a azul, verde o amarillo.
(
14_ funcionamiento
DA68-01922A.indb 14DA68-01922A.indb 14 2013.3.4 1:33:52 PM2013.3.4 1:33:52 PM
Page 43
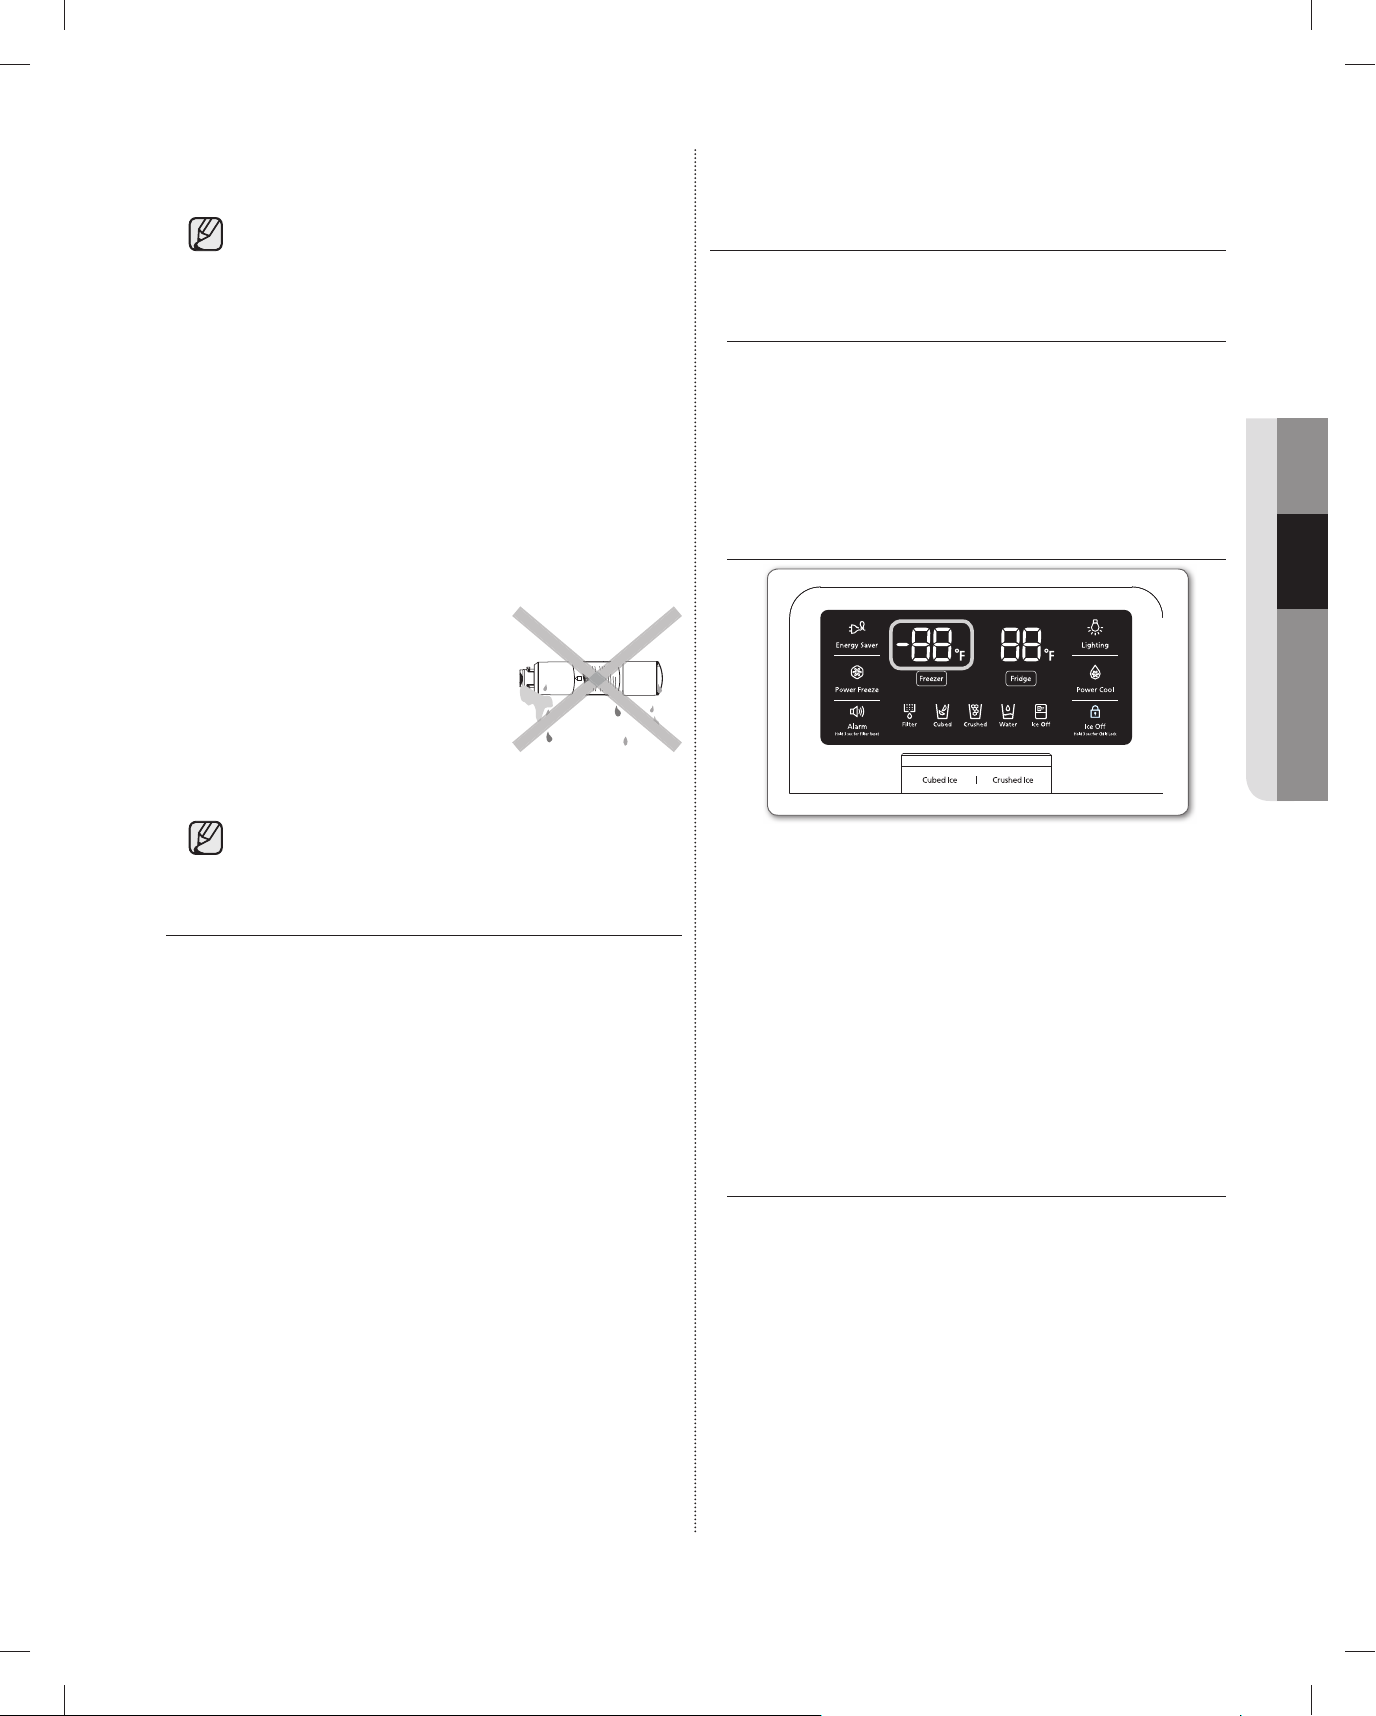
6. Si ha cerrado la válvula de suministro de agua,
Temperatura recomendada (Congelador): -2F
vuelva a abrirla.
Para reemplazar el fi ltro del agua, puede visitar
su centro de pruebas local o comunicarse con
el distribuidor de piezas Samsung. Asegúrese
de que el fi ltro de agua de reemplazo lleve el
logo SAMSUNG en la caja y en el fi ltro.
Enlace: http://www.samsungparts.com
Remoción de los materiales residuales
que se encuentran dentro de la tubería de
suministro del agua después de instalar el
fi ltro del agua.
1. Encienda el suministro de agua principal para
obtener agua de la tubería de suministro de agua.
2.
Deje correr agua por el dispensador hasta que se
vea incolora (aproximadamente de 6 a 7 minutos).
Este procedimiento limpiará el
sistema de suministro de agua y
eliminará el aire de las tuberías.
3. Es posible que se necesite
realizar una limpieza adicional
en algunos hogares.
4. Abra la puerta del refrigerador y asegúrese de que
no haya fugas de agua del fi ltro.
Limpie muy bien el dispensador, de lo
contrario puede fi ltrar agua.
Esto signifi ca que todavía hay aire en la
tubería.
Suministro del agua por ósmosis inversa
IMPORTANTE : La presión del suministro del agua
que sale de un sistema por ósmosis inversa que se
dirige a la válvula de entrada de agua del refrigerador
debe ser de 35 a 120 psi (241 a 827 kPa).
Si el sistema de fi ltrado de agua por ósmosis inversa está
conectado al suministro de agua fría, la presión del agua
para el sistema por ósmosis inversa que se necesita será
de 40 a 60 psi (276 a 414 kPa) como mínimo.
Si la presión del agua para el sistema por ósmosis
inversa es inferior de 40 a 60 psi (276 a 414 kPa):
• Verifi que si el fi ltro de sedimentos en el sistema
por ósmosis inversa está bloqueado. Reemplace
el fi ltro si es necesario.
• Deje que el tanque de almacenamiento en el
sistema por ósmosis inversa se llene después de
haberlo usado intensamente.
• Si su refrigerador cuenta con un fi ltro de agua,
es posible que reduzca aún más la presión del
agua cuando se lo utiliza junto con un sistema por
ósmosis inversa. Retire el fi ltro del agua.
Si tiene alguna pregunta acerca de la presión del agua,
comuníquese con un fontanero califi cado y con licencia.
CONTROL DE LA TEMPERATURA
Temperatura básica de los compartimentos
del congelador y refrigerador
La temperatura básica y/o las temperaturas
recomendadas de los compartimentos del congelador
y del refrigerador son -2°F y 38°F respectivamente.
Si la temperatura de los compartimentos del
congelador y del refrigerador es muy alta o baja,
ajuste la temperatura manualmente.
Control de la temperatura del congelador
Temperatura recomendada (Congelador): -2F
La temperatura del congelador puede establecerse
entre -8°F y 8°F para cumplir con sus necesidades
particulares. Pulse el botón Freezer varias veces hasta
que aparezca la temperatura deseada en el visor. La
temperatura avanzará de a 2°F cada vez que pulse
el botón (-2°F → -4°F → -6°F → -8°F → 8°F → 6°F
→ 4°F → 2°F → 0°F → -2°F). Tenga en cuenta que
los alimentos tales como el helado pueden derretirse
a 4°F. El visor de temperatura cambiará de manera
secuencial de -8°F a 8°F.
Control de la temperatura del refrigerador
La temperatura del refrigerador puede establecerse
entre 46°F y 34°F para cumplir con sus necesidades
particulares. Pulse el botón Fridge varias veces hasta
que aparezca la temperatura deseada en el visor. La
temperatura avanzará de a 2°F cada vez que presione
el botón (38°F → 36°F → 34°F → 46°F → 44°F → 42°F
→ 40°F → 38°F). El proceso de control de temperatura
para el refrigerador es igual al del congelador. Pulse el
botón Fridge para establecer la temperatura deseada.
Después de algunos segundos, el refrigerador
comenzará a ajustarse según la temperatura establecida
recientemente. Esto se verá refl ejado en el visor digital.
02 FUNCIONAMIENTO
funcionamiento _15
DA68-01922A.indb 15DA68-01922A.indb 15 2013.3.4 1:34:16 PM2013.3.4 1:34:16 PM
Page 44
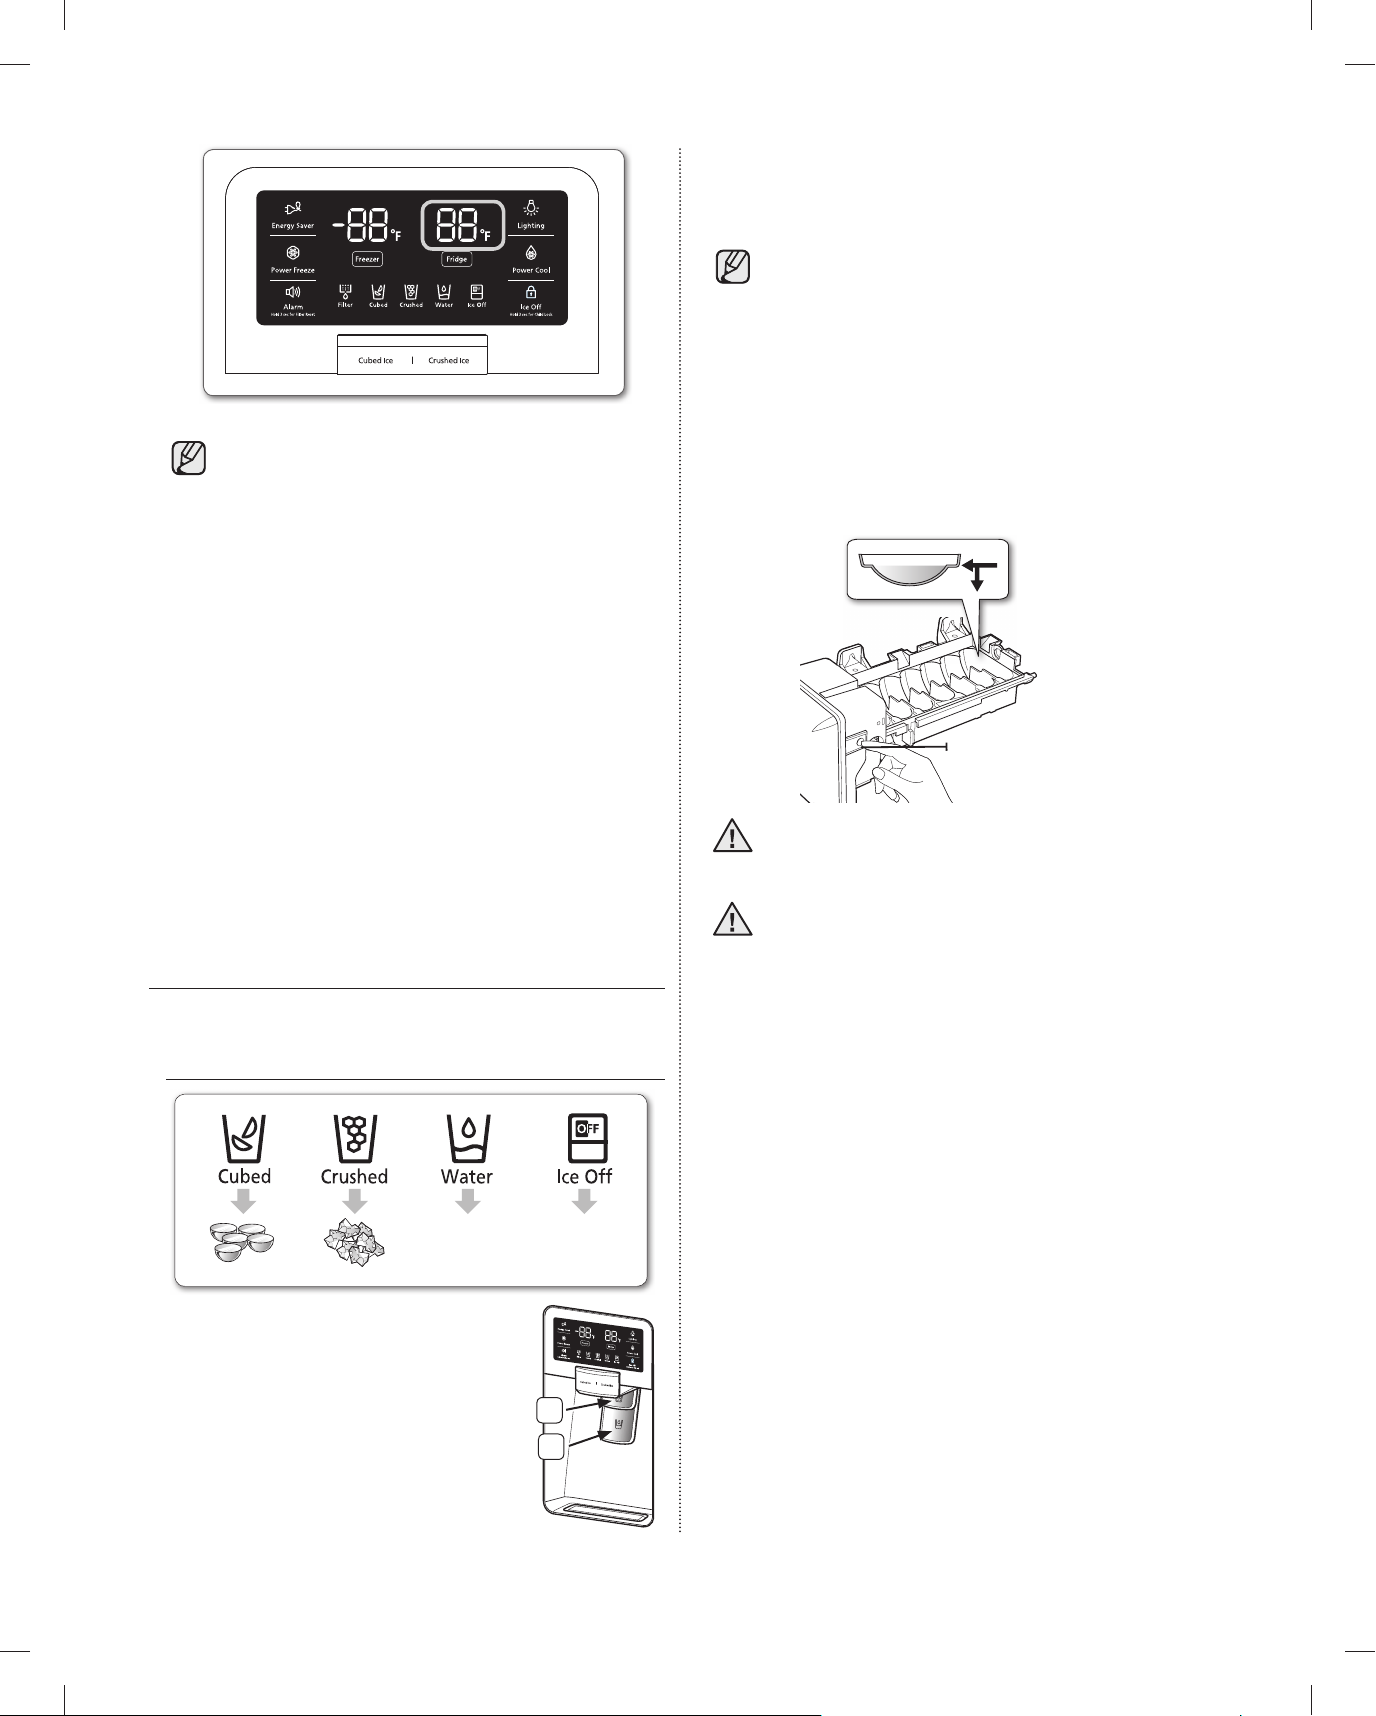
Uso de la palanca de agua ( 2 )
Temperatura recomendada (Refrigerador): 38F
NO ICE (Sin hielo)
Seleccione esta opción si desea
apagar la fábrica de hielo
verifi car
el nivel de
agua
Botón Test
Empuje levemente la palanca del dispensador de agua
( 2 ) con el vaso. El hielo saldrá del dispensador.
Aunque empuje las palancas de agua y hielo
simultáneamente, el dispensador activará
sólo la opción que se haya seleccionado o
presionado en primer lugar.
Temperatura recomendada (Refrigerador): 38F
- La temperatura del congelador, refrigerador
o compartimento convertible puede subir
cuando se abren las puertas con frecuencia
o si se coloca una gran cantidad de
alimentos calientes dentro de ellos.
- Es posible que el visor digital parpadee. Cuando
las temperaturas del congelador y del refrigerador
vuelvan a las normales, dejará de parpadear.
- Si continúa parpadeando, deberá “restablecer”
el refrigerador. Intente desenchufarlo, espere
aproximadamente 10 minutos y luego enchúfelo
nuevamente.
- Si existe un error de comunicación entre el visor
y el regulador principal, es posible que la luz del
visor del cajón convertible parpadee. Una vez que
se alcancen las temperaturas normales, dejará
de parpadear. Si continúa parpadeando durante
mucho tiempo, comuníquese con el Centro de
Servicio de Samsung Electronics.
USO DEL DISPENSADOR DE DOS PALANCAS
pulse el botón del tipo de hielo adecuado
para seleccionar lo que desea
Seleccione esta opción si desea
Uso de la palanca de hielo ( 1 )
Empuje levemente la palanca del
dispensador de hielo ( 1 ) con el vaso.
El hielo saldrá del dispensador. Puede
elegir el tipo de hielo presionando
primero el botón para hielo en cubos
o para hielo triturado.
NO ICE (Sin hielo)
apagar la fábrica de hielo
1
2
Uso simultáneo del dispensador de hielo y agua
Para obtener hielo y agua, empuje primero la palanca
del hielo ( 1 ) para obtener hielo y a continuación
mueva el vaso hacia abajo y empuje la palanca del
dispensador de agua ( 2 ) para obtener agua.
verifi car
el nivel de
agua
Botón Test
No tire de la palanca. Se podría dañar o
PRECAUCIÓN
PRECAUCIÓN
• Cuando selecciona el modo Cubed Ice después
• Si no llegara a salir el hielo, extraiga la cubeta y
•
• Uso normal
Para llenar la cubeta de hielo hasta su capacidad
máxima después de la instalación, lleve a cabo los
siguientes pasos:
1. Deje que el refrigerador funcione y se enfríe
- Si espera 24 horas la fábrica de hielo enfriará
2. Vierta de 4 a 6 cubos de hielo en el vaso.
3. Después de 8, y luego 16 horas, llene un vaso
romper el resorte de la palanca.
•
Para limpiar el cajón/cubeta de hielo, utilice
un detergente suave, enjuague y seque bien.
No utilice limpiadores ni solventes abrasivos.
de utilizar el modo Crushed Ice, puede producirse
una pequeña cantidad de hielo triturado residual.
pulse el botón test ubicado a la derecha de la
fábrica de hielo.
No pulse el botón test continuamente cuando la
charola está llena de hielo o agua. El agua se puede
desbordar o el hielo puede atascar la cubeta.
durante 24 horas (o un día entero).
correctamente.
completo.
16_ funcionamiento
DA68-01922A.indb 16DA68-01922A.indb 16 2013.3.4 1:34:16 PM2013.3.4 1:34:16 PM
Page 45
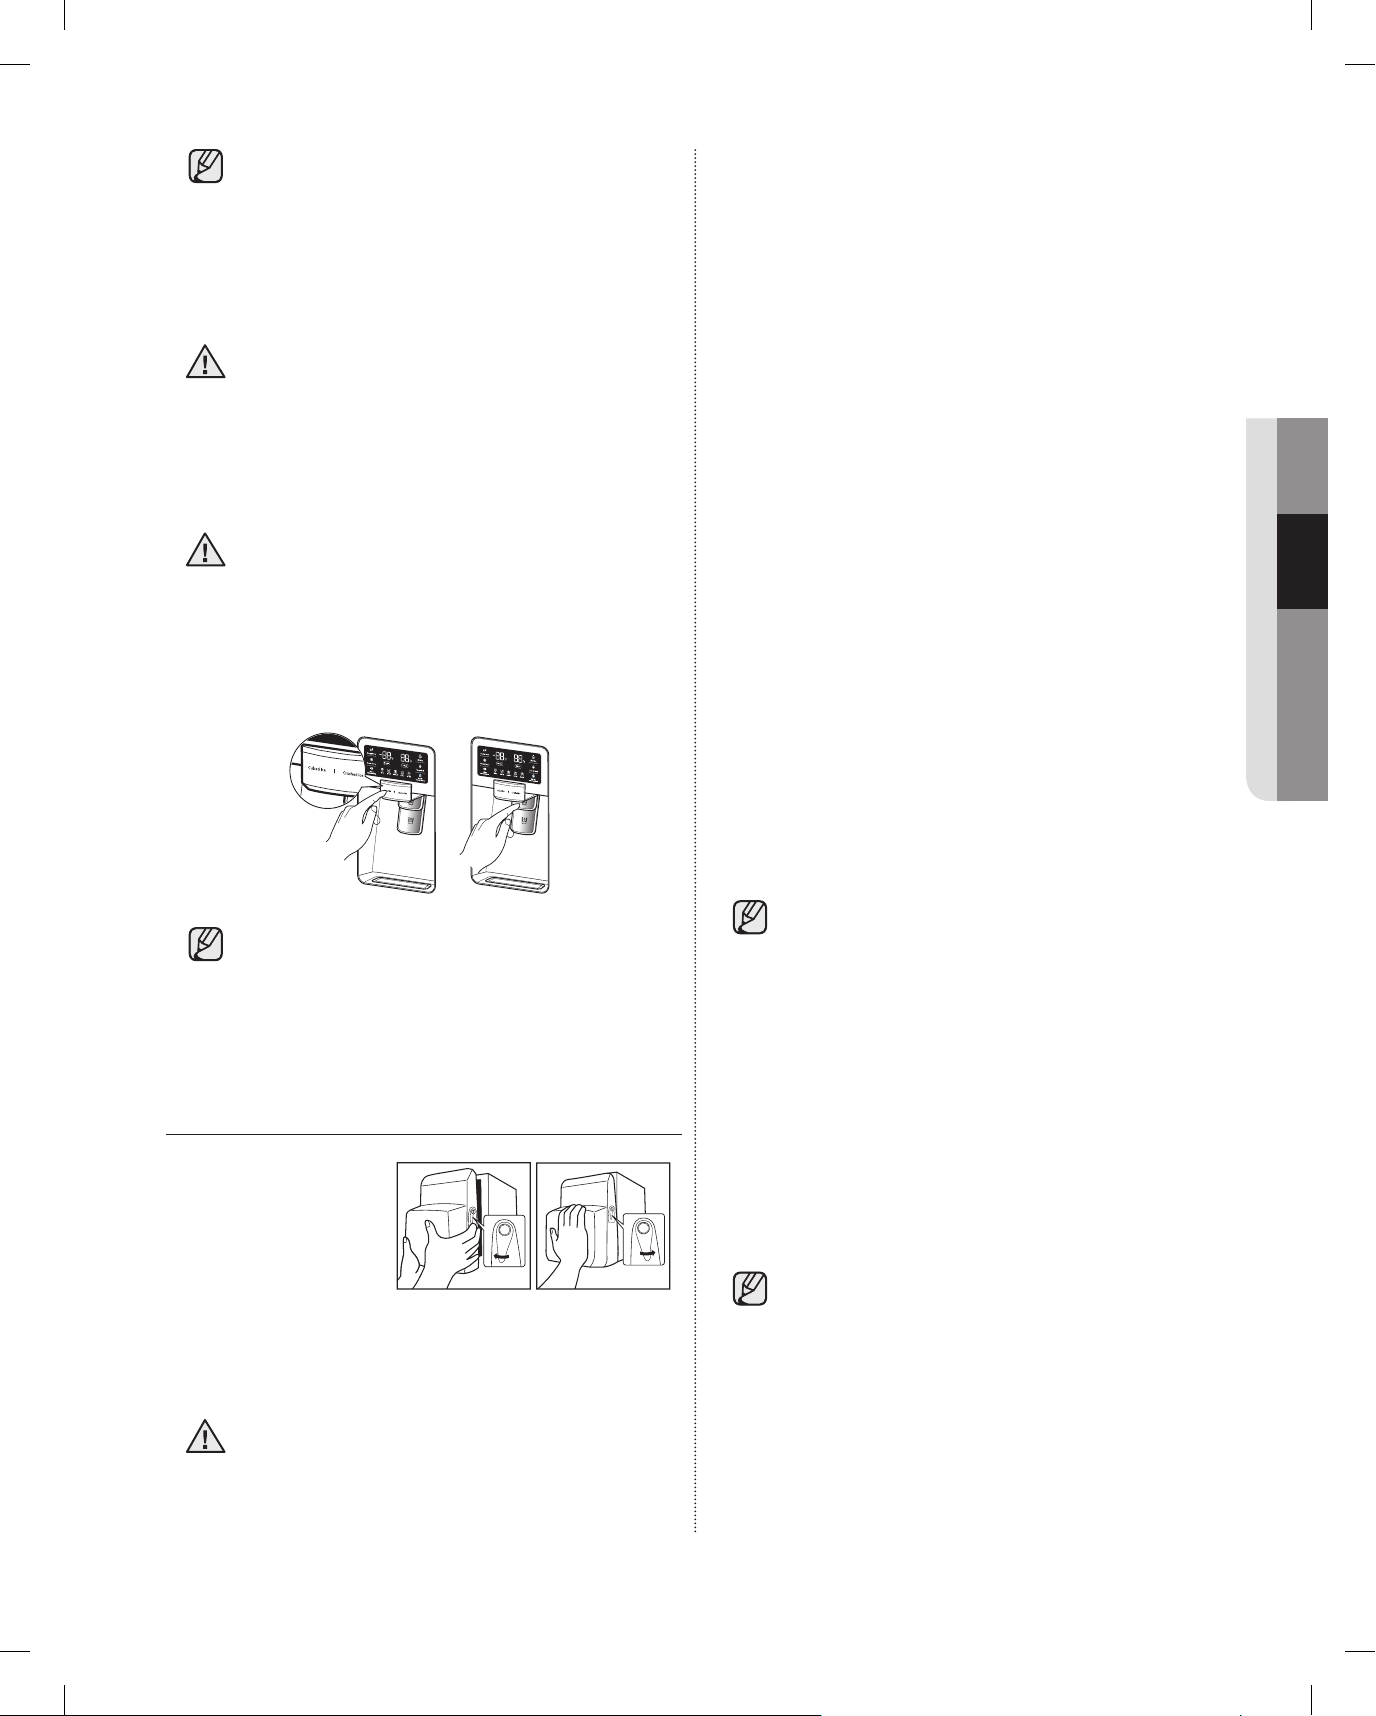
•
TIRAR
EMPUJAR
Cuando pulse el botón test, escuchará el
zumbido del refrigerador (ding-dong). Cuando
escuche el sonido, suelte el botón test.
• Se escuchará automáticamente un sonido que
indica que la máquina de hielo está funcionando
correctamente.
En caso de corte de energía, los cubos de
PRECAUCIÓN
hielo pueden derretirse y luego congelarse
cuando vuelve la energía, provocando que el
dispensador deje de funcionar. Para impedir
que esto suceda, después de un corte de
energía, extraiga la cubeta de hielo, elimine el
hielo y el agua residual.
Después de haber eliminado el hielo de la
PRECAUCIÓN
cubeta, deberá presionar la palanca del
dispensador una vez con la función ‘ICE
CUBED’ o ‘CRUSHED’ ENCENDIDA. La
fábrica de hielo producirá nuevo hielo más
rápido cuando vuelva a colocar la cubeta en
el refrigerador.
Conéctelo sólo a un suministro de agua potable.
Para que la fábrica de hielo funcione correctamente,
se necesita una presión de agua de 138 ~ 862Kpa.
Si viaja por vacaciones o negocios y no utilizará
los dispensadores de agua o hielo por un período
prolongado:
- Cierre la llave de paso. Si no lo hace, pueden
producirse fugas.
- Retire todos los alimentos.
- Desenchufe el refrigerador.
- Retire el exceso de humedad del interior del
refrigerador y deje las puertas abiertas. Si no lo
hace, pueden aparecer olores y moho.
No coloque los dedos, las manos ni cualquier otro
objeto inapropiado en el recipiente o en la cubeta de
la fábrica de hielo.
- Es posible que provoque lesiones personales o
daños materiales.
Nunca coloque los dedos ni objetos en la abertura del
dispensador.
- Puede provocar lesiones.
No intente desarmar la fábrica de hielo.
No limpie ni pulverice la cubeta de hielo con agua
mientras está dentro del refrigerador. Retírela para
limpiarla.
02 FUNCIONAMIENTO
Si utiliza todo el hielo de una sola vez, repita
los Pasos 2 y 3 de la página anterior. Sin
embargo, espere solamente 8 horas antes
de extraer los primeros 4 a 6 cubos. Este
procedimiento repondrá cubos de hielo y
garantizará su máxima producción.
USO DE LA FUNCIÓN "ICE OFF"
Cuando selecciona el
modo Ice Off, retire
todos los cubos de
hielo de la cubeta. Si
no está utilizando el
dispensador de hielo,
es posible que los cubos se amontonen. tire de la
palanca de cierre hacia adelante para retirar la cubeta.
Elimine los cubos de hielo o la masa de hielo. Empuje
la cubeta hacia atrás hasta que escuche un clic.
Utilice solamente la fábrica de hielo del
PRECAUCIÓN
refrigerador.
Sólo una persona adecuadamente califi cada deberá
instalar/conectar el suministro de agua al refrigerador.
TIRAR
EMPUJAR
El fenómeno de turbidez del agua
El agua que ingresa al refrigerador circula a
través del fi ltro principal que es un fi ltro para
agua alcalina. En el proceso de fi ltrado, la
presión del agua que sale del fi ltro aumenta,
y el agua se satura con oxígeno y nitrógeno.
Cuando ésta se pone en contacto con el
aire, la presión desciende rápidamente y el
oxígeno y el nitrógeno se sobresaturan y
generan burbujas de gas. temporariamente,
el agua puede tener una apariencia turbia
debido a estas burbujas de oxígeno.
Después de unos segundos, el agua será
incolora.
Espere 1 segundo antes de retirar el vaso
después de llenarlo de agua para evitar
derrames. No extraiga el dispensador de
palanca después de recibir hielo o agua.
Vuelve automáticamente. El hielo se fabrica
en cubos. Cuando selecciona “Crushed”, la
fábrica de hielo tritura los cubos para obtener
hielo triturado.
funcionamiento _17
DA68-01922A.indb 17DA68-01922A.indb 17 2013.3.4 1:34:17 PM2013.3.4 1:34:17 PM
Page 46
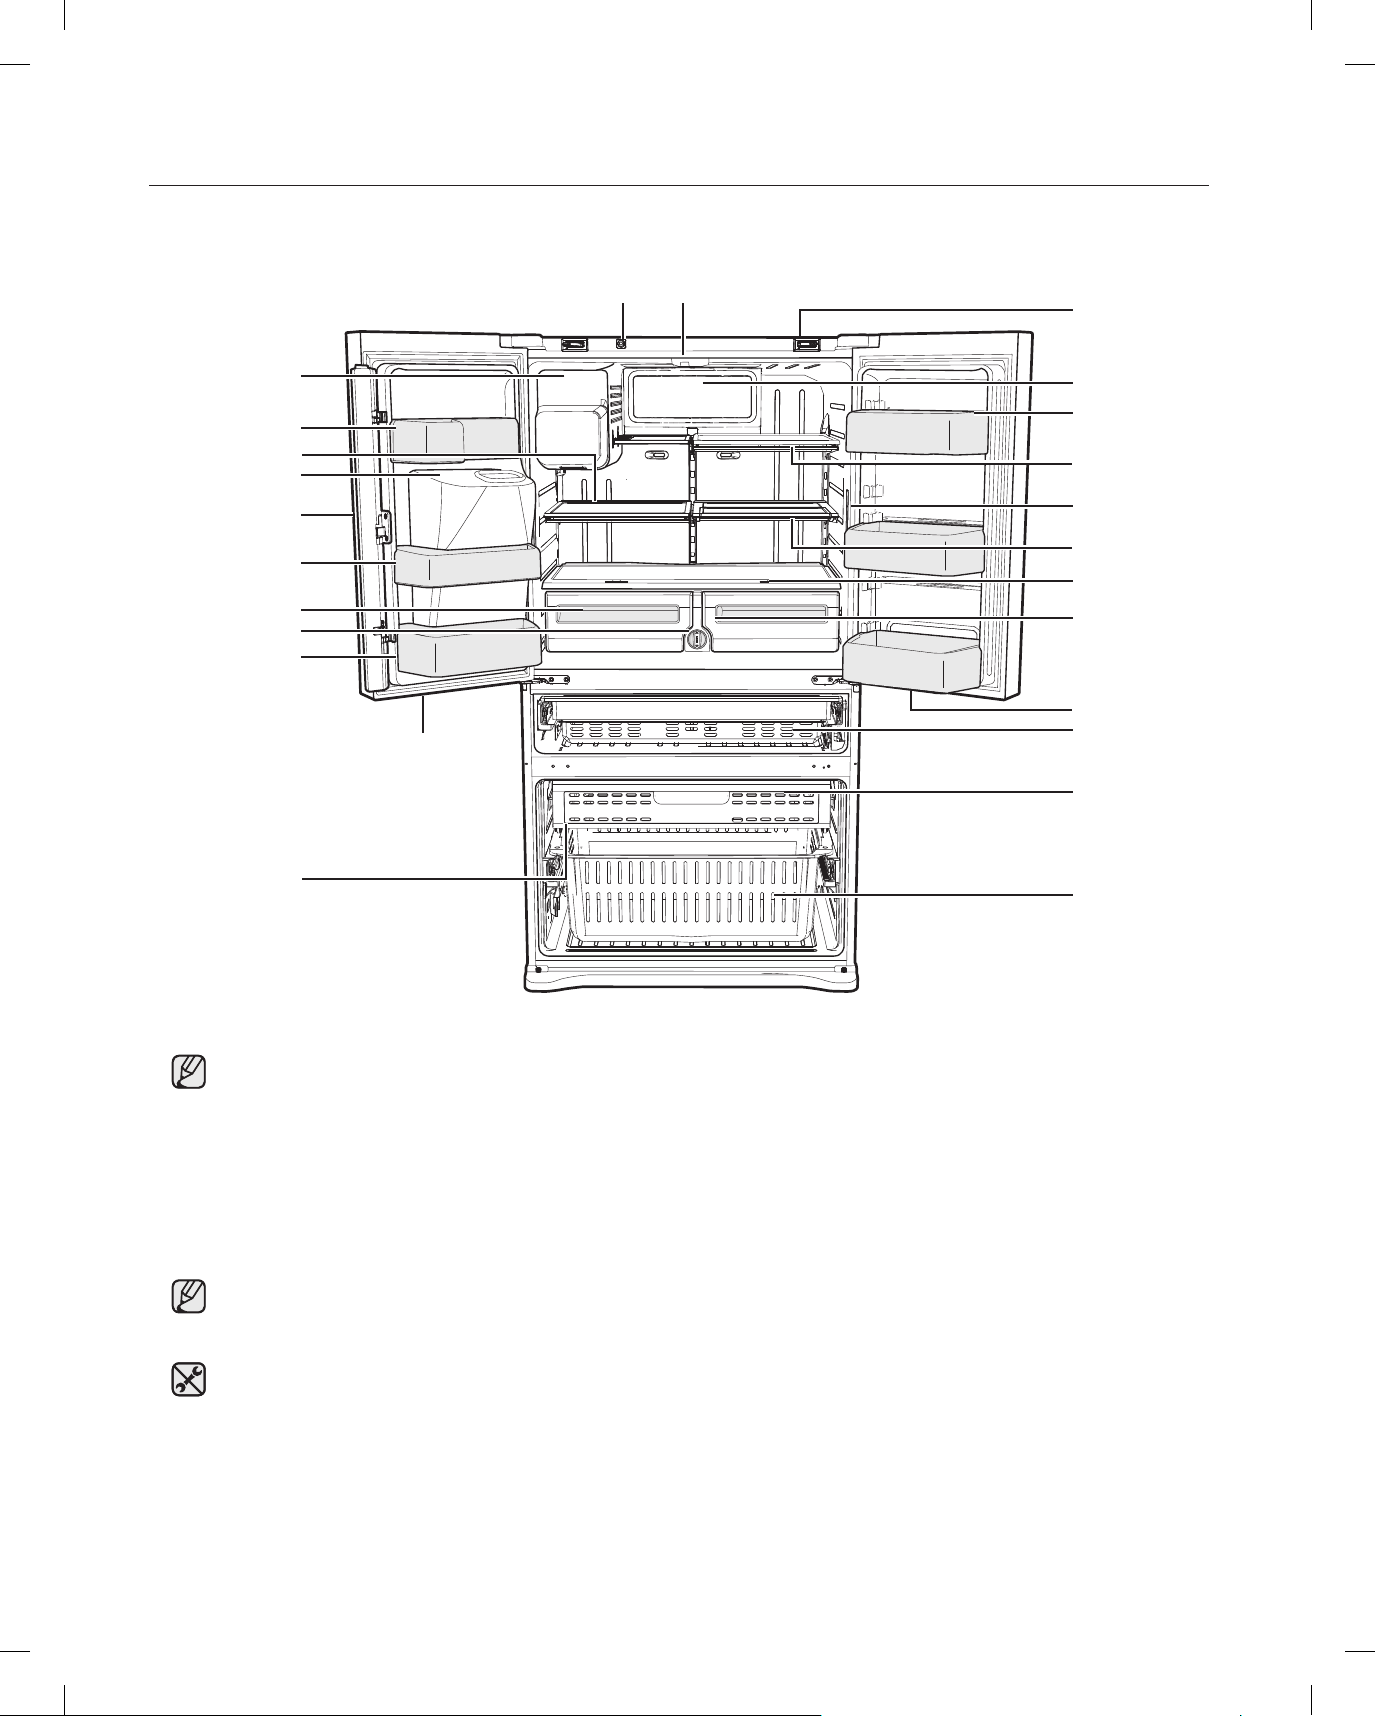
PIEZAS Y FUNCIONES
Fábrica de hielo
del refrigerador y
del congelador
Luz
Disyuntor
Cierre de la
puerta
Cubierta del
evaporador (luz)
Cajones de la puerta derecha
Estantes de
vidrio templado
Luz
Estante de vidrio
quick-Space
Cubierta vegetales
Luz
Luz
Compartimento
convertible
Cajón de
extracción
automática
Cajón del
congelador
Compartimento de la
puerta del dispensador
Estante corredizo
Tapa del hueco
Sección de la
bisagra vertical
Cajones de la puerta central
Cajones de
vegetales y frutas
Filtro del agua
Cajones de la
puerta izquierda
Compartimento
basculante
Luz
Utilice esta página para familiarizarse con las piezas y las funciones del refrigerador.
Fábrica de hielo
del refrigerador y
del congelador
Compartimento de la
puerta del dispensador
Estante corredizo
Tapa del hueco
Sección de la
bisagra vertical
Cajones de la puerta central
Cajones de
vegetales y frutas
Filtro del agua
Cajones de la
puerta izquierda
Compartimento
basculante
Luz
Disyuntor
Luz
Cierre de la
puerta
Cubierta del
evaporador (luz)
Cajones de la puerta derecha
Estantes de
vidrio templado
Luz
Estante de vidrio
quick-Space
Cubierta vegetales
Luz
Luz
Compartimento
convertible
Cajón de
extracción
automática
Cajón del
congelador
Al cerrar la puerta, asegúrese de que la sección de la bisagra vertical se encuentre en la posición
correcta para impedir que se raye con la otra puerta.
Si la sección de la bisagra vertical está invertida, colóquela en la posición correcta y cierre la puerta.
Algunas veces puede aparecer humedad en esta sección.
La manija de la puerta puede afl ojarse con el tiempo. Si esto sucede, ajuste los tornillos que se
encuentran dentro de la puerta.
Si la cierra con mucha fuerza, la otra puerta puede abrirse.
Cuando se abre la puerta, el disyuntor apaga automáticamente el motor sinfín de la fábrica de hielo por
razones de seguridad.
Si el LED interior o exterior se ha apagado, comuníquese con los agentes de servicio técnico.
18_ funcionamiento
DA68-01922A.indb 18DA68-01922A.indb 18 2013.3.4 1:34:18 PM2013.3.4 1:34:18 PM
Page 47
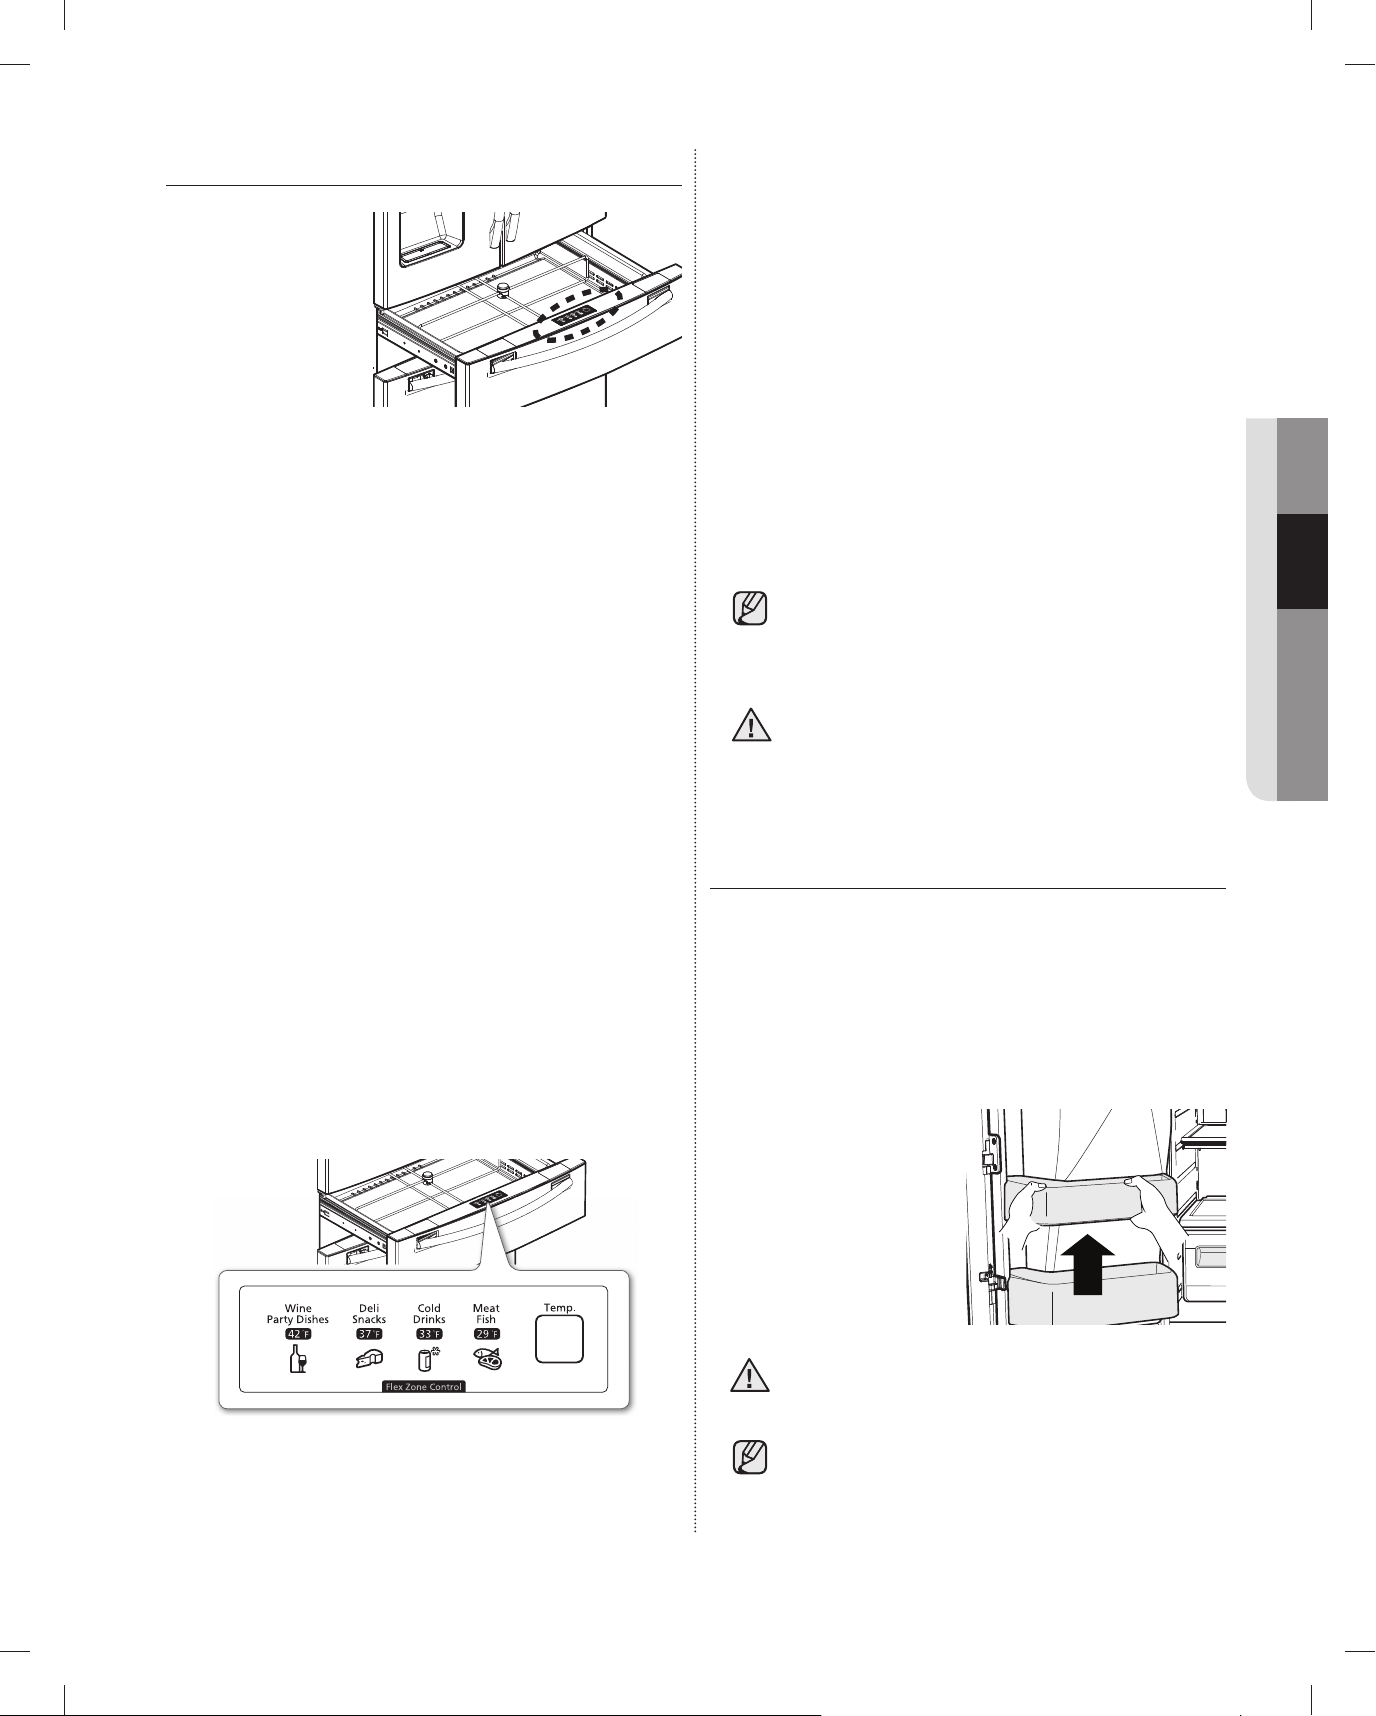
USO DEL CAJÓN FLEX ZONE
Vino platos
para fi estas
Comidas
selectas
Aperitivos
Bebidas
frías
Carne
pescado
El Flex Zone es un
cajón completo con
control de temperatura
regulable. Puede
utilizarse para grandes
bandejas de fi estas,
comidas selectas,
vinos, pizzas, bebidas
o artículos varios.
Cuenta con un sensor de temperatura que le permite regular
la cantidad de aire frío permitido en este cajón. Los botones
de control se encuentran en el centro de la cara superior
interna de la puerta.
• Pulse el botón temp varias veces hasta que se
ilumine el modo deseado.
• Cada vez que pulsa este botón, se cambia el
modo en este orden: Modo Meat/Fish (29°F),
modo Cold Drinks (33°F), modo Deli/Snack (37°F),
Wine/Party Dishes (42°F). En primer lugar, se
selecciona el modo Cold Drinks. El refrigerador
regulará automáticamente la temperatura en el
Flex Zone según lo que se haya seleccionado.
• El indicador Flex Zone temp. puede cambiar
según la cantidad de artículos almacenados, su
ubicación, la temperatura ambiente y la frecuencia
con la que se abre la puerta.
3.
Cuando se selecciona “Cold Drink”, la temperatura
del Flex Zone se mantendrá alrededor de los 33°F
(1°C). Esta función también resulta útil para mantener
las bebidas frías y para conservar su sabor.
4.
Cuando se selecciona “Meat/Fish”, la temperatura
del Flex Zone se mantendrá alrededor de los 29°F
(-1°C). Esta función resulta útil para mantener la carne
o el pescado fresco durante mucho más tiempo.
Vino platos
para fi estas
• vino • piñas
• cóctel • limones • jugo • fi ambres
• pasteles • galletas • refrescos • tocino
• quesos • papas • cerveza • perros
Comidas
selectas
Aperitivos
Bebidas
frías
• agua
embotellada
Carne
pescado
• bistec
calientes
con chile
Las frutas y los vegetales pueden descomponerse
si se selecciona la opción Meat/Fish.
No almacene lechuga u otros vegetales de hoja en
el cajón Flex Zone.
No almacene botellas de vidrio en la Flex Zone bajo
PRECAUCIÓN
las confi guraciones “Cold Drinks (bebidas frías)”
o “Meat Fish (Carne/ Pescado)”. Si se congelan,
pueden romperse y provocar lesiones personales.
REMOCIÓN DE LOS ACCESORIOS
DEL REFRIGERADOR
02 FUNCIONAMIENTO
Temperatura
Puede seleccionar la temperatura del Flex Zone del
modo Meat/Fish (29°F), modo Cold Drinks (33°F) y
Deli/Snack (37°F) o modo Wine/Party Dishes (42°F).
Botón de selección
1.
Cuando se selecciona “Wine/Party Dishes”, la
temperatura del Flex Zone se mantendrá alrededor de
los 42°F (5°C). Esta función resulta útil para mantener
los alimentos frescos durante mucho tiempo.
2.
Cuando se selecciona “Deli/Snack”, la temperatura
del Flex Zone se mantendrá alrededor de los 37°F
(3°C). Esta función resulta útil para mantener los
alimentos frescos durante mucho más tiempo.
1. Compartimentos de puertas y
compartimento de lácteos
Para retirarlos: simplemente levante la bandeja y tire hacia afuera.
Para volver a colocarlos: deslícelos por encima de la ubicación
deseada y empuje hacia abajo hasta que se traben. Pueden
producirse lesiones si los compartimentos de las puertas no
están fi rmemente colocados.
No permita que los niños jueguen con
PRECAUCIÓN
Método para retirar el polvo: retire la guarda y limpie
con agua
los compartimentos. Sus esquinas fi losas
pueden causar lesiones.
No ajuste un compartimento lleno de
alimentos. Primero retírelos.
funcionamiento _19
DA68-01922A.indb 19DA68-01922A.indb 19 2013.3.4 1:34:18 PM2013.3.4 1:34:18 PM
Page 48
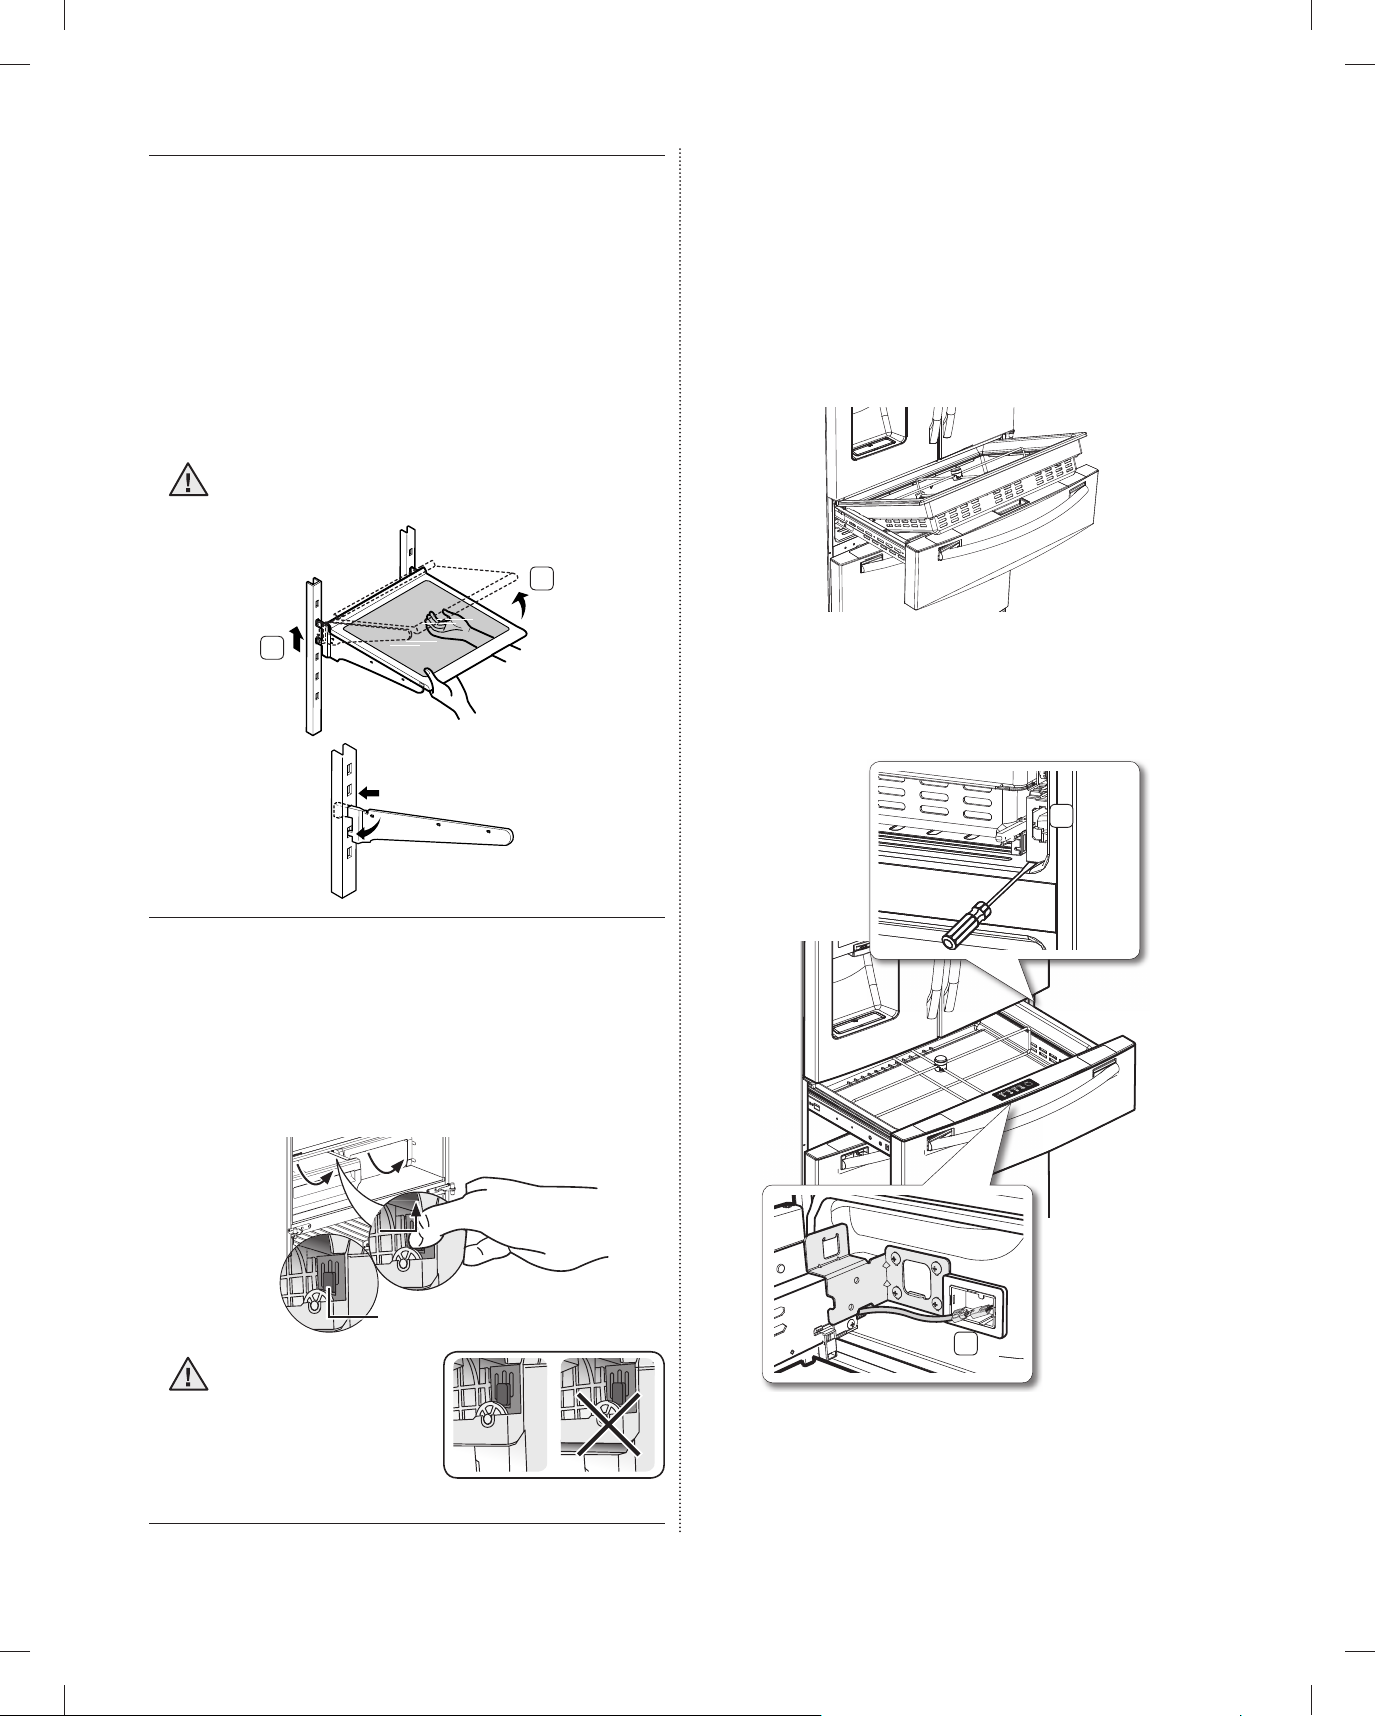
2. Estantes de vidrio templado
Botón
Gire hacia arriba
mientras pulsa el
botón.
Para retirarlos: incline el frente del estante hacia arriba
en la dirección que se muestra en el gráfi co ( 1 ) y
levántelo en forma vertical ( 2 ). Extraiga el estante.
Para volver a colocarlos: incline el frente del estante
hacia arriba y deslice los ganchos del estante
dentro de las ranuras a la altura deseada. Luego baje
el frente del estante de manera tal que los ganchos
caigan dentro de las ranuras.
Los estantes de vidrio templado son pesados.
PRECAUCIÓN
Tenga mucho cuidado cuando los retire.
1
4. Flex Zone
Para retirarlo: extraiga totalmente la puerta del cajón.
Levante el cajón Flex Zone y tire hacia adelante con
ambas manos.
Para volver a colocarlo: Abra completamente la puerta
Flex. Levante el frontal de la Flex Zone, coloque la
parte posterior de la Flex Zone sobre los rieles y baje
el frontal hasta que toda la zona descanse sobre los
rieles.
2
3. Cajones de vegetales y frutas
• Después de vaciar completamente la bandeja
de las verduras, levante la parte frontal, tire hacia
adelante y extráigala.
• Para retirar el estante de la bandeja de las
verduras, pulse el botón del lado izquierdo a la vez
que lo levanta. Extráigalo despacio.
Cuando el Flex Zone o la luz de LED no
funcionan, compruebe si hay grietas o
fugas en los conectores [ ( 1 ), ( 2 ) como se
muestra a continuación].
2
Gire hacia arriba
mientras pulsa el
botón.
Botón
Vuelva a montar en
PRECAUCIÓN
el orden inverso al
1
desmontaje.
El montaje se
completa cuando se
oye un clic.
20_ funcionamiento
DA68-01922A.indb 20DA68-01922A.indb 20 2013.3.4 1:34:31 PM2013.3.4 1:34:31 PM
Page 49
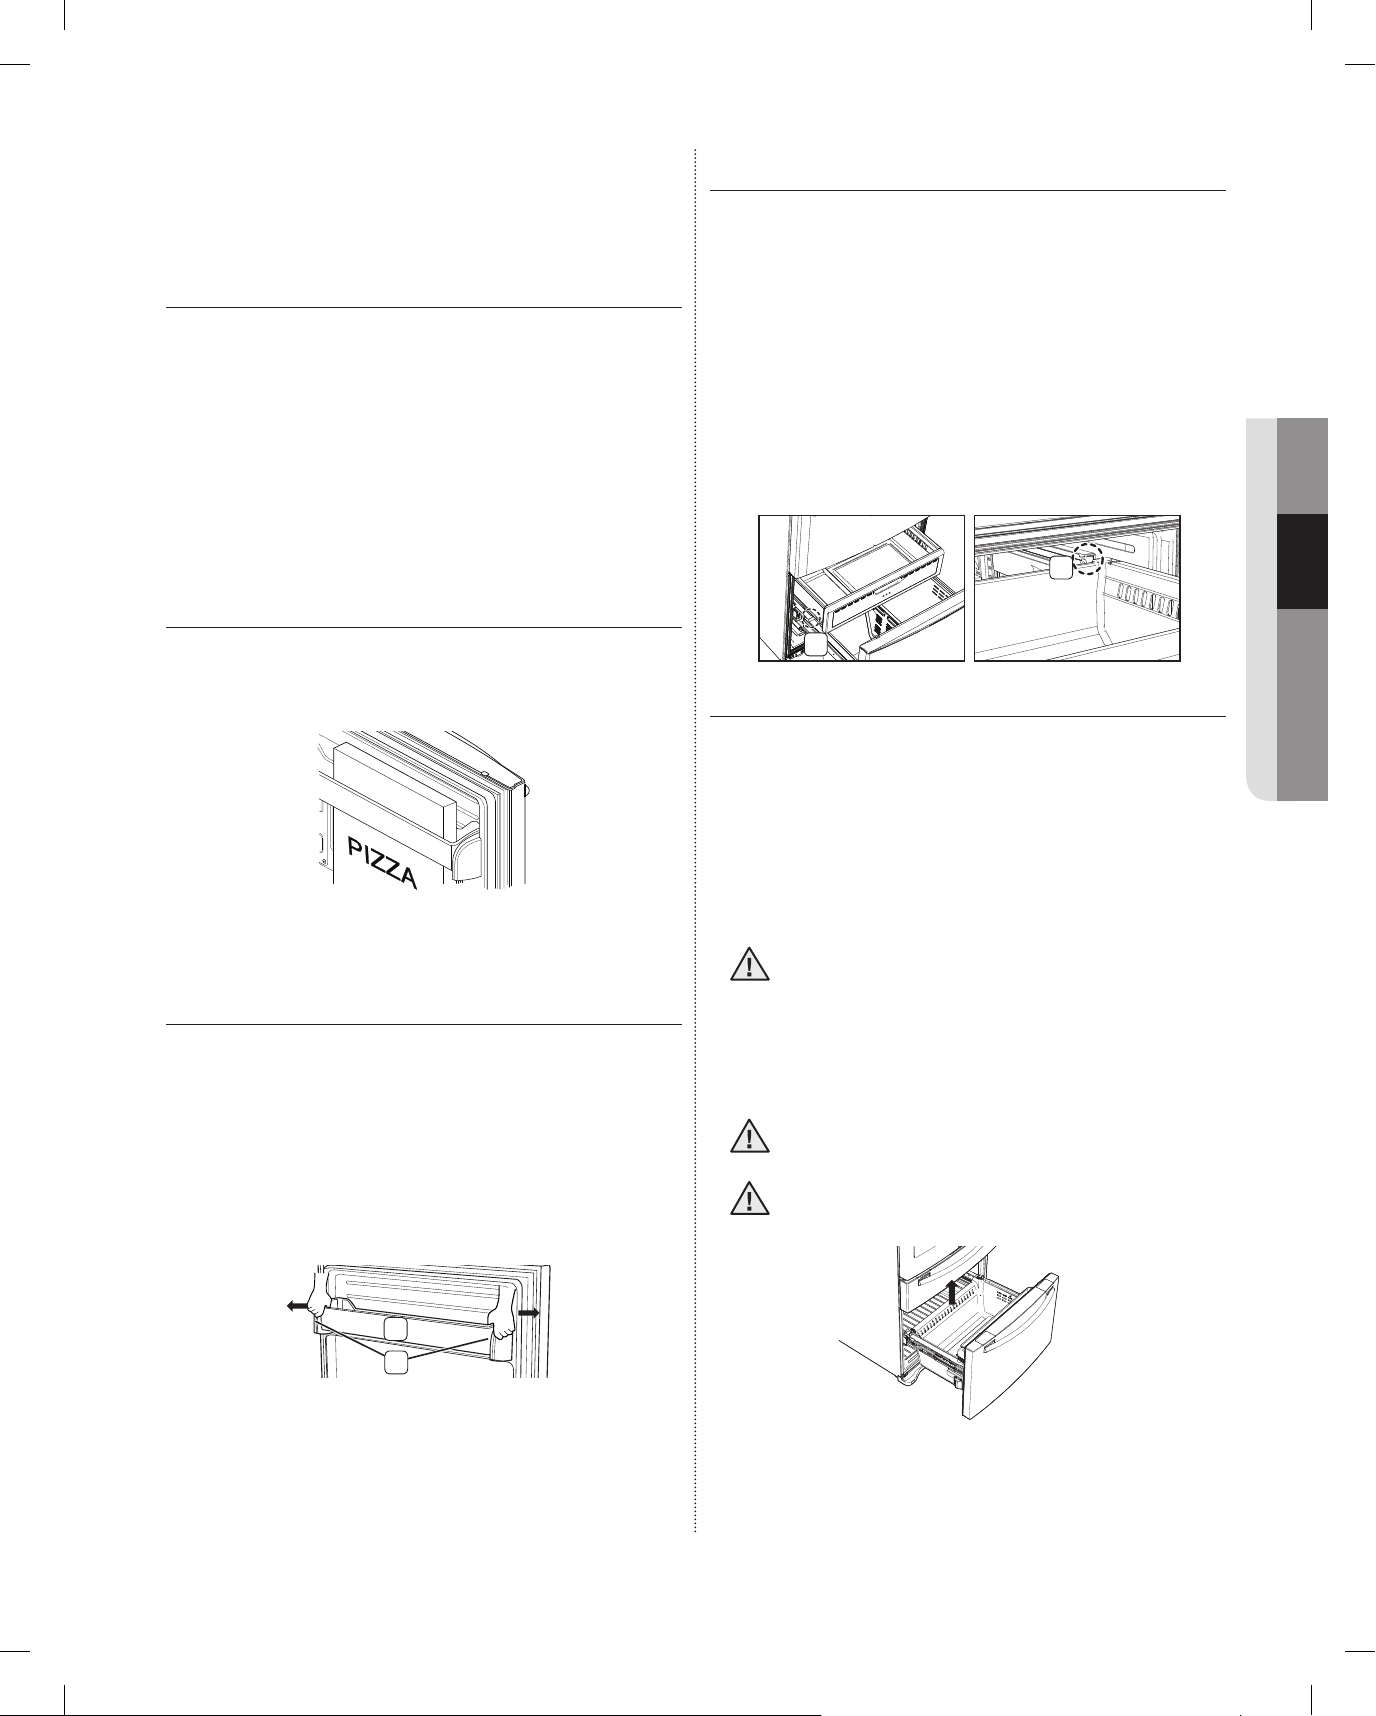
1. Consulte la página 8 para obtener instrucciones
sobre cómo desarmarlo.
2. Abra la tapa con un destornillador de punta chata.
2. Cajón súper extensible
USO DE LAS PUERTAS
Asegúrese de que las puertas cierren completamente
y están bien selladas.
Cuando la puerta del refrigerador está parcialmente
abierta, se cerrará automáticamente. Sin embargo, la
puerta quedará abierta si su ángulo de abertura está
fuera del alcance del cierre automático; en este caso
debe cerrarse manualmente.
USO DEL COMPARTIMENTO
BASCULANTE
Se puede utilizar el compartimento basculante para
almacenar hasta una pizza de 16” si la coloca como
se muestra en la ilustración.
Para retirarlo: extraiga el cajón completamente. Incline
la parte posterior del cajón hacia arriba, levántelo y
extráigalo.
Para volver a colocarlo: coloque el cajón sobre los
rieles ( 4 ) inclinándolo hacia arriba. baje el cajón y
colóquelo en su lugar hasta que se encuentre en
posición horizontal, luego deslice el cajón hasta el ( 3 )
tope.
4
3
3. Cajón del congelador
Para retirar el cajón: extraiga el cajón del congelador
completamente. Incline la parte posterior del cajón
hacia arriba y levántelo para retirarlo.
Para volver a colocarlo : insértelo en los rieles.
02 FUNCIONAMIENTO
REMOCIÓN DE LOS ACCESORIOS
DEL CONGELADOR
1. Compartimento basculante
Para retirarlo: Retire el compartimento basculante
( 1 ) tirando de ambos soportes ( 2 ). Retire ambos
soportes tirando de ellos hasta extraerlos.
Para volver a colocarlo: Enganche los extremos del
compartimento basculante ( 1 ) en los soportes ( 2 ) y
empuje hacia abajo hasta que se traben en su lugar.
1
2
No permita que bebés ni niños entren en
PRECAUCIÓN
el cajón del congelador. Pueden dañar el
refrigerador y lesionarse gravemente. No
se siente en la puerta del congelador. No
permita que los niños trepen al cajón del
congelador.
No retire el divisor.
PRECAUCIÓN
• Si un niño queda atrapado dentro se puede
ADVERTENCIA
lesionar o morir asfi xiado.
funcionamiento _21
DA68-01922A.indb 21DA68-01922A.indb 21 2013.3.4 1:34:37 PM2013.3.4 1:34:37 PM
Page 50
RECOMENDACIONES DE ALMACENAMIENTO DE ALIMENTOS
Alimentos Refrigerador Congelador Recomendaciones de almacenamiento
LÁCTEOS
Mantequilla 2-3 semanas 6-9 meses Envolver o cubrir muy bien.
Verifi car el código de fecha. La leche y casi todos los productos
Leche 1-2 semanas No recomendado
Queso crema, alimentos
que contienen queso y
queso untable
Queso duro (sin abrir) 3-4 meses 6 meses
Queso duro (abierto) 2 meses No recomendado
Requesón 10-15 días No recomendado
2-4 semanas No recomendado
derivados se venden en envases de cartón con código de fecha de
vencimiento del producto. Cerrar con tapa o envolver muy bien. No
vvolver a colocar el producto que no se ha ingerido en el envase original.
Verifi car el código de fecha. Mantener el queso envuelto fi rmemente
evitando que se fi ltre la humedad.
Crema 7-10 días 2 meses
Crema agria 2 semanas No recomendado
Salsas de crema
(abiertas)
Yogur 10-14 días No recomendado
Yogur congelado N/A 2 meses
HUEVOS
Huevos (crudos) 3-4 semanas No recomendado
Huevos (cocidos) 1 semana No recomendado Almacenar en un recipiente tapado
Sobras de comidas con
huevo
FRUTAS FRESCAS
Manzanas 1 mes No recomendado
Plátanos 2-4 días No recomendado
Duraznos, melones,
peras, aguacates
Moras y cerezas 2-3 días 12 meses
Chabacanos 3-5 días No recomendado
1 semana No recomendado
3-4 días No recomendado Almacenar en un recipiente tapado
3-5 días No recomendado
Verifi car el código de fecha. La mayoría de los yogures, cremas y
productos similares se venden en envases de cartón con código de
fecha de vencimiento del producto. Volver a cerrar o cubrir muy bien. No
volver a colocar el producto que no se ha ingerido en el envase original.
Verifi car el código de fecha. Mantener tapado.
Verifi car el código de fecha. Almacenar los huevos en el sector más frío
del refrigerador y en su recipiente original.
Si se las almacena en el refrigerador, no las lave antes de guardarlas.
Almacenar en bolsas o recipientes resistentes a la humedad. Envolver
las frutas cortadas. Algunas frutas se oscurecen cuando se las enfría.
Uvas 2-5 días N/A
Piña (entera) 2-3 días No recomendado
Piña (cortada) 5-7 días 6-12 meses
Cítricos 1-2 semanas No recomendado Almacenar sin tapa.
Verifi car el código de fecha y volver a almacenar cerrado en su
Jugo 6 días No recomendado
Jugo congelado
Se descongela
solamente
12 meses Verifi car el código de fecha. No volver a congelar.
recipiente original. No volver a colocar el producto que no se ha ingerido
en el envase original.
22_ funcionamiento
DA68-01922A.indb 22DA68-01922A.indb 22 2013.3.4 1:34:37 PM2013.3.4 1:34:37 PM
Page 51
Alimentos Refrigerador Congelador Recomendaciones de almacenamiento
PESCADOS Y MARISCOS
Pescados
Pescado graso (caballa,
trucha, salmón)
Pescado magro
(bacalao, platija, etc.)
Congelado o empanado N/A 3 meses
1-2 días 2-3 meses
1-2 días 6 meses
Mantener en el envoltorio original y almacenar en el sector más frío del
refrigerador. Envolver con un material resistente a la humedad y al vapor
para el congelador. Congelar a 0ºF. Descongelar en el refrigerador o
verifi car el código de fecha. Congelar en su envoltorio original.
Mariscos
Camarones (crudos) 1-2 días 12 meses
Cangrejo 3-5 días 10 meses
Pescado o mariscos
cocidos
CARNE
Fresca, cruda
Chuletas 2-4 días 6-12 meses
Molida 1 día 3-4 meses
Asada 2-4 días 6-12 meses
Tocino 1-2 semanas 1-2 meses
Salchichas 1-2 días 1-2 meses
Bistec 2-4 días 6-9 meses
Aves 1 día 12 meses
Fiambres 3-5 días 1 mes
Cocida
Carne 2-3 días 2-3 meses
Aves 2-3 días 4-5 meses
Jamón 1-2 semanas 1-2 meses
2-3 días 3 meses
02 FUNCIONAMIENTO
Para congelar, envolver en un recipiente resistente a la humedad y al
vapor.
Verifi car el código de fecha antes de usar. Almacenar en el sector
más frío del refrigerador en su envoltorio original. Colocar dentro de
un recipiente resistente al vapor y a la humedad para congelar. La
temperatura recomendada para el refrigerador es de 33ºF a 36ºF y para
el congelador de 0ºF a 2ºF
Verifi car el código de fecha antes de usar. Almacenar en el sector más
frío del refrigerador en su envoltorio original. Colocar dentro de un
recipiente resistente al vapor y a la humedad para congelar.
Fuentes:
American Meat Institute Foundation. 1994. Páginas amarillas: respuestas a preguntas previsibles que los
consumidores realizan con respecto a la carne y a las aves. American Meat Institute Food Marketing Institute.
1999. The food keeper. Food Marketing Institute, Washington, D.C. Freeland-Graves, J.H. y G.C. Peckham.
1996. Foundations of food preparation, 6th ed. Prentice-Hall, Inc. Englewood Cliffs, NJ. Hillers, V.N. 1993.
Storing foods at home. Washington State University Cooperative Extension, Pullman, WA. Publ. EB 1205.
National Restaurant Association. 2001. Be cool-chill out! Refrigerate promptly. National Restaurant Association
Education Foundation¼s International Food Safety Council, Washington, D.C. USDA. 1997. Basics for handling
food safely. U.S. Department of Agriculture, Food Safety and Inspection Service, Washington, D.C.
funcionamiento _23
DA68-01922A.indb 23DA68-01922A.indb 23 2013.3.4 1:34:37 PM2013.3.4 1:34:37 PM
Page 52
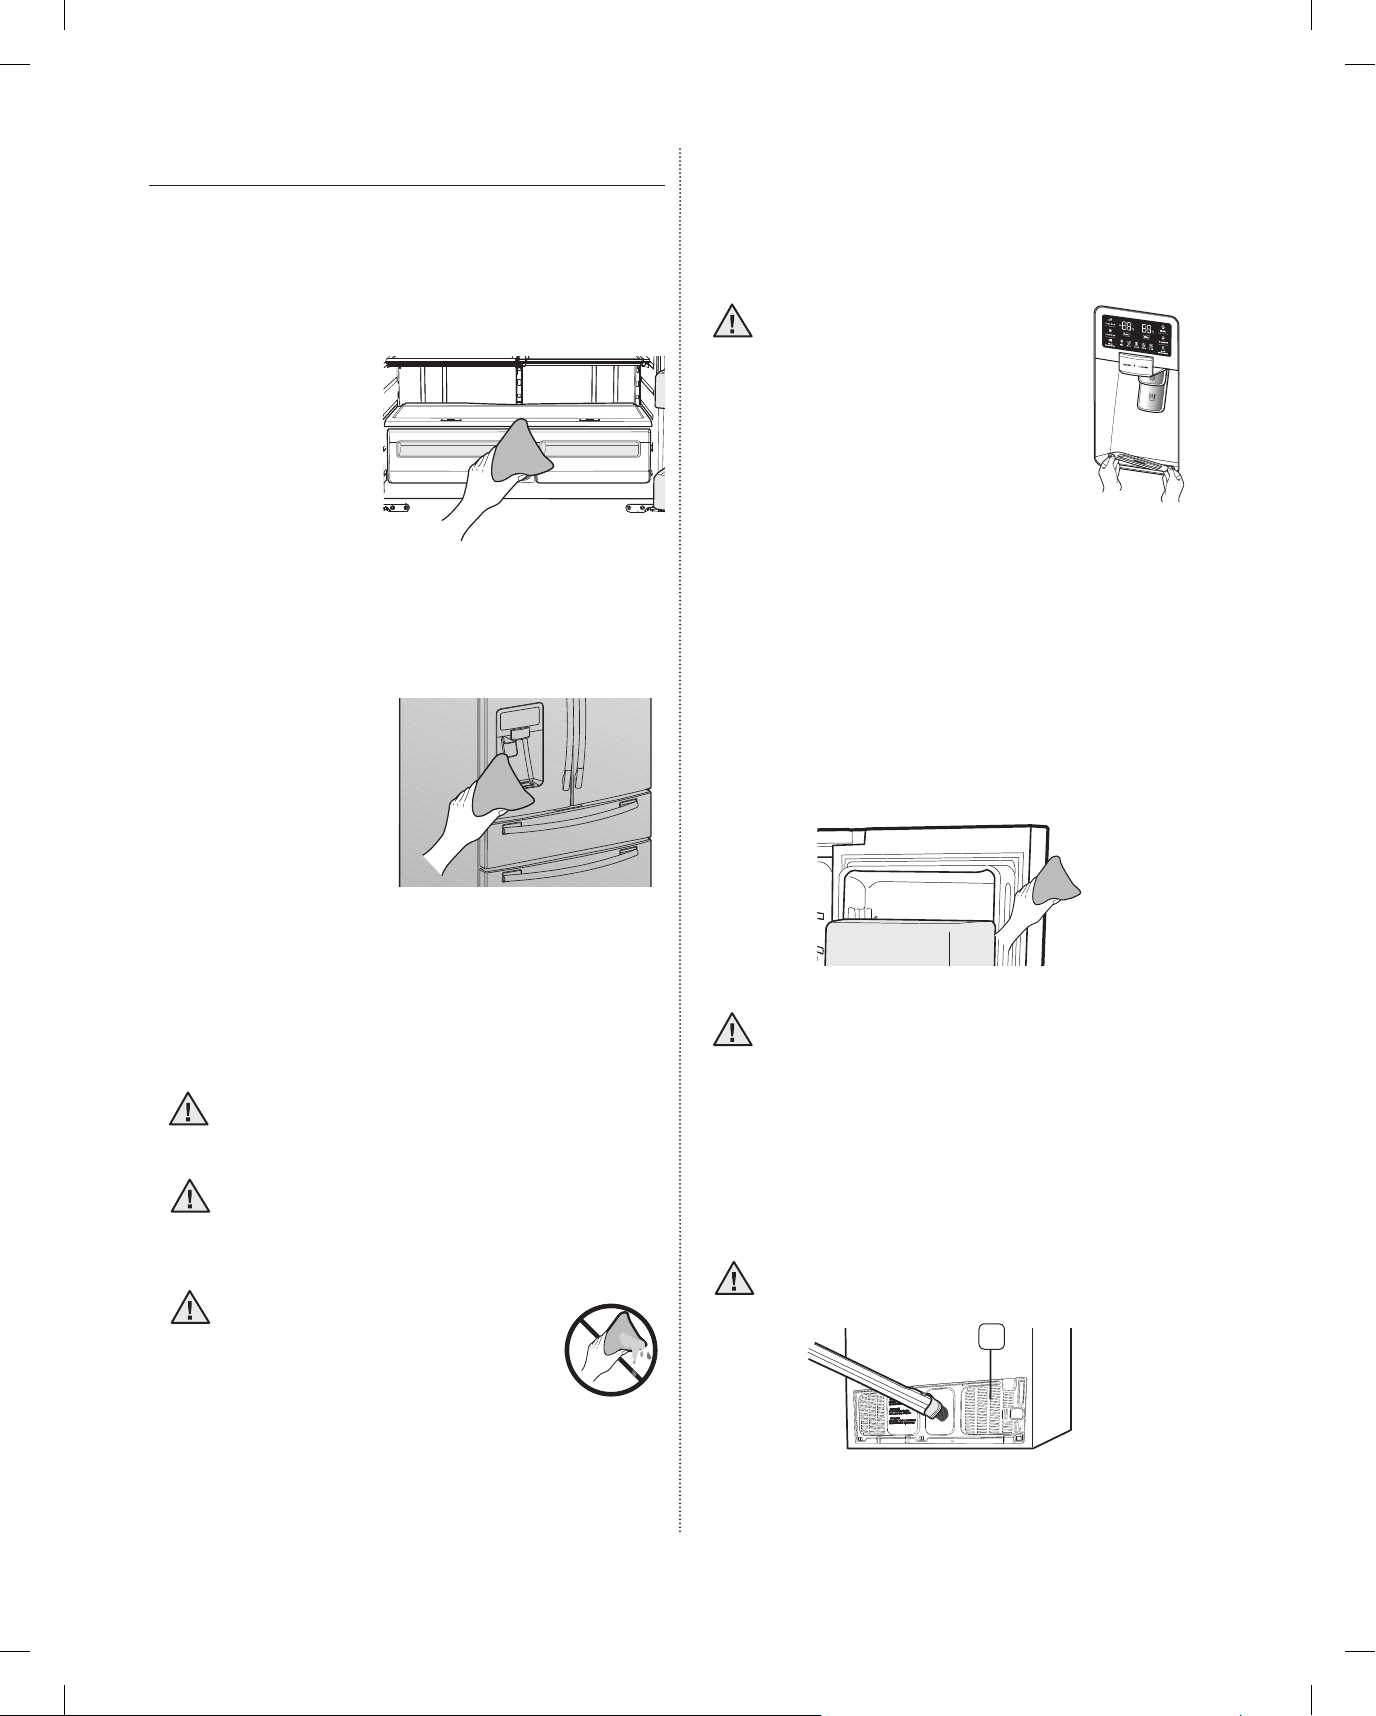
LIMPIEZA DEL REFRIGERADOR
El cuidado del refrigerador de puerta francesa
Samsung prolonga su vida útil y ayuda a que no se
fi ltren olores ni gérmenes.
Limpieza del dispensador de hielo / agua
Empuje hacia abajo un extremo de la charola del
dispensador y retírela. Limpie el dispensador de hielo /
agua con un paño limpio y suave.
Limpieza del interior
Limpie las paredes
internas y los accesorios
con un detergente
suave, luego seque con
un paño suave. Puede
retirar los cajones y
estantes para limpiar
a fondo. Asegúrese
de secar los cajones y estantes antes de colocarlos
nuevamente en su lugar.
Limpieza del exterior
Limpie el panel de
control y el visor
digital con un paño
húmedo, limpio y
suave. No pulverice
con agua directamente
sobre la superfi cie del
refrigerador.
Las puertas, manijas y las superfi cies del gabinete se
deben limpiar con un detergente suave y luego secar
con un paño suave.
Para que el refrigerador luzca mejor que nunca,
recomendamos pulir el exterior una o dos veces al
año.
Cuando se utilice la
PRECAUCIÓN
selección de hielo triturado
del dispensador es posible
que en el recipiente de hielo
se comiencen a acumular
fragmentos de hielo residual.
Para impedir que este hielo
residual se derrita y sobresalga
del recipiente, se deberá limpiar
el hielo residual cuando se vea que empieza a
acumularse en el recipiente del hielo.
Limpieza de los burletes de goma de la puerta
Si los burletes de goma de la puerta están sucios,
es posible que las puertas no cierren correctamente,
y el refrigerador no funcionará como corresponde.
Mantenga los burletes libres de polvo o manchas
limpiando las puertas con un detergente suave y un
paño húmedo. Seque con un paño limpio y suave.
No limpie el refrigerador con bencina,
PRECAUCIÓN
solvente o detergente para automóviles ya
que puede provocar un incendio.
No pulverice agua directamente ni tampoco
PRECAUCIÓN
use un paño mojado o húmedo.
No utilice bencina, solvente o Clorox para
PRECAUCIÓN
limpiarlo. Pueden dañar la superfi cie del
refrigerador y provocar un incendio.
Las letras impresas en el visor
PRECAUCIÓN
pueden borrarse si se aplica
directamente el limpiador de
acero inoxidable sobre la zona.
24_ funcionamiento
Limpieza de la parte posterior del refrigerador
Para mantener los cables y las partes expuestas
libres de polvo y suciedad aspire la parte posterior del
refrigerador una o dos veces por año.
No retire la tapa posterior ( 1 ). Podría sufrir
PRECAUCIÓN
una descarga eléctrica.
1
DA68-01922A.indb 24DA68-01922A.indb 24 2013.3.4 1:34:44 PM2013.3.4 1:34:44 PM
Page 53
solución de problemas
PROBLEMA SOLUCIÓN
El refrigerador no
funciona o no enfría lo
sufi ciente.
La comida en el
refrigerador está
congelada.
Escucha ruidos o
sonidos fuera de los
normales.
El área de cierre de la
puerta del gabinete del
refrigerador está caliente
y se está generando
condensación.
La fábrica de hielo no
funciona.
Puede oír que se generan
burbujas de agua dentro del
refrigerador.
Se siente un olor
desagradable dentro
del refrigerador.
Se forma escarcha
en las paredes del
congelador.
El dispensador de
agua no funciona.
El sistema de cierre
automático no
funciona con la puerta
del congelador.
• Verifi que que el enchufe esté conectado correctamente.
• Verifi que si la temperatura indicada en el visor digital es superior a la temperatura interior del
congelador o del refrigerador. De ser así, ajuste el refrigerador a una temperatura inferior.
• ¿Se encuentra el refrigerador expuesto a luz solar directa o ubicado cerca de una fuente de calor?
• ¿Se encuentra la parte posterior del refrigerador muy cerca de la pared impidiendo que reciba la
ventilación adecuada?
• Verifi que si la temperatura indicada en el visor digital es muy baja.
• Intente aumentar la temperatura del refrigerador.
• ¿La temperatura ambiente es muy baja? Aumente la temperatura del refrigerador.
• ¿Colocó el alimento con jugo en el sector más frío del refrigerador? Intente mover esos artículos a
otros estantes en el refrigerador en lugar de colocarlos en las áreas más frías o cajones.
• Verifi que que el refrigerador esté nivelado y estable.
• ¿Se encuentra la parte posterior del refrigerador muy cerca de la pared impidiendo que reciba la
ventilación adecuada?
Mueva el refrigerador y colóquelo a una distancia de 2 pulgadas como mínimo de la pared.
• ¿Se cayó algo detrás o debajo del refrigerador?
• Se oye un “tic” proveniente del interior del refrigerador. Es normal y se produce porque diversos
accesorios se contraen y se expanden según la temperatura interior del refrigerador.
• Es normal que se escuche como si algo golpeara algún elemento dentro del refrigerador. El
sonido se debe a que el compresor está funcionando en forma acelerada.
• Es normal que se genere algo de calor ya que los anticondensadores están instalados en la
sección de la bisagra vertical del refrigerador para impedir la condensación.
• ¿Está la puerta del refrigerador entreabierta? Puede producirse condensación cuando deja la
puerta abierta por mucho tiempo.
• ¿Esperó 12 horas para fabricar hielo después de haber instalado la tubería de suministro de
agua?
• ¿Está la tubería de agua conectada y la válvula de cierre abierta?
• ¿Detuvo manualmente la función de fabricación de hielo?
• ¿La temperatura del congelador es demasiado alta? Intente disminuir la temperatura del
congelador.
• Es normal. Las burbujas provienen del refrigerante que circula por el refrigerador.
• Verifi que si hay alimentos descompuestos.
• Alimentos con olores fuertes (por ejemplo, pescado) se deberían tapar muy bien.
• Limpie el refrigerador periódicamente y deseche los alimentos descompuestos o que considera
que pueden descomponerse.
• ¿Está bloqueada la rejilla de ventilación? Retire los elementos que puedan obstruir la circulación
del aire.
• Deje espacio sufi ciente entre los alimentos almacenados para que el aire circule correctamente.
• ¿Está el cajón del congelador cerrado adecuadamente?
• ¿Está la tubería de agua conectada y la válvula de cierre abierta?
• ¿Está la tubería de suministro de agua aplastada o enroscada?
• Asegúrese de que no haya ningún obstáculo frente a la tubería.
• ¿Está el tanque de agua congelado porque la temperatura del refrigerador es muy baja?
Intente seleccionar una opción de temperatura superior en el visor digital.
• ¿Hay desequilibrio entre las partes derecha e izquierda de la puerta?
• Abra y cierre la puerta lentamente 1 ó 2 veces. Por lo general, el sistema de cierre automático
vuelve a funcionar correctamente.
• Intente abrir la puerta lentamente para evitar que las partes derecha e izquierda de la puerta se
desequilibren.
03 SOLUCIÓN DE PROBLEMAS
solución de problemas _25
DA68-01922A.indb 25DA68-01922A.indb 25 2013.3.4 1:34:45 PM2013.3.4 1:34:45 PM
Page 54
garantía
GARANTÍA DEL REFRIGERADOR SAMSUNG
GARANTÍA LIMITADA PARA EL COMPRADOR ORIGINAL
Este producto de marca Samsung, suministrado y distribuido por Samsung Electronics America, Inc. (Samsung)
y entregado nuevo, en su caja de fábrica al comprador original, está garantizado por Samsung ante defectos de
fabricación relacionados con los materiales y la mano de obra durante un período de garantía limitado a:
Un (1) año para las piezas y la mano de obra del refrigerador
Cinco (5) años para las piezas y la mano de obra exclusivamente del sistema hermético de refrigeración*
(*Compresor, evaporador, condensador, deshumidifi cador, tuberías de conexión)
Esta garantía limitada entra en vigencia en la fecha original de compra y sólo es válida para productos adquiridos
y utilizados en los Estados Unidos. Para recibir el servicio técnico bajo garantía, el comprador debe comunicarse
con Samsung para determinar la naturaleza del problema y proceder a repararlo. El servicio de garantía sólo
puede realizarse a través de un Centro de Servicio autorizado Samsung. Debe presentarse la factura original de
venta bajo solicitud de Samsung o del Centro de Servicio autorizado Samsung como prueba de compra.
Samsung reparará o reemplazará cualquier pieza considerada defectuosa, a nuestra entera discreción y sin
cargo, según lo estipulado en este documento, por piezas nuevas o reparadas durante el período de garantía
limitada especifi cado anteriormente. Todas las piezas y productos reemplazados son de propiedad de Samsung
y deben devolverse a Samsung. Las piezas y los productos de repuesto quedarán bajo el período restante de
garantía original, o noventa (90) días, el que sea más extenso.
La prestación de servicios en el hogar se realizará durante el período de garantía de la mano de obra, sujeto a
disponibilidad dentro de los Estados Unidos. La prestación de servicios en el hogar no está disponible en todas las
zonas. Para recibir la prestación de servicio en el hogar, el producto debe estar despejado y ser accesible al nivel
del piso para el personal de servicio técnico. Si durante la prestación de servicios en el hogar, no pudiera llevarse
a cabo la reparación, podría ser necesario realizar el traslado, reparación y posterior devolución del producto. Si
la prestación de servicios en el hogar no está disponible, Samsung podría escoger, a nuestra entera discreción,
proporcionar transporte a nuestra elección hasta y desde el Centro de Servicio autorizado Samsung. De lo
contrario, el transporte hasta y desde el Centro de Servicio autorizado Samsung estará a cargo del comprador.
Esta garantía limitada cubre defectos de fabricación en materiales y mano de obra bajo condiciones de uso
normal, no comercial, del producto y no se aplicará en los siguientes casos, incluidos, aunque no limitados a:
daños ocasionados durante el transporte; entrega e instalación; aplicaciones y usos para los que el producto
no fue diseñado; producto o números de serie alterados; daños externos o del acabado exterior; accidentes,
mal uso, negligencia, incendio, agua, rayos u otros fenómenos naturales; uso de productos, equipamiento,
sistemas, servicios públicos, servicios generales, piezas, suministros, accesorios, aplicaciones, instalaciones,
reparaciones, tuberías externas y fugas, cableado externo, disyuntores, fusibles o conectores no suministrados
ni autorizados por Samsung o que dañen este producto u ocasionen problemas de servicio; voltaje incorrecto,
fl uctuaciones y sobrevoltaje del suministro eléctrico; adaptaciones y fallas por parte del cliente en el cumplimiento
de las instrucciones de funcionamiento, limpieza, mantenimiento y cuidado del medio ambiente que se incluyen
y establecen en el manual de instrucciones; pérdida de alimentos por descomposición; consumibles incluyendo
fi ltros y focos de iluminación.
26_ garantía
DA68-01922A.indb 26DA68-01922A.indb 26 2013.3.4 1:34:45 PM2013.3.4 1:34:45 PM
Page 55
NO EXISTEN OTRAS GARANTÍAS EXPLÍCITAS APARTE DE LAS MENCIONADAS Y DESCRITAS ANTERIORMENTE,
ASÍ COMO TAMPOCO EXISTEN OTRAS GARANTÍAS EXPLÍCITAS O IMPLÍCITAS, INCLUYENDO SIN
LIMITACIÓN A TODAS LAS GARANTÍAS IMPLÍCITAS DE COMERCIABILIDAD O IDONEIDAD PARA UN FIN
CONCRETO Y QUE SEAN PERTINENTES TRAS LOS PERÍODOS DE GARANTÍA EXPLÍCITA INDICADOS CON
ANTERIORIDAD, Y NINGUNA GARANTÍA EXPLÍCITA U OFRECIDA POR PERSONAS, FIRMAS O EMPRESAS
EN RELACIÓN A ESTE PRODUCTO SERÁN LEGALMENTE VINCULANTES PARA SAMSUNG. SAMSUNG NO
SERÁ LEGALMENTE RESPONSABLE DE LA PÉRDIDA DE INGRESOS O BENEFICIOS, LA FALTA DE AHORROS
U OTROS BENEFICIOS, O DE NINGÚN OTRO DAÑO RESULTANTE ESPECIAL, ACCIDENTAL O INDIRECTO
OCASIONADO POR EL USO, ABUSO O INCAPACIDAD DE USO DE ESTE PRODUCTO, INDEPENDIENTEMENTE
DE LA TEORÍA LEGAL SOBRE LA QUE SE BASE EL RECLAMO, INCLUSO SI SAMSUNG HA SIDO ADVERTIDO
DE LA POSIBILIDAD DE TALES DAÑOS. ASIMISMO, CUALQUIER TIPO DE INDEMNIZACIÓN EXIGIDA A
SAMSUNG NO SUPERARÁ EL PRECIO DE COMPRA DEL PRODUCTO VENDIDO POR SAMSUNG Y QUE
HAYA OCASIONADO EL SUPUESTO DAÑO. SIN LIMITAR LO INDICADO ANTERIORMENTE, EL COMPRADOR
ASUME TODO EL RIESGO Y RESPONSABILIDAD DE CUALQUIER PÉRDIDA, DAÑO O LESIÓN AL SÍ MISMO
O A SU PROPIEDAD, ASÍ COMO A TERCEROS Y A SU PROPIEDAD, OCASIONADOS POR EL USO, ABUSO O
INCAPACIDAD DE USO DE ESTE PRODUCTO VENDIDO POR SAMSUNG QUE NO HAYAN SIDO CAUSADOS
DIRECTAMENTE POR NEGLIGENCIA DE SAMSUNG. ESTA GARANTÍA LIMITADA NO SERÁ VÁLIDA PARA
PERSONAS AJENAS AL COMPRADOR ORIGINAL DE ESTE PRODCUTO, ADEMÁS ES INTRANSFERIBLE Y
CONSTITUYE SU RECURSO EXCLUSIVO.
Ciertos estados no permiten limitaciones en cuanto a la vigencia de una garantía implícita o la exclusión o
limitación de daños accidentales o indirectos, de tal forma que las limitaciones o excepciones mencionadas tal
vez no se apliquen a usted en particular. Esta garantía
le otorga derechos legales específi cos, e incluso puede otorgarle otros derechos que varían de un estado a
otro.
Para obtener el servicio de garantía, pónganse en contacto con Samsung en el:
04 GARANTÍA
CENTRO DE ASISTENCIA AL CLIENTE DE SAMSUNG
Samsung Electronics America, Inc. 85 Challenger Road Ridgefi eld Park, NJ 07660
1-800-SAMSUNG (1-800-726-7864) y www.samsung.com
garantía _27
DA68-01922A.indb 27DA68-01922A.indb 27 2013.3.4 1:34:45 PM2013.3.4 1:34:45 PM
Page 56
QUESTIONS OR COMMENTS?
COUNTRY CALL OR VISIT US ONLINE AT WRITE
U.S
CANADA
800-SAMSUNG
(800-726-7864)
800-SAMSUNG
(800-726-7864)
www.samsung.com
www.samsung.com/ca
Samsung Electronics America, Inc. 85 Challenger
Road Ridgefi eld Park, NJ 07660
Samsung Electronics Canada Inc. Customer Service,
55 Standish Court Mississauga, Ontario L5R 4B2
Canada
Como esfuerzo por ayudar al medio ambiente, este manual de usuario fue impreso en papel reciclado.
Code No. DA68-01922A REV(1.5)
DA68-01922A.indb 28DA68-01922A.indb 28 2013.3.4 1:34:45 PM2013.3.4 1:34:45 PM
 Loading...