

Samsung NL20J7100WB Operating Instructions
Model:
NL20J7100WB
EN
DE
FR
PL
Warming Drawer
Wärmeschublade
- Instruction Manual
- Bedienungsanleitung
- Manuel d'instructions
- Instrukcja obsługi

1
EN
Contents
Safety Instructions ............................................................................................................................. 2
Installation instructions ..................................................................................................................... 5
Before installation ............................................................................................................................. 5
Installation ........................................................................................................................................ 5
Electrical Connection ........................................................................................................................ 5
Appliance Description ........................................................................................................................ 6
Main Components ............................................................................................................................ 6
How the warming drawer works ........................................................................................................ 6
Use ....................................................................................................................................................... 7
Before using for the first time ............................................................................................................ 7
Control Panel .................................................................................................................................... 7
Using the warming drawer ................................................................................................................ 7
Selecting temperature ...................................................................................................................... 7
Cleaning and Maintenance ................................................................................................................. 9
Appliance front and control panel ................................................................................................ ..... 9
Interior of the warming drawer .......................................................................................................... 9
Mat with non-slip surface ................................ ................................ ................................ .................. 9
What should I do if the warming drawer doesn’t work? ................................................................ 10
Technical Characteristics ................................................................................................................ 11
Installation ......................................................................................................................................... 45
Combination possibilities ................................................................................................................ 45
We ask you to read the instructions in this booklet very carefully as this will allow you to get the best
results from using your warming drawer.
KEEP THE DOCUMENTATION OF THIS PRODUCT FOR FUTURE REFERENCE.
2
EN
Safety Instructions
Warning! Before connecting the
appliance compare the power data
prejudice the correct working of the
appliance.
(voltage and frequency) indicated on
the characteristics plate with those
of the power supply in question. If
these data do not match there may
be problems. In case of doubt,
contact an electrician.
Warning! If the electrical wire plug
is removed, the appliance must be
installed and connected by a
technician. Contact a qualified
electrician who knows and respects
current safety standards. The
manufacturer cannot be held
responsible for damage resulting
from fitting or connecting errors.
Warning! The electrical safety of
the appliance can only be
guaranteed if it is earthed. The
manufacturer cannot be held
Warning! Repairs and
maintenance, especially of parts
carrying electrical current, must only
be done by technicians authorised
by the manufacturer. The
manufacturer and retailers do not
accept responsibility for any
damaged caused to people, animals
or property as a result of repairs and
maintenance carried out by nonauthorised personnel.
Warning! Repairs undertaken
during the guarantee period must
only be done by technicians
authorised by the manufacturer. If
this is not the case then any
damage resulting from the repair in
question is excluded from the
guarantee.
responsible for damage resulting
from the absence of or defects in the
installation’s protection system (e.g.
electrical shock).
Warning! Only use the appliance
once it has been fitted into its built-in
position. Only in this manner can it
be guaranteed that users cannot
access the electrical components.
Warning! Never open up the
appliance’s frame. Possible contacts
with electrical conducting parts or
changes to electrical or mechanical
components may represent a
danger to users’ safety and
Warning! The appliance must be
disconnected from the electrical
current when installation and repair
work is being done. To disconnect
the appliance from the current, one
of the following conditions must
apply:
- The switchboard fuses / circuit
breakers must be disconnected.
- The plug should be removed from
the socket. To remove the plug
from the socket do not pull on the
electric cable but rather pull out
the plug itself directly.

3
EN
Safety Instructions
This appliance complies with current
safety standards. Improper use of
the appliance may put the user at
risk.
Read the operating instructions
carefully before using the appliance
for the first time. In this way you will
avoid the risk of injuring yourself or
damaging the appliance.
The warming drawer is solely for
domestic use!
Use the warming drawer solely for
warming crockery. Any other type of
use is unacceptable and may be
dangerous. The manufacturer does
not accept responsibility for
breakdowns or faults arising from
improper or erroneous use of the
appliance.
Do not use the appliance to heat up
or to cook food or drinks.
Depending on the temperature
selected and the operating time, the
temperature inside the appliance
may reach 80 ºC. To take crockery
out of the warming drawer protect
your hands by using oven gloves or
Take special care with children and
do not allow them to play close to
the appliance. If the appliance is
inadvertently switched on it will heat
up and may cause serious burns.
WARNING: The appliance and its
accessible parts become hot
during use.
Care should be taken to avoid
touching heating elements.
Children less than 8 years of age
shall be kept away unless
continuously supervised.
This appliance can be used by
children aged from 8 years and
above and persons with reduced
physical, sensory or mental
capabilities or lack of experience
and knowledge if they have been
given supervision or instruction
concerning use of the appliance
in a safe way and understand the
hazards involved. Children shall
not play with the appliance.
Cleaning and user maintenance
shall not be made by children
without supervision.
an oven cloth.

4
EN
Safety Instructions
Do not sit or hang on the drawer.
The telescopic runners will be
damaged. The maximum load
capacity of the drawer is 25 kg.
Do not store synthetic containers or
easily inflammable objects inside the
drawer warmer. When you switch on
the appliance such containers and
objects may melt or catch fire. Fire
danger.
Do not use the appliance to heat up
the air temperature in the kitchen.
The high temperatures reached may
cause easily inflammable objects
close to the appliance to catch fire.
Do not use high pressure or steam
jet cleaning devices. The steam may
affect electrical components and
cause a short circuit. The steam
pressure may also cause damage to
the appliance’s surface and
components in the long term.
When you stop using the appliance
at the end of its working life,
disconnect it from the power supply
and render the electrical cable
unusable so that the appliance is not
a danger if, for example, children
use it for playing.
5
EN
Installation instructions
Before installation
Check that the input voltage indicated on the
characteristics plate is the same as the voltage of
the power outlet you are going to use.
Open the drawer and take out all the
accessories and remove the packing material.
Attention! The front surface of the crockery
heater may be wrapped in a protective film.
Before using the warming drawer for the first
time, remove this film carefully.
Make sure that the warming drawer is not
damaged in any way. Check that the drawer
opens and closes correctly. If you find any
damage, contact the Technical Assistance
Service.
Attention: the power socket should be easily
accessible after the warming drawer has been
installed.
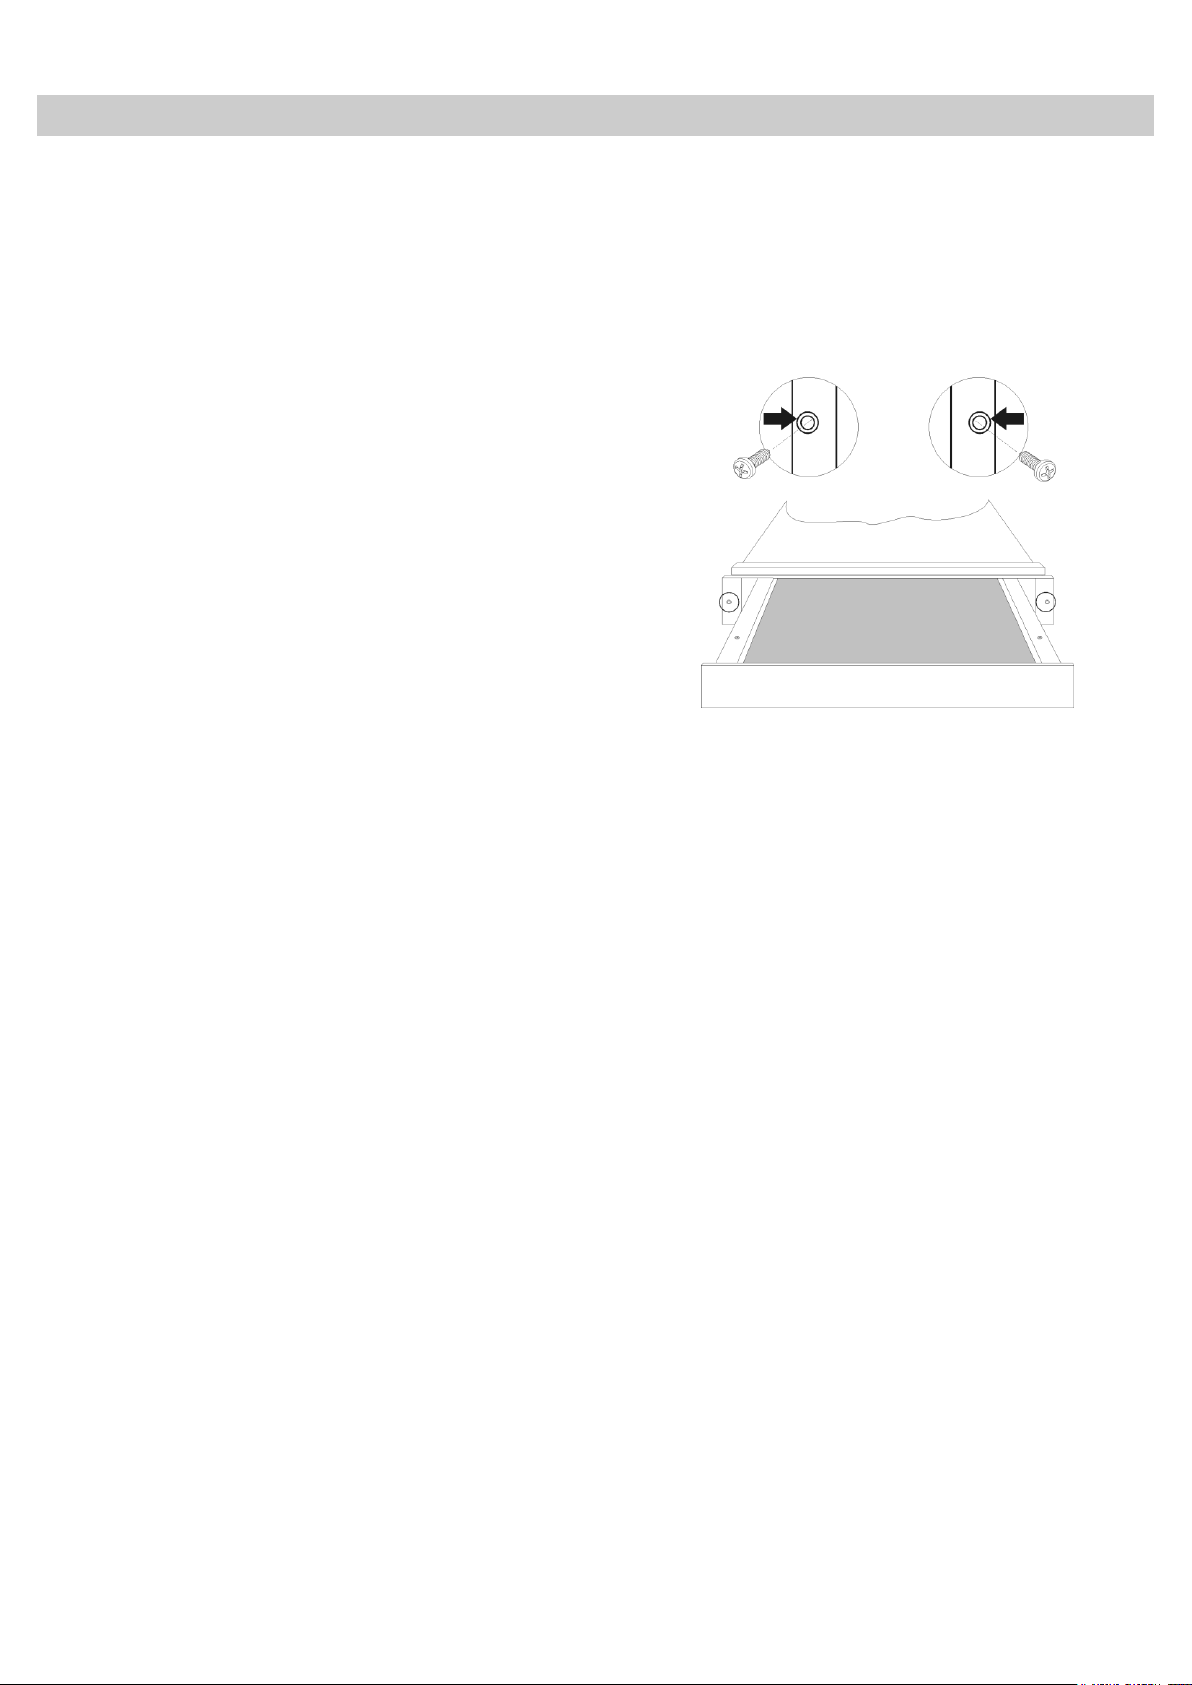
2. Check that the warming drawer frame is
properly levelled and is sitting evenly on the
shelf.
3. Open the drawer and fix the warming
drawer to the sides of the unit using the two
screws provided.
Electrical Connection
The warming drawer should only be built-in in
combination with those appliances indicated by
the manufacturer. If it is fitted in combination
with other appliances, the guarantee is no
longer valid since it is impossible to
guarantee that the warming drawer will work
correctly.
Installation
To build-in the warming drawer in combination
with another appliance there must be a fixed,
interim shelf in the housing unit to support the
weight of both appliances.
The appliance to be combined with the warming
drawer will be placed directly on the latter without
any need to have a separating shelf.
To build-in the appliance which is combined with
the warming drawer, follow the instructions set
out in the respective instructions and fitting
booklet.
The relevant installation dimensions are indicated
in mm in the diagrams shown at the end of
this booklet. Proceed as follows:
The warming drawer is equipped with a power
cable and plug for single phase current. We
advise that the plug is connected to a socket
that is easily accessible after installation.
If the warming drawer is to be installed on a
permanent basis it should be installed by a
qualified technician. In such a case, the
appliance should be connected to a circuit with
an all-pole circuit breaker with a minimum
separation of 3 mm between contacts.
The data necessary for the electrical connection
are described on the warming drawer
characteristics plate and these must be
compatible with those of the power outlet you are
going to use.
WARNING: THE WARMING DRAWER MUST
BE CONNECTED TO EARTH.
The manufacturer and retailers do not accept
responsibility for any damage that may be
caused to people, animals or property if these
installation instructions are not observed.
1. Place the warming drawer on the shelf and
slide it towards the interior of the niche in
such a way that it is centred and completely
lined up with the front of the unit.
6
EN
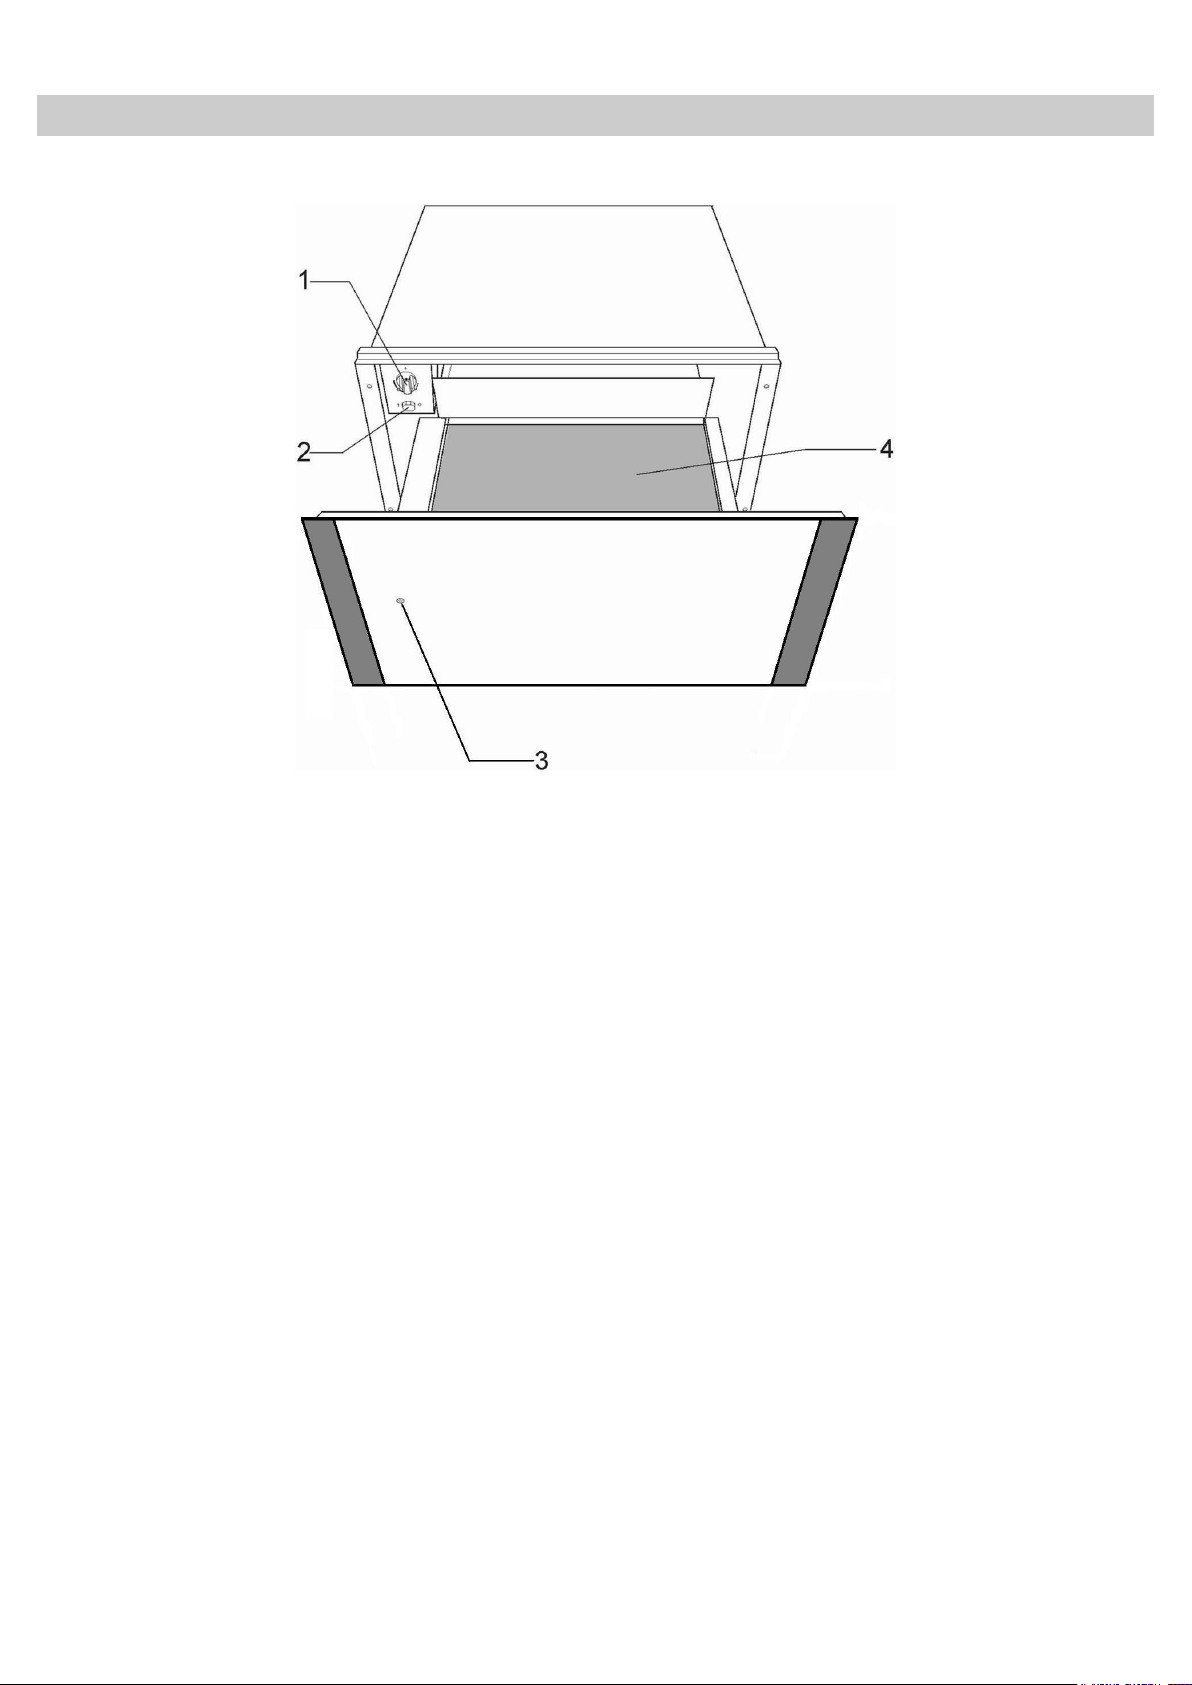
1. Temperature selector (thermostat)
2. On/Off switch (lights up)
3. Operating light
4. Anti-slip mat
Appliance Description
Main Components
How the warming drawer works
This appliance is equipped with a warm air
circulation system. A fan distributes the heat
generated by an electrical heating element
throughout the interior of the appliance.
The thermostat allows the user to define and
control the temperature wanted for the crockery.
The circulating hot air that is generated heats up
the crockery quickly and evenly.
A metal grille protects both the heating element
and the fan.
The base of the drawer is fitted with a non-slip
mat to prevent plates and dishes sliding around
when the drawer is opened and closed.
7
EN
Symbol
ºC
Function
30ºC
Defrosting
40ºC-
50ºC
Proving dough
Cups / glasses
warming
60ºC-
70ºC
Crockery warming
Keep food warm
80ºC
Low temperature
cooking
Food Warming
Use
Before using for the first time
Before using the appliance for the first time you
should clean the interior and the exterior,
following the cleaning instructions given in the
section “Cleaning and Maintenance”.
Then heat the warming drawer for at least 2
hours. For this, turn the temperature control to the
maximum position (see section ‘Selecting
temperature”).
Make sure the kitchen is well-ventilated when you
are doing this.
The appliance’s parts are protected by a special
product. For this reason, during the first heating
an odour will be released. Both the odour and any
smoke that may form will disappear after a short
time and neither signifies that there is anything
wrong with the connection or the appliance.
Control Panel
Switch on the appliance by pressing the switch,
which will light up.
Close the drawer.
Be careful not to use too much force when closing
the drawer since it may open up again.
Before taking out the warm crockery you must
switch off the warming drawer by pressing the
switch again.
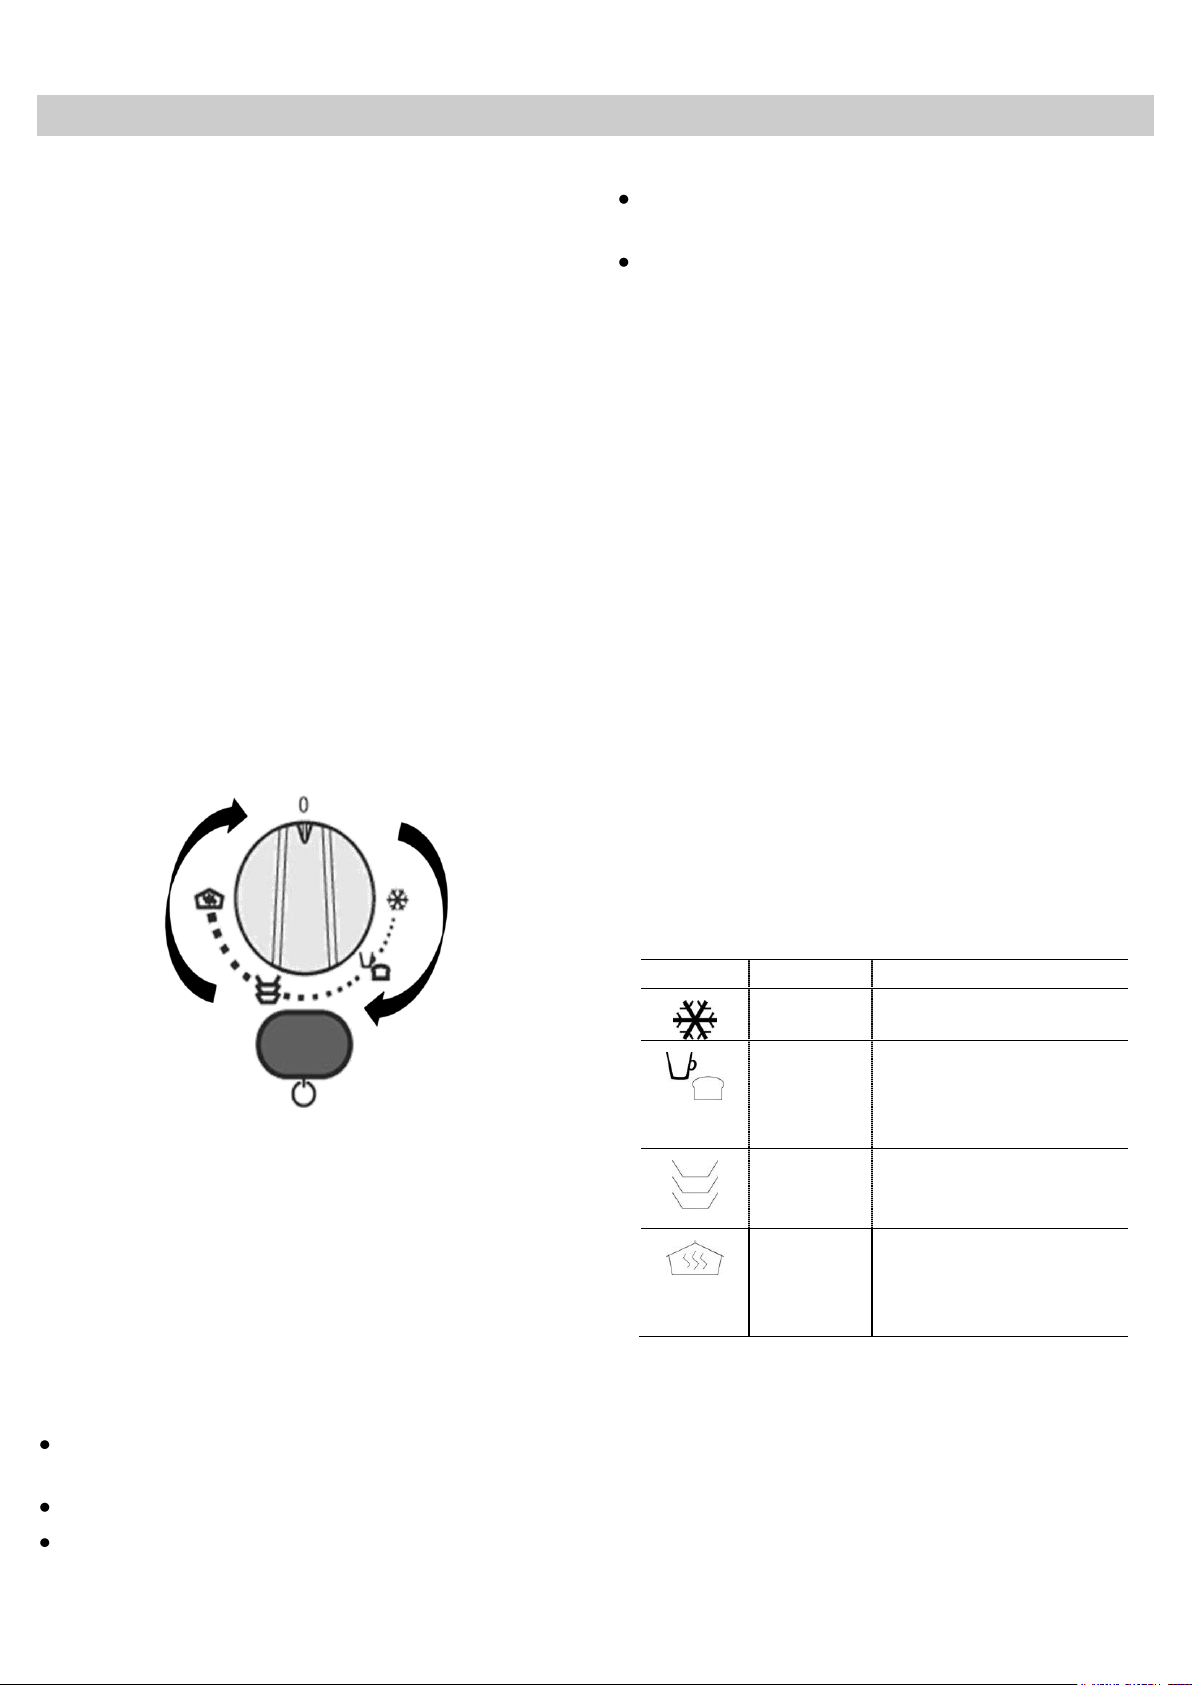
Selecting temperature
By turning the thermostat control you can select
temperatures between 30 and 85 °C.
Do not force the thermostat control to the left
of the “0” position or to the right of the
maximum position since this may damage the
appliance.
As soon as the temperature selected is reached,
the heating is turned off. When the temperature
drops to a value below that selected, the heating
is turned back on.
The control panel has a temperature selector and
the on/off switch. The control panel is only visible
when the drawer is open.
When the drawer is closed you can check
whether the warming drawer is switched on by
looking through the viewing port on the front of
the appliance.
Using the warming drawer
To use the warming drawer, proceed as follows:
The temperature scale is not marked with
absolute temperatures in ºC but instead has
symbols which correspond to the optimum
temperatures for groups of crockery:
Push the center of the front face to open the
warming drawer.
Put the crockery in the drawer.
Select the temperature you want by turning the
thermostat control to the desired position.
8
EN
Load
Time (min)
Crockery for 6 people
30 – 35
Use
Heating times
Various factors affect heating times:
Material and thickness of the crockery
Load quantity
How the crockery is arranged
Temperature setting
It is therefore not possible to give any precise
heating times.
However, as a guide, the following times are given
for the thermostat setting and for uniform
heating of the crockery:
As you use the warming drawer more and more
you will learn the best settings for your crockery.
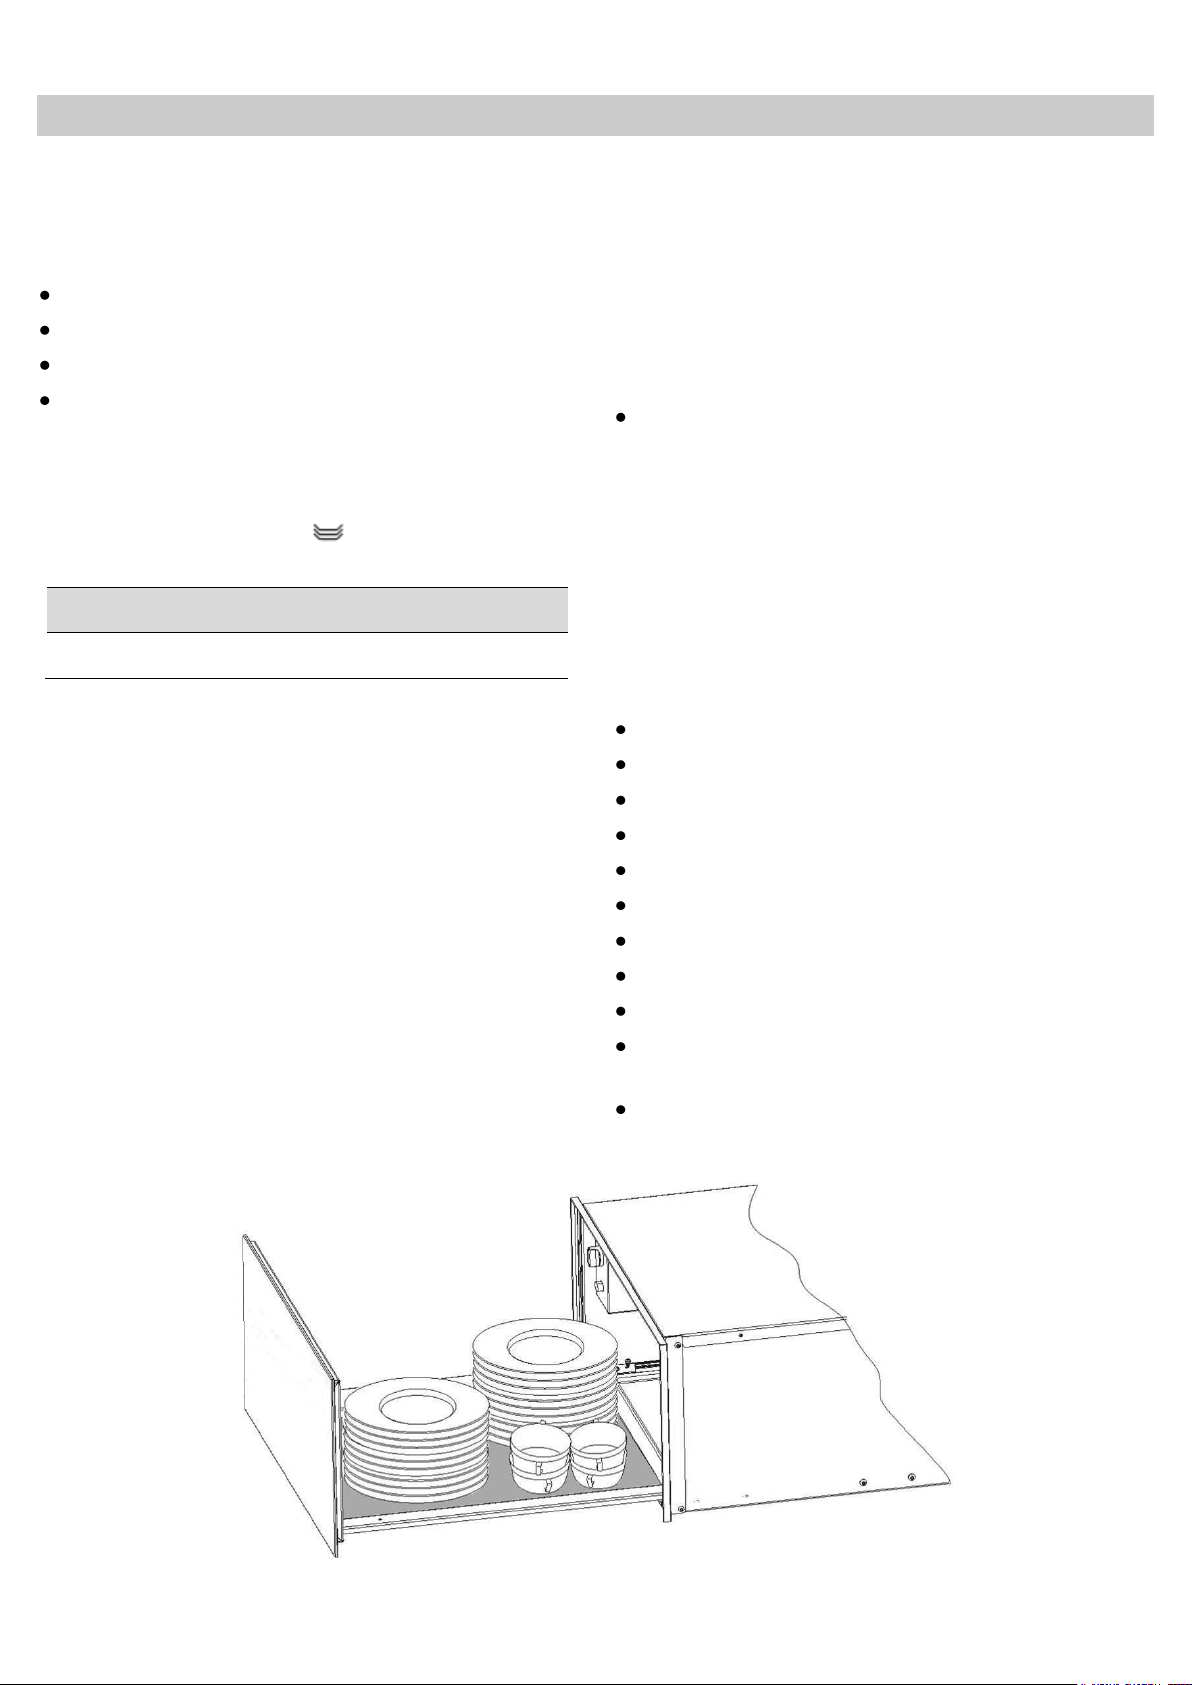
Load capacity
Load capacity depends on the size of the items of
crockery. The warming drawer can be loaded
with a maximum of 25 kg.
Below we give you some crockery arrangements
as examples:
Crockery for 6 people:
- 6 dinner plates Ø 28 cm
- 6 soup bowls Ø 10cm
- 1 dish Ø 22 cm
- 1 dish Ø 19 cm
- 1 dish Ø 17 cm
- 2 large plates Ø 36 cm
or one of the following
20 dinner plates Ø 28 cm
36 soup bowls Ø 22 cm
30 soup bowls Ø 10cm
10 dinner plates Ø 28cm
10 soup bowls Ø 22 cm
10 pizza plates Ø 36 cm
80 expresso cups
40 cappuccino cups
30 glasses
18 soup bowls Ø 22 cm; 2 soup tureens 21 cm
x 18 cm
Etc.

9
EN
Cleaning and Maintenance
Cleaning is the only maintenance action that is
required normally.
Warning! Cleaning must be done with the
warming drawer disconnected from the
electrical power supply. Remove the plug from
the power socket or disconnect the warming
drawer power supply circuit.
Do not use aggressive or abrasive cleaning
products, abrasive sponges or pointed
objects since stains or abrasion marks may
appear.
Do not use high pressure or steam jet
cleaning appliances.
Appliance front and control panel
The warming drawer can be cleaned using just a
damp cloth. If it is very dirty, add a few drops of
washing-up liquid to the washing water.
Wipe the surfaces dry using a dry cloth.
For stainless steel fronted warming drawer,
special products for treatment of stainless steel
surfaces can be used. These products prevent
the surfaces becoming dirty again for some time.
Apply a thin layer of such a product on the
surface using a soft cloth.
Interior of the warming drawer
Clean the inside of the warming drawer regularly
using a damp cloth. If it is very dirty add a few
drops of washing-up liquid to the washing water.
Wipe the surfaces dry using a dry cloth.
Avoid water entering through the air circulation
opening.
Only use the warming drawer again when it is
completely dry.
Mat with non-slip surface
The non-slip surface mat can be removed to
facilitate cleaning of the drawer.
The mat can be cleaned by hand using hot water
with a few drops of washing-up liquid.
Dry thoroughly.
The non-slip mat should only be replaced when it
is completely dry.
On aluminium fronted warming drawer use a
gentle glass cleaning product and a soft cloth that
does not release fluff. Wipe horizontally without
pressing on the surface since aluminium is
sensitive to scratches and cuts.

10
EN
What should I do if the warming drawer doesn’t work?
WARNING! Any type of repair must only be
done by a specialised technician. Any repair
done by a person not authorised by the
manufacturer is dangerous.
Before contacting Technical Assistance, check on
the following:
The crockery doesn’t heat up enough.
Check whether:
- The appliance has been switched on.
- The appropriate temperature has been
selected.
- The air circulation orifices are covered by
the crockery.
- The crockery was left to heat up for
sufficient time.
Heating time depends on several factors, such as,
for example:
- Crockery material type and thickness.
- Quantity of crockery.
- How the crockery is arranged.
The crockery doesn’t heat up at all. Check
whether:
- You can hear the noise of a fan.
If the fan is operating then the heating element
is broken; if the fan is not operating then the
fan is broken.
- The switchboard fuses / circuit breakers
have fused / tripped out.
The crockery is heating up too much.
- The temperature selector is broken.
The on/off switch does not light up.
- The switch’s pilot light has blown.
There is some noise when the drawer is
opened and closed:
- This is normal and comes from the latching
mechanism.
After checking the points and if non of them
matches your problem, please contact our
Technical Assistance.
11
EN
Model
NL20F7100WB
Power source
220-240 V / 50-60 Hz
Power consumption
Maximum Power
420W
Dimensions (WxDxH)
Outside
Drawer Cavity
595x556x140
500x470x100
Volume
25,2 ltr
Weight
Net
16,3 kg
Technical Characteristics
Environmental protection
appliances should not be put into the normal
systems for disposal of solid urban waste.
Disposal of the packaging
The packaging bears the Green Point mark.
Dispose of all the packaging materials such as
cardboard, expanded polystyrene and plastic
wrapping in the appropriate bins. In this way you
can be sure that the packaging materials will be
re-used.
Please keep all packaging materials away from
small children as there is a choking / suffocation
risk.
Disposal of equipment no longer used
According to European Directive 2002/96/EC on
the management of waste electrical and
electronic equipment (WEEE), home electrical
Outdated appliances should be collected
separately to optimise component material
recovery and re-cycling rates and to prevent
potential harm to human health and the
environment. The symbol of a rubbish container
superimposed by a diagonal cross should be put
on all such products to remind people of their
obligation to have such items collected
separately.
Consumers should contact their local authorities
or point of sale and request information on the
appropriate places to leave their old home
electrical appliances.
Before disposing of your appliance, render it nonusable by pulling out the power cable, cutting this
and disposing of it.
Technical Data
SAMSUNG strives to improve its products at all times. Both the design specifications and these user
instructions are thus subject to change without notice.

12
DE
Inhaltsverzeichnis
Sicherheitshinweise ......................................................................................................................... 13
Sachgemäßer Gebrauch................................................................................................................... 15
Installationsanleitung ................................ ....................................................................................... 16
Vor der Installation .......................................................................................................................... 16
Einbau ............................................................................................................................................ 16
Elektroanschluss ............................................................................................................................ 16
Gerätebeschreibung ......................................................................................................................... 17
Hauptkomponenten ........................................................................................................................ 17
Vorinformationen ................................ ................................ ............................................................ 17
Bedienung ......................................................................................................................................... 18
Vor dem ersten Gebrauch .............................................................................................................. 18
Bedienelemente .............................................................................................................................. 18
Bedienprinzip .................................................................................................................................. 18
Temperatur wählen ......................................................................................................................... 18
Aufheizzeiten .................................................................................................................................. 19
Fassungsvermögen ........................................................................................................................ 19
Reinigung und Pflege ................................ ................................ ....................................................... 20
Stirnseite und Bedienblende ........................................................................................................... 20
Innenraum ...................................................................................................................................... 20
Antirutschauflage ............................................................................................................................ 20
Was ist im Falle einer Funktionsstörung zu tun? .......................................................................... 21
Technische Eigenschaften ............................................................................................................... 22
Einbau ................................................................................................................................................ 45
Kombinationsmöglichkeiten ............................................................................................................ 45
Wir bitten Sie, die in diesem Buch enthaltenen Anweisungen aufmerksam durchzulesen, die Ihnen
ermöglichen werden, bei der Nutzung Ihrer Wärmeschublade bessere Ergebnisse zu erzielen.
BEWAHREN SIE DIE DOKUMENTATION DIESES GERÄTES AUF, UM KÜNFTIG IN IHR
NACHSCHLAGEN ZU KÖNNEN.
13
DE
Sicherheitshinweise
Achtung! Vergleichen Sie vor
dem Anschließen des Gerätes die
Anschlussdaten (Spannung und
oder unterbrochene
Schutzleiterverbindung verursacht
werden (z. B. elektrischer Schlag).
Frequenz) auf dem Typenschild
mit denen des Elektronetzes.
Diese Daten müssen unbedingt
übereinstimmen, damit keine
Schäden am Gerät auftreten. Im
Zweifelsfall fragen Sie Ihren
Elektroinstallateur.
Achtung! Wird der Stecker von
der Netzanschlussleitung entfernt,
muss das Gerät von einer
Elektrofachkraft eingebaut und
angeschlossen werden.
Beauftragen Sie bitte eine
Elektrofachkraft, die die
landesüblichen Vorschriften und
die Zusatzvorschriften der
örtlichen
Achtung! Benutzen Sie das
Gerät nur im eingebauten
Zustand. Nur so ist
sichergestellt, dass Sie nicht
mit Strom führenden Teilen in
Berührung kommen.
WARNUNG: Dieses Gerät kann
von Kindern ab 8 Jahren und
Personen mit verminderten
körperlichen, sensorischen
oder geistigen Fähigkeiten oder
einem Mangel an Erfahrung und
Wissen bedient werden, wenn
sie unter Aufsicht stehen oder
eine Unterweisung zum
sicheren Umgang mit dem
Gerät erhalten haben und die
Elektroversorgungsunternehmen
genau kennt und sorgfältig einhält.
Der Hersteller kann nicht für
Schäden verantwortlich gemacht
werden, die durch Fehler beim
Einbau oder Anschluss verursacht
werden.
Achtung! Die elektrische
Sicherheit des Gerätes ist nur
dann gewährleistet, wenn es an
ein vorschriftsmäßig installiertes
Schutzleitersystem angeschlossen
wird. Der Hersteller kann nicht für
Schäden verantwortlich gemacht
werden, die durch eine fehlende
damit verbundenen Gefahren
ver-stehen. Kinder dürfen nicht
mit dem Gerät spielen.
Reinigung und Wartung durch
den Benutzer dürfen von
Kindern nur unter Aufsicht
durchgeführt werden.

14
DE
Sicherheitshinweise
Achtung! Öffnen Sie auf keinen
Fall das Gehäuse des Gerätes.
Eventuelles Berühren
spannungsführender Teile sowie
Verändern des elektrischen und
mechanischen Aufbaus gefährden
Sie und führen möglicherweise zu
Funktionsstörungen des Gerätes.
Achtung! Installations- und
Wartungsarbeiten sowie
Reparaturen dürfen nur
qualifizierte Fachleute
durchführen. Durch
unsachgemäße Installations- und
Wartungsarbeiten oder
Reparaturen können erhebliche
Gefahren für den Benutzer
entstehen, für die der Hersteller
nicht haftet.
Achtung! Eine Reparatur des
vorgenommen werden, sonst
besteht bei nachfolgenden
Schäden kein Garantieanspruch
mehr.
Achtung! Bei Installations- und
Reparaturarbeiten muss das
Gerät vom Netz getrennt sein.
Das Gerät ist nur dann elektrisch
vom Netz getrennt, wenn eine der
folgenden Bedingungen erfüllt ist:
– die Sicherungen der
Hausinstallation ausgeschaltet
sind,
– die Netzanschlussleitung vom
Elektronetz getrennt ist. Ziehen
Sie bei Geräten mit Netzstecker
nicht an der Anschlussleitung,
sondern am Stecker, um das
Gerät vom Netz zu trennen.
Gerätes während der Garantiezeit
darf nur von einem vom Hersteller
autorisierten Kundendienst
 Loading...