

Page 1
MX-HS8000
PREMIUM HI-FI Component System
user manual
imagine the possibilities
Thank you for purchasing this Samsung product.
To receive more complete service,
please register your product at
www.samsung.com/register
Page 2
Safety Information
Warning
TO REDUCE THE RISK OF ELECTRIC SHOCK, DO NOT REMOVE THE COVER (OR BACK).
NO USER-SERVICEABLE PARTS ARE INSIDE. REFER SERVICING TO QUALIFIED SERVICE
PERSONNEL.
CAUTION
RISK OF ELECTRIC SHOCK DO NOT OPEN
CAUTION: TO PREVENT ELECTRIC SHOCK, MATCH WIDE
BLADE OF PLUG TO WIDE SLOT, FULLY INSERT.
WARNING
• To reduce the risk of fire or electric shock, do
not expose this appliance to rain or moisture.
CLASS 1 LASER PRODUCT
This Compact Disc player is classified as a CLASS
1 LASER product. Use of controls, adjustments
or performance of procedures other than those
specified herein may result in hazardous radiation
exposure.
Complies with 21CFR 1040.10 except for
deviations pursuant to Laser Notice No. 50, dated
June 24, 2007.
DANGER :
• VISIBLE AND INVISIBLE LASER RADIATION
WHEN OPEN. AVOID DIRECT EXPOSURE TO
BEAM. (FDA 21 CFR)
CAUTION :
• CLASS 3B VISIBLE AND INVISIBLE LASER
RADIATION WHEN OPEN. AVOID EXPOSURE
TO THE BEAM. (IEC 60825-1)
This symbol indicates "dangerous voltage"
inside the product that presents a risk of
electric shock or personal injury.
This symbol indicates important
instructions accompanying the product.
• THIS PRODUCT UTILIZES A LASER.
USE OF CONTROLS OR ADJUSTMENTS
OR PERFORMANCE OF PROCEDURES
OTHER THAN THOSE SPECIFIED HEREIN
MAY RESULT IN HAZARDOUS RADIATION
EXPOSURE. DO NOT OPEN COVER AND DO
NOT REPAIR YOURSELF. REFER SERVICING
TO QUALIFIED PERSONNEL.
CLASS 1 LASER PRODUCT
KLASSE 1 LASER PRODUKT
LUOKAN 1 LASER LAITE
KLASS 1 LASER APPARAT
PRODUCTO LÁSER CLASE 1
• An administration fee may be charged if either
an engineer is called out at your request and there is no defect in the product
(i.e. where you have failed to read this user's manual).
you bring the unit to a repair centre and there is no defect in the product
(i.e. where you have failed to read this user's manual).
• The amount of such administration charge will be advised to you before any work or home visit is
carried out.
2 English
Page 3
Precautions
• Ensure that the AC power supply in your house
complies with the identification sticker located
on the back of your product.
• Install your product horizontally, on a suitable
base (furniture), with enough space around it for
ventilation (3 - 4 inches/7.5 - 10 cm).
• Do not place the product on amplifiers or other
equipment which may become hot. Make sure
the ventilation slots are not covered.
• Do not stack anything on top of the product.
• Before moving the product, ensure the Disc
Insert Slot is empty.
• To turn off the product completely, disconnect
the AC plug from the wall outlet. Disconnect the
AC plug from the wall outlet if you will leave the
device unused for a long period of time.
• During thunderstorms, disconnect the AC plug
from the wall outlet. Voltage spikes due to
lightning could damage the product.
• Do not expose the product to direct sunlight
or other heat sources. This could cause the
product to overheat and malfunction.
• Protect the product from moisture, excess heat,
and equipment creating strong magnetic or
electric fields (i.e. speakers.).
• Disconnect the power cable from the AC supply
if the product malfunctions.
• Your product is not intended for industrial use. It
is for personal use only.
• Condensation may occur if your product or
disc has been stored in cold temperatures. If
transporting the product during the winter, wait
approximately 2 hours until the product has
reached room temperature before using.
• The batteries used with this product contain
chemicals that are harmful to the environment.
Do not dispose of batteries in the general
household trash.
• Please check the volume level before playing
not to startle the elderly, infirm and pregnant
woman at a sudden loud sound.
• Place the loudspeakers at a reasonable distance
on either side of the system to ensure good
stereo sound.
• Direct the loudspeakers towards the listening
area.
• Do not expose this apparatus to dripping or
splashing. Do not place objects filled with
liquids, such as vases, on the apparatus.
• To turn this apparatus off completely, you must
disconnect it from the wall outlet. Consequently,
the wall outlet and power plug must be readily
accessible at all times.
• Use only a properly grounded plug and
receptacle.
- An improper ground may cause electric shock
or equipment damage. (Class l Equipment
only.)
Disc Storage & Management
• Holding Discs
- Fingerprints or scratches on
a disc may reduce sound and
picture quality or cause skipping.
- Avoid touching the surface of a disc where
data has been recorded.
- Hold the disc by the edges so that fingerprints
will not get on the surface.
- Do not stick paper or tape on the disc.
• Cleaning Discs
- If you get fingerprints or dirt on a
disc, clean it with a mild detergent
diluted in water and wipe with a
soft cloth.
- When cleaning, wipe gently from the inside to
the outside of the disc.
• Disc Storage
`Do not keep in direct sunlight.
`Keep in a cool ventilated area.
`Keep in a clean protection jacket and store
vertically.
01 Safety Information
3 English
Page 4
Safety Information
Disc and Format Compatibility
This product does not support Secure (DRM)
Media files.
CD-R Discs
• Some CD-R discs may not be playable
depending on the disc recording device (CDRecorder or PC) and the condition of the disc.
• Use 650MB/74 minute CD-R discs.
Do not use CD-R discs over 700MB/80 minutes
as they may not be played back.
• Some CD-RW (Rewritable) media may not be
playable.
• Only CD-Rs that are properly "closed" can be
fully played. If the session is closed, but the disc
is left open, you may not be able to fully play the
disc.
MP3-CD Discs
• Only CD-R discs with MP3 files in ISO 9660 or
Joliet format can be played.
• MP3 file names should contain no blank spaces
or special characters (. / = +).
• Use discs recorded with a compression/
decompression data rate greater than 128Kbps.
• Only a consecutively written multisession disc
can be played. If there is a blank segment in the
Multisession disc, the disc can be played only
up to the blank segment.
• If the disc is not closed, it will take longer to
begin playback and not all of the recorded files
may play.
• For files encoded in the Variable Bit Rate (VBR)
format,( i.e. files encoded in both low bit rate
and high bit rate - 32Kbps ~ 320Kbps), the
sound may skip during playback.
• A maximum of 999 files can be played per CD.
Supported Audio Formats
File
Extension
*.mp3
*.wma
| NOTES |
✎Does not support WMA Professional codec.
✎The above table shows supported sampling
rates and bit rates. Files of not supported
formats may not be played properly.
Audio Codec
MPEG 1 Layer3
MPEG 2 Layer3
MPEG 2.5 Layer3
Wave_Format_
MSAudio1
Wave_Format_
MSAudio2
Sampling
Rate
16KHz ~
48KHz
16KHz ~
48KHz
16KHz ~
48KHz
16KHz ~
48KHz
16KHz ~
48KHz
Bit Rate
80Kbps ~
320Kbps
80Kbps ~
320Kbps
80Kbps ~
320Kbps
56Kbps ~
128Kbps
56Kbps ~
128Kbps
4 English
Page 5

Contents
SAFETY INFORMATION
2 Warning
3 Precautions
3 Disc Storage & Management
4 Disc and Format Compatibility
4 Supported Audio Formats
GETTING STARTED
7 Front Panel
8 Rear Panel
9 Remote Control
10 Accessories
10 Connecting the Speakers
10 Cautions on Moving the Speakers
11 Attaching the toroidal ferrite core to the
power cord
11 Looping the power cable around the
toroidal core
FUNCTIONS
12 The Display function
12 Changing Display mode
12 The DEMO Music function
12 Playing a CD
12 Loading a Compact Disc
12 CD/MP3/CD-R Playback
13 Selecting a Track
13 Searching for a Specific Music Passage on
a CD
13 Repeat One or All Tracks on a CD
14 Playing USB Devices
14 USB Device Playback
14 To Select a File from a USB Device
15 To Use High Speed Search
15 To Delete a File
15 To Move to the Next/Previous Folder
15 To safely remove a USB device
15 Read Before Connecting USB Storage
Devices
16 Searching for a Track Quickly
16 Using the Program Function
16 Viewing or Editing Programmed Tracks
17 Bluetooth
17 What is Bluetooth?
17 To connect the Hi-Fi Component to a
Bluetooth device
18 To disconnect the Bluetooth device from
the Hi-Fi Component
18 To disconnect the Hi-Fi Component from
the Bluetooth device
18 Using Bluetooth Power On
19 TV SoundConnect
19 To connect the Hi-Fi Component to a
SoundConnect Compatible Samsung TV
19 To disconnect the TV from the Hi-Fi
Component
19 To disconnect the Hi-Fi Component from
the TV
20 Using My Karaoke
20 Auto Change Function
20 Listening to the Radio
20 To Store the Stations You Want
21 Selecting a Stored Station
Contents
5 English
Page 6

Contents
21 Timer Function
21 Setting the Clock
21 Setting the Timer
23 Cancelling the Timer
23 The Recording Function
23 Basic Recording
24 Recording Speed
25 Special Sound Effects
25 Selecting EQ Mode
25 FOOTBALL MODE function
25 GOAL Function
26 GIGA SOUND Function
26 BEAT WAVING Function
26 DJ BEAT Function
27 +PANNING Funcion
27 NON-STOP MUSIC RELAY Function
27 DANCE TIME Function
27 TEMPO Function
27 Booting Sound Function
APPENDIX
28 Troubleshooting
29 Specifications
6 English
Page 7
Getting Started
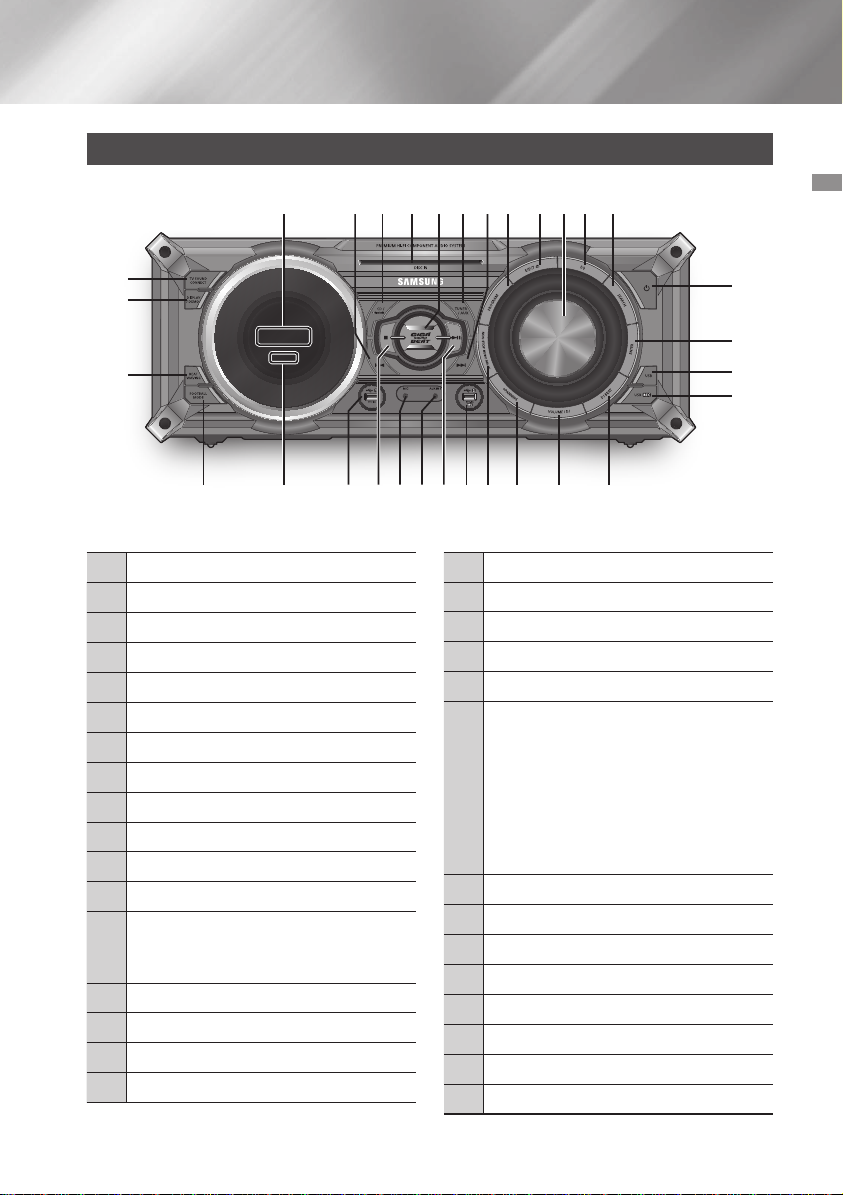
Front Panel
1
k
j
i
Display Panel
1
BACKWARD SEARCH/SKIP button
2
CD/Bluetooth button
3
DISC slot
4
GIGA SOUND BEAT button
5
TUNER/AUX button
6
FORWARD SEARCH/SKIP button
7
PROGRAM button
8
Eject button for Disc
9
VOLUME/SEARCH JOG
0
EQ button
!
SEARCH button
@
POWER button
#
• Press this button to switch your product
on or off.
ENTER button
$
USB button
%
USB REC button
^
DJ BEAT button
&
3 64 8 @9 !052 7
*
(
)
a
b
c
d
e
f
g
h
i
j
k
02 Getting Started
#
$
%
^
&*()be cf adgh
VOLUME / DJ button
+PANNING button
NON-STOP MUSIC RELAY button
USB 2 jack for Playing and USB Recording
PLAY/PAUSE button
AUX IN 1 jack
Use to connect an external device such as
an MP3 player.
• Connect AUX IN 1 on the front panel
of the product to the Audio Out of an
external device/MP3 player.
• Press the TUNER/AUX button to select
AUX1.
MIC jack
STOP button
USB 1 jack for only Playback
REMOTE CONTROL SENSOR
FOOTBALL MODE button
BEAT WAVING button
DISPLAY / DEMO button
TV SOUNDCONNECT button
7 English
Page 8

Getting Started
Rear Panel
2 4 5 6 73
1
Cooling fan
• The fan operates while the unit is
powered on.
If you set the unit to the minimum
1
volume, the fan won't operate.
Secure a minimum 6 inches (15 cm) of
clear space on from all sides of the fan
when installing the product.
POWER
2
• Insert only the provided power cable.
2.2 CH Speaker Terminals
1. To achieve the correct sound quality,
when you connect the speakers, match
the color of the speaker plugs to the
color of the speaker jacks. See below.
3
• LEFT channel (marked
• RIGHT channel (marked
• Don't force the Purple SUBWOOFER
connector into the White or Red speaker
jack.
LED Terminals for Speaker Beat
Waving, which do not distinguish
4
between left and right channel.
ONLY FOR SERVICE
5
• This jack is for testing only. Please do
not use.
, White/Purple).
, Red/Purple).
AUX IN 2 Terminals
1. Use an Audio Cable (not supplied) to
connect AUX IN 2 on the product to
Audio Out on an external analog output
device.
• Be sure to match connector colors.
• If the external analog output device has
6
only one Audio Out jack, connect either
left or right.
• Press the TUNER/AUX button to select
AUX 2.
• If the product is in AUX mode for more
than eight hours and no buttons on the
front panel or remote are pushed, the
system will turn off.
FM Antenna Terminals
1. Connect the FM antenna to the FM
antenna connector terminal.
2.
Slowly move the antenna wire until you find
a location where reception is good, then
7
fasten it to a wall or other rigid surface.
3.
If reception is poor, you may need to
install an outdoor antenna. To do so,
connect an outdoor FM antenna to the
FM socket on the rear of the system
using a 75Ω coaxial cable (not supplied).
8 English
Page 9
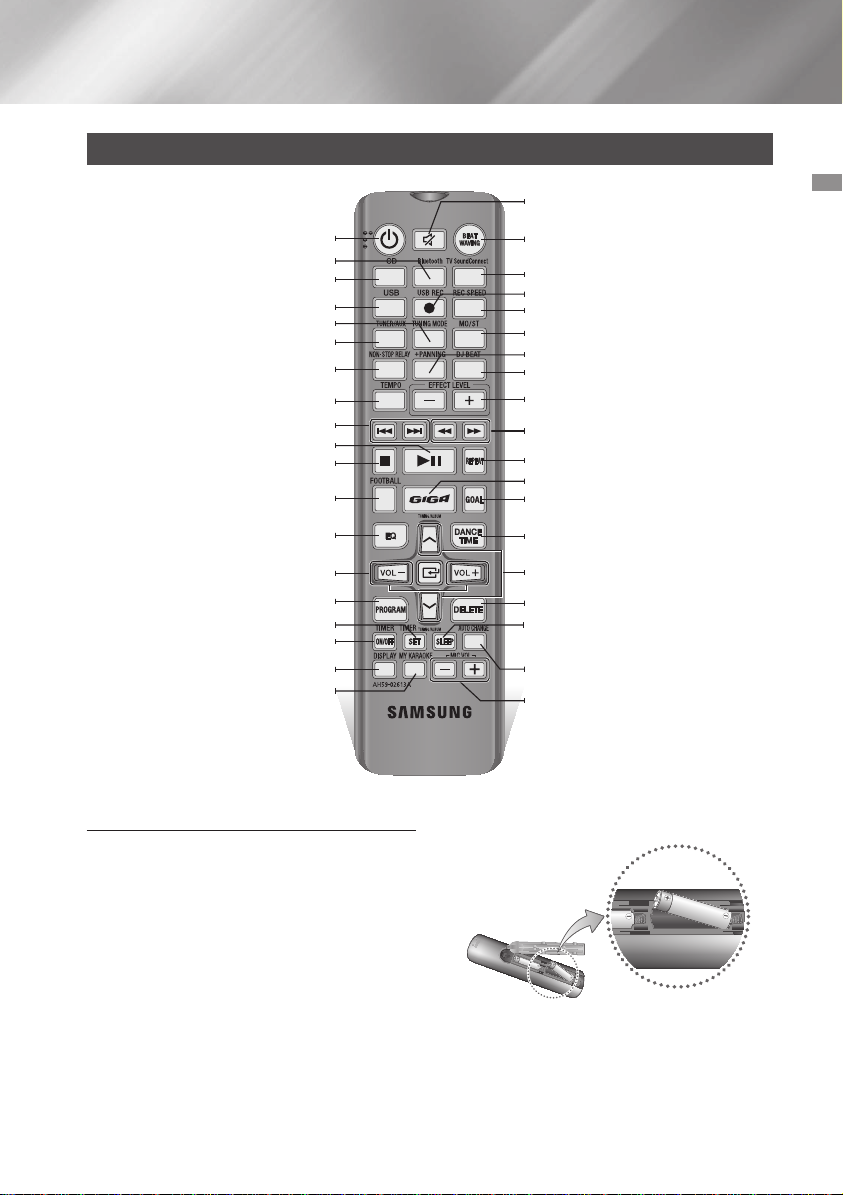
Remote Control
Power
Bluetooth
CD
USB
TUNING MODE
TUNER/AUX
NON-STOP MUSIC RELAY
TEMPO
SKIP
PLAY/PAUSE
STOP
FOOTBALL
EQ
VOLUME (–, +)
PROGRAM
TIMER SET
TIMER ON/OFF
DISPLAY
MY KARAOKE
MUTE (Turn off the sound temporarily. Press
again to turn the sound back on.)
BEAT WAVING
TV SoundConnect
USB REC
REC SPEED
MO/ST
+PANNING
DJ BEAT
EFFECT LEVEL
SEARCH
REPEAT
GIGA SOUND BEAT
GOAL
DANCE TIME
TUNING/ALBUM ,,
DELETE
SLEEP (Set a sleep time to shut off the
product.)
AUTO CHANGE
MIC VOLUME –, +
.
02 Getting Started
Installing Batteries In The Remote Control
• Place batteries in the remote control so they
match the polarity of the illustrations in the
battery compartment. : (+) to (+) and (–) to (–).
• Do not dispose of batteries in a fire.
• Do not short circuit, disassemble, or overheat
the batteries.
• There is a danger of explosion if the battery is
replaced with the wrong battery type.
• The remote control can be used up to
approximately 23 feet (7 meters) in a straight
line from the system.
9 English
Page 10
Getting Started
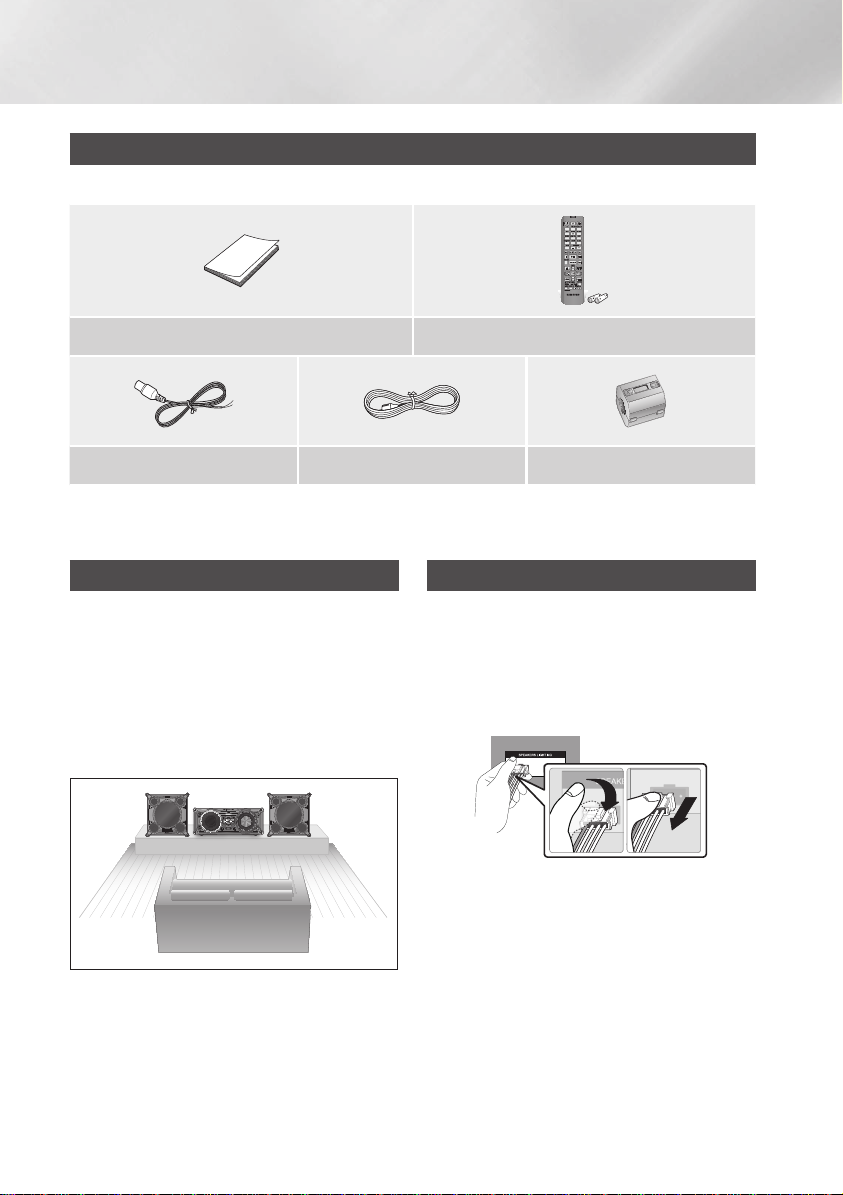
Accessories
Check for the supplied accessories below.
User Manual Remote Control/Batteries
FM Antenna Power Cable Toroidal ferrite core
• Figures and illustrations in this user's manual are provided for reference only and may differ from actual
product appearance.
Connecting the Speakers
Recommended speaker setup.
| IMPORTANT |
✎The product may not operate properly if it is
subject to shaking or external shocks or if the
speakers are not installed as recommended.
✎Do not stretch the speaker wires or place a
heavy object on them.
Cautions on Moving the Speakers
• When moving the main unit and speakers, make
sure to separate all connected speaker cables
before.
• When separating the SPEAKERS LIGHTING
cables, press the lock to release the connector
as shown below.
10 English
Page 11
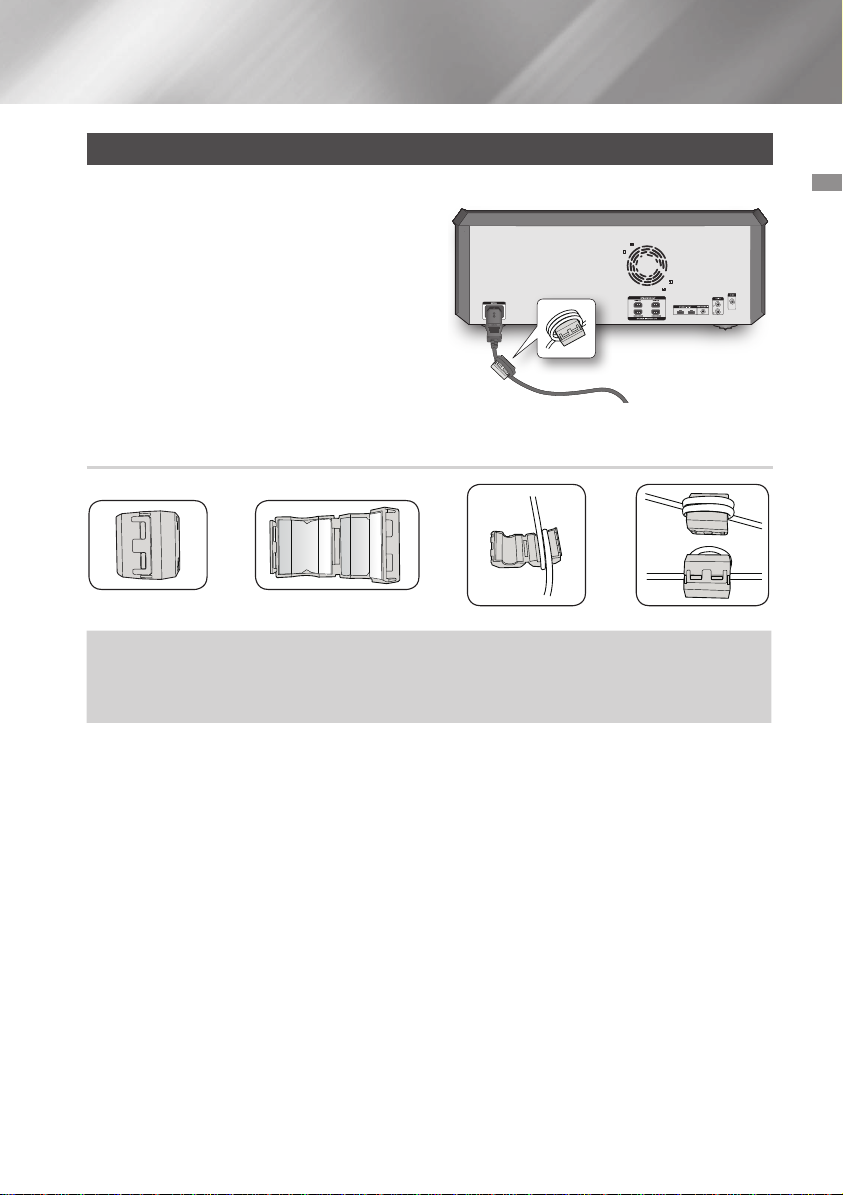
Attaching the toroidal ferrite core to the power cord
Attaching the Toroidal ferrite core to the power cord helps prevent RF interference from radio signals.
1. Pull the fixing tab of the Toroidal ferrite core to
open it.
2. Make two loops around the core with the power
cable. See the illustration below.
3. Attach the Toroidal ferrite core to the power cord
as shown in the illustration below, and then press
it until it clicks.
Looping the power cable around the toroidal core
➜ ➜ ➜
Lift up to release the
lock and open the
core.
Make two loops around the core
with the power cable. (Start winding
5 to 10 cm [2 - 4 in.] away from the
core).
Close the lock.
02 Getting Started
11 English
Page 12

Functions
The Display function
You can view functions available on the display,
adjust the brightness of the display and set the
Display/LED either on or off.
Changing Display mode
Press the DISPLAY/DEMO button on the product.
Each time you press this button, the mode will
change as follows:
• The Dimmer function
The Dimmer function is selected and the display
darkens.
• LED OFF
The Front display LED is turned off while the
dimmer function is working.
• Clock ON
The Clock you set is displayed.
• Display/LED ON
All displays and the LED are turned on.
The DEMO Music function
Press the DISPLAY/DEMO button on the product
or the DISPLAY button on the remote control for
5 seconds to start the Demo mode.
Each time you press either of these buttons, the
mode will change as follows:
DIMMER
display] ; LED On (unit/speaker)
;
LED Off (unit/speaker) ; --:-- [time
To cancel the Demo Music mode
• Press the DISPLAY/DEMO button on the
product or DISPLAY button on the remote
control again for 5 seconds.
The DEMO mode is cancelled and the product
is turns off.
• Press TUNER/AUX, CD/Bluetooth or USB
button on the product.
The DEMO mode is cancelled and the mode is
changed to the mode you selected.
| NOTES |
✎When the DEMO music function is on, only the
POWER (
the buttons mentioned above work.
✎The DEMO sampler plays for 3 minutes; only
the message remains displayed on the front
panel after its playback.
), VOL, MUTE ( ) buttons and
Playing a CD
Loading a Compact Disc
You can play standard compact discs that require
no adapter.
1. Insert a disc gently into the disc slot with the
disc's label facing up. The disc will be played
automatically.
• You can load or unload compact discs
when the radio, USB, or auxiliary source
function is selected. When you press the
8
button, all the other functions will
change to the CD mode.
• If no buttons are pressed on the product
or remote control for more than 3 minutes
when the product is in Pause mode, it will
change to Stop mode.
• If no buttons are pressed on the product
or remote control for more than 25 minutes
when the product is in Stop mode, the
product will turn off.
CD/MP3/CD-R Playback
| IMPORTANT |
✎This product is designed to play the following
audio disc types: CD, CD-R, CD-RW.
1. Insert a disc gently into the disc slot with the
disc's label facing up.
2. The disc is played automatically.
• For MP3/WMA file, it may take several
minutes for the product to finish scanning
the disc tracks.
• If you play a file with an English title, the
song title will be shown in the display. (Titles
in other languages can not be displayed.)
• An English-titled track containing a
special character (@, $, *, etc.) will not be
displayed.
<CD Playback Display>
Track Indicator
Playtime
Indicator
12 English
Page 13

3. To adjust the volume:
• Turn the VOLUME control on the product.
• Press the VOL+ or VOL- button on the
remote control.
The volume level can be adjusted in 31
steps (VOLUME MIN, VOLUME 01 ~
VOLUME 29, and VOLUME MAX).
4. Pausing playback
Main Unit
To pause playback temporarily, press the
button.
Press again to continue playing the disc.
Remote control
To pause playback temporarily, press the
button.
Press the button to continue playing the
disc.
5. To end playing, press the
| NOTES |
✎If no CD is in the disc slot, "NO DISC" appears
on the display.
✎The quality of MP3/CD-R playback may vary
depending on the condition of the disc or the
condition of the recorder used to create the
disc.
✎If a disc contains different types of files or
unnecessary folders, you will have problems
with playback.
✎Gently insert a CD into the disc slot. Do not
apply excessive force.
- Do not apply force to the product or place a
heavy object on the product.
- Do not insert an out-of-spec or oddly
shaped CD (heart shaped, octangular, etc.).
You can damage the product.
- Carefully maintain your CDs.
5
button.
Selecting a Track
You can select a desired track while the disc is
being played.
To play the previous track
Press the 1 button within 3 seconds after the
current track has started playing.
Press the 1 button twice, 3 seconds or more
after the current track starts playing.
To play the next track
Press the 2 button.
To play the current track from the
beginning
Press the 1 button, 3 seconds after the current
track started playing.
To play the track of your choice
Press the 1 or 2 button to move to a desired
track.
Searching for a Specific Music Passage
on a CD
When listening to a CD, you can quickly search for
a specific music passage on a track.
Forward Search ....................
Backward Search .................
You can also press and hold the 1, 2 buttons
on the product to automatically scan for a track.
3
4
Repeat One or All Tracks on a CD
You can play a CD or tracks on a CD repeatedly.
1. Press the REPEAT button on the remote
control.
Each time you press this button, the mode
changes as follows:
MP3 : OFF ; TRACK ; DIR ; ALL ; RANDOM
CD : OFF ; TRACK ; ALL ; RANDOM
03 Functions
13 English
Page 14

Functions
2. When you want to stop the repeat function,
press the REPEAT button until "OFF" is
displayed.
• OFF : Cancels repeat playback.
• TRACK : Repeatedly plays the selected
track.
• DIR (DIRECTORY) : Repeatedly plays all
tracks in the selected folder.
• ALL : Repeatedly plays the entire disc.
• RANDOM : Plays tracks in random order.
Playing USB Devices
Connect an external storage device such as a
USB flash memory or external HDD (Hard Disk
Drive) to the product. You can play files in MP3/
WMA format.
USB Device Playback
1. Connect the external USB storage device to
your product.
2. Select the USB mode by pressing the USB
button on the product or the USB button on
the remote control.
3. The first file of the first directory plays
automatically.
4. To stop playing
Press the
| NOTES |
✎To remove the USB device
- If you press the
| IMPORTANT |
✎Do not connect a USB recharger to the USB
port of this product. You can damage the
product.
5
button to stop playing.
5
remove the USB device safely.
button again, you can
To Select a File from a USB Device
You can select an MP3 file while the product is
playing.
| NOTES |
✎If you want to move to the previous/next track,
press the 1, 2 buttons briefly.
- The unit moves to the previous/next track
within the directory.
- If you press the 1, 2 buttons more times
than the number of the files in the directory,
the unit moves to the next directory.
To repeat
1. Press the REPEAT button.
Each time you press this button, the mode
changes as follows:
;
OFF
TRACK ; DIR ; ALL ; RANDOM
2. When you want to stop the repeat function,
press the REPEAT button until "OFF" is
displayed.
• OFF : Cancels repeat playback.
• TRACK : Repeatedly plays the selected
file.
• DIR (DIRECTORY) : Repeatedly plays all
files in the selected folder.
• ALL : Repeatedly plays all files.
• RANDOM : Plays files in random order.
| NOTES |
✎If the file selected to be played is located in a
folder all the files within that folder are played
in random order. If the file selected is located in
the root folder all files will be played in random
order.
14 English
Page 15

To Use High Speed Search
You can search a desired section quickly while the
product is playing.
Press the
• Each time you press the button, you move
| IMPORTANT |
3, 4
button.
through the section forward/backward quickly.
✎The product does not output sound during a
high speed search.
✎You can also press and hold the
button on the main unit to automatically scan
for a track.
1
or 2
To Delete a File
You can delete a file from your USB device.
1. Select a file you want to delete.
2. Press the DELETE button on the remote
control. "DELETE NO" is displayed.
3. Press the DELETE button on the remote
control and "DELETE YES" is displayed.
4. Press the
appears and deletion is completed.
¬
button. "DELETE END"
To Move to the Next/Previous Folder
Press the TUNING/ALBUM , / . button on the
remote control to move to the previous/next folder.
| NOTES |
✎When sound files are stored in the root
directory rather than in a folder, press the
TUNING/ALBUM , / . button to go to the
first TRACK.
To safely remove a USB device
1. Press the 5 button twice while the USB is
playing or press the 5 button once when
play has stopped.
2. When the REMOVE message appears on the
display, remove the USB device.
Read Before Connecting USB Storage
Devices
• Some USB devices may not work properly with
this product.
• This product only supports external HDD's that
are formatted in the FAT file system.
• USB 2.0 HDDs should be connected to a
separate power source. Otherwise, the USB 2.0
HDDs will not work.
• If multiple USB external storage are connected
together, only the MP3 files in the first HDD will
be played.
• Files with Digital Rights Management (DRM)
are not supported. DRM restricts unauthorized
access to a DRM file so that file is protected
from piracy.
• Even if a file has an .mp3 extension, the file
cannot be played if it is formatted in MPEG layer
1 or 2.
• Do not use an unrecognized USB hub.
• Only the first 15 characters of an audio file name
are shown on the product's display.
• Only removable HDDs with less than 160GB are
supported. Depending on the device, a 160GBor more removable HDD may not be supported.
• It can take several minutes for the product to
recognize the files on some USB devices.
• Some USB devices (USB HDDs, in particular)
may cause a delay when moving from track to
track.
• With USB storage devices supporting USB
VER1.1 only, the product may access files
slowly or may not recognize the file properties.
• The maximum electrical current provided by
each USB port to connected USB devices is
0.5A (based on DC 5V).
• If there is no USB connection or STOP mode
lasts for more than 25 minutes, the product will
automatically turn off.
• Some USB devices, digital cameras, USB card
readers, iPods, iPhones, and Smart Phones
may not be supported.
03 Functions
15 English
Page 16
Functions
Searching for a Track Quickly
You can select a track directly without the 1, 2
button.
CDDA/MP3-CD/USB
1. Press the SEARCH button.
After pressing the SEARCH button, turn
the VOLUME/SEARCH JOG control on the
product to the left or right to select a desired
track.
• You can move to the selected track directly.
2. When searching is done, the track will
automatically start playing.
Using the Program Function
This function is not available during playback of an
MP3-CD/USB.
• You can program the playback order of up to 99
tracks of your choice.
• However, you must stop playing the CD/USB
before selecting tracks.
1. While in CD/USB playback mode, press the
5
button to stop playing the CD/USB.
2. Press the PROGRAM button to display the
message below:
PROG 01 TRACK---
(01= program number, ---= track number)
3. Use the 1 or 2 button or the VOLUME/
SEARCH JOG to move to a desired track.
• Press 1 to move to the previous track.
• Press 2 to move to the next track.
4. Press the
selection. The selection is stored and
5. To select another track, follow Steps 3 and 4
above.
6. Press the
tracks.
7. Press the
programmed tracks, Press the 5 button
again to cancel playing the programmed
tracks.
¬
button to confirm your
is displayed.
button to play the programmed
5
button to stop playing the
• If you eject the disc, CD programming is
cancelled.
If you turn off the product, CD/USB
programming is cancelled.
| NOTES |
✎CD/USB program play will continue if you try to
switch to another mode.
✎USB REC, DELETE and TUNING/ALBUM
buttons will not work in Program mode. If
you press such buttons in Program mode,
“PROGRAM PLAY” will be displayed instead.
✎If a file in the program to be played was not in
a supported format, playback skips to the next
file automatically.
Viewing or Editing Programmed Tracks
You can view and edit a list of programmed tracks.
1. If a programmed track is being played, press
5
button once.
the
2. Press the PROGRAM button twice to display
the message below:
SAVED 01 TRACK002
(01= program number, 002= track number)
¬
3. Repeatedly press the
desired track is displayed.
4. Press the 1 or 2 button to select a
different track.
5. Press the
selection.
6. To play the programmed tracks, press the
button.
¬
button to confirm your
To repeat
1. Press the REPEAT button.
Each time you press this button, the mode
changes as follows:
;
OFF
button until the
TRACK ; ALL
16 English
Page 17

Bluetooth
You can use a Bluetooth device to enjoy music
with high quality stereo sound, all without wires!
What is Bluetooth?
Bluetooth is a technology that enables Bluetooth
compliant devices to interconnect easily with each
other using a short, wireless connection.
• A Bluetooth device may cause noise or
malfunction, depending on usage, when:
- A part of your body is in contact with the
receiving/transmitting system of the Bluetooth
device or the Hi-Fi Component.
- It is subject to electrical variation from
obstructions caused by a wall, corner, or
office partitioning.
- It is exposed to electrical interference from
same frequency-band devices including
medical equipment, microwave ovens, and
wireless LANs.
• Pair the Hi-Fi Component with the Bluetooth
device while they are close together.
• The greater the distance between the HiFi Component and the Bluetooth device, the
worse the quality. If the distance exceeds the
Bluetooth operational range, the connection is
lost.
• In poor reception areas, the Bluetooth
connection may not work properly.
• The Bluetooth connection only works when
the Bluetooth device and the Hi-Fi Component
are close together. The connection will be
automatically cut off if the Bluetooth device
is out of range. Even within range, the sound
quality may be degraded by obstacles such as
walls or doors.
• This wireless device may cause electric
interference during its operation.
To connect the Hi-Fi Component to a
Bluetooth device
Before you begin, confirm that your Bluetooth
device supports the Bluetooth-compliant stereo
headset function.
1. Press the CD/Bluetooth button of the HiFi Component to display the BLUETOOTH
message.
• You will see WAIT for a short period of time
and then READY on the front display of the
Hi-Fi Component.
2. Select the Bluetooth menu on the Bluetooth
device you want to connect. (Refer to the
Bluetooth device's user manual.)
3. Select the Stereo headset menu on the
Bluetooth device.
• You will see a list of scanned devices.
4. Select "[Samsung] HI-FI XXXXXX" from the
list.
• When the product is connected to
the Bluetooth device, it will display
CONNECTED
front display.
• If the Bluetooth device has failed to pair
with the product, delete the previous
"[Samsung] HI-FI XXXXXX" found by the
Bluetooth device and have it search for the
product again.
5. You can listen to the music playing on the
connected Bluetooth device over the Hi-Fi
Component system.
• In Bluetooth mode, some model's Play/
Stop/Next/Back functions are not available.
| NOTES |
The product only supports Middle Quality
SBC data (up to 237kbps@48kHz), and
does not support High Quality SBC data
(328kbps@44.1kHz).
✎The AVRCP feature is not supported.
✎Connect only to a Bluetooth device that
supports the A2DP (AV) function.
✎You cannot connect to a Bluetooth device that
supports only the HF (Hands Free) function.
;
BLUETOOTH on the
03 Functions
17 English
Page 18

Functions
✎Only one Bluetooth device can be paired at a
time.
✎Once you have turned off the Hi-Fi Component
and the pairing is disconnected, the pairing will
not be restored automatically. To reconnect,
you must pair the device again.
✎The Hi-Fi Component system may not search
or connect properly in the following cases:
- If there is a strong electrical field around the
Hi-Fi Component.
- If several Bluetooth devices are
simultaneously paired with Hi-Fi Component.
- If the Bluetooth device is turned off, not in
place, or malfunctions.
- Note that such devices as microwave ovens,
wireless LAN adaptors, fluorescent lights,
and gas stoves use the same frequency
range as the Bluetooth device, which can
cause electric interference.
To disconnect the Bluetooth device
from the Hi-Fi Component
You can disconnect the Bluetooth device from
the Hi-Fi Component. For instructions, see the
Bluetooth device's user manual.
• The Hi-Fi Component will be disconnected.
• When the Hi-Fi Component is disconnected
from the Bluetooth device, the Hi-Fi Component
displays DISCONNECTED
display.
;
READY on its
To disconnect the Hi-Fi Component
from the Bluetooth device
Press another mode button on the front panel of
the Hi-Fi Component to switch from Bluetooth
mode to another mode or turn off the Hi-Fi
Component. The currently connected device is
disconnected.
| NOTES |
✎The connected Bluetooth device will wait a
certain amount of time for a response from
the Hi-Fi Component before terminating the
connection. (Disconnection time may differ,
depending on the Bluetooth device)
✎In Bluetooth connection mode, the Bluetooth
connection will be lost if the distance between
the Hi-Fi Component and the Bluetooth device
exceeds 16.25 feet (5 meters).
✎If the Bluetooth device comes back into the
effective range after disconnecting, you can
restart the Hi-Fi Component to restore the
pairing with the Bluetooth device.
✎The Hi-Fi Component automatically turns off
after 25 minutes in the Ready mode.
✎When a Bluetooth device is connected to the
Hi-Fi Component system, the Hi-Fi Component
System automatically switches to the Bluetooth
mode if it was in a different mode.
Using Bluetooth Power On
When the product is turned off, you can connect
your smart device to the product via a Bluetooth
connection to turn it on.
1. Press and hold the Bluetooth button on
the remote to set the Bluetooth Power On
function On. Bluetooth Power On appears on
the display.
2. When the product is off, connect your smart
device to the product via Bluetooth. (For
information on Bluetooth connections, refer
to your smart device's manual.)
3. When the connection is complete, the
product turns itself on automatically in
Bluetooth mode.
• Select the desired music to play from your
smart device.
| NOTES |
✎Press and hold the Bluetooth button on the
remote control to turn the Bluetooth Power On
function on or off.
Each time you press and hold this button, the
Hi-Fi Component displays Bluetooth Power
;
On
Off on its display.
18 English
Page 19

TV SoundConnect
You can listen to the sound from your
SoundConnect Compatible Samsung TV
through the Hi-Fi Component by using the TV
SoundConnect function.
To connect the Hi-Fi Component to a
SoundConnect Compatible Samsung
TV
Before activating this function, be sure to set the
Samsung TV's SoundConnect or SoundShare
function to On.
1. Press the TV SoundConnect button of
the Hi-Fi Component to display the TV
SOUNDCONNECT message.
;
SEARCH ; REQUEST
WAIT
2. Set Add New Device to On in the TV's
SoundConnect Settings menu. (Refer to the
TV's user manual for details.)
3. When the Hi-Fi Component is connected
to the TV, it will display [TV] Name
CONNECTED on the front display.
4. The audio from the connected TV plays over
the Hi-Fi Component system.
| NOTES |
✎The SoundConnect feature is available on some
Samsung TVs released since 2012. Check
whether your TV supports the SoundShare or
SoundConnect function.
(For further details, refer to the TV's user's
manual.)
✎If you unplug the Hi-Fi Component, the TV
SoundConnect connection is terminated. To
re-establish the connection, plug the Hi-Fi
Component into an outlet, and then set the TV
SoundConnect connection again.
;
✎Only one Hi-Fi Component can be connected
to a TV via TV SoundConnect.
✎To connect to another TV in TV SoundConnect
at time, press the
seconds, and then connect to the other TV by
following the directions above.
button for more than 5
To disconnect the TV from the Hi-Fi
Component
You can disconnect the TV from Hi- Fi
Component.
For instructions, see the TV's user manual.
• When the Hi-Fi Component is disconnected
from the TV, the Hi-Fi Component displays
DISCONNECTED
;
REQUEST on its display.
To disconnect the Hi-Fi Component
from the TV
Press another mode button on the front panel
of the Hi-Fi Component to switch from TV
SoundConnect mode to another mode or turn off
the Hi-Fi Component. The currently connected
device is disconnected.
| NOTES |
✎The connected TV will wait a certain amount
of time for a response from the Hi-Fi
Component before terminating the connection.
(Disconnection time may differ, depending on
the TV)
✎The connection may be lost or sound may
stutter if the distance between the TV and the
Hi-Fi Component exceeds 6.5 feet (2 m).
✎Instability in the network environment may
cause the connection to be lost or sound to
stutter.
✎The Hi-Fi Component automatically turns off
after 25 minutes if it is not connected to a TV.
03 Functions
19 English
Page 20

Functions
Using My Karaoke
You can use the MY Karaoke function to sing
along with your favorite CDs and USB tracks.
1. Connect the microphone to the MIC jack on
the front of the product.
• If your microphone plug is larger than the
3.5 mm MIC jack, you need a ConnectorAdaptor (not supplied) to complete the
connection.
- First, connect the Connector-Adaptor to
the MIC jack on the front of the product,
- Second, connect the microphone (with
larger jack) to the Connector-Adaptor.
2. Press the MIC VOL-, + button on the
remote control to adjust the volume of the
microphone.
3. Press the MY KARAOKE button on the
remote control to suppress the vocal if you
need to. Each time you press the button, the
selection changes as follows:
MY KARAOKE ON
• If you hear strange noises (squealing or
howling) while using the Karaoke feature,
move the microphone away from the
speakers. Turning down the microphone's
volume or the speaker volume is also
effective. Do not aim the MICROPHONE
towards the SPEAKERS.
• The microphone does not operate in the
AUX and TUNER mode.
• If you connect a microphone, GIGA
SOUND automatically turns off. To turn
Giga Sound back on you must remove
the microphone, and then press the GIGA
SOUND BEAT button.
• When My Karaoke is on, GIGA SOUND
does not work.
• When you turn My Karaoke off, all My
Karaoke settings are lost.
• My Karaoke is only available when a
microphone is connected to the Hi-Fi
Component.
• My Karaoke does not operate in the
Bluetooth, TV SoundConnect, FM and AUX
mode.
;
MY KARAOKE OFF
Auto Change Function
You can circularly play between the disc and the
USB.
1. Press the AUTO CHANGE button to select a
mode and press
• If Program Play has not been set in CD/
USB
AUTO CHANGE OFF
• If Program Play has been set in CD/USB
AUTO CHANGE OFF
AUTO CHANGE PROGRAM
• When the AUTO CHANGE mode is "ALL",
- the music will be played on DISC
USB1 ; USB2 continuously.
- if you press the POWER button, function
change button or the EJECT button, the
AUTO CHANGE function automatically
switches to "OFF" mode.
- the recording can't work.
- the REPEAT function can't work and
automatically changes to OFF.
- the REC SPEED, USB REC button can't
work.
• When USB is playing, if you disconnected
the USB, the AUTO CHANGE function
automatically switches to "OFF" mode.
• If there's no USB1, it will jump to USB2.
¬
to apply your selection.
;
AUTO CHANGE ALL
;
AUTO CHANGE ALL ;
;
Listening to the Radio
To Store the Stations You Want
You can store up to:
15 FM stations.
1. Select FM by pressing the TUNER/AUX
button.
2. To search for a station, press the TUNING
MODE button on the remote control or the
button on the product one or more times until
MANUAL is displayed.
@
20 English
Page 21

3. Find a station by:
• Pressing and holding the TUNING/ALBUM
or . button on the remote control
,
to automatically search for broadcasting
stations.
4. Press the MO/ST button to switch between
stereo and mono.
• In a poor reception area, select MONO for
a clear, interference-free broadcast.
• This applies only when listening to an FM
station.
5. If you do not want to store the radio station
found, go back to Step 3 and search for
another station.
Otherwise:
a. Press the
b. Or, press the TUNING/ALBUM button
on the remote control to select a program
number in the PRESET mode.
c. Press the
6. To store other radio frequencies, repeat Steps
3 to 5.
¬
button.
¬
button to save the preset.
Selecting a Stored Station
To listen to a stored station, follow these steps:
1. Select FM by pressing the TUNER/AUX
button on the product or remote control.
2. Press the TUNING MODE button on the
remote control until "PRESET" is displayed.
3. Press the 1, 2 buttons on the main unit or
the TUNING/ALBUM ,, . buttons on the
remote control to select a preset number.
Timer Function
Setting the Clock
For each step, you have a few seconds to set the
required options. If you exceed this time, you must
start again.
1. Press the TIMER SET button on the remote
control twice. "CLOCK SET" is displayed.
2. Press the ¬ button on the remote control.
The hour flashes.
To increase the hours: TUNING/ALBUM
•
•
To decrease the hours: TUNING/ALBUM
3. When the correct hour is displayed, press the
button, and then the minutes flash.
¬
•
To increase the minutes: TUNING/ALBUM
•
To decrease the minutes: TUNING/ALBUM
4. When the correct minute is displayed, press
the ¬ button. "TIMER PLAY SET" appears
in the display.
,
.
,
.
Setting the Timer
The timer enables you to set the product to switch
on or off at specific times automatically.
• Before setting the timer, check that the current
time is correct.
• For each step, you have a few seconds to set
the required options. If you exceed this time,
you must start again.
• If you no longer want the product to be switched
on or off automatically, you must cancel the
timer by pressing the TIMER ON/OFF button.
Example: You want to wake up to
music every morning.
1. Press the TIMER SET button until TIMER
PLAY SET is displayed.
2. Press the ¬ button.
Result: ON TIME is displayed for a few
seconds. You can set the timer switch-on
time.
03 Functions
21 English
Page 22
Functions
3. Set the timer switch-on time.
a. Press the TUNING/ALBUM , or .
button to set the hours.
b. Press the ¬ button.
Result: The minutes flash.
c. Press the TUNING/ALBUM , or .
button to set the minutes.
d. Press the ¬ button.
Result: OFF TIME is displayed for a few
seconds. You can now set the timer
switch-off time.
4. Set the timer switch-off time.
a. Press the TUNING/ALBUM , or .
button to set the hours.
b. Press the ¬ button.
Result: The minutes flash.
c. Press the TUNING/ALBUM , or .
button to set the minutes.
d. Press the ¬ button.
Result: VOLUME XX is displayed, where
XX corresponds to the volume already
set.
5. Press the TUNING/ALBUM , or . button
to adjust the volume level and press the ¬
button.
Result: The source to be selected is
displayed.
6. Press the TUNING/ALBUM , or . button
to select the source the Hi-Fi Component will
play when it switches on.
If you select You must also
FM (radio) a. Press the ¬ button.
b. Select a preset station
by pressing the
TUNING/ALBUM ,
or . button.
CD (compact
disc)
USB Connect a USB device.
Load a compact disc.
7. Press the ¬ button.
Result: TIMER REC SET (Do you want to
record?) is displayed.
8. Press the ¬ button.
Result: REC SET YES/NO is displayed. You
can press the TUNING/ALBUM , or .
button to select REC YES or REC NO, and
then press
1) If you select REC NO, it will cancel tuner
2) If you select REC YES, you can set the
| NOTES |
✎Tuner timer recording On/Off times can differ
from Timer On/Off times.
✎If the timer switch on and off times are identical,
the word ERROR is displayed.
✎You can use the 1, 2 buttons on the
product instead of the TUNING/ALBUM ,
or . button to make adjustments in Steps 3
through 8.
✎If the switch-on or -off time is the same as the
timer recording time, only the switch-on or -off
time is effective, and the timer recording is not
applied.
✎When you use the auto timer, you may need
an additional step to use a CD or USB device
with it, depending on the disc (or device).
Consequently, it is easier to use the tuner
instead.
✎If you select CD or USB mode when there
is no disc or no USB in the product, it will
automatically change to TUNER.
¬
button.
timer recording and any currently set tuner
timer recording. Note that selecting REC
NO does not cancel the Timer setting.
tuner timer recording on and off times.
a. Press the ¬ button.
Result: ON TIME is displayed for a few
seconds. You can set the tuner timer
recording switch-on time.
b. Press the ¬ button.
Result: OFF TIME is displayed for a
few seconds. You can set the tuner
timer recording switch-off time.
22 English
Page 23
Cancelling the Timer
After you have set the timer, it will start
automatically. When it starts, the TIMER ON
message appears on the display. If you no longer
want to use the timer, you must cancel it.
• To cancel the timer, Press the TIMER ON/OFF
button once.
• To restart the timer, Press the TIMER ON/OFF
button once again.
| NOTES |
✎When you select the TIMER OFF mode, the
TIMER RECORDING and TIME function are not
available.
The Recording Function
Basic Recording
You can record from a CD, a USB device, a radio
broadcast, or an external source to a USB storage
device.
1. Connect an external USB storage device to
a USB (
can use USB 2.
2. Play a disc or USB, turn on the radio and
select a station, or connect an external
source to your product as described below.
CD
• Press the CD button on the product to
select the CD function.
• Insert a CD gently into the disc slot.
• Use the CD selection (1 or 2) buttons to
select the desired song.
TUNER
• Select FM by pressing the TUNER/AUX
button.
• Select the radio frequency you want to
record.
) jack on your product. You
USB 1 (Recording device is on USB 2)
• Connect the USB device with the files you
want to record to USB 1 jack.
• Press the USB button to select USB 1.
• Play a song from the USB 1.
External Source
• Connect an External device/MP3 player to
the product.
• Press the TUNER/AUX button to select
AUX IN 1 or AUX IN 2.
• Play a song from the external device.
3. Press the USB REC button on the remote
control to start recording.
CD
• CD recording starts and "TRACK RECORD"
and the current track number appear on
the display alternately.
• If you want to record all the tracks on the
disc, press and hold the USB REC button.
"FULL CD RECORD" is displayed.
RADIO
• "TUNER RECORD" is displayed and
recording starts.
CD-ROM/USB
• "FILE COPY" is displayed and recording
starts.
• You can also copy a folder containing MP3/
WMA files to a device on USB 2. Press
and hold the USB REC button while the
system plays an MP3 or WMA file located
in a folder. Your system displays "FOLDER
COPY", and will record all the files in that
folder.
• When the recording is done, "STOP" is
displayed.
• If there is a file with the same name on the
USB 2 device, "EXIST FILE" is displayed,
and the function is canceled.
03 Functions
23 English
Page 24

Functions
• If a microphone is connected to the product
and you press the USB REC button, you
activate the MP3 Recording function, not
the Copy function.
• Press the USB REC button for a second
to start FILE COPY. Press and hold the
USB REC button for a few seconds to start
FOLDER COPY.
External Source
• "AUX RECORD" is displayed and recording
starts.
CD/USB1(MP3) & MIC
• "MP3 RECORD" is displayed and recording
starts.
4. To stop recording, press the 5 button. The
recording is automatically saved as an MP3
file.
5. After the recording is finished, a directory
named "RECORDING"(CD-DA), "COPY" (CDROM/USB), "TUNER RECORDING", "AUX
RECORDING" or "MP3 RECORDING" is
created in your device.
| NOTES |
✎WMA/MP2 files can only be copied not
recorded.
✎Do not disconnect the USB device or the AC
Cord during recording. You can cause file
damage.
✎If you disconnected the USB device during
recording, the product will turn off and you
will not be able to delete the file that has been
recorded. If this occurs, connect the USB
device to a PC, back up the USB data to the
PC, and then reformat the USB device.
✎If the USB device does not have enough
memory, "NOT ENOUGH MEMORY" will
appear on the display.
✎The Recording function supports the FAT file
systems only. The NTFS file system is not
supported.
✎When you use the CD high speed search
function, the CD recording function is
unavailable.
✎With some USB devices, recording time may
be longer.
✎In the Program mode, you can't use the
recording function.
✎When the Recording function is active, the EQ
and GIGA SOUND functions automatically turn
off and are unavailable.
✎During a CD recording, the REPEAT function
automatically turns off and is unavailable.
✎If you use the MIC function during a CD
recording, the voice from the microphone will
be recorded.
✎You can not record audio from the radio
when searching for a station or if there are no
frequencies available when the product is set
to Tuner mode.
✎Note that setting the input level too loud when
recording music from an external device
through the AUX or USB channel may introduce
noise into the recording. If this occurs, lower
the external device's volume level.
Recording Speed
Each time you press the REC SPEED button
on the remote control, the recording speed will
change as follows:
;
RECORD SPEED x 1
• When you record from the tuner or an external
source, you cannot change the recording
speed.
• If you select RECORD SPEED X 4, sound is not
produced during the recording.
• If you connect the microphone, you have one
recording speed mode available: RECORD
SPEED X 1.
• During recording, if you disconnect the
microphone, the recording will stop. If you
reconnect the microphone, the recording will
not restart.
| NOTES |
✎Even when RECORD SPEED x4 is set,
recording may not be made in x4 speed
depending on the used USB storage device.
RECORD SPEED x 4
24 English
Page 25

Special Sound Effects
Selecting EQ Mode
Your Hi-Fi Component system provides predefined
equalizer settings that are optimized for particular
music genre. You can also adjust the bass, middle,
and treble levels manually.
1. Press the EQ button.
Each time you press the EQ button or turn
the VOLUME/SEARCH JOG control on the
product, the mode changes as follows:
;
OFF
FLAT ; RANCHERA ; CUMBIA
;
REGGAE ; MERENGUE ; SALSA ;
REGGATON ; FOLKLORE ; PARTY ; POP
;
HIP-HOP ; ROCK ; JAZZ ; CLASSIC ;
ELEC-TRONIC ; MP3 ENHANCER ; VIRTUAL
2. To set the BASS, MID (Middle), and TREB
(Treble) levels manually, select USER EQ, and
then press the ¬ button.
Result: The BASS level (left numeric) flashes.
Press the 1 or 2 button on the product or
TUNING/ALBUM ,, . button to select a
level from -06 to 06.
Then, press the ¬ button.
Result: The MIDDLE level (middle numeric)
flashes.
Press the 1 or 2 button on the product or
TUNING/ALBUM ,, . button to select a
level from -06 to 06.
Then, press the ¬ button.
Result: The TREBLE level (right numeric)
flashes.
Press the 1 or 2 button on the product or
TUNING/ALBUM ,, . button to select a
level from -06 to 06.
Then, press the ¬ button.
Result: Setting is complete.
SOUND ; USER EQ
| NOTES |
✎When the Hi-Fi Component is recording, the
EQ function is turned off automatically and is
unavailable.
✎If no buttons are pressed within 8 seconds,
your settings will automatically be cancelled
and the previous settings will be saved.
✎The EQ mode may be different depending on
your region.
✎Use the VOLUME/SEARCH JOG to alter the
EQ mode, and the selected EQ mode will be
applied after 2 seconds.
✎Use the VOLUME/SEARCH JOG to alter
the EQ mode and press
disappears.
¬
. EQ screen
FOOTBALL MODE function
The football mode brings greater realism to sports
broadcasts.
1. Press the FOOTBALL MODE button on the
product.
Each time you press this button, the mode
changes as follows:
;
ANNOUNCER ; STADIUM
OFF
2. To cancel this function, press the FOOTBALL
MODE button until "OFF" is displayed.
GOAL Function
Press this button to add the sound of cheering
while watching a football game.
1. Press the GOAL button on the remote
control.
Each time you press this button, the mode
changes as follows:
;
GOAL ON
2. To cancel this function, press the GOAL
button until "GOAL OFF" is displayed.
GOAL OFF
03 Functions
25 English
Page 26

Functions
| NOTES |
✎Press the GOAL button to output the currently
playing sound file mixed with the GOAL sound.
GIGA SOUND Function
The GIGA SOUND function amplifies the bass
sound and provides twice the bass for powerful,
realistic sound.
1. Press the GIGA SOUND BEAT button on the
main unit or the GIGA button on the remote
control. Each time you press this button, the
mode changes as follows:
;
GIGA SOUND BEAT
2. To cancel this function, press the GIGA
SOUND BEAT button until "GIGA SOUND
OFF" is displayed.
| NOTES |
✎The GIGA SOUND mode may be different
depending on your region.
GIGA SOUND OFF
BEAT WAVING Function
The Beat Waving function lets you change the
Speaker LED display mode.
1. Press the BEAT WAVING button on the
product or on the remote control.
Each time you press this button, the mode
changes as follows:
STARDUST ; EMERALD MOON ; SOLAR
BOMB ; SHOOTING STAR ; STAR ;
PARTY 1 ; PARTY 2 ; FUN 1 ; FUN 2 ;
PURE ; FRESH ; LOVE ; JOY ; SUNSET ;
SUNRISE ; NATURE 1 ; NATURE 2 ; WAVE 1
;
WAVE 2 ; AURORA ; OFF
| NOTES |
✎If you select BEAT WAVING OFF, all the
speaker LED displays are turned off.
DJ BEAT Function
The DJ Beat function lets you turn on the DJ Beat
sound effect functions. The level of each effect is
adjustable.
Press the DJ BEAT button on the remote control
or on the product.
Each time you press this button, the mode
changes as follows:
| IMPORTANT |
✎
You can set each of the DJ Beat functions from
-15 to +15. The initial setting for all functions is 0.
• FLANGER : Creates an effect similar to the
sound of a jet engine revving up and down.
• CHORUS : Creates an effect similar to a singing
chorus.
• WAHWAH : Creates a 'Wah~ Wah~' effect.
• TREMOLO : Repeatedly and rapidly turns the
volume up and down.
• FUZZ : Distorts the original sound to make it
harder and harsher.
• PHASER : Alters the original sound from clear
to dull.
• SLAPBACK : Creates the effect of a slapback
echo following the original sound.
• DJ BEAT OFF : Turns off this function.
| NOTES |
✎The red LED turns on around the button you
pushed and around the DJ BEAT button.
✎You can control the intensity of the effect with
the Volume Jog. To control the volume, press
the product's VOLUME/DJ button.
✎To cancel an effect, press the effect's button
again.
✎You can also control the effect using the
EFFECT LEVEL button on the remote control.
✎Use the Volume Jog to control the intensity of
the effect that was activated last. For example,
if you activated the WahWah effect and then
the Panning effect, the Volume Jog will control
the Panning effect.
✎To control the intensity of the effect you applied
first, press the button of effect that you applied
last to turn it off. Then, you can use the Volume
Jog to control the intensity of the first effect.
26 English
Page 27

+PANNING Funcion
Increases the left and right speaker's output in
turn and makes it seem as if the sound is moving
from side to side.
| NOTES |
✎To apply the PANNING effect to another effect,
press the +PANNING button when the other
effect is active or press another effect button
when the PANNING effect is active.
NON-STOP MUSIC RELAY Function
The NON-STOP MUSIC RELAY function plays
music continuously without an interval between
tracks/files. If there were two mp3 files, it skips to
the next file's 10 seconds from the start position
when the previous track reaches its10 seconds
before the end position.
Press the NON-STOP MUSIC RELAY button on
the product or NON-STOP RELAY button on the
remote control.
Each time you press this button, the mode
changes as follows:
;
NON-STOP RELAY ON
| NOTES |
✎This function is only available during playback
of a CD/USB.
NON-STOP RELAY
OFF
DANCE TIME Function
Press the DANCE TIME button on the remote
control when playing music to play the dance
music stored in the product.
Use this function to enjoy exciting music.
1. Press the DANCE TIME button on the
remote control.
Each time you press this button, the mode
changes as follows:
DANCE TIME ON
2. To cancel this function, press the DANCE
TIME button until "DANCE TIME OFF" is
displayed.
;
DANCE TIME OFF
| NOTES |
✎When the DANCE TIME sound file finishes
playing, the DANCE TIME mode changes to
DANCE TIME OFF.
✎When DANCE TIME mode is swithed ON, the
B/T, TV SoundConnect, TUNER, and AUX
sources enter Mute mode. The music that is
currently playing is paused.
✎When you turn off DANCE TIME, any CD or
USB whose playback had been paused when
you started DANCE TIME, resumes from the
beginning of the track that had been playing.
✎When playing a DANCE TIME sound file, you
can change the dance music by pressing the
button.
1, 2
TEMPO Function
Use this to change the TEMPO while music is
playing.
1. During playback (CDDA/ MP3/ WMA), press
the TEMPO button on the remote control.
2. Select the desired TEMPO by using the
EFFECT LEVEL button on the remote
control.
| NOTES |
✎TEMPO Function does not operate in the
Bluetooth, TV SoundConnect, FM and AUX
mode.
✎When you turn TEMPO off, all TEMPO settings
are lost.
Booting Sound Function
When the Booting Sound Function is on, your Hi-fi
Component demonstrates it's audio prowess as it
boots up.
1. Press the product's GIGA SOUND BEAT
button or the remote control's GIGA button
for 5 seconds. The BOOTING SOUND menu
appears on the display panel.
2. Press the product's GIGA SOUND BEAT
button or the remote control's GIGA button
for 5 seconds to turn the BOOTING SOUND
function On or Off.
03 Functions
27 English
Page 28
Appendix
Troubleshooting
Refer to the chart below when this product does not function properly. If the problem you are
experiencing is not listed below or if the instructions below do not help, turn off the product, disconnect
the power cord, and contact the nearest authorized dealer or Samsung Electronics Service Center.
Symptom Check/Remedy
I cannot eject the disc. • Is the power cord plugged securely into the outlet?
• Turn off the power and then turn it back on.
Playback does not start immediately
when the Play/Pause button is
pressed.
Sound is not produced. • No sound is heard during fast playback, slow playback, and
The remote control does not work. •Is the remote control being operated within its operational
The product is not working.
(Example: The power goes out or the
front panel buttons don't work, or
you hear a strange noise.)
The product is not working normally.
Can't receive radio broadcast. • Is the antenna connected properly?
Turn off automatically after displaying
"PROTECT"
• Are you using a deformed disc or a disc with scratches on the
surface?
• Wipe the disc clean.
step motion playback.
• Are the speakers connected properly? Is the speaker setup
correctly customized?
• Is the disc severely damaged?
angle and distance range?
• Are the batteries drained?
• Press the
with no disc inside. The initialization message appears on the
screen, and the power will turn off automatically. When you
turn your product on again, all the settings will be reset.
Don't use this unless absolutely necessary.
• If the antenna's input signal is weak, install an external FM
antenna in an area with good reception.
• Check the power in use is within the range of the power which
specified on the rear label of the product.
• If "Voltage Selector" is on the rear panel, check the power is
same with the voltage that you set manually.
@
button (on front panel) for more than 5 seconds
28 English
Page 29
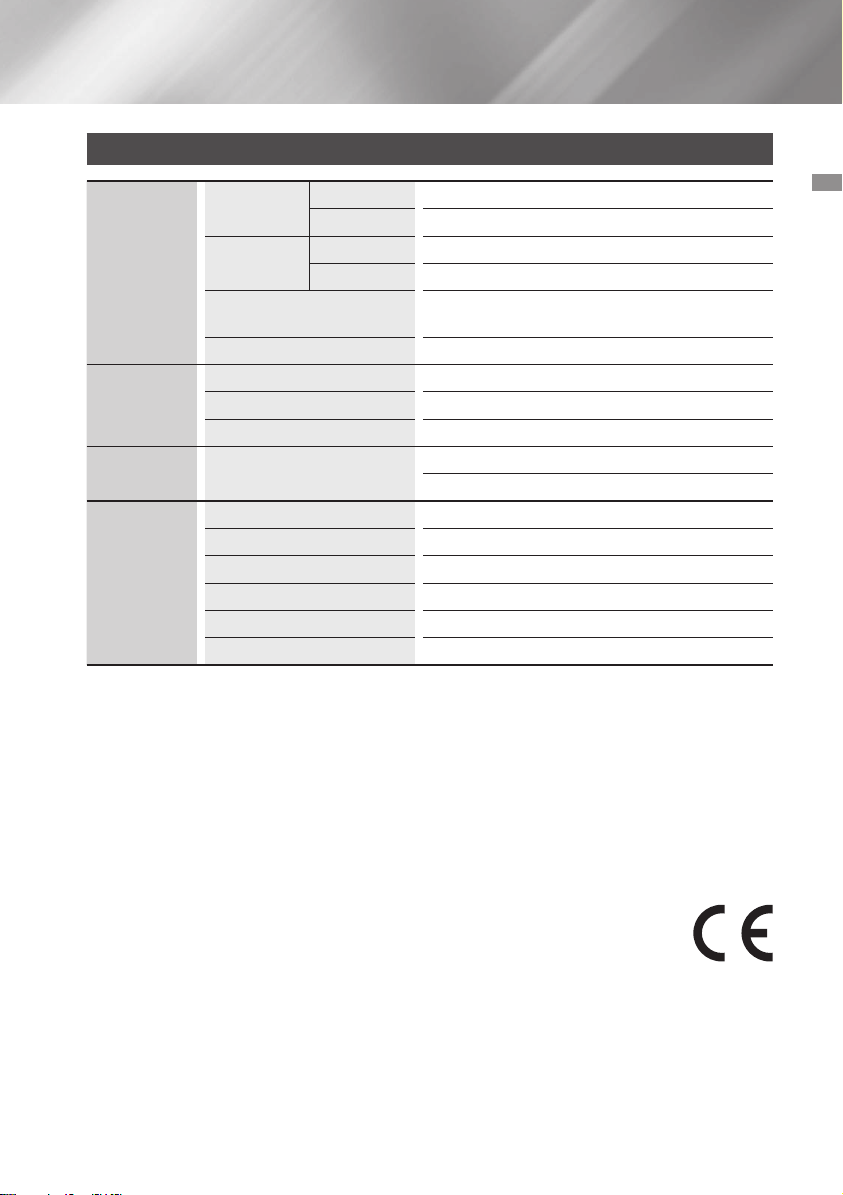
Specifications
Weight
General
FM Tuner
CD Disc
Amplifier
*: Nominal specification
- Samsung Electronics Co., Ltd reserves the right to change the specifications without notice.
- Weight and dimensions are approximate.
- Design and specifications are subject to change without prior notice.
- For information on the power supply and power consumption, refer to the label attached to the
product.
Dimensions
Operating Temperature
Range
Operating Humidity Range 10 % to 75 %
Signal/Noise ratio 55 dB
Usable sensitivity 10 dB
Total harmonic distortion 1 %
CD : 12 cm (COMPACT
DISC)
Front speaker output 575W/CH (4Ω)
Subwoofer output 575W/CH (4Ω)
Frequency range 22Hz~20KHz
S/N Ratio 65 dB
Channel separation 60 dB
Input sensitivity AUX IN1 1.2V, AUX IN2 2.0V
Main unit 6.1 Kg
Speaker 55.17 Kg
Main unit 550 (W) x 212 (H) x 367 (D) mm
Speaker 648 (W) x 652 (H) x 440 (D) mm
+5°C~+35°C
Reading Speed : 4.8 ~ 5.6 m/sec.
Maximum Play Time : 74 min.
04 Appendix
Open Source Announcement
To send inquiries and requests regarding open sources, contact Samsung via Email (oss.request@
samsung.com).
• Hereby, Samsung Electronics, declares that this equipment is in compliance with the
essential requirements and other relevant provisions of Directive 1999/5/EC.
The original Declaration of Conformity may be found at http://www.samsung.com, go to
Support > Search Product Support and enter the model name.
This equipment may be operated in all EU countries.
29 English
Page 30
Contact SAMSUNG WORLD WIDE
If you have any questions or comments relating to Samsung products, please contact the SAMSUNG customer
care centre.
Area Contact Centre
AUSTRIA
BELGIUM 02-201-24-18
BOSNIA 051 331 999
BULGARIA 07001 33 11 , sharing cost
CROATIA 062 726 786
CZECH 800 - SAMSUNG (800-726786)
DENMARK 70 70 19 70
FINLAND 030-6227 515
FRANCE 01 48 63 00 00
GERMANY
CYPRUS
GREECE
HUNGARY
ITALIA 800-SAMSUNG (800.7267864)
LUXEMBURG 261 03 710
MONTENEGRO 020 405 888
0800 - SAMSUNG (0800 - 7267864)
0180 6 SAMSUNG bzw.
0180 6 7267864*
(*0,20 €/Anruf aus dem dt. Festnetz,
aus dem Mobilfunk max. 0,60 €/Anruf)
8009 4000 only from landline, toll
free
80111-SAMSUNG (80111 726
7864) only from land line
(+30) 210 6897691 from mobile
and land line
0680SAMSUNG (0680-726-786)
0680PREMIUM (0680-773-648)
Correct disposal of batteries in this product
(Applicable in the European Union and other European countries with separate battery return systems.)
This marking on the battery, manual or packaging indicates that the batteries in this product should not be disposed of
with other household waste at the end of their working life. Where marked, the chemical symbols Hg, Cd or Pb indicate
that the battery contains mercury, cadmium or lead above the reference levels in EC Directive 2006/66.
If batteries are not properly disposed of, these substances can cause harm to human health or the environment.
To protect natural resources and to promote material reuse, please separate batteries from other types of waste and
recycle them through your local, free battery return system.
Web Site
www.samsung.com/at/support
www.samsung.com/be/
support (Dutch)
www.samsung.com/be_fr/
support (French)
www.samsung.com/support
www.samsung.com/bg/support
www.samsung.com/hr/support
www.samsung.com/cz/support
www.samsung.com/dk/support
www.samsung.com/fi/support
www.samsung.com/fr/support
www.samsung.com/de/
support
www.samsung.com/gr/
support
http://www.samsung.com/
hu/support
www.samsung.com/it/support
www.samsung.com/support
www.samsung.com/support
Area Contact Centre
SLOVENIA
NETHERLANDS
NORWAY 815 56480
POLAND
PORTUGAL 808 20 7267
ROMANIA
SERBIA 011 321 6899
SLOVAKIA 0800 - SAMSUNG(0800-726 786)
SPAIN 0034902172678
SWEDEN 0771 726 7864 (SAMSUNG)
SWITZERLAND 0848 726 78 64 (0848-SAMSUNG)
U.K 0330 SAMSUNG (7267864)
EIRE 0818 717100
LITHUANIA 8-800-77777
LATVIA 8000-7267
ESTONIA 800-7267
080 697 267
090 726 786
0900-SAMSUNG (0900-7267864)
(€ 0,10/Min)
0 801-172-678* lub +48 22 60793-33 **
*(całkowity koszt połączenia jak za 1
impuls według taryfy operatora)
** (koszt połączenia według taryfy
operatora)
08008 SAMSUNG (08008 726 7864)
TOLL FREE No.
Web Site
www.samsung.com/si/
support
www.samsung.com/nl/
support
www.samsung.com/no/support
www.samsung.com/pl/
support
www.samsung.com/pt/support
www.samsung.com/ro/support
www.samsung.com/rs/support
www.samsung.com/sk/support
www.samsung.com/es/support
www.samsung.com/se/support
www.samsung.com/ch/
support (German)
www.samsung.com/ch_fr/
support (French)
www.samsung.com/uk/support
www.samsung.com/ie/support
www.samsung.com/lt/support
www.samsung.com/lv/support
www.samsung.com/ee/support
Correct Disposal of This Product (Waste Electrical & Electronic Equipment)
(Applicable in the European Union and other European countries with separate collection systems)
This marking on the product, accessories or literature indicates that the product and its electronic accessories (e.g.
charger, headset, USB cable) should not be disposed of with other household waste at the end of their working life.
To prevent possible harm to the environment or human health from uncontrolled waste disposal, please separate these
items from other types of waste and recycle them responsibly to promote the sustainable reuse of material resources.
Household users should contact either the retailer where they purchased this product, or their local government office,
for details of where and how they can take these items for environmentally safe recycling.
Business users should contact their supplier and check the terms and conditions of the purchase contract.
This product and its electronic accessories should not be mixed with other commercial wastes for disposal.
Page 31

MX-HS8000
Système PREMIUM HI-FI Component
manuel d'utilisation
Imaginez les possibilités
Merci d'avoir acheté ce produit Samsung.
Pour recevoir un service plus complet, veuillez
enregistrer votre produit à l'adresse
www.samsung.com/register
Page 32

Consignes de sécurité
Avertissement
POUR RÉDUIRE LE RISQUE DE DÉCHARGE ÉLECTRIQUE, NE RETIREZ PAS LE COUVERCLE (OU LA
PARTIE ARRIÈRE).
CE PRODUIT NE CONTIENT AUCUNE PIÈCE RÉPARABLE PAR L'UTILISATEUR. CONFIEZ TOUTE
RÉPARATION À DU PERSONNEL QUALIFIÉ.
ATTENTION
RISQUE DE DÉCHARGE ÉLECTRIQUE NE PAS OUVRIR
ATTENTION : POUR PRÉVENIR LES DÉCHARGES ÉLECTRIQUES,
N'INSÉREZ QUE LA LAME LARGE DE LA FICHE DANS LA FENTE
AVERTISSEMENT
• Pour réduire les risques d'incendie ou de
décharges électriques, n'exposez pas l'appareil
à la pluie ou à l'humidité.
PRODUIT LASER DE CLASSE 1
Ce lecteur CD est classé comme PRODUIT
LASER DE CLASSE 1. L’utilisation de
commandes, des réglages ou la réalisation de
procédures autres que ceux spécifiés dans
le présent document peuvent entraîner une
exposition à un rayonnement dangereux.
Conforme à la norme 21CFR 1040.10 avec les
exceptions mentionnées dans « Laser Notice N°
50 » du 24 juin 2007.
DANGER :
• RAYONNEMENT LASER VISIBLE ET INVISIBLE
LORSQUE L'APPAREIL EST OUVERT. ÉVITEZ
TOUTE EXPOSITION DIRECT AU FAISCEAU
LASER. (FDA 21 CFR)
ATTENTION :
• RAYONNEMENT LASER VISIBLE ET INVISIBLE
DE CLASSE 3B LORSQUE L'APPAREIL EST
OUVERT. ÉVITEZ TOUTE EXPOSITION AU
FAISCEAU LASER. (IEC 60825-1)
LARGE DE LA PRISE.
• CE produit UTILISE UN LASER. L’UTILISATION
DE COMMANDES, DES RÉGLAGES OU LA
RÉALISATION DE PROCÉDURES AUTRES
QUE CEUX SPÉCIFIÉS DANS LE PRÉSENT
DOCUMENT PEUVENT ENTRAÎNER
UNE EXPOSITION À UN RAYONNEMENT
DANGEREUX. N’OUVREZ PAS LE CAPOT
ET NE TENTEZ PAS DE RÉPARATION
VOUS-MÊME. VEUILLEZ CONTACTER
UN TECHNICIEN QUALIFIÉ POUR TOUTE
RÉPARATION.
CLASS 1 LASER PRODUCT
KLASSE 1 LASER PRODUKT
LUOKAN 1 LASER LAITE
KLASS 1 LASER APPARAT
PRODUCTO LÁSER CLASE 1
Ce symbole indique une « tension
dangereuse » à l'intérieur du produit
présentant un risque de décharge
électrique ou de blessure.
Ce symbole attire l'attention sur des
instructions importantes accompagnant le
produit.
• Des frais d’administration pourraient être facturés
un technicien se rend à votre domicile à votre demande et détermine que le produit n'est pas
défaillant (p. ex., si vous n’avez pas lu le présent guide d’utilisation).
vous apportez l'appareil à un centre de réparation qui détermine que le produit n'est pas défaillant
(p. ex., si vous n’avez pas lu le présent guide d’utilisation).
• Le montant de ces frais administration vous sera communiqué avant qu’un quelconque travail ne
soit entrepris ou avant toute visite à domicile.
2 Français
Page 33

Précautions
• Assurez-vous que l'alimentation en courant c.a.
de votre domicile est conforme à l'étiquette
d'identification apposée à l'arrière du produit.
• Posez votre appareil sur une surface horizontale
appropriée (meuble) en veillant à laisser un
espace de 7,5 à 10 cm (3 à 4 pouces) autour
de ce dernier afin de permettre sa ventilation.
• Ne placez pas le produit sur des amplificateurs
ou d'autre équipement qui pourraient devenir
chauds. Assurez-vous que les fentes d'aération
ne sont pas couvertes.
• N'empilez rien sur le dessus du produit.
• Avant de déplacer le produit, assurez-vous que
la fente d'insertion du disque est libre.
• Pour débrancher complètement le produit de
l’alimentation, retirez la fiche c.a. de la prise
murale, particulièrement s'il ne sera pas utilisé
pendant une période de temps prolongée.
• Durant les orages, débranchez la fiche c.a. de la
prise murale. Les pics de tension causés par la
foudre pourraient endommager le produit.
• N’exposez par le produit à la lumière directe
du soleil ou à d'autres sources de chaleur.
Cela pourrait causer une surchauffe et un
dysfonctionnement du produit.
• Protégez le produit de l'humidité, de la chaleur
excessive ou de l'équipement créant un
puissant champ magnétique ou électrique (c.à-d. des enceintes).
• Débranchez le câble d'alimentation de la source
de courant c.a. en cas de dysfonctionnement
du produit. Votre produit n’est pas destiné à un
usage industriel.
• Utilisez ce produit uniquement à des fins
personnelles.
• De la condensation pourrait se former si votre
produit ou un disque ont été entreposés à des
températures froides. Si vous transportez le
produit durant l'hiver, attendez environ 2 heures
jusqu'à ce qu'il ait atteint la température de la
pièce avant son utilisation.
• Les piles utilisées pour alimenter ce
produit contient des substances chimiques
dangereuses pour l'environnement. Ne les jetez
pas avec les ordures ménagères.
• Veuillez vérifier le volume du son avant la lecture
afin de ne pas faire sursauter les personnes
âgées, malades ou les femmes enceintes avec
un bruit soudain intense.
• Placez les enceintes à une distance raisonnable
d'un côté ou de l'autre du système pour assurer
une bonne restitution stéréo.
• Dirigez-les vers la zone d'écoute.
• Évitez toute projection d’eau sur l’appareil et
ne posez jamais dessus un objet contenant un
liquide (ex : un vase).
• La fiche secteur est un dispositif permettant de
déconnecter l’appareil, elle doit rester facilement
accessible à tout moment.
• Utilisez uniquement une prise et un réceptacle
correctement mis à la terre.
- Une mise à la terre incorrecte peut provoquer un
choc électrique ou endommager l'équipement.
(Équipement de classe 1 uniquement.)
Rangement et gestion des disques
• Comment tenir le disque
- Des empreintes de doigt ou des
petites rayures sur la surface du
disque peuvent altérer la qualité
du son et de l’image ou provoquer des sauts.
- Évitez de toucher la surface du disque sur
laquelle les données ont été enregistrées.
- Tenez le disque par les bords afin de ne pas
laisser d’empreintes sur sa surface.
- Ne collez pas de papier ou d’adhésif sur le
disque.
• Nettoyage des disques
- En cas d’empreintes de doigt ou
de saleté sur le disque, nettoyezle
à l'aide d'eau additionnée de
détergent doux et d’un chiffon
doux.
- Lors de son nettoyage, essuyez le disque du
centre vers le bord.
• Rangement des disques
`N’exposez pas le disque à la lumière directe
du soleil.
`Stockez-le dans un endroit frais et aéré.
`Rangez-le dans une jaquette propre et
stockez-le verticalement.
01 Consignes de sécurité
3 Français
Page 34

Consignes de sécurité
Compatibilité des disques et des
formats
Ce produit ne prend pas en charge les fichiers
médias protégés (DRM).
Disques CD-R
• Certains disques CD-R pourraient ne pas être
lus en raison du périphérique d'enregistrement
du disque (enregistreur de CD ou ordinateur) et
de la condition des disques.
• Utilisez un disque CD-R de 650 MB/74 minutes.
N'utilisez pas des disques CD-R de plus de
700 MB/80 minutes car ils pourraient ne pas
être lus.
• Certains supports CD-RW (réinscriptibles)
pourraient ne pas être lus.
• Seuls des supports CD-R correctement
« verrouillés » peuvent être lus en entier. Si la
session est fermée mais que le disque est laissé
ouvert, vous pourriez ne pas être en mesure de
lire le disque dans son intégralité.
Disques CD MP3
• Seuls des disques CD-R contenant des fichiers
MP3 en format ISO 9660 ou Joliet peuvent être
lus.
• Les noms de fichiers MP3 ne doivent pas
contenir d'espaces ni de caractères spéciaux
(. / = +).
• Utilisez des disques enregistrés avec un taux
de compression/décompression des données
supérieur à 128 Kbps.
• Seules des multi-sessions enregistrées en
continu peuvent être lues sur un disque. Si
le disque multi-session contient un segment
vierge, la lecture s'interrompra à cet endroit.
• Si le disque n'est pas verrouillé, la lecture mettra
plus de temps à démarrer et tous les fichiers
enregistrés pourraient ne pas être lus.
• Pour les fichiers encodés au format VBR
Variable Bit Rate (Débit binaire variable), (ex: les
fichiers encodés dans les deux débits binaires
faible et élevé - 32Kbps à 320Kbps), le son peut
sauter pendant la lecture.
• Un maximum de 999 pistes peut être lu par CD.
Formats audio pris en charge
Extension
de fichier
*.mp3
*.wma
| REMARQUES |
✎Ne prend pas en charge pas le codec
professionnel WMA.
✎Le tableau ci-dessus présente les taux
d'échantillonnage pris en charge et les débits
binaires. Les fichiers aux formats non pris en
charge pourront ne pas être lus correctement.
Codec audio
MPEG 1 Couche 3
MPEG 2 Couche 3
MPEG 2.5 Couche 3
Wave_Format_
MSAudio1
Wave_Format_
MSAudio2
Taux
d’échantillonnage
16KHz ~
48KHz
16KHz ~
48KHz
16KHz ~
48KHz
16KHz ~
48KHz
16KHz ~
48KHz
80Kbps ~
80Kbps ~
80Kbps ~
56Kbps ~
56Kbps ~
Débit
binaire
320Kbps
320Kbps
320Kbps
128Kbps
128Kbps
4 Français
Page 35

Contenus
CONSIGNES DE SÉCURITÉ
2 Avertissement
3 Précautions
3 Rangement et gestion des disques
4 Compatibilité des disques et des formats
4 Formats audio pris en charge
MISE EN ROUTE
7 Panneau avant
8 Panneau arrière
9 Télécommande
10 Accessoires
10 Connexion des enceintes
10 Précautions lors du déplacement des
enceintes
11 Fixation du noyau torique en ferrite au
cordon d'alimentation
11 Enroulement du câble d'alimentation
autour du noyau torique
FONCTIONS
12 Fonction d'affichage
12 Changer le mode d’affichage
12 La fonction DEMO Music
12 Lecture d'un CD
12 Chargement d'un disque compact
12 Lecture CD/MP3/CD-R
13 Choix d'une piste
13 Recherche de passages musicaux
particuliers sur un CD
13 Lire une ou plusieurs pistes sur le CD de
manière répétée
14 Lecture d'un périphérique USB
14 Lecture de périphériques USB
14 Pour sélectionner un fichier sur un
périphérique USB
15 Utilisation de la recherche à haute vitesse
15 Pour supprimer un fichier
15 Pour accéder au prochain/précédent
dossier
15 Pour retirer un périphérique USB en toute
sécurité
15 À lire avant de connecter des périphériques
de stockage USB
16 Rechercher une piste rapidement
16 Utilisation de la fonction Programme
16 Voir ou modifier les plages programmées
17 Bluetooth
17 Qu’est-ce que le Bluetooth?
17 Pour brancher le Composant-Hi-Fi à un
dispositif Bluetooth
18 Pour débrancher le dispositif Bluetooth
d'un Composant Hi-Fi
18 Pour débrancher le Composant Hi-Fi d’un
dispositif Bluetooth
18 Utiliser la mise en marche par Bluetooth
19 TV SoundConnect
19 Pour connecter le composant Hi-Fi
à un téléviseur Samsung compatible
SoundConnect
19 Pour déconnecter le téléviseur du
composant Hi-Fi
19 Pour déconnecter le composant Hi-Fi du
téléviseur
20 Utilisation de Mon Karaoke
20 Fonction de modification automatique
20 Écoute de la radio
20 Pour mémoriser les postes que vous
désirez écouter
21 Choix d'un poste mémorisé
Contenus
5 Français
Page 36

Contenus
21 Fonction de minuterie
21 Réglage de l'horloge
21 Réglage de la minuterie
23 Annulation de la minuterie
23 Fonction Enregistrement
23 Enregistrement de base
24 Vitesse d’enregistrement
25 Effets sonores spéciaux
25 Sélection du mode EQ
25 Fonction FOOTBALL MODE
25 Fonction GOAL
26 Fonction GIGA SOUND
26 Fonction BEAT WAVING
26 Fonction DJ BEAT
27 Fonction +PANNING
27 Fonction NON-STOP MUSIC RELAY
27 Fonction DANCE TIME
27 Fonction TEMPO
27 Fonction Son au démarrage
ANNEXES
28 Dépannage
29 Caractéristiques techniques
6 Français
Page 37

Mise en route
Panneau avant
1
k
j
i
Panneau d'affichage
1
Touche BACKWARD SEARCH/SKIP
2
Touche CD/ Bluetooth
3
Fente d'insertion du DISQUE
4
Touche GIGA SOUND BEAT
5
Touche TUNER/AUX
6
Touche FORWARD SEARCH/SKIP
7
Touche PROGRAM
8
Touche d’éjection du disque
9
MOLETTE DE RECHERCHE/DU VOLUME
0
Touche EQ
!
Touche SEARCH
@
Touche d'alimentation
#
• Appuyez sur cette touche pour mettre le
produit en fonction ou hors fonction.
Touche ENTER
$
Touche USB
%
Touche USB REC
^
Touche DJ BEAT
&
3 64 8 @9 !052 7
*
(
)
a
b
c
d
e
f
g
h
i
j
k
#
$
%
^
&*()be cf adgh
Touche VOLUME / DJ
Touche +PANNING
Touche NON-STOP MUSIC RELAY
Prise USB 2 pour la lecture et
l'enregistrement USB
Touche PLAY/PAUSE
Prise D’ENTRÉE AUX IN 1
Branchement d'un périphérique externe
comme un lecteur MP3.
Connectez la prise d'entrée AUX IN 1 sur
•
la face avant du produit à la prise de sortie
audio du périphérique/lecteur MP3 externe.
• Appuyez sur la touche TUNER/AUX
pour sélectionner AUX1.
Prise MIC
Touche STOP
Prise USB 1 seulement pour la lecture
DÉTECTEUR DE TÉLÉCOMMANDE
Touche FOOTBALL MODE
Touche BEAT WAVING
Touche DISPLAY / DEMO
Touche TV SOUNDCONNECT
02 Mise en route
7 Français
Page 38

Mise en route
Panneau arrière
2 4 5 6 73
1
Ventilateur de refroidissement
• Le ventilateur fonctionne lorsque l'unité
est alimentée en tension.
S'il est réglé à l'intensité sonore minimale,
1
le ventilateur ne fonctionnera pas.
Lors de l’installation de l’appareil,
prévoyez un espace d’au moins 15 cm
(6 pouces) tout autour du ventilateur.
POWER
2
• Veuillez utiliser le câble d'alimentation
fourni en tant qu'accessoire.
Bornes d'enceintes 2.2 canaux
1. Pour bénéficier de la qualité sonore
correcte, insérez ces connecteurs
d'enceintes dans les bornes de même
couleur du système d'enceintes.
3
• Canal GAUCHE (marqué , blanc/
mauve).
• Canal DROIT (marqué
• Ne branchez pas le connecteur de
SUBWOOFER mauve à la borne blanche
ou rouge en forçant.
Bornes DEL pour le mode Beat Waving
des enceintes qui ne font pas de
4
distinction entre les canaux de gauche
et de droite.
, rouge/mauve).
ONLY FOR SERVICE
5
• Cette prise est réservé aux essais,
veuillez ne pas l’utiliser.
Bornes D’ENTRÉE AUX IN 2
1. Utilisez un câble audio (non fourni) pour
connecter AUX IN 2 situé sur l'appareil
à la sortie audio d’un dispositif de
sortie analogique externe.
• Assurez-vous d'assortir les couleurs de
connecteurs.
•
Si le périphérique de sortie analogique
6
externe est pourvu d'une seule prise de sortie
Audio Out, branchez-le à gauche ou à droite.
• Appuyez sur la touche TUNER/AUX
pour sélectionner AUX 2.
• Si le produit est en mode AUX pendant
plus de huit heures et qu’aucun bouton
de la façade ou de la télécommande
n’est actionné, le système s’éteint.
Borne de connecteur d'antenne FM
1. Branchez l’antenne FM fournie à la
borne de connecteur d'antenne FM.
2.
Déplacez lentement le fil de l'antenne dans
la pièce pour trouver un emplacement où
la réception est bonne, puis collez-la sur
7
un mur ou une autre surface rigide.
3.
Si la réception est mauvaise, il pourrait être
nécessaire d'installer une antenne extérieure.
Pour ce faire, branchez une antenne
FM extérieure à la borne du connecteur
d'antenne FM du produit en utilisant un
câble coaxial de 75Ω (non fourni).
8 Français
Page 39

Télécommande
Alimentation
Bluetooth
CD
USB
TUNING MODE
TUNER/AUX
NON-STOP MUSIC RELAY
TEMPO
SAUT
PLAY/PAUSE
ARRÊT
FOOTBALL
EQ
VOLUME (–, +)
PROGRAM
TIMER SET
TIMER ON/OFF
DISPLAY
MY KARAOKE
MUTE
(Permet de couper le son momentanément.
Appuyez une nouvelle fois pour réactiver le son.)
BEAT WAVING
TV SoundConnect
USB REC
REC SPEED
MO/ST
+PANNING
DJ BEAT
EFFECT LEVEL
RECHERCHE
REPEAT
GIGA SOUND BEAT
GOAL
DANCE TIME
TUNING/ALBUM ,,
DELETE
SLEEP (Permet de régler l'heure de mise en
veille de l'appareil.)
AUTO CHANGE
VOLUME DU MICROPHONE –, +
.
02 Mise en route
Insertion des piles dans la télécommande
•
Placez les batteries dans la télécommande
afin qu’elles correspondent à la polarité des
illustrations dans le compartiment de la batterie. :
(+) sur (+) et (–) sur (–).
• Ne jetez pas les piles au feu.
• Ne court-circuitez pas, ne désassemblez pas ni
ne faites pas surchauffer les batteries.
• Il y a danger d’explosion si la batterie est
remplacée avec un type de batterie erroné.
Lorsqu'un remplacement est nécessaire, utilisez
uniquement le même type de batterie ou un
modèle équivalent.
• La portée de la télécommande en ligne droite
est de 7 mètres (23 pieds) depuis le système.
9 Français
Page 40

Mise en route
Accessoires
Vérifiez la présence de tous les accessoires indiqués plus bas.
Guide d'utilisation Télécommande / piles
Antenne FM Câble d'alimentation Noyau torique en ferrite
• Les figures et les illustrations de ce guide de l'utilisateur sont fournies à titre de référence seulement.
Elles peuvent différer de l'apparence réelle du produit.
Connexion des enceintes
Fin de la connexion de l'enceinte.
| IMPORTANT |
✎Le produit peut ne pas fonctionner
correctement s’il est sujet à des tremblements
ou des chocs extérieurs ou si les enceintes ne
sont pas installées selon les recommandations.
✎Ne tendez pas les câbles des enceintes ni ne
placez pas d’objets lourds dessus.
Précautions lors du déplacement
des enceintes
• Lors du déplacement de l'appareil et des
enceintes, veillez à retirer tout d'abord tous les
câbles d'enceintes connectés.
• Lorsque vous retirez les câbles d'ÉCLAIRAGE
DES ENCEINTES, appuyez sur le verrou pour
desserrer le connecteur comme indiqué cidessous.
10 Français
Page 41

Fixation du noyau torique en ferrite au cordon d'alimentation
Attacher le noyau torique en ferrite sur le cordon d'alimentation aide à éviter la génération d'interférences
RF à partir des signaux radio.
1. Tirez sur la languette de fixation du noyau torique
en ferrite pour l'ouvrir.
2. Faites deux boucles autour du noyau avec le câble
d'alimentation. Reportez-vous à l’illustration cidessous.
3. Reliez le noyau torique en ferrite au cordon
d'alimentation tel qu’indiqué sur l’illustration cidessous, puis appuyez dessus jusqu’à ce qu’il
s’enclenche.
Enroulement du câble d'alimentation autour du noyau torique
➜ ➜ ➜
Soulevez pour
déverrouiller et ouvrir
le noyau.
Faites deux boucles autour du
noyau avec le câble d'alimentation.
(Commencez l’enroulement à 5 à
10 cm du noyau).
Verrouillez le noyau.
02 Mise en route
11 Français
Page 42

Fonctions
Fonction d'affichage
Vous pouvez visualiser les fonctions disponibles
sur l’écran d’affichage, ajuster la luminosité de
l’écran et régler l’affichage/DEL actif ou non.
Changer le mode d’affichage
Appuyez sur le bouton DISPLAY/DEMO de l’appareil.
Chaque fois que vous appuyez sur ce bouton, le
mode change de la manière suivante :
• La fonction Gradateur
La fonction Gradateur est sélectionnée et
l'affichage s'assombrit.
• LED OFF
La DEL de l’affichage en façade est éteinte
lorsque la fonction de variateur est activée.
• Clock ON
L'horloge définie s'affiche.
• Display/LED ON
Tous les affichages et voyants DEL sont activés.
La fonction DEMO Music
Appuyez sur le bouton DISPLAY/DEMO de l’appareil,
ou sur le bouton DISPLAY de la télécommande
pendant 5 secondes pour lancer le mode démo.
Chaque fois que vous appuyez sur ce bouton, le
mode change de la manière suivante :
DIMMER
;
(unité/enceinte)
;
--:-- [heure affichée] ; VOYANT DEL allumé
VOYANT DEL éteint (unité/enceinte)
Pour annuler le mode Demo Music
(Morceau de démonstration)
• Appuyez à nouveau sur le bouton DISPLAY/
DEMO de l’appareil ou sur le bouton DISPLAY
de la télécommande pendant 5 secondes.
Le mode actuel est annulé et le produit est mis
hors fonction.
• Appuyez sur le bouton TUNER/AUX, CD/
Bluetooth ou USB de l’appareil.
Le mode actif est annulé et le mode que vous
avez sélectionné s’active.
| REMARQUES |
✎
Lors de la lecture du morceau de démonstration,
toutes les touches ne fonctionneront pas à
l'exception des touches Alimentation ( ), VOL,
MISE EN SOURDINE ( ) mentionnées plus haut.
✎L'échantillonneur DEMO est lu pendant environ
3 minutes; seul le message reste affiché sur la
façade après sa lecture.
12 Français
Lecture d'un CD
Chargement d'un disque compact
Vous pouvez lire les CD standard qui ne
nécessitent pas d’adaptateur.
1. Insérez doucement un disque dans la fente
d'insertion des disques avec l'étiquette du
disque orientée vers le haut. Le disque sera
lu automatiquement.
• Vous pouvez charger ou décharger les
disques lorsque la fonction radio, USB ou
source auxiliaire est sélectionnée et que
vous appuyez sur la touche
autres fonctions passeront au mode CD.
• Si aucune touche n'est enfoncée sur le
produit ou la télécommande pendant plus
de 3 minutes lorsque le produit est en
mode Pause, il passera au mode Arrêt.
• Si aucune touche n'est enfoncée sur le
produit ou la télécommande pendant
plus de 25 minutes lorsque le produit
est en mode Arrêt, l'alimentation sera
automatiquement coupée.
8
toutes les
Lecture CD/MP3/CD-R
| IMPORTANT |
✎Le produit est conçu pour lire des: CD, CD-R,
CD-RW.
1. Insérez doucement un disque dans la fente
d'insertion du disque avec l’étiquette du
disque sur le dessus.
2. Le disque sera automatiquement lu.
• Pour des fichiers MP3/WMA, le balayage
de l’ensemble des plages du disque peut
nécessiter plusieurs minutes.
• Si vous lisez un fichier avec un titre anglais,
le titre de la chanson s’affiche sur l'écran.
(Les titres dans les autres langues ne
peuvent pas être affichés.)
• Une plage dont les titres sont en anglais et
contiennent des caractères spéciaux (@, $,
*, etc.) ne s’affiche pas.
<Affichage de lecture du CD>
Indicateur de
piste
Indicateur de
temps de lecture
Page 43

3. Réglage du volume:
• Activez la commande du VOLUME sur le
produit.
• Appuyez sur les boutons VOL+ ou VOL-
de la télécommande.
Le volume peut être ajusté selon 31 niveaux
(VOLUME MIN, VOLUME 01 à VOLUME 29
et VOLUME MAX).
4. Interruption de la lecture
Appareil
Pour interrompre temporairement la lecture,
appuyez sur la touche
Appuyez de nouveau sur la touche pour
continuer à lire le disque.
Télécommande
Pour interrompre temporairement la lecture,
appuyez sur la touche .
Appuyez sur pour continuer à lire le
disque.
5. Pour mettre fin à la lecture, appuyez sur la
| REMARQUES |
✎S’il n’y a pas de CD inséré, « NO DISC » est
✎La qualité de la lecture MP3/CD-R peut
✎Si différents types de dossiers inutiles se
✎Insérez doucement un CD dans la fente
5
touche
indiqué.
varier suivant l’état du disque ou l’état de
l’enregistreur utilisé pour créer le disque.
trouvent sur le même disque, vous éprouverez
des problèmes lors de la lecture.
d'insertion du disque sans exercer une force
excessive.
- Ne comprimez pas le produit et ne placez
pas un objet lourd dessus.
- N'insérez pas un CD hors spécifications, en
forme de cœur ou d'octogone dans le tiroirdisque. Autrement, le produit pourrait être
endommagé.
- Un soin particulier doit être apporté à
l'entretien des disques compacts.
.
.
Choix d'une piste
Vous pouvez sélectionner une piste désirée
pendant la lecture du disque.
Pour lire la piste précédente
Appuyez sur le bouton 1 dans les 3 secondes
qui suivent le démarrage de la lecture de la plage
en cours.
Appuyez deux fois sur le bouton 1, 3 secondes
minimum après le démarrage de la lecture de la
plage en cours.
Pour lire la piste suivante
Appuyez sur la touche 2.
Pour lire la piste actuelle
Appuyez sur la touche 1 pendant 3 secondes
une fois que la lecture de la piste a commencé.
Pour lire la piste de votre choix
Appuyez sur la touche 1 ou 2 pour déplacer
une piste que vous souhaitez écouter.
Recherche de passages musicaux
particuliers sur un CD
Lors de l'écoute d'un disque compact, vous
pouvez rapidement rechercher un passage
musical particulier d'une piste.
Recherche avant ...................
Recherche arrière .................
Vous pouvez aussi appuyer sur la touche 1, 2
du produit et la maintenir enfoncée pour rechercher
automatiquement une piste par balayage.
3
4
Lire une ou plusieurs pistes sur le CD
de manière répétée
Vous pouvez lire un CD ou des plages sur un CD
de manière répétée.
1. Appuyez sur le bouton REPEAT de la
télécommande.
Chaque fois que vous appuyez sur ce
bouton, le mode change de la manière
suivante:
MP3 : OFF ; TRACK ; DIR ; ALL ; RANDOM
CD : OFF ; TRACK ; ALL ; RANDOM
03 Fonctions
13 Français
Page 44

Fonctions
2. Lorsque vous voulez interrompre la fonction
de répétition, appuyez sur la touche REPEAT
jusqu'à ce que la mention « OFF » s'affiche.
• OFF : Annule la lecture répétée.
• TRACK : Lit la piste sélectionnée de
manière répétée.
• DIR (DIRECTORY) : Lit toutes les pistes
du dossier sélectionné de manière répétée.
• ALL : Lit tout le disque de manière répétée.
• RANDOM : Lit les pistes de manière
aléatoire.
Lecture d'un périphérique USB
Branchez un périphérique de stockage externe
comme une clé USB ou un HDD (lecteur de
disque dur) externe au produit. Vous pouvez
sélectionner des fichiers en format MP3/WMA.
Lecture de périphériques USB
1. Connectez le périphérique de stockage USB
externe à votre produit.
2. Sélectionnez le mode USB en appuyant sur
le bouton USB de l’appareil ou sur le bouton
USB de la télécommande.
3. Le premier fichier dans le premier répertoire
est lu automatiquement.
4. Pour interrompre la lecture
Appuyez sur la touche
la lecture.
| REMARQUES |
✎Pour retirer le périphérique USB
- Si vous appuyez sur la touche
fois, vous pouvez retirer le périphérique USB
en toute sécurité.
| IMPORTANT |
✎Ne branchez pas le chargeur USB au port USB
de ce produit. Autrement, le produit pourrait
être endommagé.
5
pour interrompre
5
une autre
Pour sélectionner un fichier sur un
périphérique USB
Vous pouvez sélectionner un fichier MP3 durant la
lecture.
| REMARQUES |
✎Si vous désirez aller au fichier suivant/précédent,
appuyez brièvement sur les touches 1, 2.
- Cela permet d'aller au fichier suivant/
précédent du répertoire.
- Si vous appuyez sur les touches 1, 2
plus souvent que le nombre de fichiers dans
le répertoire, vous passerez au prochain
répertoire.
Pour répéter
1. Appuyez sur la touche REPEAT.
Chaque fois que vous appuyez sur ce
bouton, le mode change de la manière
suivante:
;
OFF
TRACK ; DIR ; ALL ; RANDOM
2. Lorsque vous souhaitez interrompre la
fonction de répétition, appuyez sur la touche
REPEAT jusqu'à ce « OFF » s'affiche.
• OFF : Annule la lecture répétée.
• TRACK : Lit le fichier sélectionné de
manière répétée.
• DIR (DIRECTORY) : Lit tous les fichiers du
dossier sélectionné de manière répétée.
• ALL : Lit tous les fichiers de manière
répétée.
• RANDOM : Lit les fichiers de manière
aléatoire.
| REMARQUES |
✎Si le fichier choisi pour la lecture est situé dans
un dossier, tous les fichiers de ce dossier
seront lus en ordre aléatoire. Si le fichier choisi
pour la lecture est situé dans le dossier racine,
tous les fichiers seront lus en ordre aléatoire.
14 Français
Page 45

Utilisation de la recherche à haute
vitesse
Vous pouvez rapidement rechercher une section
désirée pendant que l’appareil est en cours de
lecture.
Appuyez sur les boutons
• Chaque appui sur ce bouton provoque un
retour/une avance rapide à travers la section.
| IMPORTANT |
✎Le produit n’émet aucun son durant une
recherche à haute vitesse.
✎Vous pouvez également appuyer et maintenir
les boutons
balayer automatiquement une piste.
1
3, 4
.
ou 2 sur l’appareil pour
Pour supprimer un fichier
Vous pouvez supprimer un fichier depuis votre
périphérique USB.
1. Sélectionnez le fichier que vous souhaitez
supprimer.
2. Appuyez sur le bouton DELETE de la
télécommande. « DELETE NO » s’affiche.
3. Appuyez sur le bouton DELETE de la
télécommander et « DELETE YES » s’affiche.
4. Appuyez sur le bouton
apparaît et la suppression est terminée.
¬
. « DELETE END »
Pour accéder au prochain/précédent
dossier
Appuyez sur le bouton TUNING/ALBUM , / .
de la télécommande pour accéder au dossier
précédent/suivant.
| REMARQUES |
✎Lorsque les fichiers audio sont stockés dans
le répertoire racine plutôt que dans un dossier,
appuyez sur le bouton TUNING/ALBUM , / .
pour accéder à la première PLAGE.
Pour retirer un périphérique USB en
toute sécurité
1. Appuyez sur le bouton 5 à deux reprises
lorsque le périphérique USB est en cours
de lecture ou appuyez une seule fois sur le
bouton 5 lorsque la lecture est arrêtée.
2. Retirez le périphérique USB lorsque le
message REMOVE est apparu sur l’écran.
15 Français
À lire avant de connecter des
périphériques de stockage USB
• Certains périphériques USB peuvent ne pas
fonctionner correctement avec cet appareil.
• Ce produit prend uniquement en charge les
disques durs qui sont formatés dans le système
de fichier FAT.
• Les disques durs USB 2.0 doivent être
connectés à une source d’alimentation séparée.
Dans le cas contraire, les disques durs USB 2.0
ne fonctionneront pas.
• Si plusieurs périphériques USB de stockage
externe sont connectés ensemble, seuls les
fichiers MP3 contenus sur le premier disque dur
seront lus.
• Les fichiers avec DRM ne sont pas pris en
charge. Digital Right Management (DRM)
(Gestion des droits numériques) limite l’accès
non autorisé à un fichier DRM afin que le fichier
soit protégé du piratage.
• Même si un fichier possède une extension .mp3,
ce fichier ne peut pas être lu s'il est formaté en
MPEG couche 1 ou 2.
•
N’utilisez pas un concentrateur USB non reconnu.
•
Seuls les 15 premiers caractères du nom d’un
fichier audio sont indiqués sur l’écran de l’appareil.
• Seuls les disques durs amovibles inférieurs
à 160 GB sont pris en charge. Suivant le
périphérique, un disque dur amovible de 160
GB ou plus peut ne pas être pris en charge.
• Sur certains périphériques USB, plusieurs
minutes peuvent s’avérer nécessaires avant que
l’appareil ne reconnaisse les fichiers.
• Certains périphériques USB (disques durs USB,
en particulier) peuvent générer un délai pour
passer d’une plage à une autre.
• Avec les périphériques de stockage USB qui
prennent uniquement en charge USB VER1.1,
l'appareil peut accéder aux fichiers lentement
ou peut ne pas reconnaître les propriétés des
fichiers.
•
Le courant électrique maximal actuellement fourni
par chaque port USB aux périphériques USB
connectés est de 0,5A (sur la base de 5V CC).
• S’il n’y a pas de connexion USB ou de mode
ARRÊT durant plus de 25 minutes, l'appareil
s’éteint automatiquement.
• Certains périphériques USB, caméras
numériques, lecteurs de carte USB, iPods,
iPhones et Smartphones peuvent ne pas être
pris en charge.
03 Fonctions
Page 46

Fonctions
Rechercher une piste rapidement
Vous pouvez sélectionner une piste directement
sans le bouton 1, 2.
CDDA/MP3-CD/USB
1. Appuyez sur le bouton SEARCH.
Après avoir appuyé sur le bouton
SEARCH, faites tourner la MOLETTE DE
RECHERCHE/DU VOLUME sur l'appareil
vers la gauche ou vers la droite pour
sélectionner la plage souhaitée.
• Vous pouvez atteindre directement la plage
souhaitée.
2. Lorsque la recherche est terminée, la plage
démarre automatiquement.
Utilisation de la fonction Programme
Cette fonction n’est pas disponible durant la
lecture d'un fichier MP3-CD/USB.
• Vous pouvez programmer l’ordre de lecture sur
un maximum de 99 plages de votre choix.
• Cependant, vous devez arrêter la lecture du CD/
USB avant de sélectionner vos plages.
En mode lecture de CD/USB, appuyez sur le
1.
bouton 5 pour arrêter la lecture du CD/USB.
2. Appuyez sur le bouton PROGRAM pour
afficher le message suivant :
PROG 01 TRACK---
(01= numéro du programme, ---= numéro de plage)
3. Utilisez les boutons 1 ou 2 ou la
MOLETTE DE RECHERCHE/DU VOLUME
pour accéder à la plage de votre choix.
• Appuyez sur 1 pour revenir à la plage
précédente.
• Appuyez sur 2 pour passer à la plage
suivante.
4. Appuyez sur le bouton
votre sélection. La sélection est mémorisée et
5. Pour sélectionner une autre plage, suivez les
étapes 3 et 4 ci-dessus.
6. Appuyez sur le bouton
programmées.
7. Appuyez sur la touche
la lecture des pistes programmées. Appuyez
de nouveau sur la touche 5 pour annuler la
lecture des pistes sélectionnées.
¬
pour confirmer
s’affiche.
pour lire les plages
5
pour interrompre
16 Français
• Si vous éjectez le disque, la programmation
du CD est annulée.
Si vous éteignez l’appareil, la
programmation CD/USB est annulée.
| REMARQUES |
✎La lecture du programme CD/USB continuera
si vous tentez de passer sur un autre mode.
✎Les boutons USB REC, DELETE et TUNING/
ALBUM sont désactivés en mode Programme.
Si vous appuyez sur ces boutons en mode
Programme, « PROGRAM PLAY » s’affichera
en réponse.
✎Si un fichier dans le programme à lire n'est pas
dans un format pris en charge, la lecture passe
automatiquement au fichier suivant.
Voir ou modifier les plages
programmées
Vous pouvez visualiser et modifier une liste de
plages programmées.
1. Si une piste programmée est lue, appuyez
une autre fois sur la touche
2. Appuyez deux fois sur la touche PROGRAM
pour afficher le message ci-dessous :
5
.
SAVED 01 TRACK002
(01= numéro de programme, 002= numéro de piste)
3. Continuez d'appuyer sur la touche ¬
jusqu'à ce la piste désirée s'affiche.
4. Appuyez sur la touche 1 ou 2 pour
sélectionner une autre piste.
5. Appuyez sur la touche
votre sélection.
6. Pour lire les pistes programmées, appuyez
sur la touche
Pour répéter
1. Appuyez sur le bouton REPEAT.
Chaque fois que vous appuyez sur ce
bouton, le mode change de la manière
suivante:
OFF
¬
pour confirmer
.
;
TRACK ; ALL
Page 47

Bluetooth
Vous pouvez utiliser un dispositif Bluetooth pour
écouter de la musique en son stéréo de haute
qualité, tout cela sans fil!
Qu’est-ce que le Bluetooth?
Bluetooth est une technologie qui permet à
des périphériques compatibles Bluetooth de se
connecter facilement entre eux en utilisant une
connexion sans fil courte.
• Un dispositif Bluetooth peut causer l’émission
d’un bruit nuisible ou une défaillance, selon
l'usage, lorsque :
- Une partie du corps est en contact avec
le système de réception/transmission du
dispositif Bluetooth ou du Composant Hi-Fi.
- Il est soumis à des variations électriques dans
les obstructions causées par un mur, un coin
ou des partitions dans les bureaux.
- Il est exposé à de l’interférence électrique
provenant d’appareils exploitant des bandes
de fréquence notamment de l’équipement
médical, des fours à micro-ondes et des
réseaux locaux sans fil.
• Appariez le Composant Hi-Fi avec le dispositif
Bluetooth tout en maintenant une courte
distance.
• Plus la distance est grande entre le Composant
Hi-Fi et le dispositif Bluetooth, plus la qualité
se dégrade. Si la distance dépasse la portée
opérationnelle du Bluetooth, la connexion est
perdue.
• Dans les zones où la réception est faible, la
connexion Bluetooth peut ne pas fonctionner
correctement.
• La connexion Bluetooth fonctionne uniquement
lorsque le périphérique Bluetooth et les
composants Hi-Fi sont à une faible distance
les uns des autres. La connexion sera
automatiquement coupée si le périphérique
Bluetooth est hors de portée. Même si la
distance est respectée, il est possible que la
qualité sonore soit détériorée par des obstacles
(ex. : murs, portes).
•
Ce périphérique sans fil peut causer de
l’interférence électrique lors de son fonctionnement.
Pour brancher le Composant-Hi-Fi à un
dispositif Bluetooth
Assurez-vous que le dispositif Bluetooth prend en
charge la fonction d’oreillette stéréo Bluetooth.
1. Appuyez sur la touche CD/Bluetooth du
Composant Hi-Fi pour afficher le message
BLUETOOTH.
• Le message WAIT reste affiché un court
instant, puis le message READY apparaît
sur la façade du composant Hi-Fi.
2. Sélectionnez le menu Bluetooth sur le
dispositif Bluetooth que vous désirez
connecter. (Reportez-vous au guide
d’utilisation du dispositif Bluetooth.)
3. Sélectionner le menu Casque d’écoute stéréo
du dispositif Bluetooth.
• Une liste d’appareils détectés s’affichera.
4. Sélectionnez « [Samsung] HI-FI XXXXXX »
dans la liste.
• Lorsque le composant est branché à un
dispositif Bluetooth, il affiche la mention
CONNECTED
avant.
• Si le dispositif Bluetooth n'a pas réussi
l'appariement avec le composant,
supprimez « [Samsung] HI-FI XXXXXX »
trouvé par le dispositif Bluetooth et
recherchez de nouveau le composant.
5. Vous pouvez écouter de la musique lue sur
un dispositif Bluetooth au moyen du système
Composant Hi-Fi.
• En mode Bluetooth, les fonctions Lire/
Répéter/Arrêter/Suivant/Précédent ne sont
pas accessibles sur certains modèles.
| REMARQUES |
Le produit prend en charge des données SBC
de qualité moyenne (jusqu’à 237 kbps@48 kHz),
mais pas les données SBC de haute qualité (328
kbps@44,1kHz).
✎La fonction AVRCP n'est pas prise en charge.
✎Branchez seulement un dispositif Bluetooth qui
prend en charge la fonction A2DP (AV).
✎Vous ne pouvez pas brancher un dispositif
Bluetooth qui prend seulement en charge la
fonction HF (mains libres).
;
BLUETOOTH sur l’écran
03 Fonctions
17 Français
Page 48

Fonctions
✎Un seul appareil peut être apparié à la fois.
✎Une fois que vous avez éteint le Composant
Hi-Fi et que l'appariement est interrompu, il ne
se rétablit pas automatiquement. Pour vous
reconnecter, il est nécessaire de d'apparier de
nouveau les appareils.
✎La recherche ou la connexion par Composant
Hi-Fi pourrait ne pas s’effectuer correctement
dans les cas suivants :
- S’il est entouré d’un fort champ électrique.
-
Si plusieurs appareils Bluetooth sont
simultanément appariés au Composant Hi-Fi.
- Si le dispositif Bluetooth est éteint, pas en
place ou défaillant.
- Veuillez noter que des appareils comme
des fours micro-ondes, des adaptateurs
de réseau local sans fil, des ampoules au
plasma et des cuisinières au gaz utilisent
la même plage de fréquences qu'un
dispositif Bluetooth ce qui peut causer une
interférence électrique.
Pour débrancher le dispositif Bluetooth
d'un Composant Hi-Fi
Vous pouvez débrancher le dispositif Bluetooth
d'un Composant Hi-Fi. Pour des directives,
consultez le guide de l’utilisateur du dispositif
Bluetooth.
• Le Composant Hi-Fi sera débranché.
• Lorsque le Composant Hi-Fi est débranché du
dispositif Bluetooth, le Composant Hi-Fi affiche
la mention DISCONNECTED
l’écran avant.
;
READY sur
Pour débrancher le Composant Hi-Fi
d’un dispositif Bluetooth
Appuyez sur le bouton d’un autre mode en
façade du composant Hi-Fi pour passer du
mode Bluetooth à un autre mode ou mettez le
composant Hi-Fi hors tension. Le périphérique
actuellement connecté est déconnecté.
| REMARQUES |
✎Le dispositif Bluetooth prendra un certain
temps pour transmettre de l’information
au Composant Hi-Fi avant de désactiver la
connexion. (Le temps de déconnexion peut
différer selon le dispositif Bluetooth)
✎En mode de connexion Bluetooth, la connexion
Bluetooth sera perdue si la distance entre le
Composant Hi-Fi et le dispositif Bluetooth
dépasse 5 mètres.
✎Si le dispositif Bluetooth se retrouve de nouveau
dans la portée effective et se reconnecte après
une déconnexion, vous pouvez redémarrer
pour réinitialiser l’appariement avec le dispositif
Bluetooth.
✎Le Composant Hi-Fi s'éteint automatiquement
après 25 minutes en mode Prêt à fonctionner.
✎Lorsqu'un périphérique Bluetooth est connecté
au système de composants Hi-Fi, il commute
automatiquement en mode Bluetooth s’il était
sur un mode différent.
Utiliser la mise en marche par
Bluetooth
Lorsque l’appareil est hors tension, vous pouvez
connecter votre dispositif intelligent à l'appareil
via une connexion Bluetooth pour le mettre en
marche.
1. Maintenez appuyé le bouton Bluetooth de
la télécommande pour activer la fonction
Bluetooth Mise en marche par Bluetooth.
Mise en marche par Bluetooth Power On
s’affiche à l’écran.
2. Lorsque l’appareil est hors tension, connectez
votre dispositif intelligent à l'appareil via
Bluetooth. (Pour plus d’informations sur
la connexion Bluetooth, reportez-vous au
manuel de votre dispositif intelligent.)
3. Une fois la connexion établie, le produit se
met lui-même automatiquement sous tension
en mode Bluetooth.
• Sélectionnez la musique que vous
souhaitez lire à partir de votre dispositif
intelligent.
| REMARQUES |
✎Appuyez et maintenez le bouton Bluetooth
de la télécommande enfoncé pour activer la
fonction Mise en marche par Bluetooth.
Chaque fois que vous appuyez et maintenez
ce bouton enfoncé, le composant Hi-Fi affiche
Bluetooth Power On
;
Off sur son écran.
18 Français
Page 49

TV SoundConnect
Vous pouvez écouter de la musique sur votre
téléviseur Samsung compatible SoundConnect
grâce au composant Hi-Fi en utilisant la fonction
TV SoundConnect.
Pour connecter le composant Hi-Fi
à un téléviseur Samsung compatible
SoundConnect
Avant d’activer cette fonction, assurez-vous
de définir les fonctions SoundConnect ou
SoundShare du téléviseur Samsung sur On.
1. Appuyez sur le bouton TV SoundConnect
de votre composant Hi-Fi pour afficher le
message TV SOUNDCONNECT.
;
SEARCH ; REQUEST
WAIT
2. Réglez Add New Device sur On dans le
menu Paramètres TV SoundConnect du
téléviseur. (Pour plus d’informations, reportezvous au manuel d’utilisation du téléviseur.)
3. Lorsque le composant Hi-Fi est connecté
au téléviseur, il affichera [TV] Name
CONNECTED en façade.
4. La sortie audio du téléviseur connecté prend
le relais du système du composant Hi-Fi.
| REMARQUES |
✎La fonction SoundConnect est disponible sur
certains téléviseurs Samsung commercialisés
depuis 2012. Vérifiez que votre téléviseur
prend en charge la fonction SoundShare ou
SoundConnect.
(Pour plus d’informations, reportez-vous au
manuel d’utilisation du téléviseur.)
✎Si vous débranchez le composant Hi-Fi, la
connexion TV SoundConnect cesse. Pour
établir à nouveau la connexion, branchez le
composant Hi-Fi à une prise, puis redéfinissez
la connexion TV SoundConnect.
;
✎Un seul composant Hi-Fi peut être connecté à
un téléviseur via TV SoundConnect.
✎Pour connecter un autre téléviseur en mode
TV SoundConnect, appuyez sur le bouton
pendant plus de 5 secondes, puis connectez
l'autre téléviseur en suivant les instructions cidessus.
Pour déconnecter le téléviseur du
composant Hi-Fi
Vous pouvez déconnecter le téléviseur du
composant Hi-Fi.
Pour les instructions, reportez-vous au manuel
d’utilisation du téléviseur.
• Lorsque le composant Hi-Fi est déconnecté
du téléviseur, ce composant Hi-Fi affiche
DISCONNECTED
;
REQUEST sur son écran.
Pour déconnecter le composant Hi-Fi
du téléviseur
Appuyez sur le bouton d’un autre mode en façade
du composant Hi-Fi pour passer du mode TV
SoundConnect à un autre mode ou mettre le
composant Hi-Fi hors tension. Le périphérique
actuellement connecté est déconnecté.
| REMARQUES |
✎Le téléviseur connecté patientera un instant
en attente d’une réponse du composant HiFi avant de cesser la connexion. (Le temps
de déconnexion peut varier en fonction du
téléviseur)
✎La connexion peut être perdue ou le son peut
sauter si la distance entre le téléviseur et le
composant Hi-Fi dépasse 2 m (6,5 pieds).
✎Une instabilité de l'environnement réseau peut
également entraîner la perte de connexion ou
la mauvaise transmission du son.
✎Le composant Hi-Fi s'éteint automatiquement
après 25 minutes si l'appareil n'est pas
connecté à un téléviseur.
03 Fonctions
19 Français
Page 50

Fonctions
Utilisation de Mon Karaoke
Vous pouvez utiliser la fonction Mon Karaoke pour
chanter sur des plages musicales enregistrées sur
un CD ou un périphérique USB.
1. Connectez le microphone à la prise MIC
située à l’avant du produit.
•
Si la prise de votre microphone est plus large
que le diamètre de la prise MIC 3.5, vous
aurez besoin d'un connecteur-adaptateur
(non fourni) pour réaliser la connexion.
- Commencez pas connecter le
connecteur-adaptateur à la prise MIC
située à l’avant du produit.
- Branchez ensuite le microphone (avec
la prise plus grosse) au connecteuradaptateur.
2. Appuyez sur la touche MIC VOL-, + de la
télécommande pour régler le volume du
microphone.
3. Appuyez sur la touche MY KARAOKE
de la télécommande pour masquer
l'accompagnement vocal. Chaque fois que la
touche est enfoncée, la sélection est modifiée
de la manière suivante :
MY KARAOKE ON
•
Si vous entendez des bruits inhabituels
(sifflements ou grincements) lorsque vous
utilisez la fonction Karaoke, éloignez le
microphone des enceintes. Abaisser le
volume du microphone ou le volume des
enceintes est également efficace. Ne placez
pas le MICROPHONE en direction de
L'ENCEINTE.
• Le microphone ne fonctionne pas en mode
AUX et TUNER.
• Si vous branchez un microphone,
l'option GIGA SOUND se désactive
automatiquement. Pour activer à nouveau
Giga Sound, vous devez débrancher le
microphone, puis appuyer sur le bouton
GIGA SOUND BEAT.
• Lorsque la fonction Mon karaoké est
activée, GIGA SOUND ne fonctionne pas.
• Lorsque vous désactivez la fonction Mon
karaoké, tous les réglages de cette fonction
sont perdus.
•
Mon karaoké est uniquement disponible lorsqu'un
microphone est relié au composant Hi-Fi.
• Mon karaoké
Bluetooth, TV SoundConnect, FM et AUX.
;
MY KARAOKE OFF
ne fonctionne pas en mode
Fonction de modification automatique
Vous pouvez passer de la lecture du disque au
périphérique USB.
1. Appuyez sur le bouton AUTO CHANGE pour
sélectionner un mode et appuyez sur
pour appliquer votre sélection.
• Si Program Play n’a pas été défini sur CD/
USB
;
AUTO CHANGE OFF
• Si Program Play a été défini sur CD/USB
AUTO CHANGE OFF
AUTO CHANGE PROGRAM
•
Lorsque le mode AUTO CHANGE est « ALL »,
- la musique sera lue sur le DISC ; USB1
;
USB2 de manière continue.
- Si vous appuyez sur la touche POWER,
la touche de modification de fonction
ou la touche EJECT, la fonction AUTO
CHANGE passe automatiquement au
mode « OFF ».
- l'enregistrement ne fonctionne pas.
- la fonction REPEAT ne fonctionne pas et
passe automatique à OFF.
- le bouton REC SPEED, USB REC ne
peut pas fonctionner.
• Lorsque le périphérique USB est en
cours de lecture, si vous le débranchez,
la fonction AUTO CHANGE passe
automatiquement au mode « OFF ».
• S'il n'y a pas de USB1, il passe à USB2.
AUTO CHANGE ALL
;
AUTO CHANGE ALL ;
¬
Écoute de la radio
Pour mémoriser les postes que vous
désirez écouter
Vous pouvez mémoriser jusqu'à :
15 stations FM.
1. Sélectionnez FM en appuyant sur la touche
TUNER/AUX.
2. Pour rechercher une station, appuyez sur
le bouton TUNING MODE ou sur le bouton
@
situé sur l'appareil une ou plusieurs fois
jusqu'à ce que MANUAL s'affiche.
20 Français
Page 51

3. Sélectionnez le poste à mémoriser en :
• Appuyer sur le bouton TUNING/ALBUM
,
ou . de la télécommande pour
rechercher automatiquement les stations
de radiodiffusion actives.
4. Appuyez sur la touche MO/ST pour passer
du mode stéréo au mode mono.
• Si la réception est mauvaise, sélectionnez
MONO pour une diffusion claire sans
interférence.
• Cela s'appliqueseulement lors de l'écoute
d'une station FM.
5. Si vous ne souhaitez pas mémoriser la station
radio, revenez à l'étape 3 et chercher une
autre station.
Sinon:
a. Appuyez sur la touche
b. Ou, appuyez sur le bouton TUNING/
ALBUM de la télécommande pour
sélectionner le numéro d’un programme
en mode PRESET.
c. Appuyez sur le bouton
sauvegarder le préréglage.
6. Pour mémoriser d’autres fréquences radio
nécessaires, répétez les étapes 3 à 5.
¬
¬
.
pour
Choix d'un poste mémorisé
Vous pouvez écouter un poste de radio mémorisé
de la manière suivante :
1. Sélectionnez FM en appuyant sur la
touche TUNER/AUX du produit et de la
télécommande.
2. Appuyez sur la touche TUNING MODE de la
télécommande jusqu'à ce que la touche
« PRESET » s'affiche.
3. Appuyez sur la touche 1, 2 de l'unité
principale ou TUNING/ALBUM ,, . de la
télécommande pour sélectionner un numéro
de préréglage désiré.
Fonction de minuterie
Réglage de l'horloge
Pour chaque étape, vous avez quelques secondes
pour régler les options requises. Si vous dépassez
ce délai, vous devez recommencer.
1. Appuyez sur la touche TIMER SET de la
télécommande deux fois, « CLOCK SET »
is'affiche.
2. Appuyez sur la touche ¬ de la
télécommande, l'heure clignote.
• Avance les heures: TUNING/ALBUM
• Recule les heures: TUNING/ALBUM
3. Lorsque l'heure correcte s'affiche, appuyez
sur la touche ¬. Les minutes se mettent
ensuite à clignoter.
• Avance les minutes: TUNING/ALBUM
•
Recule les minutes: TUNING/ALBUM
4. Lorsque la minute correcte s'affiche, appuyez
sur la touche ¬. «TIMER PLAY SET»
apparaît dans l'affichage.
,
.
,
.
Réglage de la minuterie
La minuterie vous permet d'activer et de
désactiver automatiquement le produit à des
heures préétablies.
• Avant de régler la minuterie, assurez-vous que
l'heure affichée est correcte.
• Pour chaque étape, vous avez quelques
secondes pour régler les options requises.
Si vous dépassez ce délai, vous devez
recommencer.
• Si vous ne voulez pas que le produit s'active
et se désactive automatiquement, vous devez
annuler la minuterie en appuyant sur la touche
TIMER ON/OFF.
Exemple : Vous souhaitez vous réveiller
au son de la musique chaque matin.
1. Appuyez sur la touche TIMER SET jusqu'à
ce que TIMER PLAY SET s'affiche.
2. Appuyez sur la touche ¬.
Résultat : ON TIME s'affiche pendant
quelques secondes, vous pouvez régler
l'heure d'activation de la minuterie.
03 Fonctions
21 Français
Page 52

Fonctions
3. Réglez l'heure d'activation de la minuterie.
a. Appuyez sur la touche TUNING/ALBUM
,
ou . pour régler les heures.
b. Appuyez sur la touche ¬.
Résultat : Les minutes clignotent.
c. Appuyez sur la touche TUNING/ALBUM
,
ou . pour régler les minutes.
d. Appuyez sur la touche ¬.
Résultat : OFF TIME s'affiche pendant
quelques secondes, vous pouvez
maintenant régler l'heure de désactivation
de la minuterie.
4. Réglez l'heure de désactivation de la
minuterie.
a. Appuyez sur la touche TUNING/ALBUM
,
ou . pour régler les heures.
b. Appuyez sur la touche ¬.
Résultat : Les minutes clignotent.
c. Appuyez sur la touche TUNING/ALBUM
,
ou . pour régler les minutes.
d. Appuyez sur la touche ¬.
Résultat : VOLUME XX s'affiche, où XX
correspond au volume déjà réglé.
5. Appuyez sur la touche TUNING/ALBUM
,
ou . pour régler l'intensité sonore et
appuyez sur la touche ¬.
Résultat : La source à sélectionner s'affiche.
6. Appuyez sur la touche TUNING/ALBUM ,
ou . pour sélectionner la source désirée
lorsque le produit démarre.
Si vous
sélectionnez
FM (radio) a. Appuyez sur la touche
CD (disque
compact)
USB Branchez un périphérique
Vous devez aussi
.
¬
b. Sélectionnez une
station préréglée
en appuyant sur la
touche TUNING/
ALBUM , ou ..
Chargez un disque
compact.
USB.
22 Français
7. Appuyez sur la touche ¬.
Résultat : TIMER REC SET (Désirez-vous
effectuer un enregistrement?) s'affiche.
8. Appuyez sur la touche ¬.
Résultat : REC SET YES/NO est affiché,
vous pouvez appuyer sur la touche TUNING/
ALBUM , ou . pour sélectionner REC YES
ou REC NO, puis appuyez sur la touche ¬.
1) Si vous sélectionnez REC NO,
l’enregistrement programmé par le
syntoniseur sera annulé ainsi que tous
les enregistrements programmés par le
syntoniseur actuellement définis. Veuillez
noter que sélectionner REC NO n’annule
pas le réglage du Minuterie.
2) Si vous sélectionnez REC YES, vous
pouvez régler l'enregistrement par
minuterie du syntoniseur.
a. Appuyez sur la touche ¬.
Résultat : ON TIME s'affiche pendant
quelques secondes, vous pouvez régler
l'heure d'activation de l'enregistrement
par minuterie du syntoniseur.
b. Appuyez sur la touche ¬.
Résultat : OFF TIME s'affiche pendant
quelques secondes, vous pouvez régler
l'heure de désactivation de l'enregistrement
par minuterie du syntoniseur.
| REMARQUES |
✎Les durées d'activation/désactivation de
l'enregistrement programmé par le syntoniseur
peuvent différer des durées d’activation/
désactivation de la minuterie.
✎Si les heures d'activation et de désactivation
sont identiques, la mention ERROR s'affiche.
✎
Vous pouvez utiliser les touches 1, 2 du
produit au lieu de la touche TUNING/ALBUM ,
ou . pour effectuer le réglage aux étapes 3 à 8.
✎Si l’heure de mise en marche ou d’arrêt est la
même que la durée d’enregistrement, l’heure de
mise en marche ou d’arrêt est prise en compte et
la durée d’enregistrement n’est pas appliquée.
✎Si la minuterie automatique est activée,
la fonction CD ou USB peut nécessiter la
réalisation d'une étape additionnelle pour
l'activation selon le disque (ou le périphérique).
Il est donc préférable de sélectionner la
fonction de syntonisation au lieu.
✎Si vous sélectionnez le mode USB ou
CD lorsqu’il n’y a aucun disque ou aucun
périphérique USB dans le produit, il passera
automatiquement au mode SYNTONISEUR.
Page 53

Annulation de la minuterie
Une fois que vous avez défini la minuterie, elle se
lancera automatiquement. Lorsqu’elle débute, le
message TIMER ON apparaît à l’écran. Si vous
ne souhaitez plus utiliser la minuterie, vous devez
l’annuler.
• Pour annuler la minuterie, appuyez une fois sur
la touche TIMER ON/OFF.
• Pour redémarrer la minuterie, appuyez une autre
fois sur la touche TIMER ON/OFF.
| REMARQUES |
✎
Lorsque vous sélectionnez le mode MINUTERIE
DÉSACTIVÉE, la fonction ENREGISTREMENT
PAR MINUTERIE et HEURE n'est pas accessible.
Fonction Enregistrement
Enregistrement de base
Vous pouvez enregistrer le son d'un CD, d'un
périphérique USB, d'une émission de radio ou
d’une source externe dans le périphérique de
stockage USB.
1. Branchez un périphérique de stockage
externe USB sur une prise USB (
située sur votre appareil. Vous pouvez utiliser
l'USB 2.
2. Lisez un disque ou le contenu d’un
périphérique USB, allumez la radio et
sélectionnez une station ou connectez une
source externe à votre appareil comme décrit
ci-dessous.
CD
• Appuyez sur le CD du produit pour
sélectionner la fonction CD.
• Insérez doucement un CD dans la fente
d'insertion du disque.
• Utilisez les touches de sélection du CD
(1 ou 2) pour sélectionner la chanson
désirée.
TUNER
• Sélectionnez FM en appuyant sur la touche
TUNER/AUX.
• Réglez la fréquence radio que vous
souhaitez enregistrer.
)
23 Français
USB 1 (le dispositif d'enregistrement se
trouve sur l’USB 2)
• Connectez le périphérique USB incluant les
fichiers d'origine du périphérique USB à la
prise USB 1.
• Appuyez sur la touche USB pour
sélectionner USB 1.
• Lire une chanson d'un périphérique USB 1.
Source externe
• Branchez un périphérique externe/MP3 au
produit.
• Appuyez sur le bouton TUNER/AUX pour
sélectionner AUX IN 1 ou AUX IN 2.
• Lire une chanson stockée sur un
périphérique externe.
3. Appuyez sur la touche USB REC de la
télécommande pour lancer l'enregistrement.
CD
• L’enregistrement du CD commence et le
message « TRACK RECORD » ainsi que le
numéro de la piste actuelle s’alternent sur
l’écran.
• Si vous souhaitez enregistrer toutes les
pistes sur le disque, appuyez et maintenez
le bouton USB REC enfoncé. Le message
« FULL CD RECORD » s’affiche.
RADIO
• Le message « TUNER RECORD » s’affiche
et l’enregistrement commence.
CD-ROM/USB
• Le message « FILE COPY » s’affiche et
l’enregistrement commence.
•
Vous pouvez également copier un dossier
contenant des fichiers MP3/WMA vers
un périphérique sur l’USB 2. Appuyez et
maintenez le bouton USB REC enfoncé
pendant que le système lit un fichier MP3 ou
WMA situé dans un dossier. Votre système
affiche « FOLDER COPY » et il enregistrera
tous les fichiers contenus dans ce dossier.
• Lorsque l’enregistrement est terminé,
« STOP » s’affiche.
• Si un fichier porte le même nom sur le
périphérique de l’USB 2, « EXIST FILE »
s’affiche et la fonction est annulée.
03 Fonctions
Page 54

Fonctions
• Si un microphone est relié à l’appareil et
que vous appuyez sur le bouton USB REC,
vous activez la fonction Enregistrement
MP3, et non la fonction Copie.
• Appuyez sur le bouton USB REC pendant
une seconde pour lancer la fonction COPIE
DU FICHIER. Appuyez sur le bouton USB
REC pendant quelques secondes pour
lancer la fonction COPIE DU DOSSIER.
Source externe
• Le message « AUX RECORD » s’affiche et
l’enregistrement commence.
CD/USB1(MP3) et MIC
• Le message « MP3 RECORD » s’affiche et
l’enregistrement commence.
4. Pour arrêter l'enregistrement, appuyez
sur la touche 5. Un enregistrement est
automatiquement créé et enregistré en format
MP3.
5.
Après l'enregistrement, un répertoire portant le
nom « RECORDING » (CD-DA), « COPY »
(CD-ROM/USB), « TUNER RECORDING »,
« AUX RECORDING » ou « MP3 RECORDING »
sera créé sur votre appareil.
| REMARQUES |
✎Le fichier WMA/MP2 file peut seulement être
copié, pas enregistré.
✎Ne déconnectez pas le périphérique USB ou le
cordon c.a. pendant l’enregistrement, car cela
pourrait endommager le fichier.
✎Si vous déconnectez le périphérique USB
pendant l’enregistrement, le produit ne sera
pas alimenté en courant et vous pourriez ne
pas supprimer le fichier enregistré. Dans ce
cas, veuillez connecter le périphérique USB au
PC et sauvegarder tout d’abord les données
USB sur le PC, puis formater le périphérique
USB.
✎Si la mémoire du périphérique USB est
insuffisante, celui-ci affiche le message « NOT
ENOUGH MEMORY ».
✎La fonction d'enregistrement prend en charge
les systèmes avec fichier FAT uniquement. Le
système de fichiers NTFS n’est pas pris en
charge.
24 Français
✎Si vous utilisez la fonction de recherche de CD
à grande vitesse, l’enregistrement du CD ne
peut pas fonctionner.
✎
Quelquefois, la durée de l’enregistrement peut
être plus longue avec certains périphériques USB.
✎Dans le mode de programme, vous ne pouvez
pas utiliser la fonction d’enregistrement de CD.
✎Pendant l’enregistrement du CD, la fonction
EQ ne peut pas fonctionner et se met
automatiquement à OFF).
✎Pendant l’enregistrement du CD, la fonction
REPEAT ne peut pas fonctionner et se met
automatiquement à OFF.
✎Si vous utilisez la fonction MIC durant
l'enregistrement CD, la voix du microphone
sera enregistrée.
✎Vous ne pouvez pas enregistrer la radio
lorsque vous effectuez une recherche ou s’il
n’y a pas de fréquences disponibles en mode
Syntoniseur.
✎Notez que le réglage du volume d’entrée à
un niveau trop élevé pendant l’enregistrement
de la musique depuis une source externe et
par les canaux AUX et USB pourrait introduire
du bruit dans l’enregistrement. Dans ce cas,
baissez le volume du périphérique.
Vitesse d’enregistrement
Chaque fois que vous appuyez sur le bouton
REC SPEED de la télécommande, la vitesse
d’enregistrement change de la manière suivante:
;
RECORD SPEED x 1
• Lors d’un enregistrement à partir du syntoniseur
ou d’une source externe, vous ne pouvez pas
modifier la vitesse d’enregistrement.
• Si vous sélectionnez RECORD SPEED X 4, le
son n’est pas généré durant l’enregistrement.
• Si vous branchez le microphone, vous ne
disposez que d’un seul mode de vitesse
d’enregistrement: RECORD SPEED X 1.
• Pendant l’enregistrement, si vous débranchez le
microphone, l’enregistrement s’arrête. Si vous
rebranchez le microphone, l’enregistrement ne
redémarre pas.
| REMARQUES |
✎Même si vous réglez RECORD SPEED x4,
l’enregistrement peut ne pas être réalisé en
vitesse x4 en fonction du périphérique de
stockage USB utilisé.
RECORD SPEED x 4
Page 55

Effets sonores spéciaux
Sélection du mode EQ
Votre produit prend en charge les réglages
d'égalisateur prédéfinis entre des basses et
hautes fréquences pour qu'ils s'harmonisent avec
le genre de musique actuel.
1. Appuyez sur le bouton EQ.
Chaque fois que vous appuyez sur le bouton
EQ ou que vous tournez la MOLETTE DE
RECHERCHE/DU VOLUME de l’appareil, le
mode change de la manière suivante:
;
FLAT ; RANCHERA ; CUMBIA
OFF
;
REGGAE ; MERENGUE ; SALSA ;
REGGATON ; FOLKLORE ; PARTY ; POP
;
HIP-HOP ; ROCK ; JAZZ ; CLASSIC ;
ELEC-TRONIC ; MP3 ENHANCER ; VIRTUAL
2. Pour régler les niveaux BASS, MID (Moyen),
et TREB (Aigu) manuellement, sélectionnez
USER EQ, puis appuyez sur le bouton ¬.
Résultat :
clignote.
Appuyez sur les boutons 1 ou 2 de
l’appareil ou sur les boutons , ou .
TUNING/ALBUM pour sélectionner un
niveau compris entre -06 et 06.
Puis, appuyez sur le bouton ¬.
Résultat : le niveau MOYEN (chiffre du centre)
clignote.
Appuyez sur les boutons 1 ou 2 de
l’appareil ou sur les boutons , ou .
TUNING/ALBUM pour sélectionner un
niveau compris entre -06 et 06.
Puis, appuyez sur le bouton ¬.
Résultat : le niveau AIGU (chiffre de droite)
clignote.
Appuyez sur les boutons 1 ou 2 de
l’appareil ou sur les boutons , ou .
TUNING/ALBUM pour sélectionner un
niveau compris entre -06 et 06.
Puis, appuyez sur le bouton ¬.
Résultat : le réglage est terminé.
SOUND ; USER EQ
Le niveau GRAVE (touche numérique)
| REMARQUES |
✎Lors d'un enregistrement, la fonction EQ
ne fonctionne pas et l'égaliseur passe
automatiquement en mode « Désactivé ».
✎Si vous n’appuyez sur aucune touche
pendant 8 secondes, les réglages sont
automatiquement annulés et les réglages
antérieurs seront sauvegardés.
✎Le mode EQ peut aussi différer selon votre
région.
✎Utilisez la MOLETTE DE RECHERCHE/
DU VOLUME pour modifier le mode EQ. Le
mode EQ sélectionné sera appliqué après 2
secondes.
✎Utilisez la MOLETTE DE RECHERCHE/DU
VOLUME pour modifier le mode EQ et appuyez
¬
sur
. L’écran du mode EQ disparaît.
Fonction FOOTBALL MODE
Vous pouvez sélectionner directement le mode
football pour écouter la retransmission de sports
professionnels avec réalisme.
1. Appuyez sur le bouton FOOTBALL MODE
de l'appareil.
Chaque fois que vous appuyez sur ce
bouton, le mode change de la manière
suivante :
;
ANNOUNCER ; STADIUM
OFF
2. Pour annuler cette fonction, appuyez sur le
bouton FOOTBALL MODE jusqu’à ce que
« OFF » s’affiche.
Fonction GOAL
Appuyez sur ce bouton pour ajouter le son des
acclamations lorsque vous visionnez un match de
football.
1. Appuyez sur la touche GOAL de la
télécommande.
Chaque fois que vous appuyez sur cette
touche, le mode change de manière suivante :
GOAL ON ; GOAL OFF
2. Pour annuler cette fonction, appuyez sur la
touche GOAL jusqu’à ce que « GOAL OFF »
s’affiche.
03 Fonctions
25 Français
Page 56

Fonctions
| REMARQUES |
✎Appuyez sur le bouton GOAL pour mixer le
fichier audio actuellement en lecture avec le
son GOAL.
Fonction GIGA SOUND
Votre produit est équipé de la fonction de mode
GIGA SOUND. La fonction GIGA SOUND amplifie
les basses et les améliore les aigus ou les basses
deux fois plus pour vous permettre d’apprécier un
son puissant et réel.
1. Appuyez sur la touche GIGA SOUND BEAT
de l'unité principale ou la touche GIGA de
la télécommande. Chaque fois que vous
appuyez sur ce bouton, le mode change de
la manière suivante:
GIGA SOUND BEAT
2. Pour annuler cette fonction, appuyez sur le
bouton GIGA SOUND BEAT jusqu’à ce que
le message « GIGA SOUND OFF » s’affiche.
| REMARQUES |
✎Le mode SON GIGA peut différer selon votre
région.
;
GIGA SOUND OFF
Fonction BEAT WAVING
Vous pouvez passer au mode DEL de enceinte
selon vos préférences.
1. Appuyez sur le bouton BEAT WAVING de la
télécommande ou sur l’appareil.
Chaque fois que vous appuyez sur ce
bouton, le mode change de la manière
suivante:
STARDUST ; EMERALD MOON ; SOLAR
BOMB ; SHOOTING STAR ; STAR ;
PARTY 1 ; PARTY 2 ; FUN 1 ; FUN 2 ;
PURE ; FRESH ; LOVE ; JOY ; SUNSET ;
SUNRISE ; NATURE 1 ; NATURE 2 ; WAVE 1
;
WAVE 2 ; AURORA ; OFF
| REMARQUES |
✎Si vous sélectionnez BEAT WAVING OFF, tous
les voyants DEL des enceintes s'éteindront.
26 Français
Fonction DJ BEAT
La fonction DJ Beat vous permet d’activer les
fonctions d’effets sonores DJ. Le niveau de
chaque effet est réglable.
Appuyez sur le bouton DJ BEAT de la
télécommande ou sur l’appareil.
Chaque fois que vous appuyez sur ce bouton, le
mode change de la manière suivante:
| IMPORTANT |
✎La plage de réglage est de [-15 ~ +15] et la
valeur de configuration initiale est de 0.
• FLANGER : Il crée une vibration qui s'apparente
à celle provoquée par le décollage/l'atterrissage
d'un jet.
• CHORUS : Permet de créer un effet similaire à
un chœur de chorale.
• WAHWAH : Sonne comme « Wah~ Wah~ ».
• TREMOLO : Monte et baisse le volume
rapidement et de manière répétée.
• FUZZ : Permet de déformer le son original pour
le rendre plus fort et plus dur.
• PHASER : Permet de modifier le son original de
clair à monotone.
• SLAPBACK : Permet de créer l’effet d’un écho
en retour qui accompagne le son original.
• DJ BEAT OFF :
| REMARQUES |
✎Le voyant rouge DEL entourant la touche
correspondante s’allume de même que la
touche DJ BEAT.
✎
Vous pouvez contrôler le niveau de l'effet réglé par
la molette de volume. Pour contrôler le volume,
appuyez sur la touche VOLUME/DJ du produit.
✎Pour annuler l'effet réglé, appuyez une fois de
plus sur la touche correspondante.
✎Vous pouvez également commander l’effet
en utilisant la touche EFFECT LEVEL de la
télécommande.
✎Utilisez la molette du volume pour commander
l’intensité de l’effet qui a été activé en dernier.
Par exemple, si vous activez l’effet WahWah
puis l’effet Panoramique, la molette du volume
commandera l’effet Panoramique.
✎Pour commander l’intensité de l’effet que
vous avez appliqué en premier, appuyez sur
la touche de l’effet que vous avez appliqué en
dernier pour le désactiver. Vous pouvez ensuite
utiliser la molette du volume pour commander
l’intensité du premier effet.
Permet de désactiver cette fonction.
Page 57

Fonction +PANNING
Il accroît la capacité des enceintes gauche et
droite et produit un son qui s'apparente à un
déplacement sonore latéral.
| REMARQUES |
✎Pour appliquer l’effet PANNING à un autre
effet, appuyez sur le bouton +PANNING
lorsque l’autre effet est actif ou appuyez
sur le bouton d’un autre effet lorsque l’effet
PANNING est actif.
Fonction NON-STOP MUSIC RELAY
La fonction RELAIS MUSIQUE SANS
INTERRUPTION permet de lire les fichiers
musicaux en continu sans aucun intervalle entre
les plages/les fichiers. S’il y a deux fichiers mp3,
la lecture saute à 10 secondes après la position
de départ du fichier suivant lorsque la plage
précédente atteint le point situé 10 secondes
avant la position de fin.
Appuyez sur le bouton NON-STOP MUSIC
RELAY sur l’appareil ou le bouton NON-STOP
RELAY sur la télécommande.
Chaque fois que vous appuyez sur ce bouton, le
mode change de la manière suivante:
;
NON-STOP RELAY ON
| REMARQUES |
✎Cette fonction est uniquement disponible
durant la lecture d'un fichier CD/USB.
NON-STOP RELAY
OFF
Fonction DANCE TIME
Appuyez sur la touche DANCE TIME de la
télécommande durant la lecture de fichiers musicaux
pour lire la musique de danse enregistrée dans l’appareil.
Utilisez cette fonction pour profiter de rythmes
entraînants.
1. Appuyez sur la touche DANCE TIME de la
télécommande.
Chaque fois que vous appuyez sur cette touche,
le mode change de la manière suivante :
DANCE TIME ON ; DANCE TIME OFF
2. Pour annuler cette fonction, appuyez sur
la touche DANCE TIME jusqu’à ce que «
DANCE TIME OFF » s’affiche.
| REMARQUES |
✎Lorsque le fichier audio DANCE TIME se
termine, le mode DANCE TIME passe en mode
DANCE TIME OFF.
✎Lorsque le mode DANCE TIME est sur ON,
la musique provenant de sources B/T, TV
SoundConnect, TUNER et AUX passe en
mode Muet.
✎Si vous réglez le mode DANCE TIME sur OFF
lors de la lecture d'un CD ou d'une clé USB, la
lecture revient au début de la piste actuelle.
✎Vous pouvez changer la musique de danse
en appuyant sur le bouton 1, 2 Lors de la
lecture d'un fichier audio DANCE TIME.
Fonction TEMPO
Utilisez cette fonction pour changer la TEMPO
pendant la lecture de la musique.
1. Durant la lecture (CDDA/ MP3/ WMA),
appuyez sur la touche TEMPO de la
télécommande.
2. Sélectionnez la TEMPO souhaitée en
utilisant la touche EFFECT LEVEL de la
télécommande.
| REMARQUES |
✎La fonction TEMPO ne fonctionne pas en mode
Bluetooth, TV SoundConnect, FM et AUX.
✎Lorsque vous désactivez la fonction TEMPO,
tous les paramètres TEMPO sont perdus.
Fonction Son au démarrage
Si vous réglez le son de démarrage, vous pouvez
bénéficier de la sortie audio grandiose du produit
au moment du démarrage.
1. Appuyez sur le bouton GIGA SOUND BEAT
de l'appareil ou sur le bouton GIGA de la
télécommande pendant 5 secondes.
Le BOOTING SOUND apparaît sur l'écran
d'affichage.
2. Appuyez sur le bouton GIGA SOUND BEAT
de l'appareil ou sur le bouton GIGA de la
télécommande pendant 5 secondes pour On
ou Off la fonction BOOTING SOUND.
03 Fonctions
27 Français
Page 58

Annexes
Dépannage
Reportez-vous au tableau ci-dessous si le produit ne fonctionne pas correctement. Si vous éprouvez des
problèmes qui ne sont pas énumérés ci-dessous ou si les directives fournies ne vous sont pas utiles,
éteignez le produit, débranchez le cordon d'alimentation et communiquez avec le détaillant autorisé le
plus près ou avec le centre de service électronique Samsung.
Symptôme Vérification/Solution
Il m'est impossible d'éjecter le
disque.
La lecture ne démarre pas
immédiatement lorsque la touche
Lire/Pause est enfoncée.
Aucun son n'est produit. • Aucun son n'est produit durant la lecture, la lecture au ralenti
La télécommande ne fonctionne pas. • Respecte-t-on la portée de captation (angle et distance) de la
Le produit ne fonctionne pas.
(Exemple : Le courant est coupé ou
le panneau avant ne fonctionne pas
ou un bruit étrange est produit.)
Le produit ne fonctionne pas
normalement.
Je ne capte pas les postes de radio. • L'antenne est-elle bien connectée?
• Le cordon d'alimentation est-il fermement inséré dans la
prise?
• Coupez l'alimentation, puis rétablissez-la.
• Utilisez-vous un disque déformé ou un disque dont la surface
est égratignée?
• Essuyez le disque.
ou la lecture image par image.
• Les enceintes sont-elles bien connectées? Le réglage des
enceintes a-t-il correctement personnalisé?
• Le disque est-il sévèrement endommagé?
télécommande lors de son utilisation?
• Les piles sont-elles à plat?
• Appuyez et maintenez le bouton
de 5 secondes en l'absence de disque inséré dans l'appareil.
Le message d’initialisation apparaît sur l’écran, et l’alimentation
est coupée automatiquement. Lorsque vous rallumez votre
appareil, tous les réglages sont réinitialisés.
N’utilisez pas cette fonction sans une nécessité absolue.
• Si le signal d'entrée de l'antenne est faible, installez une
antenne FM externe dans un endroit où la réception est
bonne.
@
(en façade) pendant plus
S'éteint automatiquement après
l’affichage de la mention « PROTECT »
• Vérifiez l’alimentation pour vous assurer qu’elle se situe
dans la portée indiquée sur l’étiquette apposée à l’arrière du
produit.
• Si le « sélecteur de tension » est sur le panneau arrière, vérifiez
si l’alimentation est le même que la tension que vous réglez
manuellement.
28 Français
Page 59
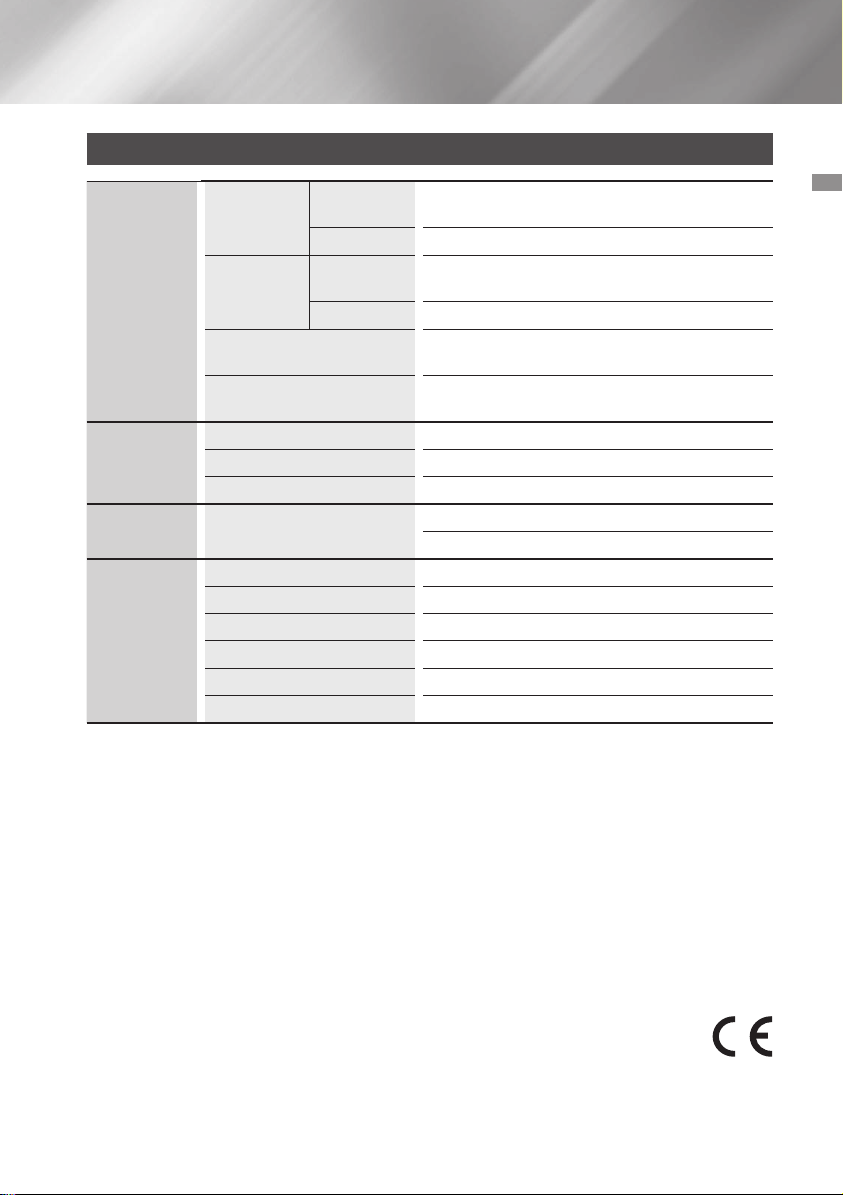
Caractéristiques techniques
Unité
Poids
Général
Syntoniseur
FM
Disque CD
Amplificateur
*: Spécification nominale
- Samsung Electronics Co., Ltd se réserve le droit d'apporter des modifications aux spécifications sans
préavis.
- Les poids et les dimensions sont approximatifs.
- Cette conception et ces spécifications techniques sont susceptibles d'être modifiées sans préavis.
- Pour obtenir de l'information sur la source d'alimentation et la consommation électrique, veuillez vous
reporter à l'étiquette apposée sur le produit.
Dimensions
Plage de températures
d’utilisation
Plage de taux d’humidité
d’utilisation
Rapport signal/bruit 55 dB
Sensibilité utile 10 dB
Distorsion harmonique totale 1 %
CD : 12 cm (DISQUE
COMPACT)
Sortie enceinte avant 575W/CH (4Ω)
Sortie du caisson des basses 575W/CH (4Ω)
Gamme de fréquences 22Hz à 20KHz
Rapport signal/bruit 65 dB
Séparation de canaux 60 dB
Sensibilité d'entrée AUX IN1 1.2V, AUX IN2 2.0V
principale
Enceinte 55.17 Kg
Unité
principale
Enceinte 648 (W) x 652 (H) x 440 (D) mm
6.1 Kg
550 (W) x 212 (H) x 367 (D) mm
+5°C à +35°C
10 % à 75 %
Vitesse de lecture : 4.8 ~ 5.6 m/sec.
Durée maximum de lecture : 74 min.
04 Annexes
Annonce relatif au code de source libre
Pour toute requête et demande concernant les sources ouvertes, contactez Samsung via l’e-mail (oss.
request@samsung.com).
• Par la présente, Samsung Electronics déclare que cet équipement est conforme aux exigences
principales et autres dispositions relatives à la Directive 1999/5/EC.
La déclaration de conformité originale se trouve sur le site http://www.samsung.com, allez
sur Assistance > Recherche assistance produit et saisissez le nom du modèle.
Cet appareil peut être utilisé dans tous les pays de l'Union Européenne.
29 Français
Page 60

Comment contacter Samsung dans le monde
Si vous avez des suggestions ou des questions concernant les produits Samsung, veuillez contacter le Service
Consommateurs Samsung.
Area Contact Centre
AUSTRIA
BELGIUM 02-201-24-18
BOSNIA 051 331 999
BULGARIA 07001 33 11 , sharing cost
CROATIA 062 726 786
CZECH 800 - SAMSUNG (800-726786)
DENMARK 70 70 19 70
FINLAND 030-6227 515
FRANCE 01 48 63 00 00
GERMANY
CYPRUS
GREECE
HUNGARY
ITALIA 800-SAMSUNG (800.7267864)
LUXEMBURG 261 03 710
MONTENEGRO 020 405 888
0800 - SAMSUNG (0800 - 7267864)
0180 6 SAMSUNG bzw.
0180 6 7267864*
(*0,20 €/Anruf aus dem dt. Festnetz,
aus dem Mobilfunk max. 0,60 €/Anruf)
8009 4000 only from landline, toll
free
80111-SAMSUNG (80111 726
7864) only from land line
(+30) 210 6897691 from mobile
and land line
0680SAMSUNG (0680-726-786)
0680PREMIUM (0680-773-648)
Web Site
www.samsung.com/at/support
www.samsung.com/be/
support (Dutch)
www.samsung.com/be_fr/
support (French)
www.samsung.com/support
www.samsung.com/bg/support
www.samsung.com/hr/support
www.samsung.com/cz/support
www.samsung.com/dk/support
www.samsung.com/fi/support
www.samsung.com/fr/support
www.samsung.com/de/
support
www.samsung.com/gr/
support
http://www.samsung.com/
hu/support
www.samsung.com/it/support
www.samsung.com/support
www.samsung.com/support
Area Contact Centre
SLOVENIA
NETHERLANDS
NORWAY 815 56480
POLAND
PORTUGAL 808 20 7267
ROMANIA
SERBIA 011 321 6899
SLOVAKIA 0800 - SAMSUNG(0800-726 786)
SPAIN 0034902172678
SWEDEN 0771 726 7864 (SAMSUNG)
SWITZERLAND 0848 726 78 64 (0848-SAMSUNG)
U.K 0330 SAMSUNG (7267864)
EIRE 0818 717100
LITHUANIA 8-800-77777
LATVIA 8000-7267
ESTONIA 800-7267
080 697 267
090 726 786
0900-SAMSUNG (0900-7267864)
(€ 0,10/Min)
0 801-172-678* lub +48 22 60793-33 **
*(całkowity koszt połączenia jak za 1
impuls według taryfy operatora)
** (koszt połączenia według taryfy
operatora)
08008 SAMSUNG (08008 726 7864)
TOLL FREE No.
Web Site
www.samsung.com/si/
support
www.samsung.com/nl/
support
www.samsung.com/no/support
www.samsung.com/pl/
support
www.samsung.com/pt/support
www.samsung.com/ro/support
www.samsung.com/rs/support
www.samsung.com/sk/support
www.samsung.com/es/support
www.samsung.com/se/support
www.samsung.com/ch/
support (German)
www.samsung.com/ch_fr/
support (French)
www.samsung.com/uk/support
www.samsung.com/ie/support
www.samsung.com/lt/support
www.samsung.com/lv/support
www.samsung.com/ee/support
Elimination des batteries de ce produit
(Applicable aux pays de l’Union européenne et aux autres pays européens dans lesquels des systèmes de collecte
sélective sont mis en place.)
Le symbole sur la batterie, le manuel ou l'emballage indique que les batteries de ce produit ne doivent pas être éliminées
en fin de vie avec les autres déchets ménagers. L'indication éventuelle des symboles chimiques Hg, Cd ou Pb signifie
que la batterie contient des quantités de mercure, de cadmium ou de plomb supérieures aux niveaux de référence
stipulés dans la directive CE 2006/66. Si les batteries ne sont pas correctement éliminées, ces substances peuvent
porter préjudice à la santé humaine ou à l'environnement.
Afin de protéger les ressources naturelles et d'encourager la réutilisation du matériel, veillez à séparer les batteries des
autres types de déchets et à les recycler via votre système local de collecte gratuite des batteries.
Les bons gestes de mise au rebut de ce produit
(Déchets d’équipements électriques et électroniques)
(Applicable dans les pays de l’Union Européenne et dans d’autres pays européens pratiquant le tri sélectif)
Ce symbole sur le produit, ses accessoires ou sa documentation indique que ni le produit, ni ses accessoires
électroniques usagés (chargeur, casque audio, câble USB, etc.) ne peuvent être jetés avec les autres déchets ménagers.
La mise au rebut incontrôlée des déchets présentant des risques environnementaux et de santé publique, veuillez
séparer vos produits et accessoires usagés des autres déchets. Vous favoriserez ainsi le recyclage de la matière qui les
compose dans le cadre d’un développement durable.
Les particuliers sont invités à contacter le magasin leur ayant vendu le produit ou à se renseigner auprès des autorités
locales pour connaître les procédures et les points de collecte de ces produits en vue de leur recyclage.
Les entreprises et professionnels sont invités à contacter leurs fournisseurs et à consulter les conditions de leur contrat
de vente. Ce produit et ses accessoires ne peuvent être jetés avec les autres déchets professionnels et commerciaux.
Page 61

MX-HS8000
PREMIUM HI-FI Kompaktanlage
Bedienungsanleitung
erleben sie die möglichkeiten
Danke für den Kauf dieses Samsung Produkts.
Registrieren Sie Ihr Produkt unter folgendem Link, und
profitieren Sie von unserem umfassenden Kundenservice:
www.samsung.com/register
Page 62

Sicherheitsinformationen
Warnung
ZUR VERMEIDUNG VON STROMSCHLÄGEN DARF DIESES GERÄT NICHT GEÖFFNET WERDEN.
ES ENTHÄLT KEINE BAUTEILE, DIE VOM BENUTZER GEWARTET WERDEN KÖNNEN. LASSEN SIE
REPARATUREN NUR VON QUALIFIZIERTEM FACHPERSONAL DURCHFÜHREN.
ACHTUNG
STROMSCHLAGGEFAHR! NICHT ÖFFNEN!
ACHTUNG: UM STROMSCHLÄGE ZU VERMEIDEN, STECKEN SIE
DEN STECKER FEST UND VOLLSTÄNDIG IN DIE STECKDOSE.
WARNUNG
• Schützen Sie das Gerät vor Regen und
Feuchtigkeit, um die Gefahr von Bränden oder
Stromschlägen zu verringern.
• IN DIESEM PRODUKT WIRD EIN LASER
LASERPRODUKT DER KLASSE 1
Dieser CD-Player ist ein LASERPRODUKT DER
KLASSE 1. Bei Verwendung von Bedienelementen
bzw. Einstellungen und Vorgängen, die von den
hier aufgeführten abweichen, kann ein Risiko
durch gefährliche Strahlung entstehen.
Entspricht 21CFR 1040.10 mit Ausnahme der
Abweichungen gemäß der Mitteilung Nr. 50 vom
24. Juni 2007.
GERFAHR:
• BEI GEÖFFNETEM GERÄT SICHTBARE UND
UNSICHTBARE LASERSTRAHLEN. DIREKTEN
KONTAKT MIT LASERSTRAHL VERMEIDEN.
(FDA 21 CFR)
ACHTUNG:
• BEI GEÖFFNETEM GERÄT SICHTBARE UND
UNSICHTBARE LASERSTRAHLEN DER
KLASSE 3B. KONTAKT MIT LASERSTRAHL
VERMEIDEN. (IEC 60825-1)
Dieses Symbol weist auf eine gefährliche
Netzspannung" im Inneren des Geräts hin.
Es besteht die Gefahr von Stromschlägen
und Verletzungen.
Dieses Symbol weist auf wichtige
Anweisungen im Begleitmaterial zum
Produkt hin.
EINGESETZT. BEI VERWENDUNG VON
STEUERUNGEN UND EINSTELLUNGEN
SOWIE BEI VORGEHENSWEISEN, DIE
VON DIESEM HANDBUCH ABWEICHEN,
KANN DER BENUTZER GEFÄHRLICHER
STRAHLUNG AUSGESETZT WERDEN.
DAS GEHÄUSE NICHT ÖFFNEN UND
REPARATURARBEITEN NIEMALS SELBST
AUSFÜHREN. QUALIFIZIERTES PERSONAL
MIT DER WARTUNG BEAUFTRAGEN.
CLASS 1 LASER PRODUCT
KLASSE 1 LASER PRODUKT
LUOKAN 1 LASER LAITE
KLASS 1 LASER APPARAT
PRODUCTO LÁSER CLASE 1
• Es kann eine Gebühr erhoben werden, wenn:
Ein Techniker auf Ihre Anfrage bestellt wird und am Gerät kein Defekt vorliegt (z. B. weil Sie diese
Bedienungsanleitung nicht gelesen haben).
Sie das Gerät in einer Reparaturwerkstatt abgegeben haben und am Gerät kein Defekt vorliegt (z. B.
weil Sie diese Bedienungsanleitung nicht gelesen haben).
• Die Höhe dieser Gebühr wird Ihnen mitgeteilt, bevor irgendwelche Arbeiten durchgeführt werden
oder der Hausbesuch erfolgt.
2 Deutsch
Page 63

Vorsichtsmaßnahmen
•
Stellen Sie sicher, dass die Stromversorgung in
Ihrem Haus den auf der Rückseite Ihres Produkts
angegebenen Anforderungen entspricht.
• Stellen Sie den Player horizontal auf einer
geeigneten Unterlage (Möbel) auf, sodass um
ihn herum ausreichend Platz (7,5 - 10 cm) zur
Belüftung bleibt.
• Stellen Sie den Player nicht auf einen Verstärker
oder ein anderes Gerät, das Wärme erzeugt.
Achten Sie darauf, dass die Belüftungsöffnungen
nicht abgedeckt sind.
• Stellen Sie keine Gegenstände auf das Gerät.
• Stellen Sie sicher, dass keine Disk eingelegt ist,
bevor Sie das Gerät bewegen.
• Um das Gerät vollständig auszuschalten, den
Stecker aus der Steckdose ziehen. Ziehen Sie
den Netzstecker aus der Steckdose, wenn Sie
das Gerät längere Zeit nicht benutzen.
• Ziehen Sie bei Gewittern das Stromkabel
aus der Steckdose. Durch Blitze verursachte
Spannungsspitzen können zur Beschädigung
des Geräts führen.
• Setzen Sie das Gerät keiner direkten
Sonneneinstrahlung oder anderen
Wärmequellen aus. Dies kann zu einer
Überhitzung und Fehlfunktion des Geräts führen.
• Schützen Sie das Produkt vor Feuchtigkeit,
übermäßiger Hitze und Geräten, die starke
magnetische oder elektrische Felder erzeugen (z.
B. Lautsprecher).
• Ziehen Sie bei einer Fehlfunktion des Geräts das
Netzkabel aus der Steckdose.
• Ihr Produkt ist nicht für den gewerblichen
Einsatz vorgesehen. Dieses Produkt ist nur für
den persönlichen Gebrauch bestimmt.
• Wenn Ihr Produkt oder die CD bei kalten
Temperaturen aufbewahrt wurden, kann
Kondensation auftreten. Wenn Sie das Gerät bei
kalten Temperaturen transportiert haben, warten
Sie mit der Inbetriebnahme circa 2 Stunden, bis
das Gerät Raumtemperatur erreicht hat.
• Die in diesem Produkt verwendeten Batterien
enthalten umweltschädliche Chemikalien.
Entsorgen Sie die Batterien nicht über den
Hausmüll.
• Prüfen Sie bitte zuerst die Lautstärke, bevor
Sie mit der Wiedergabe beginnen, um ältere
Menschen und schwangere Frauen nicht
durch eine plötzliche laute Tonwiedergabe zu
erschrecken.
• Stellen Sie die Lautsprecher in einem geeigneten
Abstand zu beiden Seiten des Geräts auf, um
einen guten Stereoklang zu erzielen.
• Richten Sie die Lautsprecher auf den Hörbereich
aus.
• Das Gerät keinem Spritz- oder Tropfwasser
aussetzen. Keine mit Flüssigkeit gefüllten
Behälter, wie Vasen auf das Gerät stellen.
• Um das Gerät vollständig abzuschalten, muss
der Netzstecker aus der Steckdose gezogen
werden. Aus diesem Grund müssen die
Steckdose und der Netzstecker jederzeit frei
zugänglich sein.
• Verwenden Sie ausschließlich ordnungsgemäß
geerdete Stecker und Steckdosen.
- Eine falsche Erdung kann zu Stromschlag
oder Beschädigung des Geräts führen. (Nur
Geräte der Klasse I.)
Lagerung und Handhabung der
Disks
• Umgang mit den Disks
- Fingerabdrücke oder Kratzer
auf der Disk verschlechtern
die Ton- und Bildqualität oder bewirken eine
springende Wiedergabe.
- Vermeiden Sie das Berühren der Oberfläche
der Disk, auf der die Daten gespeichert sind.
- Halten Sie die Disk am Rand fest, sodass
keine Fingerabdrücke auf die Oberfläche
gelangen.
- Kein Papier oder Aufkleber auf die Disk
kleben.
• Reinigung der Disks
- Wenn sich Fingerabdrücke oder
Schmutz auf der Disk befinden,
mit Seifenwasser und einem
weichen Tuch reinigen.
- Beim Reinigen vorsichtig von innen in
Richtung des Randes der Disk wischen.
• Aufbewahrung von Disks
`Setzen Sie die Disk keiner direkten
Sonneneinstrahlung aus.
`Bewahren Sie die Disk an einem kühlen, gut
belüfteten Ort auf.
`Bewahren Sie die Disk in einer Schutzhülle
auf und lagern Sie sie senkrecht.
01 Sicherheitsinformationen
3 Deutsch
Page 64

Sicherheitsinformationen
Kompatible Disks und Formate
Dieses Produkt unterstützt keine Mediendateien,
die durch DRM (Digital Rights Management)
geschützt sind.
CD-RWs
• Je nach Aufnahmegerät (CD-Recorder oder PC)
und Art des Datenträgers werden einige CD-Rs
möglicherweise nicht wiedergegeben.
•
Verwenden Sie CD-R Disks mit einer
Speicherkapazität von 650 MB/74 Minuten.
Verwenden Sie keine CD-R Disks mit über 700
MB/80 Minuten Kapazität, weil sie möglicherweise
nicht wiedergegeben werden können.
• Einige (wiederbeschreibbare) CD-RW
Datenträger können möglicherweise nicht
wiedergegeben werden.
•
Nur ordnungsgemäß finalisierte CD-Rs können
vollständig wiedergegeben werden. Wenn das
Beschreiben der Disk beendet, die Disk jedoch
nicht abgeschlossen wurde, kann die vollständige
Wiedergabe der Disk eventuell nicht möglich sein.
MP3-CD Disks
• Nur CD-Rs mit MP3-Dateien in den Formaten
ISO 9660 oder Joliet können wiedergegeben
werden.
•
Die Dateinamen von MP3-Dateien dürfen keine
Leerzeichen und Sonderzeichen (. / = +) enthalten.
• Verwenden Sie CDs, die mit einer Datenrate von
mehr als 128 kbit/s aufgenommen wurden.
• Multisession-CDs können nur wiedergegeben
werden, wenn sie durchgehend beschrieben
sind. Wenn die Multisession-CD ein leeres
Segment enthält, erfolgt die Wiedergabe nur bis
zu diesem Segment.
• Wenn eine Disk beim Brennen nicht
abgeschlossen wurde, wird der Start der
Wiedergabe verzögert und es werden
eventuell nicht alle aufgezeichneten Dateien
wiedergegeben.
• Bei Dateien, die mit variablen Bitraten (VBR)
erstellt wurden, d. h. sowohl mit niedrigen
und hohen Bitraten codierte Dateien (z. B.
32 kbit/s - 320 kbit/s), setzt die Tonwiedergabe
möglicherweise aus.
• Pro CD können maximal 999 Dateien
wiedergegeben werden.
Unterstützte Audioformate
Dateierweiterung
*.mp3
*.wma
| HINWEISE |
✎Der WMA Professional Codec wird nicht
unterstützt.
✎In der obenstehenden Tabelle sind die
unterstützten Abtastfrequenzen und Datenraten
aufgeführt. Dateien mit nicht unterstützten
Formaten werden eventuell nicht fehlerfrei
wiedergegeben.
Audio Codec
MPEG 1 Layer3
MPEG 2 Layer3
MPEG 2,5 Layer3
Wave_Format_
MSAudio1
Wave_Format_
MSAudio2
Samplingrate
16KHz bis
48KHz
16KHz bis
48KHz
16KHz bis
48KHz
16KHz bis
48KHz
16KHz bis
48KHz
Bitrate
80Kbps ~
320Kbps
80Kbps ~
320Kbps
80Kbps ~
320Kbps
56Kbps ~
128Kbps
56Kbps ~
128Kbps
4 Deutsch
Page 65

Inhalt
SICHERHEITSINFORMATIONEN
2 Warnung
3 Vorsichtsmaßnahmen
3 Lagerung und Handhabung der Disks
4 Kompatible Disks und Formate
4 Unterstützte Audioformate
ERSTE SCHRITTE
7 Vorderseite
8 Rückseite
9 Fernbedienung
10 Zubehör
10 Anschließen der Lautsprecher
10 Vorsichtsmaßnahmen beim Bewegen der
Lautsprecher
11 Anbringen des Ferrit-Ringkerns am
Netzkabel
11 Befestigung des Ferrit-Ringkerns am
Netzkabel
FUNKTIONEN
12 Das Display
12 Ändern des Display Modus
12 Die DEMO Musik Funktion
12 Abspielen einer CD
12 Einlegen einer Compact Disk
12 CD/MP3/CD-R Wiedergabe
13 Auswahl eines Titels
13 Einzelne Musikpassagen auf einer CD
suchen
13 Einen oder alle Titel auf einer CD
wiederholen
14 Wiedergabe von USB-Geräten
14 Wiedergabe von einem USB-Gerät
14 Eine Datei auf einem USB-Gerät auswählen
15 Schneller Vor- und Rücklauf
15 Löschen einer Datei
15 In den nächsten/vorherigen Ordner
wechseln.
15 Sicheres Entfernen des USB-Geräts
15 Lesen Sie diesen Abschnitt, bevor Sie
USB-Speichergeräte anschließen.
16 Schnelle Titelsuche
16 Verwenden der Programmierfunktion
16 Betrachten oder bearbeiten der
programmierten Titel
17 Bluetooth
17 Was ist Bluetooth?
17 Herstellen einer Verbindung zwischen der
Hi-Fi-Anlage und einem Bluetooth-Gerät
18 Trennen der Verbindung zwischen
Bluetooth-Gerät und Hi-Fi-Anlage
18 Verbindung zwischen Hi-Fi-Anlage und
Bluetooth-Gerät trennen
18 Einschalten des Geräts über Bluetooth
19 TV SoundConnect
19 Herstellen einer Verbindung zwischen der
Hi-Fi-Anlage und einem SoundConnect
fähigen Samsung Fernsehgerät
19 Trennen der Verbindung zwischen
Fernsehgerät und Hi-Fi-Anlage
19 Verbindung zwischen Hi-Fi-Anlage und
Fernsehgerät trennen
20 My Karaoke verwenden
20 Automatisches Wechseln der
Wiedergabequelle
20 Radio wiedergeben
20 Radiosender speichern
21 Gespeicherten Sender auswählen
Inhalt
5 Deutsch
Page 66

Inhalt
21 Timer-Funktion
21 Uhrzeit einstellen
21 Timer einstellen
23 Timer löschen
23 Die Aufnahmefunktion
23 Grundlegende Aufnahmefunktionen
24 Aufnahmegeschwindigkeit
25 Spezielle Klangeffekte
25 Auswahl des EQ-Modus
25 FOOTBALL MODE Funktion
25 GOAL Funktion
26 GIGA SOUND Funktion
26 BEAT WAVING Funktion
26 DJ BEAT Funktion
27 +PANNING Funktion
27 NON-STOP MUSIC RELAY Funktion
27 DANCE TIME Funktion
27 TEMPO Funktion
27 Booting Sound Funktion
ANHANG
28 Fehlerbehebung
29 Technische Daten
6 Deutsch
Page 67

Erste Schritte
Vorderseite
1
k
j
i
Display
1
RÜCKWÄRTSSUCHE/ÜBERSPRINGEN
2
Taste
CD/Bluetooth Taste
3
DISK-Einschub
4
GIGA SOUND BEAT Taste
5
TUNER/AUX Taste
6
VORWÄRTSSUCHE/ÜBERSPRINGEN Taste
7
PROGRAM Taste
8
Disk-Auswurftaste
9
LAUTSTÄRKE/SUCHE DREHKNOPF
0
EQ Taste
!
SEARCH Taste
@
Netzschalter
#
• Drücken Sie diesen Schalter, um Ihr
Gerät ein- oder auszuschalten.
ENTER Taste
$
USB Taste
%
USB REC Taste
^
DJ BEAT Taste
&
3 64 8 @9 !052 7
*
(
)
a
b
c
d
e
f
g
h
i
j
k
#
$
%
^
&*()be cf adgh
VOLUME / DJ Taste
+PANNING Taste
NON-STOP MUSIC RELAY Taste
USB 2 Anschluss für die Wiedergabe und
USB-Aufnahme.
WIEDERGABE/PAUSE Taste
AUX IN 1 Anschluss
Anschluss für externe Geräte wie z. B.
MP3-Player.
Verbinden Sie AUX IN 1 auf der Vorderseite
•
des Geräts mit dem Audioausgang des
externen Geräts/MP3-Players.
• Drücken Sie die TUNER/AUX Taste, um
den AUX 1 Eingang auszuwählen.
MIC Anschluss
STOPP Taste
USB 1 Anschluss nur für die Wiedergabe
FERNBEDIENUNGSSENSOR
FOOTBALL MODE Taste
BEAT WAVING Taste
DISPLAY / DEMO Taste
TV SOUNDCONNECT Taste
02 Erste Schritte
7 Deutsch
Page 68

Erste Schritte
Rückseite
2 4 5 6 73
1
Lüfter
• Der Lüfter ist in Betrieb, wenn das Gerät
eingeschaltet ist.
Wenn das Gerät auf minimale Lautstärke
1
eingestellt wird, dreht sich der Lüfter nicht.
Beim Aufstellen des Geräts muss ein
Abstand von mindestens 15 cm auf allen
Seiten des Lüfters eingehalten werden.
POWER
2
•
Verwenden Sie nur das mitgelieferte Netzkabel.
2.2 Kanal Lautsprecheranschlüsse
Um die korrekte Klangqualität zu erhalten,
1.
müssen die farbigen Lautsprecherstecker
an die Lautsprecheranschlüsse mit der
gleichen Farbe angeschlossen werden.
Siehe unten.
3
•
LINKER Kanal (Markierung , Weiß/Lila).
•
RECHTER Kanal (Markierung , Rot/Lila).
• Versuchen Sie nicht, den lila
SUBWOOFER-Stecker mit
Gewalt an den weißen oder roten
Lautsprecheranschluss anzuschließen.
LEDs für Lautsprecher Beat Waving
ohne Unterscheidung zwischen linken
4
und rechten Kanal.
ONLY FOR SERVICE
5
• Dieser Anschluss dient nur zu
Testzwecken. Bitte nicht verwenden.
AUX IN 2 Anschlüsse
1. Verwenden Sie ein Audio-Kabel (nicht
mitgeliefert), um an den AUX IN 2
Anschluss dieses Geräts den AudioAusgang eines externen analogen
Wiedergabegeräts anzuschließen.
• Achten Sie darauf, dass die Farben der
Steckverbinder übereinstimmen.
• Falls das externe, analoge
6
Wiedergabegerät nur über einen AudioAusgang verfügt, schließen Sie entweder
den linken oder den rechten Kanal an.
• Drücken Sie die TUNER/AUX Taste, um
den AUX 2 zu wählen.
• Wenn sich das Gerät im AUX-Modus
befindet und für mehr als acht Stunden
keine Taste auf dem Bedienfeld oder der
Fernbedienung gedrückt wird, wird das
Gerät ausgeschaltet.
UKW-Antenneneingang
1. Schließen Sie eine UKW-Antenne an
den UKW-Antenneneingang an.
2.
Suchen Sie mit der Antenne einen Ort,
an dem Sie einen guten Empfang haben.
Befestigen Sie das Kabel an der Wand oder
einer festen Fläche.
7
3.
Wenn der Empfang schwach ist, müssen
Sie möglicherweise eine Außenantenne
verwenden. Schließen Sie dazu eine
terrestrische UKW-Antenne an den
Anschluss für die UKW-Antenne auf der
Rückseite der Anlage an. Verwenden
Sie dazu ein 75Ω Koaxialkabel (nicht im
Lieferumfang enthalten).
8 Deutsch
Page 69

Fernbedienung
Stromversorgung
Bluetooth
CD
SENDERSUCHMODUS
NON-STOP MUSIC RELAY
ÜBERSPRINGEN
WIEDERGABE/PAUSE
LAUTSTÄRKE (–, +)
TIMER-EINSTELLUNG
TIMER EIN/AUS
USB
TUNER/AUX
TEMPO
STOPP
FOOTBALL
EQ
PROGRAM
DISPLAY
MY KARAOKE
STUMM (Schaltet den Ton vorübergehend
aus. Drücken Sie die Taste erneut, um den
Ton wieder einzuschalten.)
BEAT WAVING
TV SoundConnect
USB AUFNAHME
REC SPEED
MO/ST
+PANNING
DJ BEAT
EFFECT LEVEL
SUCHE
REPEAT
GIGA SOUND BEAT
GOAL
DANCE TIME
TUNING/ALBUM ,,
LÖSCHEN
SLEEP (Programmieren Sie eine Zeit, zu der
das Gerät ausgeschaltet werden soll.)
AUTOMATISCHER WECHSEL
MIKROFON LAUSTÄRKE -,+
.
02 Erste Schritte
Batterien in die Fernbedienung einsetzen
• Legen Sie die Batterien so in die Fernbedienung
ein, dass die Polung der Illustration im
Batteriefach entspricht. : (+) zu (+) und (-) zu (-).
• Die Batterien nicht ins Feuer werfen.
• Die Batterien nicht kurzschließen, öffnen oder
überhitzen.
• Wenn die Batterien gegen Batterien vom
falschen Typ ausgewechselt werden, besteht
Explosionsgefahr. Verwenden Sie ausschließlich
Akkus des entsprechenden Typs.
• Die Fernbedienung hat eine Reichweite von bis
zu ca. 7 Metern.
9 Deutsch
Page 70

Erste Schritte
Zubehör
Prüfen Sie, ob das nachfolgend aufgeführte Zubehör mitgeliefert wurde.
Benutzerhandbuch Fernbedienung/Batterien
UKW-Antenne Netzkabel Ferrit-Ringkern
• Die Abbildungen in dieser Anleitung dienen nur als Referenz und können sich vom aktuellen Produkt
unterscheiden.
Anschließen der Lautsprecher
Empfohlene Lautsprecheraufstellung.
| WICHTIG |
✎Das Gerät funktioniert eventuell nicht fehlerfrei,
wenn es Vibrationen oder Stößen ausgesetzt
wird oder wenn die Lautsprecher nicht wie
empfohlen aufgestellt werden.
✎Setzen Sie die Lautsprecherkabel keinen
Zugbelastungen aus und stellen Sie keine
schweren Gegenstände auf die Kabel.
Vorsichtsmaßnahmen beim
Bewegen der Lautsprecher
• Wenn Sie das Hauptgerät und die Lautsprecher
an einem anderen Ort auftellen möchten,
muss sichergestellt sein, dass zuvor alle
angeschlossenen Lautsprecherkabel vom Gerät
entfernt wurden.
• Bei Abtrennen der Kabel von den SPEAKERS
LIGHTING Anschlüssen die Verriegelung wie in
der Abbildung gezeigt nach unten drücken, um
den Steckverbinder vom Gerät zu trennen.
10 Deutsch
Page 71

Anbringen des Ferrit-Ringkerns am Netzkabel
Durch die Befestigung des Ferrit-Ringkerns am Netzkabel werden Störungen durch Radiofunksignale
unterbunden.
1. An der Verschlusslasche des Ferrit-Ringkerns
ziehen, um diesen zu öffnen.
2. Legen Sie mit dem Netzkabel zwei Schlaufen um
den Ferritkern. Siehe nachfolgende Abbildung.
3. Befestigen Sie den Ferrit Ringkern am Netzkabel,
wie auf der nachfolgenden Abbildung dargestellt,
und drücken Sie ihn zusammen, bis er einrastet.
Befestigung des Ferrit-Ringkerns am Netzkabel
➜ ➜ ➜
Den Verschluss
anheben und den
Kern öffnen.
Legen Sie mit dem Netzkabel zwei
Schlaufen um den Ferritkern. (Legen
Sie die Wicklung 5 bis 10 cm vom
Kern entfernt an).
Schließen Sie den
Verschluss.
02 Erste Schritte
11 Deutsch
Page 72

Funktionen
Das Display
Sie können die verfügbaren Funktionen vom Display
ablesen, die Helligkeit des Displays einstellen und
das Display/LED ein- oder ausschalten.
Ändern des Display Modus
Drücken Sie die DISPLAY/DEMO Taste am Gerät.
Durch wiederholtes Drücken dieser Taste wird der
Modus wie folgt umgeschaltet:
• Die Dimmer-Funktion
Bei Auswahl der Dimmer-Funktion wird die
Anzeige verdunkelt.
• LED OFF
Bei eingeschalteter Dimmer-Funktion wird die
Front-Display-LED wird ausgeschaltet.
• Clock ON
Die Uhrzeit wird angezeigt.
• Display/LED ON
Alle Displays und die LED werden ausgeschaltet.
Die DEMO Musik Funktion
Drücken Sie die DISPLAY/DEMO Taste am Gerät
oder die DISPLAY Taste auf der Fernbedienung für
5 Sekunden, um den Demo-Modus einzuschalten.
Durch wiederholtes Drücken dieser Taste wird der
Modus wie folgt umgeschaltet:
;
DIMMER
- [Zeitanzeige] ; LED Ein (Gerät/Lautsprecher)
LED Aus (Gerät/Lautsprecher) ; --:-
Ausschalten des Demo Musik Modus
• Drücken Sie erneut die DISPLAY/DEMO Taste
am Gerät oder die DISPLAY Taste auf der
Fernbedienung für 5 Sekunden.
Der aktuelle Modus wird ausgeschaltet und das
Gerät schaltet sich ab.
• Drücken Sie die TUNER/AUX, CD/Bluetooth
oder USB Taste am Gerät.
Der aktuelle Modus wird beendet und es wird auf
den von Ihnen gewählten Modus umgeschaltet.
| HINWEISE |
✎Während der Anzeige von DEMO Musik
funktionieren nur die NETZSCHALTER (
VOL, STUMM ( ) und die oben genannten
Tasten.
✎Das DEMO Beispiel wird 3 Minuten lang
abgespielt; nur die Meldung wird nach der
Wiedergabe weiterhin auf dem Frontdisplay
angezeigt.
),
Abspielen einer CD
Einlegen einer Compact Disk
Es können Standard Compact Disks abgespielt
werden, die keinen Adapter erfordern.
1. Legen Sie die Disk mit der bedruckten Seite
nach oben in den CD-Schlitz ein. Die Die Disk
wird automatisch abgespielt.
• Sie können CDs auch einlegen oder
herausnehmen, wenn sich das Gerät im
Radio, USB oder AUX-Betrieb befindet.
Wenn Sie die
alle anderen Funktionen in den CD-Modus
umgeschaltet.
• Wenn sich das Gerät im Pause-Modus
befindet und länger als 3 Minuten am Gerät
oder auf der Fernbedienung keine Taste
gedrückt wird, schaltet das Gerät in den
Stopp Modus.
•
Wenn sich das Gerät im Stopp Modus
befindet und länger als 25 Minuten am Gerät
oder auf der Fernbedienung keine Taste
gedrückt wird, schaltet sich das Gerät aus.
8
Taste drücken, werden
CD/MP3/CD-R Wiedergabe
| WICHTIG |
✎Dieses Gerät kann die folgenden Arten von
Audio Disks wiedergeben: CD, CD-R, CD-RW.
1. Legen Sie die Disk mit der bedruckten Seite
nach oben in den CD-Schlitz ein.
2. Die Die Disk wird automatisch abgespielt.
• Bei MP3/WMA Dateien kann es einige
Minuten Dauern, bevor das Gerät das
Einlesen der Titel abgeschlossen hat.
• Wenn Sie eine Datei mit einem
englischsprachigen Titel wiedergeben,
wird der Name des Titels auf der Anzeige
angezeigt. (Titel in anderen Sprachen
können nicht angezeigt werden.)
• Englischsprachige Titel, die Sonderzeichen
(@, $,*, usw.) enthalten, können nicht
angezeigt werden.
<CD-Wiedergabe Display>
Titel
Spieldauer
12 Deutsch
Page 73

3. Einstellen der Lautstärke:
• Drehen Sie den LAUTSTÄRKE Regler am
Gerät.
• Drücken Sie die VOL+ oder VOL- Taste auf
der Fernbedienung.
Die Lautstärke kann auf eine von 31 Stufen
(VOLUME MIN, VOLUME 01 ~ VOLUME
29 und VOLUME MAX) eingestellt werden.
4. Unterbrechen der Wiedergabe
Über das Gerät
Um die Wiedergabe vorübergehend
anzuhalten, die
Drücken Sie erneut, um mit der
Wiedergabe der Disk fortzufahren.
Über die Fernbedienung
Um die Wiedergabe vorübergehend
anzuhalten, die Taste drücken.
Drücken Sie die Taste, um die Wiedergabe
der Disk fortzusetzen.
5. Um die Wiedergabe zu beenden, die
Taste drücken.
| HINWEISE |
✎Wenn sich keine CD im CD-Schlitz befindet,
wird "NO DISC" auf dem Display angezeigt.
✎Die Qualität der MP3/CD-R Wiedergabe hängt
vom Zustand der Disk oder dem Zustand des
Aufnahmegeräts ab, das für die Aufnahme
verwendet wurde.
✎Wenn die Disk unterschiedliche Dateiarten oder
überflüssige Ordner enthält, kann es bei der
Wiedergabe zu Problemen kommen.
✎Führen Sie die CD vorsichtig in den CD-Schlitz
ein. Keine zu große Kraft anwenden.
- Lassen Sie keine großen Kräfte auf das
Gerät einwirken und stellen Sie keine
schweren Gegenstände auf das Gerät.
- Legen Sie keine speziell oder sonderbar
geformten (herzförmigen, achteckigen, usw.
CDs ein.
Das Gerät könnte beschädigt werden.
- Behandeln Sie Ihre CDs sorgfältig.
Taste drücken.
5
Auswahl eines Titels
Während der Wiedergabe können Sie einen
gewünschten Titel auswählen.
Wiedergabe des vorherigen Titels
Drücken Sie die 1 Taste innerhalb von 3
Sekunden, nachdem die Wiedergabe des
aktuellen Titels begonnen hat.
Drücken Sie die 1 Taste zweimal mindestens
3 Sekunden, nachdem die Wiedergabe des
aktuellen Titels begonnen hat.
Wiedergabe des nächsten Titels
Drücken Sie die 2 Taste.
Den aktuellen Titel vom Anfang
wiedergeben
Drücken Sie 3 Sekunden nach der Start der
Wiedergabe auf die 1 Taste.
Wiedergabe eines Titels Ihrer Wahl
Drücken Sie die 1 oder 2 Taste, um zum
gewünschten Titel zu springen.
Einzelne Musikpassagen auf einer CD
suchen
Bei der Wiedergabe einer CD können Sie nach
einer bestimmten Musikpassage innerhalb eines
Titels suchen.
Vorwärtssuche ......................
Rückwärtssuche ...................
Sie können ebenfalls die 1 oder 2 Tasten
am Gerät drücken und gedrückt halten, um
automatisch nach einem Titel zu suchen.
3
4
Einen oder alle Titel auf einer CD
wiederholen
Sie können die Wiedergabe einer CD oder von
Titeln auf einer CD wiederholen.
1. Drücken Sie die REPEAT Taste auf der
Fernbedienung.
Durch wiederholtes Drücken dieser Taste wird
die Wiedergabequelle wie folgt umgeschaltet:
MP3: OFF ; TRACK ; DIR ; ALL ; RANDOM
CD : OFF ; TRACK ; ALL ; RANDOM
03 Funktionen
13 Deutsch
Page 74

Funktionen
2. Wenn Sie die Wiederholfunktion beenden
möchten, auf die REPEAT Taste drücken, bis
"OFF" angezeigt wird.
• OFF : Beendet die wiederholte Wiedergabe.
• TRACK : Die Wiedergabe des
ausgewählten Titels wird wiederholt.
• DIR (DIRECTORY) : Wiederholt die
Wiedergabe aller Titel im ausgewählten
Ordner.
• ALL : Wiederholt die Wiedergabe der
gesamten Disk.
• RANDOM : Gibt die Titel in zufälliger
Reihenfolge wieder.
Wiedergabe von USB-Geräten
Schließen Sie ein externes Speichergerät, wie
einen USB-Flash-Speicher oder eine externe
Festplatte an das Gerät an. Sie können Dateien im
Mp3/WMA Format wiedergeben.
Wiedergabe von einem USB-Gerät
1. Schließen Sie das externe USB-Gerät an Ihr
Gerät an.
2. Wählen Sie den USB-Modus, indem Sie die
USB Taste am Gerät oder die USB Taste auf
der Fernbedienung drücken.
3. Es wird automatisch die erste Datei aus dem
ersten Ordner wiedergegeben.
4. Wiedergabe beenden
Drücken Sie die
Wiedergabe zu beenden.
| HINWEISE |
✎Entfernen des USB-Geräts
- Wenn Sie die
können Sie das USB-Gerät sicher entfernen.
| WICHTIG |
✎Schließen Sie kein USB-Ladegerät an den
USB-Anschluss an. Das Gerät könnte
beschädigt werden.
5
Taste, um die
5
Taste erneut drücken,
Eine Datei auf einem USB-Gerät
auswählen
Sie können während der Wiedergabe eine MP3Datei auswählen.
| HINWEISE |
✎Wenn Sie zum vorherigen/nächsten Titel
springen wollen, kurz die 1, 2 Tasten
drücken.
- Das Gerät springt zum vorherigen/nächsten
Titel im Ordner.
- Wenn Sie die 1, 2 Tasten öfter drücken
als Titel im Ordner vorhanden sind, wechselt
das Gerät in den nächsten Ordner.
Wiederholen
1. Drücken Sie die REPEAT Taste.
Durch wiederholtes Drücken dieser Taste wird
die Wiedergabequelle wie folgt umgeschaltet:
;
OFF
TRACK ; DIR ; ALL ; RANDOM
2. Wenn Sie die Wiederholfunktion beenden
möchten, auf die REPEAT Taste drücken, bis
"OFF" angezeigt wird.
• OFF : Beendet die wiederholte Wiedergabe.
• TRACK : Die Wiedergabe der
ausgewählten Datei wird wiederholt.
• DIR (DIRECTORY) : Wiederholt die
Wiedergabe aller Dateien im ausgewählten
Ordner.
• ALL : Alle Dateien werden ständig
wiederholt.
• RANDOM : Gibt die Dateien in zufälliger
Reihenfolge wieder.
| HINWEISE |
✎Wenn sich die für die Wiedergabe ausgewählte
Datei in einem Ordner befindet, werden
alle Dateien in diesem Ordner in zufälliger
Reihenfolge wiederholt. Wenn sich die
ausgewählte Datei im Root-Ordner befindet,
werden alle Dateien in zufälliger Reihenfolge
wiedergegeben.
14 Deutsch
Page 75

Schneller Vor- und Rücklauf
Sie können während der Wiedergabe den
gewünschten Abschnitt schnell suchen.
3, 4
Die
• Jedes Mal, wenn die Taste gedrückt wird, wird
der Abschnitt schnell vorwärts oder rückwärts
durchlaufen.
| WICHTIG |
✎Während der schnellen Suche wird vom Gerät
✎Sie können ebenfalls die 1 oder 2 am Gerät
Taste drücken.
kein Ton wiedergegeben.
drücken und gedrückt halten, um automatisch
nach einem Titel zu suchen.
Löschen einer Datei
Sie können Dateien von Ihrem USB-Gerät löschen.
1.
Wählen Sie die Datei, die Sie löschen möchten.
2. Drücken Sie die DELETE Taste auf der
Fernbedienung. Es wird "DELETE NO"
angezeigt.
3. Nach dem Drücken der DELETE Taste auf
der Fernbedienung wird “DELETE YES”
angezeigt.
4. Drücken Sie die
"DELETE END" und der Löschvorgang ist
abgeschlossen.
¬
Taste. Es erscheint
In den nächsten/vorherigen Ordner
wechseln.
Drücken Sie die TUNING/ALBUM , / . Taste
auf der Fernbedienung, um in den vorherigen/
nächsten Ordner zu wechseln.
| HINWEISE |
✎Wenn sich die Audiodateien im Root-
Verzeichnis und nicht in einem Ordner befinden,
die TUNING/ALBUM , / . Taste drücken,
um zum ersten TITEL zu gehen.
Sicheres Entfernen des USB-Geräts
1. Drücken Sie während der Wiedergabe vom
USB-Gerät die 5 Taste zweimal oder
drücken Sie die 5 Taste einmal, wenn die
Wiedergabe gestoppt wurde.
2. Wenn die Meldung REMOVE auf dem
Bildschirm erscheint, können Sie das USBGerät entfernen.
15 Deutsch
Lesen Sie diesen Abschnitt, bevor Sie
USB-Speichergeräte anschließen.
• Einige USB-Geräte funktionieren eventuell nicht
einwandfrei mit diesem Gerät.
• Von diesem Gerät werden nur externe
Festplatten unterstützt, die im FAT Dateisystem
formatiert sind.
• USB 2.0 Festplatten müssen an eine eigene
Stromversorgung angeschlossen werden.
Ansonsten funktionieren die USB 2.0 Festplatten
nicht.
• Wenn mehrere externe USB-Speichergeräte
an das Gerät angeschlossen sind, werden
nur die MP3 Dateien von der ersten Festplatte
wiedergegeben.
• Dateien mit DRM werden nicht unterstützt. Das
Digital Right Management (DRM) verhindert den
unautorisierten Zugriff auf eine DRM-Datei, um
diese vor Piraterie zu schützen.
• Auch wenn die Datei über die Dateierweiterung
.mp3 verfügt, kann die Datei nicht
wiedergegeben werden, wenn sie mit MPEG
Layer 1 oder 2 formatiert ist.
•
Verwenden Sie kein nicht anerkanntes USB-Hub.
• Nur die ersten 15 Zeichen des Namens einer
Audiodatei werden auf dem Display angezeigt.
• Nur externe Festplatten mit weniger als 160
GB werden unterstützt. Je nach Gerät werden
externe Festplatten mit mehr als 160 GB
eventuell nicht unterstützt.
• Bei einigen USB-Geräten kann es einige
Minuten dauern, die Dateien erkannt werden.
• Bei einigen USB-Geräten (insbesondere USBFestplatten) kann es beim Wechsel zum
nächsten Titel zu Verzögerungen kommen.
• Bei USB-Speichergeräten, die nur die USB
VER. 1.1, unterstützen, kann der Zugriff des
Geräts auf die Datei länger dauern oder es kann
eventuell Dateieigenschaften nicht erkennen.
• Der maximale von jedem USB-Anschluss
bereitgestellte Strom für angeschlossene
USB-Geräte beträgt 0,5 A (bei einer
Gleichstromspannung von 5V).
• Wenn keine USB-Verbindung besteht oder die
STOPP Taste vor mehr als 25 Minuten gedrückt
wurde, schaltet sich das Gerät automatisch aus.
• Einige USB-Geräte, Digitalkameras, USBKartenleser iPods, iPhones oder Smartphones
werden eventuell nicht unterstützt.
03 Funktionen
Page 76

Funktionen
Schnelle Titelsuche
Sie können einen Titel direkt, ohne die 1,2 Taste.
CDDA/MP3-CD/USB
1. Drücken Sie die SEARCH Taste.
Nachdem Sie die SEARCH Taste gedrückt
haben, den LAUTSTÄRKE/SUCHE
DREHKNOPF am Gerät nach links oder
rechts drehen, um den gewünschten Titel
auszuwählen.
• Sie können direkt zum ausgewählten Titel
springen.
2.
Nachdem die Suche abgeschlossen ist,
beginnt die Wiedergabe des Titels automatisch.
Verwenden der Programmierfunktion
Diese Funktion steht bei der Wiedergabe einer
MP3-CD oder von einem USB-Gerät nicht zur
Verfügung.
• Sie können die Wiedergabereihenfolge von bis
zu 99 Titeln Ihrer Wahl programmieren.
• Sie müssen jedoch die Wiedergabe der CD
bzw. vom USB-Gerät beenden, bevor Sie die
Titel auswählen können.
1. Drücken Sie während der CD/USB-
Wiedergabe die
Wiedergabe zu beenden.
2. Drücken Sie die PROGRAM Taste, um die
folgende Meldung anzuzeigen:
5
Taste, um die CD/USB-
PROG 01 TRACK---
(01= Programmnummer, --- = Titelnummer)
3. Verwenden Sie die 1 oder 2 Taste oder
den LAUTSTÄRKE/SUCHE DREHKNOPF,
um zum gewünschten Titel zu springen.
• Drücken Sie 1, um zum vorherigen Titel
zu springen.
• Drücken Sie 2, um zum nächsten Titel zu
springen.
4. Drücken Sie die
bestätigen. Die Auswahl wird gespeichert und
es wird
Um einen weiteren Titel auszuwählen, die weiter
5.
oben aufgeführten Schritte 3 und 4 wiederholen.
6. Drücken Sie die Taste, um die
programmierten Titel abzuspielen.
7. Drücken Sie die
der programmierten Titel anzuhalten. Drücken
Sie die
der programmierten Titel zu beenden.
Taste, um die Auswahl zu
angezeigt.
5
Taste, um die Wiedergabe
5
Taste erneut, um die Wiedergabe
16 Deutsch
• Wenn Sie die Disk auswerfen, wird die CDProgrammierung abgebrochen.
Wenn Sie das Gerät abschalten, wird die
CD/USB-Programmierung abgebrochen.
| HINWEISE |
✎Die programmierte CD/USB Wiedergabe wird
fortgesetzt, wenn Sie versuchen, in einen
anderen Modus umzuschalten.
✎Die USB REC, DELETE und TUNING/ALBUM
Tasten funktionieren im Programm-Modus
nicht.
✎Wenn eine Datei in dem wiederzugebenden
Programm nicht über ein unterstütztes Format
verfügt, springt die Wiedergabe automatisch
zur nächsten Datei.
Betrachten oder bearbeiten der
programmierten Titel
Sie können eine Liste mit programmierten Titeln
einsehen und bearbeiten.
1. Drücken Sie während der Wiedergabe eines
programmierten Titels einmal auf die
Taste.
2. Drücken Sie die PROGRAM Taste zweimal,
um folgende Meldung aufzurufen:
5
SAVED 01 TRACK002
(01= Programmnummer, 002 = Titelnummer)
OFF
;
¬
Taste sooft, bis der
¬
Taste, um die Auswahl
Taste, um die
TRACK ; ALL
3. Drücken Sie die
gewünschte Titel angezeigt wird.
4. Drücken Sie die 1 oder 2 Taste, um einen
anderen Titel auszuwählen.
5. Drücken Sie die
zu bestätigen.
6. Drücken Sie die
programmierten Titel wiederzugeben.
Wiederholen
1. Drücken Sie die REPEAT Taste.
Durch wiederholtes Drücken dieser Taste wird
der Modus wie folgt umgeschaltet:
Page 77

Bluetooth
Sie können von einem Bluetooth-Gerät Musik
in bester Stereo Klangqualität ganz ohne Kabel
genießen.
Was ist Bluetooth?
Bluetooth ist eine Technologie, mit der es möglich
ist, Bluetooth-fähige Geräte einfach über eine
kurze Funkverbindung miteinander zu verbinden.
• Ein Bluetooth Gerät kann Störungen erzeugen
oder falsch funktionieren, wenn:
- Wenn das Empfangs-/Sendesystem eines
Bluetooth-Geräts oder der Hi-Fi-Anlage
berührt wird.
- Die Funkübertragung durch Wände, Ecken
oder Bürotrennwände behindert wird.
- Interferenzen mit Geräten auftreten, welche
dasselbe Frequenzband verwenden, wie
medizinische Geräte, Mikrowellenherde oder
Funknetzwerke.
• Um eine Verbindung zwischen der Hi-Fi-Anlage
und einem Bluetooth-Gerät herzustellen,
müssen sich diese Geräte nah beieinander
befinden.
• Je größer der Abstand zwischen der Hi-FiAnlage und dem Bluetooth Gerät, desto
schlechter die Qualität. Wenn die Distanz den
Bluetooth-Betriebsbereich übersteigt, geht die
Verbindung verloren.
• In Gebieten mit schwachem Empfang ist
die Funktion der Bluetooth-Verbindung
möglicherweise eingeschränkt.
• Die Bluetooth-Verbindung funktioniert nur,
wenn sich das Bluetooth-Gerät und die HiFi-Anlage nahe beieinander befinden. Die
Verbindung wird automatisch unterbrochen,
wenn sich das Bluetooth-Gerät außerhalb der
Reichweite befindet. Auch innerhalb dieses
Übertragungsbereichs kann die Klangqualität
durch Hindernisse wie Mauern oder Türen
beeinträchtigt werden.
• Dieses Funkgerät kann Interferenzen während
des Betriebs verursachen.
17 Deutsch
Herstellen einer Verbindung zwischen
der Hi-Fi-Anlage und einem BluetoothGerät
Stellen Sie, bevor Sie beginnen, sicher, dass Ihr
Bluetooth-Gerät die Bluetooth Stereo Kopfhörer
Funktion unterstützt.
1. Drücken Sie die CD/Bluetooth Taste an der
Hi-Fi-Anlage, um die BLUETOOTH Meldung
anzuzeigen.
• Auf dem Display der Hi-Fi-Anlage wird für
einen Augenblick WAIT und anschließend
READY angezeigt.
2. Wählen Sie auf dem Bluetooth-Gerät, mit dem
Sie eine Verbindung herstellen möchten, das
Bluetooth-Menü aus. (Weitere Informationen
dazu finden Sie der Bedienungsanleitung des
Bluetooth-Geräts.)
3. Wählen Sie auf dem Bluetooth-Gerät das
Stereo-Headset-Menü aus.
• Es wird eine Liste der erkannten Geräte
angezeigt.
4. Wählen Sie "[Samsung] HI-FI XXXXXX" aus
der Liste.
• Wenn die Hi-Fi-Anlage mit dem Bluetooth-
Gerät verbunden ist, wird CONNECTED
;
BLUETOOTH auf dem Frontdisplay
angezeigt.
•
Wenn der Verbindungsaufbau zwischen
dem Bluetooth-Gerät und der Hi-Fi-Anlage
fehlgeschlagen ist, entfernen Sie die zuvor
vom Bluetooth-Gerät gefundene "[Samsung]
HI-FI XXXXXX" und führen Sie die Suche
nach der Hi-Fi-Anlage erneut durch.
5. Sie können nun die vom Bluetooth-Gerät
wiedergegebenen Musiktitel über die Hi-FiAnlage hören.
• Im Bluetooth Modus sind einige
Wiedergabe/Stopp/Vor/Zurück Funktionen
des Modells nicht verfügbar.
| HINWEISE |
Das Gerät unterstützt nur Middle Quality SBC
(237kbps bei 48kHz). High Quality SBC (328kbps
bei 44.1kHz) wird nicht unterstützt.
✎Die AVRCP Funktion wird nicht unterstützt.
✎Nur an ein Bluetooth-Gerät anschließen, das
die A2DP (AV) Funktion unterstützt.
✎Es können keine Verbindungen zu Bluetooth-
Geräten hergestellt werden, die nur die HF
(Hands Free) Funktion unterstützen.
03 Funktionen
Page 78

Funktionen
✎Es kann nur eine Verbindung zu einem
Bluetooth-Gerät hergestellt werden.
✎Nachdem die Hi-Fi-Anlage ausgeschaltet und
die Verbindung unterbrochen wurde, wird nach
erneutem Einschalten die Verbindung nicht
automatisch wieder hergestellt. Die Verbindung
muss erneut hergestellt werden.
✎In den folgenden Fällen kann die Hi-Fi-Anlage
nicht richtig gefunden oder angeschlossen
werden:
- Wenn sich die Hi-Fi-Anlage in einem starken
elektrischen Feld befindet.
- Wenn mit mehreren Bluetooth-Geräten
gleichzeitig eine Verbindung zur Hi-Fi-Anlage
hergestellt wurde.
- Wenn das Bluetooth-Gerät ausgeschaltet
oder nicht angeschlossen ist oder nicht
richtig funktioniert.
- Beachten Sie, dass Geräte, wie
Mikrowellenherde, WLAN-Geräte,
Leuchtstoffröhren und Gasöfen den selben
Frequenzbereich wie Bluetooth-Geräte
verwenden, wodurch es zu Interferenzen
kommen kann.
Trennen der Verbindung zwischen
Bluetooth-Gerät und Hi-Fi-Anlage
Sie können die Verbindung zwischen BluetoothGerät und Hi-Fi-Anlage trennen. Die Anleitung
hierzu finden Sie in der Bedienungsanleitung des
Bluetooth Geräts.
• Die Verbindung mit der Hi-Fi-Anlage wird
getrennt.
• Wenn die Verbindung zwischen der Hi-Fi-Anlage
und dem Bluetooth-Gerät getrennt ist, wird auf
dem Display der Hi-Fi-Anlage DISCONNECTED
;
READY angezeigt.
Verbindung zwischen Hi-Fi-Anlage und
Bluetooth-Gerät trennen
Drücken Sie eine andere Eingangswahltaste
Taste auf dem Bedienfeld der Hi-Fi-Anlage, um
vom Bluetooth-Modus auf einen anderen Modus
umzuschalten, oder schalten Sie die Hi-Fi-Anlage
aus. Die Verbindung mit dem aktuell verbundenen
Gerät wird getrennt.
| HINWEISE |
✎Das angeschlossene Bluetooth-Gerät wartet
eine gewisse Zeit auf die Antwort der Hi-FiAnlage, bevor es die Verbindung unterbricht. (Je
nach Bluetooth-Gerät kann der Zeitraum bis
zur Trennung der Verbindung variieren.)
✎Die Bluetooth-Verbindung wird unterbrochen,
wenn der Abstand zwischen der Hi-Fi-Anlage
und dem verwendeten Bluetooth-Gerät mehr
als 5 m beträgt.
✎Wenn sich das Bluetooth-Gerät nach Trennung
der Verbindung wieder in Reichweite befindet,
können Sie die Hi-Fi-Anlage wieder einschalten,
um die Verbindung mit dem Bluetooth-Gerät
wieder herzustellen.
✎Wenn sich die Hi-Fi-Anlage für mehr als 25
Minuten im Bereitschaftsmodus befindet,
schaltet er sich automatisch aus.
✎Wenn ein Bluetooth-Gerät an die Hi-Fi-Anlage
angeschlossen wird, schaltet die Anlage, wenn
sie sich in einem anderen Modus befindet,
automatisch in den Bluetooth-Modus.
Einschalten des Geräts über Bluetooth
Wenn das Gerät ausgeschaltet ist, können Sie Ihr
Smart Device über eine Bluetooth-Verbindung mit
dem Gerät verbinden, um es einzuschalten.
1. Halten Sie die Bluetooth Taste auf der
Fernbedienung gedrückt, um die Funktion
zum Einschalten des Geräts über Bluetooth
einzuschalten. Auf dem Display wird
Bluetooth Power On angezeigt.
2. Wenn das Gerät ausgeschaltet ist, stellen
Sie mit Ihrem Smart Device eine BluetoothVerbindung mit dem Gerät her. (Weitere
Informationen über den Aufbau von
Bluetooth-Verbindungen finden Sie in der
Bedienungsanleitung Ihres Smart Device.)
3. Wenn der Verbindungsaufbau abgeschlossen
ist, schaltet das Gerät automatisch in den
Bluetooth-Modus um.
• Wählen Sie die gewünschten Musiktitel, die
Sie von Ihrem Smart Device wiedergeben
möchten.
| HINWEISE |
✎Halten Sie die Bluetooth Taste auf der
Fernbedienung gedrückt, um die Funktion
zum Einschalten des Geräts über Bluetooth
auszuschalten.
Jedes Mal, wenn Sie diese Taste drücken und
gedrückt halten, wird von der Hi-Fi-Anlage
Bluetooth Power On
angezeigt.
;
Off auf dem Display
18 Deutsch
Page 79

TV SoundConnect
Mithilfe der TV SoundConnect Funktion können
Sie den Ton Ihres SoundConnect fähigen
Samsung Fernsehgeräts über den die Hi-FiAnlage wiedergeben.
Herstellen einer Verbindung
zwischen der Hi-Fi-Anlage und einem
SoundConnect fähigen Samsung
Fernsehgerät
Stellen Sie vor dem Einschalten dieser Funktion
sicher, dass die SoundConnect oder SoundShare
Funktion am Samsung Fernsehgerät auf On
eingestellt ist.
1. Drücken Sie dieTV SoundConnect
Taste an der Hi-Fi-Anlage, um die TV
SOUNDCONNECT Meldung anzuzeigen.
;
SEARCH ; REQUEST
WAIT
2. Stellen Sie im Menü für die SoundConnect
Einstellungen am Fernsehgerät Add New
Device auf On. (Lesen Sie für weitere
Informationen die Bedienungsanleitung des
Fernsehgeräts.)
3. Wenn die Verbindung zwischen der Hi-FiAnlage und dem Fernsehgerät hergestellt ist,
wird [TV] Name
Frontdisplay angezeigt.
4. Der Ton des angeschlossenen Fernsehgeräts
wird über die Hi-Fi-Anlage wiedergegeben.
| HINWEISE |
✎Die TV SoundConnect Funktion wird von
bestimmten Samsung Fernsehgeräten
unterstützt, die seit 2012 auf dem Markt sind.
Prüfen Sie nach, ob Ihr Fernsehgerät die
SoundShare oder SoundConnect Funktion
unterstützt.
(Weitere Informationen finden Sie in der
Bedienungsanleitung des Fernsehgeräts.)
✎Wenn Sie den Netzstecker der Hi-Fi-
Anlage ziehen, wird die TV SoundConnect
Verbindung beendet. Um die Verbindung
wieder herzustellen, muss die Hi-Fi-Anlage an
eine Steckdose angeschlossen und die TV
SoundConnect Verbindung erneut hergestellt
werden.
;
CONNECTED auf dem
✎Über TV SoundConnect kann nur eine Hi-Fi-
Anlage mit einem Fernsehgerät verbunden
werden.
✎Um ein anderes Fernsehgerät im TV
SoundConnect Modus anzuschließen, die
Taste für mehr als 5 Sekunden drücken und
anschließend die Verbindung zu dem anderen
Fernsehgerät, wie unter der oben aufgeführten
Anleitung beschrieben, herstellen.
Trennen der Verbindung zwischen
Fernsehgerät und Hi-Fi-Anlage
Die Verbindung zwischen dem Fernsehgerät und
der Hi-Fi-Anlage kann getrennt werden.
Die Anleitung hierzu finden Sie in der
Bedienungsanleitung des Fernsehgeräts.
• Wenn die Verbindung zwischen der Hi-Fi-Anlage
und dem Fernsehgerät getrennt ist, wird auf
dem Display der Hi-Fi-Anlage DISCONNECTED
;
REQUEST angezeigt.
Verbindung zwischen Hi-Fi-Anlage und
Fernsehgerät trennen
Drücken Sie die Taste für einen anderen Modus
auf dem Bedienfeld der Hi-Fi-Anlage, um vom TV
SoundConnect Modus auf einen anderen Modus
umzuschalten, oder schalten Sie die Hi-Fi-Anlage
aus. Die Verbindung mit dem aktuell verbundenen
Gerät wird getrennt.
| HINWEISE |
✎Das angeschlossene Fernsehgerät wartet
eine gewisse Zeit auf die Antwort der Hi-FiAnlage, bevor es die Verbindung unterbricht. (Je
nach Fernsehgerät kann der Zeitraum bis zur
Trennung der Verbindung variieren.)
✎Die Verbindung kann unterbrochen werden
oder der Ton kann gestört sein, wenn der
Abstand zwischen Fernsehgerät und der Hi-FiAnlage mehr als 2 m beträgt.
✎Eine instabile Netzwerkumgebung kann einem
Verlust der Verbindung oder Unterbrechungen
bei der Tonübertragung führen.
✎Wenn das Gerät nicht mit einem Fernsehgerät
verbunden ist, schaltet sich die Hi-Fi-Anlage
nach 25 Minuten ab.
03 Funktionen
19 Deutsch
Page 80

Funktionen
My Karaoke verwenden
Sie können die My Karaoke Funktion nutzen, um
mit Ihren lieblings CD- und USB-Titeln mitzusingen.
1. Schließen Sie das Mikrofon an den
Mikrofonanschluss auf der Vorderseite des
Geräts an.
• Wenn der Anschlussstecker Ihres Mikrofons
größer als 3,5 mm ist, benötigen Sie
einen Adapter (nicht mitgeliefert), um das
Mikrofon anschließen zu können.
- Schließen Sie zuerst den Adapter an den
Mikrofonanschluss auf der Vorderseite
des Geräts an.
- Schließen Sie anschließend das Mikrofon
(mit dem größeren Stecker) an den
Adapter an.
2. Drücken Sie die MIC VOL-, + Taste auf
der Fernbedienung, um die Lautstärke des
Mikrofons einzustellen.
3. Drücken Sie die MY KARAOKE Taste auf
der Fernbedienung, um den Gesang auf
Wunsch zu unterdrücken. Durch wiederholtes
Drücken der Taste wird die Auswahl wie folgt
umgeschaltet:
MY KARAOKE ON
• Wenn Sie bei der Nutzung der Karaoke
Funktion merkwürdige Geräusche
hören (quietschen oder Pfeifen), das
Mikrofon in einem größeren Abstand
zu den Lautsprechern aufstellen. Das
Herunterregeln der Lautstärke des
Mikrofons oder der Lautsprecher schafft
ebenfalls Abhilfe. Richten Sie das
MIKROFON nicht auf die LAUTSPRECHER.
• Das Mikrofon funktioniert nicht im AUX und
TUNER Modus.
• Wenn Sie ein Mikrofon anschließen, wird
GIGA SOUND automatisch ausgeschaltet.
Um den Giga Sound wieder einzuschalten,
müssen Sie das Mikrofon abtrennen und
anschließend die GIGA SOUND BEAT
Taste drücken.
• Wenn My Karaoke eingeschaltet ist,
funktioniert GIGA SOUND nicht.
• Wenn Sie My Karaoke ausschalten, gehen
alle My Karaoke Einstellungen verloren.
• My Karaoke ist nur verfügbar, wenn ein
Mikrofon an die Hi-Fi-Anlage angeschlossen
ist.
• My Karaoke funktioniert nicht im Bluetooth,
TV SoundConnect, FM und AUX Modus.
;
MY KARAOKE OFF
20 Deutsch
Automatisches Wechseln der
Wiedergabequelle
Sie können zyklisch zwischen der Disk- und USBWiedergabe umschalten.
1. Drücken Sie die AUTO CHANGE Taste, um
einen Modus auszuwählen, und drücken
Sie anschließend
übernehmen.
• Wenn die CD/USB-Programmwiedergabe
nicht eingestellt wurde
AUTO CHANGE OFF
• Wenn die CD/USB-Programmwiedergabe
eingestellt wurde
AUTO CHANGE OFF
AUTO CHANGE PROGRAM
• Wenn der AUTO CHANGE Modus auf
"ALL" eingestellt ist,
- Werden die Musiktitel nacheinander von
DISC
- Wenn Sie die POWER Taste,
Funktionswahltaste oder die EJECT
Taste drücken, wird die AUTO CHANGE
Funktion automatisch auf "OFF"
geschaltet.
- Funktioniert die Aufnahmefunktion nicht.
- Die REPEAT Funktion funktioniert
nicht und wird automatisch auf OFF
geschaltet.
- Die REC SPEED, USB REC Tasten
reagieren nicht.
• Wenn Sie während der Wiedergabe
von einem USB-Gerät das USB-Gerät
abtrennen, wird die AUTO CHANGE
Funktion automatisch auf "OFF" gestellt.
• Wenn an USB1 kein Gerät angeschlossen
ist, wird zu USB2 übergegangen.
¬
, um die Auswahl zu
;
AUTO CHANGE ALL
;
AUTO CHANGE ALL ;
;
USB1 ; USB2 wiedergegeben.
Radio wiedergeben
Radiosender speichern
Maximale Anzahl an gespeicherten Sendern:
15 UKW-Sender.
1. Wählen Sie FM, indem Sie die TUNER/AUX
Taste drücken.
2. Um einen Radiosender zu suchen, die
TUNING MODE auf der Fernbedienung
@
oder die
MANUAL angezeigt wird.
Taste auf dem Gerät drücken, bis
Page 81

3. Wählen Sie einen Sender wie folgt aus:
• Drücken Sie und halten Sie die TUNING/
ALBUM , oder . Taste auf der
Fernbedienung gedrückt, um automatisch
nach aktiven Rundfunkstationen zu suchen.
4. Drücken Sie die MO/ST Taste, um zwischen
Mono und Stereo umzuschalten.
• An Orten mit schlechtem Empfang können
Sie MONO einstellen, um einen klaren,
rauschfreien Empfang zu erhalten.
• Trifft nur auf UKW-Sender zu.
5. Wenn Sie den gefundenen Sender nicht
speichern möchten, wiederholen Sie Schritt 3,
und suchen Sie einen anderen Sender.
Andernfalls wie folgt vorgehen:
a. Drücken Sie die
b. Oder drücken Sie die TUNING/ALBUM
Taste auf der Fernbedienung, um im
PRESET Modus eine Programmnummer
auszuwählen.
c. Drücken Sie die
zu speichern.
6. Zum Speichern weiterer Sender wiederholen
Sie die Schritte 3 bis 5.
¬
Taste.
¬
Taste, um den Sender
Gespeicherten Sender auswählen
Um einen gespeicherten Radiosender zu hören,
bitte wie folgt vorgehen:
1. Wählen Sie FM, indem Sie die TUNER/AUX
Taste auf dem Gerät oder der Fernbedienung
drücken.
2. Drücken Sie die TUNING MODE Taste auf
der Fernbedienung, bis “PRESET” angezeigt
wird.
3. Drücken Sie die 1, 2 Taste an der Hi-Fi-
Anlage oder TUNING/ALBUM ,, . auf
der Fernbedienung, um die Nummer eines
gespeicherten Senders auszuwählen.
Timer-Funktion
Uhrzeit einstellen
Bei jedem Schritt haben Sie einige Sekunden Zeit,
um die erforderlichen Optionen einzustellen. Wenn
Sie diese Zeit überschreiten, müssen Sie erneut
beginnen.
1. Drücken Sie zweimal die TIMER SET Taste
auf der Fernbedienung. Es wird "CLOCK
SET" angezeigt.
¬
2. Drücken Sie die
Fernbedienung. Die Stundenanzeige blinkt.
•
Stunden heraufsetzen: TUNING/ALBUM
•
Stunden herabsetzen: TUNING/ALBUM
3. Wenn die richtige Stunde angezeigt wird, die
¬
Taste drücken. Die Minuten fangen an zu
blinken.
•
Minuten heraufsetzen: TUNING/ALBUM
•
Minuten herabsetzen: TUNING/ALBUM
4. Wenn die Minuten richtig angezeigt werden,
die ¬ Taste drücken. Es erscheint "TIMER
PLAY SET" auf dem Display.
Taste auf der
,
.
,
.
Timer einstellen
Mit der Timer-Funktion können Sie das Gerät zu
einer bestimmten Uhrzeit automatisch ein- oder
ausschalten.
• Überprüfen Sie vor dem Einstellen des Timers,
ob die aktuelle Uhrzeit korrekt ist.
• Bei jedem Schritt haben Sie einige Sekunden
Zeit, um die erforderlichen Optionen einzustellen.
Wenn Sie diese Zeit überschreiten, müssen Sie
erneut beginnen.
• Wenn Sie nicht mehr wünschen, dass das
Gerät automatisch ein- oder ausgeschaltet
wird, müssen Sie den Timer durch Drücken der
TIMER ON/OFF Taste abschalten.
Beispiel: Sie möchten morgens mit
Musik geweckt werden.
1. Drücken Sie die TIMER SET Taste, bis
TIMER PLAY SET angezeigt wird.
2. Drücken Sie die
Ergebnis: Für einige Sekunden wird ON TIME
angezeigt. Sie können die Timer Einschaltzeit
einstellen.
¬
Taste.
03 Funktionen
21 Deutsch
Page 82

Funktionen
3. Einstellten der Einschaltzeit:
a. Drücken Sie die TUNING/ALBUM ,
oder . Taste, um die Stunde einzustellen.
b. Drücken Sie die
Ergebnis: Die Minutenanzeige blinkt.
c. Drücken Sie die TUNING/ALBUM , oder
.
Taste, um die Minuten einzustellen.
d. Drücken Sie die
Ergebnis: Für einige Sekunden wird OFF
TIME angezeigt. Sie können nun die
Timer Ausschaltzeit einstellen.
4. So stellen Sie die Ausschaltzeit ein:
a. Drücken Sie die TUNING/ALBUM ,
oder . Taste, um die Stunde einzustellen.
b. Drücken Sie die
Ergebnis: Die Minutenanzeige blinkt.
c. Drücken Sie die TUNING/ALBUM , oder
.
Taste, um die Minuten einzustellen.
d. Drücken Sie die
Ergebnis: Es wird VOLUME XX
angezeigt, wobei XX für die eingestellte
Lautstärke steht.
5. Drücken Sie die TUNING/ALBUM , oder
.
Taste, um die Lautstärke einzustellen, und
drücken Sie anschließend die
Ergebnis: Die Wiedergabequelle wird zur
Auswahl angezeigt.
6. Drücken Sie die TUNING/ALBUM , oder .
Taste, um die Tonquelle auszuwählen, die von
der Hi-Fi-Anlage wiedergegeben werden soll,
wenn sie eingeschaltet wird.
Wenn Sie
Folgendes
wählen
FM (Radio) a. Drücken Sie die
CD (Compact
Disc)
USB Schließen Sie ein USB-
¬
Taste.
¬
Taste.
¬
Taste.
¬
Taste.
¬
Taste.
Müssen Sie Folgendes
ebenfalls wählen
Taste.
b. Wählen Sie einen
gespeicherten
Radiosender, indem
Sie die TUNING/
ALBUM , oder .
Taste drücken.
Legen Sie eine CD ein.
Gerät an.
¬
¬
¬
¬
Taste.
Taste.
Taste.
¬
¬
Taste.
Taste.
7. Drücken Sie die
Ergebnis: TIMER REC SET (Wohlen Sie die
Aufnahme starten?) wird angezeigt.
8. Drücken Sie die
Ergebnis: Es wird REC SET YES/NO
angezeigt. Sie können die TUNING/ALBUM
,
oder . Taste drücken, um REC YES
oder REC NO auszuwählen. Drücken Sie
anschließend die
1) Wenn Sie REC NO wählen, wird die Tuner
Timer-Aufnahme und jede programmierte
Tuner Timer-Aufnahme abgebrochen.
Beachten Sie, dass durch die Auswahl
von REC NO die Timer-Einstellung nicht
abgebrochen wird.
2) Wenn Sie REC YES wählen, können Sie
die Ein- und Ausschaltzeiten für die TimerAufnahme einstellen.
a. Drücken Sie die
Ergebnis: Für einige Sekunden wird
ON TIME angezeigt. Sie können
die Einschaltzeit der Tuner TimerAufnahme einstellen.
b. Drücken Sie die
Ergebnis: Für einige Sekunden wird
OFF TIME angezeigt. Sie können
die Ausschaltzeit der Tuner TimerAufnahme einstellen.
| HINWEISE |
✎Die Ein- und Ausschaltzeiten der Tuner Timer-
Aufnahme können von den Timer Ein- und
Ausschaltzeiten abweichen.
✎Wenn die Timer-Uhrzeit für das Einschalten
der Anlage mit der Uhrzeit für das Ausschalten
übereinstimmt, wird ERROR angezeigt.
✎Sie können die 1, 2 Tasten an der Hi-Fi-
Anlage anstelle der TUNING/ALBUM , oder
Taste verwenden, um die Einstellungen in
.
den Schritten 3 bis 8 vorzunehmen.
✎Wenn die Ein- und Ausschaltzeit mit der Timer
Aufnahmezeit übereinstimmt, zählt nur die Einoder Ausschaltzeit und die Timer Aufnahme
wird nicht berücksichtigt.
✎
Wenn Sie den Auto Timer verwenden, kann (je
nach Disk oder Gerät) ein zusätzlicher Schritt
erforderlich sein, um eine CD oder ein USBGerät mit dieser Funktion zu verwenden. Folglich
ist es einfacher, den Tuner zu verwenden.
✎Wenn Sie den CD- oder USB-Modus wählen,
wenn keine Disk eingelegt oder kein USBGerät angeschlossen ist, schaltet das Gerät
automatisch auf TUNER um.
22 Deutsch
Page 83

Timer löschen
Nachdem Sie den Timer eingestellt haben, wird
er automatisch gestartet. Wenn der Timer startet,
erscheint die TIMER ON Meldung auf dem Display.
Wenn der Timer nicht mehr verwendet werden
soll, müssen Sie ihn ausschalten.
• Um den Timer abzuschalten, einmal die TIMER
ON/OFF drücken.
• Um den Timer wieder einzuschalten, die TIMER
ON/OFF erneut drücken.
| HINWEISE |
✎Wenn Sie den TIMER OFF Modus wählen, sind
die TIMER RECORDING und TIMER Funktion
nicht verfügbar.
Die Aufnahmefunktion
Grundlegende Aufnahmefunktionen
Sie können von einer CD, einem USB-Gerät, eine
Radiosendung oder von einem externen Gerät auf
ein USB-Speichergerät aufnehmen.
1. Schließen Sie ein externes USB-
Speichergerät an einen USB-Anschluss (
) des Geräts an. Sie können USB 2
benutzen.
2. Spielen Sie eine Disk oder USB-Gerät ab,
schalten Sie das Radio ein und wählen Sie
einen Sender oder schließen Sie eine externe
Quelle an die Hi-Fi-Anlage wie nachfolgend
beschrieben an.
CD
• Drücken Sie die CD Taste am Gerät, um
die CD-Funktion auszuwählen.
• Legen Sie vorsichtig eine CD in den CDSchlitz ein.
• Wählen Sie mit den Tasten (1 oder 2)
den gewünschten Titel auf der CD aus.
TUNER
• Wählen FM, indem Sie die TUNER/AUX
Taste drücken.
• Stellen Sie den aufzunehmenden Sender
ein.
23 Deutsch
USB 1 (Das Aufnahmegerät befindet sich
an USB 2)
• Schließen Sie das USB-Gerät mit den
Dateien die Sie aufnehmen möchten an
den Anschluss USB 1 an.
• Drücken Sie die USB Taste, um USB 1
auszuwählen.
• Geben Sie einen Titel über den USB 1
Anschluss wieder.
Externe Quelle
• Schließen Sie ein externes Gerät/MP3Player an das Gerät an.
• Drücken Sie die TUNER/AUX Taste, um
AUX IN 1 oder AUX IN 2 auszuwählen.
• Geben Sie einen Titel vom externen Gerät
wieder.
3. Die USB REC Taste auf der Fernbedienung
drücken, um mit der Aufnahme zu beginnen.
CD
• Die CD-Aufnahme startet und "TRACK
RECORD" sowie die aktuelle Titelnummer
werden abwechselnd auf dem Display
angezeigt.
• Wenn Sie alle Titel auf der Disk aufnehmen
möchten, die USB REC Taste drücken
und gedrückt halten. Es wird "FULL CD
RECORD" angezeigt.
RADIO
• “TUNER RECORD” wird angezeigt und die
Aufnahme wird gestartet.
CD-ROM/USB
• "FILE COPY" wird angezeigt und die
Aufnahme wird gestartet.
• Sie können ebenfalls einen Ordner mit
MP3/WMA-Dateien auf ein an USB 2
angeschlossenes Gerät kopieren. Halten
Sie die USB REC Taste gedrückt, während
eine MP§ oder WMA-Datei aus einem
Ordner von dem Gerät wiedergegeben
wird. Auf der Anlage wird "FOLDER COPY"
angezeigt und es werden alle Dateien in
diesen Ordner kopiert.
• Wenn die Aufnahme abgeschlossen ist,
wird "STOP" angezeigt.
• Wenn sich auf dem an USB 2
angeschlossenen Gerät eine Datei mit
gleichem Namen befindet, wird "EXIST
FILE" angezeigt und die Funktion wird
abgebrochen.
03 Funktionen
Page 84

Funktionen
• Wenn ein Mikrofon an das Gerät
angeschlossen ist und Sie die USB
REC Taste drücken, wird die MP3Aufnahmefunktion, nicht die Kopierfunktion
aktiviert.
• Drücken Sie die USB REC Taste für eine
Sekunde, um FILE COPY zu starten. Halten
Sie die USB REC Taste für einige Sekunden
gedrückt, um FOLDER COPY zu starten.
Externe Quelle
• “AUX RECORD” wird angezeigt und die
Aufnahme wird gestartet.
CD/USB1(MP3) & MIC
• “MP3 RECORD” wird angezeigt und die
Aufnahme wird gestartet.
4. Drücken Sie zum Beenden der Aufnahme die
Taste. Die Aufnahme wird automatisch als
5
MP3-Datei gespeichert.
5. Nachdem die Aufnahme beendet ist,
wird ein Verzeichnis mit dem Namen
"RECORDING"(CD-DA), "COPY"(CDROM/ USB), "TUNER RECORDING", "AUX
RECORDING" oder "MP3 RECORDING" auf
Ihrem Gerät angelegt.
| HINWEISE |
✎WMA/MP2 können nur kopiert, aber nicht
aufgenommen werden.
✎Trennen Sie das USB-Gerät oder das
Netzkabel während einer Aufnahme nicht ab.
Die Dateien können beschädigt werden.
✎Wenn Sie das USB-Gerät während einer
Aufnahme abtrennen, schaltet sich das Gerät
ab und die aufgenommene Datei kann nicht
gelöscht werden. Falls dieser Fall eintritt,
müssen Sie das USB-Gerät an einen PC
anschließen, die Daten auf dem USB-Gerät
auf dem PC sichern und das USB-Gerät
formatieren.
✎Wenn auf dem USB-Gerät nicht genügend
Speicherplatz zur Verfügung steht, wird
"NOT ENOUGH MEMORY" auf dem Display
angezeigt.
✎Die Aufnahmefunktion unterstützt nur das FAT-
Dateisystem. Das NTFS-Dateisystem wird nicht
unterstützt.
24 Deutsch
✎Wenn Sie die CD Schnellsuchfunktion
verwenden, ist CD Aufnahme nicht verfügbar.
✎Bei einigen USB-Geräten kann die
Aufnahmezeit länger sein.
✎Im Programmmodus kann die
Aufnahmefunktion nicht verwendet werden.
✎
Wenn die Aufnahmefunktion aktiv ist, werden die
EQ und GIGA SOUND Funktionen automatisch
abgeschaltet und sind nicht verfügbar.
✎Während einer CD-Aufnahme wird die REPEAT
Funktion automatisch ausgeschaltet und ist
nicht verfügbar.
✎Wenn Sie während einer CD Aufnahme
das Mikrofon verwenden, wird der Ton vom
Mikrofon aufgezeichnet.
✎Während der Sendersuche oder wenn
kein Sender eingestellt ist, kann keine
Radioaufnahme durchgeführt werden.
✎Beachten Sie, dass bei der Aufnahme von
einem externem Gerät über den AUX oder
USB-Eingang mit zu lautem Eingangspegel die
Aufnahmequalität verschlechtert werden kann.
Wenn dieser Fall eintritt, den Lautstärkepegel
des externen Geräts verringern.
Aufnahmegeschwindigkeit
Jedes Mal, wenn Sie die REC SPEED Taste
auf der Fernbedienung drücken, ändert sich die
Aufnahmegeschwindigkeit wie folgt:
;
RECORD SPEED x 1
• Wenn Sie eine Radiosendung oder von
einem externen Gerät aufnehmen, kann die
Aufnahmegeschwindigkeit nicht geändert
werden.
• Wenn Sie RECORD SPEED X 4 auswählen,
wird der Ton während der Aufnahme nicht
wiedergegeben.
• Wenn Sie ein Mikrofon anschließen, steht nur
die Aufnahmegeschwindigkeit RECORD SPEED
X 1 zur Verfügung.
• Wenn Sie während der Aufnahme das Mikrofon
abtrennen, wird die Aufnahme angehalten.
Wenn Sie das Mikrofon wieder anschließen, wird
die Aufnahme nicht fortgesetzt.
| HINWEISE |
✎Selbst wenn RECORD SPEED auf x4
eingestellt ist, kann die Aufnahme nicht in
4-facher GEschwindigkeit erfolgen, wenn
das verwendete USB Speichergerät diese
Geschwindigkeit nicht unterstützt.
RECORD SPEED x 4
Page 85

Spezielle Klangeffekte
Auswahl des EQ-Modus
Ihre Hi-Fi-Anlage stellt voreingestellte EqualizerEinstellungen bereit, die für bestimmte Musikarten
optimiert sind. Sie können außerdem die Bässe,
Mitten und Höhen von Hand einstellen.
1. Drücken Sie die EQ Taste.
Jedes Mal, wenn Sie die EQ Taste
drücken oder den LAUTSTÄRKE/
SUCHE DREHKNOPF am Gerät drehen,
wird der Modus in folgender Reihenfolge
umgeschaltet:
;
FLAT ; RANCHERA ; CUMBIA
OFF
;
REGGAE ; MERENGUE ; SALSA ;
REGGATON ; FOLKLORE ; PARTY ; POP
;
HIP-HOP ; ROCK ; JAZZ ; CLASSIC ;
ELEC-TRONIC ; MP3 ENHANCER ; VIRTUAL
2. Um die BASS, MID (Mitten) und TREB
(Höhen) manuell einzustellen, USER
EQauswählen und anschließend die ¬ Taste
drücken.
Ergebnis: Der BASS Pegel (linke
Ziffernanzeige) blinkt.
Drücken Sie die 1 oder 2 Taste am Gerät
oder die TUNING/ALBUM ,, . Taste, um
einen Pegel von -06 bis 06 einzustellen.
Drücken Sie anschließend die ¬ Taste.
Ergebnis: Der MIDDLE Pegel (mittlere
Ziffernanzeige) blinkt.
Drücken Sie die 1 oder 2 Taste am Gerät
oder die TUNING/ALBUM ,, . Taste, um
einen Pegel von -06 bis 06 einzustellen.
Drücken Sie anschließend die ¬ Taste.
Ergebnis: Der TREBLE Pegel (rechte
Ziffernanzeige) blinkt.
Drücken Sie die 1 oder 2 Taste am Gerät
oder die TUNING/ALBUM ,, . Taste, um
einen Pegel von -06 bis 06 einzustellen.
Drücken Sie anschließend die ¬ Taste.
Ergebnis: Die Einstellung ist abgeschlossen.
SOUND ; USER EQ
| HINWEISE |
✎Wenn die Hi-Fi-Anlage aufnimmt, wird die EQ-
Funktion automatisch ausgeschaltet und ist
nicht verfügbar.
✎Wenn innerhalb von 8 Sekunden keine Taste
gedrückt wird, werden Ihre Einstellungen
automatisch abgebrochen und die vorherigen
Einstellungen werden gespeichert.
✎Der EQ-Modus kann je nach Region
unterschiedlich sein.
✎Verwenden Sie den LAUTSTÄRKE/SUCHE
DREHKNOPF um zwischen den EQEinstellungen umzuschalten. Die ausgewählte
EQ-Einstellung wird nach 2 Sekunden
übernommen.
✎Verwenden Sie den LAUTSTÄRKE/SUCHE
DREHKNOPF um die EQ-Einstellung
umzuschalten und drücken Sie
Bildschirm wird angezeigt
¬
. Der EQ-
FOOTBALL MODE Funktion
Dieser Modus verleiht Sportübertragungen
größeren Realismus.
1. Drücken Sie die FOOTBALL MODE Taste
am Gerät.
Durch wiederholtes Drücken dieser Taste wird
die Wiedergabequelle wie folgt umgeschaltet:
;
ANNOUNCER ; STADIUM
OFF
2. Um diese Funktion zu beenden, die
FOOTBALL MODE Taste drücken, bis “OFF”
angezeigt wird.
GOAL Funktion
Drücken Sie diese Taste, um während Sie ein
Fußballspiel anschauen Jubel hinzuzufügen.
1. Drücken Sie die GOAL Taste auf der
Fernbedienung.
Durch wiederholtes Drücken dieser Taste wird
die Wiedergabequelle wie folgt umgeschaltet:
;
GOAL ON
2. Um diese Funktion abzubrechen, die GOAL
Taste drücken, bis "GOAL OFF" angezeigt
wird.
GOAL OFF
03 Funktionen
25 Deutsch
Page 86

Funktionen
| HINWEISE |
✎Drücken Sie die GOAL Taste, um die gerade
abgespielte Klangdatei mit dem GOAL Klang
zu mischen.
GIGA SOUND Funktion
Die GIGA SOUND Funktion verstärkt den Bass
und verdoppelt ihn und sorgt für einen kraftvollen
und realistischen Klang.
1. Drücken Sie die GIGA SOUND BEAT Taste
am Gerät oder die GIGA Taste auf der
Fernbedienung. Durch wiederholtes Drücken
dieser Taste wird die Wiedergabequelle wie
folgt umgeschaltet:
GIGA SOUND BEAT
2. Um diese Funktion zu beenden, die GIGA
SOUND BEAT Taste drücken, bis “GIGA
SOUND OFF” angezeigt wird.
| HINWEISE |
✎Der GIGA SOUND Modus kann je nach Region
unterschiedlich sein.
;
GIGA SOUND OFF
BEAT WAVING Funktion
Mithilfe der Beat Waving Funktion können Sie den
Anzeigemodus der Lautsprecher-LED ändern.
1. Drücken Sie die BEAT WAVING am Gerät
oder auf der Fernbedienung.
Durch wiederholtes Drücken dieser Taste wird
die Wiedergabequelle wie folgt umgeschaltet:
STARDUST ; EMERALD MOON ; SOLAR
BOMB ; SHOOTING STAR ; STAR ;
PARTY 1 ; PARTY 2 ; FUN 1 ; FUN 2 ;
PURE ; FRESH ; LOVE ; JOY ; SUNSET ;
SUNRISE ; NATURE 1 ; NATURE 2 ; WAVE 1
;
WAVE 2 ; AURORA ; OFF
| HINWEISE |
✎Wenn Sie BEAT WAVING OFF auswählen,
werden alle Lautsprecher LED-Anzeigen
ausgeschaltet.
DJ BEAT Funktion
Mithilfe der DJ Beat Funktion könne Sie die DJ
Klangeffektfunktionen einschalten. Der Pegel ist
für jeden Effekt einstellbar.
Drücken Sie die DJ BEAT Taste auf der
Fernbedienung oder am Gerät.
Durch wiederholtes Drücken dieser Taste wird die
Wiedergabequelle wie folgt umgeschaltet:
| WICHTIG |
✎Der Einstellbereich liegt zwischen [-15 ~ +15]
wobei der eingestellte Anfangswert jeweils 0
beträgt.
• FLANGER : Erzeugt einen Effekt ähnlich einem
lauter und leiser werdenden Düsenantriebs.
• CHORUS : Erzeugt einen Effekt ähnlich einem
singenden Chor.
• WAHWAH : Erzeugt einen Wah-Wah-Effekt.
• TREMOLO : Der Ton wird in kurzen Abständen
lauter und leiser.
• FUZZ : Verzerrt den Originalklang und macht
ihn härter und rauer.
• PHASER : Ändert den Klang von klar zu dumpf.
• SLAPBACK : Erzeugt den Effekt eines auf den
Originalton folgenden Rückwand-Echos.
• DJ BEAT OFF : Schaltet diese Funktion aus.
| HINWEISE |
✎Die rote LED leuchtet um die gedrückte Taste
und um die DJ BEAT Taste auf.
✎Sie können die Intensität der Effekts mit dem
Lautstärkeregler einstellen. Um die Lautstärke
einzustellen, die VOLUME/DJ Taste am Gerät
drücken.
✎Um einen Effekt zu deaktivieren, die Taste
dieses Effekts erneut drücken.
✎Sie können den Effekt ebenfalls mithilfe der
EFFECT LEVEL Taste auf der Fernbedienung
steuern.
✎Verwenden Sie den Lautstärkeregler, um die
Intensität des zuletzt aktivierten Effekts zu
steuern. Wenn Sie zum Beispiel den WahWah-Effekt aktiviert haben und anschließend
den Panning Effekt aktivieren, können Sie den
Panning Effekt mit dem Lautstärkeregler regeln.
✎
Um die Intensität des zuerst aktivierten Effekts
zu regeln, die Taste des zuletzt aktivierten
Effekts drücken, um diesen auszuschalten. Nun
können Sie den Lautstärkeregler verwenden,
um die Intensität des ersten Effekts einzustellen.
26 Deutsch
Page 87

+PANNING Funktion
Erhöht und erniedrigt die Lautstärke abwechselnd
am linken und rechten Lautsprecher, um den
Eindruck zu erwecken, dass der Ton von einer
Seite auf die andere wandert.
| HINWEISE |
✎Um den PANNING Effekt zu einem anderen
Effekt hinzuzufügen, die +PANNING Taste
drücken, wenn der andere Effekt aktiv ist oder
eine andere Effekttaste drücken, wenn der
PANNING Effekt aktiv ist.
NON-STOP MUSIC RELAY Funktion
Die NON-STOP MUSIC RELAY Funktion gibt
Musiktitel nacheinander ohne eine Pause zwischen
den Titeln/Dateien wieder. Wenn zwei mp3-Dateien
vorhanden sind, springt die Funktion zur 10.
Sekunde des nachfolgenden Titels, wenn der erste
Titel die 10. Sekunde vor seinem Ende erreicht.
Drücken Sie die NON-STOP MUSIC RELAY
Taste am Gerät oder die NON-STOP RELAY
Taste auf der Fernbedienung.
Durch wiederholtes Drücken dieser Taste wird die
Wiedergabequelle wie folgt umgeschaltet:
NON-STOP RELAY ON
| HINWEISE |
✎Diese Funktion steht bei der CD/USB-
Wiedergabe zur Verfügung.
;
NON-STOP RELAY
OFF
DANCE TIME Funktion
Drücken Sie während der Musikwiedergabe die
DANCE TIME Taste auf der Fernbedienung,
um die auf Ihrem Gerät gespeicherte Tanzmusik
abzuspielen.
Verwenden Sie diese Funktion, um sich an
aufregender Musik zu erfreuen.
1. Drücken Sie die DANCE TIME Taste auf der
Fernbedienung.
Durch wiederholtes Drücken dieser Taste wird
die Wiedergabequelle wie folgt umgeschaltet:
DANCE TIME ON
2. Um diese Funktion zu beenden, die DANCE
TIME Taste drücken, bis “DANCE TIME
OFF” angezeigt wird.
;
DANCE TIME OFF
| HINWEISE |
✎Wenn die Wiedergabe der DANCE TIME
Sound-Datei beendet ist, wird der DANCE
TIME Modus auf DANCE TIME OFF geschaltet.
✎Wenn der DANCE TIME Modus auf ON
gestellt ist, wird die Musik von der B/T, TV
SoundConnect, TUNER und AUX Quelle
stumm geschaltet.
✎Wenn Sie DANCE TIME während der CD oder
USB-Wiedergabe auf OFF stellen, kehrt die
Wiedergabe zum Anfang des aktuellen Titels
zurück..
✎Sie können die Tanzmusik während der
Wiedergabe einer DANCE TIME Datei ändern,
indem Sie die 1, 2 Taste drücken.
TEMPO Funktion
Verwenden Sie diese Funktion, um das TEMPO
während der Musikwiedergabe zu ändern.
1. Drücken Sie während der Wiedergabe
(CDDA/MP3/WMA) die TEMPO Taste auf der
Fernbedienung.
2. Wählen Sie das gewünschte TEMPO durch
Drücken der EFFECT LEVEL Taste auf der
Fernbedienung aus.
| HINWEISE |
✎Die TEMPO Funktion funktioniert nicht im
Bluetooth, TV SoundConnect, FM und AUX
Modus.
✎Wenn Sie TEMPO ausschalten, gehen alle
TEMPO Einstellungen verloren.
Booting Sound Funktion
Wenn die Booting Sound Funktion eingeschaltet
ist, demonstriert Ihre Hi-Fi-Anlage ihr Können beim
Hochfahren.
1. Drücken Sie 5 Sekunden lang die GIGA
SOUND BEAT Taste am Gerät oder die
GIGA Taste auf der Fernbedienung. Das
BOOTING SOUND Menü wird auf dem
Display angezeigt.
2. Drücken Sie 10 Sekunden lang die GIGA
SOUND BEAT Taste am Gerät oder die
GIGA Taste auf der Fernbedienung, um die
BOOTINGSOUND Funktion auf On oder Off
zu stellen.
03 Funktionen
27 Deutsch
Page 88

Anhang
Fehlerbehebung
Konsultieren Sie untenstehende Liste, wenn die Hi-Fi-Anlage nicht ordnungsgemäß funktioniert. Falls
ihr Problem unten nicht aufgelistet oder die Problemlösung nicht hilfreich ist, das Gerät abschalten,
den Netzstecker ziehen und setzen Sie sich mit dem nächstgelegenen autorisierten Händler oder dem
Samsung Electronics-Servicecenter in Verbindung.
Symptom Überprüfen/Beheben
Die Disk wird nicht ausgeworfen. • Ist der Netzstecker richtig angeschlossen?
• Schalten Sie das Gerät aus und wieder ein.
Wiedergabe startet nicht sofort,
wenn die Taste Play/Pause betätigt
wird.
Kein Ton hörbar. • Bei der beschleunigten Wiedergabe, der verlangsamten
Die Fernbedienung funktioniert nicht. • Bedienen Sie die Fernbedienung innerhalb des zulässigen
Das Gerät funktioniert nicht.
(Beispiel: Die Stromversorgung wird
ausgeschaltet oder die Bedientasten
am Gerät funktionieren nicht oder Sie
hören merkwürdige Geräusche.
Das Gerät funktioniert nicht fehlerfrei.
Der Radioempfang funktioniert nicht. • Ist die UKW-Antenne richtig angeschlossen?
Nach der Anzeige von "PROTECT"
wird das Gerät automatisch
abgeschaltet.
• Ist die Disk verformt oder zerkratzt?
• Reinigen Sie die Disk.
Wieder und der Einzelbildwiedergabe wird kein Ton
wiedergegeben.
• Sind die Lautsprecher richtig angeschlossen? Sind die
Lautsprechereinstellungen korrekt?
• Ist die Disk schwer beschädigt?
Winkels bzw. der Reichweite der Fernbedienung.
• Sind die Batterien leer?
• Drücken Sie die
mindestens 5 Sekunden, ohne eine Disk eingelegt zu haben.
Die Ersteinstellungen Meldung erscheint auf dem Bildschirm
und die Stromversorgung wird automatisch abgeschaltet.
Wenn Sie ihr Gerät wieder einschalten, werden alle
Einstellungen zurückgesetzt.
Verwenden Sie diese Option nur wenn unbedingt nötig.
• Installieren Sie bei einem schwachen Antennensignal eine
externe UKW-Antenne an einem Ort mit gutem Empfang.
• Prüfen Sie, ob die verwendete Netzspannung der auf
dem Etikett auf der Rückseite des Geräts angegebenen
Netzspannung entspricht.
• Wenn sich auf der Rückseite ein Spannungswahlschalter
befindet, prüfen, ob die Netzspannung der eingestellten
Spannung entspricht.
@
Taste (auf dem vorderen Bedienfeld) für
28 Deutsch
Page 89

Technische Daten
Gewicht
Allgemein
UKW-Tuner
CD Disk CD : 12 cm (COMPACT DISK)
Verstärker
*: Nominelle Spezifikation
- Samsung Electronics Co., Ltd behält sich das Recht auf unangekündigte Änderungen vor.
- Gewicht und Abmessungen können von den Angaben abweichen.
- Das Design und die Technischen Daten können ohne vorherige Ankündigung geändert werden.
- Informationen über die Stromversorgung und die Leistungsaufnahme finden Sie auf dem Etikett am
Gerät.
Abmessungen
Betriebstemperaturbereich +5°C~+35°C
Zulässiger
Luftfeuchtigkeitsbereich
Signal/Rauschabstand 55 dB
Verwendbare Empfindlichkeit 10 dB
Klirrfaktor (Total Harmonic
Distortion)
Ausgangsleistung der FrontLautsprecher
Ausgangsleistung der
Subwoofer
Frequenzbereich 22Hz~20KHz
Signal-Rauschabstand 65 DB
Kanaltrennung 60 DB
Eingangsempfindlichkeit AUX IN1 1.2V, AUX IN2 2.0V
Haupteinheit 6.1 kg
Lautsprecher 55.17 kg
Haupteinheit 550 (B) x 212 (H) x 367 (T) mm
Lautsprecher 648 (B) x 652 (H) x 440 (T) mm
10 % bis 75 %
1 %
Lesegeschwindigkeit: 4,8 bis 5,6 M/Sek.
Maximale Spieldauer: 74 Min.
575W/Kanal (4Ω)
575W/Kanal (4Ω)
04 Anhang
Bekanntmachung zu Open Source
Wenn Sie Fragen bezüglich des Themas Open Source haben, wenden Sie sich bitte per E-Mail unter der
Adresse an Samsung. (oss.request@samsung.com)
• Hiermit erklärt Samsung Electronics, dass dieses Gerät mit den wesentlichen
Anforderungen und die relevanten Bestimmungen der Richtlinie 1999/5/EC übereinstimmt.
Die original Übereinstimmungserklärung finden Sie auf http://www.samsung.com,unter
Support > Produktsuche und geben Sie den Produktnamen oder die Artikelnummer ein.
Dieses Gerät darf in allen EU-Ländern betrieben werden.
29 Deutsch
Page 90

Kontakt zu Samsung
Falls Sie Fragen oder Anregungen zu Samsung-Produkten haben, freuen wir uns über Ihre Kontaktaufnahme mit
der Samsung-Kundenbetreuung.
Area Contact Centre
AUSTRIA
BELGIUM 02-201-24-18
BOSNIA 051 331 999
BULGARIA 07001 33 11 , sharing cost
CROATIA 062 726 786
CZECH 800 - SAMSUNG (800-726786)
DENMARK 70 70 19 70
FINLAND 030-6227 515
FRANCE 01 48 63 00 00
GERMANY
CYPRUS
GREECE
HUNGARY
ITALIA 800-SAMSUNG (800.7267864)
LUXEMBURG 261 03 710
MONTENEGRO 020 405 888
0800 - SAMSUNG (0800 - 7267864)
0180 6 SAMSUNG bzw.
0180 6 7267864*
(*0,20 €/Anruf aus dem dt. Festnetz,
aus dem Mobilfunk max. 0,60 €/Anruf)
8009 4000 only from landline, toll
free
80111-SAMSUNG (80111 726
7864) only from land line
(+30) 210 6897691 from mobile
and land line
0680SAMSUNG (0680-726-786)
0680PREMIUM (0680-773-648)
Korrekte Entsorgung der Batterien dieses Produkts
(In den Ländern der Europäischen Union und anderen europäischen Ländern mit einem separaten AltbatterieRücknahmesystem)
Die Kennzeichnung auf der Batterie bzw. auf der dazugehörigen Dokumentation oder Verpackung gibt an, dass die Batterie
zu diesem Produkt nach seiner Lebensdauer nicht zusammen mit dem normalen Haushaltsmüll entsorgt werden darf.
Wenn die Batterie mit den chemischen Symbolen Hg, Cd oder Pb gekennzeichnet ist, liegt der Quecksilber-, Cadmiumoder
Blei-Gehalt der Batterie über den in der EG-Richtlinie 2006/66 festgelegten Referenzwerten. Wenn Batterien nicht
ordnungsgemäß entsorgt werden, können sie der menschlichen Gesundheit bzw. der Umwelt schaden.
Bitte helfen Sie, die natürlichen Ressourcen zu schützen und die nachhaltige Wiederverwertung von stofflichen Ressourcen
zu fördern, indem Sie die Batterien von anderen Abfällen getrennt über Ihr örtliches kostenloses AltbatterieRücknahmesystem entsorgen.
Web Site
www.samsung.com/at/support
www.samsung.com/be/
support (Dutch)
www.samsung.com/be_fr/
support (French)
www.samsung.com/support
www.samsung.com/bg/support
www.samsung.com/hr/support
www.samsung.com/cz/support
www.samsung.com/dk/support
www.samsung.com/fi/support
www.samsung.com/fr/support
www.samsung.com/de/
support
www.samsung.com/gr/
support
http://www.samsung.com/
hu/support
www.samsung.com/it/support
www.samsung.com/support
www.samsung.com/support
Area Contact Centre
SLOVENIA
NETHERLANDS
NORWAY 815 56480
POLAND
PORTUGAL 808 20 7267
ROMANIA
SERBIA 011 321 6899
SLOVAKIA 0800 - SAMSUNG(0800-726 786)
SPAIN 0034902172678
SWEDEN 0771 726 7864 (SAMSUNG)
SWITZERLAND 0848 726 78 64 (0848-SAMSUNG)
U.K 0330 SAMSUNG (7267864)
EIRE 0818 717100
LITHUANIA 8-800-77777
LATVIA 8000-7267
ESTONIA 800-7267
080 697 267
090 726 786
0900-SAMSUNG (0900-7267864)
(€ 0,10/Min)
0 801-172-678* lub +48 22 60793-33 **
*(całkowity koszt połączenia jak za 1
impuls według taryfy operatora)
** (koszt połączenia według taryfy
operatora)
08008 SAMSUNG (08008 726 7864)
TOLL FREE No.
Web Site
www.samsung.com/si/
support
www.samsung.com/nl/
support
www.samsung.com/no/support
www.samsung.com/pl/
support
www.samsung.com/pt/support
www.samsung.com/ro/support
www.samsung.com/rs/support
www.samsung.com/sk/support
www.samsung.com/es/support
www.samsung.com/se/support
www.samsung.com/ch/
support (German)
www.samsung.com/ch_fr/
support (French)
www.samsung.com/uk/support
www.samsung.com/ie/support
www.samsung.com/lt/support
www.samsung.com/lv/support
www.samsung.com/ee/support
Korrekte Entsorgung von Altgeräten (Elektroschrott)
(In den Ländern der Europäischen Union und anderen europäischen Ländern mit einem separaten Sammelsystem)
Die Kennzeichnung auf dem Produkt, Zubehörteilen bzw. auf der dazugehörigen Dokumentation gibt an, dass das Produkt und
Zubehörteile (z. B. Ladegerät, Kopfhörer, USB-Kabel) nach ihrer Lebensdauer nicht zusammen mit dem normalen Haushaltsmüll
entsorgt werden dürfen. Entsorgen Sie dieses Gerät und Zubehörteile bitte getrennt von anderen Abfällen, um der Umwelt bzw.
der menschlichen Gesundheit nicht durch unkontrollierte Müllbeseitigung zu schaden. Helfen Sie mit, das Altgerät und
Zubehörteile fachgerecht zu entsorgen, um die nachhaltige Wiederverwertung von stofflichen Ressourcen zu fördern.
Private Nutzer wenden sich an den Händler, bei dem das Produkt gekauft wurde, oder kontaktieren die zuständigen Behörden,
um in Erfahrung zu bringen, wo Sie das Altgerät bzw. Zubehörteile für eine umweltfreundliche Entsorgung abgeben können.
Gewerbliche Nutzer wenden sich an ihren Lieferanten und gehen nach den Bedingungen des Verkaufsvertrags vor.
Dieses Produkt und elektronische Zubehörteile dürfen nicht zusammen mit anderem Gewerbemüll entsorgt werden.
Page 91

MX-HS8000
Sistema a componenti Hi-Fi PREMIUM
manuale utente
immagina le possibilità
Grazie per avere acquistato questo prodotto
Samsung.
Per ricevere un servizio più completo,
registrare il prodotto all'indirizzo
www.samsung.com/register
Page 92

Informazioni sulla sicurezza
Avvertenza
PER RIDURRE IL RISCHIO DI SCOSSE ELETTRICHE, NON RIMUOVERE IL COPERCHIO (O IL PANNELLO
POSTERIORE).
ALL'INTERNO NON VI SONO PARTI RIPARABILI DALL'UTENTE. PER LA MANUTENZIONE RIVOLGERSI
AL PERSONALE DI ASSISTENZA QUALIFICATO.
ATTENZIONE
NON APRIRE: RISCHIO DI SCOSSE ELETTRICHE
ATTENZIONE: PER EVITARE SCOSSE ELETTRICHE, INSERIRE
A FONDO LO SPINOTTO PIÙ LARGO DELLA SPINA NELLA
RELATIVA PRESA.
AVVERTENZA
• Per ridurre il rischio di incendio o scosse
elettriche, non esporre questo apparecchio alla
pioggia o all'umidità.
PRODOTTO LASER DI CLASSE 1
Questo lettore CD è classificato come prodotto
LASER DI CLASSE 1. L'utilizzo di comandi,
regolazioni o funzioni che si riferiscono a
procedure diverse da quelle specificate può
provocare l'esposizione a radiazioni pericolose.
Conforme a 21 CFR 1040.10 fatta eccezione per
le divergenze in accordo con la normativa Laser
Notice n. 50 del 24 giugno 2007.
PERICOLO:
• RAGGIO LASER VISIBILE E INVISIBILE
QUANDO L'APPARECCHIO È APERTO.
EVITARE L'ESPOSIZIONE DIRETTA AL
RAGGIO. (FDA 21 CFR)
ATTENZIONE:
• RAGGIO LASER VISIBILE E INVISIBILE DI
CLASSE 3B QUANDO L'APPARECCHIO
È APERTO. EVITARE L'ESPOSIZIONE AL
RAGGIO. (IEC 60825-1)
Questo simbolo indica la presenza di
"tensione pericolosa" all'interno del
prodotto, che comporta il rischio di scosse
elettriche o lesioni.
Questo simbolo indica istruzioni importanti
che accompagnano il prodotto.
• IL PRODOTTO UTILIZZA UN LASER.
L'UTILIZZO DI COMANDI, REGOLAZIONI
O FUNZIONI CHE SI RIFERISCONO A
PROCEDURE DIVERSE DA QUELLE
SPECIFICATE PUÒ PROVOCARE
L'ESPOSIZIONE A RADIAZIONI PERICOLOSE.
NON APRIRE IL COPERCHIO E NON
EFFETTUARE LE RIPARAZIONI DA SOLI.
PER LA MANUTENZIONE RIVOLGERSI AL
PERSONALE DI ASSISTENZA QUALIFICATO.
CLASS 1 LASER PRODUCT
KLASSE 1 LASER PRODUKT
LUOKAN 1 LASER LAITE
KLASS 1 LASER APPARAT
PRODUCTO LÁSER CLASE 1
• È possibile che vengano addebitate delle spese amministrative nei seguenti casi
L'uscita del tecnico in seguito a una chiamata non rileva difetti nel prodotto
(ad es. nel caso l'utente abbia omesso di leggere questo manuale utente).
L'utente ha portato l'unità presso un centro di riparazione che non rileva difetti nel prodotto
(ad es. nel caso l'utente abbia omesso di leggere questo manuale utente).
• L'importo di tali spese amministrative verrà comunicato all'utente prima di eseguire una visita a
domicilio o un eventuale intervento di manutenzione.
2 Italiano
Page 93

Precauzioni
• Verificare che le caratteristiche degli alimentatori
CA presenti in casa corrispondano all'etichetta
di identificazione posta sul retro del prodotto.
• Installare il prodotto orizzontalmente, su un
supporto adeguato (un mobile), verificando
che vi sia spazio sufficiente per una corretta
ventilazione (7,5 - 10 cm).
• Non sistemare il prodotto su amplificatori o
altri dispositivi che potrebbero riscaldarsi.
Assicurarsi che le aperture di ventilazione non
siano ostruite.
• Non appoggiare oggetti sul prodotto.
• Prima di spostare il prodotto, verificare che non
contenga nessun disco.
• Per spegnere completamente il prodotto,
scollegare la spina di alimentazione dalla
presa di rete. Se si prevede di non utilizzare
il dispositivo per un lungo periodo di tempo,
scollegare la spina di alimentazione dalla presa
di rete.
• Durante i temporali, scollegare la spina di
alimentazione dalla presa di rete. I picchi di
alta tensione provocati dai fulmini potrebbero
danneggiare il prodotto.
• Non esporre il prodotto alla luce diretta
del sole o ad altre fonti di calore. Questo
potrebbe provocare il surriscaldamento e il
malfunzionamento del prodotto.
• Tenere il prodotto lontano da fonti di umidità e
calore eccessivo e da apparecchi che generano
un forte campo magnetico o elettrico (ad es.
diffusori).
• In caso di malfunzionamento del prodotto,
scollegare il cavo di alimentazione dalla presa di
corrente.
• Il prodotto non è destinato all'uso industriale. È
destinato esclusivamente all'uso personale.
• Se il prodotto o il disco vengono conservati a
basse temperature, potrebbe formarsi della
condensa. Se si trasporta il prodotto in inverno,
attendere circa 2 ore prima di utilizzarlo, in
modo che ritorni a temperatura ambiente.
• Le batterie utilizzate con il prodotto contengono
sostanze chimiche nocive all'ambiente. Non
smaltirle insieme ai comuni rifiuti domestici.
• Prima di avviare la riproduzione, controllare il
livello del volume per non spaventare con un
forte suono improvviso anziani, malati e donne
in gravidanza.
• Disporre i diffusori a una distanza adeguata
da entrambi i lati del sistema per garantire una
buona qualità del suono stereo.
• Orientare i diffusori verso la zona di ascolto.
• Non schizzare o sgocciolare liquidi
sull'apparecchio. Non posizionare oggetti
contenenti liquidi, come ad esempio dei vasi,
sull'apparecchio.
• Per spegnere completamente l'apparecchio,
scollegarlo dalla presa di rete. Di conseguenza,
la spina di alimentazione e la presa di rete
devono essere facilmente accessibili in qualsiasi
momento.
• Utilizzare esclusivamente un connettore e una
presa di rete con messa a terra.
- Una messa a terra scorretta può provocare
scosse elettriche o danni all'apparecchiatura
(solo apparecchi di classe l).
Conservazione e gestione dei
dischi
• Manipolazione dei dischi
- Impronte o graffi sul disco
possono ridurre la qualità
dell'audio e dell'immagine o far
"saltare" il disco.
- Evitare di toccare la superficie di un disco in
cui sono stati registrati dei dati.
- Tenere il disco per i bordi, senza toccare la
superficie con le dita.
- Non incollare carta o nastro adesivo sul disco.
• Pulizia dei dischi
- Se sul disco sono presenti
impronte o sporcizia, pulirlo con
un detergente delicato diluito in
acqua e asciugarlo con un panno
morbido.
- Pulire delicatamente il disco dall'interno verso
l'esterno.
• Conservazione dei dischi
`Non conservare alla luce diretta del sole.
`Conservare in un luogo fresco e ventilato.
`Conservare in una custodia protettiva pulita
e in posizione verticale.
01 Informazioni sulla sicurezza
3 Italiano
Page 94

Informazioni sulla sicurezza
Compatibilità di dischi e formati
Il prodotto non supporta i file multimediali protetti
da DRM.
Dischi CD-R
• Alcuni dischi CD-R potrebbero non essere
riproducibili, a seconda del dispositivo con cui
sono stati registrati (masterizzatori CD o PC) e
delle condizioni.
• Utilizzare CD-R da 650 MB/74 minuti.
Non utilizzare CD-R superiori a 700 MB/80
minuti perché potrebbero non essere riprodotti.
• Alcuni CD-RW (riscrivibili) potrebbero non essere
riprodotti.
• Solo i CD-R che sono stati "chiusi"
correttamente possono essere riprodotti
integralmente. Se la sessione è stata chiusa, ma
il disco è rimasto aperto, potrebbe non essere
possibile riprodurre il disco integralmente.
Dischi CD MP3
• Possono essere riprodotti solo i dischi CD-R
con file MP3 in formato ISO 9660 o Joliet.
• I nomi dei file MP3 non devono contenere spazi
vuoti o caratteri speciali (. / = +).
• Utilizzare dischi registrati con una compressione/
decompressione superiore a 128 Kbps.
• Possono essere riprodotti solo i dischi
multisessione a scrittura consecutiva. I dischi
multisessione che contengono spazi vuoti
possono essere riprodotti solo fino al segmento
vuoto.
• Se il disco non viene chiuso, l'avvio della
riproduzione richiederà un tempo maggiore
e potrebbero non venir riprodotti tutti i file
registrati.
• In caso di file codificati in formato VBR (Variable
Bit Rate), per esempio file codificati in velocità di
trasmissione sia basse sia alte (32 ~ 320 Kbps),
durante la riproduzione potrebbero verificarsi
interruzioni dell'audio.
• Possono essere riprodotti al massimo 999 file
per ogni CD.
Formati audio supportati
Estensione
*.mp3
*.wma
| NOTE |
✎Non supporta il codec WMA Professional.
✎La tabella in alto mostra le frequenze di
campionamento e le velocità di trasmissione
supportate. I file in formato non supportato
potrebbero non essere riprodotti correttamente.
file
Codec audio
MPEG 1 Layer3
MPEG 2 Layer3
MPEG 2.5 Layer3
Wave_Format_
MSAudio1
Wave_Format_
MSAudio2
Frequenza di
campionamento
16KHz ~
16KHz ~
16KHz ~
16KHz ~
16KHz ~
trasmissione
48KHz
48KHz
48KHz
48KHz
48KHz
Velocità di
80Kbps ~
320Kbps
80Kbps ~
320Kbps
80Kbps ~
320Kbps
56Kbps ~
128Kbps
56Kbps ~
128Kbps
4 Italiano
Page 95

Indice
Indice
INFORMAZIONI SULLA SICUREZZA
2 Avvertenza
3 Precauzioni
3 Conservazione e gestione dei dischi
4 Compatibilità di dischi e formati
4 Formati audio supportati
OPERAZIONI PRELIMINARI
7 Pannello anteriore
8 Pannello posteriore
9 Telecomando
10 Accessori
10 Collegamento dei diffusori
10 Precauzioni per lo spostamento dei
diffusori
11 Collegamento del nucleo toroidale in
ferrite al cavo di alimentazione
11 Girare il cavo di alimentazione intorno al
nucleo toroidale in ferrite
FUNZIONI
12 Funzione di visualizzazione
12 Modifica del modo di visualizzazione
12 Funzione musica demo
12 Riproduzione di un CD
12 Caricamento di un compact disc
12 Riproduzione di CD/MP3/CD-R
13 Selezione di una traccia
13 Ricerca di un particolare passaggio
musicale su un CD
13 Ripetizione di una o di tutte le tracce su un
CD
14 Riproduzione di dispositivi USB
14 Riproduzione di dispositivi USB
14 Per selezionare un file da un dispositivo
USB
15 Per utilizzare la ricerca ad alta velocità
15 Per eliminare un file
15 Per passare alla cartella precedente/
successiva
15 Per rimuovere un dispositivo USB in modo
sicuro
15 Informazioni da leggere prima di collegare
dispositivi di memorizzazione USB
16 Ricerca rapida di una traccia
16 Utilizzo della funzione di programmazione
16 Visualizzazione o modifica delle tracce
programmate
17 Bluetooth
17 Che cos'è il Bluetooth?
17 Per collegare il sistema a componenti Hi-Fi
a un dispositivo Bluetooth
18 Per scollegare il dispositivo Bluetooth dal
sistema a componenti Hi-Fi
18 Per scollegare il sistema a componenti Hi-
Fi dal dispositivo Bluetooth
18 Utilizzo della funzione di accensione
Bluetooth
19 TV SoundConnect
19 Per collegare il sistema a componenti
Hi-Fi a una TV Samsung con funzione
SoundConnect
19 Per scollegare la TV dal sistema a
componenti Hi-Fi
19 Per scollegare il sistema a componenti Hi-
Fi dalla TV
20 Utilizzo della funzione karaoke
20 Funzione di cambio automatico
20 Ascolto della radio
20 Per memorizzare le stazioni desiderate
21 Selezione di una stazione memorizzata
Indice
5 Italiano
Page 96

Indice
21 Funzione timer
21 Impostazione dell'orologio
21 Impostazione del timer
23 Annullamento del timer
23 Funzione di registrazione
23 Registrazione di base
24 Velocità di registrazione
25 Effetti sonori speciali
25 Selezione del modo EQ
25 Funzione MODO FOOTBALL
25 Funzione GOAL
26 Funzione GIGA SOUND
26 Funzione BEAT WAVING
26 Funzione DJ BEAT
27 Funzione +PANNING
27 Funzione NON-STOP MUSIC RELAY
27 Funzione DANCE TIME
27 Funzione TEMPO
27 Funzione Suono di avvio
APPENDICE
28 Risoluzione dei problemi
29 Specifiche
6 Italiano
Page 97

Operazioni preliminari
Pannello anteriore
1
k
j
i
Pannello di visualizzazione
1
Tasto di RICERCA/SALTO ALL'INDIETRO
2
Tasto di CD/Bluetooth
3
Vano del disco
4
Tasto di GIGA SOUND BEAT
5
Tasto di TUNER/AUX
6
Tasto di RICERCA/SALTO IN AVANTI
7
Tasto di PROGRAM
8
Tasto di espulsione del disco
9
MANOPOLA VOLUME/RICERCA
0
Tasto di EQ
!
Tasto di SEARCH
@
Tasto di ACCENSIONE
#
• Premere questo tasto per accendere o
spegnere il prodotto.
Tasto di ENTER
$
Tasto di USB
%
Tasto di USB REC
^
Tasto di DJ BEAT
&
3 64 8 @9 !052 7
*
(
)
a
b
c
d
e
f
g
h
i
j
k
02 Operazioni preliminari
#
$
%
^
&*()be cf adgh
Tasto di VOLUME / DJ
Tasto di +PANNING
Tasto di NON-STOP MUSIC RELAY
Connettore USB 2 per riproduzione e
registrazione USB
Tasto di RIPRODUZIONE/PAUSA
AUX IN 1
Collegamento di un dispositivo esterno,
come ad esempio un lettore MP3.
• Collegare l'ingresso AUX 1 sul pannello
anteriore del prodotto all'uscita audio del
dispositivo esterno/lettore MP3.
• Premere il tasto TUNER/AUX per
selezionare AUX 1.
Connettore MIC
Tasto di ARRESTO
Connettore USB 1 solo per riproduzione
SENSORE TELECOMANDO
Tasto di FOOTBALL MODE
Tasto di BEAT WAVING
Tasto di DISPLAY / DEMO
Tasto di TV SOUNDCONNECT
7 Italiano
Page 98

Operazioni preliminari
Pannello posteriore
2 4 5 6 73
1
Ventola di raffreddamento
• La ventola gira quando l'unità è accesa.
Se si imposta l'unità sul volume minimo,
1
la ventola non gira.
Durante l'installazione del prodotto,
verificare che su tutti i lati della ventola ci
siano almeno 15 cm di spazio libero.
POWER
2
• Inserire esclusivamente il cavo di
alimentazione fornito.
Terminali dei diffusori 2.2 CH
1. Per ottenere la qualità del suono
corretta, quando si collegano i diffusori,
assicurarsi che i colori dei connettori
corrispondano a quelli delle relative
prese. Vedere di seguito.
3
• Canale SINISTRO (contrassegnato da
una
, bianco/porpora).
• Canale DESTRO (contrassegnato da
una
, rosso/porpora).
• Non tentare di inserire con forza il
connettore porpora del SUBWOOFER
nella presa bianca o rossa dei diffusori.
Terminali a LED per la funzione Beat
Waving dei diffusori; non fanno
4
distinzione tra canale sinistro e destro.
ONLY FOR SERVICE
5
• Questo jack è riservato all'assistenza.
Non utilizzarlo.
Terminali AUX IN 2
1. Utilizzare un cavo audio (non fornito)
per collegare l'ingresso AUX 2 sul
prodotto all'uscita audio su un
dispositivo di uscita analogico esterno.
• Fare attenzione alla corrispondenza dei
diversi colori.
• Se il dispositivo di uscita analogico
6
esterno ha un solo connettore di uscita
audio, collegarlo a sinistra o a destra.
• Premere il tasto TUNER/AUX per
selezionare AUX 2.
• In modo AUX, se non si preme alcun
tasto sul pannello anteriore o sul
telecomando per oltre 8 ore, il sistema si
spegne.
Terminali dell'antenna FM
1. Collegare l'antenna FM al relativo
terminale di collegamento.
2.
Muovere lentamente il filo dell'antenna
finché non si trova una posizione con una
buona ricezione, quindi fissarlo a un muro
o a un'altra superficie rigida.
7
3.
Se la ricezione è scarsa, può essere
necessario installare un'antenna
esterna. A questo scopo collegare
un'antenna FM esterna al relativo
connettore sul retro del sistema
utilizzando un cavo coassiale da 75Ω
(non fornito in dotazione).
8 Italiano
Page 99

Telecomando
Accensione
Bluetooth
CD
USB
TUNING MODE
TUNER/AUX
NON-STOP MUSIC RELAY
TEMPO
SALTO
RIPRODUZIONE/PAUSA
ARRESTO
FOOTBALL
EQ
VOL (–, +)
PROGRAM
TIMER SET
TIMER ON/OFF
DISPLAY
MY KARAOKE
MUTO (disattiva temporaneamente l'audio;
premerlo di nuovo per riattivare l'audio)
BEAT WAVING
TV SoundConnect
USB REC
REC SPEED
MO/ST
+PANNING
DJ BEAT
EFFECT LEVEL
RICERCA
REPEAT
GIGA SOUND BEAT
GOAL
DANCE TIME
TUNING/ALBUM ,,
DELETE
SLEEP (imposta un'ora di disattivazione per
spegnere il prodotto)
AUTO CHANGE
MIC VOL –, +
.
02 Operazioni preliminari
Inserimento delle batterie nel telecomando
• Inserire le batterie nel telecomando in modo che
le polarità corrispondano al disegno nel vano
batterie : (+) con (+) e (–) con (–).
• Non gettare le batterie nel fuoco.
• Non cortocircuitare, smontare o surriscaldare le
batterie.
• La sostituzione con un tipo di batterie non
corretto può provocare un'esplosione. Sostituire
solo con batterie dello stesso tipo o di tipo
equivalente.
• Il telecomando ha una portata di circa 7 metri in
linea d'aria dal sistema.
9 Italiano
Page 100

Operazioni preliminari
Accessori
Controllare di seguito gli accessori forniti.
Manuale utente Telecomando/batterie
Antenna FM Cavo di alimentazione Nucleo toroidale in ferrite
• Le figure e le illustrazioni di questo manuale utente sono fornite soltanto come riferimento. Possono
differire rispetto all'aspetto effettivo del prodotto.
Collegamento dei diffusori
Configurazione consigliata per i diffusori.
| IMPORTANTE |
✎Se l'apparecchio è soggetto a vibrazioni o urti
esterni o se i diffusori non sono installati come
consigliato, il prodotto potrebbe non funzionare
correttamente.
✎Non tirare i fili dei diffusori o posizionare oggetti
pesanti su di essi.
Precauzioni per lo spostamento
dei diffusori
• Quando si spostano l'unità principale e i
diffusori, assicurarsi di scollegare prima tutti i
cavi dei diffusori.
• Quando si scollegano i cavi dell'illuminazione
dei diffusori, premere il blocco per rilasciare il
connettore, come mostrato di seguito.
10 Italiano
 Loading...