

Page 1

Troubleshooting
4-1
4. Troubleshooting
4-1 DCU Control
In case of ML-6060,you can not use the DCU under ‘Diagnostic mode’
But, you can check set condition by status code
4-1-1 DCU Setup
1) Connect DCU to Controller Board Connector CN9 (4 pins)).
4-1-2 DCU Error Status Code
DCU error code will indicate malfunction area of the machine.
Display Error status
60 OPEN FUSER ERROR
62 LOW HEAT ERROR
68 OVER HEAT ERROR
64 COVER OPEN ERROR
70 NO PAPER or NO CASSETTE
71 PAPER JAM 0
72 PAPER JAM 1
73 PAPER JAM 2
95 LSU NOT READY
Page 2
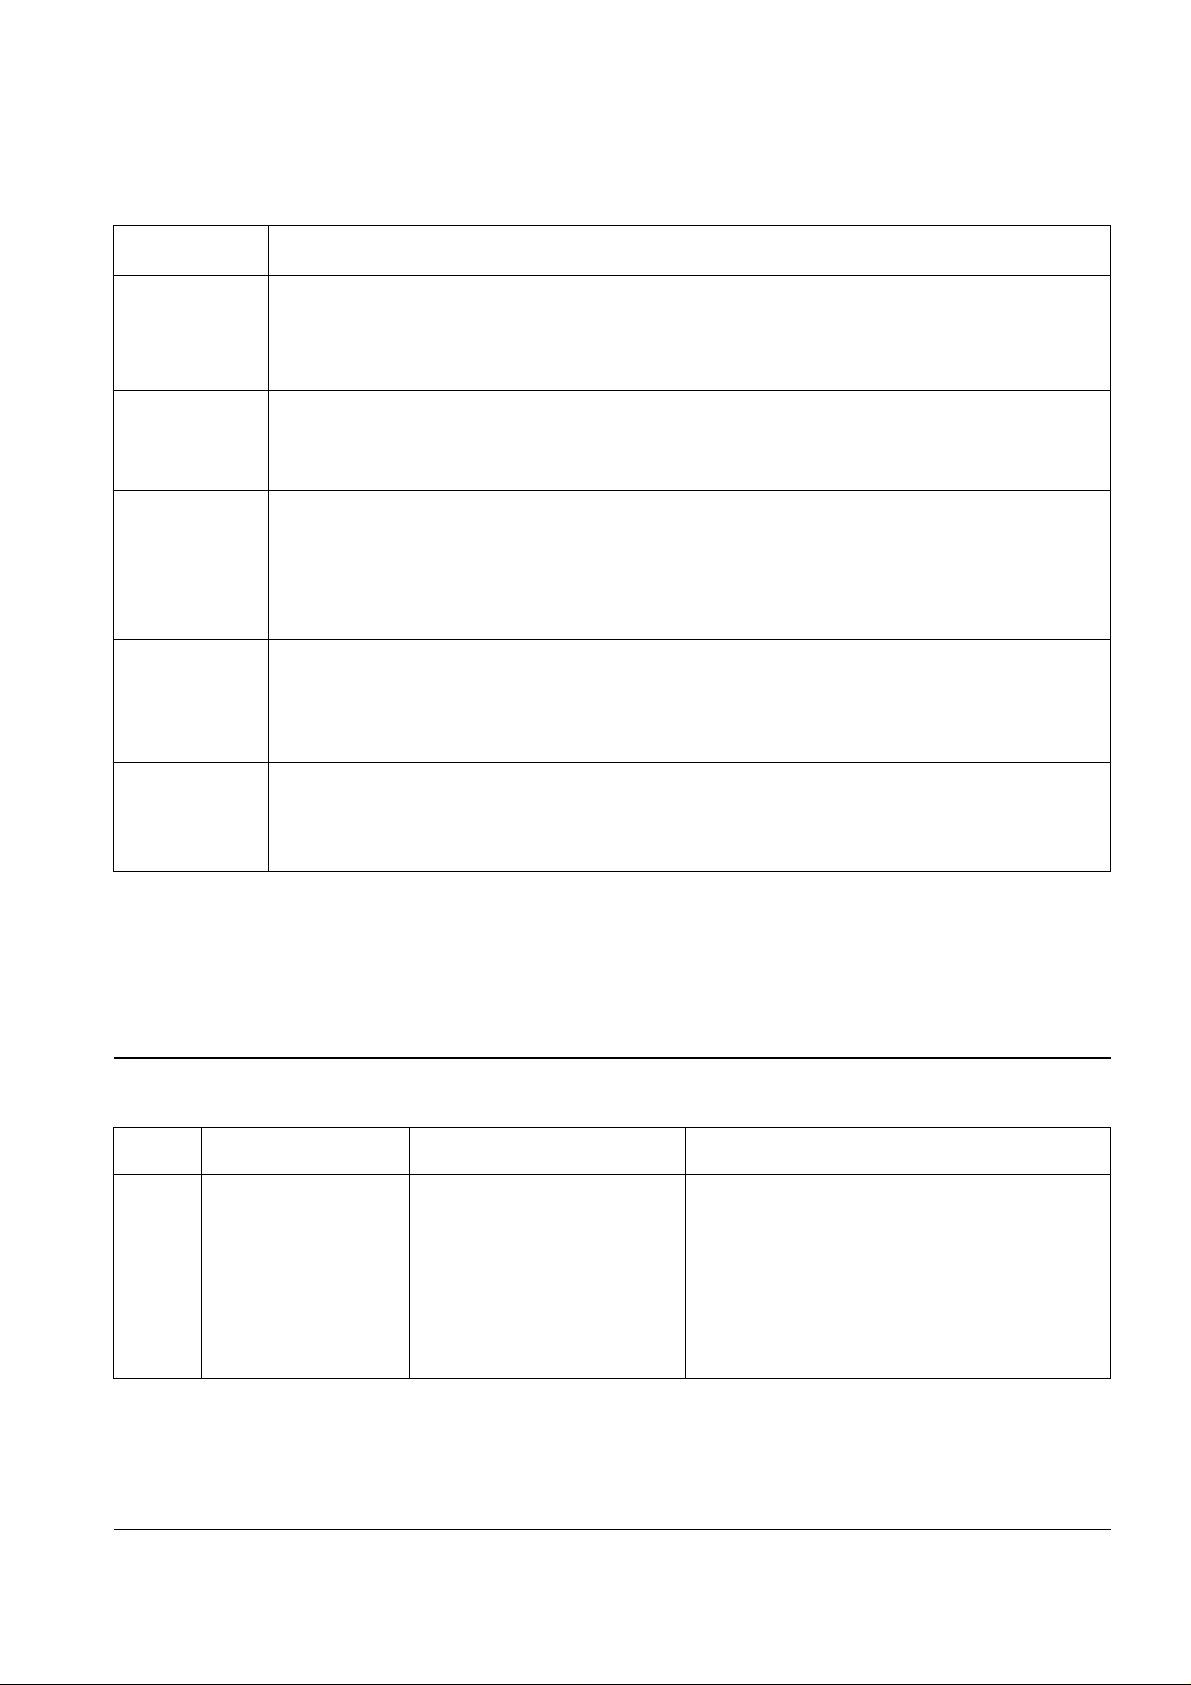
4-1-3 Error Solution
Display Solution
60, 62, 68 1. Measure the resistance of the AC connector on the Fuser. Normal resistance is 2-4 ohms
for 110V, 6-8 ohms for 220V.
2. Check if the fuser lamp works properly.
3. Measure the resistance at Q7 on the engine board. If abnormal, replace U503,CN502,
70 1. Make sure that paper is loaded in the cassette.
2. Replace U555 sensor (photo interrupter).
3. Replace U7 on controller board.
71 1. Make sure that paper is loaded in the cassette.
2. Check for pick-up unit. If it is heavily worn, replace it with new one.
3. Replace U554 sensor.
4. Check if the feed clutch works properly.
5. If abnormal, replace the feed clutch or Q3 on the Engine board .
72, 73 1. Make sure that the paper being used meets the specification.
2. Check if there is a paper jam in the fuser.
3. Replace U554 on the engine board or exits ensor on the frame.
4. Check the fuser roller for any dirt. If dirty, clean the roller.
95 1. Check for CN11,CN6 on the Controller board.
2. Replace U5,OSC1 on the Engine board.
3. Replace LSU.
Troubleshooting
4-2
4-2 Abnormal Image Printing and Defective Roller
If abnormal image prints periodically, check the parts shown below.
No Roller Abnormal image period Kind of abnormal image
1 OPC Drum 95.6mm White spot/Black spot
2 Charge Roller 38.5mm Black spot
3 Supply Roller 45.3mm Horizontal density band
4 Develop Roller 47.1mm Horizontal density band
5 Transfer Roller 56.1mm Black side contamination/transfer fault
6 Heat Roller 69.3mm Black spot and fuser ghost
7 Pressure Roller 72.5mm Black side contamination
Page 3
Troubleshooting
4-3
Repair or replace the GND
terminal.
Check the path between
video controller, engine board
and HVPS. Repair or replace
the defective component
or board.
The mirror in LSU might be misplaced so the light
path to the OPC deviates ->Repair or replace LSU
or remove any defective matters in the machine.
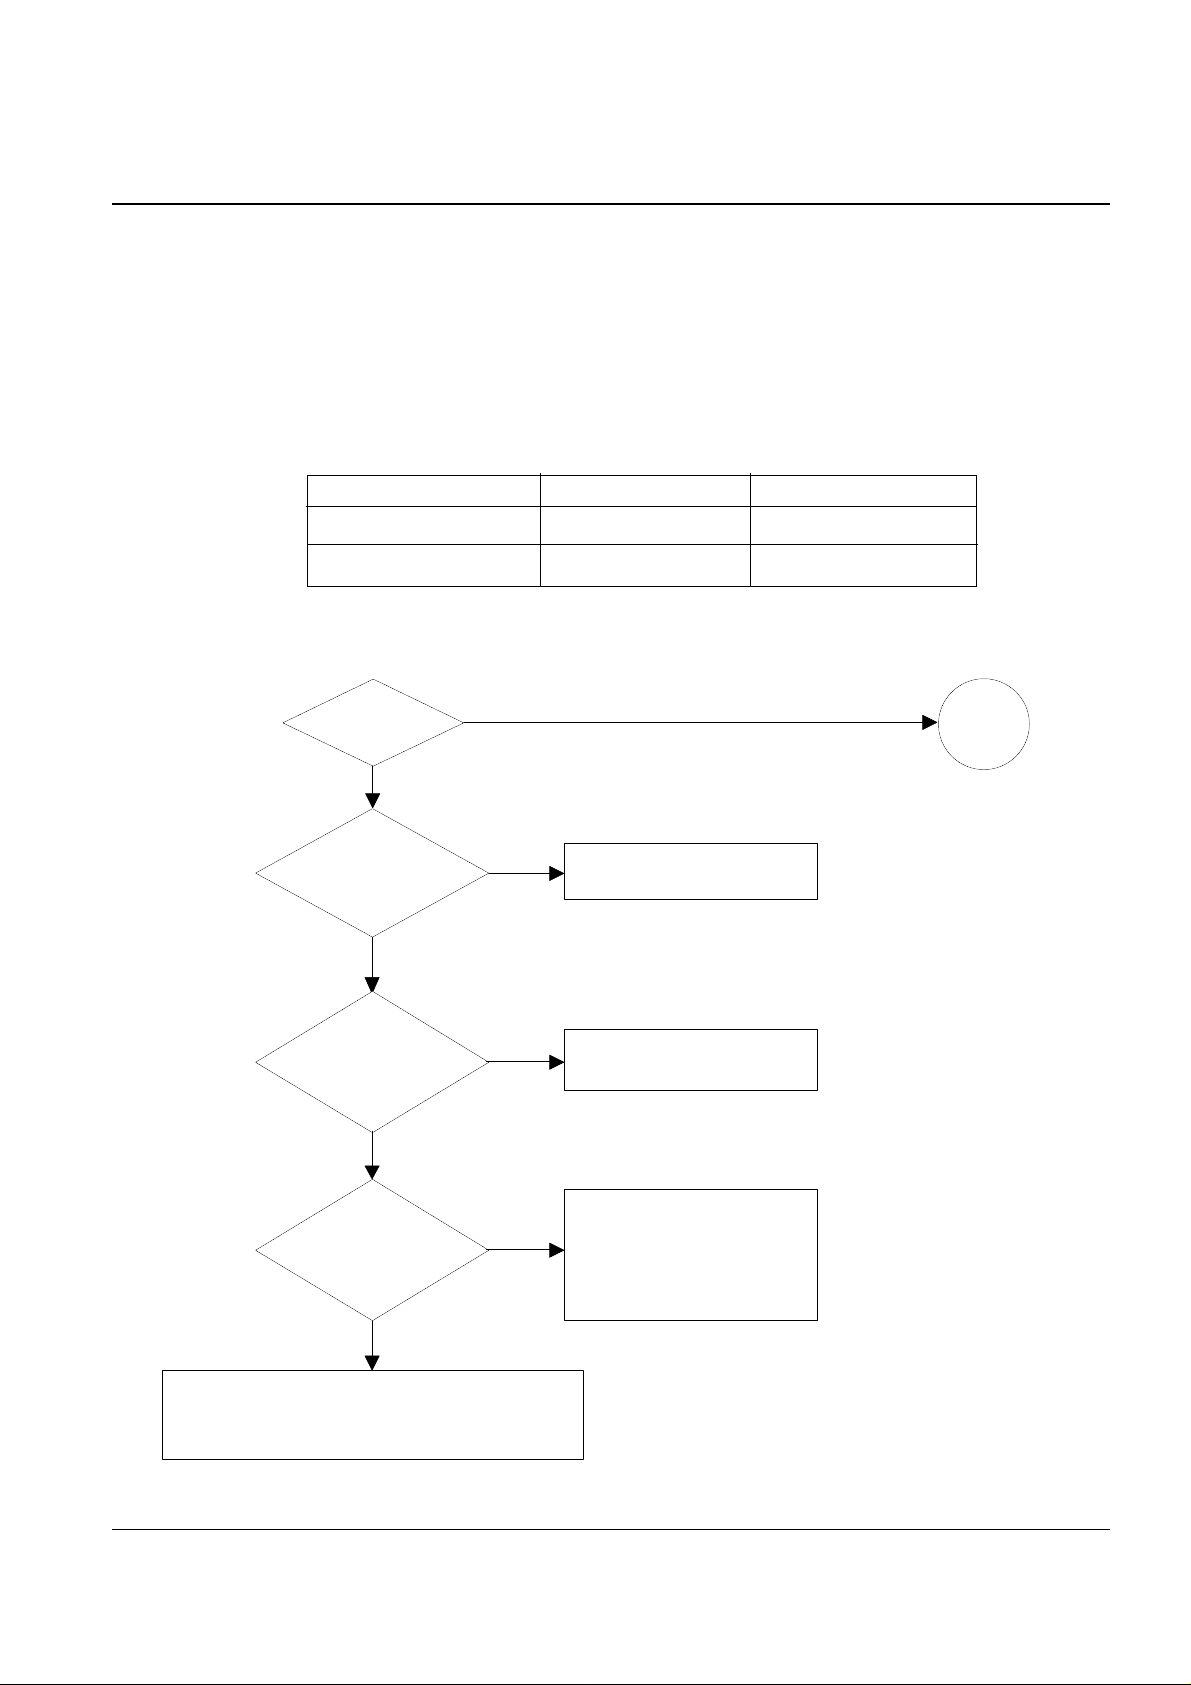
No image?
Is the OPC
terminal of machine
well-connected
to Frame?
Does the
video data line to
LSU transit to High/Low
when printing?
A on
next page
NO
NO
NO
Repair or replace he
GND terminal
Is the
OPCshaft of CRU
well-connected to
GND terminal
NO
YES
YES
YES
YES
4-3 Print Quality
4-3-1 No Image
Notice
In the ML-6060 Series system, the Developing/Supplying bias is set to decrease by -50V increments when
the system load is over the specified value. Therefore, if you check the bias without the toner cartridge, the
system load is recognized to be infinity and Developing/Supplying bias decreases by -50V increments.
At the first warm-up after the printer is powered on and then off, the software does not have the data on
system load, so the Developing/Supplying bias measures -500V/-650V, the basic voltage.
And, from the second warm-up and on, the software has the data on system load, so the bias measures
-450V/-600V, which is less -50V than the basic voltage.
Without cartridge First Warm-up Second Warm-up
Developing Bias -500V -450V
Supplying Bias -650V -600v
Page 4
Troubleshooting
4-4
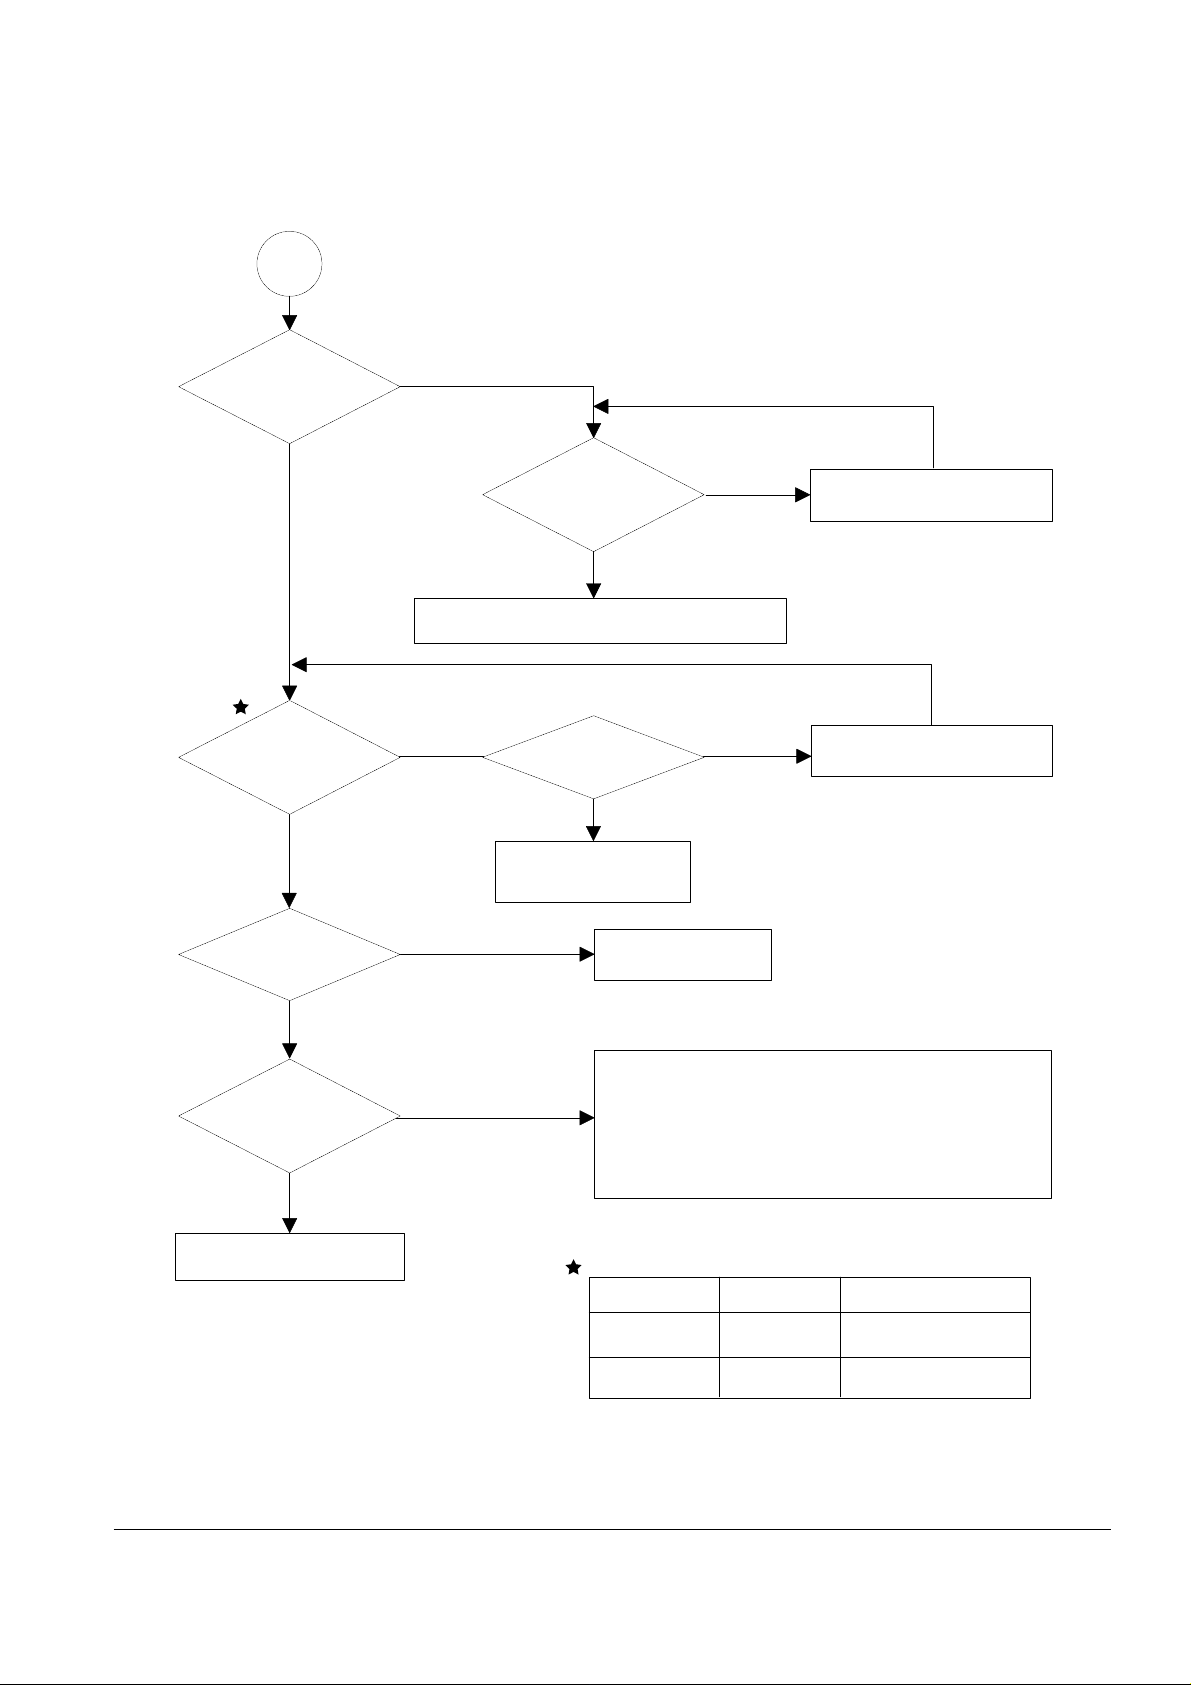
Transfer roller might be out of its location.
-> Locate the roller into its place.
This could occurrs when the power of LSU is low or
the density is low due to the obstacles on the window
-> Replace LSU or clean the window.
A
Transfer
voltage OK? (on the
transfer roller
shaft)
Are the
connection terminal
and connection
correct?
Repair or replace terminal.
Sealing tape
is removed from the
cartridge?
Replace HVPS or repair defective component.
Is the connection
terminal OK?
Replace HVPS or repair
defective component.
Repair or replace terminal.
Remove the tape.
Developing
and supplying
voltage
are OK?
Does the
counter indicate over
the toner's guarranty
life?
Replace the toner cartridge.
NO
NO
NO
NO
NO
NO
YES
YES
YES
YES
YES
YES
(
(
Normal
Without Cartridge
Developing -500V -450V
Supplying -650 -600V
(
(
Page 5
Troubleshooting
4-5
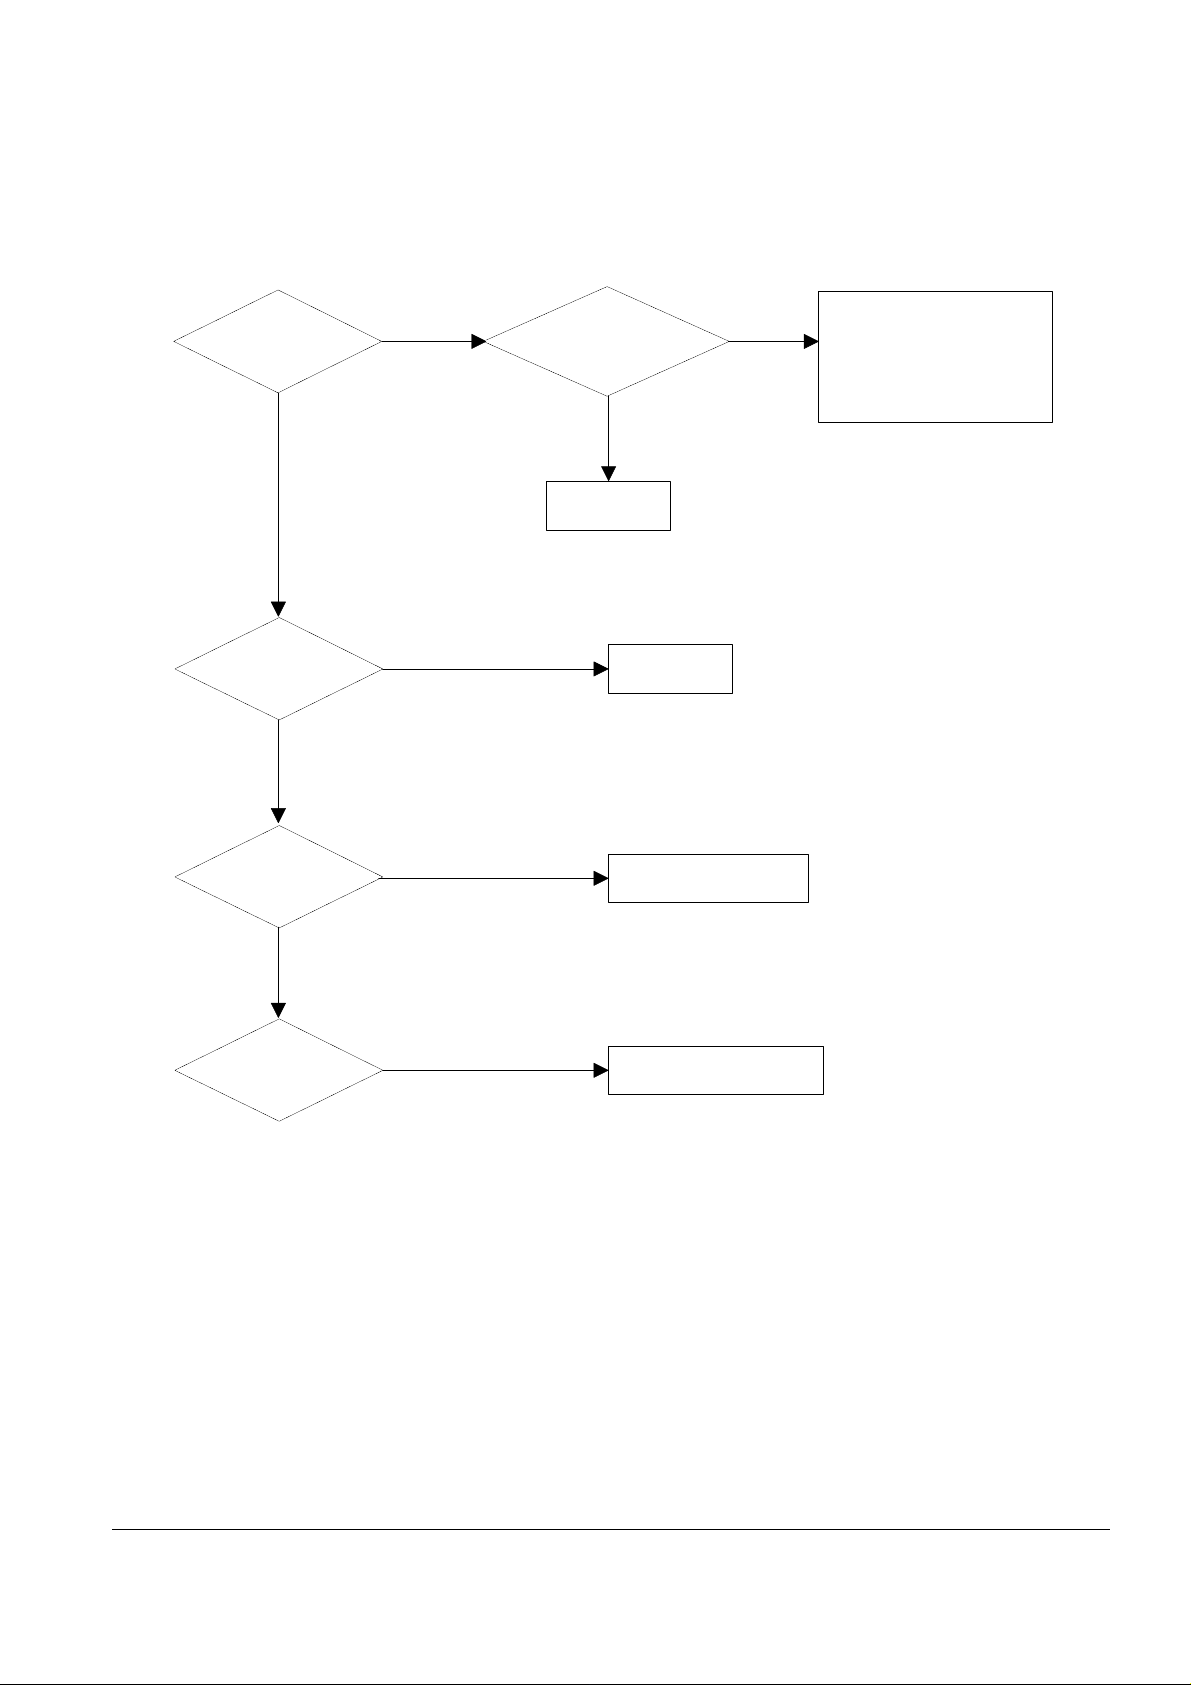
All black in
printing area?
Is the
Hsync/ signal received
in LSU?
Is Main high
Voltage supplied
from HVPS?
Does the
video data line to LSU
transit to High/Low when
printing?
Replace LSU.
Check the path among video
controller, engine board,
HVPS, LSU for the shortage
or open. -> Repair or replace
the boards.
Replace LSU.
NO
NO
Is C/R
well connected to
Main high voltage
terminal?
NO
Repair orReplace HVPS.
Repair orReplace terminal.
NO
NO
YES
YES
YES
YES
4-3-2 All Black
Page 6
Troubleshooting
4-6
White line
missing definitely?
Dirt of dust stuck onto the
window of internal lens of LSU
-> Clean it or replace LSU.
Preventive obstacles through
the path between OPC of
developer and LSU prevent the
path -> Remove the obstacles.
Dirt of dust stuck onto the
external glass of LSU
-> Remove the obstacles.
Check if the
printout is still has the
same problem even right after
passed through the
transfer roller.
Toner material might be stuck to
blade in the developer inside and it
prevents toner supply -> Replace
the developer.
Check both if the toner cartridge's
counter is over its guaranty and
amount of the toner material.
-> Replace the toner cartridge.
The ribs in fuser or toner on the
roller may invoke the image
problem. -> Replace the fuser
cover or the defective part.
The image is originally black or the
black part is far close to the top.
-> Use the pattern which has the
image below bigger than 10mm
from the top.
NO
NO
YES
YES
4-3-3 Vertical White Line (Band)
Page 7

Troubleshooting
4-7
'Dark' selected
via RCP?
Change to
'Normal' and test.
Works
correctly with
-500V of developing
Bias voltage?
Works
correctly after
replaced LSU?
Repair or replace the defective
component.
The power of LSU is set
high or internal problem.
-> Replace LSU or adjust
volume.
Same at 'Normal'?
END
NO
NO
NO
Toner over supply due to the
adjustment fault of metering
blade in developer.
-> Replace developer.
NO
YES
YES
YES
YES
(
(
Normal
Without Cartridge
Developing -500V -450V
Supplying -650 -600V
(
(
4-3-4 Dark Image
Page 8

Troubleshooting
4-8
Recommended
paper used?
Transfer,
charge and developing
voltage are OK?
Operating/
storage atmosphere is
too high temperature
/humidity?
Solve the problem under
the recommended condition
(10-32 degree Centigrade).
Dirt or
dust around the
charge roller?
Clean the charge roller
or replace step-up device
/terminal after check.
Work OK?
Internal blade or
suppying part of the
developer is defective.
-> Replace the toner
cartridge.
Check terminals or contacts and 'Guide-Deve Spring'
are misplaced.
-> Repair or replace transfer roller etc.
Check if the LED of PTL in front of the transfer roller
is on when it presses the top cover switch on purpose.
-> If not, replace PTL.
Print 20 to 30 pages using
the recommended paper.
Same problem
occurs?
- Adjust voltage or
replace HVPS.
- Repair or replace
after checking the
terminals' contacts.
END
Replace the
toner cartridge.
NO
NO
NO NO
NO
NO
YES
YES
YES
YES
YES
YES
4-3-5 Background
Page 9

Troubleshooting
4-9
YES
Is it regular
interval of 95.6mm?
PTL lamp
works OK?
Transfer
voltage is set to
standard?
Is it regular
interval of 47.1mm?
Is it regular
interval of 56.1mm?
(as transfer roller
interval)
Developing
/suppying voltage
normal? (-500V/
-650V)
Check HVPS
contacts and
HVPS's selfoutput.
-> If failed,
repair/replace
HVPS.
Replace PTL
assembly.
Irregularity of NIP
between rollers in
developer.
-> Replace developer.
- Repair or replace HVPS .
- Check and repair or
replace the terminal
contacts.
A specific part of the transfer
roller has ruined or its
resistance value is changed.
-> Replace transfer roller.
Transfer roller cannot force
regularly due to the gears
eccentricity of transfer roller.
-> Replace the defective
component.
Transfer roller is well
-connected to or not.
-> Replace the defective
component.
Bias voltage
is OK? (-500V)
Operating/storage
temperature is too low or
not recommended
paper used?
Adjust the Bias
voltage or replace
HVPS.
There may be a problem in toner
layer control in toner cartridge.
-> Replace the developer.
Use the machine with
recommended paper and
at normal condition.
NO
NO
NO
NO
NO
NO
NO
YES
YES
YES
YES
YES
YES
YES
Normal
Without Cartridge
Developing -500V -450V
Supplying -650 -600V
(
(
(
(
(
(
4-3-6 Ghost
Page 10

Troubleshooting
4-10
Is it regular
interval of 38.5mm?
Printing cleaning mode
-> If the same problem
persists replace developer
and C/R.
When taking
out the cartridge,
toner leaks?
Toner leaks and toner
material dropped onto
the paper. -> Replace the
developer.
Bad image
removes by
scratching?
Check toner is stuck onto
the P/R or H/R in fuser.
-> Clean it or replace.
The problem
randomly occured
due to the toner
fallen. -> Clean the
machine.
NO NO NO
YES
Is it regular
interval of 96mm?
OPC was damaged
-> Replace developer
and C/R.
NO
YES
YES
YES
4-3-7 Black Dot
NO
Black band?
The black
band has regular
interval?
Black band
is far about 10mm from
white band?
Problem of internal
contacts in OPC.
-> Replace developer.
The OPC is damaged under the
direct sunlight for around 5
minutes. -> If the same problem
persists in 10 hours, replace
the developer.
This occurs when no
Hsync/ at LSU.
-> Replace LSU.
95.6mm interval?
Heat roller is ruined.
-> Replace the roller.
The OPC is damaged due to
the irregular transfer voltage
of HVPS.
-> Repair OPC or the developer
-> If the same problem perststs
repair/replace HVPS
Does it appear
at every 69.3mm at
specific place?
Problems of terminal contact,
transfer voltage supplying,
and transfer roller's due to the
charge roller is ruined (38.5mm).
-> Repair/replace HVPS,
developer.
NO
NO NO
NO
YES
YES
YES
YES
4-3-8 Horizontal Band
Page 11

Troubleshooting
4-11
OK after
taking out and
rocking the toner
cartridge?
Check if printer mode is
econo mode
-> select normal mode.
It is over the guaranty
life of toner cartridge.
(Check the counter
and replace it.)
When gray
pattern printing,
irregular density
persists?
PTL lamp
works OK?
Any obstacles
on the PTL lamp?
Transfer/
charge/developing
voltage drops while
printing?
Defective agitator in
the toner supplying part
of developer.
->Replace the developer.
Check if the 'guide deve
spring' works OK and
repair/repalce.
Check high voltage
output and repair/
replace terminals/HVPS.
Replace lamp.
Clean the window of PTL.
Bad images
aroung the no image
area?
Irregualrity of toner
suppy from developer.
-> Replace developer.
Light distortion due to
the mirror ruined or
LSU's diffused reflection.
-> Replace LSU.
NO
NO NO
NO
NO
NO
YES
YES
YES
YES
YES
YES
4-3-9 Irregular Density
Page 12

Troubleshooting
4-12
Is it regular
interval of 95.6mm?
Obstacles stuck on OPC's
surface
-> Clean the OPC and
machine or replace
developer.
When putting in/out the
developer, scratch is made.
-> Replace the developer.
Is it regular
interval of 47.1mm?
D/R in developing unit has
the defect.
-> Replace the developer.
NO
YES
YES
4-3-10 White Spot
Recommended
OHP film used?
Operating
atmosphere is too
high temperature/
humidity
Solve the problem under the
recommended condition
(10~32 degree centigrade)
Replace HVPS or repair
defective component
Use the recommended film.
Transfer
voltage OK?
(on the teansfer roller
shaft)
Repair or replace the HVPS
NO
NO NO
YES
Are the connection
terminal and
connection correct?
Repair or replace terminal
NO
YES
'Transparency'
selected via RCP?
Select 'Transparency' mode.
NO
YES
YES
YES
4-3-11 Trembling at the End When OHP Printing
Page 13

Troubleshooting
4-13
After printing
completed, any error
related fuser?
Both ends
of thermostat
open?
Replace thermostat
and re-test.
Replace the contol
component on engine
board.
Check any contact
problem in thermistor
and repair.
The machine
placed under the
severe low tempera-
ture for a long
time?
Place the machine
at normal
temperature and
re-test.
While printing,
the voltage of pin 60
of U17(CPU) on controller
board is 1.5V
~2.0V?
Thermistor's
contact is OK?
Open the top
cover. When black
printing, is the fuser NIP
width is 3.0-
3.5mm?
The paper used is too
thick or contains too
much cotton in it.
-> Re-test with the
recommended paper.
Check if the hardness of
P/R, and spring force is OK?
(hardness: 24 degree,
spring's force: 3 Kg)
Re-assemble
thermistor.
NO
NO
NO
NO
NO
NO
YES
YES
YES
YES
YES
YES
4-3-12 Poor Fusing Grade
Page 14

Troubleshooting
4-14
'ENVELOPE'
selected via
RCP
Transfer voltage
is OK?
Are the
connection terminal and
connection correct?
Select 'ENVELOPE'mode
via RCP
Replace or repair HVPS.
NO
NO
Repair orReplace HVPS.
Replace HVPS or repair defective component.
NO
YES
YES
YES
4-3-13 Poor transfer and poor fusing when ENVELOPE printing
Page 15

Troubleshooting
4-15
4-4 Malfunction
Plug in the
power cord?
The power
voltage supplying is
the same as
rating?
The fan
revolves when
powered on?
LEDs blink
once when
powered on?
The On-Line
key is being pressed
or shortage on
the panel
board?
Repair/replace the
board.
Check the voltage first and plug
the power cord.
Supply the power as the rating.
Connections
on board are OK?
Re-connect firmly
and re-test.
The connection
error between
controller board
and panel board
or malfunction
of boards.
-> Replace the
boards.
Fuse of SMPS
is open?
Shortage
between 5V and
GND, or between
24V and
GND?
Replace the fuse.
Toner cartridge
is in the set?
Detect failure due to the
board which detects top
cover open or switch error.
-> Replace the board or switch.
Put in the
cartridge.
Remove the shortage
or replace the board.
NO
NO
NO
NO
NO
NO
NO NO
NO
YES
YES
YES
YES
YES
YES
YES
YES
YES
4-4-1 No Power (LED Off)
Page 16

Troubleshooting
4-16
Less than 10ohm?
AC is being supplied?
The voltage
of pin #60 of U17
(CPU) on the controller
is about 2.0V when
printing?
END
Thermostat is open due to the heat etc.
-> Replace the thermostat.
Check the fusing control
part and CN501on the
engine board.
-> Replace the component
or replace the engine
board.
Measure the resistance
at the both ends of AC
line with covers open.
Remove the covers.
Re-assemble the top
cover and close it.
Thermistor, connecting point or engine
board defected. -> Repair/replace the
component/board.
NO
NO
NO
YES
YES
YES
4-4-2 Fuser Error
Page 17

Troubleshooting
4-17
Sounds the
solenoid on when starts
print?
Does the
paper move?
Does the
paper move more than
100mm?
The engine board and joint
board defected.
-> Replace boards.
The solenoid defected.
-> Replace it.
The pick-up unit is
assembled wrong.
-> Re-assemble or replace
the unit.
Feeder
sensor and paper
width detect sensor
are assembled
reverse?
Switch them.
The sensor and
joint boards defected.
-> Repair/replace.
Too many
papers in the
feeder?
Paper guides
fit the paper width?
Paper end curled?
Does the
extender pulled out?
<Recommendation>
Use the MPF for the thick
paper such as envelope
and cardstock.
Reduce the amount
and re-test.
Take out the paper
and re-insert.
Use the recommended
and quality paper.
Pull out the
extender.
NO
NO
NO
NO
NO
NO
NO
YES
YES
YES
YES
YES
YES
YES YES
4-4-3 Paper Jam (Mis-feeding)
Page 18

Troubleshooting
4-18
Paper
stopped before
the OPC?
Check the LSU and
if it has the defect.
->Replace it.
Paper
stopped before
the fuser?
Severe skew
when feeding?
Adjust the paper guides to fit the
paper width.
The force of springs pressing the
developer is weak.
-> Check guide-DEVE.
The paper
came out through
between fuser and
developer?
Too thin
or sensitive paper to
static electricity?
Use the recommended
paper.
Check guide transfer
is grounded. Check
the shutter prevents
feeding.
Check the input path
to the fuser (such as
mis-assembly).
The
actuator of
paper exit sensor
works OK?
Check the actuator exists and its
operation and around the engine board.
-> Replace.
Is the paper
rolled around the
presseure
roller?
Remove the fuser, remove
the paper and replace the
pressure roller, if necessary.
Feeds
multiple pages?
Reduce the amount
and retest.
Check the roller
and ribs of fuser
are in place, and
remove burrs, if
any.
-> Remove the
factors of jam.
NO NO NO
NO
NO
NO
NO
NO
YES
YES
YES
YES
YES
YES
YES
YES
4-4-4 Paper Jam (Jam 1)
 Loading...