

Page 1
Page 2

This manual is provided for information purposes only. All information included herein is
subject to change without notice. Samsung Electronics is not responsible for any damages, direct
or indirect, arising from or related to use of this manual.
© 2000 Samsung Electronics Co., Ltd. All rights reserved.
• ML-6040 and Samsung logo are trademarks of Samsung Electronics Co., Ltd.
• Centronics is a trademark of Centronics Data Computer Corporation.
• IBM and IBM PC are trademarks of International Business Machines Corporation.
• Microsoft, Windows, Windows 9x, Windows 2000, Windows NT and MS-DOS are registered
trademarks of Microsoft Corporation.
• Adobe and Adobe Acrobat Reader are trademarks of Adobe Systems.
• All other brand or product names are trademarks of their respective companies or
organizations.
Page 3
Contents
Introduction
1
Special Features
Printer Components
Setting Up Your Printer
2
: Unpack Your Printer –––––––––––––––––––––––––––––––––––––– 2.1
STEP 1
: Install the Toner Cartridge ––––––––––––––––––––––––––––––– 2.2
STEP 2
: Load Paper ––––––––––––––––––––––––––––––––––––––––––––– 2.4
STEP 3
: Connect to the Computer with a Parallel Cable ––––––––––––– 2.7
STEP 4
: Turn on the Printer –––––––––––––––––––––––––––––––––––––– 2.7
STEP 5
: Print a Demo Page! –––––––––––––––––––––––––––––––––––––– 2.8
STEP 6
: Install the Printer Software ––––––––––––––––––––––––––––––– 2.9
STEP 7
Installing Software from Diskette –––––––––––––––––––––––––––––– 2.15
Using the Control Panel
3
Control Panel Buttons ––––––––––––––––––––––––––––––––––––––––– 3.1
Control Panel Lights ––––––––––––––––––––––––––––––––––––––––––– 3.3
–––––––––––––––––––––––––––––––––––––––––––––
––––––––––––––––––––––––––––––––––––––––––
1.1
1.3
Print Media
4
Choosing Paper and Other Media ––––––––––––––––––––––––––––––– 4.1
Selecting the Output Tray –––––––––––––––––––––––––––––––––––––– 4.4
Loading Paper –––––––––––––––––––––––––––––––––––––––––––––––– 4.6
Printing on Envelopes –––––––––––––––––––––––––––––––––––––––––– 4.9
Printing on Heavy Paper –––––––––––––––––––––––––––––––––––––– 4.11
Printing on Labels –––––––––––––––––––––––––––––––––––––––––––– 4.12
Printing on Transparencies –––––––––––––––––––––––––––––––––––– 4.13
Printing on Preprinted Paper ––––––––––––––––––––––––––––––––––– 4.14
Printing on Card Stock or Custom-sized Media –––––––––––––––––– 4.15
I
Page 4
Printing Tasks
5
Printing a Document ––––––––––––––––––––––––––––––––––––––––– 5.1
Using Toner Save Mode –––––––––––––––––––––––––––––––––––––– 5.6
Printing on Both Sides of the Paper (Manual Duplexing) ––––––––– 5.7
Printing Multiple Pages on One Sheet of Paper (N-Up Printing) –– 5.10
Scaling Your Document ––––––––––––––––––––––––––––––––––––– 5.11
Fitting Your Document To a Selected Paper Size ––––––––––––––– 5.12
Printing Booklets ––––––––––––––––––––––––––––––––––––––––––– 5.13
Printing Posters –––––––––––––––––––––––––––––––––––––––––––– 5.16
Setting Graphic Properties –––––––––––––––––––––––––––––––––– 5.18
Printing Watermarks –––––––––––––––––––––––––––––––––––––––– 5.21
Using Page Overlay ––––––––––––––––––––––––––––––––––––––––– 5.24
Printing on a Network Environment –––––––––––––––––––––––––– 5.28
Reprinting the Last Page –––––––––––––––––––––––––––––––––––– 5.30
Maintaining Your Printer
6
Maintaining Toner Cartridge –––––––––––––––––––––––––––––––––– 6.1
Cleaning the Printer ––––––––––––––––––––––––––––––––––––––––– 6.4
Problem Solving
7
Troubleshooting Checklist –––––––––––––––––––––––––––––––––––– 7.1
Solving General Printing Problems –––––––––––––––––––––––––––– 7.2
Clearing Paper Jams ––––––––––––––––––––––––––––––––––––––––– 7.6
Solving Print Quality Problems ––––––––––––––––––––––––––––––– 7.14
Troubleshooting Error Messages –––––––––––––––––––––––––––––– 7.19
Common Windows Problems ––––––––––––––––––––––––––––––––– 7.21
Appendix
Printer Specifications ––––––––––––––––––––––––––––––––––––––––– A.1
Paper Specifications –––––––––––––––––––––––––––––––––––––––––– A.2
Using Your Printer with a USB Cable ––––––––––––––––––––––––– A.10
Using Your Printer with Macintosh –––––––––––––––––––––––––––– A.16
Linux Driver Installation ––––––––––––––––––––––––––––––––––––– A.23
INDEX
II
Page 5
Environmental and Safety Consideration
Laser Safety Statement
The printer is certified in the U.S. to conform to the requirements of DHHS 21 CFR, chapter 1
Subchapter J for Class I(1) laser products, and elsewhere, is certified as a Class I laser
product conforming to the requirements of IEC 825.
Class I laser products are not considered to be hazardous. The laser system and printer are
designed so there is never any human access to laser radiation above a Class I level during
normal operation, user maintenance, or prescribed service condition.
WARNING
Never operate or service the printer with the protective cover removed from Laser/Scanner
assembly. The reflected beam, although invisible, can damage your eyes.
CAUTION - INVISIBLE LASER RADIATION WHEN THIS COVER OPEN. DO
NOT OPEN THIS COVER.
VORSICHT - UNSICHTBARE LASERSTRAHLUNG, WENN ABDECKUNG
GEÖFFNET. NICHT DEM STRAHL AUSSETZEN.
ATTENTION - RAYONNEMENT LASER INVISIBLE EN CAS D’OUVERTURE.EXPOSITION DAN
GEREUSE AU FAISCEAU.
ATTENZIONE -RADIAZIONE LASER INVISIBILE IN CASO DI APERTURA.
EVITARE L’ESPOSIZIONE AL FASCIO.
PRECAUCION -RADIACION LASER IVISIBLE CUANDO SE ABRE. EVITAR EXPONERSE AL
RAYO.
ADVARSEL. - USYNLIG LASERSTRÅLNING VED ÅBNING NÅR SIKKERHEDSBRYDERE ER
UDE AF FUNKTION. UNDGÅ UDSAETTELSE FOR STRÅLNING.
ADVARSEL. - USYNLIG LASERSTRÅLNING NÅR DEKSEL ÅPNES. STIRR IKKE INN I
STRÅLEN. UNNGÅ EKSPONERING FOR STRÅLEN.
VARNING - OSYNLIG LASERSTRÅLNING NÄR DENNA DEL ÄR ÖPPAND OCH SPÄRREN ÄR
URKOPPLAD. BETRAKTA EJ STRÅLEN. STRÅLEN ÄR FARLIG.
VARO! - AVATTAESSA JA SUOJALUKITUS OHITETTAESSA OLET ALTTIINA
NÄKYMÄTTÖMÄLLE LASERSÄTEILYLLE ÄLÄ KATSO SÄTEESEEN.
III
Page 6
Ozone Safety
Power Saver
Environmental and Safety Consideration
During normal operation, the ML-6040 printer produces ozone. The
ozone produced does not present a hazard to the operator.
However, it is advisable that the machine be operated in a well
ventilated area.
If you need additional information about ozone, please contact
your nearest Samsung dealer.
This printer contains advanced energy conservation technology
that reduces power consumption when it is not in active use.
When the printer does not receive data for an extended period of
time, power consumption is automatically lowered.
The energy star emblem does not represent EPA endorsement of
any product or service.
Radio Frequency Emissions
FCC Declaration of Conformity
1. Product Name : Laser Printer
2. Model Number : Samsung ML-6040
3. FCC Rules : TESTED TO COMPLY WITH FCC PART 15 CLASS B
4. Operating Environment : FOR HOME OR OFFICE USE
5. FCC Compliance Statement
This device complies with Part 15 FCC rules. Operating is subject to the following two
conditions : (1)This device may not cause harmful interference, and
(2)This device must accept any interference received, including interference
that can any cause undesired operation.
IV
Page 7

Environmental and Safety Consideration
6. Information to User
This device has been tested and found to comply with the limits for a Class B digital
device, pursuant to Part 15 of the FCC rules. These limits are designed to provide
reasonable protection against harmful interference in a residential installation. This
equipment generates, uses and can radiate radio frequency energy and, if not installed and
used in accordance with the instructions, may cause harmful interference to radio
communications. However, there is no guarantee that interference will not occur in a
particular installation. If this equipment does cause harmful interference to radio or
television reception, which can be determined by turning the equipment off and on, the
user is encouraged to try to correct the interference by one or more of the following
measures:
(1) Reorient or relocate the receiving antenna.
(2) Increase the separation between the equipment and receiver.
(3) Connect the equipment into an outlet on a circuit different from that to which the
receiver is connected.
(4) Consult the dealer or an experienced radio/TV technician for help.
CAUTION: Changes or modifications not expressly approved by the manufacturer responsible
for compliance could void the user’s authority to operate the equipment.
Party Responsible for Product Compliance
Samsung Electronics America
American QA Lab
85 West Tasman Dr.
San Jose, CA 95134
Canadian Radio Interference Regulations
This digital apparatus does not exceed the Class B limits for radio noise emissions from digital
apparatus as set out in the interference-causing equipment standard entitled “Digital
Apparatus”, ICES-003 of the Industry and Science Canada.
Cet appareil numérique respecte les limites de bruits radioélectriques applicables aux appareils
numériques de Classe B prescrites dans la norme sur le matériel brouilleur: “Appareils
Numériques”, ICES-003 édictée par l’Industrie et Sciences Canada.
V
Page 8

Environmental and Safety Consideration
EC Declaration of Conformity
We,
SAMSUNG ELECTRONICS CO., LTD.
#259, Gong Dan-Dong, Gumi-City, Kyung Buk, Korea
declares sole responsibility that the
Samsung ML-6040 Laser printer
meets the intent of Directive 89/336/EEC for Electromagnetic Compatibility and Low Voltage
Directive 73/23/EEC.
Compliance was demonstrated to the following specifications as listed in the official journal of
the European Communities:
EN 50081-Emissions:
EN 55022 Radiated, Class B
EN 55022 Conducted, Class B
EN 61000-3-2 Power Harmonics
EN 61000-3-3 Voltage Fluctuations and Flicker
EN 55024-EMS:
EN 6100-4-2 Electrostatic Discharge
EN 6100-4-3 RF Electromagnetic Field
EN 6100-4-4 Fast transients
EN 6100-4-5 Surges
EN 6100-4-6 RF Common mode
EN 6100-4-11 Voltage Dips and Interruptions
EN 60950-Safety
VI
Page 9
1
1
Congratulations on the purchase of your ML-6040 printer!
This chapter provides information on the following topics:
◆ Special Features
◆ Printer Components
Page 10
Special Features
9
8
Your new Samsung ML-6040 printer is equipped with special
features that improve print quality, giving you a competitive
edge. You can:
Print with excellent quality and high speed
• You can Print at 600 dots per inch (dpi). See page 5.18.
• Your printer can print 12 pages-per-minute.
Flexible paper handling
• Standard 270-sheet input tray (Auto Tray) supports all
standard sizes of paper.
• A 1-sheet Manual Tray supports envelopes, labels,
transparencies, custom-sized media, postcards, and heavy
paper.
• Your printer has two output trays: Select either the top face-
down output or the rear face-up output tray for the most
convenient access.
• You can use a straight-through paper path from the Manual
Tray to the rear output tray.
Cr eate professional documents
• Customize your documents by using Watermarks such as
“Confidential.” See page 5.21.
• You can print Booklets. This feature enables you to easily
print the pages required to create books. Once printed, all
you have to do is fold and staple the pages. See page 5.13.
• You can print Posters. The text and pictures of each page of
your document are magnified and printed across the selected
sheet of paper. After the document has printed, trim off the
white edges of each sheet. Tape the sheets together to form
a poster. See page 5.16.
INTRODUCTION
1.1
Page 11
Special Features
Save time and money
• You can use the Toner Save mode to save toner supply.
See page 5.6.
• Your printer allows you to print on both sides of the paper to
save paper (Manual Duplexing). See page 5.7.
• Your printer allows you to print multiple pages on a single
sheet of paper to save paper (N-Up printing).
See page 5.10.
• Preprinted forms and letterheads can be printed on plain
paper (Page Overlay). See page 5.24.
• One-touch last page printing is available when the printer
is in ready mode. See page 5.30.
• The Samsung ML-6040 printer meets Energy Star guidelines
for energy efficiency.
Print in various envir onments
• You can print in Windows 95/98/Me/2000/NT 4.0.
• Your printer supports Linux and Macintosh.
• ML-6040 printer comes with Parallel and USB interface.
1.2
INTRODUCTION
Page 12
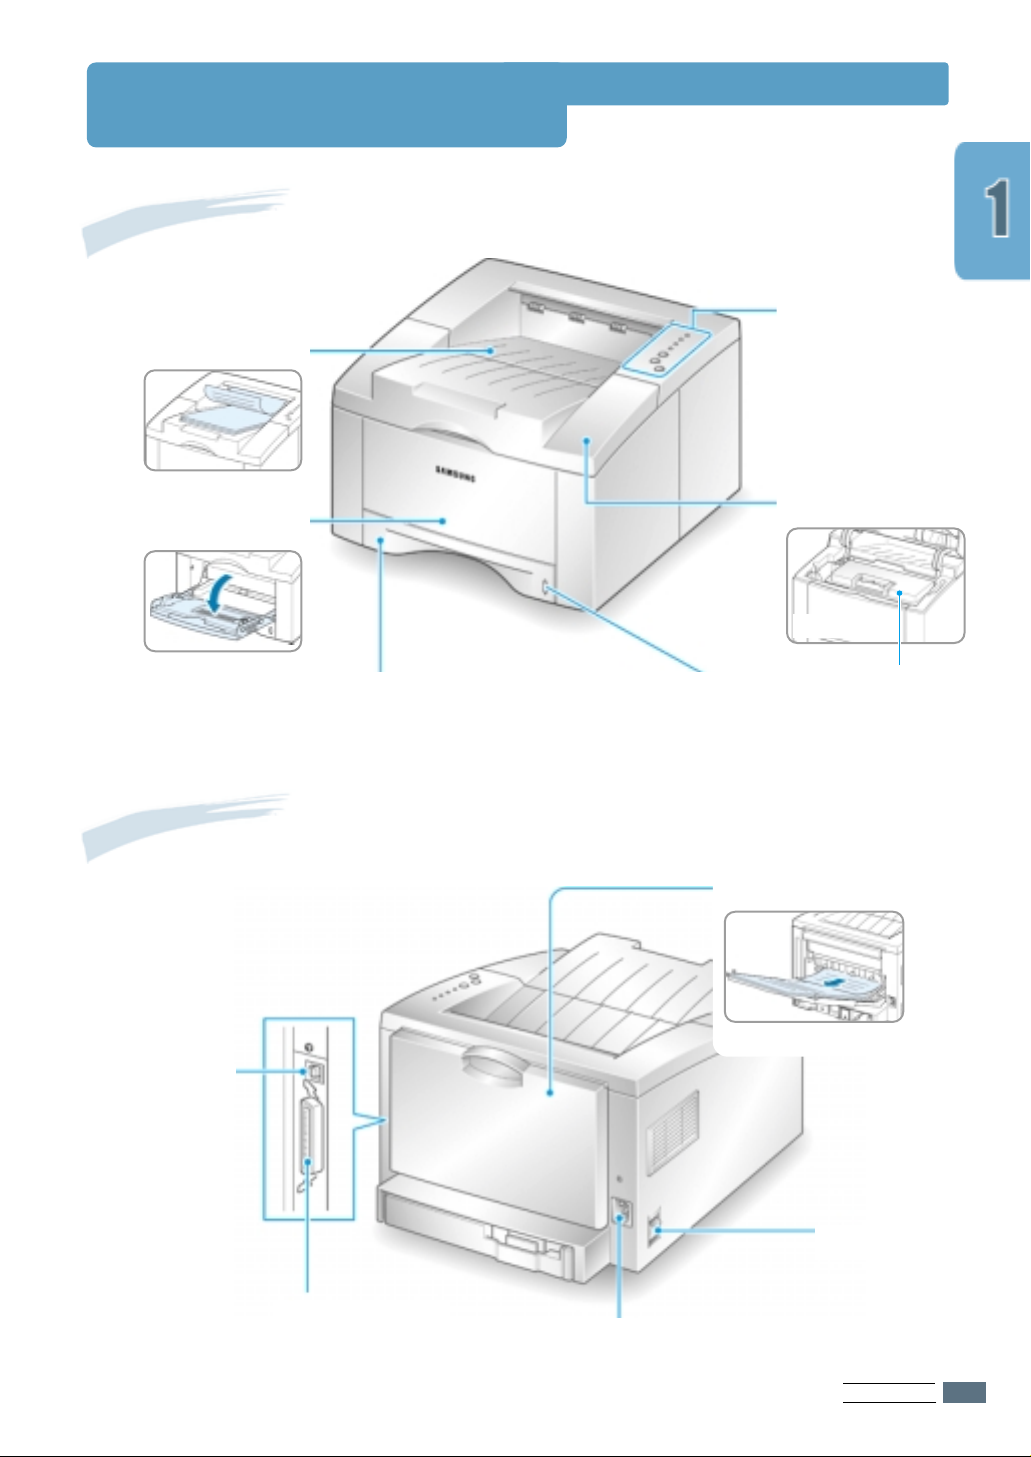
Printer Components
Front View
Top output tray
Control panel
(Face down output )
Manual Tray
(270-sheet paper feeder)
Rear View
Auto Tray
Top cover
(Inside)
Toner cartridge
Paper level
indicator
Rear output tray door
(Face up output)
USB port
Parallel port
Power receptacle
Power switch
INTRODUCTION
1.3
Page 13
2
2
This chapter provides step by step information on setting up
your printer. Topics included in this chapter are:
◆
: Unpack Your Printer
STEP 1
◆
◆
◆
◆
◆
◆
◆ Installing Software from Diskette
Install the Toner Cartridge
:
STEP 2
: Load Paper
STEP 3
: Connect to the Computer with a Parallel Cable
STEP 4
: Turn on the Printer
STEP 5
Print a Demo Page!
:
STEP 6
: Install the Printer Software
STEP 7
Page 14
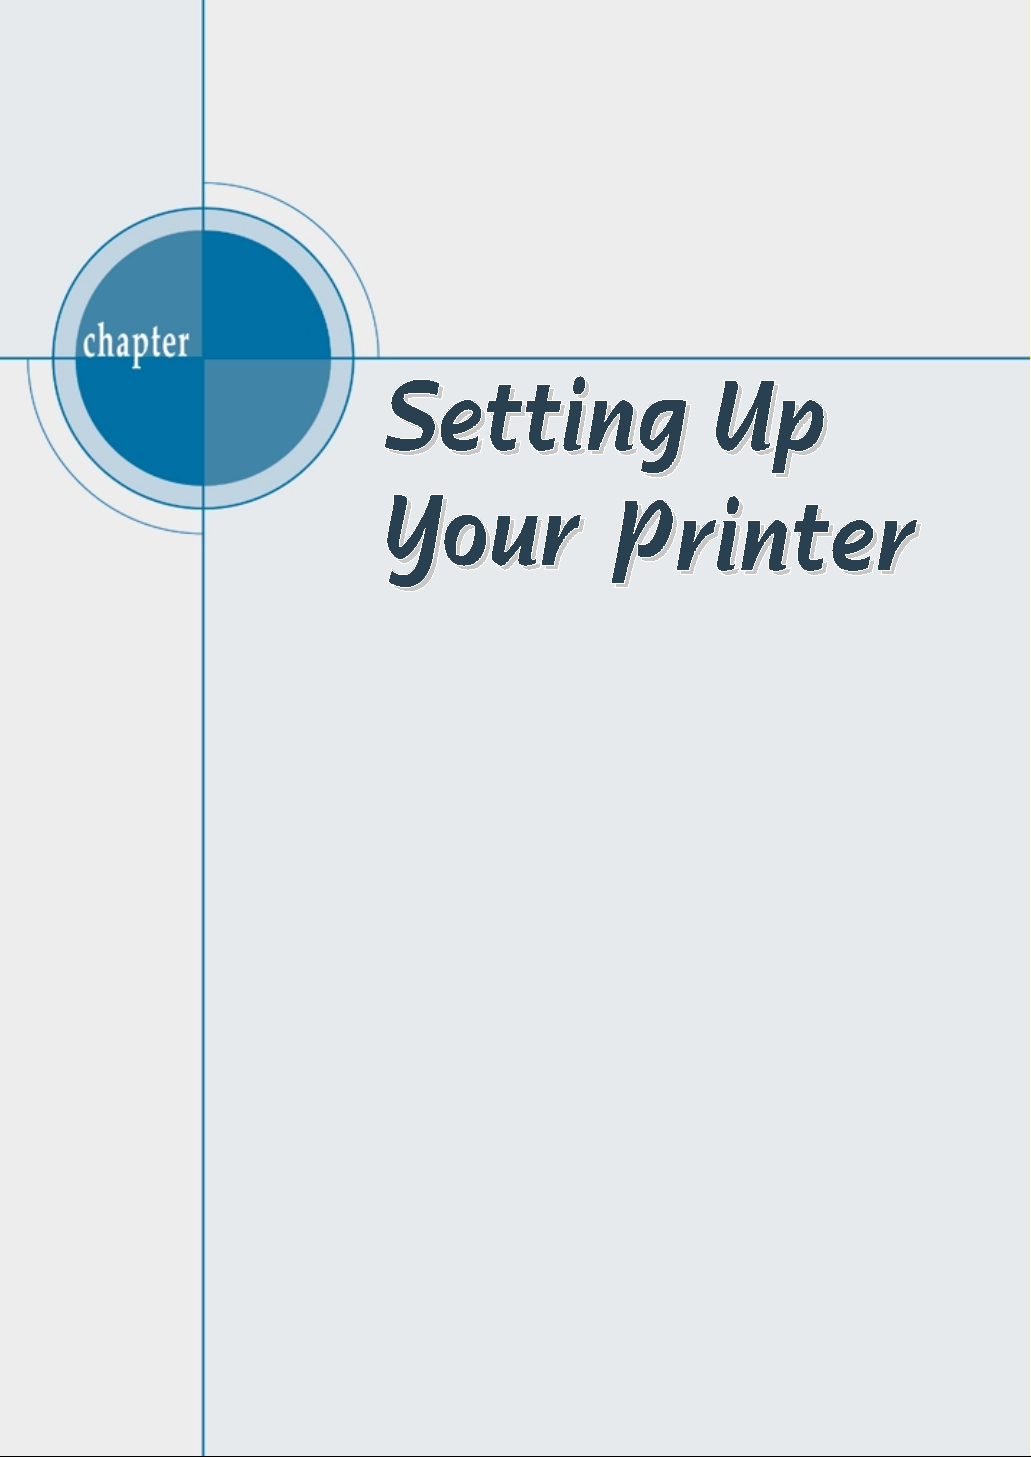
Unpack Your Printer
1
Remove the printer and all accessories
from the packing carton. Make sure that
your printer has been packed with the
following items:
Notes:
• If any items are missing or damaged,
notify your dealer immediately.
CCoommppoonneennttss mmaayy ddiiffffeerr ffrroomm oonnee
•
ccoouunnttrryy ttoo aannootthheerr
.
Toner cartridge
CD-ROM*
IEEE 1284-compliant
printer cable
Setup Guide
Power cord
* contains printer
software, User’s
Guide, Adobe
Acrobat Reader and
Make Installation
Diskette setup
software.
2
Carefully remove all packing tapes from
the printer.
SETTING UP YOUR PRINTER
2.1
Page 15
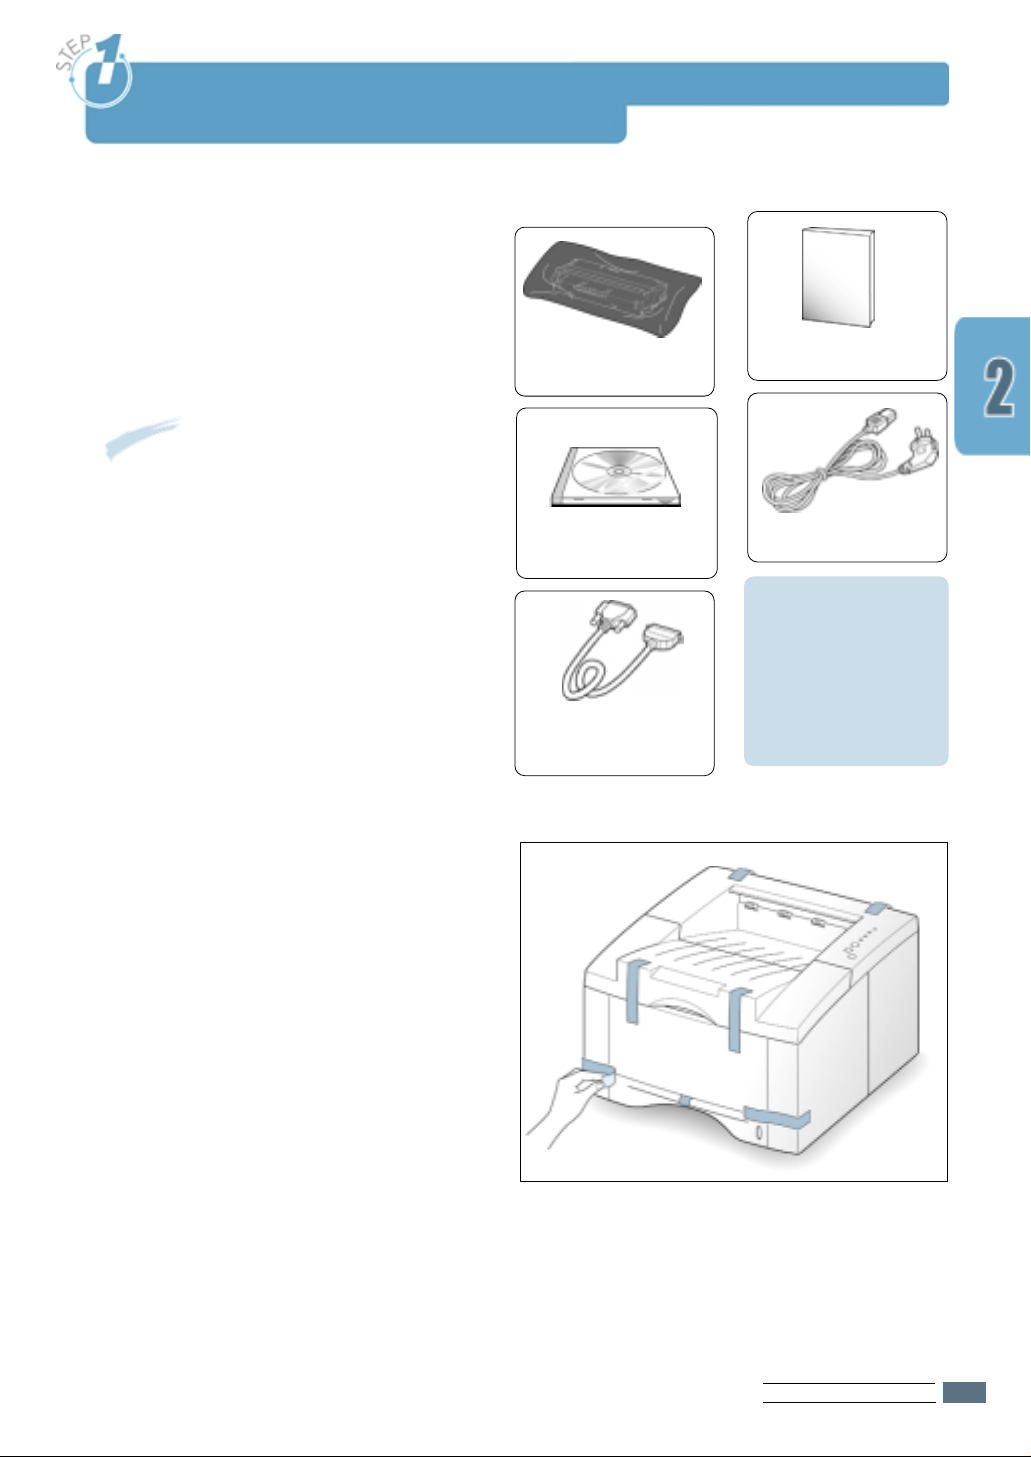
Install the Toner Cartridge
1
Open the top cover lid. Pull up on the
handle to open the lid.
2
Carefully tear one end of the plastic bag.
Don’t use a knife or other sharp objects
as they might scratch the drum of the
cartridge.
Handle
3
Locate the sealing tape at the end of the
toner cartridge. Carefully pull the tape
completely out of the cartridge. Discard
the tape.
4
Gently shake the cartridge from side to
side to distribute the toner evenly inside
the cartridge.
CAUTION:
To prevent damage, do not expose the
toner cartridge to light for more than a few
minutes. Cover it with a piece of paper if
left exposed for more than a few minutes.
If toner gets on your clothing, wipe it off
with a dry cloth and wash clothing in cold
water. Hot water sets toner into fabric.
SETTING UP YOUR PRINTER
2.2
Page 16
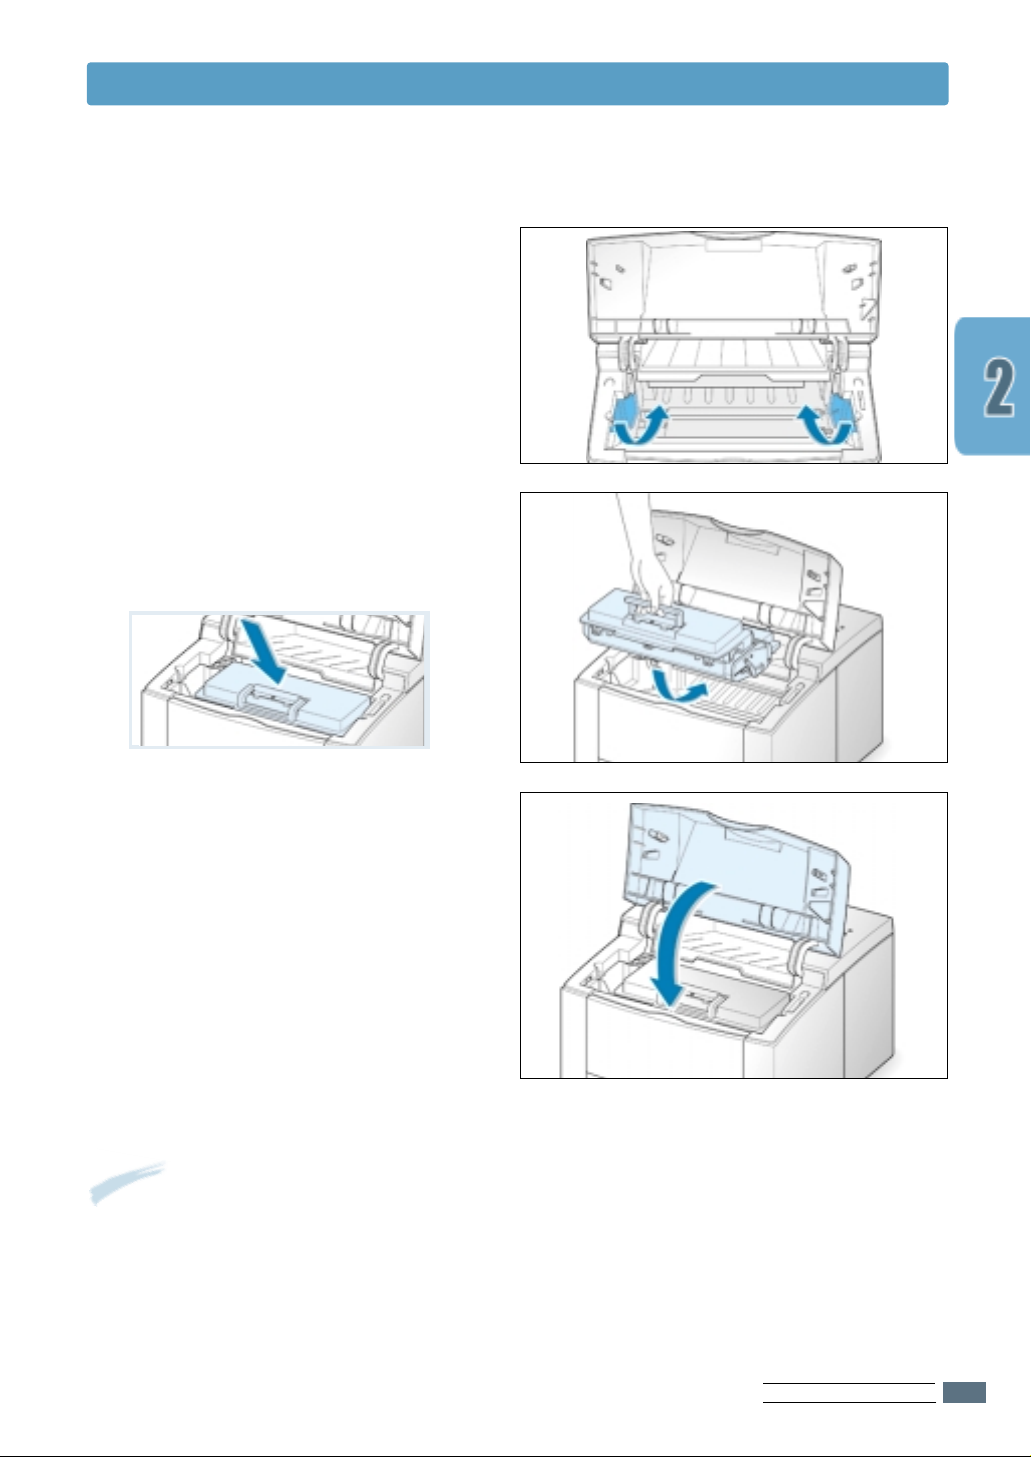
5
Locate the cartridge slots inside the
printer, one on each side.
6
Grasp the handle and insert the
cartridge in the printer until it snaps in
place.
Install the Toner Cartridge
7
Close the top cover. Make sure that the
cover is securely closed.
Note: When printing text at 5% coverage, you can expect a toner cartridge life of
approximately 6,000 pages (3,000 pages for the toner cartridge that is shipped with the
printer).
SETTING UP YOUR PRINTER
2.3
Page 17
Load Paper
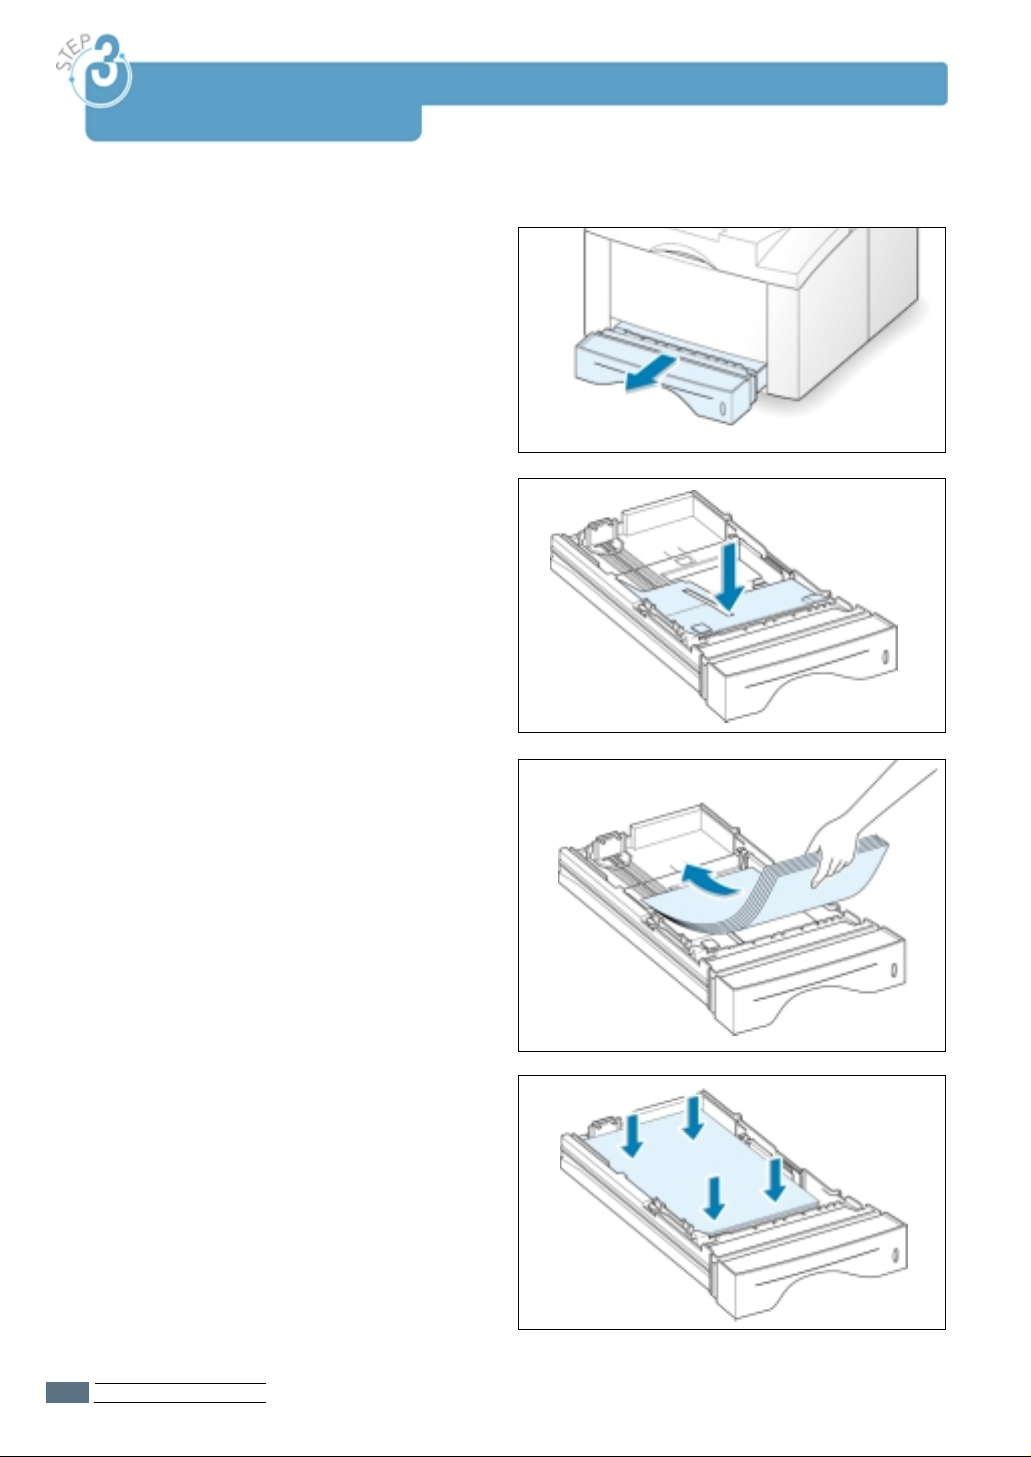
1
Pull the paper tray out of the printer.
2
Push down on the metal paper lift plate to
lock it in place.
3
Load paper with the print side facing
down.
Make sure that all four corners are flat
in the tray.
SETTING UP YOUR PRINTER
2.4
Page 18
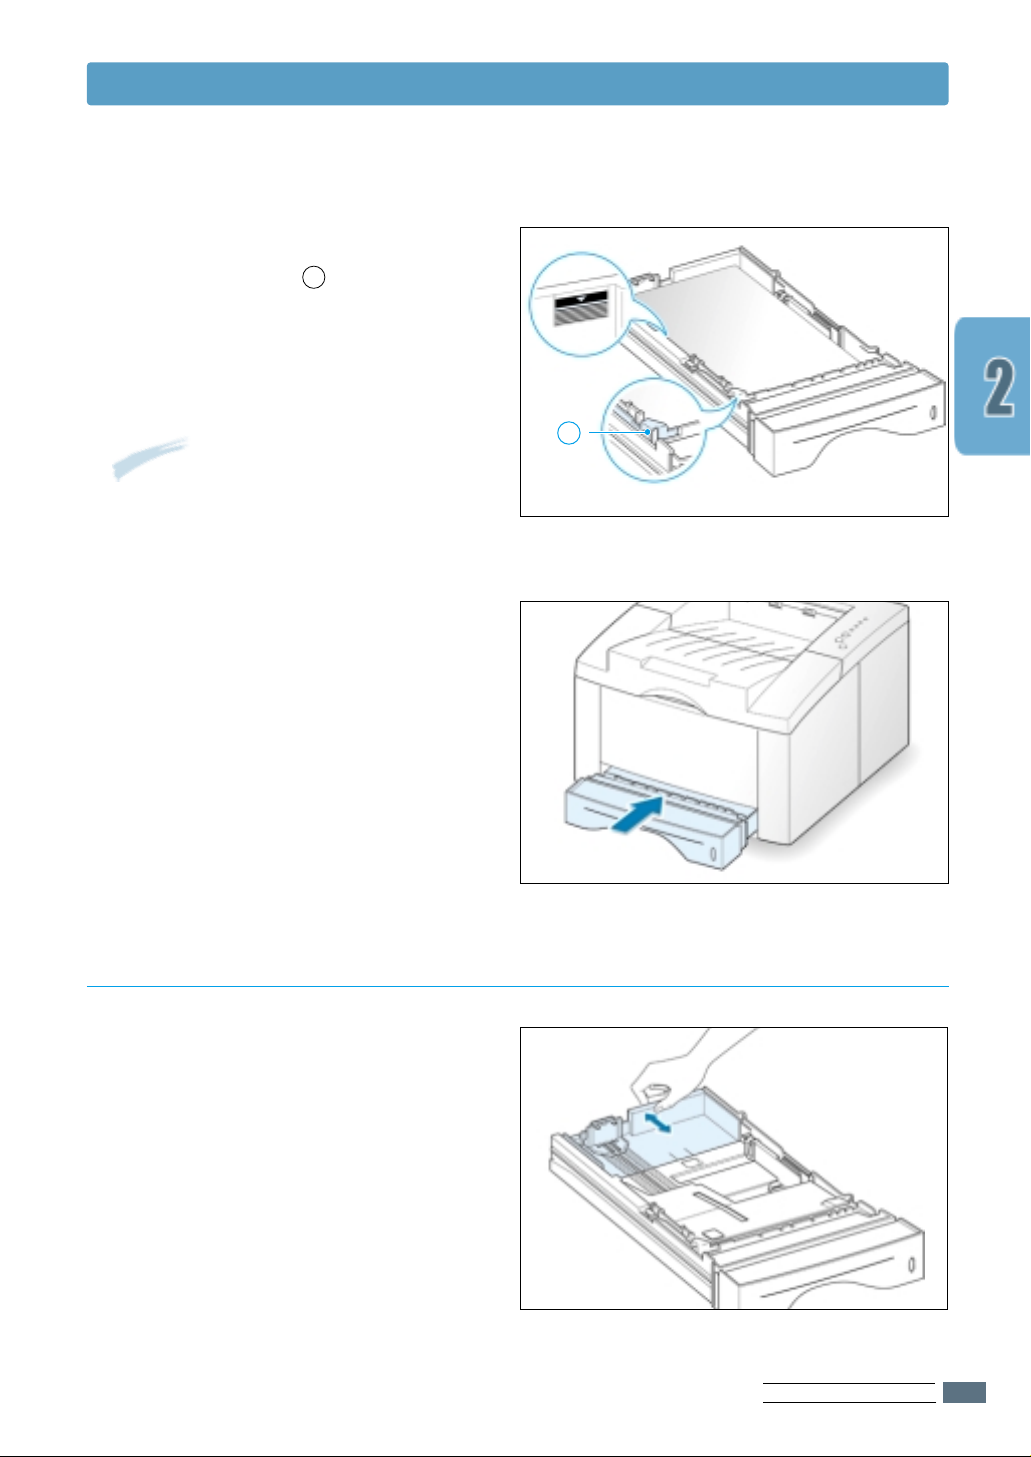
4
Make sure that the stack goes under the
metal retaining clip and the plastic
tabs on the end guides. Pay attention to
the paper limit mark on the left inside
wall of the tray. Paper overloading may
cause paper jams.
Note: If you want to change the paper
size in tray, refer to “To Change Paper
Size in Tray” below.
5
Slide the tray back into the printer.
A
Load Paper
A
To Change Paper Size in Tray
1
Adjust the tray for different paper sizes
by sliding the appropriate paper length
guide to the desired position.
SETTING UP YOUR PRINTER
2.5
Page 19
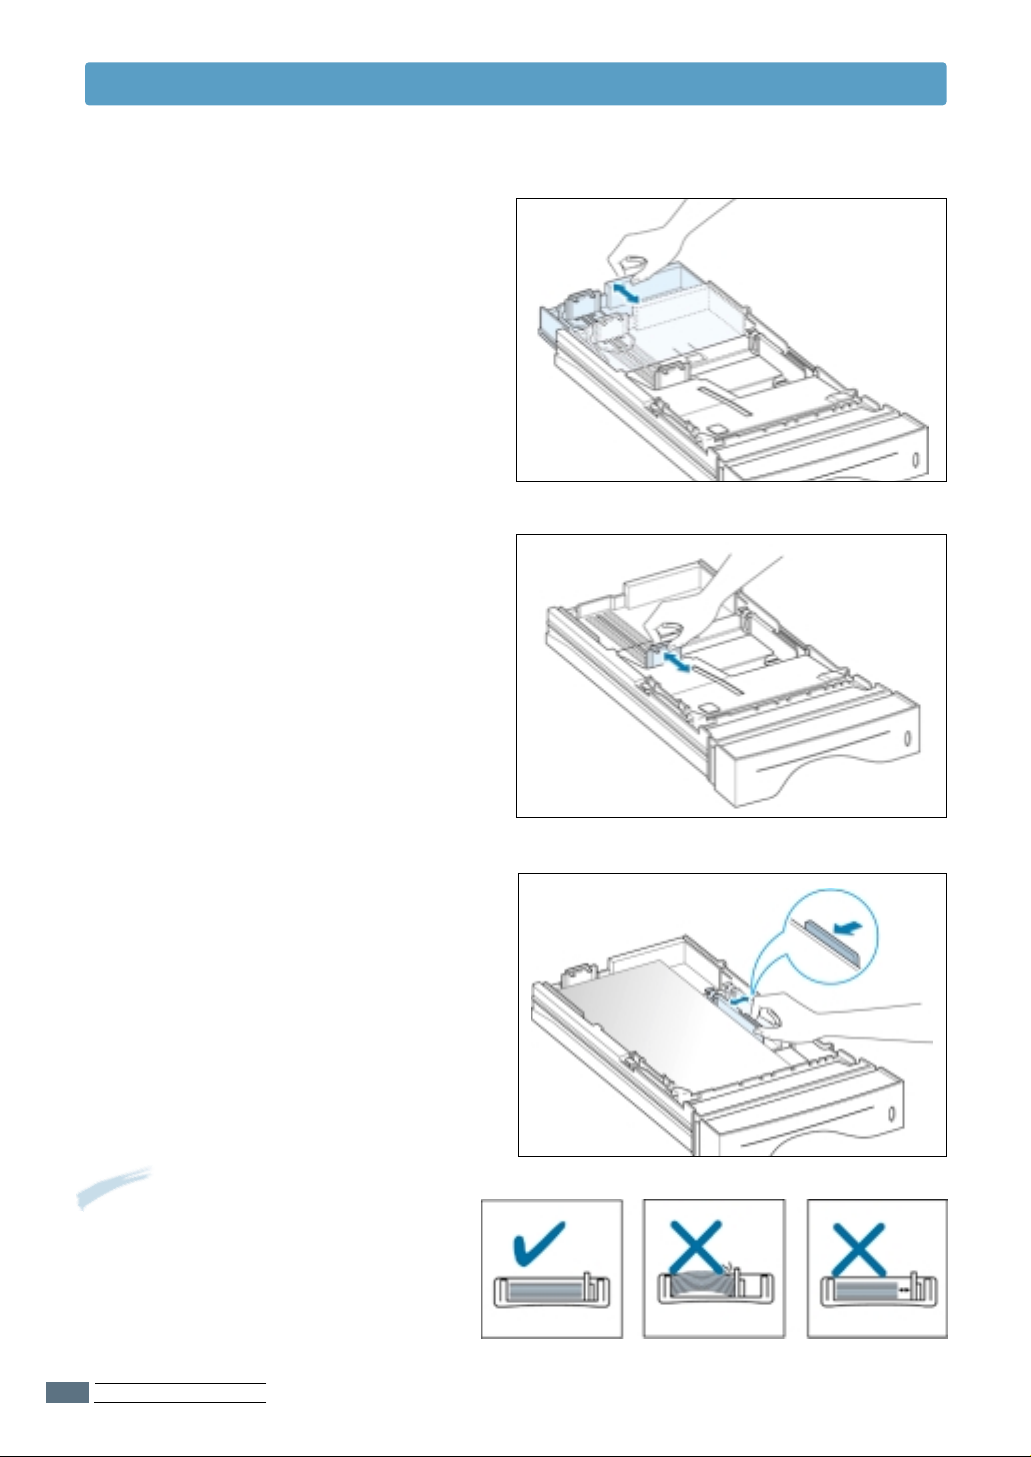
Load Paper
• For legal, folio, or paper, use the the
back guide.
• For letter, executive, A4, JIs B5, A5, or
A6 size paper, use the the front and
back guide.
2
After loading paper, squeeze the width
guide as shown and slide it to the left
until it lightly touches the paper stack.
Notes:
• Do not push the width guide far
enough to cause the media to warp.
• If you do not adjust the width guide,
it may cause a paper jam.
SETTING UP YOUR PRINTER
2.6
Page 20

Connect to the Computer
with a Parallel Cable
1
Make sure that both the printer and
the computer are turned off.
2
Plug the parallel printer cable into the
connector on the back of the printer.
Push the metal clips down to fit inside
the notches on the cable plug.
3
Connect the other end of the cable to
the parallel interface port on your
computer, and tighten the screws.
See your computer documentation if
you need help.
If you ar e using a USB interface
Go to “Using Your Printer with a USB Cable” on
page A.10.
Turn on the Printer
1
Plug the power cord into the power
receptacle on the back of the printer.
2
Plug the other end into a properly
grounded AC outlet.
➞ To the parallel
port on PC
3
Turn on the power.
➞ To AC outlet
SETTING UP YOUR PRINTER
2.7
Page 21
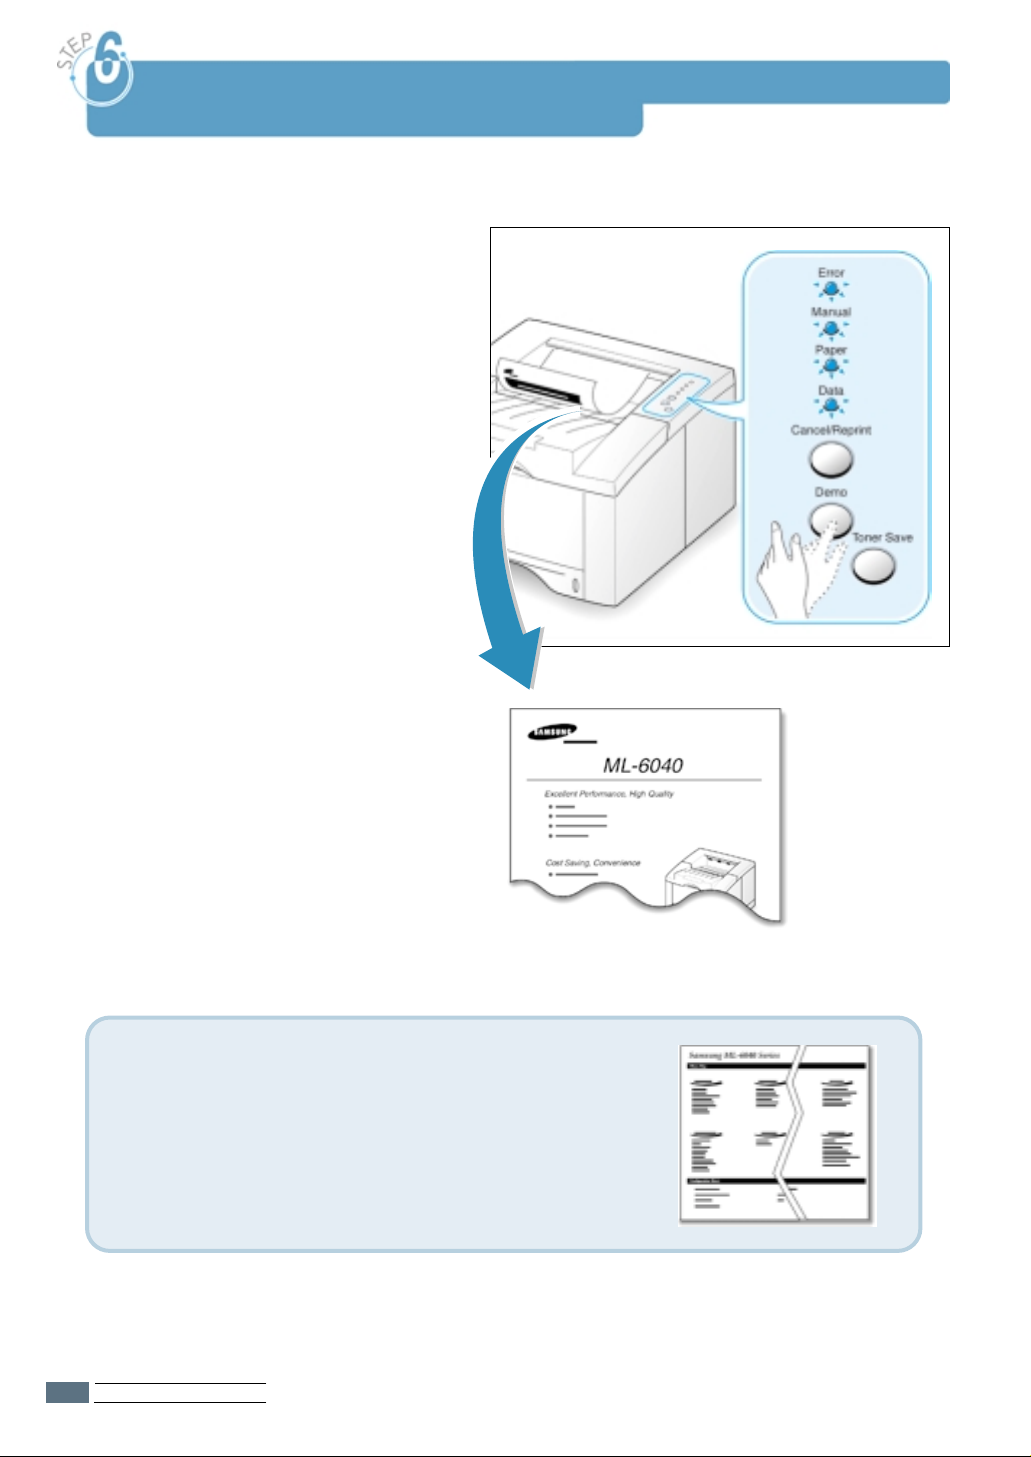
Print a Demo Page!
As the printer powers up, all the printer
control panel lights turn on briefly. When
only the Data light remains on, press and
hold the Demo button.
Hold the Demo button down until all the
lights blink (for about 2 seconds) and
then release. The demo page will print.
The demo page provides a sample of the
print quality to help you verify that the
printer is printing correctly.
You can print the configuration sheet which lists many
of the current settings and properties of the printer by
pressing and holding Demo for about 6 seconds while
the printer is in the ready mode.
SETTING UP YOUR PRINTER
2.8
Page 22

Install the Printer Software
Included with your printer is a CD-ROM containing the printer
drivers for some of the most popular Windows software
applications. To operate your printer, you must install a printer
driver, which translates data from your application into data
that the printer understands.
The CD-ROM shipped with your printer contains the following:
• GDI printer driver for Windows. Use this driver to take full
advantage of your printer’s features.
• USB driver for the USB interface to allow you to print with a
USB cable.
• Printer driver for Macintosh to allow you to use your printer
with a Macintosh.
• Linux driver for Linux to allow you to use your printer in
Linux.
If you ar e printing from a computer with a parallel cable
Go to page 2.10 for information on installing the printing
software on a computer that is attached directly to the printer
with a parallel cable.
If you ar e printing with a USB cable
Go to “Using Your Printer with a USB Cable” on page A.10, for
information on installing the print software on a USB-enabled
computer.
If you ar e printing from a Macintosh
Go to “Using Your Printer with Macintosh” on page A.16, for
information on installing the printer driver for Macintosh.
If you ar e printing from the Linux system
Go to “Linux Driver Installation” on page A.23, for information
on installing the Linux driver for printing in the Linux system.
SETTING UP YOUR PRINTER
2.9
Page 23
S
A
M
S
U
N
G
M
L
-
6
0
4
0
Install the Printer Software
Before Installing the Printer Software
Verify the following:
• At least 16 MB or more of RAM is installed on your PC.
• There is at least 30 MB of free disk space on your PC.
• All applications are closed on your PC before beginning
installation.
• Windows 9x, Windows Me, Windows 2000 or Windows NT 4.0.
Installing the Printer Software from the CD-ROM
Note: If the New Hardware
Found box appears during
the installation procedure,
click the x in the upper
right corner of the box,
or click Cancel.
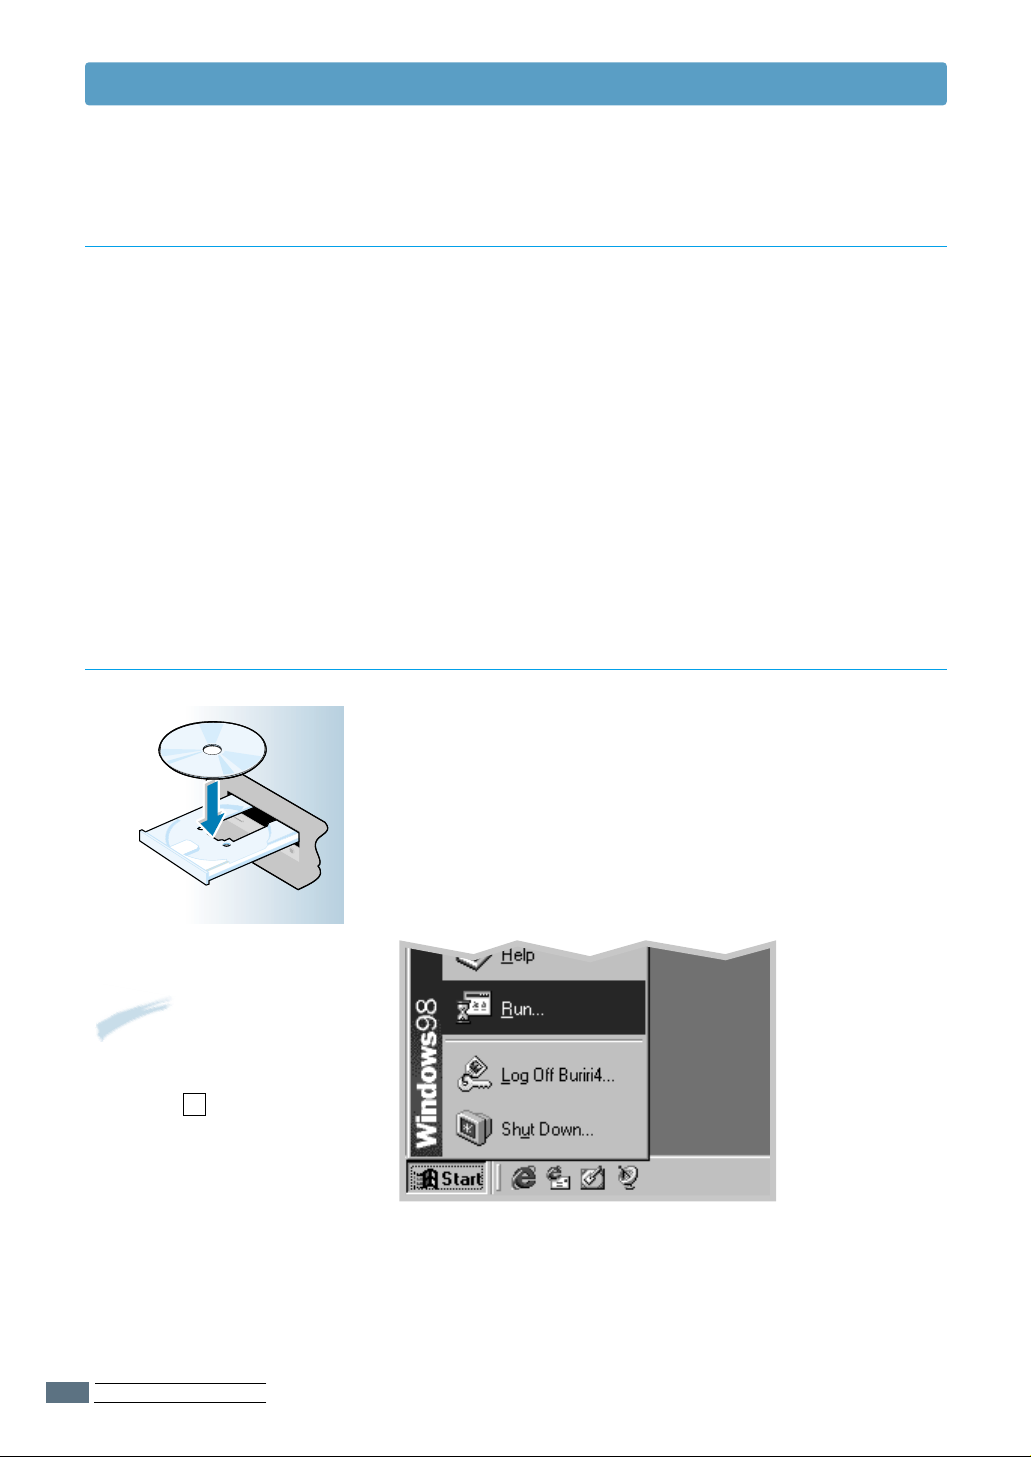
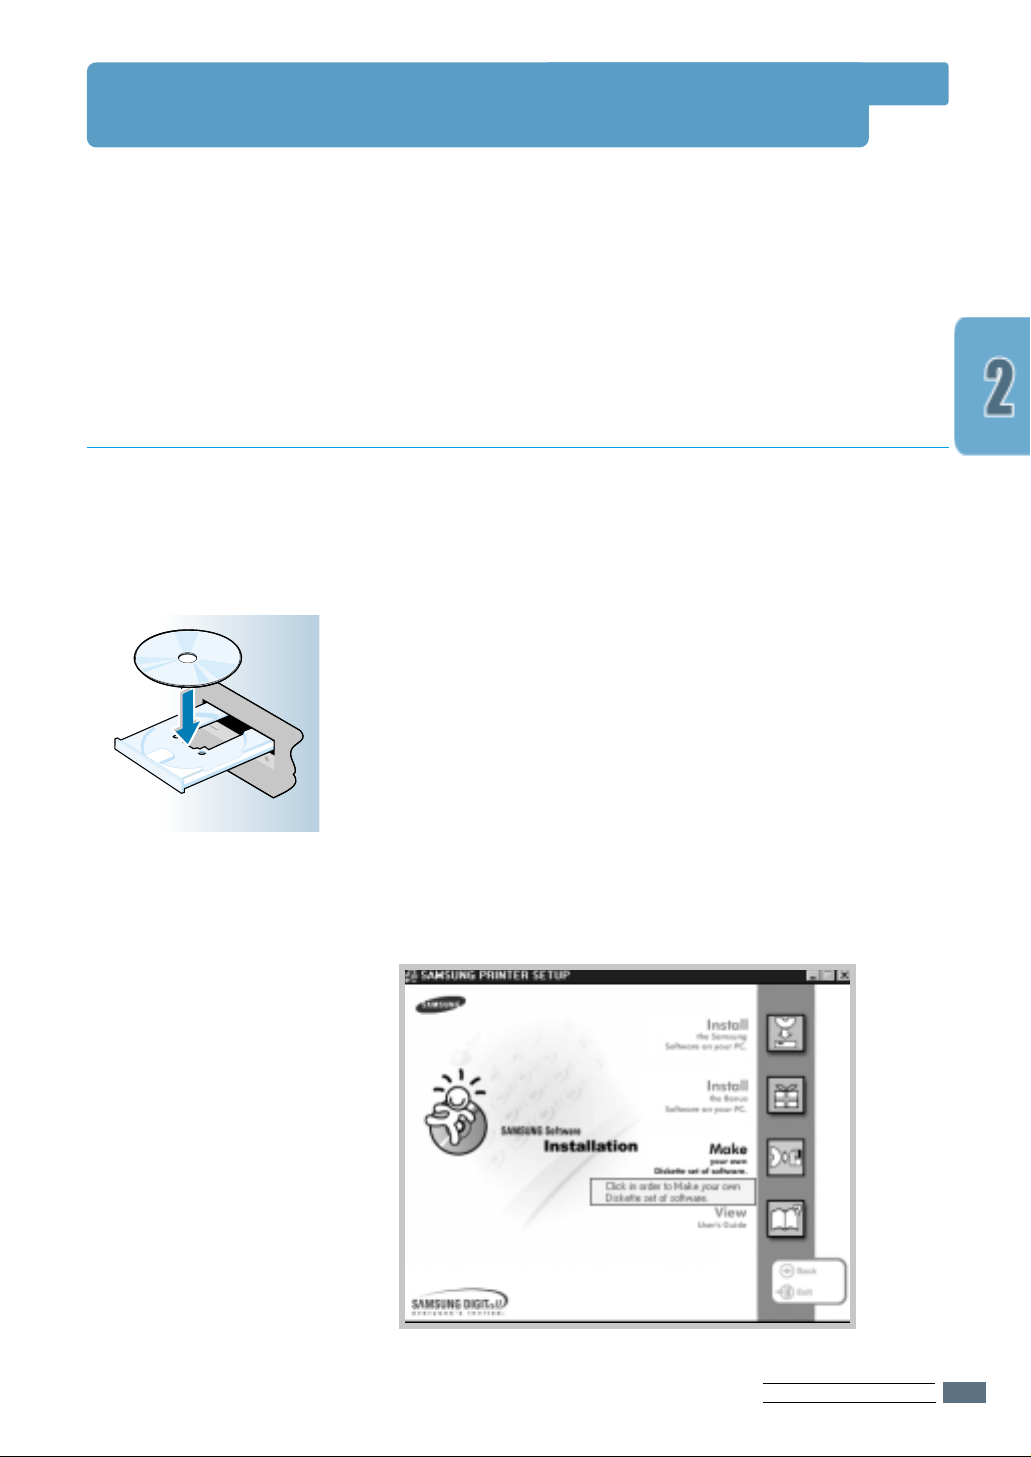
Place the CD-ROM in the CD-ROM drive. Installation will
1
start automatically.
If the CD-ROM drive does not automatically run:
Select Run from the Start menu, and type x:\cdsetup.exe
in the Open box (where x is the drive letter for the CD-ROM
drive), then click OK.
When the opening screen appears, select the appropriate
2
language.
SETTING UP YOUR PRINTER
2.10
Page 24

Install the Printer Software
Click Install the Samsung Software on your PC.
3
The Welcome window opens. Click Next.
4
SETTING UP YOUR PRINTER
2.11
Page 25
Install the Printer Software
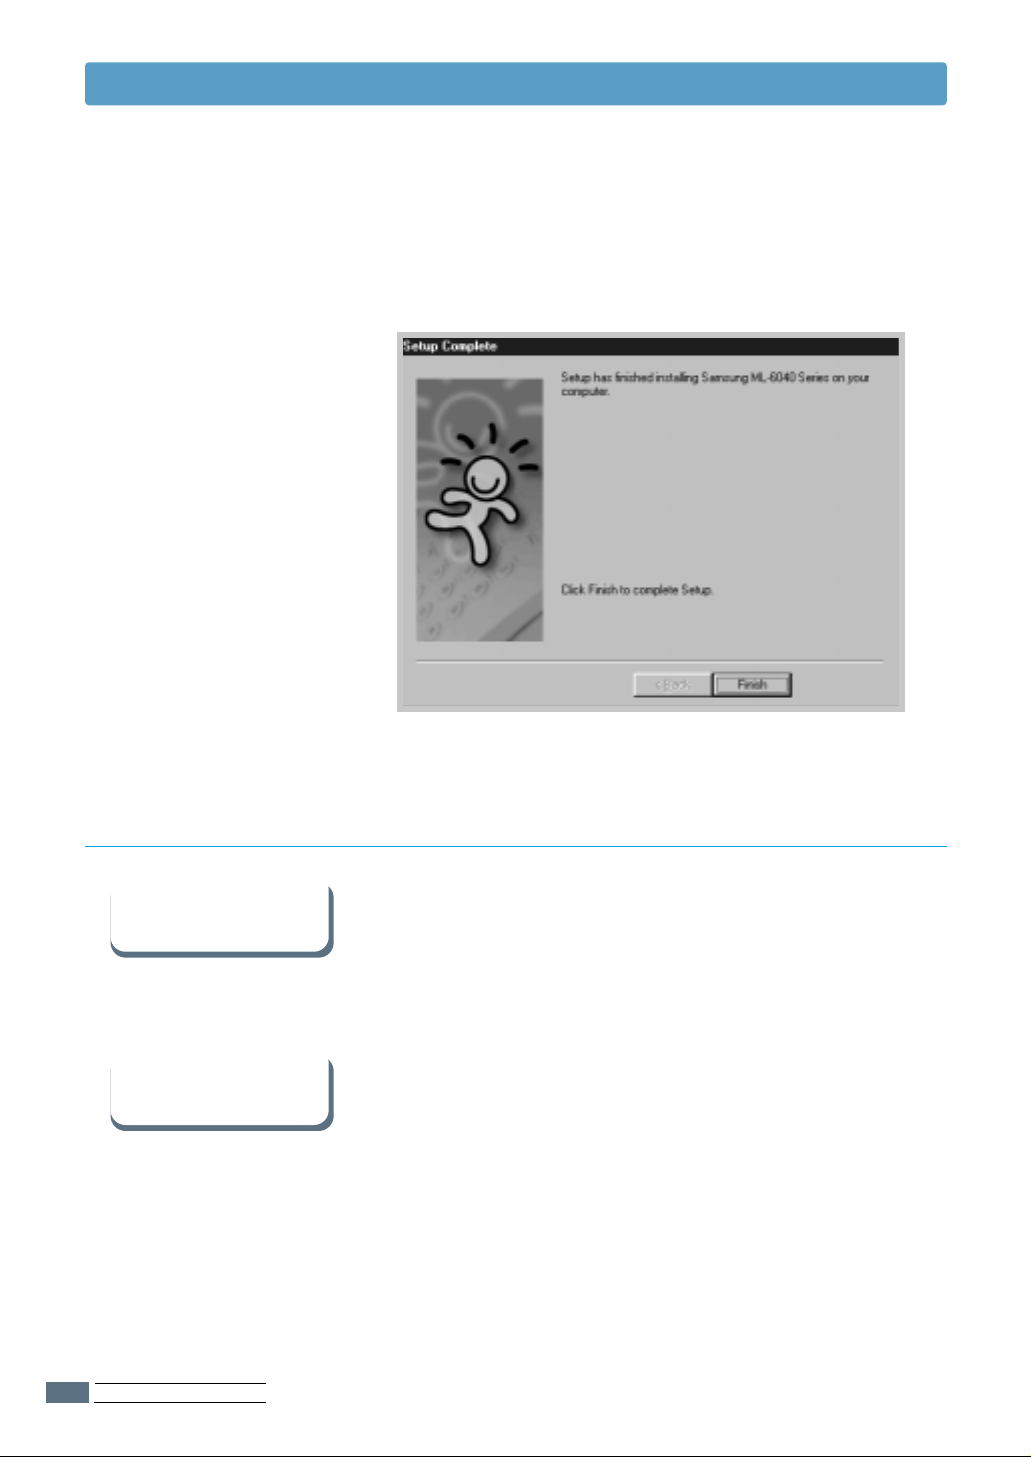
The files are copied into the appropriate directory.
5
Click Finish.
6
Software Installation Tips
I do not have a
CD-ROM drive
How do I r emove the
printing software ?
SETTING UP YOUR PRINTER
2.12
If you have access to another computer with a CD-ROM drive,
you can use the make diskette utility in Windows to create the
disks you need for the installation. Go to “Installing Software
from Diskette” on page 2.15.
In Windows, after installation, the Uninstall icon in the ML-6040
series program group allows you to select and remove any or
all of the Windows ML-6040 printing system components.
To uninstall the printer software:
From the Start menu, select Programs.
1
Page 26
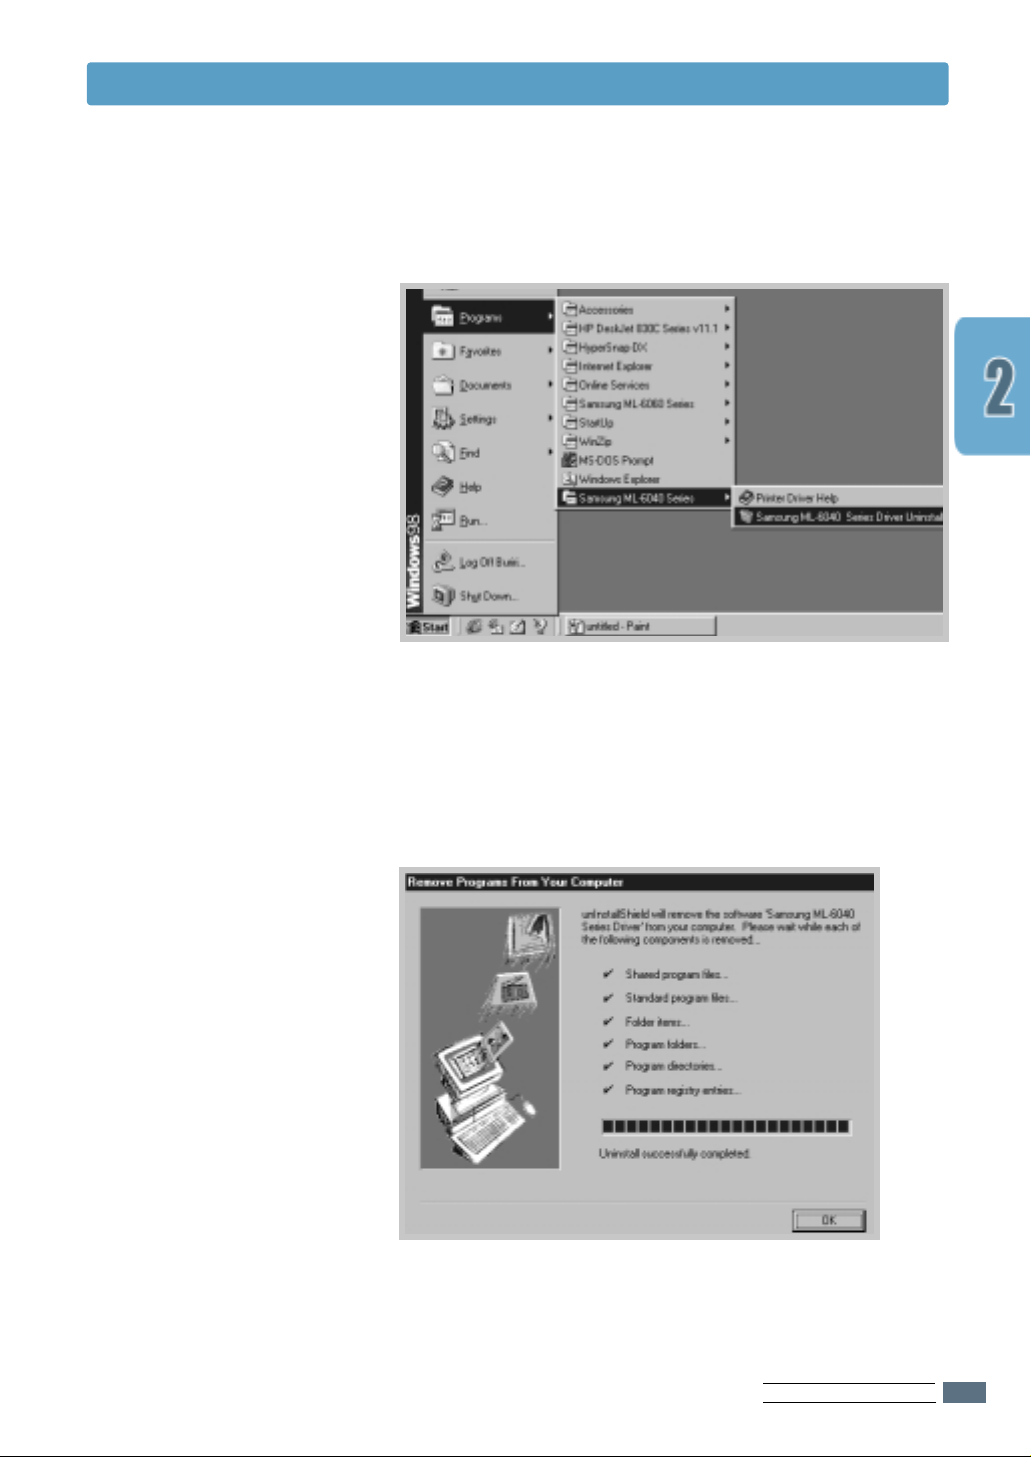
Install the Printer Software
Select Samsung ML-6040 Series, and then Samsung
2
ML-6040 Series Driver Uninstall.
When your computer confirms your selection, click Yes.
3
The Samsung ML-6040 Series printer driver and all of its
4
components are removed from your computer.
Click OK.
5
SETTING UP YOUR PRINTER
2.13
Page 27

Install the Printer Software
How do I access
printer featur es ?
If you have
pr oblems installing
Some printer features, such as paper size and page
orientation, may be available through your application settings.
Use application settings, if available, because they override
printer driver settings.
Access advanced printer features through your printer driver.
See Chapter 5, “Printing Tasks” for instructions on using your
printer driver features.
• Exit your software programs. Then turn off the computer and
the printer. Turn on the printer and the computer.
• Close any virus protection programs that are running on your
computer.
• Uninstall the printer software following the instructions on
page 2.12, then repeat the installation procedure.
SETTING UP YOUR PRINTER
2.14
Page 28
Installing Software from Diskettes
S
A
M
S
U
N
G
M
L
-
6
0
4
0
If you do not have a CD-ROM drive but you have access to
another computer with a CD-ROM drive, you can copy software
installation files from your printer software CD-ROM onto
floppy diskettes, abd then use the diskettes instead of the CDROM to install the software.
Making Installation Diskettes
You can make installation diskettes for the ML-6040 printer
driver. Make sure that you have several formatted diskettes
ready, and then follow these steps:
Insert the CD-ROM shipped with your printer into the
1
CD-ROM drive. Installation will start automatically.
If the CD-ROM drive does not automatically run:
Select Run from the Start menu, and type x:\cdsetup.exe
in the Open box (where x is the drive letter for the CD-ROM
drive), then click OK.
When the opening screen appears, select the appropriate
2
language.
Click Make your own Diskette set of software.
3
SETTING UP YOUR PRINTER
2.15
Page 29
Installing Software from Diskettes
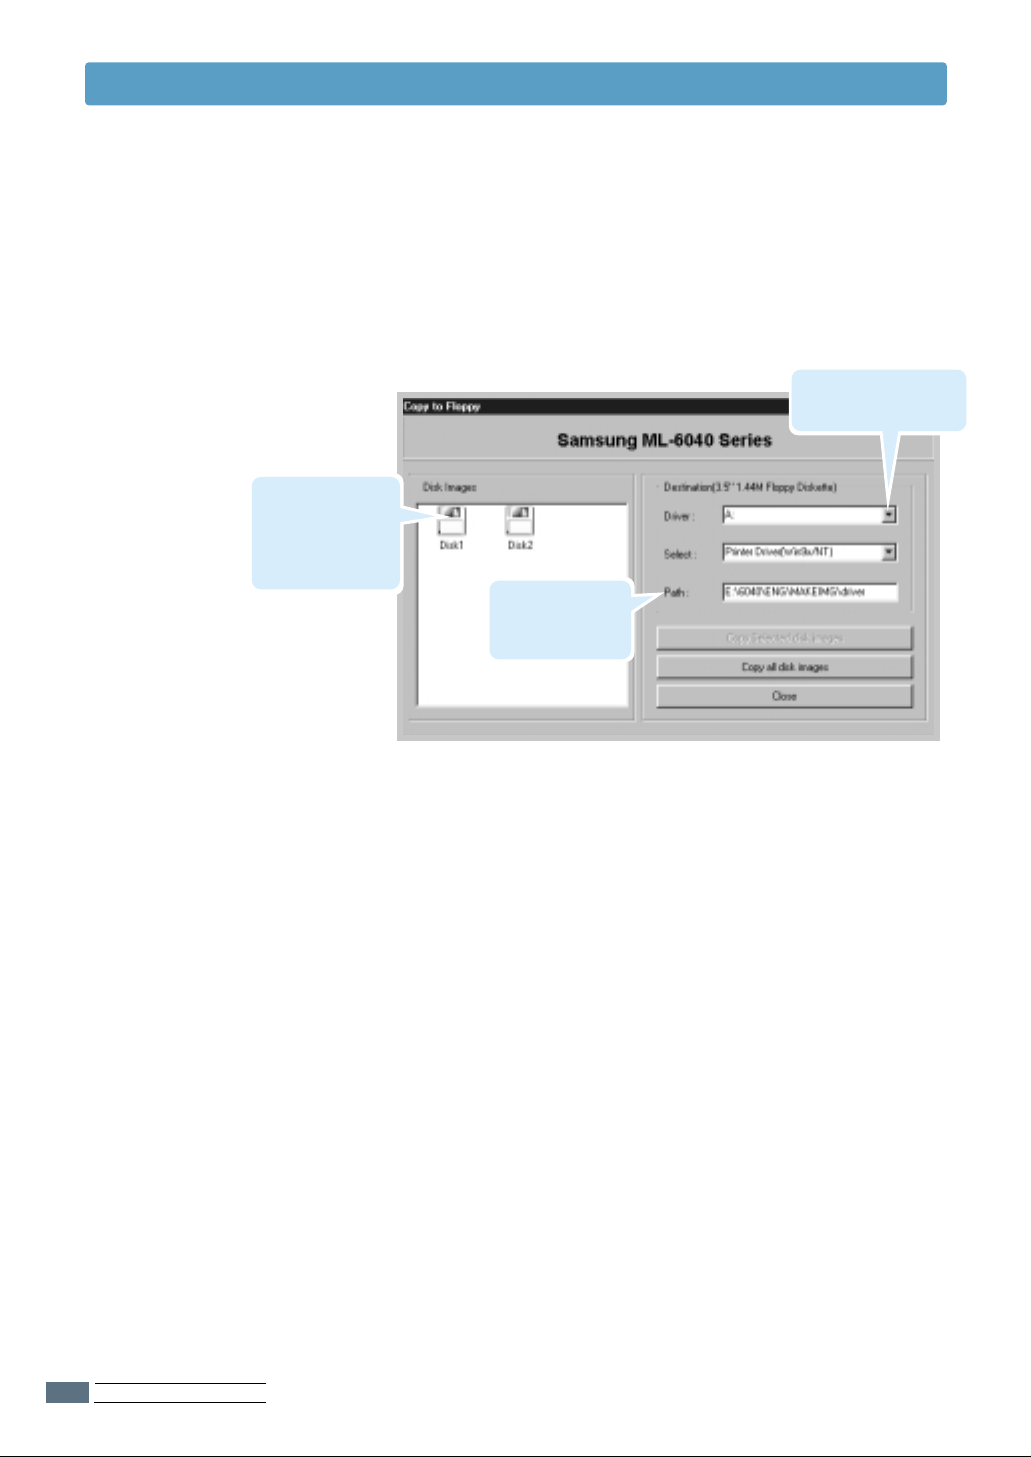
The Copy to Floppy dialog box appears.
4
Select the floppy disk drive you will use to insert the
diskette.
Shows the
number of disks
required to copy
the selected
component.
Select the floppy
drive you will use.
Shows the path
of the selected
component.
SETTING UP YOUR PRINTER
2.16
Click Copy all disk images.
5
If you want to copy a portion of the selected component,
select the disk you want to copy in the Disk Images window,
then click Copy selected disk image.
When prompted, insert a blank, formatted diskette into the
6
floppy drive, and click Yes to copy the first diskette. For
multiple diskettes, when the first diskette is finished, you
are prompted to insert disk 2.
Make sure you label each diskette in order of creation:
ML-6040 printer driver, disk 1 of 2, etc.
Page 30
Installing Software
Installing Software from Diskettes
If you have more than one disk, insert the next disk and
7
click Yes. Repeat this step for a third disk if necessary.
When copying to diskettes has been completed, click Close
8
in the Copy to Floppy dialog box. Then click Exit in the
SAMSUNG PRINTER SETUP dialog box.
To install the print software from the diskette, take the
following steps:
Insert the first diskette (if you have more than one selected
1
software diskette).
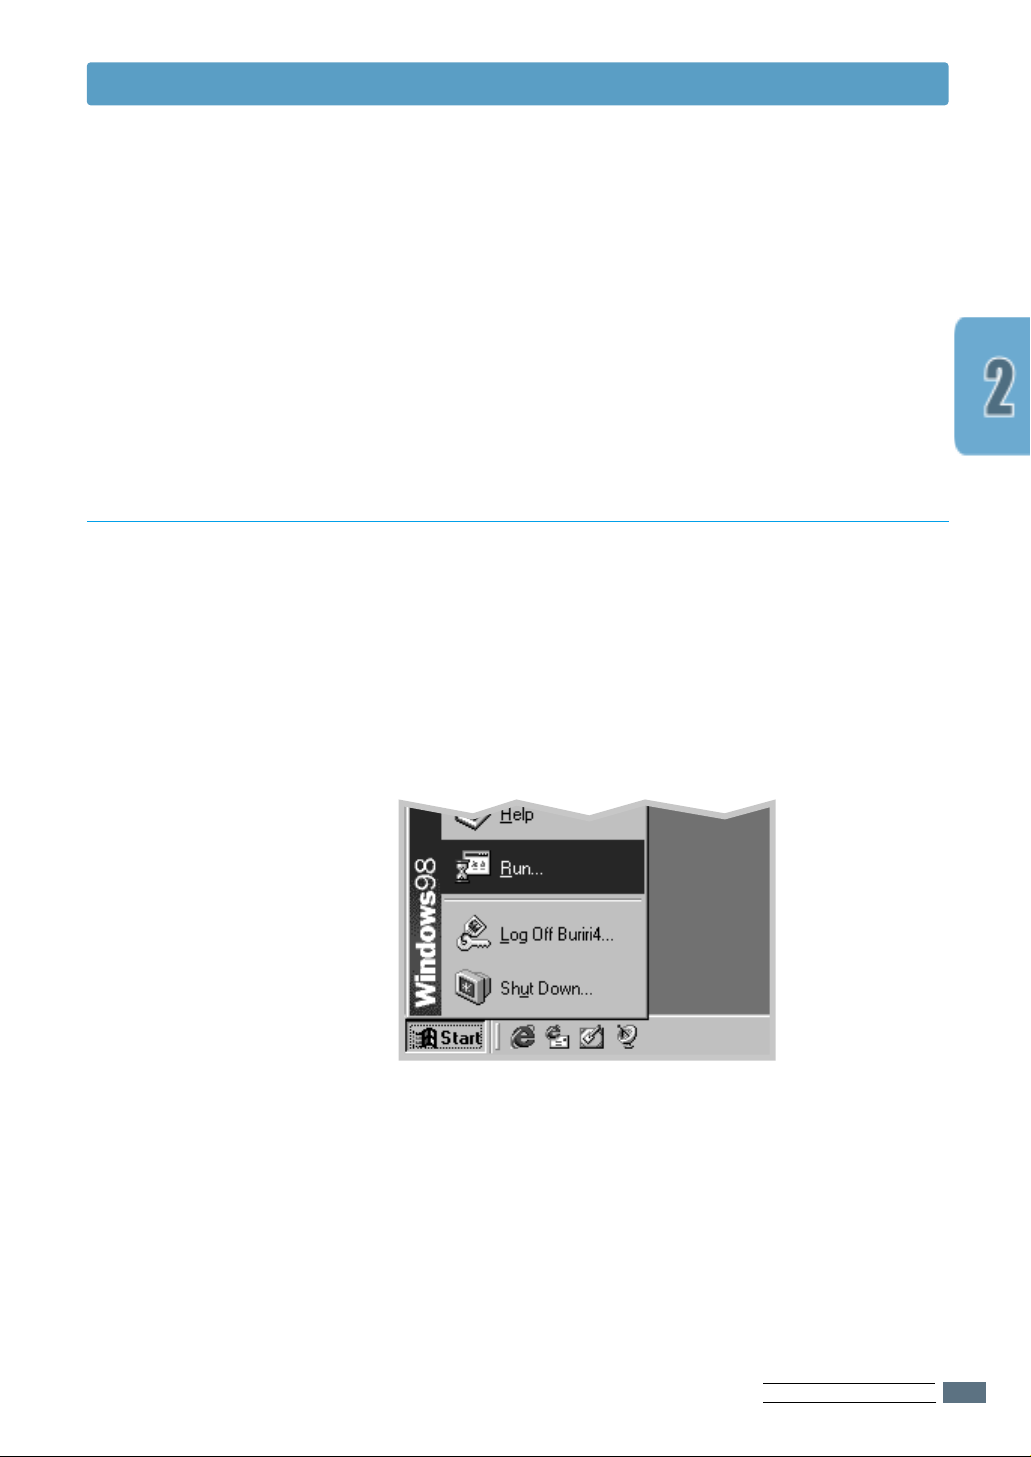
From the Start menu, select Run.
2
Type A:\setup.exe in the Open box and click OK. (if your
3
floppy drive is not A, substitute the correct letter.)
Follow the on-screen instruction to complete the installation.
4
SETTING UP YOUR PRINTER
2.17
Page 31

3
3
This chapter describes how to use the printer’s control
panel. It provides information on the following topics:
◆ Control Panel Buttons
◆ Control Panel Lights
Page 32

Control Panel Buttons
The printer has three buttons: Cancel/Reprint, Demo and Toner Save.
Cancel/Reprint
Cancel job
Press Cancel/Reprint and hold until the control panel
lights blink to cancel a job the printer is currently
printing. The Error light will blink while the print job
is cleared from both the printer and the computer, and
the printer will then return to the ready mode. This
may take some time, depending on the size of the
print job.
Note: If the Cancel/Reprint button is accidentally
pushed, the job must be reprinted. There is no undo
function.
Reprint last page of the job
If you press Cancel/Reprint in the ready mode, the
printer prints the last page of the last print job. For
further information, see page 5.30.
USING THE CONTROL PANEL
3.1
Page 33

Control Panel Buttons
Demo
Print demo page and configuration sheet
Press and hold Demo for about 2 seconds until the
control panel lights blink slowly to print a demo page.
The printer must be in the ready mode.
Press and hold Demo for about 6 seconds until the
control panel lights blink rapidly to print a configuration
sheet. The printer must be in the ready mode. For
further information, see page 2.8.
Start manual feeding
When you select Manual for Paper Source from your
software application, you should press Demo each
time you feed a sheet of paper manually. For further
information, see page 4.7.
Cleaning the inside of the printer
Press and hold Demo for about 10 seconds until the
control panel lights remain illuminated to automatically
clean the inside of the printer. After cleaning the printer,
one cleaning sheet prints. For further information,
see page 6.5.
USING THE CONTROL PANEL
3.2
Toner Save
(on)
Toner Save
(off)
Toner Save
Press Toner Save to turn the toner save mode on or
off. The printer must be in the ready mode.
• If the button backlight is on, toner save mode
activates and the printer uses less toner to print a
document.
• If the button backlight is off, toner save mode is
disabled and you will print in normal quality.
For further information on the Toner Save mode, see
page 5.6.
Page 34

Control Panel Lights
Error
Manual
Paper
Data
The control panel lights indicate the status of your printer. If the Error light is
on, the printer is experiencing an error. See “Troubleshooting Error Messages”
on page 7.19.
Light status legend
symbol for “light off”
symbol for “light on”
symbol for “light blinking”
Control Panel Light Message
Ready Mode
The Data light is on and the printer is ready to print.
No action is needed. If you press and hold the Demo
button for about 2 seconds, a demo page will print. If
you press and hold the button for about 6 seconds, a
configuration sheet will print.
USING THE CONTROL PANEL
3.3
Page 35

Control Panel Lights
Error
Manual
Paper
Data
Error
Manual
Paper
Data
Error
Manual
Paper
Data
Processing
The printer is receiving or processing data. Wait for the
job to print.
Pressing the Cancel/Reprint button cancels the
current job. One or two pages may print as the printer
clears the print job. The printer will return to the ready
mode after the job has been canceled.
Data
The Data light blinks rapidly. Data is in the printer
memory waiting to be printed.
Pressing the Cancel/Reprint button cancels the
current job and the printer returns to the ready mode.
Paper out
The printer is out of paper. The Paper light blinks until
paper is added.
Load paper into the printer. There is no need to press
any button to reset.
Manual feed mode
The printer is set to Manual mode for the paper
source. You have to feed paper manually through the
Manual Tray. If you do not want to be in the Manual
Feed mode, change the setting from your printer
properties. For details on the Manual mode, see page
4.7.
USING THE CONTROL PANEL
3.4
Page 36

Control Panel Lights
Error
Manual
Paper
Data
Error
Manual
Paper
Data
Paper out in the manual feed mode
In the manual feed mode, the printer picks up paper
from the Manual Tray, one sheet at a time.
Feed the correct paper in the Manual Tray, and press
the Demo button to start printing.
Printing in the manual feed mode
The printer is processing data in the manual feed mode.
Wait for the job to print.
USING THE CONTROL PANEL
3.5
Page 37

4
4
This chapter will help you understand what kind of paper
you can use with the ML-6040 printer and how to properly
load paper in the different paper trays for the best print
quality.
Topics included in this chapter are:
◆ Choosing Paper and Other Media
◆ Selecting Output Tray
◆ Loading Paper
◆ Printing on Envelopes
◆ Printing on Heavy Paper
◆ Printing on Labels
◆ Printing on Transparencies
◆ Printing on Preprinted Paper
◆ Printing on Card Stock or Custom-sized Media
Page 38

Choosing Paper and Other Media
You can print on a variety of print media, such as plain paper,
envelopes, labels, transparencies, card stocks and so on. See
“Paper Specifications” on page A.2. To get the best possible
print quality, use only high-quality copier-grade paper.
When you choose print media, consider the following:
• Desired outcome: The paper you choose should be
appropriate for the project.
• Size: You can use any size paper that fits easily within the
paper adjusters of the paper tray.
• Weight : Your printer supports paper weight as follows:
• 16~28 lbs bond for Auto Tray
• 16~53 lbs bond for Manual Tray
• Brightness: Some papers are whiter than others and
produce sharper, more vibrant images.
• Surface smoothness: The smoothness of the paper affects
how crisp the printing looks on the paper.
• Opacity: Opacity refers to the degree to which printing on
one side of the paper shows through the other side. Use
paper high in opacity (or thicker paper) for two-sided
(duplex) printing.
Always test a sample of paper before purchasing large
quantities.
CAUTION: Using media that does not conform to the
specification listed in the paper specification can cause
problems that may require service. This service is not covered
by the warranty or service agreements.
PRINT MEDIA
4.1
Page 39

Choosing Paper and Other Media
Media Sizes and Capacities
Media Size
Plain Paper
Letter
(8.5 x 11 in.)
Legal (8.5 x 14 in.)
Executive (7.25 x 10.5 in.)
Folio (8.5 x 13 in.)
A4 (210 x 297 mm)
JIS B5 (182 x 257 mm)
A5 (148 x 210 mm)
A6 (105 x 148 mm)
Envelopes
No. 10
Monarch (3.87 x 7.5 in.)
C5 (162 x 229 mm)
DL (110 x 220 mm)
B5 (176 x 250 mm)
(4.12 x 9.5 in.)
Input Source/Capacity*
Auto Tray
270
270
270
270
270
270
250
250
–
–
–
–
–
Manual tray
1
1
1
1
1
1
1
1
1
1
1
1
1
Labels
Letter
(8.5 x 11 in.)
A4 (210 x 297 mm)
Transparency films
Letter
(8.5 x 11 in.)
A4 (210 x 297 mm)
Card stocks/Bond
PRINT MEDIA
4.2
–
–
–
–
–
Depending on paper thickness, maximum capacity may be reduced.
*
1
1
1
1
1
Page 40

Paper Guidelines
Choosing Paper and Other Media
When selecting or loading paper, envelopes, or other special
media, keep these guidelines in mind:
• Attempting to print on damp, curled, wrinkled, or torn paper
can cause paper jams and poor print quality.
• Use cut-sheet paper only. You cannot use multi-part paper.
• Use only high-quality, copier grade paper.
• Do not use paper that has been already printed on or that
has been fed through a photocopier.
• Do not use paper with irregularities, such as tabs or
staples.
• Do not attempt to load any tray during printing and never
overfill the tray. This could cause a paper jam.
• Avoid paper with embossed lettering, perforations, or
texture that is too smooth or too rough.
• Colored paper should be of the same high quality as white
photocopy paper. The pigments must withstand the printer ’s
fusing temperature of 400°F (205°C) for 0.1 second without
deterioration. Do not use paper with a colored coating that
was added after the paper was produced.
• Preprinted forms must be printed with nonflammable, heatresistant ink that will not melt, vaporize, or release
hazardous emissions when subjected to the printer’s
approximately 400°F (205°C) fusing temperature for 0.1
second.
• Store paper in its ream wrapper until it is ready to use.
Place cartons on pallets or shelves, not on the floor.
• Do not place heavy objects on top of the paper, whether it
is packaged or unpackaged.
• Keep paper away from moisture, direct sunlight or other
conditions that can cause it to wrinkle or curl.
PRINT MEDIA
4.3
Page 41

Selecting the Output Tray
The printer has two output locations: the rear output tray and the top output tray.
To use the top output tray, be sure the rear output tray is closed. To use the rear output tray,
open it.
• If paper coming out of the top output tray has problems, such as excessive curl, try
printing to the rear output tray.
• To avoid paper jams, do not open or close the rear output tray while the printer is
printing.
Printing to the Top Output Tray
""
Top output tray
""
(Face down)
The top output tray collects paper face-down, in
correct order. The top output tray should be used
for most print jobs and is recommended for printing
the following:
• over 250 sheets of paper, continuously
• transparencies
Printing to the Rear Output Tray (Face up)
The printer always prints to the rear output tray if it
is open. Paper comes out of the printer face-up,
with the last page on top.
Printing from the Manual Tray to the rear output tray
provides the straight paper path. Opening the rear
output tray might improve output quality with the
following:
4.4
""
Rear output tray
""
PRINT MEDIA
• over 100 sheets of paper, continuously
• envelopes
• labels
• small custom-size paper
• postcards
• paper lighter than 16 lb (60 g/m
heavier than 28 lb (105 g/m
2
) or
2
)
Page 42

To open the rear output tray:
1
Open the rear door
The cover functions as the output tray.
2
Pull the extender to extend the output
tray to its full-length position. This will
allow the tray to hold longer paper.
by pulling it down
Selecting the Output Tray
.
3
If you do not want to stack the printed
pages on the rear output tray, slide the
extender back into place and close the
tray. The pages will then stack on the
top output tray.
PRINT MEDIA
4.5
Page 43

Loading Paper
Proper paper loading helps to prevent paper jams and ensure
trouble-free printing. Do not remove paper tray while a job is
printing. Doing so may cause a paper jam.
The paper level indicator on the front of the paper tray shows
the amount of paper currently left in the tray. When the tray is
empty, the indicator turns red.
Paper full
""!! !!
Paper empty
""
""
""!! !!
Using Auto Tray
Auto tray
PRINT MEDIA
4.6
Auto Tray holds 270 sheets of paper. See “Media Sizes and
Capacities” on page 4.2 for acceptable paper size and
capacities of the tray.
Load a stack of paper into the Auto Tray and print. For details
on loading paper in the Auto Tray, see “Load Paper” on page
2.4.
Page 44

Loading Paper
Using the Manual Tray
When you change the print settings, if you select Manual in the Paper Source option, you
can manually load paper in the Manual Tray. Manually loading paper can be helpful when you
want to check the print quality after each page is printed.
You must load paper sheet-by-sheet in the Manual Tray, send print data to print the first
page, and press the Demo button to print each following page.
1
Pull the Manual Tray down towards you.
2
Load the paper in the Manual Tray with
the print side up.
Adjust the guide to the width of paper.
PRINT MEDIA
4.7
Page 45

Loading Paper
3
When you print a document, you must
select Manual for Paper Source from
the software application, and then
select the correct paper size and type.
For details, see page 5.3.
4
Print the document.
5
The Manual light on the control panel
blinks. Press the Demo button on the
control panel.
The sheet of paper is loaded and
printed.
6
After one page is printed, the Manual
light on the control panel blinks again.
Feed the next sheet into the Manual
Tray and press the Demo button.
Repeat this step for every page to be
printed.
4.8
PRINT MEDIA
Page 46

Printing on Envelopes
Guidelines
• Only use envelopes recommended for laser printers. Before you load envelopes in the
Manual Tray, make sure that they are undamaged.
• Do not feed stamped envelopes.
• Never use envelopes with clasps, snaps, windows, coated lining, or self-stick adhesives.
These envelopes may severely damage the printer.
1
Open the Manual Tray by pulling it down
toward you.
2
Open the rear output tray and pull the
extender.
PRINT MEDIA
4.9
Page 47

Printing on Envelopes
3
Load the envelope with the flap side
down.
The stamp area is on the left side and the
end of the envelope with the stamp area
enters the Manual Tray first.
4
Adjust the guide to the width of envelope.
4.10
6
When you print on envelopes, configure
the paper source, type and size properly
in the software application. For details,
see page 5.3.
7
After printing, close the Manual Tray and
the rear output tray.
PRINT MEDIA
Page 48

Printing on Heavy Paper
Guidelines
• Heavy paper is any paper heavier than 24 lb (90 g/m2). The maximum paper weight
available for your printer is 43 lb (163g/m
• Do not use extremely heavy paper stock (greater than 43 lb, or 163 g/m
Misfeeds, mis-stacking, media jams, poor toner fusing, poor print quality, and excessive
mechanical wear can result.
1
Open the Manual Tray and the rear
output tray.
2
Load paper with print side up, and
against the left edge of the tray.
Adjust the guide to the width of paper.
2
).
2
bond).
3
When you print on heavy paper, select
Bond in the Paper Type section.then
configure the paper source, and size in
the software application. For details, see
page 5.3.
PRINT MEDIA
4.11
Page 49

Printing on Labels
Guidelines
• Only use labels recommended for laser printers.
• Verify that the labels’ adhesive material can tolerate fusing temperature of 200°C
(392°F) for 0.1 second.
• Make sure that there is no exposed adhesive material between the labels. Exposed areas
can cause labels to peel off during printing, which can cause paper jams. Exposed
adhesive can also cause damage to printer components.
• Do not feed a sheet of labels through the printer more than once. The adhesive backing
is designed for one pass through the printer.
• Do not use labels that are wrinkled, bubbled, separated from the backing sheet, or
damaged in any way.
1
Open the Manual Tray and the rear
output tray.
4.12
2
Load labels with print side up, and
against the left edge of the tray.
Adjust the guide to the width of paper.
3
When you print on labels, configure the
paper source, type and size in the
software application. For details, see
page 5.3.
Note: To prevent them from sticking
together, remove label sheet from the
output tray as they are printed out.
PRINT MEDIA
Page 50

Printing on Transparencies
Guidelines
• Only use transparencies recommended for use in laser printers.
• Make sure that the transparencies are not wrinkled or curled, and that they do not have
any torn edge.
• Hold the transparencies by the edges and avoid touching the print side. Oils from your
fingers that are deposited on the transparency can cause print quality problems.
• Be careful not to scratch or leave fingerprints on the print side.
• To prevent transparencies from curling, use the standard output tray. (This is for
transparencies only; for other media, use the rear output tray to reduce curling.)
1
Open the Manual Tray by pulling it down
toward you.
2
Load transparencies with print side
up, and the top with the adhesive
strip entering the printer first.
Adjust the guide to the width of paper.
3
When you print on transparencies,
configure the paper source, type and
size in the software application. For
details, see page 5.3.
Notes:
• To prevent transparencies from
sticking together, remove them from
the output tray as they are printed.
• Place transparencies on a flat
surface after removing them from the
printer.
PRINT MEDIA
4.13
Page 51

Printing on Preprinted Paper
Preprinted paper is paper that has some type of printing placed on it before it is sent through
the printer. (paper that has a preprinted logo at the top of the page, for example)
Guidelines
• Letterheads must be printed with heat-resistant ink that will not melt, vaporize, or
release hazardous emissions when subjected to the printer’s fusing temperature of 400°F
(205°C) for 0.1 second.
• Ink on letterheads must be non-flammable and should not adversely affect any printer
rollers.
• Forms and letterheads should be sealed in a moisture-proof wrapping to prevent changes
during storage.
• Before you load preprinted paper as forms and letterheads, verify that the ink on the
paper is dry. During the fusing process, wet ink can come off preprinted paper.
1
Load letterheads into the tray you want
to use as shown in the figures.
Adjust the guide to the width of paper.
2
When you print a document on the
paper, configure the paper source, type
and size in the software application. For
details, see page 5.3.
Load with the
design face down,
bottom edge
toward the printer.
Load with the design face up,
top edge toward the printer.
4.14
PRINT MEDIA
Page 52

Printing on Card Stock or Custom-sized Media
Postcards, 3 by 5 in.(index) cards and other custom-sized media can be printed with the ML6040 printer. The minimum size is 98 by 148 mm (3.9 by 5.83 in.) and the maximum size is
216 by 356 mm (8.5 by 14 in.).
Guidelines
• Always insert the short-edge into the Manual tray first. If you want to print in landscape
mode, make this selection through your software. Inserting paper long-edge first may
cause a paper jam.
• Do not print on media smaller than 98 mm (3.9 in.) wide or 148 mm(5.83 in.) long.
• Set margins at least 6.4 mm (0.25 in.) away from the edges of the media in the software
application.
1
Open the Manual Tray. Open the rear
output tray and pull the extender out to
its full-length position.
2
Load print media with print side up,
short edge first and against the left
edge of the tray.
Adjust the guide to the width of paper.
3
Configure the paper source, type and
size in the printer driver’s properties
(see page 5.3) and print.
Note: If the size of your print media is
not listed in the Paper Size box in the
Paper tab of the printer driver
properties, select Custom Paper Size
and set the paper size manually.
PRINT MEDIA
4.15
Page 53

5
5
This chapter explains your printing options and covers common
printing tasks.
Topics included in this chapter are:
◆
Printing a Document
◆
Using Toner Save Mode
◆
Printing on Both Sides of the Paper (Manual Duplexing)
◆
Printing Multiple Pages on One Sheet of Paper (N-Up Printing)
◆
Scaling Your Document
◆
Fitting Your Document To a Selected Paper Size
◆
Printing Booklets
◆
Printing Posters
◆
Setting Graphic Properties
◆
Printing Watermarks
◆
Using Page Overlay
◆
Printing on a Network Environment
◆
Reprinting the Last Page
Page 54

Printing a Document
The following procedure describes the general steps required
for printing from various Windows applications. The exact
steps for printing a document may vary depending on the
application program you are using. Refer to your software
application’s documentation for the exact printing procedure.
Open the document you want to print.
1
Select Print from the File menu. The Print dialog box for
2
your application will be displayed (the Print dialog box for
your application may look slightly different).
The basic print settings you will need are usually selected
within this Print dialog box. These settings include the
number of copies, paper size, and page orientation.
If you see a Properties button,
click it.If you see Setup,
Printer, or Options, click that
button instead; then click
Properties in the next screen.
Make sure your
printer is selected.
PRINTING TASKS
5.1
Page 55

Printing a Document
To take full advantage of the printer features provided by
3
your ML-6040 printer, click Properties in the application’s
Print dialog box and go to step 4.
If you see Setup, Printer, or Options, click that button
instead. Then click Properties in the next screen.
Now you see the Samsung ML-6040 Series printer’s
4
Properties dialog box. The Properties dialog box allows you
to access all the information you will need when using your
printer.
If necessary, click the Paper tab to display the settings
shown below. The Paper tab contains the options for
setting the basic paper handling.
5.2
PRINTING TASKS
Page 56

Printing a Document
The default paper source is Auto Select. If the paper
4
source is set to Auto Select, the printer automatically
selects the print media according to the following order:
Manual Tray, Auto Tray.
Manual source is used when printing to special media. You
have to feed one sheet at a time into the printer. See page
4.7.
The default paper type is Use Printer Default. If you load
4
a different type of print media, select the corresponding
paper type. For further information on print media, refer to
chapter 4 ‘Print Media’.
Also, select the paper size you have loaded in your printer.
The Paper Orientation option allows you to select the
4
direction in which information is printed on a page.
Portrait prints across the width of the page, letter style.
Landscape prints across the length of the page,
spreadsheet style.
"
"
Landscape
"
"
Portrait
PRINTING TASKS
5.3
Page 57

Printing a Document
Click other tabs on the top of the Properties dialog box to
5
access other features, if needed.
When you complete the print settings, click OK until the
6
Print dialog box is displayed.
Click OK to start printing.
7
Notes:
• Most Windows applications will override settings you specify
in the printer driver. Change all print settings available in the
software application first, and change any remaining settings
suing the printer driver.
• The settings you change remain in effect only while you are
using the current program. To make your changes permanent,
make them in the Printers folder. Follow this procedure:
1. Click the Windows Start button.
2. Select Settings, then Printers to open the Printers window.
3. Select the Samsung ML-6040 Series printer icon.
4. Click the right mouse button and select Properties to open
the properties window.
5.4
PRINTING TASKS
Page 58

Canceling a Print Job
There are two ways to stop a print job.
To stop a print job from the ML-6040 printer
Press the Cancel/Reprint button on the control panel.
The printer will finish printing the page that is moving through
the printer and delete the rest of the print job. Pressing
Cancel/Reprint cancels only the current job in the printer. If
more than one print job is in printer memory, Cancel/Reprint
must be pressed once for each job.
Printing a Document
Printing Help
To stop a print job from the Printers folder
1. From the Start menu, select Settings.
2. Select Printers to open the Printers window, then doubleclick the Samsung ML-6040 Series.
3. From the Document menu, select Cancel Printing
(Windows 9x) or Cancel (Windows NT 4.0).
The Samsung ML-6040 printer has a help screen that can be
activated by the Help button in the printer Properties dialog
box. These help screens give detailed information about the
printer features provided by the ML-6040 printer driver.
If you want to restore the default printer properties settings
when you change the print settings, click Defaults in the
Samsung ML-6040 Series Properties dialog box.
PRINTING TASKS
5.5
Page 59

Using Toner Save Mode
Toner Save mode allows the printer to use less toner on each
page. Selecting this option will extend the life of your toner
cartridge and reduce your cost per page, but will reduce print
quality.
There are two ways to enable the Toner Save mode.
To enable this feature from the ML-6040 series printer
Press the Toner Save button on the control panel. The printer
must be in the ready mode (Data light is on).
• If the button backlight is on, toner save mode activates and
the printer uses less toner to print a page.
• If the button backlight is off, toner save mode is disabled
and the printer prints in the normal mode.
Note: To enable or disable the Toner Save mode from the
control panel, the Toner Save Mode option in the printer driver
must be set to
PPrriinntt SSeettttiinngg
. See below.
To enable this feature from the software application
1. When you change the print settings from your software
application, access the printer properties. See page 5.2 to
access the printer properties.
2. Click the Graphic tab, and select the Toner Save Mode
option. You can select from:
• Printer Setting: If you select this option, this feature is
determined by the setting you’ve made on the control
panel of the printer.
• Standard: If you don’t need to save toner to print a
document, select this option.
• Save: Select this option to allow the printer to use less
toner on each page.
5.6
3. Click OK.
PRINTING TASKS
Page 60

Printing on Both Sides of the Paper
To print on both sides of the paper (manual duplexing), you
must run the paper through the printer twice. You can print
using the top output tray (face down tray) or the rear output
tray (face up tray). Samsung recommends using the top
output tray for light-weight paper. Use the rear output tray for
any heavy media or media that tends to curl when printed,
such as envelopes and card stock.
When you change the print settings from your software
1
application, access the printer properties. See page 5.2 to
access the printer properties.
From the Paper tab, select the paper orientation, source,
size and type.
Click the Output tab, then choose Flip on Long Edge or
2
Flip on Short Edge from the Type drop-down list in the
Duplex section.
(Manual Duplexing)
PRINTING TASKS
5.7
Page 61

Printing on Both Sides of the Paper (Manual Duplexing)
Choosing Flip on Long Edge lets you place the binding
orientation along the long edge of the paper, as in a
magazine.
Choosing Flip on Short Edge lets you place the binding
orientation along the short edge of the paper, as in a
calendar.
"
Flip on Long Edge in the
Portrait orientation
"
"
Flip on Long Edge in the
Landscape orientation
"
➛!!
Flip on Short
➛!!
Edge in the
Portrait
orientation
Flip on Short Edge in the
Landscape orientation
Select Face Down Tray (top output tray) or Face Up Tray
3
"
"
(rear output tray) in which the printed media is to be
stacked. According to this option, the printer will determine
the print page order when the second sides are printed.
If you select Face Up Tray, open the face up tray.
If you want to print the instruction page which tells you
4
how to load the paper, click Print Instruction sheet. If
the box is checked, the printer prints the instruction sheet
before the duplexing job is printed. If the box is empty, this
feature is disabled.
5.8
PRINTING TASKS
Page 62

5
6
Remove the printed
pages, and reload them
into the Manual Tray one
sheet at a time with the
printed side face down.
Printing on Both Sides of the Paper (Manual Duplexing)
Start printing. The printer automatically prints only the
odd-numbered pages.
Gather up the printed pages, and reload them into the
Manual Tray one sheet at a time in the order that they are
printed.
Note: If you have selected the Face Up Tray option in Step
3, the last page is placed on the top of the stack. Do not
rearrange the pages before reloading them to print the
second side.
The following illustrations show you how to put the printed
pages back into the printer.
Note: Duplexing can
cause the printer to
become dirty more quickly
and can therefore reduce
print quality. See “Cleaning
the Printer” on page 6.4 if
the printer becomes dirty.
(left edge toward
the printer)
Flip on Long Edge in the
Landscape orientation
(top edge toward
the printer)
Flip on Long Edge in the
Portrait orientation
You are prompted to reinsert the paper into the Manual
7
Flip on Short Edge in the
Landscape orientation
Flip on Short Edge in the
Portrait orientation
(right edge toward
the printer)
(bottom edge
toward the printer)
Tray. Click OK on the screen to start printing the second
side. The printer automatically prints only the evennumbered pages.
Note: You must press the
DDeemmoo
button to start printing each
time you load the printed page into the Manual Tray.
PRINTING TASKS
5.9
Page 63

rinting Multiple Pages on
P
One Sheet of Paper
You can select the number of pages that you want to print on
a single sheet of paper. If you choose to print more than one
page per sheet, the pages will appear decreased in size and
arranged on the sheet. You can specify up to 16 pages.
When you change the print settings from your software
1
application, access the printer properties. See page 5.2 to
access the printer properties.
"!4 pages per sheet
"!
From the Paper tab, select the paper orientation, source,
size and type.
Click the Output tab, and choose Multiple Pages per
2
Side in the Type drop-down list. Then select the number of
pages you want to print per sheet (1, 2, 4, 9 or 16) in the
Pages per Sheet drop-down list.
Click Print Page Borders if you want to print a border
3
around each page on the sheet. Print Page Borders is
enabled only if Pages per Sheet is 2, 4, 9, or 16.
(N-Up Printing)
5.10
PRINTING TASKS
Click OK, then start printing.
4
Page 64

Scaling Your Document
This printer feature allows you to scale your print job on a
page.
When you change the print settings from your software
1
application, access the printer properties. See page 5.2 to
access the printer properties.
Click the Output tab, and select Scale Printing in the
2
Type drop-down list.
Enter the desired scaling rate in the Scales input field.
3
You can also click the " or ❷ buttons.
Click OK, then start printing.
4
PRINTING TASKS
5.11
Page 65

Fitting Your Document To a Selected Paper Size
This printer feature allows you to scale your print job to any
selected paper size regardless of the digital document size.
This can be useful when you want to check fine details on a
small document.
When you change the print settings from your software
1
application, access the printer properties. See page 5.2 to
access the printer properties.
Click the Output tab, and select Fit to Page in the Type
2
drop-down list.
You’ll see the Application paper size and then you will be
3
prompted to select the Fit to paper Size. Select the
correct size from the drop-down list.
5.12
PRINTING TASKS
Click OK, then start printing.
4
Page 66

Printing Booklets
The Booklet printing feature allows you to print your document
as a 2-sided (duplex) job and to arrange the pages so that the
paper can be folded in half after printing to produce a booklet.
"
Portrait orientation
Landscape orientation
"
"
"
When you change the print settings from your software
1
application, access the printer properties. See page 5.2 to
access the printer properties.
From the Paper tab, select the paper orientation, source,
size and type.
Note: For booklet printing, only four paper sizes are
supported: Letter, A4, Legal, and Executive.
Click the Output tab, then choose Booklet Printing from
2
the Type drop-down list.
Then select the paper size you are using from the Booklet
drop-down list.
PRINTING TASKS
5.13
Page 67

Printing Booklets
Select Face Down Tray (top output tray) or Face Up Tray
3
(rear output tray) in which the printed media is stacked.
According to this option, the printer will determine the print
page order when the second sides are printed.
If you select Face Up Tray, open the face up tray.
If you want the instruction page which tells you how to load
4
the paper, click Print Instruction sheet. If the box is
checked, the printer prints the instruction page before the
duplexing job is printed. If the box is empty, this feature is
disabled.
Print the document.
5
The printer prints side one as shown below for an 8-page
6
document.
"!
8 page document
"!
Gather up the printed pages, and reload them into the
7
Manual Tray one sheet at a time. Go to the next page for
details on reloading the printed pages.
5.14
PRINTING TASKS
Page 68

Remove the printed
pages, and reload them
into the Manual Tray one
sheet at a time with
printed side face down.
Printing Booklets
The following illustrations show how to put the paper back
7
into the printer.
In Portrait orientation,
insert the pages with
left edge
toward the printer.
"!
Face Down Tray output
"
Face Up Tray output
"
"!
Note: If you have
selected the Face Up Tray
option at Step 3, the last
page is placed on the top
of the stack. Do not
rearrange the pages
before reloading the
pages.
In Landscape orientation,
insert the pages with
bottom edge
toward the printer.
"
Face Up Tray output
"
You are prompted to reinsert the paper into the Manual Tray.
8
"
Face Down Tray output
"
Click OK on the screen. The printer will finish printing.
Note: You must press the
DDeemmoo
button to start printing each
time you load the printed page into the Manual Tray.
Fold and staple the pages.
9
PRINTING TASKS
5.15
Page 69

Printing Posters
This feature allows you to print a single-page document onto
4, 9, 16, 25, or 36 sheets of paper, for the purpose of pasting
the sheets together to form one poster-size document.
When you change the print settings from your software
1
application, access the printer properties. See page 5.2 for
more information on accessing printer properties.
From the Paper tab, select the paper orientation, source,
size and type.
"
"
Poster printing
with 2x2 style
Click the Output tab, and select Poster Printing in the
2
Type drop-down list.
5.16
PRINTING TASKS
Page 70

Printing Posters
To determine the scaling factor, select the Style; 2x2, 3x3,
3
4x4, 5x5 or 6x6.
For example, if you select 2x2, the output will be
automatically stretched to cover 4 physical pages.
➛!!
2 x 2
➛!!
You may specify an overlap in millimeter or inch to make it
4
➛!!
➛!!
3 x 3
easier to reconstruct the resulting poster.
0.3 inches
"!!
Overlap=0
"!!
Click OK, then start printing.
5
"!!
Overlap=0.3
"!!
0.3 inches
PRINTING TASKS
5.17
Page 71

Setting Graphic Properties
Use the following options to adjust the print quality for your
specific printing needs when you access the printer properties.
See page 5.2 for more information on accessing printer
properties.
If necessary, click the Graphic tab to display the settings shown
below.
5.18
PRINTING TASKS
Resolution
Click here to save
the changes when
setting is done.
You can select the printing resolution by choosing either
300 dpi or 600 dpi. The higher the setting, the sharper the
clarity of printed characters and graphics. Higher settings may
increase the time it takes to print a document.
Page 72

Setting Graphic Properties
SRT Mode
Some printed characters or images appear to have jagged or
uneven edges. Set this Samsung Resolution enhancement
Technology (SRT) option to improve the print quality of your
text and image and make the characters and images appear
smoother.
• Printer Default – Choose this setting to use SRT that your
printer provides.
• Normal – SRT mode is disabled. Choose this setting if
graphics, particularly scanned images, are not
printing clearly.
• Text Enhance - This setting refines the print quality of
characters by smoothing out jagged edges
that can occur on the angles and curves of
each character.
• Image Enhance - This setting refines the print quality of
photo images using SRT.
Note: Text Enhance and Image Enhance are disabled when the
300 dpi setting is selected.
Graphic Mode
Configure the printer to process graphics as raster or vector
images. Setting this option tells Windows how to send graphic
images to the printer. All graphics can be printed as raster
images, however some geometric shapes or patterns print
faster if they are printed as vector graphics.
• Vector – If you select the Vector setting, Windows will send
graphics to the printer as a mixture of vector and
bit map images.
• Raster – When you select the Raster setting, Windows will
send all graphics to the printer as bit map images.
Note: Not all graphic images can print using the
If you are using the
VVeeccttoorr
setting, and your graphic images do
VVeeccttoorr
setting.
not print as they appear on your computer screen, select the
RRaasstteerr
setting and reprint your graphic. (Window 9x only)
PRINTING TASKS
5.19
Page 73

Setting Graphic Properties
Darkness
Reprint
Reprint When Jam
Use this option to lighten or darken the image appearance in
your print jobs.
• Normal – This setting is for normal documents.
• Light – This setting is for bolder line widths or darker gray-
scale images.
• Dark – This setting is for finer line width, higher definition in
graphics, and lighter gray-scale images.
You can set the printer not to print the last page of the last job
when the Cancel/Reprint button is pressed. For details, see
‘Reprinting the Last Page’ on page 5.30.
With this option On, the printer keeps the image for a printed
page until the printer signals that the page has successfully
exited the printer. If a paper jam occurs, the printer will
automatically reprint all jammed pages after the jam is
cleared.
5.20
Power Save Mode
PRINTING TASKS
To conserve power when a printer is idle, you can set the
printer to enter a reduced power state after completing a print
job, according to a time specified by you in the Power save
Mode box.
Select the desired length of time from the drop-down list.
If your printer is constantly used, select OFF to keep the
printer ready to print with the minimum warm-up time. This
uses more energy to keep the printer warm and ready to print.
Page 74

Printing Watermarks
The Watermark option allows you to print text over an existing
document. For example, you may want to have large gray
letters reading “Draft” or “Confidential” printed diagonally
across the first page or all pages of a document.
There are several predefined watermarks that come with the
ML-6040 series printer, and they can be modified or you can
add new ones to the list.
When you change the print settings from your software
To use an existing
watermark
1
application, access the printer properties. See page 5.2
for more information on accessing printer properties.
Click the Watermark tab, and select the desired
2
watermark in the Message drop-down list. You will see
the selected watermark in the preview window.
Click OK, then start printing.
3
preview window
PRINTING TASKS
5.21
Page 75

Printing Watermarks
To create or edit a
watermark
When you change the print settings from your software
1
application, access the printer properties. See page 5.2 for
more information on accessing the printer properties.
Click the Watermark tab, and enter the desired text
2
message in the Text field. This will be displayed in the
preview window. The preview window is provided so that you
can see how the watermark will appear on the printed page.
Select the desired watermark options. You can select the
3
font type and size, color and angle. There are three
checkboxes at the bottom of the dialog box:
• Transparent Text – Allows the document to show
through the watermark.
• As Outline Only – Prints the text outline of the
watermark. This setting globally effects
all watermarks in the list.
• On First Page Only – Prints the watermark only on the
first page.
5.22
Use these scroll
bars to adjust the
position.
PRINTING TASKS
Page 76

Printing Watermarks
If you have created a new or edited an existing watermark,
4
the Add and Update button is enabled.
To add a new watermark to the list, click Add.
If you want to edit, select the desired watermark from the
5
list, edit, then click Update.
When you complete the edit, click OK, then start printing.
6
To stop printing the watermark, select None in the Message
drop-down list.
To delete a watermark
When you change the print settings from your software
1
application, access the printer properties. See page 5.2 for
more information on accessing the printer properties.
From the Watermark tab, select the watermark you want
2
to delete in the Messages drop-down list.
Click Delete.
3
Click OK.
4
PRINTING TASKS
5.23
Page 77

Using Page Overlay
What is an Overlay?
Creating a New Page
Overlay
An overlay is text and/or images stored in the computer HDD
as a special file format that can be printed on any document
you choose. Overlays are often used to take the place of
preprinted forms and letterhead paper. Rather than using
preprinted letterhead, for example, you can create an overlay
containing the exact same information that is currently on
your letterhead. Then when you want to print a letter with
your company’s letterhead, you do not need to load preprinted
letterhead paper in the printer. You need only to tell the
printer to print the letterhead overlay on your document.
To use a page overlay, you must create a new page overlay
containing your logo or image.
Create or open a document containing a text or image you
1
want to use for page overlay. Position the items exactly as
you wish them to appear when printed as an overlay. If
needed, save the file for later use.
5.24
PRINTING TASKS
Select Print from the File menu. Then click Properties in
2
the application’s Print dialog box to access the printer
properties. For details, see page 5.2.
Click the Overlays tab, and click Create Overlay.
3
Page 78

Using Page Overlay
In the Create Overlay dialog box, type a name of up to
4
eight characters in the File name box. Select the
destination path if necessary. (The default is
C:\FORMOVER).
Using Page Overlay
Click OK. You will see the name in the Overlay List box.
5
Click OK or Yes until you complete the creation.
6
The file is not printed out. Instead it will be stored on your
computer HDD disk.
Note: The overlay document size must be the same as
documents you will print with the overlay. Do not creat overlay
with the watermark.
After an overlay has been created, it is ready to be printed
with your document. To print an overlay with a document:
Create or open the document you want to print.
1
When you change the print settings from your software
2
application, access the printer properties. See page 5.2 to
access the printer properties.
Click the Overlays tab, and select the desired overlay from
3
the Overlay List box.
PRINTING TASKS
5.25
Page 79

Using Page Overlay
If the desired overlay file does not appear in the Overlay
4
List box, click Load Overlay, and select the overlay file.
If you have stored the overlay file you want to use into an
external source, you can also load the file when you access
this Load Overlay window.
After you select the file, click OK. The file is now shown in
the Overlay List box and is available for printing. Select
the overlay from the Overlay List box.
5.26
PRINTING TASKS
Page 80

Using Page Overlay
If necessary, click Query Page Overlay. If this box is
5
checked, a message box will appear each time you submit a
document for printing, asking you to confirm your wish to
print an overlay on your document.
Answering Yes to the message box means that the selected
overlay will be printed with your document.
Answering No to the message box cancels overlay printing.
If this box is empty, and an overlay has been selected, the
overlay will be automatically printed with your document.
Click OK or Yes until the printing starts.
6
The selected overlay will be downloaded with your print job
and printed on your document.
Deleting a Page Overlay
Note: The overlay document resolution must be save as
document you will print with the overlay.
You can delete page overlays that are no longer used.
In the printer properties dialog box, click the Overlays tab.
1
Select the overlay you want to delete from the Overlay
2
List box.
Click Delete Overlay.
3
Click OK until you exit the Print dialog box.
4
PRINTING TASKS
5.27
Page 81

Printing on a Network Environment
If you work in a network environment, you can connect your
printer directly to a selected computer (called the “host
computer”) on the network. The printer can then be shared
by other users on the network through a Windows 9x, or NT
4.0 network printer connection.
Note: You need to install the Samsung ML-6040 Printer driver
on each computer that will print documents to the printer.
Setting Up Host Computer
Start Windows.
1
From the Start menu, select Control Panel, and
2
double-click on the Network icon.
Check the File and Print Sharing box, then click OK.
3
Close the window.
Click Start and select Printers from Settings, then
4
double-click your printer name.
Select Properties in the Printers menu.
5
Click the Sharing tab, then check the Shared As box.
6
Fill in the Shared Name field, then click OK.
5.28
PRINTING TASKS
Page 82

Setting Up Client PC
Printing on a Network Environment
Right-click Start, and select Explorer.
1
Open your network folder in the left column.
2
Right-click the shared name, and select Capture Printer
3
Port.
Select the port you want, check the Reconnect at log
4
on box, then click OK.
From the Start menu, select Settings, then Printers.
5
Double-click your printer icon.
6
From the Printers menu, select Properties.
7
Press the Details tab, select the printer port, then click
8
OK.
PRINTING TASKS
5.29
Page 83

Reprinting the Last Page
The Samsung ML-6040 printer’s memory always keep the last
page of the last job. If you canceled a print job due to a paper
jam or other problems and you want to know which page was
printed last, reprint the last page.
Press Cancel/Reprint briefly in the ready mode.
Note: If you want to prevent somebody from reprinting your document, you can turn
the Reprinting feature off in the printer’s properties dialog box. When you turn the
feature off in the printer’s properties, the
does not perform the reprinting operation.
CCaanncceell//RReepprriinntt
TToo ddiissaabbllee tthhiiss ffeeaattuurree::
1. From the
PPrriinntteerrss
2. Click the right mouse button on the
66004400 SSeerriieess
open the properties window.
3. From the
drop-down list.
With this option Off, you cannot reprint the last page
from the control panel.
When you want to reprint the last page on the
control panel, you must select
4. Click
SSttaarrtt
.
printer icon and select
GGrraapphhiicc
OOKK
.
button on the control panel
menu, select
tab, Select
SSeettttiinnggss
OOffff
from the
OOnn
from the list.
and then
SSaammssuunngg MMLL--
PPrrooppeerrttiieess
RReepprriinntt
to
5.30
PRINTING TASKS
Page 84

6
6
This chapter provides suggestions for high-quality and
economical printing and information for maintaining the toner
cartridge and the printer.
Topics included in this chapter are:
◆ Maintaining Toner Cartridge
◆ Cleaning the Printer
Page 85

Maintaining Toner Cartridge
Toner cartridge storage
Toner cartridge life
expectancy
To get the most from the toner cartridge, keep the following
guidelines in your mind.
• Do not remove the toner cartridge from its package until you
are ready to use it. The shelf life of a cartridge in an unopened
package is approximately 2 years. The shelf life of a cartridge
in an opened package is approximately 6 months.
• Do not refill toner cartridges. The printer warranty does not
cover damage caused by using a refilled cartridge.
• Store toner cartridges in the same environment as the printer.
• Do not remove a toner cartridge from the printer except to
replace it, clean it or clear a paper jam. Replace the cartridge
immediately.
• To prevent damage to the toner cartridge, do not expose it to
light for more than a few minutes.
The life of the toner cartridge depends on the amount of toner
that print jobs require. When printing text at 5 % coverage, a
new toner cartridge lasts an average of 6,000 pages. (But, the
toner cartridge supplied with the printer lasts an average of
3,000 pages.)
Recycling toner
cartridge
Saving toner
After you install a new toner cartridge (see page 2.2), follow the
instructions included in the toner cartridge box to recycle the old
cartridge.
To save toner, press the Toner Save button on the printer
control panel. The button will be lit. You can also enable the
Toner Save Mode in your printer properties. Refer to “Using
Toner Save Mode” on page 5.6. Selecting this option will expand
the life of the toner cartridge and reduce your cost per page, but
will reduce print quality.
MAINTAINING YOUR PRINTER
6.1
Page 86

Toner Cartridge
Redistributing Toner
When toner is low, faded or light areas may appear on a printed page. You may be able to
temporarily improve print quality by redistributing the toner. The following procedures may
allow you to finish the current print job before replacing the toner cartridge.
1
Open the top cover.
2
Remove the toner cartridge from the
printer.
CAUTIONS:
• Avoid reaching too far into the
printer. The fusing area may be hot.
• To prevent damage to the toner
cartridge, do not expose it to light
for more than a few minutes.
MAINTAINING YOUR PRINTER
6.2
Page 87

3
Gently shake the toner cartridge from
side to side 5 or 6 times to redistribute
the toner.
Note: If the toner gets on your
clothing, wipe it off with a dry cloth
and wash clothing in cold water. Hot
water sets toner into fabric.
4
Reinsert the toner cartridge into the
printer. Be sure that the toner cartridge
is firmly in its place.
Toner Cartridge
5
Firmly
If the print remains light
Remove the old cartridge and install a
new toner cartridge. See “Install the
Toner Cartridge” on page 2.2.
close the cover.
MAINTAINING YOUR PRINTER
6.3
Page 88

Cleaning the Printer
To maintain print quality, follow the cleaning procedures below every time the toner cartridge
is replaced or whenever print quality problems occur. As much as possible, keep the printer
free from dust and debris.
Notes:
• Do not use ammonia-based cleaners or volatile solvents such as thinner, on or around the
printer. These can damage the printer.
• While cleaning the inside of the printer, be careful not to touch the transfer roller (located
underneath the toner cartridge ). The oil from your hands on the roller can cause print quality
problems.
Cleaning the Outside
Wipe the outside surface of the printer with a soft, clean, lintfree cloth. You can dampen the cloth slightly with water, but be
careful not to be let any water drip onto the printer or inside of
it.
Cleaning the Inside
Cleaning inside the printer
Note: To prevent damage
to the toner cartridge, do
not expose it to light for
more than a few minutes.
Cover it with a piece of
paper, if necessary. Also,
do not touch the black
transfer roller inside the
printer. By doing so, you
can damage the printer.
During the printing process, paper, toner, and dust particles
can accumulate inside the printer. Over time, this buildup can
cause print quality problems such as toner specks or smearing.
Cleaning inside the printer will eliminate or reduce these
problems.
Turn the printer off and unplug the power cord, then wait for
1
the printer to cool.
Open the top cover and remove the toner cartridge.
2
With a dry, lint-free cloth, wipe away any dust and spilled toner
3
from the toner cartridge area and the toner cartridge cavity.
MAINTAINING YOUR PRINTER
6.4
Page 89

Cleaning the Printer
Locate the long strip of glass (LSU) inside the top of the
4
cartridge compartment, and gently swab the glass to see if dirt
turns the white cotton black.
Reinsert the toner cartridge and close the top cover. Then,
5
turn the printer on.
Printing a cleaning sheet
Note: The cartridge
cleaning process takes
some time. To stop the
printing, turn the power
off.
Printing a cleaning sheet cleans the drum inside the toner
cartridge. Use this process if you are experiencing blurred,
faded or smeared printouts. This process will produce a page
with toner debris, which should be discarded.
Make sure the printer is turned on and in the ready state and
1
that there is paper loaded in the paper tray.
Press and hold Demo on the control panel for about 10
2
seconds until all control panel lights remain steadily lit, then
release.
Your printer automatically picks up a sheet of paper from the
3
paper tray and prints out a cleaning sheet with the dust or
toner particles on it.
MAINTAINING YOUR PRINTER
6.5
Page 90

7
7
This chapter gives helpful information for what to do if you
encounter a printer error. It provides information on the
following topics:
◆ Troubleshooting Checklist
◆ Solving General Printing Problems
◆ Clearing Paper Jams
◆ Solving Print Quality Problems
◆ Troubleshooting Error Messages
◆ Common Windows Problems
Page 91

Troubleshooting Checklist
If the printer is not working properly, complete the following checklist in order. If the printer
does not pass a step, follow the corresponding troubleshooting suggestions.
Check
Make sure that the Data light on
the control panel is on.
Press the Demo button to print
a demo page to verify that the
printer is feeding paper correctly.
See page 2.8.
Check the demo page to see if it
is printed correctly.
Print a short document from a
software application to verify
that the computer and printer
are connected and are
communicating correctly.
Solution
• If no lights are on, check the power cord
connection. Check the power switch. Check the
power source by plugging into another outlet.
• If other lights are on, go to “Troubleshooting Error
Messages” on page 7.19.
• If a demo page does not print, check the paper
supply in the paper tray.
• If the paper jams in the printer, go to “ Clearing
Paper Jams” on page 7.6.
• If the Error indicator light is illuminated on the
control panel, go to “Troubleshooting Error
Messages” on page 7.19.
If there is a print quality problem, go to “Solving
Print Quality Problems” on page 7.13.
• If the page does not print, check the cable
connection between the printer and computer.
• Check the print queue or print spooler (print
monitor in Mac) to see if the printer has been
paused.
• Check the software application to make sure you
are using the proper printer driver and
communication port. If the page is interrupted
during printing, go to “Solving General Printing
Problems” on page 7.2.
If completing the checklist did
not diagnose the problem with
the printer, check the following
troubleshooting sections.
• “Solving General Printing Problems” on page 7.2.
• “Troubleshooting Error Messages” on page 7.19.
• “Common Windows Problems” on page 7.21.
PROBLEM SOLVING
7.1
Page 92

Solving General Printing Problems
If you have any problems with the operation of your ML-6040 printer, refer to the table for
suggested solutions.
Problem
The printer does not
print.
Possible Cause
The printer is not
receiving power.
Your printer is not
selected as the default
printer.
Check the printer for
the following:
The printer may be in
manual feed mode and
out of paper. (The
Manual and the Data
lights are blinking.)
Solution
If no lights are on, check the power
cord connections. Check the power
switch and the power source.
Select Samsung ML-6040 Series
as your default printer.
• The printer cover is not closed.
• Paper is jammed.
• No paper is loaded.
• Toner cartridge is not installed.
• Printer system error occurs.
Contact a service representative.
Add paper to the Manual tray, and
press the Demo button on the
printer’s control panel.
PROBLEM SOLVING
7.2
The connection cable
between the computer
and the printer is not
connected properly.
The connection cable
between the computer
and the printer is
defective.
The port setting is
incorrect.
Disconnect the printer cable and
reconnect it.
If possible, attach the cable to
another computer that is working
properly and print a job. You may
also try using a different printer
cable.
Check the Windows printer setting to
make sure that the print job is sent
to the correct port (for example,
LPT1). If the computer has more
than one port, make sure the printer
is attached to the correct one.
Page 93

Solving General Printing Problems
Problem
The printer does not
print. (continued)
Printer selects media
from the wrong
paper source.
Paper does not feed
into the printer.
Possible Cause
The printer may be
configured incorrectly.
The printer driver may
be incorrectly installed.
The printer is
malfunctioning.
The paper source
selection in the printer
properties may be
incorrect.
Paper has not been
loaded correctly.
There is too much paper
in the paper tray.
Solution
Check the printer properties to make
sure that all print settings are correct.
Uninstall the printer driver, then
reinstall the printer driver. Try printing
a demo page.
Check the lights on the control panel to
determine if the printer is indicating a
system error.
For many software applications the
paper source selection is found under
the Paper tab within the printer
properties. Select the correct paper
source.
Remove paper from the paper tray and
reload it correctly.
Remove excess paper from the tray.
Print job is extremely
slow.
The paper is too thick.
The job may be very
complex.
The maximum speed of
12 pages per minute
cannot be exceeded even
when more memory is
added.
If using Windows 95, the
Spooling Setting may be
set incorrectly.
Use only paper that meets the
specifications required by the printer.
Reduce the complexity of the page or
try adjusting the print quality settings.
If this problem occurs frequently, add
memory to the printer.
From the Start menu, choose Settings
and Printers. Right-click the Samsung
ML-6040 Series printer icon, choose
Properties, click the Details tab, and
then choose the Spool Settings
button. Select the desired spool setting
from the available choices.
PROBLEM SOLVING
7.3
Page 94

Solving General Printing Problems
Problem
Half of the page is
blank.
The paper keeps
jamming.
Possible Cause
The page layout is too
complex.
The page orientation
setting may be
incorrect.
The paper size and the
paper size settings do
not match.
There is too much
paper in the paper tray.
An incorrect type of
paper is being used.
An incorrect output
method is being used.
Solution
Simplify the page layout and remove
any unnecessary graphics from the
document, if possible.
Change the page orientation in your
application.
Make sure that the paper size in the
print settings matches the paper in
the paper tray.
Remove excess paper from the tray.
If printing special media, use the
Manual Tray.
Use only paper that meets the
specifications required by the printer.
Media such as thick paper should not
be printed using the standard facedown stacker. Use the rear face-up
output tray instead.
The printer prints,
but the text is
wrong, garbled, or
incomplete.
PROBLEM SOLVING
7.4
There may be debris
inside the machine.
The printer cable is
loose or defective.
The wrong printer driver
was selected.
Open the top cover and remove the
debris.
Disconnect the printer cable and
reconnect it. Try a print job that you
know works. If possible, attach the
cable and printer to another computer
and try a print job that you know
works. Finally, try a new printer cable.
Check the application’s printer
selection menu to make sure that your
printer is selected.
Page 95

Solving General Printing Problems
Problem
The printer prints, but
the text is wrong,
garbled, or incomplete.
(continued)
Pages print, but are
totally blank.
Possible Cause
The software application
is malfunctioning.
The operating system is
malfunctioning.
The toner cartridge is
defective or out of toner.
The sealing tape may
still be in the toner
cartridge.
Solution
Try printing a job from another
application.
If printing from Windows (any
version), exit to a Dos prompt and
verify functionality with the following
command: At a C:\ prompt, type Dir
LPT1, then press Enter. (This
assumes you are connected to LPT1.)
Exit Windows and reboot the
computer. Turn the printer off and then
back on again.
Replace the toner cartridge.
Remove the toner cartridge and pull
out the sealing tape. Reinstall the
toner cartridge, and check by printing
a demo page.
The file may have blank
pages.
Some parts, such as the
controller or the board,
may be defective.
Check the file to make sure that it
does not contain blank pages.
Contact a service representative.
PROBLEM SOLVING
7.5
Page 96

Clearing Paper Jams
Occasionally, paper can become jammed during a print job. Some of the causes include:
• The paper tray is loaded improperly or overfilled.
• The paper tray has been pulled out during a print job.
• The top cover has been opened during a print job.
• Paper that does not meet paper specifications has been used. See “Paper Specifications” on
page A.2.
• Paper that is outside of the supported size range has been used. See “Paper Specifications”
on page A.2.
If a paper jam occurs, the Paper and the Error lights remain lit on the control panel. Find
and remove the jammed paper. If the location of the paper jam is not obvious, look inside the
printer.
Output Area
Note: Paper jams in this area may result in loose toner on the page. If you get any toner on your
clothes, wash them in cold water because hot water will set the toner into the fabric.
1
If the paper is almost completely visible
from the top output tray, pull the
remaining paper carefully out of the
printer.
PROBLEM SOLVING
7.6
Page 97

2
If the jammed paper is not visible or
there is resistance when you pull the
paper, open the rear output tray.
3
Remove the stopper as shown, then
push the tray down so that it is open at
90 degrees angle.
Clearing Paper Jams
4
If there is resistance when you pull the
paper, squeeze the handle on the right
end of the exit roller , then pull the
roller in the direction of arrow .
5
Remove the jammed paper.
1
2
2
Exit roller
1
PROBLEM SOLVING
7.7
Page 98

Clearing Paper Jams
6
Replace the exit roller.
Make sure that you click the right
end of the roller back in place. If you
fail to do so, the printer system will
recognize that the printer cover is open
or that a system fuser error has
occurred, and the Error light on the
control panel will turn on.
7
Replace the stopper as shown, and close
the rear output tray.
8
PROBLEM SOLVING
7.8
To resume printing, open the top cover,
and then close it close it again.
Note: If the Paper and the Error lights
do not turn off, there is still jammed
paper inside the printer. Check the input
area and the inside of the printer.
Page 99

Clearing Paper Jams
Input Area
Note: If paper has entered the toner cartridge area, follow the instructions on page 7.10. It is
easier to remove such jams from the inside of the printer than the paper input area.
1
Slide out Auto tray to expose the
jammed paper.
2
Remove any misfed paper by pulling it
out by the visible edge from the tray.
Make sure that all of the paper is
properly aligned in the tray.
Note: If the paper is jammed in the
paper feed area and cannot be
accessed from inside the printer,
remove Tray 1 from the printer and
carefully pull the jammed paper free
from the printer.
3
Slide the tray back into the printer.
PROBLEM SOLVING
7.9
Page 100

Clearing Paper Jams
4
To resume printing, open the top cover,
and then close it again.
Note: If the Paper and the Error lights
do not turn off, there is still jammed
paper inside the printer. Check the
inside of the printer.
Inside the Printer
Note: Paper jams in this area may result in loose toner on the page. If you get any toner on
your clothes, wash them in cold water because hot water will set the toner into the fabric.
1
Open the top cover and remove the
toner cartridge.
CAUTION: To prevent damage to
the toner cartridge, do not expose it
to light for more than a few minutes.
Place a piece of paper over the top of
the toner cartridge to shield it while it
is out of the printer.
2
Carefully lift up the guide feed.
Guide feed
7.10
PROBLEM SOLVING
 Loading...