

Samsung ML-2550 Users Manual
Troubleshooting PS Errors
The following situations are PS language specific and may occur
when several printer languages are being used.
N
OTE
:
To receive a printed or screen displayed message when PS
errors occur, open the Print Options window and click the desired
selection next to the PostScript errors section.
Problem Possible Cause Solution
PostScript file can
not be printed.
“This job contains
binary data...”
message appears.
A PS error page
prints.
The optional Tray2
is not selected in
the driver.
The PostScript option
may not be installed.
The pure binary data
option is not supported
by the PostScript
driver.
Print job may not be
PS.
The printer driver has
not been configured to
recognise the optional
Tray2.
• Print a configuration page and verify
that the PS version is available for
printing.
• If PostScript is not available, install
the PostScript option. See “Installing
Memory and PostScript DIMMs” on
page F.3.
Open the Properties of the PostScript
driver, click on
Advanced
option is not supported. Choose
another.
Make sure that the print job is a PS job.
Check to see whether the software
application expected a setup or PS
header file to be sent to the printer.
Open the PostScript driver properties
and set the
option
to
PostScript
. The pure binary data
Tray2
item of the
Installed
, and click on
Device
.
7.24
S
OLVING PROBLEMS

Common Linux Problems
Problem Possible Cause and Solution
I can’t change settings in
the configuration tool.
I am using the KDE
desktop but the
configuration tool and LLPR
won’t start.
I just installed this
package but can’t find
entries in the KDE/Gnome
menus.
I get a “Some options are
not selected” error
message while editing the
printer settings.
I can’t make a printer the
system default.
You need to have administrator privileges to be able to affect
global settings.
Maybe you do not have the GTK libraries installed. These
usually come with most Linux distributions, but you may have
to install them manually. Refer to your distribution’s
installation manual for more details about installing additional
packages.
Some versions of the KDE or GNOME desktop environments
may require that you restart your session for the changes to
take effect.
Some printers have conflicting settings, meaning that some
settings for two options can’t be selected at the same time.
When you change a setting and the Printer Package detects
such a conflict, the conflicting option is changed to a “No
Choice” value, and you have to choose an option that does
not conflict before being able to submit the changes.
In some conditions, it may not be possible to change the
default queue. This happens with some variants of LPRng,
especially on recent RedHat systems that use the “printconf”
database of queues.
When using printconf, the /etc/printcap file is automatically
refreshed from the database of printers managed by the
system (usually through the “printtool” command), and the
queues in /etc/printcap.local are appended to the resulting
file. Since the default queue in LPRng is defined as the first
queue in /etc/printcap, therefore it is not possible for the
Linux Printer Package to change the default when some
queues have otherwise been defined using printtool.
7
The N-up setting does not
work correctly for some of
my documents.
LPD systems identify the default queue as the one named
“lp”. Thus, if there is already a queue by this name, and if it
doesn’t have any alias, then you won’t be able to change the
default. To work around this, you can either delete the queue
or rename it by manually editing the /etc/printcap file.
The N-up feature is achieved through post-processing of the
PostScript data that is being sent to the printing system.
However, such post-processing can only be adequately
achieved if the PostScript data conforms to the Adobe
Document Structing Conventions. Problems may arise when
using N-up and other features relying on post-processing if
the document being printed isn’t compliant.
S
OLVING PROBLEMS
7.25

Problem Possible Cause and Solution
I am using BSD lpr
(Slackware, Debian, older
distributions) and some
options chosen in LLPR
don’t seem to take effect.
I am trying to print a
document in Landscape
mode, but it prints rotated
and cropped.
Some pages come out all
white (nothing is printed),
and I am using CUPS.
I can’t print to a SMB
(Windows) printer.
Legacy BSD lpr systems have a hard limitation on the length
of the option string that can be passed to the printing system.
As such, if you selected a number of different options, the
length of the options may be exceeded and some of your
choices won’t be passed to the programmes responsible for
implementing them. Try to select less options that deviate
from the defaults, to save on memory usage.
Most Unix applications that offer a Landscape orientation
option in their printing options will generate correct PostScript
code that should be printed as is. In that case, you need to
make sure that you leave the LLPR option to its default
Portrait setting, to avoid unwanted rotations of the page that
would result in a cropped output.
If the data being sent is in Encapsulated PostScript (EPS)
format, some earlier versions of CUPS (1.1.10 and before)
have a bug preventing them from being processed correctly.
When going through LLPR to print, the Printer Package will
work around this issue by converting the data to regular
PostScript. However, if your application bypasses LLPR and
feeds EPS data to CUPS, the document may not print
correctly.
To be able to configure and use SMB-shared printers (such as
printers shared on a Windows machine), you need to have a
correct installation of the SAMBA package that enables that
feature. The “smbclient” command should be available and
usable on your system.
My application seems to be
frozen while LLPR is
running.
How do I specify the IP
address of my SMB server?
Some documents come out
as white pages when
printing.
Most Unix applications will expect a command like the regular
“lpr” command to be non-interactive and thus return
immediately. Since LLPR is waiting for user input before
passing the job on to the print spooler, very often the
application will wait for the process to return, and thus will
appear to be frozen (its windows won’t refresh). This is
normal and the application should resume functioning
correctly after the user exits LLPR.
It can be specified in the “Add Printer” dialogue of the
configuration tool, if you don’t use the CUPS printing system.
Unfortunately, CUPS currently doesn’t allow to specify the IP
address of SMB printers, so you will have to be able to browse
the resource with Samba in order to be able to print.
Some versions of CUPS, especially those shipped with
Mandrake Linux before the 8.1 release, have some known
bugs when processing the PostScript output from some
applications. Try upgrading to the latest version of CUPS (at
least 1.1.14). Some RPM packages for most popular
distributions are provided as a convenience with this Linux
Printing Package.
7.26
S
OLVING PROBLEMS

Problem Possible Cause and Solution
I have CUPS and some
options (such as N-up)
seem to be always enabled
even though I don’t pick
them in LLPR.
I configured a printer to
print to a file, but I get
“Permission denied” errors.
On my PCL (or SPL)
printer, I sometimes get
error messages printing
instead of my document.
There may be some local options defined in your ~/.lpoptions
file, which is manipulated by the lpoptions command. These
options will always be used if not overridden by LLPR settings.
To get rid of all options for a printer, run the following
command, replacing “printer” with the name of the queue:
lpoptions -x printer
Most printing systems will not run as the super-user but as a
special user (usually “lp”). Therefore, make sure that the file
you have chosen to print to is accessible to the user owning
the spooler daemon.
Unfortunately, some Unix applications may generate noncompliant PostScript output that may not be supported by
Ghostscript, or even the printer itself in PostScript mode. You
can try to capture the output to a file and view the results
with Ghostscript (gv or ghostview will allow you to do so
interactively) and see if you get error messages. However,
since the application is at probably fault, contact your
software vendor to inform them of the issue.
Common DOS Problem
Problem Possible Cause and Solution
When using the printer in
EPSON Dot Printer
Environment, sometimes I
can not get the output I
want.
Change the emulation to EPSON in the
Remote Control Panel. For detailed information about
selecting printer settings in the Remote Control Panel, see
page D.4.
Config
tab in the
7
S
OLVING PROBLEMS
7.27

M
EMO
7.28
S
OLVING PROBLEMS

A
USING YOUR PRINTER WITH
A MACINTOSH
Your printer supports Macintosh systems with a built-in USB
interface or 10/100 Base-TX network interface card (option
for ML-2550). When you print a file from a Macintosh
computer, you can use the Samsung SPL II driver to support
your printer’s major printing features. You can also use
PostScript driver by installing the PPD file.
This chapter includes:
• Installing Software for Macintosh
• Creating a Desktop Printer
• Printing a Document
• Using Advanced Printing Features

Installing Software for Macintosh
The CD-ROM that came with your printer provides you with the
SPL printer driver and the PPD file to use the PS driver, Apple
LaserWriter driver, for printing on a Macintosh computer.
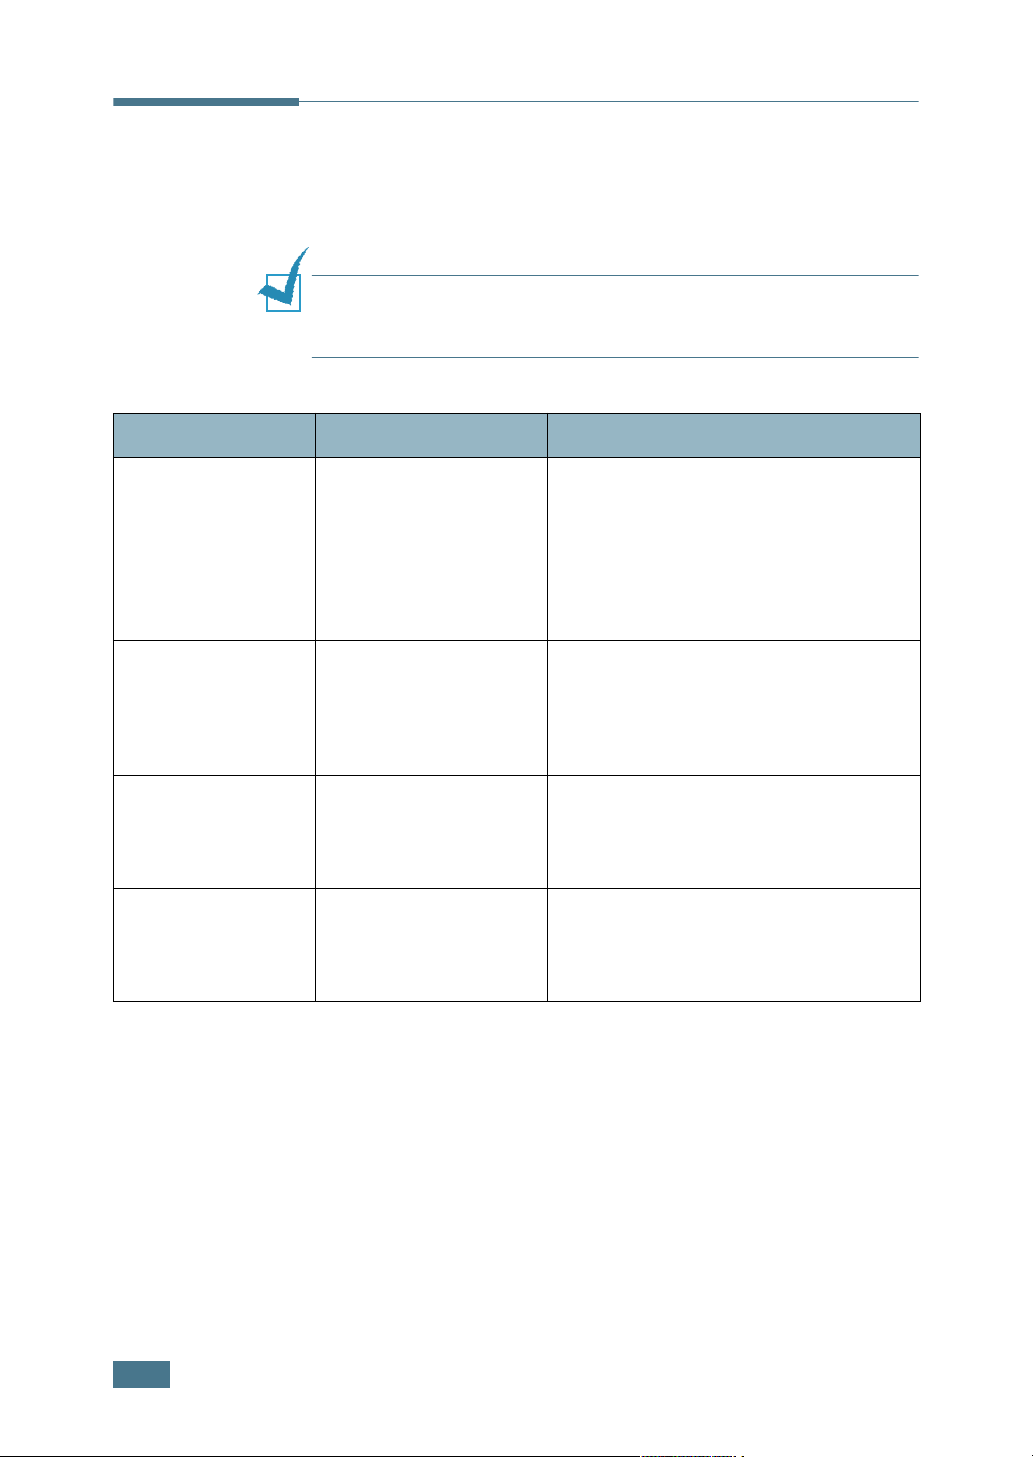
Refer to the table below for the driver available for your printer
and system requirements.
Your
Printer
ML-2550 SPL driver USB interface
ML-2551N/
ML-2552W
N
OTES
:
• If you are a ML-2550 user, you need to install the optional PS
DIMM (see page F.3) for using the PS driver.
• Please refer Samsung homepage for MAC OS 10.x Printer Driver.
Samsung homepage
1
Turn on your computer and printer.
Available
Driver
• SPL driver
• PS driver
:
www.samsungprinter.com
Connection
(see page 2.11)
USB interface
(see page 2.11)
Network
interface (see
page 2.12)
System
Requirements
Mac OS 8.6 and
G3 processor or
higher
Mac OS 8.6 and
G3 processor or
higher
Mac OS 7.5 and
7200 processor or
higher
A.2
2
Insert the CD-ROM which came with your printer into the
CD-ROM drive.
3
Double-click SAMSUNG_LBP on your Macintosh desktop.
4
Double-click the West folder.
5
Double-click the Samsung Laser Printer Installer icon
next to each language to select the correct one.
6
Click Continue, and then click Continue.
U
SING YOUR PRINTER WITH A MACINTOSH

7
The Samsung Laser Printer Installer window opens. Select
the installation type.
The window provides two options for software installation:
• Easy Install (recommended method): This option loads
the PPD file and installs the SPL driver.
• Custom Install: This option allows you to choose which
components will be installed, the SPL II driver, the PS
Level 3 PPDs and the Adobe Acrobat Reader programme
for opening the User’s Guide.
8
Click Install.
If other programmes are operating, the alert message
appears. Click Continue to install the software, or click
Cancel and close other programmes, and install the
software.
9
After the installation is completed, click Restart.
U
SING YOUR PRINTER WITH A MACINTOSH
A
A.3

Creating a Desktop Printer
After installing print software, you need to create a desktop
printer for using your printer. Depending on the connection you
are using, the procedure differs.
Creating a Desktop Printer for the SPL
Driver
1
From the Apple menu, select Chooser.
2
From the left pane of the Chooser window, click SAMSUNG
SPL II. Then your printer name will appear in thee right
pane of the Chooser window.
3
Click your printer name, and close the window.
4
The message box indicating that you have changed your
current printer appears. Click OK.
5
A SAMSUNG SPL II printer icon will be created on your
desktop.
Creating a Desktop Printer for the PS Driver
For a USB-connected Macintosh
1
Open Macintosh HD and double-click Application.
2
Double-click Utilities.
3
Double-click Desktop Printer Utility.
N
OTE
:
The position of Desktop Printer Utility may vary depending
to the MAC OS.
4
Select LaserWriter 8, and select Printer (USB) in the list
box. Then click OK.
A.4
U
SING YOUR PRINTER WITH A MACINTOSH

5
Click Change in the USB Printer Selection section. The
name of your printer appears in the list.
6
Click ML-2550, and click OK.
7
Click Auto Setup in the PostScript Printer Description
(PPD) File section.
If Auto Setup does not work properly, click Select PPD and
choose Samsung ML-2550 Series.
8
When the setup is completed, click Create.
9
Click Save.
For a Network-connected Macintosh
1
From the Apple menu, select Chooser.
2
Click LaserWriter 8 (the PostScript driver provided with
your Macintosh).
The name of your printer appears in the list.
3
Select SEC000xxxxxxxxx from the printer box (where the
xxxxxxxxx varies depending on each of the products).
4
When the setup is completed, you see your printer icon is
created as a desktop printer.
If Auto Setup does not work properly, click Select PPD,
choose SAMSUNG ML-2550 Series and click OK.
A
U
SING YOUR PRINTER WITH A MACINTOSH
A.5
Printing a Document
When you print with a Macintosh, you need to check the printer
software setting in each application you use. Follow these steps
to print from a Macintosh:
1
Open a Macintosh application and select a file you want to
print.
2
Open the File menu and click Page Setup (Document
Setup in some applications).
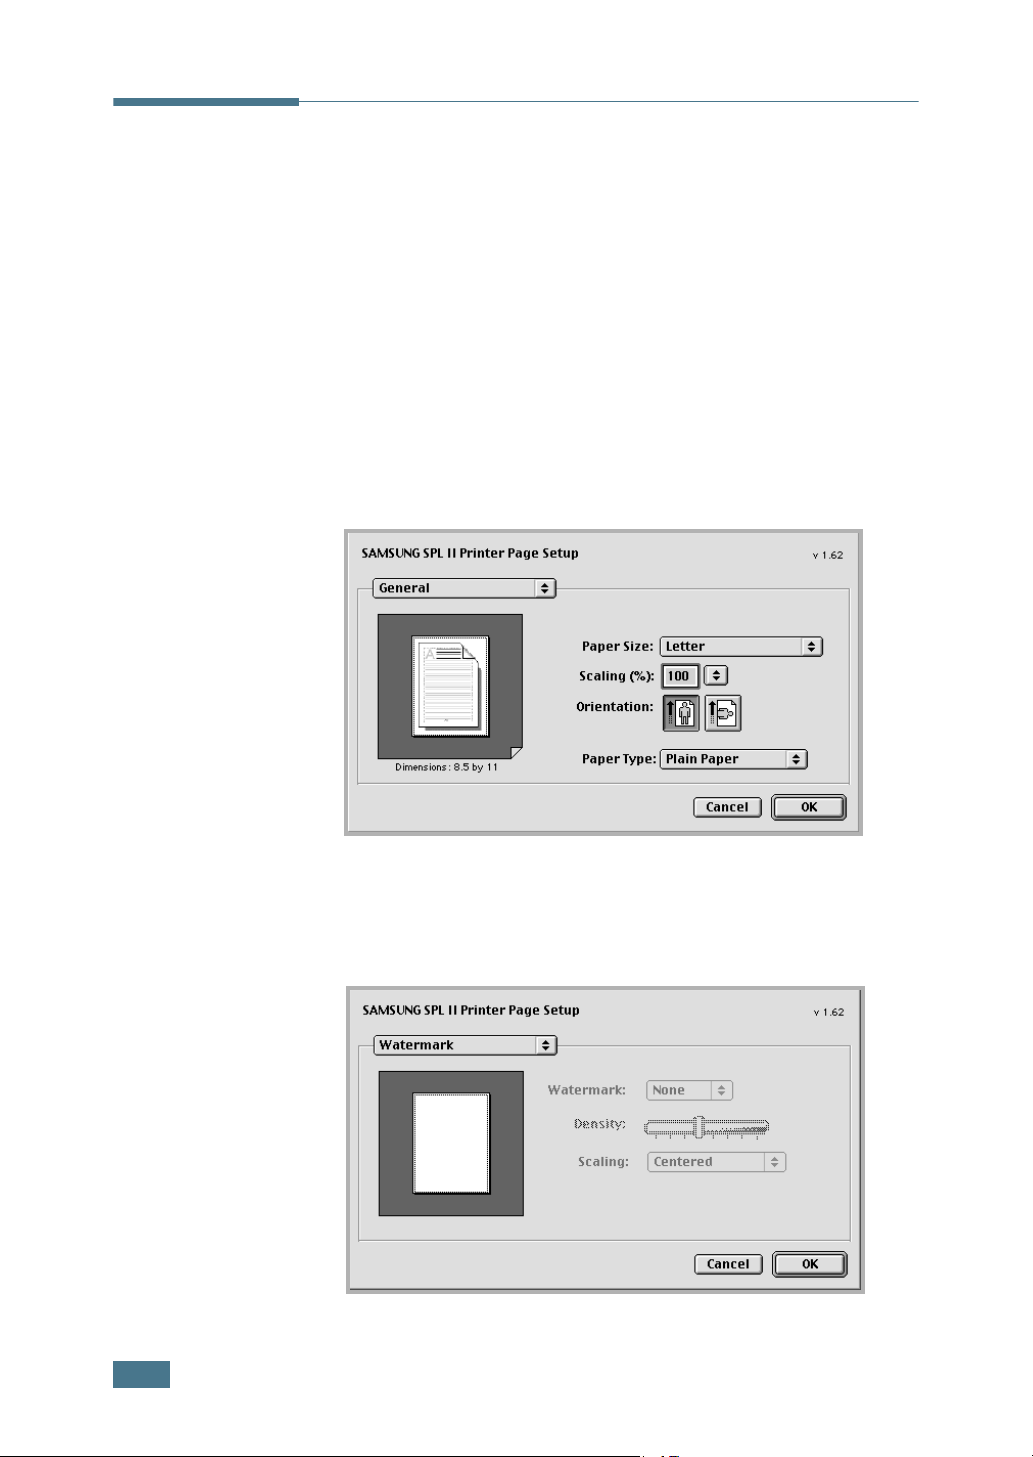
3
Choose your paper size, orientation, paper type and other
options and click OK.
A.6
Choose Watermark to add a watermark to each page in
your document to emphasize its purpose or indicate how it
should be handled. For details on the watermark options,
see page 5.18.
• Mac OS 9.1 doesn’t support the Watermark feature.
U
SING YOUR PRINTER WITH A MACINTOSH
For advanced printing
features, select the
desired option. For
details, see page A.8.
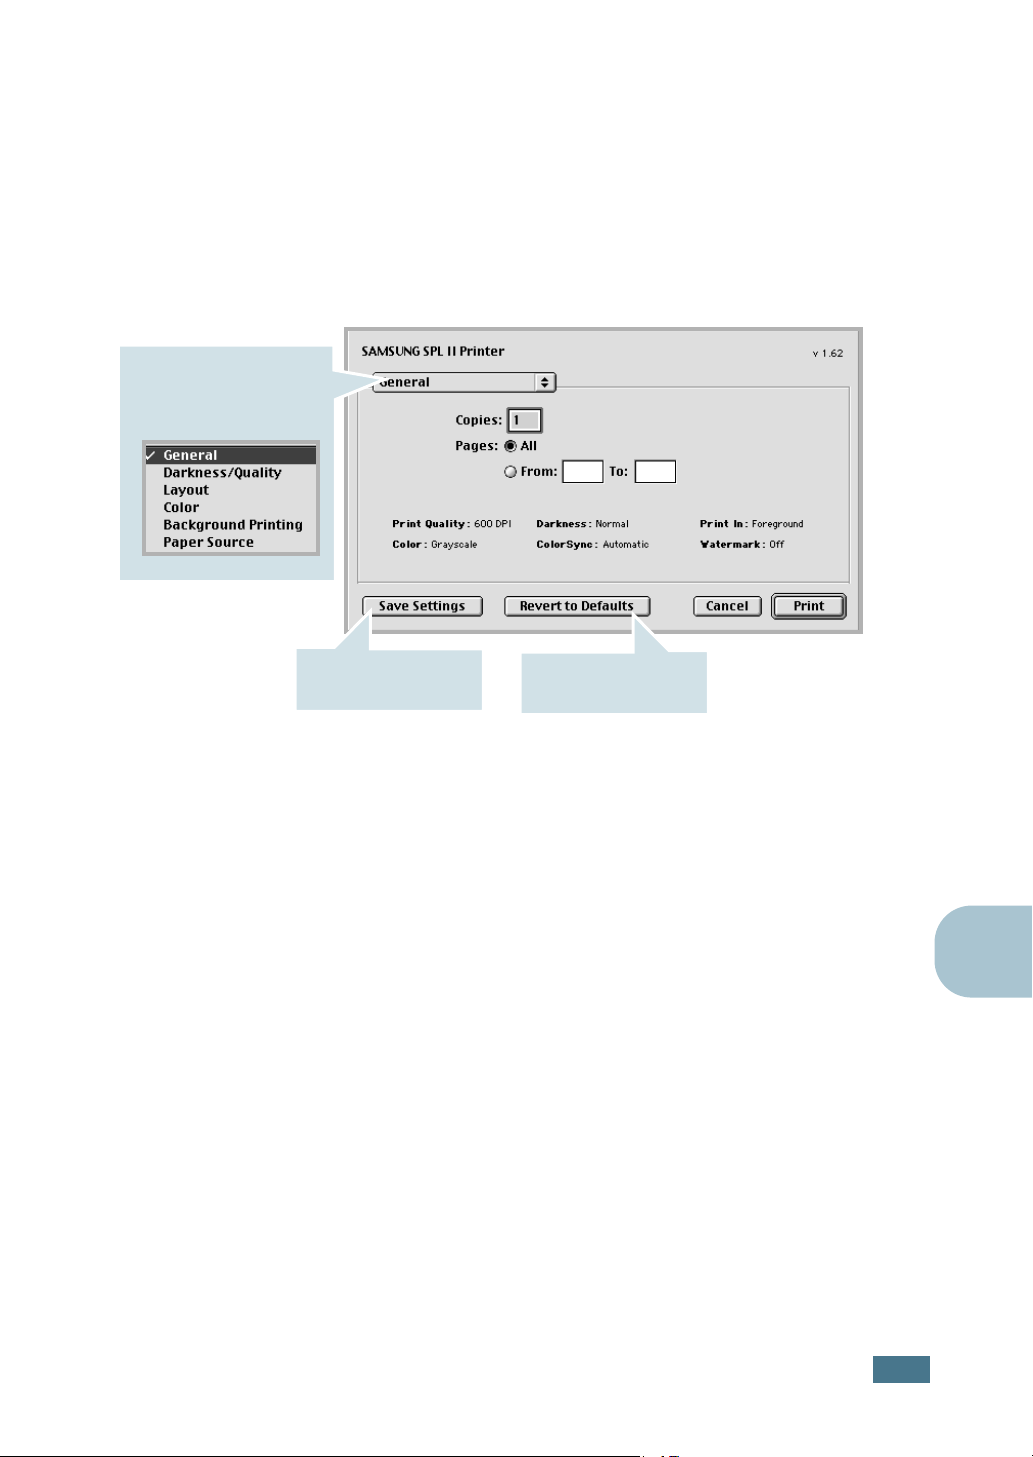
4
Open the File menu and click Print. You will see the
SAMSUNG SPL II Printer window.
If you are using the PS driver, the LaserWriter 8 driver
window appears.
5
Choose the number of copies and indicate which pages you
want to print.
Saves the current
settings for later use.
6
Click Print when you finish setting the options.
Restores the default
settings.
A
U
SING YOUR PRINTER WITH A MACINTOSH
A.7
Using Advanced Printing Features
The SAMSUNG SPL II Printer window contains five categories of
advanced properties. Listed below is the name of each property.
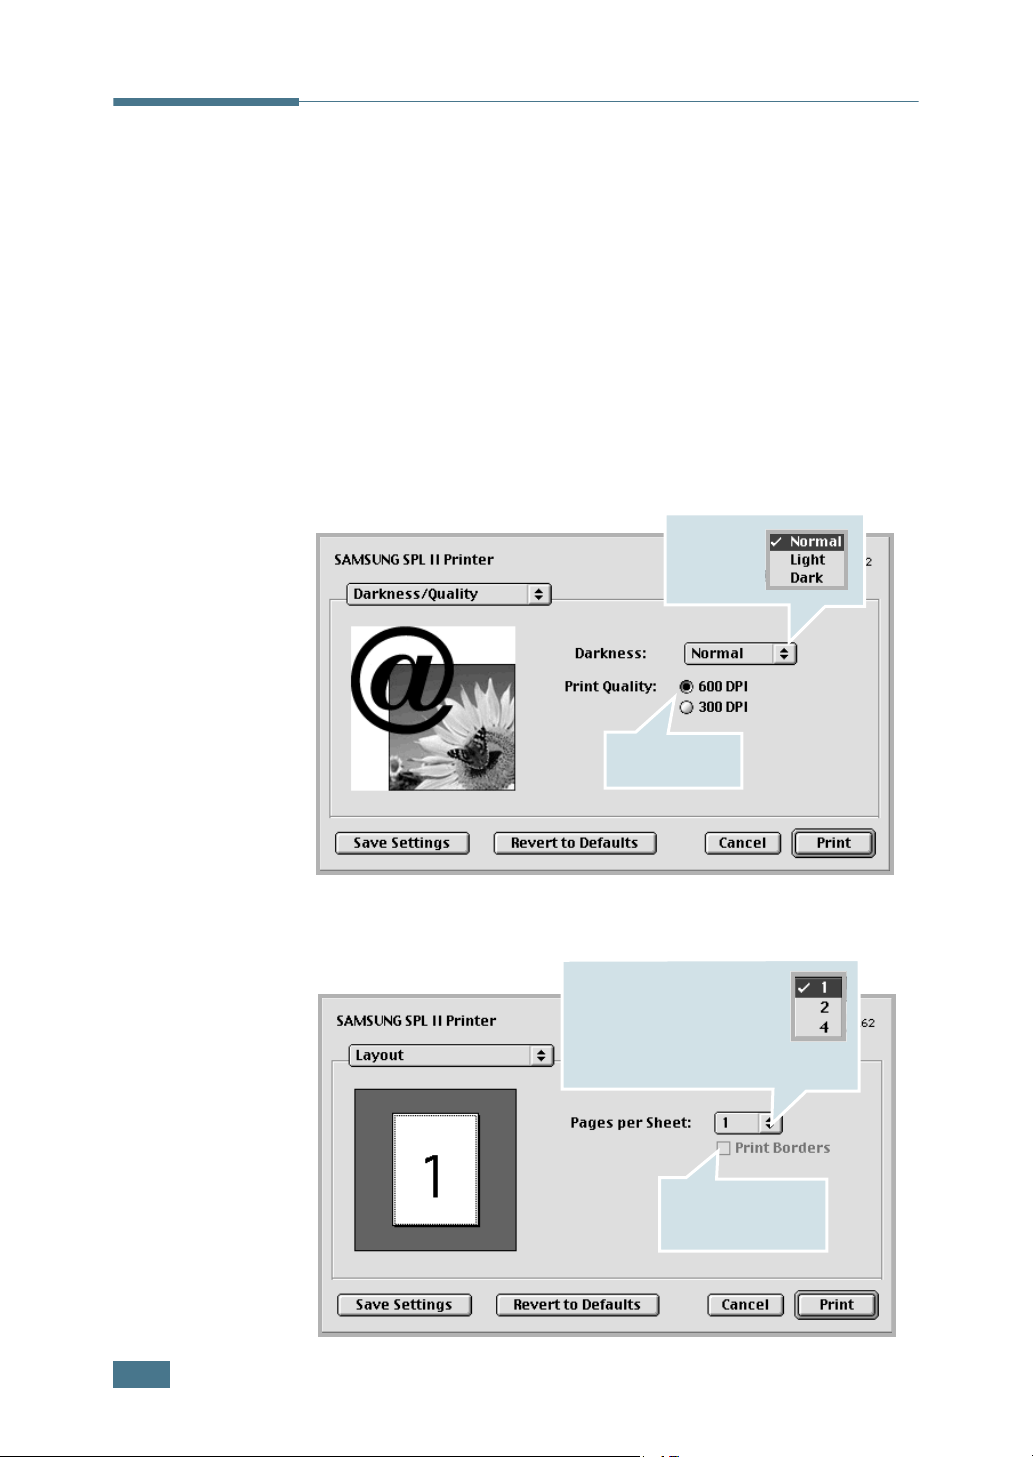
- Darkness/Quality
- Layout
- Color
- Background Printing
- Paper Source
Figures below display each property in the SAMSUNG SPL II
Printer window.
Darkness/Quality
Select the
print
darkness.
Layout
Select the print
resolution.
Select the number of pages
you want to print on one
sheet of paper. The pages
will appear decreased in
size and arranged on the
sheet.
To print the border
of each page, check
this box.
A.8
U
SING YOUR PRINTER WITH A MACINTOSH
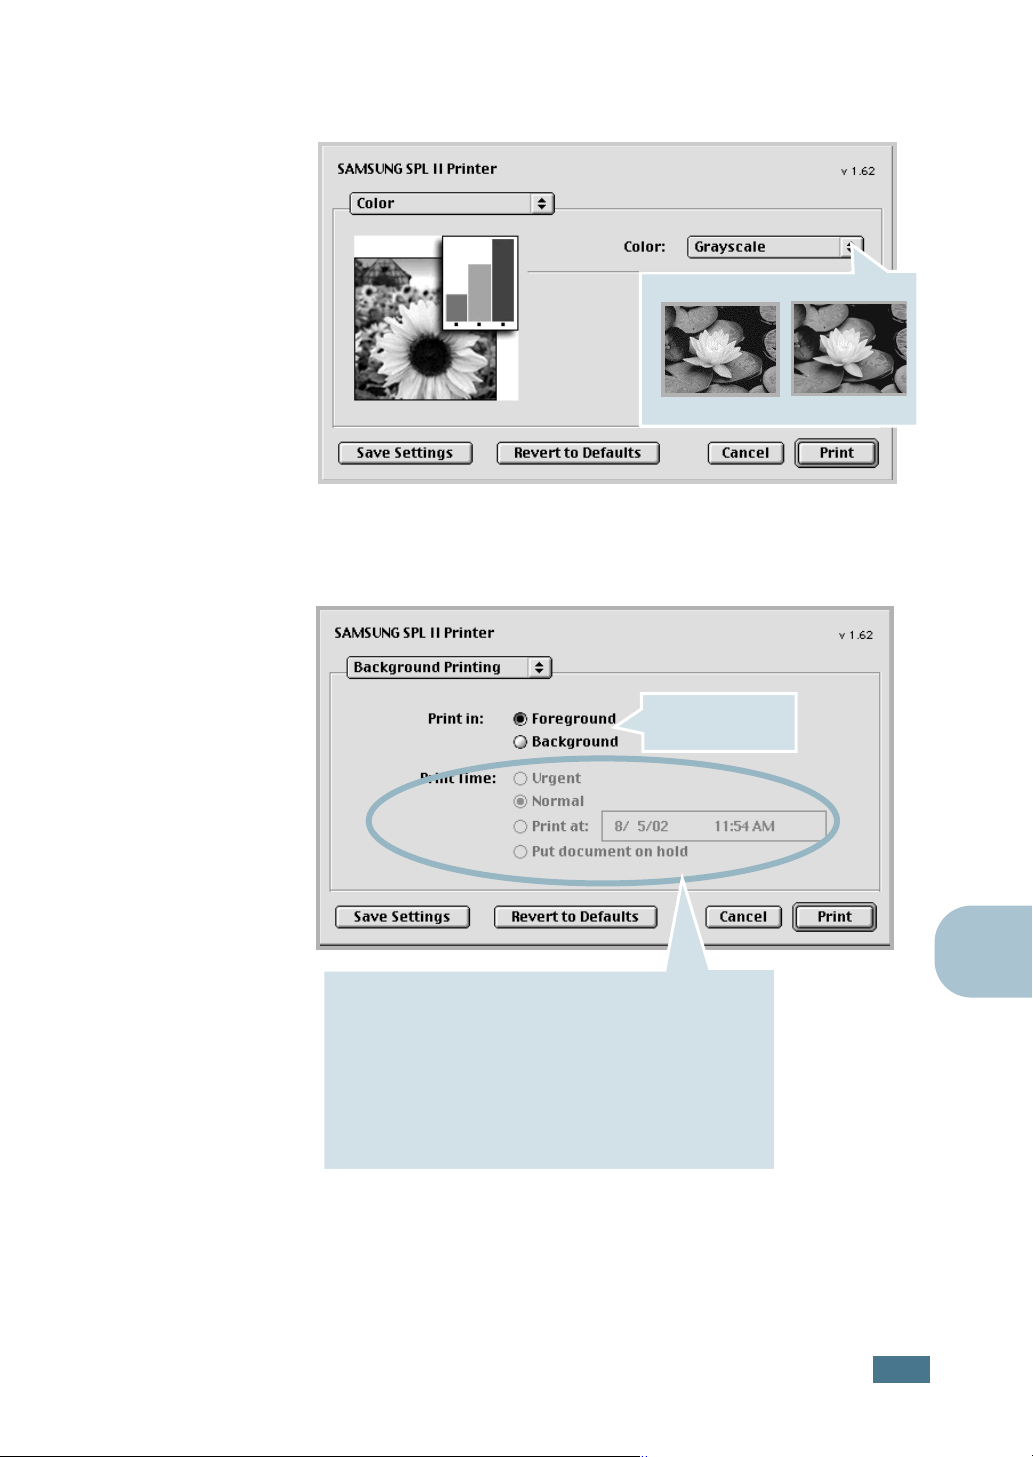
Color
Select the grayscale mode.
Black&White
Background Printing
Turns background
printing on or off.
Select a priority for your print job in the queue of jobs
waiting to print, click one of the following:
• Urgent: to print before any Normal priority job.
• Normal: to print in the order the job is received.
• Print at: to print at the specific time you enter in the day
and time in the fields to the right.
• Put document on hold: to hold the print job in the print
queue until you are ready to release it.
Grayscale
A
U
SING YOUR PRINTER WITH A MACINTOSH
A.9
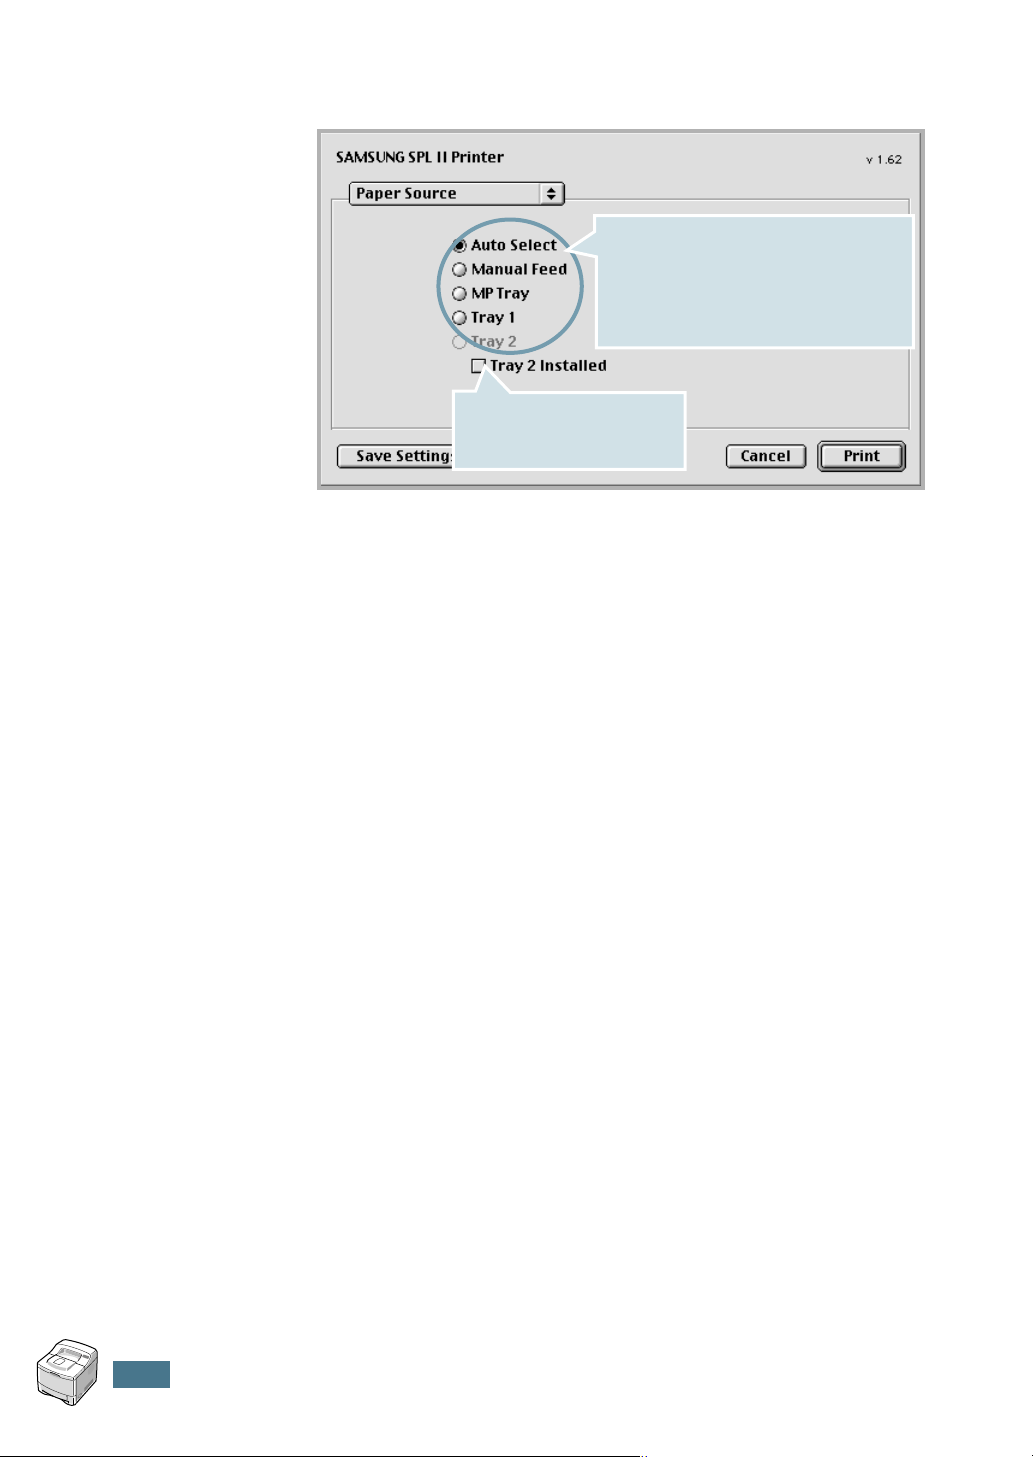
Paper Source
Select the corresponding paper source.
If Auto Select is set, the printer
automatically selects the print material
from the paper tray, according to the
following order: Multi-Purpose Tray, Tray1
and the optional Tray2.
If you installed the optional
Tray2, check this box to
activate Tray2.
A.10
U
SING YOUR PRINTER WITH A MACINTOSH

B
USING WINDOWS
P
OSTSCRIPT DRIVER
If you want to use the PostScript driver provided with your
system CD-ROM to print a document, use the information
on this Appendix.
This chapter includes:
• Installing PPD Files
• Using PS Printer Driver Features
N
OTE
:
If you are a ML-2550 user, you need to install an
optional PS DIMM for using the PostScript driver. For more
information, see Appendix F,“Programme Installing Printer
Options.”

Installing PPD Files
PPDs, in combination with the PostScript driver, access the
printer features and allow the computer to communicate with
the printer. An installation programme for the PPDs is provided
on the supplied software CD-ROM.
N
OTE
:
• Installing the PostScript printer driver in Windows 9x/Me/NT 4.0
may require the use of the operating system files on the original
CD-ROM that came with your system.
• If you have a PostScript 3 driver in Windows 9x/Me/NT 4.0 and
want to use it, you must install the PostScript 3 PPD which is also
provided on the CD-ROM.
Before installing PPD files, make sure that the printer and the PC
are properly connected with parallel, USB or network interface.
For information about:
• connecting with the parallel interface, see page 2.10.
• connecting with the USB interface, see page 2.11. For
Windows 98/Me, the USB driver must be installed. See
page 2.20.
• connecting with a network interface, see page 2.12. For a
ML-2550, you need to install an optional network interface
card; see “Installing a Network or Serial Interface Card” on
page F.6.
In Windows 95/98/Me
1
Place the CD-ROM in the CD-ROM drive. Installation will
start automatically.
If the CD-ROM drive does not automatically run:
Select Run from the Start menu, type x:\cdsetup.exe in
the Open box (where x is the drive letter for the CD-ROM
drive) and click OK.
2
Select the appropriate language.
If you can’t find the desired language from the screen, use
the scroll button on the bottom right of the window to
display more languages.
3
Click Install the Samsung Software-II on your PC
(PostScript).
B.2
U
SING WINDOWS POSTSCRIPT DRIVER

4
Click Next.
5
Select Local Printer and click Next.
6
Click on Have Disk, and then choose:
• for Windows 95/98, x:\ML-2550\PS
English (or the desired language)\Win9598\level2
• for Windows Me, x:\ML-2550\PS_DRV\ AddPrint\
English (or the desired language)\WinME\level2
(where x is the drive letter for the CD-ROM drive)
7
Click OK.
8
When Samsung ML-2550 Series PS appears in the
Printers list, click Next.
N
OTE
:
If you are prompted to insert the Windows CD-ROM, insert
the CD-ROM that came with your Windows into the CD-ROM drive.
Follows the instructions on the screen.
9
Select the port you want use and click Next.
10
Click Next.
11
When a window prompting to print a test page appears,
select Yes or No and click Finish.
DRV\ AddPrint\
—
12
If you select Yes in Step 11, the printer prints a test page.
When the page prints out properly, click Yes.
13
When the installation is completed, click Finish.
In Windows NT 4.0
1
Follow steps from 1 to 4 in “In Windows 95/98/Me” on
page B.2.
2
Select the port you want use and click Next.
3
Click on Have Disk, and then choose x:\ML-2550\
PS_DRV\ AddPrint\ English (or the desired language)\
WinNT\level2. Click OK.
U
SING WINDOWS POSTSCRIPT DRIVER
B
B.3

N
OTE
:
If you are prompted to insert the Windows CD-ROM, insert
the CD-ROM that came with your Windows into the CD-ROM drive.
Follows the instructions on the screen.
4
When Samsung ML-2550 Series PS appears in the
Printers list, click Next.
5
Click Next.
6
When a window prompting to print a test page appears,
select Yes or No and click Finish.
7
If you select Yes in Step 6, the printer prints a test page.
When the page prints out properly, click Yes.
8
When the installation is completed, click Finish.
In Windows 2000/XP
1
Follow steps from 1 to 4 in “In Windows 95/98/Me” on
page B.2.
2
When the installation is completed, click Finish.
Reinstalling the PS Driver
1
From the Start menu, select Programs.
2
Select Samsung ML-2550 Series, and then Samsung
ML-2550 Series PS Driver Maintenance.
The Samsung ML-2550 Series PS Driver Maintenance
window appears.
3
Check Repair and then click Next.
4
Click Finish.
(Windows 2000/XP)
B.4
U
SING WINDOWS POSTSCRIPT DRIVER

Uninstalling the PS Driver
In Windows 9x/Me/NT 4.0
1
From the Start menu, select Programs.
2
Select Samsung ML-2550 Series, and then Uninstall
Samsung ML-2550 Series PS Driver.
3
When you are asked to confirm your selection, click OK.
The Samsung ML-2550 Series PS driver and all of its
components are removed from your computer.
4
Click Finish.
In Windows 2000/XP
1
From the Start menu, select Programs.
2
Select Samsung ML-2550 Series, and then Samsung
ML-2550 Series PS Driver Maintenance.
The Samsung ML-2550 Series PS Driver Maintenance
window appears.
3
Check Remove and then click Next.
4
When you are asked to confirm your selection, click OK.
The Samsung ML-2550 Series PS driver and all of its
components are removed from your computer.
5
Click Finish.
B
U
SING WINDOWS POSTSCRIPT DRIVER
B.5

Using PS Printer Driver Features
Certain printer features are not available in this PS driver. For
details about the features, refer to Chapter 5,“Printing Tasks.”
The printer automatically switches between PS and SPL printer
languages depending on the driver you have selected.
Accessing Printer Properties
The properties window for the Windows PostScript printer driver
can be opened from the Printers folder or an application.
To open the properties window from the Printer folder:
1
Click the Windows Start button.
2
Select Settings then Printers to open the Printers window.
3
Select Samsung ML-2550 Series PS.
4
Click the right mouse button and select Properties to open
the properties window.
To open the properties window from an application:
1
From the File menu, select Print to open the Print window.
2
Make sure that Samsung ML-2550 Series PS is selected
in the Name drop-down list.
3
Click Properties to open the properties window.
B.6
U
SING WINDOWS POSTSCRIPT DRIVER

C
USING YOUR PRINTER IN
L
INUX
You can use your printer in a Linux environment.
This chapter includes:
• Installing the Printer Driver
• Using the Configuration Tool
• Changing LLPR Properties

Installing the Printer Driver
System Requirements
Supported OS
• Redhat 6.2/7.0/7.1 and above
• Linux Mandrake 7.1/8.0 and above
• SuSE 6.4/7.0/7.1 and above
• Debian 2.2 and above
• Caldera OpenLinux 2.3/2.4 and above
• Turbo Linux 6.0 and above
• Slackware 7.0/7.1 and above
Recommended Requirements
• Pentium II or Power PC G3
• RAM 64 MB or higher
• HDD 20 MB or higher
Softwares
• Glibc 2.1 or higher
• GTK+ 1.2 or higher
• GhostScript
Installing the Printer Driver
1
Make sure that you connect the printer to your computer.
Turn both the computer and the printer on.
2
When the Administrator Login window appears, type in
“root” in the Login field and enter the system password.
N
OTE
:
You must log in as a super user (root) to install the printer
software. If you are not, ask your system administrator.
C.2
U
SING YOUR PRINTER IN LINUX
3
Insert the printer software CD-ROM. The CD-ROM
automatically runs.
N
OTE
:
If the CD-ROM does not automatically run, click the
icon at the bottom of the window. When the Terminal screen
appears, type in:
[root@local /root]#
[root@local cdrom]#
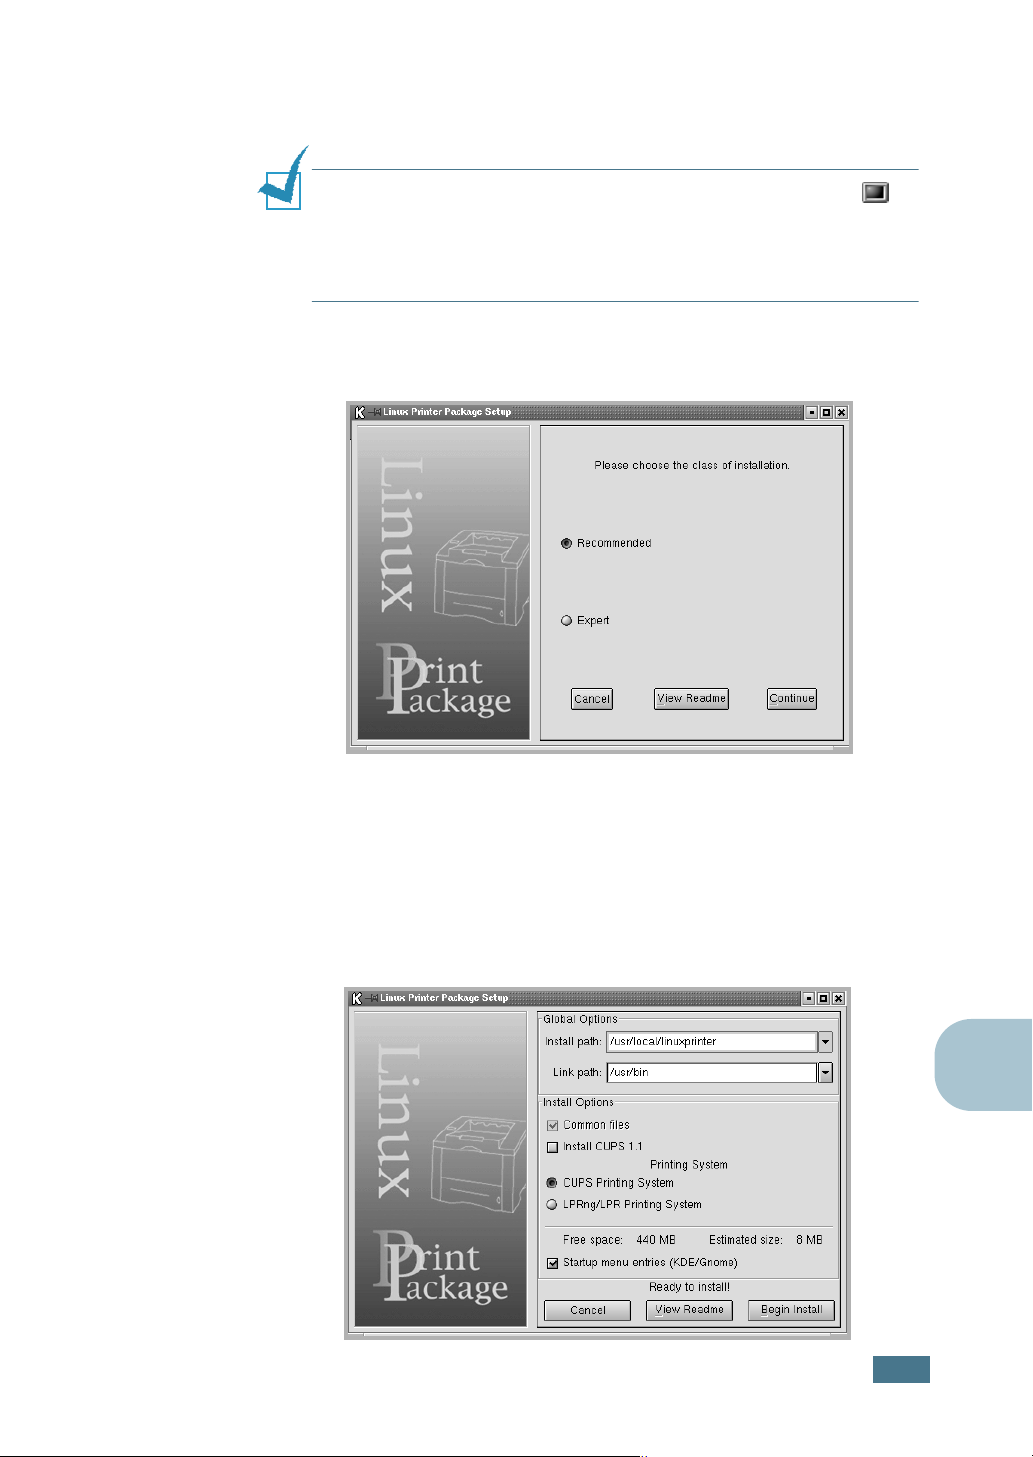
4
Select the installation type, either Recommended or
Expert, and then click Continue.
cd /mnt/cdrom
./setup.sh
(the CD-ROM directory)
Recommended is fully automated and is not required any
interaction. Expert installation allows you to select the
install path or printing system.
5
If you selected Recommended, go to Step 6.
For Expert, select the desired option and then click Begin
Install.
C
U
SING YOUR PRINTER IN LINUX
C.3
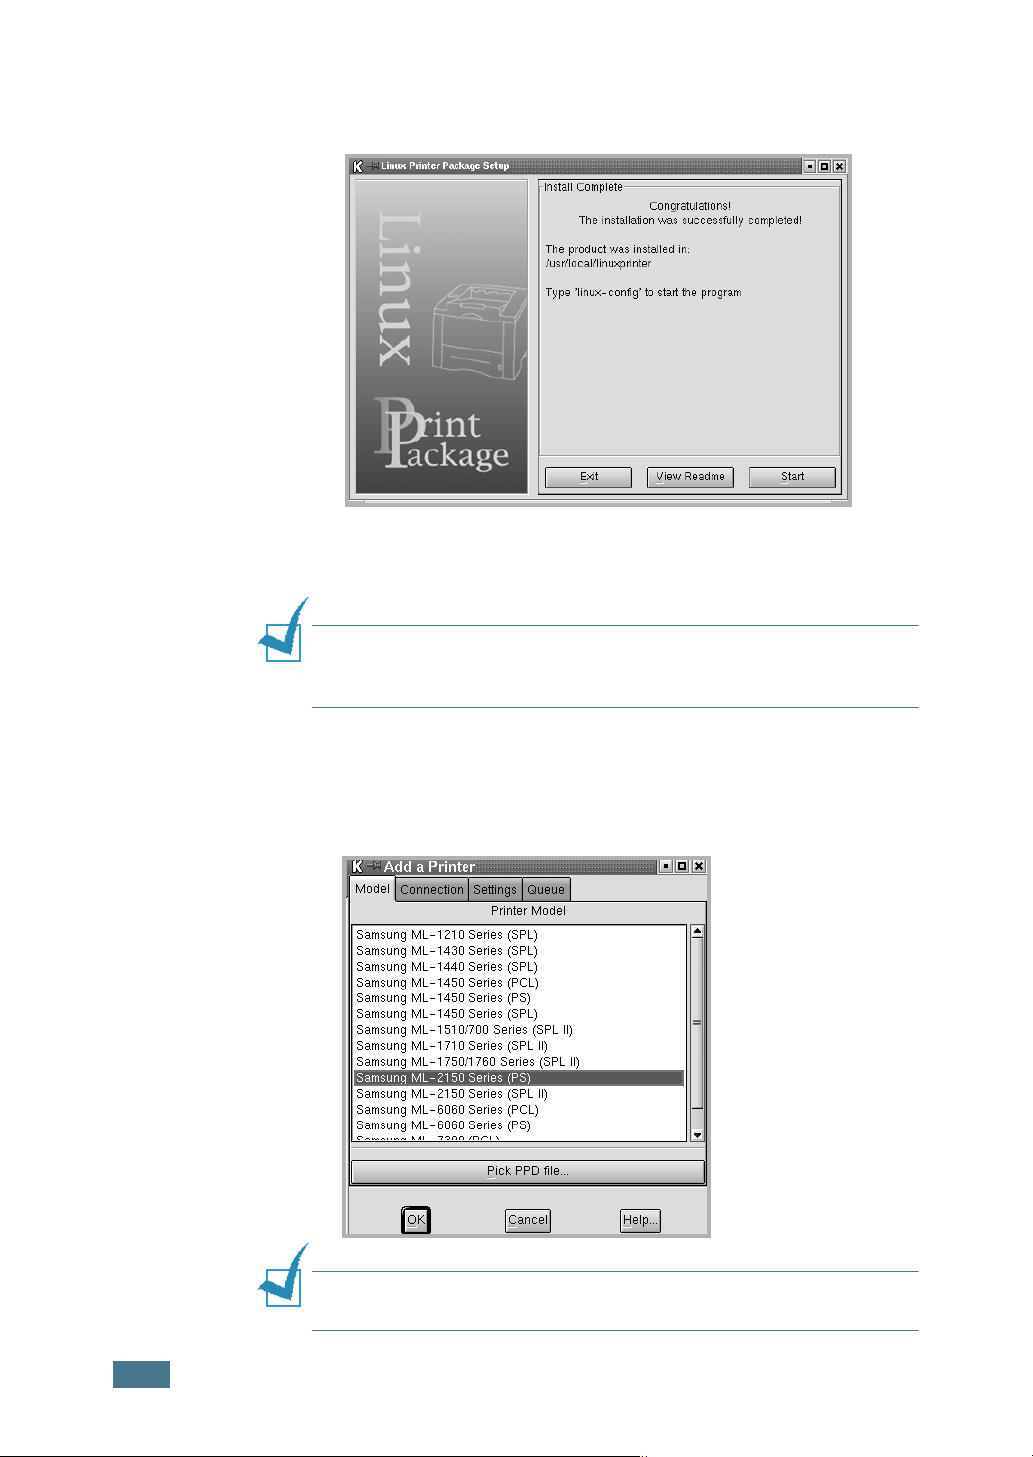
6
The printer driver installation begins. When the installation
is completed, click Start.
7
The Linux Printer Configuration window opens. Click the
Add Printer icon on the tool bar at the top of the window.
N
OTE
:
Depending on the printing system in use, the
Administrator Login window may appear. Type in “root” in the
Login field and enter the system password.
8
You see the printers currently added in your system. Select
the printer you will use. The function tabs available for the
selected printer appear at the top of the Add a Printer
window.
N
OTE
:
If the printer supports PS printing, it is recommended to
select the PS driver.
C.4
U
SING YOUR PRINTER IN LINUX
 Loading...