

SAMSUNG LASERPRINTER
Paigaldusjuhend
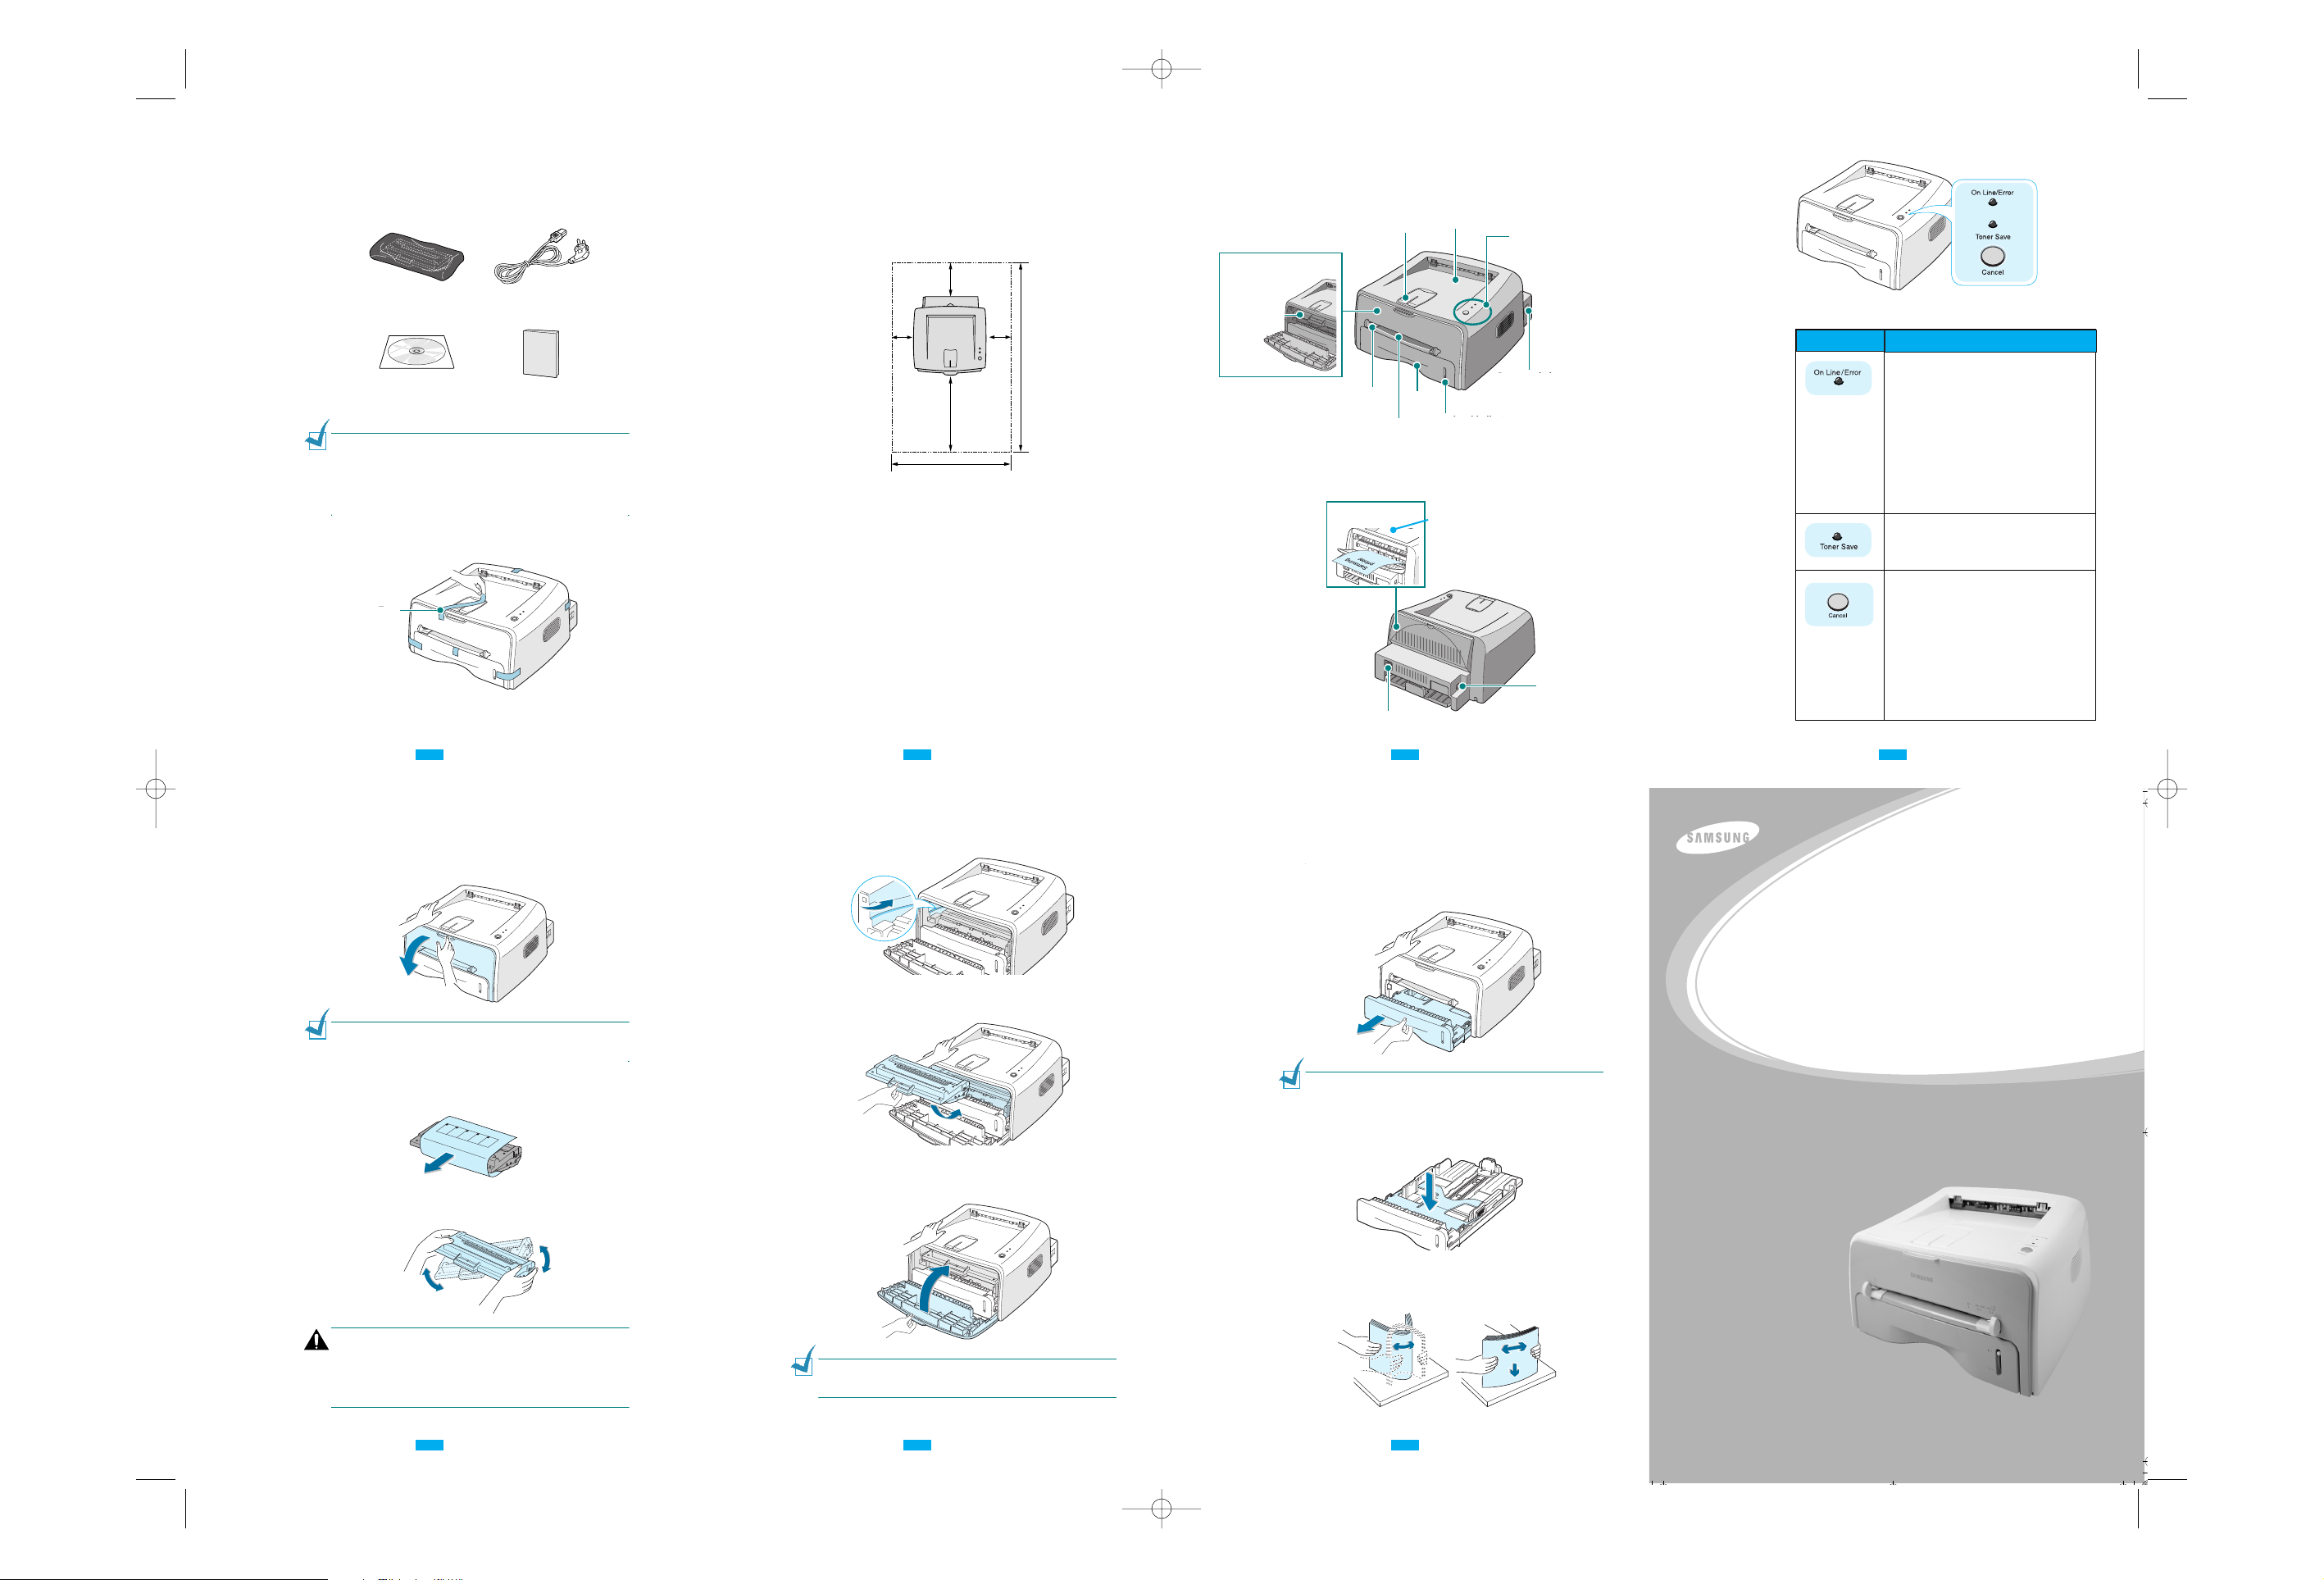
Samm 1: Lahtipakkimine
Laserprinteri kassett
CD-ROM
Toitejuhe
Paigaldusjuhend
Võtke printer ja selle tarvikud kartongpakendist välja.
Veenduge, et printeriga on kaasas järgnevad tarvikud:
2.Eemaldage printerilt ettevaatlikult kõik pakkimiseks kasutatud .
Märkused:
• Kui mõni tarvik puudub või on vigastatud, teavitage sellest kohe
seadme müüjat.
• Tarvikud võivad piirkonniti erineda.
• CD-ROM sisaldab printeri draiverit, kasutusjuhendit ja
programmi Adobe Acrobat Reader.
Koha valik
Valige printeri jaoks stabiilne tasane koht, kus õhk piisavalt ringleks.
Varuge lisaruumi avatavate kaante ja sahtlite jaoks. Printeri piirkond
peab olema hästi ventileeritud ja eemal otsesest päikesevalgusest
või soojus-, külma- ja niiskusallikatest. Vaadake allpool olevat pilti,
millel on kujutatud printeri jaoks mõeldud piirkond. Ärge paigutage
printerit liiga laua serva lähedale!
Printeri
piirkond
• Ees: 482,6 mm (piisavalt ruumi sahtli väljavõtmiseks)
• Taga: 100 mm (piisavalt ruumi küljesahtli avamiseks)
• Paremal: 100 mm (piisavalt ruumi ventileerimiseks)
• Vasakul: 100 mm (piisavalt ruumi ventileerimiseks)
Samm 2: Printeri osad
Vaade eest
Vaade tagant
Paberitugi
Ülemine
väljastussahtel
(trükitud pool
alla)
Juhtimispaneel
Toitelüliti
Sahtel
Paberi taseme
näitaja
Käsitsi söötmise
suunaja
Ava käsitsi
söötmiseks
Esikaas
Tagumine väljastussahtel
(trükitud pool üles)
Laserprinteri
kassett
USB port
Toitejuhtme pesa
Juhtimispaneel
Nupud ja hoiatuslambid
Nupp või
hoiatuslamp
Kirjeldus
• Kui hoiatuslamp On Line/Error on roheline, on
printer printimiseks valmis.
• Kui hoiatuslamp On Line/Error on punane, on
printer tuvastanud vea, näiteks paberiummistuse,
avatud sahtli või tühja kasseti. Lähemat informat
siooni leiate printeri kasutusjuhendist
• Käsitsi söötmise režiimis on hoiatuslamp punane, kui
käsitsi söötmise sahtlis ei ole paberit.
• Juhul, kui andmete vastuvõtmise ajal vajutatakse
nuppu Cancel, hakkab hoiatuslamp punasena
vilkuma, andes märku trükkimise katkestamisest.
• Ajal, mil printer võtab andmeid vastu või trükib
vastuvõetud andmeid välja, vilgub sama hoiatuslamp
rohelisena.
• Kui see hoiatuslamp põleb, on kasseti säästurežiim
sisselülitatud. Kui hoiatuslamp ei põle, on see režiim
tühistatud.
• Selleks, et režiimis Ready printida välja demoleht,
vajutage nupule ja hoidke nuppu all umbes 2 sekundit.
Puhastuslehe väljatrükkimiseks hoidke nuppu all
umbes 10 sekundit.
• Kasseti säästmisfunktsiooni sisse- või
väljalülitamiseks vajutage seda nuppu režiimis Ready.
Lähemat teavet saate printeri kasutusjuhendist.
• Vajutage nuppu iga kord, kui asetate paberit käsitsi
söötmise sahtlisse. Lähemat teavet käsitsi söötmise
kohta leiate printeri kasutusjuhendist.
• Printimise ajal vajutage nuppu printimise
katkestamiseks.
Samm 3: Laserprinteri kasseti paigaldamine
Võtke kinni esikaanest ja tõmmake seda avamiseks enda
Märkus: Printer on väga kerge, sellepärast võidakse teda
kasutamise ajal (näiteks sahtlite avamisel/sulgemisel või kasseti
paigaldamisel/eemaldamisel) liigutada. Olge ettevaatlik ja ärge
printerit liigutage.
Võtke kassett pakendist välja ja eemaldage sellelt paberkate.
Raputage kassetti õrnalt küljelt küljele, et kasseti sees olev
värvaine jaguneks ühtlaselt.
ETTEVAATUST:
• Selleks, et vältida kahjustusi, ärge jätke värvikassetti valguse kätte
kauemaks kui mõneks minutiks. Kui kassett on jäänud valguse kätte
pikemaks ajaks, katke see paberiga kinni.
• Kui värvaine satub Teie riietele, pühkige see kuiva riidega maha ja
peske riideid külmas vees. Soe vesi aitab värvainel kangasse imbuda.
Otsige printeri seest kasseti paigaldamiseks mõeldud avaused
üles. Kummalgi poolel on üks suunaja.
Võtke käepidemest kinni ja paigutage kassett printerisse, kuni
see lukustub oma kohale.
Sulgege esikaas. Veenduge, et kaas oleks kindlalt suletud. Kui
kaas ei ole tihedalt suletud, võib printimise tulemus olla
ebakvaliteetne.
Märkus: Kui prindite paberit, mis on kaetud tekstiga 5%, saab ühe
kassetiga printida välja umbes 3000 lehte teksti (1000 lehte
printeriga kaasas oleva kassetiga).
Samm 4: Paberi sissepanek
Te võite paigutada sahtlisse umbes 250 lehte paberit.
Tõmmake sahtel printerist välja.
Märkus: Printer on väga kerge, sellepärast võidakse teda
kasutamise ajal (näiteks sahtlite avamisel/sulgemisel või kasseti
paigaldamisel/eemaldamisel) liigutada. Olge ettevaatlik ja ärge
printerit liigutage.
Vajutage sahtli põhjas olev plaat alla, kuni see lukustub oma
kohale.
Valmistage printerisse panekuks ette paber, koolutades seda
kergelt ette- ja tahapoole. Tehke nurgad tasasel pinnal
siledaks.
teibid
Teip
poole.
1 2 3
5 6 7
4
1510 uz A3igaunu.qxd 28/1/04 11:24 Page 1
Step 1: Unpacking
1
Remove the Printer and all accessories from the packing
carton. Make sure that the printer has been packed with the
following items:
Toner Cartridge
CD-ROM
Notes:
• If any items are missing or damaged, notify your dealer
immediately.
• Components may differ from one country to another.
• The CD-ROM contains the printer driver, the User’s Guide, and
the Adobe Acrobat Reader program.
2
Carefully remove all of packing tapes from the printer.
Tap e
Power Cord
Setup Guide
Selecting a Location
Select a level, stable place with adequate space for air
circulation. Allow extra space for opening covers and tray. The
area should be well-ventilated and away from direct sunlight or
sources of heat, cold, and humidity. See the image below for
Clearance
clearance space. Do not place the printer close to the edge of
your desk or table!
Space
100 mm
(3.9 in.)
552 mm(21.7 in.)
•
Front
: 482.6 mm (enough space so that tray can be
removed)
Back
: 100 mm (enough space to allow opening of the rear
•
out tray)
Right
: 100 mm (enough space for ventilation)
•
Left
: 100 mm
•
100 mm
(3.9 in.)
482.6 mm(18.8 in.)
100 mm
(3.9 in.)
954.6 mm(37.5 in.)
Toner
cartridge
Step 2: Understanding Your Printer
Front View
Top output tray
(Face down)
Power switch
Paper level indicator
Front Cover
Manual Feeder guide Tray
Rear View
Output Support
Manual Feeder
Rear output tray
(Face up)
Power receptacle
Control Panel
USB port
Understanding the Control Panel
Button and LEDs
Button or LED Description
• If the
On Line/Error
printer is ready to print.
• If the
On Line/Error
printer is experiencing an error, such as
jammed paper, the open cover or the empty
toner cartridge. For detailed information, refer
to the User’s Guide of the printer.
• In Manual Feed mode, if there is no paper in the
Manual Feeder this LED blinks red.
• If you press the
printer is receiving data, this LED blinks red to
cancel printing.
• If the printer is receiving data or printing the
received data, this LED blinks green.
• If this LED is on, the Toner Save mode is
enabled. If this LED is off, the mode is disabled.
• In Ready mode, press and hold this button for
about 2 seconds to print a demo page or for
about 10 seconds to print a cleaning sheet.
• In Ready mode, press this button to turn the
Toner Save mode on or off. For detailed
information, refer to the User’s Guide of the
printer.
• Press this button each time you load a sheet of
paper in the manual feeder. For detailed
information about manual feeding, refer to the
User’s Guide of the printer.
• During printing, press this button to cancel the
print job.
LED lights green, the
LED lights red, the
Cancel
button while the
Step 3: Installing the Toner Cartridge
1
Grasp the front cover and pull it toward you to open.
Note:
Because the printer is very light, it may be moved when you
use it; for example, when opening/closing the tray or installing/
removing the toner cartridge. Be careful not to move the printer.
2
Remove the toner cartridge from its bag and remove the
paper covering the cartridge.
3
Gently shake the cartridge from side to side to distribute
the toner evenly inside the cartridge.
4
Locate the cartridge slots inside the printer, one on each
side.
5
Grasp the handle and insert the cartridge in the printer until
it snaps into place.
6
Close the front cover. Make sure that the cover is securely
closed. If the cover is not firmly closed, printing errors may
occur when you print.
Step 4: Loading Paper
You can load approximately 250 sheets of paper in the tray.
1
Pull the tray out of the printer.
Note:
Because the printer is very light, it may be moved when you
use it; for example, when opening/closing the tray or installing/
removing the toner cartridge. Be careful not to move the printer.
2
Push down the pressure plate until it locks in position.
3
Prepare a stack of paper for loading by flexing or fanning
them back and forth. Straighten the edges on a level
surface.
ML-1510
SAMSUNG LASER PRINTER
Setup Guide
CAUTION:
• To prevent damage, do not expose the toner cartridge to light for
more than a few minutes. Cover it with a piece of paper, if left
exposed for more than a few minutes.
• If toner gets on your clothing, wipe it off with a dry cloth and
wash clothing in cold water. Hot water sets toner into fabric.
Note:
When printing text at 5% coverage, you can expect a toner
cartridge life of approximately 3,000 pages (1,000 pages for the
toner cartridge that is shipped with the printer).
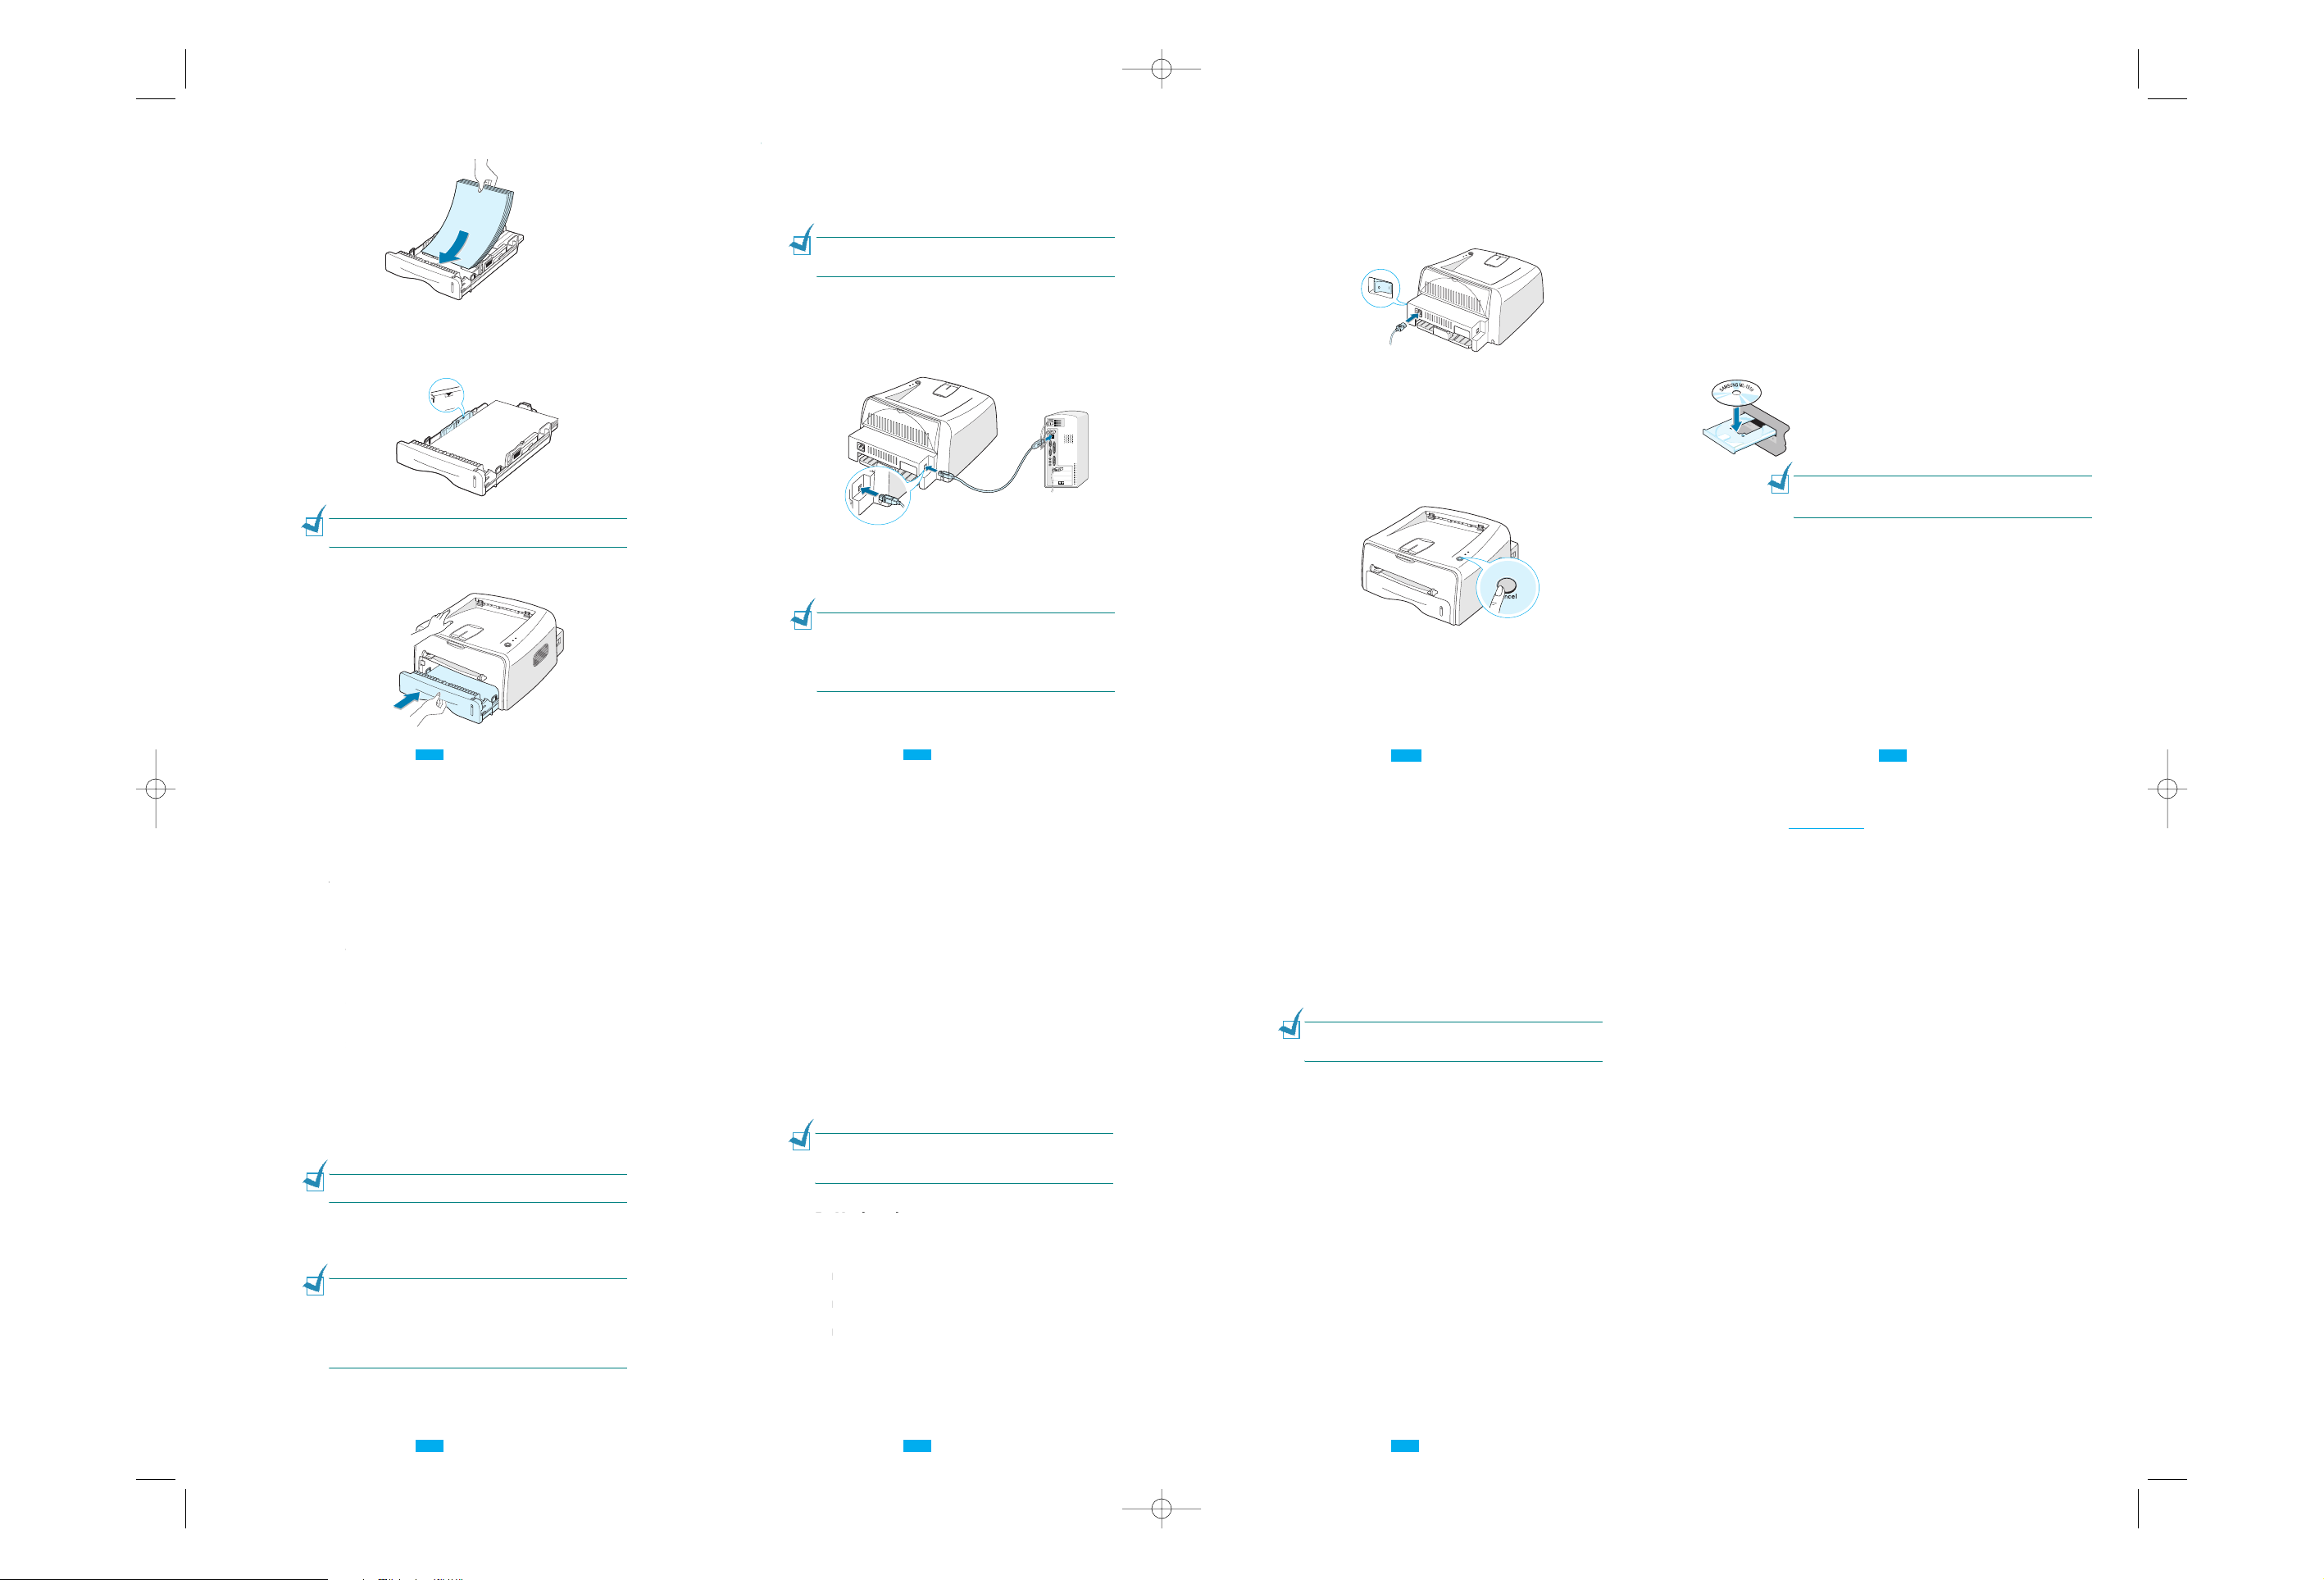
Laadige paber trükitava poolega alla.
Veenduge, et kõik neli nurka oleksid sahtlis ühel tasapinnal.
Pöörake tähelepanu paberi maksimummärgile sahtli vasakul
seinal. Liigne paber võib põhjustada paberiummistusi.
Märkus: Kui soovite paberi kogust sahtlis muuta, lugege
kasutusjuhendit.
Lükake sahtel tagasi printerisse.
Samm 5: Printeri kaabli ühendamine
Selleks, et printida oma arvutist, peate Te ühendama printeri
Universal Serial Bus (USB) kaabli vahendusel arvutiga.
USB kaabli kasutamine
Märkus: Printeri ühendamiseks USB liideste abil peab Teil olema
sertifitseeritud USB kaabel. Te peate ostma USB 1.1
parameetritele vastava kaabli, mille pikkuseks on vähemalt 3 m.
Veenduge, et nii printer kui ka arvuti on välja lülitatud.
Ühendage USB kaabel printeri taga oleva USB pesaga.
Ühendage kaabli teine ots oma arvuti USB pesaga.
Kui vajate abi, lugege oma arvuti kasutusjuhendit.
Märkus:
• USB kaabli kasutamiseks peab Teie arvuti töötama Windows
98/Me/2000/XP keskkonnas või Macintoshi keskkonnas OS 8,6,
mis kasutab G3 protsessorit või sellest veel võimsamat protsessorit.
• Windows 98/Me keskkonnas peate Te USB pordi lisamiseks
installima USB draiveri. Vt lk 12.
Arvuti USB pesasse
Samm 6: Printeri sisselülitamine
Asetage toitejuhe printeri taga olevasse pesasse.
Asetage juhtme teine ots maandatud vahelduvvoolu pesasse
ja lülitage vool sisse.
Vahelduvvoolu
pesasse
Samm 7: Demolehe printimine
Printige välja demoleht või konfiguratsioonileht veendumiseks, kas
printer töötab korrektselt.
Hoidke nuppu Cancel umbes 2 sekundit all, et demoleht välja
printida.
Demoleht näitab printeri hetkel kehtivaid seadeid.
Samm 8: Printeri tarkvara installimine
Windowsi keskkonnas
Nõutavad parameetrid
Arvuti peab vastama järgnevatele nõuetele:
• RAM vähemaalt 32 MB (Windows 98/Me), 64 MB (Windows
2000), 128 MB (Windows XP) või rohkem.
• 200 MB vaba ruumi kõvakettal.
• Enne installeerimist peavad kõik programmid olema suletud.
• Arvuti peab töötama Windows 98, Windows Me, Windows 2000
või Windows XP keskkonnas.
• Arvutis peab olema vähemalt Internet Explorer 5.0.
Windows 2000/XP keskkonnas
Paigutage CD-ROM plaat CD-ROM pesasse. Installimine
algab automaatselt.
Kui CD-ROM ei hakka tööle automaatselt:
Valige Start valikust Run ning kirjutage väljale
x:\cdsetup.exe (kus x on CD-ROM ketta nimi), seejärel
vajutage OK.
Märkus: Kui installimise käigus ilmub aken New Hardware Found,
vajutage kasti ülemisse paremasse nurka või nuppu Cancel.
Keele valiku akna ilmumisel valige vastav keel.
Kui ekraanilt pole võimalik vajalikku keelt leida, kasutage
keelte lehitsemiseks ekraani paremal serval olevat nuppu.
Vajutage Install the Samsung Software on your PC (SPL
Driver).
Avaneb tervitusaken. Vajutage Next.
Installimise lõpetamiseks järgige ekraanil olevaid juhiseid.
Windows 98/Me keskkonnas
Kui Te soovite printida USB liidese abil Windows 98/Me keskkonnast,
peate Te eelnevalt USB pordi lisamiseks installima USB draiveri.
USB draiveri installimiseks:
Ühendage printer oma arvutiga USB kaabli abil ning lülitage
mõlemad seadmed sisse. Täpsema informatsiooni leiate lehel
1.9.
Ilmub aken Add New Hardware Wizard. Vajutage Next.
Paigutage CD-ROM plaat CD-ROM pesasse, valige Search for
the best driver for your device ja vajutage Next.
Valige CD-ROM drive, vajutage Browse ning valige x:\USB (kus
x on CD-ROM ketta nimetus). Vajutage Next.
Vajutage Next. USB draiver installitakse.
Kui installimine on lõpetatud, vajutage Finish.
Keele valiku akna ilmumisel valige vastav keel.
Märkus: Kui Te olete printeri tarkvara juba installinud, siis see
enam ekraanile ei ilmu.
Järgige ekraanile ilmuvaid juhiseid selleks, et lõpetada
printeri tarkvara installimine. Täpsemat informatsiooni leiate
lehel 11.
Märkused:
• Te võite trükkida ka Macintoshi või Linuxi keskkonnast. Täpsema
informatsiooni leiate printeri kasutusjuhendist.
• Pärast tarkvara installimist võite selle uuesti installida või
vajaduse korral kõrvaldada. Samuti võite Te muuta ekraani keelt.
Täpsema informatsiooni leiate printeri kasutusjuhendist.
Samm 9: Kasutusjuhendi vaatamine
Samsung ML-1510 seeri kasutusjuhend, mis asub tarkvara
CD-ROM-il, on Adobe Acrobat PDF formaadis. See juhend aitab
Teil informatsiooniga tutvuda.
Te saate juhiseid ekraanil vaadata erineval kujul (vaadata eraldi
lehte, jätkuvat teksti, suurendada teksti kuni 1600% võrra ja
vähendada kuni 12,5%, lehitseda seda alla ja üles). Samuti võite
juhendi vajaduse korral välja printida.
Windows keskkonnas
Macintosh keskkonnas
Paigutage CD-ROM plaat CD-ROM pesasse.
Keele valiku akna ilmumisel valige vastav keel.
Vajutage View User’s Guide. Avaneb Adobe Acrobat programm
ning Te saate vaadata kasutusjuhendit.
Märkus: Kasutusjuhendi avamiseks peate oma arvutisse installima
Adobe Acrobat Reader programmi. Kui Teil seda programmi pole,
vajutage programmi installimiseks Install the Bonus Software on
your PC.
Paigutage CD-ROM plaat CD-ROM pesasse.
Vajutage kaks korda Macintoshi töölaual olevat ikooni
SAMSUNG_LBP.
Vajutage kaks korda User’s Guide kausta.
Vajutage kaks korda User’s Guide.pdf(xxx). xxx on vastav keel.
Avaneb Adobe Acrobat programm ning Te saate vaadata
kasutusjuhendit.
Linux keskkonnas
Adobe Acrobat Reader installimine
Administrator Login akna ilmumisel kirjutage Login-väljale
“root” ja sisestage süsteemi salasõna.
Paigutage pesasse CD-ROM printeri tarkvaraga.
Vajutage ekraani alumises osas olevat ikooni. Terminali
akna ilmumisel kirjutage:
[root@local /root]# cd /mnt/cdrom (CD-ROM aadress)
[root@local cdrom]# gv manual/ENGuide.pdf↵
Märkus: Kui Teie ghostscript versioon on vana, ei pruugi te pdf faili
näha. Seejärel installige oma keskkonda Acrobat Reader või lugege
Windowsi keskkonna kasutusjuhendit.
Vajutage ekraani alumises osas olevat ikooni. Terminali akna
ilmumisel kirjutage:
[root@local /root]# cd /mnt/cdrom (CD-ROM aadress)↵
[root@local cdrom]# manual/acrobat4/INSTALL↵
Pärast litsentsilepingu läbilugemist kirjutage Accept.↵
Kui Teil palutakse näidata installimisaadressi, vajutage lihtsalt
nuppu Enter.
Nüüd võite te lugeda pdf faile Acrobat Reader programmiga.
[root@local cdrom]# acroread /mnt/cdrom/manual/
ENGuide.pdf↵
Et programm Acrobat Reader jätkaks tööd, peate toimima
järgnevat:
[root@local cdrom]# ln -s /usr/local/Acrobat4/bin/
acroread /usr/bin/acroread↵
Märkused
8 9
10
11
12
13
14
1510 uz A3igaunu.qxd 28/1/04 11:24 Page 2
4
Load paper
Make sure that all four corners are flat in the tray.
5
Pay attention to the paper limit mark on the left inside wall
of the tray. Paper overloading may cause paper jams.
Note:
User’s Guide.
6
Slide the tray back into the printer.
with the print side facing down
If you want to change the paper size in the tray, refer to
.
Step 5: Connecting a Printer Cable
To print from your computer, you need to connect your printer
to your computer with a Universal Serial Bus (USB) cable.
Using a USB Cable
Note:
Connecting the printer to the USB port of the computer
requires a certified USB cable. You will need to buy a USB 1.1
compliant cable that is within 3m in length.
1
Make sure that both the printer and the computer are
turned off.
2
Plug the USB printer cable into the connector on the back of
the printer.
To the USB port on
your computer
3
Connect the other end of the cable to the USB port on your
computer.
See your computer User’s Guide if you need help.
Notes:
• For using a USB cable, you must be running Windows 98/Me/
2000/XP, or Macintosh with OS 8.6 and the G3 processor or
higher.
• In Windows 98/Me, you must install the USB driver to add the
USB port. See page 1.12.
Step 6: Turning the Printer on
1
Plug the power cord into the power receptacle on the back
of the printer.
2
Plug the other end into a properly grounded AC outlet, and
turn on the power.
To the AC outlet
Step 7: Printing a Demo Page
Print a demo page or a configuration sheet to make sure that the
printer is operating correctly.
1
Hold down the
demo page.
2
The Demo page shows the printer’s current configuration.
Cancel
button for about 2 seconds to print a
Step 8: Installing Printer software in
Windows
System Requirements
Verify the following:
32 MB
• At least
128 MB
• There is at least
• All applications are closed on your PC before beginning
installation.
• Windows 98, Windows Me, Windows 2000 or Windows XP.
• At least Internet Explorer 5.0.
(Windows 98/Me),
(Windows XP) or more of RAM is installed on your PC.
200 MB
In Windows 2000/XP
1
Place the CD-ROM in the CD-ROM drive. Installation will
start automatically.
If the CD-ROM drive does not automatically run:
Select
Run
from the
x:\cdsetup.exe
letter for the CD-ROM drive), then click
Note:
If the
installation procedure, click in the upper right coner of the box,
or click
2
3
4
5
New Hardware Found
Cancel
When the language selection window appears, select the
appropriate language.
If you can’t find the desired language from the screen,
scroll through the screen using the scroll button on the
bottom right of the screen.
Click
Install the Samsung Software on your PC (SPL
Driver)
.
The Welcome window opens. Click
Follow the instructions on the screen to complete the
installation.
Start
in the Open box (where x is the drive
.
64 MB
(Windows 2000),
of free disk space on your PC.
menu, and type
OK
.
window appears during the
Next
.
In Windows 98/Me
If you want to print using the USB interface in the Windows 98/
Me, you must first install the USB driver to add the USB port.
To install the USB driver:
1
Connect the printer to your computer using the USB cable
and turn them on. For detailed information, see page 1.9.
2
The Add New Hardware Wizard window appears. Click
Next
.
3
Place the CD-ROM in the CD-ROM drive and check
for the best driver for your device
4
Check
CD-ROM drive
x:\USB
(where x is the drive letter for the CD-ROM drive).
Click
Next
.
5
Click
Next
. The USB driver will be installed.
6
When the installation is completed, click
7
When the language selection window appears, select the
appropriate language.
Note:
If you already installed the printer software, this screen
doesn’t appear.
8
Follow the instructions on the screen to complete the
printer software installation. For more details, see
page 1.11.
Notes:
• You can also print from Macintosh, or Linux. For detailed
information, refer to the User’s Guide of the printer.
• After installation of the software, you can reinstall or remove the
printer software, if necessary. Also, you can change the display
language. For detailed information, refer to the User’s Guide of
the printer.
and click
and click
Browse
Search
Next
, and choose
Finish
.
Step 9: Viewing the User’s Guide
The Samsung ML-1510 Series User’s Guide, which is in the
software CD-ROM, is in Adobe Acrobat PDF format. The manual
will give you flexibility and convenience when you have to access
.
information.
You can view the manuals on-screen in different formats
(viewing a single page, continuous single page or continuous
facing page, zooming in up to 1600% and out up to 12.5%,
scrolling two-up page or article flow). You can also print the
manual, if necessary.
In Windows
1
2
3
Note:
Acrobat Reader program on your computer. If you do not have the
program, click
the program.
In Macintosh
1
2
3
4
Place the CD-ROM in the CD-ROM drive.
When the language selection window appears, select the
appropriate language.
Click
View User’s Guide
opens and you can view the User’s Guide.
To open the User’s Guide, you should install the Adobe
Install the Bonus Software on your PC
Place the CD-ROM in the CD-ROM drive.
Double-click
Double-click
Double-click
language. The Adobe Acrobat program opens and you can
view the User’s Guide.
SAMSUNG_LBP
User’s Guide
User’s Guide.pdf(xxx). xxx
. The Adobe Acrobat program
to install
on your Macintosh desktop.
folder.
is corresponding
In Linux
1
When the Administrator Login window appears, type in
“
root
” in the login field and enter the system password.
2
Insert the printer software CD-ROM.
3
Click the icon at the bottom of the screen. In the
terminal screen appears, type in:
[root@local /root]#
directory)
[root@local cdrom]#
Note:
If your ghostscript version is old, you may not see the pdf
file. Then, install Acrobat Reader on your system, or try to read the
User’s Guide on Windows system.
cd /mnt/cdrom
gv manual/ENGuide.pdf
Installing the Adobe Acrobat Reader
1
Click the icon at the bottom of the screen. In the terminal
screen appears, type in:
[root@local /root]#
[root@local cdrom]#
2
After reading the license agreement, type
3
When you are asked of installation directory, just type enter key.
4
You need to make a symbolic link to execute Acrobat Reader
without full path:
[root@local cdrom]#
acroread /usr/bin/acroread
5
Now, you can read the pdf files with Acrobat Reader.
[root@local cdrom]#
ENGuide.pdf
cd /mnt/cdrom
manual/acrobat4/INSTALL
ln -s /usr/local/Acrobat4/bin/
acroread /mnt/cdrom/manual/
(the CD-ROM
(the CD-ROM directory)
accept
.
S
ETTING UP YOUR PRINTER
1.16
 Loading...