

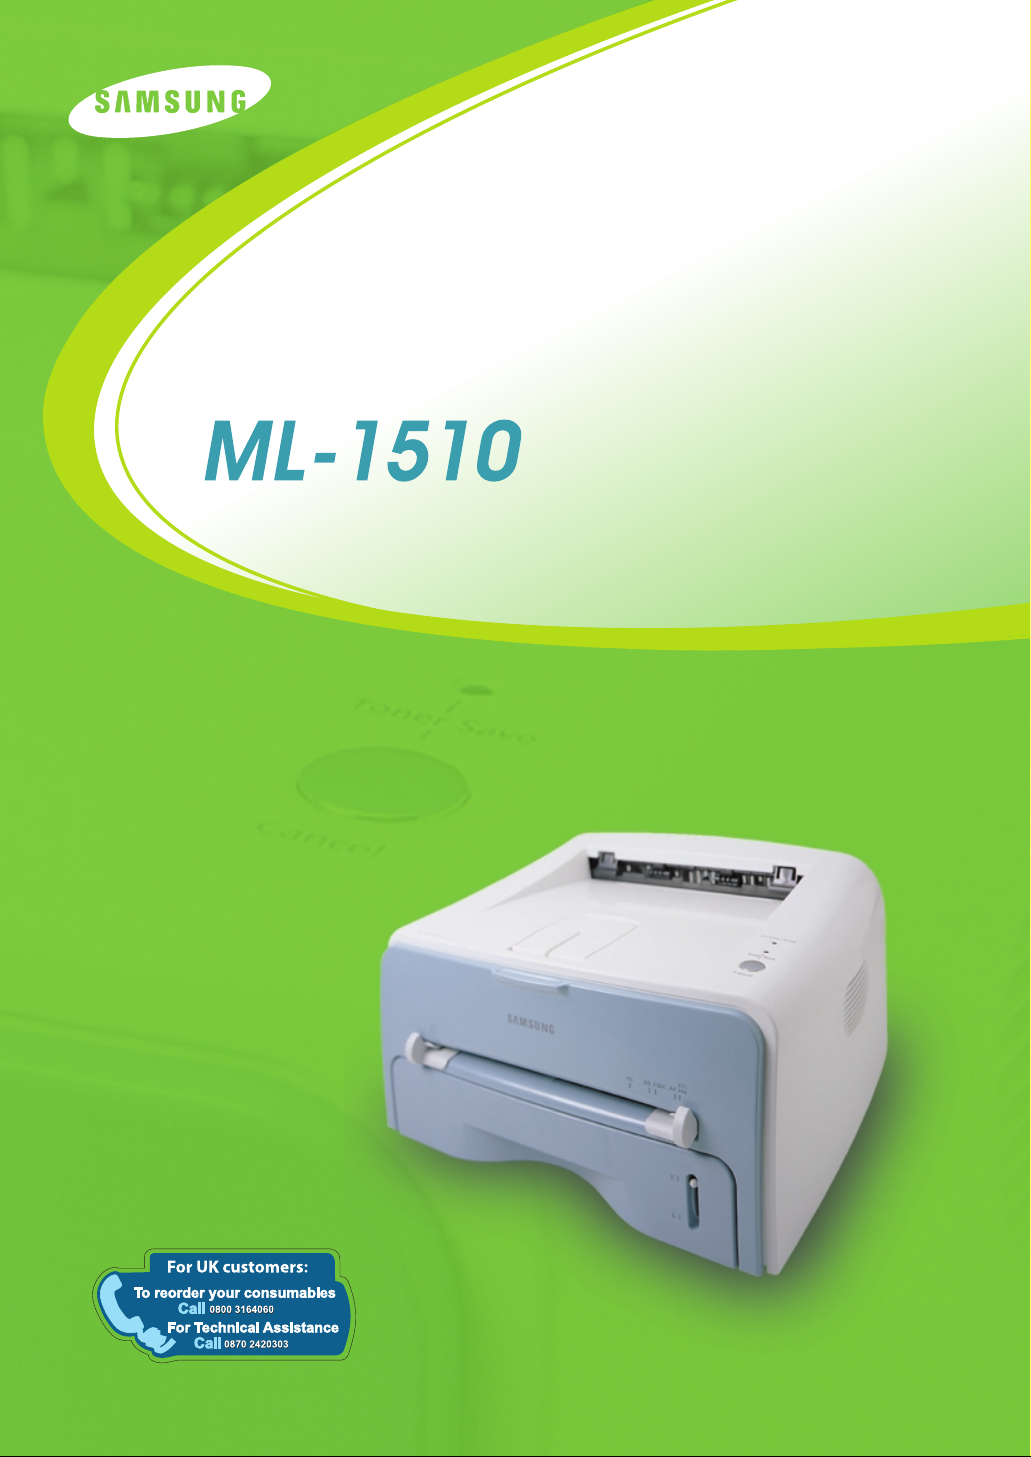
SAMSUNG LASER PRINTER
User’s Guide

This manual is provided for information purposes only. All information included herein
is subject to change without notice. Samsung Electronics is not responsible for any
damages, direct or indirect, arising from or related to use of this manual.
© 2003 Samsung Electronics Co., Ltd. All rights reserved.
• ML-1510 and Samsung logo are trademarks of Samsung Electronics Co., Ltd.
• Centronics is a trademark of Centronics Data Computer Corporation.
• IBM and IBM PC are trademarks of International Business Machines Corporation.
• Microsoft, Windows, Windows 98, Windows Me, Windows 2000 and Windows XP are
registered trademarks of Micorsoft Corporation.
• All other brand or product names are trademarks of their respective companies or
organizations.
i

CONTENTS
Chapter 1:
Chapter 2:
INTRODUCTION
Special Features .................................................. 1.2
Printer Components ............................................. 1.4
Front View ..................................................... 1.4
Inside View .................................................... 1.5
Rear View ...................................................... 1.5
Understanding the Control Panel ............................ 1.6
On Line/Error and Toner Save LEDs ................... 1.6
Cancel button ................................................. 1.7
SETTING UP YOUR PRINTER
Unpacking .......................................................... 2.2
Selecting a Location ........................................ 2.3
Installing the Toner Cartridge ................................ 2.4
Loading Paper ..................................................... 2.6
Changing the Paper Size in the Tray .................. 2.8
Connecting a Printer Cable .................................... 2.9
Turning the Printer on ......................................... 2.10
Printing a Demo Page .......................................... 2.11
Installing Printer Software ................................... 2.12
Printer Driver Features ................................... 2.13
Installing Printer software in Windows .............. 2.14
ii

Chapter 3:
USING PRINT MATERIALS
Choosing Paper and Other Materials ....................... 3.2
Sizes and Capacities ....................................... 3.3
Guidelines for Paper and Special Materials .......... 3.4
Selecting the Output Location ................................ 3.5
Printing to the Top Output Tray (Face down) ...... 3.5
Printing to the Rear Output Tray (Face up) ......... 3.6
Loading Paper ..................................................... 3.7
Using the Tray ................................................ 3.7
Using the Manual Feeder ................................. 3.8
Printing on Envelopes .......................................... 3.10
Printing on Labels ............................................... 3.12
Printing on Transparencies ................................... 3.13
Printing on Card Stock or
Custom-sized Materials ....................................... 3.15
Printing on Preprinted Paper ................................. 3.16
Chapter 4:
PRINTING TASKS
Printing a Document ............................................ 4.2
Canceling a Print Job ....................................... 4.4
Using a Favorite Setting .................................. 4.5
Using Help ..................................................... 4.5
Setting Paper Properties ....................................... 4.6
Using the Toner Save Mode ................................... 4.8
Printing Multiple Pages on One
Sheet of Paper (N-Up Printing) ............................. 4.10
Scaling Your Document ....................................... 4.11
Fitting Your Document to a Selected Paper Size ...... 4.12
Printing Posters .................................................. 4.13
Setting Graphic Properties ................................... 4.14
Printing Watermarks ........................................... 4.17
Using an existing Watermark ........................... 4.17
Creating a Watermark .................................... 4.18
Editing a Watermark ...................................... 4.19
Deleting a Watermark .................................... 4.19
Printing Overlays ................................................ 4.20
What is an Overlay? ....................................... 4.20
Creating a New Page Overlay .......................... 4.20
Using a Page Overlay ..................................... 4.22
Deleting a Page Overlay ................................. 4.23
Using the Status Monitor ..................................... 4.24
Opening the Status Monitor ............................. 4.24
Setting Up Locally Shared Printer .......................... 4.26
Windows 98/Me ............................................. 4.26
Windows 2000/XP .......................................... 4.27
iii

Chapter 5:
MAINTAINING YOUR PRINTER
Maintaining the Toner Cartridge ............................. 5.2
Redistributing Toner ........................................ 5.3
Replacing the Toner Cartridge .......................... 5.4
Cleaning the Printer ............................................. 5.5
Cleaning the Outside ....................................... 5.5
Cleaning the Inside ......................................... 5.5
Consumables and Replacement Parts ..................... 5.8
Chapter 6:
Chapter 7:
SOLVING PROBLEMS
Troubleshooting Checklist ..................................... 6.2
Solving General Printing Problems .......................... 6.3
Clearing Paper Jams ............................................. 6.7
In the Paper Exit Area ..................................... 6.7
In the Paper Feed Area .................................... 6.9
Around the Toner Cartridge ............................. 6.10
Tips for Avoiding Paper Jams When Printing
on the A5-sized Paper .................................... 6.11
Tips for Avoiding Paper Jams ........................... 6.12
Solving Print Quality Problems .............................. 6.12
Print Quality Checklist .................................... 6.12
Solving Print Quality Problems ......................... 6.13
Troubleshooting Error Messages ........................... 6.18
Common Windows Problems ................................ 6.19
Common Linux Problems ..................................... 6.20
APPENDIX
Using Your Printer in Linux .................................... 7.2
Installing the Printer Driver .............................. 7.2
Changing the Printer Connection Method ............ 7.6
Using the Configuration Tool ............................ 7.8
Changing LLPR Properties ............................... 7.10
Printer Specifications ........................................... 7.12
Paper Specifications ............................................ 7.13
Overview ...................................................... 7.13
Supported Sizes of Paper ................................ 7.14
Guidelines for Using Paper .............................. 7.15
Paper Specifications ....................................... 7.16
Paper Output Capacity .................................... 7.16
Printer and Paper Storage Environment ............ 7.17
iv
Environmental and Safety Consideration
Laser Safety Statement
The printer is certified in the U.S. to conform to the requirements of DHHS 21 CFR,
chapter 1 Subchapter J for Class I(1) laser products, and elsewhere, is certified as a
Class I laser product conforming to the requirements of IEC 825.
Class I laser products are not considered to be hazardous. The laser system and
printer are designed so there is never any human access to laser radiation above a
Class I level during normal operation, user maintenance, or prescribed service
condition.
WARNING
Never operate or service the printer with the protective cover removed from Laser/
Scanner assembly. The reflected beam, although invisible, can damage your eyes.
When using this product, these basic safety precautions should always be followed to
reduce risk of fire, electric shock, and injury to persons:
vi

Ozone Safety
During normal operation, this machine produces ozone. The
ozone produced does not present a hazard to the operator.
However, it is advisable that the machine be operated in a well
ventilated area.
If you need additional information about ozone, please contact
your nearest Samsung dealer.
Power Saver
This printer contains advanced energy conservation
technology that reduces power consumption when it is not
in active use.
When the printer does not receive data for an extended
period of time, power consumption is automatically
lowered.
The energy star emblem does not represent EPA
endorsement of any product or service.
Radio Frequency Emissions
FCC regulations
This device has been tested and found to comply with the limits for a Class B digital
device, pursuant to Part 15 of the FCC rules. These limits are designed to provide
reasonable protection against harmful interference in a residential installation. This
equipment generates, uses and can radiate radio frequency energy and, if not
installed and used in accordance with the instructions, may cause harmful
interference to radio communications. However, there is no guarantee that
interference will not occur in a particular installation. If this equipment does cause
harmful interference to radio or television reception, which can be determined by
turning the equipment off and on, the user is encouraged to try to correct the
interference by one or more of the following measures:
1
Reposition the receiving antenna.
2
Increase the separation between the equipment and receiver.
3
Connect the equipment into an outlet on a circuit different from that to which the
receiver is connected.
4
Consult the dealer or an experienced radio/TV technician for help.
CAUTION: Changes or modifications not expressly approved by the manufacturer
responsible for compliance could void the user’s authority to operate the equipment.
vii

Canadian Radio Interference Regulations
This digital apparatus does not exceed the Class B limits for radio noise emissions
from digital apparatus as set out in the interference-causing equipment standard
entitled “Digital Apparatus”, ICES-003 of the Industry and Science Canada.
Cet appareil numérique respecte les limites de bruits radioélectriques applicables aux
appareils numériques de Classe B prescrites dans la norme sur le matériel brouilleur:
“Appareils Numériques”, ICES-003 édictée par l’Industrie et Sciences Canada.
Declaration of Conformity (European Countries)
Approvals and Certifications
The CE marking applied to this product symbolizes Samsung
Electronics Co., Ltd. Declaration of Conformity with the following
applicable 93/68/EEC Directives of the European Union as of the
dates indicated:
January 1, 1995: Council Directive 73/23/EEC Approximation of the laws of the
member states related to low voltage equipment.
January 1, 1996: Council Directive 89/336/EEC (92/31/EEC), approximation of the
laws of the Member States related to electromagnetic compatibility.
March 9, 1999: Council Directive 1999/5/EC on radio equipment and
telecommunications terminal equipment and the mutual recognition of their
conformity.
A full declaration, defining the relevant Directives and referenced standards can be
obtained from your Samsung Electronics Co., Ltd. representative.
EC Certification
Certification to 1999/5/EC Radio Equipment &
Telecommunications Terminal Equipment Directive (FAX)
This Samsung product has been self-certified by Samsung for pan-European single
terminal connection to the analogue public switched telephone network (PSTN) in
accordance with Directive 1999/5/EC. The product has been designed to work with
the national PSTNs and compatible PBXs of the European countries:
In the event of problems, you should contact the Euro QA Lab of Samsung Electronics
Co., Ltd. in the first instance.
The product has been tested against TBR21 and/or TBR 38. To assist in the use and
application of terminal equipment which complies with this standard, the European
Telecommunication Standards Institute (ETSI) has issued an advisory document (EG
201 121) which contains notes and additional requirements to ensure network
compatibility of TBR21 terminals. The product has been designed against, and is fully
compliant with, all of the relevant advisory notes contained in this document.
viii
ix

Recycling
Please recycle or dispose of the packaging material for this
product in an environmentally responsible manner.
WARNING
• Do not disassemble the printer. Doing so may give you an electric shock.
• If you continuously print many pages, the surface of the output tray may become
hot. Be careful not to touch the surface, especially for children.
x

N
OTE
xi

1
INTRODUCTION
Congratulations on the purchase of your Printer!
This chapter includes:
• Special Features
• Printer Components
• Understanding the Control Panel
Special Features
Your new printer is equipped with special features that improve
the print quality, giving you a competitive edge. You can:
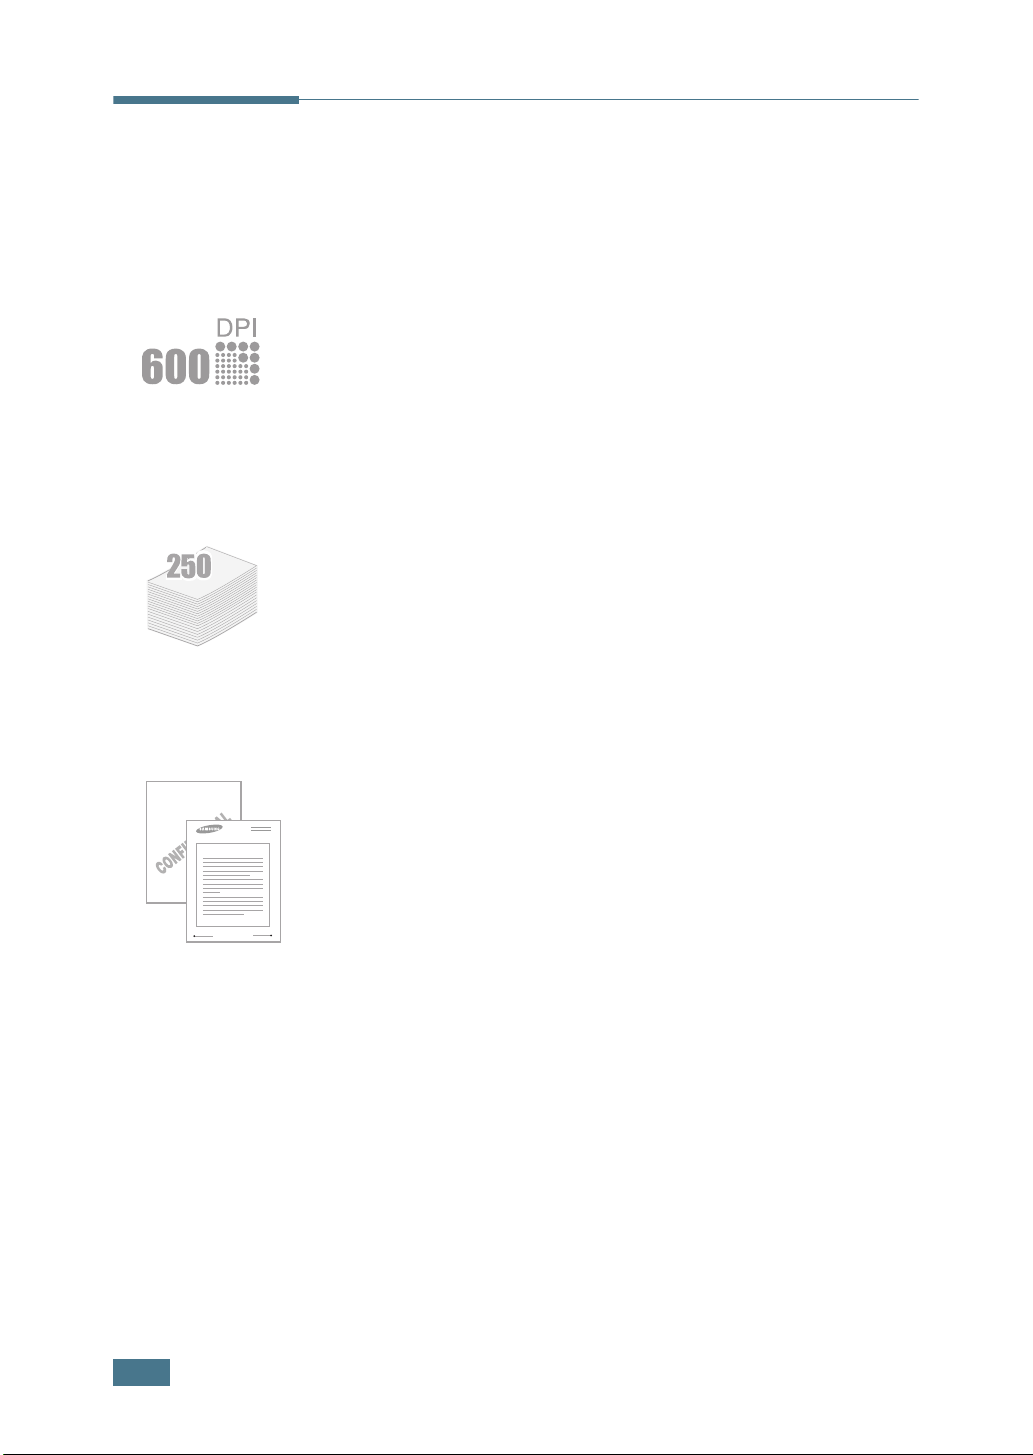
Print with excellent quality and high speed
• You can print at 600 dots per inch (dpi). See page 4.14.
• Prints up to 15 pages-per-minute (Letter size),
up to 14 pages-per-minute(A4 size).
Handle paper flexibly
• Standard 250-sheet tray and a 1-sheet Manual Feeder
support various sizes and types of paper.
• Two output trays; select either the top output tray (face-
down) or the rear output tray (face-up) for the most
convenient access.
Dear ABC
Regards
WORLD BEST
Create professional documents
• You can customize your documents using Watermarks, such
as “Confidential.” See page 4.17.
• Print Posters. The text and pictures of each page of your
document are magnified and printed across the selected sheet
of paper. After the document has printed, trim off the white
edges of each sheet. Tape the sheets together to form a
poster. See page 4.13.
1.2
I
NTRODUCTION

Save your time and money
• Allows you to use the Toner Save mode to save toner. See
page 4.8.
• Allows you to print multiple pages on one single sheet of paper
to save paper (N-Up printing). See page 4.10.
• This printer meets Energy Star guidelines for energy
efficiency.
Print in various environments
• You can print in Windows 98/Me/2000/XP.
• Your printer is compatible with Linux.
• Your printer comes with the USB interface.
1
I
NTRODUCTION
1.3
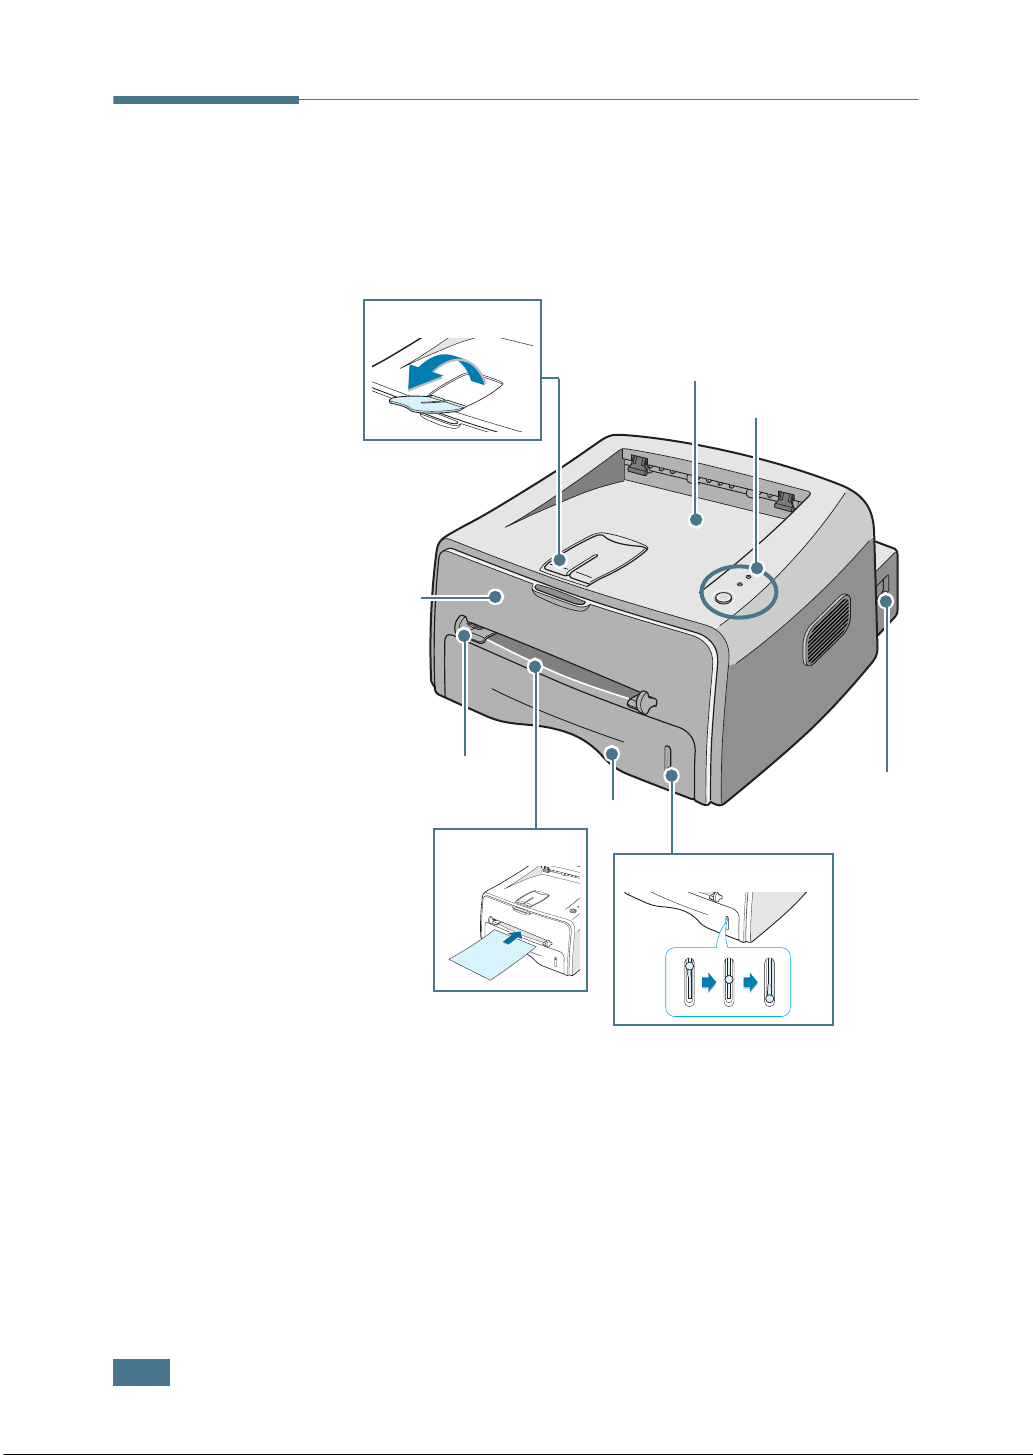
Printer Components
Paper level indicator
Front View
Output Support
Front
Cover
Top output tray
(Face down)
Control Panel
Manual Feeder guide
Power switch
Tray
Manual Feeder
1.4
I
NTRODUCTION
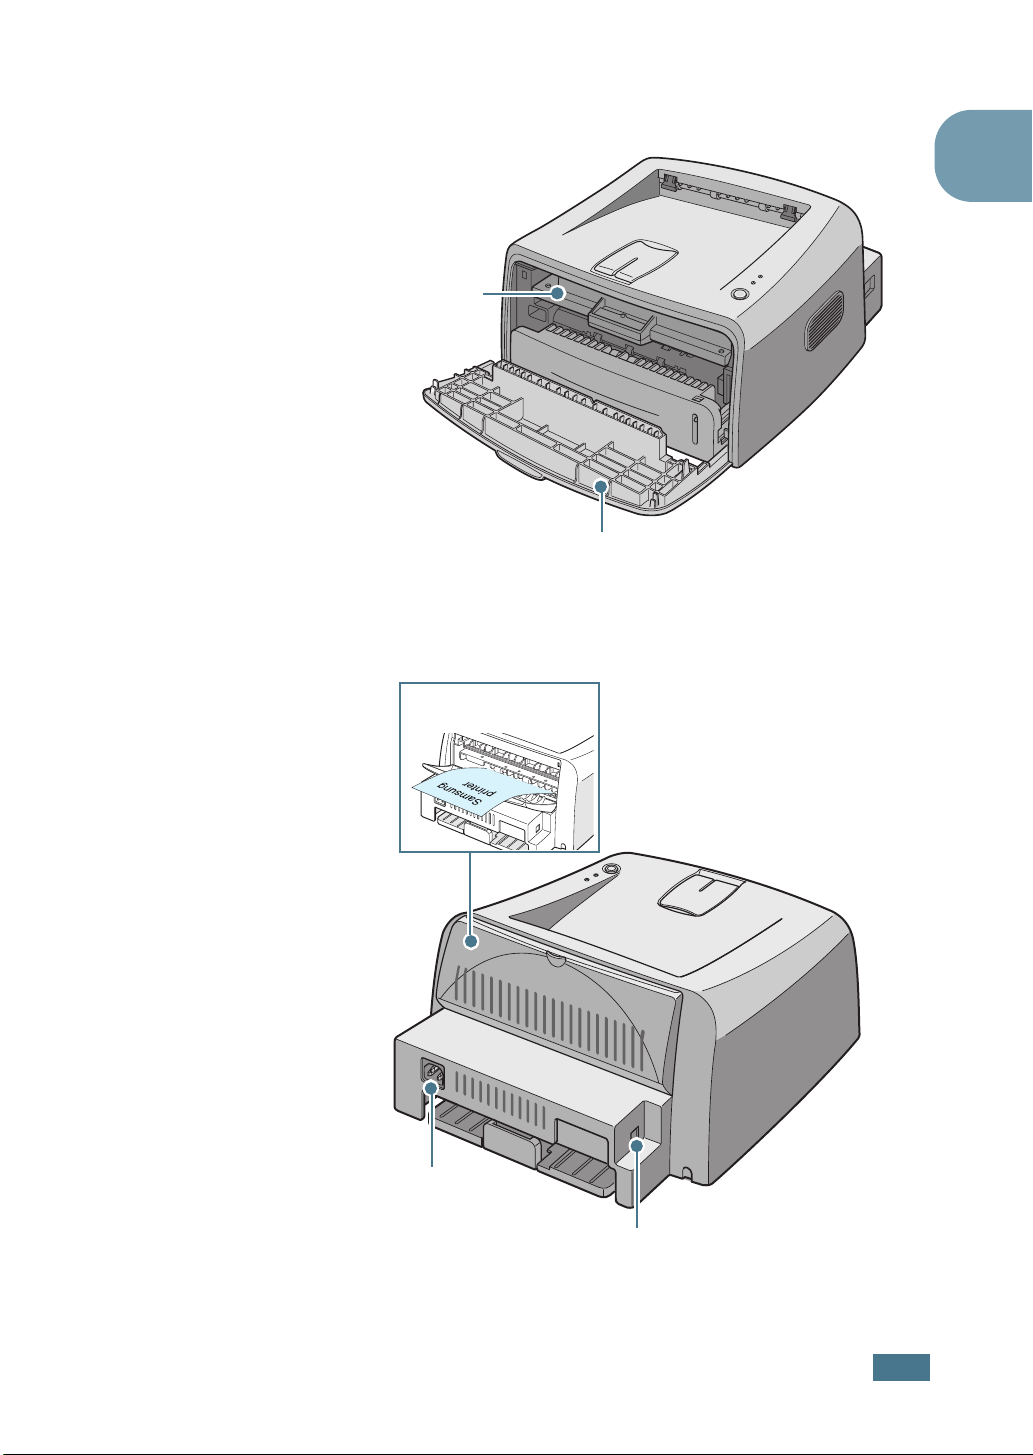
Inside View
Toner cartridge
Rear View
1
Front Cover
Rear output tray
(Face up)
Power receptacle
USB port
I
NTRODUCTION
1.5
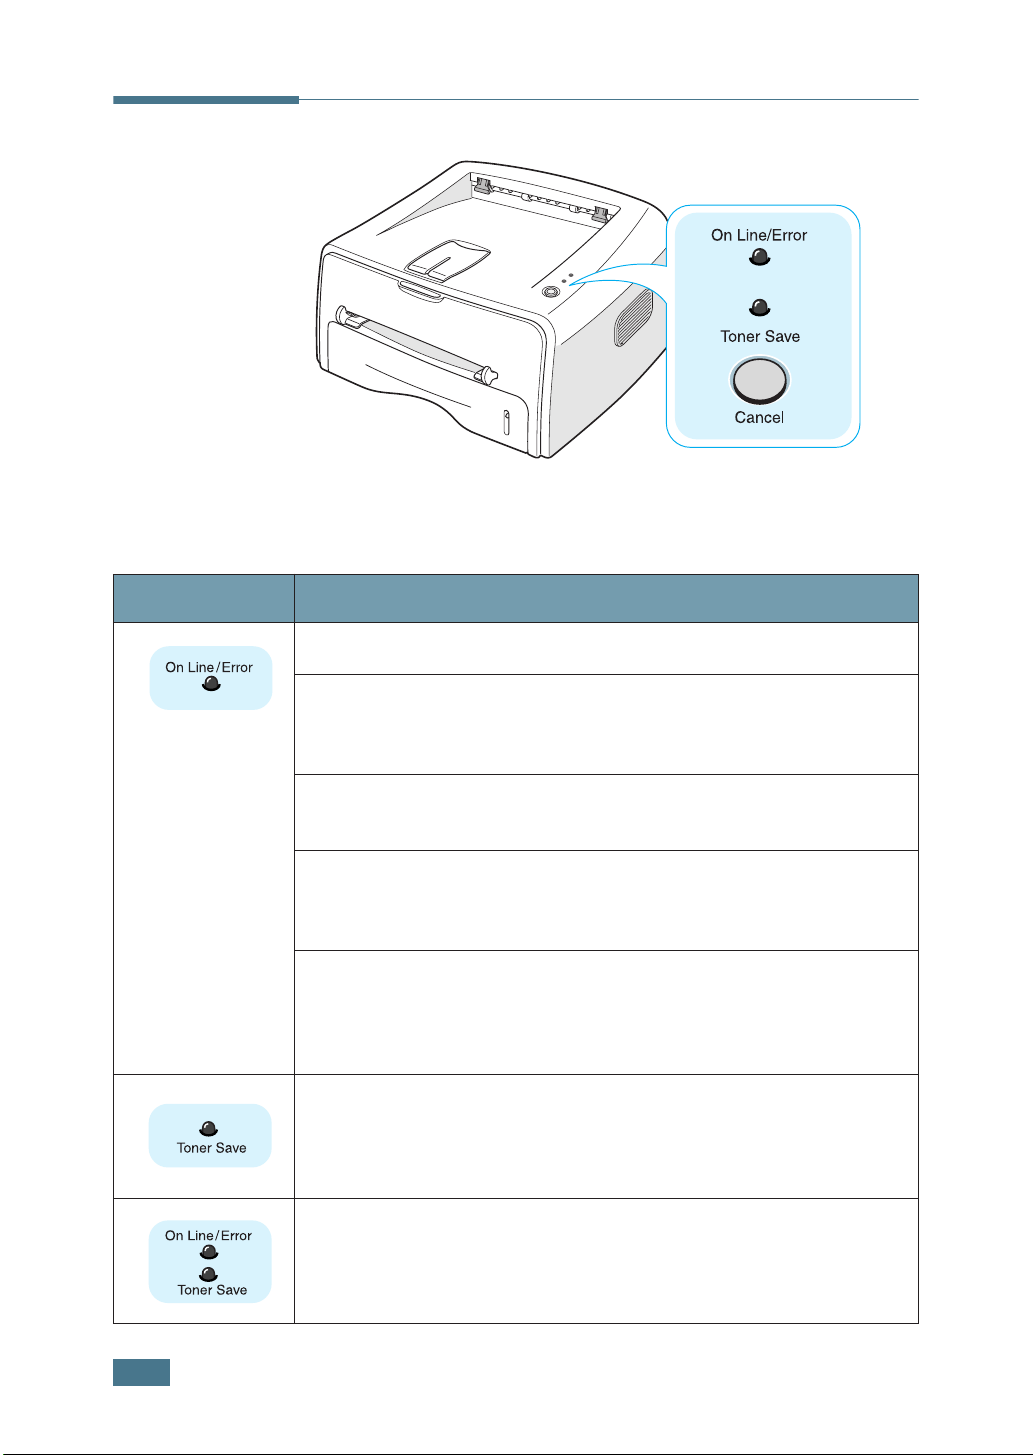
Understanding the Control Panel
On Line/Error and Toner Save LEDs
LED Description
If the
On Line/Error
lights green, the printer is ready to print.
On Line/Error
If the
error, such as jammed paper, the open cover or the empty toner
cartridge. See “Troubleshooting Error Messages” on page 6.18.
If you press the
data, the
In Manual Feed mode, if there is no paper in the Manual Feeder,
the
Feeder and the LED stops blinking.
If the printer is receiving data, the
blinks green.
If the printer is printing the received data, the
LED blinks green fast.
If you press the
and the Toner Save mode is enabled.
If you press this button once again, this LED is off and the Toner
Save mode is disabled.
If the
system has some problems. To solve the problem, see
“Troubleshooting Error Messages” on page 6.18
On Line/Error
On Line/Error
On Line/Error
lights red, the printer is experiencing an
Cancel
Cancel
button while the printer is receiving
LED blinks red to cancel printing.
LED blinks red. Load paper into the Manual
On Line/Error
button in Ready mode, this LED is on
and
Toner Save
LEDs blink, your
LED slowly
On Line/Error
1.6
I
NTRODUCTION
Cancel button
Function Description
Printing demo page
Manual feeding
Cleaning inside
printer
Canceling print job
Toner Save mode
on/off
In Ready mode, press and hold this button for about 2
seconds until all LEDs blink slowly, and release.
Press this button each time you load a sheet of paper in the
manual feeder, when you select
from your software application. For detailed information,
see “Using the Manual Feeder” on page 3.8.
In Ready mode, press and hold this button for about 10
seconds until all LEDs turn on, and release. After cleaning
the printer, one cleaning sheet is printed.
Press this button during printing. The
blinks while the print job is cleared from both the printer
and the computer, and then return to Ready mode. This
may take some time depending on the size of the print job.
In Manual Feed mode, you can’t cancel the print job by
pressing this button. For detailed information, see “Using
the Manual Feeder” on page 3.8.
In Ready mode, press this button to turn the Toner Save
mode on or off.
For detailed information, see page 4.8.
Manual Feed
On Line/Error
for
Source
LED
1
I
NTRODUCTION
1.7

N
OTE
1.8
I
NTRODUCTION

2
Setting Up Your Printer
This chapter provides step by step information on setting up
your printer.
This chapter includes:
• Unpacking
• Installing the Toner Cartridge
• Loading Paper
• Connecting a Printer Cable
• Turning the Printer on
• Printing a Demo Page
• Installing Printer Software

Unpacking
1
Remove the Printer and all accessories from the packing
carton. Make sure that the printer has been packed with the
following items:
Toner Cartridge Power Cord
CD-ROM
Notes:
• If any items are missing or damaged, notify your dealer
immediately.
• Components may differ from one country to another.
• The CD-ROM contains the printer driver, the User’s Guide, and
the Adobe Acrobat Reader program.
2
Carefully remove all of packing tapes from the printer.
Tape
Setup Guide
2.2
S
ETTING UP YOUR PRINTER
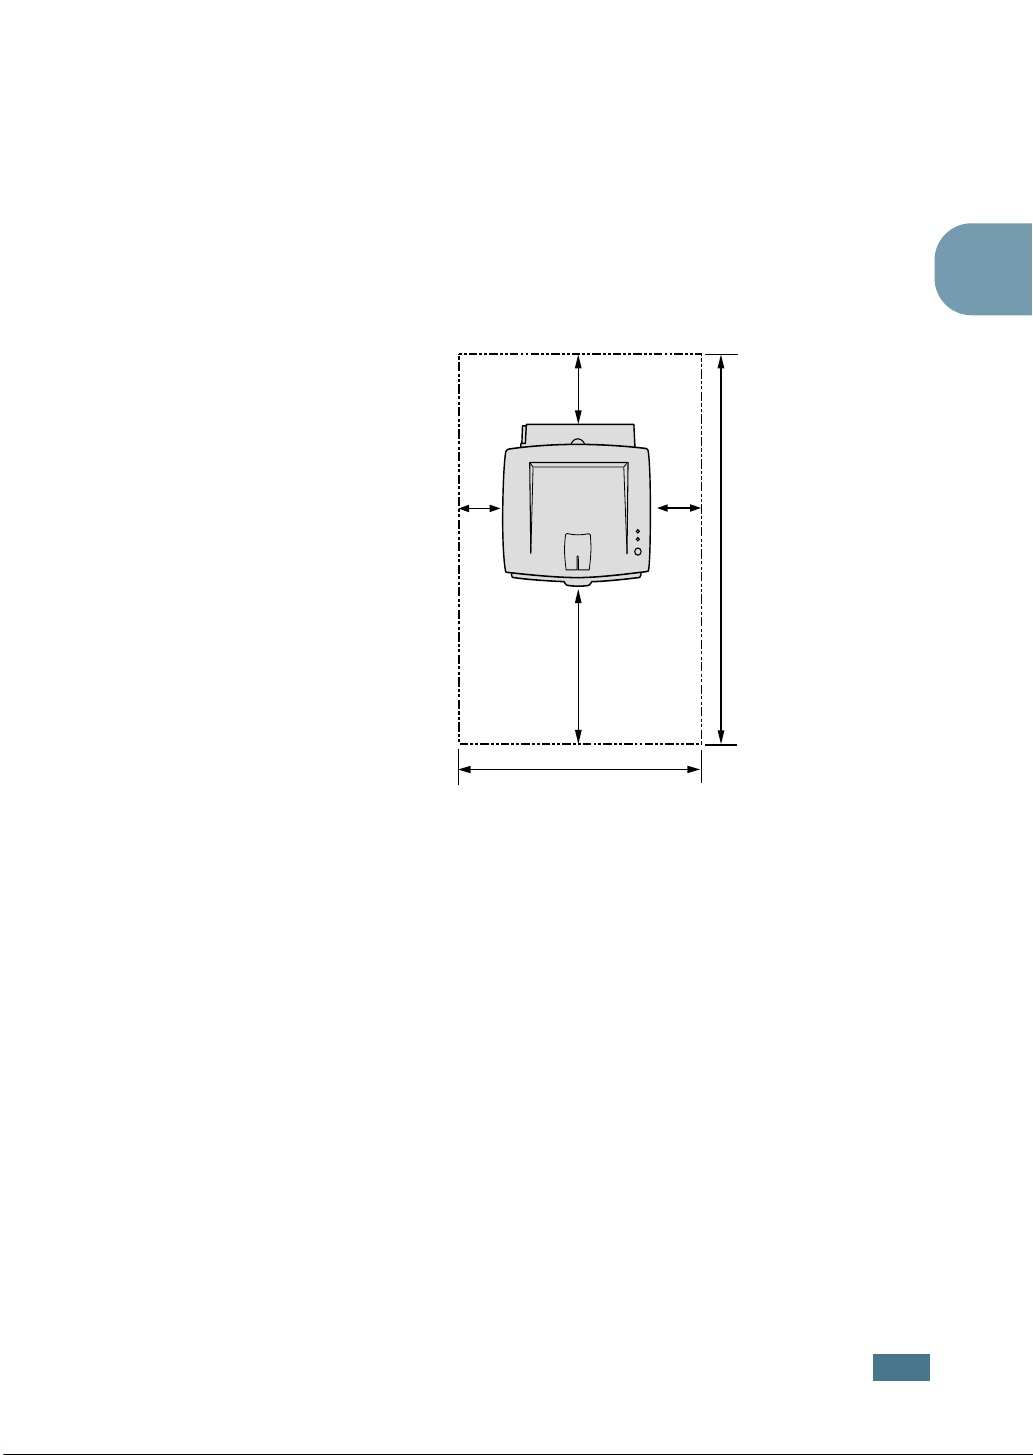
Clearance
Space
Selecting a Location
Select a level, stable place with adequate space for air
circulation. Allow extra space for opening covers and tray. The
area should be well-ventilated and away from direct sunlight or
sources of heat, cold, and humidity. See the image below for
clearance space. Do not place the printer close to the edge of
your desk or table!
100 mm
(3.9 in.)
2
100 mm
(3.9 in.)
482.6 mm(18.8 in.)
552 mm(21.7 in.)
100 mm
(3.9 in.)
954.6 mm(37.5 in.)
•Front: 482.6 mm (enough space so that tray can be
removed)
•Back: 100 mm (enough space to allow opening of the rear
out tray)
•Right: 100 mm (enough space for ventilation)
•Left: 100 mm
S
ETTING UP YOUR PRINTER
2.3
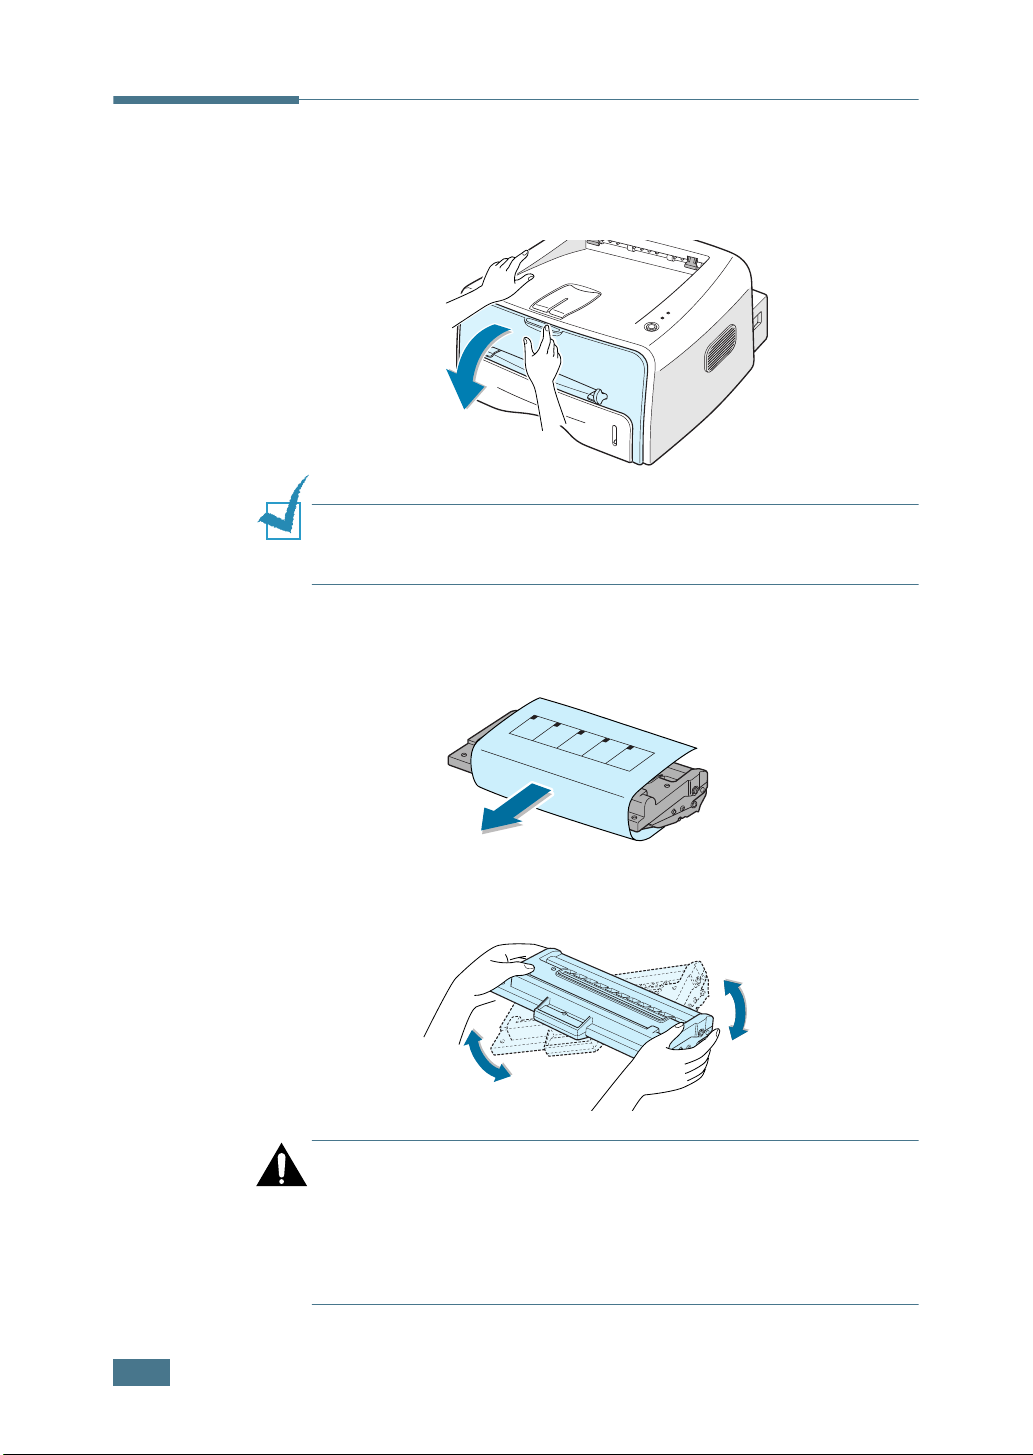
Installing the Toner Cartridge
1
Grasp the front cover and pull it toward you to open.
Note: Because the printer is very light, it may be moved when you
use it; for example, when opening/closing the tray or installing/
removing the toner cartridge. Be careful not to move the printer.
2
Remove the toner cartridge from its bag and remove the
paper covering the cartridge.
2.4
3
Gently shake the cartridge from side to side to distribute
the toner evenly inside the cartridge.
CAUTION:
• To prevent damage, do not expose the toner cartridge to light for
more than a few minutes. Cover it with a piece of paper, if left
exposed for more than a few minutes.
• If toner gets on your clothing, wipe it off with a dry cloth and
wash clothing in cold water. Hot water sets toner into fabric.
S
ETTING UP YOUR PRINTER
4
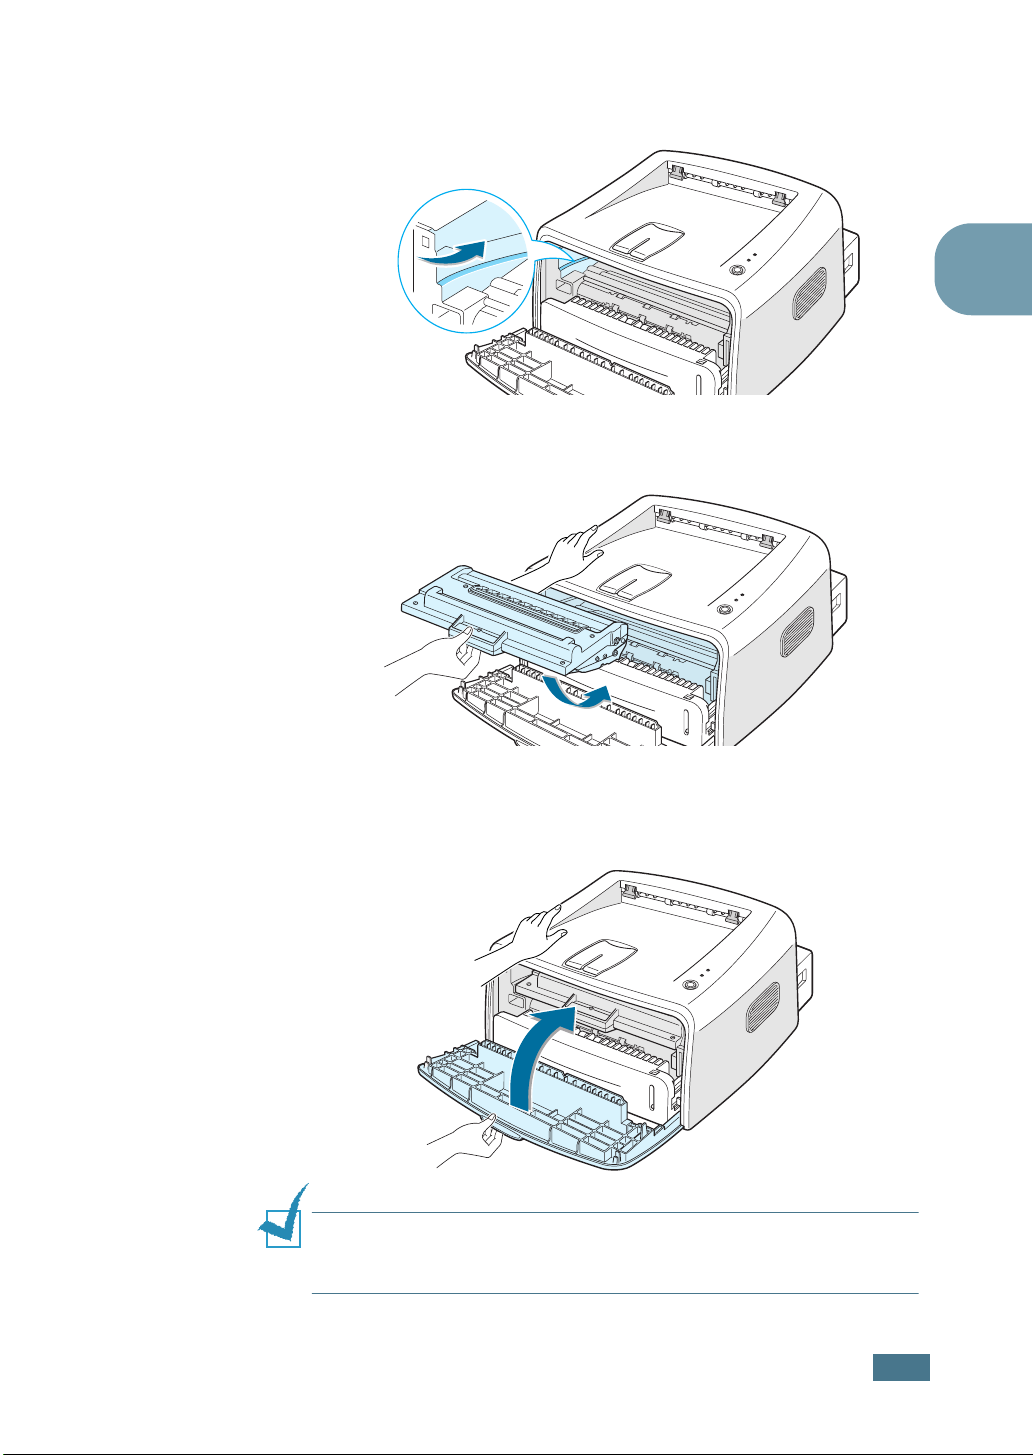
Locate the cartridge slots inside the printer, one on each
side.
5
Grasp the handle and insert the cartridge in the printer until
it snaps into place.
2
6
Close the front cover. Make sure that the cover is securely
closed. If the cover is not firmly closed, printing errors may
occur when you print.
Note: When printing text at 5% coverage, you can expect a toner
cartridge life of approximately 3,000 pages (1,000 pages for the
toner cartridge that is shipped with the printer).
S
ETTING UP YOUR PRINTER
2.5
Loading Paper
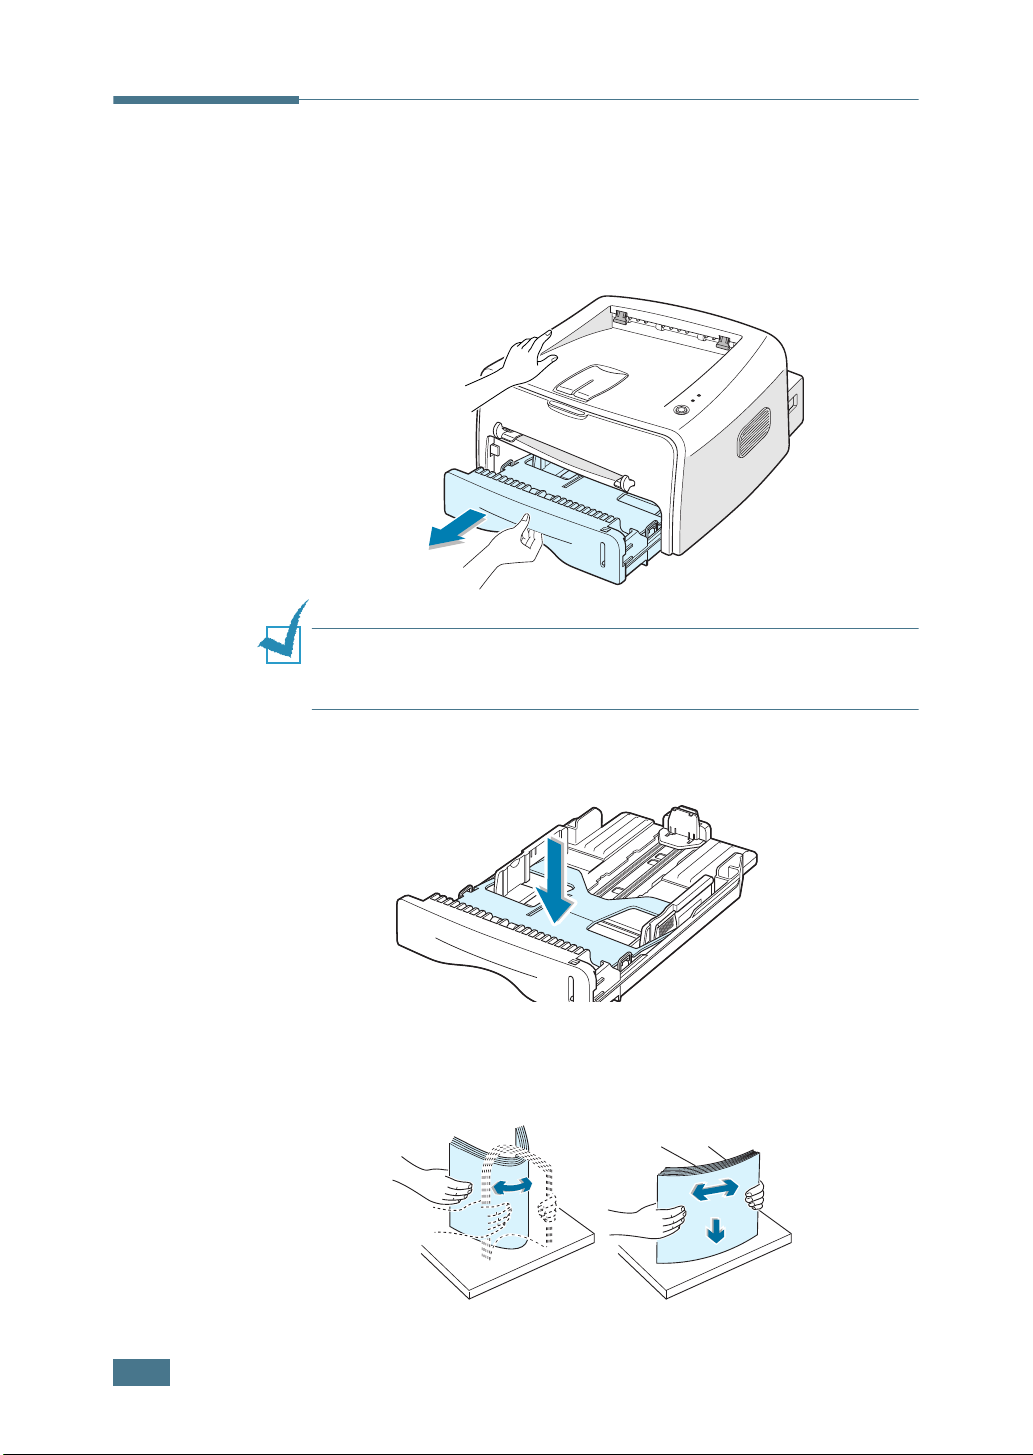
You can load approximately 250 sheets of paper in the tray.
1
Pull the tray out of the printer.
Note: Because the printer is very light, it may be moved when you
use it; for example, when opening/closing the tray or installing/
removing the toner cartridge. Be careful not to move the printer.
2
Push down the pressure plate until it locks in position.
3
Prepare a stack of paper for loading by flexing or fanning
them back and forth. Straighten the edges on a level
surface.
2.6
S
ETTING UP YOUR PRINTER
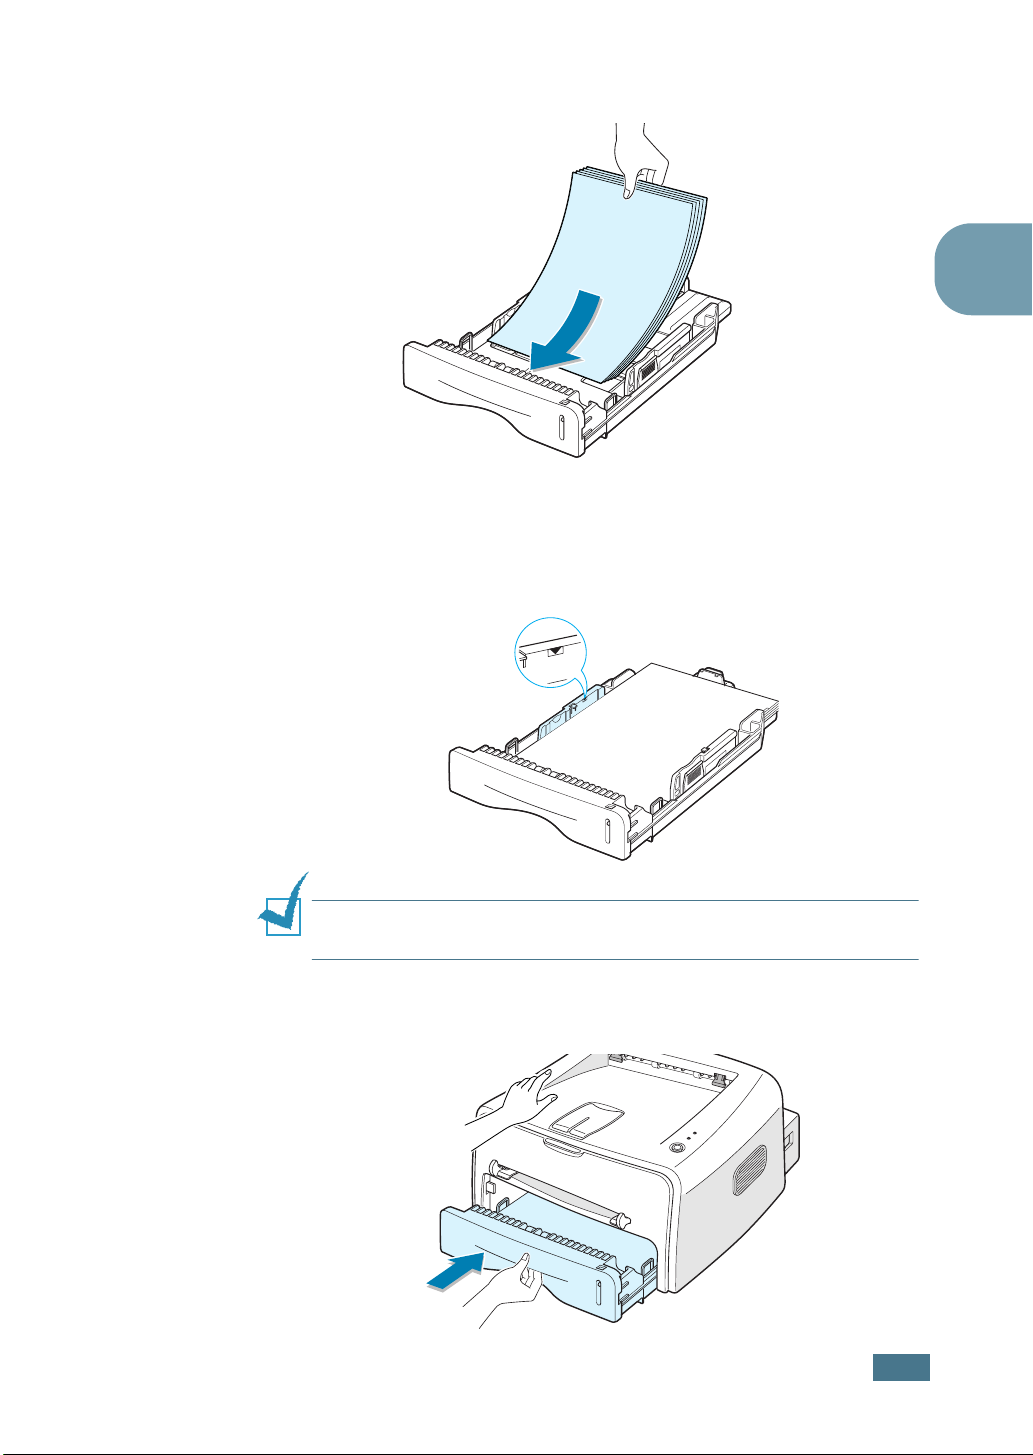
4
Load paper with the print side facing down.
Make sure that all four corners are flat in the tray.
5
Pay attention to the paper limit mark on the left inside wall
of the tray. Paper overloading may cause paper jams.
2
Note: If you want to change the paper size in the tray, see
“Changing the Paper Size in the Tray” on page 2.8.
6
Slide the tray back into the printer.
S
ETTING UP YOUR PRINTER
2.7
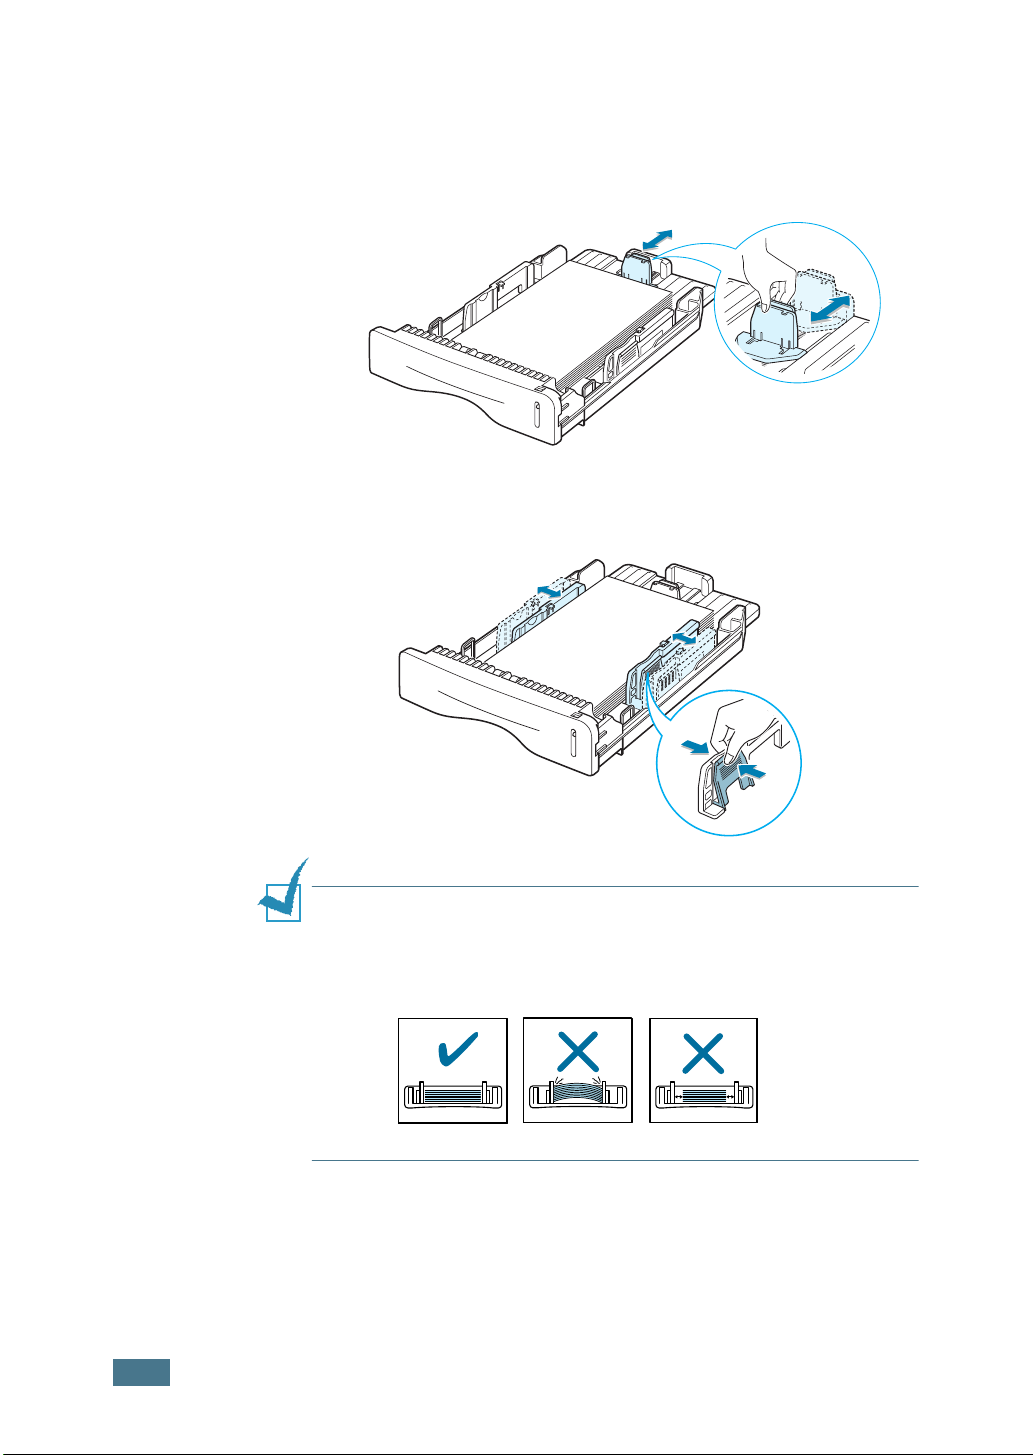
Changing the Paper Size in the Tray
1
Pinch the rear guide as shown below to adjust for the paper
length.
2
Pinch the side guide as shown and slide it to the left flush
against the paper.
2.8
Notes:
• Do not push the width guide far enough to cause the material to
warp.
• If you do no.t adjust the width guide, it may cause paper jam.
S
ETTING UP YOUR PRINTER
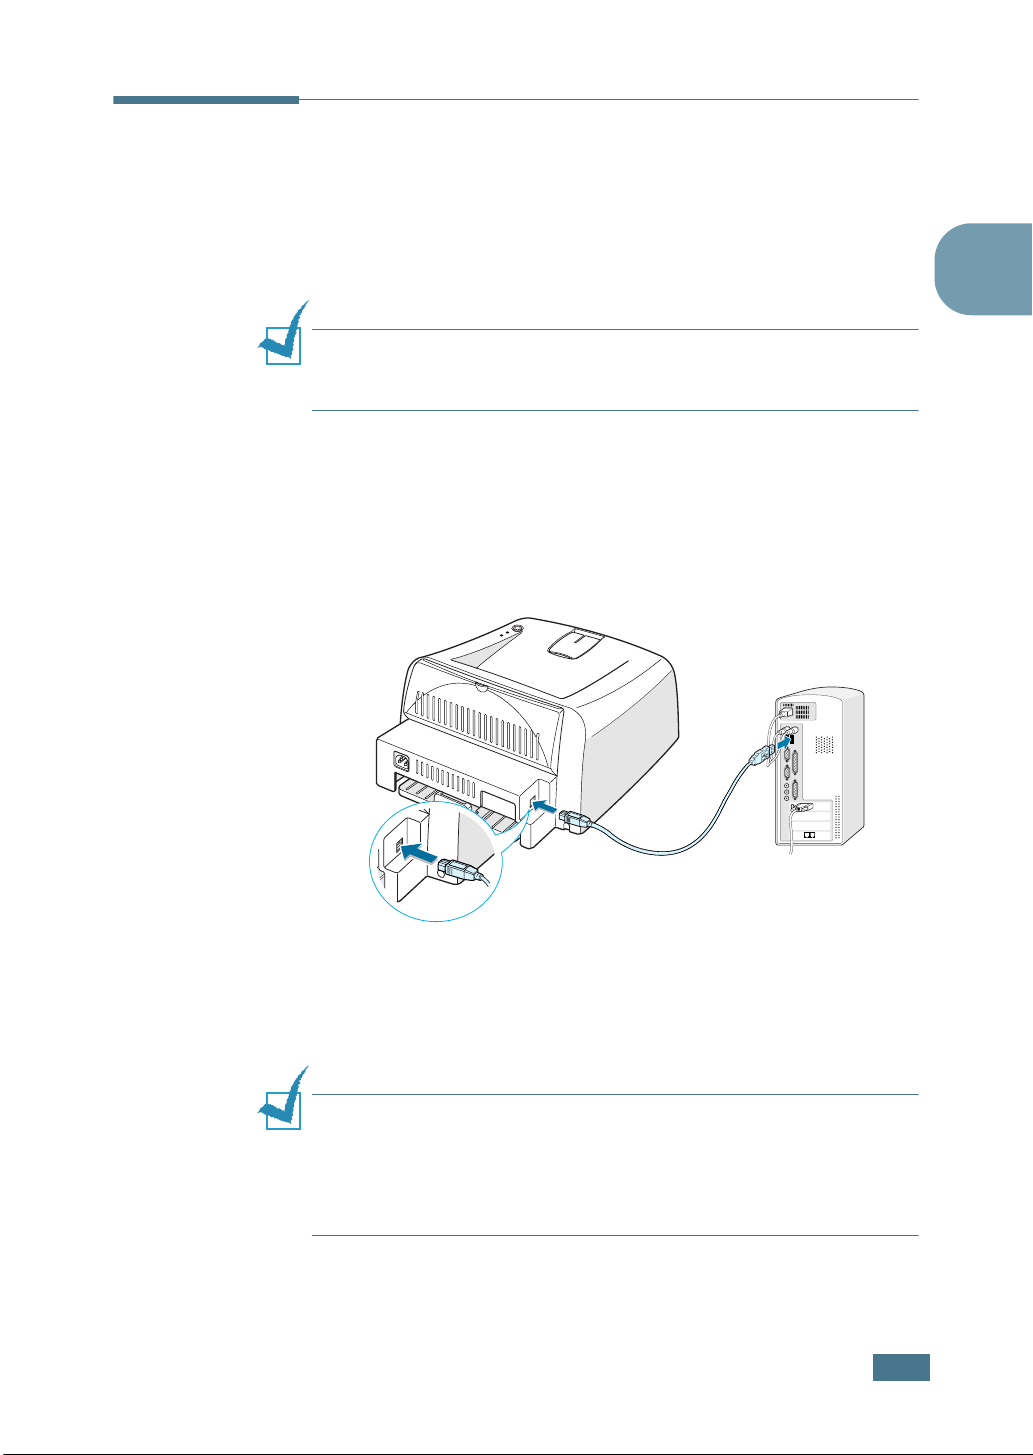
Connecting a Printer Cable
To print from your computer, you need to connect your printer
to your computer with a Universal Serial Bus (USB) cable.
Using a USB Cable
Note: Connecting the printer to the USB port of the computer
requires a certified USB cable. You will need to buy a USB 1.1
compliant cable that is within 3m in length.
1
Make sure that both the printer and the computer are
turned off.
2
Plug the USB printer cable into the connector on the back of
the printer.
2
To the USB port on
your computer
3
Connect the other end of the cable to the USB port on your
computer.
See your computer User’s Guide if you need help.
Notes:
• For using a USB cable, you must be running Windows 98/Me/
2000/XP.
• In Windows 98/Me, you must install the USB driver to add the
USB port. See page 2.15.
S
ETTING UP YOUR PRINTER
2.9
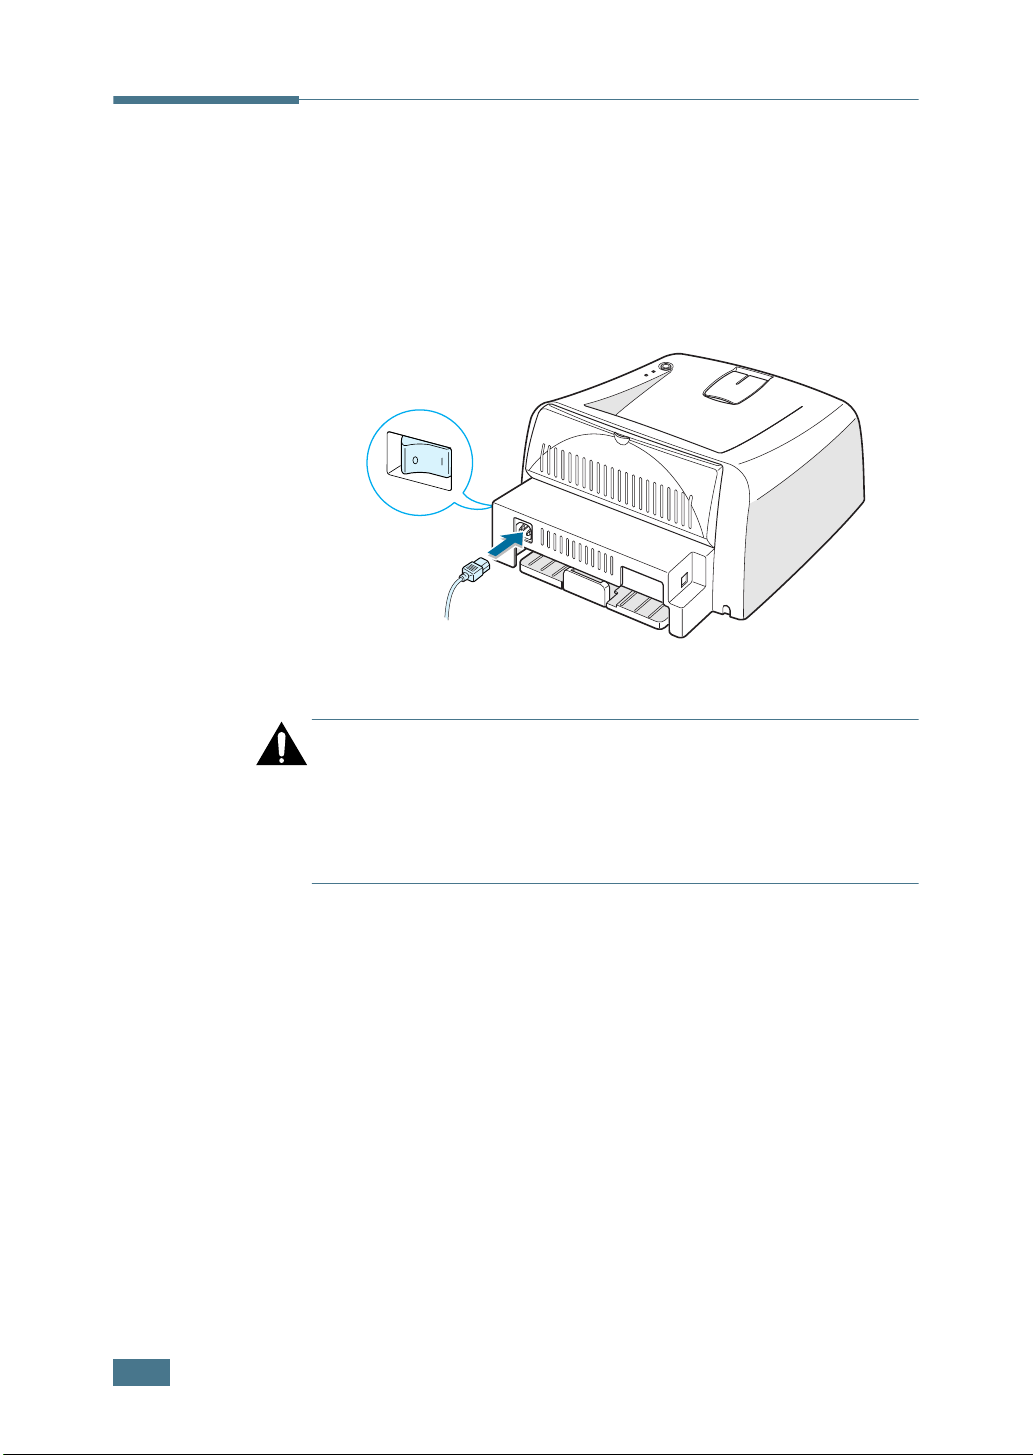
Turning the Printer on
1
Plug the power cord into the power receptacle on the back
of the printer.
2
Plug the other end into a properly grounded AC outlet and
turn on the printer using the power switch.
To the AC outlet
CAUTION:
• The fusing area at the rear portion of the inside of your printer is
hot when powered. Be careful not to be burned when accessing
this area.
• Do not disassemble the printer when it is powered. Doing so may
give you an electric shock.
2.10
S
ETTING UP YOUR PRINTER
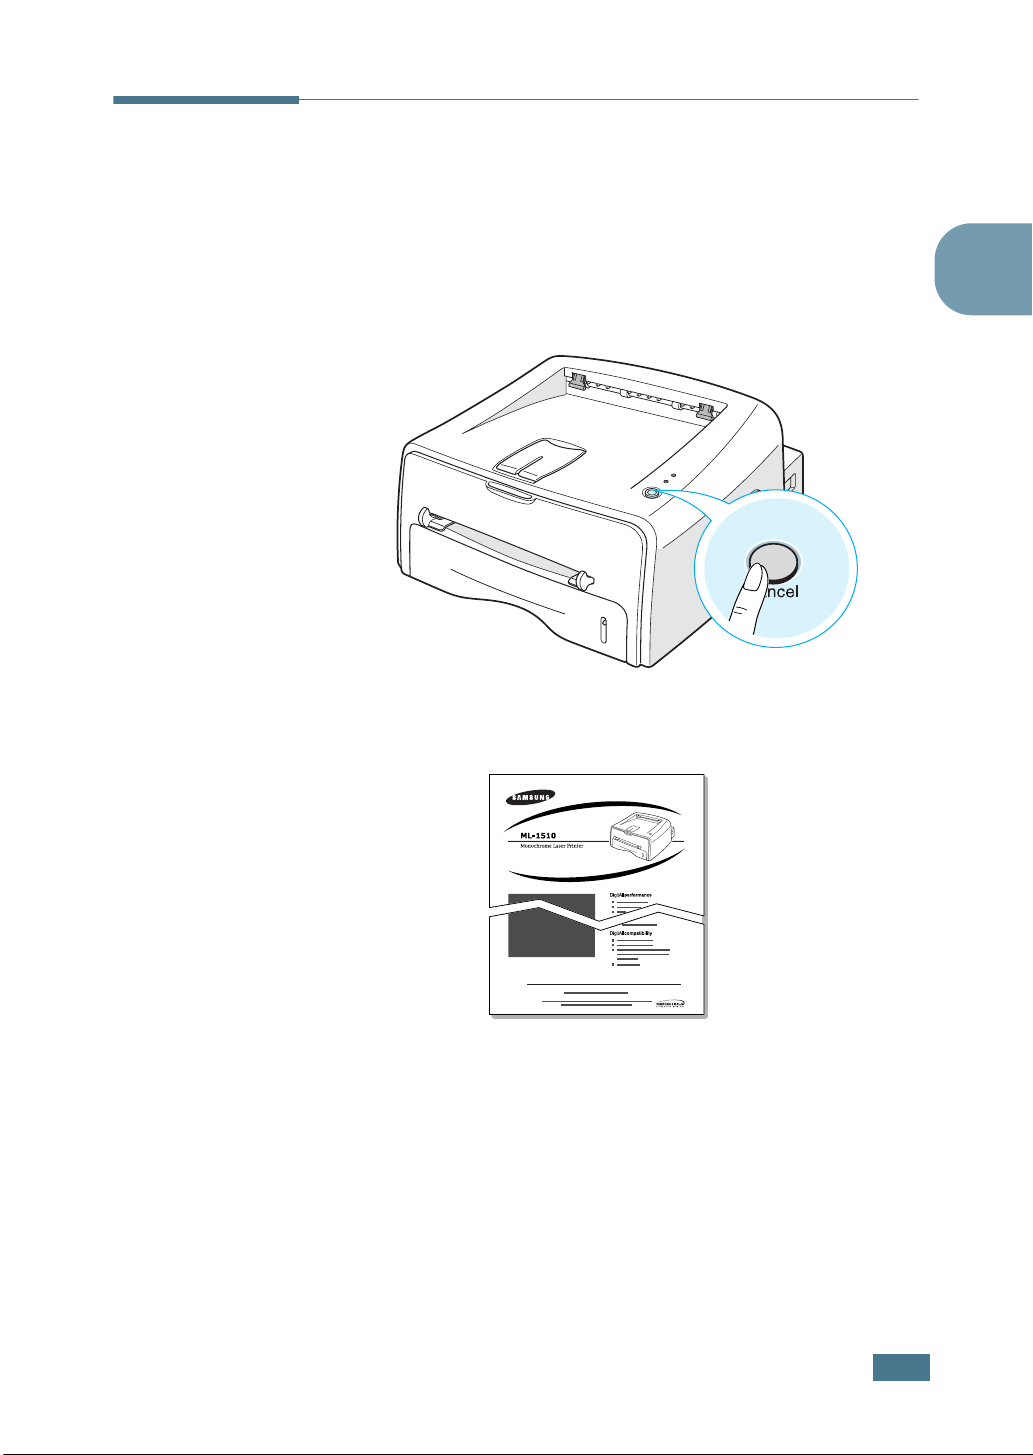
Printing a Demo Page
Print a demo page to make sure that the printer is operating
correctly.
1
Hold down the Cancel button for about 2 seconds to print a
demo page.
2
The Demo page shows the printer’s current configuration.
2
S
ETTING UP YOUR PRINTER
2.11
 Loading...