

Page 1
LCD TV
LA40N81BD
Contact SAMSUNG WORLDWIDE
If you have any questions or comments relating to Samsung products,
please contact the SAMSUNG customer care centre.
Country
AUSTRALIA
CHINA
HONG KONG
INDIA
INDONESIA
JAPAN
MALAYSIA
PHILIPPINES
SINGAPORE
THAILAND
TAIWAN
VIETNAM
SOUTH AFRICA
U.A.E
Customer Care Centre
1300 362 603
800-810-5858 , 010- 6475 1880
3698 - 4698
3030 8282
1800 1100 11
0800-112-8888
0120-327-527
1800-88-9999
1800-10-SAMSUNG (7267864)
1800-SAMSUNG (7267864)
1800-29-3232
02-689-3232
0800-329-999
1 800 588 889
0860 7267864 (SAMSUNG)
800SAMSUNG (7267864)
8000-4726
www.samsung.com/au
www.samsung.com.cn
www.samsung.com/hk
www.samsung.com/in
www.samsung.com/id
www.samsung.com/jp
www.samsung.com/my
www.samsung.com/ph
www.samsung.com/sg
www.samsung.com/th
www.samsung.com/tw
www.samsung.vn
www.samsung.com/za
www.samsung.com/mea
LA46N81BD
Web Site
Owner’s Instructions
Before operating the unit,
please read this manual thoroughly,
and retain it for future reference.
BN68-01180B-02
ON-SCREEN MENUS
PC DISPLAY
PICTURE IN PICTURE (PIP)
TELETEXT
Register your product at www.samsung.com/global/register
Record your Model and Serial number here for future reference.
▪ Model _______________ ▪ Serial No. _______________
Page 2

Precautions When Displaying a Still Image
A still image may cause permanent damage to the TV screen.
• Do not display a still image on the LCD panel for more than 2 hours as it can cause screen image retention.
This image retention is also known as "screen burn".
To avoid such image retention, reduce the degree of brightness and contrast of the screen when displaying a still image.
• Watching the LCD TV in 4:3 format for a long period of time may leave traces of borders displayed on the left, right and center
• Displaying still images from Video games and PC for longer than a certain period of time may produce partial after-images.
To prevent this effect, reduce the ‘brightness’ and ‘contrast’ when displaying still images.
of the screen caused by the difference of light emission on the screen.
Playing a DVD or a game console may cause a similar effect to the screen.
Damages caused by the above effect are not covered by the Warranty.
© 2007 Samsung Electronics Co., Ltd. All rights reserved.
Page 3

Contents
CONNECTING AND PREPARING YOUR TV
List of Parts .......................................................3
Installing the Stand ...........................................3
Installing the Wall Mount Kit ..............................3
Viewing the Control Panel .................................4
Viewing the Connection Panel ..........................5
Viewing the Remote Control .............................8
Installing Batteries in the Remote Control .........9
Switching On and Off ........................................9
Placing Your Television in Standby Mode .........9
Plug & Play .....................................................10
SETTING THE CHANNELS
Storing Channels Automatically ......................11
Storing Channels Manually .............................12
Setting the Channel Manager .........................13
Activating the Child Lock .................................13
Sorting the Stored Channels ...........................14
Assigning Channels Names ............................14
Fine Tuning Channel Reception ......................15
LNA(Low Noise Amplier) ...............................15
Changing the Picture Standard .......................16
SETTING THE PICTURE
Adjusting the Custom Picture ..........................16
Changing the Colour Tone ..............................17
Conguring Detailed Settings on the Picture ..18
Activating Backlight. .......................................19
Changing the Picture Size ..............................19
Freezing the Current Picture ...........................20
Digital NR / Active Colour / DNIe /
Movie Plus .....................................................20
Resetting the Picture Settings to the Factory
Defaults ...........................................................21
Viewing the Picture In Picture (PIP) ................21
SETTING THE SOUND
Changing the Sound Standard ........................23
Adjusting the Sound Settings ..........................23
Setting the TruSurround XT (SRS TS XT) ......24
Adjusting the Volume Automatically ................24
Selecting the Internal Mute .............................25
Listening to the Sound of the Sub Picture .......25
Resetting the Sound Settings to the Factory
Defaults ...........................................................26
Connecting Headphones ................................26
Selecting the Sound Mode ..............................26
SETTING THE TIME
Setting and Displaying the Current Time ........27
Selecting the Sleep Timer ...............................27
Switching the Television On and Off
Automatically ...................................................28
FUNCTION DESCRIPTION
Using Game Mode ..........................................29
Setting the Blue Screen Mode /
Selecting the Melody
Setting the Home Theatre PC
Setting the Light Effect...........
Using the Energy Saving Feature ...................31
HDMI Black Level ...........................................31
USING THE DTV FEATURE
Previewing the DTV Menu System .................32
Updating the Channel List Automatically ........33
Updating the Channel List Manually ...............33
Editing Your Favourite Channels .....................34
Selecting Channel List
Displaying Programme Information
Viewing the EPG
(Electronic Programme Guide) Information
Using the Scheduled List
Setting the Default Guide ................................38
Viewing All Channels and
Favourite Channels
Selecting the Time Zone
Adjusting the Menu Translucency
Setting up the Parental Lock ...........................40
Setting the Subtitle ..........................................41
Selecting the Audio Format .............................41
Viewing Product Information ...........................41
Checking the Signal Information .....................42
Upgrading the Software ..................................42
Resetting .........................................................44
Selecting the Preferred Language
(Subtitle , Audio) ................................................. 44
......................................29
.........................30
.........................30
....................................36
................................38
.........................................39
.................................39
.................36
....37
...................40
English
English - 1
Page 4

USING THE TELETEXT FEATURE
Selecting the Source .......................................45
Editing the Input Source Names .....................45
Teletext Decoder .............................................46
Displaying the Teletext Information .................46
Selecting a Specic Teletext Page ..................47
Using Fastext to Select a Teletext Page .........47
Setting Up Your Remote Control .....................48
Remote Control Codes ...................................50
SETTING THE PC
Setting up Your PC Software
(Based on Windows XP) .................................53
Display Modes ................................................53
Setting the PC .................................................54
Wall-Mount Adjustment (Sold separately)
ABOUT ANYNET
What is Anynet+? ............................................ 56
Connecting Anynet+ Devices ........................... 56
Setting Up Anynet+ .......................................... 57
Scanning and Switching between Anynet+
+
...........55
Devices ............................................................ 57
Recording ......................................................... 58
Listening through a Receiver ........................... 59
Check Points before Requesting Service ......... 59
RECOMMENDATIONS FOR USE
Using the Anti-Theft Kensington Lock .............60
Troubleshooting:
Before Contacting Service Personnel .............60
Technical and Environmental Specications ..61
English - 2
Symbol Press Important Note One-Touch
Button
Page 5
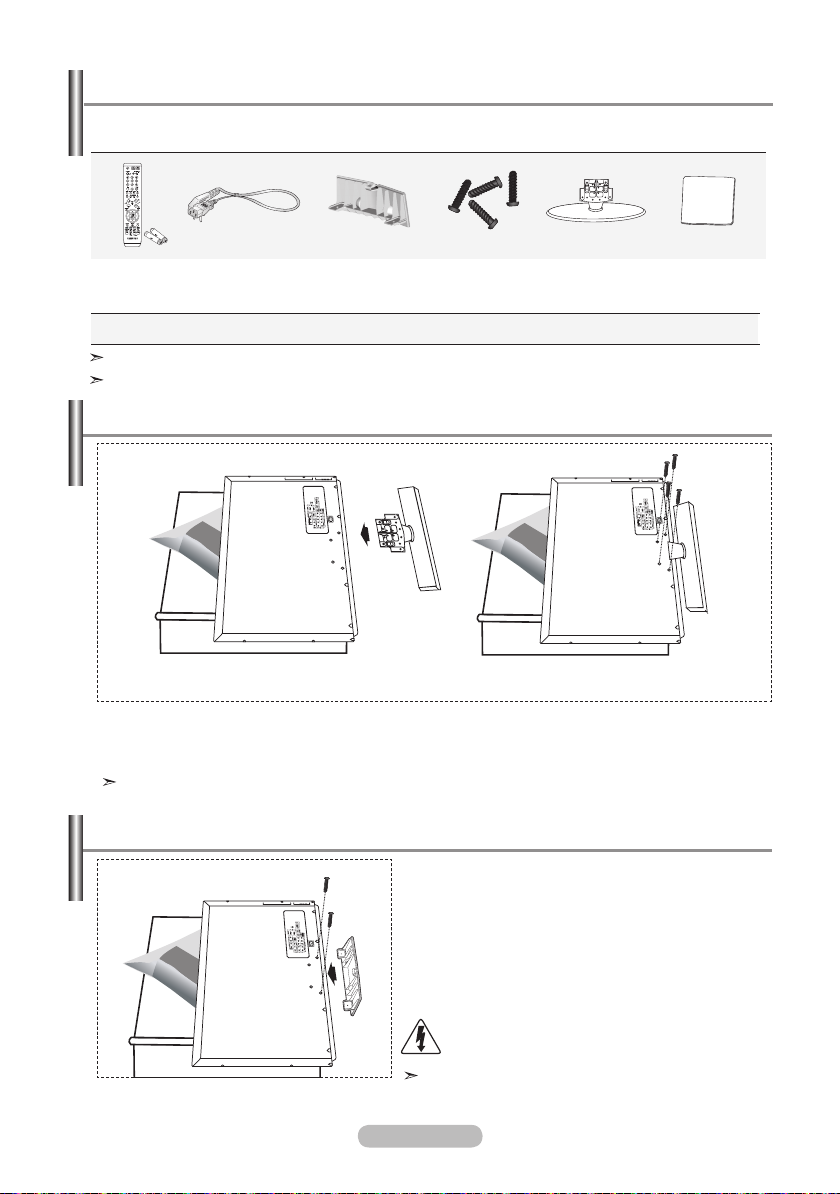
List of Parts
Please make sure the following items are included with your LCD TV.
If any items are missing, contact your dealer.
M4 X L16
Remote Control
& Batteries
(AAA x 2)
Owner’s Instructions
Warranty card / Safety Guide / Registration Cards (Not available in all locations)
The stand and stand screw may not be included depending on the model.
Power Cord Cover-Bottom
Warranty card Safety Guide Registration Card
Stand Screw
X 4
Installing the Stand
Stand Cleaning Cloth
< 2 >
1. Place the TV faced down on a soft cloth or cushion on a table.
2.
Put the stand into the hole at the bottom of the TV.
3.
Insert screw into the hole indicated and tighten.
The stand is installed for models with the screen size of 40 inch and above.
Installing the Wall Mount Kit
Wall mount items (sold separately) allow you to mount
the TV on the wall.
For detailed information on installing the wall mount,
see the instructions provided with the Wall Mount items.
Contact a technician for assistance when installing the
wall mounted bracket.
Samsung Electronics is not responsible for any damage
to the product or injury to yourself or others
if you elect to install the TV on your own.
Do not install your Wall Mount Kit while your TV
is turned on. It may result in personal injury due
to electric shock
Remove the stand and cover the bottom hole with a
cap and fasten with two screws.
English - 3
< 3 >
Page 6
Viewing the Control Panel
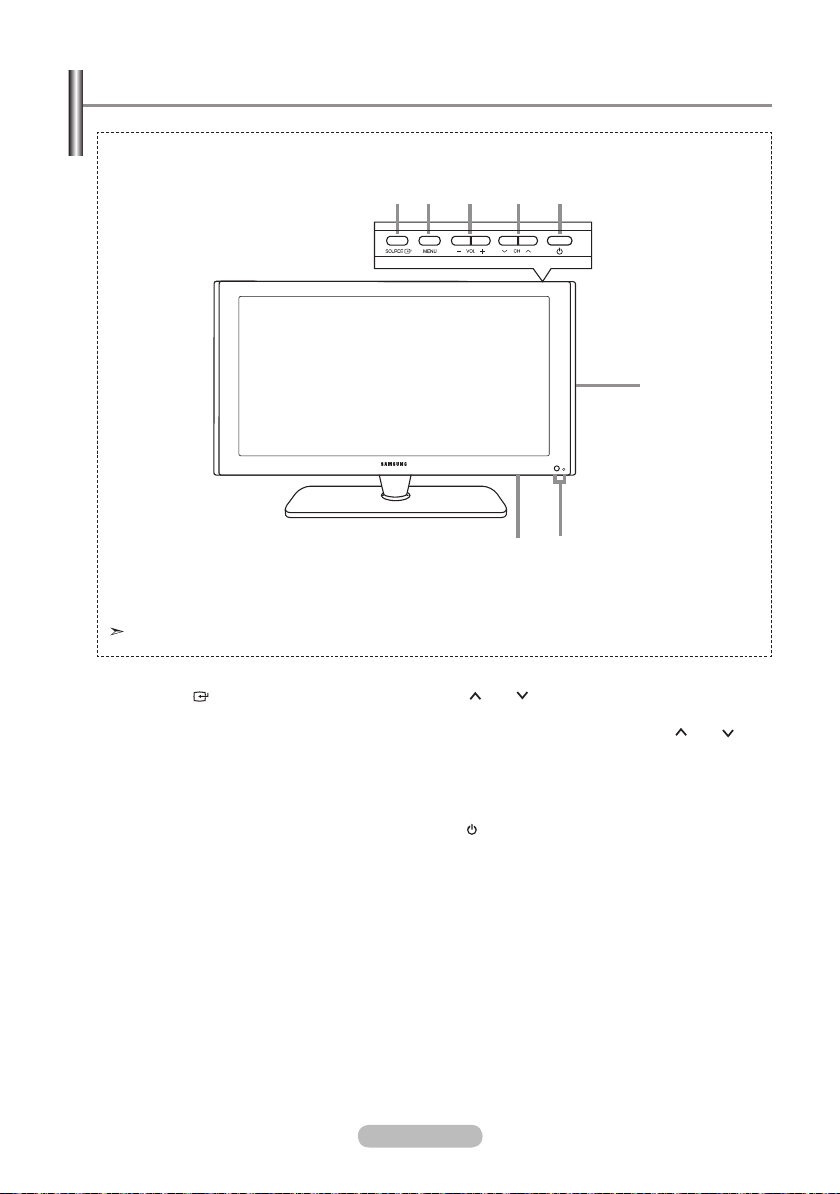
1 2 3 4 5
The product colour and shape may vary depending on the model.
6
6 5
1
SOURCE
Toggles between all the available input
sources (TV, AV1, AV2, S-Video, Component1,
Component2, PC, HDMI1, HDMI2, HDMI3,
DTV). In the on-screen menu, use this button
as you use the ENTER/OK button on the
remote control.
2
MENU
Press to see an on-screen menu of your TV’s
features.
3
+ VOL -
Press to increase or decrease the volume.
In the on-screen menu, use the + VOL -
button as you use the ◄ and ► buttons on
the remote control.
English - 4
4 CH
Press to change channels.
In the on-screen menu, use the
button as you use the ▲ and ▼ buttons on
the remote control.
(Without the Remote Control, you can turn on
the TV by using the Channel buttons.)
5
(Power)
Press to turn the TV on and off.
Power Indicator
Blinks and turns off when the power is on and
lights up in stand-by mode.
Remote Control Sensor
Aim the remote control towards this spot on
the TV.
6
Speakers
CH
Page 7
Viewing the Connection Panel
1 2 3 4
3
5
!
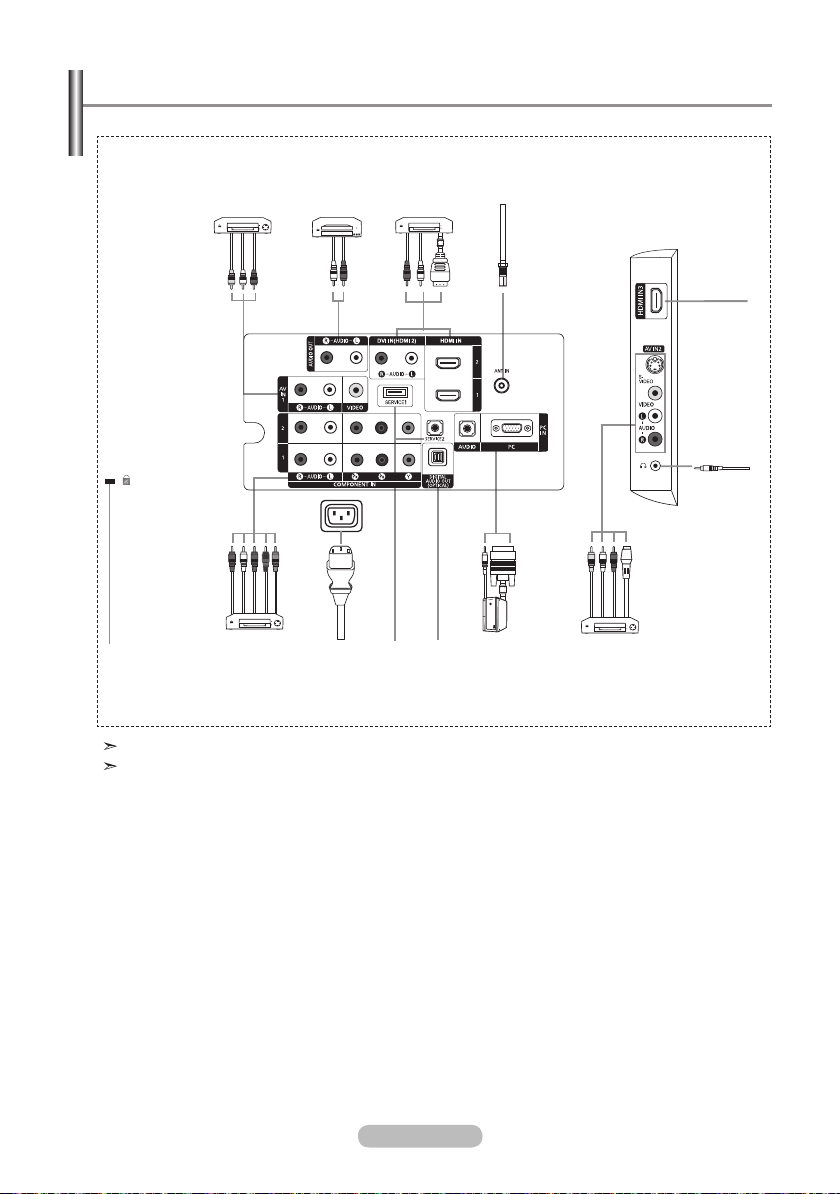
Whenever you connect an external device to your TV, make sure that power on the unit is turned off.
When connecting an external device, match the colour of the connection terminal to the cable.
1 Connecting External A/V Devices (AV IN 1)
- Connect RCA cable to an appropriate external A/V device such as VCR, DVD or Camcorder.
- Connect RCA audio cables to “R - AUDIO - L” on the rear of your set and the other ends to
corresponding audio out connectors on the A/V device.
2 Connecting AUDIO
- Connect RCA audio cables to “R - AUDIO - L” on the rear of your set and the other ends to
corresponding audio in connectors on the Amplifier or DVD Home Theater.
0
Power Input
9
English - 5
8
7
6
Page 8

3 Connecting HDMI IN 1, HDMI IN 2, HDMI IN 3
- Supports connections between HDMI-connection-enabled AV devices (Set-Top Boxes, DVD players)
- No additional Audio connection is needed for an HDMI to HDMI connection.
What is HDMI?
- "High Definition Multimedia interface" allows the transmission of high definition digital video
data and multiple channels of digital audio (5. 1 channels).
- The HDMI/DVI terminal supports DVI connection to an extended device with the appropriate cable
(not supplied). The difference between HDMI and DVI is that the HDMI device is smaller in size,
has the HDCP (High Bandwidth Digital Copy Protection) coding feature installed, and supports
multi - channel digital audio.
- The external devices that support lower versioned HDMI mode may not implement sound output
for the TV with the latest HDMI version (HDMI 1.3).
- In this case, connect to HDMI IN 2 and DVI IN (HDMI 2) "R - AUDIO - L" on the back panel of the
TV. Part of lower versioned HDMI cables may cause annoying flickers or no screen display.
In this case use the cable that supports the latest HDMI version (HDMI 1.3).
Connecting DVI IN(HDMI 2)(AUDIO R/L)
- When connecting this product via HDMI or DVI to a Set Top Box, DVD Player or Games Console
etc, make sure that it has been set to a compatible video output mode as shown in the table
below. Failure to observe this may result in picture distortion, image breakup or no picture.
- When using an HDMI/DVI cable connection, it is only possible from the HDMI 2 IN terminal.
You should use the DVI-to-HDMI cable or DVI-HDMI Adapter for the connection, and the
“R - AUDIO - L” terminal on DVI for sound output.
Supported modes for HDMI/DVI and Component
480i 480p 576i 576p 720p 1080i 1080p
HDMI/DVI 50Hz X X X O O O O
HDMI/DVI 60Hz
Component
X O X X O O O
O O O O O O O
- Do not attempt to connect the HDMI/DVI connector to a PC or Laptop Graphics Card.
(This will result in a blank screen being displayed)
4 Connecting an Aerial or Cable Television Network
To view television channels correctly, a signal must be received by the set from one of the following
sources:
- An outdoor aerial / A cable television network / A satellite network
6 Connecting External A/V Devices
- Connect RCA or S-VIDEO cable to an appropriate external A/V device such as VCR, DVD or
Camcorder.
- Connect RCA audio cables to "R - AUDIO - L" on the rear of your set and the other ends to corre
sponding audio out connectors on the A/V device.
- Headphone may be connected to the headphone output (5) on the rear of your set. While the
head phone is connected, the sound from the built-in speakers will be disabled.
7 Connecting Computer
- Connect the D- Sub cable (optional) to "PC (PC IN)" on the rear of your set and the other end to
the Video Card of your computer.
- Connect the stereo audio cable (optional) to "AUDIO (PC IN)" on the rear of your set and the other
end to "Audio Out" of the sound card on your computer.
8 DIGITAL AUDIO OUT (OPTICAL)
- Connect to a Digital Audio Component.
9 SERVICE1, SERVICE2
- Service connection for qualified service engineer.
English - 6
Page 9

0 Connecting Component Devices (DVD)
- Connect component video cables (optional) to component connector ("PR", "PB", "Y") on the rear of
your set and the other ends to corresponding component video out connectors on the DVD.
- If you wish to connect both the Set-Top Box and DVD, you should connect the Set-Top Box to the
DVD and connect the DVD to component connector ("PR", "PB", "Y") on your set.
- The PR, PB and Y connectors on your component devices DVD are sometimes labeled Y, B-Y and
R-Y or Y, Cb and Cr.
- Connect RCA audio cables (optional) to "R - AUDIO - L" on the rear of your set and the other ends to
corresponding audio out connectors on the DVD.
- This LCD TV displays its optimum picture resolution in 720p mode.
- This LCD TV displays its maximum picture resolution in 1080i mode.
! Kensington Lock
- The Kensington lock (optional) is a device used to physically fix the system when used in a public
place.
- If you want to use a locking device, contact the dealer where you purchased the TV.
- The place of the Kensington Lock may be different depending on its model.
English - 7
Page 10
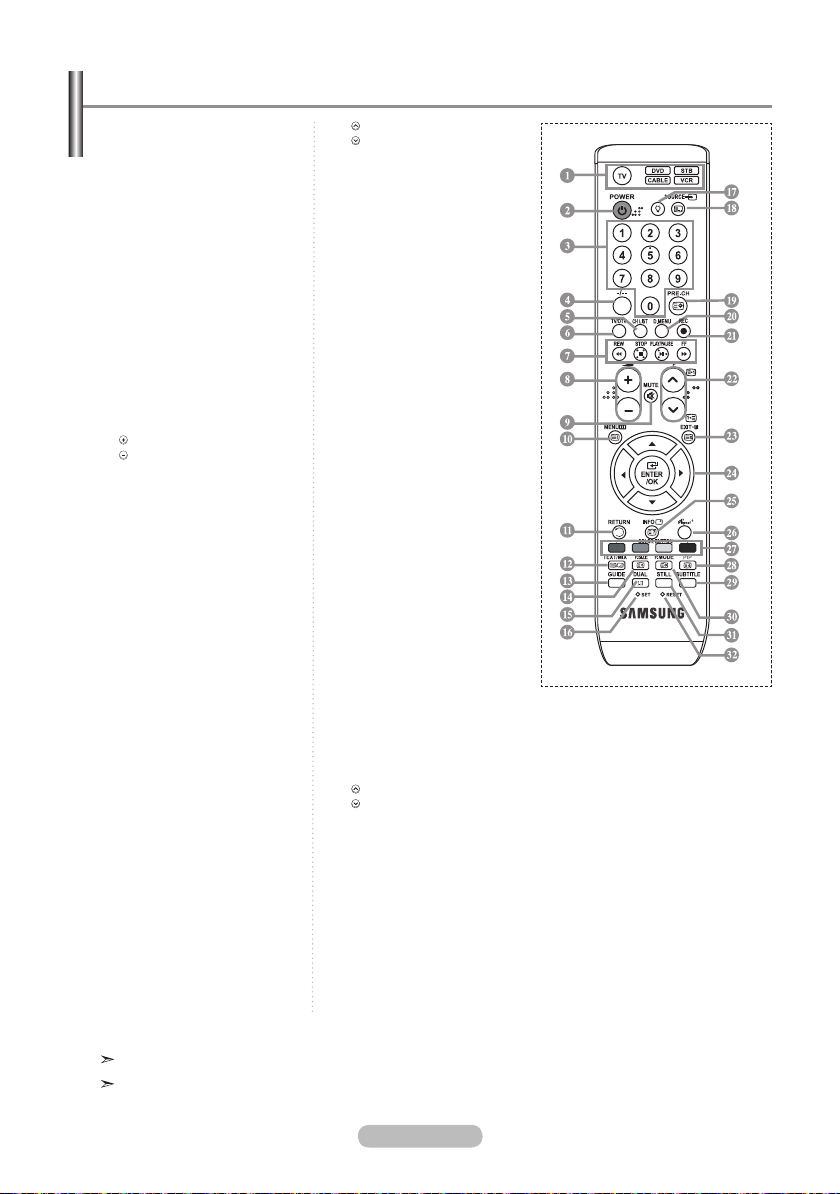
Viewing the Remote Control
1 Selects a target device to be
controlled by the Samsung
remote control (TV, DVD,
STB, CABLE, VCR)
(Refer to page 50-52)
2 Television Standby button
3 Number buttons for direct
channel access
4
One/Two-digit channel
selection
5 It display "Channel List"
on the screen.
6 Selects the TV and DTV
mode directly
7 VCR/DVD Functions
Rewind, Stop, Play/Pause,
Fast/Forward
8 Volume increase
Volume decrease
9 Temporary sound switch-off
0 Menu display and
change confirmation
! Returns to the previous
menu
# Electronic Program Guide
(EPG) display
$ Picture size selection
% Sound effect selection
^
Adjusts 5 separate devices
- TV, DVD, STB, CABLE, or
VCR
.
& When pressing this button, a
number of buttons on the
remote control (e.g. Selects
a target device, volume,
channel buttons) light up
for a few seconds and then
turn off to save power. This
function is to conveniently
use the remote control at
night or when dark.
* Available source selection
( Previous channel
) DTV menu display
a Records for Live
Broadcasting
(Anynet+ function only,
Refer to page 57)
b P : Next channel
P
: Previous channel
c Exit the OSD
d Control the cursor in the
menu
e Use to see information on
the current broadcast
f Runs the Anynet view
functions and sets up Anynet
devices.
g Colour buttons :
Press to add or delete
channels and to store
channels to the favorite
channel list in the “Channel
List” menu.
h Picture-In-Picture On / Off
i Digital subtitle display
j Picture effect selection
k Picture freeze
l When your remote does not
work, change the batteries
and press the "RESET"
button for 2-3 seconds before
use.
Teletext Functions
6 Exit from the teletext display
0 Teletext index
@ Alternately select Teletext,
Double, or Mix.
$ Teletext size selection
* Teletext mode selection
(LIST/FLOF)
( Teletext sub page
b P : Teletext next page
P
: Teletext previous page
c Teletext cancel
e Teletext reveal
g Fastext topic selection
h Teletext hold
j Teletext store
The performance of the remote control may be affected by bright light.
This is a special remote control for the visually impaired, and has Braille points on the Power,
Channel, STOP, PLAY/PAUSE and Volume buttons.
English - 8
Page 11
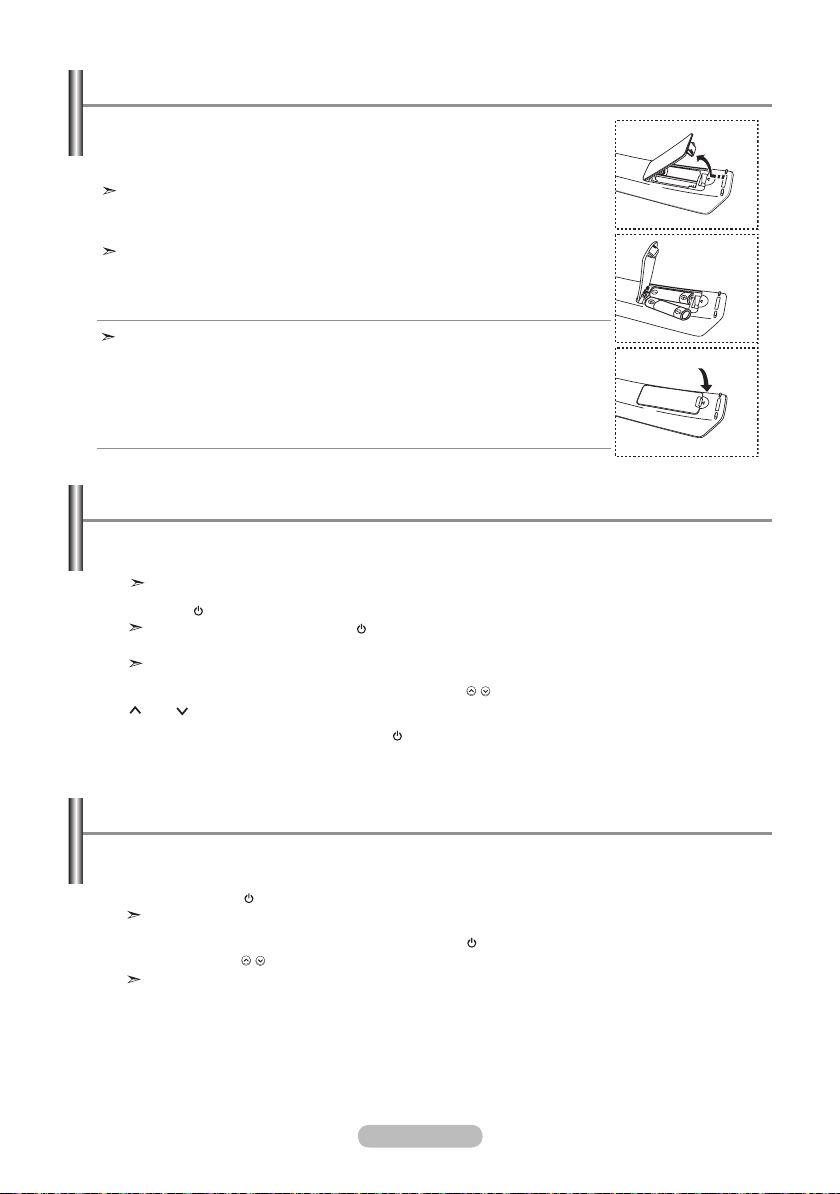
Installing Batteries in the Remote Control
1. Lift the cover at the back of the remote control upward as shown in the
figure.
2. Install two AAA size batteries.
Make sure to match the "+" and "–" ends of the batteries with the
diagram inside the compartment.
3. Replace the cover.
Remove the batteries and store them in a cool, dry place if you won’t be
using the remote control for a long time. The remote control can be used
up to about 23 feet from the TV.
(Assuming typical TV usage, the batteries last for about one year.)
If the remote control doesn’t work, check the following:
1. Is the TV power on?
2. Are the plus and minus ends of the batteries reversed?
3. Are the batteries drained?
4. Is there a power outage, or is the power cord unplugged?
5. Is there a special fluorescent light or neon sign nearby?
Switching On and Off
The mains lead is attached to the rear of your set.
1. Plug the mains lead into an appropriate socket.
The standby indicator lights up on the front of the set.
2. Press the
You also can press the POWER button or the TV/DTV button on the remote control to turn
the TV on.
The programme that you were watching last is reselected automatically.
3. Press the numeric button (0~9) or channel up/down (
CH
4. To switch your set off, press the POWER
button on the front of the set.
button on the right side of the set.
/ ) button on the remote control or
button again.
Placing Your Television in Standby Mode
Your set can be placed in standby mode in order to reduce the power consumption. The standby
mode can be useful when you wish to interrupt viewing temporarily (during a meal, for example).
1. Press the POWER
The screen is turned off and a red standby indicator appears on the front of your set.
2. To switch your set back on, simply press the POWER
channel up/down ( / ) button again.
Do not leave your set in standby mode for long periods of time
(when you are away on holiday, for example).
It is best to unplug the set from the mains and aerial.
button on the remote control.
, numeric buttons (0~9), TV/DTV button or
English - 9
Page 12
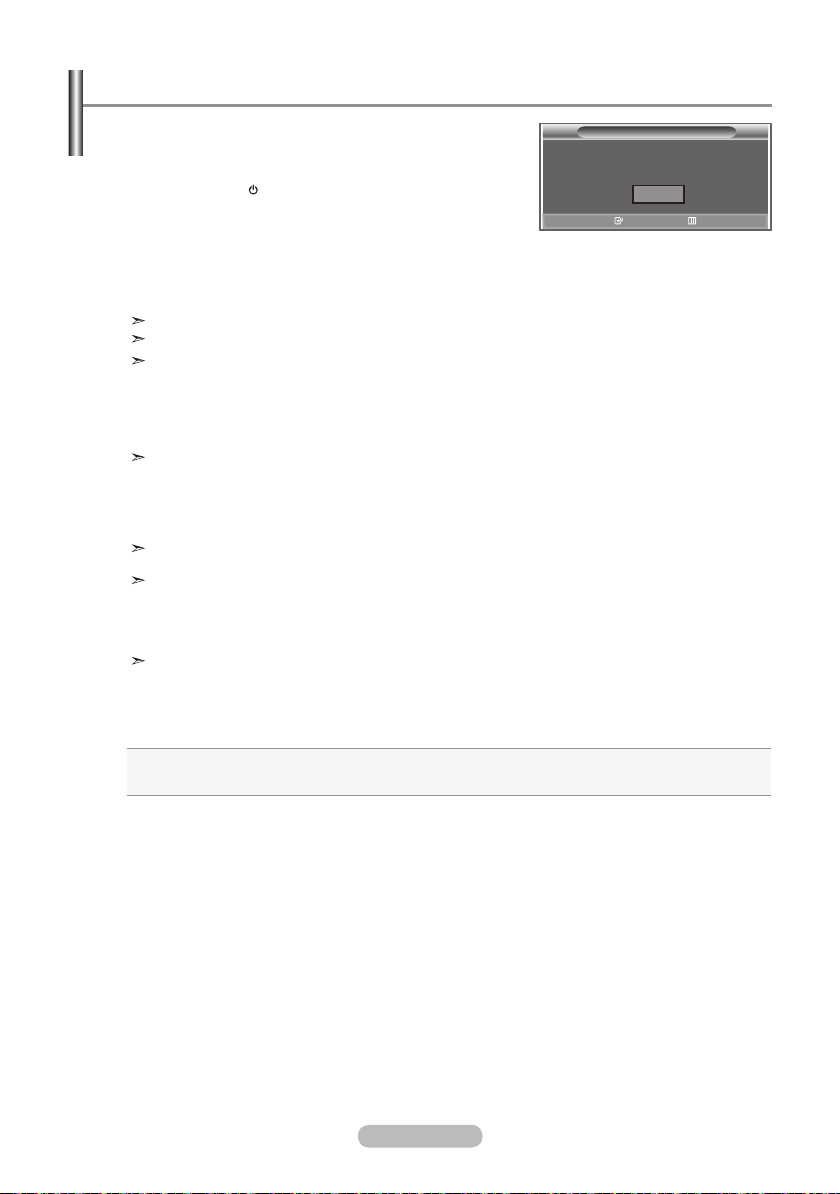
Plug & Play
When the TV is initially powered on, several basic settings
proceed automatically and subsequently. The following
settings are available.
1. Press the POWER
button on the remote control.
The message "Start Plug & Play" is displayed with "OK" selected.
Then
2.
press the ENTER/OK button.
The message "Select Home Mode When installing this TV at
Plug & Play
Start Plug & Play.
OK
Enter Exit
home" is displayed with "Shop" or "Home" selected
Press the ◄ or ► buttons to select “Shop” or “Home”, then
the ENTER/OK button.
We recommend setting the TV to Home mode for the best picture in your home envronment.
Shop mode is only intended for use in retail environments.
If the unit is accidentally set to Shop mode and you want to return to Dynamic (Home) mode,
press the Volume button and then hold down the MENU button for five seconds on the side
panel of the TV.
3. The message "Check antenna input." is displayed with "OK" selected.
Press the ENTER/OK button.
Please check that the area cable is connected correctly.
4. The message "Some DTV functions may not be available.Digital Scan?"is displayed with"Yes"
or"No" selected,press the ◄ or ►buttons to select "Yes" or"No",then the ENTER/OK button.
The "Auto Store" menu is displayed with the "Start" selected. Press the
5.
ENTER/OK
button.
The channel search will start and end automatically.
After all the available channels are stored, the "Clock Set" menu appears.
Press the ENTER/OK button at any time to interrupt the memorization process.
6. Press the ENTER/OK
button.
Press the ◄ or ► buttons to move to the "Month" , "Day" , "Year", "Hour", "Minute",
Set the "Month" , "Day" , "Year", "Hour", "Minute" by pressing the ▲ or ▼ button.
You can also set the hour and minute by pressing the number buttons on the remote control.
When you have finished, press the ENTER/OK button
The message “Enjoy your viewing.” is displayed.
7. Press the ENTER/OK button to confirm your setting.
Auto Store
Clock Set
: Automatically scans for and stores channels available in the local area.
: Sets the current time for the TV clock.
English - 10
Page 13
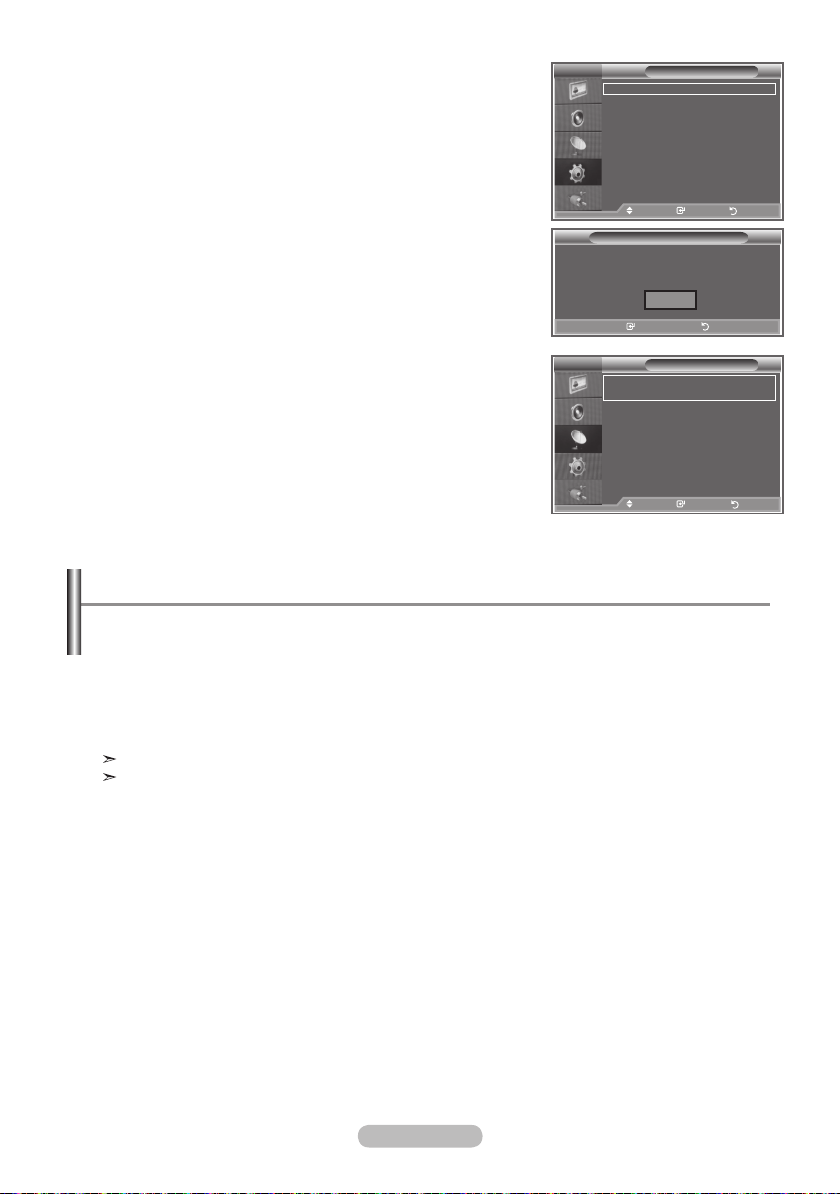
If you want to reset this feature...
1. Press the
MENU button to display the menu.
Press the ▲ or ▼ button to select "Setup", then press the
ENTER/OK button.
2. Press the ENTER/OK
button again, to select "Plug & Play".
3. The message to "Start Plug & Play" is displayed.
TV
Plug & Play
Language : English
Time
Game Mode : Off
Blue Screen : Off
Melody : Off
PC
Home Theatre PC
Light Effect : Off
More
s
Start Plug & Play.
Setup
: Off
Move Enter Return
Plug & Play
OK
Enter Return
- Storing Channels Automatically
- Storing Channels Ma nually
TV
Auto Store
Manual Store
Channel
Sort
Name
Fine
LNA : Off
Channel
Manager
Tune
Move Enter Return
Storing Channels Automatically
You can scan for the frequency ranges available to you (and availability depends on your country).
Automatically allocated programme numbers may not correspond to actual or desired programme
numbers. However, you can sort numbers manually and clear any channels you do not wish to watch.
1. Press the MENU button to display the menu.
Press the ▲ or ▼ button to select "Channel", then press the ENTER/OK button.
▲
2. Press the
3. Press the ENTER/OK
The TV will begin memorizing all of the available channels.
Press the ENTER/OK button at any time to interrupt the memorization process and return to the
"Channel" menu.
4. After all the available channels are stored, the "Sort" menu appears.
or ▼ button to select “Auto Store" then press the ENTER/OK button.
button.
English - 11
Page 14
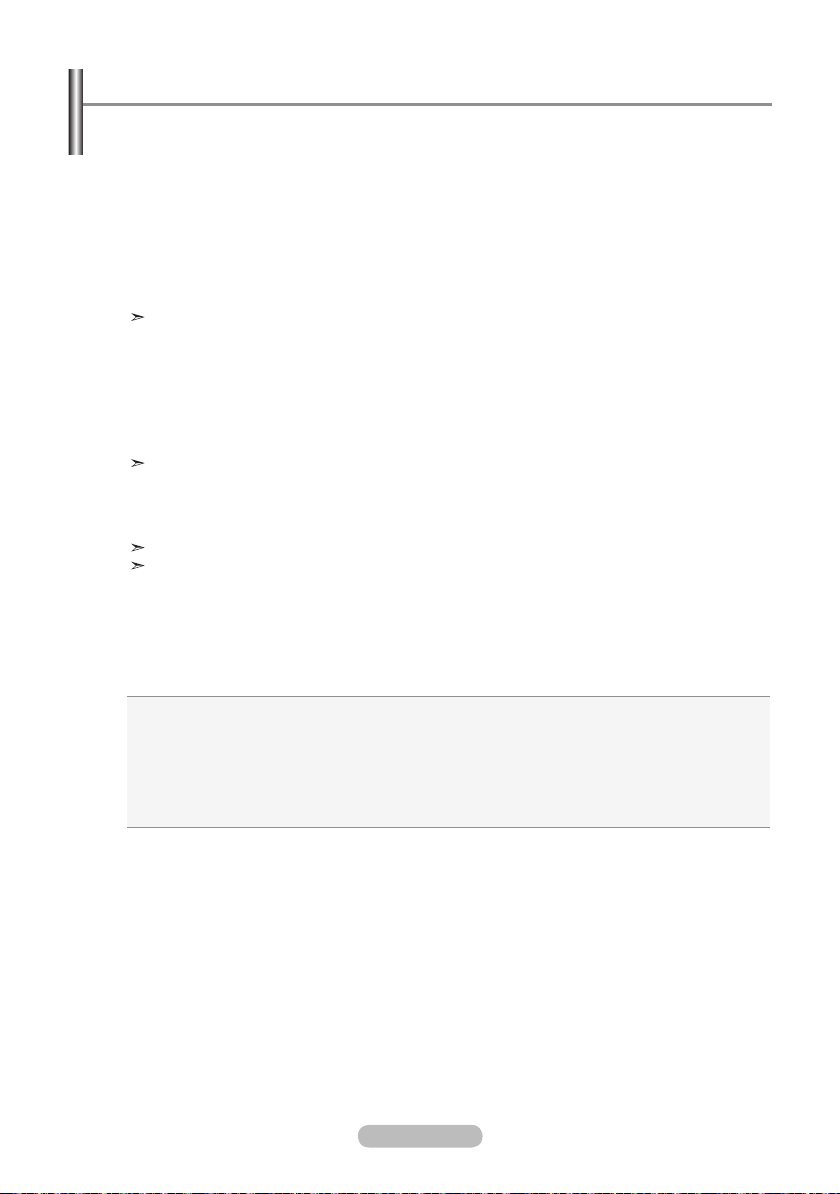
Storing Channels Manually
You can store up to 100 channels, including those received via cable networks.
When storing channels manually, you can choose:
Whether or not to store each of the channels found.
The programme number of each stored channel which you wish to identify.
1. Press the
Press the ▲ or ▼ button to select "Channel", then press the ENTER/OK button.
2. Press the
3. Press the ENTER/OK
4. To assign a programme number to a channel, find the correct number by pressing the
button and then press the ENTER/OK button.
You can also set a programme number by pressing number buttons on the remote control.
5. Press the
6. Select the colour standard required by pressing the
button.
7. Press the
8. Select the sound standard required by pressing the
button.
If there is an abnormal sound or no sound, re-select the sound system required.
9. If you know the number of the channel to be stored, press the
Press the ENTER/OK button. Select C (Air channel) or S (Cable channel) by pressing the or
button. Press the button to select channel.
Select the required number by pressing the ▲ or ▼ button and then press the ENTER/OK button.
Channel mode: P (Programme mode), C (Air channel mode), S (Cable channel mode)
You can also set a channel number by pressing number buttons on the remote control.
10. If you do not know the channel numbers, press the
Press the ENTER/OK button. Search by pressing the ▲ or ▼ button and then press the
ENTER/OK button.
11. Press the
12. Repeat steps
MENU button to display the menu.
▲
or ▼ button to select "Manual Store", then press the ENTER/OK button.
button to select "Programme".
▲
or ▼ button to select "Colour System", then press the ENTER/OK button.
▲
or ▼ button then, press the ENTER/OK
▲
or ▼ button to select "Sound System", then press the ENTER/OK button.
▲
or ▼ button, then press the ENTER/OK
▲
or ▼ button to select "Channel".
▲
or ▼ button to select "Search".
▲
or ▼ button to select "Store". Press the ENTER/OK button to select "OK".
3 to 11 for each channel to be stored.
▲
or ▼
Programme: Selects a program number for the channel.
Colour System: Sets the colour supporting system.
Sound System: Sets the sound supporting system.
Channel: Selects a channel.
Search: Scans for the frequency value for the channel.
Store: Saves your settings.
English - 12
Page 15
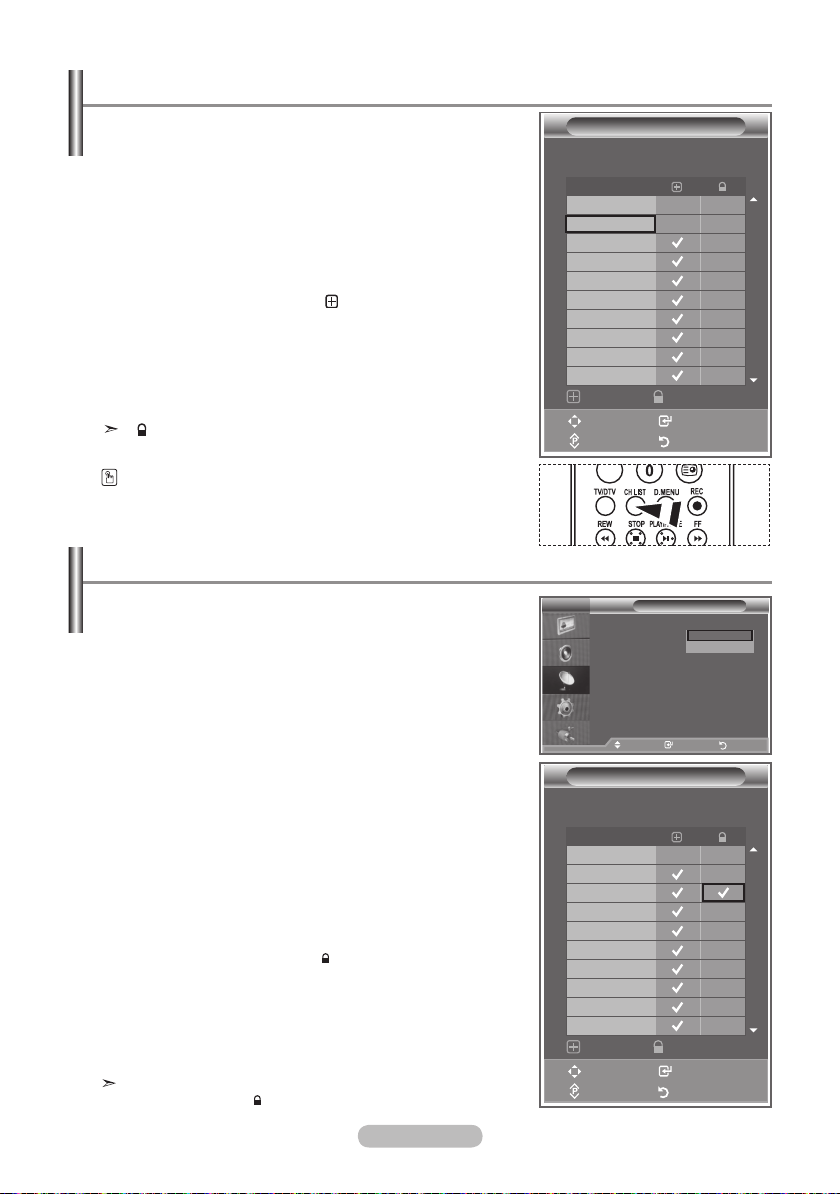
Setting the Channel Manager
Set the channels according to your preference.
You can easily delete, add, or lock the channel you want.
1. Press the
MENU button to display the menu.
Press the ▲ or ▼ button to select "Channel", then press the
ENTER/OK button.
▲
2. Press the
or ▼ button to select "Channel Manager",
then press the ENTER/OK button.
3. Press the ENTER/OK
4. Press the
5. Press the
►
▲
button again, to select "Channel List".
button to select " " line.
or ▼ button to select the undesired channel,
then press the ENTER/OK button to cancel.
6. Repeat steps 5 for each channel to be selected or canceled
7. Press the
EXIT button to exit.
" " is active when "Child Lock" is selected to "On".
You can select these options by simply pressing the CH LIST
button on the remote control.
Then you can press the EXIT button to exit.
Activating the Child Lock
This feature allows you to prevent unauthorized users, such
as children, from watching
unsuitable programmes by muting out video and audio.
Child Lock cannot be released using the buttons on the side.
Only the remote control can release the Child Lock setting,
so keep the remote control away from children.
1. Press the
Press the ▲ or ▼ button to select "Channel", then press the
ENTER/OK button.
2. Press the
then press the ENTER/OK button.
3. Press the
the ENTER/OK button.
4. Press the
ENTER/OK button.
5. Press the
then press the ENTER/OK button.
6. Press the
7. Press the
lock, then press the ENTER/OK button.
8. Repeat steps
9. Press the
Select "On" or "Off" in "Child Lock" to easily turn the channels
which selected on " " to be active or inactive.
MENU button to display the menu.
▲
or ▼ button to select "Channel Manager",
▲
or ▼ button to select "Child Lock", then press
▲
or ▼ button to select "On" or "Off". Press the
▲
or ▼ button to select "Channel List",
►
button to select " " line.
▲
or ▼ button to select the channels you want to
7 for each channel to be locked or unlocked.
EXIT button to exit.
Channel List
P 1 C3
Prog.
0 C--
1 C3
2 BBC 1
3 C74
4 C75
5 C76
6 S3
7 S4
8 S6
9 S7
Add Lock
Move Enter
Page Return
TV
Channel List
Child Lock :
Move Enter Return
Channel List
P 2 C4 BBC1
Prog.
0 C--
1 C3
2 BBC 1
3 C74
4 C75
5 C76
6 S3
7 S4
8 S6
9 S7
Add Lock
Move Enter
Page Return
1 / 10
Channel Manager
Off
On
1 / 10
English - 13
Page 16
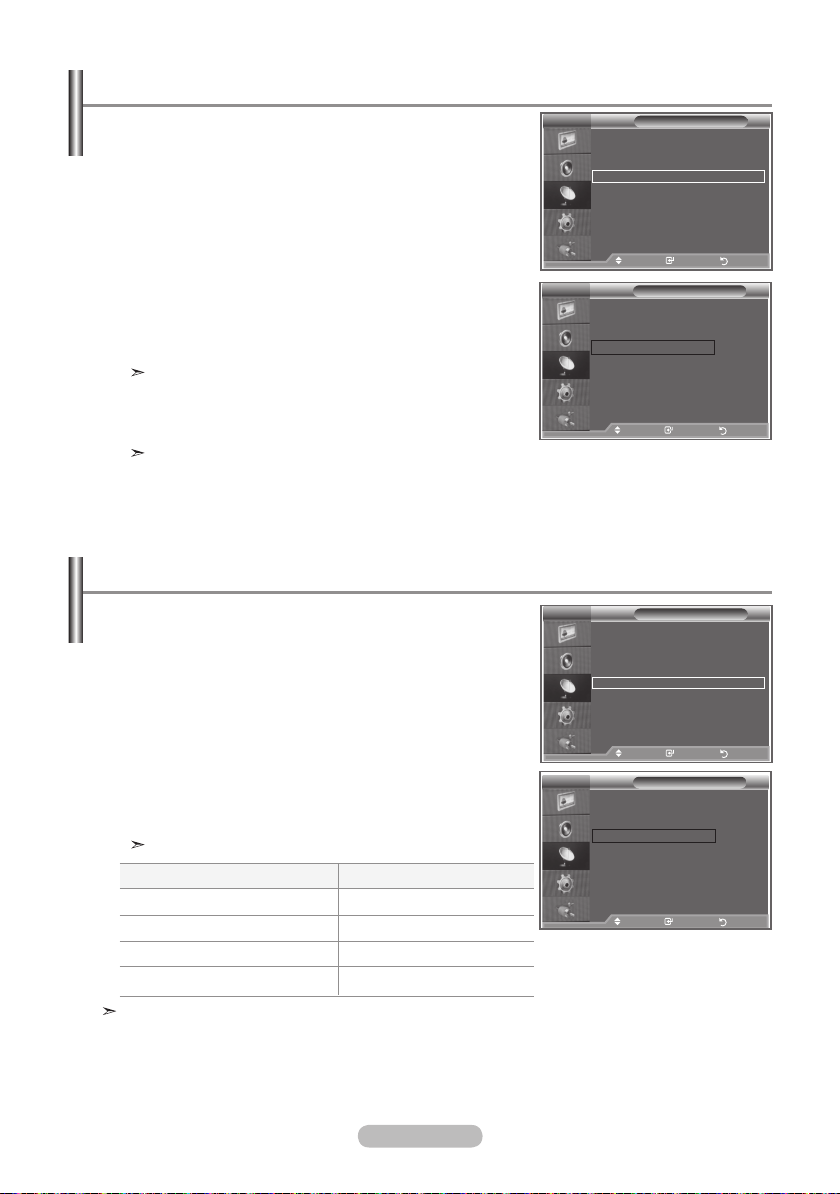
Sorting the Stored Channels
You can exchange the numbers of two channels, in order to:
Modify the numeric order in which the channels have
been automatically stored.
Give easily remembered numbers to the channels
that you watch most often.
Press the MENU button to display the menu. Press the ▲ or ▼
1.
button to select "Channel", then press the ENTER/OK button.
2. Press the ▲ or ▼ button to select "Sort", then press the
ENTER/OK button.
3. Select the channel number that you wish to change by press
▲
ing the
or ▼ button repeatedly. Press the ENTER/OK
button.
The selected channel number and name are moved to
right side.
4. Press the
▲
or ▼ button to move to the position in which you
would like to change and then press the ENTER/OK button.
The selected channel is exchanged with the one
previously stored to the chosen number.
5. Repeat steps 3 to 4 for another channel to be sorted.
6. Press the
EXIT button to exit.
Assigning Channels Names
TV
Auto Store
Manual Store
Channel Manager
Sort
Name
Fine Tune
LNA : Off
Move Enter Return
TV
Prog. Ch. Name
r
0
C--
1 C23
2 C16
3 C3
4 S1
r
Move Enter Return
Channel
Sort
Channel names will be assigned automatically when channel
information is broadcast. These names can be changed,
allowing you to assign new names.
1. Press the
MENU button to display the menu.
Press the ▲ or ▼ button to select "Channel", then press the
ENTER/OK button.
▲
2. Press the
or ▼ button to select "Name", then press the
ENTER/OK button.
3. If necessary, select the channel to be assigned to a new
name by pressing the ▲ or ▼ button. Press the ENTER/OK
button.
The selection bar is displayed around the name box.
4.
To...
Select a letter, number or symbol
Move on the next letter
Move back the previous letter
Confirm the name
Then...
Press the or button
Press the button
Press the button
Press the ENTER/OK
button
The characters available are : Letters of the alphabet
(A~Z) / Numbers (0~9) / Special characters ( -, space, / , * , + )
5. Repeat steps
6. Press the
3 to 4 for each channel to be assigned to a new name.
EXIT button to exit.
English - 14
TV
Auto Store
Manual Store
Channel Manager
Sort
Name
Fine Tune
LNA : Off
Move Enter Return
TV
Prog. Ch. Name
r
0 C-- -----
1 C23 -----
2 C16 ----3 C3 ----4 S1 -----
r
Move Enter Return
Channel
Name
Page 17
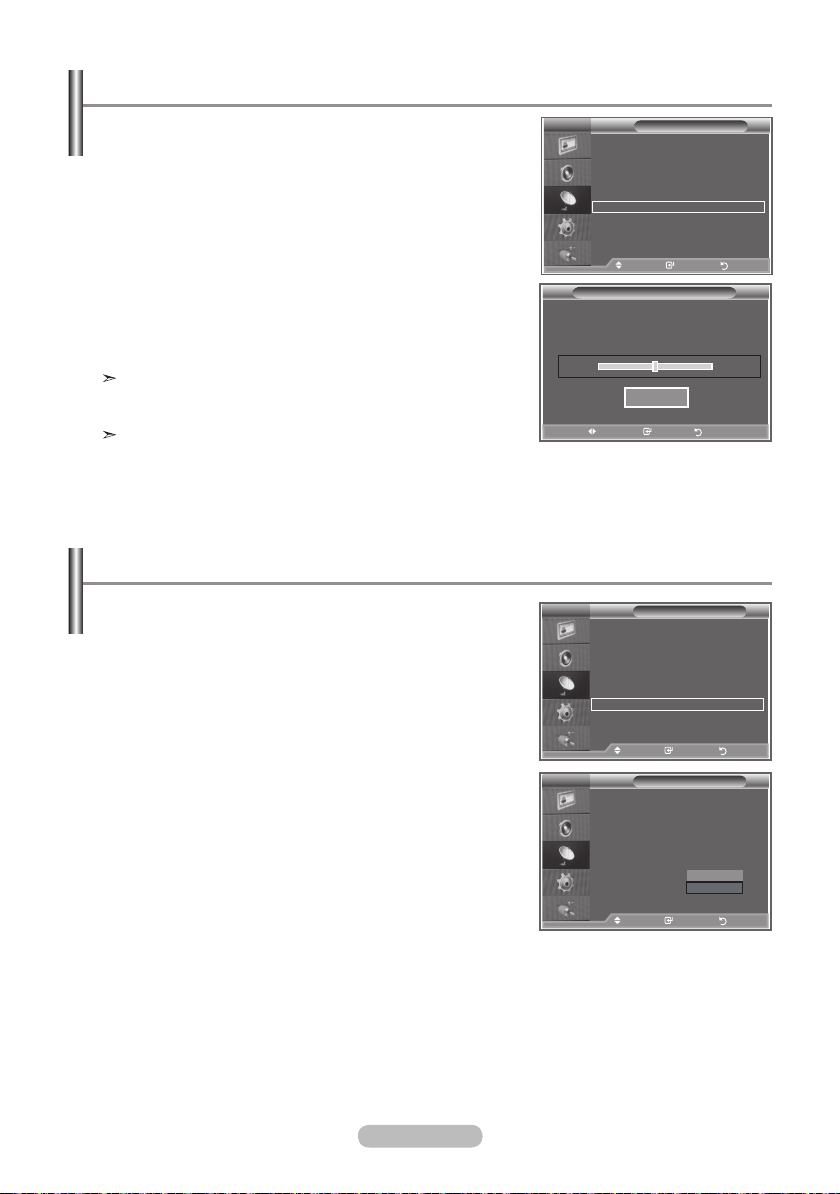
Fine Tuning Channel Reception
Use fine tuning to manually adjust a particular channel for
optimal reception.
1. Use the number buttons to directly select the channel that
you want to fine tune.
2. Press the
MENU button to display the menu.
Press the ▲ or ▼ button to select "Channel", then press the
ENTER/OK button.
3. Press the
▲
or ▼ button to select "Fine Tune", then press
the ENTER/OK button.
◄
4. Press the
Press the ENTER/OK button.
5. Press the
or ► button to adjust the fine tuning.
EXIT button to exit.
Fine tuned channels that have been saved are marked with
an asterisk "*" on the right-hand side of the channel number
in the channel banner. And the channel number turns red.
To reset the fine-tuning, select "Reset" by pressing the
▲ or ▼ button and then press the ENTER/OK button.
LNA (Low Noise Amplier)
If the TV is operating in a weak-signal area, sometimes the LNA
function can improve the reception (a low-noise preamplier
boosts the incoming signal).
1.
Press the MENU button to display the menu.
Press the ▲ or ▼ buttons to select “Channel”,
then press the ENTER/OK button.
Press the ▲ or ▼ buttons to select “LNA”, then press the
2.
ENTER/OK button.
3.
Press the▲ or ▼ buttons to select “On”, or "Off".
Press the ENTER/OK button.
Press the EXIT button to exit.
4.
TV
Auto Store
Manual Store
Channel Manager
Sort
Name
Fine Tune
LNA : Off
Move Enter Return
Fine Tune
P 1
Reset
Adjust Save Return
TV
Auto Store
Manual Store
Channel Manager
Sort
Name
Fine Tune
LNA : Off
Move Enter Return
TV
Auto Store
Manual Store
Channel Manager
Sort
Name
Fine Tune
LNA : Off
Move Enter Return
Channel
Channel
Channel
Off
On
0
English - 15
Page 18
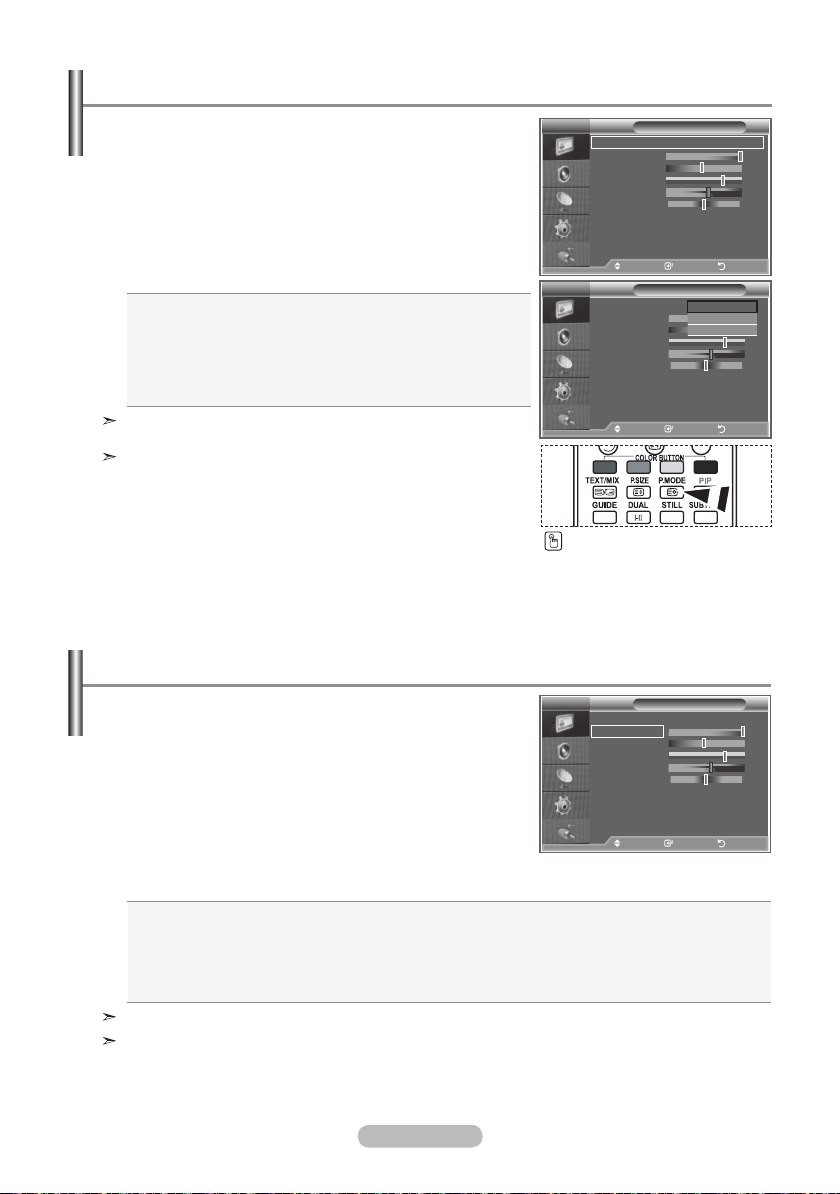
Changing the Picture Standard
You can select the type of picture which best corresponds to
your viewing requirements.
1. Press the
Press the ENTER/OK button to select "Picture".
2. Press the ENTER/OK
3. Press the
Press the ENTER/OK button.
4. Press the
The Picture mode must be adjusted separately for each input
source.
You can return to the factory defaults picture settings by
selecting the "Reset".
(Refer to "Resetting the Picture Settings to the Factory
Defaults" on page 21)
MENU button to display the menu.
button again, to select "Mode".
▲
or ▼ button to select the desired picture effect.
EXIT button to exit.
Dynamic: Selects the picture for high-definition in a bright
room.
Standard: Selects the picture for optimum display in a
normal environment.
Movie: Selects the picture for comfortable display in a
dark room.
TV
Mode : Dynamic
Contrast 100
Brightness 45
Sharpness 75
Colour 55
Tint G50 R50
Colour Tone : Cool1
Detailed Settings
Backlight: : 10
sMore
TV
Mode : Dynamic
Contrast 100
Brightness 50
Sharpness 75
Colour 55
Tint G50 R50
Colour Tone : Cool1
Detailed Settings
Backlight: : 10
sMore
Picture
Move Enter Return
Picture
Dynamic
Standard
Movie
Move Enter Return
You can also press the
P.MODE button on the remote
control to select one of the
picture settings.
Adjusting the Custom Picture
Your set has several settings which allow you to control
picture quality.
1. To select the desired picture effect, follow the
"Changing the Picture Standard" instructions number 1 to 3.
on page 16
2. Press the ▲ or ▼ button to select a particular item. Press the
ENTER/OK button.
3. Press the
◄
or ► button to decrease or increase the value of
a particular item. Press the ENTER/OK button.
4. Press the
EXIT button to exit.
Contrast: Adjusts the lightness and darkness between objects and the background.
Brightness: Adjusts the brightness of the whole screen.
Sharpness: Adjusts the outline of objects to either sharpen them or make them more dull.
Colour: Adjusts the colours, making them lighter or darker.
Tint(NTSC or DTV):
Adjusts the colour of objects, making them more red or green for a more natural look.
The adjusted values are stored according to the selected Picture mode.
In PC Mode, Only "Contrast", "Brightness" can be adjusted.
English - 16
TV
Mode : Dynamic
Contrast 100
Brightness 45
Sharpness 75
Colour 55
Tint G50 R50
Colour Tone : Cool1
Detailed Settings
Backlight: : 10
sMore
Picture
Move Enter Return
Page 19
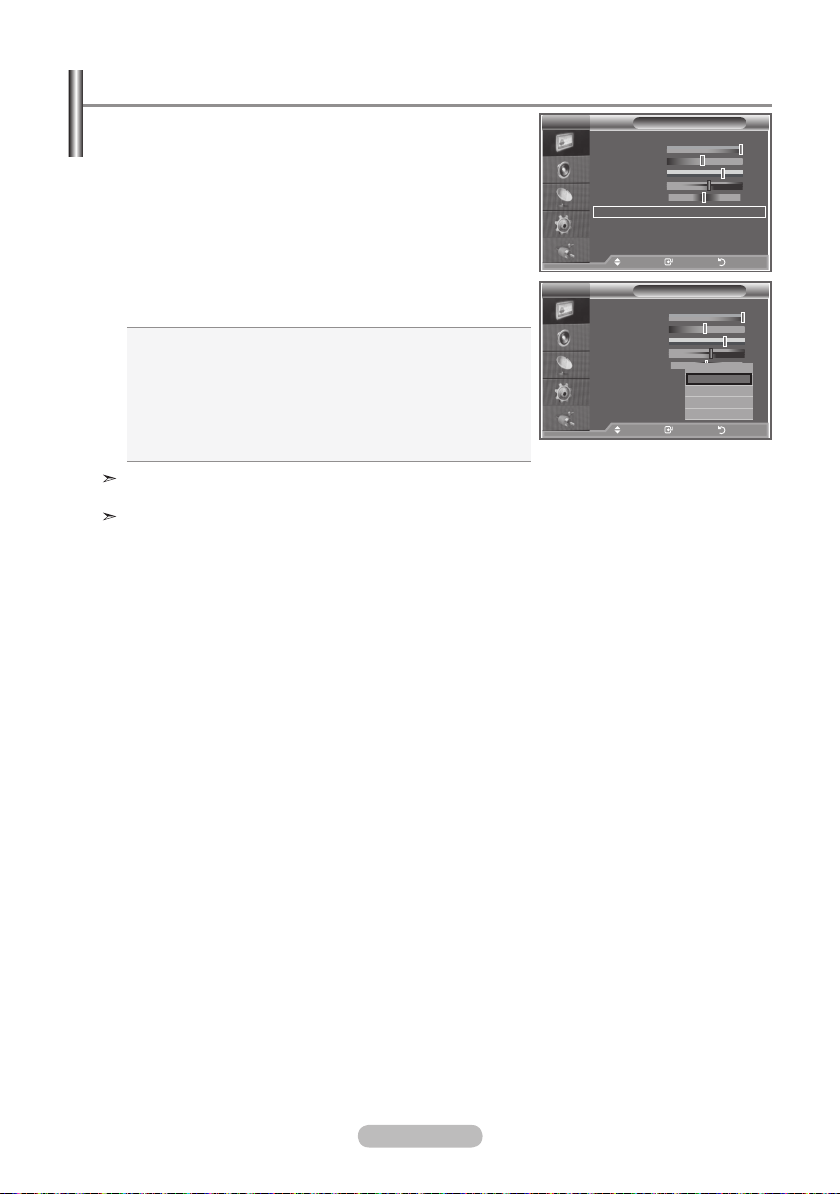
Changing the Colour Tone
You can select the most comfortable colour tone to your
eyes.
1. To select the desired picture effect, follow the
"Changing the Picture Standard" instructions number 1 to 3.
on page 16
2. Press the or button to select "Colour Tone", then press
the ENTER/OK button.
3. Press the
or button to select the desired colour tone
setting. Press the ENTER/OK button.
4. Press the
EXIT button to exit
Cool2: Makes the colour temperature bluer than "Cool1"
menu.
Cool1: Makes whites bluish.
Normal: Keeps whites white.
Warm1: Makes whites reddish.
Warm2: Makes the colour temperature redder than
"Warm1" menu.
The adjusted values are stored according to the selected
Picture mode.
When the picture mode is set to Dynamic or Standard, Warm1
and Warm2 cannot be selected.
TV
Mode : Dynamic
Contrast 100
Brightness 45
Sharpness 75
Colour 55
Tint G50 R50
Colour Tone : Cool1
Detailed Settings
Backlight: : 10
sMore
TV
Mode : Dynamic
Contrast 100
Brightness 45
Sharpness 75
Colour 55
Tint G50 R50
Colour Tone : Cool1
Detailed Settings
Backlight: : 10
sMore
Picture
Move Enter Return
Picture
Move Enter Return
Cool 2
Cool 1
Normal
Warm 1
Warm 2
English - 17
Page 20
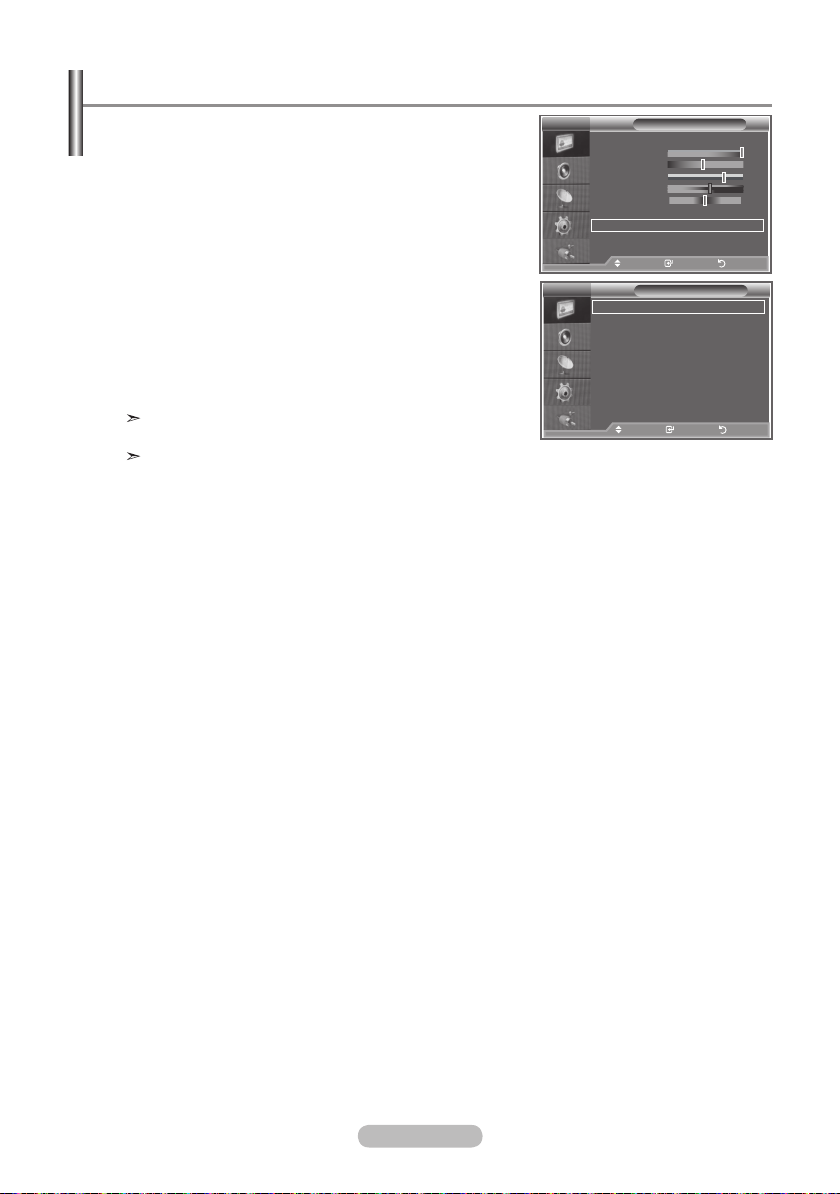
Conguring Detailed Settings on the Picture
You can set detailed picture settings.
1 Press the MENU button to display the menu.
2 Press the ENTER/OK button, to select "Picture".
3 Press the ▲ or ▼ button to select Detailed Settings, then
press the ENTER/OK button.
4 Select the required option by pressing the ▲ or ▼ button,
TV
Mode : Movie
Contrast 100
Brightness 45
Sharpness 75
Colour 55
Tint G50 R50
Colour Tone : Cool1
Detailed Settings
Backlight: : 10
sMore
then press the ENTER/OK button.
Available options: Black Adjust, Dynamic Contrast, Gamma,
White Balance, My Colour Control, Edge
Enhancement, Colour Space.
5 When you are satisfied with your setting,
press the ENTER/OK button.
6 Press the EXIT button to exit.
When the picture mode is set to Movie, Detailed
can be selected.
Settings
TV
Black Adjust : Off
Dynamic Contrast
Gamma : 0
White Balance
My Colour Control
Edge Enhancement : Off
Colour Space
xvYCC
If DNIe is Off, the Detailed Settings cannot be selected
when the Picture mode is in Standard mode.
Black Adjust: Off/Low/Medium/High
You can directly select the black level on the screen to adjust the screen depth.
Dynamic Contrast: Off/Low/Medium/High
You can adjust the screen contrast so that the optimal contrast is provided.
Gamma: -3 ~ 3
You can adjust the middle brightness of pictures.
Press the ◄ or ► button until you reach the optimal setting.
White Balance: R-Offset/G-Offset/B-Offset/R-Gain/G-Gain/B-Gain/Reset
You can adjust the colour temperature for more natural picture colours.
R-Offset/G-Offset/B-Offset/R-Gain/G-Gain/B-Gain: Changing the adjustment value will refresh the
adjusted screen.
Select the required option by pressing the ▲ or ▼ button, then press the ENTER/OK button.
Press the ◄ or ► button until you reach the optimal setting.
Reset: The previously adjusted white balance will be reset to the factory defaults.
My Colour Control: Pink/Green/Blue/White/Reset
This setting can be adjusted to suit your personal preferences.
When running the My Colour Control feature, the current picture is captured as a still image before
being displayed on the screen.
Edge Enhancement: On/Off
You can emphasize object boundaries.
Colour Space: Auto/Wide
You can set the colour reproduction space for the input signal to Auto or Wide.
XVYCC: Off/On
Setting the xvYCC mode to On increases detail and colour space when watching movies from an
external device (ie. DVD player) connected to the HDMI or Component IN jacks. You must set the
Picture Mode to Movie to enjoy this feature. When you set the xvYCC mode to On the PIP will Off
automatically.
Picture
Move Enter Return
Detailed Settings
: Off
: Auto
: Off
Move Enter Return
English - 18
Page 21
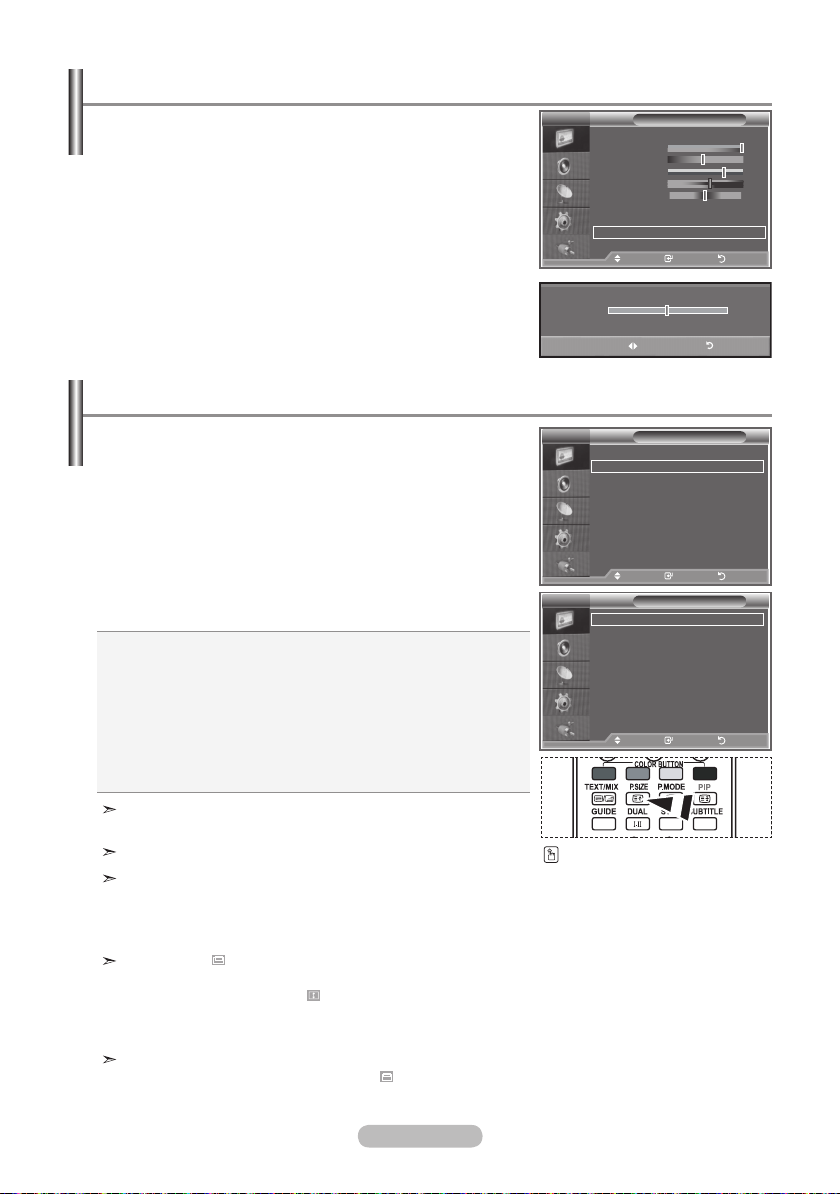
Activating Backlight
You can adjust the screen brightness by adjusting the LCD
backlight brightness. (0~10)
1.
Press the MENU button to display the menu.
Press the ENTER/OK button, to select "Picture".
2. Press the ▲ or ▼ button to select “Backlight”, then press the
ENTER/OK button.
3.
Press the ◄ or ► button to decrease or increase the value of
a particular item.
Press the ENTER/OK button.
Press the
EXIT button to exit.
Changing the Picture Size
TV
Mode : Dynamic
Contrast 100
Brightness 45
Sharpness 75
Colour 55
Tint G50 R50
Colour Tone : Cool1
Detailed Settings
Backlight: : 10
sMore
Move Enter Return
Backlight
Adjust Return
Picture
5
You can select the picture size which best corresponds to
your viewing requirements.
1. Press the
MENU button to display the menu.
Press the ENTER/OK button , to select "Picture".
2. Press the
▲
or ▼ button to select "Size", then press the
ENTER/OK button.
3. Select the required option by pressing the
▲
or ▼ button.
Press the ENTER/OK button.
4. Press the
EXIT button to exit.
16:9: Adjusts the picture size to 16:9 appropriate for DVDs or
wide broadcasting.
Wide Zoom: Magnify the size of the picture more than 4:3.
Zoom: Magnifies the 16:9 wide picture (in the vertical direction)
to fit the screen size.
4:3: This is the default setting for a video movie or normal broadcasting.
Just Scan :
Use this function to see the full image without any
truncation when HDMI 1080p,1080i, 720p signal are
input.
"Wide Zoom" function is available only in "TV", "AV1", "AV2",
and "S-Video", "component1", "component2", "HDMI" mode.
In PC Mode, only "16:9" and "4:3" mode can be adjusted.
Just Scan Mode is available only HDMI mode
With the HDMI Just Scan picture size,depending on the AV
devices,the screen may be cut off or a specific appears on
the screen.
Zoom: Select by pressing the ◄ or ► buttons.
Use the ▲ or ▼ button to move the picture up and
down.After selecting , use the ▲ or ▼ button to
magnify or reduce the picture size in the vertical
direction.
Wide Zoom : Move the screen up/down using the▲ or ▼
buttons after selecting the by pressing
the ► or ENTER/OK button.
TV
rMore
Size : 16 : 9
Digital NR : Auto
Active Colour : Off
DNle : Off
Movie Plus : On
Reset : OK
TV
16 : 9
Wide Zoom
Zoom
4 : 3
Just Scan
Picture
Move Enter Return
Move Enter Return
You can select these options
by simply pressing the P.SIZE
button on the remote control.
Size
English - 19
Page 22
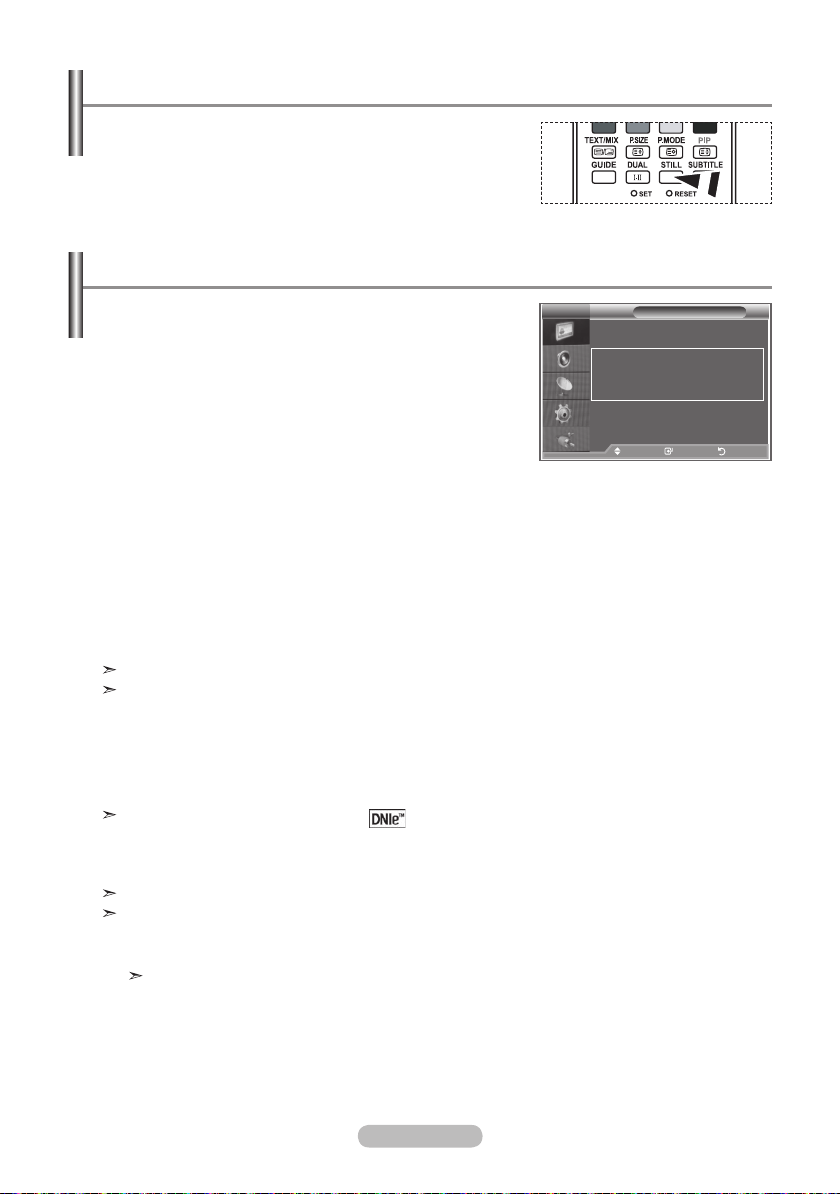
Freezing the Current Picture
Press the STILL button to freeze a moving picture into a
still one. Press again to cancel.
Digital NR / Active Colour / DNIe / Movie Plus
If the broadcast signal received by your TV is weak, you can
activate the Digital Noise Reduction feature to help reduce
any static and ghosting that may appear on the screen.
1. Press the
MENU button to display the menu.
Press the ENTER/OK button , to select "Picture".
2. Select the required option by pressing the ▲ or ▼ button,
then press the ENTER/OK
button.
Available options: Digital NR, Active Colour, DNIe,Movie Plus.
3. When you are satisfied with your setting, press the
ENTER/OK button.
4. Press the
EXIT button to exit.
Digital NR: Off/Low/Medium/High/Auto
If the signal received by the television is weak, you can activate this feature to reduce any static and
ghosting that may appear on the screen.
Active Colour: Off/On
If you turn on this option, the colours of the sky and grass will be stronger and clearer for a more
vivid on-screen picture.
This function is not available in PC mode.
This function is available in Dynamic mode
DNIe : Off/Demo/On
This TV includes the DNIe function so as to provide a high visual quality. If you set DNIe to on, you
can view the screen with the DNIe feature activated. If you set the DNIe to Demo, you can view the
applied DNIe and normal pictures on the screen, for demonstration purposes. Using this function,
you can view the difference in the visual quality.
DNIeTM (Digital Natural Image engine)
This feature brings you more detailed image with 3D noise reduction, detail enhancement,
contrast enhancement and white enhancement. New image compensation Algorithm gives
brighter, clearer, more detailed image to you. DNIeTM technology will fit every signal into your eyes.
This function is not available in PC mode.
This function is not available in Movie mode
Movie Plus: Off/On
You can view more natural skin and clear text even in fast moving scenes.
Use this function when watching movies.
TV
rMore
Size : 16 : 9
Digital NR : Auto
Active Colour : Off
DNle : Off
Movie Plus : On
Reset : OK
Move Enter Return
Picture
English - 20
Page 23
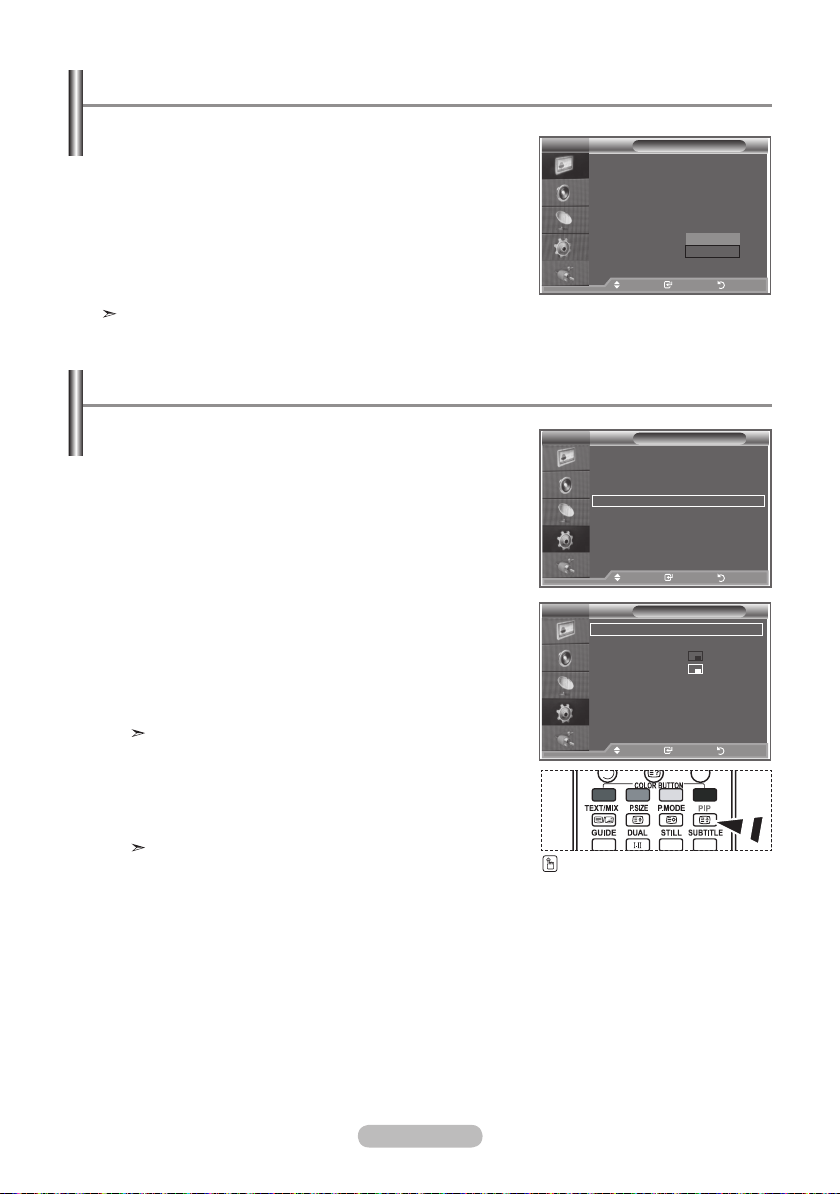
Resetting the Picture Settings to the Factory Defaults
You can return to the factory defaults picture settings.
1. To select the desired picture effect, follow the
"Changing the Picture Standard" instructions number 1 to 3
on page 16.
▲
2. Press the
ENTER/OK button.
3.
Press the ▲ or ▼ button to select “OK”,” Cancel”, then press
or ▼ button to select "Reset", then press the
the ENTER/OK button.
4. Press the
EXIT button to exit.
The "Reset" will be set for each picture mode.
Viewing the Picture In Picture (PIP)
You can display a sub picture within the main picture of set
programme or video input. In this way, you can watch the
picture of set programme or video input from any connected
equipment while watching the main picture.
1. Press the
Press the ENTER/OK button , to select "Setup".
2. Press the
ENTER/OK button.
3. Press the ENTER/OK
Press the ▲ or ▼ button to select "On",
then press ENTER/OK button.
4. Press the ▲ or ▼ button to select "Source",then press
ENTER/OK button. Select a source of the sub picture by
pressing the ▲ or ▼ button and press the ENTER/OK
button.
The sub picture can serve different source selections
based on what the main picture is set to.
5. Press the
and then press the ENTER/OK button. Select a size of the sub
picture by pressing the ▲ or ▼ button and then press the
ENTER/OK button.
If main picture is in "HDMI" mode, "Size" is available.
MENU button to display the menu.
▲
or ▼ button to select "PIP", then press the
button again.
▲
or ▼ button to select "Size" of the sub picture
TV
rMore
Size : 16:9
Digital NR : Auto
Active Colour : Off
DNle : Off
Movie Plus : On
Reset : OK
TV
rMore
Wall-Mount Adjustment
Energy Saving : Off
HDMI Black level : Low
PIP
TV
PIP : On
Source : TV
Size :
Position :
Programme : P 1
Picture
OK
Cancel
Move Enter Return
Setup
Move Enter Return
PIP
Move Enter Return
Press the PIP button on the
remote control repeatedly to activate
or deactivate the "PIP".
English - 21
Page 24
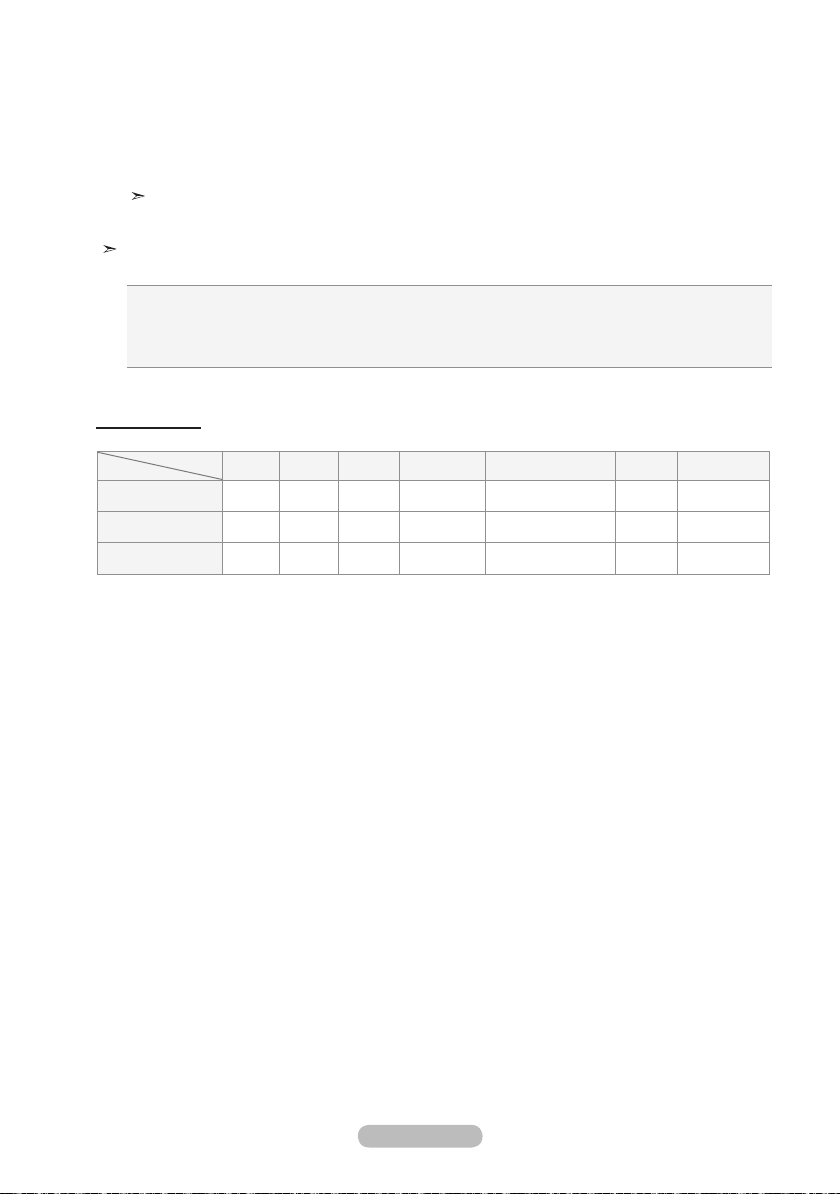
6. Press the ▲ or ▼ button to select "Position", then press the ENTER/OK button.
Select the position of the sub picture by pressing the ▲ or ▼ button and then press the ENTER/OK
button.
7. Press the
▲
or ▼ button to select "Programme" and then press the ENTER/OK button.
You can select the channel that you want to view through sub picture by pressing the ▲ or ▼
button. Press the ENTER/OK button.
The "Programme" can be active when the sub picture is set to TV.
8. Press the
EXIT button to exit.
You may notice that the picture in the PIP window becomes slightly unnatural when you use the
main screen to view a game or karaoke.
Source: Used to select a source of the sub picture.
Size: Used to select a size of the sub picture.
Position: Used to move the sub picture.
Programme: Used to Change the sub picture.
PIP Settings
Main
Component1,2
Sub
PC
HDMI1,2,3
O: PIP operates, X: PIP doesn’t operate
TV AV1 AV2
S-Video Component1,2 PC HDMI1,2,3
O O O X X X X
O O O X X X X
O O O X X X X
English - 22
Page 25
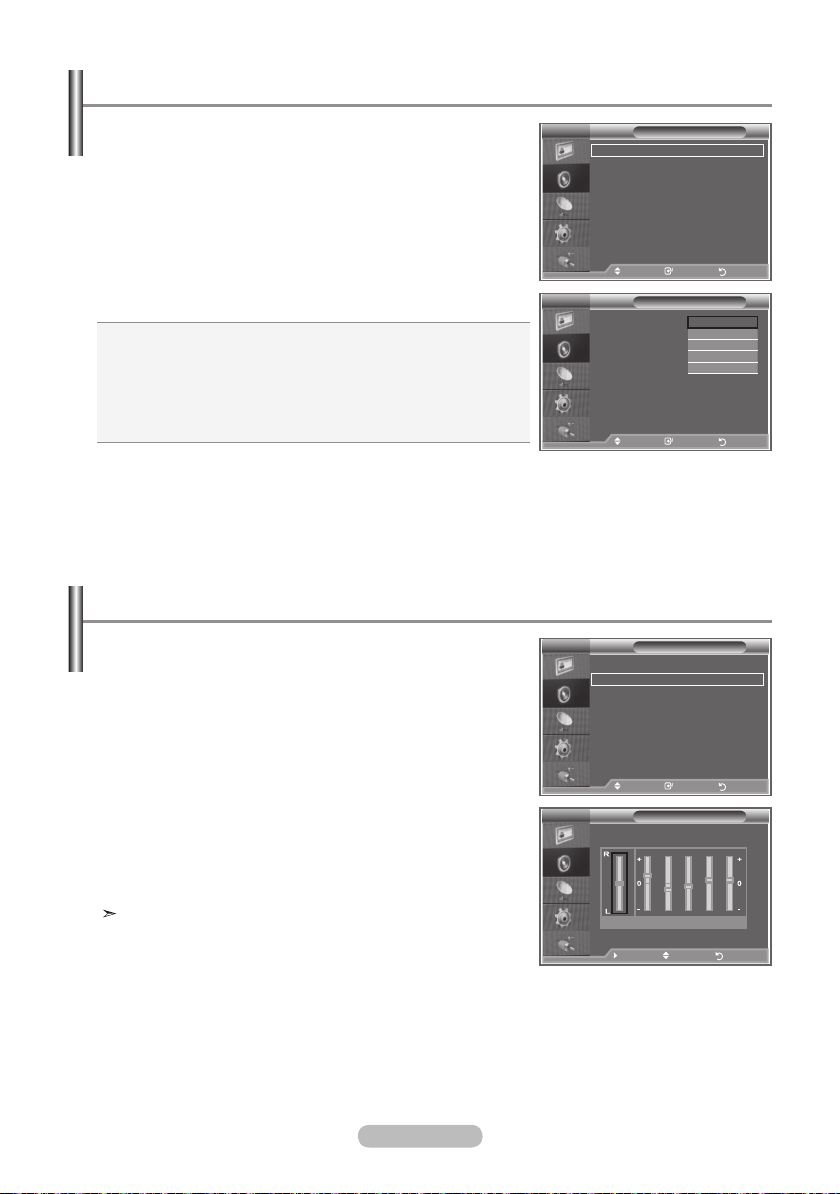
Changing the Sound Standard
You can select the type of the special sound effect to be used
when watching a given broadcast.
1. Press the
MENU button to display the menu.
Press the ▲ or ▼ button to select "Sound", then press the
ENTER/OK button.
2. Press the ENTER/OK
3. Select the required sound effect by pressing the
button again, to select "Mode".
▲
or ▼
button repeatedly and then press the ENTER/OK button.
4. Press the
EXIT button to exit.
Standard: Selects the normal sound mode.
Music: Emphasizes music over voices.
Movie: Provides live and full sound for movies.
Speech: Emphasizes voices over other sounds.
Custom: Selects your custom sound settings.
(Refer to "Adjusting the Sound Settings")
Adjusting the Sound Settings
TV
Mode : Standard
Equalizer
SRS TS XT : Off
Auto Volume : Off
Internal Mute : Off
Sound Select : Main
Reset
Move Enter Return
TV
Mode : Custom
Equalizer
SRS TS XT : Off
Auto Volume : Off
Internal Mute : Off
Sound Select : Main
Reset
Move Enter Return
Sound
Sound
Standard
Music
Movie
Speech
Custom
The sound settings can be adjusted to suit your personal
preferences.
1. Press the
MENU button to display the menu.
Press the ▲ or ▼ button to select "Sound", then press the
ENTER/OK button.
2. Press the ▲ or ▼ button to select "Equalizer", then press the
ENTER/OK button.
3. Press the ◄ or ► button to select a particular item.
Press the ENTER/OK button.
4. Press the ▲ or ▼ button to reach the required setting.
Press the ENTER/OK button.
5. Press the
EXIT button to exit.
If you make any changes to these settings, the Sound Mode
is automatically switched to "Custom".
English - 23
TV
Mode : Standard
Equalizer
SRS TS XT : Off
Auto Volume : Off
Internal Mute : Off
Sound Select : Main
Reset
Move Enter Return
TV
Balance 100Hz 300Hz 1kHz 3kHz 10kHz
Balance 100Hz 300Hz 1kHz 3kHz 10kHz
Move Adjust Return
Move Adjust Return
Sound
Equalizer
Equalizer
Page 26
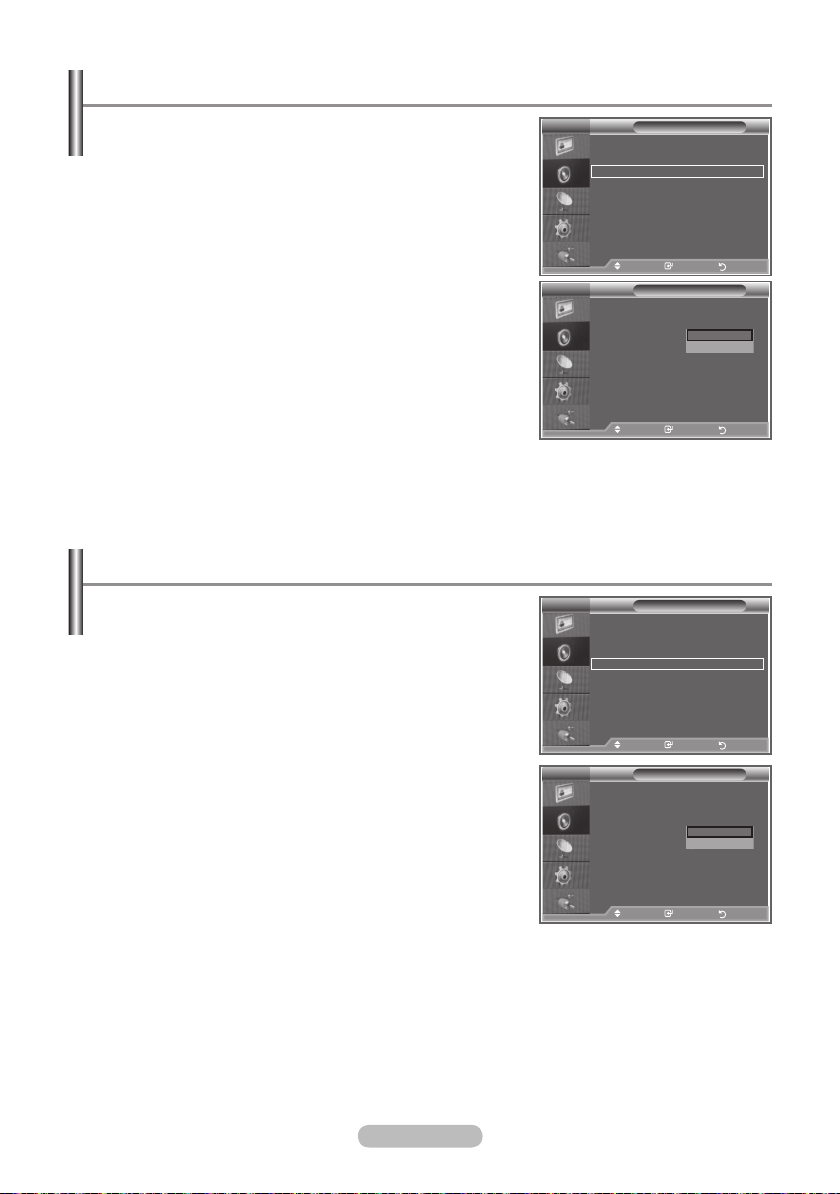
Setting the TruSurround XT (SRS TS XT)
TruSurround XT is a patented SRS technology that solves
the problem of playing 5.1 multichannel content over two
speakers. TruSurround delivers a compelling,virtual surround
sound experience through any two-speaker playback system,
including internal television speakers. It is fully compatible
with all multichannel formats.
1. Press the
MENU button to display the menu.
Press the ▲ or ▼ button to select "Sound", then press the
ENTER/OK button.
2. Press the ▲ or ▼ button to select "SRS TS XT", then press
the ENTER/OK
button.
3. Press the ▲ or ▼ button to select "On" or "Off". Press the
ENTER/OK button.
4. Press the
EXIT button to exit.
Adjusting the Volume Automatically
Each broadcasting station has its own signal conditions, and
so it is not easy for you to adjust the volume every time the
channel is changed. This feature allows you to automatically
adjust the volume of the desired channel by lowering the
sound output when the modulation signal is high or by
raising the sound output when the modulation signal is low.
1. Press the
Press the ▲ or ▼ button to select "Sound", then press the
ENTER/OK button.
2. Press the ▲ or ▼ button to select "Auto Volume", then press
the ENTER/OK
3. Press the ▲ or ▼ button to select "On" or "Off". Press the
ENTER/OK button.
4. Press the
MENU button to display the menu.
button.
EXIT button to exit.
TV
Mode : Standard
Equalizer
SRS TS XT : Off
Auto Volume : Off
Internal Mute : Off
Sound Select : Main
Reset
Move Enter Return
TV
Mode : Standard
Equalizer
SRS TS XT : Off
Auto Volume : Off
Internal Mute : Off
Sound Select : Main
Reset
Move Enter Return
TV
Mode : Standard
Equalizer
SRS TS XT : Off
Auto Volume : Off
Internal Mute : Off
Sound Select : Main
Reset
Move Enter Return
TV
Mode : Standard
Equalizer
SRS TS XT : Off
Auto Volume : Off
Internal Mute : Off
Sound Select : Main
Reset
Sound
Sound
Sound
Sound
Off
On
Off
On
English - 24
Move Enter Return
Page 27
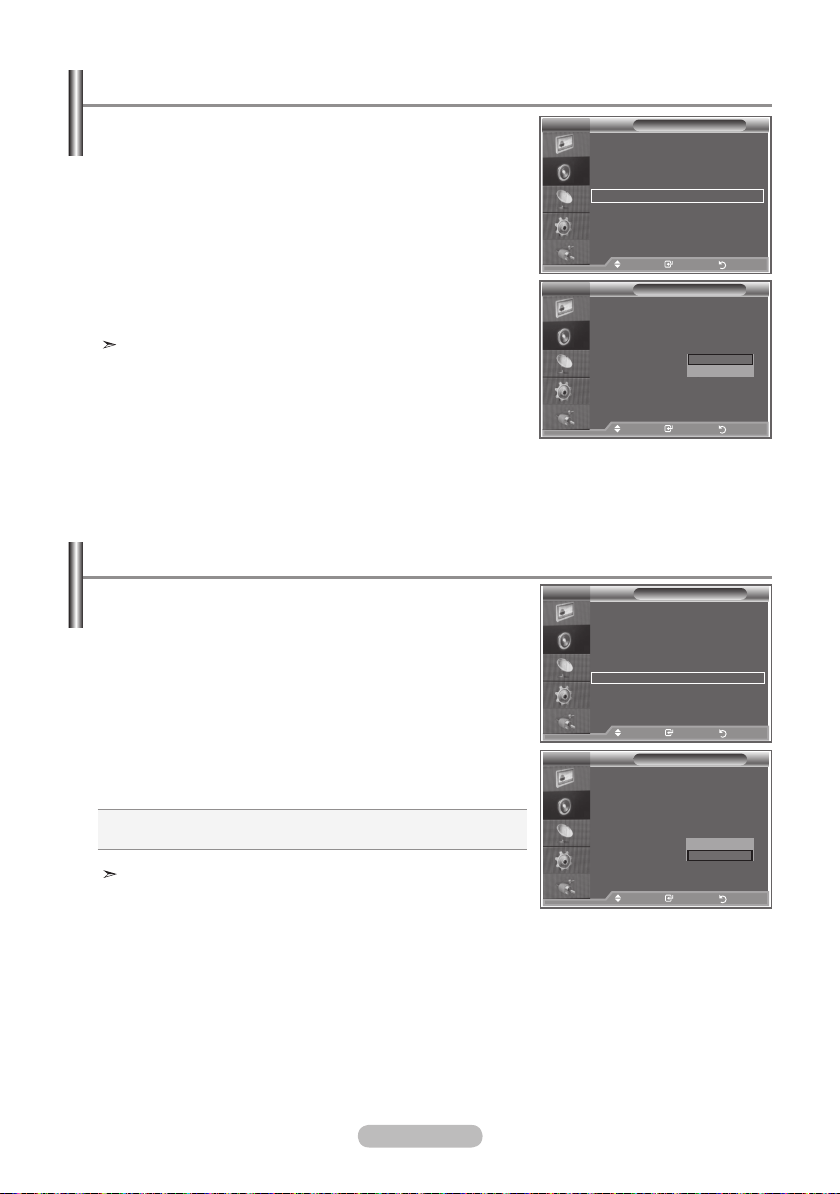
Selecting the Internal Mute
If you want to hear the sound through separate speakers,
cancel the internal amplifier.
1. Press the
MENU button to display the menu.
Press the ▲ or ▼ button to select "Sound", then press the
ENTER/OK button.
2. Press the ▲ or ▼ button to select "Internal Mute", then press
the ENTER/OK
button.
3. Press the ▲ or ▼ button to select "On" or "Off". Press the
ENTER/OK button.
4. Press the
EXIT button to exit.
When "Internal Mute" is set to "On’, the Sound menus except
for "Sound Select" (in PIP mode) cannot be adjusted.
TV
TV
Listening to the Sound of the Sub Picture
During the PIP features activation, you can listen to the
sound of the sub picture.
1. Press the
MENU button to display the menu.
Press the ▲ or ▼ button to select "Sound", then press the
ENTER/OK button.
2. Press the ▲ or ▼ button to select "Sound Select", then press
the ENTER/OK
3. Press the ▲ or ▼ button to select "Sub".
button.
Press the ENTER/OK button.
4. Press the
EXIT button to exit.
Main : Used to listen to the sound of the main picture.
Sub : Used to listen to the sound of the sub picture.
You can select this option when the “PIP” is set to “On”.
TV
TV
Mode : Standard
Equalizer
SRS TS XT : Off
Auto Volume : Off
Internal Mute : Off
Sound Select : Main
Reset
Mode : Standard
Equalizer
SRS TS XT : Off
Auto Volume : Off
Internal Mute : Off
Sound Select : Main
Reset
Mode : Custom
Equalizer
SRS TS XT : Off
Auto Volume : Off
Internal Mute : Off
Sound Select : Main
Reset
Mode : Custom
Equalizer
SRS TS XT : Off
Auto Volume : Off
Internal Mute : Off
Sound Select : Main
Reset
Sound
Move Enter Return
Sound
Off
Sound
Sound
On
Main
Sub
Move Enter Return
Move Enter Return
Move Enter Return
English - 25
Page 28
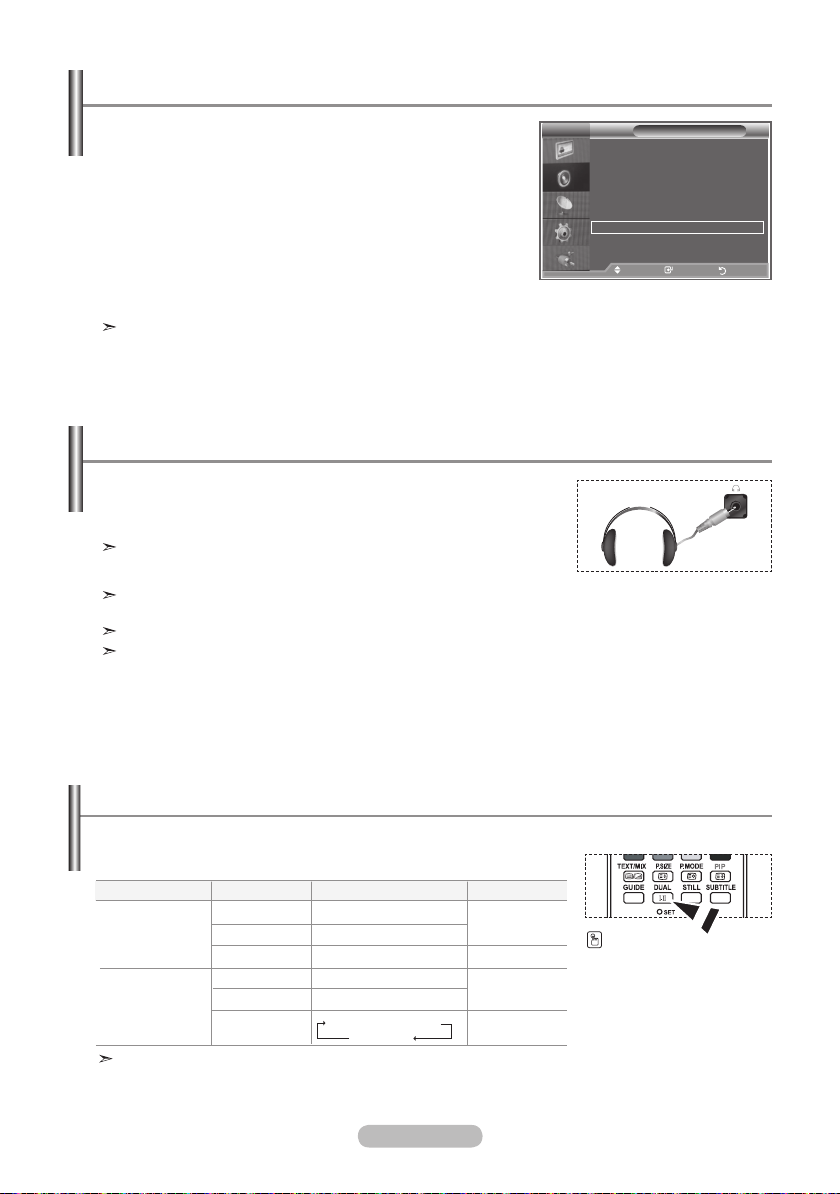
Resetting the Sound Settings to the Factory Defaults
If Game Mode is On, the Reset Sound function is activated.
Selecting the Reset function after setting the equalizer resets
the equalizer setting to the factory defaults.
1. Press the
MENU button to display the menu.
Press the ▲ or ▼ button to select "Sound", then press the
ENTER/OK button.
2. Press the ▲ or ▼ button to select "Reset", then press the
ENTER/OK button.
3. Press the
EXIT button to exit.
TV
Mode : Custom
Equalizer
SRS TS XT : Off
Auto Volume : Off
Internal Mute : Off
Sound Select : Main
Reset
Move Enter Return
You can select this option when the "Game Mode" is set to "On".
Connecting Headphones
You can connect a set of headphones to your set if you wish to
watch a TV programme without disturbing the other people in the
room.
When you insert the head set jack into the corresponding port, you
can operate only Auto Volume "SRS TS XT" and Sound Select
(in PIP mode) in Sound menu.
Prolonged use of headphones at a high volume may damage your
hearing.
You will not receive sound from the speakers when you connect headphones to the system.
The headphone volume and TV volume are adjusted differently.
Sound
Selecting the Sound Mode
You can set the sound mode by pressing the “DUAL” button.
When you press it, the current sound mode is displayed on the
screen.
Audio Type
FM
Stereo
NICAM
Stereo
If the stereo signal is weak and an automatic switching occurs, then switch to the Mono.
Mono
Stereo
Dual
Mono
Stereo
Dual
DUAL 1/2
MONO
STEREO ↔ MONO
DUAL 1 ↔ DUAL 2
MONO
MONO ↔ STEREO
MONO ↔ DUAL 1
DUAL 2
English - 26
Default
Automatic
change
DUAL 1
Automatic
change
DUAL 1
You can also set these
options simply by
pressing the
DUAL
button on remote control.
Page 29
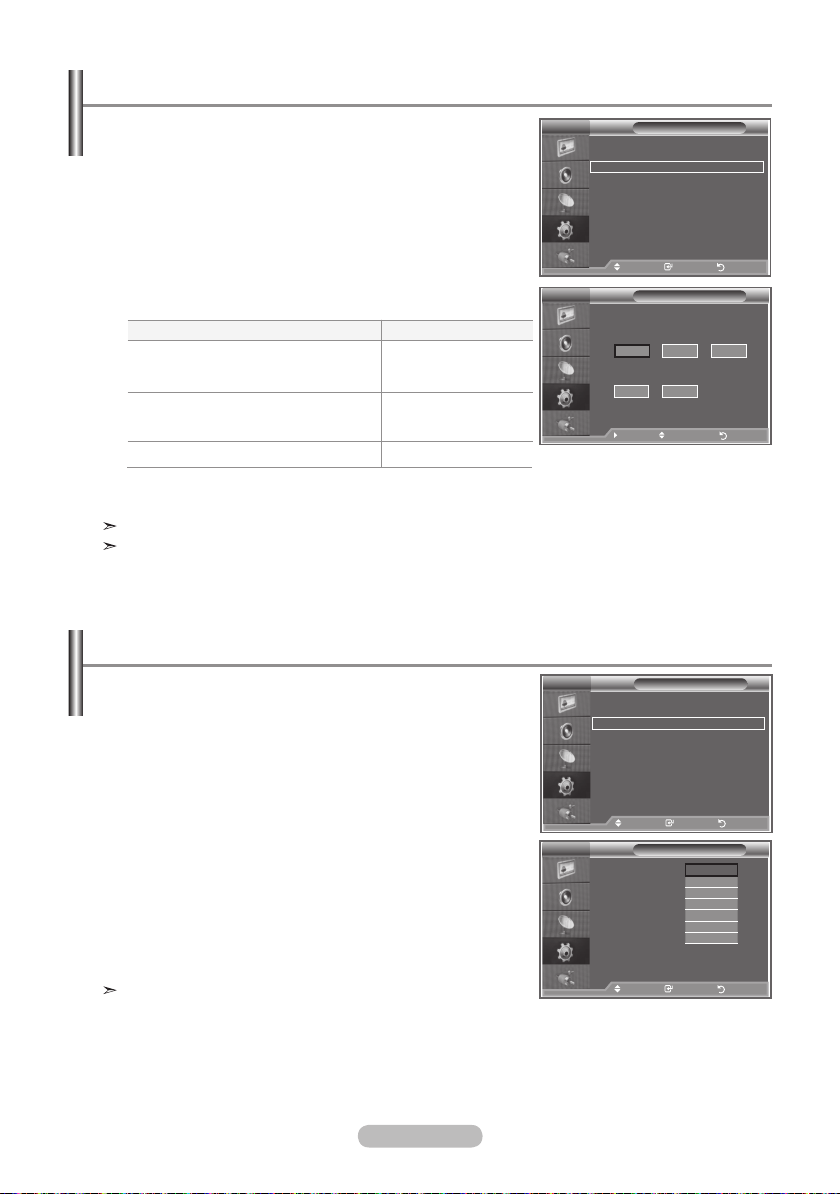
Setting and Displaying the Current Time
TV
Setup
Plug & Play
Language : English
Time
Game Mode : Off
Blue Screen : Off
Melody : Off
PC
Home Theatre PC
: Off
Light Effect :
Watching Mode On
sMore
Move Enter Return
You can set the TV’s clock so that the current time is
displayed when you press the INFO button. You must also
set the time if you wish to use the automatic On/Off timers.
1. Press the
MENU button to display the menu.
Press the ▲ or ▼ button to select "Setup", then press the
ENTER/OK button.
2. Press the ▲ or ▼ button to select "Time", then press the
TV
Plug & Play
Language : English
Time
Game Mode : Off
Blue Screen : Off
Melody : Off
PC
Home Theatre PC
Light Effect :
sMore
ENTER/OK button.
3. Press the ENTER/OK
4.
To...
Move to "Year" ,"Month"
"Day","Hour" or "Minute"
Set the "Year" ,"Month"
"Day","Hour" or "Minute"
button to select "Clock Set".
Press the...
◄ or ► button.
▲ or ▼ button.
TV
Press the ENTER/OK button.
5. Press the
EXIT button to exit.
If you disconnect the power cord, you have to set the clock again.
You can also set hour and minute by pressing the number buttons on the remote control.
Setting the Sleep Timer
You can select a time period of between 30 and 180 minutes
after which the television automatically switches to standby
mode.
1. Press the
MENU button to display the menu.
Press the ▲ or ▼ button to select "Setup", then press the
ENTER/OK button.
2. Press the ▲ or ▼ button to select "Time", then press the
ENTER/OK button.
3. Press the ▲ or ▼ button to select "Sleep Timer", then press
the ENTER/OK
button.
4. Press the ▲ or ▼ button until the desired time
appears (Off, 30, 60, 90, 120, 150, 180).
Press the ENTER/OK button.
5. Press the
EXIT button to exit.
The TV automatically switches to standby mode when the
timer reaches 0.
T
TV
Clock Set :
Sleep Timer :
Timer1 :
Timer2 :
Timer3
Setup
: Off
Watching Mode On
Move Enter Return
Clock Set
Month
Day
01
Minute
00
Time
Year
2007
Off
30
60
90
120
150
180
p
01
q
Hour
00
Move Adjust Return
Move Enter Return
English - 27
Page 30
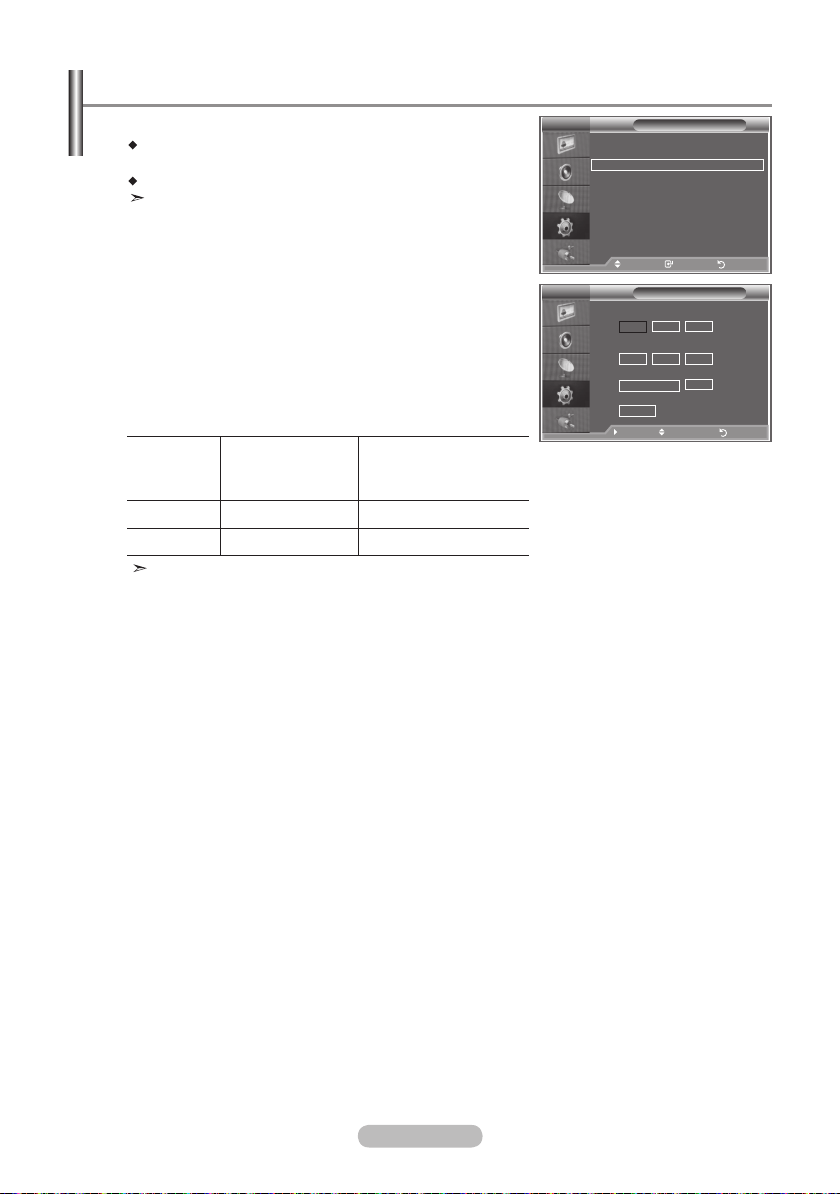
Switching the Television On and Off Automatically
You can set the On/Off timers so that the set will:
Switch on automatically and turn to the channel of
your choice at the time you select.
Switch off automatically at the time you select.
The first step is to set the television’s clock.
1. Press the MENU button to display the menu.
Press the ▲ or ▼ buttons to select "Setup", then press the
ENTER/OK button.
Press the ▲ or ▼ buttons to select "Time", then press the
ENTER/OK button.
Press the ▲ or ▼ buttons to select "Timer 1,Timer 2,Timer 3 ",
2.
then press the ENTER/OK button.
Press the ▲ or ▼ buttons to adjust “On Timer”,
3.
then press the ► button to move to the next step.
Set other items using the same method as above.
Repeat Select a Once,
Press the ▲or▼ button
Everyday, Mon-Fri,
Mon-Sat, Sat-Sun
Volume Adjust a 0~100 Press the ▲or▼ button
Programme Adjust a 00~99 Press the ▲or▼ button
When finished, press the RETURN button to return.
• The current time will appear every time you press the
INFO button.
• You can set the hour, minute directly by
pressing the number buttons on the remote control.
Press the
EXIT button to exit.
TV
Plug & Play
Language : English
Time
Game Mode : Off
Blue Screen : Off
Melody : Off
PC
Home Theatre PC
Light Effect :
sMore
Move Enter Return
TV
On Time
▲
12
▼
Off Time
:
00 00 No
Repeat
Once
Programme
01
Move Adjust Return
Setup
: Off
Watching Mode On
Timer1
00:No
Volume
10
English - 28
Page 31
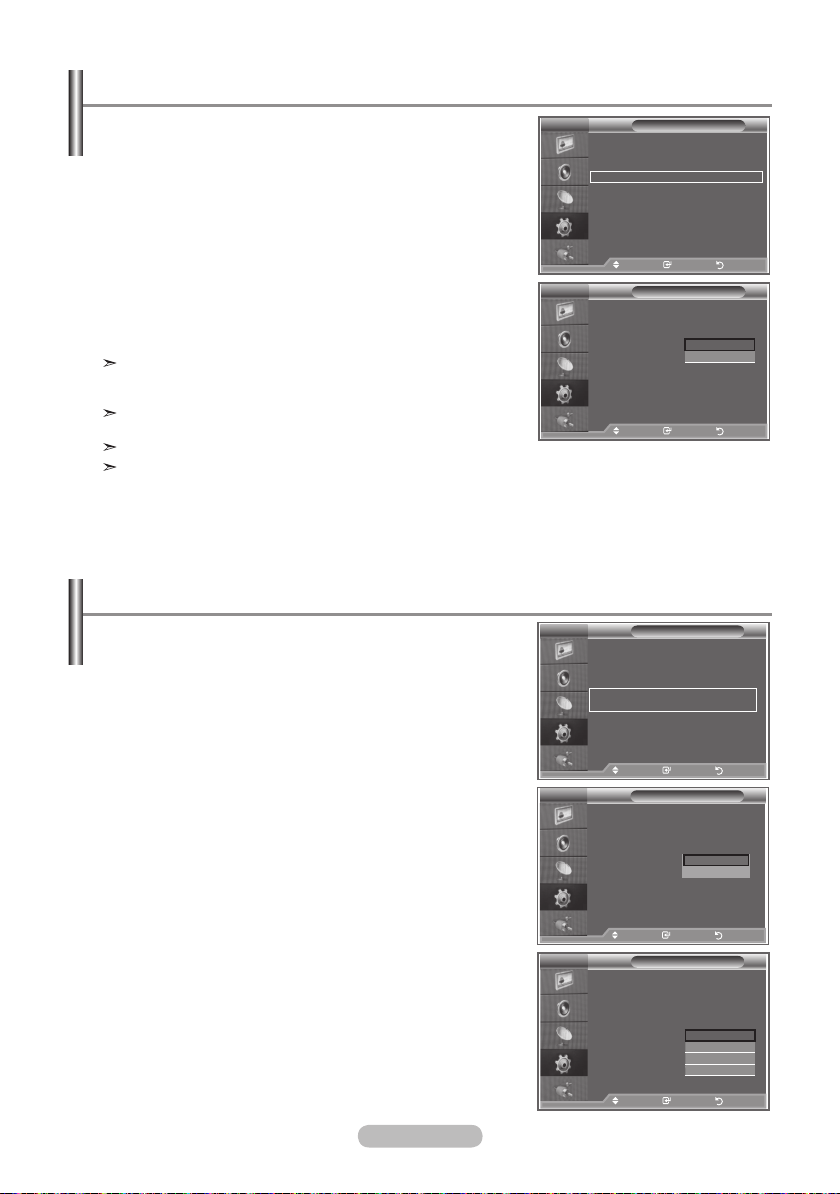
Using Game Mode
When connecting to a game console such as PlayStationTM
or XboxTM, you can enjoy a more realistic gaming experience
by selecting game menu.
1. Press the
MENU button to display the menu.
Press the ▲ or ▼ button to select "Setup", then press the
ENTER/OK button.
2. Press the ▲ or ▼ button to select "Game Mode", then press
the ENTER/OK
button.
3. Press the ▲ or ▼ button to select "On" or "Off". Press the
ENTER/OK button.
4. Press the
EXIT button to exit.
To disconnect the game console and connect another exter
nal device, cancel game mode
in the Setup menu.
If you display the TV menu in Game mode, the screen
TV
Plug & Play
Language : English
Time
Game Mode : Off
Blue Screen : Off
Melody : Off
PC
Home Theatre PC
Light Effect :
sMore
TV
Plug & Play
Language : English
Time
Game Mode : Off
Blue Screen : Off
Melody : Off
PC
Home Theatre PC
Light Effect :
sMore
shakes slightly.
Game Mode is not available in TV mode.
If Game Mode is On:
• Picture Mode changed to standard and Sound Mode are automatically changed to Custom and
users cannot change the mode.
• Sound Mode in the Sound menu is deactivated. Adjust the sound using the equalizer.
• The Reset Sound function is activated. Selecting the Reset function after setting the equalizer
resets the equalizer setting to the factory defaults.
Setup
: Off
Move Enter Return
Setup
: Off
Move Enter Return
Setting the Blue Screen Mode / Selecting the Melody
Blue Screen:
If no signal is being received or the signal is very weak, a
blue screen automatically replaces the noisy picture
background. If you wish to continue viewing the poor picture,
you must set the "Blue Screen" mode to "Off".
Melody:
You can hear melody sound when the television is powered
on or off.
1. Press the
MENU button to display the menu.
Press the ▲ or ▼ button to select "Setup", then press the
ENTER/OK button.
2. Press the ▲ or ▼ button to select "Blue Screen" or "Melody".
Press the ENTER/OK button.
3. When you are satisfied with your setting, press the
ENTER/OK button.
Blue Screen: Off/On
Melody: Off/Low/Medium/High
4. Press the
EXIT button to exit.
TV
Plug & Play
Language : English
Time
Game Mode : Off
Blue Screen : Off
Melody : Off
PC
Home Theatre PC
Light Effect :
sMore
TV
Plug & Play
Language : English
Time
Game Mode : Off
Blue Screen : Off
Melody : Off
PC
Home Theatre PC
Light Effect :
sMore
TV
Plug & Play
Language : English
Time
Game Mode : Off
Blue Screen : Off
Melody : Off
PC
Home Theatre PC
Light Effect :
sMore
Setup
: Off
Watching Mode On
Move Enter Return
Setup
: Off
Watching Mode On
Move Enter Return
Setup
: Off
Move Enter Return
Watching Mode On
Off
On
Watching Mode On
Off
On
Off
Low
Medium
High
Watching Mode On
English - 29
Page 32
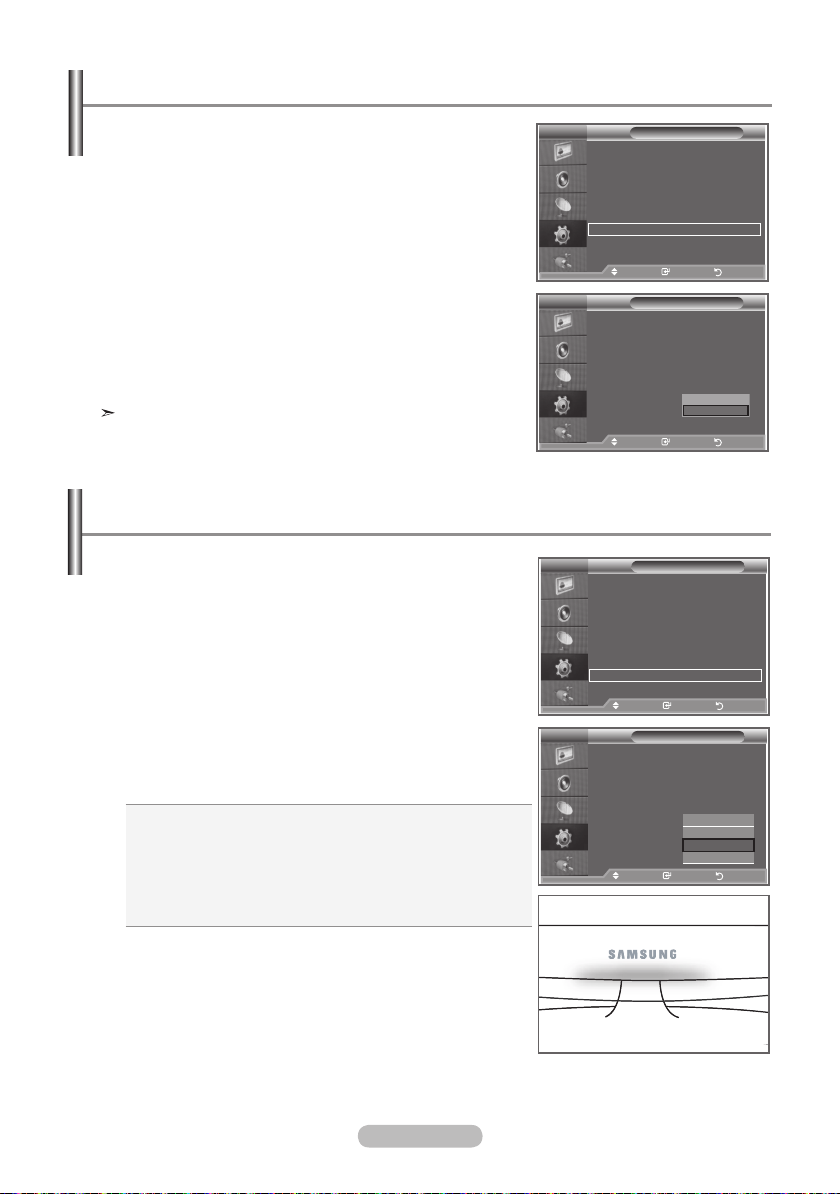
Setting the Home Theatre PC
You can view higher quality pictures by configuring the
screen settings in PC Mode.
If you set the Home Theatre PC function to On, you can
configure the Detailed Settings
(when Picture Mode is set to Movie) as in PC Mode.
1. Press the
MENU button to display the menu.
Press the ▲ or ▼ button to select "Setup", then press the
ENTER/OK button.
2. Press the ▲ or ▼ button to select "Home Theatre PC".
Press the ENTER/OK button.
3. Press the ▲ or ▼ button to select "On" or "Off".
Press the ENTER/OK button.
4. Press the
EXIT button to exit.
This function is available only in PC mode.
Setting the Light Effect
You can turn on/off the blue LED on the front of TV according to the situation. Use it for saving power or when the LED
dazzles your eyes.
1.
Press the MENU button to display the menu.
Press the
then press the
2.
Press the
the
3.
Press the
“Watching Mode On” or “Off”, then press the
ENTER/OK
• Off: LED(Blue) will not be on
• Standby Mode On: Turns the LED (blue) on in
standby mode
• Watching Mode On: Turns the LED (blue) on while
watching TV.
• On: LED(Blue) will always lights.
▲ or ▼
▲ or ▼
ENTER/OK
▲ or ▼
button.
buttons to select "Setup",
ENTER/OK
button.
buttons to select “Light Effect”, then press
button.
button to select “On”, “Standby Mode On”,
TV
Plug & Play
Language : English
Time
Game Mode : Off
Blue Screen : Off
Melody : Off
PC
Home Theatre PC
Light Effect :
sMore
TV
Plug & Play
Language : English
Time
Game Mode : Off
Blue Screen : Off
Melody : Off
PC
Home Theatre PC
Light Effect : Off
s
TV
Plug & Play
Language : English
Time
Game Mode : Off
Blue Screen : Off
Melody : Off
PC
Home Theatre PC
Light Effect :
sMore
TV
Plug & Play
Language : English
Time
Game Mode : Off
Blue Screen : Off
Melody : Off
PC
Home Theatre PC
Light Effect : Off
s
: Off
Move Enter Return
: Off
More
Move Enter Return
: Off
Move Enter Returnd(
: Off
More
Move Enter Return
Setup
Watching Mode On
Setup
Off
On
Setup
Watching Mode On
Setup
Off
Standby Mode On
Watching Mode On
On
4. Press the EXIT button to exit.
English - 30
Page 33
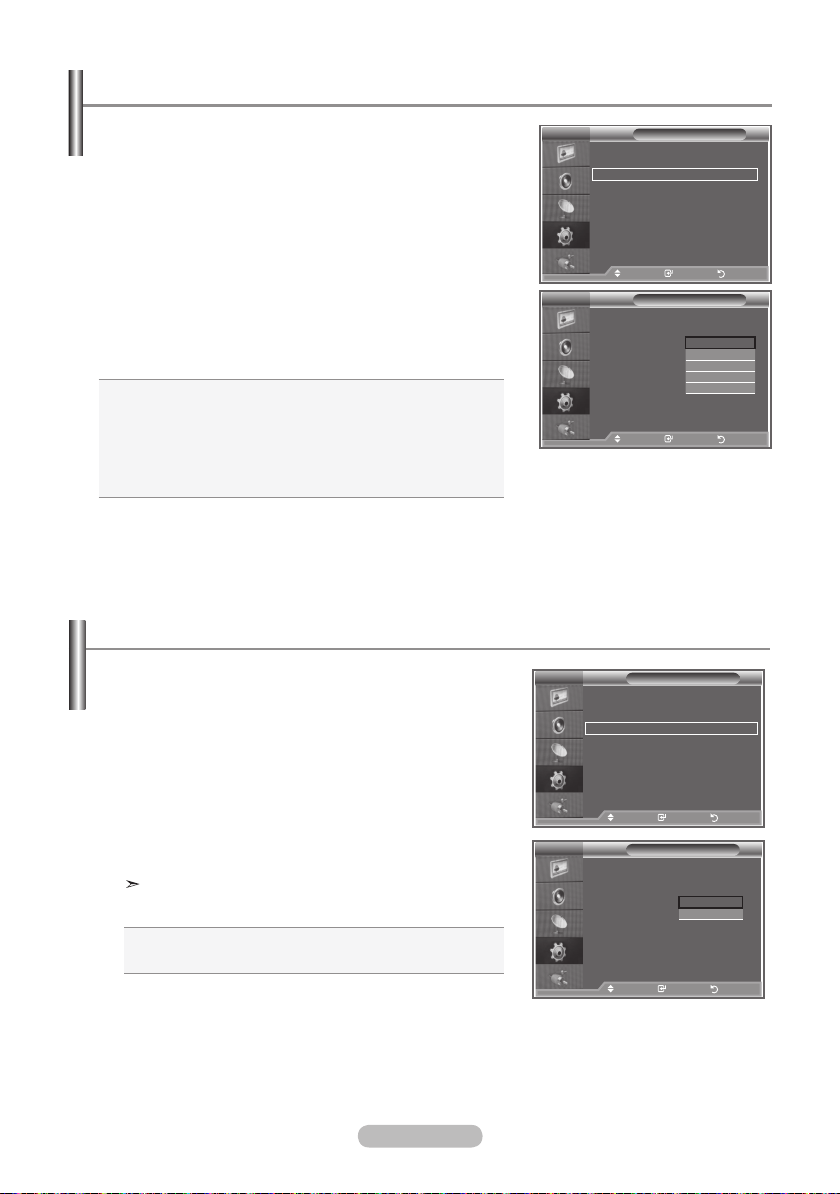
Using the Energy Saving Feature
This function adjusts the brightness of the TV so as to reduce
power consumption. When you watching TV at night, set the
"Energy Saving " mode option to "High" so as to reduce the
dazzling of your eyes as well as the power consumption.
1. Press the
MENU button to display the on-screen menu.
Press the ▲ or ▼ button to select "Setup", then press the
ENTER/OK button.
2. Press the ▲ or ▼ button to select "Energy Saving", then
press the ENTER/OK
button.
3. Select the required option (Off, Low, Medium, High, Auto) by
pressing the ▲ or ▼ button. Press the ENTER/OK
4. Press the
EXIT button to exit.
button.
• Off: Turns off the energy saving function.
• Low: Sets the monitor to low energy saving mode.
• Medium: Sets the monitor to medium energy saving mode.
• High: Sets the monitor to high energy saving mode.
• Auto: Automatically adjusts the brightness of the TV
screen in accord with the scenes.
HDMI Black Level
You can directly select the black level on the screen to adjust
the screen depth.
1. Press the MENU button to display the menu.
Press the ▲ or ▼ buttons to select “Setup”, then press the
ENTER/OK button.
Press the ▲ or ▼ buttons to select "HDMI Black Level", then
2.
press the ENTER/OK button.
3. Press the ▲ or ▼ buttons to select “Normal” or “Low”, then
press the ENTER/OK
Press the EXIT button to exit.
This function is active only when the external input
connects to HDMI and the RGB signals are input.
• Normal: The screen gets brighter.
• Low: The screen gets darker.
4. Press the EXIT button to exit.
button.
TV
rMore
Wall-Mount Adjustment
Energy Saving : Off
HDMI Black level : Low
PIP
Move Enter Return
TV
rMore
Wall-Mount Adjustment
Energy Saving : Off
HDMI Black level : Low
PIP
Move Enter Return
TV
rMore
Wall-Mount Adjustment
Energy Saving : Off
HDMI Black level : Normal
PIP
Move Enter Return
TV
rMore
Wall-Mount Adjustment
Energy Saving : Off
HDMI Black level : Low
PIP
Move Enter Return
Setup
Setup
Setup
Setup
Normal
Normal
Low
Off
Low
Medium
High
Auto
Low
English - 31
Page 34
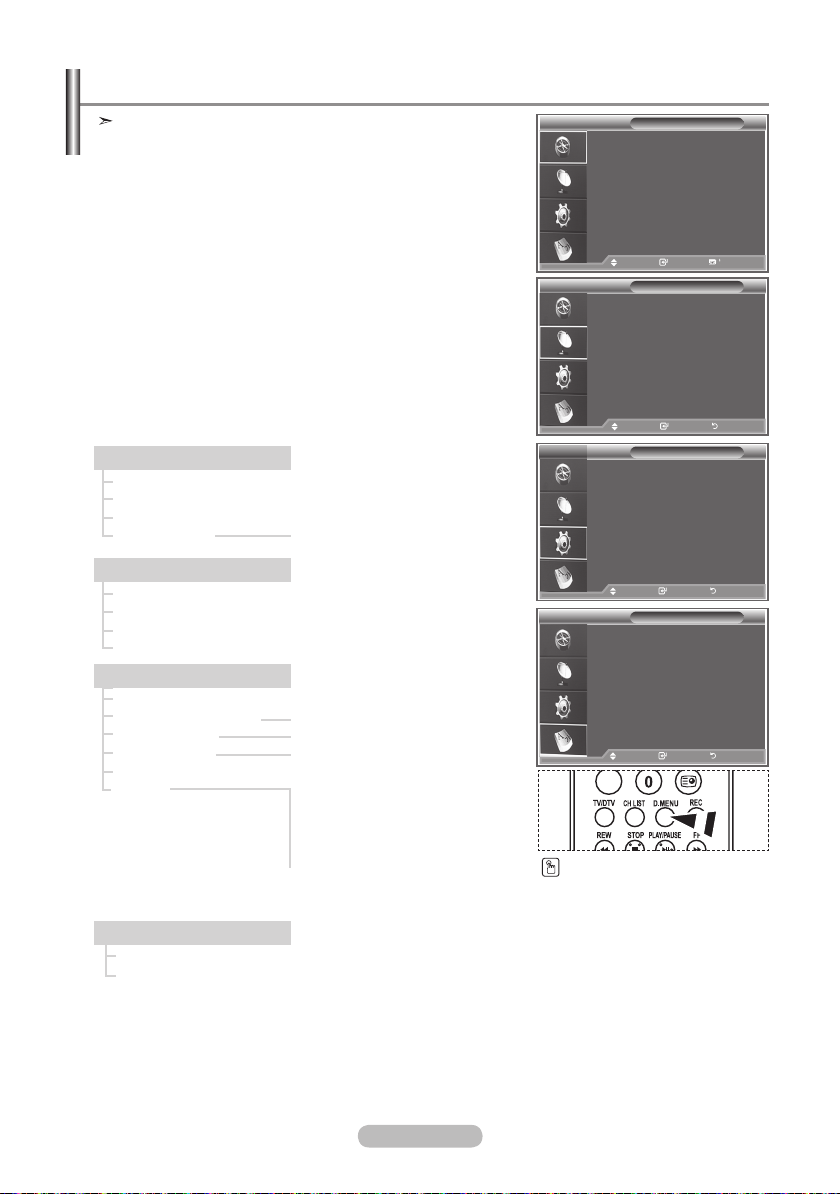
Previewing the DTV Menu System
The company does not guarantee the normal
operation of the DTV menu for countries other
than the 8 supported countries
(England, Germany, France, Sweden, Finland,
Italy, Spain, Austria) because only these country
standards are supported. In addition, when
the country of the broadcast stream differs from
the country selected by the current user, the
string appearing in the channel banner, Info,
Guide, Channel List, etc. may not be displayed
properly.
Available in DTV mode. Preset to the DTV mode
by using the TV/DTV button on your remote
control. To help you navigate around the on screen menu system and adjust the various
settings available, refer to the following illustration.
Press the D.MENU button.
Guide
Now & Next Guide
Full Guide
Scheduled List
Default Guide
Now/Next, Full Guide
Channel
Auto Store
Manual Store
Edit Favourite Channels
Channel List
Setup
Time Zone
Menu Transparency
Parental Lock
Subtitle
Audio Format
System
High, Medium, Low, Opaque
Enter PIN
Off, On
Product Information
Signal Information
Software Upgrade
Reset
Language
Subtitle Language
Audio Language
Mode : Custom
Equalizer
Now & Next Guide
SRS TSXT : Off
Full Guide
Auto Volume : Off
Scheduled List
Internal Mute : Off
Default Guide : Full Guide
Reset
Auto Store
Manual Store
Edit Favourite Channels
Channel List
Time Zone
Menu Transparency
Parental Lock
Subtitle : On
Audio Format : MPEG
▼
Subtitle Language : English
Audio Language
Guide
Move Enter Return
Move Enter Exit
Channel
Move Enter Return
Move Enter Exit
Setup
: Medium
Move Enter Return
Move Enter Exit
Language
Move Enter Return
Move Enter Exit
You can select these options
by simply pressing the
D.MENU button on the
remote control.
English - 32
Page 35
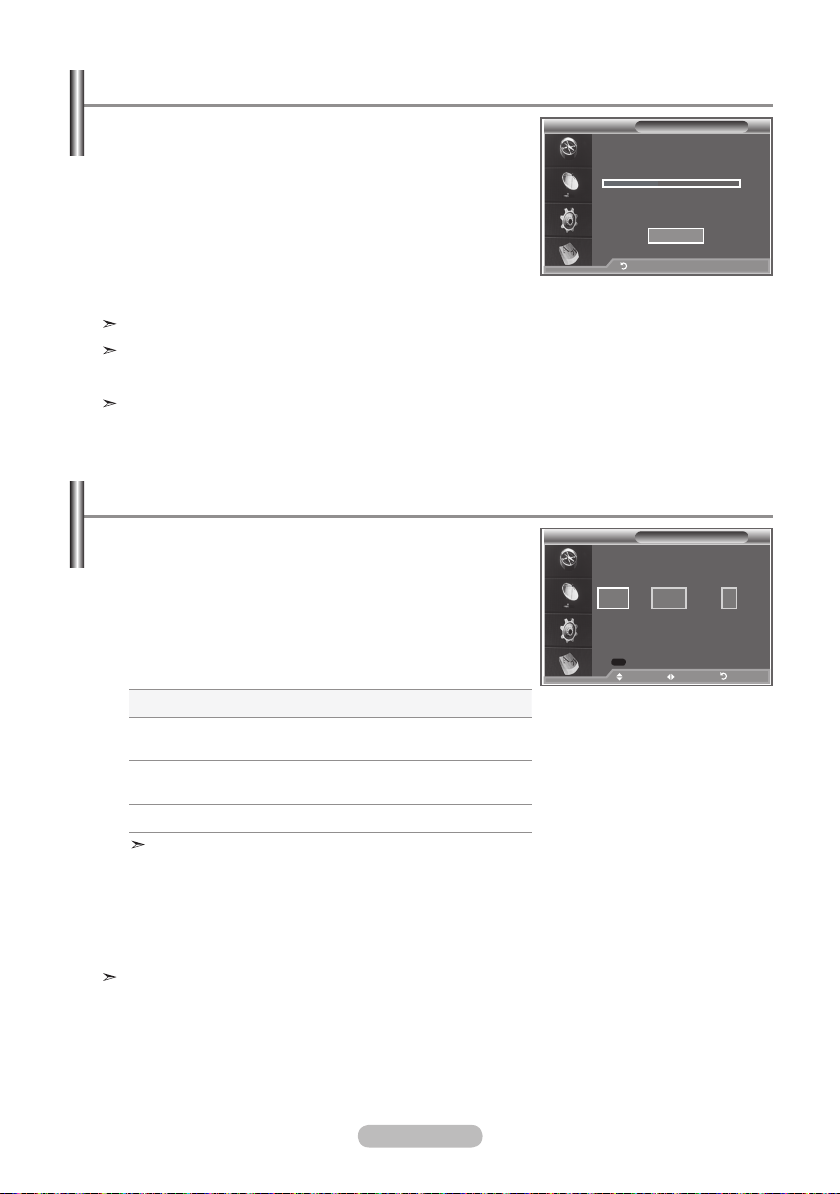
Updating the Channel List Automatically
You can update the channel list when the broadcaster
adds new Services or if you move the TV to a new
location.
1. Press the D.MENU button to display the DTV menu.
2. Press the
▲ or ▼
button to select "Channel", then press
the ENTER/OK button.
Press the ENTER/OK button again, to select "Auto Store".
3.
4.
When it has finished, the number of scanned services will
be displayed.
The existing favourite channel list will not be deleted when the channel list is updated.
To stop the scan before it has finished, press the ENTER/OK button with "STOP" selected.
5. Press the
If the signal status is poor, the "No Service found! Check the aerial connection" message is
EXIT button to exit.
displayed.
Mode : Custom
Equalizer
SRS TSXT : Off
Auto Volume : Off
Scanning for digital services...
Internal Mute : Off
Reset
Services found: 24 Channel: 38
Auto Store
Stop
Move Enter Return
Return
Updating the Channel List Manually
You can specify the channel for a fast channel search.
1. Press the D.MENU button to display the DTV menu.
▲ or ▼
2. Press the
button to select "Channel", then press
the ENTER/OK button.
3.
Press the
▲ or ▼
button to select "Manual Store", then
press the ENTER/OK button.
4.
To... Then...
Move to "Channel",
◄ or ► button
"Frequency", or "Bandwidth"
Set the "Channel", or
▲ or ▼ button
"Bandwidth"
Set the "Frequency" Numeric button (0~9)
• Channel: Channel "7-12" to "21-69" in sequence are displayed in Australia
• Frequency:
• Bandwidth:
When it has finished, the number of scanned services will be displayed.
5.
6. Press the
You can input by pressing the button on the remote control.
The frequency available in the Channel group is displayed.
The available bandwidths are 7MHz and 8MHz.
EXIT button to exit.
Channel
Manual Store
Frequency Bandwidth
▲
65
▼
Search
Adjust Move Return
KHz MHz
7474000
35%
English - 33
Page 36
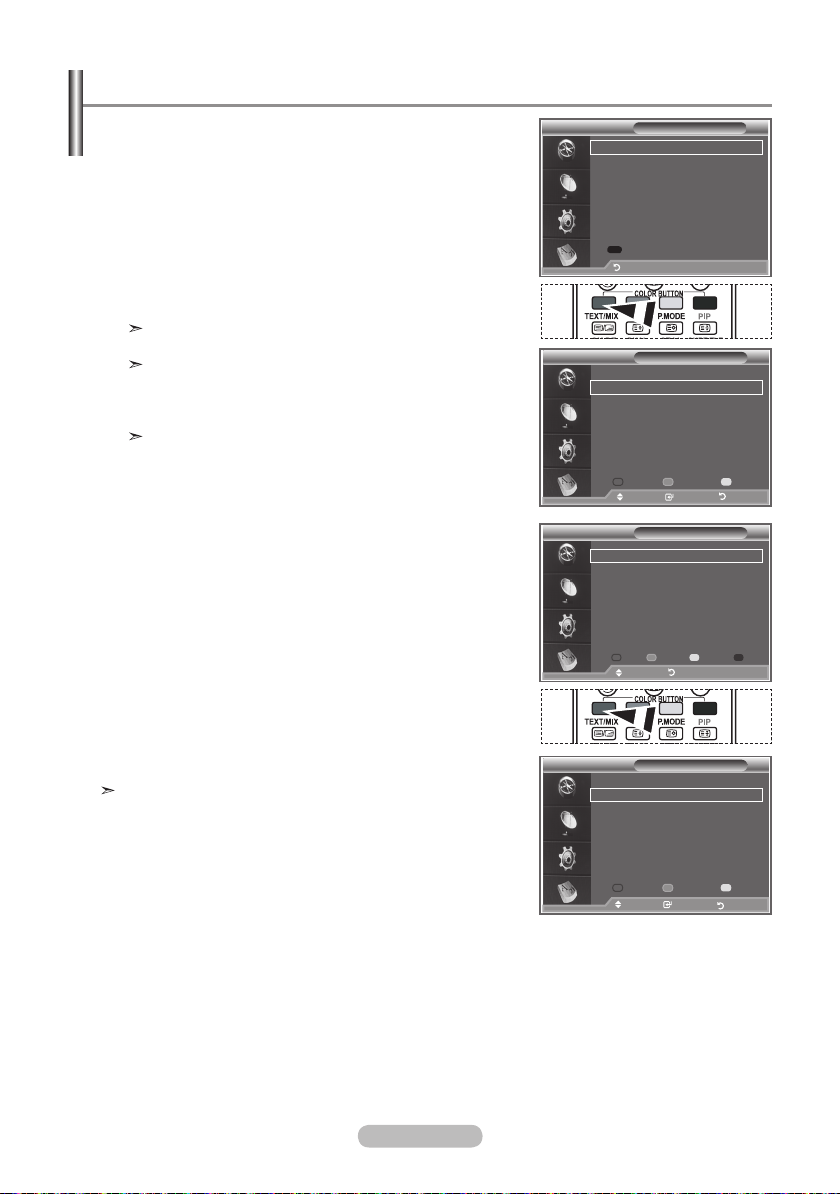
Editing Your Favourite Channels
You can edit your favourite channels using the four colour
buttons.
1.
Press the D.MENU button to display the DTV menu.
2. Press the ▲ or ▼ button to select "Channel", then press the
ENTER/OK button.
3.
Press the ▲ or ▼ button to select "Edit Favourite Channels",
then press the ENTER/OK button.
4.
Press the red button to display all currently stored channels.
5.
Press the ▲ or ▼ button to select a channel you want.
Press the ENTER/OK button.
channel will be added to the favourite channel list.
•
• Preview: Displays (a) currently selected channel(s).
6.
Add
You can use this function when one or more favourite
channels have been selected.
1.
2. Press the ▲ or ▼ button to select "Channel", then press the
ENTER/OK button.
3.
then press the ENTER/OK button.
4.
To add more channels, refer to the step 5 on the previous
description.
5.
button.
red button.
• To remove all channels, press the green button.
• Preview : Displays (a) currently selected channel(s).
• Press the CH LIST button to display the favourite channel
manager.
" icon is shown next to the selected channel and the
A "
To undo, press the ENTER/OK button again.
•
Select All
•
Select None
The Favorite Channels settings have been completed.
Press the EXIT button to exit.
: Select all channels currently displayed.
: Deselect all selected channels.
Press the D.MENU button to display the DTV menu.
Press the ▲ or ▼ button to select "Edit Favourite Channels",
Press the red button in the "Edit Favourite Channels" menu.
If you want to check the channel to be stored, press Return
Press the EXIT button to exit.
• To add all channels to the favourite channel list, press the
(no Channels)
2 BBC TWO
5 Five
7 BBC THREE
15 abc1
16 QVC
2 BBC TWO
7 BBC THREE
15 abc1
TV
2 BBC TWO
5 Five
7 BBC THREE
15 abc1
16 QVC
Edit Favourite Channels
Move Enter Return
Add Channels
Return
Edit Favourite Channels
Move Enter Return
Select All Select None Preview
Move Select Return
Edit Favourite Channels
★
★
★
Add Move Preview Delete
Move Return
Edit Favourite Channels
★
★
★
Move Enter Return
Select All Select None Preview
Move Select Return
English - 34
Page 37
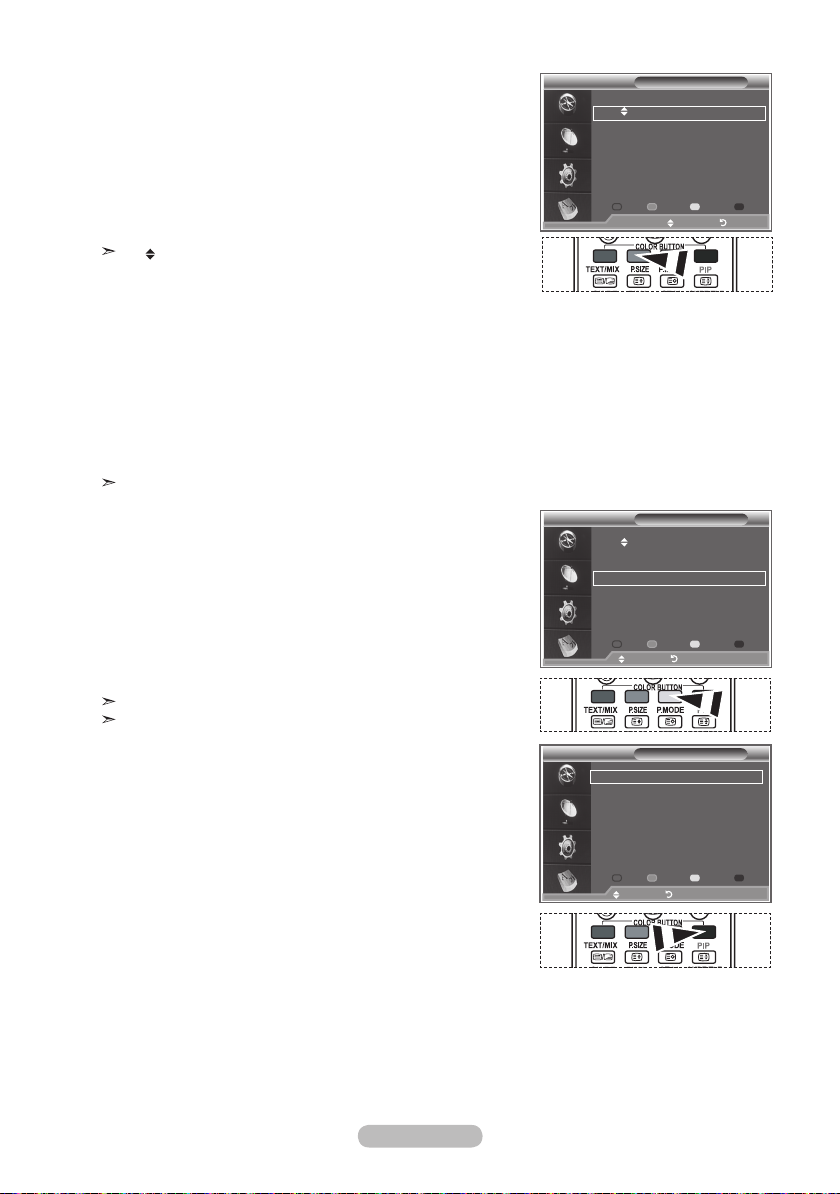
Move
1.
Press the D.MENU button to display the DTV menu.
2. Press the ▲ or ▼ button to select "Channel", then press the
ENTER/OK button.
3.
Press the ▲ or ▼ button to select "Edit Favourite Channels",
then press the ENTER/OK button.
4.
Select the required channel using the or button.
5.
Press the green button.
A " " icon is displayed on the left side of the channel
name.
6.
Press the ▲ or ▼ button to select the channel that you want to
move, and press the green or ENTER/OK button.
7. Press the EXIT button to exit.
Preview
1.
In the "Edit Favourite Channels" menu,
select the channel to be previewed by pressing the ▲ or ▼
button.
2.
Press the yellow button.
The selected channel is displayed on the screen.
Delete
1. In the "Edit Favourite Channels" menu, select the channel to
be deleted from the favourite channels list by pressing the
▲ or ▼ button.
2.
Press the blue button.
The selected channel and number will be deleted.
To add a deleted channel back into the favourite channel
list, see "Add" on page 34.
Edit Favourite Channels
2
BBC TWO ★
7 BBC THREE
15 abc1
Add Move Preview Delete
Move Return
Edit Favourite Channels
BBC TWO ★
2
7 BBC THREE
15 abc1
Add Move Preview Delete
Move Return
Edit Favourite Channels
2 BBC TWO
7 BBC THREE
★
★
★
★
★
★
English - 35
Add Move Preview Delete
Move Return
Page 38
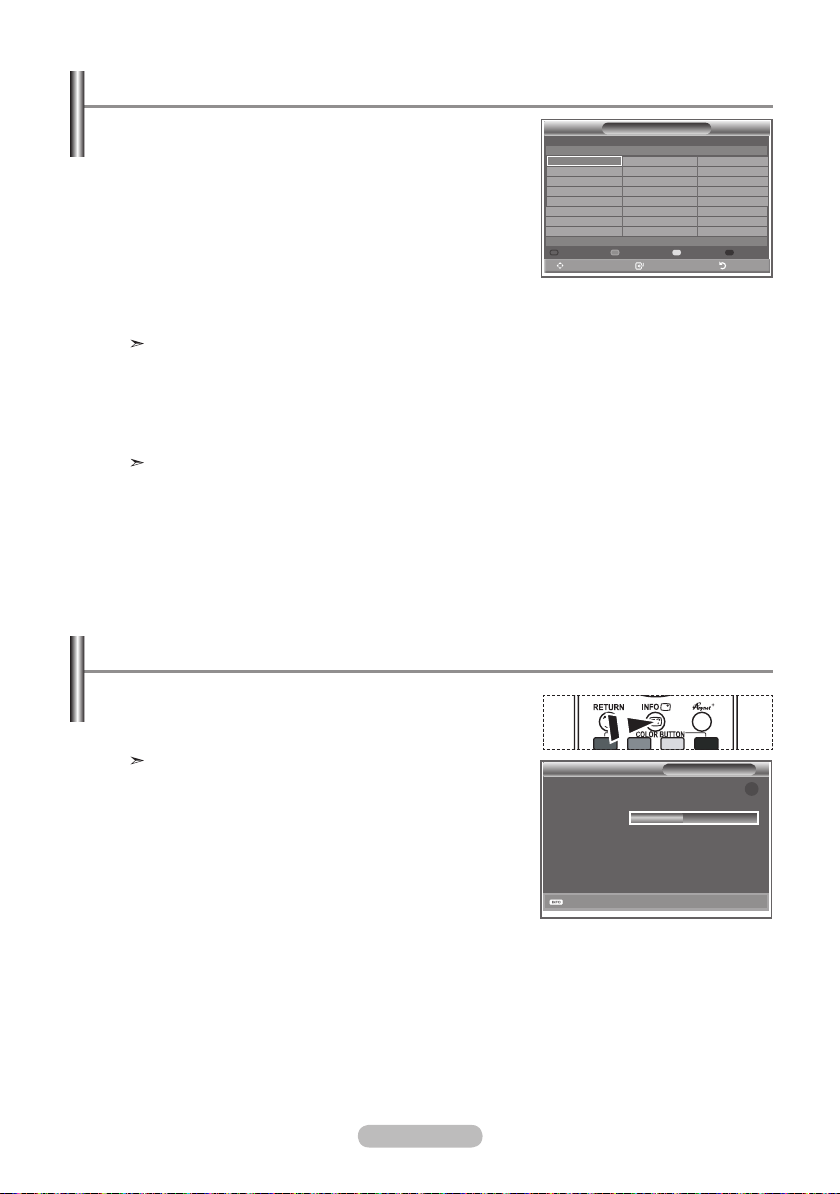
Selecting Channel List
You can exclude the channels you have chosen from the
channels you have scanned.When you scan through the
stored channels, those you have chosen to skip are not
displayed. All channels that you do not specifically choose to
skip are displayed during scanning.
1.
Press the D.MENU button to display the DTV menu.
2.
Press the ▲ or ▼ button to select "Channel", then press the
ENTER/OK button.
3.
Press the ▲ or ▼ button to select "Channel List".
Test Card M' v2.0
1 Test Card M'
3 Vida003b
4 Vida004b
5 vida005b
6 vida006b
15 Ch 15
16 QVC
17 UKTV Gold
Previous Page NextPage Favourites TV
Move Watch Return
Press the ENTER/OK button.
4.
Press the yellow button to toggle between your favourite channels and all channels.
Your favourite channels are only displayed if they were previously set in the "Editing Your
Favourite Channels" menu.
5.
Press the red or green button to display the previous or next channel List page.
6. Press the blue button to display TV, Radio, Other and All.
7.
Press the ▲ or ▼ button to select a channel to be tuned.
Press the ENTER/OK button.
The channel number, name and an icon are displayed in the top left corner while changing the
channel. The channel number and name are displayed if the channel is one of the all channels,
and a icon if the channel is one of the favourite channels.
8.
Press the EXIT or CH LIST button to exit from the channel List.
Channel List
23 bid-up.tv
25 TCM
26 UKTV Style
27 Discovery
28 DiscoveryH&L
15 Cartoon Nwk
33 Boomerang
55 Ttext Holidays
All Channels-All
60 Television X
70 BBC Radio 1
72 BBC Radio 2
73 BBC Radio 3
74 BBC Radio 4
84 heat
91 MOJO
800 ARD-MHP-Data
More
Displaying Programme Information
1/2
While viewing a channel, additional information about the
current programme may be displayed.
1.
While viewing a programme, press the INFO button.
The programme information is displayed.
2.
To exit from banner information, press the INFO button.
English - 36
1 AFDO,16:9
AFDO 16:9
No Block
SD
MPEG
Subtitle
English
Exit
14:30 Set 1 Sep
AII Channels
14:30~14:33
Contains video with AFD O; coded frame
is 16:9
Move Enter Return
A
Page 39
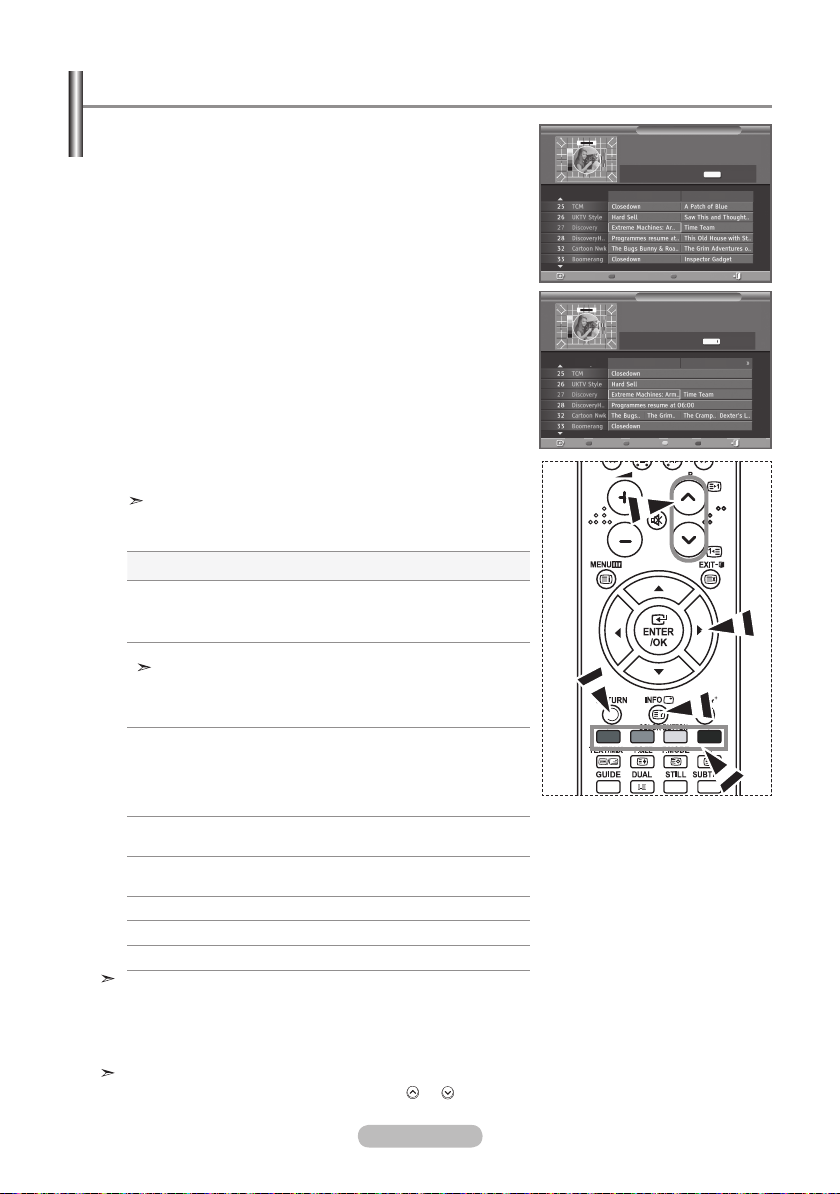
Viewing the EPG (Electronic Programme Guide) Information
The EPG (Electronic Programme Guide) information is
provided by the broadcasters. Programme entries may
appear blank or out of date as a result of the information
broadcast on a given channel. The display will dynamically
update as soon as new information becomes available.
All Channels
Now & Next Guide
27 Discovery
Extreme Machines: Armoured Cars
18:00~22:00
Now Next
13:28 Wed 16 Feb
INFO
Now & Next Guide
For the six channels indicated in the left-hand column,
displays the Current programme and the Next programme
information.
Full Guide
Displays the programme information as time ordered One
hour segments. Two hours of programme information is
displayed which may be scrolled forwards or backwards in
Watch ExitFull Guide Favourites
Full Guide
27 Discovery
Extreme Machines: Armoured Cars
18:00~22:00
13:00 14:00Today
13:28 Wed 16 Feb
INFO
time.
1.
Press the D.MENU button to display the DTV menu.
2.
Press the ENTER/OK button, to select "Guide".
3.
Press the ▲ or ▼ button to select "Now & Next Guide" or
Watch ExitNow/Next Favourites
-24Hours +24Hours
"Full Guide".
Press the ENTER/OK button.
You can also display the guide menu simply by pressing
the GUIDE button.
4.
To... Then...
• Select a programme by pressing
Watch a programme in the EPG list
If the next program is selected, it is scheduled with the clock icon
displayed. If the ENTER button is pressed again, the scheduling is
canceled with the clock icon gone. For details about scheduling
programmes, refer to the next page.
View programme information
Toggle between the "Now & Next
Guide" or "Full Guide"
Display the "Favourites" and the "All
Channels" list
Scrolls backwards quickly (24 hours). • Press the yellow button repeatedly.
Scrolls forward quickly (24 hours). • Press the blue button repeatedly.
Exit the guide • Press the EXIT button.
the ▲, ▼, ◄, ► button.
• Press the ENTER button.
• Select a programme of your choice by
pressing the ▲, ▼, ◄, ► button.
• Press the INFO
programme of your choice is
highlighted.
• Press the red button repeatedly.
• Press the green button repeatedly.
button when the
The programme title is on the upper part of the screen center. Please click on INFO button for
the detailed information. Channel Number, Running Time, Status Bar, Parental Level, Video Quality
Information(HD/SD), Sound Modes, Subtitle or Teletext, Languages of Subtitle or Teletext, and
brief summary of the highlighted programme are included on the detailed information. "..." will be
appeared if the summary is long.
Six channels are displayed. To scroll between channels, move to a channel using the ▲ or ▼
button. To display page by page, use the P or button.
English - 37
Page 40
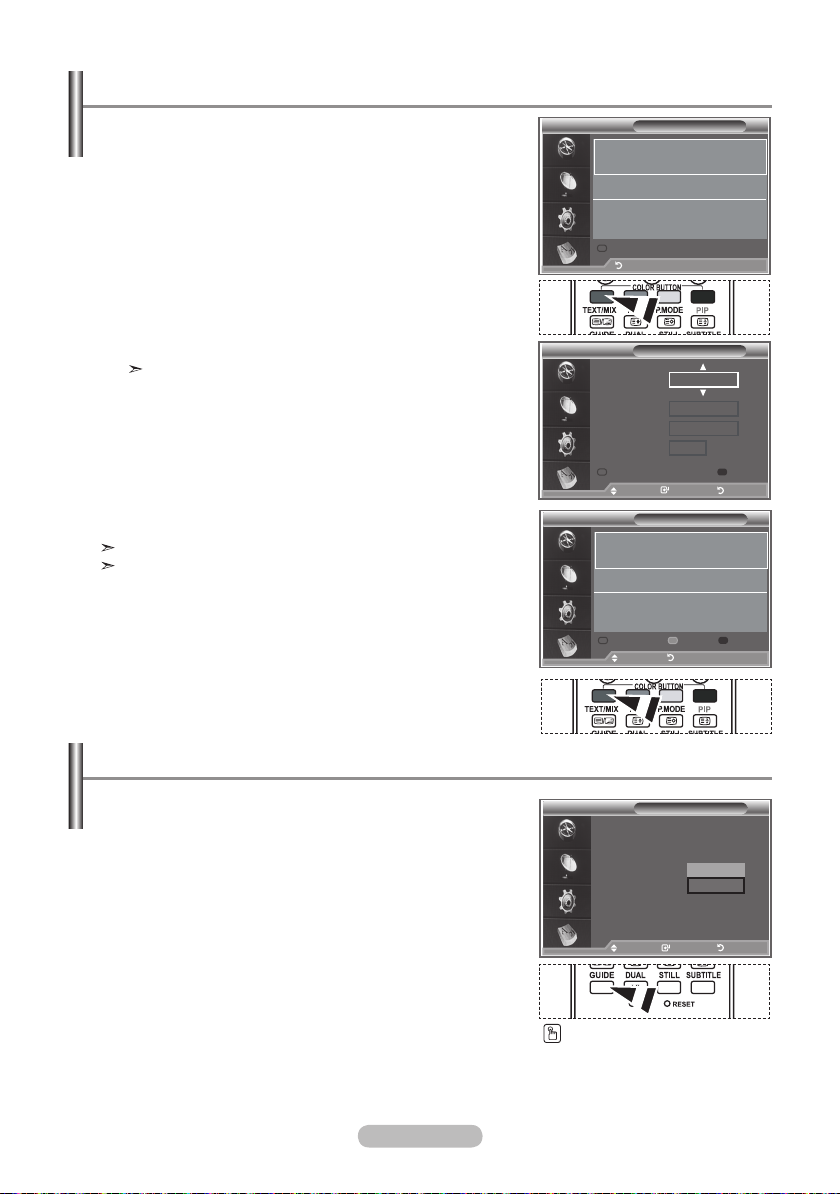
Using the Scheduled List
If you make a scheduled viewing list of programs you may
like to see, the channel will be automatically switched to the
scheduled program at the scheduled time even if you are
watching another program.
1.
Press the D.MENU button to display the DTV menu.
2.
Press the ENTER/OK button, to select "Guide".
3.
Press the ▲ or ▼ button to select "Scheduled List", then
press the ENTER/OK button.
4.
Press the red button.
The channel will be switched to the scheduled program.
5.
Press the ENTER/OK button to select an item and adjust with
the ◄ or ► button .
You can also set hour and minute by pressing the number
buttons on the remote control.
• Channel: Set the channel.
•
Time:
• Frequency: Set the frequency.
("Once", "Daily", or "Weekly")
After setting the schedule, Press the red button.
6.
7.
Press the EXIT button to exit.
The Scheduled list may be displayed in the EPG menu.
•
Save: Save the adjusted schedule.
• Cancel: Cancel the adjusted schedule.
•
Add Programme
•
Edit
•
Delete
Set the time.
•
Date:
Set Year, Month and Day.
: Add a new schedule.
: Re-adjust the selected schedule.
: Delete the selected schedule.
Scheduled List
(No programmes)
Add Programme
Return
Scheduled List
Channel
802 RaiUno
Time
15 : 20 to -- : --
Date
Tue 22 Apr 2007
Frequency
Once
Save Cancel
Adjust Move Return
Scheduled List
Tuesday 22 Apr 15:30 ~ 16:00 Once
801 RaiTre
Add Programme Edit Delete
Move Return
Setting the Default Guide
You can preset the default guide style.
1.
Press the D.MENU button to display the DTV menu.
2.
Press the ENTER/OK button, to select "Guide".
3.
Press the ▲ or ▼ button to select "Default Guide", then press
the ENTER/OK button.
4.
Select "Now/Next" or "Full Guide" using the ▲ or ▼ button,
and press the ENTER/OK button.
5.
Press the EXIT button to exit.
English - 38
Now & Next Guide
Full Guide
Scheduled List
Default Guide : Full Guide
Guide
Now/Next
Full Guide
Move Enter Return
Move Enter Return
You can select these options
by simply pressing the GUIDE
button on the remote control.
Page 41
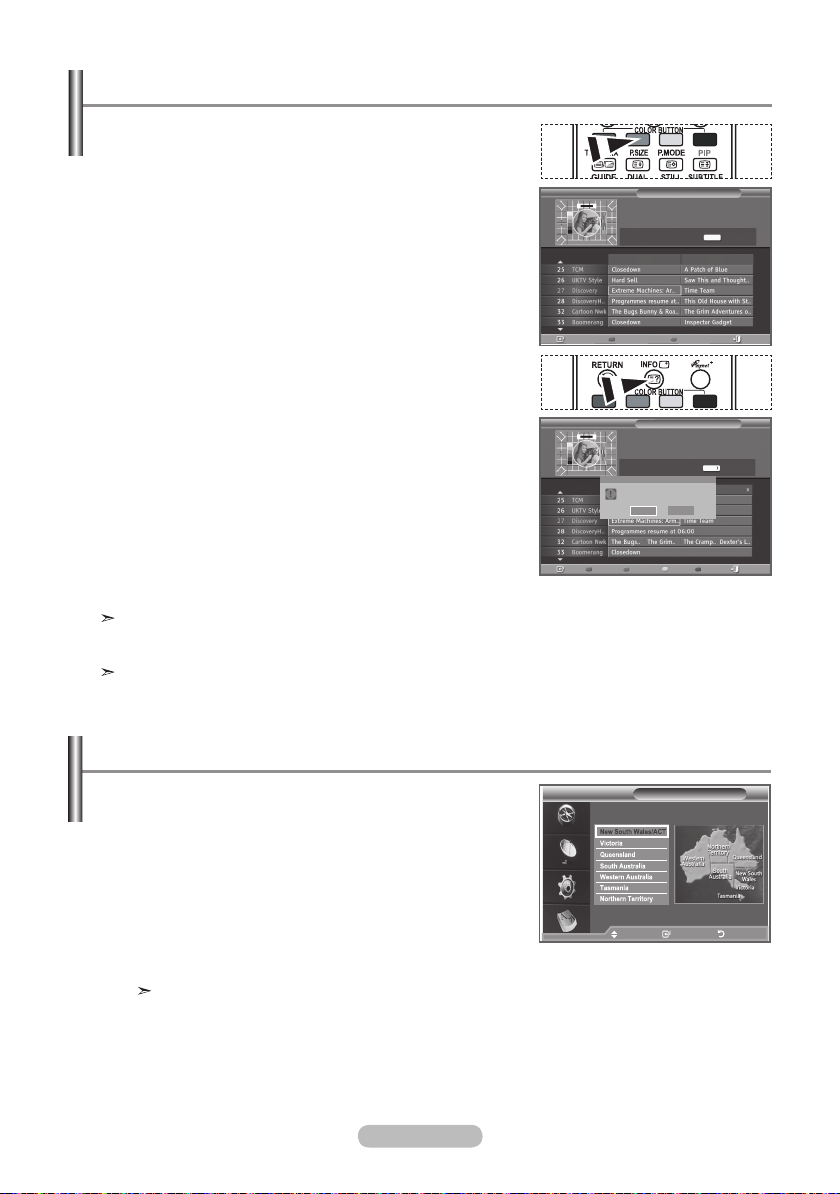
Viewing All Channels and Favourite Channels
In the EPG menu, you can display all channels or favourite
channels.
1.
Press the D.MENU button to display the DTV menu.
2.
Press the ENTER/OK button again, to select "Guide".
3. Select the your required guide ("Now & Next Guide" or "Full
Guide") by pressing the
4.
Press the ENTER/OK button.
5.
Press the green button.
▲ or ▼ button.
All the channel lists and the favorite channel lists will be
toggled.
6.
Select a programme of your choice by pressing the ▲, ▼,
◄ or ► button.
7.
Press the INFO button to display information about the
highlighted programme.
8.
When the Edit Favourite Channels list has not been set up:
•
"The favourites list is empty.
Would you like to choose your favourites now?" message is
displayed.
•
Select "Yes".
The "Edit Favourite Channels" menu is displayed.
If you select "No", all channels will remain unchanged.
• To edit the favourite channels, refer to page 34 for more
details.
Press the EXIT button to exit.
9 .
All Channels" is the list of channels that have been scanned by
"
the channel list update.
All channels are displayed in the all channel mode.
Favourites" (favourite channels) is the list of channels that has
"
been set in the "Edit Favourite Channels" menu (refer to page 34).
All Channels
27 Discovery
Extreme Machines: Armoured Cars
18:00~22:00
Watch ExitFull Guide Favourites
27 Discovery
Extreme Machines: Armoured Cars
18:00~22:00
The favourites list is empty.
Would you like to choose your
favourites now?
Watch ExitNow/Next Favourites
Now & Next Guide
Now Next
Full Guide
13:00 14:00Today
Yes No
-24Hours +24Hours
13:28 Wed 16 Feb
INFO
13:28 Wed 16 Feb
INFO
Selecting the Time Zone
Select the time zone where locate
1.
Press the D.MENU button.
2.
Press the ▲ or ▼ button to select "Setup", then press
the ENTER/OK button
3. Press the ▲ or ▼ button to select Time Zone, then press
the ENTER/OK button
4.
Select the time zone where you locate by pressing the
▲ or ▼
Press the ENTER/OK button.
- South Australia - Western Australia - Tasmania
- Northern Territory
5.
button.
The following options are available.
New South Wales/ACT - Victoria - Queensland
Press the EXIT button to exit.
English - 39
Time Zone
Move Enter Return
Adjust Enter Return
Page 42
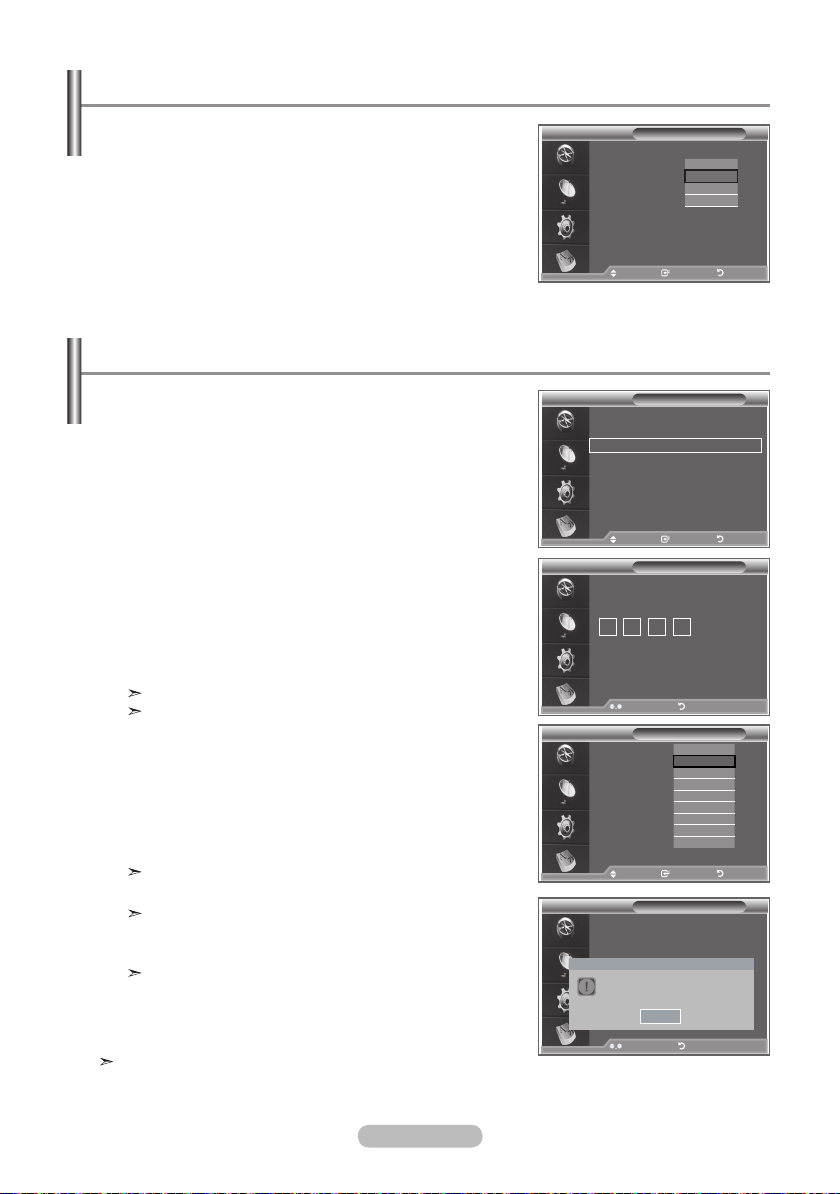
Adjusting the Menu Translucency
You can set the translucency of the menu.
1.
Press the D.MENU button to display the DTV menu.
2.
Press the ▲ or ▼ button to select "Setup", then press
the ENTER/OK button.
3.
Press the ▲ or ▼ button to select "Menu Transparency"
then press the ENTER/OK button.
4. Select the required option ("High", "Medium", "Low", or
"Opaque") by pressing the
▲ or ▼ button, and press the
ENTER/OK button to change the setting.
5.
Press the EXIT button to exit.
Setting up the Parental Lock
This feature allows you to prevent unauthorized users, such
as children, from watching unsuitable programmes by a
4-digit PIN (Personal Identification Number) code that is
defined by the user. The on-screen menu will instruct you to
assign a PIN code (you can change it later, if necessary).
1.
Press the D.MENU button to display the DTV menu.
2.
Press the or button to select "Setup", then press
the ENTER/OK button.
3.
Press the or button to select "Parental Lock.", then
press the ENTER/OK button.
4.
The "Enter PIN" is displayed.
5. Enter your current 4-digit PIN code by using the numeric
buttons (0~9).
The options available in the "Parental Lock" group are
displayed with the "Parental Rating" selected.
The default PIN code for a new TV set is 0000.
If you enter an invalid PIN code,the "Invalid PIN code.
Please try again." message is displayed.
6.
Press the ENTER/OK button.
7.
Press the or button to select the age rating you want to
lock out.
Press the ENTER/OK button.
8. If you want to change the PIN code,select "Change PIN" by
pressing the
The "Enter New PIN" is displayed.
9.
Enter your new PIN code by using the numeric buttons (0~9).
The "Confirm New PIN" is displayed.
10. Re-enter your new PIN code to confirm by using the numeric
buttons (0~9).
The Your PIN code has been changed successfully
message is displayed.
11.
Press the ENTER/OK button.
12.
Press the EXIT button to exit.
If you forget the PIN code, press the remote control buttons
in the following sequence, which resets the PIN to 0-0-0-0:
POWER (Off), MUTE, 8, 2, 4, POWER (On).
or button. Press the ENTER/OK button.
Time Zone
Menu Transparency
Parental Lock
Subtitle : On
Audio Format : MPEG
▼
Time Zone
Menu Transparency
Parental Lock
Subtitle : On
Audio Format : MPEG
▼
Enter PIN
Parental Rating: No Block
Change PIN
Confirm New PIN
Your PIN code has been changed successfully.
Setup
: Medium
High
Medium
Low
Opaque
Move Enter Return
Setup
: Medium
Move Enter Return
Move Enter Return
Parental Lock
Enter PIN Return
Parental Lock
▲
No Block
Block G
Block PG
Block M
Block MA
Block AV
Block R
Move Enter Return
Move Enter Return
Enter PIN Return
▼
Change PIN
OK
English - 40
Page 43
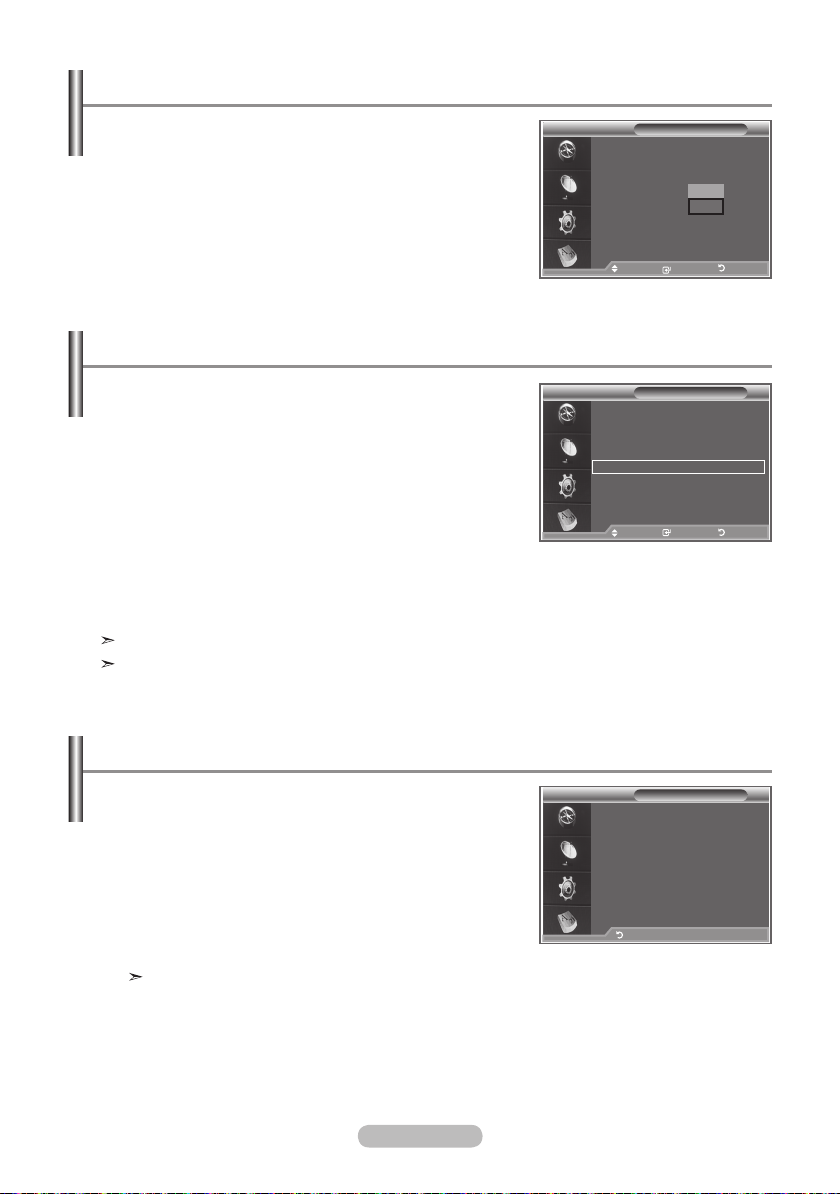
Setting the Subtitle
You can activate and deactivate the subtitles.
1.
Press the D.MENU button to display the DTV menu.
2.
Press the ▲ or ▼ button to select "Setup", then press the
ENTER/OK button.
3.
Press the ▲ or ▼ button to select "Subtitle" Press the
ENTER/OK button again, to select "Subtitle".
4.
Select "On", "Off" by pressing the ▲ or ▼ button. Press the
ENTER/OK button.
5.
Press the EXIT button to exit.
Time Zone
Menu Transparency
Parental Lock
Subtitle : On
Audio Format : MP
▼
Setup
: Medium
Move Enter Return
Move Enter Return
Selecting the Audio Format
You can only hear Dolby Digital sound through the audio
receiver connected through an optical cable. You can only
hear PCM sound through the main speaker.
When sound is emitted from both the main speaker and the
audio receiver, a sound echo may occur due to the decoding
speed difference between the main speaker and the audio
Time Zone
Menu Transparency
Parental Lock
Subtitle : On
Audio Format : MPEG
▼
receiver. In this case, use the internal mute function.
1.
Press the D.MENU button to display the DTV menu.
2.
Press the ▲ or ▼ button to select "Setup", then press the
ENTER/OK button.
3.
Press the ▲ or ▼ button to select "Audio Format", then press the ENTER/OK button.
4.
Press the EXIT button to exit.
The Audio Format appears according to the broadcasting signal.
Dolby digital sound is only available when the TV is connected with an external speaker using an
optical cable.
Setup
: Medium
Move Enter Return
Move Enter Return
Off
EG
On
Viewing Product Information
You can view your product information. For service or
repair, please contact a Samsung approved dealer.
1.
Press the D.MENU button to display the DTV menu.
2.
Press the ▲ or ▼ button to select "Setup", then press the
ENTER/OK button.
3. Press the
the ENTER/OK button.
4.
Press the ENTER/OK button again, to select "Product
Information".
- Software Version.
5.
Press the EXIT button to exit.
▲ or ▼
button to select "System", then press
The Product Information menu is selected.
English - 41
Product Information
Software Version: T_BDX2DAU0_0011
Return
Page 44
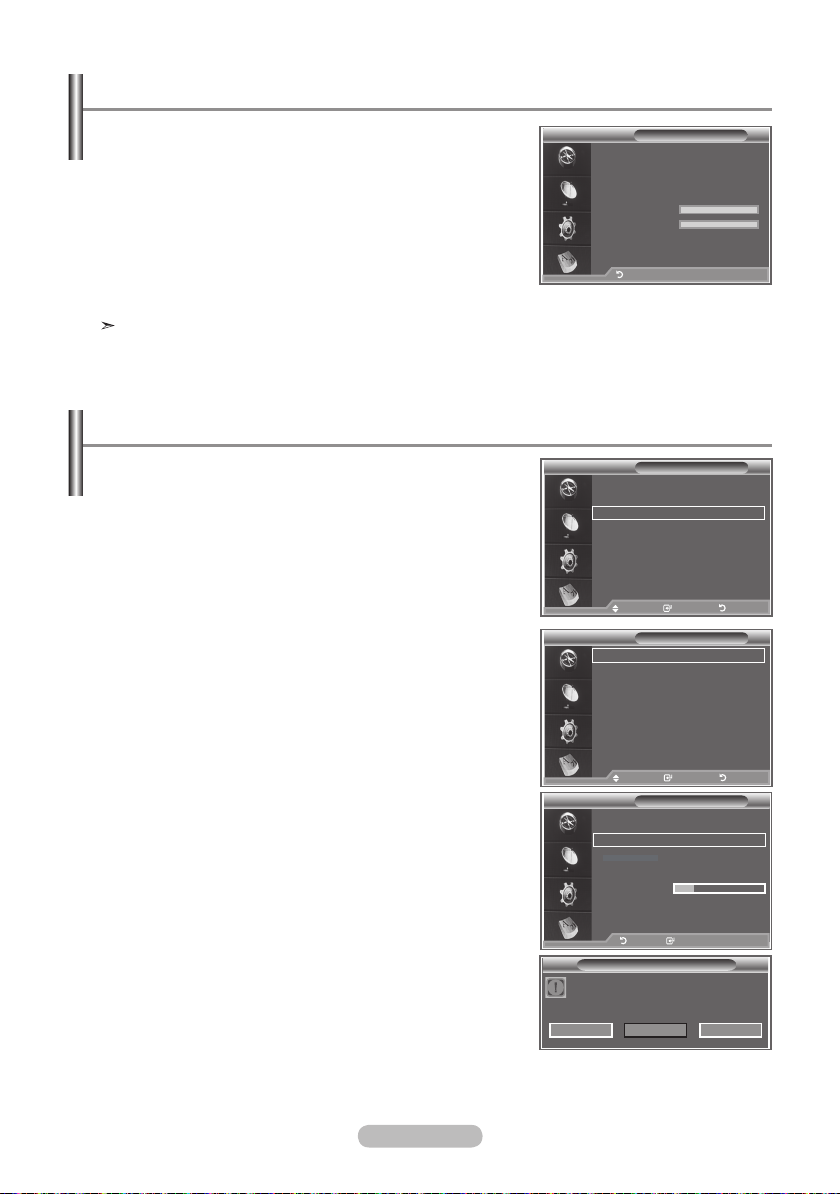
Checking the Signal Information
You can get information about the signal status.
1.
Press the D.MENU button to display the DTV menu.
2.
Press the ▲ or ▼ button to select "Setup", then press the
ENTER/OK button.
3.
Press the ▲ or ▼ button to select "System", then press the
ENTER/OK button.
4.
Press the ▲ or ▼ button to select "Signal Information",
then press the ENTER/OK button.
5.
Press the EXIT button to exit.
If the signal status is poor, the "No signal." message is
displayed.
Upgrading the Software
To keep your product up-to-date with new Digital Television
features then software upgrades are periodically broadcast as
part of the normal Television signal.
It will automatically detect these signals and display the
software upgrade banner. You are given the option to install
the upgrade.
▪ Upgrade Now
If you select Upgrade Now, the iDTV immediately installs the new
upgrade and then restarts.
▪ Upgrade Later
If you select Upgrade Later, the upgrade is postponed until the
next restart or channel change some 90 minutes later, when the
upgrade dialog appears again.
▪ Don’t Upgrade
If you select Don’t Upgrade, the iDTV does not perform the
upgrade and the software upgrade banner is not displayed again.
The upgrade is still stored internally, to subsequently upgrade
to the new version then the following sequence of steps are
performed.
Alternatively, you can manually upgrade the software.
Signal Information
Service: ?
Service ID:0000
Multiplex: ? (TSID 0000, ONID 0000)
Network: ? (ID 0000)
Bit Error Level: 10
Signal Strength: 0
Return
Product Information
Signal Information
Software Upgrade
Reset
Software Information
Manual Upgrade
Standby Mode Upgrade : On
Mode : Custom
Equalizer
SRS TSXT : Off
Auto Volume : Off
Current Software: T_BDX2DAU0_1001
Internal Mute : Off
Default
Reset
Alternative Software:
Downloding...
Software Upgrade
An upgrade is available for your TV and is ready for installation.
System
Move Enter Return
Software Upgrade
Move Enter Return
Software Information
Move Enter Return
Return Info
English - 42
Upgrade Now Upgrade Later Don't Upgrade
Page 45
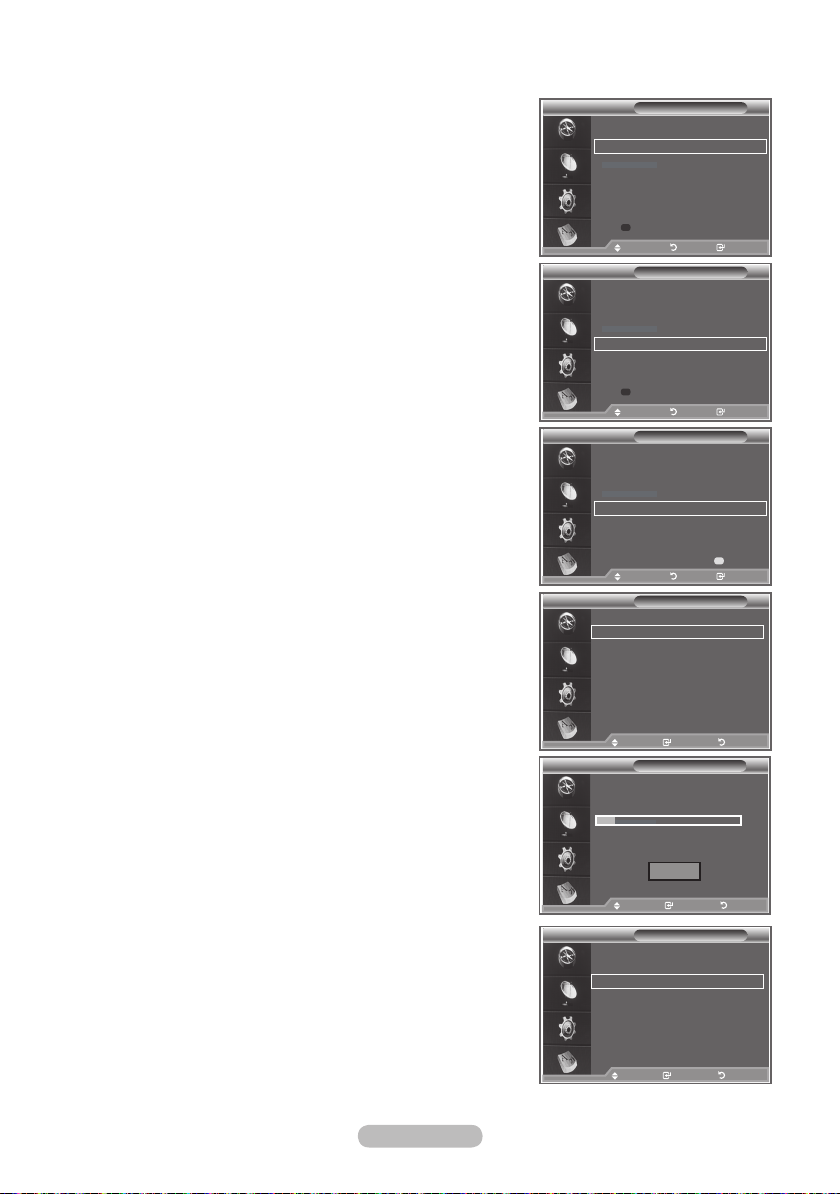
1. Press the D.MENU button to display the DTV menu.
2.
Press the ▲ or ▼ button to select "Setup", then press the
ENTER/OK button.
3.
Press the ▲ or ▼ button to select "System", then press the
ENTER/OK button.
4.
Press the ▲ or ▼ button to select "Software Upgrade",
then press the ENTER/OK button.
5.
Press the
▲ or ▼
button to select "Software Infomation",
"Manual Upgrade" or "Standby Mode Upgrade".
Press the ENTER/OK button.
Software Information
Press the ENTER/OK button, then the current software
version is shown. Then you can upgrade the software as the
pictures.
Manual Upgrade
Press the ENTER/OK button to search for new software
from the currently broadcasting channels. The operations are
same as you enter the software information.
Standby Mode Upgrade : On / Off
Press the ENTER/OK button. To continue software
upgrade with master power on, Select On by pressing
the ▲ or ▼ button.
45 minutes after entering standby mode, a manual
upgrade is automatically conducted. Since the power
of the unit is turned on internally, the screen may be
on slightly for the LCD product. This phenomenon may
continue for more than 1 hour until the software upgrade
is completed.
6.
To switch to an alternative version, press the red button.
Press the blue button to reset, activate the upgrade and
restart.
7.
Press the EXIT button to exit.
Mode : Custom
Software Information
Equalizer
SRS TSXT : Off
Auto Volume : Off
Current Software: T_BDX2DAU0_1001
Internal Mute : Off
Default
Reset
Alternative Software: T_BDX2DAU0_1100
(New version)
Move Enter Return
Switch Default Software
Move Return Info
Mode : Custom
Software Information
Equalizer
SRS TSXT : Off
Auto Volume : Off
Current Software: T_BDX2DAU0_1001
Internal Mute : Off
Default
Reset
Alternative Software: T_BDX2DAU0_1100
(New version)
Move Enter Return
Switch Default Software
Move Return Info
Mode : Custom
Software Information
Equalizer
SRS TSXT : Off
Auto Volume : Off
Current Software: T_BDX2DAU0_1001
Internal Mute : Off
Default
Reset
Alternative Software: T_BDX2DAU0_1100
(New version)
Move Enter Return
Move Return Info
Software Upgrade
Software Information
Manual Upgrade
Standby Mode Upgrade : On
Move Enter Return
Mode : Custom
Software Upgrade
Equalizer
SRS TSXT : Off
Auto Volume : Off
New software is being downloaded.
Internal Mute : Off
Reset
New Default
Confilm
10%
English - 43
Stop
Move Enter Return
Move Enter Return
Software Upgrade
Software Information
Manual Upgrade
Standby Mode Upgrade : On
Move Enter Return
Page 46
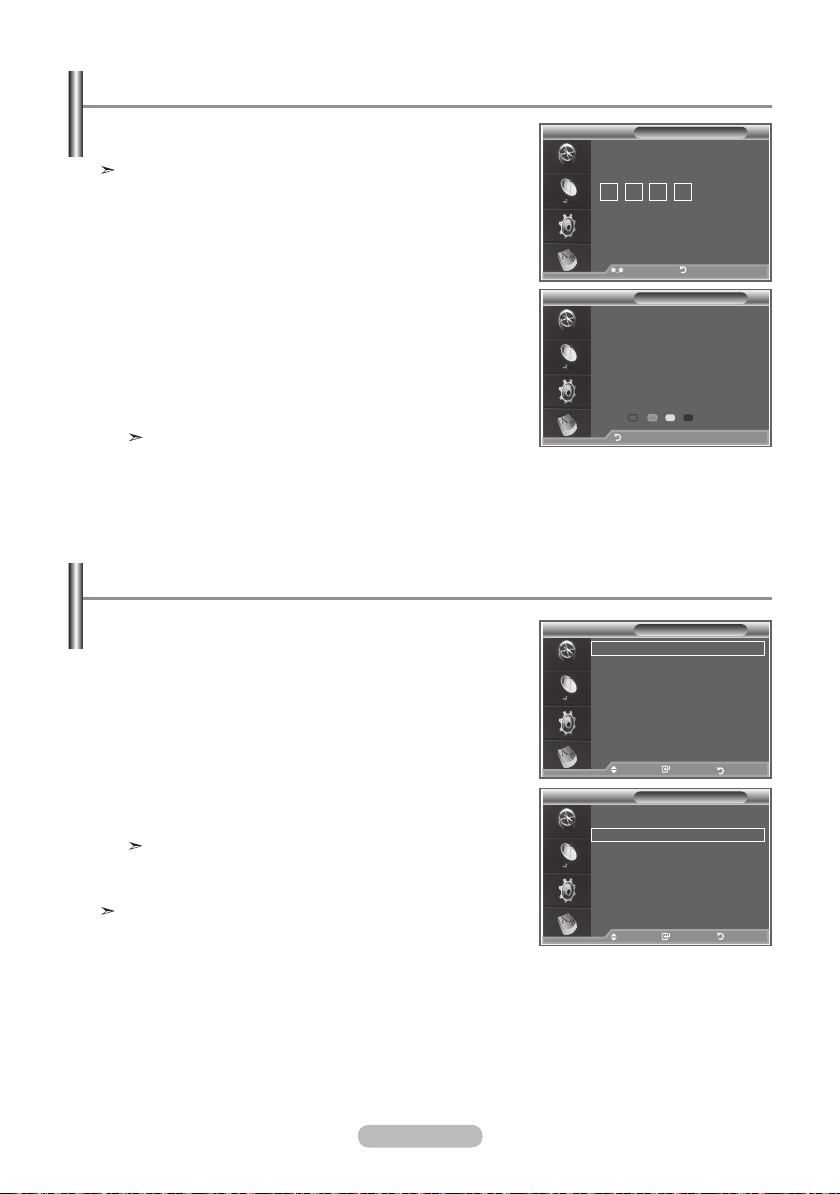
Resetting
You can reset the values stored to the factory default
values.
The Reset operation deletes all channel information and
Enter PIN
user preferences returning all values to their default
factory state.
1.
Press the D.MENU button to display the DTV menu.
2. Press the ▲ or ▼ button to select "Setup", then press the
ENTER/OK button.
3. Press the
the ENTER/OK button.
4.
Press the
ENTER/OK button.
5.
The "Enter PIN" screen will appear.
▲ or ▼
button to select "System", then press
▲ or ▼
button to select "Reset", then press the
WARNING: All channel settings and user
preferences will be lost and returned to
the factory defaults. It is recommended
that a reset is performed only when
serious problems are experienced.
6. Enter your current 4-digit PIN code by using the numeric
buttons (0~9).
The warning message is displayed.All values will be
reset by pressing the coloured buttons (red, green,
yellow, and blue)in turn.
7.
Press the EXIT button to exit.
Selecting the Preferred Language (Subtitle , Audio)
You can change the default value for subtitle, audio languages.
Displays the language information for the incoming stream.
1.
Press the D.MENU button to display the DTV menu.
2.
Press the ▲ or ▼ button to select "Language", then press
the ENTER/OK button.
3.
Press the
▲ or ▼
button to select "Subtitle Language",
"Audio Language".
Press the ENTER/OK button.
4. Select a particular language by pressing the ▲ or ▼ button
repeatedly.
Press the ENTER/OK button.
English is the default in cases where the selected
language is unavailable in the broadcast.
5.
Press the EXIT button to exit.
While viewing a programme, the subtitle can be selected.
While viewing a programme, audio languages can be
selected.
Subtitle Language
Audio Language
Subtitle Language
Audio Language
Reset
Enter PIN Return
Reset
Return
Language
Move Enter Return
Language
Move Enter Return
English - 44
Page 47
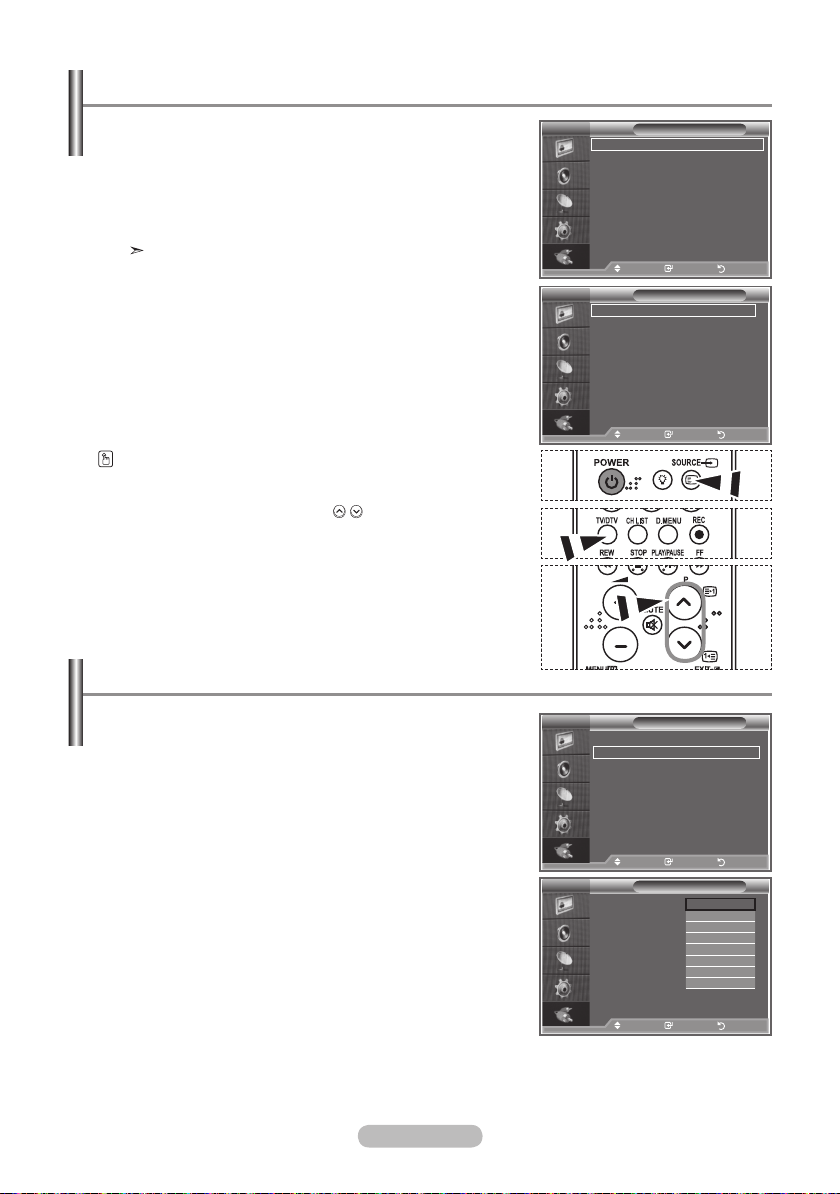
Selecting the Source
You can select among external sources connected to your
TV’s input jacks.
1. Press the
MENU button to display the menu.
Press the ▲ or ▼ button to select “Input”, then press the
ENTER/OK button.
2. Press the ENTER/OK
button again, to select "Source List".
When no external device is connected to your set, only
"TV", "DTV" are activated in the "Source List".
"AV1", "AV2" "S-Video", "Component1", "Component2",
"PC", "HDMI1", "HDMI2","HDMI3" are activated only when
they are connected to your set.
3. Select the required device by pressing the
▲ or ▼ button.
Press the ENTER/OK button.
Press the SOURCE button on the remote control to toggle
between all the available source.
TV mode can be selected by pressing the TV /DTV button,
number buttons(0~9), and the P / button on the remote
control. But it cannot be selected using the SOURCE button.
Editing the Input Source Names
Mode : Custom
TV
Equalizer
Source List : TV
SRS TSXT : Off
Edit Name
Auto Volume : Off
Anynet+(HDMI-CEC)
Internal Mute : Off
Reset
Move Enter Return
Mode : Custom
TV
Equalizer
TV
SRS TSXT : Off
AV1 : ----
Auto Volume : Off
AV2 : ----
Internal Mute : Off
S-Video : ---Component1 : ----
Reset
Component2 : ---PC : ---HDMI1 : ---HDMI2 : ---HDMI3 : ---DTV
Source List
Move Enter Return
Move Enter Return
Input
Name the device connected to the input jacks to make your
input source selection easier.
1. Press the
MENU button to display the menu.
Press the ▲ or ▼ button to select “Input”, then press the
ENTER/OK button.
2. Press the
▲ or ▼ button to select "Edit Name", then press
the ENTER/OK button.
3. Press the
▲ or ▼ button to select the device that you wish
to edit.
Press the ENTER/OK button.
4. Press the
▲ or ▼ button to select the required device.
Press the ENTER/OK button.
5. Press the
EXIT button to exit.
English - 45
Mode : Custom
TV
Equalizer
Source List : TV
SRS TSXT : Off
Edit Name
Auto Volume : Off
Anynet+(HDMI-CEC)
Internal Mute : Off
Reset
Move Enter Return
Move Enter Return
Mode : Custom
TV
Equalizer
AV1 : ----
SRS TSXT : Off
AV2 : ----
Auto Volume : Off
S-Video : ----
Internal Mute : Off
Component1 : ----
Reset
Component2 : -
PC : ----
HDMI1 : ----
HDMI2 :
HDMI3 : ----
Edit Name
Move Enter Return
Move Enter Return
Input
Cable STB
Satellite STB
----
----
VCR
DVD
D-VHS
HD STB
q
Page 48
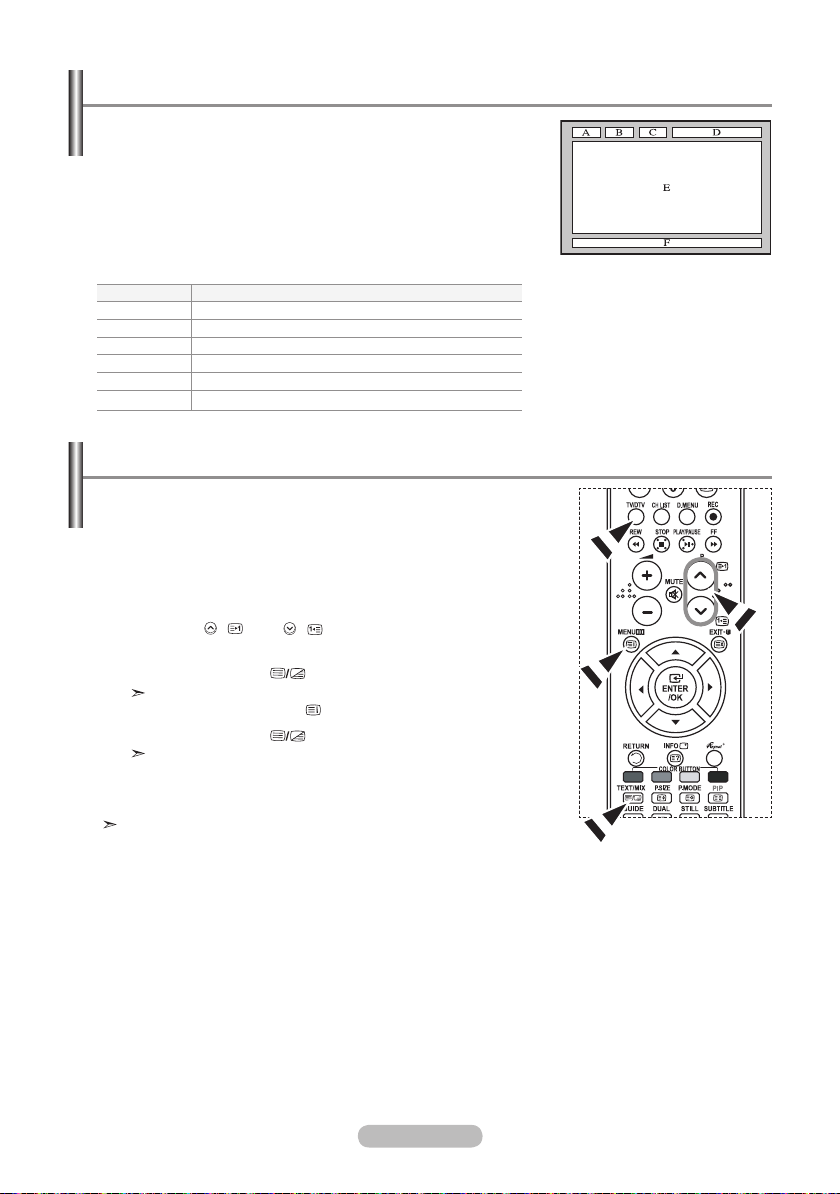
Teletext Decoder
Most set channels carry " teletext ", pages of written
information that provide information such as:
Television programme times.
News bulletins and Weather forecasts.
Sports results.
Subtitles for the hard of hearing.
The teletext pages are organized according to six categories:
Part
A
B
C
D
E
F
Contents
Selected page number.
Broadcasting station identity.
Current page number or search status.
Date and time.
Text.
Status information.
Displaying the Teletext Information
You can display teletext information at any time, but signal reception
must be good. Otherwise:
Information may be missing.
Some pages may not be displayed.
To activate the teletext mode and display the contents page:
1. Using the
the teletext service.
2. Press the TEXT/MIX
The contents page is displayed. It can be redisplayed at any time
by pressing the MENU ( ) button.
3. Press the TEXT/MIX
The actual broadcast will be displayed with "Teletext", "Double",
and "Mix" in order on the screen.
4. Press the TV/DTV
If any broken character appears while Text is being viewed, make
sure that the Text language is identical with the language in the
"Setup" menu mode. If both languages are different, select the same language with the Text
language on the "Setup" menu.
P ( ) or P ( ) button, select the channel providing
( ) button to activate the teletext mode.
( ) button again.
button to exit from the Text display.
English - 46
Page 49
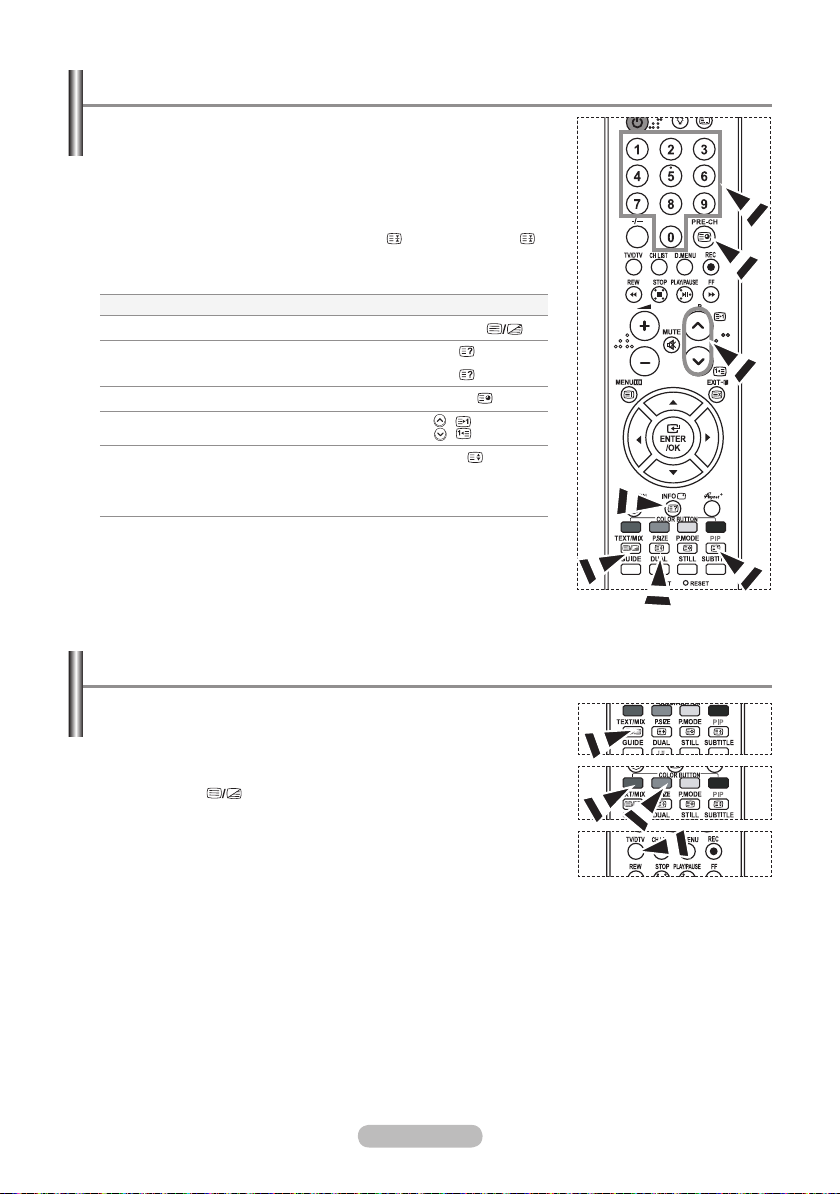
Selecting a Specic Teletext Page
Press the number buttons on the remote control to enter the
page number directly:
1. Enter the three-digit page number listed in the contents by
pressing the corresponding numeric buttons.
2. If the selected page is linked with several secondary pages, the
secondary pages are displayed in sequence. To freeze the
display on a given page, press the PIP ( ) . Press the PIP ( )
button again to resume.
3. Using the various display options:
To display...
Both teletext information and the normal broadcast
Hidden text (answers to quiz games, for example)
The normal screen
A secondary page, by entering its 4-digit number
The next page
The previous page
Double-size letters in the:
Upper half of the screen
Lower half of the screen
Normal screen
Press the...
TEXT/MIX (
INFO (
INFO (
PRE-CH (
P ( )
P
P.SIZE
Once
Twice
Three times
)
)
)
( )
( )
)
Using Fastext to Select a Teletext Page
The various topics included in the teletext pages are
colour-coded, and can be selected by pressing the coloured
buttons on the remote control.
1. Display the teletext contents page by pressing the
TEXT/MIX ( ) button.
2. Press the coloured button corresponding to the topic that you
wish to select (The available topics are listed on the status
information line).
3. Press the Red button to display the previous page.
Press the Green button to display the next page.
4. Press the TV/DTV
button to exit from the Text display.
English - 47
Page 50
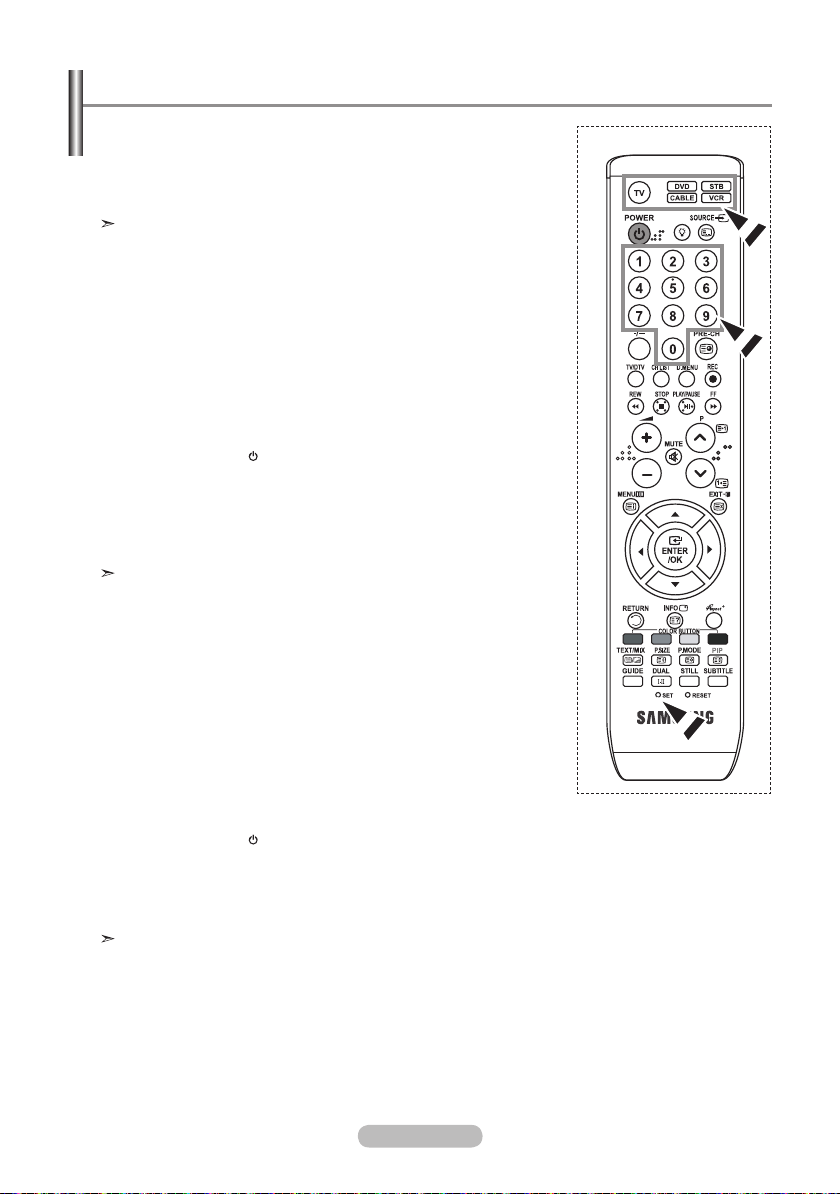
Setting Up Your Remote Control
After it has been set up properly, your remote control can
operate in five different modes: TV, DVD, Cable, Set-Top Box, VCR.
Pressing the corresponding button on the remote control allows
you to switch between these modes, and control whichever piece
of equipment you choose.
The remote control might not be compatible with all DVD Players,
VCRs, Cable boxes, and Set-Top Boxes.
Setting Up the Remote to Operate Your VCR
1. Turn off your VCR.
2. Press the VCR
3. Press the SET
4. Using the number buttons on your remote control, enter three digits
of the VCR code listed on page 50 of this manual for your brand of
VCR. Make sure you enter three digits of the code, even if the first
digit is a "0". (If more than one code is listed, try the first one.)
5. Press the POWER
Your VCR should turn on if your remote is set up correctly.
If your VCR does not turn on after set up, repeat steps 2, 3, and
4, but try one of
the other codes listed for your brand of VCR.
If no other codes are listed, try each VCR code, 000 through 083.
Note on Using Remote Control Modes: VCR
When your remote control is in "VCR" mode, the volume buttons still
control your TV’s volume.
Setting Up the Remote to Operate Your Cable Box
1. Turn off your cable box.
2. Press the CABLE
3. Press the SET
4. Using the number buttons on your remote control, enter three digits
of the cable box code listed on page 51 of this manual for your brand
of cable box. Make sure you enter three digits of the code, even if the
first digit is a "0".
(If there is more than one code listed, try the first one.)
5. Press the POWER
Your cable box should turn on if your remote is set up correctly.
If your cable box does not turn on after set up, repeat steps 2, 3, and 4,
but try one of the other codes listed for your brand of cable box. If no other codes are listed,
try each code, 000 through 046.
Note on Using Remote Control Modes: Cable Box
When your remote control is in "CABLE" mode, the volume buttons still control your TV’s volume.
button on your TV’s remote control.
button on your TV’s remote control.
button on the remote control.
button on your TV’s remote control.
button on your TV’s remote control.
button on the remote control.
English - 48
Page 51
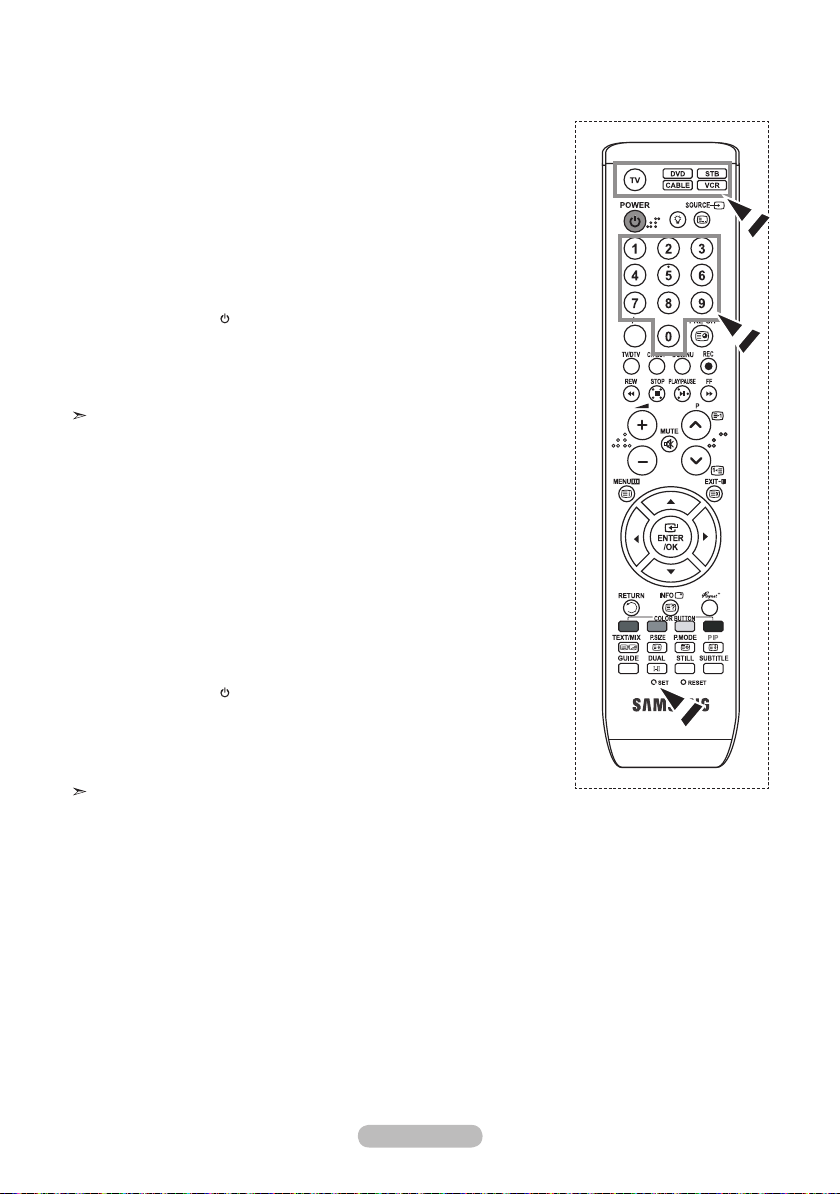
Setting Up the Remote to Operate Your DVD
1. Turn off your DVD.
2. Press the DVD
3. Press the SET
button on your TV’s remote control.
button on your TV’s remote control.
4. Using the number buttons on your remote control, enter three digits
of the DVD code listed on page 51~52 of this manual for your brand
of DVD. Make sure you enter three digits of the code, even if the first
digit is a "0". (If there is more than one code listed, try the first one.)
5. Press the POWER
Your DVD should turn on if your remote is set up correctly.
button on the remote control.
If your DVD does not turn on after set up, repeat steps 2, 3, and 4,
but try one of the other codes listed for your brand of DVD.
If no other codes are listed, try each code, 000 through 146.
Note on Using Remote Control Modes: DVD
When your remote control is in "DVD" mode, the volume buttons still
control your TV’s volume.
Setting Up the Remote to Operate Your STB
1. Turn off your STB.
2. Press the STB button on your TV’s remote control.
3. Press the SET
4. Using the number buttons on your remote control, enter three digits
button on your TV’s remote control.
of the STB code listed on page 52 of this manual for your brand of
STB. Make sure you enter three digits of the code, even if the first digit is
a "0". (If there is more than one code listed, try the first one.)
5. Press the POWER
button on the remote control.
Your STB should turn on if your remote is set up correctly.
If your STB does not turn on after set-up, repeat steps 2, 3 and 4, but
try one of the other codes listed for your brand of STB.
(If no other codes are listed, try each code, 000 through 074.)
Note on Using Remote Control Modes: STB
When your remote control is in "STB" mode, the volume buttons still
control your TV’s volume.
English - 49
Page 52
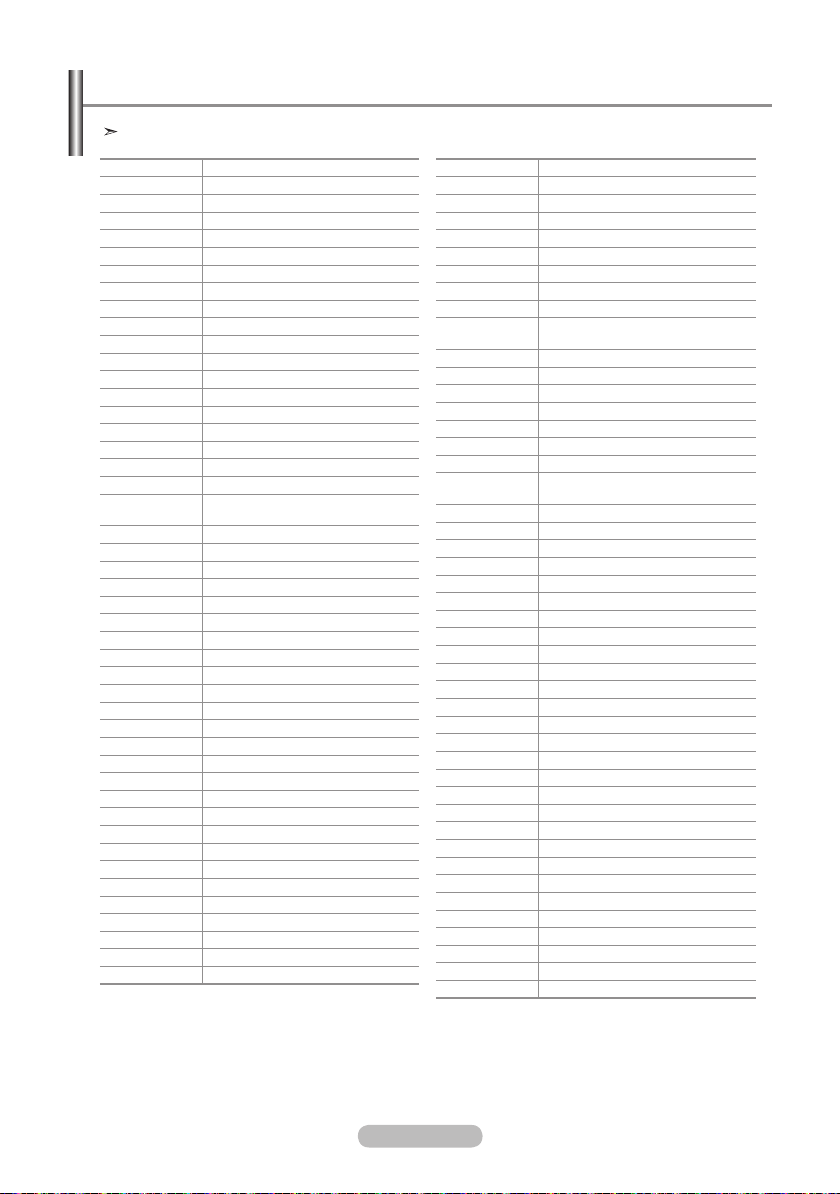
Remote Control Codes
VCR
Brand Code
SAMSUNG 000 001 002 003 004 005 077 078 079
ADMIRAL 020
AIWA 025
AKAI 004 027 032
AUDIO DYNAMICS 007 026
BELL&HOWELL 018
BROKSONIC 022
CANDLE 002 003 006 008 015 055
CANON 021 056
CITIZEN 002 003 006 008 015 055
COLORTYME 007
CRAIG 002 024
CURTIS MATHES 002 007 008 017 021 025 056 064 066
DAEWOO 003 010 011 012 013 014 015 016
DB 007 026
DIMENSIA 017
DYNATECH 025
ELECTROHOME 034
EMERSON
FISHER 018 024 028 029 048 051 061
FUNAI 025
GENERAL ELECTRIC
GO VIDEO 002
HARMAN KARDON 007
HITACHI 019 025 041 042 074
INSTANT REPLAY 021
JC PENNEY
JCL 007 008 018 021 026 037
JVC 081 082 083
KENWOOD 007 008 018 021 026 037
KLH 070
KONIA 036
LG(Goldstar) 006 007 008 009 010
LIOYD 025
LOGIK 038
LXI 025
MAGNAVOX 021 056 059
MARANTZ 007 008 018 021 026 037 062
MARTA 006
MEI 021
MEMOREX 006 021 024 025
MGA 034
MIDLAND 005
MINOLTA 019 041 075
MITSUBISHI 019 034 041 046
001 003 006 021 022 025 030 032 034 040
047 050 052 060 063 065 066 067 069 073
002 005 017 021 056
002 007 018 019 021 026 037 041 054 056
Brand Code
MONTGOMERY WARD
MTC 002 025
MULTITECH 002 005 025 038
NEC 007 008 018 026 037 062 064
OPTIMUS 020
ORION 073 074 075 076
PANASONIC 021 056 071 072
PENTAX 019 041 075
PENTEX
RESEARCH+
PHILCO 021 056 059
PHILIPS 021 080
PIONEER 019 026 039 053
PORTLAND 015 049 055
PROSCAN 017
QUARTZ 018
QUASAR 021 056
RADIO SHACK/
REALISTIC
RCA
SANSUI 026
SANYO 018 024
SCOTT 003 047 052 067
SEARS 006 018 019 024 028 029 041 048 051
SHARP 020 034 045 015
SHIMTOM 027 033 038 058
SIGNATURE 025
SONY 027 033 044
SYLVANIA
SYMPHONIC 025
TANDY 018 025
TASHIKA 006
TATUNG 037
TEAC 025 037 068
TECHNICS 021
TEKNIKA 006 021 025 031
TMK 066
TOSHIBA 003 019 029 051 052
TOTEVISION 002 006
UNITECH 002
VECTOR RESEARCH
VICTOR 026
VIDEO CONCEPTS 007 026
VIDEOSONIC 002
WARDS
YAMAHA 007 008 018 026 037
ZENITH 023 027 033
020
008
006 018 020 021 024 025 029 034 048 056
002 017 019 021 035 041 043 057 068 076
021 025 056 059
007 026
002 003 006 019 020 021 024 025 034 038 041
English - 50
Page 53
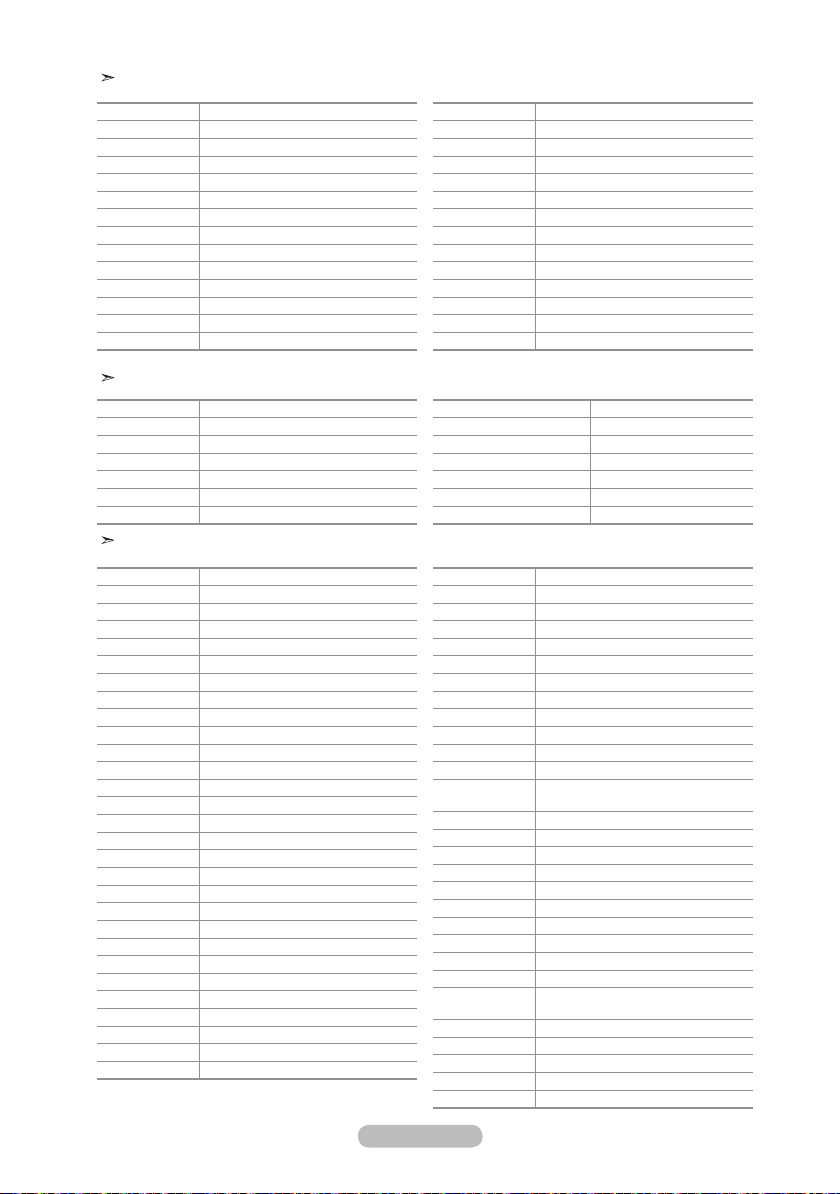
CABLE BOX
Brand Code
SAMSUNG 000 001 002 003 004 005 006 007
GI 041
HAMLIN 003 024 031
HITACHI 025 030
JERROLD 038 039
MACOM 025 030
MAGNAVOX 019 023 028
OAK 026
PANASONIC 003 022 027 037 044
PHILIPS 019 021 023 028
PIONEER 004 018 020 044
RCA 014 022 040
REGAL 003
SAMSUNG DVD
Product Code
DVD 000 001 002
DVDR 003 004
BD Record 005 006
VCR COMBO 007 008 009 010 011
VCR Record 012
DHR COMBO 013
DVD
Brand Code
REGENCY 015 023
SA 042 043
SCIENTIFIC ATLAN 042 043
SPRUCER 022
STARGATE 2000 036
SYLVANIA 016
TEXSCAN 016
TOCOM 032
UNIVERSAL 033 034
VIEWSTAR 019 021 023 028
WAMER AMEX 046
ZENITH 017 029 035 037 045
Product Code
Home Theater VCR COMBO 014 015 016
HDD Recorder COMBO 017
TWIN TRAY COMBO 018
STB DVD COMBO 019
DVD Receiver 020
AV Receiver 021
Brand Code
ANAM 030
AUDIOVOX 075
AUDIOLOGIC 085
ANABA 072
APEX DIGITAL 070 071 074 086 083 084 088 111 112
AIWA 114
BROKSONIC 062
BLAUPUNKT 074
B&K 122 123
CURTIS MATHES 027
CYBER HOME 077 078 079 082
CLARION 080 125
CIRRUS 081
CYBER HOME 065
CINEVISION 095
DAEWOO 066
DENON 146
FARENHEIT 067 068
FISHER
GPX 060
GO VIDEO 061 089 133 135
GE
GREENHILL 074
HITACHI 064 113
HITEKER 071
HOYO 073
HARMAN / KARDON 091 110
IRT 089
090
069 074
Brand Code
INTEGRA 092
JBL 091
JVC 022 033 115 116
JATON 073
KENWOOD 051 108 109
KISS 073
KONKA 059 100 106 107
KLH 074 075
LG(Goldstar) 025 031
LOEWE 057
LASONIC 058
MOBILE
AUTHORITY
MEMOREX 055
MALATA 056
MAGNAVOX 076 093
MINTEK 074 094
MONYKA 073
NORCENT 048 049 050
NEXT BASE
NEC 053
NANTAUS 144
NESA
OPTOMEDIA
ELECTRONICS
OPTIVIEW 072
ONKYO 076 092 119
PHILCO 044 045
PRINCETON 046 047
PROSCAN 023
English - 51
054
052
074
105
Page 54
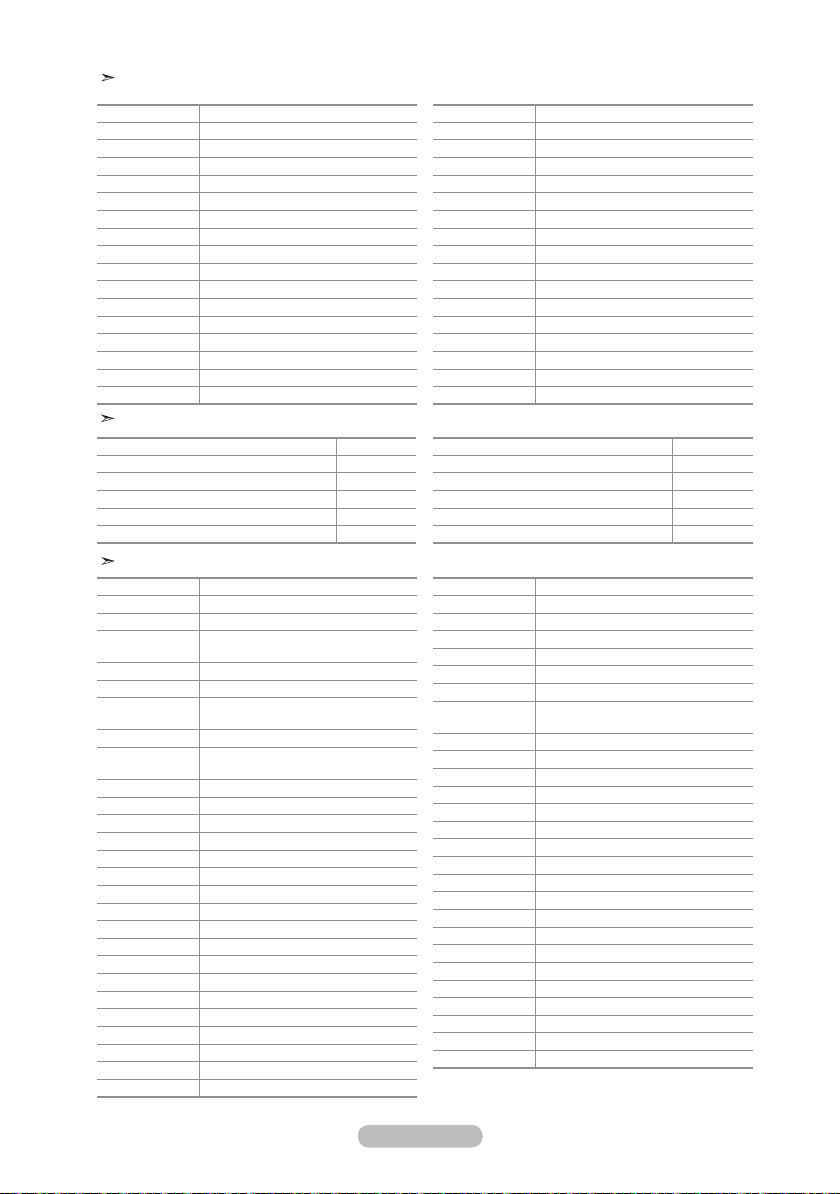
DVD
Brand Code
PANASONIC 024 034 124 134 136 137 138
PHILIPS 036 076
ROTEL 117 118
RIO 120
RCA 023 035 074 075 131 132
RAITE 073
ROWA 038
SAMPO 104
SONY 026 029 126 127 128 129 130 141
SHERWOOD 039 041
SVA 042
SYLVANIA 043 093
SHARP 140
SANSUI 062
SANYO 062 090
SHINSONIC 094
SAMSUNG SET-TOP BOX
Product Code
Ground wave STB 001 002
Satellite STB 003
CABLE STB 004
STB DVD COMBO 008
Satellite STB HDD COMBO Standard 009
SET-TOP BOX
Brand Code
ALPHASTAR 023
ANAM 043
CHANNEL
MASTER
CROSSDIGITAL 019
CHAPARRAL 035
DIRECT TV 015 016 017 019 022 045 060 061 062
DAEWOO 074
DISH NETWORK
SYSTEM
DISHPRO 069
DRAKE 018 024 032
DX ANTENNA 027
ECHOSTAR 025 069 070 071
EXPRESSVU 069
GOI 069
GE 065
GENERAL INSTRUMENT
HTS 069
HOME CABLE 056
HITACHI
HUGHES NETWORK
IQ 020
IQ PRISM
JANEIL 059
JERROID 063
JVC 069 070
LG(Goldstar) 044 073
018 034
065 066 067 068
069 070
046 047 048 063 064
022
015 017
020
Brand Code
THOMSON 145
TOSHIBA 028 062 076
TECHNICS 139
TVIEW 072
TOKAI 073
TEAC 096
TECHWOOD 097
TREDEX 098 099 101
URBAN CONCEPTS
VENTURER 075
VOCOPRO 102
YAMAHA 032 063
YAMAKAWA 040 073
XWAVE 103
ZENITH 076 121
Product Code
Satellite STB HDD COMBO Premium 010
CABLE STB HDD COMBO Standard 011
CABLE STB HDD COMBO Premium 012
Ground wave STB HDD COMBO Standard 013
Ground wave STB HDD COMBO Premium 014
Brand Code
MAGNAVOX 016 021 036 038 039 040 041 042
MEMOREX 016
MOTOROLA 064
MACOM 018
MITSUBISHI 015
NEXT LEVEL 047 048 064
PHILIPS 015 016 017 021 033 036 038 039 040
PRIMESTAR
PANASONIC 058 059 061 062
PAYSAT 016
PROSCAN 065 066
RCA 051 052 053 065 066
RADIOSHACK 064
REALISTIC 057
STAR TRAK 026
STS
SKY 031
SKY LIFE 005 006 007
SHACK
STAR CHOICE
SONY 054 060
TOSHIBA
ULTIMATE TV 060 066
UNIDEN 016 021 037 055 056 057
ZENITH 024 031 068
076
041 042 067
046 049 050 063
020 027
064
064
015 017 028 029 030 072
English - 52
Page 55
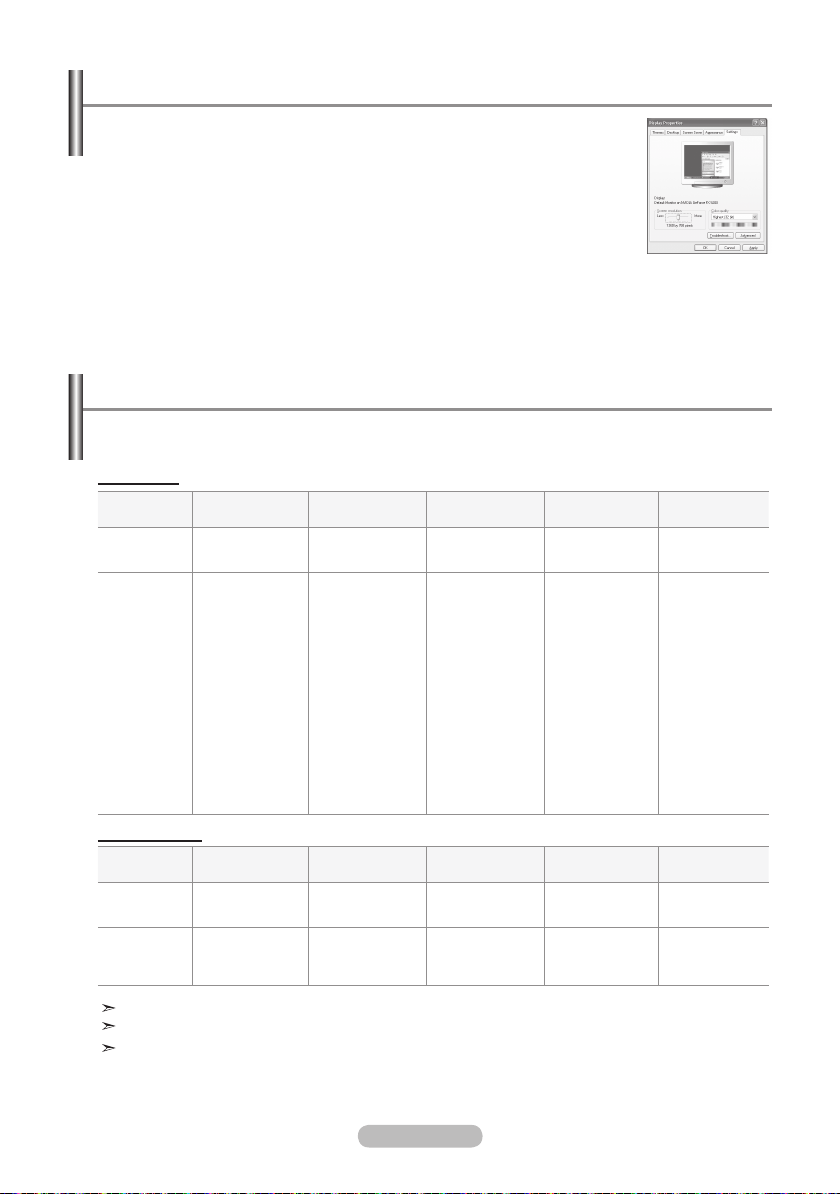
Setting up Your PC Software (Based on Windows XP)
The Windows display-settings for a typical computer are shown below. The actual
screens on your PC may be different depending upon your particular version of
Windows and your particular video card. Even if your actual screens look different,
the same, basic set-up information will apply in almost all cases. (If not, contact your
computer manufacturer or Samsung Dealer.)
1. First, click on "Control Panel" on the Windows start menu.
2. When the control panel window appears, click on "Appearance and Themes"
and a display dialog-box will appear.
3. When the control panel window appears, click on "Display" and a display
dialog-box will appear.
4. Navigate to the "Settings" tab on the display dialog-box.
The correct size setting (resolution): Optimum- 1360 X 768
If a vertical-frequency option exists on your display settings dialog box, the correct value is
"60" or "60 Hz". Otherwise, just click "OK" and exit the dialog box.
Display Modes
Both screen position and size will vary depending on the type of PC monitor and its resolution.
The resolutions in the table are recommended. (All resolutions between the supported limits are supported)
D-Sub Input
Mode Resolution
IBM
VESA
HDMI/DVI Input
Mode Resolution
IBM
VESA
640 x 350
640 x 480
720 x 400
640 x 480
640 x 480
640 x 480
800 x 600
800 x 600
800 x 600
800 x 600
1024 x 768
1024 x 768
1024 x 768
1024 x 768
1152 x 864
1280 x 960
1280 x 1024
1280 x 1024
1280 x 1024
1600 x 1200
1920 x 1080
640 x 350
640 x 480
720 x 400
800 x 600
1024 x 768
1280 x 1024
1920 x 1080
Horizontal
Frequency (kHz)
31.469
31.469
31.469
35.000
37.861
37.500
43.750
37.879
48.077
46.875
57.672
48.364
56.476
60.023
67.500
60.000
63.981
74.620
79.976
75.000
66.587
Horizontal
Frequency (kHz)
31.469
31.469
31.469
37.879
48.364
63.981
66.587
Vertical
Frequency (Hz)
70.086
59.940
70.087
70.000
72.809
75.000
70.000
60.317
72.188
75.000
72.000
60.000
70.069
75.029
75.000
60.000
60.020
70.000
75.025
60.000
59.934
Vertical
Frequency (Hz)
70.086
59.940
70.087
60.317
60.000
60.020
59.934
Pixel Clock
Frequency (MHz)
25.175
25.175
28.322
28.560
31.500
31.500
45.500
40.000
50.000
49.500
78.434
65.000
75.000
78.750
108.000
108.000
108.000
1 28.943
135.000
162.000
138.500
Pixel Clock
Frequency (MHz)
25.175
25.175
28.322
40.000
65.000
108.000
138.500
Sync Polarity
(H/V)
+ / -
- / -
- / +
- / +
- / -
- / -
- / +
+ / +
+ / +
+ / +
- / -
- / -
- / + / +
+ / +
+ / +
+ / +
- / -
+ /+
+ /+
+ / -
Sync Polarity
(H/V)
+ / -
- / -
- / +
+ / +
- / -
+ /+
+ / -
The interlace mode is not supported.
The set might operate abnormally if a non-standard video format is selected.
Separate and Composite modes are supported. SOG is not supported.
English - 53
Page 56
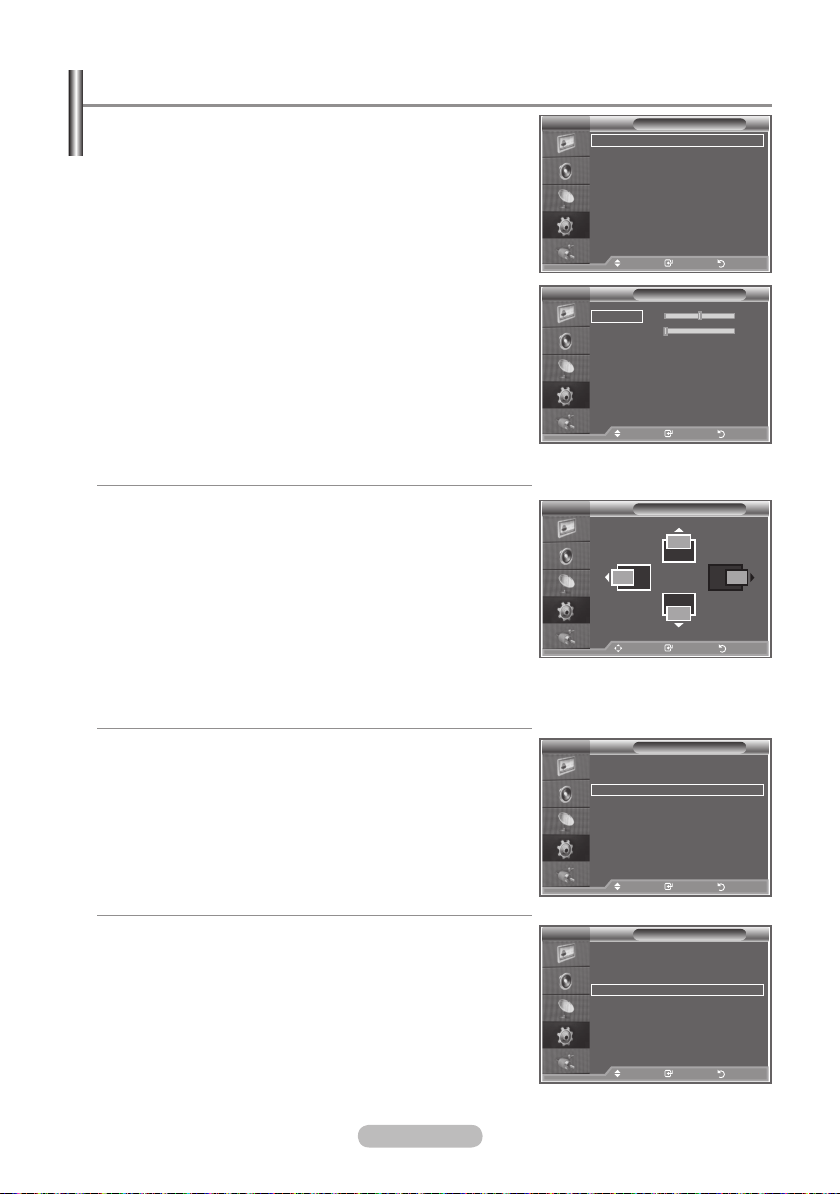
Setting the PC
Coarse and Fine Tuning of the Image (Image Lock):
The purpose of picture quality adjustment is to remove or
reduce picture noise.
If the noise is not removed by Fine-tuning alone, then adjust
the frequency as best as possible (coarse) and Fine-tune
again. After the noise has been reduced, re-adjust the picture
so that it is aligned on the center of screen.
1. Preset: Press the SOURCE
2. Press the
Press the ▲ or ▼ button to select "Setup", then press the
MENU button to display the menu.
button to select PC mode.
ENTER/OK button.
3. Press the ▲ or ▼ button to select "PC", then press the
ENTER/OK button.
4. Press the ENTER/OK
5. Press the
press the ENTER/OK button.
6. Press the
Press the ENTER/OK button.
7. Press the
▲ or ▼ button to select "Coarse" or "Fine", then
◄
or ► button to adjust the screen quality.
EXIT button to exit.
button to select "Image Lock".
Changing the Image Position:
Adjust the PC’s screen positioning if it does not fit the
TV screen.
1. Follow the "Coarse and Fine Tuning of the Image
(Image Lock)"
instructions number 1 to 3.
2. Press the ▲ or ▼ button to select "Position", then press the
ENTER/OK button.
3. Press the ▲ or ▼ button to adjusting the Vertical-Position.
Press the ◄ or ► button to adjust the Horizontal-Position.
Press the ENTER/OK button.
4. Press the
EXIT button to exit.
Adjusting the PC Screen Automatically (Auto Adjustment):
Auto adjustment allows the PC screen of set to self-adjust to
the incoming PC video signal. The values of fine, coarse and
position are adjusted automatically.
1. Follow the "Coarse and Fine Tuning of the Image
(Image Lock)" instructions number 1 to 3.
2. Press the ▲ or ▼ button to select "Auto Adjustment", then
press the ENTER/OK
3. Press the EXIT
button.
button to exit.
Initializing the Image Settings (Image Reset):
You can replace all image settings with the factory default
values.
1. Follow the "Coarse and Fine Tuning of the Image
(Image Lock)" instructions number 1 to 3.
2. Press the ▲ or ▼ button to select "Image Reset", then press
the ENTER/OK
3. Press the
button.
EXIT button to exit.
TV
Image Lock
Position
Auto Adjustment
Image Reset
Move Enter Return
Mode : Custom
TV
Equalizer
SRS TSXT : Off
Coarse 50
Auto Volume : Off
Fine 0
Internal Mute : Off
Reset
TV
TV
Image Lock
Position
Auto Adjustment
Image Reset
TV
Image Lock
Position
Auto Adjustment
Image Reset
Image Lock
Move Enter Return
Move Enter Return
Move Enter Return
Move Enter Return
Move Enter Return
PC
Position
PC
PC
English - 54
Page 57
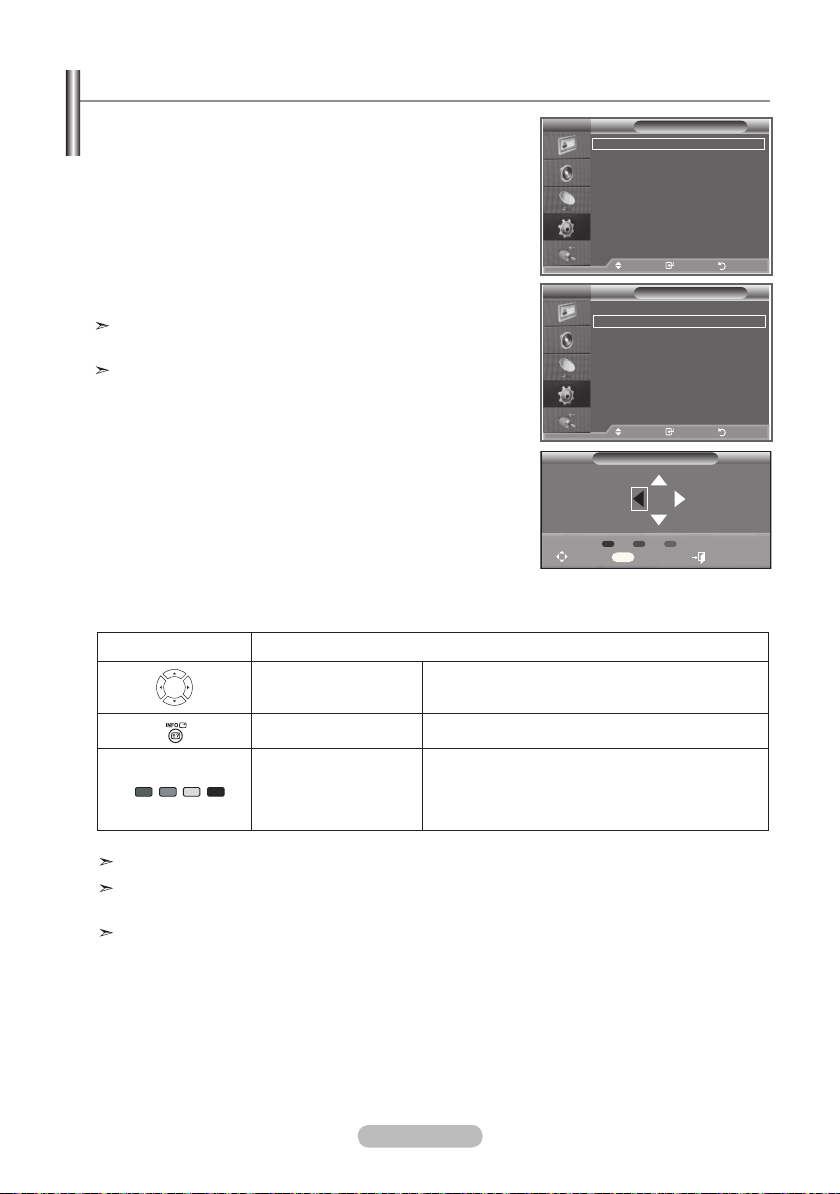
Wall-Mount Adjustment (Sold separately)
V
Setup
Plug & Play
Once the wall mount is installed, the position of your TV can
be easily adjustable.
1.
Press the MENU button to display the menu.
Press the ▲ or ▼ button to select “Setup”, then press the
ENTER/OK button.
Press the ▲ or ▼ buttons to select “Wall-Mount Adjustment”,
2.
then press the ENTER/OK button.
3.
Adjust to the desired position using the ▲,▼,◄,► buttons.
4.
Press the EXIT button to exit.
If you press an arrow button when no OSD is displayed on the
TV screen, the Adjustment screen appears.
When you turn the power off, your TV moves to the initial
installation position.
When you turn the power on, your TV moves to the last
remembered position you adjusted.
Using the Remote Control Buttons
Button Operations
Wall-mount angle
adjustment
Tilt Up, Tilt Down, Move right, Move left
T
Language : English
Time
Game Mode : Off
Blue Screen : Off
Melody : Off
PC
Home Theatre PC
Light Effect :
sMore
TV
rMore
Wall-Mount Adjustment
Energy Saving : Off
HDMI Black level : Normal
PIP
Position1
Position 1 2 3
Adjust Center Exit
: Off
Move Enter Return
Setup
Move Enter Return
Wall Mount Adjusment
INFO
Watching Mode On
For installation, refer to the Installation Manual provided.
For product installation and the installation and moving of the wall mount, make sure to consult a
specialized installation company.
This installation manual is to be used when attaching the wall mount to a wall.
When attaching to other building materials, please contact your nearest dealer
Reset Moves to the initial installation position
Remembering the
position and moving
to the remembered
position
Remembers 3 positions with the Red, Green and
Yellow buttons.
Moves to the remembered position using these 3
colour buttons.
English - 55
Page 58
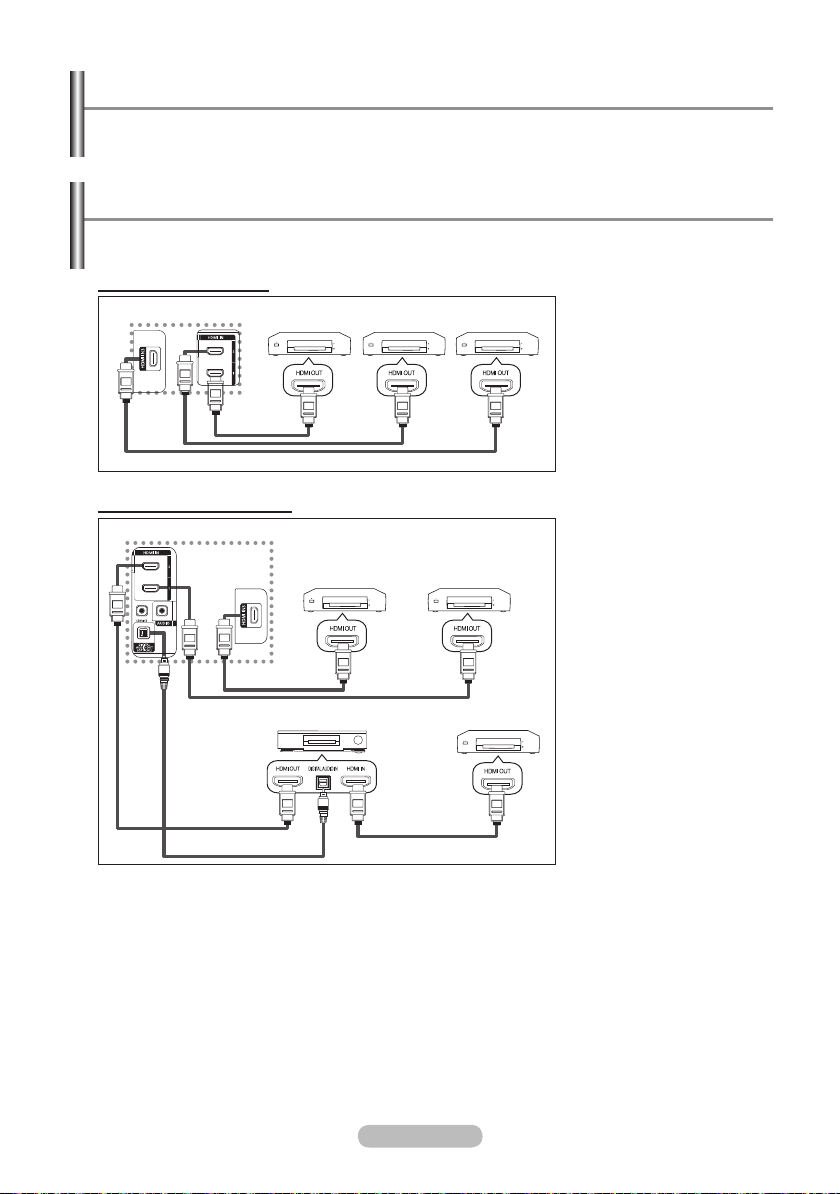
What is Anynet+?
Anynet+ is an AV network system that enables an easy-to-use AV interface for users by controlling
all connected AV devices through the Anynet+ menu when Samsung Electronics AV devices are
connected.
+
Connecting Anynet
The Anynet+ system supports AV devices supporting Anynet+ only.
Check if there is an Anynet+ mark on the AV device to be connected to the TV.
To directly connect to TV
TV
Devices
Anynet+ Device 1 Anynet+ Device 2 Anynet+ Device 3
Connect the [HDMI 1], [HDMI
2] or [HDMI 3] jack on the TV
and the HDMI OUT jack of the
corresponding Anynet+ device
using the HDMI cable.
HDMI 1.3 Cable
To connect to Home Theater
TV
HDMI 1.3 Cable
HDMI 1.3 Cable
Optical Cable
➣
Connect only the optical cable between [Digital Audio Out (Optical)] on your TV and Digital Audio Input on
the receiver.
➣
Connect only one receiver.
➣
You can listen to 5.1 channel sound through the home theater’s speakers. Otherwise, you can only listen
to 2 channel stereo sound in other cases. Make sure to connect the Digital Audio IN (Optical) of the home
theater and the TV correctly to listen to TV sound through the home theater. However, you cannot listen to
sound from the BD recorder that is sent to the home theater via the TV in 5.1 channel sound because the
TV outputs only 2 channel stereo sound. Please see the manual for the home theater.
➣
You can connect an Anynet+ device using the HDMI 1.3 cable. Some HDMI cables may not support Anynet+
functions.
➣
Anynet+ works when the AV device supporting Anynet+ is in the Standby or On status.
➣
Anynet+ supports up to 8 AV devices in total.
HDMI 1.3 Cable
Anynet+ Device 1 Anynet+ Device 2
Home Theater
HDMI 1.3 Cable
HDMI 1.3 Cable
Anynet+ Device 3
HDMI 1.3 Cable
1. Connect the [HDMI 1],
[HDMI 2] or [HDMI 3]
jack on the TV and the
HDMI OUT jack of the
corresponding Anynet+
device using the HDMI
cable.
2. Connect the HDMI IN jack
of the home theater and
the HDMI OUT jack of the
corresponding Anynet+
device using the HDMI
cable.
English - 56
Page 59
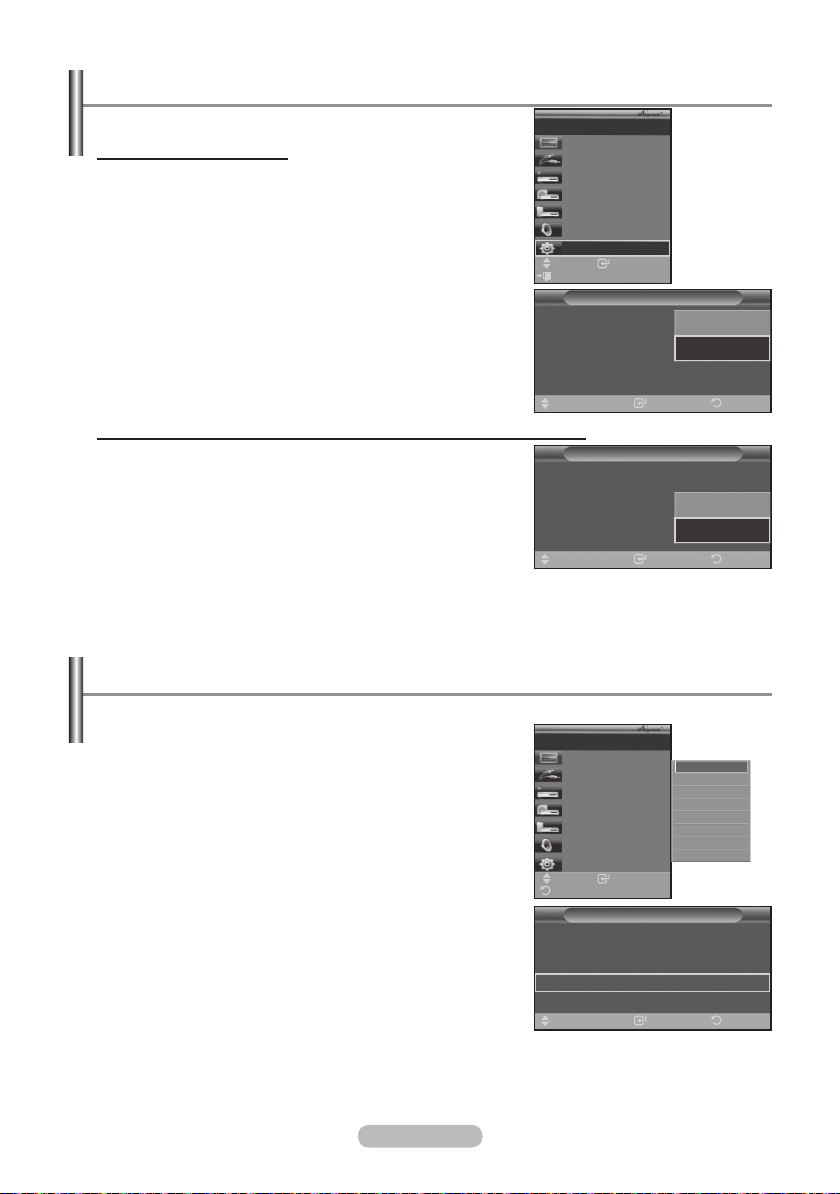
Setting Up Anynet
+
The following settings are to use Anynet+ functions.
Using the Anynet+ Function
1. Press the Anynet+
button.
Press the ▲ or ▼ button to select Setup, then press the
ENTER/OK
2. Press the ENTER/OK
button.
button to select Anynet+ (HDMI-CEC),
then press the ENTER/OK button.
3. Press the ▲ or ▼ button to select On
OK
button.
The Anynet+ (HDMI-CEC) function is enabled.
➣
If you select Off, Anynet+ (HDMI-CEC) is disabled.
➣
When the Anynet+ (HDMI-CEC) function is disabled, all the
➣
, then press the ENTER/
Anynet+ related operations are deactivated.
Air 28
View TV
Select Device
Record
Menu on Device
Device Operation
Receiver :Off
Setup
Move
Enter
Exit
Setup
Anynet+ (HDMI-CEC)
Auto Turn Off
Searching Connections
: Off
: Off
Enter ReturnMove
Turning an Anynet+ Device Off Automatically when the TV is Turned Off
ss the ▲ or ▼ button to select Auto Turn Off, then press
1. Pre
the ENTER/OK button.
2. Press the ▲ or ▼ button to select On, then press the ENTER/
OK button.
The Auto turn off function is enabled.
➣
If you select Off, the Auto turn off function is canceled.
➣
Press the EXIT button to exit.
The Select Device setting of the TV remote control is to be set to
➣
Anynet+ (HDMI-CEC)
Auto Turn Off
Searching Connections
Move
Setup
: On
: Off
Enter Return
TV to use the Anynet+ function.
If you set Auto Turn Off to On, connected external devices are also turned off when the TV is turned off.
➣
However, if the device is recording, it may not be turned off.
Scanning and Switching between Anynet+ Devices
Off
On
Off
On
1. Press the Anynet+ button.
2. Press the ▲ or ▼ button to select Select Device, then press
the ENTER/OK button.
3. Press the ▲ or ▼ button to select to a particular device and
press the ENTER/OK button.
It is switched to the selected device.
4. If you cannot find a device you want, press the ▲ or ▼ button
to select Searching Connections, then press the ENTER/OK
button.
The meassage Configuring Anynet+ connection... is
displayed. When searching devices completes, the connected
devices are listed in the Anynet+ menu.
Switching to the selected devices may take up to 2 minutes. You
➣
cannot cancel the operation during the switching operation.
The time required to scan for devices is determined by the number
➣
of connected devices.
When the device scan is complete, the number of found devices
➣
is not displayed.
Although the TV automatically scans devices when it is turned on
➣
using the POWER button, devices connected when the TV is on or
Air 28
View TV
Select Device
Record
Menu on Device
Device Operation
Receiver :Off
Setup
Move
Enter
Return
Anynet+ (HDMI-CEC)
Auto Turn Off
Searching Connections
: On
Setup
: On
Enter ReturnMove
DVDR1
DVDR2
DVD1
DVD2
under a specic circumstance are not displayed in the device list. Therefore select Searching Connections
menu to search devices.
If you have selected external input mode by pressing the SOURCE button, you cannot use the Anynet+
➣
function. Make sure to switch to an Anynet+ device by using the Anynet+ button.
English - 57
Page 60
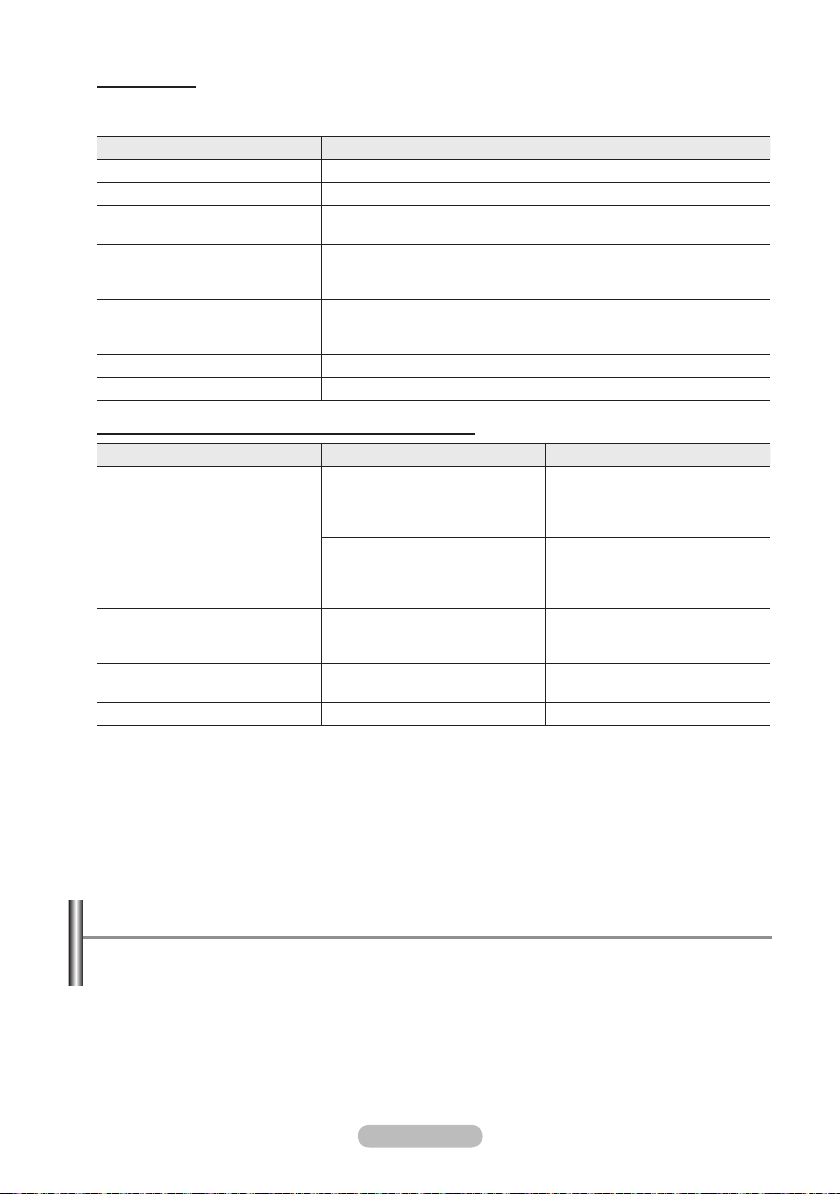
Anynet+ Menu
The Anynet+ menu changes depending on the type and status of the Anynet+ devices connected
to the TV.
Anynet+ Menu Description
View TV
Select Device
Record
Menu on Device
Device Operation
Receiver
Setup You can set the environment for using Anynet+.
TV Remote Control Buttons Available in Anynet+ Mode
Device Type Operating Status Available Buttons
Anynet+ Device
Device with built-in Tuner
Audio Device
Anyview2
The Anynet+ function only works when the remote control is set to TV.
➣
The REC button works only while in the recordable state.
➣
You cannot control Anynet+ devices using the buttons on the side of the TV. You can control Anynet+
➣
devices only using the TV remote control.
The TV remote control may not work under certain conditions. In this case, re-select the Anynet+ device.
➣
The Anynet+ functions don’t operate for the products from other manufacturers.
➣
In Anynet+ mode, the colour buttons may not work properly.
➣
The ◄◄, ►► operations may differ depending on the device.
➣
Switches from Anynet+ to TV broadcast mode.
Your TV connects to the corresponding device.
Starts a recording. (This menu works only for a device supporting
recording.)
Shows the menu of the connected device.
Example. When a DVD Recorder is connected, the DVD Recorder’s
title menu appears.
Shows the play control menu of the connected device.
Example. When a DVD Recorder is connected, the play control
menu of the DVD Recorder appears.
Sound is output through the receiver.
After switching to the
device, when the menu of
the corresponding device is
displayed on the screen.
After switching to the device,
while playing a file
After switching to the device,
when you are watching a TV
program
When Receiver is activated
When watching TV ►
Numeric buttons
▲/▼/◄/►/ENTER buttons
Colour buttons
EXIT button
◄◄(Backward search)
►►(Forward search)
(Stop)
►
(Play/Pause)
CH ▲/▼ button
VOL +/- button
MUTE button
(Play/Pause)
Recording
You can make a recording of a TV program using a recorder.
Press the REC button.
Recording begins. (Only when the Anynet+ enabled recording device is connected.)
The current TV program is recorded in the Watching TV status. If you are watching video from another
➣
device, the video from the device is recorded.
You can also record the source streams by selecting Record after pressing the Anynet+ button.
➣
Before recording, check whether the antenna jack is properly connected to the recording device. For the
➣
antenna connection to the recording device, refer to its user manual.
English - 58
Page 61
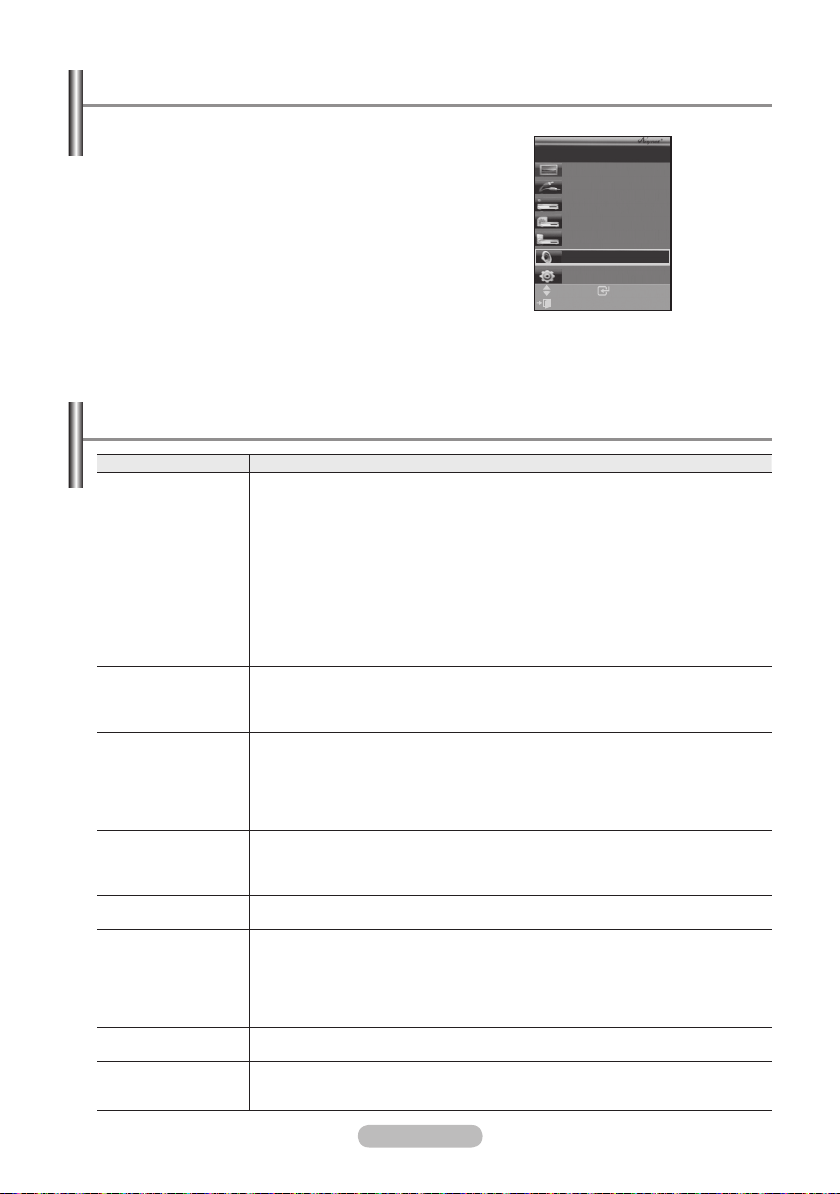
Listening through a Receiver
You can listen to sound through a receiver instead of the TV speaker.
1. Press the Anynet+
Press the ▲ or ▼ button to select Receiver, then press the
ENTER/OK
2. Press the ◄ or ► button to select to On
ENTER/OK
Now you can listen to sound through the receiver.
3. Press the
When the receiver is set to On, you can listen to the TV sound
➣
through the 2-channel receiver.
If the receiver is exclusively for a home theater only (supporting
➣
audio only), it may not appear in the device list.
Only when you have connected the optical jack of the TV and the receiver properly, does Receiver work.
➣
In case of a content with copyright problem, listening through the receiver may not properly operate.
➣
When listening through the receiver, there are restrictions for using the PIP and audio-related menu.
➣
button.
button.
button.
EXIT button to exit.
, then press the
Air 28
View TV
Select Device
Record
Menu on Device
Device Operation
Receiver :On
Setup
Move
Exit
Enter
Check Points before Requesting Service
Symptom Solution
Anynet+ does not
work.
I want to start
Anynet+.
I want to exit Anynet+. ■ Select View TV
The Connecting to
Anynet+ device…
message appears on
the screen.
The Anynet+ device
does not play.
The connected device
is not displayed.
The TV program
cannot be recorded.
The TV sound is not
output through the
receiver.
■ Check if the device is an Anynet+ device. The Anynet+ system supports Anynet+
devices only.
■ Connect only one receiver.
■ Check if the Anynet+ device power cord is properly connected.
■ Check the Anynet+ device’s Video/Audio/HDMI 1.3 cable connections.
■ Check whether Anynet+ (HDMI-CEC) is set to On in the Anynet+ setup menu.
■ Check whether the TV remote control is in TV mode.
■ Check whether it is Anynet+ exclusive remote control.
■ Anynet+ doesn’t work at a certain condition. (Searching channels)
■ When connecting or removing the HDMI 1.3 cable, please make sure to search
devices again or restart your TV.
■ Check if the Anynet+ Function of Anynet+ device is set on.
■ Check if the Anynet+ device is properly connected to the TV and check if the
Anynet+ (HDMI-CEC) is set to On in the Anynet+ Setup menu.
■ Press the TV
Anynet+ button to show the Anynet+ menu and select a menu you want.
■ Press the SOURCE
than Anynet+ devices.
■ Press any of CH
TV mode. (Note that the channel button operates only when a tuner-embedded
Anynet+ device is not connected.)
■ You cannot use the remote control when you are configuring Anynet+ or
switching to a view mode.
■ Use the remote control when the Anynet+ setting or switching to view mode is
complete.
You cannot use the play function when an auto channel scan is in progress.
■ Check whether or not the device supports Anynet+ functions.
■ Check whether or not the HDMI 1.3 cable is properly connected.
■ Check whether Anynet+ (HDMI-CEC) is set to On in the Anynet+ setup menu.
■ Search Anynet+ devices again.
■ You can connect an Anynet+ device using the HDMI 1.3 cable only. Some HDMI
cables may not support Anynet+ functions.
Check whether the antenna jack on the recording device is properly connected.
Connect the optical cable between TV and the receiver.
button on the TV remote control to switch to TV. Then press the
in Anynet+ menu.
button on the TV remote control and select a device other
, CH LIST, PRE-CH, and such to change to the
English - 59
Page 62
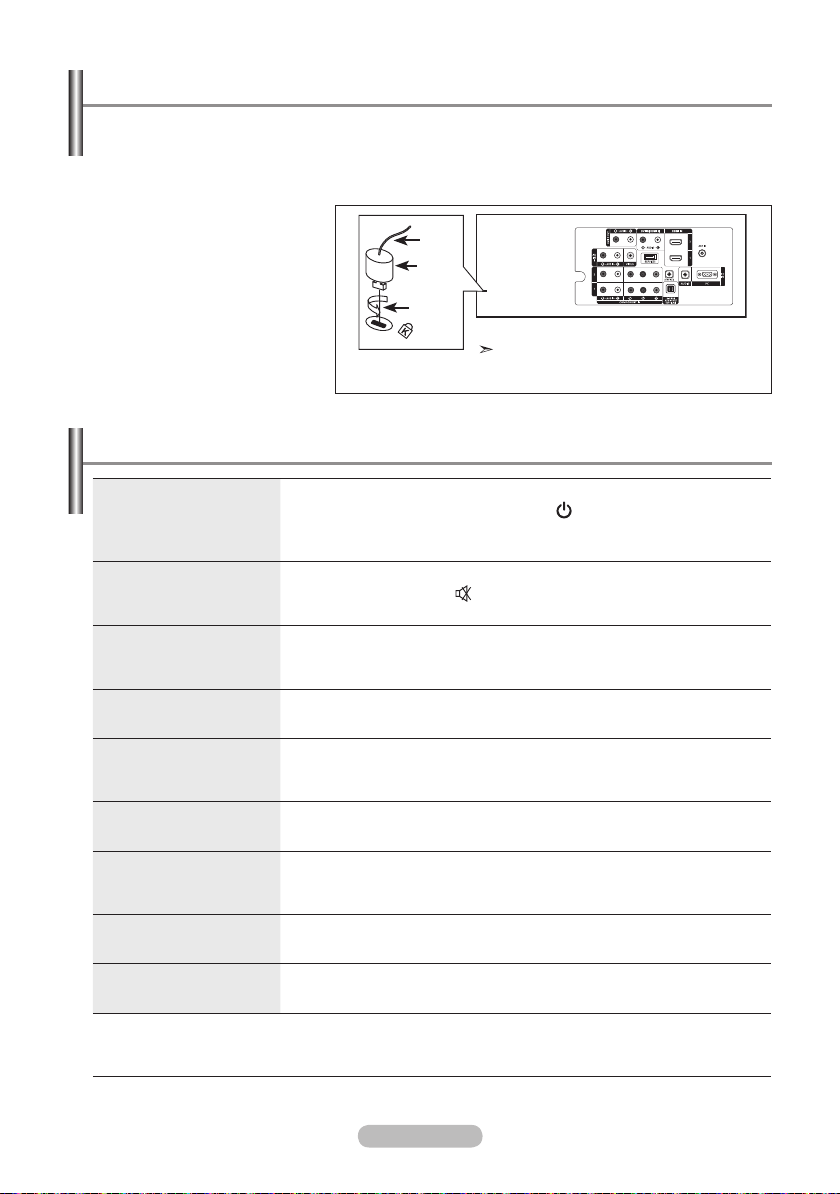
Using the Anti-Theft Kensington Lock
The Kensington lock is a device used to physically fix the system when using it in a public place.
The locking device has to be purchased separately. The appearance and locking method may differ from the illustration depending on the manufacturer. Please refer to the manual provided with
the Kensington lock for proper use.
1. Insert the locking device into
the Kensington slot on the
LCD TV (Figure 1), and turn it
in the locking direction
(Figure 2).
2. Connect the Kensington lock
cable.
3. Fix the Kensington lock to a
desk or a heavy stationary
object.
Cable
Figure 2
Figure 1
<Optional>
The place of the Kensington Lock may be
different depending on its model.
Troubleshooting: Before Contacting Service Personnel
No sound or picture
Normal picture but no sound
Screen is black and power
indicator light blinks steadily
No picture or black and white
picture
Sound and picture
interference
Blurred or snowy picture,
distorted sound
Remote control malfunctions
"Check signal cable."
message is displayed.
On PC mode, "Not Supported
Mode." message is displayed.
The TFT LCD panel uses a panel consisting of sub pixels (3,133,440) which require sophisticated
technology to produce. However, there may be few bright or dark pixels on the screen. These pixels will
have no impact on the performance of the product.
Check that the mains lead has been connected to a wall socket.
Check that you have pressed the POWER buttons on the front of the set.
Check the picture contrast and brightness settings.
Check the volume.
Check the volume.
Check whether the MUTE button has been pressed on the remote control.
Check if "Internal Mute" is on
On your computer check; Power, Signal Cable.
The TV is using its power management system.
Move the computer’s mouse or press any key on the keyboard.
Adjust the colour settings.
Check that the broadcast system selected is correct.
Try to identify the electrical appliance that is affecting the set and move it
further away.
Plug your set into a different mains socket.
Check the direction, location and connections of your aerial.
This interference is often due to the use of an indoor aerial.
Replace the remote control batteries.
Clean the upper edge of the remote control (transmission window).
Check the battery terminals.
Check that the signal cable is firmly connected to the PC or video sources.
Check that the PC or video sources are turned on.
Check the maximum resolution and the frequency of the video adaptor.
Compare these values with the data in the Display Modes.
English - 60
Page 63
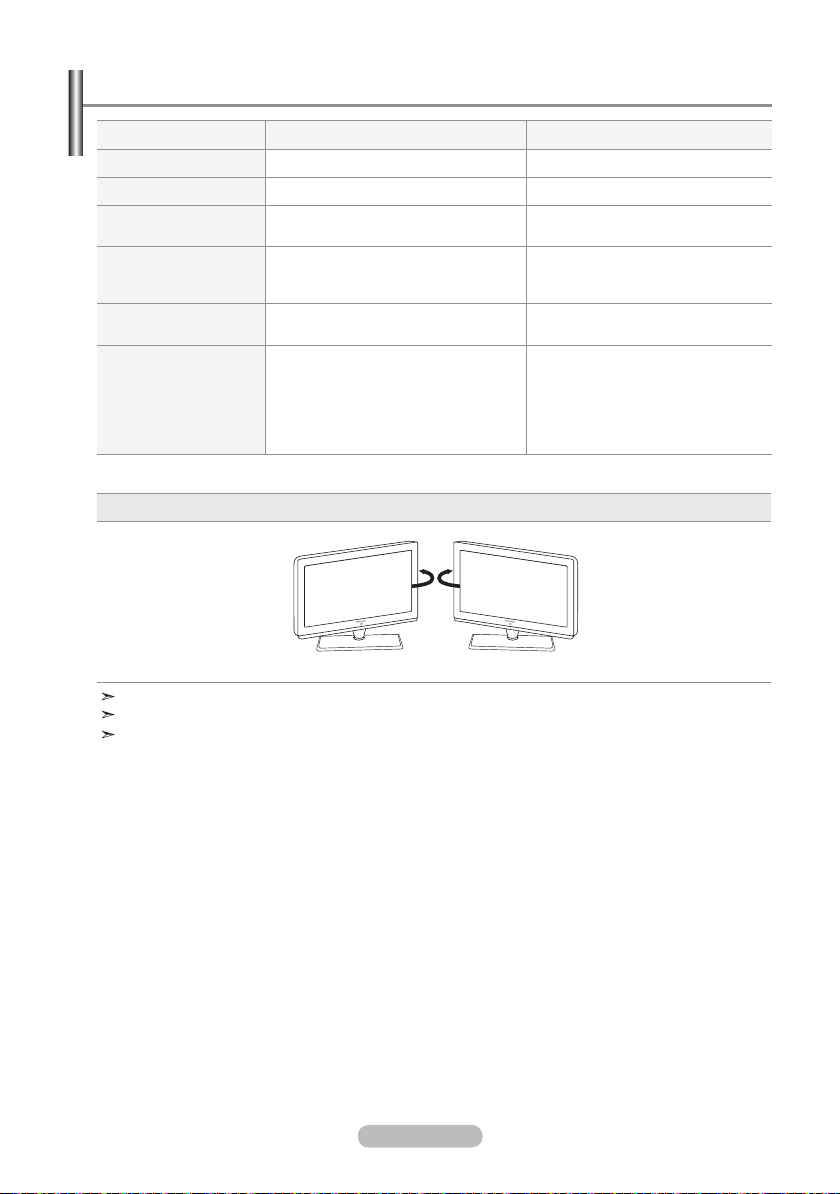
Technical and Environmental Specications
Model Name
Screen Size (Diagonal)
PC Resolution
Sound
Output
Dimension (WxDxH)
Body
With stand
Weight
With stand
Environmental
Considerations
Operating Temperature
Operating Humidity
Storage Temperature
Storage Humidity
Design and specifications are subject to change without prior notice.
This device is a Class B digital apparatus.
For the power supply and Power Consumption, refer to the label attached to the product.
LA40N81BD LA46N81BD
40 inch 46 inch
1920 X 1080 @ 60 Hz 1920 X 1080 @ 60 Hz
10 W X 2
1041 x 97 x 615mm
1041 x 290 x 671mm
22 kg
10 °C to 40 °C (50 °F to 104 °F)
10 % to 80 %, non-condensing
-20 °C to 45 °C (-4 °F to 113 °F)
5 % to 95 %, non-condensing
Stand Swivel (Left / Right)
-20˚ ~ 20˚
10 °C to 40 °C (50 °F to 104 °F)
10 % to 80 %, non-condensing
-20 °C to 45 °C (-4 °F to 113 °F)
5 % to 95 %, non-condensing
10 W X 2
1176 x 114 x 694mm
1176 x 320 x 761mm
31 kg
English - 61
Page 64

This page is intentionally
left blank.
 Loading...