

Page 1

User manual
Curved Soundbar
HW-J6500
HW-J6501
HW-J6502
Imagine the possibilities
Thank you for purchasing this Samsung product.
To receive more complete service, please register your product at
www.samsung.com/register
Page 2

GETTING STARTED
GETTING STARTED
FEATURES
Streaming Music Services
The Curved Soundbar makes diving into all your favourite
music easier than ever before, thanks to its Wi-Fi
capabilities. Simply access the Samsung Multiroom App
to experience the best of the internet’s subscription
streaming music services.
Surround Sound Expansion
The Surround Sound Expansion feature adds depth and
spaciousness to your listening experience.
TV SoundConnect
Connect your TV and Soundbar easily through Bluetooth
with TV Sound Connect. The absence of trailing wires
between the Soundbar and TV allows you to showcase
the slim and sleek design of both systems, while
maintaining a clean look in your living environment. Easily
control the Soundbar and TV from a single TV remote.
Music Source Sharing (= Multiroom Play)
Controlling and sharing one music source across multiple
audio devices in various locations is made easy with
Multiroom Link. The mobile app remotely controls volume
and music on your system across different devices,
including your TV, Soundbar, Home Entertainment
System and Blu-ray Disc Player. Enjoy the audio you
want, where you want.
HDMI
HDMI transmits video and audio signals simultaneously,
and provides a clearer picture.
The unit is also equipped with the ARC function which
lets you listen to sound from your TV through the
Soundbar via an HDMI cable. This function is only
available if you connect the unit to an ARC compliant TV.
USB Host Support
You can connect and play music files from external USB
storage devices such as MP3 players, USB flash
memory, etc. using the Soundbar's USB HOST function.
Bluetooth Function
You can connect a Bluetooth device to the Soundbar
and enjoy music with high quality stereo sound, all
without wires!
LICENCES
Manufactured under Licence from Dolby Laboratories.
Dolby and the double-D symbol are trademarks of Dolby
Laboratories.
For DTS patents, see http://patents.dts.com.
Manufactured under licence from DTS Licensing Limited.
DTS, the Symbol, & DTS and the Symbol together are
registered trademarks, and DTS 2.0 Channel is a
trademark of DTS, Inc. © DTS, Inc. All Rights Reserved.
The terms HDMI and HDMI High-Definition Multimedia
Interface, and the HDMI Logo are trademarks or
registered trademarks of HDMI Licensing LLC in the
United States and other countries.
2
Page 3
GETTING STARTED
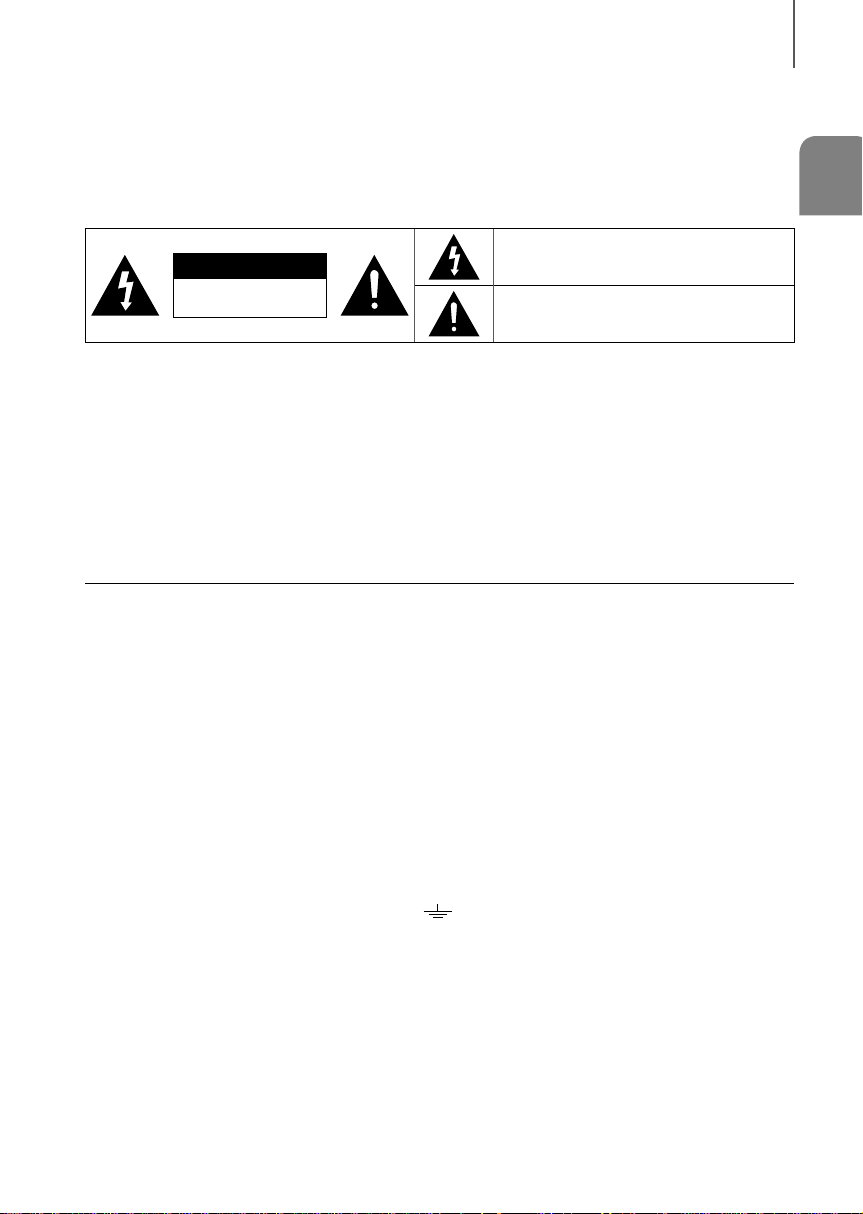
SAFETY INFORMATION
SAFETY WARNINGS
TO REDUCE THE RISK OF ELECTRIC SHOCK, DO NOT REMOVE THE COVER (OR BACK).
NO USER-SERVICEABLE PARTS ARE INSIDE. REFER SERVICING TO QUALIFIED SERVICE PERSONNEL.
This symbol indicates “dangerous voltage”
CAUTION
RISK OF ELECTRIC SHOCK
WARNING : To reduce the risk of fire or electric shock, do not expose this appliance to rain or moisture.
CAUTION : TO PREVENT ELECTRIC SHOCK, MATCH WIDE BLADE OF PLUG TO WIDE SLOT, FULLY INSERT.
• This apparatus shall always be connected to a AC outlet with a protective grounding connection.
• To disconnect the apparatus from the mains, the plug must be pulled out from the mains socket, therefore the
mains plug shall be readily operable.
CAUTION
• Do not expose this apparatus to dripping or splashing. Do not put objects filled with liquids, such as vases on the
apparatus.
• To turn this apparatus off completely, you must pull the power plug out of the wall socket. Consequently, the power
plug must be easily and readily accessible at all times.
Wiring the Main Power Supply Plug (UK Only)
IMPORTANT NOTICE
The mains lead on this equipment is supplied with a moulded plug incorporating a fuse. The value of the fuse is
indicated on the pin face of the plug and if it requires replacing, a fuse approved to BS1362 of the same rating must
be used. Never use the plug with the fuse cover removed. If the cover is detachable and a replacement is required,
it must be of the same colour as the fuse fitted in the plug. Replacement covers are available from your dealer. If the
fitted plug is not suitable for the power points in your house or the cable is not long enough to reach a power point,
you should obtain a suitable safety approved extension lead or consult your dealer for assistance. However, if there is
no alternative to cutting off the plug, remove the fuse and then safely dispose of the plug. Do not connect the plug to a
mains socket as there is a risk of shock hazard from the bared flexible cord. Never attempt to insert bare wires directly
into a mains socket. A plug and fuse must be used at all times.
IMPORTANT
The wires in the mains lead are coloured in accordance with the following code:– BLUE = NEUTRAL BROWN = LIVE
As these colours may not correspond to the coloured markings identifying the terminals in your plug, proceed as
follows:– The wire coloured BLUE must be connected to the terminal marked with the letter N or coloured BLUE or
BLACK. The wire coloured BROWN must be connected to the terminal marked with the letter L or coloured BROWN
or RED.
DO NOT OPEN
inside the product that presents a risk of electric
shock or personal injury.
This symbol indicates important instructions
accompanying the product.
ENG
WARNING : DO NOT CONNECT EITHER WIRE TO THE EARTH TERMINAL WHICH IS MARKED WITH THE
LETTER E OR BY THE EARTH SYMBOL
, OR COLOURED GREEN OR GREEN AND YELLOW.
3
Page 4
GETTING STARTED
PRECAUTIONS
68.6
99.1mm
99.1mm 99.1mm
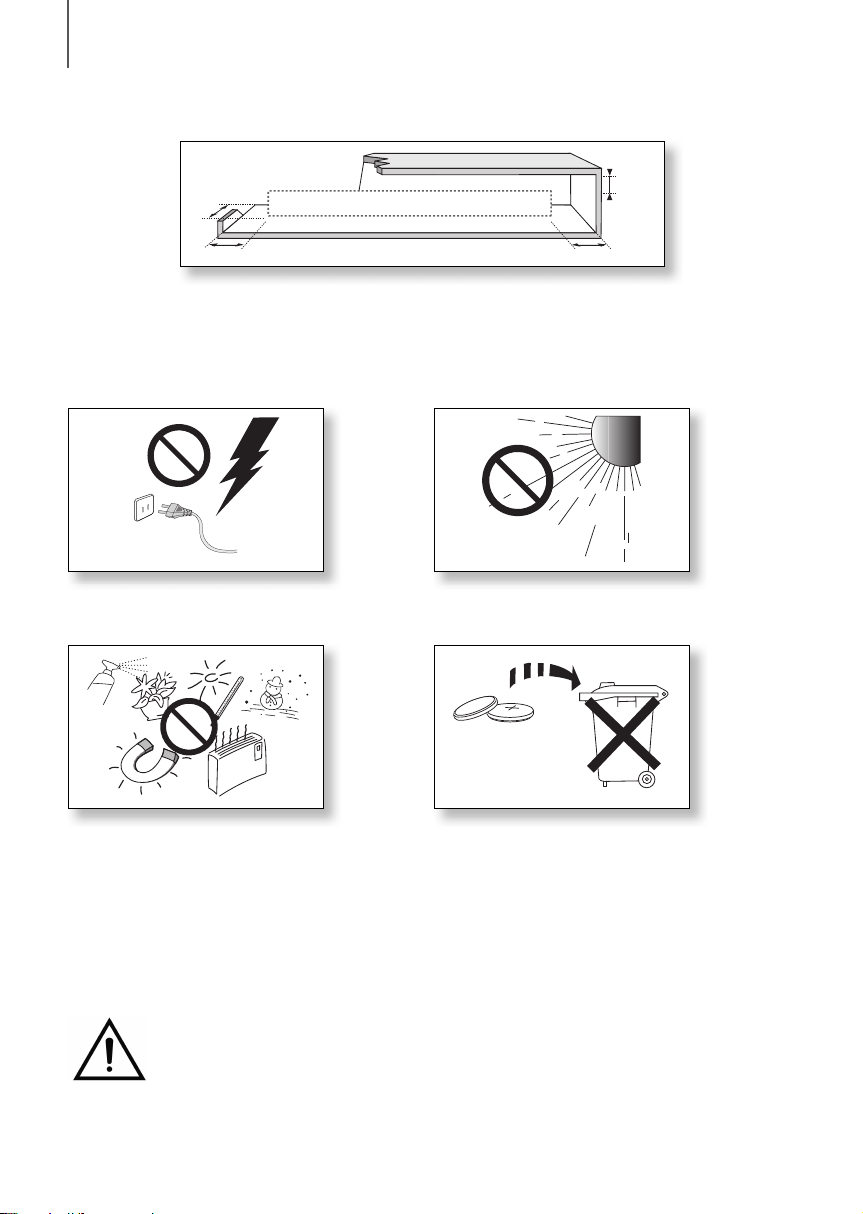
Ensure that the AC power supply in your house complies with the power requirements listed on the identification
sticker located on the back of your product. Install your product horizontally, on a suitable base (furniture), with enough
space around it for ventilation (7~10 cm). Make sure the ventilation slots are not covered. Do not place the unit on
amplifiers or other equipment which may become hot. This unit is designed for continuous use. To fully turn off the
unit, disconnect the AC plug from the wall outlet. Unplug the unit if you intend to leave it unused for a long period of
time.
mm
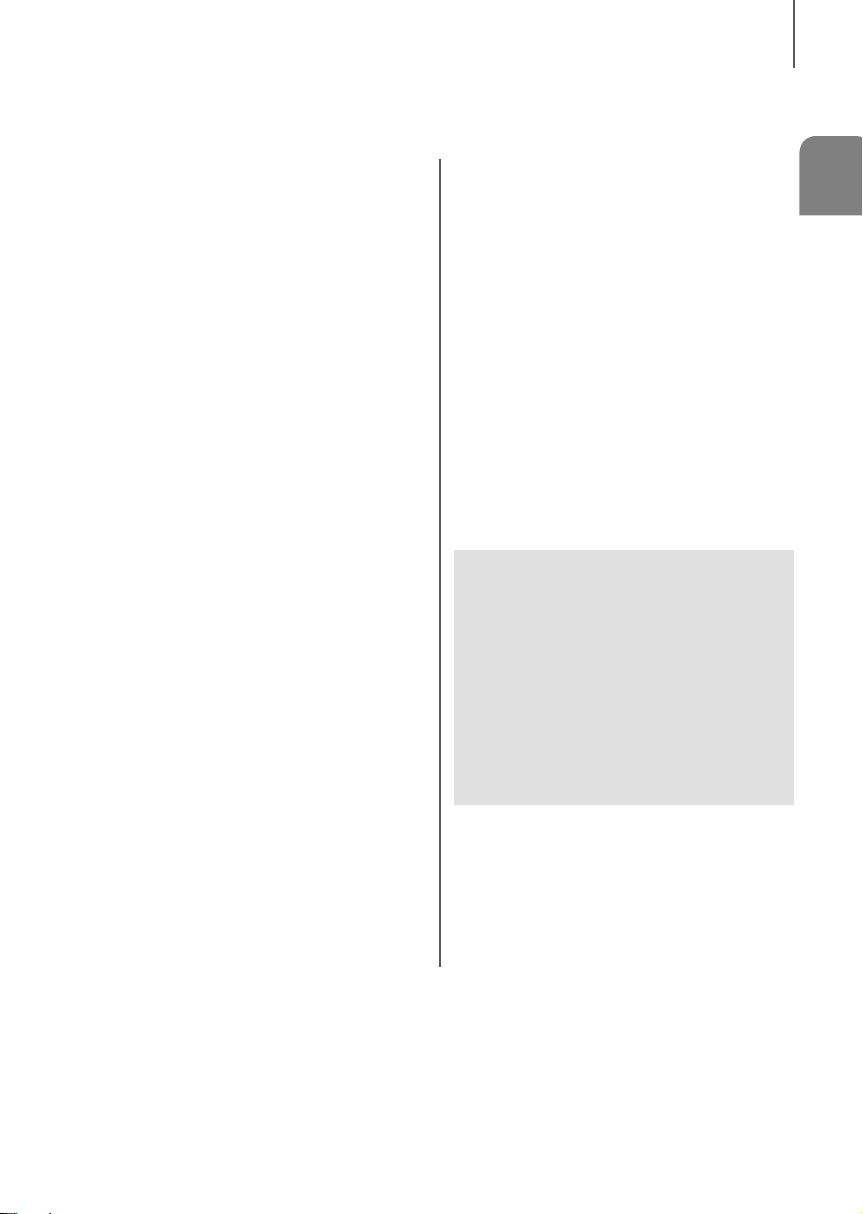
During thunderstorms, disconnect the AC plug from the
wall outlet. Voltage peaks due to lightning could damage
the unit.
Protect the product from moisture (i.e. vases), and
excess heat (e.g. a fireplace) or equipment creating
strong magnetic or electric fields. Disconnect the power
cable from the AC supply if the unit malfunctions. Your
product is not intended for industrial use. It is for
personal use only. Condensation may occur if your
product has been stored in cold temperatures. If
transporting the unit during the winter, wait approximately
Do not expose the unit to direct sunlight or other heat
sources. This could lead to overheating and cause the
unit to malfunction.
The batteries used with this product contain chemicals
that are harmful to the environment. Do not dispose of
batteries in the general household trash. Do not dispose
of batteries in a fire. Do not short circuit, disassemble, or
overheat the batteries. There is a danger of explosion if
the battery is incorrectly replaced. Replace only with the
same or equivalent type.
2 hours until the unit has reached room temperature
before using.
WARNING, DO NOT INGEST BATTERY, CHEMICAL BURN HAZARD, The remote control supplied with
this product contains a coin/button cell battery. If the coin/button cell battery is swallowed, it can cause
severe internal burns in just 2 hours and can lead to death. Keep new and used batteries away from
children. If the battery compartment does not close securely, stop using the product and keep it away
from children. If you think batteries might have been swallowed or placed inside any part of the body, seek immediate
medical attention.
4
Page 5
CONTENTS
2 GETTING STARTED
2 Features
3 Safety Information
6 What’s Included
7 DESCRIPTIONS
7 Top / Front Panel
8 Rear / Bottom Panel
9 Remote Control
11 INSTALLATION
11 Installing the Soundbar
11 Installing the Wall Mount
14 Attaching the Soundbar to your TV's Stand
14 Installing Soundbar to Free-Standing
15 CONNECTIONS
15 Connecting the Subwoofer
17 Connecting to a TV
17 Connections with TV Using HDMI (Digital)
Cable
17 Connections with TV Using Optical (Digital)
Cable
18 TV SoundConnect
20 Connections with External Device
20 HDMI Cable
20 Optical or AUX Cable
21 USB
GETTING STARTED
ENG
23 FUNCTIONS
23 Input Mode
24 Bluetooth
26 Using the Network Standby On
Function
26 Using the Multiroom Link
28 Software Update
30 TROUBLESHOOTING
30 Troubleshooting
31 APPENDIX
31 Specifications
● Figures and illustrations in this User Manual are
provided for reference only and may differ from
actual product appearance.
● An administration fee may be charged if either
(a) an engineer is called out at your request and
there is no defect with the product (i.e. where
the user manual has not been read).
(b) you bring the unit to a repair centre and there is
no defect with the product (i.e. where the user
manual has not been read).
● You will be informed of the administration fee
amount before a technician visits.
5
Page 6
GETTING STARTED
WHAT’S INCLUDED
BEFORE READING THE USER’S MANUAL
Note the following terms before reading the user manual.
+ Icons used in this manual
Icon Term Definition
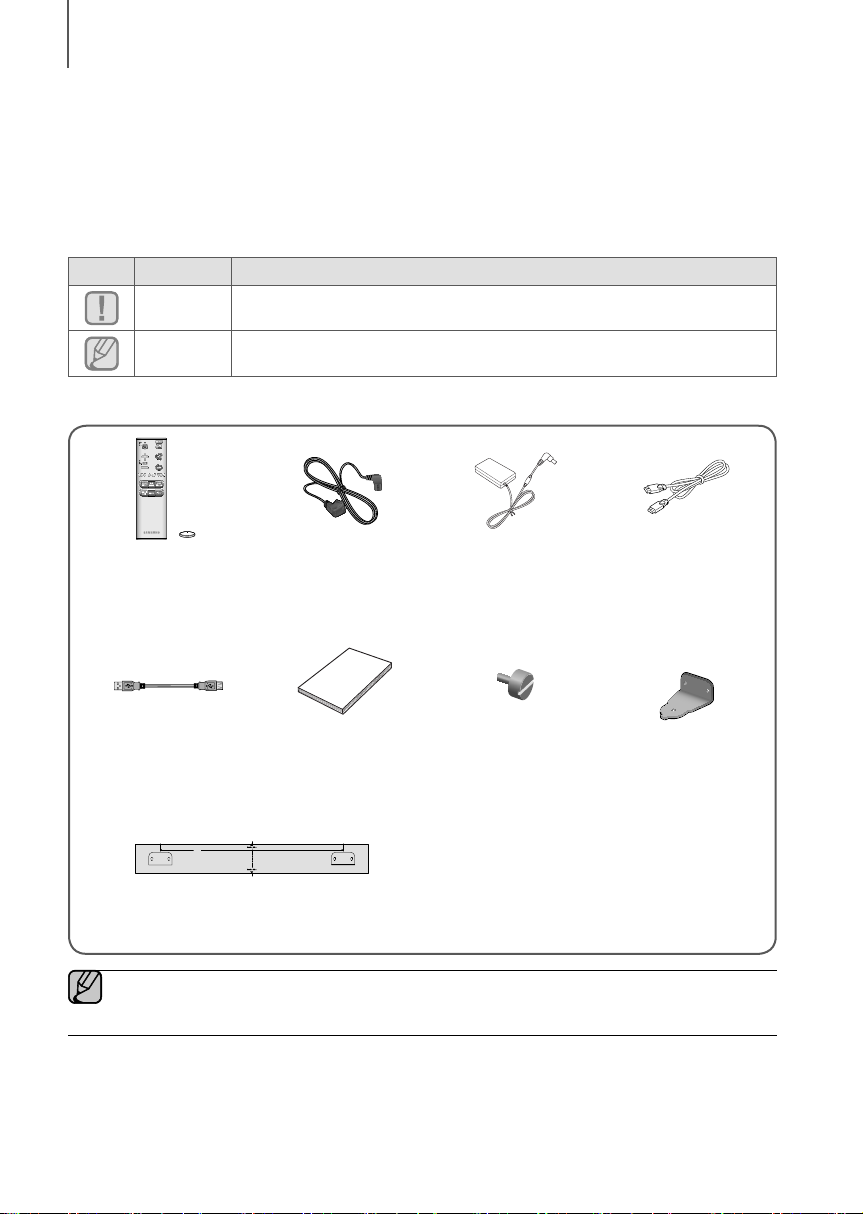
Check for the supplied accessories shown below.
Caution
Note
Remote Control /
Lithium Battery
(3V : CR2032)
USB Cable User Manual Holder-Fix Mount : 2EA Bracket-Wall : 2EA
Indicates a situation where a function does not operate or settings may be cancelled.
Indicates tips or instructions on the page that help you operate a function.
Power Cord : 2EA DC Adapter HDMI Cable
[ZW
Wall Mount Guide
● The appearance of the accessories may differ slightly from the illustrations above.
● Use the dedicated USB cable to connect external USB devices to the unit.
6
Page 7
DESCRIPTIONS
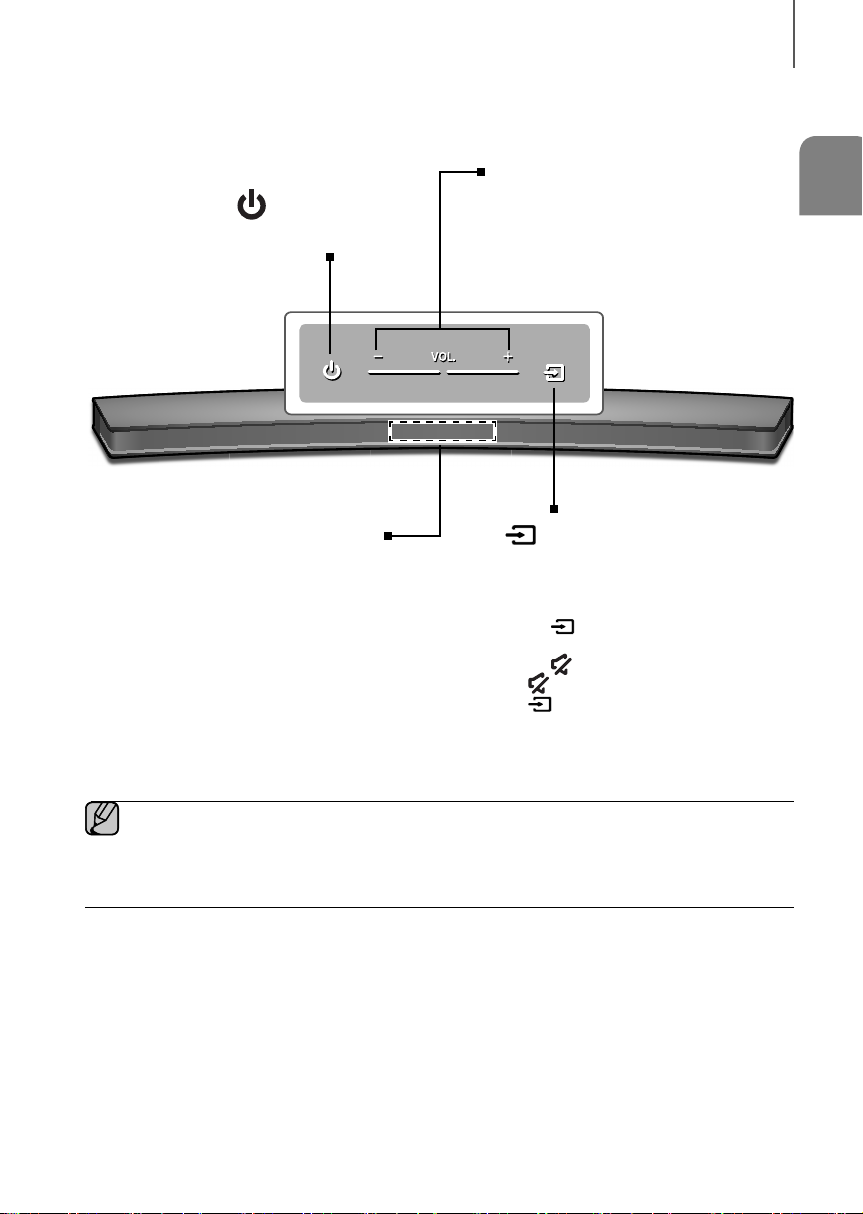
TOP / FRONT PANEL
(Power) Button
Turns the power on and off.
DESCRIPTIONS
ENG
VOL. - / +
Controls the volume level.
The numeric value of the volume level
appears in the front panel display.
Display
Displays the current mode.
● When you plug in the AC cord, the power key will work in 4 to 6 seconds.
● When you turn on this unit, there will be a 4 to 5 second delay before it produces sound.
● If you want to enjoy the sound only from the Soundbar, you must turn off the TV's speakers in the Audio
Setup menu of your TV. Refer to the owner's manual supplied with your TV.
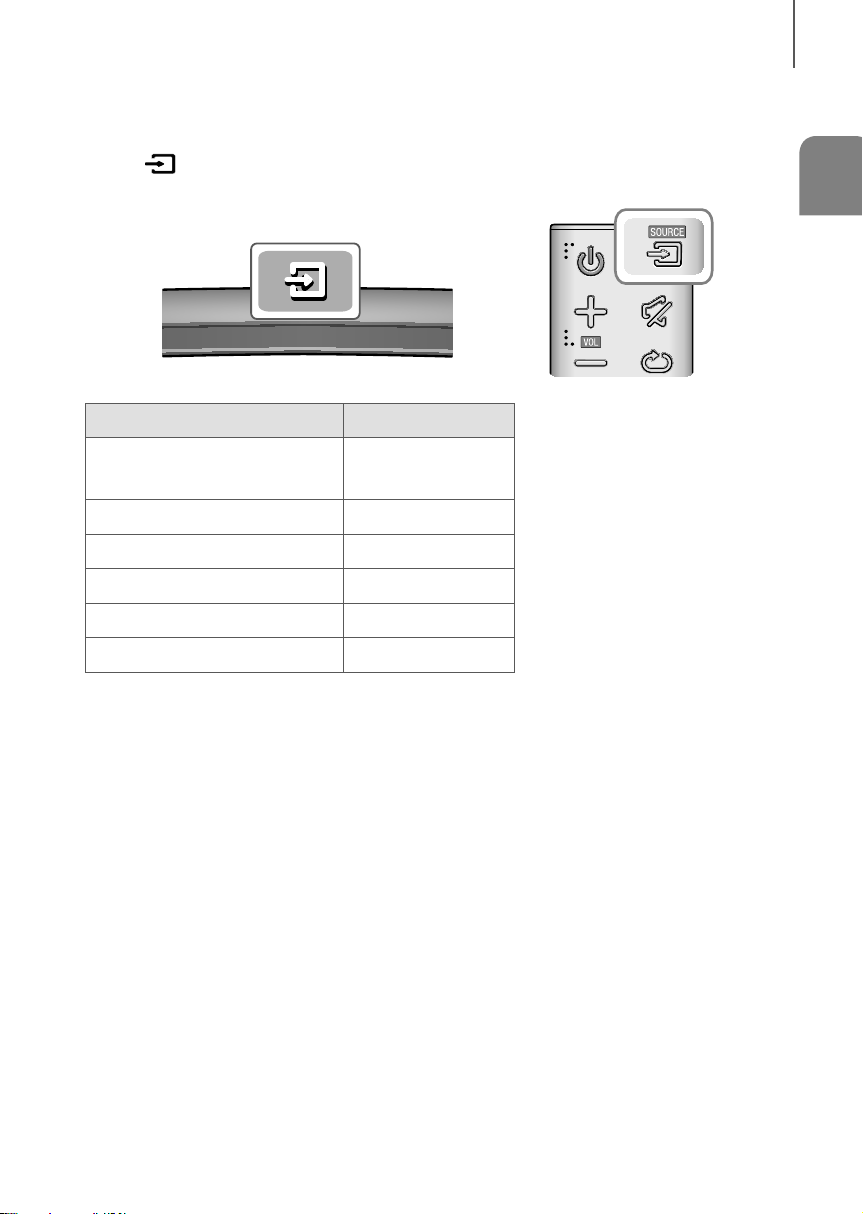
(Source) Button
Selects the D.IN, AUX, HDMI, BT, TV, or
USB input.
● While the unit is powered on, pressing
(Source) button for more than
the
3 seconds sets the button to act as
( Mute) button. To cancel the
the
( Mute) button setup, press the
(Source) button for more than 3
seconds again.
7
Page 8
DESCRIPTIONS
DC14V
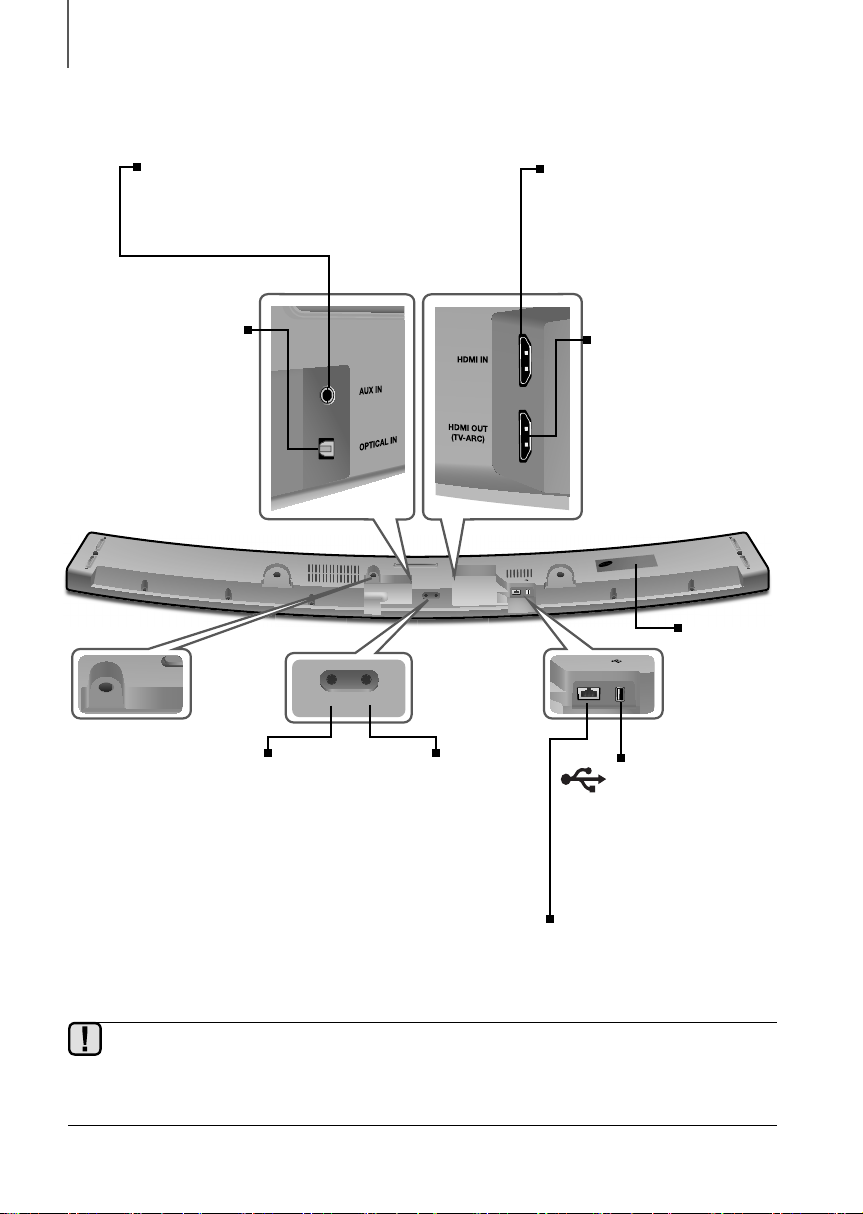
REAR / BOTTOM PANEL
AUX IN
Connect to the Analogue output of an
external device.
OPTICAL IN (D.IN)
Connect to the digital
(optical) output of an
external device.
DC 14V
(Power Supply In)
Connect the DC power
adaptor to the power supply
jack, and then connect the
AC power adaptor plug to a
wall outlet.
DC 14V
Wi-Fi SETUP
SPK ADD
Wi-Fi SETUP
Press this button to
connect your Soundbar to
your network using Wi-Fi
setup.
HDMI IN
AUX IN
HDMI OUT
(TV-ARC)
OPTICAL IN
SPK ADD
Wi-Fi SETUP
5V 0.5A
LAN
SPK ADD
Press the button to
connect Soundbar to
the HUB.
(not supplied)
HDMI IN
Inputs digital video and audio
signals simultaneously using an
HDMI cable. Use when connecting
a supported external device.
HDMI OUT (TV-ARC)
Outputs digital video and
audio signals simultaneously
using an HDMI cable.
LABEL
LAN 5V 0.5A
(USB Port)
Connect USB devices here to play
files on the devices.
LAN
Lets you connect to a network using a LAN cable.
● When disconnecting the power cable of the AC power adaptor from a wall outlet, pull the plug.
Do not pull the cable.
● Do not connect this unit or other components to an AC outlet until all connections between components
are complete.
8
Page 9
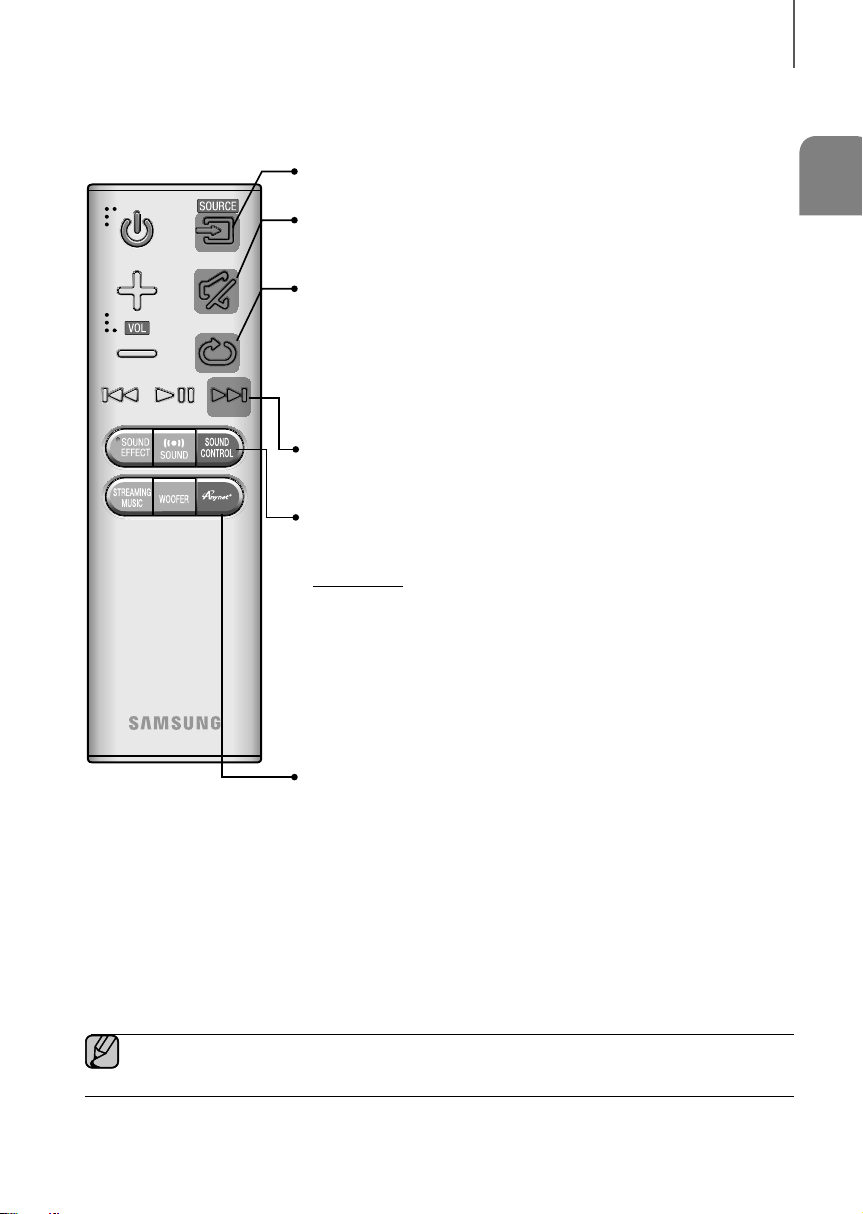
REMOTE CONTROL
SOURCE
Press to select a source connected to the Soundbar.
Mute
You can turn the volume down to 0 with the push of a button.
Press again to restore the sound to the previous volume level.
Repeat
Press to set the Repeat function during music playback from a USB device.
OFF - REPEAT : Cancells Repeat Playback.
TRACK - REPEAT : Repeatedly play a track.
ALL - REPEAT : Repeatedly play all tracks.
RANDOM - REPEAT : Plays tracks in random order.
(A track that has already been played may be played again.)
Skip Forward
If there is more than one file on the device you are playing, and you press
the $ button, the next file is selected.
SOUND CONTROL
Press to select TREBLE, BASS, or AUDIO SYNC. Then, use the #,$
buttons to adjust the Treble, Bass volume from -3 to +3.
Press and hold the SOUND CONTROL button for about 5 seconds to adjust
the sound for each frequency band. 150Hz, 300Hz, 600Hz, 1.2KHz, 2.5KHz,
5KHz, and 10KHz are selectable and each can be adjusted to a setting between
-6 and +6.
If the Soundbar is connected to a digital TV and the video appears out of sync
with the audio, press the SOUND CONTROL button to sync the audio with the
video. Use the
0 ms and 300 ms. In USB mode, TV mode, and BT mode, the Audio Sync
function may not available.
#,$
DESCRIPTIONS
ENG
(*Use the #,$ buttons to adjust level.)
buttons to set the audio delay between
● Soundbar is a Samsung proprietary name.
● Operate the TV using the TV's remote control.
Anynet+
Press the Anynet+ button to turn the Anynet+ function on or off.
(Default : Auto Power Link OFF, ON - ANYNET+ / OFF - POWER LINK or OFF
- ANYNET+ / ON - POWER LINK). The Anynet+ function lets you control the
Soundbar with the remote from an Anynet+ compatible Samsung TV. The
Soundbar must be connected to the TV via an HDMI cable.
* Auto Power Link
Synchronizes the Soundbar to a connected Optical source via the Optical
jack so it turns on automatically when you turn on your TV. (See page 18)
You can also activate Wi-Fi SETUP function by pressing and holding Anynet+
button on the remote for over 7 seconds.
9
Page 10
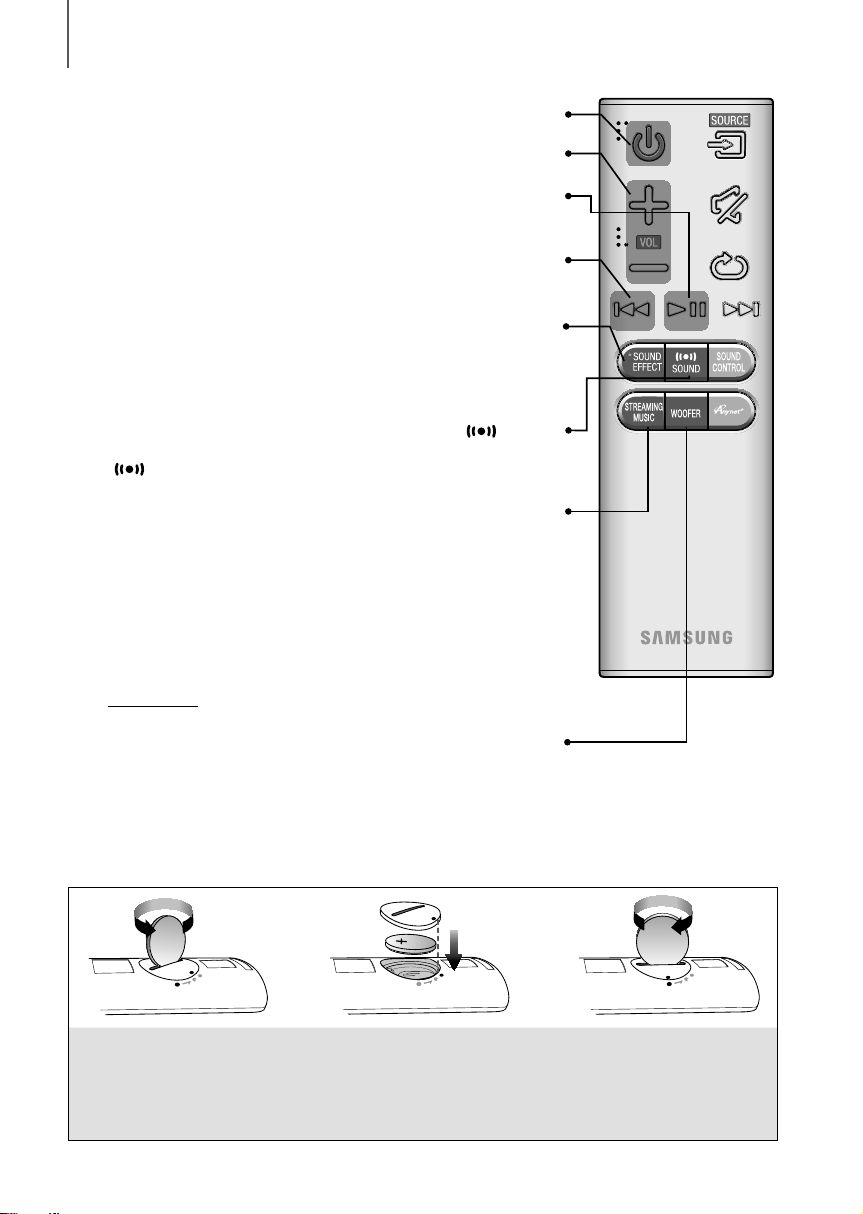
DESCRIPTIONS
Power
Turns the Soundbar on and off.
Volume
Adjusts the volume level of the unit.
Play / Pause
Press the
If there is more than one file on the device you are playing, and you press the
You can select from 6 different sound modes - STANDARD (Original Sound),
MUSIC, VOICE, SPORTS, CINEMA, and NIGHT MODE - depending on the
Select the STANDARD mode if you want to enjoy the original sound.
Surr.Sound adds depth and spaciousness to the sound. Pressing the
SOUND button repeatedly cycles through the Surr.Sound settings :
Press STREAMING MUSIC button to listen to an Internet radio station. Each
time you press this button, the Soundbar switches to the next default station,
To use the STREAMING MUSIC function, the soundbar must be connected to
Lets you apply dynamic range control to Dolby Digital, Dolby Digital Plus, and
Press and hold the STREAMING MUSIC button, then the DRC (Dynamic
WOOFER
Press the WOOFER button. Then, use the
You can also activate SPK ADD function of the soundbar by pressing and
&
button to pause the playing of a file temporarily.
&
Press the
ON - SURROUND SOUND, OFF - SURROUND SOUND
Range Control) function toggles between ON and OFF.
(* Use the #,$ buttons to adjust woofer volume.)
holding WOOFER button of the remote for over 5 seconds.
button again to play the selected file.
Skip Back
button, the previous file is selected.
SOUND EFFECT
content you want to listen to.
SOUND
STREAMING MUSIC
cycling through the 3 default stations.
the network. (See page 26)
DRC (Dynamic Range Control) *
Dolby TrueHD audio.
#,$
buttons to adjust Subwoofer
volume from -12, -6 to +6.
#
INSTALLING THE BATTERY IN THE REMOTE CONTROL
1. Use a suitable coin to turn the
remote control's battery cover
counterclockwise to remove it
as shown in the figure above.
2. Insert a 3V lithium battery. Keep the
positive (+) pole facing up when inserting
the battery. Put the battery cover on and
●' marks side by side as shown
align the '
in the figure above.
10
3. Use a suitable coin to
turn the remote control
battery cover clockwise
as far as it will go to fix it
in place.
Page 11
INSTALLATION
INSTALLATION
INSTALLING THE SOUNDBAR
INSTALLING THE WALL MOUNT
+ Installation Precautions
● Install on a vertical wall only.
● For the installation, avoid a location with high temperature or humidity, or a wall that cannot sustain the weight of
the set.
● Check the strength of the wall. If the wall is not strong enough to support the unit, reinforce the wall or install the
unit on a different wall that can support the unit's weight.
● Purchase and use the fixing screws or anchors appropriate for the kind of wall you have (plaster board, iron board,
wood, etc.). If possible, fix the support screws into wall studs.
● Purchase wall mounting screws according to the type and thickness of the wall you will mount the Soundbar on.
- Diameter : M5
- Length: L 35 mm or longer recommended.
● Connect cables from the unit to external devices before you install it on the wall.
● Make sure the unit is turned off and unplugged before you install it. Otherwise, it may cause an electric shock.
ENG
5 cm or more
1. Place the installation guide against the wall surface.
• The installation guide must be level.
• If the TV is mounted on the wall, install the Soundbar at least 5 cm below the TV.
11
Page 12

INSTALLATION
Center Line
Center Line
2. Mark the location where the screws will go through on the wall, and then remove the installation guide. Next, drill
holes for the screws using an appropriately sized drill bit.
3. Fasten the Bracket-Wall (2ea) and screws to the marked locations.
4. Lift up the product after inserting the Bracket-Wall as shown.
12
Page 13
INSTALLATION
Wi-Fi SETUP
SPK ADD
OPTICAL IN
(TV-ARC)
HDMI OUT
LAN
5V 0.5A
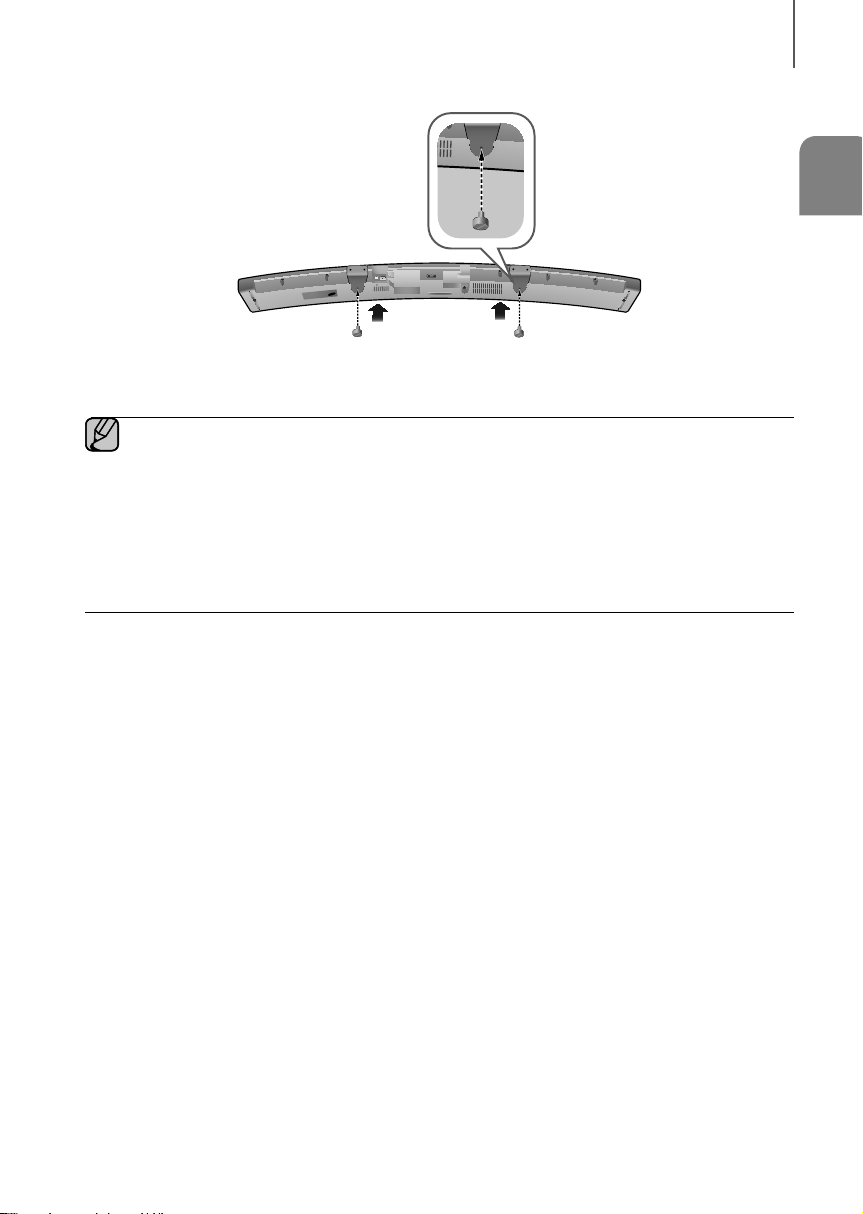
5. Insert and fasten Holder-Fix Mount into each hole on the product’s bottom side. The product is fixed to the
Bracket-Wall.
● Do not hang onto the installed unit and avoid striking or dropping the unit.
● Secure the unit firmly to the wall so that it does not fall off. If the unit falls off, it may cause an injury or
damage the product.
● When the unit is installed on a wall, please make sure that children do not pull any of the connecting
cables, as it may cause it to fall.
● For the optimal performance of a wall mount installation, install the speaker system at least 5 cm below the
TV, if the TV is mounted on the wall.
● For your safety, if you do not mount the unit on the wall, install it on a secure, flat surface where it is unlikely
to fall.
AUX IN
DC 14V
HDMI IN
ENG
13
Page 14

INSTALLATION
ATTACHING THE SOUNDBAR TO YOUR TV'S STAND
You can attach the Soundbar to your TV's stand if you have a Samsung TV that has a stand that is compatible with this
Soundbar.
● This Soundbar is compatible with model JU6700, JU6500 and JU7500, 48 inch, 55 inch and 65 inch,
JU6610 - 48 inch and 55 inch, 2015 Samsung curved TVs. Please visit the home page of Samsung
Electronics (www.Samsung.com) to see a detailed list of the co
● This Soundbar cannot be installed to a non-compatible TV, in either form of TV mount or TV stand.
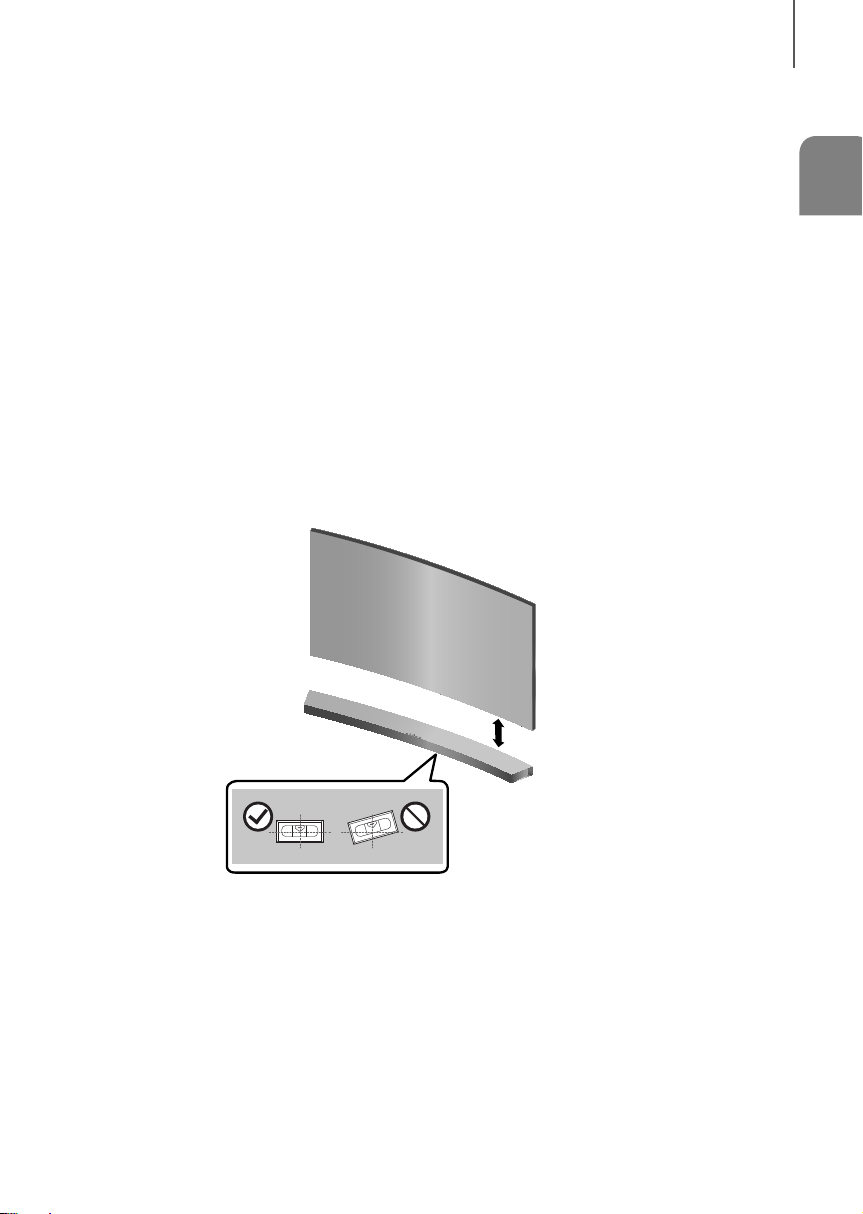
1. Align the Soundbar’s centre with the centre of the base of the TV, and then carefully push it onto the stand as far
as it will go, as shown in the illustration. Be careful not to unbalance the TV.
mp
atible models.
INSTALLING SOUNDBAR TO FREE-STANDING
1. Centre the Soundbar on the flat area in front of the TV.
● Install it on a level and firm surface.
14
Page 15

CONNECTIONS
● Do not connect the power cord of this product or your TV to a wall outlet until all connections between
components are complete.
● Before moving or installing this product, be sure to turn off the power and disconnect the power cord.
CONNECTIONS
CONNECTING THE SUBWOOFER
CONNECTING TO THE SUBWOOFER AUTOMATICALLY
The main unit and subwoofer should link (connect wirelessly) automatically when the main unit and subwoofer are
turned on.
• If it is completely connected, the blue LED in the subwoofer stops blinking.
CONNECTING TO THE SUBWOOFER MANUALLY
The Subwoofer's linking ID is preset at the factory and the main unit and subwoofer should link (connect wirelessly)
automatically when the main unit and subwoofer are turned on. If the Link indicator does not light when the main unit
and subwoofer are turned on, please set the ID by following the procedure below.
POWER
ENG
1. Plug the power cords of the main unit and subwoofer into an AC wall outlet.
2. Press the ID SET button on the back of the subwoofer with a small, pointed object for 5 seconds.
• The STANDBY indicator is turned off and the LINK indicator (Blue LED) blinks quickly.
3. While the main unit is powered off (in STANDBY mode), press and hold the
seconds.
4. The ID SET message appears on the Soundbar's display.
5. To finalise the link, turn the main unit’s power on while the subwoofer’s Blue LED blinks.
• The main unit and the subwoofer should now be linked (connected).
• The Link indicator (Blue LED) on the subwoofer should be on.
• If the Link indicator is not solid blue, the linking process has failed. Turn off the main unit and start again from
Step 2.
• You can enjoy better sound from the wireless subwoofer by selecting a Sound Effect.
(See page 10)
(Mute) on the remote control for 5
15
Page 16

CONNECTIONS
● Before moving or installing the product, be sure to turn off the power and disconnect the power cord.
● If the main unit is powered off, the wireless subwoofer will be in standby mode and the STANDBY LED on
the upper side will come on after the Link indicator (Blue LED) blinks for 30 seconds.
● If you use a device that uses the same frequency (2.4GHz) as the Soundbar near the Soundbar,
interference may cause some sound interruption.
● The transmission distance of the wireless signal between the main unit and subwoofer is about 10 meters,
but may vary depending on your operating environment. If a steel-concrete or metallic wall is between the
main unit and the wireless subwoofer, the system may not operate at all, because the wireless signal
cannot penetrate metal.
● If the main unit doesn't make a wireless connection, follow steps 1-5 in the left hand column to re-set the
connection between the main unit and wireless subwoofer.
● The wireless receiving antenna is built into the wireless subwoofer. Keep the unit away from water and
moisture.
● For optimal listening performance, make sure that the area around the wireless subwoofer location is clear
of any obstructions.
16
Page 17
CONNECTIONS
CONNECTING TO A TV
CONNECTIONS WITH TV USING HDMI (DIGITAL) CABLE
HDMI Cable
ENG
HDMI IN
DC 14V
AUX IN
OPTICAL IN
HDMI OUT
(TV-ARC)
HDMI OUT
(TV-ARC)
HDMI IN
5V 0.5A
LAN
HDMI OUT
(TV-ARC)
SPK ADD
Wi-Fi SETUP
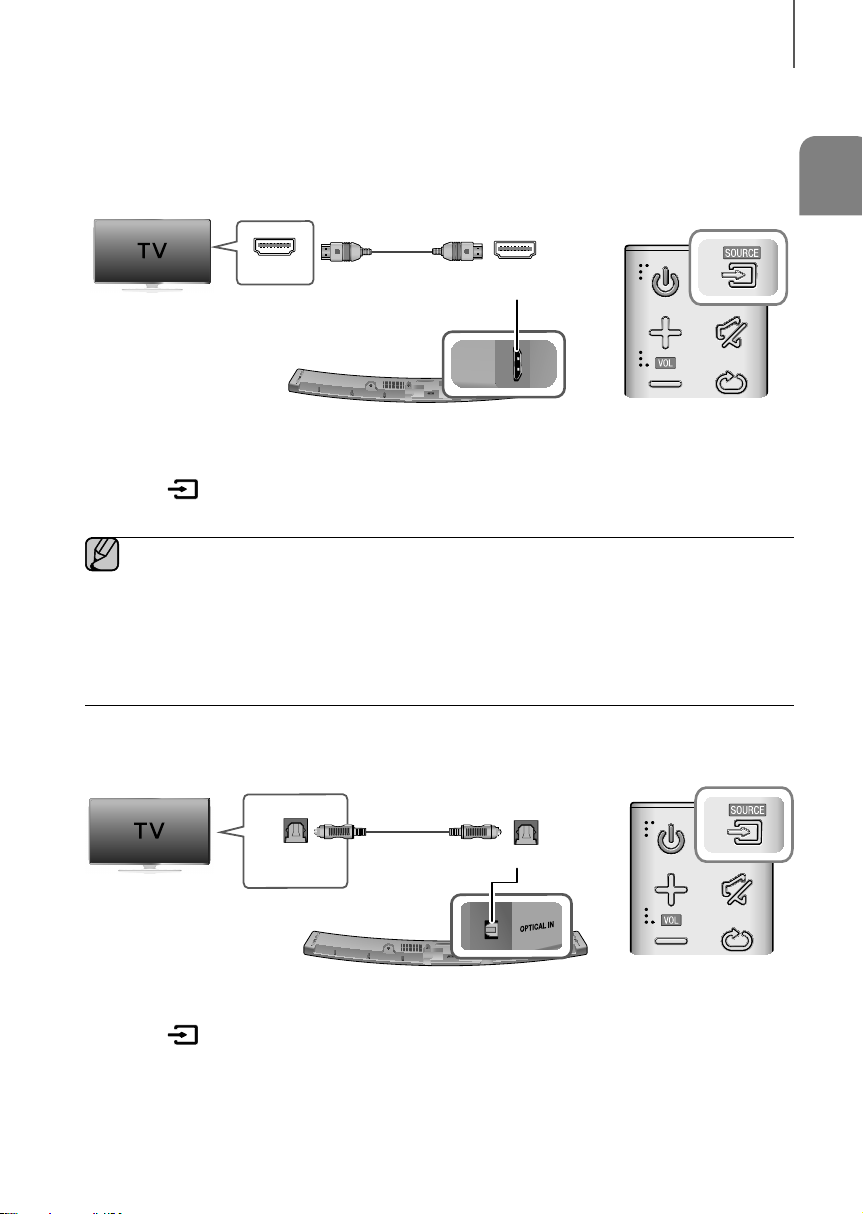
1. Connect an HDMI cable from the HDMI OUT (TV-ARC) jack on the back of the product to the HDMI IN jack on
your TV.
2. Press the
(Source) button on the top panel of Soundbar or the SOURCE button on remote control to select
the D.IN mode.
● HDMI is an interface that enables the digital transmission of video and audio data with just a single
connector.
● If the TV provides an ARC port, connect the HDMI cable to the HDMI IN (ARC) port.
● We recommend you use a coreless HDMI cable if possible. If you use a cored HDMI cable, use one whose
diameter is less than 14 mm.
● Anynet+ must be turned on.
● This function is not available if the HDMI cable does not support ARC.
CONNECTIONS WITH TV USING OPTICAL (DIGITAL) CABLE
Optical Cable
(not supplied)
OPTICAL OUT
DC 14V
AUX IN
OPTICAL IN
SPK ADD
HDMI IN
HDMI OUT
(TV-ARC)
Wi-Fi SETUP
OPTICAL IN
5V 0.5A
LAN
1. Connect OPTICAL IN (Audio) on the Soundbar to the OPTICAL OUT jack of the TV.
2. Press the
(Source) button on the top panel of Soundbar or the SOURCE button on remote control to select
the D.IN mode.
17
Page 18
CONNECTIONS
+ Auto Power Link
If you have connected the main unit to a TV with a digital optical cable, set the Auto Power function ON to have
the Soundbar turn on automatically when you turn the TV on.
AUTO POWER LINK Display
ON
OFF
1. Connect the Soundbar and
2. Press the
select the
3. Press the Anynet+ button on the remote control to toggle the Auto Power Link function on and off.
(Source) button on the main unit’s top panel or the SOURCE button on the remote control to
D.IN
mode.
● Depending on the connected device, Auto Power Link may not function.
OFF - ANYNET+ / ON - POWER LINK
ON - ANYNET+ / OFF - POWER LINK
a TV
with an Optical cable (not supplied).
TV SOUNDCONNECT
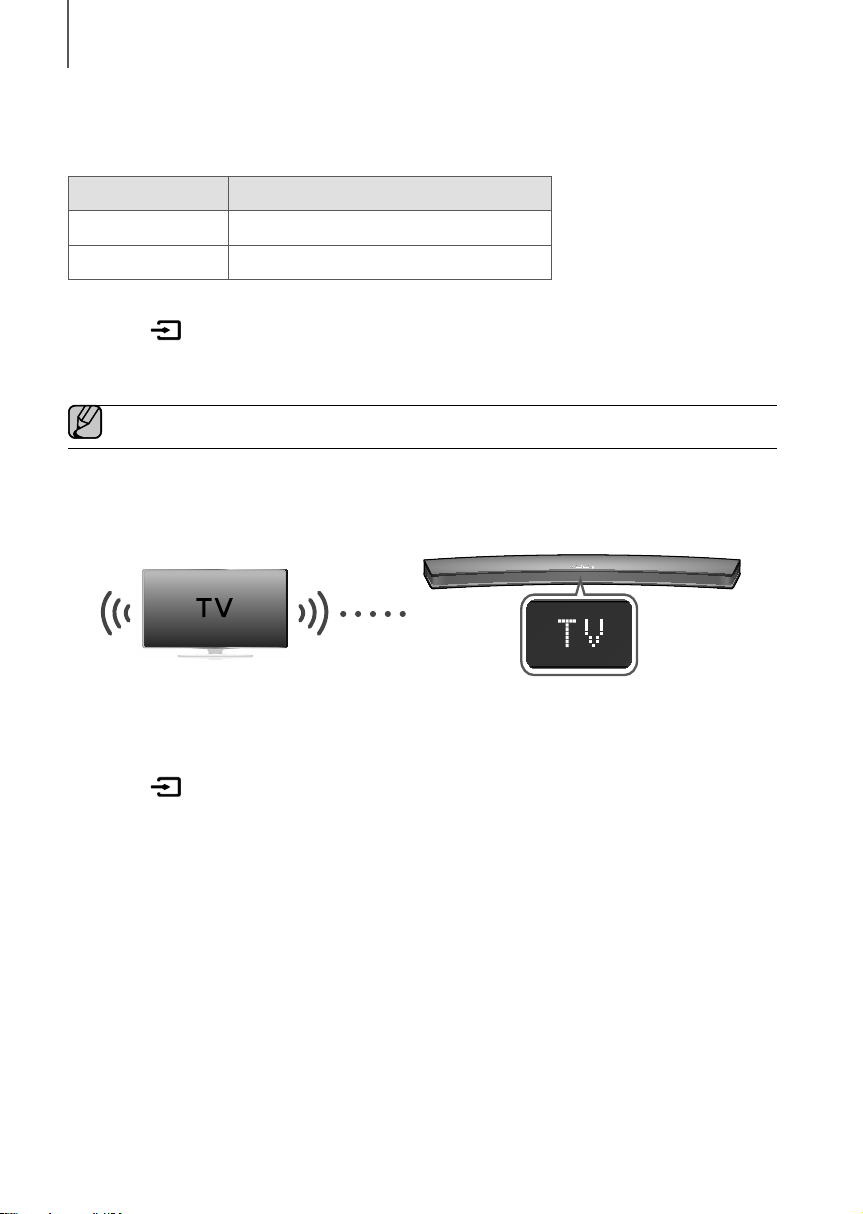
You can enjoy TV sound through your Soundbar when it is connected to a Samsung TV that supports the TV
SoundConnect function.
Connect
1. Turn on the TV and Soundbar.
• Turn on the menu of the TV.
• Move to Speaker Settings on "Sound" tab.
• Set the "Add New Device" menu to "On".
2. Press the
select the TV mode.
3. On the TV, a message asking whether to enable the TV SoundConnect function appears.
4. Select <Ye s> to finish connecting the TV and Soundbar using the TV's remote control.
(Source) button on the main unit’s top panel or the SOURCE button on the remote control to
18
Page 19
● Switching the Soundbar’s mode from TV to another mode automatically terminates TV SoundConnect.
● To connect the Soundbar to another TV, the existing connection must be terminated.
● Terminate the connection to the existing TV, and then press the
seconds to connect to another TV.
● The TV SoundConnect (SoundShare) function is supported by some Samsung TVs released from 2012 on.
Check whether your TV supports the TV SoundConnect (SoundShare) function before you begin. (For
further information, refer to the TV’s user manual.).
● If your Samsung TV was released before 2014, check the SoundShare setting menu.
● If the distance between the TV and Soundbar exceeds 10 meters, the connection may not be stable or the
audio may stutter. If this occurs, relocate the TV or Soundbar so that they are within operational range, and
then re-establish the TV SoundConnect connection.
● TV SoundConnect Operational Ranges:
- Recommended pairing range: within 2 meters.
- Recommended operational range: within 10 meters.
● The Play/Pause, Next, and Prev buttons on the Soundbar or Soundbar's remote do not control the TV.
&
button on the remote control for 5
CONNECTIONS
ENG
19
Page 20
CONNECTIONS
CONNECTIONS WITH EXTERNAL
DEVICE
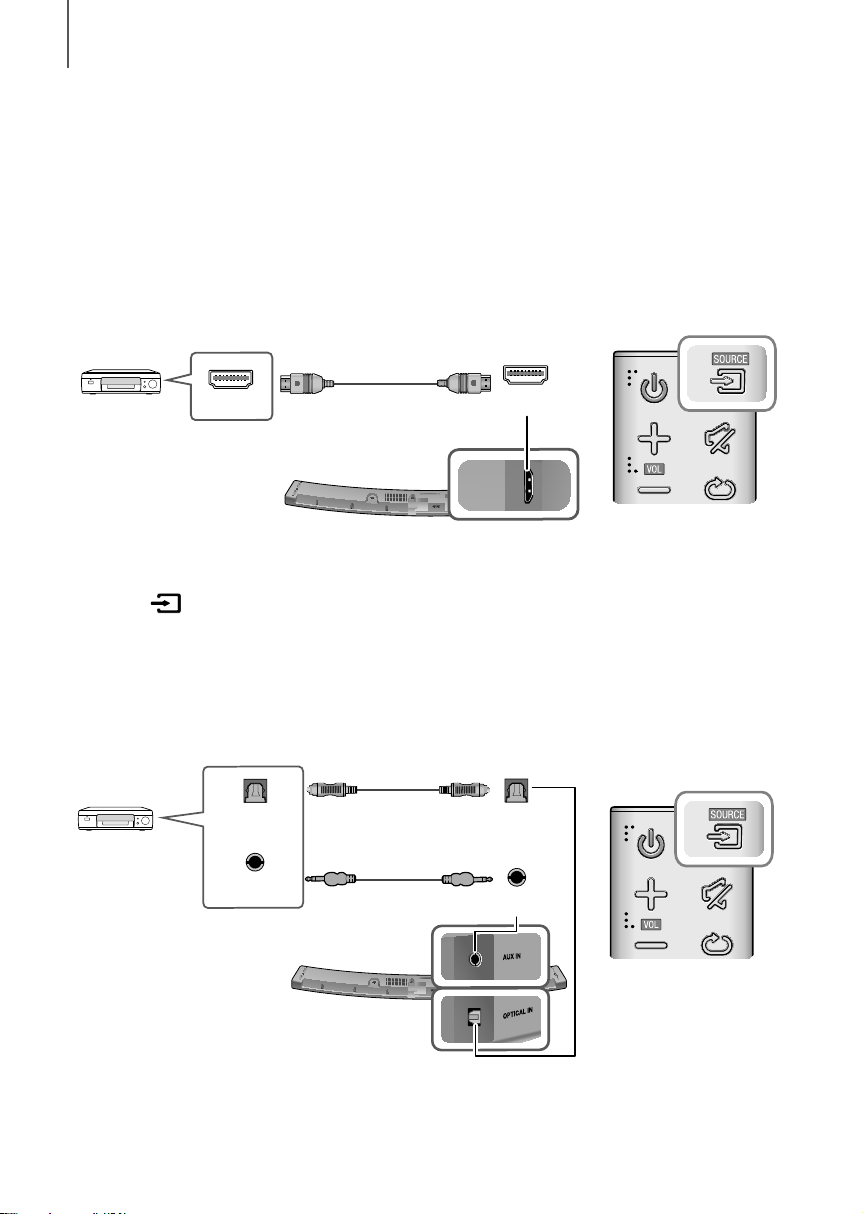
HDMI CABLE
HDMI is the standard digital interface for connecting to TVs, projectors, DVD players, Blu-ray players, set top boxes,
and more.
HDMI prevents any degradation to the signal due to conversion to analogue and maintains the video and audio
quality of the original digital source.
HDMI Cable
Digital Devices
HDMI OUT HDMI IN
HDMI IN
HDMI IN
DC 14V
AUX IN
5V 0.5A
LAN
HDMI OUT
(TV-ARC)
OPTICAL IN
SPK ADD
Wi-Fi SETUP
1. Connect an HDMI cable from the HDMI IN jack on the back of the product to the HDMI OUT jack on your digital
device.
2. Press the
(Source) button on the top panel of Soundbar or the SOURCE button on remote control to select
the HDMI mode.
OPTICAL OR AUX CABLE
This unit comes equipped with one optical in digital jack and one audio analogue in jack, giving you two ways to
connect it to an External Devices.
Optical Cable
(not supplied)
OPTICAL IN
AUX IN
HDMI IN
AUX IN
5V 0.5A
LAN
HDMI OUT
(TV-ARC)
OPTICAL IN
SPK ADD
Wi-Fi SETUP
BD / DVD player /
Set-top box /
Game console
OPTICAL OUT
Audio Cable
(not supplied)
AUX OUT
DC 14V
20
Page 21
CONNECTIONS
+ AUX Cable
1. Connect AUX IN (Audio) on the main unit to the AUDIO OUT jack of the Source Device.
2. Press the (Source) button on the top panel of Soundbar or the SOURCE button on remote control to select
the AUX mode.
+ Optical Cable
1. Connect OPTICAL IN (Audio) on the main unit to the OPTICAL OUT jack of the Source Device.
2. Press the (Source) button on the top panel of Soundbar or the SOURCE button on remote control to select
the D.IN mode.
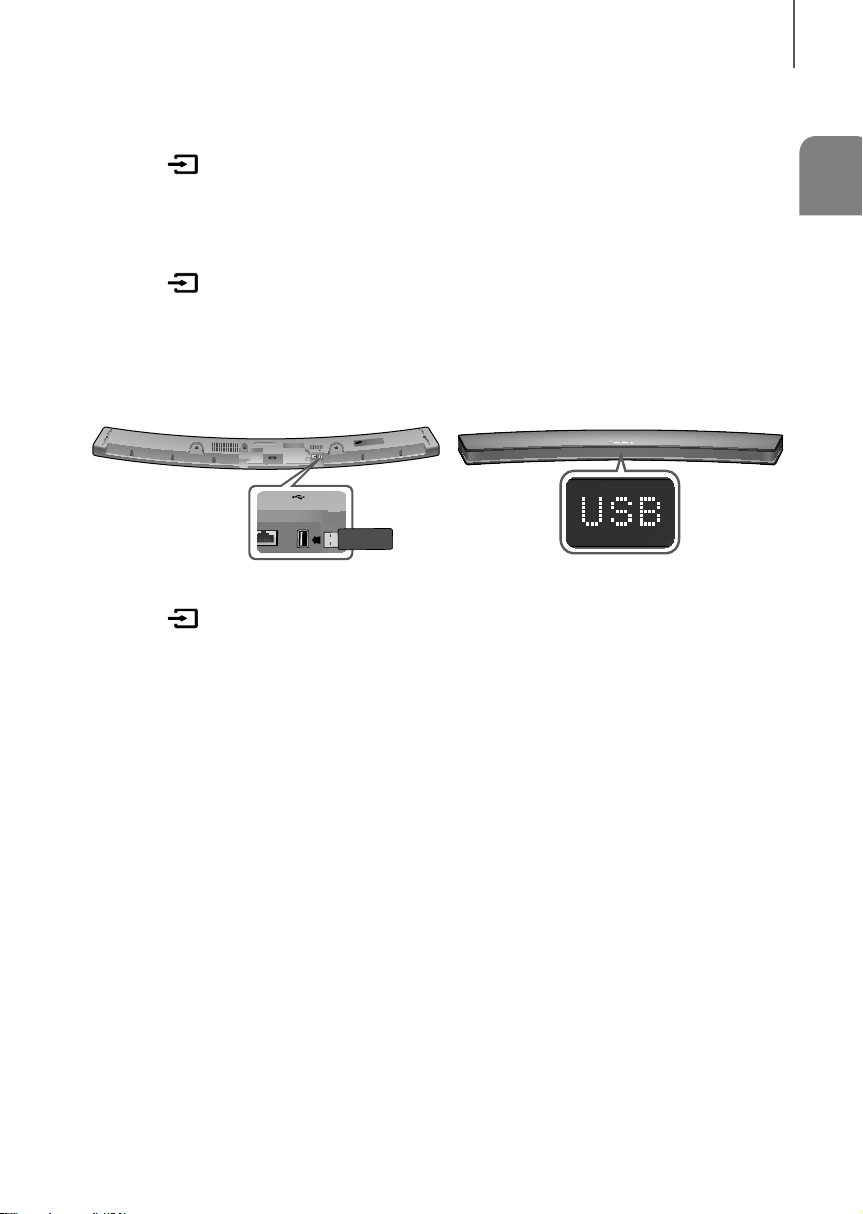
USB
You can play music files located on USB storage devices through the Soundbar.
USB port
HDMI IN
DC 14V
AUX IN
5V 0.5A
LAN
HDMI OUT
(TV-ARC)
OPTICAL IN
SPK ADD
Wi-Fi SETUP
1. Connect the USB device to the USB port on the back of the product.
2. Press the
(Source) button on the main unit’s top panel or the SOURCE button on the remote control to
select the USB mode.
3. USB appears on the display screen.
• The Soundbar connection to the USB device is complete.
• The Soundbar automatically turns off (Auto Power Off) if no USB device has been connected for more than 15
minutes.
Display
ENG
+ Before you connect a USB device
Be aware of the following:
● If the file name of a file or folder on a USB device exceeds 10 characters, it is not displayed on the Soundbar's
display.
● This product may not be compatible with certain types of USB storage media.
● The Soundbar supports the FAT16 and FAT32 file systems.
- The NTFS file system is not supported.
● Connect USB devices directly to the USB port of the product. Otherwise, you may encounter a USB compatibility
problem.
● Do not connect multiple storage devices to the product via a multi-card reader. It may not operate properly.
21
Page 22
CONNECTIONS
● Digital camera PTP protocols are not supported.
● Do not remove the USB device while it is
● DRM-protected music files (MP3, WMA) from commercial web sites cannot be played.
● External HDDs are not supported.
● Mobile phone devices are not supported.
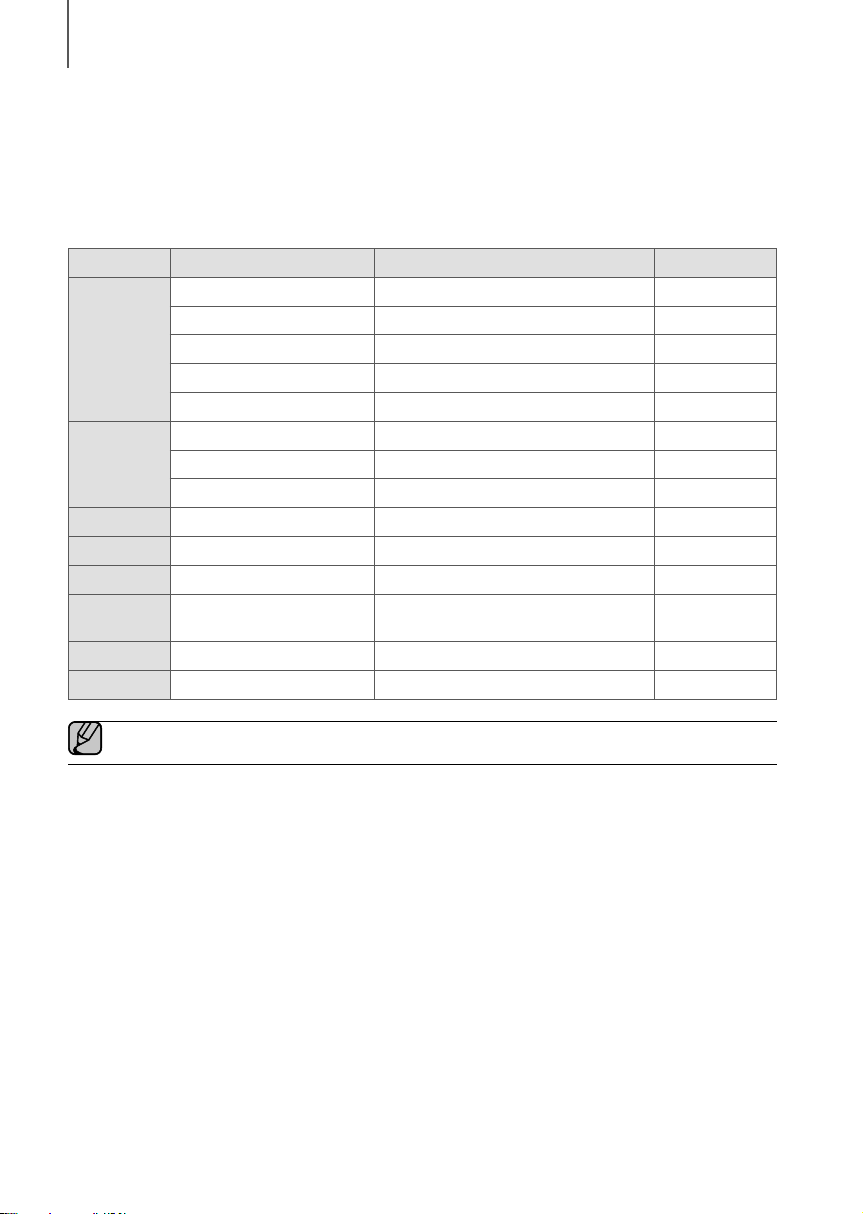
● File Format Type Compatibility list:
Extension Codec Sampling Rate Bit rate
MPEG 1 Layer1 32/44.1/48 32 ~ 448kbps
MPEG 1 Layer2 32/44.1/48 32 ~ 384kbps
*.mp3
*.wma
*.wav
*.ogg
*.flac
*.m4a
*.ape
*.aif
MPEG 1 Layer3 32/44.1/48 32 ~ 320kbps
MPEG 2 Layer3 16/22.05/24/32/44.1/48 8 ~ 160kbps
MPEG 2.5 Layer3 8/11.025/12/16/22.05/24/32/44.1/48 8 ~ 160kbps
Wave_Format_MSAudio1 - -
Wave_Format_MSAudio2 - -
WMA Professional Not Support -
- 8 KHz ~ 192KHz ~ 8.8Mbps
- 8 KHz ~ 48KHz -
- 8 KHz ~ 192KHz ~ 5.6Mbps
Alac
(Apple lossless Audo codec)
MON-KEY Audio 8 KHz ~ 48KHz ~ 1Mbps
Audio Interchange File Format 8 KHz ~ 192KHz ~ 4.4Mbps
transferring files.
8 KHz ~ 192KHz ~ 1Mbps
● If there are too many folders and files stored in the USB device, reading may take some time.
22
Page 23
FUNCTIONS
INPUT MODE
Press the (Source) button on the main unit’s
the mode you want.
Input mode Display
top panel or the
FUNCTIONS
SOURCE button on the remote control to select
ENG
Optical Digital input
ARC (HDMI OUT) input
AUX input
HDMI input
BLUETOOTH mode
TV SoundConnect
USB mode
The unit turns off automatically in the following situations.
● D.IN / HDMI / BT / TV / USB / ARC Mode
- If there is no audio signal for 15 minutes.
● AUX Mode
To turn the Auto Power Down function ON or OFF, press and hold the
ON - AUTO POWER DOWN / OFF - AUTO POWER DOWN appears on the display.
- If the AUX cable is disconnected for 15 minutes.
- If there is no KEY input for 8 hours when the AUX cable is connected.
D.IN
AUX
HDMI
BT
TV
USB
&
button for 5 seconds.
23
Page 24
FUNCTIONS
BLUETOOTH
You can connect a Bluetooth device to the Soundbar and enjoy music with high quality stereo sound, all without wires!
TO CONNECT THE SOUNDBAR TO A BLUETOOTH DEVICE
Check if the Bluetooth device supports the Bluetooth compliant stereo headset function.
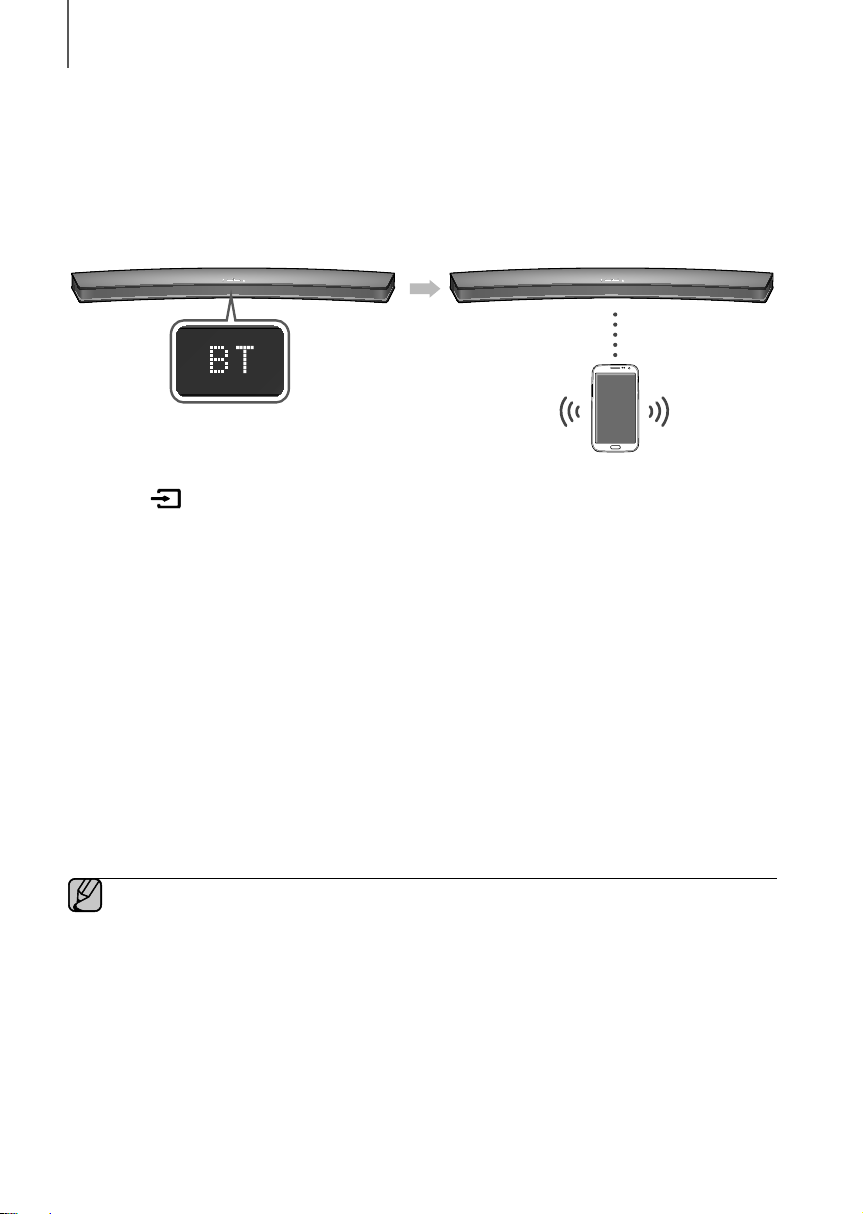
Connect
1. Press the
select the BT mode.
• You will see BT READY on the front display of the Soundbar.
2. Select the Bluetooth menu on the Bluetooth device you want to connect. (Refer to the Bluetooth device's user
manual.)
3. Select "[Samsung] Soundbar" from the list.
• When the Soundbar is connected to the Bluetooth device, it will display [Bluetooth device name]
the front display.
• The device name can only be displayed in English. An underline " _ " will be displayed if the name is not in
English.
• If the Bluetooth device has failed to pair with the Soundbar, delete the previous "[Samsung] Soundbar" found
by the Bluetooth device and have it search for the Soundbar again.
4. Play music on the connected device.
• You can listen to the music playing on the connected Bluetooth device over the Soundbar.
• In BT mode, the Play / Pause / Next / Prev functions are not available. However, these functions are available
in Bluetooth devices supporting AVRCP.
(Source) button on the main unit’s top panel or the SOURCE button on the remote control to
● If asked for PIN code when connecting a Bluetooth device, enter <0000>.
● Only one Bluetooth device can be paired at a time.
● The Bluetooth connection will be terminated when you turn the Soundbar off.
● The Soundbar may not perform Bluetooth search or connection correctly under the following
circumstances:
- If there is a strong electrical field around the Soundbar.
- If several Bluetooth devices are simultaneously paired with the Soundbar.
- If the Bluetooth device is turned off, not in place, or malfunctions.
- Note that such devices as microwave ovens, wireless LAN adaptors, fluorescent lights, and gas stoves
use the same frequency range as the Bluetooth device, which can cause electric interference.
Bluetooth device
BT on
24
Page 25
FUNCTIONS
● The Soundbar supports SBC data (44.1kHz, 48kHz).
● Connect only to a Bluetooth device that supports the A2DP (AV) function.
● You cannot connect the Soundbar to a Bluetooth device that supports only the HF (Hands Free) function.
● Once you have paired the Soundbar to a Bluetooth device, selecting "[Samsung] Soundbar" from the
device's scanned devices list will automatically change the Soundbar to BT mode.
● Available only if the Soundbar is listed among the Bluetooth device’s paired devices. (The Bluetooth device
and the Soundbar must have been previously paired at least once.)
● Soundbar will appear in the Bluetooth device’s searched devices list only when the Soundbar is displaying
BT READY.
● In the TV SoundConnect mode, the Soundbar cannot be paired to another Bluetooth device.
TO DISCONNECT THE BLUETOOTH DEVICE FROM THE
SOUNDBAR
You can disconnect the Bluetooth device from the Soundbar. For instructions, see the Bluetooth device's user manual.
● The Soundbar will be disconnected.
● When the Soundbar is disconnected from the Bluetooth device, the Soundbar will display
BT DISCONNECTED on the front display.
TO DISCONNECT THE SOUNDBAR FROM THE BLUETOOTH
DEVICE
Press the SOURCE button on the remote control or the (Source) button on the product's
from BT to another mode or turn off the Soundbar.
● The connected Bluetooth device will wait a certain amount of time for a response from the Soundbar before
terminating the connection. (Disconnection time may differ, depending on the Bluetooth device)
● In Bluetooth connection mode, the Bluetooth connection will be lost if the distance between the Soundbar
and the Bluetooth device exceeds 10 meters.
● The Soundbar automatically turns off after 15 minutes in the Ready state.
top
panel to switch
ENG
+ More About Bluetooth
Bluetooth is a technology that enables Bluetooth-compliant devices to interconnect easily with each other using a
short wireless connection.
● A Bluetooth device may cause noise or malfunction, depending on usage, when:
- A part of your body is in contact with the receiving/transmitting system of the Bluetooth device or the
Soundbar.
- It is subject to electrical variation from obstructions caused by a wall, corner, or office partition.
- It is exposed to electrical interference from same frequency-band devices including medical equipment,
microwave ovens, and wireless LANs.
● Pair the Soundbar with the Bluetooth device while they are close together.
● The further the distance between the Soundbar and Bluetooth device, the worse the quality is.
If the distance exceeds the Bluetooth operational range, the connection is lost.
● In poor reception areas, the Bluetooth connection may not work properly.
● The Bluetooth connection only works when it is close to the unit. The connection will be automatically cut off if the
Bluetooth device is out of range. Even within range, the sound quality may be degraded by obstacles such as
walls or doors.
● This wireless device may cause electric interference during its operation.
25
Page 26
FUNCTIONS
USING THE NETWORK STANDBY ON
FUNCTION
The Network Standby On function becomes available if wireless connection was properly established between the
smart device and Soundbar. This function turns on the Soundbar automatically when a smart device attempts to
connect to the Soundbar via Bluetooth or Wi-Fi. If the Soundbar was turned on via Bluetooth connection, its input
mode is set to BT automatically. Turning on the Soundbar via Wi-Fi is available only by using the App. For further
information, refer to the Web manual.
1. Connect the Smart device to your Soundbar.
2. Turn the Network Standby On function on by pressing the $ button on the Soundbar remote for more than 5
seconds. You can turn the function off by pressing the $ button again for more than 5 seconds.
● Available only if the Soundbar is listed among the Smart device’s paired devices. (The Smart device and the
Soundbar must have been previously paired at least once.)
● Soundbar will appear in the Smart device’s searched devices list only when the Soundbar is displaying [BT
READY] or [WiFi READY].
● In the TV SoundConnect mode, the Soundbar cannot be paired to another Smart device.
● If Network Standby On function did not work
- The Network Standby On is set to Off.
● Wi-Fi connection to the Soundbar will be terminated if its power cord was disconnected or the power was
cut off. Turn on the Soundbar and reconnect.
USING THE MULTIROOM LINK
Once the Soundbar is connected to a smart device with Multiroom App, you can connect multiple Samsung Multiroom
devices together wirelessly.
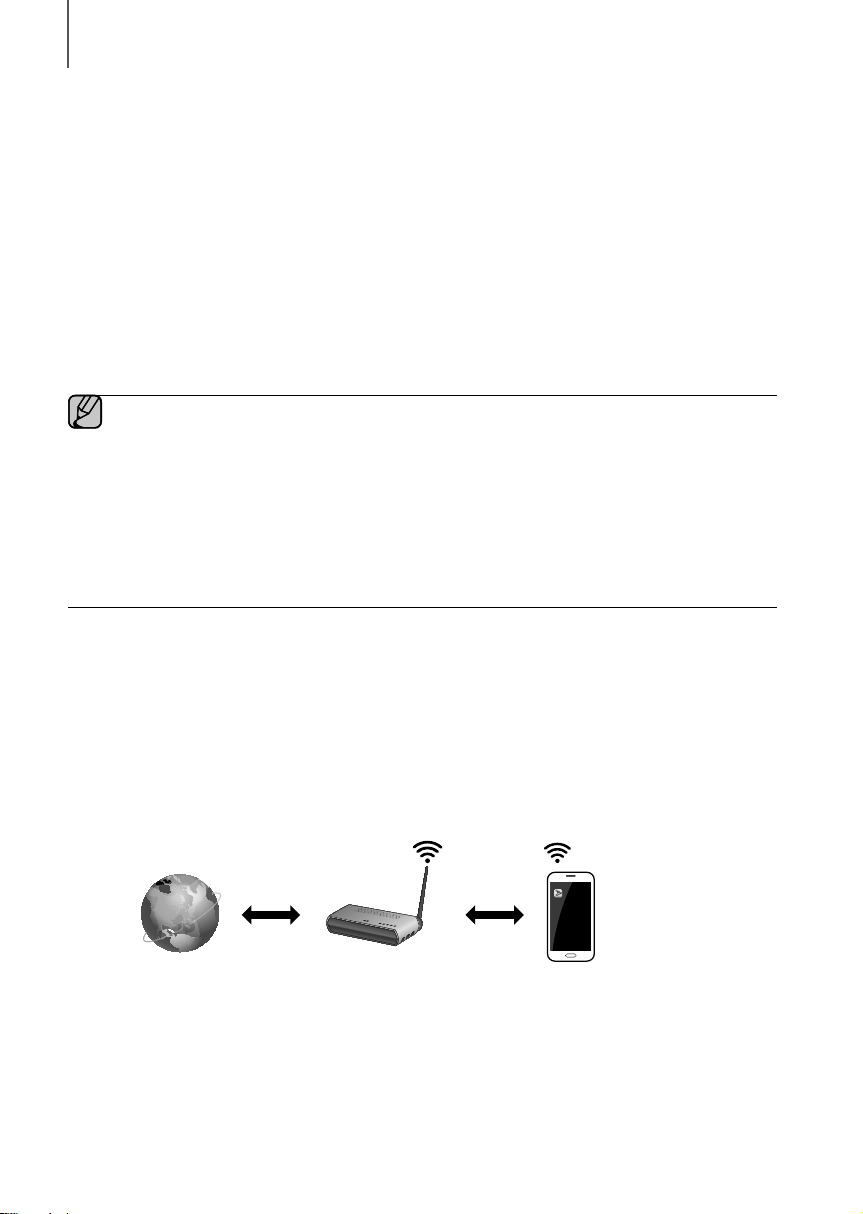
BEFORE YOU BEGIN
+ Communication Basics
Smart Device:
Android or iOS
(App Control)
Internet
1. Requirements: Wireless Router, Smart Device
2. The wireless router should be connected to the Internet.
3. The smart device should be connected to the router via a Wi-Fi connection.
Wireless Router
26
Page 27
FUNCTIONS
INSTALLING THE SAMSUNG MULTIROOM APP
To use the Soundbar, you must download and then install the Samsung Multiroom App by accessing the app through
Google play or the App Store. With the Samsung Multiroom App installed, you can play music stored in your smart
device, from connected devices and other content providers, and from Internet radio stations.
+ Android or iOS
Download the Samsung Multiroom app from Google Play or the App Store of your smart device.
* Market search : Samsung Multiroom
ANDROID APP ON
or
+ Accessing the Samsung Multiroom App
To access the Samsung Multiroom app, press the Multiroom app icon on your smart device.
CONNECTING THE SOUNDBAR TO YOUR NETWORK
On your Smart device, select the Samsung Multiroom app.
Follow the directions on your smart device’s screen.
● For further information, refer to the Web Manual.
- Web manual : www.Samsung.com Support Product name search HW-J6500, HW-J6501 or
HW-J6502 PDF file download.
● When connected to a wired network, try to use the CAT 7 cable to connect.
ENG
27
Page 28
FUNCTIONS
SOFTWARE UPDATE
HDMI IN
DC 14V
AUX IN
5V 0.5A
LAN
HDMI OUT
(TV-ARC)
OPTICAL IN
SPK ADD
Wi-Fi SETUP
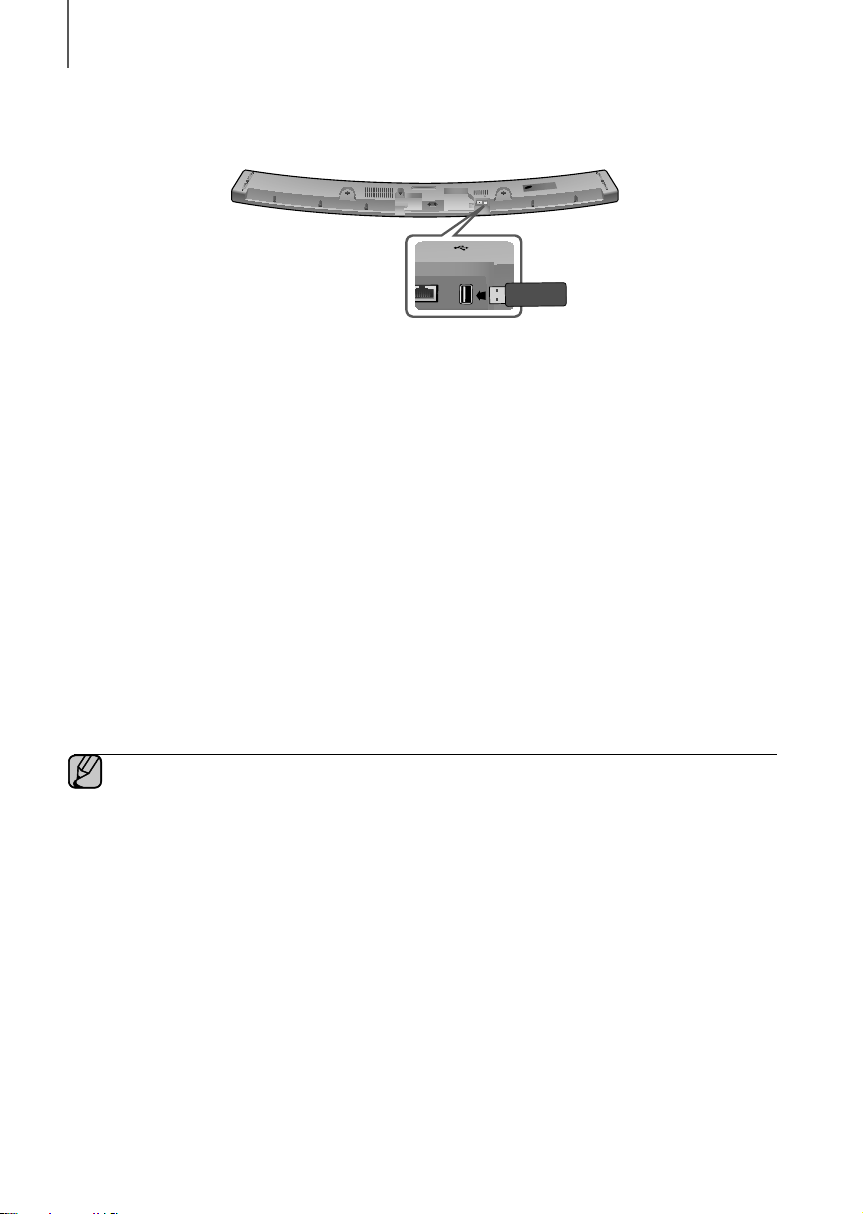
UPDATING WITH USB
Samsung may offer updates for the Soundbar's system firmware in the future.
If an update is offered, you can update the firmware by connecting a USB device with the firmware update stored on it
to the USB port on your Soundbar.
Note that if there are multiple update files, you must load them onto the USB device singly and use them to update the
firmware one file at a time.
Please visit samsung.com or contact the Samsung call centre to receive more information about downloading updates
files.
1. While the Soundbar is turned off, connect the USB storage device that contains the updating firmware to the
Soundbar’s USB port.
2. Turn on the Soundbar UPDATE appears on the display and updating begins within 3 minutes.
• Upon completion of updating, the Soundbar turns off and on automatically.
+ If UPDATE was not displayed
1. Turn off the Soundbar, connect the USB storage device that contains update files to the Soundbar’s USB port.
2. Disconnect the power cord, reconnect it and turn it on.
● Insert a USB device containing the firmware update into the USB port on the main unit.
● Updating firmware may not work properly if audio files supported by the Soundbar are stored in the USB
storage device.
● Do not disconnect the power or remove the USB device while updates are being applied. The main unit will
turn off automatically after completing the firmware update.
28
Page 29

FUNCTIONS
● After the update, all settings are reset to their factory default settings. We recommend you write down your
settings so that you can easily reset them after the update. Note that updating firmware resets the
subwoofer connection too.
If connection to the subwoofer is not re-established automatically after the update, refer to page 15.
If the firmware fails to update, we recommend formatting the USB device in FAT16 and trying again.
● Do not format the USB device in the NTFS format. The Soundbar does not support the NTFS file system.
● Depending on the manufacturer, some USB devices may not be supported.
AUTO UPDATE
Even when the Soundbar is turned off, the Soundbar will automatically check latest software version and continue to
update if it was connected to the Internet.
● The Soundbar is configured to run auto update by default.
● To use auto update function, the Soundbar must be connected to the Internet.
● Wi-Fi connection to the Soundbar will be terminated if its power cord was disconnected or the power was
cut off. Turn on the Soundbar and reconnect.
ENG
29
Page 30
TROUBLESHOOTING
TROUBLESHOOTING
TROUBLESHOOTING
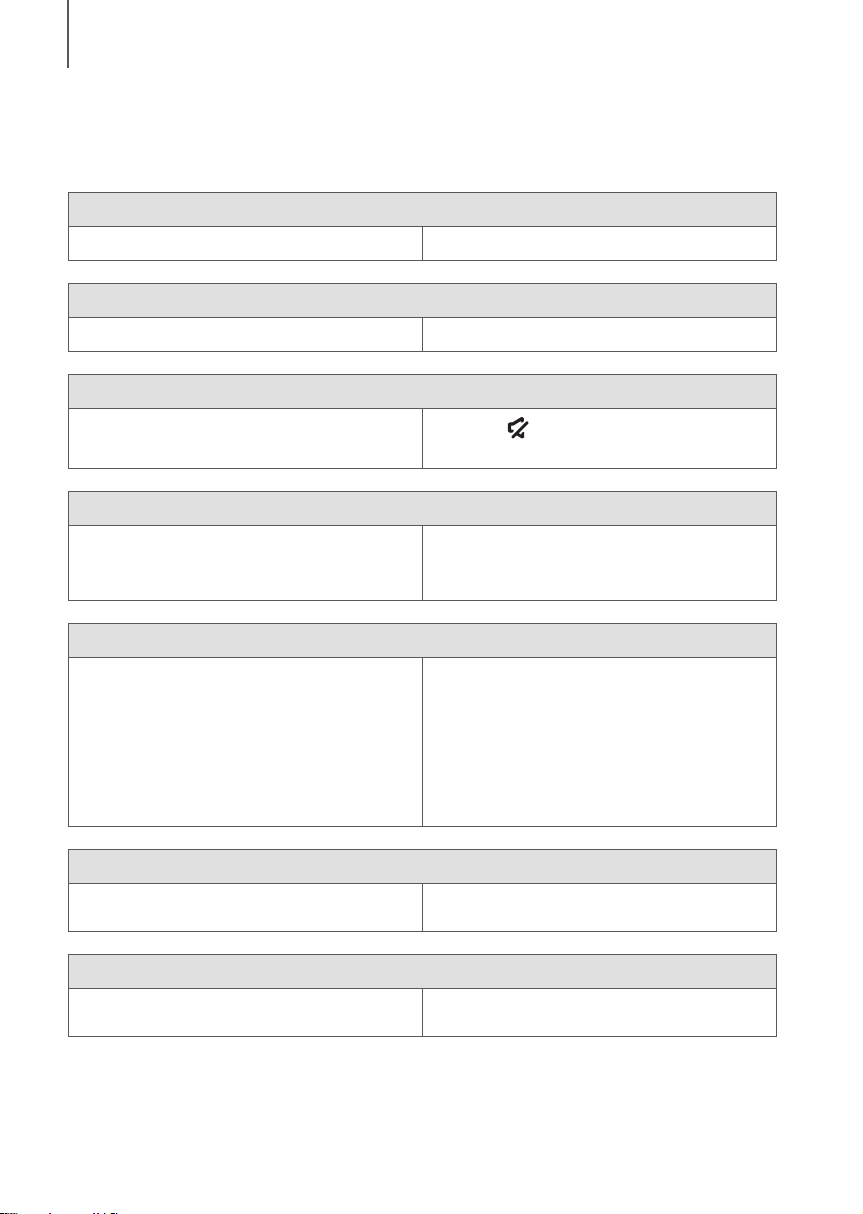
Before requesting service, please check the following.
The unit will not turn on.
• Is the power cord plugged into the outlet? Connect the power plug to the outlet.
A function does not work when the button is pressed.
• Is there static electricity in the air? Disconnect the power plug and connect it again.
Sound is not produced.
• Is the Mute function on?
• Is the volume set to minimum?
The remote control does not work.
• Are the batteries drained?
• Is the distance between the remote control and main
unit too far?
The TV SoundConnect (TV pairing) failed.
• Does your TV support TV SoundConnect?
• Is your TV firmware the latest version?
• Does an error occur when connecting?
• Reset the TV mode and connect again.
The red LED on the subwoofer blinks and the subwoofer is not producing sound.
• Your subwoofer may not be connected to the
main body of the product.
The subwoofer drones and vibrates noticeably.
• Try to adjust the vibration of your subwoofer.
Press the
Adjust the Volume.
Replace with new batteries.
Move closer to the unit.
TV SoundConnect is supported by some Samsung
TVs released from 2012 on. Check your TV to see if it
supports TV SoundConnect.
Update your TV with the latest firmware.
Contact the Samsung call centre.
Press and hold the
the TV SoundConnect connection.
Try to connect your subwoofer again.
(See Page 15)
Press the WOOFER button on your remote control to
adjust its value (between -12, -6 to +6).
( Mute) button to cancel the function.
&
button for 5 seconds to reset
30
Page 31

APPENDIX
SPECIFICATIONS
Model name
HW-J6500 / HW-J6501/ HW-J6502
APPENDIX
ENG
USB
Main Unit
Weight
GENERAL
AMPLIFIER
* S/N ratio, distortion, separation, and usable sensitivity are based on measurements using AES (Audio Engineering
Society) guidelines.
* Nominal specification
- Samsung Electronics Co., Ltd reserves the right to change the specifications without notice.
- Weight and dimensions are approximate.
- For the power supply and Power Consumption, refer to the label attached to the product.
a Precaution : The product will restart automatically if you turn on/off Wi-Fi/Ethernet.
Overall Standby Power Consumption (W)
(All the network ports are “ON” condition)
Wi-Fi/Ethernet Port deactivation method
Bluetooth Port deactivation method
a Open Source Licence Notice
- To send inquiries and requests regarding open sources, contact Samsung via Email
(oss.request@samsung.com).
Dimensions
(W x H x D)
Operating Temperature Range
Operating Humidity Range
Rated Output
Power
S/N Ratio (Analogue Input)
Separation (1kHz)
Subwoofer (PS-WJ6500 /
PS-WJ6501 / PS-WJ6502)
Main Unit
Subwoofer (PS-WJ6500 /
PS-WJ6501 / PS-WJ6502)
Main Unit
Subwoofer (PS-WJ6500 /
PS-WJ6501 / PS-WJ6502)
7.4W
Press Wi-Fi SETUP button on the product for
30 seconds to turn Wi-Fi/Ethernet On / Off.
Press SPK ADD button on the product for 30 seconds to
turn Bluetooth On / Off.
5V / 0.5A
2.7 kg
6.8 kg
1078 x 47.5 x 129 mm
452 x 335 x 154 mm
+5°C to +35°C
10 % to 75 %
22W/CH x 6, 4ohm, THD=10%, 1KHz
168W, 3ohm, THD=10%, 100Hz
65 dB
65 dB
Hereby, Samsung Electronics, declares that this equipment is in compliance with the essential requirements and other
relevant provisions of Directive 1999/5/EC.
The original Declaration of Conformity may be found at http://www.samsung.com, go to Support >
Search Product Support and enter the model name.
This equipment may be operated in all EU countries.
This equipment may only be used indoors.
31
Page 32

UNITED KINGDOM
This Samsung product is warranted for the period of
twelve (12) months from the original date of purchase,
against defective materials and workmanship. In the
event that warranty service is required, you should
return the product to the retailer from whom it was
purchased. However, Samsung Authorised Dealers
and Authorised Service Centres in other EC Countries
will comply with the warranty on the terms issued
to purchasers in the country concerned. In case of
difficulty, details of our Authorised Service Centres are
available from:
Samsung Electronics U.K. Ltd
Samsung Customer Support Centre
Selectapost 38, Sheffield, S97 3FJ
United Kingdom
United Kingdom
Tel : 0330 SAMSUNG (7267864)
www.samsung.com/uk/support
EIRE
Tel : 0818 717100
www.samsung.com/ie/support
WARRANTY CONDITIONS
1. The warranty is only valid if, when warranty
service is required, the warranty card is fully and
properly completed and is presented with the
original invoice or sales slip or confirmation, and
the serial number on the product has not been
defaced.
2. Samsung’s obligations are limited to the repair or,
at its discretion, replacement of the product or
the defective part.
3. Warranty repairs must be carried out by
Authorised Samsung Dealers or Authorised
Service Centres. No re-imbursement will be made
for repairs carried out by non Samsung Dealers
and, any such repair work and damage to the
products caused by such repair work will not be
covered by this warranty.
EIRE
4. This product is not considered to be defective
in materials nor workmanship by reason that
it requires adaptation in order to conform to
national or local technical or safety standards
in force in any Country other than the one for
which the product was originally designed and
manufactured. This warranty will not cover,
and no re-imbursement will be made for such
adaptation nor any damage which may result.
5. This warranty covers none of the following:
a)
Periodic check ups, maintenance and repair
or replacement of parts due to normal wear
and tear.
b) Cost relating to transport, removal or
installation of the product.
c) Misuse, including the faiure to use this
product for its normal purposes or incorrect
installation.
d) Damage caused by Lightning, Water, Fire,
Acts of God, War, Public Disturbances,
incorrect mains voltage, improper ventilation
or any other cause beyond the control of
Samsung.
6. This warranty is valid for any person who legally
acquired possession of the product during the
warranty period.
7. The consumers statutory rights in any applicable
national legislation whether against the retailer
arising from the purchase contract or otherwise
are not affected by this warranty. Unless there
is national legislation to the contrary, the rights
under this warranty are the consumers sole
rights and Samsung, its subsidiaries and
distributors shall not be liable for indirect or
consequential loss or any damage to records,
compact discs, videos or audio taper or any
other related equipment or material.
SAMSUNG ELECTRONICS (U.K.)
LTD.
Page 33

©2015 Samsung Electronics Co.,Ltd. All rights reserved
Contact SAMSUNG WORLD WIDE
If you have any questions or comments relating to Samsung products, please contact the SAMSUNG customer care
Centre.
Area Contact Centre
`
Europe
U.K 0330 SAMSUNG (7267864) www.samsung.com/uk/support
EIRE 0818 717100 www.samsung.com/ie/support
0180 6 SAMSUNG bzw.
0180 6 7267864*
GERMANY
(*0,20 €/Anruf aus dem dt. Festnetz, aus
dem Mobilfunk max. 0,60 €/Anruf)
FRANCE 01 48 63 00 00 www.samsung.com/fr/support
ITALIA 800-SAMSUNG (800.7267864) www.samsung.com/it/support
SPAIN 0034902172678 www.samsung.com/es/support
PORTUGAL 808 20 7267 www.samsung.com/pt/support
LUXEMBURG 261 03 710 www.samsung.com/support
NETHER-
0900-SAMSUNG (0900-7267864) (€ 0,10/
LANDS
Min)
BELGIUM 02-201-24-18
NORWAY 815 56480 www.samsung.com/no/support
DENMARK 70 70 19 70 www.samsung.com/dk/support
FINLAND 030-6227 515 www.samsung.com/fi/support
SWEDEN 0771 726 7864 (0771-SAMSUNG) www.samsung.com/se/support
801-172-678* lub +48 22 607-93-33 *
POLAND
* (koszt połączenia według taryfy operatora)
0680SAMSUNG (0680-726-786)
HUNGARY
0680PREMIUM (0680-773-648)
SLOVAKIA 0800 - SAMSUNG (0800-726 786) www.samsung.com/sk/support
0800-SAMSUNG (0800-7267864)
AUSTRIA
[Only for Premium HA] 0800-366661
[Only for Dealers] 0810-112233
[Correct disposal of batteries in this product]
Web Site
www.samsung.com/de/support
www.samsung.com/nl/support
www.samsung.com/be/support
(Dutch)
www.samsung.com/be_fr/
support (French)
www.samsung.com/pl/support
www.samsung.com/hu/support
www.samsung.com/at/support
Area Contact Centre
SWITZER-
0800 726 78 64 (0800-SAMSUNG)
LAND
800 - SAMSUNG (800-726786) www.samsung.com/cz/support
CZECH
Samsung Electronics Czech and Slovak, s.r.o. V Parku 2343/24, 148 00 -
Praha 4
CROATIA 072 726 786 www.samsung.com/hr/support
BOSNIA 055 233 999 www.samsung.com/support
MONTENE-
020 405 888 www.samsung.com/support
GRO
080 697 267 (brezplačna številka)
090 726 786 (0,39 EUR/min)
SLOVENIA
klicni center vam je na voljo od ponedeljka
do petka od 9. do 18. ure.
SERBIA 011 321 6899 www.samsung.com/rs/support
BULGARIA 800 111 31 , Безплатна телефонна линия www.samsung.com/bg/support
08008 726 78 64 (08008 SAMSUNG )
ROMANIA
Apel GRATUIT
CYPRUS 8009 4000 only from landline, toll free
80111-SAMSUNG (80111 726 7864) only
from land line
GREECE
(+30) 210 6897691 from mobile and land
line
LITHUANIA 8-800-77777 www.samsung.com/lt/support
LATVIA 8000-7267 www.samsung.com/lv/support
ESTONIA 800-7267 www.samsung.com/ee/support
Correct Disposal of This Product
(Waste Electrical & Electronic Equipment)
Web Site
www.samsung.com/ch/support
(German)
www.samsung.com/ch_fr/
support (French)
www.samsung.com/si
www.samsung.com/ro/support
www.samsung.com/gr/support
(Applicable in countries with separate collection systems)
This marking on the battery, manual or packaging indicates that the
batteries in this product should not be disposed of with other
household waste at the end of their working life. Where marked, the
chemical symbols Hg, Cd or Pb indicate that the battery contains
mercury, cadmium or lead above the reference levels in EC Directive
2006/66.
If batteries are not properly disposed of, these substances can cause
harm to human health or the environment.
To protect natural resources and to promote material reuse, please
separate batteries from other types of waste and recycle them
through your local, free battery return system.
(Applicable in countries with separate collection systems)
This marking on the product, accessories or literature indicates that
the product and its electronic accessories (e.g. charger, headset,
USB cable) should not be disposed of with other household waste at
the end of their working life. To prevent possible harm to the
environment or human health from uncontrolled waste disposal,
please separate these items from other types of waste and recycle
them responsibly to promote the sustainable reuse of material
resources.
Household users should contact either the retailer where they
purchased this product, or their local government office, for details of
where and how they can take these items for environmentally safe
recycling.
Business users should contact their supplier and check the terms and
conditions of the purchase contract. This product and its electronic
accessories should not be mixed with other commercial wastes for
disposal.
Page 34

Manuel d'utilisation
Curved Soundbar
HW-J6500
HW-J6501
HW-J6502
Imaginez les possibilités
Merci d’avoir choisi un appareil Samsung.
Pour recevoir une assistance plus complète, veuillez enregistrer votre produit sur
www.samsung.com/register
Page 35

DÉMARRAGE
démarrage
CARACTÉRISTIQUES
Services de musique en streaming
La Curved Soundbar vous permet d'accéder encore plus
facilement à votre musique préférée, grâce à ses
fonctionnalités Wi-Fi. Accès facile à l'application
Samsung Multiroom pour profiter au maximum des
services de musique en streaming disponibles avec votre
abonnement Internet.
Expansion du son ambiophonique
La fonctionnalité Expansion du son ambiophonique
ajoute de la profondeur et de la grandeur au son.
TV SoundConnect
Connectez facilement votre téléviseur à la Soundbar via
Bluetooth avec TV SoundConnect. L'absence des
câbles qui trainent entre la Soundbar et le téléviseur vous
permet de mettre en valeur le design plat et sobre de
deux systèmes tout en conservant une apparence
soignée de votre salon. Vous contrôlez facilement la
Soundbar et le téléviseur depuis une seule
télécommande.
Partage des sources de musique (= lecture
Multiroom)
Grâce à Multiroom Link, il est facile de contrôler et de
partager une seule source de musique à travers plusieurs
périphériques audio à différents emplacements.
L'application mobile contrôle le volume et la musique sur
votre système à travers différents périphériques, y
compris votre téléviseur, la Soundbar, le système
audiovisuel et le lecteur de disque Blu-ray. Bénéficiez du
son de votre choix, où vous voulez.
Prise en charge de la fonction Hôte USB
Vous pouvez connecter des périphériques de stockage
USB externes (lecteur MP3, mémoire flash USB, etc.) afin
d’en lire les fichiers musicaux à l’aide de la fonction USB
HOST du système Soundbar.
Fonction Bluetooth
Vous pouvez connecter un périphérique Bluetooth à
l'Ensemble Soundbar pour écouter de la musique avec
un son stéréo de haute qualité, tout cela sans fil!
LICENCE
Fabriqué sous licence par Dolby Laboratories. Dolby et le
symbole représentant deux D sont des marques de
commerce de Dolby Laboratories.
Pour les brevets DTS, consultez le site http://patents.dts.
com. Fabriqué sous licence de DTS Licensing Limited.
DTS, le symbole, & DTS et le symbole qui lui est associé
sont des marques déposées, et DTS 2.0 Channel est
une marque déposée de DTS, Inc. © DTS, Inc. Tous
droits réservés.
Les termes HDMI et HDMI High-Definition Multimedia
Interface, et le logo HDMI sont des marques de
commerce ou des marques déposées de HDMI
Licensing LLC aux États-Unis et dans d'autres pays.
HDMI
L'interface HDMI permet la transmission simultanée des
signaux audio et vidéo pour vous offrir une image plus
nette.
L'appareil est également équipé de la fonction ARC qui
vous permet d'écouter le son de votre téléviseur sur le
Soundbar via un câble HDMI. Cette fonction est
uniquement disponible si vous connectez l'appareil à un
téléviseur compatible ARC.
2
Page 36

DÉMARRAGE
INFORMATIONS RELATIVES À LA
SÉCURITÉ
AVERTISSEMENTS
POUR ÉVITER LES RISQUES DE CHOC ÉLECTRIQUE, NE DÉMONTEZ PAS LE CAPOT.
L’APPAREIL NE CONTIENT PAS DE PIÈCES RÉPARABLES PAR L’UTILISATEUR ; S’ADRESSER À UN SERVICE
APRÈS-VENTE QUALIFIÉ.
Ce symbole avertit l’utilisateur de la présence
ATTENTION
RISQUE DE CHOC
AVERTISSEMENT: Afin de diminuer les risques d’incendie ou de choc électrique, n’exposez pas cet appareil à la
pluie ou à l’ humidité.
ATTENTION : Pour prévenir les chocs électriques, branchez la fiche au fond, en prenant soin d'insérer la tige large
dans la fente large.
• Cet appareil doit toujours être branché à une prise terre.
• Pour déconnecter l’appareil du circuit principal, la prise doit être débranchée de la prise principale ; il est de ce fait
nécessaire que la prise principale soit facile d'accès.
ATTENTION
• Évitez toute projection d’eau sur l’appareil. Ne posez jamais d’objet contenant un liquide (ex : un vase) dessus.
• Pour éteindre complètement l'appareil, vous devez retirer le cordon d'alimentation de la prise murale. Par
conséquent, le cordon d'alimentation doit être facilement accessible à tout moment.
ÉLECTRIQUE. NE PAS
OUVRIR
d’une tension dangereuse à l’intérieur de
l’appareil.
Ce symbole avertit l’utilisateur de la présence de
directives importantes dans la documentation
accompagnant cet appareil.
FRA
3
Page 37

DÉMARRAGE
PRÉCAUTIONS
68.6
99.1mm
99.1mm 99.1mm
Assurez-vous que l'alimentation électrique de votre maison est conforme à la plaque d'identification située au dos
de votre produit. Posez votre produit à plat sur un meuble stable en veillant à laisser un espace de 7 à 10 cm
autour de l'appareil afin d’assurer une ventilation correcte de celui-ci. Faites attention à ne pas obstruer les orifices
de ventilation. Ne posez pas l'ensemble sur un amplificateur ou un autre appareil susceptible de chauffer. Cet
ensemble est conçu pour une utilisation en continu. Pour entièrement éteindre l'appareil, débranchez la fiche CA
de la prise murale. Débranchez l'appareil si vous envisagez de ne pas l'utiliser durant une longue période.
mm
En cas d'orage, débranchez la fiche de l'appareil de la
prise murale. Les surtensions occasionnées par l'orage
pourraient endommager votre appareil.
N'exposez pas l'ensemble aux rayons directs du soleil ou
à toute autre source de chaleur. Ceci pourrait entraîner une
surchauffe et un dysfonctionnement de l’appareil.
Protégez le produit de l'humidité (comme les vases) et
d'une chaleur excessive (comme une cheminée) ou de
tout équipement capable de créer des champs
magnétiques ou électriques. Débranchez le câble
d'alimentation en cas de dysfonctionnement. Votre
produit n'est pas prévu pour un usage industriel. Ce
produit ne peut être utilisé qu'à des fins personnelles.
Une condensation peut se former si le produit ou un
Les piles utilisées dans ce produit peuvent contenir des
produits ch miques dangereux pour l'environnement. Ne
jetez pas les piles dans votre poubelle habituelle. Ne
vous débarrassez pas des piles en les faisant brûler. Ne
court-circuitez pas, ne désassemblez pas ni ne faites pas
surchauffer les batteries. Le remplacement incorrect de
la batterie entraîne un risque d'explosion. Ne la
remplacez que par une batterie du même type.
disque a été stocké à basse température. Si vous devez
transporter l'ensemble pendant l'hiver, attendez environ
2 heures que l'appareil ait atteint la température de la
pièce avant de l'utiliser.
ATTENTION, NE PAS INGÉRER LA BATTERIE, RISQUE DE BRÛLURE CHIMIQUE,
[Télécommande fournie avec] Ce produit contient une pile par pièce/bouton.
Si vous avalez la pile par pièce/bouton, cela peut entraîner des brûlures internes graves en seulement
2 heures et vous pouvez mourir. Maintenez les piles neuves et usagées hors de portée des enfants. Si
le compartiment de la pile ne se ferme pas correctement, arrêter d'utiliser l'appareil et maintenez-le hors de portée
des enfants. Si vous pensez qu'il est possible que les piles aient été avalées ou placées à l'intérieur d'une partie du
corps, consultez immédiatement un médecin.
4
Page 38

SOMMAIRE
2 DÉMARRAGE
2 Caractéristiques
3 Informations relatives à la sécurité
6 Contenu
7 DESCRIPTIONS
7 Panneau supérieur/façade
8 Panneau arrière/inférieur
9 Télécommande
11 INSTALLATION
11 Installation de la Soundbar
11 Installation de la fixation murale
14 Installation de la Soundbar sur le socle de
votre téléviseur
14 Installation de la Soundbar sans socle
DÉMARRAGE
FRA
23 FONCTIONS
23 Mode D’entrée
24 Bluetooth
26 Utilisation de la fonction Network
Standby On
26 Utilisation du Multiroom Link
28 Mise à jour logicielle
30 TÉPANNAGE
30 Tépannage
31 ANNEXE
31 Spécifications
15 BRANCHEMENTS
15 Connexion du caisson de graves
17 Connexion de l'appareil à un téléviseur
17 Connexions avec le téléviseur à l'aide d'un
câble HDMI (numérique)
17 Connexions avec le téléviseur à l'aide d'un
câble optique (numérique)
18 TV SoundConnect
20 Connexions avec le périphérique
externe
20 Câble HDMI
20 Câble optique ou AUX
21 USB
● Les figures et les illustrations du présent Manuel
d'utilisation sont fournies à titre de référence
uniquement et peuvent différer de l'apparence du
produit réel.
● Des frais supplémentaires pourront vous être
facturés dans les cas suivants :
(a) Vous demandez l'intervention d'un ingénieur,
mais il s'avère que l'appareil ne présente
aucune anomalie (par ex. vous n'avez pas lu ce
Manuel d'utilisation).
(b) Vous portez l'unité à un centre de réparation,
mais il s'avère que celle-ci ne présente aucune
défaillance (par ex. vous n'avez pas lu ce
Manuel d'utilisation).
● Le montant de ces frais administratifs vous sera
notifié avant que tout travail ou toute visite à votre
domicile ne soit effectuée).
5
Page 39

DÉMARRAGE
CONTENU
AVANT DE LIRE LE MANUEL D'UTILISATION
Prenez connaissance des termes suivants avant de lire le manuel d'utilisation.
+ Icônes utilisées dans le présent manuel
Icône Terme Définition
Vérifiez la présence des accessoires fournis présentés ci-dessous.
Attention
Remarque
Indique une situation pour laquelle une fonction ne fonctionne pas ou que des
paramètres peuvent être annulés.
Donne des conseils ou des instructions permettant d'améliorer l'utilisation de chaque
fonction.
Télécommande / Batterie
Lithium (3V : CR2032)
Câble USB Manuel d'utilisation
[ZW
Guide du système de fixation murale
● L'aspect des accessoires peut légèrement différer des illustrations ci-dessus.
● Utilisez le câble USB dédié pour connecter des périphériques USB à l'unité.
Cordon d'alimentation :
2 pièces
Adaptateur CC Câble HDMI
Support-fixation :
2 pièces
6
Support de fixation
murale : 2 pièces
Page 40

descriptions
PANNEAU SUPÉRIEUR/FAÇADE
VOL. - / +
Bouton (Alimentation)
Permet d’allumer et d’éteindre l’alimentation.
Permet de régler le volume.
La valeur numérique du niveau du
volume apparaît à l'écran de la façade.
DESCRIPTIONS
FRA
Affichage
Affiche le mode actuellement sélectionné.
● Lorsque vous branchez le cordon CA, la touche Marche/Arrêt fonctionne pendant 4 à 6 secondes.
● Lorsque vous mettez l'unité sous tension, il faut compter 4 ou 5 secondes de retard avant le
déclenchement du son.
● Si vous souhaitez bénéficier du son du Soundbar uniquement, vous devrez éteindre les enceintes du
téléviseur depuis le menu Audio Setup de votre téléviseur. Reportezvous au manuel fourni avec votre
téléviseur.
Bouton (Source)
Permet de sélectionner les entrées D.IN,
AUX, HDMI, BT, TV, USB.
● Lorsque l’appareil est sous tension, si
vous appuyez sur le bouton
(Source) pendant plus de 3 secondes,
le bouton fonctionne en
(Silencieux). Pour annuler la
configuration du bouton
(Silencieux), appuyez à nouveau sur le
bouton
3 secondes.
(Source) pendant plus de
7
Page 41

DC14V
DESCRIPTIONS
PANNEAU ARRIÈRE/INFÉRIEUR
AUX IN
Permet la connexion à la sortie analogique
d’un périphérique externe.
OPTICAL IN (D.IN)
Permet la connexion à la
sortie (optique) numérique
d’un appareil externe.
DC 14V
(Entrée de
l'alimentation)
Branchez la prise de
l'adaptateur CC à la prise
d’alimentation (jack), puis
branchez la fiche de
l'adaptateur CA dans une
prise murale.
HDMI IN
Permet de recevoir simultanément
les signaux numériques audio et
vidéo à l’aide d’un câble HDMI.
Utilisez-le lorsque vous connectez un
périphérique externe pris en charge.
DC 14V
Wi-Fi SETUP
SPK ADD
Wi-Fi SETUP
Appuyez sur ce bouton
pour connecter votre
Soundbar à votre réseau
en utilisant la configuration
Wi-Fi.
HDMI IN
AUX IN
HDMI OUT
(TV-ARC)
OPTICAL IN
SPK ADD
Wi-Fi SETUP
SPK ADD
Appuyez sur le
bouton pour
connecter la
Soundbar au HUB.
(non fourni)
5V 0.5A
LAN
(Port USB)
Connectez les périphériques USB
à ce port pour lire les fichiers sur
les périphériques.
LAN
Permet la connexion à un réseau à l’aide d’un câble LAN.
HDMI OUT (TV-ARC)
Transmet les signaux vidéo et
audio numériques
simultanément au moyen
d’un câble HDMI.
ÉTIQUETTE
LAN 5V 0.5A
● Lorsque vous débranchez le câble d’alimentation de l'adaptateur CA de la prise murale, veillez à maintenir
la fiche. Ne tirez pas sur le câble.
● Ne branchez pas cette unité ou d'autres composants sur une prise CA jusqu'à ce que tous ces
branchements entre les composants sont terminés.
8
Page 42

TÉLÉCOMMANDE
SOURCE
Permet de sélectionner une source connectée au Soundbar.
Silencieux
Vous pouvez baisser le volume sur 0 en appuyant sur un bouton.
Appuyez à nouveau pour rétablir le son à son niveau de volume précédent.
Répéter
Vous pouvez régler la fonction Répéter lorsque vous écoutez de la musique à
partir d'une clé USB.
OFF - REPEAT : Permet d'annuler la lecture répétée.
TRACK - REPEAT : Permet de répéter la lecture d'une piste.
ALL - REPEAT : Permet de répéter la lecture de toutes les pistes.
RANDOM - REPEAT : Permet de lire les plages dans un ordre aléatoire. (Une
plage qui a déjà été lue peut être lue à nouveau.)
Saut en avant
Lorsque le périphérique que vous êtes en train de lire contient deux fichiers
ou plus et lorsque vous appuyez sur le bouton $, le fichier suivant est
sélectionné.
SOUND CONTROL
Permet de sélectionner TREBLE, BASS ou AUDIO SYNC. Puis, utilisez les
#, $
boutons
Appuyez sur le bouton SOUND CONTROL pendant environ 5 secondes pour
régler le son pour chaque bande de fréquences. Vous pouvez sélectionner 150
Hz, 300 Hz, 600 Hz, 1,2 KHz, 2,5 KHz, 5 KHz et 10 KHz et régler chacune de
ces options de -6 à +6.
Si le Soundbar est connecté à un téléviseur numérique et que la vidéo et l'audio
ne sont pas synchronisés, appuyez sur les boutons SOUND CONTROL pour
corriger le problème. Utilisez les boutons #,$ pour régler le temps de retard
audio entre 0 ms et 300 ms. En mode USB, en mode TV et en mode BT, la
fonction Audio Sync peut ne pas fonctionner.
Anynet+
Appuyez sur le bouton Anynet+ pour activer ou désactiver la fonction Anynet+.
(Par défaut : Auto Power Link OFF, ON - ANYNET+ / OFF - POWER LINK ou
OFF - ANYNET+ / ON - POWER LINK).
contrôler la Soundbar avec la télécommande à partir d'un téléviseur Samsung
compatible avec Anynet+. La Soundbar doit être connectée au téléviseur via un
câble HDMI.
* Auto Power Link
Permet de synchroniser la Soundbar à une source optique connectée via la
prise optique pour que le produit s'allume automatiquement lorsque vous
allumez votre télévision. (Reportez-vous à la page 18)
Vous pouvez également activer la fonction Wi-Fi SETUP en appuyant
longuement sur le bouton Anynet+ de la télécommande pendant plus de 7
● Soundbar est un nom dont Samsung est le propriétaire.
● Faire fonctionner le téléviseur en utilisant sa télécommande.
secondes.
DESCRIPTIONS
FRA
(*Utilisez les boutons #, $ pour régler le niveau.)
pour régler le volume sur Aigu ou Basse de -3 à +3.
La fonction Anynet+ vous permet de
9
Page 43

DESCRIPTIONS
Marche/Arrêt
Permet d’allumer et d’éteindre l’alimentation.
Volume
Règle le niveau de volume de l’unité.
Lecture/Pause
temporairement. Appuyez à nouveau sur le bouton & pour lire le fichier sélectionné.
Si le périphérique que vous êtes en train de lire contient plus d'un fichier et que
(Son Original), MUSIC, VOICE, SPORTS, CINEMA et NIGHT MODE selon le
Sélectionnez le mode STANDARD si vous souhaitez apprécier le son d’origine.
La fonction du son ambiophonique permet d'ajouter de la profondeur et de la
grandeur au son. Appuyez plusieurs fois sur le bouton
Appuyez sur le bouton STREAMING MUSIC pour écouter une station de radio
Internet. Chaque fois que vous appuyez sur ce bouton, le Soundbar passe sur la
station par défaut suivante, il fonctionne en boucle sur les 3 stations par défaut.
Pour utiliser la fonction STREAMING MUSIC, la Soundbar doit être connectée
Appuyez sur le bouton STREAMING MUSIC et maintenez-le enfoncé, puis la
fonction DRC (Dynamic Range Control) bascule de ON à OFF et inversement.
Appuyez sur le bouton WOOFER. Puis, utilisez les boutons
appuyant longuement sur le bouton WOOFER de la télécommande pendant
Appuyez sur le bouton & pour mettre en pause la lecture du fichier
Saut en arrière
vous appuyez sur le bouton #, le fichier précédent est sélectionné.
SOUND EFFECT
Vous avez le choix entre 6 modes de sons différents : STANDARD
type de source dont vous souhaitez profiter.
SOUND
ON - SURROUND SOUND, OFF - SURROUND SOUND
défiler les réglages Surr.Sound :
au réseau. (Reportez-vous à la page 26)
DRC (Dynamic Range Control) *
Cette option vous permet d'appliquer un contrôle de plage dynamique de
l'audio Dolby Digital, Dolby Digital Plus et Dolby TrueHD.
(* Utilisez les boutons #, $ pour régler le volume du caisson de graves.)
le volume du caisson de graves de -12, -6 à +6.
Vous pouvez également activer la fonction SPK ADD de la Soundbar en
SOUND pour faire
STREAMING MUSIC
WOOFER
#, $
pour régler
plus de 5 secondes.
INSTALLATION DES PILES DANS LA TÉLÉCOMMANDE
1. Utilisez une pièce de monnaie
adaptée pour tourner le couvercle
de la batterie de la télécommande
dans le sens inverse des aiguilles
d’une montre pour le retirer comme
indiqué sur la figure ci-dessus.
2. Insérez une pile au lithium de 3V. Veillez à ce
que le pôle positif (+) soit orienté vers le haut
lors de l’insertion de la pile dans son
logement Mettez le couvercle sur la batterie
et alignez le repère '●' l’un en face de l’autre
comme indiqué sur la figure ci-dessus.
10
3. Utilisez une pièce de monnaie
adaptée pour tourner le
couvercle de la batterie de la
télécommande dans le sens des
aiguilles d’une montre jusqu’en
butée pour le remettre en place.
Page 44

INSTALLATION
INSTALLATION
INSTALLATION DE LA SOUNDBAR
INSTALLATION DE LA FIXATION MURALE
+ Précautions d’installation
● Procédez à l'installation sur un mur vertical uniquement.
● Pour l’installation, évitez les températures extrêmes et l’humidité ou encore un mur pas assez solide pour
supporter le poids de l’appareil.
● Vérifiez la solidité du mur. Si le mur n'est pas assez solide pour supporter l'appareil, renforcez le mur ou installez
l'appareil sur un autre mur pouvant supporter son poids.
● Achetez et utilisez les vis de fixation ou l’ancrage appropriés au type de mur dont vous disposez (plaque de plâtre,
fer forgé, bois, etc.).
Si possible, fixez les vis de fixation dans les poteaux du mur.
● Achetez des vis pour fixation murale en fonction du type et de l'épaisseur du mur sur lequel vous souhaitez
installer la Soundbar.
- Diamètre : M5
- Longueur : L 35 mm ou plus recommandée
● Branchez les câbles entre l'appareil et les périphériques externes avant de l'installer sur le mur.
● Veillez à éteindre et débrancher l’unité avant installation. Autrement, vous vous exposeriez à un risque de décharge
électrique.
FRA
5 cm minimum
1. Placez le guide d'installation contre la surface murale.
• Le guide d'installation doit être de niveau.
• Si le téléviseur est monté sur le mur, installez la Soundbar à au moins 5 cm en dessous du téléviseur.
11
Page 45

INSTALLATION
Center Line
Center Line
2. Indiquez la position sur laquelle les vis vont traverser le mur à l'aide d'un stylo, puis retirez le guide d'installation.
Percez ensuite les trous pour les vis à l'aide d'un foret de taille adaptée.
3. Serrez le Support de fixation murale (2 pièces) et les vis sur les positions indiquées.
4. Soulevez le produit après avoir inséré le Support de fixation murale comme indiqué.
12
Page 46

INSTALLATION
Wi-Fi SETUP
SPK ADD
OPTICAL IN
(TV-ARC)
HDMI OUT
LAN
5V 0.5A
5. Insérez et serrez le Support-fixation dans chaque trou de la partie inférieure du produit. Le produit est fixé au
Support de fixation murale.
● Ne vous appuyez pas sur l’unité montée et évitez de la soumettre à des chocs ou des chutes.
● Fixez fermement l’unité au mur afin qu’elle ne tombe pas. La chute de l’appareil peut provoquer des
blessures ou endommager le produit.
● Lorsque l’unité est fixée au mur, veillez à ce qu’un enfant ne tire pas sur les câbles de connexion au risque
de faire tomber l’appareil.
● Pour optimiser l'installation d'une fixation murale, installez les enceintes à au moins 5 cm sous le téléviseur,
si le téléviseur est monté sur le mur.
● Pour votre sécurité, dans le cas où vous ne l’utilisez pas en montage mural, veuillez installer l’unité sur une
surface plane sécurisée où elle ne risque pas de tomber.
AUX IN
DC 14V
HDMI IN
FRA
13
Page 47

INSTALLATION
INSTALLATION DE LA SOUNDBAR SUR LE SOCLE DE VOTRE
TÉLÉVISEUR
Vous pouvez installer la Soundbar sur le socle de votre téléviseur si vous possédez un téléviseur Samsung disposant
d'un socle compatible avec cette Soundbar.
● Cette Soundbar est compatible avec les modèles de téléviseurs courbés Samsung 2015 JU6700, JU6500
et JU7500 (48 pouces, 55 pouces et 65 pouces), et JU6610 (48 pouces et 55 pouces). Reportez-vous à la
page d'accueil de Samsung Electronics (www.samsung.com) pour consulter la liste détaillée des modèles
compatibles.
● Cette Soundbar ne peut pas être installée sur un téléviseur non compatible, que ce soit sous la forme d'un
support ou d'un socle.
1. Alignez le centre de la barre audio avec le centre de la base du téléviseur, et poussez-le jusqu’au socle aussi
loin que possible, comme indiqué sur le schéma. Veillez à ne pas déséquilibrer le téléviseur.
INSTALLATION DE LA SOUNDBAR SANS SOCLE
1. Centrez la barre audio sur la zone plate devant le téléviseur.
● Installez-la sur une surface plane.
14
Page 48

BRANCHEMENTS
branchements
● Ne branchez pas le cordon d’alimentation de ce produit ou de votre téléviseur dans la prise murale avant
que toutes les connexions entre les différents composants n’aient été effectuées.
● Avant de déplacer ou d’installer l’appareil, mettez-le hors tension et débranchez le cordon d’alimentation.
CONNEXION DU CAISSON DE GRAVES
CONNEXION AUTOMATIQUE AU CAISSON DE GRAVES
L'unité principale et le caisson de graves doivent être reliés automatiquement (connexion sans fil) lorsque l'unité
principale et le caisson de graves sont allumés.
• Si elle est complètement connectée, la DEL bleue dans le caisson de graves arrête de clignoter.
CONNEXION MANUELLE AU CAISSON DE GRAVES
L'ID de lien du caisson de basses est préréglé en usine, et l’unité principale et le caisson doivent se connecter
automatiquement (connexion sans fil) à la mise sous tension des deux. Si le témoin Link ne s’allume pas à la mise sous
tension de l'unité principale et du caisson de basses, vous devrez régler l'ID tel qu'indiqué dans la procédure suivante.
FRA
POWER
1. Branchez les cordons d’alimentation de l’unité principale et du caisson de graves dans une prise murale CA.
2. Appuyez pendant 5 secondes sur le bouton ID SET situé à l’arrière du caisson de graves à l’aide d’un petit objet
pointu.
• Le témoin de veille s’éteint et le témoin de liaison (LED bleue) clignote rapidement.
3. Alors que l’unité principale est hors tension (en mode STANDBY), appuyez sur la touche
télécommande pendant 5 secondes.
4. Le message ID SET apparaît sur l'écran de la Soundbar.
5. Pour finaliser le lien, mettez l'unité principale sous tension lorsque la LED bleue du caisson de graves clignote.
• L’unité principale et le caisson de basses sont à présent liés (connectés).
• Le témoin de liaison (LED bleue) situé sur le caisson de graves doit être allumé.
• Si le témoin Link (Lien) ne s’affiche pas en bleu, la liaison a échoué. Éteignez l’unité principale et recommencez
à partir de l’étape 2.
• Vous pouvez mieux profiter du son du caisson de graves sans fil en sélectionnant les effets sonores.
(Reportez-vous à la page 10)
(Silencieux) de la
15
Page 49

BRANCHEMENTS
● Avant de déplacer ou d'installer l’appareil, mettez-le hors tension et débranchez le cordon d’alimentation.
● Si l’unité principale est hors tension, le caisson de graves sans fil sera en mode veille et la LED de veille
située sur la partie supérieure s’allumera 30 secondes après le clignotement du témoin de liaison (LED
bleue).
● Si vous utilisez un périphérique utilisant la même fréquence (2,4 GHz) que la barre audio près de la barre
audio, l'interférence peut entraîner quelques interruptions de son.
● La distance de transmission d’une onde radioélectrique est d’environ 10 m, mais elle peut varier en
fonction de l’environnement de fonctionnement. Si un mur en béton ou une paroi métallique se trouve entre
l’unité principale et le module de réception sans fil, le système risque de ne pas fonctionner car les ondes
radio ne peuvent pas traverser le métal.
● Si l’unité principale n’effectue pas de connexion sans fil, suivez les étapes 1 à 5 de la colonne de gauche
pour rétablir la connexion entre l'unité principale et le caisson de graves sans fil.
● L’antenne de réception sans fil est intégrée au caisson de graves sans fil. Maintenez l’appareil à l’abri de
l’eau et de l’humidité.
● Pour un résultat d’écoute optimal, assurez-vous que la zone autour du caisson de graves sans fil est bien
dégagée.
16
Page 50

BRANCHEMENTS
CONNEXION DE L'APPAREIL À UN
TÉLÉVISEUR
CONNEXIONS AVEC LE TÉLÉVISEUR À L'AIDE D'UN CÂBLE
HDMI (NUMÉRIQUE)
Câble HDMI
FRA
HDMI IN
DC 14V
AUX IN
OPTICAL IN
HDMI OUT
(TV-ARC)
HDMI OUT
(TV-ARC)
HDMI IN
5V 0.5A
LAN
HDMI OUT
(TV-ARC)
SPK ADD
Wi-Fi SETUP
1. À l'aide d'un câble HDMI, connectez la prise HDMI OUT (TV-ARC) située à l'arrière de l'appareil à la prise HDMI
IN de votre téléviseur.
2. Appuyez sur le bouton
(Source) situé sur le panneau supérieur de l’unité principale ou sur le bouton
SOURCE de la télécommande pour sélectionner le mode D.IN.
● Le HDMI est une interface qui permet la transmission par voie numérique de données audio et vidéo à
l'aide d'un simple connecteur.
● Si le téléviseur fournit un port ARC, connectez le câble HDMI sur le port HDMI IN (ARC).
● Il est recommandé d'utiliser un câble HDMI sans noyau si possible. Si vous utilisez un câble HDMI avec
noyau, utilisez-en un dont le diamètre est inférieur à 14 mm.
● La fonction Anynet+ doit être activée.
● La fonction sera indisponible si le câble HDMI ne prend pas en charge ARC.
CONNEXIONS AVEC LE TÉLÉVISEUR À L'AIDE D'UN CÂBLE
OPTIQUE (NUMÉRIQUE)
Câble Optique
(non fourni)
OPTICAL OUT
OPTICAL IN
HDMI IN
DC 14V
AUX IN
5V 0.5A
LAN
HDMI OUT
(TV-ARC)
OPTICAL IN
SPK ADD
Wi-Fi SETUP
1. Branchez l'entrée OPTICAL IN (Audio) sur le Soundbar de la prise OPTICAL OUT du téléviseur.
2. Appuyez sur le bouton (Source) situé sur le panneau supérieur de l’unité principale ou sur le bouton
SOURCE de la télécommande pour sélectionner le mode D.IN.
17
Page 51

BRANCHEMENTS
+ Auto Power Link
Si vous avez connecté l'unité principale à un téléviseur à l'aide d'un câble optique numérique, activez la fonction
Auto Power de sorte que la barre audio s'allume automatiquement lorsque vous allumez votre téléviseur.
AUTO POWER LINK Affichage
ACTIVÉ
DÉSACTIVÉ
1. Connectez le Soundbar et un téléviseur avec un câble optique (non fourni).
2. Appuyez sur le bouton
SOURCE de la télécommande pour sélectionner le mode D.IN.
3. Appuyez sur le bouton Anynet+ de la télécommande pour activer et désactiver la fonction Auto Power Link.
● Selon le périphérique connecté, la fonction Auto Power Link peut ne pas fonctionner.
OFF - ANYNET+ / ON - POWER LINK
ON - ANYNET+ / OFF - POWER LINK
(Source) situé sur le panneau supérieur de l’unité principale ou sur le bouton
TV SOUNDCONNECT
Vous pouvez apprécier le son du téléviseur à travers le Soundbar connecté à un Téléviseur Samsung qui prend en
charge la fonction TV SoundConnect.
Connexion
1. Allumez le téléviseur et le Soundbar.
• Activez le menu du téléviseur.
• Accédez aux Réglages des enceintes à partir de l'onglet "Son".
• Réglez le menu "Ajouter un nouveau périphérique" sur "Activé"
2. Appuyez sur le bouton (Source) situé sur le panneau supérieur de l’unité principale ou sur le bouton
SOURCE de la télécommande pour sélectionner le mode TV.
3. Sur le téléviseur, un message demandant si vous souhaitez activer la fonction TV SoundConnect apparaît.
4. Sélectionnez <Oui> pour terminer la connexion du téléviseur à la Soundbar via la télécommande du téléviseur.
18
Page 52

BRANCHEMENTS
● Commutez le mode du Soundbar de TV à un autre mode met fin automatiquement à la fonction TV
SoundConnect.
● Pour connecter le Soundbar à un autre téléviseur, la connexion existante doit être fermée.
● Fermez la connexion au téléviseur existant, puis appuyez sur le bouton
secondes pour établir la connexion à un autre téléviseur.
● La fonction TV SoundConnect (SoundShare) est prise en charge par certains téléviseurs Samsung
disponibles depuis 2012. Vérifiez si votre téléviseur prend en charge la fonction TV SoundConnect
(SoundShare) avant de commencer. (Pour plus d’informations, reportez-vous au manuel d’utilisation du
téléviseur.)
● Si votre téléviseur Samsung est sorti avant 2014, vérifiez le menu de réglages SoundShare.
● Si la distance entre le téléviseur et le Soundbar dépasse 10 m, la connexion peut ne pas être stable ou
l'audio peut être discontinu. Si tel est le cas, déplacez le téléviseur ou le Soundbar afin qu’il soit dans la
plage opérationnelle et rétablissez ensuite la connexion TV SoundConnect.
● Portée pour la plage de fonctionnement de TV SoundConnect:
- Portée recommandée pour l'appariement : 2 m maxi.
- Portée de fonctionnement recommandée : 10 m maxi.
● Les boutons Lecture/Pause, Suivant et Précédent situés sur la barre audio ou la télécommande de la barre
audio ne commandent pas le téléviseur.
&
de la télécommande pendant 5
FRA
19
Page 53

BRANCHEMENTS
CONNEXIONS AVEC LE PÉRIPHÉRIQUE
EXTERNE
CÂBLE HDMI
HDMI est une interface numérique standard qui permet de connecter des appareils tels qu’un téléviseur, un
projecteur, un lecteur de DVD, un lecteur de disques Blu-ray un décodeur, etc.
Comme l’interface HDMI transmet des signaux numériques de la plus haute qualité, vous pouvez profiter d'une
qualité vidéo et audio supérieure à la source numérique initialement créée.
Câble HDMI
Appareils
HDMI OUT HDMI IN
Numériques
HDMI IN
HDMI IN
DC 14V
AUX IN
5V 0.5A
LAN
HDMI OUT
(TV-ARC)
OPTICAL IN
SPK ADD
Wi-Fi SETUP
1. À l'aide d'un câble HDMI, connectez la prise HDMI IN située à l'arrière de l'appareil à la prise HDMI OUT de vos
périphériques numériques.
2. Appuyez sur le bouton
(Source) situé sur le panneau supérieur de l’unité principale ou sur le bouton
SOURCE de la télécommande pour sélectionner le mode HDMI.
CÂBLE OPTIQUE OU AUX
Cet appareil est équipé d'une prise d'entrée numérique optique et d'une prise d'entrée analogique audio, ce qui
vous permet de disposer de deux méthodes de connexion à un périphérique externe.
Câble Optique
(non fourni)
OPTICAL IN
AUX IN
HDMI IN
AUX IN
5V 0.5A
LAN
HDMI OUT
(TV-ARC)
OPTICAL IN
SPK ADD
Wi-Fi SETUP
Lecteur BD/ DVD/
Décodeur/
Console de jeux
OPTICAL OUT
Câble Audio
(non fourni)
AUX OUT
DC 14V
20
Page 54

BRANCHEMENTS
+ Câble AUX
1. Connectez la prise AUX IN (Audio) de l’unité principale à la prise AUDIO OUT du téléviseur ou du périphérique
source.
2. Appuyez sur le bouton
(Source) situé sur le panneau supérieur de l’unité principale ou sur le bouton
SOURCE de la télécommande pour sélectionner le mode AUX.
+ Câble Optique
1. Connectez la prise OPTICAL IN (Audio) de l’unité principale à la prise OPTICAL OUT du téléviseur ou du
périphérique source.
2. Appuyez sur le bouton
SOURCE de la télécommande pour sélectionner le mode D.IN.
(Source) situé sur le panneau supérieur de l’unité principale ou sur le bouton
USB
Vous pouvez lire des fichiers musicaux sur les périphériques de stockage USB via la barre audio.
Port USB
HDMI IN
DC 14V
AUX IN
HDMI OUT
(TV-ARC)
OPTICAL IN
SPK ADD
Wi-Fi SETUP
5V 0.5A
LAN
Affichage
FRA
1. Connectez le périphérique USB au port USB de l'appareil.
2. Appuyez sur le bouton
(Source) situé sur le panneau supérieur de l’unité principale ou sur le bouton
SOURCE de la télécommande pour sélectionner le mode USB.
3. USB apparaît sur l’écran d’affichage.
• La connexion Soundbar au périphérique USB est terminée.
• Il s'éteint automatiquement (Auto Power Off) si aucun périphérique USB n'a été connecté après plus de 15
minutes.
+ Avant de connecter un périphérique USB
L'utilisateur doit connaître les points suivants :
● Si le nom de fichier d'un fichier ou d'un dossier sur un périphérique USB dépasse 10 caractères, il ne s'affiche pas
sur l’écran du Soundbar.
● Ce produit peut ne pas être compatible avec certains types de support de stockage USB.
● Les systèmes de fichiers FAT16 et FAT32 sont pris en charge.
- Le système de fichiers NTFS n’est pas pris en charge.
● Connectez un périphérique USB directement au port USB du produit. Dans le cas contraire, vous pouvez
rencontrer un problème de compatibilité USB.
● Ne connectez pas plusieurs périphériques de stockage au produit via un lecteur à cartes multiples. Il peut ne pas
fonctionner correctement.
21
Page 55

BRANCHEMENTS
● Les protocoles PTP des caméras numériques ne sont pas pris en charge.
● Ne retirez pas le périphérique USB lorsque les fichiers sont en cours de transfert.
● Les fichiers musicaux protégés par la technologie DRM (MP3, WMA) d'un site Web commercial ne peuvent pas
être lus.
● Les disques durs externes ne sont pas pris en charge.
● Les téléphones mobiles ne sont pas pris en charge.
● Liste de compatibilités:
Extension Codec Débit d'échantillonnage Débit binaire
MPEG 1 Layer1 32/44,1/48 32 ~ 448 kbps
MPEG 1 Layer2 32/44,1/48 32 ~ 384 kbps
*.mp3
*.wma
*.wav
*.ogg
*.flac
*.m4a
*.ape
*.aif
MPEG 1 Layer3 32/44,1/48 32 ~ 320 kbps
MPEG 2 Layer3 16/22,05/24/32/44,1/48 8 ~ 160 kbps
MPEG 2,5 Layer3 8/11,025/12/16/22,05/24/32/44,1/48 8 ~ 160 kbps
Wave_Format_MSAudio1 - -
Wave_Format_MSAudio2 - -
WMA Professional Non pris en charge -
- 8 KHz ~ 192 KHz ~ 8,8 Mbps
- 8 KHz ~ 48 KHz -
- 8 KHz ~ 192 KHz ~ 5,6 Mbps
Alac
(Apple lossless Audo codec)
MON-KEY Audio 8 KHz ~ 48 KHz ~ 1 Mbps
Format de fichier
interchangeable Audio
8 KHz ~ 192 KHz ~ 1 Mbps
8 KHz ~ 192 KHz ~ 4,4 Mbps
● S'il y a trop de dossiers et de fichiers stockés sur la clé USB, la lecture peut prendre un certain temps.
22
Page 56

FONCTIONS
fonctions
MODE D’ENTRÉE
Appuyez sur le bouton (Source) situé sur le panneau supérieur de l’unité principale ou sur le bouton SOURCE
de la télécommande pour sélectionner le mode que vous souhaitez.
Mode d'entrée Affichage
FRA
Entrée Optique numérique
Entrée ARC (SORTIE HDMI)
Entrée AUX
Entrée HDMI
Mode BLUETOOTH
TV SoundConnect
Mode USB
L'appareil s'éteint automatiquement sous les conditions suivantes:
● Mode D.IN/HDMI/BT/TV/USB/ARC
- S'il n'y a aucun signal audio pendant 15 minutes.
● Mode AUX
Pour ON ou OFF la fonction d'allumage/extinction automatique Appuyez sur le bouton
ON - AUTO POWER DOWN / OFF - AUTO POWER DOWN apparaît sur l’écran.
- Si le câble AUX n'est pas connecté pendant 15 minutes.
- Si aucune entrée de TOUCHE n'est reçue durant 8 heures lorsque le câble AUX est branché.
D.IN
AUX
HDMI
BT
TV
USB
&
pendant 5 secondes.
23
Page 57

FONCTIONS
BLUETOOTH
Vous pouvez connecter un périphérique Bluetooth à l'Ensemble Soundbar pour écouter de la musique avec un son
stéréo de haute qualité, tout cela sans fil!
POUR CONNECTER LE SYSTÈME SOUNDBAR À UN
PÉRIPHÉRIQUE BLUETOOTH
Vérifiez si le périphérique Bluetooth prend en charge la fonction des écouteurs stéréo compatible Bluetooth.
Connexion
1. Appuyez sur le bouton (Source) situé sur le panneau supérieur de l’unité principale ou sur le bouton
SOURCE de la télécommande pour sélectionner le mode BT.
• Le message BT READY apparaît sur la façade de la Soundbar.
2. Sélectionnez le menu Bluetooth sur le périphérique Bluetooth que vous désirez connecter. (Reportezvous pour
cela au manuel d'utilisation de ce périphérique.)
3. Sélectionnez « [Samsung] Soundbar » dans la liste.
• Lorsque le Soundbar est connecté à l’appareil Bluetooth, [Nom du périphérique Bluetooth]
à l’écran.
• Le nom du périphérique peut uniquement être affiché en anglais. Un soulignage " _ " sera affiché si le nom
n’est pas en anglais.
• Si le fait d'associer le périphérique Bluetooth et le système Soundbar a échoué, supprimez le précédent
« [Samsung] Soundbar » identifié par le périphérique Bluetooth et faites-lui rechercher le système Soundbar à
nouveau.
4. Lisez de la musique sur le périphérique connecté.
• Vous pouvez écouter de la musique lue sur le périphérique Bluetooth connecté via le système Soundbar.
• En mode BT, les fonctions Lecture/Pause/Suivant/Précédent ne sont pas disponibles.
Cependant, ces fonctions sont disponibles dans les périphériques Bluetooth qui prennent en charge la
fonctionnalité AVRCP.
● Si le code PIN de sécurité est demandé lors de la connexion d’un périphérique Bluetooth, entrez <0000>.
● Un seul périphérique Bluetooth peut être associé à la fois.
● La connexion Bluetooth sera terminée lorsque le Soundbar sera éteint.
● Le Soundbar peut ne pas effectuer la recherche ou la connexion Bluetooth correctement dans les cas
suivants:
- En présence d'un champ électrique puissant autour du système Soundbar.
- Si plusieurs périphériques Bluetooth sont associés simultanément au système Soundbar.
- Si le périphérique Bluetooth est éteint, mal positionné ou s'il connaît des dysfonctionnements.
- Notez que des appareils tels que des fours à micro-ondes, des adaptateurs LAN sans fil, des lampes
fluorescentes et des fours à gaz pour chauffage des locaux utilisent la même plage de fréquences que le
périphérique Bluetooth, ce qui peut provoquer des interférences électriques.
Périphérique Bluetooth
BT s'affiche
24
Page 58

FONCTIONS
● Le Soundbar prend en charge les données SBC (44,1 kHz, 48 kHz).
● Effectuez uniquement la connexion à un périphérique Bluetooth qui prend en charge la fonction A2DP (AV).
● Vous ne pouvez pas connecter le Soundbar à un périphérique Bluetooth qui prend en charge uniquement
la fonction HF (Mains libres).
● Lorsque vous avez apparié la barre audio à un périphérique Bluetooth, sélectionner « [Samsung]
Soundbar » parmi la liste des périphériques connectés à ce périphérique placera automatiquement la
barre audio en mode BT.
● Disponible uniquement si le Soundbar est listé dans les périphériques appariés du périphérique Bluetooth.
(Le périphérique Bluetooth et le Soundbar doivent être appariés au préalable au moins une fois)
● Le Soundbar apparaîtra dans la liste des périphériques recherchés du périphérique Bluetooth uniquement
lorsque le Soundbar affiche BT READY.
● En mode TV SoundConnect, le Soundbar ne peut pas être apparié à un autre périphérique Bluetooth.
POUR DÉCONNECTER LE PÉRIPHÉRIQUE BLUETOOTH DU
SYSTÈME SOUNDBAR
Vous pouvez déconnecter le périphérique Bluetooth du système Soundbar. Pour les instructions, reportez-vous au
manuel d'utilisation de ce périphérique.
● Le système Soundbar sera déconnecté.
● Lorsque le système Soundbar est déconnecté du périphérique Bluetooth, le système Soundbar affiche
BT DISCONNECTED en façade.
POUR DÉCONNECTER LE SYSTÈME SOUNDBAR DU
PÉRIPHÉRIQUE BLUETOOTH
Appuyez sur le bouton SOURCE de la télécommande ou sur le bouton (Source) sur le panneau supérieur de
l’appareil pour passer du mode BT à un autre mode ou éteindre le Soundbar.
● Le périphérique Bluetooth attend un certain temps la réponse du système Soundbar avant de mettre fin à la
connexion. (Le temps de déconnexion peut varier en fonction du périphérique Bluetooth.)
● En mode Bluetooth, la connexion sera perdue si la distance entre le système Soundbar et le périphérique
Bluetooth dépasse 10 m.
● Le système Soundbar s'éteint après 15 minutes en état Prêt.
FRA
+ À propos du Bluetooth
Le système Bluetooth est une technologie qui permet de connecter facilement entre eux des périphériques
compatibles Bluetooth à l'aide d'une liaison sans fil courte distance.
● Ce périphérique Bluetooth peut générer du bruit ou créer des dysfonctionnements en fonction des conditions
d'utilisation lorsque:
- Une partie du corps de l’appareil est en contact avec le système de réception/transmission du périphérique
Bluetooth ou du système Soundbar.
- Il est soumis à des variations électriques provenant d'obstructions provoquées par un mur, un coin ou des
cloisonnements de bureaux.
- Il est exposé à des interférences électriques provenant d'appareils utilisant la même bande de fréquences
(exemple : équipements médicaux, fours à micro-ondes et réseaux LAN sans fil).
● Associer le système Soundbar et le périphérique Bluetooth tout en maintenant une faible distance.
● Plus la distance est grande entre l'Soundbar et le périphérique Bluetooth, plus la qualité de la transmission se
dégrade. Si la distance excède la plage opérationnelle Bluetooth, la connexion est perdue.
● Dans les zones où la réception est faible, la connexion Bluetooth peut ne pas fonctionner correctement.
● La connexion Bluetooth ne fonctionne que lorsqu'elle est proche de l'appareil. La connexion s’interrompt
automatiquement lorsque cette plage est dépassée. Même si la distance est respectée, il est possible que la
qualité sonore soit détériorée par des obstacles (ex. : murs, portes).
● Ce périphérique sans fil peut provoquer des interférences électriques durant son fonctionnement.
25
Page 59

FONCTIONS
UTILISATION DE LA FONCTION
NETWORK STANDBY ON
La fonction Network Standby On si la connexion sans fil a été correctement établie entre le périphérique intelligent et la
Soundbar. Cette fonction active la Soundbar automatiquement lorsque le périphérique intelligent essaie de se
connecter à la Soundbar via Bluetooth ou Wi-Fi. Si la Soundbar a été activée via une connexion Bluetooth, son mode
d’entrée est automatiquement défini sur BT. L’activation de la Soundbar via Wi-Fi n’est disponible qu’en utilisant
l’application. Pour obtenir plus d’informations à ce sujet, reportez-vous au manuel en ligne.
1. Connectez le périphérique intelligent à votre Soundbar.
2. Activez la fonction Network Standby On en appuyant sur le bouton $ situé sur la télécommande de la Soundbar
pendant plus de 5 secondes. Vous pouvez désactiver la fonction en appuyant à nouveau sur le bouton $
pendant plus de 5 secondes.
● Disponible uniquement si la Soundbar est listée parmi les périphériques associés du périphérique
intelligent. (Le périphérique intelligent et la Soundbar doivent avoir été préalablement associés au moins
une fois.)
● La Soundbar apparaîtra dans la liste des périphériques recherchés du périphérique intelligent uniquement
lorsque la Soundbar affiche [BT READY] ou [WiFi READY].
● Dans le mode TV SoundConnect, la Soundbar peut ne pas être associée à un périphérique intelligent.
● Si la fonction Network Standby On ne marche pas
- La fonction Network Standby On est désactivée.
● La connexion Wi-Fi à la Soundbar sera interrompue si son cordon d’alimentation est débranché ou si
l’alimentation est coupée. Allumez la Soundbar et procédez à une nouvelle connexion.
UTILISATION DU MULTIROOM LINK
Une fois que la Soundbar est connectée à un périphérique intelligent avec Multiroom App, vous pouvez connecter des
périphériques Samsung Multiroom sans fil ensemble.
AVANT DE DÉMARRER
+ Bases de communication
Périphérique
Intelligent :
Android ou iOS
(Contrôle de
Internet Routeur Sans Fil
1. Exigences: Routeur sans fil, périphérique intelligent
2. Le routeur sans fil doit être connecté à Internet.
3. Le périphérique intelligent doit être relié au routeur via une connexion Wi-Fi.
26
l'application)
Page 60

FONCTIONS
INSTALLATION DE L'APPLICATION SAMSUNG MULTIROOM
Pour utiliser la Soundbar, vous devez télécharger et installer l'application Samsung Multiroom en accédant à
l'application via Google play ou App Store. Une fois l'application Samsung Multiroom installée, vous pouvez lire les
fichiers musicaux enregistrés dans votre périphérique intelligent, et écouter de la musique depuis les périphériques
connectés, depuis d'autres fournisseurs de contenu, et depuis des stations de radio Internet.
+ Android ou iOS
Téléchargez l'application Samsung Multiroom depuis l'application Google Play ou App Store de votre périphérique
intelligent.
* Recherche de marché : Samsung Multiroom
ANDROID APP ON
ou
+ Accéder à l'application Samsung Multiroom
Pour accéder à l'application Samsung Multiroom, appuyez sur l'icône de l'application Multiroom sur votre périphérique
intelligent.
CONNEXION DE LA SOUNDBAR À VOTRE RÉSEAU
Sélectionnez ensuite l'application Samsung Multiroom sur votre périphérique intelligent.
Suivez les directives sur l'écran de votre périphérique intelligent.
● Pour obtenir plus d’informations à ce sujet, reportez-vous au manuel en ligne.
- Manuel en ligne : www.Samsung.com Assistance Recherche du nom de produit
Téléchargement du fichier PDF HW-J6500, HW-J6501 ou HW-J6502
● Lorsque vous êtes connecté à un réseau câblé, essayez d'utiliser le câble CAT 7 pour vous connecter.
FRA
27
Page 61

FONCTIONS
MISE À JOUR LOGICIELLE
HDMI IN
DC 14V
AUX IN
5V 0.5A
LAN
HDMI OUT
(TV-ARC)
OPTICAL IN
SPK ADD
Wi-Fi SETUP
MISE À JOUR VIA USB
Samsung peut proposer à l’avenir des mises à jour pour le micrologiciel du système de la Soundbar.
Si une mise à jour est proposée, vous pouvez mettre le micrologiciel à jour en connectant un périphérique USB,
contenant la mise à jour du micrologiciel, au port USB de votre Soundbar.
Notez qu'en présence de plusieurs fichiers de mise à jour, vous devez simplement les charger sur le périphérique USB
et les utiliser pour mettre à jour le micrologiciel l'un après l'autre.
Veuillez visiter le site Web Samsung.com ou contacter le centre d’assistance téléphonique de Samsung pour recevoir
de plus amples informations concernant le téléchargement des fichiers de mise à jour.
1. Lorsque la Soundbar est désactivée, connectez le périphérique de stockage USB contenant le micrologiciel de
mise à jour sur le port USB de la Soundbar.
2. Activez la Soundbar. UPDATE apparaît à l'écran et la mise à jour commence d'ici 3 minutes.
• Une fois que la mise à jour est terminée, la Soundbar se désactive et s'active automatiquement.
+ Si UPDATE n’est pas affiché
1. Éteignez la Soundbar, branchez le périphérique de stockage USB contenant les fichiers de mise à jour sur le port
USB de la Soundbar.
2. Débranchez le cordon d’alimentation, puis branchez-le à nouveau et allumez l’appareil.
● Insérez un périphérique USB contenant la mise à jour du micrologiciel dans le port USB situé sur l’unité
principale.
● La mise à jour du micrologiciel peut ne pas fonctionner correctement si les fichiers audio pris en charge par
la barre audio dans le périphérique de stockage USB.
● Ne débranchez pas l’alimentation ni ne retirez pas le périphérique USB alors que les mises à jour sont en
cours d’application. L’unité principale s’éteint automatiquement une fois que la mise à jour du micrologiciel
est terminée.
28
Page 62

FONCTIONS
● Après la mise à jour, tous les paramètres sont réinitialisés sur leurs valeurs par défaut. Nous vous
recommandons de noter vos réglages, vous pourrez ainsi aisément les réinitialiser après la mise à jour.
Notez que la mise à jour du micrologiciel réinitialise également la connexion du caisson de graves. Si la
connexion au caisson de graves n'est pas ré-établie automatiquement après la mise à jour, reportez-vous
à la page 15. En cas d’échec de la mise à jour du micrologiciel, nous vous recommandons de convertir le
périphérique USB au format FAT16 et de réessayer la mise à jour.
● Ne formatez pas la clé USB au format NTFS. Le Soundbar ne prend pas en charge le système de fichiers
NTFS.
● Tout dépendant du fabricant, le USB pourrait ne pas être compatible.
MISE À JOUR AUTOMATIQUE
Même si la Soundbar est éteinte, elle recherche la dernière version logicielle et se met à jour automatiquement si elle
est connectée à Internet.
● La Soundbar est configurée pour se mettre à jour automatiquement par défaut.
● Pour utiliser la fonction de mise à jour automatique, la Soundbar doit être connectée à Internet.
● La connexion Wi-Fi à la Soundbar sera interrompue si son cordon d’alimentation est débranché ou si
l’alimentation est coupée. Allumez la Soundbar et procédez à une nouvelle connexion.
FRA
29
Page 63

TÉPANNAGE
Tépannage
TÉPANNAGE
Avant de contacter l'assistance, veuillez lire ce qui suit.
L'ensemble ne s'allume pas.
• Le cordon d'alimentation est-il branché dans la
prise?
La fonction ne s'active pas lorsque vous appuyez sur le bouton correspondant.
• L'air est-il chargé en électricité statique? Débranchez la fiche d'alimentation électrique et
Aucun son n'est émis.
• La fonction Silencieux est-elle activée?
• Le volume est-il réglé au minimum?
La télécommande ne fonctionne pas.
• Les piles sont-elles usées?
• La distance entre la télécommande et l'unité
principale est-elle trop importante ?
La fonction TV SoundConnect (appariement du téléviseur) a échoué.
• Votre téléviseur prend-il en charge TV
SoundConnect?
• La version du micrologiciel du téléviseur est-elle la
plus récente?
• Une erreur s’est-elle produite lors de la connexion?
• Réinitialisez le mode TV et connectez à nouveau.
Branchez la fiche d'alimentation électrique dans la
prise murale.
rebranchez-la.
Appuyez sur le bouton
la fonction.
Permet de régler le Volume.
Remplacez-les.
Rapprochez-vous de l’appareil.
TV SoundConnect est pris en charge par certains
téléviseurs Samsung commercialisés après 2012.
Vérifiez si votre téléviseur prend en charge TV
SoundConnect.
Mettez votre téléviseur à jour avec la version du
micrologiciel la plus récente.
Contactez le centre d'appels Samsung.
Appuyez et maintenez le bouton
secondes pour réinitialiser la connexion TV
SoundConnect.
(Silencieux) pour annuler
&
pendant 5
La LED rouge sur le caisson de graves clignote et le caisson de graves ne produit aucun son.
• Votre caisson de graves peut ne pas être connecté
au corps principal de l'appareil.
Le caisson de graves bourdonne et vibre sensiblement.
• Essayez d'ajuster les vibrations de votre caisson de
graves.
Essayez de reconnecter votre caisson de graves.
(Reportez-vous en page 15)
Appuyez sur le bouton WOOFER de votre
télécommande pour ajuster sa valeur (entre -12, -6 à
+6).
30
Page 64

annexe
SPÉCIFICATIONS
Nom du modèle
HW-J6500 / HW-J6501/ HW-J6502
ANNEXE
FRA
USB
Unité principale
Poids
GÉNÉRAL
AMPLIFICATEUR
* Le rapport signal/bruit, la distorsion, la séparation et la sensibilité utilisable sont basés sur des mesures effectuées
à l'aide des directives AES (Audio Engineering Society).
* Caractéristiques nominales
- Samsung Electronics Co., Ltd se réserve le droit de modifier les caractéristiques sans préavis.
- Le poids et les dimensions sont approximatifs.
- Pour l’alimentation et la consommation d’énergie, reportez-vous à l'étiquette apposée sur l'appareil.
a Attention : le produit redémarre automatiquement si vous activez/désactivez le Wi-Fi/Ethernet.
Consommation globale d’énergie en
veille (W) (Tous les ports du réseau sont
en état activé “ON”)
Wi-Fi/Ethernet
Bluetooth
a Avis de licence libre
- Pour toute requête et demande concernant les sources ouvertes, contactez Samsung via e-mail à l’adresse
(oss.request@samsung.com).
Dimensions
(L x H x P)
Plage de températures en fonctionnement
Plage d'humidité en fonctionnement
Puissance
de sortie
nominale
Rapport signal/bruit (entrée analogique)
Séparation (1 kHz)
Méthode de
désactivation du port
Méthode de
désactivation du port
Caisson de basses (
/ PS-WJ6501 / PS-WJ6502
Unité principale
Caisson de basses (
/ PS-WJ6501 / PS-WJ6502
Unité principale
Caisson de basses (
/ PS-WJ6501 / PS-WJ6502
PS-WJ6500
PS-WJ6500
PS-WJ6500
7,4W
Appuyez sur le bouton Wi-Fi SETUP sur le produit pendant 30
secondes pour activer/désactiver le Wi-Fi/Ethernet.
Appuyez sur le bouton SPK ADD sur le produit pendant 30
secondes pour activer/désactiver le Bluetooth.
5V / 0,5A
2,7 kg
6,8 kg
)
1078 x 47,5 x 129 mm
452 x 335 x 154 mm
)
de +5 à +35 °C
de 10 à 75 %
22W/CH x 6, 4 OHM, THD=10%, 1KHz
168W, 3 OHM, THD=10%, 100Hz
)
65 dB
65 dB
Par la présente, Samsung Electronics déclare que cet équipement est conforme aux exigences principales et autres
dispositions relatives à la Directive 1999/5/EC.
La déclaration de conformité originale se trouve sur le site http://www.samsung.com, allez sur Support (Assistance) >
Search Product Support (Recherche assistance produit) et saisissez le nom du modèle.
Cet appareil peut être utilisé dans tous les pays de l'Union Européenne.
Cet appareil ne peut être utilisé qu'en intérieur.
31
Page 65

© 2015 Samsung Electronics Co., Ltd. Tous droits réservés.
Comment contacter Samsung dans le monde
Si vous avez des suggestions ou des questions concernant les produits Samsung, veuillez contacter le Service
Consommateurs Samsung.
Area Contact Centre
`
Europe
U.K 0330 SAMSUNG (7267864) www.samsung.com/uk/support
EIRE 0818 717100 www.samsung.com/ie/support
0180 6 SAMSUNG bzw.
0180 6 7267864*
GERMANY
(*0,20 €/Anruf aus dem dt. Festnetz, aus
dem Mobilfunk max. 0,60 €/Anruf)
FRANCE 01 48 63 00 00 www.samsung.com/fr/support
ITALIA 800-SAMSUNG (800.7267864) www.samsung.com/it/support
SPAIN 0034902172678 www.samsung.com/es/support
PORTUGAL 808 20 7267 www.samsung.com/pt/support
LUXEMBURG 261 03 710 www.samsung.com/support
NETHER-
0900-SAMSUNG (0900-7267864) (€ 0,10/
LANDS
Min)
BELGIUM 02-201-24-18
NORWAY 815 56480 www.samsung.com/no/support
DENMARK 70 70 19 70 www.samsung.com/dk/support
FINLAND 030-6227 515 www.samsung.com/fi/support
SWEDEN 0771 726 7864 (0771-SAMSUNG) www.samsung.com/se/support
801-172-678* lub +48 22 607-93-33 *
POLAND
* (koszt połączenia według taryfy operatora)
0680SAMSUNG (0680-726-786)
HUNGARY
0680PREMIUM (0680-773-648)
SLOVAKIA 0800 - SAMSUNG (0800-726 786) www.samsung.com/sk/support
0800-SAMSUNG (0800-7267864)
AUSTRIA
[Only for Premium HA] 0800-366661
[Only for Dealers] 0810-112233
(Applicable aux pays disposant de systèmes de collecte séparés)
Le symbole sur la batterie, le manuel ou l'emballage indique que les
batteries de ce produit ne doivent pas être éliminées en fin de vie avec
les autres déchets ménagers. L'indication éventuelle des symboles
chimiques Hg, Cd ou Pb signifie que la batterie contient des quantités de
mercure, de cadmium ou de plomb supérieures aux niveaux de référence
stipulés dans la directive CE 2006/66.
Si les batteries ne sont pas correctement éliminées, ces substances
peuvent porter préjudice à la santé humaine ou à l'environnement.
Afin de protéger les ressources naturelles et d'encourager la réutilisation
du matériel, veillez à séparer les batteries des autres types de déchets et
à les recycler via votre système local de collecte gratuite des batteries.
[Elimination des batteries de ce produit]
Web Site
www.samsung.com/de/support
www.samsung.com/nl/support
www.samsung.com/be/support
(Dutch)
www.samsung.com/be_fr/
support (French)
www.samsung.com/pl/support
www.samsung.com/hu/support
www.samsung.com/at/support
Area Contact Centre
SWITZER-
0800 726 78 64 (0800-SAMSUNG)
LAND
800 - SAMSUNG (800-726786) www.samsung.com/cz/support
CZECH
Samsung Electronics Czech and Slovak, s.r.o. V Parku 2343/24, 148 00 -
Praha 4
CROATIA 072 726 786 www.samsung.com/hr/support
BOSNIA 055 233 999 www.samsung.com/support
MONTENE-
020 405 888 www.samsung.com/support
GRO
080 697 267 (brezplačna številka)
090 726 786 (0,39 EUR/min)
SLOVENIA
klicni center vam je na voljo od ponedeljka
do petka od 9. do 18. ure.
SERBIA 011 321 6899 www.samsung.com/rs/support
BULGARIA 800 111 31 , Безплатна телефонна линия www.samsung.com/bg/support
08008 726 78 64 (08008 SAMSUNG )
ROMANIA
Apel GRATUIT
CYPRUS 8009 4000 only from landline, toll free
80111-SAMSUNG (80111 726 7864) only
from land line
GREECE
(+30) 210 6897691 from mobile and land
line
LITHUANIA 8-800-77777 www.samsung.com/lt/support
LATVIA 8000-7267 www.samsung.com/lv/support
ESTONIA 800-7267 www.samsung.com/ee/support
Les bons gestes de mise au rebut de ce produit
(Applicable aux pays disposant de systèmes de collecte
séparés)
Ce symbole sur le produit, ses accessoires ou sa documentation
indique que ni le produit, ni ses accessoires électroniques usagés
(chargeur, casque audio, câble USB, etc.) ne peuvent être jetés avec
les autres déchets ménagers. La mise au rebut incontrôlée des
déchets présentant des risques environnementaux et de santé
publique, veuillez séparer vos produits et accessoires usagés des
autres déchets. Vous favoriserez ainsi le recyclage de la matière qui
les compose dans le cadre d’un développement durable.
Les particuliers sont invités à contacter le magasin leur ayant vendu le
produit ou à se renseigner auprès des autorités locales pour connaître
les procédures et les points de collecte de ces produits en vue de leur
recyclage.
Les entreprises et particuliers sont invités à contacter leurs
fournisseurs et à consulter les conditions de leur contrat de vente. Ce
produit et ses accessoires ne peuvent être jetés avec les autres
déchets.
(Déchets d’équipements électriques &
Web Site
www.samsung.com/ch/support
(German)
www.samsung.com/ch_fr/
support (French)
www.samsung.com/si
www.samsung.com/ro/support
www.samsung.com/gr/support
électroniques)
Page 66

Gebruikershandleiding
Curved Soundbar
HW-J6500
HW-J6501
HW-J6502
Ongekende mogelijkheden
Bedankt voor het aanschaffen van dit Samsung-product.
Registreer uw product op
www.samsung.com/register
Page 67

AAN DE SLAG
aan de slag
PROGRAMMAONDERDELEN
Muziekstreamdiensten
Met de Curved Soundbar is het dankzij de Wi-Fimogelijkheden nu eenvoudiger dan ooit om al uw
favoriete muziek te verkennen. Open de app Samsung
Multiroom om de abonnementen bij de beste
muziekstreamdiensten op internet optimaal optimaal te
benutten.
Surround Sound Expansion
De functie Surround Sound Expansion voegt diepte en
ruimtelijkheid toe aan uw luisterervaring.
TV SoundConnect
Met TV SoundConnect sluit u uw tv en Soundbar
eenvoudig aan via Bluetooth. Er bevinden zich geen
kabels tussen de Soundbar en de tv, waardoor u de
slanke systemen rustig in het zicht kunt zetten, zonder
dat dit afbreuk doet aan uw nette interieur. De Soundbar
en tv bedient u eenvoudig vanaf één afstandsbediening.
Muziekbronnen delen (Multiroom-functie)
Het bedienen en delen van één muziekbron via meerdere
audioapparaten in verschillende ruimten is eenvoudig
met Multiroom Link. Met de mobiele app bedient u het
volume en de muziek die via uw systeem wordt
afgespeeld via verschillende apparaten, waaronder uw tv,
Soundbar, Home Entertainment System en Blu-ray
Disc-speler. Geniet waar u maar wilt van uw muziek.
HDMI
HDMI verzendt de beeld- en geluidssignalen gelijktijdig
en biedt een helderder beeld.
Dit toestel is ook uitgerust met de ARC-functie, waarmee
u met behulp van een HDMI-kabel het geluid van uw
televisie kunt beluisteren via de Soundbar. Deze functie is
alleen beschikbaar als u het toestel aansluit op een TV
die compatibel is met ARC.
Ondersteuning voor USB-host
Met behulp van de USB HOST-functie van de Soundbar
kunt u externe USB-opslagapparaten, zoals een
MP3-speler of een USB-pendrive, aansluiten en de
muziekbestanden die daarop zijn opgeslagen afspelen.
Bluetooth-functie
U kunt een Bluetooth-apparaat verbinden met de
Soundbar en genieten van muziek met hoogwaardig
stereogeluid, en dat allemaal draadloos!
LICENTIE
Vervaardigd onder licentie van Dolby Laboratories. Dolby
en de dubbele D zijn handelsmerken van Dolby
Laboratories.
Raadpleeg http://patents.dts.com voor DTS-patenten.
Vervaardigd onder licentie van DTS Licensing Limited.
DTS, het symbool en DTS en het symbool samen zijn
gedeponeerde handelsmerken, en DTS 2.0 Channel is
een handelsmerk van DTS, Inc. © DTS, Inc. Alle rechten
voorbehouden.
De termen HDMI en High-Definition Multimedia Interface
en het HDMI-logo zijn handelsmerken of gedeponeerde
handelsmerken van HDMI Licensing LLC in de Verenigde
Staten en andere landen.
2
Page 68

VEILIGHEIDSINFORMATIE
AAN DE SLAG
VEILIGHEIDSINSTRUCTIES
OPEN NOOIT DE BEHUIZING VAN DIT APPARAAT, WANT DAN LOOPT U HET GEVAAR EEN ELEKTRISCHE SCHOK
TE KRIJGEN. DE BEHUIZING BEVAT GEEN ONDERDELEN DIE U ZELF KUNT REPAREREN. LAAT ONDERHOUD
OVER AAN DE VAKHANDEL.
Dit symbool geeft aan dat onderdelen in het
apparaat onder levensgevaarlijke spanning
LET OP
GEVAAR OP ELEKTRISCHE
WAARSCHUWING : Om het gevaar voor een elektrische schok te vermijden dient u dit apparaat niet aan regen of
vocht bloot te stellen.
LET OP : OM EEN ELEKTRISCHE SCHOK TE VOORKOMEN, ZORGT U DAT HET BREDE UITEINDE VAN DE
STEKKER IN DE BREDE OPENING ZIT EN VOLLEDIG IS INGESTOKEN.
• Dit apparaat moet altijd aangesloten worden op een stroomingang met een geaard stopcontact.
• Om het apparaat los te koppelen van de stroomtoevoer, moet de stekker uit de stopcontact getrokken worden,
daarom moet de stroomstekker gemakkelijk bereikbaar zijn.
LET OP
• Stel dit apparaat niet bloot aan druppels of spatten. Plaats geen objecten op het apparaat die gevuld zijn met water
(zoals een vaas).
• Als u dit apparaat volledig wilt uitschakelen, moet u de stekker uit het stopcontact trekken. Vervolgens moet de
stekker altijd onder handbereik zijn.
SCHOKKEN NIET OPENEN
staan, waardoor u een elektrische schok kunt
krijgen.
Dit symbool geeft aan dat de bijgeleverde
documentatie belangrijke aanwijzingen voor de
bediening en het onderhoud bevat.
NL
3
Page 69

AAN DE SLAG
VOORZORGSMAATREGELEN
68.6
99.1mm
99.1mm 99.1mm
Controleer of de stroomvoorziening in uw huis overeenkomt met die op de identificatiesticker aan de achterkant van
het product. Plaats de speler horizontaal op een geschikte ondergrond (meubelstuk) met genoeg ruimte er omheen
voor ventilatie 7 -10 cm. Zorg dat de ventilatieopeningen niet worden geblokkeerd. Plaats het apparaat niet op
versterkers of andere apparaten die warm kunnen worden. Dit apparaat is bedoeld voor continu gebruik. Om het
toestel volledig uit te schakelen, trekt u de stekker uit het stopcontact. Haal de stekker van het toestel uit het
stopcontact als u het een lange tijd niet gaat gebruiken.
mm
Haal bij onweer de stekker uit het stopcontact. Bliksem
kan spanningspieken veroorzaken waardoor het
apparaat beschadigd kan raken.
Bescherm het product tegen vocht (bijv. vazen) en
overmatige warmte (bijv. een open haard) of tegen
apparatuur die sterke magnetische of elektrische velden
veroorzaakt. Haal de stekker uit het stopcontact wanneer
het apparaat niet goed functioneert. Dit product is niet
bedoeld voor industrieel gebruik. Dit product is uitsluitend
bestemd voor particulier gebruik. Wanneer het product of
een schijf bij een lage temperatuur wordt bewaard, kan
condensatie optreden. Als u het apparaat in de winter
Stel het apparaat niet bloot aan direct zonlicht of andere
warmtebronnen. Dit kan oververhitting veroorzaken en
ertoe leiden dat het apparaat niet goed functioneert.
De batterijen die in dit product worden gebruikt, bevatten
chemicaliën die schadelijk zijn voor het milieu. Gooi
batterijen niet met het gewone huisvuil weg. Werp de
batterijen niet in het vuur. De batterijen mogen niet
worden kortgesloten, gedemonteerd of oververhit. Bij
incorrecte plaatsing van de batterijen bestaat
ontploffingsgevaar. Vervang batterijen alleen door andere
van hetzelfde type.
verplaatst, wacht u ongeveer 2 uur totdat het apparaat weer
op kamertemperatuur is voordat u deze gaat gebruiken.
WAARSCHUWING, BATTERIJ NIET INSLIKKEN. GEVAAR VAN CHEMISCHE BRANDWONDEN
[De afstandsbediening die wordt meegeleverd met] dit product bevat een knoopcelbatterij.
Als deze knoopcelbatterij wordt ingeslikt kan deze in niet meer 2 uur ernstige inwendige brandwonden
veroorzaken en tot de dood leiden. Houd nieuwe en gebruikte batterijen uit de buurt van kinderen. Als het
batterijvakje niet goed dichtgaat, stopt u met het gebruik van het product en houdt u het uit de buurt van kinderen. Als u
denkt dat de batterijen mogelijk zijn ingeslikt of in enig lichaamsdeel geplaatst, roept u onmiddellijk de hulp van een arts in.
4
Page 70

INHOUD
AAN DE SLAG
2 AAN DE SLAG
2 Programmaonderdelen
3 Veiligheidsinformatie
6 Meegeleverde onderdelen
7 BESCHRIJVINGEN
7 Boven-/Voorpaneel
8 Achter-/Onderpaneel
9 Afstandsbediening
11 INSTALLATIE
11 Soundbar installeren
11 Wandmontage
14 De Soundbar aan de voet van de TV
Bevestigen
14 Soundbar vrij installeren
15 AANSLUITINGEN
15 De subwoofer aansluiten
17 Aansluiten op een tv
17 TV aansluiten met een HDMI (digitale) kabel
17 TV aansluiten met een optische (digitale) kabel
18 TV SoundConnect
20 Aansluiten op een extern apparaat
20 HDMI-kabel
20 Optische kabel of AUX-kabel
21 USB
23 FUNCTIES
23 Invoermodus
24 Bluetooth
26 De functie Network Standby On
gebruiken
26 De Multiroom Link gebruiken
28 Software-update
30 PROBLEMEN OPLOSSEN
30 Problemen oplossen
31 BIJLAGE
31 Specificaties
● De afbeeldingen en illustraties in deze
gebruiksaanwijzing dienen slechts te referentie en
kunnen afwijken van hoe het apparaat er in
werkelijkheid uitziet.
● In de volgende gevallen kunnen
administratiekosten in rekening worden gebracht:
(a) een technicus komt bij u langs maar de speler
vertoont geen gebreken (u hebt blijkbaar deze
gebruiksaanwijzing niet gelezen).
(b) u brengt het product naar een
reparatiecentrum maar het product vertoont
geen gebreken (u hebt blijkbaar deze
gebruiksaanwijzing niet gelezen).
● U wordt op de hoogte gesteld van deze
administratiekosten voordat een dergelijke
reparatie of bezoek wordt uitgevoerd.
NL
5
Page 71

AAN DE SLAG
MEEGELEVERDE ONDERDELEN
VORDAT U DE GEBRUIKERSHANDLEIDING LEEST
Let op de volgende voorwaarden voordat u de gebruikershandleiding leest.
+ Pictogrammen die in de handleiding worden gebruiktl
Pictogram Term Definitie
Let op
Geeft een situatie aan waarin een functie niet werkt of waarin instellingen mogelijk
worden geannuleerd.
Controleer de meegeleverde accessoires die hieronder weergegeven staan.
Afstandbediening /
Opmerking
Lithiumbatterij
(3V : CR2032)
USB-kabel Gebruikershandleiding Houder-Bevestiging : 2 st. Wandsteun : 2 st.
[ZW
Sjabloon Voor Muurbevestiging
Het betreft hier tips of instructies op de pagina voor de werking van de functies.
Stroomsnoer : 2 st. DC-adapter HDMI-kabel
● De accessoires kunnen er lichtjes anders uitzien dan de bovenstaande illustraties.
● Gebruik de speciale USB-kabel om externe USB-apparaten op het apparaat aan te sluiten.
6
Page 72

beschrijvingen
BOVEN-/VOORPANEEL
BESCHRIJVINGEN
Aan/uit-knop
Hiermee schakelt u de voeding in en uit.
Beeldscherm
Hiermee wordt de huidige modus aangegeven.
VOL. - / +
Hiermee kunt u het volumeniveau bedienen.
Het volumeniveau wordt in cijfers in het
display op het voorpaneel weergegeven.
(Bron)Toets
Hiermee wordt de D.IN-, AUX-, HDMI-,
BT-, TV- of USB-ingang geselecteerd.
● Als het apparaat is ingeschakeld en u
langer dan 3 seconden op de toets
(Bron) drukt, fungeert deze knop
als de toets
instelling van de toets
annuleren, door de toets
nogmaals langer dan 3 seconden
ingedrukt te houden.
(Dempen). U kunt de
(Dempen)
(Bron)
NL
● Wanneer u de stekker in het stopcontact steekt, zal de aan/uit-toets binnen 4 tot 6 seconden werken.
● Wanneer u dit apparaat inschakelt, is er een vertraging van 4 tot 5 seconden voordat er geluid wordt
weergegeven.
● Als u alleen het geluid van de Soundbar wilt horen, moet u de luidsprekers van de televisie uitschakelen in
het audio-instellingsmenu van uw televisie. Raadpleeg de handleiding voor de TV die met uw televisie is
meegeleverd.
7
Page 73

BESCHRIJVINGEN
DC14V
ACHTER-/ONDERPANEEL
AUX IN
Sluit aan op de analoge uitvoer van een
extern apparaat.
OPTICAL IN (D.IN)
Aansluiten op de digitale
uitvoer (optisch) van een
extern apparaat.
DC 14V
(Voedingsingang)
Sluit de gelijkstroomadapter
aan op de
netvoedingsaansluiting en
sluit de netvoedingsadapter
vervolgens aan op een
stopcontact.
Wi-Fi SETUP
SPK ADD
Wi-Fi SETUP
Druk op deze toets om
uw Soundbar te
verbinden met uw
netwerk door middel
van Wi-Fi-setup.
DC 14V
HDMI IN
AUX IN
HDMI OUT
(TV-ARC)
OPTICAL IN
SPK ADD
Wi-Fi SETUP
SPK ADD
Druk op de toets om
de Soundbar te
verbinden met de
HUB. (niet
meegeleverd)
HDMI IN
Voert tegelijkertijd digitale video- en
audiosignalen in via een HDMIkabel. Gebruik deze functie wanneer
u een ondersteund extern apparaat
aansluit.
HDMI OUT (TV-ARC)
Voert digitale video- en
audiosignalen tegelijkertijd uit
via een HDMI-kabel.
5V 0.5A
LAN
LAN 5V 0.5A
(USB-Poort)
Sluit USB-apparaten hier aan om
bestanden op de apparaten af te
spelen.
LABEL
LAN
Hiermee kunt u middels een LAN-kabel verbinding maken met een netwerk.
● Houd de voedingsadapter bij het verwijderen uit het stopcontact vast aan de stekker. Trek de kabel niet los.
● Sluit dit apparaat of andere componenten niet aan op een stopcontact totdat alle verbindingen met de
componenten gereed zijn.
8
Page 74

AFSTANDSBEDIENING
BESCHRIJVINGEN
● Soundbar is een eigen naam van Samsung.
● Bedien de TV met de afstandsbediening.
SOURCE
Druk hierop om een bron te selecteren die is aangesloten op de Soundbar.
Dempen
U kunt het volume met één druk op de knop verlagen naar 0.
Opnieuw drukken om het geluid terug te zetten naar het vorige volumeniveau.
Herhalen
U kunt de functie Herhalen instellen tijdens het afspelen van muziek vanaf een
USB-apparaat.
OFF - REPEAT : Afspelen herhalen uitschakelen.
TRACK - REPEAT : Een nummer herhaaldelijk afspelen.
ALL - REPEAT : Alle nummers herhaaldelijk afspelen.
RANDOM - REPEAT : Alle tracks worden in willekeurige volgorde afgespeeld.
(Het is mogelijk dat een nummer dat al werd afgespeeld, opnieuw wordt
afgespeeld.)
Vooruit Springen
Wanneer het apparaat dat u afspeelt meerdere bestanden bevat en u op de
toets $ drukt, wordt het volgende bestand geselecteerd.
SOUND CONTROL
Druk om TREBLE, BASS of AUDIO SYNC te selecteren. Gebruik de toetsen
#,$
om het volume voor de hoge tonen of bas van -3 tot +3 aan te passen.
Houd de toets SOUND CONTROL ongeveer 5 seconden ingedrukt om het
geluid voor elke frequentieband aan te passen. U kunt 150 Hz, 300 Hz, 600 Hz,
1,2 KHz, 2,5 KHz, 5 KHz en 10 KHz selecteren en waarde tussen -6 en +6
instellen.
Als de Soundbar is verbonden met een digitale televisie en de video lijkt niet
synchroon te lopen met de audio, drukt u op de toetsen SOUND CONTROL
om de audio te synchroniseren met de video. Gebruik de toetsen #,$ om
een audiovertraging tussen de 0 ms en 300 ms in te stellen. Het is mogelijk dat
de functie Audio Sync (Audio synchroniseren) niet werkt in de USB-, TV- en
BT-modus.
Anynet+
Druk op de toets Anynet+ om de functie Anynet+ in of uit te schakelen.
(Standaard : Auto Power Link OFF, ON - ANYNET+ / OFF - POWER LINK of
OFF - ANYNET+ / ON - POWER LINK).
Soundbar bedienen met de afstandsbediening van een Samsung-TV met
Anynet+. De Soundbar moet via een HDMI-kabel zijn aangesloten op de TV.
* Auto Power Link
Synchroniseert de Soundbar die verbonden is met een optische bron via de
optische aansluiting, zodat deze automatisch wordt ingeschakeld wanneer u
uw TV aanzet. (Zie pagina 18)
U kunt de functie Wi-Fi SETUP ook activeren door de knop Anynet+ op de
afstandsbediening langer dan 7 seconden ingedrukt te houden.
(*Gebruik de toetsen #,$ om het niveau aan te passen.)
Met de functie Anynet+ kunt u de
NL
9
Page 75

BESCHRIJVINGEN
Aan/Uit
Hiermee schakelt u de voeding in en uit.
Hiermee past u het volumeniveau van het apparaat aan.
Afspelen/Onderbreken
Druk op de toets & om het afspelen van het bestand tijdelijk te onderbreken.
Druk nogmaals op de toets & om het geselecteerde bestand af te spelen.
Achteruit Springen
Wanneer het apparaat dat u afspeelt meerdere bestanden bevat en u op de
U kunt uit 6 verschillende geluidsmodi kiezen - STANDARD (Oorspronkelijk
Geluid), MUSIC, VOICE, SPORTS, CINEMA, en NIGHT MODE - afhankelijk
Selecteer de modus STANDARD als u naar het oorspronkelijke geluid wilt luisteren.
Surr.Sound-instellingen : ON - SURROUND SOUND, OFF - SURROUND SOUND
Druk op de toets STREAMING MUSIC om naar een internetradiostation te
luisteren. Telkens wanneer u op deze toets drukt, schakelt de Soundbar over
Om de functie STREAMING MUSIC te gebruiken, moet de Soundbar zijn
Hiermee kunt u het dynamisch bereik voor het geluid instellen op Dolby Digital,
Houd de toets STREAMING MUSIC ingedrukt. De DRC-functie (Dynamic
WOOFER
WOOFER op de afstandsbediening langer dan 5 seconden ingedrukt te houden.
(* Gebruik de toetsen #,$ om het woofervolume aan te passen.)
U kunt de functie SPK ADD van de Soundbar ook activeren door de knop
toets # drukt, wordt het vorige bestand geselecteerd.
van het type bron dat u wilt afspelen.
Surr. Sound voegt diepte en ruimtelijkheid aan het geluid toe.
Als u op de toets
naar het volgende standaardstation, waarbij één voor één de 3
verbonden met het netwerk. (Zie pagina 26)
Range Control) schakelt vervolgens tussen ON en OFF.
Druk op de toets WOOFER. Gebruik de toetsen
subwoofervolume van -12, -6 tot +6 aan te passen.
SOUND
drukt, bladert u door de
STREAMING MUSIC
standaardstations worden doorlopen.
DRC (Dynamic Range Control) *
Dolby Digital Plus en Dolby TrueHD.
Volume
SOUND EFFECT
SOUND
#,$
om het
BATTERIJEN IN DE AFSTANDSBEDIENING PLAATSEN
1. Gebruik een geschikte munt om
het klepje van het batterijvak van
de afstandsbediening linksom te
draaien om deze te verwijderen
zoals weergegeven in de
bovenstaande afbeelding.
2. Plaats een lithiumbatterij van 3V. Houd
de pluspool (+) omhoog gericht bij het
plaatsen van de batterij. Plaats de
batterijklep en lijn de '●' markeringen
uit op elkaar zoals weergegeven in de
bovenstaande afbeelding.
10
3. Gebruik een geschikte munt om
het klepje van het batterijvak
van de afstandsbediening zo ver
mogelijk rechtsom te draaien
om het weer op zijn plaats te
bevestigen.
Page 76

INSTALLATIE
INSTALLATIE
SOUNDBAR INSTALLEREN
WANDMONTAGE
+ Voorzorgsmaatregelen bij de installatie
● Alleen op een verticale muur installeren.
● Bij de installatie moet u hoge temperaturen of vochtigheid, of een muur die het gewicht van het apparaat niet kan
ondersteunen, vermijden.
● Controleer of de wand stevig genoeg is. Als de wand niet sterk genoeg is om de eenheid te ondersteunen, moet u
de wand verstevigen of de wand aanbrengen op een andere wand die het gewicht van de eenheid wel kan
ondersteunen.
● Koop en gebruik bevestigingsschroeven of ankers die geschikt zijn voor uw soort muur (gipsplaat, plaatijzer, hout
enz.).
Monteer de bevestigingsschroeven indien mogelijk in de wandstijlen.
● Schaf schroeven voor wandmontage aan op basis van het type en de dikte van de muur waaraan u de Soundbar
wilt monteren.
- Diameter: M5
- Lengte: L 35 mm of langer aanbevolen.
● Sluit de kabels van het toestel op de externe apparaten aan voordat u het aan de muur bevestigt.
● Zorg ervoor dat het apparaat is uitgeschakeld en losgekoppeld voordat u dit installeert. Anders kan dit elektrische
schokken veroorzaken.
NL
5 cm of meer
1. Plaats de installatiehandleiding tegen het wandoppervlak.
• Zorg dat u de installatiehandleiding waterpas houdt.
• Als de tv aan de wand wordt bevestigd, installeer de Soundbar dan minimaal 5 cm onder de tv.
11
Page 77

INSTALLATIE
Center Line
Center Line
2. Gebruik een pen om de locatie te markeren waar de schroeven in de muur komen en verwijder de
installatiehandleiding. Boor vervolgens gaten voor de schroeven en gebruik hiervoor een boor met het juiste
formaat.
3. Bevestig de Wandsteun (2 st.) en schroeven aan de gemarkeerde locaties.
4. Til het product op nadat u de Wandsteun hebt geplaatst, zoals aangegeven.
12
Page 78

INSTALLATIE
Wi-Fi SETUP
SPK ADD
OPTICAL IN
(TV-ARC)
HDMI OUT
LAN
5V 0.5A
5. Plaats en bevestig de Houder-Bevestiging in elke opening in de onderkant van het product. Het product wordt
bevestigd aan de Wandsteun.
● Ga niet aan het geïnstalleerde apparaat hangen en laat het apparaat niet vallen.
● Bevestig het apparaat stevig aan de muur zodat dit niet naar beneden valt. Als het apparaat valt, kan dit
persoonlijk letsel veroorzaken of kan het product beschadigd raken.
● Wanneer het apparaat aan een muur is bevestigd, moet u oppassen dat kinderen niet aan de kabels
trekken. Het apparaat kan dan namelijk vallen.
● Om de prestaties van de Soundbar bij bevestiging aan een muur te optimaliseren, installeert u het
luidsprekersysteem minimaal 5 cm onder de TV wanneer de TV aan de muur is bevestigd.
● Als u het apparaat niet aan de muur bevestigt, plaats het apparaat dan voor uw eigen veiligheid op een
vast, vlak oppervlak, zodat het apparaat niet kan vallen.
AUX IN
DC 14V
HDMI IN
NL
13
Page 79

INSTALLATIE
DE SOUNDBAR AAN DE VOET VAN DE TV BEVESTIGEN
U kunt de Soundbar aan de voet van de tv bevestigen als u een Samsung-tv met een voet hebt die compatibel is met
deze Soundbar.
● Deze Soundbar is compatibel met model JU6700, JU6500 en JU7500 (48 inch, 55 inch en 65 inch),
JU6610 (48 inch en 55 inch) en curved tv's van Samsung uit 2015. Raadpleeg de startpagina van
Samsung Electronics (www.Samsung.com) voor een gedetailleerde lijst met compatibele modellen.
● Deze Soundbar kan niet worden bevestigd aan een niet-compatibele tv, hoe de tv ook is gemonteerd (aan
de wand of op een voet).
1. Lijn het midden van de Soundbar uit met het midden van de voet van de tv en duw de Soundbar vervolgens
voorzichtig zo ver mogelijk aan (zie afbeelding). Zorg ervoor dat u de tv niet uit balans brengt.
SOUNDBAR VRIJ INSTALLEREN
1. Plaats de Soundbar op een vlakke ondergrond in het midden voor de tv.
● Installeer het product op een vlak oppervlak.
14
Page 80

AANSLUITINGEN
aansluitingen
● Sluit dit apparaat of uw tv niet op de stroom aan tot alle verbindingen tussen de apparaten gereed zijn.
● Voordat u dit product verplaatst of installeert, moet u het product uitschakelen en de stekker uit het
stopcontact trekken.
DE SUBWOOFER AANSLUITEN
AUTOMATISCH VERBINDING MET DE SUBWOOFER MAKEN
De hoofdeenheid en subwoofer maken automatisch (draadloos) verbinding wanneer de hoofdeenheid en subwoofer
worden ingeschakeld.
• Indien volledig verbonden, stopt het blauwe ledlampje op de subwoofer met knipperen.
HANDMATIG VERBINDING MET DE SUBWOOFER MAKEN
De verbindings-id van de subwoofer is vooraf ingesteld in de fabriek en er zou automatisch verbinding moeten worden
gemaakt tussen het apparaat en de subwoofer (bij een draadloze verbinding) wanneer de hoofdeenheid en de
subwoofer worden ingeschakeld. Als het Link-lampje niet brandt wanneer het apparaat en de subwoofer zijn
ingeschakeld, stelt u de ID in aan de hand van de volgende instructies.
NL
POWER
1. Steek de stekker van het apparaat en de subwoofer in een stopcontact.
2. Houd de toets ID SET op de achterkant van de subwoofer gedurende 5 seconden ingedrukt met behulp van een
klein puntig voorwerp.
• Het indicatielampje STANDBY gaat uit en het indicatielampje LINK (blauwe LED) knippert snel.
3. Houd, terwijl het apparaat is uitgeschakeld (modus STANDBY), vijf seconden de toets
afstandsbediening ingedrukt.
4. Het bericht ID SET verschijnt op het display van de Soundbar.
5. Om de koppeling te voltooien, schakelt u de stroom van het hoofdtoestel in terwijl het blauwe LED-lampje van de
subwoofer knippert.
• De hoofdeenheid en de subwoofer moeten nu aan elkaar zijn gekoppeld (verbonden).
• Het verbindingslampje (blauwe LED) op de subwoofer zou aan moeten zijn.
• Als het blauwe verbindingslampje niet continu brandt, is er geen verbinding gemaakt. Schakel de hoofdeenheid
uit en begin opnieuw bij Step 2.
• U kunt door het geluidseffect te selecteren beter geluid krijgen van de draadloze subwoofer.
(Zie pagina 10)
(Dempen) op de
15
Page 81

AANSLUITINGEN
● Schakel het product uit en haal de stekker uit het stopcontact voordat u het product gaat verplaatsen of
installeren.
● Als het hoofdapparaat wordt uitgeschakeld, wordt de draadloze subwoofer stand-by gezet, gaat de LED
STANDBY op de bovenkant aan nadat verbindingslampje (blauwe LED) gedurende 30 seconden heeft
geknipperd.
● Als u een apparaat in de buurt van de Soundbar gebruikt met dezelfde frequentie (2,4 GHz) als de
Soundbar, kan het geluid door storing worden onderbroken.
● Het zendbereik van radiogolven is ongeveer 10 m, maar dit kan variëren, afhankelijk van uw werkomgeving.
Als zich een muur van gewapend beton of metaal tussen het hoofdsysteem en de draadloze ontvanger
bevindt, werkt het systeem mogelijk helemaal niet omdat de radiogolven niet door metaal heen kunnen
dringen.
● Als er geen draadloze verbinding tussen de hoofdeenheid en de draadloze subwoofer tot stand kan
worden gebracht, volgt u stap 1 t/m 5 in de linkerkolom om de verbinding tussen de hoofdeenheid en de
draadloze subwoofer opnieuw in te stellen.
● De draadloze ontvangstantenne is ingebouwd in de draadloze subwoofer. Bescherm de eenheid tegen
water en vocht.
● Voor een optimaal luistercomfort zorgt u ervoor dat het gebied rond de draadloze subwoofer geen
obstakels bevat.
16
Page 82

AANSLUITINGEN
AANSLUITEN OP EEN TV
TV AANSLUITEN MET EEN HDMI (DIGITALE) KABEL
HDMI-kabel
NL
HDMI IN
DC 14V
AUX IN
OPTICAL IN
HDMI OUT
(TV-ARC)
HDMI OUT
(TV-ARC)
HDMI IN
5V 0.5A
LAN
HDMI OUT
(TV-ARC)
SPK ADD
Wi-Fi SETUP
1. Sluit de HDMI-kabel aan op de HDMI OUT (TV-ARC)-aansluiting aan de achterzijde van de speler en op de
HDMI-IN-aansluiting van uw TV.
2. Druk op de knop
(Bron) op het bovenpaneel van de hoofdeenheid of op de SOURCE-knop op de
afstandsbediening om de D.IN-modus te selecteren.
● HDMI is een interface die digitale overdracht van video- en audiogegevens mogelijk maakt met slechts één
aansluiting.
● Als de tv een ARC-poort heeft, sluit de HDMI-kabel dan aan op de HDMI IN (ARC)-poort.
● U kunt indien mogelijk het beste een kernloze HDMI-kabel gebruiken. Als u een HDMI-kabel met kern
gebruikt, moet u een kabel gebruiken met een diameter van minder dan 14 mm.
● Anynet+ moet zijn ingeschakeld.
● Deze functie is niet beschikbaar als de HDMI-kabel geen ARC ondersteunt.
TV AANSLUITEN MET EEN OPTISCHE (DIGITALE) KABEL
Optische Kabel
(niet meegeleverd)
OPTICAL OUT
OPTICAL IN
HDMI IN
DC 14V
AUX IN
5V 0.5A
LAN
HDMI OUT
(TV-ARC)
OPTICAL IN
SPK ADD
Wi-Fi SETUP
1. Sluit OPTICAL IN (Audio) op de Soundbar aan op de uitgang OPTICAL OUT van de tv.
2. Druk op de knop (Bron) op het bovenpaneel van de hoofdeenheid of op de SOURCE-knop op de
afstandsbediening om de D.IN-modus te selecteren.
17
Page 83

AANSLUITINGEN
+ Auto Power Link
Als u de hoofdeenheid via een digitale optische kabel hebt aangesloten op een tv, stelt u de functie Auto Power
(Autom. inschakelen) in op ON (AAN), zodat de Soundbar automatisch wordt ingeschakeld wanneer u de tv
inschakelt.
AUTO POWER LINK Weergave
AAN
UIT
1. De Soundbar en een tv met een optische kabel (niet meegeleverd) verbinden.
2. Druk op de knop (Bron) op het bovenpaneel van de hoofdeenheid of op de SOURCE-knop op de
afstandsbediening om de D.IN-modus te selecteren.
3. Druk op de toets Anynet+ op de afstandsbediening om de functie Auto Power Link in en uit te schakelen.
● Het is mogelijk dat de functie Auto Power Link niet werkt. Dit is afhankelijk van het aangesloten apparaat.
OFF - ANYNET+ / ON - POWER LINK
ON - ANYNET+ / OFF - POWER LINK
TV SOUNDCONNECT
U kunt genieten van TV-geluid via uw Soundbar die is aangesloten op een Samsung-TV die de functie TV
SoundConnect (TV-geluidsaansluiting) ondersteunt.
Aansluiten
1. Schakel de TV en de Soundbar in.
• Schakel het menu op de tv in.
• Ga naar de luidsprekerinstellingen op het tabblad "Geluid".
• Stel het menu "Nieuw apparaat toevoegen" op "Aan".
2. Druk op de knop (Bron) op het bovenpaneel van de hoofdeenheid of op de SOURCE-knop op de
afstandsbediening om de TV-modus te selecteren.
3. Er verschijnt een bericht op de tv met de vraag of u de functie TV SoundConnect wilt inschakelen.
4. Selecteer <Ja> om het verbinden van de TV en Soundbar via de afstandsbediening van de TV te voltooien.
18
Page 84

● Als u de modus van de Soundbar van de TV wijzigt naar een andere modus, wordt TV SoundConnect
automatisch beëindigd.
● Als u de Soundbar met een andere televisie wilt verbinden, moet de bestaande verbinding worden
verbroken.
● Beëindig de verbinding met de bestaande TV, druk dan gedurende 5 seconden op de afstandsbediening
op de knop
● De functie TV SoundConnect (SoundShare) wordt ondersteund door sommige Samsung-TV’s die zijn
uitgegeven sinds 2012. Controleer of uw televisie de functie TV SoundConnect (SoundShare) ondersteunt
voordat u aan de slag gaat. (Zie de gebruiksaanwijzing van de TV voor meer informatie.)
● Als uw Samsung-TV werd uitgebracht vóór 2014, moet u het SoundShare-instelmenu controleren.
●
Als de afstand tussen de televisie en de Soundbar groter is dan 10 m, is de verbinding mogelijk niet stabiel
of hapert de audio. Als dat gebeurt, verplaatst u de televisie of de Soundbar zodat deze zich binnen het
werkbereik bevinden en brengt u vervolgens de verbinding met TV SoundConnect opnieuw tot stand.
● Gebruiksbereik TV SoundConnect:
- Aanbevolen koppelingsbereik : binnen 2 m
- Aanbevolen werkbereik : binnen 10 m
● Met de toetsen Afspelen/Onderbreken, Volgende en Vorige op de Soundbar of de afstandsbediening van
de Soundbar kunt u de tv niet bedienen.
&
om een verbinding te maken met een andere TV.
AANSLUITINGEN
NL
19
Page 85

AANSLUITINGEN
AANSLUITEN OP EEN EXTERN
APPARAAT
HDMI-KABEL
HDMI is de standaard digitale interface voor aansluiting op apparaten zoals een televisie, projector, DVD-speler,
Blu-ray-speler, settopbox, enzovoort.
Aangezien met HDMI een digitaal signaal wordt overgedragen van de hoogste kwaliteit, kunt u genieten van superieure
audio en video, zoals deze oorspronkelijk in de digitale bron is gemaakt.
HDMI-kabel
Digitale
HDMI OUT HDMI IN
Apparaten
HDMI IN
HDMI IN
DC 14V
AUX IN
5V 0.5A
LAN
HDMI OUT
(TV-ARC)
OPTICAL IN
SPK ADD
Wi-Fi SETUP
1. Sluit de HDMI-kabel aan tussen de HDMI IN-ingang aan de achterzijde van het product en de HDMI-OUT-uitgang
op uw digitale apparaten.
2. Druk op de knop
(Bron) op het bovenpaneel van de hoofdeenheid of op de SOURCE-knop op de
afstandsbediening om de HDMI-modus te selecteren.
OPTISCHE KABEL OF AUX-KABEL
Dit apparaat is voorzien van een optische digitale ingang en een analoge audio-ingang, waardoor u het apparaat
op twee manieren kunt aansluiten op een extern apparaat.
Optische Kabel
(niet meegeleverd)
OPTICAL IN
AUX IN
HDMI IN
AUX IN
5V 0.5A
LAN
HDMI OUT
(TV-ARC)
OPTICAL IN
SPK ADD
Wi-Fi SETUP
BD/ DVD-speler/
Set-top box/
Spelcomputer
OPTICAL OUT
Audio Kabel
(niet meegeleverd)
AUX OUT
DC 14V
20
Page 86

AANSLUITINGEN
+ AUX Kabel
1. Sluit AUX IN (Audio) op de hoofdeenheid aan op de uitgang AUDIO OUT op het geluidsapparaat.
2. Druk op de knop (Bron) op het bovenpaneel van de hoofdeenheid of op de SOURCE-knop op de
afstandsbediening om de AUX-modus te selecteren.
+ Optische Kabel
1. Sluit OPTICAL IN (Audio) op de hoofdeenheid aan op de uitgang OPTICAL OUT op het geluidsapparaat.
2. Druk op de knop (Bron) op het bovenpaneel van de hoofdeenheid of op de SOURCE-knop op de
afstandsbediening om de D.IN-modus te selecteren.
USB
U kunt via de Soundbar muziekbestanden afspelen die zich op USB-opslagapparaten bevinden.
USB-poort
HDMI IN
DC 14V
AUX IN
5V 0.5A
LAN
HDMI OUT
(TV-ARC)
OPTICAL IN
SPK ADD
Wi-Fi SETUP
1. Sluit het USB-apparaat aan op de USB-poort van het product.
2. Druk op de knop
(Bron) op het bovenpaneel van de hoofdeenheid of op de SOURCE-knop op de
afstandsbediening om de USB-modus te selecteren.
3. USB verschijnt op het display.
• De verbinding van de Soundbar met het USB-apparaat is voltooid.
• Ze wordt automatisch uitgeschakeld (Autom. uitschakelen) indien meer dan 15 minuten lang geen
USBapparaat wordt aangesloten.
Beeldscherm
NL
+ Voordat u een USB-apparaat aansluit
Let op het volgende:
● Als de naam van een map of bestand op een USB-apparaat langer is dan 10 tekens, wordt die niet op de
Soundbar weergegeven.
● Het is mogelijk dat dit product niet compatibel is met bepaalde types USB-opslagmedia.
● De bestandssystemen FAT16 en FAT32 worden ondersteund.
- Het NTFS-systeem wordt niet ondersteund.
● Sluit het USB-apparaat rechtstreeks aan op de USB-poort van het toestel. Als u dat niet doet, kan er een
probleem zijn met de USB-compatibiliteit.
● Sluit niet meerdere opslagapparaten op het product aan via een multikaartlezer. Het is mogelijk dat dat niet goed
werkt.
21
Page 87

AANSLUITINGEN
● PTP-protocollen van digitale camera's worden niet ondersteund.
● Verwijder het USB-apparaat niet tijdens de bestandsoverdracht.
● Muziekbestanden met DRM-beveiliging (MP3, WMA) van een commerciële website kunnen niet worden
afgespeeld.
● Externe vaste schijven worden niet ondersteund.
● Mobiele telefoons worden niet ondersteund.
● Compatibiliteitslijst:
Extensie Codec Samplingfrequentie Bitrate
MPEG 1 Layer1 32/44,1/48 32 ~ 448 kbps
MPEG 1 Layer2 32/44,1/48 32 ~ 384 kbps
*.mp3
*.wma
*.wav
*.ogg
*.flac
*.m4a
*.ape
*.aif
MPEG 1 Layer3 32/44,1/48 32 ~ 320 kbps
MPEG 2 Layer3 16/22,05/24/32/44,1/48 8 ~ 160 kbps
MPEG 2.5 Layer3 8/11,025/12/16/22.05/24/32/44,1/48 8 ~ 160 kbps
Wave_Format_MSAudio1 - -
Wave_Format_MSAudio2 - -
WMA Professional Niet ondersteund -
- 8 KHz ~ 192 KHz ~ 8,8 Mbps
- 8 KHz ~ 48 KHz -
- 8 KHz ~ 192 KHz ~ 5,6 Mbps
Alac
(Apple lossless Audo codec)
MON-KEY-audio 8 KHz ~ 48 KHz ~ 1 Mbps
Audio Interchange File Format 8 KHz ~ 192 KHz ~ 4,4 Mbps
8 KHz ~ 192 KHz ~ 1 Mbps
● Als het USB-apparaat veel mappen en bestanden bevat, kan het enige tijd duren voordat alle items zijn
gelezen.
22
Page 88

functies
INVOERMODUS
FUNCTIES
Druk op de knop (Bron) op het bovenpaneel van het hoofdapparaat of op de knop SOURCE op de
afstandsbediening om de gewenste modus te selecteren.
Invoermodus Beeldscherm
Optisch Digitale invoer
ARC-ingang (HDMI OUT)
AUX-invoer
HDMI-ingang
BLUETOOTH-modus
TV SoundConnect
USB-modus
Het toestel wordt automatisch uitgeschakeld in de volgende omstandigheden:
● De modus D.IN/HDMI/BT/TV/USB/ARC
- Indien 15 minuten geen audiosignaal wordt gedetecteerd.
● AUX-modus
U kunt de functie voor automatisch uitschakelen op ON of OFF, zetten door 5 seconden lang de toets
ingedrukt te houden.
ON - AUTO POWER DOWN / OFF - AUTO POWER DOWN wordt weergegeven op het display.
- Indien 15 minuten lang geen AUX-kabel is aangesloten.
- Indien 8 uur lang geen toetsen worden ingedrukt wanneer de AUX-kabel is aangesloten.
D.IN
AUX
HDMI
BT
TV
USB
&
NL
23
Page 89

FUNCTIES
BLUETOOTH
U kunt een Bluetooth-apparaat verbinden met de Soundbar en genieten van muziek met hoogwaardig stereogeluid,
en dat allemaal draadloos!
SOUNDBAR VERBINDEN MET EEN BLUETOOTH-APPARAAT
Controleer of het Bluetooth-apparaat de Bluetooth-compatibele stereo-hoofdtelefoonfunctie ondersteunt.
Aansluiten
1. Druk op de knop
afstandsbediening om de BT-modus te selecteren.
• U ziet BT READY op het display aan de voorzijde van de Soundbar.
2. Selecteer het Bluetooth-menu op het Bluetooth-apparaat waarmee u verbinding wilt maken. (Raadpleeg de
gebruiksaanwijzing van het Bluetooth-apparaat.)
3. Selecteer "[Samsung] Soundbar" in de lijst.
• Wanneer de Soundbar is verbonden met het Bluetooth-apparaat, verschijnt [Bluetooth-apparaatnaam]
BT op het voorste display.
• De apparaatnaam kan alleen worden weergegeven in het Engels. Als de naam niet in het Engels is wordt een
onderstreping " _ " weergegeven.
• Indien het Bluetooth-apparaat niet met Soundbar kan worden gekoppeld, verwijdert u de vorige "[Samsung]
Soundbar" gevonden door het Bluetooth-apparaat en laat u het opnieuw zoeken naar Soundbar.
4. Muziek afspelen op het aangesloten apparaat.
• U kunt luisteren naar muziek die op het aangesloten Bluetooth-apparaat wordt afgespeeld via het Soundbar-
systeem.
• In de BT-modus zijn de functies Afspelen/Onderbreken/Volgende/Vorige niet beschikbaar. Deze functies zijn
echter wel beschikbaar bij Bluetooth-apparaten die AVRCP ondersteunen.
● Voer <0000> als u bij het aansluiten van een Bluetooth-apparaat naar een pincode wordt gevraagd.
● U kunt slechts één Bluetooth-apparaat tezelfdertijd koppelen.
● De Bluetooth-verbinding wordt beëindigd wanneer u de Soundbar wordt uitgeschakeld.
● Onder de volgende omstandigheden voert de Soundbar mogelijk geen correcte Bluetooth-zoek- of
verbindingsactie uit:
- Indien er zich een sterk elektrisch veld rond Soundbar bevindt.
- Indien verschillende Bluetooth-apparaten tegelijkertijd met Soundbar worden gekoppeld.
- Indien het Bluetooth-apparaat is uitgeschakeld, niet is geplaatst of defect is.
- Let op, apparaten zoals magnetrons, draadloos-LAN-adapters, tl-lampen en gasfornuizen gebruiken
hetzelfde frequentiebereik als het Bluetooth-apparaat. Dat kan tot elektrische interferentie leiden.
(Bron) op het bovenpaneel van de hoofdeenheid of op de SOURCE-knop op de
Bluetooth-apparaat
24
Page 90

FUNCTIES
● De Soundbar ondersteunt SBC-data (44,1 kHz, 48 kHz).
● Sluit alleen aan op een Bluetooth-apparaat dat de functie A2DP (AV) ondersteunt.
● U kunt de Soundbar niet verbinden met een Bluetooth-apparaat dat alleen de HF-functie (handsfree)
ondersteunt.
● Zodra u de Soundbar aan een Bluetooth-apparaat hebt gekoppeld en u "[Samsung] Soundbar"
selecteert in de lijst met apparaten die door het Bluetooth-apparaat zijn gescand, schakelt de Soundbar
automatisch naar de BT-modus.
● Alleen beschikbaar als de Soundbar wordt weergegeven in de gekoppelde apparaten van het Bluetooth-
apparaat. (Het Bluetooth-apparaat en de Soundbar moeten minstens een keer vooraf gekoppeld zijn.)
● Soundbar verschijnt alleen in de lijst van gezochte apparaten in het Bluetooth-apparaat wanneer de
Soundbar BT READY weergeeft.
● In de modus TV SoundConnect, kan de Soundbar niet worden gekoppeld met een ander Bluetooth-apparaat.
DE VERBINDING TUSSEN HET BLUETOOTH-APPARAAT EN
SOUNDBAR VERBREKEN
U kunt de verbinding tussen het Bluetooth-apparaat en Soundbar verbreken. Raadpleeg de gebruiksaanwijzing van
het Bluetooth-apparaat voor instructies.
● De verbinding met Soundbar wordt verbroken.
● Wanneer de verbinding tussen Soundbar en het Bluetooth-apparaat wordt verbroken, verschijnt
BT DISCONNECTED op het voorste display van de Soundbar.
DE VERBINDING TUSSEN SOUNDBAR EN HET BLUETOOTHAPPARAAT VERBREKEN
Druk op de SOURCE-knop op de afstandsbediening of de knop (Bron) op het bovenpaneel van het product om
te schakelen van BT naar een andere modus of om de Soundbar uit te schakelen.
● Het verbonden Bluetooth-apparaat wacht enige tijd op een reactie van de Soundbar alvorens de verbinding te
verbreken. (Hoe lang het duurt voordat de verbinding wordt verbroken, kan per Bluetooth-apparaat verschillen.)
● De Bluetooth-verbinding kan worden verbroken als in de Bluetooth-verbindingsmodus de afstand tussen
de Soundbar en het Bluetooth-apparaat meer dan 10 m.
● Soundbar wordt na 15 minuten in de stand Gereed automatisch uitgeschakeld.
NL
+ Meer informatie over Bluetooth
Bluetooth is een technologie waardoor compatibele apparaten eenvoudig op elkaar aangesloten kunnen worden via
een korte, draadloze verbinding.
● Een Bluetooth-apparaat kan, afhankelijk van gebruik, lawaai of storingen veroorzaken, wanneer:
- Een deel van het lichaam in contact is met het zend-/ontvangstsysteem van het Bluetooth-apparaat of de Soundbar.
- Er spanningsvariatie is als gevolg van belemmering door muren, hoeken of scheidingswanden.
- Het wordt blootgesteld aan elektrische interferentie door apparatuur die dezelfde frequentie gebruikt,
bijvoorbeeld medische apparatuur, magnetrons en draadloze LAN’s.
● Koppel de Soundbar aan het Bluetooth-apparaat terwijl u de afstand klein houdt.
● Hoe groter de afstand tussen de Soundbar en het Bluetooth-apparaat, des te minder de kwaliteit.
Als de afstand groter is dan het maximale bereik van het Bluetooth-apparaat, gaat de verbinding verloren.
● In gebieden met slechte ontvangst werkt de Bluetooth-verbinding mogelijk niet naar behoren.
● De Bluetooth-verbinding werkt alleen als hij zich dicht bij het televisietoestel bevindt. Als de afstand groter wordt,
wordt de verbinding automatisch verbroken. Zelfs binnen dit bereik kan de geluidskwaliteit verslechteren door
obstakels zoals muren of deuren.
● Dit draadloze apparaat kan elektrische interferentie veroorzaken tijdens zijn werking.
25
Page 91

FUNCTIES
DE FUNCTIE NETWORK STANDBY ON
GEBRUIKEN
De functie Network Standby On wordt beschikbaar wanneer er een verbinding tussen het smartapparaat en de
Soundbar tot stand is gebracht. Deze functie schakelt de Soundbar automatisch in wanneer het smart-apparaat
verbinding met de Soundbar probeert te maken via Bluetooth of Wi-Fi. Als de Soundbar is ingeschakeld via een
Bluetooth-verbinding, wordt de invoermodus automatisch ingesteld op BT. Het inschakelen van de Soundbar via Wi-Fi
is alleen beschikbaar met behulp van de App. Raadpleeg de handleiding op het web voor meer informatie.
1. Verbind het smartapparaat met uw Soundbar.
2. Schakel de functie Network Standby On in door op de toets $ op de afstandsbediening van de Soundbar
minimaal 5 seconden ingedrukt te houden. U kunt de functie weer uitschakelen door de toets $ nogmaals
minimaal 5 seconden ingedrukt te houden.
● Alleen beschikbaar als de Soundbar voorkomt in de lijst met gekoppelde apparaten van het smartapparaat.
(Het smartapparaat en de Soundbar moeten minimaal één keer eerder zijn gekoppeld.)
● De Soundbar wordt alleen weergegeven in de lijst met apparaten die door het smartapparaat zijn gevonden
als op de Soundbar [BT READY] of [WiFi READY] wordt weergegeven.
● In de modus TV SoundConnect kan de Soundbar niet aan een ander smartapparaat worden gekoppeld.
● Als de functie Network Standby On niet werkte
- De functie Network Standby On is ingesteld op Uit.
● De Wi-Fi-verbinding met de Soundbar wordt verbroken als het netsnoer van het apparaat wordt
losgekoppeld of als de stroomtoevoer wordt onderbroken. Schakel de Soundbar in en breng opnieuw de
verbinding tot stand.
DE MULTIROOM LINK GEBRUIKEN
Zodra de Soundbar via de Multiroom App met een smart-apparaat is verbonden, kunt u meerdere Multiroomapparaten samen draadloos aansluiten.
VOORDAT U BEGINT
+ Beginselen van communicatie
Smart-apparaat:
Android of iOS
(App-bediening)
Internet Draadloze Router
1. Vereisten: Draadloze Router, Smart-apparaat
2. De draadloze router moet zijn verbonden met internet.
3. Het smart-apparaat moet met de router verbonden zijn via een Wi-Fi-verbinding.
26
Page 92

FUNCTIES
DE SAMSUNG MULTIROOM-APP INSTALLEREN
Voordat u de Soundbar kunt gebruiken, moet u de Samsung Multiroom-app downloaden en installeren vanuit Google
Play of de App Store. Nadat u de Samsung Multiroom-app hebt geïnstalleerd, kunt u muziek die is opgeslagen op uw
smart-apparaat, van verbonden apparaten, van andere leveranciers van inhoud en van internetradiostations afspelen.
+ Android of iOS
Download de Samsung Multiroom-app vanuit Google Play of de App Store van uw smart-apparaat.
* Zoeken in Markt: Samsung Multiroom
ANDROID APP ON
of
+ De Samsung Multiroom-app openen
U kunt de Samsung Multiroom-app openen door op het pictogram van de Multiroom-app op uw smart-apparaat te
drukken.
DE SOUNDBAR VERBINDEN MET UW NETWERK
Selecteer op uw smartapparaat de app Samsung Multiroom.
Volg de aanwijzingen op het scherm van uw smartapparaat.
● Raadpleeg de handleiding op het web voor meer informatie
- Webhandleiding: www.Samsung.com Ondersteuning Zoeken naar productnaam HW-J6500,
HW-J6501 of HW-J6502 PDF-bestand downloaden.
● Bij verbinding met een bedraad netwerk gebruikt u de CAT 7-kabel om verbinding te maken.
NL
27
Page 93

FUNCTIES
SOFTWARE-UPDATE
HDMI IN
DC 14V
AUX IN
5V 0.5A
LAN
HDMI OUT
(TV-ARC)
OPTICAL IN
SPK ADD
Wi-Fi SETUP
BIJWERKEN MET USB
Samsung kan in de toekomst updates voor de firmware van de Soundbar aanbieden.
Indien een update wordt aangeboden, kunt u de firmware bijwerken door een USB-apparaat waarop de firmwareupdate is opgeslagen aan te sluiten op de USB-poort van uw Soundbar.
Let op, als er meerdere updatebestanden zijn, moet u telkens één ervan op het USB-station zetten en ze één voor één
gebruiken om de firmware bij te werken.
Ga naar Samsung.com of neem contact op met het callcenter van Samsung voor meer informatie over het
downloaden van updatebestanden.
1. Zorg dat de Soundbar is uitgeschakeld en sluit het USB-opslagapparaat met de update van de firmware aan op
de USB-poort van de Soundbar.
2. Schakel de Soundbar in. Op het display verschijnt UPDATE en de update wordt binnen 3 minuten gestart.
• Zodra de firmware is bijgewerkt, wordt de Soundbar automatisch uitgeschakeld en weer ingeschakeld.
+ Als niet UPDATE werd weergegeven
1. Schakel de Soundbar uit en sluit het USB-opslagapparaat dat updatebestanden bevat aan op de USB-poort van
de Soundbar.
2. Koppel het netsnoer los, sluit het opnieuw aan en schakel het apparaat in.
● Plaats een USB-apparaat met de firmware-upgrade in de USB-poort op de hoofdeenheid.
● Het bijwerken van de firmware verloopt mogelijk niet naar behoren wanneer er zich audiobestanden op het
USB-opslagapparaat bevinden die door de Soundbar worden ondersteund.
● Schakel de stroom niet uit en verwijder het USB-apparaat niet terwijl updates worden uitgevoerd. Het
hoofdapparaat wordt automatisch uitgeschakeld nadat de firmware-update is voltooid.
28
Page 94

FUNCTIES
● Na de update worden alle instellingen teruggezet naar de fabrieksinstellingen. We raden u aan uw
instellingen ergens te noteren, zodat u deze na de update eenvoudig opnieuw kunt instellen. Houd er
rekening mee dat wanneer u de firmware bijwerkt, de verbinding met de subwoofer ook wordt gereset. Als
de verbinding met de subwoofer na de update niet automatisch wordt hersteld, raadpleegt u pagina 15.
Als de firmware niet kan worden bijgewerkt, raden we u aan het USB-apparaat te formatteren in FAT16 en
het nogmaals te proberen.
● Formatteer het USB-station niet in NTFS-indeling. De Soundbar biedt geen ondersteuning voor het
NTFS-bestandssysteem.
● Afhankelijk van de fabrikant worden sommige USB-opslagapparaten mogelijk niet ondersteund.
AUTOMATISCH BIJWERKEN
Zelfs als de Soundbar is uitgeschakeld, controleert de Soundbar automatisch de meest recente softwareversie en gaat
het door met bijwerken als het apparaat is verbonden met het internet.
● De Soundbar is zodanig geconfigureerd dat standaard automatisch bijwerken wordt uitgevoerd.
● Als u de functie voor automatisch bijwerken wilt gebruiken, moet de Soundbar verbinding hebben met het
internet.
● De Wi-Fi-verbinding met de Soundbar wordt verbroken als het netsnoer van het apparaat wordt
losgekoppeld of als de stroomtoevoer wordt onderbroken. Schakel de Soundbar in en breng opnieuw de
verbinding tot stand.
NL
29
Page 95

PROBLEMEN OPLOSSEN
Problemen oplossen
PROBLEMEN OPLOSSEN
Controleer het volgende voordat u contact met ons opneemt.
Het apparaat wordt niet ingeschakeld.
• Is de stekker aangesloten op het stopcontact? Sluit de stekker aan op het stopcontact.
Een functie werkt niet als de knop wordt ingedrukt.
• Is er statische elektriciteit in de lucht? Haal de stekker uit het stopcontact en sluit deze
Ik hoor geen geluid.
• Is de functie voor geluid dempen aan?
• Is het volume minimaal?
Afstandsbediening werkt niet.
• Zijn de batterijen leeg?
• Is de afstand tussen de afstandsbediening en de
speler niet te groot?
De TV SoundConnect (TV-koppeling) werkt niet.
• Ondersteunt uw TV de functie TV SoundConnect?
• Gebruikt u de laatste versie van uw TV-firmware?
• Is er een fout opgetreden tijdens de koppeling?
• Reset de TV-modus en maak opnieuw een
verbinding.
opnieuw aan.
Druk op de toets (Dempen) om de functie te
annuleren.
Het Volume aanpassen.
Plaats nieuwe batterijen.
Ga dichter naar de eenheid.
TV SoundConnect wordt ondersteund op bepaalde
Samsung-TV’s die na 2012 op de markt zijn
gekomen. Controleer of uw televisie TV
SoundConnect ondersteunt.
Update uw TV met de nieuwste firmware.
Neem contact op met de klantenservice van
Samsung.
Houd de knop & gedurende 5 seconden ingedrukt
om de verbinding TV SoundConnect te resetten.
De rode LED op de subwoofer knippert en de subwoofer produceert geen geluid.
• Uw subwoofer heeft mogelijk geen verbinding met
het hoofdapparaat van het product.
De subwoofer dreunt en trilt waarneembaar.
• Probeer de vibratie van uw subwoofer aan te passen. Druk op de toets WOOFER op de afstandsbediening
Probeer uw subwoofer opnieuw te verbinden.
(Zie pagina 15)
om de waarde aan te passen (tussen -12, -6 tot +6).
30
Page 96

bijlage
SPECIFICATIES
BIJLAGE
Modelnaam
ALG EMEEN
VERSTERKER
* S/N (signaal-ruis)-ratio, vervorming, verschil en bruikbare gevoeligheid zijn gebaseerd op metingen uitgevoerd
volgens de AES (Audio Engineering Society)-richtlijnen.
* Nominale specificatie
- Samsung Electronics Co., Ltd behoudt zich het recht voor de specificaties zonder voorafgaande
waarschuwing te wijzigen.
- Gewicht en afmetingen zijn bij benadering.
- Voor de stroomtoevoer en het energieverbruik raadpleegt u het aan het product bevestigde label.
a Voorzorgsmaatregel : Het product wordt automatisch opnieuw gestart als u Wi-Fi/Ethernet in-/uitschakelt.
HW-J6500 / HW-J6501/ HW-J6502
USB
Hoofdapparaat
Gewicht
Afmetingen
(b x h x d)
Temperatuurbereik voor gebruik
Vochtigheidspercentage voor gebruik
Uitvoervermogen
S/N-ratio (analoge invoer)
Verschil (1kHz)
Subwoofer (PS-WJ6500 /
PS-WJ6501 / PS-WJ6502)
Hoofdapparaat
Subwoofer (PS-WJ6500 /
PS-WJ6501 / PS-WJ6502)
Hoofdapparaat
Subwoofer (PS-WJ6500 /
PS-WJ6501 / PS-WJ6502)
5V / 0,5A
2,7 kg
6,8 kg
1078 x 47,5 x 129 mm
452 x 335 x 154 mm
+5 °C - +35 °C
10 % - 75 %
22W/CH x 6, 4 OHM, THD=10%, 1KHz
168W, 3 OHM, THD=10%, 100Hz
65 dB
65 dB
NL
Algeheel stroomverbruik bij stand-by (W)
(Alle netwerkpoorten in de toestand “AAN”)
Wi-Fi/Ethernet
Bluetooth
a Kennisgeving Open Source-licentie
- Neem voor vragen en verzoeken met betrekking tot open source contact op met Samsung via e-mail
(oss.request@samsung.com).
Hierbij verklaart Samsung Electronics dat deze apparatuur compatibel is met de essentiële vereisten en andere
relevante bepalingen van Richtlijn 1999/5/EG.
U vindt de originele Conformiteitsverklaring op http://www.samsung.com. Ga naar Support (Ondersteuning) > Search
Product Support (Productondersteuning zoeken) en voer de modelnaam in.
Dit apparaat mag in alle Europese landen worden gebruikt.
Dit apparaat is uitsluitend geschikt voor binnengebruik.
Methode voor deactivering
van poorten
Methode voor deactivering
van poorten
7,4W
Houd de Wi-Fi SETUP-knop op het product 30
seconden lang ingedrukt om Wi-Fi/Ethernet op Aan/Uit te
zetten.
Houd de SPK ADD-knop op het product 30 seconden
lang ingedrukt om Bluetooth op Aan/Uit te zetten.
31
Page 97

© 2015 Samsung Electronics Co., Ltd. Alle rechten voorbehouden.
Contact SAMSUNG Wereldwijd
Wanneer u suggesties of vragen heeft met betrekking tot Samsung producten, verzoeken wij u contact op te nemen met
de consumenten service- en informatie dienst van Samsung.
Area Contact Centre
`
Europe
U.K 0330 SAMSUNG (7267864) www.samsung.com/uk/support
EIRE 0818 717100 www.samsung.com/ie/support
0180 6 SAMSUNG bzw.
0180 6 7267864*
GERMANY
(*0,20 €/Anruf aus dem dt. Festnetz, aus
dem Mobilfunk max. 0,60 €/Anruf)
FRANCE 01 48 63 00 00 www.samsung.com/fr/support
ITALIA 800-SAMSUNG (800.7267864) www.samsung.com/it/support
SPAIN 0034902172678 www.samsung.com/es/support
PORTUGAL 808 20 7267 www.samsung.com/pt/support
LUXEMBURG 261 03 710 www.samsung.com/support
NETHER-
0900-SAMSUNG (0900-7267864) (€ 0,10/
LANDS
Min)
BELGIUM 02-201-24-18
NORWAY 815 56480 www.samsung.com/no/support
DENMARK 70 70 19 70 www.samsung.com/dk/support
FINLAND 030-6227 515 www.samsung.com/fi/support
SWEDEN 0771 726 7864 (0771-SAMSUNG) www.samsung.com/se/support
801-172-678* lub +48 22 607-93-33 *
POLAND
* (koszt połączenia według taryfy operatora)
0680SAMSUNG (0680-726-786)
HUNGARY
0680PREMIUM (0680-773-648)
SLOVAKIA 0800 - SAMSUNG (0800-726 786) www.samsung.com/sk/support
0800-SAMSUNG (0800-7267864)
AUSTRIA
[Only for Premium HA] 0800-366661
[Only for Dealers] 0810-112233
[Correcte behandeling van een gebruikte accu uit
(Van toepassing in landen waar afval gescheiden wordt
ingezameld)
Dit merkteken op de accu, handleiding of verpakking geeft aan dat de
accu in dit product aan het einde van de levensduur niet samen met
ander huishoudelijk afval mag worden weggegooid. De chemische
symbolen Hg, Cd of Pb geven aan dat het kwik-, cadmium- of
loodgehalte in de accu hoger is dan de referentieniveaus in de Richtlijn
2006/66/EC.
Indien de gebruikte accu niet op de juiste wijze wordt behandeld,
kunnen deze stoffen schadelijk zijn voor de gezondheid van mensen of
het milieu.
Ter bescherming van de natuurlijke hulpbronnen en ter bevordering van
het hergebruik van materialen, verzoeken wij u afgedankte accu’s en
batterijen te scheiden van andere soorten afval en voor recycling aan te
bieden bij het gratis inzamelingssysteem voor accu’s en batterijen in uw
omgeving.
Web Site
www.samsung.com/de/support
www.samsung.com/nl/support
www.samsung.com/be/support
(Dutch)
www.samsung.com/be_fr/
support (French)
www.samsung.com/pl/support
www.samsung.com/hu/support
www.samsung.com/at/support
dit product]
Area Contact Centre
SWITZER-
0800 726 78 64 (0800-SAMSUNG)
LAND
800 - SAMSUNG (800-726786) www.samsung.com/cz/support
CZECH
Samsung Electronics Czech and Slovak, s.r.o. V Parku 2343/24, 148 00 -
Praha 4
CROATIA 072 726 786 www.samsung.com/hr/support
BOSNIA 055 233 999 www.samsung.com/support
MONTENE-
020 405 888 www.samsung.com/support
GRO
080 697 267 (brezplačna številka)
090 726 786 (0,39 EUR/min)
SLOVENIA
klicni center vam je na voljo od ponedeljka
do petka od 9. do 18. ure.
SERBIA 011 321 6899 www.samsung.com/rs/support
BULGARIA 800 111 31 , Безплатна телефонна линия www.samsung.com/bg/support
08008 726 78 64 (08008 SAMSUNG )
ROMANIA
Apel GRATUIT
CYPRUS 8009 4000 only from landline, toll free
80111-SAMSUNG (80111 726 7864) only
from land line
GREECE
(+30) 210 6897691 from mobile and land
line
LITHUANIA 8-800-77777 www.samsung.com/lt/support
LATVIA 8000-7267 www.samsung.com/lv/support
ESTONIA 800-7267 www.samsung.com/ee/support
(Van toepassing in landen waar afval gescheiden wordt
ingezameld)
Dit merkteken op het product, de accessoires of het informatiemateriaal
duidt erop dat het product en zijn elektronische accessoires (bv. lader,
headset, USB-kabel) niet met ander huishoudelijk afval verwijderd
mogen worden aan het einde van hun gebruiksduur. Om mogelijke
schade aan het milieu of de menselijke gezondheid door
ongecontroleerde afvalverwijdering te voorkomen, moet u deze artikelen
van andere soorten afval scheiden en op een verantwoorde manier
recyclen, zodat het duurzame hergebruik van materiaalbronnen wordt
bevorderd.
Huishoudelijke gebruikers moeten contact opnemen met de winkel waar
ze dit product hebben gekocht of met de gemeente waar ze wonen om
te vernemen waar en hoe ze deze artikelen milieuvriendelijk kunnen
laten recyclen.
Zakelijke gebruikers moeten contact opnemen met hun leverancier en
de algemene voorwaarden van de koopovereenkomst nalezen. Dit
product en zijn elektronische accessoires mogen niet met ander
bedrijfsafval voor verwijdering worden gemengd.
Correcte verwijdering van dit product
(elektrische & elektronische afvalapparatuur)
Web Site
www.samsung.com/ch/support
(German)
www.samsung.com/ch_fr/
support (French)
www.samsung.com/si
www.samsung.com/ro/support
www.samsung.com/gr/support
Page 98

Bedienungsanleitung
Curved Soundbar
HW-J6500
HW-J6501
HW-J6502
Erleben Sie die Möglichkeiten
Vielen Dank, dass Sie sich für ein Produkt von Samsung entschieden haben.
Registrieren Sie Ihr Produkt unter
www.samsung.com/register
Page 99

ERSTE SCHRITTE
erste schritte
MERKMALE
Musik-Streaming-Dienste
Die Curved Soundbar macht das Eintauchen in Ihre
Lieblingsmusik, Dank ihrer W-Fi-Fähigkeit einfacher als je
zuvor. Verwenden Sie einfach die Samsung Multiroom
App, um in den Genuss der besten Abo-MusikStreaming-Dienste im Internet zu kommen.
Surround Sound Expansion
Die Surround Sound Expansion Funktion fügt Ihrem
Klangerlebnis Tiefe und Räumlichkeit hinzu.
TV SoundConnect
Verbinden Sie ihr Fernsehgerät mit der Soundbar einfach
über Bluetooth mit TV SoundConnect. Durch die
Abwesenheit der Verbindungskabel zwischen der
Soundbar und dem Fernsehgerät können Sie das
schlanke und elegante Design beider Systeme richtig zur
Geltung bringen, ohne Ihre Wohnumgebung mit Kabeln
zu verunstalten. Bedienen Sie die Soundbar und das
Fernsehgerät einfach mit einer einzigen TVFernbedienung.
Teilen von Musikquellen (= Multiroom Play)
Die Bedienung und Bereitstellung einer Musikquelle auf
mehreren Audiogeräten an verschiedenen Standorten ist
mit Multiroom Link ein Kinderspiel. Mit der mobilen App
können Sie die Lautstärke und Musiktitel auf Ihrem
System auf verschiedenen Geräten, wie Ihrem
Fernsehgerät, Soundbar, Heimunterhaltungssystem und
Blu-ray Disk-Player fernsteuern. Genießen Sie Audio wo
immer Sie wollen.
HDMI
HDMI überträgt gleichzeitig Video- und Audiosignale und
sorgt so für eine besonders gute Bildqualität.
Dieses Gerät verfügt ebenfalls über die ARC Funktion,
mit der Sie den Ton Ihres Fernsehgeräts über ein
HDMI-Kabel über den Soundbar hören können. Diese
Funktion ist nur dann verfügbar, wenn Sie das Gerät an
ein für ARC geeignetes Fernsehgerät anschließen.
Unterstützung der USB-Host-Funktion
Mit der USB-Host-Funktion können Sie externe
USB-Speichergeräte wie MP3-Player oder USB-FlashSpeicher anschließen und darauf enthaltene Dateien
wiedergeben.
Bluetooth Funktion
Sie können ein Bluetooth-Gerät an den Soundbar
anschließen und Musik in hoher Stereo-Klangqualität
genießen - ganz ohne störende Kabel!
LIZENZ
Hergestellt unter Lizenz von Dolby Laboratories. Dolby
sowie das Doppel-D-Symbol sind Warenzeichen der
Dolby® Laboratories.
Pour les brevets DTS, voir http://patents.dts.com.
Fabriqué sous licence de DTS Licensing Limited. DTS, le
symbole & DTS et le symbole ensemble sont des
marques déposées et DTS 2.0 Channel est une marque
de commerce de DTS, Inc. © DTS, Inc. Tous droits
réservés.
Die Begriffe HDMI und HDMI High-Definition Multimedia
Interface sowie das HDMI-Logo sind in den USA und
anderen Ländern Warenzeichen oder eingetragene
Warenzeichen der HDMI Licensing LLC.
2
Page 100

ERSTE SCHRITTE
SICHERHEITSINFORMATIONEN
HINWEISE ZUR SICHERHEIT
ZUR VERMEIDUNG VON STROMSCHLÄGEN DARF DIESES GERÄT NICHT GEÖFFNET WERDEN.
ES ENTHÄLT KEINE BAUTEILE, DIE VOM BENUTZER GEWARTET ODER REPARIERT WERDEN KÖNNEN.
WARTUNGS- UND REPARATURARBEITEN DÜRFEN NUR VON FACHPERSONAL AUSGEFÜHRT WERDEN.
Im Gerät befinden sich Hochspannung führende
ACHTUNG
GEFAHR ELEKTRISCHER
WARNUNG : Setzen Sie das Gerät nicht Nässe oder Feuchtigkeit aus, um die Gefahr eines Brandes bzw. eines
elektrischen Schlags zu vermeiden.
ACHTUNG : UM ELEKTRISCHE SCHLÄGE ZU VERMEIDEN, RICHTEN SIE DEN BREITEN KONTAKTSTIFT DES
STECKERS AN DEM BREITEN STECKPLATZ AUS, UND STECKEN SIE DEN STECKER VOLL EIN.
• Dieses Gerät darf nur an eine Netzsteckdose mit Schutzerdung angeschlossen werden.
• Um das Gerät vom Netzbetrieb zu trennen, muss der Stecker aus der Netzsteckdose gezogen werden. Deshalb
sollte der Netzstecker jederzeit zugänglich und leicht trennbar sein.
ACHTUNG
• Das Gerät keinem Spritz- oder Tropfwasser aussetzen. Keine mit Flüssigkeit gefüllten Behälter, wie Vasen auf das
Gerät stellen.
• Um das Gerät vollständig auszuschalten, muss der Netzstecker aus der Steckdose gezogen werden. Somit muss
der Netzstecker immer bequem erreichbar sein.
SCHLÄGE! GERÄT NICHT
ÖFFNEN!
Teile, die elektrische Schläge verursachen
können.
Die Dokumentation zu diesem Gerät enthält
wichtige Hinweise zu Betrieb und Wartung.
GER
3
 Loading...