

Page 1

User manual
5.1CH Blu-ray™
Home Entertainment System
HT-J5150
imagine the possibilities
Thank you for purchasing this Samsung product.
To receive more complete service, please register your product at
www.samsung.com/register
Page 2

Safety Information
CAUTION
RISK OF ELECTRIC SHOCK. DO NOT OPEN
CAUTION: TO REDUCE THE RISK OF ELECTRIC SHOCK, DO
NOT REMOVE THE COVER (OR BACK). THERE ARE NO USER
SERVICEABLE PARTS INSIDE. REFER ALL SERVICING TO
~The slots and openings in the cabinet and in the back
or bottom are provided for necessary ventilation. To
ensure reliable operation of this apparatus, and to
protect it from overheating, these slots and openings
must never be blocked or covered.
- Do not place this apparatus in a confined space,
such as a bookcase, or built-in cabinet, unless
proper ventilation is provided.
- Do not place this apparatus near or over a radiator
or heat register, or where it is exposed to direct
sunlight.
- Do not place vessels (vases etc.) containing water
on this apparatus. A water spill can cause a fire or
electric shock.
~Do not expose this apparatus to rain or place it near
water (near a bathtub, washbowl, kitchen sink, or
laundry tub, in a wet basement, or near a swimming
pool, etc.). If this apparatus accidentally gets wet,
unplug it and contact an authorized dealer immediately.
~This apparatus uses batteries. In your community,
there might be environmental regulations that require
you to dispose of these batteries properly. Please
contact your local authorities for disposal or recycling
information.
~Do not overload wall outlets, extension cords or
adaptors beyond their capacity, since this can result in
fire or electric shock.
~Route power-supply cords so that they are not likely to
be walked on or pinched by items placed on or against
them. Pay particular attention to cords at the plug end,
at wall outlets, and the point where they exit from the
apparatus.
~To protect this apparatus from a lightning storm, or
when it is left unattended and unused for long periods
of time, unplug it from the wall outlet and disconnect
the antenna or cable system. This will prevent damage
to the set due to lightning and power line surges.
~Before connecting the AC power cord to the DC
adaptor outlet, make sure the voltage designation of
the DC adaptor corresponds to the local electrical
supply.
~Never insert anything metallic into the open parts
of this apparatus. Doing so may create a danger of
electric shock.
QUALIFIED PERSONNEL.
~To avoid electric shock, never touch the inside of this
apparatus. Only a qualified technician should open this
apparatus.
~Make sure to plug the power cord in until it is firmly
seated. When unplugging the power cord from a wall
outlet, always pull on the power cord's plug. Never
unplug by pulling on the power cord. Do not touch the
power cord with wet hands.
~If this apparatus does not operate normally - in
particular, if there are any unusual sounds or smells
coming from it - unplug it immediately and contact an
authorized dealer or service centre.
~Maintenance of Cabinet.
~Be sure to pull the power plug out of the outlet if the
product is to remain unused or if you are leaving the
house for an extended period of time (especially when
children, elderly, or disabled people will be left alone in
the house).
~Contact an authorized service centre for information
if you intend to install your product in a location with
heavy dust, high or low temperatures, high humidity,
chemical substances, or where it will operate 24 hours
a day such as in an airport, a train station, etc. Failing
to do so may lead to serious damage of your product.
~Use only a properly grounded plug and wall outlet.
~To turn this apparatus off completely, you must
disconnect it from the wall outlet. Consequently, the
wall outlet and power plug must be readily accessible
at all times.
This symbol indicates that high voltage
is present inside. It is dangerous to
make any kind of contact with any
internal part of this product.
This symbol indicates that important
literature concerning operation and
maintenance has been included with
this product.
- Before connecting other components to this
product, be sure to turn them off.
- If you move your product suddenly from a cold place
to a warm place, condensation may occur on the
operating parts and lens and cause abnormal disc
playback. If this occurs, unplug the product, wait for
two hours, and then connect the plug to the power
outlet. Then, insert the disc, and try to play back
again.
- Accumulated dust can cause an electric shock, an
electric leakage, or a fire by causing the power cord
to generate sparks and heat or the insulation to
deteriorate.
- An improper ground may cause electric shock or
equipment damage. (Class l Equipment only.)
2 - English
Page 3

~Do not allow children to hang on the product.
~Store the accessories (battery, etc.) in a location safely
out of the reach of children.
~Do not install the product in an unstable location such
as a shaky self, a slanted floor, or a location exposed
to vibration.
~Do not drop or strike the product. If the product is
damaged, disconnect the power cord and contact a
service centre.
~To clean this apparatus, unplug the power cord from
the wall outlet and wipe the product using a soft,
dry cloth. Do not use any chemicals such as wax,
benzene, alcohol, thinners, insecticide, air fresheners,
lubricants, or detergent. These chemicals can damage
the appearance of the product or erase the printing on
the product.
~Do not expose this apparatus to dripping or splashing.
Do not put objects filled with liquids, such as vases on
the apparatus.
~Do not dispose of batteries in a fire.
~Do not plug multiple electric devices into the same wall
socket. Overloading a socket can cause it to overheat,
resulting in a fire.
~There is danger of an explosion if you replace the
batteries used in the remote with the wrong type of
battery. Replace only with the same or equivalent type.
WARNING :
~TO PREVENT THE SPREAD OF FIRE,
KEEP CANDLES AND OTHER ITEMS
WITH OPEN FLAMES AWAY FROM
THIS PRODUCT AT ALL TIMES.
~To reduce the risk of fire or electric
shock, do not expose this appliance to rain or
moisture.
CLASS 1 LASER PRODUCT
This product is classified as a CLASS 1 LASER product.
Use of controls, adjustments or performance of
procedures other than those specified herein may result
in hazardous radiation exposure.
CAUTION :
~INVISIBLE LASER RADIATION WHEN OPEN AND
INTERLOCKS DEFEATED, AVOID EXPOSURE TO
BEAM.
CLASS 1 LASER PRODUCT
KLASSE 1 LASER PRODUKT
LUOKAN 1 LASER LAITE
KLASS 1 LASER APPARAT
PRODUCTO LÁSER CLASE 1
Safety Information
3 - English
Page 4

Contents
GETTING STARTED
5 Accessories
5 Speaker Components
6 Front Panel
6 Rear Panel
7 Remote Control
CONNECTIONS
8 Connecting the Speakers
11 Connecting to a TV and External Devices
SETTINGS
12 The Initial Settings Procedure
12 The Home Screen at a Glance
13 Accessing the Settings Screen
13 Settings Menu Functions
16 Radio Setup
18 Upgrading Software
PLAYING CONTENT
19 Switching the Source Device
19 Playing Commercial Discs
19 Playing a Disc with User Recorded Content
20 Playing Files on a USB Device
21 Controlling Video Playback
23 Playing a Pre-Recorded Commercial Audio Disc
23 Controlling Music Playback
25 Playing Photo Content
25 Using the Special Effects Remote Control
Buttons
APPENDIX
27 Additional Information
28 Disk and Format Compatibility
33 Troubleshooting
36 Specifications
37 Licences
Wiring the Main Power Supply Plug (UK Only)
IMPORTANT NOTICE : The mains lead on this equipment is supplied with a moulded plug incorporating a fuse.
The value of the fuse is indicated on the pin face of the plug and if it requires replacing, a fuse approved to BS1362
of the same rating must be used. Never use the plug with the fuse cover removed. If the cover is detachable and
a replacement is required, it must be of the same colour as the fuse fitted in the plug. Replacement covers are
available from your dealer. If the fitted plug is not suitable for the power points in your house or the cable is not long
enough to reach a power point, you should obtain a suitable safety approved extension lead or consult your dealer
for assistance. However, if there is no alternative to cutting off the plug, remove the fuse and then safely dispose of
the plug. Do not connect the plug to a mains socket as there is a risk of shock hazard from the bared flexible cord.
Never attempt to insert bare wires directly into a mains socket. A plug and fuse must be used at all times.
IMPORTANT : The wires in the mains lead are coloured in accordance with the following code:– BLUE = NEUTRAL
BROWN = LIVE As these colours may not correspond to the coloured markings identifying the terminals in your
plug, proceed as follows:–The wire coloured BLUE must be connected to the terminal marked with the letter N or
coloured BLUE or BLACK. The wire coloured BROWN must be connected to the terminal marked with the letter L
or coloured BROWN or RED.
IMPORTANT : DO NOT CONNECT EITHER WIRE TO THE EARTH TERMINAL WHICH IS MARKED WITH
LETTER E OR BY THE EARTH SYMBOL U, OR COLOURED GREEN OR GREEN AND YELLOW.
4 - English
Page 5
Getting Started
Figures and illustrations in this User Manual are provided for reference only and may differ from
actual product appearance.
An administration fee may be charged if either
a. an engineer is called out at your request and there is no defect in the product (i.e. where you
have failed to read this user manual)
b. you bring the unit to a repair centre and there is no defect in the product (i.e. where you have
failed to read this user manual).
The amount of such administration charge will be advised to you before any work or home visit is
carried out.
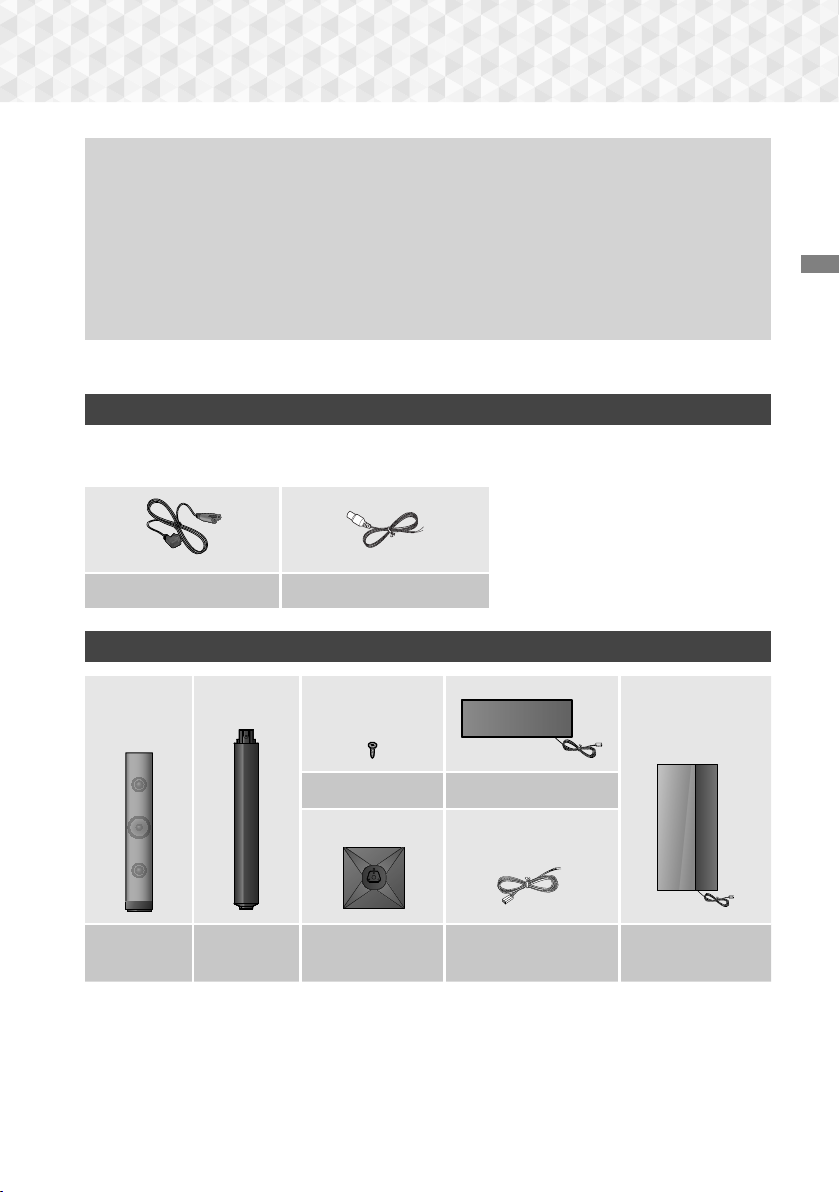
Check the box for the accessories and speaker components listed or shown below.
Accessories
~ Remote Control
~ Batteries (AAA size)
Power Cable FM Antenna
Speaker Components
~ User Manual
Getting Started
Front x 2
Surround x 2
Screw (5x15) x 16 Centre
Stand x 4 Stand Base x 4 Speaker Cable x 4 Subwoofer
5 - English
Page 6
Getting Started
5V 0.5A
SURROUND
SURROUND
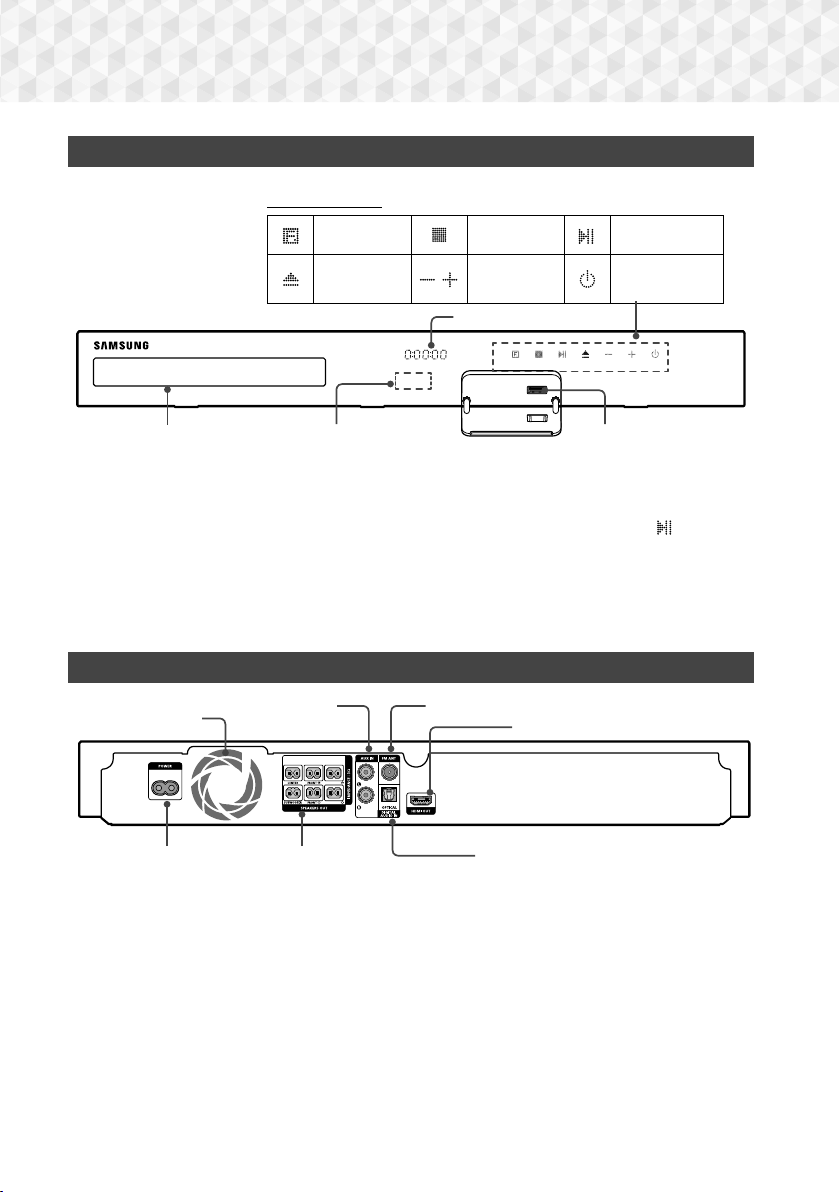
Front Panel
DISPLAY ICONS
FUNCTION STOP PLAY/PAUSE
OPEN/
CLOSE
DISC TRAY
✎
When the product is on, do not let children touch the product's surface. It will be hot.
✎
To upgrade the product's software through the USB jack, you must use a USB flash drive.
✎
When the product displays a Blu-ray Disc menu, you cannot start the movie by pressing the /6 button
on the product or the remote. To play the movie, you must select Play Movie or Start in the disc menu, and
then press the E button.
✎
If you are playing content from a USB device on your TV through the home cinema, you cannot select the
BD/DVD mode with the FUNCTION button. To select the BD/DVD mode, stop the content you are playing
on the TV, and then select the BD/DVD mode.
VOLUME
CONTROL
DISPLAY
POWER
USBREMOTE CONTROL SENSOR
Rear Panel
COOLING FAN
AUX IN
* FM ANTENNA
HDMI OUT
POWER CORD EXTERNAL DIGITAL
* Connecting the FM Antenna
1. Connect the supplied FM antenna to the FM ANT Jack.
2. Slowly move the antenna wire around until you find a location where reception is good, then fasten it to a
wall or other rigid surface.
✎
Maintain a minimum of 10 cm of clear space on all sides of the home cinema to ensure adequate ventilation.
Do not obstruct the cooling fan or ventilation holes.
✎
This product does not receive AM broadcasts.
SPEAKER OUTPUT
CONNECTORS
AUDIO IN (OPTICAL)
6 - English
Page 7
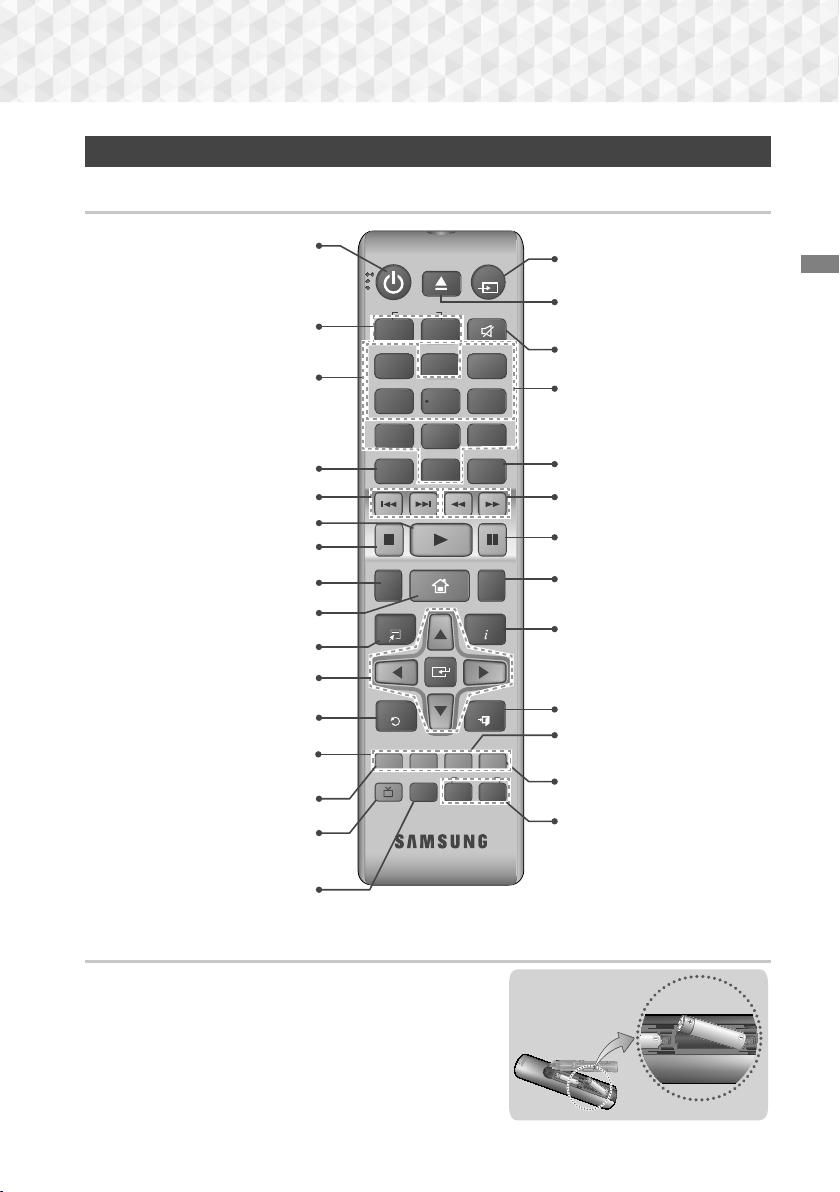
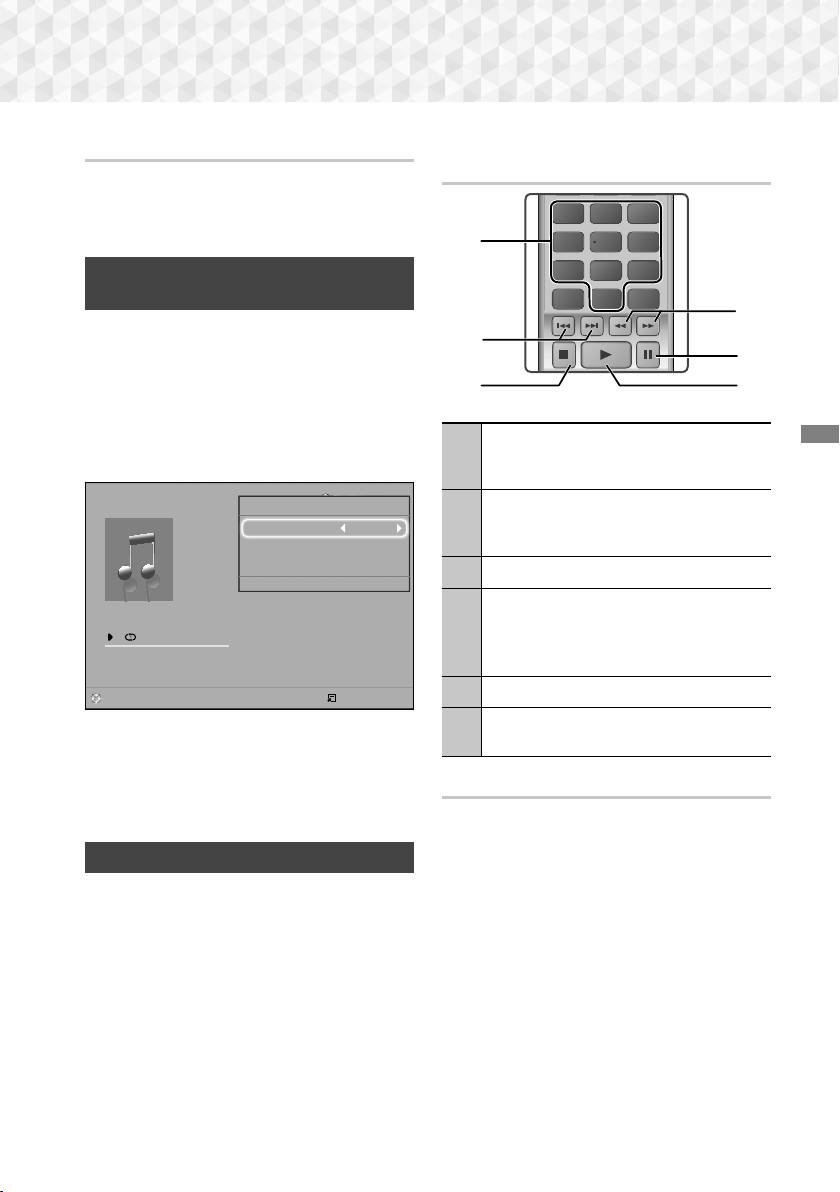
Remote Control
Tour of the Remote Control
Turn the product on and off.
Adjust the volume.
Press numeric buttons to operate
options.
Press to view the disc menu.
Press to skip backwards or forwards.
Press to play a disc or files.
Press to stop a disc or files.
Selects the disc subtitle language.
Press to move to the Home screen.
Press to use the Tools menu.
Select on-screen menu items
and change menu values.
Return to the previous menu.
These buttons are used both for
menus on the product and also
several Blu-ray Disc functions.
Press to record FM radio
broadcasts.
Press to direct the audio signal to the
home cinema speakers or TV speaker.
(See page 25)
Select the desired DSP/EQ audio
mode.
FUNCTION
VOLUME
-
RDS DISPLAY TA
1
PTY - PTY SEARCH PTY +
4
7
DISC MENU
SUBTITLE HOME
TOOLS
RETURN
ABCD
DSP/EQTV SOUND
MUTE
+
2
3
56
89
TITLE MENU
POPUP
0
REPEAT
INFO
EXIT
TUNER
MO/ST
MEMORY
TUNING
DOWN
Press to select Home Cinema's
mode. (BD/DVD, D. IN, AUX,
etc.).
Getting Started
To open and close the disc tray.
Cut off the sound temporarily.
Use the RDS function to
receive FM stations.
Use to enter the Popup menu/
Title menu.
Press to search backwards or
forwards.
Press to pause playing.
Allows you to repeat a title,
chapter, track or disc.
Use to display the playback
information when playing
a Blu-ray/DVD disc or files.
Press to exit the menu.
Use to set a preset radio frequency.
UP
Select MONO or STEREO for radio
broadcasts.
Search for active FM stations and
to change channels.
Installing batteries in the Remote Control
✎
Make sure to match the "+" and "–" ends of the batteries with
the diagram inside the compartment.
✎
Assuming typical usage, the batteries last for about one year.
✎
The remote control can be used up to approximately
7 meters from the product in a straight line.
7 - English
Battery size: AAA
Page 8
Connections
This section describes various methods of connecting the product to other external components.
Before moving or installing the product, be sure to turn off the power and disconnect the power cord.
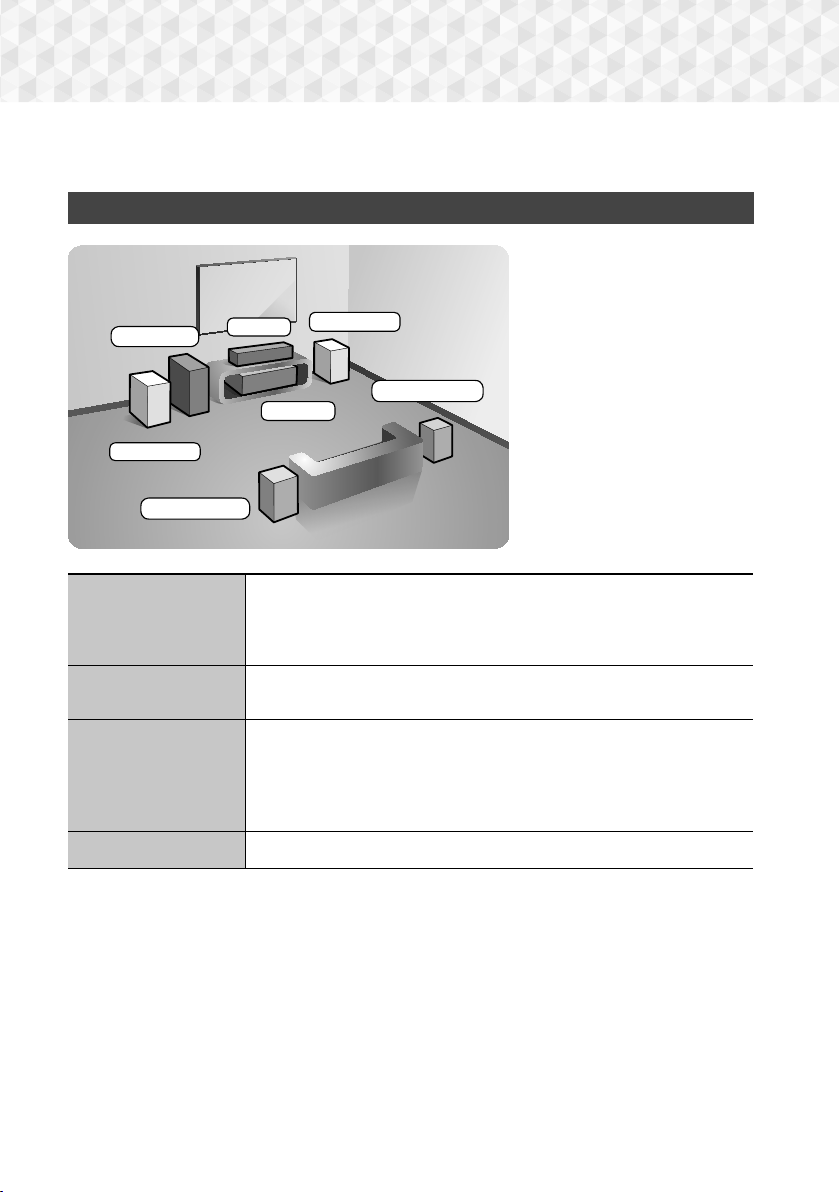
Connecting the Speakers
Position of the product
Place it on a stand or cabinet
shelf, or under the TV stand.
Subwoofer
Front (L)
Surround (L)
Front Speakers
Centre
Place these speakers in front of your listening position, facing inwards (about
45°) toward you. Place the front speakers so that their tweeters will be at the
same height as your ear. Align the front face of the front speakers with the front
face of the centre speaker or place them slightly in front of the centre speakers.
Front (R)
Surround (R)
Product
Selecting the Listening Position
The listening position should be
located about 2.5 to 3 times the
TV's screen size away from the
TV. For example, if you have a 46
inch screen, locate the listening
position 2.92 to 3.50 meters from
the screen.
Centre Speaker
Surround Speakers
Subwoofer
* The appearance of your speakers may differ from the illustrations in this manual.
* Each speaker has a coloured label on its back or underside. Each cable has a single coloured band
near its end. Match the band on each cable to the speaker label by colour, and then connect the
cable to the speaker. See page 9 for exact instructions.
It is best to install the centre speaker at the same height as the front speakers.
You can also install it directly over or under the TV.
Place these speakers to the side of your listening position. If there isn't enough
room, place these speakers so they face each other. Position them about 60 to
90cm above your ear, facing slightly downward.
* Unlike the front and centre speakers, the surround speakers are used mainly
for sound effects. Sound will not come from them all the time.
The position of the subwoofer is not so critical. Place it anywhere you like.
8 - English
Page 9
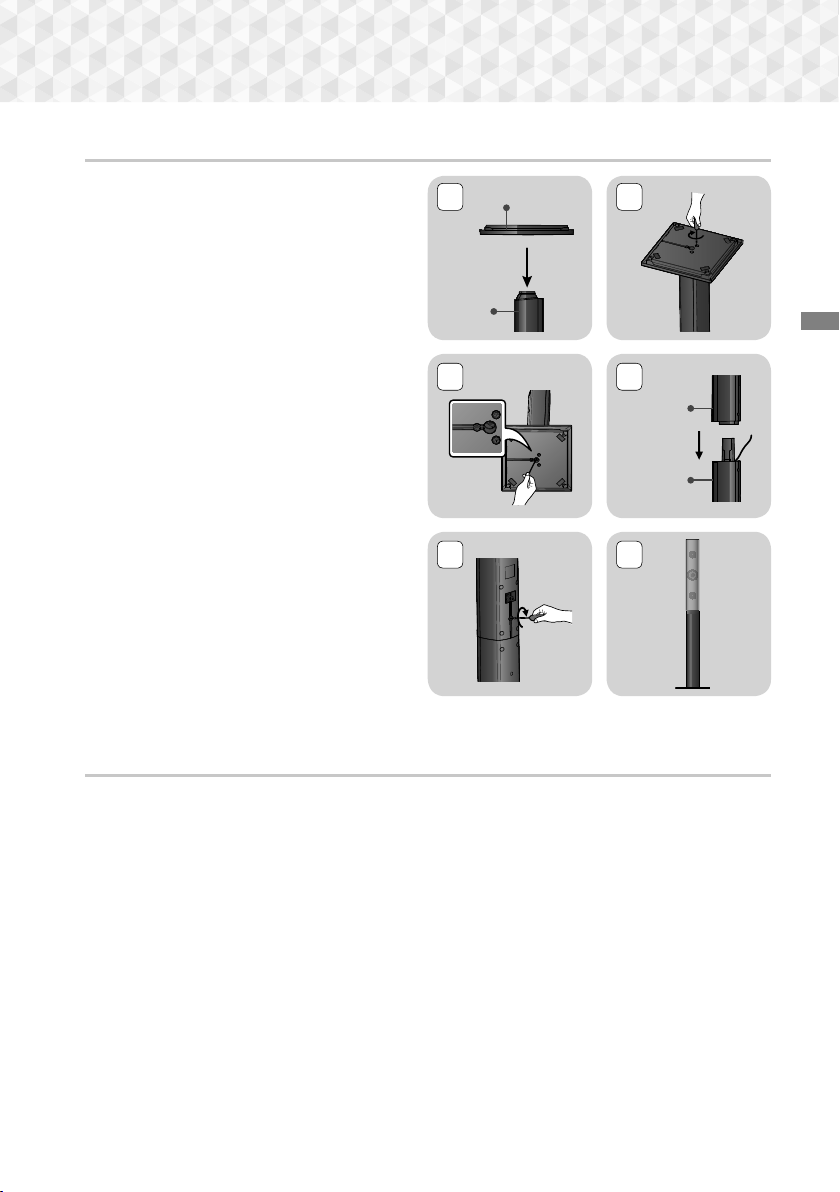
Installing the Speakers on the Tallboy Stand
1. Turn the Stand Base upside-down and connect
it to the Stand.
2. Use the driver to combine the screws on the 3
marked holes.
3. Straighten a supplied speaker wire and put in
the hole on the centre of Stand Base.
4. Connect the upper Speaker to the assembled
Stand.
5. Insert a screw clockwise into the hole on the
rear of the speaker using a screwdriver.
And then connect a speaker cable.
6. This is the appearance after the speaker is
installed.
Follow this steps to install other speaker.
1
Stand
3
5
Stand Base
2
4
Speaker
Stand
6
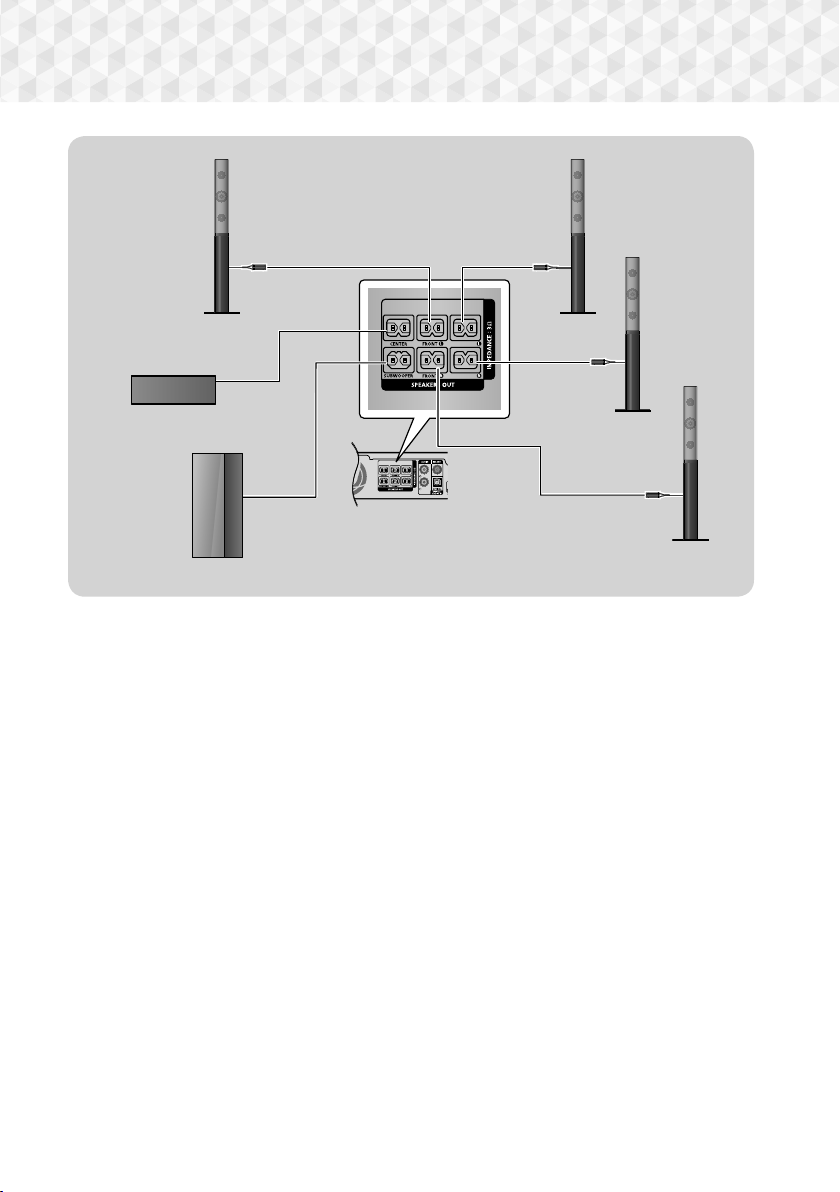
Speaker Cable Connections
* Front/
Surround Speakers
1. Match each speaker cable bundle to the correct speaker by matching the colour coded plug on each
bundle to the coloured sticker on the bottom of each speaker.
2. Connect the speaker wire plugs from each speaker to the back of the product by matching the colours of
the speaker plugs to the colours of the speaker jacks. When connecting, make sure to match label colour
on the back of speaker.
only
Connections
9 - English
Page 10
Connections
SURROUND
SURROUND
SURROUND
SURROUND
Front Speaker (L)
Centre Speaker
Subwoofer
✎
If you place a speaker near your TV set, the screen colour may be distorted because of the magnetic field.
| CAUTION |
If you want to install the speakers on the wall, fasten screws or nails (not provided) firmly to the wall wherever
you want to hang a speaker, and then, using the hole in the rear of each speaker, carefully hang each
speaker on a screw or nail.
Do not let children play with or near the speakers. They could get hurt if a speaker falls.
When connecting the speaker wires to the speakers, make sure that the polarity (+/ –) is correct.
Keep the subwoofer speaker out of reach of children to prevent children from inserting their hands or alien
substances into the duct (hole) of the subwoofer speaker.
Do not hang the subwoofer on the wall by the duct (hole).
Surround Speaker (L)
Surround Speaker (R)
Front Speaker (R)
10 - English
Page 11
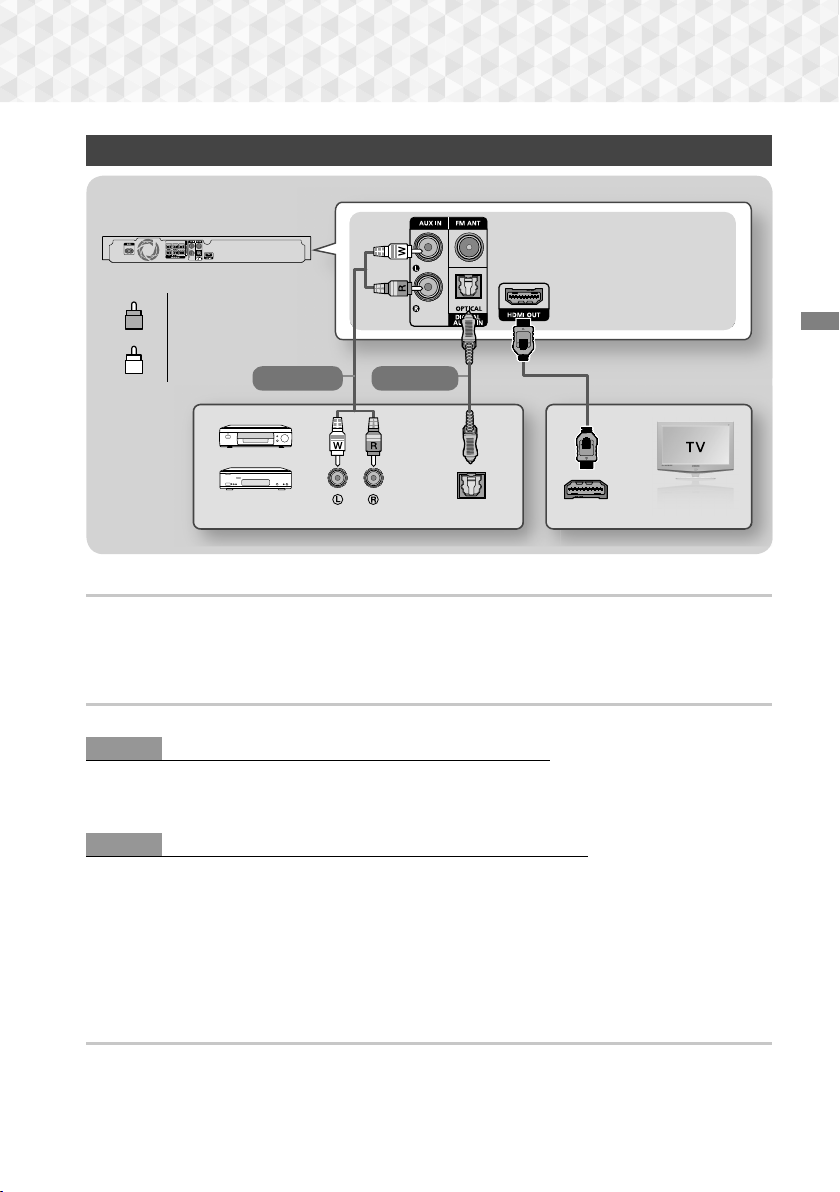
Connecting to a TV and External Devices
OPTICAL OUT
AUDIO OUT
HDMI IN (ARC)
SURROUND
SURROUND
Red
R
White
W
Method 1 Method 2
External Devices
Connecting to a TV
Connect an HDMI cable (not supplied) from the HDMI OUT jack on the back of the product to the HDMI IN jack
on your TV. If the TV supports ARC, you can hear the audio from your TV through the home cinema with only
this cable connected. See page 14 in this manual and the section on ARC in your TV's user's manual for
details.
Connecting to External Devices
Two methods of connecting external devices to your home cinema are explained below.
Method 1 AUX IN : Connecting an External Analogue Component
Using an RCA audio cable (not supplied), connect the AUDIO In jack on the product to the AUDIO Out jack on
the external analogue component. Select the AUX mode.
~ Be sure to match the colours on the cable plugs to the colours on the input and output jacks.
Method 2 OPTICAL : Connecting an External Digital Audio Component
Use to connect the digital audio output of digital signal components such as Cable Boxes and Satellite
Receivers (Set-Top-Boxes) to the home cinema. Using a digital optical cable (not supplied), connect the Optical
Digital Audio In jack on the product to the Digital Optical Out jack of the external digital device using a digital
optical cable. Select the D. IN mode.
✎
To see video from your Cable Box/Satellite receiver, you must connect its video output directly to your TV.
✎
This system supports Digital sampling frequencies of 32 kHz or higher from external digital components.
✎
This system supports only DTS and Dolby Digital audio. MPEG audio, a bitstream format, is not supported.
Connections
Selecting an External Device to Use
To select an external device after you have connected it, press the FUNCTION button. Each time you press the
button, the mode changes in this order : BD/DVD D. IN AUX FM
11 - English
Page 12
Settings
The Initial Settings Procedure
~The Home menu will not appear if you do not
configure the initial settings.
~The OSD (On Screen Display) may change in
this product after you upgrade the software
version.
~The access steps may differ depending on the
menu you selected.
1. Turn on your TV after connecting the product,
and then turn on the product. When you turn
on the product for the first time, the product
automatically displays the Setup Language
screen.
2. Press the ▲▼ buttons to select the desired
language, and then press the E button.
3. The TV Aspect Ratio screen appears. Press
the ▲▼ buttons to select a TV aspect ratio, and
then press the E button.
You have four choices:
16:9 Original - For widescreen TVs. Displays
widescreen pictures in their original 16:9 format
and 4:3 pictures (the old, standard format) in 4:3
pillar box format with black bars on the left and
right.
16:9 Full - For widescreen TVs. Displays
widescreen pictures in their original 16:9 format
and expands 4:3 pictures to fill the 16:9 screen.
4:3 Letter Box - For older, standard screen,
analogue TVs. Displays 4:3 pictures in full screen
and 16:9 pictures in letter box format that retains
the 16:9 aspect ratio but puts black bars above
and below the picture.
4:3 Pan-Scan - For older, standard screen,
analogue TVs. Displays 4:3 pictures in full screen
and 16:9 pictures in Pan-Scan format that fills
the screen, but cuts off the left and right sides of
the picture and enlarges the middle vertically.
4. The "Initial settings completed." screen
appears, and then the Home screen appears.
✎
If you want to display the Setup screen again
and make changes, select the Reset option. (See
page 16)
✎
If you use an HDMI cable to connect the product
to an Anynet+ (HDMI-CEC)-compliant Samsung
TV and 1.) You have set the Anynet+ (HDMI-CEC)
feature to On in both the TV and the product and
2.) You have set the TV to a language supported
by the product, the product will select that
language as the preferred language automatically.
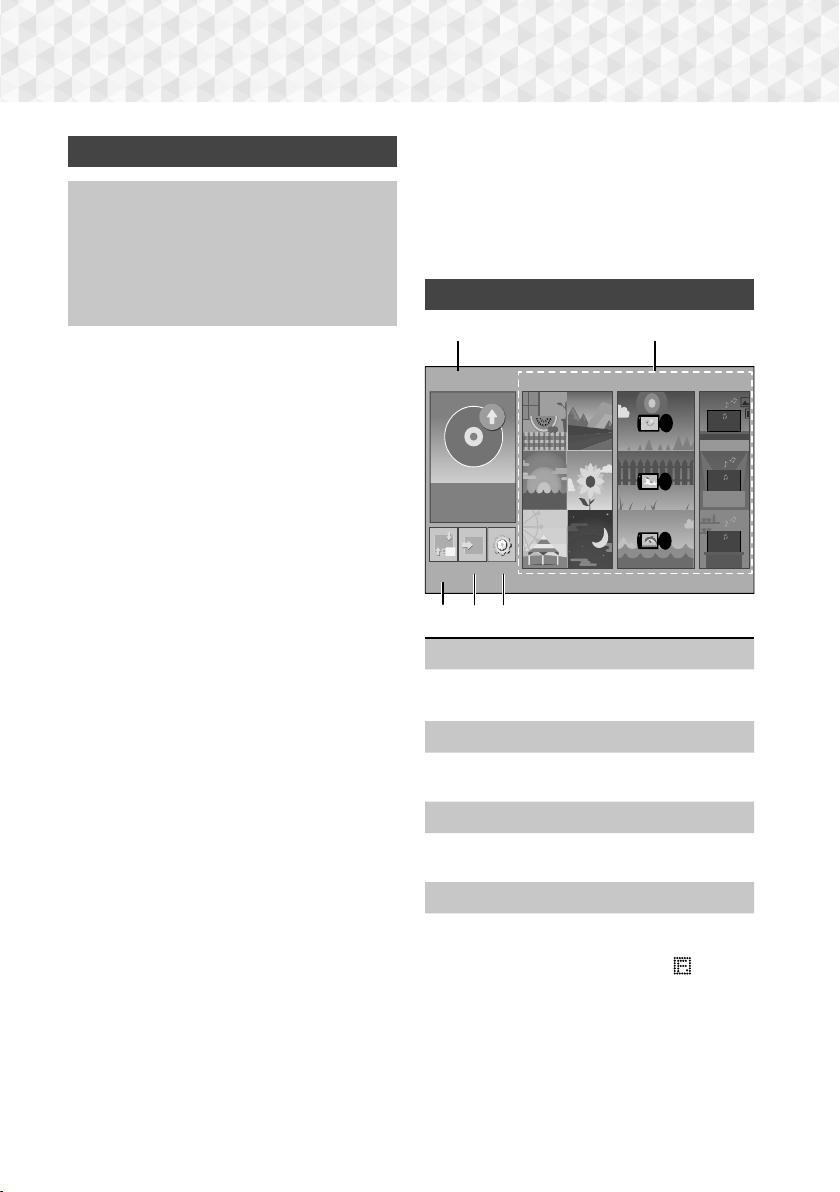
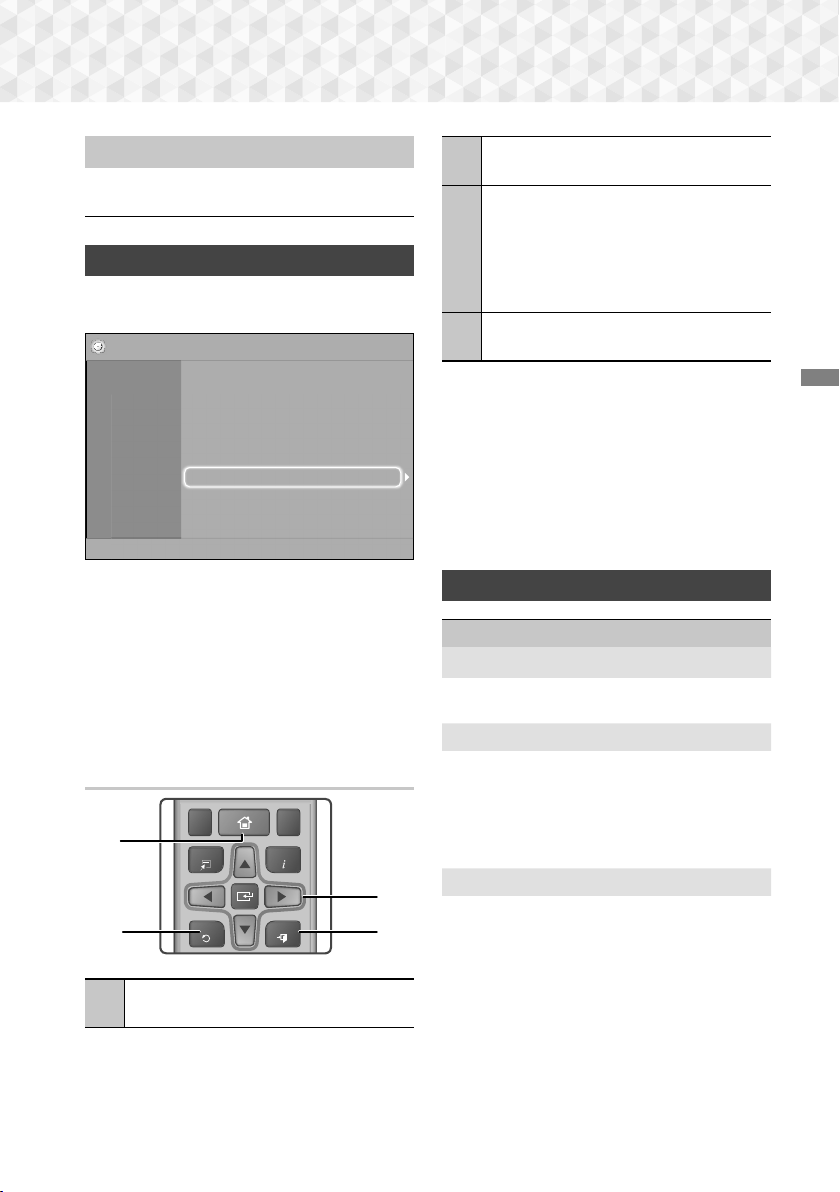
The Home Screen at a Glance
1
PLAY DISC
No Disc
Change
Function
Device
PHOTOS VIDEOS MUSIC
Settings
2
345
PLAY DISC
1
The disc currently in the tray is displayed.
Press E to start playing the disc.
PHOTOS/VIDEOS/MUSIC
2
Play photos, videos, or music content from a
Disc or a USB device.
Change Device
3
Displays a list of external devices connected to the
main unit. Switch to the desired device.
Function
4
Use for switching to an external device or to
the radio. You can use the remote control’s
FUNCTION button and the main unit’s button
for mode switching.
12 - English
Page 13
Settings
TOOLS
RETURN
EXIT
INFO
SUBTITLE HOME
REPEAT
5
Set various functions to suit your personal
preferences.
Accessing the Settings Screen
1. Select Settings on the Home screen, and then
press E. The Settings screen appears.
Settings
Picture
Sound
System
Language
Security
Support
TV Aspect Ratio : 16:9 Original
BD Wise : Off
Resolution : Auto
Movie Frame (24 fps) : Off
HDMI Colour Format : Auto
HDMI Deep Colour : Off
Progressive Mode : Auto
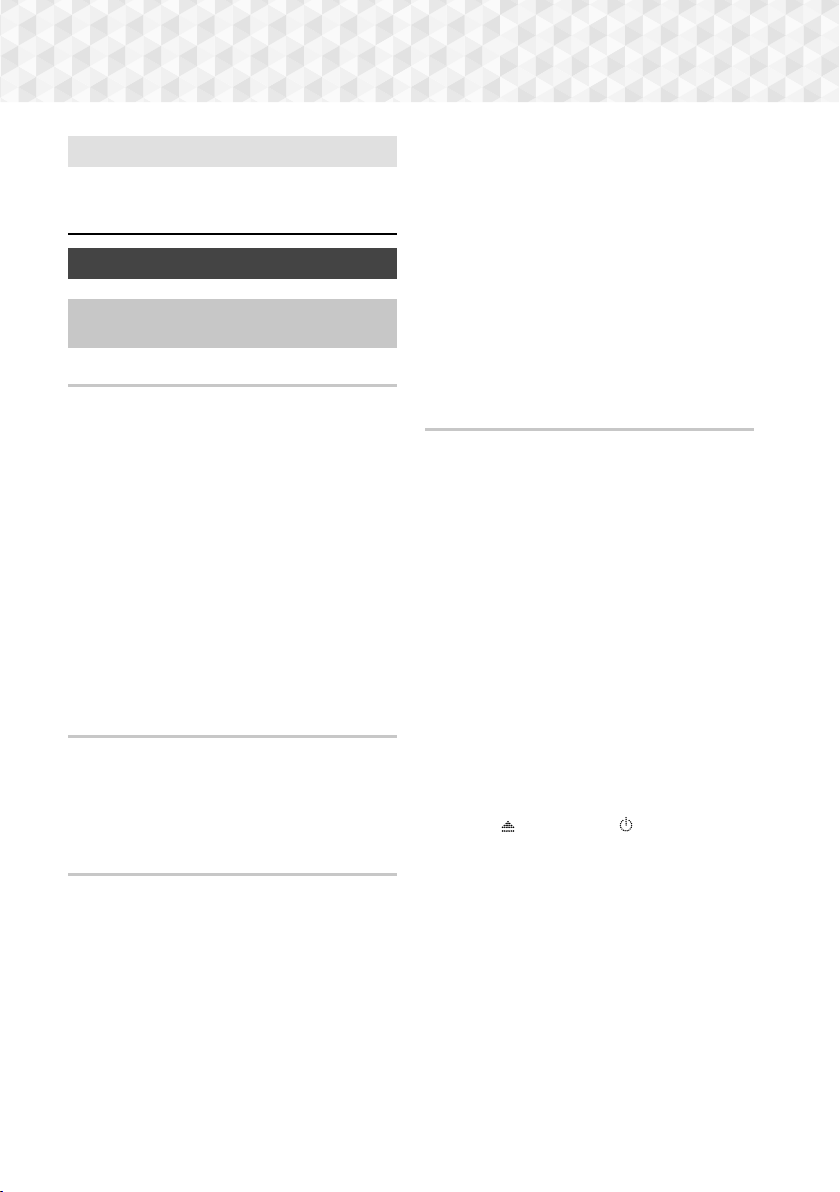
RETURN Button : Press to return to the
2
previous menu.
ENTER) / DIRECTION Button :
(
E
~Press ▲▼◄► to move the cursor or
select an item.
3
~Press the E button to activate the
currently selected item or confirm a
setting.
EXIT Button : Press to exit the current
4
menu.
Detailed Function Information
Each Settings function, menu item, and individual
option is explained in detail on-screen. To view an
explanation, use the ▲▼◄► buttons to select the
function, menu item, or option. The explanation will
usually appear on the bottom of the screen.
A short description of each Settings function starts
on this page. Additional information on some of the
functions is also in the Appendix of this manual.
Settings
2. To access the menus, sub-menus, and options
Settings Menu Functions
on the Settings screen, please refer to the
remote control illustration. (See below)
✎
If you leave the product in the stop mode for more
than 5 minutes without using it, a screen saver
appears on your TV. If the product is left in the
screen saver mode for more than 20 minutes, the
power automatically turns off.
Buttons on the Remote Control Used
for the Settings Menu
TV Aspect Ratio
Lets you adjust the output of the product to the
screen size of your TV. (See page 27)
BD Wise
BD Wise is Samsung’s latest inter-connectivity
feature. When you connect a Samsung product
and a Samsung TV with BD Wise to each other
via HDMI, and BD Wise is on in both the product
1
and TV, the product outputs video at the video
resolution and frame rate of the Blu-ray/DVD Disc.
Resolution
3
24
Lets you set the output resolution of the HDMI
video signal to BD Wise, Auto, 1080p, 1080i,
720p, 576p/480p. The number indicates the
number of lines of video per frame. The i and
HOME Button : Press to move to the Home
1
screen.
13 - English
p indicate interlaced and progressive scan,
respectively. The more lines, the higher quality.
Picture
Page 14

Settings
Movie Frame (24 fps)
Setting the Movie Frame (24 fps) feature to Auto lets
the product adjust its HDMI output to 24 frames per
second automatically for improved picture quality if
attached to a 24 fps compatible TV.
~You can enjoy the Movie Frame (24 fps) feature
only on a TV supporting this frame rate.
~Movie Frame is only available when the product
is in the HDMI 1080p output resolution modes.
HDMI Colour Format
Lets you set the colour space format for the HDMI
output to match the capabilities of the connected
device (TV, monitor, etc).
HDMI Deep Colour
Lets you set the product to output video from the
HDMI OUT jack with Deep Colour. Deep Colour
provides more accurate colour reproduction with
greater colour depth.
Progressive Mode
Lets you improve picture quality when viewing
DVDs.
Sound
Speaker Settings
Lets you adjust the following speaker settings and
turn the speaker test on and off so you can test
the speakers.
: Lets you adjust the relative loudness of
Level
each speaker from 6dB to -6dB. For example, if
you like deep bass, you can increase the loudness
of the subwoofer by 6dB.
Distance
Speaker Test: Lets you run the Speaker Test
: Lets you adjust the relative distance
of each speaker from the listening position up to
9 meters. The farther the distance, the louder the
speaker will be.
function so you can test your adjustments. Setting
Speaker Test to On turns the Speaker Test on.
Setting it to Off turns it off.
Speaker Selection
Lets you select which speakers you want active,
either the TV's speakers or the home cinema's
speakers.
Equaliser Mode
Set Equaliser Mode on to use the equaliser.
Equaliser Settings
Lets you set the equaliser.
✎
Equaliser Settings only appears when
Equaliser Mode is On.
Audio Return Channel
Lets you direct the sound from the TV to the Home
Cinema speakers. Requires an HDMI connection
and an Audio Return Channel (ARC) compatible
TV.
~If Audio Return Channel is set to on and you
are using an HDMI cable to connect the product
to the TV, digital optical input will not work.
~If Audio Return Channel is set to Auto and you
are using an HDMI cable to connect the product
to the TV, ARC or digital optical input is selected
automatically.
Digital Output
Lets you set the Digital Output to match the
capabilities of the AV receiver you’ve connected to
the product. For more details, please refer to the
digital output selection table. (See page 32)
Dynamic Range Control
Lets you apply dynamic range control to Dolby Digital,
Dolby Digital Plus, and Dolby TrueHD audio.
Auto:
Automatically controls the dynamic range of
Dolby TrueHD audio, based on information in the
Dolby TrueHD soundtrack. Also turns dynamic range
control off for Dolby Digital and Dolby Digital Plus.
Off: Leaves the dynamic range uncompressed,
letting you hear the original sound.
On: Turns dynamic range control on for all three
Dolby formats. Quieter sounds are made louder
and the volume of loud sounds is reduced.
14 - English
Page 15

Downmixing Mode
Lets you select the multi-channel downmix method
that is compatible with your stereo system. You can
choose to have the product downmix to Normal
Stereo or to Surround Compatible.
Audio Sync
When the product is attached to a digital TV, lets
you adjust the audio delay so that the audio syncs
with the video. You can set the delay between 0
and 300 milliseconds.
System
Setup
Lets you re-run the Setup procedure. (See page
12)
Quick start
You can turn on the power quickly by decreasing
the boot time.
✎
If this function is set to On, Standby power
consumption will be increased. (About 12W ~
20W)
Anynet+ (HDMI-CEC)
Anynet+ is a convenient function that offers linked
operations with other Samsung products that have
the Anynet+ feature and lets you control those
products with one Samsung TV remote. To operate
this function, you must connect this product to an
Anynet+ Samsung TV using an HDMI cable.
BD Data Management
Enables you to manage the downloaded contents
you accessed through a Blu-ray disc and stored
on a flash drive.
You can check the device's information including
the available storage size, delete the BD data, or
change the Flash memory device.
DivX® Video On Demand
View DivX® VOD Registration Codes to purchase
and play DivX® VOD contents.
Language
Lets you select the language you prefer for the OnScreen Menu, Disc Menu, etc.
~The selected language will only appear if it is
supported on the disc.
Security
The default PIN is 0000. Enter the default PIN to
access the security function if you haven't created
your own PIN.
BD Parental Rating
Prevents playback of Blu-ray Discs with a rating
equal to or above a specific age rating unless you
enter the PIN.
DVD Parental Rating
Prevents playback of DVDs with a rating above a
specific numerical rating unless you enter the PIN.
Change PIN
Changes the 4-digit PIN used to access security
functions.
Support
Software Upgrade
For more information about this function, see page
18.
Contact Samsung
Provides contact information for assistance with
your product.
Settings
15 - English
Page 16
Settings
Reset
Reverts all settings to their defaults. Requires that
you enter your security PIN. The default security
PIN is 0000.
Radio Setup
~To listen to the radio, you must connect the
supplied FM antenna.
Operating the Radio with the Remote Control
1. Press the FUNCTION button to select FM.
2. Tune to the desired station.
~Preset Tuning 1 : Press the 5 button to
select PRESET, and then press the
UP, DOWN button to select a preset station.
- Before you can tune to preset stations, you
must add preset stations to the product's
memory.
~Manual Tuning : Press the 5 button to
select MANUAL, and then press the TUNING
UP, DOWN button to tune in to a lower or
higher frequency.
~Automatic Tuning : Press the 5 button to
select MANUAL, and then press and hold
the
TUNING UP, DOWN button for a few
seconds to automatically search the band.
TUNING
Selecting Mono or Stereo
Press the MO/ST button.
~Each time you press the button, the sound
switches between STEREO and MONO.
~In a poor reception area, select MONO for a clear,
interference-free broadcast.
Presetting Stations
Example : Presetting FM 89.10 into memory.
1. Press the FUNCTION button to select FM.
2. Press the TUNING UP, DOWN button to scroll
the FM frequencies, and then select <89.10>.
3. Press the
C button at the bottom of the remote).
TUNER MEMORY button (the yellow
4. Press the TUNER MEMORY button again
within about 5 seconds. The station is stored in
memory.
✎
If you press the
repeatedly without changing the station, the
inputted station may be overwritten.
5. To preset another station, repeat steps 2 to 4.
~To tune in to a preset station, press the
TUNING UP, DOWN button.
✎
To delete all Preset FM stations at once, press the
TITLE MENU button for about 5 seconds in FM
Manual mode until DEFAULT PRESET appears
on the display.
TUNER MEMORY
button
Recording FM Radio
You can record your favourite radio broadcast on a
USB storage device.
1. Insert a USB device into the USB jack on the
front of the product.
2. Press the
then press the TUNING UP, DOWN button to
select the station you want to record.
3. Press the RED (A) button to start recording. The
recording process begins.
4. Press the
The recording is stopped and saved as an .mp3
file at the same time. To play the recorded file,
refer to "Playing Files on a USB Device".
✎
The recorded file is saved in the Tuner folder which
is created automatically.
✎
Only the (OPEN/CLOSE), (POWER), EXIT,
MUTE, and VOLUME +/-, buttons are operable
while FM radio is being recorded.
✎
If you don't press any buttons while recording, the
screen saver will be enabled.
✎
Sound effects, such as DSP, EQ, etc., are not
recorded during FM radio recording.
✎
The radio is recorded at a set, default volume
even if you change the volume or press the
button during the recording process.
FUNCTION button to select FM, and
~The recorded time is displayed on the left and
the recording time still available, based on
the amount of free space in the USB storage
device, is displayed on the right.
EXIT button to finish your recording.
MUTE
16 - English
Page 17

✎
If you remove the USB device or Power Cable
during the recording process, the portion of the
file which has already been recorded may not play
back.
✎
Recording will not start if the remaining free space
in the USB storage device is less than 2MB.
✎
If the USB device is removed or has insufficient
space (under 2MB), the appropriate message is
displayed and the recording stops.
About RDS Broadcasting
Using the RDS (Radio Data System) to receive
FM stations
RDS allows FM stations to send an additional signal
along with their regular program signals.
For example, the stations send their station names,
as well as information about what type of program
they broadcast, such as sports or music, etc.
When tuned to an FM station which provides the RDS
service, the RDS indicator lights up on the display.
Description on RDS function
~PTY (Program Type) : Displays the type of program
currently being broadcast.
~PS NAME (Program Service Name) : Indicates the
name of broadcasting station and is composed of
8 characters.
~RT (Radio Text) : Decodes the text broadcast by
a station (if any) and is composed of maximum 64
characters.
~CT (Clock Time) : Decodes the real time clock from
the FM frequency. Some stations may not transmit
PTY, RT or CT information therefore this may not
be displayed in all cases.
~TA (Traffic Announcement) : TA ON/OFF it shows
that the traffic announcement is in progress.
✎
RDS may not operate correctly if the station tuned
is not transmitting RDS signal properly or if the
signal strength is weak.
To show the RDS signals
You can see the RDS signals the station sends on the
display.
Press the
FM station.
RDS DISPLAY button while listening to an
~Each time you press the button, the display change
to show you the following information : PS NAME
RT CT Frequency
While searching, <PS NAME>
PS (Program
Service)
RT (RadioText)
Frequency
appears and then the station
names will be displayed.
<NO PS> appears if no signal is
sent.
While searching, <RT> appears
and then text messages the
station sends will be displayed.
<NO RT> appears if no signal is
sent.
Station frequency (non-RDS
service)
About characters shown in the display
When the display shows PS,or RT signals,the
following characters are used.
~The display window cannot differentiate upper case
and lower case letters and always uses upper case
letters.
~The display window cannot show accented letters,
<A,> for instance, may stands for accented <A’s>
like <À, Â, Ä, Á, Å and Ã.>
PTY (Program Type) indication and
PTY-SEARCH function
One of the advantages of the RDS service is that
you can locate a particular kind of program from the
preset channels by specifying the PTY codes.
To search for a program using the PTY codes
~Before you start!
- The PTY Search is only applicable to preset
stations.
- To stop searching any time during the process,
press 5 button while searching.
- There is a time limit in doing the following steps.
If the setting is cancelled before you finish, start
from step 1 again.
Settings
17 - English
Page 18

Settings
+
- When pressing the buttons on the primary
remote control, make sure that you have selected
the FM station using the primary remote control.
RDS DISPLAY TA
1
PTY - PTY SEARCH PTY +
4
1. Press the PTY SEARCH button while listening
to an FM station.
2. Press the PTY- or PTY+ button until the PTY
code you want appears on the display.
~The display gives you the PTY codes
described to the right.
3. Press the
PTY code selected in the previous step is still on
the display.
PTY SEARCH button again, while the
~The centre unit searches 15 preset FM
stations, stops when it finds the one you have
selected, and tunes in that station.
2
3
56
Upgrading Software
The Software Upgrade menu allows you to upgrade
the product’s software for performance improvements
or additional services.
~Never turn the product off or back on manually
during the update process.
~The update is complete when the product turns
off after restarting. Press the
turn on the updated product for your use.
1. Visit www.samsung.com.
2. Click OWNERS & SUPPORT on the top
right of the page, and then select Manuals &
Downloads from the drop down that appears.
3. On the next screen, enter the product's model
number into the search field. As you enter
the model number, a drop down will display
products that match the model number.
POWER button to
4. Left click your product's model number in the
drop down list.
5. On the page that appears, select Downloads.
6. Find the Upgrade File (USB type) in the
Description column. Click the ZIP icon in the
Download File column on the right.
7. Click Send in the pop-up that appears. The file
downloads to your PC.
8. Unzip the zip archive to your computer. You
should have a single folder with the same name
as the zip file.
9. Copy the folder to a USB flash drive.
10. Make sure no disc is inserted in the product,
and then insert the USB flash drive into the USB
port of the product.
11. In the product’s menu, go to Settings >
Support > Software Upgrade.
12. Select By USB.
13. The home cinema searches for the software on
the USB drive. When it finds the software, the
Update Request pop-up appears.
14. Select OK. The home cinema turns off, turns on,
and then begins the upgrade. When the upgrade
is done, the home cinema turns off.
15. Press the
cinema.
✎
There should be no disc in the product when you
upgrade the software using the USB Host jack.
✎
When the software upgrade is done, check the
software details in the Software Upgrade menu.
POWER button to turn on the home
18 - English
Page 19
Playing Content
Your home cinema can play content located on
Blu-ray/DVD/CD discs and USB devices.
Switching the Source Device
If two or more external devices are connected to
the main unit, you can use any of the three methods
described below to change the source device.
Method 1
From the Home screen, use the ▲▼◄► buttons to
move to Change Device, and then press E.
The Change Device popup window will appear. Use
the ▲▼ buttons to move to the desired device, and
then press E.
Method 2
If you move to PHOTOS, VIDEOS, MUSIC or other
file-based contents, a list of folders and files will
appear. Press the RED (A) button to display the
Change Device popup window, use the ▲▼ buttons
to move to the desired device, and then press E.
Method 3
When a device is connected for the first time, a
popup window appears. In the popup, you can
change the source device by using the ◄► buttons,
and then pressing E.
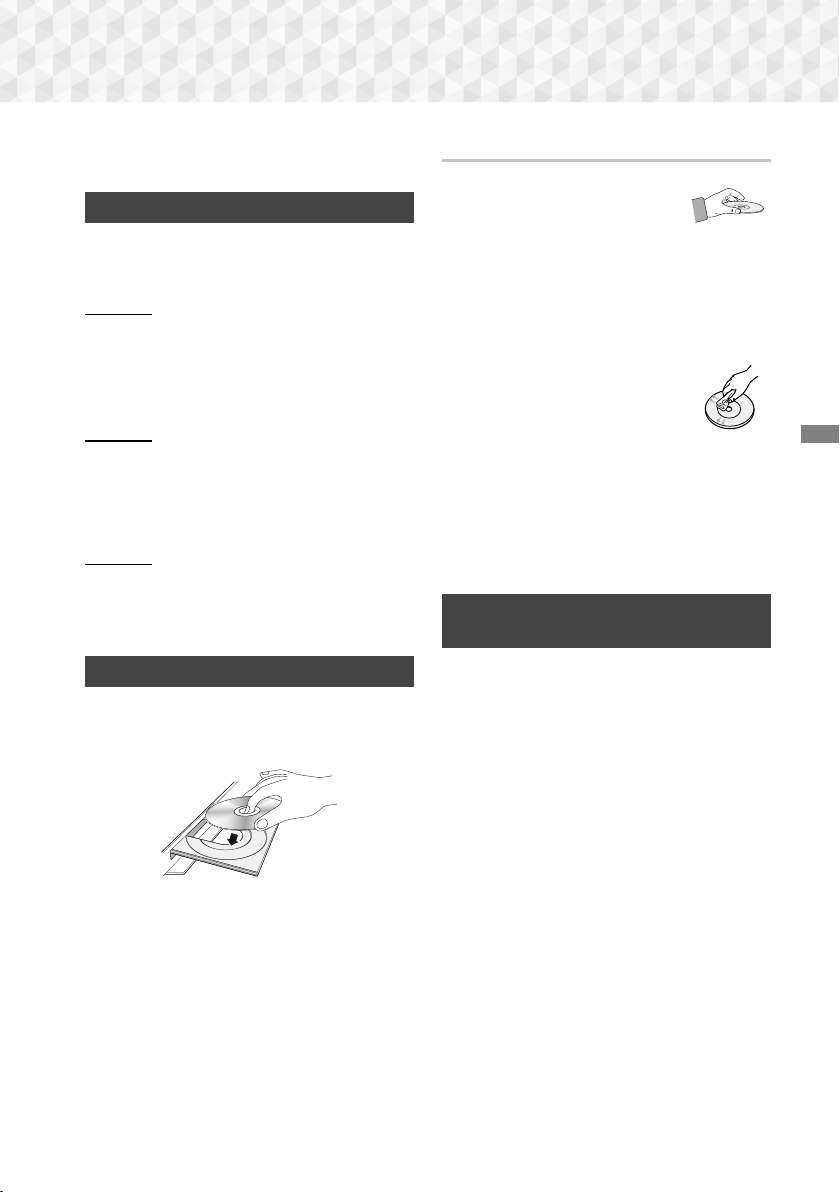
Playing Commercial Discs
1. Press the button to open the disc tray.
2. Place a disc gently into the disc tray with the
disc’s label facing up.
3. Press the button to close the disc tray.
Playback starts automatically.
4. If playback does not start automatically, press
the 6 button on the remote.
Disc Storage & Management
~Holding Discs
- Fingerprints or scratches on
a disc may reduce sound and
picture quality or cause skipping.
- Avoid touching the surface of a disc where data
has been recorded.
- Hold the disc by the edges so that fingerprints
will not get on the surface.
- Do not stick paper or tape on the disc.
~Cleaning Discs
- If you get fingerprints or dirt on a
disc, clean it with a mild detergent
diluted in water and wipe with a soft
cloth.
- When cleaning, wipe gently from the
inside to the outside of the disc.
- Disc Storage
Do not keep in direct sunlight.
Keep in a cool ventilated area.
Keep in a clean protective jacket and store
vertically.
Playing a Disc with User Recorded
Content
You can play multimedia files you have recorded on
Blu-ray, DVD, or CD discs.
1. Place a user recorded disc into the disc tray with
the disc’s label facing up, and then close the
tray.
2. Use the ◄► buttons to select the type of
content you want to view or play - PHOTOS,
VIDEOS, or MUSIC - and then press the E
button.
-1
2
. Select PLAY DISC from the Home screen.
The PLAY DISC screen appears. Use the ▲▼
buttons to select the desired content type,
Photos, Videos, or Music.
OR
Playing Content
19 - English
Page 20

Playing Content
P
SC
C
Device
Functio
S
OS
V
OS
MUSIC
3. A screen appears listing the contents of the disc.
Depending on how the contents are arranged,
you will see either folders, individual files, or
both.
4. If necessary, use the ▲▼◄► buttons to select
a folder, and then press the E button.
5. Use the ▲▼◄► buttons to select a file to view
or play, and then press the E button.
6. Press the
RETURN button one or more times to
exit a current screen, exit a folder, or to return to
the Home screen.
Press the EXIT button to return directly to the
Home Screen.
7. Go to pages 21~25 for instructions that
explain how to control playback of videos,
music, and pictures on a disc.
Playing Files on a USB Device
There are two methods you can use to play or view
multimedia files located on a USB device through
your product.
Method 1 : If you connect a USB device while
the product is turned on
1. The "New device connected." pop-up appears.
PLAY DISC
LAY DI
No Disc
No Disc
Change
Function
hange
Device
PHOTOS VIDEOS MUSIC
Settings
n
PHOT
Photos
Videos
Music
ettings
New device connected.
STORAGE DEVICE
> Move " Enter ' Return
IDE
3. If necessary, use the ▲▼◄► buttons to select
a folder, and then press the E button.
4. Select a file to view or play, and then press the
button.
E
5. Press the
RETURN button to exit a folder or the
EXIT button to return to the Home screen.
6. Go to pages 21~25 for instructions that
explain how to control playback of videos,
music, and pictures on a USB device.
Method 2 : If the product is turned on after
you connect a USB device
1. Turn the product on.
2. Press Change Device and select a USB device.
3. Use the ◄► buttons to select PHOTOS,
VIDEOS, or MUSIC on the Home screen, and
then press the E button.
4. If necessary, use the ▲▼◄► buttons to select
a folder, and then press the E button.
5. Select a file to view or play, and then press the
button.
E
6. Press the
RETURN button to exit a folder or the
EXIT button to return to the Home screen.
7. Go to pages 21~25 for instructions that
explain how to control playback of videos,
music, and pictures on a USB device.
✎
If you insert a disc while playing a USB device, the
device mode changes to "Disc" automatically.
✎
If the pop-up does not appear, go to Method 2.
2. Use the ▲▼ buttons to select Photos, Videos,
or Music and then press the E button.
Depending on how the contents are arranged,
you will see either folders, individual files, or
both.
20 - English
Page 21
SUBTITLE HOME
REPEAT
DISC MENU
TITLE MENU
0
POPUP
Controlling Video Playback
You can control the playback of video content located
on a Blu-ray/DVD disc or USB device. Depending on
the disc or contents, some of the functions described
in this manual may not be available.
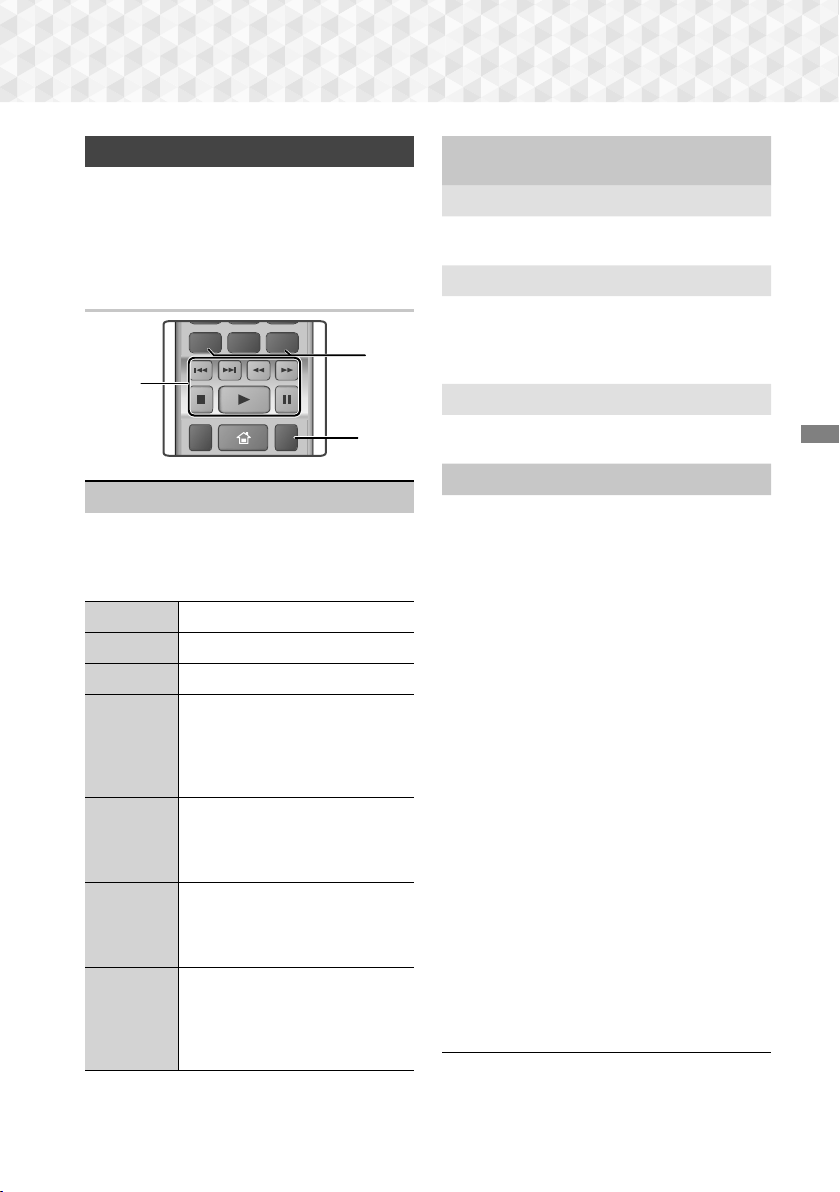
Buttons on the Remote Control used
for Video Playback
2
1
3
Playback related buttons
1
The product does not play sound in Search, Slow,
or Step mode.
~To return to normal speed playback, press the
button.
6
Starts playback.
Stops playback.
Pauses playback.
During playback, press the 3 or
button.
Each time you press the 3 or
button, the playback speed will
change.
In pause mode, press the
button.
Each time you press the button,
the playback speed will change.
In pause mode, press the 7
button.
Each time you press the 7 button,
a new frame appears.
During playback, press the 1 or
button.
2
Each time you press the 1 or
button, the disc moves to the
2
previous or next chapter or file.
6
5
7
Fast
Motion
Play
Slow
Motion
Play
Step
Motion
Play
Skip
Motion
Play
Using the disc menu, title menu, popup
2
menu, and title list
DISC MENU
During playback, press this button to display the
Disc menu.
TITLE MENU
During playback, press this button to display the
Title menu.
~If your disc has a playlist, press the
button to go to the playlist.
POPUP MENU
During playback, press this button to display the
Popup menu.
Repeat Playback
3
1. During playback, press the REPEAT button
on the remote control.
2. Press the ▲▼ buttons to select Off, Title,
Chapter, All or Repeat A-B, and then press
the E button.
Repeat A-B
1. Press the E button at the point where you
want repeat play to start (A).
2. Press the E button at the point where you
want repeat play to stop (B).
3. To return to normal play, press the REPEAT
button again.
4. Press the E button.
✎
Depending on the disc, the screen may not
display all repeat options.
✎
The screen may not display Chapter or Title
immediately. Continue to press the ▲▼ buttons
until your choice is inside the applicable field.
✎
To return to normal play, press the REPEAT
button again, press the ▲▼ buttons to select
Off, and then press the E button.
✎
The screen may not display Repeat A-B
immediately. Continue to press the ▲▼ buttons
until Repeat A-B is inside the applicable field.
✎
You must set point (B) at least 5 seconds of
playing time after point (A).
GREEN (B)
Playing Content
21 - English
Page 22
Playing Content
Using the TOOLS Menu
During playback, press the TOOLS button.
Title
If there is more than one title on a disk or device,
lets you move to or select a desired title.
✎
When searching DVD title, in stop mode, enter
the
TOOLS button and title number (01,02,...)
you want.
Playing Time
Lets you go to a specific playback point. Use the
numeric buttons to input the playback point.
Repeat Mode
Lets you repeat a specific title, chapter, or marked
section.
Audio Sync
Lets you adjust the audio delay so that the audio
syncs with the video. You can set the delay from
0 to 300 milliseconds.
Equaliser Mode
Set Equaliser Mode on to use the equaliser.
Equaliser Settings
Lets you set the equaliser.
✎
Equaliser Settings only appears when
Equaliser Mode is On.
Picture Settings
Lets you set the picture mode.
Mode
- User : Go to Advanced Settings, and
then press the E button. Lets you adjust
the Brightness, Contrast, Colour, and
Sharpness functions manually.
- Dynamic : Choose this setting to increase
sharpness.
- Normal : Choose this setting for most viewing
applications.
- Movie : This is the best setting for watching
movies.
Menu selections that appear only when a
BD/DVD disc plays
Chapter
Lets you move to a chapter that you want to
watch.
Audio
Lets you set the desired audio language.
Subtitle
Lets you set the desired subtitle language.
Angle
To view a scene from another angle. The Angle
option displays the number of angles available to
view (1/1, 1/2, 1/3, etc.).
BONUSVIEW Video BONUSVIEW Audio
Lets you set the desired Bonusview option.
Menu selections that appear only while a file
plays
Full Screen
Lets you set the desired full screen size. You
can select Original, Mode1 (larger), and Mode2
(largest).
Information
Select to view video file information.
✎
Depending on the disc or storage device, the
Tools menu may differ. All options may not be
displayed.
22 - English
Page 23
Creating a Video Playlist
1
2
3
7
89
DISC MENU
PTY - PTY SEARCH PTY +
RDS DISPLAY TA
TITLE MENU
0
POPUP
4
56
You can create a playlist of video files in nearly the
same way you create a playlist of music files. See
page 24 for instructions. Select video files instead
of music files.
Playing a Pre-Recorded Commercial
Audio Disc
1. Insert an Audio CD (CD-DA) or an MP3 Disc into
the disc tray.
~For an Audio CD (CD-DA), the first track will
be played automatically. Tracks on a disc
are played in the order in which they were
recorded on the disc.
~For an MP3 disc, press the ◄► buttons to
select MUSIC, then press the E button.
Playlist
TRACK 001
CD
Repeat Mode Track
Equaliser Mode Off
Rip
00:00/00:00
" Pause Select
Tools
> Move < Adjust ' Return
TRACK 004 04:02
TRACK 005 03:43
TRACK 006 03:40
0/16
Tools ' Return
2. To play a particular track, use the ▲▼ buttons
on the remote to select the track, and then press
the E button.
✎
For more information about playing music, see
Controlling Music Playback below.
Controlling Music Playback
You can control the playback of music content
located on a DVD, CD, or USB. Depending on the
disc or contents, some of the functions described in
this manual may not be available.
Buttons on the Remote Control used
for Music Playback
1
4
2
5
3
Number buttons : During Playlist playback,
press the desired track number. The
1
selected track is played.
Skip : During playback, press the 1 or
2
button to move to the previous or next
2
music track.
button : Stops a track.
3
5
Fast Play (Audio CD [CD-DA] only) :
During playback, press the 3 or button.
4
Each time you press the 3 or button,
the playback speed will change.
button : Pauses a track.
5
7
button : Plays the currently selected
6
6
track.
Repeating Tracks
You can set the product to repeat tracks.
1. During music playback, press the TOOLS
button.
2. Select Repeat Mode, then use the ◄► buttons
to select Off, Track or One, All or Shuffle, and
then press the E button.
6
Playing Content
23 - English
Page 24

Playing Content
Creating a Music Playlist
1. If you are playing music from a commercial CD
or DVD, press the 5 or RETURN button. The
Music List Screen appears. If you are creating
a playlist from music on a user created disk or
USB device, access the Music list as described
on page 19 or 20.
2. Press the ▲▼◄► buttons to move to a desired
file, and then press the
to select it. Repeat this procedure to select
additional files.
3. If you want to select all files, press the
button, use the ▲▼ buttons to select Select All,
and then press E. If you want to deselect all
files, press the TOOLS button, select Deselect
All, and then press E.
MUSIC TRACK 001 1 file selected 1/2 Page
㾎
TRACK 001
05:57
TRACK 003
04:07
TRACK 005
03:17
TRACK 007
03:47
TRACK 009
03:53
CD a Change Device
4. To remove a file from the Playlist, move to the
file, and then press the YELLOW (C) button.
5. Press the E button to play the selected files.
The Playlist screen appears.
6. To go to the Music List, press the 5 or
RETURN button.
7. To go back to the Playlist, press the E button.
✎
You can create a playlist with up to 99 tracks on
Audio CDs (CD-DA).
✎
If you go to the Music List from the Playlist, and
then return to the Playlist, the Playlist will start
playing again from the beginning.
YELLOW (C) button
Select
Tools () Jump to Page ' Return
TRACK 002
04:27
TRACK 004
03:41
TRACK 006
03:35
TRACK 008
03:49
TRACK 010
03:45
TOOLS
Ripping
1. Insert a USB device into the USB jack on the
front of the product.
2. With the Playback screen displayed, use the ▲▼
buttons to select a track, and then press the
YELLOW (C) button. A check appears to the left
of the track.
3. Repeat Step 2 to select and check additional
tracks.
4. To remove a track from the list, move to the
track, and then press the
again. The check on the track is removed.
5. When done, press the TOOLS button.
The Tools menu appears.
6. Use the ▲▼ buttons to select Rip, and then
press the E button. The Rip screen appears.
7. Use the ▲▼ buttons to select the device to
store the ripped files on, and then press the E
button.
✎
Do not disconnect the device while ripping is in
progress.
8. If you want to cancel ripping, press the E
button, and then select Yes. Select No to
continue ripping.
9. When ripping is complete, the "Ripping
completed." message appears.
10. Press the E button to go back to the Playback
screen.
✎
This function is not available for DTS Audio CDs.
✎
This function may not be supported by some
discs.
✎
Ripping encodes music in the .mp3 format at
192kbps.
✎
On the Track list screen, you can choose Select
All or Deselect All.
- Use Select All to select all tracks, and then
press the E button. This cancells your
individual track selections.
- Use Deselect All to deselect all selected tracks
at once.
YELLOW (C) button
24 - English
Page 25
Playing Photo Content
You can play photo contents located on a DVD or
USB.
Using the Tools Menu
During playback, press the TOOLS button.
Start / Stop Slide Show
Select to play/pause the slide show.
Slide Show Speed
Select to adjust the slide show speed.
Background Music
Select to listen to music while viewing a slide show.
Zoom
Select to enlarge the current picture.
(Enlarge up to 4 times)
Rotate
Select to rotate a picture. (This will rotate the
picture either clockwise or counter clockwise.)
Information
Shows the picture information including the file
name and size, etc.
✎
Depending on the disc or storage device, the
Tools menu may differ. All options may not be
displayed.
✎
To enable the background music function, the
photo file must be in the same storage media as
the music file. However, the sound quality can be
affected by the bit rate of the MP3 file, the size of
the photo, and the encoding method.
Creating a Photo Playlist
You can create a photo playlist in nearly the same
way you create a music playlist. See page 24 for
instructions. Select photo files instead of music files.
Using the Special Effects Remote
Control Buttons
TV SOUND
If you have a TV that supports Anynet+ (HDMICEC), the TV SOUND button lets you direct the
TV's audio to the Home Cinema Speakers or the TV
Speakers. To use this function, follow these steps:
1. Connect an HDMI cable to the TV and home
cinema. (See page 11)
2. Set Anynet+ (HDMI-CEC) On in the home
cinema and TV.
Press the TV SOUND button on the remote
3.
control. TV SOUND ON flashes on the display on
the front panel, and then changes to
D. IN.
~When TV SOUND is on, TV audio outputs
through the Home Cinema speakers.
4. Press the TV SOUND button again to turn TV
SOUND off.
~When TV SOUND is off, TV audio outputs
through the speakers of the connected
Anynet+ TV.
Use TV SOUND:
1) When you want to listen to the TV's audio
through the home cinema speakers.
2) When you want to listen to the audio from a
USB device plugged into the TV through the
home cinema speakers.
TV SOUND
Playing Content
25 - English
Page 26
Playing Content
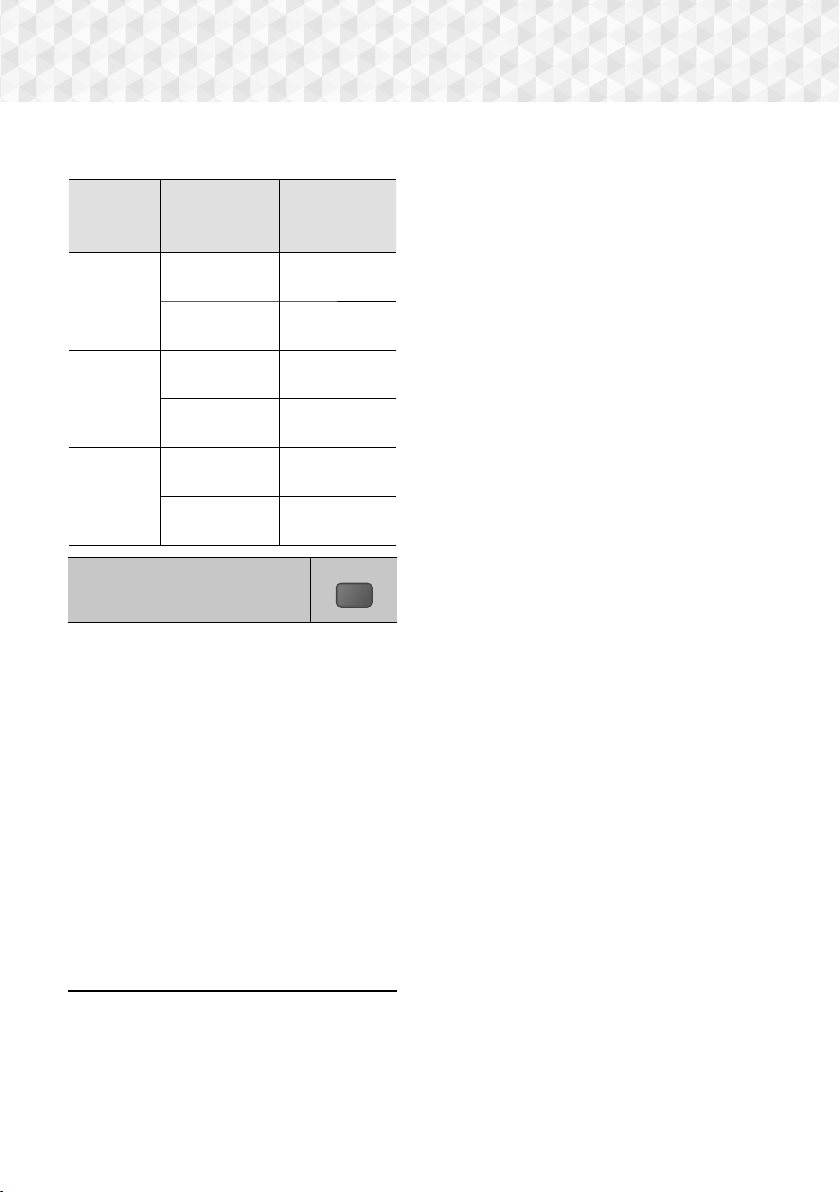
TV SOUND ON/OFF support specifications:
Anynet+
(HDMI-CEC)
Setting
ON
OFF
No
Operation
TV Sound ON TV Sound OFF
HTS Speaker
Output
TV Speaker
Mute
HTS Speaker
Output
TV Speaker
Output
HTS Speaker
Output
TV Speaker
Output
HTS Speaker
TV Speaker
Output
HTS Speaker
TV Speaker
Output
HTS Speaker
TV Speaker
Output
Mute
Mute
Mute
DSP/EQ
You can adjust the sound with various sound
modes.
DSPOFF : Select for normal listening.
CINEMA : Produces realistic and powerful
sound for movies.
MUSIC : Suitable for all music sources.
GAME : Revs up video games with powerful
and realistic sound.
M-STEREO (Multi Stereo) : Produces
surround sound from 2 channel input sources.
POWER BASS : Pumps up the bass sound.
LOUD : Improves bass sound characteristics
according to output level.
NIGHT : Optimizes sound for night time
listening by compressing the dynamic range
and softening the sound.
USER EQ : Provides a user adjustable equaliser
so you can adjust music to your liking.
DSP/EQ
26 - English
Page 27

Appendix
Additional Information
Notes
Connections
HDMI OUT
~Certain HDMI output resolutions may not work,
depending on your TV.
~A long HDMI cable may cause screen noise. If this
occurs, set HDMI Deep Colour to Off in the menu.
Settings
TV Aspect Ratio
~Depending on the disc type, some aspect ratios
may not be available.
~If you select an aspect ratio and option which is
different than the aspect ratio of your TV screen, the
picture might appear to be distorted.
~If you select 16:9 Original, your TV may display 4:3
Pillarbox (black bars on the sides of the picture).
BD Wise (Samsung Products only)
~When BD Wise is on, the Resolution setting
automatically defaults to BD Wise and BD Wise
appears in the Resolution menu.
~If the product is connected to a device that does
not support BD Wise, you cannot use the BD Wise
function.
~For proper operation of BD Wise, set the BD Wise
option in both the product and the TV to On.
Digital Output
~Be sure to select the correct Digital Output or you
will hear no sound or just loud noise.
~If the HDMI device (AV receiver, TV) is not
compatible with compressed formats (Dolby Digital,
DTS), the audio signal outputs as PCM.
~Regular DVDs do not have BONUSVIEW audio and
Navigation Sound Effects.
~Some Blu-ray Discs do not have BONUSVIEW
audio and Navigation Sound Effects.
~This Digital Output setup does not affect the
analogue (L/R) audio or HDMI audio output to your
TV. It affects the optical and HDMI audio output
when your product is connected to an AV receiver.
~If you play MPEG audio soundtracks, the audio
signal outputs as PCM regardless of your Digital
Output selections (PCM or Bitstream).
~Digital Output can be activated when Speaker
Selection is set to TV Speaker.
Anynet+ (HDMI-CEC)
~Depending on your TV, certain HDMI output
resolutions may not work. Please refer to the user
manual of your TV.
~This function is not available if the HDMI cable does
not support CEC.
~If your Samsung TV has an Anynet+ logo, then it
supports the Anynet+ function.
BD Data Management
~In the external memory mode, disc playback may
be stopped if you disconnect the USB device in the
middle of playback.
~Only those USB devices formatted in the FAT file
system (DOS 8.3 volume label) are supported.
We recommend you use USB devices that support
the USB 2.0 protocol with 4 MB/sec or faster read/
write speeds.
~The Resume Play function may not work after you
format the storage device.
~The total memory available to BD Data
Management may differ, depending on conditions.
DivX® Video On Demand
~For more information about DivX(R) VOD, visit
“http://vod.divx.com”.
Speaker Settings
~When Speaker Selection is set to TV Speaker,
audio is produced by the TV speakers.
HDMI audio
~When HDMI audio is output to the TV speakers, it is
automatically down-mixed to 2 channels.
Appendix
27 - English
Page 28

Appendix
Audio Return Channel
~When Anynet+ (HDMI-CEC) is Off, the Audio
Return Channel function is not available.
~Using an HDMI cable not certified for ARC (Audio
Return Channel) may cause a compatibility problem.
~The ARC function is only available if an ARC-
compliant TV is connected.
Playback
Playing Video files
~Video files with high bit rates of 20Mbps or more
strain the product’s capabilities and may stop
playing during playback.
Selecting the Audio Language
~The ◄► indicator will not appear on the screen
if the BONUSVIEW section does not contain any
BONUSVIEW audio settings.
~The languages available through the Audio
Language function depend on the languages that
are encoded on the disc. This function or certain
languages may not be available.
~Some Blu-ray Discs may allow you to select either
the PCM or Dolby Digital audio English soundtrack.
Selecting the Subtitle Language
~Depending on the Blu-ray Disc / DVD, you may be
able to change the subtitle language in the Disc
Menu. Press the
~This function depends on the selection of subtitles
that are encoded on the disc and may not be
available on all Blu-ray Discs/DVDs.
~Information about the main feature BONUSVIEW
mode will also appear if the Blu-ray Disc has a
BONUSVIEW section.
~This function changes both the primary and
secondary subtitles at the same time.
~The total number of primary and secondary
subtitles, respectively, is displayed.
Playing JPEG files
~You can’t enlarge the subtitle and PG graphics in
the full screen mode.
DISC MENU button.
Playing Content
Using the
TOOLS button while playing pictures
~If the home cinema is connected to a BD Wise
compliant TV that has BD Wise On, the Picture
Settings menu will not appear.
~The Background Music function will not work
unless the music file and the photo file are located
on the same storage media. Also, sound quality can
be impacted by the bit rate of the MP3 music file,
the size of the photos, and the encoding method.
Disk and Format Compatibility
Disc types and content your Product
can Play
Media Disc Type Details
Blu-ray Disc
VIDEO
MUSIC
PHOTO
✎
DVD-VIDEO,
DVD-RW,
DVD-R,
DVD+RW,
DVD+R,
VCD 1.1
CD-RW/-R,
DVD-RW/-R,
BD-RE/-R
CD-RW/-R,
DVD-RW/-R,
BD-RE/-R
The product may not play certain CD-RW/-R and
DVD-R because of the disc type or recording
conditions.
BD-ROM or BD-RE/-R
disc recorded in the BDRE format.
DVD-VIDEO, recorded
DVD+RW/DVD-RW(V)/
DVD-R/+R discs that
have been recorded and
finalised, or a USB storage
media containing DivX,
MKV, MP4, VCD 1.1
contents.
Music recorded on CDRW/-R, DVD-RW/-R, BDRE/-R discs or a USB
storage media containing
MP3 or WMA contents.
Photos recorded on CDRW/-R, DVD-RW/-R, BDRE/-R discs or a USB
storage media containing
JPEG contents.
28 - English
Page 29

If a DVD-RW/-R disc has not been recorded properly
✎
in DVD video format, it will not be playable.
Your product will not play content that has been
✎
recorded on a DVD-R at a bit rate that exceeds 10
Mbps.
Your product will not play content that has been
✎
recorded on a BD-R or USB device at a bit rate that
exceeds 30 Mbps.
Playback may not work for some types of discs, or
✎
when you use specific operations, such as angle
change and aspect ratio adjustment. Information
about the discs is written in detail on the disc box.
Please refer to this if necessary.
When you play a BD-J title, loading may take longer than
✎
a normal title or some functions may perform slowly.
Disc Types your Product cannot Play
Logos of Discs the Product can Play
Blu-ray Disc DivX
Dolby DTS
~HD DVD
~DVD-ROM/PD/MV-Disc,
etc
~DVD-RW(VR mode)
~CVD/CD-ROM/CDV/
CD-G/CD-I/LD
(CD-Gs play audio only,
not graphics.)
This product may not respond to all operating
✎
commands because some Blu-ray Disc, DVD, and
CD discs allow specific or limited operation and
provide only certain features during playback.
Please note that this is not a defect in the product.
Samsung cannot guarantee that this product will
✎
play every disc bearing the Blu-ray Disc, DVD, or CD
logo because disc formats evolve, and problems and
errors may occur during the creation of Blu-ray Disc,
DVD, and CD software and/or the manufacture of
discs.
Please contact the SAMSUNG Customer Care
✎
Centre at, if you have questions or encounter difficulty
when playing Blu-ray Disc, DVD, or CD discs in this
product. Also, refer to rest of this user manual for
additional information on playback restrictions.
Some commercial discs and DVD discs purchased
✎
outside your region may not play on this product.
~DVD-RAM
~Super Audio CD
(except CD layer)
~3.9 GB DVD-R Disc for
Authoring.
Java
PAL broadcast system in
U.K, France, Germany, etc.
Region Code
Both products and discs are coded by region. These
regional codes must match for a disc to play. If the codes
do not match, the disc will not play.
The Region Number for this product is displayed on the
rear panel of the product.
Disc
Type
Blu-ray
Disc
Region
Code
A
B
C
North America, Central America,
South America, Korea, Japan,
Taiwan, Hong Kong and South
Europe, Greenland, French
territories, Middle East, Africa,
Australia and New Zealand.
India, China, Russia, Central
Area
East Asia.
and South Asia.
Appendix
29 - English
Page 30
Appendix
1
2
3
DVD-
VIDEO
4
5
6
If the Region number of a Blu-ray Disc/DVD does
✎
not correspond to the Region number of this
product, the product cannot play the disc.
AVCHD (Advanced Video Codec High
Definition)
~This product can play back AVCHD format discs.
These discs are normally recorded and used in
camcorders.
~The AVCHD format is a high definition digital video
camera format.
~The MPEG-4 AVC/H.264 format compresses images
with greater efficiency than the conventional image
compressing format.
~Some AVCHD discs use the "x.v.Colour" format. This
product can play back AVCHD discs that use the
"x.v.Colour" format.
~"x.v.Colour" is a trademark of Sony Corporation.
~"AVCHD" and the AVCHD logo are trademarks of
Matsushita Electronic Industrial Co., Ltd. and Sony
Corporation.
Some AVCHD format discs may not play, depending
✎
on the recording conditions.
AVCHD format discs need to be finalised.
✎
The U.S., U.S. territories and
Canada
Europe, Japan, the Middle East,
Egypt, Africa, Greenland
Taiwan, Korea, the Philippines,
Indonesia, Hong Kong
Mexico, South America,
Central America, Australia,
New Zealand, Pacific Islands,
Caribbean
Russia, Eastern Europe, India,
North Korea, Mongolia
China
"x.v.Colour" offers a wider colour range than normal
✎
DVD camcorder discs.
Some DivX, MKV and MP4 format discs may not play,
✎
depending on their video resolution and frame rate.
Supported Formats
Notes on the USB connection
~Your product supports USB storage media, MP3
players, digital cameras, and USB card readers.
~The product does not support folder or file names
longer than 128 characters.
~Some USB/digital camera devices may not be
compatible with the product.
~Your product supports the FAT 16, FAT 32, and NTFS
file systems.
~Connect USB devices directly to the product’s USB
port. Connecting through a USB cable may cause
compatibility problems.
~Inserting more than one memory device into a
multi-card reader may cause the reader to operate
improperly.
~The product does not support the PTP (Peer to Peer)
protocol.
~Do not disconnect a USB device while it is transferring
or recording data.
~The bigger the image resolution, the longer the image
takes to display.
~This product cannot play MP3 files with DRM (Digital
Rights Management) downloaded from commercial
sites.
~Your product only supports video that is under 30fps
(frames per second).
~Your product only supports USB Mass Storage Class
(MSC) devices such as thumb drives and USB HDD.
(HUB is not supported.)
~Certain USB HDD Devices, multi-card readers and
thumb drives may not be compatible with this product.
~If some USB devices require excessive power, they
may be limited by the circuit safety device.
~If playback from a USB HDD is unstable, provide
additional power by plugging the HDD into a wall
socket. If the problem continues, contact the USB
HDD manufacturer.
~SAMSUNG is not responsible for any data file damage
or data loss.
30 - English
Page 31

Video File Support
File Extension Container Video Codec Audio Codec Resolution
*.avi
*.mkv
*.wmv
*.mp4
*.mpg / *.mpeg
AVI
MKV
WMV
(wmv9)
MP4
PS
DivX 3.11/4/5/6
MP4v3
H.264 BP/MP/HP
VC-1 AP, DivX 5/6
H.264 BP/MP/HP
VC-1 AP
VC-1 SM
MP4 (mp4v)
H.264 BP/MP/HP
MPEG1
MPEG2
H.264 BP/MP/HP
MP3, Dolby Digital, DTS,
WMA, PCM
MP3, Dolby Digital, DTS
WMA
AAC
MP1, 2
Dolby Digital, DTS
1920x1080
Limitations
- Even when a file is encoded by a supported codec listed above, the file might not play if its content has a problem.
- Normal playback is not guaranteed if the file’s container information is wrong or the file itself is corrupted.
- Files having a higher bit rate/frame rate than standard may stutter during sound/video playback.
- The Seek (skip) function is not available if the file’s index table is damaged.
Video decoder
- Supports up to H.264 Level 4.1 and AVCHD
- Does not support H.264 FMO/ASO/RS and VC1 SP/MP/AP L4
- MPEG4 SP, ASP :
Below 1280 x 720 : 60 frames max
Above 1280 x 720 : 30 frames max
- Does not support GMC 2 or higher
Audio decoder
- Supports WMA 7, 8, 9 and STD
- Does not support WMA sampling rate of 22050Hz mono.
- AAC: Max sampling rate: 96Khz (8, 11, 12, 16, 22,24, 32,44.1, 48, 64, 88.2, 96) Max bit rate: 320kbps
Supported DivX subtitle file formats
- *.ttxt, *.smi, *.srt, *.sub, *.txt
Music File Support
File Extension Container Audio Codec Support Range
*.mp3
*.wma
MP3
WMA
MP3 -
WMA
* Sampling rates (in kHz) - 8, 11, 16, 22, 32, 44.1, 48
* Bit Rates - All bit rates from 5kbps to 384kbps
Appendix
Picture File Support
File Extension Type Resolution
*.jpg / *.jpeg / *.jpe
*.png
JPEG
PNG
31 - English
15360x8640
Page 32

Appendix
Digital Output Selections
Setup PCM
Connection HDMI supported AV receiver
PCM Up to PCM 7.1ch PCM
Dolby Digital Up to PCM 5.1ch Dolby Digital
Dolby Digital
Plus
Audio
Stream on
Blu-ray Disc
Audio
Stream on
DVD
Definition for
Blu-ray Disc
If the Source Stream is 2ch or mono, "Re-encoded Dolby D" Setting are not applied. Output will be PCM 2ch.
Dolby TrueHD Up to PCM 5.1ch Dolby TrueHD
DTS Up to PCM 5.1ch DTS
DTS-HD High
Resolution
Audio
DTS-HD Master
Audio
PCM PCM 2ch PCM 2ch PCM 2ch PCM 2ch
Dolby Digital Up to PCM 5.1ch Dolby Digital Dolby Digital Dolby Digital
DTS Up to PCM 5.1ch DTS DTS DTS
Any
Up to PCM 5.1ch Dolby Digital Plus
Up to PCM 5.1ch
Up to PCM 5.1ch
Decodes the main
feature audio and
BONUSVIEW audio
stream together
into PCM audio and
adds Navigation
Sound Effects.
Bitstream
(Unprocessed)
DTS-HD High
Resolution Audio
DTS-HD Master
Audio
Outputs only the
main feature audio
stream so that your
AV receiver can
decode the audio
bitstream.
You will not hear
BONUSVIEW audio
or Navigation Sound
Effects.
Bitstream
(Re-encoded DTS)
DTS re-encoded
Decodes the main
feature audio and
BONUSVIEW audio
stream together
into PCM audio and
adds Navigation
Sound Effects, then
re-encodes the
PCM audio into DTS
bitstream.
Bitstream
(Re-encoded
Dolby D)
Re-encoded
Dolby Digital *
Decodes the
main feature
audio and
BONUSVIEW
audio stream
together into
PCM audio and
adds Navigation
Sound Effects,
then re-encodes
the PCM audio
into Dolby Digital
bitstream or
PCM.
Blu-ray Discs may include three audio streams :
- Main Feature Audio : The audio soundtrack of the main feature.
- BONUSVIEW audio : An additional soundtrack such as the director or actor’s commentary.
- Navigation Sound Effects : When you choose some menu navigation options, Navigation Sound Effects may sound.
Navigation Sound Effects are different on each Blu-ray Disc.
32 - English
Page 33

Resolution according to the output mode
Blu-ray Disc/E-contents/Digital Contents playback DVD playback
Disc
HDMI Mode
Digital contents
E-contents/
1080p@60F 576i/480i
HDMI Mode
Setup
BD Wise
1080p@60F 1080p@60F -
1080p - 1080p
Movie Frame : Auto (24 fps) 1080p@24F -
576p/480p 576p/480p 576p/480p
Output
Blu-ray Disc
Resolution of Blu-ray
Auto Max. Resolution of TV input Max. Resolution of TV input
1080i 1080i 1080i
720p 720p 720p
Troubleshooting
Refer to the table below when this product does not function properly. If the problem you are experiencing is not listed
below or if the instructions below do not help, turn off the product, disconnect the power cord and contact the nearest
authorized dealer or Samsung Electronics Service Centre.
Symptom Check/Remedy
You cannot eject the disc. ~
Playback does not start. ~
Playback does not start
immediately when you
press the 6/7 button.
No sound.
You can only hear sound
from a few speakers, but
not all 6.
Is the power cord plugged securely into the outlet?
~Turn off the power, and then turn it back on.
Check the region number of the Blu-ray/DVD disc.
A Blu-ray/DVD disc purchased from abroad may not be playable.
~CD-ROMs and DVD-ROMs cannot be played on this product.
~Make sure that the rating level is correct.
~Are you using a deformed disc or a disc with scratches on the surface?
~Wipe the disc clean.
~The home cinema does not play sound during fast playback, slow playback, and
step motion playback.
~Are the speakers connected properly? Is the speaker setup correctly customized?
~Is the disc severely damaged?
~On certain Blu-ray/DVD discs, sound is output from the front speakers only.
~Check if the speakers are connected properly.
~Adjust the volume.
~When playing audio from a CD, the radio, or a TV, the unit outputs sound to the
front speakers only.
Appendix
33 - English
Page 34

Appendix
Symptom Check/Remedy
Dolby Digital 5.1 CH
Surround Sound is not
produced.
The remote control does
not work.
~The disc is rotating but
there is no picture.
~Picture quality is poor
and the picture is
shaking.
Audio language and
subtitles do not work.
The menu screen does
not appear even when you
select the menu function.
The aspect ratio cannot be
changed.
~The product is not
working.
(Example: The power
goes off or you hear a
strange noise.)
~The Product is not
working normally.
You have forgotten the
rating level password.
Can't receive radio
broadcasts.
There is no sound when
you try to listen to TV audio
through the home cinema
speakers.
~Is there "Dolby Digital 5.1 CH" mark on the disc? Dolby Digital 5.1 CH Surround
Sound is produced only if the disc is recorded with 5.1 channel sound.
~Is the audio language correctly set to Dolby Digital 5.1-CH in the information
display?
~Are you operating the remote within its operational range and within the proper
angle relative to the sensor?
~Are the batteries drained?
~Have you selected the correct mode? Press the function button to change the
mode (BD/DVD, D. IN, AUX, etc.).
~Is the TV power on?
~Are the video cables connected properly?
~Is the disc dirty or damaged?
~A poorly manufactured disc may not be playable.
~The Audio Language and subtitle functions will not work if the disc does not
contain multiple language sound tracks or subtitles.
~Are you using a disc that does not contain menus?
~
The home cinema can play 16:9 Blu-ray/DVD discs in 16:9 Full mode, 4:3 Letter Box
mode, or 4:3 Pan-Scan mode, but plays 4:3 Blu-ray/DVD discs in 4:3 mode only. Refer
to the Blu-ray Disc jacket, and then select the appropriate aspect ratio.
~Press and hold the remote control's 5 button for 5 seconds in STANDBY mode.
This will reset the unit.
- Using the RESET function will erase all stored settings.
Do not use this function unless necessary.
~With no disc in the product, press and hold the product's 5 button for longer
than 5 seconds. INIT appears on the display and all settings will return to their
default values.
- Using the RESET function will erase all stored settings.
Do not use this function unless necessary.
~Is the antenna connected properly?
~If the antenna's input signal is weak, install an external FM antenna in an area with
good reception.
~If you press the ^ button while listening to TV audio using the D. IN or AUX
functions, the Blu-ray/DVD disc functions are turned on and the TV audio is
muted.
34 - English
Page 35

Symptom Check/Remedy
"Not Available" appears on
screen.
If the HDMI output is set to
a resolution your TV cannot
support (for example,
1080p), you may not see a
picture on your TV.
No HDMI output.
Abnormal HDMI output
appears on the screen.
When the factory default settings are restored, all stored user BD data is deleted.
✎
~The feature is unavailable or the action cannot be completed at this time because:
1. The Blu-ray/DVD disc's software restricts it.
2. The Blu-ray/DVD disc's software doesn’t support the feature (e.g., angles)
3. The feature is not available at the moment.
4. You’ve requested a title or chapter number or search time that is out of range.
~Press and hold the 5 button on front panel for more than 5 seconds with no disc
in the product. All settings will revert to their factory settings.
~Check the connection between the TV and the HDMI jack of the product.
~Check if your TV supports 576p/480p/720p/1080i/1080p HDMI input resolution.
~If random noise appears on the screen, it means that TV does not support HDCP
(High-bandwidth Digital Content Protection).
Appendix
35 - English
Page 36

Appendix
Specifications
Weight 1.90 kg
General
FM Tuner
HDMI
Amplifier
Speaker
system
Surround
Centre
Subwoofer 20Hz ~ 200Hz 168.0 x 350.0 x 285.0 3.67
Samsung Electronics Co., Ltd reserves the right to change the specifications without notice.
✎
Weight and dimensions are approximate.
✎
Design and specifications are subject to change without prior notice.
✎
For the power supply and Power Consumption, refer to the label attached to the product.
✎
Dimensions 430.0 (W) x 55.0 (H) x 224.0 (D) mm
Operating Temperature Range +5°C to +35°C
Operating Humidity Range 10 % to 75 %
Signal/noise ratio 55 dB
Usable sensitivity 12 dB
Total harmonic distortion 1.0 %
Video 1080p, 1080i, 720p, 576p/480p
Audio PCM multichannel audio, Bitstream audio, PCM audio
Front speaker output 165W x 2 (3)
Centre speaker output 170W (3)
Surround speaker output 165W x 2 (3)
Subwoofer speaker output 170W (3)
Frequency response 20Hz~20kHz (±3dB)
S/N Ratio 70dB
Channel separation 60dB
Input sensitivity (AUX) 500mV
Speaker (5.1ch speaker system)
Front
Impedance Frequency range Rated input
165W
170W
3
200Hz ~ 20kHz
(W x H x D) (mm)
89.0 x 1053.0 x 71.0
230.0 x 230.0 x 23.8
89.0 x 1053.0 x 71.0
230.0 x 230.0 x 23.8
228.0 x 77.0 x 70.0 0.49
Dimensions
(Stand base:
)
(Stand base:
)
Weights
(kg)
2.93
2.93
36 - English
Page 37

Licences
Manufactured under licence from Dolby Laboratories. Dolby and the double-D symbol are
trademarks of Dolby Laboratories.
For DTS patents, see http://patents.dts.com. Manufactured under licence from DTS
Licencing Limited. DTS, DTS-HD, the Symbol, & DTS and the Symbol together are
registered trademarks, and DTS-HD Master Audio | Essential is a trademark of DTS,
Inc. © DTS, Inc. All Rights Reserved.
This DivX Certified® device has passed rigorous testing to ensure it plays DivX® video.
To play purchased DivX movies, first register your device at vod.divx.com. Find your
registration code in the DivX VOD section of your device setup menu.
DivX Certified® to play DivX® video up to HD 1080p, including premium content.
DivX®, DivX Certified® and associated logos are trademarks of DivX, LLC and are used under license.
Covered by one or more of the following U.S. patents: 7,295,673; 7,460,668; 7,515,710; 7,519,274.
The terms HDMI and HDMI High-Definition Multimedia Interface, and the HDMI Logo are
trademarks or registered trademarks of HDMI Licencing LLC in the United States and other
countries.
Oracle and Java are registered trademarks of Oracle and/or its affiliates. Other names may be trademarks
of their respective owners.
Appendix
This item incorporates copy protection technology that is protected by U.S. patents and other intellectual property
rights of Rovi Corporation. Reverse engineering and disassembly are prohibited.
Blu-ray Disc™, Blu-ray™, and the logos are trademarks of Blu-ray Disc Association.
This product uses Cinavia technology to limit the use of unauthorized copies of some commercially-produced film and
videos and their soundtracks. When a prohibited use of an unauthorized copy is detected, a message will be displayed
and playback or copying will be interrupted.
More information about Cinavia technology is provided at the Cinavia Online Consumer Information Centre at http://
www.cinavia.com. To request additional information about Cinavia by mail, send a postcard with your mailing address
to: Cinavia Consumer Information Centre, P.O. Box 86851, San Diego, CA, 92138, USA."
This product incorporates proprietary technology under licence from Verance Corporation and is protected by U.S.
Patent 7,369,677 and other U.S. and worldwide patents issued and pending as well as copyright and trade secret
protection for certain aspects of such technology. Cinavia is a trademark of Verance Corporation. Copyright 20042010 Verance Corporation. All rights reserved by Verance. Reverse engineering or disassembly is prohibited.
- Open Source Licence Notice
In the case of using open source software, Open Source Licences are available on the product menu.
37 - English
Page 38

UNITED KINGDOM
EIRE
This Samsung product is warranted for the period of
twelve (12) months from the original date of purchase,
against defective materials and workmanship. In the
event that warranty service is required, you should
return the product to the retailer from whom it was
purchased. However, Samsung Authorised Dealers
and Authorised Service Centres in other EC Countries
will comply with the warranty on the terms issued
to purchasers in the country concerned. In case of
difficulty, details of our Authorised Service Centres are
available from:
Samsung Electronics U.K. Ltd
Samsung Customer Support Centre
Selectapost 38, Sheffield, S97 3FJ
United Kingdom
United Kingdom
Tel : 0330 SAMSUNG (7267864)
www.samsung.com/uk/support
EIRE
Tel : 0818 717100
www.samsung.com/ie/support
WARRANTY CONDITIONS
1. The warranty is only valid if, when warranty
service is required, the warranty card is fully and
properly completed and is presented with the
original invoice or sales slip or confirmation, and
the serial number on the product has not been
defaced.
2.
Samsung’s obligations are limited to the repair or,
at its discretion, replacement of the product or
the defective part.
3.
Warranty repairs must be carried out by
Authorised Samsung Dealers or Authorised
Service Centres. No re-imbursement will be made
for repairs carried out by non Samsung Dealers
and, any such repair work and damage to the
products caused by such repair work will not be
covered by this warranty.
4. This product is not considered to be defective
in materials nor workmanship by reason that
it requires adaptation in order to conform to
national or local technical or safety standards
in force in any Country other than the one for
which the product was originally designed and
manufactured. This warranty will not cover,
and no re-imbursement will be made for such
adaptation nor any damage which may result.
5. This warranty covers none of the following:
a)
Periodic check ups, maintenance and repair
or replacement of parts due to normal wear
and tear.
b) Cost relating to transport, removal or
installation of the product.
c) Misuse, including the faiure to use this
product for its normal purposes or incorrect
installation.
d) Damage caused by Lightning, Water, Fire,
Acts of God, War, Public Disturbances,
incorrect mains voltage, improper ventilation
or any other cause beyond the control of
Samsung.
6. This warranty is valid for any person who legally
acquired possession of the product during the
warranty period.
7. The consumers statutory rights in any applicable
national legislation whether against the retailer
arising from the purchase contract or otherwise
are not affected by this warranty. Unless there
is national legislation to the contrary, the rights
under this warranty are the consumers sole
rights and Samsung, its subsidiaries and
distributors shall not be liable for indirect or
consequential loss or any damage to records,
compact discs, videos or audio taper or any
other related equipment or material.
SAMSUNG ELECTRONICS (U.K.) LTD.
Page 39

© 2015 Samsung Electronics Co., Ltd. All rights reserved.
Contact SAMSUNG WORLD WIDE
If you have any questions or comments relating to Samsung products, please
contact the SAMSUNG customer care centre.
Area Contact Centre
`
Europe
U.K 0330 SAMSUNG (7267864) www.samsung.com/uk/support
EIRE 0818 717100 www.samsung.com/ie/support
0180 6 SAMSUNG bzw.
0180 6 7267864*
GERMANY
(*0,20 €/Anruf aus dem dt. Festnetz, aus
dem Mobilfunk max. 0,60 €/Anruf)
FRANCE 01 48 63 00 00 www.samsung.com/fr/support
ITALIA 800-SAMSUNG (800.7267864) www.samsung.com/it/support
SPAIN 0034902172678 www.samsung.com/es/support
PORTUGAL 808 20 7267 www.samsung.com/pt/support
LUXEMBURG 261 03 710 www.samsung.com/support
NETHER-
0900-SAMSUNG (0900-7267864) (€ 0,10/
LANDS
Min)
BELGIUM 02-201-24-18
NORWAY 815 56480 www.samsung.com/no/support
DENMARK 70 70 19 70 www.samsung.com/dk/support
FINLAND 030-6227 515 www.samsung.com/fi/support
SWEDEN 0771 726 7864 (0771-SAMSUNG) www.samsung.com/se/support
801-172-678* lub +48 22 607-93-33 *
POLAND
* (koszt połączenia według taryfy operatora)
0680SAMSUNG (0680-726-786)
HUNGARY
0680PREMIUM (0680-773-648)
SLOVAKIA 0800 - SAMSUNG (0800-726 786) www.samsung.com/sk/support
0800-SAMSUNG (0800-7267864)
AUSTRIA
[Only for Premium HA] 0800-366661
[Only for Dealers] 0810-112233
Web Site
www.samsung.com/de/support
www.samsung.com/nl/support
www.samsung.com/be/support
(Dutch)
www.samsung.com/be_fr/
support (French)
www.samsung.com/pl/support
www.samsung.com/hu/support
www.samsung.com/at/support
SWITZERLAND
CZECH
CROATIA 072 726 786 www.samsung.com/hr/support
BOSNIA 055 233 999 www.samsung.com/support
MONTENE-
GRO
SLOVENIA
SERBIA 011 321 6899 www.samsung.com/rs/support
BULGARIA 800 111 31 , Безплатна телефонна линия www.samsung.com/bg/support
ROMANIA
CYPRUS 8009 4000 only from landline, toll free
GREECE
LITHUANIA 8-800-77777 www.samsung.com/lt/support
LATVIA 8000-7267 www.samsung.com/lv/support
ESTONIA 800-7267 www.samsung.com/ee/support
Area Contact Centre
0800 726 78 64 (0800-SAMSUNG)
800 - SAMSUNG (800-726786) www.samsung.com/cz/support
Samsung Electronics Czech and Slovak, s.r.o. V Parku 2343/24, 148 00 -
Praha 4
020 405 888 www.samsung.com/support
080 697 267 (brezplačna številka)
090 726 786 (0,39 EUR/min)
klicni center vam je na voljo od ponedeljka
do petka od 9. do 18. ure.
08008 726 78 64 (08008 SAMSUNG )
Apel GRATUIT
80111-SAMSUNG (80111 726 7864) only
from land line
(+30) 210 6897691 from mobile and land
line
www.samsung.com/ch/support
(German)
www.samsung.com/ch_fr/
support (French)
www.samsung.com/si
www.samsung.com/ro/support
www.samsung.com/gr/support
Web Site
Correct disposal of batteries in this product
(Applicable in countries with separate collection systems)
This marking on the battery, manual or packaging indicates that the batteries in this product should not be
disposed of with other household waste at the end of their working life. Where marked, the chemical symbols
Hg, Cd or Pb indicate that the battery contains mercury, cadmium or lead above the reference levels in EC
Directive 2006/66. If batteries are not properly disposed of, these substances can cause harm to human health
or the environment.
To protect natural resources and to promote material reuse, please separate batteries from other types of waste
and recycle them through your local, free battery return system.
Correct Disposal of This Product (Waste Electrical & Electronic Equipment)
(Applicable in countries with separate collection systems)
This marking on the product, accessories or literature indicates that the product and its electronic accessories
(e.g. charger, headset, USB cable) should not be disposed of with other household waste at the end of their
working life. To prevent possible harm to the environment or human health from uncontrolled waste disposal,
please separate these items from other types of waste and recycle them responsibly to promote the sustainable
reuse of material resources.
Household users should contact either the retailer where they purchased this product, or their local government
office, for details of where and how they can take these items for environmentally safe recycling.
Business users should contact their supplier and check the terms and conditions of the purchase contract.
This product and its electronic accessories should not be mixed with other commercial wastes for disposal.
Page 40

Manuel d'utilisation
5.1CH Blu-ray™
Système audiovisuel
HT-J5150
imaginez les possibilités
Merci d'avoir choisi cet appareil Samsung.
Pour recevoir une assistance plus complète, veuillez enregistrer votre produit sur
www.samsung.com/register
Page 41

Consignes de Sécurité
ATTENTION
RISQUES D'ÉLECTROCUTION. NE PAS OUVRIR.
ATTENTION : POUR LIMITER LES RISQUES DE DÉCHARGE
ÉLECTRIQUE, NE RETIREZ JAMAIS LE CACHE (NI L'ARRIÈRE DE
L'APPAREIL). CERTAINES PIÈCES QU'IL CONTIENT NE SONT
PAS RÉPARABLES PAR L'UTILISATEUR. VEUILLEZ CONTACTER
UN TECHNICIEN QUALIFIÉ POUR TOUTE RÉPARATION.
• Les fentes et les ouvertures situées à l'arrière et
en dessous de l'appareil permettent d'assurer
une ventilation correcte. Afin d'assurer le bon
fonctionnement de l'appareil et d'empêcher toute
surchauffe, veillez à ne jamais obstruer ces ouvertures
de quelque façon que ce soit.
- Ne placez pas l'appareil dans un endroit confiné,
comme une bibliothèque ou un meuble intégré, sauf
si une ventilation suffisante y est assurée.
- Ne placez pas l'appareil à proximité ou sur un
radiateur ou une bouche de chaleur et ne l'exposez
jamais à la lumière directe du soleil.
- Ne posez pas de récipients contenant du liquide
(ex. : vase, etc.) sur l'appareil afin d'éviter tout risque
d'incendie ou d'électrocution en cas de projections.
• N'exposez pas l'appareil à la pluie et ne le placez pas à
côté d'une source d'eau (baignoire, lavabo, évier, cuve,
sous-sol humide, piscine, etc.). Si l'appareil est exposé
à de l'eau ou à de l'humidité par accident, débranchezle et contactez immédiatement un représentant agréé.
• Cet appareil fonctionne avec des piles. Il se peut
qu'une réglementation sur la mise au rebut des piles
soit en vigueur dans votre commune. Contactez votre
municipalité pour le savoir.
• Ne surchargez pas les prises murales, les rallonges et
les adaptateurs afin d'éviter tout risque d'incendie ou
d'électrocution.
• Organisez les câbles de sorte qu'ils ne gênent pas
la circulation dans la pièce ou qu'ils ne soient pas
écrasés par le mobilier attenant. Assurez-vous toujours
que les parties côté fiche, prise murale et sortie de
l'appareil sont en bon état.
• Afin de protéger l'appareil de la foudre, ou si vous
prévoyez de ne pas l'utiliser pendant une période
prolongée, débranchez-le. Faites de même avec
l'antenne ou le système de câblage. Vous éviterez ainsi
qu'ils ne soient endommagés par la foudre ou une
surtension.
• Avant de brancher le cordon d'alimentation CA sur
la prise de l'adaptateur CC, assurez-vous que les
caractéristiques électriques de l'adaptateur CC
correspondent à l'alimentation électrique locale.
• N'insérez jamais d'objets métalliques dans les
ouvertures de l'appareil. Vous risqueriez de vous
électrocuter.
• Pour éviter tout risque d'électrocution, ne touchez
jamais les composants internes de l'appareil. Seul un
technicien qualifié est autorisé à ouvrir l'appareil.
• Enfoncez correctement la prise dans le mur. Pour
débrancher l'appareil du mur, tirez toujours sur la fiche
du câble. Ne tentez jamais de le débrancher en tirant
directement sur le câble. Ne touchez jamais le cordon
d'alimentation si vous avez les mains mouillées.
• Si vous constatez que l'appareil ne fonctionne
pas normalement (bruits ou odeurs inhabituels),
débranchez-le immédiatement et contactez un
revendeur ou un centre de services agréé.
• Entretien du meuble.
- Avant de brancher un composant sur cet appareil,
- Si vous déplacez soudainement l'appareil d'un endroit
• Débranchez toujours l'appareil si vous prévoyez
de ne pas l'utiliser pendant une période prolongée
(en particulier si des enfants ou des personnes aux
capacités réduites sont laissées sans surveillance).
- L'accumulation de poussière sur l'appareil risque
• Contactez un centre de services agréé pour obtenir
plus d'informations si vous souhaitez installer votre
produit dans une pièce exposée à la poussière,
à des températures extrêmes, à l'humidité ou à
des substances chimiques ou dans un endroit où
il fonctionnera en permanence, comme dans un
hall d'aéroport ou de gare. Le non-respect de ces
consignes risque d'endommager gravement l'appareil.
• Utilisez uniquement une fiche et une prise murale
correctement mises à la terre.
- Une mise à la terre incorrecte peut provoquer un
• Pour éteindre complètement l'appareil, vous devez
débrancher le cordon d'alimentation de la prise murale.
C'est pourquoi le cordon d'alimentation doit être
facilement accessible à tout moment.
Ce symbole indique la présence d'une
tension dangereuse dans l'appareil. Ne
touchez jamais les composants internes
du produit.
Ce symbole indique que ce produit est
fourni avec des documents importants
relatifs au fonctionnement et à l'entretien.
assurez-vous que celui-ci est hors tension.
froid à un endroit chaud, de la condensation pourra se
former sur les pièces et la lentille et occasionner des
problèmes de lecture. Dans pareil cas, débranchez
l'appareil et patientez deux heures avant de le
rebrancher sur la prise d'alimentation. Insérez ensuite
le disque et essayez à nouveau de le lire.
de provoquer des étincelles, une surchauffe ou
un problème d'isolation et de provoquer un choc
électrique, une fuite électrique ou un incendie.
choc électrique ou endommager l'équipement.
(Équipement de classe 1 uniquement.)
2 - Français
Page 42

• Ne laissez jamais les enfants jouer avec l'appareil.
• Conservez les accessoires (piles, etc.) dans un endroit
sûr, hors de leur portée.
• N'installez pas le produit dans un endroit instable,
comme sur une étagère branlante, un sol incliné ou
dans un local exposé à des vibrations.
• Ne faites pas tomber l'appareil et ne l'exposez pas à
des chocs. S'il est endommagé, débranchez le câble
d'alimentation et contactez le centre de services.
• Pour nettoyer l'appareil, débranchez d'abord le câble
d'alimentation de la prise murale, puis essuyez-le
avec un chiffon doux et sec. N'utilisez pas de produits
chimiques, tels que de la cire, du benzène, de l'alcool,
des diluants, des insecticides, des purificateurs
d'air, des lubrifiants ou des détergents. Ils risquent
d'endommager le revêtement du produit ou d'en
effacer les inscriptions.
• Évitez toute projection d'eau sur l'appareil. Ne posez
jamais d’objets contenant un liquide (ex : un vase) sur
l’appareil.
• Ne jetez pas les piles au feu.
• Ne branchez pas plusieurs appareils électriques sur
une même prise murale. Surcharger une prise murale
peut provoquer une surchauffe et donc un incendie.
• Utiliser le mauvais type de pile dans la télécommande
risque de provoquer une explosion. Lorsqu'un
remplacement est nécessaire, utilisez uniquement le
même type de pile ou un modèle équivalent.
AVERTISSEMENT :
• AFIN D'ÉVITER TOUT RISQUE DE
PROPAGATION D'INCENDIE, ÉLOIGNEZ
LES BOUGIES OU LES AUTRES
DISPOSITIFS À FEU NU DE L'APPAREIL.
• Pour réduire les risques d’incendie ou de
choc électrique, veuillez ne pas exposer cet appareil à
la pluie ou à l’humidité.
Produit LASER DE CLASSE 1
Ce produit est classé comme PRODUIT LASER DE
CLASSE 1. L'utilisation de commandes, de réglages
ou de procédés différents de ceux spécifiés dans le
présent document peut entraîner une exposition à un
rayonnement dangereux.
ATTENTION :
• RAYONNEMENT LASER INVISIBLE LORSQUE
L'APPAREIL EST OUVERT ET VERROUILLAGES
DÉSACTIVÉS.
CLASS 1 LASER PRODUCT
KLASSE 1 LASER PRODUKT
LUOKAN 1 LASER LAITE
KLASS 1 LASER APPARAT
PRODUCTO LÁSER CLASE 1
Consignes de Sécurité
3 - Français
Page 43

Sommaire
MISE EN ROUTE
5 Accessoires
5 Accessoires des enceintes
6 Façade
6 Face arrière
7 Télécommande
BRANCHEMENTS
8 Connexion des enceintes
11 Connexion à un téléviseur et des périphériques
externes
PARAMÈTRES
12 Procédure de réglage des paramètres initiaux
12 Présentation de l'écran d'accueil
13 Accéder à l'écran Paramètres d'accueil
13 Paramètres Fonctions du menu
16 Configuration radio
18 Mise à niveau du logiciel
LIRE UN CONTENU
19 Changement du dispositif source
19 Lecture de disques disponibles dans le
commerce
19 Lecture d’un disque dont le contenu est
enregistré par l’utilisateur
20 Lecture de fichiers sur un périphérique USB
21 Contrôle de la lecture Vidéo
23 Lecture d'un disque audio commercial pré-
enregistré
23 Contrôle de la lecture de musique
25 Visionnage des photos
25 Utilisation des boutons spécifiques de la
télécommande
ANNEXES
27 Informations complémentaires
28 Compatibilité des disques et des formats
33 Dépannage
36 Caractéristiques techniques
37 Licences
4 - Français
Page 44

Mise en Route
Les figures et les illustrations du présent Manuel d'utilisation sont fournies à titre de référence
uniquement et peuvent différer de l'apparence du produit réel.
Des frais supplémentaires pourront vous être facturés dans les cas suivants :
a. Vous demandez l'intervention d'un ingénieur, mais il s'avère que l'appareil ne présente aucune
anomalie (par ex. vous n'avez pas lu ce Manuel d'utilisation).
b. Vous portez l'unité à un centre de réparation, mais il s'avère que celle-ci ne présente aucune
défaillance (par ex. vous n'avez pas lu ce Manuel d'utilisation).
Le montant de ces frais administratifs vous sera notifié avant que tout travail ou toute visite à votre
domicile ne soit effectué(e).
Vérifiez que tous les accessoires et tous les composants des enceintes figurant ci-dessous sont inclus.
Accessoires
• Télécommande
• Piles (taille AAA)
• Manuel d’utilisation
Mise en Route
Câble d'alimentation Antenne FM
Accessoires des enceintes
Vis (5 x 15) x 16 Enceinte centrale
Enceinte avant x 2
Enceinte
d'ambiance x 2
Pied x 4 Socle x 4 Câble de l'enceinte X 4
Caisson de
basse
5 - Français
Page 45

Mise en Route
5V 0.5A
SURROUND
SURROUND
Façade
ICÔNES D'AFFICHAGE
USB CAPTEUR DE LA TÉLÉCOMMANDE
LECTURE/
PAUSE
MARCHE/
ARRÊT
FONCTION
OUVRIR/
FERMER
TIROIR DISQUE
Tenez l'appareil hors de portée des enfants lorsqu'il est sous tension afin d'éviter tout risque de brûlure.
✎
Pour mettre à niveau le logiciel de l'appareil via la prise USB, vous devez utiliser une clé USB à mémoire
✎
flash.
Lorsque l'appareil affiche le menu du disque Blu-ray, vous ne pouvez pas lancer la vidéo en appuyant sur le
✎
bouton
dans le menu du disque, puis appuyez sur le bouton E.
Si vous lisez le contenu à partir d'un périphérique USB sur votre téléviseur via le Home cinéma, vous ne
✎
pouvez pas sélectionner le mode BD/DVD avec le bouton
arrêtez la lecture du contenu sur le téléviseur et sélectionnez le mode BD/DVD.
/6 situé sur l'appareil ou la télécommande. Pour lire la vidéo, sélectionnez Play Movie ou Start
ARRÊT
RÉGLAGE DU
VOLUME
AFFICHAGE
FUNCTION. Pour sélectionner le mode BD/DVD,
Face arrière
VENTILATEUR
ENTRÉE AUX
* ANTENNE FM
SORTIE HDMI
CORDON
D'ALIMENTATION
* Connexion de l'antenne FM
1. Branchez l'antenne FM fournie dans la prise FM ANT (ANTENNE FM).
2. Déplacez progressivement le fil de l'antenne jusqu'à trouver une position dans laquelle la réception est de
qualité, fixez-le ensuite solidement à un mur ou une autre surface solide.
Veillez à prévoir un minimum d'espace libre de 10 cm sur tous les côtés du Home cinéma dans le but de
✎
garantir une ventilation appropriée. Veuillez à ne pas obstruer le ventilateur ou les orifices d'aération.
Cet appareil ne reçoit pas les émissions AM.
✎
PRISES DE SORTIE
DES ENCEINTES
ENTRÉE AUDIO NUMÉRIQUE
EXTERNE (OPTIQUE)
6 - Français
Page 46

Télécommande
Boîtier de la télécommande
Permet d'allumer et d'éteindre
l'appareil.
Permet de régler le volume.
Appuyez sur les boutons numériques
pour commander les options.
Appuyez sur ce bouton pour visualiser
le menu du disque.
Appuyez sur ces boutons pour effectuer
un saut vers l'arrière ou l'avant.
VOLUME
-
RDS DISPLAY TA
DISC MENU
+
2
1
PTY - PTY SEARCH PTY +
4
56
89
7
0
Appuyez sur ce bouton pour lire un
disque ou des fichiers.
Appuyez sur ce bouton pour arrêter la
lecture d'un disque ou de fichiers.
Permet de sélectionner la langue de
SUBTITLE HOME
sous-titrage du disque.
Permet de passer à l'écran d'accueil.
TOOLS
Permet d'accéder au menu Tools.
Sélectionnez les éléments de menu à
l'écran, puis changez les valeurs du
menu sélectionné.
RETURN
Permet de revenir au menu précédent.
Ces boutons sont utilisés à la fois pour
les menus de l'appareil et certaines
fonctions liées aux disques Blu-ray.
ABCD
DSP/EQTV SOUND
Appuyez pour enregistrer un
programme radio FM.
Appuyez sur ce bouton pour diriger le
signal audio vers l'enceinte du Home
cinéma ou vers l'enceinte du téléviseur
(reportez-vous à la page 25).
Sélectionnez le mode audio DSP/EQ
souhaité.
Insertion des piles dans la télécommande
Veillez à faire correspondre les pôles « + » et « – » de la pile avec
✎
les symboles équivalents dans le compartiment.
Sur la base d'une utilisation classique, la durée de vie des piles
✎
est d'environ un an.
La portée de la télécommande en ligne droite est d'environ
✎
7 mètres par rapport à l'appareil.
TUNER
MEMORY
DOWN
TUNING
FUNCTION
MUTE
3
TITLE MENU
POPUP
REPEAT
INFO
EXIT
MO/ST
UP
Appuyez ici pour sélectionner le
mode du Home cinéma.
(BD/DVD, D. IN, AUX, etc.).
Permet d'ouvrir et de fermer le
tiroir disque.
Permet de couper le son
momentanément.
Utilisez la fonction RDS pour
recevoir des stations FM.
Permet d'accéder au menu
contextuel/menu titre.
Appuyez sur ces boutons pour
effectuer une recherche vers
l'arrière ou l'avant.
Permet de mettre la lecture en pause.
Permet de répéter la lecture
d'un titre, d'un chapitre, d'une
piste ou d'un disque.
Permet d'afficher les informations
relatives à la lecture, en cours de
lecture d'un disque Blu-ray/DVD
ou de fichiers.
Permet de quitter le menu.
Permet de configurer une fréquence
radio préréglée.
Permet de sélectionner les réglages
MONO ou STEREO pour les
radiodiffusions.
Permet de rechercher les
stations FM actives et de changer
les canaux en conséquence.
Taille des
piles : AAA
Mise en Route
7 - Français
Page 47

Branchements
Dans ce chapitre, vous trouverez plusieurs méthodes vous expliquant comment connecter votre appareil à
d’autres composants externes. Avant de déplacer ou d'installer l’appareil, mettez-le hors tension et débranchez
le cordon d’alimentation.
Connexion des enceintes
Position de l'appareil
Posez-le sur un support, sur une
Caisson
de basse
Enceinte
avant (G)
d'ambiance (G)
Enceintes avant
Enceinte centrale
Enceintes d'ambiance
Caisson de basse
* L'aspect des enceintes peut différer des illustrations du manuel.
* Chaque enceinte possède une étiquette colorée située à l'arrière ou sur le dessous. Chaque câble
dispose d'une bande colorée à proximité de son extrémité. Faites correspondre la bande présente
sur chaque câble avec l'étiquette de l'enceinte par couleur puis connectez le câble à l'enceinte.
Reportez-vous à la page 9 pour obtenir des instructions.
Enceinte
centrale
Appareil
Enceinte
Placez les enceintes face à votre position d’écoute en les orientant vers vous
(d’environ 45°). Positionnez-les de manière à ce que les haut-parleurs d'aigus
se situent à la hauteur de vos oreilles. Alignez la face avant des enceintes avant
avec la face avant de l’enceinte centrale ou avancez-les légèrement par rapport
à l’enceinte centrale.
Il est préférable d’installer l’enceinte centrale à la même hauteur que les
enceintes avant. Vous pouvez également l’installer directement sur ou sous le
téléviseur.
Placez les enceintes ambiophoniques de chaque côté de votre position d’écoute.
Si vous ne disposez pas d'assez d'espace, positionnez-les face à face. Elles
doivent être situées à environ 60 à 90 cm de vos oreilles et légèrement inclinées
vers le sol.
* Contrairement aux enceintes avant et centrale, les enceintes d'ambiance
servent principalement pour les effets sonores. Elles n’émettent donc pas de
son en permanence.
La position du caisson de basse n’a pas d’importance. Vous pouvez l’installer
où vous voulez.
Enceinte
avant (D)
Enceinte
d'ambiance (D)
étagère ou sous un meuble TV.
Choix de la position d'écoute
La position d'écoute doit être
située à une distance équivalente
à environ 2,5 à 3 fois la taille de
l'écran du téléviseur. Si vous avez
par exemple un écran 46 pouces,
situez les positions d’écoute entre
2,92 et 3,5 m de l'écran.
8 - Français
Page 48

Installation des enceintes sur le pied type Tallboy
1. Retournez le socle et emboîtez-le sur le pied.
2. Utilisez un tournevis pour insérer les vis dans les
3 orifices marqués.
1
Socle
2
Pied
3. Redressez le câble pour enceinte fourni et
insérez-le dans l’orifice au centre du socle.
4. Branchez l'enceinte supérieure au pied ainsi
monté.
5. À l'aide d'un tournevis, serrez une vis dans le
sens des aiguilles d'une montre dans le trou
situé à l'arrière de l'enceinte. Puis, connectez le
câble de l'enceinte.
6. Voici à quoi ressemble l'enceinte une fois celle-
ci installée. Respectez cette procédure pour
installer l'autre enceinte.
3
5
4
Enceinte
Pied
6
Raccordement des câbles d'enceinte
* Enceintes avant/ambiophoniques uniquement
1. Chaque ensemble de câble d'enceinte doit être relié à l'enceinte correspondante. Pour cela, la prise avec le
codage couleur sur chaque ensemble doit correspondre à l'autocollant coloré situé sur la face inférieure de
chaque enceinte.
2. Branchez les fiches des câbles de chaque enceinte à l'arrière de l'appareil en respectant les couleurs entre
les fiches et les prises femelles des enceintes. Lors du raccordement, assurez-vous de faire correspondre la
couleur de l'étiquette à l'arrière de l'enceinte.
Branchements
9 - Français
Page 49

Branchements
SURROUND
SURROUND
SURROUND
SURROUND
Enceinte avant (G)
Enceinte centrale
Caisson de basse
Si vous placez une enceinte à proximité de votre téléviseur, la couleur des images peut être déformée en
✎
raison du champ magnétique.
| ATTENTION |
Si vous souhaitez installer les enceintes au mur, fixez les vis ou les clous (non fournis) fermement au mur
et utilisez pour l'installation les orifices situés à l'arrière de l'enceinte. Suspendez chaque enceinte avec
précaution.
Ne laissez pas jouer des enfants avec ou à proximité des enceintes. Ils peuvent se blesser en cas de chute
d'une enceinte.
Lors du branchement des fils sur les enceintes, assurez-vous que la polarité (+/ –) est respectée.
Conservez l'enceinte de caisson de basse hors de portée des enfants afin d'éviter qu'ils ne mettent leurs
mains ou des objets étrangers dans le conduit (orifice) de l'enceinte du caisson de basse.
N'accrochez pas le caisson de basse au mur à l'aide du conduit (orifice).
Enceinte d'ambiance (G)
Enceinte d'ambiance (D)
Enceinte avant (D)
10 - Français
Page 50

Connexion à un téléviseur et des périphériques externes
OPTICAL OUT
AUDIO OUT
HDMI IN (ARC)
SURROUND
SURROUND
Rouge
R
Blanche
W
Méthode 1 Méthode 2
Périphériques
externes
Connexion de l'appareil à un téléviseur
À l'aide d'un câble HDMI (non fourni), connectez la prise SORTIE HDMI située à l'arrière de l'appareil à la prise
ENTRÉE HDMI de votre téléviseur. Si le téléviseur prend en charge la fonction ARC, vous pouvez écouter le son
de votre téléviseur depuis votre Home cinéma juste en connectant ce câble. Consultez la page 14 de ce manuel
et la section sur l'ARC du manuel d'utilisation de votre téléviseur pour obtenir plus de détails.
Connexion à des périphériques externes
Deux méthodes de connexion des périphériques externes à votre Home cinéma sont décrites ci-dessous.
Méthode 1 AUX IN : Connexion d'un composant analogique externe
En utilisant un câble audio RCA (non fourni), connectez la prise d'entrée AUDIO située sur l'appareil à la prise de
Sortie AUDIO située sur le composant analogique externe. Permet de sélectionner le mode AUX.
•
Assurez-vous de faire correspondre les couleurs des fiches des câbles avec celles des prises d'entrée et de sortie.
Méthode 2 OPTIQUE : connexion d'un composant audio numérique externe
Permet de connecter la sortie audio numérique des composants à signaux numériques tels que les récepteurs
câble/satellite (décodeur) : En utilisant un câble optique numérique (non fourni), connectez la prise d'entrée
Audio numérique optique située sur l'appareil à la prise de Sortie optique numérique située sur le périphérique
numérique externe. Sélectionnez le mode D. IN.
Pour visionner un film depuis votre récepteur câble/satellite, vous devez connecter sa prise de sortie vidéo
✎
directement à votre téléviseur.
Ce système prend en charge les fréquences d'échantillonnage numériques de 32 kHz minimum provenant
✎
de composants numériques externes.
Ce système prend en charge uniquement les données audio DTS et Dolby Digital. Les données audio
✎
MPEG, un format type train de bits n'est pas pris en charge.
Sélection d'un périphérique externe à utiliser
Pour sélectionner un périphérique externe une fois que vous l'avez connecté, appuyez sur le bouton
FUNCTION. Chaque appui sur ce bouton change le mode selon cet ordre : BD/DVD D. IN AUX FM
Branchements
11 - Français
Page 51

Paramètres
Procédure de réglage des
paramètres initiaux
• Le menu d'accueil n'apparaîtra pas si vous ne
configurez pas les paramètres initiaux.
• L'OSD (On Screen Display, Affichage à l'écran)
peut changer dans ce produit après la mise à
niveau de la version du logiciel.
• Les étapes d'accès peuvent varier selon le
menu sélectionné.
1. Mettez votre téléviseur sous tension après avoir
connecté l'appareil, puis mettez ce dernier à
son tour sous tension. Lorsque vous mettez
l'appareil sous tension pour la première fois, il
affiche automatiquement l'écran des langues
Configuration.
2.
Appuyez sur les boutons ▲▼ pour sélectionner la
langue appropriée, puis appuyez sur le bouton E.
3. L'écran Format TV apparaît. Appuyez sur les
boutons ▲▼ pour sélectionner le format d'image
du téléviseur souhaité, puis appuyez sur le
bouton E.
Quatre possibilités s'offrent à vous :
16:9 Original - Pour les téléviseurs grand écran.
Permet d'afficher les images en grand écran
dans leur format original 16.9 et les images 4:3
(l'ancien format standard) en format 4:3 pillar box
(Encadrement horizontal du 4:3) avec des barres
noires sur la gauche et la droite.
16:9 Plein écran - Pour les téléviseurs grand
écran. Permet d'afficher les images en grand
écran dans leur format original 16.9 et d'étirer les
images 4:3 pour remplir l'écran 16:9.
4:3 Letter Box - Pour les téléviseurs analogiques à
écran standard. Permet d'afficher les images 4:3 en
plein écran et les images 16.9 au format boîte aux
lettres qui conserve le rapport 16:9 mais place des
barres noires au-dessus et en-dessous de l'image.
4:3 Pan-Scan - Pour les téléviseurs analogiques
à écran standard. Permet d'afficher les images
4:3 en plein écran et les images 16.9 au format
Pan-Scan qui remplit l'écran, mais coupe les
côtés droit et gauche de l'image et agrandit le
milieu verticalement.
4. L'écran « Paramètre initial défini. » apparaît,
puis l'écran d'accueil s'affiche également.
Si vous souhaitez afficher à nouveau l'écran
✎
Configuration pour procéder à des modifications,
sélectionnez l'option Réinitialisation. (Reportezvous à la page 16)
Si vous utilisez un câble HDMI pour connecter
✎
l'appareil à un téléviseur Samsung conforme à
la fonctionnalité Anynet+ (HDMI-CEC) et que :
1. Vous avez activé la fonction Anynet+ (HDMI-
CEC) pour le téléviseur et le produit et 2. Vous
avez réglé le téléviseur sur une langue prise en
charge par l'appareil, ce dernier sélectionne alors
automatiquement cette langue comme langue
préférée.
Présentation de l'écran d'accueil
1
LIRE LE DISQUE
Pas de Disque
Changer
Fonction
Paramètres
périph.
PHOTOS VIDÉOS
2
MUSIQUE
345
LIRE LE DISQUE
1
Les informations relatives au disque en cours de
lecture s'affichent.
Appuyez sur E pour lancer la lecture du disque.
PHOTOS/VIDÉOS/MUSIQUE
2
Lisez les photos, les vidéos ou les fichiers
musicaux se trouvant sur un disque ou un
périphérique USB.
Changer périph.
3
Affiche la liste des périphériques externes
connectés à votre appareil. Permet de sélectionner
le périphérique souhaité.
Fonction
4
Utilisez cette fonction pour passer sur un
périphérique externe et pour écouter la radio.
Utilisez le bouton
et le bouton
mode.
FUNCTION de la télécommande
de l'appareil pour changer de
12 - Français
Page 52

Paramètres
TOOLS
RETURN
EXIT
INFO
SUBTITLE HOME
REPEAT
5
Permet de régler diverses fonctions selon vos
préférences.
Accéder à l'écran Paramètres
d'accueil
1. Sélectionnez Paramètres sur l'écran d'accueil,
puis appuyez sur E. L'écran Paramètres
apparaît.
Paramètres
Image
Son
Système
Langue
Sécurité
Assistance
Format TV : 16:9 Original
BD Wise : Arrêt
Résolution : Auto.
Trame vidéo (24 ips) : Arrêt
Format couleur HDMI : Auto.
Couleur intense HDMI : Arrêt
Mode progressif : Auto.
Bouton RETURN : Permet de revenir au
2
menu précédent.
Bouton
• Appuyez sur
curseur ou sélectionner un élément.
3
• Appuyez sur le bouton E pour activer
ENTRÉE) / DIRECTION
(
E
▲▼◄►
pour déplacer le
l'élément sélectionné actuellement ou
confirmer un réglage.
Bouton EXIT : Appuyez sur ce bouton pour
4
quitter le menu actuellement sélectionné.
Informations détaillées sur les fonctions
Les fonctions, éléments de menu et options
Paramètres sont expliqués en détail à l'écran. Pour
afficher les informations, utilisez les boutons ▲▼◄►
pour sélectionner la fonction, l'élément de menu ou
l'option. Les informations apparaissent en général en
bas de l'écran.
Une brève description des différentes fonctions
Paramètres s'affiche sur cette page. Vous pourrez
également trouver des informations complémentaires
sur certaines fonctions dans l'Annexe de ce manuel.
Paramètres
2. Pour accéder aux menus, sous-menus et
options sur l'écran Paramètres, veuillez vous
reporter à l'illustration de la télécommande. (Voir
ci-dessous)
Si l'appareil reste en mode Arrêt pendant plus de
✎
5 minutes et qu'aucune action n'est effectuée,
un écran de veille s'affiche sur le téléviseur.
Si l'appareil reste en mode d'écran de veille
pendant plus de 20 minutes, l'alimentation est
automatiquement coupée.
Boutons de la télécommande utilisés
pour le menu Paramètres
1
3
2 4
Bouton HOME : permet de passer à l'écran
1
d'accueil.
13 - Français
Paramètres Fonctions du menu
Image
Format TV
Vous permet de régler la sortie de l'appareil sur la
taille de l'écran de votre téléviseur. (Reportez-vous
à la page 27)
BD Wise
BD Wise est la dernière fonctionnalité
d'interconnectivité de Samsung. Lorsque vous
connectez un appareil Samsung et un téléviseur
Samsung doté de la fonction BD Wise via l'interface
HDMI et que la fonction BD Wise est activée sur
l'appareil et le téléviseur, le produit émet des images
dont la résolution vidéo et la vitesse de défilement
sont identiques à celles du disque Blu-ray/DVD.
Résolution
Cette option vous permet de régler la définition du
signal vidéo HDMI respectivement sur les valeurs BD
Wise, Auto., 1080p, 1080i, 720p, 576p/480p. Ces
valeurs sont indicatives du nombre de lignes vidéo
par image. Les lettres i et p signifient respectivement
balayage entrelacé (i) et balayage progressif (p). Plus
il y a de lignes, plus la qualité de l'image est élevée.
Page 53

Paramètres
Trame vidéo (24 ips)
Le réglage de la fonction Trame vidéo (24 ips) sur
Auto. vous permet de spécifier automatiquement la
sortie HDMI de l'appareil sur 24 images par seconde
pour une qualité d'image améliorée si un téléviseur
compatible 24Fs est connecté.
•
Vous ne pouvez bénéficier de la fonction Trame
vidéo (24 ips) que sur un téléviseur prenant en
charge cette vitesse de défilement.
• Fréquence cinéma est uniquement disponible
lorsque l'appareil est en mode de résolution de
sortie HDMI 1080p.
Format couleur HDMI
Vous pouvez régler le format de l'espace chromatique
pour la sortie HDMI afin qu'il corresponde aux capacités
de l'appareil branché (télévision, moniteur, etc.).
Couleur intense HDMI
Cette option vous permet de régler l'appareil pour
émettre des données vidéo en sortie avec Deep
Colour via la prise HDMI OUT. L'option Deep
Colour permet une reproduction plus fidèle des
couleurs, notamment en termes de profondeur.
Mode progressif
Cette option permet d'améliorer la qualité de
l'image lors de la lecture d'un DVD.
Son
Paramètre haut-parleur
Cette fonction vous permet de régler les
paramètres d'enceinte suivants et d'activer et
désactiver la tonalité d'essai afin de tester les
enceintes.
Niveau: Vous permet de régler les paramètres
des enceintes suivantes et d'activer et désactiver
la tonalité d'essai afin de tester les enceintes.
-6dB. Par exemple, si vous aimez les basses
puissantes, vous pouvez augmenter le niveau
sonore du caisson de basse de 6dB.
Distance: vous permet de régler la distance
relative de chaque enceinte à partir de la position
d'écoute jusqu'à 9 mètres. Plus la distance est
grande, plus le son de l'enceinte sera fort.
Test haut-parleurs: vous permet d'exécuter
la fonction Test haut-parleurs afin de tester
vos réglages. Régler Test haut-parleurs sur
Activé permet d'activer la fonction Test hautparleurs. Régler la fonction sur Arrêt permet de
la désactiver.
Sélect. haut-parleur
Cette option vous permet de sélectionner les
enceintes que vous souhaitez activer : celles du
téléviseur ou celles du Home cinéma.
Mode égaliseur
Activez Mode égaliseur pour utiliser l’égaliseur.
Paramètres Egaliseur
Cette option vous permet de régler l'égaliseur.
Paramètres Egaliseur n'apparaît que lorsque
✎
Mode égaliseur est réglé sur Activé.
Fonct. Retour Audio
Cette option vous permet de diriger le son du
téléviseur vers les haut-parleurs du Home cinéma.
Elle nécessite une connexion HDMI et un téléviseur
compatible avec la fonction Fonct. Retour Audio
(ARC) compatible TV.
• Si la fonction Fonct. Retour Audio est activée
et si vous utilisez un câble HDMI pour connecter
l'appareil au téléviseur, l'entrée optique
numérique ne fonctionne pas.
• Si la fonction Fonct. Retour Audio est définie
sur Auto. et si vous utilisez un câble HDMI
pour connecter l'appareil au téléviseur, la
fonction ARC ou l'entrée optique numérique est
sélectionnée automatiquement.
Sortie numérique
Cette option vous permet de définir la fonction
Sortie numérique de manière à ce qu'elle
corresponde aux capacités du récepteur AV que
vous avez connecté à l'appareil. Pour obtenir plus
de détails, reportez-vous au tableau de sélection des
sorties numériques. (Reportez-vous à la page 32)
Contrôle de la dynamique
Cette option vous permet d'appliquer un contrôle
de plage dynamique de l'audio Dolby Digital, Dolby
Digital Plus et Dolby TrueHD.
Auto.: Contrôle automatiquement la plage
dynamique de l'audio Dolby TrueHD selon les
informations fournies par la piste audio Dolby
TrueHD. Désactive également le contrôle de la
plage dynamique pour Dolby Digital et Dolby
Digital Plus.
Arrêt: la plage dynamique reste non
compressée, vous permettant ainsi d'entendre
le son original.
Activé: cette option active le contrôle de la
dynamique pour les trois formats Dolby. Les
sons les moins forts sont amplifiés et le volume
des sons forts est abaissé.
14 - Français
Page 54

Mode sous-mixage
Permet de sélectionner la méthode du sousmixage multicanal compatible avec le système
stéréo utilisé. Vous pouvez alors choisir de spécifier
le sous-mixage de l'appareil sur l'option Stéréo
Normal ou Compatible Surround.
Sync. audio
Lorsque l'appareil est relié à un téléviseur
numérique, cette option vous permet de régler
le temps de retard audio afin que le son soit
synchronisé avec la vidéo. Vous pouvez régler le
retard entre 0 et 300 millisecondes.
Système
Configuration
Cette option vous permet de relancer la procédure
Configuration. (Reportez-vous à la page 12)
Démarr. rapide
Vous pouvez accélérer la mise en route en
réduisant le temps de démarrage.
Si cette fonction est Activé, la consommation
✎
d’énergie en mode veille sera plus grande. (12 W
à 20 W environ)
Anynet+ (HDMI-CEC)
Anynet+ est une fonction pratique qui autorise
des commandes liées entre plusieurs produits
Samsung compatibles Anynet+ et vous permet de
contrôler ces produits via une télécommande de
téléviseur Samsung. Pour utiliser cette fonction,
vous devez connecter cet appareil à un téléviseur
Samsung Anynet+ à l'aide d'un câble HDMI.
Gestion données BD
Cette option vous permet de gérer le contenu
téléchargé auquel vous avez accédé via un
disque Blu-ray et que vous avez stocké sur un
périphérique à mémoire flash.
Vous pouvez vérifier les informations relatives au
périphérique, notamment la taille de stockage,
et supprimer les données BD ou modifier le
périphérique de mémoire flash.
DivX® Vidéo à la demande
Affichez les codes d'enregistrement DivX® VOD
pour acheter et lire des contenus DivX® VOD.
Langue
Cette option vous permet de sélectionner la langue
de votre choix pour Menu à l’écran, Menu du
Disque, etc.
• La langue sélectionnée n'apparaît que si elle est
prise en charge par le disque.
Sécurité
Le code PIN par défaut est 0000. Pour accéder
à la fonction de sécurité, entrez le code PIN par
défaut si vous n'avez pas créé votre propre code
PIN personnel.
Contrôle parent. BD
Cette option empêche la lecture des disques Bluray ayant une classification égale ou supérieure à
une classification d'âge particulière que vous avez
définie jusqu'à la saisie du code PIN.
Contrôle parent. DVD
Cette option empêche la lecture des disques
DVD ayant une classification supérieure à une
classification numérique spécifique jusqu'à la saisie
du code PIN.
Modifier PIN
Cette option permet de modifier le code PIN à
4 chiffres utilisé pour accéder aux fonctions de
sécurité.
Assistance
Mise à niveau du logiciel
Pour obtenir plus d'informations sur la fonction,
reportez-vous en page 18.
Contacter Samsung
Permet d'obtenir les informations de contact pour
les demandes d'assistance relatives à votre appareil.
Paramètres
15 - Français
Page 55

Paramètres
Réinitialisation
Rétablit les valeurs par défaut de tous les paramètres.
Il est nécessaire d'entrer le code PIN de sécurité. Le
code PIN de sécurité par défaut est 0000.
Configuration radio
• Pour écouter la radio, vous devez connecter
l'antenne FM fournie.
Fonctionnement du téléviseur à partir de
la télécommande
1. Appuyez sur le bouton FUNCTION pour
sélectionner FM.
2. Syntonisez la station désirée.
• Syntonisation préréglée 1 : Appuyez sur le
bouton 5 pour sélectionner PRESET, puis
appuyez sur le bouton
pour sélectionner une station préréglée.
- Avant de syntoniser des stations
préréglées, vous devez ajouter les stations
préréglées à la mémoire de l'appareil.
• Syntonisation manuelle : Appuyez sur le
bouton 5 pour sélectionner MANUAL, puis
appuyez sur le bouton
pour syntoniser sur une fréquence plus basse
ou plus haute.
• Syntonisation automatique : Appuyez sur le
bouton 5 pour sélectionner MANUAL puis
maintenez le bouton
enfoncé pendant quelques secondes pour
rechercher la fréquence automatiquement.
TUNING UP, DOWN
TUNING UP, DOWN
TUNING UP, DOWN
Sélection de Mono ou Stéréo
Appuyez sur le bouton MO/ST.
• Chaque fois que vous appuyez sur le bouton, le
son commute entre STEREO et MONO.
• Dans une zone où la réception est faible,
sélectionnez MONO pour une diffusion claire et
sans interférence.
Préréglage des stations
Exemple : Préréglage de FM 89.10 dans la mémoire.
1. Appuyez sur le bouton
sélectionner FM.
2. Appuyez sur le bouton TUNING UP, DOWN
pour faire défiler les fréquences FM, puis
sélectionnez <89.10>.
3. Appuyez sur le bouton TUNER MEMORY, c'est-
à-dire le bouton C en bas de la télécommande.
FUNCTION pour
4. Appuyez à nouveau sur le bouton TUNER
MEMORY pendant 5 secondes environ. La
station est stockée en mémoire.
Si vous appuyez plusieurs fois sur le bouton
✎
TUNER MEMORY
station entrée peut être écrasée.
5. Pour prérégler une autre station, répétez les
étapes 2 à 4.
• Pour écouter une station préréglée, appuyez
sur le bouton
Pour supprimer toutes les stations FM préréglées,
✎
appuyez sur le bouton
environ 5 secondes en mode Manuel FM jusqu'à
ce que DEFAULT PRESET apparaisse à l'écran.
sans changer la station, la
TUNING UP, DOWN.
TITLE MENU pendant
Enregistrement d'un programme radio FM
Vous pouvez enregistrer votre programme radio favori
sur le périphérique de stockage USB inséré.
1. Insérez un périphérique USB dans la prise USB
située à l'avant de l'appareil.
2. Appuyez sur le bouton
sélectionner FM, puis appuyez sur les
UP
, DOWN boutons pour sélectionner la station
que vous voulez enregistrer.
3. Appuyez sur le bouton
commencer l'enregistrement. Le processus
d'enregistrement a commencé.
• La durée enregistrée est affichée sur la gauche
et la durée enregistrée toujours disponible,
basée sur la quantité d'espace libre du
périphérique de stockage USB, s'affiche sur la
droite.
4. Appuyez sur le bouton
l'enregistrement. L'enregistrement s'arrête et est
enregistré, en même temps, en tant que fichier
.mp3. Pour lire le fichier enregistré; reportezvous à la section « Lecture de fichiers sur un
périphérique USB ».
Le fichier enregistré est enregistré dans le dossier
✎
Tuner qui a été créé automatiquement.
Seuls les boutons ( OUVRIR/FERMER),
✎
( MARCHE/ARRÊT),
peuvent être utilisés lorsque la radio FM est en
cours d'enregistrement.
Si vous n'appuyez sur aucun bouton pendant
✎
l'enregistrement, l'économiseur d'écran se met en
marche.
Les effets sonores, tels que DSP, EQ, etc., ne sont
✎
pas enregistrés lors de l'enregistrement radio FM.
La radio est enregistrée sur un volume réglé
✎
par défaut même si vous changez le volume ou
si vous appuyez sur le bouton MUTE lors du
processus d'enregistrement.
FUNCTION pour
ROUGE (A) pour
EXIT pour arrêter
EXIT,
MUTE
TUNING
, et VOLUME +/-
16 - Français
Page 56

Si vous retirez le périphérique USB ou le câble
✎
d'alimentation lors du processus d'enregistrement,
il est possible que la partie du fichier qui a déjà
été enregistrée ne puisse pas être lue.
L'enregistrement ne commencera pas si l'espace
✎
libre restant sur le périphérique de stockage USB
est inférieur à 2 Mo.
Si le périphérique USB est retiré ou dispose d'un
✎
espace insuffisant (inférieur à 2 Mo), le message
approprié s'affiche et l'enregistrement s'arrête.
A propos de la radiodiffusion RDS
Utilisez la fonction RDS (Système de
radiocommunication de données) pour
recevoir des stations FM
Grâce à la fonction RDS, des stations FM peuvent
envoyer un signal supplémentaire avec leurs signaux
de programmes réguliers.
Les stations envoient p. ex. leurs noms de station
ainsi que des informations sur le type de programme
diffusé (sport, musique, etc.).
Lorsque vous réglez une station FM qui fournit le
service RDS, le témoin RDS s'affiche sur l'écran.
Description de la fonction RDS
• PTY (Type de programme) : permet d'afficher le
type de programme en cours de diffusion.
• PS NAME (Nom du service de programme) :
permet d'indiquer le nom de la station de
radiodiffusion. Il est composé de 8 caractères.
• RT (Texte de radio) : permet de décoder le texte
diffusé par une station (s'il y en a). Il est composé
de 64 caractères au maximum.
• CT (Horloge) : Permet de décoder l'horloge en
temps réel depuis la fréquence FM. Certaines
stations peuvent ne pas transmettre les
informations PTY, RT ou CT, en conséquence elles
peuvent ne pas être affichées dans tous les cas.
• TA (Annonce de trafic) : la mention « TA ON/OFF »
(ANNONCE DE TRAFIC ACTIVÉE/DÉSACTIVÉE)
montre l’état de progression de l’annonce de trafic.
La fonction RDS peut ne pas fonctionner
✎
correctement si la station réglée ne transmet pas
correctement le signal RDS ou si le signal est faible.
Pour afficher les signaux RDS
Vous pouvez visualiser les signaux RDS envoyés par
la station sur l'écran.
Appuyez sur le bouton
vous écoutez une station FM.
• Chaque fois que vous appuyez sur ce bouton,
l'affichage des informations suivantes est modifié
comme suit : PS NAME RT CT Fréquence
PS
(Service de
programme)
RT (Texte de
radio)
Fréquence
RDS DISPLAY lorsque que
Lors de la recherche, <PS
NAME> (NOM DU SERVICE DE
PROGRAMME) apparaît, puis
les noms de stations s'affichent.
<NO PS> (AUCUN SERVICE DE
PROGRAMME) apparaît si aucun
signal n'est envoyé.
Lors de la recherche, <RT>
(TEXTE DE RADIO) apparaît, puis
les messages texte envoyés par
la station s'affichent. <NO RT>
(AUCUN TEXTE DE RADIO) apparaît
si aucun signal n'est envoyé.
Fréquence de la station (sans
service RDS)
A propos des caractères affichés sur l'écran
Lorsque l'écran affiche les signaux PS; ou RT, les
caractères suivants sont utilisés.
• L'écran d'affichage ne peut pas faire la différence
entre des lettres majuscules et minuscules et
n'utilise que des majuscules.
• L'écran ne peut pas afficher des lettres accentuées.
Par exemple, <A,> peut signifier des lettres <A’s>
accentuées comme <À, Â, Ä, Á, Å et Ã>.
Indication PTY (Type de programme) et
fonction PTY-SEARCH
L'un des avantages du service RDS consiste en
la possibilité de localiser un type de programme
particulier à partir des canaux préréglés en spécifiant
les codes PTY.
Pour rechercher un programme à l'aide des
codes PTY
• Avant de démarrer !
- La fonction de recherche PTY ne peut être
appliquée qu'aux stations préréglées.
- Pour arrêter la recherche à tout moment au
cours du processus, appuyez sur le bouton 5
pendant que la recherche est en cours.
- Il y a une limite de temps pour réaliser les étapes
suivantes. Si le réglage est annulé avant que vous
ayez terminé, recommencez à nouveau par l'étape 1.
Paramètres
17 - Français
Page 57

Paramètres
+
- Lorsque vous appuyez sur les boutons de la
télécommande principale, assurez-vous d'avoir
sélectionné la station FM à l'aide de cette
télécommande principale.
RDS DISPLAY TA
2
1. Appuyez sur le bouton PTY SEARCH lorsque
que vous écoutez une station FM.
2. Appuyez sur le bouton
que le code PTY que vous désirez s'affiche sur
l'écran.
• L'écran affiche les codes PTY décrits à droite.
3. Appuyez à nouveau sur le bouton
lorsque le code PTY sélectionné à l'étape
précédente est toujours affiché sur l'écran.
• L'unité centrale recherche les 15 stations FM
1
PTY - PTY SEARCH PTY +
4
56
préréglées, s'arrête lorsqu'elle trouve la station
sélectionnée et règle cette station.
3
PTY- ou PTY+ jusqu'à ce
PTY SEARCH
Mise à niveau du logiciel
Le menu Mise à niveau du logiciel vous permet
de mettre le logiciel de l'appareil à niveau pour en
améliorer la performance et obtenir des services
supplémentaires.
•
Évitez d'éteindre et de rallumer le produit
manuellement durant le processus de mise à jour.
•
La mise à jour est terminée lorsque l'appareil
s'éteint après avoir redémarré. Appuyez sur le
bouton MARCHE/ARRÊT pour allumer l'appareil
mis à jour pour une utilisation ultérieure.
1. Rendez-vous sur le site www.samsung.com.
2. Cliquez sur OWNERS & SUPPORT sur le coin
inférieur droit de la page, puis sélectionnez
Manuals & Downloads sur la liste déroulante
qui apparaît.
3. À l'écran suivant, entrez le numéro de modèle
du produit dans le champ de recherche.
Une fois que vous avez entré le numéro du
modèle, une liste déroulante affiche les produits
correspondant aux numéros de modèle.
4. Effectuez un clic gauche sur le numéro de
modèle du produit dans la liste déroulante.
5. Sélectionnez Downloads sur la page qui
s'affiche.
6. Recherchez l'option Mettre à niveau le fichier
(type USB) sur la colonne Description. Cliquez
sur l'icône ZIP dans la colonne Télécharger le
fichier sur la droite.
7. Cliquez sur Send dans la fenêtre contextuelle
qui apparaît. Le fichier se télécharge sur votre
ordinateur.
8. Dézippez le dossier compressé sur votre
ordinateur. Vous devriez avoir un seul dossier
dézippé portant le même nom que le fichier
compressé.
9. Copiez le dossier sur une clé USB à mémoire
flash.
10. Vérifiez qu'aucun disque n'est inséré dans
l'appareil, puis insérez la clé USB à mémoire
flash dans le port USB de l'appareil.
11. Dans le menu de l'appareil, allez dans
Paramètres > Assistance > Mise à niveau du
logiciel.
12. Sélectionnez USB.
13. Le Home cinéma recherche le logiciel sur la
clé USB. Lorsqu'il trouve le logiciel, la fenêtre
contextuelle Update Request (Demande de mise
à jour) apparaît.
14. Sélectionnez OK. Le Home cinéma s'éteint
automatiquement, s'allume puis la mise à jour
démarre. Lorsque la mise à niveau est terminée,
le Home cinéma s'éteint.
15. Appuyez sur le bouton
d'allumer le Home cinéma
Aucun disque ne doit être inséré dans le produit
✎
lors de la mise à niveau du logiciel via la prise
Hôte USB.
Une fois la mise à niveau terminée, consultez les
✎
détails du logiciel dans le menu Mise à niveau du
logiciel.
MARCHE/ARRÊT afin
18 - Français
Page 58

Lire un Contenu
Votre Home cinéma peut lire le contenu se trouvant
sur des disques Blu-ray/DVD/CD et des périphériques
USB.
Rangement et gestion des disques
• Comment tenir le disque
Changement du dispositif source
Si deux appareils externes ou plus sont connectés
à l'appareil principal, vous pouvez utiliser l'une des
trois méthodes décrites ci-dessous pour changer le
dispositif source.
Méthode 1
Depuis l'écran d'accueil, utilisez les boutons ▲▼◄► pour
passer à Changer périph., et appuyez ensuite sur E.
Le menu Changer périph.. Utilisez les boutons ▲▼ pour
sélectionner le périphérique souhaité puis appuyez sur le
bouton E.
Méthode 2
Si vous passez à
sur d'autres contenus basés sur les fichiers, une liste
de dossiers et de fichiers va apparaître. Appuyez sur le
bouton
Changer périph. utilisez les boutons ▲▼ pour se
déplacer sur l'appareil désiré, et appuyez ensuite sur E.
PHOTOS, VIDÉOS, MUSIQUE
ROUGE (A) pour afficher la fenêtre contextuelle
ou
Méthode 3
Lorsqu'un périphérique est connecté pour la première
fois, une fenêtre contextuelle apparaît. Sur la fenêtre
contextuelle, vous pouvez modifier le périphérique
source en utilisant les boutons ◄► puis appuyer sur
E
.
Lecture de disques disponibles
dans le commerce
1.
Appuyez sur le bouton ^ pour ouvrir le tiroir disque.
2. Introduisez doucement le disque dans le tiroir,
face imprimée dirigée vers le haut.
3. Appuyez sur le bouton ^ pour fermer le tiroir
disque.La lecture commence automatiquement.
4. Si la lecture ne commence pas automatiquement,
appuyez sur le bouton 6 de la télécommande.
• Nettoyage des disques
Vous pouvez lire les fichiers multimédia que vous avez
enregistrés sur des disques Blu-ray, DVD ou CD.
1. Placez un disque enregistré par l'utilisateur dans
2. Servez-vous des boutons ◄► pour sélectionner
2
- Des empreintes digitales ou des
rayures sur la surface d'un disque
peuvent altérer la qualité du son et
de l'image ou provoquer des sauts.
- Évitez de toucher la surface du disque sur
laquelle les données ont été enregistrées.
- Tenez le disque par les bords afin de ne pas
laisser d'empreintes sur sa surface.
- Ne collez pas de papier ou d'adhésif sur le
disque.
- En cas d'empreintes ou de saleté
sur un disque, nettoyez-le à l'aide
d'eau additionnée de détergent
doux et d'un chiffon doux.
- Lors de son nettoyage, essuyez le
disque du centre vers le bord.
- Rangement des disques
N'installez pas l'appareil à la lumière directe
du soleil.
Stockez-le dans un endroit frais et aéré.
Rangez-le dans une pochette propre et
verticalement.
Lecture d’un disque dont le
contenu est enregistré par
l’utilisateur
le tiroir disque en veillant à ce que l'étiquette du
disque soit orientée vers le haut puis fermez le
tiroir disque.
le type de contenus que vous souhaitez afficher
ou lire PHOTOS, VIDÉOS ou MUSIQUE, puis
appuyez sur le bouton E.
-1
Sélectionnez LIRE LE DISQUE depuis l'écran
d'accueil. L'écran LIRE LE DISQUE apparaît.
Utilisez les boutons ▲▼ pour sélectionner le type
de contenu désiré, Photos, Vidéos ou Musique.
OU
Lire un Contenu
19 - Français
Page 59

Lire un Contenu
E
pé
Fonctio
P
e
Paramètres
OS
S
3. Un écran listant le contenu du disque apparaît.
En fonction de la manière dont le contenu est
classé vous allez voir soit des documents, soit
des fichiers individuels, ou les deux.
4. Si nécessaire, servez-vous des boutons ▲▼◄►
pour sélectionner un dossier, puis appuyez sur le
bouton E.
5. Utilisez les boutons ▲▼◄► pour sélectionner
un fichier à visionner ou à lire, puis appuyez sur
le bouton E.
6. Appuyez sur le bouton
RETURN une ou plusieurs
fois pour quitter l'écran actuel, quitter un dossier
ou revenir à l'écran d'accueil. Appuyez sur le
bouton EXIT pour revenir directement à l'écran
d'accueil.
7. Consultez les pages 21 à 25 pour obtenir plus
d'instructions concernant la méthode de contrôle
de la lecture de vidéos, musiques et photos sur
un disque.
Lecture de fichiers sur un
périphérique USB
Vous pouvez recourir à deux méthodes différentes
pour lire ou afficher via votre appareil les fichiers
multimédia stockés sur un périphérique USB.
Méthode 1 : Avant de connecter un
périphérique USB l'appareil est allumé
1.
La fenêtre contextuelle"Nv. périph. conn."
apparaît.
LIRE LE DISQUE
LIRE LE DISQU
Pas de Disque
as de Disqu
Changer
Fonction
Changer
périph.
riph.
PHOTOS VIDÉOS
PHOT
Nv. périph. conn.
STORAGE DEVICE
Photos
Vidéos
Musique
> Déplacer " Entrée ' Retour
Paramètres
n
VIDÉO
MUSIQUE
MUSIQUE
3. Si nécessaire, servez-vous des boutons ▲▼◄►
pour sélectionner un dossier, et appuyez ensuite
sur le bouton E.
4. Sélectionnez un fichier à afficher ou à lire, puis
appuyez sur le bouton E.
5. Appuyez sur le bouton RETURN pour quitter
un dossier ou sur le bouton EXIT pour revenir à
l'écran d'accueil.
6. Consultez les pages 21~25 pour obtenir plus
d'instructions concernant la méthode de contrôle
de la lecture de vidéos, musiques et photos sur
un périphérique USB.
Méthode 2 : Si l'appareil est éteint après que
vous avez connecté un périphérique USB
1. Mettez l'appareil sous tension.
2. Appuyez sur Changer périph. et sélectionnez un
périphérique USB.
3. Utilisez les boutons ◄► pour sélectionner
PHOTOS, VIDÉOS ou MUSIQUE sur l'écran
d'accueil, et ensuite appuyez sur le bouton E.
4. Si nécessaire, servez-vous des boutons ▲▼◄►
pour sélectionner un dossier, et appuyez ensuite
sur le bouton E.
5. Sélectionnez un fichier à afficher ou à lire, puis
appuyez sur le bouton E.
6. Appuyez sur le bouton
RETURN pour quitter
un dossier ou sur le bouton EXIT pour revenir à
l'écran d'accueil.
7. Consultez les pages 21~25 pour obtenir plus
d'instructions concernant la méthode de contrôle
de la lecture de vidéos, musiques et photos sur
un périphérique USB.
Si vous insérez un disque en cours de lecture
✎
d'un périphérique USB, le mode du périphérique
passe automatiquement à « Disc » (Disque).
Si la fenêtre contextuelle n'apparaît pas, passez à
✎
la méthode 2.
2. Utilisez les boutons ▲▼ pour sélectionner
Photos, Vidéos ou Musique et appuyez ensuite
sur le bouton E. En fonction de la manière
dont le contenu est classé, vous verrez soit des
dossiers, soit des fichiers individuels ou les deux
types d'éléments à la fois.
20 - Français
Page 60

SUBTITLE HOME
REPEAT
DISC MENU
TITLE MENU
0
POPUP
Contrôle de la lecture Vidéo
Vous pouvez contrôler la lecture du contenu vidéo
se trouvant sur un disque Blu-ray/DVD ou sur un
périphérique USB. En fonction du disque ou du
contenu, certaines fonctions décrites dans ce manuel
peuvent ne pas être disponibles.
Boutons de la télécommande servant à
la lecture vidéo
2
1
3
Boutons liés à la lecture
1
L'appareil ne lit pas le son en mode Recherche,
Lent ou Pas.
• Pour reprendre la lecture à une vitesse normale,
appuyez sur le bouton 6.
Permet de démarrer la lecture.
Permet d'arrêter la lecture.
Permet d’interrompre la lecture.
Au cours de la lecture, appuyez sur
le bouton 3 ou sur le bouton .
Chaque fois que appuyez sur le
bouton 3 ou sur le bouton , la
vitesse de lecture change.
en mode pause, appuyez sur
le bouton . Chaque fois que
appuyez sur le bouton , la
vitesse de lecture change.
En mode pause, appuyez sur
le bouton 7. Chaque fois que
appuyez sur le bouton 7, la
vitesse de lecture change.
Au cours de la lecture, appuyez
sur le bouton 1 ou 2. Chaque
fois que appuyez sur le bouton
ou 2, le disque se déplace sur
le chapitre ou le fichier suivant ou
précédent.
1
6
5
7
Lecture
rapide
Lecture au
ralenti
Lecture
pas à pas
Saut de
lecture
Utilisation du menu du disque, du menu des
2
titres, du menu contextuel et de la liste des titres
DISC MENU
Au cours de la lecture, appuyez sur ce bouton
pour afficher le menu Disque.
TITLE MENU
Au cours de la lecture, appuyez sur ce bouton
pour afficher le menu Titre.
•
Si le disque possède une liste de lecture, appuyez
sur le bouton VERT (B) : pour y accéder.
POPUP MENU
Au cours de la lecture, appuyez sur ce bouton
pour afficher le menu contextuel.
Répétition de la lecture
3
1. Durant la lecture, appuyez sur le bouton
REPEAT de la télécommande.
2. Utilisez les boutons ▲▼ pour sélectionner
Arrêt, Titre, Chapitre, Tous ou Répétition
A-B, puis appuyez sur le bouton E.
❏ Répétition A-B
1.
Appuyez sur le bouton E à l'emplacement sur
lequel vous souhaitez démarrer la répétition (A).
2.
Appuyez sur le bouton E à l'emplacement sur
lequel vous souhaitez démarrer la répétition (B).
3.
Pour reprendre le cours normal de la relecture,
appuyez à nouveau sur le bouton REPEAT.
4. Appuyez sur le bouton E.
En fonction du disque, l’écran peut ne pas
✎
afficher toutes les options de répétition.
L'écran peut ne pas afficher immédiatement
✎
Chapitre ou Titre. Continuez à appuyer sur les
boutons ▲▼ jusqu’à ce que votre choix soit à
l’intérieur du champ applicable.
Pour reprendre la lecture normale, appuyez
✎
une nouvelle fois sur le bouton
sur les boutons ▲▼ pour sélectionner Arrêt,
puis appuyez sur le bouton E.
L'écran peut ne pas afficher immédiatement
✎
Répétition A-B. Continuez à appuyer sur les
boutons ▲▼ jusqu'à ce que Répétition A-B
soit à l'intérieur du champ applicable.
Vous devez définir le point (B) à un intervalle
✎
d'au moins 5 secondes de temps de lecture
après le point (A).
REPEAT puis
Lire un Contenu
21 - Français
Page 61

Lire un Contenu
Utilisation du menu TOOLS
Durant la lecture, appuyez sur le bouton TOOLS.
Titre
S'il y a plusieurs titres sur un disque ou un appareil,
passez au titre souhaité ou sélectionnez-le.
Lorsque vous recherchez un titre de DVD, en
✎
mode Arrêt, appuyez sur le bouton
puis saisissez le numéro du titre que vous
souhaitez (01, 02, etc.).
Durée de lecture
Allez jusqu'à un point de lecture particulier. Utilisez
les boutons numériques pour entrer le point de
lecture.
Mode Répétition
Vous permet de répéter un titre particulier, un
chapitre, ou une section spécifique.
Sync. audio
Vous permet de régler le temps de retard audio
afin que l'audio synchronise avec la vidéo. Vous
pouvez régler le délai entre 0 et 300 millisecondes.
Mode égaliseur
Activez Mode égaliseur pour utiliser l’égaliseur.
Paramètres Egaliseur
Cette option vous permet de régler l'égaliseur.
Paramètres Egaliseur n'apparaît que lorsque
✎
Mode égaliseur est réglé sur Activé.
Paramètres d'image
Vous permet de régler le mode d'utilisation.
Mode
- Utilisateur : Placez-vous sur les Paramètres
avancés activés et appuyez sur le bouton
. vous permet d'ajuster manuellement les
E
fonctions Luminosité, Contraste, Couleur et
Netteté.
- Dynamique : choisissez ce réglage pour
accentuer la netteté de l'image.
- Normal : choisissez ce réglage pour la plupart
des applications d'affichage.
- Cinéma : il s’agit du réglage le mieux adapté au
visionnage de films.
TOOLS
La sélection des menus apparaît uniquement
lorsque les disques BD/DVD sont lus.
Chapitre
Sélectionnez cette option pour accéder à un
chapitre que vous désirez regarder.
Audio
Sélectionnez cette option pour régler la langue de
bande son souhaitée.
Sous-titres
Sélectionnez cette option pour régler la langue de
sous-titres souhaitée.
Angle
Utilisé pour regarder une scène sous un autre
angle. Le menu Angle affiche le nombre d'angles
disponibles (1/1, 1/2, 1/3, etc.).
BONUSVIEW Vidéo BONUSVIEW Audio
Réglez l'option Bonusview souhaitée.
La sélection des menus apparaît uniquement
lorsqu'un fichier est lu
Plein écran
Réglez la taille de plein écran souhaitée. Vous
pouvez sélectionner Original, Mode1 (plus grand),
et Mode2 (le plus grand).
Information
Permet d'afficher les informations relatives au
fichier vidéo.
Le menu Outils peut varier en fonction du disque
✎
ou du périphérique de stockage. Toutes les
options peuvent ne pas s'afficher.
22 - Français
Page 62

Création d’une liste de lecture des
1
2
3
7
89
DISC MENU
PTY - PTY SEARCH PTY +
RDS DISPLAY TA
TITLE MENU
0
POPUP
4
56
vidéos
Vous pouvez créer une liste de lecture des fichiers
vidéo presque de la même façon que vous créez
une liste de lecture des fichiers musicaux. Reportezvous à la page 24 pour obtenir des instructions.
Sélectionnez les fichiers vidéo au lieu des fichiers
musicaux.
Lecture d'un disque audio
commercial pré-enregistré
1. Insérez un CD audio (CD-DA) ou un disque MP3
2.
✎
Contrôle de la lecture de musique
Vous pouvez contrôler la lecture du contenu musical
se trouvant sur un DVD, un CD ou un périphérique
USB. En fonction du disque ou du contenu, certaines
fonctions décrites dans ce manuel peuvent ne pas
être disponibles.
dans le tiroir disque.
• Pour un CD audio (CD-DA), la première piste
s'exécute automatiquement. Les plages d'un
disque sont lues dans l'ordre dans lequel elles
ont été enregistrées sur le disque.
• Pour un disque MP3, appuyez sur les boutons
◄► pour sélectionner MUSIQUE, puis
appuyez sur le bouton E.
Playlist
TRACK 001
CD
Mode Répétition Piste
Mode égaliseur Arrêt
Extract.
00:00/00:00
Pause Choisir
"
Outils
Déplacer < Régler ' Retour
>
TRACK 004 04:02
TRACK 005 03:43
TRACK 006 03:40
Outils ' Retour
Pour lire une piste particulière, utilisez les boutons
▲▼ de la télécommande pour sélectionner la
piste, puis appuyez sur le bouton E.
Pour plus d'informations sur la lecture de la
musique, consultez la section Contrôle de la
lecture de musique ci-dessous.
Boutons de la télécommande servant à
l'écoute de musique
1
2
3
Boutons numériques : durant la lecture de
la liste de lecture, appuyez sur le numéro
1
de piste souhaité. La piste sélectionnée est
alors reproduite.
Saut : Durant la lecture, appuyez sur le
bouton 1 ou 2 pour accéder à la piste
2
musicale précédente ou suivante.
0/16
Répétition de pistes
Vous pouvez configurer la répétition de pistes sur
l’appareil.
1. Durant la lecture de musiques, appuyez sur le
2. Sélectionnez Mode Répétition, puis utilisez les
bouton : permet d'arrêter la lecture
5
3
d'une piste.
Lecture rapide (CD audio [CD-DA]
uniquement) :
4
Durant la lecture, appuyez sur le bouton 3 ou
. Chaque fois que appuyez sur le bouton
ou , la vitesse de lecture change.
3
bouton : permet de mettre en pause une
7
5
piste.
bouton : permet de lire la plage
6
6
sélectionnée.
bouton
TOOLS.
boutons ◄► pour sélectionner Arrêt, Piste ou
Une fois, Tous ou Aléatoire, puis appuyez sur le
bouton E.
4
5
6
Lire un Contenu
23 - Français
Page 63

Lire un Contenu
Création d’une liste de lecture de musiques
1. En cas de lecture de musiques sur CD ou
DVD commercial, appuyez sur le bouton 5
ou
RETURN. L’écran Liste des musiques
s'affiche. Si vous créez une liste de lecture de
musiques sur un disque créé par vous ou sur
un périphérique USB, accédez à la liste des
musiques de la manière décrite page 19 ou 20.
2. Appuyez sur les boutons ▲▼◄► pour passer
au fichier souhaité puis appuyez sur le bouton
JAUNE (C) pour le sélectionner Répétez cette
procédure pour sélectionner d’autres fichiers.
Si vous souhaitez sélectionner tous les fichiers,
3.
appuyez sur le bouton
boutons ▲▼ pour sélectionner Sélectionner
tout, et appuyez ensuite sur E. Si vous
souhaitez désélectionner tous les fichiers,
appuyez sur le bouton
désélectionner, et appuyez ensuite sur E.
MUSIQUE TRACK 001 1 fich. sélect 1/2 Page
㾎
TRACK 001
05:57
TRACK 003
04:07
TRACK 005
03:17
TRACK 007
03:47
TRACK 009
03:53
CD a Changer périph.
4. Pour retirer un fichier de la Liste lect, placez-
vous sur le fichier puis appuyez sur le bouton
JAUNE (C).
5. Appuyez sur le bouton E pour lire les fichiers
sélectionnés. L'écran Liste lect apparaît.
6. Pour accéder à la liste des musiques, appuyez
sur le bouton 5 ou
7. Pour revenir à la Liste lect appuyez sur le
bouton E.
Vous pouvez créer une liste de lecture comportant
✎
jusqu'à 99 pistes sur un CD audio (CD-DA).
Si vous allez sur la Music List (Liste des musiques)
✎
Liste lect, et que vous retournez ensuite sur la
Liste lect, la Liste lect redémarrera la lecture
depuis le début.
TOOLS, utilisez les
TOOLS, sélectionnez Tout
TRACK 002
04:27
TRACK 004
03:41
TRACK 006
03:35
TRACK 008
03:49
TRACK 010
03:45
Outils () Acc à page ' Retour
Choisir
RETURN.
Extraction
1. Insérez un périphérique USB dans la prise USB
située à l'avant de l'appareil.
2. Lorsque l'écran Lecture est affiché utilisez les
boutons ▲▼ pour sélectionner une piste de
lecture, et appuyez ensuite sur le bouton
(C). Une coche s’affiche à la gauche de la piste.
3. Répétez l’étape 2 pour sélectionner et cocher
des pistes supplémentaires.
Pour retirer une piste de la liste, accéder à la piste
4.
de lecture, et appuyez à nouveau sur le bouton
JAUNE (C). La coche de la piste est retirée.
5. Une fois terminée, appuyez sur le bouton
TOOLS. Le menu Outils apparaît
6. Utilisez les boutons ▲▼ pour sélectionner
Extract., puis appuyez sur le bouton E.
L'écran Extract. apparaît.
7. Utilisez les boutons ▲▼ pour sélectionner le
périphérique de stockage des fichiers extraits,
puis appuyez sur le bouton E.
Ne débranchez pas le périphérique lorsque
✎
l'extraction est en cours d’exécution.
8. Si vous souhaitez annuler l'extraction, appuyez
sur le bouton E puis sélectionnez Oui.
Sélectionnez Non pour continuer l'extraction.
9. Lorsque l'extraction est terminée, le message
"Extraction terminée." apparaît.
10. Appuyez sur le bouton E pour revenir à l'écran
de Lecture.
Cette fonction n'est pas disponible pour les CD
✎
Audio DTS.
Cette fonction n'est pas prise en charge par
✎
certains disques.
L'extraction encode la musique au format .mp3 à
✎
192 kbps.
Sur l'écran de liste des pistes de lecture, vous
✎
pouvez choisir Sélectionner tout ou Tout
désélectionner.
- Sélectionnez Sélectionner tout, puis appuyez
sur le bouton E. Cette action annule toutes
vos sélections de pistes individuelles.
- Sélectionnez Tout désélectionner pour
désélectionner toutes les pistes sélectionnées
en une fois.
JAUNE
24 - Français
Page 64

Visionnage des photos
Vous pouvez visionner les photos se trouvant sur un
DVD ou un périphérique USB.
Utilisation du menu Tools
Durant la lecture, appuyez sur le bouton TOOLS.
Lancer le diaporama / Arrêter le diaporama
Sélectionnez cette option pour lire ou mettre en
pause le diaporama.
Vit. diaporama
Sélectionnez cette option pour régler la vitesse du
diaporama.
Fond musical
Sélectionnez cette option pour écouter de la
musique tout en visionnant un diaporama.
Zoom
Sélectionnez cette option pour agrandir l'image
actuellement sélectionnée. (Agrandissement
jusqu'à 4 fois la taille réelle)
Pivoter
Sélectionnez cette option pour faire pivoter une
image. (Cela entraînera la rotation de l'image dans
le sens des aiguilles d'une montre ou dans le sens
inverse.)
Information
Cette option permet d'afficher les informations
relatives à l'image, notamment son nom et sa taille.
Le menu Outils peut varier en fonction du disque
✎
ou du périphérique de stockage. Toutes les
options peuvent ne pas s'afficher.
Pour activer la fonction de fond musical, le
✎
fichier photo et le fichier de musique doivent être
contenus sur le même support de stockage.
Cependant, la qualité sonore peut être affectée
par le débit binaire du fichier MP3, la taille de la
photo et la méthode d'encodage utilisée.
Création d’une liste de lecture de photos
Vous pouvez créer une liste de lectures de photos
presque de la même manière que vous créez une
liste de lectures audio. Reportez-vous à la page 24
pour obtenir des instructions. Sélectionnez les fichiers
photos à la place des fichiers audios.
Utilisation des boutons
spécifiques de la télécommande
TV SOUND
Si votre téléviseur prend en charge la fonction
Anynet+ (HDMI-CEC), le bouton
permet de diriger le son du téléviseur vers les
enceintes du Home cinéma ou les enceintes du
téléviseur. Pour utiliser, suivez ces étapes :
1. Connectez un câble HDMI au téléviseur et au
Home cinéma. (Reportez-vous à la page 11)
2. Réglez Anynet+ (HDMI-CEC) Activé dans le
Home cinéma et le téléviseur.
3. Appuyez sur le bouton
télécommande. TV SOUND ON clignote à
l'écran en façade, puis passe à D. IN.
• Lorsque que le TV SOUND (SON DU
TÉLÉVISEUR) est activé, le son du téléviseur
émet à travers les enceintes du Home
cinéma.
4. Appuyez à nouveau sur le bouton
pour le désactiver.
• Lorsque le TV SOUND (SON DU
TÉLÉVISEUR) est désactivé, le son du
téléviseur émet à travers les enceintes du
téléviseur Anynet+ connecté.
❏ Utilisez SON DU TÉLÉVISEUR :
1) Lorsque vous voulez écouter le son du
téléviseur à travers les enceintes du Home
cinéma.
2) Lorsque vous voulez écouter le son d'une clé
USB branchée dans le téléviseur à travers les
enceintes du Home cinéma.
TV SOUND de la
TV SOUND
TV SOUND vous
TV SOUND
Lire un Contenu
25 - Français
Page 65

Lire un Contenu
❏ Spécifications de prise en charge TV
SOUND ON/OFF (SON DU TÉLÉVISEUR
ACTIVÉ/DÉSACTIVÉ) :
Anynet+
(HDMI-CEC)
Réglage
ACTIVÉ
DÉSACTIVÉ
Aucune
opération
DSP/EQ
Vous pouvez régler le son à l'aide de divers
modes sonores.
DSPOFF : Sélectionnez cette option pour une
écoute normale.
CINEMA : Produit un son réaliste et puissant
pour les films.
MUSIC : Mode adapté aux sources musicales.
GAME : Intensifie les jeux vidéo à l'aide d'un
son puissant et réaliste.
M-STEREO (Multi Stéréo) : Produit un son
surround pour des sources d’entrée 2 canaux.
POWER BASS : Augmente le son des basses.
LOUD : Optimise le son pour une écoute
nocturne en comprimant la plage dynamique et
en atténuant le son.
NIGHT : Fournit un égaliseur pouvant être réglé
par l'utilisateur afin que vous puissiez régler la
musique selon vos préférences.
USER EQ : Fournit un égaliseur pouvant être
réglé par l'utilisateur afin que vous puissiez
régler la musique selon vos préférences.
Son du
téléviseur
activé)
Sortie Enceintes
HTS
Silence
Enceintes
Téléviseur
Sortie Enceintes
HTS
Sortie Enceintes
Téléviseur
Sortie Enceintes
HTS
Sortie Enceintes
Téléviseur
Son du
téléviseur
désactivé
Silence
Enceintes HTS
Sortie Enceintes
Téléviseur
Silence
Enceintes HTS
Sortie Enceintes
Téléviseur
Silence
Enceintes HTS
Sortie Enceintes
Téléviseur
DSP/EQ
26 - Français
Page 66

Annexes
Informations complémentaires
Remarques
Branchements
SORTIE HDMI
• Selon votre téléviseur, il est possible que certaines
résolutions de sortie HDMI ne fonctionnent pas.
• Un câble HDMI trop long peut provoquer du bruit
à l'écran. Si tel est le cas, réglez Couleur intense
HDMI sur Arrêt dans le menu.
Paramètres
Format TV
• Selon le type de disque utilisé, certains formats
d'image peuvent être indisponibles.
• Si vous sélectionnez un format d'image différent de
celui de votre téléviseur, il est possible que l'image
affichée soit déformée.
• Si vous sélectionnez 16:9 Original, votre téléviseur
peut afficher 4:3 Pillarbox (barres noires sur les
côtés de l'image).
BD Wise (Produits Samsung uniquement)
• Lorsque l'option BD Wise est activée, l'option
Résolution est définie par défaut sur BD Wise et
BD Wise s'affiche dans le menu Résolution.
• Si le produit est connecté à un appareil qui ne prend
pas en charge BD Wise, la fonction BD Wise n'est
pas disponible..
• Pour que l'option BD Wisefonctionne correctement,
définissez BD Wise sur Activé pour l'appareil et le
téléviseur.
Sortie numérique
• Assurez-vous de sélectionner l'option Sortie
numérique appropriée, sinon vous n'entendrez
aucun son ou un son très fort.
• Si le périphérique HDMI (récepteur AV, téléviseur)
n'est pas compatible avec les formats compressés
(Dolby digital, DTS), le signal audio sera émis en
sortie au format PCM.
• Les DVD n'ont pas habituellement de fonctionnalité
audio BONUSVIEW ni d'effet sonore de navigation.
• Certains disques Blu-ray ne sont pas dotés de
fonctionnalité audio BONUSVIEW ni d'effet sonore
de navigation.
•
La configuration Sortie numérique n'affecte pas
la sortie audio analogique (G/D) ou HDMI de votre
téléviseur. Elle affecte les sorties audio optique et HDMI
lorsque l'appareil est connecté à un récepteur AV.
• Si vous lisez des pistes de son audio MPEG, le
signal audio sera émis en sortie au format PCM
indépendamment de vos sélections de sortie
numérique Sortie numérique (PCM ou Bitstream).
• Sortie numérique peut être activée lorsque Sélect.
haut-parleur est définie sur Haut-parleur TV.
Anynet+ (HDMI-CEC)
• En fonction de votre téléviseur, il est possible que
certaines résolutions de sortie HDMI ne fonctionnent
pas. Veuillez vous reporter au manuel d'utilisation
de votre téléviseur.
• La fonction sera indisponible si le câble HDMI ne
prend pas en charge CEC.
• Si votre téléviseur Samsung dispose d'un logo
Anynet+, cela signifie qu'il est compatible Anynet+.
Gestion données BD
• En mode mémoire externe, la lecture du
disque pourra s'arrêter si vous déconnectez le
périphérique USB en cours d'exécution.
• Seuls les périphériques USB formatés selon le
système de fichiers FAT (label de volume DOS 8.3)
sont pris en charge. Nous vous recommandons
d'utiliser des périphériques USB prenant en charge
le protocole USB 2.0 avec une vitesse de lecture/
d'écriture supérieure ou égale à 4 Mo/s.
• La fonction Reprendre Play peut être inopérante
après le formatage du périphérique de stockage.
• La capacité totale de mémoire disponible pour
l'option Gestion données BD peut varier selon les
conditions.
DivX® Vidéo à la demande
Pour plus d'informations sur DivX(R) à la demande(VOD),
•
veuillez visiter le site « http://vod.divx.com ».
Paramètre haut-parleur
• Lorsque l'option Sélect. haut-parleur est définie
sur Haut-parleur TV, le son est émis depuis les
enceintes du téléviseur.
Son HDMI
• Lorsque le son HDMI sort vers les haut-parleurs du
téléviseur, il subit automatiquement un mixage final
en deux canaux.
Annexes
27 - Français
Page 67

Annexes
Fonct. Retour Audio
• Lorsque l'option Anynet+ (HDMI-CEC) est définie
sur Arrêt, la fonction Fonct. Retour Audio n'est
pas disponible.
• L'utilisation d'un câble HDMI non certifiée pour ARC
(Canal retour audio) peut provoquer un problème de
compatibilité.
• La fonction ARC est uniquement disponible si un
téléviseur compatible ARC est connectée.
Lecture
Lecture de fichiers vidéo
• La lecture des fichiers vidéo au débit binaire élevé,
égal ou supérieur à 20 Mbps, exerce une forte
charge sur les capacités de l’appareil et risque, de
ce fait, de s’interrompre en cours de lecture.
Sélection de la langue de la bande son
• L'indicateur ◄► ne s'affichera pas à l'écran si la
section BONUSVIEW ne contient pas de réglages
BONUSVIEW audio.
• La disponibilité des langues proposées via la
fonction de la langue de la bande son dépend des
langues encodées sur le disque. Par conséquent,
cette fonction ou certaines langues peuvent être
indisponibles.
Certains disques Blu-ray vous autorisent à sélectionner
•
la bande son anglaise PCM ou Dolby Digital.
Sélection de la langue des sous-titres
• En fonction du disque Blu-ray/DVD, vous pouvez
changer la langue des sous-titres dans le Menu du
disque. Appuyez sur le bouton
• Cette fonction dépend de la sélection des soustitres encodés sur le disque et peut ne pas être
disponible sur tous les disques Blu-ray/DVD.
•
Les informations concernant la fonction principale ou
le mode BONUSVIEW s'afficheront également si le
disque Blu-ray dispose d'une section BONUSVIEW.
• Cette fonction modifie à la fois les sous-titres
principaux et secondaires au même moment.
• Le nombre total de sous-titres principaux et
secondaires s'affiche.
Lecture des fichiers JPEG
Vous ne pouvez pas agrandir les sous-titres et les
•
graphiques PG pour les afficher en mode plein écran.
DISC MENU.
Lire un Contenu
Utilisation de la touche
d’images.
Si le Home cinéma est connecté à un téléviseur
•
compatible BD Wise dont la fonction BD Wise Activé,
le menu Paramètres d'image ne s'affiche pas.
• La fonction Fond musical ne fonctionne que si
le fichier musical et le fichier photo sont situés
sur le même support de stockage. Cependant, la
qualité sonore peut être affectée par le débit binaire
du fichier musical MP3, la taille des photos et la
méthode d'encodage utilisée.
TOOLS lors du visionnage
Compatibilité des disques et des
formats
Types de disques et contenus pouvant
être lus sur cet appareil
Support
VIDÉO
MUSIQUE
PHOTO
Selon le type de disque ou les conditions
✎
d'enregistrement, il se peut que certains disques CDRW/-R et DVD-R ne puissent pas être lus sur cet appareil.
Type de
disque
Disque Blu-ray
DVD-VIDEO,
DVD-RW,
DVD-R,
DVD+RW,
DVD+R,
VCD 1,1
CD-RW/-R,
DVD-RW/-R,
BD-RE/-R
CD-RW/-R,
DVD-RW/-R,
BD-RE/-R
Détails
Disque BD-ROM ou BDRE/-R enregistré au format
BD-RE.
DVD-VIDEO, disques
DVD+RW/DVD-RW(V)/
DVDR/+R enregistrés qui ont
été enregistrés et finalisés,
ou un support de stockage
USB possédant des
contenus DivX, MKV, MP4,
VCD 1,1
.
Musique enregistrée sur
des disques CD-RW/-R,
DVD-RW/-R, BD-RE/-R ou
un support de stockage
USB possédant des
contenus MP3 ou WMA.
Photos enregistrées sur
des disques CD-RW/-R,
DVD-RW/-R, BD-RE/-R ou
un support de stockage
USB possédant des
contenus JPEG.
28 - Français
Page 68

Si un disque DVD-RW/-R n'a pas été enregistré
✎
correctement au format vidéo DVD, il ne pourra pas
être lu.
Votre appareil ne lit pas les contenus ayant été
✎
enregistrés sur un disque DVD-R selon un débit
binaire dépassant les 10 Mbps.
Il ne lit pas les contenus ayant été enregistrés sur un
✎
disque BD-R ou un périphérique USB selon un débit
binaire dépassant les 30 Mbps.
La lecture peut être inopérante sur certains types
✎
de disque ou lorsque vous effectuez des opérations
spécifiques telles que les changements d'angle ou
le réglage du format de l'image. Des informations
détaillées concernant le disque sont inscrites sur le
boîtier. Consultez-les si nécessaire.
Lors de la lecture d'un titre BD-J, il se peut que le
✎
chargement prenne plus de temps que pour un titre
normal et que certaines fonctions s'exécutent plus
lentement que d'habitude.
Types de disques ne pouvant pas être
lus sur cet appareil
• HD DVD
• Disque DVD-ROM/PD/
MV, etc.
• DVD-RW (VR
mode) (mode VR –
enregistrement vidéo) :
• CVD/CD-ROM/CDV/
CD-G/CD-I/LD (Les CD-G
lisent des données audio
uniquement et non des
données graphiques.)
Il se peut que l'appareil ne réponde pas à toutes les
✎
commandes car certains disques Blu-ray, DVD et
CD ne permettent qu'un fonctionnement limité ou
spécifique et offrent certaines fonctions seulement
lors de la lecture.
Samsung ne peut garantir que cet appareil pourra
✎
lire tous les disques portant les logos Blu-ray, DVD
ou CD car les formats évoluent et des problèmes et
erreurs peuvent se produire lors de la création d'un
logiciel BD, DVD et CD et/ou la fabrication du disque.
Veuillez contacter le service après-vente de SAMSUNG
✎
pour toute question ou tout problème concernant
la lecture des disques Blu-ray, DVD ou CD sur cet
appareil. Vous pouvez également vous reporter au
manuel d'utilisation pour obtenir plus d'informations
sur les restrictions en matière de lecture.
Il se peut que certains disques et DVD du commerce
✎
achetés en dehors de votre zone ne puissent pas être
lus sur cet appareil.
• DVD-RAM
• CD Super Audio (à
l'exception de la couche
CD)
• Disque DVD-R 3,9 Go
enregistrable.
Logos des disques pouvant être lus sur
cet appareil
Disque Blu-ray DivX
Dolby DTS
Java
Norme de lecture PAL au
Royaume-Uni, en France, en
Allemagne, etc.
Code régional
Les produits et les disques sont codés par région. Ces
codes régionaux doivent correspondre pour que le
disque puisse être lu. Si les codes ne correspondent pas,
le disque ne sera pas lu. Le code régional de ce lecteur
figure sur le panneau arrière de l'appareil.
Type de
disque
Disque
Blu-ray
Code
régional
A
B
C
Zone
Amérique du Nord, Amérique
centrale, Amérique du Sud,
Corée, Japon, Taïwan, Hong
Kong et Sud-Est asiatique.
Europe, Groenland, France
d'outre-mer, Moyen-Orient,
Afrique, Australie et Nouvelle-
Zélande.
Inde, Chine, Russie, Asie
centrale et Asie du Sud.
Annexes
29 - Français
Page 69

Annexes
1
2
États-Unis, Territoires organisés
des États-Unis et Canada
Europe, Japon, Moyen-Orient,
Égypte, Afrique du Sud,
Groenland
Le format « x.v.Colour » offre une gamme de couleurs
✎
plus large qu'un DVD de caméscope normal.
Il est possible que certains disques de format DivX,
✎
MKV ou MP4 ne puissent pas être lus, selon leur
résolution d'image vidéo et leur vitesse de défilement.
Formats pris en charge
3
DVD
VIDÉO
4
5
6
Si le code régional d'un disque Blu-ray/DVD ne
✎
correspond pas à celui de l'appareil, ce dernier ne
peut pas lire le disque.
Taïwan, Corée, Philippines,
Indonésie, Hong Kong
Mexique, Amérique du Sud,
Amérique centrale, Australie,
Nouvelle-Zélande, Îles du
Pacifique, Caraïbes
Russie, Europe de l'Est, Inde,
Corée du Nord, Mongolie
Chine
AVCHD (Codec vidéo avancé haute
définition)
• Cet appareil prend en charge les disques au format
AVCHD. Ces disques sont normalement enregistrés et
lus sur des caméscopes.
• Le format AVCHD est un format vidéo numérique haute
définition.
• Le format MPEG-4 AVC/H.264 compresse les images
de manière plus efficace que le format de compression
d'image conventionnel.
• Certains disques AVCHD utilisent le format « x.
v.Colour ». Cet appareil peut lire les disques AVCHD
faisant appel au format « x.v.Colour ».
• « x.v.Colour » est une marque de commerce de Sony
Corporation.
• « AVCHD » et le logo AVCHD sont des marques de
commerce de Matsushita Electronic Industrial Co., Ltd.
et de Sony Corporation.
En fonction des conditions d'enregistrement, il est
✎
possible que certains disques au format AVCHD ne
puissent pas être lus.
Les disques au format AVCHD doivent être finalisés.
✎
Remarques sur la connexion USB
• Cet appareil prend en charge les supports de stockage
USB, les lecteurs MP3, les caméras numériques et les
lecteurs de carte USB.
• Cet appareil ne gêne pas les noms de dossier ou de
ficher dépassant 128 caractères.
• Il peut ne pas être compatible avec certains
périphériques USB ou certaines caméras numériques.
• Il prend en charge les systèmes de fichiers FAT 16, FAT
32 et NTFS.
• Effectuez la connexion des périphériques USB
directement au port USB de l'appareil. La connexion
via un câble USB peut causer des problèmes de
compatibilité.
• L'insertion de plusieurs périphériques de mémoire
dans un lecteur multicarte peut entraîner le
dysfonctionnement de celui-ci.
• L'appareil ne prend pas en charge le protocole PTP
(Peer to Peer).
• Ne déconnectez pas un périphérique USB pendant le
transfert ou l'enregistrement de données.
• Plus la résolution de l'image est élevée, plus le délai
d'affichage de cette image est long.
• Cet appareil ne peut pas lire les fichiers MP3 de type
DRM (Gestion des droits numériques) téléchargés
depuis des sites commerciaux.
• Votre appareil ne prend en charge que les vidéos dont
la vitesse de défilement des images est inférieure à
30 fps.
• Il ne prend en charge que les périphériques de classe
de stockage de masse (MSC) USB tels que les
clés USB et les disques durs USB. (HUB n'est pas
disponible.)
• Certains disques durs USB, lecteurs multicartes et
clés USB peuvent ne pas être compatibles avec cet
appareil.
• Si certains périphériques USB requièrent une
puissance excessive, ils pourront être limités par le
dispositif de sécurité du circuit.
• Si la lecture à partir d'un disque dur USB est instable,
fournissez-lui une alimentation supplémentaire en
branchant le disque dur dans une prise murale. Si le
problème persiste, contactez le fabricant du disque dur
USB.
• SAMSUNG ne peut être tenu pour responsable de la
corruption de fichiers de données ou de la perte de
données.
30 - Français
Page 70

Prise en charge des fichiers vidéo
Extension de fichier Conteneur Codec vidéo Codec audio Résolution
*.avi
*.mkv
*.wmv
*.mp4
*.mpg / *.mpeg
AVI
MKV
WMV (wmv9) VC-1 AP, VC-1 SM
MP4
PS
DivX 3.11/4/5/6
MP4v3
H.264 BP/MP/HP
VC-1 AP, DivX 5/6
H.264 BP/MP/HP
MP4 (mp4v)
H.264 BP/MP/HP
MPEG1
MPEG2
H.264 BP/MP/HP
MP3, Dolby Digital,
DTS,
WMA, PCM
MP3, Dolby Digital,
DTS,
WMA
AAC
MP1, 2
Dolby Digital, DTS
1920 x 1080
Limitations
- Même lorsqu'un fichier est codé selon un codec pris en charge mentionné ci-dessus, ce fichier peut ne pas être lu en
cas de problème au niveau de son contenu.
- La lecture normale ne sera pas garantie si les informations relatives au conteneur du fichier sont erronées ou si le
fichier lui-même est corrompu.
- Les fichiers ayant un débit binaire ou une vitesse de défilement supérieur(e) à la normale peuvent présenter des
discontinuité au niveau de la lecture audio/vidéo.
- La fonction Recherche (Saut) sera indisponible si la table d'indexage du fichier est corrompue.
Décodeur vidéo
- Prend en charge le format H.264 de niveau 4.1 et AVCHD
- Ne prend pas en charge les formats H.264 FMO/ASO/RS et VC1 SP/MP/AP L4
- MPEG4 SP, ASP :
Inférieure à 1280 x 720 : 60 images maxi.
Supérieure à 1280 x 720 : 30 images maxi.
- Ne prend pas en charge le format GMC 2 ou supérieur
Décodeur audio
- Prend en charge les formats WMA 7, 8, 9 et STD
- Ne prend pas en charge le taux d'échantillonnage WMA de 220/50 Hz mono.
- AAC: Taux d'échantillonnage maxi. : 96 Khz (8, 11, 12, 16, 22, 24, 32, 44,1, 48, 64, 88,2, 96) Débit binaire maxi. : 320 kbps
Formats des fichiers de sous-titrage DivX pris en charge
- *.ttxt, *.smi, *.srt, *.sub, *.txt
Prise en charge des fichiers musicaux
Extension de fichier Conteneur Codec audio
*.mp3
*.wma
MP3
WMA
MP3 -
WMA
* Taux d'échantillonnage (en kHz) - 8, 11, 16, 22, 32, 44,1, 48
* Débits binaires - Tous les débits binaires dans la plage allant
Plage de prise en charge
de 5 kbps à 384 kbps
Prise en charge de fichier image
Extension de fichier Type Résolution
*.jpg / *.jpeg / *.jpe
*.png
JPEG
PNG
15360 x 8640
Annexes
31 - Français
Page 71

Annexes
Sélections des sorties numériques
Configuration PCM
Connexion Récepteur AV prenant en charge l'interface HDMI
PCM Jusqu'à PCM 7,1 ca PCM
Dolby Digital Jusqu'à PCM 5,1 ca Dolby Digital
Dolby Digital
Flux de
données
audio sur
disque Blu-
ray
Flux de
données
audio sur
DVD
Résolution
pour disque
Blu-ray
Si le flux de données source est 2 ca ou mono, le réglage « Re-encoded Dolby D » (Dolby D. réencodé) ne sera pas
appliqué. La sortie sera PCM 2 ca.
Les disques Blu-ray peuvent contenir trois types de flux de données audio :
- Principale fonction audio : Bande son de la fonction principale.
- Fonctionnalité audio BONUSVIEW : Bande son supplémentaire, comportant, par exemple, le commentaire du
réalisateur ou de l’acteur.
- Effets sonores de navigation : Lorsque vous choisissez certaines options du menu de navigation, les effets sonores
de navigation peuvent retentir. Les effets sonores de navigation sont différents sur chaque disque Blu-ray.
Plus
Dolby TrueHD Jusqu'à PCM 5,1 ca Dolby TrueHD
DTS Jusqu'à PCM 5,1 ca DTS
DTS-HD High
Resolution
Audio
DTS-HD Master
Audio
PCM PCM 2 ca PCM 2 ca PCM 2 ca PCM 2 ca
Dolby Digital Jusqu'à PCM 5,1 ca Dolby Digital Dolby Digital Dolby Digital
DTS Jusqu'à PCM 5,1 ca DTS DTS DTS
Aucune
Jusqu'à PCM 5,1 ca Dolby Digital Plus
Jusqu'à PCM 5,1 ca
Jusqu'à PCM 5,1 ca
Décode la principale
fonction audio et
le flux de données
audio BONUSVIEW
en données PCM
et ajoute des
effets sonores de
navigation.
Train de bits (non
traités)
DTS-HD High
Resolution Audio
DTS-HD Master
Audio
Émet uniquement
le flux de données
audio de la fonction
principale, de
sorte que votre
récepteur AV puisse
décoder les trains
de bits audio. Vous
n'entendrez pas
de données audio
BONUSVIEW ni
d'effets sonores de
navigation.
Train de bits
(DTS Réencodé)
DTS réencodé
Décode la
principale fonction
audio et le flux de
données audio
BONUSVIEW en
données PCM
et ajoute des
effets sonores
de navigation,
puis réencode
les données
audio PCM en
trains de bits DTS.
Train de bits
(Dolby D.
Réencodé)
Dolby D.
Réencodé *
Décode la
principale fonction
audio et le flux de
données audio
BONUSVIEW en
données PCM
et ajoute des
effets sonores
de navigation,
puis réencode
les données
audio PCM en
trains de bits Dolby
Digital ou PCM.
32 - Français
Page 72

Résolution selon le mode de sortie
Lecture du disque Blu-ray/des e-contenus/des contenus numériques Lecture DVD
Configuration
Trame vidéo : Auto (24Fs) 1080p/24F -
Puissance
Disque Blu-ray
BD Wise
Auto Résolution optimale de l'entrée du téléviseur
1080p@60F 1080p@60F -
1080p - 1080p
1080i 1080i 1080i
720p 720p 720p
576p/480p 576p/480p 576p/480p
Résolution du disque
Blu-ray
Mode HDMI
E-content/Contenus
numériques
1080p@60F 576i/480i
Mode HDMI
Résolution optimale de l'entrée
du téléviseur
Dépannage
Reportez-vous au tableau ci-dessous lorsque cet appareil ne fonctionne pas correctement. Si le problème que
vous rencontrez n’est pas répertorié ci-dessous ou si les consignes ne vous sont d’aucune aide, éteignez l’appareil,
débranchez le cordon d’alimentation et contactez le revendeur agréé le plus proche ou un centre de dépannage
Samsung Electronics.
Problème Vérification/Solution
Le disque ne peut pas être
éjecté.
La lecture ne démarre pas.
La lecture ne commence
pas immédiatement
lorsque vous appuyez sur
le bouton 6/7.
Aucun son.
Le son est émis par
certaines enceintes
seulement et non
par l'ensemble des
6 enceintes.
• Le cordon d'alimentation est-il branché correctement sur la prise secteur ?
• Coupez l'alimentation électrique, puis rallumez-la.
• Vérifiez le numéro de zone du disque Blu-ray/DVD. Les disques Blu-ray/DVD
achetés à l'étranger peuvent ne pas être compatibles.
• Les CD-ROM et DVD-ROM ne peuvent pas être lus sur ce lecteur.
• Vérifiez que le niveau de classification est approprié.
• Le disque est-il déformé ou rayé ?
• Nettoyez le disque.
• Le système home cinéma n'émet aucun son pendant la lecture rapide, au ralenti,
et en mode pas à pas.
• Les enceintes sont-elles correctement branchées ? La configuration des enceintes
est-elle réglée correctement ?
• Le disque est-il sale ou endommagé ?
• Sur certains disques Blu-ray/DVD, le son est émis depuis les enceintes avant
uniquement.
• Vérifiez que les enceintes sont correctement raccordées.
• Permet de régler le volume.
• Lors de la lecture audio d'un CD, de la radio ou du téléviseur, l'appareil émet du
son vers les enceintes frontales uniquement.
Annexes
33 - Français
Page 73

Annexes
Problème Vérification/Solution
Le son ambiophonique
Dolby Digital 5.1 CH n’est
pas produit.
La télécommande ne
fonctionne pas.
Le disque tourne mais
•
aucune image ne s'affiche.
• La qualité est mauvaise
et l'image tremble.
La langue de la bandeson et les sous-titres ne
fonctionnent pas.
L'écran de menu n'apparaît
pas même si la fonction de
menu est sélectionnée.
Impossible de modifier le
format d'image.
• L'appareil ne fonctionne
pas. (exemple :
L'appareil s'éteint ou
émet un bruit anormal.)
• L'appareil ne fonctionne
pas normalement.
Vous avez oublié le mot
de passe du niveau de
classification.
Réception des émissions
de radio impossible.
Aucun son n'est entendu
lors de l'écoute du son
du téléviseur à travers les
enceintes du Home cinéma.
•
Le disque porte-t-il l’indication « Dolby Digital 5.1 CH » ? Le son ambiophonique
Dolby Digital 5.1 CH est produit uniquement si le disque est enregistré au format 5.1.
• La langue audio est-elle correctement réglée sur Dolby Digital 5.1-CH dans
l'affichage des informations ?
• Faites-vous fonctionner la télécommande dans sa plage opérationnelle et dans
l'angle correct par rapport au capteur ?
• Les piles sont-elles déchargées ?
• Avez-vous sélectionné le bon mode ? Appuyez sur le bouton de la fonction pour
changer le mode (BD/DVD, D. IN, AUX, etc.)
• Le téléviseur est-il sous tension ?
• Les câbles vidéo sont-ils correctement branchées ?
• Le disque est-il sale ou endommagé ?
• La lecture d'un disque de mauvaise fabrication peut s'avérer impossible.
• La langue de la bande son et les sous-titres ne fonctionnent pas si le disque ne
comporte pas de pistes ou de sous-titres dans plusieurs langues.
• Le disque que vous utilisez contient-il des menus ?
• La lecture des disques Blu-ray/DVD 16:9 est possible en mode 16:9 Plein
écran, 4:3 Letter Box ou 4:3 Pan-Scan en revanche, les disques Blu-ray/DVD
4:3 peuvent être lus au format 4:3 uniquement. Reportez-vous à la pochette du
disque Blu-ray et sélectionnez la fonction appropriée.
• Appuyez et maintenez enfoncé le bouton 5 de la télécommande pendant 5
secondes en mode STANDBY. Cela réinitialise l'appareil.
- L'utilisation de la fonction RESET efface tous les réglages enregistrés. N'utilisez
ce bouton que si cela est vraiment nécessaire.
• Sans disque dans le lecteur, appuyez et maintenez enfoncé le bouton 5 de
l'appareil pendant plus de 5 secondes. INIT s'affiche sur l'écran et les réglages
par défaut sont rétablis.
- L'utilisation de la fonction RESET efface tous les réglages enregistrés. N'utilisez
ce bouton que si cela est vraiment nécessaire.
• L'antenne est-elle correctement branchée ?
• Si le signal d'entrée de l'antenne est faible, installez une antenne FM extérieure
dans une zone bénéficiant d'une bonne réception.
• Si vous appuyez sur le bouton ^ lorsque vous regardez la télévision à l'aide des
fonctions D. IN ou AUX, les fonctions du disque Blu-ray/DVD sont activées et le
son du téléviseur est coupé.
34 - Français
Page 74

Problème Vérification/Solution
« Indisponible » apparaît à
l'écran.
Il est possible que
l'écran du téléviseur
n'affiche pas d'image
lorsque la résolution de la
sortie HDMI n'est pas prise
en charge par le téléviseur
(par exemple 1080p).
Aucune sortie HDMI.
Sortie HDMI anormale
apparaît à l'écran.
Lorsque les réglages d'usine par défaut sont rétablis, toutes les données Blu-ray utilisateur stockées sur le lecteur
✎
seront effacées.
• Les fonctions ou les commandes ne peuvent être exécutées pour le moment car :
1. Le logiciel du disque Blu-ray/DVD les limite.
2. Le logiciel du disque Blu-ray/DVD ne prend pas en charge la fonction en
question (par ex. : les angles).
3. La fonction n'est pas disponible pour le moment.
4. Vous avez demandé un titre, un numéro de chapitre ou un temps de recherche
hors de portée du disque.
• Appuyez et maintenez le bouton 5 du panneau avant pendant plus de 5
secondes en l'absence de disque inséré dans l'appareil. Tous les paramètres
seront réinitialisés sur leur valeur d'origine.
• Vérifiez la connexion entre le téléviseur et la prise HDMI de l'appareil.
• Vérifiez que votre téléviseur prend en charge les résolutions d'entrée HDMI
576p/480p/720p/1080i/1080p.
• Si du bruit aléatoire apparaît à l'écran, cela signifie que le téléviseur ne prend pas
en charge la protection HDCP (High-bandwidth Digital Content Protection).
Annexes
35 - Français
Page 75

Annexes
Caractéristiques techniques
Poids 1,90 kg
Dimensions 430,0 (L) x 55,0 (H) x 224,0 (P) mm
Généralités
Tuner FM
HDMI
Amplificateur
Enceintes Impédance
Avant
Ambiophonique
Enceinte
centrale
Caisson de
basse
Samsung Electronics Co., Ltd se réserve le droit de modifier les caractéristiques sans préavis.
✎
Le poids et les dimensions figurent à titre approximatif.
✎
La conception et les spécifications sont soumises à modification sans avis préalable.
✎
Pour l’alimentation et la consommation d’énergie, reportez-vous à l'étiquette apposée sur l'appareil.
✎
Plage de températures de
fonctionnement
Plage de taux d'humidité de
fonctionnement
Rapport signal/bruit 55 dB
Sensibilité utilisable 12 dB
Distorsion harmonique totale 1,0 %
Vidéo 1080p, 1080i, 720p, 576p/480p
Audio Audio PCM multicanaux, audio Bitstream et audio PCM
Sortie de l’enceinte avant 165W x 2 (3)
Sortie de l’enceinte centrale 170W (3)
Sortie de l’enceinte ambiophonique 165W x 2 (3)
Sortie du caisson de basse 170W (3)
Réponse en fréquence 20Hz~20kHz (±3dB)
Rapport signal/bruit 70dB
Séparation des canaux 60dB
Sensibilité d’entrée (AUX) 500mV
Plage de
fréquences
200Hz ~ 20kHz
3
20Hz ~ 200Hz 168,0 x 350,0 x 285,0 3,67
+5 °C à +35 °C
10 % à 75 %
Enceinte ( Enceintes 5.1)
Entrée nominale
165W
170W
Dimensions
(L x H x P) (mm)
89,0 x 1053,0 x 71,0
( Socle:
230,0 x 230,0 x 23,8
89,0 x 1053,0 x 71,0
( Socle:
230,0 x 230,0 x 23,8
228,0 x 77,0 x 70,0 0,49
Poids
(kg)
2,93
)
2,93
)
36 - Français
Page 76

Licences
configuration de votre appareil.
Les appareils DivX Certified® peuvent lire des vidéos DivX® avec une résolution HD allant jusqu'à 1080p, y compris le
contenu surfacturé.
DivX®, DivX Certified® et les logos qui leur sont associés sont des marques déposées de DivX, LLC et sont utilisés
sous licence. Cette norme est couverte par un ou plusieurs des brevets américains suivants : 7,295,673; 7,460,668;
7,515,710; 7,519,274.
Ce produit intègre la technique de protection contre la copie applicable aux brevets américains ainsi que d’autres
droits de propriété intellectuelle de Rovi Corporation. Il est interdit de tenter de démonter l’appareil et d’en étudier le
fonctionnement en vue de le reproduire.
Fabriqué sous licence par Dolby Laboratories. Dolby et le symbole représentant deux D sont
des marques de commerce de Dolby Laboratories.
Pour consulter les brevets DTS, rendez-vous sur http://patents.dts.com. Fabriqué sous
licence par DTS Licensing Limited. DTS, DTS-HD, le symbole, et DTS-HD et le symbole
qui lui est associé sont des marques déposées, et DTS-HD Master Audio | Essential est
une marque déposée de DTS, Inc. © DTS, Inc. Tous droits réservés.
Cet appareil DivX Certified® a fait l'objet de tests rigoureux afin de s'assurer qu'il lit le contenu
vidéo DivX® et il les a réussis avec succès.
Pour lire des films DivX achetés, enregistrez d'abord votre appareil sur le site vod.divx.
com. Vous trouverez votre code d'enregistrement dans la section DivX VOD du menu de
Les termes HDMI et HDMI High-Definition Multimedia Interface, et le logo HDMI sont des
marques de commerce ou des marques déposées de HDMI Licensing LLC aux États-Unis et
dans d'autres pays.
Oracle et Java sont des marques déposées de Oracle et/ou ses filiales. D'autres noms mentionnés peuvent
être des marques de commerce de leurs propriétaires respectifs.
Annexes
Blu-ray Disc™, Blu-ray™ et les logos y afférents sont des marques de commerce de Blu-ray Disc Association.
Cet appareil utilise la technologie Cinavia qui limite l'utilisation de copies non autorisées de certains films et vidéos
ainsi que leurs bandes son disponibles dans le commerce. Lorsqu'une utilisation interdite d'une copie non autorisée
est détectée, un message s'affiche et la lecture ou la copie est interrompue. Pour obtenir de plus amples informations
sur la technologie Cinavia, veuillez consulter le Cinavia Online Consumer Information Centre ? (Centre d'informations
consommateur en ligne Cinavia) à l'adresse http://www.cinavia.com. Pour toute demande d'informations
complémentaires par courrier concernant Cinavia, envoyez une carte postale comportant votre adresse postale
à : Cinavia Consumer Information Centre, P.O. Box 86851, San Diego, CA, 92138, USA. Cet appareil intègre une
technologie brevetée sous licence de Verance Corporation et qui est protégée par le brevet américain 7 369 677
ainsi que par d'autres brevets américains et internationaux accordée et en attente ainsi que par des droits d'auteur
et une protection commerciale confidentielle pour certains aspects de cette technologie. Cinavia est une marque de
commerce de Verance Corporation. Copyright 2004-2010 Verance Corporation. Tous droits réservés par Verance. Il
est interdit de tenter de démonter l’appareil et d’en étudier le fonctionnement en vue de le reproduire.
- Avis de licence libre
En cas d'utilisation de logiciels libres, les licences libres sont disponibles dans le menu du produit.
37 - Français
Page 77

© 2015 Samsung Electronics Co., Ltd. Tous droits réservés.
Comment contacter Samsung dans le monde
Si vous avez des suggestions ou des questions concernant les produits Samsung,
veuillez contacter le Service Consommateurs Samsung.
Area Contact Centre
`
Europe
U.K 0330 SAMSUNG (7267864) www.samsung.com/uk/support
EIRE 0818 717100 www.samsung.com/ie/support
0180 6 SAMSUNG bzw.
0180 6 7267864*
GERMANY
(*0,20 €/Anruf aus dem dt. Festnetz, aus
dem Mobilfunk max. 0,60 €/Anruf)
FRANCE 01 48 63 00 00 www.samsung.com/fr/support
ITALIA 800-SAMSUNG (800.7267864) www.samsung.com/it/support
SPAIN 0034902172678 www.samsung.com/es/support
PORTUGAL 808 20 7267 www.samsung.com/pt/support
LUXEMBURG 261 03 710 www.samsung.com/support
NETHER-
0900-SAMSUNG (0900-7267864) (€ 0,10/
LANDS
Min)
BELGIUM 02-201-24-18
NORWAY 815 56480 www.samsung.com/no/support
DENMARK 70 70 19 70 www.samsung.com/dk/support
FINLAND 030-6227 515 www.samsung.com/fi/support
SWEDEN 0771 726 7864 (0771-SAMSUNG) www.samsung.com/se/support
801-172-678* lub +48 22 607-93-33 *
POLAND
* (koszt połączenia według taryfy operatora)
0680SAMSUNG (0680-726-786)
HUNGARY
0680PREMIUM (0680-773-648)
SLOVAKIA 0800 - SAMSUNG (0800-726 786) www.samsung.com/sk/support
0800-SAMSUNG (0800-7267864)
AUSTRIA
[Only for Premium HA] 0800-366661
[Only for Dealers] 0810-112233
Web Site
www.samsung.com/de/support
www.samsung.com/nl/support
www.samsung.com/be/support
(Dutch)
www.samsung.com/be_fr/
support (French)
www.samsung.com/pl/support
www.samsung.com/hu/support
www.samsung.com/at/support
Area Contact Centre
SWITZERLAND
CZECH
CROATIA 072 726 786 www.samsung.com/hr/support
BOSNIA 055 233 999 www.samsung.com/support
MONTENE-
GRO
SLOVENIA
SERBIA 011 321 6899 www.samsung.com/rs/support
BULGARIA 800 111 31 , Безплатна телефонна линия www.samsung.com/bg/support
ROMANIA
CYPRUS 8009 4000 only from landline, toll free
GREECE
LITHUANIA 8-800-77777 www.samsung.com/lt/support
LATVIA 8000-7267 www.samsung.com/lv/support
ESTONIA 800-7267 www.samsung.com/ee/support
0800 726 78 64 (0800-SAMSUNG)
800 - SAMSUNG (800-726786) www.samsung.com/cz/support
Samsung Electronics Czech and Slovak, s.r.o. V Parku 2343/24, 148 00 -
Praha 4
020 405 888 www.samsung.com/support
080 697 267 (brezplačna številka)
090 726 786 (0,39 EUR/min)
klicni center vam je na voljo od ponedeljka
do petka od 9. do 18. ure.
08008 726 78 64 (08008 SAMSUNG )
Apel GRATUIT
80111-SAMSUNG (80111 726 7864) only
from land line
(+30) 210 6897691 from mobile and land
line
Web Site
www.samsung.com/ch/support
(German)
www.samsung.com/ch_fr/
support (French)
www.samsung.com/si
www.samsung.com/ro/support
www.samsung.com/gr/support
Mise au rebut appropriée de la batterie de ce produit
(applicable dans les pays dotés d'un système de tri sélectif)
Ce symbole sur la batterie, le manuel ou l'emballage indique que la batterie de ce produit ne doit pas
être mise au rebut avec les autres déchets ménagers à la fin de sa durée de vie. Lorsqu’ils sont indiqués,
les symboles chimiques Hg, Cd ou Pb indiquent que cette batterie contient du mercure, du cadmium ou
de plomb en quantité supérieure aux niveaux de référence de la Directive CE 2006/66. Si les batteries
ne sont pas correctement mises au rebut, ces substances peuvent provoquer un danger pour la santé
humaine ou l’environnement.
Afin de protéger les ressources naturelles et de promouvoir le recyclage, séparez les piles des autres
déchets et recyclez-les via votre système local gratuit de retour de piles.
Mise au rebut appropriée de ce produit (Déchets d'équipements
électriques et électroniques)
(applicable dans les pays dotés d'un système de tri sélectif)
Ce symbole sur le produit, les accessoires ou le manuel indique que le produit et ses accessoires électroniques
(par exemple, le chargeur, les casques ou le câble USB) ne doivent pas être mis au rebut avec les autres déchets
ménagers à la fin de leur durée de vie. Pour éviter toute nuisance à l'environnement ou à la santé par une mise au
rebut incontrôlée des déchets, veuillez séparer ces articles des autres types de déchets et les recycler de façon
responsable pour promouvoir la réutilisation à long terme des ressources matérielles.
Pour assurer un recyclage du produit dans le respect de l'environnement, les particuliers doivent s'enquérir des lieux
et procédures appropriés auprès du détaillant qui leur a vendu ces articles ou auprès des collectivités locales
Les utilisateurs professionnels doivent contacter leur fournisseur et se reporter aux conditions du contrat d'achat.
Ce produit et ses accessoires électroniques ne doivent pas être jetés avec les autres déchets commerciaux.
Page 78

Bedienungsanleitung
5.1CH Blu-ray™
Heimkino-System
HT-J5150
Unvorstellbare Möglichkeiten
Vielen Dank, dass Sie sich für dieses Produkt von Samsung entschieden haben.
Wenn Sie einen umfassenderen Service nutzen möchten, registrieren Sie bitte Ihr Produkt unter
www.samsung.com/register
Page 79

Sicherheitsinformationen
ACHTUNG
STROMSCHLAGGEFAHR! NICHT ÖFFNEN!
ACHTUNG: ZUR VERMEIDUNG VON STROMSCHLÄGEN
DARF DIESES GERÄT NICHT GEÖFFNET WERDEN. IM
GERÄTEINNEREN BEFINDEN SICH KEINE VOM BENUTZER ZU
WARTENDEN TEILE. LASSEN SIE REPARATUREN NUR VON
QUALIFIZIERTEM KUNDENDIENSTPERSONAL DURCHFÜHREN.
• Die Schlitze und Öffnungen im Gehäuse und in der
Rückwand oder im Boden sind für die Belüftung
erforderlich. Um den zuverlässigen Betrieb des Geräts
zu gewährleisten und es vor Überhitzung zu schützen,
dürfen diese Öffnungen keinesfalls blockiert oder
bedeckt werden.
- Stellen Sie das Gerät nicht in abgeschlossene
Räume wie z. B. in ein Bücherregal oder einen
Einbauschrank. Dieser Einbau ist nur dann zulässig,
wenn für ausreichende Belüftung gesorgt wird.
- Außerdem darf das Gerät keinesfalls in der
Nähe oder über einem Radiator oder Heizkörper
aufgestellt werden, oder an Orten, an denen es
direkter Sonneneinstrahlung ausgesetzt ist.
- Stellen Sie keine Behälter (wie z. B. Vasen) mit
Wasser auf dieses Gerät. Ausgegossenes Wasser
kann zu Brand und Stromschlag führen.
• Setzen Sie das Gerät keinesfalls Regen aus und stellen
Sie es nicht in der Nähe von Wasser auf (Badewanne,
Küchenspüle, feuchter Keller, Schwimmbecken usw.).
Falls das Gerät dennoch Nässe ausgesetzt wurde,
trennen Sie es von der Stromversorgung und wenden
Sie sich umgehend an Ihren örtlichen Vertreter.
•
Für den Betrieb dieses Geräts werden Batterien benötigt.
Befolgen Sie die bei Ihnen Vorort geltenden Vorschriften
über die Entsorgung von verbrauchten Batterien. Bitte
wenden Sie sich bei Fragen zur ordnungsgemäßen
Entsorgung an Ihre örtlichen Behörden.
• Überlasten Sie Steckdosen, Verlängerungskabel und
Steckerleisten keinesfalls, da dies zu einem Brand oder
Stromschlag führen kann.
• Verlegen Sie die Netzkabel so, dass nicht auf sie
getreten werden kann oder das keine Gegenstände
auf ihnen stehen. Achten Sie besonders auf Kabel
im Bereich der Stecker, Steckdosen und den
Kabelausgängen am Gerät.
• Zum Schutz des Geräts bei einem Gewitter oder
längerem Nichtbetrieb trennen Sie das Gerät vom
Netz. Trennen Sie darüber hinaus das Antennenkabel
vom Gerät. Auf diese Weise werden Schäden durch
Blitzschlag oder Spannungsstöße vermieden.
•
Stellen Sie sicher, dass die Nennspannung des Netzteils
für die örtliche Stromversorgung geeignet ist, bevor Sie
das Netzkabel an die Stromversorgung anschließen.
• Stecken Sie keine Metallgegenstände in die Öffnungen
des Geräts. Dies kann zu Stromschlägen führen.
• Berühren Sie keinesfalls Bauteile im Geräteinneren, um
• Stellen Sie sicher, dass der Netzstecker fest in der
•
• Wartung des Gehäuses.
•
•
• Verwenden Sie ausschließlich richtig geerdete Stecker
• Um das Gerät vollständig abzuschalten, muss der
Dieses Symbol weist auf eine hohe
Spannung im Inneren des Geräts
hin. Das Berühren von Teilen im
Geräteinneren ist gefährlich.
Dieses Symbol weist darauf hin, dass
diesem Gerät wichtige Anweisungen
zu Betrieb und Wartung beigefügt sind.
Stromschläge zu vermeiden. Das Gerät darf nur von
einem qualifizierten Techniker geöffnet werden.
Steckdose sitzt. Ziehen Sie das Netzkabel nur am
Stecker aus der Steckdose. Ziehen Sie niemals am
Netzkabel, um es aus der Steckdose zu ziehen.
Berühren Sie das Netzkabel nicht mit nassen Händen.
Wenn das Gerät nicht einwandfrei funktioniert, insbesondere
beim Auftreten ungewöhnlicher Geräusche oder Gerüche
aus dem Inneren, trennen Sie es unverzüglich von der
Stromversorgung und wenden Sie sich umgehend an Ihren
autorisierten Händler oder den Kundendienst.
- Bevor Sie andere Geräte an dieses Gerät anschließen,
vergewissern Sie sich, dass diese Geräte ausgeschaltet sind.
- Wenn das Gerät plötzlich von einem kalten an
einen warmen Ort umgestellt wird, kann es zu einer
Kondensation an den Betriebsteilen und der Linse
kommen, was zu einer fehlerhaften Wiedergabe der Disk
führen kann. Falls dieser Fall eintritt, den Netzstecker
ziehen und nach zwei Stunden den Stecker wieder in die
Steckdose stecken. Legen Sie anschließend die Disk ein,
und versuchen Sie, die Wiedergabe der Disk zu starten.
Ziehen Sie den Netzstecker aus der Steckdose, wenn
Sie das Gerät für längere Zeit nicht benutzen oder wenn
Sie das Haus verlassen (insbesondere wenn sich Kinder,
ältere oder behinderte Personen allein im Haus befinden).
- Staubansammlungen können zu Stromschlag,
Kriechströmen oder einem Brand führen, da es am
Netzkabel zu Funkenbildung, Überhitzung oder einer
Verschlechterung der Isolierung kommen kann.
Wenden Sie sich an einen autorisierten Kundendienst, um
entsprechende Hinweise zu erhalten, wenn Sie das Gerät
an einen Ort mit extremer Staubbelastung, hohen oder
niedrigen Temperaturen, hoher Luftfeuchtigkeit oder an dem
chemische Substanzen auftreten aufstellen wollen oder wenn
es 24 Stunden am Tag betrieben werden soll, wie z. B. an
Flughäfen, Bahnhöfen, usw. Falls Sie dies unterlassen, kann
es zu einer ernsthaften Beschädigung des Produkts kommen.
und Steckdosen.
- Eine falsche Erdung kann zu Stromschlag oder
Beschädigung des Geräts führen. (Nur Geräte der Klasse I.)
Netzstecker aus der Steckdose gezogen werden.
Aus diesem Grund muss die Steckdose und der
Netzstecker jederzeit frei zugänglich sein.
2 - Deutsch
Page 80

• Halten Sie Kinder vom Gerät fern.
• Bewahren Sie das Zubehör (Batterien usw.) an einem
für Kinder nicht zugänglichen Ort auf.
• Stellen Sie das Gerät nicht an einem instabilen Ort, wie
einem instabilen Regal, auf einer schrägen Fläche oder
an einem Vibrationen ausgesetzten Ort auf.
• Das Gerät nicht fallen lassen oder Stößen aussetzen.
Wenn das Gerät beschädigt ist, das Netzkabel
aus der Steckdose ziehen und den Kundendienst
benachrichtigen.
• Um das Gerät zu reinigen, das Netzkabel aus
der Steckdose ziehen und das Gerät mit einem
weichen, trockenen Tuch abwischen. Verwenden
Sie keine Chemikalien, wie Wachs, Benzin, Alkohol,
Verdünner, Insektizide, Lufterfrischer, Schmiermittel
oder Detergentien. Diese Chemikalien können
die Oberfläche des Geräts beschädigen oder die
Beschriftung auf dem Gerät entfernen.
• Das Gerät keinem Spritz- oder Tropfwasser aussetzen.
Keine mit Flüssigkeit gefüllten Behälter, wie Vasen auf
das Gerät stellen.
• Die Batterien nicht ins Feuer werfen.
•
Schließen Sie nicht mehrere elektrische Geräte an die
selbe Steckdose an. Eine Überlastung der Steckdose
kann zu Überhitzung führen und einen Brand verursachen.
• Es besteht Explosionsgefahr, wenn Sie die Batterien in
der Fernbedienung durch Batterien des falschen Typs
ersetzen. Verwenden Sie ausschließlich Akkus des
entsprechenden Typs.
WARNUNG:
• UM DAS AUSBRECHEN EINES
BRANDES ZU VERHINDERN, DÜRFEN
SICH KEINE KERZEN UND ANDERE
GEGENSTÄNDE MIT OFFENEM FEUER
IN DER NÄHE DES GERÄTS BEFINDEN.
• Schützen Sie das Gerät vor Regen und Feuchtigkeit,
um die Gefahr von Bränden oder Stromschlägen zu
verringern.
CLASS 1 LASER PRODUKT
Dieses Gerät ist als CLASS 1 LASER Produkt eingestuft.
Die Verwendung von anderen Bedienelementen,
Einstellungen oder die Durchführung von Prozeduren die
von denen hier angegebenen abweichen, können zu einer
zu einer gefährlichen Strahlenbelastung führen.
ACHTUNG
• UNSICHTBARER LASERSTRAHL BEI GEÖFFNETEM
GERÄT ODER BESCHÄDIGTER VERRIEGELUNG,
KONTAKT MIT LASERSTRAHL VERMEIDEN!
CLASS 1 LASER PRODUCT
KLASSE 1 LASER PRODUKT
LUOKAN 1 LASER LAITE
KLASS 1 LASER APPARAT
PRODUCTO LÁSER CLASE 1
Sicherheitsinformationen
3 - Deutsch
Page 81

Inhalt
ERSTE SCHRITTE
5 Zubehör
5 Lautsprecherkomponenten
6 Vorderseite
6 Rückseite
7 Fernbedienung
ANSCHLÜSSE
8 Anschließen der Lautsprecher
11 Anschließen an ein Fernsehgerät und Externes
Gerät
EINSTELLUNGEN
12 Ersteinstellungen konfigurieren
12 Der Home Bildschirm im Überblick
13 Aufrufen des Einstellungen Bildschirms
13 Einstellungen Menüfunktionen
16 Radio Einrichten
18 Aktualisieren der Software
WIEDERGABE VON INHALTEN
19 Umschalten des Wiedergabegeräts
19 Wiedergabe von kommerziellen Disks
19 Wiedergabe von selbst aufgenommenen Disks
20 Wiedergabe von Dateien auf einem USB-Gerät
21 Steuern der Videowiedergabe
23 Wiedergabe von kommerziellen Audio Disks
23 Steuern der Musikwiedergabe
25 Anzeigen von Fotos
25 Verwenden der Tasten für Spezialeffekte auf der
Fernbedienung
ANHANG
27 Zusätzliche Informationen
28 Disk und Format Kompatibilität
33 Fehlerbehebung
36 Technische Daten
37 Lizenzen
4 - Deutsch
Page 82

Erste Schritte
Die Abbildungen in dieser Anleitung dienen nur als Referenz und können sich vom aktuellen
Produkt unterscheiden.
Es kann eine Gebühr erhoben werden, wenn:
a. Ein Techniker auf Ihre Anfrage bestellt wird und am Gerät kein Defekt vorliegt (z. B. weil Sie diese
Bedienungsanleitung nicht gelesen haben)
b. Sie das Gerät in einer Reparaturwerkstatt abgegeben haben und am Gerät kein Defekt vorliegt (z.
B. weil Sie diese Bedienungsanleitung nicht gelesen haben).
Die Höhe dieser Gebühr wird Ihnen mitgeteilt, bevor irgendwelche Arbeiten durchgeführt werden
oder der Hausbesuch erfolgt.
Prüfen Sie, ob die im Folgenden aufgeführten Zubehör- und Lautsprecherkomponenten dem Karton beiliegen.
Zubehör
• Fernbedienung
• Batterien (AAA)
Netzkabel UKW-Antenne
Lautsprecherkomponenten
• Bedienungsanleitung
Erste Schritte
Front 2x
Surround 2x
Schrauben (5x15)
16x Center
Ständer 4x Ständerfuß 4x Lautsprecherkabel 4x Subwoofer
5 - Deutsch
Page 83

Erste Schritte
5V 0.5A
SURROUND
SURROUND
Vorderseite
DISPLAY SYMBOLE
FUNKTION
ÖFFNEN/
SCHLIESSEN
DISK-LADE
Wenn das Gerät eingeschaltet ist, darauf achten, das Kinder die Oberfläche des Geräts nicht berühren. Das
✎
Gerät ist heiß.
Um die Software des Geräts über den USB-Anschluss zu aktualisieren, benötigen Sie einen USB-Speicherstick.
✎
Wenn das Gerät das Blu-ray-Disk Menü anzeigt, kann der Film nicht durch Drücken der /6 Taste am
✎
Gerät oder auf der Fernbedienung gestartet werden. Um den Film abzuspielen müssen Sie Film Wiedergabe
oder Start im Menü der Disk auswählen und anschließend die E Taste drücken.
Wenn Sie Inhalte von einem USB-Gerät auf Ihrem Fernsehgerät über das Heimkino wiedergeben, können Sie
✎
den BD/DVD Modus nicht mit der
gerade auf dem Fernsehgerät wiedergegebenen Inhalt beenden und dann den BD/DVD Modus einstellen.
FUNCTION Taste einstellen. Um den BD/DVD Modus einzustellen, den
STOPP
LAUTSTÄRKEREGLER NETZSCHALTER
ANZEIGE
WIEDERGABE/
PAUSE
USB FERNBEDIENUNGSSENSOR
Rückseite
AUX EINGANG
LÜFTER
* UKW-ANTENNE
HDMI-AUSGANG
NETZKABEL EXTERNER DIGITAL AUDIO
* Anschließen der UKW-Antenne
1. Schließen Sie die mitgelieferte UKW-Antenne an den FM ANT Anschluss an.
2. Bewegen Sie den Antennendraht langsam hin und her, bis Sie einen guten Empfang haben. Befestigen Sie
den Draht an der Wand oder einer festen Fläche.
Beim Aufstellen des Geräts ist ein Abstand von mindestens 10 cm auf allen Seiten einzuhalten um eine
✎
ausreichende Belüftung zu gewährleisten. Halten Sie den Lüfter und die Belüftungsöffnungen stets frei.
Dieses Gerät empfängt keine MW-Übertragungen.
✎
LAUTSPRECHER-
AUSGÄNGE
EINGANG (OPTISCH)
6 - Deutsch
Page 84

Fernbedienung
Übersicht der Fernbedienung
Schaltet das Gerät ein und aus.
Lautstärke regeln.
Drücken Sie die Nummerntasten,
um die Optionen zu bedienen.
Zum ansehen des Diskmenüs diese
Zum Vorwärts- oder Rückwärtsspringen
Taste drücken.
diese Taste drücken.
VOLUME
-
RDS DISPLAY TA
DISC MENU
+
2
1
PTY - PTY SEARCH PTY +
4
56
89
7
0
Zur Wiedergabe einer Disk oder
Datei diese Taste drücken.
Zum Beenden der Wiedergabe einer
Disk oder Datei diese Taste drücken.
Auswahl der Untertitelsprache für
SUBTITLE HOME
die Disk-Wiedergabe
Drücken, um den Home Bildschirm
aufzurufen.
TOOLS
Mit dieser Taste wird das Extras-
Menü geöffnet.
Zum Auswählen der
Bildschirmmenüpunkte und zum Ändern
der Menüwerte diese Tasten verwenden.
Um zum vorherigen Menü
zurückkehren diese Taste drücken.
Diese Tasten werden zur Auswahl
der verschiedenen Menüs auf dem
Gerät und auch mehrere Blu-ray-
Drücken, um eine FM-Radiosendung
Diskfunktionen.
RETURN
MEMORY
ABCD
DSP/EQTV SOUND
aufzuzeichnen.
Drücken Sie diese Taste, um
das Audiosignal an die Heimkino
Lautsprecher oder die TV-Lautsprecher
zu leiten. (Siehe Seite 25)
Wählen Sie das gewünschte
DSP/EQ-Audiomodus.
Batterien in die Fernbedienung einsetzen
Achten Sie darauf, dass der "+" und "-" Pol der Batterien wie im
✎
Batteriefach angezeigt eingelegt sind.
Bei normaler Nutzung halten die Batterien ungefähr ein Jahr.
✎
Die Fernbedienung hat in gerader Linie zum Gerät eine
✎
Reichweite von bis zu ca. 7 Metern.
FUNCTION
MUTE
TITLE MENU
POPUP
REPEAT
INFO
EXIT
TUNER
TUNING
DOWN
3
MO/ST
UP
Batteriegröße: AAA
Drücken, um den Betriebsmodus
des Heimkinos auszuwählen.
(BD/DVD, D. IN, AUX, usw.).
Zum Öffnen und Schließen des
Diskfachs.
Damit schalten Sie den Ton
vorübergehend aus.
Verwenden Sie die RDS-Funktion
für den UKW-Senderempfang.
Mit dieser Taste wird das PopupMenü/Titelmenü geöffnet.
Für den Vorwärts- oder
Rückwärtssuchlauf diese Taste
drücken.
Zum Unterbrechen der Wiedergabe
diese Taste drücken.
Ermöglicht Ihnen die Wiederholung
eines Titels, eines Kapitels, eines
Tracks oder einer Disk.
Zur Anzeige der
Wiedergabeinformationen während
der Wiedergabe einer Blu-ray-Disk/
DVD oder von Dateien drücken.
Drücken, um das Menü zu verlassen.
Dient zum Einstellen einer
gespeicherten Radiofrequenz.
Stellt MONO oder STEREO für
Radiosendungen ein.
Suche nach verfügbaren UKW-
Sendern und Kanäle umschalten.
Erste Schritte
7 - Deutsch
Page 85

Anschlüsse
In diesem Kapitel werden verschiedene Methoden erläutert, mit denen dieses Gerät an andere externe
Komponenten angeschlossen werden kann. Bevor Sie das Hauptgerät installieren oder an einer anderen Stelle
aufstellen, müssen Sie es ausschalten und den Netzstecker ziehen.
Anschließen der Lautsprecher
Platzierung des Hauptgeräts
Platzieren Sie das Hauptgerät auf
einem Regal, einer Kommode
oder unter dem Fernsehtisch.
Subwoofer
Front (L)
Surround (L)
Frontlautsprecher
Center-Lautsprecher
Surround-
Lautsprecher
Subwoofer
* Die Lautsprecher können anders aussehen als auf den Abbildungen dieser Bedienungsanleitung
dargestellt.
* Jeder Lautsprecher verfügt über ein farbiges Etikett auf der Rück- bzw. Unterseite. An jedem
Kabelende befindet sich ein farbiges Band. Schließen Sie die Kabel mit dem farbigen Bändern an die
Lautsprecher mit den gleichfarbigen Etiketten an. Die genaue Anleitung finden Sie auf Seite 9.
Center
Gerät
Platzieren Sie diese Lautsprecher vor Ihrer Hörposition so, dass sie nach innen
zeigen (in einem Winkel von ca. 45°) und auf Sie ausgerichtet sind. Platzieren Sie
die Lautsprecher so, dass sich die Hochtöner auf Ohrhöhe befinden. Richten
Sie die Vorderseite der Front-Lautsprecher an der Vorderseite des CenterLautsprechers aus, oder versetzen Sie sie etwas vor die Center-Lautsprecher.
Am besten ist es, den Center Lautsprecher auf der gleichen Höhe zu installieren,
wie die Frontlautsprecher. Sie können ihn aber auch direkt über oder unter dem
Fernsehgerät installieren.
Stellen Sie die Rücklautsprecher seitlich von Ihrer Hörposition auf. Falls
dafür der Platz nicht ausreicht, platzieren Sie die Rücklautsprecher einander
gegenüberliegend. Platzieren Sie die Lautsprecher 60 bis 90 cm über Ihrem
Kopf, leicht nach unten ausgerichtet.
* Im Gegensatz zu den Front- und Center Lautsprechern werden die Surround
Lautsprecher hauptsächlich für Klangeffekte verwendet. Von diesen
Lautsprechern wird nicht die ganze Zeit über Ton wiedergegeben.
Die Position des Subwoofers ist nicht wichtig. Sie können ihn beliebig platzieren.
Front (R)
Surround (R)
Auswahl der Hörposition
Die Hörposition sollte sich
in einem Abstand vom
Fernsehgerät befinden, die das
2,5 bis 3-fache der Größe des
Bildschirms beträgt. Wenn Sie
zum Beispiel über einen 46 Zoll
Bildschirm verfügen, sollte sich
die Hörposition 2,92 bis 3,5 m
vom Bildschirm entfernt befinden.
8 - Deutsch
Page 86

Zum Installieren der Lautsprecher auf dem Tallboy-Stand
1. Stellen Sie die Bodenplatte auf den Kopf, und
befestigen Sie den Ständer.
2. Befestigen Sie die Schrauben mithilfe eines
Schraubenziehers in den 3 markierten
Öffnungen.
3. Biegen Sie das Lautsprecherkabel gerade und
führen Sie es in die Öffnung im Standfuß ein.
4. Befestigen Sie den zusammengesetzten Stand
am oberen Lautsprecher.
Ständerfuß
1
Ständer
3
2
Anschlüsse
4
Lautsprecher
Ständer
5. Drehen Sie mit einem Schraubenzieher eine
Schraube im Uhrzeigersinn in das Loch auf der
Rückseite des Lautsprechers. Schließen Sie
anschließend das Lautsprecherkabel an.
6. Lautsprecher nach der Installation. Die
gleichen Schritte für die anderen Lautsprecher
wiederholen.
5
6
Anschließen der Lautsprecherkabel
* Nur Front/Surround-Lautsprecher
1. Ordnen Sie jedes Lautsprecherkabel dem entsprechenden Lautsprecher zu, indem Sie die mit
einer bestimmten Farbe gekennzeichneten Stecker den farbigen Aufklebern am Boden eines jeden
Lautsprechers zuordnen.
2. Schließen Sie die Stecker der Lautsprecherkabel aller Lautsprecher auf der Rückseite des Geräts an, wobei
die Farbe des Steckers mit der Farbe der Anschlussbuchse übereinstimmen muss. Beim Anschließen
darauf achten, dass die Farben der Kennzeichnungen auf der Rückseite der Lautsprecher mit den Kabeln
übereinstimmen.
9 - Deutsch
Page 87

Anschlüsse
SURROUND
SURROUND
SURROUND
SURROUND
Lautsprecher (L)
Wenn Sie einen Lautsprecher in der Nähe des Fernsehers aufstellen, kann die Farbwiedergabe auf dem
✎
Bildschirm durch die von den Lautsprechern erzeugten magnetischen Felder gestört werden.
| ACHTUNG |
Wenn Sie die Lautsprecher an der Wand befestigen wollen, müssen Sie zuerst die Schrauben oder Nägel
(nicht mitgeliefert) sicher in der Wand befestigen und anschließend den Lautsprecher an der Öffnung auf der
Rückseite vorsichtig an der Schraube oder dem Nagel aufhängen.
Achten Sie darauf, dass Kinder nicht mit den Lautsprechern oder in deren Nähe spielen. Sie können durch
umkippende Lautsprecher verletzt werden.
Stellen Sie beim Anschluss der Lautsprecherkabel an die Lautsprecher sicher, dass die Polarität (+/-) korrekt
ist.
Halten Sie den Subwoofer außerhalb der Reichweite von Kindern. Verhindern Sie, dass Kinder ihre Hände
oder Fremdkörper in die Bassreflexöffnung des Subwoofers einführen.
Hängen Sie den Subwoofer nicht an der Schallöffnung an der Wand auf.
Front-
Center-Lautsprecher
Subwoofer
Surround-
Lautsprecher (L)
Surround-
Lautsprecher (R)
Front-Lautsprecher (R)
10 - Deutsch
Page 88

Anschließen an ein Fernsehgerät und Externes Gerät
SURROUND
SURROUND
Rot
R
Weiß
W
Methode 1 Methode 2
Anschlüsse
Externe Geräte
AUDIO OUT
OPTICAL OUT
HDMI IN (ARC)
Anschluss an ein Fernsehgerät
Verbinden Sie ein HDMI-Kabel (nicht mitgeliefert) über die HDMI OUT (HDMI AUSGANGS) -Buchse an der
Rückseite des Geräts mit der HDMI Eingangsbuchse des Fernsehgeräts. Wenn das Fernsehgerät ARC
unterstützt, können Sie den Ton von Ihrem Fernsehgerät über das Heimkino wiedergeben, indem Sie nur einfach
nur dieses Kabel anschließen. Schlagen Sie auf Seite 14 dieser Anleitung und in dem Kapitel über ARC in der
Bedienungsanleitung Ihres Fernsehgeräts nach um weitere Informationen zu erhalten.
Externe Geräte anschließen
Es werden im Folgenden zwei Methoden zum Anschluss von externen Geräten an Ihr Heimkino beschrieben.
Methode 1 AUX EINGANG : Anschließen eines externen Analoggeräts
Mit Hilfe eines RCA Audiokabels (nicht mitgeliefert) den AUDIO Eingang des Geräts an den AUDIO Ausgang des
externen Analoggeräts anschließen. Wählen Sie den AUX Modus.
• Achten Sie darauf, die farbigen Kabelstecker an die Anschlussbuchsen gleicher Farbe anzuschließen.
Methode 2 OPTISCH : Anschließen eines externen Digitalgeräts
Verwenden Sie diese Methode für den Anschluss von Digitalgeräten mit digitaler Audioausgabe, wie Kabelboxen
und Satellitenempfänger (Set-Top-Boxen). Mit der Hilfe eines optischen Kabels (nicht mitgeliefert) den optischen
Digital Audioeingang am Gerät mit dem optischen Digitalausgang am Receiver verbinden.
Stellen Sie den D. IN Modus ein.
Wenn Sie Videobilder über den Kabelanschluss oder den Satellitenempfänger sehen möchten, müssen Sie
✎
deren Videoausgang direkt an das Fernsehgerät anschließen.
Dieses System unterstützt eine digitale Abtastraten von 32 kHz oder höher von externen digitalen Geräten.
✎
Dieses System unterstützt nur DTS und Dolby Digital Audio. MPEG Audio, ein Bitstream Format, wird nicht
✎
unterstützt.
Ein externes Gerät für die Wiedergabe auswählen
Um ein angeschlossenes externes Gerät auszuwählen, die FUNCTION Taste drücken. Durch wiederholtes
Drücken, wird der Modus in folgender Reihenfolge umgeschaltet : BD/DVD D. IN AUX FM
11 - Deutsch
Page 89

Einstellungen
Ersteinstellungen konfigurieren
• Das Home Menü wird nicht angezeigt, wenn die
Ersteinstellungen nicht konfiguriert wurden.
• Bildschirmanzeige dieses Geräts kann sich
möglicherweise nach Aktualisierung der
Softwareversion ändern.
• Die Schritte für den Zugriff können sich je nach
ausgewähltem Menü unterscheiden.
1. Schalten Sie das Fernsehgerät ein, nachdem Sie
das Gerät angeschlossen haben und schalten
Sie es ein. Wenn Sie das Gerät das erste Mal
einschalten, zeigt das Gerät automatisch den
Zurücksetzen Bildschirm an.
2. Wählen Sie mit den ▲▼ Tasten die gewünschte
Sprache aus, und drücken Sie die E Taste.
Der Bildschirm
3.
Wählen Sie mithilfe der ▲▼ Tasten ein TV-Format
und drücken Sie anschließend die E Taste.
Ihnen stehen vier Möglichkeiten zur Wahl:
16:9 Original - Für Breitbild Fernsehgeräte.
Zeigt Breitbandbilder im originalen 16:9 Format
und 4:3 Bilder (das alte Standardformat) im 4:3
Pillarbox Format mit schwarzen Rändern auf der
linken und rechten Seite an.
16:9 Voll - Für Breitbild Fernsehgeräte. Zeigt
Breitbild Bilder im originalen 16:9 Format an und
vergrößert Bilder im 4:3 Format so, dass der
Bildschirm im 16:9 voll gefüllt ist.
4:3 Letterbox - Für ältere analog Fernsehgeräte
mit Standardbildschirm. Zeigt Bilder im 4:3
Format im Vollbildmodus und Bilder mit 16:9
Format im Letterbox Format an, bei dem das
Seitenverhältnis von 16:9 beibehalten wird,
jedoch über und unter dem Bild schwarze
Ränder angezeigt werden.
4:3 Passend - Für ältere analog Fernsehgeräte
mit Standardbildschirm. Zeigt Bilder im 4:3
Format im Vollbildmodus und Bilder im 16:9
Forma im Pan-Scan Format an, bei dem der
linke und rechte Rand des Bildes abgeschnitten
und die Mitte des Bildes vertikal vergrößert wird.
4. Der "Ersteinstellung abgeschlossen"
Bildschirm wird angezeigt und anschließend
erscheint der Home Bildschirm.
Wenn Sie den Zurücksetzen Bildschirm erneut
✎
aufrufen wollen, um Änderungen vorzunehmen,
müssen Sie die Zurücksetzen Option auswählen.
(Siehe Seite 16)
TV-Format
wird angezeigt.
Wenn Sie ein HDMI-Kabel verwenden, um das
✎
Gerät an ein Anynet+ (HDMI-CEC)-kompatibles
Samsung-Fernsehgerät anzuschließen und 1.) Die
Anynet+ (HDMI-CEC) Funktion am Fernsehgerät
und dem Gerät auf Ein gestellt haben und 2.) Das
Fernsehgerät auf eine vom Gerät unterstützte
Sprache eingestellt haben, stellt das Gerät diese
Sprache automatisch als die bevorzugte Sprache
ein.
Der Home Bildschirm im Überblick
1
DISK WIEDERGEBEN
Keine Disk
Gerät
Funktion
wechseln
FOTOS VIDEOS MUSIK
Einstellungen
2
345
DISK WIEDERGEBEN
1
Die sich in der Disk-Lade befindende Disk wird
wiedergegeben.
Drücken Sie die Taste E, um die Wiedergabe der
Disk zu starten.
FOTOS/ VIDEOS/ MUSIK
2
Gibt Videos, Fotos oder Musik von einer Disk oder
einem USB-Gerät wieder.
Gerät wechseln
3
Zeigt eine Liste der an das Hauptgerät
angeschlossenen Geräte an. Schalten Sie zu dem
gewünschten Gerät.
Funktion
4
Zum Umschalten auf ein externes Gerät und für
Radio. Sie können die
Fernbedienung oder die Taste am Hauptgerät
zum Umschalten des Modus verwenden.
FUNCTION Taste auf der
12 - Deutsch
Page 90

Einstellungen
TOOLS
RETURN
EXIT
INFO
SUBTITLE HOME
REPEAT
5
Passt verschiedene Funktionen an Ihre
persönlichen Vorlieben an.
Aufrufen des Einstellungen
Bildschirms
1. Auf dem Home Bildschirm Einstellungen
auswählen und anschließend die E Taste
drücken. Der Bildschirm Einstellungen wird
angezeigt.
Einstellungen
Bild
Ton
System
Sprache
Sicherheit
Unterstützung
TV-Format : 16:9 Original
BD Wise : Aus
Auflösung : Auto
Film-Bildfrequenz (24 F/s) : Aus
HDMI-Farbformat : Auto
HDMI-Deep Color : Aus
Progressiver Modus : Auto
RETURN Taste : Zum vorherigen Menü
2
zurückkehren
ENTER) / RICHTUNGSTASTEN Taste :
(
E
• Mit Hilfe der
Tasten können Sie
▲▼◄►
den Cursor bewegen oder eine Position
auswählen.
3
• Drücken Sie die E Taste, um die
ausgewählte Position zu aktivieren oder
um eine Einstellung zu bestätigen.
EXIT Taste : Verlassen des Menüs.
4
Ausführliche Funktionsinformationen
Jede Einstellungen Funktion, Menüposition
und individuelle Option wird ausführlich auf dem
Bildschirm erklärt. Um sich eine Erklärung anzeigen
zu lassen, verwenden Sie bitte die ▲▼◄► Tasten,
um eine Funktion, Menüposition oder Option
auszuwählen. Die Erklärung wird für gewöhnlich am
unteren Bildschirmrand angezeigt.
Eine Kurzbeschreibung für jede Einstellungen
Funktion beginnt auf dieser Seite. Zusätzliche
Informationen über einige der Funktionen befinden
sich ebenfalls im Anhang dieser Anleitung.
Einstellungen
2. Den Zugriff auf die Menüs, Untermenüs und
Optionen auf dem Einstellungen Bildschirm,
können Sie der nachfolgenden Darstellung der
Fernbedienung entnehmen. (Siehe unten)
Wenn nach Betätigung der Stopp Taste des
✎
Geräts das Gerät länger als 5 Minuten nicht
benutzt wird, schaltet sich automatisch der
Bildschirmschoner ein. Wenn sich das Gerät
länger als 20 Minuten im Bildschirmschonermodus
befindet, wird er automatisch ausgeschaltet.
Im Einstellungen Menü verwendete
Fernbedienungstasten
1
3
2 4
HOME Taste : Drücken, um den Home
1
Bildschirm aufzurufen.
13 - Deutsch
Einstellungen Menüfunktionen
Bild
TV-Format
Mit dieser Funktion kann die Bildausgabe des
Geräts an die Bildschirmgröße Ihres Fernsehgeräts
angepasst werden. (Siehe Seite 27)
BD Wise
BD Wise ist Samsungs neueste Geräte-
Anschlussfunktion. Wenn Sie ein Samsung Gerät
und ein Samsung-Fernsehgerät mit BD Wise über
HDMI aneinander anschließen und BD Wise auf
beiden Geräten aktiviert ist, gibt das Gerät das
Video mit der Videoauflösung und der Bildfrequenz
der Blu-ray/DVD-Disk wieder.
Auflösung
Mit dieser Funktion können Sie die Auflösung des
HDMI Videosignals auf BD Wise, Auto, 1080p, 1080i,
720p oder 576p/480p einstellen. Die Zahl zeigt die
Anzahl der Zeilen des Videos pro Bild an. Das i und
das p stehen für interlace scan (Zeilensprungverfahren)
und progressive scan (progressive Abtastung). Je
mehr Zeilen, desto höher die Qualität.
Page 91

Einstellungen
Film-Bildfrequenz (24 F/s)
Wenn die Film-Bildfrequenz (24 F/s) Funktion auf
Auto eingestellt wird, wird die HDMI-Ausgabe des
Geräts für eine bessere Bildqualität auf 24 Bilder
pro Sekunde eingestellt, wenn ein 24 fps fähiges
Fernsehgerät angeschlossen ist.
• Die Film-Bildfrequenz (24 F/s) Funktion kann
nur auf Fernsehgeräten verwendet werden, die
diese Bildfrequenz unterstützen.
• Film-Bildfrequenz steht nur zur Verfügung, wenn
sich das Gerät im Modus für die HDMI 1080i
oder 1080p Ausgabeauflösung befindet.
HDMI-Farbformat
Hier kann das Farbraumformat für die HDMIWiedergabe an die Möglichkeiten des
angeschlossenen Geräts (Fernsehgerät,
Bildschirm, usw.) angepasst werden.
HDMI-Deep Color
Mit dieser Option können Videos über die HDMI
OUT Buchse mit der Deep Colour Farbtiefe
wiedergeben werden. Deep Color bietet genauere
Farbwiedergabe mit höherer Farbentiefe.
Progressiver Modus
Mit dieser Funktion kann die Bildqualität bei der
Wiedergabe von DVDs verbessert werden.
To n
Lautsprechereinstellung
Sie können die folgenden
Lautsprechereinstellungen vornehmen und den
Lautsprechertest ein- und ausschalten, um die
Lautsprecher zu testen.
Pegel: Sie können die relative Lautstärke des
Lautsprechers zwischen 6dB bis -6dB einstellen.
Wenn Sie zum Beispiel tiefe Bässe mögen, können
Sie die Lautstärke des Subwoofers um 6dB
erhöhen.
Entfernung: Sie können die relative Entfernung von
jedem Lautsprecher zur Hörposition auf bis zu 9 m
einstellen. Je größer der Abstand, desto lauter tönt
der Lautsprecher.
Lautsprechertest
Lautsprechertest
Einstellungen zu testen. Wenn
auf Ein eingestellt wird, wird
eingeschaltet. Wird diese Option auf Aus gesetzt
wird sie ausgeschaltet.
: Sie können die
Funktion ausführen, um Ihre
Lautsprechertest
Lautsprechertest
Lautsprecher auswählen
Hier können Sie einstellen, ob Sie die Lautsprecher
des Fernsehgeräts oder die des Heimkinos
aktivieren möchten.
Equalizer-Modus
Schalten Sie den Equalizer-Modus ein, um den
Equalizer nutzen zu können.
Equalizer-Einstell.
Hier können Sie den Equalizer einstellen.
Equalizer-Einstell.
✎
Equalizer-Modus
Audioausgabekanal
Hier können Sie einstellen, den Ton vom
Fernsehgerät auf die Lautsprecher des Heimkinos
umzuleiten. Erfordert eine HDMI-Verbindung und ein
Audioausgabekanal (ARC) kompatibles Fernsehgerät.
• Wenn Audioausgabekanal auf Ein gesetzt ist
und das Gerät über ein HDMI-Kabel an das
Fernsehgerät angeschlossen ist, funktioniert der
digitale optische Eingang nicht.
•
Wenn Audioausgabekanal auf Auto eingestellt
ist und das Gerät über ein HDMI-Kabel an das
Fernsehgerät angeschlossen ist, wird ARC und der
digitale optische Eingang automatisch ausgewählt.
Digital-Ausgang
Mit dieser Funktion können Sie den Digital-
Ausgang an die Möglichkeiten des an das Gerät
angeschlossenen AV-Receivers anpassen. Für weitere
Einzelheiten, schlagen Sie bitte in der Auswahltabelle
für den Digitalausgang nach. (Siehe Seite 32.)
Dynamikumfangsteuerung
Mit dieser Funktion können Sie die
Dynamikumfangsteuerung auf Dolby Digital, Dolby
Digital Plus, und Dolby TrueHD Audio anwenden.
Auto
: Steuert automatisch den Dynamikumfang
von Dolby TrueHD Audio auf Grundlage der
Informationen im Dolby TrueHD Soundtrack.
Schaltet ebenfalls die Dynamikumfangsteuerung
für Digital und Dolby Digital Plus aus.
Aus
: Der Dynamikumfang wird nicht komprimiert
und Sie hören den Originalklang.
Ein
: Schaltet die Dynamikumfangsteuerung für
alle drei Dolby Formate ein. Leisere Töne werden
verstärkt und die Lautstärke von lauten Tönen
wird reduziert.
erscheint nur, wenn
auf Ein gestellt ist.
14 - Deutsch
Page 92

Downmix-Modus
Mit dieser Einstellung können Sie Methode zum
Heruntermischen von Mehrkanalton auswählen, die
mit Ihrem Stereo System kompatibel ist. Sie können
wählen, ob das Gerät auf Normal-Stereo oder auf
Surround-kompatibel heruntermischen soll.
Audio-Sync
Wenn das Gerät an einen Digitalfernsehgerät
angeschlossen ist, können Sie die Audioverzögerung
einstellen, so dass die Audiowiedergabe mit dem
Videobild synchron ist. Die Verzögerungszeit kann 0
und 300 Millisekunden eingestellt werden.
System
Zurücksetzen
Mit dieser Funktion können Sie die Zurücksetzen
Prozedur erneut ausführen. (Siehe Seite 12)
Schnellstart
Sie können den Einschaltvorgang verkürzen, indem
Sie die zum Hochfahren benötigte Zeit verkürzen.
Wenn diese Funktion auf Ein gestellt ist, ist der
✎
Stromverbrauch im Standby-Modus höher. (Ca.
12W ~ 20W)
Anynet+ (HDMI-CEC)
Bei Anynet+ handelt es sich um eine nützliche
Funktion, die den vernetzten Betrieb mit anderen
Samsung Geräten zur Verfügung stellt, die über
die Anynet+ Funktion verfügen. Um diese Funktion
zu nutzen, müssen Sie dieses Gerät mithilfe eines
HDMI-Kabels an ein Samsung Fernsehgerät mit
Anynet+ Funktion anschließen.
BD-Datenmanagement
Ermöglicht die Verwaltung der von Blu-ray-Disks
heruntergeladenen und auf einem Flash-Speicher
gespeicherten Inhalte.
Sie können Geräteinformationen einsehen,
einschließlich der Speicherkapazität, BDDaten löschen oder das Flash Speichermedium
wechseln.
DivX® Video On Demand
Anzeige von DivX® VOD-Registrierungscodes, um
DivX® VOD-Inhalt zu erwerben und wiedergeben.
Sprache
Mit dieser Funktion können die Sprache
auswählen, in der das Bildschirmmenü,
Diskmenü, usw. angezeigt werden soll.
• Die ausgewählte Sprache wird nur dann
erscheinen, wenn sie auf der Disk unterstützt
wird.
Einstellungen
Sicherheit
Die voreingestellte PIN lautet 0000. Geben Sei
die voreingestellte PIN für den Zugriff auf die
Sicherheitsfunktion ein, wenn Sie keine eigene PIN
erstellt haben.
BD-Sicherungsstufe
Verhindert die Wiedergabe von Blu-ray-Disks
mit festgelegter Altersbeschränkung, bis die PIN
eingegeben wurde.
DVD-Sicherungsstufe
Verhindert die Wiedergabe von DVDs mit
festgelegter Altersbeschränkung, bis die PIN
eingegeben wird.
PIN ändern
Ändern der 4-stelligen PIN für den Zugriff auf
Sicherheitsfunktionen.
Unterstützung
Software-Update
Für weitere Informationen über diese Funktion
finden Sie auf Seite 18.
Samsung kontaktieren
Hier erhalten Sie Kontaktinformationen, wenn Sie
Hilfe für Ihr Gerät benötigen.
15 - Deutsch
Page 93

Einstellungen
Zurücksetzen
Setzt alle Einstellungen auf ihre Voreinstellungen
zurück. Sie müssen den PIN-Code eingeben. Die
voreingestellte PIN lautet 0000.
Radio Einrichten
• Um Radio hören zu können, müssen Sie die
mitgelieferte UKW-Antenne anschließen.
Bedienen des Radios mit der
Fernbedienung
1. Drücken Sie die FUNCTION Taste, um FM
auszuwählen.
2. Stellen Sie den gewünschten Sender ein.
• Gespeicherter Sender 1 : Drücken Sie die
Taste, um PRESET auszuwählen und
5
drücken Sie anschließend die TUNING UP,
DOWN Taste, um einen gespeicherten Sender
aufzurufen.
- Bevor Sie voreingestellte Sender aufrufen
können, müssen Sie die Sender im Gerät
abspeichern.
• Manuelle Sendersuche : Drücken Sie die
Taste, um MANUAL auszuwählen und
5
drücken Sie anschließend die
DOWN Taste, um das Frequenzband nach
oben oder unten zu durchlaufen.
• Automatische Sendersuche : Drücken Sie
die 5 Taste, um MANUAL auszuwählen
und anschließend für ein paar Sekunden
die
TUNING UP, DOWN Taste, um das
Frequenzband automatisch zu durchsuchen.
TUNING UP,
Mono oder Stereo einstellen
Drücken die MO/ST Taste.
Jedes Mal, wenn Sie die Taste drücken wird zwischen
•
STEREO und MONO Empfang umgeschaltet.
• An Orten mit schlechtem Empfang, können Sie
MONO einstellen, einen klaren, rauschfreien
Empfang zu erhalten.
Sender voreinstellen
Beispiel : Speichern des Senders FM 89.10.
1. Drücken Sie die
auszuwählen.
2. Drücken Sie die
durch die FM-Frequenzen zu durchlaufen und
wählen Sie <89.10>.
3. Drücken Sie die
(die gelbe
Fernbedienung).
FUNCTION Taste, um FM
TUNING UP, DOWN Taste, um
TUNER MEMORY Taste
C Taste am unteren Rand der
16 - Deutsch
4. Drücken Sie innerhalb von 5 Sekunden die
TUNER MEMORY Taste erneut. Der Sender
wird gespeichert.
Wenn Sie die TUNER MEMORY Taste wiederholt
✎
drücken ohne den Sender zu wechseln, kann der
gespeicherte Sender überschrieben werden.
5. Zur Voreinstellung eines anderen Senders
wiederholen Sie bitte Schritte 2 bis 4.
• Um einen gespeicherten Sender einzustellen,
die
TUNING UP, DOWN Taste drücken.
Um alle gespeicherten Radiosender zu lösen, die
✎
TITLE MENU im manuellen Radiomodus ca. für
5 Sekunden drücken, bis DEFAULT PRESET auf
der Anzeige erscheint.
Radiosendungen aufzeichnen
Sie können Radiosendungen auf ein angeschlossenes
USB-Speichergerät aufzeichnen.
1. Schließen Sie ein USB-Gerät an den USBAnschluss auf der Vorderseite des Geräts an.
2. Drücken Sie die
auszuwählen und betätigen anschließend einer
der
TUNING UP, DOWN Tasten, um den
Sender auszuwählen, den Sie aufzeichnen
möchten.
3. Drücken Sie die
Aufnahme zu starten. Die Aufnahme wird
gestartet.
• Die aufgezeichnete Zeit wird auf der linken
Seite und die dem freien Speicherplatz auf
dem USB-Gerät entsprechende verbleibende
Aufnahmezeit auf der rechten Seite angezeigt.
4. Drücken Sie die
zu beenden. Die Aufnahme wird beendet und
als mp3-Datei gespeichert. Um die Aufnahme
wiederzugeben, schlagen Sie bitte unter
" Wiedergabe von Dateien auf einem USB-Gerät"
nach.
Die aufgezeichnete Datei wird im Ordner Tuner
✎
gespeichert, der automatisch erstellt wurde.
Während eine Radiosendung aufgezeichnet wird,
✎
können nur die Tasten
( NETZSCHALTER), EXIT, MUTE
bedient werden.
Wenn Sie während der Aufnahme keine Taste
✎
drücken, wird der Bildschirmschoner aktiviert.
Klangeffekte, wie DSP, EQ, usw. werden bei
✎
der Aufzeichnung einer Radiosendung nicht
aufgenommen.
Die Radiosendung wird mit einem fest
✎
eingestellten Aufnahmepegel aufgezeichnet, auch
wenn Sie während der Aufnahme die Lautstärke
ändern oder die
FUNCTION Taste, um FM
ROTE (A) Taste, um die
EXIT Taste, um die Aufnahme
( ÖFFNEN/SCHLIESSEN),
MUTE
Taste drücken.
und VOL +/-
Page 94

Wenn Sie während der Aufnahme das USB-Gerät
✎
entfernen oder das Netzkabel ziehen, kann der bereits
aufgezeichnete Teil nicht wiedergegeben werden.
Die Aufnahme wird nicht gestartet, wenn der
✎
verbleibende freie Speicherplatz auf dem USBSpeichergerät weniger als 2MB beträgt.
Wenn das USB-Gerät entfernt wird oder nur
✎
unzureichender Speicherplatz (unter 2 MB) zur
Verfügung steht, wird eine entsprechende Meldung
angezeigt und die Aufnahme wird beendet.
Über RDS-Sender
Verwenden von RDS (Radio Data System) für
den Empfang von UKW-Sendern UKW-Sender
RDS ermöglicht es Radiostationen ein zusätzliches
Signal neben den regulären Programmsignalen zu
senden.
Dazu gehören beispielsweise Informationen über den
Sendernamen oder die Art des Radioprogramms, wie
etwa Sport oder Musik usw.
Wenn Sie eine Radiostation mit RDS-Dienst gewählt
haben, erscheint das RDS-Symbol auf der Anzeige.
Beschreibung der RDS-Funktion
• PTY (Programmtyp): Zeigt den Programmtyp an,
der gerade wiedergegeben wird.
• PS NAME (Program Service Name) : Zeigt den
Namen der Radiostation an und besteht aus 8
Zeichen.
• RT (Radio Text) : Dekodiert die vom Sender
übertragenen Texte (wenn vorhanden) und besteht
aus maximal 64 Zeichen.
• CT (Clock (Time Uhrzeit)): Dekodiert die Echtzeit
aus der Radiofrequenz. Einige Radiostationen
übertragen eventuelle keine PTY, RT oder
CT Informationen. Deswegen können diese
Informationen nicht immer angezeigt werden.
• TA (Verkehrsdurchsage): TA ON/OFF zeigt an, dass
die Verkehrsdurchsage gerade läuft.
RDS funktioniert möglicherweise nicht richtig,
✎
wenn die gewählte Station RDS-Signale nicht
korrekt übermittelt oder das Signal schwach ist.
Anzeigen der RDS-Signale
Sie können die von der Station gesendeten RDSSignale auf dem display ablesen.
Betätigen Sie die Taste
eine Radiostation hören.
• Bei jeder Betätigung der Taste ändert sich
die Anzeige um Ihnen folgende Informationen
anzuzeigen: PS NAME RT CT Frequenz
PS
(Programmdienst)
RT (RadioText)
Frequenz
RDS DISPLAY während Sie
Während des Suchvorgangs,
erscheint <PS NAME> und
anschließend werden die
Sendernamen angezeigt.
<NO PS> erscheint, wenn
kein Signal gesendet wird.
Während des Suchvorgangs
erscheint <RT> und
anschließend werden die von
der Radiostation gesendeten
Mitteilungen angezeigt. <NO
RT> erscheint wenn kein
Signal gesendet wird.
Senderfrequenz (kein-RDSService)
Über auf dem Bildschirm angezeigte Zeichen
Wenn im Bildschirm PS, oder RT-Signale angezeigt
werden, werden die folgenden Zeichen verwendet.
• Das Display-Fenster unterschiedet nicht zwischen
Groß- und Kleinbuchstaben. Es werden nur
Großbuchstaben verwendet.
•
Die Anzeige kann keine akzentuierten Buchstaben
darstellen. So kann <A,> beispielsweise für
akzentuierte <A’s> stehen, wie <À, Â, Ä, Á, Å und Ã.>
PTY (Program-Typ) Anzeige und
PTY-SEARCH Funktion
Einer der Vorteile des RDS-Service ist dass Sie
eine besondere Art vom Programm von der vor
eingestellten Kanälen durch das Angeben der PTYCodes ausfindig machen können.
Programmsuche mithilfe der PTY-Codes
• Bevor Sie beginnen!
- PTY Suche gilt für alle programmierte Sender.
- Um den Suchvorgang vorzeitig abzubrechen,
während der Suche die 5 Taste drücken.
- Es gibt eine Zeitbegrenzung für die folgende
Schritte. Wenn die Einstellung vor ihrer
Beendigung abgebrochen wird, starten Sie
nochmals mit Schritt 1.
Einstellungen
17 - Deutsch
Page 95

Einstellungen
+
- Wenn Sie eine Taste auf der Hauptfernbedienung
drücken. Achten Sie darauf dass Sie
für die Auswahl des UKW Senders die
Hauptfernbedienung benutzen.
RDS DISPLAY TA
2
1. Betätigen Sie die Taste PTY SEARCH, während
Sie einen UKW-Sender hören.
2. Drücken Sie die Taste
gewünschte PTY-Code auf dem Bildschirm
angezeigt wird.
• Auf dem Bildschirm auf der rechten Seite
3. Drücken Sie die Taste
während der gewünschte PTY-Code auf dem
Bildschirm noch angezeigt wird.
• Das Center-Lautsprecher Gerät sucht nach 15
1
PTY - PTY SEARCH PTY +
4
56
werden die beschriebenen PTY-Codes
angezeigt.
programmierten Sendern, stoppt wenn einen
ausgewählte Sender erkannt wurde, und stellt
diesen Sender ein.
3
PTY- oder PTY+ bis der
PTY SEARCH erneut,
Aktualisieren der Software
Mit dem Software-Update Menü können Sie
Software-Updates herunterladen, welche die Leistung
des Geräts verbessern oder zusätzliche Dienste zur
Verfügung stellen.
• Das Gerät während des Aktualisierungsvorgangs
niemals manuell ein oder aus schalten.
• Die Aktualisierung ist beendet, wenn sich das
Gerät nach dem Neustart abschaltet. Drücken
NETZSCHALTER Taste, um das
Sie die
aktualisierte Gerät einzuschalten.
1. Besuchen Sie die Webseite www.samsung.com.
2. Klicken Sie oben rechts auf der Seite auf
OWNERS & SUPPORT und anschließend in der
Dropdown Leiste auf Manuals & Downloads.
3. Geben Sie im nächsten Fenster die
Modellnummer in das Suchfeld ein. Während
der Eingabe der Modellnummer erscheint
eine Klappliste mit den Geräten, die der
Modellnummer entsprechen.
4. Klicken Sie in der Klappliste mit der linken
Maustaste auf die Modellnummer Ihres Geräts.
5. Auf der angezeigten Seite Downloads anklicken.
6. Suchen Sie Upgrade-Datei (USB-Typ) in der
Spalte Beschreibung. Klicken Sie auf das ZIP
Symbol in der Spalte Datei Download auf der
rechten Seite.
7. Klicken Sie im Popup-Fenster auf Send. Die
Datei wird auf Ihren PC heruntergeladen.
8. Entpacken Sie das Zip-Archiv auf Ihrem
Computer. Sie sollten einen eigenen Ordner mit
dem gleichen Namen wie die Zip-Datei anlegen.
9. Den Ordner auf ein USB-Flash-Laufwerk
kopieren.
10. Stellen Sie sicher, dass sich keine Disk im Gerät
befindet, und stecken Sie das USB-FlashLaufwerk in den USB-Anschluss des Geräts.
11. Im Menü des Geräts nach Einstellungen >
Unterstützung > Software-Update wechseln.
12. Wählen Sie Per USB.
13. Das Gerät sucht auf dem USB-Laufwerk nach
der Software. Nachdem die Software gefunden
wurde, erscheint das Update Aufruf Pop-up.
14. Wählen Sie OK. Das Heimkino schaltet sich
aus und wieder ein und beginnt dann mit der
Aktualisierung. Nachdem die Aktualisierung
abgeschlossen ist, schaltet sich das Heimkino
aus.
15. Drücken Sie die
das Heimkino einzuschalten.
Es darf keine Disk im Gerät eingelegt sein, wenn
✎
die Software über den USB-Anschluss aktualisiert
wird.
Überprüfen Sie nach Abschluss der Aktualisierung
✎
im Menü Software-Update die Software Details.
NETZSCHALTER Taste, um
18 - Deutsch
Page 96

Wiedergabe von Inhalten
Ihr Heimkino kann Inhalte auf Blu-ray-Disks/DVD/CD
und USB-Geräten wiedergeben.
PCs die mit Windows 7 oder Windows 8
✎
betrieben werden, verfügen bereits über die DLNA
(Play To) Software.
Umschalten des Wiedergabegeräts
Wenn zwei oder mehr externe Geräte an das
Hauptgerät angeschlossen sind, können Sie jede
der drei im Nachfolgenden beschriebenen Methoden
verwenden, um das Wiedergabegerät umzuschalten.
Methode 1
Verwenden Sie auf dem Home Bildschirm die
▲▼◄► Tasten um nach Gerät wechseln zu gehen
und drücken Sie dann die E Taste.
Das Gerät wechseln Popup wird angezeigt. Gehen
Sie mit den ▲▼ Tasten zum gewünschten Gerät und
drücken Sie die E Taste.
Methode 2
Wenn Sie zu FOTOS, VIDEOS, MUSIK oder anderen
dateibasierten Inhalten wechseln, erscheint eine Liste mit
Ordnern und Dateien. Drücken Sie die
um das Gerät wechseln Popup-Fenster anzuzeigen und
verwenden Sie die ▲▼ Tasten, um zum gewünschten
Gerät zu gehen und drücken Sie die E Taste.
ROTE (A) Taste,
Methode 3
Wenn ein Gerät zum ersten Mal angeschlossen wird,
erscheint ein Popup-Fenster. In dem Popup-Fenster
können Sie das Quellgerät mithilfe der ◄► Tasten
und anschließendes Drücken von E wechseln.
Wiedergabe von kommerziellen
Disks
1. Drücken Sie die ^ Taste, um das Diskfach zu
öffnen.
2. Legen Sie die Disk vorsichtig mit der bedruckten
Seite nach oben in das Diskfach ein.
3. Drücken Sie die ^ Taste, um die Disklade zu
schließen. Die Wiedergabe wird automatisch
gestartet.
4.
Wenn die Wiedergabe nicht automatisch startet,
bitte die 6 Taste auf der Fernbedienung drücken.
Lagerung & Handhabung der Disks
• Umgang mit den Disks
- Fingerabdrücke oder Kratzer
auf der Disk können zu einer
Verschlechterung der Klang- und
Bildqualität oder zu Springen führen.
- Vermeiden Sie das Berühren der Oberfläche der
Disk, auf der die Daten gespeichert sind.
- Halten Sie die Disk mit den Fingerspitzen am
Rand fest.
- Kleben Sie kein Papier oder Klebeband auf die Disk
• Reinigen der Disks
- Wenn sich Fingerabdrücke oder
Schmutz auf der Disk befinden,
säubern Sie sie mit einem milden
Reinigungsmittel und einem weichen
Tuch.
- Beim Reinigen vorsichtig von innen in Richtung
des Randes der Disk wischen.
- Disk-Lagerung
Setzen Sie die Disk keiner direkten
Sonneneinstrahlung aus.
Bewahren Sie die Disk an einem kühlen, gut
belüfteten Ort auf.
Bewahren Sie die Disk in einer Schutzhülle
auf und lagern Sie sie senkrecht.
Wiedergabe von selbst
aufgenommenen Disks
Sie können Multimedia Dateien wiedergeben, die Sie auf
Blu-ray Disks, DVDs oder CDs aufgenommen haben.
1. Legen Sie eine selbst aufgenommene Disk mit
der Aufschrift nach oben in das Diskfach ein und
schließen Sie das Fach.
2. Verwenden Sie die ◄► Tasten, um die Art des
Inhalts auszuwählen, den Sie ansehen oder
wiedergeben möchten - FOTOS, VIDEOS, oder
MUSIK - und drücken Sie dann die E Taste.
ODER
2-1. Wählen DISK WIEDERGEBEN auf dem Home
Bildschirm. Der Bildschirm DISK WIEDERGEBEN
wird angezeigt. Verwenden Sie die ▲▼ Tasten,
um zwischen den Inhaltstypen Fotos, Videos
oder Musik zu wählen.
Wiedergabe von Inhalten
19 - Deutsch
Page 97

Wiedergabe von Inhalten
N
G
n
k
n
OS
OSMUS
3. Es wird ein Bildschirm mit dem Inhalt der
Disk angezeigt. Je nachdem, wie der Inhalt
angeordnet ist, sehen Sie entweder Ordner,
einzelne Dateien oder beides.
4. Falls erforderlich mithilfe der ▲▼◄► Tasten
einen Ordner auswählen und anschließend die
Taste drücken.
E
5. Verwenden Sie die ▲▼◄► Tasten, um eine
Datei für die Wiedergabe auszuwählen und
drücken Sie die E Taste.
6. Drücken Sie die
RETURN Taste ein- oder
mehrmals, um den aktuellen Bildschirm oder
einen Ordner zu verlassen oder um zum Home
Bildschirm zurückzukehren. Drücken Sie die
EXIT Taste, um direkt zum Home Bildschirm
zurückzukehren.
7. Schlagen Sie auf den Seiten 21 - 25 nach, um
zu erfahren, wie die Wiedergabe von Videos,
Musik oder Bildern von einer Disk gesteuert
wird.
Wiedergabe von Dateien auf einem
USB-Gerät
Es gibt zwei Methoden, um Multimediadateien auf
einem USB-Gerät über Ihr Gerät wiederzugeben.
Methode 1 : Wenn Sie ein USB-Gerät
anschließen, während das Gerät eingeschaltet ist
1. Das "Neues Gerät angeschlossen." Popup-
Fenster erscheint.
DISK WIEDERGEBEN
DISK WIEDERGEBE
Keine Disk
Keine Dis
Gerät
Funktion
erät
Funktio
wechseln
wechseln
FOTOS VIDEOS MUSIK
FOT
Neues Gerät angeschlossen.
STORAGE DEVICE
Fotos
Videos
Musik
> Beweg. " Eingabe ' Zurück
Einstellungen
Einstellunge
VIDE
IK
3. Falls erforderlich, verwenden Sie die ▲▼◄►
Tasten, um einen Ordner auszuwählen und
drücken Sie die E Taste.
4. Wählen Sie eine wiederzugebende Datei aus
und drücken Sie die E Taste.
5. Drücken Sie die RETURN Taste, um einen
Ordner zu verlassen oder die EXIT Taste, um
zum Home Bildschirm zurückzukehren.
6. Schlagen Sie auf den Seiten 21 - 25 nach, um
zu erfahren, wie die Wiedergabe von Videos,
Musik oder Bildern von einem USB-Gerät
gesteuert wird.
Methode 2 : Wenn das Gerät eingeschaltet wird,
nachdem ein USB-Gerät angeschlossen wurde
1. Schalten Sie das Gerät ein.
2. Drücken Sie Gerät wechseln und wählen Sie
ein USB-Gerät aus.
3. Mithilfe der ◄► Tasten FOTOS, VIDEOS oder
MUSIK auf dem Home Bildschirm auswählen,
und die E Taste drücken.
4. Falls erforderlich, verwenden Sie die ▲▼◄►
Tasten, um einen Ordner auszuwählen und
drücken Sie die E Taste.
5. Wählen Sie eine wiederzugebende Datei aus
und drücken Sie die E Taste.
6. Drücken Sie die
RETURN Taste, um einen
Ordner zu verlassen oder die EXIT Taste, um
zum Home Bildschirm zurückzukehren.
7. Schlagen Sie auf den Seiten 21 - 25 nach, um
zu erfahren, wie die Wiedergabe von Videos,
Musik oder Bildern von einem USB-Gerät
gesteuert wird.
Wenn Sie eine Disk einlegen, während Sie über ein
✎
USB-Gerät wiedergeben, wird der Gerätemodus
automatisch auf "Disk" umgeschaltet.
Wenn das Popup-Fenster nicht angezeigt wird,
✎
fahren Sie mit Methode 2 fort.
2. Mithilfe der ▲▼ Tasten Fotos, Videos oder
Musik auswählen, und die E Taste drücken.
Je nachdem, wie der Inhalt angeordnet ist,
sehen Sie entweder Ordner, einzelne Dateien
oder beides.
20 - Deutsch
Page 98

SUBTITLE HOME
REPEAT
DISC MENU
TITLE MENU
0
POPUP
Steuern der Videowiedergabe
Sie können die Wiedergabe von Videoinhalten auf
Blu-ray-Disks/DVDs oder USB-Geräten steuern.
Je nach Disk oder Inhalt können einige in dieser
Anleitung beschriebenen Funktionen nicht zur
Verfügung stehen.
Tasten auf der Fernbedienung für die
Videowiedergabe
1
Wiedergabetasten
1
Das Gerät gibt im Suchen, Langsam oder Schritt
Modus keinen Ton wieder.
• Drücken Sie die Taste 6, um zur normalen
Wiedergabegeschwindigkeit zurückzukehren.
6
5
7
Beschleunigte
Wiedergabe
Wiedergabe in
Zeitlupe
Einzelbildwiedergabe
Springen
Startet die Wiedergabe.
Beendet die Wiedergabe.
Unterbricht die Wiedergabe.
Drücken Sie während der
Wiedergabe die Taste
oder Taste. Jedes Mal,
wenn Sie die 3 oder
Taste drücken, ändert sich die
Wiedergabegeschwindigkeit.
Drücken Sie im PauseModus die Taste. Jedes
Mal, wenn Sie die Taste
drücken, ändert sich die
Wiedergabegeschwindigkeit.
Drücken Sie im Pause-Modus
die 7 Taste. Jedes Mal, wenn
Sie die 7 Taste drücken, wird
ein neues Bild angezeigt.
Drücken Sie während der
Wiedergabe die 1 oder 2
Taste. Jedes Mal, wenn Sie die
oder 2 Taste drücken, wird
1
zum nächsten oder vorherigen
Kapitel bzw. Datei gesprungen.
3
2
3
Bedienen des Disk Menüs, Titel Menüs,
2
Popup Menüs und der Titelliste
DISC MENU
Während der Wiedergabe diese Taste drücken, um
das Disk Menü aufzurufen.
TITLE MENU
Während der Wiedergabe diese Taste drücken, um
das Titel Menü aufzurufen.
• Wenn Ihre Disk über eine Wiedergabeliste
verfügt, drücken Sie die
zur Wiedergabeliste zu wechseln.
POPUP MENU
Während der Wiedergabe diese Taste drücken, um
das Popup Menü aufzurufen.
Wiedergabe wiederholen
3
1. Drücken Sie während der Wiedergabe auf der
Fernbedienung die Taste
2. Mithilfe der ▲▼ Tasten Aus, Titel, Kapitel,
Alle oder Wiederhol. A-B auswählen, und
die E Taste drücken.
❏ Wiederhol. A-B
1. Drücken Sie die E Taste, um den Punkt zu
markieren, an dem die Wiederholung starten
soll (A).
2. Drücken Sie die E Taste, um den Punkt zu
markieren, an dem die Wiederholung enden
soll (B).
3. Drücken Sie die
um in den normalen Wiedergabemodus
zurückzukehren.
4. Drücken Sie die E Taste.
In Abhängigkeit von der Disk werden eventuelle
✎
nicht alle Wiederholungsoptionen auf dem
Bildschirm angezeigt.
Kapitel oder Titel wird eventuell nicht sofort
✎
auf dem Bildschirm angezeigt. Drücken Sie die
▲▼ Tasten solange, bis sich Ihre Auswahl in
dem entsprechenden Feld befindet.
Um zur normalen Wiedergabe zurückzukehren,
✎
REPEAT Taste erneut drücken und mithilfe
die
der ▲▼ Tasten Aus auswählen und dann die
Taste betätigen.
E
Wiederhol. A-B wird eventuell nicht sofort auf
✎
dem Bildschirm angezeigt. Drücken Sie die
▲▼ Tasten solange, bis sich Wiederhol. A-B
im entsprechenden Feld befindet.
Der Punkt (B) muss mindestens 5 Sekunden
✎
hinter Punkt (A) liegen.
GRÜNE (B) Taste, um
REPEAT.
REPEAT Taste erneut,
Wiedergabe von Inhalten
21 - Deutsch
Page 99

Wiedergabe von Inhalten
EXTRAS Menü verwenden
Drücken Sie während der Wiedergabe die TOOLS
Taste.
Titel
Wenn sich mehr als ein Titel auf der Disk oder dem
Gerät befindet, können Sie so dem gewünschten
Titel gehen und ihn auswählen.
Wenn Sie im Stoppmodus einen DVD-Titel
✎
suchen, müssen Sie die
und die Nummer des gewünschten Titels (01,
02, ...) eingeben.
Wiedergabezeit
Mit dieser Funktion können Sie zu einer
bestimmten Stelle gehen, von der aus Sie die
Wiedergabe starten oder fortsetzen wollen.
Verwenden Sie die Nummerntasten, um den
Wiedergabepunkt einzugeben.
Wiederholmod.
Mit dieser Option kann ein Titel, Kapitel oder ein
markierter Abschnitt wiederholt werden.
Audio-Sync
Sie können die Verzögerung des Tons einstellen,
sodass der Ton mit dem Bild synchron läuft.
Die Verzögerungszeit kann zwischen 0 und 300
Millisekunden eingestellt werden.
Equalizer-Modus
Schalten Sie den Equalizer-Modus ein, um den
Equalizer nutzen zu können.
Equalizer-Einstell.
Hier können Sie den Equalizer einstellen.
Equalizer-Einstell.
✎
Equalizer-Modus
Bildeinstellungen
Hier können Sie den Bildmodus einstellen.
Modus
- Benutzer : Gehen Sie zu den aktivierten
Erweiterte Einstellungen und drücken Sie
die E Taste. Mit dieser Option können Sie
die Helligkeit, Kontrast, Farbe und Schärfe
Funktionen manuell einstellen.
- Dynamisch : Wählen Sie diese Einstellung,
um die Schärfe zu erhöhen.
- Normal : Wählen Sie diese Einstellung für die
meisten Programme.
- Film : Dies ist die beste Einstellung zum
Ansehen von Filmen.
TOOLS Taste drücken
erscheint nur, wenn
auf Ein gestellt ist.
Menüpositionen, die nur bei der Wiedergabe
einer BD/DVD Disk erscheinen.
Kapitel
Mit dieser Option können Sie zu dem Kapitel
springen, dass Sie sich ansehen möchten.
Audio
Mit dieser Option können Sie die gewünschte
Audiosprache einstellen.
Untertitel
Mit dieser Option können Sie die gewünschte
Untertitelsprache einstellen.
Winkel
Wählen Sie diese Option, um eine Szene unter
einem anderen Blickwinkel aus zu betrachten. Die
Winkel Option zeigt die Anzahl der verfügbaren
Blickwinkel an (1/1, 1/2, 1/3 usw.).
BONUSVIEW Video BONUSVIEW Audio
Hier können Sie die gewünschte Bonusview Option
einstellen.
Menüpositionen, die nur bei der Wiedergabe
einer Datei erscheinen
Vollbild
Mit dieser Option können Sie den Vollbildmodus
einstellen. Sie können zwischen Original, Modus1
(größer) und Modus2 (am größten) wählen.
Information
Wählen Sie diese Option, um Informationen der
Videodatei anzuzeigen.
Abhängig von der Disk oder dem Speichergerät
✎
kann das Extras Menü abweichen. Eventuell
werden nicht alle Optionen angezeigt.
22 - Deutsch
Page 100

Eine Video Wiedergabeliste erstellen
1
2
3
7
89
DISC MENU
PTY - PTY SEARCH PTY +
RDS DISPLAY TA
TITLE MENU
0
POPUP
4
56
Sie können eine Wiedergabeliste von Videodateien
auf ähnliche Weise wie für Musiktitel erstellen. Die
Anleitung dazu finden Sie auf Seite 24. Wählen Sie
anstelle der Musikdateien Videodateien aus.
Wiedergabe von kommerziellen
Audio Disks
1. Legen Sie eine Audio-CD (CD-DA) oder eine
MP3-Disk in die Disk-Lade ein.
• Von einer Audio-CD (CD-DA) wird der erste
Titel automatisch abgespielt. Die Titel werden
in der Reihenfolge abgespielt, in der sie auf
der Disk gespeichert wurden.
• Bei einer MP3-Disk wählen Sie mit den Tasten
◄► MUSIK und drücken Sie anschließend
die E Taste.
Playlist
TRACK 001
Wiederholmod. Track
Equalizer-Modus Aus
Ripp.
00:00/00:00
CD
2.
Um einen bestimmten Titel wiederzugeben, die ▲▼
Pause Wählen
"
Extras
Beweg. < Einstellen ' Zurück
>
TRACK 004 04:02
TRACK 005 03:43
TRACK 006 03:40
Extras ' Zurück
0/16
Tasten auf der Fernbedienung verwenden, um den
Titel auszuwählen und die
Weitere Informationen über die
✎
Musikwiedergabefinden Sie im nächsten Abschnitt
Taste drücken.
E
"Steuern der Musikwiedergabe".
Steuern der Musikwiedergabe
Sie können die Wiedergabe von Musikinhalten auf
DVDs, CDs oder USB steuern. Je nach Disk oder
Inhalt können einige in dieser Anleitung beschriebenen
Funktionen nicht zur Verfügung stehen.
Tasten auf der Fernbedienung für die
Musikwiedergabe
1
4
2
5
3
Nummerntasten : Drücken Sie während
der Wiedergabe der Wiedergabeliste die
1
gewünschte Titelnummer. Das ausgewählte
Video wird wiedergegeben.
Überspringen : Während der Wiedergabe
die 1 oder 2 Taste drücken, um zum
2
vorherigen oder nächsten Musiktitel zu
wechseln.
Taste : Stoppt die Wiedergabe eines
5
3
Musiktitels.
Schnelle Wiedergabe (nur bei Audio CDs
(CD-DA)) :
Drücken Sie während der Wiedergabe die
4
Taste 3 oder Taste. Jedes Mal, wenn
Sie die 3 oder Taste drücken, wird die
Wiedergabegeschwindigkeit geändert.
Taste : Unterbrechen eines Titels.
5
7
Taste : Wiedergabe des ausgewählten
6
6
Musiktitels.
Wiederholen von Titeln
Sie können eine Titelwiederholung einstellen.
1. Drücken Sie während der Wiedergabe die
TOOLS Taste.
2. Wählen Sie Wiederholmod. und wählen Sie
anschließend mit den ◄► Tasten Aus, Track
oder Eins, Alle oder Zuf.-Wdg.. Drücken Sie
anschließend die E Taste.
6
Wiedergabe von Inhalten
23 - Deutsch
 Loading...