

Page 1

HT-H7500WM
HT-H7750WM
Blu-ray™
Home Entertainment System
user manual
imagine the possibilities
Thank you for purchasing this Samsung product.
To receive more complete service,
please register your product at
www.samsung.com/register
Page 2

Safety Information
CAUTION
RISK OF ELECTRIC SHOCK DO NOT OPEN
CAUTION: TO REDUCE THE RISK OF ELECTRIC SHOCK, DO
NOT REMOVE THE COVER (OR BACK). THERE ARE NO USER
SERVICEABLE PARTS INSIDE. REFER ALL SERVICING TO
• The slots and openings in the cabinet and in the back
or bottom are provided for necessary ventilation. To
ensure reliable operation of this apparatus, and to
protect it from overheating, these slots and openings
must never be blocked or covered.
- Do not place this apparatus in a confined space,
such as a bookcase, or built-in cabinet, unless
proper ventilation is provided.
- Do not place this apparatus near or over a radiator
or heat register, or where it is exposed to direct
sunlight.
- Do not place vessels (vases etc.) containing water
on this apparatus. A water spill can cause a fire or
electric shock.
• Do not expose this apparatus to rain or place it near
water (near a bathtub, washbowl, kitchen sink, or
laundry tub, in a wet basement, or near a swimming
pool, etc.). If this apparatus accidentally gets wet,
unplug it and contact an authorized dealer immediately.
• This apparatus uses batteries. In your community,
there might be environmental regulations that require
you to dispose of these batteries properly. Please
contact your local authorities for disposal or recycling
information.
• Do not overload wall outlets, extension cords or
adaptors beyond their capacity, since this can result in
fire or electric shock.
• Route power-supply cords so that they are not likely to
be walked on or pinched by items placed on or against
them. Pay particular attention to cords at the plug end,
at wall outlets, and the point where they exit from the
apparatus.
• To protect this apparatus from a lightning storm, or
when it is left unattended and unused for long periods
of time, unplug it from the wall outlet and disconnect
the antenna or cable system. This will prevent damage
to the set due to lightning and power line surges.
• Before connecting the AC power cord to the DC
adaptor outlet, make sure the voltage designation of
the DC adaptor corresponds to the local electrical
supply.
QUALIFIED PERSONNEL.
• Never insert anything metallic into the open parts
• To avoid electric shock, never touch the inside of this
• Make sure to plug the power cord in until it is firmly
• If this apparatus does not operate normally - in
• Maintenance of Cabinet.
• Be sure to pull the power plug out of the outlet if the
• Contact an authorized service centre for information
This symbol indicates that high voltage is
present inside. It is dangerous to make
any kind of contact with any internal part
of this product.
This symbol indicates that important
literature concerning operation and
maintenance has been included with this
product.
of this apparatus. Doing so may create a danger of
electric shock.
apparatus. Only a qualified technician should open this
apparatus.
seated. When unplugging the power cord from a wall
outlet, always pull on the power cord's plug. Never
unplug by pulling on the power cord. Do not touch the
power cord with wet hands.
particular, if there are any unusual sounds or smells
coming from it - unplug it immediately and contact an
authorized dealer or service centre.
- Before connecting other components to this
product, be sure to turn them off.
- If you move your product suddenly from a cold place
to a warm place, condensation may occur on the
operating parts and lens and cause abnormal disc
playback. If this occurs, unplug the product, wait for
two hours, and then connect the plug to the power
outlet. Then, insert the disc, and try to play back
again.
product is to remain unused or if you are leaving the
house for an extended period of time (especially when
children, elderly, or disabled people will be left alone in
the house).
- Accumulated dust can cause an electric shock, an
electric leakage, or a fire by causing the power cord
to generate sparks and heat or the insulation to
deteriorate.
if you intend to install your product in a location with
heavy dust, high or low temperatures, high humidity,
chemical substances, or where it will operate 24 hours
a day such as in an airport, a train station, etc. Failing
to do so may lead to serious damage of your product.
2 - English
Page 3

• Use only a properly grounded plug and wall outlet.
- An improper ground may cause electric shock or
equipment damage. (Class l Equipment only.)
• To turn this apparatus off completely, you must
disconnect it from the wall outlet. Consequently, the
wall outlet and power plug must be readily accessible
at all times.
• Do not allow children to hang on the product.
• Store the accessories (battery, etc.) in a location safely
out of the reach of children.
• Do not install the product in an unstable location such
as a shaky self, a slanted floor, or a location exposed
to vibration.
• Do not drop or strike the product. If the product is
damaged, disconnect the power cord and contact a
service centre.
• To clean this apparatus, unplug the power cord from
the wall outlet and wipe the product using a soft,
dry cloth. Do not use any chemicals such as wax,
benzene, alcohol, thinners, insecticide, air fresheners,
lubricants, or detergent. These chemicals can damage
the appearance of the product or erase the printing on
the product.
• Do not expose this apparatus to dripping or splashing.
Do not put objects filled with liquids, such as vases on
the apparatus.
• Do not dispose of batteries in a fire.
• Do not plug multiple electric devices into the same wall
socket. Overloading a socket can cause it to overheat,
resulting in a fire.
• There is danger of an explosion if you replace the
batteries used in the remote with the wrong type of
battery. Replace only with the same or equivalent type.
WARNING :
• TO PREVENT THE SPREAD OF FIRE,
KEEP CANDLES AND OTHER ITEMS
WITH OPEN FLAMES AWAY FROM
THIS PRODUCT AT ALL TIMES.
CLASS 1 LASER PRODUCT
This product is classified as a CLASS 1 LASER product.
Use of controls, adjustments or performance of
procedures other than those specified herein may result
in hazardous radiation exposure.
CAUTION :
• INVISIBLE LASER RADIATION WHEN OPEN AND
INTERLOCKS DEFEATED, AVOID EXPOSURE TO
BEAM.
CLASS 1 LASER PRODUCT
KLASSE 1 LASER PRODUKT
LUOKAN 1 LASER LAITE
KLASS 1 LASER APPARAT
PRODUCTO LÁSER CLASE 1
3D Precautions
IMPORTANT HEALTH AND SAFETY INFORMATION FOR
3D PICTURES.
Read and understand the following safety information
before using the 3D function.
• Some viewers may experience discomfort while viewing
3D TV such as dizziness, nausea, and headaches.
If you experience any such symptom, stop viewing 3D
TV, remove the 3D Active Glasses, and rest.
• Watching 3D images for an extended period of time
may cause eye strain. If you feel eye strain, stop
viewing 3D TV, remove your 3D Active Glasses, and
rest.
• A responsible adult should frequently check on children
who are using the 3D function.
If there are any reports of tired eyes, headaches,
dizziness, or nausea, have the child stop viewing 3D
TV and rest.
• Do not use the 3D Active Glasses for other purposes
(such as general eyeglasses, sunglasses, protective
goggles, etc.)
• Do not use the 3D function or 3D Active Glasses while
walking or moving around. Using the 3D function or 3D
Active Glasses while moving around may cause you to
bump into objects, trip, and/or fall, and cause serious
injury.
• If you want to enjoy 3D content, connect a 3D device
(3D compliant AV receiver or TV) to the product’s HDMI
OUT port using a high-speed HDMI cable. Put on 3D
glasses before playing the 3D content.
• The product outputs 3D signals only through an HDMI
cable connected to the HDMI OUT port.
• The video resolution in 3D play mode is fixed to the
resolution of the original 3D video. You can not change
the resolution.
• Some functions such as BD Wise, screen size
adjustment, and resolution adjustment may not operate
properly in 3D play mode.
• You must use a high-speed HDMI cable for proper
output of the 3D signal.
• Stay at least three times the width of the screen from
the TV when watching 3D images. For example, if
you have a 46 inch screen, stay 3.5 meters from the
screen.
• Place the 3D video screen at eye level for the best 3D
picture.
• When the product is connected to some 3D devices,
the 3D effect may not function properly.
• This product does not convert 2D content into 3D.
• "Blu-ray 3D" and "Blu-ray 3D" logo are trademarks of
the Blu-ray Disc Association.
Safety Information
3 - English
Page 4

Contents
GETTING STARTED
5 Accessories
5 Speaker Components
6 Front Panel
7 Rear Panel
8 Remote Control
CONNECTIONS
9 Connecting the Speakers
12 Attaching the Toroidal Ferrite Core to the Power
Cord of the Wireless Receiver Module (SWA-
6000)
13 Connecting to a TV and External Devices
14 Connecting to a Network Router
SETTINGS
15 The Initial Settings Procedure
15 The Home Screen at a Glance
16 Accessing the Settings Screen
16 Settings Menu Functions
22 Network Setup
24 Wi-Fi Direct
25 Upgrading Software
PLAYING CONTENT
27 Playing Commercial Discs
27 Playing Multimedia Files
29 Controlling Video Playback
32 Controlling Music Playback
37 Using Bluetooth
40 Playing Photo Contents
41 Listening to the Radio
42
Using the Special Effects Remote Control Buttons
NETWORK SERVICES
43 Logging In to Your Samsung Account
43 Adding a Credit Card
43 Before Using FILMS AND TV SHOWS or
SAMSUNG APPS
44 Using FILMS AND TV SHOWS
45 Using SAMSUNG APPS
47 Screen Mirroring
47 Using the Web Browser
50 Linking your Internet Service Accounts to the
Product
50 BD-LIVE™
APPENDIX
51 Additional Information
52 Disk and Format Compatibility
59 Troubleshooting
62 Specifications
64 Licences
Wiring the Main Power Supply Plug (UK Only)
IMPORTANT NOTICE : The mains lead on this equipment is supplied with a moulded plug incorporating a fuse.
The value of the fuse is indicated on the pin face of the plug and if it requires replacing, a fuse approved to BS1362
of the same rating must be used. Never use the plug with the fuse cover removed. If the cover is detachable and
a replacement is required, it must be of the same colour as the fuse fitted in the plug. Replacement covers are
available from your dealer. If the fitted plug is not suitable for the power points in your house or the cable is not long
enough to reach a power point, you should obtain a suitable safety approved extension lead or consult your dealer
for assistance. However, if there is no alternative to cutting off the plug, remove the fuse and then safely dispose of
the plug. Do not connect the plug to a mains socket as there is a risk of shock hazard from the bared flexible cord.
Never attempt to insert bare wires directly into a mains socket. A plug and fuse must be used at all times.
IMPORTANT : The wires in the mains lead are coloured in accordance with the following code:– BLUE = NEUTRAL
BROWN = LIVE As these colours may not correspond to the coloured markings identifying the terminals in your
plug, proceed as follows:–The wire coloured BLUE must be connected to the terminal marked with the letter N or
coloured BLUE or BLACK. The wire coloured BROWN must be connected to the terminal marked with the letter L
or coloured BROWN or RED.
IMPORTANT : DO NOT CONNECT EITHER WIRE TO THE EARTH TERMINAL WHICH IS MARKED WITH
LETTER E OR BY THE EARTH SYMBOL U, OR COLOURED GREEN OR GREEN AND YELLOW.
4 - English
Page 5
Getting Started
Figures and illustrations in this User Manual are provided for reference only and may differ from actual
product appearance.
An administration fee may be charged if either
a. an engineer is called out at your request and there is no defect in the product (i.e. where you have
failed to read this user manual)
b. you bring the unit to a repair centre and there is no defect in the product (i.e. where you have failed
to read this user manual).
The amount of such administration charge will be advised to you before any work or home visit is
carried out.
Check the box for the accessories and speaker components listed or shown below.
Accessories
• Remote Control • Lithium Battery • User Manual
(For Power cord)
Power Cable FM Antenna
WARNING, DO NOT INGEST BATTERY, CHEMICAL BURN HAZARD,
[The remote control supplied with] This product contains a coin/button cell battery.
If the coin/button cell battery is swallowed, it can cause severe internal burns in just 2 hours and
can lead to death. Keep new and used batteries away from children. If the battery compartment does not
close securely, stop using the product and keep it away from children. If you think batteries might have been
swallowed or placed inside any part of the body, seek immediate medical attention.
Toroidal Ferrite Core
Soft Cloth
Getting Started
Speaker Components
HT-H7500WM - 5.1CH
Centre
Front x 2 Surround x 2 Speaker Cable x 6 Subwoofer
5 - English
Wireless Receiver
Module (SWA-6000)
Page 6
Getting Started
HT-H7750WM - 7.1CH
Speaker Cable x 2
Front/
Front Top x 2
Screw (5x20) x 16
Stand Base x 4 Centre
Stand x 4 Surround x 2 Subwoofer
Front Panel
DISPLAY ICONS
FUNCTION STOP PLAY/PAUSE
OPEN/
CLOSE
NFC
VOLUME
CONTROL
POWER
DISPLAY
Wireless Receiver
Module (SWA-6000)
VACUUM TUBE AMP
U
M
U
T
C
U
A
B
V
E
D
S
N
O
E
-
U
H
N
G
D
I
H
5V 0.5A
DISC TRAY
Cellular phones or mobile devices placed near the vacuum tube amp or electronic products placed on the
✎
USBREMOTE CONTROL SENSOR
top of the product can cause audio noise or distortion.
When the product is on, do not let children touch the product's surface. It will be hot.
✎
To upgrade the product's software through the USB jack, you must use a USB flash drive.
✎
6 - English
Page 7

When the product displays a Blu-ray Disc menu, you cannot start the movie by pressing the button on
✎
the product or the remote. To play the movie, you must select Play Movie or Start in the disc menu, and then
press the
If you are using the Internet or are playing content from a USB device on your TV through the home cinema,
✎
you cannot select the BD/DVD mode with the
OK
button.
SOURCE button. To select the BD/DVD mode, exit the
Internet or stop the content you are playing on the TV, and then select the BD/DVD mode.
To use the NFC function, tag the compatible Bluetooth source device to the N on the top of the product
✎
(See page 39).
Rear Panel
SPEAKERS OUT
L
FRONT
R
FRONT
CENTER
SUBWOOFER
COOLING FAN * FM ANTENNA
* In case of HT-H7500WM
IMPEDANCE : 3
HDMI OUT
HDMI IN
AUX IN
Getting Started
POWER
POWER CORD LAN TERMINAL
SPEAKER OUTPUT
FRONT TOP
FRONT
SUBWOOFER
SPEAKERS OUT
L
R
FRONT TOP
L
FRONT
R
IMPEDANCE : 3
CENTER
HDMI OUT
1 2
LAN
HDMI IN
CONNECTORS
AUX IN FM ANT
L
OPTICAL
R
DIGITAL
AUDIO IN
EXTERNAL DIGITAL
AUDIO IN (OPTICAL)
* Connecting the FM Antenna
1. Connect the supplied FM antenna to the FM ANT Jack.
2. Slowly move the antenna wire around until you find a location where reception is good, then fasten it to a
wall or other rigid surface.
Maintain a minimum of 10 cm of clear space on all sides of the home cinema to ensure adequate ventilation.
✎
Do not obstruct the cooling fan or ventilation holes.
This product does not receive AM broadcasts.
✎
7 - English
Page 8
Getting Started
Remote Control
Tour of the Remote Control
Turn the product on and off.
Adjust the volume.
Press to skip backwards([) or
Press and hold to search
backwards(() or forwards()).
Press to move to the Home screen.
Select on-screen menu items and
,. :
Search for active FM stations
and to change channels.
Return to the previous menu.
Use to enter the Popup menu/Title
Press to apply sound effects.
Press to apply the DTS Neo:Fusion II
These buttons are used both for
menus on the product and also several
Press to select MANUAL/PRESET in
forwards(])
or
change menu values.
menu.
or 3D sound effect.
Blu-ray Disc functions.
the Tuner function.
Press to open and close the disc tray.
Press to select the Home Cinema's
mode (HDMI, AUX, BD/DVD, etc.).
Cut off the sound temporarily.
Press to play disc or files.
or
Press to pause playing.
Press to use the Tools menu.
or
To display the number keypad (may
include function keys when applicable)
on the screen, press and hold the
button.
Press to stop the disc playing or to exist
the menu.
Press to view the disc menu.
Use to display the playback information
when playing a Blu-ray/DVD disc or files.
Set a Sleep time to shut off the product.
Select STEREO or MONO for radio
broadcasts.
Use to set a preset radio frequency.
While playing multimedia content in SAMSUNG APPS, press and hold 5 button on the remote to pause
✎
playback. To stop playback, press and hold
e
(
EXIT) button on the remote.
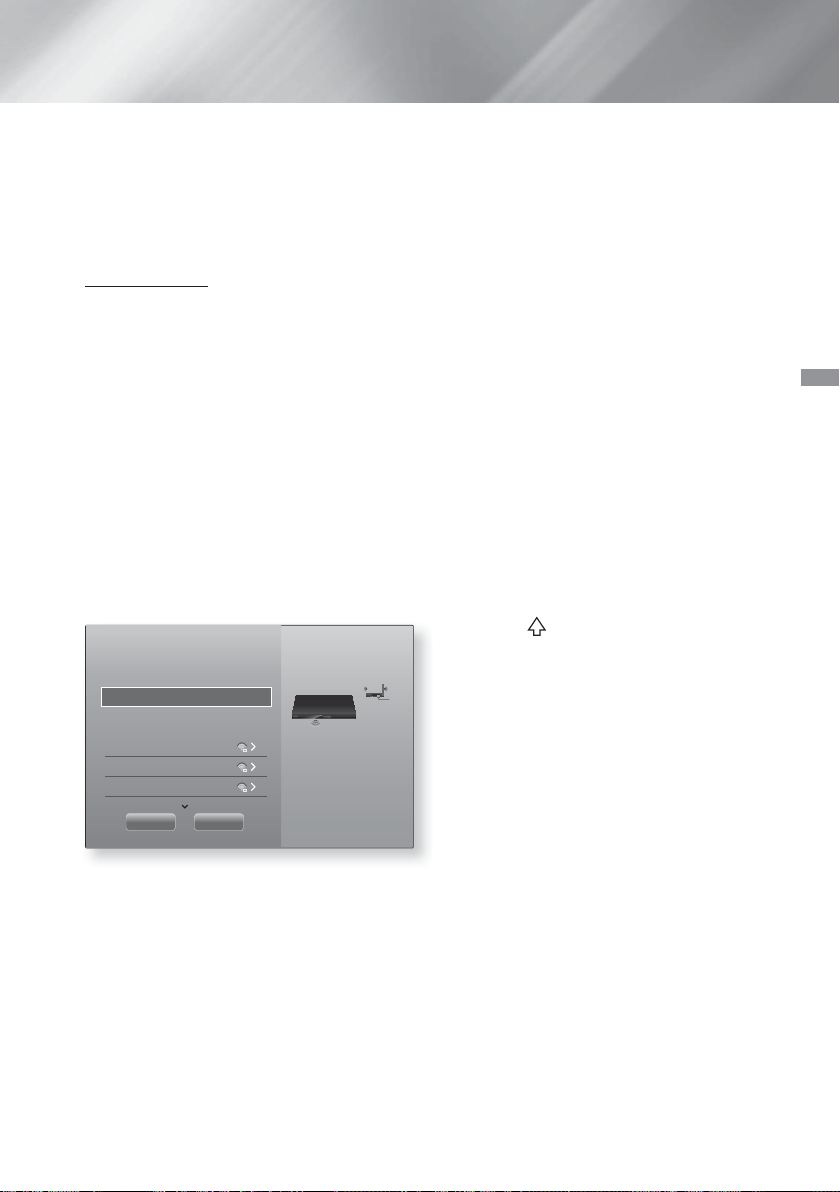
Installing batteries in the Remote Control
1
Use a coin to turn the remote
control cover anti-clockwise to
remove it as shown in the figure
above.
2
Insert a 3V lithium battery. Keep
the positive (+) pole upward when
inserting the battery. Put the
battery cover on and align the '●'
marks side by side as shown in
the figure above.
3
Use a coin to turn the cover
clockwise as far as it will go to fix
it in place.
8 - English
Page 9

Connections
This section describes various methods of connecting the product to other external components.
Before moving or installing the product, be sure to turn off the power and disconnect the power cord.
Connecting the Speakers
Subwoofer
Front (L)
Surround (L)
* HT-H7500WM
Position of the product
Place it on a stand or cabinet shelf, or under the TV stand.
Selecting the Listening Position
The listening position should be located about 2.5 to 3 times the TV's screen size away from the TV. For
example, if you have a 46 inch screen, locate the listening position 2.92 to 3.50 meters from the screen.
HT-H7500WM :
Front Speakers
HT-H7750WM :
Front/Front Top
Speakers
HT-H7500WM :
Centre Speaker
HT-H7750WM :
Centre Speaker
Centre
Front (R)
Product
Surround (R)
Wireless
Receiver Module
Place these speakers in front of your listening position, facing inwards (about
45°) toward you. Place the front speakers so that their tweeters will be at the
same height as your ear. Align the front face of the front speakers with the front
face of the centre speaker or place them slightly in front of the centre speakers.
Place these speakers in front of your listening position, facing inwards (about
45°) toward you. Place the front speakers so that their tweeters will be at the
same height as your ear. Align the front face of the front/front top speakers with
the front face of the centre speaker or place them slightly in front of the centre
speakers.
It is best to install the Centre Speaker at the same height as the front speakers.
You can also install it directly over or under the TV.
It is best to install the Centre Speaker at the same height as the front/front top
speakers. You can also install it directly over or under the TV.
Subwoofer
Front/
Front Top (L)
Surround (L)
* HT-H7750WM
Centre
Product
Front/
Front Top (R)
Surround (R)
Wireless
Receiver Module
Connections
9 - English
Page 10
Connections
Place these speakers to the side of your listening position. If there isn't enough
room, place these speakers so they face each other. Position them about 60 to
Surround Speakers
90cm above your ear, facing slightly downward.
* Unlike the front and centre speakers, the surround speakers are used mainly
for sound effects. Sound will not come from them all the time.
Subwoofer
* Surround speakers must be connected to the wireless receiver module.
* The appearance of your speakers may differ from the illustrations in this manual.
* Each speaker has a coloured label on its back or underside. Each cable has a single coloured band
near its end. Match the band on each cable to the speaker label by colour, and then connect the
cable to the speaker. See page 11 for exact instructions.
The position of the subwoofer is not so critical. Place it anywhere you like.
Installing the Speakers on the Tallboy Stands
* HT-H7750WM only
1. Find the speaker cable that is attached to the Stand.
Turn the Stand and Stand Base upside-down, unravel
the speaker cable, and then draw it through the hole in
the Stand Base.
Handle the Stand carefully. It is heavy.
✎
2. Connect the Stand Base to the bottom of the Stand.
3. Insert three 5x20 screws into the marked holes in the
Stand Base, and then tighten them with a screwdriver as
shown in the illustration.
4. Place the speaker cable into the slot on the bottom of
the stand base.
5. Connect the assembled stand and a speaker together by
matching the labels on the stand and speaker with each
other as shown in the picture.
6. Insert a screw (5x20) into the hole on the rear of the
speaker and tighten by turning it clockwise with a
screwdriver.
7. Repeat steps 1 through 6 with the other speaker and
stand.
1
3
5 6
Speaker
Stand
2
Stand
4
Stand Base
10 - English
Page 11

Speaker Cable Connections
HDMI OUT
1
SPEAKERS OUT
CENTER
SUBWOOFER
FRONT
L
FRONT
R
IMPEDANCE : 3
HDMI OUT
1
SPEAKERS OUT
CENTER
SUBWOOFER
FRONT
L
FRONT
R
FRONT TOP
L
FRONT TOP
R
IMPEDANCE : 3
1. Match each speaker cable bundle to the correct speaker by matching the colour coded plug on each
bundle to the coloured sticker on the bottom or back of each speaker.
2. Connect the speaker wire plugs from each speaker to the back of the product by matching the colours of
the speaker plugs to the colours of the speaker jacks.
HT-H7500WM
HT-H7750WM
Wireless Receiver Module
Surround Speaker (R)Surround Speaker (L)
Front Top/
Front Speaker (R)
Wireless Receiver Module
Subwoofer
Front Speaker (L)Front Speaker (R)
SPEAKERS OUT
FRONT
R
FRONT
CENTER
SUBWOOFER
Front Speaker (L)
R
FRONT TOP
FRONT TOP
FRONT
R
FRONT
CENTER
SUBWOOFER
SPEAKERS OUT
L
L
L
IMPEDANCE : 3
Connections
IMPEDANCE : 3
Centre Speaker
Front Top/
Surround Speaker (L) Surround Speaker (R)
* This product should be connected with the SWA-6000 only.
Centre Speaker
Subwoofer
11 - English
Page 12
Connections
If you place a speaker near your TV set, the screen colour may be distorted because of the magnetic field.
✎
Place the wireless receiver module at the rear of the listening position. If the wireless receiver module is too
✎
close to the product, sound from the speakers may be disrupted because of interference.
If you use a device such as a microwave oven, wireless LAN Card, Bluetooth device, or any other device
✎
that uses the 2.4/5.8GHz frequencies near the product, sound from the speakers may be disrupted because
of interference.
The maximum transmission distance from the product to the wireless receiver module is about 10m, but
✎
may vary depending on your operating environment. If a steel-concrete wall or metallic wall is between the
product and the wireless receiver module, the system may not operate at all, because the radio waves
cannot penetrate metal.
If the product doesn't make a wireless connection, you need to run an ID Set between the product and
✎
wireless receiver module. With the product turned off, press and hold
for 5 seconds. Turn on the wireless receiver module. Then, press and hold the "ID SET" button on the back
of the wireless receiver module for 5 seconds, and then turn the product on.
| CAUTION |
If you want to install the speakers on the wall, fasten screws or nails (not provided) firmly to the wall wherever
you want to hang a speaker, and then, using the hole in the rear of each speaker, carefully hang each
speaker on a screw or nail.
Do not let children play with or near the speakers. They could get hurt if a speaker falls.
When connecting the speaker wires to the speakers, make sure that the polarity (+/ –) is correct.
Keep the subwoofer speaker out of reach of children to prevent children from inserting their hands or alien
substances into the duct (hole) of the subwoofer speaker.
Do not hang the subwoofer on the wall using the duct (hole).
The wireless receiving antenna is built into the wireless receiver module. Keep it away from water and
moisture.
For optimal listening performance, make sure that the area around the wireless receiver module location is
clear of any obstructions.
In 2-CH mode, you will hear no sound from the wireless surround speakers.
(mute) button on the remote control
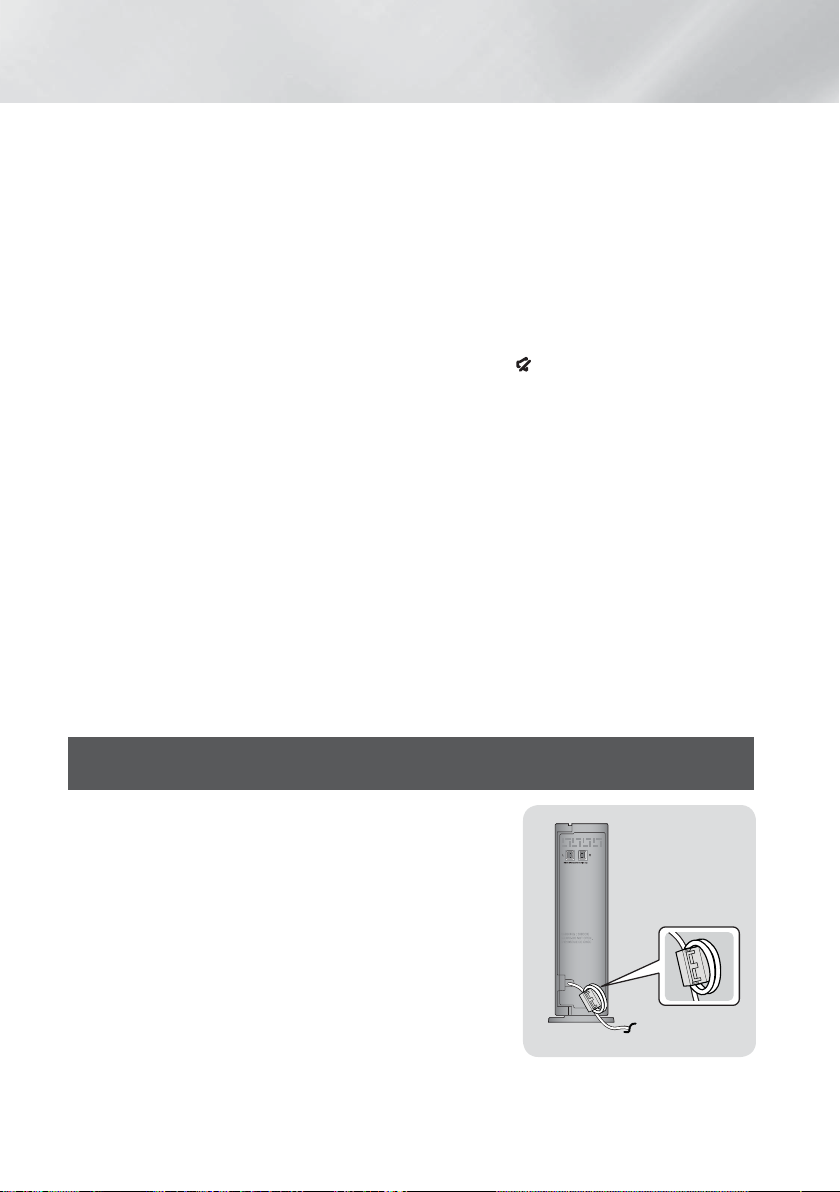
Attaching the Toroidal Ferrite Core to the Power Cord of the Wireless
Receiver Module (SWA-6000)
If you attach a Toroidal ferrite core to the power cord of the wireless
receiver module, it will help prevent RF interference from radio signals.
1. Pull the fixing tab of the Toroidal ferrite core to open it.
2. Make two loops in the wireless receiver module power cord.
3. Attach the Toroidal ferrite core to the wireless receiver module's
power cord as shown in the figure on the right, and then close it
by pressing it until it clicks.
• Attach the ferrite core as close to the Wireless Receiver Module
as possible.
12 - English
Page 13
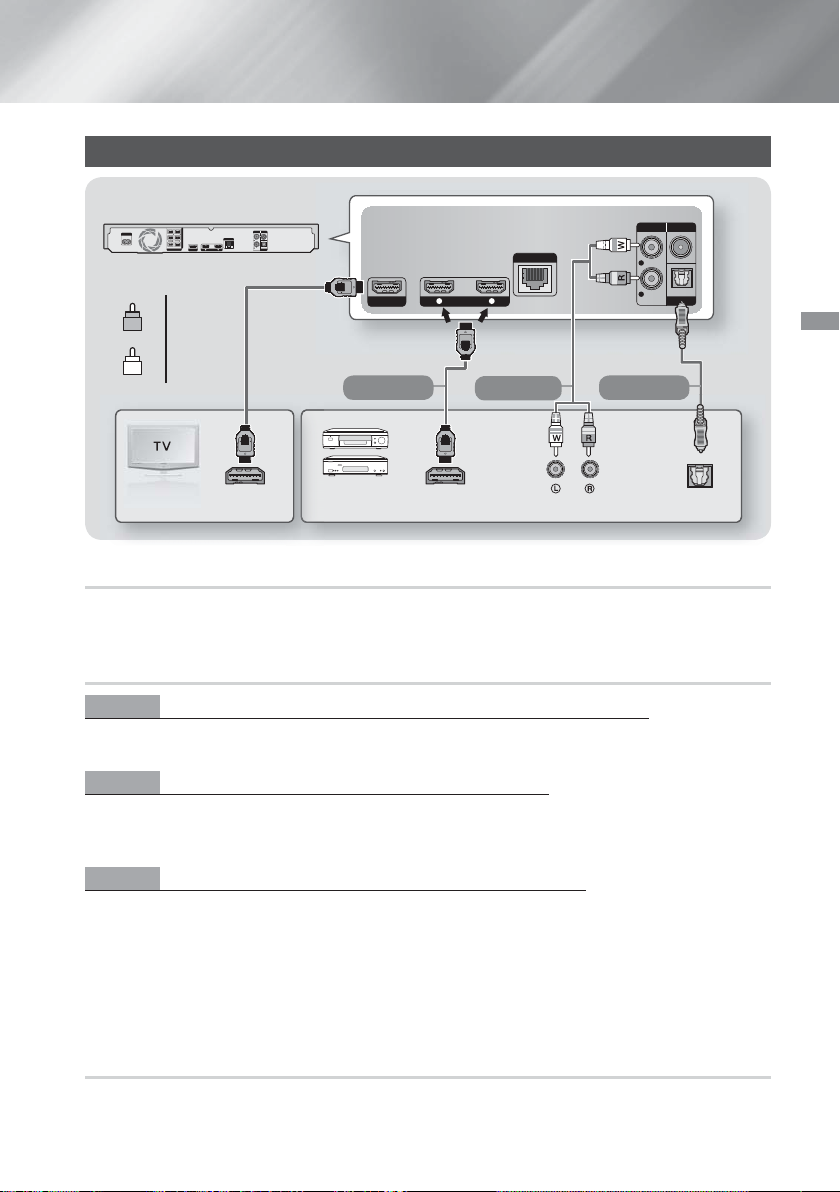
Connecting to a TV and External Devices
HDMI OUT
HDMI IN
1 2
LAN
AUX IN FM ANT
OPTICAL
DIGITAL
AUDIO IN
L
R
OPTICAL OUTAUDIO OUTHDMI OUTHDMI IN
HDMI OUT
HDMI IN
1 2
LAN
POWER
AUX IN FM ANT
OPTICAL
DIGITAL
AUDIO IN
L
R
SPEAKERS OUT
CENTER
SUBWOOFER
FRONT
L
FRONT
R
FRONT TOP
L
FRONT TOP
R
IMPEDANCE : 3
Red
R
White
W
Method 1 Method 3
Method 2
Connections
External
Devices
Connecting to a TV
Connect an HDMI cable (not supplied) from the HDMI OUT jack on the back of the product to the HDMI IN jack on
your TV. If the TV supports ARC, you can hear the audio from your TV through the home cinema with only this cable
connected. See page 18 in this manual and the section on ARC in your TV's user's manual for details.
Connecting to External Devices
Method 1 HDMI IN : Connecting to an External Component with an HDMI Cable
Connect an HDMI cable (not supplied) from the HDMI IN jack on the back of the product to the HDMI OUT jack
on your digital device. Select the HDMI1 or HDMI2 mode.
Method 2 AUX IN : Connecting an External Analogue Component
Using an RCA audio cable (not supplied), connect the AUDIO In jack on the product to the AUDIO Out jack on
the external analogue component. Select the AUX mode.
• Be sure to match the colours on the cable plugs to the colours on the input and output jacks.
Method 3 OPTICAL : Connecting an External Digital Audio Component
Use to connect the digital audio output of digital signal components such as Cable Boxes and Satellite
Receivers (Set-Top-Boxes) to the home cinema. Using a digital optical cable (not supplied), connect the Optical
Digital Audio In jack on the product to the Digital Optical Out jack of the external digital device using a digital
optical cable. Select the D. IN mode.
To see video from your Cable Box/Satellite receiver, you must connect its video output directly to your TV.
✎
This system supports Digital sampling frequencies of 32 kHz or higher from external digital components.
✎
This system supports only DTS and Dolby Digital audio. MPEG audio, a bitstream format, is not supported.
✎
Selecting an External Device to Use
To select an external device after you have connected it, press the SOURCE button. Each time you press the
button, the mode changes in this order : BD/DVD D. IN AUX HDMI1 HDMI2 FM BT
13 - English
Page 14

Connections
Connecting to a Network Router
You can connect your product to your network router
using one of the methods illustrated below.
Wired Network
POWER
L
R
FRONT TOP
FRONT TOP
L
FRONT
R
FRONT
IMPEDANCE : 3
CENTER
SUBWOOFER
SPEAKERS OUT
1 2
HDMI OUT
Broadband modem
(with integrated router)
Or
Router
Your router or your Internet Service Provider's
✎
policies may prevent the product from accessing
Samsung's software update server. If this occurs,
contact your Internet Service Provider (ISP) for
more information.
DSL users, please use a router to make a network
✎
connection.
To use the DLNA function, you must connect your
✎
PC to your network as shown in the illustrations
above.
The connection can be wired or wireless.
LAN
HDMI IN
AUX IN FM ANT
L
OPTICAL
R
DIGITAL
AUDIO IN
Broadband
modem
Broadband
service
Broadband
service
Wireless Network
Wireless IP sharer
Broadband
service
If your wireless IP router supports DHCP, this
✎
product can use a DHCP or static IP address to
connect to the wireless network.
Set your wireless IP router to Infrastructure mode.
✎
Ad-hoc mode is not supported.
The product supports only the following wireless
✎
security key protocols:
- WEP (OPEN/SHARED), WPA-PSK (TKIP/AES),
WPA2-PSK (TKIP/AES)
Select a channel on the wireless IP router that is
✎
not currently being used. If the channel set for
the wireless IP router is currently being used by
another device nearby, it will result in interference
and communication failure.
In compliance with the newest Wi-Fi certification
✎
specifications, Samsung home cinemas do not
support WEP, TKIP, or TKIP-AES (WPS2 Mixed)
security encryption in networks running in the
802.11n mode.
Wireless LAN, by its nature, may cause
✎
interference, depending on the operating
conditions (AP performance, distance, obstacles,
interference by other radio devices, etc).
14 - English
Page 15
Settings
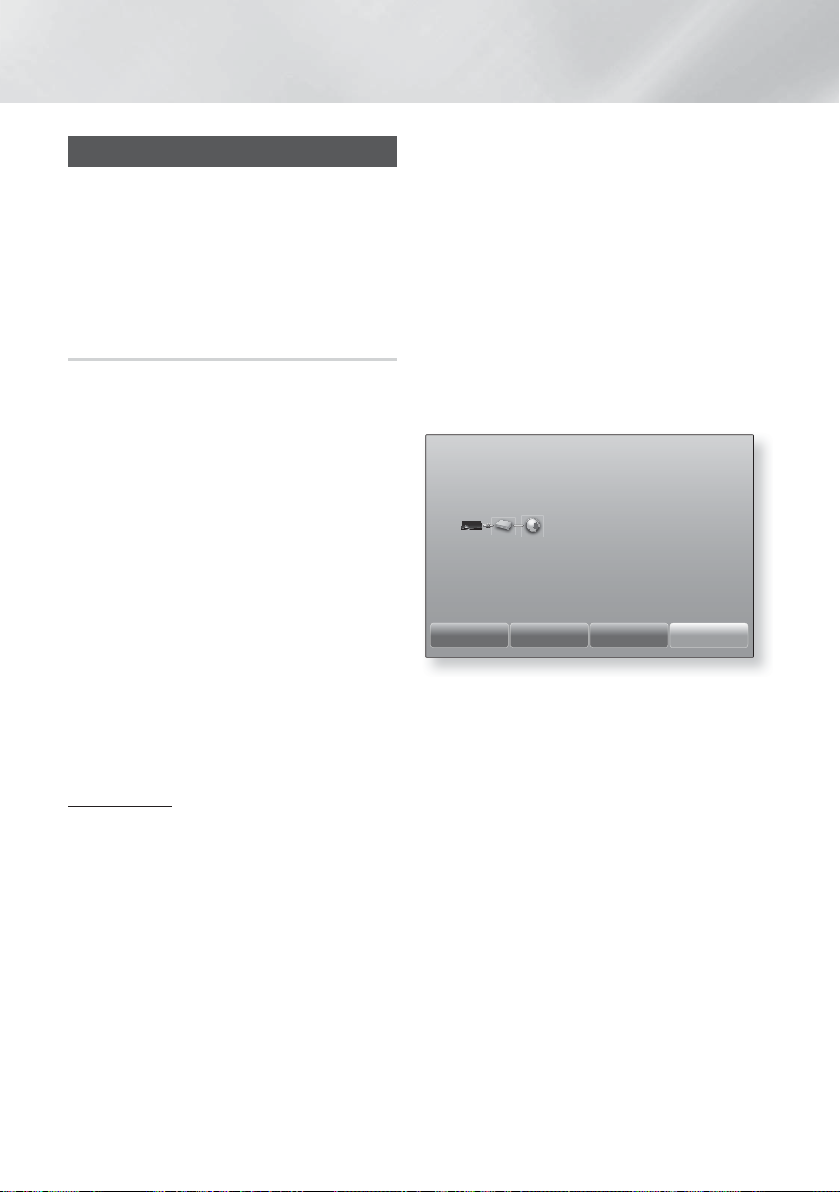
The Initial Settings Procedure
• The Home menu will not appear if you do not
configure the initial settings.
• The OSD (On Screen Display) may change in
this product after you upgrade the software
version.
• The access steps may differ depending on the
menu you selected.
After you have finished connecting the home cinema
to your TV, turn on the TV, and then turn on the
home cinema. The first initial setup screen appears.
The setup screens appear in this order: Language,
Network Configuration, Terms and Conditions, Screen
Resolution (Aspect Ratio), and Speaker Layout.
Depending on the software version installed on your
home cinema, you may also see the Software Update
screen. Follow the instructions displayed on each
screen, which will guide you through the easy setup
procedure.
If you are not ready to set up the network
configuration or it is problematic, you can select Skip
and set it up later.
To edit your settings after the initial setup, select
✎
Settings > System > Setup in the Home screen
or select the Reset option. (See page 21)
(See page 22)
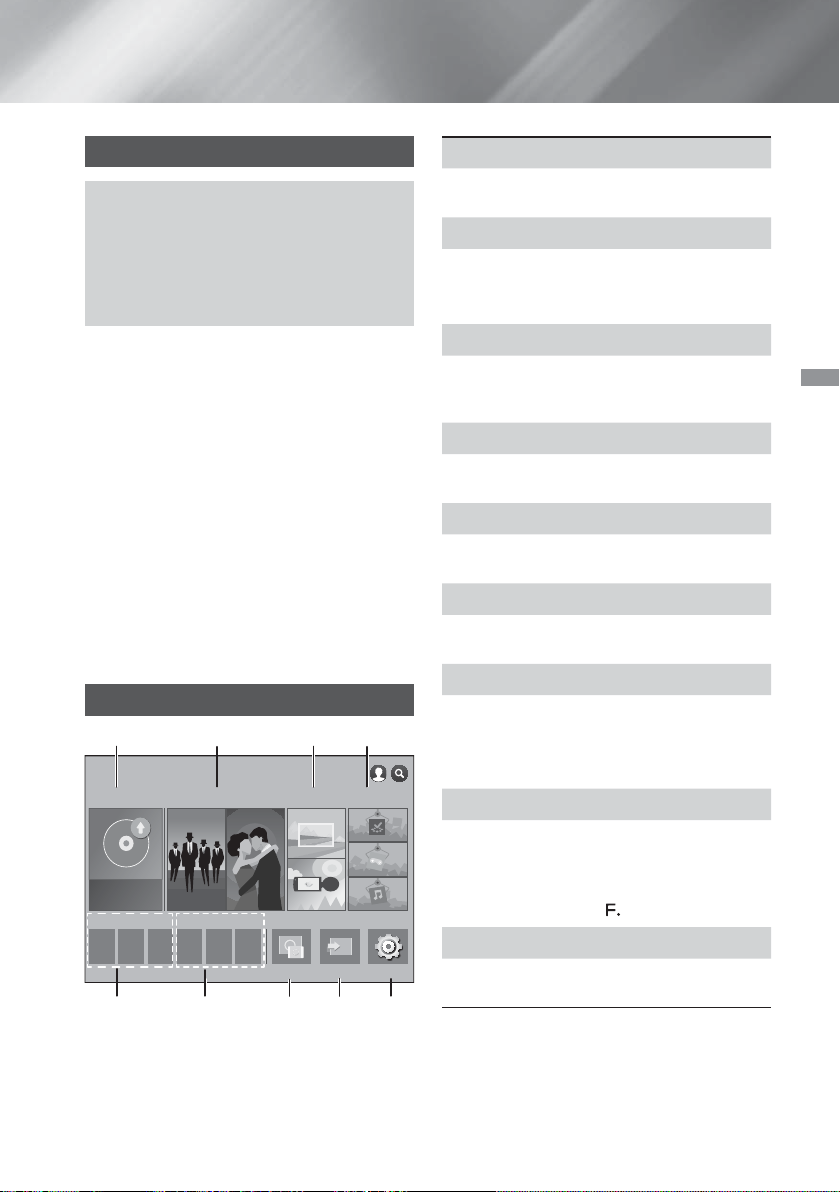
The Home Screen at a Glance
1234
PLAY DISC
RECOMMENDED MY APPS
App 1 App 2 App 3 App 4 App 5 App 6
FILMS AND TV SHOWS
No Disc
MULTIMEDIA
Screen Mirroring
SAMSUNG APPS
Function Settings
56 897
PLAY DISC
1
Displays information about the disc currently in the
disc tray. Press
FILMS AND TV SHOWS
2
Download movies and TV Shows from the Internet.
Depending on your country, this menu function
✎
may not be supported.
MULTIMEDIA
3
Play photos, videos, or music content from Discs,
USB devices, PCs, mobile devices, or cloud
services.
SAMSUNG APPS
4
Download/Access various for pay or free-of-charge
applications.
RECOMMENDED
5
A list of useful and popular apps we recommend
you download.
MY APPS
6
Displays downloaded and installed apps. You can
change the display order. (See page 45)
Screen Mirroring
7
Set up the wireless mirroring function between the
home cinema and a smart phone or tablet.
Depending on your country, this menu function
✎
may not be supported.
Function
8
Use to switch between external devices connected
to Digital In, Aux, HDMI 1, or HDMI 2, to switch to
the Tuner, or to switch to a connected Bluetooth
device. You can also use the remote's
button or the main unit's
Settings
9
Set various functions to suit your personal
preferences.
OK to start playing the disc.
SOURCE
button.
Settings
15 - English
Page 16
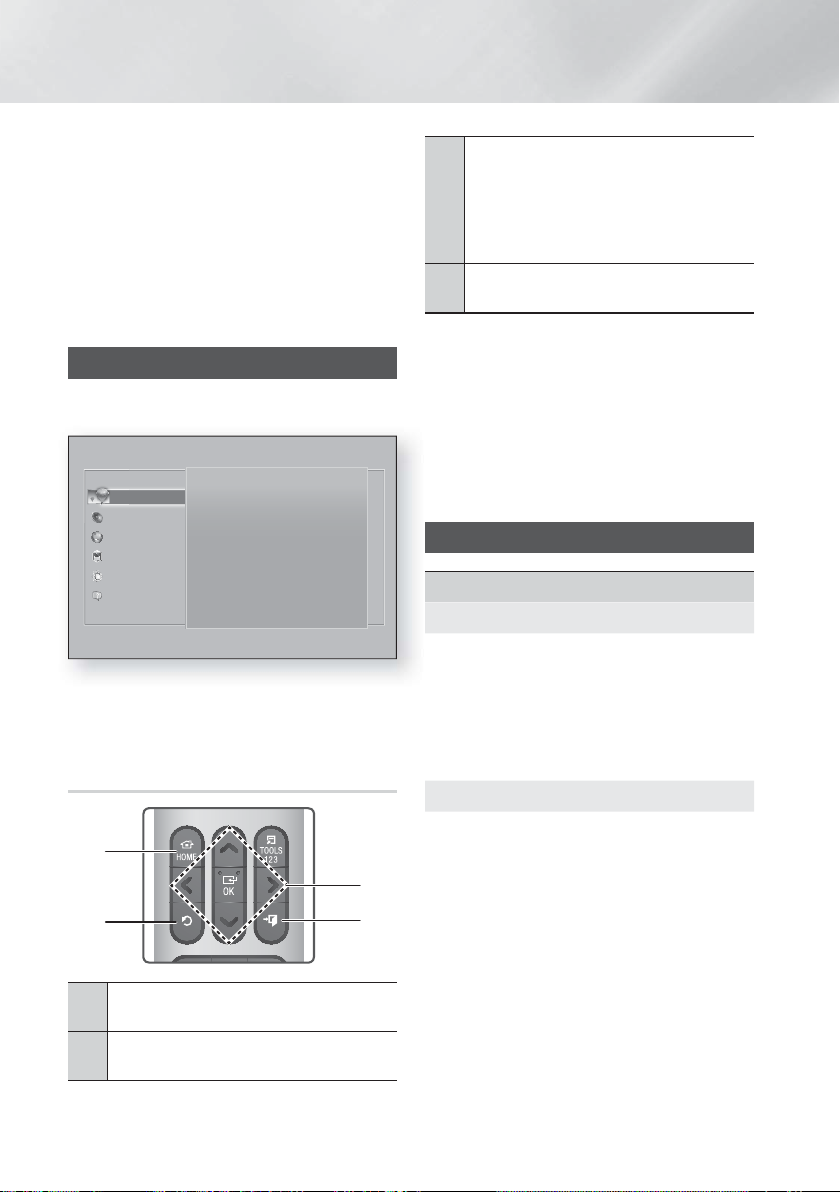
Settings
Selecting an Option on the Home Screen
1. To select an option on the Home screen, move
the cursor using the
highlights the option of your choice, and then
press the
If you leave the product in the stop mode for more
✎
than 5 minutes without using it, a screen saver
will appear on your TV. If the product is left in the
screen saver mode for more than 20 minutes, the
power will automatically turn off.
OK button.
78:;
buttons until it
Accessing the Settings Screen
1. Select Settings on the Home screen, and then
press OK. The Settings screen appears.
Settings
Picture
Picture
Sound
Network
Smart Hub
System
Support
2. To access the menus, sub-menus, and options
on the Settings screen, please refer to the
remote control illustration below.
UHD Output Auto
3D Settings
TV Aspect Ratio
BD Wise Off
Resolution Auto
Movie Frame (24 fps) Auto
DVD 24 fps Conversion Off
16:9 Original
Buttons on the Remote Control Used
for the Settings Menu
1
3
2
HOME Button : Press to move to the Home
1
screen.
RETURN) Button : Press to return to the
(
'
2
previous menu.
4
OK / DIRECTION Button :
78:;
• Press
select an item.
3
• Press the OK button to activate the
currently selected item or confirm a
setting.
EXIT) Button : Press to exit the current
(
e
4
menu.
to move the cursor or
Detailed Function Information
Each Settings function, menu item, and individual
option is explained in detail on-screen. To view an
explanation, use the
function, menu item, or option. The explanation will
usually appear on the right of the screen.
A short description of each Settings function
starts below. Additional information on some of the
functions is also in the Appendix of this manual.
78:;
buttons to select the
Settings Menu Functions
Picture
UHD Output
This option outputs HDMI video at UHD (Ultra High
Definition) resolution. This is only available when
Movie Frame is set to Auto.
To use this feature, you must connect the
✎
product to a device that supports UHD
resolution and you must have content that
plays at 24Fs (film speed).
3D Settings
Set up the 3D related functions.
3D Blu-ray Playback Mode: Select whether to
play a Blu-ray Disc with 3D contents in 3D Mode. If
you move to the Home or Smart Hub Home menu
while in 3D mode, the product will switch to 2D
automatically.
Screen Size: Enter the size of the TV attached to
the product. The product will automatically adjust
the 3D output to the screen size of the TV.
Carefully read the health and safety information
✎
before viewing
3D content. (See page 3)
16 - English
Page 17

TV Aspect Ratio
Lets you adjust the output of the product to the
screen size of your TV. (See page 51)
BD Wise
BD Wise is Samsung’s latest inter-connectivity
feature.
When you connect a Samsung product and a
Samsung TV with BD Wise to each other via
HDMI, and BD Wise is on in both the product
and TV, the product outputs video at the video
resolution and frame rate of the Blu-ray/DVD Disc.
Resolution
Lets you set the output resolution of the HDMI
video signal to BD Wise, Auto, 1080p, 1080i,
720p, 576p/480p. The number indicates the
number of lines of video per frame. The i and
p indicate interlaced and progressive scan,
respectively.
The more lines, the higher quality.
Movie Frame (24 fps)
Setting the Movie Frame (24 fps) feature to
Auto lets the product adjust its HDMI output to
24 frames per second automatically for improved
picture quality if attached to a 24Fs compatible TV.
• You can enjoy the Movie Frame (24 fps) feature
only on a TV supporting this frame rate.
• Movie Frame is only available when the product
is in the HDMI 1080p output resolution modes.
DVD 24 fps Conversion
Converts DVD playback to 24 frames per second
and outputs it via HDMI. This option is only
available when Movie Frame (24 fps) is set to on.
Fit Screen Size
Lets you select the optimal size for the Smart Hub
or Screen Mirroring Screen.
HDMI Colour Format
Lets you set the colour space format for the HDMI
output to match the capabilities of the connected
device (TV, monitor, etc).
HDMI Deep Colour
Lets you set the product to output video from the
HDMI OUT jack with Deep Colour. Deep Colour
provides more accurate colour reproduction with
greater colour depth.
Progressive Mode
Lets you improve picture quality when viewing
DVDs.
Sound
Simple Speaker Setup (HT-H7500WM only)
Lets you configure the settings of the speakers
you have connected to obtain the best possible
surround sound.
Normal Mode : Select if you have set up your
speakers in the recommended speaker layout
with the surround speakers next to or behind the
listening positions.
Simple Mode : Select if you have put your
surround speakers in front of the listening position.
Downmixes the front sound to the surround sound
speakers.
SFE, Virtual 7.1 will not operate when the
✎
Simple Mode is on.
Speaker Settings
Sound Output : Lets you select which speakers
are active, either the TV's speakers or the home
cinema's speakers.
Settings (Home theatre speakers) : Lets you
adjust the following speaker settings and turn the
test tone on and off so you can test the speakers.
- Volume Level : Lets you adjust the relative
loudness of each speaker from 6dB to -6dB.
For example, if you like deep bass, you can
increase the loudness of the subwoofer by
6dB.
:
- Distance
distance of each speaker from the listening
position up to 10
distance, the louder the speaker will be.
- Speaker Test
surround sound configuration. Press Stop
Test to stop the test while it is in progress.
Lets you adjust the relative
meters
. The farther the
:
Begins a test to set the best
Settings
17 - English
Page 18

Settings
Settings (Multiroom Link)
through a remote speaker that is connected to
the home cinema through your home network.
To use the network speaker, select
If there is a network speaker available, it will
appear on the screen.
- Don't Use : The network speaker is not used.
- Multiroom
audio. All network speakers output the same
audio regardless of channel using the PCM
format only.
SOUND EFFECT and 3D SOUND are not
✎
applied if
The network speaker is not available when
✎
Screen Mirroring is active.
For further details, refer to the Multiroom Link
✎
manual from the web site.
www.samsung.com > Support > Search for the
product name > Multiroom Link > Download
PDF
Sound Customiser
Sound Customiser lets you calibrate the home
cinema for the optimal sound quality based on
your hearing level and the ambient conditions.
To create a Custom Sound Profile, follow these
steps:
1. In the Sound Customiser Menu, select Add
Custom Sound.
2. On the next screen, select Start. The Preview
screen appears.
3. Select Preview to preview the Test Sound.
Select Next, and then press
4. A 6-step test will start. During each stage,
the TV will sound a test tone at a different
frequency. The tone will begin softly and
increase in volume. Select Yes when you can
hear the test tone. If you want to listen to it
again, select Retry. Each time you select
Yes, the TV will move on to the next tone.
Once the test is complete, a screen appears
that lets you compare the original sound to
the calibrated sound.
5. Select Next, and then press the
continue. The on-screen keyboard appears
with a default profile name.
6. Enter a name for the calibrated sound profile
or accept the default name, select Done, and
then press the
: The network speaker outputs
Multiroom
: You can enjoy sound
is set to on.
OK to continue.
OK button.
Multiroom
OK button to
.
7. Select Done on the next screen, and then
press the OK button. The Sound Customiser
screen reappears.
Custom Sound Profile : Select a Sound Profile
you created to activate it. Or select Hearing
Impaired, a Custom Sound Profile especially
composed of large sounds for those with hearing
disorders.
If there are more than 3 Custom Sounds
✎
registered, Family mode will be activated which
is composed of the average value of all registered
profiles.
Add Custom Sound : Create and add a new
Custom Sound Profile. See the instructions
above.
Edit Custom Sound : Choose a Custom Sound
Profile to modify it. Follow the same steps you
used when creating a sound profile. This function is
only available if you have added a Custom Sound
Profile using Add Custom Sound. (See above.)
Manage Custom Sound : Rename or delete
Custom Sound Profiles. This function is only
available if you have added a Custom Sound
Profile using Add Custom Sound. To select a
profile, highlight the check box to the right of the
profile, and then select Rename or Delete.
Equaliser
Lets you configure the Equaliser settings manually.
Smart Volume
Lets you set the product so that the volume
remains stable when a scene change occurs or
when you change the channel.
Audio Return Channel
Lets you direct the sound from the TV to the Home
Cinema speakers. Requires an HDMI connection
and an Audio Return Channel (ARC) compatible
TV.
• If Audio Return Channel is set to On and you
are using an HDMI cable to connect the product
to the TV, digital optical input is disabled.
• If Audio Return Channel is set to Auto and you
are using an HDMI cable to connect the product
to the TV, ARC or digital optical input is selected
automatically.
18 - English
Page 19

Digital Output
Lets you set the Digital Output to match the
capabilities of the AV receiver you’ve connected to
the product. For more details, please refer to the
digital output selection table. (See page 57)
Dynamic Range Control
Lets you apply dynamic range control to Dolby
Digital, Dolby Digital Plus, and Dolby TrueHD audio.
Auto: Automatically controls the dynamic range
of Dolby TrueHD audio, based on information in
the Dolby TrueHD soundtrack. Also turns dynamic
range control off for Dolby Digital and Dolby Digital
Plus.
Off: Leaves the dynamic range uncompressed,
letting you hear the original sound.
On: Turns dynamic range control on for all three
Dolby formats. Quieter sounds are made louder
and the volume of loud sounds is reduced.
Downmixing Mode
Lets you select the multi-channel downmix method
that is compatible with your stereo system. You
can choose to have the product downmix to
Normal Stereo or to Surround Compatible.
Audio Sync
When the product is attached to a digital TV, lets
you adjust the audio delay so that the audio syncs
with the video. You can set the delay between 0
and 300 milliseconds.
The Auto function in Audio Sync is guaranteed
✎
to work only with a Samsung TV that supports
the ARC function (the Anynet+ function).
Network
Network Status
Lets you check the current network and Internet
status.
Network Settings
Lets you configure the network connection so
you can enjoy various features such as Internet
services or AllShare Wi-Fi functionality, and perform
software upgrades.
Wi-Fi Direct
Lets you connect a Wi-Fi Direct device to the
product using a peer-to-peer network, without the
need for a wireless router. Note that if the product
is connected to a wireless network, it may be
disconnected when you use Wi-Fi Direct. (See
page 24)
Text files, such as files with a .TXT or .DOC
✎
extension, will not display when you are using the
Wi-Fi Direct function.
Multimedia Device Settings
Allow other devices on your network, such as smart
phones and tablets, to share content with your
product.
Device Name
Lets you assign an identifying name to the product.
You use this name to identify the product when
you are connecting external Wi-Fi devices (smart
phones, tablets, etc.) to it.
BD-Live Settings
Lets you set various BD-Live functions. BD-Live
allows you to access extra features available on
some Blu-ray Discs if you are connected to the
Internet.
BD-Live Internet Connection : Lets you fully
allow, partly allow, or prohibit a BD-Live Internet
connection.
BD Data Management : Manage BD data
downloaded from a BD-Live service or Blu-ray
Disc.
To use BD-Live, you must insert a USB storage
✎
device into the home cinema's USB port.
Settings
19 - English
Page 20

Settings
Smart Hub
VOD Rating Lock
Lets you lock access to Video on Demand (VOD)
content based on its rating. To use, you must enter
the security PIN.
the Num pad appears on the screen. When the Num
pad appears, select a number using the
button and then press the OK button.
The default security PIN is 0000.
✎
Depending on your country, this menu function
✎
may not be supported.
Caption
Use to modify captions on VOD playback that
supports closed captions. Lets you change
displayed caption's font colour and size.
The Caption function does not work with VOD
✎
services that don't support closed captions.
For some VOD services that do support closed
captions, the functions settings may not be
applied.
Depending on your country, this menu function
✎
may not be supported.
Terms & Policy
Samsung account Terms and Conditions,
Privacy Policy
You can view the terms of use and privacy policy
for Smart Hub, Samsung accounts, and various
other services.
Reset Smart Hub
Resets all Smart Hub settings to their default
settings. To use, you must enter the security PIN.
Press and hold the 123 button until the Num pad
appears on the screen. When the Num pad appears,
select a number using the
press the OK button.
The default security PIN is 0000.
✎
Press and hold the 123 button until
78:;
78:;
button and then
System
Setup
Lets you re-run the Initial Settings procedure.
Refer to the descriptions displayed on the screen.
Quick start
Lets you set the product to turn on quickly by
decreasing the boot time.
If this function is set to On, Standby power
✎
consumption will increase. (About 12W ~ 20W)
Language
Lets you select the language you prefer for the onscreen menu, disc menu, audio, subtitles, etc.
• The language you select for the disc menu,
disc audio, or subtitles will only appear if it is
supported on the disc.
Device Manager
Lets you connect a wireless USB keyboard or
mouse to the USB port on the front of the product.
Keyboard Settings: Lets you configure a
wireless USB keyboard connected to the
product.
You can use the keyboard only when a
✎
QWERTY keyboard screen or window appears
in the Web Browser.
Mouse Settings: Lets you configure a wireless
USB mouse connected to the product. You can
use the mouse in the product's menu in the
same way you use a mouse on your PC.
To use a mouse with the product's menu:
product
1. Connect the USB mouse to the
2. Click the primary button you selected in
Mouse Settings. The Simple Menu appears.
3. Click the menu options you want.
Some USB HID keyboards and mice may not be
✎
compatible with your product.
Some HID keyboard keys may not work.
✎
Wired USB keyboards are not supported.
✎
Some applications may not be supported.
✎
If a wireless HID Keyboard does not operate
✎
because of interference, move the keyboard closer
to the
product.
.
20 - English
Page 21

Security
Press and hold the 123 button until the Num pad
appears on the screen. When the Num pad appears,
select a number using the
press the OK button.
0000. Enter the default PIN to access the security
function if you haven't created your own PIN.
BD Parental Rating: Prevents playback of
Blu-ray Discs with a rating equal to or above a
specific age rating you have set unless you enter
the PIN.
DVD Parental Rating: Prevents playback of
DVDs with a rating above a specific numerical
rating you have set unless you enter the PIN.
Change PIN: Lets you change the 4-digit PIN
used to access security functions.
If you forget your PIN
1. Remove any disc or USB storage device.
2. Press and hold the @ button on the front
panel for 5 seconds or more.
All settings will revert to the factory default
settings.
When the factory default settings are restored,
✎
all the user stored BD data is deleted.
General
Lets you specify the display brightness and time
zone.
Front Display: Lets you change the brightness
of the front panel.
Time Zone: You can specify the time zone that
is applicable to your area.
Menu Transparency: Lets you adjust the
transparency of the menu box.
Anynet+ (HDMI-CEC)
Anynet+ is a convenient function that offers linked
operations with other Samsung products that have
the Anynet+ feature, and lets you control those
products with one Samsung TV remote. To operate
this function, you must connect this product to an
Anynet+ Samsung TV using an HDMI cable.
To use an Anynet+ (HDMI-CEC) function, follow
the instructions below.
1) Connect the product to an Anynet+ (HDMI-
CEC)-compliant Samsung TV using HDMI
Cable.
78:;
The default security PIN is
button and then
2) Set the Anynet+ (HDMI-CEC) feature to On
in both the TV and the product.
3) Search for and then select the product in the
TV's Anynet+ (HDMI-CEC) list. For more
exact instructions, see the Anynet+ section of
the TV's user's manual.
DivX® Video On Demand
View DivX® VOD Registration Codes to purchase
and play DivX® VOD contents.
Support
Remote Management
When activated, lets Samsung Call Centre agents
diagnose and fix problems with the product
remotely. Requires an active Internet connection.
Remote Management service might not be
available in some countries.
Software Update
For more information about the Software Update
function, see "Upgrading Software" on page 25.
Usage Mode
Lets you set the Usage Mode. If you are using the
home cinema at home, always select Home Use.
Store Demo is for retail display settings only.
Contact Samsung
Provides contact information for assistance with
your product.
Reset
Reverts all settings to their defaults except for the
network and Smart Hub settings. Requires that
you enter your security PIN.
button until the Num pad appears on the screen.
When the Num pad appears, select a number using
78:;
the
The default security PIN is 0000.
button and then press the OK button.
Press and hold the 123
Settings
21 - English
Page 22
Settings
Network Setup
When you connect this product to a network, you
can use network based applications and functions
such as Smart Hub and BD-LIVE, and upgrade the
product's software through the network connection.
For more information about accessing and using
Internet services, see the Network Services chapter
of this manual on pages 43~50. Instructions for
configuring the network connection start below.
Configuring Your Network Connection
If you didn't configure your network connection during
the initial settings procedure or you need to reset the
network connection, follow the directions below.
Before you begin, contact your Internet Service
Provider to find out if your IP address is static or
dynamic. If it is dynamic, and you have a wired
or wireless network, we recommend using the
Automatic configuration procedures described below.
If you are connecting to a wired network, connect the
product to your router using a LAN cable before you
start the configuration procedure.
To begin configuring your network connection, follow
these steps:
1. In the Home screen, select Settings, and then
press the
2. Select Network, and then press the
3. Select Network Settings, and then press the
OK button.
4. Go to the instructions for Wired networks
starting or the instructions for Wireless networks
starting on the next page.
Wired Network
Wired – Automatic
After following Steps 1 to 3 above:
1. In the Network Settings screen, change
Network type to Wired. Then, select Connect
and press the OK button. The product detects
the wired connection, verifies the network
connection, and then connects to the network.
2. When it is done, highlight OK, and then press
OK button.
OK button.
OK button.
Wired - Manual
If you have a static IP address or the automatic
procedure does not work, you'll need to set the
Network Settings values manually.
After following Steps 1 to 3 above:
1. In the Network Settings screen, change
Network type to Wired. Then, select Connect
and press the
OK button.
The product searches for a network, and then
displays the connection failed message.
If it is possible to connect the home cinema to
✎
your network wirelessly, select Change Network
at this point, change the Network type to
Wireless, and then go to the instructions for
wireless networks on the next page.
Network Settings
Wired network connection failed.
Unable to connect to the network. Try the following: check if your IP address is set
correctly in IP Settings. Contact your Internet service provider for more information.
Change Network IP Settings Retry Close
MAC Address XX:XX:XX:XX:XX:XX
IP Address 0. 0. 0. 0
Subnet Mask 0. 0. 0. 0
Gateway 0. 0. 0. 0
DNS Server 0. 0. 0. 0
2. Use the :; buttons to select IP Settings,
and then press the OK button. The IP Settings
screen appears.
3. Select the IP setting field, and then set it to
Enter manually.
4. Select a parameter to enter (IP Address, for
example), and then press
OK. Use the 78
buttons on the remote control to enter the
numbers for the parameter.
Or use the Num
keypad to enter a parameter number.Press and
hold the 123 button until the Num pad appears on
the screen. When the Num pad appears, select a
number using the
the OK button.
78:;
Use the :; buttons on the
button and then press
remote control to move from entry field to entry
field within a parameter. When done with one
parameter, press the
OK button.
5. Press the 7 or 8 button to move to another
parameter, and then enter the numbers for that
parameter following the instructions in Step 4.
6. Repeat Steps 4 and 5 until you have filled in all
parameters.
22 - English
Page 23
You can get the network parameter values from
✎
your Internet provider.
7. When finished entering all the parameter values,
select OK, and then press the
OK button. The
home cinema verifies the network connection
and then connects to the network.
Wireless Network
You can set up a wireless network connection in three
ways:
- Wireless Automatic
- Wireless Manual
- WPS(PBC)
Before you configure the wireless network
connection, disconnect any wireless network devices
currently connected to the product or, if applicable,
the product's current wired connection.
Wireless - Automatic
After following Steps 1 to 3 in "Configuring Your
Network Connection" on page 22:
1. In the Network Settings screen, change
Network type to Wireless. The product
searches for and then displays a list of the
available networks.
Network Settings
Select your network type.
Network type Wireless
Wireless network
si-ap
iptime
KIMING_VTOWER
Refresh WPS(PBC)
You can connect your Bluray player to the internet.
Please select which wireless
network to use.
2. Select the desired network, and then press the
OK button.
3. On the Security screen, enter your network's
security code or pass phrase.
Enter letters by selecting a letter with
78:;
buttons, and then pressing OK button.
4. When finished, select Done, and then press the
OK button. The product verifies the network
connection and then connects to the network.
You should be able to find the security code or
✎
pass phrase on one of the set up screens you
used to set up your router or modem.
Wireless - Manual
If you have a static IP address or the Automatic
procedure does not work, you'll need to set the
Network Settings values manually.
After following Steps 1 to 3 in "Configuring Your
Network Connection" on page 22:
1. In the Network Settings screen, change
Network type to Wireless. The product
searches for and then displays a list of the
available networks.
2. Scroll through the list, select the desired network
or Add Network, and then press the
OK button.
3. If you selected a network in Step 2, go to Step 6.
If you selected Add Network, go to Step 4.
4. Enter your wireless network or wireless router's
name.
• Enter letters by selecting a letter with the
78:;
buttons, and then pressing the OK
button.
• To display capital letters (or redisplay lower
case letters if capital letters are displayed),
select
, and then press the OK button.
• To display symbols and punctuation, select
123#&, and then press the
OK button. To
redisplay letters, select 123#&, and then press
the OK button.
When finished, select Done, and then press the
OK button.
5. On the Security type screen that appears,
use the ,. buttons to select the network's
Security type, and then press the OK button.
On the next screen, enter your network's
security code or pass phrase.
• Enter letters by selecting a letter with the
78:;
buttons, and then pressing the
OK
button.
When finished, select Done, and then press
OK button. The product searches for the
the
network.
6. The Network connection fail screen appears.
Use:; buttons to select IP Settings, and then
press the
OK button.
Settings
23 - English
Page 24

Settings
7. Select the IP setting field, and then set it to
Enter manually.
8. Select a network parameter to enter (IP
Address, for example), and then press
button. Use the 78 buttons on the remote
control to enter the numbers for the parameter.
Or use the Num keypad to enter a parameter
number.Press and hold the 123 button until the
Num pad appears on the screen. When the Num
pad appears, select a number using the
button and then press the OK button.
buttons on the remote control to move from
entry field to entry field within a parameter. When
done with one value, press the
9. Press the , or . button to move to another
parameter, and then enter the numbers for that
parameter following the instructions in Step 8.
10. Repeat Steps 8 and 9 until you have filled in all
parameters.
You can get the Network parameter values from
✎
your Internet provider.
11. When finished, select OK, and then press the
OK button. The Security screen appears.
12. On the Security screen, enter your network's
security code or pass phrase. Enter letters by
selecting a letter with the
then pressing the
13. When finished, select Done at the right of the
screen, and then press the
product verifies the network connection and
then connects to the network.
14. After the home cinema verifies the network,
select OK, and then press the OK button.
You can also begin the Manual Network setup by
✎
going to Settings > Network > Network Status.
WPS(PBC)
One of the easiest ways to set up the wireless
network connection is using the WPS(PBC) function.
If your wireless router has a WPS(PBC) button, follow
these steps:
After following Steps 1 to 3 in "Configuring Your
Network Connection" on page 22:
1. In the Network Settings screen, change
Network type to Wireless. The product
searches for and then displays a list of the
available networks.
2. Scroll the list down, select WPS(PBC), and then
press the
OK button.
78:;
OK button.
OK button. The
OK
78:;
Use the :;
OK button.
buttons, and
3. Press the WPS(PBC) button on your router
within two minutes. Your product automatically
acquires all the network settings values it needs
and connects to your network after the network
connection is verified.
4. When it is done, highlight OK, and then press
the OK button.
For a WPS connection, set your wireless router’s
✎
security encryption to AES. WEP security
encryption does not support a WPS connection.
Wi-Fi Direct
The Wi-Fi Direct function allows you to connect
Wi-Fi Direct devices to the product and each other
using a peer-to-peer network, without a wireless
router.
Some Wi-Fi Direct devices may not support the
✎
AllShare function if connected via Wi-Fi Direct. If
this is the case, change the network connection
method you used to connect the device to the
home cinema.
Wi-Fi Direct transmissions can interfere with
✎
Bluetooth signals. Before you use the Bluetooth
function, we strongly recommend that you turn off
the Wi-Fi Direct function on any device in which
it is currently on.
1. Turn on the Wi-Fi Direct device and activate its
Wi-Fi Direct function.
2. In the Home screen, select Settings, and then
press the
3. Select Network, and then press the OK button.
4. Select Wi-Fi Direct, and then press the
button.
The Wi-Fi Direct devices that you can connect
the home cinema to appear.
Settings
OK button.
Wi-Fi Direct
Device Name : [HTS]H7500WM
Select your Wi-Fi Direct device to connect to.
AndroidXXXXXXX Disconnected
OK
Refresh
Close
24 - English
Page 25

5. You have three ways to complete the Wi-Fi
connection:
• Through the Wi-Fi device.
• Through the product using PBC.
• Through the product using a PIN.
Each is covered below.
Through the Wi-Fi Device
1. On the Wi-Fi device, follow the device's
procedure for connecting to another Wi-Fi
Direct device. See the device's user manual for
instructions.
2. When you have completed the procedure, you
should see a pop-up on your TV screen saying
that a device that supports Wi-Fi Direct has
requested to connect. Select OK, and then
press the OK button to accept.
3. The Connecting pop-up appears, followed by
the Connected pop-up. When it closes, you
should see the device listed on the Wi-Fi Direct
screen as connected.
• The PBC and PIN procedures connect devices
automatically.
Through the Product Using PBC
1. Select the Wi-Fi Direct device you want to
connect to this product, and then press the OK
button.
2. The Connecting pop-up appears, followed by
the Connected pop-up. When it closes, you
should see the device listed on the Wi-Fi Direct
screen as connected.
Through the Product Using a PIN
1. Select the Wi-Fi Direct device you want to
connect to this product, and then press the OK
button.
2. The PIN pop-up appears.
3. Note the PIN code in the pop-up, and then enter
it into the appropriate field in the Wi-Fi Direct
device you want to connect.
4. The Connecting pop-up appears, followed by
the Connected pop-up. When it closes, you
should see the device listed on the Wi-Fi Direct
screen as connected.
The current wired or wireless network connection
✎
will be disconnected when you use the Wi-Fi
Direct function.
Text files, such as files with a .TXT or .DOC
✎
extension, will not display when you are using the
Wi-Fi Direct function.
Upgrading Software
The Software Update menu allows you to upgrade
the product’s software for performance improvements
or additional services.
• Never turn the product off or back on manually
during the update process.
1. In the Home menu, select Settings, and then
press the
2. Select Support, and then press the
3. Select Software Update, and then press the
OK button.
4. To download update software and update now,
select Update now, and then press the OK
button. See "Update now" on the next page for
details.
5. To let the product download update software
automatically when available, select Auto
update, and then press the
page 26)
The upgrade is complete when the product turns
✎
off, and then turns on again by itself.
Samsung Electronics takes no legal responsibility
✎
for product malfunction caused by an unstable
Internet connection or consumer negligence
during a software upgrade.
If you want to cancel the upgrade while the
✎
upgrade software is downloading, press the
button.
When a system upgrade is in progress, "UPDATE"
✎
is displayed on the front panel.
OK button.
OK button.
OK button. (See
OK
Settings
25 - English
Page 26

Settings
Update now
You can use Update now to update the software
through your network connection or by using a USB
flash drive. The network instructions are below. The
USB flash drive instructions are on this page.
1. Select Update now, and then press the
button. The Update now pop-up appears.
2. The product searches on line for the latest
software version.
3. If it does not find an update, the "There are no
new updates for you at the moment." pop-up
appears. Press the OK button to exit.
4. If it finds a new version, the Update Request
pop-up appears.
5. Select OK. The product upgrades the software,
turns off, and then turns on automatically.
6. If you do not select OK or Cancel in one minute,
the product stores the new upgrade software.
You can upgrade the software later using Auto
update.
7. If you select Cancel, the product cancells the
upgrade.
When the system upgrade is done, check the
✎
software details in the Product Information section
of the Contact Samsung screen.
Do not turn off the product during the Software
✎
Upgrade. It may cause the product to malfunction.
OK
Auto update
You can set the Auto update function so that the
product downloads new upgrade software when it is
in Auto update mode.
In Auto update mode, the product is on, but its
Internet connection is active. This allows the product to
download upgrade software automatically, when you
are not using it.
1. Press the 78 buttons to select Auto update
mode, and then press the OK button.
2. Select On or Off.
If you select On, the product will automatically
download new upgrade software when it is
in Auto update mode with the power on. If it
downloads new upgrade software, the product
will ask you if you want to install it when you turn
the product on.
To use the Auto update function, your product
✎
must be connected to the Internet.
Update by USB
1. Visit www.samsung.com.
2. Click SUPPORT on the top right of the page.
3. Enter the product's model number into the
search field. As you enter the model number, a
drop down will display products that match the
model number.
4. Left click your product's model number in the
drop down list.
5. On the page that appears, scroll down to and
then click Firmware Manuals & Downloads.
6. Click Firmware in the centre of the page.
7. Click the ZIP button in the File column on the
right side of the page.
8. Click Send in the first pop-up that appears.
Click OK in the second pop-up to download and
save the firmware file to your PC.
9. Unzip the zip archive to your computer. You
should have a single folder with the same name
as the zip file.
10. Copy the folder to a USB flash drive.
11. Make sure no disc is inserted in the product,
and then insert the USB flash drive into the USB
port of the product.
12. In the product’s menu, go to Settings >
Support > Software Update.
13. Select Update now.
14. The product searches for the software on the
USB drive. When it finds the software, the
Update Request pop-up appears.
15. Select OK. The product upgrades the software,
turns off, and then turns on automatically.
16. There should be no disc in the product when
you upgrade the software using the USB jack.
When the system upgrade is done, check the
✎
software details in the Product Information section
of the Contact Samsung screen.
Do not turn off the product during the software
✎
upgrade. It may cause the product to malfunction.
Software upgrades using the USB jack must be
✎
performed with a USB flash drive only.
26 - English
Page 27

Playing Content
Your home cinema can play content located on Bluray/DVD/CD discs, USB devices, PCs, smart phones,
tablets, and on the Web.
To play content located on your PC or a mobile
device, you must connect the PC or mobile device
and the product to your network. To play content on
your PC, you must also download and install AllShare
network software or already have DLNA network
software on your PC.
PCs running Windows 7 and Windows 8 have
✎
DLNA software (Play To) built in.
Playing Commercial Discs
1. Press the button to open the disc tray.
2. Place a disc gently into the disc tray with the
disc’s label facing up.
3. Press the button to close the disc tray.
Playback starts automatically.
4. If playback does not start automatically, press
the p button on the remote.
Disc Storage & Management
• Holding Discs
- Fingerprints or scratches on
a disc may reduce sound and
picture quality or cause skipping.
- Avoid touching the surface of a disc where data
has been recorded.
- Hold the disc by the edges so that fingerprints
will not get on the surface.
- Do not stick paper or tape on the disc.
• Cleaning Discs
- If you get fingerprints or dirt on a
disc, clean it with a mild detergent
diluted in water and wipe with a
soft cloth.
- When cleaning, wipe gently from the inside to the
outside of the disc.
- Disc Storage
Do not keep in direct sunlight.
Keep in a cool ventilated area.
Keep in a clean protective jacket and store
vertically.
Playing Multimedia Files
1. In the Home screen, select MULTIMEDIA, and
then press the OK button. The Recently Played
screen appears.
2. Select Storage, Network Device, or Storage
Service at the bottom of the screen.
• Storage - Displays storage devices connected
to the product.
• Network Device - Displays mobile devices,
PCs, tablets, and similar devices connected
through the network.
• Storage Service - Displays the cloud services
you are logged in to.
When you select an item, information about the
✎
item scrolls across the bottom of the item's listing
window.
3. Select an item or device, and then press the
button. A screen appears listing the contents
of the item or device. Depending on how the
contents are arranged, you will see either
folders, individual files, or both.
4. If necessary, use the
a folder, and then press the
5. Use the
6. The selected file plays.
7. Press the ' (
8. Go to pages 29~41 for instructions that
To list only one type of media file, use the Filter
✎
(
device screen.
78:;
or play, and then press the
or the
screen.
explain how to control playback of videos,
music, and pictures on a storage device.
(
EXIT) button to return to the Home
e
) function in the top-right corner of the item or
78:;
buttons to select a file to view
RETURN) button to exit a folder
buttons to select
OK button.
OK button.
OK
Playing Content
27 - English
Page 28
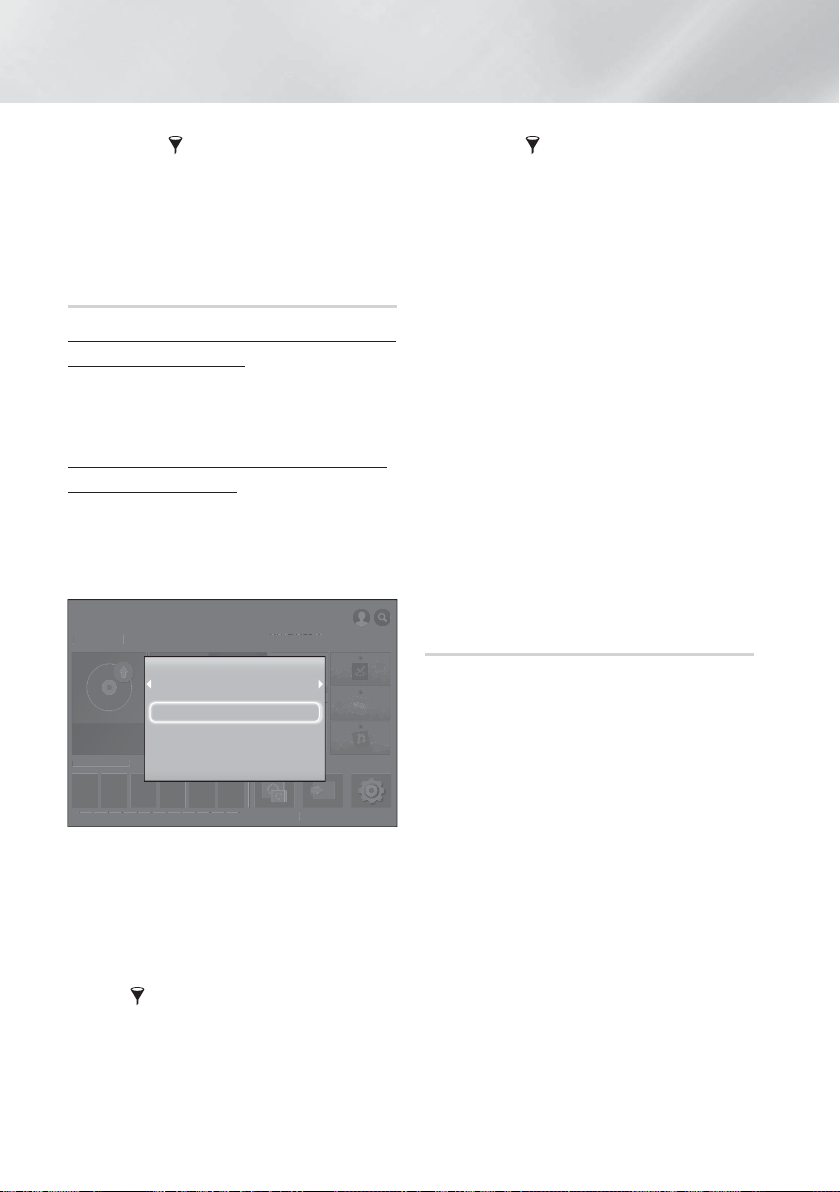
Playing Content
SC
App
App 2
App 3
App
App
App 6
S
g
Functio
F
A
SAMSUNG
S
No Di
sc
In the Filter( ) drop down, select Photos,
✎
Videos, or Music.
Even though the product will display folders that
✎
contain all content types, it will only display files
of the content type you selected For example, if
you selected Music, you will only be able to see
music files.
Playing Files on a Storage Device
Method 1 : If the product is turned on after you
connect a storage device
1. Turn the product on.
2. Follow the directions in “Playing Multimedia
Files” on page 27. In Step 2, select Storage.
Method 2 : If you connect a USB device while
the product is turned on
1. Connect the storage device to the product. (a
recorded CD, a USB device, etc.) The "New
device connected." pop-up appears. If two or
more storage devices are connected, use the
:;
buttons to switch between devices.
PLAY DISC
PLAY DI
RECOMMENDED MY APPS
RECOMMENDED
App 1 App 2 App 3 App 4 App 5 App 6
✎
2. Use the 78 buttons to select All Content,
✎
FILMS AND TV SHOWS
ILMS AND TV SHOWSMULTIMEDI
No Disc
1
New device connected.
USB Flash Disk
All Content
Photos
Videos
Music
4
5
MULTIMEDIA
Screen Mirroring
creen Mirrorin
SAMSUNG APPS
Function Settings
nSettings
If the pop-up does not appear, go to Method 1.
Photos, Videos, or Music, and then press the
OK button. Depending on how the contents are
arranged, you will see either folders, individual
files, or both.
To list only one type of media file, use the
) function in the top-right corner of the
Filter(
item or device screen.
APP
In the Filter( ) drop down, select Photos,
✎
Videos, or Music.
Even though the product will display folders that
✎
contain all content types, it will only display files
of the content type you selected For example, if
you selected Music, you will only be able to see
music files.
3. If necessary, use the
a folder, and then press the
78:;
OK button.
buttons to select
4. Select a file to view or play, and then press the
OK button.
5. Press the ' (RETURN) button to exit a folder
or the
(EXIT) button to return to the Home
e
screen.
6. Go to pages 29~41 for instructions that
explain how to control playback of videos,
music, and pictures on a storage device.
If you insert a disc when playing a USB device
✎
or phone, the device mode changes to "Disc"
automatically.
If your cellular phone is DLNA compatible, you
✎
can play contents without connecting a USB
cable.
Playing Media Content Saved on a
Computer/Mobile Device
You can play media content on the Home cinema that
is stored on a computer or mobile device connected
to the same network as the Home cinema.
Samsung Link software must be installed on
✎
the computer that contains the content you
want to play on the Home cinema. The mobile
device must support Samsung Link. For more
information, visit Samsung’s content and service
portal at http://link.samsung.com.
You may experience compatibility issues when
✎
attempting to play media files via a third-party
DLNA server.
The content shared by a computer or a mobile
✎
device may not play depending on the encoding
type and file format of the content. In addition,
some functions may not be available.
The media content may not play smoothly
✎
depending on the network status. If this occurs,
use a USB storage device.
28 - English
Page 29
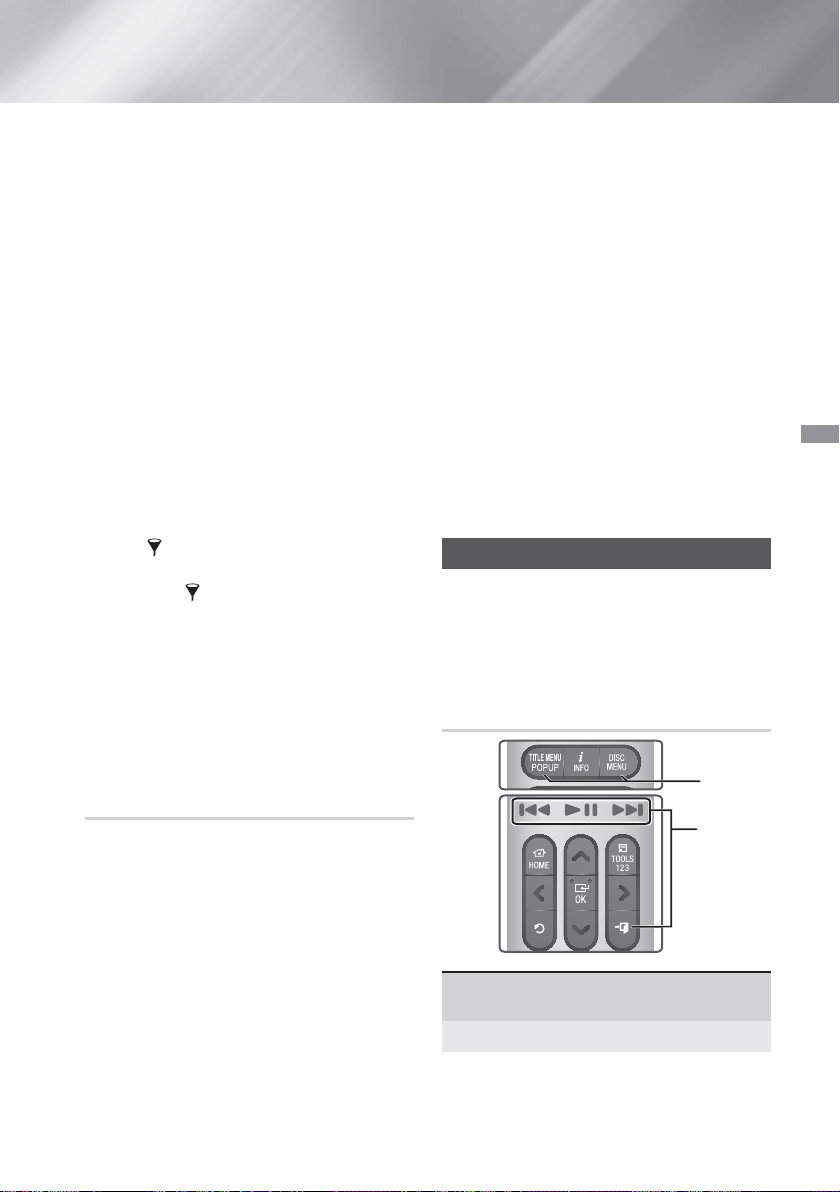
1. In the Home screen, select MULTIMEDIA, and
then press the OK button.
2. Select Network Device at the bottom of the
screen, and then press the
devices connected to the same network as the
Home cinema are listed.
3. Select a storage device, and then press the
OK button. The folders and files shared by the
selected storage device are listed.
4. If necessary, use the
a folder, and then press the OK button.
5. Select a file to view or play, and then press the
OK button.
6. Press the ' (
or the
screen.
7. Go to pages 29~41 for instructions that
explain how to control playback of videos,
music, and pictures on a storage device.
To list only one type of media file, use the
✎
Filter(
item or device screen.
In the Filter( ) drop down, select Photos,
✎
Videos, or Music.
Even though the product will display folders that
✎
contain all content types, it will only display files
of the content type you selected For example, if
you selected Music, you will only be able to see
music files.
Alternatively, move to the media content to play
✎
and press the
RETURN) button to exit a folder
(
EXIT) button to return to the Home
e
) function in the top-right corner of the
OK button to play the content.
OK button. Storages
78:;
buttons to select
Playing Media Content Saved in a
Cloud Service
Dropbox and SkyDrive and other cloud services save
user content such as photos, videos, and music files
on a remote server accessible through the Internet.
When your home cinema is connected to the Internet,
you can view or play the media content saved in a
cloud service through the home cinema.
To play the content in a cloud service, you must
✎
log into your Samsung account and link the
Samsung account to the cloud service account.
For the information about linking your Samsung
account to a cloud service account, refer to the
"Logging In to Your Samsung Account" section.
1. In the Home screen, move to MULTIMEDIA and
press OK button.
2. Select Storage Service at the bottom of the
screen.
3. The cloud services linked with your Samsung
account appear.
4. Select a cloud service. The folders and files in
the selected cloud service are listed.
5. If necessary, use the
a folder, and then press the
6. Select a file to view or play, and then press the
OK button.
7. Press the ' (RETURN) button to exit a folder
8. Go to pages 29~41 for instructions that
or the
screen.
explain how to control playback of videos,
music, and pictures located in a Storage
Service.
(EXIT) button to return to the Home
e
78:;
OK button.
buttons to select
Controlling Video Playback
You can control the playback of video content located
on a Blu-ray/DVD disc, USB device, mobile device,
or PC. Depending on the disc or contents, some of
the functions described in this manual may not be
available.
Buttons on the Remote Control used
for Video Playback
1
2
Using the disc menu, title menu, popup
1
menu, and title list
DISC MENU
During playback, press this button to display the
Disc menu.
Playing Content
29 - English
Page 30

Playing Content
TITLE MENU
During playback, press this button to display the
Title menu or Popup menu.
• If your disc has a playlist, press the Sort By
button to go to the playlist.
Playback related buttons
2
The product does not play sound in Search, or
Slow mode.
• To return to normal speed playback, press the
p
button.
p
(
e
Fast
Motion
Play
Slow
Motion
Play
Skip
Motion
Play
Starts/Pauses playback.
Stops playback.
EXIT)
During playback, press and hold
[
the
or ] button.
Each time you press and hold the
[
or ] button, the playback
speed will change.
In pause mode, press and hold
the ] button.
Each time you press and hold the
]
button, the playback speed
will change.
During playback, press the
]
button.
Each time you press the
]
button, the disc moves to the
previous or next chapter or file.
[
[
or
Using the TOOLS Menu
Commercial Discs
During playback, press the TOOLS button.
File-based Video
During playback, press the TOOLS button.
Use the :; buttons to select Settings(
upper right corner, and then press the OK button.
Play from the beginning
Select to return to the beginning of the movie, and
then press the OK button.
T
) in the
or
3D
Use 3D menu to select the Side by Side or Top
Bottom option if the 3D content currently playing
does not appear properly in 3D mode.
Use 3D menu for 3D content only. If you apply
✎
the
Side by Side
content, it will not be displayed properly.
Select Scene
You can use the Select Scene function during
playback to view or start a movie from the scene
of your choice.
If the index information in the file is damaged or
✎
the file does not support indexing, you will not
be able to use the Select Scene function.
If you are using the DLNA function after
✎
connecting to a computer through your
network, Select Scene may not be supported.
Search Titles :
on the disc or device, select to start a different
title.
1. Select Search Titles, and then press the
OK button.
2. Use the 78 buttons to select a title, and
then press the OK button.
Chapter Search :
your choice.
1. Select Chapter Search, and then press the
OK button.
2. Use the 78 buttons to select a chapter,
and then press the
Search Time Bar :
a selected time point.
1. Select Search Time Bar, and then press
the
2.
Press and hold the 123 button until the Num
pad appears on the screen. When the Num
pad appears, select a number using the
,.
button.
You can also
✎
or rewind the movie. The movie advances or
rewinds one minute each time you press the
:;
buttons.
or
Top Bottom
If there is more than one movie
Select to play the chapter of
OK button.
Select to play the movie from
OK button.
:;
button and then press the OK
use the:; buttons to advance
format to 2D
30 - English
Page 31

Repeat Mode
Lets you repeat a title, chapter, or specific section.
- Off : Select to return to normal playback.
- Title : Choose to repeat a selected title.
- Chapter : Choose to repeat a specific chapter.
- Repeat A-B : Choose to repeat a specific
section.
1. Press the
want repeat play to start (A).
2. Press the OK button at the point where you
want repeat play to stop (B).
Depending on the disc, the screen may not
✎
display all repeat options.
Off, Repeat One, and Repeat All appear
✎
when you play a video recorded as a digital file.
The screen may not display Chapter or
✎
Title immediately. Continue to press the
78
applicable field.
The screen may not display Repeat A-B
✎
immediately. Continue to press the 78
buttons until Repeat A-B is inside the
applicable field.
You must set point (B) at least 5 seconds of
✎
playing time after point (A).
Picture Mode
Lets you set the Picture Mode.
- Dynamic : Increases sharpness and brightness.
- Standard : Choose this setting for most viewing
applications.
- Movie : The best setting for watching movies.
- User : Lets you adjust the sharpness and noise
reduction function respectively.
When you use the BD Wise function, this
✎
menu will not appear.
Equaliser Mode
Set Equalizer Mode on to use the equalizer.
OK button at the point where you
buttons until your choice is inside the
Equaliser Settings
Lets you set the equalizer.
Equaliser Settings only appears when
✎
Equaliser Mode is On.
Audio
Select to set the desired audio language.
Audio Sync
In some cases when the product is connected to
a digital TV, the audio signal may not synchronize
with the video signal. If this occurs, use Audio
Sync to adjust the audio delay time to match the
video signal.
Subtitle
Lets you set the desired subtitle language.
Subtitle Settings
Lets you set the desired subtitle options.
Angle
To view a scene from another angle. The Angle
option displays the number of angles available to
view (1/1, 1/2, 1/3, etc.).
BONUSVIEW Video BONUSVIEW Audio
Lets you set the desired Bonusview option.
Rotate
You can rotate the screen clockwise or
counterclockwise by 90 degrees.
Full Screen
Lets you set the size of the video image. Choose
Original, Mode1 (larger), or Mode2 (largest).
Information
Select to view video file information.
Depending on the disc or storage device, the
✎
Tools menu may differ.
Video files with high bitrates of 20Mbps or more
✎
strain the product’s capabilities and may stop
playing during playback.
Playing Content
31 - English
Page 32

Playing Content
Using the Sort By & Options Menus
Select the Filter( ) function, and then Videos to
display videos only.
Even though the product will display folders that
✎
contain all content types, it will only display files
of the content type you selected For example, if
you selected Videos, you will only be able to see
video files.
On the screen that lists the video files, use the
78:;
buttons to select Sort By or Options in the
upper right, and then press the OK button.
Videos
Sort By
Date
Displays all the folders with videos by date. If
you select a folder, and then press OK button,
displays all the video files in the folder by date.
Title
Displays all the video files on the media or
storage device by title.
Folder
Displays all the folders on the media or storage
device.
Options
Play Selected
Play Selected lets you create a playlist by
selecting specific files to play. It works essentially
the same way for all media. See "Using Play
Selected with a Commercial CD" on page 35.
Send
Select Send to upload selected files to on-line
sites (Picasa, Facebook, etc.) or to devices.
To use Send with an on-line site, you need to
establish an account with the on-line site, and
then log in using the Log In function. Send works
essentially the same way for music, photos, and
videos. For general instructions, see "Using the
Send Function" on page 41.
Depending on the disc or storage device, the
✎
Options and Sort By menus may differ. All
options may not be displayed.
The Sort By and Options menus are usually
✎
available when you are viewing video files on
a USB flash drive, a PC, a disc you recorded
yourself, or a mobile device. They are usually not
available if you are viewing a commercial Blu-ray,
DVD, or CD disc.
Controlling Music Playback
You can control the playback of music content
located on a DVD, CD, USB, mobile device, or
PC. Depending on the disc or contents, some of
the functions described in this manual may not be
available.
Buttons on the Remote Control used
for Music Playback
143
2
[ ]
1
2
3
4
buttons : Move to the previous/
next track.
(
EXIT) button : Stops a track.
e
Fast Play (Audio CD [CD-DA] only)
During playback, press and hold the [ or
]
button.
Each time you press and hold the
or ] button, the playback speed will
change.
p
button : Plays/Pause a track.
[
32 - English
Page 33

Music Screen Controls
TRACK 001 00:43
TRACK 002 03:56
TRACK 003 04:41
TRACK 004 04:02
TRACK 005 03:43
TRACK 001
00:00/00:00
TRACK 006 03:40
TRACK 007 04:06
TRACK 008 03:52
TRACK 009 03:04
TRACK 010 04:02
The Track List screen appears initially, and the first
track begins to play. If you are playing a commercially
recorded disk and don't press a button on the remote
momentarily, the Playback screen appears. To return
to the Track List screen, press the ' (RETURN)
button.
TRACK 001
00:00:40 00:03:35
On the Track List screen, use 78 buttons to move
the highlight to the track you want. Press the OK
button to play the track.
On Screen Music Controls
Pause a track.
Play a track.
Move to the previous track.
Move to the next track.
Rewind the track.
Advance the track.
Repeat one track or all tracks.
,
1
Play tracks in random order.
Display the Equaliser.
Equaliser Settings : Adjust the
equalizer manually. (Available only
when Equaliser Mode is on)
Play Selected :
Play Selected
lets you select specific files to
play. It works essentially the same
way for all media. See "Using
Play Selected with Self-Recorded
On the Music
List screen
only.
Media (CDs, USB Devices, etc.)"
on page 35.
Ripping :
The Ripping function
converts CD audio to the mp3
format and saves the converted
files on a USB device or a mobile
device connected to the product.
See Ripping on page 37.
Information :
Shows the track
information.
To access the controls, play a track, and then use
78:;
the
buttons to move to the control of your
choice.
The music screen controls are only accessible
✎
when a track is playing.
All controls do not appear at the same time.
✎
For file-based contents, the available Settings
✎
(
) options will differ.
Using the Sort By & Options Menus
Select the Filter( ) function, and then Music to
display music files only.
Even though the product will display folders that
✎
contain all content types, it will only display files
of the content type you selected For example, if
you selected Music, you will only be able to see
music files.
Playing Content
33 - English
Page 34

Playing Content
On the screen that lists the music files, use the
78:;
buttons to select Sort By or Options in the
upper right, and then press the OK button.
Music
Sort By
Track
Displays all the music tracks on the media or
storage device.
Album
Displays all the music on the media or storage
device by album.
Artist
Displays all the music files on the media or
storage device by artist
Genre
Displays all music on the media or storage
device by genre.
Folder
Displays all the folders on the media or storage device.
Options
Play Selected
Play Selected lets you select specific files
to play. It works essentially the same way for
all media. See "Using Play Selected with a
Commercial CD" on page 35 and "Using Play
Selected with Self-Recorded Media (CDs, USB
Devices, etc.)" on page 35.
Send
Select Send to upload selected files to on line
sites (Picasa, Facebook, etc.) or to devices. To
use Send, you need to establish an account
with the on-line site, and then log in using
the Log In function. Send works essentially
the same way for music, photos, and videos.
For general instructions, see "Using the Send
Function" on page 41.
Encoding
Select to manage the text encoding options.
Rename Playlist
Lets you modify the name of a playlist.
Delete Playlist
Lets you delete a playlist.
Add to Playlist
Lets you add additional files to a playlist.
Depending on the disc or storage device, the
✎
Options menu may differ. All options may not be
displayed.
Rename Playlist and Delete Playlist appear only
✎
if a playlist exists.
Repeating Tracks on an Audio CD
You can set the product to repeat tracks on an audio
CD (CD-DA/MP3).
1. On the Track List screen during playback, use
78:;
the
buttons to select
left corner of the screen, and then press the OK
button.
2. Use the 78 to select the Repeat mode you
want - Off, One Song, or All - and then press
the OK button.
TRACK 001
00:00/00:00
Track List screen
TRACK 001
00:00:40 00:03:35
Playback screen
Press the ' (
RETURN) button on the remote to
return to the Track List screen.
in the lower
TRACK 001 00:43
TRACK 002 03:56
TRACK 003 04:41
TRACK 004 04:02
TRACK 005 03:43
TRACK 006 03:40
TRACK 007 04:06
TRACK 008 03:52
TRACK 009 03:04
TRACK 010 04:02
34 - English
Page 35

Shuffling Tracks on an Audio CD
You can set the product to play tracks on an audio
CD (CD-DA/MP3) at random.
,.
1. During playback, use the
select
in the lower left corner of the screen,
and then press the OK button.
2. Use the 78 to set the Shuffle mode Off or On,
and then press the
OK button.
:;
buttons to
Using Play Selected with a Commercial
CD
1. On the Track List screen, select Settings ( ) on
the bottom left, and then press the OK button.
The Settings menu appears.
2. Select Play Selected, and then press the OK
button. The Play Selected screen appears.
3. Use the 78 buttons to select a track, and then
press the
of the track.
4. Repeat Step 3 to select and check additional
tracks.
5. To remove a track from the list, move to the
track, and then press the
check on the track is removed.
6. When done, select Play on the bottom left, and
then press the
reappears listing only the tracks you checked.
The selected tracks play automatically.
7. To cancel the Play Selected list, select Settings
(
On the Settings menu select Play All. The Track
List screen reappears with all tracks on the CD
listed.
You can select up to 99 tracks from an Audio CD
✎
(CD-DA) using Play Selected.
On the Play Selected screen, you can also
✎
choose Select All, Clear All, and Cancel.
- Use Select All to select all tracks. This cancels
your individual track selections. When you
press the ' (
or select Play and then press the OK button,
all tracks will appear on the Track List screen,
and the product will begin to play all tracks from
Track 001.
OK button. A check appears to the left
OK button again. The
OK button. The Track List screen
) on the bottom left of the Track list screen.
RETURN) button on your remote
- Use Clear All to deselect all selected tracks
at once. Then, select individual tracks or use
Select All to select all the tracks, and then press
the ' (RETURN) button on your remote or
select Play and then press the OK button. If you
do not use Select All or select individual tracks,
the Play Selected list will not change.
- Cancel cancels any changes you made on the
Play Selected screen. When you return to the
Track List screen, the Play Selected list will be
unchanged.
Using Play Selected with Self-Recorded
Media (CDs, USB Devices, etc.)
1. Insert a self-recorded CD or USB device with
self-recorded files into the home cinema. The
New device connected. pop-up appears.
2. Select Music, and then press the OK button
on your remote. The File List screen appears
displaying icons for tracks, folders, or both.
3. If necessary, use the
a folder, and then press the
4. When the tracks you want to play are displayed,
select Options in the upper right, and then press
the OK button.
5. Select Play Selected, and then press the OK
button. Check boxes appear on the upper left
sides of the track icons.
6. Use the
7. Repeat Step 6 to check and select additional
8. To remove a track from the list, move to the
9. When done, select Play, and then press the
10. To cancel the Play Selected list, press the
78:;
then press the
the check box.
tracks.
track, and then press the OK button again. The
check on the track is removed.
button. The Track List screen appears listing only
the tracks you checked. The selected tracks
play automatically.
(RETURN) button or the
press ' (RETURN), you return to the File List
screen. If you press
Home screen.
78:;
buttons to select
OK button.
buttons to select a track, and
OK button. A check appears in
OK
(EXIT) button. If you
e
(EXIT), you go to the
e
'
Playing Content
35 - English
Page 36

Playing Content
If you want to use Play Selected to watch videos,
✎
use the Filter(
instead of Music.
) function to select Videos
Using Play Selected Starting from the
Home Screen
Select PLAY DISC or MULTIMEDIA depending
✎
on the media you are using.
- If you selected PLAY DISC, the Track List screen
appears. Use the Filter(
Music, and then follow the directions starting at
Step 3 above.
- If you selected MULTIMEDIA, select Storage or
Network Device on the MULTIMEDIA screen.
Then, select your storage media on the Storage
screen or device on the Network Device
screen. The File List screen appears. Use the
) function to select Music, and then
Filter(
follow the directions starting at Step 3 above.
) function to select
Creating and Editing a Playlist Stored
in a Storage Device
Creating a playlist
1. Connect a USB device with stored music to the
home cinema's USB jack, and then turn on the
home cinema.
2. On the Home screen, select MULTIMEDIA, and
then press the OK button.
3. On the MULTIMEDIA screen, select Storage,
and then press the
4. Select the USB device, and then press the
button.
5. At the top of the screen, select Filter(
Music.
6. After the screen re-displays, select Options ( )
Add to Playlist.
7. On the next screen, select an existing playlist,
and then press the
OR
Select New Playlist, and then press the OK
button. If you selected an existing playlist, go to
Step 9. If you selected New Playlist, go to Step
8.
OK button.
OK
)
OK button.
8. On the on-screen keyboard, accept the default
name for the new playlist or enter a new name.
When finished, select Done, press OK, and then
go to Step 9.
9. Navigate to the screen that displays the music
you want to put into the playlist.
10. Use the
11. Repeat Step 10 to check and select additional
12. To remove a track from the list, move to the
13. When finished, select Add at the top of the
78:;
then press the
the check box on the left side of the track icon.
tracks.
track, and then press the OK button again. The
check on the track is removed.
screen, and then press the
playlist is saved to the USB device and the
Added pop-up appears. Press the OK button.
buttons to select a track, and
OK button. A check appears in
OK button. The
Playing a playlist
1. Connect the USB device with the playlist to the
home cinema's USB port.
2. Navigate to the playlist (Home screen
MULTIMEDIA Storage USB device
playlist).
3. Select the playlist, and then press OK. The Track
List screen appears and the first track of the
playlist starts to play.
Editing a playlist
1. While playing a playlist, select Settings( )
Edit Playlist at the bottom-left corner of the
Track List screen.
2. Use the
3. To cancel a selection, select the track again, and
✎
78:;
and then press the
appears next to the track.
then press the
To select all tracks at once, use Select All. To
cancel all selections at once, use Deselect All.
buttons to select a track,
OK button. A check mark
OK button.
36 - English
Page 37

4. When finished, select Delete at the bottom left
of the screen, and then press the OK button.
A confirmation pop-up appears.
5. Select Yes , and then press the
Deleting all files included in a playlist will delete the
✎
playlist itself, too.
You can save up to 5 playlists.
✎
OK button.
Ripping
1. Insert a USB device into the USB jack on the
front of the product. This is the device you will
rip the files to.
2. Put a music CD into the home cinema. In a few
moments, the Track List screen appears.
3. On the Track List screen, select Settings(
the lower left of the screen, and then press the
OK button. The Settings menu appears.
4. Use the 78 buttons to select Ripping, and
then press the
appears.
5. Use the 78 buttons to select a track, and then
press the
of the track.
6. Repeat Step 5 to select and check additional
tracks.
To select all tracks at once, select Select All on
✎
the bottom left of the screen, and then press the
OK button.
7. To remove a track from the list, move to the
track, and then press the
check on the track is removed.
8. When done, select the Rip button using the
78
buttons, and then press the
The Rip pop-up appears.
9. Use the 78 buttons to select the device to
store the ripped files to, and then press the
button. Ripping begins.
Do not disconnect the device while ripping is in
✎
progress.
OK button. The Ripping screen
OK button. A check appears to the left
OK button again. The
OK button.
) on
OK
10. If you want to cancel ripping after ripping has
begun, press the OK button and then select
Yes. Select No to continue ripping.
11. When ripping is complete, the "Successfully
ripped." message appears. Press the
button. The Track List screen reappears.
OK
Using Bluetooth
You can use a Bluetooth device to enjoy music with
high quality stereo sound, all without wires!
What is Bluetooth?
Bluetooth is a technology that enables Bluetoothcompliant devices to interconnect with each other
easily using a short, wireless connection.
• A Bluetooth device may hum or malfunction:
- When a part of your body is in contact with the
receiving/transmitting system of the Bluetooth
device or the Home Cinema.
- When it is subject to electrical variation from
obstructions caused by a wall, corner, or office
partitioning.
- When it is exposed to electrical interference from
same frequency-band devices including medical
equipment, microwave ovens, and wireless
LANs.
• Pair the Home Cinema with the Bluetooth device
while the two are close together.
• The further the distance is between the Home
Cinema and the Bluetooth device, the worse the
quality is.
If the distance exceeds the Bluetooth operational
range, the connection is lost.
• In poor reception areas, the Bluetooth connection
may not work properly.
Playing Content
37 - English
Page 38

Playing Content
• The Home Cinema has an effective reception range
of up to 10 meters in all directions if there are no
obstacles. The connection will be automatically
cut off if the device is out of this range. Even within
this range, the sound quality may be degraded by
obstacles such as walls or doors.
• This wireless device may cause electrical
interference. during its operation.
To connect the Home Cinema to a Bluetooth
device
Connect
Bluetooth device
Before you begin, confirm that the Bluetooth device
supports the Bluetooth compliant stereo headset
function.
1. Press the SOURCE button on the remote
control to display the BT message.
2. Select the Bluetooth menu on the Bluetooth
device you want to connect. For instructions,
refer to the Bluetooth device's manual.
3. Select the Stereo headset menu on the
Bluetooth device.
• You will see a list of devices.
4. Select "[HTS]Hxxxxx" from the searched list.
• When the Home Cinema is connected to the
Bluetooth device, the device name of the
connected Bluetooth device, followed by the
name of home cinema will appear on the front
display of home cinema.
5. Play music on the connected device.
• You can listen to the music playing on the
connected Bluetooth device over the Home
Cinema system.
The Home Cinema only supports Middle
✎
Quality SBC data (up to 237kbps@48kHz),
and does not support High Quality SBC data
(328kbps@44.1kHz).
The AVRCP feature is supported. It's functionality
✎
will differ, depending on the specifications of the
connected device.
Connect only to a Bluetooth device that supports
✎
the A2DP Profile.
Only one Bluetooth device can be paired at a
✎
time.
The search or connection functions may not work
✎
properly in the following cases:
- If there a strong electric field near or around the
home cinema.
- If several Bluetooth devices are simultaneously
paired with product.
- If the Bluetooth device is turned off, not in place,
or malfunctions.
- Note that such devices as microwave ovens,
wireless LAN adapters, fluorescent lights, and
gas stoves use the same frequency range as
the Bluetooth device, and can cause electric
interference.
For a more reliable connection to a Bluetooth
✎
device or to other devices such as a smart phone,
we recommend you update the device's software
to the most current version.
To disconnect the Bluetooth device from the
Home Cinema
You can disconnect the Bluetooth device from the
Home Cinema. For instructions, refer to the Bluetooth
device's manual.
• When the Home Cinema is disconnected from the
Bluetooth device, the Home Cinema will display
DISCONNECTED on the front display.
To disconnect the Home Cinema from the
Bluetooth device
Press the (F) button on the front panel of the Home
Cinema to switch from BT to another mode or turn
off the Home Cinema.
• Except when you disconnect the Home Cinema
by changing functions, the connected Bluetooth
device will wait a certain time for a response
from the Home Cinema before terminating the
connection. (Disconnection time may differ,
depending on the Bluetooth device.)
38 - English
Page 39

In Bluetooth connection mode, the Bluetooth
✎
connection will be lost if the distance between the
Home Cinema System and the Bluetooth device
exceeds 10 meters. When the Bluetooth device
comes back into effective range or you restart the
Bluetooth device, you have to pair the device and
home cinema again to reconnect.
In Bluetooth mode, the screen saver will start if
✎
the Bluetooth device stays in the Ready state for
5 minutes. To reconnect the Bluetooth device,
turn off the screen saver, and then connect the
device. To turn off the screen saver, press any
button on the remote control (the Volume button,
78:;
an
buttons, etc.).
Using Bluetooth Power On
When the home cinema is turned off, connecting a
previously connected smart device to the product via a
Bluetooth connection can turn the home cinema on.
The home cinema must be plugged in for Quick
✎
Start to work.
To use this function, set Settings > System >
✎
Quick start to On.
To use this function, the Bluetooth connection
✎
between the Home cinema and your smart device
must have been established previously, and the
Home cinema must be on your smart phone's list
of known Bluetooth devices.
1.
Connect your previously connected smart device
to the product via Bluetooth. (For information
on Bluetooth connections, refer to your smart
device’s manual.)
2. Once connected, the home cinema turns itself
on automatically in BT mode.
• Select the desired music to play on your smart
device.
Using NFC (Near Field Communication)
Connect your NFC compatible device via Bluetooth to
the Home Cinema using this simple set-up procedure.
You can play music from the smart phone through the
Home Cinema.
1. Turn on the NFC function on the smart phone
and make sure the screen lock function on the
smart phone is off. The smart phone's NFC
function will
2. Gently touch the NFC logo N on the top of the
Home Cinema with the NFC supported device.
• If the Home Cinema is off, it will turn on
automatically.
3. A pop-up asking whether to proceed with the
Bluetooth connection appears on the smart
phone. Select 'Yes'.
• When the connection is complete, the
'connected' message appears.
4. To disconnect the NFC device, touch the device
to the Home Cinema's top panel again.
• To connect another NFC device while the first
smart phone is still connected, touch that
device to the Home Cinema's top panel. The
Home Cinema will disconnect the first smart
phone and connect to the second smart
phone.
The NFC function is built into Android devices
✎
running Android OS 4.1 Jellybean or later.
- If your device is running an Android OS earlier
than Android OS 4.1 Jellybean, you must
download the 'Samsung NFC Connection'
application from Android market to use the NFC
function.
The position of the NFC antenna differs on smart
✎
phones. Check where the NFC antenna is located
before connecting. Refer to the user manual
of your mobile phone to check the antenna’s
location before making the connection.
If your smart phone is covered with a thick case,
✎
the connection may not succeed.
The N is a trademark or
✎
registered trademark of NFC
Forum, Inc. in the United States
and in other countries.
NFC tagging for Bluetooth
✎
connection cannot be established
while powering on and off.
NFC tagging for Bluetooth
✎
connection will not work while the battery
indicator is blinking.
not work if screen lock is on.
Note2
S3/S4
Note3
Playing Content
39 - English
Page 40

Playing Content
Playing Photo Contents
You can play photo contents located on a DVD, USB,
mobile device, or PC.
Using the Tools Menu
While displaying a photo, press the TOOLS button on
the remote.
Select Settings(
screen, and then press the OK button. The Tools
menu drop down list appears.
Slideshow Settings
Speed : Select to set a slide show's speed.
Effects : Select to set a slide show's special
effects.
Rotate
Select to rotate the picture. (This will rotate the
picture either clockwise or counter clockwise.)
Zoom
Select to enlarge the current picture. (Enlarge up to
4 times)
Picture Mode
Dynamic
Standard
applications.
Movie : This is the best setting for watching
movies.
User : Lets you adjust the sharpness and noise
reduction function respectively.
Background Music
Select to listen to music while viewing a slide show.
Equaliser Mode
Set to On to use the equalizer. Customize your
own personal sound preferences using the
equalizer settings.
Equaliser Settings
This function is only available when Equaliser
Mode is On.
) in the upper right corner of the
T
: Choose to increase sharpness.
: Choose for most viewing
Send
Select Send to upload selected files to on-line
sites (Picasa, Facebook, etc.) or devices. To use
Send with an on-line site, you need to establish
an account with the on-line site, and then log in
using the Log In function. Send works essentially
the same way for music, photos, and videos. For
general instructions, see "Using the Send Function"
on page 41.
Information
Displays the picture information.
Depending on the disc or storage device, the
✎
Options menu may differ. All options may not be
displayed.
To enable the Background Music function, the
✎
photo file must be in the same storage media as
the music file. However, the sound quality can be
affected by the bitrate of the MP3 file, the size of
the photo, and the encoding method.
You can't enlarge the subtitle and PG graphic in
✎
the full screen mode.
Using the Sort By and Options Menus
When the Photo File List is Displayed
Select the Filter( ) function, and then Photos to
display photos only.
Even though the product will display folders that
✎
contain all content types, it will only display files
of the content type you selected For example, if
you selected Photos, you will only be able to see
photo files.
On the screen that lists the photo files, use the
78:;
buttons to select Sort By or Options in the
upper right, and then press the
Sort By
Date
Groups all the photo files on the media or
storage device by date. Click a group to see the
photos in that group.
Title
Displays all the photo files on the media or
storage device by title.
Folder
Displays all the folders on the media or storage
device.
OK button.
Photos
40 - English
Page 41

Options
Slide Show
Starts the slide show. Shows all the files in the
current folder, one after another. If you want to
create a slide show with a selected group of
photos, see Play Selected below.
Play Selected
Play Selected lets you select specific files to
play. It works essentially the same way for all
media. See "Using Play Selected with SelfRecorded Media (CDs, USB Devices, etc.)" on
page 35.
Send
Select Send to upload selected files to on line
sites (Picasa, Facebook, etc.) or to devices.
To use Send with an on-line site, you need to
establish an account with the on-line site, and
then log in using the Log In function.
Depending on the disc or storage device, the
✎
Options menu may differ. All options may not be
displayed.
Using the Send Function
1. Use the 78 buttons to select Send, and then
press the OK button. The Selection screen
appears.
2. Use the 78 buttons to select a picture, and
then press the OK button. A check appears to
the left of the picture.
3. Repeat Step 2 to select and check additional
pictures.
4. To remove a picture from the list, move to the
picture, and then press the
The check on the picture is removed.
5. When done, press the 78 button to select
Send, and then press the OK button. The Send
pop-up appears listing the on-line sites (Picasa,
Facebook, etc.) or devices that you can send
the photos to.
6. Select a destination, and then press the
button.
7. If you are sending the photos to an on-line site,
the site starts. Log in and follow the directions
on the screen.
To send photos to an on-line site, you must have
✎
an account with that site.
OK button again.
OK
Listening to the Radio
• To listen to the radio, you must connect the
supplied FM antenna.
Operating the Radio with the Remote Control
1. Press the SOURCE button to select FM.
2. Tune to the desired station.
• Preset Tuning 1 : Press the PRESET button
to select PRESET, and then press the 78
buttons to select a preset station.
- Before you can tune to preset stations, you
must add preset stations to the product's
memory.
• Manual Tuning : Press the PRESET button
to select MANUAL, and then press the 78
buttons to tune to a lower or higher frequency.
• Automatic Tuning : Press the
to select MANUAL, and then press and hold
the 78 buttons to automatically search the
band.
PRESET button
Setting Mono/Stereo
Press the ST/MO button.
• Each time you press the button, the sound
switches between STEREO and MONO.
• In a poor reception area, select MONO for a clear,
interference-free broadcast.
Presetting Stations
Example : Presetting FM 89.10 into memory.
1. Press the
2. Press the 78 buttons to select <89.10>.
3. Press the MEMORY button.
• NUMBER flashes on the display.
4. Press the
• Press the
• After you press the
SOURCE button to select FM.
MEMORY button again.
MEMORY button before NUMBER
disappears from the display on its own.
MEMORY button,
NUMBER disappears from the display and the
station is stored in memory.
Playing Content
41 - English
Page 42

Playing Content
5. To preset another station, repeat steps 2 to 4.
• To tune to a preset station, press the
button to select PRESET, and then press the
78
buttons to select the preset station.
PRESET
Using the Special Effects Remote
Control Buttons
SOUND EFFECT Function
Lets you select a mode that optimizes the sound.
1. Press the SOUND EFFECT button.
2. Press the 78 buttons to select the desired
mode: DSP, Virtual Surround, SFE Mode, or
Sports.
3. Press the :; buttons to select the desired
sound effect.
DSP
MP3 Enhancer : Helps enhance your sound
experience (ex. mp3 music). You can upscale
your MP3 level sound (24 kHz, 8bit) to CD level
sound (44.1 kHz, 16bit).
Power Bass : Increases the volume level of bass
tones and provides thudding sound effects.
Virtual 7.1 (HT-H7500WM only) : Creates a virtual
7.1 CH sound using the 5.1 CH speaker system.
Off : Select for normal listening.
Virtual Surround
You can set a two-channel input source to produce
sound in 5.1 channel surround mode.
SFE Mode
Symphony Hall in Boston (Hall 1) : Provides a
clear vocal as if listening in a concert hall.
Philharmonic Hall in Bratislava (Hall 2) : Also
provides a clear vocal as if listening in a concert
hall, but less powerful than HALL1.
Jazz Club in Seoul B : Recommended setting
for Jazz.
Church in Seoul : Gives the feel of being in a
grand church.
Amphitheater (Rock) : Recommended setting
for Rock.
Off : Select for normal listening.
Sports
Announcer : Emphasizes the commentator's
voice during a sports game to increase your
absorption in the game.
Stadium : Emphasizes spectators' cheering
during a sports game to add immediacy.
Off : Select for normal listening.
DTS Neo:Fusion II / 3D Sound
You can enjoy more natural and vivid surround
sound with enriched tones by adjusting the depth
of sound using the level options.
• DTS Neo:Fusion II : Off On
• 3D Sound (HT-H7500WM only) :
Off High Low
3D Sound is not available in FM mode.
✎
The 3D Sound is displayed only if you selected
✎
Simple Speaker Setup > Simple Mode.
42 - English
Page 43

Network Services
You can enjoy various network services such as
streaming video or on-line apps by connecting the
product to your network.
To use network services, you must first:
1. Connect the product to a network.
(See page 14)
2. Configure the network settings.
(See pages 22~24)
Logging In to Your Samsung
Account
Before you access FILMS AND TV SHOWS or
SAMSUNG APPS, we suggest you log in to your
Samsung account.
If you do not have a Samsung account, create
✎
one by selecting Create Account.
To create a Samsung account, follow these steps:
1. With the Home screen displayed, press the
button. The Sign In screen appears.
2. Select the ID field, and then press the OK
button. The keyboard pop-up appears.
3. Using the keyboard, enter your e-mail address.
When finished, select the Done button, and then
press the OK button. The Sign In screen reappears.
4. Select the Password field, and then press the
OK button. The keyboard pop-up appears.
5. Using the keyboard, enter your password. When
finished, select the Done button, and then press
OK button. The Sign In screen re-appears.
the
6. To make the log in process easier next time,
select Sign me in automatically, and then
press the OK button.
7.
Select Sign In, and then press the OK button.
8. The Samsung account Terms and Conditions
screen appears.
9.
Select I agree, and then press the OK button.
10. Select an image you want to use to identify your
account, and then press the OK button.
11. Select Done.
If you selected Sign me in automatically, the
✎
next time you log in, the product will automatically
enter your e-mail and password. All you need to
do is select Sign In.
If you press the button after you have logged
✎
in, the Sign In screen appears. You can select
Link Accounts, Edit profile, Remove Account,
and Sign out.
Adding a Credit Card
To add a credit card to your account, follow these
steps:
1. Select the in the upper right of the Home
Screen, and then press the
Account Sign In screen appears.
2. Sign in to your account if you are not signed in.
The Home Screen reappears. If you are already
signed in, go to Step 4.
3. Select the
button. The Account Sign In screen appears.
4. On the Account Sign In screen, select Edit
profile, and then press the OK button. The on-
screen keyboard appears.
5. Enter your account password. When finished,
select Done, and then press the OK button. The
Edit profile screen appears.
6. Select Add Card, and then press the OK button.
The Add Card pop-up appears.
7. Read the Add Card text, and then press the
button. The Add Card screen appears.
8. Enter the requested credit card information.
When done, select Save, and then press the OK
button.
again, and then press the OK
OK button. The
OK
Before Using FILMS AND TV
SHOWS or SAMSUNG APPS
If you haven’t set up Smart Hub, when you use
FILMS AND TV SHOWS or SAMSUNG APPS for
the first time, the product will ask you to perform the
Smart Hub set up procedure.
1.
On the Home screen, select either FILMS AND TV
SHOWS or SAMSUNG APPS, and then press the
OK
button.
2. If you selected FILMS AND TV SHOWS, the
Smart Hub pop-up appears asking if you want
to set up Smart Hub. Select Yes, and then press
the OK button. The Welcome screen appears.
Network Services
43 - English
Page 44

Network Services
3. Select Start, and then press the OK button. The
Smart Hub Terms & Conditions, Privacy Policy
screen appears.
4. On the Additional Services and Options
screen, you must review and agree to both
the Smart Hub Terms and Conditions and the
Privacy Policy to use Smart Hub.
5. Scroll down, and then click the View details
buttons to review the full documents.
You do not need to consent to the Supplemental
✎
Privacy Notice, but one or more Smart TV features
or functionalities may not be available if you do
not.
6. Select I agree to all, and then press the OK
button. The Setup Complete screen appears.
Press the OK button.
Using FILMS AND TV SHOWS
Through the FILMS AND TV SHOWS screen, you
can stream movies and TV shows and watch them
on your TV.
To stream and watch most movies and TV shows,
you need a Samsung account with a registered credit
card. To register a card, see page 43.
Depending on your country, this menu function
✎
may not be supported.
FILMS AND TV SHOWS
NEWLY ADDED
Featured Movies TV Shows Trailers TrendingFavourites
1. On the Home screen, select FILMS AND TV
SHOWS, and then press the OK button.
2. Select one of the Recommended Movies or
TV Shows, and then press the OK button. The
Information screen for that movie appears.
As you highlight each movie or TV show, the icons
✎
for the apps you can use to stream the movie
or show appear at the bottom of each movie or
show selection icon.
-1
2
. Alternately, select Favourites, Featured,
Movies, TV Shows, Trailers or Trending and
then press the OK button.
On the page that appears, use the
buttons to select a show, movie, or trailer, and
then press the
On the Movies or TV Shows screen, you can
also select What’s New or Genres to see more
available shows or films. On the Genres screen,
use the
and then press the
To make a selection on a page displaying movies
or TV shows, use the
a selection, and then press the
3. If you have downloaded and installed one of the
video streaming apps that you can use to stream
the movie or show, select Watch Now, and
then press the OK button. The app launches.
Follow the directions on the screen to watch the
movie or show you have chosen. If you have not
downloaded one of the apps, go to Step 4.
4. If you have not downloaded one of the video
streaming apps, Watch Via appears on the
screen instead of Watch Now. Select one of the
video streaming apps to the right of Watch Via,
and then press the
5. You will be asked if you want to install the app
now. Select Install, press the OK button, and
then follow the directions on the screen to install
the app. You can also select View Details
to view information about the app. The View
Details screen lets you download the app as
well.
6. Once the app is installed, select Play, and then
press
can press the ' (RETURN) button to go back
to the FILMS AND TV SHOWS screen, select
the show or movie again, and then follow the
directions in Step 3 to watch the movie or show.
Contents items and the corresponding bottom
✎
menu in FILMS AND TV SHOWS differ between
countries.
OK button.
78:;
buttons to select a genres,
OK button.
78:;
OK Button.
OK to launch the app. Alternately, you
78:;
buttons to make
OK button.
44 - English
Page 45

On the each movie or show information screen,
✎
the Watch Now button is displayed only after
you have download one of the video streaming
apps you can use to stream that particular movie
or show. Watch Via appears if you have not
downloaded the necessary video streaming app.
To the right of Watch Via is a listing of the video
streaming apps you can use to stream the movie
or show. Select an app icon to download and
install the app.
Favourites will not appear unless you have
✎
tagged one or more films or TV shows as a
favourites. To tag a movie or show as a favorite,
select the show. The Detail screen appears.
Select the heart symbol, and then press the
button.
OK
Using SAMSUNG APPS
Through the SAMSUNG APPS screen, you can
download applications from the Internet, and launch
and run downloaded applications on your TV. To
access some applications, you need to have a
Samsung account.
While playing multimedia content in SAMSUNG
✎
APPS, press and hold 5 button on the remote
to pause playback. To stop playback, press and
e
hold
(
EXIT) button on the remote.
The SAMSUNG APPS Screen at a Glance
1 2
SAMSUNG APPS
RECOMMENDED
2233445
1
MY APPS
WebBrowser
Most Popular What's New Categories
567 9810
3
RECOMMENDED : Displays recommended
contents managed by Samsung. You cannot
1
delete Recommended Apps.
MY APPS : Displays your personal gallery
of applications modifiable on the MY APPS
2
screen.
Most Popular, What’s New and Categories :
3
Select to view and download additional apps.
The first time you open the SAMSUNG APPS screen,
the Home cinema automatically downloads a group of
free apps. Once these apps have been downloaded,
they appear on the SAMSUNG APPS screen. To see
additional apps, select Most Popular, What's New,
or Categories on the bottom of the screen, and then
press the OK button.
Most Popular displays the most popular apps,
What's New the newest. Categories displays a
series of icons representing categories such as
Video, Game, and Sports. Select a category icon,
and then press the
displays the apps in that category.
OK button. The Home cinema
Downloading an App
1. Select Most Popular, What's New, or
Categories, and then press the OK button.
If you selected Categories, select a category
2.
icon, and then press the OK button.
Otherwise, go to Step 3.
On the Most Popular, What's New, and
✎
Categories screens, a green arrow is displayed
on apps you have already downloaded.
3.
Select an app you want to download, and then
press the OK button. The Detail Information
screen for the App appears.
4. Select the Download button on the screen, and
then press the OK button. Download changes
to Cancel and the app begins to download.
5. If you want to cancel the download, select
Cancel, and then press the OK button.
6. When the download is complete, Cancel
changes to Play. Select Play, and then press
OK button to start the application.
the
Alternately, press the ' (RETURN) button until
the SAMSUNG APPS screen reappears. The
app you downloaded will be displayed on the
App screen under MY APPS.
Starting an Application
1. Select SAMSUNG APPS on the Home screen,
and then press the OK button.
2. On the SAMSUNG APPS screen, use the
78:;
buttons to select an app, and then
press the OK button. The app starts.
Network Services
45 - English
Page 46

Network Services
The Option Menu
The Option menu lets you add apps to and delete
apps from MY APPS. It also lets you change the
position of an app in MY APPS and update apps.
Move
1. On the MY APPS screen, select the app you
want to move, and then press the OK button for
3 seconds. The Option menu appears.
2.
Select Move, and then press the OK button.
OK or
78:;
(
EXIT) button.
e
buttons to move the app.
3. Use the
4. When the app is where you want it, press the
Delete
1. On the MY APPS screen, select the app you
want to delete, and then press the OK button for
3 seconds. The Option menu appears.
2. Select Delete, and then press the
3. Use the :; buttons to select OK, and then
press the
OK button.
OK
button .
Delete Multiple
1. On the MY APPS screen, select an app you
want to delete and then press the OK button for
3 seconds. The Options menu appears.
2. Select the Delete Multiple, and then press the
OK button.
3. Use the
4. Use the 8 button to select Delete, and then
78:;
want to delete, and then press the OK button.
press the OK button.
buttons to select apps you
View Details
1. On the MY APPS screen, select the app you
want to see detailed information for, and then
press the OK button for 3 seconds. The Option
menu appears.
2. Select View Details, and then press the OK
button.
Change View
1. On the MY APPS screen, select an app, and
then press the OK button for 3 seconds. The
Option menu appears.
2. Select Change View, and then press the
button. If the current view is Most Played, you
will be asked if you want to change to Custom
View. If the current view is Custom View, you
will be asked if you want to change the view to
Most Played. Most Played sorts the apps by
the number of times you ran each app. Custom
View lets you arrange the apps to your liking.
3. Select OK, and then press the OK button to
change the view.
OK
Lock/Unlock
Locking an app makes it more difficult to delete
accidently.
1. On the MY APPS screen, select the app you
want to lock, and then press the OK button for 3
seconds. The Option menu appears.
2. Select Lock/Unlock, and then press the
button.
3. The PIN input pop-up appears. Enter your PIN.
Press and hold the 123 button until the Num pad
appears on the screen. When the Num pad
appears, select a number using the ,.
button and then press the OK button.
haven't set a PIN, enter the default PIN: 0000.
4. A checkbox appears on each app icon. Use the
78:;
to lock, and then press the
it. A check mark appears on the icon.
5. Repeat Step 4 to select other apps. Use Select
All or Deselect All on the bottom of the screen
to select or deselect all apps at once. To
deselect individual apps, select the app again,
and then press the OK button. The check mark
disappears.
6. When you have finished marking your selections,
move to Lock on the bottom of the screen, and
then press the OK button.
7. A lock mark appears on the selected app’s icon.
You will be prompted to enter the PIN number to
delete or unlock a locked app.
button to move to the app you want
OK button to select
OK
If you
Update Apps
1. On the MY APPS screen, select any app, and
then press the OK button for 3 seconds. The
Option menu appears.
2. Select Update Apps, and then press the OK
button.
46 - English
Page 47

3. The Update Apps screens lists all the apps that
have updates available. Select each app you
want to update, and then press the OK button.
You can also choose Select All to update all the
apps listed.
4. Select Update, and then press the OK button.
Screen Mirroring
The Screen Mirroring function lets you view the
screen of your smart phone or android tablet on the
TV you have connected to the product.
1. In the Home screen, select Screen Mirroring,
and then press the OK button.
2. Launch AllShare Cast or Screen Mirroring on
your device.
3. On your device, find the name of the product in
the list of available devices and then select it.
4. The TV displays a connecting message (for
example, Connecting to Android_92gb...) and
then displays the connected message.
5. In a few moments, the screen of your device
appears on the TV screen.
(
6. To stop Screen Mirroring, press the
or ' (RETURN) button on the remote control,
or exit the Screen Mirroring function on your
smart phone.
You can connect to a device that supports
✎
AllShare Cast. Note that all devices that have
AllShare Cast may not be fully supported,
depending on the manufacturer. For further
information on mobile connection support, refer to
the manufacturer’s web site.
When you are using the Screen Mirroring
✎
function, video stuttering or audio dropouts may
occur, depending on your environment.
Bluetooth transmissions can interfere with the
✎
Screen Mirroring signal. Before using the Screen
Mirroring function, we strongly recommend that
you turn off the Bluetooth function on your smart
phone or smart device (tablet, etc.).
e
EXIT)
Using the Web Browser
You can access the Internet using the Web Browser
application.
1. Select SAMSUNG APPS on the Home screen
and then press the OK button.
2. On the SAMSUNG APPS screen, select
WebBrowser, and then press the OK button.
When you run the Web Browser with the product
✎
connected by HDMI to a BD Wise compatible TV
- and BD Wise is on - the browser is maximized
to fill the screen and the TV's resolution is set to
the optimal resolution automatically.
The Web Browser is not compatible with Java
✎
applications.
If you attempt to download a file, and the file
✎
cannot be saved, an error message will appear.
E-commerce (purchasing products online) is not
✎
supported.
ActiveX is not supported.
✎
Access may be blocked to some websites or to
✎
web browsers operated by certain businesses.
Link Browsing and Pointer Browsing
The Web Browser provides two types of browsing,
Pointer Browsing and Link Browsing. When you
launch the browser for the first time, Pointer Browsing
is active. If you are using a mouse to navigate in
the Web Browser, we recommend leaving Pointer
Browsing active. With Pointer Browsing, you move
the pointer using the directional arrow keys on your
remote. The pointer moves freely around the screen,
much like the pointer on a computer when you use a
mouse. With Link Browsing, you use the directional
arrow keys to move a highlight from one link, button,
or entry field to the next. The highlight is restricted to
the links, buttons, and entry fields.
To activate Link Browsing, follow these steps:
1. Use the
2. Press the OK button. Link Browsing is activated
78:;
move the pointer to the Link Browser icon on the
top right of the screen. The Link Browser icon is
the third icon from the right.
The pointer will be in the correct position if the
icon turns blue and the words “Link Browsing”
appear on the screen.
and will remain active whenever you bring up
the Web Browser or until you change to Pointer
Browsing.
buttons on your remote to
Network Services
47 - English
Page 48

Network Services
http://www.samsung.com
100%
http://www.samsung.com
The Control Panel at a Glance
The Control Panel, which runs across the top of the
screen, has a series of icons which start a number
of useful functions. The icons are described below,
starting with the icon on the far left of the screen.
http://www.samsung.com
• : Moves to the previous page.
•
: Moves to the next web page.
•
: Displays the Bookmarks and History
screen. You can bookmark the current page,
select an existing bookmark, and edit and delete
bookmarks. You can also view your browsing
history and select a page to revisit.
•
: Moves to the Home screen of the Web
Browser.
•
: Lets you enter a page
address manually using the keyboard pop-up.
•
: Reloads the current page so that it is
refreshed on the screen.
•
: Adds the current page to your bookmarks.
•
: Lets you search for
information by entering words or characters
using the keyboard pop-up. See Using the
Keyboard Popup on this page.
•
: Lets you enlarge or shrink the screen
by various percentages.
•
/ : Lets you switch between Pointer
Browsing and Link Browsing.
: Lets you configure the Browser’s settings.
•
See “Using the Settings Menu” on page 49.
•
: Closes the Web Browser.
100%
Using the Keyboard Pop-up
When you click the
or access a data or text entry field,
and then press the OK button, the keyboard pop-up
appears.
http://www.samsung.com
As you enter characters, recommended text will be shown.
Caps 1 2 3 4 5 6 7 8 9 0 Clear
q w e r t y u i o p ^ *
123#& a s
z x c v b n m , . ? - Cancel
ENG
d f g h j k l ~ @ ! Done
www. .com
To use the keyboard pop-up with your remote, follow
these steps:
1. Use the
78:;
buttons on your remote to
move the highlight to a letter or number of your
choice.
2. Press the
OK button to enter the letter or
number into the entry field.
3. To access capital letters, move the highlight to
the Caps key on the top left, and then press
the OK button. Press the OK button again with
the Caps key highlighted to access small letters
again.
4. To access symbols and additional punctuation
marks, highlight the 123#& button on the left,
and then press the
OK button.
5. To delete a character you entered, move the
highlight to the button, and then press the OK
button.
6. To delete all the characters you entered, move
the highlight to the Clear button, and then press
the OK button.
7. When finished entering, move the highlight to
the Done button, and then press the
If you have a wireless keyboard connected to your
✎
product, you can use the wireless keyboard to
enter letters, numbers, symbols, and punctuation.
Note that the wireless keyboard will work only
when the keyboard popup appears and can only
be used to enter letters, numbers, symbols, and
punctuation.
/
, the
100%
OK button.
48 - English
Page 49

Options on the Keyboard Pop-Up
To access the keyboard pop-up options, highlight the
button on the bottom left of the keyboard, and
then press the
OK button.
Language
Select the language for the keyboard. You can
select English, French, Russian, etc.
Recommend text
The keyboard suggests recommended words as
you enter text. You can turn this function On or
Off.
Reset recommended text data
Reset erases the Samsung Keyboard's memory.
Select OK to erase everything that the Samsung
Keyboard has learned about your writing style,
including any new words you have used.
Predict Next Letter
The keyboard will predict the next letter as you
enter letters. The predictions appear in a ring
around the letter you have just entered. You can
select a predicted letter or move to another letter.
You can turn this function On or Off.
Accented Character Preview
Select if you want to type letters with accent
marks.
Using the Settings Menu
The Settings menu contains functions that control
how the Browser operates and Browser security
functions. To open the Settings menu, highlight the
icon in the Control Panel, and then press the OK
button. To select an option in the Settings menu,
highlight the option, and then press the OK button.
http://www.samsung.com
Enable Grabbing
Approved Sites
Private browsing on
Set Search Engine
Web Browser Settings
Help
100%
Close
Enable/Disable Grabbing
Turns the Grabber function on and off. When the
Grabber function is on, you can move a web page
up and down without dragging the scroll bar.
The Grabber function is only available in Pointer
Browsing.
Approved Sites
Lets you restrict your children’s access to
inappropriate web pages by allowing access only
to the web sites you have registered.
Every time you access this function, the PIN screen
Press and hold the 123 button until the
appears.
Num pad appears on the screen. When the Num pad
appears, select a number using the ,. button
and then press the OK button.
The first time you
access this function, enter the default PIN, 0000.
You can change the PIN using the Reset password
for the Approved Sites function. See below.
Approved Sites feature : Turns the Approved
Sites function on or off.
Reset password for Approved Sites : Change
the Approved Sites password.
Add current site : Lets you add the currently
displayed web site to the Approved Sites list.
Manage Approved Sites : Lets you key in URLs
to add to the Approved Sites List and delete
sites from the Approved Sites list. If you turn
this function on and have not added any sites to
the Approved Sites list, you will not be able to
access any Internet sites.
Private browsing on/off
Enable or disable the Privacy mode. When the
Privacy mode is enabled, the browser does not
retain the URLs of sites you visit. If you want to
enable Privacy mode, select OK.
If the Privacy mode is running, the “Stop” icon
appears in front of the URL at the top of the
screen. To disable Privacy mode, select it again
when Privacy mode is enabled.
Set Search Engine
You can set the desired Search Engine.
Network Services
49 - English
Page 50

Network Services
Web Browser Settings
Set as homepage : You can set the Browser's
home page.
Pop-up Block : Turns the Pop-up Block on and
off.
Page Block : You can determine whether to
block advertisements and select the URLs for
which advertisements are blocked.
General : You can delete personal in information
such as website history and browsing data
(cookies, etc.), and reset all web browser
settings to their factory defaults. You can also
set the Security Mode.
Set the Security Mode to On to avoid
✎
accessing malicious/phishing sites and prevent
malicious code from running.
Encoding : You can set the Encoding setting for
web pages to Automatic or select the encoding
format manually from a list.
Pointer : You can set the speed of the cursor
when the cursor is set to Pointer Browsing.
Browser Information : Displays the version
number and copyright information for the Web
Browser.
Help
Provides basic information about the operation of
the Web Browser.
Depending on the web site, some of the Web
✎
Browser Settings functions may not be activated.
Functions that are not activated are greyed out
and cannot be used.
Linking your Internet Service
Accounts to the Product
The Link Accounts function lets you link your product
to your accounts with Internet services such as
Pandora so that the product can log you in to the
service automatically when you start the app for that
service.
To create a service account link, follow these steps:
1. On the Home screen, select the
the upper right corner, and then press the
button to log in to your Samsung Account.
button in
OK
2. After you have logged in, select the button
again, and then press the
3. Select Link Accounts in the My Account screen,
and then press the
4. On the Link Accounts screen, select the service
you want to link to the product, and then press
OK button.
the
5. In the ID and Password screen, enter the ID you
use to log in to the service you selected using
the pop-up keyboard. When finished, select
Done, and then press the OK button.
6. Repeat the same process for the password.
When finished select Done, and then press the
OK button.
7. Select OK, and then press the
OK button.
OK button.
OK button.
BD-LIVE™
Once the product is connected to your network, you
can enjoy various movie-related service contents
available on BD-LIVE compliant discs.
1. Attach a USB flash drive to the USB jack
on the front of the product, and then check
its remaining memory. The memory device
must have at least 1GB of free space to
accommodate the BD-LIVE services.
2. Select Settings on the Home screen, and then
press the OK button.
3. Select Network, and then press the
4. Select BD-Live Settings, and then press the
OK button.
5. Select BD Data Management, and then press
the OK button.
6. Select Select Device, and then press the
button.
7. Select USB device, and then press the OK
button.
8. Insert a Blu-ray Disc that supports BD-LIVE.
9. Select an item from the list of BD-LIVE service
contents provided by the disc manufacturer.
The way you use BD-LIVE and the provided
✎
contents may differ, depending on the disc
manufacturer.
OK button.
OK
50 - English
Page 51

Appendix
Additional Information
Notes
Connections
HDMI OUT
• Certain HDMI output resolutions may not work,
depending on your TV.
• You must have an HDMI connection to enjoy videos
with 3D technology.
• A long HDMI cable may cause screen noise. If this
occurs, set HDMI Deep Colour to Off in the menu.
Settings
3D Settings
• For some 3D discs, to stop a movie during 3D
playback, press the
The movie stops and the 3D mode option is deactivated.
To change a 3D option selection when you are
playing a 3D movie, press the
once. The Blu-ray menu appears. Press the
(EXIT) button again, then select 3D Settings in the
Blu-ray menu.
• Depending on the content and the position of the
picture on your TV screen, you may see vertical
black bars on the left side, right side, or both sides.
TV Aspect Ratio
• Depending on the disc type, some aspect ratios
may not be available.
• If you select an aspect ratio and option which is
different than the aspect ratio of your TV screen, the
picture might appear to be distorted.
• If you select 16:9 Original, your TV may display 4:3
Pillarbox (black bars on the sides of the picture).
BD Wise (Samsung Products only)
• When BD Wise is On, the Resolution setting
automatically defaults to BD Wise and BD Wise
appears in the Resolution menu.
• If the product is connected to a device that does
not support BD Wise, you cannot use the BD Wise
function.
• For proper operation of BD Wise, set the BD Wise
option in both the product and the TV to On.
EXIT) button once.
(
e
e
(EXIT) button
e
Digital Output
• Be sure to select the correct Digital Output or you
will hear no sound or just loud noise.
• If the HDMI device (AV receiver, TV) is not
compatible with compressed formats (Dolby Digital,
DTS), the audio signal outputs as PCM.
• Regular DVDs do not have BONUSVIEW audio and
Navigation Sound Effects.
• Some Blu-ray Discs do not have BONUSVIEW
audio and Navigation Sound Effects.
• This Digital Output setup does not affect the
analogue (L/R) audio or HDMI audio output to your
TV.
It affects the optical and HDMI audio output when
your product is connected to an AV receiver.
• If you play MPEG audio soundtracks, the audio
signal outputs as PCM regardless of your Digital
Output selections (PCM or Bitstream).
• Digital Output can be activated when Sound
Output is set to TV Speaker.
BD-Live Internet Connection
• The Internet connection may be restricted while you
are using BD-LIVE contents.
Anynet+ (HDMI-CEC)
• Depending on your TV, certain HDMI output
resolutions may not work. Please refer to the user
manual of your TV.
• This function is not available if the HDMI cable does
not support CEC.
• If your Samsung TV has an Anynet+ logo, then it
supports the Anynet+ function.
BD Data Management
• In the external memory mode, disc playback may
be stopped if you disconnect the USB device in the
middle of playback.
• Only those USB devices formatted in the FAT file
system (DOS 8.3 volume label) are supported.
We recommend you use USB devices that support
the USB 2.0 protocol with 4 MB/sec or faster read/
write speeds.
• The Resume Play function may not work after you
format the storage device.
• The total memory available to BD Data
Management may differ, depending on conditions.
DivX® Video On Demand
• For more information about DivX(R) VOD, visit
“http://vod.divx.com”.
Appendix
51 - English
Page 52

Appendix
Front Display
• You cannot change the brightness of the
and the VOL +, - button.
Speaker Settings
• When Sound Output is set to TV Speaker, audio is
produced by the TV speakers.
HDMI audio
• When HDMI audio is output to the TV speakers, it is
automatically down-mixed to 2 channels.
Audio Return Channel
• When Anynet+ (HDMI-CEC) is Off, the Audio
Return Channel function is not available.
• Using an HDMI cable not certified for ARC (Audio
Return Channel) may cause a compatibility problem.
• The ARC function is only available if an ARCcompliant TV is connected.
Playback
Playing Video files
• Video files with high bitrates of 20Mbps or more
strain the product’s capabilities and may stop
playing during playback.
Selecting the Audio Language
• The
• The languages available through the Audio
• Some Blu-ray Discs may allow you to select either
Selecting the Subtitle Language
• Depending on the Blu-ray Disc/DVD, you may be
• This function depends on the selection of subtitles
• Information about the main feature BONUSVIEW
• This function changes both the primary and
• The total number of primary and secondary
indicator will not appear on the screen
.,
if the BONUSVIEW section does not contain any
BONUSVIEW audio settings.
Language function depend on the languages that
are encoded on the disc. This function or certain
languages may not be available.
the PCM or Dolby Digital audio English soundtrack.
able to change the subtitle language in the Disc
Menu. Press the
that are encoded on the disc and may not be
available on all Blu-ray Discs/DVDs.
mode will also appear if the Blu-ray Disc has a
BONUSVIEW section.
secondary subtitles at the same time.
subtitles, respectively, is displayed.
DISC MENU button.
button
Playing JPEG files
• You can’t enlarge the subtitle and PG graphics in
the full screen mode.
Playing Content
Using the
pictures
• If the home cinema is connected to a BD Wise
• The Background Music function will not work
TOOLS button while playing back
compliant TV that has BD Wise On, the Picture
Settings menu will not appear.
unless the music file and the photo file are located
on the same storage media. Also, sound quality can
be impacted by the bitrate of the MP3 music file,
the size of the photos, and the encoding method.
Disk and Format Compatibility
Disc types and content your Product
can Play
Media Disc Type Details
BD-ROM or BD-RE/-R
disc recorded in the BDRE format.
DVD-VIDEO, recorded
DVD+RW/DVD-RW(V)/
DVD-R/+R discs that
have been recorded and
finalised, or a USB storage
media containing DivX,
MKV, MP4 contents.
Music recorded on CDRW/-R, DVD-RW/-R, BDRE/-R discs or a USB
storage media containing
MP3 or WMA contents.
Photos recorded on CDRW/-R, DVD-RW/-R, BDRE/-R discs or a USB
storage media containing
JPEG contents.
VIDEO
MUSIC
PHOTO
Blu-ray Disc
3D Blu-ray Disc
DVD-VIDEO,
DVD-RW,
DVD-R,
DVD+RW,
DVD+R
CD-RW/-R,
DVD-RW/-R,
BD-RE/-R
CD-RW/-R,
DVD-RW/-R,
BD-RE/-R
52 - English
Page 53

The product may not play certain CD-RW/-R and
✎
DVD-R because of the disc type or recording
conditions.
If a DVD-RW/-R disc has not been recorded properly
✎
in DVD video format, it will not be playable.
Your product will not play content that has been
✎
recorded on a DVD-R at a bitrate that exceeds 10
Mbps.
Your product will not play content that has been
✎
recorded on a BD-R or USB device at a bitrate that
exceeds 30 Mbps.
Playback may not work for some types of discs, or
✎
when you use specific operations, such as angle
change and aspect ratio adjustment. Information
about the discs is written in detail on the disc box.
Please refer to this if necessary.
When you play a BD-J title, loading may take longer than
✎
a normal title or some functions may perform slowly.
Disc Types your Product cannot Play
Logos of Discs the Product can Play
Blu-ray Disc 3D Blu-ray Disc
BD-LIVE Dolby
DTS
• HD DVD
• DVD-ROM/PD/MV-Disc,
etc
• DVD-RW(VR mode)
• CVD/CD-ROM/CDV/
CD-G/CD-I/LD
(CD-Gs play audio only,
not graphics.)
This product may not respond to all operating
✎
commands because some Blu-ray Disc, DVD, and
CD discs allow specific or limited operation and
provide only certain features during playback.
Please note that this is not a defect in the product.
Samsung cannot guarantee that this product will
✎
play every disc bearing the Blu-ray Disc, DVD, or CD
logo because disc formats evolve, and problems and
errors may occur during the creation of Blu-ray Disc,
DVD, and CD software and/or the manufacture of
discs.
Please contact the SAMSUNG Customer Care
✎
Centre at, if you have questions or encounter difficulty
when playing Blu-ray Disc, DVD, or CD discs in this
product. Also, refer to rest of this user manual for
additional information on playback restrictions.
Some commercial discs and DVD discs purchased
✎
outside your region may not play on this product.
• DVD-RAM
• Super Audio CD
(except CD layer)
• 3.9 GB DVD-R Disc for
Authoring.
Java DivX
PAL broadcast system in
U.K, France, Germany, etc.
Region Code
Both products and discs are coded by region. These
regional codes must match for a disc to play. If the codes
do not match, the disc will not play.
The Region Number for this product is displayed on the
rear panel of the product.
Disc
Type
Blu-ray
Disc
Region
Code
A
B
C
North America, Central America,
South America, Korea, Japan,
Taiwan, Hong Kong and South
Europe, Greenland, French
territories, Middle East, Africa,
Australia and New Zealand.
India, China, Russia, Central
Area
East Asia.
and South Asia.
Appendix
53 - English
Page 54

Appendix
The U.S., U.S. territories and
1
Europe, Japan, the Middle East,
2
Taiwan, Korea, the Philippines,
3
DVD-
VIDEO
4
New Zealand, Pacific Islands,
Russia, Eastern Europe, India,
5
6
If the Region number of a Blu-ray Disc/DVD does
✎
not correspond to the Region number of this
product, the product cannot play the disc.
AVCHD (Advanced Video Codec High
Definition)
• This product can play back AVCHD format discs.
These discs are normally recorded and used in
camcorders.
• The AVCHD format is a high definition digital video
camera format.
• The MPEG-4 AVC/H.264 format compresses images
with greater efficiency than the conventional image
compressing format.
• Some AVCHD discs use the “x.v.Colour” format. This
product can play back AVCHD discs that use the
“x.v.Colour” format.
• “x.v.Colour” is a trademark of Sony Corporation.
• “AVCHD” and the AVCHD logo are trademarks of
Matsushita Electronic Industrial Co., Ltd. and Sony
Corporation.
Some AVCHD format discs may not play, depending
✎
on the recording conditions.
AVCHD format discs need to be finalised.
✎
“x.v.Colour” offers a wider colour range than normal
✎
DVD camcorder discs.
Canada
Egypt, Africa, Greenland
Indonesia, Hong Kong
Mexico, South America,
Central America, Australia,
Caribbean
North Korea, Mongolia
China
Some DivX, MKV and MP4 format discs may not play,
✎
depending on their video resolution and frame rate.
Supported Formats
Notes on the USB connection
• Your product supports USB storage media, MP3
players, digital cameras, and USB card readers.
• The product does not support folder or file names
longer than 128 characters.
• Some USB/digital camera devices may not be
compatible with the product.
• Your product supports the FAT 16, FAT 32, and NTFS
file systems.
• Connect USB devices directly to the product’s USB
port. Connecting through a USB cable may cause
compatibility problems.
• Inserting more than one memory device into a
multi-card reader may cause the reader to operate
improperly.
• The product does not support the PTP (Peer to Peer)
protocol.
• Do not disconnect a USB device while it is transferring
or recording data.
• The bigger the image resolution, the longer the image
takes to display.
• This product cannot play MP3 files with DRM (Digital
Rights Management) downloaded from commercial
sites.
• Your product only supports video that is under 30fps
(frame rate).
• Your product only supports USB Mass Storage Class
(MSC) devices such as thumb drives and USB HDD.
(HUB is not supported.)
• Certain USB HDD Devices, multi-card readers and
thumb drives may not be compatible with this product.
• If some USB devices require excessive power, they
may be limited by the circuit safety device.
• If playback from a USB HDD is unstable, provide
additional power by plugging the HDD into a wall
socket. If the problem continues, contact the USB
HDD manufacturer.
• SAMSUNG is not responsible for any data file damage
or data loss.
54 - English
Page 55

Video File Support
File
Extension
*.avi
*.mkv
*.asf
*.wmv
*.mp4
*.mov
*.3gp
*.vro
*.mpg
*.mpeg
*.ts
*.tp
*.trp
*.mov
*.flv
*.vob
*.svi
*.m2ts
*.mts
*.divx
*.ps
*.webm
*.rmvb
Container Video Codec Resolution
AVI
MKV
ASF
MP4
3GP
MOV
FLV
VRO
VOB
PS
TS
SVAF
WebM VP8 1920x1080
RMVB RV8/9/10 (RV30/40) 1920x1080
MVC
Motion JPEG
H.264 BP/MP/HP
Divx 3.11 / 4 / 5 / 6
MPEG4 SP/ASP
Window Media Video
v9(VC1)
AVS
MPEG2
MPEG1
Microsoft MPEG-4 v3
Window Media Video
v7(WMV1), v8(WMV2)
H 263 Sorrenson
Microsoft MPEG-4 v1, v2
VP6 640x480
1920x1080
1280x720
720x576
Frame rate
(fps)
24/25/30 60
FHD :
MAX 30
HD :
MAX 60
MAX 30
6~30 4
6~30 20 Vorbis
6~30 20 RealAudio 6
Bitrate
(Mbps)
30
Audio Codec
AC3
LPCM
ADPCM
(IMA, MS)
AAC
HE-AAC
WMA
DD+
MPEG(MP3)
DTS
(Core, LBR)
Appendix
Limitations
- Files are not supported if there are some issues with
contents among the supported codecs listed above.
- Normal playback is not guaranteed if the file's container
information is wrong or the file itself is corrupted.
- Sound or video play may cutoff for contents with
bitrate/frame rates that are above standard.
- The seek (skip) function is not available if the file's
index table is damaged.
- Depending on your network status, play may become
disrupted when playing contents from the network.
- Some USB/Digital camera devices may not be
compatible with the product.
- RMVB format is supported in China and Hong Kong
only
- AVS codec is supported for contents for China only
- *.ps extension is supported for contents for China only
- DivX codec is not supported for contents in the US
55 - English
Video decoder
- Supports up to H.264 Level 4.1 (except for FMO/ASO/
RS)
- Does not support VC1 AP L4
- Except for WMV v7, v8, MSMPEG4 v3, MVC, VP6
Below 1280 X 720: 60 frame max
Above 1280 X 720: 30 frame max
- Does not support GMC 2 or higher
- Supports SVAF Top/Bottom, Side by Side, Left/Right
view sequence type(2 ES) Only
- Supports BD MVC Spec Only
Audio decoder
- Supports WMA 10 Pro (Up to 5.1)
- Does not support WMA lossless audio.
- Supports M2 profile
- ReadlAudio 10 lossless is not supported for contents
for China and Hong Kong
- Does not support QCELP, AMR NB/WB
- vorbis : Supported up to 5.1 channel
- DD+ : Supported up to 7.1ch
- DTS LBR codec is supported in MKV/MP4/TS
containers only
Page 56

Appendix
Music File Support
File Extension Type Codec Comments
*.mp3
*.m4a
*.mpa
*.aac
*.flac
*.ogg
*.wma
*.wav
*.mid
*.midi
*.ape
*.aif
*.aiff
*.m4a
MPEG
MPEG4
FLAC
OGG
WMA
wav
midi
ape
AIFF
ALAC
MPEG1 Audio Layer 3 -
AAC -
FLAC Supports up to 2ch
Vorbis Supports up to 2ch
Supports WMA 10 Pro (Up to 5.1) Does
WMA
wav -
midi
ape NonSmart not supported
AIFF -
ALAC -
not support WMA lossless audio
Supports up to M2 profile
type 0 and type 1
Seek not supported
Supported on USB only
Picture File Support
File Extension Type Resolution Comments
*.jpg
*.jpeg
*.png
*.bmp
*.mpo
JPEG
PNG
BMP
MPO
15360x8640 -
4096x4096 -
4096x4096 -
15360x8640 -
56 - English
Page 57

Digital Output Selections
Setup PCM
Connection HDMI supported AV receiver
PCM Up to PCM 7.1ch PCM
Dolby Digital Up to PCM 5.1ch Dolby Digital
Dolby Digital
Plus
Dolby
Audio
Stream on
Blu-ray Disc
Audio
Stream on
DVD
Definition for
Blu-ray Disc
If the Source Stream is 2ch or mono, “Re-encoded Dolby D” Setting are not applied. Output will be PCM 2ch.
TrueHD
DTS DTS
DTS-
HD High
Resolution
Audio
DTS-HD
Master
Audio
PCM PCM 2ch
Dolby Digital Up to PCM 5.1ch Dolby Digital
DTS
Any
HT-H7500WM :
Up to PCM 5.1ch
HT-H7750WM :
Up to PCM 7.1ch
HT-H7500WM :
Up to PCM 5.1ch
HT-H7750WM :
Up to PCM 7.1ch
Decodes the main
feature audio and
BONUSVIEW audio
stream together
into PCM audio and
adds Navigation
Sound Effects.
Bitstream
(Unprocessed)
Dolby Digital Plus
Dolby TrueHD
DTS-HD High
Resolution Audio
DTS-HD Master
Audio
Outputs only the
main feature audio
stream so that your
AV receiver can
decode the audio
bitstream.
You will not hear
BONUSVIEW audio
or Navigation Sound
Effects.
Bitstream
(Re-encoded DTS)
DTS re-encoded
DTS
Decodes the main
feature audio and
BONUSVIEW audio
stream together
into PCM audio and
adds Navigation
Sound Effects, then
re-encodes the
PCM audio into DTS
bitstream.
Bitstream
(Re-encoded
Dolby D)
Re-encoded
Dolby Digital *
Decodes the main
feature audio and
BONUSVIEW audio
stream together
into PCM audio and
adds Navigation
Sound Effects, then
re-encodes the PCM
audio into Dolby
Digital bitstream or
PCM.
Appendix
Blu-ray Discs may include three audio streams :
- Main Feature Audio : The audio soundtrack of the main feature.
- BONUSVIEW audio : An additional soundtrack such as the director or actor’s commentary.
- Navigation Sound Effects : When you choose some menu navigation options, Navigation Sound Effects may sound.
Navigation Sound Effects are different on each Blu-ray Disc.
57 - English
Page 58

Appendix
Resolution according to the content type
HT-H7500WM
Blu-ray Disc/E-contents/Digital Contents playback DVD playback
Setup
BD Wise Resolution of Blu-ray Disc 1080p@60F 576i/480i
1080p@60F 1080p@60F -
1080p - 1080p
Movie Frame : Auto (24Fs) 1080p@24F -
576p/480p 576p/480p 576p/480p
HT-H7750WM
Setup
Movie Frame : Auto
Auto
Output
Blu-ray Disc
Auto Max. Resolution of TV input Max. Resolution of TV input
1080i 1080i 1080i
720p 720p 720p
Content Type
BD Wise Resolution of Blu-ray Disc 1080p@60F
UHD Output : Auto 2160p@24F 2160p@24F
UHD Output : Off 1080p@24F 1080p@24F
Movie Frame : Off Max. Resolution of TV input Max. Resolution of TV input
Movie Frame : Auto (24Fs)
1080p only
1080p 1080p@60F 1080p@60F
1080i 1080i 1080i
720p 720p 720p
576p/480p 576p/480p 576p/480p
HDMI Mode
E-contents/
Digital contents
Blu-ray Disc
1080p@24F 1080p@24F
HDMI Mode
E-contents/
Digital contents
Setup
Auto
BD Wise 576i/480i
Movie Frame : Auto
Movie Frame : Auto (DVD 24fps Conversion : Auto)
DVD 24fps Conversion : Auto
DVD 24fps Conversion : Off Max. Resolution of TV input
Movie Frame : Off Max. Resolution of TV input
1080p only
1080p 1080p@60F
1080i 1080i
720p 720p
576p/480p 576p/480p
58 - English
Content Type
UHD Output : Auto 2160p@24F
UHD Output : Off 1080p@24F
DVD
1080p@24F
Page 59

If the TV you connected to the product does not support Movie Frame or the resolution you selected, the message
✎
"If no pictures are shown after selecting 'Yes', please wait for 15 seconds to return to the previous resolution. Do
you want to change the resolution?" appears. If you select Yes, the TV's screen will go to blank for 15 seconds, and
then the resolution will revert to the previous resolution automatically.
If the screen stays blank after you have changed the resolution, remove all discs, and then press and hold the
✎
@
button on the top of the product for more than 5 seconds. All settings are restored to the factory default. Run the
Initial Settings procedure again. Then, go to Settings > Picture > Resolution in the Menu, and select the correct
resolution for your TV.
When you run the Initial Settings procedure, re-select the language and aspect ratio (screen size and format) only.
✎
Resetting does not affect your network settings, so you should be able to skip Network Setup and Software Update.
When the factory default settings are restored, all stored user BD data will be deleted.
✎
The Blu-ray Disc must have the 24 frame feature for the product to use the Movie Frame (24fps) mode.
✎
Troubleshooting
Refer to the table below when this product does not function properly. If the problem you are experiencing is not listed
below or if the instructions below do not help, turn off the product, disconnect the power cord and contact the nearest
authorized dealer or Samsung Electronics Service Centre.
Symptom Check/Remedy
You cannot eject the disc.
Playback does not start.
Playback does not start
immediately when you
press the p button.
• Is the power cord plugged securely into the outlet?
• Turn off the power, and then turn it back on.
• Check the region number of the Blu-ray/DVD disc.
Blu-ray/DVD disc purchased from abroad may not be playable.
• CD-ROMs and DVD-ROMs cannot be played on this product.
• Make sure that the rating level is correct.
• Are you using a deformed disc or a disc with scratches on the surface?
• Wipe the disc clean.
Appendix
No sound.
HT-H7500WM : You can
only hear sound from a few
speakers, but not all 6.
HT-H7750WM : You can
only hear sound from a few
speakers, but not all 8.
HT-H7500WM : Dolby
Digital 5.1 CH Surround
Sound is not produced.
HT-H7750WM : Dolby
Digital 7.1 CH Surround
Sound is not produced.
• The home cinema does not play sound during fast playback, slow playback, and
step motion playback.
• Are the speakers connected properly? Is the speaker setup correctly customized?
• Is the disc severely damaged?
• On certain Blu-ray/DVD discs, sound is output from the front speakers only.
• Check if the speakers are connected properly.
• Adjust the volume.
• When playing audio from a CD, the radio, or a TV, the unit outputs sound to the
front speakers only.
• Is there "Dolby Digital 5.1 CH" mark on the disc? Dolby Digital 5.1 CH Surround
Sound is produced only if the disc is recorded with 5.1 channel sound.
• Is the audio language correctly set to Dolby Digital 5.1-CH in the information
display?
• Is there "Dolby Digital 7.1 CH" marked on the disc? Dolby Digital 7.1 CH Surround
Sound is produced only if the disc is recorded with 7.1 channel sound.
• Is the audio language correctly set to Dolby Digital 7.1-CH in the information
display?
59 - English
Page 60

Appendix
Symptom Check/Remedy
The remote control does
not work.
• The disc is rotating but
there is no picture.
• Picture quality is poor
and the picture is
shaking.
Audio language and
subtitles do not work.
The menu screen does
not appear even when you
select the menu function.
The aspect ratio cannot be
changed.
• The product is not
working.
(Example: The power
goes off or you hear a
strange noise.)
• The Product is not
working normally.
You have forgotten the
rating level password.
Can't receive radio
broadcasts.
While listening to TV audio
through the product, there
is no sound.
"Not Available" appears on
screen.
If the HDMI output is set to
a resolution your TV cannot
support (for example,
1080p), you may not see a
picture on your TV.
• Are you operating the remote within its operational range and within the proper
angle relative to the sensor?
• Are the batteries drained?
• Is the TV power on?
• Are the video cables connected properly?
• Is the disc dirty or damaged?
• A poorly manufactured disc may not be playable.
• The Audio Language and subtitle functions will not work if the disc does not
contain them.
• Are you using a disc that does not contain menus?
• You can play 16:9 Blu-ray/DVD discs in 16:9 Full mode, 4:3 Letter Box mode, or 4:3
Pan-Scan mode, but 4:3 Blu-ray/DVD discs are played in 4:3 mode only. Refer to
the Blu-ray Disc jacket, and then select the appropriate function.
• Press and hold the remote control's
mode. This will reset the unit.
- Using the RESET function will erase all stored settings.
Do not use this function unless necessary.
• With no disc in the product, press and hold the product's
5 seconds. INIT appears on the display and all settings will return to their default
values.
- Using the RESET function will erase all stored settings.
Do not use this function unless necessary.
• Is the antenna connected properly?
• If the antenna's input signal is weak, install an external FM antenna in an area with
good reception.
• If you press the OPEN/CLOSE ^ button while listening to TV audio using the
D. IN or AUX functions, the Blu-ray/DVD disc functions are turned on and the TV
audio is muted.
• The features or action cannot be completed at this time because:
1. The Blu-ray/DVD disc's software restricts it.
2. The Blu-ray/DVD disc's software doesn’t support the feature (e.g., angles)
3. The feature is not available at the moment.
4. You’ve requested a title or chapter number or search time that is out of range.
• Press and hold the
in the product. All settings will revert to their factory settings.
@
button on front panel for more than 5 seconds with no disc
EXIT) button for 5 seconds in STANDBY
(
e
@
button for longer than
60 - English
Page 61

Symptom Check/Remedy
No HDMI output.
Abnormal HDMI output
appears on the screen.
AllShare function
You can see folders shared
through AllShare, but
cannot see the files.
Video plays intermittently.
The AllShare connection
between the product and
PC is unstable.
BD-LIVE
The home cinema cannot
connect to the BD-LIVE
server.
When using the BD-LIVE
service, an error occurs.
When the factory default settings are restored, all stored user BD data is deleted.
✎
• Check the connection between the TV and the HDMI jack of the product.
• Check if your TV supports 576p/480p/720p/1080i/1080p HDMI input resolution.
• If random noise appears on the screen, it means that TV does not support HDCP
(High-bandwidth Digital Content Protection).
• AllShare only shows Video, Photo, and Music files. Other types of files are not
displayed.
• Check if the network is stable.
• Check if the network cable is properly connected and if the network is overloaded.
• The wireless connection between the DLNA compatible device and the product is
unstable.
Check the connection.
• IP addresses under the same subnetwork should be unique, otherwise IP collision
can results in such a phenomenon.
• Check if you have a firewall enabled.
If so, disable the firewall function.
• Test whether the network connection is active by using the Network Status
function.
• Check whether a USB memory device is connected to the product.
• The memory device must have at least 1GB of free space to accommodate the
BD-LIVE service.
You can check the available size in BD Data Management. (See page 51)
• See if the BD-Live Internet Connection option is set to Allow(All).
• If all above fails, contact the contents provider or update to the latest firmware.
• The USB memory device must have at least 1GB of free space to accommodate
the BD-LIVE service.
You can check the available size in BD Data Management. (See page 51)
Appendix
Hereby, Samsung Electronics, declares that this equipment is in compliance with the essential requirements
and other relevant provisions of Directive 1999/5/EC.
The original Declaration of Conformity may be found at http://www.samsung.com, go to Support > Search
Product Support and enter the model name.
This equipment may be operated in all EU countries.
This equipment may only be used indoors.
61 - English
Page 62

Appendix
Specifications
Weight 2.7 kg
General
FM Tuner
HDMI
Amplifier
Dimensions 430.0 (W) x 55.0 (H) x 312.0 (D) mm
Operating Temperature Range +5°C to +35°C
Operating Humidity Range 10 % to 75 %
Signal/noise ratio 55 dB
Usable sensitivity 12 dB
Total harmonic distortion 0.5 %
Video
Audio PCM multichannel audio, Bitstream audio, PCM audio
Front speaker output 165W x 2(3)
Front Top speaker output
(HT-H7750WM only)
Centre speaker output 170W(3)
Surround speaker output 165W x 2(3)
Subwoofer speaker output 170W(3)
Frequency response
S/N Ratio 70dB
Channel separation 60dB
Input sensitivity (AUX)500mV
HT-H7500WM 1080p, 1080i, 720p, 576p/480p
HT-H7750WM
2D : 2160p, 1080p, 1080i, 720p, 576p/480p
3D : 1080p, 720p
165W x 2(3)
Analogue input : 20Hz~20kHz (±3dB)
Digital input : 20Hz~40kHz (±4dB)
62 - English
Page 63

HT-H7500WM
Speaker
system
Surround 95.0 x 150.0 x 101.0 0.64
Centre
Subwoofer
Speaker
system
Front Top
Surround
Centre
Subwoofer
Impedance
Front
Impedance
Front/
3
3
Frequency
range
140Hz~
20kHz
40Hz ~
160Hz
Frequency
range
140Hz~
20kHz
40Hz ~
160Hz
Output sound
pressure level
87dB/W/M
88dB/W/M 200.0 x 390.0 x 350.0 5.75
Output sound
pressure level
87dB/W/M
88dB/W/M 200.0 x 390.0 x 350.0 5.75
Rated
input
165W 330W
170W 340W
HT-H7750WM
Rated
input
165W 330W
170W 340W
Maximum
input
Maximum
input
Dimensions
(W x H x D) (Unit : mm)
95.0 x 280.0 x 101.0 1.75
320.0 x 80.5 x 101.0 1.02
Dimensions
(W x H x D) (Unit : mm)
95.0 x 1215.0 x 101.0
(Stand base: 276.0 x 23.0 x
264.0)
95.0 x 1160.0 x 101.0
(Stand base: 276.0 x 23.0 x
264.0)
320.0 x 80.5 x 101.0 1.02
Weights
(Unit : kg)
Weights
(Unit : kg)
• Network speeds equal to or below 10Mbps are not supported.
• Samsung Electronics Co., Ltd reserves the right to change the specifications without notice.
• Weight and dimensions are approximate.
• Design and specifications are subject to change without prior notice.
• For the power supply and Power Consumption, refer to the label attached to the product.
SWA-6000
5.01
4.73
Appendix
Weight 1.1 kg
Dimensions (W x H x D) 76.2 x 228.6 x 152.4 mm
Operating Temperature Range +5°C to +35°C
Operating Humidity Range 10 % to 75 %
Output 165W x 2 CH
Frequency range 20Hz~20KHz
S/N Ratio 65dB
63 - English
Page 64

Appendix
Licences
Manufactured under license from Dolby Laboratories. Dolby and the double-D symbol are
trademarks of Dolby Laboratories.
For DTS patents, see http://patents.dts.com. Manufactured
under license from DTS Licencing Limited. DTS, DTS-HD, the
Symbol together are registered trademarks of DTS, Inc. DTS-HD Master Audio | Essential and DTS Neo:Fusion II are
trademarks of DTS, Inc. © DTS, Inc. All Rights Reserved.
ABOUT DIVX VIDEO: DivX® is a digital video format created by DivX, LLC, a subsidiary of Rovi
Corporation. This is an official DivX Certified® device that has passed rigorous testing to verify
that it plays DivX video. Visit divx.com for more information and software tools to convert your
files into DivX videos.
ABOUT DIVX VIDEO-ON-DEMAND: This DivX Certified® device must be registered in order to play purchased DivX
Video-on-Demand (VOD) movies. To obtain your registration code, locate the DivX VOD section in your device setup
menu. Go to vod.divx.com for more information on how to complete your registration.
DivX Certified® to play DivX® video up to HD 1080p, including premium content.
DivX®, DivX Certified® and associated logos are trademarks of Rovi Corporation or its subsidiaries and are used
under licence.
Covered by one or more of the following U.S. patents : 7,295,673; 7,460,668; 7,515,710; 7,519,274
The terms HDMI and HDMI High-Definition Multimedia Interface, and the HDMI Logo are
trademarks or registered trademarks of HDMI Licencing LLC in the United States and other
countries.
Symbol, DTS and the Symbol together, & DTS-HD and the
Oracle and Java are registered trademarks of Oracle and/or its affiliates. Other names may be trademarks
of their respective owners.
This item incorporates copy protection technology that is protected by U.S. patents and other intellectual property
rights of Rovi Corporation. Reverse engineering and disassembly are prohibited.
Blu-ray Disc™, Blu-ray™, and the logos are trademarks of Blu-ray Disc Association.
This product uses Cinavia technology to limit the use of unauthorized copies of some commercially-produced film and
videos and their soundtracks. When a prohibited use of an unauthorized copy is detected, a message will be displayed
and playback or copying will be interrupted.
More information about Cinavia technology is provided at the Cinavia Online Consumer Information Centre at http://
www.cinavia.com. To request additional information about Cinavia by mail, send a postcard with your mailing address
to: Cinavia Consumer Information Centre, P.O. Box 86851, San Diego, CA, 92138, USA."
This product incorporates proprietary technology under license from Verance Corporation and is protected by U.S.
Patent 7,369,677 and other U.S. and worldwide patents issued and pending as well as copyright and trade secret
protection for certain aspects of such technology. Cinavia is a trademark of Verance Corporation. Copyright 20042010 Verance Corporation. All rights reserved by Verance. Reverse engineering or disassembly is prohibited.
- Open Source Licence Notice
In the case of using open source software, Open Source Licences are available on the product menu.
64 - English
Page 65

Contact SAMSUNG WORLD WIDE
If you have any questions or comments relating to Samsung products, please
contact the SAMSUNG customer care centre.
Area Contact Centre
`
Europe
AUSTRIA 0800 - SAMSUNG (0800 - 7267864) www.samsung.com/at/support
BELGIUM 02-201-24-18
BOSNIA 051 331 999 www.samsung.com/support
BULGARIA 07001 33 11 , sharing cost www.samsung.com/bg/support
CROATIA 062 726 786 www.samsung.com/hr/support
800 - SAMSUNG (800-726786) www.samsung.com/cz/support
CZECH
Samsung Electronics Czech and Slovak, s.r.o. V Parku 2343/24, 148 00 -
Praha 4
DENMARK 70 70 19 70 www.samsung.com/dk/support
FINLAND 030-6227 515 www.samsung.com/fi/support
FRANCE 01 48 63 00 00 www.samsung.com/fr/support
0180 6 SAMSUNG bzw.
0180 6 7267864*
0180 6 67267864*
GERMANY
(*0,20 €/Anruf aus dem dt. Festnetz, aus
dem Mobilfunk max. 0,60 €/Anruf)
CYPRUS 8009 4000 only from landline, toll free
80111-SAMSUNG (80111 726 7864) only
from land line
GREECE
(+30) 210 6897691 from mobile and land
line
0680SAMSUNG (0680-726-786)
HUNGARY
0680PREMIUM (0680-773-648)
ITALIA 800-SAMSUNG (800.7267864) www.samsung.com/it/support
LUXEMBURG 261 03 710 www.samsung.com/support
Web Site
www.samsung.com/be/support
(Dutch)
www.samsung.com/be_fr/support (French)
www.samsung.com/de/support
www.samsung.com/gr/support
http://www.samsung.com/hu/
support
Correct disposal of batteries in this product
(Applicable in countries with separate collection systems)
This marking on the battery, manual or packaging indicates that the batteries in this product should not be
disposed of with other household waste at the end of their working life. Where marked, the chemical symbols
Hg, Cd or Pb indicate that the battery contains mercury, cadmium or lead above the reference levels in EC
Directive 2006/66. If batteries are not properly disposed of, these substances can cause harm to human health
or the environment.
To protect natural resources and to promote material reuse, please separate batteries from other types of waste
and recycle them through your local, free battery return system.
Area Contact Centre
MONTENE-
020 405 888 www.samsung.com/support
GRO
080 697 267
SLOVENIA
090 726 786
NETHER-
0900-SAMSUNG (0900-7267864) (€ 0,10/
LANDS
Min)
NORWAY 815 56480 www.samsung.com/no/support
0 801-172-678* lub +48 22 607-93-33 **
*(całkowity koszt połączenia jak za 1 impuls
POLAND
według taryfy operatora)
** (koszt połączenia według taryfy operatora)
PORTUGAL 808 20 7267 www.samsung.com/pt/support
08008 SAMSUNG (08008 726 7864)
ROMANIA
TOLL FREE No.
SERBIA 011 321 6899 www.samsung.com/rs/support
SLOVAKIA 0800 - SAMSUNG(0800-726 786) www.samsung.com/sk/support
SPAIN 0034902172678 www.samsung.com/es/support
SWEDEN 0771 726 7864 (SAMSUNG) www.samsung.com/se/support
SWITZER-
0848 726 78 64 (0848-SAMSUNG)
LAND
U.K 0330 SAMSUNG (7267864) www.samsung.com/uk/support
EIRE 0818 717100 www.samsung.com/ie/support
LITHUANIA 8-800-77777 www.samsung.com/lt/support
LATVIA 8000-7267 www.samsung.com/lv/support
ESTONIA 800-7267 www.samsung.com/ee/support
Web Site
www.samsung.com/si/support
www.samsung.com/nl/support
www.samsung.com/pl/support
www.samsung.com/ro/support
www.samsung.com/ch/support
(German)
www.samsung.com/ch_fr/support (French)
Correct Disposal of This Product (Waste Electrical & Electronic Equipment)
(Applicable in countries with separate collection systems)
This marking on the product, accessories or literature indicates that the product and its electronic accessories
(e.g. charger, headset, USB cable) should not be disposed of with other household waste at the end of their
working life. To prevent possible harm to the environment or human health from uncontrolled waste disposal,
please separate these items from other types of waste and recycle them responsibly to promote the sustainable
reuse of material resources.
Household users should contact either the retailer where they purchased this product, or their local government
office, for details of where and how they can take these items for environmentally safe recycling.
Business users should contact their supplier and check the terms and conditions of the purchase contract.
This product and its electronic accessories should not be mixed with other commercial wastes for disposal.
Page 66

HT-H7500WM
HT-H7750WM
Blu-ray™
Système audiovisuel
manuel d'utilisation
imaginez les possibilités
Merci d'avoir choisi cet appareil Samsung.
Pour recevoir une assistance plus complète, veuillez
enregistrer votre produit sur
www.samsung.com/register
Page 67

Consignes de Sécurité
ATTENTION
RISQUES D'ÉLECTROCUTION. NE PAS OUVRIR.
ATTENTION : POUR LIMITER LES RISQUES DE
DÉCHARGE ÉLECTRIQUE, NE RETIREZ JAMAIS LE
CACHE (NI L'ARRIÈRE DE L'APPAREIL). CERTAINES
PIÈCES QU'IL CONTIENT NE SONT PAS RÉPARABLES
PAR L'UTILISATEUR. VEUILLEZ CONTACTER UN
TECHNICIEN QUALIFIÈ POUR TOUTE RÉPARATION.
• Les fentes et les ouvertures situées à l'arrière et
en dessous de l'appareil permettent d'assurer
une ventilation correcte. Afin d'assurer le bon
fonctionnement de l'appareil et d'empêcher toute
surchauffe, veillez à ne jamais obstruer ces ouvertures
de quelque façon que ce soit.
- Ne placez pas l'appareil dans un endroit confiné
comme une bibliothèque ou un meuble intégré sauf
si une ventilation suffisante y est assurée.
- Ne placez pas l'appareil à proximité ou sur un
radiateur ou une bouche de chaleur et ne l'exposez
jamais à la lumière directe du soleil.
- Ne posez pas de récipients contenant du liquide
(ex. : vase, etc.) sur l'appareil afin d'éviter tout risque
d'incendie ou d'électrocution en cas de projections.
• N'exposez pas l'appareil à la pluie et ne le placez pas à
côté d'une source d'eau (baignoire, lavabo, évier, cuve,
sous-sol humide, piscine, etc.). Si l'appareil est exposé
à de l'eau ou à de l'humidité par accident, débranchezle et contactez immédiatement un représentant agréé.
• Cet appareil fonctionne avec des piles. Il se peut
qu'une règlementation sur la mise au rebut des piles
soit en vigueur dans votre commune. Contactez votre
municipalité pour le savoir.
• Ne surchargez pas les prises murales, les rallonges et
les adaptateurs afin d'éviter tout risque d'incendie ou
d'électrocution.
• Organisez les câbles de sorte qu'ils ne gênent pas
la circulation dans la pièce ou qu'ils ne soient pas
écrasés par le mobilier attenant. Assurez-vous toujours
que les parties côté fiche, prise murale et sortie de
l'appareil sont en bon état.
• Afin de protéger l'appareil de la foudre, ou si vous
prévoyez de ne pas l'utiliser pendant une période
prolongée, débranchez-le. Faites de même avec
l'antenne ou le système de câblage. Vous éviterez ainsi
qu'ils ne soient endommagés par la foudre ou une
surtension.
• Avant de brancher le cordon d'alimentation CA sur
la prise de l'adaptateur CC, assurez-vous que les
caractéristiques électriques de l'adaptateur CC
correspondent à l'alimentation électrique locale.
• N'insérez jamais d'objets métalliques dans les
ouvertures de l'appareil. Vous risqueriez de vous
électrocuter.
• Pour éviter tout risque d'électrocution, ne touchez
jamais les composants internes de l'appareil. Seul un
technicien qualifié est autorisé à ouvrir l'appareil.
• Enfoncez correctement la prise dans le mur. Pour
débrancher l'appareil du mur, tirez toujours sur la fiche
du câble. Ne tentez jamais de le débrancher en tirant
directement sur le câble. Ne touchez jamais le cordon
d'alimentation si vous avez les mains mouillées.
• Si vous constatez que l'appareil ne fonctionne
pas normalement (bruits ou odeurs inhabituels),
débranchez-le immédiatement et contactez un
revendeur ou un centre de services agréé.
• Entretien du meuble.
- Avant de brancher un composant sur cet appareil,
assurez-vous que celui-ci est hors tension.
- Si vous déplacez soudainement l'appareil d'un
endroit froid à un endroit chaud, de la condensation
pourra se former sur les pièces et la lentille et
occasionner des problèmes de lecture. Dans pareil
cas, débranchez l'appareil et patientez deux heures
avant de le rebrancher sur la prise d'alimentation.
Insérez ensuite le disque et essayez à nouveau de le
lire.
• Débranchez toujours l'appareil si vous prévoyez
de ne pas l'utiliser pendant une période prolongée
(en particulier si des enfants ou des personnes aux
capacités réduites sont laissées sans surveillance).
- L'accumulation de poussière sur l'appareil risque
de provoquer des étincelles, une surchauffe ou
un problème d'isolation et de provoquer un choc
électrique, une fuite électrique ou un incendie.
• Contactez un centre de services agréé pour obtenir
plus d'informations si vous souhaitez installer votre
produit dans une pièce exposée à la poussière,
à des températures extrêmes, à l'humidité ou à
des substances chimiques ou dans un endroit où
il fonctionnera en permanence, comme dans un
hall d'aéroport ou de gare. Le non-respect de ces
consignes risque d'endommager gravement l'appareil.
Ce symbole indique la présence d'une
tension dangereuse dans l'appareil.
Ne touchez jamais les composants
internes du produit.
Ce symbole indique que ce produit est
fourni avec des documents importants
relatifs au fonctionnement et à
l'entretien.
2 - Français
Page 68

• Utilisez uniquement une fiche et une prise murale
correctement mises à la terre.
- Une mise à la terre incorrecte peut provoquer un
choc électrique ou endommager l'équipement.
(équipement de classe 1 uniquement.)
• Pour éteindre complètement l'appareil, vous devez
débrancher le cordon d'alimentation de la prise murale.
C'est pourquoi le cordon d'alimentation doit être
facilement accessible à tout moment.
• Ne laissez jamais les enfants jouer avec l'appareil.
• Conservez les accessoires (piles, etc.) dans un endroit
sûr, hors de leur portée.
• N'installez pas le produit dans un endroit instable,
comme sur une étagère branlante, un sol incliné ou
dans un local exposé à des vibrations.
• Ne faites pas tomber l'appareil et ne l'exposez pas à
des chocs. S'il est endommagé débranchez le câble
d'alimentation et contactez le centre de services.
• Pour nettoyer l'appareil, débranchez d'abord le câble
d'alimentation de la prise murale, puis essuyez-le
avec un chiffon doux et sec. N'utilisez pas de produits
chimiques, tels que de la cire, du benzène, de l'alcool,
des diluants, des insecticides, des purificateurs
d'air, des lubrifiants ou des détergents. Ils risquent
d'endommager le revêtement du produit ou d'en
effacer les inscriptions.
Évitez toute projection d'eau sur l'appareil. Ne posez jamais
•
d'objets contenant un liquide (ex : un vase) sur l'appareil.
• Ne jetez pas les piles au feu.
• Ne branchez pas plusieurs appareils électriques sur
une même prise murale. Surcharger une prise murale
peut provoquer une surchauffe et donc un incendie.
• Utiliser le mauvais type de pile dans la télécommande
risque de provoquer une explosion. Lorsqu'un
remplacement est nécessaire, utilisez uniquement le
même type de pile ou un modèle équivalent.
AVERTISSEMENT :
AFIN D'ÉVITER TOUT RISQUE DE
•
PROPAGATION D'INCENDIE, ÉLOIGNEZ
LES BOUGIES OU LES AUTRES
DISPOSITIFS À FEU NU DE L'APPAREIL.
PRODUIT LASER DE CLASSE 1
Ce produit est classé comme PRODUIT LASER DE
CLASSE 1. L'utilisation de commandes, de réglages
ou de procédé différents de ceux spécifiés dans le
présent document peut entraîner une exposition à un
rayonnement dangereux.
ATTENTION :
• RAYONNEMENT LASER INVISIBLE LORSQUE
L'APPAREIL EST OUVERT ET VERROUILLAGES
DÉSACTIVÉS.
CLASS 1 LASER PRODUCT
KLASSE 1 LASER PRODUKT
LUOKAN 1 LASER LAITE
KLASS 1 LASER APPARAT
PRODUCTO LÁSER CLASE 1
Consignes relatives au
visionnage 3D
CONSIGNES IMPORTANTES RELATIVES À LA SANTÉ ET
LA SÉCURITÉ EN CAS DE VISIONNAGE D'IMAGES 3D.
Lisez attentivement les consignes de sécurité avant
d'utiliser la fonction 3D.
• Certains utilisateurs peuvent ressentir une gêne en
visionnant des images de télévision en 3D, comme
des vertiges, des nausées ou des maux de tête. Dès
que vous ressentez l'un de ces symptômes, arrêtez
immédiatement le visionnage en 3D, retirez les lunettes
Active 3D et essayez de vous reposer.
• Le visionnage d'images en 3D sur une période de
temps prolongée peut occasionner une fatigue
oculaire. Dès que vous ressentez une fatigue oculaire,
cessez immédiatement le visionnage en 3D, retirez les
lunettes Active 3D et essayez de vous reposer.
• Des enfants utilisant la fonction 3D doivent être
constamment surveillés par un adulte responsable.
Au moindre signalement de fatigue visuelle, mal de
tête, vertige ou nausée, interrompez immédiatement le
visionnage en 3D et laissez-les se reposer.
N'utilisez pas les lunettes Active 3D à d'autres fins (comme
•
lunettes de vue, de soleil ou de protection, par exemple).
• N'utilisez pas la fonction 3D ou les lunettes Active 3D
en marchant ou en bougeant. En utilisant la
fonction 3D ou en portant des lunettes Active 3D en
cours de marche ou de mouvement, vous risquez de
vous cogner contre des objets, de trébucher et/ou de
tomber, et de vous blesser gravement.
Pour bénéficier du visionnage de contenus en 3D,
•
connectez un appareil 3D (récepteur AV ou téléviseur
compatible 3D) au port de sortie HDMI OUT (SORTIE HDMI)
de l'appareil à l'aide d'un câble HDMI haut débit. Veillez à
porter des lunettes 3D avant de visionner le contenu 3D.
• Le produit émet des signaux 3D uniquement via le
câble HDMI connecté au port de sortie HDMI OUT.
• La résolution de l'image vidéo en mode de lecture 3D
est déterminée par la définition de l'image vidéo 3D
d'origine. Vous ne pouvez pas modifier la résolution.
Des fonctions telles que BD Wise, l'adaptation de la
•
taille de l'écran ou le réglage de la résolution peuvent ne
pas fonctionner correctement en mode de lecture 3D.
•
Il vous faut obligatoirement utiliser un câble HDMI haut
débit pour garantir une émission appropriée du signal 3D.
•
Lorsque vous visionnez des images en 3D, assurezvous de vous tenir éloigné du téléviseur à une distance
équivalente à au moins trois fois la taille de l'écran. Par
exemple, si vous avez un écran 46 pouces, vous devrez
rester à une distance de 3,5 mètres du téléviseur.
• Positionnez l'écran à hauteur des yeux pour mieux
apprécier l'image en 3D.
• Lorsque l'appareil est connecté à plusieurs appareils
3D, l'effet 3D peut ne pas fonctionner correctement.
Ce lecteur ne convertit pas de contenus 2D en contenus 3D.
•
• « Blu-ray 3D » et le logo « Blu-ray 3D »sont des
marques de commerce de Blu-ray Disc Association.
Consignes de Sécurité
3 - Français
Page 69

Sommaire
MISE EN ROUTE
5 Accessoires
5 Accessoires des enceintes
6 Façade
7 Face arrière
8 Télécommande
BRANCHEMENTS
9 Connexion des enceintes
12 Fixation du noyau torique en ferrite au cordon
d'alimentation du module de réception sans fil
(SWA-6000)
13 Connexion à un téléviseur et des périphériques
externes
14 Connexion à un routeur réseau
PARAMÈTRES
15 Procédure de réglage des paramètres initiaux
15 Présentation de l'écran d'accueil
16 Accéder à l'écran Paramètres
16 Fonctions du menu Paramètres
22 Configuration réseau
24 Wi-Fi Direct
25 Mise à niveau du logiciel
LIRE UN CONTENU
27 Lecture de disques disponibles dans le
commerce
27 Lire des fichiers multimédias
29 Contrôle de la lecture Vidéo
32 Contrôle de la lecture de musique
37 Utilisation du système Bluetooth
40 Visionnage des photos
41 Écouter la radio
42 Utilisation des boutons spécifiques de la
télécommande
SERVICES RÉSEAU
43 Connexion à votre compte Samsung
43 Ajout d’une carte de crédit
43 Avant d’utiliser MON VIDEO CLUB ou SAMSUNG
APPS
44 Utilisation de MON VIDEO CLUB
45 Utilisation des SAMSUNG APPS
47 Screen Mirroring
47 Utilisation de Navigateur Web
50 Lier vos comptes de service Internet à l’appareil
50 BD-LIVE™
ANNEXES
51 Informations complémentaires
52 Compatibilité des disques et des formats
59 Dépannage
62 Caractéristiques techniques
64 Licences
4 - Français
Page 70

Mise en Route
Les figures et les illustrations du présent Manuel d'utilisation sont fournies à titre de référence
uniquement et peuvent différer de l'apparence du produit réel.
Des frais supplémentaires pourront vous être facturés dans les cas suivants :
a. Vous demandez l'intervention d'un ingénieur, mais il s'avère que l'appareil ne présente aucune
anomalie (par ex. vous n'avez pas lu ce Manuel d'utilisation).
b. Vous portez l'unité à un centre de réparation, mais il s'avère que celle-ci ne présente aucune
défaillance (par ex. vous n'avez pas lu ce Manuel d'utilisation).
Le montant de ces frais administratifs vous sera notifié avant que tout travail ou toute visite à votre
domicile ne soit effectuée).
Vérifiez que tous les accessoires et tous les composants des enceintes figurant ci-dessous sont inclus.
Accessoires
• Télécommande • Pile au lithium • Manuel d’utilisation
Mise en Route
Câble d'alimentation Antenne FM
ATTENTION, NE PAS INGÉRER LA BATTERIE, RISQUE DE BRÛLURE CHIMIQUE,
[Télécommande fournie avec] Ce produit contient une pile par pièce/bouton.
Si vous avalez la pile par pièce/bouton, cela peut entraîner des brûlures internes graves en
seulement 2 heures et vous pouvez mourir. Maintenez les piles neuves et usagées hors de portée des
enfants. Si le compartiment de la pile ne se ferme pas correctement, arrêter d'utiliser l'appareil et maintenezle hors de portée des enfants. Si vous pensez qu'il est possible que les piles aient été avalées ou placées à
l'intérieur d'une partie du corps, consultez immédiatement un médecin.
(pour le cordon d'alimentation)
Noyau torique en ferrite
Chiffon doux
Accessoires des enceintes
HT-H7500WM - 5.1CH
Enceinte centrale
Module de
réception sans fil
Module (SWA-6000)
Enceinte avant
X 2
Enceinte
d'ambiance X 2
Câble d'enceinte
x 6 Caisson de basse
5 - Français
Page 71

Mise en Route
HT-H7750WM - 7.1CH
Câble d'enceinte
x 2
Avant/Supérieur
avant x 2
Façade
ICÔNES D'AFFICHAGE
FONCTION
OUVRIR/
FERMER
NFC
Vis (5 x 20) x 16
Pied x 4
ARRÊT
RÉGLAGE
DU VOLUME
Socle x 4 Enceinte centrale
Enceinte
d'ambiance x 2
Caisson de
basse
LECTURE/
PAUSE
MARCHE/
ARRÊT
Module de
réception sans fil
Module (SWA-6000)
AMPLIFICATEUR À
TUBE À VIDE
U
M
U
T
C
U
A
B
V
E
D
S
N
O
E
-
U
H
N
G
D
I
H
AFFICHAGE
5V 0.5A
TIROIR DISQUE
Les téléphones portables ou les périphériques mobiles placés à proximité de l’amplificateur à tube à vide ou
✎
USB CAPTEUR DE LA TÉLÉCOMMANDE
des dispositifs électroniques posés sur l’appareil peuvent provoquer des bruits parasites ou une distorsion.
Tenez l'appareil hors de portée des enfants lorsqu'il est sous tension afin d'éviter tout risque de brûlure.
✎
Pour mettre à niveau le logiciel de l'appareil via la prise USB, vous devez utiliser une clé USB à mémoire
✎
flash.
6 - Français
Page 72

Lorsque l'appareil affiche le menu du disque Blu-ray, vous ne pouvez pas lancer la vidéo en appuyant sur le
✎
bouton
le menu du disque, puis appuyez sur le bouton
Si vous utilisez Internet ou lisez le contenu du périphérique USB sur le téléviseur via le Home cinéma, vous
✎
ne pouvez pas sélectionner le mode BD/DVD à l'aide du bouton
situé sur l'appareil ou la télécommande. Pour lire la vidéo, sélectionnez Play Movie ou Start dans
OK.
SOURCE. Pour sélectionner le mode BD/
DVD, quittez Internet ou arrêtez la lecture du contenu sur le téléviseur et sélectionnez le mode BD/DVD.
Pour utiliser la fonction NFC, reliez le périphérique Bluetooth source compatible au symbole situé en haut
✎
du produit
(voir page 39).
Face arrière
SPEAKERS OUT
FRONT
SUBWOOFER
L
FRONT
R
CENTER
* Pour le modèle HT-H7500WM
SORTIE HDMI
IMPEDANCE : 3
ENTRÉE HDMI
Mise en Route
VENTILATEUR * ANTENNE FM
POWER
CORDON
D'ALIMENTATION
PRISES DE SORTIE
DES ENCEINTES
FRONT TOP
FRONT
SUBWOOFER
SPEAKERS OUT
L
R
FRONT TOP
L
FRONT
R
IMPEDANCE : 3
CENTER
HDMI OUT
HDMI IN
1 2
ENTRÉE AUX
LAN
PRISE LAN
AUX IN FM ANT
L
OPTICAL
R
DIGITAL
AUDIO IN
ENTRÉE AUDIO NUMÉRIQUE
EXTERNE (OPTIQUE)
* Connexion de l'antenne FM
1. Branchez l'antenne FM fournie dans la prise FM ANT (ANTENNE FM).
2. Déplacez progressivement le fil de l'antenne jusqu'à trouver une position dans laquelle la réception est de
qualité fixez-le ensuite solidement à un mur ou une autre surface solide.
Veillez à prévoir un minimum d'espace libre de 10 cm sur tous les côtés du Home cinéma dans le but de
✎
garantir une ventilation appropriée. Veuillez à ne pas obstruer le ventilateur ou les orifices d'aération.
Cet appareil ne reçoit pas les émissions AM.
✎
7 - Français
Page 73

Mise en Route
Télécommande
Boîtier de la télécommande
Appuyez sur ce bouton pour ouvrir et
Permet d'allumer et d'éteindre
Permet de régler le volume.
Appuyez sur ces boutons pour effectuer
un saut vers l'arrière ([) ou l'avant (]).
Appuyez sur ces boutons pour effectuer
une recherche vers l'arrière (() ou
l'avant ())et maintenez-les enfoncés.
Permet de passer à l'écran d'accueil.
Sélectionnez les éléments de menu à
l'écran, puis changez les valeurs du
,. :
stations FM actives et de changer les
Permet de revenir au menu précédent.
Permet d'accéder au menu contextuel/
Appuyez pour appliquer le DTS Neo
Ces boutons sont utilisés à la fois pour
les menus de l'appareil et certaines
Appuyez pour sélectionner MANUAL/
PRESET sur la fonction Syntoniseur.
Lors de la lecture de contenu multimédia dans SAMSUNG APPS, appuyez sur le bouton 5 de la
✎
télécommande et maintenez-le enfoncé pour mettre la lecture en pause. Pour arrêter la lecture, appuyez sur
le bouton
Permet de rechercher les
canaux en conséquence.
Appuyez sur cette touche pour
appliquer les effets sonores.
Fusion II ou l'Effet sonore 3D.
fonctions liées aux disques Blu-ray.
(
QUITTER) de la télécommande et maintenez-le enfoncé.
e
l'appareil.
ou
menu sélectionné.
menu titre.
Insertion des piles dans la télécommande
fermer le tiroir disque.
Appuyez pour sélectionner le mode Home
Cinéma (HDMI, AUX, BD/DVD, etc.).
Permet de couper le son momentanément.
Permet de lire un disque ou des fichiers.
ou
Permet de mettre la lecture en pause.
Permet d'accéder au menu Tools.
ou
Pour afficher le clavier numérique
(pouvant inclure des touches de fonction
le cas échéant) à l'écran, appuyez sur le
bouton et maintenez-le enfoncé.
Permet d'arrêter la lecture du disque ou
de quitter le menu.
Appuyez sur ce bouton pour visualiser le
menu du disque.
Permet d'afficher les informations
relatives à la lecture, en cours de lecture
d'un disque Blu-ray/DVD ou de fichiers.
Permet de régler l'heure de mise en
veille de l'appareil.
Permet de sélectionner les réglages
STEREO ou MONO pour les
radiodiffusions.
Permet de configurer une fréquence
radio préréglée.
1
Utilisez une pièce de monnaie
pour tourner le couvercle de
la télécommande dans le sens
inverse des aiguilles d’une montre
pour le retirer comme montré sur
la figure ci-dessus.
2
Insérez une pile au lithium de
3 V. Veillez à ce que le pôle positif
(+) soit orienté vers le haut lors
de l’insertion de la pile dans son
logement. Mettez le couvercle sur la
batterie et alignez le repère « ● » l’un
en face de l’autre comme indiqué
sur la figure ci-dessus.
8 - Français
3
Utilisez une pièce de monnaie
pour tourner le couvercle dans le
sens des aiguilles d’une montre
jusqu’en butée pour le remettre
en place.
Page 74

Branchements
Dans ce chapitre, vous trouverez plusieurs méthodes vous expliquant comment connecter votre appareil à
d’autres composants externes. Avant de déplacer ou d'installer l’appareil, mettez-le hors tension et débranchez
le cordon d’alimentation.
Connexion des enceintes
Caisson de
basse
Enceinte
avant (G)
Enceinte
d'ambiance (G)
* HT-H7500WM
Position de l'appareil
Posez-le sur un support, sur une étagère ou sous un meuble TV.
Choix de la position d'écoute
La position d'écoute doit être située à une distance équivalente à environ 2,5 à 3 fois la taille de l'écran du
téléviseur. Si vous avez par exemple un écran 46 pouces, situez les positions d'écoute entre 2,92 et 3,5 m de
l'écran.
HT-H7500WM :
Enceintes avant
HT-H7750WM :
Enceintes avant/
supérieure avant
HT-H7500WM :
Enceinte centrale
HT-H7750WM :
Enceinte centrale
Enceinte
centrale
Appareil
Enceinte
avant (D)
Enceinte
d'ambiance (D)
Module de
réception sans fil
Placez les enceintes face à votre position d'écoute en les orientant vers vous
(d'environ 45 °). Positionnez-les de manière à ce que les haut-parleurs d'aigus
se situent à la hauteur de vos oreilles. Alignez la face avant des enceintes avant
avec la face avant de l'enceinte centrale ou avancez-les légèrement par rapport
à l'enceinte centrale.
Placez les enceintes face à votre position d’écoute en les orientant vers vous
(d’environ 45 °). Positionnez-les de manière à ce que les haut-parleurs d'aigus
se situent à la hauteur de vos oreilles. Alignez la face avant des enceintes
avant/supérieure avant avec la face avant de l’enceinte centrale ou avancez-les
légèrement par rapport à l’enceinte centrale.
Il est préférable d'installer l'enceinte centrale à la même hauteur que les
enceintes avant. Vous pouvez également l'installer directement sur ou sous le
téléviseur.
Il est préférable d’installer l’enceinte centrale à la même hauteur que les
enceintes avant/supérieure avant. Vous pouvez également l’installer directement
sur ou sous le téléviseur.
Caisson
de basse
Avant/Supérieur
avant (G)
Enceinte
d'ambiance (G)
* HT-H7750WM
Enceinte
centrale
Appareil
Avant/Supérieur
avant (D)
Enceinte
d'ambiance (D)
Module de
réception sans fil
Branchements
9 - Français
Page 75

Branchements
Placez les enceintes d'ambiance de chaque côté de votre position d'écoute.
Si vous ne disposez pas d'assez d'espace, positionnez-les face à face. Elles
doivent être situées à environ 60 à 90 cm de vos oreilles et légèrement inclinées
Enceintes d'ambiance
vers le sol.
* Contrairement aux enceintes avant et centrale, les enceintes d'ambiance
servent principalement pour les effets sonores. Elles n'émettent donc pas de
son en permanence.
Caisson de basse
* Les enceintes ambiophoniques doivent être reliées au module de réception sans fil.
* L'aspect des enceintes peut différer des illustrations du manuel.
* Chaque enceinte possède une étiquette colorée située à l'arrière ou sur le dessous. Chaque câble
dispose d'une bande colorée à proximité de son extrémité. Faites correspondre la bande présente
sur chaque câble avec l'étiquette de l'enceinte par couleur puis connectez le câble à l'enceinte.
Reportez-vous à la page 11 pour obtenir des instructions.
La position du caisson de basse n'a pas d'importance. Vous pouvez l'installer
où vous voulez.
Installation des enceintes sur le pied type Tallboy
* HT-H7750WM seulement
1. Recherchez le câble d'enceinte qui est fixé au pied.
Retournez le pied et le socle, démêlez le câble d'enceinte
puis tirez-le à travers le trou présent dans le socle.
Manipulez le pied avec précaution. Il est lourd.
✎
2. Raccordez le socle au bas du pied.
3. Insérez trois vis de 5 x 20 dans les trous repérés dans
le support, puis serrez-les avec un tournevis comme
indiqué sur l'illustration.
4. Placez le câble d'enceinte dans la fente située sous le
socle.
5. Raccordez le support assemblé et une enceinte en
faisant correspondre les étiquettes sur le pied et sur
l'enceinte comme indiqué sur l'illustration.
6. Insérez une vis (5 x 20) dans le trou situé à l'arrière de
l'enceinte et serrez en la tournant dans le sens des
aiguilles d'une montre avec un tournevis.
7. Répétez les étapes 1 à 6 avec l'autre enceinte et le pied.
1
3
5 6
Enceinte
Pied
2
Pied
4
Socle
10 - Français
Page 76

Raccordement des câbles d'enceinte
HDMI OUT
1
SPEAKERS OUT
CENTER
SUBWOOFER
FRONT
L
FRONT
R
IMPEDANCE : 3
HDMI OUT
1
SPEAKERS OUT
CENTER
SUBWOOFER
FRONT
L
FRONT
R
FRONT TOP
L
FRONT TOP
R
IMPEDANCE : 3
1. Chaque faisceau de câbles d'enceinte doit être relié à l'enceinte correspondante. Pour cela, la prise avec le
codage couleur sur chaque faisceau doit correspondre à l'autocollant coloré situé sur la face inférieure ou
arrière de chaque enceinte.
2. Branchez les fiches des câbles de chaque enceinte à l'arrière de l'appareil en respectant les couleurs entre
les fiches et les prises femelles des enceintes.
HT-H7500WM
Enceinte
d'ambiance (G)
HT-H7750WM
Module de réception
sans fil
Enceintes avant/
supérieure (D)
Module de
réception sans fil
Caisson de
Enceinte
d'ambiance (D)
basse
Enceinte avant (G) Enceinte avant (D)
SPEAKERS OUT
R
FRONT
SUBWOOFER
FRONT TOP
R
FRONT
SUBWOOFER
SPEAKERS OUT
R
FRONT
CENTER
FRONT TOP
FRONT
CENTER
L
IMPEDANCE : 3
Enceintes avant/
supérieure (G)
L
L
IMPEDANCE : 3
Branchements
Enceinte
centrale
Enceinte
d'ambiance (G)
Enceinte
d'ambiance (D)
* Ce produit doit être connecté au module SWA-6000 uniquement.
Caisson de
basse
11 - Français
Enceinte
centrale
Page 77

Branchements
Si vous placez une enceinte à proximité de votre téléviseur, la couleur des images peut être déformée en
✎
raison du champ magnétique.
Placez le module de réception sans fil en arrière de la position d'écoute. Si le module de réception sans fil
✎
est situé trop près de l'appareil, le son émis par les enceintes peut être interrompu en raison d'interférences.
Si vous utilisez un appareil tel qu'un four à micro-ondes, une carte LAN sans fil, un équipement Bluetooth ou
✎
tout autre périphérique utilisant la fréquence 2,4/5,8 GHz à proximité de l'appareil, vous pourrez provoquer
une coupure de son en raison des interférences.
La distance maximale de transmission entre l'appareil et le module de réception sans fil est d'environ
✎
10 m, mais elle peut varier en fonction de l'environnement de fonctionnement. Si l'appareil et le module de
réception sans fil sont séparés par un mur en bêton armé ou en métal, le système est susceptible de ne pas
fonctionner du tout, car les ondes radio ne traversent pas le métal.
Si l'appareil n'établit pas de connexion sans fil, vous devez exécuter un réglage ID entre l'appareil et
✎
le module de réception sans fil. Lorsque l'appareil est éteint, appuyez sur le bouton
télécommande pendant 5 secondes. Allumez le module de réception sans fil. Puis, appuyez sur le bouton
« ID SET » situé à l'arrière du module de réception sans fil et maintenez-le enfoncé pendant 5 secondes.
Enfin, mettez l'appareil sous tension.
| ATTENTION |
Si vous souhaitez installer les enceintes au mur, fixez les vis ou les clous (non fournis) fermement au mur
et utilisez pour l'installation les orifices situés à l'arrière de l'enceinte. Suspendez chaque enceinte avec
précaution.
Ne laissez pas jouer des enfants avec ou à proximité des enceintes. Ils peuvent se blesser en cas de chute
d'une enceinte.
Lors du branchement des fils sur les enceintes, assurez-vous que la polarité (+/ –) est respectée.
Conservez l'enceinte de caisson de basse hors de portée des enfants afin d'éviter qu'ils ne mettent leurs
mains ou des objets étrangers dans le conduit (orifice) de l'enceinte du caisson de basse.
N'accrochez pas le caisson de basse au mur à l'aide du conduit (orifice).
L'antenne de réception sans fil est intégrée au module de réception sans fil. Maintenez l'appareil à l'abri de
l'eau et de l'humidité.
Pour un résultat d'écoute optimal, assurez-vous que la zone autour du module de réception sans fil est bien
dégagée.
En mode 2-CH, aucun son n'est émis par les enceintes d'ambiance sans fil.
(muet) de la
Fixation du noyau torique en ferrite au cordon d'alimentation du module
de réception sans fil (SWA-6000)
Fixez un noyau torique en ferrite au cordon d'alimentation du module
de réception sans fil afin d'empêcher la génération d'interférences RF à
partir de signaux radio.
1. Tirez sur la languette de fixation du noyau torique en ferrite pour
l'ouvrir.
2. Enroulez en boucle le cordon d'alimentation du module de
réception sans fil en deux fois.
3. Attachez le noyau torique en ferrite au module de réception sans
fil tel qu'indiqué sur l'illustration à droite, puis appuyez dessus
jusqu'à ce qu'il s'enclenche.
• Fixez le noyau en ferrite aussi près que possible du module de
réception sans fil.
12 - Français
Page 78

Connexion à un téléviseur et des périphériques externes
POWER
L
R
FRONT TOP
FRONT TOP
L
FRONT
R
FRONT
IMPEDANCE : 3
CENTER
SUBWOOFER
SPEAKERS OUT
HDMI OUT
Rouge
R
Blanche
W
AUX IN FM ANT
LAN
L
OPTICAL
R
DIGITAL
HDMI IN
1 2
AUDIO IN
HDMI IN
HDMI OUT
1 2
Méthode 1 Méthode 3
LAN
Méthode 2
Périphériques
externes
AUX IN FM ANT
L
R
OPTICAL
AUDIO IN
OPTICAL OUTAUDIO OUTHDMI OUTHDMI IN
DIGITAL
Connexion de l'appareil à un téléviseur
À l'aide d'un câble HDMI (non fourni), connectez la prise SORTIE HDMI située à l'arrière de l'appareil à la prise
ENTRÉE HDMI de votre téléviseur. Si le téléviseur prend en charge la fonction ARC, vous pouvez écouter le son
de votre téléviseur depuis votre Home cinéma juste en connectant ce câble. Consultez la page 18 de ce manuel
et la section sur l'ARC du manuel d'utilisation de votre téléviseur pour obtenir plus de détails.
Connexion à des périphériques externes
Méthode 1 ENTRÉE HDMI : connexion d'un composant externe à l'aide d'un câble HDMI
À l'aide d'un câble HDMI (non fourni), connectez la prise HDMI IN (ENTRÉE HDMI) située à l'arrière de l'appareil à la prise
HDMI OUT (SORTIE HDMI) de votre périphérique numérique. Permet de sélectionner le mode HDMI1 ou HDMI2.
Méthode 2 ENTRÉE AUX : Connexion d'un composant analogique externe
En utilisant un câble audio RCA (non fourni), connectez la prise d'entrée AUDIO située sur l'appareil à la prise de
Sortie AUDIO située sur le composant analogique externe. Permet de sélectionner le mode AUX.
•
Assurez-vous de faire correspondre les couleurs des fiches des câbles avec celles des prises d'entrée et de sortie.
Méthode 3 OPTIQUE : connexion d'un composant audio numérique externe
Permet de connecter la sortie audio numérique des composants à signaux numériques tels que les récepteurs
câble/satellite (décodeurs) au home cinéma. En utilisant un câble optique numérique (non fourni), connectez la
prise d'entrée Audio numérique optique située sur l'appareil à la prise de Sortie optique numérique située sur le
périphérique numérique externe. Permet de sélectionner le mode D. IN.
Pour visionner un film depuis votre récepteur câble/satellite, vous devez connecter sa prise de sortie vidéo
✎
directement à votre téléviseur.
Ce système prend en charge les fréquences d'échantillonnage numériques de 32 kHz minimum provenant
✎
de composants numériques externes.
Ce système prend en charge uniquement les données audio DTS et Dolby Digital. Les données audio
✎
MPEG, un format type train de bits n'est pas pris en charge.
Sélection d'un périphérique externe à utiliser
Pour sélectionner un périphérique externe une fois que vous l'avez connecté, appuyez sur le bouton SOURCE.
Chaque appui sur ce bouton change le mode selon cet ordre : BD/DVD D. IN AUX HDMI1 HDMI2
FM BT
Branchements
13 - Français
Page 79

Branchements
Connexion à un routeur réseau
Vous pouvez connecter votre appareil à votre routeur
réseau en utilisant l'une des méthodes illustrées cidessous.
Réseau câblé
POWER
L
R
FRONT TOP
FRONT TOP
L
FRONT
R
FRONT
IMPEDANCE : 3
CENTER
SUBWOOFER
SPEAKERS OUT
1 2
HDMI OUT
Modem large bande
(avec routeur intégré)
ou
Routeur
Votre routeur ou la politique de votre fournisseur
✎
de services Internet peut empêcher l'accès de
l'appareil au serveur de mise à jour du logiciel
Samsung. Si cela se produit, contactez votre
fournisseur de services Internet pour plus
d'informations.
Les utilisateurs DSL doivent passer par un routeur
✎
pour la connexion au réseau.
Pour utiliser la fonction DLNA, vous devez
✎
connecter l'ordinateur au réseau, tel qu'indiqué
sur les illustrations ci-dessus.
La connexion peut être câblée ou sans fil.
LAN
HDMI IN
Modem
large bande
AUX IN FM ANT
L
OPTICAL
R
DIGITAL
AUDIO IN
Service
large bande
Service
large bande
Réseau sans fil
Si le dispositif de partage IP sans fil prend en
✎
charge le protocole DHCP, votre appareil pourra
utiliser une adresse DHCP ou une adresse IP fixe
pour la connexion au réseau sans fil.
Réglez le routeur IP sans fil en mode
✎
Infrastructure. Le mode Ad-hoc n'est pas pris en
charge.
L'appareil ne prend en charge que les protocoles
✎
de clé de sécurité sans fil suivants :
- WEP (OPEN/SHARED), WPA-PSK (TKIP/AES),
WPA2-PSK (TKIP/AES)
Sélectionnez un canal qui est actuellement non
✎
utilisé sur le routeur IP sans fil. Si le canal défini
pour le routeur IP sans fil est en cours d'utilisation
par un autre périphérique à proximité il pourra
en résulter des interférences et un échec de
communication.
Conformément aux dernières spécifications
✎
concernant la certification Wi-Fi, les Home
cinémas Samsung ne prennent pas en charge
le cryptage de sécurité WEP, TKIP ou TKIP-AES
(WPA2 Mixed) dans des réseaux fonctionnant en
mode 802.11n.
Par nature, le réseau LAN peut provoquer
✎
des interférences, selon les conditions de
fonctionnement (performance du point d'accès,
distance, obstacles, interférences avec d'autres
appareils radio, etc.).
Dispositif de
partage IP sans fil
Service large
bande
14 - Français
Page 80

Paramètres
Procédure de réglage des
paramètres initiaux
• Le menu d'accueil n'apparaîtra pas si vous ne
configurez pas les paramètres initiaux.
• L'OSD (On Screen Display, Affichage à l'écran)
peut changer dans ce produit après la mise à
niveau de la version du logiciel.
• Les étapes d'accès peuvent varier selon le
menu sélectionné.
Lorsque la connexion du home cinéma à votre
téléviseur est terminée, allumez le téléviseur puis le
home cinéma. Le premier écran de configuration
initiale s’affiche. Les écrans de configuration s’affichent
dans cet ordre : Langue, Configuration du réseau,
Conditions générales, Résolution d’écran (Format
d’image) et disposition des enceintes.
Selon la version du logiciel installée sur votre home
cinéma, l'écran de mise à jour du logiciel peut
également s’afficher. Suivez les instructions affichées
sur chaque écran, ce qui vous guidera dans la
procédure simple de configuration.
Si vous n’êtes pas prêt à configurer le réseau ou si
cela vous pose problème, vous pouvez sélectionner
Ignorer et le configurer ultérieurement. (Reportez-vous
à la page 22)
Pour modifier vos réglages après l'installation
✎
initiale, sélectionnez Paramètres > Système
> Configuration dans l'écran d'accueil ou
sélectionnez l'option Réinitialisation. (Reportezvous à la page 21)
Présentation de l'écran d'accueil
1234
LIRE LE DISQUE
Pas de Disque
RECOMMANDE MES APPLIS
App 1 App 2 App 3 App 4 App 5 App 6
MON VIDEO CLUB
MULTIMEDIA
Screen Mirroring
SAMSUNG APPS
Fonction Paramètres
56 897
LIRE LE DISQUE
1
Affiche les informations relatives au disque
actuellement dans le tiroir. Appuyez sur
lancer la lecture du disque.
MON VIDEO CLUB
2
Permet de télécharger des films et des émissions
de télévision depuis Internet.
Selon le pays, cette fonction de menu peut ne
✎
pas être prise en charge.
MULTIMEDIA
3
Permet de lire des photos, des vidéos ou des
fichiers musicaux contenus sur des disques,
des périphériques USB, des ordinateurs ou des
périphériques mobiles ou depuis le Cloud.
SAMSUNG APPS
4
Vous permet de télécharger/accéder à diverses
applications gratuites ou payantes.
RECOMMANDE
5
Une liste des applications utiles et populaires que
nous recommandons de télécharger.
MES APPLIS
6
Affiche les applications téléchargées et installées.
Vous pouvez modifier l’ordre d’affichage.
(Reportez-vous à la page 45)
Screen Mirroring
7
Permet de configurer la fonction de mise en miroir
sans fil entre le Home cinéma et un smartphone ou
une tablette.
Selon le pays, cette fonction de menu peut ne
✎
pas être prise en charge.
Fonction
8
Permet de commuter entre les périphériques
externes connectés à Digital In, Aux, HDMI 1
ou HDMI 2, de commuter sur le syntoniseur ou
sur un périphérique Bluetooth connecté. Vous
pouvez également utiliser le bouton
de la télécommande ou le bouton de l'unité
principale.
Paramètres
9
Permet de régler diverses fonctions selon vos
préférences.
OK pour
SOURCE
Paramètres
15 - Français
Page 81

Paramètres
Sélection d'une option sur l'écran Accueil
Pour sélectionner une option sur l'écran Accueil,
1.
déplacez le curseur à l'aide des boutons
78:;
jusqu'à ce que l'option de votre choix
soit mise en surbrillance, puis appuyez sur le
bouton
OK.
Si l'appareil reste en mode Arrêt pendant plus
✎
de 5 minutes sans l'utiliser, un écran de veille
s'affichera sur le téléviseur. Si l'appareil reste en
mode d’écran de veille pendant plus de 20 minutes,
l'alimentation sera automatiquement coupée.
Accéder à l'écran Paramètres
1. Sélectionnez Paramètres sur l'écran d'accueil,
puis appuyez sur OK. L'écran Paramètres
apparaît.
Paramètres
Image
Image
Son
Réseau
Smart Hub
Système
Assistance
2. Pour accéder aux menus, sous-menus et
options sur l'écran Paramètres, veuillez vous
reporter à l'illustration de la télécommande cidessous.
Sortie UHD Auto.
Paramètres 3D
Format TV
16:9 Original
BD Wise Arrêt
Résolution Auto.
Trame vidéo (24Fs) Auto.
Convers. 24 img/s DVD Arrêt
Boutons de la télécommande utilisée
pour le menu Paramètres
1
2
Bouton HOME : Permet de passer à l'écran
1
d'accueil.
Bouton ' (RETOUR) : Permet de revenir au
2
menu précédent.
3
4
Bouton
OK / DIRECTION :
• Appuyez sur
curseur ou sélectionner un élément.
3
• Appuyez sur le bouton OK pour activer
l'élément sélectionné actuellement ou
confirmer un réglage.
Bouton
bouton pour quitter le menu actuellement
4
sélectionné.
78:;
pour déplacer le
(QUITTER) : Appuyez sur ce
e
Informations détaillées sur les fonctions
Les fonctions, éléments de menu et options
Paramètres sont expliqués en détail à l'écran. Pour
afficher les informations, utilisez les boutons
pour sélectionner la fonction, l'élément de menu ou
l'option. Les informations apparaissent en général à
droite de l'écran.
Une brève description des différentes fonctions
Paramètres s'affiche en-dessous. Vous pourrez
également trouver des informations complémentaires
sur certaines fonctions dans l'Annexe de ce manuel.
78:;
Fonctions du menu Paramètres
Image
Sortie UHD
Les options de sorties vidéo HDMI en résolution UHD
(Très Haute Définition). Disponible uniquement lorsque
la fonction Trame vidéo est réglée sur Auto..
Pour utiliser cette caractéristique, vous devez
✎
connecter le lecteur à un appareil qui supporte
les résolutions UHD et vous devez avoir un
contenu qui est lu à 24Fs (vitesse des films)
Paramètres 3D
Permet de configurer les fonctions relatives à la 3D.
Mode lecture Blu-ray 3D : vous pouvez choisir
de lire en mode 3D ou non un disque Blu-ray
comportant des contenus 3D. Si vous passez au
menu Home (Accueil) ou Smart Hub Home (Accueil
Smart Hub) tout en étant en mode 3D, l'appareil
passera automatiquement en 2D.
Taille écran : permet d'entrer la taille du
téléviseur connecté à l'appareil. L'appareil règle
automatiquement la sortie 3D en fonction de la
taille de l'écran du téléviseur.
Lisez attentivement les informations relatives
✎
à la santé et la sécurité avant de visionner un
contenu 3D. (Reportez-vous à la page 3)
16 - Français
Page 82

Format TV
Vous permet de régler la sortie de l'appareil sur la
taille de l'écran de votre téléviseur. (Reportez-vous
à la page 51)
BD Wise
BD Wise est la dernière fonctionnalité
d'interconnectivité de Samsung. Lorsque vous
connectez un appareil Samsung et un téléviseur
Samsung dotée de la fonction BD Wise via l'interface
HDMI et que la fonction BD Wise est activée sur
l'appareil et le téléviseur, le produit émet des images
dont la résolution vidéo et la vitesse de défilement
sont identiques à celles du disque Blu-ray/DVD.
Résolution
Cette option vous permet de régler la définition
du signal vidéo HDMI respectivement sur les
valeurs BD Wise, Auto., 1080p, 1080i, 720p,
576p/480p. Ces valeurs indiquent le nombre de
lignes vidéo par image. Les lettres i et p signifient
respectivement balayage entrelacé (i) et balayage
progressif (p). Plus il y a de lignes, plus la qualité
de l'image est élevée.
Trame vidéo (24Fs)
Le réglage de la fonction Trame vidéo (24Fs) sur
Auto. vous permet de spécifier automatiquement
la sortie HDMI de l'appareil sur 24 images par
seconde pour une qualité d'image améliorée si un
téléviseur compatible 24Fs est connecté.
• Vous ne pouvez bénéficier de la fonction Trame
vidéo (24Fs) que sur un téléviseur prenant en
charge cette vitesse de défilement.
• Movie Frame est uniquement disponible lorsque
l'appareil est en mode de résolution de sortie
HDMI 1080p.
Convers. 24 img/s DVD
Permet de convertir la lecture d’un DVD en 24
images par seconde et de la diffuser via un
branchement HDMI. Disponible uniquement
lorsque la fonction Trame vidéo (24Fs) est activée.
Adapter taille de l'écran
Permet de sélectionner la taille optimale de l'écran
Smart Hub ou l'écran Screen Mirroring.
Format couleur HDMI
Vous pouvez régler le format de l'espace
chromatique pour la sortie HDMI afin qu'il
corresponde aux capacités de l'appareil branché
(télévision, moniteur, etc.).
Couleur intense HDMI
Cette option vous permet de régler l'appareil pour
émettre des données vidéo en sortie avec Deep
Colour via la prise HDMI OUT. L'option Deep
Colour permet une reproduction plus fidèle des
couleurs, notamment en termes de profondeur.
Mode progressif
Cette option permet d'améliorer la qualité de
l'image lors de la lecture d'un DVD.
Son
Config. haut-parleur simple
(HT-H7500WM seulement)
Permet de configurer les paramètres des
enceintes connectées afin d'obtenir le meilleur son
ambiophonique possible.
Mode normal : Permet de sélectionner si vous
avez placé vos enceintes dans la disposition
recommandée avec les enceintes ambiophoniques
proches ou en arrière des positions d’écoute.
Mode simple : Permet de sélectionner si vous
avez placé vos enceintes ambiophoniques en avant
de la position d’écoute. Ce réglage réduit le mixage
du son en façade vers le son ambiophonique.
SFE, Virtual 7.1 ne fonctionnent pas lorsque
✎
Mode simple est activé.
Paramètre haut-parleur
Sortie son : Cette option vous permet de
sélectionner les enceintes que vous souhaitez
activer : celles du téléviseur ou celles du Home
cinéma.
Paramètres (Haut-parleurs Home Cinéma)
: Vous permet de régler les paramètres des
enceintes suivantes et d'activer et désactiver la
tonalité d'essai afin de tester les enceintes.
- Niveau du volume : vous permet de régler le
niveau sonore relatif de chaque enceinte de
6 dB à -6 dB. Par exemple, si vous aimez les
basses puissantes, vous pouvez augmenter le
niveau sonore du caisson de graves de 6 dB.
- Distance : vous permet de régler la distance
relative de chaque enceinte à partir de la position
d'écoute jusqu'à 10 mètres. Plus la distance est
grande, plus le son de l'enceinte sera fort.
- Test haut-parleurs : Commence un essai
pour régler la meilleure configuration de l'effet
sonore ambiophonique. Appuyez sur Arrêter le
test pour arrêter le test lorsqu'il est en marche.
Paramètres
17 - Français
Page 83

Paramètres
Paramètres (Multiroom Link)
profiter du son via une enceinte distante
connectée au home cinéma par l’intermédiaire
de votre réseau domestique. Pour utiliser
l'enceinte en réseau, sélectionnez
S'il y a une enceinte en réseau disponible, elle
apparaîtra sur l'écran.
- Ne pas utiliser : L'enceinte en réseau n'est
pas utilisée.
- Multiroom
son. Toutes les enceintes en réseau émettent
le même son sans tenir compte du canal en
utilisant uniquement le format PCM.
SOUND EFFECT et 3D SOUND ne sont pas
✎
appliquées si
L’enceinte en réseau n’est pas disponible
✎
lorsque Screen Mirroring, est activée.
Pour en savoir plus, reportez-vous au manuel
✎
Multiroom Link.
Manuel Multiroom : www.samsung.com >
Support > Rechercher le nom de produit >
Multiroom Link > Télécharger PDF
Personnalisation son
Personnaliseur audio vous permet de calibrer le
home cinéma pour obtenir une qualité optimale
du son sur la base de votre niveau auditif et des
conditions ambiantes.
Pour créer un Profil audio personnalisé, respectez
les étapes suivantes :
1. Dans le menu Personnalisation son,
sélectionnez Ajout. un son perso..
2. Sur l’écran suivant, sélectionnez Démarrer.
L'écran Aperçu apparaît.
3. Sélectionnez Aperçu pour obtenir un aperçu
du test audio. Sélectionnez Suivant et
appuyez sur
4. Un test en 6 étapes démarre. Au cours
de chaque niveau, le téléviseur émet une
tonalité test à une fréquence différente.
La tonalité commence doucement puis
augmente en volume. Sélectionnez Oui
lorsque vous pouvez entendre la tonalité
test. Si vous souhaitez l’entendre à nouveau,
sélectionnez Réessayer. Chaque fois que
vous sélectionnez Oui, le téléviseur passe
à la tonalité suivante. Lorsque le test est
terminé, un écran s’affiche, vous permettant
de comparer le son original au son calibré.
5. Sélectionnez Suivant et appuyez sur le
bouton OK pour poursuivre. Un clavier
s’affiche à l’écran accompagné d’un nom de
profil par défaut.
6.
Entrez un nom pour le profil audio calibré ou
acceptez le nom par défaut, sélectionnez
Terminé puis appuyez sur le bouton OK.
: L’enceinte en réseau émet du
Multiroom
OK
pour poursuivre.
: Vous pouvez
Multiroom
est réglé sur Activée.
.
18 - Français
7. Sélectionnez
puis appuyez sur le bouton
Personnalisation son s’affiche à nouveau.
Profil son perso. : Sélectionnez un profil audio
que vous avez créé pour l’activer. Ou sélectionnez
Malentendant, un profil sonore personnalisé
spécifiquement composé de sons puissants
adaptés aux personnes atteintes de troubles
auditifs.
S'il y a plus de 3 sons personnalisés
✎
enregistrés, le mode
composé de la valeur moyenne de tous les
profils enregistrés.
Ajout. un son perso. : Créez et ajoutez un
nouveau Profil son perso.. Reportez-vous aux
instructions ci-dessus.
Modif. son perso : Choisissez le Profil son perso.
à modifier. Suivez les mêmes étapes que celles
utilisées pour la création du profil audio. Cette
fonction est uniquement disponible si vous avez
ajouté un Profil son perso. à l’aide de la fonction
Ajout. un son perso.. (Voir ci-dessus)
Gestion son perso. : Renommer ou supprimer
des profils audio personnalisés. Cette fonction
est uniquement disponible si vous avez ajouté un
Profil son perso. à l’aide de la fonction Ajout. un
son perso.. Pour sélectionner un profil, mettez
en surbrillance la case à cocher située à droite du
profil, puis sélectionnez Renommer ou Supprimer.
Egaliseur
Cette option vous permet de configurer
manuellement les réglages de Egaliseur.
Volume intelligent
Cette option vous permet de régler l'appareil de
sorte que le volume demeure stable lorsqu'un
changement de scène se produit ou lorsque vous
changez de chaîne.
Fonct. Retour Audio
Cette option vous permet de diriger le son du téléviseur
vers les haut-parleurs du Home cinéma. Elle nécessite
une connexion HDMI et un téléviseur compatible avec
la fonction Fonct. Retour Audio (ARC).
• Si la fonction Fonct. Retour Audio est
et si vous utilisez un câble HDMI pour connecter
l'appareil au téléviseur, l'entrée optique
numérique ne fonctionne pas.
• Si la fonction Fonct. Retour Audio est définie
sur Auto. et si vous utilisez un câble HDMI
pour connecter l'appareil au téléviseur, la
fonction ARC ou l'entrée optique numérique est
sélectionnée automatiquement.
Terminé
sur l'écran suivant
Famille
OK
. L’écran
sera activé. Il est
Activé
Page 84

Sortie numérique
Cette option vous permet de définir la fonction
Sortie numérique de manière à ce qu'elle
corresponde aux capacités du récepteur AV que
vous avez connecté à l'appareil. Pour obtenir plus
de détails, reportez-vous au tableau de sélection des
sorties numériques. (Reportez-vous à la page 57)
Contrôle de la dynamique
Cette option vous permet d'appliquer un contrôle
de plage dynamique de l'audio Dolby Digital, Dolby
Digital Plus et Dolby TrueHD.
Auto. : contrôle automatiquement la plage
dynamique de l'audio Dolby TrueHD selon les
informations fournies par la piste audio Dolby
TrueHD. Désactive également le contrôle de la plage
dynamique pour Dolby Digital et Dolby Digital Plus.
Arrêt: la plage dynamique reste non compressée,
vous permettant ainsi d'entendre le son original.
Activé : cette option active le contrôle de plage
dynamique pour les trois formats Dolby. Les sons
les moins forts sont amplifiés et le volume des sons
forts est abaissé.
Mode sous-mixage
Permet de sélectionner la méthode du sousmixage multicanal compatible avec le système
stéréo utilisé. Vous pouvez alors choisir de spécifier
le sous-mixage de l'appareil sur l'option Stéréo
Normal ou Compatible Surround.
Sync. audio
Lorsque l'appareil est relié à un téléviseur
numérique, cette option vous permet de régler
le temps de retard audio afin que le son soit
synchronisé avec la vidéo. Vous pouvez régler le
retard entre 0 et 300 millisecondes.
La fonction Auto. en Sync. audio est garantie
✎
pour fonctionner avec un téléviseur Samsung qui
supporte la fonction ARC (La fonction Anynet+).
Réseau
État du réseau
Permet de vérifier le réseau actuel et l'état
d'Internet.
Paramètres réseau
Permet de configurer la connexion du réseau
pour profiter des diverses fonctions telles que
les services Internet ou les fonctionnalités Wi-Fi
AllShare et effectuer des mises à niveau de logiciel.
Wi-Fi Direct
Permet de connecter un périphérique Wi-Fi Direct
à l'appareil via un réseau peer-to-peer, sans qu'il
soit nécessaire de recourir à un routeur sans fil.
Notez que si l'appareil est connecté à un réseau
sans fil, il peut être déconnecté si vous utilisez Wi-
Fi Direct. (Reportez-vous à la page 24)
Les fichiers texte, tels que ceux ayant l'extension
✎
.TXT ou .DOC, ne sont pas affichés lorsque vous
utilisez la fonction Wi-Fi Direct.
Paramètres du périphérique multimédia
Permet aux autres appareils sur votre réseau,
come les smartphones et les tablettes, de partager
des contenus avec votre lecteur.
Nom du périph.
Cette option vous permet d'affecter un nom
identifiant l'appareil. Vous utilisez ce nom pour
identifier l'appareil lorsque vous lui connectez
des périphériques Wi-Fi externes (Smartphones,
tablettes, etc.)
Paramètres BD-Live
Permet de régler diverses fonctions de BD-Live.
BD-Live vous permet d'accéder à des fonctions
complémentaires disponibles sur certains disques
Blu-ray si vous êtes connecté à Internet.
Connexion internet BD-Live : Permet d'interdire
ou d'autoriser, en tout ou partie, une connexion
Internet BD-Live.
Gestion données BD : Permet de gérer les
données BD téléchargées depuis un service BDLive ou un disque Blu-ray.
Pour utiliser BD-Live, vous devez insérer un
✎
périphérique de stockage USB dans le port
USB du home cinéma.
Paramètres
19 - Français
Page 85

Paramètres
Smart Hub
Verr. classif. VOD
Permet de verrouiller l'accès au contenu des
Vidéos à la demande (VOD) en fonction de sa
classification. Pour l'utiliser, vous devez entrer le
code PIN de sécurité. Appuyez sur le bouton 123
et maintenez-le enfoncé jusqu'à ce que le clavier
numérique apparaisse à l'écran. Lorsque le clavier
numérique s'affiche, sélectionnez un numéro à
l'aide du bouton
bouton
Le code PIN de sécurité par défaut est 0000.
✎
Selon le pays, cette fonction de menu peut ne
✎
pas être prise en charge.
Sous-titres
Permet de modifier le sous-titrage lors de la lecture
en VOD qui prend en charge les sous-titrages
fermés. Vous pouvez changer la couleur et la taille
de la police du sous-titrage affiché.
La fonction Sous-titres ne fonctionne pas
✎
avec les services de VOD qui ne prennent
pas en charge les sous-titrages fermés. Pour
certains services de VOD qui prennent en
charge les sous-titrages fermés, les réglages
des fonctions peuvent ne pas être appliqués.
Selon le pays, cette fonction de menu peut ne
✎
pas être prise en charge.
Conditions générales d'utilisation
Conditions générales, politique de
confidentialité compte Samsung
Vous pouvez consulter les conditions d’utilisation et
de confidentialité pour le Smart Hub, les comptes
Samsung et divers autres services.
Réinitialiser Smart Hub
Permet de réinitialiser tous les réglages du
Smart Hub sur leurs paramètres par défaut.
Pour l'utiliser, vous devez entrer le code PIN de
sécurité. Appuyez sur le bouton 123 et maintenezle enfoncé jusqu'à ce que le clavier numérique
apparaisse à l'écran. Lorsque le clavier numérique
s'affiche, sélectionnez un numéro à l'aide du
bouton
Le code PIN de sécurité par défaut est 0000.
✎
78:;
OK.
78:;
, puis appuyez sur le bouton
, puis appuyez sur le
OK.
Système
Configuration
Cette option vous permet de relancer la procédure
de réglage des paramètres initiaux.
Se référer à la description affichée sur l'écran.
Démarr. rapide
Vous pouvez régler l’appareil pour qu’il s’allume
rapidement en réduisant le temps de démarrage.
Si cette fonction est réglée sur Activé, la
✎
consommation d’énergie en mode veille sera
plus grande. (12 W à 20 W environ)
Langue
Vous permet de sélectionner la langue de votre
choix pour le menu à l’écran, le menu du disque,
le son, les sous-titres, etc.
• La langue que vous avez sélectionnée pour le
menu du disque, la bande-son du disque ou les
sous-titres apparaîtra seulement si elle est prise
en charge sur le disque.
Gest. périph.
Permet de connecter une souris ou un clavier USB
sans fil au port USB situé à l'avant de l'appareil.
Paramètres clavier: Cette option vous permet
de configurer un clavier USB sans fil connecté à
l'appareil.
Vous pouvez utiliser le clavier uniquement
✎
lorsqu'un écran ou une fenêtre de clavier
QWERTY apparaît dans le navigateur Web.
Paramètres souris: Cette option vous permet
de configurer une souris USB sans fil connecté
à l'appareil. Vous pouvez utiliser la souris dans
le menu de l'appareil de la même manière que
vous utilisez une souris sur votre ordinateur.
Pour utiliser une souris avec le menu de l'appareil :
1. Connectez la souris USB à
2. Cliquez sur le bouton principal que vous avez
sélectionné dans Paramètres souris. Le
menu Simple s'affiche.
3. Cliquez sur les options du menu que vous
désirez.
Certains claviers et souris USB HID peuvent ne
✎
pas être compatibles avec votre appareil.
Certaines touches de clavier HID peuvent ne
✎
pas fonctionner.
Les claviers USB câblés ne sont pas pris en
✎
charge.
Certaines applications peuvent ne pas être
✎
prises en charge.
Si un clavier HID sans fil ne fonctionne pas en raison
✎
d'interférence, rapprochez le clavier de l'
l'appareil
.
appareil.
20 - Français
Page 86

Sécurité
Appuyez sur le bouton 123 et maintenez-le enfoncé
jusqu'à ce que le clavier numérique apparaisse
à l'écran. Lorsque le clavier numérique s'affiche,
sélectionnez un numéro à l'aide du bouton
78:;
, puis appuyez sur le bouton
PIN par défaut est 0000. Pour accéder à la fonction
de sécurité entrez le code PIN par défaut si vous
n'avez pas créé votre code PIN personnel.
Contrôle parent. BD: Cette option empêche la
lecture des disques Blu-ray ayant une classification
égale ou supérieure à une classification d'âge
particulière jusqu'à la saisie du code PIN.
Contrôle parent. DVD: cette option empêche la
lecture des disques DVD ayant une classification
supérieure à une classification numérique
particulière que vous avez définie jusqu'à la saisie
du code PIN.
Modifier PIN: Cette option permet de modifier
le code PIN à 4 chiffres utilisé pour accéder aux
fonctions de sécurité.
En cas d'oubli du code PIN
1. Retirez tout disque ou périphérique de
stockage USB.
2. Appuyez et maintenez le bouton @ sur le
devant pendant 5 secondes ou plus. Tous
les réglages seront réinitialisés sur leur valeur
d'origine.
Lorsque les réglages d'usine par défaut sont
✎
rétablis, toutes les données Blu-ray utilisateur
stockées sur le lecteur seront effacées.
Général
Vous pouvez spécifier la luminosité de l'affichage
et le fuseau horaire.
Affichage du lecteur: Cette option permet de
modifier la luminosité du panneau avant.
Fuseau Horaire: Vous pouvez spécifier le fuseau
horaire applicable à votre région.
Transparence menu: Cette option vous permet
d'ajuster la transparence de la boîte de menu.
Anynet+ (HDMI-CEC)
Anynet+ est une fonction pratique qui autorise
des commandes liées entre plusieurs produits
Samsung compatibles Anynet+ et vous permet de
contrôler ces produits via une télécommande de
téléviseur Samsung. Pour utiliser cette fonction,
vous devez connecter cet appareil à un téléviseur
Samsung Anynet+ à l'aide d'un câble HDMI.
Pour utiliser une fonction Anynet+ (HDMI-CEC),
suivez les instructions ci-dessous.
1) Connectez l'appareil à Anynet+ (HDMI-CEC)-
un téléviseur Samsung conforme en utilisant le
câble HDMI.
OK. Le code
2) Permet de régler les caractéristiques Anynet+
(HDMI-CEC) sur Activé à la fois dans le
téléviseur et dans l'appareil.
3) Recherchez puis sélectionnez le produit dans
la liste des téléviseurs Anynet+ (HDMI-CEC).
Pour obtenir des instructions plus exactes,
consultez la section Anynet+ du manuel
d'utilisation du téléviseur.
DivX® Vidéo à la demande
Affichez les codes d'enregistrement DivX® VOD
pour acheter et lire des contenus DivX® VOD.
Assistance
Gestion à distance
Lorsque cette option est activée, elle permet
aux agents du Centre d’assistance téléphonique
de Samsung de diagnostiquer et de résoudre à
distance des problèmes concernant l'appareil.
Nécessite une connexion Internet active Gestion
à distance ce service peut ne pas être disponible
dans certains pays.
Mise à jour du logiciel
Pour obtenir de plus amples informations sur la
fonction Mise à jour du logiciel consultez « Mise
à niveau du logiciel » en page 25.
Mode d'utilisation
Cette option vous permet de définir la fonction
Mode d'utilisation. Si vous utilisez le Home
cinéma à votre domicile, sélectionnez toujours Util.
domicile. Util. magasin est destiné aux réglages
pour l’affichage magasin uniquement.
Contacter Samsung
Permet d'obtenir les informations de contact pour
les demandes d'assistance relatives à votre appareil.
Réinitialisation
Réinitialisez tous les paramètres sur leur valeur
d'origine par défaut sauf en ce qui concerne les
paramètres réseau et Smart Hub. Il est nécessaire
d'entrer le code PIN de sécurité. Appuyez sur le
bouton 123 et maintenez-le enfoncé jusqu'à ce
que le clavier numérique apparaisse à l'écran.
Lorsque le clavier numérique s'affiche, sélectionnez
un numéro à l'aide du bouton
appuyez sur le bouton
sécurité par défaut est 0000.
78:;
OK. Le code PIN de
, puis
Paramètres
21 - Français
Page 87

Paramètres
Configuration réseau
Lorsque vous connectez cet appareil à un réseau,
vous pouvez utiliser les applications et les fonctions
basées sur les Réseaux telles que Smart Hub et
BD-LIVE, et mettre à niveau le logiciel de l'appareil
via la connexion réseau. Pour plus d'informations
concernant l'accès et l'utilisation des services
Internet, reportez-vous au chapitre Services réseau
de ce manuel en pages 43 à 50. Les instructions
permettant la configuration de la connexion réseau
débutent ci-dessous.
Configuration de votre connexion réseau
Si vous ne configurez pas votre connexion au réseau
au cours de la procédure des paramètres initiaux
ou si vous devez réinitialiser la connexion au réseau,
respectez les instructions ci-dessous.
Avant de commencer, contactez votre fournisseur
de services Internet pour savoir si votre adresse IP
est fixe ou dynamique. Si vous avez une adresse IP
dynamique et utilisez un réseau câblé ou sans fil,
nous vous recommandons de suivre les procédures
de Configuration automatique décrites ci-dessous.
Si vous vous connectez à un réseau câblé connectez
l'appareil à votre routeur en utilisant un câble LAN
avant d'entreprendre la procédure de configuration.
Pour commencer la configuration de votre connexion
réseau, respectez les étapes suivantes :
1. Dans le menu d'accueil, sélectionnez
Paramètres, puis appuyez sur le bouton
2. Sélectionnez Réseau, puis appuyez sur le
OK.
bouton
3. Sélectionnez Paramètres réseau, puis appuyez
sur le bouton OK.
4. Consultez les instructions pour les Réseaux
câblés qui débutent ci-dessous ou les
instructions pour les Réseaux sans fil
commençant sur la page suivante.
Réseau câblé
❏ Câble – Automatique
Après avoir suivi les étapes 1 à 3 ci-dessus :
1. Dans le menu Paramètres réseau, réglez Type
de réseau sur Câble. Sélectionnez Connexion,
puis appuyez sur le bouton
OK. L'appareil
détecte la connexion câblée, vérifie la connexion
réseau, puis se connecte au réseau.
2. Une fois terminé, sélectionnez OK, puis appuyez
sur le bouton
OK.
OK.
❏ Câble - Manuel
Si vous disposez d'une adresse IP fixe ou si la
procédure automatique est inopérante, vous devrez
définir les valeurs Paramètres réseau manuellement.
Après avoir suivi les étapes 1 à 3 ci-dessus :
1. Dans le menu Paramètres réseau, réglez Type
de réseau sur Câble. Sélectionnez ensuite
Connexion, puis appuyez sur le bouton
OK.
L'appareil recherche un réseau, puis affiche le
message d'échec de la connexion.
S’il est possible de connecter votre Home
✎
cinéma à votre réseau sans fil, sélectionnez
maintenant Modifier réseau, changez le Type de
réseau pour Sans fil et passez aux instructions
concernant les réseaux sans fil à la page suivante.
Paramètres réseau
Echec de la connexion au réseau câblé.
Echec connexion réseau. Essayez solut. suiv. : vérif. si adr. IP est définie
correctement dans Paramètres IP. Contactez le fournisseur de services Internet
pour plus d'infos.
Modifier réseau Param. IP Réess. Fermer
Adresse MAC XX:XX:XX:XX:XX:XX
Adresse IP 0. 0. 0. 0
Masque ss-réseau 0. 0. 0. 0
Passerelle 0. 0. 0. 0
Serveur DNS 0. 0. 0. 0
2. Utilisez les boutons :; pour sélectionner
Param. IP, puis appuyez sur le bouton
OK.
L'écran Param. IP apparaît.
3. Cliquez sur le champ Config. IP, puis choisissez
Entrer manuellement.
4. Sélectionnez un paramètre à saisir (ex. :
Adresse IP), puis appuyez sur
OK. Utilisez les
boutons 78 de votre télécommande pour
saisir les numéros du paramètre. Ou utilisez
le clavier numérique pour entrer un numéro
de paramètre.Appuyez sur le bouton 123 et
maintenez-le enfoncé jusqu'à ce que le clavier
numérique apparaisse à l'écran. Lorsque le
clavier numérique s'affiche, sélectionnez un
numéro à l'aide du bouton
appuyez sur le bouton
:;
de la télécommande pour passer d'un
78:;
, puis
OK. Utilisez les boutons
champ d'entrée à l'autre au sein d'un même
paramètre. Une fois un paramètre saisi, appuyez
sur le bouton
OK.
5. Appuyez sur le bouton 7 ou 8 pour passer
à un autre paramètre et saisissez-en la valeur
en respectant les instructions contenues dans
l'étape 4.
6. Répétez les étapes 4 et 5 jusqu'à ce que vous
ayez renseigné tous les paramètres.
22 - Français
Page 88

Vous pouvez obtenir les valeurs du réseau auprès
✎
de votre fournisseur d'accès Internet.
7. Après avoir terminé la saisie de toutes les
valeurs, sélectionnez OK, puis appuyez sur le
bouton
OK. Le Home cinéma vérifie la connexion
réseau, puis il se connecte au réseau.
Réseau sans fil
Vous pouvez configurer une connexion à un réseau
sans fil de trois manières :
- Sans fil - Automatique
- Sans fil - Manuel
- WPS(PBC)
Avant de configurer la connexion au réseau sans
fil, débranchez tous les périphériques réseau sans
fil actuellement connectés à l'appareil ou, le cas
échéant, la connexion câblée actuelle de l'appareil.
❏ Sans fil - Automatique
Après avoir exécuté les étapes 1 à 3 de la section
« Configuration de votre connexion réseau » en page
22, procédez comme suit.
1. Dans le menu Paramètres réseau, réglez Type
de réseau sur Sans fil. L'appareil recherche
puis affiche une liste des réseaux disponibles.
Paramètres réseau
Sélectionnez type de réseau.
Type de réseau Sans fil
Réseau sans fil
si-ap
iptime
KIMING_VTOWER
Rafraîchir WPS(PBC)
Vous pouvez connecter votre
Lecteur Blu-ray à Internet.
Sélectionnez le réseau sans
fil à utiliser.
2. Sélectionnez le réseau souhaité et appuyez sur
le bouton OK.
3.
Sur l'écran de sécurité entrez le code de sécurité
ou la phrase de passe correspondant à votre
réseau. Sélectionnez les lettres à l'aide des boutons
78:;
, puis appuyez sur le bouton OK.
4. Lorsque vous avez terminé, sélectionnez
Terminé, puis appuyez sur le bouton OK.
L'appareil se connecte au réseau une fois que la
connexion réseau a été confirmée.
Vous devriez pouvoir trouver la phrase de passe
✎
ou le code de sécurité sur l'un des écrans de
configuration servant à la configuration du routeur
ou du modem.
❏ Sans fil - Manuel
Si vous disposez d'une adresse IP fixe ou si la
procédure automatique est inopérante, vous devrez
définir les valeurs de Paramètres réseau manuellement.
Après avoir exécuté les étapes 1 à 3 de la section
« Configuration de votre connexion réseau » en page
22, procédez comme suit.
1.
Dans le menu Paramètres réseau, réglez Type
de réseau sur Sans fil. L'appareil recherche puis
affiche une liste des réseaux disponibles.
2. Faites défiler la liste, sélectionnez le réseau
souhaité ou l'option Ajouter réseau, puis
appuyez sur le bouton OK.
3. Si vous avez sélectionné un réseau à l'étape 2,
passez à l'étape 6. Si vous avez sélectionné
Ajouter réseau, passez à l'étape 4.
4. Saisissez le nom de votre réseau sans fil ou de
votre routeur sans fil.
• Sélectionnez les lettres à l'aide des boutons
78:;
, puis appuyez sur le bouton OK.
• Pour afficher les lettres en majuscule (ou
réafficher des lettres en minuscule si des
majuscules sont affichées), sélectionnez
,
puis appuyez sur le bouton OK.
• Pour afficher des symboles et la ponctuation,
sélectionnez 123#&, puis appuyez sur le
bouton
OK. Pour réafficher des lettres,
sélectionnez 123#&, puis appuyez sur le
bouton OK.
Lorsque vous avez terminé, sélectionnez
Terminé, puis appuyez sur le bouton
OK.
5. Sur l'écran Type de sécurité qui s'affiche,
sélectionnez à l'aide des boutons 78, le type
de réseau Type de sécurité, et appuyez sur le
bouton OK. Sur l'écran suivant, entrez le code
de sécurité ou la phrase de passe correspondant
à votre réseau.
• Sélectionnez les lettres à l'aide des boutons
78:;
, puis appuyez sur le bouton
OK.
Lorsque vous avez terminé, sélectionnez
Terminé, et appuyez sur le bouton
OK.
L'appareil recherche le réseau.
6. L'écran d'échec de la connexion réseau
apparaît. Utilisez les boutons :; pour
sélectionner Param. IP, puis appuyez sur le
bouton
OK.
Paramètres
23 - Français
Page 89

Paramètres
7. Cliquez sur le champ Config. IP, puis choisissez
Entrer manuellement.
8.
Sélectionnez un paramètre réseau à saisir (ex. :
Adresse IP), puis appuyez sur
boutons 78 de votre télécommande pour saisir
les numéros du paramètre. Ou utilisez le clavier
numérique pour entrer un numéro de paramètre.
Appuyez sur le bouton 123 et maintenez-le
enfoncé jusqu'à ce que le clavier numérique
apparaisse à l'écran. Lorsque le clavier
numérique s'affiche, sélectionnez un numéro à
l'aide du bouton
le bouton
télécommande pour passer d'un champ d'entrée
à l'autre au sein d'un même paramètre. Une fois
une valeur saisie, appuyez sur le bouton
9. Appuyez sur le bouton 7 ou 8 pour passer
à un autre paramètre et saisissez-en la valeur
en respectant les instructions contenues dans
l'étape 8.
10. Répétez les étapes 8 et 9 jusqu'à ce que vous
ayez renseigné tous les paramètres.
Vous pouvez obtenir les valeurs du réseau auprès
✎
de votre fournisseur d'accès Internet.
11. Lorsque vous avez terminé, sélectionnez OK,
puis appuyez sur le bouton
apparaît.
12.
Sur l'écran Sécurité, entrez le code de sécurité ou
la phrase de passe correspondant à votre réseau.
Sélectionnez les lettres à l'aide des boutons
78:;
13. Une fois que vous avez terminé, sélectionnez
Terminé sur la droite de l'écran, puis appuyez
sur le bouton
réseau une fois que la connexion réseau a été
confirmée.
14.
Lorsque le Home cinéma a vérifié le réseau,
sélectionnez OK, puis appuyez sur le bouton
Pour commencer à configurer manuellement le
✎
réseau, allez dans Paramètres > Réseau > État
du réseau.
❏ WPS(PBC)
L'une des façons les plus simples de configurer la
connexion au réseau sans fil est de faire appel à la
fonction WPS(PBC). Si votre routeur sans fil dispose
d'un bouton WPS(PBC), effectuez les étapes cidessous :
Après avoir exécuté les étapes 1 à 3 de la section
« Configuration de votre connexion réseau » en page
22, procédez comme suit.
1.
Dans le menu Paramètres réseau, réglez Type
de réseau sur Sans fil. L'appareil recherche puis
affiche une liste des réseaux disponibles.
2. Faites défiler la liste vers le bas, sélectionnez
WPS(PBC), puis appuyez sur le bouton
78:;
OK. Utilisez les boutons :; de la
, puis appuyez sur le bouton
OK. L'appareil se connecte au
OK . Utilisez les
, puis appuyez sur
OK.
OK. L'écran Sécurité
OK.
OK.
OK.
3.
Appuyez sur le bouton WPS(PBC) situé sur votre
routeur dans les deux minutes qui suivent. L'appareil
obtient automatiquement toutes les valeurs des
paramètres réseau nécessaires et se connecte au
réseau une fois que la connexion a été vérifiée.
4. Une fois terminé, sélectionnez OK, puis appuyez
sur le bouton
Pour la connexion WPS, réglez le cryptage de
✎
sécurité de votre routeur sans fil sur AES. Un
cryptage de sécurité WEP ne prend pas en
charge les connexions WPS.
OK.
Wi-Fi Direct
La fonction Wi-Fi Direct vous permet de connecter
les périphériques Wi-Fi Direct à l'appareil et entre
eux en utilisant un réseau peer-to-peer, sans utiliser
un routeur sans fil.
Certains périphériques Wi-Fi Direct peuvent ne
✎
pas prendre en charge la fonction AllShare s'ils
sont connectés via Wi-Fi Direct. Si tel est le cas,
changez la méthode de connexion réseau que
vous avez utilisée pour connecter le périphérique
au Home cinéma.
Les transmissions Wi-Fi Direct peuvent créer
✎
des interférences avec les signaux Bluetooth.
Avant d'utiliser la fonction Bluetooth, nous vous
recommandons fortement de désactiver la
fonction Wi-Fi Direct sur les périphériques où elle
est activée.
1. Allumez le périphérique Wi-Fi Direct et activez
la fonction Wi-Fi Direct.
2. Dans le menu d'accueil, sélectionnez
Paramètres, puis appuyez sur le bouton
3. Sélectionnez Réseau, puis appuyez sur le
bouton
OK.
4. Sélectionnez Wi-Fi Direct, puis appuyez sur
le bouton
que vous pouvez connecter au home cinéma
s’affichent.
Paramètres
OK. Les périphériques Wi-Fi Direct
Wi-Fi Direct
Nom périph. : [HTS]H7500WM
Sélect. le périph. Wi-Fi Direct pour la connexion.
AndroidXXXXXXX Déconnecté
Rafraîchir
OK.
Fermer
24 - Français
Page 90

5. Vous avez trois manières de procéder à la
connexion Wi-Fi.
• Via le périphérique Wi-Fi
• Via l'appareil en utilisant l'option PBC.
• Via l'appareil en utilisant un code PIN.
Chacune d'elles est indiquée ci-dessous.
Via le périphérique Wi-Fi
1. Sur le périphérique Wi-Fi, suivez la procédure
du périphérique pour la connexion à un
autre périphérique Wi-Fi Direct. Concernant
les instructions, reportez-vous au manuel
d'utilisation du périphérique.
2. Lorsque vous aurez terminé la procédure, vous
devriez voir une fenêtre pop-up sur votre écran
TV indiquant que l'appareil prenant en charge
Wi-Fi Direct a demandé à être connecté.
Sélectionnez OK, puis appuyez sur le bouton
OK pour accepter.
3. La fenêtre contextuelle de connexion s'affiche,
suivie de la fenêtre pop-up connectée.
Lorsqu'elle se ferme, vous devez voir le
périphérique listé sur l'écran Wi-Fi Direct en
tant que connecté.
• Les procédures PBC et PIN connectent les
périphériques automatiquement.
Via l'appareil en utilisant l'option PBC
1. Sélectionner l'appareil Wi-Fi Direct que vous
souhaitez connecter à ce produit, et appuyez
sur le bouton OK.
2. La fenêtre contextuelle de connexion s'affiche,
suivie de la fenêtre pop-up connectée.
Lorsqu'elle se ferme, vous devez voir le
périphérique listé sur l'écran Wi-Fi Direct en
tant que connecté.
Via l'appareil en utilisant un code PIN
1. Sélectionner l'appareil Wi-Fi Direct que vous
souhaitez connecter à ce produit, et appuyez
sur le bouton OK.
2. La fenêtre contextuelle PIN s'affiche.
3. Notez le code PIN de la fenêtre contextuelle,
puis saisissez-le dans le champ approprié du
périphérique Wi-Fi Direct que vous voulez
connecter.
4. La fenêtre contextuelle de connexion s'affiche,
suivie de la fenêtre pop-up connectée.
Lorsqu'elle se ferme, vous devez voir le
périphérique listé sur l'écran Wi-Fi Direct en
tant que connecté.
La connexion actuelle au réseau câblé ou sans fil
✎
sera déconnectée lorsque vous utilisez la fonction
Wi-Fi Direct.
Les fichiers texte, tels que ceux ayant l'extension
✎
.TXT ou .DOC, ne sont pas affichés lorsque vous
utilisez la fonction Wi-Fi Direct.
Mise à niveau du logiciel
Le menu Mise à jour du logiciel vous permet de
mettre le logiciel de l'appareil à niveau pour en
améliorer la performance et obtenir des services
supplémentaires.
• Évitez d'éteindre et de rallumer le produit
manuellement durant le processus de mise à
jour.
1. Dans le menu d'accueil, sélectionnez
Paramètres, puis appuyez sur le bouton
2. Sélectionnez Assistance, puis appuyez sur le
bouton
OK.
3. Sélectionnez Mise à jour du logiciel, puis
appuyez sur le bouton
4. Pour télécharger une mise à jour de logiciel et
mettre à jour, sélectionnez MàJ maintenant,
puis appuyez sur le bouton
plus amples détails, reportez-vous à « MàJ
maintenant » à la page suivante.
5.
Pour permettre au logiciel de télécharger les mises à
jour automatiquement dès qu’elles sont disponibles,
sélectionnez Mise à jour auto, puis appuyez sur le
bouton
OK. (Reportez-vous à la page 26)
La mise à niveau est terminée lorsque l'appareil
✎
s’éteint et s’allume ensuite par lui-même.
Samsung Electronics n'accepte aucune
✎
responsabilité légale concernant un
dysfonctionnement de l'appareil provoqué par
une connexion Internet instable ou une négligence
de la part de l'utilisateur durant la mise à niveau
du logiciel.
Si vous souhaitez annuler la mise à niveau en cours
✎
de téléchargement, appuyez sur le bouton
Lorsqu’une mise à niveau du système est en
✎
cours, « UPDATE » s'affiche sur la façade.
OK.
OK. Pour de
OK.
OK.
Paramètres
25 - Français
Page 91

Paramètres
MàJ maintenant
Vous pouvez utiliser MàJ maintenant pour mettre à jour
le logiciel via votre connexion réseau ou en utilisant une
clé USB à mémoire flash. Les instructions du réseau
sont indiquées ci-dessous. Les instructions de la clé
USB à mémoire flash se trouvent sur cette page.
1. Sélectionnez MàJ maintenant, puis appuyez
sur le bouton
à jour maintenant s'affiche.
2. L’appareil recherche en ligne la version du
logiciel la plus récente.
3. S’il ne trouve pas de mise à jour, la fenêtre
contextuelle"Il n'y a actuellement aucune
nouvelle mise à jour pour vous." apparaît.
Appuyez sur le bouton
4. S’il trouve une nouvelle version, la fenêtre
contextuelle Demande de mise à jour apparaît.
5. Sélectionnez OK. L’appareil procèdera à la
mise à niveau du logiciel, puis s’éteindra et se
rallumera automatiquement.
6. Si vous ne sélectionnez pas OK ou Annuler en
une minute, l'appareil stocke la nouvelle mise à
niveau du logiciel. Vous pouvez mettre à niveau
le logiciel ultérieurement en utilisant la fonction
Mise à jour auto.
7. Si vous sélectionnez Annuler, la mise à niveau
sera annulée par l'appareil.
Lorsque la mise à niveau du système est
✎
terminée, vérifiez les informations du logiciel dans
la section Informations sur le produit de l’écran
Contacter Samsung.
N'éteignez pas l'appareil lorsque l'option Mise à
✎
jour du logiciel est en cours d'exécution. Ceci peut
provoquer le dysfonctionnement de l'appareil.
OK. La fenêtre contextuelle Mettre
OK pour sortir.
Mise à jour auto
Vous pouvez régler la fonction Mise à jour auto de sorte
que l'appareil télécharge de nouveaux logiciels de mise
à niveau lorsqu'il est en mode Mise à jour auto.
En mode
Mise à jour auto
sa connexion à Internet reste activée. Ceci permet à
l'appareil de télécharger automatiquement des logiciels
de mise à niveau lorsque l’appareil n’est pas utilisé.
1. Appuyez sur les boutons 78 pour sélectionner
le mode Mise à jour auto puis appuyez sur le
bouton
2. Si vous sélectionnez Activé ou Arrêt. Si vous
✎
OK.
sélectionnez Activé, l'appareil télécharge
automatiquement le nouveau logiciel de
mise à jour lorsqu'il est en mode Mise à
jour automatique et sous tension. Avant de
télécharger le nouveau logiciel de mise à niveau,
l'appareil vous demandera si vous souhaitez
l’installer à la mise sous tension de l’appareil.
Pour utiliser la fonction Mise à jour auto votre
appareil doit être connecté à Internet.
, l'appareil est allumé mais
Mise à jour par USB
1. Rendez-vous sur le site www.samsung.com.
2. Cliquez sur SUPPORT dans le coin supérieur
droit de la page.
3. Entrez le numéro de modèle de l'appareil dans
le champ de recherche. Une fois que vous avez
entré le numéro du modèle, une liste déroulante
affiche les produits correspondant aux numéros
de modèle.
4. Effectuez un clic gauche sur le numéro de
modèle du produit dans la liste déroulante.
5. Une page s'affiche, faites défiler puis cliquez sur
Firmware Manuals & Downloads.
6. Cliquez sur Firmware au centre de la page.
7. Cliquez sur le bouton ZIP dans la colonne
Fichier sur le côté droit de la page.
8. Cliquez sur Send dans la première fenêtre
contextuelle qui apparaît. Cliquez sur OK
dans la seconde fenêtre contextuelle pour le
téléchargement puis l'enregistrement du fichier
micrologiciel sur votre ordinateur.
9.
Dézippez le dossier compressé sur votre ordinateur.
Vous devriez avoir un seul dossier dézippé portant
le même nom que le fichier compressé.
10. Copiez le dossier sur une clé USB à mémoire
flash.
11. Vérifiez qu'aucun disque n'est inséré dans
l'appareil, puis insérez la clé USB à mémoire
flash dans le port USB de l'appareil.
12.
Dans le menu de l'appareil, allez dans Paramètres
> Assistance > Mise à jour du logiciel.
13. Sélectionnez MàJ maintenant.
14. L’appareil recherche le logiciel sur la clé USB.
Lorsqu'il trouve le logiciel, la fenêtre contextuelle
Demande de mise à jour apparaît.
15. Sélectionnez OK. L’appareil procèdera à la
mise à niveau du logiciel, puis s’éteindra et se
rallumera automatiquement.
16.
Aucun disque ne doit être inséré dans l’appareil
lors de la mise à niveau du logiciel via la prise USB.
Lorsque la mise à niveau du système est
✎
terminée, vérifiez les informations du logiciel dans
la section Informations sur le produit de l’écran
Contacter Samsung.
N'éteignez pas l'appareil durant la mise à
✎
niveau du logiciel. Ceci peut provoquer le
dysfonctionnement de l'appareil.
Les mises à niveau logicielles via la prise USB
✎
doivent être effectuées uniquement à l’aide d’une
clé USB à mémoire flash.
26 - Français
Page 92

Lire un Contenu
Votre Home cinéma peut lire le contenu situé sur des
disques Blu-ray/DVD/CD, des périphériques USB,
des ordinateurs, des smartphones, des tablettes et
sur Internet.
Pour lire le contenu situé sur votre ordinateur ou
un périphérique mobile, vous devez connecter
l’ordinateur ou le périphérique mobile et l’appareil à
votre réseau. Pour lire le contenu sur votre ordinateur,
vous devez également télécharger et installer le
logiciel de réseau AllShare ou posséder déjà le logiciel
de réseau DNLA sur votre ordinateur.
Les ordinateurs fonctionnant sous Windows 7 et
✎
Windows 8 possèdent le logiciel DLNA (Play To)
intégré.
Lecture de disques disponibles
dans le commerce
1. Appuyez sur le bouton 6 pour ouvrir le tiroir
disque.
2. Introduisez doucement le disque dans le tiroir,
face imprimée dirigée vers le haut.
3. Appuyez sur le bouton 6 pour fermer le tiroir
disque. La lecture commence automatiquement.
4.
Si la lecture ne commence pas automatiquement,
appuyez sur le bouton
p
sur la télécommande.
Rangement & gestion des disques.
• Comment tenir le disque
- Des empreintes digitales ou des
rayures sur la surface d'un disque
peuvent altérer la qualité du son et
de l’image ou provoquer des sauts.
- Évitez de toucher la surface du disque sur
laquelle les données ont été enregistrées.
- Tenez le disque par les bords afin de ne pas
laisser d'empreintes sur sa surface.
- Ne collez pas de papier ou d'adhésif sur le
disque.
• Nettoyage des disques
- En cas d'empreintes ou de saleté
sur un disque, nettoyez-le à l'aide
d'eau additionnée de détergent
doux et d'un chiffon doux.
- Lors de son nettoyage, essuyez le disque du
centre vers le bord.
- Rangement des disques
N'installez pas l'appareil à la lumière directe
du soleil.
Stockez-le dans un endroit frais et aéré.
Rangez-le dans une pochette propre et
verticalement.
Lire des fichiers multimédias
1. Sur l'écran Accueil, sélectionnez MULTIMEDIA,
puis appuyez sur le bouton
Récemment lus apparaît.
2.
Sélectionnez Stockage, Périphérique réseau, ou
Service de stockage affichés au bas de l’écran.
• Stockage - affiche les périphériques de
stockage connectés à l’appareil.
• Périphérique réseau - affiche les
périphériques mobiles, les ordinateurs,
les tablettes et les périphériques similaires
connectés au réseau.
• Service de stockage - affiche les services
Cloud auxquels vous êtes connecté.
Lorsque vous sélectionnez un élément, les
✎
informations relatives à cet élément défilent au
bas de la fenêtre de la liste des éléments.
3. Sélectionnez un élément ou un périphérique,
puis appuyez sur le bouton
le contenu de l’élément ou du périphérique
apparaît. En fonction de la manière dont
le contenu est classé, vous verrez soit des
dossiers, soit des fichiers individuels ou les deux
types d'éléments à la fois.
4. Si nécessaire, servez-vous des boutons
78:;
pour sélectionner un dossier, puis
appuyez sur le bouton
5. Utilisez les boutons
un fichier à visionner ou à lire, puis appuyez sur
le bouton
6. Le fichier sélectionné est lu.
7. Appuyez sur le bouton ' (
un dossier ou sur le bouton
revenir à l'écran d'accueil.
8. Consultez les pages 29 à 41 pour obtenir
plus d'instructions concernant la méthode de
contrôle de la lecture de vidéos, musiques et
photos sur un périphérique de stockage.
Pour lister un seul type de fichier support, utilisez
✎
la fonction Filtrer(
supérieur droit de l’écran de l’élément ou du
périphérique.
OK.
OK. L’écran
OK. Un écran listant
OK.
78:;
pour sélectionner
RETOUR) pour quitter
(
QUITTER) pour
e
) située dans le coin
Lire un Contenu
27 - Français
Page 93

Lire un Contenu
A
6
ion Paramètres
e
Dans le menu déroulant Filtrer( ), sélectionnez
✎
Photos, Vidéos ou Musique.
Même si l’appareil affiche des dossiers qui
✎
contiennent tous les types de contenu, il affichera
uniquement les fichiers du type que vous
avez sélectionné. Par exemple, si vous avez
sélectionné Musique, vous ne verrez que les
fichiers musicaux.
Lecture de fichiers sur un périphérique
de stockage
Méthode 1 : Si l'appareil est éteint après que
vous ayez connecté un périphérique de stockage
1. Mettez l'appareil sous tension.
2. Suivez les directives dans « Lire des fichiers
multimédias » à la page 27. À l’étape 2,
sélectionnez Stockage.
Méthode 2 : Avant de connecter un
périphérique USB l'appareil est allumé
1. Connectez le périphérique de stockage au
produit. (un CD enregistré, un périphérique
USB, etc.). La fenêtre contextuelle "Nv. périph.
conn." s'affiche. S'il y a deux ou plus de
périphériques de stockage qui sont connectés
au même moment, utilisez le bouton :; pour
se déplacer entre les périphériques.
LIRE LE DISQUE
LIRE LE DISQUE
Pas de Disque
Pas de Disqu
RECOMMANDE MY APPS
RECOMMANDE
App 1 App 2 App 3 App 4 App 5 App 6
pp 1 App 2 App 3 App 4 App 5 App
✎
2.
✎
MON VIDEO CLUB
MON VIDEO CLUB
Nv. périph. conn.
Tout le contenu
Photos
Vidéos
Musique
Si la fenêtre contextuelle n'apparaît pas, passez à
la méthode 1.
Utilisez les boutons 78 pour sélectionner Tout
le contenu, Photos, Vidéos, ou Musique, et
appuyez ensuite sur le bouton
de la manière dont le contenu est classé,
vous verrez soit des dossiers, soit des fichiers
individuels ou les deux types d'éléments à la fois.
Pour lister un seul type de fichier support, utilisez
la fonction Filtrer(
supérieur droit de l’écran de l’élément ou du
périphérique.
MULTIMEDIA
MULTIMEDIASAMSUNG APPS
Clé USB
Screen Mirroring
Fonction Paramètres
Screen Mirroring Fonct
OK. En fonction
) située dans le coin
SAMSUNG APPS
Dans le menu déroulant Filtrer( ), sélectionnez
✎
Photos, Vidéos ou Musique.
Même si l’appareil affiche des dossiers qui
✎
contiennent tous les types de contenu, il affichera
uniquement les fichiers du type que vous
avez sélectionné. Par exemple, si vous avez
sélectionné Musique, vous ne verrez que les
fichiers musicaux.
3. Si nécessaire, servez-vous des boutons
78:;
appuyez sur le bouton
4. Sélectionnez un fichier à afficher ou lire, puis
appuyez sur le bouton
5. Appuyez sur le bouton ' (RETOUR) pour quitter
un dossier ou sur le bouton
quitter un dossier ou sur le bouton.
6. Consultez les pages 29 à 41 pour obtenir
plus d'instructions concernant la méthode de
contrôle de la lecture de vidéos, musiques et
photos sur un périphérique USB.
Si vous insérez un disque en cours de lecture de
✎
contenu sur un périphérique de stockage USB
ou un téléphone, le mode de l'appareil passe
automatiquement « Disque ».
Si votre téléphone cellulaire est compatible DLNA,
✎
vous pouvez lire le contenu sans la connexion
d'un câble USB.
pour sélectionner un dossier, puis
OK.
OK.
(
QUITTER) pour
e
Lire le contenu enregistré sur un PC/
Périphérique mobile
Vous pouvez lire le contenu multimédia sur le Home
cinéma qui est stocké sur votre ordinateur ou votre
périphérique mobile connecté au même réseau que
le Home cinéma.
Le logiciel Samsung Link doit être installé sur le
✎
PC qui contient le contenu que vous désirez lire
sur le Home cinéma. Le périphérique mobile doit
supporter Samsung Link. Pour plus d'informations
visitez le portail des contenus et services
Samsung sur http://link.samsung.com.
Vous devriez rencontrer des problèmes de
✎
compatibilité lorsque vous tentez de lire les fichiers
multimédias via un server DLNA en trois parties
Le contenu partagé par un ordinateur ou un
✎
périphérique mobile ne doit pas dépendre du type
d'encodage et du format des fichiers du contenu.
De plus, certaines fonctions peuvent ne pas être
disponibles.
Le contenu multimédia peut ne pas être lu
✎
correctement suivant l'état du réseau. Si c'est le
cas, utilisez un périphérique de stockage USB.
28 - Français
Page 94

1. Sur l'écran Accueil, sélectionnez MULTIMEDIA,
puis appuyez sur le bouton
2. Sélectionnez Périphérique réseau au bas de
l’écran, puis appuyez sur le bouton
périphériques de stockage connectés au même
réseau que le home cinéma sont listés.
3. Sélectionnez un périphérique de stockage, puis
appuyez sur le bouton
fichiers partagés par le périphérique de stockage
sélectionné sont listés.
4. Si nécessaire, servez-vous des boutons
78:;
pour sélectionner un dossier, puis
appuyez sur le bouton
5. Sélectionnez un fichier à visualiser ou lire, puis
appuyez sur le bouton
6. Appuyez sur le bouton ' (
un dossier ou sur le bouton
revenir à l'écran d'accueil.
7. Consultez les pages 29 à 41 pour obtenir
plus d'instructions concernant la méthode de
contrôle de la lecture de vidéos, musiques et
photos sur un périphérique de stockage.
Pour lister un seul type de fichier support, utilisez
✎
la fonction Filtrer(
supérieur droit de l’écran de l’élément ou du
périphérique.
Dans le menu déroulant Filtrer( ), sélectionnez
✎
Photos, Vidéos ou Musique.
Même si l’appareil affiche des dossiers qui
✎
contiennent tous les types de contenu, il affichera
uniquement les fichiers du type que vous
avez sélectionné. Par exemple, si vous avez
sélectionné Musique, vous ne verrez que les
fichiers musicaux.
Alternativement, déplacez-vous jusqu'au contenu
✎
à lire et appuyez sur le bouton OK pour lire le
contenu.
OK.
OK. Les
OK. Les dossiers et
OK.
OK.
RETOUR) pour quitter
(
QUITTER) pour
e
) située dans le coin
Lire les contenus multimédia
enregistrés dans un service Cloud
Dropbox, SkyDrive et autres services du Cloud
enregistrent le contenu de l’utilisateur tel que les
photos, les vidéos et les fichiers musicaux sur un
serveur distant accessible via Internet.
Lorsque votre home cinéma est connecté à Internet,
vous pouvez voir ou lire le contenu des supports
enregistrés dans un service Cloud via le home
cinéma.
Pour lire le contenu dans le service Cloud, vous
✎
devez vous identifier dans votre compte Samsung
et lier le compte Samsung au compte de service
Cloud. Pour les informations liées à la méthode
permettant de lier votre compte Samsung à
votre compte de service Cloud, référez vous à la
section «Connexion à votre compte Samsung».
1. Dans le menu d'accueil, sélectionnez
MULTIMEDIA, puis appuyez sur le bouton
2. Sélectionnez Service de stockage dans le coin
inférieur de l'écran.
3. Les services Cloud connectés à votre compte
Samsung apparaissent.
4. Sélectionnez un service Cloud. Les dossiers et
fichiers dans le service Cloud sont listés.
5. Si nécessaire, servez-vous des boutons
78:;
pour sélectionner un dossier, puis
appuyez sur le bouton
6. Sélectionnez un fichier à visualiser ou lire, puis
appuyez sur le bouton
7. Appuyez sur le bouton ' (
un dossier ou sur le bouton
revenir à l'écran d'accueil.
8. Consultez les pages 29 à 41 pour obtenir
plus d'instructions concernant la méthode de
contrôle de la lecture de vidéos, musiques et
photos situés dans un Service de stockage.
OK.
OK.
RETOUR) pour quitter
(
QUITTER) pour
e
OK.
Contrôle de la lecture Vidéo
Vous pouvez commander la lecture du contenu vidéo
stocké sur un disque Blu-ray/DVD, un périphérique
USB, un périphérique mobile, ou un ordinateur.
En fonction du disque ou du contenu, certaines
fonctions décrites dans ce manuel peuvent ne pas
être disponibles.
Boutons de la télécommande servant à
la lecture vidéo
1
Utilisation du menu du disque, du menu des
1
titres, du menu contextuel et de la liste des titres
DISC MENU
Au cours de la lecture, appuyez sur ce bouton
pour afficher le menu Disque.
2
Lire un Contenu
29 - Français
Page 95

Lire un Contenu
TITLE MENU
Au cours de la lecture, appuyez sur ce bouton
pour afficher le menu Titre ou le menu Contextuel.
• Si le disque possède une liste de lecture,
appuyez sur le bouton Trier par pour y accéder.
Boutons liés à la lecture
2
L'appareil ne lit pas le son en mode Recherche, ou
Lent.
• Pour reprendre la lecture à une vitesse normale,
appuyez sur la touche p.
p
e
(
QUITTER)
Lecture
rapide
Lecture au
ralenti
Saut de
lecture
Permet de démarrer/d’interrompre
la lecture.
Permet de démarrer/d’interrompre
la lecture.
Durant la lecture, appuyez sur le
[
bouton
le enfoncé. Chaque fois que
vous appuyez longuement sur le
bouton
lecture change.
En mode Pause, appuyez sur
le bouton ] et maintenezle enfoncé. Chaque fois que
vous appuyez longuement sur le
bouton ], la vitesse de lecture
change.
Durant la lecture, appuyez sur le
bouton
Chaque fois que vous appuyez
sur le bouton
passe au chapitre ou au fichier
suivant ou précédent.
ou ] et maintenez-
[
ou ], la vitesse de
[
ou sur le bouton ].
[
ou ] le disque
Utilisation du menu OUTILS
Disques disponibles dans le commerce
Durant la lecture, appuyez sur le bouton TOOLS.
Vidéo basée sur un fichier
Durant la lecture, appuyez sur le bouton TOOLS.
Utilisez les boutons :; pour sélectionner
Paramètres (
puis appuyez sur le bouton OK.
Lire depuis le début
Sélectionnez cette option pour revenir en début de
film, puis appuyez sur le bouton OK.
) situé dans le coin supérieur droit,
T
3D
Utilisez le menu 3D pour sélectionner l'option Côteà-côte ou Haut-bas si le contenu 3D en cours de
lecture n'apparaît pas correctement en mode 3D.
N'utilisez le menu 3D que pour du contenu 3D.
✎
Si vous appliquez le format Côte-à-côte ou
Haut-bas au contenu 2D, il ne s'affichera pas
correctement.
Sélectionner la scène
Vous pouvez utiliser la fonction Sélectionner la
scène durant la lecture pour visualiser ou démarrer
un film à partir de la scène de votre choix.
Si les informations d'index contenues dans
✎
le fichier sont endommagées ou si le fichier
ne prend pas en charge l'indexage, vous
ne serez pas en mesure d'utiliser la fonction
Sélectionner la scène.
Si vous utilisez la fonction DLNA après avoir
✎
connecté un ordinateur via votre réseau, la
fonction Sélectionner la scène peut ne pas être
prise en charge.
Rech. titres :
contient plusieurs films, sélectionnez cette
option pour lancer un autre titre.
1. Sélectionnez Rech. titres, puis appuyez sur
le bouton
2. Utilisez les boutons 78 pour sélectionner
un titre puis appuyez sur le bouton OK.
Rechercher des chapitres :
option pour lire le chapitre de votre choix.
1. Sélectionnez Rechercher des chapitres,
puis appuyez sur le bouton
2. Utilisez les boutons 78 pour sélectionner
Rech. barre de temps : Sélectionnez cette
option pour lire le film à partir d'un point temporel
spécifique.
1. Sélectionnez Rech. barre de temps, puis
appuyez sur le bouton
2. Appuyez sur le bouton 123 et maintenez-le
enfoncé jusqu'à ce que le clavier numérique
apparaisse à l'écran. Lorsque le clavier
numérique s'affiche, sélectionnez un numéro
à l'aide du bouton
sur le bouton
Vous pouvez également vous servir des
✎
boutons :; pour avancer dans le film ou le
rembobiner. Le film effectue respectivement une
avance ou un retour d'une minute à chaque fois
que vous appuyez sur les boutons :;.
Si le disque ou le périphérique
OK.
Sélectionnez cette
OK.
un chapitre puis appuyez sur le bouton
OK.
78:;
OK.
, puis appuyez
OK.
30 - Français
Page 96

Mode Répétition
Vous permet de répéter un titre, un chapitre ou
une section spécifique.
- Arrêt : cette option permet de revenir en mode
de lecture normale.
- Titre : cette option permet de répéter la lecture
d'un titre spécifique.
- Chapitre : cette option permet de répéter la
lecture d'un chapitre spécifique.
- Répétition A-B : cette option permet de répéter
la lecture d'une section spécifique.
1. Appuyez sur le bouton
sur lequel vous souhaitez démarrer la
répétition (A).
2.
Appuyez sur le bouton OK à l'emplacement sur
lequel vous souhaitez arrêter la répétition (B).
En fonction du disque, l’écran peut ne pas
✎
afficher toutes les options de répétition.
Les options Arrêt, Rep. 1X et Répét. Tout
✎
apparaissent lors de la lecture d'une vidéo
enregistrée en temps que fichier numérique.
L’écran peut ne pas afficher immédiatement
✎
Chapitre ou Titre. Continuez à appuyer sur les
boutons 78 jusqu’à ce que votre choix soit à
l’intérieur du champ applicable.
L’écran peut ne pas afficher immédiatement
✎
Répétition A-B. Continuez à appuyer sur les
boutons 78 jusqu’à ce que Répétition A-B
soit à l’intérieur du champ applicable.
Vous devez définir le point (B) à un intervalle
✎
d'au moins 5 secondes de temps de lecture
après le point (A).
Mode Image
Cette option vous permet de définir la fonction
Mode Image.
- Dynamique : permet d'accentuer la netteté et la
luminosité.
- Standard : choisissez ce réglage pour la plupart
des applications d'affichage.
- Cinéma : ce réglage est le mieux adapté au
visionnage de films.
- Utilisateur : ce réglage vous permet de régler
respectivement la fonction de netteté et de
réduction de bruit.
Lorsque vous utilisez la fonction BD Wise, ce
✎
menu ne s'affiche pas.
Mode égaliseur
Activez Mode égaliseur pour utiliser l’égaliseur.
OK à l'emplacement
Paramètres Egaliseur
Vous permet d'utiliser l'égaliseur.
Equaliser Paramètres apparaît uniquement
✎
lorsque le Mode égaliseur est défini sur Activé.
Audio
Sélectionnez cette option pour régler la langue de
bande son souhaitée.
Sync. audio
Dans certains cas, lorsque le produit est connecté à un
téléviseur numérique, le signal audio peut ne pas être
synchronisé avec le signal vidéo. Lorsque cela se produit,
utilisez Audio Sync pour régler le temps de retard audio
de manière à ce qu'il corresponde au signal vidéo.
Sous-titres
Sélectionnez cette option pour régler la langue de
sous-titres souhaitée.
Param. de sous-titre
Sélectionnez cette option pour régler la langue de
sous-titres souhaitée.
Angle
Utilisé pour regarder une scène sous un autre
angle. L’option Angle affiche le nombre d'angles
disponibles (1/1, 1/2, 1/3, etc.).
BONUSVIEW Vidéo BONUSVIEW Audio
Réglez l'option Bonusview souhaitée.
Pivoter
Vous pouvez faire pivoter l'écran de 90 degrés
dans le sens des aiguilles d'une montre ou dans le
sens inverse des aiguilles d'une montre.
Plein écran
Permet de régler la taille de l'image vidéo.
Choisissez Original, Mode1 (plus grand) ou
Mode2 (le plus grand).
Information
Permet d'afficher les informations relatives au
fichier vidéo.
Le menu Outils peut varier en fonction du disque
✎
ou du périphérique de stockage.
La lecture des fichiers vidéo au débit binaire élevé
✎
égal ou supérieur à 20 Mbps, exerce une forte
charge sur les capacités du lecteur et risque, de
ce fait, de s’interrompre en cours d’exécution.
Lire un Contenu
31 - Français
Page 97

Lire un Contenu
Utilisation des menus Trier par & Options
Sélectionnez la fonction Filtrer
afficher uniquement les vidéos.
Même si l’appareil affiche des dossiers qui
✎
contiennent tous les types de contenu, il affichera
uniquement les fichiers du type que vous avez
sélectionné. Par exemple, si vous avez sélectionné
Vidéos, vous ne verrez que les fichiers vidéos.
Sur l’écran listant les fichiers vidéos, utilisez les boutons
78:;
pour sélectionner Trier par ou Options en
haut à droite, puis appuyez sur le bouton
Trier par
Date
Permet d'afficher tous les dossiers contenant
des vidéos classés par date. Si vous
sélectionnez un dossier et appuyez sur le bouton
OK
, tous les fichiers vidéos contenus dans ce
dossier s’affichent classés par date.
Titre
Permet d'afficher tous les fichiers vidéo contenus
sur le support ou le périphérique de stockage
classés par titre.
Dossier
Permet d'afficher tous les dossiers contenus sur
le support ou le périphérique de stockage.
Options
Lire élém. sél.
L’option Lire élém. sél. vous permet de créer
une liste de lecture en sélectionnant les fichiers
spécifiques à lire. Elle fonctionne essentiellement
de la même manière sur tous les supports.
Reportez-vous à « Utilisation de Lire élém. sél.
avec un CD du commerce » à la page 35.
Envoyer
Sélectionnez Envoyer pour envoyer des fichiers
sélectionnés vers des sites en ligne (Picasa,
Facebook, etc.) ou des périphériques. Pour
utiliser la fonction Envoyer avec un site en ligne,
il vous faut établir un compte auprès de ce site
en ligne, et y accéder en utilisant la fonction
Connexion. Envoyer fonctionne essentiellement
de la même manière pour la musique, les photos
et les vidéos. Pour les instructions générales,
reportez-vous à « Utilisation de la fonction
Envoyer » à la page 41.
Vidéos
( )
puis Vidéos pour
OK.
Les menus Trier par et Options sont généralement
✎
disponibles lorsque vous regardez des fichiers
vidéos sur une clé USB à mémoire flash, un
ordinateur, un disque que vous avez enregistré
vous-même ou un périphérique mobile. Ils ne sont
en général pas disponibles si vous regardez un
disque Blu-ray, DVD ou CD du commerce.
Contrôle de la lecture de musique
Vous pouvez commander la lecture du contenu
musical stocké sur un DVD, CD, un périphérique
USB, un périphérique mobile ou un ordinateur.
En fonction du disque ou du contenu, certaines
fonctions décrites dans ce manuel peuvent ne pas
être disponibles.
Boutons de la télécommande servant à
l'écoute de musique
143
2
Boutons [ ] : Ils permettent de passer à
1
la piste précédente/suivante.
Bouton
2
lecture d'une piste.
Lecture rapide (CD audio [CD-DA]
uniquement)
Durant la lecture, appuyez sur le bouton
3
ou ] et maintenez-le enfoncé.
Chaque fois que vous appuyez longuement
sur le bouton [ ou ], la vitesse de
lecture change.
Bouton p : Permet de lire ou mettre en pause
4
une piste.
QUITTER) : Permet d'arrêter la
(
e
[
Les menus Options, Trier par peuvent varier
✎
en fonction du disque ou du périphérique de
stockage utilisé. Toutes les options peuvent ne
pas s'afficher.
32 - Français
Page 98

Commandes de l’écran Musique
TRACK 001 00:43
TRACK 002 03:56
TRACK 003 04:41
TRACK 004 04:02
TRACK 001
00:00/00:00
TRACK 005 03:43
TRACK 006 03:40
TRACK 007 04:06
TRACK 008 03:52
TRACK 009 03:04
TRACK 010 04:02
L’écran Liste des pistes apparaît initialement et la lecture
commence par la première piste. Si vous lisez un disque
enregistré du commerce et si vous n’appuyez pas
momentanément sur un bouton de la télécommande,
l’écran Lecture s’affiche. Pour revenir à l’écran Liste des
pistes, appuyez sur le bouton ' (
RETOUR).
TRACK 001
00:00:40 00:03:35
Sur l’écran Liste des pistes, utilisez les boutons 78
pour mettre en surbrillance la piste désirée. Appuyez
sur le bouton
OK pour lire la piste.
Commandes des musiques à l’écran
Permet de mettre en pause une
piste.
Lecture d’une piste.
Permet de revenir à la plage
précédente.
Permet de passer à la piste
suivante.
1
Permet de rembobiner la piste.
Permet d'avancer sur la piste.
Répétition d'une piste ou de toutes
,
les pistes.
Lecture des pistes dans un ordre
aléatoire.
Affichage de l’égaliseur.
Paramètres Egaliseur :
Ajustement manuel de l’égaliseur.
(Disponible uniquement lorsque
Mode Égaliseur est Activé)
Lire élém. sél. : L'option Lire élém.
sél. vous permet de sélectionner
les fichiers spécifiques à lire.
Elle fonctionne essentiellement
de la même manière sur tous
les supports. Reportez-vous à «
Sur l’écran
Liste
musicale
uniquement.
Utilisation de Lire les éléments
sélectionnés avec Self-Recorded
Media (CD, périphériques USB,
etc.)
» à la page 35.
Extraction : La fonction Extraction
permet de convertir un CD audio
en format mp3 et de sauvegarder
les fichiers convertis sur une clé
USB ou sur le périphérique mobile
connecté à l'appareil. Consultez la
section
Extraction
à la page 37.
Information : Affiche les
informations de la piste.
Pour accéder aux commandes, lancez la lecture d'une
piste, puis servez-vous des boutons
78:;
afin de
passer à la commande de votre choix.
Les commandes de l’écran Musique sont accessibles
✎
uniquement lorsqu’une piste est en lecture.
Toutes les commandes ne s’affichent pas
✎
simultanément.
Pour le contenu basé sur des fichiers, les options
✎
de Paramètres(
) disponibles peuvent varier.
Utilisation des menus Trier par & Options
Sélectionnez la fonction
pour afficher uniquement les fichiers musicaux.
Même si l’appareil affiche des dossiers qui
✎
contiennent tous les types de contenu, il affichera
uniquement les fichiers du type que vous avez
sélectionné. Par exemple, si vous avez sélectionné
Musique, vous ne verrez que les fichiers musicaux.
Filtrer
( ) puis
Musique
Lire un Contenu
33 - Français
Page 99

Lire un Contenu
Sur l’écran listant les fichiers vidéos, utilisez les boutons
78:;
pour sélectionner Trier par ou Options en
haut à droite, puis appuyez sur le bouton OK.
Musique
Trier par
Piste
Permet d'afficher toutes les pistes de musique
contenues sur le support ou le périphérique de
stockage.
Album
Permet d'afficher toutes les musiques contenues
sur le support ou le stockage classées par
album.
Artiste
Permet d'afficher tous les fichiers de musique
contenus sur le support ou le périphérique de
stockage classés par artiste.
Genre
Permet d'afficher toutes les musiques contenues
sur le support ou le stockage classées par
genre.
Dossier
Permet d'afficher tous les dossiers contenus sur
le support ou le périphérique de stockage.
Options
Lire élém. sél.
L'option Lire élém. sél. vous permet de
sélectionner les fichiers spécifiques à lire. Elle
fonctionne essentiellement de la même manière
sur tous les supports. Reportez-vous à « Utilisation
de Lire élém. sél. avec un CD du commerce »
à la page 35 et « Utilisation de Lire les éléments
sélectionnés avec Self-Recorded Media (CD,
périphériques USB, etc.) » à la page 35.
Envoyer
Sélectionnez Envoyer pour envoyer des fichiers
sélectionnés sur des applications en ligne (Picasa,
Facebook, etc.) ou des périphériques. Pour
utiliser la fonction Envoyer, vous devez établir
un compte auprès du site en ligne et y accéder
en utilisant la fonction Connexion. Envoyer
fonctionne essentiellement de la même manière
pour la musique, les photos et les vidéos. Pour
les instructions générales, reportez-vous à «
Utilisation de la fonction Envoyer » à la page 41.
Encodage
Vous pouvez modifier le nom d’une liste de lecture.
Renommer liste lecture
Vous pouvez modifier le nom de la liste de lecture.
Supprimer une liste de lecture
Vous pouvez supprimer une liste de lecture.
Aj. Liste lect.
Vous pouvez ajouter des fichiers
complémentaires à une liste de lecture.
Le menu Options peut varier en fonction du
✎
disque ou du périphérique de stockage utilisé.
Toutes les options peuvent ne pas s'afficher.
Renommer liste lecture et Supprimer une liste
✎
de lecture s’affichent uniquement si une liste de
lecture existe.
Répétition des pistes d’un CD Audio
Vous pouvez régler l'appareil pour répéter les pistes
d’un CD audio (CD-DA/MP3).
1. Pendant la lecture, utilisez les boutons
pour sélectionner
dans le coin inférieur
gauche de l’écran Liste des pistes, puis appuyez
sur le bouton OK.
2. Utilisez les boutons 78 pour sélectionner le
mode de répétition souhaité - Arrêt, 1 musique
ou Tous - puis appuyez sur le bouton OK.
TRACK 001 00:43
TRACK 002 03:56
TRACK 003 04:41
TRACK 004 04:02
TRACK 001
00:00/00:00
TRACK 005 03:43
TRACK 006 03:40
TRACK 007 04:06
TRACK 008 03:52
TRACK 009 03:04
TRACK 010 04:02
Liste des pistes
TRACK 001
00:00:40 00:03:35
Écran de lecture
Appuyez sur le bouton ' (
RETOUR) de la
télécommande pour revenir à l’écran Liste des pistes.
78:;
34 - Français
Page 100

Lecture aléatoire des pistes d’un CD Audio
Vous pouvez régler l'appareil pour lire les pistes d’un
CD audio (CD-DA/MP3) de façon aléatoire.
Pendant la lecture, utilisez les boutons
1.
pour sélectionner
de l'écran, puis appuyez sur le bouton
2. Utilisez les boutons 78 to pour définir le mode
Aléatoire sur Arrêt ou Activé, puis appuyez sur
le bouton
OK.
dans le coin inférieur gauche
78:;
OK.
Utilisation de Lire élém. sél. avec un CD
du commerce
1. Sur l’écran Liste des pistes, sélectionnez
Paramètres (
puis appuyez sur le bouton
Paramètres s’affiche.
2. Sélectionnez Lire élém. sél., puis appuyez sur
le bouton
3. Utilisez les boutons 78 pour sélectionner
une piste, puis appuyez sur le bouton
coche s’affiche à la gauche de la piste.
4. Répétez l’étape 3 pour sélectionner et cocher
des pistes supplémentaires.
5. Pour retirer une piste de la liste, accédez à la
piste et appuyez à nouveau sur le bouton
La coche de la piste est retirée.
6. Une fois terminé, sélectionnez Lecture sur le
bouton gauche, puis appuyez sur le bouton
OK. L’écran Liste des pistes s’affiche à nouveau
en listant uniquement les pistes que vous avez
cochées. Les pistes sélectionnées sont alors
lues automatiquement.
7. Pour annuler la liste Lire élém. sél., sélectionnez
Paramètres (
Liste des pistes. Dans le menu Paramètres,
sélectionnez Lire tout. L’écran Liste des pistes
s’affiche à nouveau avec toutes les pistes
contenues sur le CD listées.
Vous pouvez sélectionner jusqu’à 99 pistes d’un CD
✎
audio (CD-DA) en utilisant Lire élément sélectionné.
Sur l'écran Lire élém. sél., vous pouvez
✎
également choisir Sélect. tout, Tout suppr et
Annuler.
- Utilisez Sélect. tout pour sélectionner toutes
les pistes. Ceci annule vos sélections de pistes
individuelles. Lorsque vous appuyez sur le
bouton ' (
que vous sélectionnez Lecture puis appuyez sur
le bouton
l’écran Liste des pistes et l'appareil commence
à lire toutes les pistes à partir de la piste 001.
) sur le bouton gauche,
OK. Le menu
OK. L’écran Lire élém. sél. apparaît.
OK. Une
OK.
) au bas à gauche de l’écran
RETOUR) de votre télécommande ou
OK, toutes les pistes s’affichent sur
- Utilisez Tout suppr pour désélectionner en une
seule fois toutes les pistes sélectionnées. Puis,
sélectionnez des pistes individuelles ou utilisez
Sélect. tout pour sélectionner toutes les pistes,
puis appuyez sur le bouton ' (
votre télécommande ou sélectionnez Lecture
puis appuyez sur le bouton
pas l'option Sélect. tout ou ne sélectionnez pas
de piste individuelle, la liste Lire élém. sél. ne
sera pas modifiée.
- Annuler annule tout changement effectué sur
l’écran Lire élém. sél.. Lorsque vous revenez à
l’écran Liste des pistes, la liste Lire élém. sél.
sera inchangée.
RETOUR) de
OK. Si vous n'utilisez
Utilisation de Lire les éléments
sélectionnés avec Self-Recorded
Media (CD, périphériques USB, etc.)
1. Insérez un CD auto-enregistré ou un
périphérique USB contenant des fichiers autoenregistrés dans le home cinéma. La fenêtre
contextuelle Nv. périph. conn. s'affiche.
2. Sélectionnez Musique, puis appuyez sur le
bouton
OK de votre télécommande. L’écran
Liste des fichiers affiche les icônes pour les
pistes, les dossiers ou les deux.
3. Si nécessaire, servez-vous des boutons
78:;
pour sélectionner un dossier, puis
appuyez sur le bouton
4. Lorsque les pistes que vous souhaitez lire sont
affichées, sélectionnez Options en haut à droite,
puis appuyez sur le bouton
5. Sélectionnez Lire les éléments sélectionnés,
puis appuyez sur le bouton
cocher apparaissent en haut à gauche des
icônes des pistes.
6. Utilisez les boutons
une piste, puis appuyez sur le bouton
coche apparaît dans la case.
7. Répétez l’étape 6 pour cocher et sélectionner
des pistes supplémentaires.
8. Pour retirer une piste de la liste, accédez à la
piste et appuyez à nouveau sur le bouton
La coche de la piste est retirée.
9. Une fois terminé, sélectionnez Lire, puis appuyez
sur le bouton
s’affiche en listant uniquement les pistes que
vous avez cochées. Les pistes sélectionnées
sont alors lues automatiquement.
10. Pour annuler la liste Lire les éléments
sélectionnés, appuyez sur le bouton
(
RETOUR) ou sur le bouton
vous appuyez sur ' (
à l’écran Liste des fichiers. Si vous appuyez sur
(
QUITTER), vous revenez à l’écran d’accueil.
e
OK.
OK.
OK. Les cases à
78:;
pour sélectionner
OK. Une
OK. L’écran Liste des pistes
'
(QUITTER). Si
e
RETOUR), vous revenez
OK.
Lire un Contenu
35 - Français
 Loading...