

Samsung HT-C550-XAC User Manual
HT-C550
HT-C553
HT-C555
HT-C650W
HT-C653W
HT-C655W
Digital Home
Theater System
user manual
Imagine the possibilities
Thank you for purchasing this Samsung product.
To receive more complete service,
please register your product at
www.samsung.com/register

Safety Information
Safety Warnings
TO REDUCE THE RISK OF ELECTRIC SHOCK, DO NOT REMOVE THE COVER(OR BACK).
NO USER-SERVICEABLE PARTS ARE INSIDE. REFER SERVICING TO QUALIFIED SERVICE PERSONNEL.
CAUTION
RISK OF ELECTRIC SHOCK
DO NOT OPEN
This symbol indicates “dangerous voltage”
inside the product that presents a risk of
electric shock or personal injury.
CAUTION :
SHOCK, DO NOT REMOVE COVER (OR BACK).
NO USER SERVICEABLE PARTS INSIDE. REFER
SERVICING TO QUALIFIED SERVICE PERSONNEL.
TO REDUCE THE RISK OF ELECTRIC
This symbol indicates important
instructions accompanying the product.
WARNING
To reduce the risk of fi re or electric shock, do not
•
expose this appliance to rain or moisture.
To prevent injury, this apparatus must be securely
•
attached to the fl oor/wall in accordance with the
installation instructions.
CLASS 1 LASER PRODUCT
KLASSE 1 LASER PRODUKT
LUOKAN 1 LASER LAITE
KLASS 1 LASER APPARAT
PRODUCTO LÁSER CLASE 1
CLASS 1 LASER PRODUCT
This product is classifi ed as a CLASS 1 LASER product.
Use of controls, adjustments or performance of
procedures other than those specifi ed herein may result in
hazardous radiation exposure.
CAUTION
Apparatus shall not be exposed to dripping or splashing and
•
no objects fi lled with liquids, such as vases, shall be placed on
the apparatus.
DANGER
VISIBLE AND INVISIBLE LASER RADIATION WHEN OPEN.
AVOID DIRECT EXPOSURE TO BEAM. (FDA 21 CFR)
CAUTION
CLASS 3B VISIBLE AND INVISIBLE LASER RADIATION
•
WHEN OPEN. AVOID EXPOSURE TO THE BEAM (IEC
60825-1)
THIS PRODUCT UTILIZES A LASER. USE OF CONTROLS
•
OR ADJUSTMENTS OR PERFORMANCE OF PROCEDURES
OTHER THAN THOSE SPECIFIED HEREIN MAY RESULT IN
HAZARDOUS RADIATION EXPOSURE. DO NOT OPEN
COVER AND DO NOT REPAIR YOURSELF. REFER
SERVICING TO QUALIFIED PERSONNEL.
Note to CATV system installer
This reminder is provided to call the CATV system installer’s attention to Section 820~40 of the NEC which provides
guidelines for proper grounding and, in particular, specifies that the cable ground shall be connected to the grounding
system of the building, as close to the point of cable entry as practical.
2 English
Precautions
Ensure that the AC power supply in your house complies with the identifi cation sticker located on the back of your product.
•
Install your product horizontally, on a suitable base (furniture), with enough space around it for ventilation (3~4 inches).
•
Do not place the product on amplifi ers or other equipment which may become hot.
•
Make sure the ventilation slots are not covered.
Do not stack anything on top of the product.
•
Before moving the product, ensure the Disc Insert Hole is empty.
•
In order to disconnect the product completely from the power supply, remove the AC plug from the wall outlet, especially when left
•
unused for a long period of time.
•
During thunderstorms, disconnect the AC plug from the wall outlet. Voltage peaks due to lightning could damage the
product.
•
Do not expose the product to direct sunlight or other heat sources. This could lead to overheating and malfunction of the
product.
Protect the product from moisture, and excess heat or equipment creating strong magnetic or electric fi elds (i.e.
•
speakers.).
Disconnect the power cable from the AC supply if the product malfunctions.
•
Your product is not intended for industrial use. Use of this product is for personal use only.
•
Condensation may occur if your product or disc has been stored in cold temperatures. If transporting the product during
•
the winter, wait approximately 2 hours until the product has reached room temperature before using.
The batteries used with this product contain chemicals that are harmful to the environment.
•
Do not dispose of batteries in the general household trash.
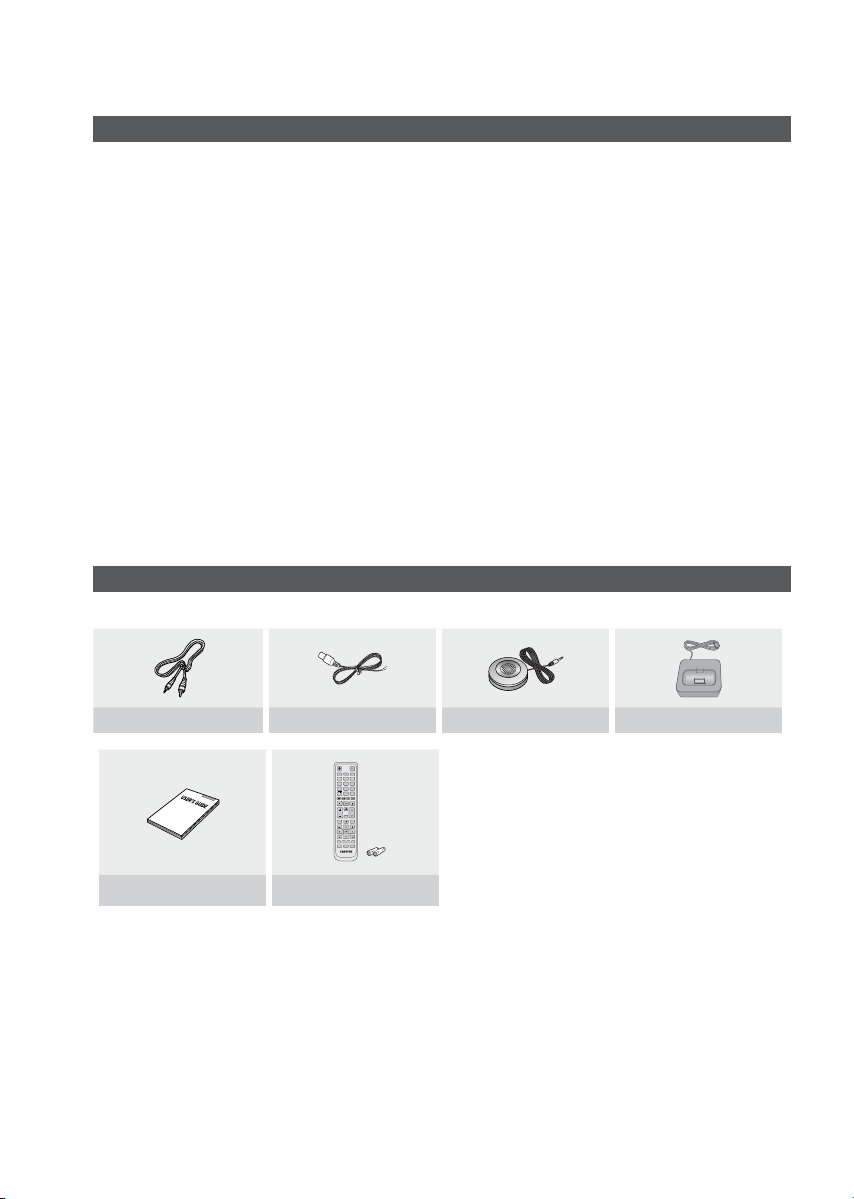
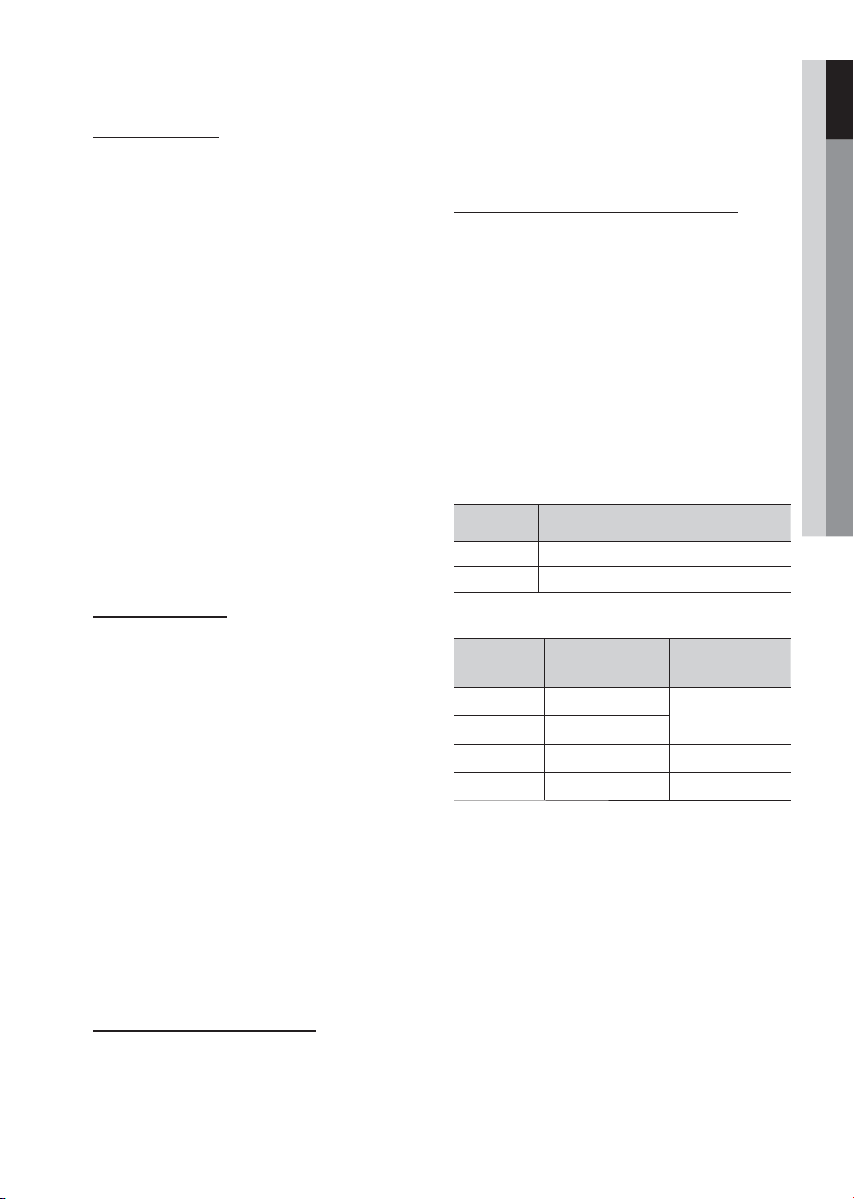
Accessories
Check for the supplied accessories below.
Video Cable FM Antenna ASC microphone iPod Dock
FUNCTION
POWER
TV SOURCE
DVD RECEIVER/TV SLEEP
㪈㪉㪊
㪋㪌㪍
㪎㪏㪇㪐
DSP /EQ
MUTE
TUNING
VOL
/CH
REPEAT
DISC MENU MENU
TITLE MENU
TOOLS
INFO
RETURN
EXIT
TUNER MEMORY
MO/ST CD RIPPING
ABCD
DIMMER S . VOL AUDIO UPSCALE
P .BASS
User's Manual
Remote Control/Batteries (AAA size)
English 3
Safety Information
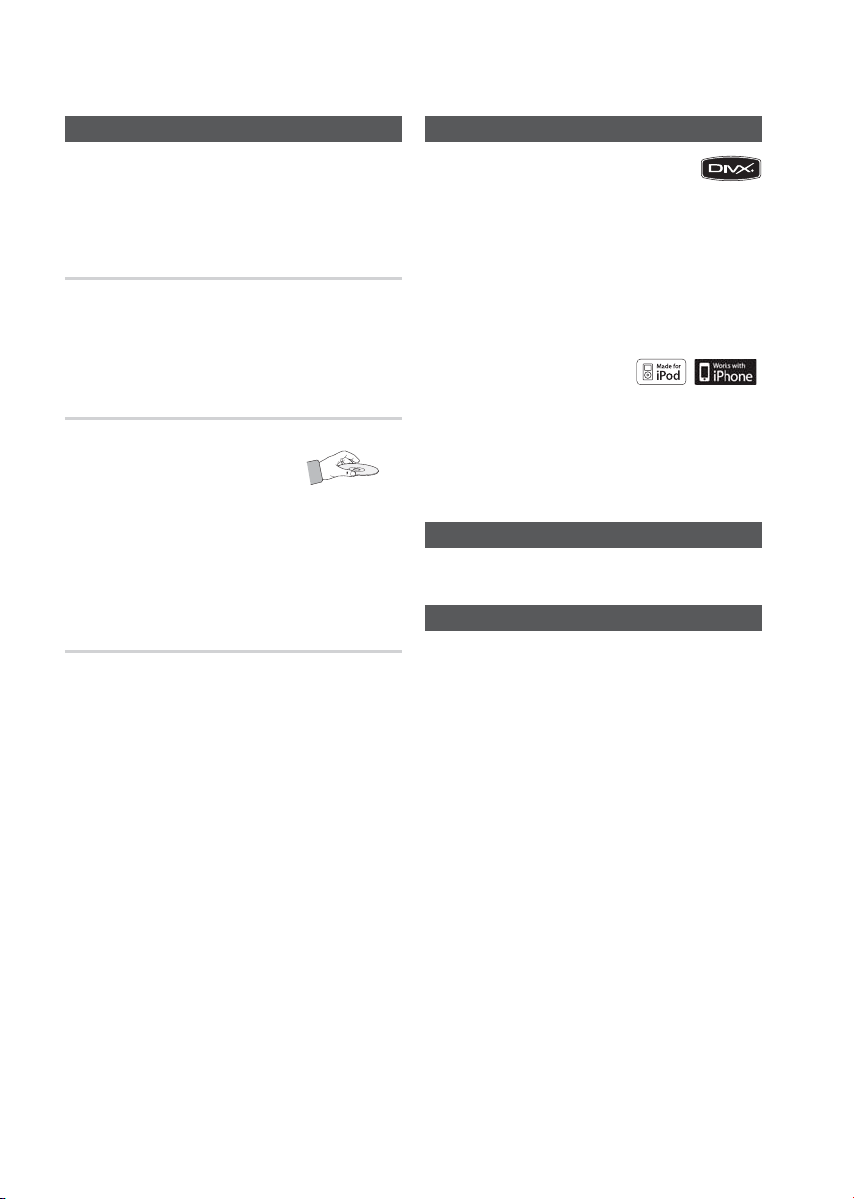
Cautions on Handling and Storing Discs
Small scratches on the disc may reduce sound and
picture quality or cause skipping.
Be especially careful not to scratch discs when
handling them.
Holding discs
Do not touch the playback side of the disc.
•
•
Hold the disc by the edges so that fi ngerprints will not get
on the surface.
•
Do not stick paper or tape on the disc.
Disc Storage
•
Do not keep in direct sunlight
•
Keep in a cool ventilated area
•
Keep in a clean Protection jacket.
Store vertically.
NOTE
✎
Do not allow the discs to become contaminated with dirt.
Do not load cracked or scratched discs.
Handling and Storing Discs
If you get fingerprints or dirt on the disc, clean it with a
mild detergent diluted in water and wipe with a soft cloth.
When cleaning, wipe gently from the inside to the
•
outside of the disc
NOTE
✎
Condensation may form if warm air comes into contact
with cold parts inside the product. When condensation
forms inside the product, it may not operate correctly. If
this occurs, remove the disc and let the product stand
for 1 or 2 hours with the power on.
ABOUT DIVX VIDEO: DivX® is a digital video format
•
created by DivX,Inc. This is an offi cial DivX Certifi ed
device that plays DivX video. Visit www.divx.com for more information
and software tools to convert your fi les into DivX video. ABOUT DIVX
VIDEO-ON-DEMAND: This DivX Certifi ed® device must be registered in
order to play DivX Video-on-Demand (VOD) content. To generate the
registration code, locate the DivX VOD section in the device setup menu.
Go to vod.divx.com with this code to complete the registration process
and learn more about DivX VOD.
DivX Certifi ed® to play DivX ® video
•
•
iPod is a trademark of Apple Inc.,
registered in the U.S. and other
countries.
iPhone is a trademark of Apple Inc.
•
Dolby and the double-D symbol are registered trademarks of Dolby
Laboratories.
•
“Pat. 7,295,673; 7,460,688; 7,519,274”
© 2010 Samsung Electronics Co., Ltd. All rights
reserved.
•
Many DVD discs are encoded with copy protection. Because of this,
you should only connect your product directly to your TV, not to a
VCR. Connecting to a VCR results in a distorted picture from copyprotected DVD discs.
•
This product incorporates copyright protection technology that is
protected by U.S. patents and other intellectual property rights. Use
of this copyright protection technology must be authorized by
Macrovision, and is intended for home and other limited viewing
uses only unless otherwise authorized by Macrovision. Reverse
engineering or disassembly
License
Copyright
Copy Protection
is prohibited
.
4 English

Contents
SAFETY INFORMATION
2
GETTING STARTED
7
CONNECTIONS
15
SETUP
26
2 Safety Warnings
3 Precautions
3 Accessories
4 Cautions on Handling and Storing Discs
4 License
4 Copyright
4 Copy Protection
7 Features
7 Icons that will be used in manual
8 Disc Types and Characteristics
11 Description
11 Front Panel
12 Rear Panel
13 Remote control
15 Connecting the Speakers
22 Connecting the Video Out to your TV
24 Connecting the FM Antenna
24
Connecting Audio from External Components
26 Before Starting (Initial Setting)
26 Setting the Setup menu
27 Display
27 TV Aspect
27 BD Wise
27 Resolution
27 HDMI Format
28 Audio
28 Speaker Setting
29 ASC (Auto Sound Calibration) Setting
30 DRC (Dynamic Range Compression)
30 AV-SYNC
30 HDMI AUDIO
30 EQ Optimizer
31 System
31 Initial Setting
31 DivX(R) Registration
31 Language
31 Security
31 Parental Rating
31 Change Password
31 Support
31 Product Information
ENGLISH
English 5

Contents
BASIC FUNCTIONS
32
ADVANCED FUNCTIONS
32 Disc Playback
32 Audio CD(CD-DA)/MP3/WMA Playback
33 JPEG File Playback
33 Using the Playback Function
37 Sound Mode
39 Listening to Radio
40 USB Function
40 Using an iPod
42 CD Ripping
40
OTHER INFORMATION
43 Troubleshooting
44 Language code list
45 Index
46 Specifi cations
43
Figures and illustrations in this User Manual are provided for reference only and may differ from actual product appearance.
•
6 English

Getting Started
01 Getting Started
Features
Playback of many disc types
This product allows you to play back various discs,
including DVD-Video, DVD±R/±RW , CD-DA,
CD-R/-RW, MP3-CD, WMA-CD and DivX.
USB Host support
You can enjoy media fi les such as pictures, movies
and music saved on a MP3 player, digital camera or
USB memory stick by connecting the storage device
to the USB port of the product.
Dolby Pro Logic II
Dolby Pro Logic II is a form of multi-channel audio
signal decoding technology that improves upon
existing Dolby Pro Logic.
HDMI
HDMI transmits DVD video and audio signals
simultaneously, and provides a clearer picture.
The 1080p(Full HD) resolution provides even clearer
pictures.
iPod & iPhone support
You can enjoy music fi les by connecting your iPod to
the product with the supplied iPod dock.
BD Wise
BD Wise automatically adjusts BD Wise-compliant
Samsung products to the optimal settings between
them. This feature is enabled only if BD Wise-compliant
Samsung products are connected to each other
using an HDMI cable.
AV SYNC Function
Video may lag behind the audio if the product is
connected to a digital TV.
To compensate for this, you can adjust the audio delay
time to sync up with the video.
Icons that will be used in manual
Make sure to check the following terms before
reading the user manual.
Icon Term Defi nition
This involves a function
available with DVD-Video or
DVD±R/±RW discs that
have been recorded and
fi nalised in Video Mode.
This involves a function
CD
available with a data CD (CD
DA, CD-R/-RW).
This involves a function
available with CD-R/-RW
discs.
This involves a function
available with CD-R/-RW
discs.
This involves a function
available with MPEG4 discs.
(DVD±R/±RW, CD-R/-RW)
This involves a case where a
function does not operate or
settings may be canceled.
This involves tips or instructions
on the page that help each
function operate.
This function provides direct and
Key
easy access pressing the button
on the remote control.
d
B
A
G
D
!
✎
DVD
MP3
JPEG
DivX
CAUTION
NOTE
Shortcut
English 7
Getting Started
Getting Started
Disc Types and Characteristics
Region Code
The product and the discs are coded by region. These
regional codes must match in order for the disc to play. If the
codes do not match, the disc will not play.
Disc Type
DVD-VIDEO
Region
Code
The U.S., U.S. territories and
1
Canada
Europe, Japan, the Middle East,
2
Egypt, South Africa, Greenland
Taiwan, Korea, the Philippines,
3
Indonesia, Hong Kong
Mexico, South America, Central
America, Australia, New Zealand,
4
Pacifi c Islands, Caribbean
Russia, Eastern Europe, India,
most of Africa, North Korea,
5
Mongolia
China
6
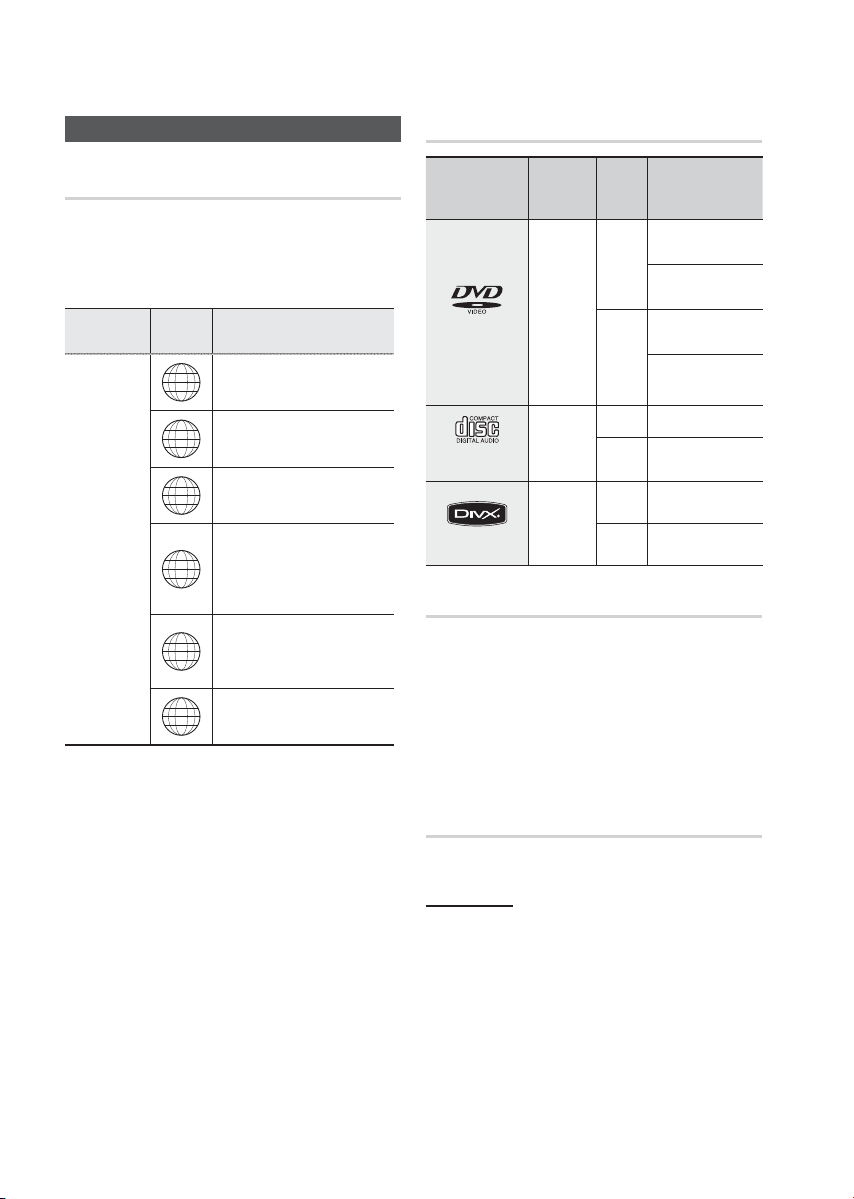
Area
Disc types that can be played
Disc Types &
Mark (Logo)
DVD-VIDEO
AUDIO-CD
DivX
Do not use the following type of discs!
LD, CD-G, CD-I, CD-ROM, DVD-ROM and DVD-
•
RAM discs cannot be played on this product.
If such discs are played, a <WRONG DISC
FORMAT> message appears on the TV screen.
DVD discs purchased abroad may not play on this
•
product.
If such discs are played, a <Wrong Region. Please
check Disc.> message appears on the TV screen.
Recorded
Signals
VIDEO
AUDIO
AUDIO
+
VIDEO
Disc
Size
5 inches
3 1/2
inches
5 inches
3 1/2
inches
5
inches
3 1/2
inches
Max. Playing Time
Approx. 240 min.
(single-sided)
Approx. 480 min.
(double-sided)
Approx. 80 min.
(single-sided)
Approx. 160 min.
(double-sided)
74 min.
20 min.
-
-
8 English
Disc Types And Disc Format
This product does not support Secure (DRM) Media fi les.
CD-R Discs
•
Some CD-R discs may not be playable depending on
the disc recording device (CD-Recorder or PC) and the
condition of the disc.
•
Use a 650MB/74 minute CD-R disc.
Do not use CD-R discs over 700MB/80 minutes as
they may not be played back.
•
Some CD-RW (Rewritable) media, may not be playable.
•
Only CD-Rs that are properly "closed" can be fully
played. If the session is closed but the disc is left open,
you may not be able to fully play the disc.
CD-R MP3 Discs
Only CD-R discs with MP3 fi les in ISO 9660 or
•
Joliet format can be played.
MP3 fi le names should contain no blank spaces
•
or special characters (. / = +).
Use discs recorded with a compression/
•
decompression data rate greater than 128Kbps.
Only fi les with the ".mp3" and ".MP3" extensions
•
can be played.
Only a consecutively written multisession disc can
•
be played. If there is a blank segment in the
Multisession disc, the disc can be played only up
to the blank segment.
•
If the disc is not closed, it will take longer to begin
playback and not all of the recorded fi les may be played.
•
For fi les encoded in Variable Bit Rate (VBR)
format, i.e. fi les encoded in both low bit rate and
high bit rate (e.g., 32Kbps ~ 320Kbps), the
sound may skip during playback.
•
A maximum of 500 tracks can be played per CD.
•
A maximum of 300 folders can be played per CD.
CD-R JPEG Discs
•
Only fi les with the "jpg" extensions can be played.
•
If the disc is not closed, it will take longer to start
playing and not all of the recorded fi les may be played.
•
Only CD-R discs with JPEG fi les in ISO 9660 or Joliet
format can be played.
•
JPEG fi le names should be 8 characters or less in
length and contain no blank spaces or special
characters (. / = +).
•
Only a consecutively written multisession disc can be
played. If there is a blank segment in the multisession
disc, the disc can be played only up to the blank
segment.
•
A maximum of 999 images can be stored on a folder.
•
When playing a Kodak/Fuji Picture CD, only the JPEG
fi les in the picture folder can be played.
•
Picture discs other than Kodak/Fuji Picture CDs may
take longer to start playing or may not play at all.
DVD±R/±RW, CD-R/RW Discs
Software updates for incompatible formats are not
•
supported.
(Example : QPEL, GMC, resolutions higher than
800 x 600 pixels, etc.)
01 Getting Started
If a DVD-R/-RW disc has not been recorded
•
properly in DVD Video format, it will not be
playable.
DivX (Digital internet video express)
DivX is a video fi le format developed by Microsoft and is
based on MPEG4 compression technology to provide
audio and video data over the Internet in real-time.
MPEG4 is used for video encoding and MP3 for audio
encoding so that the users can watch a movie at near
video and audio.
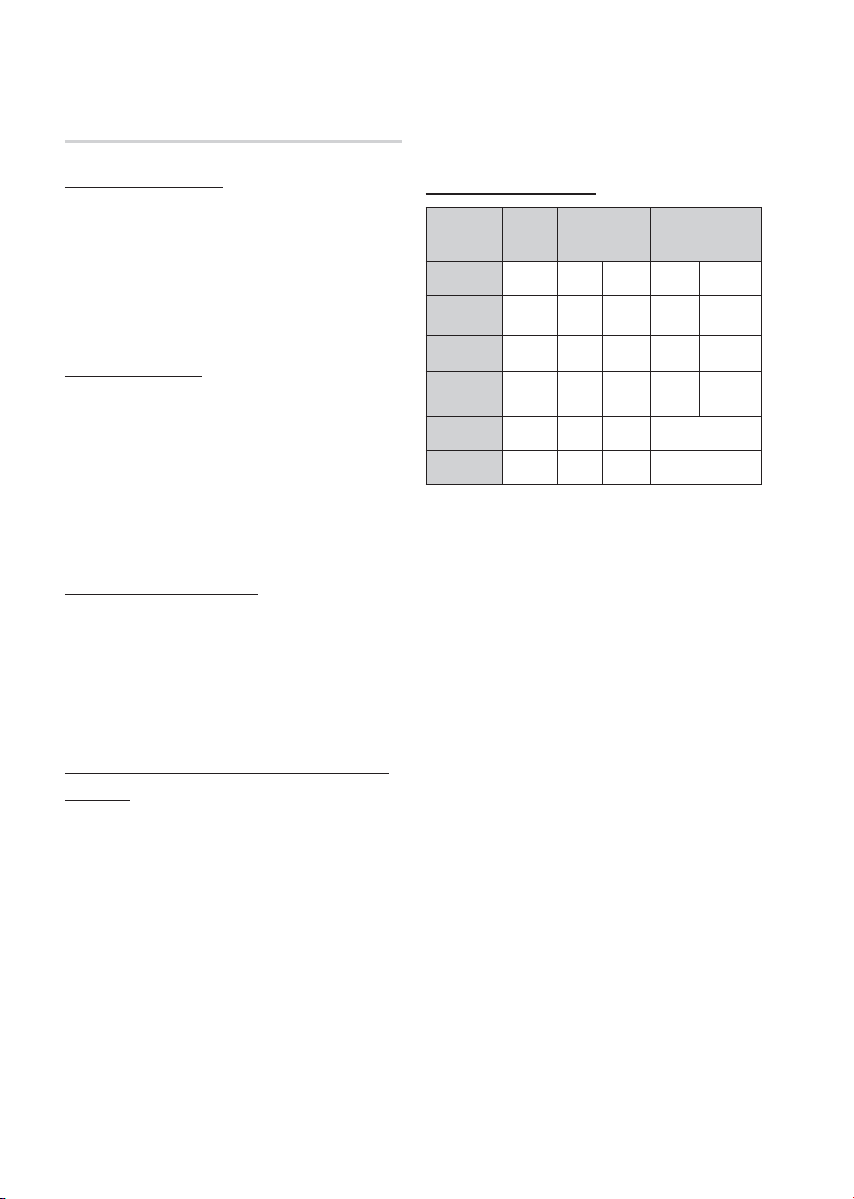
Supported Formats (DivX)
This product only supports the following media formats.
If both video and audio formats are not supported, the
user may experience problems such as broken images
or no sound.
Supported Video Formats
Format Supported Versions
AVI
WMV
Format Bit Rate
MP3
WMA
AC3
DTS
•
DivX fi les, including audio and video fi les, created in
the DTS format can only support up to 6Mbps.
•
Aspect Ratio : Although the default DivX resolution is
640x480 pixels, this product supports up to
720x480 pixels. TV screen resolutions higher than
800 will not be supported.
•
When you play a disc whose sampling frequency is
higher than 48khz or 320kbps, you may experience
shaking on the screen during playback.
•
Sections with a high frame rate might not be played
while playing a DivX fi le.
•
Since this product only provides encoding formats
authorized by DivX Networks, Inc., a DivX fi le
created by the user might not play.
DivX3.11~DivX5.1, XviD
V1/V2/V3/V7
Supported Audio Formats
80~320kbps
56~128kbps
128~384kbps 44.1/48khz
1.5Mbps 44.1khz
Sampling
Frequency
44.1khz
English 9
Getting Started
USB Host Specifi cation
USB Host Specifi cation
• Supports USB 1.1 or USB 2.0 compliant devices.
• Supports devices connected using the USB A type
cable.
• Supports UMS (USB Mass Storage Device) V1.0
compliant devices.
• Supports the device of which the connected drive is
formatted in the FAT (FAT, FAT16, FAT32) fi le system.
Non-compliance
• Does not support a device that requires installing a
separate driver on the PC (Windows).
• Does not support connection to a USB hub.
• A USB device that is connected using the USB
extension cable may not be recognized.
• A USB device requiring a separate power source
needs to be connected to the product with the
separate power connection.
Operational Limitations
• If the connected device has multiple drives (or
partitions) installed, only one drive (or partition) can be
connected.
• A device supporting USB 1.1 alone may cause a
difference in the picture quality, depending on the
device.
USB Devices that can be used with the
product
USB Storage Device, MP3 Player, Digital Camera
•
Removable HDD
•
- Removable HDDs equipped with less than 160
Gbytes are supported. Removable HDDs
equipped with 160Gbytes or more may not be
recognized, depending on the device.
- If the connected device does not work due to
insuffi cient power supply, you can use a
separate power cable to supply power so that it
can work properly. The connector of the USB
cable may differ, depending on the manufacturer
of the USB device.
USB card Reader: One slot USB card reader and
•
Multi slot USB card reader.
- The USB card reader may not be supported,
depending on the manufacturer.
- If you install multiple memory devices into a multi
card reader, you may experience problems.
Supported fi le Formats
Format
File name
File
extension
Bit rate
Version
Pixel
Sampling
Frequency
CBI (Control/Bulk/Interrupt) is not supported.
•
Digital Cameras that use PTP protocol or require
•
additional program installation when connected to a
PC are not supported.
A device using NTFS fi le system is not supported.
•
(The system supports only the FAT fi le system and
will not play a movie larger than 1 GB in USB mode.)
Some MP3 players, when connected to this product,
•
may not operate depending on the sector size of their
fi le system.
The USB host function is not supported if a product
•
that transfers media fi les by its manufacturer specifi c
program is connected.
Does not operate with Janus enabled MTP (Media
•
Transfer Protocol) devices.
The USB host function of this product does not
•
support all USB devices.
Still
Picture
JPG MP3 WMA WMV DivX
JPG
.JPEG
–
––
640x480
–
Music Movie
.MP3 .WMA .WMV .AVI
80~320
56~128
kbps
V8
4Mbps 4Mbps
V1,V2,
V3,V7
720x480
44.1KHz~ 48KHz
kbps
––
44.1kHz 44.1kHz
DivX3.11~
DivX5.1,
XviD
10 English

Front Panel
01 Getting Started
Description
1 2 4 5 6 7 9 108
DISC TRAY
1
DISPLAY
2
REMOTE CONTROL SENSOR
3
OPEN/CLOSE BUTTON (
4
5
FUNCTION BUTTON (
TUNING DOWN & SKIP BUTTON ( )
6
STOP BUTTON (
7
)
3
AUX IN 1/
ASC IN
11
12 13
Insert disc here.
Displays the playing status, time, etc.
Detects signals from the remote control.
)
)
Opens and closes the disc tray.
The mode switches as follows :
DVD/CD ➞ D.IN ➞ AUX 1 ➞AUX 2 ➞ USB ➞IPOD ➞ FM.
Goes back to the previous title/chapter/track.
Tunes down the FM frequency band.
Stops disc playback.
PLAY/ PAUSE BUTTON (
8
TUNING UP & SKIP BUTTON ( )
9
VOLUME CONTROL BUTTON ( , )
10
POWER BUTTON ( )
11
AUX IN 1/ASC IN CONNECTOR
12
USB PORT
13
)
Plays a disc or pauses playback.
Goes to the next title/chapter/track.
Tunes up the FM frequency band.
Volume adjustment.
Turns the product on and off.
Connect external components such as an MP3 player.
Connect to use the ASC (Auto Sound Calibration) function.
Connect here and play fi les from external USB storage devices such as
MP3 players, USB fl ash memory, etc.
English 11
Getting Started
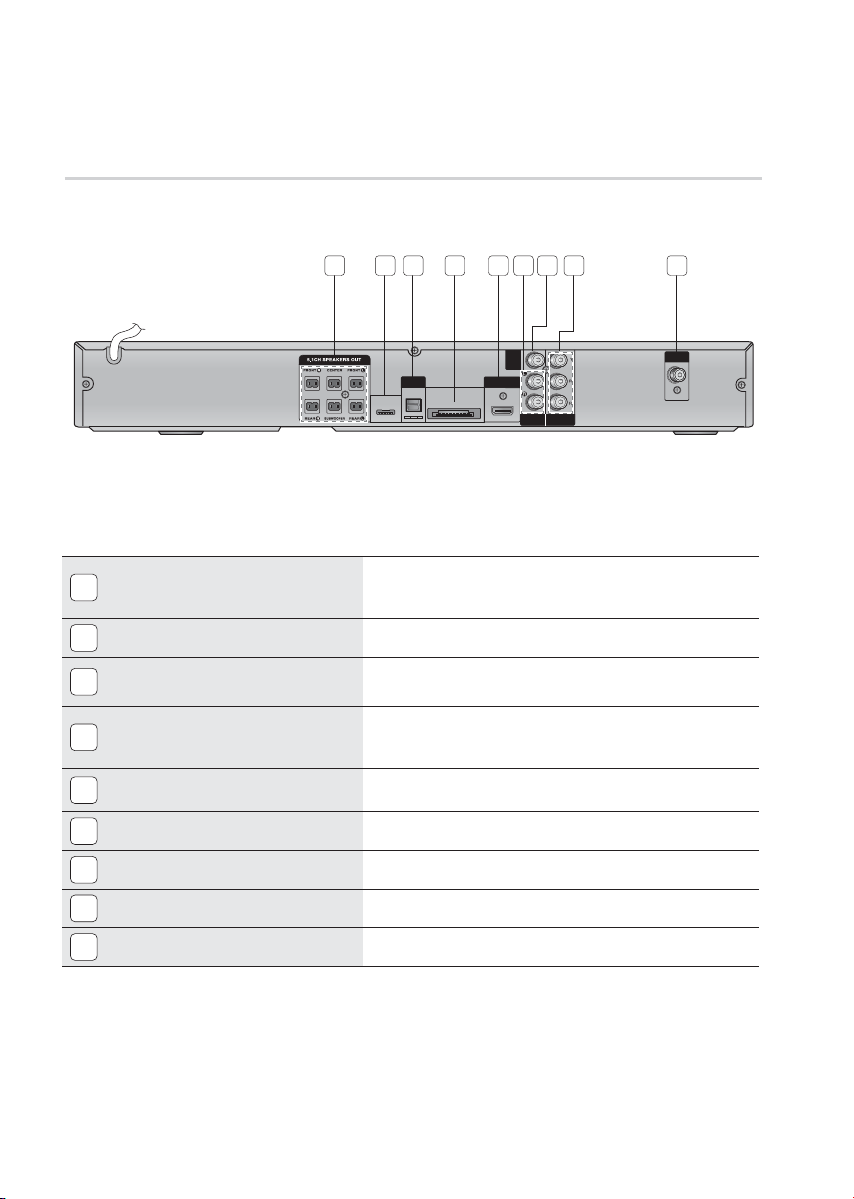
Rear Panel
1 2 3 4 5 7 8 96
5.1 CHANNEL SPEAKER OUTPUT
1
CONNECTORS
iPod JACK
2
EXTERNAL DIGITAL OPTICAL IN JACK
3
(DIGITAL AUDIO IN)
TX CARD CONNECTION (WIRELESS)
4
HDMI OUT JACK
5
AUX IN 2 JACKS
6
VIDEO OUT JACK
7
COMPONENT VIDEO OUTPUT JACKS
8
VIDEO
DIGITAL
AUDIO IN
OPTICAL
iPod
WIRELESS
HDMI OUT
OUT
COMPONENT
AUX IN 2
OUT
FM ANT .
Connect the front, center,rear speakers and subwoofer.
(HT-C650W/C653W/C655W does not have rear speaker connectors on the product, the
rear speakers are connected to the Wireless Receiver module.)
Connect the iPod dock connector here.
Use this to connect external equipment capable of digital output.
The TX card enables communication between the product and the
wireless receiver module.
(The wireless receiver module is not provided for HT-C550/C553/C555 )
Use an HDMI cable, connect this HDMI output terminal to the HDMI input
terminal on your TV for the best quality picture.
Connect to the 2CH Analog output of an external device (such as a VCR).
Connect your TV's Video Input jack (VIDEO IN) to the VIDEO OUT jack.
Connect a TV with Component video inputs to these jacks.
FM ANTENNA JACK
9
12 English
Connect the FM antenna.
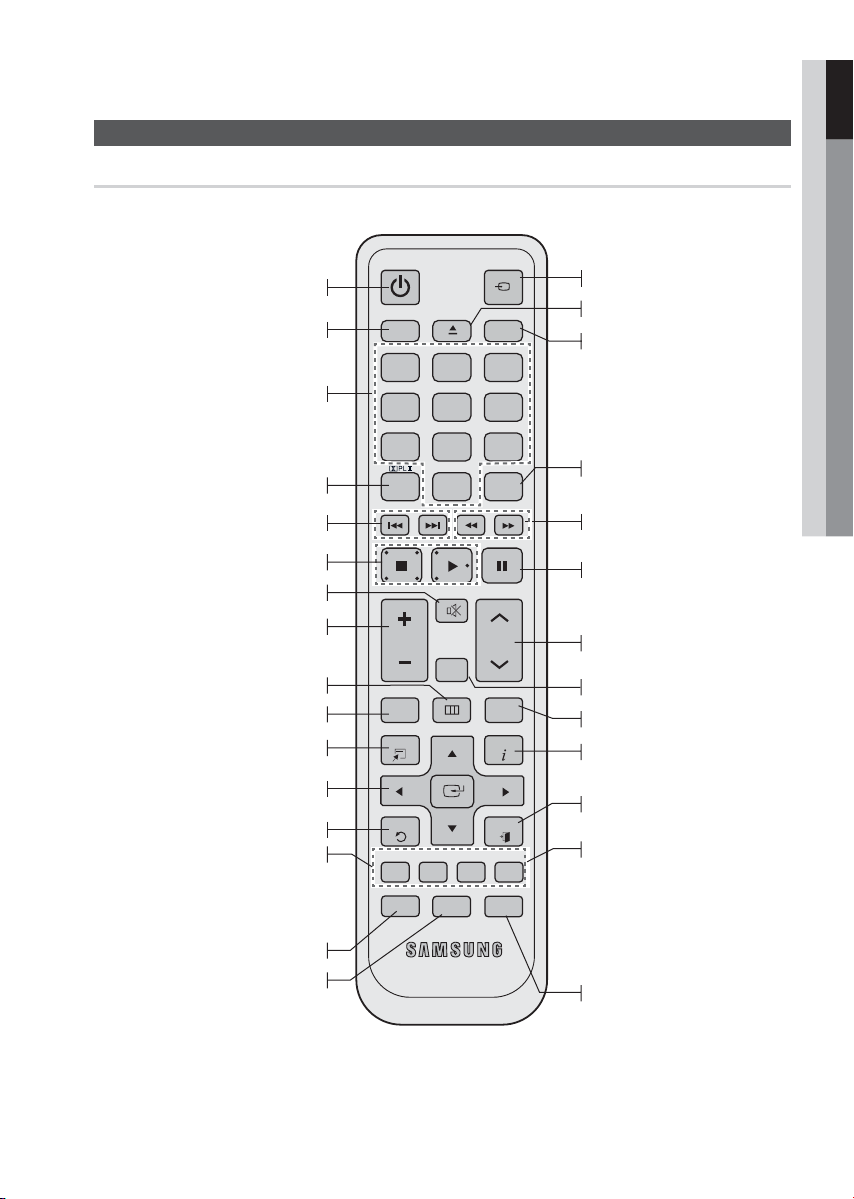
Tour of the Remote Control
01 Getting Started
Remote control
Turn the product on and off.
Press to select DVD RECEIVER/TV
mode.
Press the number button to operate
options.
Select the desired Dolby Pro Logic II audio
mode.
Press to skip backwards or forwards.
Press to stop/play a disc.
Cut off the sound temporarily.
Adjust the volume.
Press this to move to the home
menu.
Press to check the disc menu.
Used to change the audio/subtitle
language, angle etc.
Select on-screen menu items and
change menu value.
Return to the previous menu.
Allow access to common functions
of the product such as the Photo List.
or
GREEN(B) : Press to preset FM stations.
Adjust the brightness of Display.
Regulate and stabilize the
volume level against a
drastic volume change.
POWER
DVD RECEIVER/TV SLEEP
FUNCTION
TV SOURCE
㪈 㪉 㪊
㪋㪌㪍
㪎㪏㪇㪐
DSP /EQ
MUTE
REPEAT
MO/ST CD RIPPING
TUNING
/CH
TITLE MENU
INFO
EXIT
P .BASS
VOL
DISC MENU MENU
TOOLS
RETURN
TUNER MEMORY
ABCD
DIMMER S . VOL AUDIO UPSCALE
This is mode selection button.
or
Press to select TV's video mode.
To open and close the disc tray.
Set the time to shut off the
product itself.
Select the desired DSP/EQ audio
mode.
Press to search backwards
or forwards.
Press to pause a disc.
Search for active FM stations and
change channels.
Allows you to repeat a title,
chapter, track or disc.
Use this to enter the Title menu.
Display current disc(file) status.
Exit the menu.
Allow access to common functions
of the product such as the Photo List.
or
YELLOW(C) : Select MONO or STEREO
for radio broadcasting.
BLUE(D) : Converts audio sound of the
CD into a MP3 file format.
Select the desired P.BASS or
MP3 Enhancement mode.
English 13
Getting Started
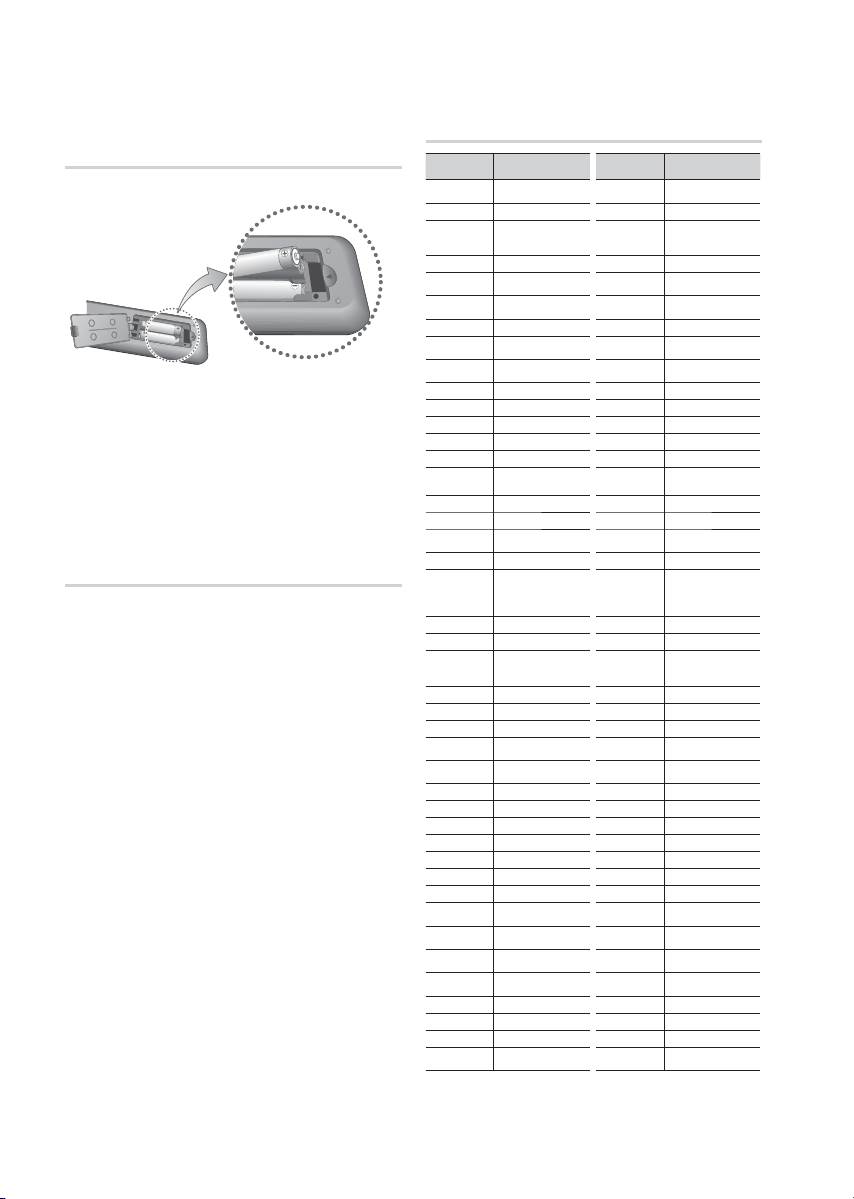
Installing batteries in the Remote
Control
* Battery size: AAA
NOTE
✎
Place batteries in the remote control so they match
the polarity : (+) to (+) and (–) to (–).
Always replace both batteries at the same time.
Do not expose the batteries to heat or fl ame.
The remote control can be used up to approximately
23 feet (7 meters) in a straight line.
Setting the Remote Control
You can control certain functions of your TV with this
remote control.
When operating a TV with the remote control
Press the DVD RECEIVER/TV button to set the
1.
remote control to TV mode.
Press the POWER button to turn on the TV.
2.
3.
While holding down the POWER button, enter
the code corresponding to your brand of TV.
•
If there is more than one code listed for your
TV in the table, enter one at a time to
determine which code works.
•
Example : For a Samsung TV
While holding down the POWER button, use the
number buttons to enter 00, 15, 16, 17 and 40.
4.
If the TV turns off, the setting is complete.
•
You can use the TV POWER, VOLUME,
CHANNEL, and Numeric buttons (0~9).
NOTE
✎
The remote control may not work on some brands of
TV's. Also, some operations may not be possible
depending on your brand of TV.
If you do not set the remote control with the code
for your brand of TV, the remote control will work
on a Samsung TV by default.
TV Brand Code List
Brand Code Brand Code
Admiral
(M.Wards)
A Mark
Anam
AOC
Bell & Howell
(M.Wards)
Brocsonic
Candle
Cetronic
Citizen
Cinema
Classic
Concerto
Contec
Coronado
Craig
Croslex
Crown
Curtis Mates
CXC
Daewoo
Daytron
Dynasty
Emerson
Fisher
Funai
Futuretech
General
Electric (GE)
Hall Mark
Hitachi
Inkel
JC Penny
JVC
KTV
KEC
KMC
LG (Goldstar)
Luxman
LXI (Sears)
Magnavox
Marantz
Matsui
MGA
Mitsubishi/
MGA
56, 57, 58
01, 15
01, 02, 03, 04, 05, 06,
07, 08, 09, 10, 11,
12, 13, 14
01, 18, 40, 48
57, 58, 81
59, 60
18
03
03, 18, 25
97
03
18
46
15
03, 05, 61, 82, 83, 84
62
03
59, 61, 63
03
02, 03, 04, 15, 16, 17, 18,
19, 20, 21, 22, 23, 24, 25,
26, 27, 28, 29, 30, 32, 34,
35, 36, 48, 59, 90
40
03
03, 15, 40, 46, 59, 61,
64, 82, 83, 84, 85
19, 65
03
03
06, 40, 56, 59, 66,
67, 68
40
15, 18, 50, 59, 69
45
56, 59, 67, 86
70
59, 61, 87, 88
03, 15, 40
15
01, 15, 16, 17, 37, 38,
39, 40, 41, 42, 43, 44
18
19, 54, 56, 59, 60, 62,
63, 65, 71
15, 17, 18, 48, 54, 59,
60, 62, 72, 89
40, 54
54
18, 40
18, 40, 59, 60, 75
MTC
NEC
Nikei
Onking
Onwa
Panasonic
Penney
Philco
Philips
Pioneer
Portland
Proton
Quasar
Radio Shack
RCA/
Proscan
Realistic
Sampo
Samsung
Sanyo
Scott
Sears
Sharp
Signature
2000
(M.Wards)
Sony
Soundesign
Spectricon
SSS
Sylvania
Symphonic
Tatung
Techwood
Teknika
TMK
Toshiba
Vidtech
Videch
Wards
Yamaha
York
Yupiteru
Zenith
Zonda
Dongyang
18, 19, 20, 40, 59, 60
06, 07, 08, 09, 54, 66,
03, 15, 17, 18, 48, 54,
15, 17, 18, 40, 48,
17, 48, 56, 60, 61, 75
18, 59, 67, 76, 77, 78,
00, 15, 16, 17, 40, 43, 46,
50, 51, 52, 53, 55
18, 40, 48, 54, 59,
15, 17, 18, 40, 48,
18
03
03
03
67, 73, 74
18
59, 62, 69, 90
54, 62, 72
63, 66, 80, 91
15, 18, 59
40
06, 66, 67
92, 93, 94
03, 19
40
47, 48, 49,
19, 61, 65
03, 40, 60, 61
15, 18, 19
15, 57, 64
57, 58
03, 40
01
18
60, 62
61, 95, 96
06
18
03, 15, 18, 25
18, 40
19, 57, 63, 71
18
59, 60, 69
54, 60, 64
18
40
03
58, 79
01
03, 54
14 English
02 Connections
Connections
This section involves various methods of connecting the product to other external components.
Before moving or installing the product, be sure to turn off the power and disconnect the power cord.
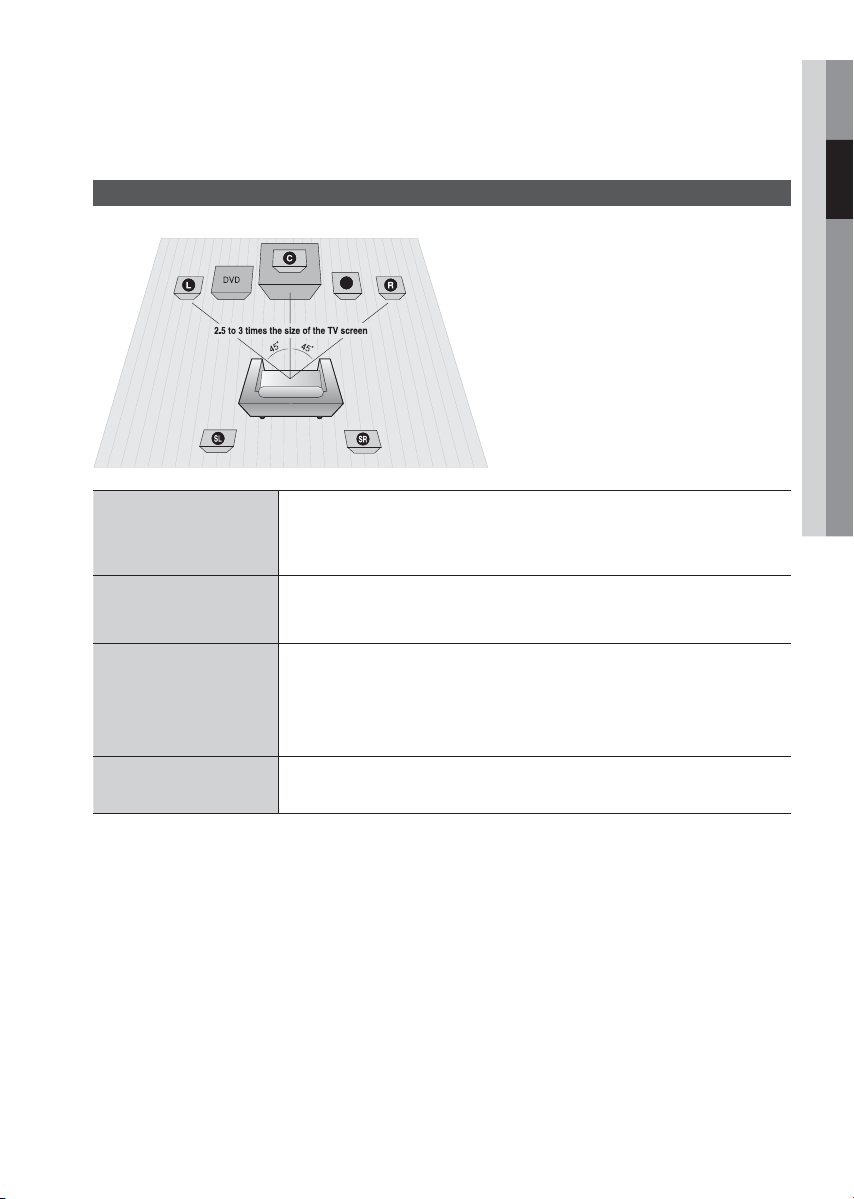
Connecting the Speakers
Position of the product
Place it on a stand or cabinet shelf, or under the
TV stand.
Selecting the Listening Position
The listening position should be located about 2.5
to 3 times the distance of the TV's screen size
away from the TV.
Example : For 32" TV's 6.56 ~ 7.87 feet(2~2.4m)
For 55" TV's 11.5 ~ 13.1 feet(3.5~4m)
Front Speakers
ei
SW
Place these speakers in front of your listening position, facing inwards (about 45°)
toward you. Place the speakers so that their tweeters will be at the same height
as your ear. Align the front face of the front speakers with the front face of the
center speaker or place them slightly in front of the center speakers.
Center Speaker
Rear Speakers
Subwoofer
CAUTION
!
Do not let children play with or near the speakers. They could get hurt if the speaker falls.
When connecting the speaker wires to the speakers, make sure that the polarity (+/ –) is correct.
Keep the subwoofer out of the reach of children so as to prevent them from inserting their hands or alien
substances into the duct (hole) of the subwoofer.
Do not hang the subwoofer on the wall through the duct (hole).
NOTE
✎
If you place a speaker near your TV set, screen color may be distorted because of the magnetic fi eld
generated by the speaker. If this occurs, place the speaker away from your TV set.
f
hj
g
It is best to install it at the same height as the front speakers. You can also install it
directly over or under the TV.
Place these speakers to the side of your listening position. If there isn't enough
room, place these speakers so they face each other. Place them about 2 to 3
feet (60 to 90cm) above your ear, facing slightly downward.
Unlike the front and center speakers, the rear speakers are used to handle
*
mainly sound effects and sound will not come from them all the time.
The position of the subwoofer is not so critical. Place it anywhere you like.
English 15
Connections
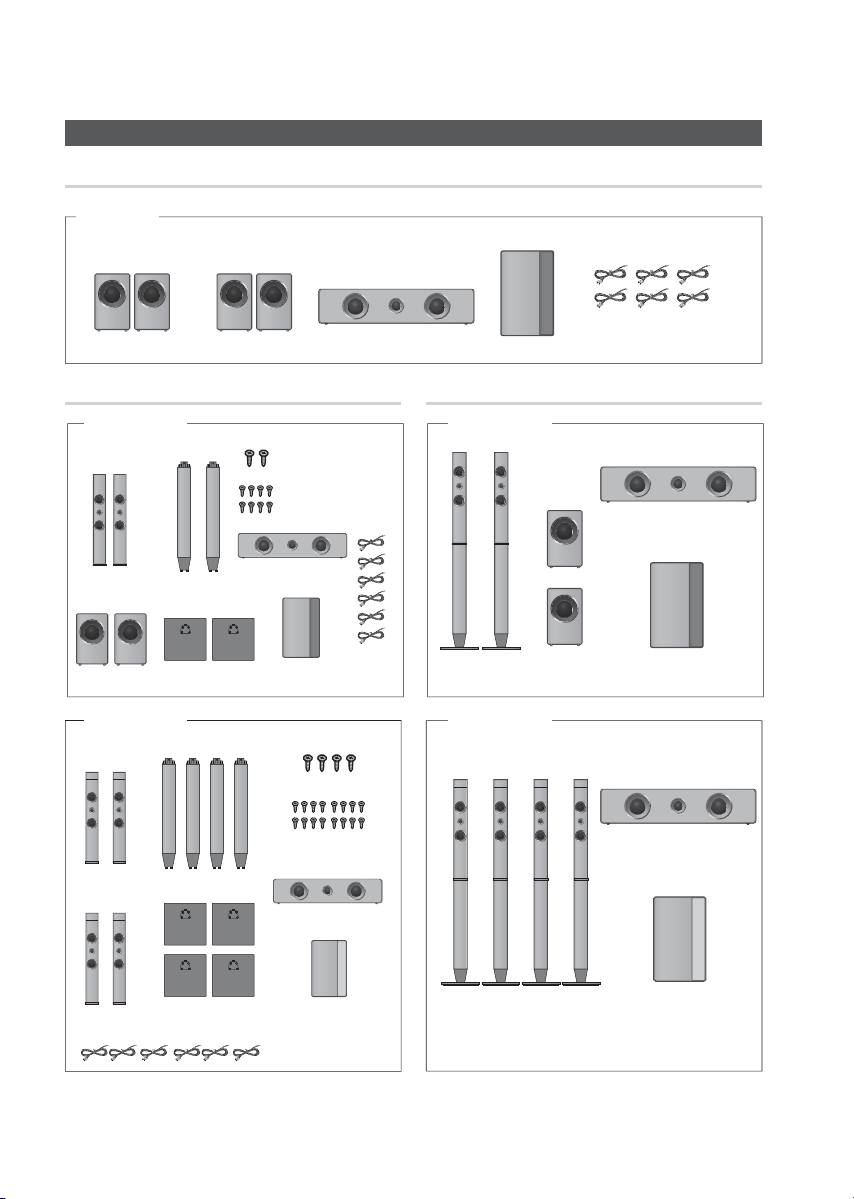
Speaker Components
HT-C550
(L) (R)(L) (R)
Connecting the Speakers
FRONT REAR
Speaker Components
HT-C553
(L) (R)
FRONT
(L) (R)
REAR
HT-C555
(L) (R)
FRONT
(L) (R)
STAND
STAND BASE
STAND
SUBWOOFER
SCREW (Large): 2EA
SCREW (Small): 8EA
CENTER
SPEAKER
CABLE
SCREW (Large): 4EA
SCREW (Small): 16EA
CENTER
CENTER
SUBWOOFER
Assembled Speakers
HT-C553
¨
FRONT
SPEAKER
HT-C555
¨
REAR
SPEAKER
SPEAKER CABLE
CENTER SPEAKER
SUBWOOFER
CENTER SPEAKER
REAR
NOTE
✎
Refer to page 18 to install the Speakers on the Tallboy Stand.
STAND BASE
SUBWOOFER
SPEAKER CABLE
FRONT/REAR SPEAKERS
16 English
SUBWOOFER
 Loading...