

Page 1
quick start guide
FM
1 disc playback
2 remote control functions
3 connecting the speakers
4 connecting the video out to your tv
Home Theater System
5 connecting audio from external components
6 listening to radio
1 disc playback
Insert a disc into the disc slot.
1.
Insert a disc so that the label side faces upward.
•
Playback starts automatically.
•
To eject the disc, press the EJECT button.
2.
When you stop disc play, the player remembers where you
•
stopped, so when you press PLAY/PAUSE ( ) button again,
it will pick up where you left off.
Press the STOP ( ) button twice during playback to disable the
•
Resume function.
To pause the playback, press the PLAY/PAUSE ( ) button
•
during playback.
again.
Thank you for purchasing this Samsung 5.1CH Blu-ray Home Theater System.
We have manufactured this product to provide you with many hours of Audio/Video
Entertainment. This “QUICK START GUIDE” guide has been included to get
you up and running in the least amount of time as possible.
If you have any questions or comments relating to Samsung products, please contact
the SAMSUNG customer care center.
To resume, press the PLAY/PAUSE( ) button once
Samsung Electronics America, Inc.
1-800-SAMSUNG (7267864)
www.samsung.com/us
5.1CH Blu-ray
HT-BD2E
2 remote control functions
BD RECEIVER button
1
You can operate your BD receiver(
Home Theater
TV button
2
You can operate your Samsung TV with the
remote control.
POWER button
3
Press to tur
your Samsung TV On/Off.
4
Number (0~9) buttons
SLEEP button
5
Press to set the sleep off time.
SLOW button
Selects three different slow motion
playback speeds.
6
MO/ST button
You can listen to radio broadcasts in
MONO or STEREO.
Tuning Preset/CD Skip buttons
Tune in radio broadcasting, skip the
7
song/scene.
VOLUME button
8
Press + to raise the volume and – to
lower it.
MENU button
9
Press to see the menu.
POPUP MENU, TITLE Menu button
10
Use this to enter the popup menu/title
menu.
Color buttons
11
Allow access to common functions of the Blu-ray
Home Theater such as the Music or Photo List.
INFO button
View or change disc playback information
12
on screen.
TUNER MEMORY, MARKER button
13
Press to memorize radio frequencies.
ZOOM button
14
Enlarges the picture during disc playback.
AUDIO button
15
Selects the disc Audio language.
DIMMER button
16
The front display brightness will be
adjusted.
SUBTITLE button
17
Selects the disc subtitle language.
Press to select the BD/DVD mode.
Press to listen to radio broadcasting.
18
Press to select external audio input.
Press to select external digital input.
) with the remote control.
n the Blu-ray Home Theater or
BD button
TUNER button
AUX button
D.IN button
10
11
12
13
14
15
16
17
1
2
3
4
5
6
7
8
9
18
19
20
21
22
23
24
25
26
27
28
29
30
31
32
33
34
35
Blu-ray
EJECT button
19
Press to eject the disc.
TV/VIDEO button
20
Press to select TV in VIDEO mode.
CANCEL button
21
Used to cancel a wrong entry.
STEP button
The picture moves forward one frame
22
each time the button is pressed during
playback.
PLAY/PAUSE button
Press to play or pause.
STOP button
23
24
25
26
27
28
29
30
31
32
33
34
35
Press to stop.
SEARCH buttons
Fast backward or forward
TUNING/CH button
Press to select the channel or to tune in
radio broadcasting.
MUTE button
Press to mute the sound.
RETURN button
Press to return to the previous menu.
Cursor/ENTER button
Used to select or move up/down, left/
right when setting the menu function.
DISC MENU button
Use this to enter the disc menu.
EXIT button
Press to exit the setup screen.
Allows you to select six different Dolby
Pro Logic II audio modes.
Adjusts the Dolby Pro Logic II audio
effect.
SFE (Sound Field Effect) MODE button
You can select a sound mode suited for the
type of music you’re listening to.
REPEAT A-B button
Allows you to repeat playback of a certain
section.
NEO:6 MODE button
You can enjoy 2 channel or DTS audio
signals over 5.1 channels.
REPEAT button
Repeat playback of a chapter, title, group
or track.
through a song/scene.
PL II MODE button
PL II EFFECT button
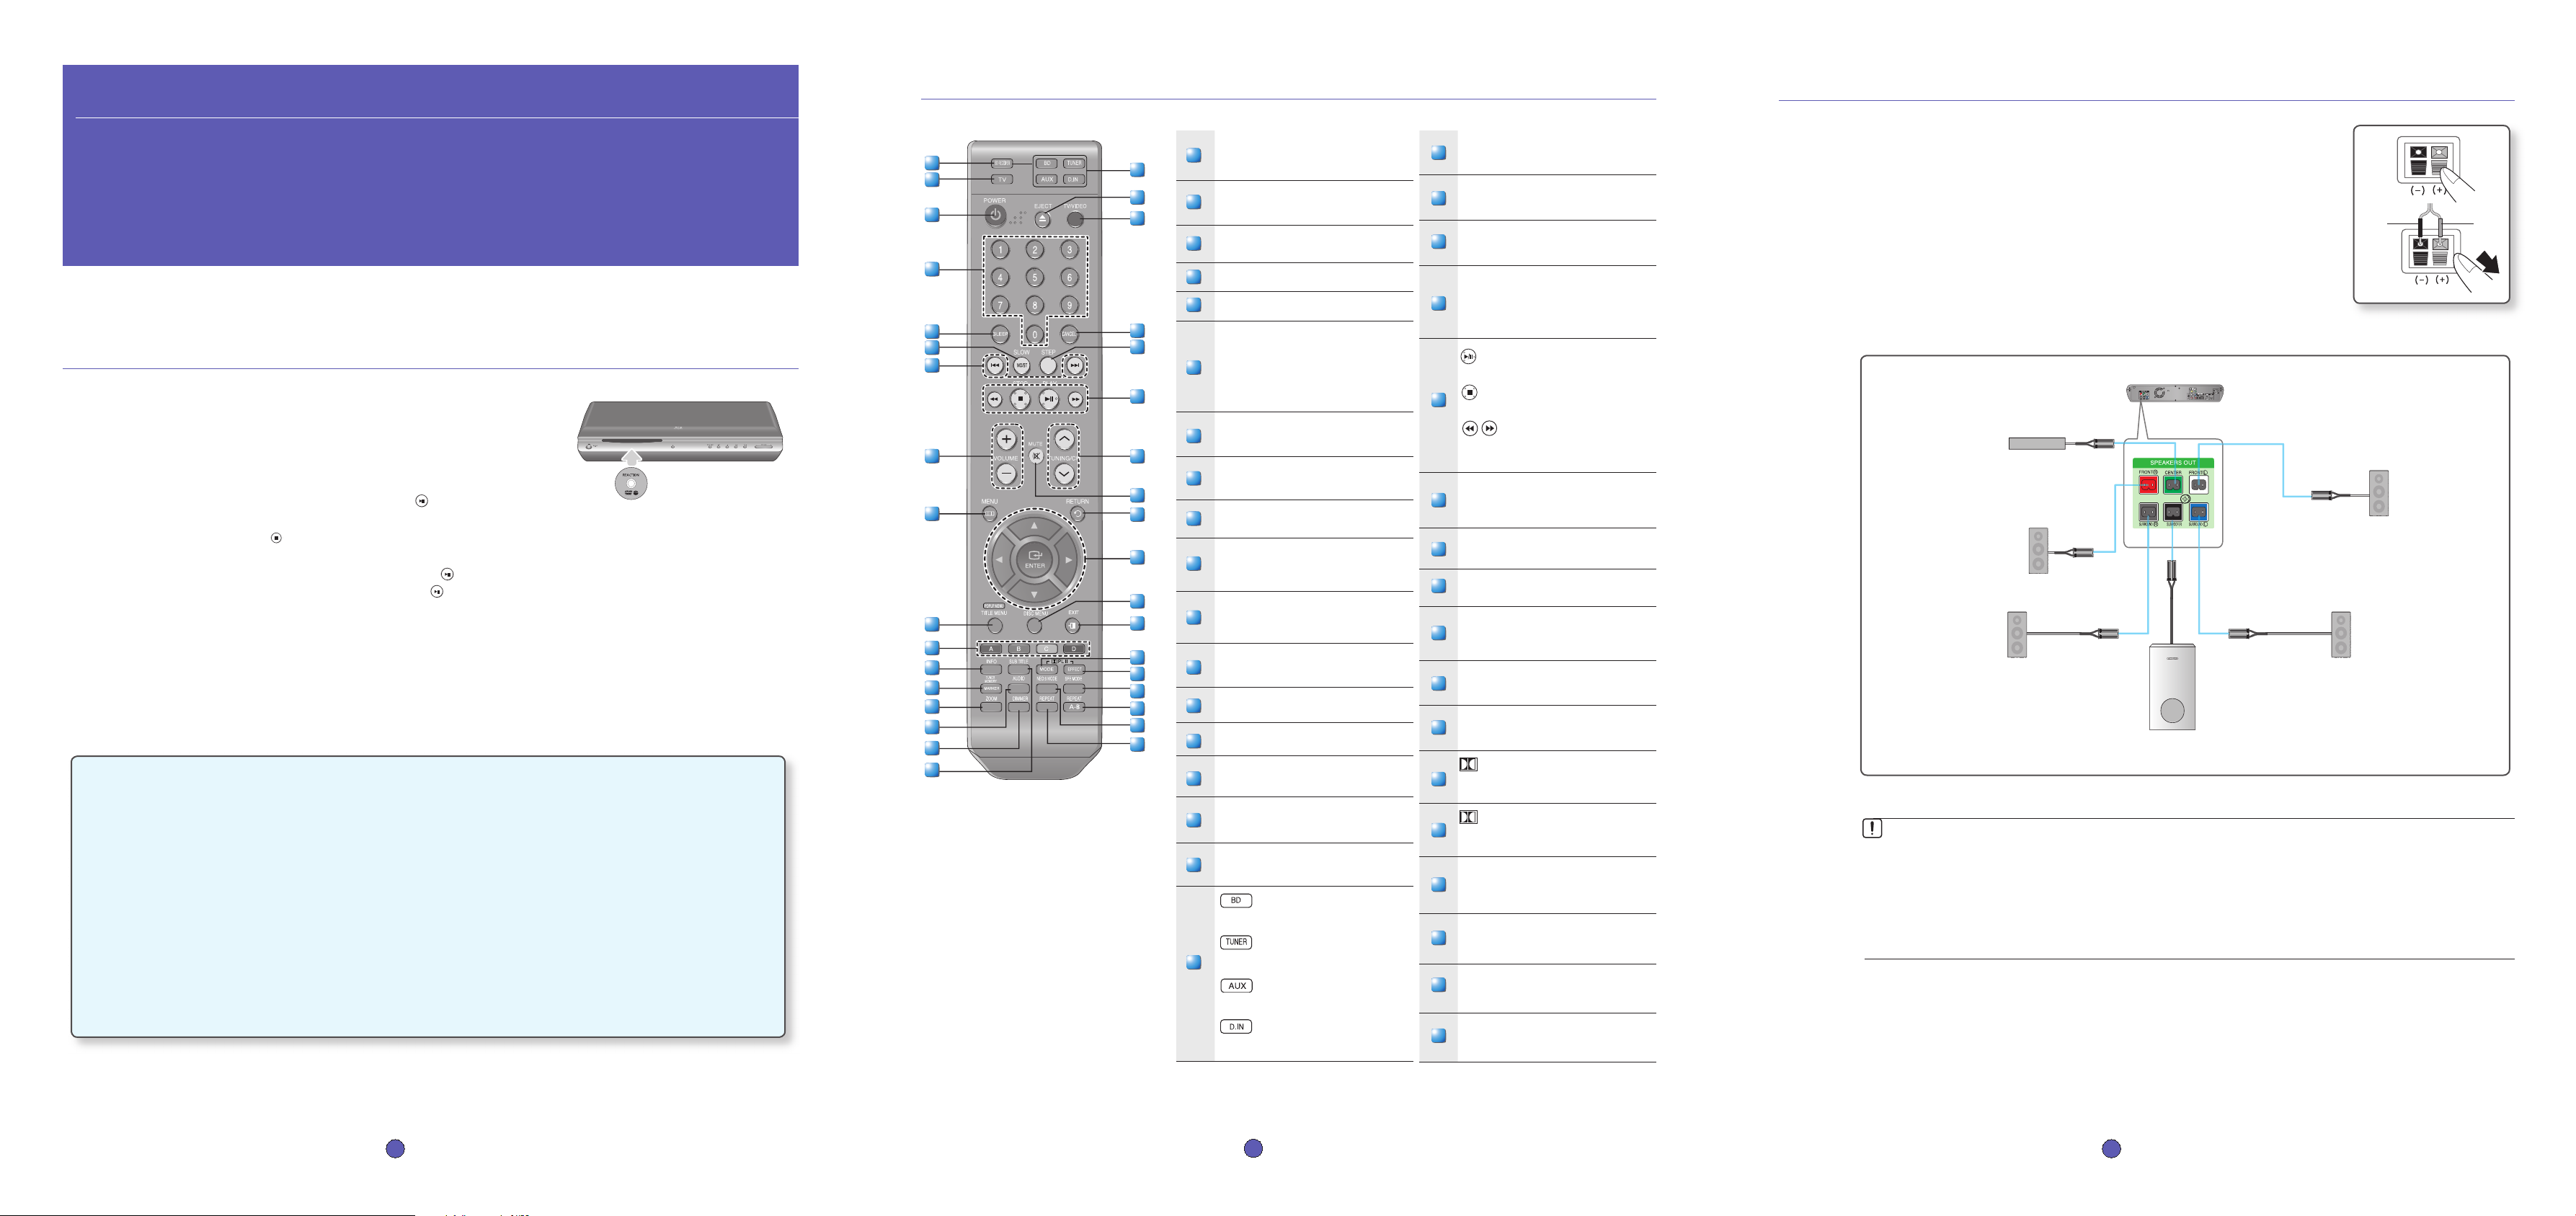
3 connecting the speakers
Press down the terminal tab on the back of the speaker.
1.
Insert the black wire into the black terminal (–) and the red wire into the red (+) terminal,
2.
and then release the tab.
Connect the connecting plugs to the back of the Blu-ray Home Theater by matching the
3.
colors of the speaker plugs to the speaker jacks.
Center Speaker
Front Speaker (L)
Front Speaker (R)
Surround Speaker (R)
Subwoofer Speaker
Do not let children play with or near the speakers. They could get hurt if a speaker falls.
When connecting the speaker wires to the speakers, make sure that the polarity (+/ –) is correct.
M
Keep the subwoofer speaker out of reach of children so as to prevent children from inserting their hands or alien
substances into the duct (hole) of the subwoofer speaker.
Do not hang the subwoofer on the wall through the duct (hole).
If you place a speaker near your TV set, screen color may be distorted because of the magnetic fi eld generated
by the speaker. If this occurs, place the speaker away from your TV set.
Surround Speaker (L)
RedBlack
1 - English
Code No. AH68-02133Y
2 - English
3 - English
Page 2
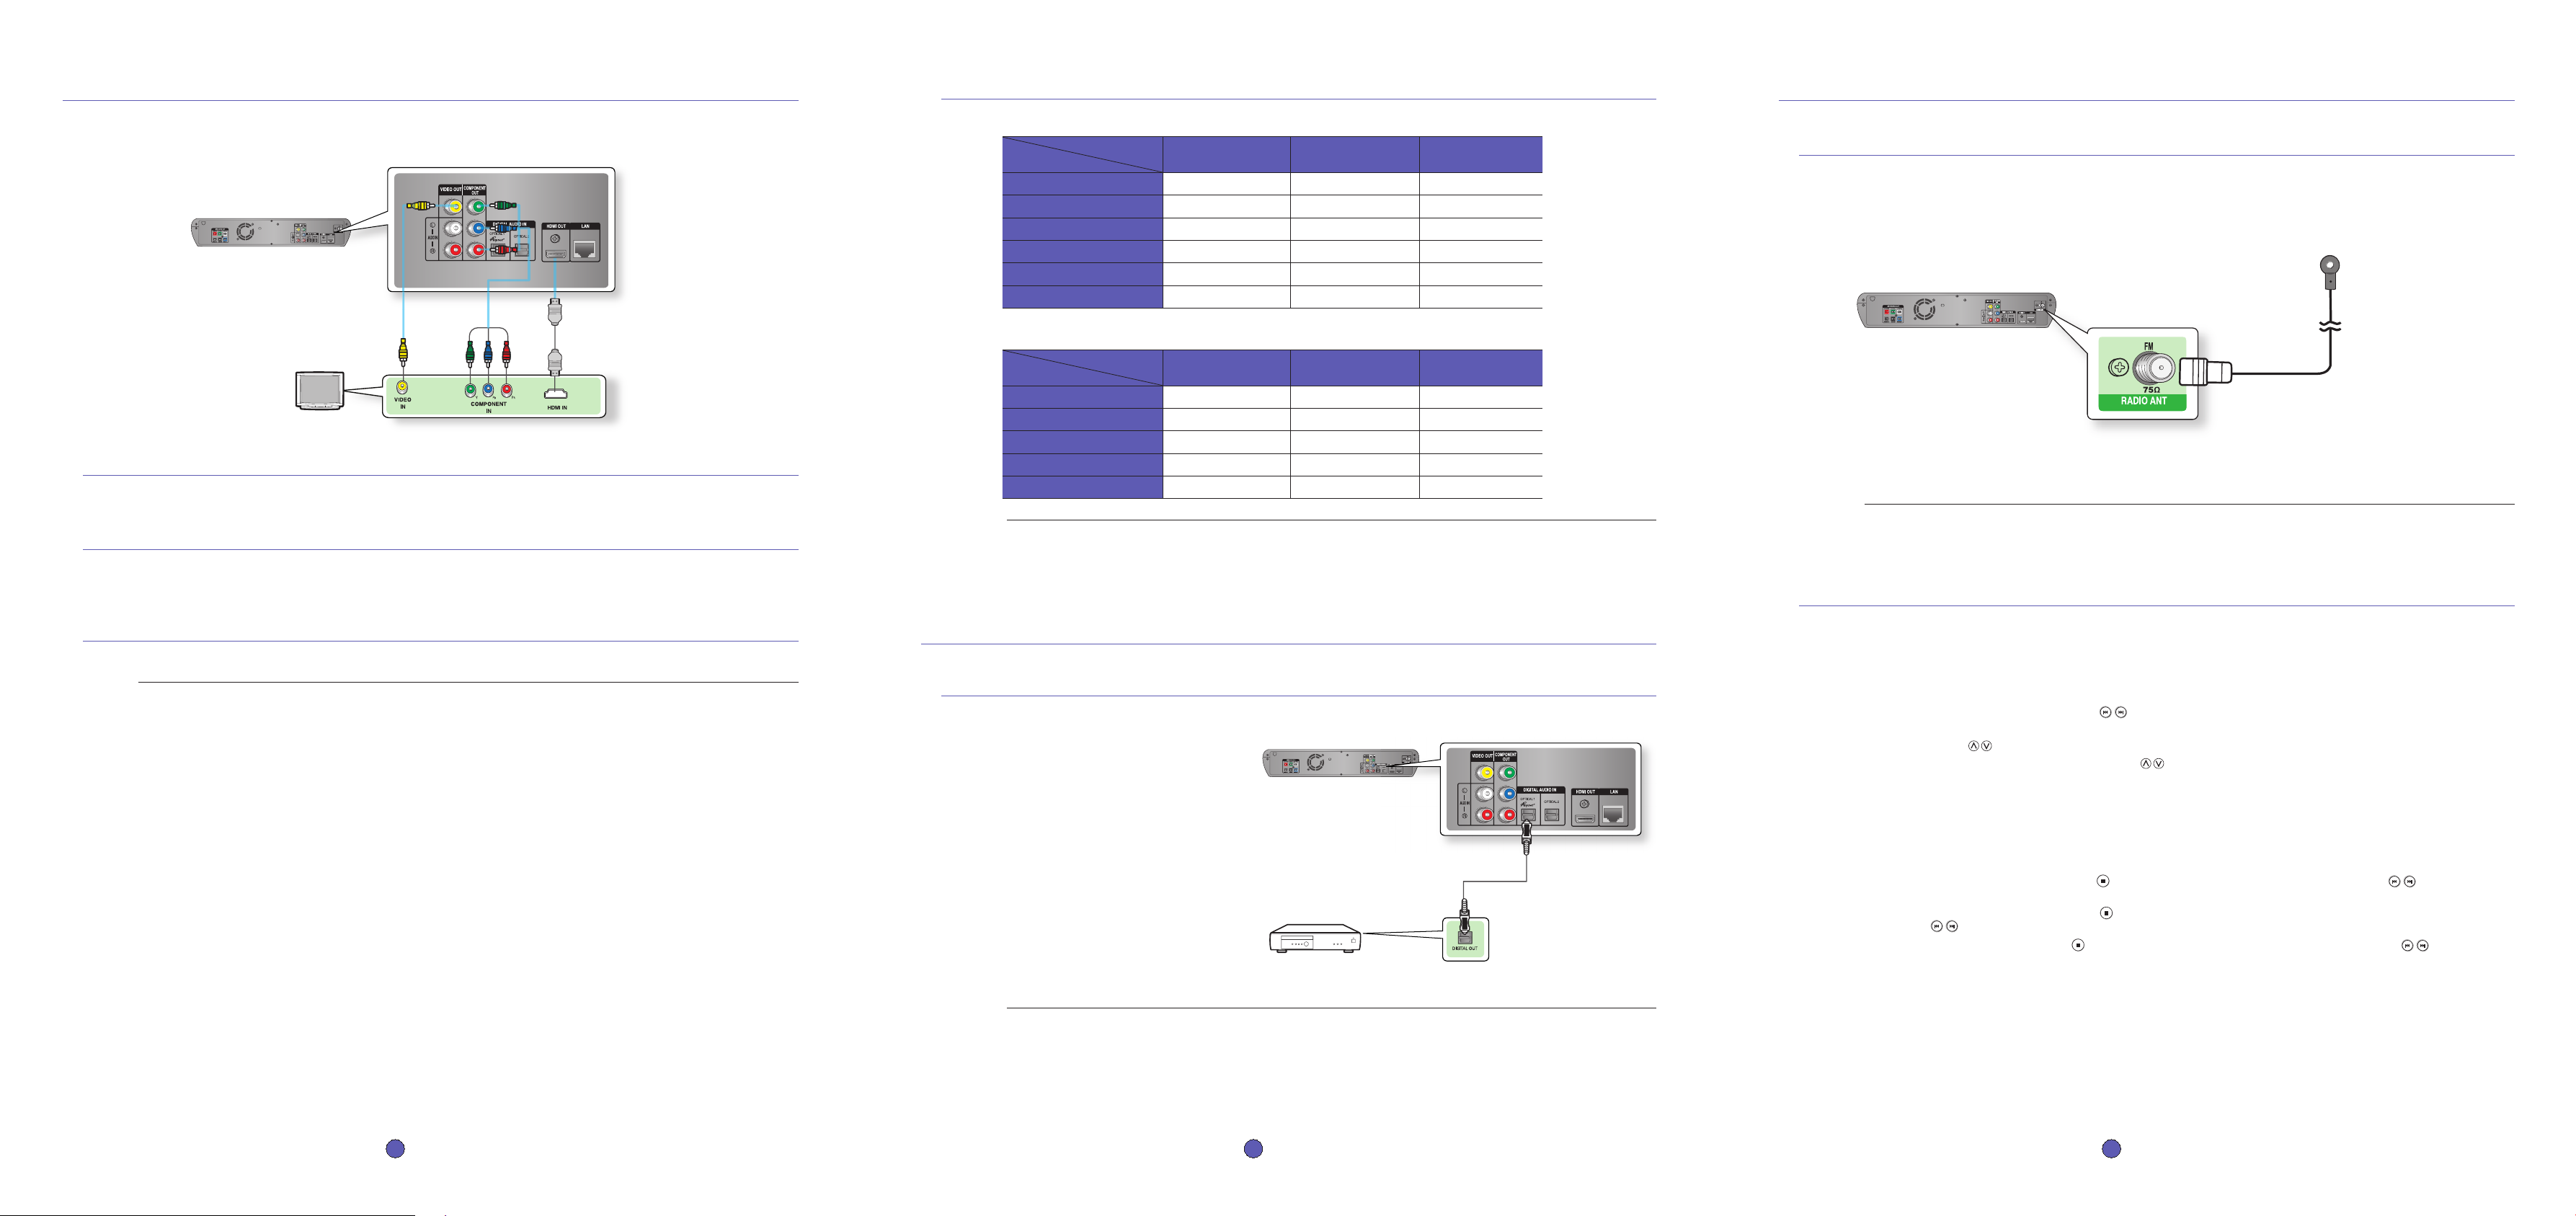
4 connecting the video out to your tv
Choose one of the three methods for connecting to a TV.
METHOD3
(supplied)
METHOD 1 : HDMI
Connect the HDMI cable(not supplied) from the HDMI OUT jack on the back of the Blu-ray Home Theater to the HDMI IN jack on your TV.
METHOD2
METHOD1
Resolution according to the output mode
BD playback
•
Output
Setup
1080p, Movie Frame(24Fs) off 1080p@60F 1080i 480i
1080p/1080i, Movie Frame (24Fs) on
1080i, Movie Frame (24Fs) off 1080i 1080i 480i
720p 720p 720p 480i
480p 480p 480p 480i
480i 480P 480i 480i
DVD playback
•
Output
Setup
1080p 1080p@60F 480p 480i
1080i 1080i 480p 480i
720p 720p 480p 480i
480p 480p 480p 480i
480i 480P 480i 480i
HDMI Component VIDEO
1080p@24F 1080i 480i
HDMI Component VIDEO
6 listening to radio
Connecting the FM Antenna
Connect the FM antenna supplied to the FM 75Ω COAXIAL Jack.
1.
2.
Slowly move the antenna wire around until you find a location where reception is good, then fasten it to a wall or other rigid
surface.
FM Antenna(supplied)
METHOD 2 : Component Video
If your television is equipped with Component Video inputs, connect a Component video cable(not supplied) from the Component Video
Output (Pr, Pb and Y) Jacks on the back of the Blu-ray Home Theater to the Component Video Input Jacks on your TV.
METHOD 3 : Composite Video
Connect the supplied Video cable from the VIDEO OUT jack on the back of the Blu-ray Home Theater to the VIDEO IN jack on your TV.
M
Depending on your TV, certain HDMI output resolutions may not work.
If an HDMI cable is connected from the player to a TV, the Blu-ray Home Theater’s output is set to
HDMI automatically within 10 seconds.
If Component and HDMI are both connected, HDMI mode is automatically selected.
When you connect the player to the TV using the HDMI cable for the first time or to a new TV, the
HDMI output resolution will be automatically set to the highest provided by the TV.
If you connect a Samsung TV to the Blu-ray Home Theater using an HDMI cable, the player can be easily
operated using the TV remote control.
(This is only available with Samsung TVs that support the Anynet+ feature.)
If the HDMI cable is connected or removed during playback of a CDDA, MP3 or JPEG file, the player will stop
playing.
After making the video connection, set the Video input source on your TV to match the Corresponding Video
output (HDMI, Component or Composite) on your Home theater.
See your TV owner’s manual for more information on how to select the TV’s Video Input source.
The actual resolution may differ from the setting in the SETUP menu if both Component and HDMI cables are
connected. The resolution may also be different depending on the disc.
If the resolution is set to ‘i’ (ex: 480i or 1080i), the output is displayed in 30 frames per second and if set to ‘p’
(ex: 480p, 720p, 1080p), it will be displayed in 60 frames per second.
i : interlaced mode (30 frames) p : progressive mode (60 frames)
M
5
connecting audio from external components
Please refer to user guide for more detail.
OPTICAL : Connecting an External Digital Component
Digital signal components such as a Cable Box/Satellite receiver (Set-Top Box).
Connect the Digital Input
1.
(OPTICAL 1 or OPTICAL 2) on the
Blu-ray Home Theater to the Digital Output of
the external digital component.
Press the D.IN button on the remote control
2.
to select D.IN 1 or D.IN 2 input.
You can also use the FUNCTION button
•
on the main unit.
The mode switches as follows :
BD/DVD ➞ D.IN 1 ➞ D.IN 2 ➞ AUX ➞ FM
To see video from your Cable Box/Satellite receiver, you must connect it’s video output to a TV.
M
Optical Cable(not supplied)
This unit does not receive AM broadcasts.
M
Listening to Radio
Remote Control
Press the TUNER button to select the FM band.
1.
Tune in to the desired station.
2.
Automatic Tuning 1 : When the SKIP ( ) button is pressed, a preset broadcast station is selected.
•
Automatic Tuning 2 : Press and hold the
•
TUNING/CH ( ) button to
Manual Tuning : Briefly press the TUNING/CH ( ) button to increase or
•
Main Unit
Press the FUNCTION button to select the FM band.
1.
Select a broadcast station.
2.
Automatic Tuning 1 : Press the STOP ( ) button to select PRESET and then press the SKIP ( ) button to select
•
the preset station.
Automatic Tuning 2 : Press the STOP ( ) button to select MANUAL and then press and hold the
•
( )
SKIP
Manual Tuning : Press the
•
in to a lower or higher frequency.
automatically search for active broadcasting stations.
button to automatically search the band.
STOP ( )
button to select MANUAL
and then briefly press the SKIP ( ) button to tune
decrease the frequency incrementally.
4 - English
5 - English
6 - English
 Loading...