

Samsung HCP4252WX-XAC User Manual
Remote Control
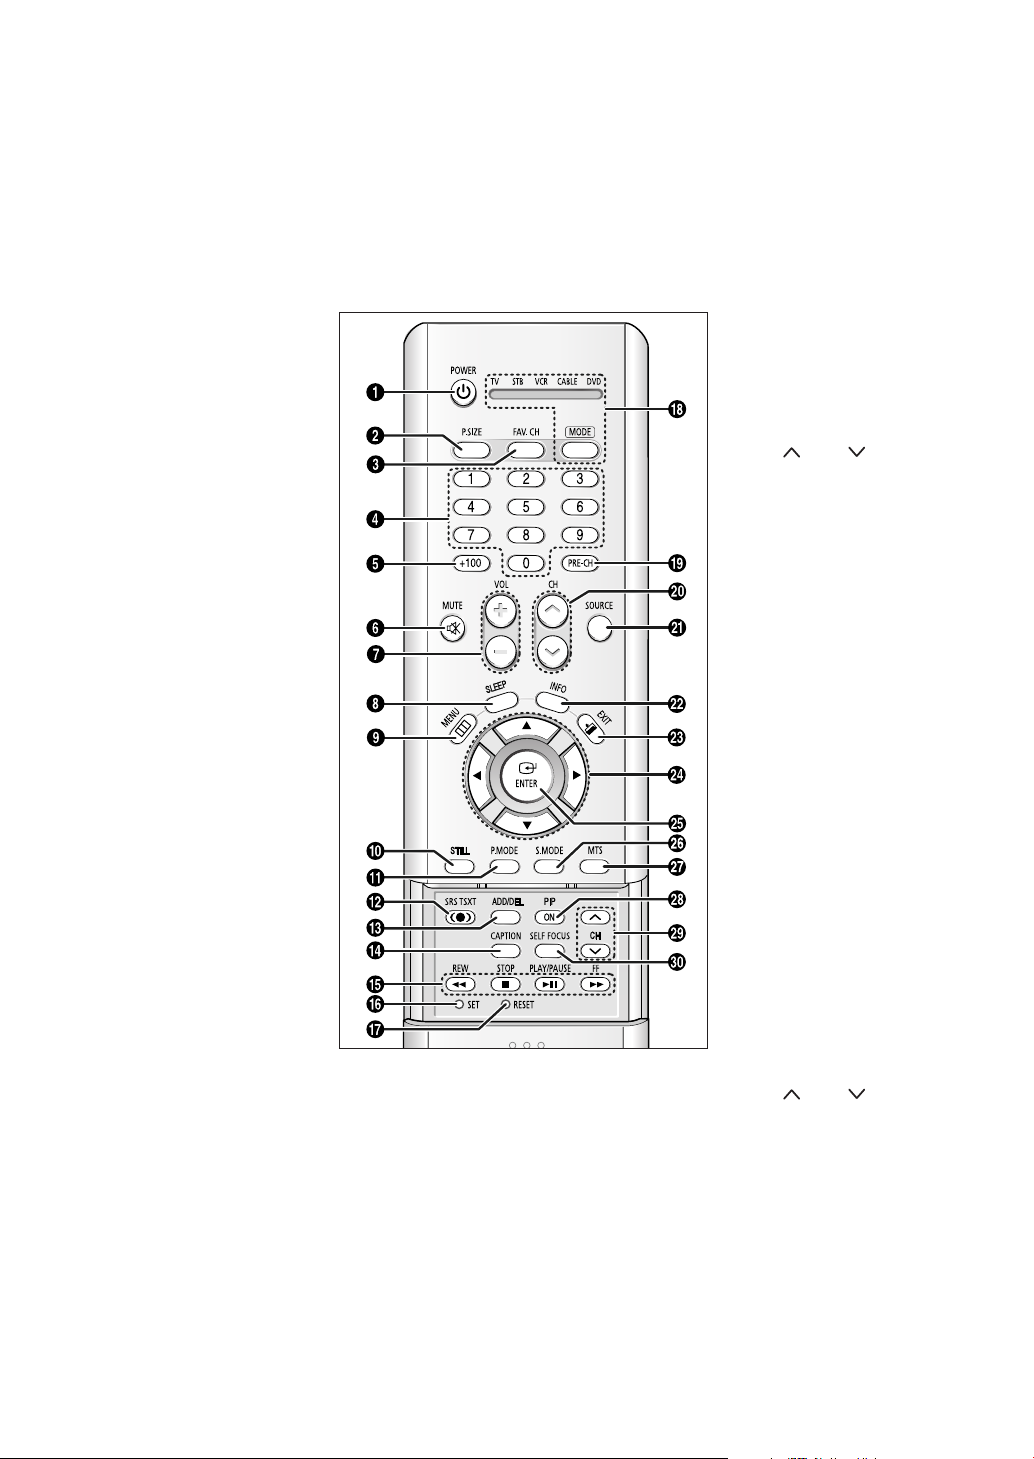
You can use the remote control up to about 23 feet from the TV. When using the remote
control, always point it directly at the TV. You can also use your remote control to operate your
Set-Top box, VCR, Cable box or DVD player.
Œ
POWER
Turns the TV on and off.
´
P.SIZE
Press to change the picture size.
ˇ
FAV. CH
Press to switch between your
favorite channels.
¨
Number buttons
Press to select channels directly
on the TV.
ˆ
+100
Press to select channels over 100.
For example, to select channel 121,
press the “+100,” then press the
“2” and “1.”
Ø
MUTE
Press to temporarily cut off the
sound.
∏
VOL +, VOL -
Press to increase or decrease the
volume.
”
SLEEP
Press to select a preset time
interval for automatic shut off.
’
MENU
Displays the main on-screen menu.
˝
STILL
Press to stop the action during a
particular scene. Press again to
resume normal video.
The still function doesn’t operate in
“Component 1, 2, 3” mode.
Ô
P.MODE
Adjust the TV picture by selecting
one of the preset factory settings
(or select your personal,
customized picture settings.)
SRS TSXT
Activates TruSurround.
Ò
ADD/DEL
Press to add or erase channels in
the TV’s memory. Use to memorize
or erase the fine tuning after fine
tuning channels.
Ú
CAPTION
Press to view closed caption
information.
(Favorite Channel)
(Main picture)
Æ
VCR/DVD Controls
Controls VCR/DVD functions: Rewind, Stop,
Play/Pause, Fast Forward.
ı
SET
Used during set up of this remote control, so that
it will work compatibly with other devices (VCR,
Set-Top box, Cable box, DVD, etc.)
˜
RESET
If your remote control is not functioning properly,
take out the batteries and press the RESET
button for about 2~3 seconds. Re-insert the
batteries and try using the remote control again.
¯
MODE
Selects a target device to be
controlled by this remote control
(i.e., TV, STB, VCR, CABLE or DVD).
˘
PRE-CH
Tunes to the previous channel.
¿
CH , CH
Press to change channels.
¸
SOURCE
Each time the button is pressed, all
the inputs connected to the
external component jacks will be
shown in regular sequence.
˛
INFO
Press to display information on the
TV screen.
◊
EXIT
Press to exit the menu.
±
œ/√/†/…
Control the cursor in the menu.
≠
ENTER
While using the on-screen menus,
press ENTER to activate (or
change) a particular item.
–
S.MODE
Adjust the TV sound by selecting
one of the preset factory settings
(or select your personal,
customized sound settings.)
—
MTS
(Multichannel Television
Sound)
Press to choose “Stereo”, “Mono”
or “SAP (Secondary Audio
Program)”.
÷
PIP ON
Activates PIP (Picture-In-Picture).
®
CH , CH
Displays the available channels in
sequence. (These buttons change
channels in the PIP window only.)
∑
SELF FOCUS
Press to adjust for the optimum
picture set in the factory.
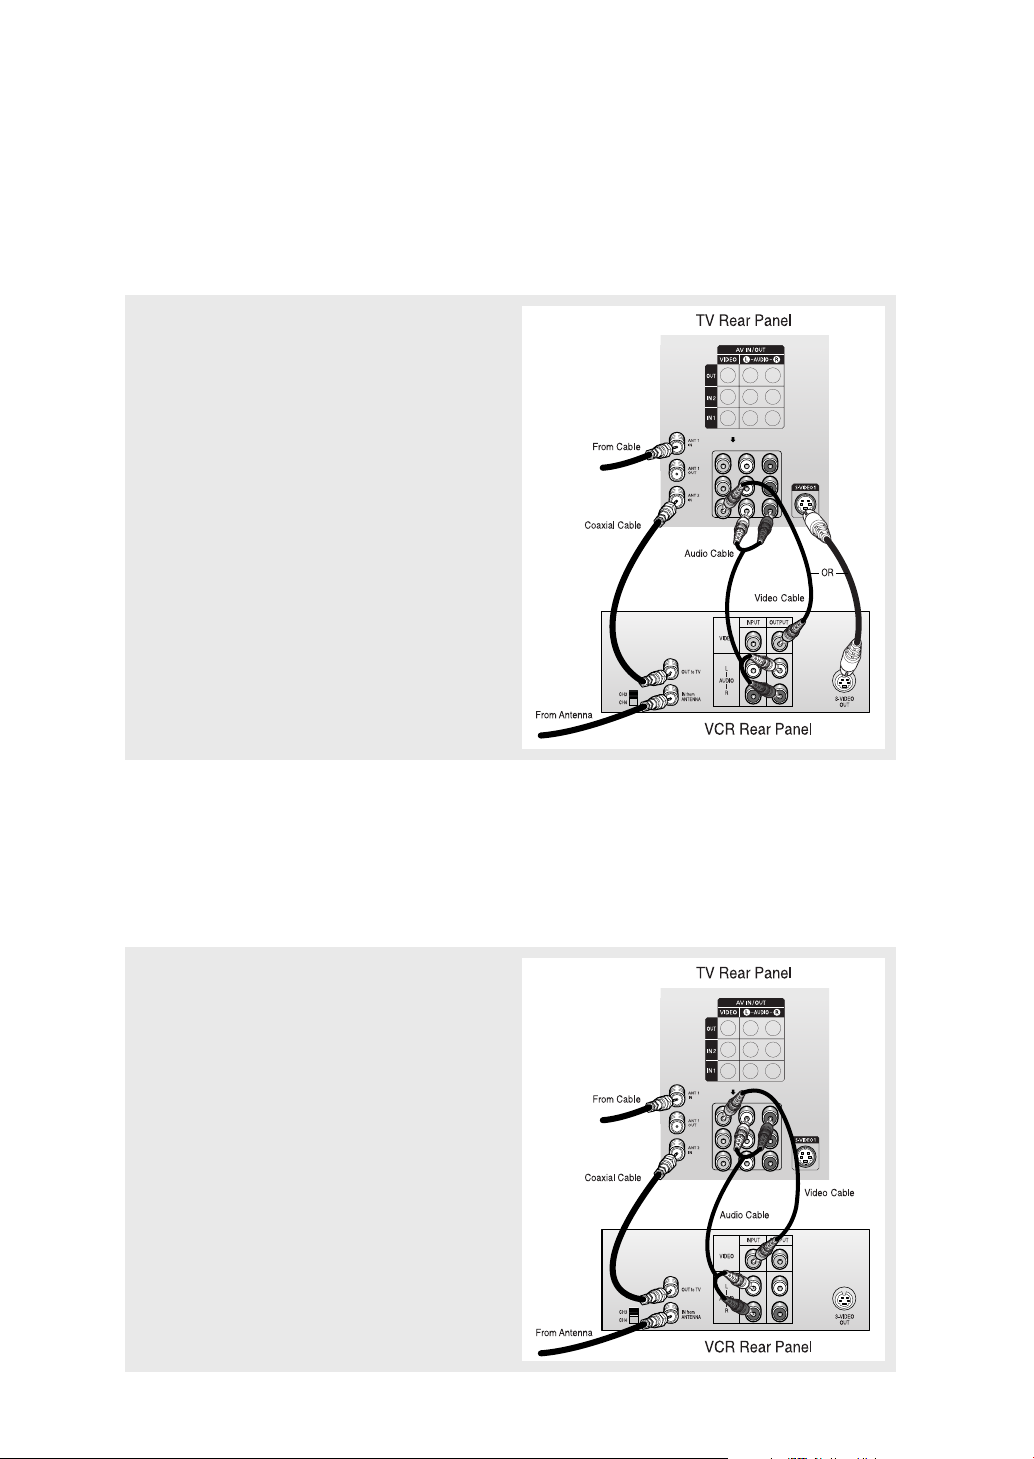
Connecting a VCR
These instructions assume that you have already connected your TV to an antenna or a cable
TV system . Skip step 1 if you have not yet
connected to an antenna or a cable system.
1
Connect a coaxial cable between the “ANT IN” (1 or
2) terminal on the TV and the ANTENNA OUT terminal
on the VCR.
A coaxial cable is usually included with a VCR. (If
not, check your local electronics store).
2
Connect a set of audio cables between the “AV IN 1
(L, R)” (or “AV IN 2 (L, R)”) jacks on the TV and AUDIO
OUT jacks on the VCR.
If you have a mono VCR, connect L(mono) to VCR
audio out using only one audio cable.
3
Connect a video cable between the “AV IN 1 (VIDEO)”
(or “AV IN 2 (VIDEO)”) jack on the TV and the VIDEO
OUT jack on the VCR.
Follow the instructions in “Viewing a VCR or
Camcorder Tape” to view your VCR tape.
• Also, you can connect to “AV 3” on the side panel of TV.
Connecting a Second VCR to Record from the TV
Your TV can send out signals of its picture and sound to be recorded by a second VCR. To do
this, connect your second VCR as follows:
1
Connect a set of audio cables between the “AV OUT
(L, R)” jacks on the TV and the AUDIO IN jacks on the
VCR.
(The VCR input jacks might be either on the front or
rear of the VCR.)
2
Connect a video cable between the “AV OUT (VIDEO)”
jack on the TV and the VIDEO IN jack on the VCR.
Refer to your VCR’s instructions for more information
about how to record using this kind of connection.
 Loading...