

Page 1
Dishwasher
User manual
DW80R706* Series
DW8000R_DD68-00211A-00_EN.indd 1 2019-04-24 5:59:10
Page 2
Contents
Safety information 4
Contents
What you need to know about the safety instructions 4
Important safety symbols 4
Before using your dishwasher 7
Before you start 8
Unpacking your dishwasher 8
Checking parts 9
Unsuitable items for the dishwasher 11
Using your dishwasher 12
Basic use of racks 12
Detergent guidelines 23
Touchpad responsiveness 26
Operations 27
Control panel 27
Cycle overview 30
Simple steps to start your dishwasher 31
Settings 32
Special features 34
Maintenance 35
Cleaning 35
Long-term care 39
Cleaning the drain pump 40
Storing your dishwasher 40
Troubleshooting 41
Check these solutions if your dishwasher… 41
Information codes 47
English2
DW8000R_DD68-00211A-00_EN.indd 2 2019-04-24 5:59:10
Page 3

Cycle chart 48
Appendix 50
Helping the environment 50
Specications 50
Warranty (U.S.A) 51
Contents
English 3
DW8000R_DD68-00211A-00_EN.indd 3 2019-04-24 5:59:10
Page 4

SAVE THESE INSTRUCTIONS
Safety information
Safety information
Congratulations on your new Samsung dishwasher. This manual contains important
information on the installation, use, and care of your appliance. Please take time to read
this manual to take full advantage of your dishwasher’s many benets and features.
What you need to know about the safety instructions
Warnings and Important Safety Instructions in this manual do not cover all possible
conditions and situations that may occur. It is your responsibility to use common sense,
caution, and care when installing, maintaining, and operating your dishwasher.
Important safety symbols
What the icons and signs in this user manual mean:
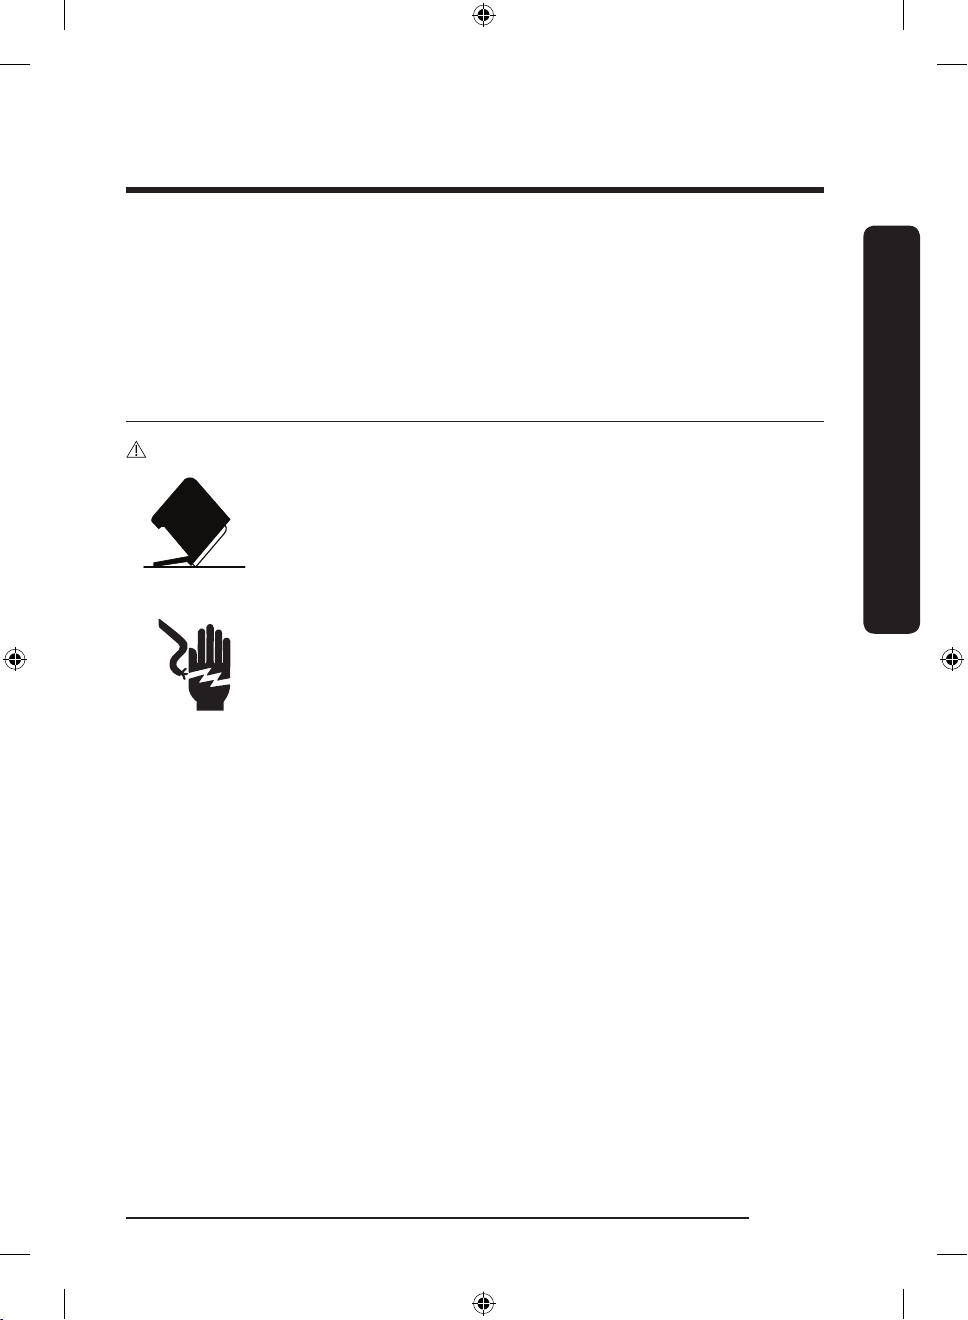
WARNING
Hazards or unsafe practices that may result in severe personal injury or death.
To reduce the risk of re, explosion, electric shock, or personal injury when using your
dishwasher, follow these basic safety precautions:
CAUTION
Hazards or unsafe practices that may result in minor personal injury or property damage.
NOTE
These warning signs are here to prevent injury to you and others.
Please follow them explicitly.
After reading this section, keep it in a safe place for future reference.
English4
DW8000R_DD68-00211A-00_EN.indd 4 2019-04-24 5:59:10
Page 5
SAVE THESE INSTRUCTIONS
California Proposition 65 Warning
WARNING: Cancer and Reproductive Harm www.P65Warnings.ca.gov
WARNING
When using your dishwasher, follow basic precautions, including the following:
1. Read all instructions before using the dishwasher.
2. Use the dishwasher only for its intended function.
3. Use only detergents or wetting agents recommended for use in a dishwasher and keep
them out of the reach of children.
4. When loading items to be washed:
- locate sharp items so that they are not likely to damage the door seal, and
- load sharp knives with the handles up to reduce the risk of cut-type injuries.
5. Do not wash plastic items unless they are marked “dishwasher safe” or the equivalent.
For plastic items not so marked, check the manufacturer’s recommendations.
6. Do not touch the HEATING ELEMENT during or immediately after use.
7. Do not operate your dishwasher unless all ENCLOSURE panels are properly in place.
8. Do not tamper with the controls.
9. Do not abuse, sit on, or stand on the door or dish rack of the dishwasher.
10. To reduce the risk of injury, do not allow children to play in or on the dishwasher.
11. Under certain conditions, hydrogen gas may be produced in a hot-water system that
has not been used for two weeks or more. HYDROGEN GAS IS EXPLOSIVE. If the hotwater system has not been used for such a period, before using the dishwasher turn
on all hot-water faucets and let the water ow from each for several minutes. This will
release any accumulated hydrogen gas. As the gas is ammable, do not smoke or use
an open ame during this time.
12. Remove the door to the washing compartment when removing an old dishwasher from
service or discarding it.
Safety information
DW8000R_DD68-00211A-00_EN.indd 5 2019-04-24 5:59:10
English 5
Page 6

SAVE THESE INSTRUCTIONS
Safety information
Safety information
CAUTION
• After unpacking the dishwasher, keep the packaging out of the reach of children.
• The dishwasher is extremely heavy. Do not attempt to move or carry the dishwasher
by yourself. Two or more people are needed to move a dishwasher and avoid potential
injuries.
• As with any equipment using electricity, water, and moving parts, potential hazards
exist.
• Do not install the dishwasher near electrical components. Keep the dishwasher away
from open ames.
• Install and level your dishwasher on an uncarpeted oor that can support its weight.
• Your dishwasher must be properly grounded. Never connect it to an ungrounded outlet.
See page 7 for more information on grounding your dishwasher.
• Connect the ground wire to the green ground connector in the terminal box.
• After the dishwasher is installed, check that the drain hose is properly connected and
that there is no leakage from the hose connectors. If the drain hose is loose, it may
cause property damage.
• The water supply line is susceptible to breakage. As time goes by, it becomes less
exible. Check the line periodically. If it is swollen, torn, cut, or there is a water leak,
replace it immediately.
• To safely operate this appliance, familiarize yourself with its operations and exercise
care when using it.
• Do not put gasoline, solvents, or other flammable materials inside the dishwasher. Do
not wash dishes exposed to these materials.
• Keep your dishwasher detergent out of the reach of children. Detergent has an adverse
effect on human organs. It contains elements for polishing and is corrosive. Avoid
letting the detergent come into contact with your skin and eyes.
• Do not push or place pressure on the door when it is open, as this may damage the
dishwasher or cause harm.
• Do not allow children to play in or on the dishwasher. They may harm themselves or
damage the dishwasher.
• Disconnect the power cable (or set the circuit breaker to off) before servicing your
dishwasher.
• Do not repair, replace, or service any part of your dishwasher yourself. Disassembly,
repairs, and modications are permitted by authorized service technicians only. Work
done by an unauthorized person may void your warranty.
English6
DW8000R_DD68-00211A-00_EN.indd 6 2019-04-24 5:59:10
Page 7
SAVE THESE INSTRUCTIONS
• Before disposing of your dishwasher, remove the door of the washing compartment or
the door latch so that children or small animals cannot get trapped inside.
• If the dishwasher is left unused for an extended period of time, turn off the water
supply.
• This dishwasher is intended for residential use only.
Before using your dishwasher
WARNING
Tip-Over Hazard
• Do not use the dishwasher until it is correctly installed.
• Do not push down on the dishwasher door when it is open.
• Do not place excessive weight on the dishwasher door when it is
open.
Electric Shock Hazard
Failure to follow these instructions can result in death, re, or electric
shock:
• Electrically ground the dishwasher
• Connect the ground wire to the green ground connector in the
junction box.
• Do not use an extension cord.
Safety information
DW8000R_DD68-00211A-00_EN.indd 7 2019-04-24 5:59:11
English 7
Page 8

Before you start
Be sure to have your installer follow these instructions closely so that your new
dishwasher works properly and that you’re not at risk of injury when washing dishes.
Unpacking your dishwasher
• Once your new dishwasher has been delivered to you, carefully unpack it and check for
any damage.
Before you start
If the dishwasher has been damaged, make note of it on the waybill and keep a copy.
Do not install the dishwasher, and contact Samsung Customer Service at the number
listed on the next page.
• If there is no damage to the product, you can proceed with the installation. If you are
going to install it yourself, make sure to read through the installation guide and follow
the directions inside.
• After unpacking your dishwasher, keep the packaging out of the reach of children to
ensure their safety.
English8
DW8000R_DD68-00211A-00_EN.indd 8 2019-04-24 5:59:11
Page 9
Checking parts
When your dishwasher has been unpacked, make sure you’ve received all the parts shown
below.
If your dishwasher was damaged during shipping, or if you do not have all the parts,
contact Samsung Customer Service at 1-800-SAMSUNG (726-7864).
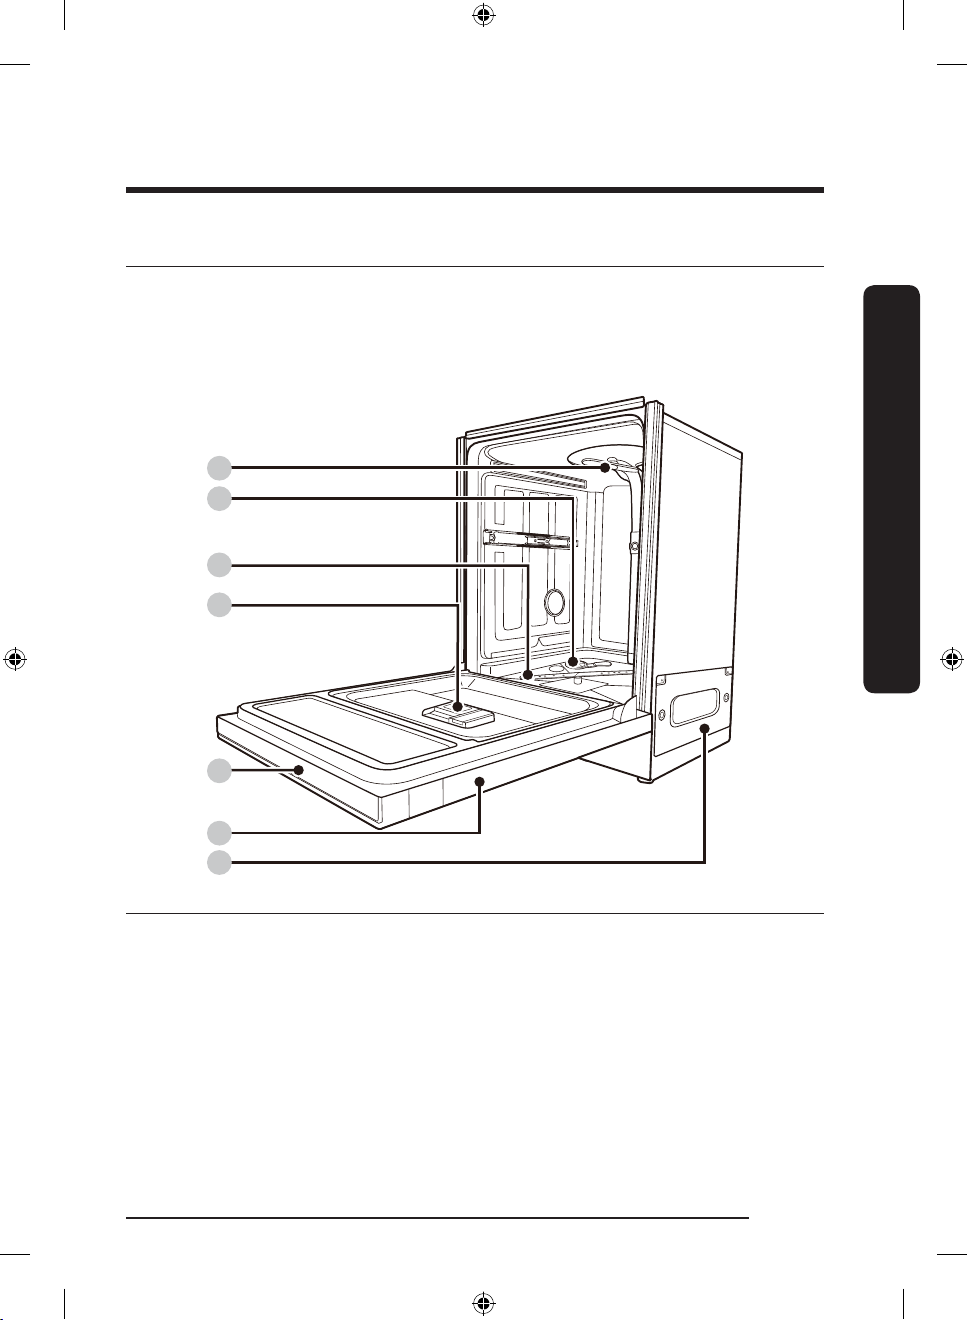
01
02
03
04
05
Before you start
06
07
01 Top nozzle 02 Storm Wash 03 Lower nozzle
04 Dispenser 05 Control panel 06 Door
07 Base
English 9
DW8000R_DD68-00211A-00_EN.indd 9 2019-04-24 5:59:11
Page 10

Before you start
Accessories
Before you start
NOTE
Accessory parts - User/Installation manual, Installation Kit, Kick Plate.
CAUTION
• Do not wash items that are covered with ash, sand, wax, lubricating grease, or paint.
These materials will damage the dishwasher. Ash does not dissolve and will spread
inside the dishwasher.
• Remove food remains such as bones, fruit seeds, etc. and waste such as toothpicks,
paper napkins, etc. from your dishes. Food remains and waste can make noise, cause the
dishwasher to malfunction, and damage your dishes and dishwasher.
Upper rack Lower rack
Cutlery rack 3rd rack
English10
DW8000R_DD68-00211A-00_EN.indd 10 2019-04-24 5:59:12
Page 11

Unsuitable items for the dishwasher
WARNING
Wash only items such as glass, porcelain, and cutlery which the manufacturer states is
dishwasher safe. Do not wash aluminium (e.g. grease lters). The dishwasher may damage
aluminium, or in extreme cases, cause a severe chemical reaction.
Do not wash the following items in the dishwasher.
• Copper, brass, tin, ivory, and aluminium items or items with adhesive
• Non-heat resistant plastics
• Craft items, antiques, valuable vases, and decorative glassware
• Pottery or glazed-ceramic items
• Wooden cutlery and crockery or items with wooden parts
• Delicate glassware or glassware containing lead crystal. Clouding may occur on the
glassware after frequent washing.
NOTE
Silverware that has contacted food containing sulphur may become discoloured. Food with
sulphuric content include egg yolks, onions, mayonnaise, mustard, sh, sh brine, and
marinades.
Before you start
English 11
DW8000R_DD68-00211A-00_EN.indd 11 2019-04-24 5:59:12
Page 12
Using your dishwasher
Using your dishwasher
Basic use of racks
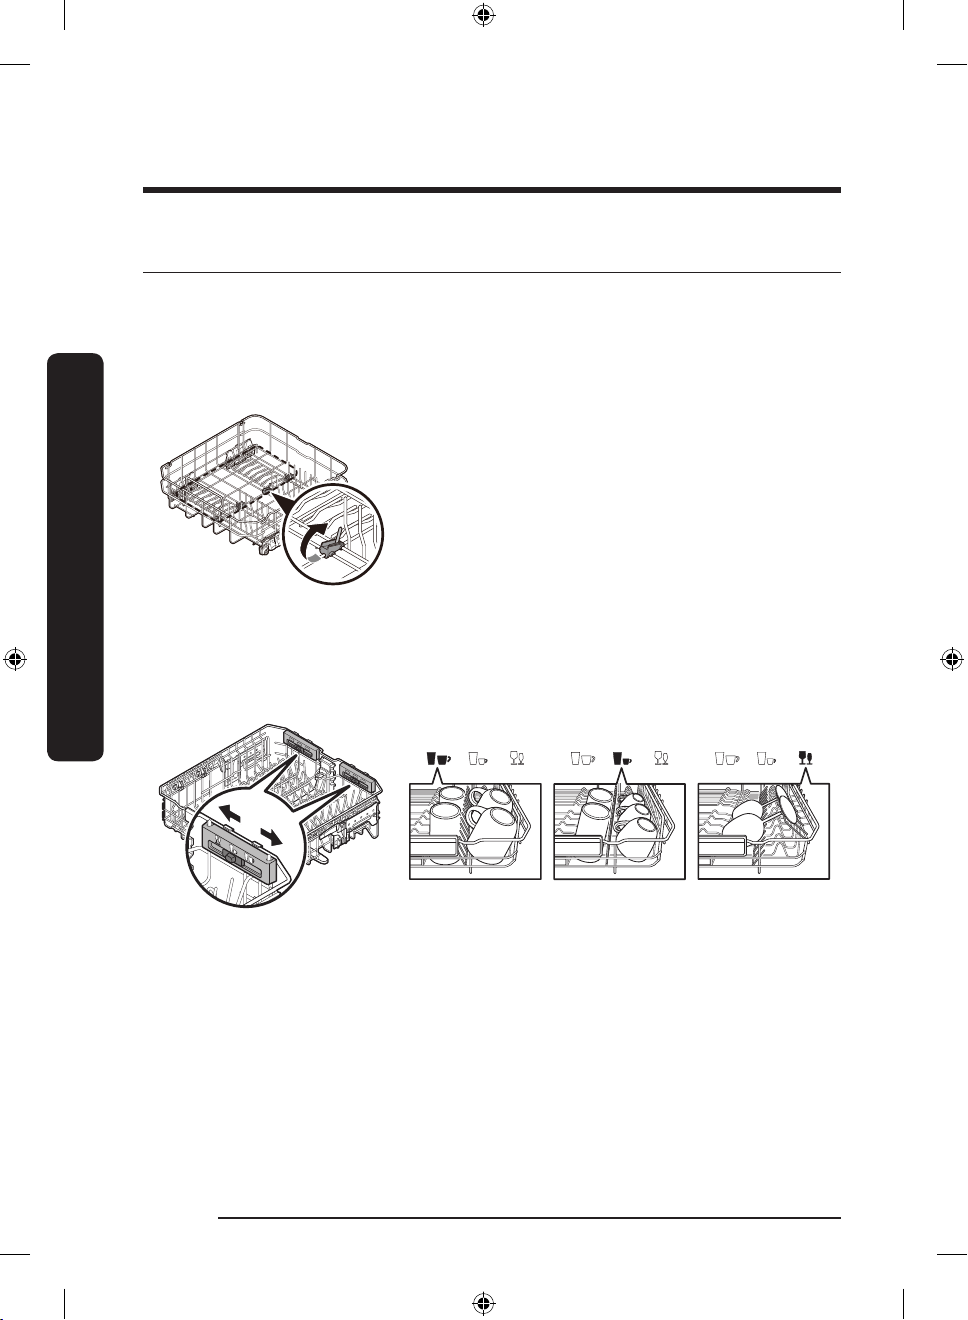
Angle of the plate supports
In the Lower rack, you can easily fold down the fold-down tines to make room for
large items such as pots and pans in the Zone Booster area. Remove the rack from the
dishwasher, and then fold down the tines one at a time. See the illustration below.
Lower rack
In the Upper rack, you can adjust the angle of the tines to three different positions to
match the size and shape of your dishes. To adjust the tines, grasp the handle at the front
of the rack, and then push it left or right. See the illustration below.
Upper rack
English12
DW8000R_DD68-00211A-00_EN.indd 12 2019-04-24 5:59:13
Page 13
Height adjustment
You can adjust the height of the upper rack in your Samsung dishwasher so that the lower
rack can accommodate larger sized dishes. Depending on where you set the upper rack
height, the lower rack can accommodate plates up to 12 in. (30 cm) in diameter and the
upper rack can accommodated plates up to 8 in. (20 cm) in diameter.
To raise the upper rack
Pull the upper rack upwards. The adjustable
handle will latch, and the upper rack will
rise.
To lower the upper rack
Hold both the adjustable handles located at
the left and right sides of the upper rack,
and then evenly press down.
CAUTION
• Adjust the height of the upper rack
before loading dishes into the rack.
Adjusting the rack after loading the
dishes may damage the dishes.
• Make sure to hold both handles when
adjusting, or the dishwasher door may
not close properly.
Using your dishwasher
English 13
DW8000R_DD68-00211A-00_EN.indd 13 2019-04-24 5:59:13
Page 14
Using your dishwasher
Using your dishwasher
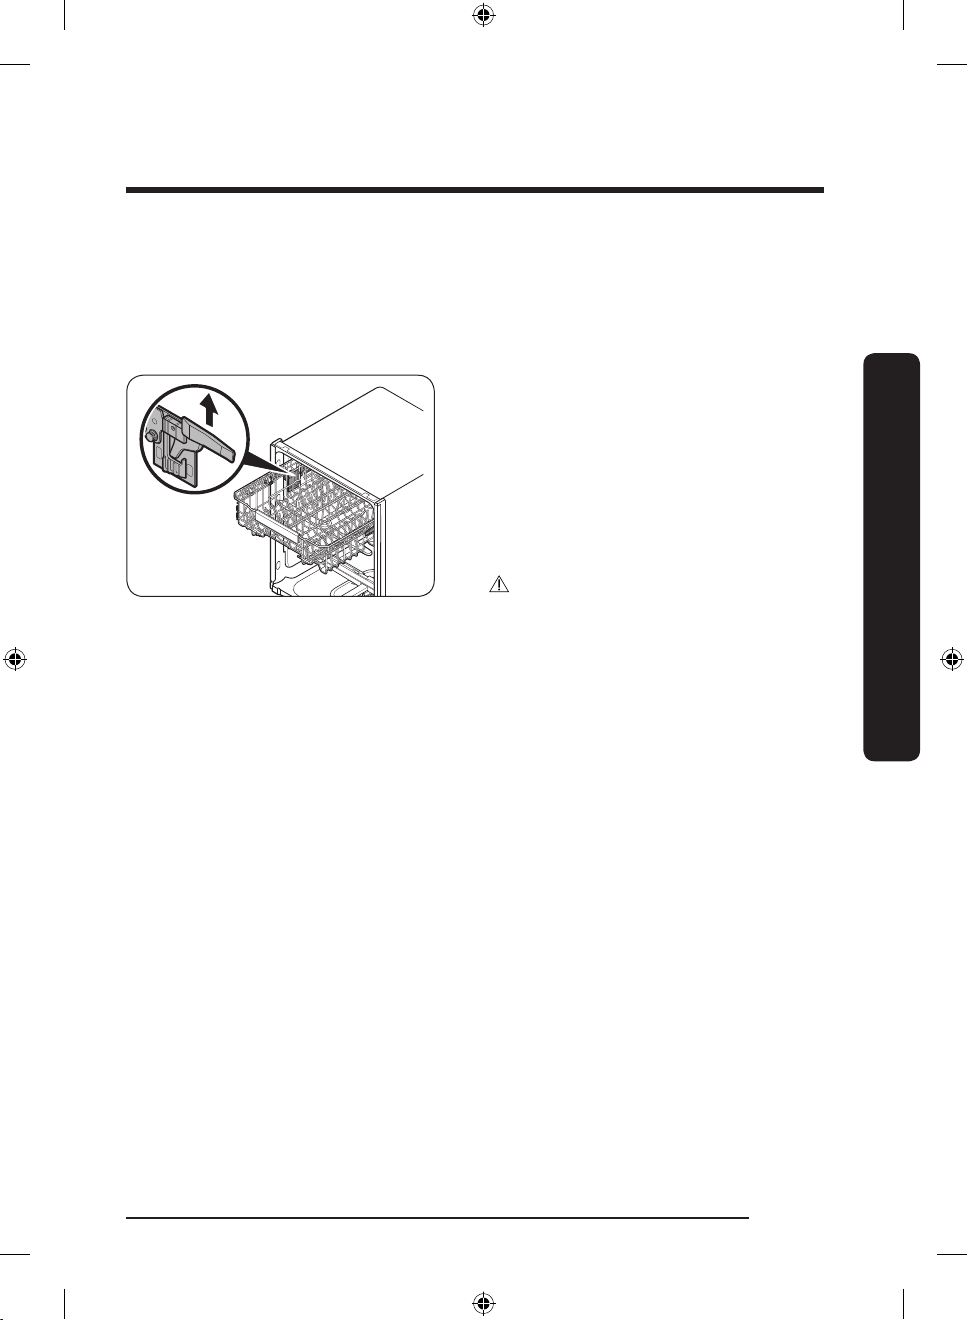
To remove the upper rack
1. Push the hook on the left rail holder
and then the right rail holder.
2. Remove the rail holders from the left
and right rails.
3. Check the position of the shaft (dark
grey in the illustration) on the rail
bracket.
4. Slide the upper rack so that the shaft is
positioned at end of the rail bracket.
English14
DW8000R_DD68-00211A-00_EN.indd 14 2019-04-24 5:59:14
Page 15
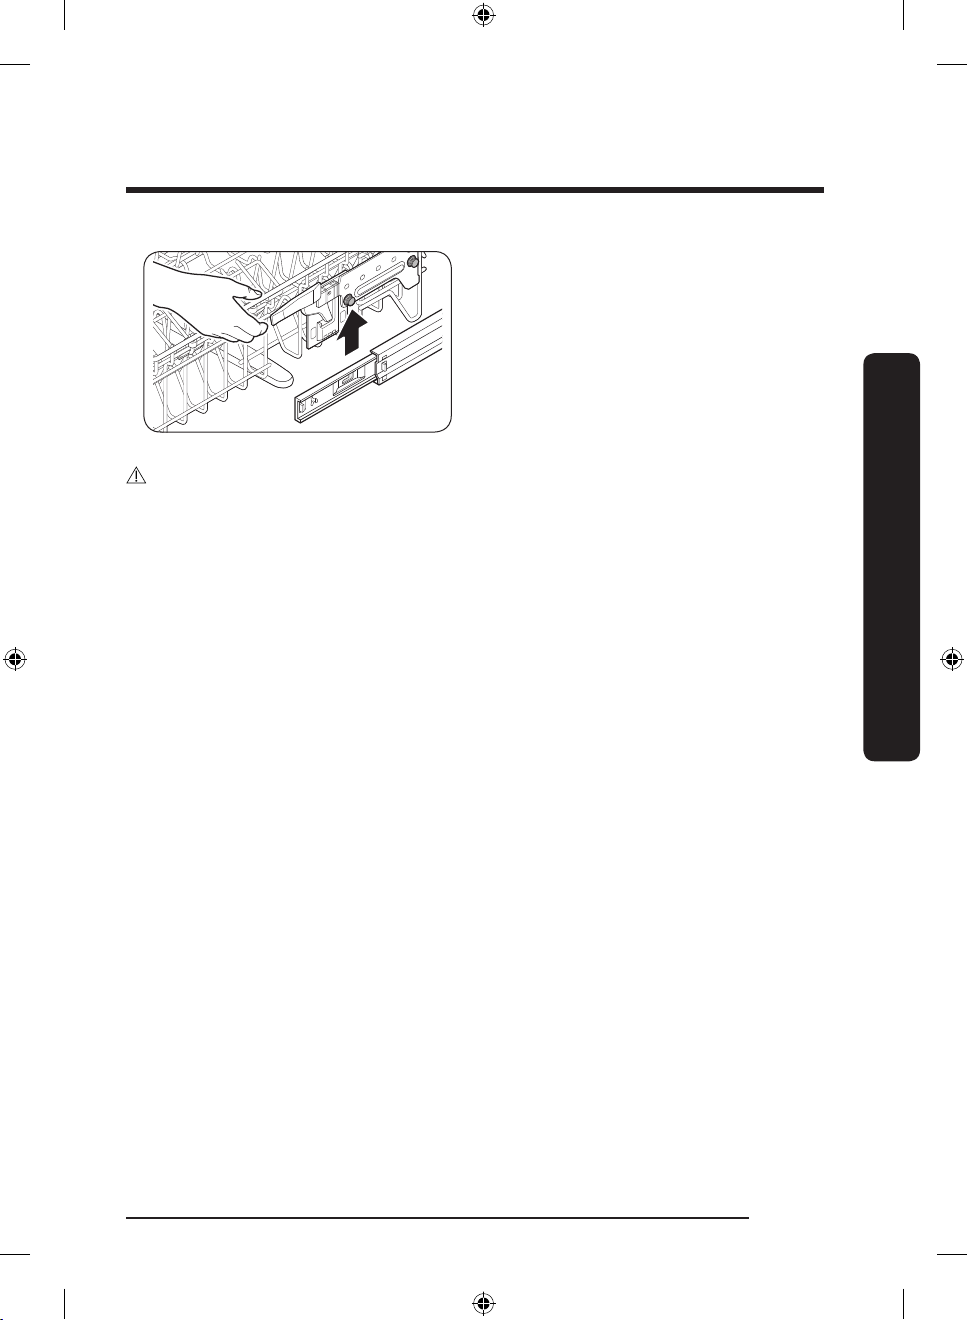
5. Lift the upper rack to remove.
6. Reverse the order of removal to re-
insert the upper rack.
CAUTION
• Do not operate the dishwasher without the upper rack. Otherwise, noises occur and the
dishwasher does not operate properly.
• Because the upper rack is removable, insert the upper rack properly to ensure the
dishwasher operates normally.
• Take care that you do not lose the holder rails during this process.
Using your dishwasher
English 15
DW8000R_DD68-00211A-00_EN.indd 15 2019-04-24 5:59:14
Page 16
Using your dishwasher
Using your dishwasher
To remove the 3rd Rack
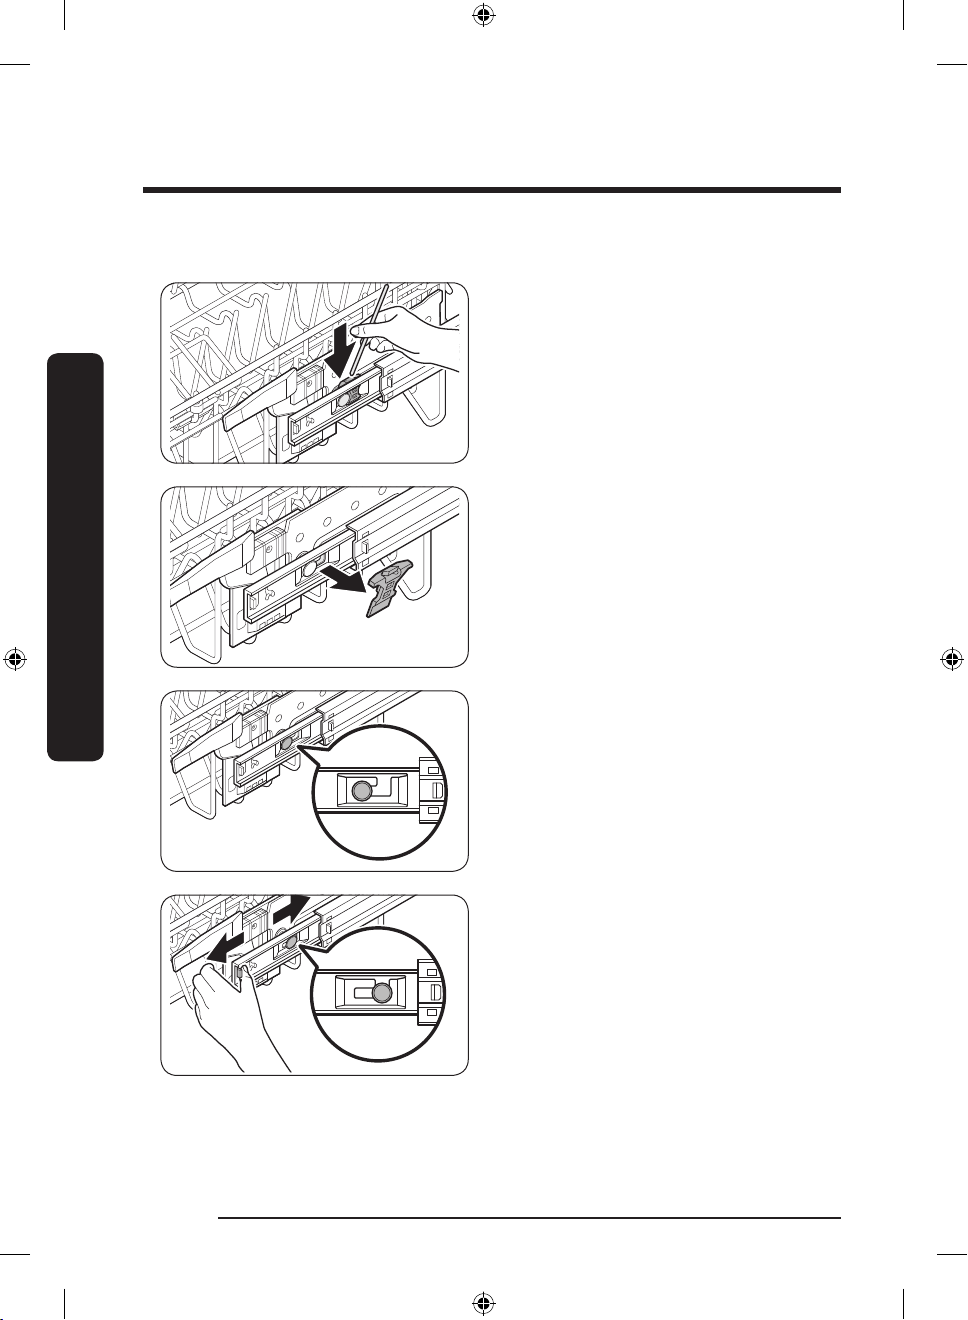
1. Stand facing the dishwasher, and then
pull the 3rd rack out so that the handles
at the ends of the rack supports (dark
grey in the illustration) are even with
the end of the rack.
2. With your right thumb, nd the small
indentation on the inside of the left
rack support that houses the tab for the
handle lock.
3. Push the handle lock tab in (i.e. to your
left) with the tip of your thumb, and
then pull the handle towards you until
it disengages from the support.
4. Repeat this process with the right
handle using your left thumb.
5. When the handles are removed, remove
the 3rd rack from the dishwasher.
6. Reverse the order of removal to
re-insert the 3rd rack.
CAUTION
Make sure the hook-shaped part of the
handle faces downward and the handle
lock (circled) re-engages when reinserting
the handle into the rail.
English16
DW8000R_DD68-00211A-00_EN.indd 16 2019-04-24 5:59:14
Page 17
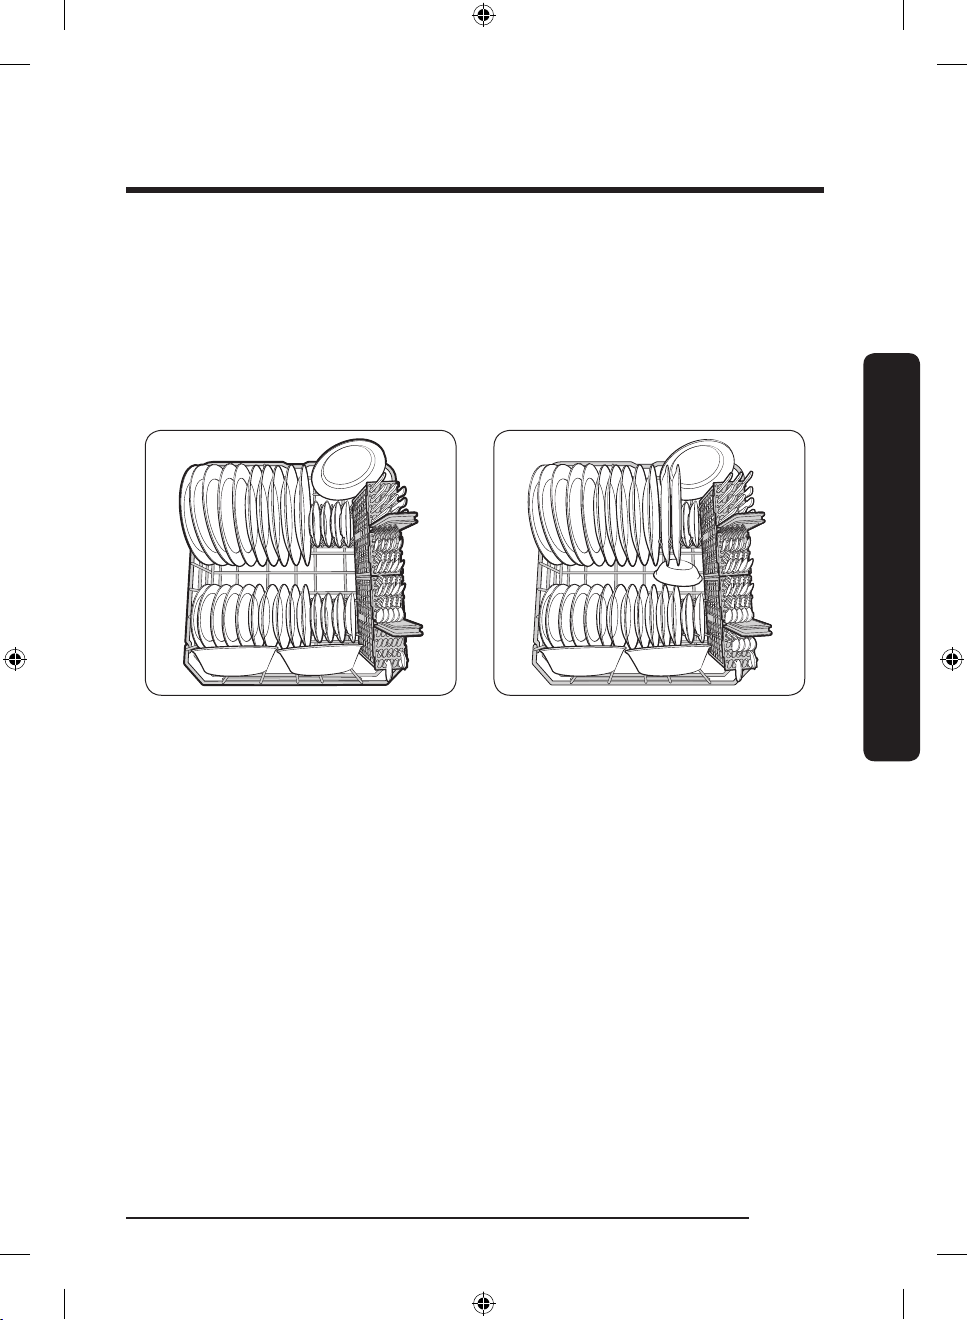
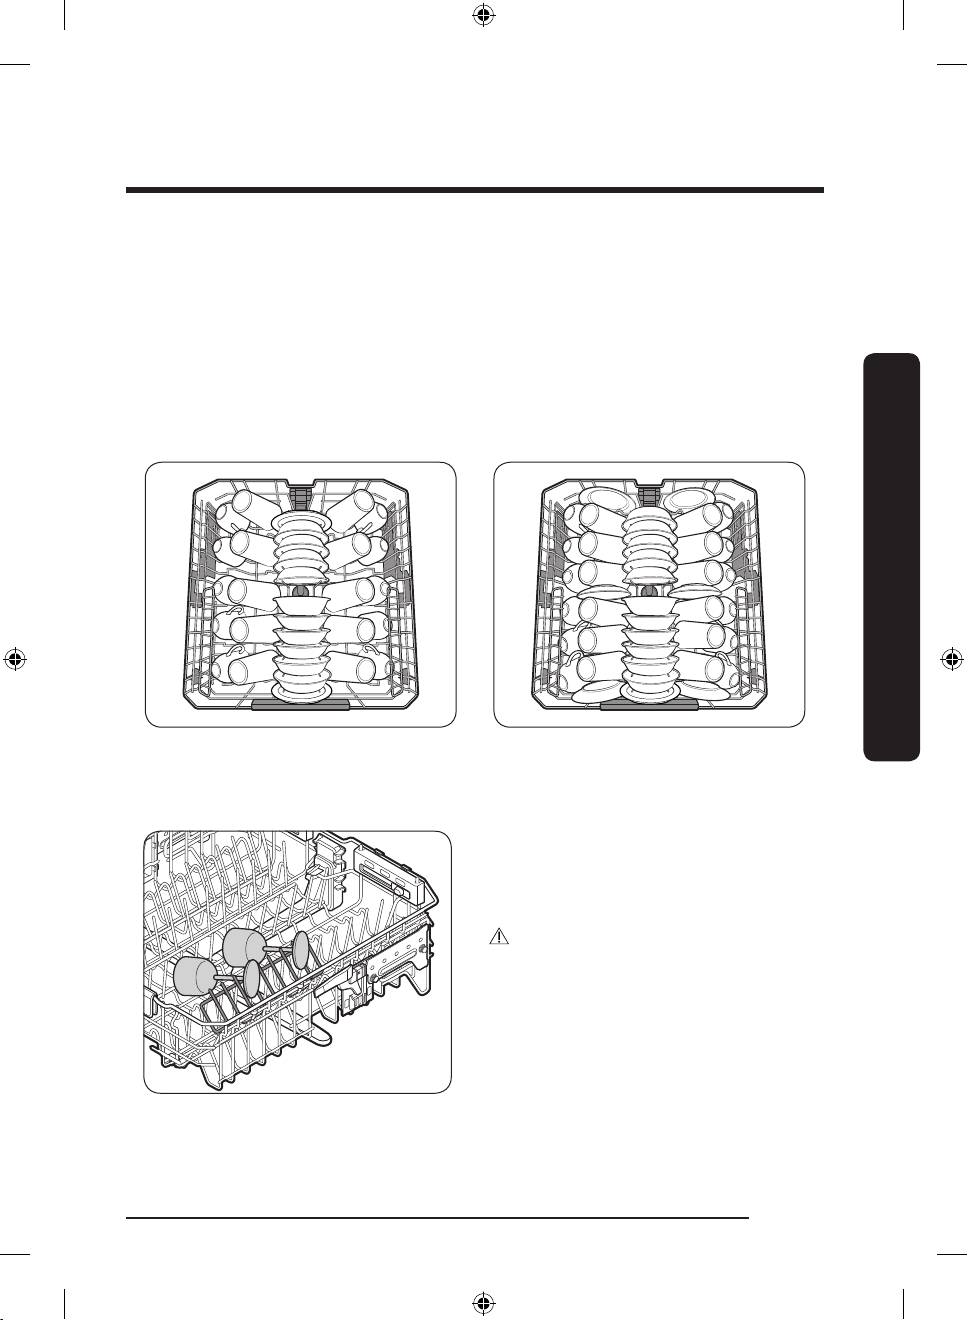
Loading dishes
Loading the lower rack
The lower rack has been especially designed for dinner dishes, soup bowls, plates, pots,
lids, casserole dishes, and plates.
Load large items such as pans and pots into the dishwasher so their open sides face
downwards. We recommend loading cups, stemware, and small plates into the upper rack.
See the recommended loading patterns below.
10 place setting 12 place setting
Using your dishwasher
English 17
DW8000R_DD68-00211A-00_EN.indd 17 2019-04-24 5:59:14
Page 18
Using your dishwasher
Using your dishwasher
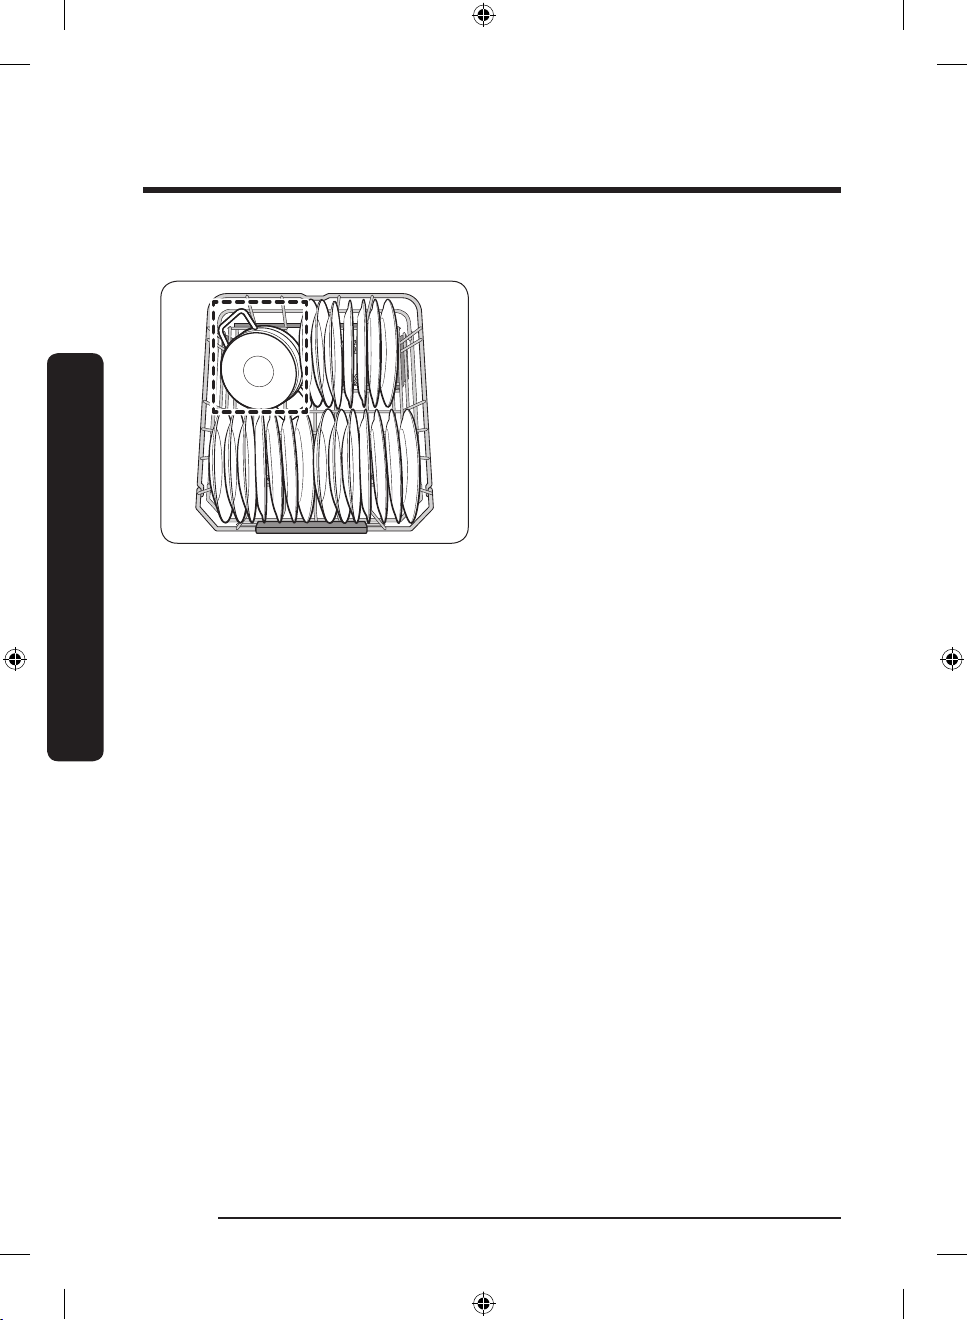
Loading the Storm Wash Area
For more effective cleaning, load large
items into the Storm Wash area on the left
side of the lower rack (Red zone).
When you select Storm Wash, the
dishwasher supplies additional power to
reinforce the water jet in the Storm Wash
area.
Make sure pot handles and other items
do not interfere with the rotation of the
nozzles.
English18
DW8000R_DD68-00211A-00_EN.indd 18 2019-04-24 5:59:15
Page 19
Loading the upper rack
The upper rack has been designed for small plates, mugs, glasses, and plastic items marked
“dishwasher safe”. Load your plates into the dishwasher in two half rows, so that the front
of each plate faces the back of the plate in front of it, and the open sides of the plates at
the center of the dishwasher face each other. See the illustrations below.
Make sure the loaded dishes do not interfere with the rotation of the nozzle which is
located at the bottom of the upper rack. (Check this by rotating the nozzle by hand.)
When loading dishes, pull the upper rack out sufciently so you can load it without striking
the counter above.
10 place setting 12 place setting
Using the glass support
Using your dishwasher
The glass support is especially suited for
wine glasses. Hang wine glasses onto the
pegs of the glass support. Fold the glass
support back when it is not being used.
CAUTION
Do not adjust the level of the upper rack
with the glass support propped up. This will
make it impossible to adjust the upper rack.
English 19
DW8000R_DD68-00211A-00_EN.indd 19 2019-04-24 5:59:15
Page 20

Using your dishwasher
Using your dishwasher
Loading the 3rd Rack
The cutlery rack is best suited for atware and cooking or serving utensils. You can place
cutlery and utensils randomly or regularly on the cutlery rack.
Removing the Cutlery Rack
The entire cutlery rack can be removed if more space is needed on the upper rack for
larger items. (See the “To remove the 3rd Rack” section on page 16.)
TM
English20
DW8000R_DD68-00211A-00_EN.indd 20 2019-04-24 5:59:15
Page 21

Loading the Cutlery rack
Left Right
The cutlery rack consists of two
compartments.
You can place each knife, spoon, or fork
separately into the spoon stands in the
basket’s covers to prevent chipping and
discoloration. See the illustrations below.
You can use the cutlery rack with the
cover open. Refer to the illustration on
the left.
10 place setting
Using your dishwasher
Left Right
12 place setting
English 21
DW8000R_DD68-00211A-00_EN.indd 21 2019-04-24 5:59:16
Page 22
Using your dishwasher
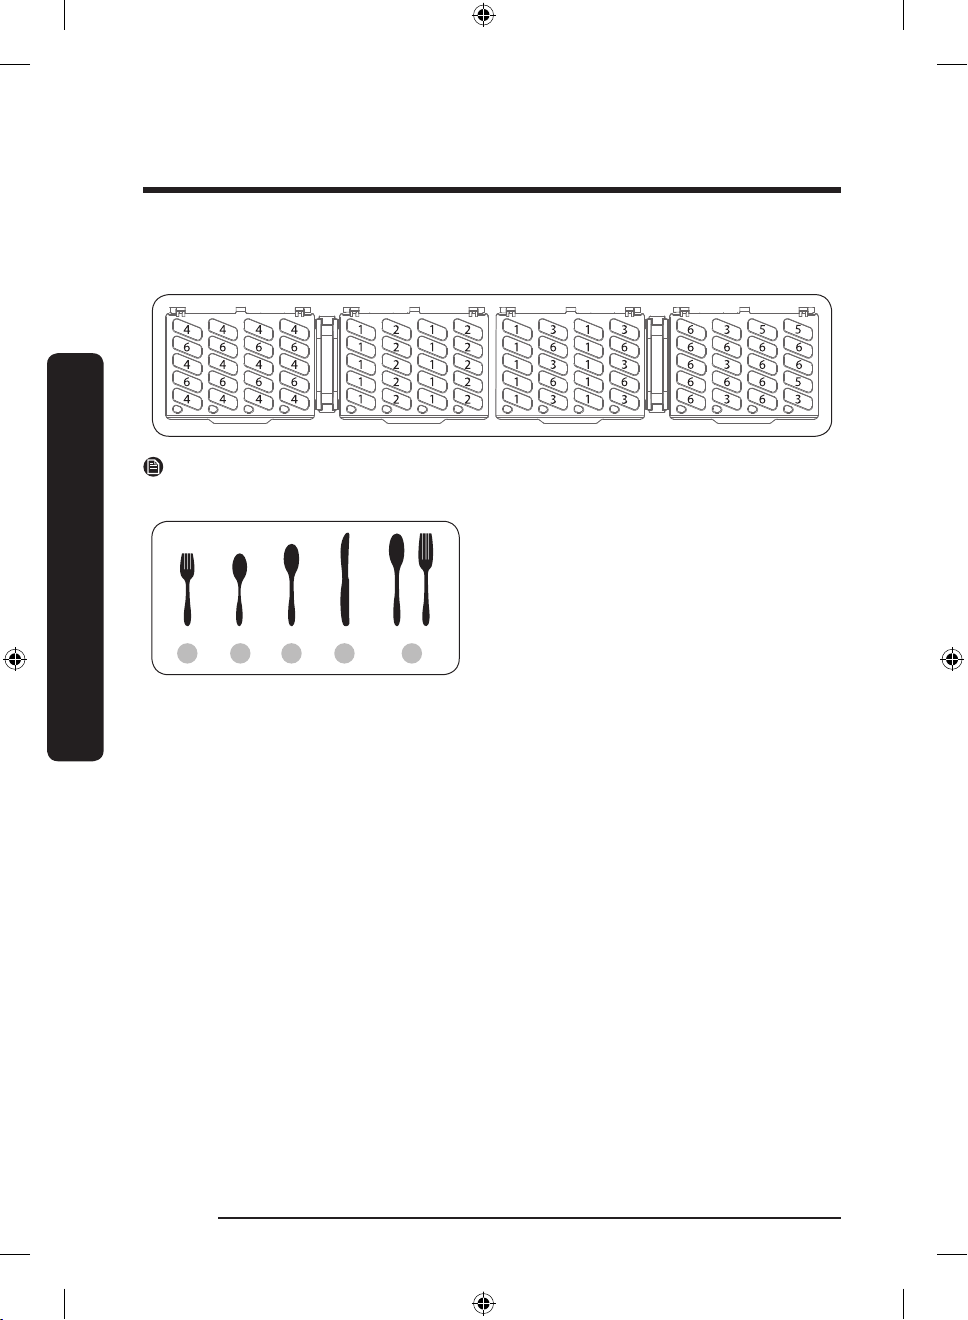
The spoon stands as seen from above with the suggested placement of cutlery items.
Match the numbers in the diagram to the numbers in the list of cutlery items below.
Using your dishwasher
NOTE
DO NOT let any item extend through the bottom.
1 2 3 4 5
1. Forks
2. Tea spoons
3. Dinner spoons
4. Knives
5. Serving spoons and Serving forks
6. Remaining items
English22
DW8000R_DD68-00211A-00_EN.indd 22 2019-04-24 5:59:16
Page 23
Detergent guidelines
All dishwasher cycles require detergent in the detergent compartment. Apply detergent as
appropriate for the selected cycle to ensure best performance.
WARNING
• Do not consume dishwasher detergent. Avoid breathing in detergent fumes. Dishwasher
detergent contains irritants and caustic chemicals that can induce respiratory conditions.
If you have consumed dishwasher detergent or inhaled detergent fumes, seek medical
attention immediately.
• Keep dishwasher detergent out of children’s reach.
CAUTION
Use dishwasher detergent only. Other types of detergent produce excessive foam, which
may decrease the dishwasher’s performance or cause it to malfunction.
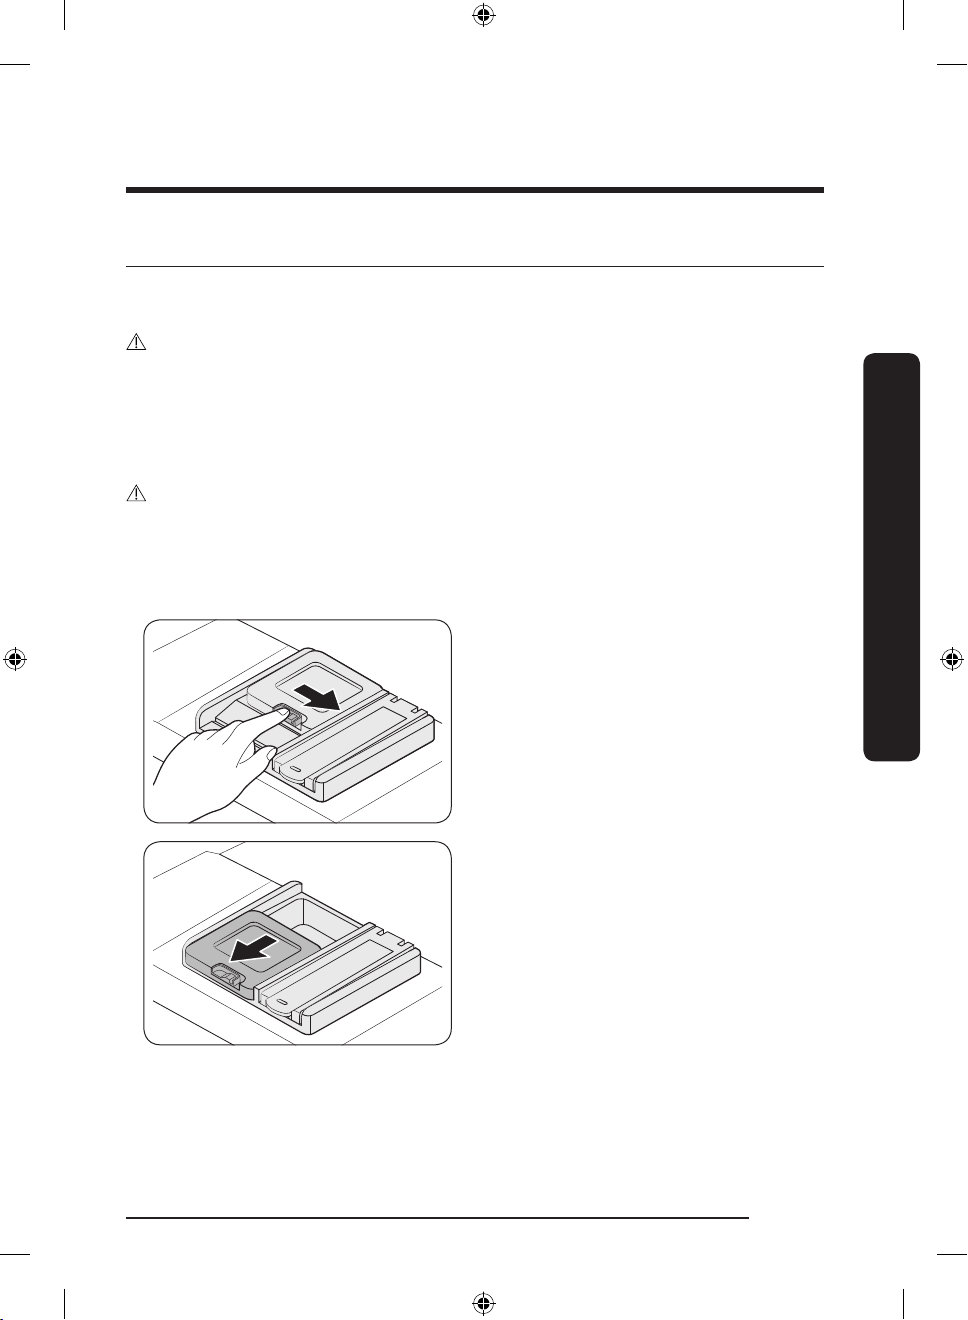
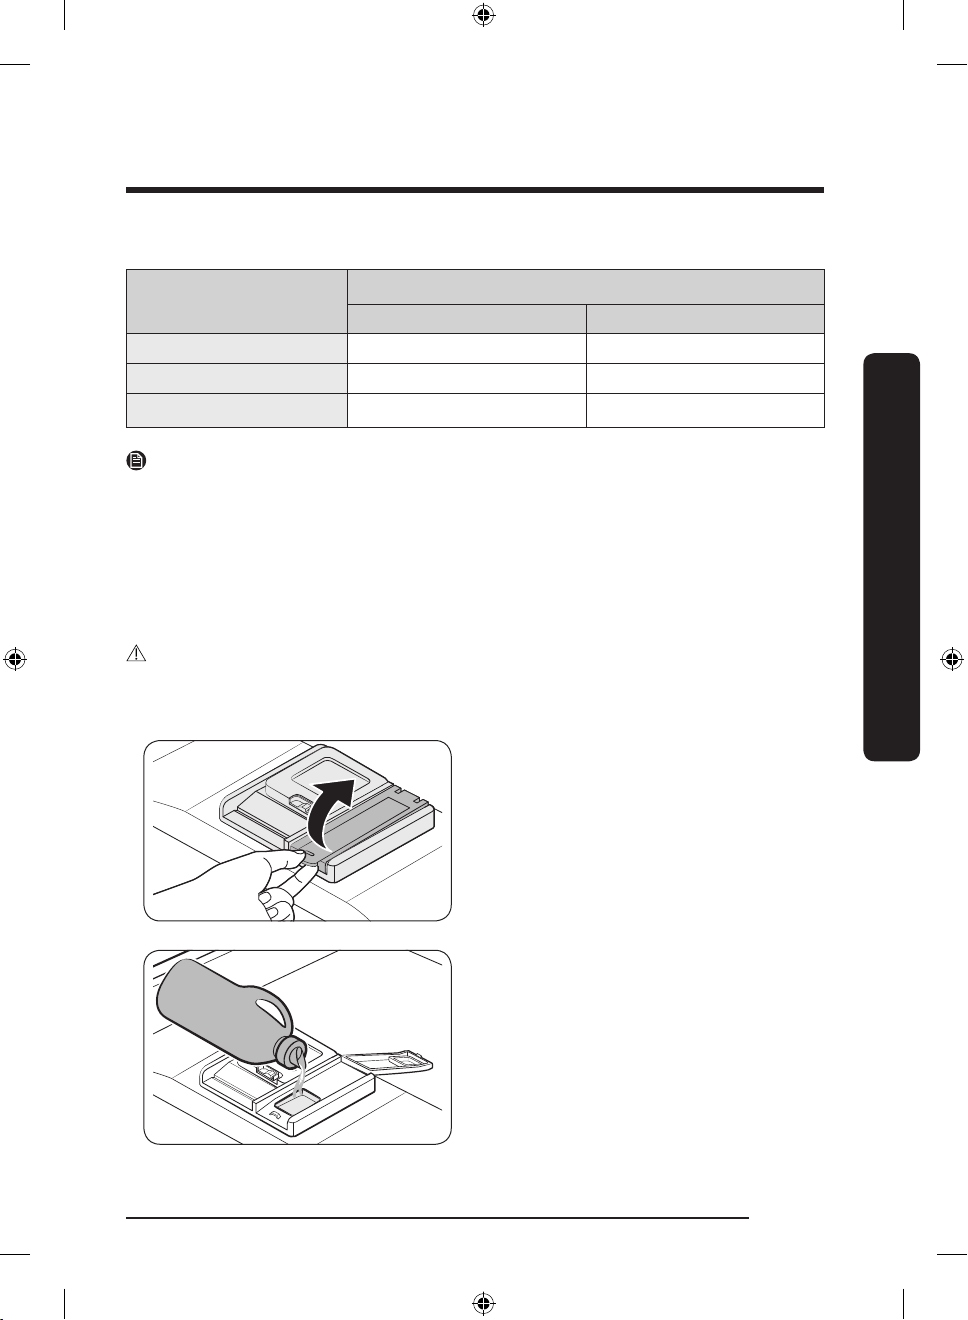
To ll the detergent dispenser
1. Gently press the dispenser ap to
unlock, and then slide it open. Note that
the dispenser ap opens at the end of
each cycle.
Using your dishwasher
English 23
DW8000R_DD68-00211A-00_EN.indd 23 2019-04-24 5:59:16
Page 24
Using your dishwasher
Using your dishwasher
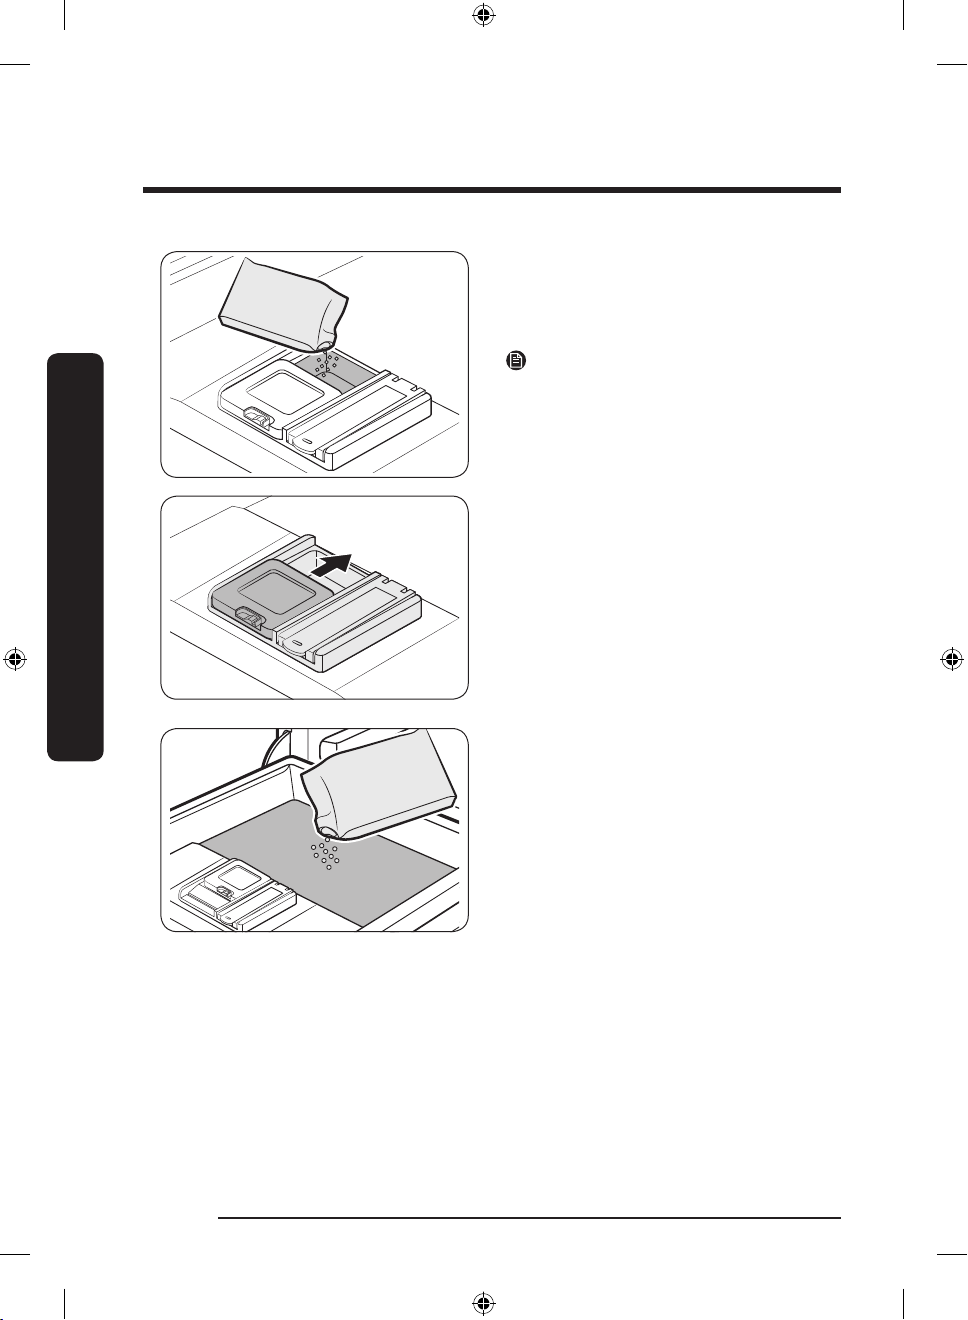
2. Apply the recommended amount of
detergent to the main compartment.
3. Close the ap, and then press down to
lock.
NOTE
This dishwasher has no separate
compartment for tablet detergent.
4. For better performace, pour a small
amount of detergent onto the door
to clean heavily soiled items more
effectively. The additional detergent
will activate during the pre-wash
process.
English24
DW8000R_DD68-00211A-00_EN.indd 24 2019-04-24 5:59:17
Page 25
The cover opens automatically to dispense the detergent during the wash.
CYCLE
AMOUNT OF DETERGENT
Main wash dispenser Onto the door for pre-wash
Auto, Normal 3/4 oz (20 g) 1/3 oz (10 g)
Heavy, Express 60 1 oz (30 g) 1/2 oz (15 g)
Delicate 3/4 oz (20 g) 1/5 oz (5 g)
NOTE
The numbers inside the dispenser refer to grams.
Rinse aid
Rinse aid improves the drying performance of the dishwasher. When the Rinse Rell
indicator lights up on the control panel, rell with rinse aid. Only use liquid rinse aid.
Powdered rinse aid will clog the compartment opening and cause the dishwasher to
malfunction.
CAUTION
• Do not apply any type of detergent to the rinse aid compartment.
• Do not over ll the compartment. Excessive rinse aid may overow during a cycle.
1. Pull up the cap of the rinse
compartment to open.
Using your dishwasher
2. Fill the compartment with rinse aid as
specied by the rinse aid manufacturer.
English 25
DW8000R_DD68-00211A-00_EN.indd 25 2019-04-24 5:59:17
Page 26
Using your dishwasher
Using your dishwasher
NOTE
For more information on setting the rinse
aid amount, see page 32.
3. Press down the circle area of the cap
to close.
Touchpad responsiveness
To prevent the touch-enabled controls from losing responsiveness, follow these
instructions.
• Touch the center of each button with
one nger.
• Do not touch more than one button at a
time, except as directed.
• Clean the surface of the control panel
regularly with a soft, damp cloth.
English26
DW8000R_DD68-00211A-00_EN.indd 26 2019-04-24 5:59:17
Page 27
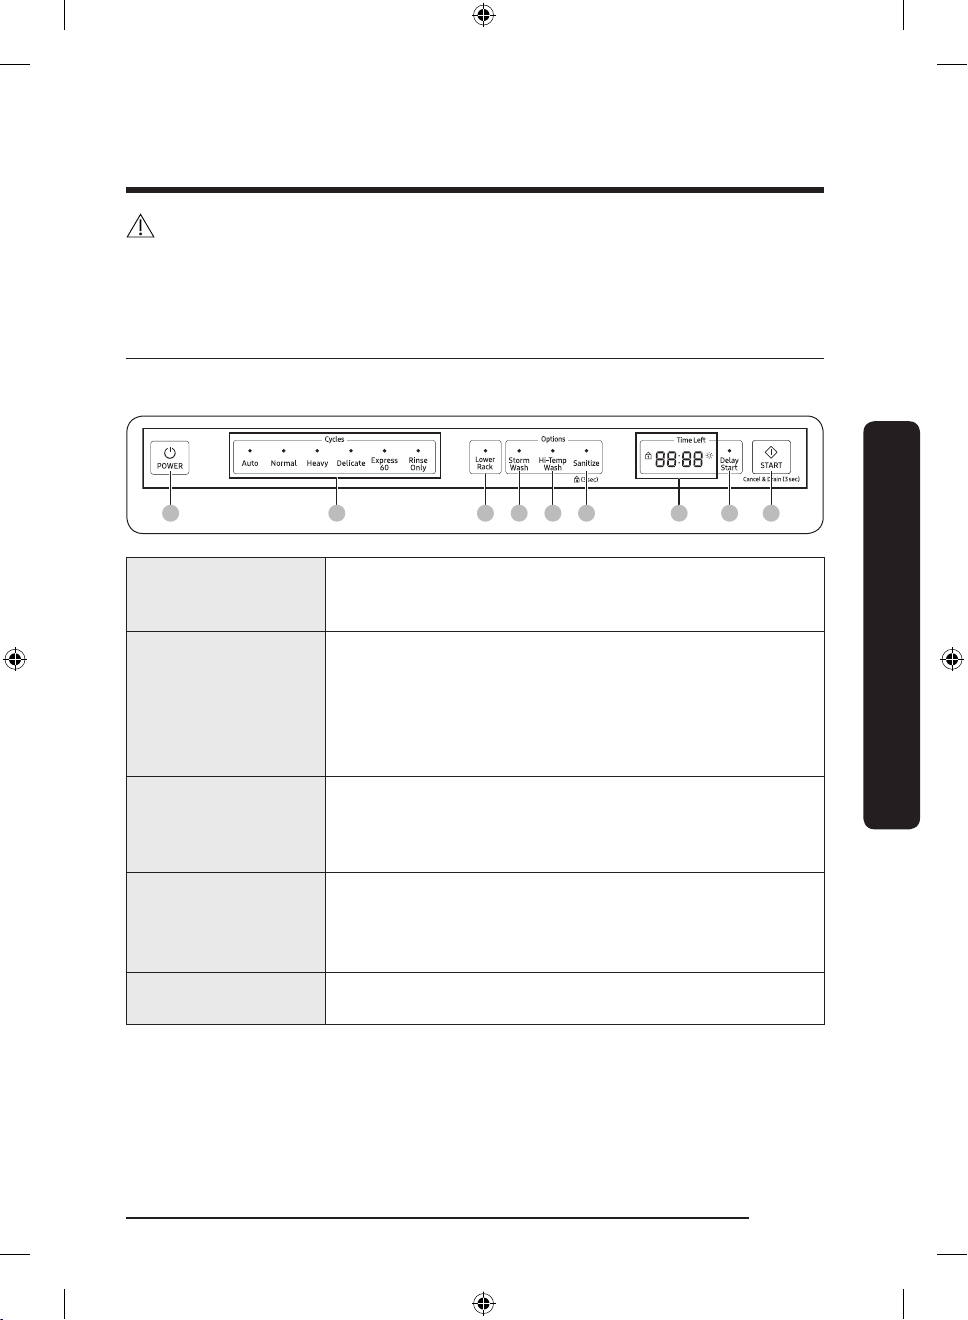
Operations
01 02 03 04 05 06 07 08 09
WARNING
To reduce the risk of re, electric shock, or injury to persons, read the IMPORTANT SAFETY
INSTRUCTIONS before operating this appliance.
Control panel
DW80R706* Series
01 POWER
02 Cycle Selector
03 Lower Rack
04 Storm Wash
05 Hi-Temp Wash
When you press the POWER button, the Cycle On light for the
most recently started cycle turns on. When the selected cycle
is complete, the dishwasher powers off automatically.
Select the appropriate wash cycle depending on the soil level
of your dishes. After you select a cycle, the Cycle On light for
that cycle lights.
If you want to change the cycle once it has started, press the
POWER button. Then, turn on the dishwasher again and select
a new cycle.
If selected, only the lower rack nozzle is activated to reduce
both the cycle time and power consumption. Use this cycle to
wash a small load of dishes or glasses in the lower rack. To
wash heavily soiled items, select the Storm Wash option.
Use this option when you want to wash pots and pans, durable
serving bowls, and other large, very dirty, hard to clean dishes.
To use Storm Wash, place the dishes face down in the marked
Storm Wash area in the lower basket.
Raises the main wash temperature to improve cleaning for
loads containing tough, baked-on food.
Operations
DW8000R_DD68-00211A-00_EN.indd 27 2019-04-24 5:59:17
English 27
Page 28

Operations
Operations
06 Sanitize /
(Control Lock)
07 Display
08 Delay Start
With the Sanitize option selected, the water temperature is
increased to 163 ˚F (73 ˚C) in the nal rinse cycle for high
temperature sanitization.
If you select the Sanitize option, the "Sanitize" lamp blinks
when the water temperature reaches the sanitary temperature
(over 155 ˚F (68 ˚C)), and then remains illuminated until the
Sanitize option ends.
When you open the door or press the POWER button, the
"Sanitize" lamp turns off.
NOTE
The Normal cycle with the Sanitize option selected is NSF
Certied and operates in accordance with NSF/ANSI Standard
184 for Residential Dishwashers. Certied residential
dishwashers are not intended for licensed food establishments.
Your dishwasher is NSF Certied.
Control Lock allows you to lock the buttons on the control
panel so children cannot accidently start the dishwasher by
pressing the buttons on the panel.
To lock and unlock the buttons on the control panel, hold the
Sanitize button down for three (3) seconds when the power
is On.
Displays information about the current cycle including the
cycle time, remaining time, Delay Start settings, and other
cycle-specic information.
If a problem occurs during operation, an information code
appears with a warning sound. Refer to the information codes
on page 47.
Delay a cycle for up to 24 hours in one-hour increments.
To increase the delay start time, press or hold the Delay Start
button. The hour displayed indicates the time at which the
wash will start.
- After setting the delay time, press the START button, and
then close the door to start the cycle.
- To change the delay time after the dishwasher has started,
rst turn the dishwasher off and turn it back on. Then,
select a new cycle and change the delay time settings.
English28
DW8000R_DD68-00211A-00_EN.indd 28 2019-04-24 5:59:18
Page 29
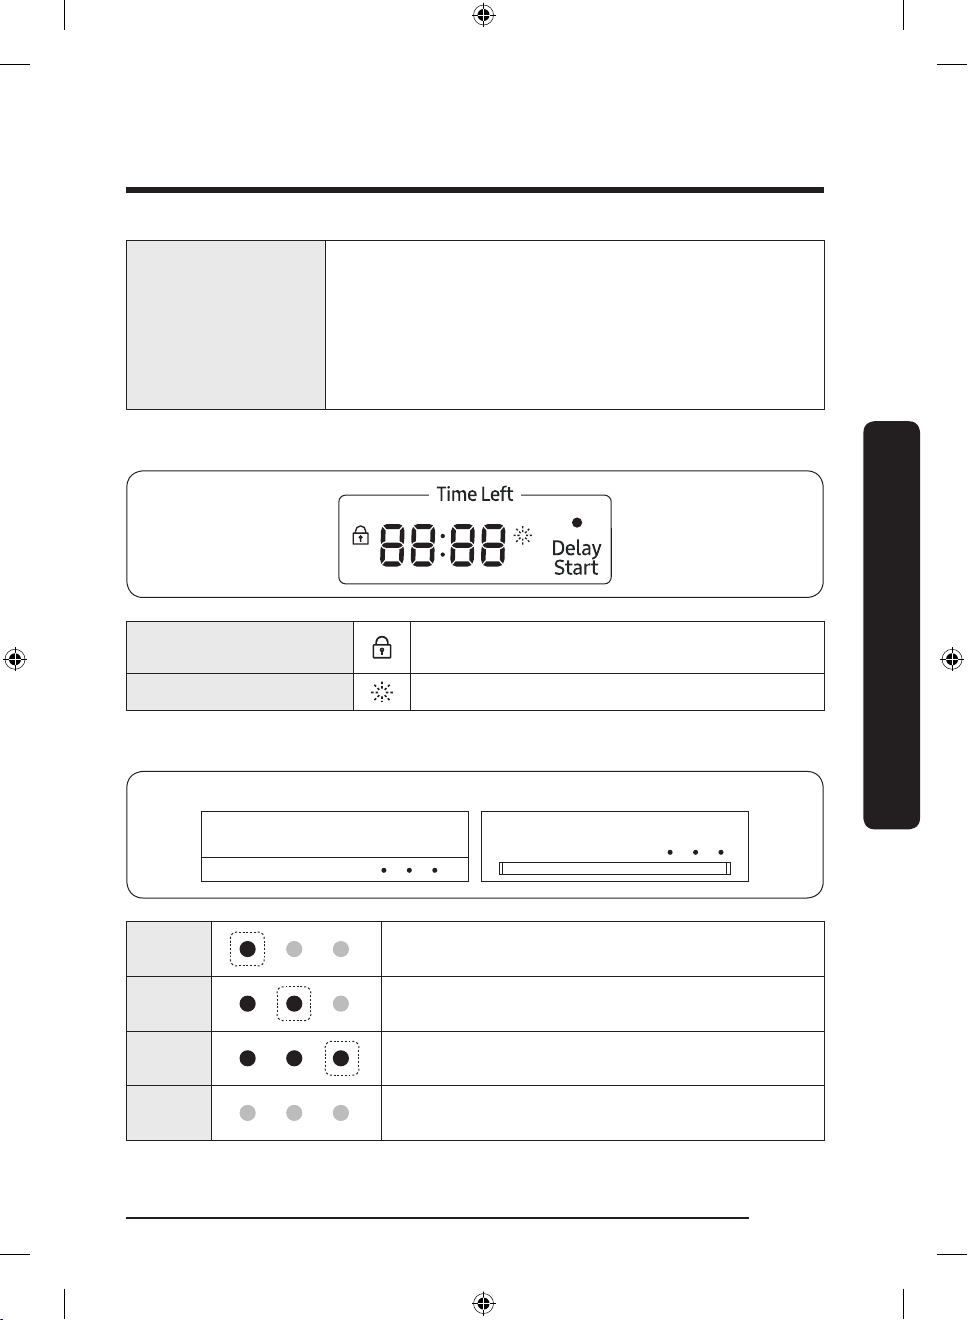
09 START
Indicators
To start a cycle, press the START button before closing the
door.
Cancel & Drain: To cancel a currently running cycle and drain
the dishwasher, press and hold the START button for three (3)
seconds.
Once the dishwasher is reset, select a cycle and option, and
then press START to restart the dishwasher.
Operations
Control Lock indicator
Rinse Rell indicator Lights up if the dishwasher runs out of rinse aid.
Lights up if Control Lock is activated, and blinks if
any button except for the POWER button is pressed.
Progress displays
DW80R7060 series DW80R7061 series
Wash
Rinse
Dry
End
When the dishwasher is in a wash portion of a cycle,
the rst light is illuminated.
When the dishwasher is in a rinse portion of a cycle,
the second light is illuminated.
When the dishwasher is in a drying portion of a cycle,
the third light is illuminated.
After the dishwasher has completed all portions of a
cycle, all lights are turned off.
English 29
DW8000R_DD68-00211A-00_EN.indd 29 2019-04-24 5:59:18
Page 30
Operations
01 02 03 04 05 06
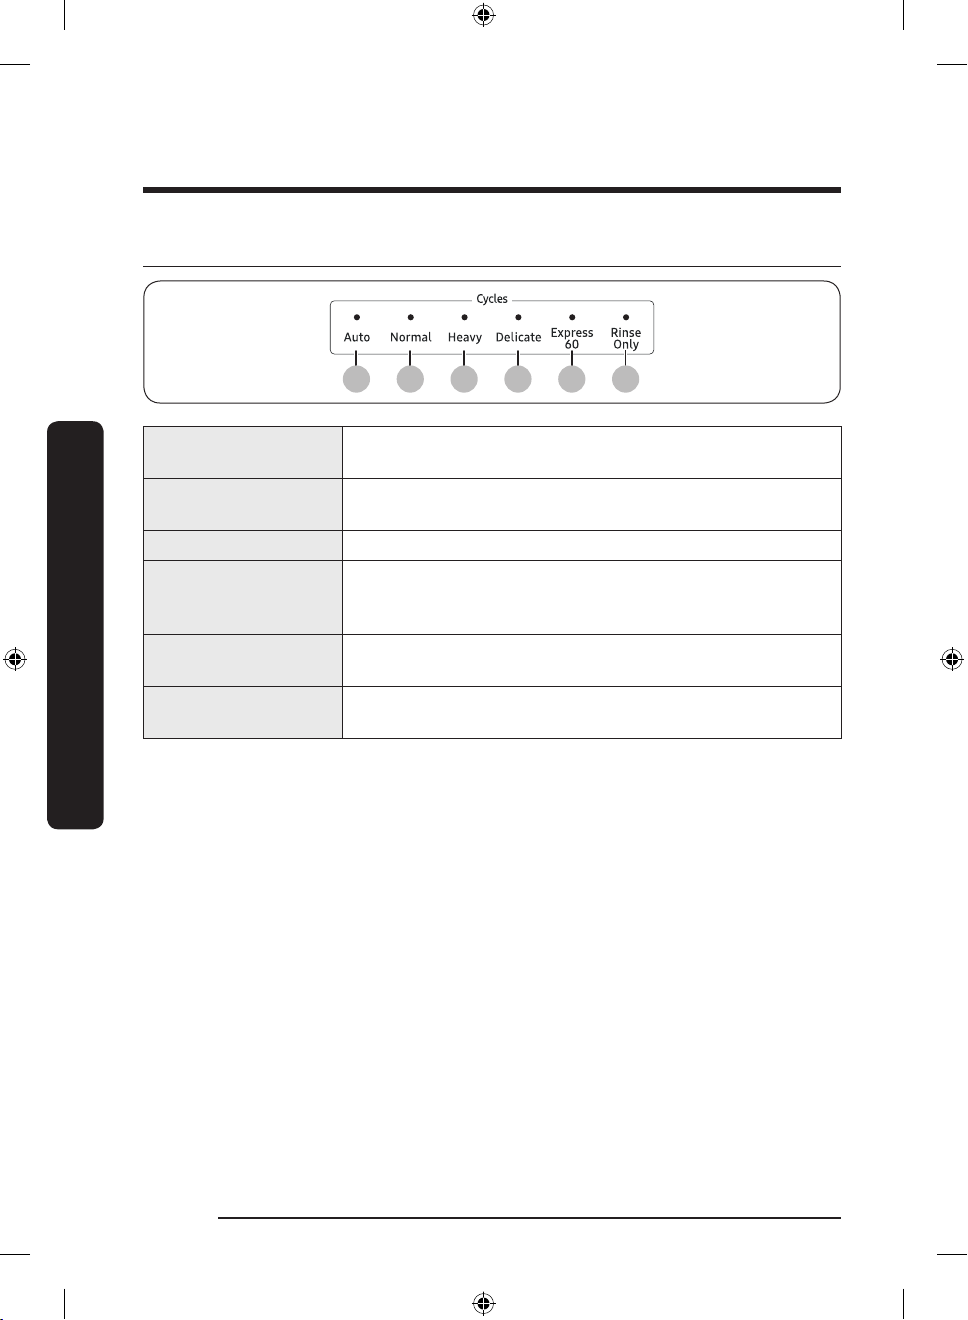
Cycle overview
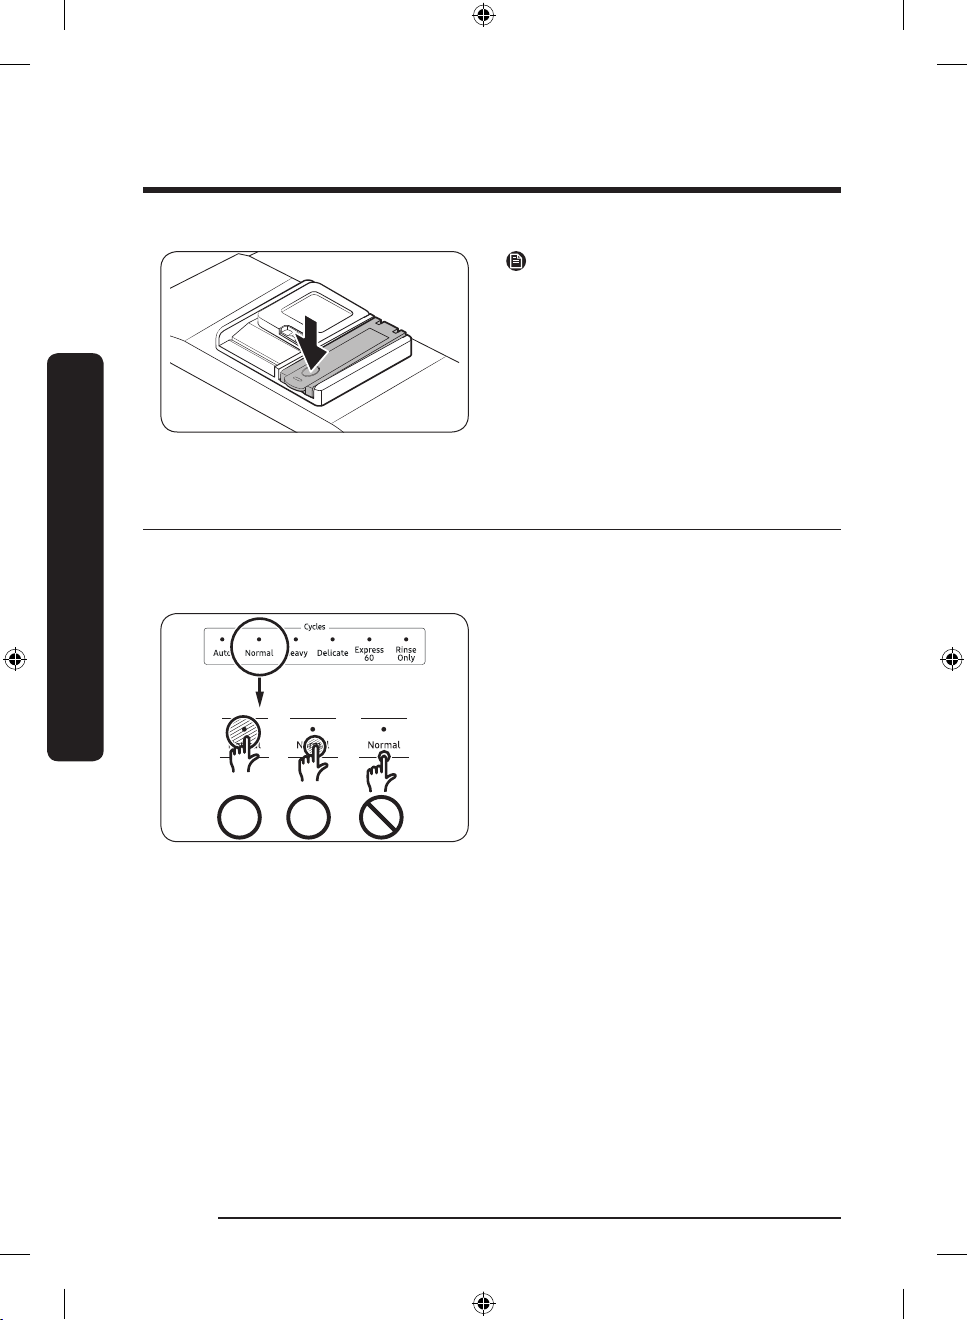
Operations
01 Auto
02 Normal
03 Heavy Use this cycle for heavily soiled dishes.
04 Delicate
05 Express 60
06 Rinse Only
This cycle detects the level of soil and automatically initiates
the optimal cycle after a few minutes of operation.
Use this cycle for normally soiled dishes.
The energy-usage label is based on this cycle.
Use this cycle for soiled, fragile items such as ne glassware
and crystal glass (wine glass). Do not use this cycle for other
glassware because clouding or etching may occur.
Use this cycle when you need to wash dishes quickly. It takes
about 1 hour.
Use for rinsing dishes, glasses, and silverware that will not be
washed right away. Do not use detergent.
English30
DW8000R_DD68-00211A-00_EN.indd 30 2019-04-24 5:59:18
Page 31

Simple steps to start your dishwasher
1. Open the door, and then load the dishwasher. Make sure dishes are empty.
2. If applicable, put the dishes in the lower rack. If adding the Storm Wash option, put the
dishes in the left side of the lower rack.
3. Add detergent to the detergent dispenser. For better results, add rinse aid to the rinse
aid compartment.
NOTE
You should use rinse aid for better drying performance. You can further improve drying
performance by also selecting the Sanitize option.
4. Press POWER, and then select a cycle with necessary options (Lower Rack, Storm Wash,
Hi-Temp Wash, Sanitize).
If you change the cycle after selecting an option, the original cycle is reset.
5. Press START, and then close the door within 3 seconds. The dishwasher starts the cycle
after draining for a few seconds.
NOTE
• To change the cycle after it has started, press and hold START for 3 seconds to cancel
the cycle. Then, select a new cycle.
• To resume after you have opened the door to stop the dishwasher while operating,
simply press START rst, and then close the door.
Operations
English 31
DW8000R_DD68-00211A-00_EN.indd 31 2019-04-24 5:59:18
Page 32

Operations
Settings
You can change the sound, Auto Release™ Dry alert, Rinse aid amount, and Auto Release™
Dry settings to your preference. To change the settings, press the Sanitize and Delay Start
buttons simultaneously for 3 seconds. Press Sanitize to navigate through the sub menus,
and then press Delay Start to conrm your changes.
Sound
U1/U0
Auto Release™
Dry alert
J1/J0
Rinse aid amount
F1~F6
Sound
Press Sanitize until ‘U1’ or ‘U0’ is displayed. To mute the dishwasher, select ‘U0’, and then
press Delay Start. To unmute, select ‘U1’, and then press Delay Start.
Auto Release™
Dry
A1/A0
Operations
Auto Release™ Dry alert
You can enable or disable the setting that alerts you when the door opens to start the Auto
Release™ Dry function.
Press Sanitize until ‘J1’ or ‘J0’ is displayed. To disable the Auto Release™ alert, select ‘J0’,
and then press Delay Start. To enable, select ‘J1’, and then press Delay Start.
Rinse aid amount
Press Sanitize until ‘F1~F6’ is displayed. The higher the number, the more rinse aid the
dishwasher uses. To improve drying performance, select a higher number.
If your dishes appear discolored after a wash, switch to a lower number.
The factory default level is ‘F4’.
English32
DW8000R_DD68-00211A-00_EN.indd 32 2019-04-24 5:59:18
Page 33

Auto Release™ Dry
The Auto Release™ Dry function, which is designed to improve drying performance,
automatically opens the dishwasher’s door 5 to 15 minutes before a cycle ends.
You can enable or disable Auto Release™ Dry in two ways: Using the Setting Mode or using
the toggle keys. Both methods are described starting below.
Press Sanitize until “A1” or “A0” is
displayed. Then, press Delay Start to enable
(A1) or disable (A0) Auto Release™ Dry.
Using the Toggle Keys :
Press the Lower + Hi-Temp Wash button
for 3 seconds to enable (A1) or disable (A0)
Auto Release™ Dry.
NOTE
• Once the door opens on the Auto Release™ Dry mode, the door cannot be closed
manually for the next 2 minutes.
• Disabling (A0) “Auto Release™ Dry” can affect the drying results. Enable (A1) “Auto
Release™ Dry” for better drying result.
• After a cycle is complete, the door automatically opens to let steam out. This is normal
and not a product malfunction.
Operations
English 33
DW8000R_DD68-00211A-00_EN.indd 33 2019-04-24 5:59:18
Page 34

Operations
Operations
Special features
Delay Start
You can delay the cycle starting time up to 24 hours in 1-hour increments. To increase the
delay time, press Delay Start. The hour displayed indicates the time at which the cycle will
start.
1. Open the door, and then load the dishwasher.
2. Press Delay Start, and then press or hold Delay Start to change the time in 1-hour
increments.
3. Close the door, and then press START.
NOTE
To change the delay time once the dishwasher has started, press POWER and then restart
the dishwasher.
Touch Controls
Touch controls allow you to operate the dishwasher easily.
• They are convenient to operate, requiring only a soft touch.
• Have a simple and stylish design.
• Are easy to clean.
NOTE
If you have children or you want to clean the Control Interface, we recommend activating
the Control Lock feature to lock the control buttons.
Control Lock
To prevent children from playing with the dishwasher, Control Lock locks all button
controls except for POWER.
• To activate Control Lock, press and hold Sanitize for 3 seconds. With Control Lock
activated, you cannot select a cycle or option, or start an operation.
• To deactivate Control Lock, press and hold Sanitize again for 3 seconds.
• Control Lock remains active after the dishwasher restarts. To cancel Control Lock, you
must deactivate it rst.
English34
DW8000R_DD68-00211A-00_EN.indd 34 2019-04-24 5:59:18
Page 35

Maintenance
Cleaning
Keep the dishwasher clean to improve performance, reduce unnecessary repairs, and
lengthen its lifecycle.
Exterior
Clean spills on the surface of the dishwasher as they occur. Use a soft, damp cloth on the
control panel to gently wipe away spills and dust.
CAUTION
• Do not use benzene, wax, thinner, chlorine bleach, alcohol, or other chemical substances.
These materials may discolour the surface of the dishwasher and cause stains.
• The dishwasher has electric parts inside. Do not sprinkle water directly onto the
dishwasher. Protect electrical components from coming in contact with water.
• For a stainless-steel door panel, clean using a stainless steel cleaner for home
appliances and a clean, soft cloth.
Interior
Clean the interior of the dishwasher on a regular basis to remove any dirt or food particles.
Wipe inside the dishwasher and inside the door with a wet dishcloth. To maintain optimum
cleanliness, we recommend running the Self Clean cycle periodically with the dishwasher
empty.
To keep the cutlery pad clean, turn it over after each use. To remove white spots and odors
from the cutlery pad, run the Self Clean cycle with the dishwasher empty and no detergent
until the cutlery pad ushes. Then, stop the cycle and put an 8-ounce cup of white vinegar
into the lower basket. Close the door, and then resume the cycle.
Use a damp cloth to remove lime scale or grease deposits inside the dishwasher.
Alternatively, apply some detergent, and then run an empty cycle using the highest rinse
temperature.
CAUTION
• Do not remove the front seal (the long rubber seal enclosing the opening of the
dishwasher). The seal keeps the inner side of the dishwasher sealed.
Maintenance
English 35
DW8000R_DD68-00211A-00_EN.indd 35 2019-04-24 5:59:18
Page 36

Maintenance
Nozzles
To prevent the nozzles from being clogged, or if the nozzles are clogged, remove and clean
each nozzle. Use caution when removing the nozzles as they may break.
Upper nozzle
1. Open the door, and then pull out the
upper rack to reveal the upper nozzle.
2. Turn counter clockwise to remove the
nozzle cap, and then remove the nozzle.
3. Unclog and clean the nozzle.
4. Reinsert the nozzle, and then tighten
the cap clockwise.
5. Rotate the nozzle by hand to make sure
the nozzle is engaged correctly.
Maintenance
Top nozzle
1. Check whether the nozzle holes are
clogged by food particles.
2. If cleaning is needed, remove the top
nozzle.
3. To remove the top nozzle, pull out the
upper rack rst, unfasten the nozzle
cap by turning it counterclockwise, and
then remove the nozzle.
4. Clean the nozzle, re-insert it, and then
fasten the nozzle cap to the nozzle by
turning the cap clockwise.
5. Check whether the nozzle is engaged
correctly by rotating it by hand.
English36
DW8000R_DD68-00211A-00_EN.indd 36 2019-04-24 5:59:19
Page 37

Lower nozzle
Filter
We recommend cleaning the lter every month.
1. Open the door, and then pull out the
lower rack to reveal the lower nozzle.
2. Pull up the nozzle to remove it.
3. Clean the nozzle.
4. Re-insert the nozzle, and then push the
nozzle down until you hear a click.
5. Rotate the nozzle by hand to make sure
the nozzle is engaged correctly.
1. Open the door, and then remove the
lower rack.
2. Turn the lter handle counterclockwise
to unlock the lter cover.
Maintenance
English 37
DW8000R_DD68-00211A-00_EN.indd 37 2019-04-24 5:59:19
Page 38

Maintenance
3. Remove the lter cover, and then the
cylindrical micro lter underneath.
Maintenance
4. Remove any dirt and impurities from
the micro lter and the lter cover.
5. Rinse them with running water, and
then dry well.
English38
DW8000R_DD68-00211A-00_EN.indd 38 2019-04-24 5:59:19
Page 39

6. Reinsert the lter, and then the lter
cover.
7. Turn the lter handle clockwise to lock.
CAUTION
Make sure the lter cover is closed properly. A loose cover can reduce the ltering
performance.
Long-term care
If you will not use the dishwasher for an extended period of time, rst drain the unit
completely, and then disconnect the water hose. Shut off the water supply valve and the
circuit breaker. Water remaining in the hoses or the internal components can damage the
dishwasher.
Maintenance
English 39
DW8000R_DD68-00211A-00_EN.indd 39 2019-04-24 5:59:19
Page 40

Maintenance
1
2
Cleaning the drain pump
If the dishwasher fails to drain because the drain pump is clogged with foreign matter or
there is an abnormal noise coming from the drain pump, you must unclog and clean the
drain pump as instructed below.
1. Remove the lower rack.
2. See the "Filter" section to remove the
cylindrical micro lter.
3. Remove any moisture from the lter
using a sponge.
4. Remove the drain-pump cover by
pushing its handle in the direction of
the arrow (1), and then pulling up (2).
5. Check the impeller to see if it's in good
condition. Then, remove any foreign
matter from the pump.
Maintenance
6. Reinsert the drain-pump cover and then
press down until you hear a click.
Storing your dishwasher
If you need to store your dishwasher for an extended period of time, rst drain and
disconnect it. If you leave water in the hoses and internal components, you can damage
the dishwasher.
After draining and disconnecting the dishwasher, be sure to turn off the water supply valve
and circuit breaker.
English40
DW8000R_DD68-00211A-00_EN.indd 40 2019-04-24 5:59:19
Page 41

Troubleshooting
Check these solutions if your dishwasher…
Problem Possible cause Solution
• Check if the door is latched and
closed completely. Check whether the
Upper Rack is properly joined to the
Duct Nozzle.
• Also, check if the Upper Rack is
crooked or unbalanced.
The door is not closed
completely.
Will not start.
An operation or
cycle is taking too
long.
The START button was
not pressed.
Doesn't operate at all.
The water supply does
not work.
The Control Panel is
locked.
A circuit breaker is open. • Reset the circuit breaker.
The dishwasher is
connected to a cold water
supply.
• See the information code that appears
on the display.
• Make sure the power cable is
connected properly.
• Check if the water supply valve is
open.
• Check if the supplied water pressure
is between 20 and 120 psi (between
140 and 830 kPa).
• Unlock the Control Lock, (See page
28.)
• Check if the water supply line is
connected to a cold water supply. To
work properly, the dishwasher must
be connected to a hot water supply.
(If connected to a cold water supply,
additional time is required to heat the
cold water.)
Troubleshooting
English 41
DW8000R_DD68-00211A-00_EN.indd 41 2019-04-24 5:59:20
Page 42

Troubleshooting
Troubleshooting
Problem Possible cause Solution
• Select a cycle according to the
number and soil level of the dishes, as
directed in this manual.
• Connect the water supply line to a hot
water supply. For best performance,
the temperature of the supplied water
should be 120 ˚F (49 ˚C).
• The water pressure should be
between 20 and 120 psi (140830 kPa).
• Use a commercial dishwasher cleaner.
• Use high-quality, fresh detergent with
rinse aid.
• Use automatic dishwasher detergent.
• We recommend a powder type or
multi-function tablet dishwasher
detergent.
• Make sure large items such as cookie
sheets, cutting boards, or contaners,
etc. are not blocking the detergent
dispenser and preventing it from
opening properly.
• Rearrange the dishes so they do not
interfere with detergent dispenser
operation.
There are
food particles
remaining on
dishes.
(Not cleaning
properly.)
The cycle selected was
unsuitable.
The water temperature
is low.
Low water pressure.
The water is too hard.
Dishwasher detergent
was not used.
Detergent remains in the
dispenser.
English42
DW8000R_DD68-00211A-00_EN.indd 42 2019-04-24 5:59:20
Page 43

Problem Possible cause Solution
• Check the dispenser and add rinse
There is no rinse aid.
aid.
• Use liquid type rinse aid.
A nozzle is clogged. • Clean the nozzle. See page 36.
• Rearrange the dishes so they do not
interfere with nozzle rotation and
detergent dispenser operation.
• Load only an appropriate number of
dishes.
• Load your dishes as recommended.
(See page 17.)
• Load the heavily soiled items into the
Storm Wash area. (See page 18)
• Scrape food from dishes prior to
loading. (Do not pre-rinse.)
• Clean the lter. (See page 37.)
• Make sure the lters are correctly
fastened.
• Check if the supplied water pressure
is between 20 and 120 psi (between
140 and 830 kPa).
• Underload the dishwasher and use a
rinse aid to minimize this.
• Remove the marks on the dishes
using a low sensitivity cleaner.
• Remove the soils using a spot cleaner.
• Use a cycle with a higher
temperature.
There are
food particles
remaining on
dishes.
(Not cleaning
properly.)
Leaves glasses
with a light lm.
Leaves a yellow
or brown lm on
the inside of the
dishwasher.
The dishes are
improperly loaded.
Too many dishes have
been loaded.
The lters are clogged or
not correctly fastened.
(Food soils remain on the
lter.)
Less water than required
is supplied.
The water supplied is soft
and too much detergent
was used.
Aluminum dishes were
included in the wash
load.
This is caused by coffee
and tea soils.
Troubleshooting
English 43
DW8000R_DD68-00211A-00_EN.indd 43 2019-04-24 5:59:20
Page 44

Troubleshooting
Troubleshooting
Problem Possible cause Solution
• Check the dispenser and add rinse
aid.
• Use a liquid type rinse aid.
• Check the rinse aid settings.
• Connect the water supply line to a hot
water supply.
• Use rinse aid with the Sanitize option.
• Proper loading of items can affect
drying.
• Load your dishes as recommended.
(See page 17.)
• After nishing the cycle, empty the
lower rack rst and then the upper
rack. This will prevent water dripping
from the upper rack onto the dishes
in the lower rack.
• Turn Auto Release™ Dry on. Press the
Lower + Hi-Temp Wash button for
3 seconds to access the Auto Release™
Dry menu. Select "A1" to activate Auto
Release™ Dry.
• Select the Sanitize option or use rinse
aid.
Does not dry
dishes well.
There is no rinse aid
in the dispenser or not
enough rinse aid was
used.
The temperature of the
water is low when the
dishwasher is running.
Too many dishes have
been loaded.
Glasses and cups with
concave bottoms hold
water. This water may
spill onto other items
when you unload.
Auto Release™ Dry is
turned off.
Multiple detergent
tablets were used
without selecting the
Sanitize option.
English44
DW8000R_DD68-00211A-00_EN.indd 44 2019-04-24 5:59:20
Page 45

Problem Possible cause Solution
• Clean the dishwasher by running the
Heavy cycle with the dishwasher
empty and no detergent.
• Contact a qualied service technician
to remove any obstruction from the
drain hose.
• With the dishwasher empty and no
detergent, place a glass with 8 ounces
of vinegar upright into the lower rack,
and then run a Heavy cycle.
Has a bad odor.
Water was left over from
an incomplete cycle.
The Drain Hose is
obstructed.
The dishwasher is not
used daily or soiled
dishes are left in unit too
long.
Sound is generated when
the dispenser cover is
open and the drain pump
• This is normal operation.
is operating in an early
stage.
Is too noisy.
The dishwasher is not
level.
Foreign material (a screw,
a plastic piece) is in the
pump chamber.
• Ensure the dishwasher is level.
• Contact a qualied service technician
to remove foreign material from the
pump chamber.
There is a ‘chopping’
sound because a nozzle
is bumping against the
• Rearrange the dishes.
dishes.
• Check if the supplied water pressure
is between 20 and 120 psi (between
140 and 830 kPa).
• Clean the nozzle holes. (See page 36.)
• After placing the dishes into the
racks, rotate the nozzles by hand
to check whether any of the dishes
interfere with them.
• Clean the drain pump by removing
the drain-pump cover. (See page 40.)
Does not have a
smoothly rotating
nozzle.
Water won’t
pump out of the
dishwasher.
Less water than required
is supplied.
Nozzle holes are clogged
with food particles.
The nozzle is blocked by
a dish or pot and cannot
rotate.
The drain is clogged.
Troubleshooting
English 45
DW8000R_DD68-00211A-00_EN.indd 45 2019-04-24 5:59:20
Page 46

Troubleshooting
Troubleshooting
Problem Possible cause Solution
Has a bent upper
rack after dishes
are loaded.
Cannot close the
door.
The dishes are not loaded
properly.
Auto Release™ Dry mode
is in operation.
• Load your dishes as recommended.
(See page 17.)
• Once the door opens in the Auto
Release™ Dry mode, the door cannot
be closed manually for the next
2 minutes. You may close the door
after 2 minutes.
English46
DW8000R_DD68-00211A-00_EN.indd 46 2019-04-24 5:59:20
Page 47

Information codes
The Control Panel displays information codes to help you understand what is occurring
with your dishwasher.
Code Action
Leakage check.
• If a water supply valve connection leak occurs, close the water supply
LC
4C
5C
HC
3C
PC
valve and go to your house circuit breaker panel, set the dishwasher’s
circuit breaker switch to off, and then contact the installer to x.
If the problem continues, contact an authorized Samsung service center.
Water supply check.
• Check if the water supply valve is closed or clogged, or is frozen. Also
check if the supplied water pressure is less than required.
If the problem continues, close the water supply valve, and then contact
an authorized Samsung service center.
Drain check.
• After closing the water supply valve, check whether the drain hose is
clogged or folded. Also, check whether the drain hole inside the sump is
clogged.
If the problem continues, contact an authorized Samsung service center.
High temperature heating check.
• Functional check. With the dishwasher empty, add detergent, and then
run a cycle. If the problem continues, go to your house circuit breaker
panel, set the dishwasher’s circuit breaker switch to off, and then contact
an authorized Samsung service center.
Pump operation check.
• Functional check. Turn off the dishwasher and try to start it again.
If the problem continues, contact an authorized Samsung service center.
Zone wash function check.
• Functional check. Turn off the dishwasher and try to start it again.
If the problem continues, contact an authorized Samsung service center.
Troubleshooting
For any codes not listed above, call 1-800-SAMSUNG (726-7864).
English 47
DW8000R_DD68-00211A-00_EN.indd 47 2019-04-24 5:59:20
Page 48

Cycle chart
Cycle Auto Normal Heavy
Cycle sequence
Main wash 122-140 (50-60) 113-144 (45-62) 149 (65)
Temp
[˚F (˚C)]
Water consumption
Cycle time (min) 109-143 117-145 155
Available
Options
Hot Rinse
*Sanitize 163 ˚F
(73 ˚C)
[gal (ℓ)]
Lower Rack O O O
Storm Wash O O O
Hi-Temp Wash O O O
Sanitize O O O
Delay Start O O O
Prewash
Mainwash
Rinse
Hot Rinse
Dry End
145-154 (63-68) 129-149 (54-65) 154 (68)
4.0-5.3 (15.2-
20.2)
Prewash
Mainwash
Rinse
Hot Rinse
Dry End
2.6-5.3 (9.8-20.0) 5.4 (20.5)
Prewash
Mainwash
Rinse
Hot Rinse
Dry End
Cycle chart
English48
DW8000R_DD68-00211A-00_EN.indd 48 2019-04-24 5:59:20
Page 49

Cycle Delicate Express 60 Rinse Only
Cycle sequence
Prewash
Mainwash
Rinse
Hot Rinse
Dry End
Mainwash
Rinse
Hot Rinse
Dry End
Main wash 122 (50) 126 (52) -
Temp
[˚F (˚C)]
Hot Rinse
*Sanitize 163 ˚F
149 (65) 140 (60) 104 (40)
(73 ˚C)
Water consumption
[gal (ℓ)]
4.3 (16.4) 2.9 (10.8) 1.1 (4.1)
Cycle time (min) 112 60 14
Lower Rack O O O
Storm Wash X O X
Available
Options
Hi-Temp Wash X O X
Sanitize X O X
Delay Start O O O
Rinse End
• When you select the Auto or Normal cycle, running the Prewash and Rinse cycles
depends on the soil level of the load.
• The water consumption and wash time varies depending on the steps or options you
add, and on the pressure and temperature of the supplied water.
• When the Rinse Aid is empty, wash time and Last Rinse temperature can increase a
little.
English 49
DW8000R_DD68-00211A-00_EN.indd 49 2019-04-24 5:59:20
Cycle chart
Page 50

Appendix
Helping the environment
• Your dishwasher is manufactured from recyclable materials. If you decide to dispose of
it, please observe local waste disposal regulations. Cut off the power cable so that the
appliance cannot be connected to a power source.
• Remove the door so that animals and small children cannot get trapped inside the
appliance.
• Do not exceed the detergent quantities recommended in the detergent manufacturers’
instructions.
Specications
Appendix
MODEL
Type Built-in Dishwasher
Power 120 V / 60 Hz AC only, 15 A circuit breaker
Wash capacity 15 place settings
Used water pressure 20-120 psi (140-830 kPa)
Rated power uasge
Dimensions
(Width × Depth ×
Height)
Weight (Unpacked)
DW80R7060UG / DW80R7060US / DW80R7061UG /
DW80R7061US
Wash Motor 60-100 W
Heater 1100 W
23⅞ x 25 x 33⅞ in. (605 x 636 x 860 mm)
89.5 Ib (40.5 kg)
[DW80R7060UG / DW80R7060US / DW80R7061UG /
DW80R7061US]
English50
DW8000R_DD68-00211A-00_EN.indd 50 2019-04-24 5:59:20
Page 51

Warranty (U.S.A)
SAMSUNG DISHWASHER
LIMITED WARRANTY TO ORIGINAL PURCHASER WITH PROOF OF PURCHASE
This SAMSUNG brand product, as supplied and distributed by SAMSUNG ELECTRONICS
AMERICA, INC. (SAMSUNG) and delivered new, in the original carton to the original
consumer purchaser, is warranted by SAMSUNG against manufacturing defects in materials
or workmanship for the limited warranty period, starting from the date of original
purchase, of:
One (1) year parts and labor
This limited warranty is valid only on products purchased and used in the United States
that have been installed, operated, and maintained according to the instructions attached
to or furnished with the product. To receive warranty service, the purchaser must contact
SAMSUNG at the address or phone number provided below for problem determination and
service procedures. Warranty service can only be performed by a SAMSUNG authorized
service center. The original dated bill of sale must be presented upon request as proof
of purchase to SAMSUNG or SAMSUNG’s authorized service center to receive warranty
service.
SAMSUNG will provide in-home service within the contiguous United States during the
warranty period at no charge, subject to availability of SAMSUNG authorized servicers
within the customer’s geographic area. If in-home service is not available, SAMSUNG may
elect, at its option, to provide transportation of the product to and from an authorized
service center. If the product is located in an area where service by a SAMSUNG authorized
servicer is not available, you may be responsible for a trip charge or required to bring the
product to a SAMSUNG authorized service center for service.
To receive in-home service, product must be unobstructed and accessible to the service
agent.
During the applicable warranty period, a product will be repaired, replaced, or the purchase
price refunded, at the sole option of SAMSUNG. SAMSUNG may use new or reconditioned
parts in repairing a product, or replace the product with a new or reconditioned product.
Replacement parts and products are warranted for the remaining portion of the original
product’s warranty or ninety (90) days, whichever is longer. All replaced parts and products
are the property of SAMSUNG and you must return them to SAMSUNG.
Warranty (U.S.A)
English 51
DW8000R_DD68-00211A-00_EN.indd 51 2019-04-24 5:59:20
Page 52

Warranty (U.S.A)
Warranty (U.S.A)
This limited warranty covers manufacturing defects in materials or workmanship
encountered in normal household, noncommercial use of this product and shall not
cover the following: damage that occurs in shipment, delivery, installation, and uses for
which this product was not intended; damage caused by unauthorized modication or
alteration of the product; product where the original factory serial numbers have been
removed, defaced, changed in any way, or cannot be readily determined; cosmetic damage
including scratches, dents, chips, and other damage to the product’s nishes; damage
caused by abuse, misuse, pest infestations, accident, re, oods, or other acts of nature or
God; damage caused by use of equipment, utilities, services, parts, supplies, accessories,
applications, installations, repairs, external wiring or connectors not supplied or authorized
by SAMSUNG; damage caused by incorrect electrical line current, voltage, uctuations
and surges; damage caused by failure to operate and maintain the product according
to instructions; in-home instruction on how to use your product; and service to correct
installation not in accordance with electrical or plumbing codes or correction of household
electrical or plumbing (i.e., house wiring, fuses, or water inlet hoses).
The cost of repair or replacement under these excluded circumstances shall be the
customer’s responsibility.
Visits by an authorized servicer to explain product functions, maintenance or installation
are not covered by this limited warranty. Please contact SAMSUNG at the number below
for assistance with any of these issues.
EXCLUSION OF IMPLIED WARRANTIES
IMPLIED WARRANTIES, INCLUDING THE IMPLIED WARRANTIES OF MERCHANTABILITY OR
FITNESS FOR A PARTICULAR PURPOSE, ARE LIMITED TO ONE YEAR OR THE SHORTEST
PERIOD ALLOWED BY LAW. Some states do not allow limitations on how long an implied
warranty lasts, so the above limitations or exclusions may not apply to you. This warranty
gives you specic rights, and you may also have other rights, which vary from state to
state.
English52
DW8000R_DD68-00211A-00_EN.indd 52 2019-04-24 5:59:20
Page 53

LIMITATION OF REMEDIES
YOUR SOLE AND EXCLUSIVE REMEDY IS PRODUCT REPAIR, PRODUCT REPLACEMENT,
OR REFUND OF THE PURCHASE PRICE AT SAMSUNG’S OPTION, AS PROVIDED IN THIS
LIMITED WARRANTY. SAMSUNG SHALL NOT BE LIABLE FOR SPECIAL, INCIDENTAL OR
CONSEQUENTIAL DAMAGES, INCLUDING BUT NOT LIMITED TO TIME WAY FROM WORK,
HOTELS AND/OR RESTAURANT MEALS, REMODELING EXPENSES, LOSS OF REVENUE OR
PROFITS, FAILURE TO REALIZE SAVINGS OR OTHER BENEFITS REGARDLESS OF THE LEGAL
THEORY ON WHICH THE CLAIM IS BASED, AND EVEN IF SAMSUNG HAS BEEN ADVISED OF
THE POSSIBILITY OF SUCH DAMAGES. Some states do not allow exclusion or limitation of
incidental or consequential damages, so the above limitations or exclusions may not apply
to you. This warranty gives you specic rights, and you may also have other rights, which
vary from state to state.
SAMSUNG does not warrant uninterrupted or error-free operation of the product. No
warranty or guarantee given by any other person, rm, or corporation with respect to this
product shall be binding on SAMSUNG.
To obtain warranty service, please contact SAMSUNG at:
In USA
Samsung Electronics America, Inc.
85 Challenger Road
Ridgeeld Park, NJ 07660
1-800-SAMSUNG (726-7864)
www.samsung.com/us/support
English 53
DW8000R_DD68-00211A-00_EN.indd 53 2019-04-24 5:59:20
Warranty (U.S.A)
Page 54

Memo
DW8000R_DD68-00211A-00_EN.indd 54 2019-04-24 5:59:20
Page 55

Memo
DW8000R_DD68-00211A-00_EN.indd 55 2019-04-24 5:59:20
Page 56

QUESTIONS OR COMMENTS?
bit.ly/samsungdishwashers
COUNTRY CALL OR VISIT US ONLINE AT
U.S.A
- Consumer
Electronics
- Mobile Phones
MEXICO 01-800-SAMSUNG(726-7864) www.samsung.com/mx/support
1-800-SAMSUNG (726-7864)
1-844-SAM-PAYS (726-7297)
www.samsung.com/us/support
DD68-00211A-00
DW8000R_DD68-00211A-00_EN.indd 56 2019-04-24 5:59:21
Page 57

Lavavajillas
Manual del usuario
Serie DW80R706*
DW8000R_DD68-00211A-00_MES.indd 1 2019-04-24 6:00:33
Page 58

Contenidos
Información sobre seguridad 4
Contenidos
Lo que necesita saber sobre las instrucciones de seguridad 4
Símbolos de seguridad importantes 4
Antes de usar la lavavajillas 7
Antes de comenzar 8
Desempaque de la lavavajillas 8
Vericación de las piezas 9
Artículos no adecuados para la lavavajillas 11
Uso de la lavavajillas 12
Uso básico de los estantes 12
Guías sobre detergentes 23
Respuesta del teclado táctil 26
Operaciones 27
Panel de control 27
Descripción general de los ciclos 31
Pasos sencillos para encender su lavavajillas 32
Conguración 33
Características especiales 35
Mantenimiento 36
Limpieza 36
Cuidado a largo plazo 40
Limpieza de la bomba de drenaje 41
Cómo guardar la lavavajillas 41
Solución de problemas 42
Intente implementar las siguientes soluciones si su lavavajillas… 42
Códigos de información 48
Español2
DW8000R_DD68-00211A-00_MES.indd 2 2019-04-24 6:00:33
Page 59

Tabla de ciclos 49
Apéndice 51
Ayuda al medio ambiente 51
Especicaciones 51
Garantía (EE. UU.) 52
Contenidos
Español 3
DW8000R_DD68-00211A-00_MES.indd 3 2019-04-24 6:00:34
Page 60

CONSERVE ESTAS INSTRUCCIONES
Información sobre seguridad
Información sobre seguridad
Felicitaciones por la compra de su nueva lavavajillas Samsung. Este manual contiene información
importante acerca de la instalación, el uso y el cuidado del electrodoméstico. Lea detenidamente
estas instrucciones a n de aprovechar al máximo los múltiples benecios y funciones de la
lavavajillas.
Lo que necesita saber sobre las instrucciones de seguridad
Las advertencias y las instrucciones de seguridad importantes de este manual no cubren todas las
posibles condiciones y situaciones que pueden ocurrir. Es su responsabilidad actuar con sentido
común, precaución y cuidado cuando instale, realice el mantenimiento y ponga en funcionamiento
la lavavajillas.
Símbolos de seguridad importantes
Signicado de los íconos y señales de este manual del usuario:
ADVERTENCIA
Peligros o prácticas inseguras que pueden causar lesiones físicas graves o la muerte.
Para reducir el riesgo de incendio, explosión, descargas eléctricas o lesiones físicas cuando usa la
máquina lavavajillas, siga estas instrucciones básicas de seguridad:
PRECAUCIÓN
Peligros o prácticas inseguras que pueden causar lesiones físicas leves o daños a la propiedad.
NOTA
Estas señales de advertencia sirven para evitar que usted y otras personas sufran lesiones.
Sígalas explícitamente.
Después de leer esta sección, guárdela en un lugar seguro para consultas futuras.
Español4
DW8000R_DD68-00211A-00_MES.indd 4 2019-04-24 6:00:34
Page 61

CONSERVE ESTAS INSTRUCCIONES
Advertencia sobre la California Proposition 65
ADVERTENCIA: Cáncer y afecciones reproductivas www.P65Warnings.ca.gov
ADVERTENCIA
Cuando utilice la lavavajillas, tome todas las precauciones básicas, incluyendo las siguientes:
1. Lea todas las instrucciones antes de usar la lavavajillas.
2. Utilice la lavavajillas únicamente para la función para la cual está diseñada.
3. Utilice únicamente detergentes o productos humectantes recomendados para utilizarse en
lavavajillas y manténgalos fuera del alcance de los niños.
4. Cuando cargue los artículos que se lavarán:
- coloque los artículos cortantes de manera que no dañen las juntas de la puerta y
- Cargue los cuchillos alados con el mango hacia arriba para reducir el riesgo de sufrir
lesiones por cortes.
5. No lave objetos de plástico a menos que tengan el rótulo "apto para lavavajillas" o su
equivalente. En el caso de los artículos de plástico que no tengan tal rótulo, consulte las
recomendaciones del fabricante.
6. No toque el ELEMENTO CALENTADOR durante el uso o inmediatamente luego de él.
7. No ponga en funcionamiento la lavavajillas a menos que todos los paneles de CIERRE estén
correctamente colocados.
8. No modique los controles.
9. Trate con cuidado la puerta y el estante de la lavavajillas, y no se siente ni se pare encima.
10. Para reducir el riesgo de lesiones, evite que los niños jueguen dentro o fuera de la lavavajillas.
11. En ciertas circunstancias, se puede producir gas hidrógeno en un sistema de agua caliente que
no se ha usado durante dos semanas o más. EL GAS HIDRÓGENO ES EXPLOSIVO. Si el sistema
de agua caliente no se ha usado durante dicho período, abra todas las llaves de agua caliente
y deje que el agua uya durante varios minutos antes de usar la lavavajillas. Esto disipará el
gas hidrógeno acumulado. Dado que el gas es inamable, no fume ni utilice una llama abierta
en ese momento.
12. Cuando deje de utilizar o descarte una lavavajillas antigua, retire la puerta del compartimiento
de lavado.
Información sobre seguridad
DW8000R_DD68-00211A-00_MES.indd 5 2019-04-24 6:00:34
Español 5
Page 62

CONSERVE ESTAS INSTRUCCIONES
Información sobre seguridad
Información sobre seguridad
PRECAUCIÓN
• Después de desempacar la lavavajillas, mantenga el empaque fuera del alcance de los niños.
• La máquina lavavajillas es muy pesada. No intente mover o trasladarla usted mismo. Se
necesitan dos o más personas para mover una lavavajillas y evitar lesiones potenciales.
• Al igual que con cualquier equipo que use electricidad, agua y piezas movibles, existen riesgos
potenciales.
• No instale la lavavajillas cerca de componentes eléctricos. Mantenga la lavavajillas alejada de
llamas abiertas.
• Instale y nivele la lavavajillas sobre una supercie no alfombrada que pueda soportar su peso.
• La lavavajillas debe conectarse a tierra correctamente. Nunca la conecte a un tomacorriente sin
conexión a tierra. Consulte la página 7 para obtener más información sobre cómo conectar la
lavavajillas a tierra.
• Conecte el cable a tierra a la conexión a tierra de color verde de la caja de terminales.
• Después de instalar la lavavajillas, asegúrese que la manguera de desagüe esté correctamente
conectada y que las conexiones de la manguera no tengan pérdidas. Si la manguera de desagüe
está oja, puede ocasionar pérdidas materiales.
• El conducto puede romperse. A medida que transcurre el tiempo, pierde su exibilidad. Revise
el conducto periódicamente. Si está hinchado, rasgado, cortado o si hay pérdida de agua,
reemplácelo inmediatamente.
• Para usar este electrodoméstico en forma segura, familiarícese con su funcionamiento y
manéjelo con cuidado cuando lo use.
• No vierta gasolina, solventes ni otros materiales inamables dentro de la lavavajillas. No lave
vajilla que haya sido expuesta a estos materiales.
• Mantenga el detergente de la lavavajillas fuera del alcance de los niños. El detergente causa un
efecto adverso en los órganos del cuerpo humano. Contiene sustancias para otorgar brillo y es
corrosivo. Evite que el detergente entre en contacto con la piel o los ojos.
• No empuje ni presione la puerta cuando esté abierta, ya que al hacerlo podría dañar la
lavavajillas o hacerse daño.
• No permita que los niños jueguen dentro o encima de la máquina lavavajillas. Pueden hacerse
daño o dañar la lavavajillas.
• Desconecte el cable de alimentación (o corte el disyuntor) antes de realizar el mantenimiento
de la lavavajillas.
• No repare, reemplace ni realice el mantenimiento de ninguna de las piezas de su lavavajillas
por su cuenta. Solo se permite que técnicos calicados autorizados realicen el desensamble, las
reparaciones y las modicaciones. El trabajo efectuado por una persona no autorizada puede
invalidar su garantía.
Español6
DW8000R_DD68-00211A-00_MES.indd 6 2019-04-24 6:00:34
Page 63

CONSERVE ESTAS INSTRUCCIONES
• Antes de deshacerse de su lavavajillas, retire la puerta del compartimiento de lavado o la traba
de la puerta para evitar que niños o animales pequeños puedan quedar atrapados adentro.
• Si no va a utilizarse la lavavajillas durante un período prolongado, corte el suministro de agua.
• Esta lavavajillas ha sido diseñada para uso residencial únicamente.
Antes de usar la lavavajillas
ADVERTENCIA
Riesgo de vuelco
• No utilice la lavavajillas hasta que no esté correctamente instalada.
• No ejerza presión sobre la puerta de la lavavajillas cuando está abierta.
• No coloque excesivo peso sobre la puerta de la lavavajillas cuando está
abierta.
Riesgo de descarga eléctrica
El incumplimiento con estas instrucciones puede tener como resultado la
muerte, incendios o descargas eléctricas:
• Conecte a tierra la lavavajillas.
• Conecte el cable a tierra a la conexión a tierra de color verde de la caja
de conexiones.
• No utilice un cable prolongador.
Información sobre seguridad
DW8000R_DD68-00211A-00_MES.indd 7 2019-04-24 6:00:35
Español 7
Page 64

Antes de comenzar
Antes de comenzar
Asegúrese de que su instalador siga estas instrucciones minuciosamente para que su nueva
lavavajillas funcione adecuadamente y no existan riesgos de sufrir lesiones al lavar los platos.
Desempaque de la lavavajillas
• Cuando haya recibido la lavavajillas, desembálela con cuidado y compruebe que no esté
dañada.
Si la lavavajillas está dañada, tome nota de ello en la carta de porte y guarde una copia.
No instale la lavavajillas y comuníquese con el Servicio al cliente de Samsung al número que se
indica en la siguiente página.
• Si el producto no está dañado, comience con la instalación. Si va a instalarlo por su cuenta,
asegúrese de leer la guía de instalación y de seguir sus instrucciones.
• Después de desempacar la lavavajillas, mantenga el empaque fuera del alcance de los niños
para garantizar su seguridad.
Español8
DW8000R_DD68-00211A-00_MES.indd 8 2019-04-24 6:00:35
Page 65

Vericación de las piezas
Una vez desempacada la lavavajillas, asegúrese de haber recibido todas las piezas que aparecen a
continuación.
Si su lavavajillas sufrió daños durante el transporte, o si falta alguna pieza, comuníquese con el
Servicio al cliente de Samsung al 1-800-SAMSUNG (726-7864).
01
02
03
04
05
Antes de comenzar
06
07
01 Boquilla techo 02 Storm Wash (Lavado
03 Boquilla inferior
potente)
04 Dosicador 05 Panel de control 06 Puerta
07 Base
Español 9
DW8000R_DD68-00211A-00_MES.indd 9 2019-04-24 6:00:35
Page 66

Antes de comenzar
Accesorios
Antes de comenzar
Estante superior Estante inferior
Estante para cubiertos 3er estante
NOTA
Accesorios - Manual del usuario/instalación, kit de instalación, placa de protección.
PRECAUCIÓN
• No lave artículos que estén cubiertos con cenizas, arena, cera, grasa lubricante o pintura.
Estos materiales dañarán la lavavajillas. La ceniza no se disuelve y se esparcirá dentro de la
lavavajillas.
• Retire de la vajilla los restos de alimentos tales como huesos, semillas, etc. y los desechos como
palillos, servilletas de papel, etc. Los restos de alimentos y los desechos pueden generar ruidos,
causar el mal funcionamiento de la lavavajillas y dañar la vajilla y el electrodoméstico.
Español10
DW8000R_DD68-00211A-00_MES.indd 10 2019-04-24 6:00:35
Page 67

Artículos no adecuados para la lavavajillas
ADVERTENCIA
Lave solamente artículos tales como vidrio, porcelana y cubiertos que el fabricante declara como
aptos para lavavajillas. No lave artículos de aluminio (por ejemplo, ltros de grasa). La lavavajillas
puede dañar el aluminio o, en casos extremos, puede provocar una reacción química grave.
No lave los siguientes artículos en la lavavajillas.
• Elementos de cobre, latón, hojalata, marl y aluminio o elementos con adhesivo
• Plásticos no resistentes al calor
• Elementos artesanales, antigüedades, jarrones valiosos y cristalería decorativa
• Elementos de cerámica o cerámica vidriada
• Cubiertos y vajilla de madera o elementos con partes de madera
• Cristalería delicada o que contenga cristal al plomo. El cristal puede enturbiarse con el lavado
frecuente.
NOTA
Los cubiertos que entran en contacto con alimentos que contienen azufre pueden decolorarse. Los
alimentos con contenido de azufre con las yemas de huevo, cebolla, mayonesa, mostaza, pescado,
espinas de pescado y adobos.
Antes de comenzar
Español 11
DW8000R_DD68-00211A-00_MES.indd 11 2019-04-24 6:00:35
Page 68

Uso de la lavavajillas
Uso de la lavavajillas
Uso básico de los estantes
Ángulo de los soportes para platos
En el estante inferior, puede plegar fácilmente los dientes plegables para hacer lugar para
artículos grandes, como ollas y sartenes en la zona de respuesta. Retire el estante de la
lavavajillas, luego pliegue los dientes uno a uno. Consulte la ilustración inferior.
Estante inferior
En el estante superior,
puede ajustar el ángulo de los dientes en tres posiciones diferentes para adaptarse al tamaño y
la forma de sus platos. Para ajustar los dientes, sujete la manija de la parte anterior del estante y
empuje hacia la izquierda o hacia la derecha. Consulte la ilustración inferior.
Estante superior
Español12
DW8000R_DD68-00211A-00_MES.indd 12 2019-04-24 6:00:36
Page 69

Ajuste de la altura
Puede ajustar la altura del estante superior de su lavavajillas Samsung para dar cabida a platos
de mayor tamaño en el estante inferior. Según la altura del estante superior que establezca, en
el estante inferior puede ubicar platos de hasta 12 pulgadas (30 cm) de diámetro y en el estante
superior platos de hasta 8 pulgadas (20 cm) de diámetro.
Para elevar el estante superior
Jale el estante superior hacia arriba. La manija
ajustable se trabará y el estante superior se
elevará.
Para bajar el estante superior
Sujete ambas manijas ajustables, ubicadas a la
izquierda y la derecha del estante superior, y,
luego, presione uniformemente hacia abajo.
PRECAUCIÓN
• Ajuste la altura del estante superior antes
de cargar la vajilla. Si ajusta el estante
luego de cargar la vajilla, esta puede
resultar dañada.
• Asegúrese de sujetar ambas manijas al
realizar el ajuste; de lo contrario, es posible
que la puerta no cierre adecuadamente.
Uso de la lavavajillas
Español 13
DW8000R_DD68-00211A-00_MES.indd 13 2019-04-24 6:00:37
Page 70

Uso de la lavavajillas
Para retirar el estante superior
1. Empuje el gancho en el riel de soporte a
la izquierda y luego el riel de soporte a la
derecha.
Uso de la lavavajillas
2. Quite los rieles de soporte de los rieles de
la izquierda y de la derecha.
3. Verique la posición del eje (gris oscuro en
la ilustración) en la ménsula del riel.
4. Deslice el estante superior para que el eje
esté ubicado al extremo de la ménsula del
riel.
Español14
DW8000R_DD68-00211A-00_MES.indd 14 2019-04-24 6:00:37
Page 71

5. Levante el estante superior para quitarlo.
6. Realice el procedimiento en el sentido
inverso para insertar nuevamente el
estante superior.
PRECAUCIÓN
• No haga funcionar la lavavajillas sin el estante superior. De lo contrario, se producirán ruidos y
la lavavajillas no funcionará correctamente.
• Dado que el estante superior es extraíble, insértelo adecuadamente para asegurar que la
lavavajillas funcione con normalidad.
• Tenga cuidado de no aojar los rieles de soporte durante el proceso.
Uso de la lavavajillas
Español 15
DW8000R_DD68-00211A-00_MES.indd 15 2019-04-24 6:00:38
Page 72

Uso de la lavavajillas
Uso de la lavavajillas
Para retirar el 3º estante
1. De pie frente a la lavavajillas, jale el
3º estante hacia afuera para que las
manijas y los extremos de los soportes
del estante (gris oscuro en la ilustración)
se encuentren a la misma altura que el
extremo del estante.
2. Con su pulgar derecho, busque la pequeña
hendidura en el interior del soporte
izquierdo del estante que aloja la lengüeta
para bloquear la manija.
3. Empuje la lengüeta hacia adentro (por
ej. hacia la izquierda) con la punta de
su pulgar y luego jale la manija hacia el
frente hasta que se separe del soporte.
4. Repita este proceso con la manija derecha
utilizando su pulgar izquierdo.
5. Cuando se hayan retirado las manijas,
retire el 3º estante de la lavavajillas.
6. Realice el procedimiento en el sentido
inverso
para insertar nuevamente el 3º estante.
PRECAUCIÓN
Asegúrese de que la pieza con forma de
gancho del soporte esté mirando hacia abajo y
la manija (encerrada en un círculo) enganchada
al insertar la manija en el riel.
Español16
DW8000R_DD68-00211A-00_MES.indd 16 2019-04-24 6:00:38
Page 73

Cómo cargar la vajilla
Carga del estante inferior
Se ha diseñado el estante inferior especícamente para la vajilla para comida, recipientes para
sopa, platos, ollas, tapas y fuentes de horno.
Cargue los objetos grandes como recipientes y ollas en la lavavajillas de manera que sus lados
abiertos miren hacia abajo. Recomendamos cargar las tazas, la cristalería y los platos pequeños en
el estante superior.
Observe los patrones recomendados de carga que se encuentran a continuación.
10 puestos 12 puestos
Uso de la lavavajillas
Español 17
DW8000R_DD68-00211A-00_MES.indd 17 2019-04-24 6:00:38
Page 74

Uso de la lavavajillas
Uso de la lavavajillas
Cargar la zona de Storm Wash (Lavado potente)
Para una limpieza más ecaz, coloque los
artículos grandes en la zona de Storm Wash
(Lavado potente) a la izquierda del estante
inferior(Zona roja).
Cuando selecciona Storm Wash (Lavado
potente), la lavavajillas suministra energía
adicional para reforzar el chorro de agua en la
zona de Storm Wash (Lavado potente).
Asegúrese de que las manijas de las ollas y
otros objetos no intereran con la rotación de
las boquillas.
Español18
DW8000R_DD68-00211A-00_MES.indd 18 2019-04-24 6:00:38
Page 75

Carga del estante superior
Se ha diseñado el estante superior para platos pequeños, jarras, vasos y objetos de plástico
que tengan el rótulo "apto para lavavajillas". Cargue los platos en la lavavajillas en dos medias
hileras, de manera que la cara de cada plato mire la parte trasera del otro que tiene enfrente, y
que las caras de los platos en el centro de la lavavajillas se enfrenten unas a otras. Consulte las
ilustraciones inferiores.
Asegúrese de que la vajilla cargada no interera con la rotación de la boquilla que se encuentra en
la parte inferior del estante superior. (Para vericarlo, haga rotar la boquilla a mano.)
Para cargar la vajilla, tire del estante superior dejando el espacio suciente para que pueda
cargarlo sin golpear la encimera superior.
10 puestos 12 puestos
Uso del soporte para vasos
Uso de la lavavajillas
El soporte para vasos es ideal para las copas
de vino. Cuelgue las copas de vino de las
espigas del soporte para copas. Vuelva a
plegar el soporte para copas cuando no lo
utilice.
PRECAUCIÓN
No ajuste el nivel del estante superior con el
soporte para copas elevado. Esto hará que sea
imposible ajustar el estante superior.
Español 19
DW8000R_DD68-00211A-00_MES.indd 19 2019-04-24 6:00:39
Page 76

Uso de la lavavajillas
Uso de la lavavajillas
Cargar el 3º Rack
El estante para cubiertos es adecuado para cubiertos y utensilios para cocinar y servir. Puede
acomodar los cubiertos y utensilios en forma aleatoria u ordenada en el estante para cubiertos.
Cómo retirar el estante para cubiertos
Se puede retirar el estante para cubiertos completo si se necesita disponer de más espacio en el
estante superior para artículos voluminosos. (Consulte la sección “Para retirar el 3º estante” en la
página 16.)
TM
Español20
DW8000R_DD68-00211A-00_MES.indd 20 2019-04-24 6:00:39
Page 77

Carga del estante para cubiertos
Izquierda Derecha
El estante para cubiertos consiste en dos
compartimientos.
Puede colocar independientemente cada
cuchillo, cuchara o tenedor en el soporte
para cucharas en la cubierta de la canasta
para evitar roturas o decoloración. Consulte
las ilustraciones inferiores.
El estante para cubiertos puede utilizarse
con la cubierta abierta. Consulte la
ilustración de la izquierda.
10 puestos
Uso de la lavavajillas
Izquierda Derecha
12 puestos
Español 21
DW8000R_DD68-00211A-00_MES.indd 21 2019-04-24 6:00:40
Page 78

Uso de la lavavajillas
Soporte para cucharas visto desde arriba con las ubicaciones sugeridas para los cubiertos. Haga
coincidir los números del diagrama con los números de la lista inferior de los cubiertos.
Uso de la lavavajillas
NOTA
NO permita que ningún objeto llegue hasta la parte inferior.
1. Tenedores
2. Cucharitas para té
3. Cucharas
4. Cuchillos
1 2 3 4 5
5. Cucharas y tenedores de servir
6. Elementos restantes
Español22
DW8000R_DD68-00211A-00_MES.indd 22 2019-04-24 6:00:40
Page 79

Guías sobre detergentes
Todos los ciclos de la lavavajillas requieren detergente en el compartimiento correspondiente.
Agregue detergente según corresponda para el ciclo seleccionado a n de asegurar el mejor
rendimiento.
ADVERTENCIA
• No ingiera detergente para lavavajillas. Evite inhalar las emanaciones del detergente.
Los detergentes para lavavajillas contienen productos químicos irritantes y cáusticos que
pueden provocar trastornos respiratorios. Si ingirió detergente para lavavajillas o inhaló sus
emanaciones, busque atención médica inmediatamente.
• Mantenga el detergente fuera del alcance de los niños.
PRECAUCIÓN
Use solamente detergente para lavavajillas. Otros tipos de detergentes producen demasiada
espuma, lo que puede afectar el rendimiento de la lavavajillas o causar su mal funcionamiento.
Para llenar el dosicador de detergente
1. Presione suavemente la tapa del
dosicador para destrabarla y, luego,
deslícela para abrirla. Tenga en cuenta que
la tapa del dosicador se abre al nal de
cada ciclo.
Uso de la lavavajillas
Español 23
DW8000R_DD68-00211A-00_MES.indd 23 2019-04-24 6:00:40
Page 80

Uso de la lavavajillas
Uso de la lavavajillas
2. Agregue la cantidad recomendada de
detergente en el compartimiento principal.
3. Cierre la tapa y presiónela para trabarla.
NOTA
Esta lavavajillas no cuenta con un
compartimiento separado para tabletas de
detergente.
4. Para un mejor desempeño, coloque una
pequeña cantidad de detergente en la
puerta para una limpieza más ecaz de
los elementos muy sucios. El detergente
adicional se activará durante el proceso de
prelavado.
Español24
DW8000R_DD68-00211A-00_MES.indd 24 2019-04-24 6:00:41
Page 81

La cubierta se abre automáticamente para dosicar el detergente durante el lavado.
CANTIDAD DE DETERGENTE
CICLO
Dosicador para el lavado
principal
En la puerta para el prelavado
Auto (Automático), Normal 3/4 oz (20 g) 1/3 oz (10 g)
Heavy (Muy sucio),
Express 60 (Rápido 60)
1 oz (30 g) 1/2 oz (15 g)
Delicate (Vajilla delicada) 3/4 oz (20 g) 1/5 oz (5 g)
NOTA
Los números que se encuentran dentro del dosicador aluden a gramos.
Producto para el enjuague
El producto de enjuague mejora el desempeño del secado de la lavavajillas. Cuando se encienda
el indicador Rinse Rell (Reponer producto de enjuague) en el panel de control, reponga el
producto para el enjuague. Use solamente productos líquidos para el enjuague. Los productos
en polvo pueden obstruir la apertura del compartimiento y hacer que la lavavajillas no funcione
correctamente.
PRECAUCIÓN
• No agregue ningún tipo de detergente en el compartimiento para el producto de enjuague.
• No llene excesivamente el compartimiento. El exceso de producto de enjuague se puede
derramar durante un ciclo.
Uso de la lavavajillas
1. Quite la tapa para abrir el compartimiento
de enjuague.
Español 25
DW8000R_DD68-00211A-00_MES.indd 25 2019-04-24 6:00:41
Page 82

Uso de la lavavajillas
2. Llene el compartimento con el producto
de enjuague según lo especicado por el
fabricante de dicho producto.
Uso de la lavavajillas
NOTA
Para más información sobre el ajuste de
cantidad de producto de enjuague, consulte la
página 33.
3. Para cerrar, presione hacia abajo la zona
del círculo de la tapa.
Respuesta del teclado táctil
Para evitar que los controles táctiles pierdan la capacidad de respuesta, siga estas instrucciones.
• Toque con el dedo el centro de cada botón.
• No toque más de un botón al mismo tiempo,
excepto cuando así se le indique.
• Limpie de forma regular la supercie del
panel táctil con un trapo suave y húmedo.
Español26
DW8000R_DD68-00211A-00_MES.indd 26 2019-04-24 6:00:41
Page 83

Operaciones
01 02 03 04 05 06 07 08 09
ADVERTENCIA
Para reducir el riesgo de incendio, descarga eléctrica o lesiones personales, lea las INSTRUCCIONES
DE SEGURIDAD IMPORTANTES antes de poner en marcha este electrodoméstico.
Panel de control
Serie DW80R706*
01 POWER (ENCENDIDO)
02 Selector de ciclos
03 Lower Rack
(Estante inferior)
04 Storm Wash
(Lavado potente)
05 Hi-Temp Wash
(Lavado a alta
temperatura)
Cuando presiona el botón POWER (ENCENDIDO) se enciende la luz
del último ciclo iniciado. Una vez completado el ciclo seleccionado,
la lavavajillas se apaga automáticamente.
Seleccione el ciclo de lavado adecuado según el nivel de suciedad
de la vajilla. Cuando se selecciona un ciclo, se enciende el indicador
de ciclo activado correspondiente.
Si desea modicar el ciclo una vez iniciado, presione el botón
POWER (ENCENDIDO). Luego encienda de nuevo la lavavajillas y
seleccione un nuevo ciclo.
Si se selecciona esta opción, solo se activa la boquilla del estante
inferior para reducir tanto el tiempo del ciclo como el consumo
de energía. Utilice este ciclo para lavar cargas pequeñas de platos
o vasos en el estante inferior. Para lavar artículos muy sucios,
seleccione la opción Storm Wash (Lavado potente).
Use esta opción cuando desee lavar ollas y sartenes, bowls de
servir duraderos y otros elementos de gran tamaño, muy sucios y
difíciles de limpiar.
Para usar Storm Wash (Lavado potente), coloque los platos cara
abajo en la zona marcada Storm Wash (Lavado potente) en la
canasta inferior.
Eleva la temperatura del lavado principal para mejorar la limpieza
de cargas muy sucias o que contienen restos de alimentos
adheridos.
Operaciones
DW8000R_DD68-00211A-00_MES.indd 27 2019-04-24 6:00:42
Español 27
Page 84

Operaciones
Cuando se selecciona la opción Sanitize (Desinfección), la
temperatura del agua se eleva a 163 ˚F (73 ˚C) en el ciclo de
enjuague nal para la desinfección a alta temperatura.
Si selecciona la opción Sanitize (Desinfección), el indicador
“Sanitize (Desinfección)” parpadea cuando la temperatura del
agua alcanza la temperatura de desinfección (más de 155 ˚F
(68 ˚C)) y permanece encendido hasta el nal de la opción
Sanitize (Desinfección).
Cuando abre la puerta o presiona el botón POWER (ENCENDIDO), el
06 Sanitize (Desinfección)
/
(Control Lock (Bloqueo
de controles))
Operaciones
07 Pantalla
08 Delay Start
(Inicio retardado)
indicador "Sanitize (Desinfección)" se apaga.
NOTA
El ciclo Normal con la opción Sanitize (Desinfección) seleccionada
está certicado por NSF y cumple con la norma NSF/ANSI 184 para
lavavajillas residenciales. Las lavavajillas residenciales certicadas
no han sido diseñadas para los establecimientos alimentarios
autorizados. Su lavavajillas ha sido certicada por NSF.
Control Lock (Bloqueo de controles) le permite bloquear los botones
del panel de control para que los niños no puedan encender la
lavavajillas en forma accidental al presionarlos.
Para bloquear y desbloquear los botones del panel de control,
mantenga presionado el botón Sanitize (Desinfección) durante tres
(3) segundos con la máquina encendida.
Muestra la información sobre el ciclo actual que incluye el tiempo
del ciclo, el tiempo restante, los parámetros de Inicio retardado y
otra información especíca del ciclo.
Si ocurre un problema durante el funcionamiento, aparece un
código de información con un sonido de advertencia. Consulte los
códigos de información en la página 48.
Retarde un ciclo hasta 24 horas, en incrementos de una hora. Para
aumentar el tiempo del inicio retardado, presione o mantenga
presionado el botón Delay Start (Inicio retardado). La hora en
pantalla indica el tiempo en el cual comenzará el lavado.
- Después de congurar el tiempo de retardo, presione el botón
START (INICIO) y cierre la puerta para iniciar el ciclo.
- Para modicar el tiempo de retardo después de la puesta
en marcha de la lavavajillas, primero apáguela y enciéndala
nuevamente. Luego, seleccione un nuevo ciclo con una nueva
conguración de inicio retardado.
Español28
DW8000R_DD68-00211A-00_MES.indd 28 2019-04-24 6:00:42
Page 85

Para iniciar un ciclo, presione el botón START (INICIO) antes de
cerrar la puerta.
Cancel & Drain (Cancelar y drenar): Para cancelar un ciclo que esté
09 START (INICIO)
ejecutándose y desaguar la lavavajillas, mantenga presionado el
botón START (INICIO) durante tres (3) segundos.
Una vez restablecida la lavavajillas, seleccione un ciclo y una
opción y luego presione START (INICIO) para reiniciar la lavavajillas.
Indicadores
El indicador Control Lock
(Bloqueo de controles)
El indicador Rinse Rell
(Reponer producto de enjuague)
Operaciones
Se enciende cuando
Control Lock (Bloqueo de controles) está activado, y
parpadea si se presiona cualquier botón excepto si se
presiona el botón POWER (ENCENDIDO).
Se enciende cuando la lavavajillas se queda sin
producto de enjuague.
Español 29
DW8000R_DD68-00211A-00_MES.indd 29 2019-04-24 6:00:42
Page 86

Operaciones
Pantallas de progreso
Serie DW80R7060 Serie DW80R7061
Lavado
Enjuague
Secado
Operaciones
Fin
Cuando la lavavajillas está ejecutando un ciclo de lavado,
se enciende el primer indicador.
Cuando la lavavajillas está ejecutando un ciclo de
enjuague, se enciende el segundo indicador.
Cuando la lavavajillas está ejecutando un ciclo de secado,
se ilumina el tercer indicador.
Cuando la lavavajillas ha completado todo el ciclo, se
apagan todos los indicadores.
Español30
DW8000R_DD68-00211A-00_MES.indd 30 2019-04-24 6:00:42
Page 87

Descripción general de los ciclos
01 02 03 04 05 06
01 Auto (Automático)
02 Normal
03 Heavy (Muy sucio) Utilice este ciclo para vajilla muy sucia.
04 Delicate
(Vajilla delicada)
05 Express 60
(Rápido 60)
06 Rinse Only
(Solo enjuague)
Este ciclo detecta el nivel de suciedad e inicia automáticamente el
ciclo óptimo luego de algunos minutos de funcionamiento.
Utilice este ciclo para vajilla con suciedad normal.
La etiqueta del uso de energía se basa en este ciclo.
Utilice este ciclo para artículos frágiles sucios, tales como cristalería
na y copas de cristal (copas de vino). No utilice este ciclo para
otros artículos de la vajilla porque pueden aparecer opacidades o
marcas.
Utilice este ciclo cuando desee lavar la vajilla rápidamente. Tarda
aproximadamente 1 hora.
Utilice para enjuagar platos, vasos y cubiertos que no es necesario
lavar en ese momento. No utilice detergente.
Operaciones
Español 31
DW8000R_DD68-00211A-00_MES.indd 31 2019-04-24 6:00:42
Page 88

Operaciones
Pasos sencillos para encender su lavavajillas
1. Abra la puerta y, luego, cargue la lavavajillas. Asegúrese de que los platos estén vacíos.
2. Si corresponde, coloque los platos en el estante inferior. En caso de agregar la opción
Storm Wash (Lavado potente), coloque los platos en el lado izquierdo del estante inferior.
3. Agregue detergente en el dosicador. Para obtener mejores resultados, agregue producto de
enjuague en el compartimiento para el producto de enjuague.
NOTA
Para lograr un mejor desempeño en el secado debería utilizar productos para el enjuague. Puede
lograr un mejor desempeño del secado seleccionando la opción Sanitize (Desinfección).
4. Presione POWER (ENCENDIDO), y seleccione un ciclo con las opciones
necesarias (Lower Rack (Estante inferior), Storm Wash (Lavado potente),
Hi-Temp Wash (Lavado a alta temperatura), Sanitize (Desinfección)).
Operaciones
Si cambia el ciclo después de seleccionar una opción, se regresa al ciclo original.
5. Presione el botón START (INICIO), y cierre la puerta antes de 3 segundos. La lavavajillas inicia
el ciclo después de drenarse unos segundos.
NOTA
• Para cambiar el ciclo una vez que se ha iniciado, mantenga presionado START (INICIO) durante
3 segundos para cancelarlo. A continuación, seleccione un nuevo ciclo.
• Para reanudar después de abrir la puerta para detener la lavavajillas durante el
funcionamiento, simplemente presione START (INICIO) primero, y cierre la puerta.
Español32
DW8000R_DD68-00211A-00_MES.indd 32 2019-04-24 6:00:42
Page 89

Conguración
Puede modicar los ajustes de sonido, Auto Release™ Dry alert, Rinse aid amount, y Auto Release™
Dry según su preferencia. Para modicar los ajustes, presione los botones Sanitize (Desinfección)
y Delay Start (Inicio retardado) simultáneamente durante 3 segundos. Presione Sanitize
(Desinfección) para navegar por los submenús, y presione Delay Start (Inicio retardado) para
conrmar los cambios.
Sonido
U1/U0
Alerta de secado
Auto Release™
J1/J0
Sonido
Presione Sanitize (Desinfección) hasta que aparezca ‘U1’ o ‘U0’. Para silenciar la lavavajillas,
seleccione ‘U0’, y, luego, presione Delay Start (Inicio retardado). Para desactivar el silenciamiento,
seleccione ‘U1’, y, luego, presione Delay Start (Inicio retardado).
Alerta de secado Auto Release™
Puede activar o desactivar la conguración que alerta cuando abre la puerta para iniciar la
función de secado Auto Release™.
Presione Sanitize (Desinfección) hasta que aparezca ‘J1’ o ‘J0’. Para desactivar la alerta Auto
Release™, seleccione ‘J0’, y, luego, presione Delay Start (Inicio retardado). Para activarla, seleccione
‘J1’, y, luego, presione Delay Start (Inicio retardado).
Cantidad de producto de enjuague
Presione Sanitize (Desinfección) hasta que aparezca ‘F1~F6’. Cuanto más alto es el número, más
cantidad de producto de enjuague utiliza la lavavajillas. Para mejorar el rendimiento del secado,
seleccione un número superior.
Si los platos parecen decolorados después de un lavado, seleccione a un número inferior.
El nivel predeterminado de fábrica es ‘F4’.
Cantidad de
producto de
enjuague
F1~F6
Auto Release™ Dry
(Secado)
A1/A0
Operaciones
Español 33
DW8000R_DD68-00211A-00_MES.indd 33 2019-04-24 6:00:42
Page 90

Operaciones
Auto Release™ Secado
La función de secado Auto Release™, diseñada para mejorar el desempeño del secado, abre
automáticamente la puerta de la lavavajillas de 5 a 15 minutos antes de nalizar un ciclo.
Puede activar o desactivar el secado Auto Release™ en dos maneras: Con el modo de conguración
o con las teclas de alternancia. Ambos métodos se describen a continuación.
Presione Sanitize (Desinfección) hasta que
aparezca “A1” o “A0”. Luego, presione Delay
Start (Inicio retardado) para activar (A1) o
desactivar (A0) secado Auto Release™.
Uso de las teclas de alternancia:
Presione el botón Lower (Inferior) + Hi-Temp
Wash (Lavado a alta temperatura) durante
Operaciones
NOTA
• Cuando la puerta se abre en el modo de Secado Auto Release™, no se puede cerrar
manualmente durante los 2 minutos siguientes.
• Desactivar (A0) el “Secado Auto Release™” puede afectar los resultados de secado. Active (A1)
“Secado Auto Release™” para mejores resultados de secado.
• Una vez nalizado un ciclo, la puerta se abre automáticamente para que salga el vapor. Esto es
normal y no se trata de un mal funcionamiento del producto.
3 segundos para activar (A1) o desactivar (A0)
secado Auto Release™.
Español34
DW8000R_DD68-00211A-00_MES.indd 34 2019-04-24 6:00:42
Page 91

Características especiales
Inicio retardado
Puede retrasar el tiempo de inicio de un ciclo hasta 24 horas en incrementos de 1 hora. Para
aumentar el tiempo de inicio retardado, presione Delay Start (Inicio retardado). La hora en
pantalla indica el tiempo en el cual comenzará el ciclo.
1. Abra la puerta y, luego, cargue la lavavajillas.
2. Presione Delay Start (Inicio retardado), y, luego, mantenga presionado Delay Start (Inicio
retardado) para cambiar el tiempo en incrementos de 1 hora.
3. Cierre la puerta y, luego, presione START (INICIO).
NOTA
Para modicar el tiempo de retardo después de la puesta en marcha de la lavavajillas, presione
POWER (ENCENDIDO) y reinicie la lavavajillas.
Controles táctiles
Los controles táctiles le permiten operar fácilmente la lavavajillas.
• Se activan fácilmente con un toque suave.
• Tienen un diseño sencillo y elegante.
• Son fáciles de limpiar.
NOTA
Si tiene niños o desea limpiar la Interfaz de control, recomendamos activar la función Control Lock
(Bloqueo de controles) para bloquear los botones de control.
Bloqueo de controles
Para evitar que los niños jueguen con la lavavajillas, Control Lock (Bloqueo de controles) bloquea
todos los botones excepto POWER (ENCENDIDO).
• Para activar Control Lock (Bloqueo de controles), mantenga presionado
Sanitize (Desinfección) durante 3 segundos. Con Control Lock (Bloqueo de controles) activado,
no es posible seleccionar ciclos u opciones ni iniciar una operación.
• Para desactivar Control Lock (Bloqueo de controles), mantenga presionado nuevamente
Sanitize (Desinfección) durante 3 segundos.
• Control Lock (Bloqueo de controles) permanece activo después de reiniciar la lavavajillas. Para
cancelar Control Lock (Bloqueo de controles), primero debe desactivarlo.
Operaciones
Español 35
DW8000R_DD68-00211A-00_MES.indd 35 2019-04-24 6:00:43
Page 92

Mantenimiento
Limpieza
Mantenga limpia la lavavajillas para mejorar su rendimiento, reducir la cantidad de reparaciones
innecesarias y alargar su vida útil.
Exterior
Limpie los derrames en la supercie de la lavavajillas a medida que ocurran. Utilice un paño suave
y húmedo para limpiar suavemente todos los derrames y el polvo del panel de control.
PRECAUCIÓN
• No utilice benceno, cera, diluyente, blanqueador a base de cloro, alcohol u otras sustancias
químicas. Estos materiales pueden decolorar la supercie de la lavavajillas y ocasionar
manchas.
• La lavavajillas tiene piezas eléctricas en su interior. No rocíe agua directamente sobre la
lavavajillas. Proteja los componentes eléctricos para evitar que entren en contacto con el agua.
• Para un panel en puerta de acero inoxidable, limpie con un limpiador de acero inoxidable para
electrodomésticos y un paño limpio y suave.
Mantenimiento
Interior
Limpie con regularidad el interior de la lavavajillas para eliminar las partículas de suciedad o
comida. Limpie el interior de la lavavajillas y de la puerta con un paño húmedo. Para mantener un
nivel de limpieza óptimo, recomendamos ejecutar el ciclo de autolimpieza periódicamente con la
lavavajillas vacía.
Para mantener limpia la rejilla para cubiertos, voltéela luego de usarla. Para eliminar las manchas
blancas y los olores de la rejilla para cubiertos, ejecute el ciclo de autolimpieza con la lavavajillas
vacía y sin detergente hasta que se vacíe. Luego, detenga el ciclo y agregue una taza de 8 onzas
de vinagre blanco en la canasta inferior. Cierre la puerta y reanude el ciclo.
Utilice un paño húmedo para eliminar los depósitos de cal o grasa dentro de la lavavajillas. Como
alternativa, agregue un poco de detergente y, luego, ejecute un ciclo vacío usando la temperatura
de enjuague más alta.
PRECAUCIÓN
• No quite el sello frontal (el sello de goma largo que rodea la abertura de la lavavajillas). El sello
mantiene el interior de la lavavajillas sellado.
Español36
DW8000R_DD68-00211A-00_MES.indd 36 2019-04-24 6:00:43
Page 93

Boquillas
Para evitar que las boquillas se atasquen o si las boquillas están obstruidas, retire y limpie cada
una. Tenga cuidado al retirar las boquillas porque pueden romperse.
Boquilla superior
1. Abra la puerta y, luego, jale el estante
superior para revelar la boquilla superior.
2. Gire hacia la izquierda y retire la tapa de
la boquilla; luego, retire la boquilla.
3. Desobstruya y limpie la boquilla.
4. Vuelva a insertar la boquilla y, luego,
ajuste la tuerca hacia la derecha.
5. Gire manualmente la boquilla para
asegurarse de que esté bien enganchada.
Boquilla techo
1. Verique que los oricios de la boquilla no
estén obstruidos con partículas de comida.
2. Si hace falta limpiarla, retire la boquilla del
techo.
3. Para retirar la boquilla del techo, quite
primero el estante superior, aoje la
tapa de la boquilla girándola en sentido
contrario al de las agujas del reloj y luego
extraiga la boquilla.
4. Limpie la boquilla, insértela nuevamente y
ajuste la tapa de la boquilla girándola en el
sentido de las agujas del reloj.
5. Haga rotar manualmente la boquilla para
vericar que haya quedado instalada
correctamente.
Mantenimiento
Español 37
DW8000R_DD68-00211A-00_MES.indd 37 2019-04-24 6:00:43
Page 94

Mantenimiento
Boquilla inferior
1. Abra la puerta y, luego, jale el estante
inferior para revelar la boquilla inferior.
2. Quite la boquilla para extraerla.
3. Limpie la boquilla.
4. Vuelva a insertar la boquilla y, luego,
empuje la boquilla hacia abajo hasta que
se oiga un clic.
5. Gire manualmente la boquilla para
asegurarse de que esté bien enganchada.
Filtro
Recomendamos limpiar el ltro de forma mensual.
1. Abra la puerta y, luego, retire el estante
Mantenimiento
inferior.
2. Gire la manija del ltro hacia la izquierda
para destrabar la cubierta del ltro.
Español38
DW8000R_DD68-00211A-00_MES.indd 38 2019-04-24 6:00:43
Page 95

3. Retire la cubierta y, luego, el microltro
cilíndrico que está debajo.
4. Elimine la suciedad y las impurezas del
microltro y la cubierta del ltro.
5. Enjuague con agua corriente y, luego,
seque bien.
Mantenimiento
Español 39
DW8000R_DD68-00211A-00_MES.indd 39 2019-04-24 6:00:44
Page 96

Mantenimiento
6. Vuelva a insertar el ltro y, luego, la
cubierta.
7. Gire la manija del ltro hacia la derecha
para bloquearlo.
PRECAUCIÓN
Asegúrese de que la cubierta del ltro esté bien cerrada. Una cubierta suelta puede reducir el
rendimiento del ltrado.
Cuidado a largo plazo
Mantenimiento
Si no va a utilizar la lavavajillas durante un período de tiempo prolongado, primero drene
completamente la unidad y, a continuación, desconecte la manguera de agua. Cierre la válvula
de suministro de agua y corte el disyuntor. El agua que queda en las mangueras o en los
componentes internos puede dañar la lavavajillas.
Español40
DW8000R_DD68-00211A-00_MES.indd 40 2019-04-24 6:00:44
Page 97

Limpieza de la bomba de drenaje
1
2
Si la lavavajillas no desagua porque la bomba de drenaje está obstruida con objetos extraños,
o esta produce un ruido anormal, deberá desatascar y limpiar la bomba como se indica a
continuación.
1. Retire el estante inferior.
2. Consulte la sección "Filtro" para retirar el
microltro cilíndrico.
3. Retire la humedad del ltro con una
esponja.
4. Retire la tapa de la bomba de drenaje
empujando la manija en la dirección de la
echa (1) y, luego, levantándola (2).
5. Revise el estado del impulsor. Luego, retire
los objetos extraños de la bomba.
6. Vuelva a colocar la tapa de la bomba de
drenaje y presione hacia abajo hasta que
oiga un clic.
Mantenimiento
Cómo guardar la lavavajillas
Si necesita guardar su lavavajillas durante un período prolongado, primero drénela y desconéctela.
Si queda agua en las mangueras y los componentes internos se puede dañar la lavavajillas.
Después de drenar y desconectar la lavavajillas, asegúrese de cerrar la válvula de suministro de
agua y de cortar el disyuntor.
Español 41
DW8000R_DD68-00211A-00_MES.indd 41 2019-04-24 6:00:44
Page 98

Solución de problemas
Intente implementar las siguientes soluciones si su lavavajillas…
Problema Causa posible Solución
• Verique que la puerta esté trabada
y completamente cerrada. Verique
si el estante superior está unido
correctamente a la boquilla del conducto.
• Verique asimismo si el estante
superior está torcido o desnivelado.
La puerta no está
completamente cerrada.
Solución de problemas
No enciende.
Una operación o
ciclo está
demorando
demasiado.
Español42
No se presionó el botón
START (INICIO).
No funciona para nada.
No funciona el suministro
de agua.
El panel de control está
bloqueado.
Un disyuntor está abierto. • Reinicie el disyuntor.
La lavavajillas está
conectada al suministro de
agua fría.
• Consulte el código de información que
aparece en la pantalla.
• Asegúrese de que el cable de
alimentación esté correctamente
conectado.
• Verique que la válvula de suministro de
agua esté abierta.
• Verique si la presión del agua
suministrada está entre 20 y 120 psi
(entre 140 y 830 kPa).
• Desactive el
Control Lock (Bloqueo de controles),
(consulte la página 28.)
• Verique que el conducto esté conectado
al suministro de agua fría. Para
funcionar con ecacia, la lavavajillas
debe estar conectada a un suministro
de agua caliente. (Si está conectada a un
suministro de agua fría, se requiere más
tiempo para calentar el agua fría.)
DW8000R_DD68-00211A-00_MES.indd 42 2019-04-24 6:00:44
Page 99

Problema Causa posible Solución
El ciclo seleccionado no es
el adecuado.
• Seleccione un ciclo de acuerdo con
la cantidad de vajilla y su nivel de
suciedad, tal como lo indica este manual.
• Conecte la tubería de suministro de agua
La temperatura del agua
es baja.
a la llave del agua caliente. Para obtener
el mejor desempeño, la temperatura del
agua suministrada debe ser de 120 ˚F
(49 ˚C).
Presión de agua baja.
• La presión del agua debe estar entre
20 y 120 psi (140-830 kPa).
• Use un limpiador para lavavajillas
La vajilla presenta
partículas de
comida.
(La limpieza no es
adecuada).
El agua es demasiado dura.
No se usó detergente para
lavavajillas.
comercial.
• Utilice un detergente fresco, de alta
calidad, con producto de enjuague.
• Utilice detergente para lavavajillas
automático.
• Recomendamos el uso de detergente en
polvo o de una tableta de detergente
multifunción para lavavajillas.
• Asegúrese de que los artículos grandes,
como láminas para hornear galletas,
Quedan restos de
detergente en el
dosicador.
tablas para cortar, recipientes, etc. no
bloqueen el dosicador de detergente o
impidan que se abra adecuadamente.
• Reacomode la vajilla de manera que
no interera con el funcionamiento del
dosicador del detergente.
Solución de problemas
Español 43
DW8000R_DD68-00211A-00_MES.indd 43 2019-04-24 6:00:44
Page 100

Solución de problemas
Solución de problemas
Problema Causa posible Solución
• Verique el dosicador y agregue agente
de enjuague.
• Utilice un agente de enjuague líquido.
• Reacomode la vajilla de manera que no
interera con la rotación de la boquilla ni
con el funcionamiento del dosicador del
detergente.
• Cargue solamente la cantidad adecuada
de platos.
• Cargue la vajilla según las
recomendaciones.
(Consulte la página 17.)
• Cargue los artículos muy sucios en la
zona de la Storm Wash (Lavado potente).
(Véase la página 18)
• Elimine los restos de comida de la
vajilla antes de cargarla. (No realice un
enjuague previo.)
• Limpie el ltro. (Consulte la página 38.)
• Asegúrese de que los ltros estén bien
ajustados.
• Verique si la presión del agua
suministrada está entre 20 y 120 psi
(entre 140 y 830 kPa).
• Disminuya la carga de la lavavajillas
y utilice un agente de enjuague para
minimizar esto.
• Elimine las marcas de la vajilla con un
limpiador de baja sensibilidad.
• Elimine esta suciedad con un limpiador
de manchas.
• Use un ciclo con una temperatura más
alta.
La vajilla presenta
partículas de
comida.
(La limpieza no es
adecuada).
Deja los vasos con
una ligera película.
Deja una película
amarilla o marrón
en el interior de la
lavavajillas.
No hay producto de
enjuague.
Hay una boquilla obstruida. • Limpie la boquilla. Consulte la página 37.
La vajilla no se cargó
correctamente.
Se cargó demasiada vajilla.
Los ltros están obstruidos
o no están ajustados
correctamente.
(Quedan restos de
alimentos en el ltro.)
Se suministra menos agua
que la requerida,
El agua suministrada es
blanda y se ha usado
demasiado detergente.
La carga incluye vajilla de
aluminio.
Esto es debido a restos de
café o té.
Español44
DW8000R_DD68-00211A-00_MES.indd 44 2019-04-24 6:00:44
 Loading...