

Page 1
Dishwasher
user manual
DW80M9* Series
imagine the possibilities
Thank you for purchasing this Samsung product.
DW9900M_DD68-00184A-02_EN.indd 1DW9900M_DD68-00184A-02_EN.indd 1 2017-09-20 3:26:372017-09-20 3:26:37
Page 2
contents
SETTING UP YOUR DISHWASHER
8
USING YOUR DISHWASHER
10
CLEANING AND MAINTAINING YOUR
DISHWASHER
27
8 Unpacking your dishwasher
8 Checking parts
9 Meeting installation requirements
10 Control panel
13 Cycle selector
14 Basic guidelines
17 Samsung smart home (applicable models
only)
19 Adjusting the angle of the plate supports
20 Adjusting the height of the upper rack
20 Removing the upper rack
21 Loading the lower rack
21 Loading the upper rack
22 Using the 3
models)
23 Using the cutlery rack
24 Using the glass support
24 Using the easy caddy (for some models)
24 using zone booster
25 Using detergent
26 Using rinse aid
27 Cleaning the exterior
27 Cleaning the interior
28 Cleaning the nozzles
29 Cleaning the fi lter
30 Cleaning the drain pump
30 Storing your dishwasher
rd
(cutlery) rack (for some
CYCLES
31 Cycle chart
31
TROUBLESHOOTING
32 Check these points if your dishwasher…
35 Information codes
32
APPENDIX
36 Helping the environment
36 Specifi cations
36
English - 2
DW9900M_DD68-00184A-02_EN.indd 2DW9900M_DD68-00184A-02_EN.indd 2 2017-09-20 3:26:472017-09-20 3:26:47
Page 3
safety information
Congratulations on your new Samsung dishwasher. This manual contains important
information on the installation, use, and care of your appliance. Please take time to
read this manual to take full advantage of your washer’s many benefi ts and features.
WHAT YOU NEED TO KNOW ABOUT THE SAFETY INSTRUCTIONS
Warnings and Important Safety Instructions in this manual do not cover all
possible conditions and situations that may occur. It is your responsibility to use
common sense, caution, and care when installing, maintaining, and operating
your washer.
IMPORTANT SAFETY INSTRUCTIONS
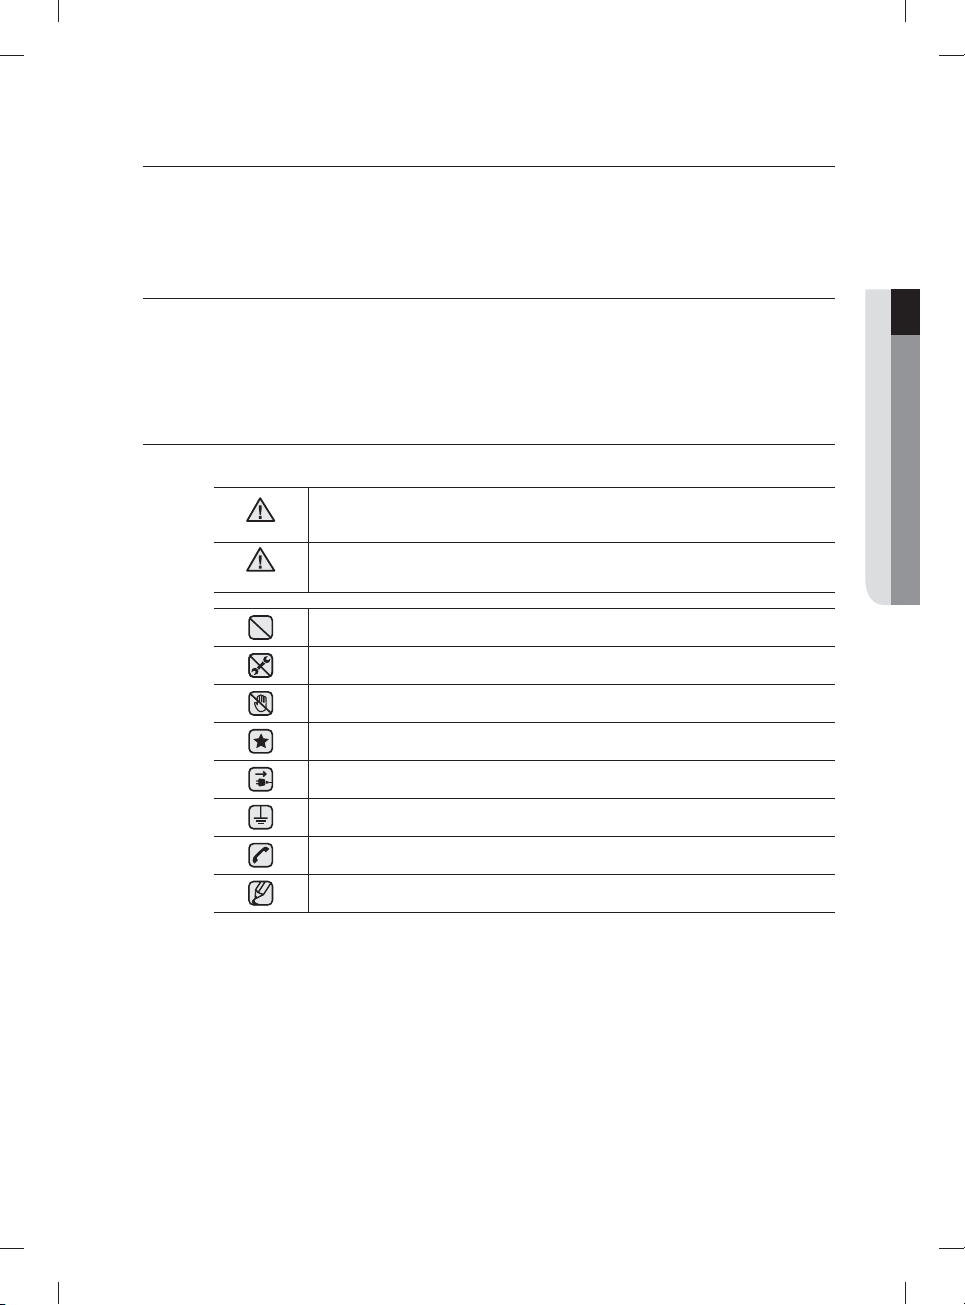
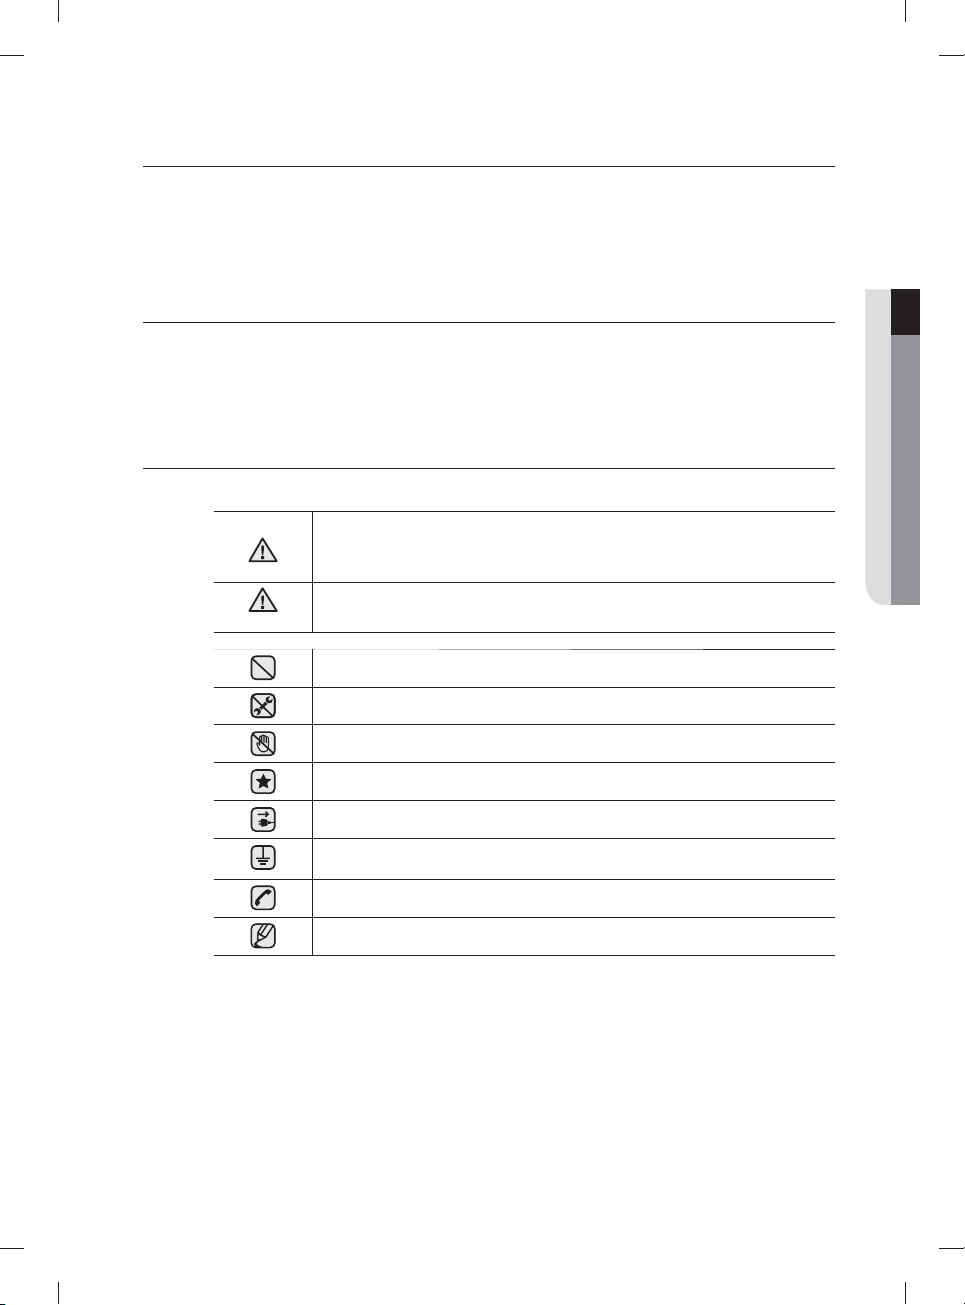
What the icons and signs in this user manual mean:
Hazards or unsafe practices that may result in severe personal injury or death.
WARNING
CAUTION
To reduce the risk of fi re, explosion, electric shock, or personal injury when using
your dishwasher, follow these basic safety precautions:
Hazards or unsafe practices that may result in minor personal injury or property
damage.
Do NOT attempt.
Do NOT disassemble.
Do NOT touch.
Follow directions explicity.
Unplug the power plug from the wall socket.
Make sure the machine is grounded to prevent electric shock.
Call the service center for help.
01 safety information
Note
These warning signs are here to prevent injury to you and others.
Please follow them explicitly.
After reading this section, keep it in a safe place for future reference.
SAVE THESE INSTRUCTIONS
English - 3
DW9900M_DD68-00184A-02_EN.indd 3DW9900M_DD68-00184A-02_EN.indd 3 2017-09-20 3:26:472017-09-20 3:26:47
Page 4
safety information
WARNING
WARNING
State of California Proposition 65 Warning (US only)
This product contains chemicals known to the State of California to cause cancer and birth
defects or other reproductive harm.
WARNING: When using your dishwasher, follow basic precautions, including the following:
WARNING
1. Read all instructions before using the dishwasher.
2. Use the dishwasher only for its intended function.
3. Use only detergents or wetting agents recommended for use in a dishwasher and keep them
out of the reach of children.
4. When loading items to be washed:
- locate sharp items so that they are not likely to damage the door seal, and
- load sharp knives with the handles up to reduce the risk of cut-type injuries.
5. Do not wash plastic items unless they are marked "dishwasher safe" or the equivalent. For
plastic items not so marked, check the manufacturer’s recommendations.
6. Do not touch the HEATING ELEMENT during or immediately after use.
7. Do not operate your dishwasher unless all ENCLOSURE panels are properly in place.
8. Do not tamper with the controls.
9. Do not abuse, sit on, or stand on the door or dish rack of the dishwasher.
10. To reduce the risk of injury, do not allow children to play in or on the dishwasher.
11. Under certain conditions, hydrogen gas may be produced in a hot-water system that has
not been used for two weeks or more. HYDROGEN GAS IS EXPLOSIVE. If the hot-water
system has not been used for such a period, before using the dishwasher turn on all hotwater faucets and let the water fl ow from each for several minutes. This will release any
accumulated hydrogen gas. As the gas is fl ammable, do not smoke or use an open fl ame
during this time.
12. Remove the door to the washing compartment when removing an old dishwasher from
service or discarding it.
• After unpacking the dishwasher, keep the packaging out of the reach of children.
CAUTION
• The dishwasher is extremely heavy. Do not attempt to move or carry the dishwasher by
yourself. Two or more people are needed to move a dishwasher and avoid potential injuries.
• As with any equipment using electricity, water, and moving parts, potential hazards exist.
• Do not install the dishwasher near electrical components. Keep the dishwasher away from
open fl ames.
• Install and level your dishwasher on an uncarpeted fl oor that can support its weight.
• Your dishwasher must be properly grounded. Never connect it to an ungrounded outlet. See
page 9 for more information on grounding your dishwasher.
• Connect the ground wire to the green ground connector in the terminal box.
• After the dishwasher is installed, check that the drain hose is properly connected and
that there is no leakage from the hose connectors. If the drain hose is loose, it may cause
property damage.
• The water supply line is susceptible to breakage. As time goes by, it becomes less fl exible.
Check the line periodically. If it is swollen, torn, cut, or there is a water leak, replace it
immediately.
SAVE THESE INSTRUCTIONS
English - 4
DW9900M_DD68-00184A-02_EN.indd 4DW9900M_DD68-00184A-02_EN.indd 4 2017-09-20 3:26:472017-09-20 3:26:47
Page 5
• To safely operate this appliance, familiarize yourself with its operations and exercise care
when using it.
• Do not put gasoline, solvents, or other flammable materials inside the dishwasher. Do not
wash dishes exposed to these materials.
• Keep your dishwasher detergent out of the reach of children. Detergent has an adverse
e ect on human organs. It contains elements for polishing and is corrosive. Avoid letting the
detergent come into contact with your skin and eyes.
• Do not push or place pressure on the door when it is open, as this may damage the
dishwasher or cause harm.
• Do not allow children to play in or on the dishwasher. They may harm themselves or damage
the dishwasher.
• Disconnect the power cable (or set the circuit breaker to o ) before servicing your
dishwasher.
• Do not repair, replace, or service any part of your dishwasher yourself. Disassembly, repairs,
and modifi cations are permitted by authorized service technicians only. Work done by an
unauthorized person may void your warranty.
• Before disposing of your dishwasher, remove the door of the washing compartment or the
door latch so that children or small animals cannot get trapped inside.
• If the dishwasher is left unused for an extended period of time, turn o the water supply.
• This dishwasher is intended for residential use only.
BEFORE USING YOUR DISHWASHER
WARNING
WARNING
Tip-Over Hazard
- Do not use the dishwasher until it is correctly installed.
- Do not push down on the dishwasher door when it is open.
- Do not place excessive weight on the dishwasher door when it is open.
Electric Shock Hazard
Failure to follow these instructions can result in death, fi re, or electric shock:
- Electrically ground the dishwasher
- Connect the ground wire to the green ground connector in the junction box.
- Do not use an extension cord.
01 safety information
SAVE THESE INSTRUCTIONS
English - 5
DW9900M_DD68-00184A-02_EN.indd 5DW9900M_DD68-00184A-02_EN.indd 5 2017-09-20 3:26:472017-09-20 3:26:47
Page 6
safety information
REGULATORY NOTICE
FCC Notice
FCC CAUTION:
CAUTION
Any changes or modifi cations not expressly approved by the party responsible for compliance
could void the user’s authority to operate the equipment.
This device complies with Part 15 of FCC Rules. Operation is Subject to following two
conditions:
(1) This device may not cause harmful interference, and
(2) This device must accept any interference received including interference that cause
undesired operation.
For products sold in the US and Canadian markets, only channels 1–11 are available. You
cannot select any other channels.
FCC STATEMENT:
This equipment has been tested and found to comply within the limits for a Class B digital
device, pursuant to part 15 of the FCC Rules. These limits are designed to provide reasonable
protection against harmful interference in a residential installation.
This equipment generates, uses, and can radiate radio frequency energy and, if not installed
and used in accordance with the instructions, may cause harmful interference to radio
communications. However, there is no guarantee that interference will not occur in a particular
installation. If this equipment does cause harmful interference to radio or television reception,
which can be determined by turning the equipment o and on, the user is encouraged to try to
correct the interference by one or more of the following measures:
• Reorienting or relocating the receiving antenna
• Increasing the separation between the equipment and receiver
• Connecting the equipment to an outlet that is on a di erent circuit than the radio or TV.
• Consulting the dealer or an experienced radio/TV technician for help.
FCC RADIATION EXPOSURE STATEMENT:
This equipment complies with FCC radiation exposure limits set forth for an uncontrolled
environment. This equipment should be installed and operated so there is at least 8 inches
(20cm) between the radiator and your body. This device and its antenna(s) must not be colocated or operated in conjunction with any other antenna or transmitter.
SAVE THESE INSTRUCTIONS
English - 6
DW9900M_DD68-00184A-02_EN.indd 6DW9900M_DD68-00184A-02_EN.indd 6 2017-09-20 3:26:472017-09-20 3:26:47
Page 7
IC Notice
The term “IC” before the radio certifi cation number only signifi es that Industry Canada technical
specifi cations were met. Operation is subject to the following two conditions: (1) this device may
not cause interference, and (2) this device must accept any interference, including interference
that may cause undesired operation of the device.
This Class B digital apparatus complies with Canadian ICES-003.
Cet appareil numérique de la classe B est conforme á la norme NMB-003 du Canada.
For products sold in the US and Canadian markets, only channels 1–11 are available. You
cannot select any other channels.
IC RADIATION EXPOSURE STATEMENT:
This equipment complies with IC RSS-102 radiation exposure limits set forth for an uncontrolled
environment. This equipment should be installed and operated so there is at least 8 inches
(20cm) between the radiator and your body. This device and its antenna(s) must not be colocated or operated in conjunction with any other antenna or transmitter.
Open Source License Notice
The software included in this product contains open source software. You may obtain the
complete corresponding source code for a period of three years after the last shipment of this
product by sending an email to mailto:[email protected].
It is also possible to obtain the complete corresponding source code in a physical medium such
as a CD-ROM; a minimal charge will be required.
The following URL http://opensource.samsung.com/opensource/SimpleConnectTP/seq/0 leads
to the download page of the source code made available and open source license information as
related to this product. This o er is valid to anyone in receipt of this information.
01 safety information
SAVE THESE INSTRUCTIONS
English - 7
DW9900M_DD68-00184A-02_EN.indd 7DW9900M_DD68-00184A-02_EN.indd 7 2017-09-20 3:26:472017-09-20 3:26:47
Page 8
setting up your dishwasher
Be sure to have your installer follow these instructions closely so that your new
dishwasher works properly and that you’re not at risk of injury when washing
dishes.
UNPACKING YOUR DISHWASHER
• Once your new dishwasher has been delivered to you, carefully unpack it and check for any damage.
If the dishwasher has been damaged, make note of it on the waybill and keep a copy.
Do not install the dishwasher, and contact Samsung Customer Service at the number listed below.
• If there is no damage to the product, you can proceed with the installation. If you are going to install it
yourself, make sure to read through the installation guide and follow the directions inside.
• After unpacking your dishwasher, keep the packaging out of the reach of children to ensure their safety.
CHECKING PARTS
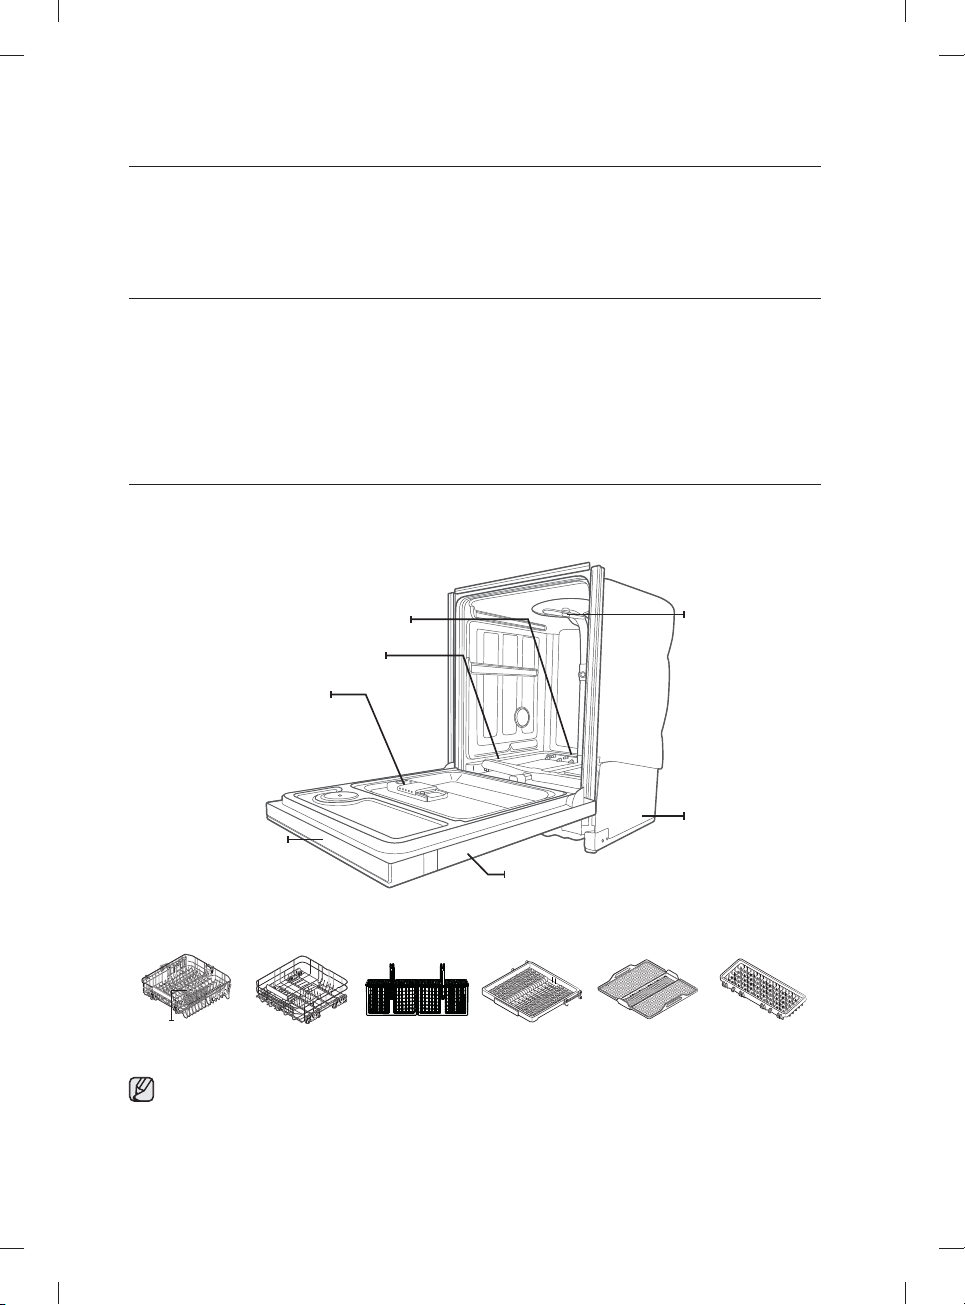
When your dishwasher has been unpacked, make sure you’ve received all the parts shown below.
If your dishwasher was damaged during shipping, or if you do not have all the parts, contact Samsung
Customer Service at 1-800-SAMSUNG (726-7864).
Lower nozzle
Water refl ector
Dispenser
Control panel
Door
Upper nozzle
Upper rack Lower rack Cutlery rack
Accessory parts - User/Installation manual, Installation Kit, Kick Plate.
3rd rack
(for some models)
Top nozzle
Base
3rd rack PAD
(for some models)
Easy Caddy
(for some models)
English - 8
DW9900M_DD68-00184A-02_EN.indd 8DW9900M_DD68-00184A-02_EN.indd 8 2017-09-20 3:26:472017-09-20 3:26:47
Page 9
MEETING INSTALLATION REQUIREMENTS
Electrical supply and grounding
To prevent the risk of fire, electric shock, or personal injury, all wiring and grounding must be
done in accordance with the National Electrical Code ANSI/FNPA, No. 70 Latest Revision and
local codes and ordinances. It is the personal responsibility of the appliance owner to provide
adequate electrical service for this appliance.
Never use an extension cord.
CAUTION
When preparing for installation, ensure that your power supply provides:
• An individual 120 Volt, 60 Hz branch circuit serving only your dishwasher with a 15 AMP fuse
or circuit breaker.
Your dishwasher must be grounded. If your dishwasher malfunctions or breaks down, grounding
will reduce the risk of electric shock by providing a path of least resistance for the electric
current.
Never connect the ground wire to plastic plumbing lines, gas lines, or hot water pipes.
WARNING
Grounding instructions
For a permanently connected appliance:
This appliance must be connected to a grounded metal, permanent wiring system, or an
equipment-grounding conductor must be run with the circuit conductors and then connected to
the equipment-grounding terminal or lead on the appliance.
Water supply
The hot water supply line pressure must be between 20-120 psi (140-830 kPa).
Adjust the water heater to deliver water between 120 ˚F (49 ˚C)-149 ˚F (65 ˚C).
Most plumbing supply stores sell water supply lines of various lengths up to 10 feet
(305cm) long.
You can reduce the risk of leaks and water damage by:
• Making water faucets easily accessible.
• Turning o faucets when the dishwasher is not in use.
• Periodically checking for leaks at water supply line fittings.
Before using your dishwasher for the first time, check all connections at the water supply valve
and faucets for leaks.
WARNING
Flooring
For safety, your dishwasher must be installed on a solidly constructed fl oor.
Never install your dishwasher on a platform or poorly supported structure.
02 setting up your dishwasher
Your dishwasher must be properly installed in accordance with the Installation Guide before you use it.
If you did not receive an Installation Guide with your dishwasher, you can obtain one by visiting our website
at www.samsung.com.
English - 9
DW9900M_DD68-00184A-02_EN.indd 9DW9900M_DD68-00184A-02_EN.indd 9 2017-09-20 3:26:482017-09-20 3:26:48
Page 10
using your dishwasher
WARNING: To reduce the risk of fi re, electric shock, or injury to persons, read the IMPORTANT
SAFETY INSTRUCTIONS before operating this appliance.
WARNING
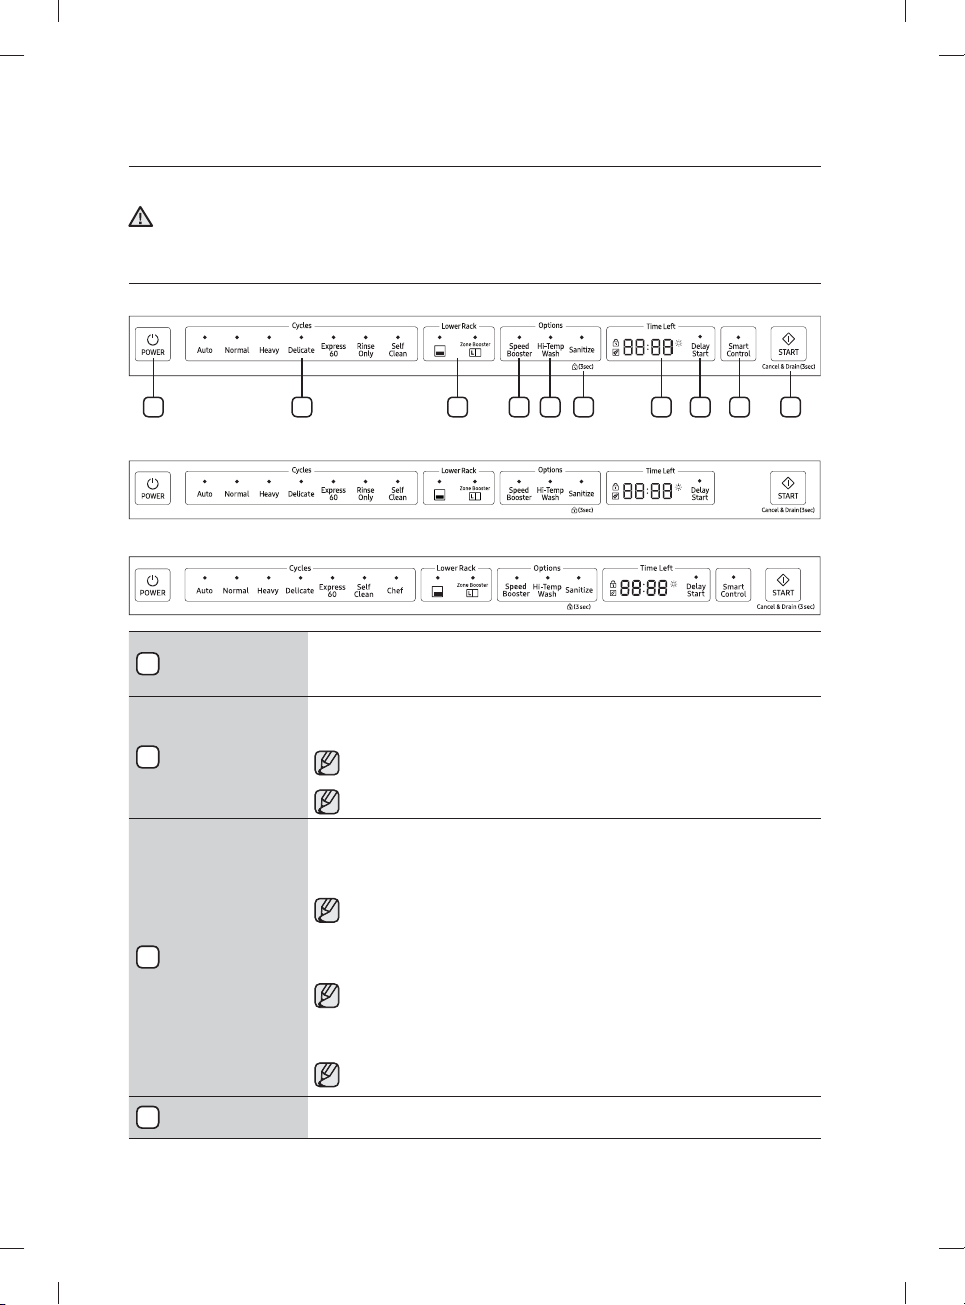
CONTROL PANEL
DW80M9960 Series
7 8 96 10321 4 5
DW80M95** Series
DW80M9990 Series
1
Power
2
Cycle Selector
3
Lower
4
Speed Booster Select this option to reduce washing time.
When you press the Power button, the Cycle On light for the most recently started cycle turns
on. When the selected cycle is complete, the dishwasher powers o automatically.
Select the appropriate wash cycle depending on the soil level of your dishes. After you select a
cycle, the Cycle On light for that cycle lights.
If you want to change the cycle once it has started, press the Power button. Then, turn
on the dishwasher again and select a new cycle.
The default cycle is Normal.
When you select Lower (Lower Rack - Only), only the lower rack nozzle is activated. The upper
nozzle will not operate.
Use this feature to wash a small load of dishes or glasses placed in the lower rack.
When you select Lower (Lower Rack - Only), place items, glasses, etc. in the lower rack
only. The dishwasher will not wash items placed in the upper rack.
Selecting Lower (Lower Rack - Only) reduces both the cycle time and the amount of electricity
consumed.
If you want to wash heavily soiled items such as pots and pans, select the Zone Booster
option. (This option consumes slightly more water and energy.)
The Zone Booster option applies intensive washing power to the left part of the lower
rack.
Selecting the Zone Booster option does not turn o the Upper Nozzle.
English - 10
DW9900M_DD68-00184A-02_EN.indd 10DW9900M_DD68-00184A-02_EN.indd 10 2017-09-20 3:26:492017-09-20 3:26:49
Page 11
5
Hi-Temp Wash
Sanitize /
6
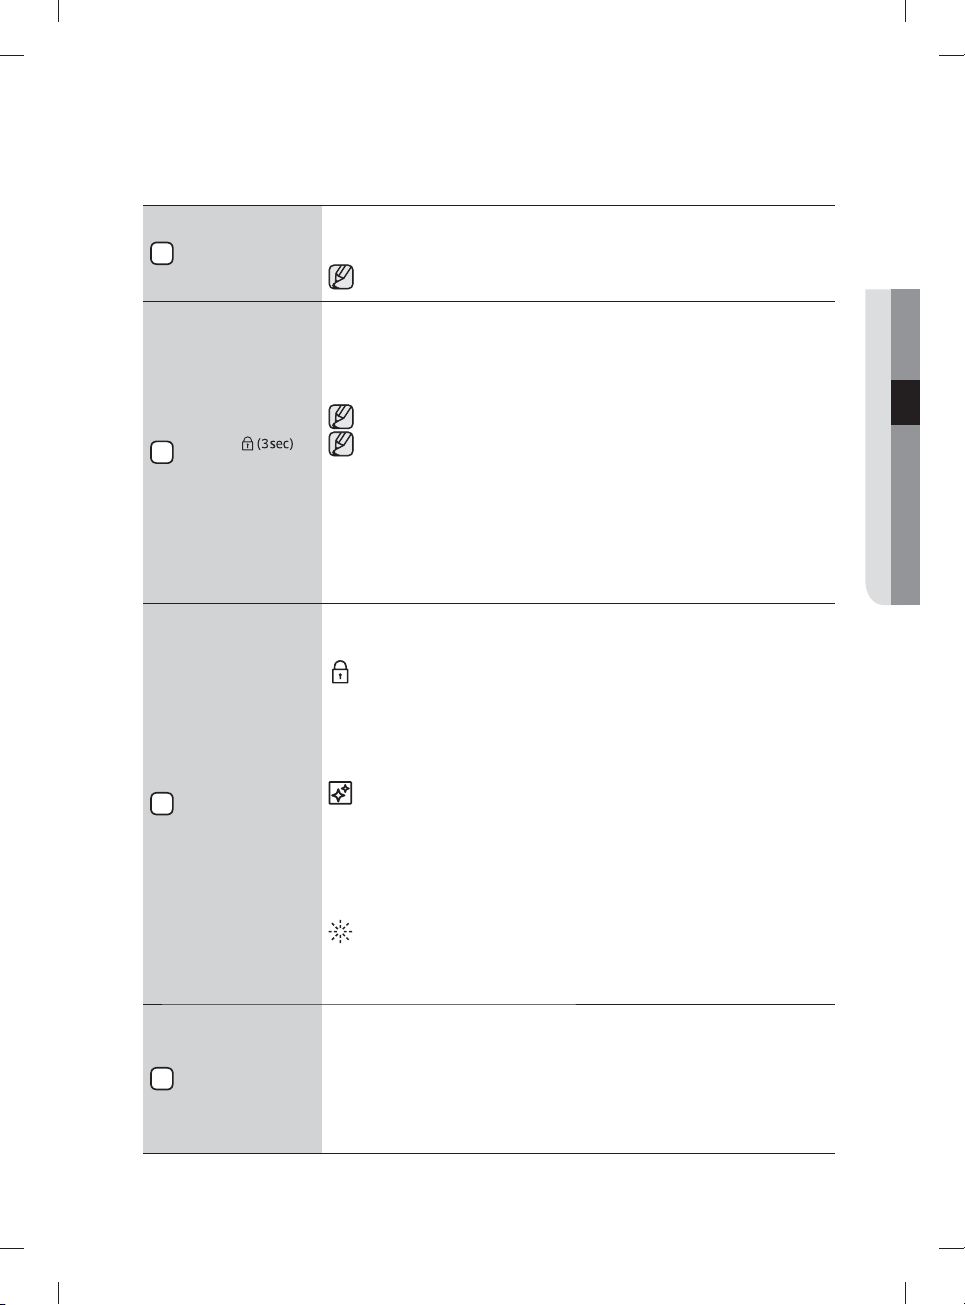
( Control Lock)
7
Display
8
Delay Start
Raises the main wash temperature to improve cleaning for loads containing tough, baked-on
food.
Hi-Temp Wash is not available for the Delicate and Rinse Only cycles.
03 using your dishwasher
With the Sanitize option selected, the water temperature is increased to 163˚F (73 ˚C) in the
fi nal rinse cycle for high temperature sanitization.
If you select the Sanitize option, the "Sanitize" lamp blinks when the water temperature reaches
the sanitary temperature (over 155 ˚F (68 ˚C)), and then remains illuminated until the Sanitize
option ends. When you open the door or press the Power button, the "Sanitize" lamp turns o .
You cannot select the Sanitize option if you select the Delicate and Rinse Only cycles.
The Sanitize feature operates in accordance with NSF/ANSI Standard 184 for Residential
Dishwashers. Certifi ed residential dishwashers are not intended for licensed food
establishments. Your dishwasher is NSF Certifi ed.
Only the Heavy cycle with the Sanitize option has been designed to meet the requirements for
soil removal and sanitization e cacy in NSF 184.
Control Lock allows you to lock the buttons on the control panel so children cannot accidently
start the dishwasher by pressing the buttons on the panel.
To lock and unlock the buttons on the control panel, hold the Sanitize button down for three (3)
seconds when the power is On.
Displays cycle time and remaining hours and minutes, Delay Start hours, and Information
codes. If a problem occurs during operation, an information code appears with a warning
sound. Refer to the information codes page.
Control Lock indicator
- Turns on if the Control Lock is set (or the dishwasher is in the standby or pause
modes).
- Turns o while the dishwasher is operating.
- When Control Lock is on, the Control Lock indicator blinks for several seconds if any
button except the Power button is pressed.
Self Clean indicator
- Turns on when the Self Clean option is enabled (or the dishwasher is in the standby
or pause modes), but turns o while the dishwasher is operating.
- Blinks for 5 seconds every 20 to 22 cycles.
- The cycle counter disappears when the Self Clean operation is complete or when
the dishwasher reaches the 23rd cycle without the Self Clean cycle being used.
(The Cancel or Self Clean operation is not counted by the cycle counter.)
Rinse Refi ll indicator
- Turns on if the dishwasher runs out of rinse aid (or the dishwasher is in the standby
or pause modes).
- Turns o while the dishwasher is operating.
Delay a cycle for up to 24 hours in one-hour increments. To increase the delay start time, press
or hold the Delay Start button. The hour displayed indicates the time at which the wash will
start.
- After setting the delay time, press the Start button, and then close the door to start the
cycle.
- If you want to change the delay time once the dishwasher has started, press the Cancel
button and turn o the dishwasher. Then, turn on the dishwasher again and select a new
cycle with a new delay setting.
English - 11
DW9900M_DD68-00184A-02_EN.indd 11DW9900M_DD68-00184A-02_EN.indd 11 2017-09-20 3:26:492017-09-20 3:26:49
Page 12
using your dishwasher
To connect the dishwasher to your smart phone, use this option.
9
Smart Control
10
Start
You can select options (Self Clean, Lower, Speed Booster, Zone Booster, Sanitize, Delay Start) before
starting a cycle. If you change the cycle after selecting an option, the original cycle is reset.
When you pause a cycle by opening the door during operation, press the Start button before closing
the door to continue the cycle.
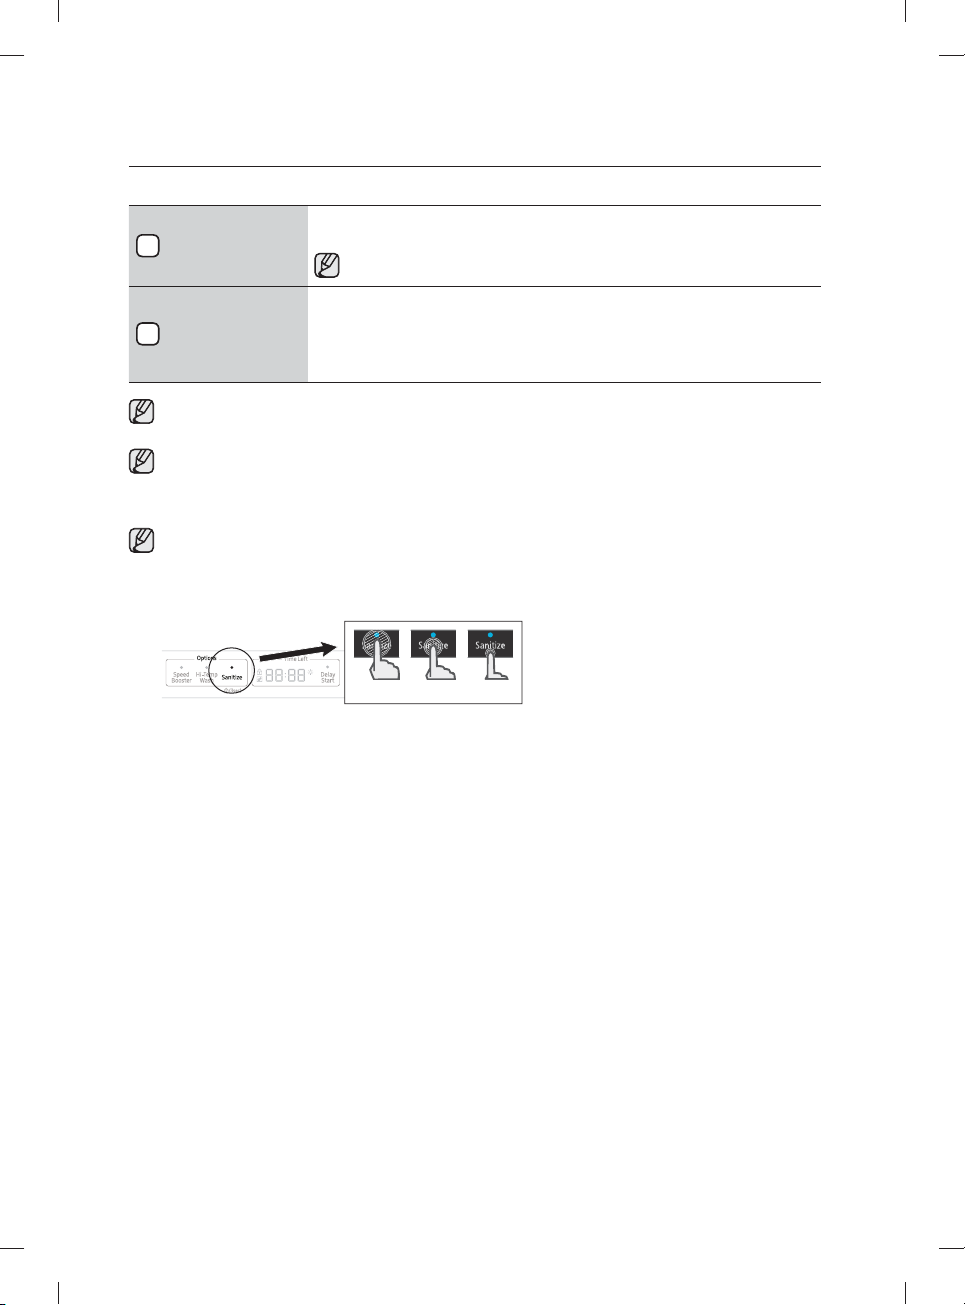
Push the door closed fi rmly within 3 seconds of pressing the Start button.
If the door is not closed within 3 seconds, the cycle will not start.
To prevent the touchpad from losing response sensitivity, follow these instructions:
- Touch the center of each keypad using one fi nger. Do not push.
- Clean the touch control’s surface regularly with a soft, damp cloth.
- Be careful not to touch more than one touch key pad at a time, except as directed.
For details, see page 17.
To connect the dishwasher to your smart phone the fi rst time. press and hold
Smart Control to start the AP mode in the dishwasher.
To start a cycle, press the Start button before closing the door.
*Cancel: To cancel a currently running cycle and drain the dishwasher, press and hold the Start
button for three (3) seconds.
Once the dishwasher is reset, select a cycle and option, and then press Start to restart the
dishwasher.
OO X
English - 12
DW9900M_DD68-00184A-02_EN.indd 12DW9900M_DD68-00184A-02_EN.indd 12 2017-09-20 3:26:502017-09-20 3:26:50
Page 13
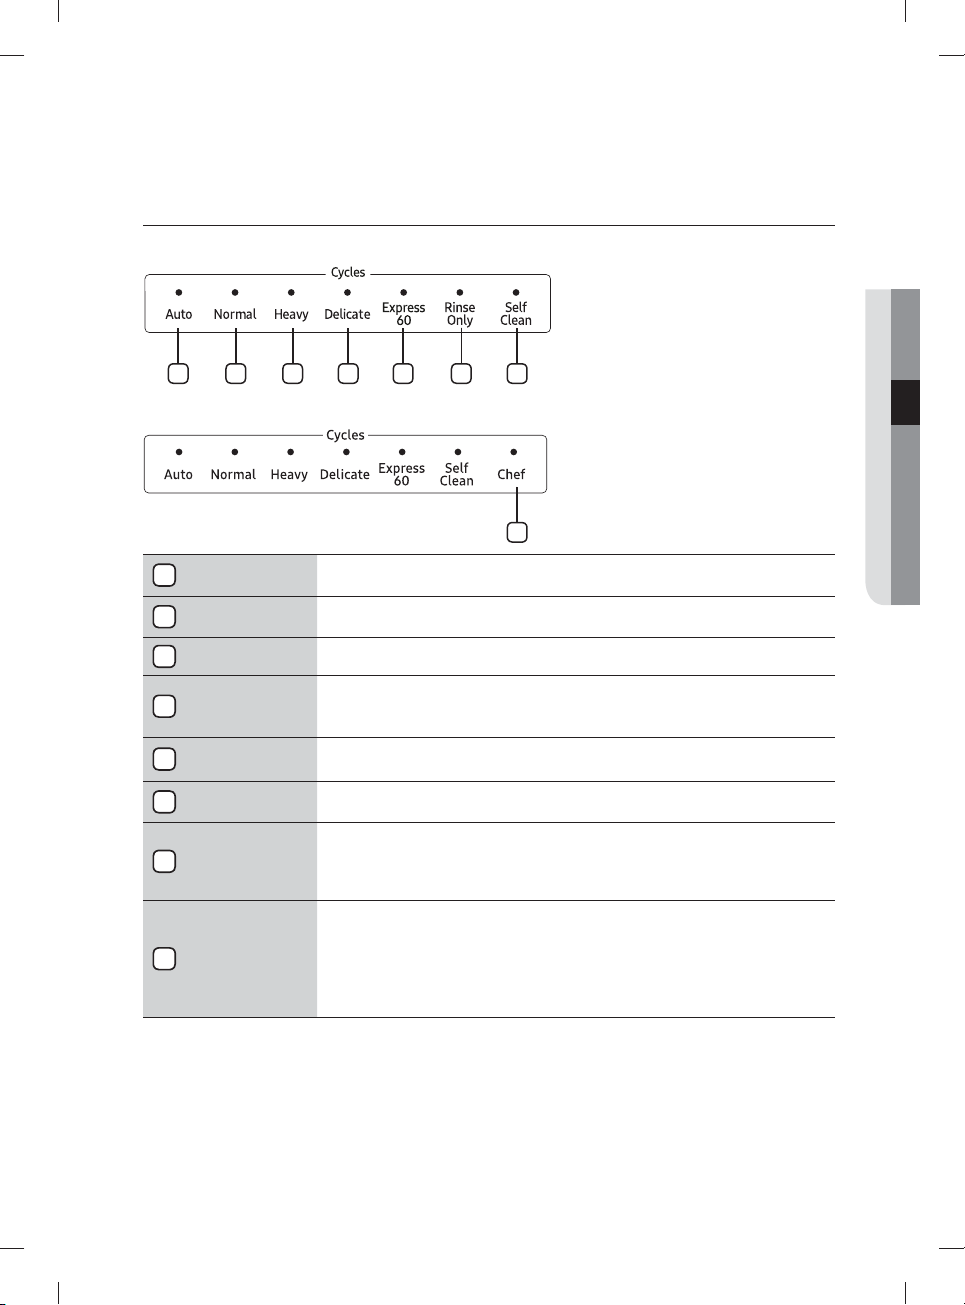
CYCLE SELECTOR
DW80M9960, DW80M95** Series
1 2 3 4 5 6 7
DW80M9990 Series
03 using your dishwasher
8
1
Auto
2
Normal
3
Heavy Use this cycle for heavily soiled dishes.
This cycle detects the level of soil and automatically initiates the optimal cycle after a few
minutes of operation.
Use this cycle for normally soiled dishes.
The energy-usage label is based on this cycle.
Use this cycle for soiled, fragile items such as fi ne glassware and crystal glass (wine glass). Do
4
Delicate
not use this cycle for other glassware because clouding or etching may occur.
The Zone Booster and Sanitize options are not available with this cycle.
5
Express 60
Rinse Only
6
(for some models)
Use this cycle when you need to wash dishes quickly. It takes about 1 hour.
You cannot select the Speed Booster or Zone Booster option if you select this cycle.
Use for rinsing dishes, glasses, and silverware that will not be washed right away. Do not use
detergent.
Use the Self Clean function to clean the dishwasher's tub. If the dishwasher needs self cleaning,
7
Self Clean
the Self Clean indicator will blink for 5 seconds when you turn the power on. If you start the
dishwasher when the indicator is blinking, the indicator will turn o automatically. Always run the
Self Clean cycle with the dishwasher empty. Never use it as a Normal cycle to clean dishes.
Use this cycle to clean both stubborn and lightly soiled items simultaneously. Load heavily soiled
items in the Zone Booster area and lightly soiled items in other areas. Make sure stubborn
Chef
8
(for some models)
items are loaded in the Zone Booster area. Otherwise, they will not be cleaned well.
For optimal performance, connect the dishwasher to a hot water source.
Use caution when loading light-weighted items in the Zone Booster area. They can be turned
over easily in the process.
English - 13
DW9900M_DD68-00184A-02_EN.indd 13DW9900M_DD68-00184A-02_EN.indd 13 2017-09-20 3:26:502017-09-20 3:26:50
Page 14
using your dishwasher
BASIC GUIDELINES
1. Open the door and load your dishes (see page 21-23).
- Place dishes into the upper and lower racks, unless you have selected the
Lower (Lower Rack - Only) option.
- Remove any food remains from the dishes before placing them in the rack(s).
- After placing the dishes into the racks, turn the upper nozzles to make sure none of the dishes will
block nozzle rotation.
- Make sure the dishes will not prevent the detergent dispenser from opening.
2. Add detergent to the dispenser (see page 25).
- Make sure to use only automatic dishwasher detergent.
- Refer to "Using detergent" on how to add detergent.
3. Press the Power button.
- When you press the Power button, the cycle light of the most recently started cycle lights up.
- If "Rinse Refi ll" Indicator is illuminated, you should refi ll the rinse aid dispenser to improve washing
and drying performance.
4.
Select an appropriate cleaning cycle depending on the soil level of the dishes. (see pages 13 and 31).
- Press the appropriate Cycle button.
- When you press a Cycle button, the cycle indicator light is illuminated.
- For information about selecting a cycle according to the soil level of the dishes, see "Cycle
selector".
5. Press the Start button, and then close the door.
- Push the racks back so that they are in place, and then press the Start button and close the door.
- Make sure to close the door fi rmly. If the door is slightly ajar, the selected cycle will not start
automatically.
- The dishwasher will start draining after a few seconds, and then start the cycle you selected.
6. When the wash cycle is completed.
- Power is automatically turned o after one minute.
If you want to load more dishes or pause the dishwasher while it is already running, make sure to open
the door slowly and carefully as there is a possibility of injury from the hot steam or water inside the
CAUTION
dishwasher.
(If the door is opened while the dishwasher is running, a safety mechanism is activated that stops the
cycle.) To resume operation, press the Start button, and then close the door.
Note that adding dishes several minutes after the dishwasher started operating may a ect the
performance.
You should use rinse aids for better drying performance. You can further improve drying performance
by also selecting the Sanitize option.
English - 14
DW9900M_DD68-00184A-02_EN.indd 14DW9900M_DD68-00184A-02_EN.indd 14 2017-09-20 3:26:502017-09-20 3:26:50
Page 15
Touch Controls
Touch controls allow you to operate the dishwasher easily.
• They are convenient to operate, requiring only a soft touch.
• Have a simple and stylish design.
• Are easy to clean.
If you have children or you want to clean the Control Interface, we recommend activating
the Control Lock feature to lock the control buttons.
- Children will not be able to accidently start the dishwasher by touching the controls with
this option selected.
- If a cycle is running, the buttons will not respond. (except the Power button and
Control Lock & Cancel options)
- If the dishwasher is o , only the Power button responds.
Delay Start
When you select the Delay Start option, your dishwasher will begin the selected cycle when the
delay time expires.
The Water Refl ector Interference Signal:
• The water refl ector interference feature automatically detects obstacles in the tub. If it detects
an obstacle, the display blinks and the dishwasher chimes for several minutes. If an obstacle
is detected at the end a cycle, "0" blinks for several minutes.
• Remove any obstacles in the bottom of the dishwasher.
Auto Release™
The Auto Release™ Dry function, which is designed to improve drying performance,
automatically opens the dishwasher's door 5 to 15 minutes before a cycle ends.
You can enable or disable Auto Release™ Dry in two ways: Using the Setting Mode or using the
toggle keys. Both methods are described starting below.
03 using your dishwasher
Auto Release™ On/O
Using Setting Mode
• To enter Setting mode, press the Delay Start + Sanitize buttons for 3 seconds while the
dishwasher is on.
• Press the Sanitize button until "A1" or "A0" is displayed. "A0" disables Auto Release™ Dry.
"A1" enables Auto Release™ Dry. Select "A1" for better drying results.
• Press the Delay Start button to implement your choice.
English - 15
DW9900M_DD68-00184A-02_EN.indd 15DW9900M_DD68-00184A-02_EN.indd 15 2017-09-20 3:26:502017-09-20 3:26:50
Page 16
using your dishwasher
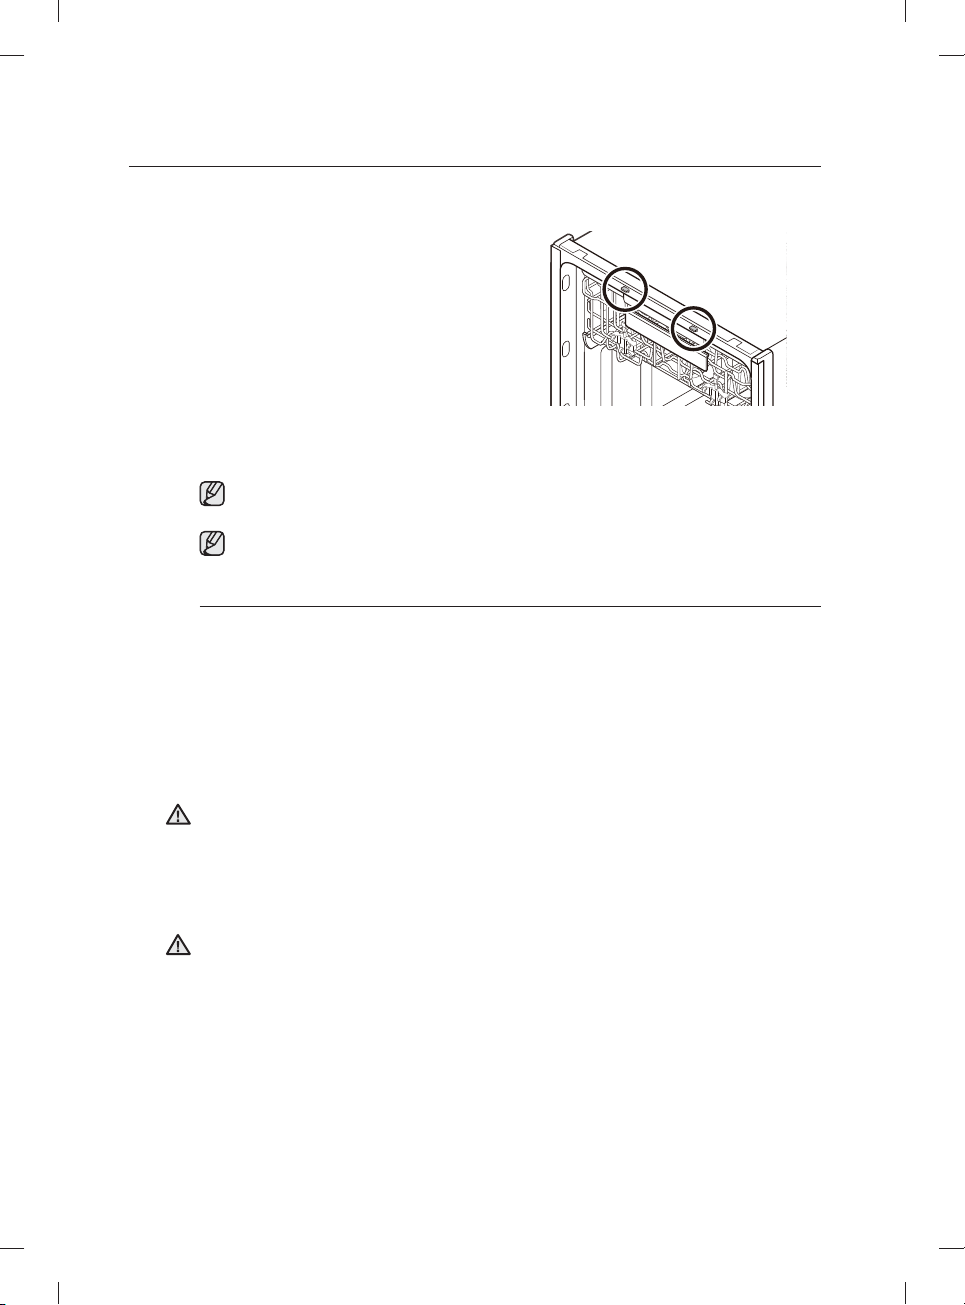
Using the Toggle keys
• Press the Lower + Hi-Temp Wash
button for 3 seconds to enable or disable
Auto Release™ Dry.
* "A0" disables Auto Release™ Dry.
"A1" activates Auto Release™ Dry.
More About Auto Release Dry
* Once the door opens in the
Auto Release™ Dry mode, the door
cannot be closed manually for the next
2minutes.
* The Auto Release™ Dry mode will be
disabled for the Rinse Only cycle.
Changing the "Auto Release™ Dry" setting can infl uence drying results. Select "A1" mode
for better drying results. ("A1" is the default setting.)
After a cycle is complete, the door automatically opens to let steam out. This is normal and
not a product malfunction.
Setting Mode
The Setting Mode lets you change the dishwasher's sound setting and LED brightness setting.
To enter the Setting mode, press the Delay Start + Sanitize buttons for 3 seconds while the
dishwasher is on. Press the Sanitize button to select a sub-setting menu, and then press the
Delay Start button to change a setting.
- Sound Setting: Press the Sanitize button until "U1" or " U0" is displayed. To change the
setting, press the Delay Start button. "U0" means that the sound is o for all cycles. The
dishwasher maintains the Sound Setting you have selected until you change it.
- Pocket LED Brightness Setting: Press the Sanitize button until "B0-B5" is displayed.
The higher the number, the brighter the LEDs. To change the setting on the dishwasher,
press the Delay Start button.
When using the dishwasher, try to arrange the dishes properly as described on page 21.
WARNING
• You should remove food remains such as bones, fruit seeds, etc. and any other waste such
as toothpicks, paper, etc. from the dishes as these may cause damage to the dishes, create
noise, or cause the dishwasher to malfunction.
• Select the appropriate cycle depending on the level of soil and the type of dishes.
• Use only the proper amount of detergent and rinsing agent.
Do not wash the following items in your dishwasher.
WARNING
• Acrylic or Aluminum items: Acrylic and aluminum items can discolor dishes with printed
gold rim decoration and mar other items.
• Dishes treated with adhesive: Treated plastics can come apart. Wood, ivory, copper, and
tin glued to dishes can come loose.
• Plastics with a temperature tolerance less than 194 ˚F (90 ˚C): Thin plastics wash and dry
poorly, and may be damaged by elevated wash temperatures.
• Tin: Tin should be washed by hand and dried immediately as it can rust.
• Wooden utensils: Wooden items can crack.
English - 16
DW9900M_DD68-00184A-02_EN.indd 16DW9900M_DD68-00184A-02_EN.indd 16 2017-09-20 3:26:502017-09-20 3:26:50
Page 17
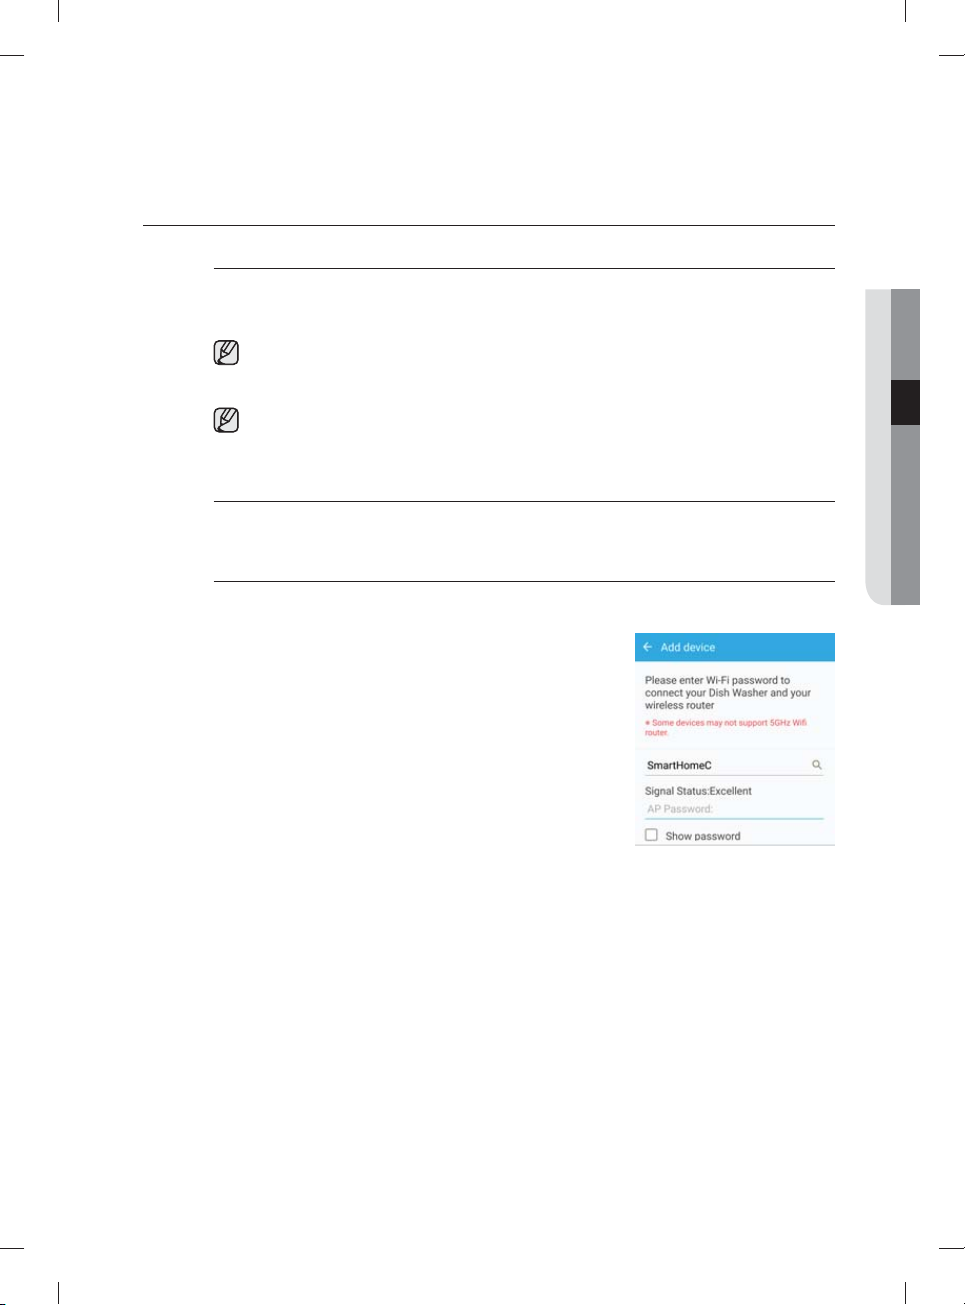
SAMSUNG SMART HOME (APPLICABLE MODELS ONLY)
Installation
Visit the Google Play Store, Galaxy Apps, or Apple App Store and search for “Samsung Smart
Home”. Download and install the Samsung Smart Home app provided by Samsung Electronics
to your smart device.
The Samsung Smart Home app is designed for Android 4.0 (ICS) or higher, or iOS 7.0 or
higher, and is optimized for Samsung smartphones (Galaxy S and Galaxy Note series).
On other smartphone models, some functions may operate di erently.
For improved performance, the Samsung Smart Home app is subject to change
without notice. App support can also be discontinued without notice according to the
manufacturer’s policy.
Samsung account
You must have a registered Samsung account to use the app. If you don’t have a Samsung
account, follow the app’s on-screen instructions to create a free Samsung account.
Getting started
For Android smartphone users
1. Run the Samsung Smart Home App on your smartphone.
2. Tap Add Device > Select other device > Dish Washer
on the app screen.
3. Press and hold Smart Control on the dishwasher’s
control panel for more than 3 seconds.
4. Wait while the app scans for available network
connections and fi nds your network (AP).
5. Tap your AP, and then input your network password.
6. When the device registration is complete, tap Done. Now
you can control your dishwasher remotely.
03 using your dishwasher
English - 17
DW9900M_DD68-00184A-02_EN.indd 17DW9900M_DD68-00184A-02_EN.indd 17 2017-09-20 3:26:502017-09-20 3:26:50
Page 18
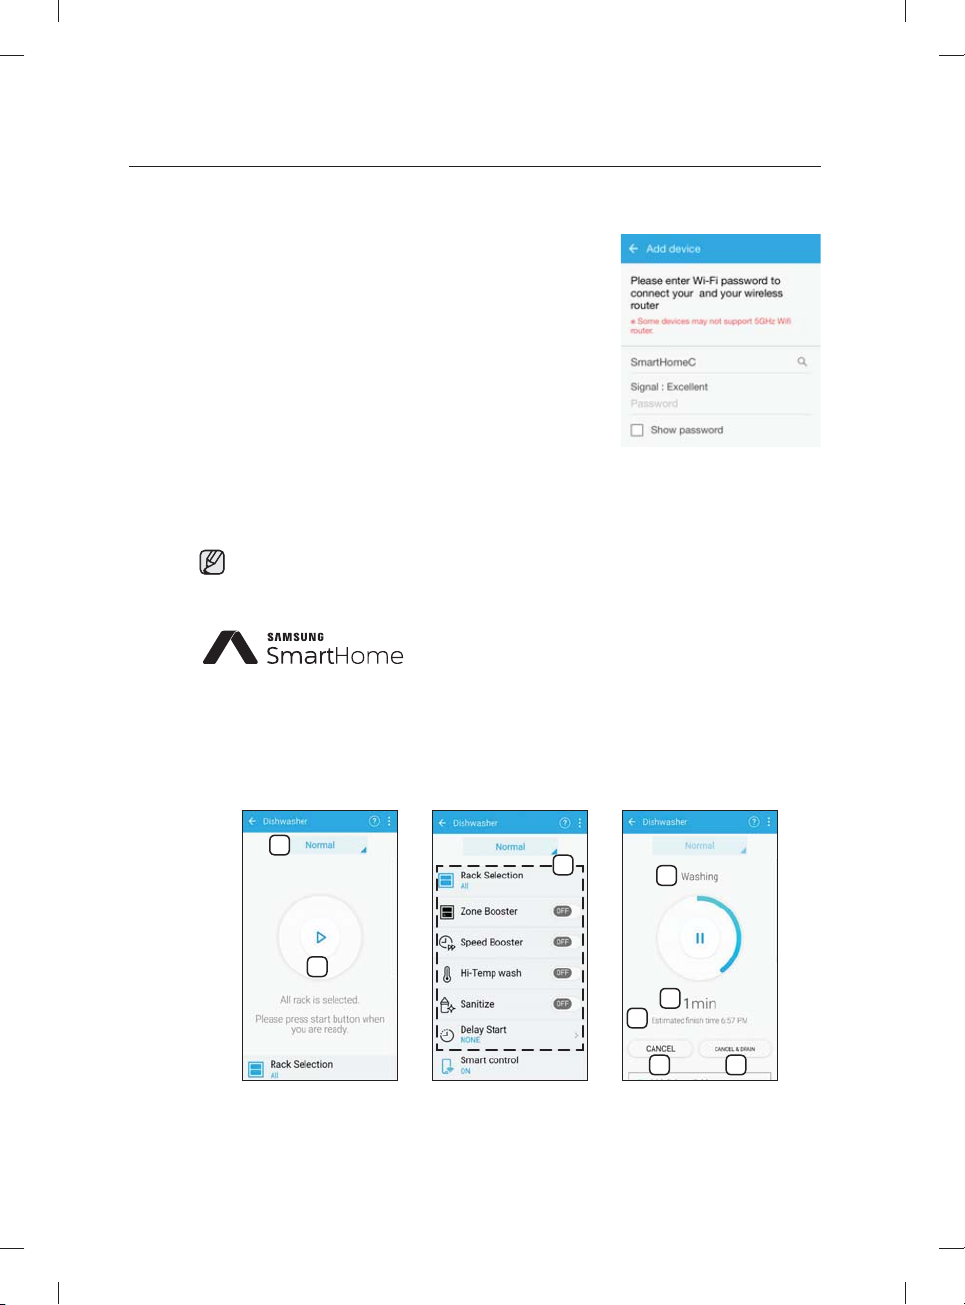
using your dishwasher
For iOS smartphone users
1. Run the Samsung Smart Home App on your iPhone, and
then tap Add Device.
2. Log in using your Samsung account ID and password.
Tap Select other device > Dish Washer.
3. Press and hold Smart Control on the dishwasher’s
control panel for more than 3 seconds. Tap Next.
4. Follow the onscreen instructions, and then go to
Settings. Tap Wi-Fi > [Dish Washer] Samsung Wi-Fi,
and then input the password, ‘1111122222’.
5. Back on the app screen, tap Next. When the app fi nds
your network (AP), input the network password.
6. Follow the onscreen instructions, and then go to Settings
again. Tap the connected AP. Back on the app screen,
tap Next.
7. When the device registration is complete, tap Done. Now
you can control your dishwasher remotely.
If the Smart Control function is activated, the Smart Control indicator on the door lights up
accordingly.
This product is a smart dishwasher that supports the Samsung
Smart Home service.
For more information, visit www.samsung.com.
Key features
Register Samsung smart home appliances to the Samsung Smart Home server for remote
access.
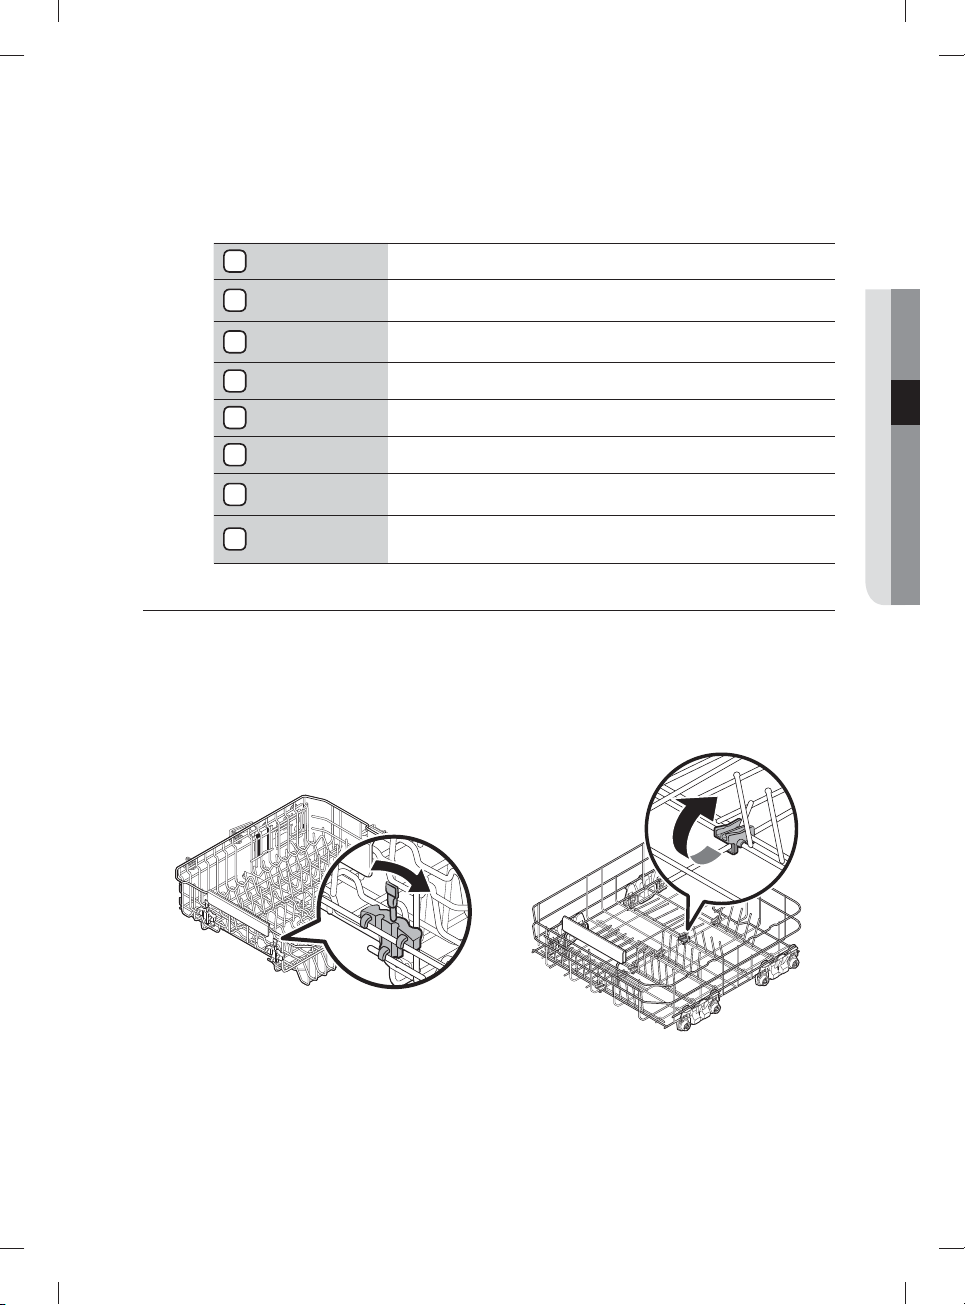
Menu overview
1
2
3
4
5
6
7 8
English - 18
DW9900M_DD68-00184A-02_EN.indd 18DW9900M_DD68-00184A-02_EN.indd 18 2017-09-20 3:26:502017-09-20 3:26:50
Page 19
For improved performance, the content and design of the app is subject to change without
notice.
1
Current cycle Tap to select a desired cycle.
2
Start/Pause
3
Options
4
Current Process The currently running process of the selected cycle is displayed.
5
Time Progress The time progress for the selected cycle is displayed.
Estimated
6
Finish Time
7
Cancel
8
Cancel & Drain
With Smart Control enabled on the dishwasher, you can Start or
Pause operation temporarily using your smart phone.
Set or adjust the options as necessary. You can fi nd an
explanation of each option in the Control panel explanation.
The estimated fi nish time is displayed.
Tap to cancel the current cycle and return to the cycle selection
screen.
Tap to cancel the current cycle, drain the water from the
dishwasher, and return to the cycle selection screen.
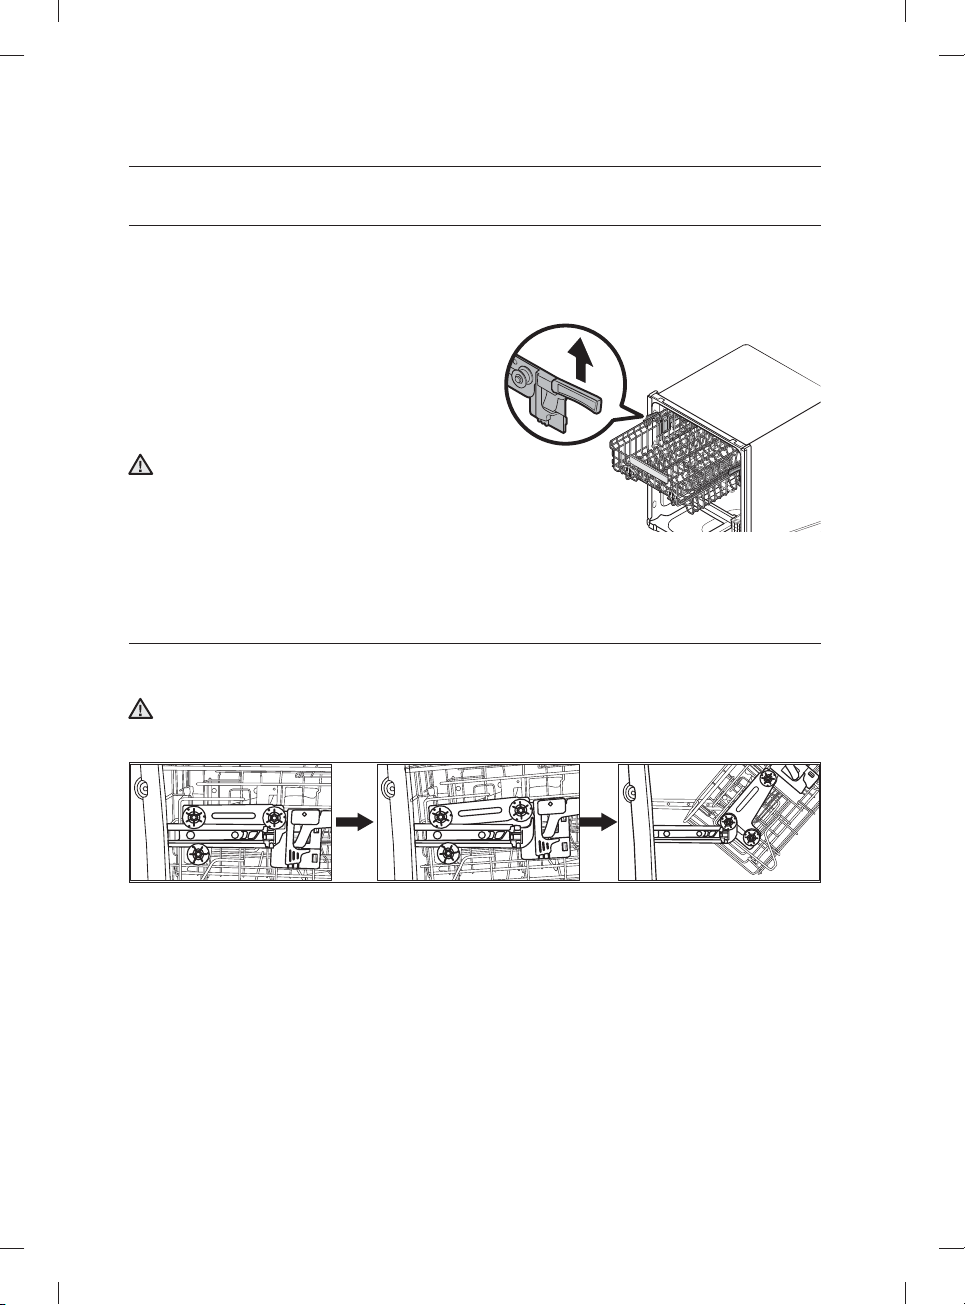
ADJUSTING THE ANGLE OF THE PLATE SUPPORTS
You can adjust the angle of the tines in the upper rack to three di erent positions to match the size and
shape of your dishes. To adjust the tines, grasp the handle at the front of the rack, and then push it left or
right. See the illustration below.
In the lower rack, you can easily fold down the fold-down tines to make room for large items such as pots
and pans. Remove the rack from the dishwasher, and then fold down the tines one at a time. See the
illustration below.
03 using your dishwasher
Upper rack Lower rack
English - 19
DW9900M_DD68-00184A-02_EN.indd 19DW9900M_DD68-00184A-02_EN.indd 19 2017-09-20 3:26:502017-09-20 3:26:50
Page 20
using your dishwasher
ADJUSTING THE HEIGHT OF THE UPPER RACK
You can adjust the height of the upper rack in your Samsung dishwasher so that the lower rack can
accommodate larger sized dishes. Depending on where you set the upper rack height, the lower rack can
accommodate plates up to 12 in. (30 cm) in diameter and the upper rack can accommodated plates up to
8 in. (20 cm) in diameter.
1. To lower the upper rack by 2 in. (5 cm), pull the
adjust handles located at the left and right sides
of the upper rack, and then push the upper rack
downwards slightly at the same time.
2. To raise the upper rack, just pull the upper rack
upwards. The adjuster handle will latch and the
upper rack will move to the high position.
We recommend adjusting the height of the upper
rack before loading dishes into the rack. If you
CAUTION
adjust the the rack after loading the dishes, you
may damage the dishes. If you do not adjust with
left and right handle together, the dishwasher
door may not close properly.
Pull out the upper rack from the tub until it is fully
revealed before adjusting the upper rack.
REMOVING THE UPPER RACK
Pull the upper rack towards the front and then remove it by lifting it up slightly and pulling it towards the
front. See the illustrations below.
While the upper rack is removable, it must be installed for the dishwasher to operate properly.
If you attempt to operate the dishwasher without the rack, noise will occur and the dishwasher will
CAUTION
perform poorly.
Step 1. Step 2. Step 3.
English - 20
DW9900M_DD68-00184A-02_EN.indd 20DW9900M_DD68-00184A-02_EN.indd 20 2017-09-20 3:26:512017-09-20 3:26:51
Page 21
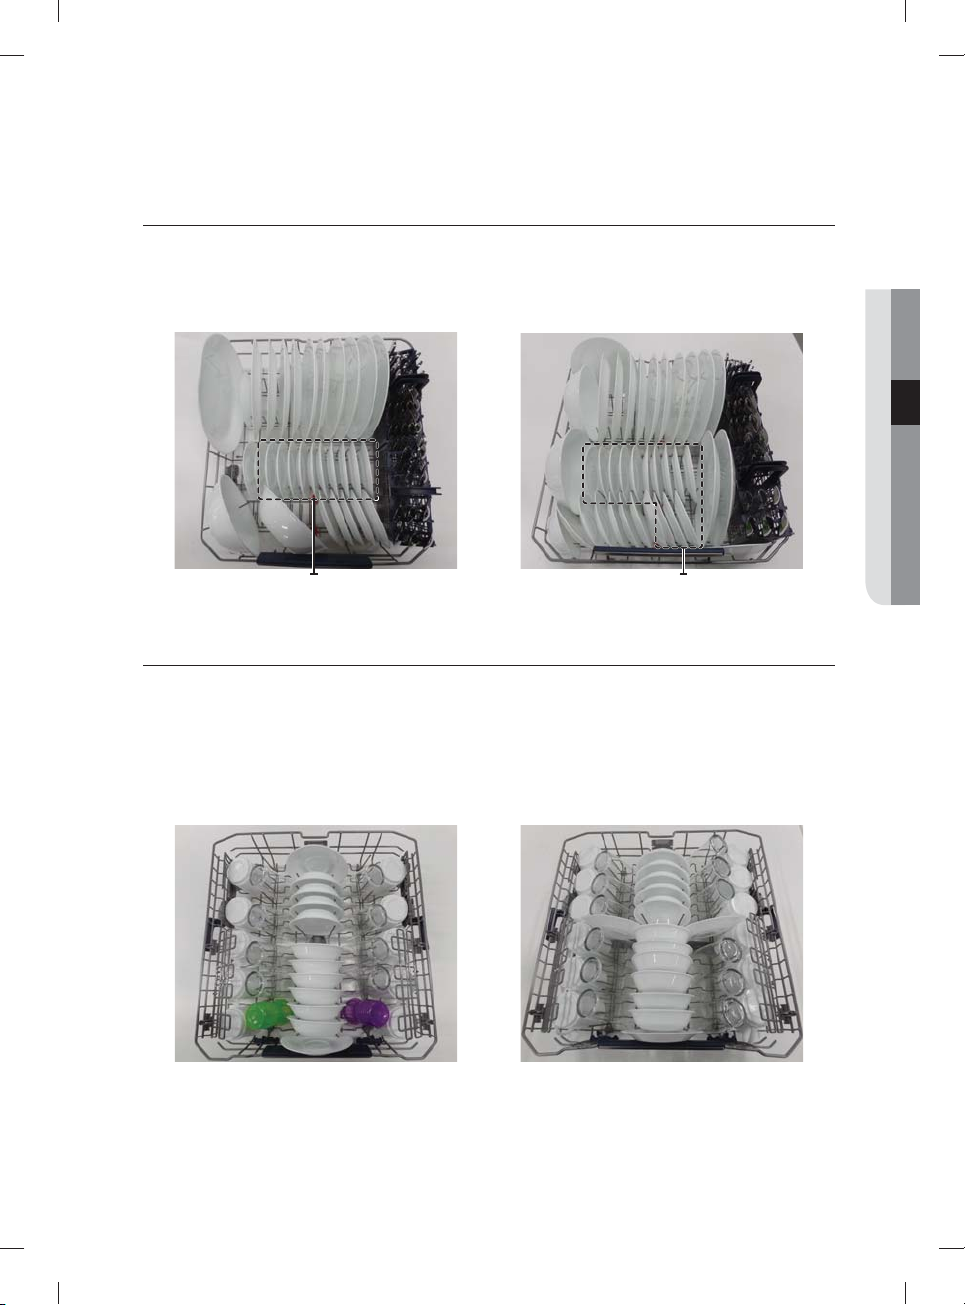
LOADING THE LOWER RACK
Dessert plate
Dessert plate
The lower rack has been especially designed for dinner dishes, soup bowls, plates, pots, lids, casserole
dishes, and plates.
Load large items such as pans and pots into the dishwasher so their open sides face downwards. We
recommend loading cups, stemware, and small plates into the upper rack.
See the recommended loading patterns below.
03 using your dishwasher
Dessert plate
10 place setting 12 place setting
Dessert plate
LOADING THE UPPER RACK
The upper rack has been designed for small plates, mugs, glasses, and plastic items marked “dishwasher
safe”. Load your plates into the dishwasher in two half rows, so that the front of each plate faces the back of
the plate in front of it, and the open sides of the plates at the center of the dishwasher face each other. See
the illustrations below.
Make sure the loaded dishes do not interfere with the rotation of the nozzle which is located at the bottom
of the upper rack. (Check this by rotating the nozzle by hand.)
When loading dishes, pull the upper rack out su ciently so you can load it without striking the counter
above.
10 place setting 12 place setting
English - 21
DW9900M_DD68-00184A-02_EN.indd 21DW9900M_DD68-00184A-02_EN.indd 21 2017-09-20 3:26:512017-09-20 3:26:51
Page 22
using your dishwasher
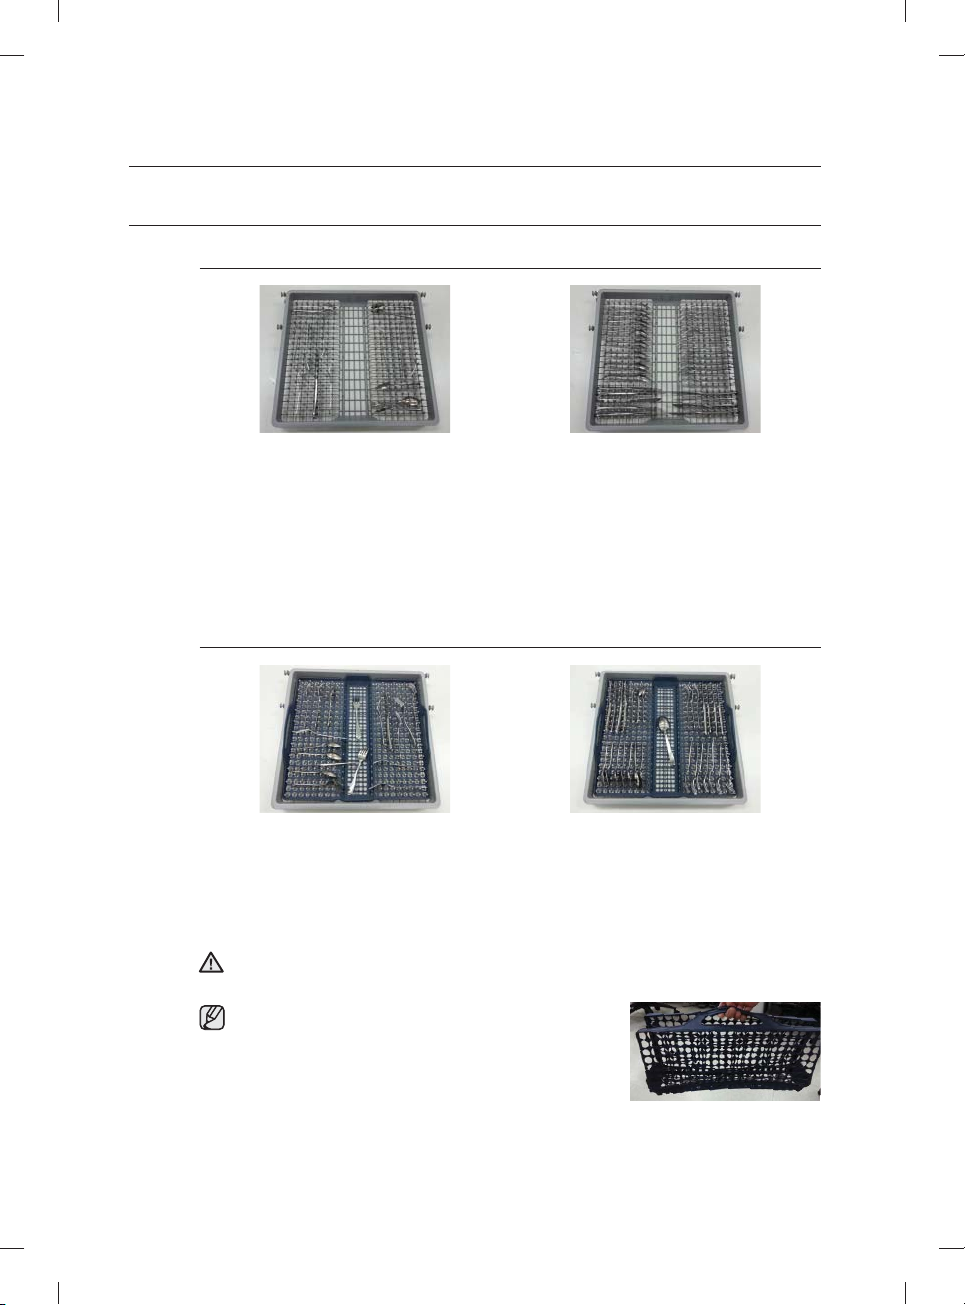
USING THE 3RD (CUTLERY) RACK (FOR SOME MODELS)
Loading the cutlery rack
<Place items randomly or regularly.>
In addition to the standard cutlery basket in the lower rack, some models come with a cutlery rack.
The cutlery rack is best suited for fl atware and cooking or serving utensils. You can place cutlery and
utensils randomly or regularly on the cutlery rack.
Heavily soiled utensils or items with baked on foods should be placed in the lower cutlery basket for
the most e ective cleaning.
Removing the Cutlery Rack
The entire cutlery rack can be removed if more space is needed on the upper rack for larger items.
Loading the cutlery pad
<Place items randomly or regularly.>
Some models come with a removable, foldable cutlery pad along with a cutlery rack. To use,
place the pad on the cutlery rack. and then place cutlery and serving and cooking utensils on the
pad in a random or regular fashion. After a wash cycle is complete, and the cutlery and utensils
are dry, you can fold the pad and carry the cutlery and utensils in the pad to their storage
locations.
Use caution when folding and moving the rack with a long thin item inside the pad.
The item may fall out in this process, causing physical injury.
WARNING
It is advisable not to move the pad while it is wet.
Wait until the pad is dry.
The pad dries quickly after a wash cycle when exposed to
air for a few minutes.
English - 22
DW9900M_DD68-00184A-02_EN.indd 22DW9900M_DD68-00184A-02_EN.indd 22 2017-09-20 3:26:522017-09-20 3:26:52
Page 23
USING THE CUTLERY RACK
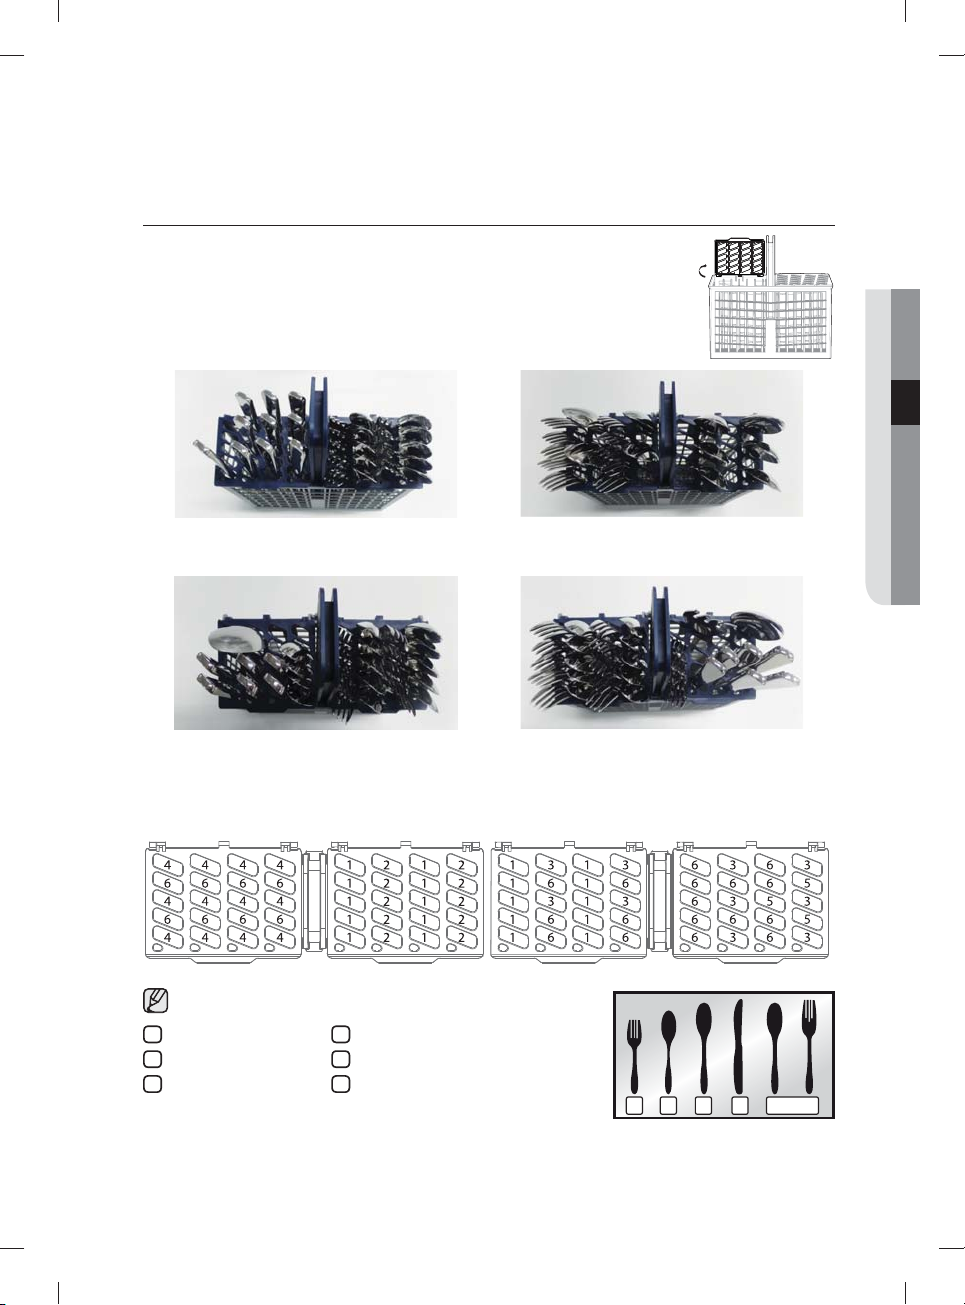
The cutlery rack consists of two compartments.
You can place each knife, spoon, or fork separately into the spoon stands in the
basket’s covers to prevent chipping and discoloration.
You can use the cutlery rack with the cover open. Refer to the illustration to the right.
Left Right
10 place setting
Left Right
12 place setting
03 using your dishwasher
The spoon stands as seen from above with the suggested placement of cutlery items. Match the numbers
in the diagram to the numbers in the list of cutlery items below.
DO NOT let any item extend through the bottom.
1
Forks
2
Tea spoons
3
Dinner spoons
4
Knives
5
Serving spoons and Serving forks
6
Remaining items
1 3 42 5
English - 23
DW9900M_DD68-00184A-02_EN.indd 23DW9900M_DD68-00184A-02_EN.indd 23 2017-09-20 3:26:522017-09-20 3:26:52
Page 24
using your dishwasher
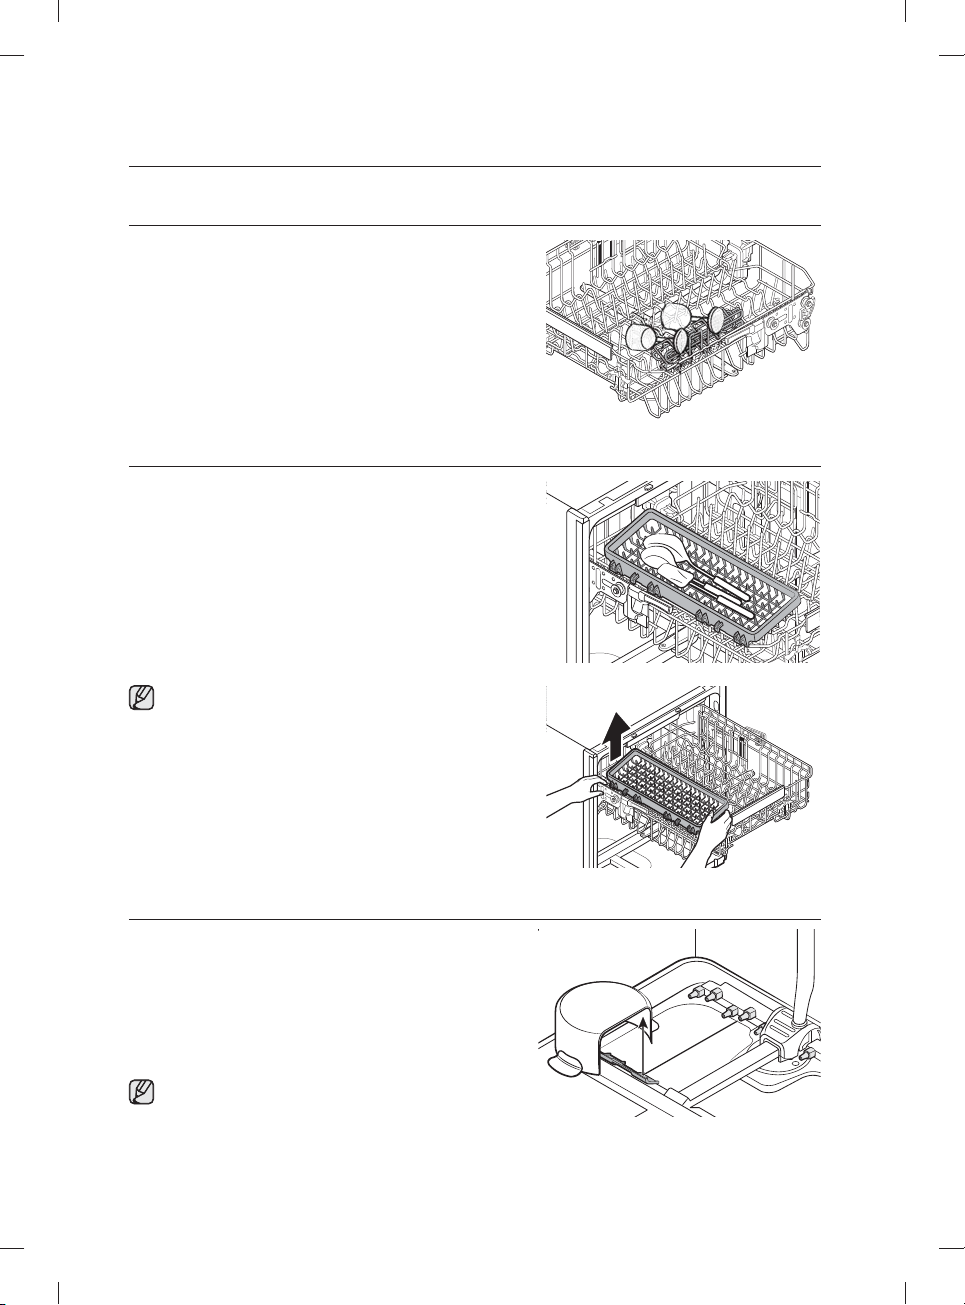
USING THE GLASS SUPPORT
You can load cups or glasses onto the glass support. This
is also very convenient for washing wine glasses. Hang your
wine glasses on the pegs of the glass support.
You can fold the glass support back when it is not being used.
USING THE EASY CADDY (FOR SOME MODELS)
Use this Easy caddy on the left of the upper rack to hold
spatulas, serving spoons, and similar items.
If you want to remove the Easy Caddy, hold the upper
basket and one end of the Easy Caddy, before lifting it
up.
USING ZONE BOOSTER
To use the Chef cycle (for some models) and the
Zone Booster option, load heavily soiled items into the left
side of the lower rack-the Zone Booster area. With the Chef
cycle, you can clean stubborn items that were used with your
oven. The Zone Booster function supplies more powerful
water jets to the Zone Booster area. Make sure pot handles
and other items do not interfere with the rotation of the
nozzles and the water refl ector.
You can load lightly soiled items in other areas or racks
while using the Chef cycle.
English - 24
DW9900M_DD68-00184A-02_EN.indd 24DW9900M_DD68-00184A-02_EN.indd 24 2017-09-20 3:26:532017-09-20 3:26:53
Page 25
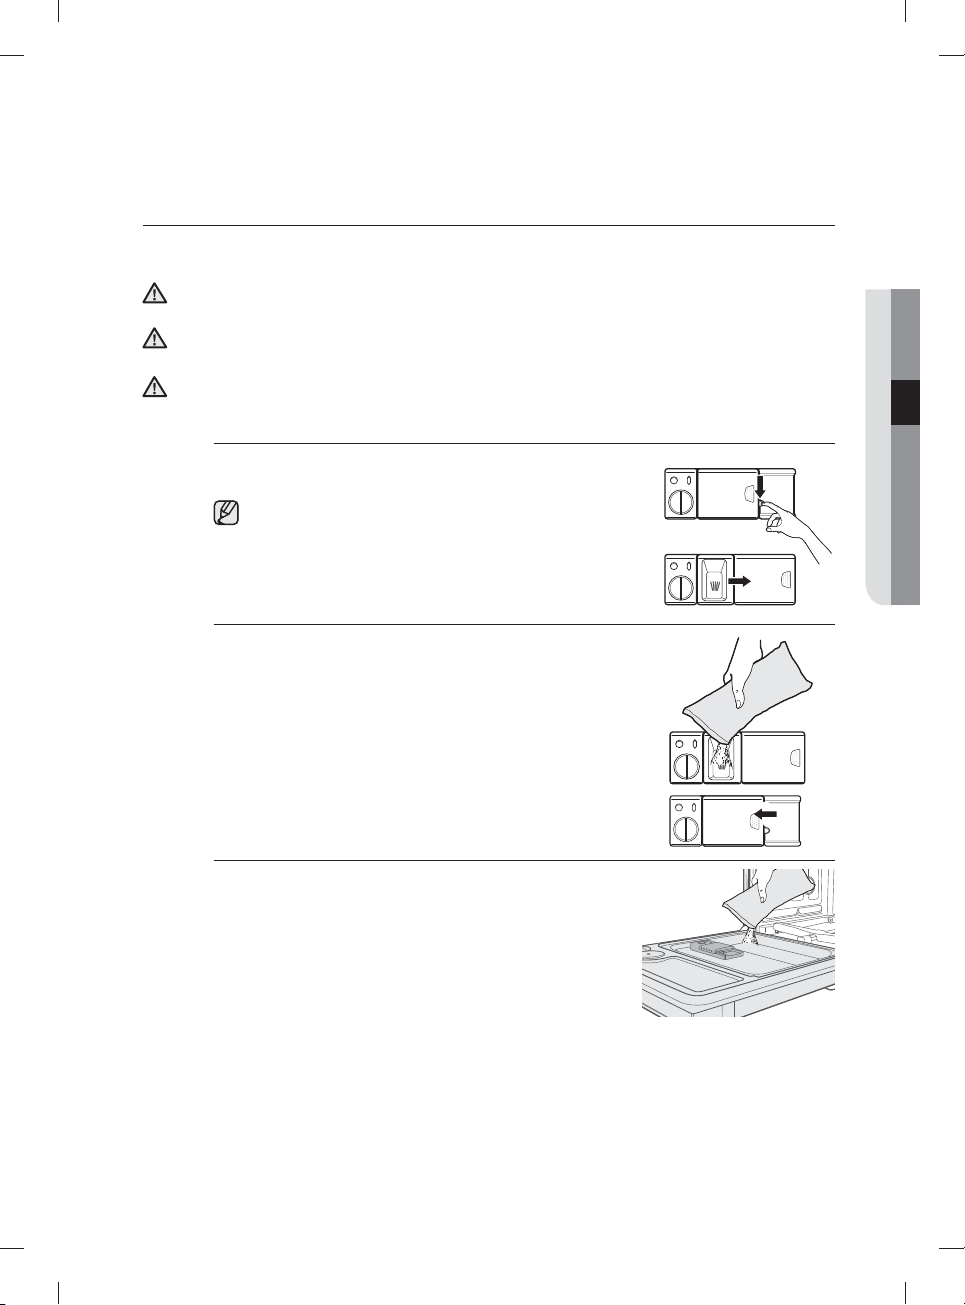
USING DETERGENT
All dishwasher cycles require detergent in the detergent compartment.
Add the correct amount of detergent for the selected cycle to ensure the best performance.
Use dishwasher detergent only. Regular detergent produces too much foam, which may decrease the
dishwasher’s performance or cause it to malfunction.
CAUTION
Do not swallow dishwasher detergent. Avoid breathing in the fumes. Dishwasher detergent contains
irritants and caustic chemicals that can induce respiratory conditions. If you have swallowed
WARNING
dishwasher detergent or inhaled the fumes, seek medical attention immediately.
Keep dishwasher detergent out of the reach of children.
WARNING
Filling the detergent dispenser
1. Open the detergent dispenser fl ap by pushing the detergent
dispenser release catch.
The fl ap is always open at the end of a dishwashing cycle.
2. Add the recommended amount of detergent to the main
wash detergent compartment.
3. Close the fl ap by sliding it to the left and then pressing it
down.
03 using your dishwasher
4. For better cleaning result, especially if you have very dirt
items, pour a small amount (about 1/2 of an ounce or 15g)
of detergent onto the door.
The additional detergent will activate during the pre-wash
phase.
English - 25
DW9900M_DD68-00184A-02_EN.indd 25DW9900M_DD68-00184A-02_EN.indd 25 2017-09-20 3:26:542017-09-20 3:26:54
Page 26
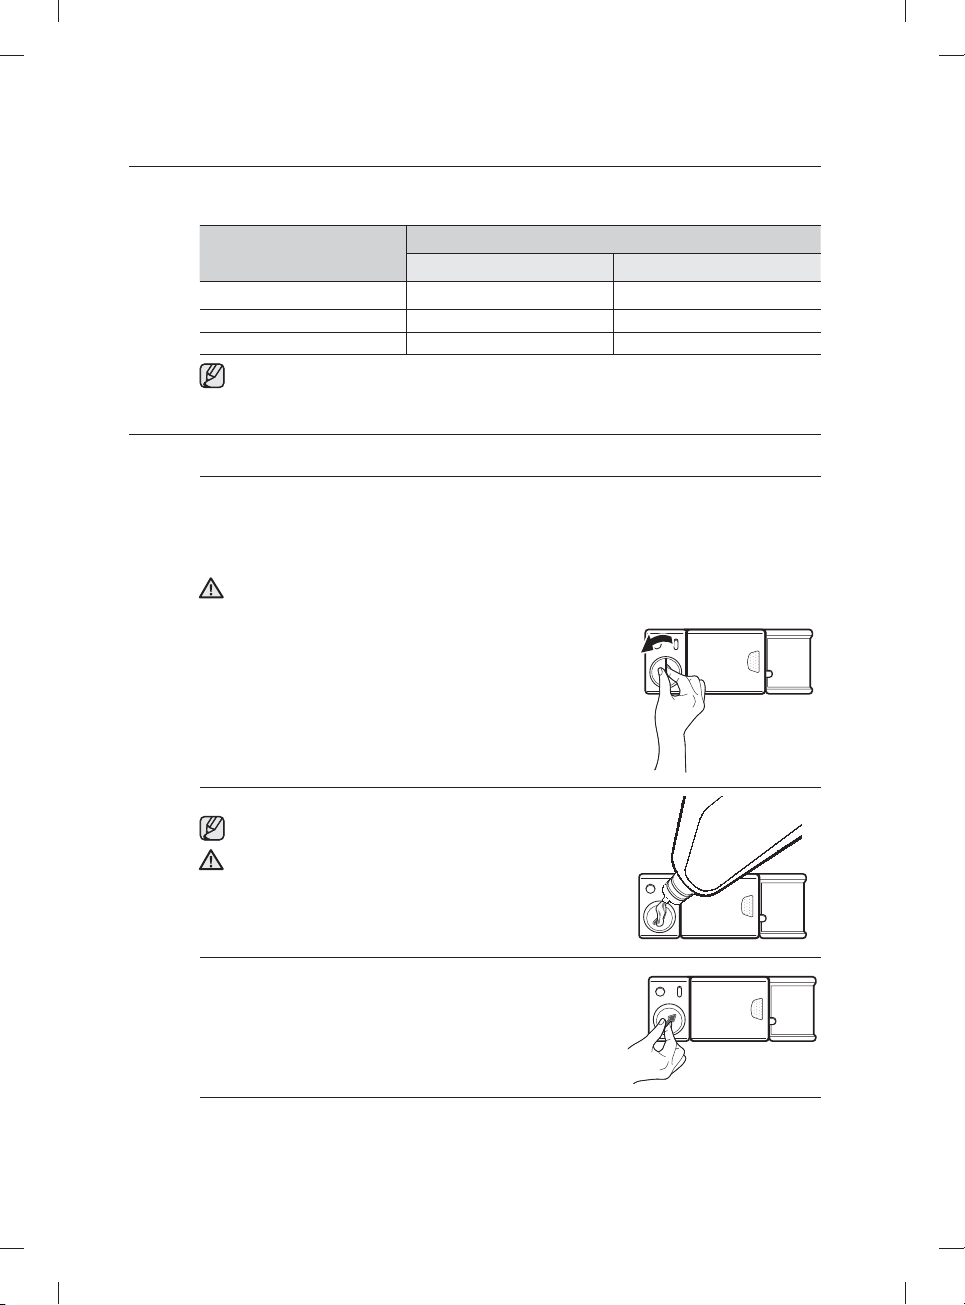
using your dishwasher
The cover opens automatically to dispense the detergent during the wash.
CYCLE
Auto, Normal 3/4 oz (20 g) 1/3 oz (10 g)
Heavy, Express 60, Chef 1 oz (30 g) 1/2 oz (15 g)
Delicate 3/4 oz (20 g) 1/5 oz (5 g)
The numbers inside the dispenser refer to grams.
USING RINSE AID
Filling the rinse aid reservoir
When the Rinse Refi ll indicator lights up on the control panel, refi ll with rinse aid.
Your dishwasher has been designed to use liquid rinse aid only.
Using a powdered rinse aid will clog the reservoir opening and cause the dishwasher to
malfunction.
Rinse aid improves the drying performance of the dishwasher.
Do not add regular detergent to the rinse aid reservoir.
CAUTION
1. Remove the rinse aid reservoir cap by rotating it
counterclockwise.
Main wash dispenser Onto the door for pre-wash
AMOUNT OF DETERGENT
2. Fill the rinse aid reservoir with rinse aid.
Use the viewing port when fi lling the rinse aid reservoir.
Do not fi ll the reservoir above the full level indicator.
Excess rinse aid can overfl ow during the wash cycle.
CAUTION
3. Turn the rinse aid indicator dial to a number between 1 and
6. The higher the number, the more rinse aid the dishwasher
uses. If you are unable to rotate the rinse aid dial easily, try
using a coin.
4. Close the rinse aid reservoir cap by rotating it clockwise.
English - 26
DW9900M_DD68-00184A-02_EN.indd 26DW9900M_DD68-00184A-02_EN.indd 26 2017-09-20 3:26:542017-09-20 3:26:54
Page 27
cleaning and maintaining your
dishwasher
Keeping your dishwasher clean improves its performance, reduces unnecessary
repairs, and lengthens its life.
CLEANING THE EXTERIOR
It’s best to clean spills on the outside of your dishwasher as they occur. Use a soft, damp cloth on the
control panel to gently wipe away spills and dust. Do not use benzene, wax, thinner, chlorine bleach, or
alcohol. These materials may discolor the door panel and other outer surfaces and cause stains. Do not
clean the dishwasher by sprinkling water over it and avoid letting water come into contact with any of the
electrical parts.
If your dishwasher has a stainless steel door panel, you can clean it with a stainless steel cleaner for
Home Appliances or similar product using a clean, soft cloth.
CLEANING THE INTERIOR
Clean the interior of your dishwasher periodically to remove any dirt or food particles. Wipe the inside of
the dishwasher and the inner part of the door with a wet dishcloth. We recommend fi lling the detergent
dispenser with dishwasher soap, and then running the dishwasher empty periodically using the Self Clean
option. To keep the cutlery pad clean, turn it over. This will keep your dishwasher clean.
If white spots and odor are still present in your dishwasher, run the Self Clean option with the dishwasher
empty and without detergent until it fl ushes. Then, interrupt the cycle and put an 8 ounce cup of white
vinegar into the lower basket. Close the dishwasher and let the cycle fi nish.
Do not remove the tub front seal (the long rubber seal enclosing the opening of the dishwasher).
CAUTION
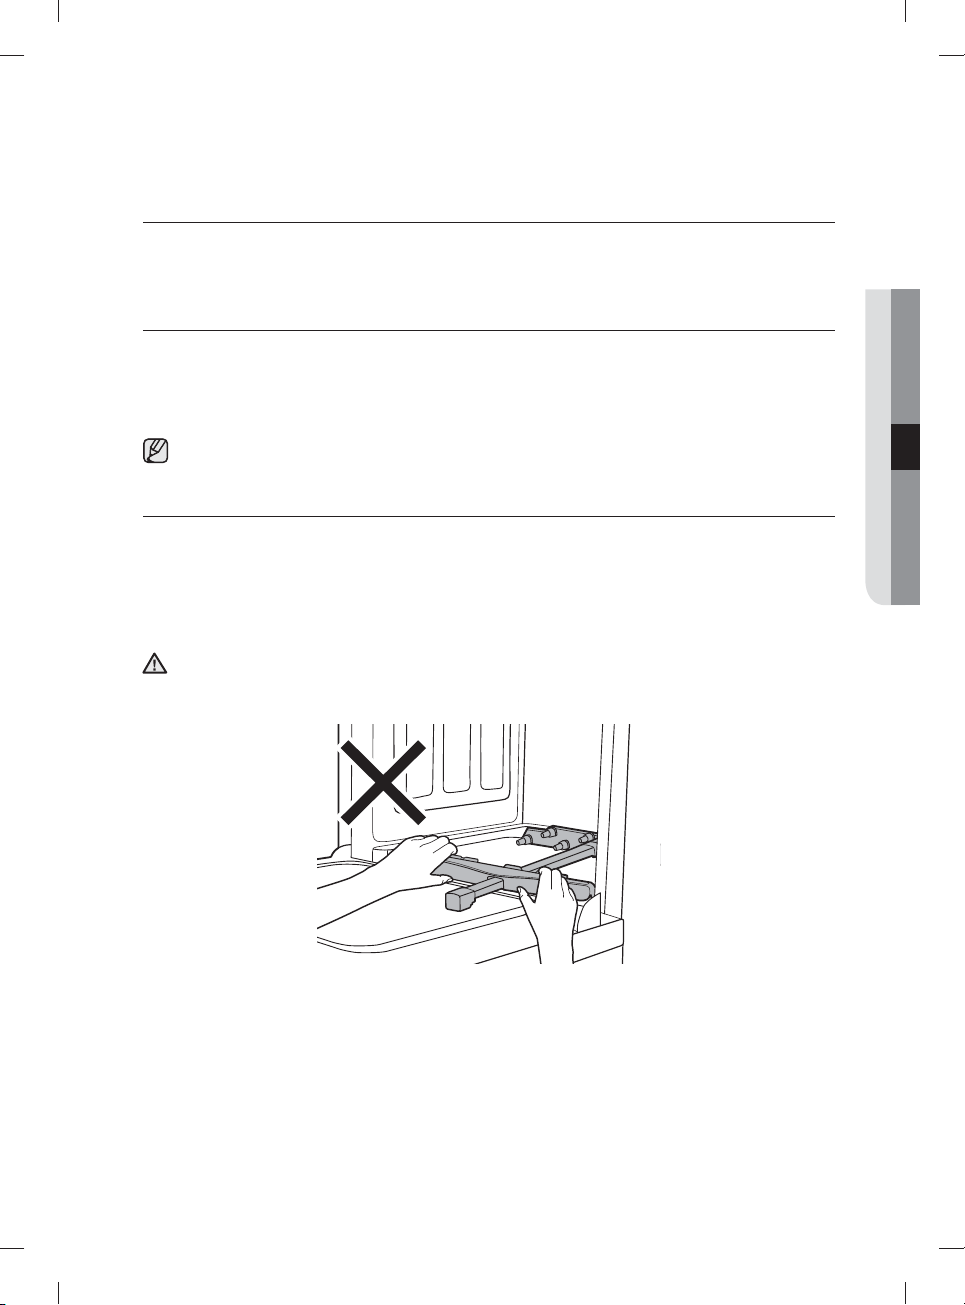
Do not move the water refl ector by hand. You can damage the dishwasher's motor.
04 cleaning and maintaining your dishwasher
English - 27
DW9900M_DD68-00184A-02_EN.indd 27DW9900M_DD68-00184A-02_EN.indd 27 2017-09-20 3:26:552017-09-20 3:26:55
Page 28
cleaning and maintaining your
dishwasher
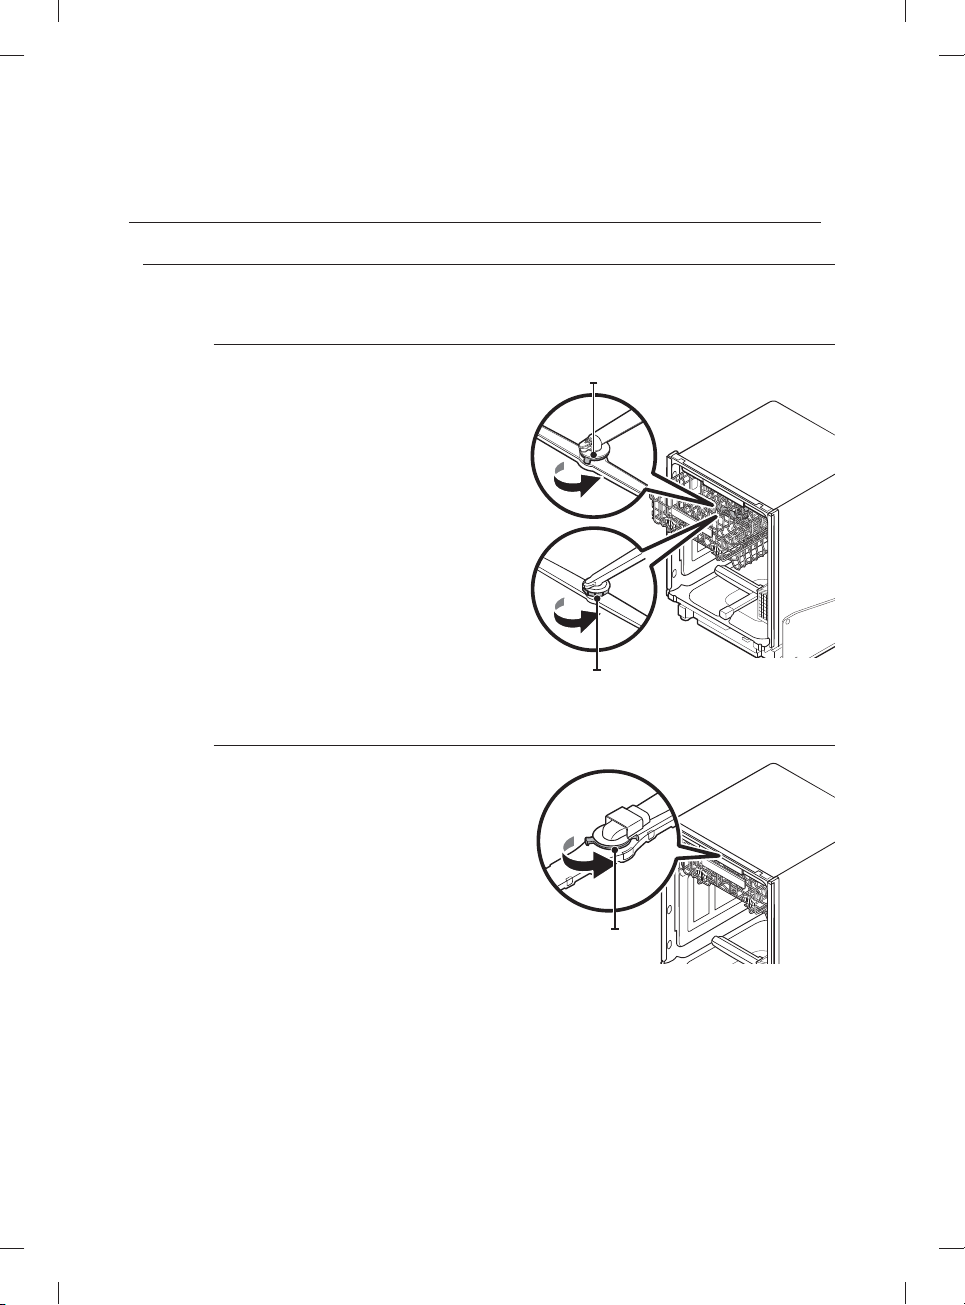
CLEANING THE NOZZLES
If your dishwasher does not seem to be cleaning adequately or the nozzles seem clogged, you can clean
each of the nozzles. When removing the nozzles, take care as they can break.
Upper nozzle
1. Open the door, and then pull out the upper
rack to reveal the upper nozzle.
2. Turn counter clockwise to remove the
nozzle cap (95** series) or the nozzle nut
(9990 & 9960 series), and then remove the
nozzle.
3. Unclog and clean the nozzle.
4. Reinsert the nozzle, and then tighten the
cap clockwise.
5. Rotate the nozzle by hand to make sure the
nozzle is engaged correctly.
Top nozzle
1. Check whether the nozzle holes are
clogged by food particles.
2. If cleaning is needed, remove the top
nozzle.
3. To remove the top nozzle, pull out the
upper rack fi rst, unfasten the nozzle cap
by turning it counterclockwise, and then
remove the nozzle.
4. Clean the nozzle, re-insert it, and then
fasten the nozzle cap to the nozzle by
turning the cap clockwise.
5. Check whether the nozzle is engaged
correctly by rotating it by hand.
Cap nozzle
Nut nozzle
Cap nozzle
English - 28
DW9900M_DD68-00184A-02_EN.indd 28DW9900M_DD68-00184A-02_EN.indd 28 2017-09-20 3:26:552017-09-20 3:26:55
Page 29
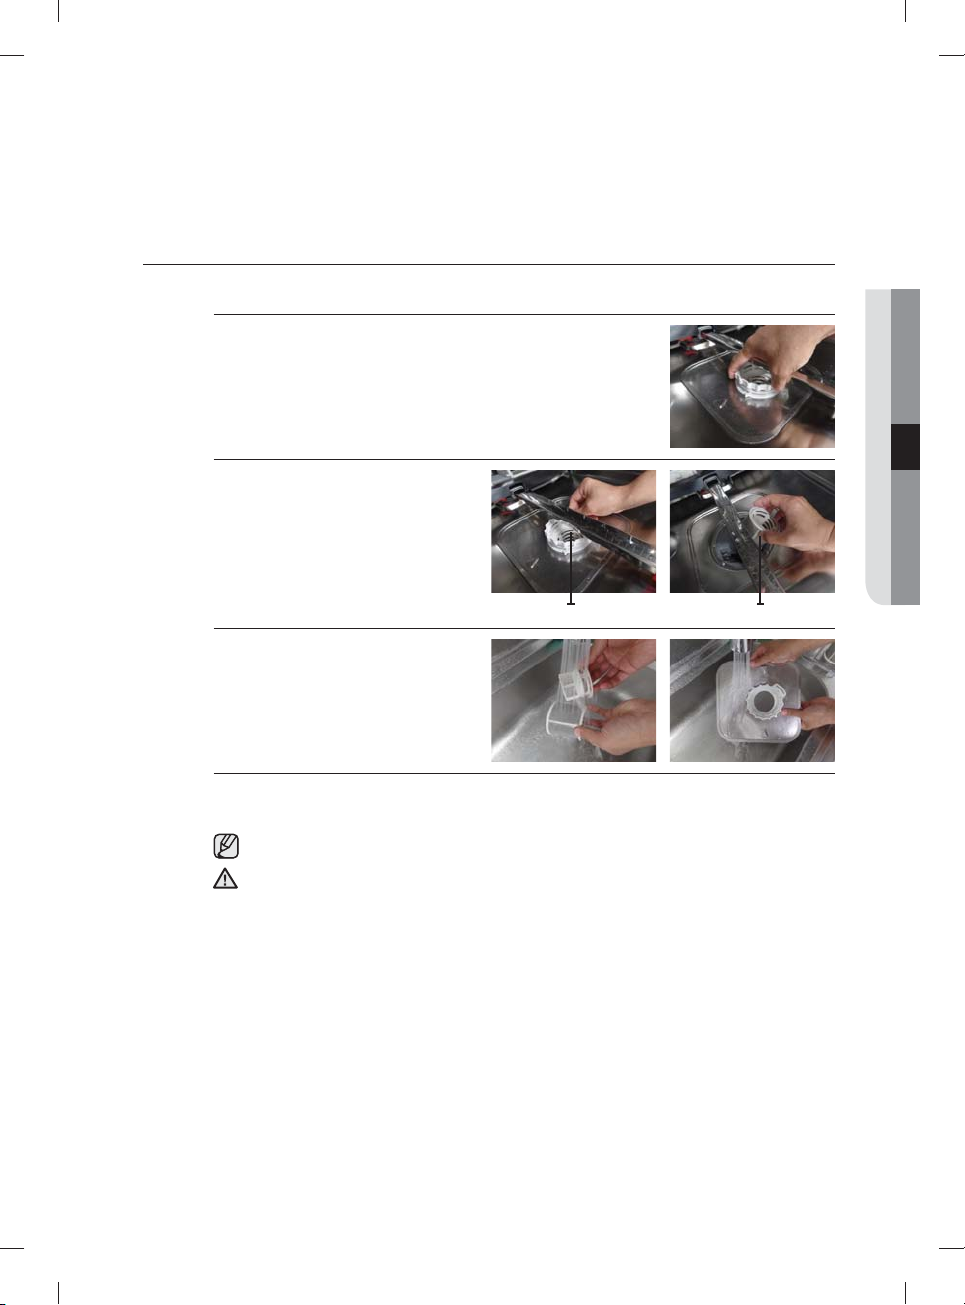
CLEANING THE FILTER
1. Remove the lower rack fi rst.
2. Rotate the fi lter handle counterclockwise to unfasten the fi lter
compartment door.
3. Remove the fi lter door, and then the
cylindrical micro fi lter underneath.
Filter with handle cylindrical micro fi lter
4. Remove any dirt or other remains
from the micro fi lter and the fi lter
door, and then rinse them under
running water.
5. Re-install the cylindrical micro fi lter, and then the fi lter door.
6. Rotate the fi lter door handle clockwise to lock the fi lter door.
Once a month, clean the fi lter for better washing performance.
04 cleaning and maintaining your dishwasher
If the fi lter door does not close properly, cleaning performance will decrease.
CAUTION
English - 29
DW9900M_DD68-00184A-02_EN.indd 29DW9900M_DD68-00184A-02_EN.indd 29 2017-09-20 3:26:552017-09-20 3:26:55
Page 30
cleaning and maintaining your
dishwasher
CLEANING THE DRAIN PUMP
If the dishwasher fails to drain because the drain pump is
clogged with foreign matter or there is an abnormal noise
coming from the drain pump, you must unclog and clean
the drain pump as instructed below.
1. Remove the lower rack.
2. See the "Cleaning the fi lter" section to remove the
cylindrical micro fi lter.
3. Remove any moisture from the fi lter using a sponge.
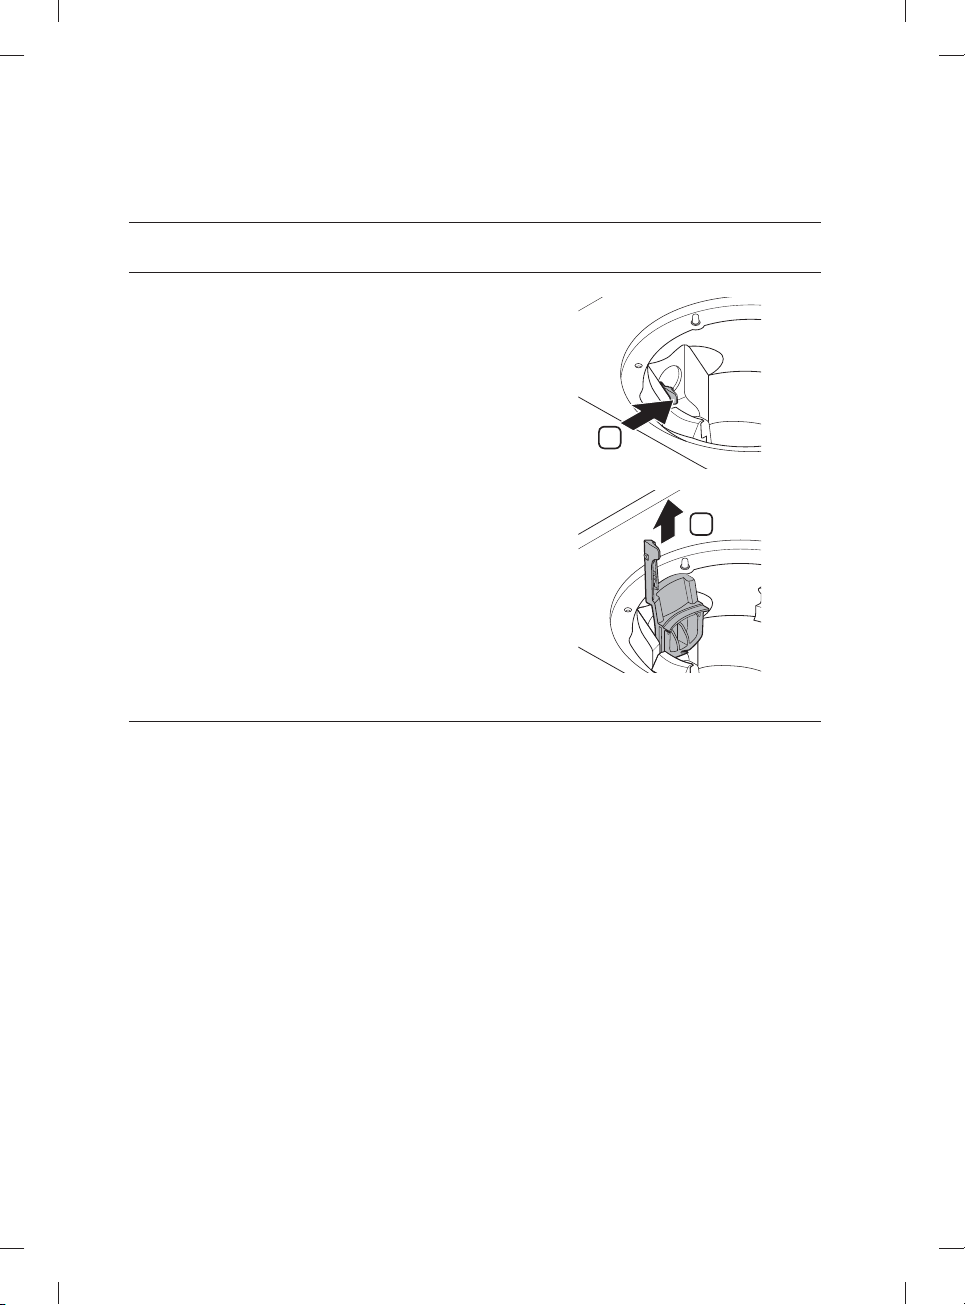
4. Remove the drain-pump cover by pushing its handle
in the arrow direction (1), and then pulling up (2).
5. Check the impeller to see if it's in good condition.
Then, remove any foreign matter from the pump.
6. Reinsert the drain-pump cover into place, and then
press down until you hear a clicking sound.
STORING YOUR DISHWASHER
If you need to store your dishwasher for an extended period of time, fi rst drain and disconnect it. If you leave
water in the hoses and internal components, you can damage the dishwasher.
After draining and disconnecting the dishwasher, be sure to turn o the water supply valve and circuit
breaker.
1
2
English - 30
DW9900M_DD68-00184A-02_EN.indd 30DW9900M_DD68-00184A-02_EN.indd 30 2017-09-20 3:26:562017-09-20 3:26:56
Page 31
cycles
CYCLE CHART
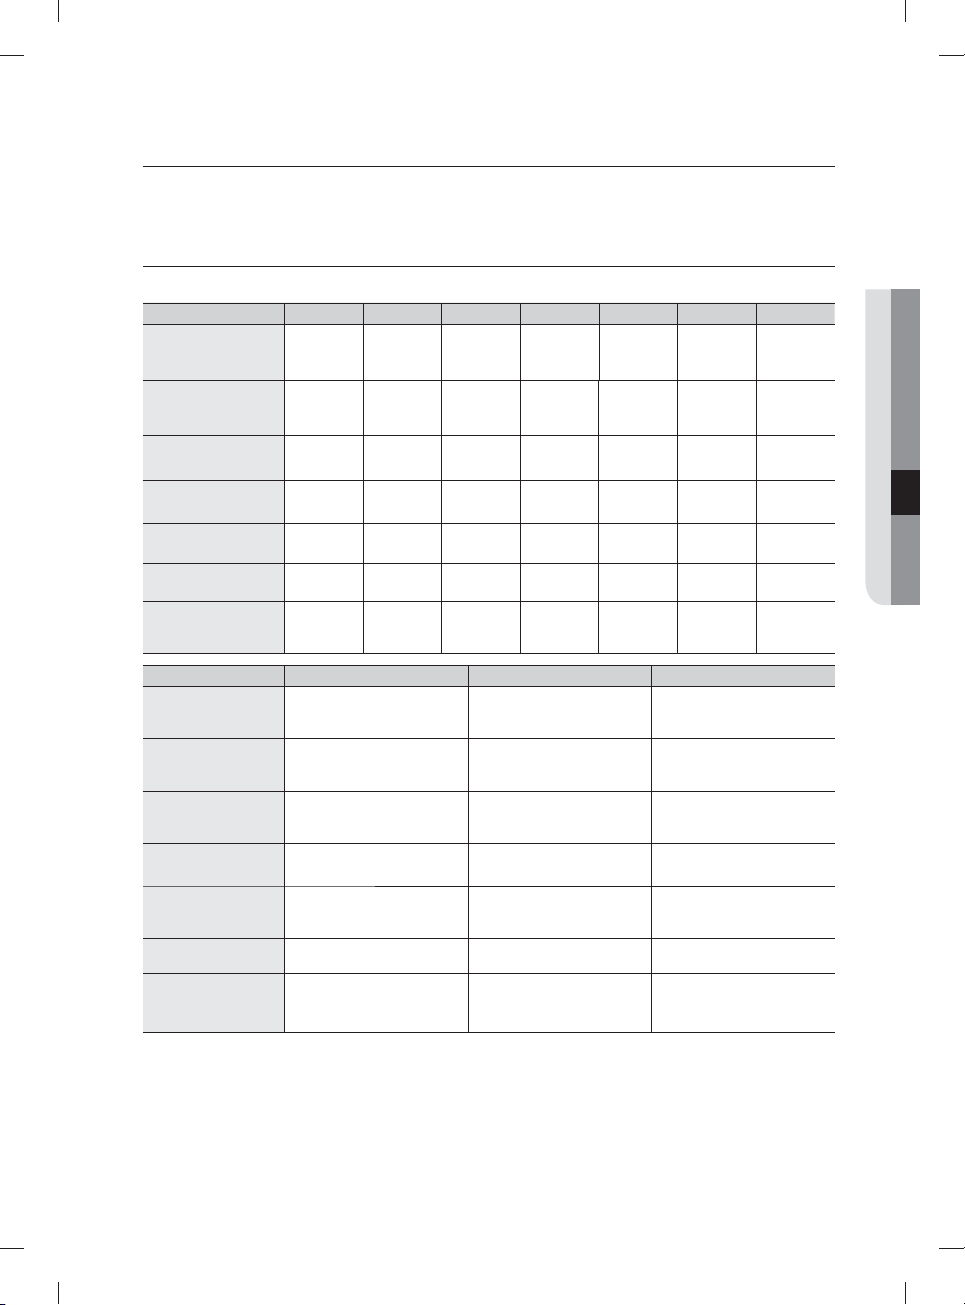
( : Basic, : Optional step)
Cycle Pre-Wash1 Pre-Wash2 Pre-Wash3 Main wash Rinse1 Rinse2 Rinse3
Auto
Normal
Heavy
Delicate
Express 60
Rinse Only
(for some models)
Chef
(for some models)
Cycle Last Rinse (Sanitize) Dry Water [gal(ℓ)]
Auto
Normal
Heavy
Delicate
Express 60
Rinse Only
(for some models)
Chef
(for some models)
136-154 ˚F (58-68 ˚C)
163 ˚F (73 ˚C)
131-149 ˚F (55-65 ˚C)
163 ˚F (73 ˚C)
154 ˚F (68 ˚C)
163 ˚F (73 ˚C)
149 ˚F (65 ˚C)
140 ˚F (60 ˚C)
163 ˚F (73 ˚C)
131-149 ˚F (55-65 ˚C)
163 ˚F (73 ˚C)
• The temperatures (˚F and ˚C) in the Last Rinse column represent the water temperature when you select
Sanitize.
• When you select the Auto or Normal cycle, you can eliminate optional steps depending on the soil level
of the dishes.
• The water consumption and wash time varies depending on the steps or options you add, and on the
pressure and temperature of the supplied water.
• When the Rinse Aid is empty, wash time and Last Rinse temperature can increase a little.
122-140 ˚F
(50-60 ˚C)
113-143 ˚F
(45-62 ˚C)
149 ˚F (65 ˚C)
122 ˚F (50 ˚C)
122 ˚F (50 ˚C)
140-163 ˚F
(60-73 ˚C)
104 ˚F (40 ˚C)
4.8-6.2 (18.0-23.4 ℓ)
2.4-6.0 (8.9-22.9 ℓ)
7.5 (28.3 ℓ)
4.5 (17.0 ℓ)
2.9 (11.1 ℓ)
1.1 (4.1 ℓ)
3.9 (14.7 ℓ)
05 cycles
English - 31
DW9900M_DD68-00184A-02_EN.indd 31DW9900M_DD68-00184A-02_EN.indd 31 2017-09-20 3:26:562017-09-20 3:26:56
Page 32
troubleshooting
CHECK THESE POINTS IF YOUR DISHWASHER…
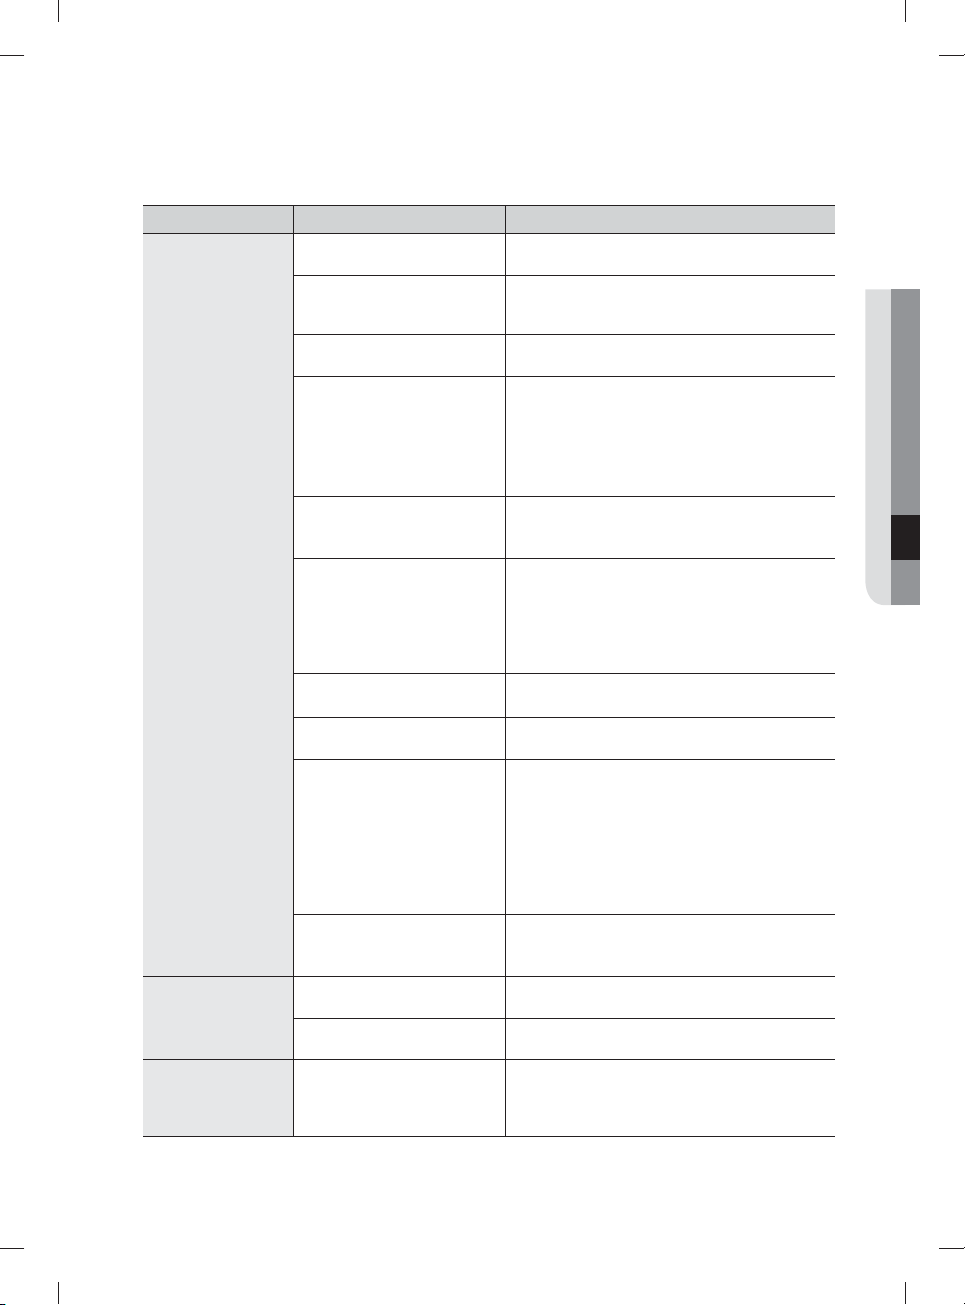
PROBLEM POSSIBLE CAUSE SOLUTION
Will not start.
It’s taking too long
with an operation
or cycle.
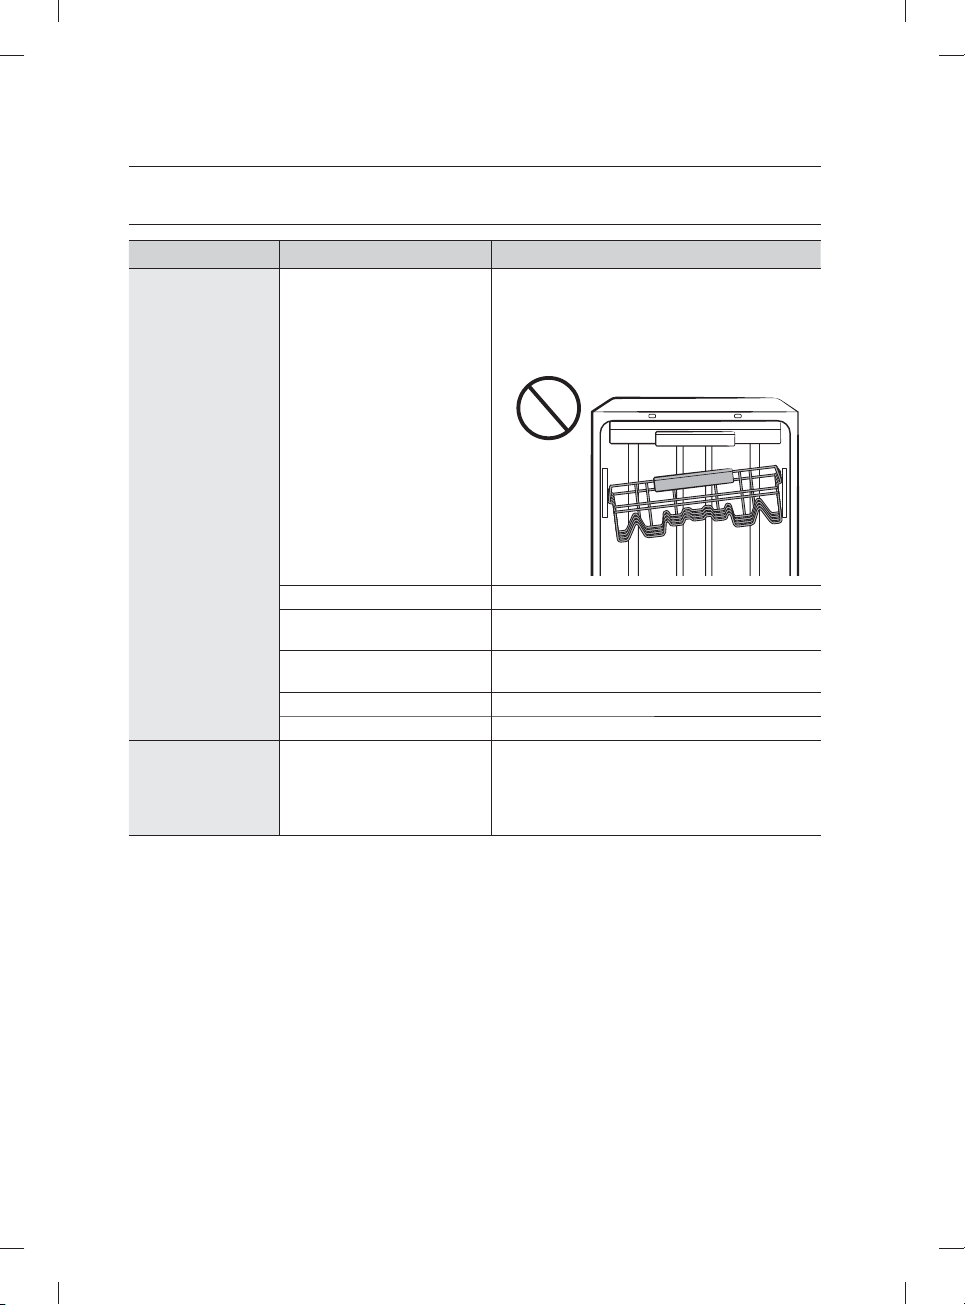
The door is not closed
completely.
No cycle is selected. Select a proper cycle.
The power cable is not
connected.
The water supply does not
work.
The Control Panel is locked. Unlock the Control Lock, (See page 11.)
A circuit breaker is open. Reset the circuit breaker.
The dishwasher is connected
to a cold water supply.
Check if the door is latched and closed
completely. Check whether the Upper Rack is
properly joined with Duct Nozzle.
Also, check if the Upper Rack is crooked or
unbalanced.
Connect the power cable properly.
Check if the water supply valve is open.
Check if the water supply line is connected
to a hot water supply. To work properly, the
dishwasher must be connected to a hot water
supply. (If connected to a cold water supply,
additional time is required to heat the cold water.)
English - 32
DW9900M_DD68-00184A-02_EN.indd 32DW9900M_DD68-00184A-02_EN.indd 32 2017-09-20 3:26:562017-09-20 3:26:56
Page 33
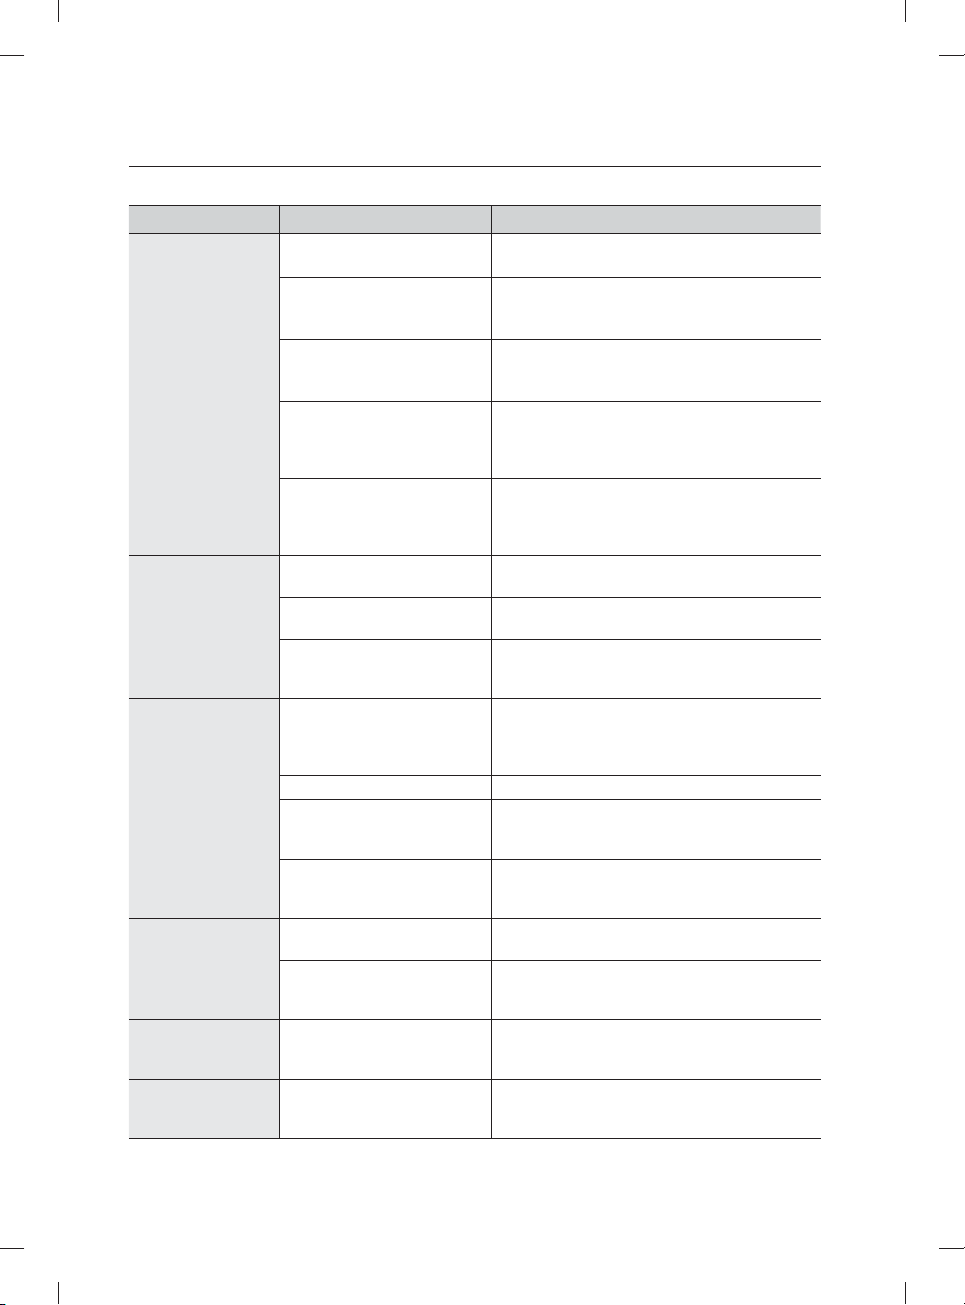
PROBLEM POSSIBLE CAUSE SOLUTION
The cycle selected was
unsuitable.
Select a cycle according to the number and soil
level of the dishes, as directed in this manual.
The water temperature is low. Connect the water supply line to a hot water
supply. For best performance, the temperature of
the supplied water should be 120 ˚F (49 ˚C).
Low water pressure. The water pressure should be between 20and
120 psi (140-830 kPa).
The water is too hard. Use a commercial dishwasher cleaner.
Use high-quality, fresh detergent with rinse aid.
Clean the fi lter at least once per month. (See
page 29.)
Use a water softener additive designed for
dishwashers.
Dishwasher detergent was not
used.
Use automatic dishwasher detergent.
We recommend a powder or gel type
dishwasher detergent.
There are food
particles remaining
on dishes.
(Not cleaning
properly.)
Detergent remains in the
dispenser.
Make sure large items such as cookie sheets,
cutting boards, or contaners, etc. are not
blocking the detergent dispenser and preventing
it from opening properly.
Rearrange the dishes so they do not interfere
with detergent dispenser operation.
There is no rinse aid. Check the dispenser and add rinse aid.
Use liquid type rinse aid.
A nozzle is clogged. Clean the nozzle. See pages 27 and 28.
06 troubleshooting
The dishes are improperly
loaded.
Too many dishes have been
loaded.
Rearrange the dishes so they do not interfere
with nozzle rotation and detergent dispenser
operation.
Load only an appropriate number of dishes.
Load your dishes as recommended.
(See page 21.)
Load the heavily soiled items onto Zone Booster
area. (See page 24)
Filter could be clogged.
(Food soils remain on the fi lter.)
Scrape food from dishes prior to loading. (Do not
pre-rinse.)
Clean the fi lter. (See page 29.)
Leaves glasses
with a light fi lm.
Leaves a yellow
or brown fi lm on
The water supplied is soft and
too much detergent was used.
Aluminum dishes were
included in the wash load.
This is caused by co ee and
tea soils.
Underload the dishwasher and use a rinse aid to
minimize this.
Remove the marks on the dishes using a low
sensitivity cleaner.
Remove the soils using a spot cleaner.
the inside of the
dishwasher.
English - 33
DW9900M_DD68-00184A-02_EN.indd 33DW9900M_DD68-00184A-02_EN.indd 33 2017-09-20 3:26:562017-09-20 3:26:56
Page 34
troubleshooting
PROBLEM POSSIBLE CAUSE SOLUTION
Does not dry
dishes well.
Has a bad odor.
Is too noisy.
Does not have a
smoothly rotating
nozzle.
Water won’t
pump out of the
dishwasher.
Has a bent upper
rack after loading
dishes.
There is no rinse aid in the
dispenser.
The temperature of the water
is low when the dishwasher is
running.
Too many dishes have been
loaded.
Glasses and cups with
concave bottoms hold water.
This water may spill onto other
items when unloading.
Auto Release™ is turned o . Turn Auto Release™ Dry on. Press the Lower +
Water was left over from an
incomplete cycle.
The Drain Hose is obstructed. Contact a qualifi ed service technician to remove
The dishwasher is not used
daily or soiled dishes are left in
unit too long.
Sound is generated when the
dispenser cover is open and
the drain pump is operating in
an early stage.
The dishwasher is not level. Ensure the dishwasher is level.
Foreign material (a screw, a
plastic piece) is in the pump
chamber.
There is a ‘chopping’ sound
because a nozzle is bumping
against the dishes.
Nozzle holes are clogged with
food particles.
The nozzle is blocked by a
dish or pot and cannot rotate.
The drain is clogged. Clean the drain pump by removing the drain-
The dishes are not loaded
properly.
Check the dispenser and add rinse aid.
Use a liquid type rinse aid.
Connect the water supply line to a hot water
supply.
Use rinse aid with the Sanitize option.
Proper loading of items can a ect drying.
Load your dishes as recommended.
(See page 21.)
After fi nishing the cycle, empty the lower rack
fi rst and then the upper rack. This will prevent
water dripping from the upper rack onto the
dishes in the lower rack.
Hi-Temp Wash button for 3 seconds to access
the Auto Release™ menu. Select "A1" to activate
Auto Release™ Dry.
Insert detergent without loading dishes, and run
the Normal cycle to clean the dishwasher.
any obstruction from the drain hose.
With the dishwasher empty and no detergent,
place a glass with 8 ounces of vinegar upright
into the lower rack, and then run a Normal cycle.
This is normal operation.
Contact a qualifi ed service technician to remove
foreign material from the pump chamber.
Rearrange the dishes.
Clean the nozzle holes.
See pages 27 and 28.
After placing the dishes into the racks, rotate the
nozzles by hand to check whether any of the
dishes interfere with them.
pump cover. (See page 30.)
Load your dishes as recommended.
(See page 21.)
English - 34
DW9900M_DD68-00184A-02_EN.indd 34DW9900M_DD68-00184A-02_EN.indd 34 2017-09-20 3:26:562017-09-20 3:26:56
Page 35
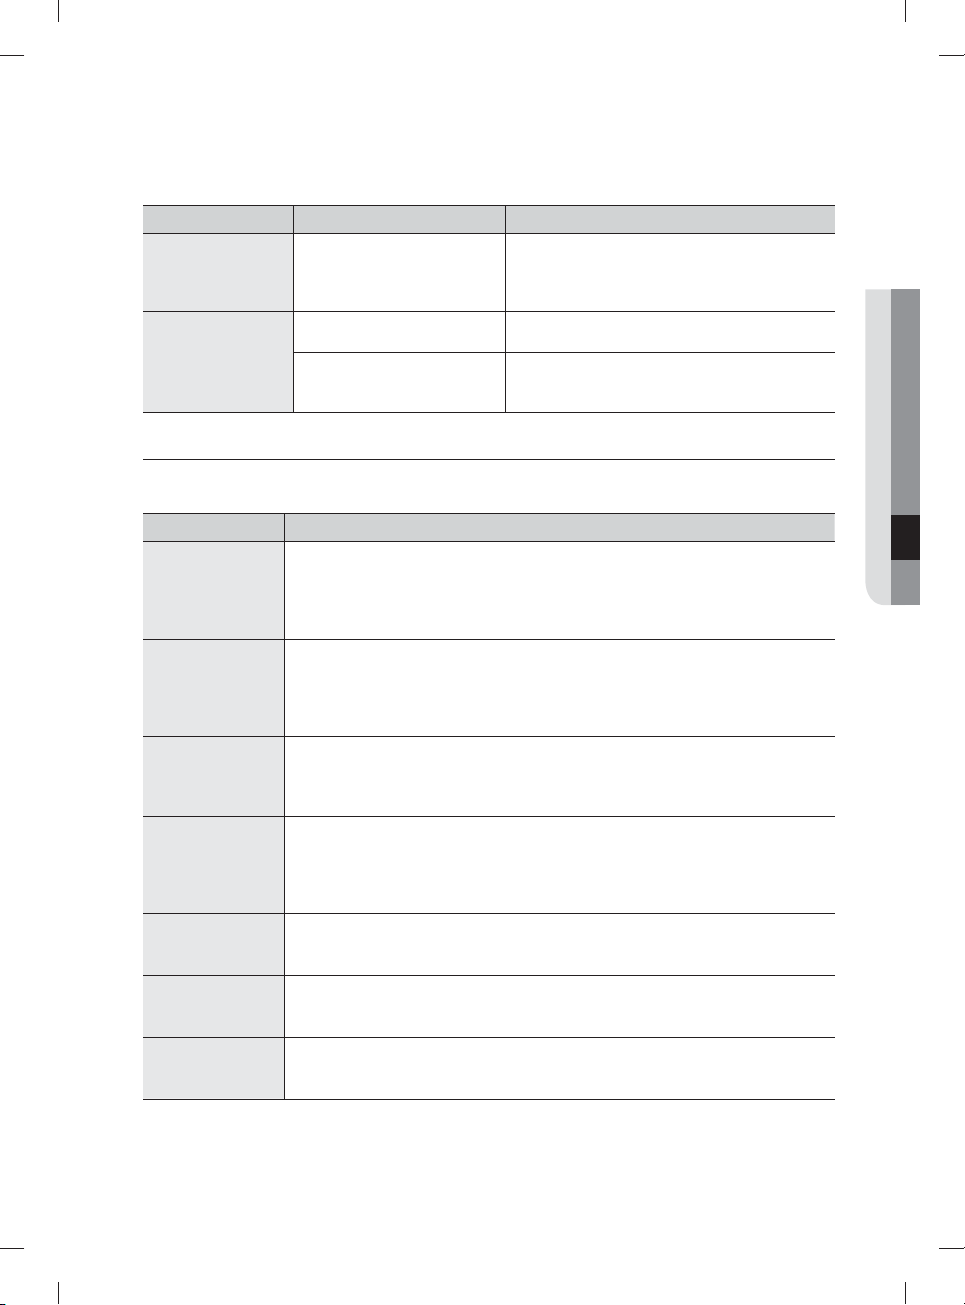
PROBLEM POSSIBLE CAUSE SOLUTION
Cannot close the
door.
Auto Release™ Dry mode is in
operation.
Once the door opens in the Auto Release™ Dry
mode, the door cannot be closed manually for
the next 2 minutes. You may close the door after
2 minutes.
Cannot start Smart
Control.
The device registration is not
fi nished.
The door is not closed within
3 seconds of pressing Smart
Finish the device registration. (See page 17.)
Push the door closed fi rmly within 3 seconds of
pressing Smart Control.
control.
INFORMATION CODES
The Control Panel displays information codes to help you understand what is occurring with your
dishwasher.
Code Action
Leakage check.
LC
4C
5C
HC
3C
PC
AP
For any codes not listed above, call 1-800-SAMSUNG (726-7864).
• If a water supply valve connection leak occurs, close the water supply valve
and go to your house circuit breaker panel, set the dishwasher’s circuit breaker
switch to o , and then contact the installer to fi x.
If the problem continues, contact an authorized Samsung service center.
Water supply check.
• Check if the water supply valve is closed, the water supply is suspended, or the
water inlet valve or line is frozen or clogged by foreign particles.
If the problem continues, close the water supply valve, and then contact an
authorized Samsung service center.
Drain check.
• After closing the water supply valve, check whether the drain hose is clogged or
folded. Also, check whether the drain hole inside sump is clogged.
If the problem continues, contact an authorized Samsung service center.
High temperature heating check.
• Functional check. With the dishwasher empty, add detergent, and then run
a cycle. If the problem continues, go to your house circuit breaker panel, set
the dishwasher’s circuit breaker switch to o , and then contact an authorized
Samsung service center.
Pump operation check.
• Functional check. Turn o the dishwasher and try to start it again.
If the problem continues, contact an authorized Samsung service center.
Zone wash function check.
• Functional check. Turn o the dishwasher and try to start it again.
If the problem continues, contact an authorized Samsung service center.
Connect with smart phone.
• When the control panel displays AP, press and hold Smart Control on the
control panel to connect your dishwasher with your smart phone.
06 troubleshooting
English - 35
DW9900M_DD68-00184A-02_EN.indd 35DW9900M_DD68-00184A-02_EN.indd 35 2017-09-20 3:26:562017-09-20 3:26:56
Page 36
appendix
HELPING THE ENVIRONMENT
• Your dishwasher is manufactured from recyclable materials. If you decide to dispose of it, please
observe local waste disposal regulations. Cut o the power cable so that the appliance cannot be
connected to a power source.
• Remove the door so that animals and small children cannot get trapped inside the appliance.
• Do not exceed the detergent quantities recommended in the detergent manufacturers’ instructions.
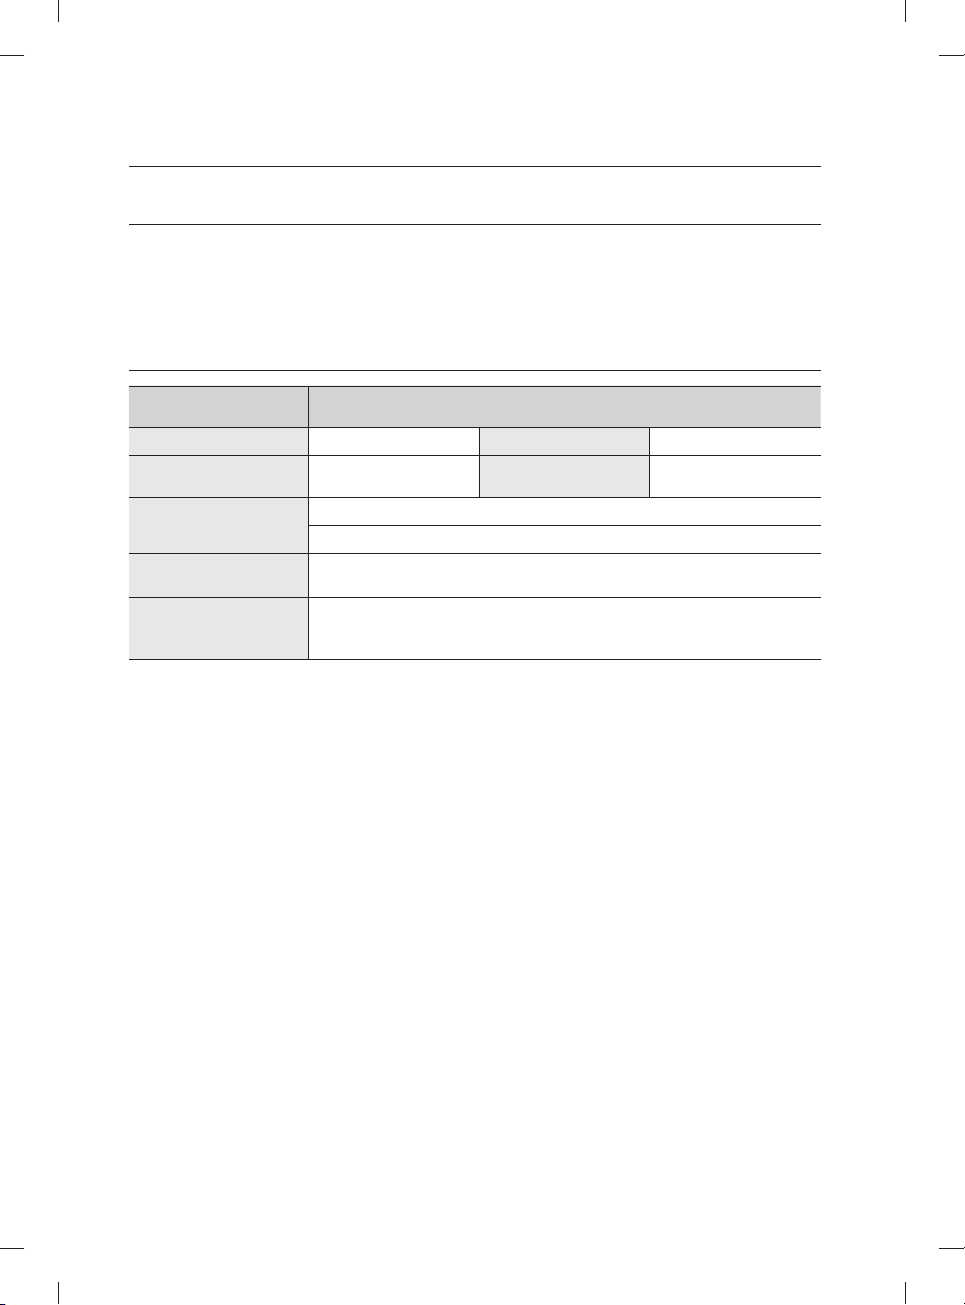
SPECIFICATIONS
Model
Type Built-in Dishwasher Wash capacity 15 place setting
Power
Rated power uasge
Dimensions
(Width × Depth × Height)
Weight
DW80M9960US / DW80M9960UG / DW80M9550US / DW80M9550UG /
DW80M9990UM / DW80M9990US
120 V / 60 Hz AC only,
15 A circuit breaker
Wash Motor: 60-100 W
Heater: 1100 W
23⅞ x 25 x 33⅞ in. (605 x 636 x 860 mm)
Unpacked 90 lb (41 kg) [DW80M9550US / DW80M9550UG]
Unpacked 95 lb (43 kg) [ DW80M9960US / DW80M9960UG /
Used water pressure
DW80M9990UM / DW80M9990US]
20-120 psi
(140-830 kPa)
English - 36
DW9900M_DD68-00184A-02_EN.indd 36DW9900M_DD68-00184A-02_EN.indd 36 2017-09-20 3:26:562017-09-20 3:26:56
Page 37
warranty
SAMSUNG DISHWASHER
LIMITED WARRANTY TO ORIGINAL PURCHASER
This SAMSUNG brand product, as supplied and distributed by USA: SAMSUNG ELECTRONICS AMERICA,
INC./CANADA: SAMSUNG ELECTRONICS CANADA, INC. (SAMSUNG) and delivered new, in the original
carton to the original consumer purchaser, is warranted by SAMSUNG against manufacturing defects in
materials and workmanship for a limited warranty period of:
One (1) Year All Parts and Labor, Five (5) Years Linear Motion Parts*, Printed Circuit Board, Racking (Labor
Charges for in-home service starting from the 2nd year is customer’s responsibility), and Lifetime Stainless
Door Liner & Tub for leakage. Samsung will replace your unit with same or current model (that is better or
equivalent in functionality) (Labor related to replacement is customer’s responsibility).
* Linear Motion Parts: Belt operating AC motor [Motor Geared], Belt V-Timing, Rail, Holder Rail [Front Up,
Front Low].
This limited warranty begins on the original date of purchase, and is valid only on products purchased and
used in the United States/Canada. To receive warranty service, the purchaser must contact SAMSUNG for
problem determination and service procedures. Warranty service can only be performed by a SAMSUNG
authorized service center. The original dated bill of sale must be presented upon request as proof of
purchase to SAMSUNG or SAMSUNG’s authorized service center. SAMSUNG will provide in-home service
during the warranty period at no charge, subject to availability within the contiguous United States/Canada.
In home service is not available in all areas.
To receive in-home service, product must be unobstructed and accessible to the service agent. If service
is not available, SAMSUNG may elect to provide transportation of the product to and from an authorized
service center.
SAMSUNG will repair, replace, or refund this product at our option and at no charge as stipulated herein,
with new or reconditioned parts or products if found to be defective during the limited warranty period
specifi ed above. All replaced parts and products become the property of SAMSUNG and must be returned
to SAMSUNG. Replacement parts and products assume the remaining original warranty, or ninety (90)
days, whichever is longer.
This limited warranty covers manufacturing defects in materials and workmanship encountered in normal,
noncommercial use of this product and shall not apply to the following: damage that occurs in shipment;
delivery and installation; applications and uses for which this product was not intended; altered product or
serial numbers; cosmetic damage or exterior fi nish; accidents, abuse, neglect, fi re, water, lightning, or other
acts of nature or God; use of products, equipment, systems, utilities, services, parts, supplies, accessories,
applications, installations, repairs, external wiring or connectors not supplied or authorized by SAMSUNG
that damage this product or result in service problems; incorrect electrical line voltage, fl uctuations and
surges; customer adjustments and failure to follow operating instructions, maintenance and environmental
instructions that are covered and prescribed in the instruction book; product removal and reinstallation;
problems caused by pest infestations. This limited warranty does not cover problems resulting from
incorrect electric current, voltage or supply, light bulbs, house fuses, house wiring, cost of a service call for
instructions, or fi xing installation errors. SAMSUNG does not warrant uninterrupted or error-free operation of
the product.
English - 37
DW9900M_DD68-00184A-02_EN.indd 37DW9900M_DD68-00184A-02_EN.indd 37 2017-09-20 3:26:562017-09-20 3:26:56
Page 38
EXCEPT AS SET FORTH HEREIN, THERE ARE NO WARRANTIES ON THIS PRODUCT EITHER EXPRESS
OR IMPLIED, AND SAMSUNG DISCLAIMS ALL WARRANTIES INCLUDING, BUT NOT LIMITED TO, ANY
IMPLIED WARRANTIES OF MERCHANTABILITY, INFRINGEMENT OR FITNESS FOR A PARTICULAR
PURPOSE. NO WARRANTY OR GUARANTEE GIVEN BY ANY PERSON, FIRM, OR CORPORATION WITH
RESPECT TO THIS PRODUCT SHALL BE BINDING ON SAMSUNG. SAMSUNG SHALL NOT BE LIABLE
FOR LOSS OF REVENUE OR PROFITS, FAILURE TO REALIZE SAVINGS OR OTHER BENEFITS, OR ANY
OTHER SPECIAL, INCIDENTAL OR CONSEQUENTIAL DAMAGES CAUSED BY THE USE, MISUSE, OR
INABILITY TO USE THIS PRODUCT, REGARDLESS OF THE LEGAL THEORY ON WHICH THE CLAIM IS
BASED, AND EVEN IF SAMSUNG HAS BEEN ADVISED OF THE POSSIBILITY OF SUCH DAMAGES.
NOR SHALL RECOVERY OF ANY KIND AGAINST SAMSUNG BE GREATER IN AMOUNT THAN THE
PURCHASE PRICE OF THE PRODUCT SOLD BY SAMSUNG AND CAUSING THE ALLEGED DAMAGE.
WITHOUT LIMITING THE FOREGOING, PURCHASER ASSUMES ALL RISK AND LIABILITY FOR LOSS,
DAMAGE, OR INJURY TO PURCHASER AND PURCHASER’S PROPERTY AND TO OTHERS AND THEIR
PROPERTY ARISING OUT OF THE USE, MISUSE, OR INABILITY TO USE THIS PRODUCT. THIS LIMITED
WARRANTY SHALL NOT EXTEND TO ANYONE OTHER THAN THE ORIGINAL PURCHASER OF THIS
PRODUCT, IS NONTRANSFERABLE AND STATES YOUR EXCLUSIVE REMEDY.
Some states or provinces do not allow limitations on how long an implied warranty lasts, or the exclusion
or limitation of incidental or consequential damages, so the above limitations or exclusions may not apply
to you. This warranty gives you specifi c rights, and you may also have other rights, which vary from state to
state or province to province.
To obtain warranty service, please contact SAMSUNG at:
In USA
Samsung Electronics America, Inc.
85 Challenger Road
Ridgefi eld Park, NJ 07660
1-800-SAMSUNG (726-7864)
www.samsung.com/us/support
In CANADA
Samsung Electronics Canada Inc.
2050 Derry Road West
Mississauga, Ontario L5N 0B9 Canada
1-800-SAMSUNG (726-7864)
www.samsung.com/ca/support (English)
www.samsung.com/ca_fr/support (French)
English - 38
DW9900M_DD68-00184A-02_EN.indd 38DW9900M_DD68-00184A-02_EN.indd 38 2017-09-20 3:26:562017-09-20 3:26:56
Page 39
memo
English - 39
DW9900M_DD68-00184A-02_EN.indd 39DW9900M_DD68-00184A-02_EN.indd 39 2017-09-20 3:26:562017-09-20 3:26:56
Page 40
bit.ly/samsungdishwashers
Questions or comments?
COUNTRY CALL OR VISIT US ONLINE AT
U.S.A
MEXICO 01-800-SAMSUNG (726-7864) www.samsung.com/mx/support
DW9900M_DD68-00184A-02_EN.indd 40DW9900M_DD68-00184A-02_EN.indd 40 2017-09-20 3:26:562017-09-20 3:26:56
1-800-SAMSUNG (726-7864)
1-844-SAM-PAYS (726-7297)
www.samsung.com/us/support
DD68-00184A-02
Page 41
Lavavajillas
manual del usuario
Serie DW80M9*
imagine las posibilidades
Gracias por adquirir este producto Samsung.
DW9900M_DD68-00184A-02_MES.indd 1DW9900M_DD68-00184A-02_MES.indd 1 2017-09-20 3:27:252017-09-20 3:27:25
Page 42
contenido
CONFIGURACIÓN DE SU LAVAVAJILLAS
8
USO DE LA LAVAVAJILLAS
10
LIMPIEZA Y MANTENIMIENTO DE LA
LAVAVAJILLAS
27
8 Desempaque de la lavavajillas
8 Verifi cación de las piezas
9 Cumplimiento de los requisitos de instalación
10 Panel de control
13 Selector de ciclos
14 Pautas básicas
17 Samsung smart home (solo modelos aplicables)
19 Ajuste del ángulo de los soportes para platos
20 Ajuste de la altura del estante superior
20 Cómo retirar el estante superior
21 Carga del estante inferior
21 Carga del estante superior
22 Uso del 3
23 Uso del estante para cubiertos
24 Uso del soporte para copas
24 Uso de la cubeta auxiliar (para algunos modelos)
24 Uso de la zona de refuerzo
25 Uso del detergente
26 Uso del producto de enjuague
27 Limpieza del exterior
27 Limpieza del interior
28 Limpieza de las boquillas
29 Limpieza del fi ltro
30 Limpieza de la bomba de drenaje
30 Cómo guardar la lavavajillas
modelos)
er
estante (cubiertos) (en algunos
CICLOS
31 Tabla de ciclos
31
SOLUCIÓN DE PROBLEMAS
32 Controle estos puntos si su lavavajillas…
35 Códigos de información
32
APÉNDICE
36 Ayuda al medio ambiente
36 Especifi caciones
36
Español - 2
DW9900M_DD68-00184A-02_MES.indd Sec9:2DW9900M_DD68-00184A-02_MES.indd Sec9:2 2017-09-20 3:27:312017-09-20 3:27:31
Page 43
información sobre seguridad
Felicitaciones por la compra de su nueva lavavajillas Samsung. Este manual contiene
información importante acerca de la instalación, el uso y el cuidado del electrodoméstico.
Lea detenidamente estas instrucciones a fi n de aprovechar al máximo los múltiples
benefi cios y funciones de la lavavajillas.
LO QUE NECESITA SABER SOBRE LAS INSTRUCCIONES DE SEGURIDAD
Las advertencias y las instrucciones de seguridad importantes de este manual no cubren
todas las posibles condiciones y situaciones que pueden ocurrir. Es su responsabilidad
actuar con sentido común, precaución y cuidado cuando instale, realice el mantenimiento
y ponga en funcionamiento la máquina lavavajillas.
INSTRUCCIONES DE SEGURIDAD IMPORTANTES
Signifi cado de los íconos y señales de este manual del usuario:
Peligros o prácticas inseguras que pueden causar lesiones físicas graves o la
muerte.
ADVERTENCIA
PRECAUCIÓN
Para reducir el riesgo de incendio, explosión, descargas eléctricas o lesiones físicas
cuando usa la máquina lavavajillas, siga estas instrucciones básicas de seguridad:
Peligros o prácticas inseguras que pueden causar lesiones físicas leves o daños
a la propiedad.
NO intente.
NO desensamble.
01 información sobre seguridad
NO toque.
Siga las instrucciones explícitamente.
Desenchufe el cable de alimentación del tomacorriente de pared.
Asegúrese de que la máquina esté conectada a tierra para evitar descargas
eléctricas.
Llame al servicio técnico para solicitar ayuda.
Nota
Estas señales de advertencia sirven para evitar que usted y otras personas sufran daños.
Respételas completamente.
Después de leer esta sección, guárdela en un lugar seguro para consultas futuras.
CONSERVE ESTAS INSTRUCCIONES
Español - 3
DW9900M_DD68-00184A-02_MES.indd Sec1:3DW9900M_DD68-00184A-02_MES.indd Sec1:3 2017-09-20 3:27:312017-09-20 3:27:31
Page 44
información sobre seguridad
ADVERTENCIA
ADVERTENCIA
Advertencia sobre la State of California Proposition 65 (solo EE.UU.)
Este producto contiene productos químicos reconocidos en el estado de California como capaces de
provocar cáncer y defectos de nacimiento u otras afecciones reproductivas.
ADVERTENCIA: Cuando utilice la lavavajillas, tome todas las precauciones básicas, incluyendo las
siguientes:
ADVERTENCIA
1. Lea todas las instrucciones antes de usar la lavavajillas.
2. Utilice la lavavajillas únicamente para la función para la cual está diseñada.
3. Utilice únicamente detergentes o productos humectantes recomendados para utilizarse en lavavajillas y
manténgalos fuera del alcance de los niños.
4. Cuando cargue los artículos que se lavarán:
- coloque los objetos cortantes de manera que no dañen las juntas de la puerta.
- cargue los cuchillos fi losos con el mango hacia arriba para reducir el riesgo de sufrir lesiones por
cortes.
5. No lave objetos de plástico a menos que tengan el rótulo "apto para lavavajillas" o su equivalente. En el
caso de los artículos de plástico que no tengan tal rótulo, consulte las recomendaciones del fabricante.
6. No toque el ELEMENTO CALENTADOR durante el uso o inmediatamente luego de él.
7. No ponga en funcionamiento la lavavajillas a menos que todos los paneles de CIERRE estén
correctamente colocados.
8. No modifi que los controles.
9. Trate con cuidado la puerta y el estante de la lavavajillas, no se siente o pare sobre ellas.
10. Para reducir el riesgo de lesiones, evite que los niños jueguen dentro o fuera de la lavavajillas.
11. En ciertas circunstancias, se puede producir gas hidrógeno en un sistema de agua caliente que no
se ha usado durante dos semanas o más. EL GAS HIDRÓGENO ES EXPLOSIVO. Si el sistema de
agua caliente no se ha usado durante dicho período, abra todas las llaves de agua caliente y deje
que el agua fl uya durante varios minutos antes de usar la lavavajillas. Esto disipará el gas hidrógeno
acumulado. Dado que el gas es infl amable, no fume ni utilice una llama abierta en ese momento.
12.
Cuando deje de utilizar o descarte una lavavajillas antigua, retire la puerta del compartimiento de lavado.
• Después de desempacar la lavavajillas, mantenga el empaque fuera del alcance de los niños.
PRECAUCIÓN
• La máquina lavavajillas es muy pesada. No intente mover o trasladarla usted mismo. Se necesitan dos
o más personas para mover una lavavajillas y evitar lesiones potenciales.
• Al igual que con cualquier equipo que use electricidad, agua y piezas movibles, existen riesgos
potenciales.
• No instale la lavavajillas cerca de componentes eléctricos. Mantenga la lavavajillas alejada de llamas
abiertas.
• Instale y nivele la lavavajillas sobre una superfi cie no alfombrada que pueda soportar su peso.
• La lavavajillas debe conectarse a tierra correctamente. Nunca la conecte a un tomacorriente sin
conexión a tierra. Consulte la página 9 para obtener más información sobre cómo conectar la
lavavajillas a tierra.
• Conecte el cable a tierra a la conexión a tierra de color verde de la caja de terminales.
• Después de instalar la lavavajillas, asegúrese que la manguera de desagüe esté correctamente
conectada y que las conexiones de la manguera no tengan pérdidas. Si la manguera de desagüe está
fl oja, puede ocasionar pérdidas materiales.
• El conducto puede romperse. A medida que transcurre el tiempo, pierde su fl exibilidad. Revise el
conducto periódicamente. Si está hinchado, rasgado, cortado o si hay pérdida de agua, reemplácelo
inmediatamente.
CONSERVE ESTAS INSTRUCCIONES
Español - 4
DW9900M_DD68-00184A-02_MES.indd Sec1:4DW9900M_DD68-00184A-02_MES.indd Sec1:4 2017-09-20 3:27:312017-09-20 3:27:31
Page 45
• Para usar este electrodoméstico en forma segura, familiarícese con su funcionamiento y manéjelo con
cuidado cuando lo use.
• No vierta gasolina, solventes ni otros materiales infl amables dentro de la lavavajillas. No lave vajilla que
haya sido expuesta a estos materiales.
• Mantenga el detergente de la lavavajillas fuera del alcance de los niños. El detergente causa un efecto
adverso en los órganos del cuerpo humano. Contiene sustancias para otorgar brillo y es corrosivo.
Evite que el detergente entre en contacto con la piel o los ojos.
• No empuje ni presione la puerta cuando esté abierta, ya que al hacerlo podría dañar la lavavajillas o
hacerse daño.
• No permita que los niños jueguen dentro o encima de la máquina lavavajillas. Pueden hacerse daño o
dañar la lavavajillas.
• Desconecte el cable de alimentación (o corte el disyuntor) antes de realizar el mantenimiento de la
lavavajillas.
• No repare, reemplace ni realice el mantenimiento de ninguna de las piezas de su lavavajillas por su
cuenta. Sólo se permite que técnicos califi cados autorizados realicen el desensamble, las reparaciones
y las modifi caciones. El trabajo efectuado por una persona no autorizada puede invalidar su garantía.
• Antes de deshacerse de su lavavajillas, retire la puerta del compartimiento de lavado o la traba de la
puerta para evitar que niños o animales pequeños puedan quedar atrapados adentro.
• Si no va a utilizarse la lavavajillas durante un período prolongado, corte el suministro de agua.
• Esta lavavajillas ha sido diseñada para uso residencial únicamente.
ANTES DE USAR LA LAVAVAJILLAS
ADVERTENCIA
ADVERTENCIA
Riesgo de vuelco
- No utilice la lavavajillas hasta que no esté correctamente instalada.
- No ejerza presión sobre la puerta de la lavavajillas cuando está abierta.
- No coloque excesivo peso sobre la puerta de la lavavajillas cuando está abierta.
Riesgo de descarga eléctrica
El incumplimiento de estas instrucciones puede tener como resultado la muerte, incendios o
descargas eléctricas:
- Conecte a tierra la lavavajillas
- Conecte el cable a tierra a la conexión a tierra de color verde de la caja de conexiones.
- No utilice un cable prolongador.
01 información sobre seguridad
CONSERVE ESTAS INSTRUCCIONES
Español - 5
DW9900M_DD68-00184A-02_MES.indd Sec1:5DW9900M_DD68-00184A-02_MES.indd Sec1:5 2017-09-20 3:27:312017-09-20 3:27:31
Page 46
información sobre seguridad
AVISO REGULATORIO
Aviso de FCC
PRECAUCIÓN FCC:
PRECAUCIÓN
Todos los cambios y modifi caciones que no cuenten con la aprobación expresa de la parte responsable del
cumplimiento invalidará la autoridad del usuario para operar el equipo.
Este dispositivo cumple con el Apartado 15 de las Normas de la FCC. El funcionamiento se encuentra
sujeto a las siguientes dos condiciones:
(1) Este aparato no puede causar interferencias perjudiciales, y
(2) Este aparato debe aceptar la recepción de cualquier interferencia, incluidas aquellas que puedan
causar un funcionamiento indeseado.
En el producto disponible en el mercado de Estados Unidos/Canadá, solo puede operarse el canal 1~11.
No es posible seleccionar otros canales.
DECLARACIÓN DE LA FCC:
Este equipo ha sido sometido a pruebas y se ha determinado que se encuentra dentro de los límites para
los dispositivos digitales clase B, de acuerdo con el apartado 15 de las Normas de la FCC. Dichos límites
han sido diseñados para proporcionar una protección razonable contra las interferencias perjudiciales en
una instalación residencial.
Este equipo genera, utiliza y puede irradiar energía de frecuencias de radio y, si no se lo instala y utiliza
de acuerdo con las instrucciones, puede provocar interferencias perjudiciales a las comunicaciones de
radio. Sin embargo, no existe garantía alguna de que no se producirán interferencias en una instalación
determinada. Si el equipo provoca interferencias perjudiciales a la recepción de radio o televisión,
que puede determinarse al encender y apagar el equipo, se sugiere que el usuario trate de corregir la
interferencia mediante una o más de las siguientes medidas:
• Reorientando o reubicando la antena receptora
• Aumentando la distancia entre el equipo y el receptor
• Conectando el equipo en una toma que está en un circuito diferente que la radio o el televisor.
• Consultando a su distribuidor o a un técnico experimentado en radio/TV para obtener ayuda.
DECLARACIÓN DE LA FCC SOBRE LA EXPOSICIÓN A LA RADIACIÓN:
Este equipo cumple con los límites de exposición a la radiación establecidos por la FCC para un entorno
no controlado. Este equipo debe instalarse y utilizarse de manera que queden por lo menos 8 pulgadas
(20cm) entre el radiador y su cuerpo. Este aparato y su/s antena/s no deben ubicarse ni utilizarse junto con
cualquier otra antena o transmisor.
CONSERVE ESTAS INSTRUCCIONES
Español - 6
DW9900M_DD68-00184A-02_MES.indd Sec1:6DW9900M_DD68-00184A-02_MES.indd Sec1:6 2017-09-20 3:27:312017-09-20 3:27:31
Page 47
Aviso IC
El término “IC” antes del número de certifi cación de radio signifi ca únicamente que se han cumplido las
especifi caciones técnicas
de la Industria Canadiense. El funcionamiento se encuentra sujeto a las siguientes dos condiciones: (1)
Este aparato no puede causar interferencias perjudiciales, y (2) Este aparato debe aceptar la recepción de
cualquier interferencia, incluidas aquellas que puedan causar un funcionamiento indeseado.
Este aparato digital Clase B cumple con la norma canadiense ICES-003.
Cet appareil numérique de la classe B est conforme á la norme NMB-003 du Canada.
En el producto disponible en el mercado de Estados Unidos/Canadá, solo puede operarse el canal 1~11.
No es posible seleccionar otros canales.
DECLARACIÓN DE LA IC SOBRE LA EXPOSICIÓN A LA RADIACIÓN:
Este equipo cumple con los límites de exposición a la radiación establecidos por la IC RSS-102 para
un entorno no controlado. Este equipo debe instalarse y utilizarse de manera que queden por lo menos
8pulgadas (20cm) entre el radiador y su cuerpo. Este aparato y su/s antena/s no deben ubicarse ni
utilizarse junto con cualquier otra antena o transmisor.
Aviso de licencia de código abierto
El software incluido en este producto software de código abierto. Puede obtener el correspondiente código
fuente completo para un periodo de tres años a partir del último envío de este producto enviando un correo
electrónico a mailto:[email protected].
Asimismo es posible obtener el correspondiente código fuente completo en un soporte físico como un CDROM; se le cobrará una tasa mínima.
La siguiente URL http://opensource.samsung.com/opensource/SimpleConnectTP/seq/0 lleva a la página
de descarga del código fuente disponible y a la información de licencia de código abierto relacionada con
este producto. Esta oferta es válida para quienes reciban esta información.
01 información sobre seguridad
CONSERVE ESTAS INSTRUCCIONES
Español - 7
DW9900M_DD68-00184A-02_MES.indd Sec1:7DW9900M_DD68-00184A-02_MES.indd Sec1:7 2017-09-20 3:27:312017-09-20 3:27:31
Page 48
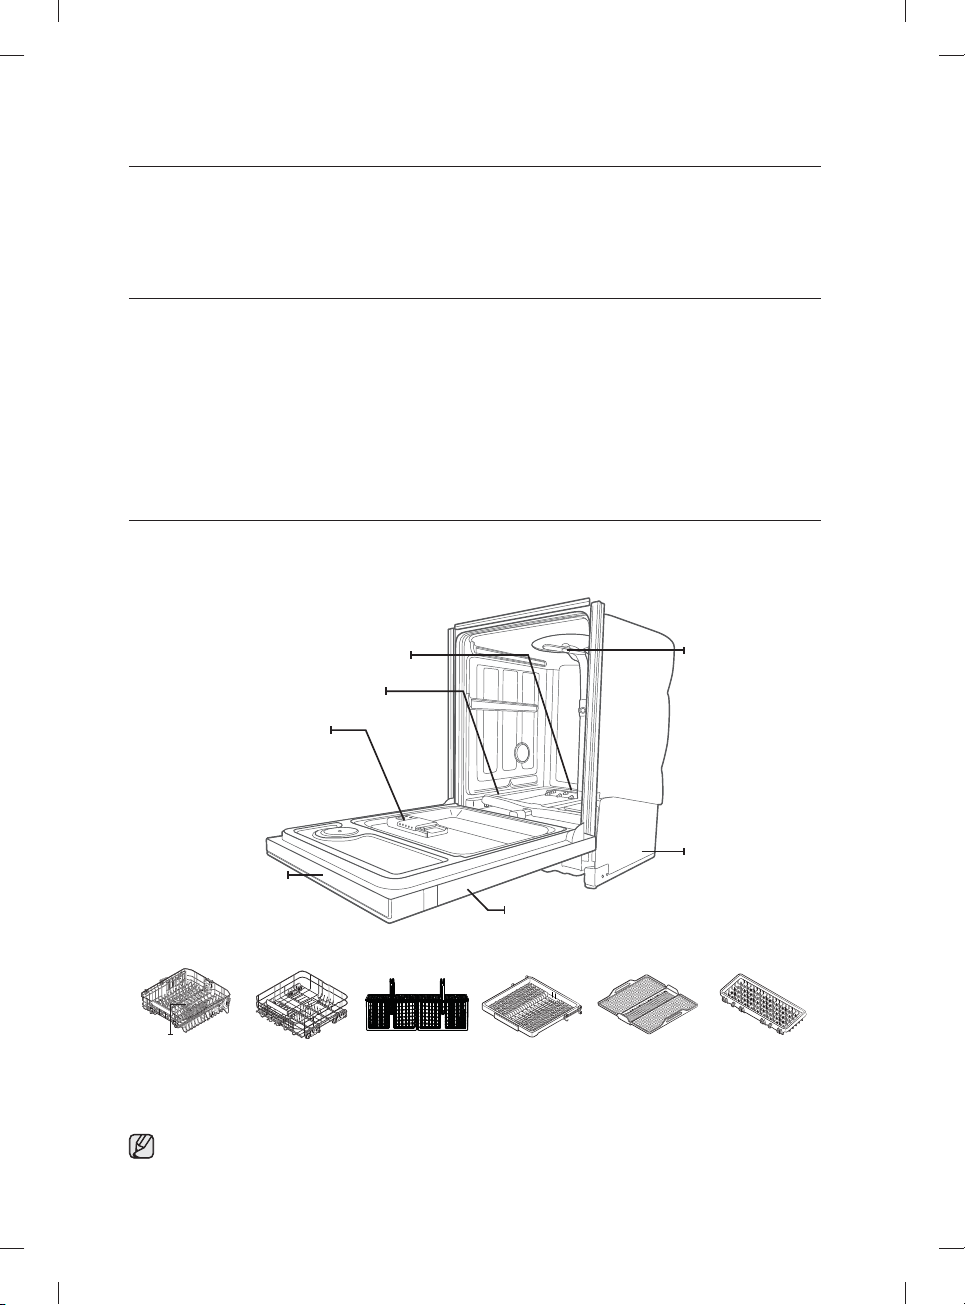
confi guración de su lavavajillas
Asegúrese de que su instalador siga estas instrucciones minuciosamente para que su
nueva lavavajillas funcione adecuadamente y no existan riesgos de sufrir lesiones al lavar
la vajilla.
DESEMPAQUE DE LA LAVAVAJILLAS
• Cuando haya recibido la lavavajillas, desempáquela con cuidado y verifi que que no esté dañada.
Si la lavavajillas está dañada, tome nota de ello en la carta de porte y guarde una copia.
No instale la lavavajillas y comuníquese con el Servicio al cliente de Samsung al número que se indica a
continuación.
• Si el producto no está dañado, comience con la instalación. Si va a instalarlo por su cuenta, asegúrese de leer la
guía de instalación y de seguir sus instrucciones.
• Después de desempacar la lavavajillas, mantenga el empaque fuera del alcance de los niños para garantizar su
seguridad.
VERIFICACIÓN DE LAS PIEZAS
Una vez desempacada la lavavajillas, asegúrese de haber recibido todas las piezas que aparecen a continuación.
Si su lavavajillas sufrió daños durante el transporte, o si falta alguna pieza, comuníquese con el Servicio al cliente de
Samsung al 1-800-SAMSUNG (726-7864).
Boquilla inferior
Refl ector de agua
Dosifi cador
Panel de control
Puerta
Boquilla superior
Estante superior Estante inferior Estante para
Accesorios - Manual del usuario/instalación, kit de instalación, placa de protección.
cubiertos
3er estante
(para algunos
modelos)
Español - 8
Rejilla del 3er
estante
(para algunos
modelos)
Boquilla techo
Base
Cubeta auxiliar
(para algunos
modelos)
DW9900M_DD68-00184A-02_MES.indd Sec3:8DW9900M_DD68-00184A-02_MES.indd Sec3:8 2017-09-20 3:27:312017-09-20 3:27:31
Page 49
CUMPLIMIENTO DE LOS REQUISITOS DE INSTALACIÓN
Suministro eléctrico y conexión a tierra
Para evitar el riesgo de incendio, descarga eléctrica o lesiones físicas, todo el cableado y la conexión a
tierra deben realizarse de conformidad con la versión más reciente del Código Eléctrico Nacional, ANSI/
FNPA, Nro. 70 y los códigos y ordenanzas locales. Es exclusiva responsabilidad del propietario del
electrodoméstico proveer los servicios eléctricos adecuados para este electrodoméstico.
Nunca utilice un cable prolongador.
PRECAUCIÓN
Cuando prepare la instalación, asegúrese de que el suministro eléctrico ofrezca las siguientes
características:
• Un circuito derivado individual de 120 voltios, 60 Hz destinado únicamente a la lavavajillas con un
fusible o disyuntor de 15 amp.
La lavavajillas debe estar conectada a tierra. En caso de que la lavavajillas funcione mal o se
descomponga, la conexión a tierra reducirá el riesgo de descarga eléctrica al ofrecer una vía de menor
resistencia para la corriente eléctrica.
Nunca conecte un cable a tierra a las tuberías de plástico, las tuberías de gas o las cañerías de agua
ADVERTENCIA
caliente.
Instrucciones de conexión a tierra
Para un electrodoméstico con conexión permanente:
Este electrodoméstico debe estar conectado a un metal con conexión a tierra, a un sistema de cableado
permanente, o se debe conectar el conductor de conexión a tierra del equipo a los conductores del circuito
y luego a la terminal de conexión a tierra del equipo.
Suministro de agua
La presión del conducto de agua caliente debe estar entre 20 y 120 psi (140 y 830 kPa).
Ajuste el calentador de agua para obtener una temperatura de agua entre 120 ˚F (49 ˚C) y -149 ˚F (65 ˚C).
La mayoría de las tiendas de suministros de plomería venden conductos de diversas longitudes, de
hasta 10 pies (305cm) de largo.
Para reducir el riesgo de pérdidas y daños ocasionados por el agua puede hacer lo siguiente:
• Coloque las llaves de agua en un lugar de fácil acceso.
• Cierre las llaves cuando no use la lavavajillas.
• Verifi que periódicamente que no haya pérdidas de agua en los accesorios del conducto.
Antes de utilizar la lavavajillas por primera vez verifi que que no haya pérdidas en ninguna de las conexiones
de la válvula de suministro de agua ni en las llaves.
ADVERTENCIA
Piso
Por razones de seguridad, su lavavajillas debe estar instalada sobre un piso de construcción sólida.
Nunca instale la lavavajillas sobre una plataforma o sobre una estructura con soportes poco resistentes.
02 confi guración de su lavavajillas
La lavavajillas debe instalarse adecuadamente, conforme a la Guía de instalación, antes de utilizarla.
Si no recibió una Guía de instalación junto con la lavavajillas, puede obtener una en nuestro sitio Web
www.samsung.com.
Español - 9
DW9900M_DD68-00184A-02_MES.indd Sec3:9DW9900M_DD68-00184A-02_MES.indd Sec3:9 2017-09-20 3:27:322017-09-20 3:27:32
Page 50
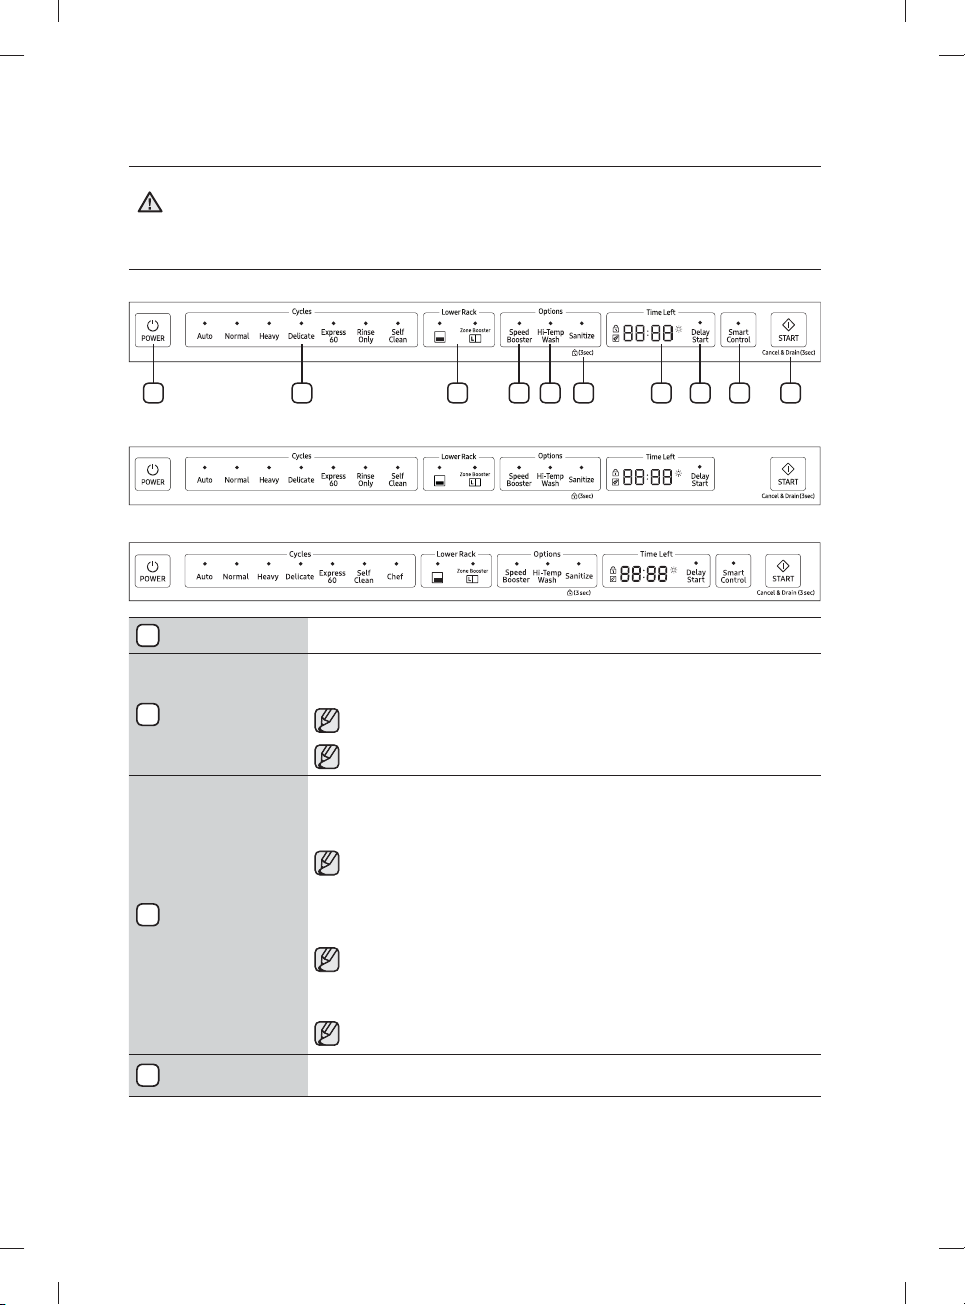
uso de la lavavajillas
ADVERTENCIA: Para reducir el riesgo de incendio, descarga eléctrica o lesiones personales, lea las
INSTRUCCIONES DE SEGURIDAD IMPORTANTES antes de poner en marcha este electrodoméstico.
ADVERTENCIA
PANEL DE CONTROL
Serie DW80M9960
7 8 96 10321 4 5
Serie DW80M95**
Serie DW80M9990
1
Power (Encendido)
2
Selector de ciclos
3
Lower (Inferior)
Speed Booster (Aumentar
4
velocidad)
Cuando presiona el botón Power (Encendido) se enciende la luz del último ciclo iniciado. Una vez completado
el ciclo seleccionado, la lavavajillas se apaga automáticamente.
Seleccione el ciclo de lavado adecuado según el nivel de suciedad de la vajilla. Cuando se selecciona un ciclo,
se enciende el indicador de ciclo activado correspondiente.
Si desea modifi car el ciclo una vez iniciado, presione el botón Power (Encendido). Luego encienda de
nuevo la lavavajillas y seleccione un nuevo ciclo.
El ciclo predeterminado es Normal.
Cuando selecciona Lower (Lower Rack - Only) (Inferior (Estante inferior - Solo)) únicamente se activa la
boquilla del estante inferior. La boquilla superior no funciona.
Utilice esta función para lavar cargas pequeñas de platos o vasos colocados en el estante inferior.
Cuando seleccione Lower (Lower Rack - Only) (Inferior (Estante inferior - Solo)), coloque artículos,
vasos, etc. únicamente en el estante inferior. La lavavajillas no lavará los artículos colocados en el
estante superior.
Si selecciona Lower (Lower Rack - Only) (Inferior (Estante inferior - Solo)) se reduce el tiempo del ciclo y el
consumo de electricidad.
Si desea lavar recipientes muy sucios como ollas y sartenes, seleccione la opción
Zone Booster (Zona de refuerzo). (Esta opción consume algo más de agua y energía.)
La opción Zone Booster (Zona de refuerzo) efectúa un lavado intensivo en la zona izquierda del
estante inferior.
Seleccionando la opción Zone Booster (Zona de refuerzo) no se apaga la boquilla superior.
Seleccione esta opción para reducir el tiempo de lavado.
Español - 10
DW9900M_DD68-00184A-02_MES.indd 10DW9900M_DD68-00184A-02_MES.indd 10 2017-09-20 3:27:322017-09-20 3:27:32
Page 51
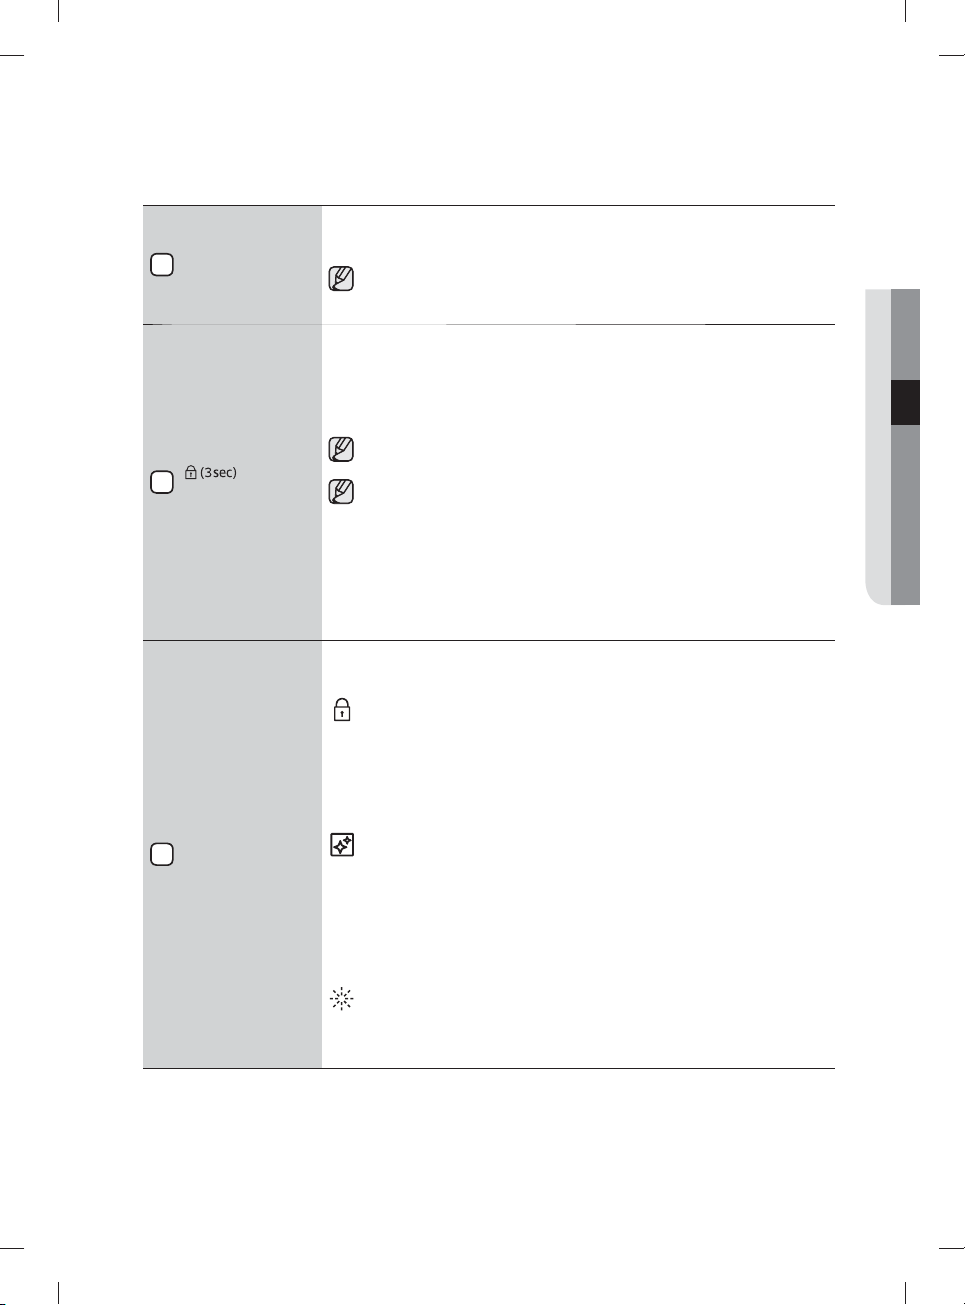
Hi-Temp Wash (Lavado a
5
alta temperatura)
Sanitize (Desinfección) /
6
( Control Lock (Bloqueo
controles))
7
Pantalla
Eleva la temperatura del lavado principal para mejorar la limpieza de cargas muy sucias o que contienen restos
de alimentos adheridos.
Hi-Temp Wash (Lavado a alta temperatura) no está disponible para los ciclos
Delicate (Vajilla delicada) y Rinse Only (Solo enjuague).
03 uso de la lavavajillas
Cuando se selecciona la opción Sanitize (Desinfección), la temperatura del agua se eleva a 163˚F (73 ˚C) en
el ciclo de enjuague fi nal para la desinfección a alta temperatura.
Si selecciona la opción Sanitize (Desinfección) el indicador "Sanitize (Desinfección)" parpadea cuando
la temperatura del agua alcanza la temperatura de desinfección, más de 155 ˚F (68 ˚C), y permanece
encendido hasta el fi nal de la opción Sanitize (Desinfección). Cuando abre la puerta o presiona el botón
Power (Encendido), el indicador "Sanitize (Desinfección)" se apaga.
No puede seleccionar la opción Sanitize (Desinfección) si selecciona los ciclos
Delicate (Vajilla delicada) y Rinse Only (Solo enjuague).
La función Sanitize (Desinfección) cumple con la Norma 184 NSF/ANSI para Lavavajillas Residenciales.
Las lavavajillas residenciales certifi cadas no han sido diseñadas para los establecimientos alimentarios
autorizados. Su lavavajillas ha sido certifi cada por NSF.
Solo el ciclo Heavy (Muy sucio) con la opción Sanitize (Desinfección) ha sido diseñado para que se ajuste a
los requisitos para la eliminación de suciedad y la efi cacia de la desinfección de NSF 184.
Control Lock (Bloqueo controles) le permite bloquear los botones del panel de control para que los niños no
puedan encender la lavavajillas en forma accidental al presionarlos.
Para bloquear y desbloquear los botones del panel de control, mantenga presionado el botón
Sanitize (Desinfección) durante tres (3) segundos con la máquina encendida.
Muestra el tiempo del ciclo y las horas y los minutos restantes, las horas del Delay Start (Inicio retardado)
y los códigos de información. Si ocurre un problema durante el funcionamiento, aparece un código de
información con un sonido de advertencia. Consulte la página de códigos de información.
Indicador de Control Lock (Bloqueo controles)
- Está encendido cuando Control Lock (Bloqueo controles) está activado (o la lavavajillas está en el
modo de espera o de pausa).
- Está apagado cuando la lavavajillas está en funcionamiento.
- Cuando Control Lock (Bloqueo controles) está activado, el indicador
Control Lock (Bloqueo controles) parpadea durante varios segundos si no se presiona ningún
botón excepto Power (Encendido).
Indicador de Self Clean (Autolimpieza)
- Está encendido cuando la opción Self Clean (Autolimpieza) está activada (o la lavavajillas está
en el modo de espera o de pausa), pero se apaga cuando la lavavajillas está en funcionamiento.
- Parpadea durante 5 segundos cada 20 o 22 ciclos.
- El contador de ciclos desaparece cuando se completa la operación Self Clean (Autolimpieza)
o cuando la lavavajillas alcanza el ciclo 23 sin que se utilice el ciclo Self Clean (Autolimpieza).
(El contador de ciclos no cuenta el funcionamiento de Cancel (Cancelar) o
Self Clean (Autolimpieza).)
Indicador de Rinse Refi ll (Reponer producto de enjuague)
- Está encendido cuando se agota el producto de enjuague de la lavavajillas (o la lavavajillas está
en el modo de espera o de pausa).
- Está apagado cuando la lavavajillas está en funcionamiento.
Español - 11
DW9900M_DD68-00184A-02_MES.indd 11DW9900M_DD68-00184A-02_MES.indd 11 2017-09-20 3:27:332017-09-20 3:27:33
Page 52
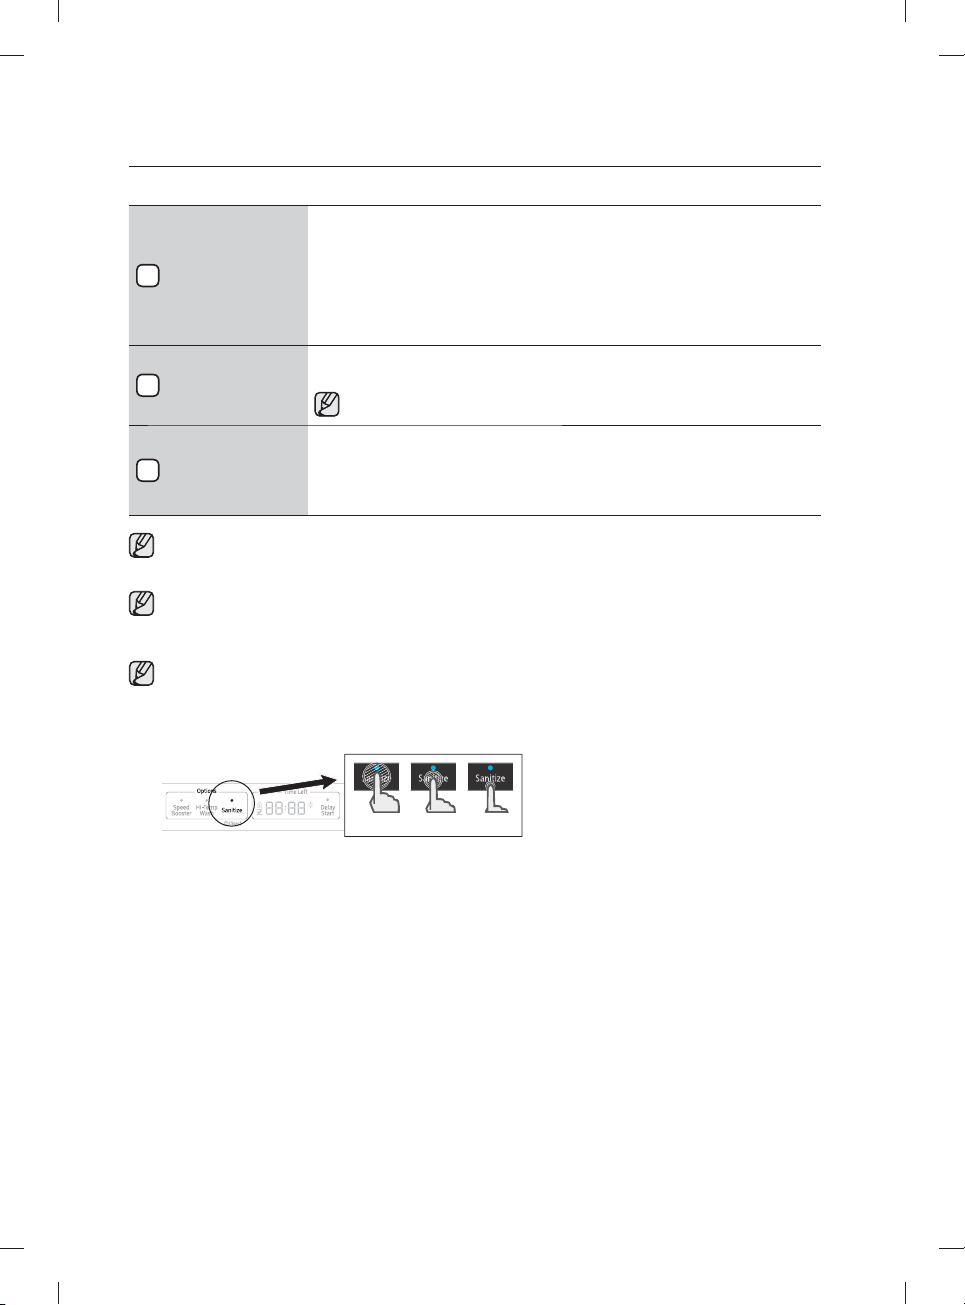
uso de la lavavajillas
Retarde un ciclo hasta 24 horas, en incrementos de una hora. Para aumentar el tiempo del inicio retardado,
presione o mantenga presionado el botón Delay Start (Inicio retardado). La hora en pantalla indica el tiempo
en el cual comenzará el lavado.
Delay Start
8
(Inicio retardado)
9
Smart Control
10
Start (Inicio)
Puede seleccionar las opciones (Self Clean (Autolimpieza), Lower (Inferior), Speed Booster (Aumentar velocidad),
Zone Booster (Zona de refuerzo), Sanitize (Desinfección), Delay Start (Inicio retardado)) antes de iniciar un ciclo. Si
cambia el ciclo después de seleccionar una opción, se regresa al ciclo original.
Cuando pause un ciclo abriendo la puerta durante el funcionamiento, presione el botón Start (Inicio) antes de
cerrar la puerta para reanudar el ciclo.
Empuje la puerta hasta cerrarla fi rmemente durante los 3 segundos siguientes a presionar el botón Start (Inicio).
Si la puerta no se cierra antes de 3 segundos, el ciclo no se inicia.
Para impedir que el teclado táctil pierda sensibilidad de respuesta, siga estas instrucciones:
- Toque con el dedo el centro de cada tecla. No ejerza presión.
- Limpie de forma regular la superfi cie del control táctil con un trapo suave y húmedo.
- Tenga cuidado de no tocar más de una tecla al mismo tiempo, excepto cuando así se le indique.
- Después de confi gurar el tiempo de retardo, presione el botón Start (Inicio) y cierre la puerta para iniciar
el ciclo.
- Si desea modifi car el tiempo de retardo después de la puesta en marcha de la lavavajillas, presione el
botón Cancel (Cancelar) y apague la lavavajillas. Luego encienda de nuevo la lavavajillas y seleccione un
nuevo ciclo con una nueva confi guración de inicio retardado.
Use esta opción para conectar la lavavajillas con el teléfono inteligente.
Para obtener más información, consulte la página 17.
Para conectar por primera vez la lavavajillas al teléfono inteligente, mantenga presionado Smart Control
para iniciar el modo AP en la lavavajillas.
Para iniciar un ciclo, presione el botón Start (Inicio) antes de cerrar la puerta.
*Cancel (Cancelar): Para cancelar un ciclo que esté ejecutándose y desaguar la lavavajillas, mantenga
presionado el botón Start (Inicio) durante tres (3) segundos.
Una vez restablecida la lavavajillas, seleccione un ciclo y una opción y luego presione Start (Inicio) para
reiniciar la lavavajillas.
OO X
Español - 12
DW9900M_DD68-00184A-02_MES.indd 12DW9900M_DD68-00184A-02_MES.indd 12 2017-09-20 3:27:332017-09-20 3:27:33
Page 53
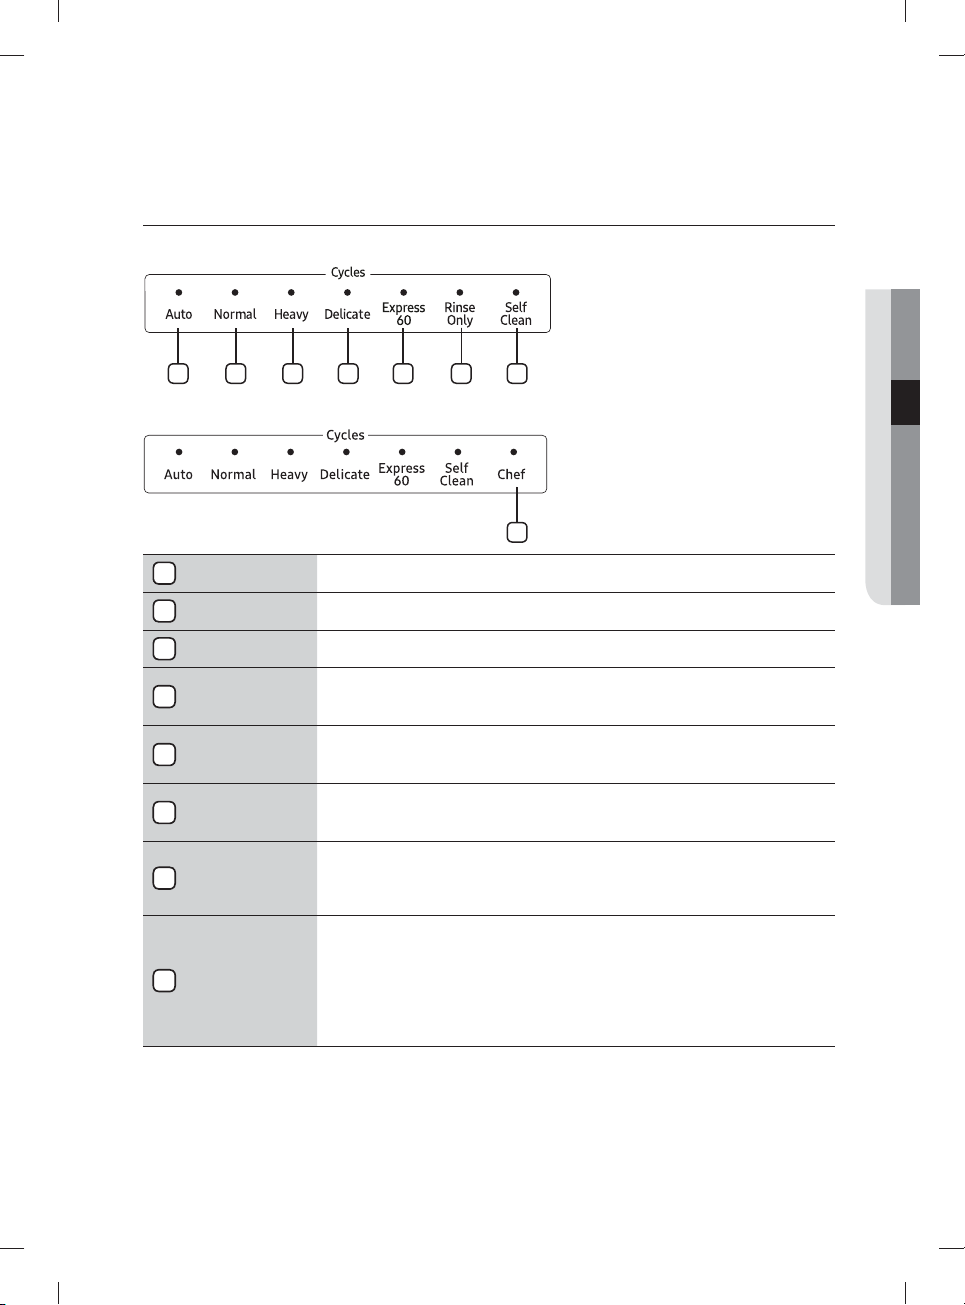
SELECTOR DE CICLOS
Serie DW80M9960, DW80M95**
1 2 3 4 5 6 7
Serie DW80M9990
03 uso de la lavavajillas
8
1
Auto
2
Normal
3
Heavy (Muy sucio) Utilice este ciclo para vajilla muy sucia.
Delicate
4
(Vajilla delicada)
Este ciclo detecta el nivel de suciedad e inicia automáticamente el ciclo óptimo luego de algunos minutos de
funcionamiento.
Utilice este ciclo para vajilla con suciedad normal.
La etiqueta del uso de energía se basa en este ciclo.
Utilice este ciclo para artículos frágiles sucios, tales como cristalería fi na y copas de cristal (copas de vino). No
utilice este ciclo para otros artículos de la vajilla porque pueden aparecer opacidades o marcas.
Las opciones Zone Booster (Zona de refuerzo) y Sanitize (Desinfección) no están disponibles para este ciclo.
Utilice este ciclo cuando desee lavar la vajilla rápidamente. Tarda aproximadamente 1 hora.
5
Express 60 (Rápido 60)
No puede seleccionar la opción Speed Booster (Aumentar velocidad) o Zone Booster (Zona de refuerzo) si
selecciona este ciclo.
Rinse Only
6
(Solo enjuague)
Utilice para enjuagar platos, vasos y cubiertos que no es necesario lavar en ese momento. No utilice detergente.
(en algunos modelos)
Use la Self Clean (Autolimpieza) función para limpiar la tina de la lavavajillas. Si es necesaria la autolimpieza de la
Self Clean
7
(Autolimpieza)
lavavajillas, el indicador Self Clean (Autolimpieza) parpadea durante 5 segundos cuando la enciende. Si pone en
marcha la lavavajillas cuando el indicador está parpadeando, este se apaga automáticamente. Ejecute siempre el
ciclo Self Clean (Autolimpieza) con la lavavajillas vacía. Nunca lo use como ciclo Normal para lavar la vajilla.
Use este ciclo para lavar al mismo tiempo artículos muy sucios y artçiculos ligeramente sucios. Cargue los
artículos muy sucios en el área de la Zone Booster (Zona de refuerzo) y los ligeramente sucios en otras zonas.
Chef
8
(en algunos modelos)
Asegúrese de cargar los artículos muy sucios en el área de la Zone Booster (Zona de refuerzo). De lo contrario,
no se limpiarán bien.
Para obtener un óptimo desempeño, conecte el lavavajillas a un suministro de agua caliente.
Tenga cuidado cuando cargue artículos poco pesados en la Zone Booster (Zona de refuerzo). Pueden caer
fácilmente durante el proceso.
Español - 13
DW9900M_DD68-00184A-02_MES.indd 13DW9900M_DD68-00184A-02_MES.indd 13 2017-09-20 3:27:342017-09-20 3:27:34
Page 54
uso de la lavavajillas
PAUTAS BÁSICAS
1. Abra la puerta y cargue la vajilla (consulte la página 21-23).
- Coloque la vajilla en los estantes superior e inferior, a menos que seleccione la opción
Lower (Lower Rack - Only) (Inferior (Estante inferior - Solo)).
- Retire los restos de comida de la vajilla antes de colocarla en los estantes.
- Después de cargar la vajilla en los estantes, rote las boquillas superiores para asegurarse de que ninguno de
los platos bloquee la rotación de las boquillas.
- Asegúrese de que los platos no impidan que se abra la apertura del dosifi cador del detergente.
2. Agregue detergente al dosifi cador (consulte la página 25).
- Asegúrese de
- Consulte "Uso del detergente" para saber cómo agregar el detergente.
3. Presione el botón Power (Encendido).
- Cuando presiona el botón Power (Encendido), se enciende el indicador del último ciclo iniciado.
- Si se enciende el indicador de "Rinse Refi ll (Reponer producto de enjuague)" debe reponer el producto de
enjuague para mejorar el desempeño del lavado y del secado.
4.
Seleccione el ciclo de limpieza adecuado según el nivel de suciedad de la vajilla.
(consulte las páginas 13 y 31).
- Presione el botón de ciclo adecuado.
- Cuando presiona un botón de ciclo, se enciende el indicador correspondiente.
- Para obtener información sobre cómo seleccionar un ciclo según el nivel de suciedad de la vajilla, consulte
"Selector de ciclos".
5. Presione el botón Start (Inicio) y cierre la puerta.
- Empuje los estantes hacia atrás para colocarlos en su lugar, pulse el botón Start (Inicio) y cierre la puerta.
- Asegúrese de cerrar la puerta fi rmemente. Si la puerta está levemente entreabierta, el ciclo seleccionado no
comenzará automáticamente.
- La lavavajillas comenzará a drenar después de algunos segundos y se iniciará el ciclo seleccionado.
6. Cuando se completa el ciclo de lavado.
- La lavavajillas se apaga automáticamente luego de un minuto.
Si desea cargar más vajilla o para que la lavavajillas haga una pausa mientras funciona, asegúrese de abrir la
puerta lenta y cuidadosamente, ya que existe la posibilidad de sufrir lesiones a causa del vapor caliente que
PRECAUCIÓN
contiene la máquina.
(Si se abre la puerta mientras funciona la lavavajillas, se activa un mecanismo de seguridad que detiene el ciclo.)
Para reanudar la operación, presione el botón Start (Inicio) y cierre la puerta.
Tenga en cuenta que agregar vajilla algunos minutos después de que la lavavajillas comience a funcionar puede
afectar al desempeño.
Para lograr un mejor desempeño en el secado debe utilizar productos para el enjuague. Puede lograr un mejor
desempeño del secado seleccionando asimismo la opción Sanitize (Desinfección).
utilizar únicamente detergente para lavavajillas automática..
Español - 14
DW9900M_DD68-00184A-02_MES.indd 14DW9900M_DD68-00184A-02_MES.indd 14 2017-09-20 3:27:342017-09-20 3:27:34
Page 55
Controles táctiles
Los controles táctiles le permiten operar fácilmente la lavavajillas.
• Se activan fácilmente con un toque suave.
• Tienen un diseño sencillo y elegante.
• Son fáciles de limpiar.
Si tiene niños o desea limpiar la Interfaz de control, recomendamos activar la función
Control Lock (Bloqueo controles) para bloquear los botones de control.
- Cuando esta opción esté seleccionada, los niños no podrán encender la lavavajillas en forma
accidental al tocar los controles.
- Si un ciclo se está ejecutando, los botones no responderán (excepto el botón Power (Encendido)
y las opciones Control Lock (Bloqueo controles) y Cancel (Cancelar) options)
- Si la lavavajillas está apagada, únicamente responde el botón Power (Encendido).
Inicio retardado
Al seleccionar la opción Delay Start (Inicio retardado), la lavavajillas inicia el ciclo seleccionado luego de
que se cumpla el tiempo establecido.
Señal de interferencia del refl ector de agua:
• La función de interferencia del refl ector de agua detecta automáticamente los obstáculos en la tina.
Si detecta algún obstáculo, la pantalla parpadea y la lavavajillas emite una señal sonora durante unos
minutos. Si se detecta algún obstáculo al fi nal del ciclo, "0" parpadea durante unos minutos.
• Retire cualquier obstáculo de la parte inferior de la lavavajillas.
Auto Release™
La función de secado Auto Release™, diseñada para mejorar el desempeño del secado, abre
automáticamente la puerta de la lavavajillas de 5 a 15minutos antes de fi nalizar un ciclo.
Puede activar o desactivar el secado Auto Release™ en dos maneras: con el modo de confi guración o con
las teclas de alternancia. Ambos métodos se describen a continuación.
03 uso de la lavavajillas
Activación/desactivación de Auto Release™
Uso del modo de confi guración
• Para ingresar en el modo de confi guración, presione los botones Delay Start (Inicio retardado) +
Sanitize (Desinfección) durante 3 segundos con la lavavajillas encendida.
• Presione el botón Sanitize (Desinfección) hasta que se muestre "A1" o "A0". "A0" desactiva el
Secado Auto Release™. "A1" activa el Secado Auto Release™. Seleccione "A1" para obtener mejores
resultados de secado.
• Presione el botón Delay Start (Inicio retardado) para implementar su selección.
Español - 15
DW9900M_DD68-00184A-02_MES.indd 15DW9900M_DD68-00184A-02_MES.indd 15 2017-09-20 3:27:342017-09-20 3:27:34
Page 56
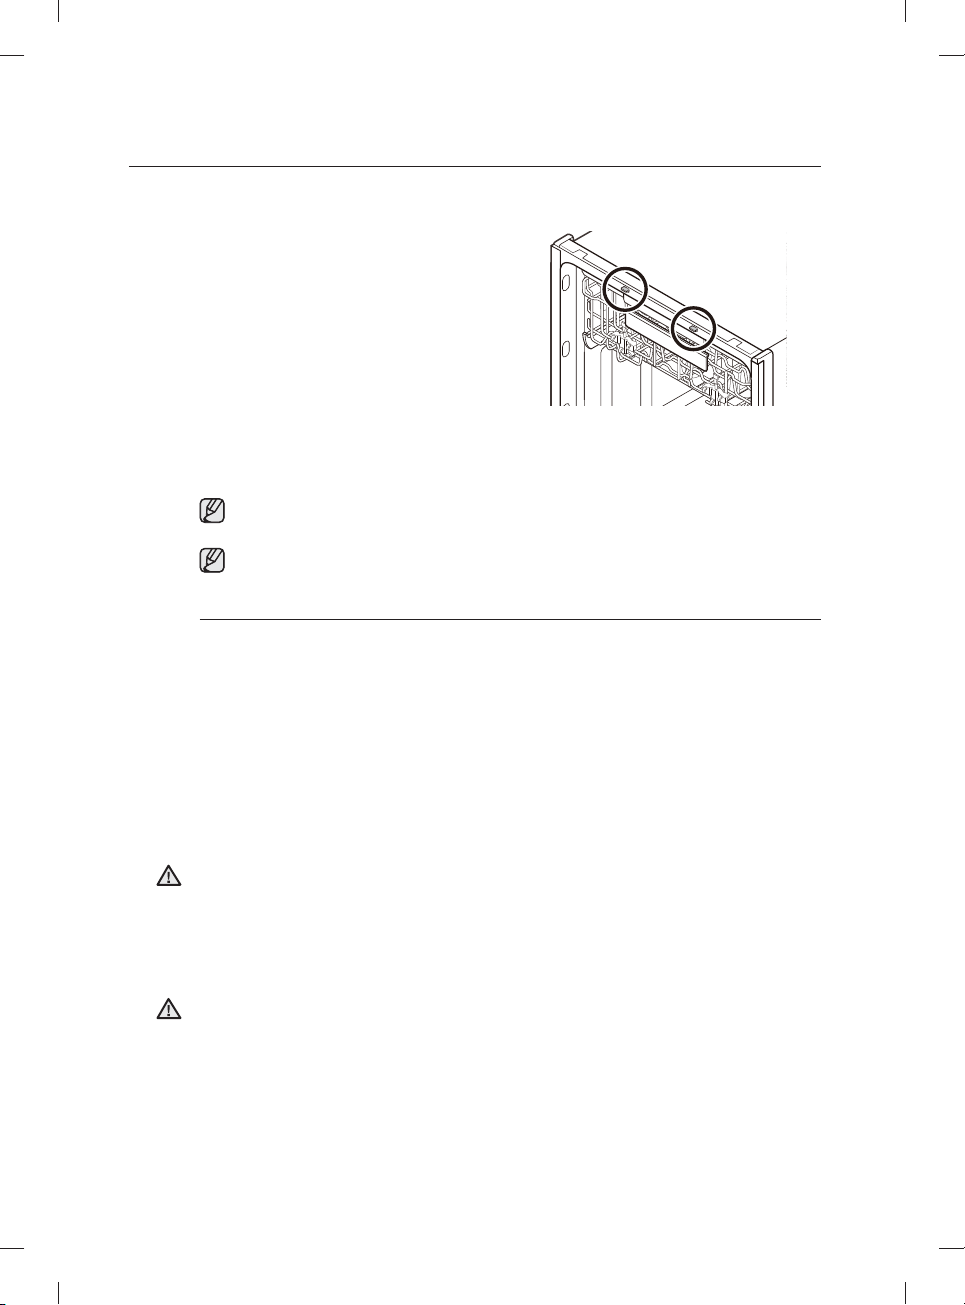
uso de la lavavajillas
Uso de las teclas de alternancia
• Presione los botones Lower (Inferior) + Hi-Temp
Wash (Lavado a alta temperatura) durante 3
segundos para activar o desactivar el Secado Auto
Release™.
"A0" desactiva el Secado Auto Release™.
*
"A1" activa el Secado Auto Release™.
Más acerca del secado Auto Release
* Cuando la puerta se abre en el modo de
Secado Auto Release™, no se puede
cerrar manualmente durante los 2 minutos
siguientes.
* El modo de Secado Auto Release™ se
desactivará en el ciclo Rinse Only (Solo
enjuague).
Cambiar la confi guración de "Secado Auto Release™" puede afectar al desempeño del secado.
Seleccione el modo "A1" para obtener mejores resultados de secado. ("A1" es el ajuste predeterminado.)
Una vez fi nalizado un ciclo, la puerta se abre automáticamente para que salga el vapor. Esto es
normal y no se trata de un mal funcionamiento del producto.
Modo de confi guración
El modo de confi guración permite cambiar el sonido y el brillo del LED de la lavavajillas. Para ingresar en el modo de
confi guración, presione los botones Delay Start (Inicio retardado) + Sanitize (Desinfección) durante 3 segundos
con la lavavajillas encendida. Presione el botón Sanitize (Desinfección) para seleccionar un subelemento del menú
de confi guración y luego presione el botón Delay Start (Inicio retardado) para cambiar una confi guración.
- Confi guración del sonido: Presione el botón
se muestre "U1" (Sonido activado) o "U0" (Sonido desactivado). Para cambiar la
confi guración, presione el botón
está desactivado durante todos los ciclos. La lavavajillas conservará la confi guración del
sonido seleccionada hasta que vuelva a cambiarla.
- Confi guración del brillo del LED de bolsillo: Presione el botón
hasta que se muestre "B0-B5". Cuanto más alto es el número, más brillan los LED. Para
cambiar la confi guración en la lavavajillas, presione el botón
Delay Start (Inicio retardado)
Sanitize (Desinfección)
hasta que
. "U0" signifi ca que el sonido
Sanitize (Desinfección)
Delay Start (Inicio retardado)
.
Cuando use la lavavajillas, trate de acomodar los platos de manera adecuada, como se describe en la
página 21.
ADVERTENCIA
• Debe retirar de la vajilla todos los restos de comida, como huesos, semillas, etc., y cualquier otro tipo
de desecho como los palillos, papel u otros, ya que es posible que dañen la vajilla, generen ruidos u
ocasionen incluso mal funcionamiento.
• Seleccione el ciclo adecuado dependiendo del nivel de suciedad y el tipo de vajilla.
• Utilice únicamente la cantidad adecuada de detergente y de producto de enjuague.
No lave los siguientes artículos en la lavavajillas.
ADVERTENCIA
• Artículos de acrílico o aluminio: Los artículos de acrílico o aluminio pueden decolorar los platos con
un borde dorado impreso y dañar otros artículos.
• Platos tratados con adhesivo: Los plásticos tratados se deben lavar aparte. Los adornos de madera,
marfi l, cobre y hojalata de los platos pueden despegarse.
• Plásticos con una tolerancia a la temperatura inferior a 194 ˚F (90 ˚C): Los plásticos delgados no
se lavan ni secan bien y es posible que se dañen debido a las altas temperaturas de lavado.
• Hojalata: La hojalata debe lavarse a mano y secarse inmediatamente, ya que puede oxidarse.
• Utensilios de madera: Los artículos de madera pueden agrietarse.
Español - 16
DW9900M_DD68-00184A-02_MES.indd 16DW9900M_DD68-00184A-02_MES.indd 16 2017-09-20 3:27:342017-09-20 3:27:34
Page 57
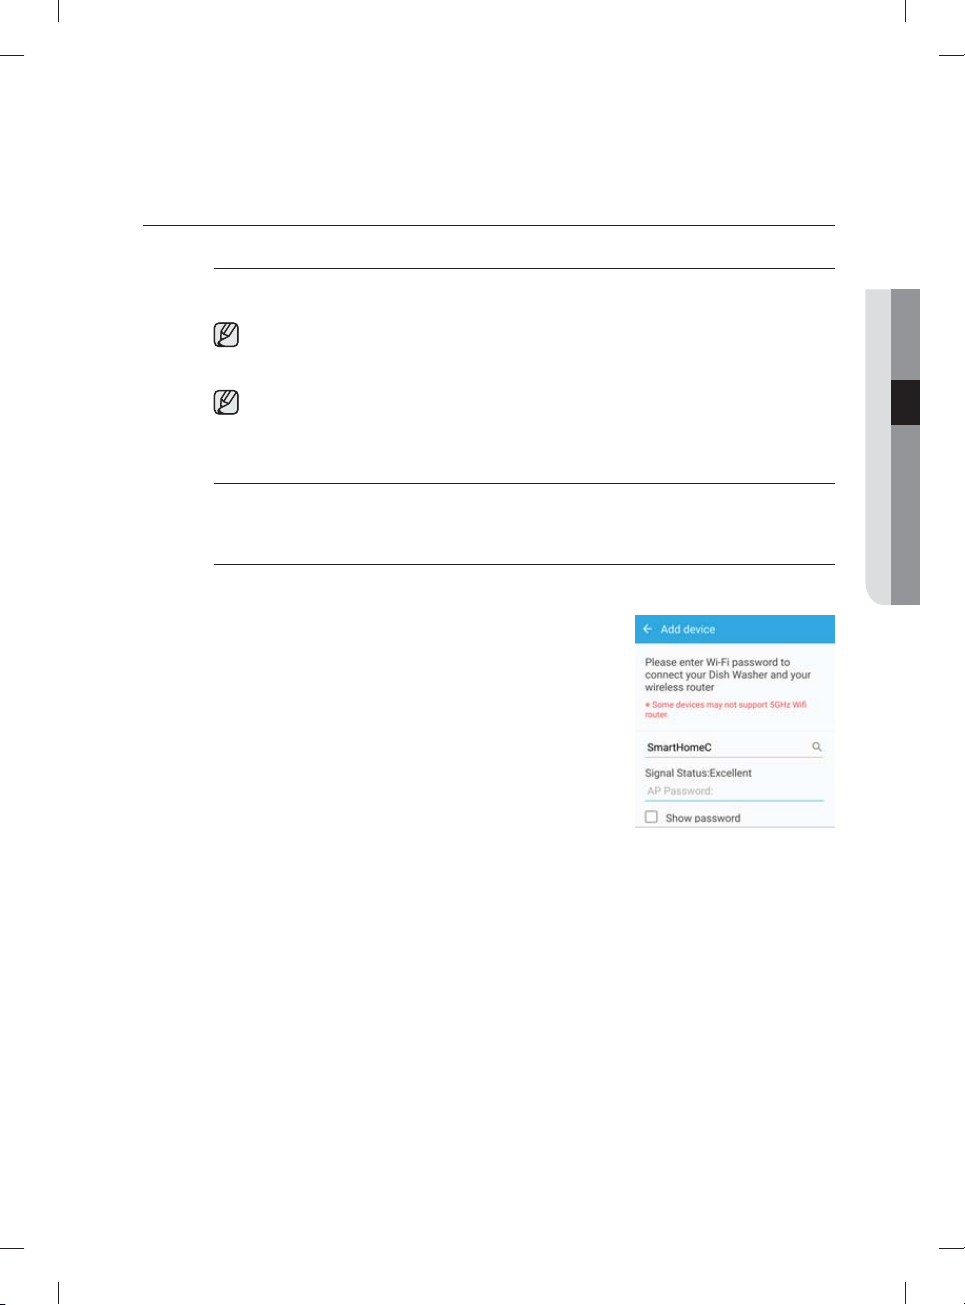
SAMSUNG SMART HOME (SOLO MODELOS APLICABLES)
Instalación
Visite Google Play Store, Galaxy Apps o Apple App Store y busque “Samsung Smart Home”. Descargue e
instale la aplicación Samsung Smart Home provista por Samsung Electronics a su dispositivo inteligente.
La aplicación Samsung Smart Home está diseñada para Android 4.0 (ICS) o superior, o iOS 7.0 o
superior, y está optimizada para teléfonos inteligentes Samsung (series Galaxy S y Galaxy Note).
En otros modelos de teléfono inteligente, algunas funciones pueden operar de una manera distinta.
Para un mejor desempeño, la aplicación Samsung Smart Home está sujeta a cambios sin previo
aviso. El soporte técnico de la aplicación puede interrumpirse sin previo aviso de acuerdo con la
política del fabricante.
Cuenta Samsung
Para usar la aplicación debe tener una cuenta Samsung registrada. Si no dispone de una cuenta Samsung,
siga las instrucciones en pantalla de la aplicación para crear una cuenta Samsung gratuita.
Cómo comenzar
Para usuarios de teléfonos inteligentes Android
1. Ejecute la aplicación Samsung Smart Home en su teléfono
inteligente.
2. Toque Add Device (Agregar dispositivo) > Select other
device (Seleccionar otro dispositivo) > Dish Washer
(Lavavajillas) en la pantalla de la aplicación.
3. Mantenga presionado Smart Control en el panel de control de
la lavavajillas durante más de 3 segundos.
4. Espere hasta que la aplicación busque las conexiones de red
disponibles y encuentre su red (AP).
5. Toque su AP y luego ingrese su contraseña de red.
6. Cuando fi nalice el registro del dispositivo, toque Done (Listo).
Ahora puede controlar su lavavajillas remotamente.
03 uso de la lavavajillas
Español - 17
DW9900M_DD68-00184A-02_MES.indd 17DW9900M_DD68-00184A-02_MES.indd 17 2017-09-20 3:27:342017-09-20 3:27:34
Page 58
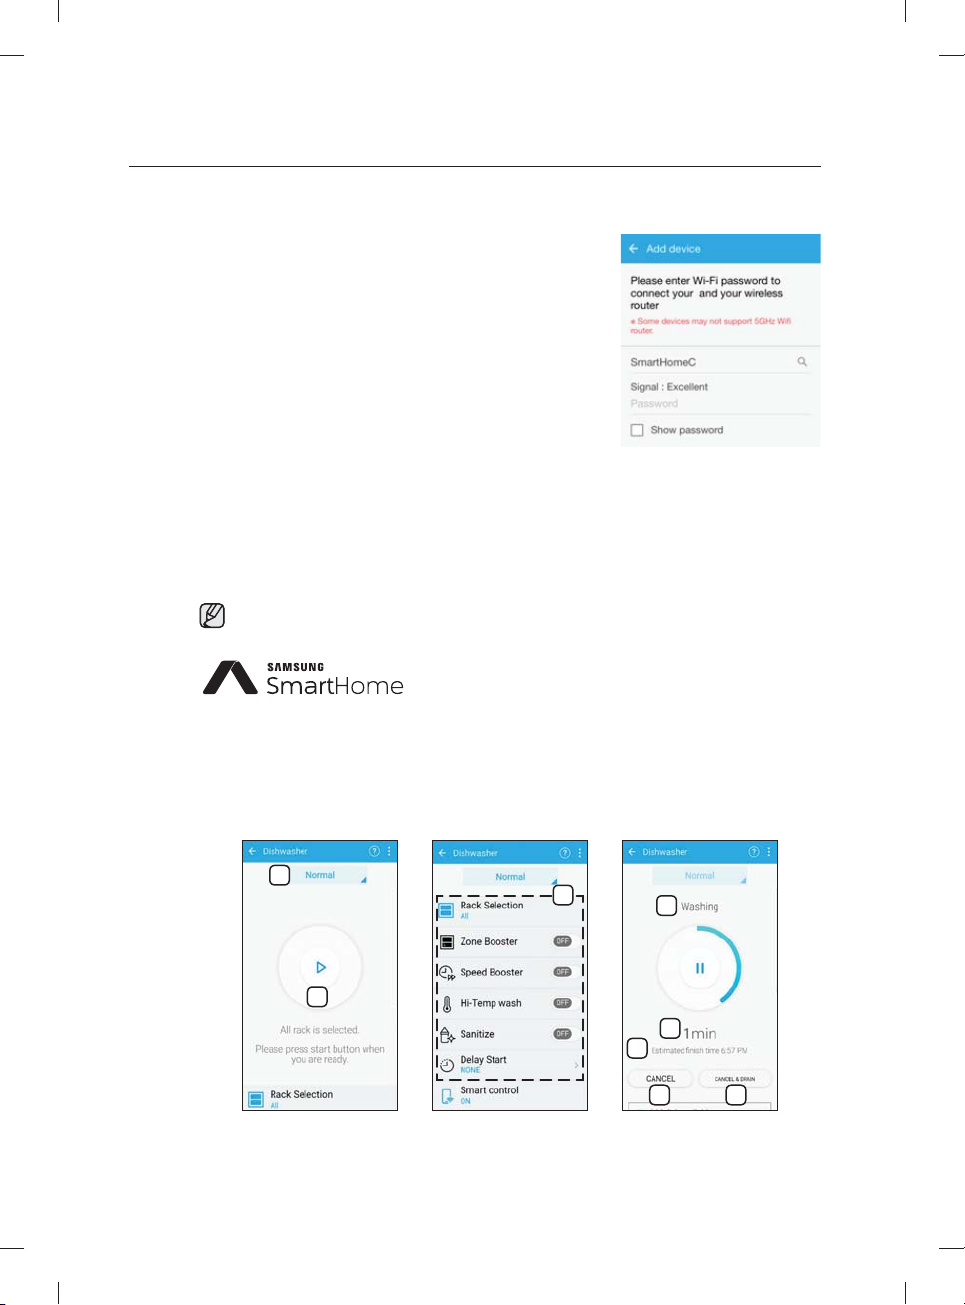
uso de la lavavajillas
Para usuarios de teléfonos inteligentes iOS
1. 1. Ejecute la aplicación Samsung Smart Home en su iPhone y
luego toque Add Device (Agregar dispositivo).
2. Inicie sesión con el ID y la contraseña de su cuenta Samsung.
Toque Select other device (Seleccionar otro dispositivo) >
Dish Washer (Lavavajillas).
3. Mantenga presionado Smart Control en el panel de control
de la lavavajillas durante más de 3 segundos. Toque Next
(Siguiente).
4. Siga las instrucciones en pantalla y luego vaya a Settings
(Confi guración). Toque Wi-Fi > [Dish Washer (Lavavajillas)]
Samsung Wi-Fi y luego ingrese la contraseña, ‘1111122222’.
5. De regreso a la pantalla de la aplicación, toque Next
(Siguiente). Cuando la aplicación encuentre su red (AP),
ingrese la contraseña de red.
6. Siga las instrucciones en pantalla y luego vaya nuevamente a
Settings (Confi guración). Toque el AP conectado. De regreso
a la pantalla de la aplicación, toque Next (Siguiente).
7. Cuando fi nalice el registro del dispositivo, toque Done (Listo).
Ahora puede controlar su lavavajillas remotamente.
Si la función Smart Control está activada, el indicador de Smart Control en la puerta de enciende en
consecuencia.
Este producto en una lavavajillas inteligente que admite el servicio
Samsung Smart Home.
Para obtener más información, visite www.samsung.com.
Funciones principales
Registre los electrodomésticos Samsung smart home en el servidor de Samsung Smart Home para acceso
remoto.
Descripción del menú
1
2
Español - 18
DW9900M_DD68-00184A-02_MES.indd 18DW9900M_DD68-00184A-02_MES.indd 18 2017-09-20 3:27:342017-09-20 3:27:34
3
4
5
6
7 8
Page 59
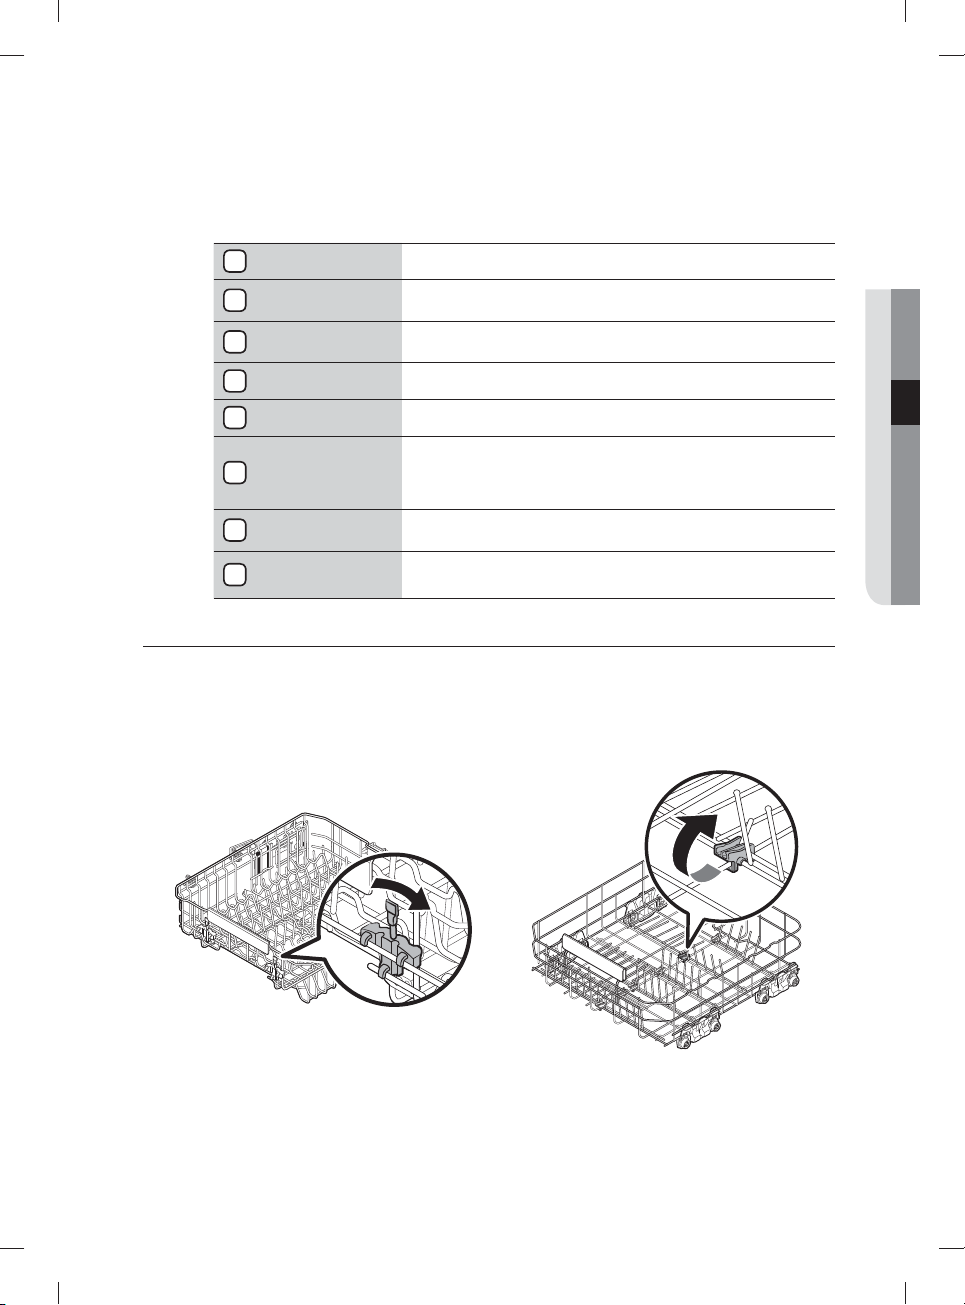
Para un mejor desempeño, el contenido y el diseño de la aplicación están sujetos a cambios sin previo
aviso.
1
Ciclo actual Toque para seleccionar el ciclo deseado.
2
Inicio/Pausa
3
Opciones
4
Proceso actual Se muestra el proceso que está ejecutándose del ciclo seleccionado.
5
Progreso de tiempo Se muestra el progreso de tiempo del ciclo seleccionado.
Con Smart Control activado en la lavavajillas, puede iniciar o pausar
temporalmente la operación con el teléfono inteligente.
Confi gure o ajuste las opciones según sea necesario. Encontrará una
explicación de cada opción en el panel de control.
Estimated Finish
Time (Hora
6
aproximada de
Se muestra la hora aproximada de fi nalización.
fi nalización)
7
Cancel (Cancelar)
Cancel & Drain
8
(Cancelar y drenar)
Toque para cancelar el ciclo actual y regresar a la pantalla de selección
de ciclos.
Toque para cancelar el ciclo actual, drenar el agua de la lavavajillas y
regresar a la pantalla de selección de ciclos.
AJUSTE DEL ÁNGULO DE LOS SOPORTES PARA PLATOS
Puede ajustar el ángulo de los dientes del estante superior en tres posiciones distintas para que coincida con el
tamaño y la forma de la vajilla. Para ajustar los dientes, sujete la manija de la parte anterior del estante y empuje hacia la
izquierda o hacia la derecha. Consulte la ilustración inferior.
En el estante inferior, puede plegar fácilmente los dientes plegables para hacer lugar para artículos grandes, como ollas
y sartenes. Retire el estante de la lavavajillas, luego pliegue los dientes uno a uno. Consulte la ilustración inferior.
03 uso de la lavavajillas
Estante superior Estante inferior
Español - 19
DW9900M_DD68-00184A-02_MES.indd 19DW9900M_DD68-00184A-02_MES.indd 19 2017-09-20 3:27:352017-09-20 3:27:35
Page 60
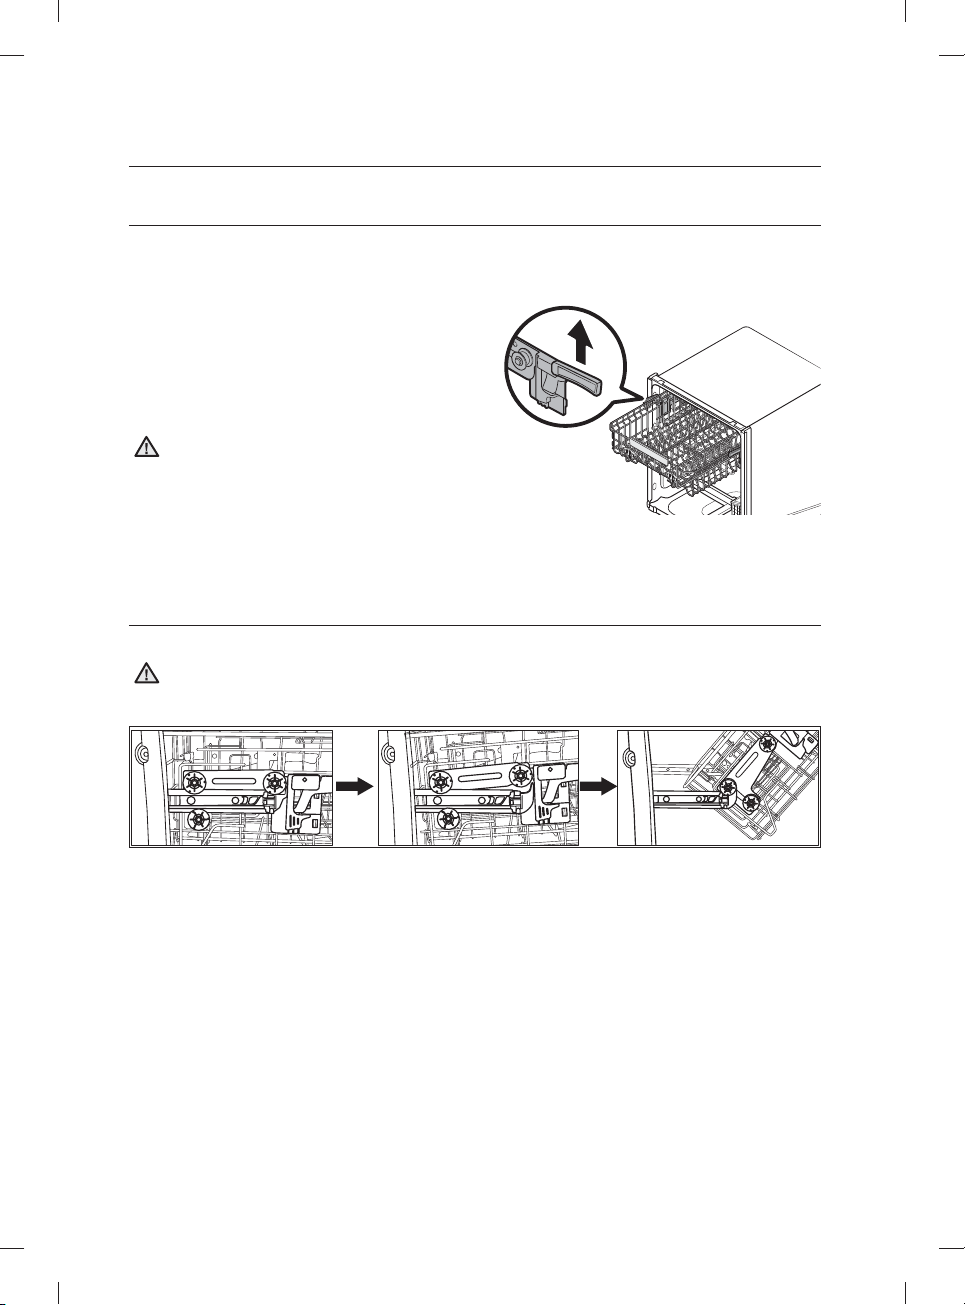
uso de la lavavajillas
AJUSTE DE LA ALTURA DEL ESTANTE SUPERIOR
Puede ajustar la altura del estante superior de su lavavajillas Samsung para dar cabida en el estante inferior a platos de
mayor tamaño. Según la altura del estante superior que establezca, en el estante inferior puede ubicar platos de hasta
12 pulgadas (30 cm) de diámetro y en el estante superior platos de hasta 8 pulgadas (20 cm) de diámetro.
1. Para bajar el estante superior 2 pulgadas (5 cm),
presione las manijas de ajuste que están situadas a la
izquierda y a la derecha del estante superior y luego
presiónelo suavemente hacia abajo al mismo tiempo.
2. Para subir el estante superior, simplemente empújelo
hacia arriba. La manija de ajuste se trabará y el estante
superior quedará en posición alta.
Recomendamos que ajuste la altura del estante
superior antes de cargar la vajilla. Si la ajusta luego
PRECAUCIÓN
de cargar la vajilla, esta puede resultar dañada. Si no
la ajusta utilizando las manijas izquierda y derecha al
mismo tiempo, la puerta de la lavavajillas puede que
no se cierre correctamente.
Para ajustar el estante superior, jale hasta retirarlo
totalmente de la tina.
CÓMO RETIRAR EL ESTANTE SUPERIOR
Jale el estante superior, levántelo levemente y jale hacia el frente para retirarlo. Consulte las ilustraciones inferiores.
Si bien puede retirarse el estante superior, debe estar instalado para que la lavavajillas funcione correctamente.
Si trata de operar la lavavajillas sin el estante, se escuchará ruido y el desempeño de la lavavajillas será
PRECAUCIÓN
defi ciente.
Paso 1. Paso 2. Paso 3.
Español - 20
DW9900M_DD68-00184A-02_MES.indd 20DW9900M_DD68-00184A-02_MES.indd 20 2017-09-20 3:27:352017-09-20 3:27:35
Page 61
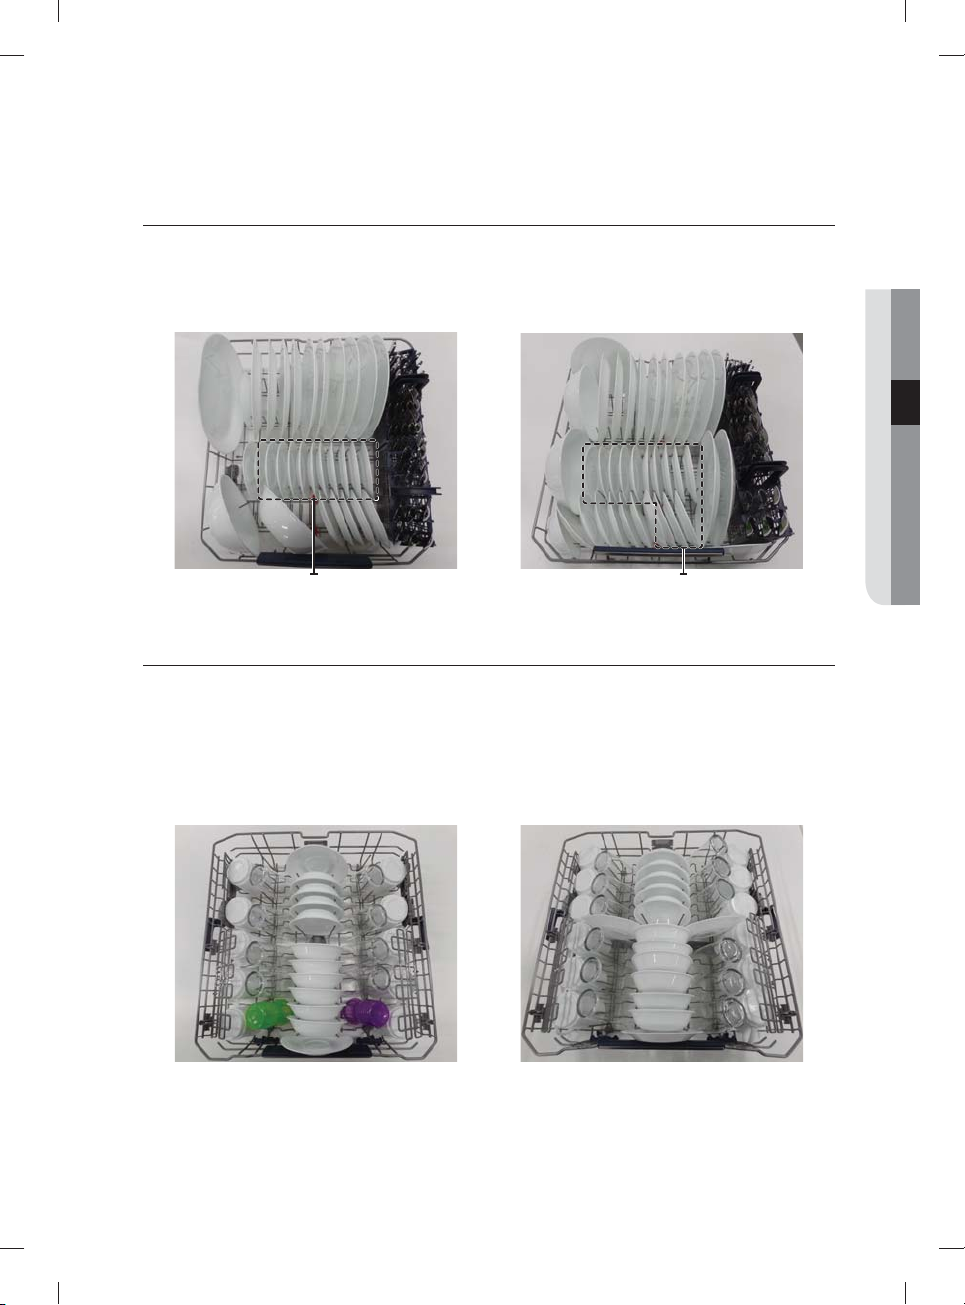
CARGA DEL ESTANTE INFERIOR
Platos de postre
Platos de postre
El estante inferior se ha diseñado específi camente para vajilla, tazones para sopa, platos, ollas, tapas y fuentes de
horno.
Cargue los objetos grandes como recipientes y ollas de manera que sus lados abiertos miren hacia abajo.
Recomendamos colocar las tazas, la cristalería y los platos pequeños en el estante superior.
Consulte los patrones de carga recomendados que se encuentran a continuación.
03 uso de la lavavajillas
Platos de postre
10 puestos 12 puestos
Platos de postre
CARGA DEL ESTANTE SUPERIOR
El estante superior se ha diseñado para platos pequeños, jarras, vasos y objetos de plástico que tengan el rótulo "apto
para lavavajillas". Cargue los platos en la lavavajillas en dos medias hileras, de manera que la cara de cada plato mire la
parte trasera del otro que tiene enfrente, y que las caras de los platos en el centro de la lavavajillas se enfrenten unas a
otras. Consulte las ilustraciones inferiores.
Asegúrese de que la vajilla cargada no interfi era con la rotación de la boquilla que se encuentra en la parte inferior del
estante superior. (Para verifi carlo, haga rotar la boquilla a mano.)
Para cargar la vajilla, jale el estante superior dejando el espacio sufi ciente para que pueda cargarlo sin golpear la
encimera superior.
10 puestos 12 puestos
Español - 21
DW9900M_DD68-00184A-02_MES.indd 21DW9900M_DD68-00184A-02_MES.indd 21 2017-09-20 3:27:352017-09-20 3:27:35
Page 62
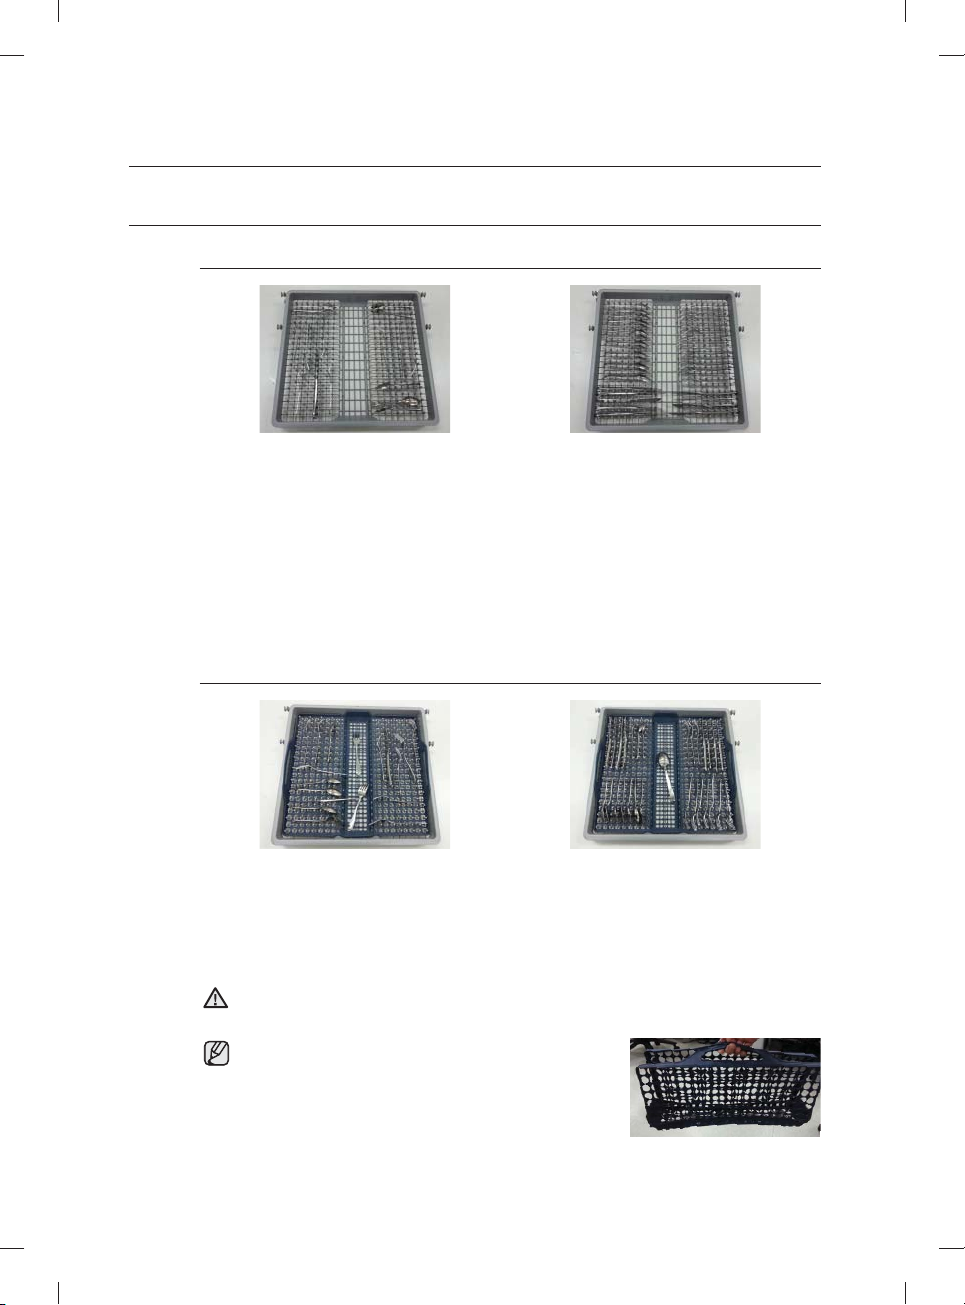
uso de la lavavajillas
USO DEL 3ER ESTANTE (CUBIERTOS) (EN ALGUNOS MODELOS)
Carga del estante para cubiertos
<Coloque los artículos en forma aleatoria u ordenada.>
Además de la canasta para cubiertos estándar del estante superior, algunos modelos cuentan con un
estante para cubiertos.
El estante para cubiertos es adecuado para cubiertos y utensilios para cocinar y servir. Puede
acomodar los cubiertos y utensilios en forma aleatoria u ordenada en el estante para cubiertos.
Para una limpieza más efi caz, los utensilios o artículos muy sucios o con restos de alimentos
adheridos deben colocarse en la canasta para cubiertos inferior.
Cómo retirar el estante para cubiertos
Se puede retirar el estante para cubiertos completo si se necesita disponer de más espacio en el
estante superior para artículos voluminosos.
Carga de la rejilla para cubiertos
<Coloque los artículos en forma aleatoria u ordenada.>
Algunos modelos tienen una rejilla plegable junto con el estante para cubiertos. Para utilizarla, coloque la
rejilla en el estante para cubiertos y luego acomode los cubiertos y los utensilios para cocinar y servir en
la parrilla en forma aleatoria u ordenada. Luego de completar el ciclo de lavado, y cuando los cubiertos
y utensilios estén secos, puede plegar la rejilla y llevar los cubiertos y utensilios en la rejilla a su lugar de
almacenamiento.
Actúe con precaución cuando pliegue o mueva el estante con un artículo delgado y largo en la
rejilla. El artículo se podría caer y provocar lesiones personales.
ADVERTENCIA
Es aconsejable no mover la rejilla cuando está mojada.
Espere hasta que esté seca.
Después de un ciclo de lavado, la rejilla se seca rápidamente si
se la deja al aire algunos minutos.
Español - 22
DW9900M_DD68-00184A-02_MES.indd 22DW9900M_DD68-00184A-02_MES.indd 22 2017-09-20 3:27:362017-09-20 3:27:36
Page 63
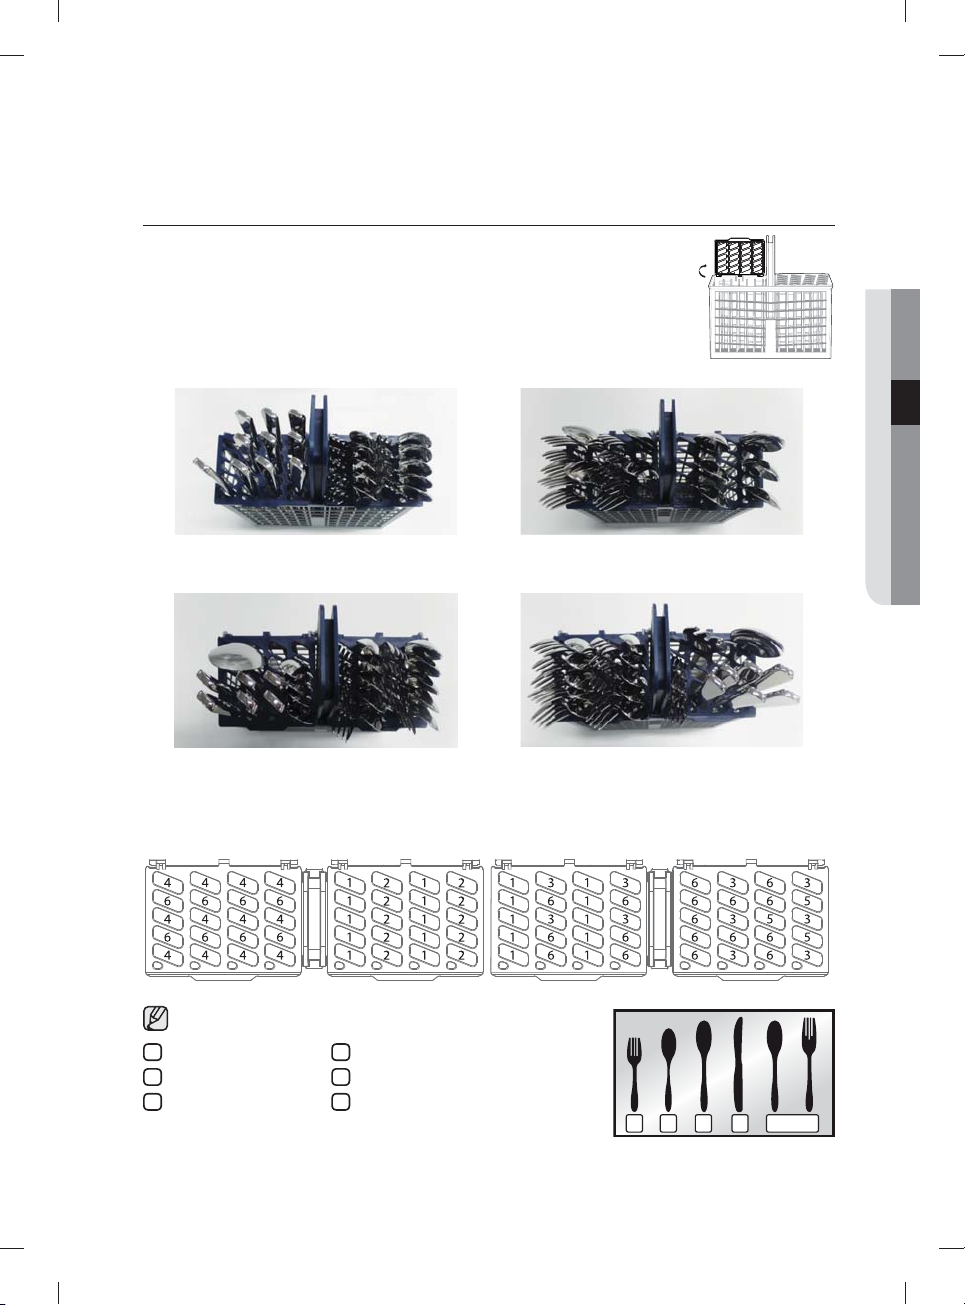
USO DEL ESTANTE PARA CUBIERTOS
El estante para cubiertos consiste en dos compartimientos.
Puede colocar independientemente cada cuchillo, cuchara o tenedor en el soporte para
cucharas en la cubierta de la canasta para evitar roturas o decoloración.
El estante para cubiertos puede utilizarse con la cubierta abierta. Consulte la ilustración de la
derecha.
Izquierda Derecha
10 puestos
Izquierda Derecha
12 puestos
03 uso de la lavavajillas
Soporte para cucharas visto desde arriba con las ubicaciones sugeridas para los cubiertos. Haga coincidir los números
del diagrama con los números de la lista inferior de los cubiertos.
NO permita que ningún artículo llegue hasta la parte inferior.
1
Tenedores
2
Cucharitas para té
3
Cucharas
4
Cuchillos
5
Cucharas y tenedores de servir
6
Artículos restantes
1 3 42 5
Español - 23
DW9900M_DD68-00184A-02_MES.indd 23DW9900M_DD68-00184A-02_MES.indd 23 2017-09-20 3:27:362017-09-20 3:27:36
Page 64
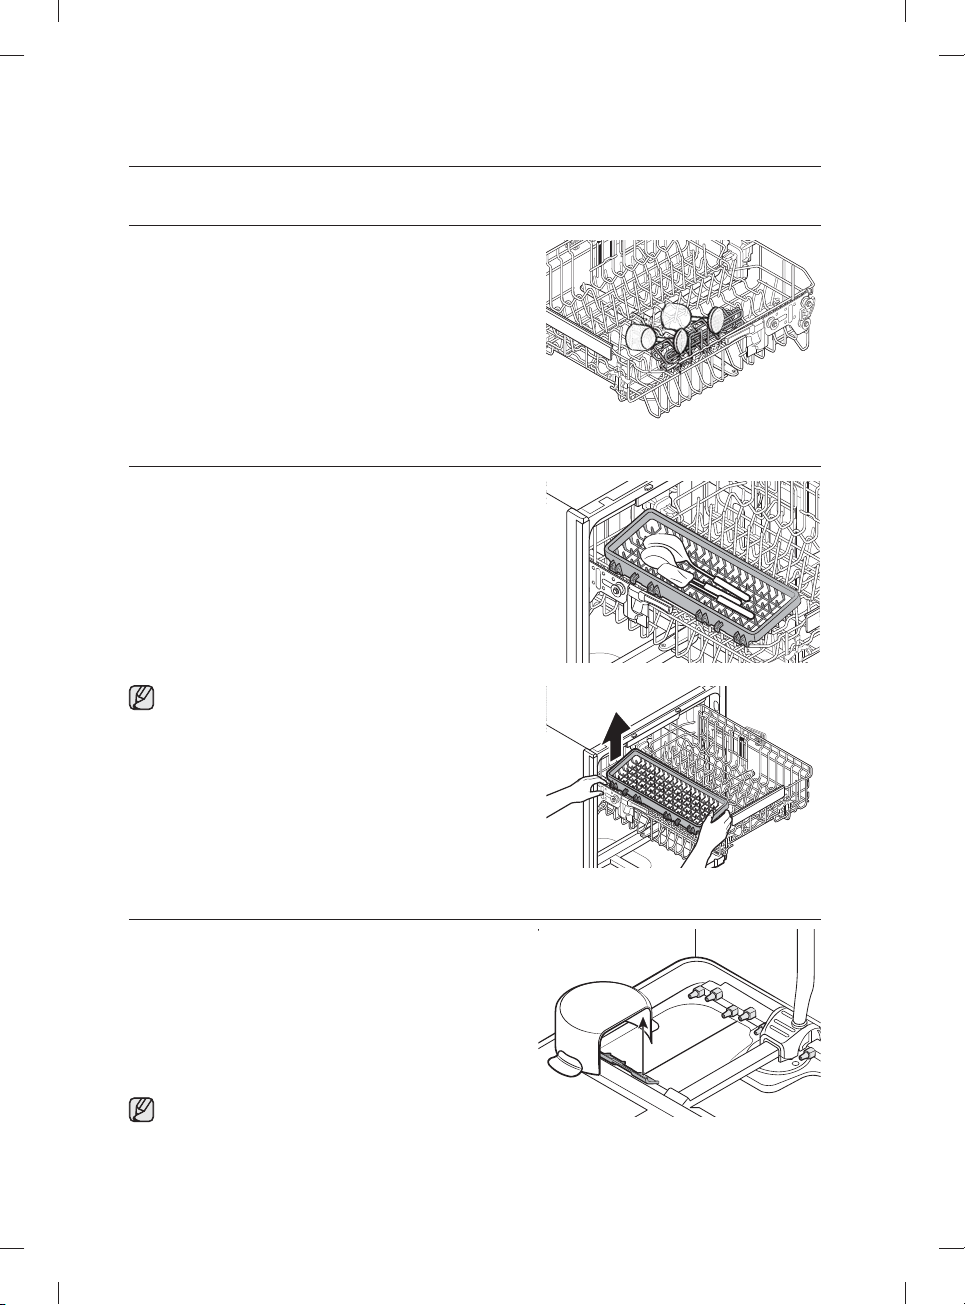
uso de la lavavajillas
USO DEL SOPORTE PARA COPAS
Puede cargar tazas o vasos en el soporte para copas. Resulta muy
práctico también para lavar copas de vino. Cuelgue sus copas de
vino de las espigas del soporte para copas.
Puede plegar el soporte para copas cuando no se use.
USO DE LA CUBETA AUXILIAR (PARA ALGUNOS MODELOS)
Use la cubeta auxiliar a la izquierda del estante superior para colocar
espátulas, cucharas de servir y artículos similares.
Si desea retirar la cubeta auxiliar, sostenga la canasta superior
y un extremo de la cubeta auxiliar antes de levantarla.
USO DE LA ZONA DE REFUERZO
Para usar el ciclo Chef (en algunos modelos) y la opción
Zone Booster (Zona de refuerzo), cargue los artículos muy
sucios en el lado izquierdo del lower rack (estante inferior), la
Zone Booster (Zona de refuerzo). Con el ciclo Chef puede
lavar artículos muy sucios utilizados en el horno. La función
Zone Booster (Zona de refuerzo) suministra chorros de agua
más potentes en el área de la Zone Booster (Zona de refuerzo).
Asegúrese de que las manijas de las ollas y otros artículos no
interfi eran con la rotación de las boquillas y el refl ector de agua.
Puede cargar artículos ligeramente sucios en otras zonas o
estantes mientras utiliza el ciclo Chef.
Español - 24
DW9900M_DD68-00184A-02_MES.indd 24DW9900M_DD68-00184A-02_MES.indd 24 2017-09-20 3:27:372017-09-20 3:27:37
Page 65
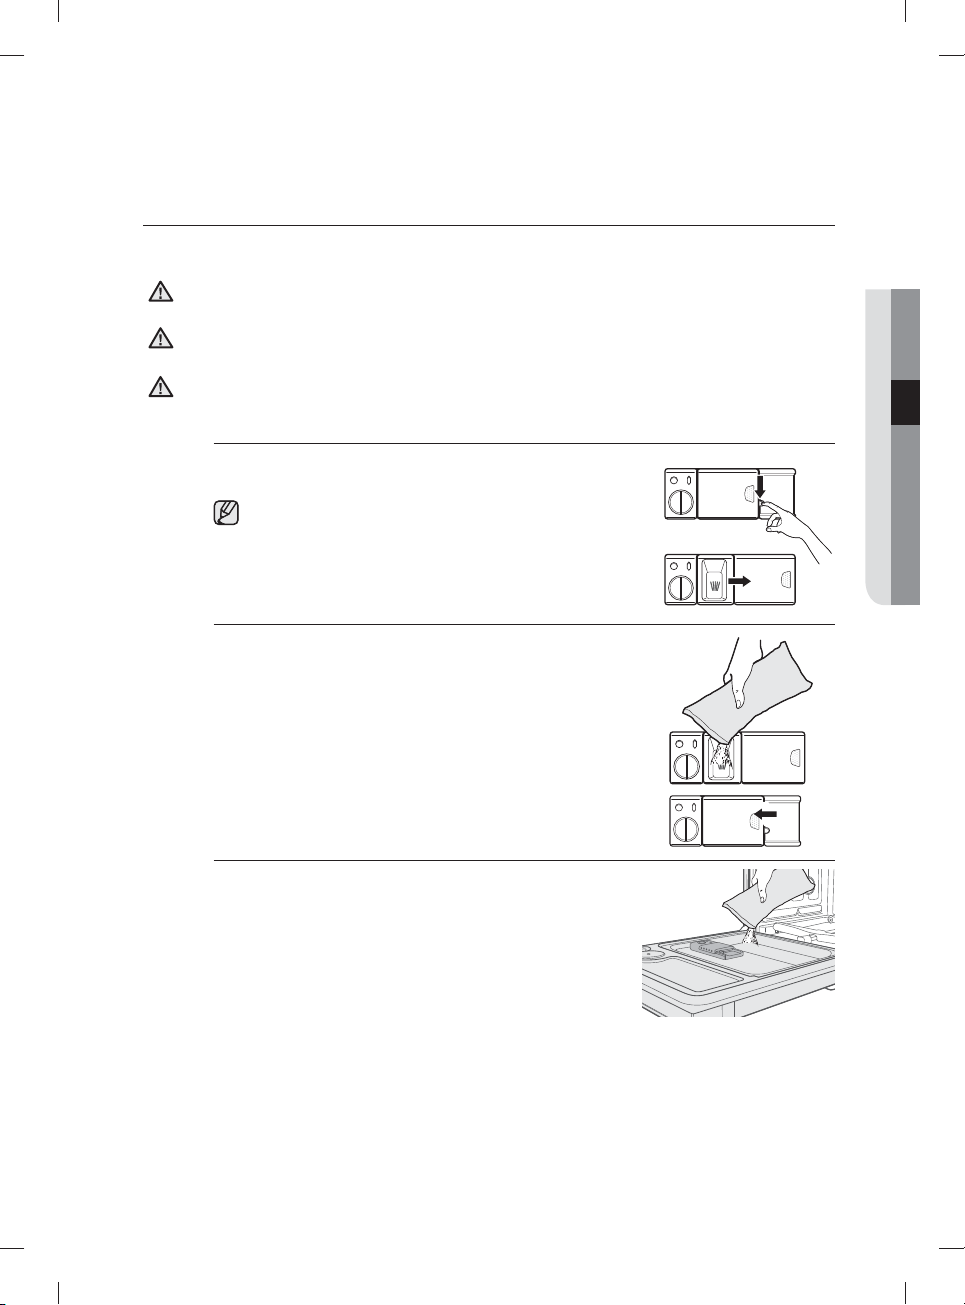
USO DEL DETERGENTE
Todos los ciclos de la lavavajillas requieren detergente en el compartimiento correspondiente.
Agregue la cantidad adecuada de detergente para el ciclo seleccionado para asegurar el mejor desempeño.
Use solamente detergente para lavavajillas. Los detergentes normales producen demasiada espuma, lo que
PRECAUCIÓN
puede reducir el desempeño de la lavavajillas o causar su mal funcionamiento.
No ingiera detergente para lavavajillas. Evite inhalar las emanaciones. Los detergentes para lavavajillas contienen
productos químicos irritantes y cáusticos que pueden provocar trastornos respiratorios. Si ingirió detergente
ADVERTENCIA
para lavavajillas o inhaló sus emanaciones, procúrese atención médica inmediatamente.
Mantenga el detergente para lavavajillas fuera del alcance de los niños.
ADVERTENCIA
Llenado del dosifi cador de detergente
1. Abra la tapa del dosifi cador de detergente empujando su pestillo de
liberación.
La tapa siempre está abierta al fi nal del ciclo de lavado.
2. Agregue la cantidad recomendada de detergente en el
compartimiento del detergente de lavado principal.
3. Cierre la tapa deslizándola hacia la izquierda y presionándola.
03 uso de la lavavajillas
4. Para obtener los mejores resultados, en especial con los artículos
muy sucios, vierta una pequeña cantidad (alrededor de 1/2 onza o
15 gramos) de detergente en la puerta.
El detergente adicional se activará durante la fase de prelavado.
Español - 25
DW9900M_DD68-00184A-02_MES.indd 25DW9900M_DD68-00184A-02_MES.indd 25 2017-09-20 3:27:382017-09-20 3:27:38
Page 66
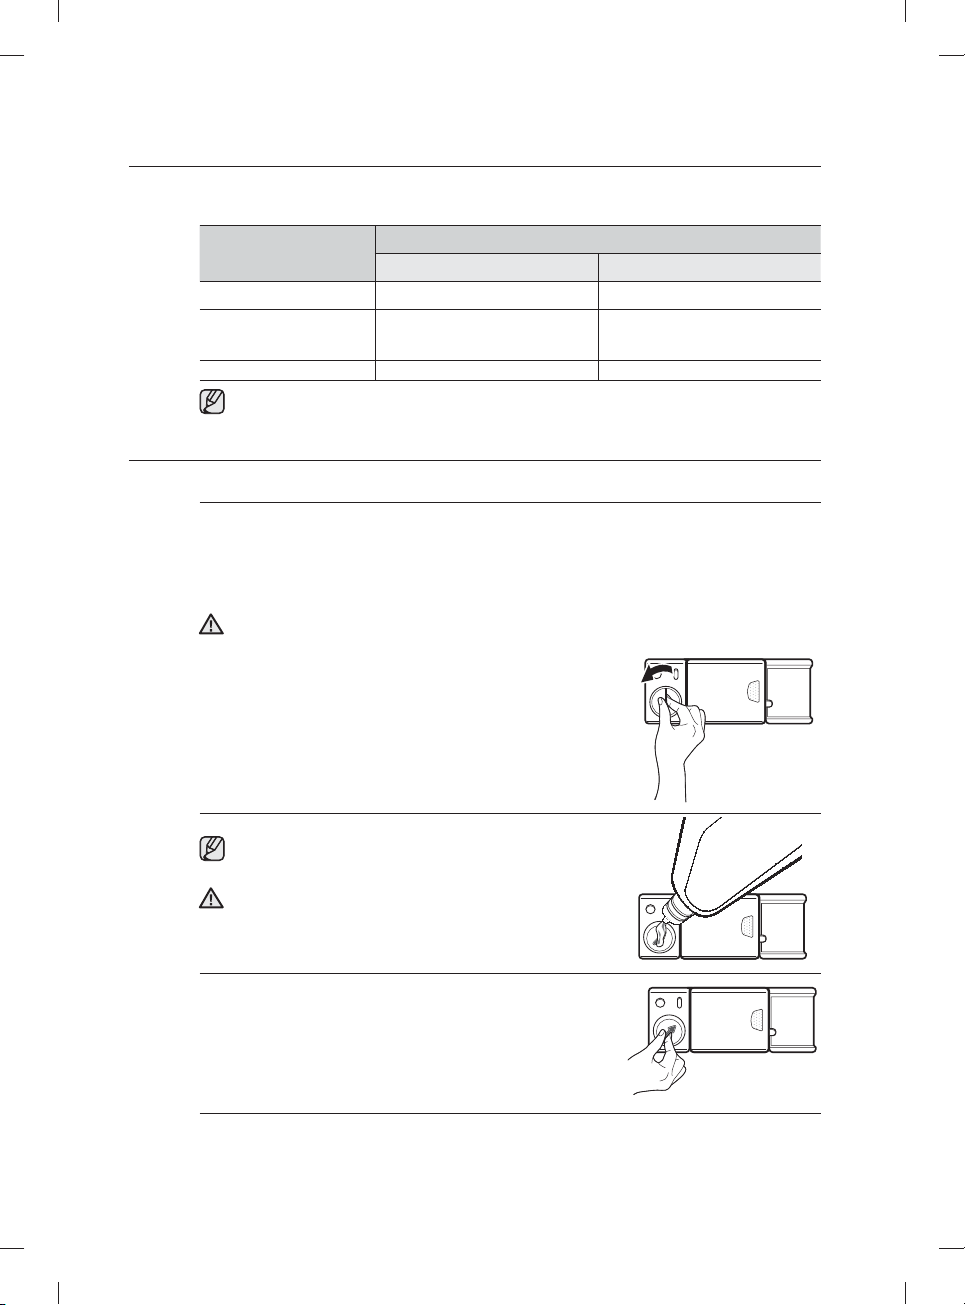
uso de la lavavajillas
La cubierta se abre automáticamente para dosifi car el detergente durante el lavado.
CICLO
Auto, Normal 3/4 oz (20 g) 1/3 oz (10 g)
Heavy (Muy sucio),
Express 60 (Rápido 60),
Chef
Delicate (Vajilla delicada) 3/4 oz (20 g) 1/5 oz (5 g)
Los números que se encuentran dentro del dosifi cador aluden a gramos.
Dosifi cador para el lavado principal En la puerta para el prelavado
USO DEL PRODUCTO DE ENJUAGUE
Llenado del depósito de producto de enjuague
Cuando se enciende el indicador Rinse Refi ll (Reponer producto de enjuague) del panel de control, reponga
el producto para el enjuague.
La lavavajillas se ha diseñado para usar solo producto de enjuague líquido.
El uso de un producto en polvo puede obstruir la apertura del depósito y hacer que la lavavajillas no
funcione correctamente
El producto de enjuague mejora el desempeño del secado de la lavavajillas.
No agregue un detergente normal en el depósito del producto de enjuague.
PRECAUCIÓN
1. Retire la tapa del depósito del producto de enjuague girándola en
sentido contrario al de las agujas del reloj.
CANTIDAD DE DETERGENTE
1 oz (30 g) 1/2 oz (15 g)
2. Llene el depósito de producto para el enjuague.
Utilice el orifi cio de visualización al llenar el depósito de producto
para el enjuague.
No sobrepase el indicador de nivel lleno.
El exceso de producto de enjuague se puede derramar durante el
PRECAUCIÓN
ciclo de lavado.
3. Gire el dial del indicador del producto de enjuague hasta un
número entre 1 y 6. Cuanto más alto es el número, más cantidad
de producto de enjuague utiliza la lavavajillas. Si no puede rotar
el dial del producto de enjuague fácilmente, inténtelo con una
moneda.
4. Cierre la tapa del depósito de producto para el enjuague girándola en el sentido de las agujas del reloj.
Español - 26
DW9900M_DD68-00184A-02_MES.indd 26DW9900M_DD68-00184A-02_MES.indd 26 2017-09-20 3:27:392017-09-20 3:27:39
Page 67
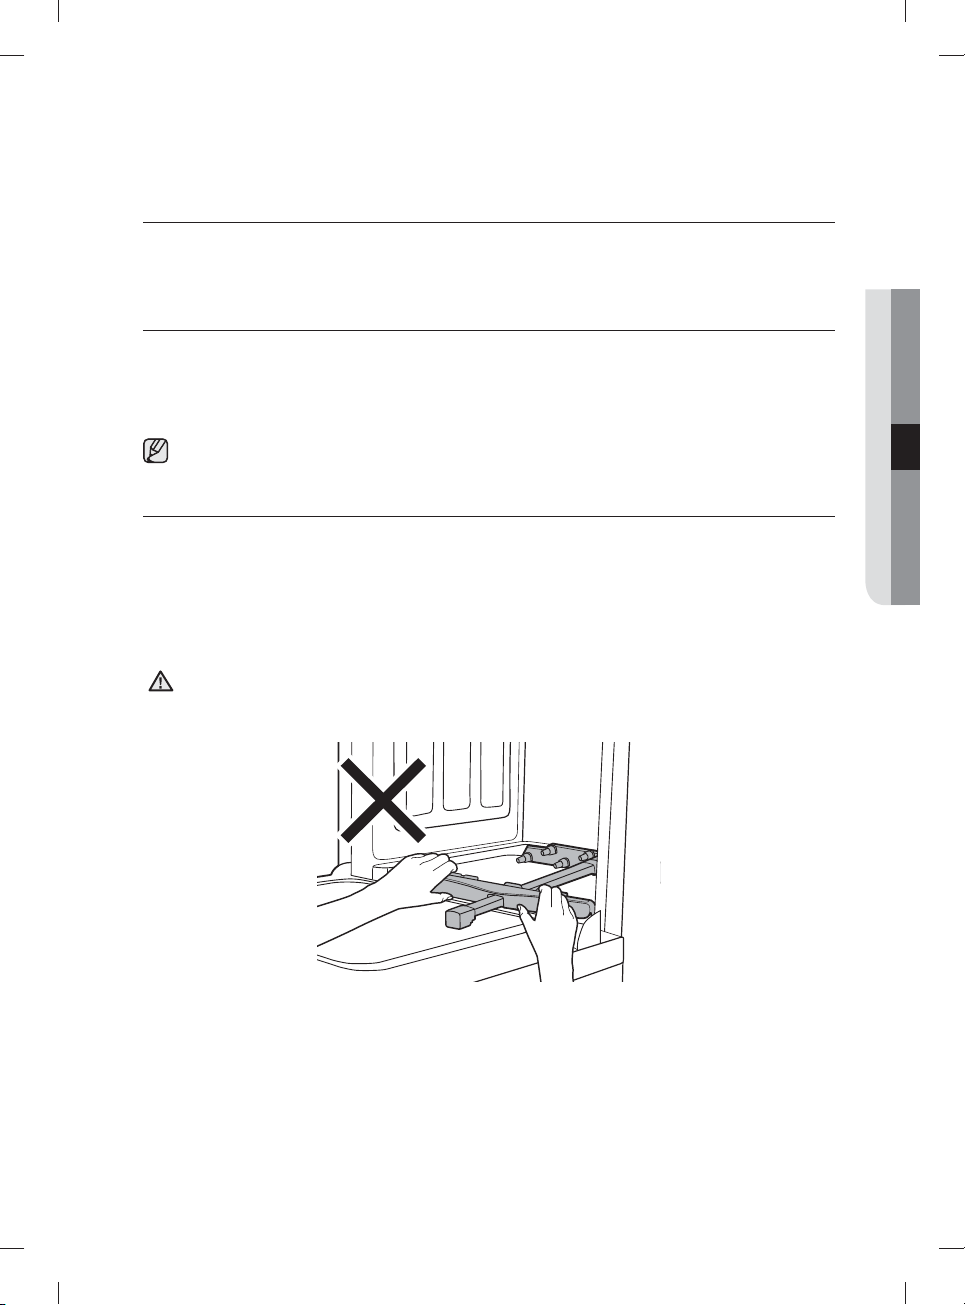
limpieza y mantenimiento de la
lavavajillas
Mantener la lavavajillas limpia mejora su desempeño, reduce la cantidad de reparaciones
innecesarias y alarga su vida.
LIMPIEZA DEL EXTERIOR
Se recomienda limpiar los derrames en el exterior de la lavavajillas a medida que ocurran. Utilice un paño suave
y húmedo para limpiar suavemente todos los derrames y el polvo del panel de control. No utilice benceno, cera,
diluyente, blanqueador a base de cloro ni alcohol. Estos materiales pueden decolorar el panel de la puerta y las
superfi cies externas y producir manchas. No debe rociarse agua sobre la lavavajillas para limpiarla y debe evitarse que
el agua entre en contacto con las partes eléctricas.
Si la lavavajillas posee un panel de acero inoxidable en la puerta, puede limpiarlo con un paño limpio y suave y un
limpiador para acero inoxidable de electrodomésticos o un producto semejante.
LIMPIEZA DEL INTERIOR
Limpie periódicamente el interior de la lavavajillas para eliminar las partículas de suciedad o comida. Limpie el
interior de la lavavajillas y la parte interior de la puerta con un repasador húmedo. Recomendamos que llene el
dosifi cador con detergente para lavavajillas y luego opere la lavavajillas vacía periódicamente usando la opción
Self Clean (Autolimpieza). Para mantener la rejilla para cubiertos despejada, voltéela. Esto mantendrá limpia su
lavavajillas.
Si en la lavavajillas hay aún manchas blancas y olores, ejecute la opción Self Clean (Autolimpieza) con la lavavajillas
vacía y sin detergente hasta que se vacíe. Luego, interrumpa el ciclo y ponga una taza de 8 onzas de vinagre blanco en
la canasta inferior. Cierre la lavavajillas y deje terminar el ciclo.
No quite el sello frontal de la tina (el sello de goma largo que rodea la abertura de la lavavajillas).
PRECAUCIÓN
No mueva el refl ector de agua a mano. Puede dañar el motor de la lavavajillas.
04 limpieza y mantenimiento de la lavavajillas
Español - 27
DW9900M_DD68-00184A-02_MES.indd Sec5:27DW9900M_DD68-00184A-02_MES.indd Sec5:27 2017-09-20 3:27:392017-09-20 3:27:39
Page 68
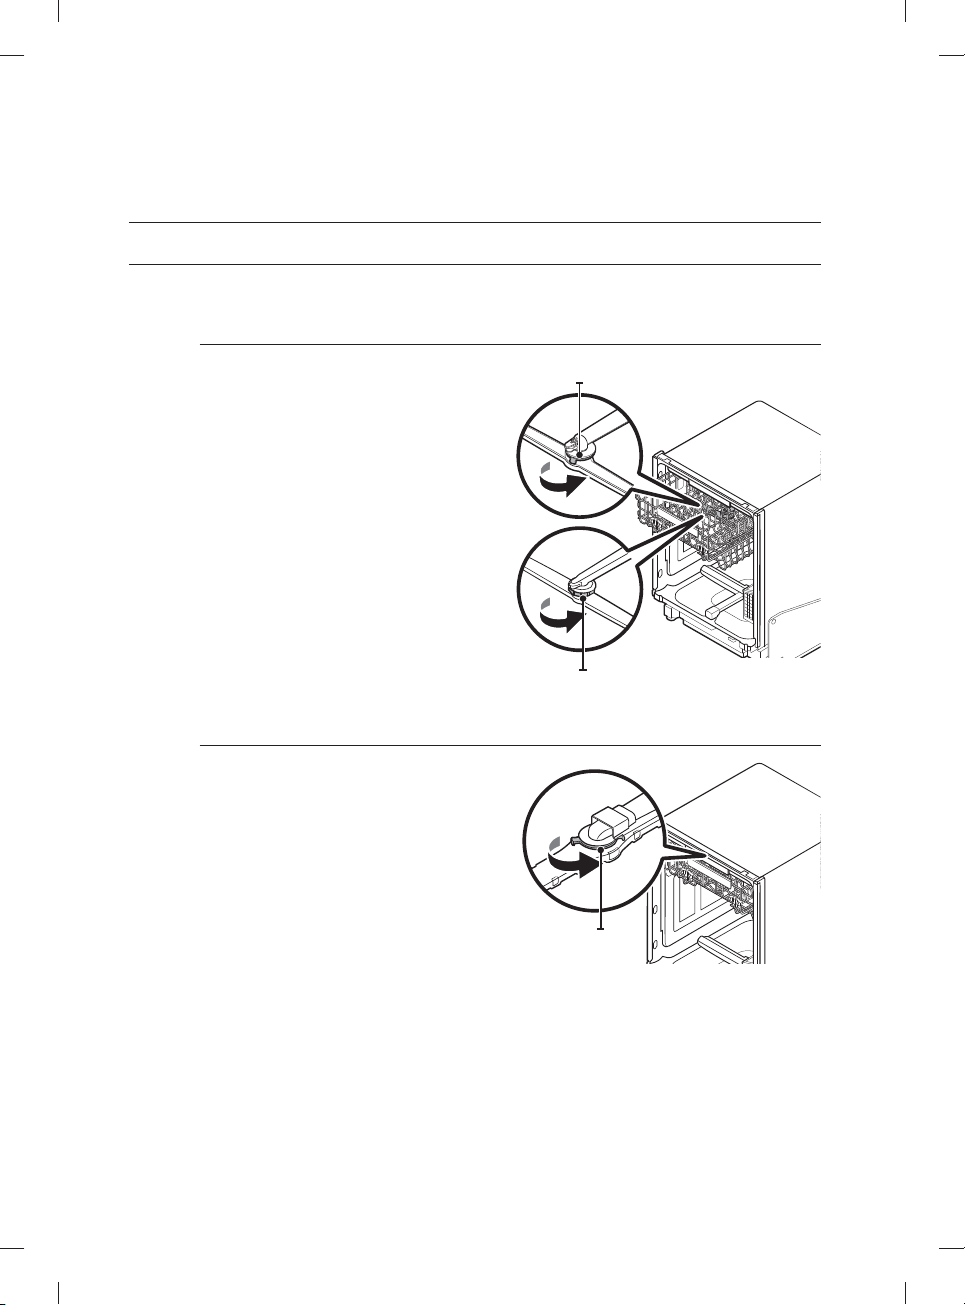
limpieza y mantenimiento de la
lavavajillas
LIMPIEZA DE LAS BOQUILLAS
Si la lavavajillas no limpia correctamente o las boquillas parecen estar obstruidas, puede limpiarlas en forma individual.
Tenga cuidado al retirar las boquillas, ya que pueden romperse.
Boquilla superior
1. Abra la puerta y, luego, jale el estante superior
para revelar la boquilla superior.
2. Gire hacia la izquierda y retire la tapa de la
boquilla (serie 95**) o la tuerca de la boquilla
(series 9990 y 9960); luego, retire la boquilla.
3. Desobstruya y limpie la boquilla.
4. Vuelva a insertar la boquilla y, luego, ajuste la
tuerca hacia la derecha.
5. Gire manualmente la boquilla para asegurarse
de que esté bien enganchada.
Boquilla techo
1. Verifi que que los orifi cios de la boquilla no estén
obstruidos con partículas de comida.
2. Si hace falta limpiarla, retire la boquilla del techo.
3. Para retirar la boquilla del techo, quite primero
el estante superior, afl oje la tapa de la boquilla
girándola en sentido contrario al de las agujas
del reloj y luego extraiga la boquilla.
4. Limpie la boquilla, insértela nuevamente y ajuste
la tapa de la boquilla girándola en el sentido de
las agujas del reloj.
5. Haga rotar manualmente la boquilla para
verifi car que haya quedado instalada
correctamente.
Tapa de la boquilla
Tuerca de la boquilla
Tapa de la
boquilla
Español - 28
DW9900M_DD68-00184A-02_MES.indd Sec5:28DW9900M_DD68-00184A-02_MES.indd Sec5:28 2017-09-20 3:27:392017-09-20 3:27:39
Page 69
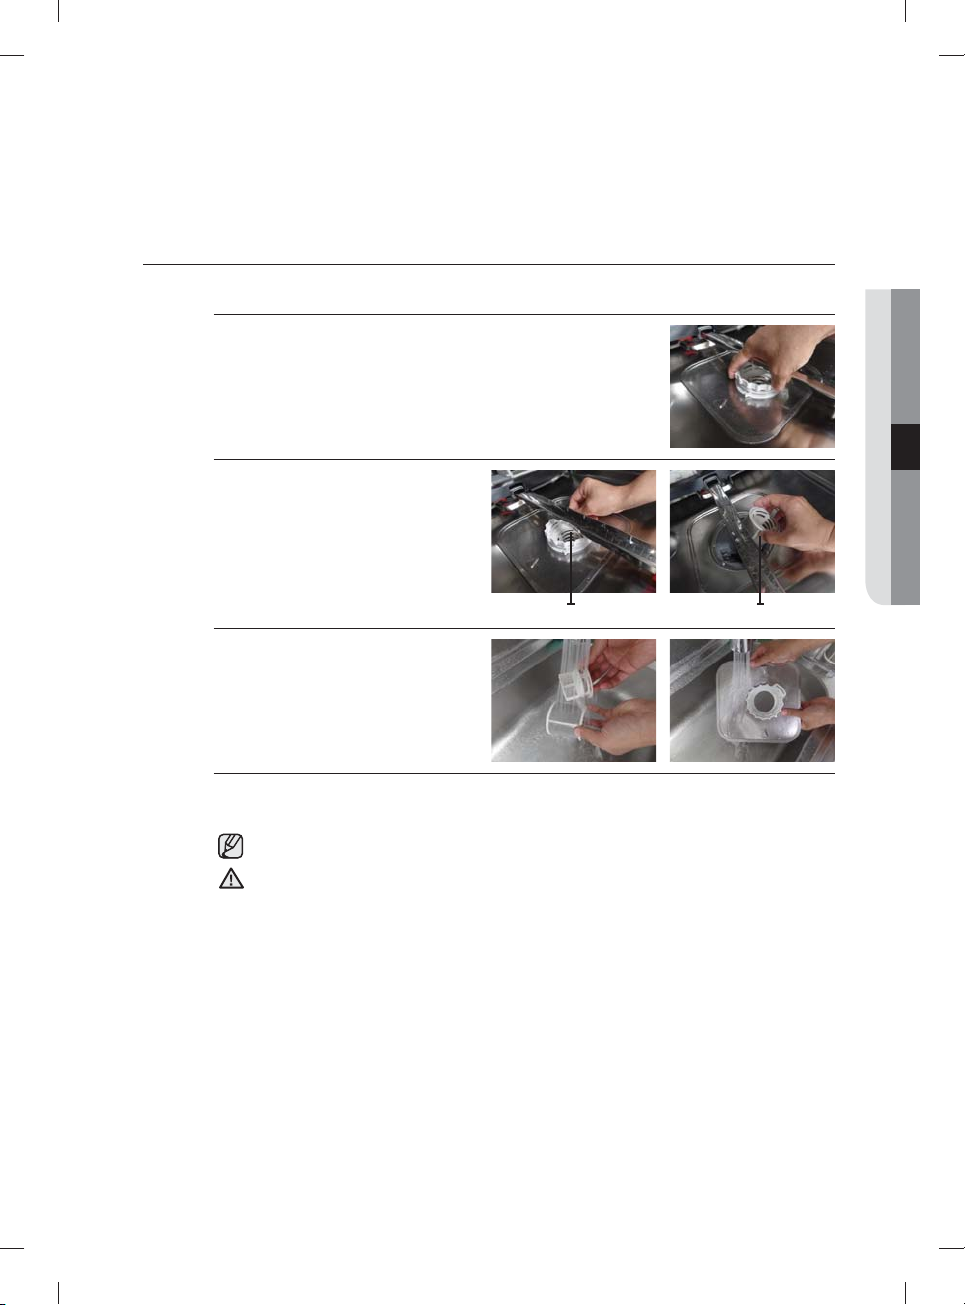
LIMPIEZA DEL FILTRO
1. Retire el estante inferior.
2. Rote la manija del fi ltro en sentido contrario al de las agujas del reloj para
afl ojar la puerta del compartimiento del fi ltro.
3. Retire la puerta del fi ltro y el microfi ltro
cilíndrico que está debajo.
Filtro con manija Microfi ltro cilíndrico
4. Elimine el polvo y cualquier otro residuo
del microfi ltro y la puerta del fi ltro y
enjuague estos con agua de la llave.
5. Vuelva a colocar el microfi ltro cilíndrico y la puerta del fi ltro.
6. Rote la manija de la puerta del fi ltro en el sentido de las agujas del reloj para bloquear la puerta del fi ltro.
Una vez al mes, limpie el fi ltro para obtener el mejor desempeño de lavado.
04 limpieza y mantenimiento de la lavavajillas
Si la puerta del fi ltro no está bien cerrada, el desempeño de la limpieza se reduce.
PRECAUCIÓN
Español - 29
DW9900M_DD68-00184A-02_MES.indd Sec5:29DW9900M_DD68-00184A-02_MES.indd Sec5:29 2017-09-20 3:27:402017-09-20 3:27:40
Page 70
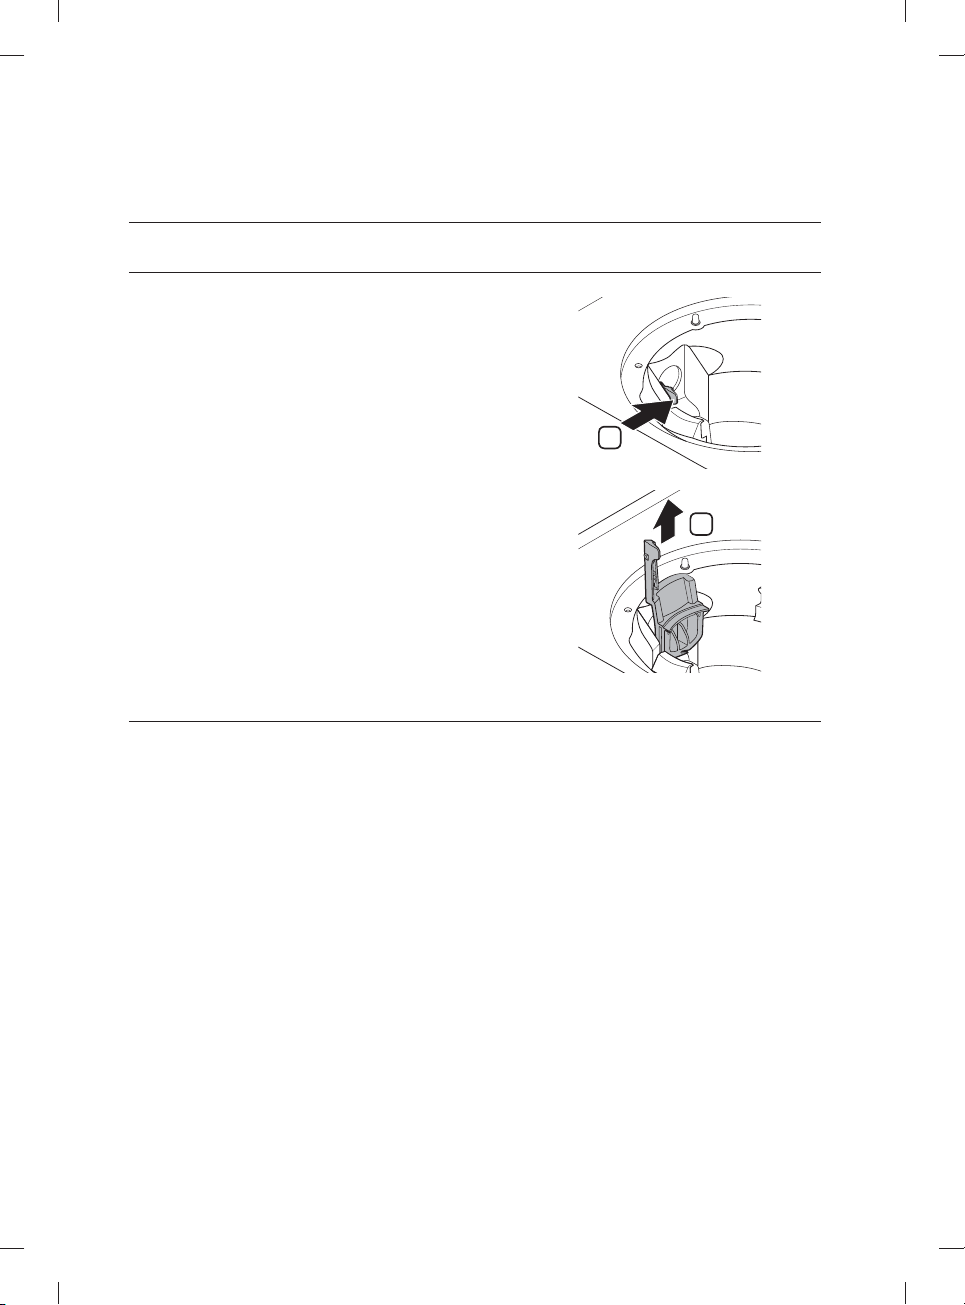
limpieza y mantenimiento de la
lavavajillas
LIMPIEZA DE LA BOMBA DE DRENAJE
Si la lavavajillas no desagua porque la bomba de drenaje
está obstruida con objetos extraños, o esta produce un ruido
anormal, deberá desatascar y limpiar la bomba como se indica
a continuación.
1. Retire el estante inferior.
2. Consulte la sección "Limpieza del fi ltro" para retirar el
microfi ltro cilíndrico.
3. Retire la humedad del fi ltro con una esponja.
4. Retire la tapa de la bomba de drenaje empujando la manija
en la dirección de la fl echa (1) y luego levantándola (2).
5. Revise el estado del impulsor. Luego, retire los objetos
extraños de la bomba.
6. Vuelva a colocar la tapa de la bomba de drenaje en su lugar
y presione hacia abajo hasta que oiga un clic.
CÓMO GUARDAR LA LAVAVAJILLAS
Si necesita guardar su lavavajillas durante un período prolongado, primero drénela y desconéctela. Si queda agua en
las mangueras y los componentes internos se puede dañar la lavavajillas.
Después de drenar y desconectar la lavavajillas, asegúrese de cerrar la válvula de suministro de agua y de cortar el
disyuntor.
1
2
Español - 30
DW9900M_DD68-00184A-02_MES.indd Sec5:30DW9900M_DD68-00184A-02_MES.indd Sec5:30 2017-09-20 3:27:402017-09-20 3:27:40
Page 71
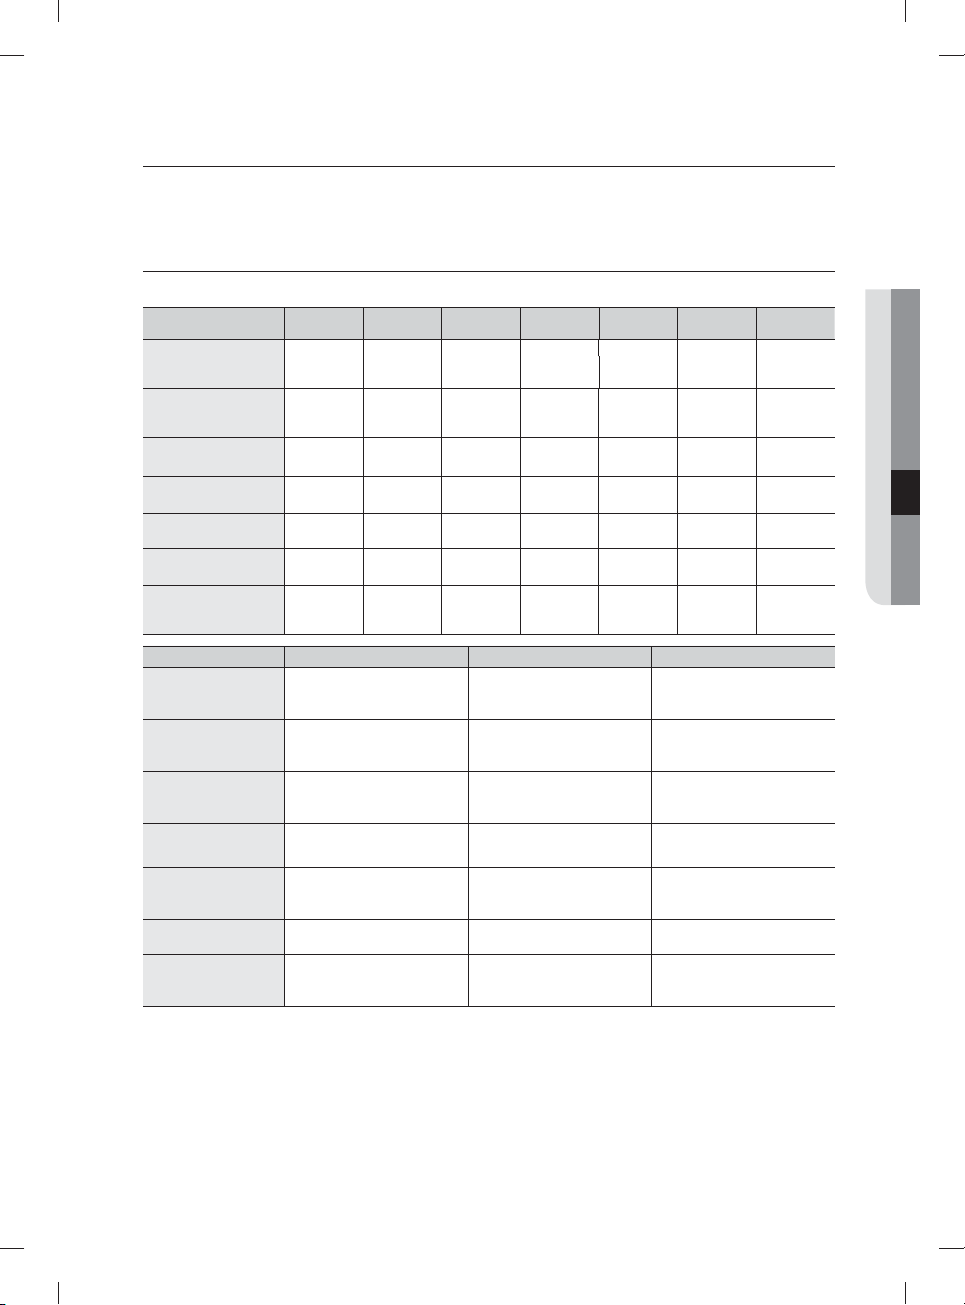
ciclos
TABLA DE CICLOS
( : Básico, : paso opcional)
Ciclo Prelavado 1 Prelavado 2 Prelavado 3
Auto
Normal
Heavy (Muy sucio)
Delicate (Vajilla delicada)
Express 60 (Rápido 60)
Rinse Only (Solo enjuague)
(en algunos modelos)
Chef
(en algunos modelos)
Ciclo Último enjuague (Desinfección) Secado Agua [gal(ℓ)]
Auto
Normal
Heavy (Muy sucio)
Delicate (Vajilla delicada)
Express 60 (Rápido 60)
Rinse Only (Solo enjuague)
(en algunos modelos)
Chef
(en algunos modelos)
136-154 ˚F (58-68 ˚C)
163 ˚F (73 ˚C)
131-149 ˚F (55-65 ˚C)
163 ˚F (73 ˚C)
154 ˚F (68 ˚C)
163 ˚F (73 ˚C)
149 ˚F (65 ˚C)
140 ˚F (60 ˚C)
163 ˚F (73 ˚C)
131-149 ˚F (55-65 ˚C)
163 ˚F (73 ˚C)
• Las temperaturas (˚F y ˚C) que se encuentran en la columna Último enjuague representan la temperatura del agua
cuando está seleccionado Sanitize (Desinfección).
•
Cuando selecciona el ciclo Auto o Normal puede eliminar los pasos opcionales según el nivel de suciedad de la vajilla.
• El consumo de agua y el tiempo de lavado dependen de los pasos o las opciones que agregue, y de la presión y la
temperatura del agua suministrada.
• Cuando falta producto de enjuague, el tiempo de lavado y la temperatura del último enjuague se pueden
incrementar un poco.
Lavado
principal
122-140 ˚F
(50-60 ˚C)
113-143 ˚F
(45-62 ˚C)
149 ˚F (65 ˚C)
122 ˚F (50 ˚C)
122 ˚F (50 ˚C)
140-163 ˚F
(60-73 ˚C)
Enjuague 1 Enjuague 2 Enjuague 3
104 ˚F (40 ˚C)
4.8-6.2 (18.0-23.4 ℓ)
2.4-6.0 (8.9-22.9 ℓ)
7.5 (28.3 ℓ)
4.5 (17.0 ℓ)
2.9 (11.1 ℓ)
1.1 (4.1 ℓ)
3.9 (14.7 ℓ)
05 ciclos
Español - 31
DW9900M_DD68-00184A-02_MES.indd Sec6:31DW9900M_DD68-00184A-02_MES.indd Sec6:31 2017-09-20 3:27:402017-09-20 3:27:40
Page 72
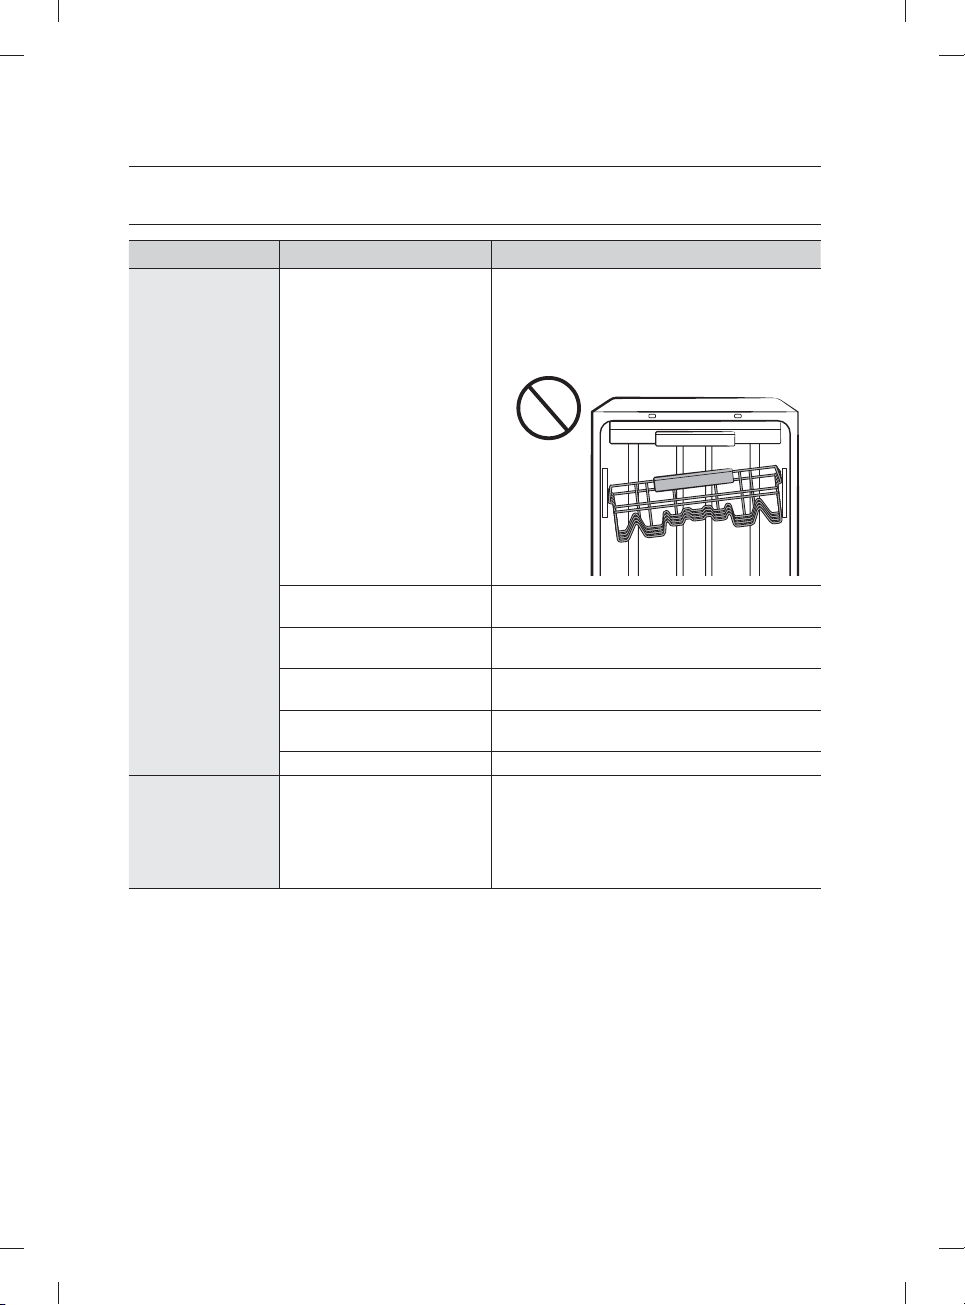
solución de problemas
CONTROLE ESTOS PUNTOS SI SU LAVAVAJILLAS…
PROBLEMA CAUSA POSIBLE SOLUCIÓN
No enciende.
Tarda demasiado
tiempo con una
operación o un ciclo.
La puerta no está completamente
cerrada.
No se ha seleccionado ningún
ciclo.
El cable de alimentación no está
conectado.
No funciona el suministro de
agua.
El panel de control está
bloqueado.
Un disyuntor está abierto. Reinicie el disyuntor.
La lavavajillas está conectada al
suministro de agua fría.
Verifi que que la puerta esté trabada y completamente
cerrada. Verifi que si el estante superior está unido
correctamente a la boquilla del conducto.
Verifi que asimismo si el estante superior está torcido o
desnivelado.
Seleccione un ciclo adecuado.
Conecte el cable de alimentación adecuadamente.
Verifi que que la válvula de suministro de agua esté
abierta.
Desactive el Control Lock (Bloqueo controles),
(consulte la página 11.)
Verifi que que el conducto esté conectado al suministro
de agua caliente. Para funcionar con efi cacia, la
lavavajillas debe estar conectada a un suministro de
agua caliente. (Si está conectada a un suministro de
agua fría, se requiere más tiempo para calentar el
agua fría.)
Español - 32
DW9900M_DD68-00184A-02_MES.indd Sec7:32DW9900M_DD68-00184A-02_MES.indd Sec7:32 2017-09-20 3:27:402017-09-20 3:27:40
Page 73
solución de problemas
PROBLEMA CAUSA POSIBLE SOLUCIÓN
La vajilla presenta
partículas de comida.
(No limpia
correctamente.)
El ciclo seleccionado no es el
adecuado.
La temperatura del agua es baja. Conecte la tubería de suministro de agua a la llave del
Presión de agua baja. La presión del agua debe estar entre 20 y 120 psi
El agua es demasiado dura. Use un limpiador para lavavajillas comercial.
No se usó detergente para
lavavajillas.
Quedan restos de detergente en
el dosifi cador.
No hay producto de enjuague. Verifi que el dosifi cador y agregue producto de
Hay una boquilla obstruida. Limpie la boquilla. Consulte las páginas 27 y 28.
Seleccione un ciclo de acuerdo con la cantidad de
vajilla y su nivel de suciedad, tal como se indica en
este manual.
agua caliente. Para obtener el mejor desempeño, la
temperatura del agua suministrada debe ser de
120 ˚F (49 ˚C).
(140-830 kPa).
Utilice un detergente fresco, de alta calidad, con
producto de enjuague. Limpie el fi ltro por lo menos
una vez por mes. (Consulte la página 29.)
Use un aditivo ablandador de agua especial para
lavavajillas.
Utilice detergente para lavavajillas automático.
Recomendamos un detergente para lavavajillas en
polvo o en gel.
Asegúrese de que los artículos grandes, como láminas
para hornear galletas, tablas para cortar, recipientes,
etc. no bloqueen el dosifi cador de detergente o
impidan que se abra adecuadamente.
Reacomode la vajilla de manera que no interfi era con
el funcionamiento del dosifi cador del detergente.
enjuague. Utilice un producto de enjuague líquido.
06 solución de problemas
Deja los vasos con
una ligera película.
Deja una película
amarilla o marrón
en el interior de la
lavavajillas.
La vajilla no se cargó
correctamente.
Se cargó demasiada vajilla.
El fi ltro puede estar obstruido.
(Quedan restos de alimentos en
el fi ltro.)
El agua suministrada es blanda y se
ha usado demasiado detergente.
La carga incluye artículos de
aluminio.
Esto es debido a restos de café
o té.
Reacomode la vajilla de manera que no interfi era con
la rotación de la boquilla ni con el funcionamiento del
dosifi cador del detergente.
Cargue solamente la cantidad adecuada de platos.
Cargue la vajilla según las recomendaciones.
(Consulte la página 21.)
Cargue los artículos muy sucios en el área de la Zone
Booster (Zona de refuerzo). (Consulte la página 24)
Elimine los restos de comida de la vajilla antes de
cargarla. (No realice un enjuague previo.)
Limpie el fi ltro (Consulte la página 29.)
Disminuya la carga de la lavavajillas y utilice un
producto de enjuague para minimizar esto.
Elimine las marcas de la vajilla con un limpiador de
baja sensibilidad.
Elimine esta suciedad con un limpiador de manchas.
Español - 33
DW9900M_DD68-00184A-02_MES.indd Sec7:33DW9900M_DD68-00184A-02_MES.indd Sec7:33 2017-09-20 3:27:402017-09-20 3:27:40
Page 74
solución de problemas
PROBLEMA CAUSA POSIBLE SOLUCIÓN
Verifi que el dosifi cador y agregue producto de enjuague.
Use un producto líquido para el enjuague.
Conecte la tubería de suministro de agua a la llave del
agua caliente.
Utilice producto de enjuague con la opción
Sanitize (Desinfección).
secado.
Cargue la vajilla según las recomendaciones.
(Consulte la página 21.)
Luego de fi nalizar el ciclo, vacíe primero el estante
inferior y luego el superior. Esto evitará que el agua
del estante superior gotee sobre la vajilla del estante
inferior.
botones Lower (Inferior) + Hi-Temp Wash (Lavado a
alta temperatura) durante 3 segundos para acceder
al menú Auto Release™. Seleccione "A1" para activar
el Secado Auto Release™.
Coloque detergente, sin cargar vajilla, y haga funcionar
el ciclo Normal para limpiar la lavavajillas.
Comuníquese con un técnico de servicio califi cado para
eliminar cualquier obstrucción de la manguera de drenaje.
Con la lavavajillas vacía y sin detergente, ponga un
vaso con 8 onzas de vinagre boca arriba en el estante
inferior y ejecute un ciclo Normal.
Este funcionamiento es normal.
Comuníquese con un técnico de servicio califi cado
para eliminar cualquier material extraño de la cámara
de la bomba.
Reacomode la vajilla.
Limpie los orifi cios de la boquilla.
Consulte las páginas 27 y 28.
Después de colocar los platos en los estantes, gire las
boquillas de forma manual para verifi car si alguno de
los platos interfi ere con ellas.
bomba de drenaje (consulte la página 30).
Cargue la vajilla según las recomendaciones.
(Consulte la página 21.)
Los platos no se
secan bien.
Tiene mal olor.
Hace demasiado
ruido.
La boquilla no gira
fácilmente.
No se vacía el agua
de la lavavajillas.
Presenta su estante
superior doblado
luego de cargar la
vajilla.
No hay producto de enjuague en
el dosifi cador.
Cuando la lavavajillas está
funcionando, la temperatura del
agua es baja.
Se cargó demasiada vajilla. La carga inadecuada de los artículos puede afectar el
Los vasos y las copas con pies
cóncavos retienen agua. El agua
puede derramarse sobre otros
objetos al sacarlos.
Auto Release™ está desactivado. Active el Secado Auto Release™. Presione los
Quedó agua después de un ciclo
incompleto.
La manguera de desagüe está
obstruida.
No usa la lavavajillas cada día
o deja vajilla sucia en la unidad
demasiado tiempo.
Cuando la cubierta del dosifi cador
está abierta y el funcionamiento de
la bomba de desagüe está en las
primeras etapas, se genera ruido.
La lavavajillas no está nivelada. Asegúrese de que la lavavajillas esté nivelada.
Hay materiales extraños (un
tornillo, una pieza de plástico) en
la cámara de la bomba.
Se escucha un "golpeteo" porque
una boquilla golpea contra la vajilla.
Los orifi cios de la boquilla están
obstruidos con partículas de comida.
Un plato o una olla bloquean la
boquilla y esta no puede girar.
El drenaje se obstruyó. Para limpiar la bomba de drenaje retire la tapa de la
Se cargó incorrectamente la
vajilla.
Español - 34
DW9900M_DD68-00184A-02_MES.indd Sec7:34DW9900M_DD68-00184A-02_MES.indd Sec7:34 2017-09-20 3:27:402017-09-20 3:27:40
Page 75
PROBLEMA CAUSA POSIBLE SOLUCIÓN
No se puede cerrar la
puerta.
El modo de Secado
Auto Release™ está en uso.
Cuando la puerta se abre en el modo de Secado
Auto Release™, no se puede cerrar manualmente
durante los 2 minutos siguientes. Puede cerrar la
puerta después de 2 minutos.
No se inicia Smart
Control.
El registro del dispositivo no ha
fi nalizado.
La puerta no se cierra durante los
3 segundos siguientes a presionar
Finalice el registro del dispositivo
(consulte la página 17).
Empuje la puerta hasta cerrarla fi rmemente durante los
3 segundos siguientes a presionar el Smart Control.
el Smart Control.
CÓDIGOS DE INFORMACIÓN
El panel de control muestra códigos de información para ayudarle a comprender mejor qué ocurre con la lavavajillas.
Código Acción
Verifi cación de fugas.
Si se producen fugas desde la conexión de la válvula de suministro de agua,
•
LC
4C
5C
HC
3C
PC
AP
Para los códigos que no fi guran más arriba, llame al 1-800-SAMSUNG (726-7864).
cierre la válvula y vaya al panel del disyuntor de su casa, apague el disyuntor
de la lavavajillas y, luego, comuníquese con el instalador para que realice la
reparación.
Si el problema continúa, contacte a un centro de servicio técnico de Samsung
autorizado.
Control de suministro de agua.
•
Verifi que si la válvula de suministro de agua está cerrada, si se ha suspendido
el suministro de agua o si el conducto o la válvula de entrada de agua están
congelados u obstruidos.
Si el problema continúa, cierre la válvula del suministro de agua y contacte a un servicio
técnico de Samsung autorizado.
Control del drenaje.
•
Luego de cerrar la válvula de suministro de agua, revise si la manguera de desagüe está
obstruida o doblada. Además, verifi que si el orifi cio de desagüe está obstruido.
Si el problema continúa, contacte a un centro de servicio técnico de Samsung autorizado.
Control de calentamiento de temperatura alta.
• Control funcional. Con la lavavajillas vacía, agregue detergente y, luego, ejecute un ciclo.
Si el problema continúa, vaya al panel del disyuntor de su casa, desconecte el disyuntor
de la lavavajillas y contacte a un servicio técnico de Samsung autorizado.
Control del funcionamiento de la bomba.
•
Control funcional. Apague la lavavajillas y enciéndala nuevamente.
Si el problema continúa, contacte a un centro de servicio técnico de Samsung autorizado.
Control de funcionamiento del lavado de zona.
• Control funcional. Apague la lavavajillas y enciéndala nuevamente.
Si el problema continúa, contacte a un centro de servicio técnico de Samsung
autorizado.
Conexión con el teléfono inteligente.
• Cuando el panel de control muestra AP, mantenga presionado Smart Control en el
panel de control para conectar la lavavajillas con el teléfono inteligente.
06 solución de problemas
Español - 35
DW9900M_DD68-00184A-02_MES.indd Sec7:35DW9900M_DD68-00184A-02_MES.indd Sec7:35 2017-09-20 3:27:402017-09-20 3:27:40
Page 76
apéndice
AYUDA AL MEDIO AMBIENTE
• Esta lavavajillas se fabrica con materiales reciclables. Si decide deshacerse de ella, siga la normativa local
relacionada con la eliminación de desechos. Corte el cable de alimentación para que el aparato no pueda
conectarse a una fuente de alimentación.
• Quite la puerta para que los animales y los niños pequeños no puedan quedar atrapados dentro del
electrodoméstico.
• No utilice cantidades de detergente superiores a las recomendadas por el fabricante del detergente.
ESPECIFICACIONES
Modelo
Tipo Lavavajillas integrable Capacidad de lavado 15 puestos
Alimentación
Uso de potencia nominal
Dimensiones
(Ancho × Profundidad × Altura)
Peso
DW80M9960US / DW80M9960UG / DW80M9550US / DW80M9550UG /
DW80M9990UM / DW80M9990US
120 V / 60 Hz AC
solamente, disyuntor 15 A
Motor de lavado: 60-100 W
Calentador: 1100 W
23⅞ x 25 x 33⅞ pulgada (605 x 636 x 860 mm)
Desempacado 90 lb (41 Kg) [DW80M9550US / DW80M9550UG]
Desempacado 95 lb (43 Kg) [ DW80M9960US / DW80M9960UG /
Presión de agua utilizada
DW80M9990UM / DW80M9990US]
20-120 psi
(140-830 kPa)
Español - 36
DW9900M_DD68-00184A-02_MES.indd Sec8:36DW9900M_DD68-00184A-02_MES.indd Sec8:36 2017-09-20 3:27:412017-09-20 3:27:41
Page 77
garantía
LAVAVAJILLAS SAMSUNG
GARANTÍA LIMITADA PARA EL COMPRADOR ORIGINAL
El presente producto de la marca SAMSUNG, tal como lo provee y distribuye EE.UU: SAMSUNG ELECTRONICS
AMERICA, INC./CANADÁ: SAMSUNG ELECTRONICS CANADA, INC. (SAMSUNG) y lo entrega como nuevo, en su
empaque de cartón original al comprador o consumidor original, está garantizado por SAMSUNG contra defectos de
fabricación de los materiales y la mano de obra durante el período limitado de la garantía de:
Un (1) año para todas las piezas y la mano de obra, cinco (5) años para las piezas de movimiento lineal,* la placa de
circuito impreso, los estantes (los gastos de mano de obra del servicio técnico a domicilio a partir del segundo año son
responsabilidad del cliente), y toda la vida para el revestimiento inoxidable de la puerta y la tina de acero inoxidable con
respecto a pérdidas. Samsung reemplazará la unidad por un mismo modelo o actual (es decir, mejor o equivalente en
prestaciones) (La mano de obra necesaria para la sustitución correrá a cargo del cliente).
* Piezas de movimiento lineal: Motor AC de accionamiento por correa [motor de engranajes], correa de distribución en
V, riel, riel de soporte [frontal superior, frontal inferior].
La presente garantía limitada comienza en la fecha original de compra y es válida únicamente para productos
comprados y usados en los Estados Unidos/Canadá. Para recibir el servicio técnico de la garantía, el comprador debe
comunicarse con SAMSUNG con el fi n de que se determine el problema y los procedimientos del servicio. El servicio
técnico de la garantía solo puede ser prestado por un centro de servicio técnico autorizado de SAMSUNG. Se debe
presentar la factura de compra original como prueba de compra a SAMSUNG o al servicio técnico autorizado de
SAMSUNG. SAMSUNG prestará servicio técnico a domicilio durante el período de la garantía sin costo, sujeto a la
disponibilidad dentro de los Estados Unidos/Canadá contiguos.
El servicio técnico a domicilio no está disponible en todas las áreas.
Para recibir el servicio técnico a domicilio, el producto no debe presentar obstrucciones y debe ser accesible para
el agente del servicio técnico. Si el servicio técnico no está disponible, SAMSUNG puede optar por transportar el
producto hasta y desde el servicio técnico autorizado.
SAMSUNG reparará, reemplazará el producto u ofrecerá un reembolso a nuestra discreción y sin cargo adicional, tal
como se establece en la presente garantía, con piezas o productos nuevos o reacondicionados si se comprueba que
es defectuoso durante el período limitado de la garantía especifi cado anteriormente. Todas las piezas y los productos
reemplazados pasan a ser propiedad de SAMSUNG y deben ser devueltos a SAMSUNG. Las piezas y los productos
reemplazados asumen la garantía original que resta, o noventa (90) días, el período que sea el más prolongado.
La presente garantía limitada cubre defectos de fabricación de los materiales y la mano de obra encontrados durante
el uso normal y doméstico de este producto y no será válida para lo siguiente: daños que ocurran durante el envío;
entrega e instalación; aplicaciones y usos para los cuales el presente producto no fue destinado; producto o números
de serie alterados; daño cosmético o acabado exterior; accidentes, abuso, descuido, incendio, inundación, caída de
rayos, u otros casos fortuitos o de fuerza mayor; uso de productos, equipo, sistemas, utilidades, servicios, piezas,
suministros, accesorios, aplicaciones, instalaciones, reparaciones, cableado externo o conectores no provistos ni
autorizados por SAMSUNG que dañen este producto o que acarreen problemas en el servicio; voltaje de la línea
eléctrica incorrecto, fl uctuaciones y sobretensión; ajustes del cliente e incumplimiento de lo establecido en el manual
de instrucciones, instrucciones de mantenimiento y ambientales que están cubiertas y recomendadas en el manual
de instrucciones; traslado y reinstalación del producto; problemas causados por plagas. La presente garantía limitada
no cubre problemas derivados de la corriente, el voltaje o el suministro eléctrico incorrectos, las bombillas de luz, los
fusibles de la casa, el cableado de la casa, el costo del servicio técnico para recibir instrucciones o corregir errores en la
instalación. SAMSUNG no garantiza el funcionamiento ininterrumpido o sin errores del producto.
Español - 37
DW9900M_DD68-00184A-02_MES.indd Sec10:37DW9900M_DD68-00184A-02_MES.indd Sec10:37 2017-09-20 3:27:412017-09-20 3:27:41
Page 78
SALVO LO ESTABLECIDO EN LA PRESENTE GARANTÍA, NO EXISTEN GARANTÍAS SOBRE EL PRESENTE
PRODUCTO, YA SEAN EXPRESAS O TÁCITAS, Y SAMSUNG DESCONOCE TODAS LAS GARANTÍAS QUE
INCLUYEN, AUNQUE NO EN CARÁCTER TAXATIVO, CUALQUIER GARANTÍA TÁCITA DE QUE EL PRODUCTO
SE ENCUENTRA EN CONDICIONES APTAS PARA LA VENTA, DE DEFRAUDACIÓN DE DERECHOS O DE QUE
EL PRODUCTO SE ADECUA A LOS FINES ESPECÍFICOS PARA LOS CUALES SE ADQUIERE. NINGÚN AVAL O
GARANTÍA OTORGADOS POR PERSONA, COMPAÑÍA O CORPORACIÓN ALGUNA CON RESPECTO AL PRESENTE
PRODUCTO REVESTIRÁ CARÁCTER VINCULANTE PARA SAMSUNG. SAMSUNG NO SERÁ RESPONSABLE POR
PÉRDIDA DE INGRESOS O LUCRO CESANTE, IMPOSIBILIDAD DE GENERAR AHORROS U OBTENER OTROS
BENEFICIOS, O CUALQUIER DAÑO DERIVADO DE CIRCUNSTANCIAS ESPECIALES, DAÑO IMPREVISTO O
DERIVADO CAUSADO POR EL USO, USO INCORRECTO, O INCAPACIDAD PARA USAR EL PRESENTE PRODUCTO,
INDEPENDIENTEMENTE DE LA TEORÍA LEGAL EN QUE SE FUNDE EL RECLAMO Y AUN CUANDO SE LE HAYA
NOTIFICADO A SAMSUNG DE LA POSIBILIDAD DE TALES DAÑOS.
NINGÚN RESARCIMIENTO DE NINGUNA ÍNDOLE CONTRA SAMSUNG SUPERARÁ EL MONTO DEL PRECIO DE
COMPRA DEL PRODUCTO VENDIDO POR SAMSUNG Y CAUSANTE DEL PRESUNTO DAÑO.
SIN LIMITAR LO PRECEDENTE, EL COMPRADOR ASUME TODO EL RIESGO Y LA RESPONSABILIDAD POR
PÉRDIDA, DAÑO O LESIÓN AL COMPRADOR Y A LOS BIENES DEL COMPRADOR Y A TERCEROS Y A SUS BIENES
DERIVADOS DEL USO, USO INCORRECTO O INCAPACIDAD PARA USAR EL PRESENTE PRODUCTO. LA PRESENTE
GARANTÍA LIMITADA NO SE EXTENDERÁ A NINGUNA PERSONA DISTINTA DEL COMPRADOR ORIGINAL DEL
PRESENTE PRODUCTO, ES INTRANSFERIBLE Y ESTABLECE SU EXCLUSIVA REPARACIÓN.
Algunos estados o provincias no permiten limitaciones en cuanto al plazo de una garantía implícita, o la exclusión o
limitación de daños imprevistos o derivados, por lo tanto las limitaciones o exclusiones antedichas pueden no aplicarse
en su caso. Esta garantía le otorga derechos específi cos, y además puede tener otros derechos que varían según el
estado o la provincia.
Para recibir un servicio técnico de garantía, comuníquese con SAMSUNG a:
En EE.UU.
Samsung Electronics America, Inc.
85 Challenger Road
Ridgefi eld Park, NJ 07660
1-800-SAMSUNG (726-7864)
www.samsung.com/us/support
En CANADÁ
Samsung Electronics Canada Inc.
2050 Derry Road West
Mississauga, Ontario L5N 0B9 Canada
1-800-SAMSUNG (726-7864)
www.samsung.com/ca/support (English)
www.samsung.com/ca_fr/support (French)
Español - 38
DW9900M_DD68-00184A-02_MES.indd Sec10:38DW9900M_DD68-00184A-02_MES.indd Sec10:38 2017-09-20 3:27:412017-09-20 3:27:41
Page 79
memo
Español - 39
DW9900M_DD68-00184A-02_MES.indd Sec10:39DW9900M_DD68-00184A-02_MES.indd Sec10:39 2017-09-20 3:27:412017-09-20 3:27:41
Page 80
bit.ly/samsungdishwashers
¿Tiene alguna pregunta o algún comentario?
PAÍS LLAME AL O VISÍTENOS EN LÍNEA EN
U.S.A
MEXICO 01-800-SAMSUNG (726-7864) www.samsung.com/mx/support
DW9900M_DD68-00184A-02_MES.indd Sec10:40DW9900M_DD68-00184A-02_MES.indd Sec10:40 2017-09-20 3:27:412017-09-20 3:27:41
1-800-SAMSUNG (726-7864)
1-844-SAM-PAYS (726-7297)
www.samsung.com/us/support
DD68-00184A-02
 Loading...