

Samsung DW80R2031US, DW80R2031UG, DW80R2031UB, DW80R2031UW User Manual
Dishwasher
user manual
DW80 SeriesR2031
DD81-02157B-01
imagine the possibilities
Thank you for purchasing this Samsung product.

contents
SETTING UP YOUR DISHWASHER
6
USING YOUR DISHWASHER
11
CLEANING AND MAINTAINING YOUR
DISHWASHER
19
CYCLES
6 Unpacking your dishwasher
6 Checking parts
7 Control panel
9 Cycle selector
10 Meeting installation requirements
11 Basic guidelines
13 Adjusting the height of the upper rack
13 Removing the upper rack
14 Loading the lower rack
14 Loading the upper rack
15 Using the glass support
16 Using the cutlery rack
17 Using detergent
19
Cleaning the exterior
19
Cleaning the interior
19
Cleaning the filters
0
2 Cleaning the nozzles
21 Storing your dishwasher
22 Cycle chart
22
TROUBLESHOOTING
23
APPENDIX
27
English - 2
23 Check these points if your dishwasher…
26 Information codes
27 Helping the environment
27 Specifi cations
safety information
Congratulations on your new Samsung dishwasher. This manual contains
important information on the installation, use, and care of your appliance.
Please take time to read this manual to take full advantage of your
dishw as he r' s
WHAT YOU NEED TO KNOW ABOUT THE SAFETY INSTRUCTIONS
Warnings and Important S afety Instructions in this manual do not cove r a ll
possib le c onditions and situations that may occur. It is your responsibility
to use com mo n sense, caution, and care when installing, maintaini ng , and
operat in g your washer
IMPORTANT SAFETY INSTRUCTIONS
What the icons and signs in this user manual mean :
many benefits and features.
dish
.
.
01 safety information
WARNING
CAUTION
CAUTION
Hazards or unsafe practices that may result in severe personal injury or death
Hazards or unsafe practices that may result in personal injury or property
damage.
To reduce the risk of fir e, explosion, electric shock, or personal injury when using
your dishwasher, follow these basic safety precautions:
Do NOT attempt.
Do NOT disassemble.
Do NOT touch.
Follow directions explicity.
Unplug the power plug from the wall socket.
Make sure the machine is grounded to prevent electric shock.
Call the service center for help.
WARNING
Cancer and Reproductive Harm-www.P65Warnings.ca.gov.
WARNING - When using the dishwasher, follow basic precautions, including the
following:
Read all instructions before using the dishwasher.
As with any equipment using electricity, water, and moving parts, potential hazards exist.
Use the dishwasher only for its intended function.
Use only detergents or wetting agents recommended for use in a dishwasher, and keep
them out of the reach of children.
When loading items to be washed:
- Locate sharp items so that they are not likely to damage the door seal, and
- Load sharp knives with the handles up to reduce the risk of cut-type injuries.
SAVE THESE INSTRUCTIONS
.
English - 3

safety information
Do not wash plastic items unless they are marked “dishwasher safe” or the equivalent.
For plastic items not so marked, check the manufacturer’s recommendations.
Do not touch the HEATING ELEMENT during or immediately after use.
01 safety information
Do not touch the VENT ELEMENT during or immediately after use.
WARNING : When using your dishwasher, follow basic precautions, including the following:
WARNING
1. Read all instructions before using the dishwasher.
2. Use the dishwasher only for its intended function.
3. Use only detergents or wetting agents recommended for use in a dishwasher and keep
them out of the reach of children.
4. When loading items to be washed:
- locate sharp items so that they are not likely to damage the door seal, and
- load sharp knives with the handles up to reduce the risk of cut-type injuries.
5. Do not wash plastic items unless they are marked “dishwasher safe” or the equivalent.
For plastic items not so marked, check the manufacturer’s recommendations.
6. Do not touch the HEATING ELEMENT during or immediately after use.
7. Do not operate your dishwasher unless all ENCLOSURE panels are properly in place.
8. Do not tamper with the controls.
9. Do not abuse, sit on, or stand on the door or on a dish rack of the dishwasher.
10. To reduce the risk of injury, do not allow children to play in or on the dishwasher.
11. Under certain conditions, hydrogen gas may be produced in a hot-water system that
has not been used for two weeks or more. HYDROGEN GAS IS EXPLOSIVE. If the hotwater system has not been used for such a period, before using the dishwasher, tur
on all hot-water faucets and let the water flo w from each for several minutes. This will
release any accumulated hydrogen gas. As the gas is f lammable, do not smoke or use
an open flame d uring this time.
12. Remove the door to the washing compartment when removing an old dishwasher from
service or discarding it.
After unpacking the dishwasher, keep the packaging out of the reach of children.
•
WARNING
The dishwasher is extremely heavy
•
yourself. Two or more people are needed to move a dishwasher and avoid potential injuries.
Do not install the dishwasher near electrical components. Keep the dishwasher away fr
•
open f lames.
Install and level your dishwasher on an uncarpete
•
Your dishwasher must be properly grounded. Never connect it to an ungr
•
See page 10 for more information on grounding your dishwasher.
Connect the ground wire to the green ground connector in the terminal box.
•
After the dishwasher is installed, check that the drain hose is pr
•
that there is no leakage from the hose connectors. If the drain hose is loose, it may cause
property damage.
The water supply line is susceptible to breakage. As time goes by, it becomes less f
•
Check the line periodically. If it is swollen, torn, cut, or there is a water leak, replace it
immediately.
. Do not attempt to move or carry the dishwasher by
n
om
floor that can support its weight.
ounded outlet.
operly connected and
lexible.
SAVE THESE INSTRUCTIONS
English - 4

To safely operate this appliance, familiarize yourself with its operations and exercise care
•
when using it.
Do not put gasoline, solvents, or other flammable materials inside the dishwasher. Do not
•
wash dishes exposed to these materials.
Keep your dishwasher detergent out of the reach of children. Detergent has an adverse
•
effect on human organs. It contains elements for polishing and is corrosive. Avoid letting the
detergent come into contact with your skin and eyes.
Do not push or place pressure on the door when it is open, as this may damage the
•
dishwasher or cause harm.
Do not allow children to play in or on the dishwasher. They may harm themselves or
•
damage the dishwasher.
Disconnect the power cable (or set the circuit breaker to off) before servicing your
•
dishwasher.
Do not repair, replace, or service any part of your dishwasher yourself. Disassembly, repairs
•
and modific ations must be performed by authorized service technicians only. Work done by
an unauthorized person may void your warranty.
Before disposing of your dishwasher, remove the door of the washing compartment or the
•
door latch so that children or small animals cannot get trapped inside.
If the dishwasher is left unused for an extended period of time, turn off the water supply.
•
This dishwasher is intended for residential use only.
•
BEFORE USING YOUR DISHWASHER
WARNING
WARNING
Tip-Over Hazard
- Do not use the dishwasher until it is correctly installed.
-
Do not pu sh down o n the d ishwa sher do or wh en it is op en.
o not pla ce exce ssi ve weig ht on the d ish washe r door wh en it i s open. D
-
01 safety information
Electric Shock Hazard
Failure to follow these instructions can result in death, f ire, or electric shock:
- Electrically ground the dishwasher
- Connect the ground wire to the green ground connector in the junction box.
- Do not use an extension cord.
SAVE THESE INSTRUCTIONS
English - 5
setting up your dishwasher
Be sure to have your installer follow these instructions closely so that your new
dishwasher works properly and that you’re not at risk of injury when washing
dishes.
UNPACKING YOUR DISHWASHER
02 setting up your dishwasher
Once your new dishwasher has been delivered to you, carefully unpack it and check for any damage.
If the dishwasher has been damaged, make note of it on the waybill and keep a copy. Do not install the
dishwasher, and contact Samsung Customer Service at the number listed below.
If there is no damage to the product, you can proceed with the installation. If you are going to install it
yourself, make sure to read through the installation guide and follow the directions inside.
After unpacking your dishwasher, keep the packaging out of the reach of children to ensure their safety.
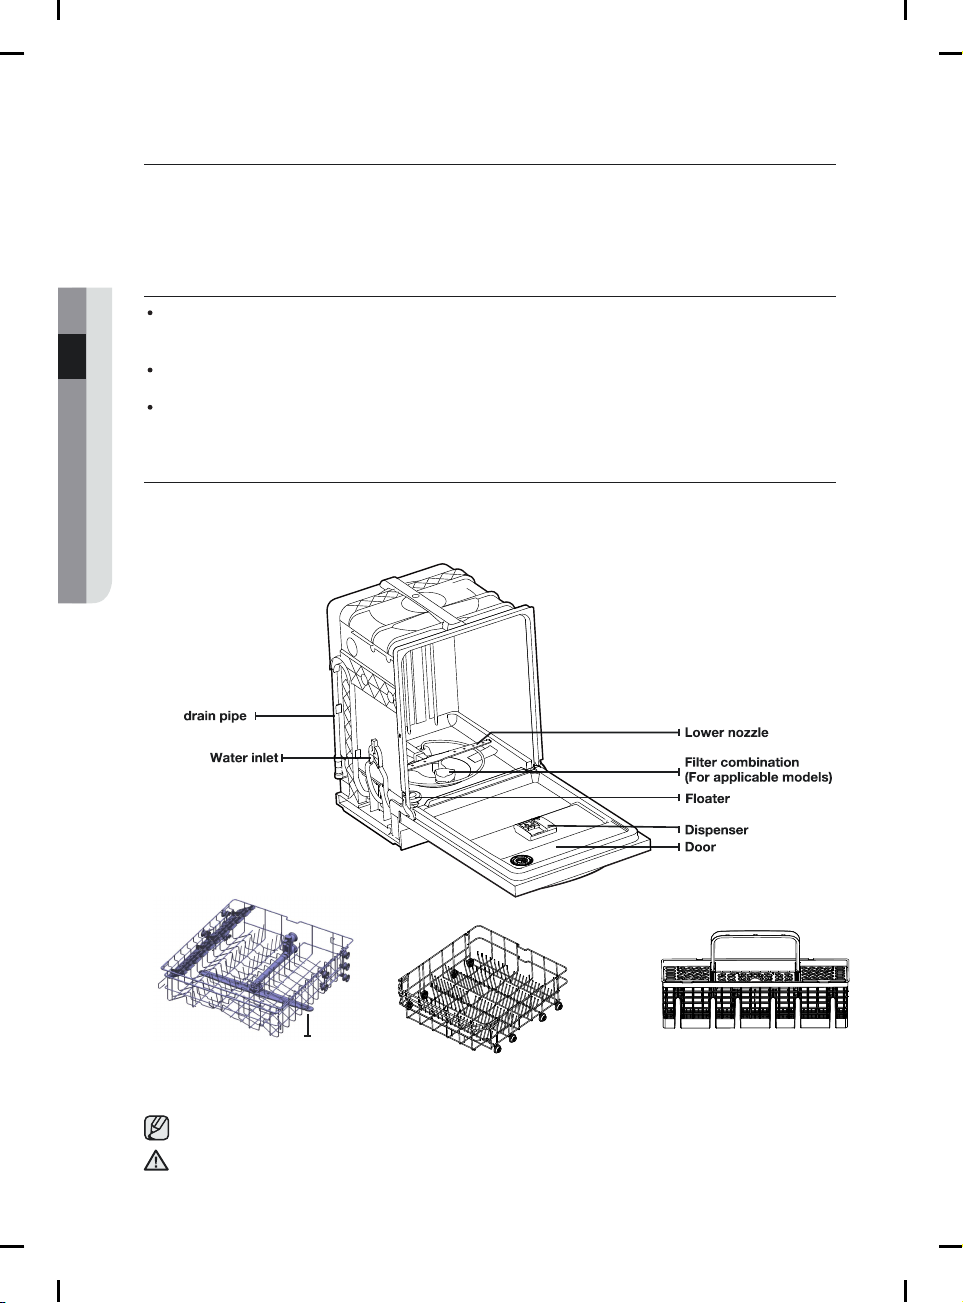
CHECKING PARTS
When your dishwasher has been unpacked, make sure you’ve received all the parts shown below.
If your dishwasher was damaged during shipping, or if you do not have all the parts, contact Samsung
Customer Service at 1-800-SAMSUNG (726-7864)
.
Middle nozzle
Upper rack
Accessory parts - User/Installation manual, Installation Kit.
The flo ater is v ery i mport ant for t he op erati on of your dis hwash er.
WARNING
Pleas e do not ta mpe r with, d amage , or re mov e the flo ater.
Lower rack
English - 6
Cutlery rack
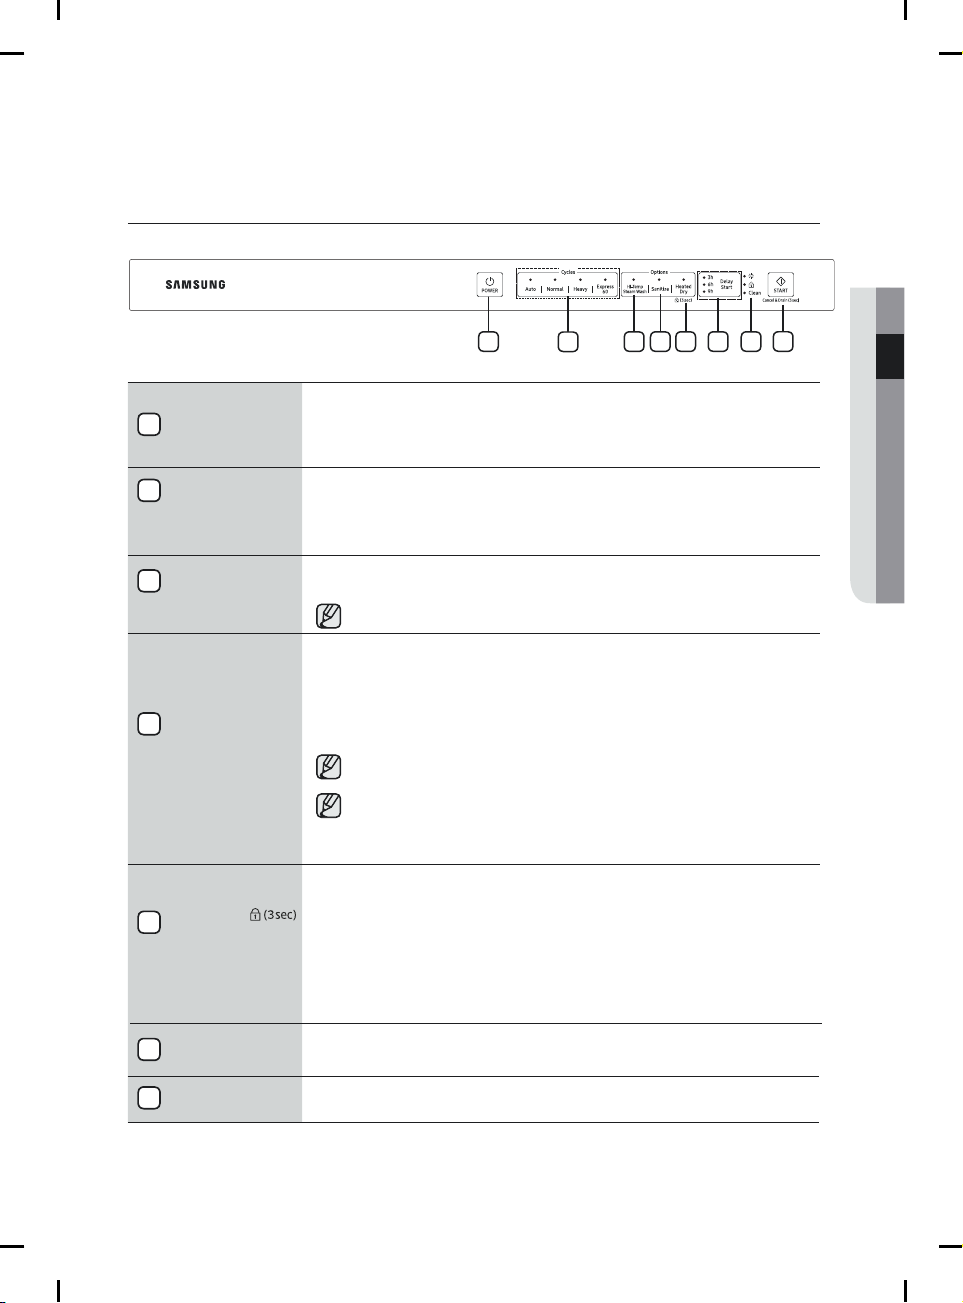
CONTROL PANEL
1
Power
2
Cycle Selector
3
Hi-Temp Steam
Wash
4
Sanitize
5
6
7
1
2
3
4
8
When you press the Power button, the entire display turns on and off, and
then the light of the most recently f inished cycle lights up.
When the selected cycle is complete, the dishwasher powers off
automatically.
Select the appropriate wash cycle depending on the soil level of your
dishes. After you select a cycle, the Cycle On light for that cycle lights up.
If a proble occurs during an operation,
the cau se of the p rob lem. The bli nking i s accompan ied by a wa rning
tone. F or more info rmation, r efe r to "Inf ormat ion C odes" o n page 26 .
m
speci fic LED S bli nk, ind icati ng
Raises the main wash temperature to improve cleaning for loads containing
tough, baked-on food.
Hi-Temp Steam Wash is not available for the cycle. Express 60
The temperature rises to 15 °F ( °C) in the f inal rinse cycle for high
8 70
temperature sanitization.
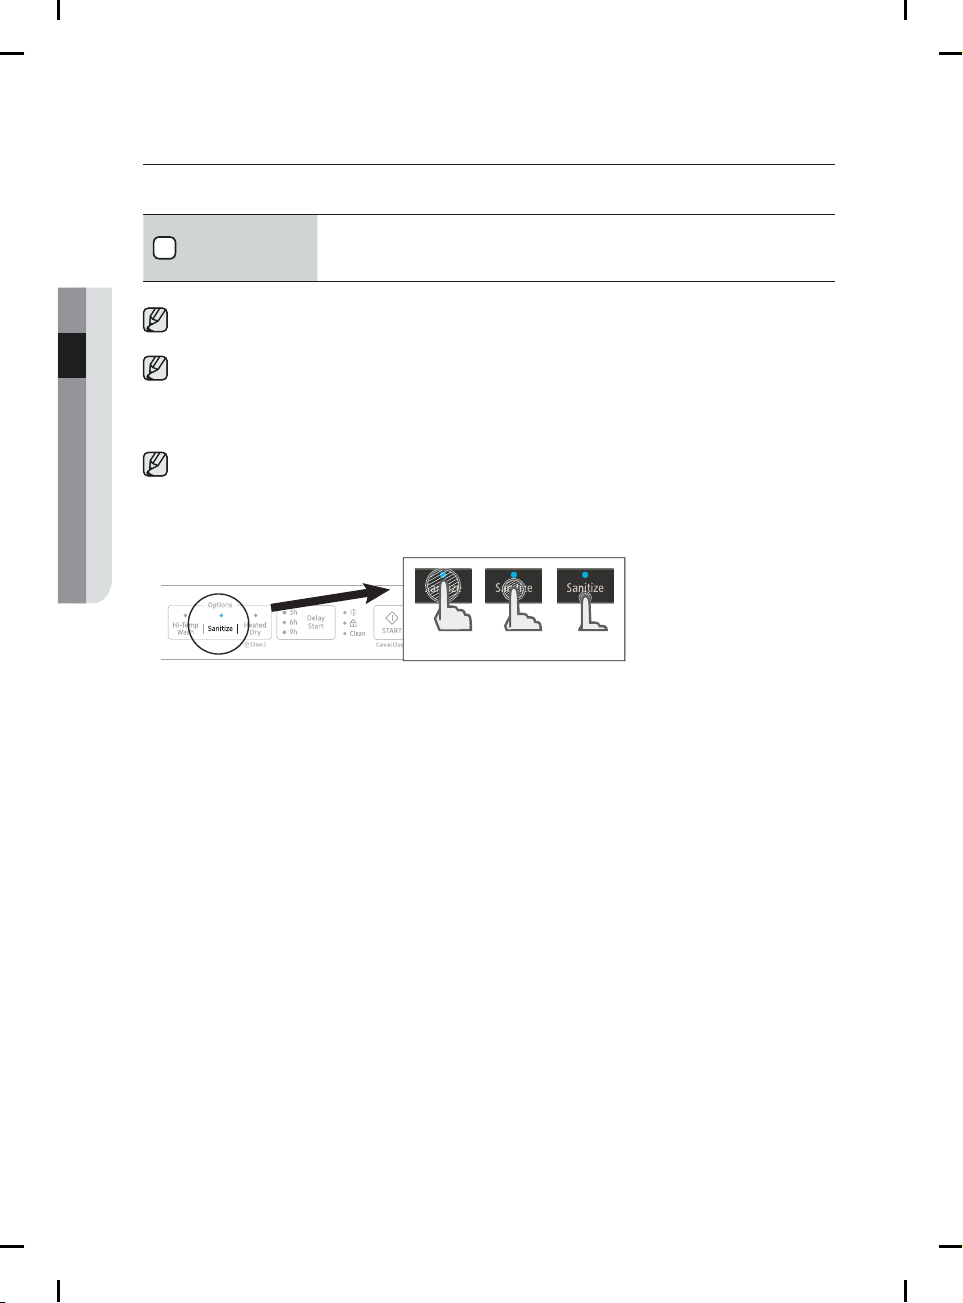
If you select the Sanitize option, the “Sanitize” lamp blinks when the water
temperature reaches the sanitary temperature (over 156 °F (69 °C)), and
then remains illuminated until the Sanitize option ends. When you press the
Power button, the “Sanitize” lamp turns off.
The Normal Cycle with the Sanitize option selected is NSF certified.
The Sanitize feature operates in accordance with NSF/ANSI Standard
184 for Residential Dishwashers. Certified residential dishwashers are
not intended for
licensed food establishments.
02 setting up your dishwasher
Heated Dry
5
(Control Lock)
6
Delay Start
7
Clean
When the “Heated Dry” function is selected,the heater will work during the
/
drying process.
Control Lock allows you to lock the buttons on the control panel so children
cannot accidently start the dishwasher by pressing the buttons on the
panel.
To lock and unlock the buttons on the control panel, hold the Heated Dry
button down for three (3) seconds when power is On.
Delay a cycle for 3, , or 9 hours , The hour displayed indicates the time at which
6
the dishwasher will start.
Indicates that the operation is over and that your dishes are clean.
English - 7
setting up your dishwasher
8
Start
02 setting up your dishwasher
You can select options (Hi-Temp Steam Wash, Sanitize,Heated Dry) before starting a
cycle. If you change the cycle after selecting an option, the original cycle is reset.
To prevent the touchpad from losing response sensitivity, follow these instructions:
- Touch the center of each keypad using one finger . Do not push.
- Clean the touch control’s surface regularly with a soft, damp cloth.
- Be careful not to touch more than one touch key pad at a time, except as directed.
When you pause a cycle by opening the door, press the Start button before closing
the door to continue the cycle.
the
Push door f irmly closed within 3 seconds of pressing Start button.
If the door is not closed within 3 seconds, the cycle will not start.
To start a cycle, press the Start button before closing the door.
To cancel the cycle, press and hold the Start button for 3 seconds or press
the Power button to power off .
the dishwasher
the
O O X
English - 8
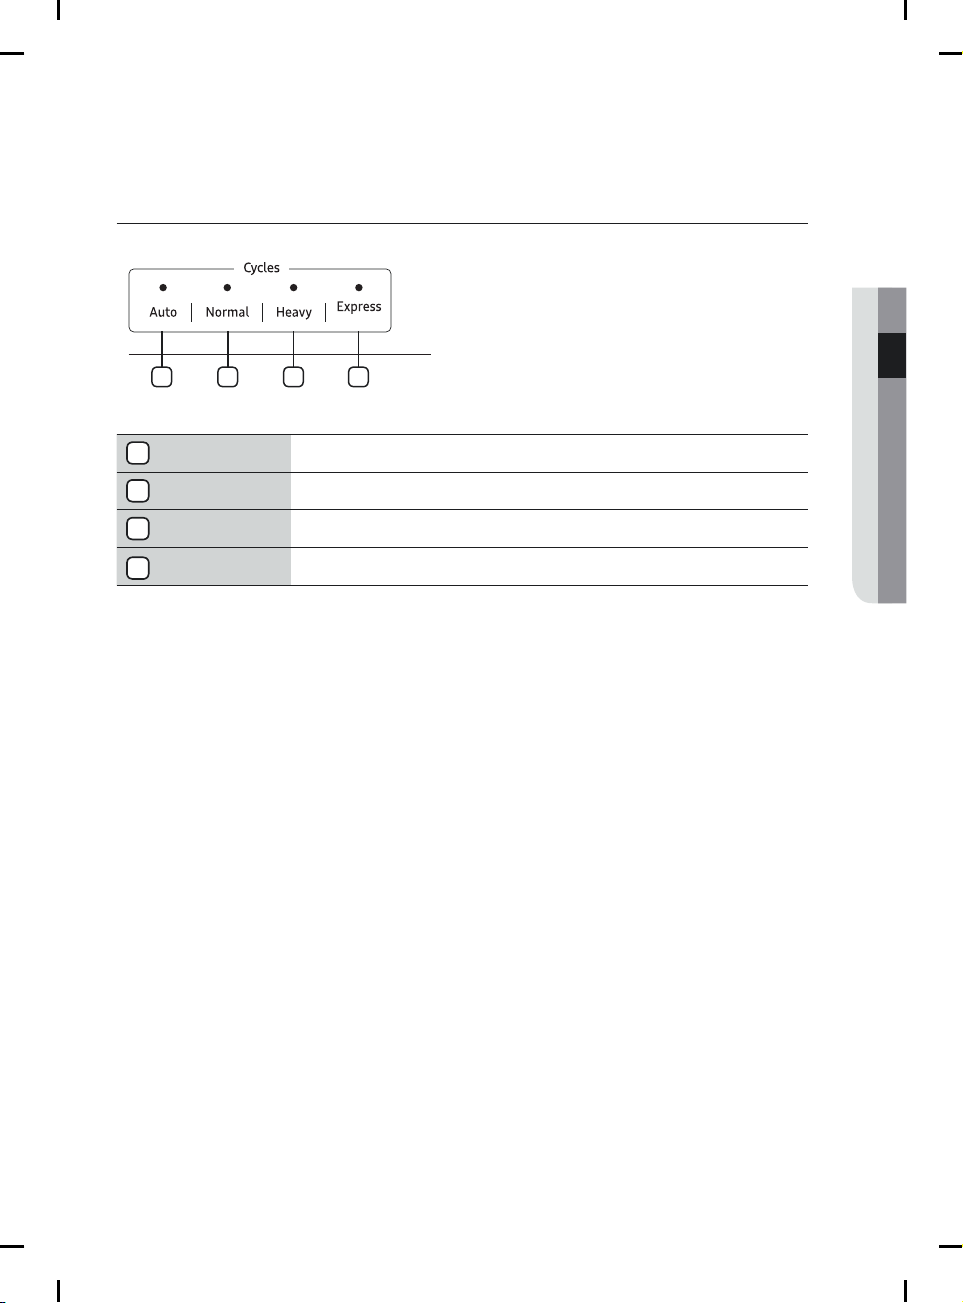
CYCLE SELECTOR
1 2 3 4
02 setting up your dishwasher
60
1
Auto
2
Normal Use this cycle for normally soiled dinner dishes.
3
Heavy Use this cycle for heavily soiled dishes and dishes with heavy soil.
4
Express 60
This cycle detects the level of soil and automatically initiates the optimal cycle
after a few minutes of operation.
Use this cycle for lightly soiled dishes.
English - 9
setting up your dishwasher
MEETING INSTALLATION REQUIREMENTS
Electrical supply and grounding
02 setting up your dishwasher
To prevent the risk of fire, electric shock, or personal injury, all wiring and grounding must be
done in accordance with the National Electrical Code ANSI/FNPA, No. 70 Latest Revision and
local codes and ordinances. It is the personal responsibility of the appliance owner to provide
adequate electrical service for this appliance.
Never use an extension cord.
CAUTION
When preparing for installation, ensure that you provide:
An individual branch circuit with a 120 V, 60Hz, 15 AMP fuse or circuit breaker that serves
only your dishwasher .
Your dishwasher must be grounded. If your dishwasher malfunctions or breaks down, grounding
will reduce the risk of electric shock by providing a path of least resistance for the electric
current.
Never connect the ground wire to plastic plumbing lines, gas lines, or hot water pipes.
WARNING
GROUNDING INSTRUCTIONS
For a permanently connected appliance:
This appliance must be connected to a grounded metal, permanent wiring system, or an
equipment-grounding conductor must be run with the circuit conductors and then connected to
the equipment-grounding terminal or lead on the appliance.
Water supply
The hot water supply line pressure must be between 20-120 psi (140-830 kPa).
Adjust the water heater to deliver water between 120 F (49 ) - 149 (65 ).° °C °F °C
Most plumbing supply stores sell water supply lines of various lengths up to 10 feet
(305 cm) long.
You can reduce the risk of leaks and water damage by:
Making water faucets easily accessible.
Turning off faucets when the dishwasher is not in use.
Periodically checking for leaks at water supply line fittings.
Before using your dishwasher for the first time, check all connections at the water supply valve
and faucets for leaks.
WARNING
Flooring
For safety, your dishwasher must be installed on a solidly constructed f loor.
Never install your dishwasher on a platform or poorly supported structure.
Your dishwasher must be properly installed in accordance with the Installation Guide before you use it. If
you did not receive an Installation Guide with your dishwasher, you can obtain one by visiting our website at
www.samsung.com.
English - 10
using your dishwasher
BASIC GUIDELINES
1. Open the door and load your dishes (see page 14).
- Place dishes into the upper and lower racks, unless you have selected Lower Rack.
- Remove any food remains from the dishes before placing them in the rack(s).
- After placing the dishes into the racks, rotate the nozzles by hand to check whether any
of the dishes will interfere with them.
- Make sure the dishes will not prevent the detergent dispenser from opening.
2. Add detergent to the dispenser (see page
- Make sure to use only automatic dishwasher detergent and rinse aid.
- Refer to “Using detergent” on page
rinse aid.
3. Press the Power button.
- When you press the Power button, the entire display turns on and off, and then the indicator of the
most recently f inished cycle lights up.
4.
Select an appropriate cleaning cycle depending on the soil level of the dishes. (See pages
- Press the appropriate cycle button.
- When you press a cycle button, the cycle indicator lights up.
5. Press the Start button, and then close the door within 3 seconds.
- The dishwasher will start draining after a few seconds, and then start the selected cycle.
- Make sure to close the door f irmly. If the door is not closed properly, the selected cycle will not start
automatically.
6. When the wash cycle is completed.
- The light illuminates and the dishwasher sounds a chime.
- The dishwasher powers off automatically.
- If you want to load more dishes or pause the dishwasher while it is already running, make sure to
CAUTION
open the door slowly and carefully as there is a possibility of injury from the hot steam inside the
dishwasher.
- If the door is opened while the dishwasher is running, a safety mechanism is activated and stops
the cycle.
- To resume operation, press the Start button, and then close the door within 3 seconds.
- Adding dishes several minutes after the dishwasher starts operating may affect its performance.
- If you open the door while the dishwasher is running at high temperature, it will drain the hot water
automatically to protect you from scalding.
You should use rinse aids for better drying performance. You can further improve drying performance
by also selecting the Sanitize and Heated D .
17).
17 for instructions explaining how to add detergent and
ry option
03 using your dishwasher
22.)9 and
English - 11
using your dishwasher
Touch controls
Touch controls allow you to operate the dishwasher easily. hey:
Are convenient to operate, requiring only a soft touch.
03 using your dishwasher
WARNING
WARNING
Have a simple and stylish design.
Are easy to clean.
If you have children or you want to clean the Control Interface, we recommend activating
the Control Lock feature to lock the control buttons. See page 7.
- Children will not be able to accidently start the dishwasher by touching the controls with
this option selected.
- If a cycle is running, the buttons will not respond. (except the P ower button)
- If dishwasher is off, only the P ower button responds.
Do not touch the VENT ELEMENT during or immediately after use.
Delay start
When you select the Delay Start option, your dishwasher will:
Start draining to remove remaining water at once (pre-drain).
Your dishwasher will operate the selected cycle when the delay time expires.
When using the dishwasher, try to arrange the dishes properly as described on page 14 to 16.
You should remove food remains such as bones, fruit seeds, etc. and any other waste such
as toothpicks, paper, etc. from the dishes as these may cause damage to the dishes, create
noise, or cause the dishwasher to malfunction.
Select the appropriate cycle depending on the level of soil and the type of dishes.
Use only the proper amount of detergent and rinsing agent.
Do not wash the following items in your dishwasher
Acrylic or Aluminum items: Dishes with printed gold rim decoration may become
discolored.
Dishes treated with adhesive: Treated plastics, wood, ivory, copper, and tin may come
loose.
Plastics with a temperature tolerance less than 194 (90 ):°F °C Thin plastics wash and dry
poorly, and may be damaged due to elevated wash temperatures.
Tin: Tin items should be washed by hand and dried immediately as may rust.
Wooden utensils: Wooden items may crack.
T
they
English - 12
ADJUSTING THE HEIGHT OF THE UPPER RACK
You can adjust the height of the upper rack in your Samsung dishwasher so that the lower rack can
accommodate larger sized dishes. With the upper rack set at the highest position, the lower rack can
accommodate plates up to 12 in. (30 cm) in diameter and the upper rack can accommodated plates up to
8 in. (20 cm) in diameter.
1.
To lower th e upp er rack b y 2 in. ( 5 cm),
To lower th e upp er rack b y 2 in. ( 5 cm),
rem ove the u ppe r rack as s how n in
rem ove the u ppe r rack as s how n in
Remov ing t he Uppe r Rac k w. Then,
Remov ing t he Uppe r Rac w. Then
rei nsert t he rack s o that th e upp er four
rei nsert t he ck s o tha t the upper fo ur
wheel s on ea ch side
wheel s on ea ch side a r
and below the
illus tra tion to t he ri ght
illus tra tion to t he ri ght
To raise th e upper r ack , remove the
To raise th e upper r ack , remove the
2.
upper r ack as sh own i
upper r ack as sh own i
Upper R ack hen reinse rt the
Upper R ack hen reinse rt the
rack so t hat the l owe r three whee ls
rack so t hat the l owe r three whee ls
on each s ide of the rack are above and
on each s id
elow the
b
illus trati on to t he righ t.
illus trati on to t he righ t.
a
guide r ail . See th owe r position
guide r ail . See th w er po sition
w. T
belo
guide r ail. Se
guide r ail. Se
belo
of the rack are above
Loe
.
n
Remov inRemov ing
the
,
e the th e U
pper position
Lower posi tio n
We recommend adjusting the height of the
upper rack before loading dishes into the
CAUTION
rack. If you adjust the rack after loading
the dishes, you may damage the dishes.
Upper posi tio n
REMOVING THE UPPER RACK
Pull the upper rack towards the front and then remove it by lifting it up slightly and pulling it towards the
front. See the illustrations below.
While the upper rack is removable, it must be installed for the dishwasher to operate properly.
If you attempt to operate the dishwasher without the rack, noise will occur and the dishwasher will
CAUTION
perform poorly.
03 using your dishwasher
Step 1. Step 2. Step 3.
English - 13
using your dishwasher
LOADING THE LOWER RACK
The lower rack has been especially designed for dinner dishes, soup bowls, plates, pots, lids, casserole
dishes, and plates.
Load large items such as pans and pots into the dishwasher so their open sides face downwards. We
03 using your dishwasher
recommend loading cups, stemware, and small plates into the upper rack.
See the recommended loading patterns below.
Saucer
10 place setting
12 place setting
LOADING THE UPPER RACK
The upper rack has been designed for small plates, mugs, glasses, and plastic items marked “dishwasher
safe”. Load your plates into the dishwasher in two half rows, so that the front of each plate faces the back
of the plate in front of it, and the open sides of the plates at the center of the dishwasher face each other.
See the illustrations below.
Make sure the loaded dishes do not interfere with the rotation of the nozzle which is located at the bottom
of the upper rack. (Check this by rotating the nozzle by hand.)
When loading dishes, pull the upper rack out suf iciently so you can load it without striking the counter
above.
10 place setting
12 place setting
English - 14
USING THE GLASS SUPPORT
You can load cups or glasses onto the glass support. This is also very convenient for washing
wine glasses. Hang your wine glasses onto the pegs of the glass support.
You can fold the glass support back when it is not being used.
03 using your dishwasher
cup support
glass support
English - 15

using your dishwasher
USING THE CUTLERY RACK
You can place each knife, spoon, or fork separately into the spoon stands in the
basket’s covers to prevent chipping and discoloration.
You can use the cutlery rack with the cover open. Refer to the illustration to the right.
03 using your dishwasher
10 place setting
12 place setting
The spoon stands as seen from above with the suggested placement of cutlery items. Match the numbers
in the diagram to the numbers in the list of cutlery items below.
2
2
44
4
4
2
2
2
2
2
2
2
2
2
33
4
33
44
33
33
4
11
11
11
11
11
11
11
11
11
11
11
11
11
4
11
11
11
11
11
11
11
11
33
11
11
11
11
11
11
11
11
1
1
1
1
1
1
1
1
3
11
11
11
11
11
11
11
11
11
11
11
11
11
11
11
11
11
11
11
11
11
11
11
11
11
11
11
11
11
11
11
11
11
11
11
11
11
11
11
11
11
11
11
11
11
11
11
11
11
11
11
11
11
11
11
11
11
11
11
11
11
11
11
11
11
11
11
1
1
1
1
1
1
1
1
1
1
11
11
11
11
1
11
11
11
11
11
11
11
11
11
11
11
11
11
11
11
11
11
11
11
11
11
11
11
11
11
11
6
5
11
11
11
11
5
1
1
1
1
11
11
11
11
11
11
11
11
11
11
11
11
11
1
1
1
1
1
1
1
1
1
1
1
1
4
33
4
33
33
33
33
3
2
44
2
2
4
2
44
2
4
2
DO NOT let any item extend through the bottom.
1
Spoons
2
Knives
3
Salad forks
4
Forks
5
Serving spoons
6
Serving forks
1 32
6444 5
English - 16
using your dishwasher
USING DETERGENT
All dishwasher cycles require detergent in the detergent compartment.
Add the correct amount of detergent for the selected cycle to ensure the best performance.
Use dishwasher detergent only. Regular detergent produces too much foam, which may decrease the
dishwasher’s performance or cause it to malfunction.
CAUTION
Do not swallow dishwasher detergent. Avoid breathing in the fumes. Dishwasher detergent contains
irritants and caustic chemicals that can induce respiratory conditions. If you have swallowed
WARNING
dishwasher detergent or inhaled the fumes, seek medical attention immediately.
Keep dishwasher detergent out of the reach of children.
WARNING
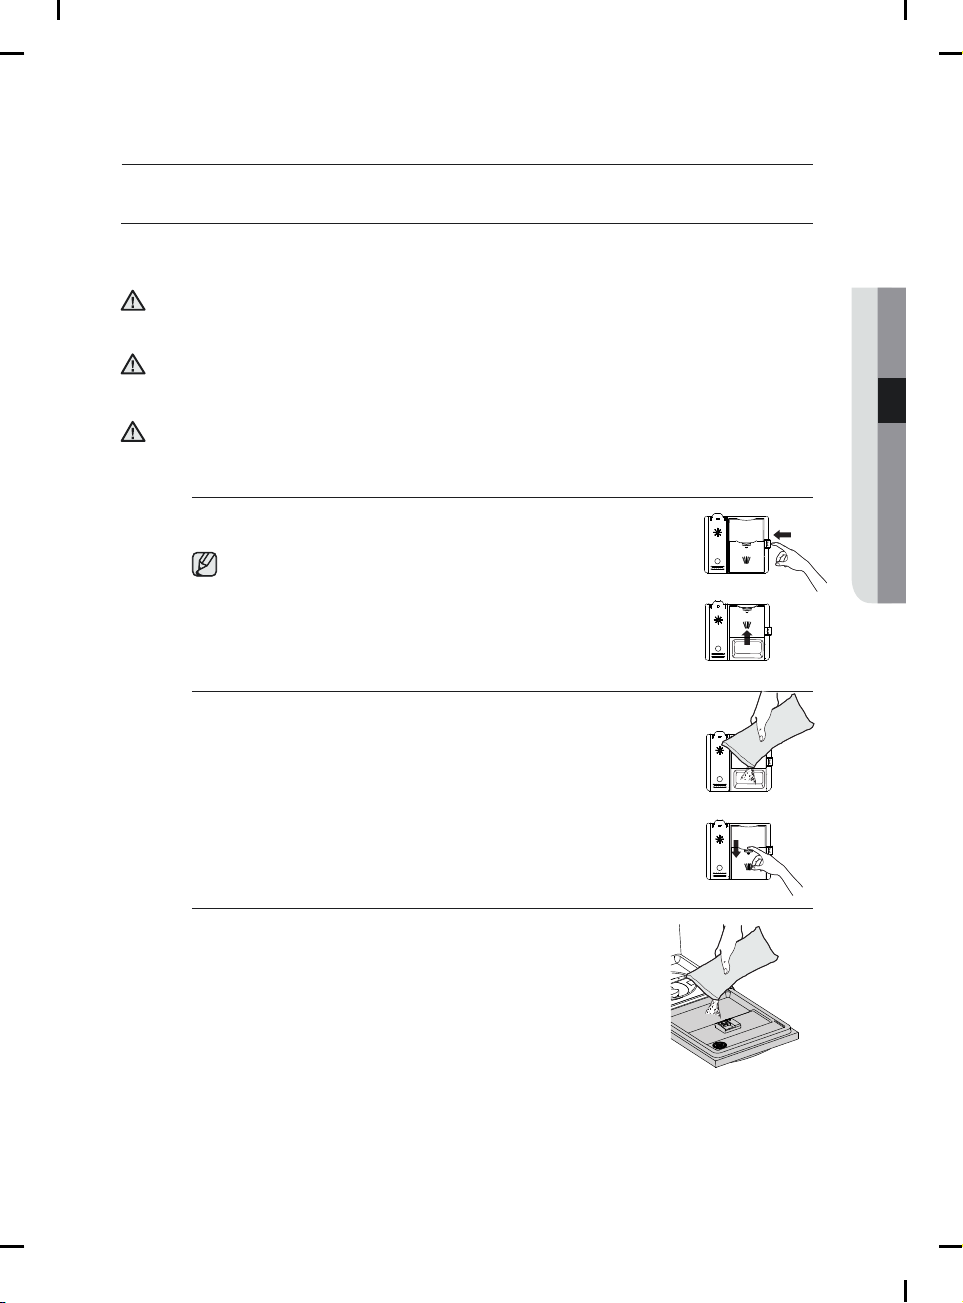
Filling the detergent dispenser
1. Open the detergent dispenser c ap by pushing the detergent
dispenser release catch.
The f lap is always open at the end of a dishwashing cycle.
2. Add the recommended amount of detergent to the main
wash detergent compartment.
3. Close the f lap by sliding it to the and then pressing it
down.
down
03 using your dishwasher
4. For better cleaning result, especially if you have very dirt
items, pour a small amount (about 15 g) of
onto the door.
The additional detergent will activate during the pre-wash
phase.
deter
gent
English - 17

The cover opens automatically to dispense the detergent during the wash.
03 using your dishwasher
The numbers inside the dispenser refer to grams.
Filling the rinse aid reservoir
Your dishwasher has been designed to use liquid rinse aid only.
Using a powdered rinse aid will clog the reservoir opening and cause the dishwasher to
malfunction.
Rinse aid improves the drying performance of the dishwasher.
Do not add regular detergent to the rinse aid reservoir.
CAUTION
Open
1. the rinse aid reservoir cap.
2. Fill the rinse aid reservoir with rinse aid.
Use the viewing port when fil ling the rinse aid reservoir.
CYCLE
Auto, Normal 20 g 10 g
Heavy, Express 60 30 g 15 g
Main wash dispenser Onto the door for pre-wash
AMOUNT OF DETERGENT
Do not f ill the reservoir above the full level indicator
Excess rinse aid can over flo w during the wash cycle.
CAUTION
3.
Vi ew th e amoun t of rins e aid in th e res ervoir thr oug h
the c lea r viewi ng port . Sto p addin g when th e
reserv oir r eaches the f ull lev el.
4. Close the rinse aid reservoir cap.
English - 18
.
cleaning and maintaining your
dishwasher
Keeping your dishwasher clean improves its performance, reduces unnecessary
repairs, and lengthens its life.
CLEANING THE EXTERIOR
It’s best to clean spills on the outside of your dishwasher as they occur. Use a soft, damp cloth on the
control panel to gently wipe away spills and dust. Do not use benzene, wax, thinner, chlorine bleach, or
alcohol. These materials may discolor the inner walls and cause stains. Do not clean the dishwasher by
sprinkling water over it and avoid letting water come into contact with any of the electrical parts.
If your dishwasher has a stainless steel door panel, you can clean it with a stainless steel cleaner for
Home Appliances or a similar product using a clean, soft cloth.
CLEANING THE INTERIOR
Clean the interior of your dishwasher periodically to remove any dirt or food particles. Wipe the inside of
the dishwasher and the inner part of the door with a wet dishcloth. We recommend f illing the detergent
dispenser with dish detergent, and then running the dishwasher empty periodically using either the Normal
or Express 60 cycle with the sanitize option. This will keep your dishwasher clean.
If white spots and odor are still present in your dishwasher, run the Normal cycle with the dishwasher empty
and without detergent until it f lushes. Then, interrupt the cycle and put an 8 ounce cup of white vinegar into
the lower basket. Close the dishwasher and let the cycle f inish.
Do not remove the tub front seal (the long rubber seal enclosing the opening of the dishwasher).
CAUTION
Do not touch the HEATING ELEMENT during or immediately after use.
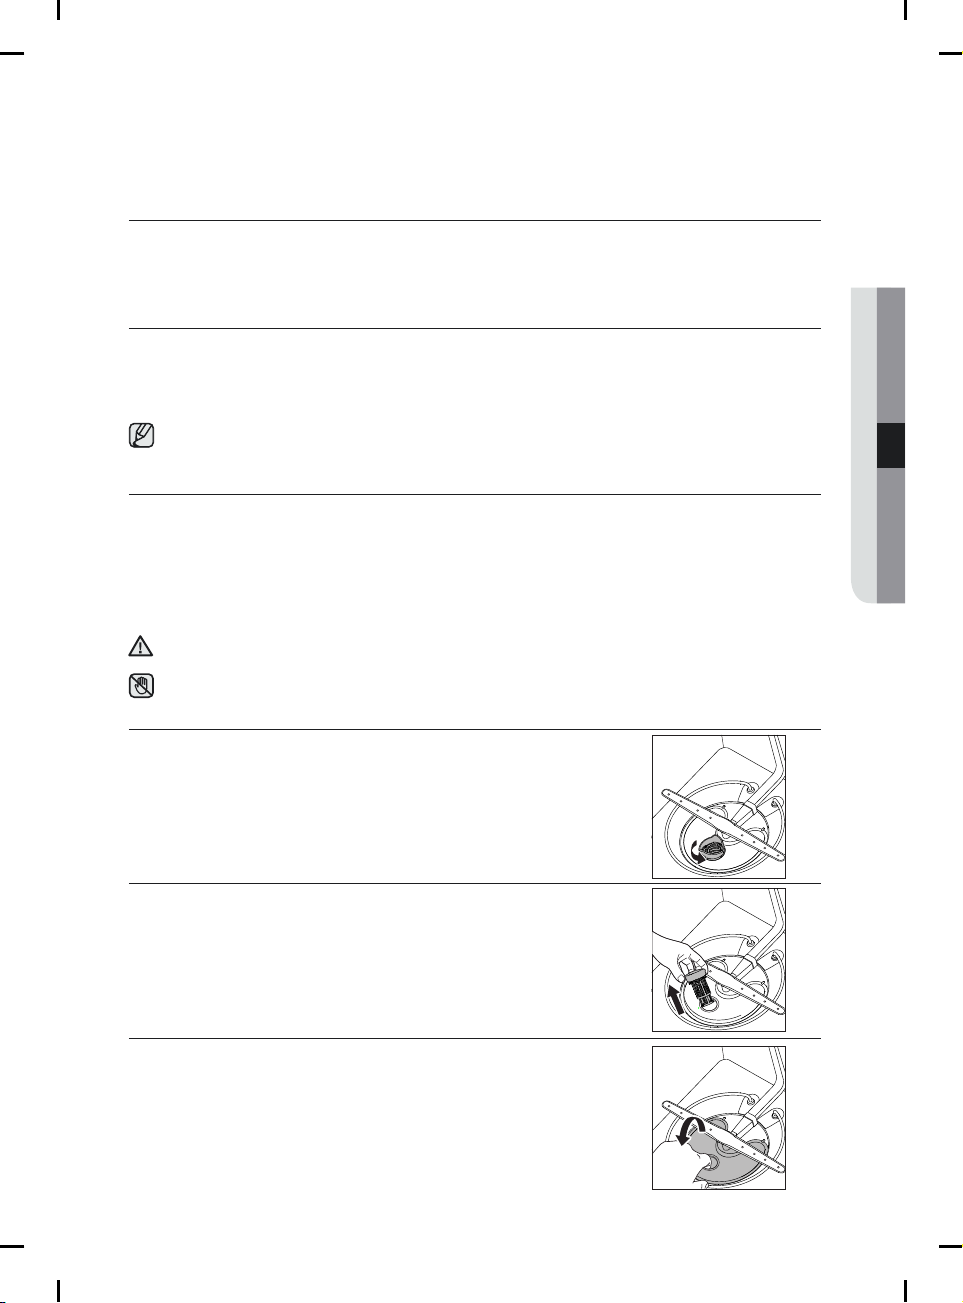
CLEANING THE FILTERS
1. Turn off the dishwasher.
04 cleaning and maintaining
2. Rotate the f ilter insert counterclockwise to unfasten and then detach
the f ilter insert.
3. Remove the f ine f ilter (f lat, rectangular).
English - 19

4. Remove any dirt or other remains from the fil ter, and then rinse
under running water.
04 cleaning and maintaining
5. Reassemble the f ilter in the reverse order of the dissasembly, re-insert
the f ilter insert, and then rotate clockwise as shown until close .
If the fil ter insert is not closed properly
be decreased.
CAUTION
, its performance will
it
d
CLEANING THE NOZZLES
If your dishwasher does not seem to be cleaning adequately or the nozzles seem clogged, you can clean
each of the nozzles. When removing the nozzles, take care as they may break.
Lower nozzle
1. Check whether the nozzle holes are
2. If cleaning is needed, remove the nozzle by
3. Clean the nozzle, and then push it back
4. Check whether the nozzle is engaged
clogged by food particles.
pulling it upwards.
into place.
correctly by rotating it by hand.
English - 20

cleaning and maintaining your
dishwasher
Middle nozzle
1. Pull the upper rack towards the front and
remove it.
2. Check whether the nozzle holes are
clogged by food particles.
3. If cleaning is needed, remove the nozzle.
4. To remove the nozzle, unfasten and
remove the nut, and then remove the
nozzle.
5. Clean the nozzle, re-insert it, and fasten
the nut.
6. When fastening the nut, turn it fir mly by
hand.
7. Check whether the nozzle is engaged
correctly by rotating it by hand.
Upper nozzle
1. Check whether the nozzle holes are
clogged by food particles.
2. If cleaning is needed, remove the nozzle.
3. To remove the nozzle, pull out the upper
rack f irst, unfasten the nozzle cap by
turning it counterclockwise, and then
remove the upper nozzle.
4. Clean the nozzle, re-insert it, and then
fasten the nozzle cap to the nozzle by
turning the cap clockwise.
5. Check whether the nozzle is engaged
correctly by rotating it by hand.
1
2
Cap nozzle
04 cleaning and maintaining
STORING YOUR DISHWASHER
If you need to store your dishwasher for an extended period of time, fir st drain and disconnect it. If you
leave water in the hoses and internal components, you can damage the dishwasher.
After draining and disconnecting the dishwasher, be sure to turn off the water supply valve and circuit
breaker.
English - 21
cycles
CYCLE CHART
05 cycles
Cycle sequence
Temp.
° °
[ F( C)]
Water consumption
Cycle time (min.)
Main Wash
Hot Rinse
*
158 F( 70 C)
[gal(I)]
Sanitize
°
°
Auto Normal Heavy Express 60
Pre wash
Main Wash
Rinse
Hot Rinse
▶
Dry
End
118-126
(48-52)
1 6-144
3
(59-62)
3-6
(11.8-22.7)
109-143
Pre wash
▶
▶
Main Wash
▶
▶
Hot Rinse
Dry
108-126
(42-52)
136-144
(59-62)
3-6
(11.8-22.7)
119-144
Rinse
▶
End
▶
▶
▶
▶
Pre wash
Main Wash
Hot Rinse
Dry
Rinse
▶
End
▶
▶
▶
▶
131(55) 126(52)
149(65) 136(58)
7.3(27.4) 4(15.3)
162 60
Pre wash
Main Wash
Hot Rinse
Dry
Rinse
▶
End
▶
▶
▶
▶
0
0
0
0
0
X
0
0
Available
Options
Delay Start
Hi-Temp
Steam Wash
Sanitize
Heated Dry
0
0
0
0
0
0
0
0
When you select the Auto or Normal cycle, you can eliminate optional steps depending on the soil level
of the dishes.
The water consumption and wash time varies depending on the steps or options you add, and on the
pressure and temperature of the supplied water.
When you select any options, the cycle time can be changed.
When the Rinse Aid is empty, wash time and Last Rinse temperature can increase a little.
English - 22
troubleshooting
CHECK THESE POINTS IF YOUR DISHWASHER…
PROBLEM POSSIBLE CAUSE SOLUTION
Will not start.
Is taking too long
with an operation or
cycle.
Remains food
particles
(Not cleaning
properly.)
on dishes.
The door is not closed completely. Check if the door is latched and closed
No cycle is selected. Select a proper cycle.
The power cable is not connected. Connect the power cable properly.
The Control Panel is locked. Unlock the child lock
A circuit breaker is open. Reset the circuit breaker.
Cold water is being supplied.
to a hot water supply
You selected an inappropriate
cycle.
The water temperature is low. Connect the water supply line to a hot
Low water pressure. The water pressure should be between 20
The water is too hard. Use high-quality, fresh detergent with rinse
Dishwasher detergent was not
used.
Detergent remains in the
dispenser.
completely.
Make sure the Water supply line is
(Additional time is required to heat cold
water.)
Select a cycle according to the number and
soil level of the dishes, as directed in this
manual.
water supply.
For best performance, the temperature of
the supplied water should be 120 (49 ).°F °C
and 120 psi (140 - 830 kPa).
aid.
Use automatic dishwasher detergent.
We recommend a powder or gel type
dishwasher detergent.
Make sure large items such as cookie
sheets, cutting boards, or contaners, etc.
are not blocking the detergent dispenser
and preventing it from opening properly.
Rearrange the dishes so they do not
interfere with detergent dispenser
operation.
06 troubleshooting
connected
.
There is no rinse aid. Check the dispenser and add rinse aid.
Use liquid type rinse aid.
A nozzle is clogged. Clean the nozzle ee page 20.
The dishes are improperly loaded.
Too many dishes have been
loaded.
Rearrange the dishes so they do not
interfere with nozzle rotation and detergent
dispenser operation.
Load only an appropriate number of dishes.
Load your dishes as recommended. (See
page 14.)
. S
English - 23

troubleshooting
PROBLEM POSSIBLE CAUSE SOLUTION
Leaves glasses with
a dull film.
Leaves a yellow
or brown film on
the inside of the
dishwasher.
Does not dry dishes
well.
Has a bad odor.
The water supplied is soft and too
much detergent was used.
Aluminum dishes were included in
the wash load.
This is caused by coffee and tea
soils.
There is no rinse aid in the
dispenser.
The temperature of the water
is low when the dishwasher is
running.
Too many dishes have been
loaded.
Glasses and cups with concave
bottoms hold water. This water
may spill onto other items when
you are unloading.
Water was left over from an
incomplete cycle.
The Drain Hose is obstructed. Contact a qualifie d service technician to
The dishwasher is not used daily
or soiled dishes are left in unit too
long.
Underload the dishwasher and use a rinse
aid to minimize this.
Remove the marks on the dishes using a
low sensitivity cleaner.
Remove the soils using a spot cleaner.
Check the dispenser and add rinse aid.
Use a liquid type rinse aid.
Make sure that the water supply line is conne-
cted to a hot water supply
Use rinse aid with the Sanitize option.
Proper loading of items can affect drying.
Load your dishes as recommended. (See
page 14.)
After the cycle fin ishes, empty the lower
rack fir st and then the upper rack. This will
prevent water from dripping from the upper
rack onto the dishes in the lower rack.
With the dishwasher empty, add detergent to
the dispenser, then
to clean the
dishwasher
remove any obstruction from the drain
hose.
With the dishwasher empty and no
detergent in the dispenser, place a glass with
8 ounces of vinegar upright into the lower
rack, and then run a Normal cycle.
.
nd run the Normal cycle
a
.
Is too noisy.
Sound is generated when the
dispenser cover is open and the
drain pump is operating in an early
stage.
The dishwasher is not level. Ensure the dishwasher is level.
Foreign material (a screw, a plastic
piece) is in the pump chamber.
There is a ‘chopping’ sound
because a nozzle is bumping
against the dishes.
This is normal operation.
Contact a qualif ied service technician to
remove foreign material from the pump
chamber.
Rearrange the dishes.
English - 24
PROBLEM POSSIBLE CAUSE SOLUTION
N
ozzle d oes not
rotat e smoot hly .
ozzle hole clogged with
N s are s
food particles.
The nozzle is blocked by a dish or
pot and cannot rotate.
Clean the nozzle hole . See page 20.
After placing the dishes into the racks,
rotate the nozzles by hand to check
whether any of the dishes interfere with
them.
Water won’t
pump out of the
dishwasher.
Has a bent upper
rack after loading
dishes.
The drain is clogged. Contact a qualif ied service technician to
remove any obstruction from the drain hose
and check the drain pump operation.
The dishes are not loaded
properly.
Load your dishes as recommended.
(See page 14.)
06 troubleshooting
English - 25

troubleshooting
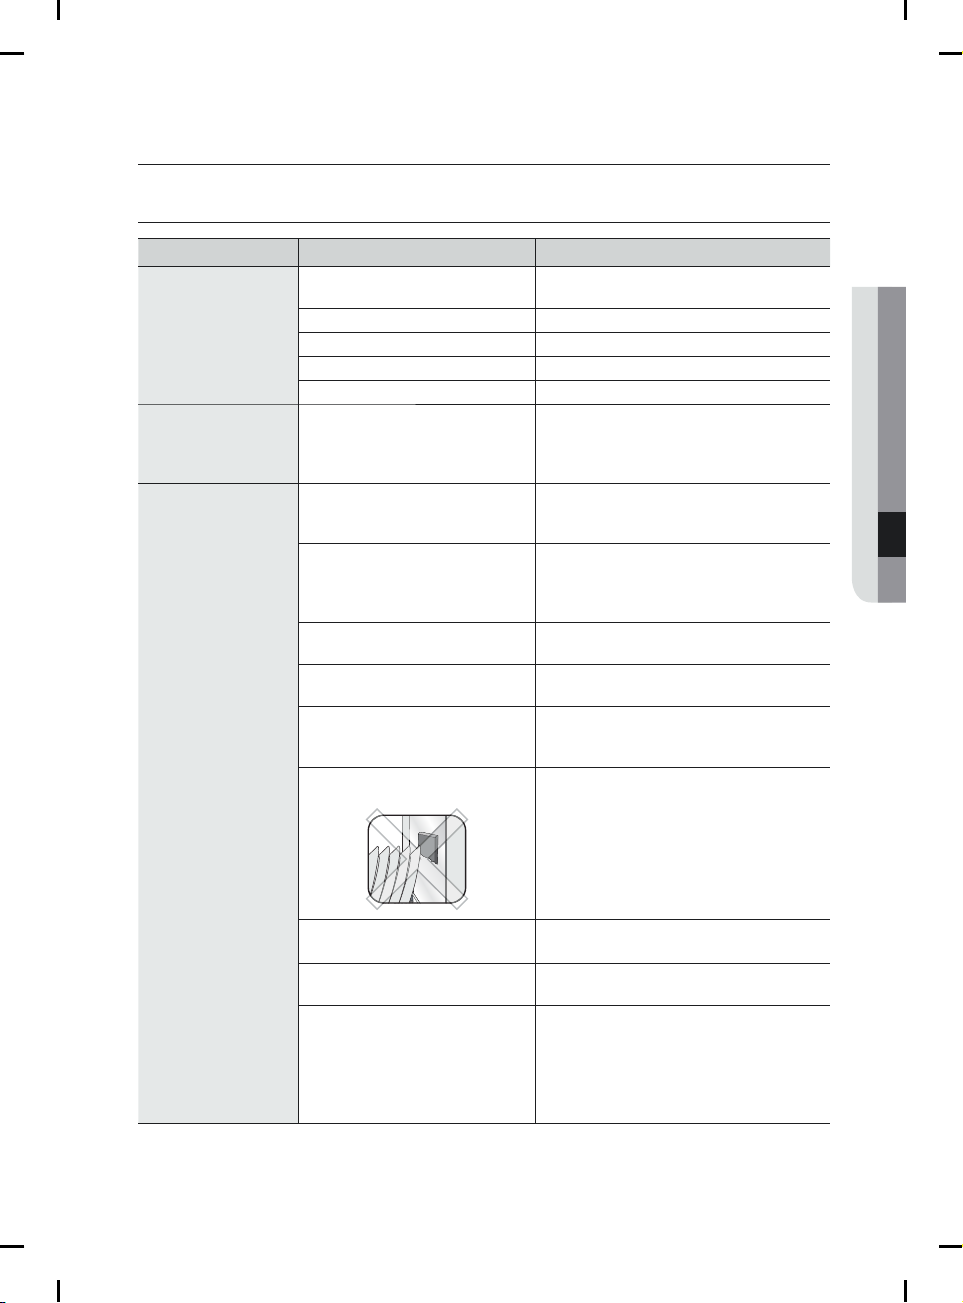
INFORMATION CODES
The Control Panel displays information codes to help you understand what is occurring with your
dishwasher.
If your dishwasher has a problem, the CODE SYMBOL lights blink as shown below.
60
60
60
60
60
No water
High-w ate r lev el
Not reac hin g requ ire d
temper atu re
Water lea kag e
The rmist or open -circ uit
fai lure
Po ss ib le
e wat er ta p isn 't op ened .
Th
e pre ssu re swi tch i s bro ken.
Th
he wash pu mp sn' t wor k .
T ing
The re is a pro blem with
e high wat er sw itc h econds.
Th was activ ated 5 stim es for 5
The h igh wat er swit ch was on c ontin uousl y for 1 20 se con ds.
The re is a pro ble m with t he Ma in PB A.
The h eater w as on con tinuo usly fo r 60 minu tes , but t he wa ter
did n ot heat u p to the re qui red te mpe rat ure.
e e ater i s bro ken .
Th
h
he em peratur e det ecte d by th e m ist or is w rong .
T t
The re is a pro ble m with t he Ma in PB A.
leakag e switch is bro ken .
T
he
The l eakag e switc h was act ivate d for 2 sec onds.
The re is a pro ble m with t he Ma in PB A.
The t hermi stor su ffere d an op en-c irc uit failu re.
The re is a pro ble m with t he Ma in PB A.
i
the Main P BA .
ther
The rmist or shor t-cir cui t
fai lure
60
Abn ormal o perat ion of
tou ch key- press
60
Abn ormal s ignal
60
The t hermi stor su ffere d a sho rt cir cui t failure .
The re is a pro ble m with t he Ma in PB A.
A tou ch key wa s opera ted abn ormal ly or ope rated a bnorm ally.
Exa mple: A k ey was pr ess ed fo r more t han 3 0 sec onds .
The re is a pro ble m with t he Su b PBA .
A tou ch key wa s opera ted abn ormal ly or ope rated a bnorm ally.
Exa mple: A k ey was pr ess ed fo r more t han 3 0 sec onds
The re is a pro ble m with t he Ma in PB A.
The re is a pro ble m with t he Su b PBA .
For any codes not listed above, call 1-800-SAMSUNG (726-7864)
If an overflow occurs, turn off the main water supply before calling
WARNING
If there is water in the base pan because of an overfill or small leak,
the water should be removed before restarting the dishwasher.
English - 26
fo r s er vic e.
appendix
HELPING THE ENVIRONMENT
Your dishwasher is manufactured from recyclable materials. If you decide to dispose of it, please
observe local waste disposal regulations. Cut off the power cable so that the appliance cannot be
connected to a power source.
Remove the door so that animals and small children cannot get trapped inside the appliance.
Do not exceed the detergent quantities recommended in the detergent manufacturers’ instructions.
SPECIFICATIONS
07 appendix
Model
Type Built-in Dishwasher Wash capacity 14 place settings
Power
Rated power uasge
Dimensions
(Width × Depth × Height)
Weight
DW80R2031U*
120 V, 60 Hz only
Wash Motor
Heater W
5
23 ¾ x 24
[604 x 62 5 (Excl uding H andle ) x 858mm] ( )
Unpacked
⁄ in.
(Excl uding H andle ) x
8
Used water pressure
75-125 W
700-1100
33 ¾
64 lb (29 kg)
20 - 120 psi
(140 - 830 kPa)
DW80R2031 Series
English - 27

warranty (U.S.A)
SAMSUNG DISHWASHER
LIMITED WARRANTY TO ORIGINAL PURCHASER WITH PROOF OF PURCHASE
This SAMSUNG brand product, as supplied and distributed by SAMSUNG ELECTRONICS AMERICA, INC.
(SAMSUNG) and delivered new, in the original carton to the original consumer purchaser, is warranted by
SAMSUNG against manufacturing defects in materials or workmanship for the limited warranty period,
starting from the date of original purchase, of:
One (1) year parts and labor
This limited warranty is valid only on products purchased and used in the United States that have been
installed, operated, and maintained according to the instructions attached to or furnished with the product.
To receive warranty service, the purchaser must contact SAMSUNG at the address or phone number
provided below for problem determination and service procedures. Warranty service can only be performed
by a SAMSUNG authorized service center. The original dated bill of sale must be presented upon request as
proof of purchase to SAMSUNG or SAMSUNG’s authorized service center to receive warranty service.
SAMSUNG will provide in-home service within the contiguous United States during the warranty period
at no charge, subject to availability of SAMSUNG authorized servicers within the customer’s geographic
area. If in-home service is not available, SAMSUNG may elect, at its option, to provide transportation of the
product to and from an authorized service center. If the product is located in an area where service by a
SAMSUNG authorized servicer is not available, you may be responsible for a trip charge or required to bring
the product to a SAMSUNG authorized service center for service.
To receive in-home service, product must be unobstructed and accessible to the service agent.
During the applicable warranty period, a product will be repaired, replaced, or the purchase price refunded,
at the sole option of SAMSUNG. SAMSUNG may use new or reconditioned parts in repairing a product, or
replace the product with a new or reconditioned product. Replacement parts and products are warranted
for the remaining portion of the original product’s warranty or ninety (90) days, whichever is longer. All
replaced parts and products are the property of SAMSUNG and you must return them to SAMSUNG.
This limited warranty covers manufacturing defects in materials or workmanship encountered in normal
household, noncommercial use of this product and shall not cover the following: damage that occurs in
shipment, delivery, installation, and uses for which this product was not intended; damage caused by
unauthorized modifi cation or alteration of the product; product where the original factory serial numbers
have been removed, defaced, changed in any way, or cannot be readily determined; cosmetic damage
including scratches, dents, chips, and other damage to the product’s fi nishes; damage caused by abuse,
misuse, pest infestations, accident, fi re, fl oods, or other acts of nature or God; damage caused by use of
equipment, utilities, services, parts, supplies, accessories, applications, installations, repairs, external wiring
or connectors not supplied or authorized by SAMSUNG; damage caused by incorrect electrical line current,
voltage, fl uctuations and surges; damage caused by failure to operate and maintain the product according
to instructions; in-home instruction on how to use your product; and service to correct installation not in
accordance with electrical or plumbing codes or correction of household electrical or plumbing (i.e., house
wiring, fuses, or water inlet hoses).
English - 28
DW9900M_DD68-00184B-03_EN.indd 37DW9900M_DD68-00184B-03_EN.indd 37 2018-07-17 5:17:182018-07-17 5:17:18

warranty (U.S.A)
The cost of repair or replacement under these excluded circumstances shall be the customer’s
responsibility.
Visits by an authorized servicer to explain product functions, maintenance or installation are not covered
by this limited warranty. Please contact SAMSUNG at the number below for assistance with any of these
issues.
EXCLUSION OF IMPLIED WARRANTIES
IMPLIED WARRANTIES, INCLUDING THE IMPLIED WARRANTIES OF MERCHANTABILITY OR FITNESS
FOR A PARTICULAR PURPOSE, ARE LIMITED TO ONE YEAR OR THE SHORTEST PERIOD ALLOWED BY
LAW. Some states do not allow limitations on how long an implied warranty lasts, so the above limitations
or exclusions may not apply to you. This warranty gives you specifi c rights, and you may also have other
rights, which vary from state to state.
LIMITATION OF REMEDIES
YOUR SOLE AND EXCLUSIVE REMEDY IS PRODUCT REPAIR, PRODUCT REPLACEMENT, OR REFUND
OF THE PURCHASE PRICE AT SAMSUNG’S OPTION, AS PROVIDED IN THIS LIMITED WARRANTY.
SAMSUNG SHALL NOT BE LIABLE FOR SPECIAL, INCIDENTAL OR CONSEQUENTIAL DAMAGES,
INCLUDING BUT NOT LIMITED TO TIME WAY FROM WORK, HOTELS AND/OR RESTAURANT MEALS,
REMODELING EXPENSES, LOSS OF REVENUE OR PROFITS, FAILURE TO REALIZE SAVINGS OR
OTHER BENEFITS REGARDLESS OF THE LEGAL THEORY ON WHICH THE CLAIM IS BASED, AND EVEN
IF SAMSUNG HAS BEEN ADVISED OF THE POSSIBILITY OF SUCH DAMAGES. Some states do not allow
exclusion or limitation of incidental or consequential damages, so the above limitations or exclusions may
not apply to you. This warranty gives you specifi c rights, and you may also have other rights, which vary
from state to state.
SAMSUNG does not warrant uninterrupted or error-free operation of the product. No warranty or guarantee
given by any other person, fi rm, or corporation with respect to this product shall be binding on SAMSUNG.
To obtain warranty service, please contact SAMSUNG at:
In USA
Samsung Electronics America, Inc.
85 Challenger Road
Ridgefi eld Park, NJ 07660
1-800-SAMSUNG (726-7864)
www.samsung.com/us/support
English - 29
DW9900M_DD68-00184B-03_EN.indd 38DW9900M_DD68-00184B-03_EN.indd 38 2018-07-17 5:17:182018-07-17 5:17:18

warranty (CANADA)
SAMSUNG DISHWASHER
LIMITED WARRANTY TO ORIGINAL PURCHASER
This SAMSUNG brand product, as supplied and distributed by SAMSUNG ELECTRONICS CANADA, INC.
(SAMSUNG) and delivered new, in the original carton to the original consumer purchaser, is warranted by
SAMSUNG against manufacturing defects in materials and workmanship for a limited warranty period of:
One (1) Year All Parts and Labor.
This limited warranty begins on the original date of purchase, and is valid only on products purchased
and used in the Canada. To receive warranty service, the purchaser must contact SAMSUNG for problem
determination and service procedures. Warranty service can only be performed by a SAMSUNG authorized
service center. The original dated bill of sale must be presented upon request as proof of purchase to
SAMSUNG or SAMSUNG’s authorized service center. SAMSUNG will provide in-home service during the
warranty period at no charge, subject to availability within the contiguous Canada.
In home service is not available in all areas.
To receive in-home service, product must be unobstructed and accessible to the service agent. If service
is not available, SAMSUNG may elect to provide transportation of the product to and from an authorized
service center.
SAMSUNG will repair, replace, or refund this product at our option and at no charge as stipulated herein,
with new or reconditioned parts or products if found to be defective during the limited warranty period
specifi ed above. All replaced parts and products become the property of SAMSUNG and must be returned
to SAMSUNG. Replacement parts and products assume the remaining original warranty, or ninety (90)
days, whichever is longer.
This limited warranty covers manufacturing defects in materials and workmanship encountered in normal,
noncommercial use of this product and shall not apply to the following: damage that occurs in shipment;
delivery and installation; applications and uses for which this product was not intended; altered product or
serial numbers; cosmetic damage or exterior fi nish; accidents, abuse, neglect, fi re, water, lightning, or other
acts of nature or God; use of products, equipment, systems, utilities, services, parts, supplies, accessories,
applications, installations, repairs, external wiring or connectors not supplied or authorized by SAMSUNG
that damage this product or result in service problems; incorrect electrical line voltage, fl uctuations and
surges; customer adjustments and failure to follow operating instructions, maintenance and environmental
instructions that are covered and prescribed in the instruction book; product removal and reinstallation;
problems caused by pest infestations. This limited warranty does not cover problems resulting from
incorrect electric current, voltage or supply, light bulbs, house fuses, house wiring, cost of a service call for
instructions, or fi xing installation errors. SAMSUNG does not warrant uninterrupted or error-free operation of
the product.
English - 30
DW9900M_DD68-00184B-03_EN.indd 39DW9900M_DD68-00184B-03_EN.indd 39 2018-07-17 5:17:182018-07-17 5:17:18
 Loading...