

Samsung DVD-R120 Owner’s Manual
Instruction Manual
@@@@@_@
C7 Cr_ _ !_
www.samsung.com
Warning
TO REDUCE THE RISK OF ELECTRIC SHOCK. DO NOT
RElYOVETHE COVER,OR BACK
NO USER-SERVICEABLE PARTSARE INSIDE. REFER
SERVICING TO QUALIFIED SERVICE PERSONNEL,
reside the product that presents a risk of
This symbol indicates 'dangerous voltage"
electric shock or personal iniur}:
FCC NOTE (for U.S.A):
This equipment has been tested and found to comply
with tfie limits for a Class B digital device, pursuant to
Part 15 of the FCC Rules. These limits are designed to
provide reasonable protection against harmful
interference in a residential installation. This equipment
generates, uses and can radiate radio frequency energy
and, if not installed and used m accordance with the
instrt.tctiorls, may cause harmful interference to radio
communications. However, there is no guarantee that
interference will not occur m a particular installation. If
this equipment does cause harmful interference to radio
or television reception, which can be detennined by
turning the equipment off and on, the user is
encouraged to try to correct the interference by one or
more of the following measures:
• Reorient or relocate the receiving antenna.
• Increase the separation between the equipment and
receiver.
• Connect the equipment into an outlet on a circuit
different from that to which the receiver is connected.
• Consult the dealer or an experienced radio/TV
technician for help.
This symbol indicates important
instructions accompanying the product.
Do not install this equipment in a confined space such
as a bookcase or similar unit.
WARNING : TO prevent damage x_hicfi may result in fire
or electric shock hazard, do not expose
this appliance to rain or moisture.
CAUTION : DVD RECORDERS USE AN INVISIBLE
LASER BEAM WHICH CAN CAUSE
HAZARDOUS RADIATION EXPOSURE
IF DIRECTED.
BE SURE TO OPERATE RECORDER
CORRECTLY AS INSTRUCTED.
CAUTION
THIS PRODUCT UTILIZES A LASER.
USE OF CONTROLS OR ADJUSTMENTS OR
PERFORMANCE OF PROCEDURES OTHER THAN
THOSE SPECIFIED HEREIN MAY RESULT IN
HAZARDOUS RADIATION EXPOSURE.
DO NOT OPEN COVERS AND DO NOT REPAIR
YOURSELF. REFER SERVICING TO QUALIFIED
PERSONNEL.
CAUTIONS
Caution: To prevent electric shock, match wide blade of
plug to wide slot, fully insert.
Attention: Pour (.viter les chocs _lectriqnes, introduire la
lame la plus large de la fiche dans la borne
correspondante de la prise et pousser .jusqu
au fond.
This product satisfies FCC regulations when shielded
cables and connectors are used to connect the unit to
other equipment. To prevent electromagnetic
interference with electric appliances, such as radios and
televisions, use shiekled cables and connectors for
connections.
_0f[
DANGER
CAUTION
ATTENTION
ADVARSEL
VARO !
VARNING
ADVARSEL
VORSICH r
_A
This unit can be used only where the
power supply is AC 120V, 60Hz. It cannot
be used elsewhere.
This DVD recorder is designed and
manufactured to respond to the Region
Management Information.
If the Region number of a DVD disc does
not correspond to the Region number of
this DVD recorder, the DVD recorder
cannot play the disc.
This device is protected by U.S. Patent
Nos.4,631,603;4,577,216;4,819,098;4,907,
093; and 6,516,132.This product
incorporates copyright protection
technology that is protected by U.S.
patents and other intellectual property
rights.Use of this copyright protection
technology must be authorized by
Macrovision,and is intended for home and
other limited viewing uses only unless
otherwise authorized by
Macrovision.Reverse engineering or
disassembly is prohibited.
- VISIBLEAND INVISIBLE lASER RADIATION WHEN OPEN.
AVOID DIRECT EXPOSURE TO BEAM.
- VISIBLE AND iNVISIBLE LASER RADIAl ION WHEN OPEN.
AVOID EXPOSURE TO BEAM.
- RAYONNEMENT LASER VISIBLE ET INVISIBLE EN CAS D'OUVERTURE.
EXPOSITION OANGEREUSE AU FAJSCEAU.
- SYNLIG OG USYNLIG LASERSTR/_LING VED ,_BNING.
UNDG_, UDS/ETTELSE FOR STR_&ING.
- AVATTAESSA OLET ALTTIINA NAKYVAA JA NAKYMATON
LASERSATEILYLLE. ,'_LA, KATSO SATEESEEN.
= SYNLIG OCH OSYNLIG LASERSTRALNING N,ikR DENNA DEL
'AR OPPNAD. BETRAKTA EJ STR_,LEN.
- SYNLIG OG USYNLIG LASERSTR,g, LING N,a,R DEKSEL AliNES
UNNG_, EKSPONERING FOR STR,_LEN.
= SICHTBARE UND UNSICHTBARE LASERSTRAHLUNG WENN ABDECKUNG
GEOFFNE£ NICHT DEIvl STRAHL AUSSETZEN.
- _t'_,]SgA>_x_Sgif, tt_a_J, '_'_YA_A,!,_'f,
_- English
| Important Safety Instructions
Read tllese operating instructions carefully before using
the unit. Follow all the safety instructions listed below.
Keep these operating instructions handy for future
reference.
electricity can affect normal operation of tl-lisrecorder.
If this occurs, turn the recorder off and on again with
tl-_ePOW'ER button, or disconnect and then reconnect
d-_eAC power cord to tile AC power oudet.
The recorder will operate normally
Be sure to remove the disc and turn off tl-le recorder
after use.
Disconnect the AC power cord from tile AC outlet
when you dont intend to use tt-_erecorder fur long
periods of time.
Clean the disc by wiping m a straight line from tl-ie
inside to the outside of the disc.
1) Read these instructions.
2) Keep these instructions.
3) Heed all warnings.
4) Follow all instructions.
5) Do not use tllis apparatus near water.
6) Clean only with dry cloth.
7) Do not block any ventilation openings, Install in
accordance with tile manufacturer's instructions.
8) Do not install near any heat sources such as radiators.
heat registers, stoves, or other apparatus (including
amplifiers) that produce heat.
9) Do not defeat the safety purpose of the polarized or
grounding- type plug. A polarized plug has two
blades with one wider than the other. A grounding-
type plug has two blades and a third grounding
prong. The wide blade or tl-ie third prong are
provided for your safer> if the provided plug does not
fit into your oudet, consult an electrician for
replacement of the obsolete outlet.
10) Protect the power cord from being walked on or
pind-_ed particularly at plugs, convenience receptacles,
and tl-lepoint where they exit from the apparatus.
1l) Only use attachments/aceessories specified by the
manufacturer.
12) Use only with the cart. stand, tripod, bracket, or
table specified by the manufacturer, or sold with the
apparatus. \7v'hen a cart is used, use caution when
moving the cart/apparatus combination to avoid
in.jury from tip-over.
13) Wnpl ug this apparatus during lightning storms or
when unused for long periods of time.
14) Refer all servicing to qualified service personnel.
Servicing is required when the apparatus has been
damaged m any wa 5 such as power-supply cord or
plug is damaged, liquid has been spilled or objects
have fi/llen into the apparatus, the apparatus has
been exposed to ram or moisture, does not operate
normally, or has been dropped.
I Maintenance of Cabinet
For safety reasons, be sure to disconnect the AC power
cord from d-le AC outlet.
• Do not use benzene, thinner, or od-ler solvents for
cleaning.
• Wipe the cabinet with a soft cloth.
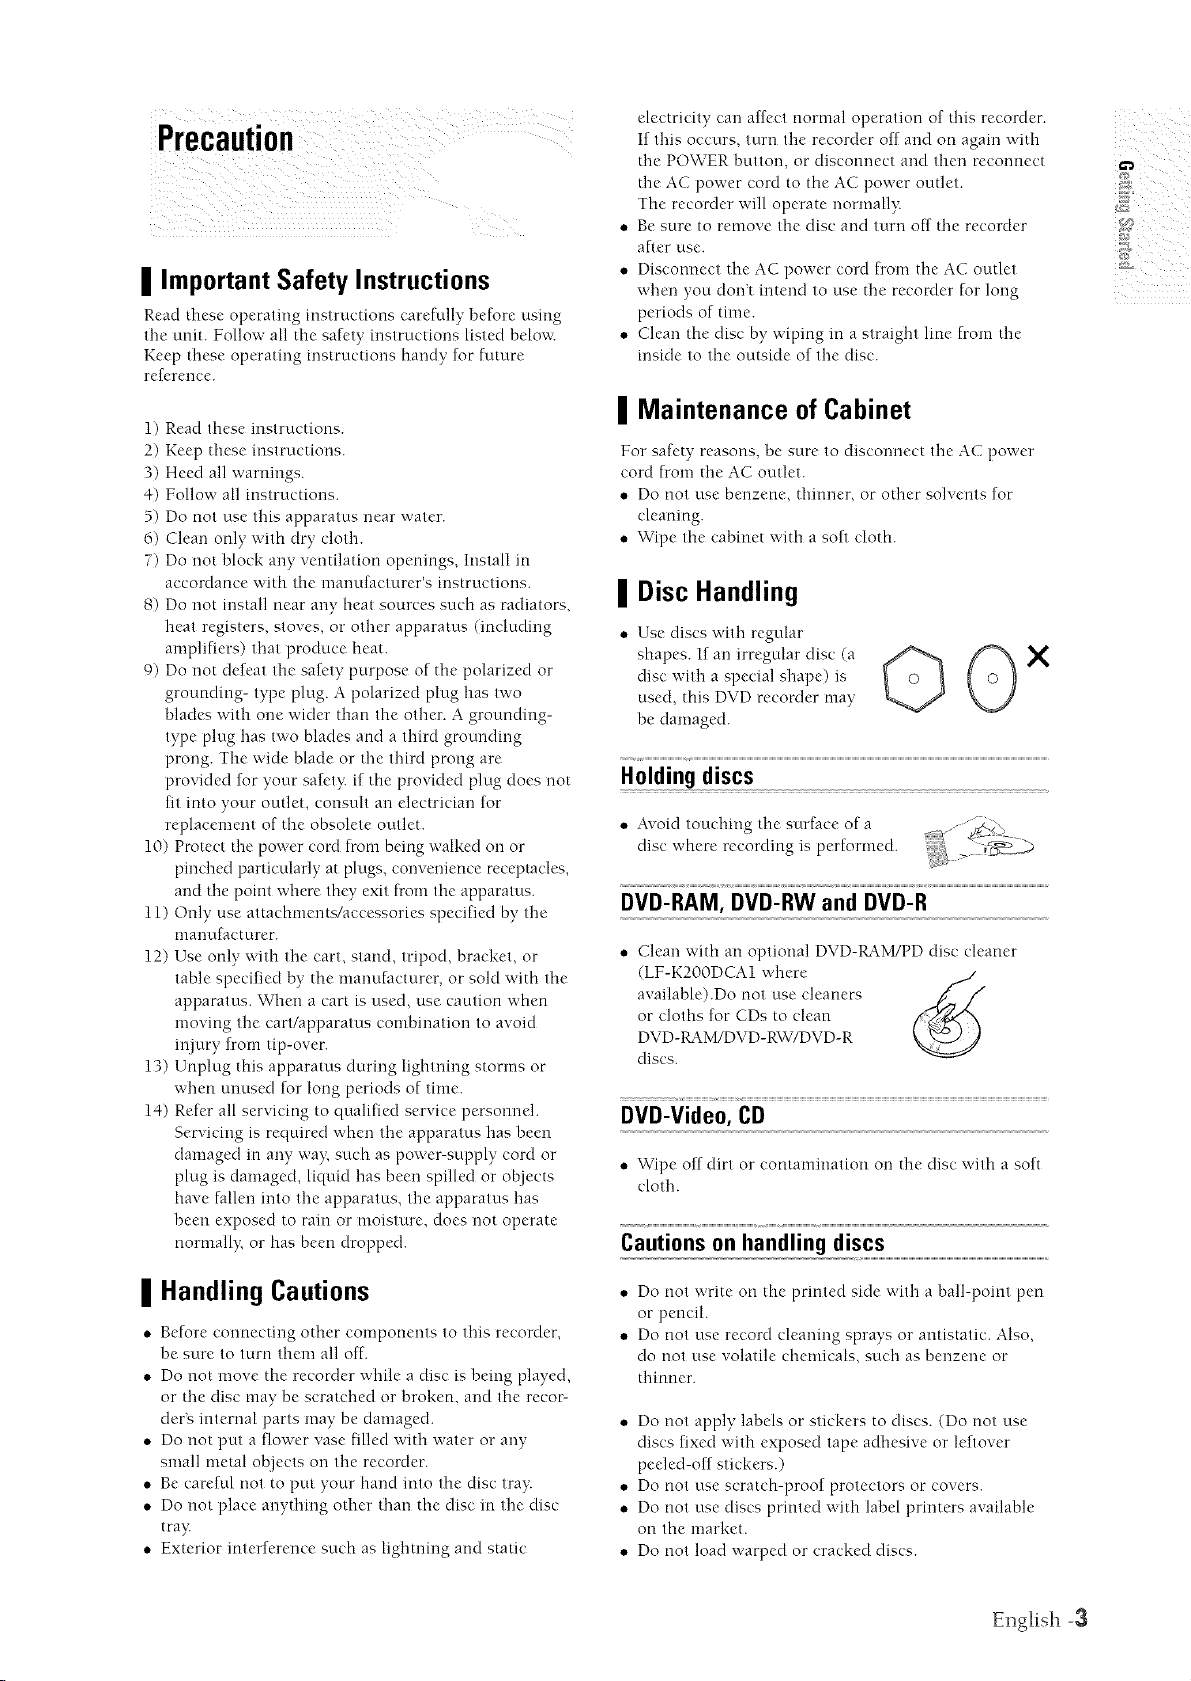
I Disc Handling
Use discs with regular
shapes. If an irregular disc (a
disc with a special shape) is
used, this DVD recorder may
be damaged.
Holding discs
• Avoid touchit_g tile surface of a
disc where recording is performed.
DVD-RAM, DVD-RW and DVD-R
• Clean with an optional DVD-RAM/PD disc cleaner
(LF-K2OODCAI where
available).Do not use cleaners
or cloths for CDs to clean
DVD-tL_M/DVD-RW/DVD-R
discs.
DVD-Video, CD
• Wipe off dirt or comamiuatiou on the disc v,ith a soft
cloth.
Cautions on handling discs
X
I Handling Cautions
,, Before connecting other components to this recorder,
be sure to turn them all off-.
,, Do not move the recorder while a disc is being played,
or tl-ie disc may be scratched or broken, and the recor-
der's internal parts may be damaged.
,, Do not put a flower vase filled with water or any
small metal objects on the recorder.
,, Be careful not to put your hand into the disc tra):
,, Do not place anyd-_ing other d-ian the disc in the disc
tray
,, Exterior interference such as lightrling and static
• Do not write on the printed side with a ball-point pen
or pencil.
• Do not use record cleaning sprays or antistatic. Also,
do not use volatile chemicals, such as benzene or
d-iinner.
• Do not apply labels or stickers to discs. (Do not use
discs fixed with exposed tape adhesive or leftover
peeled-off stickers.)
• Do not use scratch-proof protectors or covers.
• Do not use discs printed with label printers available
on the market.
• Do not load warped or cracked discs.
El-lglish -3
II Disc Storage
Be careful not to harm d-le disc because the data o2-1
these discs is highly vulnerable to the environment.
,, Do not keep under direct sunlight.
,, Keep m a cool ventilated area.
,, Store verticall?:
,, Keep in a clean protection jacket.
,, If you move your DVD recorder suddenly from a cold
place to a warm place, condensation may generate on
the operating parts and lens and cause abnormal disc
playback. If this occurs, remove the disc and wait for
one to two hours with file power on before
atttemptmg playback.
II Disc Specifications
DVD-Video
• A digital versatile disc (DVD) can contain up to 135-
minutes of images, 8-language audio and 32 subtitle
languages. It is equipped with MPEG-2 picture
compression arid Dolby 3D surrounding, allowing you
to en.joy vivid and clear theater quality images in the
comfort of your own home.
,, Wherl switching from the first layer to the second
layer of a double-layered DVD Video disc. there may
be n_otnentary distortion m the image and sound.
This is not a malfunction of the unit.
,, Once a DVD-R/RW recorded m Video Mode is
finalized, it becomes DVD-Video.
Audio CD
• An audio disc on v,,hich 44.1kHz PCM Audio is
recorded
,, Plays CD-DA format audio CD-R and CD-RW discs.
The unit may not be able to play some CD-R or CD-
RW discs clue to the condition of the recording.
• MOTION JPEG is not supported.
,, Use a 700MB(80 minutes) CD-P./R\V disc.
If possible, do not use a 800MB(90 minutes) or above
disc, as the disc may not play back.
,, If the CD-R/RW disc was not recorded as a closed
session, you may experience a delay in the early
playback time, and all recorded files may not play
,, Some CD-R/RW discs may not be playable with this
unit, clependmg ou the device which was used to burn
them.
For contents recorded on CD-R!RW media from CDs
for your personal use, playability may vary depending
on contents and discs.
DVD-R Disc Playback and Recording
• Once a DVD-R recorded m Video Mode is finalized, it
becomes DVD-Video.
,, You can record onto the available space on the disc
and perlurm editing functions such as giving titles to
discs and programs and erasing programs before
finalizing.
,, When programming is erased from a DVD-R, that
space does not become available. Once an area on a
DVD-R is recorded on, that area is no longer available
for recording, whether the recording is erased or not.
,, It takes about 30 seconds for the unit to complete
recording management reformation after recording
finishes.
,, This product optimizes the DVD-R for each recording.
Optimizing is carried out when you start recording
alter inserting the disc or turning on the unit.
Recording onto the disc may become impossible if
optimizing is carried out too mauy times.
,, Playback may be impossible m some cases clue to the
condition of recording.
,, This t.u-litcan play back DVD-R discs recorded and
finalized with a Samsung DVD video recorder. It may
not be able to play some DVD-R discs depending on
the disc and the condition of the recording.
CD-R/RW
,, Only CD-R discs _,x,itllMP3 files recorded with
ISO9660 or JOLIET furmat can be played back
,, Only MP3 files with the ".rap3". ".MPY' extension
can be used.
,, For MP3 files recorded with a VBR(Mlriable Bit
Rates), from 32 Kbps to 320 Kbps, the sound may cut
in out.
,, Playable bitrate range is from 56Kbps to 320Kbps.
,, The unit can handle a nlaximum of 1000 files and
folders.
,, OnlyJPEG files v,,ith the ".jpg", ".JPG" extension can
be used.
,, The unit can handle a tnaximum of 1000 files and
folders.
,, Maximum size of progressiveJPEG is 3M pixels.
4- English
DVD-RW Disc Playback and Recording
• Recording and playback can be performed on DVD-
RW discs m both the Video and VR Modes.
• Once a DVD-RW recorded in VR Mode or Video mode
is finalized, you catmot perform addtional recording.
,, Once a DVD-RW recorded in Video Mode is finalized.
it becomes DVD-Video.
,, In both modes, playback can be performed before and
after finalization, but additional recording, deleting
and editing can not be performed after finalization.
,, If you want to record the disc m VR Mode and d-_en
record m V Mode, be sure to execute Format.
Be careful when executing Format because all the
recorded data may be lost.
A DVD-RW" blanl_ disc is initialized to VR Mode v,,hen
first initialized.
DVD-RW (VR mode)
- This is a format that is used for recording data on a
DVD-1LhM or DVD-RW disc. You can record
multiple titles, edit, delete, partial delete, create a
playlist, etc.
- A disc that is recorded m this mode may not be
played by an existing DVD player.
,, DVD-RW (Video mode)
- This is a format that is used for recording data on a
DVD-RW or DVD-R disc. The disc can be played by
an existing DVD player once it has been finalized.
- If a disc that has been recorded in Video Mode by a
different maker's recorder but has not been
finalized, it cannot be played or additionally be
recorded by this recorder.
DVD-RAM Disc Playback and Recording
• DVD-1L_M discs corne with or without a cartridge.
For this product, we recommend DVD-RAM discs tl-mt
come without cartridges.
• Ensure that the recording mode is set to VR mode.
Otherwise, this product will not be able to play the
recording.
• You cannot play a DVD-1L%Mm most DVD players
due to compatibility issues.
• Ordy DVD-1L_M standard Vc:rsion 2.0. discs can be
played in this unit.
• DVD-1L_M recorded on this unit may not work with
other DVD players. To determine compatibility with
these DVD-1L_M discs, reh'r to the user's manual for
the player.
• For cartridge type DVD-tL%M discs, remove the
cartridge and use the disc onl}:
Protection
Do not use the following discs!
• LD, CD-G, CD-1, CD-ROM, DVD-ROM, DVD+R and
DVD+RW discs should not be used in this product.
[Note]
Disc types that can be played : CD/CD-WCD-
RW£VIP3/JPEG/DVD-Video/DVD-IL_M/DVD-RW7
DVD-R. For a DVD-R/DVD-RW disc, wlJch has been
recorded in Video Mode on another component, it can
play only when finalized.
• Some commercial discs and DVD discs purchased
outside your region may not be playable with this
product. When these discs are played, either "No
disc." or "Please check the regional code." v,'ill be
displayed.
• If your DVD-RW disc is an illegal copy or is not m
DVD video format, it may also not be playable.
\t/
";r W'c recommend using one of the discs in the table as
they l-rovebeen confirmed to be compatible with this
unit. Other discs may not perform correctl}<
Media Brand Speed
DVD-R That's 4x
DVD-RW JVC 2x
DVD-IL_M Panasonic 2x
TDK 4x
Beall 4x
Sony 4x
Mitsubishi 4x
Maxell 4x
Panasonic 4x
TDK 2x
Maxell 2x
Optodisc 2x
Mitsubishi 2x
Radius 2x
Verbatim 2x
Maxell 3x
Maxell 2x
Fu]ifilm 3x
TDK 2x
PanasonicGold 3x
Panasonic 3x
i i i
:}-"DVD-RAM/DVD-RW7DVD-R discs It-mrare
incompatible with the DVD-VIDEO format cannot be
played with this product.
:}-"For more reformation on DVD recording
compatibility, consuh your DVD-tL%M/DVD-
RW/DVD-R manufacturer.
:}-"If poor quality DVD-P_M/DVD-RW7DVD-R discs are
used, your recordings may faih
Disc Maximum no. of recordings by disc type
DVD-tL4M 100,000
DVD-RW_ ],000
DVD-R ]
EnglM-I -5
Contents
Step 4 : Connecting the Audio cable ................... 18
Method I : Cotmecting to your TV........................... 18
Method 2 : Cotmectmg to a stereo amplifier with
analog input .jacks...................................................... 18
/
_;eHi_g S_ar_ed
Warning ....................................................................... 2
Precaution .................................................................... 3
hnportant Safety Instructions ...................................... 3
Handling Cautions ....................................................... 3
Maintenance of Cabinet ............................................... 3
Disc Handling .............................................................. 3
Disc Storage ................................................................. 4
Disc Specifications ....................................................... 4
General Features ......................................................... 8
Before reading the userg manual .............................. O
How to use the DVD recorder ................................... O
Description ................................................................ 11
Front panel ................................................................ 11
Front Panel Display ................................................... 11
Rear Pan el .................................................................. 12
Tour of the Remote Control ...................................... 13
Method 3: Cormectmg to an AV amplifier with a
digital input jack ...................................................... 19
Step 5 : Connecting external devices ...................... 19
Method 1 : Connecting a VCR, Set-Top Box(STB)
or DVD player to the LINE 1 IN jacks ...................... 19
Method 2 : Comlecting a Camcorder to the LINE 2 1N
.jacks ........................................................................... 20
Method 3 : Comlecting a Camcorder to the DV IN
.jack ............................................................................. 20
Step 6 : Connecting the Power Cord ....................... 20
Step 7 : Preparing the Remote Control ................... 21
Setting the Remote Control ....................................... 21
Step 8 : Initial Setup ................................................. 22
1. OSD Language Setup ............................................. 22
2. Clock Set ................................................................ 23
3. Channel Set............................................................ 25
4. Setting Up the Audio Options ............................... 27
5. Setting Up the TV Aspect ..................................... 29
Com ecting & Se/ting UP
Quick Overview ........................................................ 14
Step 1 : Unpacking ................................................... 15
Accessories ................................................................. 15
Step 2 : Connecting the Antenna cable .................. 15
Method 1 :Antenrm + DVD Recorder + TV : No Cable
box ............................................................................. 15
Method 2 :Antem-m +Cable box + DVD Recorder +
TV : Cable box with many scrambled charmels ........ 15
Method 3 : Antem-m + DVD Recorder + Cable box
+TV : Cable box with a few scrambled chanrMs ...... 16
Step 3 : Connecting the Video cable ....................... 16
Method 1 : Cormecting to a Video input .jack ........... 16
Method 2 : Cormecting to an S-video input jack ...... 17
Method 3 : Cormecting to Component video input
.jacks(Y,P_,P_) ............................................................. 17
Before Recording ....................................................... 30
Recordable discs ........................................................ 30
Recording Formats .................................................... 31
Recording Mode ......................................................... 31
Unrecordable video .................................................... 31
About 1NFO Key ........................................................ 32
Checking the available disc space
(Disc Information) ..................................................... 32
Recording Ihe currem TV program you art-
watching .................................................................... 32
Recording from external equipment ........................ 34
Copying from a Camcorder ..................................... 35
Making a One Touch Recording (OTR) .................. 36
Setting a Timer Recording ....................................... 37
Flexible Recording (for Timer recording only) ....... 38
6- Er@ish
Editing the Scheduled Record List ...................... 38
Ddeting the Scheduled Record List .................... ..39
Recording the Scheduled Record List ................. ..40
Before Playing ........................................................... 41
Region code (DVD-Video ordy) ................................. 41
Disc lypcs lhat can be played .................................... 41
Discs that cannot be played ....................................... 41
Playing a Disc ............................................................ 42
Using the Disc Menu & Title Mm_u ......................... A3
Using the Search Fm-_ctim3s...................................... A3
Slow Motion Play ...................................................... A4
Step Molion Play....................................................... A4
About ANYKEY ........................................................ A4
Using the Repeal Function ....................................... A5
Sdcc/ing the Sublitle ............................................... ..4-7
Sdcc/ing the Audio language ................................... A8
Changing the Camera Angle .................................... A8
Zoot'ning-Irl ................................................................ 49
Using Bookmarks. ..................................................... A9
i \
?
7\
Basic Editing (Title List) ......................................... .67
Renaming(Labcling) a Title ...................................... .07
LocMng(Protcclmg) a Ti/le ...................................... .08
Ddeling a Title ......................................................... 08
Dclcling a Scclion of a Title ..................................... 09
Advanced Editing (Play List) ................................ 71
Creating a Playlist ..................................................... 71
Playing Enlries in lhe Playlist .................................. 72
Renaming a Playlist Emry ......................................... 73
Editing a Sccne for the Playlis/ .................................. 74
Copying a Playlisl Entry to tl3e Playlist ..................... 77
Dcleling a Playlisl Entry from lhe Playlist ................ 78
Disc Manager. ....................................................... 79
Editing tl3e Disc Name. ............................................. .79
Disc Protcc/ion .......................................................... 80
Formatting a Disc ..................................................... £0
Ddelc All Title Lists ................................................. £1
Finalizing a disc ........................................................ £2
Unfinalizing a disc (VATR modc) ............................ .83
Using Markers. ........................................................... 50
Playing an Audio CD/MP3 .................................. 51
Playing an Audio CD (CD-DA)/MP3 ...................... ..51
Playing a Picture CD .......................................... 54
Playing the Title List .......................................... 55
Se ings & Ad ts men s
Uong the Setup Menu .............................................. 58
System Setting ......................................................... ..59
Clock Sct .................................................................... 59
Channel Sct................................................................ 59
CM Skip Time Sc/ting. ............................................... 59
EP Mode Time Sclling .............................................. .00
Automatic Chapter Creation .................................... .00
Language Setting ....................................................... 61
Video (Display) Setting ............................................ 62
Parental Control ........................................................ 63
Additional _fo_matio_
Troubleshooting ....................................................... .84
Spedfication ............................................................. .88
Warranty .................................................................... 89
English -7

GeneralFeatures
The DVD-R120 allows vou lo record and play high
quamv digital video on DVD-I_4M/DVD-RW/DVD-R
discs. You can record and edit digital video on DVD-
K4.M/DVD-RW/DVD-R discs as if they wcrc VCR tapes.
High quality digital audio and video recording
and playback
Record up to 16-hours of video with a double sided 9.4
GB DVD-_M disc, and up to 8-hours of images with a
4-.7 GB DVD-P_4.M/DVD-RW/DVD-R disc, depending on
the recording mode.
Selectable Recording Mode
You can set your recorder to one of five different
recording speeds, each varying in recording quality arm
length. EP mode yields the most recording time, LP 8-,r
SP modes provide less recording time with higher
quality recording, and XP mode gives you the highest
quality recording. There's also the FR (Flexible
Recording) mode that lets you record with the best
picture quality possible for the recording time and
remaining space on the disc in timer recording.
High quality progressive scan
Progressive scanning provides high resolution and
flicker free video.
The 10-bit 54-MHz DAC arm 2D Y/C Separating
Circuitry provides the highest video playback and
recording qualit}: (See page 17.)
A variety of functions with an easy-to-use user
interface
The integrated menu system and the messaging function
allow you to perform desired operations both easily and
conveniently: W_ith a DVD-RAM or DVD-RW"disc, you
can edit recorded images, create a playlist, and edit
video m a specific sequence according to your
requirenlents.
Automated Quality Adjustment for Timer Recording
If FR mode is selected, the video quality is adjusted
automatically so that all video for the scheduled time
can be recorded onto the free disc space. (See page 38.)
Creating a DVD video title using DVD-RVV7DVD-R disc
W'ith a DVD-R120, create your own DVD video title on
4-.7 GB DVD-RW7DVD-R discs.
Copying data from a digital camcorder using a DV
input jack
Record digital camcorder video onto DVD-P_M or
DVD-RW_ DVD-R discs using the DV input .jack (1EEE
1394-4pin). (See pages 35.)
8- English
Beforereadingtheuser's
manua!
Make sure to check tile following matters before reading
the user_ manual.
Icon Term Definition
This involves a function available
DVD
_4M
RW
CD
JPEG m a data picture CD (CD-R or
MP3 in a data CD (CD-R or CD-RW on
Caution function does not operate or
NOTE on the page that help each
One-Touch A function that can be operated by,
button using only one button.
ANYKEY A function that can be operated by,
button using Any Key button.
in DVD or DVD-WDVD-RW discs
that have been recorded and
finalized m Video Mode.
This revolves a function available
m DVD-P_4M.
This involves a function available
m DVD-RW:
This involves a ft.tnctiol-i available
R
m DVD-R.
This revolves a function available
m a data CD (CD-R or CD-RW').
This involves a fLlnctiol-Iavailable
CD-RW).
This revolves a function available
which MP3 is recorded).
This involves a case where a
settings may be cancelled.
This revolves tips or instructions
function operate.
HowtousetheDVDrecorder
ii
i!
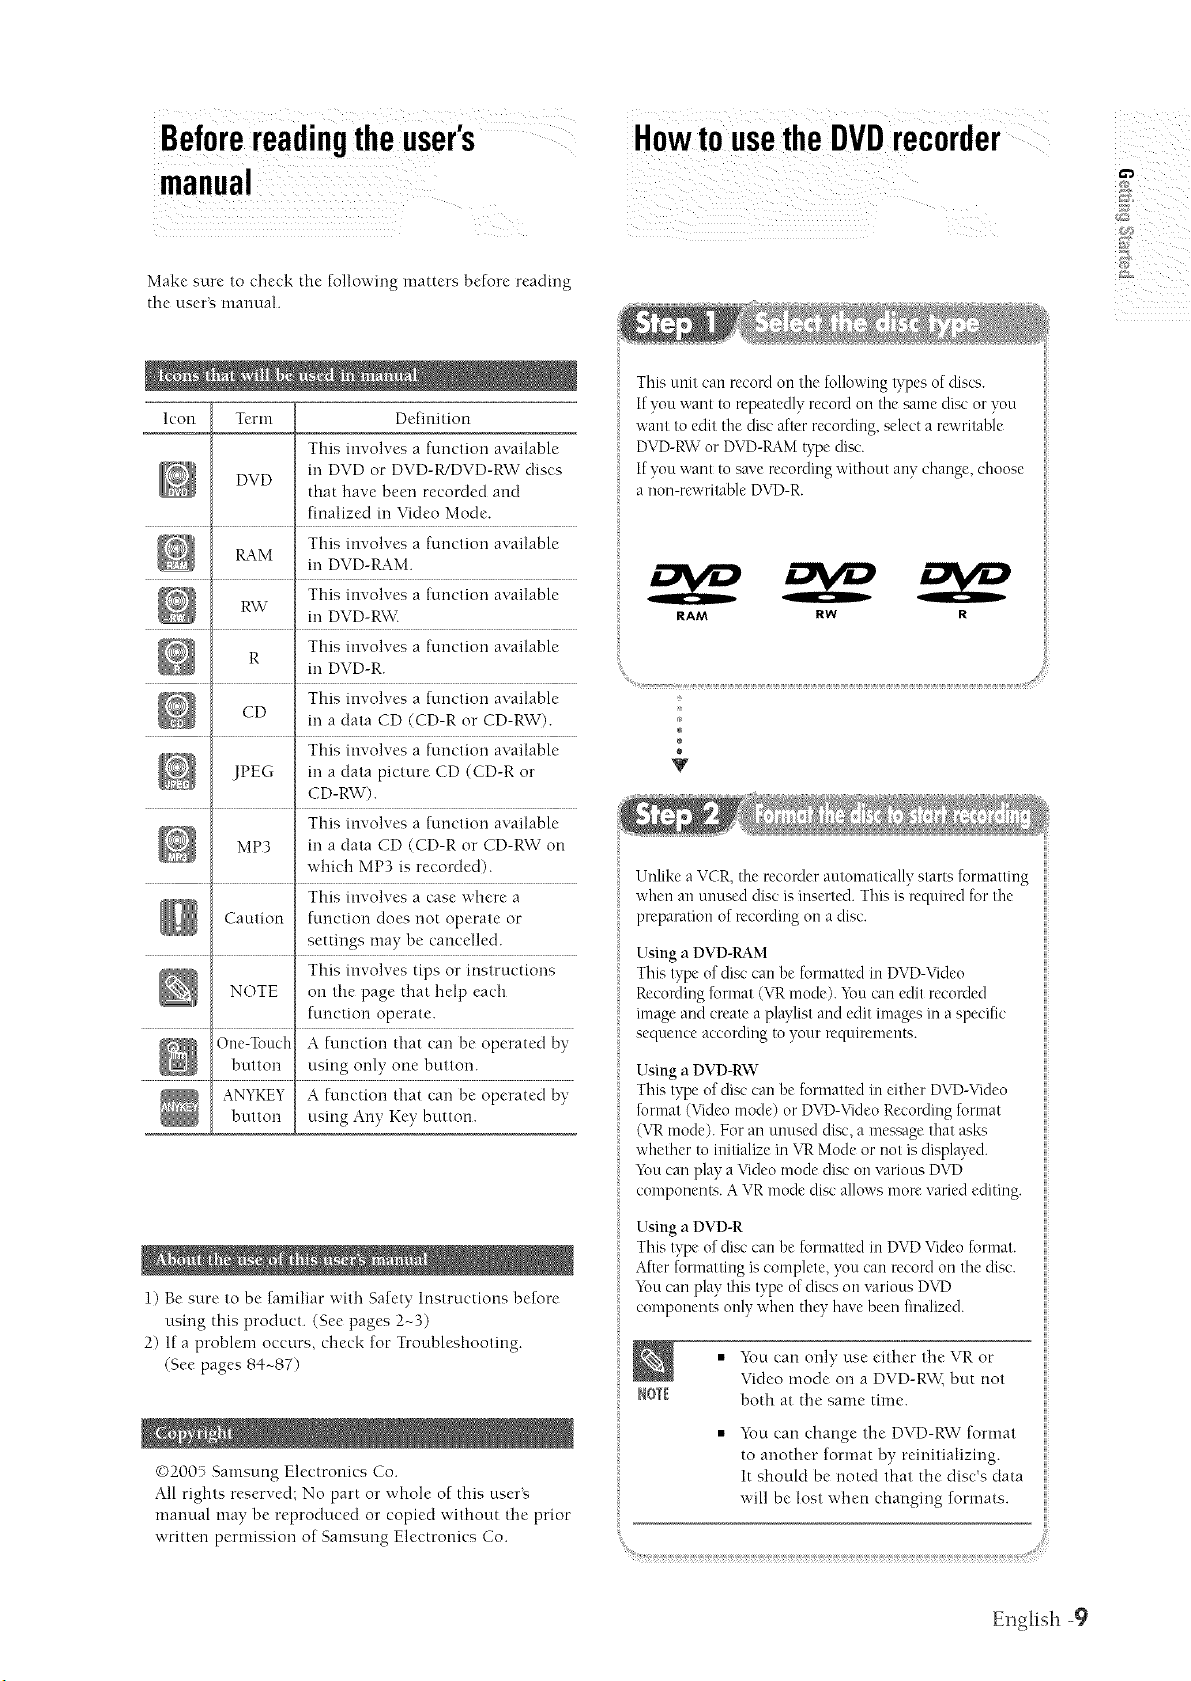
This unit can record on tile fo ow lg types of discs.
If you want to repeatedly recorclon the same disc or you
want to edit tile disc after recording, select a rewritable
DVD-RW or DVD-K_M type disc.
If you want to save recoMmg without any change, choose
a non-rewritable DVI)-R.
RAM RW
a
®
÷
Unlike a VCR, the recorder automatically starts formatting
when an unused disc is inserted. This is required for tile
preparation of recording on a disc.
Using a DVD-RAM
This type of disc can be formatted in DVD-Video
RccoMing format (\q_ mode). You can edit recoMed
image and create a playlist and edit images m a specific
sequence according to your requirements.
Using a DVD-RW
This type of disc can be formatted in either D\©-Video
format (Video mode) or DVD-VideoRecoMmg format
(VRmode). For an unused disc, a message that asks
whether to initialize m VR Mode or not is displayed.
_bu can play a Video mode disc on various D\©
components. A VR mode disc allows more varied editing.
1) Be sure to be familiar with Safety Instructions before
using this product. (See pages 2~3)
2) If a problem occurs, check for Troubleshooting.
(See pages 84~87)
©200) Samsung Electronics Co.
All rights reserved: No part or whole of this user_
marmal may be reproduced or copied without the prior
written permission of Samsung Electronics Co.
Using a DVD-R
This type of disc can be formatted in DVDVideo format.
After formatting iscomplete, you can record on the disc.
_bu carl play this type of discs on various D\q)
components only when they have been finalized.
• You can only use either the VR or
R0K
Video mode on a DVD-RW _,but not
both at the same time.
You can change the DVD-RW format
to another format by reinitializing.
It should be noted that the disc's data
will be lost when changing formats.
Er@ish -9

There are two different recording methods, Direct
Recording and Timer Recording. Timer recording is
classified as a Date : Once(mm/dd), Every Day; MON-SAT.
%
Every SAT, etc. as a recording mode : XP (fi gh qua ty
mode), SP (standard quality mode), kP (long recording
mode), and EP (extended mode) according to tile
recording mode. Wfien recording is set irl the FR mode,
the best quality picture is recorded with regards to the
To play your DVD on other D\© components, finalizing
may be necessary First, finish all editing and recording
operations, then finalize the disc.
When using a DVD-RW disc in VR Mode
Ahhougfi finalizing is generally unnecessa¢" when playing
the disc on a VRMode compatible component, a finalized
disc should be used for playback.
When using a DVD-RW disc in Video Mode
Tile disc should be finalized first to enable playback on
anything other than this recorder. No more rditing or
recording can be made on the disc once it has been
finalized.
When using a DVD-R disc
E_mshould finalize the disc to play it on a component
other tfian this recorder. _m cannot edit or record on the
disc once it has been finalized.
i You can select tile title you want to play in a displayed
menu and then immediately start playback.
A D\rD consists of sections called titles, and sub sections
i called chapters.
During recording, a title is created between two points
where you start and stop recording. Chapters wall be
_i created automatically when you finalize recording on
D\_-R / D\_-RW discs m Video mode. The chapter_
length (intel_'al between chapters) varies according to the
recording mode.
v
Editing on discs is easier than conventional video tapes.
The recorder supports many dif[i:mnt edit functions,
poa'dble only with D\©s.
"@-itba simple and easy edit menu, you can operate
various edit functions, such as delete, cop}; rename, lock,
etc., on a reconled title.
Creating a playlist (DVD-RAIW-RW in VR mode)
_:ith this recorder, you can create a new playlist on tile
same disc and edit it without the change of tile original
recording.
®
÷
| O- English
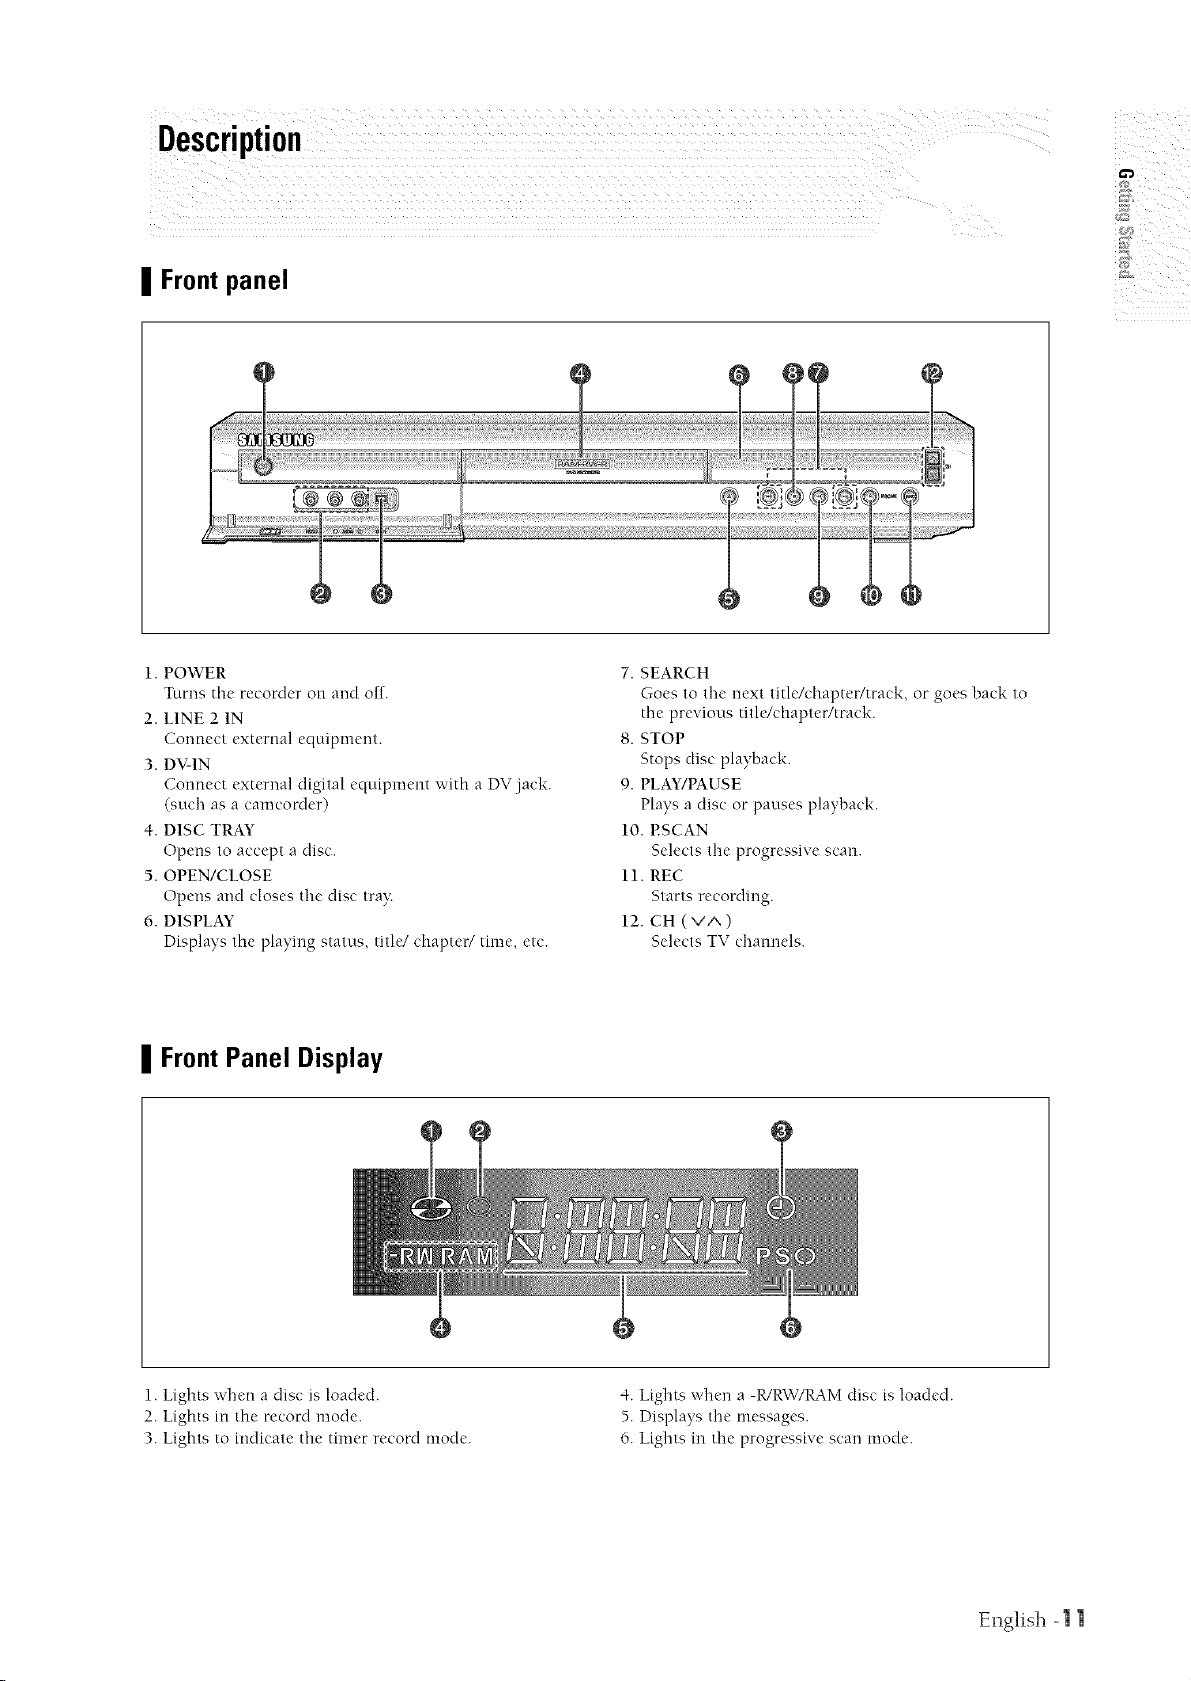
Description
II Front panel
i i i
1. POWER
Turns the recorder on and off.
2. LINE 2 1N
Connect external equipment.
3. DV-1N
Cormect external digital equipment with a DV.jack.
(such as a camcorder)
4. DISC TRAY
Opens to accept a disc.
5. OPEN/CLOSE
Opens and closes the disc tray
6. DISPLAY
Displays the playing status, title/chapter/time, etc.
| Front Panel Display
7. SEARCH
Goes to the next title/chapter/track, or goes back to
the previous title/chapter/track.
8. STOP
Stops disc playback.
9. PLAY/PAUSE
Plays a disc or pauses playback.
10. P.SCAN
Selects the progressive scan.
11. REC
Starts recordmg.
12. CH ( v/',, )
Selects TV chanrmls.
1. Lights when a disc is loaded.
2. Lights m the record mode.
3. Lights to indicate the timer record mode.
4. Lights when a -WRW/K4M disc is loaded.
5. Displays the messages.
6. Lights in the progressive scan mode.
English - 1|
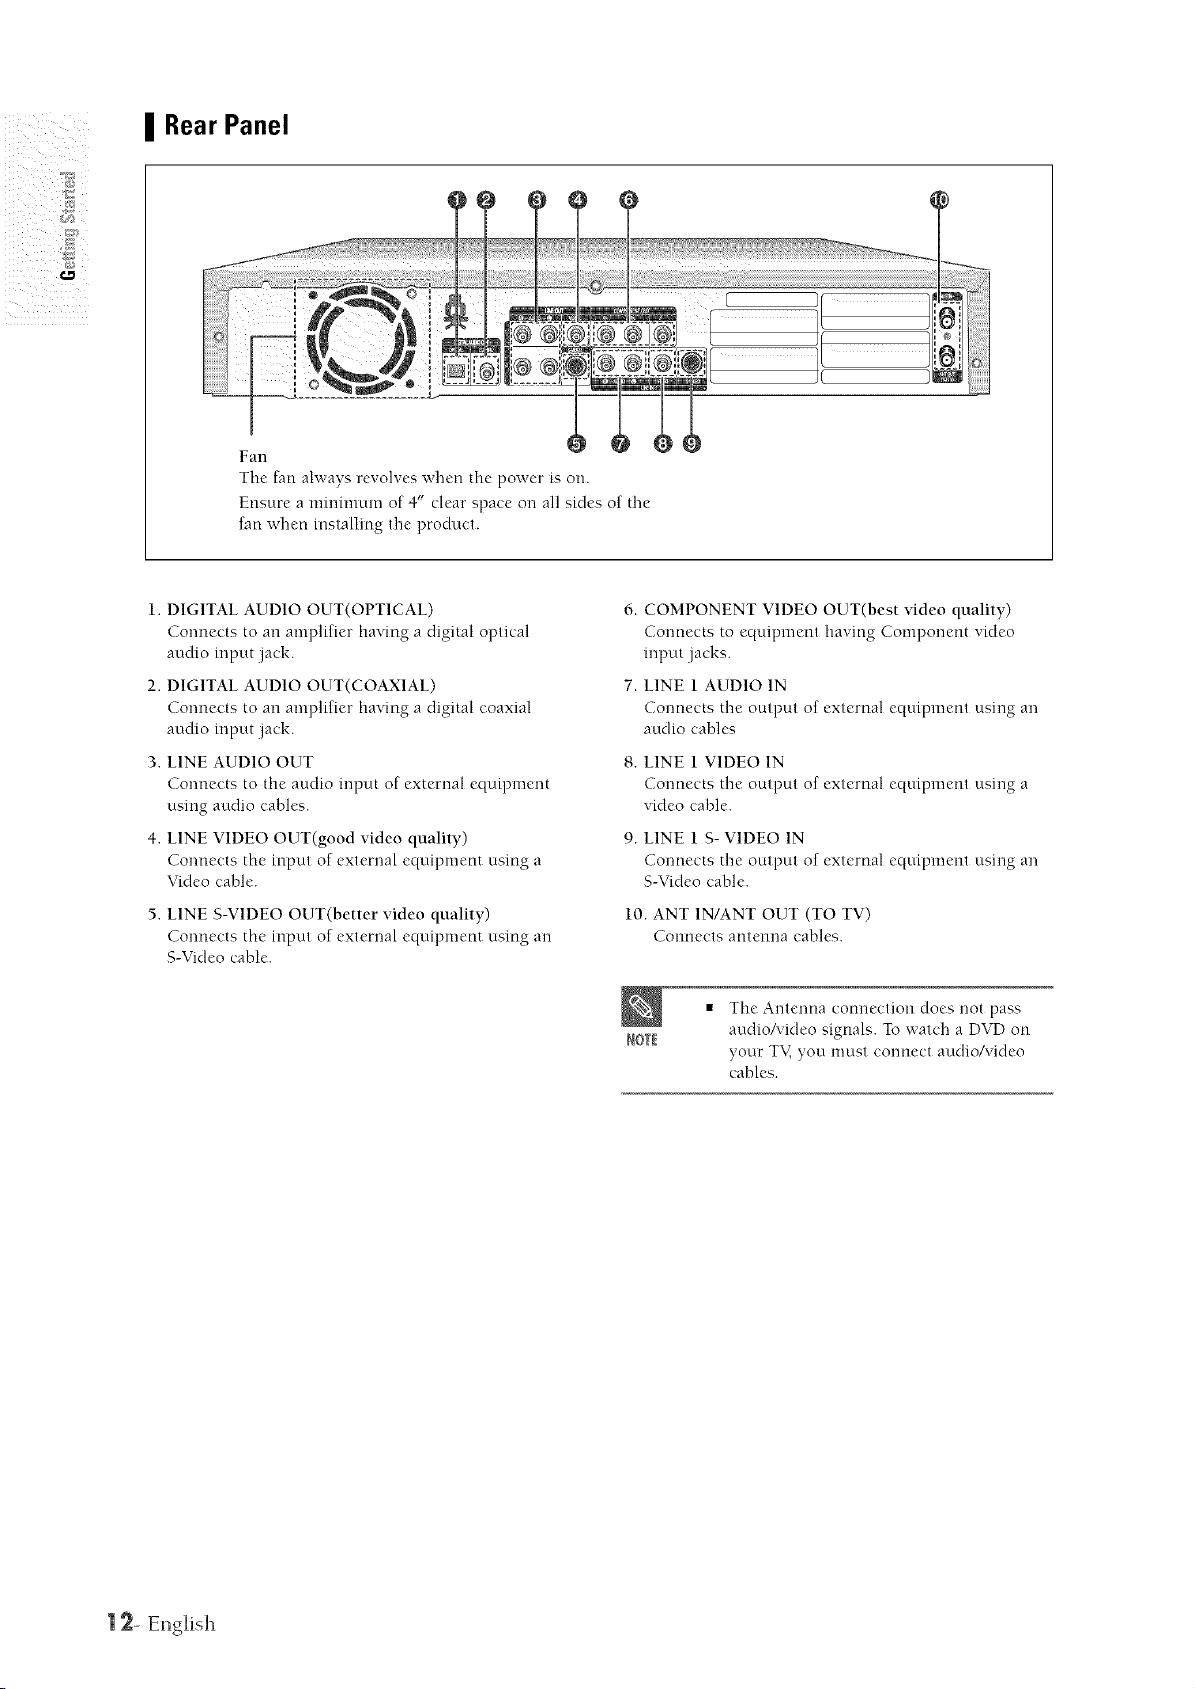
II Rear Panel
Fan
The fan always revolves when the power is on.
Ensure a minimum of 4" clear space on all sides of the
fan when installing the product.
1. DIGITAL AUDIO OUT(OPTICAL)
Connects to an amplifier having a digital optical
audio input .jack.
2. DIGITAL AUDIO OUT(COAXIAL)
Connects to an amplifier having a digital coaxial
audio input .jack.
3. LINE AUDIO OUT
Connects to the audio input of external equipment
using audio cables.
4. LINE VIDEO OUT(good video quality)
Cormeets the input of external equipment using a
Video cable.
LINE S-VIDEO OUT(better video quality)
Cormects the input of external equipment using an
S-Video cable.
6. COMPONENT VIDEO OUT(best video quality)
Connects to equipment having Component video
input .jacks.
7. LINE 1 AUDIO 1N
Cormects the output of external equipment using an
audio cables
8. LINE i VIDEO 1N
Cormects the output of external equipment using a
video cable.
9. LINE 1 S- VIDEO 1N
Cormects the output of external equipment using an
S-Video cable.
10. ANT 1N/ANT OUT (TO TV)
Connects antenna cables.
The Anterma connection does not pass
ROTI
audioAqdeo signals. To watch a DVD on
your TK you must eormect audio/video
cables.
| 2- El'lgtsh

I Tour of the Remote Control
1--
2--
3--
4--
5--
6--
7--
8--
9--
10--
11--
12--
13--
14--
15--
1.
POWER Button
2.
Number Buttons
3.
lO0+/CM SKIP Button
Press this to select channel 100 or higher.
When a program recorded on a DVD-I_kM, a
DVD-RW_ a DVD-R or DVD-Video is played, tbe unit
can be set to automatically skip a portion of the
program.
4.
DVD Button
Press this when you use a DVD.
5.
TV VOL Button
TV volmne ac[justment.
6.
Reverse_orward Skip Buttons
Press to skip a disc backwards or forwards.
These buttons also function as STEP buttons.
Each press will play one-frame forward or reverse
(see page 44).
7.
Reverse/Forward Search Buttons
Press to search a disc backwards or forwards.
8.
Stop Button
Press to stop a disc.
9.
Play/Pause Button
Press to play/pause a disc.
,==e
2,: ZZ
C e = =
NtCEE I{EPEAT INFO _R
$_NSUNG
a
--17
--18
--19
--8
-- 21
-- 23
28
22
24
28
28
i i i
10. MENU Button
Brings up the DVD recorder's setup menu.
11. ENTER/DIRECTION Buttons
(UP/DOW'N or LEFT/RIGHT Buttons)
This button functions as a toggle switch.
12. REC MODE Button
This will display the recording status.
13. REC Button
Use to make a recording on DVD-_M/-RW/-R
discs.
14. CANCEL Button
15. REPEAT
Allows you to repeat a title, chapter, track or disc.
16. OPEN/CLOSE Button
To open and close the disc tra_:
17. AUD10/TV MUTE Button
Use Ibis to access various audio functions on a
disc.(DVD mode)
This operates as Sound Mute. (TV mode)
18. TV Button
Press this to operate T\,:
19. INPUT Button
Select line input signal in external input mode
(Tnner, Line input or DV INPUT)
20. CHANNEL Button
Use this to select a channel. (DVD, TV mode)
21. TITLE LIST/DISC MENU Button
Use this to enter the View Recording list!Disc menu.
22. PLAY L1ST/T1TLE MENU Button
Use this to return to the Title menu, or to view the
recorded files list.
23. ANYKEY Button
Use this to view the status of the disc that is being
played.
24. SUBTITLE Button
Press this to switch the DVD's subtitle language.
25. RETURN Button
Returns to a previous menu.
26. MARKER Button/TIMER Button
Use this to bookmark a position while playing a
disc.
Press to directly enter the Timer Recording Mode
InellU.
27. INFO Button
This will display current settings or disc status.
English - ] 3
)i iil iiiiiiiiii5
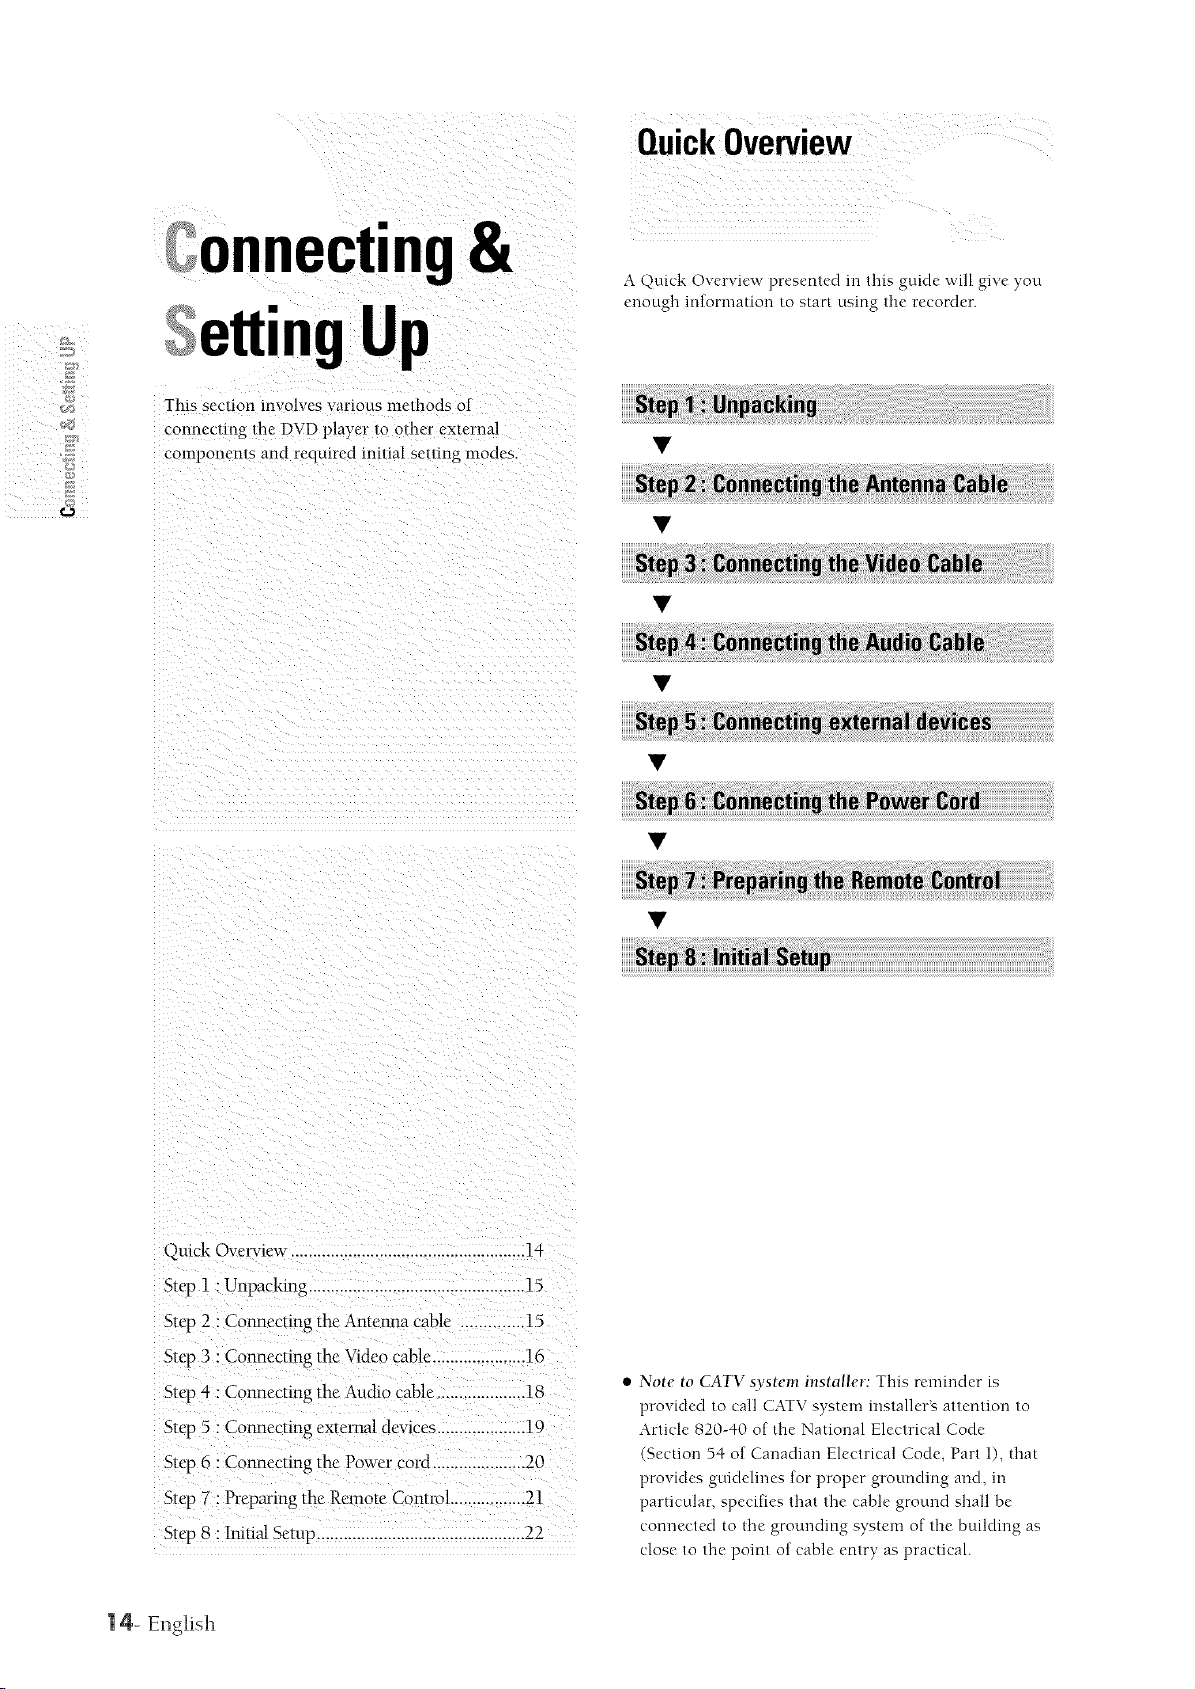
onnecting&
Up
This sec/ion tnvolves various methods ot
connecting lhe DVD player 1o other external
cornponen/s and required ini/ial seumg modes.
A Quick Overview presented in this guide will give you
enough information to start using the recorder.
Quick Overview ....................................................1-
Step 1: Unpacking .................................................15
Step 2 : Connecting the Antenna cable ..............15
Step 3 :Connecting the Video cable.....................16
Stq_4 : Connecting the Audio cable................... 18
Step 5 : Connecting external dewces ....................19
Step 6 : Connecting the Power cord .....................20
Step 7 : Preparing the'Remote Control .................21
Step 8 : InitiN Setup ...............................................22
| 4- Ellglish
Note to CATV system installer: This reminder is
provided to call CATV system installer_ attention to
Article 820-40 of the National Electrical Code
(Section 54 of Canadian Electrical Code, Part 1), fl-mt
provides guidelines for proper grounding and, m
particular, specifies that the cable ground shall be
connected to tfie grounding system of the building as
close to the point of cable entry as practical.
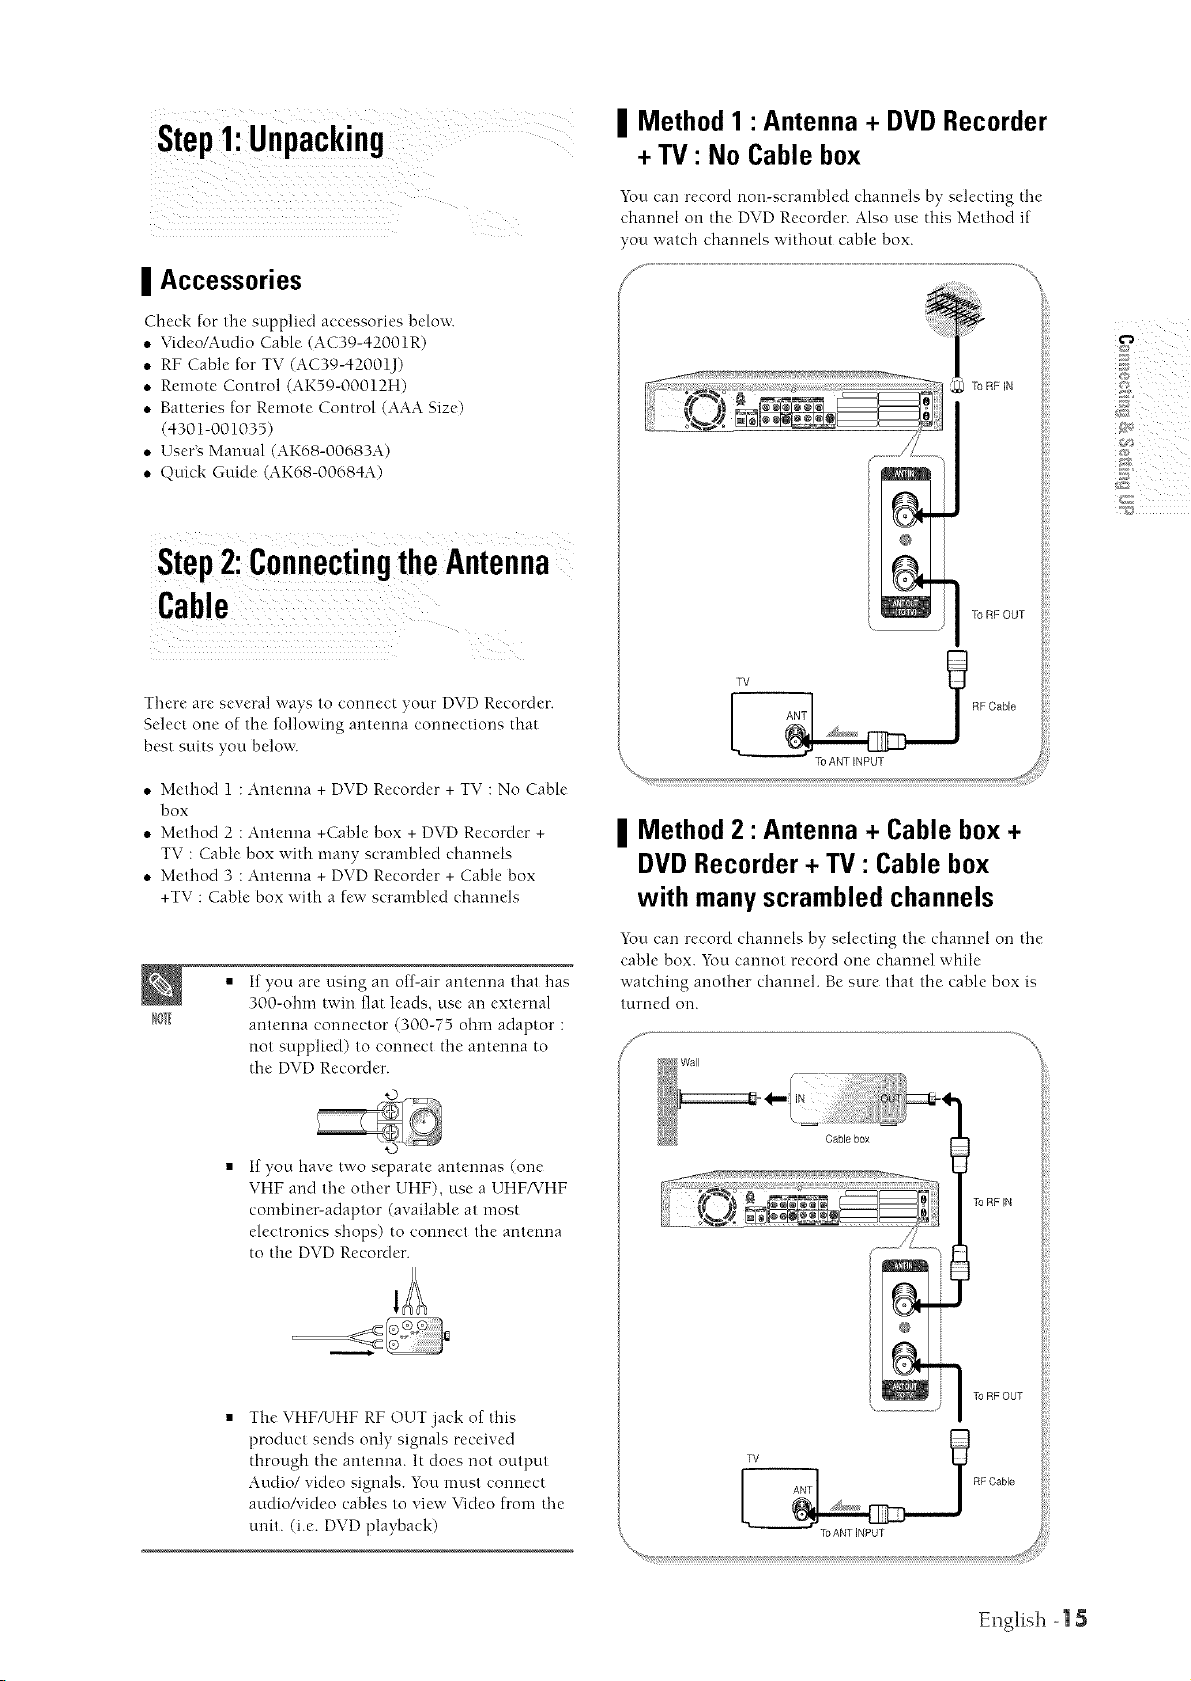
| Method 1 :Antenna + DVD Recorder
+ TV" No Cable box
_i__i!ililli!_ii :
I Accessories
Check for tlre supplied accessories below.
,, Video/Audio Cable (AC39-42001R)
,, RF Cable for TV (AC39-42001J)
,, Remote Control (AK59-00012H)
,, Batteries for Remote Control (AAA Size)
(4301-001035
,, User's Manual, AK68-00683A)
• Quick Guide AK68-00684A)
Step2:ConnectingtheAntenna
Cable
There are several ways to connect your DVD Recorder.
Select one of the following antenna cormections that
best suits you below.
You can record non-scrambled channels by selecting the
charmel on the DVD Recorder. Also use this Method if
you watch channels without cable box.
®
To RF OUT
T_ RF Cable
• Method 1 : Antenna + DVD Recorder + TV : No Cable
box
• Method 2 : Antemra +Cable box + DVD Recorder +
TV : Cable box with many scrambled channels
• Method 3 : Antemra + DVD Recorder + Cable box
+TV : Cable box with a few scrambled channels
If you are using an off-air antenna that has
I01
300-olrm twin flat leads, use an external
antenna connector (300-75 ohm adaptor :
not supplied) to connect the antenna to
tire DVD Recorder.
If you have two separate antennas (one
VHF and tlre other UHF), use a UHF/VHF
combiner-adaptor (available at most
electronics slrops) to comreet tire antemra
to the DVD Recorder.
| Method 2" Antenna + Cable box +
DVD Recorder+ TV" Cable box
with many scrambled channels
Yuu can record channels by selecting the channel on the
cable box. You cannot record one chamrel while
watching another chamrel. Be sure that the cable box is
turned on.
_ Cable box
To RF IN
The VHF/UHF RF OUT jack of tlris
product sends only signals received
through the antenna. It does not output
Audio/video signals. You must eormect
attdio/video cables to view Video from the
unit. (i.e. DVD playback)
TORFOUT
T RF Cable
To ANT INPUT
English - 15
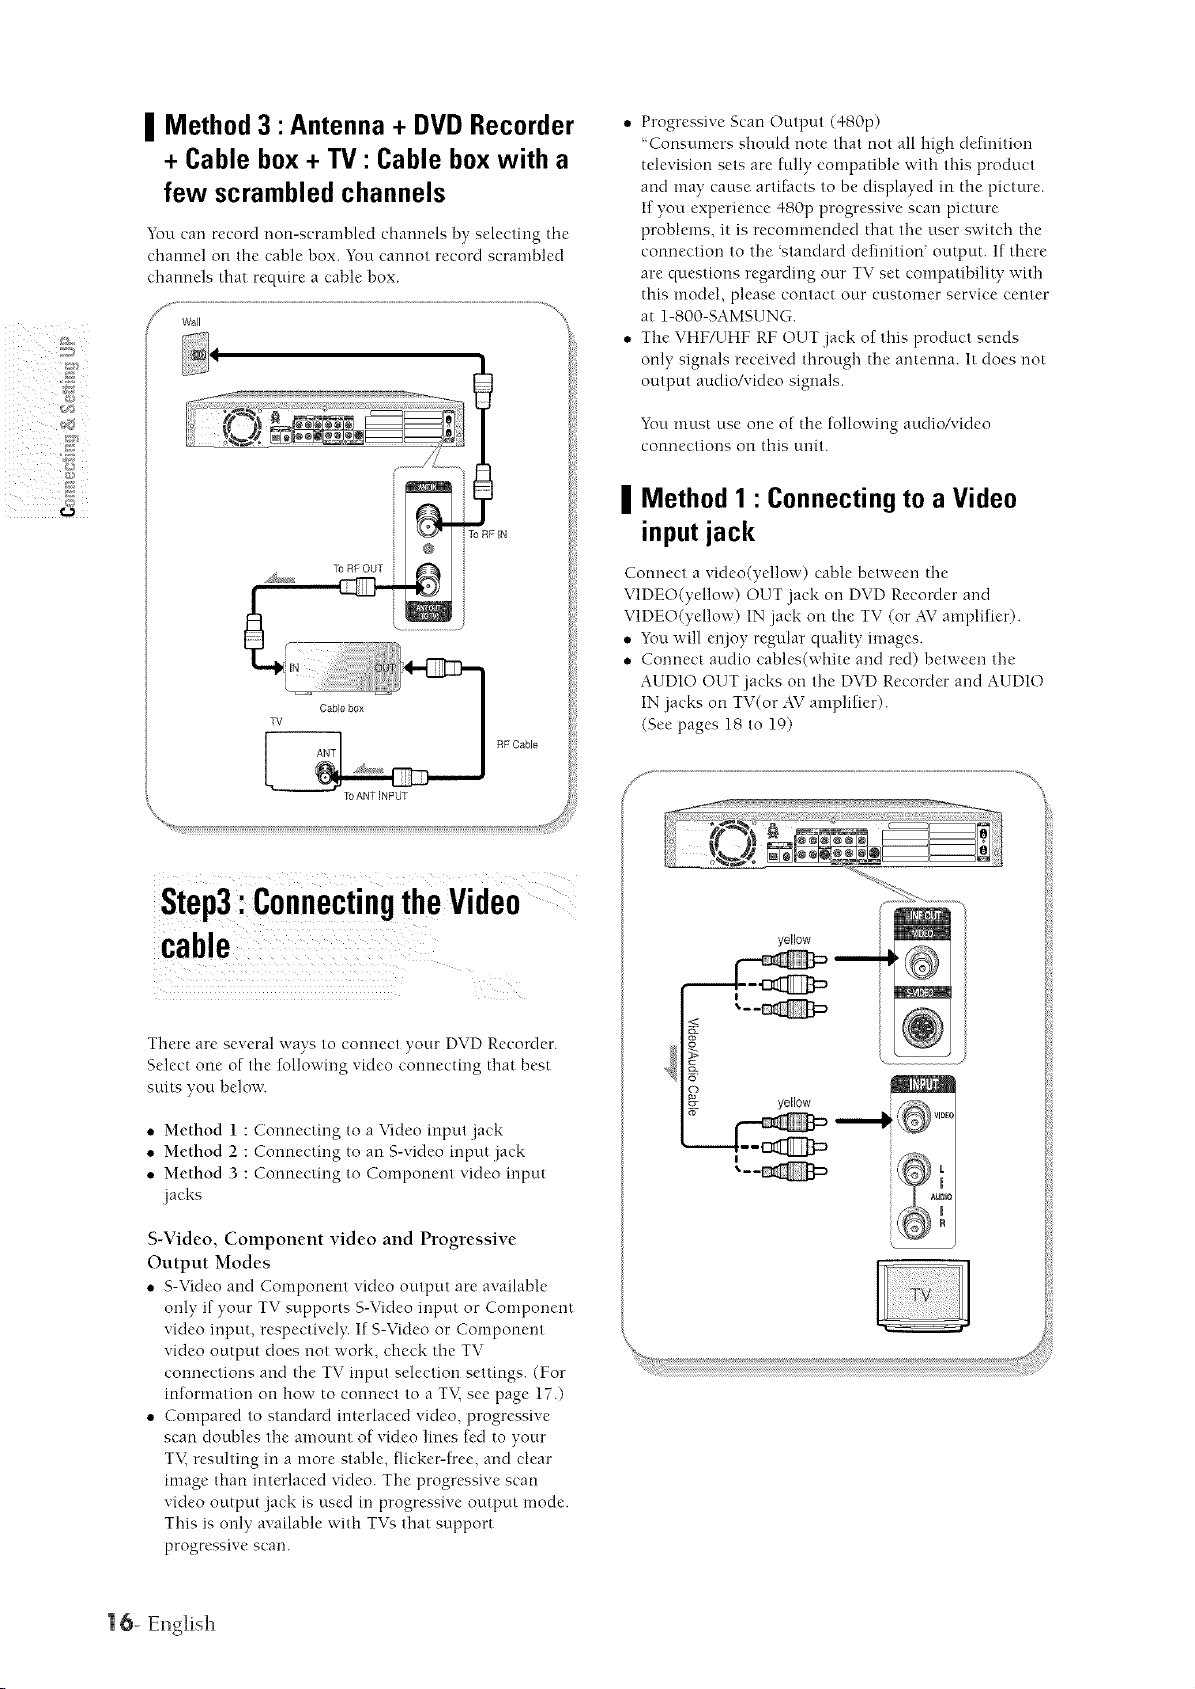
II Method 3 :Antenna + DVD Recorder
+ Cable box+ TV" Cable box with a
few scrambled channels
You can record non-scrambled channels by selecting the
channel on the cable box. You cannot record scrambled
channels that rectuire a cable box.
• Progressive Scan Output (480p)
'Consumers should note that not all Mgh definition
television sets are fully compatible with tl-fisproduct
and may cause artifacts to be displayed in the picture.
If you experience 480p progressive scan picture
problems, it is recommended that the user switch the
connection to the 'standard definition' output, l[ there
are questions regarding our TV set compatibility with
this model, please contact our customer service center
at 1-800-SAMSUNG.
• The VHFAJHF RF OUT .jack of tl-fisproduct sends
only signals received through d-_eantenna. It does not
output audio/video signals.
You must use one of tire following audio/video
connections on this unit.
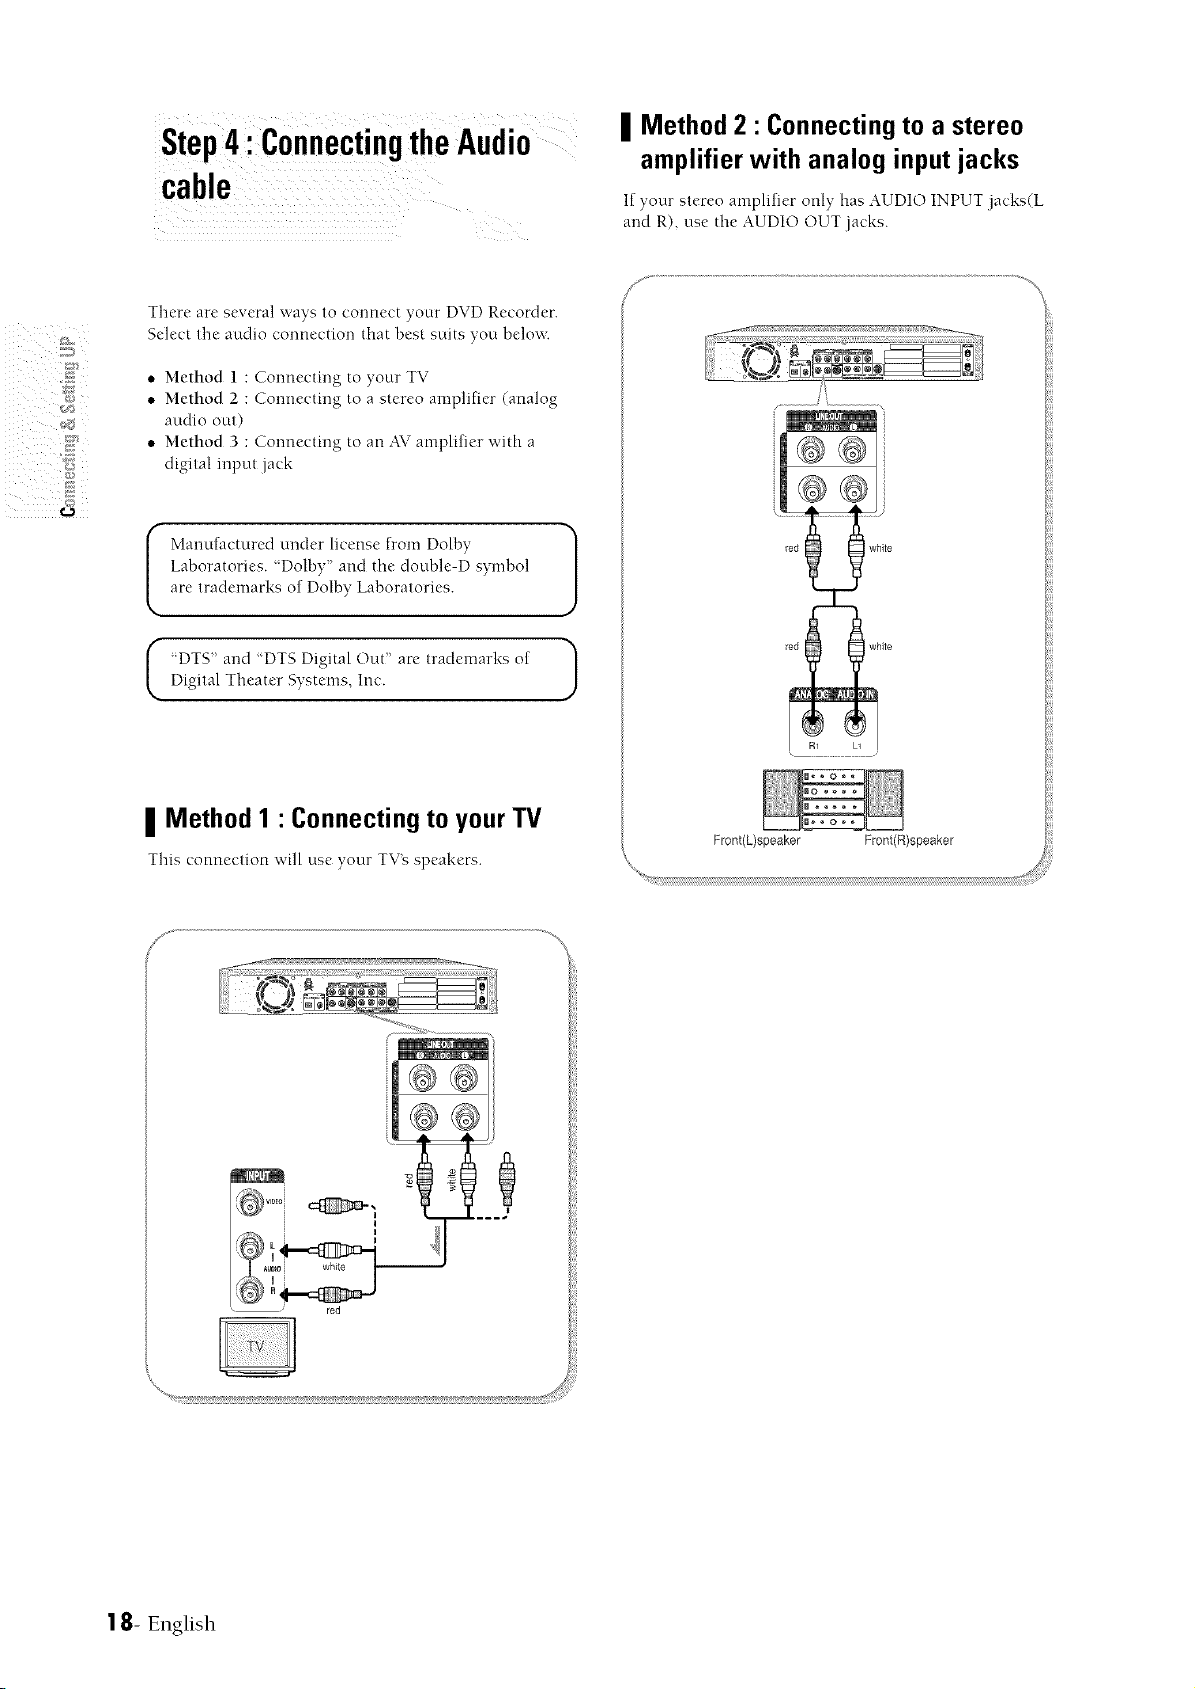
II Method 1: Connectingto a Video
input jack
Connect a video(yellow) cable between d-m
VIDEO(yellow) OUT jack on DVD Recorder and
VIDEO(yellow) IN jack on the TV (or AVamplifier).
• You will enjoy regular quality images.
• Connect audio cables(white and red) between the
AUDIO OUT jacks on the DVD Recorder and AUDIO
IN jacks on TV(or AVamplifier).
(See pages 18 to 19)
_ANTINPUT
Step3:ConnectingtheVideo
There are several ways to connect your DVD Recorder.
Select one of the following video connecting that best
suits you below.
• Method 1 : Connecting to a Video input jack
• Method 2 : Connecting to an S-video input jack
• Method 3 : Cormeeting to Component video input
.jacks
S-Video, Component video and Progressive
Output Modes
• S-Video and Component video output are available
only if your TV supports S-Video input or Component
video input, respeetivel> If S-Video or Component
video output does not work, check the TV
connections and the TV input selection settings. (For
reformation on how to connect to a TM see page 17.)
• Compared to standard interlaced video, progressive
scan doubles the an[ount of video lines fed to your
TM resuhmg in a more stable, flicker-free, and clear
image than interlaced video. The progressive scan
video output .jack is used in progressive output mode.
This is only available with TVs that support
progressive scan.
I yellow
........................................................../
yellOW
I
| 6- Er@ish

II Method 2 • Connecting to an
S-Video inputjack
4. The message 'Please set },our TV to Progressive input,
TOdeactivate, press [STOP] key will appear.
Press the ENTER button.
Connect an S-Video cable(not supplied) between ff_e S-
VIDEO OUT jack on DVD Recorder and S-VIDEO IN
jack on your TV (or AV amplifier).
• You will e_joy high quality images. S-Video separates
the picture element into black and white (Y) and color
(C) signals to present clearer images than regular
video input mode.
• Connect attdio cables(white and red) between fl-_e
AUDIO OUT .jacks on the DVD Recorder and AUDIO
IN jacks on TV(or AV amplifier).
(See pages 18 to 19)
5. The message 'Video Output Mode Progressive Scar?'
will appear.
_-VIDEO
II Method 3" Connectingto
Componentvideo input
jacks(Y,PB,P.)
1. Connect Component video cables(not supplied)
between the COMPONENT OUT(Y,P_,P_) jacks on
DVD Recorder and COMPONENT 1N(Y,P_,P_)jacks
on your TV (or AV amplifier).
2. If the TV cormected supports Progressive Scan, press
the RSCAN buttorl orl the front of the DVD Recorder
to euioy higher quality video.
3. The message "Please [Yes] to confirm Progressive scan
mode. Otherwise press [No] will appear.
Press the _1 • buttons to select Yes, and then press
the ENTER button.
• You will enjoy t-figh quality accurate color reproduction
images. Component video separates the picture
element into black and White(Y), blue(P_), red(P_)
signals to present most clear and clean images.
• Connect audio cables(white and red) between the
AUDIO OUT jacks on the DVD Recorder and AUDIO
IN jacks on TV(or AVamplifier).
(See pages 18 to 19)
Make sure that the color coded
IOTI
connections match. The Y, P_, P_
component output jacks of your DVD
Recorder must be connected to the exact
corresponding component input jacks on
your TV
Er@ish - 17
Step4 :ConnectingtheAudio
cable
There are several ways to connect your DVD Recorder.
Select the audio connection that best suits you below.
• Method 1 : Connecting to your TV
• Method 2 : Cormecting to a stereo amplifier (analog
audio out)
• Method 3 : Connecting to an AV amplifier with a
digital input jack
Manufactured under license from Dolby
Laboratories. "Dolby and the double-D symbol
are trademarks of Dolby Laboratories.
I DTS" and "DTS Digital Out" are trademarks of
Digital Theater Systems, Inc.
II Method 2 • Connectingto a stereo
amplifier with analog input jacks
If your stereo amplifier only has AUDIO INPUT jacks(L
and R), use the AUDIO OUT .jacks.
/j .......................................................................................................................................................................................\
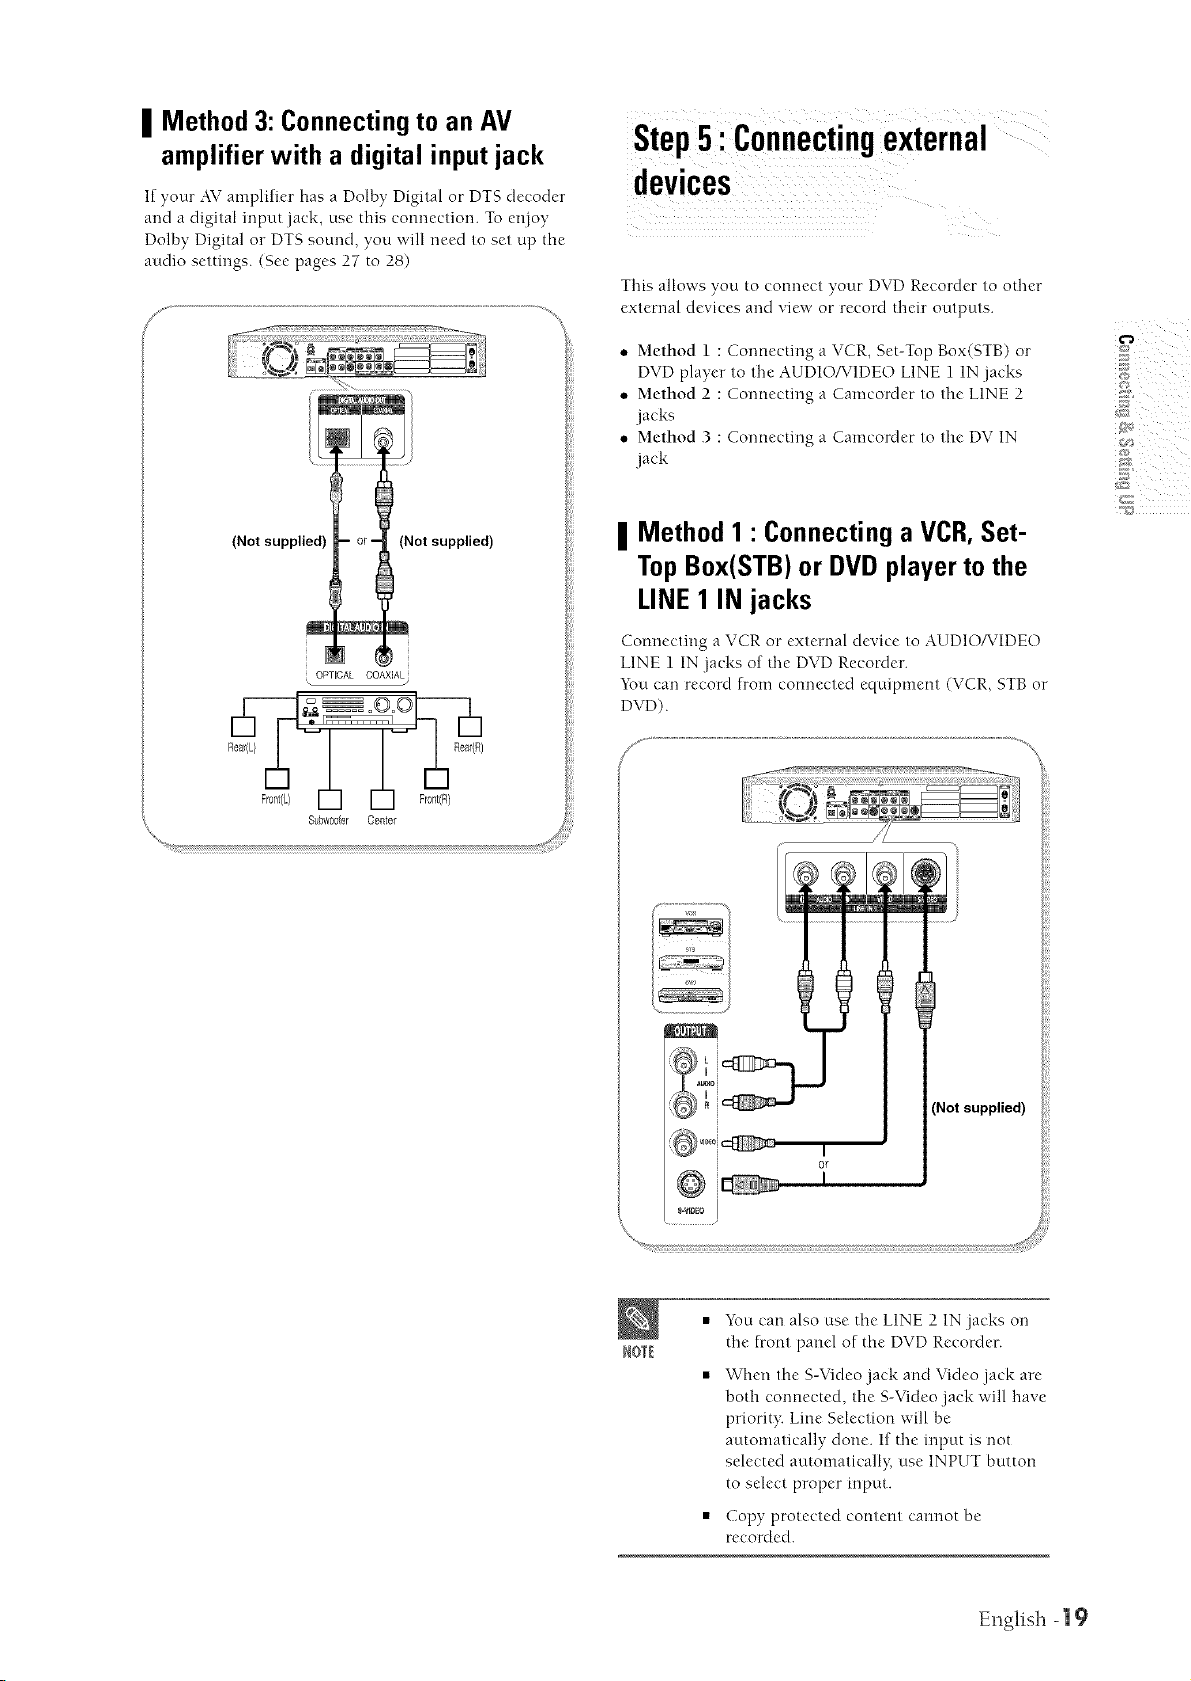
II Method 1 • Connectingto yourTV
This connection will use your TV's speakers.
@@
@@
vmmi
E i
,!
i white
' red
Front(L)speaker Front(R)speaker
1 8- English
| Method 3: Connectingto an AV
amplifier with a digital input jack
If your AV amplifier has a Dolby Digital or DTS decoder
and a digital input jack, use this connection. To et\joy
Dolby Digital or DTS sound, you will need to set up the
audio settings. (See pages 27 to 28)
This allows you to connect your DVD Recorder to other
external devices and viex_ or record their outputs.
• Method 1 : Connecting a VCR, Set-Top Box(STB) or
DVD player to the AUDIO/VIDEO LINE 1 1N .jacks
• Method 2 : Connecting a Camcorder to the LINE 2
.jacks
• Method 3 : Connecting a Camcorder to the DV 1N
.jack
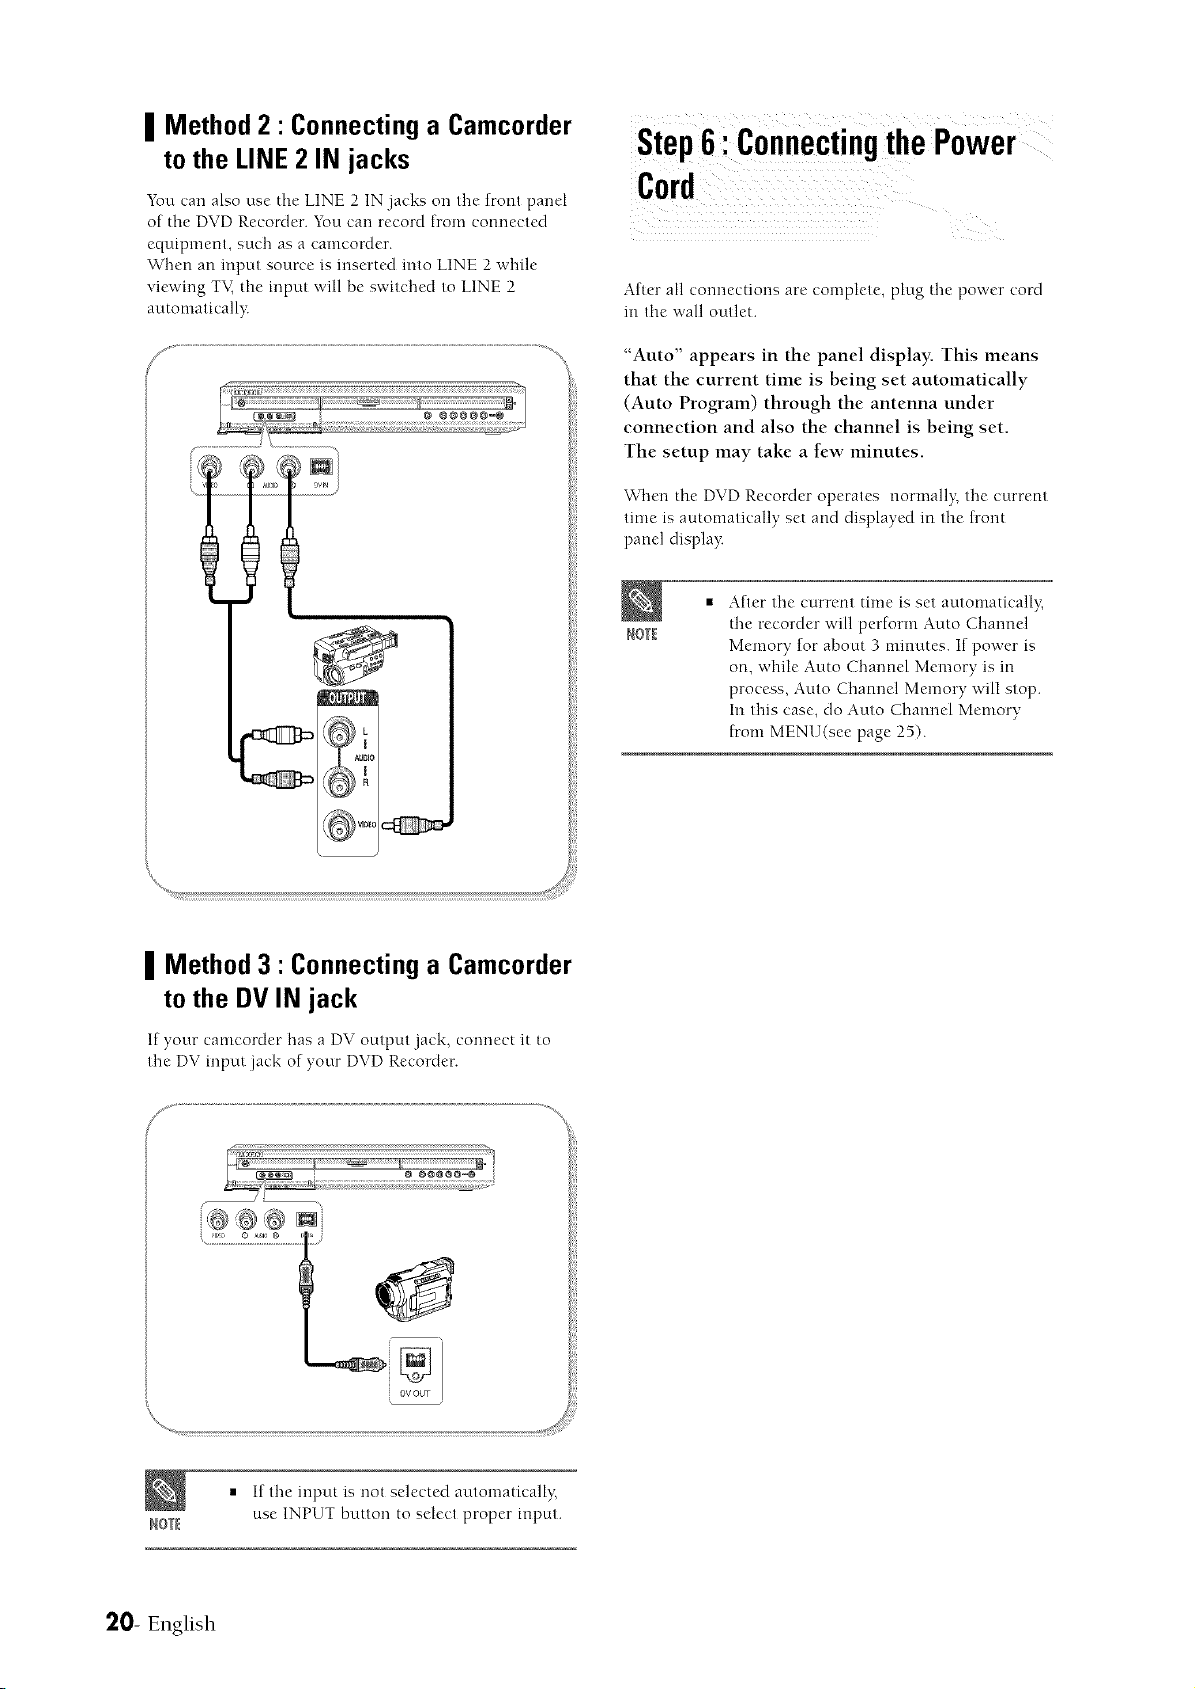
| Method 1 • Connecting a VCR,Set-
TopBox(STB) or DVD player to the
LINE1 IN jacks
Connecting a VCR or external device to AUD1OATIDEO
LINE 1 IN jacks of the DVD Recorder.
_km can record from connected equipment (VCR, STB or
DVD).
/ "\
__!
8i_
Not supplied)
I
0_
IOTI
I
I-VIIEI ]
• You can also use the LINE 2 1N.jacks on
the front panel of the DVD Recorder.
• When the S-Video.jack and Video jack are
both connected, the S-Video .jack will have
priorit?: Line Selection will be
automatically done. If the input is not
selected automaticall}; use INPUT button
to select proper input.
• Copy protected content cannot be
recorded.
i
English - 19
II Method 2" Connectinga Camcorder
to the LINE2 IN jacks
You can also use the LINE 2 1N jacks on the front panel
of the DVD Recorder. You can record from connected
equipment, such as a camcorder.
W]3en an input source is inserted into LINE 2 while
viewing TK the input will be switched to LINE 2
automaticall}:
m _l_rJm
Step6: ConnectingthePower
After all connectiorls are complete, plug the power cord
ira the wall outlet.
"Auto" appears in the panel display. This means
that the current time is being set automatically
(Auto Program) through the antenna under
connection and also the channel is being set.
The setup may take a few minutes.
When the DVD Recorder operates normall}; the current
time is automatically set and displayed in the front
panel displa}<
After the current time is set automaticall',;
ROTE
the recorder will perform Auto Charmel
Memory for about 3 minutes. If power is
on, while Auto Channel Memory is in
process, Auto Channel Memory will stop.
In this case, do Auto Channel Memory
from MENU(see page 25).
II Method 3" Connectinga Camcorder
to the DVIN jack
If your camcorder has a DV output jack, connect it to
the DV input iack of your DVD Recorder.
DV OUT
• If the input is not selected at.ttomatically;
NO_
use INPUT button to select proper input.
20- English

5 ¸¸¸
Step7 :PreparingtheRemote
Control
Install Batteries in the Remote Control
• Open the battery cover on the back of the remote.
• hlsert two AAA batteries. Make sure that the polarities
(+ and -) are aligned correctly
• Replace tile battery cover.
If the remote control does not operate properly:
• Check the polarity + - of tile batteries (Dry-Cell)
• Clleck if the batteries are drained.
• Clleck if remote sensor is blocked by obstacles.
• Check if there is any fluorescent ligllting nearb):
Dispose of batteries according to local environmental
regulations. Do not put them in the household trash.
\
II Setting the Remote Control
You can control certain functions of anotller
manufacturer_ TV witll tllis remote control.
Control function buttons involve: POWER, Channel
Up/Down, Volume Up/Down, Direct Number buttons,
TV MUTE, INPUT.
o_ sKiP _aur E
rv VOL _t
CZ3 CZ) CX)
CN) (ZD CDCZ)
n_
Controlling TVs with the Remote Control
1. Press and hold tile POWER button.
2. Enter a 2-cligit code by using tile numerical buttons
on the remote control.
See "Controllable IV Codes"
If tile code works, your TV set will be turned on or off.
If it does not respond, try other codes.
Controllable TV Codes
BK_ND BUTTON
AI'_'£4 82
ANAM 10,11,12,13,14,15,10,17,18
BANG&OLUFSEN 57
BLAUPUNKT 71
BK4NDT 73
BRION\_GA 57
CGE 52
CONTINENTALEDISON 75
DAEWOO 19,20,23,24,25,20,27,28,29,30,31,32,33,34
EMERSON 64
FERGUSON 73
FINLUX 06,49,57
FORMENTI 57
FUJITSU 84
GK_DIENTE 70
GRUNDIG 49,52,71
HITACHI 60,72,73,75
IMPERLKL 52
jvc 01,79
LG 06,19,20,21,22,78
LOEWE 06,09
LOEWEOPTA 06,57
MAGNAVOX 40
METZ 57
MITSUBISHI 06,48,(_2,(_5
MIVAR 52,77
NEC 83
NEWqAN 68
NOBLEX 66
NOKIA 74
NORDMENDE 72,73,75
PANASONIC 53,54,74,75
PHILIPS 06,55,56,57
PHONOLA 06,56,57
PIONEER 58,59,73,74
KQDIOLA 06,56
K4DIOMARELLI 57
RCA 45,46
REX 74
SABA 57,72,73,74,75
5ALOt_ 74
SAMSUNG 01,02,03,04,05,06,07,08,09
SAN_O 41,42,43,44,48
SCHNEIDER 06
SELECO 74
English -2 |

BRRND BUTTON
SELKRP 36,37,38,39, 48
SIEMENS 71
SINGER 57
SINUDYNE 57
SONY 35,48
TELEAVA 73
TELEFUNKEN 67,73,75,76
THOMSON 72,73,75
THOMSONASIA 80,81
TOSHIBA 47,48,49, 50,51,52
WEGA 57
YOKO 06
ZENITH 63
{,}
• If you replac{" the R'mote control's
batteries, you must set the brand code
ROTE again.
Before Play,
Turn on your TV and switch the input selector on your
TV so that the signal from the DVD Recorder appears on
your TV screen. If you connected an external Audio
System, turn on your Audio System and select AUX, CD
or DVD.
The OSD (On-Screen Display) displayed on the screen
may vary depending on conditions such as fl-mdisc type
and whether the disc has been inserted or not.
1. OSD LanguageSetup
After plugging m the recorder, fl-mfirst ti]ne you press
the POW'ER button, this screen comes up.
(This screen will only appear when you plug in the
recorder for the first time.)
Press the POWER button.
Press a Number button to select the
language.
!( i )i))))))))))))) ¸
For ease of use, we recommend that you set up initial
settings befure using the DVD Recorder.
Br_s_lP w _ta'rE
NOTE
If the language for the startup screen is
not set, the settings may change whenever
you turn the power on or off-.Tfiereforc,
make sure that you select fl-mlanguage
you want to use.
22- English
CZ) CZ) CZ), C_,
11NEll
 Loading...