

Page 1
Step Getting Connected
Step Basic Operation
Quick Setup Guide
Step
Step Getting Connected
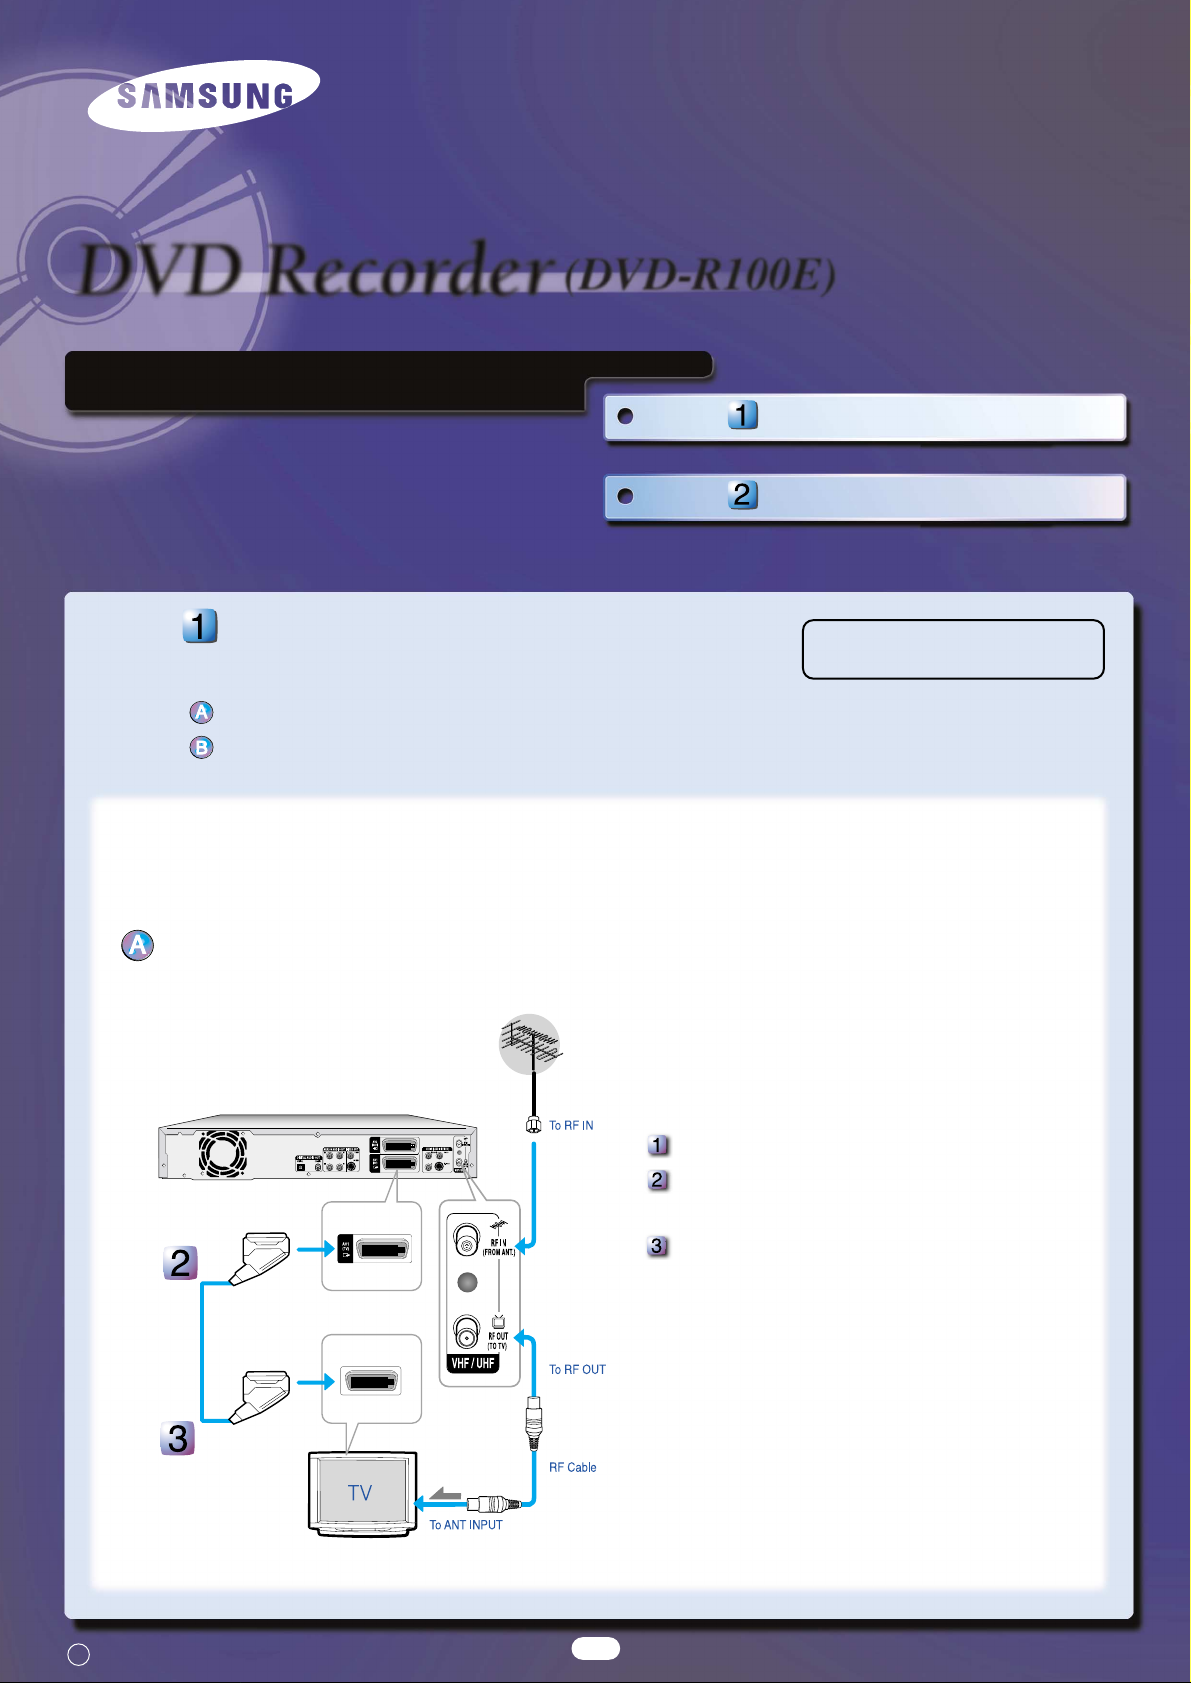
Select one of the following three types of connections:
Antenna + DVD Recorder + TV
Antenna + VCR/satellite receiver/cable box + DVD Recorder + TV
Antenna + DVD Recorder + TV
You can connect your DVD Recorder to the television using the
SCART cable if the appropriate input is available on the television.
You thus:
● Obtain better quality sound and pictures
● Simplify the setting up procedure of your DVD Recorder
Connect the RF cable as shown.
Connect one end of the SCART cable to the AV1 socket on the rear
of the DVD Recorder.
Plug the other end into the appropriate connector on the television.
The VHF/UHF RF OUT jack of this product sends only signals received through the antenna.It does not output audio/video signals.
You must use one of the following connections on this unit.
1
This Recorder will only record on
DVD-R, DVD-RW and DVD-RAM discs.
C Samsung Electronics Printed in Korea
Page 2
2
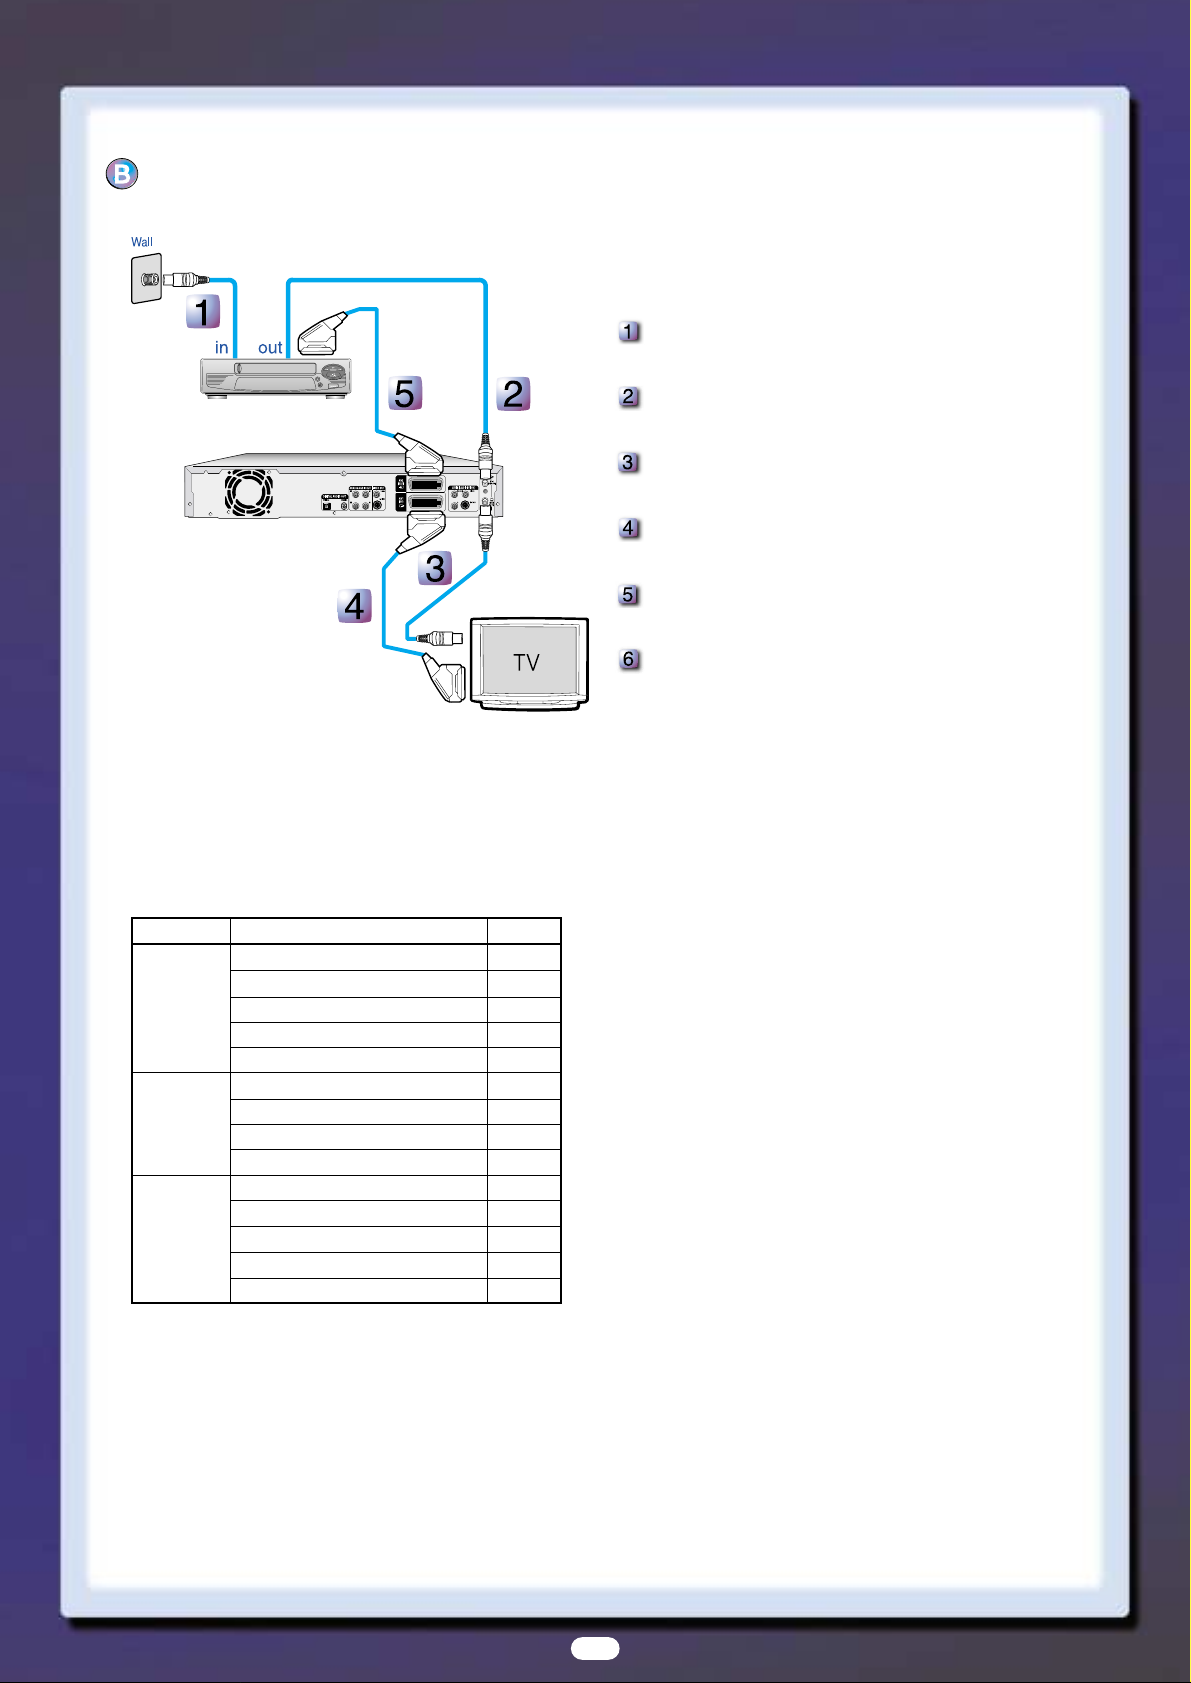
Antenna + VCR/satellite receiver/cable box + DVD Recorder + TV
external device
(VCR/satellite receiver/cable box)
Before making or changing any rear panel connections,make sure
that all components are switched off and unplugged from the wall
outlet.
Connect the cable from the antenna/cable TV outlet to the antenna
input on your VCR/satellite receiver/cable box.
Connect the antenna output of your VCR/satellite receiver/cable box
to the ANTENNA IN of DVD Recorder using antenna cable.
Use another RF antenna cable to connect the ANTENNA OUT of
DVD Recorder to the antenna input on your TV.
Connect the AV1 connector on DVD Recorder to the SCART AV
connector on TV using a SCART cable.
Connect the AV2 connector to a SCART AV connector on
VCR/satellite receiver/cable box.
Setup “AV1 Output” using on-screen menu.
Refer to page 29 of the Instruction Manual for more information.
❇
We recommend using one of the discs in the table
as they have been confirmed to be compatible with
this unit. Other discs may not perform correctly.
Media Brand Speed
TDK 4x
That’s 4x
DVD-R Maxell 4x
Panasonic 4x
Ritek 4x
Verbatim 2x
JVC 2x
DVD-RW
Radius 2x
TDK 2x
MCC 2x
MEI 2x
DVD-RAM Fuji 2x
Maxell 2x
TDK 2x
Page 3

3
The following instructions will give you a quick overview about how to
use the DVD Recorder.
Formatting a Disc
Recording the current TV program you are watching
Making a Timer Recording
Finalizing a Disc
Formatting a Disc
When you insert a blank disc, you will be asked whether or
not you want to format or initialize it.Since available functions
differ depending on the disc type, select a disc that best fits
your preferences.
DVD-RAM : Must be
formatted.
DVD-R W : When “Yes”
is selected, the mode will
be formatted in VR mode.
If you want to format in
Video mode, refer to
“Formatting a Disc” on
page 79~80 of the
Instruction Manual for
more information.
DVD-R : Formatting is unnecessary and only Video
Mode Recording is supported.
Press the MENU button with the disc stopped.
Press the …/† buttons
to select “Disc
Manager”, and then
press the
OK or √
button.
Press the …/† buttons
to select “Disc
Format”, and then
press the
OK or √ button.
DVD-RAM(VR)
●
You will be prompted with
the confirmation message
'Do you want to format
disc?'.
Press the œ/√ buttons to
select “Yes”, then press the
OK button.The DVD-RAM
disc is formatted.
DVD-RW
●
You will be prompted with
the confirmation message
’Choose the recording
format for DVD-RW’.
Press the œ/√ buttons to
select the desired format
type, then press OK
button.The DVD-RW Disc
is formatted.
Recording the current TV program you are watching
Press the OPEN/CLOSE button, and place a recordable
disc on the disc tray.
You can not change the recording mode or the channel while
recording.
Press the OPEN/CLOSE button to close the disc tray.
Wait until “LOADING” disappears from the front panel display.
■ If a blank DVD-RAM or DVD-RW disc is used, you will be
asked whether or not you want to format or initialize it.
■ DVD-RAM/DVD-RW discs should be formatted in advance
before starting to record.
■ Most new discs are sold unformatted.Make sure that your
unformatted discs are formatted before recording.
■ Recording will stop automatically if copy protected content is
selected.
Press the PROG ( / ) or number (0~9) buttons to select
the current program you want to record.
Step
Step Basic Operation
RETURNOKMOVE EXIT
Disc Manager
DVD-RAM(VR)
Disc Name :
√√
Disc Protection : Not protected
√√
Disc Format
√√
Delete All Title Lists
√√
Cartridge Protection Info
√√
RETURNOKMOVE EXIT
Disc Manager
DVD-RAM(VR)
Disc Name :
√√
Disc Protection : Not protected
√√
Disc Format
√√
Delete All Title Lists
√√
Cartridge Protect Inf
√√
Do you want to format disc?
Yes No
Unformatted Disc
Do you want to format this disc?
Yes No
Uninitialized Disc
Do you want to initialize this disc?
Yes No
RETURNOKMOVE EXIT
Disc Manager
DVD-RW
Disc Name :
√√
Disc Protection : Not protected
√√
Disc Format
√√
Delete All Title Lists
√√
Choose the recording format for DVD-RW.
DVD-VR DVD-V
-
-
-
-
Page 4

4
Press the REC MODE
button repeatedly, (or
press the REC MODE
button and then press
the …/† buttons) to
select the recording
speed (quality).
➜SP➜LP➜EP➜XP
Mode Recording Times
XP (high quality mode) Approx.1 hour
SP (standard quality mode) Approx.2 hours
LP (long recording mode) Approx.4 hours
EP (extended mode) Approx.6 hours
Press the REC button.
Information concerning the channel being recorded is
displayed on the screen and then recording begins.
To stop recording
Press the STOP (■ ) button to stop or finish a recording in
progress.
To pause recording
Press the REC PAUSE button to pause a recording in progress.
●
Press the REC PAUSE button again to resume recording.
●
You can switch channels by pressing the PROG ( / )
buttons while recording is paused.
Making a Timer Recording
Press the OPEN/CLOSE button, and place a recordable
disc on the disc tray.
Press the OPEN/CLOSE button to close the disc tray.
Press the MENU button in Stop mode.
Press the …/† buttons to select “Programme”, and then
press the OK or √ button.
Press the …/† buttons
to select “Standard
Timer”, and then press
the OK button.
The Timer Record Input
items (Date/Time etc.)
are displayed.
Fill in the items using
the …/†/œ/√ buttons.
Press the OK button.
Turn the power off to finish the Timer Recording setting.
Timer Recording will not work when the power is on.
()
will blink if disc is not inserted.
■ If FR mode is selected, the video quality is adjusted
automatically so that scheduled recordings fit onto the free
disc space.
Finalizing a Disc
After you record programs onto a DVD-RW/DVD-R disc with
your DVD Recorder, it needs to be finalised before it can be
played back on external devices.
Press the MENU button with the disc stopped.
Press the …/† buttons to select “Disc Manager”, and then
press the OK or √ button.
Press the …/†
button to select
“Disc Finalise”, and
then press the OK
or √ button.
You will be
prompted with the
message 'Do you
want to finalise disc?'.
If you select Yes, you
will be prompted again
with the
message 'Disc will be
finalised. Do you want
to continue?'.
Press the œ/√buttons to select “Yes”, and then press the OK
button.
The disc is finalised.
Once a disc is finalised, you cannot delete entries from the
record list.
■ After being finalised, the DVD-R/DVD-RW(Video mode)
operates in the same manner as a regular DVD-Video disc.
■ Depending on the disc type, the screen display may appear
different.
Record Mode
SP
RETURNOKMOVE EXIT
Scheduled Record List
DVD-RAM(VR)
01 CH 09 11/22 09:22AM 10:30AM Once SP
√√
02 CH 05 12/10 12:30AM 09:00PM Weekly LP
√√
03
-----/----:---- --:---- -- --
√√
No. Source Date Start End Type Mode V/P Edit
Remaining Recording Time 02:12 SP
No. 01
RETURNOKMOVE EXIT
Scheduled Record List
DVD-RAM(VR)
01 PR 01 01/ 01 12:00 14:00 Once SP Off
√√
02
---- ----- --:-- --:-- -- -- --
√√
No. Source Date Start End Type Mode V/P Edit
Remaining Recording Time 02:12 SP
RETURNOKMOVE EXIT
Disc Manager
DVD-RW(VR)
Disc Name :
√√
Disc Protection : Not protected
√√
Disc Format : DVD-VR
√√
Disc Finalise
√√
Delete All Title Lists
√√
RETURNOKMOVE EXIT
Disc Manager
DVD-R(V)
Disc Name :
√√
Disc Protection : Not protected
√√
Disc Finalise
√√
Delete All Title Lists
√√
-
-
-
-
-
-
-
-
-
-
-
Source PR 01 Date 01/ 01
Start 12 : 00 End 14 : 00
Type Once Mode SP
V/P Off
AK68-00493D-00
 Loading...