

Page 1

BD-F7500
Blu-ray
user manual
imagine the possibilities
Thank you for purchasing this Samsung product.
To receive more complete service,
please register your product at
www.samsung.com/register
™
Disc Player
Page 2
Safety Information
Warning
TO REDUCE THE RISK OF ELECTRIC SHOCK, DO NOT REMOVE THE COVER (OR BACK).
NO USER-SERVICEABLE PARTS ARE INSIDE. REFER SERVICING TO QUALIFIED SERVICE PERSONNEL.
CAUTION
RISK OF ELECTRIC SHOCK
DO NOT OPEN
The lighting flash and Arrowhead within the
triangle is a warning sign alerting you to
dangerous voltage inside the product.
WARNING
• To reduce the risk of fire or electric shock, do
not expose this appliance to rain or moisture.
FCC NOTE (for U.S.A)
This equipment has been tested and found to
comply with the limits for a Class B digital device,
pursuant to Part 15 of the FCC rules. These limits are
designed to provide reasonable protection against
harmful interference in a residential installation. This
equipment generates, uses and can radiate radio
frequency energy and, if not installed and used in
accordance with the instructions, may cause harmful
interference to radio or television reception, which can
be determined by turning the equipment off and on.
The user is encouraged to try to correct the
interference by one or more of the following measures.
• Reorient or relocate the receiving antenna.
• Increase the separation between the equipment
and receiver.
• Connect this equipment into an outlet on a
circuit different from that to which the receiver is
connected.
• Consult the dealer or an experienced radio/TV
technician for help.
• This class B digital product meets all
requirements of the Canadian Interference Causing Equipment Regulations.
Note to CATV system installer
This reminder is provided to call CATV system
installer's attention to Article 820-40 of the
National Electrical Code (Section 54 of Canadian
Electrical Code, Part I) that provides guidelines
for proper grounding and, in particular, specifies
that the cable ground shall be connected to the
grounding system of the building as close to the
point of cable entry as practical.
CAUTION:
TO REDUCE THE RISK OF ELECTRIC
SHOCK, DO NOT REMOVE COVER (OR BACK).
NO USER SERVICEABLE PARTS INSIDE. REFER
SERVICING TO QUALIFIED SERVICE PERSONNEL.
The exclamation point within the triangle
is a warning sign alerting you to important
instructions accompanying the product.
CLASS 1 LASER PRODUCT
This Compact Disc player is classified as a CLASS
1 LASER product. Use of controls, adjustments
or performance of procedures other than those
specified herein may result in hazardous radiation
exposure.
DANGER :
• VISIBLE AND INVISIBLE LASER RADIATION
WHEN OPEN. AVOID DIRECT EXPOSURE TO
BEAM. (FDA 21 CFR)
CAUTION :
• CLASS 3B VISIBLE AND INVISIBLE LASER
RADIATION WHEN OPEN. AVOID EXPOSURE
TO THE BEAM. (IEC 60825-1)
• THIS PRODUCT UTILIZES A LASER.
USE OF CONTROLS OR ADJUSTMENTS
OR PERFORMANCE OF PROCEDURES
OTHER THAN THOSE SPECIFIED HEREIN
MAY RESULT IN HAZARDOUS RADIATION
EXPOSURE. DO NOT OPEN COVER AND DO
NOT REPAIR YOURSELF. REFER SERVICING
TO QUALIFIED PERSONNEL.
CLASS 1 LASER PRODUCT
KLASSE 1 LASER PRODUKT
LUOKAN 1 LASER LAITE
KLASS 1 LASER APPARAT
PRODUCTO LÁSER CLASE 1
| NOTES |
\If the Region number of a Blu-ray Disc/DVDs does not
correspond to the Region number of this player, the player
cannot play the disc.
|
2 English
Page 3
01 Safety Information
Precautions
Important Safety Instructions
Read these operating instructions carefully before
using the unit. Follow all the safety instructions
listed below.
Keep these operating instructions handy for future
reference.
1. Read these instructions.
2. Keep these instructions.
3. Heed all warnings.
4. Follow all instructions.
5. Do not use this apparatus near water.
6. Clean only with a dry cloth.
7. Do not block any ventilation openings. Install
in accordance with the manufacturer's
instructions.
8. Do not install near any heat sources such
as radiators, heat registers, stoves, or other
apparatus (including AV receivers) that
produce heat.
9. Do not defeat the safety purpose of the
polarized or grounding-type plug. A polarized
plug has two blades with one wider than the
other. A grounding type plug has two blades
and a third grounding prong. The wide blade
or the third prong are provided for your safety.
If the provided plug does not fit into your
outlet, consult an electrician for replacement
of the obsolete outlet.
10. Protect the power cord from being walked on
or pinched particularly at plugs, convenience
receptacles, and the point where it exits the
apparatus.
11. Only use attachments/accessories specified
by the manufacturer.
12. Use only with the cart,
stand, tripod, bracket,
or table specified by the
manufacturer, or sold with
the apparatus. When a cart
is used, use caution when
moving the cart/apparatus combination to
avoid injury from tip-over.
13. Unplug this apparatus during lightning storms
or when unused for long periods of time.
14. Refer all servicing to qualified service
personnel. Servicing is required when the
apparatus has been damaged in any way,
such as when the power-supply cord or plug
is damaged, liquid has been spilled or objects
have fallen into the apparatus, the apparatus
has been exposed to rain or moisture, does
not operate normally, or has been dropped.
Disc Storage & Management
• Holding Discs
- Fingerprints or scratches on
a disc may reduce sound and
picture quality or cause skipping.
- Avoid touching the surface of a disc where
data has been recorded.
- Hold the disc by the edges so that fingerprints
will not get on the surface.
- Do not stick paper or tape on the disc.
• Cleaning Discs
- If you get fingerprints or dirt on a
disc, clean it with a mild detergent
diluted in water and wipe with a
soft cloth.
- When cleaning, wipe gently from the inside to
the outside of the disc.
• Disc Storage
`Do not keep in direct sunlight.
`Keep in a cool ventilated area.
`Keep in a clean protection jacket and store
vertically.
Handling Cautions
• Do not expose this apparatus to dripping or
splashing. Do not put objects filled with liquids,
such as vases on the apparatus.
• To turn this apparatus off completely, you must
pull the power plug out of the wall socket.
Consequently, the power plug must be easily
and readily accessible at all times.
English 3
|
Page 4

Safety Information
• Do not plug multiple electric devices into the
same wall socket. Overloading a socket can
cause it to overheat, resulting in a fire.
• Before connecting other components to this
player, be sure to turn them off.
• If you move your player suddenly from a cold
place to a warm place, condensation may occur
on the operating parts and lens and cause
abnormal disc playback. If this occurs, unplug
the player, wait for two hours, and then connect
the plug to the power outlet.
Then, insert the disc, and try to play back again.
• If the product makes an abnormal noise or
produces a burning smell or smoke, turn off
the power switch immediately and disconnect
the power plug from the wall outlet. Then,
contact the nearest customer service center for
technical assistance. Do not use the product.
Using the product as it is may cause a fire or an
electric shock.
Using the 3D function
IMPORTANT HEALTH AND SAFETY
INFORMATION FOR 3D PICTURES.
Read and understand the following safety
information before using the 3D function.
• Some viewers may experience discomfort while
viewing 3D TV such as dizziness, nausea, and
headaches.
If you experience any such symptom, stop
viewing 3D TV, remove the 3D Active Glasses,
and rest.
• Watching 3D images for an extended period of
time may cause eye strain. If you feel eye strain,
stop viewing 3D TV, remove your 3D Active
Glasses, and rest.
• A responsible adult should frequently check on
children who are using the 3D function.
If there are any reports of tired eyes, headaches,
dizziness, or nausea, have the child stop viewing
3D TV and rest.
• Do not use the 3D Active Glasses for other
purposes (Such as general eyeglasses,
sunglasses, protective goggles, etc.).
• Do not use the 3D function or 3D Active Glasses
while walking or moving around. Using the 3D
function or 3D Active Glasses while moving
around may cause you to bump into objects,
trip, and/or fall, and cause serious injury.
• If you want to enjoy 3D content, connect a 3D
device (3D compliant AV receiver or TV) to the
player's HDMI OUT port using a high-speed
HDMI cable. Put on 3D glasses before playing
the 3D content.
• The player outputs 3D signals only through
HDMI cable connected to the HDMI OUT port.
• As the video resolution in 3D play mode is fixed
according to the resolution of the original 3D
video, you can not change the resolution to your
preference.
• Some functions such as BD Wise, screen size
adjustment, and resolution adjustment may not
operate properly in 3D play mode.
• You must use a high-speed HDMI cable for
proper output of the 3D signal.
• Stay at least three times the width of the screen
from the TV when watching 3D images. For
example, if you have a 46-inch screen, stay 138
inches (11.5 feet) from the screen.
• Place the 3D video screen at eye level for the
best 3D picture.
• When the player is connected to some 3D
devices, the 3D effect may not function properly.
• This player does not convert 2D content into
3D.
• "Blu-ray 3D" and "Blu-ray 3D" logo are
trademarks of the Blu-ray Disc Association.
Copyright
© 2013 Samsung Electronics Co.,Ltd.
All rights reserved; No part or whole of this user's
manual may be reproduced or copied without the
prior written permission of Samsung Electronics
Co.,Ltd.
|
4 English
Page 5

Contents
Contents
SAFETY INFORMATION
SETTINGS
2 Warning
3 Precautions
3 Important Safety Instructions
3 Disc Storage & Management
3 Handling Cautions
4 Using the 3D function
4 Copyright
7 Disc and Format Compatibility
7 Disc types and contents your player can
7 Disc types your player cannot play
8 Region Code
8 Logos of Discs the player can play
9 Supported Formats
12 Accessories
13 Front Panel
13 Rear Panel
14 Remote Control
14 Tour of the Remote Control
15 Connecting to a TV
16 Connecting to an Audio System
16 Method 1 Connecting to an HDMI 4K
17 Method 2 Connecting to an AV receiver
18 Method 3 Connecting to an Audio System
18 Method 4 Connecting to an AV receiver
19 Connecting to a Network Router
19 Wired Network
19 Wireless Network
GETTING STARTED
play
CONNECTIONS
supported AV receiver
that does not support HDMI 4K using
HDMI cable
(7.1 Channel Amplifier)
with Dolby Digital or DTS decoder
20 The Initial Settings Procedure
20 The Home Screen
21 Accessing the Settings Screen
21 Buttons on the Remote Control Used for
the Settings Menu
22 Settings Menu Functions
29 Networks and the Internet
29 Configuring Your Network Connection
32 Wi-Fi Direct
33 Upgrading Software
33 Update Now
34 Auto Update
MEDIA PLAY
35 The AllShare Play Screen
35 Accessing the AllShare Play Screen
35 Playing Commercial Discs
35 Playing Files on a USB Device
36 Playing a Disc with User Recorded
Content
37 Using the Allshare Network Function
37 To Download the Allshare Software
38 Playing Content Located on Your PC or
Allshare Device through the Blu-ray Disc
Player
38 Controlling the Playback of Content
Located on Your PC with Your Smart
Phone
39 Controlling Video Playback
39 Buttons on the Remote Control used for
Video Playback
39 Using the Tools Menu
41 Using the View & Options Menus
English 5
|
Page 6

42 Controlling Music Playback
42 Buttons on the Remote Control used for
Music Playback
42 Using the View & Options Menus
43 Repeating Tracks on an Audio CD
43 Shuffling Tracks on an Audio CD
43 Creating a Playlist from an Audio CD
44 Ripping
44 Playing Photo Contents
44 Using the Tools Menu
45 Using the View & Options Menus
46 Using the Send Function
NETWORK SERVICES
47 Logging In to Your Samsung Account
47 Before Using Movies & TV Shows or
Apps
48 Using Movies & TV Shows
49 Using Apps
49 The Apps Screen at a Glance
49 Downloading Applications
50 Starting an Application
50 Using the Downloaded Screen
50 Sorting the Apps
50 Using the Edit Menu Functions
54 Screen Mirroring
54 Using the Web Browser
54 Link Browsing and Pointer Browsing
55 The Control Panel at a Glance
56 Using the Setting Menu
57 Linking Your Internet Service Accounts
to the Player
58 BD-LIVE™
APPENDIX
59 Compliance and Compatibility Notice
60 Copy Protection
60 Network Service Disclaimer
61 License
62 Additional Information
62 Notes
64 Resolution according to the contents type
65 Digital Output Selection
66 Troubleshooting
68 Repairs
69 Specifications
|
6 English
Page 7

02 Getting Started
Getting Started
Disc and Format Compatibility
Disc types and contents your player can play
Media Disc Type Details
Blu-ray Disc
3D Blu-ray Disc
VIDEO
MUSIC
PHOTO
| NOTES |
\The player may not play certain CD-RW/-R and DVD-R because of the disc type or recording conditions.
\If a DVD-RW/-R has not been recorded properly in DVD video format, it will not be playable.
\Your player will not play content that has been recorded on a DVD-R at a bit-rate that exceeds 10 Mbps.
\Your player will not play content that has been recorded on a BD-R or USB device at a bitrate that exceeds 25 Mbps.
\Playback may not work for some types of discs, or when you use specific functions, such as angle change and aspect ratio
adjustment. Information about the discs is written in detail on the disc box. Please refer to this if necessary.
\When you play a BD-J title, loading may take longer than a normal title or some functions may perform slowly.
DVD-VIDEO
DVD-RW
DVD-R
DVD+RW
DVD+R
CD-RW/-R,
DVD-RW/-R,
BD-RE/-R
CD-RW/-R,
DVD-RW/-R,
BD-RE/-R
BD-ROM or BD-RE/-R recorded in the BD-RE format.
DVD-VIDEO, recorded DVD+RW/DVD-RW(V)/DVD-R/+R that have been recorded and
finalized, or a USB storage media containing MKV, MP4 contents.
Music recorded on CD-RW/-R, DVD-RW/-R, BD-RE/-R or a USB storage media
containing MP3 or WMA contents.
Photos recorded on CD-RW/-R, DVD-RW/-R, BD-RE/-R or a USB storage media
containing JPEG contents.
Disc types your player cannot play
• HD DVD
• DVD-ROM/PD/
MV, etc
• DVD-RAM
• Super Audio CD
(except CD layer)
• DVD-RW (VR mode)
• CVD/CD-ROM/CDV/
CD-G/CD-I/LD
(CD-Gs play audio only,
not graphics.)
• 3.9 GB DVD-R for
Authoring.
English 7
|
Page 8
Getting Started
Region Code
Both players and discs are coded by region.
These regional codes must match for a disc to
play. If the codes do not match, the disc will not
play.
The Region Number for this player is displayed on
the rear panel of the player.
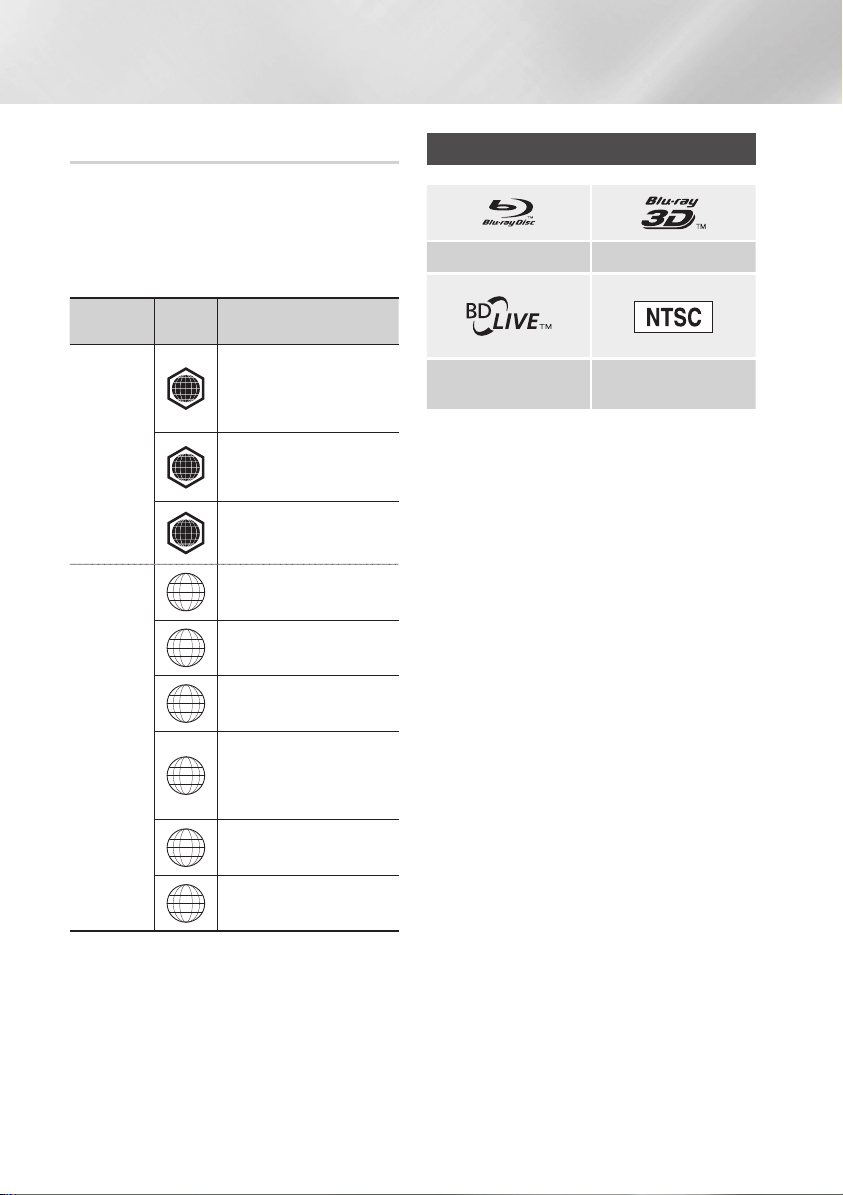
Logos of Discs the player can play
Blu-ray Disc 3D Blu-ray Disc
Disc Type
Blu-ray Disc
DVD-VIDEO
Region
Code
North America, Central America,
South America, Korea, Japan,
A
Taiwan, Hong Kong and South
East Asia.
Europe, Greenland, French
territories, Middle East, Africa,
B
Australia and New Zealand.
India, China, Russia, Central and
C
South Asia.
The U.S., U.S. territories and
1
Canada
Europe, Japan, the Middle East,
2
Egypt, Africa, Greenland
Taiwan, Korea, the Philippines,
3
Indonesia, Hong Kong
Mexico, South America,
Central America, Australia,
4
New Zealand, Pacific Islands,
Caribbean
Russia, Eastern Europe, India,
5
North Korea, Mongolia
Area
BD-LIVE
NTSC broadcast system in
U.S.A, Canada, Korea, Japan
China
6
|
8 English
Page 9

02 Getting Started
Supported Formats
Video File Support
File Extension Container Video Codec Resolution
*.avi
*.mkv
*.asf
*.wmv
*.mp4
*.3gp
*.vro
*.mpg
*.mpeg
*.ts
*.tp
*.trp
*.mov
*.flv
*.vob
*.svi
*.m2ts
*.mts
*.webm
`Limitations
- Even when the file is encoded by a supported codec listed above, a file might not be played if its
content is defective or corrupted.
- Normal playback is not guaranteed if the file’s container information is wrong or the file itself is
corrupted.
- Files having higher bit or frame rates than indicated in the table above may stutter when played back.
- The Seek (Jump) function is not available if the file’s index table is damaged.
- When you playback a file remotely through a network connection, video playback may stutter
depending on the network speed.
- Some USB/Digital camera devices may not be compatible with the product.
`Video decoder
- Supports up to H.264 Level 4.1. (Does not support FMO/ASO/RS)
- Does not support VC1/AP/L4.
AVI
MKV
ASF
MP4
3GP
MOV
FLV
VRO
VOB
PS
TS
SVAF
WebM VP8 1920x1080
MPEG4 SP/ASP
H.264 BP/
MP/HP
Motion JPEG
Microsoft
MPEG-4 v3
Window Media
Video v7,v8,v9
MPEG2
MPEG1
VP6 640x480
MVC
1920x1080
(WMV v7,v8,
MSMPEG4 v3 :
1280x720)
Frame rate
(fps)
6~30 30
24/25/30 60
6~30 20 Vorbis
Bitrate (Mbps) Audio Codec
ADPCM(IMA, MS)
Dolby Digital Plus
4
Dolby Digital
LPCM
AAC
HE-AAC
WMA
MPEG(MP3)
DTS (Core)
English 9
|
Page 10

Getting Started
- CODECs except for WMVv7, v8, MSMPEG4 v3,
MVC, VP6
1) Below 1280 x 720 : 60 frames max.
2) Above 1280 x 720 : 30 frames max.
- Does not support GMC 2 or higher.
- Supports SVAF (Top/Bottom, Side by Side).
- Supports BD MVC Spec.
`Audio decoder
- Supports WMA 10 PRO (Up to 5.1).
- Does not support WMA lossless audio.
- Supports ADPCM IMA,MS.
- Does not support ADPCM(A-Law, μ-Law).
- Does not support QCELP/AMR NB/WB.
- Supports vorbis (Up to 2ch).
- Supports DD+ (Up to 7.1ch)
| NOTES |
\Playback of some MKV or MP4 file may not be supported
depending on their video resolution and frame rate.
Supported Subtitle File Formats
File
Extension
.ttxt
.smi
.srt
.sub
.sub or.txt
.ssa
.ass
.psb
AVI
MKV
MKV
MKV
MP4
External
Internal
Name
MPEG-4 Timed text
SAMI
SubRip
SubViewer
Micro DVD
SubStation Alpha
Advanced SubStation
Alpha
Powerdivx
Xsub
SubStation Alpha
Advanced SubStation
Alpha
SubRip
MPEG-4 Timed text
Music File Support
File
Extension
*.mp3
*.m4a
*.mpa
*.aac
*.flac
*.ogg
*.wma
*.wav
*.mid
*.midi
*.ape
Type Codec Support Range
MPEG1
MPEG
MPEG4
FLAC
OGG
WMA
wav
midi
ape
Audio
Layer 3
AAC -
FLAC Supports up to 2ch
Vorbis Supports up to 2ch
WMA
wav -
midi type 0 and type 1
ape
-
Supports WMA 10
Pro (Up to 5.1).
Does not support
WMA lossless audio.
Supports up to M2
profile.
Does not support
LBR mode.
Picture File Support
File Extension Type Resolution
*.jpg
*.jpeg
*.png
*.bmp
*.mpo
JPEG
PNG
BMP
MPO
15360x8640
4096x4096
4096x4096
15360x8640
|
10 English
Page 11

02 Getting Started
Notes on the USB connection
• Your player supports USB storage media, MP3
players, digital cameras, and USB card readers.
• Some USB/digital camera devices may not be
compatible with the player.
• Your player supports the FAT16, FAT32, and
NTFS files systems.
• Connect USB devices directly to the player's
USB port. Connecting through a USB cable
may cause compatibility problems.
• Inserting more than one memory device into
a multi-card reader may cause the reader to
operate improperly.
• The player does not support the PTP protocol.
• Do not disconnect a USB device during a
"loading" process.
• The bigger the image resolution, the longer the
image takes to display.
• This player cannot play MP3 files with DRM
(Digital Rights Management) downloaded from
commercial sites.
• Your player only supports video that is under
30fps (frame rate).
• Your player only supports USB Mass Storage
Class (MSC) devices such as thumb drives and
USB HDD. (HUB is not supported.)
• Certain USB HDD Devices, multi-card readers
and thumb drives may not be compatible with
this player.
• If some USB devices require excessive power,
they may be limited by the circuit safety device.
• If playback from a USB HDD is unstable, provide
additional power by plugging the HDD into a
wall socket.
If the problem continues, contact the USB HDD
manufacturer.
• SAMSUNG is not responsible for any data file
damage or data loss.
•
Your player does not support NTFS compressed,
sparse, or encrypted files.
- You can repair or format a USB device on
your Desktop PC. (MS-Windows OS only)
AVCHD (Advanced Video Codec High
Definition)
• This player can play back AVCHD format discs.
These discs are normally recorded and used in
camcorders.
• The AVCHD format is a high definition digital
video camera format.
• The MPEG-4 AVC/H.264 format compresses
images with greater efficiency than the
conventional image compressing format.
• Some AVCHD discs use the "x.v.Color" format.
This player can play back AVCHD discs that use
"x.v.Color" format.
• "x.v.Color" is a trademark of Sony Corporation.
• "AVCHD" and the AVCHD logo are trademarks
of Matsushita Electronic Industrial Co., Ltd. and
Sony Corporation.
| NOTES |
\Some AVCHD format discs may not play, depending on
the recording conditions.
AVCHD format discs need to be finalized.
\"x.v.Color" offers a wider color range than normal DVD
camcorder discs.
English 11
|
Page 12
Getting Started
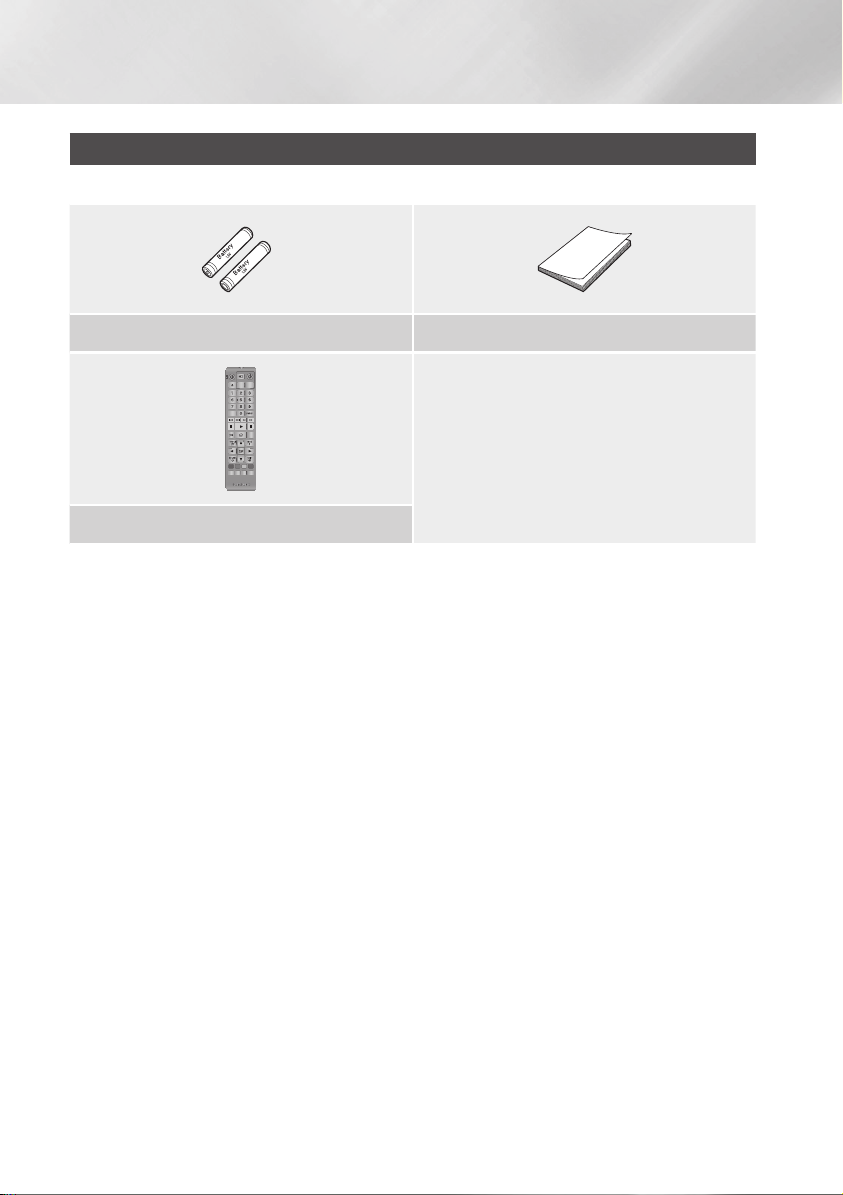
Accessories
Check for the supplied accessories shown below.
Batteries for Remote Control (AAA Size) User Manual
SOURCE
VOL VOL
– +
VOL
+
VOL
–
SAMSUNG TV
1
2
3
4
5
6
7
8
9
DISC MENU
TITLE MENU
POPUP
0
SMART
HOME
REPEAT
HOME
APPS
HUB
INFOTOOLS
RETURN
EXIT
A B C D
SEARCH FULLSUBTITLE
AUDIO
SCREEN
PANDORA
DIGITAL
SUBTITLE
INPUT
Remote Control
|
12 English
Page 13
02 Getting Started
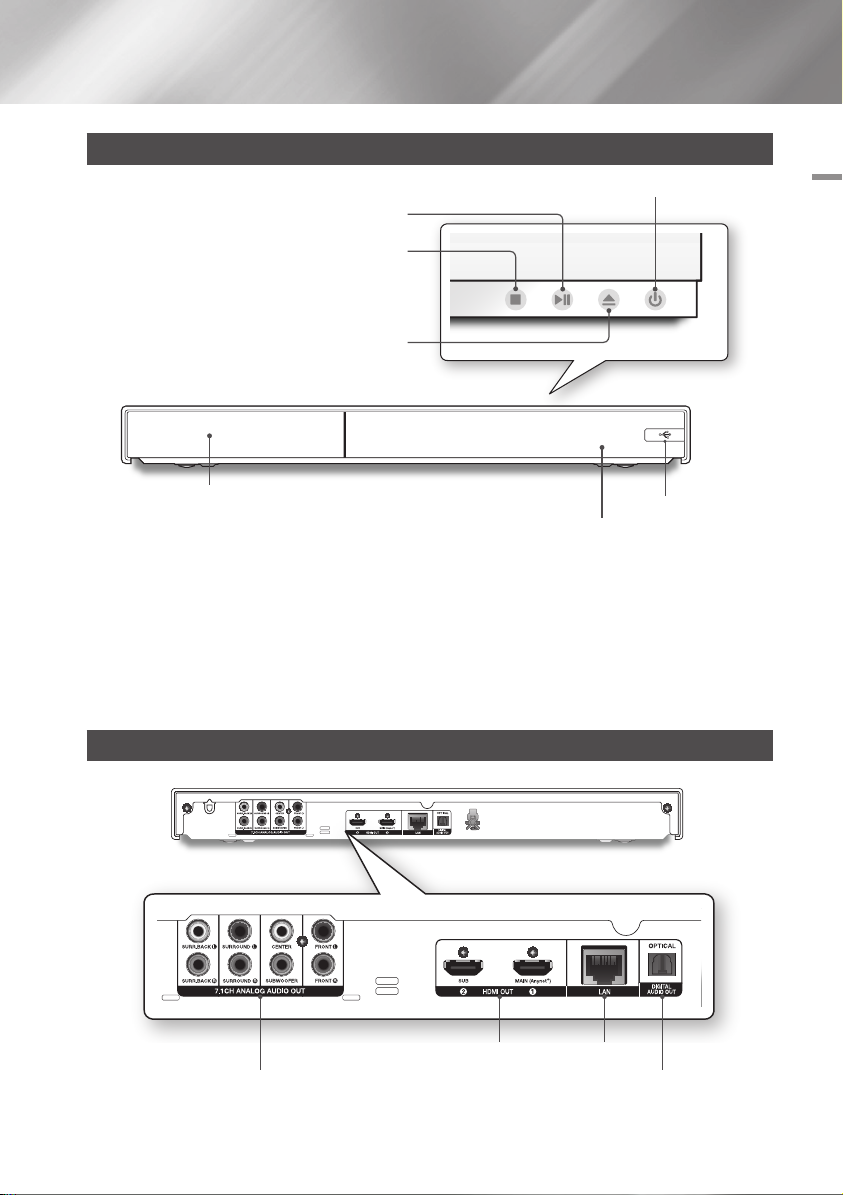
Front Panel
POWER BUTTON
PLAY/PAUSE BUTTON
STOP BUTTON
OPEN/CLOSE BUTTON
DISC TRAY
REMOTE CONTROL SENSOR
| NOTES |
\To upgrade the player's software through the USB Host jack, you must use a USB memory stick.
\When the player displays the Blu-ray Disc menu, you cannot start the movie by pressing the Play button on the player or the
remote control. To play the movie, you must select Play Movie or Start in the disc menu, and then press the v button on
the remote control.
\To use Anynet+ (HDMI-CEC) function, connect an HDMI cable to HDMI 1 terminal.
When you connect the HDMI 2 terminal, Anynet+ (HDMI-CEC) function is not available.
USB HOST
Rear Panel
HDMI OUT LAN
DIGITAL AUDIO OUT7.1CH ANALOG AUDIO OUT
English 13
|
Page 14
Getting Started
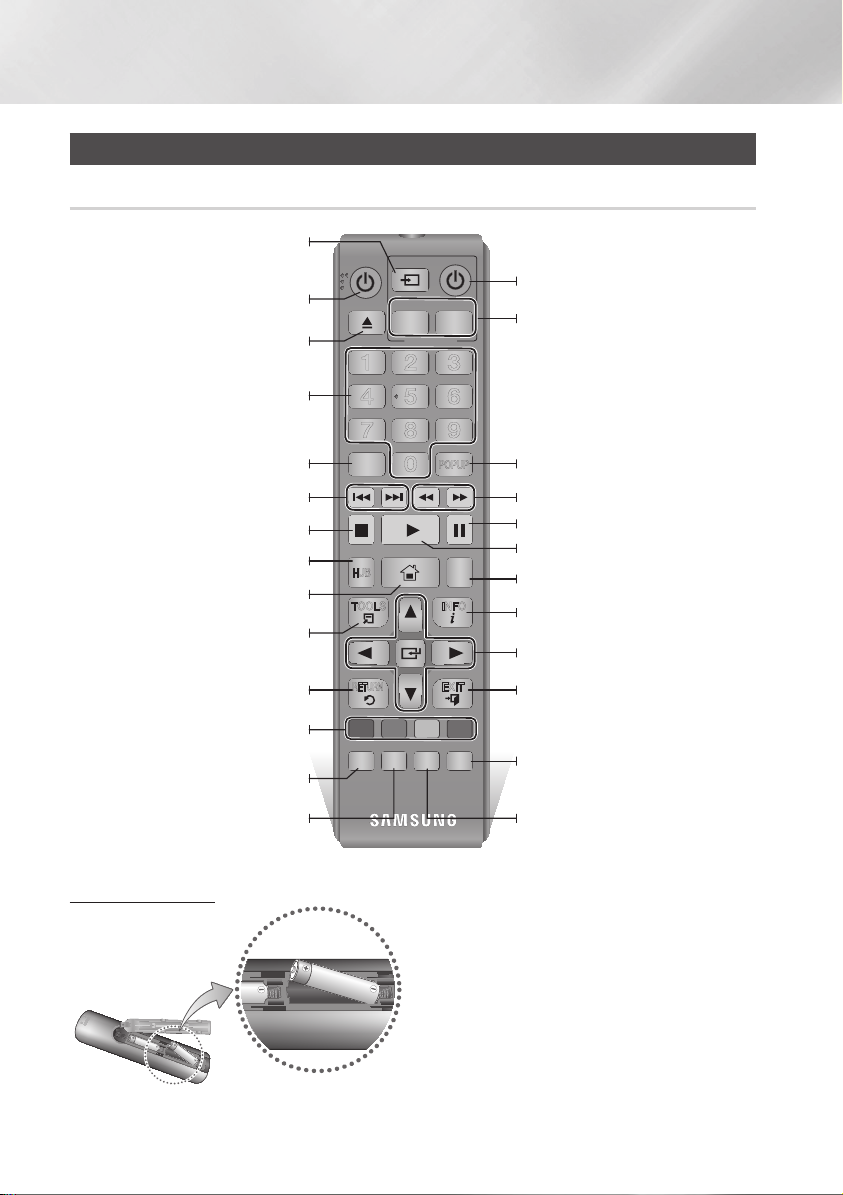
Remote Control
Tour of the Remote Control
After setup, allows you to set the input
(This button is only available in Samsung TV.)
Press to open and close the disc tray.
Press the number buttons to operate
Press to skip backwards or forwards.
Press to move to the Home screen.
These buttons are used both for menus
on the player and also several Blu-ray Disc
Use to access various audio functions on a
source on your TV.
Turn the player on and off.
options.
Use to enter the disc menu.
Press to stop a disc.
Press to use Apps.
Press to use the Tools menu.
Return to the previous menu.
functions.
Press to search contents.
disc.
SOURCE
VOL VOL
– +
VOL
+
SAMSUNG TV
1
2
4
5
7
8
DISC MENU
0
SMART
HOME
HOME
HUB
RETURN
A B C D
SEARCH FULLSUBTITLE
AUDIO
PANDORA
DIGITAL
SUBTITLE
VOL
–
3
6
9
TITLE MENU
POPUP
REPEAT
APPS
INFOTOOLS
EXIT
SCREEN
INPUT
Turn the TV on and off.
(This button is only available for Samsung
TV volume adjustment.
(This button is only available for Samsung TVs.)
Use to enter the Popup menu/Title menu.
Press to search backwards or forwards.
Press to pause a disc.
Press to play a disc.
Allows you to repeat a title, chapter, track
or disc.
Use to display the playback information.
Use to select menu items and change
menu values.
Press to exit the menu.
Press to use full screen function.
During the Blu-ray Disc/DVDs playback,
this button does not operate.
Press to switch the Blu-ray Disc/DVD's
subtitle language.
TVs.)
Installing batteries
|
14 English
| NOTES |
\If the remote control does not operate properly:
- Check the polarity +/– of the batteries.
- Check if the batteries are drained.
- Check if the remote sensor is blocked by obstacles.
- Check if there is any fluorescent lighting nearby.
| CAUTION |
\Dispose of batteries according to local environmental
regulations. Do not put them in the household trash.
Page 15
03 Connections
Connections
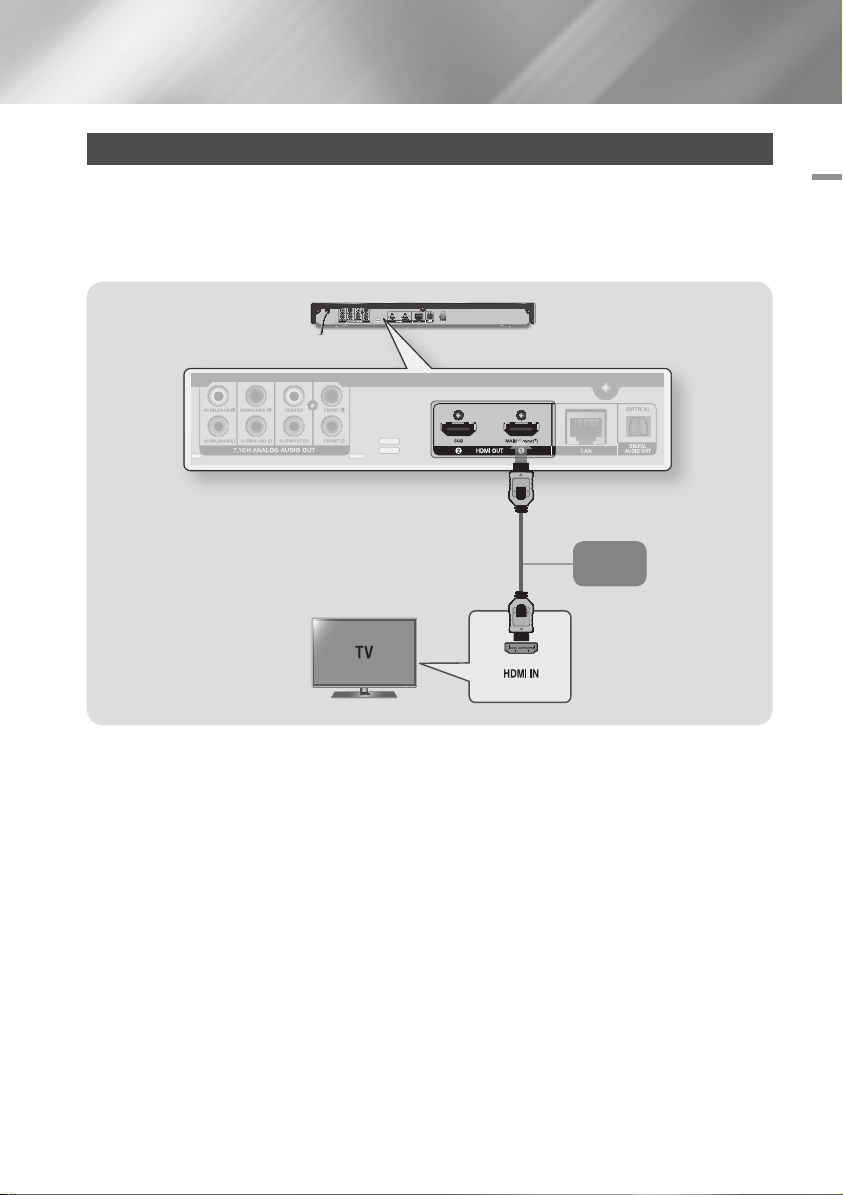
Connecting to a TV
Connect an HDMI cable (not supplied) from the HDMI OUT jack on the back of the product to the HDMI
IN jack on your TV.
- Do not connect the power cord to the wall outlet until you have made all the other connections.
- When you change the connections, turn off all devices before you start.
Audio
Video
| NOTES |
\To use the Anynet+ (HDMI-CEC) function, connect the HDMI cable to HDMI 1 terminal.
If you connect the cable to the HDMI 2 terminal, the Anynet+ (HDMI-CEC) function will not be available.
\HDMI 2 terminal does not output the video signal.
\If you use an HDMI-to-DVI cable to connect to your display device, you must also connect the Digital Audio Out on the player
to an audio system to hear audio.
\An HDMI cable outputs digital video and audio, so you don't need to connect an audio cable.
\Depending on your TV, certain HDMI output resolutions may not work. Please refer to the user manual of your TV.
\When you connect the player to your TV using the HDMI cable or to a new TV, and then turn it on for the first time, the player
automatically sets the HDMI output resolution to the highest supported by the TV.
\A long HDMI cable may cause screen noise. If this occurs, set HDMI Deep Color to Off in the menu.
\To view video in the HDMI 720p,1080i,1080p or 2160p output mode, you must use a High speed (category 2) HDMI cable.
\HDMI outputs only a pure digital signal to the TV.
If your TV does not support HDCP (High-bandwidth Digital Content Protection), random noise appears on the screen.
English 15
|
Page 16
Connections
Connecting to an Audio System
You can connect the Blu-ray player to the audio system using the methods illustrated below.
- Do not connect the power cord to the wall outlet until you have made all the other connections.
- When you change the connections, turn off all devices before you start.
Method 1 Connecting to an HDMI 4K supported AV receiver
• Connect an HDMI cable (not supplied) from the HDMI OUT jack on the back of the product to the
HDMI IN jack on your receiver.
• Best quality (Recommended)
Audio/Video
HDMI 4K
supported AV
receiver
|
16 English
Video
Page 17

03 Connections
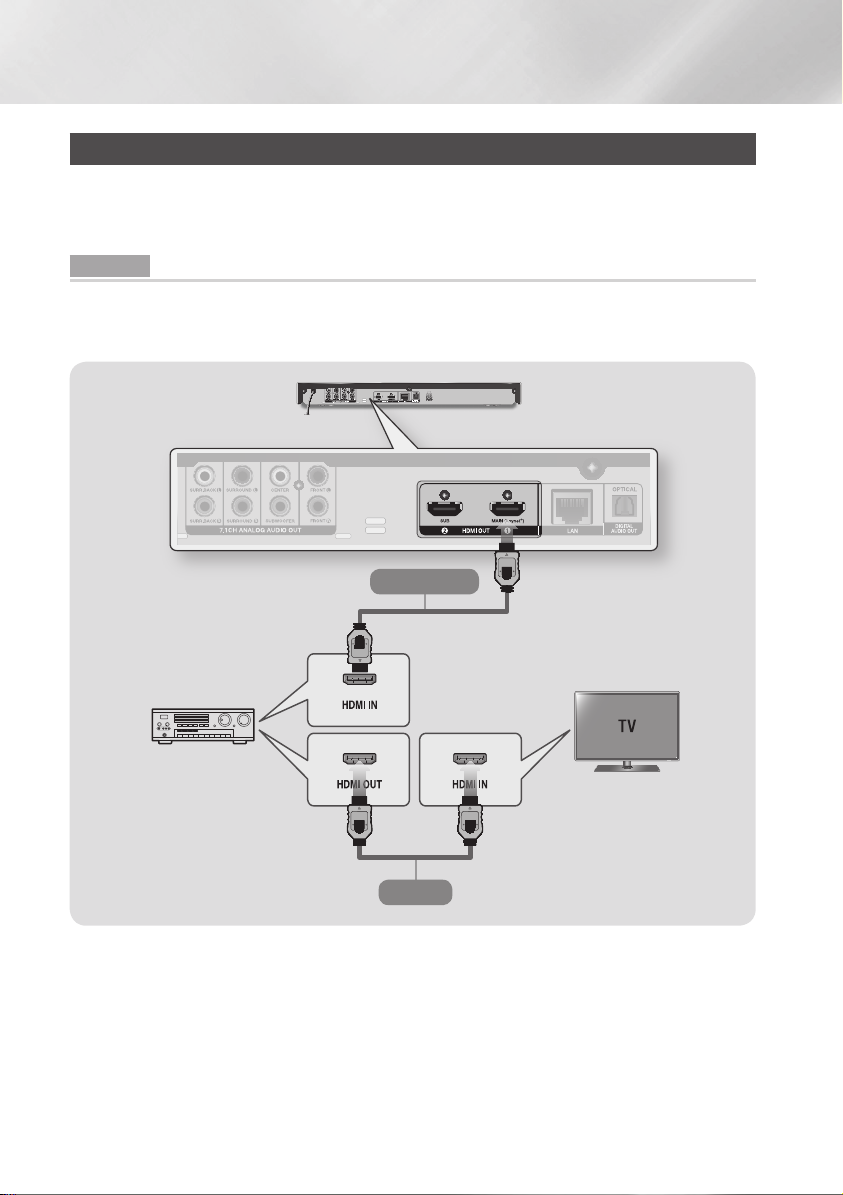
Method 2 Connecting to an AV receiver that does not support HDMI 4K using HDMI cable
• Connect an HDMI cable (not supplied) from the HDMI OUT jack on the back of the product to the
HDMI IN jack on your receiver.
• Best quality (Recommended)
Or
VideoAudio
HDMI Receiver
| CAUTION |
\Do not connect the HDMI OUT 1 and HDMI OUT 2 terminals of the product with an HDMI cable.
English 17
|
Page 18

Connections
Method 3 Connecting to an Audio System (7.1 Channel Amplifier)
• Using 7.1CH audio cables (not supplied), connect the 7.1CH ANALOG AUDIO OUT terminals on the
rear of the Player to the 7.1CH ANALOG AUDIO IN terminals of your Amplifier.
• Better Quality
Method 4 Connecting to an AV receiver with Dolby Digital or DTS decoder
• Using a digital Optical cable (not supplied), connect the Optical Digital Audio Out jack on the product to
the Digital Optical In jack of the receiver.
• Good quality
• You will hear sound only through the front two speakers with Digital Output set to PCM.
Audio
7.1 Channel
Amplifier
| NOTES |
\The front left and right outputs on your player and 7.1 channel amplifier must be connected to hear disc menu audio from
certain Blu-ray discs.
\When connecting to a 5.1 channel home theater or receiver, connect all the Analog Audio output jacks from the player
except for the Surround Back Left/Surround Back Right outputs.
|
18 English
Page 19
03 Connections
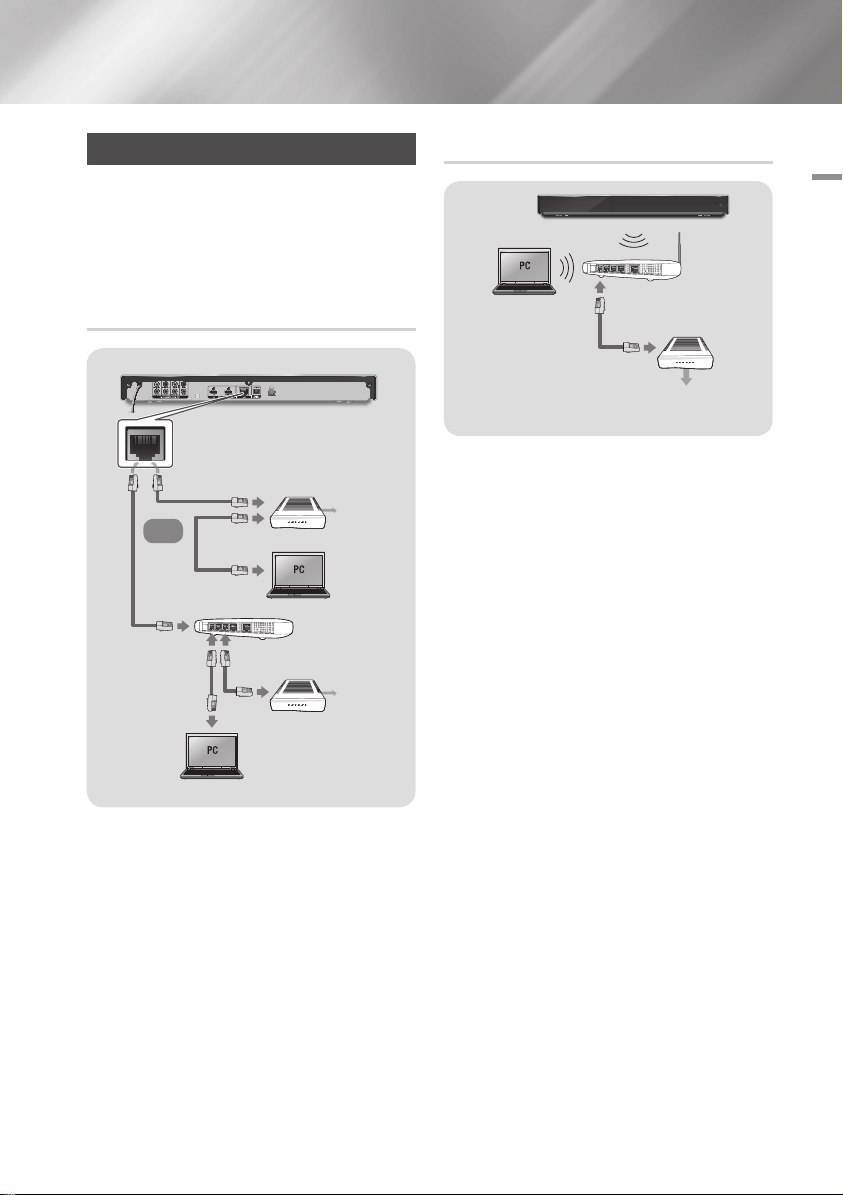
Connecting to a Network Router
You can connect your player to your network
router using one of the methods illustrated below.
To use the AllShare network functionality, you
must connect your PC to your network as shown
in the illustrations.
The connection can be wired or wireless.
Wired Network
Wireless Network
Wireless Router
Broadband
service
Broadband modem
(with integrated router)
Broadband
Or
Router
Broadband
modem
| NOTES |
\Your router or your Internet Service Provider's policies
may prevent the player from accessing Samsung's
software update server. If this occurs, contact your
Internet Service Provider (ISP) for more information.
\DSL users, please use a router to make a network
connection.
service
Broadband
service
| NOTES |
\If your wireless router supports DHCP, this player can use
a DHCP or static IP address to connect to the wireless
network.
\Set your wireless router to Infrastructure mode. Ad-hoc
mode is not supported.
\The player supports only the following wireless security
key protocols:
- WEP (OPEN/SHARED), WPA-PSK (TKIP/AES),
WPA2-PSK (TKIP/AES)
\Select a channel on the wireless router that is not
currently being used. If the channel set for the wireless
router is currently being used by another device nearby, it
will result in interference and communication failure.
\If you select the Pure High-throughput (Greenfield)
802.11n mode and set the Encryption type on your router
to WEP, TKIP or TKIP-AES (WPS2Mixed), the player will
not support a connection in compliance with new Wi-Fi
certification specifications.
\Wireless LAN, by its nature, may cause interference,
depending on the operating conditions (router
performance, distance, obstacles, interference by other
radio devices, etc).
English 19
|
Page 20
Settings
The Initial Settings Procedure
• The Home screen will not appear if you do not
configure the initial settings.
• The OSD (On Screen Display) may change in this
player after you upgrade the software version.
• The access steps may differ depending on the menu
you selected.
After you have connected the player to your TV,
turn on the TV and player. When you turn on the
player the first time, the player's Initial Settings
screen appears on the TV. The Initial Setting
procedure lets you set the On Screen Display
(OSD) and menu languages, the aspect ratio
(screen size), the network type, and connect the
player to your network.
| NOTES |
\If you skip Network Setup during the Initial Settings
procedure, you can configure your network settings later.
See "Configuring Your Network Connection" on pages
29~31 for instructions.
\If you want to display the Initial Settings screen again and
make changes, select Settings > System > Setup in
the Home screen or select the Reset option. (See pages
26 or 28)
\If you want to use an Anynet+(HDMI-CEC) function,
please follow the instructions below.
1) Connect the player to an Anynet+(HDMI-CEC)compliant Samsung TV using HDMI Cable.
2) Set the Anynet+(HDMI-CEC) feature to On in both the
TV and the player.
3) Set the TV to the Initial Settings Procedure.
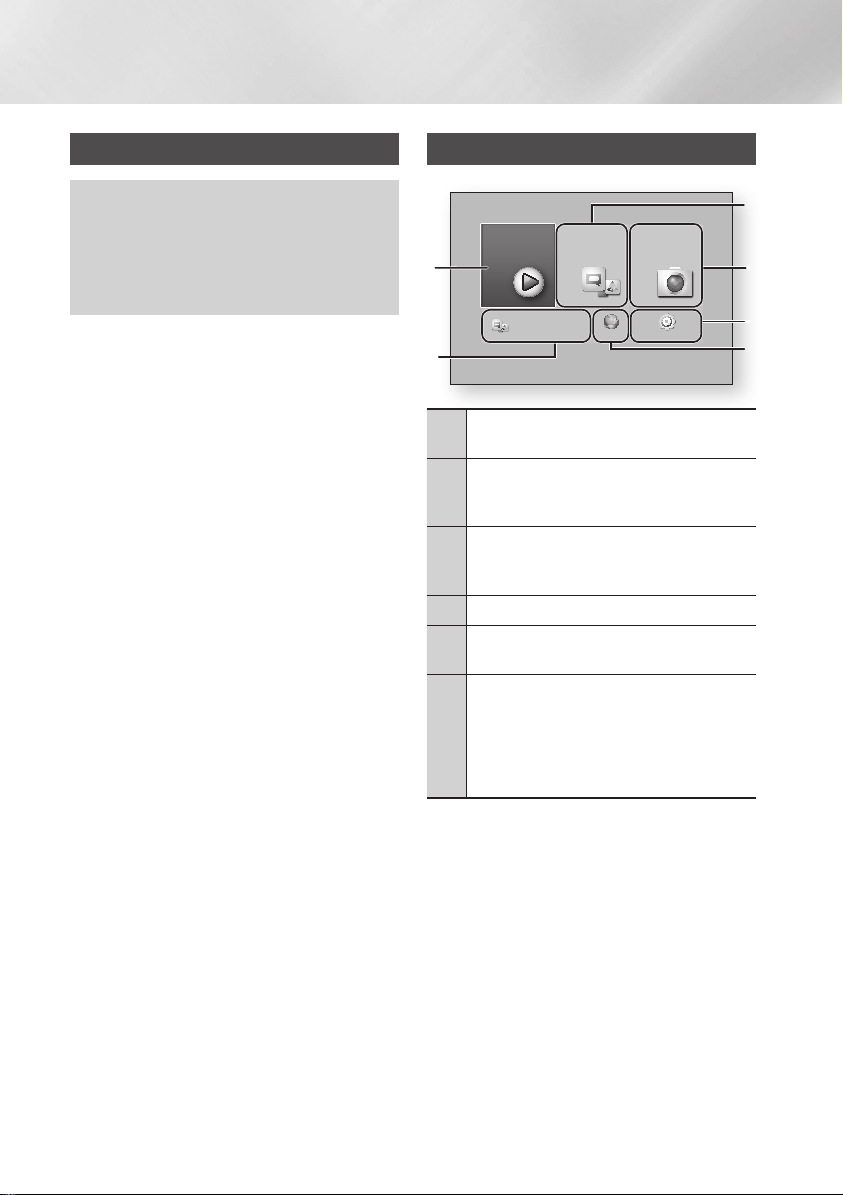
The Home Screen
Movies & TV
Shows
6
5
Apps : Gives you access to various for pay or free-
1
of-charge applications you can download.
Photos, Videos & Music : Lets you play photos,
Videos or music content from Disc, USB, PC or
2
mobile devices.
Settings : Opens the player's menu where you
can set various functions to suit your personal
3
preferences.
Web Browser : Provides access to the Internet.
4
Recommended Apps : Gives you direct access to
5
recommended applications.
Movies & TV Shows : Lets you download movies
and TV Shows from the Internet.
6
| NOTES |
\Depending on your country, this menu function
may not be supported.
| NOTES |
\
If you leave the player in the stop mode for more than
5 minutes without using it, a screen saver will appear on
your TV. If the player is left in the screen saver mode for
more than 20 minutes, the power will automatically turn off.
Apps Photos,
Go to Apps and connect to the network
to get recommended apps.
Videos &
Music
Web Browser Settings
a
Samsung Account d Screen Mirroring
1
2
3
4
|
20 English
Page 21
04 Settings
Accessing the Settings Screen
1
4
7
VOL
+
2
5
8
0
VOL
–
3
6
9
SOURCE
DISC MENU
SMART
TITLE MENU
VOL VOL
POPUP
SAMSUNG TV
– +
HOME
REPEAT
1. Select Settings on the Home screen, and
then press v button. The Settings screen
appears.
Settings
Display
Display
4K Output Auto
Audio
3D Settings
Network
TV Aspect Ratio
16:9 Original
BD Wise Off
Smart Features
Resolution Auto
System
Movie Frame (24Fs) Auto
Support
DVD 24fps Conversion Off
2. To access the menus, sub-menus, and
options on the Settings screen, please refer
to the remote control illustration below.
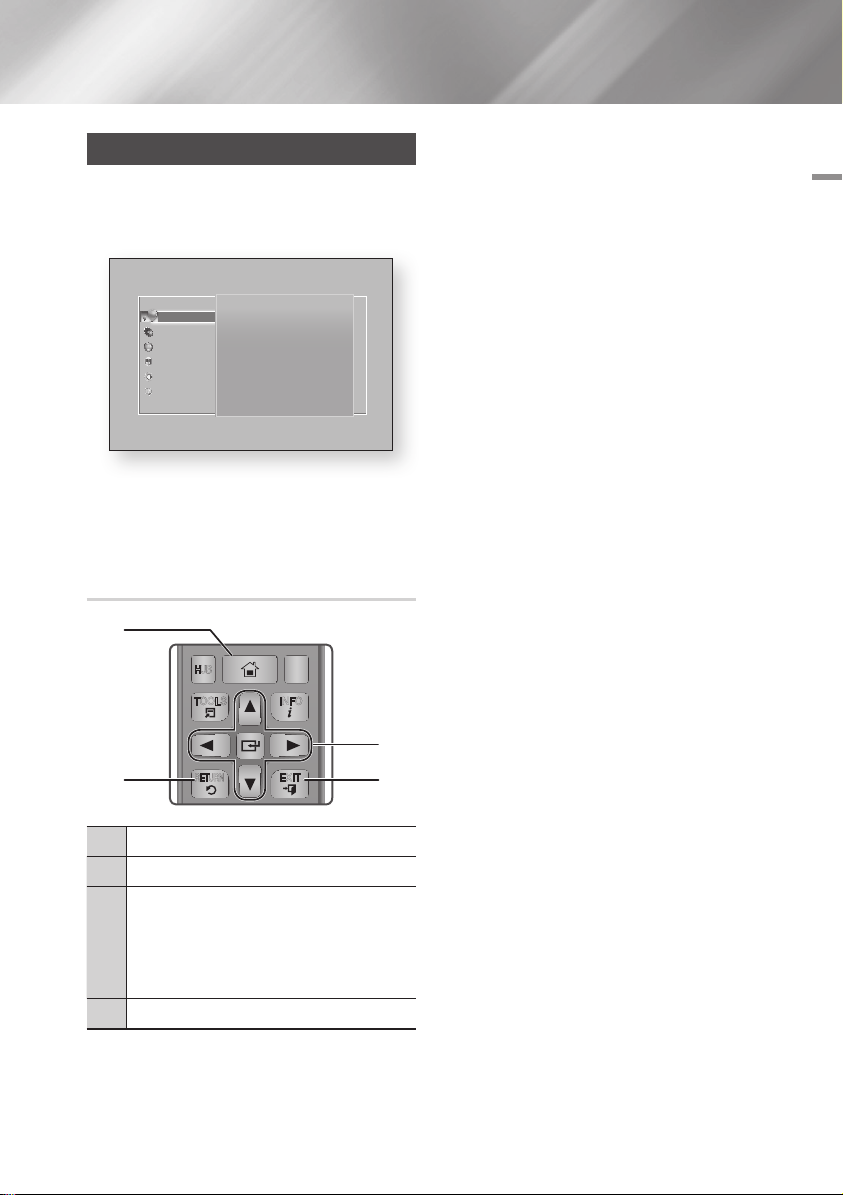
Buttons on the Remote Control Used
for the Settings Menu
1
HOME
HUB
APPS
INFOTOOLS
Detailed Function Information
Each Settings function, menu item, and individual
option is explained in detail on-screen. To view an
explanation, use the ▲▼◄► buttons to select the
function, menu item, or option. The explanation
will usually appear on the right side of the screen.
A short description of each Settings function
starts on the next page. Additional information on
some of the functions is also in the Appendix of
this manual.
2 4
HOME Button : Press to move to the Home screen.
1
RETURN Button : Return to the previous menu.
2
v
• Press ▲▼◄► to move the cursor or select an
3
• Press the v button to activate the currently
RETURN
EXIT
(Enter) / DIRECTION Buttons :
item.
selected item or confirm a setting.
EXIT Button : Press to exit the current menu.
4
3
English 21
|
Page 22

Settings
Settings Menu Functions
Display
4K Output
3D Settings
TV Aspect Ratio
BD Wise
Resolution
Movie Frame (24Fs)
This option outputs HDMI video at 4K resolution. This is
only available when Movie Frame is set to Auto.
| NOTES |
\
To use this feature, you must connect the player to a device
that supports 4K resolution and you must have content that
plays at 24Fs (film speed).
Select whether to play a Blu-ray Disc with 3D contents
in 3D Mode.
•
If you move to the Home or Smart Hub Home
screen while in 3D mode, the player will switch to 2D
automatically.
Lets you adjust the output of the player to the screen
size and screen format of your TV.
BD Wise is Samsung's latest inter-connectivity feature.
When you connect a Samsung player and a Samsung
TV with BD Wise to each other via HDMI, and BD Wise
is on in both the player and TV, the player outputs video
at the video resolution and frame rate of the Blu-ray
Disc/DVD.
Set the output resolution of the HDMI video signal to BD
Wise, Auto, 1080p, 1080i, 720p or 480p.
The number indicates the number of lines of video per
frame.
The i and p indicate interlaced and progressive scan,
respectively. Generally, the more lines, the higher quality.
If the player is connected to a 24Fs compatible TV,
setting the Movie Frame (24Fs) feature to Auto lets the
player adjust its HDMI output to 24 frames per second
automatically for improved picture quality.
•
You can enjoy the Movie Frame (24Fs) feature only on
a TV supporting this frame rate.
•
Movie Frame is only available when the player is in the
HDMI 1080i or 1080p output resolution modes.
|
22 English
Page 23

04 Settings
Display
DVD 24Fs Conversion
Smart Hub Screen Size
HDMI Color Format
HDMI Deep Color
Progressive Mode Lets you improve picture quality when viewing DVDs.
Converts DVD playback to 24 frames per second and
outputs it via HDMI. This option is only available when
Movie Frame (24Fs) is set to on.
Lets you select the optimal size for the Smart Hub
Screen.
Lets you set the color space format for the HDMI output
so that it matches the capabilities of the connected
device (TV, monitor, etc). The screen goes black
momentarily after you have selected a format.
Lets you set the product to output HDMI video with
Deep Color. Deep Color provides more accurate color
reproduction with greater color depth.
Audio
Digital Output
PCM Downsampling
Dynamic Range Control
Downmixing Mode
Lets you select the digital audio output format that is
suitable for your TV or AV Receiver. For more details,
see the digital output selection table on page 65.
Lets you choose to have 96Khz PCM signals
downsampled to 48Khz before they are outputted to an
amplifier. Choose On if your amplifier or receiver is not
compatible with a 96Khz signal.
Lets you apply dynamic range control to Dolby Digital,
Dolby Digital Plus, and Dolby TrueHD audio.
Auto : Automatically controls the dynamic range of
Dolby TrueHD audio, based on information in the
Dolby TrueHD soundtrack. Also turns dynamic range
control on for Dolby Digital and Dolby Digital Plus.
Off : Leaves the dynamic range uncompressed,
letting you hear the original sound.
On : Turns dynamic range control on for all three
Dolby formats. Quieter sounds are made louder and
the volume of loud sounds is reduced.
Lets you select the multi-channel downmix method that
is compatible with your stereo system. You can choose
to have the player downmix to normal stereo or to
surround compatible stereo.
English 23
|
Page 24

Settings
Audio
DTS Neo:6 Mode
Audio Sync
HDMI Audio Output
Speaker Settings
You can enjoy multichannel sound via HDMI output from
a 2 channel audio source.
In some cases when the product is connected to a
digital TV, the audio signal may not synchronize with the
video signal. If this occurs, adjust the audio delay time
to match the video signal.
•
You can set the audio delay time between 0 msec
and 200 msec.
Adjust it to the optimal setting.
| NOTES |
\The audio delay time you specify may not be exact depending
on the played content.
Set HDMI audio to output through HDMI1 or HDMI2.
Auto : Audio output will be set automatically based
on the devices connected to HDMI1 and HDMI2.
HDMI1 : Audio will output to the device connected to
HDMI1.
HDMI2 : Audio will output to the device connected to
HDMI2.
Lets you select the kind, size, and number of speakers
you have attached to your player, adjust the following
speaker settings for the speakers attached, and turn the
test tone on and off so you can test the speakers.
Size : Lets you select the size of each kind of
attached speaker - Large or Small - or indicate that
you don't have a particular kind of speaker attached
by selecting None. If you select None for a kind of
speaker, that kind of speaker will be grayed out on
the Level and Distance screens.
Level : Lets you adjust the relative loudness of each
speaker from 6db to -6db. For example, if you like
deep bass, you can increase the loudness of the
subwoofer by 6db.
Distance : Lets you adjust the relative distance of
each speaker from the listening position up to 30 feet.
The farther the distance, the louder the speaker will
be.
Test Tone : Lets you run the Test Tone function so
you can test your adjustments. Setting Test Tone to
On turns the Test Tone on. Setting it to Off turns it off.
|
24 English
Page 25

04 Settings
Network
Network Status Lets you check the current network and Internet status.
Network Settings
Wi-Fi Direct
AllShare Settings
Device Name
BD-Live Settings
Configure the network connection so you can enjoy
various features such as Internet services or AllShare
Wi-Fi functionality, and perform Software Updates.
Lets you connect a Wi-Fi Direct device to the player
using a peer-to-pear network, without the need for a
wireless router.
Note that if the player is connected to a wireless network,
it may be disconnected when you use Wi-Fi Direct.
| NOTES |
\Text files, such as files with a .TXT or .DOC extension, will not
display when you are using the Wi-Fi Direct function.
Lets you control which devices on your network, such
as smart phones and tablets, can share content with
your TV.
Lets you input a name for the player that will identify it
on your networks.
Set various BD-Live functions. BD-Live allows you to
access extra features available on some Blu-ray Discs if
you are connected to the Internet.
BD-Live Internet Connection : Lets you fully allow,
partly allow, or prohibit a BD-Live Internet connection.
BD Data Management : Manage BD data
downloaded from a BD-Live service or Blu-ray Disc.
Smart Features
Apps Settings
VOD Rating Lock
Terms & Conditions,
Privacy Policy
Reset Smart Hub
Lets you configure App notification settings and view
basic info about your Apps.
Push Notification Settings : Receive notifications
from selected services.
Properties : See basic info about Apps.
You can lock access to Video on Demand (VOD)
content based on its rating.
| NOTES |
\Depending on your country, this menu function may not be
supported.
You must review and agree to both the Smart Hub
Terms & Conditions and the privacy policy in order to
enjoy Smart Hub services.
Resets the Smart Hub and Samsung account settings
stored on your device.
English 25
|
Page 26

Settings
System
Setup Lets you re-run the Initial Settings procedure.
Lets you set the player to turn on quickly by decreasing
the boot time.
Quick Start
Language
Device Manager
| NOTES |
\If this function is set to On, Standby power consumption will
be increased.
You can select the language you prefer for the Onscreen menu, disc menu, audio, subtitles, etc.
•
The language you select for the disc menu, disc
audio, or subtitles will only appear if it is supported on
the disc.
You can connect a wireless USB keyboard or mouse to
the USB port on the front of the player.
Keyboard Settings : Lets you configure a wireless
USB keyboard connected to the player.
| NOTES |
\You can use the keyboard only when a QWERTY keyboard
screen or window appears in the Web Browser.
Mouse Settings : Lets you configure a wireless USB
mouse connected to the player. You can use the
mouse in the player's menu and the Web Browser in
the same way you use a mouse on your PC.
`To use a mouse with the player's menu:
Connect the USB mouse to the player.
1.
2.
Click the primary button you selected in Mouse
Settings. The Simple Menu appears.
3.
Click the menu options you want.
| NOTES |
\Some USB HID keyboards and mice may not be compatible
with your product.
\Some HID keyboard keys may not work.
\Wired USB keyboards are not supported.
\Some applications may not be supported.
\If a wireless HID Keyboard does not operate because of
interference, move the keyboard closer to the player.
|
26 English
Page 27

04 Settings
System
Security
General
Anynet+ (HDMI-CEC)
The default security PIN is 0000. Enter the default PIN to
access the security function if you haven't created your
own PIN. After you have accessed the security function
for the first time, change the PIN using the Change PIN
function.
BD Parental Rating : Prevents playback of Blu-ray
Discs with a rating equal to or above a specific age
rating you have set unless the PIN is entered.
DVD Parental Rating : Prevents playback of DVDs
with a rating above a specific numerical rating you
have set unless the PIN is entered.
Change PIN : Change the 4-digit PIN used to access
security functions.
`If you forget your PIN:
Remove any disc or USB storage device.
1.
2.
Press and hold the @ button on the top panel for 5
seconds or more.
All settings will revert to the factory default settings.
You can change the options listed below to match your
preferences.
Front Display : Change the brightness of the front
panel.
Time Zone : Select the time zone in which you live.
Menu Transparency : Adjust the transparency of the
menu box.
Anynet+ is a convenient function that offers linked
operations with other Samsung players that have the
Anynet+ feature and lets you control those products
with one Samsung TV remote. To operate this function,
you must connect this player to an Anynet+ Samsung
TV using an HDMI cable.
English 27
|
Page 28

Settings
Support
Remote Management
Software Update
Contact Samsung
Reset
When activated, lets Samsung Call Center agents
diagnose and fix problems with the product remotely.
Requires an active Internet connection.
| NOTES |
\Remote Management service might not be available in some
countries.
\Contact your nearest service center for your PIN code and tell
the code to the person in charge. It enables remote diagnosis
of the product and required measures.
For more information about the Software Update
function, see "Upgrading Software" on pages 33~34.
Provides contact information for assistance with your
player.
Resets all settings to their default settings except for the
network and Smart Hub settings, and then launches the
Setup function.
The default security PIN is 0000.
|
28 English
Page 29

04 Settings
Networks and the Internet
When you connect this player to a network,
you can use network based applications and
functions such as Smart Hub and BD-LIVE,
and upgrade the player's software through the
network connection. For more information about
accessing and using Internet services, see the
Network Services chapter of this manual on pages
47~58. Instructions for configuring the network
connection start below.
Configuring Your Network Connection
Before you begin, contact your ISP to find out
if your IP address is static or dynamic. If it is
dynamic, and you have a wired or wireless
network, we recommend using the Automatic
configuration procedures described below.
If you are connecting to a wired network, connect
the player to your router using a LAN cable before
you start the configuration procedure.
If you are connecting to a wireless network,
disconnect any wired network connection before
you begin.
To begin configuring your network connection,
follow these steps:
Wired Network
Ğ
Wired - Automatic
1. In the Home screen, select Settings, and
then press the v button.
2. Select Network, and then press the v
button.
3. Select Network Settings, and then press the
button.
v
4. Select Wired in the Network Settings screen,
and then press the v button.
5. Select Connect button, and then press the
button. The product detects the wired
v
connection, verifies the network connection
and then connects to the network.
Ğ
Wired - Manual
If you have a static IP address or the Automatic
procedure does not work, you'll need to set the
Network Settings values manually.
Follow Steps 1 and 2 in Wired Network, and then
follow these steps:
1. Select Network Status. The player searches
for a network, and then displays the
connection failed message.
2. On the bottom of the screen, select IP
Settings, and then press the v button.
The IP Settings screen appears.
3. Select the IP Setting field, and then press the
button.
v
4. Select Enter manually in the IP Setting field,
and then press the v button.
5. Select a value to enter (IP Address, for
example), and then press the v button.
Use the number keypad on your remote
control to enter the numbers for the value.
You can also enter numbers using the ▲▼
buttons. Use the ◄► buttons on the remote
control to move from entry field to entry field
within a value. When done with one value,
press the v button.
6. Press the ▲ or ▼ button to move to another
value, and then enter the numbers for that
value following the instructions in Step 5.
7. Repeat Steps 5 and 6 until you have filled in
all values.
| NOTES |
\You can get the Network values from your Internet
provider.
8. When finished entering all the values, select
OK, and then press the v button. The
player verifies the network connection and
then connects to the network.
English 29
|
Page 30

Settings
Wireless Network
You can setup a wireless network connection in
four ways:
- Wireless Automatic
- Wireless Manual
- WPS(PBC)
- WPS(PIN)
When you configure the wireless network
connection, any wireless network devices currently
connected through the player or, if applicable,
the player's current wired connection, will be
disconnected.
Ğ
Wireless - Automatic
1. In the Home screen, select Settings, and
then press the v button.
2. Select Network, and then press the v
button.
3. Select Network Settings, and then press the
button.
v
4. Select Wireless in the Network Settings
screen, and then press the v button. The
player searches for and then displays a list of
the available networks.
Select your network type.
Network type Wireless
Wireless network
linksys3
solugen_edu#2
iptime23
solugen_edu#1
Network Settings
Refresh WPS(PBC)
You can connect your Blu-ray
player to the internet. Please
select which wireless network to
use.
5. Select the desired network, and then press
the v button.
6. On the Security screen, enter your network's
Security Code or Pass Phrase.
Enter numbers directly using the number
buttons on your remote control. Enter letters
by selecting a letter with an arrow button, and
then pressing v button.
| NOTES |
\To view the password as you enter it, use the arrow
buttons to select Show Password on the right side, and
then press v button.
7. When done, select Done and then press the
button. The player verifies the network
v
connection and then connects to the
network.
8. When verification is complete, select OK, and
then press the v button.
| NOTES |
\You should be able to find the Security Code or Pass
Phrase on one of the set up screens you used to set up
your router or modem.
Ğ
Wireless - Manual
If you have a static IP address or the Automatic
procedure does not work, you'll need to set the
Network Settings values manually.
1. Follow the directions in Wireless - Automatic
through Step 5.
2. The player searches for a network, and then
displays the connection failed message.
3. On the bottom of the screen, select IP
Settings, and then press the v button.
The IP Settings screen appears.
4. Select the IP Setting field, and then press the
button.
v
5. Select Enter manually in the IP Setting field,
and then press the v button.
|
30 English
Page 31

04 Settings
6. Select a value to enter (IP Address, for
example), and then press v button. Use
the number keypad on your remote control
to enter the numbers for the value. You can
also enter numbers using the ▲▼ buttons.
Use the ◄► buttons on the remote control
to move from entry field to entry field within a
value. When done with one value, press the
button.
v
7. Press the ▲ or ▼ button to move to another
value, and then enter the numbers for that
value following the instructions in Step 6.
8. Repeat Steps 6 and 7 until you have filled in
all values.
| NOTES |
\You can get the Network values from your Internet
provider.
9. When finished, select OK, and then press the
button. The Security Screen appears.
v
10. On the Security screen, enter your network's
Security Code or Pass Phrase. Enter
numbers directly using the number buttons
on your remote control. Enter letters by
selecting a letter with the ▲▼◄► buttons,
and then pressing the v button.
11. When finished, select Done at the right of the
screen, and then press the v button.
The player verifies the network connection
and then connects to the network.
12. After the player verifies the network, select
OK, and then press the v button.
Ğ
WPS(PBC)
1. In the Home screen, select Settings, and
then press the v button.
2. Select Network, and then press the v
button.
3. Select Network Settings, and then press the
button.
v
4. Select Wireless in the Network Settings
screen, and then press the v button.
5. Press the ▲ button on your remote, and then
press the ► button to select the WPS(PBC).
6. Press the v button on your remote. The
"Press the PBC button" message appears.
7. Press the WPS(PBC) button on your router
within two minutes. Your player automatically
acquires all the network settings values it
needs and connects to your network.
The Network Status screen appears. The
player connects to the network after the
network connection is verified.
Ğ
WPS(PIN)
Before you begin, open the router's setup menu
on your PC and access the screen with the WPS
PIN entry field.
1. In the Home screen, select Settings, and
then press the v button.
2. Select Network, and then press the v
button.
3. Select Network Settings, and then press the
button.
v
4. Select Wireless in the Network Settings
screen, and then press the v button.
The player searches for and then displays a
list of the available networks.
5. Select the desired network, and then press
the v button.
6. Select the WPS(PIN), and then press the
► button. The PIN pop-up appears.
7. Enter the PIN into the WPS PIN entry field in
the router's Set Up screen and then save the
the screen.
| NOTES |
\Contact the manufacturer of the router for instructions
explaining how to access the route's Set Up screens or
refer to the router's user's manual.
\For WPS connection, set your wireless router’s security
encryption to AES. Setting to WEP security encryption
does not support WPS connection.
English 31
|
Page 32

Settings
Wi-Fi Direct
The Wi-Fi Direct function allows you to connect
Wi-Fi Direct devices to the player and each other
using a peer-to-peer network, without a wireless
router.
| NOTES |
\Some Wi-Fi Direct devices may not support the AllShare
function if connected via Wi-Fi Direct. If this is the case,
it is advisable to change the network connection method
between devices.
\Bluetooth transmissions can interfere with the Wi-Fi
Direct signal. Before you use the Wi-Fi Direct function,
we strongly recommend that you turn off the Bluetooth
function of any active mobile device.
1. Turn on the Wi-Fi direct device and activate
its Wi-Fi Direct function.
2. In the Home screen, select Settings, and
then press the v button.
3. Select Network, and then press the v
button.
4. Select Wi-Fi Direct, and then press the v
button.
The Wi-Fi Direct devices that you can
connect appear.
5. You have three ways to complete the Wi-Fi
connection:
• Through the Wi-Fi device.
• Through the player using PBC.
• Through the player using a PIN.
Each is covered below.
Through the Wi-Fi Device
1. On the Wi-Fi device, follow the procedure on
the device for connecting to another Wi-Fi
Direct device. See the device's user manual
for instructions.
2. When you have completed the procedure,
you should see a pop-up on your TV screen
saying that a device that supports Wi-Fi
Direct has requested to connect. Select OK,
and then press the v button to accept.
3. The Connecting pop-up appears, followed
by the Connected pop-up. When it closes,
you should see the device listed on the Wi-Fi
Direct screen as connected.
Through the Player Using PBC
1. Select the Wi-Fi Direct device you want to
connect to this player, and then press the v
button. The PBC/PIN pop up appears.
2. Select PBC, and then press the v button.
The PBC pop-up appears.
3. Press the PBC button on the Wi-Fi Direct
device within 2 minutes.
4. The Connecting pop-up appears, followed
by the Connected pop-up. When it closes,
you should see the device listed on the Wi-Fi
Direct screen as connected.
Through the Player Using a PIN
1. Select the Wi-Fi Direct device you want to
connect to this player, and then press the v
button. The PBC/PIN pop up appears.
2. Select PIN, and then press the v button.
The PIN pop-up appears.
3. Note the PIN code in the pop-up, and then
enter it into the appropriate field in the Wi-Fi
Direct device you want to connect.
4. The Connecting pop-up appears, followed
by the Connected pop-up. When it closes,
you should see the device listed on the Wi-Fi
Direct screen as connected.
| NOTES |
\The current wired or wireless network connection will be
disconnected when you use the Wi-Fi Direct function.
\Text files, such as files with a .TXT or .DOC extension, will
not display when you are using the Wi-Fi Direct function.
|
32 English
Page 33

04 Settings
Upgrading Software
The Software Update menu allows you to
upgrade the player's software for performance
improvements or additional services.
• Never turn the player off or back on manually during
the update process.
1. In the Home screen, select the Settings, and
then press the v button.
2. Select Support, and then press the v
button.
3. Select Software Update, and then press the
button.
v
4. To download update software and update
now, select Update Now, and then press the
button. See Update Now on this page for
v
details.
5. To let the product download update software
automatically when available, select Auto
Update, and then press the v button. See
Auto Update on page 34 for details.
| NOTES |
\The upgrade is complete when the player turns off, and
then turns on again by itself.
\Samsung Electronics shall takes no legal responsibility
for player malfunction caused by an unstable Internet
connection or consumer negligence during a software
Update.
\If you want to cancel the upgrade while the upgrade
software is downloading, press the v button.
\When a system upgrade is in progress, "UPDATE" is
displayed on the front panel.
Update Now
You can use Update Now to update the software
through your network connection or by using a
USB flash drive. The network instructions are
below. The USB flash drive instructions are on the
next page.
1. Select Update Now, and then press the v
button.
The Update now pop-up appears.
2. The product searches on line for the latest
software version.
3. If it finds a new version, the Update Request
pop-up appears.
4. Select OK. The product upgrades the
software, turns off, and then turns on
automatically.
5. If you do not select OK or Cancel in one
minute, the product stores the new upgrade
software. You can upgrade the software later
using Auto Update.
6. If you select Cancel, the product cancels the
upgrade.
| NOTES |
\When the system upgrade is done, check the software
details in the Product Information section of the Contact
Samsung screen.
\Do not turn off the player during the Software Update. It
may cause the player to malfunction.
English 33
|
Page 34

Settings
Auto Update
You can set the Auto Update function so that the
player downloads new upgrade software when it
is in Auto Update mode.
In Auto Update mode, the player is off, but its
Internet connection is active. This allows the player
to download upgrade software automatically,
when you are not using it.
1. Press the ▲▼ buttons to select Auto
Update, and then press the v button.
2. Select On or Off.
If you select On, the player will automatically
download new upgrade software when it is
in Auto Update mode with the power off. If it
downloads new upgrade software, the player
will ask you if you want to install it when you
turn the player on.
| NOTES |
\To use the Auto Update Mode Upgrade function, your
player must be connected to the Internet.
< By USB >
1. Visit www.samsung.com.
2. Click SUPPORT on the top right of the page.
3. Enter the product's model number into the
search field. As you enter the model number,
a drop down will display products that match
the model number.
4. Left click your product's model number in the
drop down list.
5. On the page that appears, scroll down to and
then click Firmware Manuals & Downloads.
6. Click Firmware in the center of the page.
7. Click the ZIP button in the File column on the
right side of the page.
8. Click Send in the first pop-up that appears.
Click OK in the second pop-up to download
and save the firmware file to your PC.
9. Unzip the zip archive to your computer. You
should have a single folder with the same
name as the zip file.
10. Copy the folder to a USB flash drive.
11. Make sure no disc is inserted in the product,
and then insert the USB flash drive into the
USB port of the product.
12. In the product’s menu, go to Settings >
Support > Software Update.
13. Select Update Now.
14. The product searches for the software on the
USB drive. When it finds the software, the
Update Request pop-up appears.
15. Select OK. The product upgrades the
software, turns off, and then turns on
automatically.
| NOTES |
\There should be no disc in the player when you upgrade
the software using the USB jack.
\When the system upgrade is done, check the software
details in the Product Information section of the Contact
Samsung screen.
\Do not turn off the player during the Software Update.
It may cause the player to malfunction.
\Software Updates using the USB jack must be performed
with a USB flash memory stick only.
|
34 English
Page 35

05 Media Play
Media Play
Your Blu-ray Disc Player can play content located
on Blu-ray/DVD/CD discs, USB devices, PCs,
smart phones, tablets, and on the Web.
To play content located on your PC or on mobile
devices, you must connect them and this product
to your network. To play content on your PC, you
must also install Allshare network software on your
PC.
| NOTES |
\
PCs running Windows 7 and Windows 8 have Allshare
software (Play To) built in.
The AllShare Play Screen
For all media, the AllShare Play Main screen or
one of its sub screens is your primary means of
accessing and playing contents saved on a variety
of devices, either connected directly or using your
network.
Accessing the AllShare Play Screen
To access the AllShare Play Main screen, select
Photos, Videos & Music on the Home screen,
and then press the v button.
Playing Commercial Discs
1. Press the 8 button to open the disc tray.
2. Place a disc gently into the disc tray with the
disc’s label facing up.
3. Press the 8 button to close the disc tray.
Playback starts automatically.
4. If playback does not start automatically, press
6
the
button on the remote control.
Playing Files on a USB Device
There are two methods you can use to play or
view multimedia files located on a USB device
through your player.
Method 1
1. Turn the player on.
2. Connect the USB device to the USB port on
the front panel of the player. The New Device
Connected pop-up appears.
Movies & TV
Shows
| NOTES |
\
If the pop-up does not appear, go to Method 2.
3. Use the ▲▼ buttons to select Photos,
Videos, Music or All Content, and then
press the v button. The AllShare Play
screen appears listing the content of the
device. Depending on how the contents is
arranged, you will see either folders, individual
files, or both.
Apps Photos,
New device connected.
Photos
Videos
Music
All Content
Go to Apps and connect to the network
to get recommended apps.
Videos &
Music
m80
Web Browser Settings
a
Samsung Account d Screen Mirroring
English 35
|
Page 36

Media Play
| NOTES |
\
Even though the player will display folders for all content
types, it will only display files of the Content Type you
selected in Step 2. For example, if you selected music,
you will only be able to see music files. You can change
this selection by returning to the All Share Play screen and
going to Step 4 in Method 2 below.
4. If necessary, use the the ▲▼◄► buttons
to select a folder, and then press the v
button.
5. Select a file to view or play, and then press
the v button.
6. Press the RETURN button to exit a folder
or the EXIT button to return to the Home
screen.
7. Go to pages 39~46 for instructions that
explain how to control playback of videos,
music, and pictures on a USB device.
Method 2
1. Turn the player on.
2. Connect the USB device to the USB port on
the front panel of the player.
3. Select Photos, Videos & Music on the
Home screen, and then press the v button.
4. Select Photos, Videos, Music or All
Content, and then press the v button.
| NOTES |
\Even though the player will display folders for all content
types, it will only display files of the Content Type you
selected in Step 2. For example, if you selected music,
you will only be able to see music files. You can change
this selection by returning to the AllShare Play screen and
repeating Step 4.
5. Use the ◄► buttons to select the desired
device and then press the v button.
Depending on how the contents are
arranged, you will see either folders, individual
files, or both.
6. If necessary, use the ▲▼◄► buttons to
select a folder, and then press the v button.
7. Use the ▲▼◄► buttons to select a file to
view or play, and then press the v button.
8. Press the RETURN button to exit a folder or
the EXIT button to return to Home screen.
9. Go to pages 39~46 for instructions that
explain how to control playback of videos,
music, and pictures on a USB device.
| NOTES |
\If you insert a disc when playing a USB device, the device
mode changes to "Disc" automatically.
Playing a Disc with User Recorded
Content
You can play multimedia files you have recorded
on Blu-ray, DVD, or CD discs.
1. Place a user recorded disc into the disc
tray with the disc’s label facing up, and then
close the tray. The Device Connected pop-up
appears.
2. Use the ▲▼ buttons to select the type of
content you want to view or play - Photos,
Videos, Music, or All Content - and then
press the v button.
| NOTES |
\Even though the player will display folders for all content
types, it will only display files of the Content Type you
selected in Step 2. For example, if you selected music,
you will only be able to see music files. You can change
this selection by returning to the AllShare Play screen and
repeating Step 2.
3. A screen appears listing the contents of the
disc. Depending on how the contents are
arranged, you will see either folders, individual
files, or both.
|
36 English
Page 37

05 Media Play
4. If necessary, use the ▲▼◄►buttons to
select a folder, and then press the v button.
5. Use the ◄►▲▼ buttons to select a file to
view or play, and then press the v button.
6. Press the RETURN button one or more times
to exit a current screen, exit a folder, or to
return to the Home screen.
Press the EXIT button to return directly to the
Home Screen.
7. Go to pages 39~46 for instructions that
explain how to control playback of videos,
music, and pictures on a disc.
Using the Allshare Network
Function
Allshare software lets you play Photos, Videos,
or Music located on your PC or your Allshare
compatible device through the player using a
wireless connection.
To Download the Allshare Software
If your PC is not running Windows 7 or 8, you must
install Allshare software on your PC to use the
Allshare function. You can download the Allshare
software and get detailed instructions for using the
Allshare software from the Samsung.com website.
1. Go to www.samsung.com.
2. Click Support at the top of the page.
3. On the Support page, enter the model
number of your player into the Model Number
field, and then press the v button.
4. On the page that appears, click See All
Downloads on the left side of the screen
under Downloads. The Download Tab
appears.
5. On the Download Tab, click Software.
6. In the list of software, click the EXE button on
the right side of the Allshare software line.
7. In the pop-up that appears, click the Send
button.
8. In the next pop-up, click Save File.
9. Find the Allshare install file on your disk, and
then double click the file.
10. In the pop-up that appears, click Run, and
then follow the directions that appear on your
screen.
Download the Allshare software Installation/
Instruction manual from the same Software Tab by
clicking the corresponding PDF file symbol in the
File column on the right. The file, in PDF format,
will download and open. You can view and/or
save the file.
English 37
|
Page 38

Media Play
Playing Content Located on Your PC
or Allshare Device through the Blu-ray
Disc Player
Controlling the Playback of Content
Located on Your PC with Your Smart
Phone
PC Blu-ray Disc Player
Play back
PC's files
Allshare Connection
1. Connect the Blu-ray Disc Player, your PC,
and/or your Allshare compatible device to the
same wireless network.
2. Follow the directions in the Allshare software
Installation/Instruction manual to set up
devices and files for playing or viewing.
3. Select Photos, Videos & Music on the
player's Home screen, and then press
the v button. The AllShare Play screen
appears.
4. Select the type of content you want to play
- Photos, Videos, Music, or All Content and then press the v button.
5. On the next screen, select Allshare, and then
press the v button.
6. In the list of Allshare connected devices that
appears, select your PC or other Allshare
compatible device, and then press the v
button. A screen listing the available files
appears.
7. Select the file you want to play or view, and
then press the v button.
PC Blu-ray Disc Player
Play back
AllShare
Connection
Allshare Smart Phone
(Only available with Samsung phones supporting
Allshare functionality.)
1. Connect the Blu-ray Disc Player, your PC,
and your Allshare compatible cellular phone
to the same wireless network.
2. Follow the directions in the Allshare software
Installation/Instruction manual to set up
devices and files for playing or viewing.
3. On your computer, using the Allshare
software, confirm your phone is connected.
4. On the phone, select the file you want to view
or play, and then select the Blu-ray player as
the playback device.
5. On the phone, start playback.
PC's files
Control PC's files on the
Blu-ray Disc Player
|
38 English
Page 39

05 Media Play
Controlling Video Playback
1
4
VOL
+
2
5
VOL
–
3
6
SOURCE
VOL VOL
SAMSUNG TV
– +
You can control the playback of video content located on a Blu-ray/DVD disc, USB, mobile device or PC.
Depending on the disc or contents, some of the functions described in this manual may not be available.
Buttons on the Remote Control used for Video Playback
7
8
0
HOME
9
TITLE MENU
POPUP
REPEAT
APPS
DISC MENU
SMART
HOME
HUB
Playback related buttons
The player does not play sound in Search, Slow or
Step mode.
• To return to normal speed playback, press the
button.
6
6
5
7
button
button
button
Starts playback.
Stops playback.
Pauses playback.
During playback, press the 3 or 4
Fast Motion
Play
button.
Each time you press the 3 or 4
button, the playback speed will change.
Slow Motion
Play
Step Motion
Play
In pause mode, press the 4 button.
Each time you press the 4 button, the
playback speed will change.
In pause mode, press the 7 button.
Each time you press the 7 button, a
new frame appears.
During playback, press the 1 or 2
Skip Motion
Play
button.
Each time you press 1 or 2 button,
the disc moves to the previous or next
chapter or file.
Using the disc menu, title menu, popup
menu, and title list
DISC MENU
button
During playback, press this button to
display the Disc menu.
During playback, press this button to
TITLE MENU
button
display the Title menu.
• If your disc has a playlist, press the
View to go to the playlist.
POPUP MENU
button
During playback, press this button to
display the Popup menu.
Using the Tools Menu
During playback or in pause mode, press the
TOOLS button.
Play from the
Beginning
3D
Movie Note
Search Scene
Select to return to the beginning of the
movie, and then press the v button.
Use 3D menu to select Side by Side
or Top and Bottom option if the 3D
content currently playing does not
properly appear in 3D mode.
| NOTES |
\Use 3D menu for 3D contents only.
If applied to 2D contents, it may not
be displayed properly.
Movie Note provides information such
as director, cast, synopsis, etc.
| NOTES |
\This function is available if the disc
includes Movie Note information
and the player is connected to a
network.
You can use the Search Scene function
during playback to view or start a
movie from the scene of your choice.
English 39
|
Page 40

Media Play
Search Scene
Search Titles
Search
Chapters
Search Time
Bar
| NOTES |
\If the index information in the file
is damaged or the file does not
support indexing, you will not be
able to use the Search Scene
function.
\If you are using the Allshare function
after connecting to a computer
through your network, Search
Scene may not be supported.
If there is more than one movie on the
disc or device, select to start a different
title.
1. Select Search Titles, and then
press the v button.
2. Use the ▲▼ buttons to select
a title, and then press the v
button.
Select to play the chapter of your
choice.
1. Select Search Chapters, and then
press the v button.
2. Use the ▲▼ buttons to select a
chapter, and then press the v
button.
Select to play the movie from a
selected time point.
1. Select Search Time Bar, and then
press the v button.
2. Using the number buttons, enter
the time point you want to go to,
and then press the v button.
| NOTES |
\You can also use the ◄► buttons
to advance or rewind the movie.
The movie advances or rewinds one
minute each tme you press the ◄
► buttons.
Repeat Mode
Picture Mode
Audio
Select to repeat a title, chapter, or
specific section.
- Off : Select to return to normal
playback.
- Title : Choose to repeat a selected
title.
- Chapter : Choose to repeat a
specific chapter.
- Repeat A-B : Choose to repeat a
specific section.
1. Press the ▲▼ buttons to select
repeat A-B, and then press the
button.
v
2. Press the v button at the point
where you want repeat play to start
(A). Let the movie play.
3. Press the v button at the point
where you want repeat play to stop
(B).
| NOTES |
\You must set point (B) at least 5
seconds of playing time after point
(A).
Select to set the picture mode.
- Dynamic : Increases sharpness and
brightness.
- Standard : Choose this setting for
most viewing applications.
- Movie : The best setting for
watching movies.
- User : Lets you adjust the sharpness
and noise reduction function
respectively.
| NOTES |
\When you use the BD wise function,
this menu will not appear.
Select to set the desired audio
language.
|
40 English
Page 41

05 Media Play
Select to set the desired subtitle
language.
Subtitle
Subtitle
Settings
Angle
BONUSVIEW
Video
BONUSVIEW
Audio
Full screen
Information
| NOTES |
\Depending on the disc or storage device, the Tools menu
may differ or not be shown.
\Video files with high bitrates of 20Mbps or more strain
the player's capabilities and may stop playing during
playback.
- You can also operate this function
by pressing the SUBTITLE button on
the remote control.
Select to set the desired subtitle
options.
Select to view a scene from another
angle. The Angle option displays the
number of angles available to view.
When a Blu-ray Disc/DVD contains
multiple angles of a particular scene,
you can change angle.
Select to set the desired bonusview
option.
Select to set the size of the video
image. Choose Original, Mode 1
(larger), or Mode 2 (largest).
Select to view video file information.
Using the View & Options Menus
Using the View Menu
On the video file playback screen, use the ▲▼◄►
buttons to select View and then press the v
button.
Title
Date
Folder
Playlist
Title List
| NOTES |
\Depending on the disc or storage device, the View menu
may differ or not be shown.
Displays all the video files on the media
or storage device by title.
Displays all the folders with videos by
date. If you select a folder, and then
press the v button, displays all the
videos in the folder by date.
Displays all the folders on the media or
storage device.
Displays available play lists.
Displays all the video files on the media
or storage device by title. Alternate to
Title.
Using the Options Menu
On the video file playback screen, use the ▲▼◄►
buttons to select Options and then press the v
button.
Lets you create a playlist by selecting
Play Selected
Send
Delete
| NOTES |
\Depending on the disc or storage device, the Options
menu may differ or not be shown.
specific files to play. It works essentially
the same way for all media. See
Creating a Playlist on an Audio CD on
pages 43~44.
Select to upload selected files to online sites (Picasa, Facebook etc) or a
device. To use this function, you need
to establish an account with the on-line
site, and then log in using the Log In
function.
Select to delete a file from a device.
English 41
|
Page 42

Media Play
Controlling Music Playback
VOL
+
VOL
–
SOURCE
VOL VOL
SAMSUNG TV
– +
Using the View & Options Menus
You can control the playback of music content
located on a DVD, CD, USB, mobile device or PC.
Depending on the disc or contents, some of the
functions described in this manual may not be
available.
Buttons on the Remote Control used
for Music Playback
1
2
3
4
5
1
7
DISC MENU
6
8
9
TITLE MENU
POPUP
0
42
5
3
NUMBER buttons :
press the number of a track.The selected track is
1
played.
2
3
4
5
6
button : Moves to the previous/next track.
12
button : Stops a track.
5
Fast Play (Audio CD (CD-DA) only)
During playback, press the 3 or 4 button.
Each time you press the 3 or 4 button, the
playback speed will change.
button : Pauses a track.
7
button : Plays the currently selected track.
6
If numbered tracks are displayed,
6
Using the View Menu
On the music file playback screen, use the ▲▼◄►
buttons to select View, and then press the v
button.
Track
Album
Artist
Genre
Folder
| NOTES |
\Depending on the disc or storage device, the View menu
may differ or not be shown.
Displays all the music tracks on the
media or storage device.
Displays all music on the media or
storage device by album.
Displays all the the music files on the
media or storage device by artist.
Displays all the music on the media or
storage device by genre.
Displays all the folders on the media or
storage device.
Using the Options Menu
On the music file playback screen, use the ▲▼◄►
buttons to select Options and press the v button.
Lets you create a playlist by selecting
Play Selected
Send
specific files to play. It works essentially
the same way for all media. See
Creating a Playlist on an Audio CD on
pages 43~44.
Select to send selected files to other
devices.
|
42 English
Page 43

05 Media Play
The Ripping function converts CD
audio to the mp3 format and saves the
Ripping
converted files on a USB device or the
mobile device connected to the player.
See Ripping on page 44.
Information
Encoding
Delete
Select to see the (Contents)
information.
Select to manage the text encoding
options.
Select to delete a file from the device.
| NOTES |
\Depending on the disc or storage device, the Options
menu may differ or not be shown.
Repeating Tracks on an Audio CD
You can set the product to repeat tracks on an
audio CD (CD-DA/MP3).
1. On the Playback screen, use the ▲▼◄►
buttons to select
of the screen, and then press the v button.
2. Use the ▲▼ to select the repeat mode you
want - Off, One Song, or All - and then
press the v button.
TRACK 001
00:09 00:43
off off
in the lower left corner
TRACK 001 00:43
TRACK 002 03:56
TRACK 003 04:41
TRACK 004 04:02
TRACK 005 03:43
TRACK 006 03:40
TRACK 007 04:06
TRACK 008 03:52
TRACK 009 03:04
TRACK 010 04:02
Options
Shuffling Tracks on an Audio CD
You can set the product to play tracks on an audio
CD (CD-DA/MP3) at random.
1. On the Playback screen, use the ▲▼◄►
buttons to select
in the lower left corner
of the screen, and then press the v button.
2. Use the ▲▼ to set the Shuffle mode On or
Off, and then press the v button.
Creating a Playlist from an Audio CD
1. With the Playback screen displayed, select
the Options button, and then press the v
button. The Options menu appears.
2. Use the ▲▼ buttons to select Play Selected,
and then press the v button. The Selection
Play screen appears.
3. Use the ▲▼ buttons to select a track, and
then press the v button. A check appears
to the left of the track.
4. Repeat Step 3 to select and check additional
tracks.
5. To remove a track from the list, move to the
track, and then press the v button again.
The check on the track is removed.
6. When done, press the ▲▼ button to select
Play, and then press the v button. The
Music Playback screen reappears listing only
the tracks you checked. The selected tracks
play automatically.
| NOTES |
\You can create a playlist with up to 99 tracks on Audio
CDs (CD-DA).
\If you have created a playlist, Play Selected is replaced
by Edit Playlist on the Options menu.
\On the Selection Play screen, you can also choose Select
All, Clear All, and Cancel.
English 43
|
Page 44

Media Play
- Use Select All to select all tracks. This cancels
your individual track selections. When you press the
RETURN button on your remote control or select the
Play button, and then press the v button, all tracks
will appear on the Music Playback screen, and the
product will begin to play all tracks from Track 001.
- Use Clear All to deselect all selected tracks at once.
Then, select individual tracks or use Select All to
select all the tracks, and then press the RETURN
button on your remote control. If you do not use Select
All or select individual tracks, the Playlist will not
change.
- Cancel cancels any changes you made on the Play
Select screen. When you return to the Playback screen,
the Playlist will be unchanged.
Ripping
1. Insert a USB device into the USB jack on the
front of the product.
2. With the Playback screen displayed, select
the Options and then press the v button.
The Options menu appears.
3. Use the ▲▼ buttons to select Ripping,
and then press the v button. The Ripping
screen appears.
4. Use the ▲▼ buttons to select a track, and
then press the v button. A check appears
to the left of the track.
5. Repeat Step 4 to select and check additional
tracks.
6. To remove a track from the list, move to the
track, and then press the v button again.
The check on the track is removed.
7. When done, select the Rip button using the
▲▼ buttons, and then press the v button.
The Rip pop-up appears.
8. Use the ▲▼ buttons to select the device to
store the ripped files to, and then press the
button.
v
| NOTES |
\Do not disconnect the device while ripping is in progress.
9. If you want to cancel ripping, press the v
button and then select Yes. Select No to
continue ripping.
10. When ripping is complete, the "Successfully
Ripped." message appears. Press the v
button.
11. Press the RETURN button or select Cancel,
and then press the v button to go back to
the Playback screen.
| NOTES |
\This function is not available with DTS Audio CD.
\This function may not be supported by some discs.
\Ripping encodes music to the .mp3 format at 192kbps.
\On the Ripping screen, you can also choose Select All
and Clear All.
- Use Select All to select all tracks and press the v
button. This cancels your individual track selections.
- Use Clear All to deselect all selected tracks at once.
Playing Photo Contents
You can play photo contents located on a DVD,
USB, mobile device or PC.
Using the Tools Menu
During playback, press the TOOLS button. A
series of icons appears at the bottom of the
screen. The icons, which are shown from left to
right on the screen, are shown in the same order,
from top to bottom, in the table below.
Previous
Next
Start / Stop
Slide Show
Select to move to the previous picture.
Select to move to the next picture.
Select to play/pause the slide show.
|
44 English
Page 45

05 Media Play
Slide Show
Settings
Zoom
Rotate
Background
Music
Settings
| NOTES |
\Depending on the disc or storage device, the Tools menu
may differ or not be shown.
\
To enable the background music function, the photo file must
be in the same storage media as the music file.
However, the sound quality can be affected by the bitrate of
the MP3 file, the size of the photo, and the encoding method.
\You can't enlarge the subtitle and PG graphic in the full
screen mode.
Select the Slide Show settings.
Select to enlarge the current picture.
(Enlarge up to 4 times)
Select to rotate the picture. (This will
rotate the picture either clockwise or
counter clockwise.)
Select to listen to music while viewing
a slide show.
Select the picture mode - Dynamic,
Standard, Movie, or User - or display
information about the current picture.
Using the View & Options Menus
Using the View Menu
On a file screen containing photo files, select the
View and press the v button.
Title
Date
Folder
Displays all the photo files on the media
or storage device by title.
Groups all the the photo files on the
media or storage device by date. Click a
group to see the photos in that group.
Displays all the folders on the media or
storage device.
Using the Options Menu
On a file screen containing photo files, select the
Options and press the v button.
Starts the slide show. Shows all the
Slide show
Play Selected
Send
Delete
| NOTES |
\Depending on the disc or storage device, the Options
menu may differ or not be shown.
files in the current folder, one after
another. If you want to create a slide
show with a selected group of photos,
see Play Selected below.
Lets you create a playlist by selecting
specific photos to see. It works
essentially the same for all media.
See Creating a Playlist from an Audio
CD on pages 43~44 for instructions.
Select to upload selected files to an
on-line site (Picasa, Facebook etc) or a
device. To use this function, you need
to establish an account with the on-line
site, and then log in using the Log In
function. See Using the Send Function
on page 46.
Select to delete the a file from the
device.
| NOTES |
\Depending on the disc or storage device, the View menu
may differ or not be shown.
English 45
|
Page 46

Media Play
Using the Send Function
You can upload files to an on-line site (Picasa,
Facebook etc) or a device.
1. With the Photo Playback screen displayed,
select the Options button, and then press
the v button. The Options menu appears.
2. Use the ▲▼ buttons to select Send, and
then press the v button. The Selection
screen appears.
3. Use the ▲▼ buttons to select a picture, and
then press the v button. A check appears
to the left of the picture.
4. Repeat Step 3 to select and check additional
pictures.
5. To remove a picture from the list, move to the
picture, and then press the v button again.
The check on the picture is removed.
6. When done, press the ▲▼ button to select
Send, and then press the v button.
The Send pop-up appears listing the on-line
sites (Picassa, Facebook, etc.) or devices
that you can send the photos to.
7. Select a destination, and then press the v
button.
8. If you are sending the photos to an on-line
site, the site starts. Log in and follow the
directions on the screen.
| NOTES |
\To send photos to an on-line site you must have an
account with that site.
|
46 English
Page 47

06 Network Services
Network Services
You can enjoy various network services such as
streaming video or on-line apps by connecting the
player to your network.
To use network services, you must first:
1. Connect the player to the network.
(See page 19)
2. Configure the network settings.
(See pages 29~31)
Logging In to Your Samsung
Account
Before you access Movies & TV Shows or Apps,
we suggest you log in to your Samsung account.
To log in to your Samsung account, follow these
steps:
1. With the Home screen displayed, press the
RED (A) button. The Log In screen appears.
2. Select the Email field, and then press the v
button. The keyboard pop-up appears.
3. Using the keyboard, enter your e-mail
address. When finished, select the Done
button, and then press the v button. The
Log In screen re-appears.
4. Select the Password field, and then press the
button. The keyboard pop-up appears.
v
5. Using the keyboard, enter your password.
When finished, select the Done button, and
then press the v button. The Log In screen
re-appears.
6. To make the log in process easier next time,
select Sign me in automatically, and then
press the v button.
7. Select Log In, and then press the v button.
The player logs you in to your account. Your
account e-mail is displayed on the bottom left
of the screen.
| NOTES |
\If you selected Sign me in automatically, the next time
you log in, the player will automatically enter your e-mail
and password. All you need to do is select Log In.
\If your e-mail address and password are not displayed
when the Log In screen appears, select the button with
the down pointing arrow head next to the Email field, and
then press the v button. A drop down list of all your
registered accounts will appear. Select your account,
and then press the v button. The player will fill in the
e-mail and password fields.
\If you press the RED (A) button after you have logged
in, the My Account pop-up appears. On the pop-up, you
can select Logout, Change Account Information, Link
Service Accounts, Remove Accounts from the Device,
and Deactivate Account.
\To rent movies and purchase for-pay apps, you must have
a credit card registered in your account. If you haven’t
registered a card, select Change Account Information.
On the Change Account information page, select
Register Card, press the v button, and then follow the
directions on the screen.
Before Using Movies & TV Shows
or Apps
If you haven’t set up Smart Hub, when you use
Movies & TV Show or Apps for the first time, the
player will ask you to perform the Smart Hub set
up procedure.
English 47
|
Page 48

Network Services
1.
On the Home screen, select either Movies &
TV Shows or Apps, and then press the v
button. If you have selected Apps, go to Step 4.
2. If you selected Movies & TV Shows, the
Smart Hub pop-up appears asking if you
want to set up Smart Hub. Select Yes, and
then press the v button. The Welcome
screen appears.
3. Select Start, and then press the v button.
The Smart Hub Terms & Conditions, Privacy
Policy screen appears.
4. On the Smart Hub Terms & Conditions,
Privacy Policy screen, you must review and
agree to both the Smart Hub Terms and
Conditions and the Privacy Policy to use
Smart Hub.
5. Scroll down, and then click the View Details
buttons to review the full documents.
6. When done reading, scroll up to the first entry
field, and press the v button to agree to
the Terms and Conditions and consent to the
Privacy Policy.
7. Press the ► button twice to go to the
Supplemental Privacy Notices screen.
8. Click the View Details button to view the
entire notice.
9. When done reading, scroll up to the top entry
field, and then press the v button.
| NOTES |
\You do not need to consent to the Supplemental
Privacy Notice, but one or more Smart TV features or
functionalities may not be available if you do not.
10. Press the ► button twice. The Setup
Complete screen appears. Press the v
button.
Using Movies & TV Shows
You can download or stream for pay and free-ofcharge movies and TV shows and view them on
your TV.
Movies & TV Shows
Featured Recommended
Favorites Featured TV Shows Movies Purchased
1. On the Home screen, select Movies & TV
Shows, and then press the v button.
2. Select one of the Featured or Recommended
movies, and then press the v button. The
page for that movie appears.
OR
Use the ▼ button to go to the bottom of
the screen. Select Favorites, Featured, TV
Shows, Movies, or Purchased, and then
press the v button.
On the page that appears, use the ▲▼◄►
buttons to select a show or movie, and then
press the v button.
On the TV Shows or Movies screen, you can
also select What’s New, Most Popular,
or Genres to see more available shows
or movies. On the Genre screen, use the
▲▼◄► buttons to select a Genre, and then
press the v button.
To make a selection on a page displaying TV
shows or movies, use the ▲▼◄► buttons
to make a selection, and then press the v
button.
|
48 English
Page 49

06 Network Services
3. To watch a selection, select Watch now, and
then press the v button. A selection screen
appears listing various locations from which
you can rent the film along with prices.
4. Select a location, and then press the v
button. Follow the directions on the screen to
start the movie.
| NOTES |
\If you haven't logged into your Samsung account, the Log
In screen will appear after Step 3 and you will need to log
in.
\If you don't have a credit card associated with your
Samsung account, after you log in, the Register Card
screen will appear. Follow the directions on the screen.
You must have a credit card registered to your account to
rent movies and to purchase for-pay apps.
Using Apps
You can download applications from the Internet,
and access various for pay or free-of-charge
application and view them on your TV. To access
some applications, you need to have a Samsung
account.
The Apps Screen at a Glance
Apps
Recommended
1
2 3 4 5
1
My Apps
WebBrowser
Apps
Apps
Downloaded
Recommended :
1
managed by Samsung.
My Apps :
2
applications modifiable on the Downloaded screen.
Displays recommended contents
Displays your personal gallery of
Samsung
TV
Downloaded :
screen where you can add to, modify, and delete
3
Select to access the Downloaded
applications and see all downloaded applications.
Featured Applications :
to highlight the displayed Feature Application, and
4
then press the
Use the
button. Information about the
v
featured application appears
Downloading Applications
You can download for pay or free-of-charge
applications through Samsung Apps.
1. On the Apps screen, select Samsung Apps,
and then press the v button. The Samsung
Apps screen appears.
2. Across the top of the screen, under What’s
New, you'll see a series of new apps. Use
the ◄► buttons to scroll the list right or left,
and then select an app. Press the v button
to see more information about the app. If the
app is free, select Download, and then press
the v button to download the app.
If it is a for pay app, select Buy, press the
button, and then follow the instructions
v
on the screen.
| NOTES |
\To buy an app, you must be logged into your Samsung
account and have a credit card registered to the account.
Press the RED (A) button on your remote to log in.
4
\If you haven’t registered a card, after you log in, press the
RED (A) button again, and then select Change Account
2
3
Information in the pop-up that appears. On the Change
Account information page, select Register Card, press
the v button, and then follow the directions on the
screen.
\You can also access and download apps from the
categories listed on the left of the screen. For instructions,
see Step 4.
▲▼◄►
buttons
English 49
|
Page 50

Network Services
3. After the app has downloaded, select Run,
and then press the v button to run the app
now. To run the app later, press the RETURN
button. In either case, the icon for the app will
appear on the Apps screen.
4. To see additional apps, use the ▲▼◄►
buttons to move to the category list on the
left side of the screen.
5. Use the ▲▼ buttons to select a category.
Each time you move the highlight to another
category, a different set of applications
appears on the right.
6. Use the ► button to move to the applications
and the ▲▼◄► buttons to move from app
to app.
7. To see more information about an app, select
it, and then press the v button.
8. To download the app, follow the directions in
Steps 2 and 3.
Starting an Application
1. Select Apps on the Home screen, and then
press the v button.
2.
On the Apps screen, use the ▲▼◄► buttons
to select an app, and then press the v
button. The app starts.
Using the Downloaded Screen
The Downloaded Screen lists all the apps you
have downloaded and lets you:
• Sort the apps on the Downloaded screen by
Date downloaded, Recently opened, and
Title.
• Apply a number of Edit Menu functions to the
apps listed in the My Apps section of the Apps
screen including updating apps, moving apps
into a folder, deleting the apps from My Apps,
and locking the apps.
• Start apps.
Sorting the Apps
To sort the apps on the Download screen, follow
these steps:
1. On the Home screen, select Apps, and then
press the v button.
2. On the Apps screen, use the ▼ button to
move to the Downloaded hotspot at the
bottom of the page, and then press the v
button.
3. On the Downloaded screen, use the ▲►
buttons to move to View at the top of the
screen, and then press the v button.
4. In the drop down that appears, select Date
Downloaded, Recently Opened, or Title,
and then press the v button. The apps on
the Downloaded screen are sorted by the
criteria you have chosen.
Downloaded
App1 App2 App3
App 1
Category : XXXXX | Version : X.XXX | Size : XX.XKB
|
50 English
View : Date Downloaded Edit
Using the Edit Menu Functions
1 /23
Lock/Unlock
Using the Lock/Unlock function and the Security
PIN, you can lock applications so they cannot
be started on either the Apps screen or the
Downloaded screen. The default PIN is 0000.
1. On the Downloaded screen, use the ▲►
buttons to go to Edit at the top of the screen,
and then press the v button.
Page 51

06 Network Services
2. Select Lock/Unlock, and then press the v
button.
3. When the Lock Service appears, enter the
PIN using the number buttons on your remote
control.
4. To lock an application, select the application,
and then press the v button. A lock
appears on the app. Repeat to lock other,
individual apps.
5. To unlock a locked app, select the
application, and then press the v button.
6. To lock all the apps at once, use the ▲►
buttons to select the Lock All button, and
then press the v button.
7. To unlock all the locked apps at once, use the
▲► buttons to select the Unlock All button
and then press the v button.
8. Press the RETURN button twice to return to
the Apps screen. Locked apps will display a
lock on the upper right side.
Edit My Apps
Edit My Apps lets you add apps to and delete
apps from My Apps. It also lets you change the
position of an app in My Apps.
Add an App to My Apps
1. On the Downloaded screen, use the ▲►
buttons to go to Edit at the top of the screen,
and then press the v button.
2. Select Edit My Apps, and then press the v
button. The Edit My Apps screen appears.
3. Select a full color app from the top row of
apps, and then press the v button. The
full color app icon appears in the My Apps
area below and the app icon in the top row is
grayed out.
4. When you return to the Apps screen, the app
will appear in the My Apps area.
Delete an App from My Apps
1. On the Downloaded screen, use the ▲►
buttons to go to Edit at the top of the screen,
and then press the v button.
2. Select Edit My Apps, and then press the v
button. The Edit My Apps screen appears.
3. Select the app you want to delete from My
Apps, press the v button, and then press
the ▲▼◄► button in the direction of the X.
The Remove from My Apps pop-up appears.
4. Select Yes, and then press the v button.
5. When you return to the Apps screen, the app
will have been removed from the My Apps
area.
Move an App in My Apps
1. On the Downloaded screen, use the ▲►
buttons to go to Edit at the top of the screen,
and then press the v button.
2. Select Edit My Apps, and then press the v
button. The Edit My Apps screen appears.
3. Select the app you want to move in My Apps,
press the v button, and then press the
▲▼◄► button to move the app icon in the
direction of one of the arrows (<, >, ^, etc.)
that appears around the app icon. The app
icon moves in the direction you have chosen.
4. After you have placed the app icon where
you want, press the v button.
5. When you return to the Apps screen, the
app will be positioned in the location you had
selected.
| NOTES |
\Grayed out apps are already in My Apps.
English 51
|
Page 52

Network Services
Create Folder
Create Folder lets you create a folder on the
Downloaded screen into which you can put apps.
1. On the Downloaded screen, use the ▲►
buttons to go to Edit at the top of the screen,
and then press the v button.
2. Select Create Folder, and then press the
button. The Set Folder Name pop-up
v
appears.
3. Press the v button. The keyboard appears.
4. Select the Clear button on the right side,
and then press the v button to remove
Folder 1 from the entry field. Then, using the
keyboard, enter the name you want to apply
to the folder.
5. When finished, select the Done button on the
right side, and then press the v button.
The pop-up reappears.
6. Select OK, and then press the v button.
The new folder appears in the list of apps on
the left side of the screen.
Move to Folder
Move to Folder lets you move apps to the folder of
your choice.
1. On the Downloaded screen, use the ▲►
buttons to go to Edit at the top of the screen,
and then press the v button.
2. Select Move to Folder, and then press
the v button. The Move to Folder screen
appears.
3. Use the ►◄▼▲ buttons to move to an app,
and then press the v button to select the
app. A check appears in the upper left corner
of the app.
4. To deselect an app, press the v button.
The check disappears.
5. Repeat Step 3 to select additional apps.
| NOTES |
\To select all the downloaded apps, select Select All at the
top right of the screen, and then press the v button. To
deselect all the apps, select Deselect All at the top right
of the screen, and then press the v button.
6. When done, select Select folder at the top
of the screen, and then press the v button.
The Select folder pop-up appears.
7. In the Select folder pop-up, use the ▲▼
buttons to select the folder you want to move
the apps you selected to and then press the
button.
v
8. The Apps Moved pop up appears. Press the
button.
v
9. To open a folder, use the ▲▼◄► buttons to
highlight the folder, and then press the v
button.
Rename Folder
Rename Folder lets you rename an existing folder.
1. On the Downloaded screen, use the ▲►
buttons to go to Edit at the top of the screen,
and then press the v button.
2. Select Rename Folder, and then press
the v button. The Rename Folder screen
appears, and a folder is highlighted.
3. User the ▲▼◄► buttons to highlight a
folder of your choice, and then press the v
button. The Rename pop-up appears.
4. Press the v button. The keyboard appears.
5. Enter the new name for the folder. When
finished, select Done on the right side, and
then press the v button. The Rename popup reappears displaying the new name.
6. Select OK, and then press the v button.
The folder is renamed.
7. Select Close on the right side of the screen,
and then press the v button.
|
52 English
Page 53

06 Network Services
Delete
Delete lets you delete apps and folders from the
My Apps screen. If there are apps in a folder,
both the folder and the apps are deleted together.
Delete removes apps permanently. If you decide
you want to use an app you deleted, you will need
to download it again.
1. On the Downloaded screen, use the ▲►
buttons to go to Edit at the top of the screen,
and then press the v button.
2. Select Delete, and then press the v button.
The Delete screen appears.
3. Use the ▲▼◄► buttons to move to an app,
or folder and then press the v button to
select. A check appears in the upper left
corner of the app or folder you selected.
4. To deselect an app, press the v button.
The check disappears.
5. Repeat Step 3 to select additional apps or
folders.
| NOTES |
\To select all the downloaded apps, select Select All at the
top right of the screen, and then press the v button. To
deselect all the apps, select Deselect All at the top right
of the screen, and then press the v button.
6. After you have made all your selections,
select Delete at the top of the screen, and
then press the v button. The Delete popup appears.
7. Select Yes, and then press the v button.
All the apps you selected are deleted.
| NOTES |
\You cannot immediately delete a locked app or folder.
If you select a locked app or folder to delete, when you
perform Step 7, the Lock Service pop-up appears. Enter
the Security PIN into the pop-up, and then press the v
button. The lock will be released and the app or folder will
be deleted.
Update Apps
Update Apps automatically searches the Internet
for updated versions of the apps you have
downloaded and updates them if it finds newer
versions.
1. On the Downloaded screen, use the ▲►
buttons to go to Edit at the top of the screen,
and then press the v button.
2. Select Update Apps, and then press the v
button.
3. The unit searches the Internet for newer
versions of your apps. If there are new apps,
the Update Apps pop-up appears.
4. To download the update for a particular app,
highlight the app, and then press the v
button. A check appears to the left of the
app.
5. To deselect the app, highlight it, and then
press the v button.
| NOTES |
\To select all the updates, select Select All on the right of
the pop-up, and then press the v button. To deselect
all the updates, select Deselect All, and then press the
button.
v
6. After you have selected the updates you
want to download, select Update on the right
side of the pop-up, and then press the v
button.
7. The unit downloads the updates you have
chosen. A download bar appears in each
app icon as the update for that app is
downloaded. The download is complete
when the download bars disappear.
English 53
|
Page 54

Network Services
Screen Mirroring
The Screen Mirroring function lets you view the
screen of your smart phone or android tablet on
the TV you have connected to the Blu-ray player.
1. With the Blu-ray's Home screen displayed,
press the BLUE (D) button on the remote.
The Screen Mirroring pop-up appears.
2. Launch AllShare Cast or Miracast on your
device.
3. On your device, find the name of the Blu-ray
player in the list of available devices and then
select it.
4. The TV will display a PIN. Enter the PIN into
your device.
5. The TV displays a connecting message (for
example, Connecting to Android_92gb...) and
then displays the connected message.
6. In a few moments, the screen of your device
appears on the TV screen.
| NOTES |
\When you are using the Screen Mirroring function, video
stuttering or audio dropouts may occur, depending on
your environment.
\Before using the Screen Mirroring function, confirm that
your smart phone has a compatible function. Depending
on your smart phone, the Screen Mirroring function may
have a different name ( AllShare Cast, etc.).
\Bluetooth transmissions can interfere with the Screen
Mirroring signal. Before using the Screen Mirroring
function, we strongly recommend that you turn off the
Bluetooth function on your smart phone or smart device
(tablet, etc.).
Using the Web Browser
You can access the Internet using the Web
Browser application.
Select Web Browser on the Home screen, and
then press the v button.
| NOTES |
\When you run the Web Browser with the player connected
by HDMI to a BD Wise compatible TV - and BD Wise is on
- the browser is maximized to fill the screen and the TV's
resolution is set to the optimal resolution automatically.
\The Web Browser is not compatible with Java
applications.
\If you attempt to download a file, and the file cannot be
saved, an error message will appear.
\E-commerce (purchasing products online) is not
supported.
\ActiveX is not supported.
\Access may be blocked to some websites or to web
browsers operated by certain businesses.
Link Browsing and Pointer Browsing
The Web Browser provides two types of browsing,
Pointer Browsing and Link Browsing. When you
launch the browser for the first time, Pointer
Browsing is active. If you are using a mouse to
navigate in the Web Browser, we recommend
leaving Pointer Browsing active. If you are using
your remote to navigate in the Web Browser, we
recommend that you replace Pointer Browsing
with Link Browsing. Link Browsing moves a
highlight from one link to the next in the Web
Browser and is much faster than Pointer Browsing
if you are using your remote.
To activate Link Browsing, follow these steps:
1. Use the ▲▼◄► buttons on your remote to
move the pointer to the Link Browser icon on
the top right of the screen. The Link Browser
icon is the third icon from the right.
The pointer will be in the correct position
if the icon turns blue and the words “Link
Browsing” appear on the screen.
2. Press the v button. Link Browsing is
activated and will remain active whenever you
bring up the Web Browser.
|
54 English
Page 55

06 Network Services
The Control Panel at a Glance
The Control Panel, which runs across the top
of the screen, has a series of icons which start
a number of useful functions. The icons are
described below, starting with the icon on the far
left of the screen.
1
http://www.samsung.com
Using the Keyboard Pop-up
When you click the
or access a data or text entry field,
and then press the v button, the keyboard popup appears.
To use the keyboard pop-up with your remote,
follow these steps:
http://www.samsung.com
http://www.samsung.com
, the
• : Moves to the previous page.
•
: Moves to the next web page.
•
: Displays the Bookmarks and History screen.
You can bookmark the current page, select
an existing bookmark, and edit and delete
bookmarks. You can also view your browsing
history and select a page to revisit.
•
: Moves to the Home screen of the Web
Browser.
http://www.samsung.com
•
: Lets you enter a page
address manually using the keyboard pop-up.
•
: Reloads the current page so that it is
refreshed on the screen.
1
•
: Adds the current page to your bookmarks.
•
: Lets you search for information
by entering words or characters using the
keyboard pop-up. See Using the Keyboard Popup on page 55.
•
: Lets you enlarge or shrink the screen
by various percentages.
•
: Turns on the PIP function.
•
: Lets you switch between Pointer Browsing
and Link Browsing.
•
: Lets you configure the Browser’s settings.
See Using the Settings Menu on page 56.
•
: Closes the Web Browser.
Caps
1 2 3 4 5 6 7 8 9 0 :
q w e r t y u i o p ^ *
123#&
a s d f g h j k l ~ @ !
z x c v b n m , . ? -
ENG
.com
Clear
Done
Cancel
1. Use the ▲▼◄► buttons on your remote to
move the highlight to a letter or number of
your choice.
2. Press the v button to enter the letter or
number into the entry field.
3. To access capital letters, move the highlight
to the Caps key on the top left, and then
press the v button. Press the v button
again with the Caps key highlighted to
access small letters again.
4. To access symbols and additional punctuation
marks, highlight the 123#& button on the left,
and then press the v button.
5. To delete a character you entered, move the
highlight to the : button, and then press the
button.
v
6. To delete all the characters you entered,
move the highlight to the Clear button, and
then press the v button.
7. When finished entering, move the highlight
to the Done button, and then press the v
button.
English 55
|
Page 56

Network Services
| NOTES |
\If you have a wireless keyboard connected to your
player, you can use the wireless keyboard to enter
letters, numbers, symbols, and punctuation. Note that
the wireless keyboard will work only when the keyboard
popup appears and can only be used to enter letters,
numbers, symbols, and punctuation.
Options on the Keyboard Pop-Up
To access the keyboard pop-up options, highlight
button on the bottom left of the keyboard,
the
and then press the v button.
Select the language for the keyboard.
Language
You can select English, French,
Russian, etc.
Recommended
Tex t
The keyboard will suggest
recommended words as you enter text.
You can turn this function On or Off.
The keyboard will predict the next letter
as you enter letters. The predictions
Predict Next
Letter
appear in a ring around the letter you
have just entered. You can select a
predicted letter or move to another
letter. You can turn this function On or
Off.
Using the Setting Menu
The Setting menu contains functions that control
how the Browser operates and Browser security
functions. To open the Setting menu, highlight
the
icon in the Control Panel, and then press
the v button. To select an option in the setting
menu, highlight the option, and then press the
button.
v
http://www.samsung.com
Enable Grabbing
Reading Tools
Approved Sites
Private browsing on
Web Browser Settings
Help
Close
Enable/Disable
Grabbing
Reading Tools
Approved Sites
Turns the Grabber function on and off.
When the Grabber function is on, you
can move a web page up and down
without dragging the scroll bar.
The Grabber function is only available
in Pointer Browsing.
Provides an easy-to-read page by
enlarging the main text.
This function is not available for all
pages.
Lets you restrict your children’s access
to inappropriate web pages by allowing
access only to the web sites you have
registered.
Every time you access this function, the
PIN screen appears. The first time you
access this function, enter the default
PIN, 0000 using the number buttons
on your remote.
You can change the PIN using the
Reset password for the Approved Sites
function. See below.
Approved Sites Feature : Turns the
Approved Sites function on or off.
Reset password for Approved Sites :
Change the Approved Sites password.
Add current site : Lets you add the
currently displayed web site to the
Approved Sites list.
Manage Approved Sites : Lets you
key in URLs to add to the Approved
Sites List and delete sites from the
Approved Sites list.
If you turn this function on and have
not added any sites to the Approved
Sites list, you will not be able to access
any Internet sites.
|
56 English
Page 57

06 Network Services
Private
Browsing On/Off
Web Browser
Setting
Help
Enable or disable the Privacy mode.
When the Privacy mode is enabled,
the browser does not retain the URLs
of sites you visit. If you want to enable
Privacy mode, select OK.
If the Privacy mode is running, the
“Stop” icon appears in front of the URL
at the top of the screen. To disable
Privacy mode, select it again when
Privacy mode is enabled.
Set as homepage : You can set the
Browser's home page.
Pop-up Block : Turns the Popup Block
on and off.
Ad Block : You can determine whether
to block advertisements and select the
URLs for which advertisements are
blocked.
General : You can delete personal
information such as website history
and browsing data (cookies, etc.), and
reset all web browser settings to their
factory defaults.
Encoding : You can set the Encoding
setting for web pages to Automatic or
select the encoding format manually
from a list.
Pointer : You can set the speed of the
cursor when the cursor is set to Pointer
and turn Smart Cursor On and Off.
Browser Information : Displays
the version number and copyright
information for the Web Browser.
Provides basic information about the
operation of the Web Browser.
Linking Your Internet Service
Accounts to the Player
The Link Service Accounts function lets you link
your player to your accounts with Internet services
such as Pandora so that the player can log you
in to the service automatically when you start the
app for that service.
To create a service account link, follow these
steps:
1. On the Home screen, press the RED (A)
button on your remote to log in to your
Samsung Account.
2. After you have logged in, press the RED (A)
button on your remote again.
3. Select Link Service Accounts in the My
Account pop-up, and then press the v
button.
4. On the Link Service Accounts screen, select
the service you want to link to the player, and
then press the v button.
5. Select Register, and then press the v
button.
6. In the ID and Password screen, enter the ID
you use to log in to the service you selected
using the pop-up keyboard. When finished,
select Done, and then press the v button.
7. Repeat the same process for the password.
When finished select Done, and then press
the v button.
8. Select OK, and then press the v button.
| NOTES |
\Depending on the web site, some of the Web Browser
Setting functions may not be activated. Functions that are
not activated are greyed out and cannot be used.
English 57
|
Page 58

Network Services
BD-LIVE™
Once the player is connected to your network, you
can enjoy various movie-related service contents
available on BD-LIVE compliant discs.
1. Attach a USB flash memory drive to the
USB jack on the front of the player, and then
check its remaining memory. The memory
device must have at least 1GB of free space
to accommodate the BD-LIVE services.
2. Select Settings on the Home screen, and
then press the v button.
3. Select Network, and then press the v
button.
4. Select BD-Live Settings, and then press the
button.
v
5. Select BD Data Management, and then
press the v button.
6. Select Select Device, and then press the
button.
v
7. Select USB device, and then press the v
button.
8. Insert a Blu-ray Disc that supports BD-LIVE.
9. Select an item from the list of BD-LIVE service
contents provided by the disc manufacturer.
| NOTES |
\The way you use BD-LIVE and the provided contents may
differ, depending on the disc manufacturer.
|
58 English
Page 59

07 Appendix
Appendix
Compliance and Compatibility Notice
NOT ALL discs are compatible
• Subject to the restrictions described below and those noted throughout this Manual, including the Disc
Type and Characteristics section of this user manual, disc types that can be played are: pre-recorded
commercial BD-ROM, DVD-VIDEO, and Audio CD (CD-DA); BD-RE/-R, DVD-RW/-R; and CD-RW/-R.
• Discs other than the above cannot and/or are not intended to be played by this player. And some of
the above discs may not play due to one or more reasons provided below.
• Samsung cannot assure that this player will play every disc bearing the BD-ROM, BD-RE/-R,
DVD-VIDEO, DVD-RW/-R, DVD+RW/+R and CD-RW/-R logos, and this player may not respond to
all operating commands or operate all features of every disc. These and other disc compatibility and
player operation issues with new and existing format discs are possible because:
- Blu-ray is a new and evolving format and this player may not operate all features of Blu-ray Discs
because some features may be optional, additional features may have been added to the Blu-ray
Disc format after the production of this player, and certain available features may be subject to
delayed availability;
- not all new and existing disc format versions are supported by this player;
- new and existing disc formats may be revised, changed, updated, improved and/or supplemented;
- some discs are produced in a manner that allows specific or limited operation and feature during
playback;
- some features may be optional, additional features may have been added after the production of this
player or certain available features may be subject to delayed availability;
- some discs bearing the BD-ROM, BD-RE/-R, DVD-VIDEO, DVD-RW/-R, DVD+RW/+R and
CD-RW/-R logos may still be non-standardized discs;
- some discs may not be played depending on their physical state or recording conditions;
- problems and errors can occur during the creation of Blu-ray Disc, DVD software and/or the
manufacture of discs;
- this player operates differently than a standard DVD player or other AV equipment; and/or
- for reasons noted throughout this user manual and for other reason(s) discovered and posted by
SAMSUNG customer care center.
• If you encounter disc compatibility or player operation problems, please contact SAMSUNG customer
care center.
You may also contact SAMSUNG customer care center for possible updates on this player.
• For additional information on playback restrictions and disc compatibility, refer to the Precautions,
Before Reading the user manual, Disc Types and Characteristics, and Before Playing sections of this
user manual.
• For Blu-ray Disc Player progressive scan output : CONSUMERS SHOULD NOTE THAT NOT
ALL HIGH DEFINITION TELEVISION SETS ARE FULLY COMPATIBLE WITH THIS PRODUCT AND
MAY CAUSE ARTIFACTS TO BE DISPLAYED IN THE PICTURE. IN CASE OF PROGRESSIVE SCAN
PICTURE PROBLEMS, IT IS RECOMMENDED THAT THE USER SWITCH THE CONNECTION TO
THE 'STANDARD DEFINITION' OUTPUT. IF THERE ARE QUESTIONS REGARDING OUR TV SET
COMPATIBILITY WITH THIS PRODUCT, PLEASE CONTACT OUR CUSTOMER SERVICE CENTER.
English 59
|
Page 60

Appendix
Copy Protection
• Because AACS (Advanced Access Content System) is approved as content protection system for
Blu-ray Disc format, similar to use of CSS (Content Scramble System) for DVD format, certain
restrictions are imposed on playback, analog signal output, etc., of AACS protected contents.
The operation of this product and restrictions on this product may vary depending on your time of
purchase as those restrictions may be adopted and/or changed by AACS after the production of this
product. Furthermore, BD-ROM Mark and BD+ are additionally used as content protection system for
Blu-ray Disc format, which imposes certain restrictions including playback restrictions for BD-ROM
Mark and/or BD+ protected contents. To obtain additional information on AACS, BD-ROM Mark, BD+,
or this product, please contact SAMSUNG customer care center.
• Many Blu-ray Disc/DVDs are encoded with copy protection. Because of this, you should only connect
your Player directly to your TV, not to a VCR. Connecting to a VCR results in a distorted picture from
copy-protected Blu-ray Disc/DVDs.
• Under the U.S. Copyright laws and Copyright laws of other countries, unauthorized recording, use,
display, distribution, or revision of television programs, videotapes, Blu-ray Discs, DVDs, and other
materials may subject you to civil and/or criminal liability.
• Cinavia Notice : This product uses Cinavia technology to limit the use of unauthorized copies of
some commercially-produced film and videos and their soundtracks. When a prohibited use of
an unauthorized copy is detected, a message will be displayed and playback or copying will be
interrupted.
More information about Cinavia technology is provided at the Cinavia Online Consumer Information
Center at http://www.cinavia.com. To request additional information about Cinavia by mail, send a
postcard with your mailing address to: Cinavia Consumer Information Center, P.O. Box 86851, San
Diego, CA, 92138, USA.
This product incorporates proprietary technology under license from Verance Corporation and is
protected by U.S. Patent 7,369,677 and other U.S. and worldwide patents issued and pending as well
as copyright and trade secret protection for certain aspects of such technology. Cinavia is a trademark
of Verance Corporation. Copyright 2004-2010 Verance Corporation. All rights reserved by Verance.
Reverse engineering or disassembly is prohibited.
Network Service Disclaimer
All content and services accessible through this device belong to third parties and are protected by
copyright, patent, trademark and/or other intellectual property laws. Such content and services are
provided solely for your personal noncommercial use. You may not use any content or services in a
manner that has not been authorized by the content owner or service provider. Without limiting the
foregoing, unless expressly authorized by the applicable content owner or service provider, you may
not modify, copy, republish, upload, post, transmit, translate, sell, create derivative works, exploit, or
distribute in any manner or medium any content or services displayed through this device.
|
60 English
Page 61

07 Appendix
THIRD PARTY CONTENT AND SERVICES ARE PROVIDED "AS IS." SAMSUNG DOES NOT WARRANT
CONTENT OR SERVICES SO PROVIDED, EITHER EXPRESSLY OR IMPLIEDLY, FOR ANY PURPOSE.
SAMSUNG EXPRESSLY DISCLAIMS ANY IMPLIED WARRANTIES, INCLUDING BUT NOT LIMITED
TO, WARRANTIES OF MERCHANTABILITY OR FITNESS FOR A PARTICULAR PURPOSE. SAMSUNG
DOES NOT GUARANTEE THE ACCURACY, VALIDITY, TIMELINESS, LEGALITY, OR COMPLETENESS
OF ANY CONTENT OR SERVICE MADE AVAILABLE THROUGH THIS DEVICE AND UNDER NO
CIRCUMSTANCES, INCLUDING NEGLIGENCE, SHALL SAMSUNG BE LIABLE, WHETHER IN
CONTRACT OR TORT, FOR ANY DIRECT, INDIRECT, INCIDENTAL, SPECIAL OR CONSEQUENTIAL
DAMAGES, ATTORNEY FEES, EXPENSES, OR ANY OTHER DAMAGES ARISING OUT OF, OR IN
CONNECTION WITH, ANY INFORMATION CONTAINED IN, OR AS A RESULT OF THE USE OF ANY
CONTENT OR SERVICE BY YOU OR ANY THIRD PARTY, EVEN IF ADVISED OF THE POSSIBILITY OF
SUCH DAMAGES.
Third party services may be terminated or interrupted at any time, and Samsung makes no representation
or warranty that any content or service will remain available for any period of time. Content and services
are transmitted by third parties by means of networks and transmission facilities over which Samsung
has no control. Without limiting the generality of this disclaimer, Samsung expressly disclaims any
responsibility or liability for any interruption or suspension of any content or service made available
through this device.
Samsung is neither responsible nor liable for customer service related to the content and services.
Any question or request for service relating to the content or services should be made directly to the
respective content and service providers.
License
• Manufactured under license from Dolby Laboratories. Dolby and the double-D symbol
are registered trademarks of Dolby Laboratories.
• Manufactured under license under U.S. Patent Nos: 5,956,674; 5,974,380;
6,226,616; 6,487,535; 7,212,872; 7,333,929; 7,392,195; 7,272,567 & other U.S.
and worldwide patents issued & pending. DTS-HD, the Symbol, & DTS-HD and the
Symbol together are registered trademarks & DTS-HD Master Audio is a trademark of
DTS, Inc. Product includes software. © DTS, Inc. All Rights Reserved.
• The terms HDMI and HDMI High-Definition Multimedia Interface, and the HDMI
Logo are trademarks or registered trademarks of HDMI Licensing LLC in the United
States and other countries.
• Oracle and Java are registered trademarks of Oracle and/or its affiliates. Other names
may be trademarks of their respective owners.
• Open Source License Notice
- In the case of using open source software, Open Source Licenses are available on the product
menu.
• Blu-ray Disc™, Blu-ray™ and the logos are trademarks of the Blu-ray Disc Association.
English 61
|
Page 62

Appendix
Additional Information
Notes
3D Settings
• For some 3D discs, to stop a movie during 3D playback, press the 5 (STOP) button once. The
movie stops and the 3D mode option is de-activated.
To change a 3D option selection when you are playing a 3D movie, press the 5 (STOP) button
once. The Blu-ray menu appears. Press the 5 (STOP) button again, then select 3D Settings in
the Blu-ray menu.
• Depending on the content and the position of the picture on your TV screen, you may see vertical
black bars on the left side, right side, or both sides.
TV Aspect Ratio
• Depending on the disc type, some aspect ratios may not be available.
• If you select an aspect ratio and option that is different than the aspect ratio of your TV screen,
the picture might appear to be distorted.
• If you select the 16:9 Original, your TV may display 4:3 Pillarbox (black bars on sides of picture).
BD Wise (Samsung Players only)
• When BD Wise is on, the Resolution setting automatically defaults to BD Wise and BD Wise
appears in the Resolution menu.
• If the player is connected to a device that does not support BD Wise, you can not use the BD
Wise function.
Settings
• For proper operation of BD Wise, set the BD Wise option of both the player and the TV to On.
Digital Output
• Be sure to select the correct Digital Output or you will hear no sound or just loud noise.
• If the HDMI device (AV receiver, TV) is not compatible with compressed formats (Dolby Digital,
DTS), the audio signal outputs as PCM.
• Regular DVDs do not have BONUSVIEW audio and Navigation Sound Effects.
• Some Blu-ray Discs do not have BONUSVIEW audio and Navigation Sound Effects.
• This Digital Output setup does not affect the HDMI audio output to your TV.
It affects the optical and HDMI audio output when your player is connected to an AV receiver.
• If you play MPEG audio soundtracks, the audio signal outputs as PCM regardless of your Digital
Output selections (PCM or Bitstream).
PCM Downsampling
• Even when PCM Downsampling is set to Off, some discs will only output downsampled audio
through the optical digital output.
• HDMI
- If your TV is not compatible with compressed multi-channel formats (Dolby Digital, DTS), the
player may output PCM 2ch downmixed audio even though you selected Bitstream (either
Reencoded or Unprocessed) in the setup menu.
- If your TV is not compatible with PCM sampling rates over 48kHz, the player may output
48kHz.
|
62 English
Page 63

07 Appendix
Settings
Media Play
BD-LIVE Internet Connection
• What is a valid certificate?
When the player uses BD-LIVE to send the disc data and a request to the server to certify the
disc, the server uses the transmitted data to check if the disc is valid and sends the certificate
back to the player.
• The Internet connection may be restricted while you are using BD-LIVE contents.
BD Data Management
• In the external memory mode, disc playback may be stopped if you disconnect the USB device in
the middle of playback.
• Only those USB devices formatted in the FAT file system (DOS 8.3 volume label) are supported.
We recommend you use USB devices that support USB 2.0 protocol with 4 MB/sec or faster
read/write speed.
• The Resume Play function may not work after you format the storage device.
• The total memory available to BD Data Management may differ, depending on conditions.
Anynet+ (HDMI-CEC)
• Depending on your TV, certain HDMI output resolutions may not work. Please refer to the user
manual of your TV.
• This function is not available if the HDMI cable does not support CEC.
• If your Samsung TV has an Anynet+ logo, then it supports the Anynet+ function.
Selecting the Audio Language
• The ◄► indicator will not appear on the screen if the BONUSVIEW section does not contain any
BONUSVIEW audio settings.
• The languages available through the Audio Language function depend on the languages that are
encoded on the disc. This function or certain languages may not be available.
• Some Blu-ray Discs may allow you to select either the PCM or Dolby Digital audio soundtrack in
English.
Selecting the Subtitle Language
• Depending on the Blu-ray Disc / DVD, you may be able to change the subtitle language in the
Disc Menu. Press the DISC MENU button.
• This function depends on the selection of subtitles that are encoded on the disc and may not be
available on all Blu-ray Discs/DVDs.
• Information about the main feature BONUSVIEW mode will also appear if the Blu-ray Disc has a
BONUSVIEW section.
• This function changes both the primary and secondary subtitles at the same time.
• The total number of primary and secondary subtitles are displayed respectively.
• If you press the SUBTITLE button on the remote control, the subtitle bar appears.
Press the RETURN button to remove the subtitle bar.
English 63
|
Page 64

Appendix
Resolution according to the contents type
Setup
Auto
Setup
Auto
Contents Type
BD Wise Resolution of Blu-ray Disc 1080p@60F
Movie Frame : Auto
Movie Frame : Off Max. Resolution of TV input Max. Resolution of TV input
Movie Frame : Auto (24Fs)
※
1080p & 1080i only
1080p 1080p@60F 1080p@60F
1080i 1080i 1080i
720p 720p 720p
480p 480p 480p
Movie Frame : Auto
Movie Frame : Auto (DVD 24Fs Conversion : Auto )
4K Output : Auto 2160p@24F 2160p@24F
4K Output : Off 1080p@24F 1080p@24F
BD Wise 480i
DVD 24Fs Conversion : Auto
DVD 24Fs Conversion : Off Max. Resolution of TV input
Movie Frame : Off Max. Resolution of TV input
※
1080p & 1080i only
1080p 1080p@60F
1080i 1080i
720p 720p
480p 480p
Blu-ray Disc
1080p@24F 1080p@24F
Contents Type
4K Output : Auto 2160p@24F
4K Output : Off 1080p@24F
E-contents/
Digital contents
DVD
1080p@24F
| NOTES |
\If the TV you connected to the player does not support Movie Frame or the resolution you selected, the message "If no
pictures are shown after selecting 'Yes', please wait for 15 seconds to return to the previous resolution. Do you want to
change the resolution?" appears. If you select Yes, the TV's screen will go blank for 15 seconds, and then the resolution will
revert to the previous resolution automatically.
\If the screen stays blank after you have changed the resolution, remove all discs, and then press and hold the
on the top of the player for more than 5 seconds. All settings are restored to the factory default. Run the Initial Settings
procedure again. Then, go to Settings > Display > Resolution in the Menu, and select the correct resolution for your TV.
\When you run the Initial Settings procedure, re-select the language and aspect ratio (screen size and format) only. Resetting
does not affect your network settings, so you should be able to skip Network Setup and Software Update.
\When the factory default settings are restored, all stored user BD data will be deleted.
\The Blu-ray Disc must have the 24 frame feature for the player to use the Movie Frame (24Fs) mode.
|
64 English
@
button
Page 65

07 Appendix
Digital Output Selection
Setup PCM
Connection
PCM
Dolby Digital
Dolby Digital
Plus
Audio Stream
on Blu-ray
Audio Stream
on DVD
Definition for
Blu-ray Disc
* If the Source Stream is 2ch or mono, "Re-encoded Dolby D" Settings are not applied. Output will be
PCM 2ch.
Blu-ray Discs may include three audio streams :
- Main Feature Audio : The audio soundtrack of the main feature.
- BONUSVIEW audio : An additional soundtrack such as the director or actor's commentary.
- Navigation Sound Effects : When you choose some menu navigation, Navigation Sound Effects may
sound. Navigation Sound Effects are different on each Blu-ray Disc.
Disc
Dolby TrueHD
DTS
DTS-HD High
Resolution
Audio
DTS-HD
Master Audio
PCM PCM 2ch PCM 2ch PCM 2ch PCM 2ch PCM 2ch PCM 2ch
Dolby Digital
DTS
Any
HDMI
supported
AV receiver
Up to PCM
7.1ch
Up to PCM
7.1ch
Up to PCM
7.1ch
Up to PCM
7.1ch
Up to PCM
6.1ch
Up to PCM
7.1ch
Up to PCM
7.1ch
Up to PCM
5.1ch
Up to PCM
6.1ch
Decodes the main feature
audio and BONUSVIEW
audio stream together
into PCM audio and adds
Navigation Sound Effects.
Optical
PCM 2ch PCM PCM 2ch DTS re-encoded
PCM 2ch Dolby Digital Dolby Digital DTS re-encoded
PCM 2ch
PCM 2ch Dolby TrueHD Dolby Digital DTS re-encoded
PCM 2ch DTS DTS DTS re-encoded
PCM 2ch
PCM 2ch
PCM 2ch Dolby Digital Dolby Digital Dolby Digital Dolby Digital
PCM 2ch DTS DTS DTS DTS
Bitstream
(Unprocessed)
HDMI
supported
AV receiver
Dolby Digital
Plus
DTS-HD High
Resolution
Audio
DTS-HD
Master Audio
Outputs only the main
feature audio stream so that
your AV receiver can decode
the audio bitstream.
You will not hear
BONUSVIEW audio or
Navigation Sound Effects.
Optical
Dolby Digital DTS re-encoded
DTS DTS re-encoded
DTS DTS re-encoded
Bitstream
(Re-encoded
DTS)
HDMI
supported AV
receiver or
Optical
Decodes the main
feature audio
and BONUSVIEW
audio stream
together into PCM
audio and adds
Navigation Sound
Effects, then re-
encodes the PCM
audio into DTS
bitstream.
Bitstream
(Re-encoded
Dolby D)
HDMI supported
AV receiver or
Optical
Re-encoded
Dolby Digital *
Re-encoded
Dolby Digital *
Re-encoded
Dolby Digital *
Re-encoded
Dolby Digital *
Re-encoded
Dolby Digital *
Re-encoded
Dolby Digital *
Re-encoded
Dolby Digital *
Decodes the main
feature audio and
BONUSVIEW audio
stream together
into PCM audio and
adds Navigation
Sound Effects,
then re-encodes
the PCM audio
into Dolby Digital
bitstream or PCM.
English 65
|
Page 66

Appendix
Troubleshooting
Before requesting service, please try the following solutions.
PROBLEM SOLUTION
No operation can be performed with the
remote control.
The disc does not play. • Ensure that the disc is installed with the label side facing up.
The disc Menu does not appear. • Ensure that the disc has disc menus.
The prohibition message appears on the
screen.
Play mode differs from the Setup Menu
selection.
The screen ratio cannot be changed. • The Screen Ratio is fixed on your Blu-ray Disc/DVD.
No audio. • Make sure you have selected the correct Digital Output in the Audio Options
The screen is blank. • If the HDMI output is set to a resolution your TV cannot support (for
• Check the batteries in the remote control. They may need replacing.
• Operate the remote control at a distance of no more than 20 feet from the
player.
• Remove the batteries and hold down one or more buttons for several
minutes to drain the microprocessor inside the remote control to reset it.
Reinstall the batteries and try to operate the remote control again.
• Check the region number of the Blu-ray Disc/DVD.
• This message appears when an invalid button is pressed.
• The Blu-ray Disc/DVD's software doesn't support the feature (e.g., angles).
• You've requested a title or chapter number or search time that is out of
range.
• Some of the functions selected in the Setup Menu may not work properly if
the disc is not encoded with the corresponding function.
• This is not a problem with the player.
Menu.
example, 1080p), you may not see a picture on your TV.
• Press the
• When the factory default settings are restored, all stored user BD data will
@
inside. All settings will revert to the factory settings.
be deleted.
button (on top panel) for more than 5 seconds with no disc
Forgot password. • Press the
|
66 English
inside. All settings including the password will revert to the factory settings.
Don't use this unless absolutely necessary.
• When the factory default settings are restored, all stored user BD data will
be deleted.
@
button (on top panel) for more than 5 seconds with no disc
Page 67

07 Appendix
PROBLEM SOLUTION
The picture is noisy or distorted. • Make sure that the disc is not dirty or scratched.
• Clean the disc.
No HDMI output. • Check the connection between the TV and the HDMI jack of the player.
• Check if your TV supports the 480p, 720p, 1080i or 1080p HDMI input
resolution.
Abnormal HDMI output screen. • If random noise appears on the screen, it means that TV does not support
If you experience other problems. • Go to the table of contents and find the section of the user manual that
AllShare function
I can see folders shared through AllShare,
but I cannot see the files.
The video plays intermittently. • Check if the network is stable.
The AllShare connection between the player
and the PC is unstable.
HDCP (High-bandwidth Digital Content Protection).
contains information about the feature you are having the problem with,
and then follow the procedure again.
• If you still cannot resolve the problem, please contact your nearest
Samsung authorized service center.
• AllShare only shows Video, Photo, and Music files. Other types of files are
not displayed.
• Check if the network cable is properly connected and if the network is not
overloaded.
• The wireless connection between the AllShare compatible device and the
player is unstable.
Check the connection.
• IP addresses within the same subnetwork should be unique.
If they are not, IP interference can cause this phenomenon.
• Check if you have a firewall enabled.
If so, disable the firewall function.
English 67
|
Page 68

Appendix
PROBLEM SOLUTION
BD-LIVE
I cannot connect to the BD-LIVE server. • Test whether the network connection is working using the Network Status
function. (See page 25)
• Check whether a USB memory device is connected to the player.
• The memory device must have at least 1GB of free space to accommodate
the BD-LIVE service.
You can check the available size in BD Data Management. (See page 25)
• See if the BD-LIVE Internet Connection option is set to Allow(All).
• If all above fails, contact the contents provider or update to the player to the
latest firmware.
When using the BD-LIVE service, an error
occurs.
| NOTES |
\When the factory default settings are restored, all stored user BD data will be deleted.
• The memory device must have at least 1GB of free space to accommodate
the BD-LIVE service.
You can check the available size in BD Data Management. (See page 25)
Repairs
If you contact us to repair your player, an administration fee may be charged if either:
1. An engineer is called out to your home at your request and there is no defect in the product.
2. You bring the unit to a repair center and there is no defect in the product.
We will provide you with the amount of the administration fee before we make a home visit or begin any
work on your player.
We recommend you read this manually thoroughly, search for a solution on line at www.samsung.com, or
contact Samsung Customer Care before seeking to repair your player.
|
68 English
Page 69

07 Appendix
Specifications
Weight 3.74 Ibs
General
USB
HDMI
Audio Output
Network
• Network speeds equal to or below 10Mbps are not supported.
• Design and specifications are subject to change without prior notice.
• For the power supply and power consumption, refer to the label attached to the player.
• Weight and dimensions are approximate.
Dimensions 16.9 (W) X 7.9 (D) X 1.8 (H) inches
Operating Temperature Range +41°F to +95°F
Operating Humidity Range 10 % to 75 %
Type A USB 2.0
DC output 5V 500mA Max.
Video
Audio PCM, Bitstream
7.1 Channel
Digital Audio Output Optical
Ethernet 100BASE - TX Terminal
Wireless LAN Built-in
Security
WPS(PBC) Supported
2D : 2160p, 1080p, 1080i, 720p, 480p
3D : 1080p, 720p
Front Left/Front Right, Center, Subwoofer, Surround Left/
Surround Right, Surround Back Left/Surround Back Right
WEP (OPEN/SHARED)
WPA-PSK (TKIP/AES)
WPA2-PSK (TKIP/AES)
English 69
|
Page 70

LIMITED WARRANTY TO ORIGINAL PURCHASER
Samsung Electronics Canada Inc.(SECA), warrants that this product is free from defective material and
workmanship.
SECA further warrants that if this product falls to operate properly within the specified warranty period
and the failure is due to improper workmanship or defective materials, SECA will repair or replace the
product at its option.
All warranty repairs must be performed by a SECA Authorized Service Center. (The name and address
of the location nearest you can be obtained by calling toll free: 1- 800- SAMSUNG)
LABOR
One year (Carry- in)
On carry-in models, transportation to and from the service center is the customer’s responsibility.
The original dated sales receipt must be retained by the customer and is the only acceptable proof of
purchase. It must be presented to the authorized service center at the time service is requested.
PARTS
One year
EXCLUSIONS (WHAT IS NOT COVERED)
This warranty does not cover damage due to accident, fire, flood and/ or other acts of God; misuse,
incorrect line voltage, improper installation, improper or unauthorized repairs, commercial use or
damage that occurs in shipping. Exterior and interior finish, lamps, glass are not covered under this
warranty. Customer adjustments which are explained in the instruction manual are not covered under
the terms of this warranty. This warranty will automatically be voided for any unit found with a missing or
altered serial number. This warranty is valid only on products purchased and used in Canada.
HEADQUARTERS
SAMSUNG ELECTRONICS CANADA INC.,
CUSTOMER SERVICE
55 STANDISH COURT MISSISSAUGA, ONTARIO L5R 4B2 CANADA
1-800-SAMSUNG (1-800-7267864)
www.samsung.com/ca
Page 71

HEADQUARTERS
Samsung Electronics Canada Inc .,
55 Standish Court Misisauga ,
Ontario L5R 4B2 Canada
TEL: 1-800-SAMSUNG (1-800-7267864)
www.samsung.com/ca
Contact SAMSUNG WORLD WIDE
If you have any questions or comments relating to Samsung products, please contact the SAMSUNG customer
care center.
`
North America
CANADA 1-800-SAMSUNG(726-7864)
MEXICO 01-800-SAMSUNG(726-7864) www.samsung.com
`
Latin America
ARGENTINE 0800-333-3733 www.samsung.com
BRAZIL
CHILE
Bolivia 800-10-7260 www.samsung.com
COLOMBIA 01-8000112112 www.samsung.com
COSTA RICA 0-800-507-7267 www.samsung.com
DOMINICA 1-800-751-2676 www.samsung.com
ECUADOR 1-800-10-7267 www.samsung.com
EL SALVADOR 800-6225 www.samsung.com
GUATEMALA 1-800-299-0013 www.samsung.com
HONDURAS 800-27919267 www.samsung.com
JAMAICA 1-800-234-7267 www.samsung.com
NICARAGUA 00-1800-5077267 www.samsung.com
PANAMA 800-7267 www.samsung.com
PERU 0-800-777-08 www.samsung.com
PUERTO RICO 1-800-682-3180 www.samsung.com
TRINIDAD & TOBAGO 1-800-SAMSUNG(726-7864) www.samsung.com
VENEZUELA 0-800-100-5303 www.samsung.com
Area Contact Center
0800-124-421
4004-0000
800-SAMSUNG(726-7864)
From mobile 02-482 82 00
Web Site
www.samsung.com/ca
www.samsung.com/ca_fr (French)
www.samsung.com
www.samsung.com
AK68-02349B-01
Page 72

BD-F7500
Lecteur de disque Blu-ray™
Guide d'utilisation
imaginez les possibilités
Merci d'avoir acheté ce produit Samsung.
Profitez de tous les avantages offerts par notre service intégral !
Enregistrez votre produit dès aujourd’hui sur le portail
www.samsung.com/register
et sélectionnez Enregistrement de produit
Page 73

Consignes de sécurité
Avertissement
POUR RÉDUIRE LES RISQUES D’ÉLECTROCUTION, NE RETIREZ PAS LE COUVERCLE (NI LE PANNEAU ARRIÈRE).
AUCUNE PIÈCE SITUÉE À L'INTÉRIEUR NE PEUT ÊTRE RÉPARÉE PAR L'UTILISATEUR. POUR TOUT
DÉPANNAGE, ADRESSEZ-VOUS À UN TECHNICIEN QUALIFIÉ.
ATTENTION
RISQUE D’ÉLECTROCUTION
NE PAS OUVRIR
L’éclair et la flèche inclus dans le triangle
représentent un avertissement à l’égard
de tensions dangereuses se trouvant à
l’intérieur du produit.
AVERTISSEMENT
• Afin de réduire les risques d’incendie ou de
chocs électriques, ne pas exposer l'appareil à la
pluie ou à l’humidité.
AVIS DE LA FCC (pour les É-U)
Cet appareil a été mis à l’essai, il est conforme aux
exigences en matière de limites pour un appareil
numérique de classe B, selon le paragraphe 15 de la
Réglementation de la FCC.
Ces limites sont conçues pour prévenir
raisonnablement les brouillages préjudiciables pour
les installations domestiques. Cet appareil génère,
utilise et peut émettre de l’énergie radioélectrique.
S’il n'est pas installé et utilisé selon les instructions, il
peut provoquer des brouillages préjudiciables pour la
réception radio ou télévision. Ces brouillages peuvent
être déterminés en allumant et en éteignant l’appareil.
L’utilisateur est encouragé à essayer de corriger le
brouillage à l’aide de l’une ou l’autre des mesures
suivantes.
• Réorientez l'antenne de réception ou changez
son emplacement.
Augmentez la distance entre l'appareil et le récepteur.
•
• Branchez l'appareil sur une prise murale
différente de celle à laquelle le récepteur est relié.
• Demandez de l'aide au revendeur ou à un
technicien radio/TV expérimenté.
• Cet lecteur numérique de classe B respecte
toutes les exigences du Règlement sur le
matériel brouilleur du Canada.
Remarque destinée à l’installateur de la
câblodistribution
Ce rappel a pour objectif d’attirer l’attention de
l’installateur de la câblodistribution sur l’article 820-40 du
Code national électrique (alinéa 54 du Code électrique
canadien, chapitre I) qui donne des instructions pour une
mise à la terre correcte et, notamment, spécifie que le
câble de mise à la terre doit être branché à l’installation
de mise à la terre du bâtiment la plus proche possible du
point d’entrée du câble.
|
2 Français
ATTENTION: AFIN DE RÉDUIRE LES RISQUES
DE CHOCS ÉLECTRIQUES, NE PAS RETIRER
LE COUVERCLE (OU LE PANNEAU ARRIÈRE).
L'APPAREIL NE CONTIENT PAS DE PIÈCES EXIGEANT
UN ENTRETIEN DE LA PART DE L’UTILISATEUR.
CONFIER L’ENTRETIEN À UN PERSONNEL QUALIFIÉ.
Un triangle contenant un point d’exclamation
signifie un avertissement vous demandant
de consulter les instructions importantes qui
accompagnent le produit.
Produit AVEC DISPOSITIF AU LASER DE
CLASSE 1
Ce lecteur de disque compact est catégorisé comme
un produit LASER DE CLASSE 1. Si les consignes
relatives à l'utilisation des commandes, aux réglages ou
à l'application des procédés, spécifiées dans le présent
manuel ne sont pas respectées, vous risquez d'être
exposé à une source de rayonnement nocif pour la santé.
DANGER :
• PEUT ÉMETTRE UN RAYONNEMENT LASER
VISIBLE OU INVISIBLE SI LE COUVERCLE EST
OUVERT. ÉVITEZ UNE EXPOSITION DIRECTE
AUX RAYONS. (FDA 21 CFR)
ATTENTION :
• PEUT ÉMETTRE UN RAYONNEMENT LASER
VISIBLE OU INVISIBLE DE CLASSE B SI LE
COUVERCLE EST OUVERT. ÉVITEZ UNE
EXPOSITION AUX RAYONS (IEC 60825-1)
•
CE PRODUIT FAIT APPEL À LA TECHNOLOGIE
DU LASER. SI LES CONSIGNES RELATIVES À
L'UTILISATION DES COMMANDES, AUX RÉGLAGES OU
À L'APPLICATION DES PROCÉDÉS, SPÉCIFIÉES DANS
LE PRÉSENT MANUEL NE SONT PAS RESPECTÉES,
VOUS RISQUEZ D'ÊTRE EXPOSÉ À UNE SOURCE DE
RAYONNEMENT NOCIF POUR LA SANTÉ. NE TENTEZ
PAS D'OUVRIR LE COUVERCLE OU DE RÉPARER
VOUS-MÊME L’APPAREIL. POUR TOUTE RÉVISION,
ADRESSEZ-VOUS À UN TECHNICIEN SPÉCIALISÉ.
CLASS 1 LASER PRODUCT
KLASSE 1 LASER PRODUKT
LUOKAN 1 LASER LAITE
KLASS 1 LASER APPARAT
PRODUCTO LÁSER CLASE 1
| REMARQUE |
\Si le numéro de région d'un disque Blu-ray/DVD ne
correspond pas au numéro de ce lecteur, ce dernier ne
peut pas lire le disque.
Page 74

Précautions
01 Consignes de sécurité
Consignes de sécurité importantes
Lisez attentivement ces consignes avant d'utiliser
l'appareil. Veillez à respecter toutes les consignes
répertoriées ci-après.
Conservez ces instructions à portée de main pour
vous y référer ultérieurement.
1. Lisez attentivement ces consignes.
2. Conservez-les précieusement.
3. Tenez compte de tous les avertissements
mentionnés.
4. Respectez toutes les instructions sans
exception.
5. N'utilisez pas cet appareil à proximité de
l'eau.
6. Nettoyez-le à l'aide d'un tissu sec.
7. Ne bloquez pas les ouvertures de ventilation.
Installez l'appareil conformément aux
instructions du fabricant.
8. N'installez pas le lecteur à proximité d’une
source de chaleur de type radiateur, registre
de chaleur, cuisinière ou tout autre appareil
(y compris les récepteurs AV) générateur de
chaleur.
9. Ne désactivez pas le dispositif de sécurité
de la fiche de mise à la terre ou de la fiche
polarisée. Une fiche polarisée comporte
deux lames dont l’une est plus large que
l’autre. Une fiche de mise à la terre comporte
deux lames et une troisième broche de
mise à la terre. La lame la plus large et la
troisième broche sont destinées à assurer
votre sécurité. Si la fiche fournie ne s'insère
pas dans la prise utilisée, faites appel à un
électricien pour faire remplacer celle-ci.
10. Placez le cordon d'alimentation de sorte qu'il ne
puisse être ni piétiné ni pincé, particulièrement
au niveau de la fiche, de la prise de courant et
du point de sortie de l'appareil.
11. Utilisez exclusivement les fixations/
accessoires spécifiés par le fabricant.
12.
Utilisez exclusivement le
meuble à roulettes, le socle, le
trépied, le support ou la table
recommandés par le fabricant
ou vendus avec l’appareil.
Si l’appareil est posé sur un
meuble à roulettes, déplacez
l’ensemble avec précaution pour éviter de faire
tomber le lecteur et de vous blesser.
13. Débranchez l’appareil en cas d'orage ou
lorsqu’il est inutilisé pendant une période
prolongée.
14. Confiez toutes les réparations à un technicien
qualifié. Votre appareil doit impérativement être
réparé lorsqu’il a été endommagé de quelque
manière que ce soit : détérioration du cordon
ou de la fiche d’alimentation, projection de
liquide sur l’appareil, chute d’objets à l’intérieur
de l’appareil, exposition à la pluie ou à
l’humidité, dysfonctionnement, chute.
Rangement et gestion des disques
• Comment tenir le disque
- Des traces de doigts ou des
rayures sur la surface du disque
peuvent altérer la qualité du son et de l’image
ou provoquer des sauts.
- Évitez de toucher la surface du disque sur
laquelle les données ont été enregistrées.
- Tenez le disque par les bords afin de ne pas
laisser d’empreintes sur sa surface.
- Ne collez pas de papier ou d’adhésif sur le disque.
• Nettoyage du disque
- En cas d’empreintes ou de saleté
sur le disque, nettoyez-le à l'aide
d'eau additionnée de détergent
doux et d’un chiffon doux.
- Lors de son nettoyage, essuyez le disque du
centre vers le bord.
• Rangement des disques
`N’exposez pas le disque à la lumière directe
du soleil.
`Stockez-le dans un endroit frais et aéré.
`Rangez-le dans une jaquette propre,
verticalement.
Précautions de manipulation
• Veillez à éviter tout égouttement ou toute
projection de liquide sur l’appareil et ne placez
jamais sur celui-ci des récipients contenant des
liquides, tels que des vases.
• Pour mettre cet appareil totalement hors
tension, vous devez retirer la fiche électrique de
la prise murale. Par conséquent, la fiche doit
être aisément accessible en tout temps.
Français 3
|
Page 75

• Ne branchez pas plusieurs appareils électriques
Consignes de sécurité
sur la même prise électrique. Cela pourrait
entraîner une surcharge et provoquer un incendie.
• Avant de brancher un composant sur ce lecteur,
assurez-vous que celui-ci est hors tension.
• Si vous déplacez soudainement le lecteur
d'un endroit froid à un endroit chaud, de la
condensation pourra se former sur les pièces
et la lentille, et occasionner des problèmes de
lecture. Dans pareil cas, débranchez le lecteur et
patientez deux heures avant de le rebrancher sur
la prise d’alimentation. Insérez ensuite le disque et
essayez à nouveau de le lire.
• Si vous entendez un bruit inhabituel ou décelez
un dégagement anormal de fumée ou une odeur
suspecte, coupez immédiatement l’alimentation et
débranchez la fiche électrique de la prise murale.
Puis contactez le service après-vente le plus
proche pour obtenir de l’aide. Si vous persistez
à utiliser le produit dans l’état, vous risquerez de
provoquer un choc électrique ou un incendie.
Utilisation de la fonction 3D
CONSIGNES IMPORTANTES RELATIVES
À LA SANTÉ ET LA SÉCURITÉ EN CAS DE
VISIONNAGE D'IMAGES 3D.
Lisez attentivement les consignes de sécurité
avant d'utiliser la fonction 3D.
• Certains utilisateurs peuvent ressentir une gêne
en visionnant des images de télévision en 3D,
comme par exemple des vertiges, des nausées
ou des maux de tête.
Dès que vous ressentez un de ces symptômes,
arrêtez immédiatement le visionnage en 3D, retirez
les lunettes Active 3D et essayez de vous reposer.
Le visionnage d'images en 3D sur une période de
•
temps prolongée peut occasionner une fatigue
oculaire. Dès que vous ressentez une fatigue oculaire,
arrêtez immédiatement le visionnage en 3D, retirez
les lunettes Active 3D et essayez de vous reposer.
• Des enfants utilisant la fonction 3D doivent être
constamment surveillés par un adulte responsable.
Au moindre signalement de fatigue visuelle,
mal de tête, vertige ou nausée, interrompez
immédiatement le visionnage en 3D par les
enfants, et laissez-les se reposer.
• N'utilisez pas les lunettes Active 3D à d'autres
fins (comme lunettes de vue, de soleil ou de
protection, par exemple).
|
4 Français
• N'utilisez pas la fonction 3D ou les lunettes
Active 3D en marchant ou en bougeant. En
utilisant la fonction 3D ou en portant des
lunettes Active 3D en cours de marche ou
de mouvement, vous risquez de vous cogner
contre des objets, de trébucher et/ou de
tomber, et de vous blesser gravement.
• Pour bénéficier du visionnage de contenus
3D, connectez un appareil 3D (récepteur AV
ou téléviseur compatible 3D) au port de sortie
HDMI OUT du lecteur à l'aide d'un câble HDMI
haut débit. Portez les lunettes 3D avant de lire
des contenus 3D.
Le lecteur émet des signaux 3D uniquement via le
•
câble HDMI connecté au port de sortie HDMI OUT.
• La résolution de l'image vidéo en mode de lecture
3D étant déterminée par la définition de l'image
vidéo 3D d'origine, vous ne pourrez pas modifier
la résolution de l'image selon vos préférences.
• Des fonctions telles que BD Wise, l'adaptation
de la taille de l'écran ou le réglage de la
résolution peuvent ne pas fonctionner
correctement en mode de lecture 3D.
• Il vous faut obligatoirement utiliser un câble
HDMI haut débit pour garantir une émission
appropriée du signal 3D.
• Lorsque vous visionnez des images en 3D,
assurez-vous de vous tenir éloigné du téléviseur
à une distance équivalente à au moins trois
fois la taille de l'écran. Par exemple, si vous
avez un écran 46 pouces, vous devrez rester
à une distance de 35 mètres (138 pouces) du
téléviseur.
• Positionnez l'écran à hauteur des yeux pour
mieux apprécier l'image en 3D.
• Lorsque le lecteur est connecté à plusieurs
appareils 3D, l'effet 3D peut ne pas fonctionner
correctement.
• Ce lecteur ne convertit pas de contenus 2D en
contenus 3D.
• « Blu-ray 3D » et le logo « Blu-ray 3D » sont
des marques de commerce de Blu-ray Disc
Association.
Copyright
© 2013 Samsung Electronics Co.,Ltd.
Tous droits réservés ; il est interdit de reproduire
ou de copier tout ou partie de ce manuel
d'utilisation sans l'accord préalable écrit de
Samsung Electronics Co.,Ltd.
Page 76

Contenus
Contenus
CONSIGNES DE SÉCURITÉ
2 Avertissement
3 Précautions
3 Consignes de sécurité importantes
3 Rangement et gestion des disques
3 Précautions de manipulation
4 Utilisation de la fonction 3D
4 Copyright
MISE EN ROUTE
7 Compatibilité des disques et des formats
7 Types de disques et contenus pouvant être
7 Types de disques ne pouvant pas être lus
8 Code régional
8 Logos des disques pouvant être lus sur
9 Formats pris en charge
12 Accessoires
13 Panneau avant
13 Panneau arrière
14 Télécommande
14 Boîtier de la télécommande
lus sur ce lecteur
sur ce lecteur
ce lecteur
BRANCHEMENTS
15 Connexion du lecteur à un téléviseur
16 Connexion à une chaîne hi-fi
16 Méthode 1 Connexion à un récepteur AV
17 Méthode 2
18 Méthode 3 Méthode 3 Raccordement à
18 Méthode 4 Connexion à un récepteur AV
19 Connexion à un routeur réseau
19 Réseau câblé
19 Réseau sans fil
prenant en charge la technologie HDMI 4K
Branchement à un récepteur
AV ne prenant pas en charge la
spécification HDMI 4K à l’aide d’un câble
HDMI
une chaîne hi-fi (amplificateur 7.1 canaux)
prenant en charge la technologie Dolby
Digital ou un décodeur DTS
PARAMÈTRES
20 Procédure de paramétrage initiale
20 L'écran Accueil
21 Accès au menu Paramètres
21 Boutons de la télécommande utilisés pour
22 Fonctions du menu Paramètres
29 Réseaux et Internet
29 Configuration de votre connexion réseau
32 Wi-Fi Direct
33 Mise à niveau logicielle
33 Mettre à jour
34 Mise à jour auto
naviguer dans le menu Paramètres
MEDIA PLAY
35 L'écran AllShare Play
35 Accès à l'écran AllShare Play
35 Lecture de disques du commerce
35 Lecture de fichiers sur une périphérique
USB
36 Lecture d’un disque avec contenu
enregistré par l’utilisateur
37 Utilisation de la fonction réseau AllShare
37 Téléchargement du logiciel AllShare
38 Lecture de contenus situés sur votre
38 Contrôle de la lecture de contenus
39 Contrôle de la lecture vidéo
39 Boutons de la télécommande servant au
39 Utilisation du menu Outils
41 Utilisation des menus Afficher et Options
ordinateur ou périphérique Allshare par le
lecteur de disque Blu-ray
stockés dans l'ordinateur à partir de votre
téléphone intelligent
visionnement des vidéos
Français 5
|
Page 77

42 Contrôle de l'écoute de musique
42 Boutons de la télécommande servant à
l'écoute de musique
42 Utilisation des menus Afficher et Options
43 Répétition de pistes sur un CD audio.
43 Lecture aléatoire de pistes sur un CD
audio.
43 Création d'une liste de lecture à partir d'un
CD audio
44 Extraction
44 Lecture de fichiers photo
44 Utilisation du menu Outils
45 Utilisation des menus Afficher et Options
46 Utilisation de la fonction Envoyer
SERVICES RÉSEAU
47 Connexion à votre compte Samsung
47 Avant d'utiliser Films et programmes
télévisée ou Applications
48 Par les films et les programmes télévisés
49 Utilisation des applications
49 Aperçu sur l'écran Applications
49 Téléchargement d'applications
50 Démarrage d'une application
50 Utilisation de l’écran Toutes téléchargées
50 Tri des applications
50 Utilisation des fonctions du menu Modifier
54 Mise en miroir de l’écran
54 Utilisation du navigateur Web
54 Navigation par liens et Navigation par
pointeur
55 Aperçu du panneau de commande
56 Utilisation du menu Réglage
57 Appariement des comptes de services
Internet au produit
58 BD-LIVE™
ANNEXES
59 Avis de conformité et de compatibilité
60 Protection cotnre la copie
60 Clause de non responsabilité du service
réseau
61 Licence
62 Informations supplémentaires
62 Remarques
64 Résolution selon le type de contenus
65 Sélections des sorties numériques
66 Dépannage
68 Réparation
69 Caractéristiques techniques
|
6 Français
Page 78

02 Mise en route
Mise en route
Compatibilité des disques et des formats
Types de disques et contenus pouvant être lus sur ce lecteur
Support
VIDÉO
MUSIQUE
PHOTO
| REMARQUE |
\Selon le type de disque ou les conditions d'enregistrement, il se peut que certains CD-RW/-R et DVD-R ne puissent pas être
lus sur cet appareil.
\Si un disque DVD-RW/-R n'a pas été enregistré correctement au format vidéo DVD, il ne pourra pas être lu.
\Le lecteur ne lit pas les contenus ayant été enregistrés sur un disque DVD-R selon un débit binaire dépassant les 10 Mbps.
\Le lecteur ne lit pas les contenus ayant été enregistrés sur un disque BD-R ou un périphérique USB selon un débit binaire
dépassant les 25 Mbps.
\La lecture peut être inopérante sur certains types de disque ou lorsque vous effectuez des opérations spécifiques tels que
les changements d'angle ou le réglage du format de l'image. Des informations détaillées concernant le disque sont inscrites
sur le boîtier. Consultez-les si nécessaire.
\Lors de la lecture d'un titre BD-J, il se peut que le chargement prenne plus de temps que pour un titre normal et que
certaines fonctions s'exécutent plus lentement que d'habitude.
Type de
disque
Disque Blu-ray
Disque Blu-ray 3DBD-ROM ou BD-RE/-R enregistré au format BD-RE.
DVD-VIDÉO
DVD-RW
DVD-R
DVD+RW
DVD+R
CD-RW/-R,
DVD-RW/-R,
BD-RE/-R
CD-RW/-R,
DVD-RW/-R,
BD-RE/-R
DVD-VIDÉO, DVD+RW/DVD-RW(V)/DVD-R/+R enregistrés ou finalisés, ou un support de
stockage USB sur lequel des contenus MKV et MP4 sont stockés.
Musique enregistrée sur CD-RW/-R, DVD-RW/-R, BD-RE/-R ou un support de stockage
USB sur lequel des contenus MP3 ou WMA sont stockés.
Photos enregistrées sur CD-RW/-R, DVD-RW/-R, BD-RE/-R ou un support de stockage
USB sur lequel des contenus JPEG sont stockés.
Détails
Types de disques ne pouvant pas être lus sur ce lecteur
• DVD HD
• DVD-ROM/PD/
MV, etc
• DVD-RAM
• CD Super Audio
(à l'exception de la
couche CD)
• DVD-RW (mode VR)
• CVD/CD-ROM/CDV/
CD-G/CD-I/LD
(Les CD-G lisent
des données audio
uniquement et non des
données graphiques.)
• Disque DVD-R 3,9 Go
pour système auteur.
Français 7
|
Page 79

Code régional
Mise en route
Les lecteurs et les disques sont codés par région.
Ces codes régionaux doivent correspondre pour
que le disque puisse être lu.
correspondent pas, le disque ne pourra pas être lu.
Le code régional du lecteur est affiché sur son
panneau arrière.
Si les codes ne
Logos des disques pouvant être
lus sur ce lecteur
Disque Blu-ray Disque Blu-ray 3D
Type de
disque
Disque
Blu-ray
DVD VIDÉO
Code
régional
A
B
C
1
2
3
4
5
Zone
Amérique du Nord, Amérique
centrale, Amérique du Sud,
Corée, Japon, Taïwan, Hong
Kong et Sud-Est asiatique.
Europe, Groenland, France
d'outre-mer, Moyen-Orient,
Afrique, Australie et NouvelleZélande.
Inde, Chine, Russie, Asie
centrale et Asie du Sud.
États-Unis, Territoires organisés
des États-Unis et Canada
Europe, Japon, Moyen-Orient,
Égypte, Afrique, Groenland
Taïwan, Corée, Philippines,
Indonésie, Hong Kong
Mexique, Amérique du Sud,
Amérique centrale, Australie,
Nouvelle-Zélande, Îles du
Pacifique, Caraïbes
Russie, Europe de l’Est, Inde,
Corée du Nord, Mongolie
BD-LIVE
Norme de lecture NTSC aux
États-Unis, au Canada, en
Corée, au Japon.
Chine
6
|
8 Français
Page 80

Formats pris en charge
02 Mise en route
Prise en charge des fichiers vidéo
Extension de
fichier
*.avi
*.mkv
*.asf
*.wmv
*.mp4
*.3gp
*.vro
*.mpg
*.mpeg
*.ts
*.tp
*.trp
*.mov
*.flv
*.vob
*.svi
*.m2ts
*.mts
*.webm
`Limitations
- Même lorsque le fichier est codé selon un codec pris en charge mentionné ci-dessus, ce fichier peut
ne pas être lu en cas de problème au niveau de son contenu.
- La lecture normale ne sera pas garantie si les informations relatives au conteneur du fichier sont
erronées ou si le fichier lui-même est corrompu.
- Les fichiers ayant un débit binaire ou une vitesse de défilement supérieur(e) à la normale peuvent
présenter des discontinuités de lecture.
- La fonction Recherche (Saut) sera indisponible si la table d'indexage du fichier est corrompue.
- Lors de la lecture d'un fichier à distance via une connexion réseau, la lecture vidéo peut présenter des
discontinuités en fonction de la vitesse du réseau.
- Le lecteur peut ne pas être pas compatible avec certains périphériques USB ou certaines caméras
numériques.
`Video decoder
- Prend en charge jusqu'au format H.264 de niveau 4.1 (Ne prend pas en charge FMO/ASO/RS)
- Ne prend pas en charge l’encodage VC1/AP/L4
Conteneur Codec vidéo Résolution
MPEG4 SP/ASP
H.264 BP/
AVI
MKV
ASF
MP4
3GP
MOV
FLV
VRO
VOB
PS
TS
SVAF
WebM VP8 1920x1080
MP/HP
Motion JPEG
Microsoft
MPEG-4 v3
Window Media
Video v7, v8, v9
MPEG2
MPEG1
VP6 640x480
MVC
1920x1080
(WMV v7,v8,
MSMPEG4 v3 :
1280x720)
Vitesse de
défilement
(fps)
6~30 30
24/25/30 60
6~30 20 Vorbis
Déb bin (Mbps) Codec audio
ADPCM(IMA, MS)
Dolby Digital Plus
4
Dolby Digital
LPCM
AAC
HE-AAC
WMA
MPEG(MP3)
DTS (Core)
Français 9
|
Page 81

- CODEC sauf WMV v7, v8, MSMPEG4 v3, MVC, VP6
Mise en route
1) Inférieure à 1280 x 720 : 60 images max.
2) Supérieure à 1280 x 720 : 30 images max.
- Ne prend pas en charge le format GMC 2 ou
supérieur.
- Prend en charge SVAF (haut/bas, côte à côte).
- Prend en charge les spécifications BD MVC
`Décodeur audio
- Prend en charge les formats WMA 10 PRO
(jusqu’à 5.1)
- Ne prend pas en charge le format WMA sans
perte, audio.
- ADPCM IMA, MS pris en charge.
- Ne prend pas en charge ADPCM (A-Law, μ-Low)
- Ne prend pas en charge QCELP/ AMR NB/WB
- Prend en charge l'algorithme vorbis (jusqu’à 2
canaux),
- Prend en charge DD+ (jusqu’à 7.1ch)
| REMARQUE |
\Il est possible que certains disques de format MKV ou
MP4 ne puissent pas être lus, selon la résolution de
l’image vidéo et sa vitesse de défilement.
Formats de fichiers de sous-titres pris en charge
Extension de
fichier
.ttxt
.smi
.srt
.sub
.sub or.txt
.ssa
.ass
.psb
AVI
MKV
MKV
MKV
MP4
Externe
Interne
Nom
MPEG-4 Timed text
SAMI
SubRip
SubViewer
Micro DVD
SubStation Alpha
Advanced SubStation
Alpha
Powerdivx
Xsub
SubStation Alpha
Advanced SubStation
Alpha
SubRip
MPEG-4 Timed text
Prise en charge des fichiers musicaux
Extension
de fichier
*.mp3
*.m4a
*.mpa
*.aac
*.flac
*.ogg
*.wma
*.wav
*.mid
*.midi
*.ape
Type Codec
MPEG
MPEG4
FLAC
OGG
WMA
wav
midi
ape
Plage de prise en
charge
MPEG1
Audio
Layer 3
AAC -
FLAC
Vorbis
WMA
wav -
midi type 0 et type 1
ape
-
Prend en charge
jusqu’à 2 canaux
Prend en charge
jusqu’à 2 canaux
Prend en charge les
formats WMA 10 Pro
(jusqu’à 5.1).
Ne prend pas en
charge le format WMA
sans perte, audio.
Prend en charge
jusqu'au profil M2.
Ne prend pas en
charge le mode LBR.
Prise en charge des fichiers de photos
Extension de
fichier
*.jpg
*.jpeg
*.png
*.bmp
*.mpo
Type Définition
JPEG
PNG
BMP
MPO
15360x8640
4096x4096
4096x4096
15360x8640
|
10 Français
Page 82

Remarques sur la connexion USB
02 Mise en route
• Ce lecteur prend en charge les supports de
stockage USB, les lecteurs MP3, les caméras
numériques et les lecteurs de carte USB.
• Le lecteur peut ne pas être pas compatible
avec certains périphériques USB ou certaines
caméras numériques.
• Le lecteur prend en charge les systèmes de
fichiers FAT16, FAT32 et NTFS.
• Effectuez la connexion des périphériques
USB directement au port USB du lecteur. La
connexion via un câble USB peut causer des
problèmes d'incompatibilité.
• L’insertion de plusieurs périphériques de
mémoire dans un lecteur multicarte peut
entraîner le dysfonctionnement de celui-ci.
• Le lecteur ne prend pas en charge le protocole
PTP.
• Ne déconnectez pas le périphérique USB durant
un processus de « chargement ».
• Plus la résolution de l’image est élevée, plus lent
le délai d'affichage de l'image.
• Ce lecteur ne peut pas lire les fichiers MP3
de type DRM (Gestion des droits numériques)
téléchargés depuis des sites commerciaux.
• Votre lecteur ne prend en charge que les vidéos
dont la vitesse de défilement des images est
inférieure à 30 fps.
• Votre lecteur ne prend en charge que les
périphériques de classe de stockage de masse
(MSC) USB tels que clés et disques durs USB.
(HUB n'est pas disponible.)
• Certains lecteurs de disque dur USB, lecteurs
multicarte et clés USB ne sont pas compatibles
avec ce lecteur.
• Si certains périphériques USB requièrent une
puissance excessive, ils pourraient être limités
par le dispositif de sécurité du circuit.
• Si la lecture d'un disque dur USB est instable,
amplifiez l'alimentation en branchant le lecteur
de disque dur dans une prise murale.
Si le problème persiste, contactez le fabricant
du lecteur de disque dur USB.
• SAMSUNG ne peut être tenu responsable de la
corruption de fichiers de données ou de la perte
de données.
• Votre lecteur ne prend pas en charge les fichiers
comprimé, éparpillés ou cryptés.
- Vous pouvez réparer ou formater un
périphérique USB sur votre ordinateur de
bureau. (MS-Windows seulement)
AVCHD (Codec vidéo avancé haute
définition)
• Ce lecteur prend en charge les disques au
format AVCHD. Ces disques sont normalement
enregistrés et lus sur des caméscopes.
• Le format AVCHD est un format vidéo
numérique haute définition.
• Le format MPEG-4 AVC/H.264 compresse les
images de manière plus efficace que le format
de compression d'image conventionnel.
• Certains disques AVCHD utilisent le format
« x.v.Color ». Ce lecteur peut lire les disques
AVCHD faisant appel au format « x.v.Color ».
• « x.v.Color » est une marque déposée de Sony
Corporation.
• « AVCHD » et le logo AVCHD sont des marques
de commerce de Matsushita Electronic
Industrial Co., Ltd. et de Sony Corporation.
| REMARQUE |
\Il se peut que certains disques de format AVCHD ne
puissent pas être lus sur l'appareil, en fonction de leurs
conditions d'enregistrement.
Les disques de format AVCHD doivent être finalisés.
\Le format « x.v.Color » offre une gamme de couleurs plus
large qu’un DVD de caméscope normal.
Français 11
|
Page 83

Accessoires
Mise en route
Vérifiez que les accessoires ci-dessous sont fournis.
Piles pour télécommande (format AAA) Manuel d'utilisation
SOURCE
VOL VOL
– +
VOL
+
VOL
–
SAMSUNG TV
1
2
3
4
5
6
7
8
9
DISC MENU
TITLE MENU
POPUP
0
SMART
HOME
REPEAT
HOME
APPS
HUB
INFOTOOLS
RETURN
EXIT
A B C D
SEARCH FULLSUBTITLE
AUDIO
SCREEN
PANDORA
DIGITAL
SUBTITLE
INPUT
Télécommande
|
12 Français
Page 84

Panneau avant
02 Mise en route
BOUTON MARCHE/ARRÊT
BOUTON LECTURE/PAUSE
BOUTON ARRÊT
BOUTON OUVERTURE/
FERMETURE
TIROIR DISQUE
CAPTEUR DE LA TÉLÉCOMMANDE
| REMARQUE |
\Pour effectuer des mises à niveau du logiciel du lecteur via la prise Hôte USB, vous devez utiliser une clé USB.
\Lorsque le lecteur affiche le menu du disque Blu-ray, vous ne pouvez pas lancer le film en appuyant sur le bouton Lecture
situé sur l'appareil ou la télécommande. Pour lire le film, sélectionnez Lire la vidéo ou Démarrer dans le menu du disque
puis appuyez sur le bouton v de la télécommande.
\Pour utiliser la fonction Anynet+ (HDMI-CEC), branchez le câble HDMI à la borne HDMI 1.
Lorsque vous branchez la borne HDMI 2, la fonction Anynet+ (HDMI-CEC) n’est pas disponible.
USB HOST
Panneau arrière
HDMI OUT LAN
DIGITAL AUDIO OUT7.1CH ANALOGUE AUDIO OUT
Français 13
|
Page 85

Télécommande
Mise en route
Boîtier de la télécommande
Permet de configurer la source d'entrée sur le
téléviseur, une fois la configuration effectuée.
(Ce bouton n'est disponible que sur
Permet d'allumer et d'éteindre le lecteur.
Appuyez sur ce bouton pour ouvrir ou
Appuyez sur les boutons numériques pour
Appuyez sur ce bouton pour accéder au
Appuyez sur ces boutons pour effectuer un
Appuyez sur ce bouton pour arrêter la
Appuyez sur ce bouton pour utiliser la
Appuyez sur ce bouton pour acceder au
Appuyez sur ce bouton pour utiliser le
Permet de revenir au menu précédent.
Ces boutons sont utilisés à la fois pour les
menus du lecteur et certaines fonctions
Appuyez sur ce bouton pour rechercher
Pour accéder aux différentes fonctions
téléviseur Samsung.)
fermer le tiroir disque.
commander les options.
menu du disque.
saut vers l'arrière ou l'avant.
lecture d’un disque.
fonction Applications.
menu d'accueil.
menu Outils.
liées au disque Blu-ray.
du contenu.
audio d’un disque.
SOURCE
VOL VOL
– +
VOL
+
SAMSUNG TV
1
2
4
5
7
8
DISC MENU
0
SMART
HOME
HOME
HUB
RETURN
A B C D
SEARCH FULLSUBTITLE
AUDIO
PANDORA
DIGITAL
SUBTITLE
VOL
–
3
6
9
TITLE MENU
POPUP
REPEAT
APPS
INFOTOOLS
EXIT
SCREEN
INPUT
Permet d'allumer et d'éteindre le téléviseur.
(Ce bouton n'est disponible que sur
téléviseur Samsung.)
Permet de régler le volume du téléviseur.
(Ce bouton n'est disponible que sur
téléviseur Samsung.)
Permet d'accéder au menu contextuel/
menu titre.
Appuyez sur ces boutons pour effectuer
une recherche vers l'arrière ou l'avant.
Appuyez sur ce bouton pour suspendre la
lecture d’un disque.
Appuyez sur ce bouton pour lire un disque.
Permet de répéter la lecture d’un titre, d’un
chapitre, d’une piste ou d’un disque.
Permet d'afficher les informations de
lecture.
Permet de sélectionner les éléments de
menu et de changer la valeur du menu.
Appuyez sur ce bouton pour quitter le
menu.
Appuyez sur ce bouton pour utiliser la
fonction plein ecran.
Ce bouton ne fonctionne pas durant la
lecture du disque Blu-ray ou du DVD.
Appuyez sur ce bouton pour modifier la langue
de sous-titrage du disque Blu-ray/DVD.
Insertion des piles
|
14 Français
| REMARQUE |
\Si la télécommande ne fonctionne pas correctement :
- Vérifiez la polarité +/– des piles.
- Vérifiez que les piles ne sont pas usées.
- Vérifiez qu’aucun obstacle n'obstrue le capteur de la
télécommande.
- Vérifiez qu’aucun éclairage fluorescent ne se trouve à
proximité.
| ATTENTION |
\Débarrassez-vous des piles en respectant les mesures
environnementales locales en vigueur. Ne les jetez pas
avec les ordures ménagères.
Page 86

03 Branchements
Branchements
Connexion du lecteur à un téléviseur
À l’aide du câble HDMI (non fourni), reliez la prise HDMI OUT située à l'arrière de l'appareil à la prise
HDMI IN de votre téléviseur.
- Ne connectez pas le cordon d'alimentation avant d'avoir effectué toutes les autres connexions.
- Lorsque vous changez les connexions, éteignez tous les appareils avant de commencer.
Audio
Vidéo
| REMARQUE |
\Pour utiliser la fonction Anynet+ (HDMI-CEC), branchez le câble HDMI à la borne HDMI 1.
Si vous connectez le câble à la borne HDMI 2, la fonction Anynet+ (HDMI-CEC) ne pourra pas être utilisée.
\La borne HDMI 2 ne restitue pas le signal vidéo.
\Si vous utilisez un câble HDMI-vers-DVI pour la connexion à un dispositif d’affichage, vous devez aussi connecter la prise
Digital Audio OUT du lecteur à un système audio pour écouter les données audio.
\
Un câble HDMI émet en sortie des données vidéo/audio numériques, de sorte que vous n’ayez pas à connecter de câble audio.
\Selon votre téléviseur, il est possible que certaines résolutions de sortie HDMI ne fonctionnent pas. Veuillez vous reporter au
manuel d'utilisation de votre téléviseur.
\Lorsque le lecteur est raccordé au téléviseur via le câble HDMI pour la première fois ou connecté à un téléviseur neuf, la
résolution de sortie HDMI est automatiquement réglée sur la valeur la plus élevée prise en charge par le téléviseur.
\Un câble HDMI trop long peut provoquer du bruit à l'écran. Si tel est le cas, désactivez l'option Couleur foncée HDMI dans le
menu.
\Si le lecteur est connecté à votre téléviseur en mode de sortie HDMI 720p, 1080i ou 1080p, 2160p vous devrez utiliser un
câble HDMI haut débit (catégorie 2).
\La sortie HDMI ne transmet qu'un signal numérique pur au téléviseur.
Si votre téléviseur ne prend pas en charge la protection HDCP (Système de protection des contenus numériques en haute
définition), un bruit aléatoire sera transmis à l'écran.
Français 15
|
Page 87

Branchements
Connexion à une chaîne hi-fi
Vous pouvez connecter le lecteur Blu-ray à un système audio à l'aide de la méthode illustrée ci-dessous.
- Ne connectez pas le cordon d'alimentation avant d'avoir effectué toutes les autres connexions.
- Lorsque vous changez les connexions, éteignez tous les appareils avant de commencer.
Méthode 1 Connexion à un récepteur AV prenant en charge la technologie HDMI 4K
• À l’aide du câble HDMI (non fourni), reliez la prise HDMI OUT située à l'arrière de l'appareil à la prise
HDMI IN de votre récepteur.
• Qualité optimale (recommandé)
Audio/Vidéo
Récepteur AV
compatible
HDMI 4K
|
16 Français
Vidéo
Page 88

03 Branchements
Méthode 2
Branchement à un récepteur AV ne prenant pas en charge la spécification HDMI
4K à l’aide d’un câble HDMI
• À l’aide du câble HDMI (non fourni), reliez la prise HDMI OUT située à l'arrière de l'appareil à la prise
HDMI IN de votre récepteur.
• Qualité optimale (recommandé)
Ou
VidéoAudio
Récepteur HDMI
| ATTENTION |
\Ne connectez pas les bornes HDMI OUT 1 et HDMI OUT 2 au produit à l’aide d'un câble HDMI.
Français 17
|
Page 89

Branchements
Méthode 3 Méthode 3 Raccordement à une chaîne hi-fi (amplificateur 7.1 canaux)
• L’utilisation de câbles audio 7.1 canaux (non fournis), branchez les bornes 7.1CH ANALOG AUDIO
OUT à l’arrière du lecteur 7.1CH ANALOG AUDIO IN à votre amplificateur.
• Meilleure qualite
Méthode 4 Connexion à un récepteur AV prenant en charge la technologie Dolby Digital ou
un décodeur DTS
• À l’aide d'un câble coaxial numérique (non fourni), reliez la prise de sortie audio numérique Optique
située sur l'appareil à la prise d'entrée coaxiale numérique de votre récepteur.
• Bonne qualité
• Le son ne sortira que par les deux enceintes frontales si l'option Audio numérique est réglée à PCM.
Audio
Amplificateur
7.1 canaux
| REMARQUE |
\Les sorties gauche et droite de votre lecteur et l’amplificateur 7.1 canaux doivent être branchées pour entendre le son du
menu du disque de certains disques Blu-ray.
\Lors de la connexion à un cinéma maison ou à un récepteur 5.1 canaux, connectez tous les prises de sortie audio
analogiques du lecteur sauf les sorties ambiophoniques arrière gauche/ambiophoniques droite.
|
18 Français
Page 90

03 Branchements
Connexion à un routeur réseau
Vous pouvez connecter le lecteur à un routeur à
l'aide d'une des méthodes illustrées ci-dessous.
Pour utiliser la fonction AllShare, vous devez
connecter l’ordinateur au réseau, tel qu’indiqué
dans les figures.
La connexion peut être câblée ou sans fil.
Réseau câblé
Modem large bande
(avec routeur intégré)
Service
Ou
Routeur
Modem large
bande
| REMARQUE |
\Votre routeur ou les politiques de votre fournisseur
d’accès Internet pourrait empêcher le lecteur d’accéder
au serveur de mise à jour du logiciel Samsung. Si cela se
produit, contactez votre fournisseur d'accès Internet pour
obtenir de plus amples renseignements.
\Les utilisateurs DSL doivent passer par un routeur pour la
connexion au réseau.
large bande
Service
large bande
Réseau sans fil
Routeur sans fil
Service large
bande
| REMARQUE |
\Si le routeur prend en charge le protocole DHCP,
votre lecteur pourra utiliser une adresse DHCP ou une
adresse IP fixe pour la connexion au réseau sans fil.
\Réglez le routeur réseau en mode Infrastructure. Le mode
Ad-hoc n'est pas pris en charge.
\Le lecteur ne prend en charge que les protocoles de clé
de sécurité sans fil suivants :
- WEP (OPEN/SHARED), WPA-PSK (TKIP/AES),
WPA2-PSK (TKIP/AES)
\Sélectionnez un canal sur le routeur réseau qui soit
actuellement libre. Si le canal défini pour le routeur
réseau est en cours d’utilisation par un autre périphérique
à proximité, il pourra en résulter des interférences et un
échec de communication.
\Lorsque le mode Pure High-throughput (Greenfield)
802.11n est sélectionné et le type de cryptage sur
le routeur est réglé à WEP, à TKIP ou à TKIP-AES
(WPS2Mixed), le lecteur ne prendra pas en charge une
connexion compatible avec les nouvelles spécifications de
certification Wi-Fi.
\Par nature, le réseau LAN peut provoquer des
interférences, selon les conditions de fonctionnement
(performance du routeur, distance, obstacles,
interférences avec d'autres appareils radio, etc.).
Français 19
|
Page 91

Paramètres
Procédure de paramétrage initiale
• L'écran Accueil n'apparaîtra pas si vous ne configurez
pas les paramètres initiaux.
• L'affichage à l'écran OSD peut changer sur ce lecteur
après la mise à niveau de la version du logiciel.
• Les étapes d'accès peuvent varier selon le menu
sélectionné.
Allumez le téléviseur et le lecteur, après avoir
branché le lecteur au téléviseur.
Lorsque vous allumez le lecteur pour la première
fois, l’écran Paramètres initiaux s’affiche sur le
téléviseur. La procédure Paramètres initiaux vous
permet de configurer l’affichage à l’écran et les
langues du menu, le format d’affichage (taille
de l'écran), le type de réseau et de connecter le
lecteur à votre réseau.
| REMARQUE |
\Si vous décidez d'ignorer la Configuration réseau pendant
la procédure Paramètres initiaux, vous pouvez le faire
ultérieurement. Consultez la section « Configuration de
votre connexion réseau » aux pages 29 à 31 pour les
instructions.
\Si vous souhaitez afficher de nouveau l'écran Paramètres
initiaux pour procéder à des modifications, sélectionnez
Paramètres > Système > Configuration à l'écran
Accueil ou sélectionnez l'option Réinitialisation. (reportezvous aux pages 26 et 28).
\Si vous souhaitez utiliser une fonction Anynet+(HDMI-
CEC), veuillez suivre les directives ci-dessous.
1) Branchez le lecteur à un téléviseur Samsung conforme
à la fonctionnalité Anynet+(HDMI-CEC) à l'aide d'un
câble HDMI.
2) Réglez la fonction Anynet+(HDMI-CEC) sur Activ. à la
fois sur le téléviseur et le lecteur.
3) Réglez le téléviseur à la Procédure de paramétrage
initiale.
L'écran Accueil
Films et
émissions de
6
télé
5
Applications : Cette option vous permet de
télécharger plusieurs applications gratuites ou
1
payantes.
Photos, vidéos et musique : Vous permet de
lire des contenus vidéo, photo ou musicaux d'un
2
disque, un périphérique USB, un ordinateur ou un
appareil mobile.
Paramètres : Ouvre le menu du lecteur qui vous
permet de configurer plusieurs fonctions de manière
3
à ce qu’elles reflètent vos préférences personnelles.
Navigateur Web : Procure l'accès à Internet.
4
Applications recommandées : Vous donne un
5
accès direct aux applications recommandées.
Films et émissions de télé : Vous permet de
télécharger des films et des programmes télévisés à
partir d'Internet.
6
| REMARQUE |
\Selon le pays, cette fonction de menu pourrait
ne pas être prise en charge.
| REMARQUE |
\
Si le lecteur reste en mode Arrêt pendant plus de 5 minutes
sans interface utilisateur, un économiseur d'écran
s'affichera sur le téléviseur. Si le lecteur reste en mode
Économiseur d'écran pendant plus de 20 minutes, il
s'éteindra automatiquement.
Applications Photos,
Allez à Apps et connectez-vous au
réseau pour obtenir les applications
recommandées.
vidéos et
musique
Navigateur Web
Paramètres
a
Compte Samsung d Recopie d'écran
1
2
3
4
|
20 Français
Page 92

04 Paramètres
Accès au menu Paramètres
1
4
7
VOL
+
2
5
8
0
VOL
–
3
6
9
SOURCE
DISC MENU
SMART
TITLE MENU
VOL VOL
POPUP
SAMSUNG TV
– +
HOME
REPEAT
1. Sélectionnez Paramètres sur l'écran Accueil,
puis appuyez sur le bouton v. L’écran
Paramètres apparaît.
Paramètres
Affichage
Affichage
Sortie 4K Auto
Audio
Réglages 3D
Réseau
Format d'image télé
16:9 original
BD Wise Désac.
Fonctions Smart
Définition Auto
Système
Fréquence cinéma (24 ips) Auto
Assistance
Conversion DVD 24 i/s Désac.
2. Pour accéder aux menus, sous-menus et
options de l'écran Paramètres, veuillez vous
reporter à l'illustration de la télécommande cidessous.
Boutons de la télécommande utilisés
pour naviguer dans le menu Paramètres
1
HOME
HUB
APPS
INFOTOOLS
Informations détaillées sur les fonctions
Chaque fonction, élément et option du menu
Paramètres est expliqué en détail à l'écran. Pour
voir une explication, utilisez les boutons ▲▼◄►
pour sélectionner la fonction, l'élément ou l'option.
En général, l'explication apparaîtra à la droite
de l’écran. Une brève description de chaque
fonction du menu Paramètres commence à la
page suivante. On peut trouver de l'information
supplémentaire sur certaines fonctions dans
l'Annexe de ce manuel.
2 4
Bouton HOME : Appuyez sur ce bouton pour
1
accéder au menu Accueil.
Bouton RETURN : Permet de revenir au menu
2
précédent.
Boutons v (Entrée)/DIRECTION :
RETURN
EXIT
• Appuyez sur les boutons ▲▼◄► pour
déplacer le curseur ou sélectionner un élément.
3
• Appuyez sur le bouton v pour activer
l'élément actuellement sélectionné ou confirmer
un réglage.
Bouton EXIT : Appuyez sur ce bouton pour quitter le
4
menu actuellement sélectionné.
3
Français 21
|
Page 93

Paramètres
Fonctions du menu Paramètres
Affichage
Sortie 4K
Réglages 3D
Format d'image télé
BD Wise
Définition
Fréquence cinéma
(24 ips)
Cette option restitue la vidéo HDMI à une résolution de
4K. Cette option est seulement accessible lorsque la
fonction Trame vidéo est réglée à Auto.
| REMARQUE |
\
Pour utiliser cette fonction, vous devez brancher le lecteur
à un dispositif qui prend en charge la résolution 4K et le
contenu doit pouvoir être lu en 24 ips (images par seconde).
Vous pouvez choisir de lire en mode 3D ou non un
disque Blu-ray comportant des contenus 3D.
•
Si vous allez à l'écran Accueil ou Smart Hub en mode
3D, le lecteur basculera en 2D automatiquement.
Vous permet d'ajuster la sortie du lecteur à la taille et au
format de l'écran de votre téléviseur.
BD Wise est la fonctionnalité d’interconnectivité de
Samsung la plus récente. Lorsque vous connectez un
lecteur Samsung et un téléviseur Samsung doté de
la fonction BD Wise via HDMI et que le lecteur et le
téléviseur disposent tous deux de la fonctionnalité BD
Wise, le lecteur émet des images dont la résolution
vidéo et la vitesse de défilement sont identiques à celles
du disque Blu-ray/DVD.
Pour régler la résolution de sortie du signal vidéo HDMI
à BD Wise, Auto,1080p, 1080i, 720p ou 480p.
Ces valeurs sont indicatives du nombre de lignes vidéo
par image.
Les lettres i et p signifient balayage entrelacé (i) et
progressif (p). De manière générale, plus il y a de lignes,
plus la qualité de l'image est supérieure.
Si le lecteur est connecté à un téléviseur compatible 24
ips, le réglage de la fonction Fréquence cinéma (24 ips)
à Auto permet au lecteur d'ajuster automatiquement la
sortie HDMI à 24 images par seconde afin d'améliorer la
qualité de l'image.
•
La fonction Fréquence cinéma (24 ips) n'est
disponible que sur un téléviseur compatible avec
cette vitesse de défilement.
•
Vous ne pouvez sélectionner Fréquence cinéma que
lorsque le lecteur est en mode de résolution de sortie
HDMI 1080i ou 1080p.
|
22 Français
Page 94

04 Paramètres
Affichage
Conversion DVD 24 i/s
Taille écran Smart Hub
Format couleurs HDMI
Couleurs profondes
HDMI
Mode progressif
Convertit les données de lecture du DVD à une cadence
de 24 images par seconde et les restitue par une
connexion HDMI. Cette option est seulement accessible
lorsque la fonction Fréquence cinéma (24 ips) est activée.
Permet de sélectionner le format d'image optimal de
l'écran Smart Hub.
Permet de régler l'espace colorimétrique applicable à
la sortie HDMI en réponse aux capacités de l'appareil
connecté (téléviseur, moniteur, etc.). L'écran s'obscurcit
temporairement suite à la sélection d'un format.
Pour obtenir une sortie vidéo HDMI en couleurs profondes.
L'option Couleur intense permet une reproduction plus
fidèle des couleurs, notamment en termes de profondeur.
Cette option permet d'améliorer la qualité de l'image
lors de la lecture d'un DVD.
Audio
Sortie numérique
Sous-échantillonnage
PCM
Réglage de la plage
dynamique
Mode de mixage
réducteur
Pour sélectionner le format de sortie audio numérique
qui convient à votre téléviseur ou récepteur AV. Pour de
plus amples renseignements, reportez-vous au tableau
de sélection de la sortie numérique de la page 65.
Pour obtenir un sous-échantillonnage des signaux
96 Khz PCM à 48 Khz avant leur sortie vers un
amplificateur. Choisissez Activ. si votre amplificateur ou
votre récepteur n'est pas compatible avec un signal de
96 Khz.
Règle la compression dynamique pour les formats audio
Dolby Digital, Dolby Digital Plus et Dolby TrueHD.
Auto : Contrôle automatiquement la dynamique de
l'audio Dolby TrueHD, en fonction des informations
fournies par la piste audio Dolby TrueHD. Active aussi
la compression dynamique pour les formats Dolby
Digital et Dolby Digital Plus.
Désac. : Aucune compression dynamique, vous
laisse entendre le son original.
Activ. : Active la compression dynamique pour les
trois formats Dolby. Le volume des sons feutrés
est augmenté et le volume des sons bruyants est
diminué.
Pour sélectionner la méthode de sous-mixage
multicanal compatible avec votre chaîne stéréo. Vous
pouvez choisir un sous-mixage en stéréo normale ou en
stéréo ambiophonique.
Français 23
|
Page 95

Paramètres
Audio
Mode DTS Neo:6
Sync. audio
Sortie audio HDMI
Réglage haut-parleurs
Vous pouvez bénéficier du son multicanal via la sortie
HDMI d'une source audio à deux canaux.
Dans certains cas, lorsque le produit est connecté à
un téléviseur numérique, le signal audio peut ne pas
être synchronisé avec le signal vidéo. Lorsque cela
se produit, il faut régler le temps de retard audio de
manière à ce qu'il corresponde au signal vidéo.
•
Vous pouvez régler le délai de retard audio entre 0
msec et 200 msec.
Veillez à le spécifier sur le réglage optimal.
| REMARQUE |
\ Le temps de retard audio ainsi spécifié peut ne pas être
exact, selon le type de contenu en cours d'exécution.
Réglez la sortie audio par les bornes HDMI1 et HDMI2.
Auto : La sortie audio peut être automatiquement
réglée en fonction des périphériques branchés aux
bornes HDMI1 et HDMI2.
HDMI1 : Le son sera restitué par le périphérique
branché à la borne HDMI1.
HDMI2 : Le son sera restitué par le périphérique
branché à la borne HDMI2.
Vous permet de sélectionner le type, la taille et le nombre
d’enceintes que vous avez raccordées au lecteur, de régler
les paramètres des enceintes raccordées et d'activer et de
désactiver la tonalité d’essai pour que vous puissiez vérifier
les enceintes.
Taille :
Vous permet de sélectionner la taille de chaque
type d'enceinte raccordée - Petit ou Grand - ou
d’indiquer que vous n'avez pas d'enceinte d'un type
particulier raccordé en sélectionnant Aucun. Si vous
sélectionnez
d’enceinte apparaîtra en grisé dans les écrans Niveau
et Distance.
Niveau : Vous permet de régler le niveau sonore
relatif de chaque enceinte de 6 dB à -6 dB. Par
exemple, si vous aimez les basses profondes, vous
pouvez augmenter le niveau sonore du caisson des
basses de 6dB.
Distance : Vous permet de régler la distance relative
de chaque enceinte de la position d’écoute jusqu’à
9 mètres (30 pieds). Plus grande est la distance, plus
fort sera le son restitué par l'enceinte.
Tonalité d’essai : Vous permet d'utiliser la fonction
de tonalité d’essai pour que vous puissiez vérifier
vos réglages. Régler la tonalité d’essai à Activ.
permet d’activer cette fonction. Le réglage à Désac.
désactive la fonction.
Aucun pour ce type d’enceinte, le type
|
24 Français
Page 96

04 Paramètres
Réseau
État du réseau Pour vérifier l'état actuel du réseau et de l'Internet.
Paramètres réseau
Wi-Fi Direct
Paramètres AllShare
Nombre dispos.
Paramètres BD-Live
Configure la connexion réseau de façon à profiter de
fonctionnalités variées telles que des services Internet,
AllShare Wi-Fi et la mise à niveau de logiciels.
Permet de connecter un périphérique Wi-Fi Direct
au lecteur à l'aide d'un réseau poste-à-poste, sans
nécessiter de routeur sans fil.
Notez que si le lecteur est connecté à un réseau sans
fil, il pourrait être déconnecté pendant l'utilisation de la
fonction Wi-Fi Direct.
| REMARQUE |
\Des fichiers texte, comme des fichiers portant une extension
.TXT ou .DOC ne peuvent pas être lus lors de l'utilisation de
la fonction Wi-Fi Direct.
Vous permet de contrôler quels appareils de votre réseau,
comme des téléphones intelligents et des tablettes,
peuvent partager du contenu sur votre téléviseur.
Pour saisir le nom du lecteur servant à l'identifier sur vos
réseaux.
Règle diverses fonctions BD-Live. BD-Live permet
d'accéder à des fonctions supplémentaires disponibles sur
certains disques Blu-ray si vous êtes connecté à Internet.
Connexion Internet BD-Live : Pour autoriser
pleinement, partiellement, ou interdire la connexion
Internet BD-Live.
Gestion données Blu-ray : Permet de gérer les
données téléchargées sur des disques Blu-ray depuis
le service BD-Live.
Fonctions Smart
Réglage des app.
Verrouillage de
classement VOD
Conditions, politique de
confid.
Réinitialisation Smart
Hub
Vous permet de configurer les réglages de notification
des applications et d’afficher des renseignements de
base sur vos applications.
Param. de notification forcée : Permet de recevoir
des notifications des services sélectionnés.
Propriétés : Permet de consulter des renseignements
de base sur les applications.
Vous pouvez bloquer l’accès au contenu de vidéo sur
demande (VOD) en fonction de sa classification.
| REMARQUE |
\Selon le pays, cette fonction de menu pourrait ne pas être
prise en charge.
Vous devez lire et accepter les conditions relatives au
Smart Hub et à la vie privée avant de pouvoir utiliser les
services Smart Hub.
Réinitialise les paramètres de compte Samsung et
Smart Hub stockés dans votre appareil.
Français 25
|
Page 97

Paramètres
Système
Configuration
Démarr. rapide
Langue
Gest. périph.
Pour recommencer l'exécution de la procédure
Paramètres initiaux.
Pour mettre le lecteur sous tension rapidement en
abrégeant le temps d'amorçage.
| REMARQUE |
\Si cette fonction est réglée à Activ., la consommation en
mode Veille augmentera.
Vous pouvez sélectionner la langue de votre choix pour le
menu à l'écran, le menu du disque, les sous-titres, etc.
•
La langue sélectionnée pour le menu du disque,
l'audio du disque ou les sous-titres ne s'appliquera
que si le disque la prend en charge.
Vous pouvez connecter un clavier ou une souris USB
dans le port USB situé à l’avant du lecteur.
Réglages du clavier : Pour configurer un clavier USB
sans fil connecté au lecteur.
| REMARQUE |
\L'utilisation du clavier est seulement possible à partir du
moment où l'écran ou la fenêtre du clavier QWERTY apparaît
dans le navigateur Web.
Réglages du souris : Pour configurer une souris USB
sans fil connectée au lecteur. Vous pouvez utiliser la
souris dans le menu du lecteur et le navigateur Web
de la même manière que vous utilisez une souris sur
un ordinateur.
`Pour utiliser une souris avec le menu du lecteur :
Connectez la souris USB au lecteur.
1.
2.
Cliquez sur un bouton primaire que vous avez
sélectionné à la rubrique Paramètres de la souris.
Le menu Simple apparaît.
3.
Cliquez sur les options de menu désirées.
| REMARQUE |
\Certains claviers et souris USB HIB pourraient ne pas être
compatibles avec votre produit.
\Certaines touches de clavier HID peuvent ne pas fonctionner.
\Les claviers USB câblés ne sont pas pris en charge.
\Il se peut que certaines applications ne soient pas prises en
charge.
\Si un clavier HID sans fil ne fonctionne pas à cause du
brouillage, rapprochez-le du lecteur.
|
26 Français
Page 98

04 Paramètres
Système
Sécurité
Général
Anynet+(HDMI CEC)
Saisissez le NIP par défaut (0000) pour accéder à la
fonction de sécurité si vous n'avez pas créé le vôtre.
Après votre premier accès à la fonction de sécurité,
changez le NIP à l'aide de la fonction Changer NIP.
Classement BD : Empêche la lecture des disques
Blu-ray comportant un classement égal ou supérieure
à une tranche d'âge spécifique à moins d'entrer le
NIP.
Classem. parental DVD : Empêche la lecture de
DVD comportant un classement numérique spécifique
à moins d'entrer le NIP.
Changer NIP : Pour modifier le NIP à 4 chiffres utilisé
pour accéder aux fonctions de sécurité.
`En cas d'oubli du NIP :
Retirez le disque ou le support de stockage USB.
1.
2.
Ppuyez sur la touche @ située sur la face
supérieure et maintenez-la enfoncée pendant 5
secondes ou plus.
Tous les paramètres seront réinitialisés sur leur
valeur d'origine par défaut.
Vous pouvez personnaliser les options énumérées selon
vos préférences.
preferences.
Affichage avant : Permet de modifier la luminosité du
panneau avant.
Fuseau hor. : Choisissez le fuseau horaire de votre
région.
Transparence menu : Ajuste la transparence de la
boîte de menu.
Anynet+ est une fonction pratique qui offre des
commandes communes avec d'autres lecteurs
Samsung dotées de la fonction Anynet+; vous
pouvez contrôler ces produits à l'aide d'une seule
télécommande de téléviseur Samsung. Pour utiliser
cette fonction, connectez ce lecteur à un téléviseur
Samsung compatible Anynet+ à l'aide d'un câble HDMI.
Français 27
|
Page 99

Paramètres
Assistance
Gestion à distance
Mise à jour du logiciel
Communiquer avec
Samsung
Réinit.
Une fois activée, cette fonction permet aux techniciens
du Centre d'appels Samsung de diagnostiquer et de
résoudre, à distance, les problèmes relatifs au produit.
Une connexion Internet active est nécessaire.
| REMARQUE |
\Il se peut que le service de gestion à distance ne soit pas
disponible dans certains pays.
\Contactez votre centre de service local en ayant votre code
NIP à portée de la main et communiquez-le à la personne
responsable. Cela permet d'établir un diagnostic et des
mesures correctrices à distance du produit.
Pour de plus amples renseignements sur la fonction
Mise à niveau du logiciel, consultez la section « Mise à
niveau du logiciel » aux pages 33 et 34.
Permet d’obtenir les informations de contact pour les
demandes d’assistance portant sur le lecteur.
Réinitialise tous les réglages à leurs valeurs par défaut,
à l'exception des paramètres réseau et Smart Hub, puis
lance la fonction de configuration.
Le NIP de sécurité par défaut est 0000.
|
28 Français
Page 100

04 Paramètres
Réseaux et Internet
Lorsque vous connectez ce lecteur à un réseau,
vous pouvez utiliser des applications et des
fonctions réseau telles que Smart Hub et BDLIVE, et aussi mettre à niveau les logiciels du
lecteur par une connection réseau. Pour en
savoir plus sur l'accès et l'utilisation des services
Internet, consultez le chapitre Services réseau de
ce manuel aux pages 47 à 58. Les directives pour
configurer le réseau débutent ci-dessous.
Configuration de votre connexion
réseau
Avant de commencer, contactez votre fournisseur
de services Internet pour savoir si votre adresse
IP est fixe ou dynamique. Si elle est dynamique
et utilisez un réseau câblé ou sans fil, nous vous
recommandons de suivre les procédures de
configuration automatique décrites ci-dessous.
Si vous vous connectez à un réseau câblé,
branchez le lecteur à votre routeur à l'aide d'un
câble LAN avant de lancer la procédure de
configuration.
Si vous vous connectez à un réseau sans fil,
débranchez toute connexion réseau câblée avant
de commencer.
Pour configurer la connexion réseau, suivez ces
étapes :
Réseau câblé
Ğ
Câblé - Automatique
1. À l'écran Accueil, sélectionnez Paramètres,
puis appuyez sur le bouton v.
2. Sélectionnez Réseau, puis appuyez sur le
bouton v.
3. Sélectionnez Paramètres réseau, puis
appuyez sur la bouton v.
4. Sélectionnez Câblé à l'écran Paramètres
réseau, puis appuyez sur le bouton v.
5. Sélectionnez Connexion, puis appuyez sur le
bouton v. Le produit détecte la connexion
câblée, vérifie la connexion puis se connecte
au réseau.
Ğ
Câblé - Manuel
Si vous disposez d'une adresse IP fixe ou si la
procédure automatique est inopérante, vous
devrez définir les valeurs de Paramètres réseau
manuellement.
Suivez les étapes 1 et 2 de la rubrique Réseau
câble, puis procédurez comme suit :
1. Sélectionnez État du réseau. Le lecteur
recherche un réseau, puis affiche le message
indiquant l'échec de la connexion.
2. Au bas de l'écran, sélectionnez Param. IP,
puis appuyez sur le bouton v.
L'écran Paramètres IP apparaît.
3. Sélectionnez le champ Paramètre IP, puis
appuyez sur le bouton v.
4. Sélectionnez Entrer manuellement dans
le champ Paramètre IP, puis appuyez sur le
bouton v.
5. Sélectionnez une valeur à saisir (par exemple
l'Adresse IP), puis appuyez sur le bouton
.Utilisez le pavé numérique de votre
v
télécommande pour saisir les chiffres de la
valeur. Vous pouvez saisir les chiffres à l'aide
des boutons ▲▼. Utilisez les boutons ◄►
de la télécommande pour vous déplacer
d'un champ de saisie à l'autre d'une valeur.
Une fois l'opération terminée pour une valeur,
appuyez sur le bouton v.
6. Appuyez sur le bouton ▲ ou ▼ pour passer
d'une valeur à une autre, puis saisissez les
chiffres correspondant à cette valeur en
suivant les directives de l'étape 5.
7. Répétez les étapes 5 et 6 jusqu'à ce que
toutes les valeurs aient été saisies.
| REMARQUES |
\Vous pouvez obtenir les valeurs du réeau de votre
fournisseur Internet.
8. Une fois l'opération de saisie terminée pour
toutes les valeurs, sélectionnez OK, puis
appuyez de nouveau sur le bouton v. Le
lecteur vérifie la connexion réseau puis se
connecte à celui-ci.
Français 29
|
 Loading...