

Page 1

BD-ES5000
Blu-ray
user manual
imagine the possibilities
Thank you for purchasing this Samsung product.
To receive more complete service,
please register your product at
www.samsung.com/register
™
Disc Player
ENGLISH
Page 2
Key features
Safety Information
Blu-ray Disc Features
Blu-ray Discs support the highest quality HD
video available in the industry - Large capacity
means no compromise on video quality.
The following Blu-ray Disc features are disc
dependant and will vary. Appearance and
navigation of features will also vary from disc
to disc. Not all discs will have the features
described below.
Video highlights
The BD-ROM format supports three highly
advanced video codecs, including AVC, VC-1
and MPEG-2.
HD video resolutions are also supported:
• 1920 x 1080 High Definition
• 1280 x 720 High Definition
For High-Definition Playback
To view high-definition contents on a Blu-ray Disc,
you need an HDTV (High Definition Television).
Some Blu-ray Discs may require you to use the
player’s HDMI OUT to view high-definition content.
The ability to view high-definition content on
Blu-ray Discs may be limited depending on
the resolution of your TV.
BD-LIVE
You can use a Blu-ray Disc that supports
BD-LIVE to download content provided by
the disc manufacturer through a network
connection.
Blu-ray Disc Player Features
AllShare
You can play videos, music, and photos
saved on your devices (such as your PC or
NAS [Network-Attached Storage]) through a
network connection.
Playing multimedia files
You can use the USB connection to play
various kinds of multimedia files (MP3, JPEG,
DivX, etc.) located on a USB storage device.
Warning
TO REDUCE THE RISK OF ELECTRIC SHOCK, DO NOT REMOVE THE COVER (OR BACK).
NO USER-SERVICEABLE PARTS ARE INSIDE. REFER SERVICING TO QUALIFIED SERVICE
PERSONNEL.
CAUTION
RISK OF ELECTRIC SHOCK
DO NOT OPEN
The lighting flash and Arrowhead within
the triangle is a warning sign alerting you
of dangerous voltage inside the product.
Do not install this equipment in a confined
space such as a bookcase or similar unit.
WARNING
To prevent damage which may result in fire
or electric shock hazard, do not expose this
appliance to rain or moisture.
CAUTION
Blu-ray Disc Player USES AN INVISIBLE
LASER BEAM WHICH CAN CAUSE
HAZARDOUS RADIATION EXPOSURE IF
DIRECTED. BE SURE TO OPERATE Blu-ray
Disc Player CORRECTLY AS INSTRUCTED.
CLASS 1 LASER product
This Compact Disc player is classified as a
CLASS 1 LASER product. Use of controls,
adjustments or performance of procedures
other than those specified herein may result
in hazardous radiation exposure.
CAUTION:
TO REDUCE THE RISK OF ELECTRIC
SHOCK, DO NOT REMOVE COVER (OR BACK)
NO USER SERVICEABLE PARTS INSIDE.
REFER SERVICING TO QUALIFIED SERVICE
PERSONNEL.
CAUTION :
• CLASS 3B VISIBLE AND INVISIBLE
LASER RADIATION WHEN OPEN. AVOID
EXPOSURE TO THE BEAM (IEC 60825-1)
• THIS PRODUCT UTILIZES A LASER.
USE OF CONTROLS OR ADJUSTMENTS
OR PERFORMANCE OF PROCEDURES
OTHER THAN THOSE SPECIFIED HEREIN
MAY RESULT IN HAZARDOUS RADIATION
EXPOSURE. DO NOT OPEN COVER AND
DO NOT REPAIR YOURSELF. REFER
SERVICING TO QUALIFIED PERSONNEL.
CLASS 1 LASER PRODUCT
KLASSE 1 LASER PRODUKT
LUOKAN 1 LASER LAITE
KLASS 1 LASER APPARAT
PRODUCTO LÁSER CLASE 1
The explanation point within the
triangle is a warning sign alerting you
of important instructions accompanying
the product.
2
Page 3
This product satisfies CE regulations when
shielded cables and connectors are used
to connect the unit to other equipment.
To prevent electromagnetic interference
with electric appliances, such as radios
and televisions, use shielded cables and
connectors for connections.
IMPORTANT NOTE
The mains lead on this equipment is supplied
with a moulded plug incorporating a fuse. The
value of the fuse is indicated on the pin face
of the plug.
If it requires replacing, a fuse approved to
BS1362 of the same rating must be used.
Never use the plug with the fuse cover
omitted if the cover is detachable. If a
replacement fuse cover is required, it must be
of the same colour as the pin face of the plug.
Replacement covers are available from your
dealer.
If the fitted plug is not suitable for the power
points in your house or the cable is not long
enough to reach a power point, you should
obtain a suitable safety approved extension
lead or consult your dealer for assistance.
However, if there is no alternative to cutting
off the plug, remove the fuse and then safely
dispose of the plug. Do not connect the plug
to a mains jack, as there is a risk of shock
hazard from the bared flexible cord.
To disconnect the apparatus from the mains,
the plug must be pulled out from the mains
socket, therefore the mains plug shall be
readily operable.
The product unit accompanying this user
manual is licensed under certain intellectual
property rights of certain third parties.
Precautions
Important Safety Instructions
Read these operating instructions carefully
before using the unit. Follow all the safety
instructions listed below.
Keep these operating instructions handy for
future reference.
1. Read these instructions.
2. Keep these instructions.
3. Heed all warnings.
4. Follow all instructions.
5. Do not use this apparatus near water.
6. Clean only with a dry cloth.
7. Do not block any ventilation openings.
Install in accordance with the
manufacturer’s instructions.
8. Do not install near any heat sources such
as radiators, heat registers, stoves, or
other apparatus (including AV receivers)
that produce heat.
9. Do not defeat the safety purpose of
the polarized or grounding-type plug.
A polarized plug has two blades with
one wider than the other. A grounding
type plug has two blades and a third
grounding prong. The wide blade or
the third prong are provided for your
safety. If the provided plug does not fit
into your outlet, consult an electrician for
replacement of the obsolete outlet.
10. Protect the power cord from being
walked on or pinched particularly at
plugs, convenience receptacles, and the
point where they exit from the apparatus.
11. Only use attachments/accessories
specified by the manufacturer.
12. Use only with the
cart, stand, tripod,
bracket, or table
specified by the
manufacturer,
or sold with the
apparatus. When a
cart is used, use caution when moving
the cart/apparatus combination to avoid
injury from tip-over.
13. Unplug this apparatus during lightning
storms or when unused for long periods
of time.
14. Refer all servicing to qualified service
personnel. Servicing is required when
the apparatus has been damaged in any
way, such as when power-supply cord or
plug is damaged, liquid has been spilled
or objects have fallen into the apparatus,
the apparatus has been exposed to rain
or moisture, does not operate normally,
or has been dropped.
Disc Storage & Management
Disc Handling
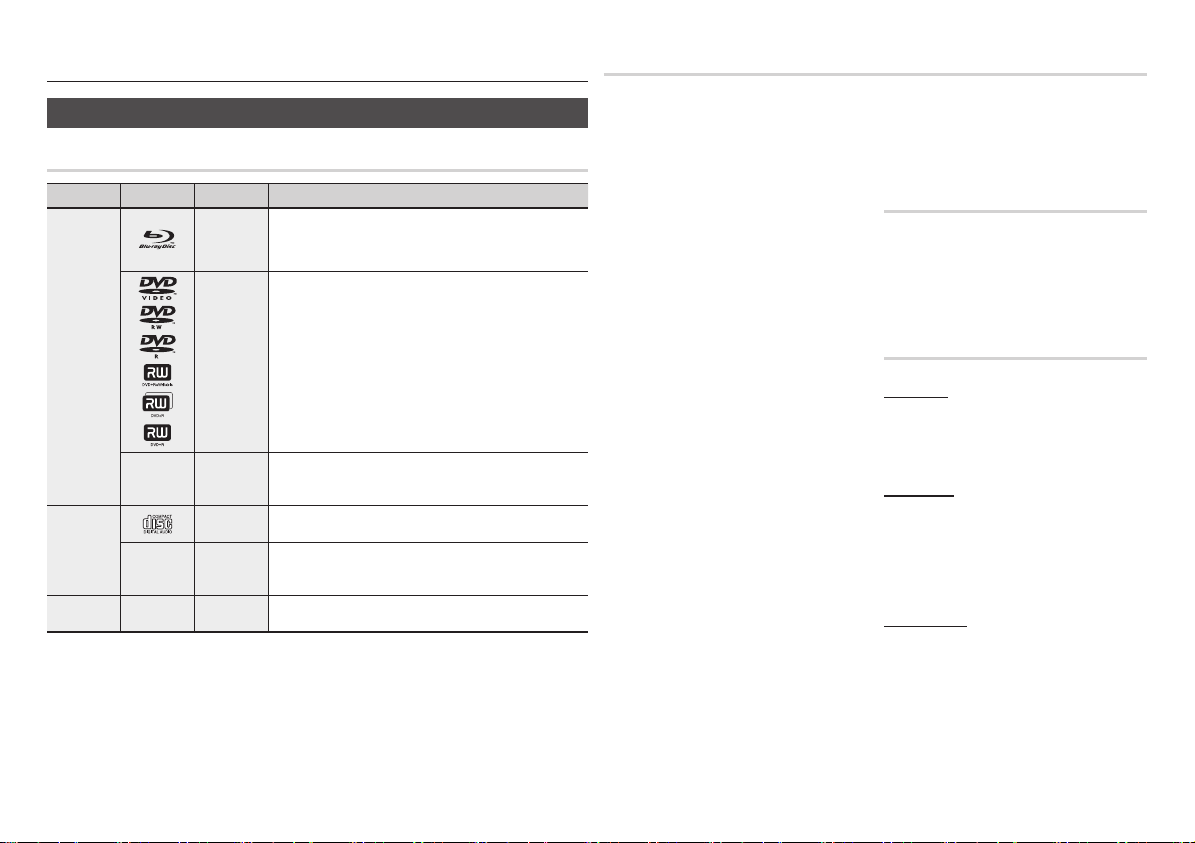
Disc Shape
• Use discs with
regular shapes. If you
use an irregular disc
(a disc with a special
shape), you can damage the player.
Holding discs
• Avoid touching the surface
of a disc where data has
been recorded.
Blu-ray Discs
• Do not leave a Blu-ray Disc in the player for
long periods of time. Remove the Blu-ray
Disc from the player and store it in its case.
• Be careful not to scratch or leave
fingerprints on the surface of the Blu-ray
Disc.
DVD-VIDEO, Audio CD (CD-DA)
• Wipe off dirt or contamination on the disc
with a soft cloth.
Disc Storage
Be careful not to damage the disc because
the data on these discs is highly vulnerable to
the environment.
• Do not keep under direct sunlight.
• Keep in a cool ventilated area.
• Store vertically.
• Keep in a clean, protective jacket.
• If you move your player suddenly from a
cold place to a warm place, condensation
may occur on the operating parts and lens
and cause abnormal disc playback. If this
occurs, unplug the player, wait for two
hours, and then connect the plug to the
power outlet. Then, insert the disc, and try
to play back again.
Handling Cautions
• Do not write on the printed side with a ballpoint pen or pencil.
• Do not use record cleaning sprays or
antistatic sprays to clean discs. Also,
do not use volatile chemicals, such as
benzene or thinner.
• Do not apply labels or stickers to discs.
(Do not use discs fixed with exposed tape
adhesive or leftover peeled-off stickers.)
• Do not use scratch-proof protectors or covers.
3
Page 4

• Do not use discs printed on by label
printers available on the market.
• Do not load warped or cracked discs.
• Before connecting other components to
this player, be sure to turn them off.
• Do not move the player while it is playing
a disc. The disc can be scratched or
damaged and the player’s internal parts
can be damaged.
• Do not put a flower vase filled with water or
any small metal objects on the player.
• Be careful not to put your hand into the
disc slot.
• Do not place anything other than the disc
in the disc slot.
• Interference from exterior sources such as
lightening and static electricity can affect
the normal operation of this player. If this
occurs, turn the player off and on again with
the POWER button, or disconnect and then
reconnect the AC power cord to the AC
power outlet. The player will operate normally.
• Be sure to remove the disc and turn off the
player after use.
• Disconnect the AC power cord from the
AC outlet when you don’t intend to use the
player for long periods of time.
• To clean a disc, wipe it in a
straight line from the inside to
the outside of the disc.
• Do not expose the player to
any liquid.
• When the AC plug is connected to a wall
outlet, the player will still draw power
(standby mode) when it is turned off.
• Apparatus shall not be exposed to dripping
or splashing and no objects filled with
liquids, such as vases, shall be placed on
the apparatus.
• The main plug is used as a disconnect device
and shall stay readily operable at any time.
• Do not touch the power plug with a wet hand.
Otherwise, it can cause an electric shock.
• Do not share one power socket with
multiple electric devices. Otherwise, it may
cause an overheat, resulting in a fire.
• If you encounter an abnormal noise, burning
smell or smoke, turn off the power switch
immediately and disconnect the power plug
from the wall outlet. Then, contact the nearest
customer centre for technical assistance.
If you still use the product as it is, this may
cause an electric shock or fire.
Maintenance of Cabinet
Before you clean the Blu-ray Disc’s cabinet,
be sure to disconnect the AC power cord
from the AC outlet.
• Do not use benzene, thinner, or other
solvents for cleaning.
• Wipe the cabinet with a soft cloth.
Restrictions on Playback
• This player may not respond to all operating
commands because some Blu-ray Disc,
DVD, and CD discs allow specific or limited
operation and provide only certain features
during playback.
Please note that this is not a defect in the
player.
• Samsung cannot guarantee that this player
will play every disc bearing the Blu-ray
Disc, DVD or CD logo because disc
formats evolve, and problems and errors
may occur during the creation of Blu-ray
Disc, DVD, and CD software and/or the
manufacture of discs.
Please contact the SAMSUNG customer
care centre if you have questions or
encounter difficulty in playing Blu-ray Disc,
DVD, or CD discs in this player. Also, refer
to rest of this user manual for additional
information on playback restrictions.
Contents
KEY FEATURES
Blu-ray Disc Features...................................2
Blu-ray Disc Player Features ........................2
SAFETY INFORMATION
Warning .......................................................2
Precautions .................................................3
Disc Storage & Management .......................3
GETTING STARTED
Before using the User Manual ......................5
Accessories .................................................7
Front Panel ..................................................8
Rear Panel ...................................................8
Remote Control ...........................................9
CONNECTIONS
A. Connecting to a TV .................................9
B. Connecting to an Audio System ............10
C. Connecting to a Network ......................10
SETUP
The Initial Settings Procedure.....................12
Menu Navigation ........................................12
Accessing the Settings Menu ....................12
Display ......................................................13
Audio .........................................................14
Network ....................................................16
System ......................................................17
Language ..................................................17
Security .....................................................17
General ......................................................18
Support .....................................................18
BASIC FUNCTIONS
Playing a Video ..............................................19
Using the Disc Menu/Title Menu/
Popup Menu..................................................19
Using the Search and Skip Functions ............19
Slow Motion Play/Step Motion Play ...............20
Using the TOOLS button ...............................20
Listening to Music..........................................21
Playing back Pictures ....................................22
Playing back a USB Storage Device ..............22
NETWORK SERVICES
BD-LIVE™ .................................................23
Using the AllShare Function .......................23
APPENDIX
Troubleshooting .........................................23
Specifications ............................................25
4
Page 5
Getting Started
Before using the User Manual
Disc Types and Contents your player can play
Content
VIDEO
MUSIC
PHOTO
NOTE
✎
▪The player may not play certain CD-RW/-R and DVD-R because of the disc type or recording conditions.
▪If a DVD-RW/-R disc has not been recorded properly in DVD video format, it will not be playable.
▪Your player will not play content that has been recorded on a DVD-R at a bit-rate that exceeds 10 Mbps.
▪Your player will not play content that has been recorded on a BD-R or USB device at a bit rate that exceeds
25 Mbps.
Logo Icon
h
z
Z
y
-
x
o
-
w
-
G
Definition
Indicates a function available on a BD-ROM or BD-RE/-R disc
recorded in the BD-RE format.
Indicates a function available on a DVD-VIDEO or recorded
DVD+RW/DVD-RW(V)/DVD-R/+R discs that have been recorded
and finalized.
Indicates a function available on a CD-RW/-R, DVD-RW/-R, BDRE/-R disc or in a USB storage media containing DivX, MKV, MP4
contents.
Indicates a function available on an audio CD-RW/-R (CD-DA
format).
Indicates a function available on a CD-RW/-R, DVD-RW/-R, BDRE/-R disc or in a USB storage media containing MP3 or WMA
contents.
Indicates a function available on a CD-RW/-R, DVD-RW/-R, BDRE/-R disc or in a USB storage media containing JPEG contents.
Disc types your player cannot play
• HD DVD
• DVD-ROM/PD/MV-
Disc, etc
NOTE
✎
▪Some commercial discs and DVDs discs purchased
outside your region may not play on this player.
▪Playback may not work for some types of discs,
or when you use specific operations, such as
angle change and aspect ratio adjustment.
Information about the discs is written in detail on
the disc box. Please refer to this if necessary.
▪Do not allow the disc to become dirty or
scratched. Fingerprints, dirt, dust, scratches or
deposits of cigarette smoke on the recording
surface may make it impossible to use the disc
for playback.
▪When you play a BD-J title, loading may take
longer than a normal title or some functions may
perform slowly.
▪This player may not respond to all operating
commands because some Blu-ray Disc, DVD, and
CD discs allow specific or limited operation and
provide only certain features during playback.
Please note that this is not a defect in the player.
▪Samsung cannot guarantee that this player will
play every disc bearing the Blu-ray Disc, DVD
or CD logo because disc formats evolve, and
problems and errors may occur during the creation
of Blu-ray Disc, DVD, and CD software and/or the
manufacture of discs.
Please contact the SAMSUNG customer care
centre if you have questions or encounter difficulty
when playing Blu-ray Disc, DVD, or CD discs in
this player. Also, refer to rest of this user manual
for additional information on playback restrictions.
• DVD-RAM
• Super Audio CD
(except CD layer)
• DVD-RW(VR mode)
• CVD/CD-ROM/CDV/
• 3.9 GB DVD-R Disc for
CD-G/CD-I/LD
(CD-Gs play audio only,
not graphics.)
Authoring.
Blu-ray Disc Compatibility
Blu-ray Disc is a new and evolving format.
Accordingly, disc compatibility issues are
possible. Not all discs are compatible and
not every disc will play back. For additional
information, refer to the Compliance and
Compatibility Notice section of this user manual.
Disc Types
BD-ROM
Blu-ray ROM discs can only be played back.
This player can play back pre-recorded
commercial BD-ROM discs.
BD-RE/-R
Blu-ray RE/-R discs can be recorded on and
played back.
This player can play back a BD-RE/-R disc
recorded by other compatible Blu-ray Disc
recorders.
DVD-VIDEO
• This player can play back pre-recorded
commercial DVDs (DVD-VIDEO discs) with
movies.
• When switching from the first layer to the
second layer of a dual-layered DVD-VIDEO
disc, there may be momentary distortion
in the image and sound. This is not a
malfunction of the player.
5
Page 6
DVD-RW/-R/+R
This player can play back a DVD-RW/-R/+R
disc recorded and finalized with a DVD video
recorder. The ability to play back may depend
on recording conditions.
DVD+RW
• This player can play back a DVD+RW
disc recorded with a DVD Video recorder.
The ability to play back may depend on
recording conditions.
Audio CD (CD-DA)
• This player can play back CD-DA format
audio CD-RW/-R discs.
• The player may not be able to play some
CD-RW/-R discs due to the condition of
the recording.
CD-RW/-R
• Use a 700MB (80 minute) CD-RW/-R disc.
If possible, do not use an 800MB (90
minute) or larger disc, as the disc may not
play back.
• If the CD-RW/-R disc was not recorded
as a closed session, you may experience
delays when playing back the beginning of
the disc or all recorded files may not play.
• Some CD-RW/-R discs may not play on
this player, depending on the device which
was used to burn them. For contents
recorded on CD-RW/-R media from CDs
for your personal use, playability may vary
depending on the contents and discs.
AVCHD (Advanced Video Codec High
Definition)
• This player can play back AVCHD format
discs. These discs are normally recorded
and used in camcorders.
• The AVCHD format is a high definition
digital video camera format.
• The MPEG-4 AVC/H.264 format
compresses images with greater efficiency
than the conventional image compressing
format.
• Some AVCHD discs use the “x.v.Color”
format. This player can play back AVCHD
discs that use “x.v.Color” format.
• “x.v.Color” is a trademark of Sony
Corporation.
• “AVCHD” and the AVCHD logo are
trademarks of Matsushita Electronic
Industrial Co., Ltd. and Sony Corporation.
NOTE
✎
▪Some AVCHD format discs may not play,
depending on the recording condition.
AVCHD format discs need to be finalized.
▪“x.v.Color” offers a wider color range than
normal DVD camcorder discs.
▪Some DivX, MKV and MP4 format discs may
not play, depending on the video resolution and
frame rate condition.
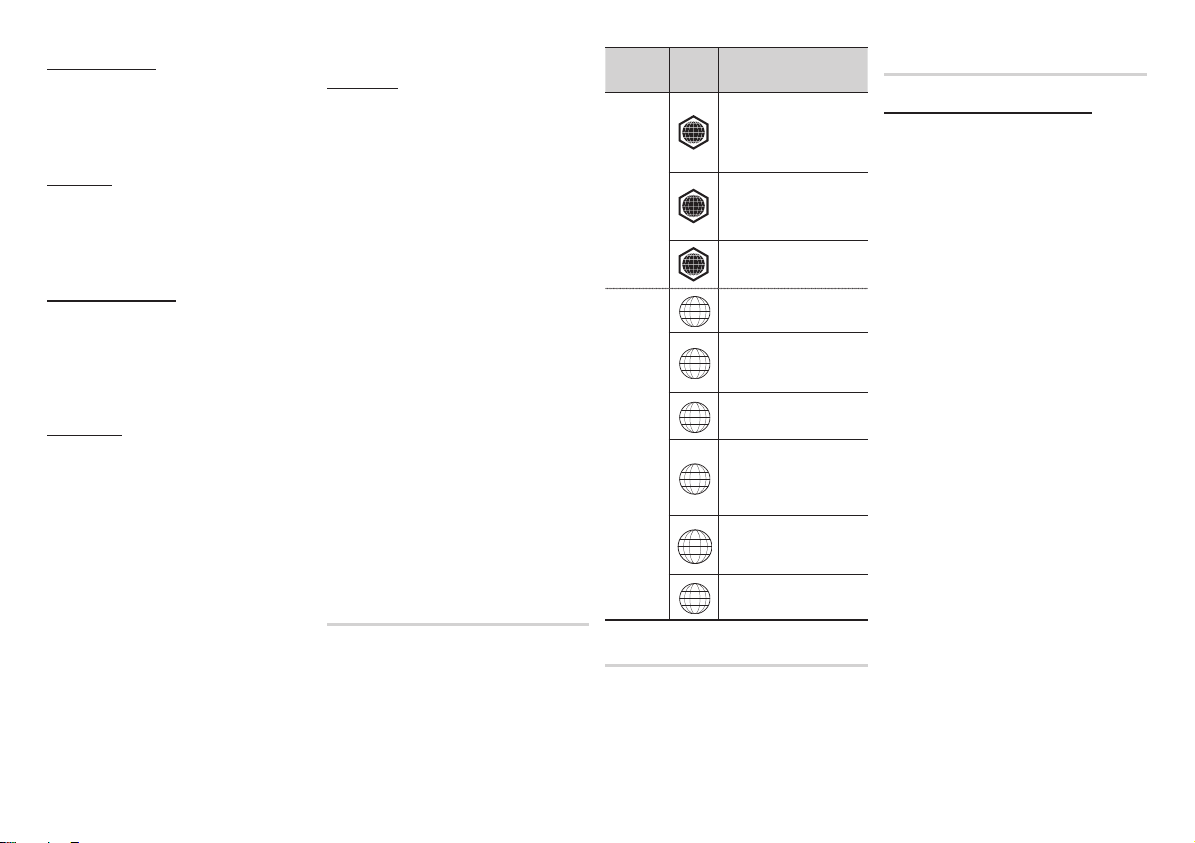
Region Code
Both players and discs are coded by region.
These regional codes must match for a disc
to play. If the codes do not match, the disc
will not play.
The Region Code for this player is displayed
on the rear panel of the player.
Blu-ray
Disc
Region
Code
North America, Central
America, South America,
A
Korea, Japan, Taiwan, Hong
Kong and South East Asia.
Europe, Greenland, French
territories, Middle East, Africa,
B
Australia and New Zealand.
India, China, Russia, Central
C
and South Asia.
The U.S., U.S. territories and
1
Canada
Europe, Japan, the Middle
East, Egypt, South Africa,
2
Greenland
Taiwan, Korea, the Philippines,
3
Indonesia, Hong Kong
Mexico, South America,
Central America, Australia,
4
New Zealand, Pacific Islands,
Caribbean
Russia, Eastern Europe, India,
most of Africa, North Korea,
5
Mongolia
China
6
Area
Disc Type
DVD-VIDEO
Copyright
© 2012 Samsung Electronics Co.,Ltd.
All rights reserved; No part or whole of this
user’s manual may be reproduced or copied
without the prior written permission of
Samsung Electronics Co.,Ltd.
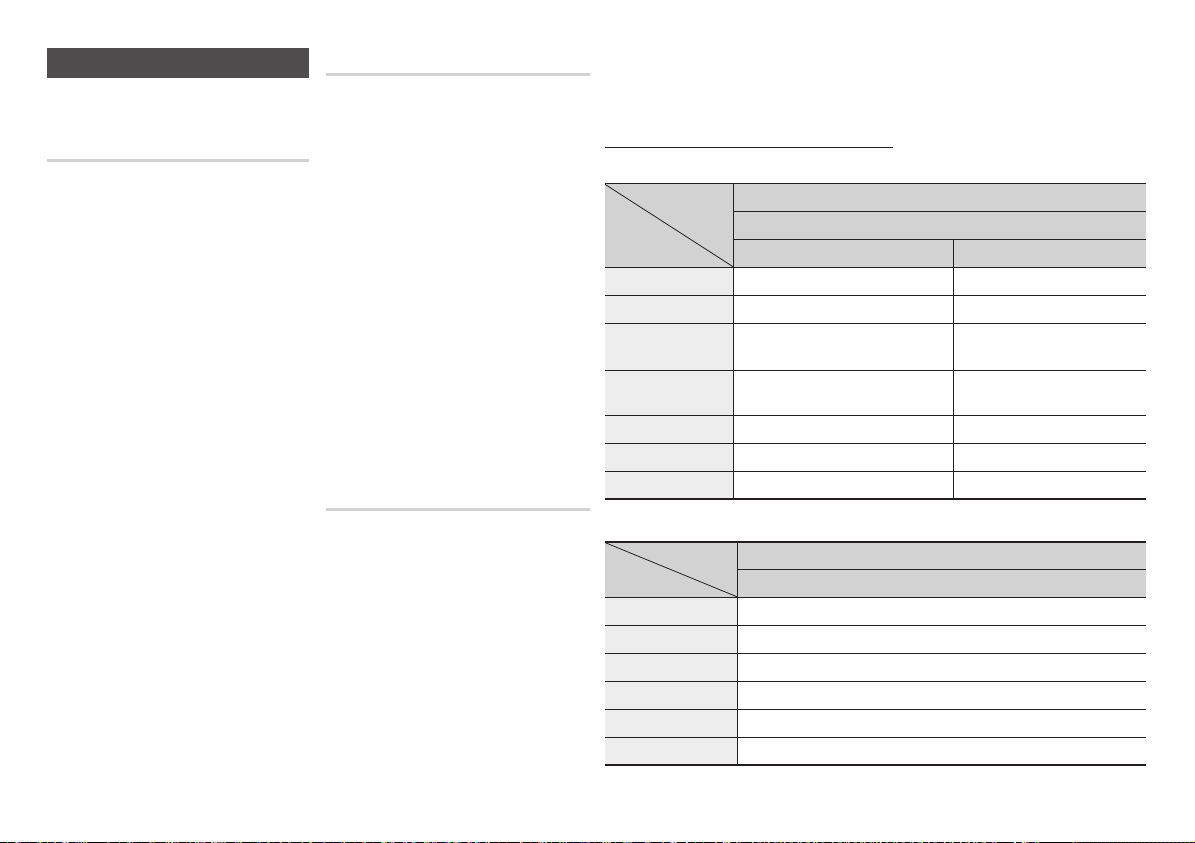
Supported File Formats
Notes on the USB connection
• Your player supports USB storage media,
MP3 players, digital cameras, and USB
card readers.
• The player does not support folder or file
names longer than 128 characters.
• Some USB/External HDD/digital camera
devices may not be compatible with the
player.
• Your player supports the FAT16, FAT32,
and NTFS files systems.
• Connect USB devices directly to the
player’s USB port. Connecting through
a USB cable may cause compatibility
problems.
• Inserting more than one memory device
into a multi-card reader may cause the
reader to operate improperly.
• The player does not support the PTP
protocol.
• Do not disconnect a USB device during a
“loading” process.
• The bigger the image resolution, the longer
the image takes to display.
• This player cannot play MP3 files with DRM
(Digital Rights Management) downloaded
from commercial sites.
• Your player only supports the video that is
under 30fps (frame rate).
6
Page 7
Video File Support
File Extension Container Video Codec Audio Codec Resolution
DivX 3.11/4.x/5.1/6.0
*.avi
*.mkv
*.wmv
*.mp4
*.mpg
*.mpeg
•Limitations
- Even when the file is encoded by a supported codec mentioned above, a file might not be
played if its content has a problem.
- Normal playback is not guaranteed if the file’s container information is wrong or the file itself is
corrupted.
-
Files having higher Bit rate/frame rate than standard may stutter during sound/video playback.
- The Seek (skip) function is not available if the file’s index table is damaged.
•Video decoder
- Supports up to H.264 Level 4.1and AVCHD
- Does not support H.264 FMO/ASO/RS, VC1 SP/MP/AP L4
- MPEG4 SP, ASP :
Below 1280 x 720 : 60 frames max
Above 1280 x 720 : 30 frames max
- Does not support GMC 2 or higher
•Audio decoder
- Supports WMA 7, 8, 9 and STD
- Does not support WMA sampling rate of 22050Hz mono.
AVI
MKV
WMV (wmv9)
MP4
PS
MP4v3
H.264 BP/MP/HP
VC-1 AP
DivX 5.1/6.0
H.264 BP/MP/HP
VC-1 AP
VC-1 SM
MP4 (mp4v)
H.264 BP/MP/HP
MPEG1
MPEG2
H.264 BP/MP/HP
MP3
Dolby Digital
DTS
WMA
PCM
MP3
Dolby Digital
DTS
WMA
AAC
MP1, 2
Dolby Digital
DTS
1920x1080
1920x1080
1920x1080
1920x1080
1920x1080
1920x1080
1920x1080
1920x1080
1920x1080
1920x1080
1920x1080
1920x1080
1920x1080
Music File Support
File Extension Container Audio Codec Support Range
*.mp3
*.wma
MP3
WMA
MP3 -
*
WMA
Sampling rates (in kHz) - 8, 11, 16, 22, 32, 44.1, 48
*
Bit rates - All bit-rates from 5kbps to 384kbps
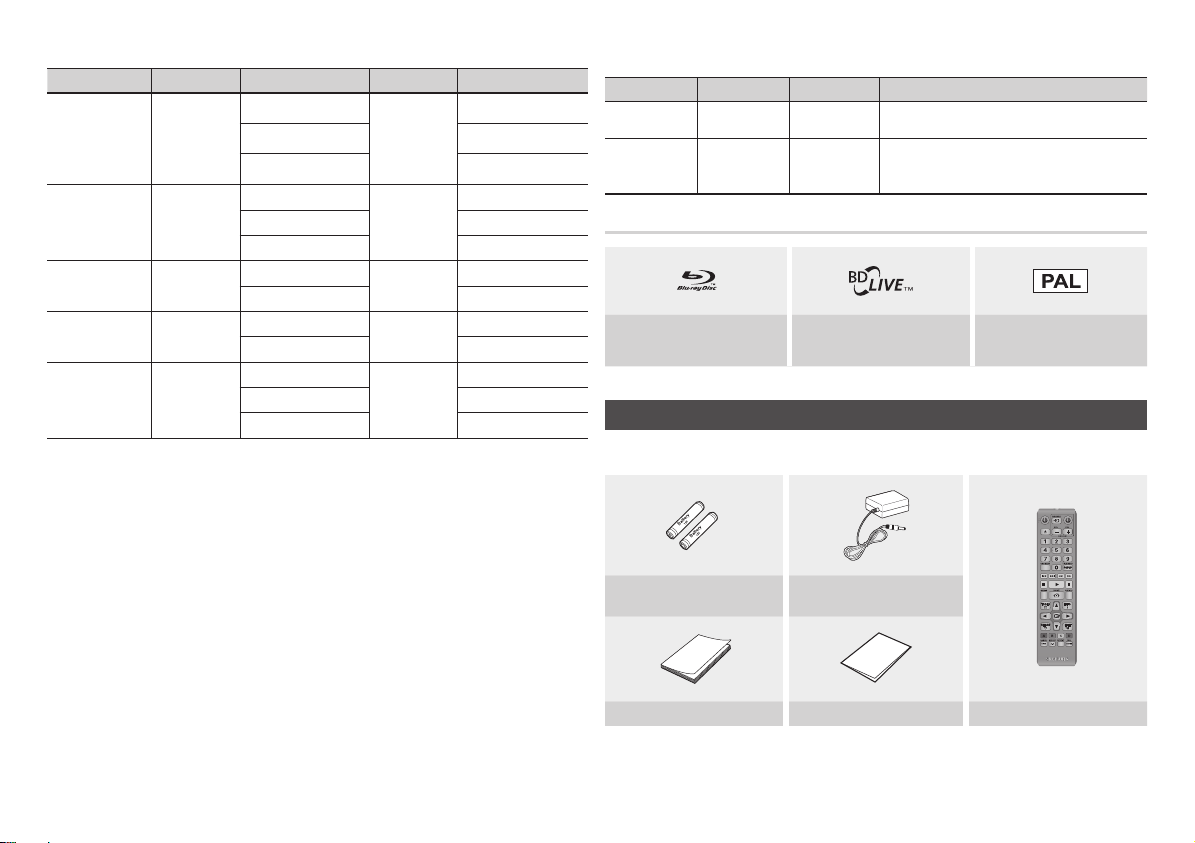
Logos of Discs the player can play
Blu-ray Disc BD-LIVE
Accessories
Check for the supplied accessories shown below.
Batteries for Remote Control
(AAA Size)
User Manual Quick Guide Remote Control
Adapter
PAL broadcast System in
U.K., France, Germany, etc
7
Page 8
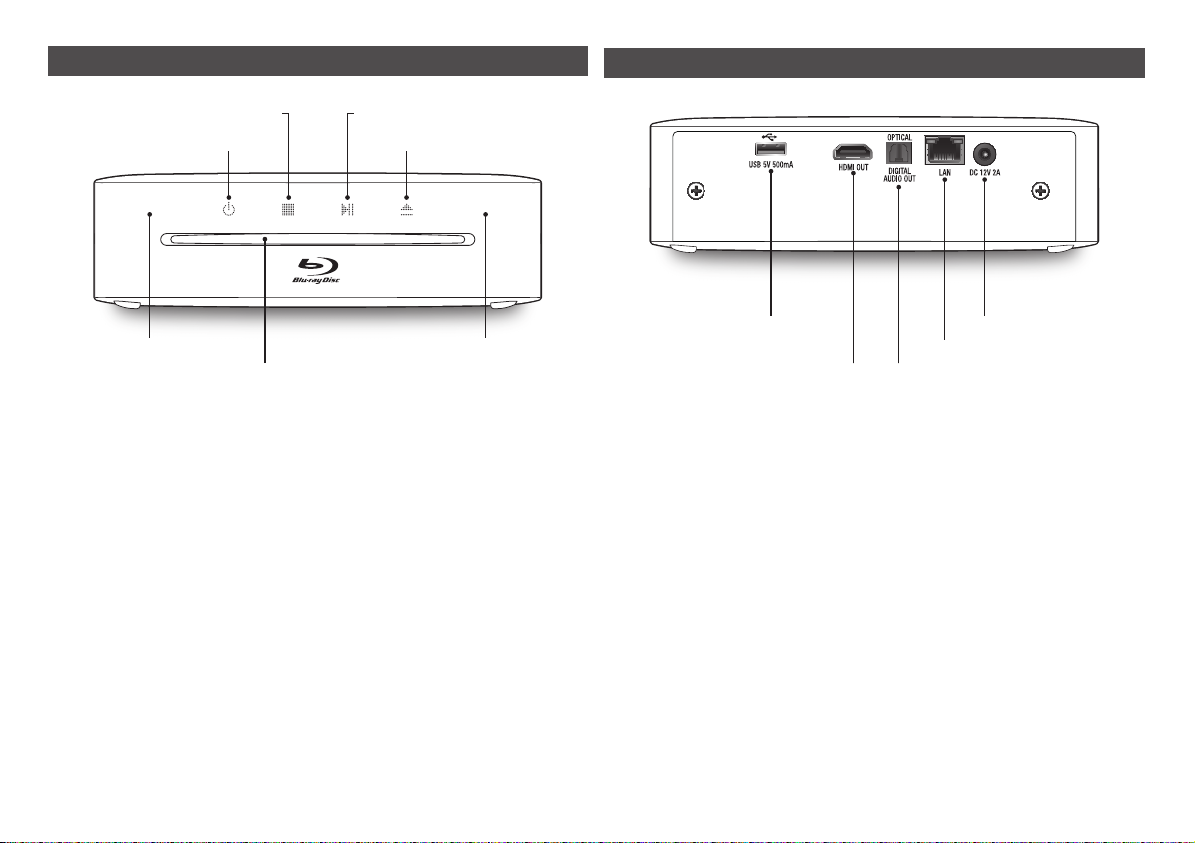
Front Panel
Rear Panel
STOP BUTTON
PLAY/PAUSE BUTTON
EJECT BUTTONPOWER BUTTON
STANDBY INDICATORREMOTE CONTROL SENSOR
DISC SLOT
NOTE
✎
▪When the player displays the Blu-ray Disc menu, you cannot start the movie by pressing the Play button on
the player or the remote. To play the movie, you must select Play Movie or Start in the disc menu, and then
press the e button.
▪Lights when this player is in Standby mode, and it flashes while a signal is being received from the remote
control sensor.
USB HOST DC 12V 2A
LAN
HDMI OUT
NOTE
✎
▪To upgrade the player's software through the USB Host jack, you must use a USB memory stick.
DIGITAL AUDIO OUT
8
Page 9
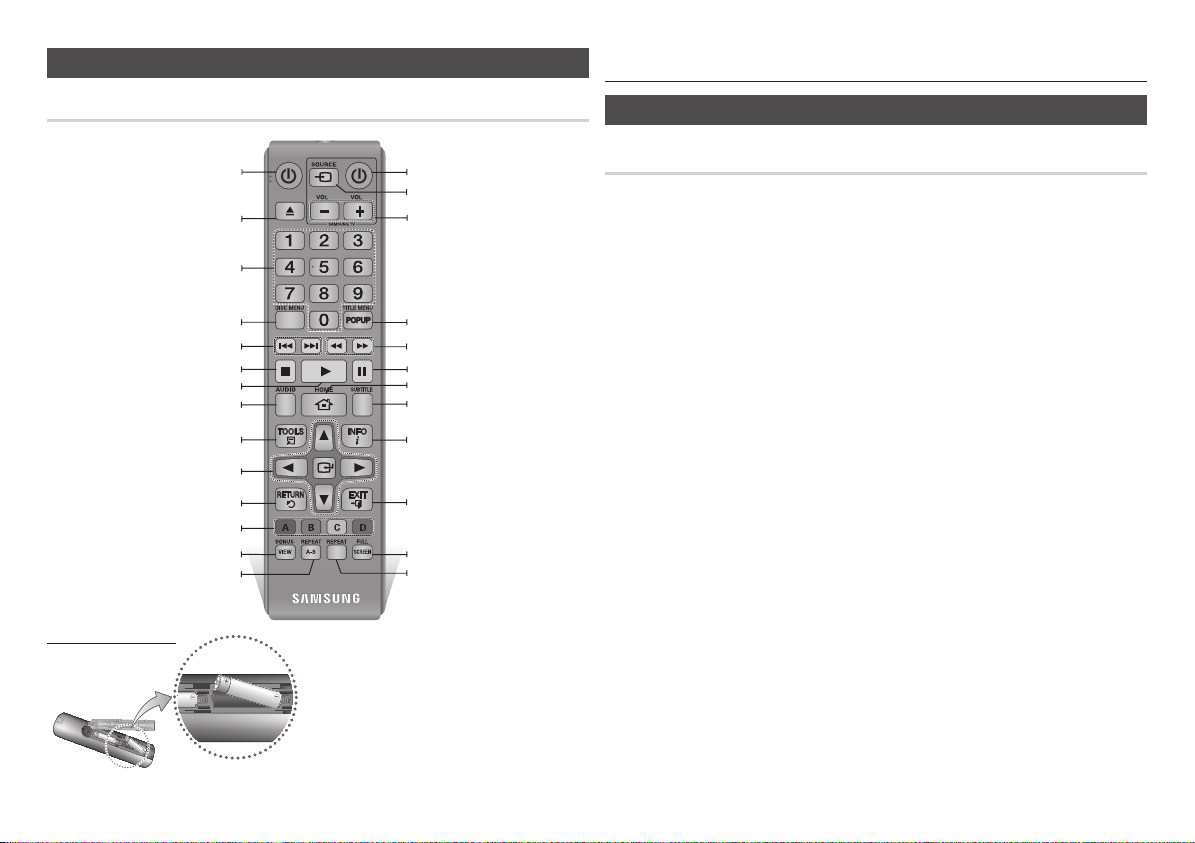
Tour of the Remote Control
Remote Control
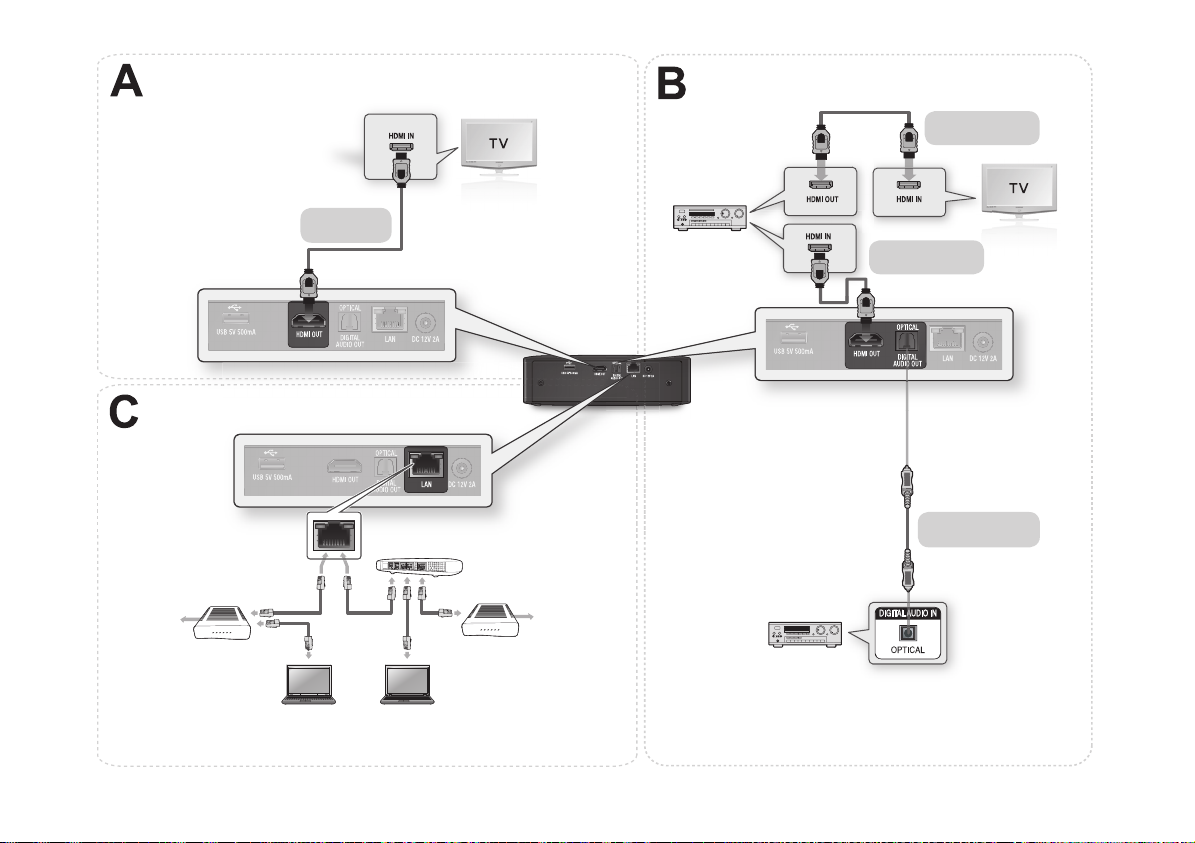
Connections
A. Connecting to a TV
Turn the player on and off.
Press to eject a disc.
Press numeric buttons to operate options.
Use to enter the disc menu.
Press to skip backwards or forwards.
Press to stop a disc.
Use to access various audio functions on a
Use to select menu items and change menu
These buttons are used both for menus on the
player and also several Blu-ray Disc functions.
Press to use the bonusview function.
Press to play a disc.
disc (Blu-ray Disc/DVD).
Press to use Tools menu.
value.
Return to the previous menu.
Allows you to repeat A-B disc.
Installing batteries
Turn the TV on and off.
After setup, allows you to set the input
source on your TV.
TV volume adjustment.
Use to enter the popup menu/title menu.
Press to search a disc backwards or
forwards.
Press to pause a disc.
Press to move to the home menu.
Press to switch the Blu-ray Disc/DVD’s
subtitle language.
Use to display the playback information
when playing a Blu-ray Disc/DVDs.
Press to exit the menu.
Press to see the full screen on a TV.
Allows you to repeat a title, chapter, track
or disc.
NOTE
✎
If the remote does not operate properly:
▪
•Check the polarity (+/–) of the batteries.
•Check if the batteries are drained.
•Check if the remote sensor is blocked by obstacles.
•Check if there is any fluorescent lighting nearby.
CAUTION
!
Dispose of batteries according to local environmental
▪
regulations. Do not put them in the household trash.
Connecting to a TV with an HDMI Cable - Best Quality
1. Using an HDMI cable, connect the HDMI OUT terminal on the rear of the player to the
HDMI IN terminal of your TV. See page 11.
2. Turn on the player and TV.
3. Press the input selector on your TV remote control until the HDMI signal from the player
appears on your TV screen.
NOTE
✎
▪An HDMI cable outputs digital video/audio, so you don’t need to connect an audio cable.
▪If the player is connected to your TV in the HDMI 720p, 1080i, or 1080p output mode, you must use a High
speed (category 2) HDMI cable.
▪HDMI outputs only a pure digital signal to the TV.
If your TV does not support HDCP (High-bandwidth Digital Content Protection), random noise appears on the
screen.
▪Depending on your TV, certain HDMI output resolutions may not work. Please refer to the user manual of
your TV.
▪When you connect the player to the TV using the HDMI cable for the first time or to a new TV, the HDMI
output resolution will be automatically set to the highest supported by the TV.
▪A long HDMI cable may cause screen noise. If this occurs, set Deep Colour to Off in the menu.
▪If you use an HDMI-to-DVI cable to connect to your display device, you must also connect the Digital Audio
Out to an audio system to hear audio.
9
Page 10

B. Connecting to an Audio System
• Please turn the volume down when you turn on the AV receiver. A sudden loud sound
may cause damage to the speakers and your ears.
• Please set the audio format according to the capabilities of your AV receiver.
• The position of HDMI input terminals may vary depending on your AV receiver. Please
refer to the user manual of your AV receiver.
C. Connecting to a Network
This player lets you use network based services such as BD-LIVE and download software
upgrades when it is connected to a network. We recommend using a Broadband modem (with
integrated router) or IP router for the connection. For more information on router connections,
refer to the user manual of the router or contact the router manufacturer for technical assistance.
Cable Network
Case 1 : Connecting to an Audio System (HDMI supported AV
receiver) - Best Quality (Recommended)
1. Using an HDMI cable, connect the HDMI OUT terminal on the rear of the player to the
HDMI IN terminal of your AV receiver. See page 11.
2. Using an HDMI cable, connect the HDMI OUT terminal of the AV receiver to the HDMI IN
terminal of your TV.
3. Turn on the player, TV, and AV receiver.
4. Using the input select button of the AV receiver and TV, select the correct HDMI input or
each to hear sound and see video from the player. Refer to your AV receiver’s user manual
to set the AV receiver’s audio input.
Case 2 : Connecting to an Audio System (AV receiver with Dolby
Digital or DTS decoder) - Better Quality
1. Using a optical cable, connect the DIGITAL AUDIO OUT (OPTICAL) terminal on the rear of
the player to the DIGITAL AUDIO IN (OPTICAL) terminal of your AV receiver. See page 11.
2. Using an HDMI cable, connect the HDMI terminal on the rear of the player to the HDMI
terminal of your TV.
3. Turn on the player, TV, and AV receiver.
4. Press the input select button of the
sound from the player. Refer to your
input.
5. Press the input selector on your TV remote control to select the HDMI video source.
AV receiver
AV receiver’s
to select the correct external input and hear
user manual to set the
AV receiver’s
audio
10
1. Using a Direct LAN (UTP) CAT 5 cable, connect the LAN terminal of the player to the LAN
terminal of your modem or router. See page 11
2. Set the network options. See page 16.
NOTE
✎
▪Internet access to Samsung’s software update server may not be allowed, depending on the router you use
or your ISP’s policy. For more information, contact your ISP (Internet Service Provider).
▪DSL users, please use a router to make a network connection.
▪To use the AllShare function, you must connect your PC to your network as shown in the figure.
The connection can be wired.
Page 11
Connecting to a TV
Network
Broadband modem (with
integrated router)
Broadband
service
HDMI cable
(not included)
Or
Router
Broadband modem
Broadband
service
Connecting to an Audio System
Case 1 : HDMI cable
(not included)
Case 1 : HDMI cable
(not included)
Case 2 : Optical cable
(not included)
Networking with PC for AllShare function
NOTE : You can only connect this unit to a network via a wired connection.
✎
11
Page 12
Setup
The Initial Settings Procedure
1. Turn on your TV after connecting the
player.
When you connect the player to a TV for the
first time, the player turns on automatically
and the Initial Settings screen appears.
Initial Settings I On-Screen Language
Select a language for the on-screen displays.
English
Français
Deutsch
Español
Italiano
Nederlands
2. Use the ▲▼ buttons on the remote to
select the desired language, and then
press the ENTER button.
3. Press the ENTER button to select Start.
4. Use the ▲▼ buttons to select an Aspect
Ratio, and then press the ENTER button.
5. Select Auto, and then press the ENTER
button. If you do not have a home
network, press the BLUE (D) button on
your remote. You will go directly to the
Home menu.
6. The Blu-ray player automatically verifies
your wired network. When verification
in complete, the screen displays “Your
network is operating properly.” Press the
ENTER button.
>
Move " Select
7. The “Initial settings completed.” message
appears, and then the Home screen
appears.
- If you Blu-ray player does not connect to your
network or you want to connect manually, go to
Network Setup on page 16.
NOTE
✎
▪The Home menu will not appear if you do not
configure the initial settings except as noted
below.
▪If you press the BLUE (D) button during network
setup, you can access the Home menu even if
the network setup is not completed yet.
▪When you return to the Home menu, the full
screen mode is cancelled automatically.
▪If you want to display the Initial Setting screen again
to make changes, press the STOP ( @ ) button
on the front panel of the player for more than 5
seconds with no disc inserted. This resets the player
to its default settings.
▪If you want to use an Anynet+(HDMI-CEC)
function, please follow the instructions below.
1) Connect the player to an Anynet+(HDMICEC)-compliant Samsung TV using HDMI
Cable.
2) Set the Anynet+(HDMI-CEC) feature to On in
both the TV and the player.
3) Set the TV to the Initial Settings Procedure.
▪If you leave the player in the stop mode for more
than 5 minutes without using it, a screen saver
will appear on your TV. If the player is left in the
screen saver mode for more than 25 minutes,
the power will automatically turn off.
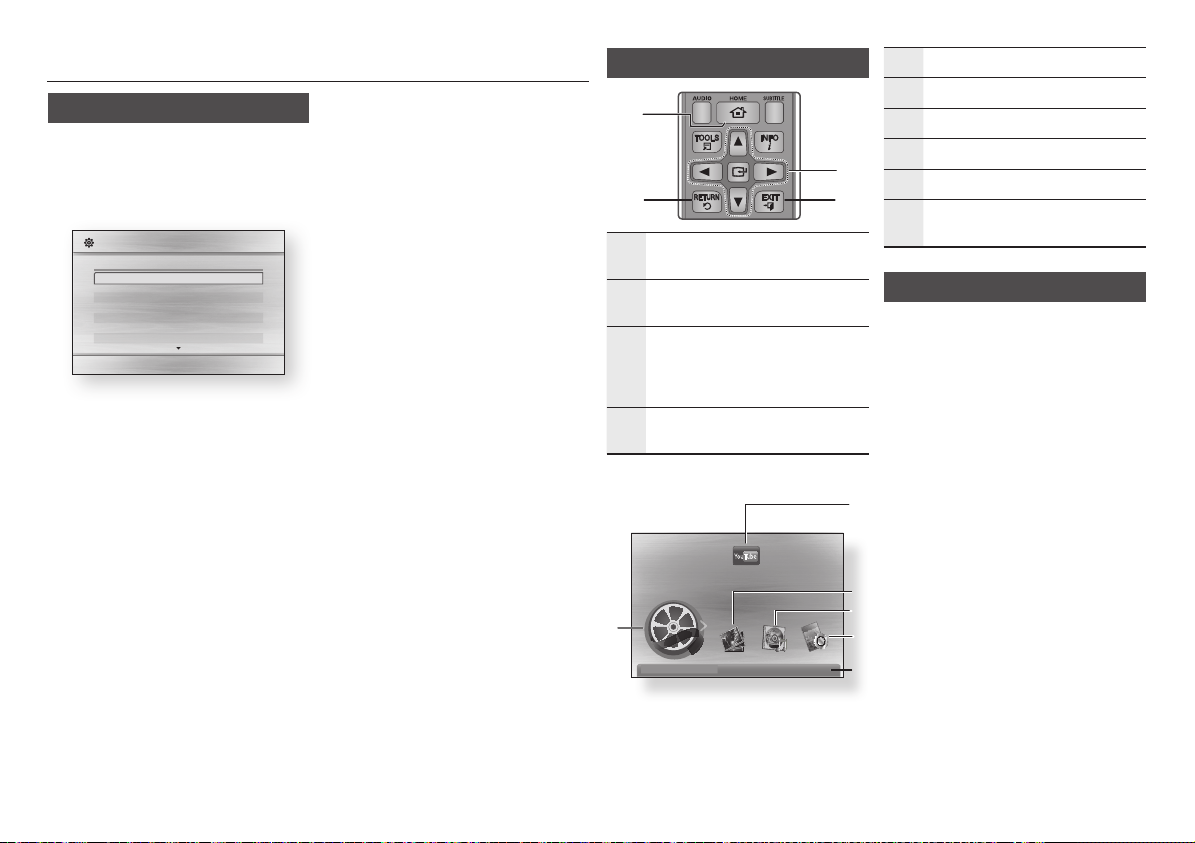
Menu Navigation
1
2
HOME Button :
1
menu.
RETURN Button : Return to the previous
2
menu.
Press to move to the Home
ENTER / DIRECTION Button :
Move the cursor or select an item.
3
Activate the currently selected item.
Confirm a setting.
4
EXIT Button :
menu.
Press to exit the current
• Home Menu
You Tube
Videos
1
No Disc a Change Device
d
View Devices
Selects Videos.
1
Selects YouTube.
2
Selects Photos.
3
Selects Music.
3
4
4
Selects Settings.
5
Displays the buttons you can use on the
6
remote to access functions.
Accessing the Settings Menu
To access the Settings menu and sub-menus,
follow these steps:
1. Press the POWER button.
The Home Menu appears.
2. Press the ◄► buttons to select Settings,
and then press the ENTER button.
3. Press the ▲▼ buttons to select the
desired submenu, and then press the
ENTER button.
4. Press the ▲▼ buttons to select the desired
item, and then press the ENTER button.
2
5. Press the EXIT button to exit the menu.
NOTE
✎
▪The access steps may differ depending on the
3
4
menu you selected.
may change in this player after you upgrade the
software version.
5
Enter
"
6
The OSD (On Screen Display)
12
Page 13
Display
You can configure various display options
such as the TV Aspect Ratio, Resolution, etc.
TV Aspect Ratio
Depending on the type of television you have,
you may want to adjust the screen size setting.
•16:9 Original : Select when you connect
the player to a 16:9 TV screen. The player
will display all content in its original aspect
ratio.
Content formatted in 4:3 will be displayed
with black bars on the left and right.
•16:9 Full : Select when you connect the
player to a 16:9 TV screen. All content will
fill the full screen. Content formatted in 4:3
will be stretched.
•4:3 Letter Box : Select when you connect
the player to a 4:3 TV screen. The player will
display all content in its original aspect ratio.
Content formatted in 16:9 will be displayed
with black bars on the top and bottom.
•4:3 Pan-Scan : Select when you connect
the player to a 4:3 TV screen. 16:9 content
will have the extreme left and right portions
cut off.
NOTE
✎
▪Depending on the disc type, some aspect ratios
may not be available.
▪If you select an aspect ratio and option which is
different than the aspect ratio of your TV screen,
then the picture might appear to be distorted.
▪If you select the 4:3 Pan-Scan or 4:3 Letter
Box, pressing the FULL SCREEN button on the
remote will not bring up a full screen picture.
▪If you select the 16:9 Original, your TV may
display 4:3 Pillar-box (black bars on sides
of picture). If this occurs, pressing the FULL
SCREEN button on the remote will not bring up
a full screen picture.
BD Wise (Samsung Players only)
BD Wise is Samsung’s latest inter-connectivity
feature.
When you connect a Samsung player and a
Samsung TV with BD Wise to each other via
HDMI, and BD Wise is on in both the player and
TV, the player outputs video at the video resolution
and frame rate of the Blu-ray Disc/DVDs.
•Off :
The output resolution stays fixed at
the resolution you set previously in the
Resolution menu, regardless of the resolution
of the disc.
•On : The player outputs video at the original
resolution and frame rate of the Blu-ray
Disc/DVDs.
NOTE
✎
▪When BD Wise is on, the Resolution setting
automatically defaults to BD Wise and BD Wise
appears in the Resolution menu.
▪If the player is connected to a device that does
not support BD Wise, you can not use the BD
Wise function.
▪For proper operation of BD Wise, set the BD Wise
menu of both the player and the TV to On.
Resolution
Lets you set the output resolution of the HDMI
video signal to Auto, 1080p, 1080i, 720p or
576p/480p. The number indicates the number
of lines of video per frame. The i and p indicate
interlaced and progressive scan, respectively.
The more lines, the higher the quality.
•Auto : Automatically sets the output
resolution to the connected TV’s maximum
resolution.
•BD Wise : Automatically sets the resolution
to the resolution of the Blu-ray Disc/DVDs
if you have connected the player via HDMI
to a TV with the BD Wise feature. (The BD
Wise menu item appears only if BD Wise is
set to On. See BD Wise above.)
•1080p : Outputs 1080 lines of progressive
video.
•1080i : Outputs 1080 lines of interlaced
video.
•720p : Outputs 720 lines of progressive
video.
•576p/480p : Outputs 576/480 lines of
progressive video.
Resolution according to the output mode
• Blu-ray Disc/E-contents/Digital Contents playback
HDMI / connected
Setup
(Movie Frame : Off)
Movie Frame : Auto
• DVD playback
Setup
Output
Blu-ray Disc E-contents/Digital contents
BD Wise Resolution of Blu-ray Disc 1080p
Auto Max. Resolution of TV input Max. Resolution of TV input
1080p@60F
(24Fs)
1080i 1080i 1080i
720p 720p 720p
576p/480p 576p/480p 576p/480p
Output
BD Wise 576i/480i
Auto Max. Resolution of TV input
1080p 1080p
1080i 1080i
720p 720p
576p/480p 576p/480p
1080p@60F 1080p@60F
1080p@24F 1080p@24F
HDMI Mode
HDMI / connected
HDMI Mode
13
Page 14
NOTE
✎
▪If the TV you connected to the player does not
support Movie Frame or the resolution you
selected, the message “If no pictures are shown
after selecting ‘Yes’, please wait for 15 seconds
to return to the previous resolution. Do you want
to change the resolution?” appears. If you select
Yes, the TV’s screen will go blank for 15 seconds,
and then the resolution will revert to the previous
resolution automatically.
▪If the screen stays blank after you have changed
the resolution, remove all discs, and then press
and hold the
the player for more than 5 seconds. All settings
are restored to the factory default. Follow the
steps on the previous page to access each mode
and select the Display Setup that your TV will
support.
▪When the factory default settings are restored, all
stored user BD data is deleted.
▪The Blu-ray Disc must have the 24 frame feature
for the player to use the Movie Frame (24Fs)
mode.
STOP
( @ ) button on the front of
Movie Frame (24 Fs)
Setting the Movie Frame (24Fs) feature to Auto
allows you to adjust the player’s HDMI output to
24 frames per second for improved picture quality.
You can enjoy the Movie Frame (24Fs) feature
only on a TV supporting this frame rate.
You can select Movie Frame only when the
player is in the HDMI 1080i or 1080p output
resolution modes.
• Auto : Movie Frame (24Fs) functions work.
• Off : Movie Frame (24Fs) functions are off.
HDMI Colour Format
Lets you set the colour space format for
HDMI output to match the capabilities of the
connected device (TV, monitor, etc).
• Auto : Automatically sets the player to the
optimum format supported by your device.
• YCbCr (4:4:4) : If your TV supports the
YCbCr colour space via HDMI, select this
to output the normal YCbCr colour gamut.
• RGB (Standard) : Select to output the
normal RGB colour gamut.
• RGB (Enhanced) : If you have connected
the player to a DVI display device such as a
monitor, select this to output the enhanced
RGB colour gamut.
HDMI Deep Colour
Lets you output video from the HDMI OUT
jack with Deep Colour. Deep Colour provides
more accurate colour reproduction with
greater colour depth.
• Auto : The player outputs video with Deep
Colour to a connected TV which supports
HDMI Deep Colour.
• Off : The picture is output without Deep
Colour
.
Progressive Mode
Lets you improve picture quality when viewing
DVDs.
• Auto : Select to have the player
automatically select the best picture quality
for the DVD you’re watching.
• Video : Select for the best picture quality
from concert or TV show DVDs.
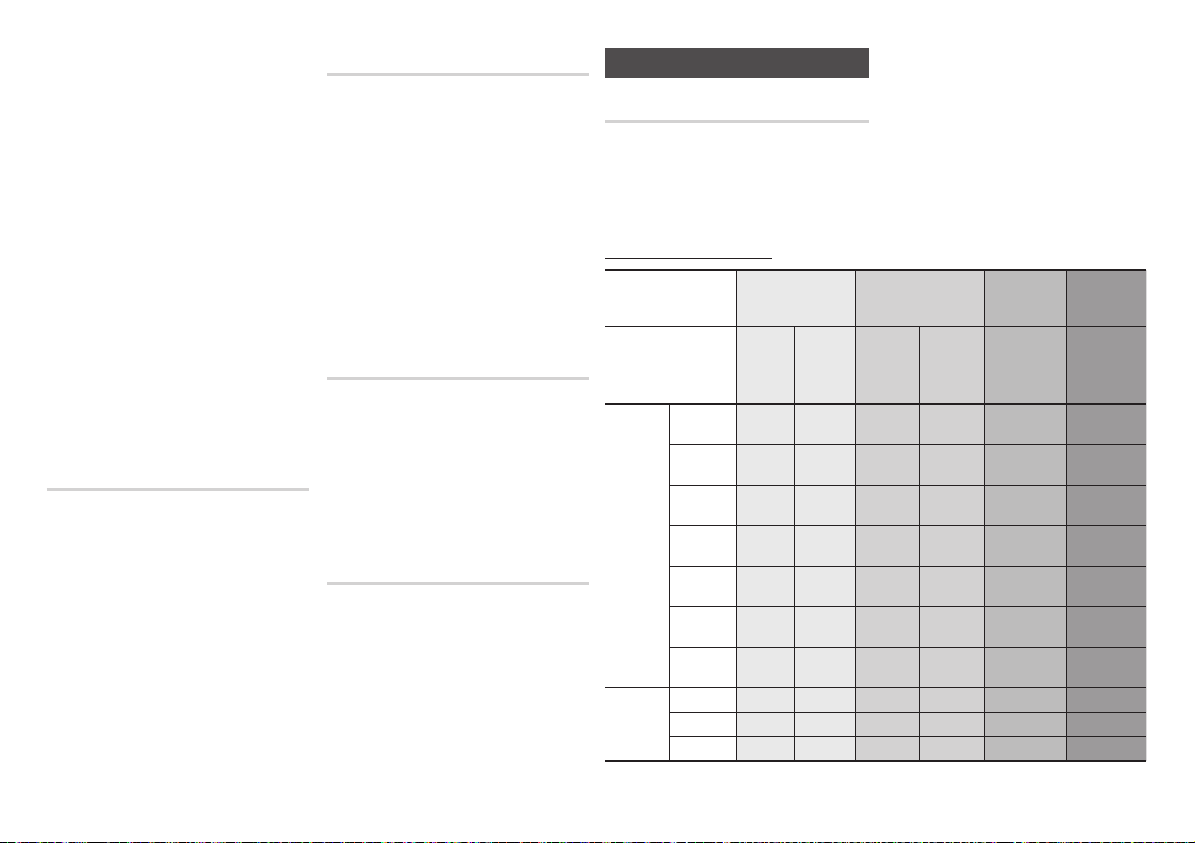
Audio
Digital Output
Set the Digital Output to match the capabilities
of the AV receiver you’ve connected to the
player :
• PCM : This is the default setting. It is
compatible with most TVs and receivers.
Digital Output Selection
Setting PCM
HDMI
Connection
Audio
Stream on
Blu-ray
Disc
Audio
Stream on
DVD
supported
receiver
Up to PCM
PCM
Dolby Digital PCM 2ch PCM 2ch Dolby Digital Dolby Digital DTS re-encoded
Dolby Digital
Dolby TrueHD
DTS-HD
DTS-HD MA PCM 2ch PCM 2ch DTS-HD MA DTS DTS re-encoded
Dolby Digital PCM 2ch PCM 2ch Dolby Digital Dolby Digital Dolby Digital Dolby Digital
PCM 2ch PCM 2ch
Plus
PCM 2ch PCM 2ch
DTS PCM 2ch PCM 2ch DTS DTS DTS re-encoded
PCM 2ch PCM 2ch
HRA
PCM PCM 2ch PCM 2ch PCM 2ch PCM 2ch PCM 2ch PCM 2ch
DTS PCM 2ch PCM 2ch DTS DTS DTS DTS
Optical
AV
PCM 2ch PCM PCM 2ch DTS re-encoded
7.1ch
• Bitstream (Unprocessed) : Choose if you
want your receiver to decode all the audio.
Bonusview audio will not be available.
• Bitstream (Re-encoded DTS) : The
original audio will be re-encoded into DTS.
• Bitstream (Re-encoded Dolby D) : The
original audio will be re-encoded into Dolby
Digital
For more details, please refer to the Digital
Output Selection table.
Bitstream
(Unprocessed)
HDMI
supported
AV receiver
Dolby Digital
Plus
Dolby TrueHD
DTS-HD
HRA
Bitstream
(Re-encoded
DTS)
HDMI
Optical
Dolby Digital DTS re-encoded
Dolby Digital DTS re-encoded
supported
AV receiver or
Optical
DTS DTS re-encoded
Bitstream
(Re-encoded
supported
AV receiver or
Re-encoded
Dolby Digital *
Re-encoded
Dolby Digital *
Re-encoded
Dolby Digital *
Re-encoded
Dolby Digital *
Re-encoded
Dolby Digital *
Re-encoded
Dolby Digital *
Re-encoded
Dolby Digital *
Dolby D)
HDMI
Optical
14
Page 15

Setup PCM
HDMI
Connection
Definition
for Blu-ray
Disc
* If the Source Stream is 2ch, “Re-encoded Dolby D” Setting is not applied. Output will be
LPCM 2ch.
Blu-ray Discs may include three audio
streams :
- Main Feature Audio : The audio soundtrack
of the main feature.
- BONUSVIEW audio : An additional
soundtrack such as the director or actor’s
commentary.
- Navigation Sound Effects : When you
choose a menu navigation selection, a
Navigation Sound Effect may sound.
Navigation Sound Effects are different on
each Blu-ray Disc.
NOTE
✎
▪Be sure to select the correct Digital Output or
you will hear no sound or just loud noise.
supported
receiver
Any
PCM audio and adds
Optical
AV
Decodes the main
feature audio and
BONUSVIEW audio
stream together into
Navigation Sound
Effects.
Bitstream
(Unprocessed)
HDMI
supported
AV receiver
Outputs only the main
feature audio stream
so that your AV receiver
can decode the audio
BONUSVIEW audio or
Navigation Sound Effects.
Optical
bitstream.
You will not hear
▪If the HDMI device (AV receiver, TV) is not
compatible with compressed formats (Dolby
digital, DTS), the audio signal outputs as PCM.
▪Regular DVDs do not have BONUSVIEW audio
and Navigation Sound Effects.
▪Some Blu-ray Discs do not have BONUSVIEW
audio and Navigation Sound Effects.
▪This Digital Output setup does not affect the
HDMI audio output to your TV. It affects the
optical and HDMI audio output when your player
is connected to an AV receiver.
▪If you play MPEG audio soundtracks, the audio
signal outputs as PCM regardless of your Digital
Output selections (PCM or Bitstream).
Bitstream
(Re-encoded
DTS)
HDMI
supported
AV receiver or
Optical
Decodes the
main feature
audio and
BONUSVIEW
audio stream
together into
PCM audio and
adds Navigation
Sound Effects,
then re-encodes
the PCM
audio into DTS
bitstream.
Bitstream
(Re-encoded
Dolby D)
HDMI
supported
AV receiver or
Optical
Decodes the
main feature
audio and
BONUSVIEW
audio stream
together into
PCM audio and
adds Navigation
Sound Effects,
then re-
encodes the
PCM audio into
Dolby digital
bitstream or
PCM.
PCM Downsampling
Lets you set 48kHz and 96kHz PCM downsampling on or off.
• Off : Select when the AV receiver
connected to the player is 96kHz
compatible.
• On : Select when the AV receiver
connected to the player is not 96kHz
compatible. 96kHz signals will be down
converted to 48kHz.
NOTE
✎
▪ Even when PCM Downsampling is set to Off,
some discs will only output downsampled audio
through the optical digital outputs.
HDMI
• If your TV is not compatible with
compressed multi-channel formats (Dolby
Digital, DTS), the player may output PCM
2ch downmixed audio even though you
selected Bitstream (either Re-encoded or
Unprocessed) in the setup menu.
• If your TV is not compatible with PCM
sampling rates over 48kHz, the player may
output 48kHz downsampled PCM audio
even though you set PCM Downsampling
to Off.
Dynamic Range Control
You can listen at low volumes, but still hear
dialog clearly.
This is only active if your player detects a
Dolby Digital signal.
• Auto : The Dynamic Range Control will be
set automatically based on the information
provided by the Dolby TrueHD Soundtrack.
• Off : You can enjoy the movie with the
standard Dynamic Range.
• On : When Movie soundtracks are played
at low volume or through smaller speakers,
the system can apply appropriate
compression to make low-level content
more intelligible and prevent dramatic
passages from getting too loud.
Downmixing Mode
Select Downmix method for stereo output.
• Normal Stereo : Downmix the multichannel
audio into normal stereo. Choose this if you
hear the sound from TV or Stereo Amplifier.
• Surround Compatible : Downmix
the multichannel audio into surround
compatible stereo. This mode helps your
AV Receiver to decode stereo into surround
sound.
15
Page 16

Network
Please contact your ISP to find out if your IP
address is static or dynamic. If it is dynamic
- and most are - we recommend using the
Auto procedure for network setup. This is
easiest and will work in the majority of cases.
If it is static, you must use the manual set up
procedure.
Network setup directions start below.
NOTE
✎
▪This unit can only be connected to a Network via
a wired connection.
Automatic Network Setup
1. In the Home menu, press the ◄► buttons
to select Settings, and then press the
ENTER button.
2. Press the ▲▼ buttons to select Network,
and then press the ENTER button.
3. Press the ▲▼ buttons to select Wired
Network Settings, and then press the
ENTER button. The Wired Network
Settings screen appears.
Settings
Wired Network Settings
Display
Internet Protocol Setup : Auto
Audio
IP Address : 0 0 0 0
Network
Subnet Mask :
System
Gateway :
Language
DNS
DNS Server
: Auto
:
>
Move " Select ' Return
Security
General
Support
4. In the Internet Protocol Setup field, select
Auto if it is not selected. (Press ENTER
select AUTO, and then press ENTER.)
0 0 0
0
0 0 0
0
0 0 0
0
5. The Auto Function acquires and fills in the
values for IP Address, Subnet Mask,
etc., automatically.
NOTE
✎
▪This process can take up to five minutes.
6. After the Network Function has acquired
the network values, press the RETURN
button.
7. Select Network Test, and then press
ENTER to ensure the player has connected
to your network.
8. When the Network Test is complete, press
the RETURN twice to return to the Main
Menu.
9. If the Network Function does not acquire
the network values, go to the directions for
Manual Setup.
Manual Network Setup
Before you start manual network setup, you
need the network setting values.
To get the Network setting values through
most Windows computers, follow these
steps:
■
Windows XP
1. Right click the Network icon on the bottom
right of the Windows desktop.
2. In the pop-up menu, click Status.
3. On the dialog that appears, click the
Support tab.
4. On the Support tab, click the Details
button. The Network settings are
displayed.
■
Windows 7
1. Click the Network icon on the bottom right
of the Windows desktop.
2. In the pop-up menu, click Network and
Sharing Center.
3. On the dialog that appears, click the Local
Area Connection or Wireless Network
Connection depending on your network
connection.
4. On the Support tab, click the Details
button. The Network settings are
displayed.
To enter the Network Settings into your
player, follow these steps:
1. In the Home menu, press the ◄► buttons
to select Settings, and then press the
ENTER button.
2. Press the ▲▼ buttons to select Network,
and then press the ENTER button.
3. Press the ▲▼ buttons to select Wired
Network Settings, and then press the
ENTER button. The Wired Network
Settings screen appears.
4. Select the Internet Protocol Setup field,
and then press the ENTER button.
5. Press the ▲▼ buttons to select Manual,
and then press the ENTER button.
6. Press the ▼ button to go to the first entry
field (IP Address).
7. Use the number buttons on your remote
to enter numbers.
8. When done with each field, use the ►
button to move to the next field. You can
also use the other arrow buttons to move
up, down, and back.
9. Enter the IP Address, Subnet Mask,
and Gateway values in the same way.
10. Press the ▼ button to go to DNS.
11. Press the ▼ button to go to the first DNS
entry field.
12. Enter the numbers as above.
13. Press the RETURN button on your
remote.
14. Run a Network Test to ensure the player
has connected to your network.
Network Test
Use this menu item to connect to the wired
network or check whether your network
connection is working or not.
Network Status
Use to check whether a connection to
the network and the Internet have been
established.
BD-Live Internet Connection
Set to allow or prohibit an Internet connection
when you use the BD-LIVE service.
• Allow (All) : The Internet connection is
allowed for all BD-LIVE contents.
• Allow (Valid Only) : The Internet
connection is allowed only for BD-LIVE
contents containing a valid certificate.
• Prohibit : No Internet connection is allowed
for any BD-LIVE content.
NOTE
✎
▪What is a valid certificate?
When the player uses BD-LIVE to send the disc data
and a request to the server to certify the disc, the
server uses the transmitted data to check if the disc
is valid and sends the certificate back to the player.
▪The Internet connection may be restricted while
you are using BD-LIVE contents.
16
Page 17

System
Initial Settings
By using the Initial Settings function, you can
set the language, Network Settings, etc.
For more information about the Initial Settings
function, refer to the Initial Settings section of
this user manual (page 12).
Anynet+ (HDMI-CEC)
Anynet+ is a convenient function that offers linked
operations with other Samsung players that have
the Anynet+ feature.
To operate this function, connect this player to an
Anynet+ Samsung TV with an HDMI cable.
With Anynet+ on, you can operate this player
using a Samsung TV remote control and start
disc playback simply by pressing the PLAY
( ) button on the TV’s remote control.
For more information, please see the TV user
manual.
• Off : Anynet+ functions will not work.
• On : Anynet+ functions will work.
NOTE
✎
▪This function is not available if the HDMI cable
does not support CEC.
▪If your Samsung TV has an Anynet+ logo,
then it supports the Anynet+ function.
▪Depending on your TV, certain HDMI output
resolutions may not work.
Please refer to the user manual of your TV.
BD Data Management
Enables you to manage the downloaded
contents you accessed through a Blu-ray disc
that supports the BD-LIVE service and stored
on a flash drive.
You can check the device’s information
including the storage size, delete the BD
data, or change the Flash memory device
BD Data Management Screen Information :
• Current Device : Display the connected
• Total Size :
• Available Size : Available memory in the
• Delete BD Data : Delete all BD data in the
• Change Device : Change desired flash
✎
device.
Total memory size of the device.
device.
storage.
memory to store BD data.
NOTE
▪In the external memory mode, disc playback
may be stopped if you disconnect the USB
device in the middle of playback.
▪Only those USB devices formatted in FAT file
format (DOS 8.3 volume label) are supported.
We recommend you use USB devices that
support USB 2.0 protocol with 4 MB/sec or
faster read/write speed.
▪The Resume Play function may not work after
you format the storage device.
▪The total memory available to BD Data
Management may differ, depending on the
conditions.
DivX® Video On Demand
View DivX® VOD Registration Codes to
purchase and play DivX® VOD contents.
Language
You can select the language you prefer for the
.
Home menu, disc menu, etc.
• On-Screen Menu : Select the language for
the on-screen displays.
• Disc Menu : Select the language for the
disc menu displays.
• Audio : Select the language for disc audio.
• Subtitle :
✎
Select the language for disc subtitles.
NOTE
▪ The selected language will only appear if it is
supported on the disc.
Security
When you access this function for the first
time, the password setup screen appears.
Enter a desired 4-digit password using the
number buttons. (The default password is
0000.)
BD Parental Rating
Prevent playback of Blu-ray Discs with specific
age ratings unless a password is entered.
• Off : BD Parental Rating is not active and
all Blu-ray discs will play in full.
• On : This will prohibit playback of Blu-ray
disc rated above Parental Rating.
DVD Parental Rating
This function works in conjunction with DVDs
that have been assigned an age rating or
numeric rating that indicates the maturity
level of the content. These numbers help you
control the types of DVDs that your family can
watch.
Select the rating level you want to set.
For example, if you select Level 6, discs rated
above 6 - Level 7 and 8 - will not play.
A larger number indicates more mature
content.
YouTube Lock
Restrict the use of the YouTube service unless
a password is entered.
• Off : Turn Off YouTube lock.
• On : Turn On YouTube lock.
Change PIN
Change the 4-digit password used to access
security functions.
If you forgot your password
1. Remove any discs.
2. Press and hold the STOP ( @ ) button on
the front panel for 5 seconds or more.
All settings will revert to the factory
settings.
NOTE
✎
▪ When the factory default settings are restored,
all the user stored BD data will be deleted.
17
Page 18

General
Time Zone
You can specify the time zone that is
applicable to your area.
Support
Software Upgrade
The Software Upgrade menu allows you to
upgrade the player’s software for performance
improvements or additional services.
By Online
To upgrade By Online, follow these steps:
1. Select By Online, and then press the
ENTER button. The Connecting to Server
message appears.
2. A popup message will appear if an update
is available.
3. If you select Yes , the player will turn off
automatically before restarting.
(Never turn the player on during an
upgrade.)
4. The update progress popup will appear.
When the update is completed, the player
will turn back off automatically.
5. Press the POWER button to turn on the
player.
NOTE
✎
▪The Update is complete when the player turns
off after restarting. Press the POWER button to
turn on the updated player for your use.
▪Never turn the player off or back on manually
during the update process.
▪Samsung Electronics shall take no legal
responsibility for player malfunction caused by
an unstable Internet connection or consumer
negligence during a software upgrade.
▪If you want to cancel the upgrade while the
upgrade software is downloading, press the
ENTER button.
By USB
To upgrade by USB, follow these steps:
1. Visit www.samsung.com/bluraysupport.
2. Download the latest USB software
upgrade zip archive to your computer.
3. Unzip the zip archive to your computer.
You should have a single RUF file with the
same name as the zip file.
4. Copy the RUF file to a USB flash drive.
5. Make sure there is no disc in the player,
and then insert the USB flash drive into the
USB port of the player.
6. In the player’s menu, go to Settings >
Support > Software Upgrade.
7. Select By USB.
NOTE
✎
▪No disc should be inserted in the product when
you upgrade the software using the USB Host
jack.
▪When the software upgrade is done, check the
software details in the software Upgrade menu.
▪Do not turn off the player during the software
upgrade. It may cause the player to malfunction.
▪Software upgrades using the USB Host jack
must be performed with a USB flash memory
stick only.
Auto Upgrade Notification
If you have connected the player to your
network, and then set Auto Upgrade
Notification on, the player automatically
notifies you when a new software version is
available for the player.
To set Auto Upgrade Notification on, follow
these steps:
1. Select Auto Upgrade Notification, and
then press the ENTER button.
2. Use the ▲▼ buttons to select On, and
then press the ENTER button.
If there is a new software version available,
the player notifies you with a popup message.
1. To upgrade the firmware, select Ye s on the
Pop-up. The player turns off automatically,
then restarts, and begins the download.
(Never turn on the player manually here.)
2. The update progress popup appears.
3. When the update is complete, the player
turns off again automatically.
4. Press the POWER button to turn on the
player.
NOTE
✎
▪Update is complete when the player turns off
after restarting. Press the POWER button to turn
on the updated player for your use.
Never turn the player off or on manually during
the update process.
▪Samsung Electronics shall take no legal
responsibility for player malfunction caused by
an unstable Internet connection or consumer
negligence during software upgrade.
Contact Samsung
Provides contact information for assistance
with your player.
Terms of Service Agreement
View the general disclaimer regarding third
party contents and services.
Reset
All settings will revert to the default except for
the network settings.
18
Page 19
Basic Functions
Playing a Video
Playback
1. Push a disc gently into the slot with the
disc's label facing up.
2. Press the PLAY ( ) button.
Playback related buttons
PLAY ( )
STOP (
PAUSE (
NOTE
✎
▪For some discs, pressing the STOP (
▪Video files with high bit rates of 20Mbps or
Starts playback.
Stops playback.
• If you press the button once : The
stop position is memorized.
)
• If you press the button twice : The
stop position is not memorized.
Pauses playback.
)
once may not memorize the stop position.
more strain the player’s capabilities and may
stop playing during playback.
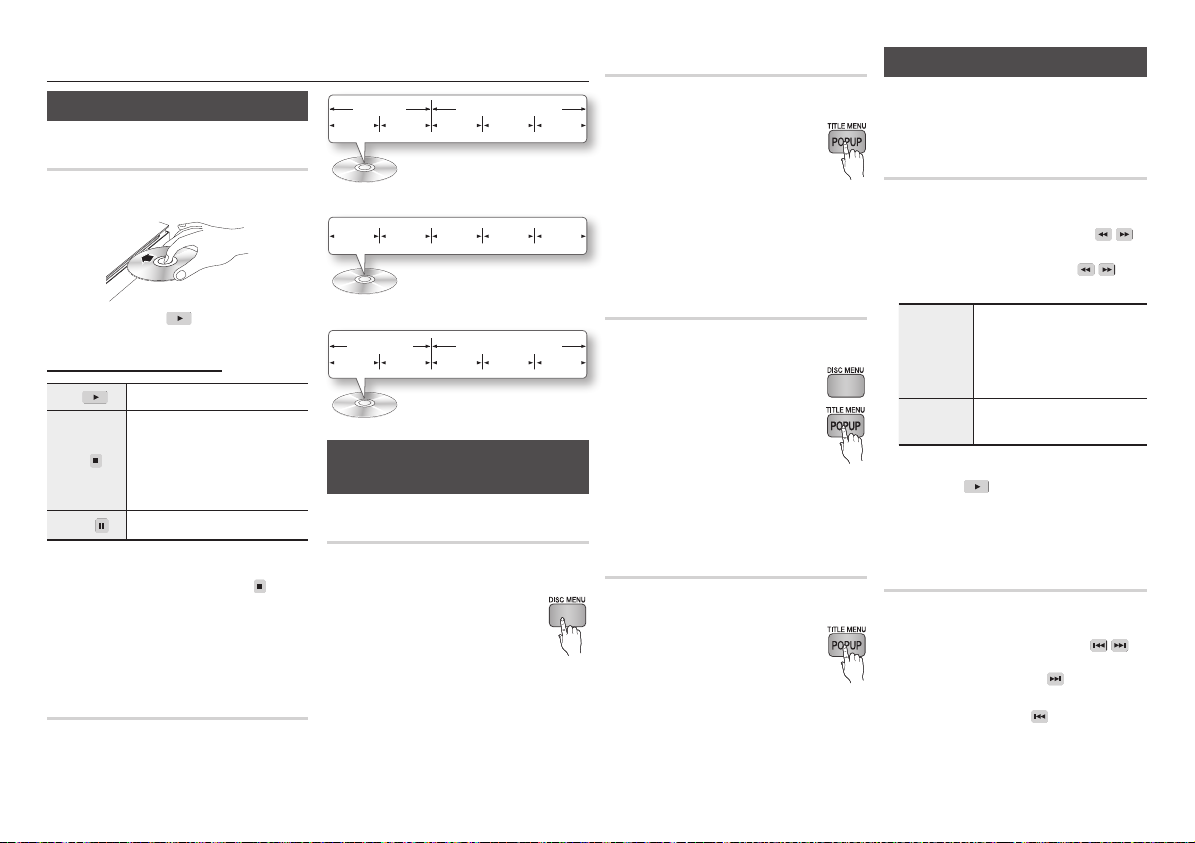
Disc Structure
The content of discs are usually divided as
shown below.
• Blu-ray Disc, DVD-VIDEO
)
button
title 1 title 2
chapter 1 chapter 2 chapter 1 chapter 2 chapter 3
• Audio CD (CD-DA)
track 1 track 2 track 3 track 4 track 5
• MP3, WMA, DivX, MKV and MP4
folder (group) 1 folder (group) 2
file 1 file 2 file 1 file 2 file 3
Using the Disc Menu/Title Menu/
Popup Menu
Using the Disc Menu
hZ
1. During playback, press the DISC
MENU button on the remote
control.
2. Press the ▲▼◄► buttons to make
a selection, and then press the ENTER
button.
NOTE
✎
▪Depending on the disc, the menu items may
differ or this menu may not be available.
Using the Title Menu
1. During playback, press the TITLE
MENU button on the remote control.
2. Press the ▲▼◄► buttons to
make the desired selection, then
press the ENTER button.
NOTE
✎
▪Depending on the disc, the menu items may
differ or this menu may not be available.
Playing the Title List
1. During playback, press the DISC
MENU or TITLE MENU button.
2. Press the ▲▼ buttons to select
an entry you want to play from
the Title List, and then press the
ENTER button.
NOTE
✎
▪If your disc has a playlist, press the GREEN (B)
button to go to the playlist.
Using the Popup Menu
1. During playback, press the POPUP
MENU button on the remote control.
2. Press the ▲▼◄► buttons or
ENTER button to select the desired
menu.
NOTE
✎
▪Depending on the disc, the menu items may
differ or this menu may not be available.
Z
z
h
Using the Search and Skip Functions
During play, you can search quickly through a
chapter or track, and use the skip function to
jump to the next selection.
Searching for a Desired Scene
hzZyx
• During playback, press the SEARCH ( )
button.
Each time you press the SEARCH ( )
button, the playback speed will change as follows:
BD-ROM,
BD-RE/-R,
DVD-RW/-R,
DVD+RW/+R,
DVD-VIDEO
DivX, MKV,
• To return to normal speed playback, press
the PLAY (
NOTE
✎
▪The player does not play sound in search mode.
MP4
)
1
)
4
(
1
(
4
)
1
(
1
) button.
)
2 ) 3
)
5 ) 6 ) 7
(
2 ( 3
(
5 ( 6 ( 7
)
2 ) 3
(
2 ( 3
Skipping Chapters
hzZyx
• During playback, press the SKIP ( )
button.
If you press the SKIP (
disc moves to the next chapter.
If you press the SKIP (
disc moves to the beginning of the chapter.
One more press makes the disc move to
the beginning of the previous chapter.
) button, the
) button, the
19
Page 20
Slow Motion Play/Step Motion Play
Slow Motion Play
hzZyx
• In pause mode, press the SEARCH ( )
button.
Each time you press the SEARCH (
button, the playback speed will change as
*
follows:
• To return to normal speed playback, press
the PLAY (
NOTE
✎
1/8 * 1/4 * 1/2
) button.
▪The player does not play sound in Slow mode.
)
Step Motion Play
hzZyx
• In pause mode, press the PAUSE ( )
button.
Each time you press the PAUSE (
button, a new frame appears.
• To return to normal speed playback, press
the PLAY (
NOTE
✎
▪The player does not play sound in step mode.
) button.
Using the TOOLS button
During playback, you can operate
the disc menu by pressing the
TOOLS button.
NOTE
✎
▪Depending on the disc, the Tools menu may
differ.
)
Moving to a Desired Scene
Directly
hzZy
1. During playback, press the TOOLS button.
2. Press the ▲▼ buttons to select Title,
Chapter or Playing Time.
3. Press the ◄► or number button to select
the desired Title, Chapter or Playing Time,
then press the ENTER button.
Repeating the Title or Chapter
hzZy
Lets you repeat the disc title or chapter.
Depending on the disc, the Repeat function
may not be available.
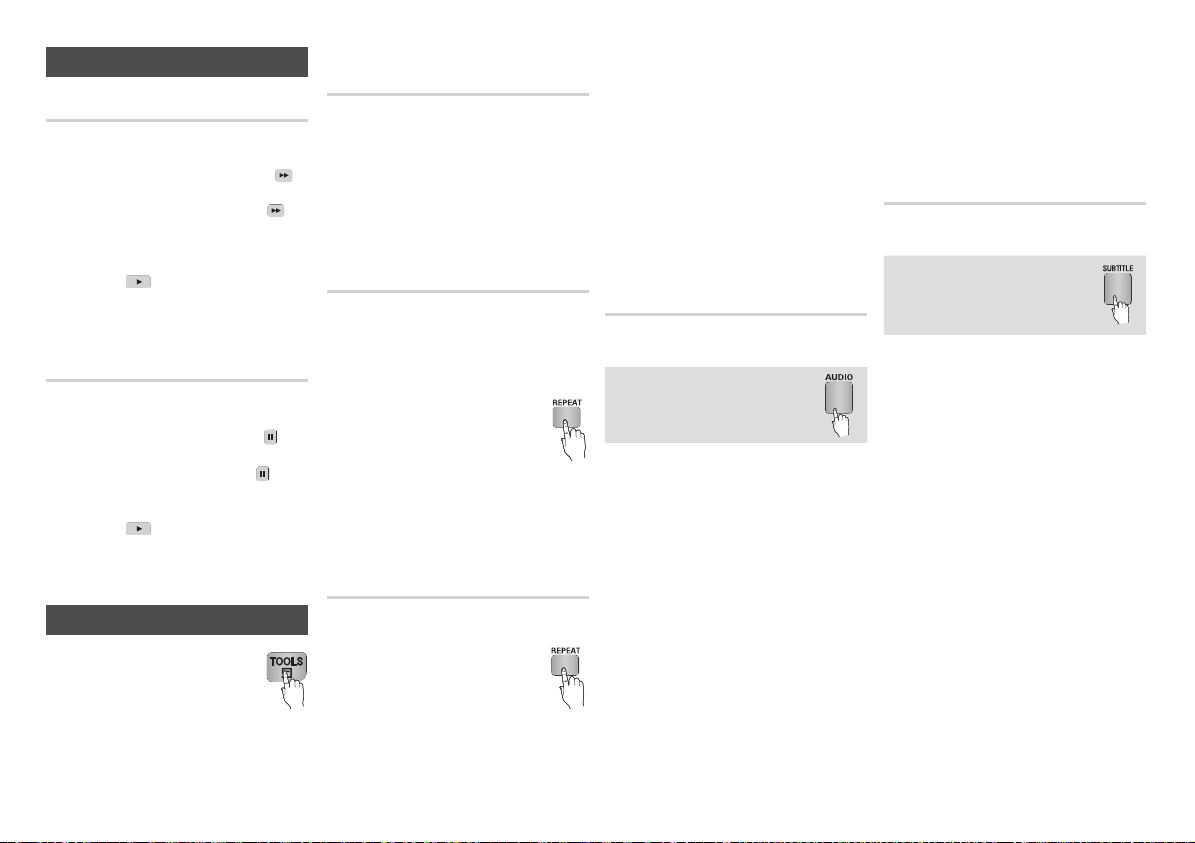
1. During playback, press the
REPEAT button.
2. Press the ▲▼ buttons to select
Chapter or Title, then press the
ENTER button.
3. To return to normal play, press the
REPEAT
button again.
4. Press the
▲▼
press the ENTER button.
buttons to select Off, then
Repeating a Section
hzZy
1. During playback, press the REPEAT
button.
2. Press the ▲▼ buttons to select
Repeat A-B.
3. Press the ENTER button at the
point where you want repeat play to start (A).
4. Press the ENTER button at the point
where you want repeat play to stop (B).
5. To return to normal play, press the
REPEAT button again.
6. Press the
NOTE
✎
▲▼
then press the ENTER button.
▪If you set point (B) less than 5 seconds of
playing time after point (A), a prohibition
message appears.
▪Depending on the disc, the menu items may
differ and this menu may not be available.
buttons to select Off, and
Selecting the Audio Language
hzZx
You can also operate this function
by pressing the AUDIO button on
the remote control.
1. During playback, press the TOOLS button.
2. Press the ▲▼ buttons to select Audio.
3. Press the ◄► buttons to select the
desired audio language.
NOTE
✎
▪The ◄► indicator will not appear on the screen
if the BONUSVIEW section does not contain any
BONUSVIEW audio settings.
▪Information about the main feature/BONUSVIEW
mode will also appear if the Blu-ray Disc has a
BONUSVIEW section.
Press the ◄► button to switch between main
feature and BONUSVIEW audio modes.
▪This function depends on the selection of audio
languages encoded on the disc and may not be
available.
▪A Blu-ray Disc can contain up to 32 audio
languages and a DVD up to 8.
▪Some Blu-ray Discs may allow you to select
either the PCM or Dolby digital audio soundtrack
in English.
▪If you press the AUDIO button on the remote
control, the Audio bar appears.
Press the RETURN button to remove the Audio
bar.
Selecting the Subtitle Language
hZx
You can also operate this function
by pressing the SUBTITLE
button on the remote control.
1. During playback, press the TOOLS button.
2. Press the ▲▼ buttons to select Subtitle.
3. Press the ◄► buttons to select the
desired subtitle language.
NOTE
✎
▪Depending on the Blu-ray Disc / DVD, you may
be able to select the desired subtitle in the Disc
Menu. Press the DISC MENU button.
▪This function depends on the selection of
subtitles that are encoded on the disc and may
not be available on all Blu-ray Discs/DVDs.
▪A Blu-ray Disc can contain up to 255 subtitle
languages and a DVD up to 32.
▪Information about the main feature/BONUSVIEW
mode will also appear if the Blu-ray Disc has a
BONUSVIEW section.
▪This function changes both the primary and
secondary subtitles at the same time.
▪The total number of primary and secondary
subtitles are displayed respectively.
▪If you press the SUBTITLE button on the remote
control, the subtitle bar appears.
Press the RETURN button to remove the subtitle
bar.
20
Page 21
Changing the Camera Angle
hZ
When a Blu-ray Disc/DVD contains multiple
angles of a particular scene, you can use the
ANGLE function.
1. During playback, press the TOOLS button.
2. Press the ▲▼ buttons to select Angle.
3. Press the ◄► buttons to select the
desired Angle.
Selecting the Picture Settings
hzZy
This function enables you to adjust video
quality when the player is connected to a TV.
1. During playback, press the TOOLS button.
2. Press the ▲▼ buttons to select Picture
Setting, and then press the ENTER
button.
3. Press the ◄► buttons to select the
desired Picture Setting
• Dynamic : Choose this setting to
increase Sharpness.
• Normal : Choose this setting for most
viewing applications.
• Movie : This is the best setting for
watching movies.
• User : Lets you adjust the sharpness
and noise reduction function
respectively.
NOTE
✎
▪When you use BD wise function, this menu will
not appear.
.
Setting BONUSVIEW
h
The BONUSVIEW feature allows you to view
additional content (such as commentaries)
in a small screen window while the movie is
playing.
This function is only available if the disc has
the Bonusview feature.
1. During playback, press the
TOOLS button.
2. Press the ▲▼ buttons to
select BONUSVIEW Video or
BONUSVIEW Audio.
3. Press the ◄► buttons to select the
desired Bonusview.
NOTE
✎
▪ If you switch from BONUSVIEW Video,
BONUSVIEW Audio will change automatically in
accordance with BONUSVIEW Video.
Listening to Music
ow
Playing an Audio CD (CD-DA)/MP3
1. Insert an Audio CD (CD-DA) or an MP3
Disc.
• For an Audio CD (CD-DA), the first
track plays automatically.
• For an MP3 disc, press the ◄►
buttons to select Music, then press
the ENTER button.
2. Press the ▲▼ buttons to select the track
you want to play, and then press the
ENTER button.
Audio CD (CD-DA)/MP3 Screen
Elements
TRACK 001
7
+
00:08 / 05:57
6
CD
5
Displays the music information.
1
Displays the playlist.
2
Display the current track/total tracks.
3
Displays buttons available.
4
Shows the current play time/total play time.
5
Displays the current playback status.
6
Displays the repeated playback status.
7
Playlist
TRACK 001
TRACK 002
TRACK 003
TRACK 004
TRACK 005
TRACK 006
Pause Tools ' Return
"
4
05:57
04:27
04:07
03:41
03:17
03:35
Repeat an Audio CD (CD-DA)/
MP3
1. During the Playlist playback,
press the TOOLS button.
2. Select Repeat Mode, and then
press the ◄► buttons to select
the desired repeat mode.
3. Press the ENTER button
.
Repeat Modes :
Tracks on a disc are
Audio CD
Off
) Track
) One
) All
) Shuffle
(CD-DA)/MP3
Audio CD
(CD-DA)
MP3
Audio CD
(CD-DA)/MP3
Audio CD
(CD-DA)/MP3
31 2
1/6
(
(
(
(
played in the order
in which they were
recorded on the disc.
Current track is
repeated.
Current track is
repeated.
All tracks are
repeated.
The random option
plays a disc’s tracks
in random order.
Playlist
1. Insert an Audio CD (CD-DA) or an MP3
Disc.
•For an Audio CD (CD-DA), the first track
plays automatically.
•For an MP3 disc, press the ◄► buttons
to select Music, then press the ENTER
button.
2. To move to the Music List, press the
STOP (
The Music List screen appears.
3. Press the ▲▼◄► buttons to move to a
desired track, then press the YELLOW (C)
button to check the desired track.
Repeat this procedure to select additional
tracks.
4. If you want to remove a track from the
playlist, go to the track, and then press the
YELLOW (C) button again. The track is
removed.
5. Press the ENTER button to play the
selected tracks.
The selected tracks will play automatically.
) or RETURN button.
21
Page 22
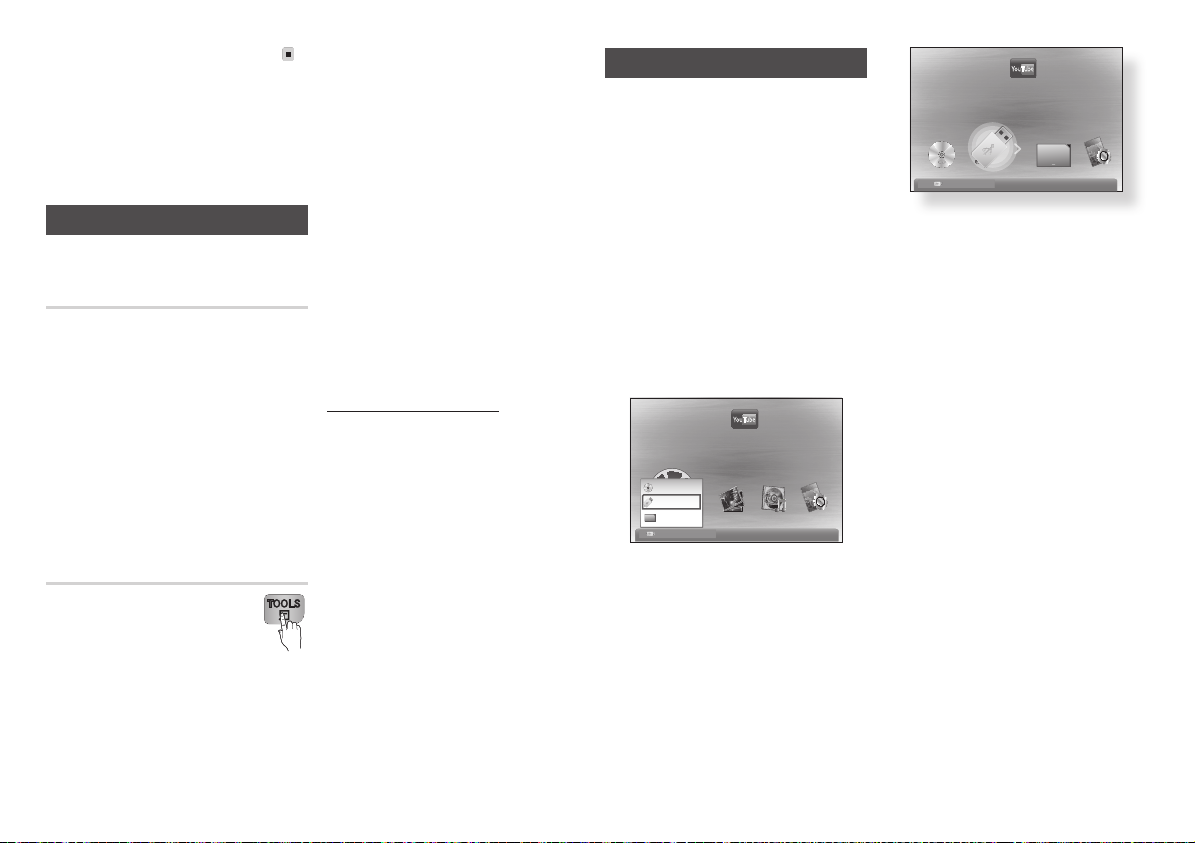
6. To go to the Music List, press the STOP ( )
or RETURN button.
7. To go to the Playlist, press the ENTER
button.
NOTE
✎
▪ You can create a playlist with up to 99 tracks on
Audio CDs (CD-DA).
Playing back Pictures
G
Playing JPEG files
1. Insert a JPEG disc.
2. Press the ◄► buttons to select Photos,
and then press the ENTER button.
3. Press the ▲▼◄► buttons to select the
folder you want to play, and then press the
ENTER button.
4. Press the ▲▼◄► buttons to select the
photo you want to play, and then press the
ENTER button.
NOTE
✎
▪You can’t enlarge the subtitle and PG graphic in
the full screen mod
Using the TOOLS button
You can use various functions by
pressing the TOOLS button.
• Start Slide Show : Select to start
the slide show.
• Stop Slide Show : Select if you want to
stop the slide show.
• Slide Show Speed : Select if you want to
adjust the Slide Show speed.
e.
• Background Music : Select to listen to
music while viewing a slide show.
• Zoom : Select to enlarge the current
picture. (Enlarged up to 4 times)
• Rotate : Select to rotate the picture. (This
will rotate the picture either clockwise or
counter clockwise.)
• Information : Shows the picture information
including the name and size, etc.
NOTE
✎
▪To enable the background music function, the
photo file must be in the same storage media as
the music file. However, the sound quality can
be affected by the bit rate of the MP3 file, the
size of the photo, and the encoding method.
▪Start Slide Show and Stop Slide Show alternate,
depending on whether you are running a slide
show or not.
Playing Selected Photos
You can select specific photos to play pressing
the YELLOW (C) button on your remote. To
select specific photos, follow these steps:
1. Select the folder that contains the photos
you want to view, and then press the
ENTER button.
2. Press the ▲▼◄► buttons to select a
photo you want to play, and then press
the YELLOW (C) button. A check mark
appears on the photo.
3. Repeat Step 2 for each photo you want to
play.
NOTE
✎
▪To deselect a photo, press the ▲▼◄►
buttons to highlight the photo, and then press
the YELLOW (C) button.
4. Press the ENTER button when done. The
slide show starts.
Playing back a USB Storage Device
You can use the USB connection to play
multimedia files (MP3, JPEG, DivX, etc) located
on a USB storage device.
1. Move to the Home menu.
2. In Stop mode, connect the USB storage
device to the USB port on the rear panel
of the player.
The message “Do you want to access the
device?” will be displayed.
3. Press the ◄► button to select Yes , then
press the ENTER button.
4. Press the RED (A) button or BLUE (D)
button.
If you pressed the RED (A) button, go to
Step 5.
If you pressed the BLUE (D) button, go to
Step
4-1.
You Tube
No Disc
123
DLNA
123 a Change Device
c
Safely Remove USB
d
View Devices
Enter
"
5. Press the ▲▼ buttons to select USB,
then press the ENTER button.
6. Press the ◄► buttons to select the
desired Videos, Music or Photos, then
press the ENTER button. Go to Step 7
-1
. If you pressed the BLUE (D) button, the
4
screen below appears. Go to 5
-1
.
You Tube
123
123
d
Home
Enter
"
5-1. Press the ◄► buttons to select USB,
then press the ENTER button.
-1
6
. Press the ▲▼ buttons to select the
desired Videos, Music or Photos, then
press the ENTER button.
7. For playing back Video, Music or Photo
files see pages 19~22.
NOTE
✎
▪You must remove the USB storage device
safely (by performing the “Safely Remove USB”
function) in order to prevent possible damage
to the USB memory. Press the MENU button to
move to the Home menu, select the YELLOW (C)
button, and then press the ENTER button.
▪When the Audio-CD (CD-DA), MP3 or JPEG files
are in stop mode, pressing the FULL SCREEN
button on the remote will not bring up a full
screen picture.
▪If you insert a disc when playing a USB storage
device, the device mode changes to “DVD or
CD” automatically.
22
Page 23
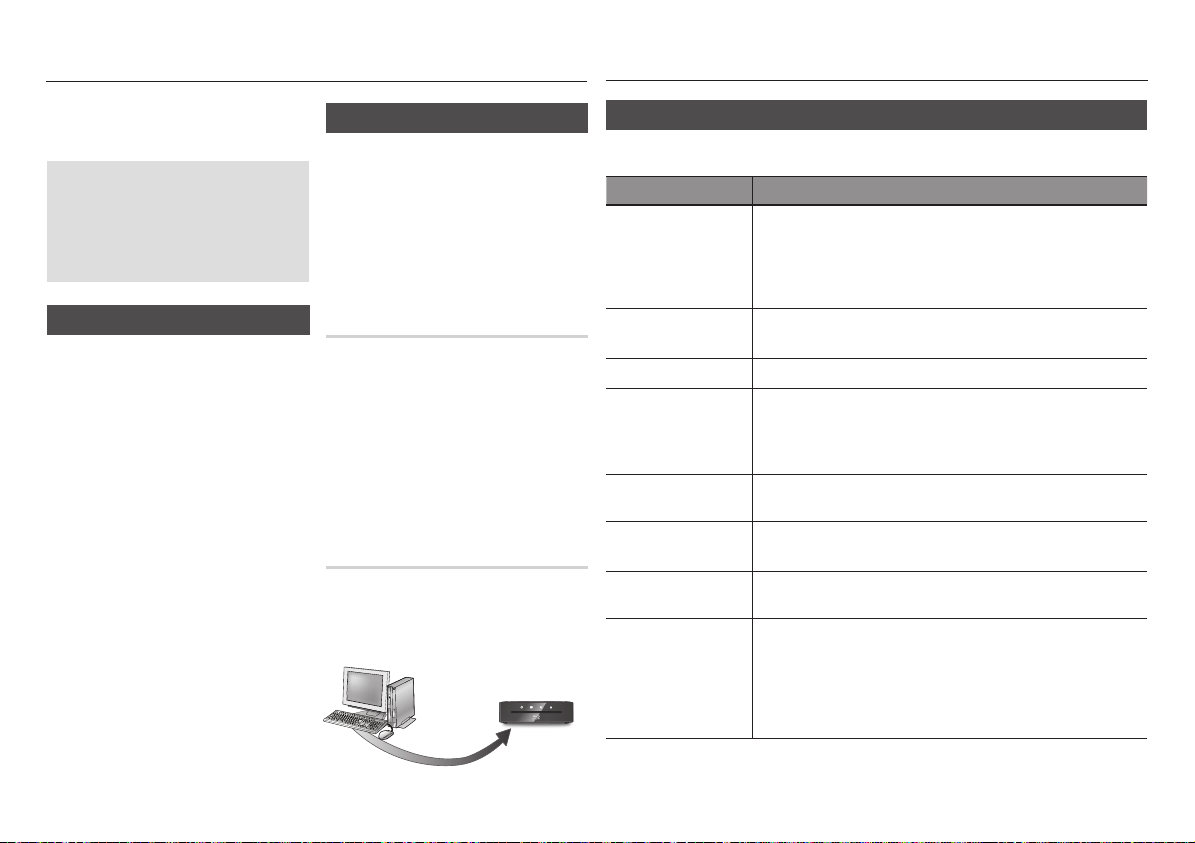
Network Services
Appendix
You can enjoy various network services such
as BD-LIVE by connecting the player to your
network.
Read the following instructions before
using any network service.
1. Connecting the player to the network
(pages 10 and 11).
2. Configuring the network settings
(page 16).
BD-LIVE™
Once the player is connected to the network,
you can enjoy various movie-related service
contents using a BD-LIVE compliant disc.
1. Attach a USB memory stick to the USB
jack on the rear panel of the player, and
then check its remaining memory. The
memory device must have at least 1GB of
free space to accommodate the BD-LIVE
services.
2. Insert a Blu-ray Disc that supports BD-
LIVE.
3. Select an item from various BD-LIVE
service contents provided by the disc
manufacturer.
NOTE
✎
▪The way you use BD-LIVE and the provided contents
may differ, depending on the disc manufacturer.
Using the AllShare Function
AllShare lets you play music, video, and photo
files located in your PC or NAS on the player.
To use AllShare with your player, you must
connect the player to your network (See
pages 10~11).
To use AllShare with your PC, you must install
AllShare software on your PC.
If you have NAS, you can use AllShare without
any additional software.
To download AllShare software
1. Go to Samsung.com
2. Click Support, enter your player’s product
number in the field that appears, and then
click Product.
3. On the next screen, click Get downloads
under Downloads.
4. Click Software on the next page.
5. Click the icon in the AllShare line under File
to start the download.
Playing content located in your
PC on the Blu-ray Disc Player
You can view shared files of your computer to
your Blu-ray Disc Player.
You can get detailed instructions for using
AllShare from the Samsung.com web site.
Blu-ray Disc Player
AllShare Connection
Play back PC’s files
Troubleshooting
Before requesting service, please try the following solutions.
PROBLEM SOLUTION
No operation can be
performed with the remote
control.
Disc does not play. • Ensure that the disc is installed with the label side facing up.
Disc Menu does not appear. • Ensure that the disc has disc menus.
The prohibition message
appears on the screen.
Play mode differs from the
Setup Menu selection.
The screen ratio cannot be
changed.
No audio. • Make sure you have selected the correct Digital Output in the Audio Options
The screen is blocked • If the HDMI output is set to a resolution your TV cannot support (for example,
• Check the batteries in the remote control. They may need replacing.
• Operate the remote control at a distance of no more than 6.1m.
• Remove batteries and hold down one or more buttons for several minutes
to drain the microprocessor inside the remote control to reset it. Reinstall
batteries and try to operate the remote control again.
• Check the region number of the Blu-ray Disc/DVD.
• This message appears when an invalid button is pressed.
• The Blu-ray Disc/DVD’s software doesn’t support the feature (e.g., angles).
• You’ve requested a title or chapter number or search time that is out of
range.
• Some of the functions selected in the Setup Menu may not work properly if
the disc is not encoded with the corresponding function.
• The Screen Ratio is fixed on your Blu-ray Disc/DVD.
• This is not a problem with the player.
Menu.
1080p), you may not see a picture on your TV.
• Press the STOP ( @ ) button (on front panel) for more than 5 seconds with no
disc inside. All settings will revert to the factory settings.
• When the factory default settings are restored, all stored user BD data is
deleted.
23
Page 24

PROBLEM SOLUTION
Forgot password • Press the STOP ( @ ) button (on front panel) for more than 5 seconds with
If you experience other
problems.
The picture is noisy or
distorted
No HDMI output. • Check the connection between the TV and the HDMI jack of the player.
Abnormal HDMI output
screen.
AllShare function
I can see folders shared
through AllShare, but I
cannot see the files.
Video is played
intermittently.
AllShare connection
between Player and PC is
unstable.
no disc inside. All settings including the password will revert to the factory
settings.
Don’t use this unless absolutely necessary.
• When the factory default settings are restored, all stored user BD data is
deleted.
• Go to the contents and find the section of the user manual that contains the
explanations regarding the current problem, and follow the procedure once
again.
• If the problem still cannot be solved, please contact your nearest Samsung
authorised service center.
• Make sure that the disc is not dirty or scratched.
• Clean the disc.
• Check if your TV supports 576p/480p, 720p, 1080i, 1080p HDMI input
resolution.
• If random noise appears on the screen, it means that TV does not support
HDCP (High-bandwidth Digital Content Protection).
• AllShare shows only files corresponding to the Image, Music, and Movie
categories. Files that do not correspond to these categories may not be
displayed.
• Check if the network is stable.
• Check if the network cable is properly connected and if the network is not
overloaded.
• The IP address under the same subnetwork should be unique. If they are not,
IP interference can cause this phenomenon.
• Check if you have a firewall enabled.
If so, disable the firewall function.
PROBLEM SOLUTION
BD-LIVE
I cannot connect to the BDLIVE server.
When using the BD-LIVE
service, an error occurs.
NOTE
✎
▪ When the factory default settings are restored, all stored user BD data is deleted.
• Check whether the network connection is successful or not by using the
Network Status menu.
• Check whether the USB memory device is connected to the player.
• The memory device must have at least 1GB of free space to accommodate
the BD-LIVE service.
You can check the available size in BD Data Management.
• Check whether the BD-LIVE Internet Connection menu is set to Allow(All).
• If all above fails, contact the contents provider or update the player to the
latest firmware.
• The memory device must have at least 1GB of free space to accommodate
the BD-LIVE service.
You can check the available size in BD Data Management.
Repairs
If you contact us to repair your player, an administration fee may be charged if either:
1. An engineer is called out to your home at your request and there is no defect in the product.
2. You bring the unit to a repair center and there is no defect in the product.
We will provide you with the amount of the administration fee before we make a home visit
or begin any work on your player.
We recommend you read this manually thoroughly, search for a solution on line at www.
samsung.com, or contact Samsung Customer Care before seeking to repair your player.
24
Page 25

Specifications
Weight 1 Kg
General
USB
HDMI
Audio Output Digital Audio Output Optical
Network Ethernet
- It is not supported when the network speed is below or equal to 10Mbps.
- Design and specifications are subject to change without prior notice.
- For the power supply and power consumption, refer to the label attached to the
product.
- Weight and dimensions are approximate.
Dimensions 187 (W) X 187 (D) X 56 (H) mm
Operating Temperature Range +5°C to +35°C
Operating Humidity Range 10 % to 75 %
Type A USB 2.0
DC output 5V 500mA Max.
Video 1080p, 1080i, 720p, 576p/480p
Audio PCM, Bitstream
100BASE - TX Terminal
25
Page 26

Compliance and Compatibility Notice
NOT ALL discs are compatible
• Subject to the restrictions described below and those noted throughout this Manual, including the Disc Type
and Characteristics section of this user manual, disc types that can be played are: pre-recorded commercial
BD-ROM, DVD-VIDEO, and Audio CD (CD-DA) discs; BD-RE/-R, DVD-RW/-R discs; and CD-RW/-R discs.
• Discs other than the above cannot and/or is not intended to be played by this player. And some of the
above discs may not play due to one or more reasons provided below.
• Samsung cannot assure that this player will play every disc bearing the BD-ROM, BD-RE/-R,
DVD-VIDEO, DVD-RW/-R, DVD+RW/+R and CD-RW/-R logos, and this player may not respond to all
operating commands or operate all features of every disc. These and other disc compatibility and player
operation issues with new and existing format discs are possible because:
- Blu-ray is a new and evolving format and this player may not operate all features of Blu-ray Discs because
some features may be optional, additional features may have been added to the Blu-ray
Disc format after the production of this player, and certain available features may be subject to delayed
availability;
- not all new and existing disc format versions are supported by this player;
- new and existing disc formats may be revised, changed, updated, improved and/or supplemented;
- some discs are produced in a manner that allows specific or limited operation and feature during playback;
- some features may be optional, additional features may have been added after the production of this
player or certain available features may be subject to delayed availability;
- some discs bearing the BD-ROM, BD-RE/-R, DVD-VIDEO, DVD-RW/-R, DVD+RW/+R and
CD-RW/-R logos may still be non-standardized discs;
- some discs may not be played depending on their physical state or recording conditions;
- problems and errors can occur during the creation of Blu-ray Disc, DVD software and/or the manufacture
of discs;
- this player operates differently than a standard DVD player or other AV equipment; and/or
- for reasons noted throughout this user manual and for other reason(s) discovered and posted by
SAMSUNG customer care centre.
• If you encounter disc compatibility or player operation problems, please contact SAMSUNG customer care
centre.
You may also contact SAMSUNG customer care centre for possible updates on this player.
• For additional information on playback restrictions and disc compatibility, refer to the Precautions, Before
Reading the user manual, Disc Types and Characteristics, and Before Playing sections of this user manual.
• For Blu-ray Disc Player progressive scan output : CONSUMERS SHOULD NOTE THAT NOT ALL
HIGH DEFINITION TELEVISION SETS ARE FULLY COMPATIBLE WITH THIS PRODUCT AND MAY
CAUSE ARTIFACTS TO BE DISPLAYED IN THE PICTURE. IN CASE OF PROGRESSIVE SCAN PICTURE
PROBLEMS, IT IS RECOMMENDED THAT THE USER SWITCH THE CONNECTION TO THE ‘STANDARD
DEFINITION’ OUTPUT. IF THERE ARE QUESTIONS REGARDING OUR TV SET COMPATIBILITY WITH THIS
PRODUCT, PLEASE CONTACT OUR CUSTOMER SERVICE CENTER.
Copy Protection
• Because AACS (Advanced Access Content System) is approved as content protection system for
Blu-ray Disc format, similar to use of CSS (Content Scramble System) for DVD format, certain restrictions
are imposed on playback, analogue signal output, etc., of AACS protected contents.
The operation of this product and restrictions on this product may vary depending on your time of purchase
as those restrictions may be adopted and/or changed by AACS after the production of this product.
Furthermore, BD-ROM Mark and BD+ are additionally used as content protection system for Blu-ray Disc
format, which imposes certain restrictions including playback restrictions for BD-ROM Mark and/or BD+
protected contents. To obtain additional information on AACS, BD-ROM Mark, BD+, or this product, please
contact SAMSUNG customer care centre.
• Many Blu-ray Disc/DVDs are encoded with copy protection. Because of this, you should only connect
your Player directly to your TV, not to a VCR. Connecting to a VCR results in a distorted picture from copy
protected Blu-ray Disc/DVDs.
• Under the U.S. Copyright laws and Copyright laws of other countries, unauthorised recording, use, display,
distribution, or revision of television programs, videotapes, Blu-ray Discs, DVDs, and other materials may
subject you to civil and/or criminal liability.
• Cinavia Notice : This product uses Cinavia technology to limit the use of unauthorized copies of some
commercially-produced film and videos and their soundtracks. When a prohibitet use of an unauthorized
copy is detected, a message will be displayed and playback or copying will be interrupted.
More information about Cinavia technology is provided at the Cinavia Online Consumer Information Center
at http://www.cinavia.com. To request additional information about Cinavia by email, send a postcard with
your mailing address to: Cinavia Consumer Information Center, P.O. Box 86851, San Diego CA, 92138,
USA.
This product incorporates proprietary technology under licence from Verance Corporation and is protected
by U.S. Patent 7,369,677 and other U.S. and worldwide patens issued and pending as well as copyright
and trade secret protection for certain aspects of such technology. Cinavia is a trademark of Verance
Corporation. Copyright 2004-2010 Verance Corporation. All right reserved by Verance. Reverse engineering
or disassembly is prohibited.
Network Service Disclaimer
All content and services accessible through this device belong to third parties and are protected by copyright,
patent, trademark and/or other intellectual property laws. Such content and services are provided solely for
your personal non-commercial use. You may not use any content or services in a manner that has not been
authorised by the content owner or service provider. Without limiting the foregoing, unless expressly authorised
by the applicable content owner or service provider, you may not modify, copy, republish, upload, post,
transmit, translate, sell, create derivative works, exploit, or distribute in any manner or medium any content or
services displayed through this device.
THIRD PARTY CONTENT AND SERVICES ARE PROVIDED “AS IS.” SAMSUNG DOES NOT WARRANT
CONTENT OR SERVICES SO PROVIDED, EITHER EXPRESSLY OR IMPLIEDLY, FOR ANY PURPOSE.
SAMSUNG EXPRESSLY DISCLAIMS ANY IMPLIED WARRANTIES, INCLUDING BUT NOT LIMITED TO,
WARRANTIES OF MERCHANTABILITY OR FITNESS FOR A PARTICULAR PURPOSE. SAMSUNG DOES NOT
GUARANTEE THE ACCURACY, VALIDITY, TIMELINESS, LEGALITY, OR COMPLETENESS OF ANY CONTENT
OR SERVICE MADE AVAILABLE THROUGH THIS DEVICE AND UNDER NO CIRCUMSTANCES, INCLUDING
NEGLIGENCE, SHALL SAMSUNG BE LIABLE, WHETHER IN CONTRACT OR TORT, FOR ANY DIRECT,
INDIRECT, INCIDENTAL, SPECIAL OR CONSEQUENTIAL DAMAGES, ATTORNEY FEES, EXPENSES, OR
ANY OTHER DAMAGES ARISING OUT OF, OR IN CONNECTION WITH, ANY INFORMATION CONTAINED IN,
OR AS A RESULT OF THE USE OF ANY CONTENT OR SERVICE BY YOU OR ANY THIRD PARTY, EVEN IF
ADVISED OF THE POSSIBILITY OF SUCH DAMAGES.
Third party services may be terminated or interrupted at any time, and Samsung makes no representation
or warranty that any content or service will remain available for any period of time. Content and services are
transmitted by third parties by means of networks and transmission facilities over which Samsung has no
control. Without limiting the generality of this disclaimer, Samsung expressly disclaims any responsibility or
liability for any interruption or suspension of any content or service made available through this device.
Samsung is neither responsible nor liable for customer service related to the content and services. Any
question or request for service relating to the content or services should be made directly to the respective
content and service providers.
26
Page 27

License
• Manufactured under license from Dolby Laboratories. Dolby and the
double-D symbol are trademarks of Dolby Laboratories.
• Manufactured under license under U.S. Patent Nos: 5,956,674; 5,974,380;
6,487,535 & other U.S. and worldwide patents issued & pending. DTS, the
Symbol, & DTS and the Symbol together are registered trademarks & DTS
2.0+Digital Out is a trademark of DTS, Inc. Product includes software.
© DTS, Inc. All Rights Reserved.
• DivX
- ABOUT DIVX VIDEO: DivX® is a digital video format created by DivX,
LLC, a subsidiary of Rovi Corporation. This is an official DivX Certified®
device that plays DivX video. Visit divx.com for more information and software tools to
convert your files into DivX videos.
- ABOUT DIVX VIDEO-ON-DEMAND: This DivX Certified® device must be registered in
order to play purchased DivX Video-on-Demand (VOD) movies. To obtain your registration
code, locate the DivX VOD section in your device setup menu. Go to vod.divx.com for
more information on how to complete your registration.
- DivX Certified® to play DivX® video up to HD 1080p, including premium content.
DivX®, DivX Certified® and associated logos are trademarks of Rovi Corporation or its
subsidiaries and are used under license.
Covered by one or more of the following U.S. patents : 7,295,673; 7,460,668; 7,515,710;
7,519,274.
• The terms HDMI and HDMI High-Definition Multimedia Interface, and the
HDMI Logo are trademarks or registered trademarks of HDMI Licensing
LLC in the United States and other countries.
• Oracle and Java are registered trademarks of Oracle and/or its affiliates.
Other names may be trademarks of their respective owners
• Open Source License Notice
- In the case of using open source software, Open Source Licenses are available on the
product menu.
• Blu-ray Disc™, Blu-ray™ and the logos are trademarks of the Blu-ray Disc Association.
UNITED KINGDOM
This Samsung product is warranted for the period of
twelve (12) months from the original date of purchase,
against defective materials and workmanship. In the
event that warranty service is required, you should
return the product to the retailer from whom it was
purchased.
However, Samsung Authorised Dealers and
Authorised Service Centres in other EC Countries will
comply with the warranty on the terms issued to
purchasers in the country concerned.
In case of difficulty, details of our Authorised Service
Centres are available from:
Samsung Customer Support Centre, PO Box 479,
Gateshead, NE9 9BJ United Kingdom
Telephone : 0330 SAMSUNG (7267864)
Fax : 0330 7260001 (UK & Northern Ireland)
@ WARRANTY CONDITIONS
1. The warranty is only valid if, when warranty service
is required, the warranty card is fully and properly
completed and is presented with the original invoice
or sales slip or confirmation, and the serial number
on the product has not been defaced.
2. Samsung’s obligations are limited to the repair or, at
its discretion, replacement of the product or the
defective part.
3. Warranty repairs must be carried out by Authorised
Samsung Dealers or Authorised Service Centres.
No re-imbursement will be made for repairs carried
out by non Samsung Dealers and, any such repair
work and damage to the products caused by such
repair work will not be covered by this warranty.
Tel : 0818 717 100
Fax : +44 (0)117 915 6736 (EIRE Only)
Web : www.samsung.com
EIRE
4. This product is not considered to be defective in
materials nor workmanship by reason that it
requires adaptation in order to conform to national
or local technical or safety standards in force in any
Country other than the one for which the product
was originally designed and manufactured. This
warranty will not cover, and no re-imbursement will
be made for such adaptation nor any damage
which may result.
5. This warranty covers none of the following:
a) Periodic check ups, maintenance and repair or
replacement of parts due to normal wear and
tear.
b)
Cost relating to transport, removal or installation
of the product.
c) Misuse, including the failure to use this product
for its normal purposes or incorrect installation.
d) Damage caused by Lightning, Water, Fire, Acts
of God, War, Public Disturbances, incorrect
mains voltage, improper ventilation or any other
cause beyond the control of Samsung.
6. This warranty is valid for any person who legally
acquired possession of the product during the
warranty period.
7. The consumers statutory rights in any applicable
national legislation whether against the retailer
arising from the purchase contract or otherwise are
not affected by this warranty. Unless there is
national legislation to the contrary, the rights under
this warranty are the consumers sole rights and
Samsung, its subsidiaries and distributors shall not
be liable for indirect or consequential loss or any
damage to records, compact discs, videos or audio
taper or any other related equipment or material.
SAMSUNG ELECTRONICS (U.K.) LTD.
27
Page 28
Contact SAMSUNG WORLD WIDE
If you have any questions or comments relating to Samsung products, please contact the
SAMSUNG customer care centre.
Area Contact Centre
ALBANIA 42 27 5755 www.samsung.com
AUSTRIA 0810 - SAMSUNG (7267864, € 0.07/min) www.samsung.com
BELGIUM 02-201-24-18
BOSNIA 05 133 1999 www.samsung.com
BULGARIA 07001 33 11 www.samsung.com
CROATIA 062 SAMSUNG (062 726 7864) www.samsung.com
CZECH 800 - SAMSUNG (800-726786) www.samsung.com
DENMARK 70 70 19 70 www.samsung.com
FINLAND 030 - 6227 515 www.samsung.com
FRANCE 01 48 63 00 00 www.samsung.com
GERMANY 01805 - SAMSUNG(726-7864 € 0,14/Min) www.samsung.com
CYPRUS 8009 4000 only from landline www.samsung.com
GREECE
HUNGARY 06-80-SAMSUNG(726-7864) www.samsung.com
ITALIA 800-SAMSUNG(726-7864) www.samsung.com
KOSOVO +381 0113216899 www.samsung.com
LUXEMBURG 261 03 710 www.samsung.com
MACEDONIA 023 207 777 www.samsung.com
MONTENEGRO 020 405 888 www.samsung.com
NETHERLANDS 0900-SAMSUNG (0900-7267864) (€ 0,10/Min) www.samsung.com
NORWAY 815-56 480 www.samsung.com
POLAND
PORTUGAL 808 20-SAMSUNG (808 20 7267) www.samsung.com
ROMANIA
SERBIA 0700 Samsung (0700 726 7864) www.samsung.com
SLOVAKIA 0800 - SAMSUNG(0800-726 786) www.samsung.com
SPAIN 902 - 1 - SAMSUNG (902 172 678) www.samsung.com
SWEDEN 0771 726 7864 (SAMSUNG) www.samsung.com
Switzerland 0848 - SAMSUNG(7267864, CHF 0.08/min)
U.K 0330 SAMSUNG (7267864) www.samsung.com
EIRE 0818 717100 www.samsung.com
LITHUANIA 8-800-77777 www.samsung.com
LATVIA 8000-7267 www.samsung.com
ESTONIA 800-7267 www.samsung.com
80111-SAMSUNG (80111 726 7864) only from land line
(+30) 210 6897691 from mobile and land line
0 801-1SAMSUNG(172-678)
+48 22 607-93-33
08010 SAMSUNG (08010 726 7864) only from landline
(+40) 21 206 01 10 from mobile and land line
Web Site
www.samsung.com/be (Dutch)
www.samsung.com/be_fr (French)
www.samsung.com
www.samsung.com
www.samsung.com
www.samsung.com/ch
www.samsung.com/ch_fr (French)
Correct disposal of batteries in this product
(Applicable in the European Union and other European countries with separate
battery return systems.)
This marking on the battery, manual or packaging indicates that the batteries in this
product should not be disposed of with other household waste at the end of their
working life. Where marked, the chemical symbols Hg, Cd or Pb indicate that the
battery contains mercury, cadmium or lead above the reference levels in EC
Directive 2006/66.
If batteries are not properly disposed of, these substances can cause harm to
human health or the environment.
To protect natural resources and to promote material reuse, please separate
batteries from other types of waste and recycle them through your local, free
battery return system.
Correct Disposal of This Product
(Waste Electrical & Electronic Equipment)
(Applicable in the European Union and other European countries with separate
collection systems)
This marking on the product, accessories or literature indicates that the product
and its electronic accessories (e.g. charger, headset, USB cable) should not be
disposed of with other household waste at the end of their working life.
To prevent possible harm to the environment or human health from uncontrolled
waste disposal, please separate these items from other types of waste and recycle
them responsibly to promote the sustainable reuse of material resources.
Household users should contact either the retailer where they purchased this
product, or their local government office, for details of where and how they can
take these items for environmentally safe recycling.
Business users should contact their supplier and check the terms and conditions of
the purchase contract.
This product and its electronic accessories should not be mixed with other
commercial wastes for disposal.
AK68-02231Q-01
Page 29

BD-ES5000
Blu-ray
Bedienungsanleitung
erleben sie die möglichkeiten
Danke für den Kauf dieses Samsung Produkts.
Registrieren Sie Ihr Produkt unter folgendem Link, und
profitieren Sie von unserem umfassenden
Kundenservice:
www.samsung.com/register
™
Disc Player
deutsch
Page 30
Hauptfunktionen
Sicherheitsinformation
Blu-ray Disc-Funktionen
Blu-ray-Disks unterstützen die höchste derzeit
verfügbare HD-Videoqualität - Eine hohe
Kapazität bedeutet keinen Kompromiss bei der
Videoqualität.
Die folgenden Blu-ray Disc-Funktionen
hängen von der Disk selbst ab und können
unterschiedlich sein.
Das Erscheinungsbild und die Navigation durch
die Funktionen sind ebenfalls von Disk zu Disk
unterschiedlich.
Nicht alle Disks verfügen über die im Folgenden
beschriebenen Funktionen.
Video-Highlights
Das BD-ROM-Format für den Filmvertrieb
unterstützt drei hoch entwickelte Video-Codecs,
unter anderem AVC, VC-1 und MPEG-2.
HD Videoauflösungen werden ebenfalls
unterstützt:
• 1920 x 1080 High Definition
• 1280 x 720 High Definition
Für hochauflösende Wiedergabe
Um den HD Inhalt einer Blu-ray-Disk ansehen
zu können, benötigen Sie einen HD-Fernseher.
Bei einigen Blu-ray-Disks kann es erforderlich
sein, den HDMI OUT Anschluss des Players zu
verwenden, um den HD-Inhalt anschauen zu
können.
Die Möglichkeit, HD-Inhalte auf Blu-ray-Disks
anschauen zu können, kann je nach Auflösung
Ihres Fernsehgeräts eingeschränkt sein.
BD-LIVE
Sie können eine Blu-ray-Disk, die BD-LIVE
unterstützt verwenden, um vom Disk-Hersteller
zur Verfügung gestellten Inhalt über eine
Netzwerkverbindung herunterzuladen.
2
Blu-ray Disk-Player Funktionen
AllShare
Sie können auf Ihren Geräten (wie PCs
oder NAS [Network-Attached Storage])
gespeicherte Videos, Musik und Fotos über
eine Netzwerkverbindung wiedergeben
.
Wiedergabe von Multimedia Dateien
Sie können den USB-Anschluss verwenden,
um verschiedene Arten von Multimedia
Dateien (MP3, JPEG, DivX, usw.) über ein
USB-Speichergerät wiederzugeben.
Warnung
ABDECKUNG ODER RÜCKWAND NICHT ÖFFNEN! STROMSCHLAGGEFAHR!
TEILE IM GERÄTEINNEREN KÖNNEN VOM BENUTZER NICHT GEWARTET WERDEN. LASSEN
SIE REPARATUREN NUR VON QUALIFIZIERTEM FACHPERSONAL DURCHFÜHREN.
ACHTUNG
STROMSCHLAGGEFAHR!
NICHT ÖFFNEN!
Dieses Symbol weist auf eine
„gefährliche Netzspannung“ im Inneren
des Geräts hin. Es besteht die Gefahr von
Stromschlägen und Verletzungen.
Achten Sie beim Aufstellen des Geräts darauf,
dass genügend Platz zur Verfügung steht.
Stellen Sie das Gerät daher beispielsweise
nicht in einem engen Bücherregal auf.
WARNUNG
Um Schäden zu vermeiden, die eine Brand- oder
Stromschlaggefahr nach sich ziehen können, setzen
Sie dieses Gerät nicht Regen oder Feuchtigkeit aus.
ACHTUNG
IN DIESEM BLU-RAY DISC-PLAYER KOMMT EIN
UNSICHTBARER LASERSTRAHL ZUM EINSATZ,
DER ZU VERLETZUNGEN ODER SCHÄDEN FÜHREN
KANN, WENN ER DIREKT AUF PERSONEN ODER
GEGENSTÄNDE GERICHTET WIRD. BEDIENEN SIE DEN
BLU-RAY DISC-PLAYER AUSSCHLIESSLICH GEMÄSS
DEN ANWEISUNGEN IN DER BEDIENUNGSANLEITUNG.
CLASS 1 LASER PRODUCT
Dieses Compact Disk Gerät ist als CLASS 1 LASER
Produkt eingestuft. Die Verwendung von anderen
Bedienelementen, Einstellungen oder die
Durchführung von Prozeduren die von denen hier
angegebenen abweichen, können zu einer zu einer
gefährlichen Strahlenbelastung führen.
ACHTUNG: NEHMEN SIE DIE ABDECKUNG ODER
RÜCKWAND AUF KEINEN FALL AB, UM DAS RISIKO
EINES ELEKTRISCHEN SCHLAGS ZU VERRINGERN.
IM INNEREN BEFINDEN SICH KEINE TEILE, DIE VOM
BENUTZER GEWARTET WERDEN MÜSSEN LASSEN
SIE REPARATUREN NUR VON QUALIFIZIERTEM
FACHPERSONAL DURCHFÜHREN.
ACHTUNG :
• NACH DEM ÖFFNEN SICHTBARE UND UNSICHTBARE
LASERSTRAHLUNG DER KLASSE 3B. EINWIRKUNG
DES STARHLS VERMEIDEN (IEC 60825-1)
• DIESES GERÄT VERWENDET EINEN
LASER: DIE VERWENDUNG VON ANDEREN
BEDIENELEMENTEN, EINSTELLUNGEN ODER
DIE DURCHFÜHRUNG VON PROZEDUREN
DIE VON DENEN HIER ANGEGEBENEN
ABWEICHEN, KÖNNEN ZU EINER ZU EINER
GEFÄHRLICHEN STRAHLENBELASTUNG
FÜHREN. DAS GEHÄUSE NICHT ÖFFNEN
UND KEINE REPARATUREN SELBST
DURCHFÜHREN. QUALIFIZIERTES PERSONAL
MIT DER WARTUNG BEAUFTRAGEN.
CLASS 1 LASER PRODUCT
KLASSE 1 LASER PRODUKT
LUOKAN 1 LASER LAITE
KLASS 1 LASER APPARAT
PRODUCTO LÁSER CLASE 1
Dieses Symbol weist auf wichtige
Anweisungen im Begleitmaterial zum
Produkt hin.
Page 31

Dieses Produkt erfüllt die CE-Richtlinien für
abgeschirmte Kabel und Anschlüsse zur
Verbindung mit anderen Geräten. Um eine
elektromagnetische Beeinflussung anderer
Geräte (z. B. Radios und Fernsehgeräte) zu
vermeiden, verwenden Sie nur abgeschirmte
Kabel und Anschlüsse für die Verbindungen.
WICHTIGER HINWEIS
Das Netzkabel dieses Geräts ist mit einem
Formstecker mit integrierter Sicherung
ausgestattet. Die Nennspannung dieser
Sicherung ist auf der Unterseite des Steckers
angegeben.
Im Bedarfsfall ist die Sicherung gegen eine
Sicherung nach BS 1362 (bzw. der jeweiligen
Entsprechung dieser Norm) mit derselben
Nennspannung auszutauschen.
Verwenden Sie den Stecker keinesfalls, wenn
die Sicherungsabdeckung entfernt ist, sofern
diese abnehmbar ist. Wenn eine Ersatzabdeckung
für die Sicherung benötigt wird, muss diese
dieselbe Farbe wie die Stiftseite des Steckers
haben. Ersatzabdeckungen sind im Fachhandel
erhältlich.
Falls der montierte Stecker nicht für die Steckdosen
in Ihrem Haushalt geeignet ist oder das Kabel nicht
bis zu einer Steckdose reicht, erwerben Sie ein
geeignetes, geprüftes Verlängerungskabel oder
wenden Sie sich an Ihren Fachhändler.
Wenn es keine andere Möglichkeit als das
Abtrennen des Steckers vom Kabel gibt, entfernen
Sie die Sicherung, und entsorgen Sie den Stecker
ordnungsgemäß. Stecken Sie den Stecker nicht
in eine Steckdose. Es besteht Stromschlaggefahr
durch die nicht isolierten Enden des Stromkabels.
Entfernen Sie den Stecker aus der Steckdose,
um das Gerät vollständig abzuschalten. Aus
diesem Grund sollte sich der Netzstecker in
Reichweite befinden.
Die zu diesem Benutzerhandbuch gehörige
Produkteinheit ist unter geistigen
Eigentumsrechten Dritter lizenziert. Diese Lizenz
beschränkt sich auf die private, nicht gewerbliche
Verwendung durch den Endbenutzer und auf die
in dieser Lizenz vorliegenden Inhalte.
Wichtige Sicherheitshinweise
Lesen Sie diese Bedienungsanleitung sorgfältig
durch, bevor Sie das Gerät in Betrieb nehmen.
Befolgen Sie alle folgenden Sicherheitshinweise.
Halten Sie sie diese Bedienungsanleitung zur
späteren Einsichtnahme griffbereit.
1. Lesen Sie diese Anweisungen.
2. Bewahren Sie diese Anweisungen auf.
3. Beachten Sie alle Warnhinweise.
4. Befolgen Sie alle Anweisungen.
5. Betreiben Sie das Gerät nicht in der
6. Nur mit einem trockenen Tuch reinigen.
7. Blockieren Sie nicht die Belüftungsöffnungen.
8. Nicht in der Nähe von Wärmequellen wie
9. Nehmen Sie unter keinen Umständen
10. Nicht auf das Netzkabel treten und
11. Zubehör und/oder Zusatzgeräte dürfen
Vorsichtsmaßnahmen
Nähe von Wasser.
Halten Sie sich bei der Montage an die
Anweisungen des Herstellers.
Heizkörpern, Warmluftgittern, Öfen oder
anderen Wärme erzeugenden Apparaten
(einschließlich AV-Receiver) aufstellen.
Änderungen am gepolten oder geerdeten
Schutzkontaktstecker vor. Ein gepolter
Stecker verfügt über zwei Kontaktstifte,
von denen einer breiter ist als der andere.
Ein geerdeter Stecker verfügt über zwei
Stiften sowie einen Erdungskontakt. Der
breite Kontaktstift bzw. der Erdungsstift
wird aus Sicherheitsgründen verwendet.
Falls der vorhandene Stecker nicht in
Ihre Steckdose passt, lassen Sie die
Steckdose durch einen qualifizierten
Elektriker austauschen.
insbesondere an den Steckern,
Steckerbuchsen und an der Stelle aus dem
es aus dem Gerät austritt nicht knicken.
nur mit Genehmigung des Herstellers
hinzugefügt werden.
12. Verwenden Sie für
das Gerät nur
Gestelle, Ständer,
Stative, Konsolen
und Tische, die vom
Hersteller empfohlen
oder in Verbindung
mit dem Gerät verkauft werden. Bei
Verwendung eines Transportwagens
bewegen Sie das Gerät nur mit äußerster
Vorsicht, um Verletzungen durch
Umkippen zu vermeiden.
13. Trennen Sie das Gerät bei Gewitter oder
längerer Abwesenheit vom Stromnetz.
14. Überlassen Sie Reparaturarbeiten stets
Fachleuten. Eine Wartung ist immer dann
erforderlich, wenn das Gerät auf irgendeine
Weise beschädigt wurde, beispielsweise
bei beschädigtem Netzkabel oder Stecker,
bei in das Gerät gelangter Flüssigkeit oder
Objekten, wenn das Gerät Regen oder
Feuchtigkeit ausgesetzt war, nicht
ordnungsgemäß arbeitet oder
fallengelassen wurde.
Lagerung und Handhabung der Disks
Handhabung von Disks
Disk-Form
• Verwenden Sie
nur Disks mit
Standardform. Wenn
Sie unregelmäßige
Disks (Disks mit besonderen Formen)
verwenden, kann dies den Player beschädigen.
Halten der Disks
• Vermeiden Sie das
Berühren der Oberfläche
der Disk, auf der die Daten
gespeichert sind.
Blu-ray Discs
• Lassen Sie die Blu-ray-Disk nicht über einen längeren
Zeitraum im Player. Nehmen Sie die Blu-ray-Disk aus
dem Player und bewahren Sie sie in ihrer Hülle auf.
• Achten Sie darauf, die Oberfläche der Blu-ray
Disk nicht zu zerkratzen oder Fingerabdrücke
auf ihr zurückzulassen.
DVD-VIDEO, Audio CD (CD-DA)
• Wischen Sie den Schmutz und Staub auf
der Disk mit einem weichen Tuch ab.
Disk-Lagerung
Achten Sie darauf, dass die Disk nicht
beschädigt wird. Die Daten auf der Disk sind
äußerst anfällig gegenüber Umwelteinflüssen.
• Setzen Sie die Disk nicht direkter
Sonneneinstrahlung aus.
• Bewahren Sie die Disk an einem kühlen,
gut belüfteten Ort auf.
• Stellen Sie die Disk vertikal auf.
• Bewahren Sie die Disk in einer sauberen
Schutzhülle auf.
• Wenn der Player plötzlich von einem kalten an
einen warmen Ort umgestellt wird, kann es zu
einer Kondensation an den Betriebsteilen und
der Linse kommen, was zu einer fehlerhaften
Wiedergabe der Disk führen kann. Falls dieser
Fall eintritt, den Netzstecker des Players ziehen,
zwei Stunden warten und den Stecker erneut in
die Steckdose stecken. Anschließend die Disk
einlegen und die Wiedergabe erneut versuchen.
Vorsichtsmaßnahmen für den Betrieb
• Beschreiben Sie die bedruckte Seite nicht mit
Kugelschreiber oder Bleistift.
• Keine Reinigungs- oder Antistatik Sprays für die
Reinigung der Disks verwenden. Verzichten Sie auch
auf flüchtige Chemikalien wie Benzin oder Verdünner.
• Bringen Sie keine Aufkleber oder Etiketten auf den
Disks an. (Verwenden Sie keine Disks mit Resten
von Klebeband oder von unvollständig entfernten
Aufklebern.)
• Verwenden Sie keine kratzfesten Schutzabdeckungen.
3
Page 32

• Verwenden Sie keine Disks, die mit einem
Etikettendrucker beschriftet wurden.
• Legen Sie keine gewölbten oder gesprungenen
Disks ein.
• Wenn Sie andere Komponenten an diesen
Player anschließen, müssen diese vorher
abgeschaltet werden.
• Den Player während der Wiedergabe einer
Disk nicht bewegen. Die Disk kann zerkratzt
oder beschädigt bzw. die inneren Teile des
Players beschädigt werden.
• Keine mit Wasser gefüllte Blumenvasen oder
kleine Metallgegenstände auf den Player stellen.
• Führen Sie Ihre Hand nicht in die Disk-Lade ein.
• Es dürfen ausschließlich Disks in die Disk-Lade
eingelegt werden.
• Externe Störungsquellen, wie Blitze und
elektrostatische Aufladung können den
normalen Betrieb des Players beeinträchtigen.
Wenn dieser Fall eintritt, den Player mit der
POWER Taste aus- und wieder einschalten
oder den Netzstecker aus der Steckdose
ziehen und wieder anschließen. Anschließend
funktioniert der Player wieder normal.
• Vergewissern Sie sich, dass Sie die Disk
nach der Benutzung entfernt und den Player
ausgeschaltet haben.
• Wenn Sie beabsichtigen, den Player für einen
längeren Zeitraum nicht zu benutzen, den
Stecker aus der Steckdose ziehen.
• Wischen Sie beim Reinigen der Disk mit
geraden Bewegungen von der Mitte zur
Außenkante der Disk.
• Den Player keinen Flüssigkeiten
aussetzen.
• Solange das Gerät mit einer
Stromquelle verbunden ist, steht
es auch in ausgeschaltetem
Zustand unter Strom (Stand-byModus).
• Halten Sie Wasser und andere Flüssigkeiten
vom Gerät fern, und schützen Sie es vor
Flüssigkeitsspritzern und Tropfen. Stellen Sie
keine mit Flüssigkeiten gefüllten Behälter auf
dem Gerät ab (z. B. Vasen).
• Der Netzstecker wird als ein Trennungs-Gerät
verwendet, daher muss der Netzstecker stets
leicht zugänglich sein.
• Das Netzkabel nicht mit nassen Händen
berühren. Es besteht Stromschlaggefahr.
• Schließen Sie nicht mehrere elektrische Geräte
an die gleiche Steckdose an. Dies kann zu einer
Überhitzung führen und einen Brand auslösen.
• Wenn Sie unnormale Geräusche, einen
stechenden Geruch oder Rauch wahrnehmen,
schalten Sie das Gerät unverzüglich über den
Netzschalter aus und ziehen Sie den Netzstecker.
Setzen Sie sich anschließend mit dem nächsten
Kundendienst in Verbindung um technische
Hilfe zu erhalten. Wenn Sie das Gerät in solch
einem Zustand trotzdem weiterverwenden,
kann dies zu Stromschlag führen oder einen
Brand auslösen.
Wartung des Gehäuses
Bevor Sie das Gehäuse des Blu-ray Players
reinigen sicherstellen, dass der Netzstecker aus
der Steckdose gezogen ist.
• Verwenden Sie kein Benzin, keinen Verdünner
oder andere Lösungsmittel für die Reinigung.
• Wischen Sie das Gehäuse mit einem weichen
Tuch ab.
Beschränkungen bei der Wiedergabe
• Der Player kann unter Umständen nicht auf
alle Bedienungsbefehle reagieren, da einige
Blu-ray, DVD und CD Disks eine spezielle
oder eingeschränkte Bedienung ermöglichen
und nur einige Wiedergabefunktionen zur
Verfügung stellen. Hierbei handelt es sich nicht
um einen Defekt des Players.
• Samsung kann nicht garantieren, dass
dieser Player alle Disks mit dem Blu-ray,
DVD oder CD Logo wiedergegeben kann,
da sich die Diskformate weiterentwickeln
und bei der Erstellung der Blu-ray Disk,
DVD oder CD Software und/oder der
Herstellung von Disks Fehler auftreten
können. Wenden Sie sich bitte an den
SAMSUNG Kundendienst wenn Sie Fragen
oder oder Probleme bei der Wiedergabe
von Blu-ray, DVD oder CD Disks auf diesem
Player haben. Weitere Informationen zu den
Wiedergabebeschränkungen finden Sie in
diesem Handbuch.
Inhalt
HAUPTFUNKTIONEN
Blu-ray Disc-Funktionen ..............................2
Blu-ray Disk-Player Funktionen ....................2
SICHERHEITSINFORMATION
Warnung ......................................................2
Vorsichtsmaßnahmen ..................................3
Lagerung und Handhabung der Disks .........3
ERSTE SCHRITTE
Vor der Benutzung des
Benutzerhandbuchs ....................................5
Zubehör .......................................................7
Vorderseite ..................................................8
Rückseite ....................................................8
Fernbedienung ............................................9
ANSCHLÜSSE
A. Anschluss an ein Fernsehgerät ................ 9
B. Anschluss an ein Audiosystem ..............10
C. Anschluss an das Netzwerk ..................10
EINSTELLUNG
Ersteinstellung ...........................................12
Menü Navigation ........................................12
Zugriff auf das Einstellungen Menü ............12
Anzeige .....................................................13
Audio .........................................................14
Netzwerk ...................................................16
System ......................................................17
Sprache .....................................................17
Sicherheit ..................................................17
Allgemein ...................................................18
Unterstützung ............................................18
GRUNDFUNKTIONEN
Ein Video wiedergeben ..................................19
Verwenden des Diskmenüs/Titelmenüs/
Popup-Menüs ...............................................19
Such- und Überspringen-Funktionen
verwenden ....................................................19
Wiedergabe in Zeitlupe/
Einzelbildwiedergabe .....................................20
Verwenden der TOOLS Taste .........................20
Musikwiedergabe ..........................................21
Bilder wiedergeben ........................................22
Wiedergabe eines USB-Speichergeräts .........22
NETZWERKDIENSTE
BD-LIVE™ .................................................23
AllShare-Funktion verwenden ....................23
ANHANG
Problembehebung .....................................23
Technische Daten ......................................25
4
Page 33

Erste Schritte
Vor der Benutzung des Benutzerhandbuchs
Disktypen und Inhalte, die Ihr Player wiedergeben kann
Begriff
VIDEO
MUSIC
FOTO
HINWEIS
✎
▪Der Player kann unter Umständen einige CD-RW/-R und DVD-R Disks aufgrund des Disktyps oder der
Aufnahmebedingungen nicht wiedergeben.
▪Wenn eine DVD-RW/-R-Disk nicht korrekt im DVD-Videoformat aufgenommen wurde, kann sie nicht
wiedergegeben werden.
▪Der Player kann keine Inhalte auf DVD-Rs wiedergeben, die bei einer Bitrate von mehr als 10 Mbps
aufgenommen wurden.
▪Der Player kann keine Inhalte auf BD-R Disks oder USB-Geräten wiedergeben, die bei einer Bitrate von mehr
als 25 Mbps aufgenommen wurden.
Logo Symbol
h
z
Z
y
-
x
o
-
w
-
G
Erklärung
Zeigt eine zur Verfügung stehende Funktion auf einer BD-ROM
oder BD-RE/-R Disk an, die im BD-RE Format aufgenommen
wurde.
Zeigt eine auf DVD-VIDEO oder aufgenommenen und
abgeschlossenen DVD+RW/DVD-RW(V)/DVD-R/+R Disks zur
Verfügung stehende Funktion an.
Zeigt eine auf CD-RW/-R, DVD-RW/-R, BD-RE/-R Disks oder einem USB
Speichergerät mit DivX, MKV, MP4 Inhalten zur Verfügung stehende Funktion an.
Zeigt eine auf Audio CD-RW/-R Disks (CD-DA Format) zur
Verfügung stehende Funktion an.
Zeigt eine auf CD-RW/-R, DVD-RW/-R, BD-RE/-R Disks oder
einem USB Speichergerät mit MP3 oder WMA Inhalten zur
Verfügung stehende Funktion an.
Zeigt eine auf CD-RW/-R, DVD-RW/-R, BD-RE/-R Disks oder einem USB
Speichergerät mit JPEG Inhalten zur Verfügung stehende Funktion an.
Disktypen und Inhalte, die Ihr Player nicht wiedergeben kann.
• HD DVD
• DVD-ROM/PD/
MV usw.
HINWEIS
✎
▪Einige im Handel erhältliche Disks und DVDs, die
außerhalb Ihrer Region erworben wurden, können
eventuell auf diesem Player nicht wiedergegeben werden.
▪Auf einigen Disktypen oder bei der Verwendung
von speziellen Funktionen, wie die Änderung
des Winkels und der Einstellung des
Seitenverhältnisses, kann die Wiedergabe nicht
funktionieren. Ausführlichere Informationen zu den
Disks finden Sie auf der jeweiligen Verpackung.
Lesen Sie diese Informationen bei Bedarf durch
▪Verhindern Sie, dass die Disk verschmutzt oder
verkratzt wird. Fingerabdrücke, Schmutz, Staub,
Kratzer oder Ablagerungen von Zigarettenrauch auf
der beschreibbaren Oberfläche der Disk können dazu
führen, dass die Wiedergabe nicht mehr möglich ist.
▪Bei der Wiedergabe eines BD-J Titels kann das Laden
länger dauern als bei einem normalen Titel oder einige
Funktionen können langsamer ausgeführt werden.
▪Der Player kann unter Umständen nicht auf alle
Bedienungsbefehle reagieren, da einige Blu-ray,
DVD und CD Disks eine spezielle oder eingeschränkte
Bedienung ermöglichen und nur einige
Wiedergabefunktionen zur Verfügung stellen. Hierbei
handelt es sich nicht um einen Defekt des Players.
▪Samsung kann nicht garantieren, dass dieser
Player alle Disks mit dem Blu-ray, DVD oder CD
Logo wiedergegeben kann, da sich die Diskformate
weiterentwickeln und bei der Erstellung der Bluray Disk, DVD oder CD Software und/oder der
Herstellung von Disks Fehler auftreten können.
Wenden Sie sich bitte an den SAMSUNG
Kundendienst wenn Sie Fragen oder oder
Probleme bei der Wiedergabe von Blu-ray, DVD
oder CD Disks auf diesem Player haben. Weitere
Informationen zu den Wiedergabebeschränkungen
finden Sie in diesem Handbuch.
• DVD-RAM
• Super Audio CD
(außer CD-Layer)
• DVD-RW (VR-Modus)
• CVD/CD-ROM/CDV/
CD-G/CD-I/LD
(CD-Gs nur Audio
Wiedergabe ohne Grafik.)
• 3.9 GB DVD-R für
Videoschnittarbeiten.
Blu-ray Disc-Kompatibilität
Blu-ray Disk ist ein neues, sich noch
weiterentwickelndes Format. Infolgedessen können
Kompatibilitätsprobleme auftreten. Nicht alle Disks
sind kompatibel, und nicht jedes Format kann
wiedergegeben werden. Weitere Informationen
dazu finden Sie im Kapitel „Compliance und
Kompatibilität“ dieses Handbuchs.
.
Disktypen
BD-ROM
Blu-ray ROM Disks können nur
wiedergegeben werden.
Dieser Player kann im Handel erhältliche,
bespielte BD-ROM Disks abspielen.
BD-RE/-R
Blu-ray RE/-R Disks können aufgenommen
und wiedergegeben werden.
Dieser Player kann auf anderen kompatiblen
Blu-ray-Disk Rekordern aufgenommene BDRE/-R Disks wiedergeben.
DVD-VIDEO
• Dieser Player kann im Handel erhältliche,
mit Filmen bespielte DVDs (DVD-VIDEO
Disks) abspielen.
• Beim Wechsel von der ersten zur zweiten
Schicht einer doppelschichtigen DVD-VIDEO
können Ton und Bild kurzzeitig verzerrt sein.
Dies ist keine Fehlfunktion des Players.
5
Page 34

DVD-RW/-R/+R
Dieser Player kann DVD-RW/-R/+R Disks
wiedergeben, die mit einem DVD VideoRekorder aufgenommen und abgeschlossen
wurden. Die Wiedergabe kann von den
Aufnahmebedingungen abhängen.
DVD+RW
• Dieser Player kann DVD+RW Disks
wiedergeben, die mit einem DVD
Video-Rekorder aufgenommen
wurden. Die Wiedergabe kann von den
Aufnahmebedingungen abhängen.
Audio CD (CD-DA)
• Dieser Player kann CD-DA-Format und Audio
CD-RW/-R Disks abspielen.
• Der Player kann aufgrund der
Aufnahmebedingungen nicht in der Lage sein,
bestimmte CD-RW/-R Disks wiederzugeben.
CD-RW/-R
• Verwenden Sie CD-RW/-R Disks mit
700MB (80 Minuten).
Verwenden Sie wenn möglich keine Disks
mit 800MB (90 Minuten) oder mehr, da
diese Disk eventuell nicht wiedergegeben
werden können.
• Wenn die CD-RW/-R Disk nicht in einer
abgeschlossenen Sitzung aufgenommen
wurde, können Verzögerung bei der
Wiedergabe am Anfang der Disk auftreten
oder es können alle aufgenommenen
Dateien nicht wiedergegeben werden.
• Einige CD-RW/-Rs können je nach Gerät
auf dem sie gebrannt wurden, eventuell
auf diesem Player nicht wiedergegeben
werden. Bei für den persönlichen Bedarf
von CDs auf CD-RW/-Rs aufgenommenen
Medien, kann die Abspielbarkeit vom Inhalt
und den Disks abhängen.
AVCHD (Advanced Video Codec
Höchauflösung)
• Dieser Player kann Disks im AVCHD
Format wiedergeben. Diese Disks werden
normalerweise aufgezeichnet und in
Camcordern verwendet.
• Das AVCHD-Format ist ein hochauflösendes
digitales Videokameraformat.
• Das MPEG-4 AVC/H.264 Format
komprimiert Bilder effizienter als das
herkömmliche Bildkomprimierungsformat.
• Einige AVCHD-Disks verwenden das
„x.v.Color“ Format. Dieser Player kann
AVCHD Disks wiedergeben, die das
„x.v.Color“ Format verwenden.
• „x.v.Color“ ist eine Handelsmarke von Sony
Corporation.
• „AVCHD“ und das AVCHD Logo sind
ein eingetragenes Warenzeichen von
Matsushita Electronic Industrial Co., Ltd.
und Sony Corporation.
HINWEIS
✎
▪Einige Disks mit dem AVCHD Format können
je nach Aufnahmebedingungen eventuell nicht
wiedergegeben werden.
Disks im AVCHD Format müssen abgeschlossen
werden.
▪”x.v.Color“ bieten einen größeren Farbbereich als
normaler Camcorder DVDs.
▪Einige DivX-, MKV- und MP4-Diskformaten
können möglicherweise nicht wiedergegeben
werden. Dies hängt von der Videoauflösung und
der Bildfrequenz ab
.
Regionalcode
Sowohl Player als auch Disks sind nach
Regionen codiert. Diese Regionalcodes
müssen für die Wiedergabe einer Disk
übereinstimmen. Wenn diese Codes
nicht übereinstimmen, kann die Disk nicht
wiedergegeben werden.
Die Nummer der Region für diesen Player ist
auf der Rückseite des Player aufgedruckt.
Regional
Disktyp
Blu-ray
DVD-VIDEO
code
A
B
C
1
2
3
4
5
6
Region
Nordamerika, Mittelamerika,
Südamerika, Korea, Japan,
Taiwan, Hongkong und
Sudostasien.
Europa, Grönland, Französische
Überseegebiete, Naher Osten,
Afrika, Australien und Neuseeland
Indien, China, Russland,
Zentral- und Südasien.
USA, US-Territorien und
Kanada
Europa, Japan, Naher Osten,
Ägypten, Südafrika, Grönland
Taiwan, Korea, Philippinen,
Indonesien, Hongkong
Mexiko, Südamerika,
Mittelamerika, Australien,
Neuseeland, Pazifische
Inseln, Karibik
Russland, Osteuropa, Indien,
die meisten afrikanischen
Länder, Nordkorea, Mongolei
China
Copyright
© 2012 Samsung Electronics Co.,Ltd.
Alle Rechte vorbehalten. Ohne vorherige
schriftliche Genehmigung von Samsung
Electronics Co.,Ltd. ist das vollständige oder
teilweise Reproduzieren oder Kopieren dieser
Bedienungsanleitung nicht gestattet.
Unterstützte Dateiformate
Hinweise für den USB-Anschluss
• Ihr Player unterstützt USB-Speichergeräte,
MP3-Player, Digitalkameras, USBKartenlesegeräte.
• Der Player unterstützt keine Ordner- oder
Dateinamen mit mehr als 128 Zeichen.
• Einige USB-Geräte,
oder Digitalkameras können unter
Umständen nicht mit dem Player
kompatibel sein.
• Ihr Player unterstützt das FAT16, FAT32,
und NTFS Dateisystem.
• USB-Geräte direkt an den USBAnschluss des Geräts anschließen. Der
Anschluss über ein USB-Kabel kann zu
Kompatibilitätsproblemen führen.
• Wenn mehr als ein Speichergerät in einen
Multi-Kartenleser eingelegt wird, kann dies
zu einer Fehlfunktion des Players führen.
• Der Player unterstützt das PTP-Protokoll
nicht.
• Das USB-Gerät nicht während eines
Ladevorgangs entfernen.
• Je größer die Bildauflösung, desto länger
dauert die Anzeige des Bildes.
• Der Player kann keine MP3-Dateien
mit DRM (Digital Rights Management)
abspielen, die von kommerziellen
Webseiten heruntergeladenen wurden.
• Ihr Player unterstützt nur Videos mit einer
Bildfrequenz von unter 30fps.
Externe Festplatten
.
6
Page 35

Unterstützte Videodatei
Dateierweiterung Container Video Codec Audio Codec Auflösung
DivX 3.11/4.x/5.1/6.0
*.avi
*.mkv
*.wmv
*.mp4
*.mpg
*.mpeg
•Einschränkungen
- Auch wenn die Datei durch ein unterstütztes, oben genanntes Codec codiert ist, kann eine
Datei nicht wiedergegeben werden, wenn im Inhalt Probleme auftreten.
-
Die normale Wiedergabe wird nicht garantiert,
sind oder die Datei selbst beschädigt ist.
- Dateien mit einer höheren Bitrate/Bildfrequenz als der Standard, können zu einer stotternden
Wiedergabe führen.
- Die Suche (Überspringen) Funktion steht nicht zur Verfügung, wenn die Indextabelle der Datei
beschädigt ist.
•Video Decoder
- Unterstützung von H.264 bis Level 4.1 und AVCHD
- H.264 FMO/ASO/RS, VC1 SP/MP/AP L4 werden nicht unterstützt.
- MPEG4 SP, ASP :
Unter 1280 x 720: Max. 60 Bilder
Über 1280 x 720: Max. 30 Bilder
- GMC 2 oder höher wird nicht unterstützt
•Audio Decoder
- Unterstützt WMA 7, 8, 9 und STD
- Eine WMA - Abtastfrequenz von 22050Hz mono wird nicht unterstützt
AVI
MKV
WMV (wmv9)
MP4
PS
MP4v3
H.264 BP/MP/HP
VC-1 AP
DivX 5.1/6.0
H.264 BP/MP/HP
VC-1 AP
VC-1 SM
MP4 (mp4v)
H.264 BP/MP/HP
MPEG1
MPEG2
H.264 BP/MP/HP
wenn die Dateiinformationen im Container falsch
MP3
Dolby Digital
DTS
WMA
PCM
MP3
Dolby Digital
DTS
WMA
AAC
MP1, 2
Dolby Digital
DTS
1920x1080
1920x1080
1920x1080
1920x1080
1920x1080
1920x1080
1920x1080
1920x1080
1920x1080
1920x1080
1920x1080
1920x1080
1920x1080
Unterstützte Musikdatei
Dateierweiterung
*.mp3
*.wma
Container Audio Codec Unterstützter Bereich
MP3
WMA
MP3 -
*
WMA
Abtastfrequenzen (in kHz) - 8, 11, 16, 22, 32, 44.1, 48
* Bitraten Alle Bitraten im Bereich von 5kbps bis 384kbps
Logos der vom Player wiedergegebenen Disk-Typen
Blu-ray Disc BD-LIVE
Zubehör
Überprüfen Sie die unten stehende Liste für mitgeliefertes Zubehör.
Batterien für die Fernbedienung (Größe AAA) Netzteil
Benutzerhandbuch Fernbedienung
Großbritannien, Frankreich,
PAL-Fernsehsystem in
Deutschland, usw.
7
Page 36

Vorderseite
Rückseite
STOPP TASTE
TASTE WIEDERGABE/ANHALTEN
AUSWERFEN TASTENETZSCHALTER
STANDBY ANZEIGEFERNBEDIENUNGSSENSOR
DISK-EINSCHUB
HINWEIS
✎
▪Wenn das Gerät das Menü der Blu-ray-Disk anzeigt, kann der Film nicht über die Wiedergabe Taste am
Gerät oder der Fernbedienung gestartet werden. Um einen Film abzuspielen, muss Film Wiedergabe oder
Start im Menü der Disk ausgewählt und anschließend die E Taste gedrückt werden.
▪Leuchtet, wenn sich das Gerät im Standby-Modus befindet und blinkt, wenn vom Fernbedienungssensor ein
Signal empfangen wird.
USB-HOST DC 12V 2A
LAN
HDMI OUT
HINWEIS
✎
▪Um die Firmware des Geräts über den USB-Anschluss zu aktualisieren, muss ein USB-Speicherstick
verwendet werden.
DIGITAL AUDIO OUT
8
Page 37

Fernbedienung
Übersicht der Fernbedienung
Anschlüsse
A. Anschluss an ein Fernsehgerät
Ein- und Ausschalten des Players.
Zum Öffnen und Schließen des Diskfachs.
Zifferntasten für die Bedienung von Optionen.
Zugriff auf das Disk-Menü.
Vorwärts- oder Rückwärts springen.
Anhalten der Wiedergabe.
Starten der Wiedergabe einer Disk.
Zugriff auf verschiedene Audio-Funktionen auf
Auswahl von Menüoptionen und Ändern der
Tasten für die Bedienung von Menüs des
Players und einiger Blu-ray-Disk Funktionen.
Zur wiederholten Wiedergabe eines gewählten
einer Disk (Blu-ray/DVD).
Tools-Menü.
Menüwerte.
Rückkehr zum vorherigen Menü.
Verwendung der Bonusfunktionen.
Abschnitts A-B.
Batterien einlegen
Ein- und Ausschalten des Fernsehgeräts.
Nach Beendigung der Einstellungen, können Sie mit
dieser Taste an Ihrem Fernseher das Quellgerät festlegen.
Einstellen der Lautstärke am Fernsehgerät.
Zugriff auf das Popup-Menü/Titel-Menü.
Vorwärts- oder Rückwärtssuchlauf der
Disk.
Unterbrechen der Wiedergabe einer Disk.
Wechseln zum Home-Menü.
Umschalten der Untertitelsprache der
Blu-ray-Disk/DVD.
Anzeige der Wiedergabeinformationen
während der Wiedergabe einer Blu-rayDisk/DVD.
Verlassen des Menüs.
Drücken Sie diese Taste um das
Vollfernsehbildschirm anzuzeigen.
Wiederholung eines Titels, Kapitels, Tracks
oder einer Disk.
HINWEIS
✎
Falls die Fernbedienung nicht ordnungsgemäß funktioniert:
▪
•Die Polarität (+/−) der Batterien prüfen.
•Überprüfen Sie, ob die Batterien leer sind.
•
Überprüfen Sie, ob der Sensor der Fernbedienung verdeckt ist.
•
Überprüfen Sie, ob sich Leuchtstofflampen in der Nähe befinden.
ACHTUNG
!
Entsorgen Sie Batterien gemäß den örtlichen Umweltschut-
▪
zvorschriften. Werfen Sie Batterien nicht in den Hausmüll.
Anschluss an ein Fernsehgerät mit einem HDMI-Kabel - Beste Qualität
1. Mit der Hilfe eines HDMI-Kabels die HDMI OUT Buchse auf der Rückseite des Players an
die HDMI IN Buchse Ihres Fernsehgeräts anschließen. Siehe Seiten 11.
2. Den Player und das Fernsehgerät einschalten.
3. Den Eingangswahlschalter auf der Fernbedienung Ihres Fernsehgeräts betätigen, bis das
HDMI-Signal des Players auf dem Bildschirm erscheint.
HINWEIS
✎
▪Ein HDMI-Kabel überträgt digitale Video- und Audiosignale, sodass Sie kein Audiokabel anschließen müssen.
▪Wenn der Player im HDMI 720p, 1080i, oder 1080p Ausgabemodus an Ihr Fernsehgerät angeschlossen ist,
müssen Sie ein Hochgeschwindigkeits-HDMI-Kabel (Kategorie 2) verwenden.
▪HDMI sendet ein rein digitales Signal an das Fernsehgerät.
Wenn Ihr Fernsehgerät HDCP (High-bandwidth Digital Content Protection) nicht unterstützt, wird ein
Rauschsignal auf dem Bildschirm angezeigt.
▪Je nach Fernsehgerät stehen für den HDMI-Ausgang bestimmte Auflösungen möglicherweise nicht zur
Verfügung. Informationen dazu finden Sie in der Bedienungsanleitung Ihres Fernsehgeräts.
▪Wenn Sie den Player das erste Mal mit einem HDMI-Kabel an den Fernseher oder an ein neues
Fernsehgerät anschließen, wird die HDMI-Auflösung des Ausgangs automatisch an die höchste vom
Fernsehgerät unterstützte Auflösung eingestellt.
▪Ein langes HDMI-Kabel kann Bildrauschen verursachen. Wenn dieser Fall eintritt, Deep Color im Menü auf Aus stellen.
▪Wenn Sie Ihren Bildschirm über ein HDMI-DVI-Adapterkabel anschließen, müssen Sie ebenfalls den Digital
Audio OUT Ausgang an das Audiosystem anschließen, um den Ton wiedergeben zu können.
9
Page 38

B. Anschluss an ein Audiosystem
C. Anschluss an das Netzwerk
• Regeln Sie bitte die Lautstärke runter, wenn Sie den AV-Receiver einschalten. Ein
plötzlicher lauter Ton kann Ihre Lautsprecher und Ohren schädigen.
• Stellen Sie das Audio Ausgangsformat auf die Möglichkeiten Ihres AV-Receivers ein.
• Die Positionen der HDMI-Anschlüsse hängt von Ihrem AV-Receiver ab. Schlagen Sie
bitte in der Bedienungsanleitung Ihres AV-Receivers nach.
1. Option : Anschluss an ein Audiosystem (AV-Receiver mit HDMI
Unterstützung) - Beste Qualität (Empfohlen)
1. Mit der Hilfe eines HDMI-Kabels die HDMI OUT Buchse auf der Rückseite des Players an
die HDMI IN Buchse Ihres AV-Receivers anschließen. Siehe Seiten 11.
2. Mit der Hilfe eines HDMI-Kabels die HDMI OUT Buchse des AV-Receivers an die HDMI IN
Buchse Ihres Fernsehgeräts anschließen.
3. Den Player, Fernseher und AV-Receiver einschalten.
4. Mit Hilfe des Eingangswahlschalters des AV-Receivers und Fernsehgeräts den richtigen
HDMI-Eingang ausgewählten, über den Ton und Bild vom Player wiedergegeben werden
sollen. Für die Einstellung des Audioeingangs des AV-Receivers, schlagen Sie bitte in der
Bedienungsanleitung Ihres AV-Receivers nach.
2. Option : Anschluss an ein Audiosystem (AV-Receiver mit Dolby
Digital- oder DTS-Decoder) - Bessere Qualität
1. Mit der Hilfe eines optischen Kabels die DIGITAL AUDIO OUT (OPTICAL) Buchse auf der
Rückseite des Players an die DIGITAL AUDIO IN (OPTICAL) Buchse Ihres AV-Receivers
anschließen. Siehe Seite 11.
2. Mit Hilfe HDMI signalkabeln die HDMI Buchsen auf der Rückseite des Players an die HDMI
Buchsen Ihres Fernsehgeräts anschließen.
3. Den Player, Fernseher und AV-Receiver einschalten.
4. Um den Ton des Players wiederzugeben, mit dem Eingangswahlschalter des AV-Receivers
den entsprechenden externen Eingang auswählen. Für die Einstellung des Audioeingangs
des AV-Receivers schlagen Sie bitte in der Bedienungsanleitung Ihres AV-Receivers nach.
5. Den Eingangswahlschalter auf der Fernbedienung des Fernsehers drücken, um die HDMI
Videoquelle einzustellen
.
Mit diesem Player können Sie netzwerkbasierte Dienste, wie BD-LIVE sowie SoftwareAktualisierungen nutzen, wenn der Player an ein Netzwerk angeschlossen ist. Wir empfehlen
Ihnen bei einem Netzwerk die Verwendung eines Breitbandmodem (mit integriertem Router)
oder IP-Routers. Für weitere Informationen über den Anschluss eines Routers, schlagen
Sie bitte in der Bedienungsanleitung des Routers nach oder wenden Sie sich für technische
Unterstützung an den Hersteller des Routers.
Kabel-Netzwerk
1. Mit Hilfe des Direct LAN-Kabels (UTP) CAT 5-Kabel, den LAN-Anschluss des Players an den
LAN-Anschluss Ihres Modems oder Routers anschließen. Siehe Seiten 11.
2. Für die Einstellung der Netzwerkoptionen, schlagen Sie bitte auf den Seiten 16 nach.
HINWEIS
✎
▪Der Zugriff auf den Samsung Software-Aktualisierungsserver kann je nach verwendetem Router oder
den Richtlinien Ihres Internetanbieters untersagt sein. Weitere Informationen erhalten Sie von Ihrem ISP
(Internetdienstanbieter).
▪Bei Verwendung von DSL muss die Netzwerkverbindung über einen Router hergestellt werden.
▪Um die AllShare Funktion nutzen zu können, muss Ihr PC, wie in der Abbildung dargestellt, mit einem
Netzwerk verbunden sein. Die Verbindung kann über Kabel erfolgen.
10
Page 39

Anschluss an ein Fernsehgerät
HDMI-Kabel
(nicht im Lieferumfang enthalten)
Netzwerk
Breitbandmodem
(mit integriertem Router)
Breitband-
Dienste
Oder
Router
Breitbandmodem
BreitbandDienste
Anschluss an ein Audiosystem
1. Option : HDMI-Kabel
(nicht im Lieferumfang enthalten)
1. Option : HDMI-Kabel
(nicht im Lieferumfang enthalten)
2. Option : Optisches Kabel
(nicht im Lieferumfang enthalten)
Netzwerkbetrieb mit dem PC für die
AllShare-Funktion
HINWEIS : Dieses Gerät kann nur über einen Kabelanschluss an das Internet angeschlossen werden.
✎
11
Page 40

Einstellung
Ersteinstellung
1. Schalten Sie Ihr Fernsehgerät ein, nachdem
der Player angeschlossen wurde.
Wenn der Player das erste Mal ein
Fernsehgerät angeschlossen wird, schaltet sich
der Player automatisch ein und der Bildschirm
mit den Ersteinstellungen wird angezeigt.
Initial Settings I On-Screen Language
Select a language for the on-screen displays.
English
Français
Deutsch
Español
Italiano
Nederlands
2. Mit Hilfe der ▲▼ Tasten die gewünschte
Sprache auswählen und anschließend die
EINGABE Taste drücken.
3. Die EINGABE Taste drücken, um Start
auszuwählen.
4. Wählen Sie mit den ▲▼ Tasten das
gewünschte Bildformat des Fernsehgeräts
aus, und drücken Sie anschließend die
EINGABE Taste.
5. Wählen Sie anschließen Auto drücken Sie
die Taste EINGABE. Wenn Sie nicht über
ein Heimnetzwerk verfügen, die BLAUE
(D) Taste auf Ihrer Fernbedienung drücken.
Sie gelangen direkt zum Home Menü.
6. Der Blu-ray Player prüft automatisch
Ihr Kabelnetzwerk. Wenn die Prüfung
abgeschlossen ist, wird auf dem
Bildschirm die Meldung “Ihr Netzwerk
arbeitet fehlerfrei” angezeigt. Die
EINGABE Taste drücken.
>
Move " Select
7. Die Meldung “Ersteinstellung
abgeschlossen” erscheint und der Home
Bildschirm wird angezeigt.
- Wenn Ihr Blu-ray Player keine Verbindung mit
dem Netzwerk herstellt oder Sie manuell eine
Verbindung herstellen möchten, schlagen Sie
bitte unter Einrichtung des Netzwerks auf Seite
16 nach.
HINWEIS
✎
▪Mit Ausnahme der weiter unten aufgeführten
Fälle wird das Home-Menü nicht angezeigt, wenn
die Ersteinstellungen nicht konfiguriert wurden.
▪Wenn Sie während der Netzwerkeinstellung
die BLAUE Taste (D) gedrückt haben, können
Sie auf das Home-Menü zugreifen, obwohl die
Netzwerkeinstellung noch nicht abgeschlossen ist.
▪Wenn Sie zu Home-Menü zurückkehren, der
Vollbildschirmmodus wird automatisch beendet.
▪Wenn Sie Werkeinstellungsbildschirm nochmals
sehen möchten um Änderungen vorzunehmen,
halten Sie die Taste
STOPP ( @ )
an der Vorderseite
des Blu-ray Disk-Players. mindesten 5 Sekunden
lang gedrückt. Dies setzt den Player auf seine
Standardeinstellungen zurück.
▪Wenn Sie eine Anynet+(HDMI-CEC) Funktion
nutzen möchten, folgen Sie bitte den folgenden
Anweisungen.
1) Schließen Sie das Gerät mit Hilfe eines
HDMI-Kabels an ein Anynet+(HDMI-CEC)
kompatibles Samsung Fernsehgerät an.
2) Aktivieren Sie die Anynet+(HDMI-CEC) Funktion
am Fernsehgerät und am Gerät
3) Stellen Sie das Fernsehgerät in die
Ersteinstellungen Prozedur ein.
▪Wenn nach Betätigung der Stopp Taste des Players
das Gerät länger als 5 Minuten nicht benutzt wird,
schaltet sich automatisch der Bildschirmschoner
ein. Wenn sich der Player länger als 25 Minuten im
Screensaver Modus befindet, wird er automatisch
ausgeschaltet.
Menü Navigation
1
2
HOME Taste : Wechseln zum Home-Menü.
1
RETURN Taste : Rückkehr zum vorherigen
2
Menü.
EINGABE / AUSWAHL Taste : Cursor bewegen
oder eine Position auswählen.
3
Die aktuell ausgewählte Position aktivieren.
Einstellung bestätigen.
EXIT Taste : Verlassen des Menüs.
4
• Home-Menü
You Tube
Videos
1
Keine Disk a Gerät wechseln
d
Geräte anzeigen
Wechselt zu Videos.
1
Wechselt zu YouTube.
2
Wechselt zu Fotos.
3
Wechselt zu Musik.
4
Wechselt zu Einsstellungen.
3
4
5
Zeigt die Tasten an, die auf der
Fernbedienung für den Zugriff auf
6
Funktionen dienen.
Zugriff auf das Einstellungen Menü
Befolgen Sie die folgenden Schritte, um das
Einstellungen Menü und die Untermenüs aufzurufen:
1. Die POWER Taste drücken.
Das Home Menü wird angezeigt.
2. Die ◄► Tasten drücken um Einstellungen,
auszuwählen und anschließend die
EINGABE Taste drücken.
3. Mit den ▲▼ Tasten das gewünschte
Untermenü aus, und anschließend die
2
EINGABE Taste drücken.
4. Mit den ▲▼ Tasten die gewünschte
Option auswählen und anschließend die
EINGABE Taste drücken.
5. Mit der EXIT Taste könne Sie das Menü
3
verlassen.
4
HINWEIS
✎
5
Eingabe
"
6
▪ Die Schritte für den Zugriff können sich je
nach ausgewähltem Menü unterscheiden. Die
OSD (Bildschirmanzeige) dieses Players kann
sich möglicherweise nach Aktualisierung der
Softwareversion ändern.
12
Page 41

Anzeige
Sie können verschiedene Anzeigeoptionen, wie
Bildseitenverhältnis, Auflösung, usw. konfigurieren.
TV-Format
Sie haben die Möglichkeit, die Bildschirmgröße
je nach Art des verwendeten Fernsehgerätes
entsprechend anzupassen
•16:9 Original :
der Player an einen 16:9 Fernsehbildschirm
angeschlossen wird. Der Player gibt den Inhalt in
seinem originalen Bildseitenverhältnis wieder.
Im Verhältnis von 4:3 formatierter Inhalt wird
mit schwarzen Streifen am linken und rechten
Bildschirmrand wiedergegeben.
•16:9 Voll : Diese Option einstellen, wenn
der Player an einen 16:9 Fernsehbildschirm
angeschlossen wird. Alle Inhalte werden im
Vollbildmodus angezeigt. Im Verhältnis 4:3
formatierter Inhalt wird gedehnt.
•4:3 Normal : Diese Option einstellen, wenn
der Player an einen 4:3 Fernsehbildschirm
angeschlossen wird. Der Player gibt alle Inhalte
in ihrem originalen Bildseitenverhältnis wieder.
Im Verhältnis 16:9 formatierter Inhalt wird mit
schwarzen Streifen am oberen und unteren
Bildschirmrand angezeigt.
•4:3 Passend :
Player an einen 4:3 Fernsehbildschirm angeschlossen
wird. Bei im Verhältnis von 16:9 formatiertem Inhalt
werden die sich am linken und rechten Bildrand
befindenden Bildteile abgeschnitten.
HINWEIS
✎
▪Einige Bildformate sind nicht bei allen Disks
verfügbar.
▪Wenn Sie Bildformate und Optionen wählen, die vom
Bildschirmformat Ihres Fernsehgeräts abweichen,
kann das Bild verzerrt erscheinen.
▪Wenn Sie 4:3 Passend oder 4:3 Letterbox
auswählen, Können Sie durch Drücken der
Taste FULL SCREEN auf der Fernbedienung das
Vollbildschirm nicht sehen.
▪Wenn Sie 16:9 Original einstellen, kann Ihr
Fernsehgerät das Format 4:3 Letterbox (schwarze
Streifen an den Bildschirmrändern) anzeigen.
In diesem Fall, können Sie das Vollbildschirm
durch Drücken der Taste FULL SCREEN auf der
Fernbedienung auch nicht sehen.
.
Diese Option einstellen, wenn
Diese Option einstellen, wenn der
BD Wise (nur bei Samsung Playern
Bei BD Wise handelt es sich um Samsungs
neueste Geräte-Anschlussfunktion.
Wenn Sie einen Samsung Player und ein
Samsung-Fernsehgerät mit BD Wise Funktion
über ein HDMI aneinander anschließen und BD
Wise auf beiden Geräten aktiviert ist, gibt der
Player das Video mit der Videoauflösung und
der Bildfrequenz der BD/DVD-Disk wieder.
•Aus : Die Wiedergabe erfolgt immer,
unabhängig von der Auflösung der Disk, mit
der zuvor im Menü Auflösung eingestellten
Auflösung. Siehe Auflösung weiter unten
•Ein : Der Player gibt das Video mit der
originalen Auflösung und Bildfrequenz der
BD/DVD-Disk wieder.
HINWEIS
✎
▪Wenn BD Wise aktiviert ist, wird die Auflösung
automatisch auf BD Wise gesetzt und es wird BD
Wise im Menü Auflösung angezeigt.
▪Wenn der Player an ein Gerät angeschlossen ist,
das BD Wise nicht unterstützt, können Sie die
BD Wise-Funktion nicht verwenden.
▪Damit BD Wise richtig funktioniert, muss die BD
Wise-Funktion im Player und Fernsehgerät auf
Ein gestellt werden.
)
Auflösung
Mit dieser Funktion kann die Auflösung von
HDMI-Videosignalen auf Auto, 1080p, 1080i,
720p oder 576p/480p gesetzt werden.
Die Zahl zeigt die Anzahl der Zeilen des
Videos pro Bild an. Das i und das p stehen
entsprechend für „Zeilensprungverfahren“
und „progressive Abtastung“. Je mehr Zeilen,
desto höher die Qualität.
•Auto : Stellt die Auflösung automatisch
auf die maximale Auflösung des
angeschlossenen Fernsehgeräts ein.
•BD Wise :
Fernsehgerät mit der BD-Wise Funktion über
HDMI, wird automatisch die Auflösung der BD/
DVD-Disk eingestellt. (Die Menüoption BD-Wise
erscheint nur, wenn BD-Wise auf Ein gesetzt
wurde. siehe BD Wise weiter oben.)
Bei Anschluss des Players an ein
•1080p : Gibt Videobilder mit 1080 Zeilen
und progressiver Abtastung wieder.
•1080i : Gibt Videobilder mit 1080 Zeilen im
Zeilensprungverfahren wieder.
•720p : Gibt Videobilder mit 720 Zeilen und
progressiver Abtastung wieder.
•576p/480p : Gibt Videobilder mit 576/480
Zeilen und progressiver Abtastung wieder.
Auflösung nach Wiedergabemodus
• Bei der Wiedergabe von Blu-ray Disk/E-content/Digital Content
HDMI / angeschlossen
Setup
Ausgang
Blu-ray Disc E-contents/Digital contents
BD Wise Auflösung der Blu-ray-Disk 1080p
Auto Max. Auflösung des TV-Eingangs Max. Auflösung des TV-Eingangs
1080p@60F
Film-Bildfrequenz : Aus)
(
Film-Bildfrequenz : Auto
(24Fs)
1080p@60F 1080p@60F
1080p@24F 1080p@24F
1080i 1080i 1080i
720p 720p 720p
576p/480p 576p/480p 576p/480p
• DVD-Wiedergabe
Setup
Ausgang
BD Wise 576i/480i
Auto Max. Auflösung des TV-Eingangs
1080p 1080p
1080i 1080i
720p 720p
576p/480p 576p/480p
HDMI Modus
HDMI / angeschlossen
HDMI Modus
13
Page 42

HINWEIS
✎
▪ Falls das an den Player angeschlossene Fernsehgerät
die Film-Bildfrequenz oder die eingestellte Auflösung
nicht unterstützt, wird folgende Meldung angezeigt:
„Wenn keine Bilder angez. werden, nachd. Sie ‘Ja’
ausgew. haben, warten Sie 15 Sek. u. kehren Sie
zur vorher. Auflösung zur. Möchten Sie die Auflösung
ändern?“.
Wenn Sie Ja, auswählen, erscheint der
Fernsehbildschirm 15 Sekunden schwarz und kehrt
automatisch zu der vorherigen Auflösung zurück.
▪ Wenn der Bildschirm schwarz bleibt, nachdem Sie
Auflösung geändert haben, alle Disks aus dem Gerät
entfernen und die
des Players drücken und für mehr als 5 Sekunden
gedrückt halten. Alle Einstellungen werden auf die
werksseitigen Standardeinstellungen zurückgesetzt.
Folgen Sie den Anweisungen auf der vorherigen Seite,
um auf die einzelnen Modi zuzugreifen, und wählen Sie
die Anzeigeeinstellungen, die von Ihrem Fernsehgerät
unterstützt werden.
▪ Wenn die Werkseinstellungen wieder hergestellt
werden, werden alle gespeicherten BD-Daten
gelöscht.
▪ Die Blu-ray Disk muss die Bildfrequenz von 24
Bildern unterstützen, damit der Player die FilmBildfrequenz (24 fps) nutzen kann.
STOPP ( @ )
Taste auf der Vorderseite
Film-Bildfrequenz(24 fps)
Durch die Einstellung der Film-Bildfrequenz
(24 fps) auf Auto, haben Sie die Möglichkeit,
den HDMI-Ausgang des Players auf 24 Bilder
pro Sekunde für eine verbesserte Bildqualität
einzustellen.
Sie können die Film-Bildfrequenz (24 fps)
Funktion nur auf Fernsehgeräten nutzen, die
diese Bildfrequenz unterstützen. Sie können
Film-Bildfrequenz nur dann einstellen, wenn
sich der Player im HDMI 1080i oder 1080p
Auflösungsmodus befindet.
• Auto : Die Film-Bildfrequenz (24 fps)
Funktionen werden aktiviert.
• Aus : Film-Bildfrequenz (24 fps) Funktionen
sind deaktiviert.
14
HDMI-Farbformat
Hier kann das Farbraumformat für die HDMIWiedergabe an die Möglichkeiten des
angeschlossenen Geräts (Fernsehgerät,
Bildschirm, usw.) angepasst werden.
• Auto :
Stellt den Player automatisch auf
das optimale von Ihrem Gerät unterstützte
Format ein.
• YCbCr (4:4:4) : Wenn Ihr Fernsehgerät den
YCbCr Farbraum über HDMI unterstützt,
stellen Sie diese Option ein, um die normale
YCbCr Farbskala wiederzugeben.
• RGB (Standard) : Wählen Sie diese
Option, um die normale RGB Farbskala
wiederzugeben.
• RGB (Erweitert) : Wenn Sie den Player an
ein DVI-Anzeigegerät, wie einen Monitor
angeschlossen haben, wählen Sie diese
Option aus, um die erweiterte RGB
Farbskala wiederzugeben.
HDMI-Deep Color
Mit dieser Option können Video über die
HDMI OUT Buchse mit der Deep Color
Farbtiefe wiedergeben. Deep Color bietet
genauere Farbwiedergabe mit größerer
Farbentiefe.
• Auto : Der Player sendet Videosignale
mit Deep Color an angeschlossene
Fernsehgeräte, die HDMI Deep Color
unterstützen.
• Aus : Bildwiedergabe ohne Deep Color.
Progressiver Modus
Mit dieser Funktion kann die Bildqualität bei
der Wiedergabe von DVDs verbessert werden.
• Auto :
Wenn Sie diese Option einstellen,
stellt der Player automatisch die beste
Bildqualität für die wiedergegebene DVD ein.
• Video : Wählen Sie diese Option für die
beste Bildqualität bei DVDs mit Konzerten
oder TV-Shows aus.
Audio
Digital-Ausgang
Mit dieser Funktion können Sie den DigitalAusgang an die Möglichkeiten des an den Player
angeschlossenen AV-Receivers anpassen :
• PCM : Dies ist die Standardeinstellung. Sie
ist mit den meisten Fernsehgeräten und
Empfängern kompatibel.
Auswahl des Digitalausgangs
Setup PCM
PCM
Plus
DTS
Audio
PCM
DTS
HDMI-
fähiger AV
Receiver
Bis zu PCM
7.1 Kanal
PCM 2 Kanal
PCM 2 Kanal
PCM 2 Kanal
PCM 2 Kanal
PCM 2 Kanal
PCM 2 Kanal
PCM 2 Kanal
PCM 2 Kanal
PCM 2 Kanal
Optisch
PCM 2 Kanal
PCM 2 Kanal
PCM 2 Kanal
PCM 2 Kanal
PCM 2 Kanal
PCM 2 Kanal
PCM 2 Kanal
PCM 2 Kanal
PCM 2 Kanal
PCM 2 Kanal
Dolby Digital
Dolby Digital
Dolby TrueHD
DTS HD High
Master Audio
PCM 2 Kanal
Dolby Digital
Anschluss
Audiostrom
auf der
Blu-ray
Disc
Audiostrom
auf DVD
Dolby Digital
Dolby Digital
Dolby TrueHD
DTS HD High
Resolution
DTS HD
Master Audio
Dolby Digital
• Bitstream (Unverarbeitet) : Wählen Sie
diese Option aus, wenn der Receiver alle
Audiosignale decodieren soll.
Bonosview Audio wird dann nicht zur
Verfügung stehen.
• Bitstream (DTS Re-encoded) : Der
Originalton wird wieder in DTS codiert.
• Bitstream (Dolby D Re-encoded) : Der
Originalton wird wieder in Dolby Digital
codiert.
Für weitere Einzelheiten, schlagen Sie bitte in der
Auswahltabelle für den Digitalausgang nach.
Bitstream
(Unverarbeitet)
HDMI-
fähiger AV
Receiver
Resolution
Optisch
PCM
PCM 2 Kanal
Dolby Digital DTS re-encoded
Dolby Digital DTS re-encoded
Plus
Dolby Digital DTS re-encoded
DTS DTS DTS re-encoded
Audio
DTS HD
PCM 2 Kanal
Dolby Digital Dolby Digital Dolby Digital
DTS DTS DTS DTS
Bitstream
(DTS Re-
encoded)
HDMI-fähiger AV
Receiver oder
Optisch
DTS re-encoded
DTS DTS re-encoded
DTS DTS re-encoded
PCM 2 Kanal PCM 2 Kanal
Bitstream
(Doby D Re-
encoded)
HDMI-fähiger AV
Receiver oder
Optisch
Dolby D. Re-encoded *
Dolby D. Re-encoded *
Dolby D. Re-encoded *
Dolby D. Re-encoded *
Dolby D. Re-encoded *
Dolby D. Re-encoded *
Dolby D. Re-encoded *
Page 43

Setup PCM
Anschluss
Blu-ray
Disc-
Definition
Wenn es sich bei dem Ursprungssignal um ein 2 Kanal oder Mono Signal handelt, wird die “Dolby D
*
Re-encoded“ Einstellung nicht verwendet. Die Wiedergabe erfolgt im PCM 2 Kanal Modus.
Blu-ray Discs können drei Audio-Ströme
enthalten :
- Haupt-Audio : Haupt Audio-Soundtrack.
- BONUSVIEW Audio : Zusätzlicher
Soundtrack wie Kommentare von
Regisseuren und Schauspielern.
- Navigationssoundeffekte : Bei der Auswahl
von einigen Menünavigationsoptionen
können Navigationssoundeffekte zu hören
sein. Die Navigationssoundeffekte sind je
nach Blu-ray-Disk unterschiedlich.
HINWEIS
✎
▪Achten Sie darauf, den richtigen Digitalausgang
auszuwählen, da andernfalls kein Ton oder ein
Störgeräusch zu hören ist.
fähiger AV
Receiver
Decodiert den Hauptaudio
und BONUSVIEW Audio
Alle
Navigationssoundeffekte
HDMI-
Optisch
Strom zusammen in
PCM Audio und fügt
hinzu.
Bitstream
(Unverarbeitet)
HDMI-
fähiger AV
Receiver
sodass der AV-Receiver
Optisch
Gibt nur den HauptAudiostrom wieder,
den Audio-Bitstrom
decodieren kann.
Es werden kein
BONUSVIEW Audio
oder Navigations
soundeffekte
wiedergegeben.
▪Falls das HDMI-Gerät (AV-Receiver, Fernsehgerät)
komprimierte Formate (Dolby digital, DTS) nicht
unterstützt, wird das Audiosignal als PCM
wiedergegeben.
▪Reguläre DVDs haben keinen BONUSVIEW-Audio
und keine Navigationssoundeffekte.
▪Einige Blu-ray-Disks haben keinen BONUSVIEW-
Audio und keine Navigationssoundeffekte.
▪Diese Digitalausgabe Einstellung hat keinen
Einfluss auf die HDMI Audio Ausgabe an Ihren
Fernseher. Beeinflusst die optische und HDMI
Audio Wiedergabe, wenn Ihr Player an einen AVReceiver angeschlossen ist.
▪Bei der Wiedergabe von MPEG- Soundtracks,
wird das Audiosignal, unabhängig von der
Digitalausgang Einstellung, als PCM (PCM oder
Bitstrom) wiedergeben.
Bitstream
(DTS Reencoded)
HDMI-fähiger AV
Receiver oder
Optisch
Decodiert den
Hauptaudio und
BONUSVIEW
Audio Strom
zusammen in
PCM Audio,
fügt Navigations
soundeffekte
hinzu und
codiert PCM-
Audio erneut
in den DTS-
Bitstrom.
Bitstream
(Doby D Re-
encoded)
HDMI-fähiger AV
Receiver oder
Optisch
Decodiert den
Hauptaudio und
BONUSVIEW Audio
Strom zusammen
in PCM Audio,
fügt Navigations
soundeffekte hinzu
und codiert PCM-
Audio erneut in
den Dolby Digital-
Bitstrom oder PCM.
PCM-Downsampling
Mit dieser Funktion kann die Herabsetzung
der 48kHz und 96kHz PCM Abtastfrequenz
ein oder ausgeschaltet werden.
• Aus : Wählen Sie diese Option aus, wenn
der an den Player angeschlossene AVReceiver für 96kHz geeignet ist.
• Ein : Wählen Sie diese Option aus,
wenn der an den Player angeschlossene
AV-Receiver nicht für 96kHz geeignet
ist. 96kHz-Signale werden in 48kHz
umgewandelt.
HINWEIS
✎
▪ Auch wenn PCM Downsampling auf Aus
eingestellt ist, geben manche Disks über den
optischen Digitalausgang nur auf 48kHz
reduzierte Audiosignale aus.
HDMI
• Wenn Ihr Fernsehgerät für komprimierte
Mehrkanal-Formate (Dolby Digital, DTS)
nicht geeignet ist, kann das Produkt PCM 2
Kanal reduzierte Audiosignale wiedergeben,
selbst wenn Sie Bitstrom (entweder ReEncoded oder Unverarbeitet) im SetupMenü gewählt haben.
• Wenn Ihr Fernsehgerät nicht PCMAbtasraten von mehr als 48kHz kompatibel
ist, kann der Player auf 48kHz reduzierte
Audiosignale wiedergeben, selbst wenn
PCM Downsampling auf Aus gestellt ist.
Dynamikumfangsteuerung
Selbst bei geringen Lautstärken hören Sie
Dialoge klar und deutlich.
Diese Funktion ist nur aktiv, wenn der Player
ein Dolby Digital Signal erkennt.
• Auto : Die Dynamikumfangsteuerung wird
auf Grundlage der der vom Dolby TrueHD
Soundtrack zur Verfügung gestellten
Informationen automatisch eingestellt.
• Aus : Bei Auswahl dieser Option können
Sie den Film im Standard-Dynamikumfang
genießen.
• Ein : Wenn Film-Soundtracks mit
niedriger Lautstärke oder über kleinere
Lautsprecher wiedergegeben werden, wird
die Kompression so angepasst, dass leise
Passagen besser hörbar und dramatische
Höhepunkte nicht zu laut werden.
Downmix-Modus
Wählen Sie den Downmix-Modus für die
Stereo Ausgabe.
• Normal-Stereo : Reduziert Mehrkanal-
Audio auf normales Stereo. Wählen Sie
diese Option, wenn Sie den Ton über
das Fernsehgerät oder die Stereoanlage
wiedergeben.
• Surround Compatible : Reduziert
Mehrkanal-Audio auf Surround kompatibles
Stereo. Dieser Modus unterstützt Ihren AVReceiver bei der Dekodierung von Stereo in
Surround Sound.
15
Page 44

Netzwerk
Kontaktieren Sie Ihre ISP um zu erfahren, ob Sie
eine statische oder eine dynamische IP-Adresse
verwenden. Wenn es sich um eine dynamische
Adresse handelt - was meistens der Fall ist - wird
empfohlen, die Auto Prozedur
für die Netzwerkeinrichtung zu verwenden. Dies
ist der einfachste Weg und führt in den meisten
Fällen zum Erfolg. Wenn es sich um eine
statische Adresse handelt, muss eine manuelle
Einrichtung vorgenommen werden.
Befolgen Sie die nachfolgenden Schritte, um die
Netzwerkeinstellungen zu konfigurieren.
HINWEIS
✎
▪Dieses Gerät kann nur über ein Kabel an das
Netzwerk angeschlossen werden.
Automatische Einrichtung des Netzwerks
1. Im Home-Menü, drücken Sie mit den
Tasten ◄► die Einstellungen aus, und
drücken Sie dann die Taste EINGABE.
2. Drücken Sie die Tasten ▲▼, um Netzwerk
auszuwählen, und drücken Sie die Taste
EINGABE.
3. Drücken Sie die Tasten ▲▼, um Einstell.
für kabelgeb. Netzwerk auszuwählen,
und drücken Sie die Taste EINGABE. Der
Bildschirm für Kabelnetzwerk Einstellungen
wird angezeigt.
Einstellungen
Einstell. für kabelgeb. Netzwerk
Anzeige
IP-Konfiguration : Auto
Audio
IP-Adresse : 0 0 0 0
Netzwerk
Subnet-Maske :
System
Gateway :
Sprache
DNS
Sicherheit
DNS-Server
Allgemein
Unterstützung
4. In dem Feld für die Einrichtung des Internet
Protokolls, falls nicht bereits eingestellt, Auto
auswählen. (EINGABE drücken, AUTO
auswählen, und erneut EINGABE drücken.)
: Auto
:
>
Beweg. " Auswählen ' Zurück
0 0 0
0
0 0 0
0
0 0 0
0
5. Die Auto Funktion ruft die Werte für die IPAdresse, Subnet-Maske, usw. ab und
trägt diese automatisch ein.
HINWEIS
✎
▪Dieser Vorgang dauert bis zu 5 Minuten.
6. Nachdem die Netzwerk Funktion die
Netzwerkwerte ermittelt hat, drücken Sie
die Taste RETURN.
7. Wählen Sie Netzwerk, und drücken Sie
EINGABE
Player eine Verbindung mit dem Netzwerk
hergestellt hat.
8. Wenn der Netzwerk Test abgeschlossen
ist, zweimal die RETURN Taste drücken,
um zum Hauptmenü zurückkehren.
9. Wenn die Netzwerk-Funktion die
Netzwerkwerte nicht ermitteln kann oder
Sie Manuell ausgewählt haben, siehe die
Hinweise für Manuelle Einstellungen.
Manuelle Eirichtung des
Netzwerks
Bevor Sie mit der manuellen Einrichtung des
Netzwerks beginnen, benötigen Sie die Werte
für die Netzwerkeinstellungen.
Um die Werte der Netzwerkeinstellung auf den
meisten Windows-Computern anzuzeigen,
müssen Sie die folgenden Schritte ausführen:
■
Windows XP
1. Klicken Sie mit der rechten Maustaste
auf das Netzwerk Symbol in der unteren
rechten Ecke des Arbeitsplatzes.
2. Klicken Sie auf Status im Pop-up-Menü.
3. Im angezeigten Dialogfeld klicken Sie auf
Support-Tab.
4. Auf dem Support-Tab, die Schaltfläche
Details anklicken.
werden angezeigt.
, um sicherzustellen, dass der
Die Netzwerkeinstellungen
■
Windows 7
1. Klicken Sie auf das Netzwerk Symbol in der
unteren rechten Ecke des Arbeitsplatzes.
2. In dem Popup-Fenster auf ‚Netzwerk- und
Freigabecenter öffnen‘ klicken.
3. In dem angezeigten Dialogfenster je nach Ihrer
Netzwerkverbindung auf ‚LAN-Verbindung‘
oder ‚WLAN-Verbindung‘ klicken.
4. Im Tab Allgemein auf die Schaltfläche
‚Details‘ klicken Die Netzwerkeinstellungen
werden angezeigt
Um mit der Konfiguration des Geräts zu
beginnen, folgen Sie den folgenden Schritten:
1. Im Home-Menü, drücken Sie mit den
Tasten ◄► die Einstellungen aus, und
drücken Sie dann die Taste EINGABE.
2. Drücken Sie die Tasten ▲▼, um
Netzwerk auszuwählen, und drücken Sie
die Taste EINGABE.
3. Drücken Sie die Tasten ▲▼, um Einstell.
für kabelgeb. Netzwerk auszuwählen,
und drücken Sie die Taste EINGABE.
Der Bildschirm für Kabelnetzwerk
Einstellungen wird angezeigt.
4. Wenn der IP-Konfiguration Bildschirm
erscheint, drücken Sie die Taste EINGABE.
5. Drücken Sie die Tasten ▲▼, um Manuell
auszuwählen. Drücken Sie anschließend
die Taste EINGABE.
6. Drücken Sie Taste ▼, um zum ersten
Eingabefeld zu gelangen (IP-Adresse).
7. Benutzen Sie die Nummerntasten auf Ihrer
Fernbedienung um die Nummern einzugeben.
8. Wenn sie mit jedem Feld fertig sind
verwenden Sie die Taste ► um zum
nächsten Feld zu gelangen.
Sie können auch die anderen Pfeiltasten
verwenden um nach oben, unten und
rückwärts zu wechseln.
9. Geben Sie IP-Adresse, Subnet-Maske
und Gateway Werte ein.
10. Drücken Sie die Taste ▼ um DNS
auszuwählen.
11. Betätigen Sie die Taste ▼ um zum ersten
DNS Eingabefeld zu gehen.
12. Geben Sie die Nummern wie oben ein.
13. Drücken Sie auf der Fernbedienung die
Taste RETURN.
14. Danach führen Sie ein Netzwerktest aus, um
sichergehen zu können das der Blu-ray DiskPlayer mit Ihrem Netzwerk verbunden ist
.
Netzwerktest
V
erwenden Sie dieses Menü um eine
Verbindung herzustellen und zu überprüfen, ob
Ihre Netzwerkverbindung funktioniert oder nicht.
Netzwerkstatus
Überprüfen ob eine Verbindung zum Netzwerk
und Internet hergestellt wurde.
BD-Live Internet-Verbindung
Mit dieser Funktion können Sie eine
Internetverbindung zulassen oder sperren,
wenn Sie den BD-LIVE Dienst verwenden.
• Zulassen (Alle) : Die Internetverbindung
wird für alle BD-LIVE-Inhalte zugelassen.
• Zulassen (Nur gültige)
Internetverbindung wird nur für BD-LIVE-Inhalte
mit einem gültigen Zertifikat zugelassen.
• Ablehnen : Für keine BD-LIVE-Inhalte wird
eine Internetverbindung zugelassen.
HINWEIS
✎
▪Was ist ein gültiges Zertifikat?
Wenn der Player BD-LIVE verwendet, um die Disk-Daten
und eine Anfrage an den Server für die Zertifizierung
der Disk zu senden, verwendet der der Server die
übertragenden Daten um zu prüfen, ob die Disk gültig
ist und sendet das Zertifikat zurück an den Player.
▪Die Internetverbindung kann während der Nutzung
der BD-LIVE-Inhalte eingeschränkt sein.
: Die
16
Page 45

System
Ersteinstellung
Mit der Hilfe der Funktion Ersteinstellungen
können Sie die Sprache, Netzwerkeinstellung
usw. einstellen.
Für weitere Informationen über die
Funktion Ersteinstellungen schlagen Sie
im Abschnitt Ersteinstellungen in dieser
Bedienungsanleitung nach. (Siehe Seiten 12)
Anynet+ (HDMI-CEC)
Bei Anynet+ handelt es sich um eine nützliche
Funktion, die den vernetzten Betrieb mit anderen
Samsung Playern zur Verfügung stellt, die über die
Anynet+ Funktion verfügen.
Um diese Funktion nutzen zu können, muss der
Player über ein HDMI-Kabel an ein Samsung
Fernsehgerät angeschlossen werden.
Bei aktiver Anynet+ Funktion könne Sie diesen Player
mit der Fernbedienung eines Samsung Fernsehgeräts
bedienen und die Wiedergabe einer Disk bequem
durch Drücken der WIEDERGABE (
der Fernbedienung des Fernsehgeräts starten.
Für weitere Informationen, schlagen Sie bitte in der
Bedienungsanleitung des Fernsehgeräts nach.
• Aus
: Die Anynet+-Funktionen sind deaktiviert.
• Ein : Die Anynet+-Funktionen sind aktiviert.
HINWEIS
✎
▪Für diese Funktion muss das HDMI-Kabel CEC
unterstützen.
▪Wenn sich ein Anynet+ Logo auf Ihrem
Samsung-Fernsehgerät befindet, wird die
Anynet+-Funktion unterstützt.
▪Je nach Fernsehgerät stehen für den
HDMI-Ausgang bestimmte Auflösungen
möglicherweise nicht zur Verfügung.
Schlagen Sie bitte in der Bedienungsanleitung
Ihres Fernsehgeräts nach.
) Taste auf
BD-Datenmanagement
Mit dieser Funktion können sie die
heruntergeladenen Inhalte verwalten, die Sie
über eine Blu-ray Disk bezogen haben, die den
BD-LIVE Dienst unterstützt, und auf einem
angeschlossenen Flash-Speichergerät
gespeichert sind.
Sie können Geräteinformationen einschließlich
der Speicherkapazität einsehen, BD-Daten
löschen oder das Flash Speichermedium
wechseln.
Informationen auf dem BD-Datenmanagement
Bildschirm :
• Aktuelles Gerät : Zeigt das angeschlossene
• Gesamtgröße : Gesamte Speicherkapazität
• Verfügbare Größe : Verfügbare
• BD-Daten löschen
• Gerät wechseln
✎
Gerät an.
des Geräts.
Speicherkapazität des Geräts.
im Speicher.
gewünschten Flash-Speicher für die
Speicherung der BD-Daten.
HINWEIS
▪Die Wiedergabe einer Disk kann im externen
Speichermodus angehalten werden, wenn das
USB-Gerät während der Wiedergabe entfernt
wird.
▪Es werden nur USB-Geräte mit einem FAT-
Dateisystem (DOS 8.3 Datenträgerbezeichnung)
unterstützt. Es wird die Verwendung eines USBGeräts mit USB 2.0-Protokoll Unterstützung und
einer Lese-/Schreibgeschwindigkeit von 4 MB/
Sek. oder mehr empfohlen.
▪Nach dem Formatieren des Speichergeräts
funktioniert die Funktion Wiedergabe fortsetzen
möglicherweise nicht.
▪Die gesamte für das BD-Datenmanagement zur
Verfügung stehende Speicherkapazität kann je
nach vorliegenden Bedingungen abweichen.
Löscht alle BD-Daten
:
Wechselt den
:
DivX® Videos auf Abruf
Anzeige von DivX® VOD-Registrierungscodes, um
DivX® VOD-Inhalt zu erwerben und wiedergeben.
Sprache
Sie können die Sprache auswählen, in der das
Home-Menü, Diskmenü, usw. angezeigt werden
soll.
• Bildschirmmenü : Einstellen der Sprache
für das Bildschirmmenü.
• Diskmenü : Einstellen der Sprache für die
Anzeige des Diskmenüs.
• Audio : Sprachauswahl für die
Audiowiedergabe der Disk.
• Untertitel : Sprachauswahl für die Untertitel
der Disk.
HINWEIS
✎
▪ Die ausgewählte Sprache wird nur dann angezeigt,
wenn sie von der Disk unterstützt wird
.
Sicherheit
Wenn Sie Ihren Player zum ersten Mal
verwenden, wird der Einstellungsbildschirm
für das Kennwort angezeigt.
Geben Sie das 4-stellige Passwort durch
Benutzung der Nummerntasten ein. (Das
voreingestellte Passwort lautet 0000.)
BD-Sicherungsstufe
Verhindert die Wiedergabe von Blu-ray-Disks
mit festgelegter Altersbeschränkung, bis das
Passwort eingegeben wurde.
• Aus : Die BD-Sicherungsstufe ist nicht
aktiviert und alle Blu-ray Disks werden
uneingeschränkt wiedergegeben.
• Ein : Durch diese Einstellung wird die
Wiedergabe von Blu-ray-Disks, die über
der Schwankungen liegen, verhindert.
DVD-Sicherungsstufe
Diese Funktion arbeitet mit DVDs zusammen,
denen eine Altersbeschränkung oder
nummerische Beschränkung zugewiesen
wurden, die die Freigabe des Inhalts angibt.
Diese Zahlen helfen Ihnen, die Arten von DVDs
zu kontrollieren, die Ihre Familie ansehen darf.
Wählen Sie den Einstufungslevel.
Wenn Sie beispielsweise Level 6 auswählen,
werden Disks mit Level 7 und 8 nicht
wiedergegeben.
Eine höhere Zahl gibt an, dass der Inhalt erst
ab 18 Jahren freigegeben ist.
YouTube-Sperre
Beschränkung der Nutzung von YouTubeDiensten bis ein Kennwort eingegeben wird.
• Aus : YouTube-Sperre ausschalten.
• Ein : YouTube-Sperre einschalten.
PIN ändern
Ändern des 4-stelligen Passwortes für Zugriff
auf Sicherheitsfunktionen.
Falls Sie Ihr Passwort vergessen haben
1. Entfernen Sie die Disk.
2. Drücken Sie die
Vorderseite des Geräts und halten Sie sie
für mindestens 5 Sekunden gedrückt.
Alle Einstellungen werden auf die
Werkseinstellungen zurückgesetzt.
HINWEIS
✎
▪ Bei der Werkseinstellung der Werkseinstellungen
werden alle vom Benutzer gespeicherten BDDaten gelöscht.
STOPP ( @ )
Taste auf der
17
Page 46

Allgemein
Zeitzone
Sie können die ihrer Region entsprechende
Zeitzone auswählen.
Unterstützung
Softwareaktualisierung
Mit diesem Menü können Sie SoftwareUpdates herunterladen, welche der Leistung
des Players verbessern oder zusätzliche
Dienste zur Verfügung stellen.
Online
Um das Update über das Internet
durchzuführen, folgen Sie diesen Schritten:
1. Online auswählen, und die EINGABE
Taste drücken. Die Mitteilung über den
Verbindungsaufbau mit dem Server erscheint.
2. Wenn eine Aktualisierung verfügbar ist,
wird eine Popup-Meldung angezeigt.
3. Wenn Sie Ja wählen, schaltet sich der
Player automatisch vor dem Neustart aus.
(Schalten Sie den Player während eines
Upgrades niemals ein)
4. Das Popup mit dem Fortschritt der
Aktualisierung erscheint. Wenn die
Aktualisierung abgeschlossen ist, schaltet
sich der Player automatisch ab.
5. Drücken Sie die POWER Taste, um den
Player einzuschalten.
HINWEIS
✎
▪Das Update ist abgeschlossen, wenn sich der
Player nach dem Neustart wieder abschaltet. Sie
die Taste POWER um den aktualisierten Player
einzuschalten.
18
▪Den Player während des Aktualisierungsvorgangs
niemals manuell ein oder aus schalten.
▪Samsung Electronics haftet nicht für
Fehlfunktionen des Players, die auf eine instabile
Internetverbindung oder fahrlässiges Handeln des
Benutzers während der Software-Aktualisierung
zurückzuführen sind.
▪Wenn Sie das Upgrade während des
Herunterladens der Software abbrechen möchten,
müssen Sie die EINGABE Taste drücken.
Per USB
Um das Update über USB durchzuführen,
folgen Sie diesen Schritten:
1. Besuchen Sie www.samsung.com/
bluraysupport.
2. Laden Sie das letzte USB Software Upgrade
Zip-Archiv auf Ihren Computer herunter.
3. Entpacken Sie das Zip-Archiv auf Ihrem
Computer. Sie sollten eine einzelne RUFDatei mit dem gleichen Namen wie die
Zip-Datei haben.
4. Kopieren Sie die RUF-Datei auf ein USB-
Flash-Laufwerk.
5. Stellen Sie sicher, dass sich keine Disk im
Player befindet und stecken Sie das USBFlash-Laufwerk in den USBAnschluss des
Players.
6. Im Menü des Players nach Einstell. >
Unterstützung > Software-Update wechseln.
7. Per USB auswählen.
HINWEIS
✎
▪Disk-Lade muss leer sein, wenn Sie das
Software-Upgrade über den USB-Anschluss
durchführen.
▪Überprüfen Sie nach Abschluss der
Aktualisierung im Software-Upgrade-Menü die
Firmware-Details.
▪Schalten den Player während der Software-
Aktualisierung nicht aus. Der Player könnte
beschädigt werden.
▪Software-Upgrades über den USB-Anschluss
dürfen nur mit einem USB-Memorystick
durchgeführt werden.
Auto. Aktual.-Benach.
Wenn Sie den Player an Ihr Netzwerk
angeschlossen und die die Auto Upgrade
Benachrichtigung eingeschaltet haben,
werden Sie vom Player automatisch
informiert, wenn eine neue Softwareversion
für den Player zur Verfügung steht.
Folgen Sie den folgenden Schritten, um die
Auto Upgrade Benachrichtigung zu aktivieren:
1. Wählen Sie Auto. Aktual.-Benach.
aus und drücken Sie anschließend die
EINGABE
2. Mit Hilfe der ▲▼ Tasten Ein auswählen,
Wenn eine neue Softwareversion zur Verfügung
steht, werden Sie vom Player mit einer PopupMeldungen informiert.
1. Für eine Aktualisierung der Firmware
2. Ein Popup wird erscheinen und Sie über
3. Wenn die Aktualisierung abgeschlossen
4. Drücken Sie die Taste POWER um den
HINWEIS
✎
Taste.
und die
EINGABE
Taste drücken.
wählen Sie Ja in der erscheinenden
Pop-up-Meldung. Der Player schaltet
sich automatisch aus, wird wieder
neu gestartet und beginnt mit der
Aktualisierung. (Den Player während des
Aktualisierungsvorgangs niemals manuell
einschalten.)
den Fortschritt informieren.
ist, wird sich das Gerät automatisch
wieder ausschalten.
Player einzuschalten.
▪Die Aktualisierung ist beendet, wenn sich das
Gerät nach dem Neustart abschaltet. Sie die
Taste POWER um den aktualisierten Player
einzuschalten.
Den Player während des Aktualisierungsvorgangs
niemals manuell ein oder aus schalten.
▪Samsung Electronics übernimmt keine Haftung
für Fehlfunktionen, die durch instabile
Internetverbindung oder fahrlässiges
Verhalten des Benutzers während der
Softwareaktualisierung verursacht werden.
Samsung kontaktieren
Hier erhalten Sie Kontaktinformationen, wenn
Sie Hilfe für Ihren Player benötigen.
Vertragsbedingungen
Informationen über Inhalte und Dienste
Dritter finden Sie im Allgemeinen
Haftungsausschluss.
Rücksetzen
Mit Ausnahme der Netzwerk Einstellungen
werden alle Einstellungen auf ihre
Standardwerte zurückgesetzt.
Page 47

Grundfunktionen
Ein Video wiedergeben
Wiedergabe
1. Schieben Sie vorsichtig eine Disk mit der
bedruckten Seite nach oben in den Schlitz ein.
2. Drücken Sie die WIEDERGABE ( )
Taste.
Tasten für die Wiedergabe:
WIEDERGABE
(
STOPP (
PAUSE (
HINWEIS
✎
▪Bei manchen Disks wird durch einmaliges
▪Videodateien mit hohen Bitraten von 20Mbps oder
Startet die Wiedergabe.
)
Beendet die Wiedergabe.
• Wenn die Taste einmal gedrückt wird :
Die Stoppposition wird gespeichert.
)
• Wenn die Taste zweimal gedrückt
wird : Die Stoppposition wird
nicht gespeichert.
Unterbricht die Wiedergabe.
)
Drücken der STOPP (
Stoppposition möglicherweise nicht gespeichert.
mehr beanspruchen der Player stark und können
zu einem Anhalten der Wiedergabe führen.
Disk-Struktur
Die Inhalte einer Disk sind üblicherweise wie
folgt dargestellt unterteilt.
• Blu-ray Disk, DVD-VIDEO
) Taste die
titel 1 titel 2
kapitel 1 kapitel 2 kapitel 1 kapitel 2 kapitel 3
• Audio CD (CD-DA)
track 1 track 2 track 3 track 4 track 5
• MP3, WMA, DivX, MKV und MP4
ordner (gruppe)
datei 1 datei 2 datei 1 datei 2 datei 3
1 ordner (gruppe) 2
Verwenden des Diskmenüs/
Titelmenüs/Popup-Menüs
Diskmenü verwenden
hZ
1. Drücken Sie während der
Wiedergabe die DISC MENU
Taste auf der Fernbedienung.
2. Mit Hilfe der ▲▼◄► Tasten eine
Auswahl treffen und anschließend
die EINGABE Taste drücken.
HINWEIS
✎
▪Abhängig von der Disk können die Menüpunkte
abweichen und dieses Menü ist möglicherweise
nicht vorhanden.
Titelmenü verwenden
Z
1. Drücken Sie während der
Wiedergabe die TITLE MENU
Taste auf der Fernbedienung.
2. Mit Hilfe der ▲▼◄► Tasten
die gewünschte Auswahl treffen und
anschließend die EINGABE Taste drücken.
HINWEIS
✎
▪Abhängig von der Disk können die Menüpunkte abweichen
und dieses Menü ist möglicherweise nicht vorhanden.
Titelliste abspielen
z
1. Drücken Sie während der
Wiedergabe die DISC MENU oder
TITLE MENU Taste.
2. Mit den ▲▼ Tasten den gewü
Titelliste auswählen und anschließend
die EINGABE Taste drücken.
HINWEIS
✎
▪Wenn Ihre Disk über eine Wiedergabeliste verfügt, drücken Sie
die GRÜNE Taste (B), um zur Wiedergabeliste zu wechseln.
Das Popup-Menü verwenden
h
1. Drücken Sie während der
Wiedergabe die POPUP MENU
Taste auf der Fernbedienung.
2. Wählen Sie mit Hilfe der ▲▼◄► Tasten oder
der EINGABE Taste das gewünschte Menü
aus.
HINWEIS
✎
▪Abhängig von der Disk können die Menüpunkte abweichen
und dieses Menü ist möglicherweise nicht vorhanden.
Such- und Überspringen-
Funktionen verwenden
Während der Wiedergabe haben Sie die
Möglichkeit, einzelne Kapitel oder Tracks schnell
zu durchsuchen sowie mit der ÜberspringenFunktion zum nächsten Kapitel/Track zu wechseln
Nach gewünschter Szene suchen
hzZyx
• Drücken Sie während der Wiedergabe die
SUCHE ( ) Taste.
Mit jedem Drücken der SUCHE ( ) Taste
ändert sich die Wiedergabegeschwindigkeit wie folgt:
BD-ROM,
BD-RE/-R,
DVD-RW/-R,
DVD+RW/+R,
DVD-VIDEO
DivX, MKV,
• Um zur normalen Wiedergabegeschwindigkeit
zurückzukehren, die WIEDERGABE ( )
Taste drücken.
HINWEIS
✎
▪Im Suchmodus gibt der Player keinen Ton wieder.
MP4
)
)
(
(
)
(
1
4
1
4
1
1
)
)
(
(
)
(
2 ) 3
5 ) 6 ) 7
2 ( 3
5 ( 6 ( 7
2 ) 3
2 ( 3
Kapitel Überspringen
hzZyx
• Drücken Sie während der Wiedergabe die
ÜBERSPRINGEN ( ) Taste.
Wenn Sie die ÜBERSPRINGEN ( ) Taste drücken,
wird zum nächsten Kapitel auf der Disk gesprungen.
Wenn Sie die ÜBERSPRINGEN ( ) Taste drücken,
springt der Player zum Anfang des aktuellen Kapitels
Durch nochmaliges Drücken springt der Player zum
Anfang des vorhergehenden Kapitels.
19
Page 48

Wiedergabe in Zeitlupe/
Einzelbildwiedergabe
Wiedergabe in Zeitlupe
hzZyx
Drücken Sie im Pause-Modus die SUCHE (
•
Jedes Mal, wenn Sie die SUCHE ( ) Taste
drücken, wird die Wiedergabegeschwindigkeit
wie folgt geändert :
• Um zur normalen Wiedergabegeschwindigkeit
zurückzukehren, die WIEDERGABE (
Taste drücken.
HINWEIS
✎
▪Bei der Zeitlupenwiedergabe gibt der Player
keinen Ton wieder.
*
1/8 * 1/4 * 1/2
Einzelbildwiedergabe
) Taste.
)
hzZyx
• Drücken Sie im Pause-Modus die PAUSE
( ) Taste.
Jedes Mal, wenn Sie die PAUSE ( ) Taste
drücken, wird ein neues Bild angezeigt.
• Um zur normalen Wiedergabegeschwindigkeit
zurückzukehren, die WIEDERGABE ( )
Taste drücken.
HINWEIS
✎
▪Bei der Einzelbildwiedergabe gibt der Player
keinen Ton wieder.
Verwenden der TOOLS Taste
Während der Wiedergabe können Sie
das Disk-Menü durch Drücken der
TOOLS Taste bedienen.
HINWEIS
✎
▪Abhängig von der Disk kann das Extras-Menü abweichen.
20
Eine gewünschte Szene direkt
auswählen
hzZy
1. Drücken Sie während der Wiedergabe die TOOLS Taste.
2. Mit Hilfe der ▲▼ Tasten Titel, Kapitel, oder
Wiederg.zeit auswählen.
3. Mit Hilfe der ◄► oder Zifferntasten den gewünschten
Titel, das Kapitel oder die Zeit auswählen und
anschließend die EINGABE Taste drücken.
Wiederholung des aktuellen
Kapitels oder Titels
hzZy
Wiederholung des aktuellen Kapitels oder Titels.
Die Wiederholfunktion ist unter Umständen
nicht bei allen Disks verfügbar.
1. Drücken Sie während der Wiedergabe
die REPEAT Taste auf der
Fernbedienung.
2. Drücken Sie die ▲▼ Tasten, um Kapitel
oder Titel auszuwählen und drücken Sie
anschließend die EINGABE Taste.
3. Drücken Sie die REPEAT Taste erneut, um in den
normalen Wiedergabemodus zurückzukehren.
4. Drücken sie die ▲▼ Tasten, um Aus zu wählen
und anschließend die EINGABE Taste.
Abschnitt wiederholen
hzZy
1. Drücken Sie während der
Wiedergabe die
der Fernbedienung.
2. Mit Hilfe der ▲▼ Tasten
Wiederhol. A-B auswählen
3. Drücken Sie die EINGABE Taste, um
den Punkt zu markieren, an dem die
Wiederholung starten soll (A).
REPEAT
Taste auf
.
4. Drücken Sie die EINGABE Taste, um den
Punkt zu markieren, an dem die Wiederholung
enden soll (B).
5. Drücken Sie die
normalen Wiedergabemodus zurückzukehren.
6. Drücken sie die ▲▼ Tasten, um Aus zu
wählen und anschließend die EINGABE Taste.
HINWEIS
✎
▪Wenn Sie die Stelle (B) vor Ablauf von fünf Sekunden
festlegen, erscheint eine Verbotsmeldung.
▪Abhängig von der Disk können die Menüpunkte abweichen
und dieses Menü ist möglicherweise nicht vorhanden.
REPEAT
Taste erneut, um in den
Audiosprache wählen
hzZx
Sie können diese Funktion auch
durch Drücken der AUDIO
Taste auf der Fernbedienung
auswählen.
1. Drücken Sie während der Wiedergabe die
TOOLS Taste.
2. Mit Hilfe der ▲▼ Tasten Audio auswählen.
3. Wählen Sie mit den ◄► Tasten die
gewünschte Sprache aus.
HINWEIS
✎
▪Die ◄► Anzeige wird nicht auf dem Bildschirm
angezeigt, wenn der BONUSVIEW Bereich keine
Einstellungen für BONUSVIEW-Audio enthält.
▪Die Informationen über den Hauptfunktion/BONUSVIEW
Modus werden ebenfalls angezeigt, wenn die Blu-rayDisk über einen BONUSVIEW Bereich verfügt.
Mit Hilfe der ◄► Taste kann zwischen
Hauptfunktion und BONUSVIEW Audio-Modus
umgeschaltet werden.
▪Die über die Audiosprache Funktion zur
Verfügung stehenden Sprachen hängen von
den auf der Disk kodierten Sprachen ab. Diese
Funktion oder einige Sprachen können nicht zur
Verfügung stehen.
▪Eine Blu-ray Disk kann bis zu 32 und eine DVD
bis zu 8 Audiosprachen speichern.
▪Bei einigen Blu-ray-Disks können Sie auch PCM
oder englischsprachige Tonspuren in Dolby
Digital Audio auswählen.
▪Wenn Sie die AUDIO Taste auf der Fernbedienung
drücken, erscheint der Audio-Balken.
Drücken Sie die RETURN Taste, um den AudioBalken auszublenden.
Untertitelsprache wählen
hZx
Sie können diese Funktion auch
durch Drücken der SUBTITLE
Taste auf der Fernbedienung
auswählen.
1. Drücken Sie während der Wiedergabe die
TOOLS Taste.
2. Mit Hilfe der ▲▼ Tasten Untertitel auswählen.
3. Wählen Sie mit den Tasten ◄► die
gewünschte Untertitelsprache aus.
HINWEIS
✎
▪Je nach Blu-ray Disc / DVD können Sie den
gewünschten Untertitel im Disk-Menü einstellen.
Drücken Sie die DISC MENU Taste.
▪Diese Funktion hängt von der Auswahl der
Untertitel ab, die auf der Disk codiert sind und
können nicht auf allen Blu-ray Discs/DVDs zur
Verfügung stehen.
▪Eine Blu-ray-Disk kann bis zu 255 und eine DVD
bis zu 32 Untertitelsprachen enthalten.
▪Informationen über den Hauptfunktion/
BONUSVIEW-Modus werden auch dann
angezeigt, wenn die Blu-ray Disk über einen
BONUSVIEW-Bereich verfügt.
▪Diese Funktion wechselt gleichzeitig sowohl die
primären als auch sekundären Untertitel.
▪Es wird entsprechend die Gesamtanzahl der
primären oder sekundären Untertitel angezeigt.
▪Wenn Sie die SUBTITLE Taste auf der Fernbedienung
drücken, erscheint der Untertitel-Balken.
Drücken Sie die RETURN Taste, um den
Untertitel-Balken auszublenden.
Page 49

Kamerawinkel Ändern
hZ
Wenn eine Blu-ray-Disk/DVD mehrere Winkel
einer bestimmter Szene enthält, können Sie
die WINKEL Funktion verwenden.
1. Drücken Sie während der Wiedergabe die
TOOLS Taste.
2. Wählen Sie mit den ▲▼ Tasten Winkel aus.
3. Wählen Sie mit den Tasten ◄► den
gewünschten Winkel aus.
Bildeinstellungen einstellen
hzZy
Diese Funktion ermöglicht es Ihnen, die
Videoqualität anzupassen, wenn der Player
an ein Fernsehgerät angeschlossen ist.
1. Drücken Sie während der Wiedergabe die
TOOLS Taste.
2. Mit Hilfe der ▲▼ Tasten Bildeinstellungen
auswählen, und die EINGABE Taste
drücken.
3. Mit Hilfe der ◄► Tasten die gewünschten
Bildmodus auswählen.
• Dynamisch : Wählen Sie diese
Einstellung, um die Schärfe zu erhöhen.
• Standard : Wählen Sie diese Einstellung
für die meisten Programme.
• Film : Dies ist die beste Einstellung zum
Ansehen von Filmen.
• Benutzer : Ermöglicht die Einstellung der
Schärfe und der Rauschunterdrückung.
HINWEIS
✎
▪Wenn Sie die BD-Wise Funktion eingeschaltet
haben, wird dieses Menü nicht angezeigt.
BONUSVIEW Einstellen
h
Mithilfe der BONUSVIEW-Funktion können
Sie während der Filmwiedergabe zusätzliche
Inhalte (z. B. Kommentare) in einem kleinen
Bildschirmfenster anzeigen.
Diese Funktion steht nur dann zur Verfügung,
wenn die Disk über die Bonusview Funktion
verfügt.
1. Drücken Sie während der
Wiedergabe die TOOLS Taste.
2. Mit Hilfe der ▲▼ Tasten
BONUSVIEW Video oder
BONUSVIEW Audio auswählen.
3. Wählen Sie mit den Tasten ◄► den
gewünschten Bonusview aus.
HINWEIS
✎
▪ Wenn Sie BONUSVIEW Video umschalten, wird
BONUSVIEW Audio automatisch in Übereinstimmung
mit BONUSVIEW Video umgeschaltet.
Musikwiedergabe
ow
Wiedergeben von Audio CD
(CD-DA)/MP3
1. Legen Sie eine Audio-CD (CD-DA) oder
eine MP3-Disk ein.
• Bei einer Audio-CD (CD-DA) wird der
erste Titel automatisch abgespielt.
• Bei MP3-Disks die ◄► Tasten drücken,
um Musik zu wählen und anschließend
die EINGABE Taste drücken.
2. Mit den ▲▼ Tasten den gewünschten
Titel auswählen und anschließend die
EINGABE Taste drücken.
Bildschirmelemente für Audio-CD
(CD-DA)/MP3
31 2
Wiedergabeliste
TRACK 001
TRACK 001
TRACK 002
5
TRACK 003
TRACK 004
TRACK 005
TRACK 006
Pause Extras ' Zurück
"
7
+
00:08 / 05:57
6
CD
Zeigt Informationen über das Musikstück an.
1
Zeigt die Wiedergabeliste an.
2
Zeigt die Nummer des aktuellen Titels/
3
Anzahl aller Titel an.
Zeigt die verfügbaren Tasten an.
4
Zeigt die aktuelle Wiedergabedauer und die
5
Gesamtdauer der Wiedergabe an.
Zeigt den aktuellen Wiedergabestatus an.
6
Zeigt den Wiederholungsstatus an.
7
1/6
05:57
04:27
04:07
03:41
03:17
03:35
4
Eine Audio-CD (CD-DA)/MP3
wiederholen
1. Drücken Sie während der Playlist
Wiedergabe die TOOLS Taste.
2. Wählen Sie die Wiederhol.Modus auswählen, und
anschließend die ◄► Tasten drücken,
um den gewünschten Wiederholmodus
auszuwählen.
3. Drücken Sie die EINGABE Taste.
Wiederholen.-Modus
Die Titel werden
Aus
) Track
(
) Eins
(
) Alle
(
( ) Zufalls-
wiederg.
Audio CD
(CD-DA)/MP3
Audio CD
(CD-DA)
MP3
Audio CD
(CD-DA)/MP3
Audio CD
(CD-DA)/MP3
in der Reihenfolge
abgespielt, in der
sie auf der Disk
gespeichert sind.
Wiederholung des
aktuellen Titels.
Wiederholung des
aktuellen Titels.
Alle Titel werden
wiederholt.
Mit der Option
Zufall werden die
Titel auf der Disk in
zufälliger Reihenfolge
wiedergegeben.
Wiedergabeliste
1. Legen Sie eine Audio-CD (CD-DA) oder
eine MP3-Disk ein.
•Bei einer Audio-CD (CD-DA) wird der
erste Titel automatisch abgespielt.
•Bei MP3-Disks die ◄► Tasten drücken,
um Musik zu wählen und anschließend
die EINGABE Taste drücken.
2. Um zur Musikliste zu gelangen, drücken
Sie auf STOPP (
Der Bildschirm der Musikliste wird angezeigt.
) oder RETURN.
3. Drücken Sie die Tasten ▲▼◄►, um
ein gewünschte Titel auszuwählen, und
drücken Sie dann auf die Taste GELB(C).
Wiederholen Sie den Vorgang, um weitere
Titel auszuwählen.
4. Um einen Titel aus der Liste zu entfernen,
drücken Sie die Taste GELB(C) erneut.
Der ausgewählte Titel wird gelöscht.
5. Drücken Sie die Taste EINGABE, um die
ausgewählten Titel wiederzugeben.
Die ausgewählten Titel werden
automatisch wiedergegeben.
21
Page 50

6. Um zur Musikliste zu gelangen, drücken
Sie auf STOPP (
) oder RETURN.
7. Um zur Musikliste zu wechseln, drücken
Sie die Taste EINGABE.
HINWEIS
✎
▪ Sie können auf Audio CDs (CD-DA) eine
Wiedergabeliste mit maximal 99 Titeln erstellen.
Bilder wiedergeben
G
JPEG-Dateien wiedergeben
1. Legen Sie eine JPEG Disk ein.
2. Mit Hilfe der ◄► Tasten Fotos auswählen,
und die EINGABE Taste drücken.
3. Mit den ▲▼◄► Tasten den gewünschten
Ordner auswählen und anschließend die
EINGABE Taste drücken.
4. Mit den ▲▼◄► Tasten das gewünschte
Foto auswählen und anschließend die
EINGABE Taste drücken
HINWEIS
✎
▪Sie können den Untertitel und die PG-Grafik im
Vollbildschirmmodus nicht vergrößern.
Verwenden der TOOLS Taste
Durch Drücken der TOOLS Taste
könne Sie verschiedene Funktionen
verwenden.
• Diashow starten : Startet die
Diashow.
• Diashow anhalten :
wenn Sie die Diashow beenden möchten.
• Diashow-Geschw. : Wählen Sie diese
Option, wenn Sie die Geschwindigkeit der
Diashow anpassen möchten.
22
.
Wählen Sie diese Option,
• Hintergrundmusik : Wählen Sie diese
Option, wenn sie während der Diashow
Musik hören möchten.
• Zoom : Vergrößert das aktuelle Bild. (bis zu
vierfache Vergrößerung.)
• Drehen : Dreht das Bild. (Das Bild wird
entweder im Uhrzeigersinn oder gegen den
Uhrzeigersinn gedreht.)
• Information : Zeigt die Bildinformation an,
inklusive Name und Größe, usw.
HINWEIS
✎
▪Um die Hintergrundmusik Funktion aktivieren
zu können, muss sich die Bilddatei im gleichen
Ordner befinden, wie die Musikdatei. Die
Audioqualität kann durch die Bitrate der MP3Datei, die Bildgröße und die Kodierungsmethode
beeinträchtigt werden.
▪Startet und stoppt die Diashow abwechselnd, je
nachdem, ob Sie eine Diashow abspielen oder nicht.
Wiedergabe von ausgewählten Fotos
Sie können durch Drücken der GELB(C)
Taste auf der Fernbedienung einzelne Fotos
für die Wiedergabe auswählen. Um einzelne
Fotos auszuwählen, befolgen Sie bitte die
folgenden Schritte:
1. Wählen Sie den Ordner mit den
wiederzugebenden Fotos aus, und
drücken Sie dann die EINGABE Taste.
2. Wählen Sie mit Hilfe der ▲▼◄► Tasten
die Fotos aus, die Sie wiedergeben
möchten und drücken Sie dann die
GELB(C) Taste. Es wird eine Markierung
neben dem Foto angezeigt.
3. Wiederholen Sie den Schritt 2 für jedes
Foto, dass Sie wiedergeben möchten.
HINWEIS
✎
▪Um ein Foto abzuwählen, mit Hilfe der ▲▼◄►
Tasten das Foto markieren und drücken Sie
anschließend die GELB(C) Taste.
4. Nach Abschluss die EINGABE Taste
betätigen. Die Diashow wird gestartet.
Wiedergabe eines USB-
Speichergeräts
Sie können den USB-Anschluss verwenden,
um Multimediadateien (wie MP3, JPEG,
DivX, usw.) über ein USB-Speichergerät
abzuspielen.
1. Gehen Sie zum Home-Menü.
2. Schließen Sie das USB-Gerät im
Stoppmodus an den USB-Anschluss auf
der Rückseite des Geräts an.
Die Meldung „Möchten Sie das Gerät
ändern?“ wird angezeigt.
3. Wählen Sie mit den Tasten ◄► die
Option Ja, und drücken Sie die Taste
EINGABE.
4. Drücken Sie die Taste ROT(A) oder
BLAU(D) auf der Fernbedienung.
Wenn Sie die Taste ROT(A) gedrückt
haben, fahren Sie zum Schritt 5 fort.
Wenn Sie die Taste BLAU(D) gedrückt
haben, fahren Sie zum Schritt 4
You Tube
Keine Disk
123
DLNA
123 a Gerät wechseln
c
USB sicher entf.
5. Wählen Sie mit den Tasten ▲▼ USB aus,
und drücken Sie die Taste EINGABE.
6. Drücken Sie die Taste ◄►, um die
gewünschten Videos, Musikstücke oder
Fotos auszuwählen, und drücken Sie
dann die Taste EINGABE.
Fahren Sie zum Schritt 7 fort.
-1
4
. Drücken Sie die Taste BLAU(D), der
folgende Bildschirm erscheint. Fahren Sie
zum Schritt 5-1 fort.
d
Geräte anzeigen
-1
"
fort.
Eingabe
You Tube
123
123
5-1.
Wählen Sie mit den Tasten ◄► USB aus,
d
Start
Eingabe
"
und drücken Sie die Taste EINGABE.
6-1. Drücken Sie die Taste ▲▼, um den
gewünschten Videos, Musik oder Fotos
auszuwählen, und drücken Sie dann die
Taste EINGABE.
7. Weitere Informationen über die
Wiedergabe von Videos, Musik oder
Fotos finden Sie auf den Seiten 19-22.
HINWEIS
✎
▪Sie müssen das USB-Speichergerät sicher
entfernen, (führen Sie die „USB sicher entf.“Funktion durch) um die gespeicherten Daten auf
Ihrem USB-Gerät nicht zu beschädigen. Drücken
Sie die MENU Taste, um zum Home-Menü zu
wechseln, wählen Sie die GELBE (C) Taste aus
und betätigen sie anschließend die EINGABE
Taste.
▪Wenn sich die Audio-CD (CD-DA), MP3 und
JPEG-Dateien im Stoppmodus befinden, ist es
nicht möglich, den Vollbildschirm durch Drücken
der Taste FULL SCREEN auf der Fernbedienung
zu sehen
▪Wenn Sie während der Wiedergabe eines USB-
Speichergerätes eine Disk einlegen, wird der
Gerätemodus automatisch auf “DVD oder CD“
gestellt.
Page 51

Netzwerkdienste
Anhang
Sie können Netzwerkdienste wie BD-LIVE in
Anspruch nehmen, wenn Sie das Produkt an
einem Netzwerk anschließen.
Lesen Sie sich die folgende Anleitung
durch, bevor Sie irgendeinen
Netzwerkdienst verwenden.
1. Schließen Sie den Player an das
Netzwerk an. (Siehe Seite 10 zu 11)
2. Die Netzwerkeinstellungen
konfigurieren. (Siehe Seiten 16)
BD-LIVE™
Sobald der Blu-ray Disk-Player mit dem Netzwerk
verbunden ist, können sie bei Verwendung einer
BD-LIVE fähigen Disk verschiedene filmbezogene
Serviceinhalte genießen.
1. Schließen Sie einen USB Speicherstick an
die USB-Buchse auf der Rückseite des
Players an und prüfen Sie den zur Verfügung
stehenden Speicherplatz. Das Speichergerät
muss für den BD-LIVE-Service mindestens
über 1 GB freien Speicherplatz verfügen.
2. Legen Sie eine Blu-ray Disk ein, die BD-
LIVE unterstützt.
3. Wählen Sie die vom Disk-Hersteller zur
Verfügung gestellten BD-LIVE-Inhalte.
HINWEIS
✎
▪Wie Sie BD-LIVE und dessen Funktionen nutzen
können, kann je nach Disk variieren.
AllShare-Funktion verwenden
Mit AllShare können Sie auf Ihrem PC oder
NAS gespeicherte Musik, Video und Foto
Dateien auf dem Player wiedergeben.
Um AllShare mit Ihrem Spieler verwenden zu
können, müssen Sie den Player an Ihr
Netzwerk anschließen (Siehe Seiten 10 zu 11).
Um AllShare mit Ihrem PC nutzen zu können,
müssen Sie die AllShare Software auf Ihrem
PC installieren.
Wenn Sie über ein NAS verfügen, können Sie
AllShare ohne zusätzliche Software nutzen.
Herunterladen der AllShare Software
1. Besuchen Sie die Webseite Samsung.com.
2. Klicken Sie auf Support, tragen Sie die
Modellbezeichnung in das angezeigte Feld ein
und drücken Sie anschließend auf Produktsuche.
3. Klicken Sie rechts auf der nächsten Webseite
unter Weiterer Support auf AllShare PC S/W.
4. Die nächste Webseite mit dem Link zum
Download der AllShare Software wird
aufgerufen.
5. Auf die Schaltfläche AllShare PC-Software
herunterladen, um die Datei herunterzuladen.
Gibt Inhalte auf Ihrem PC über
den Blu-ray Disk-Player wieder
Sie können freigegebene Dateien von Ihrem
Computer über Ihren Blu-ray Disk-Player
wiedergeben. Auf der Webseite www.
samsung.com erhalten Sie ausführliche
Anweisungen für die Nutzung von AllShare.
Blu-ray Disc Player
AllShare Verbindung
PC-Dateien
wiedergeben.
Problembehebung
Bevor Sie sich an den Kundendienst wenden, überprüfen Sie bitte die folgenden Punkte.
PROBLEM LÖSUNG
Die Fernbedienung funktioniert
nicht.
Disk wird nicht wiedergegeben.
Das Disk-Menü wird nicht angezeigt.
Die Verbotsmeldung erscheint auf
dem Bildschirm.
Der Wiedergabemodus weicht
von der Auswahl im Menü
Einstellungen ab.
Das Bildseitenformat kann nicht
geändert werden.
Keine Tonwiedergabe. • Überprüfen Sie, ob Sie im Menü Tonoptionen den richtigen digitalen
Der Bildschirm ist blockiert. • Wenn der HDMI-Ausgang mit einer Auflösung eingestellt ist, die Ihr
• Überprüfen Sie die Batterien der Fernbedienung. Ersetzen Sie die
Batterien, falls erforderlich.
• Verwenden Sie die Fernbedienung in einer Entfernung von maximal 6,1m
zum Fernsehgerät.
• Entfernen Sie die Batterien, und halten Sie eine oder mehrere Tasten für
einige Minuten gedrückt, um den Mikroprozessor vollständig zu entladen
und die Fernbedienung auf die Werkseinstellung zurückzusetzen. Legen
Sie die Batterien wieder ein und versuchen Sie erneut, die Fernbedienung
zu verwenden.
• Überprüfen Sie, ob die Disk mit der Beschriftung nach oben eingelegt wurde.
• Überprüfen Sie den Regionalcode der Blu-ray-Disk/DVD.
• Gehen Sie sicher, dass die Disk überhaupt Disk-Menüs hat.
• Diese Meldung zeigt einen ungültigen Tastendruck an.
• Die Blu-ray-Disk/DVD’s-Software unterstützt die Option (z. B. Winkel) nicht.
• Sie haben einen Titel, ein Kapitel oder eine Abtastzeit außerhalb des
zulässigen Bereichs gewählt.
• Einige der im Setup-Menü ausgewählten Funktionen funktionieren nicht
einwandfrei, wenn die Disk nicht für die Ausführung der entsprechenden
Funktion vorgesehen ist.
• Die Bildschirmeinstellung ist durch die BD/DVD festgelegt.
• Dies ist keine Fehlfunktion des Players.
Ausgang gewählt haben.
Fernsehgerät nicht unterstützt (z. B. 1080p), wird möglicherweise kein
Bild wiedergegeben.
• Drücken Sie die STOPP (
für mindestens 5 Sekunden, ohne eine Disk eingelegt zu haben. Alle
Einstellungen werden auf die werksseitigen Standardeinstellungen
zurückgesetzt.
• Beim Zurücksetzen auf die Werkseinstellungen werden alle vom
Benutzer gespeicherten BD-Daten gelöscht.
@
) Taste auf (dem vorderen Bedienfeld)
23
Page 52

PROBLEM LÖSUNG
Sie haben das Passwort
vergessen.
Wenn andere Probleme auftreten
sollten:
Das Bild rauscht oder ist verzerrt. • Überprüfen Sie die Disk auf Verunreinigungen oder Kratzer.
Keine HDMI-Ausgang.
Ungewöhnliche HDMIWiedergabe.
All Share-Funktion
Ich kann durch AllShare
veröffentlichte Ordner sehen,
nicht aber die Dateien.
Unterbrechungen bei
Videowiedergabe.
Die AllShare Verbindung zwischen
Player und PC ist instabil.
• Drücken Sie die STOPP ( @ ) Taste auf (dem vorderen Bedienfeld)
für mindestens 5 Sekunden, ohne eine Disk eingelegt zu haben. Alle
Einstellungen werden auf die werksseitigen Standardeinstellungen
zurückgesetzt.
Verwenden Sie diese Option nur wenn unbedingt nötig.
• Beim Zurücksetzen auf die Werkseinstellungen werden alle vom
Benutzer gespeicherten BD-Daten gelöscht.
• Suchen Sie im Inhalt nach den Abschnitten des Benutzerhandbuchs, die das
aktuelle Problem behandeln, und befolgen Sie die Anweisungen nochmals.
• Wenn das Problem nicht behoben werden kann, wenden Sie sich an
einen Samsung-Kundendienst in Ihrer Nähe.
• Reinigen Sie die Disk.
• Prüfen Sie die Verbindung zwischen dem Fernsehgerät und dem HDMI-
Anschluss des Players.
• Überprüfen Sie, ob Ihr Fernsehgerät die HDMI-Eingangsauflösungen
576p/480p, 720p, 1080i, 1080p unterstützt.
• Wenn auf dem Bildschirm nur Rauschen angezeigt wird, bedeutet dies,
dass der Fernseher HDCP (High-bandwidth Digital Content Protection) nicht
unterstützt.
• AllShare zeigt nur Dateien an, die den Bild, Musik und Film Kategorien
entsprechen. Dateien, die diesen Kategorien nicht entsprechen können
nicht angezeigt werden.
• Überprüfen Sie die Stabilität des Netzwerks.
• Anschluss des Netzwerkkabels überprüfen und ob das Netzwerk
überlastet ist.
• Die IP-Adresse in einem Subnetzwerk muss einmalig sein. Wenn dies
nicht der Fall ist können IP-Adressenkonflikte auftreten.
• Prüfen Sie ob Sie eine Firewall aktiviert haben.
Wenn ja, deaktivieren Sie die Firewall.
PROBLEM LÖSUNG
BD-LIVE
Keine Verbindung zum BD-LIVE
Server.
Fehler während der Benutzung
von BD-LIVE- Service.
HINWEIS
✎
▪ Wenn die Werkseinstellungen wieder hergestellt werden, werden alle gespeicherten BD-Daten gelöscht.
• Prüfen Sie mit Hilfe des Netzwerkstatus Menüs, ob der Aufbau der
Netzwerkverbindung erfolgreich war.
• Überprüfen Sie, ob das USB-Speichergerät mit dem Player verbunden ist.
• Das Speichergerät muss mindestens über 1GB freien Speicherplatz
verfügen, um BD-LIVE Dienst aufnehmen zu können.
Sie können den zur Verfügung stehenden Speicherplatz unter
BD-Datenmanagement prüfen.
• Überprüfen Sie, ob das BD-LIVE Internetverbindungsmenü auf Zulassen
(Alle) eingestellt ist.
• Wenn oben genannten Maßnahmen fehlschlagen, setzen Sie sich mit
Anbieter des Inhalts in Verbindung oder aktualisieren Sie Firmwareversion
des Players auf die neueste Version.
• Das Speichergerät muss mindestens über 1 GB freien Speicherplatz
verfügen, um BD-LIVE Dienst aufnehmen zu können.
Sie können den zur Verfügung stehenden Speicherplatz unter
BD-Datenmanagement prüfen.
Reparaturen
Wenn Sie uns Ihren Player zur Reparatur zusenden, kann eine Verwaltungsgebühr erhoben
werden, wenn:
1. Wenn Sie einen Kundendienstmitarbeiter zu sich nach Hause bestellen und kein Defekt am
Gerät festgestellt wird.
2. Sie das Gerät zu einem Reparaturdienst bringen und kein Defekt am Gerät festgestellt wird.
Wir teilen Ihnen die Höhe der Verwaltungsgebühr mit, bevor wir einen Hausbesuch durchführen
oder mit Arbeiten an Ihrem Gerät beginnen.
Bevor Sie Ihren Player zur Reparatur einreichen empfehlen wir Ihnen, diese
Bedienungsanleitung sorgfältig durchzulesen, eine Lösung für Ihr Problem Online unter www.
samsung.com zu suchen oder sich mit unserem Kundendienst in Verbindung zu setzen.
24
Page 53

Technische Daten
Gewicht 1 Kg
Allgemein
USB
HDMI
Audio ausgang
Netzwerk Ethernet 100BASE-TX Anschluss
- Wird nicht unterstützt, wenn die Netzwerkgeschwindigkeit weniger als 10Mbps beträgt.
- Gestaltung und Spezifikationen vorbehaltlich Änderungen.
- Weitere Informationen über Energiespargründe und Energieverbrauch finden Sie am
Etiketten-Aufkleber auf dem Gerät.
- Gewicht und Abmessungen können von den Angaben abweichen.
Abmessungen 187 (W) X 187 (D) X 56 (H) mm
Betriebstemperaturbereich +5°C bis +35°C
Zulässiger Luftfeuchtigkeitsbereich
Typ A USB 2.0
DC Ausgang 5V 500mA Max.
Video 1080p, 1080i, 720p, 576p/480p
Audio PCM, Bitstrom
Digitaler Audioausgang Optisch
10 % bis 75 %
25
Page 54

Übereinstimmungs- und Kompatibilitätshinweis
NICHT ALLE Disks sind kompatibel
• Entsprechend der nachfolgend und in der gesamten Anleitung, einschließlich des Abschnitts Merkmale der
einzelnen Datenträger, aufgeführten Beschränkungen, können folgende Disktypen wiedergegeben werden:
im Handel erhältliche, bespielte BD-ROM, DVD-VIDEO, und Audio CD (CD-DA) Disks; BD-RE/-R, DVDRW/-R Disks; und CD-RW/-R Disks.
• Andere als die zuvor genannten Disks können mit diesem Player nicht wiedergegeben werden und/oder
sind für diesen nicht vorgesehen. Einige der oben genannten Disks können aufgrund eines oder mehrerer
der nachfolgend aufgeführten Gründe möglicherweise nicht abgespielt werden.
• Samsung kann nicht garantieren, dass dieser Player jede Disk wiedergeben kann, die mit dem BD-ROM, BD-RE/-R,
DVD-VIDEO, DVD-RW/-R, DVD+RW/+R und CD-RW/-R-Logo gekennzeichnet ist. Dieser Player führt möglicherweise
nicht alle Funktionsbefehle und Funktionen einer Disk aus. Diese und andere Probleme mit der Diskkompatibilität und
Funktionen bei neuen und bereits etablierten Diskformaten, ergeben sich aus folgenden Gründen:
- Blu-ray ist ein neues und noch in der Entwicklung begriffenes Format. Dieser Player kann unter
Umständen nicht alle Funktionen von Blu-ray Disks ausführen, da einige Funktionen optional sein können,
weitere Funktionen erst nach Herstellung dieses Gerätes dem Blu-ray Diskformat hinzugefügt wurden
oder bestimmte, bereits verfügbare Funktionen zeitversetzt verfügbar sind;
- Dieser Player unterstützt nicht alle neuen und bestehenden Diskformat-Versionen.
- Neue und bestehende Diskformate werden möglicherweise überarbeitet, verändert, aktualisiert,
verbessert und/oder ergänzt.
- Einige Disks sind so hergestellt, dass sie während der Wiedergabe nur bestimmte oder beschränkte
Funktionen zulassen.
- Bei einigen Funktionen kann es sich möglicherweise um optionale, zusätzliche Funktionen handeln, die
erst nach Herstellung dieses Players hinzugefügt wurden. Bestimmte, bereits vorhandene Funktionen
sind möglicherweise erst zeitversetzt verfügbar.
- Einige Disks, die mit dem BD-ROM, BD-RE/-R, DVD-VIDEO, DVD-RW/-R, DVD+RW/+R und CD-RW/-RLogo gekennzeichnet sind, entsprechen unter Umstanden noch immer nicht den Diskstandards.
- Einige Disks können möglicherweise aufgrund ihres Zustandes oder aufgrund der Aufnahmebedingungen
nicht abgespielt werden.
- Bei der Erstellung der BD-, DVD- und CD-Software sowie bei der Herstellung der Disks können Fehler auftreten.
- Dieser Player unterscheidet sich in seiner Funktionsweise von herkömmlichen DVD-Playern und anderen
AV-Geräten.
- Probleme bei der Wiedergabe können sich auch aus anderen Gründen ergeben. Diese werden in dieser
Anleitung genannt oder, wenn es sich um neu entdeckte Ursachen handelt, vom Kundendienst von
SAMSUNG bekannt gegeben.
• Sollten Kompatibilitätsprobleme oder Funktionsstörungen des Players auftreten, wenden Sie sich an den
Kundendienst von SAMSUNG.
Sie können sich an den Kundendienst von SAMSUNG auch bezüglich möglicher Aktualisierungen des
Players wenden.
• Weitere Informationen zu Wiedergabebeschränkungen und Diskkompatibilität finden Sie in dieser Anleitung
in den Abschnitten Vorsichtsmaßnahmen, Wichtige Informationen zum Gebrauch der Bedienungsanleitung,
Merkmale der einzelnen Datenträger und Vor der Wiedergabe.
• Bei Blu-ray Disc-Player Wiedergabe mit progressiver Abtastung : DER BENUTZER WIRD DARAUF
HINGEWIESEN, DASS NICHT ALLE HOCHAUFLÖSENDEN FERNSEHGERÄTE VOLLSTÄNDIG MIT
DIESEM Produkt KOMPATIBEL SIND UND DASS ES DAHER BEI DER WIEDERGABE ZUM AUFTRETEN
VON ARTEFAKTEN KOMMEN KANN. FALLS PROBLEME BEI DER WIEDERGABE MIT PROGRESSIVER
ABTASTUNG AUFTRETEN, WIRD EMPFOHLEN, DIE AUSGABE AUF STANDARDDEFINITION
UMZUSCHALTEN. WENN SIE FRAGEN ZUR KOMPATIBILITÄT DIESES Produkts MIT UNSEREN
FERNSEHGERÄTEN HABEN, KONTAKTIEREN SIE BITTE UNSER KUNDENSERVICECENTER.
Kopierschutz
• Da AACS (Advanced Access Content System) als Kopierschutzverfahren für das BD-Format anerkannt ist,
ähnlich dem CSS (Content Scramble System) für das DVD-Format, gelten für AACS-geschützte Inhalte
bestimmte Beschränkungen bezüglich Wiedergabe, analogem Ausgangssignal usw.
Die Funktionen und Beschränkungen für dieses Produkt können sich je nach Kaufdatum unterscheiden,
weil diese Beschränkungen möglicherweise nach der Herstellung des Geräts von AACS übernommen oder
geändert wurden. Darüber hinaus werden das BD-ROM-Zeichen und BD+ als Kopierschutzverfahren für das
BD-Format verwendet. Dadurch gelten für Inhalte, die durch das BD-ROM-Zeichen und/oder BD+ geschützt
sind, bestimmte Beschränkungen, einschließlich Wiedergabebeschränkungen. Für weitere Informationen zu
AACS, BD-ROM-Zeichen, BD+ oder diesem Gerät wenden Sie sich an den Kundendienst von SAMSUNG.
• Viele Blu-ray Disc/DVD-Disks sind mit einem Kopierschutz versehen. Deshalb sollten Sie den DVD-Player
nur direkt an das Fernsehgerät, und nicht über den Videorekorder anschließen. Bei Blu-ray Disk/DVD-Disks
mit Kopierschutz erzeugt die Wiedergabe über Videorekorder ein verzerrtes Bild.
• Durch die nicht autorisierte Aufnahme, Verwendung, Anzeige, Vervielfältigung und Überarbeitung von
Fernsehprogrammen, Videobändern, Blu-ray Discs, DVDs und anderer Materialien machen Sie sich gemäß
den US-amerikanischen Urheberrechten sowie den Urheberrechten anderer Länder möglicherweise
zivilrechtlich und/oder strafrechtlich haftbar.
• Cinavia Hinweise : Dieses Gerät nutzt die Cinavia Technologie um die Erstellung illegaler Kopien
kommerziell produzierter Filme und Videos sowie deren Soundtracks zu verhindern. Wenn die verbotene
Nutzung einer illegalen Kopie festgestellt wird, erscheint eine Meldung und die Wiedergabe bzw. der
Kopiervorgang werden abgebrochen.
Mehr Informationen über die Cinavia Technologie finden Sie im Online Kundeninformationszentrum unter
http://www.cinavia.com. Wenn Sie zusätzliche Informationen über Cinavia über E-Mail erhalten möchten,
senden Sie bitte eine Postkarte mit Ihrer E-Mail Adresse an: Cinavia Consumer Information Centre, P.O. Box
86851, San Diego, CA, 92138, USA.
Dieses Gerät nutzt geschützte Technologie unter der Lizenz von Verance Corporation und ist durch das U.S.
Patent 7.369.677 und andere in der USA und weltweit ausgestellten & angemeldeten Patenten sowie durch
die Urheberrechte und die Sicherung von Betriebsgeheimnissen bestimmter Aspekte dieser Technologie
geschützt. Cinavia ist eine Handelsmarke von Verance Corporation. Copyright 2004-2010 Verance
Corporation. Alle Rechte vorbehalten für Verance Reverse Engineering oder Demontage sind verboten.
Netzwerkdienst Haftungsausschluss
Alle Inhalte und Dienste auf die mit Hilfe dieses Geräts zugegriffen werden kann gehören Drittpersonen und sind
durch Urheberrechte, Patente, Warenzeichen und/oder andere Leistungsschutzrechte geschützt. Diese Inhalte und
Dienste werden ausschließlich für den persönlichen, nicht kommerziellen Gebrauch zur Verfügung gestellt. Es ist
verboten Inhalte oder Dienste auf eine Art und Weise zu nutzen, die nicht vom Eigentümer der Inhalte oder dem
Dienstanbieter genehmigt wurden. Ohne Einschränkung des vorstehenden, dürfen Sie ohne die ausdrückliche
Genehmigung des Eigentümers der Inhalte oder des Dienstanbieters die durch dieses Gerät wiedergegebenen
Inhalte oder Dienste auf keine Art und Weise verändern, kopieren, neu veröffentlichen, hochladen, versenden,
übertragen, übersetzen, verkaufen, abgeleitete Arbeiten erstellen, sich zunutze machen oder vertreiben.
DIE INHALTE UND DIENSTE VON DRITTPERSONEN WERDEN „WIE GESEHEN“ ZUR VERFÜGUNG
GESTELLT. SAMSUNG ÜBERNIMMT WEDER DIREKT NOCH INDIREKT UND UNTER KEINEN UMSTÄNDEN
KEINE GARANTIE FÜR DIE DERART ZUR VERFÜGUNG GESTELLTEN INHALTE UND DIENSTE. SAMSUNG
LEHNT AUSDRÜCKLICH ALLE INDIREKTEN GEWÄHRLEISTUNGSPFLICHTEN, EINSCHLIEESLICH JEDOCH
NICHT AUSSCHLIESSLICH DER GEWÄHRLEISTUNGSPFLICHT FÜR DIE VERKEHRSFÄHIGKEIT ODER
EIGUNUNG FÜR EINEN BESTIMMTEN ZWECK AB. SAMSUNG ÜBERNIMMT KEINE GARANTIE FÜR
DIE FEHLERFREIHEIT, GÜLTIGKEIT, RECHTZEITIGKEIT, LEGALITÄT ODER VOLLSTÄNDIGKEIT ALLER
INHALT ODER DIENSTE, DIE ÜBER DIESES GERÄT ZUR VERFÜGUNG GESTELLT WERDEN, UND UNTER
KEINEN UMSTÄNDEN; EINSCHLIESSLICH FAHRLÄSSIGKEIT, KANN SAMSUNG WEDER VERTRAGLICH
NOCH RECHTLICH FÜR IRGENDWELCHE DIREKTEN, INDIREKTEN, ZUFÄLLIGEN, BESONDEREN ODER
HERVORGEHENDEN SCHÄDEN, ANWALTSGEBÜHREN, AUSGABEN, ODER IRGENDWELCHE ANDEREN
SCHÄDEN VON IHNEN ODER DRITTEN ZUR VERANTWORTUNG GEZOGEN WERDEN, DIE AUS DER ODER
IN FOLGE VON INFORMATIONEN ENTSTANDEN SIND, ODER AUS DER VERWENDUNG VON BELIEBIGEN
INHALTEN ODER DIENSTEN RESULTIEREN, AUCH WENN SIE ÜBER DIE MÖGLICHKEIT VON SOLCHEN
SCHÄDEN UNTERRICHTET WAREN.
Dienste von Drittanbietern können zu jeder Zeit geschlossen oder unterbrochen werden und Samsung erklärt und
garantiert nicht, das irgendwelche beliebigen Inhalte oder Dienste zu jeder Zeit zur Verfügung stehen. Inhalte und
Dienste werden von Drittpersonen mit Hilfe von Netzwerk- und Übertragungsvorrichtungen übertragen, über die
Samsung keine Kontrolle hat. Ohne die Allgemeingültigkeit dieses Haftungsausschlusses einzuschränken, lehnt
Samsung die Verantwortung oder Haftung für beliebige Unterbrechungen oder die Unterbrechung von beliebigen
Inhalten oder Diensten, die über dieses Gerät zur Verfügung gestellt werden, ausdrücklich ab.
Samsung ist weder verantwortlich noch haftbar für die mit den Inhalten oder Diensten in Verbindung stehenden
Kundenservice. Alle Fragen oder Serviceanfragen bezüglich der Inhalte oder Dienste müssen direkt an den
entsprechenden Anbieter des Inhalts oder Dienstes gerichtet werden.
26
Page 55

Lizenzen
• Hergestellt unter Lizenz von Dolby Laboratories. Dolby“ sowie das Doppel-D-Symbol
sind Warenzeichen der Dolby® Laboratories.
• Hergestellt unter Lizenz, US-Patentnummern; 5,956,674; 5,974,380;
6,487,535 & anderen U.S. und weltweit ausgestellten & angemeldeten
Patente. DTS, das Symbol, & DTS und das Symbol zusammen sind
registrierte Warenzeichen & DTS 2.0+Digital Out ist ein Warenzeichen
der DTS, Inc. Das Produkt beinhaltet Software. © DTS, Inc. Alle Rechte
vorbehalten.
• DivX
- ÜBER DIVX VIDEO: Bei DivX® handelt es sich um ein von DivX entwickeltes, digitales
Videoformat, LLC ist ein Tochterunternehmen der Rovi Corporation. Hierbei handelt
e sich um ein offizielles DivX Certified® Gerät, mit dem DivX Videos wiedergegeben werden können.
Nähere Informationen und Softwareanwendungen zum Konvertieren Ihrer Videodateien in DivX Videos
finden Sie unter www.divx.com.
- ÜBER DIVX VIDEO-ON-DEMAND: Dieses DivX Certified® Gerät muss registriert werden, damit VideoOn-Demand-Inhalte (VOD) wiedergegeben werden können. Um den Registrierungscode zu erzeugen,
wechseln Sie in den DivX VOD-Bereich im Setup-Menü des Geräts. Besuchen Sie vod.divx.com für
weitere Informationen über den Abschluss der Registrierung.
- DivX-Certified® für die Wiedergabe von DivX® -Videos mit einer Auflösung bis zu HD 1080p, einschließlich
Premium-Inhalt.
DivX®, DivX Certified® und die dazugehörigen Logos sind Markenzeichen von Rovi Corporation oder ihrer
Tochtergesellschaften und sind urheberrechtlich geschützt.
Geschützt durch eines oder mehrere der folgenden US-Patente: 7,295,673; 7,460,668; 7,515,710;
7,519,274
• Die Begriffe HDMI und High-Definition Multimedia Interface sowie das HDMI Logo
sind Warenzeichen oder eingetragene Warenzeichen von HDMI Licensing LLC in
den Vereinigten Staaten und anderen Ländern.
• Oracle und Java sind eingetragene Markenzeichen von Oracle und/oder deren
verbundenen Unternehmen. Andere Namen können Marken ihrer entsprechenden
Eigentümer sein.
• Bekanntmachung zu Open Source Lizenzen
- Wenn Sie Open Source Software verwenden, sind Open Source Lizenzen auf dem Produkt verfügbar.
• Das Blu-ray Disc™ und Blu-ray™ Logo sind eingetragene Markenzeichen der Blu-ray Disc Association.
DEUTSCHLAND
Auf dieses Samsung-Produkt wird vom Hersteller eine vierundzwanzigmonatige Garantie gegen Material- und
Verarbeitungsfehler gegeben. Die Garantiezeit beginnt mit dem Kauf des Gerätes beim Fachhändler.
Sollte es erforderlich werden, Garantieleistungen in Anspruch zu nehmen, wenden Sie sich bitte an den
Fachhändler, bei dem Sie das Gerät erworben haben. Garantieleistungen können jedoch auch von SamsungVertragswerkstätten in anderen Ländern eingefordert werden; dabei gelten die Garantiebedingungen des jeweiligen
Landes. Bei Fragen zu unseren Vertragswerkstätten wenden Sie sich bitte an folgende Adresse:
Samsung Electronics GmbH
Samsung House Am Kronberger Hang
65824 Schwalbach/Ts.
@ GARANTIEBEDINGUNGEN
1. Bei der Anmeldung von Garantieansprüchen muss der Kunde die vollständig und richtig ausgefüllte
2. Es liegt im Ermessen von Samsung, ob die Garantie durch Reparatur oder durch Austausch des Gerätes bzw.
3. Garantie-Reparaturen müssen von Samsung-Fachhändlern oder Samsung-Vertragswerkstätten ausgeführt
4. Soll das Gerät in einem anderen als dem Land betrieben werden, für das es ursprünglich entwickelt und
5. Ausgenommen von der Garantieleistung sind:
a) Regelmäßige Inspektionen, Wartung und Reparatur oder Austausch von Teilen aufgrund normaler
b) Transport- und Fahrtkosten sowie durch Auf- und Abbau des Gerätes entstandene Kosten;
c) Missbrauch und zweckentfremdete Verwendung des Gerätes sowie falsche Installation;
d)
6. Diese Garantie ist produktbezogen und kann innerhalb der Garantiezeit von jeder Person, die das Gerät legal
7.
Samsung-Hotline: 01805 - SAMSUNG(726-7864 € 0,14/Min) Fax: 01805 - 121214
Garantiekarte sowie die Originalrechnung oder den vom Händler ausgestellten Kassenbeleg oder eine
entsprechende Bestätigung vorlegen. Die Seriennummer am Gerät muss lesbar sein.
des defekten Teils erfüllt wird. Weitere Ansprüche sind ausgeschlossen.
werden. Bei Reparaturen, die von anderen Händlern durchgeführt werden, besteht kein Anspruch auf
Kostenerstattung, da solche Reparaturen sowie Schäden, die dadurch am Gerät entstehen können, von dieser
Garantie nicht abgedeckt werden.
produziert wurde, müssen eventuell Veränderungen am Gerät vorgenommen werden, um es an die
technischen und/oder sicherheitstechnischen Normen dieses anderen Landes anzupassen.
Solche Veränderungen sind nicht auf Material oder Verarbeitungsfehler des Gerätes zurückzuführen und
werden von dieser Garantie nicht abgedeckt. Die Kosten für solche Veränderungen sowie für dadurch am
Gerät entstandene Schäden werden nicht erstattet.
Verschleißerscheinungen;
Schäden, die durch Blitzschlag, Wasser, Feuer, höhere Gewalt, Krieg, falsche Netzspannung, unzureichende
Belüftung oder andere von Samsung nicht zu verantwortende Gründe entstanden sind.
erworben hat, in Anspruch genommen werden.
Die Rechte des Käufers nach der jeweils geltenden nationalen Gesetzgebung, d. h. die aus dem Kaufvertrag
abgeleiteten Rechte des Käufers gegenüber dem Verkäufer wie auch andere Rechte, werden von dieser
Garantie nicht angetastet. Soweit die nationale Gesetzgebung nichts anderes vorsieht, beschränken sich die
Ansprüche des Käufers auf die in dieser Garantie genannten Punkte.
Die Samsung Ltd. sowie deren Tochtergesellschaften und Händler haften nicht für den indirekten bzw. in Folge
auftretenden Verlust von Disks, Daten, Video- und Audiokassetten oder anderem ähnlichen Material bzw.
Zusatzgeräten.
Deutschland
EUROPÄISCHE GARANTIEKARTE
27
Page 56

Kontakt zu Samsung
Falls Sie Fragen oder Anregungen zu Samsung-Produkten haben, wenden Sie sich bitte an
den Samsung-Kundendienst.
Area Contact Centre
ALBANIA 42 27 5755 www.samsung.com
AUSTRIA 0810 - SAMSUNG (7267864, € 0.07/min) www.samsung.com
BELGIUM 02-201-24-18
BOSNIA 05 133 1999 www.samsung.com
BULGARIA 07001 33 11 www.samsung.com
CROATIA 062 SAMSUNG (062 726 7864) www.samsung.com
CZECH 800 - SAMSUNG (800-726786) www.samsung.com
DENMARK 70 70 19 70 www.samsung.com
FINLAND 030 - 6227 515 www.samsung.com
FRANCE 01 48 63 00 00 www.samsung.com
GERMANY 01805 - SAMSUNG(726-7864 € 0,14/Min) www.samsung.com
CYPRUS 8009 4000 only from landline www.samsung.com
GREECE
HUNGARY 06-80-SAMSUNG(726-7864) www.samsung.com
ITALIA 800-SAMSUNG(726-7864) www.samsung.com
KOSOVO +381 0113216899 www.samsung.com
LUXEMBURG 261 03 710 www.samsung.com
MACEDONIA 023 207 777 www.samsung.com
MONTENEGRO 020 405 888 www.samsung.com
NETHERLANDS 0900-SAMSUNG (0900-7267864) (€ 0,10/Min) www.samsung.com
NORWAY 815-56 480 www.samsung.com
POLAND
PORTUGAL 808 20-SAMSUNG (808 20 7267) www.samsung.com
ROMANIA
SERBIA 0700 Samsung (0700 726 7864) www.samsung.com
SLOVAKIA 0800 - SAMSUNG(0800-726 786) www.samsung.com
SPAIN 902 - 1 - SAMSUNG (902 172 678) www.samsung.com
SWEDEN 0771 726 7864 (SAMSUNG) www.samsung.com
Switzerland 0848 - SAMSUNG(7267864, CHF 0.08/min)
U.K 0330 SAMSUNG (7267864) www.samsung.com
EIRE 0818 717100 www.samsung.com
LITHUANIA 8-800-77777 www.samsung.com
LATVIA 8000-7267 www.samsung.com
ESTONIA 800-7267 www.samsung.com
80111-SAMSUNG (80111 726 7864) only from land line
(+30) 210 6897691 from mobile and land line
0 801-1SAMSUNG(172-678)
+48 22 607-93-33
08010 SAMSUNG (08010 726 7864) only from landline
(+40) 21 206 01 10 from mobile and land line
Web Site
www.samsung.com/be (Dutch)
www.samsung.com/be_fr (French)
www.samsung.com
www.samsung.com
www.samsung.com
www.samsung.com/ch
www.samsung.com/ch_fr (French)
Korrekte Entsorgung der Batterien dieses Produkts
(In den Ländern der Europäischen Union und anderen europäischen Ländern mit
einem separaten Altbatterie-Rücknahmesystem)
Die Kennzeichnung auf der Batterie bzw. auf der dazugehörigen Dokumentation oder
Verpackung gibt an, dass die Batterie zu diesem Produkt nach seiner Lebensdauer
nicht zusammen mit dem normalen Haushaltsmüll entsorgt werden darf. Wenn die
Batterie mit den chemischen Symbolen Hg, Cd oder Pb gekennzeichnet ist, liegt der
Quecksilber-, Cadmium- oder Blei-Gehalt der Batterie über den in der EG-Richtlinie
2006/66 festgelegten Referenzwerten. Wenn Batterien nicht ordnungsgemäß entsorgt
werden, können sie der menschlichen Gesundheit bzw. der Umwelt schaden.
Bitte helfen Sie, die natürlichen Ressourcen zu schützen und die nachhaltige
Wiederverwertung von stofflichen Ressourcen zu fördern, indem Sie die Batterien
von anderen Abfällen getrennt über Ihr örtliches kostenloses AltbatterieRücknahmesystem entsorgen.
Korrekte Entsorgung von Altgeräten
(In den Ländern der Europäischen Union und anderen europäischen Ländern mit
einem separaten Sammelsystem)
Die Kennzeichnung auf dem Produkt, Zubehörteilen bzw. auf der dazugehörigen
Dokumentation gibt an, dass das Produkt und Zubehörteile (z. B. Ladegerät,
Kopfhörer, USB-Kabel) nach ihrer Lebensdauer nicht zusammen mit dem normalen
Haushaltsmüll entsorgt werden dürfen. Entsorgen Sie dieses Gerät und
Zubehörteile bitte getrennt von anderen Abfällen, um der Umwelt bzw. der
menschlichen Gesundheit nicht durch unkontrollierte Müllbeseitigung zu schaden.
Helfen Sie mit, das Altgerät und Zubehörteile fachgerecht zu entsorgen, um die
nachhaltige Wiederverwertung von stofflichen Ressourcen zu fördern.
Private Nutzer wenden sich an den Händler, bei dem das Produkt gekauft wurde,
oder kontaktieren die zuständigen Behörden, um in Erfahrung zu bringen, wo Sie das
Altgerät bzw. Zubehörteile für eine umweltfreundliche Entsorgung abgeben können.
Gewerbliche Nutzer wenden sich an ihren Lieferanten und gehen nach den
Bedingungen des Verkaufsvertrags vor. Dieses Produkt und elektronische
Zubehörteile dürfen nicht zusammen mit anderem Gewerbemüll entsorgt werden.
(Elektroschrott)
AK68-02231Q-01
Page 57

Lecteur de disque Blu-ray™
manuel d’utilisation
imaginez les possibilités
Nous vous remercions d’avoir choisi ce produit Samsung.
Pour avoir accès à d’avantage de services, veuillez
enregistrer votre produit sur le site
www.samsung.com/register
BD-ES5000
FRANÇAIS
Page 58

Fonctions principales
Consignes de sécurité
Caractéristiques du disque Blu-ray
Les disques Blu-ray prennent en charge
la qualité HD vidéo la plus sophistiquée
actuellement disponible sur le marché Capacité élevée rime avec absence de
compromis sur la qualité vidéo.
Les caractéristiques suivantes du disque Blu-ray
dépendent du type de disque utilisé et sont, par
conséquent, variables.
L’apparence et la navigation liées aux
fonctionnalités varient également selon le disque.
Tous les disques ne disposent pas des
caractéristiques décrites ci-dessous.
Caractéristiques de l’image vidéo
Le format BD-ROM prend en charge trois codecs
vidéo avancés, à savoir AVC, VC-1 et MPEG-2.
Les résolutions HD vidéo sont également disponibles :
• 1920 x 1080 Haute définition
• 1280 x 720 Haute définition
AllShare
Vous avez la possibilité de lire les données
vidéo, musique et photo enregistrées sur
différents appareils (ordinateur, ou NAS
[Network-Attached Storage]) via une
connexion réseau.
Lecture de fichiers multimédia
Vous pouvez utiliser la connexion USB pour
lire différents types de fichiers multimédia
(MP3, JPEG, DivX, etc.) contenus sur un
périphérique de stockage USB.
Pour une lecture haute définition
Pour afficher du contenu en haute définition
sur un disque Blu-ray, vous devez disposer
d’une télévision à haute définition HDTV.
Sur certains disques Blu-ray, l’affichage du
contenu haute définition peut nécessiter
d’utiliser la prise de sortie HDMI OUT.
La capacité de visionner des contenus haute
définition sur des disques Blu-ray peut être
limitée par la résolution de votre téléviseur.
BD-LIVE
Vous pouvez utiliser un disque Blu-ray prenant
en charge la technologie BD-LIVE via la
connexion réseau pour profiter des différents
contenus proposés par les fabricants de
disques.
2
Caractéristiques du lecteur de
disque Blu-ray
Avertissement
POUR DIMINUER LES RISQUES D’ELECTROCUTION, NE RETIREZ PAS LE COUVERCLE (OU LE
CACHE ARRIERE).
AUCUN DES ELEMENTS CONTENUS A L’INTERIEUR N’EST REPARABLE PAR L’UTILISATEUR.
CONFIEZ L’ENTRETIEN DE CET APPAREIL A UNE PERSONNE QUALIFIEE.
ATTENTION
RISQUE D’ELECTROCUTION
NE PAS OUVRIR
Ce symbole signale la présence à l’intérieur
du produit d’une tension dangereuse qui
peut provoquer des chocs électriques ou des
blessures corporelles.
N’installez pas ce produit dans un espace confiné comme
une bibliothèque ou un meuble du même type.
AVERTISSEMENT
Pour éviter tout dommage susceptible de provoquer
un incendie ou un risque d’électrocution, n’exposez
pas l’appareil à la pluie ou à l’humidité.
ATTENTION
LE LECTEUR DE DISQUE BLU-RAY EST EQUIPE D’UN RAYON
LASER INVISIBLE QUI PEUT PROVOQUER DE GRAVES
LESIONS DUES A DES IRRADIATIONS SI VOUS VOUS Y
EXPOSEZ. ASSUREZ-VOUS D’UTILISER LE LECTEUR DE
DISQUE BLU-RAY CONFORMEMENT AUX CONSIGNES
D’UTILISATION.
PRODUIT LASER DE CLASSE 1
Le lecteur de disque compact est homologué comme
produit LASER DE CLASSE 1. L’utilisation des
commandes, les réglages ou l’exécution de procédures
autres que celles spécifiées dans ce document peuvent
entraîner une exposition aux radiations dangereuses.
ATTENTION: POUR DIMINUER LES RISQUES
D’ÉLECTROCUTION, NE RETIREZ PAS LE
CACHE (OU LE CACHE ARRIÈRE). AUCUN DES
ÉLÉMENTS INTERNES N’EST RÉPARABLE PAR
L’UTILISATEUR. CONFIEZ L’ENTRETIEN DE CET
APPAREIL À UNE PERSONNE QUALIFIÉE.
ATTENTION :
• DES RAYONNEMENTS LASER VISIBLES ET INVISIBLES
DE CLASSE 3B SONT ÉMIS EN CAS D’OUVERTURE DU
PRODUIT. ÉVITEZ TOUTE EXPOSITION AU FAISCEAU
LASER (IEC 60825-1).
• CE PRODUIT UTILISE UN LASER. L’UTILISATION DES
COMMANDES, LES RÉGLAGES OU L’EXÉCUTION DE
PROCÉDURES AUTRES QUE CELLES SPÉCIFIÉES DANS
CE DOCUMENT PEUVENT ENTRAÎNER UNE EXPOSITION
AUX RADIATIONS DANGEREUSES. N’OUVREZ PAS LE
COUVERCLE ET NE RÉPAREZ PAS LE PRODUIT VOUSMÊME. TOUTE RÉPARATION DOIT ÊTRE CONFIÉE À DU
PERSONNEL QUALIFIÉ
CLASS 1 LASER PRODUCT
KLASSE 1 LASER PRODUKT
LUOKAN 1 LASER LAITE
KLASS 1 LASER APPARAT
PRODUCTO LÁSER CLASE 1
Ce symbole précède les consignes
importantes qui accompagnent le produit.
.
Page 59

Ce produit est conforme aux normes européennes
et se relie à d’autres appareils à l’aide de câbles
et de connecteurs blindés. Pour éviter toute
interférence électromagnétique avec d’autres
appareils électriques (ex. : radios, téléviseurs),
utilisez des câbles et des connecteurs blindés
pour tous vos branchements.
REMARQUE IMPORTANTE
Le câble d’alimentation de cet appareil est
fourni avec une prise moulée munie d’un
fusible intégré. La tension du fusible est
inscrite sur le côté de la prise comportant
les broches. S’il doit être changé, utilisez
uniquement un fusible conforme à la norme
BS1362 et de même tension.
N’utilisez en aucun cas la prise lorsque le
boîtier du fusible est démonté, si celui-ci
est détachable. Si le boîtier du fusible doit
être remplacé, le nouveau boîtier doit être
de la même couleur que le côté de la prise
comportant les broches. Des boîtiers de
rechange sont disponibles auprès de votre
revendeur.
Si la prise intégrée n’est pas adaptée aux
prises électriques de votre maison ou si
le câble n’est pas suffisamment long pour
atteindre une prise, procurez-vous une
rallonge conforme aux normes de sécurité ou
consultez votre revendeur.
Toutefois, si vous n’avez pas d’autre choix
que de couper la prise, retirez-en le fusible
et jetez-la en toute sécurité. Pour éviter tout
risque d’électrocution, ne branchez pas
la fiche à une prise d’alimentation secteur
lorsque le cordon est dénudé.
Pour débrancher l’appareil, il convient de
retirer la fiche de la prise murale afin que
celle-ci soit facilement accessible.
Le produit accompagnant ce manuel
d’utilisation est protégé par certains droits de
propriété intellectuelle appartenant à des tiers.
Précautions
Consignes de sécurité importantes
Lisez attentivement ces consignes avant d’utiliser
l’appareil. Veillez à respecter toutes les consignes
répertoriées ci-après.
Conservez ces instructions à portée de main pour vous
y référer ultérieurement.
1. Lisez attentivement ces consignes.
2. Conservez-les précieusement.
3. Tenez compte de tous les avertissements
mentionnés.
4. Respectez toutes les instructions sans exception.
5. N’utilisez pas cet appareil à proximité de l’eau.
6. Nettoyez-le à l’aide d’un tissu sec.
7. Ne bloquez pas les ouvertures de ventilation.
Installez l’appareil conformément aux instructions
du fabricant.
8. N’installez pas le lecteur à proximité d’une source
de chaleur de type radiateur, registre de chaleur,
cuisinière ou tout autre appareil (y compris les
récepteurs AV) générateur de chaleur.
9. Ne désactivez pas le dispositif de sécurité de la
fiche de mise à la terre ou de la fiche polarisée.
Une fiche polarisée comporte deux lames dont
l’une est plus large que l’autre. Une fiche de mise
à la terre comporte deux lames et une troisième
broche de mise à la terre. La lame la plus large
et la troisième broche sont destinées à assurer
votre sécurité. Si la fiche fournie ne s’insère pas
dans la prise utilisée, faites appel à un électricien
pour faire remplacer celle-ci.
10. Placez le cordon d’alimentation de sorte qu’il ne
puisse être ni piétiné ni pincé, particulièrement
au niveau de la fiche, de la prise de courant et
des points de sortie de ces éléments.
11. Utilisez exclusivement les fixations/accessoires
spécifiés par le fabricant.
12. Utilisez exclusivement
le meuble à roulettes,
le socle, le trépied,
le support ou la table
recommandés par le
fabricant ou vendus avec
l’appareil. Si l’appareil est
posé sur un meuble à roulettes, déplacez l’ensemble
avec précaution pour éviter de faire tomber le
lecteur et de vous blesser.
13. Débranchez l’appareil en cas d’orage ou lorsqu’il
est inutilisé pendant une période prolongée.
14. Confiez toutes les réparations à un technicien
qualifié. Votre appareil doit impérativement être
réparé lorsqu’il a été endommagé de quelque
manière que ce soit : détérioration du cordon ou
de la fiche d’alimentation, projection de liquide
sur l’appareil, chute d’objets à l’intérieur de
l’appareil, exposition à la pluie ou à l’humidité,
dysfonctionnement, chute.
Rangement et manipulation des
disques
Manipulation des disques
Nombre de faces gravées
• Utilisez des disques
de forme standard.
Les disques de
format inhabituel
peuvent endommager le lecteur.
Comment tenir le disque
• Évitez de toucher la surface
du disque sur laquelle
les données ont été
enregistrées.
Disques Blu-ray
• Ne laissez pas un disque Blu-ray séjourner
dans le lecteur pendant de longues
périodes de temps. Retirez le disque Bluray du lecteur et rangez-le dans son étui.
• Prenez garde à ne pas rayer la surface du
disque Blu-ray et à ne pas y laisser des
traces de doigt.
DVD VIDEO, CD audio (CD-DA)
• Pour retirer les éventuelles traces laissées sur la
surface d’un disque, utilisez un chiffon doux.
Rangement des disques
Veillez à ne pas endommager le disque car les
données qu’il contient sont extrêmement sensibles à
l’environnement.
• Ne laissez pas le disque exposé à la lumière directe
du soleil.
• Stockez-le dans un endroit frais et aéré.
• Rangez-le verticalement.
• Rangez-le dans une jaquette propre.
• Si vous déplacez soudainement le lecteur d’un endroit
froid à un endroit chaud, de la condensation pourra se
former sur les pièces et la lentille, et occasionner des
problèmes de lecture. Dans pareil cas, débranchez
le lecteur et patientez deux heures avant de le
rebrancher sur la prise d’alimentation. Insérez ensuite
le disque et essayez à nouveau de le lire.
Précautions de manipulation
• N’écrivez pas sur la face imprimée du disque avec un
stylo à bille ou un crayon.
• Ne nettoyez pas le disque à l’aide d’aérosols
nettoyants ou antistatiques. N’utilisez pas non plus
à cet effet de produits chimiques volatils tels que le
benzène ou des diluants.
• N’apposez pas d’étiquette ou d’autocollant sur le
disque. (N’utilisez pas de disque dont la surface ne
serait pas parfaitement propre et lisse, dépourvue de
traces de ruban adhésif ou de restes de colle.)
• N’utilisez pas de cache ou de protection anti-rayures.
3
Page 60

• N’utilisez pas de disque imprimé à l’aide d’une
imprimante pour étiquettes disponible dans le
commerce.
• N’insérez pas de disque déformé ou fendu.
• Avant de brancher un composant sur ce lecteur,
assurez-vous que celui-ci est hors tension.
• Ne déplacez pas le lecteur en cours de lecture
de disque. Vous risquez de rayer le disque ou de
l’endommager et d’endommager les pièces internes du
lecteur.
• Ne posez pas de vase rempli d’eau ou de petits objets
métalliques sur le lecteur.
• Prenez garde à ne pas insérer votre main dans le
logement du disque.
• N’insérez rien d’autre qu’un disque dans ce logement.
• Les interférences causées par des sources externes tel
que l’éclair ou l’électricité statique peuvent affecter le
fonctionnement normal du lecteur. Si cela se produit,
éteignez le lecteur puis rallumez-le à l’aide du bouton
POWER ou débranchez le cordon d’alimentation de la
prise murale et rebranchez-le. Le lecteur devrait alors
fonctionner normalement à nouveau.
• Assurez-vous de retirer le disque du tiroir et d’éteindre le
lecteur après chaque utilisation.
• Débranchez le cordon d’alimentation CA de la prise
secteur lorsque vous ne vous servez pas du lecteur
pendant une période prolongée.
• Nettoyez le disque en l’essuyant du
centre vers le bord, par un mouvement
en ligne droite.
• Ne placez pas de liquide à proximité
du lecteur.
• Lorsque la fiche de courant CA est
branchée à une prise murale, il y a toujours de l’électricité
qui circule dans le lecteur (en mode veille), même si
celui-ci est éteint.
• Veillez à éviter toute projection de liquide sur l’appareil
et ne placez jamais sur celui-ci des récipients contenant
des liquides, tels que des vases.
• La prise d’alimentation fait office de système de
déconnexion ; elle doit donc rester accessible en
permanence.
• Ne tenez pas le cordon d’alimentation avec les mains
mouillées. Vous risquez autrement de vous exposer à un
choc électrique.
• Ne branchez pas plusieurs appareils électriques sur
la même prise électrique. Cela pourrait entraîner une
surcharge et provoquer un incendie.
• Si vous entendez un bruit inhabituel ou décelez
un dégagement anormal de fumée ou une odeur
suspecte, coupez immédiatement l’alimentation et
débranchez la fiche électrique de la prise murale.
Puis contactez le service après-vente le plus
proche pour obtenir de l’aide. Si vous persistez
à utiliser le produit dans l’état, vous risquerez de
provoquer un choc électrique ou un incendie.
Entretien du meuble
Avant de nettoyer le meuble Blu-ray, assurez-vous de
débrancher le cordon d’alimentation CA de la prise
secteur.
• N’utilisez pas de benzène, de diluant ou d’autres
solvants de nettoyage.
• Essuyez le meuble à l’aide d’un chiffon doux.
Restrictions en termes de lecture
• Le lecteur peut ne pas réagir à toutes les
commandes car certains disques Blu-ray, DVD
et CD ne permettent qu’un fonctionnement
spécifique ou limité et autorisent un nombre
déterminé de fonctionnalités en cours de lecture.
Veuillez noter que ceci n’est pas une défaillance
du lecteur.
• Samsung ne peut garantir que le lecteur pourra
lire tous les disques portant les logos Blu-ray,
DVD ou CD car les formats évoluent et des
problèmes ou des erreurs peuvent se produire
lors de la création d’un logiciel Blu-ray, DVD ou
CD et/ou de la fabrication des disques.
Veuillez contacter le service après-vente de
SAMSUNG pour toute question ou toute difficulté
concernant la lecture des disques Blu-ray, DVD
ou CD sur ce lecteur. Vous pouvez également
vous reporter au manuel d’utilisation pour obtenir
plus d’informations sur les restrictions en matière
de lecture.
Tables des matières
FONCTIONS PRINCIPALES
Caractéristiques du disque Blu-ray ..............2
Caractéristiques du lecteur
de disque Blu-ray ........................................2
CONSIGNES DE SÉCURITÉ
Avertissement ..............................................2
Précautions .................................................3
Rangement et manipulation des disques .....3
MISE EN ROUTE
Avant de consulter le manuel d’utilisation .....5
Accessoires .................................................7
Panneau avant ............................................8
Panneau arrière ...........................................8
Télécommande ............................................9
BRANCHEMENTS
A. Connexion du lecteur à un téléviseur .......9
B. Connexion à une chaîne hi-fi .................10
C. Connexion au réseau ............................10
CONFIGURATION
Paramètres initiaux ....................................12
Navigation dans les menus ........................12
Pour accéder au menu Paramètres ...........12
Affichage ...................................................13
Audio .........................................................14
Réseau ......................................................16
Système ....................................................17
Langue ......................................................17
Sécurité .....................................................17
Général ......................................................18
Assistance .................................................18
FONCTIONS DE BASE
Lecture d’un vidéo
Utilisation du Menu du disque,
du Menu des titres/Menu contextuel
Utilisation des fonctions
Rechercher et Saut
Lecture au ralenti / Lecture pas à pas
Utilisation du bouton TOOLS
Écouter de la musique
Lecture de photos
Lecture de contenu à partir d’un
périphérique de stockage USB
SERVICES RÉSEAU
BD-LIVE™ .................................................23
Utilisation de la fonction AllShare ...............23
ANNEXES
Dépannage ................................................23
Caractéristiques techniques .......................25
.......................................19
...........19
......................................19
.........20
.......................20
.................................21
........................................22
...................22
4
Page 61

Mise en route
Avant de consulter le manuel d’utilisation
Types de disques et contenus pouvant être lus sur ce lecteur
Terme Logo Icône
h
z
VIDÉO
Z
y
-
x
o
MUSIQUE
PHOTO
REMARQUE
✎
▪Selon le type de disque ou les conditions d’enregistrement, il se peut que certains CD-RW/-R et DVD-R ne puissent pas
être lus sur cet appareil.
▪Si un disque DVD-RW/-R n’a pas été enregistré correctement au format vidéo DVD, il ne pourra pas être lu.
▪Le lecteur ne lit pas les contenus ayant été enregistrés sur un disque DVD-R selon un débit binaire dépassant les 10 Mbps.
▪Le lecteur ne lit pas les contenus ayant été enregistrés sur un disque BD-R ou un périphérique USB selon un débit binaire
dépassant les 25 Mbps.
-
w
-
G
Indique une fonction disponible sur un BD-ROM ou un disque BD-RE/-R
enregistré au format BD-RE.
Indique une fonction disponible sur des DVD VIDÉO ou des disques DVD+RW/
DVD-RW(V)/DVD-R/+R enregistrés et finalisés.
Indique une fonction disponible sur un disque CD-RW/-R, DVD-RW/-R, BDRE/-R ou un support de stockage USB sur lequel des contenus DivX, MKV, MP4
sont stockés.
Indique une fonction disponible sur un CD-RW/-R audio (format CD-DA).
Indique une fonction disponible sur un disque CD-RW/-R, DVD-RW/-R, BDRE/-R ou un support de stockage USB sur lequel des contenus MP3 ou WMA
sont stockés.
Indique une fonction disponible sur un disque CD-RW/-R, DVD-RW/-R, BDRE/-R ou un support de stockage USB sur lequel des contenus DivX, MKV,
MP4 sont stockés.
Définition
Types de disques ne pouvant pas être lus sur ce lecteur
• HD DVD
• Disque DVD-ROM/
PD/MV, etc
REMARQUE
✎
▪Il se peut que certains disques et DVD commerciaux
achetés en dehors de votre zone ne puissent pas être
lus sur ce lecteur.
▪La lecture peut être inopérante sur certains types
de disque ou lorsque vous effectuez des opérations
spécifiques tels que les changements d’angle ou
le réglage du format de l’image. Des informations
détaillées concernant le disque sont inscrites sur le
boîtier. Consultez-les si nécessaire.
▪Veillez à ne pas laisser le disque se rayer ou se salir.
Les empreintes de doigt, la saleté, la poussière, les
rayures ou les dépôts de fumée de cigarette sur la
surface d’enregistrement peuvent rendre la lecture du
disque impossible.
▪Lors de la lecture d’un titre BD-J, il se peut que le
chargement prenne plus de temps que pour un titre
normal et que certaines fonctions s’exécutent plus
lentement que d’habitude.
▪Ce lecteur peut ne pas réagir à toutes les commandes
car certains disques Blu-ray, DVD et CD ne permettent
qu’un fonctionnement spécifique ou limité et
autorisent un nombre déterminé de fonctionnalités en
cours de lecture.
Veuillez noter que ceci n’est pas une défaillance du
lecteur.
▪Samsung ne peut garantir que ce lecteur pourra lire
tous les disques portant les logos Blu-ray, DVD ou
CD car les formats évoluent et des problèmes ou des
erreurs peuvent se produire lors de la création d’un
logiciel Blu-ray, DVD ou CD et/ou de la fabrication des
disques.
Veuillez contacter le service après-vente de SAMSUNG
pour toute question ou toute difficulté concernant la
lecture des disques Blu-ray, DVD ou CD sur ce lecteur.
Vous pouvez également vous reporter au manuel
d’utilisation pour obtenir plus d’informations sur les
restrictions en matière de lecture.
• DVD-RAM
• Super Audio CD
(à l’exception de la
couche CD)
• DVD-RW(mode VR)
• CVD/CD-ROM/CDV/
CD-G/CD-I/LD (Les CD-G
lisent des données audio
uniquement et non des
données graphiques.)
Compatibilité du disque Blu-ray
Le disque Blu-ray est un format nouveau, en
pleine évolution. Par conséquent, des questions
de compatibilité peuvent se poser. Ces disques ne
sont pas tous compatibles ou lisibles. Pour obtenir
des renseignements supplémentaires, consultez la
section Conformité et compatibilité du présent manuel
d’utilisation.
Type de disque
BD-ROM
Les disques Blu-ray ROM peuvent être uniquement lus.
Ce lecteur peut lire des disques BD-ROM
préenregistrés disponibles dans le commerce.
BD-RE/-R
Les disques Blu-ray RE/-R peuvent être lus et
enregistrés.
Ce lecteur peut lire un disque enregistré sur d’autres
enregistreurs de disques Blu-ray compatibles.
DVD VIDEO
• Ce lecteur peut lire des DVD préenregistrés
disponibles dans le commerce (disques
DVD VIDEO) comportant des films.
• Lorsque vous passez de la première à la
deuxième couche d’un DVD VIDEO double
couche, des déformations visuelles et
sonores peuvent se produire. Il ne s’agit
pas d’un dysfonctionnement du lecteur.
• Disque DVD-R 3,9 Go
pour système auteur.
5
Page 62

DVD-RW/-R/+R
Ce lecteur peut lire des disques DVD-RW/-R/+R
enregistrés et finalisés à l’aide d’un enregistreur de
DVD Video. La capacité à lire un disque peut dépendre
des conditions d’enregistrement de ce dernier.
DVD+RW
• Ce lecteur peut lire un disque DVD+RW
enregistré sur un enregistreur de DVD Video.
La capacité à lire un disque peut dépendre des
conditions d’enregistrement de ce dernier.
CD Audio (CD-DA)
• Ce lecteur peut lire les disques CD-RW/-R au
format audio CD-DA.
• Il se peut que cet appareil ne lise pas certains
disques CD-RW/-R pour des raisons liées aux
conditions d’enregistrement.
CD-RW/-R
• Optez pour les disques CD-RW/-R de 700 Mo
(80 minutes).
Dans la mesure du possible, évitez d’utiliser des
disques de 800 Mo (90 minutes) ou de capacité
supérieure car le lecteur pourrait ne pas les lire.
• Si le disque CD-RW/-R n’a pas été enregistré
en session fermée, vous pourrez rencontrer des
retards en début de lecture ou ne pas pouvoir
lire la totalité des fichiers enregistrés.
• Il se peut que certains CD-RW/-R ne puissent
pas être lus sur ce lecteur ; cela dépend
de l’appareil sur lequel ils ont été gravés.
Concernant les contenus enregistrés sur un
support CD-RW/-R à partir d’un CD et destinés
à un usage personnel, la capacité à lire le disque
peut varier selon le disque et le contenu.
AVCHD (Codec vidéo avancé haute définition)
• Ce lecteur prend en charge les disques au
format AVCHD. Ces disques sont normalement
enregistrés et lus sur des caméscopes.
• Le format AVCHD est un format vidéo
numérique haute définition.
• Le format MPEG-4 AVC/H.264 compresse les
images de manière plus efficace que le format
de compression d’image conventionnel.
• Certains disques AVCHD utilisent le format « x.
v.Color ». Ce lecteur peut lire les disques AVCHD
faisant appel au format « x.v.Color ».
• « x.v.Color » est une marque de commerce de
Sony Corporation.
• « AVCHD » et le logo AVCHD sont des marques
de commerce de Matsushita Electronic Industrial
Co., Ltd. et de Sony Corporation.
REMARQUE
✎
▪Il se peut que certains disques de format AVCHD
ne puissent pas être lus sur l’appareil, en fonction
de leurs conditions d’enregistrement.
Les disques de format AVCHD n’ont pas encore
été finalisés.
▪Le format « x.v.Color » offre une gamme de
couleurs plus étendue qu’un DVD de caméscope
normal.
▪Il est possible que certains disques de format
DivX, MKV ou MP4 ne puissant pas être lus, selon
la résolution de l’image vidéo et sa vitesse de
défilement.
Type de
disque
Blu-ray
DVD vidéo
Code régional
Les lecteurs et les disques sont codés par région. Ces
codes régionaux doivent correspondre pour que le
disque puisse être lu. Si les codes ne correspondent
pas, le disque ne pourra pas être lu.
Le code régional du lecteur est affiché sur son panneau
arrière.
Copyright
© 2012 Samsung Electronics Co.,Ltd.
Tous droits réservés ; il est interdit de
reproduire ou de copier tout ou partie de ce
manuel d’utilisation sans l’accord préalable
écrit de Samsung Electronics Co.,Ltd.
Code
régional
Amérique du Nord, Amérique
centrale, Amérique du Sud,
A
Corée, Japon, Taïwan, Hong
Kong et Sud-Est asiatique..
Europe, Groenland, France d’outremer, Moyen-Orient, Afrique,
B
Australie et Nouvelle-Zélande.
Inde, Chine, Russie, Asie
C
centrale et Asie du Sud.
États-Unis, Territoires organisés
1
des États-Unis et Canada
Europe, Japon, Moyen-Orient,
Égypte, Afrique du Sud,
2
Groenland
Taiwan, Corée, Philippines,
3
Indonésie, Hong Kong
Mexique, Amérique du Sud,
Amérique centrale, Australie,
4
Nouvelle-Zélande, Îles du
Pacifique, Caraïbes
Russie, Europe de l’Est, Inde,
majorité des pays d’Afrique,
5
Corée du Nord, Mongolie
Chine
6
Zone
Formats de fichiers pris en charge
Remarques sur la connexion USB
• Ce lecteur prend en charge les supports de
stockage USB, les lecteurs MP3, les caméras
numériques et les lecteurs de carte USB.
• Le lecteur ne gère pas les noms de dossier
ou de ficher dépassant les 128 caractères.
• Le lecteur peut ne pas être pas compatible
avec certains périphériques USB, Le
périphérique de disque dur externe ou
certaines caméras numériques.
• Le lecteur prend en charge les systèmes de
fichiers FAT16, FAT32 et NTFS.
• Effectuez la connexion des périphériques
USB directement au port USB du lecteur. La
connexion via un câble USB peut causer des
problèmes d’incompatibilité.
• L’insertion de plusieurs périphériques de
mémoire dans un lecteur multicarte peut
entraîner le dysfonctionnement de celui-ci.
• Le lecteur ne prend pas en charge le
protocole PTP.
• Ne déconnectez pas le périphérique USB
durant un processus de « chargement ».
• Plus la résolution de l’image est élevée, plus
lent le délai d’affichage de l’image.
• Ce lecteur ne peut pas lire les fichiers MP3
de type DRM (Gestion des droits numériques)
téléchargés depuis des sites commerciaux.
• Votre lecteur ne prend en charge que les
vidéos dont la vitesse de défilement des
images est inférieure à 30 fps.
6
Page 63

Prise en charge des fichiers vidéo
Extension de
fichier
*.avi
*.mkv
*.wmv
*.mp4
*.mpg
*.mpeg
•Limitations
- Même lorsque le fichier est codé selon un codec pris en charge mentionné ci-dessus, ce fichier peut ne
Conteneur Codec vidéo Codec audio Résolution
1920x1080
1920x1080
1920x1080
1920x1080
1920x1080
1920x1080
1920x1080
1920x1080
1920x1080
1920x1080
1920x1080
1920x1080
1920x1080
AVI
MKV
WMV (wmv9)
MP4
PS
DivX 3.11/4.x/5.1/6.0
MP4v3
H.264 BP/MP/HP
VC-1 AP
DivX 5.1/6.0
H.264 BP/MP/HP
VC-1 AP
VC-1 SM
MP4 (mp4v)
H.264 BP/MP/HP
MPEG1
MPEG2
H.264 BP/MP/HP
MP3
Dolby Digital
DTS
WMA
PCM
MP3
Dolby Digital
DTS
WMA
AAC
MP1, 2
Dolby Digital
DTS
Prise en charge des fichiers musicaux
Extension de
fichier
*.mp3
*.wma
Logos des disques pouvant être lus sur ce lecteur
Disque Blu-ray BD-LIVE
Vérifiez que les accessoires ci-dessous sont fournis.
pas être lu en cas de problème au niveau de son contenu.
- La lecture normale ne sera pas garantie si les informations relatives au conteneur du fichier sont
erronées ou si le fichier lui-même est corrompu.
- Les fichiers ayant un débit binaire ou une vitesse de défilement supérieur(e) à la normale peuvent
présenter des discontinuités au niveau de la lecture audio/vidéo.
- La fonction Recherche (Saut) sera indisponible si la table d’indexage du fichier est corrompue.
•Décodeur vidéo
Prend en charge le format H.264 de niveau 4.1 et AVCHD
-
Batteries for Remote Control (AAA Size) Adaptateur
- Ne prend pas en charge les formats H.264 FMO/ASO/RS, et VC1 SP/MP/AP L4
- MPEG4 SP, ASP :
Résolution inférieure à 1280 x 720 : 60 images maxi
Résolution supérieure à 1280 x 720 : 30 images maxi
- Ne prend pas en charge le format GMC 2 ou supérieur
•Décodeur audio
- Prend en charge les formats WMA 7, 8, 9 et STD
- Ne prend pas en charge le taux d’échantillonnage WMA de 22050 Hz
mono
Conteneur Codec audio Plage de prise en charge
MP3
WMA
MP3 -
* Taux d’échantillonnage (en kHz) - 8, 11, 16, 22, 32,
WMA
44,1, 48
* Débits binaires - Tous les débits binaires dans la
plage allant de 5 kbps à 384 kbps
Royaume-Uni, en France, en
Système PAL applicable au
Allemagne, etc.
Accessoires
Manuel d’utilisation Télécommande
7
Page 64

Panneau avant
Panneau arrière
BOUTON ARRÊT
BOUTON LECTURE/PAUSE
BOUTON D'ÉJECTIONBOUTON MARCHE/ARRÊT
CAPTEUR DE LA TÉLÉCOMMANDE
INDICATEUR DE VEILLE
LOGEMENT DE DISQUE
REMARQUE
✎
▪Lorsque le lecteur affiche le menu du disque Blu-ray, vous ne pouvez pas lancer la vidéo en appuyant sur le
bouton Lecture du lecteur ou de la télécommande. Pour lire la vidéo, sélectionnez Lire la vidéo ou Démarrer
dans le menu du disque puis appuyez sur le bouton e.
▪S'allume lorsque le lecteur est en mode Veille, et clignote pour indiquer qu'un signal est en cours de
réception en provenance du capteur de la télécommande.
USB HOST DC 12V 2A
LAN
HDMI OUT
REMARQUE
✎
▪Pour mettre à niveau le logiciel du lecteur via la prise Hôte USB, vous devez utiliser une carte mémoire flash
USB.
DIGITAL AUDIO OUT
8
Page 65

Télécommande
Branchements
Télécommande
Permet d’allumer et d’éteindre l’appareil.
Permet d’ouvrir et de fermer le tiroir disque.
Appuyez sur les boutons numériques
pour commander les options.
Utilisez ce bouton pour accéder au
Permet d’effectuer un saut vers l’avant
Permet d’arrêter la lecture d’un disque.
Ce bouton sert à accéder aux différentes
fonctions audio d’un disque (Blu-ray/DVD).
Permet de sélectionner les entrées du
Permet de revenir au menu précédent.
Ces boutons sont utilisés à la fois pour les menus
de l’appareil et pour différentes fonctions des
Appuyez sur ce bouton pour utiliser la fonction
Repeat de répeter la lecture d’un disque
menu du disque.
ou l’arrière.
Permet de lire un disque.
Donne accès au menu Outils.
menu et de les modifier.
disques Blu-ray.
Bonusview.
d’un instant A á un instant B
Insertion des piles
Permet d’allumer et d’éteindre le téléviseur.
Après la configuration, vous permet de définir la
source d’entrée sur votre téléviseur.
Permet de couper le son de votre téléviseur.
Utilisez ce bouton pour accéder au menu
contextuel ou au menu Titre.
Permet d’effectuer une recherche vers
l’arrière ou l’avant.
Permet de suspendre la lecture d’un disque.
Permet de revenir au menu d’accueil.
Appuyez sur ce bouton pour modifier la langue
de sous-titrage du disque Blu-ray/DVD.
Permet d’afficher les informations de lecture
pendant la lecture d’un disque Blu-ray/DVD.
Appuyez sur ce bouton pour quitter le menu.
Permet de passer en mode plein écran
sur le téléviseur.
Ce bouton permet de répéter la lecture d’un
titre, d’un chapitre, d’une piste ou d’un disque.
REMARQUE
✎
Si la télécommande ne fonctionne pas correctement :
▪
• Vérifiez la polarité (
• Vérifiez que les piles ne sont pas usées.
• Vérifiez qu’aucun obstacle n’obstrue le capteur de la
télécommande.
• Vérifiez qu’aucun éclairage fluorescent ne se trouve à proximité
ATTENTION
!
▪ La batterie rechargeable intégrée au produit n’est pas remplaçable
par l’utilisateur. Pour obtenir des informations sur le remplacement
de la batterie, contactez votre fournisseur de services.
+/–
) des piles.
A. Connexion du lecteur à un téléviseur
Connexion à un téléviseur via un câble HDMI - Qualité optimale
1. Utilisez le câble HDMI pour connecter la borne HDMI OUT située à l’arrière du lecteur à la
borne HDMI IN du téléviseur. Voir pages 11.
2. Allumez le lecteur et le téléviseur.
3. Appuyez sur le sélecteur d’entrée de la télécommande de votre téléviseur jusqu’à ce que
le signal HDMI du lecteur s’affiche sur l’écran du téléviseur.
REMARQUE
✎
▪Un câble HDMI émet en sortie les données vidéo/audio numériques, de sorte que vous n’ayez pas à
connecter de câble audio.
▪Si le lecteur est connecté à votre téléviseur en mode de sortie HDMI 720p, 1080i ou 1080p, vous
devrez utiliser un câble HDMI haut débit (catégorie 2).
▪La sortie HDMI ne transmet qu’un signal numérique pur au téléviseur.
Si votre téléviseur ne prend pas en charge la protection HDCP (Système de protection des contenus
numériques en haute définition), un bruit aléatoire sera transmis à l’écran.
▪Selon votre téléviseur, il est possible que certaines résolutions de sortie HDMI ne fonctionnent pas.
Veuillez vous reporter au manuel d’utilisation de votre téléviseur.
▪Lorsque le lecteur est raccordé au téléviseur via le câble HDMI pour la première fois ou connecté à un
téléviseur neuf, la résolution de sortie HDMI est automatiquement réglée sur la valeur la plus élevée
prise en charge par le téléviseur.
▪Un câble HDMI trop long peut provoquer du bruit à l’écran. Si tel est le cas, désactivez l’option
Couleur foncée dans le menu.
▪Si vous utilisez un câble HDMI-vers-DVI pour la connexion à un dispositif d’affichage, vous devez aussi
connecter les bornes à un système audio pour écouter les données audio.
9
Page 66

B. Connexion à une chaîne hi-fi
C. Connexion au réseau
• Baissez le volume sonore lorsque vous allumez le récepteur AV. Un bruit violent et
soudain pourrait endommager les haut-parleurs et nuire à votre oreilles.
• Réglez le format de sortie audio selon les capacités du récepteur AV.
• L’emplacement des bornes d’entrée HDMI peut varier selon le récepteur AV utilisé.
Veuillez vous reporter au manuel d’utilisation de votre récepteur AV.
Cas 1 :
technologie HDMI)
1. Utilisez le câble HDMI pour connecter la borne HDMI OUT située à l’arrière du lecteur à la
2. Utilisez le câble HDMI pour connecter la borne HDMI OUT du récepteur AV à la borne
3. Allumez le lecteur, le téléviseur et le récepteur AV.
4. En utilisant le bouton de sélection d’entrée du récepteur AV et du téléviseur, sélectionnez
Connexion à une chaîne hi-fi (récepteur AV prenant en charge la
- Qualité optimale (Recommandé)
borne HDMI IN du récepteur AV. Voir pages 11.
HDMI IN du téléviseur.
l’entrée HDMI adéquate afin que sons et images soient émis par le lecteur. Reportez-vous
au manuel d’utilisation du récepteur AV pour régler l’entrée audio de ce dernier.
Cas 2 : Connexion d’une chaîne hi-fi (récepteur AV prenant en charge la
technologie Dolby Digital ou un décodeur DTS) - Qualité optimale
1. Utilisez un câble optique pour connecter la borne DIGITAL AUDIO OUT (OPTICAL)
située à l’arrière du lecteur à la borne DIGITAL AUDIO IN (OPTICAL) du récepteur AV.
Voir pages 11.
2. Utilisez le câble HDMI, connectez les bornes HDMI situées à l’arrière du lecteur
respectivement aux bornes HDMI de votre téléviseur.
3. Allumez le lecteur, le téléviseur et le récepteur AV.
4. Appuyez sur le bouton de sélection d’entrée du
externe afin que le son soit émis à partir du lecteur.
récepteur AV
5. Appuyez sur le sélecteur d’entrée de la télécommande de votre téléviseur pour
sélectionner HDMI
pour régler l’entrée audio du
la source vidéo.
récepteur AV pour sélectionner
Reportez-vous au manuel d’utilisation du
récepteur AV
.
l’entrée
Lorsqu’il est relié au réseau, ce lecteur vous permet d’accéder aux services réseau tels que
BD-LIVE ainsi qu’aux mises à niveau logicielles. Pour procéder à la connexion, nous vous
recommandons d’utiliser le Modem large bande (avec routeur intégré) ou le routeur IP. Pour plus
d’informations sur les connexions du routeur, reportez-vous au manuel d’utilisation du routeur ou
contactez le fabricant du routeur afin de bénéficier de son service d’assistance technique.)
Réseau câblé
1. À l’aide du Direct LAN (UTP) CAT 5 câble, connectez la borne LAN du lecteur à la borne
LAN de votre modem ou routeur. Voir pages 11
2. Pour régler les options de réseau. Voir pages 16.
REMARQUE
✎
▪Il est possible que l’accès Internet au serveur de mise à jour Samsung ne soit pas
autorisé, selon le routeur que vous utilisez ou le contrat établi avec votre fournisseur
d’accès. Pour de plus amples informations, contactez votre fournisseur d’accès Internet.
▪Les utilisateurs DSL doivent passer par un routeur pour la connexion au réseau.
▪Pour utiliser la fonction AllShare, vous devez connecter l’ordinateur au réseau, tel
qu’indiqué dans la figure.
La connexion peut être câblée.
10
Page 67

Connexion du lecteur à un téléviseur
Câble HDMI
(non fourni)
Réseau
Routeur
Modem haut débit
(avec routeur intégré)
Internet
haut débit
ou
Modem haut débit
Internet
haut débit
Connexion à une chaîne hi-fi
Cas 1 : Câble HDMI
(non fourni)
Cas 2 : Câble optique
Cas 1 : Câble HDMI
(non fourni)
(non fourni)
Mise en réseau avec l’ordinateur pour la
fonction AllShare
REMARQUE : Vous pouvez uniquement connecter cette unité à un réseau via une connexion câblée.
✎
11
Page 68

Configuration
Paramètres initiaux
1. Allumez votre téléviseur après avoir
branché l’appareil.
À sa première connexion au téléviseur,
l’appareil s’allume automatiquement et
l’écran Paramètre initial s’affiche.
Initial Settings I On-Screen Language
Select a language for the on-screen displays.
English
Français
Deutsch
Español
Italiano
Nederlands
2. Appuyez sur les boutons ▲▼
télécommande
pour sélectionner la
langue souhaitée, puis appuyez sur le
bouton ENTRÉE.
3. Appuyez sur le bouton ENTRÉE pour
sélectionner le bouton Démarrage.
4. Appuyez sur les boutons ▲▼ pour
sélectionner le format d’écran voulu, puis
sur le bouton ENTRÉE
5. Appuyez sur les boutons ◄► pour
sélectionner Auto, puis appuyez sur le
bouton ENTRÉE. Si vous n’avez pas de
réseau domestique, appuyez sur le bouton
BLEU (D) de votre télécommande. Vous
accéderez directement au menu Accueil.
6. Le lecteur Blu-ray vérifie automatiquement
votre réseau câblé. Lorsque la vérification
est achevée, le message «Votre réseau
fonctionne correctement»
.
ENTRÉE
>
Move " Select
.
puis sur le bouton
7. Le message « Paramétre initial défini »
s’affiche, et l’écran d’accueil apparaît.
- Si votre lecteur Blu-ray ne se connecte pas
à votre réseau ou que vous souhaitez vous
connecter manuellement, rendez-vous à la
section Configuration Réseau en page 16
REMARQUE
✎
▪Le menu Accueil n’apparaîtra pas si vous ne
configurez pas les paramètres initiaux, sauf dans le
cas décrit ci-dessous.
▪Si vous appuyez sur le bouton BLEU (D) durant
la configuration réseau, vous pourrez accéder au
menu Accueil même lorsque la configuration réseau
n’est pas encore terminée.
▪Lorsque vous retournez au menu principal, le mode
plein écran est automatiquement annulé.
▪Si vous souhaitez réafficher l’écran Paramètre
initial pour apporter des modifications, maintenez
le bouton ARRÊT ( @ ) situé sur la face avant de
l’appareil appuyé pendant plus de 5 secondes en
l’absence de tout disque dans le tiroir disque. Ceci
rétablit les paramètres par défaut du lecteur.
▪Si vous voulez utiliser une fonction Anynet+(HDMI-
CEC), veuillez suivre les instructions ci-dessous.
1) Connectez le lecteur à un téléviseur Samsung
compatible Anynet+(HDMI-CEC) à l'aide d'un
câble HDMI.
2) Définissez la fonction Anynet+(HDMI-CEC) sur
Activé à la fois sur le téléviseur et le lecteur.
3) Réglez le téléviseur sur la procédure de réglage
initial.
▪Si le lecteur reste en mode Arrêt pendant plus de
5 minutes sans interface utilisateur, un économiseur
d’écran s’affichera sur le téléviseur. Si le lecteur
reste en mode Économiseur d’écran pendant plus
de 25 minutes, il s’éteindra automatiquement.
1
.
2
1
2
3
4
• Menu Accueil
1
Navigation dans les menus
Bouton HOME : Appuyez sur ce bouton
pour accéder au menu Accueil.
Bouton RETURN : Permet de revenir au
menu précédent.
Boutons ENTRÉE / DIRECTION :
Permet de déplacer le curseur ou de
sélectionner un élément.
Permet d’activer l’élément actuellement
sélectionné.
Permet de confirmer un réglage.
Bouton EXIT : Appuyez sur ce bouton pour
quitter le menu actuellement sélectionné.
You Tube
Vidéos
Pas de Disque a Changer périph.
d
Afficher périph.
Entrer
"
Permet de sélectionner Vidéos.
1
Permet de sélectionner YouTube.
2
Permet de sélectionner Photos.
3
Permet de sélectionner Musique.
4
Permet de sélectionner Paramètres.
3
4
5
Permet d’afficher les boutons que vous
pouvez utiliser sur la télécommande pour
6
accéder aux fonctions.
Pour accéder au menu Paramètres
Pour accéder au menu Paramètres et aux
sous-menus, suivez les étapes suivantes :
1. Appuyez sur le bouton POWER.
Le menu Accueil apparaît.
2. Appuyez sur les boutons ◄► pour
sélectionner Paramètres, puis appuyez
sur le bouton ENTRÉE.
3. Appuyez sur les boutons ▲▼ pour
sélectionner le sous-menu souhaité, puis
appuyez sur le bouton ENTRÉE.
4. Appuyez sur les boutons ▲▼ pour
2
sélectionner l’élément souhaité, puis
appuyez sur le bouton ENTRÉE.
5. Appuyez sur le bouton EXIT pour quitter
3
4
5
6
le menu.
REMARQUE
✎
▪Les étapes d’accès peuvent varier selon le menu
L’affichage à l’écran (OSD) peut
sélectionné.
changer sur ce lecteur après la mise à niveau
de la version du logiciel.
12
Page 69

Affichage
Vous pouvez configurer les diverses options
d’affichage telles que Format image, Définition, etc.
Format TV
Selon le type de téléviseur que vous possédez, vous
pouvez ajuster le réglage de la taille de l’écran.
• 16:9 Original : Sélectionnez cette option lorsque
vous connectez le lecteur à un téléviseur au format
d’écran 16:9. Tous les contenus s’afficheront selon
leur format d’origine.
Le contenu formaté en 4:3 apparaîtra avec des
barres noires à gauche et à droite de l’écran.
• 16:9 Entier :
connectez le lecteur à un téléviseur au format d’écran
16:9. Tous les contenus s’afficheront en mode plein
écran. Le contenu formaté en 4:3 apparaîtra étiré.
• 4:3 Letter Box
vous connectez le lecteur à un téléviseur au format
d’écran 4:3. Tous les contenus s’afficheront selon leur
format d’origine. Le contenu formaté en 16:9 apparaîtra
avec des barres noires en haut et en bas de l’écran.
• 4:3 Pan-Scan :
vous connectez le lecteur à un téléviseur au format
d’écran 4:3. Le contenu en 16:9 apparaîtra tronqué
des portions à l’extrême gauche et droite de l’image.
✎
Sélectionnez cette option lorsque vous
: Sélectionnez cette option lorsque
Sélectionnez cette option lorsque
REMARQUE
▪Selon le type de disque utilisé, certains formats
d’image peuvent être indisponibles.
▪Si vous sélectionnez un format d’image différent
de celui de votre téléviseur, il est possible que
l’image affichée soit déformée.
▪Si vous sélectionnez le format 4:3 Pan-Scan
ou 4:3 Letter Box, vous ne pouvez pas afficher
l’image en plein écran en appuyant sur le
bouton FULL SCREEN de la télécommande.
▪Si vous sélectionnez l’option 16:9 original,
le téléviseur pourra afficher l’image dans un
encadrement horizontal au format 4:3 (bandes
noires sur les côtés de l’image).
Dans ce cas, vous ne pouvez pas afficher l’image
en plein écran en appuyant sur le bouton FULL
SCREEN de la télécommande.
BD Wise (Lecteurs Samsung uniquement)
BD Wise est la fonctionnalité d’interconnectivité
de Samsung la plus récente.
Lorsque vous connectez un lecteur Samsung et un
téléviseur Samsung doté de la fonction BD Wise via
HDMI et que le lecteur et le téléviseur disposent tous
deux de la fonctionnalité BD Wise, le lecteur émet
des images dont la résolution vidéo et la vitesse de
défilement sont identiques à celles du disque BD/DVD.
• Arrêt. : La résolution en sortie reste équivalente
à la valeur que vous aviez précédemment réglée
dans le menu Définition, indépendamment de la
résolution du disque. Reportez-vous à la section
Définition ci-dessous.
•Activé : Le lecteur émet la vidéo en sortie
selon la résolution d’origine et la vitesse de
défilement de l’image sur le disque BD/DVD.
REMARQUE
✎
▪Lorsque la fonction BD Wise est activée, le paramètre
▪Si le lecteur est connecté à un appareil ne prenant
▪Pour garantir le bon fonctionnement de BD Wise, réglez
Résolution
Cette option vous permet de régler la définition du
signal vidéo HDMI respectivement sur les valeurs
Auto, 1080p, 1080i, 720p, ou 576p/480p. Ces
valeurs sont indicatives du nombre de lignes vidéo
par image. Les lettres i et p signifient respectivement
balayage entrelacé (i) et balayage progressif (p). Plus il
y a de lignes, plus la qualité de l’image est supérieure.
• Auto. : Cette option règle automatiquement la
définition de la sortie sur la résolution maximale
pris en charge par le téléviseur connecté.
• BD Wise : Cette option règle automatiquement
la définition de l’image sur celle du disque
BD/DVD, à condition toutefois que vous ayez
connecté le lecteur via HDMI à un téléviseur doté
de la fonctionnalité BD Wise. (L’élément de menu
BD Wise apparaîtra seulement si le réglage de BD
Wise est spécifié sur Activé. Reportez-vous à la
section relative à BD Wise ci-dessus).
Définition est automatiquement spécifié sur BD Wise et
BD Wise apparaît dans le menu Définition.
pas en charge BD Wise, vous ne pourrez pas utiliser la
fonction BD Wise.
le menu BD Wise du lecteur et du téléviseur sur Activé.
• 1080p : Émet 1080 lignes vidéo en balayage
progressif.
• 1080i : Émet 1080 lignes vidéo en balayage
entrelacé.
• 720p : Émet 720 lignes vidéo en balayage
progressif.
• 576p/480p : Émet 480 lignes vidéo en balayage
progressif.
Résolution selon le mode de sortie
• Lecture du disque Blu-ray/des e-contenus/des contenus numériques
Configuration
BD Wise
1080p@60F
(Trame vidéo :
Trame vidéo : Auto. (24 ips) 1080p@24F 1080p@24F
576p/480p 576p/480p 576p/480p
• Lecture DVD
Configuration
BD Wise 576i/480i
576p/480p 576p/480p
Sortie
Disque Blu-ray E-content/Contenus numériques
Résolution du disque Blu-ray
Auto.
Arrêt.)
1080i 1080i 1080i
720p 720p 720p
Sortie
Auto. Résolution maxi de l’entrée du téléviseur
1080p 1080p
1080i 1080i
720p 720p
Résolution maxi de l’entrée du
téléviseur
1080p@60F 1080p@60F
HDMI connecté
Mode HDMI
HDMI connecté
Mode HDMI
1080p
Résolution maxi de l’entrée du
téléviseur
13
Page 70

REMARQUE
✎
▪Si le téléviseur connecté ne prend pas en charge la
fonction Fréquence cinéma ou la résolution sélectionnée, le
message suivant apparaîtra : « Si, après avoir sélectionné
«Oui» aucune image n’apparaît, patientez 15 secondes
pour revenir à la résolution précédente. Modifier la
résolution ?».
Si vous sélectionnez Oui, l’écran du téléviseur s’affichera
en blanc pendant 15 secondes, puis la résolution sera
ramenée automatiquement à la valeur précédente.
▪Si l’écran est toujours blanc après que la résolution ait
été changée, éjectez le disque inséré, puis appuyez sur
ARRÊT ( @ )
le bouton
maintenez-le enfoncé pendant plus de 5 secondes. Tous
les réglages d’usine seront alors rétablis. Suivez les étapes
de la page précédente pour accéder aux différents modes
et sélectionner la Configuration de l’affichage prise en
charge par votre téléviseur.
▪Lorsque les réglages d’usine par défaut sont rétablis,
toutes les données Blu-ray de l’utilisateur sont supprimées.
▪Pour que l’utilisateur puisse utiliser le mode Fréquence
cinéma (24 ips), le disque Blu-ray doit être doté d’une
fonction 24 images.
situé à l’avant du lecteur et
Trame vidéo (24Fs)
Le réglage de la fonction Trame vidéo (24 ips) sur
Auto. vous permet de spécifier la sortie HDMI du
lecteur sur 24 images par seconde pour une qualité
d’image améliorée.
Vous ne pouvez bénéficier de la fonction Trame vidéo
(24 ips) que sur un téléviseur prenant en charge cette
vitesse de défilement. Vous ne pouvez sélectionner
Fréquence cinéma que lorsque le lecteur est en mode
de résolution de sortie HDMI 1080i ou 1080p.
• Auto. : La fonction Trame vidéo (24 ips) est activée.
• Arrêt : La fonction Trame vidéo (24 ips) est désactivée.
Format couleur HDMI
Permet de régler le format de l’espace colorimétrique
applicable à la sortie HDMI en réponse aux capacités de
l’appareil connecté (téléviseur, moniteur, etc.)
• Auto. : Permet de régler automatiquement le lecteur
sur le format optimal pris en charge par votre appareil.
• YCbCr (4:4:4) : Si votre téléviseur prend en charge
l’espace colorimétrique YCbCr via HDMI, sélectionnez
cette option pour émettre en sortie la gamme normale
des couleurs YCbCr.
• RVB (Standard) : Sélectionnez cette option pour
émettre en sortie la gamme de couleurs RVB normale.
• RVB (avancé) : Si vous avez connecté le lecteur
à un dispositif d’affichage DVI tel qu’un moniteur,
sélectionnez cette option pour émettre en sortie la
gamme de couleurs RVB améliorée.
Couleur intense HDMI
Cette option vous permet d’émettre des données
vidéo en sortie avec Couleurs profondes via la
prise HDMI OUT. L’option Couleurs profondes
permet une reproduction plus fidèle des couleurs,
notamment en termes de profondeur.
• Auto. : Le lecteur émet la vidéo en sortie
avec l’option Couleurs profondes sur un
téléviseur connecté prenant en charge la
fonctionnalité Couleurs profondes HDMI.
• Arrêt : L’image est émise sans activation
de l’option Couleurs profondes.
Mode progressif
Cette option permet d’améliorer la qualité de l’image lors
de la lecture d’un DVD.
• Auto. : Sélectionnez ce réglage afin que le lecteur
choisisse automatiquement la meilleure qualité
d’image pour la diffusion du DVD en cours de lecture.
• Vidéo : Sélectionnez ce réglage pour obtenir
la meilleure qualité d’image disponible pour le
visionnage de concerts ou de programmes télévisés
en DVD.
14
Audio
• Bitstream (non traités) : À sélectionner si vous
Sortie numérique
Vous pouvez définir l’option Digital Output (Sortie
numérique) de manière à ce qu’elle corresponde
aux capacités du récepteur AV que vous avez
connecté au lecteur :
• PCM : Il s’agit du réglage par défaut. Ce réglage
est compatible avec la plupart des téléviseurs et
des récepteurs.
Sélections des sorties numériques
Configuration PCM
Récepteur
Connexion
Digital Plus
Flux de
données
audio sur
disque
Blu-ray
Resolution
Flux de
données
audio sur
DVD
AV prenant
en charge
l'interface
PCM
Dolby
PCM 2 ca PCM 2 ca Dolby Digital
Digital
Dolby
PCM 2 ca PCM 2 ca
Dolby
PCM 2 ca PCM 2 ca
TrueHD
DTS PCM 2 ca PCM 2 ca DTS DTS DTS réencodé
DTS-
HD High
DTS-HD
PCM 2 ca PCM 2 ca
Audio
Master
PCM 2 ca PCM 2 ca
Audio
PCM PCM 2 ca PCM 2 ca PCM 2 ca PCM 2 ca PCM 2 ca PCM 2 ca
Dolby
PCM 2 ca PCM 2 ca Dolby Digital
Digital
DTS PCM 2 ca PCM 2 ca DTS DTS DTS DTS
Optique
HDMI
Jusqu'à
PCM 2 ca PCM PCM 2 ca DTS réencodé
7,1 ca
• Bitstream (DTS Ré-encodé) : Le son d’origine
• Bitstream (Dolby D Ré-encodé) : Le son
Pour les détails, reportez-vous au tableau de
sélection des sorties numériques.
Bitstream
(non traités)
Récepteur
AV prenant
en charge
l'interface
HDMI
Dolby Digital
Plus
Dolby
TrueHD
DTS-
HD High
Resolution
Audio
DTS-HD
Master
Audio
souhaitez que votre récepteur décode tous les
signaux audio.La fonctionnalité audio Bonusview
ne sera pas disponible.
sera ré-encodé en DTS.
d’origine sera ré-encodé en Dolby Digital.
Bitstream
(DTS Réencodé)
Récepteur
AV prenant
Optique
Digital
Digital
Digital
Digital
en charge
l’interface HDMI
ou optique
Dolby
DTS réencodé
Dolby
DTS réencodé
Dolby
DTS réencodé
DTS DTS réencodé
DTS DTS réencodé
Dolby
Dolby Digital Dolby Digital
Bitstream
(Dolby D.
Ré-encodé)
Récepteur
AV prenant
en charge
l’interface HDMI
ou optique
Dolby Digital
réencodé *
Dolby Digital
réencodé *
Dolby Digital
réencodé *
Dolby Digital
réencodé *
Dolby Digital
réencodé *
Dolby Digital
réencodé *
Dolby Digital
réencodé *
Page 71

Configuration PCM
Récepteur
Aucune
AV prenant
en charge
l’interface
Décode la principale
audio BONUSVIEW en
données PCM et ajoute
des effets sonores de
Optique
HDMI
fonction audio et
le flux de données
navigation.
Connexion
Définition
pour
disque
Blu-ray
Si le flux de données source est 2 ca, le réglage « Dolby D. Ré-encodé » ne sera pas appliqué. La sortie
*
sera émise sur PCM 2 ca.
Les disques Blu-ray peuvent contenir trois
flux de données audio :
- Principale fonction audio : Bande son de la
fonction principale.
- Fonctionnalité audio BONUSVIEW : Bande
son supplémentaire, comportant, par
exemple, le commentaire du réalisateur ou
de l’acteur.
- Effets sonores de navigation : Lorsque vous
choisissez une navigation via un quelconque
menu, les effets sonores de navigation peuvent
retentir. Les effets sonores de navigation sont
différents sur chaque disque Blu-ray.
REMARQUE
✎
▪Assurez-vous de sélectionner la sortie
numérique appropriée, sinon vous n’entendrez
aucun son ou un son très fort.
Bitstream
(non traités)
Récepteur
AV prenant
en charge
l’interface
Émet uniquement le flux
de données audio de la
fonction principale, de
sorte que le récepteur AV
puisse décoder les trains
Vous n’entendrez pas
BONUSVIEW ni d'effet
sonore de navigation.
Optique
HDMI
de bits audio.
de données audio
▪Si l’appareil HDMI (récepteur AV, téléviseur) n’est
pas compatible avec les formats compressés
(Dolby digital, DTS), le signal audio sera émis
en sortie au format PCM.
▪Les DVD n’ont pas habituellement de
fonctionnalité audio BONUSVIEW ni d’effet
sonore de navigation.
▪Certains disques Blu-ray ne sont pas dotés
de fonctionnalité audio BONUSVIEW ni d’effet
sonore de navigation.
▪Cette configuration de sortie numérique
n’affecte pas la sortie audio HDMI vers votre
téléviseur. Elle a une incidence sur la sortie
audio optique et HDMI lorsque le lecteur est
relié à un récepteur AV.
▪ Si vous lisez des pistes de son audio MPEG, le
signal audio sera émis en sortie au format PCM
indépendamment de vos sélections de sortie
numérique (PCM ou Bitstream).
Bitstream
(DTS Ré-
encodé)
Récepteur
AV prenant
en charge
l’interface HDMI
ou optique
Décode la
principale fonction
audio et le flux
de données audio
BONUSVIEW en
données PCM
et ajoute des
effets sonores
de navigation,
puis réencode
les données
audio PCM en
trains de bits DTS.
Bitstream
(Dolby D.
Ré-encodé)
Récepteur
AV prenant
en charge
l’interface HDMI
ou optique
Décode la
principale fonction
audio et le flux
de données audio
BONUSVIEW en
données PCM
et ajoute des
effets sonores
de navigation,
puis réencode
les données
audio PCM en
trains de bits Dolby
Digital ou PCM.
Sous Echantillonnage PCM
Ce réglage vous permet d’activer ou de
désactiver l’échantillonnage réduit PCM
48 kHz ou 96 kHz.
• Arrêt : Sélectionnez cette option lorsque
le récepteur AV connecté au lecteur est
compatible avec l’échantillonnage à 96 kHz.
• Activé : Sélectionnez cette option lorsque
le récepteur AV connecté au lecteur n’est
pas compatible avec l’échantillonnage à
96 kHz. Les signaux 96 kHz seront réduits
et convertis en signaux 48 kHz.
REMARQUE
✎
▪ Même si le Sous Échantillonnage PCM est
spécifié sur Arrêt, certains disques ne pourront
émettre qu’un son à échantillonnage réduit via
les sorties numériques optiques.
HDMI
• Si votre téléviseur ne prend pas en charge
les formats multicanaux compressés (Dolby
Digital, DTS), le lecteur pourra émette un
son sous-mixé via deux canaux PCM,
même lorsque vous avez sélectionné
Bitstream (réencodage ou non traité) dans
le menu de configuration.
• Si votre téléviseur ne prend pas en
charge les fréquences d’échantillonnage
PCM supérieures à 48 kHz, le lecteur
pourra émettre un son audio PCM à
échantillonnage réduit, même lorsque la
fonction de l’échantillonnage PCM réduit
est spécifiée sur
Arrêt.
Contrôle de la dynamique
Vous pouvez écouter le son à de faibles volumes mais
vous entendrez toujours les dialogues avec clarté.
Cette option est activée dès que le lecteur détecte un
signal Dolby Digital.
• Auto. : Le Réglage de la plage dynamique sera
automatiquement défini selon les informations
fournies par la piste audio Dolby TrueHD.
• Arrêt : Vous pouvez visionner le film avec une
plage dynamique standard.
• Activé : Lorsque la bande son d’un film est
émise à faible volume ou via des enceintes plus
petites, le système peut appliquer la compression
appropriée pour que le son de faible volume soit
plus intelligible et les temps forts moins bruyants.
Mode sous-mixage
Pour sélectionner le mode Mixage réducteur pour
la sortie stéréo.
• Stéréo Normal : Pour formater l’audio
multicanal en stéréo normale en utilisant le
mixage réducteur. Sélectionnez ce mode si
vous entendez le son du téléviseur ou de
l’amplificateur stéréo.
• Compatible Surround : Pour formater l’audio
multicanal en stéréo ambiophonique compatible
en utilisant le mixage réducteur. Ce mode prend en
charge le décodage stéréo du récepteur A/V en son
ambiophonique.
15
Page 72

Réseau
5. La Fonction automatique permet
Veuillez contacter votre fournisseur d’accès
Internet pour savoir si votre adresse IP est
statique ou dynamique. S’il s’agit d’une adresse
dynamique – et la plupart le sont – nous vous
✎
recommandons d’utiliser la procédure
automatique pour la configuration réseau. C’est la
procédure la plus simple et cela fonctionne dans
6. Une fois que la fonction Réseau a acquis les
la majorité des cas.
Si l’adresse est statique, vous devez utiliser la
procédure de configuration manuelle.
7. Sélectionnez Test réseau et ensuite,
Veuillez suivre les étapes suivantes pour configurer
les paramètres réseau.
REMARQUE
✎
8. Lorsque le Test réseau est achevé, appuyez
▪ Vous pouvez uniquement connecter cette
unité à un réseau via une connexion câblée.
9. Si la fonction Réseau n’acquiert pas les
Paramètres réseau Automatique
1. Dans le menu Accueil, appuyez sur les
boutons ◄► pour sélectionner Paramètres,
puis appuyez sur le bouton ENTRÉE.
2. Appuyez sur les boutons ▲▼ pour sélectionner
Réseau, puis appuyez sur le bouton ENTRÉE.
3. Appuyez sur les boutons ▲▼ pour sélectionner
Paramètres réseau Câble, puis appuyez sur
le bouton ENTRÉE. L’écran Paramètres du
Réseau Câblé apparaît.
Paramètres
Paramètre réseau câblé
Affichage
Paramètre initial
Config. prot. Internet : Auto
Audio
Adresse IP : 0 0 0 0
Système
Masque sous-réseau :
Réseau
Passerelle :
Langue
DNS : Auto
Sécurité
Serveur DNS :
Général
Assistance
>
Déplacer " Sélectionner ' Retour
0 0 0
0
0 0 0
0
0 0 0
0
4. Dans le champ Configuration du protocole
Internet, sélectionnez Automatique. (Appuyez
sur ENTRÉE, sélectionnez AUTOMATIQUE,
puis appuyez à nouveau sur ENTRÉE.)
Paramètres réseau Manuelle
Avant de débuter la configuration réseau manuelle,
vous devez avoir en votre possession les valeurs de
réglage du réseau.
Pour obtenir les paramètres du réseau sur
la plupart des ordinateurs fonctionnant sous
Windows, vous devez suivre les étapes suivantes :
■
Windows XP
1. Cliquez avec le bouton droit sur l’icône
2. Dans le menu contextuel, cliquez sur État.
3. Cliquez sur l’onglet Assistance dans la boîte
4. Dans l’onglet Assistance, cliquez sur le bouton
16
automatiquement d’obtenir et de renseigner
les valeurs de l’Adresse IP, du Masque
sous-réseau, etc.
REMARQUE
▪ Ce processus peut prendre jusqu’à cinq minutes
.
paramètres du réseau, appuyez sur le bouton
RETURN.
appuyez sur ENTRÉE pour vous assurer
que le lecteur s’est bien connecté à votre
réseau.
deux fois sur RETURN pour revenir au Menu
principal.
paramètres du réseau, reportez-vous aux
consignes pour la configuration manuelle.
Réseau, située en bas à droite du bureau de
Windows.
de dialogue qui s’affiche.
Détails.
Les Paramètres réseau s’affichent.
■
Windows 7
1. Cliquez sur l’icône Réseau, située en bas à
droite du bureau de Windows.
2. Dans le menu contextuel, cliquez sur Centre
Réseau et partage.
3. Dans la boîte de dialogue qui s’ouvre, cliquez
sur Connexion au réseau local ou Connexion
au réseau sans fil, selon votre type de
connexion réseau.
4. Dans la fenêtre État de Connexion au réseau
local, cliquez sur le bouton Détails. Les
réglages réseau s’affichent.
Pour saisir les paramètres du réseau dans votre
appareil, suivez les étapes ci-dessous :
1. Dans le menu d’accueil, appuyez sur les
boutons ◄► pour sélectionner Paramètres,
puis sur le bouton ENTRÉE.
2. Appuyez sur les boutons ▲▼ pour
sélectionner Réseau, puis sur le bouton
ENTRÉE.
3. Appuyez sur les boutons ▲▼ pour
sélectionner Câble Paramètre Réseau, puis
sur le bouton ENTRÉE. L’écran Paramètres du
Réseau Câblé apparaît.
4. Sélectionnez champ Configuration du
protocole Internet, appuyez sur le bouton
ENTRÉE.
5. Appuyez sur les boutons ▲▼ pour
sélectionner Manuel, puis sur le bouton
ENTRÉE.
6. Appuyez sur le bouton ▼ pour aller dans le
premier champ de saisie (Adresse IP)
7. Utilisez les touches numériques de votre
télécommande pour saisir les chiffres.
8. Quand vous avez rempli un champ, passez au
champ suivant avec le bouton ►.
Vous pouvez aussi utiliser les autres touches
avec les flèches pour vous déplacer vers le
haut et le bas et pour revenir en arrière.
9. Renseignez les champs Adresse IP, Masque
sous-réseau et Passerelle.
10. Appuyez sur le bouton ▼ pour passer au DNS.
11. Appuyez sur le bouton ▼ pour aller dans le
premier champ de saisie du DNS.
12. Saisissez les chiffres comme pour les champs
précédents.
13. Appuyez sur le bouton RETURN de votre
télécommande.
14. Faites un Test réseau pour vous assurer que
l’appareil s’est connecté à votre réseau.
Test réseau
Utilisez ce menu pour vous connecter au
réseau filaire ou contrôler si votre connexion
au réseau fonctionne.
État du réseau
Vérifiez qu’une connexion au réseau et à
Internet a été établie.
Connexion internet BD-Live
Réglez cette option pour autoriser ou bloquer
la connexion Internet lors de l’utilisation du
service BD-LIVE.
• Autoriser (Tout) : La connexion Internet est
autorisée pour tous les contenus BD-LIVE.
• Autoriser (Valide uniquement) :
La connexion Internet est autorisée
uniquement pour les contenus BD-LIVE
contenant un certificat valide.
• Interdire : Aucune connexion Internet n’est
autorisée pour les contenus BD-LIVE.
REMARQUE
✎
▪Qu’est-ce qu’un certificat valide?
Lorsque le lecteur utilise le service BD-LIVE pour
transmettre les données de disque ainsi qu’une
demande de certification du disque au serveur,
celui-ci utilise les données transmises pour vérifier
la validité du disque avant de renvoyer le certificat
au lecteur.
▪Il est possible que la connexion Internet soit limitée
lorsque vous utilisez des contenus BD-LIVE.
Page 73

Système
Paramètre initial
Vous pouvez exécuter la fonction Paramètres
initiaux pour régler les options de langue, les
Paramètres réseau, etc.
Pour obtenir de plus amples informations sur
la fonction Paramètres initiaux, reportezvous à la section y afférente dans le présent
manuel d’utilisation. (Voir pages 12).
Anynet+ (HDMI-CEC)
Anynet+ est une fonction pratique qui
autorise des commandes liées entre plusieurs
lecteurs Samsung compatibles Aynet+.
Pour exécuter cette fonction, connectez le
lecteur à un téléviseur Samsung à l’aide d’un
câble HDMI.
En activant la fonction Anynet+, vous pouvez
commander le lecteur via la télécommande
du téléviseur Samsung et démarrer la lecture
de disque en appuyant tout simplement
sur le bouton LECTURE (
télécommande.
Pour plus d’informations, reportez-vous au
manuel d’utilisation du téléviseur.
• Arrêt: Les fonctions Anynet+ sont
désactivées.
• Activé : Les fonctions Anynet+ sont activées.
REMARQUE
✎
▪Cette fonction sera indisponible si le câble
HDMI ne prend pas en charge le format CEC.
▪Si votre téléviseur Samsung dispose
d’un logo Anynet+, cela signifie qu’il est
compatible Anynet+.
▪Selon le téléviseur utilisé, certaines résolutions
de sortie HDMI peuvent être inopérantes.
Reportez-vous au manuel d’utilisation de
votre téléviseur.
) de la
Gestion données BD
Cette option vous permet de gérer les contenus
téléchargés auxquels vous avez accédé via un
disque Blu-ray prenant en charge le service
BD-LIVE et que vous avez stockés sur un
périphérique de mémoire flash connecté.
Vous pouvez consulter les informations relatives
au périphérique, notamment sa capacité de
stockage, supprimer les données Blu-ray ou
changer le périphérique de mémoire flash.
Informations relatives à l’écran Gestion
données Blu-ray :
• Périph. Actuel : Permet d'afficher le
périphérique connecté.
• Taille totale : Capacité totale de la mémoire
du périphérique.
• Taille disponible : Mémoire disponible sur le
périphérique.
• Supprimer données BD : Permet de supprimer
toutes les données BD conservées sur le
périphérique de stockage.
• Changer périph. : Permet de changer la
mémoire flash souhaitée pour stocker les
données BD.
REMARQUE
✎
▪En mode mémoire externe, la lecture du
disque pourra s’arrêter si vous déconnectez
le périphérique USB en cours d’exécution.
▪Seuls les périphériques USB formatés selon
le système de fichiers FAT (label de volume
DOS 8.3) sont pris en charge. Nous vous
recommandons d’utiliser des périphériques
USB prenant en charge le protocole USB
2.0 avec une vitesse de lecture/d’écriture
supérieure ou égale à 4 Mo/s.
▪La fonction Reprise de la lecture peut
être inopérante après le formatage du
périphérique de stockage.
▪La capacité totale de mémoire disponible
pour l’option Gestion données Blu-ray peut
varier selon les conditions.
DivX® Video On Demand
Affichez les codes d’enregistrement DivX® VOD
pour acheter et lire des contenus DivX® VOD.
Langue
Vous pouvez sélectionner la langue de votre
choix pour le menu Accueil, le menu du
disque, etc.
• Menu A l’écran : Permet de sélectionner la
langue de l’affichage à l’écran.
• Menu du Disque : Permet de sélectionner
la langue d’affichage du menu de disque.
• Audio : Permet de sélectionner la langue
pour les données audio du disque.
• Sous-titre : Permet de sélectionner la
langue pour les sous-titres du disque
REMARQUE
✎
▪ La langue sélectionnée n’apparaîtra que si elle
est prise en charge par le disque.
Sécurité
Lorsque vous ouvrez ce menu pour la
première fois, l’écran de configuration du mot
de passe s’affiche.
Renseignez ce code à 4 chiffres à l’aide des
touches numériques. (Le mot de passe par
défaut est 0000.)
Contrôle parent. BD
Permet d’empêcher la lecture de disques Blu-ray
comportant une classification par tranche d’âge
spécifique à moins d’entrer un mot de passe.
• Arrêt: Le Contrôle Parental BD n’est pas
activé : tous les disques Blu-ray seront lus
dans leur intégralité.
• Activé : Ceci empêche la lecture du disque
Blu-ray non conforme à la classification
agréée par le Contrôle Parental.
.
Contrôle parent. DVD
Cette fonction opère en conjonction avec les
disques les DVD auxquels une classification par
catégorie d’âge ou une classification numérique
a été attribuée indiquant le niveau de maturité du
contenu. Ces numéros vous aident à contrôler les
types de disques ou les DVD que vous pouvez
regarder en famille sans souci.
Sélectionnez le niveau de contrôle que vous
souhaitez définir.
Par exemple, si vous sélectionnez le niveau 6,
l’appareil lira les disques classés 6 et au-dessous,
et ne lira pas les disques classés 7 ou 8.
Les numéros aux valeurs élevées sont indicatifs de
contenu pour adultes
.
Verrouillage YouTube
Limitez l’utilisation du service YouTube tant
que le mot de passe n’est pas saisi.
• Arrêt : Désactivez le verrouillage YouTube.
• Activé : Activez le verrouillage YouTube.
Modifier PIN
Cette option permet de modifier le mot de passe
à 4 chiffres utilisé pour accéder aux fonctions de
sécurité.
Si vous avez oublié votre mot de passe
1. Retirez le disque.
2. Appuyez sur le bouton ARRÊT
panneau avant et maintenez-le enfoncé
pendant au moins 5 secondes.
Tous les paramètres seront réinitialisés sur
leur valeur d’origine par défaut.
REMARQUE
✎
▪ Lorsque les réglages d’usine par défaut sont
rétablis, toutes les données Blu-ray utilisateur
stockées sur l’appareil seront effacées.
( @ )
du
17
Page 74

Général
Fuseau horaire
Vous pouvez spécifier le fuseau horaire
applicable
à votre région.
Assistance
Mise à niveau du logiciel
Le menu Mise à niveau du logiciel vous permet
de mettre à niveau le logiciel du lecteur pour
améliorer ses performances ou obtenir des
services supplémentaires.
En ligne
Pour effectuer la mise à niveau En ligne, suivez les
étapes suivantes :
1. Sélectionnez En ligne, puis appuyez sur le
bouton ENTRÉE. Le message Connexion au
serveur en cours apparaît.
2. Un message contextuel apparaîtra dès qu’une
mise à jour est disponible.
3. Si vous sélectionnez Oui, le lecteur s’éteindra
automatiquement avant de se rallumer.
(N’allumez jamais le lecteur durant la mise à
jour.)
4. La fenêtre du processus de mise à jour
apparaît. Lorsque la mise à jour est
terminée, le lecteur s’éteindra à nouveau
automatiquement.
5. Appuyez sur le bouton POWER afin de mettre
sous tension le lecteur.
REMARQUE
✎
▪La mise à jour sera terminée une fois que l’appareil
se sera à nouveau éteint après le redémarrage
automatique. Appuyez sur le bouton POWER si
vous souhaitez allumer l’appareil mis à jour.
USB
Pour effectuer la mise à niveau par USB, suivez les
étapes suivantes :
1. Visitez www.samsung.com/bluraysupport
2. Téléchargez sur l’ordinateur le dossier
3. Dézippez le dossier compressé sur
4. Copiez le fichier RUF sur une clé USB à
5. Vérifiez qu’il n’y a pas de disque dans le
6. Dans le menu du lecteur, allez à Paramètres >
7. Sélectionnez USB.
✎
▪Évitez d’éteindre et de rallumer le lecteur
manuellement durant le processus de mise à
jour.
▪Samsung Electronics ne saurait être tenu
responsable du dysfonctionnement du lecteur
causé par une connexion Internet instable ou
une négligence de la part de l’utilisateur durant
la mise à niveau du logiciel.
▪Si vous souhaitez annuler la mise à niveau en
cours de téléchargement du logiciel de mise à
niveau, appuyez sur le bouton ENTRÉE.
compressé de la mise à niveau la plus récente
du logiciel USB.
l’ordinateur. Vous devriez avoir un seul fichier
RUF portant le même nom que le dossier
compressé.
mémoire flash.
lecteur, puis introduisez la clé USB à mémoire
flash dans le port USB du lecteur.
Assistance > Mise à niveau du logiciel.
REMARQUE
▪Le tiroir disque doit être vide lors de la mise à
niveau du logiciel via la prise USB hôte.
▪Une fois la mise à niveau terminée, consultez les
détails du logiciel dans le menu Mise à niveau
du logiciel.
▪N’éteignez pas le lecteur durant la mise à
niveau du logiciel. Ceci peut provoquer le
dysfonctionnement du lecteur.
▪Les mises à niveau logicielles à l’aide de
la prise USB hôte doivent être effectuées
uniquement à l’aide d’une mémoire flash USB.
Notif. mise à niveau auto
Si vous avez connecté votre lecteur à votre
réseau, puis activé la Notification de mise à
jour automatique, le lecteur vous informera
automatiquement lorsqu’une nouvelle version du
logiciel est disponible pour le lecteur.
Pour activer la Notification de mise à jour
automatique, veuillez suivre les étapes suivantes :
1. Sélectionnez la Notif. mise à niveau auto
2. Appuyez sur les boutons ▲▼ pour sélectionner
Si une nouvelle version du logiciel est disponible,
le lecteur vous en informe grâce à un message
contextuel.
1. Un message contextuel apparaîtra si
2. La barre de progression de la mise à jour
3. L’appareil s’éteindra automatiquement
4. Appuyez sur le bouton POWER pour
REMARQUE
✎
Contacter Samsung
Permet d’obtenir les informations de contact pour
les demandes d’assistance portant sur le lecteur.
Conditions contrat de service
Affichez le déni de responsabilité concernant le
contenu et les services tiers.
et appuyez ensuite sur le bouton ENTRÉE.
Activé, puis sur le bouton ENTRÉE.
une mise à niveau est disponible, vous
demandant si vous souhaitez l’effectuer.
Si vous sélectionnez Oui, l’appareil s’éteint
automatiquement, redémarre puis débute
la mise à niveau. (Ne le rallumez pas
manuellement à ce moment!)
s’affichera.
une fois la mise à jour effectuée.
allumer l’appareil.
▪La mise à jour sera terminée une fois que l’appareil
se sera à nouveau éteint après le redémarrage
automatique. Appuyez sur le bouton POWER si
vous souhaitez allumer l’appareil mis à jour.
Évitez d’éteindre et de rallumer le lecteur
manuellement durant le processus de mise à jour.
▪Samsung Electronics ne saurait être tenu
responsable du dysfonctionnement du lecteur
causé par une connexion Internet instable ou une
négligence de la part de l’utilisateur durant la mise
à niveau du logiciel.
Reset
Réinitialise tous les paramètres par défaut sauf
les paramètres réseau.
18
Page 75

Fonctions de base
Lecture d’un vidéo
Lecture
1. Placez délicatement un disque dans le
tiroir, face imprimée dirigée vers le haut.
2. Appuyez sur le bouton LECTURE (
Boutons liés à la lecture
LECTURE ( )
ARRÊT (
PAUSE (
REMARQUE
✎
▪Pour certains disques, il ne suffit pas toujours
d’appuyer sur le bouton ARRÊT (
fois pour mettre en mémoire la position d’arrêt.
▪La lecture des fichiers vidéo d’un débit binaire
égal ou supérieur à 20 Mbps exerce une forte
charge sur les capacités du lecteur et risque, de
ce fait, de s’interrompre en cours d’exécution.
Structure des disques
Le contenu des disques est généralement
réparti tel qu’indiqué ci-dessous.
• Disques Blu-ray, DVD Vidéo
Permet de démarrer la lecture.
Permet d’arrêter la lecture.
• Si vous appuyez sur ce bouton
une fois : La position d’arrêt
sera mémorisée.
)
• Si vous appuyez sur ce bouton
deux fois : La position d’arrêt
ne sera pas mémorisée.
Permet de suspendre la lecture.
)
) une seule
titre 1 titre 2
chapitre1 chapitre2 chapitre1 chapitre2 chapitre3
• CD audio (CD-DA)
piste 1 piste 2 piste 3 piste 4 piste 5
).
• MP3, WMA, DivX, MKV et MP4
dossier (groupe)
fichier 1 fichier 2 fichier 1 fichier 2 fichier 3
1
dossier (groupe) 2
Utilisation du Menu du disque, du
Menu des titres/Menu contextuel
Utilisation du Menu du disque
1. Durant la lecture, appuyez sur
le bouton DISC MENU de la
télécommande.
2. Appuyez sur les boutons ▲▼◄►
pour effectuer une sélection, puis appuyez
sur le bouton ENTRÉE.
REMARQUE
✎
▪Les éléments de menu peuvent varier selon le
disque et ce menu risque d’être indisponible.
hZ
Utilisation du Menu de titres
1. Durant la lecture, appuyez sur
le bouton TITLE MENU de la
télécommande.
2. Appuyez sur les boutons
▲▼◄► pour effectuer la
sélection souhaitée, puis appuyez sur le
bouton ENTRÉE
REMARQUE
✎
▪Les éléments de menu peuvent varier selon le
disque et ce menu risque d’être indisponible.
Lecture de la liste de titres
1. Durant la lecture, appuyez sur le
bouton DISC MENU ou TITLE MENU.
2. Appuyez sur les boutons ▲▼
pour sélectionner l’entrée à
lire dans la liste de titres, puis
appuyez sur le bouton ENTRÉE.
REMARQUE
✎
▪Si le disque possède une liste d’écoute, appuyez
sur le bouton VERT (B) pour y accéder.
Utilisation du Menu contextuel
1. Durant la lecture, appuyez sur
le bouton POPUP MENU de la
télécommande.
2. Appuyez sur les boutons
▲▼◄► ou ENTRÉE pour
sélectionner le menu souhaité
REMARQUE
✎
▪Les éléments de menu peuvent varier selon le
disque et ce menu risque d’être indisponible.
.
Utilisation des fonctions
Z
Rechercher et Saut
Au cours de la lecture, vous pouvez effectuer
une recherche rapide dans un chapitre ou une
piste donné(e) et utiliser la fonction de saut
pour passer à la sélection suivante.
Recherche d’une scène
hzZyx
• Pendant la lecture, appuyez sur le bouton
RECHERCHER (
À chaque fois que vous appuyez sur le bouton
RECHERCHER (
lecture défilent dans l’ordre suivant :
z
h
BD-ROM,
BD-RE/-R,
DVD-RW/-R,
DVD+RW/+R,
DVD-VIDEO
DivX, MKV,
MP4
• Pour reprendre la lecture à une vitesse normale,
appuyez sur le bouton LECTURE (
REMARQUE
✎
▪Le lecteur ne lit pas les données audio en mode recherche.
Saut de chapitre
)
)
(
(
)
(
1
4
1
4
1
1
), les vitesses de
)
)
5 ) 6 ) 7
(
(
5 ( 6 ( 7
)
(
hzZyx
• Pendant la lecture, appuyez sur le bouton SAUT
(
).
Si vous appuyez sur le bouton SAUT (
disque passera au chapitre suivant.
Si vous appuyez sur le bouton SAUT (
le disque passera en début de chapitre. Si vous
appuyez une nouvelle fois sur ce bouton, le
disque reviendra au début du chapitre précédent.
).
2 ) 3
2 ( 3
2 ) 3
2 ( 3
).
), le
),
19
Page 76

Lecture au ralenti / Lecture pas à pas
Lecture au ralenti
hzZyx
• En mode pause, appuyez sur le bouton
RECHERCHER (
Chaque fois que vous appuyez sur le bouton
RECHERCHER (
change comme suit : * 1/8 * 1/4 * 1/2
• Pour reprendre la lecture à une vitesse normale,
appuyez sur le bouton LECTURE (
REMARQUE
✎
▪Le lecteur ne lit pas les données audio en mode
Ralenti.
Lecture pas à pas
).
), la vitesse de lecture
).
hzZyx
• En mode pause, appuyez sur le bouton
PAUSE (
appuyez sur le bouton PAUSE (
nouvelle image apparaît.
• Pour reprendre la lecture à une vitesse
normale, appuyez sur le bouton LECTURE
( ).
REMARQUE
✎
▪Le lecteur ne lit pas les données audio en mode Pas à pas.
Utilisation du bouton TOOLS
Durant la lecture, vous pouvez
commander le menu du disque en
appuyant sur le bouton TOOLS.
REMARQUE
✎
▪Le menu Outils peut varier selon le disque.
20
). À chaque fois que vous
), une
Accès direct à la scène souhaitée
hzZy
1. Durant la lecture, appuyez sur le bouton
TOOLS.
2. Appuyez sur les boutons ▲▼ pour
sélectionner Titre, Chapitre, ou Durée de
lecture.
3. Appuyez sur les boutons ◄► ou sur les
boutons numériques pour sélectionner le
titre, le chapitre ou le temps souhaité, puis
appuyez sur le bouton ENTRÉE.
Répétition du titre ou du chapitre
4. Appuyez sur le bouton ENTRÉE à
5. Pour reprendre le cours normal de la lecture,
6. Appuyez sur les boutons ▲▼ pour sélectionner
REMARQUE
✎
Sélection de la langue de la bande son
hzZy
Cette option vous permet de répéter le titre du
disque ou le chapitre.
Selon les disques, il est possible que la fonction de
répétition ne soit pas disponible.
1. Durant la lecture, appuyez
sur le bouton REPEAT de la
télécommande.
2. Appuyez sur les boutons ▲▼ pour
sélectionner Chapitre ou Titre, puis
appuyez sur le bouton ENTRÉE.
3. Pour reprendre le cours normal de la lecture,
appuyez à nouveau sur le bouton REPEAT.
4. Appuyez sur les boutons ▲▼ pour
sélectionner Arrêt, puis appuyez sur le
bouton ENTRÉE.
Répétition de la section
Vous pouvez également activer
cette fonction en appuyant sur le
bouton AUDIO de la télécommande.
1. Durant la lecture, appuyez sur le bouton TOOLS.
2. Appuyez sur les boutons ▲▼ pour
3. Appuyez sur les boutons ◄► pour sélectionner
REMARQUE
✎
hzZy
1. Durant la lecture, appuyez
sur le bouton REPEAT de la
télécommande.
2. Appuyez sur les boutons ▲▼ pour
sélectionner Répétition A-B.
3. Appuyez sur le bouton ENTRÉE à
l’emplacement sur lequel vous souhaitez
démarrer la répétition (A).
l’emplacement sur lequel vous souhaitez
arrêter la répétition (B).
appuyez à nouveau sur le bouton REPEAT.
Arrêt, puis appuyez sur le bouton ENTRÉE.
▪Si vous définissez le point (B) dans les cinq secondes
qui suivent, le signal d’interdiction apparaîtra.
▪Les éléments de menu peuvent varier selon le
disque et ce menu risque d’être indisponible.
hzZx
sélectionner Audio.
la langue souhaitée pour la bande son.
▪L’indicateur ◄► ne s’affichera pas à l’écran si la
section BONUSVIEW ne contient pas de réglages
BONUSVIEW audio.
▪Les informations concernant la fonction principale ou le
mode BONUSVIEW s’afficheront également si le disque
Blu-ray dispose d’une section BONUSVIEW.
Utilisez le bouton ◄► pour basculer entre le mode
audio principal et le mode audio BONUSVIEW.
▪La disponibilité des langues proposées via la fonction
de la langue de la bande son dépend des langues
encodées sur le disque. Par conséquent, cette fonction
ou certaines langues peuvent être indisponibles.
▪Un disque Blu-ray peut contenir jusqu’à 32 langues
pour la bande son alors qu’un DVD dispose d’un total
de 8 langues.
▪Certains disques Blu-ray vous autorisent à sélectionner la
bande son anglaise PCM ou Dolby Digital.
▪Si vous appuyez sur le bouton AUDIO de la
télécommande, la barre Audio apparaîtra.
Appuyez sur le bouton RETURN pour supprimer la
barre Audio.
Sélection de la langue des sous-titres
hZx
Vous pouvez également activer cette
fonction en appuyant sur le bouton
SUBTITLE de la télécommande.
1. Durant la lecture, appuyez sur le bouton TOOLS.
2. Appuyez sur les boutons ▲▼ pour
sélectionner Sous-titres.
3. Appuyez sur les boutons ◄►pour sélectionner
la langue des sous-titres de votre choix.
REMARQUE
✎
▪Selon le disque Blu-ray ou le DVD utilisé, vous pouvez
changer la langue des sous-titres depuis le Menu du
disque. Appuyez sur le bouton DISC MENU.
▪Cette fonction dépend de la sélection des sous-titres
encodés sur le disque et peut ne pas être disponible sur
tous les disques Blu-ray/DVD.
▪Un disque Blu-ray peut contenir jusqu’à 255 langues
de sous-titres alors qu’un DVD dispose d’un total de 32
langues.
▪Les informations concernant la fonction principale ou le
mode BONUSVIEW s’afficheront également si le
Blu-ray dispose d’une section BONUSVIEW.
▪Cette fonction modifie à la fois les sous-titres
principaux et secondaires.
▪Le nombre total de sous-titres principaux et
secondaires s’affiche.
▪Si vous appuyez sur le bouton SUBTITLE de la
télécommande, la barre des sous-titres apparaîtra.
Appuyez sur le bouton RETURN pour supprimer la barre
.
des sous-titres
disque
Page 77

Changement d’angle de la caméra
Réglage de BONUSVIEW
hZ
Lorsqu’un disque Blu-ray/DVD propose plusieurs
angles de vue pour une scène donnée, vous
pouvez utiliser la fonction ANGLE.
1. Durant la lecture, appuyez sur le bouton TOOLS.
2. Appuyez sur les boutons ▲▼ pour
sélectionner Angle.
3. Appuyez sur les boutons ◄► pour
sélectionner l’angle souhaité.
Sélection des Paramètres de l’image
hzZy
Cette fonction vous permet de régler la qualité de
l’image vidéo lorsque le lecteur est connecté à un
téléviseur.
1. Durant la lecture, appuyez sur le bouton TOOLS.
2. Appuyez sur les boutons ▲▼ pour sélectionner
Réglage de l’image, puis appuyez sur le
bouton ENTRÉE.
3. Appuyez sur les boutons ◄► pour sélectionner
le Réglage de l’image.
• Dynamique : Choisissez ce réglage pour
accentuer la netteté de l’image.
• Normal : Choisissez ce réglage pour la
plupart des applications d’affichage.
• Film : Ceci est le réglage le mieux adapté au
visionnage de films.
• Utilisateur : Ce réglage vous permet
de régler respectivement la netteté et la
réduction de bruit.
REMARQUE
✎
▪ Ce menu n’apparaît pas lors de l’utilisation de la
fonction BD Wise.
La fonction BONUSVIEW vous permet d’afficher
du contenu supplémentaire (tels que des
commentaires) dans une petite fenêtre d’écran
alors que le film est en cours de lecture.
Cette fonction ne sera disponible que si le disque
prend en charge la fonctionnalité Bonusview.
1. Durant la lecture, appuyez sur le
bouton TOOLS.
2. Appuyez sur les boutons ▲▼ pour
sélectionner BONUSVIEW Vidéo
ou BONUSVIEW Audio.
3. Appuyez sur les boutons ◄► pour sélectionner
la fonction bonusview de votre choix.
REMARQUE
✎
Lecture d’un CD Audio (CD-DA)/MP3
1. Insérez un CD audio (CD-DA) ou un
2. Appuyez sur les boutons ▲▼ pour
h
▪ Si vous modifiez le réglage de BONUSVIEW
Vidéo l’option, BONUSVIEW Audio changera
automatiquement en fonction du paramétrage de
BONUSVIEW Vidéo
.
Écouter de la musique
ow
disque MP3.
• Pour un CD audio (CD-DA), la première
piste s’exécute automatiquement.
• Pour un disque MP3, appuyez sur les
boutons
◄►
puis appuyez sur la touche ENTRÉE
et sélectionnez
sélectionner la piste que vous souhaitez
écouter puis appuyez sur le bouton ENTRÉE.
Musique,
.
Éléments de l’écran CD audio
(CD-DA)/MP3
31 2
1/6
TRACK 001
TRACK 002
TRACK 003
TRACK 004
TRACK 005
TRACK 006
"
Pause
Liste de lecture
Outils
4
.
05:57
04:27
04:07
03:41
03:17
03:35
Retour
'
TRACK 001
7
+
00:08 / 05:57
6
CD
5
Affiche les informations relatives à la
1
musique.
Affiche la liste d’écoute.
2
Affiche la piste actuellement sélectionnée/la
3
totalité des pistes.
Affiche les boutons disponibles.
4
Affiche la durée de lecture actuelle/la durée
5
de lecture totale.
Affiche l’état actuel de la lecture.
6
Affiche l’état de la répétition de la lecture.
7
Répétition d’un CD Audio (CD-DA)/MP3
1. Durant la reproduction de la liste
d’écoute, appuyez sur le bouton
TOOLS.
2. Sélectionnez Mode Répétition,
puis appuyez sur les boutons ◄► pour
choisir le mode de répétition souhaité.
3. Appuyez sur le bouton ENTRÉE
Mode Répétition :
Les pistes du disque
sont lues dans l’ordre
dans lequel elles ont
été enregistrées sur le
disque.
La piste en cours est
répétée.
La piste en cours est
répétée.
Toutes les pistes sont
répétées.
L’option de lecture
aléatoire permet de lire
les pistes d’un disque
dans un ordre aléatoire.
(
(
(
( )
Arrêt
Piste
)
Une fois
)
) Tous
Aléatoire
Audio CD
(CD-DA)/MP3
Audio CD
(CD-DA)
MP3
Audio CD
(CD-DA)/MP3
Audio CD
(CD-DA)/MP3
Liste d’écoute
1. Insérez un CD audio (CD-DA) ou un disque
MP3.
• Pour un CD audio (CD-DA), la première
piste s’exécute automatiquement.
• Pour un disque MP3, appuyez sur les
boutons ◄► et sélectionnez Musique,
puis appuyez sur le bouton ENTRÉE.
2. Pour accéder à la Liste musicale, appuyez
sur le bouton ARRÊT (
L’écran Liste musicale s’affiche.
3. Appuyez sur les boutons ▲▼◄► pour
aller à la piste audio souhaitée, puis sur le
bouton JAUNE(C) pour cocher la piste.
Répétez cette procédure pour sélectionner
d’autres pistes.
4. Si la liste de lecture contient une piste que
vous ne souhaitez pas, appuyez à nouveau
sur le bouton JAUNE(C).
La piste sélectionnée est alors supprimée.
5. Appuyez sur le bouton ENTRÉE pour lire les
pistes sélectionnées.
La piste sélectionnée est lue automatiquement.
) ou RETURN.
21
Page 78

6. Pour accéder à la Liste musicale, appuyez sur le
bouton ARRÊT (
7. Pour accéder à la Liste de lecture, appuyez sur
) ou RETURN.
le bouton ENTRÉE.
REMARQUE
✎
▪ Vous pouvez créer une liste d’écoute comportant jusqu’à
99 pistes extraites de différents CD audio (CD-DA).
Lecture de photos
• Fond musical: Sélectionnez cette option pour
écouter de la musique tout en visionnant une
photo.
• Zoom : Sélectionnez cette option pour
agrandir l’image actuellement sélectionnée.
(Agrandissement jusqu’à 4 fois la taille réelle)
• Pivoter : Sélectionnez cette option pour faire
tourner l’image. (Ceci entraînera la rotation de
l’image dans le sens des aiguilles d’une montre
ou dans le sens inverse.)
• Information : Cette option permet d’afficher les
informations relatives à l’image, notamment son
G
Lecture de fichier JPEG
nom et sa taille.
REMARQUE
✎
▪Pour activer la fonction de musique de fond, le
1. Insérez un disque JPEG.
2. Appuyez sur les boutons ▲▼ pour
sélectionner Photos, puis appuyez sur le
bouton ENTRÉE.
3. Appuyez sur les boutons ▲▼◄► pour
sélectionner le dossier que vous souhaitez
▪Démarrez puis arrêtez tour à tour le Diaporama,
exécuter, puis appuyez sur le bouton
ENTRÉE.
4. Appuyez sur les boutons ▲▼◄► pour
sélectionner la photo que vous souhaitez lire,
puis appuyez sur le bouton ENTRÉE.
REMARQUE
✎
▪ Vous ne pouvez pas agrandir les sous-titres ou
les graphiques PG (Accord parental) pour les
afficher en mode plein écran.
Utilisation du bouton TOOLS
Vous pouvez faire appel à différentes
fonctions en appuyant sur le bouton
TOOLS.
• Lancer le diaporama : Sélectionnez
cette option pour démarrer le diaporama
• Arrêter le diaporama : permet d’arrêter le
Lecture des photos sélectionnées
Vous pouvez sélectionner uniquement certaines
photos à lire en appuyant sur le bouton JAUNE (C) de
votre télécommande. Pour sélectionner des photos
spécifiques, veuillez suivre les étapes suivantes :
1. Sélectionnez le dossier contenant les photos que
vous souhaitez visionner, et appuyez ensuite sur le
bouton ENTRÉE.
2. Appuyez sur les boutons ▲▼◄► pour sélectionner
la photo à lire, et appuyez ensuite sur le bouton
JAUNE (C). Une coche apparaît sur la photo
3. Répétez l’Étape 2 mentionnée ci-dessus pour
chaque photo que vous souhaitez lire.
REMARQUE
✎
▪ Pour désélectionner une photo, appuyez sur les
diaporama.
• Vit. diaporama : permet de régler la vitesse
d’affichage du diaporama.
4. Une fois l’opération terminée, appuyez sur le
bouton ENTRÉE. Le diaporama démarre.
fichier photo et le fichier musical doivent être
contenus sur le même support de stockage.
Cependant, la qualité sonore peut être affectée
par le débit binaire du fichier MP3, la taille de la
photo et la méthode d’encodage utilisée.
selon que vous utilisez le diaporama ou non.
boutons ▲▼◄► pour la mettre en surbrillance, puis
appuyez sur le bouton JAUNE (C).
Lecture de contenu à partir d’un
périphérique de stockage USB
Vous pouvez utiliser la connexion USB pour
lire différents types de fichiers multimédia
(MP3, JPEG, DivX, etc.) contenus sur un
périphérique de stockage USB.
1. Allez au menu d’accueil.
2. En mode Arrêt, connectez le périphérique
de stockage USB au port USB situé sur
le panneau arrière du lecteur.
Le message « Changer de périphérique ? »
s’affiche.
3. Appuyez sur les boutons ◄► pour
sélectionner Oui, puis sur le bouton
ENTRÉE.
4. Appuyez sur le bouton ROUGE(A) ou sur
le bouton BLEU(D).
Si vous appuyez sur le bouton
ROUGE(A), passez à l’étape 5.
Si vous appuyez sur le bouton BLEU(D),
passez à l’étape 4
Pas de Disque
123
DLNA
123 a Changer périph.
5. Appuyez sur les boutons ▲▼ pour
sélectionner USB, puis appuyez sur le
bouton ENTRÉE.
6. Appuyez sur les boutons ◄► pour
sélectionner les vidéos, la musique ou
les photos désirées, puis sur le bouton
ENTRÉE. Passez à l’étape 7.
-1
. Appuyez sur le bouton BLEU(D), l’écran
4
ci-dessous s’affiche. Passez à l’étape 5
c
Retirer péri. USB
-1
You Tube
.
d
Afficher périph.
Entrer
"
-1
.
You Tube
123
123 d
Accueil "
Entrer
5-1. Appuyez sur les boutons ◄► pour
sélectionner USB, puis sur le bouton
ENTRÉE.
-1
6
. Appuyez sur les boutons ▲▼ pour
sélectionner les vidéos, la musique ou les
photos désirées, puis sur le bouton ENTRÉE.
7. Pour lire les fichiers de vidéo, de musique ou
de photo, reportez-vous aux pages 19 à 22.
REMARQUE
✎
▪Vous devez retirer le périphérique de stockage
USB en toute sécurité (en exécutant la fonction
« Retirer péri. USB ») pour éviter d’endommager la
mémoire USB. Appuyez sur le bouton MENU pour
aller sur le menu Accueil, sélectionnez le bouton
JAUNE (C), puis appuyez sur le bouton ENTRÉE.
▪Lorsque les fichiers Audio-CD (CD-DA), MP3 et
JPEG sont en mode Arrêt, vous ne pouvez pas
afficher l’image en plein écran en appuyant sur le
bouton FULL SCREEN de la télécommande.
▪Si vous insérez un disque en cours d’exécution
d’un contenu sur le périphérique de stockage USB,
le mode de l’appareil passe automatiquement à
« DVD ou CD ».
22
Page 79

Services réseau
Annexes
Vous pouvez profiter de différents services réseau
tels que BD-LIVE en connectant le lecteur au réseau.
Lisez les instructions qui suivent avant de
recourir à un service réseau.
1. Connectez le lecteur au réseau.
(pages 10~11)
2. Configurez les paramètres réseau.
(Voir pages 16)
BD-LIVE™
Une fois que le lecteur est connecté au réseau,
vous pouvez profiter de différents contenus
de services liés aux films en utilisant un disque
compatible BD-LIVE.
1. Connectez une carte mémoire flash USB à
la prise USB située à l’arrière du lecteur, puis
vérifiez sa capacité de mémoire disponible.
Le périphérique de mémoire doit avoir au
moins 1 Go d’espace libre pour satisfaire
aux exigences des services BD-LIVE.
2. Insérez un disque Blu-ray prenant en charge
la technologie BD-LIVE.
3. Sélectionnez un élément dans les contenus
de service BD-LIVE fournis par le fabricant
de disque.
REMARQUE
✎
▪L’utilisation du service BD-LIVE ainsi que
des contenus fournis peuvent varier selon le
fabricant du disque.
Utilisation de la fonction AllShare
AllShare vous permet de lire sur le lecteur des
fichiers de musique, de vidéo et de photo stockés
sur votre ordinateur, ou votre périphérique NAS.
Pour utiliser AllShare sur le lecteur, il faut connecter
le lecteur à votre réseau (Voir pages 10 - 11).
Pour exécuter Allshare sur l’ordinateur, vous devez
d’abord installer le logiciel AllShare sur l’ordinateur.
Si vous disposez d’un ou d’un périphérique de
stockage NAS, vous pourrez utiliser AllShare sans
recourir à un logiciel supplémentaire.
Pour télécharger le logiciel AllShare
1. Connectez-vous sur Samsung.com.
2. Cliquez sur Assistance, saisissez la référence
de votre produit dans la fenêtre dédiée à cet
effet puis cliquez sur Voir les Résultats.
3. Une fois l’écran suivant affiché, cliquez sur
Téléchargements pour accéder au menu
Téléchargements.
4. Cliquez ensuite sur Logiciel.
5. Dans la ligne dédiée à AllShare, cliquez sur
l’icône du fichier listé sous Fichier afin de
lancer le téléchargement.
Lecture de contenu se trouvant dans
votre PC avec un lecteur Blu-ray
Vous pouvez visionner les fichiers partagés de
votre ordinateur avec votre lecteur Blu-ray.
Vous pouvez obtenir les instructions détaillées pour
utiliser AllShare sur le site Web Samsung.com.
Connexion AllShare
Lecteur Blu-ray
Lecture de fichiers
situés sur le PC
Dépannage
Avant de requérir une réparation, vérifiez d’abord les points suivants.
PROBLÈME SOLUTION
La télécommande ne permet
d’exécuter aucune opération.
Le disque ne fonctionne pas. • Assurez-vous que le disque est inséré la face imprimée orientée vers le haut.
Le menu du disque ne s’affiche
pas.
Le message d’interdiction apparaît
à l’écran.
Le mode Lecture n’est pas celui
qui a été sélectionné dans le menu
de configuration.
Impossible de modifier le format
d’image de l’écran.
Absence de son. • Assurez-vous d’avoir sélectionné la sortie numérique appropriée dans le menu
L’écran est bloqué. • Il est possible que l’écran du téléviseur n’affiche pas d’image lorsque la résolution
• Vérifiez les piles de la télécommande. Vous devez peut-être les remplacer.
• Utilisez la télécommande à une distance maximale de 6,1 m du lecteur.
• Retirez les piles et appuyez sur un ou plusieurs boutons pendant plusieurs
minutes afin de procéder au drainage du microprocesseur de la télécommande
pour la réinitialiser. Insérez à nouveau les piles et essayez de faire fonctionner la
télécommande.
• Vérifiez le numéro de zone du disque Blu-ray/DVD.
• Vérifiez que le disque possède des menus.
• Ce message s’affiche lorsque vous appuyez sur un bouton non valide.
• Le logiciel du disque Blu-ray/DVD ne prend pas en charge la fonction en question
(par ex. : les angles).
• Vous avez demandé un titre, un numéro de chapitre ou un temps de recherche
hors de portée du disque.
• Certaines fonctions sélectionnées dans le menu de configuration pourront ne
pas s’exécuter correctement si le disque n’a pas été encodé avec les fonctions
correspondantes.
• Sur le disque Blu-ray/DVD, le format d’image de l’écran est spécifié sur une valeur
fixe.
• Il ne s’agit pas d’un problème lié au lecteur.
Options audio.
de la sortie HDMI n’est pas prise en charge par le téléviseur (par exemple 1080p).
• Appuyez sur le bouton ARRÊT (
secondes en l’absence de disque inséré dans le lecteur. Tous les paramètres
seront réinitialisés sur leur valeur d’origine.
• Le rétablissement des réglages par défaut entraîne l’effacement de toutes les
données Blu-ray de l’utilisateur stockées sur le lecteur.
@
) (du panneau avant) pendant plus de 5
23
Page 80

PROBLÈME SOLUTION
Mot de passe oublié. • Appuyez sur le bouton ARRÊT
Si vous rencontrez d’autres
problèmes que ceux qui ont été
mentionnés ci-dessus.
L’image est bruyante ou déformée. • Assurez-vous que le disque n’est ni sale ni rayé.
Aucune sortie HDMI. • Vérifiez la connexion entre le téléviseur et la prise HDMI du lecteur.
Écran de sortie HDMI anormal. • Si du bruit aléatoire apparaît à l’écran, cela signifie que le téléviseur
Fonction AllShare
Je peux voir les dossiers partagés
via AllShare mais pas les fichiers.
La vidéo est lue par intermittence. • Vérifiez si le réseau est instable.
La connexion AllShare entre
le téléviseur et l’ordinateur est
instable.
de 5 secondes en l’absence de disque inséré dans le lecteur. Tous les
paramètres seront réinitialisés sur leur valeur d’origine, y compris le mot
de passe.
N’utilisez ce bouton qu’en cas d’extrême nécessité.
• Le rétablissement des réglages par défaut entraîne l’effacement de
toutes les données Blu-ray de l’utilisateur stockées sur le lecteur.
• Consultez la table des matières du manuel d’utilisation et repérez la
section comportant les explications relatives au problème, puis suivez à
nouveau la procédure indiquée.
• Si le problème n’est toujours pas résolu, contactez le service après-vente
agréé Samsung le plus proche.
• Nettoyez le disque.
• Vérifiez que votre téléviseur prend en charge les résolutions d’entrée
HDMI 576p/480p, 720p, 1080i, 1080p.
ne prend pas en charge le système HDCP (Système de protection des
contenus numériques en haute définition).
• AllShare affiche uniquement les fichiers correspondant aux catégories
suivantes : image, musique et film. Les fichiers ne qui correspondent à
aucune de ces trois catégories peuvent ne pas s’afficher.
• Vérifiez que le câble réseau est correctement branché et que le réseau
n’est pas surchargé.
• L’adresse IP au sein d’un même sous-réseau doit être unique. Si tel
n’est pas le cas, ce phénomène pourra être dû à des interférences IP.
• Vérifiez que vous disposez d’un pare-feu activé.
Dans ce cas, désactivez la fonction de pare-feu.
( @ )
(du panneau avant) pendant plus
PROBLÈME SOLUTION
BD-LIVE
Je n’arrive pas à me connecter au
serveur BD-LIVE.
Une erreur s’est produite en cours
d’utilisation du service BD-LIVE.
REMARQUE
✎
▪ Le rétablissement des réglages par défaut entraîne l’effacement de toutes les données Blu-ray de
l’utilisateur stockées sur le lecteur.
• Vérifiez si la connexion réseau a été établie ou pas en utilisant le menu État
réseau.
• Vérifiez si le périphérique de mémoire USB est connecté au lecteur.
• Le périphérique de mémoire doit avoir au moins 1 Go d’espace libre pour
héberger le service BD-LIVE.
Vous pouvez vérifier la capacité disponible sous Gestion données Blu-ray.
• Vérifiez si le menu Connexion Internet BD-Live est spécifié sur Permettre tout.
• Si toutes les mesures préconisés ci-dessus échouent, contactez le fournisseur
de contenus ou mettez à jour le lecteur à l’aide de la dernière version de
micrologiciel disponible.
• Le périphérique de mémoire doit avoir au moins 1 Go d’espace libre pour
héberger le service BD-LIVE.
Vous pouvez vérifier la capacité disponible sous Gestion données Blu-ray.
Réparation
Si vous nous contactez pour une demande de réparation, des frais supplémentaires pourront vous
être facturés dans les cas suivants :
1. Vous demandez l’intervention d’un ingénieur à domicile mais il s’avère que le produit ne
présente aucune anomalie.
2. Vous portez l’unité au centre de réparation mais il s’avère que celle-ci ne présente aucune
défaillance.
Le montant de ces frais vous sera communiqué avant la conduite d’une intervention à domicile ou
l’exécution d’éventuels travaux sur votre lecteur.
Nous vous recommandons de lire ce manuel attentivement, de rechercher une solution en ligne
sur le site Web www.samsung.com, ou de contacter le service après-vente de SAMSUNG avant
de demander à faire réparer votre lecteur.
24
Page 81

Caractéristiques techniques
Poids 1 Kg
Dimensions 187 (L) X 187 (P) X 56 (H) mm
Général
USB
HDMI
Sortie audio Sortie audio numérique Optique
Network
- Non pris en charge si la vitesse du réseau est inférieure à 10 Mbit/s.
- La conception et les caractéristiques techniques sont susceptibles d’être modifiées sans préavis.
- Pour obtenir des précisions sur l’alimentation et la consommation d’énergie, reportez-vous à
l’étiquette apposée sur le produit.
- Le poids et les dimensions sont approximatifs.
Plage de températures de
fonctionnement
Plage de taux d’humidité 10 % à 75 %
Type A USB 2.0
Sortie c.c 5V 500mA max
Vidéo 1080p, 1080i, 720p, 576p/480p
Audio PCM, Bitstream
Ethernet
+5°C à +35°C
Borne 100BASE-TX
25
Page 82

Avis de conformité et de compatibilité
TOUS les disques ne sont PAS compatibles.
• Selon les restrictions décrites ci-dessous ou mentionnées tout au long de ce manuel, y compris dans la section Types et
caractéristiques de disque, les types de disque pouvant être lus sont comme suit : disques BD-ROM préenregistrés disponibles
dans le commerce, DVD vidéo et CD audio (CD-DA) ; disques BD-RE/-R, DVD-RW/-R et disques CD-RW/-R .
• Les disques qui ne sont pas mentionnés ci-dessus ne peuvent pas et/ou ne sont pas conçus pour être lus sur ce lecteur. De
même, il est possible que certains disques répertoriés dans l’énumération précédente ne puissent pas être lus à cause d’une
ou de plusieurs raisons fournies ci-dessous.
• Samsung ne peut garantir que ce lecteur pourra lire tous les disques portant les logos BD-ROM, BD-RE/-R, DVD-VIDÉO, DVDRW/-R, DVD+RW/+R et CD-RW/-R. Par ailleurs, il est possible que ce lecteur ne réagisse pas à toutes les commandes ou
n’exécute pas la totalité des fonctionnalités disponibles sur un disque. Ces problèmes, ainsi que d’autres questions liées à la
compatibilité et au fonctionnement du lecteur avec des formats nouveaux ou existants s’expliquent comme suit :
- Blu-ray est un format nouveau, en constante évolution. Par conséquent, il est possible que ce lecteur ne puisse pas exploiter
toutes les fonctionnalités d’un disque Blu-ray car certaines d’entre elles ont été proposées en option ou ajoutées au format
Blu-ray après la fabrication du lecteur alors que d’autres fonctionnalités fournies sont soumises à un délai de disponibilité ;
- les versions existantes et nouvelles des formats de disque ne sont pas toutes prises en charge par ce lecteur ;
- les formats de disque existants et nouveaux peuvent être révisés, modifiés, mis à jour, améliorés et/ou complétés ;
- certains disques sont fabriqués de manière à restreindre le fonctionnement ou à n’autoriser que certaines fonctions lors de
la lecture ;
- certaines fonctionnalités ont été proposées en option ou ajoutées au format Blu-ray après la fabrication du lecteur alors que
d’autres fonctionnalités fournies sont soumises à un délai de disponibilité ;
- certains disques portant les logos BD-ROM, BD-RE/-R, DVD-VIDEO, DVD-RW/-R, DVD+RW/+R ou CD-RW/-R ne sont pas
encore normalisés ;
- certains disques peuvent être illisibles en raison de leur état ou des conditions d’enregistrement ;
- des problèmes ou des erreurs peuvent se produire lors de la création d’un logiciel Blu-ray, DVD ou CD et/ou de la fabrication
des disques ;
- ce lecteur fonctionne différemment d’un lecteur DVD classique ou de tout autre équipement AV ; et/ou
- pour les raisons évoquées tout au long de ce manuel d’utilisation et pour d’autres raisons identifiées et diffusées par le
service après-vente de SAMSUNG.
• Si vous rencontrez des problèmes liés à la compatibilité du disque ou au fonctionnement du lecteur, contactez le service aprèsvente de SAMSUNG.
Vous pouvez également contacter le service après-vente SAMSUNG pour vous renseigner sur les mises à jour disponibles pour
ce lecteur.
• Pour de plus amples informations sur les restrictions de lecture et sur la compatibilité du disque, reportez-vous aux sections
suivantes de ce manuel d’utilisation : Précautions, Avant de lire le manuel d’utilisation, Types et caractéristiques de disque et
Avant la lecture.
• En ce qui concerne la sortie à balayage progressif des lecteurs de disques Blu-ray : NOUS INFORMONS NOS AIMABLES
CLIENTS QUE LES TÉLÉVISEURS HAUTE DÉFINITION NE SONT PAS TOUS ENTIÈREMENT COMPATIBLES AVEC CE produit
ET PEUVENT DE CE FAIT GÉNÉRER DES ARTEFACTS AU NIVEAU DE L’IMAGE. EN CAS DE PROBLÈME LIÉ AUX IMAGES À
BALAYAGE PROGRESSIF, IL EST CONSEILLÉ À L’UTILISATEUR DE CHANGER DE CONNEXION ET DE CHOISIR LA SORTIE
« DÉFINITION STANDARD ». SI VOUS AVEZ DES QUESTIONS CONCERNANT LA COMPATIBILITÉ DE CE produit AVEC
VOTRE TÉLÉVISEUR, VEUILLEZ CONTACTER NOTRE SERVICE APRÈS-VENTE.
Protection contre la copie
• La norme de distribution de contenu et de gestion numérique des droits AACS (Advanced Access Content System) ayant été
approuvée pour le format de disque Blu-ray tout comme le système de brouillage du contenu CSS (Content Scramble System)
l’a été pour le format DVD, il existe certaines restrictions qui sont imposées, notamment en matière de lecture et de sortie du
signal analogique, sur les contenus protégés par le système AACS.
Le fonctionnement de ce lecteur ainsi que les restrictions dont il fait l’objet peuvent varier en fonction de la date d’achat du
produit car ces restrictions ont pu être adaptées et/ou modifiées par le système AACS après la fabrication du produit. Par
ailleurs, les systèmes BD-ROM Mark et BD+ sont également utilisés pour la protection des contenus au format Blu-ray, ce qui
impose aux disques Blu-ray certaines restrictions, notamment en termes de lecture, appliquées aux contenus protégés par les
systèmes BD-ROM Mark et/ou BD+. Pour obtenir de plus amples informations sur les systèmes AACS, BD-ROM Mark et BD+
ou sur ce produit, contactez le service après-vente de SAMSUNG.
• Un grand nombre de disques Blu-ray/DVD sont encodés avec une technique de protection contre la copie. Par conséquent,
vous devriez connecter le lecteur directement et uniquement au téléviseur, sans passer par un magnétoscope. La connexion du
lecteur à un magnétoscope produit une image déformée sur les disques Blu-ray/DVD protégés contre la copie.
• En vertu des lois des États-Unis et d’autres pays sur le droit d’auteur, l’enregistrement, l’utilisation, l’affichage, la distribution ou
la modification non autorisés de programmes télévisés, de cassettes vidéo, de disques Blu-ray, de DVD et d’autres matériels
engage votre responsabilité civile et/ou pénale.
•
Avis Cinavia : Ce produit utilise la technologie Cinavia pour limiter l’utilisation de copies illégales de certains films et
vidéos disponibles dans le commerce et de leur bande sonore. Lorsqu’une utilisation illégale ou une reproduction
interdite est détectée, un message s’affiche et la lecture ou la reproduction s’interrompt.
De plus amples renseignements sur la technologie Cinavia sont disponibles auprès du Centre d’information des
consommateurs en ligne de Cinavia sur http://www.cinavia.com. Pour obtenir des renseignements supplémentaires par
la poste sur Cinavia, envoyez votre demande avec votre adresse au : Cinavia Consumer Information Center, P.O. Box
86851, San Diego, CA, 92138, USA.
Ce produit intègre une technologie sous licence de Verance Corporation protégée par le brevet américain 7,369,677 et
d’autres brevets américains et internationaux déposés ou en attente, de même que par des droits d’auteur et le secret
industriel pour certains aspects de cette technologie. Cinavia est une marque de commerce de Verance Corporation.
Copyright 2004-2010 Verance Corporation. Tous droits réservés par Verance. Il est interdit de tenter de démonter
l’appareil et d’en étudier le fonctionnement en vue de le reproduire.
Clause de non responsabilité du service réseau
Tous les contenus et services accessibles via cet appareil appartiennent à des tiers et sont protégés par les lois sur le droit d’auteur, les brevets,
les marques de commerce et/ou d’autres lois sur la propriété intellectuelle. De tels contenus et services vous sont fournis exclusivement pour
un usage personnel non commercial. Vous ne pouvez pas affecter ces contenus et services à une utilisation non autorisée par le propriétaire
du contenu ou le fournisseur du service. Sans limiter ce qui précède, et à moins d’y être expressément autorisé par le propriétaire du contenu
applicable ou le fournisseur du service concerné, vous ne pouvez pas modifier, copier, rééditer, télécharger, publier, transmettre, traduire,
vendre, créer des travaux dérivés, exploiter ou distribuer de quelque manière que ce soit, et sur quelque support que ce soit, les contenus et
services affichés via cet appareil.
LES CONTENUS ET SERVICES DE TIERS SONT FOURNIS « EN L’ÉTAT ». SAMSUNG N’OFFRE AUCUNE GARANTIE, NI EXPRESSE NI IMPLICITE,
QUANT AUX CONTENUS ET SERVICES AINSI FOURNIS, QUELQUE QU’EN SOIT LA FINALITÉ. SAMSUNG REJETTE EXPLICITEMENT LES
GARANTIES IMPLICITES, Y COMPRIS MAIS SANS Y ÊTRE LIMITÉ, LES GARANTIES QUANT À LA QUALITÉ MARCHANDE OU L’ADAPTABILITÉ
À UN USAGE PARTICULIER. SAMSUNG DÉCLINE TOUTE RESPONSABILITÉ QUANT À L’EXACTITUDE, LA VALIDITÉ, L’ACTUALITÉ, LA LÉGALITÉ
OU L’EXHAUSTIVITÉ DES CONTENUS OU SERVICES DISPONIBLES VIA CET APPAREIL. EN AUCUN CAS SAMSUNG NE SAURAIT ÊTRE TENU
RESPONSABLE, ET QUEL QUE SOIT LE MOTIF JURIDIQUE INVOQUÉ, CONTRACTUEL, RESPONSABILITÉ CIVILE OU PÉNALE, Y COMPRIS
NÉGLIGENCE OU AUTRE, DE TOUT DOMMAGE DIRECT, INDIRECT, ACCESSOIRE, SPÉCIAL OU CONSÉCUTIF, HONORAIRES D’AVOCAT, DÉPENSES
OU TOUT AUTRE DOMMAGE DÉCOULANT DE/OU EN RELATION AVEC LES INFORMATIONS CONTENUES DANS CES CONTENUS OU SERVICES
OU POUVANT SURVENIR SUITE A L’UTILISATION DE CES CONTENUS ET SERVICES PAR VOUS-MÊME OU UN TIERS, MÊME SI VOUS AVEZ ETE
AVISÉ DE LA POSSIBILITÉ DE TELS DOMMAGES.
Les services tiers peuvent être résiliés ou interrompus à tout moment. Samsung ne prétend ni ne garantit aucunement que ces contenus ou
services resteront disponibles pour une période de temps donnée. Ces contenus et services sont transmis par des tiers via des réseaux et des
installations de transmission sur lesquels Samsung n’a aucun contrôle. Sans vouloir restreindre le caractère général de cette clause de non
responsabilité, Samsung s’exonère expressément de toute responsabilité quant à l’interruption ou la suspension de tout contenu ou service
rendu disponible via cet appareil.
Samsung ne peut en aucune sorte être tenu responsable des services à la clientèle afférents à ces contenus et services. Toute question
ou demande d’intervention liée à ces contenus ou services devrait être directement adressée aux fournisseurs des contenus et services
concernés.
26
Page 83

Licence
• Fabriqué sous licence par Dolby Laboratories. Dolby et le symbole représentant deux D
sont des marques de commerce de Dolby Laboratories.
• Fabriqué sous licence sous les brevets américains suivants : 5,956,674;
5,974,380; 6,487,535 et autres brevets américains et internationaux
déposés ou en attente. DTS, le Symbole, DTS et le Symbole ensemble,
et DTS 2.0+Digital Out sont des marques déposées ou de commerce de
DTS, Inc. Le produit inclut le logiciel. © DTS, Inc.Tous droits réservés.
• DivX
- À PROPOS DU FORMAT VIDÉO DIVX : DivX® est un format vidéo numérique
créé par DivX, LLC, une filiale de Rovi Corporation. C'est un périphérique officiel
DivX Certified® permettant de lire des vidéos au format DivX. Pour obtenir plus de détails sur les
outils logiciels qui vous permettent de convertir vos fichiers au format vidéo DivX, consultez le site
Web à l’adresse suivante : divx.com.
- À PROPOS DU FORMAT VIDÉO À LA DEMANDE DIVX : Cet appareil DivX Certified® doit être enregistré
afin de vous permettre de visionner des films vidéo à la demande (VOD) au format DivX, achetés dans le
commerce. Pour obtenir votre code d’enregistrement, identifiez l’emplacement de la section DivX VOD
dans le menu de configuration de votre appareil. Allez sur le site Web vod.divx.com pour obtenir de plus
amples informations sur la procédure d’enregistrement.
- Les appareils DivX Certified® peuvent lire des vidéos DivX® jusqu’à une résolution HD de 1080p, y
compris les programmes d’appel.
DivX®, DivX Certified® et les logos qui leur sont associés sont des marques déposées de Rovi Corporation
et ses filiales dont l’utilisation fait l’objet d’une licence.
Couverte par un ou plusieurs des brevets américains suivants : 7,295,673; 7,460,668; 7,515,710;
7,519,274.
• Les termes HDMI et HDMI High-Definition Multimedia Interface, et le logo HDMI sont
des marques de commerce ou des marques déposées de HDMI Licensing LLC aux
États-Unis et dans d’autres pays.
• Oracle et Java sont des marques déposées de Oracle et/ou ses filiales. D’autres noms
mentionnés peuvent être des marques de commerce de leurs propriétaires respectifs.
• Avis de licence libre
- En cas d’utilisation de logiciels libres, les licences libres sont disponibles dans le menu du produit.
• Blu-ray Disc™, Blu-ray™ et les logos y afférents sont des marques de commerce de Blu-ray Disc Association.
FRANCE
Cher Client,
Nous vous remercions d’avoir acheté un produit SAMSUNG. Au cas où vous auriez besoin de notre service après-vente, nous vous invitons à
retourner ce produit au revendeur qui en a effectué la vente. Si vous avez un problème, n’hésitez pas à nous contacter à l’adresse suivante:
GARANTIE
@
Sans préjudice de la garantie légale du fabricant ou du vendeur conformément à l’article 1641 du Code Civil, la société SAMSUNG applique les
garanties suivantes:
Par la présente carte, SAMSUNG ELECTRONICS FRANCE garantit que ce produit est exempt de défaut de matière et de fabrication existant lors
de l’acquisition par le client chez un distributeur pour un délai d’un an (pièces et main d’oeuvre), pour les appareils audio, vidéo, télévision et micro
ondes. La période de garantie commence le jour de l’achat de l’appareil. Elle n’est en aucun cas prolongée par l’échange de l’appareil.Si ce
produit s’avère défectueux pendant la période de garantie en raison de matière ou de fabrication incorrecte, le distributeur prendra en charge le
produit ou à défaut SAMSUNG ELECTRONICS FRANCE dans les conditions exposées ci-après. Les filiales de SAMSUNG ELECTRONICS
CORPS. ainsi que ses distributeurs et les stations techniques agréées des autres états membres de l'UE honoreront aussi cette garantie selon les
termes et conditions en vigueur dans le pays où est demandé la réparation.
@ CONDITIONS DE GARANTIE
1. La garantie sera seulement assurée si la facture d’achat et la carte de garantie remises au consommateur par le distributeur sont présentées et
si elles mentionnent:
a) Le nom de l’acheteur,
b) Le nom, l’adresse et le cachet du distributeur,
c) Le nom du modèle et le numéro de série du produit acquis
d) La date d’acquisition de ce produit.
2. SAMSUNG ELECTRONICS FRANCE se réserve le droit de refuser la garantie si tout ou partie de ces mentions a été enlevé ou modifié après
l’acquisition du produit par le client chez le distributeur.
3. Ce produit ne sera jamais considéré comme défectueux en matière ou en fabrication s’il doit être adapté, changé ou réglé afin d’être conforme
aux standards techniques ou de sécurité nationaux ou locaux en vigueur dans tout autre pays que celui pour lequel il a été fabriqué à l’origine.
Cette garantie ne s’applique pas:
a) À ces adaptations, changements ou réglages qu’ils soient exécutés de facon correcte ou pas,
b) Aux dommages qui en résulteraient.
4. Cette garantie ne couvre pas les cas suivants:
A. Les contrôles périodiques, l’entretien, la réparation et le remplacement de pièces par suite d’usure normale;
B. Les frais et les risques de transport directs ou indirects à la mise en oeuvre de la garantie de ce produit;
C. Le dommage du produit résultant:
1) D’abus et de mauvais usage, en particulier mais non de facon exclusive à:
a. La négligence ou faute d’utilisateur (utilisation contraire aux instructions ou non prévue, fausse manoeuvre, chute, cassure, félure
accidentelle), etc.
b. L’installation ou l’utilisation de ce produit en contradiction avec les standards techniques ou de sécurité en vigueur dans le pays où le
produit est utilisé;
2) De réparations faites par les réparateurs non agréés;
3) D’accidents, de cas de force majeure ou de toute autre cause hors du controle de SAMSUNG ECTRONICS FRANCE, en particulier
mais non de facon exclusive : la foudre, l’inondation, l’incendie, les troubles publics, des piles qui ont coulé, une mauvaise ventilation,
etc....
5. Cette garantie ne limite aucunement les droits statutaires du client sous les lois nationales en vigueur. Faute de lois nationales en vigueur, cette
garantie ou son application dans la C.E.E. sera l’unique et exclusif recours légal du client et ni SAMSUNG ELECTRONICS CORP., ni ses filiales
ne seront tenus pour responsables des dommages directs ou indirects résultant d’une infraction aux conditions de garantie ci-dessus.
Samsung Service Consommateurs
BP 50116 - Villepinte - 95950 ROISSY cedex
66 rue des Vanesses
France
TEL : 01 4863 0000
Fax : 01 48 63 06 38
SAMSUNG ELECTRONICS FRANCE
27
Page 84

Cet appareil est distribué par :
Pour toute information ou tout
renseignement complémentaire sur nos
produits, notre service consommateurs
est à votre disposition au :
Elimination des batteries de ce produit
(Applicable aux pays de l’Union européenne et aux autres pays européens dans
lesquels des systèmes de collecte sélective sont mis en place.)
Le symbole sur la batterie, le manuel ou l'emballage indique que les batteries de ce
produit ne doivent pas être éliminées en fin de vie avec les autres déchets
ménagers. L'indication éventuelle des symboles chimiques Hg, Cd ou Pb signifie
que la batterie contient des quantités de mercure, de cadmium ou de plomb
supérieures aux niveaux de référence stipulés dans la directive CE 2006/66. Si les
batteries ne sont pas correctement éliminées, ces substances peuvent porter
préjudice à la santé humaine ou à l'environnement.
Afin de protéger les ressources naturelles et d'encourager la réutilisation du
matériel, veillez à séparer les batteries des autres types de déchets et à les recycler
via votre système local de collecte gratuite des batteries.
Vous pouvez également vous connecter à notre site Internet :
http://www.samsung.com
Cet appareil est garanti un an pièces et main d’oeuvre
pour la France (métropolitaine)
La facture d’achat faisant office de bon de garantie.
Comment contacter Samsung dans le monde
Si vous avez des suggestions ou des questions concernant les produits Samsung,
veuillez contacter le Service Consommateurs Samsung.
Area Contact Centre
France 42 27 5755 www.samsung.com
Web Site
Les bons gestes de mise au rebut de ce produit
(Déchets d’équipements électriques et électroniques)
(Applicable dans les pays de l’Union Européenne et dans d’autres pays européens
pratiquant le tri sélectif)
Ce symbole sur le produit, ses accessoires ou sa documentation indique que ni le
produit, ni ses accessoires électroniques usagés (chargeur, casque audio, câble
USB, etc.) ne peuvent être jetés avec les autres déchets ménagers. La mise au
rebut incontrôlée des déchets présentant des risques environnementaux et de
santé publique, veuillez séparer vos produits et accessoires usagés des autres
déchets. Vous favoriserez ainsi le recyclage de la matière qui les compose dans le
cadre d’un développement durable.
Les particuliers sont invités à contacter le magasin leur ayant vendu le produit ou à
se renseigner auprès des autorités locales pour connaître les procédures et les
points de collecte de ces produits en vue de leur recyclage.
Les entreprises et professionnels sont invités à contacter leurs fournisseurs et à
consulter les conditions de leur contrat de vente. Ce produit et ses accessoires ne
peuvent être jetés avec les autres déchets professionnels et commerciaux.
AK68-02231Q-01
Page 85

Lettore di dischi Blu-ray™
manuale utente
immaginare le possibilità
Grazie per avere acquistato questo prodotto Samsung.
Per ricevere un servizio più completo,
registrare il prodotto sul sito
www.samsung.com/register
BD-ES5000
ITalIano
Page 86

Caratteristiche principali
Informazioni sulla sicurezza
Caratteristiche dei dischi Blu-ray
I dischi Blu-ray supportano i video HD di
massima qualità disponibili in commercio
- Una grande capacità significa nessun
compromesso sulla qualità video.
Le seguenti funzioni dei dischi Blu-ray
dipendono dal disco e possono quindi variare.
Anche l’aspetto e la navigazione delle funzioni
variano a seconda del disco.
Non tutti i dischi hanno le funzioni descritte di
seguito.
Caratteristiche video
Il formato BD-ROM supporta tre codec video
molto avanzati: AVC, VC-1 e MPEG-2.
Sono anche supportate risoluzioni video HD:
• HD 1920 x 1080
• HD 1280 x 720
Per la riproduzione ad alta definizione
Per visualizzare contenuti ad alta definizione
dei dischi Blu-ray, è necessario disporre di un
televisore HD.
Alcuni dischi Blu-ray possono richiedere
di utilizzare l’USCITA HDMI del lettore per
visualizzare contenuti ad alta definizione.
La capacità di riprodurre il contenuto ad alta
definizione dei dischi Blu-ray può essere
limitata a seconda della risoluzione del
televisore.
BD-LIVE
È possibile utilizzare un disco Blu-ray che
supporta BD-LIVE per scaricare i contenuti
forniti dal produttore del disco attraverso una
connessione di rete.
Caratteristiche del lettore di dischi
Blu-ray
AllShare
È possibile riprodurre video, brani musicali
e foto salvati sui dispositivi (come PC o
NAS[Network-Attached Storage]) attraverso
una connessione di rete.
Riproduzione di file multimediali
È possibile utilizzare il collegamento USB
per riprodurre file multimediali (MP3, JPEG,
DivX, ecc.) disponibili dal dispositivo di
memorizzazione USB.
Avvertenza
PER RIDURRE IL RISCHIO DI SCOSSE ELETTRICHE, NON RIMUOVERE IL COPERCHIO (O IL
PANNELLO POSTERIORE). ALL’INTERNO NON È PRESENTE ALCUNA PARTE RIPARABILE
DALL’UTENTE. RIVOLGERSI AL PERSONALE DI ASSISTENZA QUALIFICATO.
ATTENZIONE
NON APRIRE: RISCHIO DI
SCOSSE ELETTRICHE
Questo simbolo indica una “tensione
pericolosa” all’interno del prodotto, che può
causare il rischio di scosse elettriche o lesioni
personali.
Non installare l’apparecchio in uno spazio ristretto,
ad esempio una libreria o un luogo analogo.
AVVERTENZA
Per evitare danni che potrebbero provocare
incendi o scosse elettriche, non esporre
l’apparecchiatura alla pioggia o all’umidità.
ATTENZIONE
IL LETTORE DI DISCHI BLU-RAY USA
UN RAGGIO LASER INVISIBILE CHE, SE
DIRETTO, PUÒ PROVOCARE L’ESPOSIZIONE
A RADIAZIONI PERICOLOSE. UTILIZZARE IL
LETTORE DI DISCHI BLU-RAY NEL MODO
CORRETTO, IN BASE ALLE ISTRUZIONI.
PRODOTTO LASER DI CLASSE 1
Questo lettore CD è classificato come prodotto
LASER DI CLASSE 1. L’utilizzo di comandi,
regolazioni o funzioni che si riferiscono a
procedure
diverse da quelle specificate può provocare
l’esposizione a radiazioni pericolose.
ATTENZIONE: PER RIDURRE IL RISCHIO DI
SCOSSE ELETTRICHE, NON RIMUOVERE IL
COPERCHIO (O LA PARTE POSTERIORE):
ALL’INTERNO VI SONO PARTI NON RIPARABILI
DALL’UTENTE. RIVOLGERSI AL PERSONALE DI
ASSISTENZA QUALIFICATO.
ATTENZIONE
• RAGGIO LASER VISIBILE E INVISIBILE DI
CLASSE 3B QUANDO L’APPARECCHIO
È APERTO. EVITARE L’ESPOSIZIONE AL
FASCIO (IEC 60825-1)
• QUESTO PRODOTTO UTILIZZA UN LASER.
L’UTILIZZO DI COMANDI, REGOLAZIONI
O FUNZIONI CHE SI RIFERISCONO A
PROCEDURE DIVERSE DA QUELLE
SPECIFICATE PUÒ PROVOCARE
L’ESPOSIZIONE A RADIAZIONI
PERICOLOSE. NON APRIRE IL COPERCHIO
E NON EFFETTUARE LE RIPARAZIONI
PERSONALMENTE. PER LA MANUTENZIONE
RIVOLGERSI AL PERSONALE DI ASSISTENZA
QUALIFICATO.
CLASS 1 LASER PRODUCT
KLASSE 1 LASER PRODUKT
LUOKAN 1 LASER LAITE
KLASS 1 LASER APPARAT
PRODUCTO LÁSER CLASE 1
Il simbolo indica la presenza di istruzioni
importanti relative al prodotto.
:
2
Page 87

Il prodotto è conforme alla norme CE se
vengono utilizzati connettori e cavi schermati per
collegare l’unità ad altre apparecchiature. Per
non creare interferenze elettromagnetiche con
altre apparecchiature elettriche come radio e
televisori, per la connessione usare connettori e
cavi schermati.
NOTA IMPORTANTE
Il conduttore isolato di corrente di questa
apparecchiatura è fornito con una spina
pressofusa dotata di fusibile. Il valore del fusibile
è indicato sul lato dei poli della spina. In caso
di sostituzione, utilizzare un fusibile approvato
BS1362 avente la stessa potenza nominale.
Non utilizzare mai la spina senza coperchio
del fusibile, se questo è rimovibile. Se occorre
sostituire il coperchio del fusibile, è necessario
utilizzarne uno dello stesso colore del lato dei
poli della spina. I coperchi di ricambio sono
disponibili presso i rivenditori.
Se la spina in dotazione non è adatta alle prese
della propria abitazione o se il cavo non è
sufficientemente lungo per raggiungere una presa
di corrente, occorre acquistare un apposito cavo
di prolunga di sicurezza approvato o rivolgersi al
rivenditore per assistenza.
Tuttavia, se non vi è alternativa all’eliminazione
della spina, rimuovere il fusibile e smaltire la
spina in modo sicuro. Non collegare la spina
a una presa qualora il cavo presenti parti
scoperte poiché ciò può causare rischi di scosse
elettriche.
Per scollegare l’apparecchio dalla rete è
necessario estrarre la spina dalla presa: pertanto
la spina dev’essere facilmente accessibile.
L’unità di prodotto accompagnata da questo
manuale utente è concessa in licenza in base
a determinati diritti di proprietà intellettuale di
determinate terze parti. Questa licenza è limitata a
un uso privato e non commerciale da parte degli
utenti finali per i contenuti concessi in licenza.
Informazioni importanti sulla sicurezza
Prima di utilizzare l’unità, leggere attentamente
le seguenti istruzioni per l’uso. Seguire tutte le
istruzioni per la sicurezza elencate di seguito.
Conservare le istruzioni per l’uso per
riferimento futuro.
1. Leggere queste istruzioni.
2. Conservare queste istruzioni.
3. Prestare attenzione a tutti i messaggi d’avviso.
4. Attenersi a tutte le istruzioni.
5. Non utilizzare questo apparecchio vicino
6. Pulire solo con un panno asciutto.
7. Non ostruire le aperture per la ventilazione.
8. Non installare vicino a fonti di calore come
9. Non eliminare la protezione garantita dalla
10. Non calpestare il cavo di alimentazione ed
11. Utilizzare solo gli accessori indicati dal
Precauzioni
all’acqua.
Installare secondo le istruzioni fornite dal
costruttore.
caloriferi, bocchette di riscaldamento, stufe
o altri apparecchi (compresi ricevitori AV) che
generino calore.
spina polarizzata o con contatto di terra.
Una spina polarizzata ha due lame di diverse
dimensioni. Una spina con messa a terra ha
due lame e un terzo polo di messa a terra.
La lama più grande o il terzo polo svolgono
una funzione di sicurezza. Qualora la spina
usata non si inserisca correttamente nella
presa, consultare un elettricista per sostituire
la presa obsoleta.
evitare che venga schiacciato particolarmente
in prossimità della presa, del punto di uscita
dall’apparecchio o nelle zone di passaggio.
produttore.
12. Utilizzare solo carrelli,
13. Durante forti temporali o in caso di non
14. Per la manutenzione ricorrere al personale di
Manipolazione dei dischi
Forma dei dischi
• Utilizzare dischi
Manipolazione dei dischi
• Evitare di toccare la
supporti, treppiedi,
staffe o tavoli consigliati
dal produttore o
venduti assieme
all’apparecchio.
Qualora si utilizzi
un carrello, spostare il gruppo carrello/
apparecchio con attenzione per evitare che si
ribalti provocando incidenti.
utilizzo per lunghi periodi di tempo, scollegare
questa apparecchiatura dall’alimentazione
elettrica.
assistenza qualificato. Il ricorso al servizio di
assistenza è necessario in caso di qualsiasi
danneggiamento, come ad esempio un
deterioramento del cavo o della spina
di alimentazione, versamento di liquidi o
cadute di oggetti all’interno dell’apparecchio,
esposizione dell’apparecchio a pioggia
o umidità, funzionamento anormale o
danneggiamento da caduta accidentale.
Conservazione e manipolazione
dei dischi
con forme regolari.
Se si usa un disco
irregolare (un
disco con una forma particolare), si può
danneggiare il lettore.
superficie di un disco in cui
sono stati registrati dei dati.
Dischi Blu-ray
• Non lasciare un disco Blu-ray nel lettore
per periodi prolungati. Estrarre il disco Bluray dal lettore e riporlo nella sua custodia.
• Prestare attenzione a non lasciare graffi o
impronte sulla superficie del disco Blu-ray.
DVD-VIDEO, CD audio (CD-DA)
• Rimuovere sporco o residui con un panno morbido.
Conservazione dei dischi
Fare attenzione a non danneggiare i
dischi, poiché i dati in essi contenuti sono
estremamente vulnerabili alle condizioni
ambientali.
• Non esporre alla luce diretta del sole.
• Conservare in un luogo fresco e ventilato.
• Conservare in posizione verticale.
• Conservare in una custodia di protezione
pulita.
• Se il lettore viene spostato improvvisamente da
un luogo freddo a uno caldo, si può formare
condensa sulle parti in funzione e sull’obiettivo,
con il rischio di provocare una riproduzione
anomala del disco. In questo caso, scollegare
l’alimentazione dal lettore e attendere due
ore prima di collegare la spina alla presa di
corrente. Inserire quindi il disco e provare
nuovamente ad avviare la riproduzione.
Precauzioni per la manipolazione
• Non scrivere sul lato stampato usando una
penna a sfera o una matita.
• Non usare spray per la pulizia dei dischi o
prodotti antistatici per la pulizia dei dischi.
Inoltre, non utilizzare sostanze chimiche volatili,
come benzene o diluenti.
• Non applicare etichette o adesivi sui dischi. (Non
utilizzare dischi riparati con nastro adesivo o che
presentano residui di adesivo).
• Non usare coperchi o protezioni a prova di graffio.
3
Page 88

• Non usare dischi stampati con le stampanti per
etichette disponibili sul mercato.
• Non caricare dischi deformati o crepati.
• Prima di collegare altri componenti a questo
lettore, controllare che siano spenti.
• Non spostare il lettore durante la riproduzione
di un disco. Il disco può essere graffiato o
danneggiato e le parti interne del lettore possono
essere danneggiate.
• Non collocare sopra il lettore vasi di fiori pieni
d’acqua o piccoli oggetti di metallo.
• Non inserire la mano nel vano del disco.
• Non inserire oggetti che non siano dischi nel vano
del disco.
• Fattori esterni come l’illuminazione e l’elettricità
statica possono influire sul normale funzionamento
di questo lettore. In questo caso, spegnere il
lettore e riaccenderlo con il tasto POWER oppure
scollegare il cavo di alimentazione CA dalla relativa
presa di alimentazione e quindi ricollegarlo. Il
lettore funzionerà normalmente.
• Dopo l’uso, togliere il disco e spegnere il lettore.
• Scollegare il cavo di alimentazione
CA dalla relativa presa quando
si prevede di non utilizzare il
lettore per un periodo di tempo
prolungato.
• Pulire il disco dall’interno
all’esterno in linea retta.
• Non esporre il lettore agli schizzi di sostanze
liquide.
• Quando il connettore CA è collegato a una presa
di rete, il lettore continua ad essere alimentato
(modo standby) anche se è spento.
• Non schizzare o sgocciolare liquidi
sull’apparecchio e non porre su di esso oggetti
contenenti liquidi, come ad esempio vasi di fiori.
• La spina di alimentazione viene utilizzata per
scollegare l’apparecchio: deve essere facilmente
accessibile in qualsiasi momento.
• Non toccare la spina del cavo di alimentazione
con le mani bagnate. Rischio di scossa elettrica.
• Non collegare più dispositivi elettrici alla stessa
• Se si sente un rumore insolito, odore di bruciato
Manutenzione della custodia
Prima di pulire la custodia del Bluray, assicurarsi di scollegare il cavo di
alimentazione CA dall’uscita CA.
• Non utilizzare benzene, diluente o altri
• Pulire la custodia usando un panno
Restrizioni sulla riproduzione
• È possibile che questo lettore non
• Samsung non può garantire che questo
4
presa di corrente. Rischio di surriscaldamento e
incendio conseguente.
o si vede del fumo, spegnere immediatamente
l’interruttore di alimentazione e scollegare la spina
dalla presa a muro. Quindi contattare il centro di
assistenza più vicino. Se si continua ad utilizzare
il prodotto in quelle condizioni, si può provocare
una scossa elettrica o un incendio.
solventi per la pulizia.
morbido.
risponda a tutti i comandi perché alcuni
dischi Blu-ray, DVD e CD consentono di
effettuare operazioni specifiche o limitate e
presentano solo alcune funzioni durante la
riproduzione.
Si noti che non si tratta di un difetto del
lettore.
lettore sia in grado di riprodurre tutti i dischi
contrassegnati dal logo Blu-ray, DVD o CD;
i formati dei dischi si evolvono e potrebbero
verificarsi problemi ed errori nella creazione
dei software Blu-ray, DVD, CD e/o nella
fabbricazione dei dischi.
Per eventuali domande o in caso di
difficoltà nella riproduzione di dischi Blu-ray,
DVD o CD con questo lettore, contattare
il Centro di assistenza clienti SAMSUNG.
Inoltre, fare riferimento al resto del presente
manuale utente per ulteriori informazioni
sulle restrizioni per la riproduzione.
Indice
CARATTERISTICHE PRINCIPALI
Caratteristiche dei dischi Blu-ray ..................2
Caratteristiche del lettore di
dischi Blu-ray ...............................................2
INFORMAZIONI SULLA SICUREZZA
Avvertenza ...................................................2
Precauzioni ..................................................3
Conservazione e manipolazione dei dischi ...3
GUIDA INTRODUTTIVA
Prima di utilizzare il manuale utente ..............5
Accessori ....................................................7
Pannello anteriore ........................................8
Pannello posteriore ......................................8
Telecomando ...............................................9
CONNESSIONI
A. Collegamento a un televisore ...................9
B. Collegamento a un sistema audio..........10
C. Connessione alla rete ............................10
IMPOSTAZIONE
Impostazione iniziale ..................................12
Menu di navigazione ..................................12
Accesso al menu Impostazioni...................12
Display ......................................................13
Audio .........................................................14
Rete ..........................................................16
Sistema .....................................................17
Lingua .......................................................17
Sicurezza ...................................................17
Generale ....................................................18
Supporto ...................................................18
FUNZIONI DI BASE
Riproduzione di un video
Uso del menu del disco, dei
titoli e popup
Utilizzo delle funzioni di
ricerca e salto
Riproduzione al rallentatore/
fotogramma per fotogramma
Uso del tasto TOOLS
Ascolto di musica
Riproduzione di immagini
Riproduzione da un dispositivo
di memorizzazione USB
SERVIZI DI RETE
BD-LIVE™ .................................................23
Utilizzo della funzione AllShare ...................23
APPENDICE
Risoluzione dei problemi ............................23
Specifiche ..................................................25
................................................19
...............................................19
.............................19
......................20
...................................20
.........................................21
.............................22
...............................22
Page 89

Guida introduttiva
Prima di utilizzare il manuale utente
Tipi di dischi e contenuti riproducibili.
Termine Logo Icona Definizione
h
z
VIDEO
Z
y
-
x
MUSICA
FOTO
NOTA
✎
▪Il lettore potrebbe non riprodurre determinati CD-RW/-R e DVD-R a causa del tipo di disco o delle condizioni di
registrazione.
▪I dischi DVD-RW/-R non registrati correttamente in formato DVD Video non possono essere riprodotti.
▪Il lettore non riproduce i contenuti registrati su un DVD-R ad una velocità di trasmissione superiore a 10 Mbps.
▪Il lettore non riproduce i contenuti registrati su un BD-R o su un dispositivo USB ad una velocità di trasmissione
superiore a 25 Mbps.
o
-
w
-
G
Indica una funzione disponibile su un disco BD-ROM o BD-RE/-R
registrato in formato BD-RE.
Indica una funzione disponibile su un DVD-VIDEO o su dischi DVD+RW/
DVD-RW(V)/DVD-R/+R registrati e finalizzati.
Indica una funzione disponibile per i dischi CD-RW/-R, DVD-RW/-R, BDRE/-R o supporti USB con contenuto DivX, MKV, MP4.
Indica una funzione disponibile per i CD-RW/-R audio (formato CD-DA).
Indica una funzione disponibile per i dischi CD-RW/-R, DVD-RW/-R, BDRE/-R o supporti USB con contenuto MP3 o WMA.
Indica una funzione disponibile per i dischi CD-RW/-R, DVD-RW/-R, BDRE/-R o supporti USB con contenuto JPEG.
Tipi di dischi non riproducibili
• HD DVD
• Dischi DVD-ROM/PD/
MV, ecc
NOTA
✎
▪Alcuni dischi commerciali e alcuni dischi DVD
acquistati all’estero potrebbero non essere
riproducibili con questo lettore.
▪La funzione di riproduzione potrebbe non essere
disponibile con alcuni tipi di disco oppure quando si
eseguono operazioni specifiche, come la modifica
dell’angolo di visualizzazione o del formato.
Informazioni dettagliate sui dischi sono stampate
sulla custodia. Consultarle qualora necessario.
▪Fare in modo che il disco non si sporchi e non
si graffi. Impronte, sporco, polvere, graffi o
depositi di fumo di sigaretta sulla superficie di
registrazione potrebbero danneggiare il disco
rendendone impossibile la riproduzione.
▪Quando si riproduce un titolo BD-J, il caricamento
può richiedere più tempo rispetto a un titolo normale
o alcune funzioni potrebbero essere rallentate.
▪È possibile che questo lettore non risponda a tutti
i comandi perché alcuni dischi Blu-ray, DVD e CD
consentono di effettuare operazioni specifiche o
limitate e presentano solo alcune funzioni durante
la riproduzione.
Si noti che non si tratta di un difetto del lettore.
▪Samsung non può garantire che questo lettore sia
in grado di riprodurre tutti i dischi contrassegnati
dal logo Blu-ray, DVD o CD; i formati dei dischi
si evolvono e potrebbero verificarsi problemi ed
errori nella creazione dei software Blu-ray, DVD,
CD e/o nella fabbricazione dei dischi.
Per eventuali domande o in caso di difficoltà nella
riproduzione di dischi Blu-ray, DVD o CD con
questo lettore, contattare il Centro di assistenza
clienti SAMSUNG. Inoltre, fare riferimento al
resto del presente manuale utente per ulteriori
informazioni sulle restrizioni per la riproduzione.
• DVD-RAM
• Super Audio CD (eccetto
CD layer)
• DVD-RW (modo VR)
• CVD/CD-ROM/CDV/
CD-G/CD-I/LD (per i CD-G
viene riprodotto solo
l’audio, non le immagini)
• Disco DVD-R per
authoring da 3,9 GB.
Compatibilità dei dischi Blu-ray
I dischi Blu-ray sono un formato nuovo e in
evoluzione. Di conseguenza è possibile che si
verifichino problemi di compatibilità. Non tutti
i dischi sono compatibili e non tutti i dischi
verranno riprodotti. Per informazioni aggiuntive,
fare riferimento alla sezione Avvertenza sulla
compatibilità del presente manuale utente.
Tipo di disci
BD-ROM
I dischi Blu-ray ROM possono soltanto essere
riprodotti.
Questo lettore può riprodurre dischi BD-ROM
commerciali preregistrati.
BD-RE/-R
I dischi Blu-ray RE/-R possono essere
registrati e riprodotti.
Questo lettore riproduce dischi BD-RE/-R
registrati da altri registratori di dischi Blu-ray
compatibili.
VIDEO DVD
• Questo lettore può riprodurre dischi DVD
commerciali preregistrati (dischi DVD video)
contenenti filmati.
• Passando dal primo al secondo strato
di un disco DVD video a due strati, può
verificarsi una distorsione momentanea
dell’immagine e dell’audio. Questo non è
un malfunzionamento del lettore.
5
Page 90

DVD-RW/-R/+R
Questo lettore può riprodurre dischi DVD-RW/R/+R registrati e finalizzati con un registratore DVD.
La possibilità di riprodurre i seguenti dischi può
dipendere dalle condizioni di registrazione.
DVD+RW
• Questo lettore riproduce dischi DVD+RW
registrati con un registratore DVD. La
possibilità di riprodurre i seguenti dischi può
dipendere dalle condizioni di registrazione.
CD audio (CD-DA)
• Questo lettore riproduce dischi CD-RW/-R
audio in formato CD-DA.
• Il lettore potrebbe non essere in grado di
riprodurre alcuni dischi CD-RW/-R a causa
delle condizioni di registrazione.
CD-RW/-R
• Utilizzare un disco CD-RW/-R da 700 MB (80
minuti).
Se possibile, non utilizzare dischi da 800 MB
(90 minuti) o superiori: potrebbero non essere
riproducibili.
• Se il disco CD-RW/-R non è stato chiuso,
potrebbe verificarsi un ritardo all’inizio della
riproduzione del disco oppure i file registrati
potrebbero non venire riprodotti.
• Alcuni dischi CD-RW/-R potrebbero non essere
riproducibili con questo lettore, a seconda
del dispositivo utilizzato per masterizzarli.
Per quanto riguarda i contenuti registrati su
supporti CD-RW/-R da CD per uso personale,
la riproducibilità potrebbe variare in funzione del
contenuto e del disco.
AVCHD (Advanced Video Codec High
Definition)
• Questo lettore può riprodurre dischi
AVCHD. Questi dischi sono registrati e
utilizzati normalmente nelle videocamere.
• AVCHD è un formato per videocamere
digitali ad alta definizione.
• Il formato MPEG-4 AVC/H.264 comprime
le immagini con maggiore efficienza rispetto
al formato di compressione tradizionale.
• Alcuni dischi AVCHD utilizzano il formato
“x.v.Color”. Questo lettore riproduce i dischi
AVCHD che utilizzano il formato “x.v.Color”.
• “x.v.Color” è un marchio di Sony
Corporation.
• “AVCHD” e il logo AVCHD sono marchi di
Matsushita Electronic Industrial Co., Ltd. e
Sony Corporation.
NOTA
✎
▪A seconda delle condizioni di registrazione,
potrebbe non essere possibile riprodurre alcuni
dischi di formato AVCHD.
I dischi AVCHD devono essere finalizzati.
▪“x.v.Color” offre una gamma di colori più ampia
di quella dei normali dischi per videocamere
DVD.
▪È possibile che alcuni dischi in formato DivX,
MKV e MP4 non vengano riprodotti a seconda
della risoluzione video e della frequenza dei
fotogrammi.
Codice regionale
I lettori e i dischi sono codificati in base alla
regione. Per poter riprodurre un disco, i
codici regionali devono corrispondere. Se i
codici non corrispondono, il disco non viene
riprodotto.
Il codice regionale di questo lettore è indicato
sul pannello posteriore del lettore.
Tipo di
disco
Blu-ray
DVD VIDEO
Codice
regionale
A
B
C
1
2
3
4
5
6
Zona
America del Nord, America
centrale, America del Sud,
Corea, Giappone, Taiwan, Hong
Kong e Sud-est asiatico.
Europa, Groenlandia, territori
francesi, Medio Oriente, Africa,
Australia e Nuova Zelanda.
India, Cina, Russia, Asia
centrale e meridionale.
USA, territori USA e Canada
Europa, Giappone, Medio
Oriente, Egitto, Sudafrica,
Groenlandia
Taiwan, Corea, Filippine,
Indonesia, Hong Kong
Messico, America del Sud,
America centrale, Australia,
Nuova Zelanda, Isole del
Pacifico, Caraibi
Russia, Europa orientale, India,
maggior parte dei paesi africani,
Corea del Nord, Mongolia
Cina
Copyright
© 2012 Samsung Electronics Co., Ltd.
Tutti i diritti riservati; è vietata la riproduzione
di una parte o dell’intero manuale utente
senza la preventiva autorizzazione scritta di
Samsung Electronics Co., Ltd.
Formati file supportati
Note sulla connessione USB
• Il lettore è compatibile con supporti
di memorizzazione USB, lettori MP3,
videocamere digitali e lettori schede USB.
• Il lettore non supporta nomi di file o cartelle
di lunghezza superiore a 128 caratteri.
• Alcuni dispositivi USB/ HDD esterno/
videocamere digitali possono non essere
compatibili con il lettore.
• Il lettore supporta i file system FAT16,
FAT32 e NTFS.
• Collegare i dispositivi USB direttamente alla
porta USB del lettore. Se si utilizza un cavo
USB per il collegamento possono verificarsi
problemi di compatibilità.
• Se si inserisce più di un dispositivo di
memoria in un lettore multischeda, possono
verificarsi problemi di funzionamento.
• Il lettore non supporta il protocollo PTP.
• Non scollegare il dispositivo USB durante il
“caricamento” .
• Più la risoluzione dell’immagine è elevata,
più il ritardo nella visualizzazione è lungo.
• Questo lettore non riproduce file MP3 con
DRM (Digital Rights Management) scaricato
da siti commerciali.
• Il lettore supporta solo video inferiori a 30
fps (frequenza fotogrammi).
6
Page 91

File video supportati
Estensione file Contenitore Codec video Codec audio Risoluzione
DivX 3.11/4.x/5.1/6.0
*.avi
*.mkv
*.wmv
*.mp4
*.mpg
*.mpeg
Limitazioni
- Anche se il file è codificato con il codec supportato sopra menzionato, potrebbe non essere riprodotto
se il contenuto è danneggiato.
- La normale riproduzione non è garantita se le informazioni del contenitore del file sono errate o se il file
stesso è danneggiato.
- La riproduzione audio/video dei file con un numero di bit/fotogrammi superiore alla norma potrebbe
avanzare a scatti.
- La funzione di ricerca (salto) non è disponibile se la tabella degli indici del file è danneggiata.
Decoder video
- Supporta fino a H.264 livello 4.1 e AVCHD
- Non supporta H.264 FMO/ASO/RS, e VC1 SP/MP/AP L4
- MPEG4 SP, ASP :
Al di sotto di 1280 x 720: Max 60 fotogrammi
Al di sopra di 1280 x 720: Max 30 fotogrammi
- Non supporta GMC 2 o superiore
Decoder audio
- Supporta WMA 7, 8, 9 e Standard
- Non supporta la frequenza di campionamento WMA mono 22050 Hz
AVI
MKV
WMV (wmv9)
MP4
PS
MP4v3
H.264 BP/MP/HP
VC-1 AP
DivX 5.1/6.0
H.264 BP/MP/HP
VC-1 AP
VC-1 SM
MP4 (mp4v)
H.264 BP/MP/HP
MPEG1
MPEG2
H.264 BP/MP/HP
MP3
Dolby Digital
DTS
WMA
PCM
MP3
Dolby Digital
DTS
WMA
AAC
MP1, 2
Dolby Digital
DTS
1920x1080
1920x1080
1920x1080
1920x1080
1920x1080
1920x1080
1920x1080
1920x1080
1920x1080
1920x1080
1920x1080
1920x1080
1920x1080
File musicali supportati
Estensione file Contenitore Codec audio Intervallo supportato
*.mp3
*.wma
MP3
WMA
MP3 -
* Frequenze di campionatura (in kHz) - 8, 11, 16, 22, 32,
WMA
44.1, 48
* Bit rate - Tutti i bit rate compresi tra 5 kbps e 384 kbps
Loghi dei dischi riproducibili dal lettore
Disco Blu-ray BD-LIVE
Sistema di trasmissione PAL in Gran
Bretagna, Francia, Germania, ecc.
Accessori
Controllare di seguito gli accessori forniti.
Batterie per il telecomando (dimensione AAA) Adattatore
Manuale utente Telecomando
7
Page 92

Pannello anteriore
Pannello posteriore
TASTO DI ARRESTO
TASTO RIPRODUZIONE/PAUSA
TASTO DI ESPULSIONETASTO DI ACCENSIONE
INDICATORE STANDBYSENSORE TELECOMANDO
VANO DEL DISCO
NOTA
✎
▪Quando il lettore visualizza il menu del disco Blu-ray, non è possibile avviare il filmato premendo il tasto
di riproduzione sul lettore o sul telecomando. Per riprodurre il filmato, è necessario selezionare Riproduci
filmato o Avvio nel menu del disco e quindi premere il tasto e.
▪Si accende quando il lettore è in modo standby, e lampeggia quando si riceve un segnale dal sensore del
telecomando.
USB HOST DC 12V 2A
LAN
HDMI OUT
NOTA
✎
▪Per aggiornare il software del lettore attraverso la presa host USB, è necessario utilizzare una memoria USB.
DIGITAL AUDIO OUT
8
Page 93

Telecomando
Connessioni
Descrizione del telecomando
Spegne e accende il prodotto.
Per aprire e chiudere il vano del disco.
Premere i tasti numerici per attivare le
Per accedere al menu del disco.
Premere per saltare in avanti o all’indietro.
Premere questo tasto per arrestare il disco.
Premere questo tasto per riprodurre un disco.
Premere questo tasto per accedere alle varie
funzioni audio di un disco (Blu-ray/DVD).
Premere questo tasto per utilizzare il menu
Per selezionare e cambiare le voci del menu.
Ritorna al menu precedente.
Questi tasti vengono usati sia per i menu sul
prodotto sia per varie funzioni dei dischi Blu-ray.
Premere questo tasto per utilizzare la
Permette di ripetere un A-B disco.
opzioni.
Strumenti.
funzione Bonusview.
Installazione delle batterie
Spegne e accende il televisore.
Una volta impostato, permette di configurare
la sorgente di ingresso sul televisore.
Regolazione del volume del televisore.
Premere questo tasto per accedere al menu
popup/titolo.
Premere questi tasti per effettuare una
ricerca avanti o indietro all’interno del disco.
Premere per mettere in pausa un disco.
Premere questo tasto per passare al menu
principale.
Premere questo tasto per cambiare la lingua
dei sottotitoli del disco Blu-ray/DVD.
Premere questo tasto per visualizzare le informazioni sulla
riproduzione durante la visione di un disco Blu-ray/DVD.
Premere questo tasto per uscire dal menu.
Premere questo tasto per visualizzare
l’immagine a schermo intero su un televisore.
Permette di ripetere un titolo, un capitolo,
una traccia o un disco.
NOTA
✎
Se il telecomando non funziona correttamente:
▪
•Controllare la polarità (+/–) delle batterie.
•Verificare che le batterie non siano scariche.
Verificare che il sensore remoto non sia bloccato da ostacoli.
•
•
Controllare se nelle vicinanze è presente una luce a fluorescenza.
ATTENZIONE
!
La batteria ricaricabile incorporata in questo prodotto
▪
non può essere sostituita dall’utente. Per informazioni
sulla sostituzione, contattare il fornitore.
A. Collegamento a un televisore
Collegamento a un televisore con cavo HDMI - Qualità massima
1. Usando un cavo HDMI, collegare il terminale HDMI OUT sul retro del lettore al terminale
HDMI IN del televisore. Vedere le pagine 11.
2. Accendere il lettore e il televisore.
3. Premere il selettore di ingresso sul telecomando del televisore finché sullo schermo del
televisore non appare il segnale HDMI del lettore.
NOTA
✎
▪Il cavo HDMI trasmette il segnale digitale video/audio, pertanto non è necessario collegare un cavo audio.
▪Se il lettore è collegato al televisore nel modo di uscita HDMI 720p, 1080i o 1080p, è necessario utilizzare
un cavo HDMI ad alta velocità (categoria 2).
▪HDMI trasmette al televisore solo un puro segnale digitale.
Se il televisore non supporta la funzione HDCP (High-bandwidth Digital Content Protection), l’immagine a
video appare disturbata.
▪Su alcuni televisori, alcune risoluzioni di uscita HDMI potrebbero non essere utilizzabili. Consultare il
manuale utente del televisore.
▪Quando si collega il lettore al televisore utilizzando il cavo HDMI per la prima volta oppure lo si collega a
un nuovo televisore, la risoluzione di uscita HDMI viene automaticamente impostata al livello massimo
supportato dal televisore.
▪Un cavo HDMI lungo potrebbe provocare disturbi. Se questo accade, impostare la profondità del colore su
Off nel menu.
▪Se si utilizza il cavo da HDMI a DVI per connettersi al dispositivo di visualizzazione, è necessario collegare
anche l’ o l’uscita audio digitale ad un sistema audio per sentire l’audio
.
9
Page 94

B. Collegamento a un sistema audio
C. Connessione alla rete
• Abbassare il volume quando si accende il ricevitore AV. Un forte suono improvviso può
danneggiare i diffusori e l’udito.
• Impostare il formato di uscita audio secondo le capacità del ricevitore AV.
• La posizione dei terminali di ingresso HDMI può variare a seconda del ricevitore AV.
Vedere il manuale utente del ricevitore AV.
Caso 1 :
Collegamento a un sistema audio (ricevitore AV con supporto HDMI)
- Qualità massima (consigliato)
1. Usando un cavo HDMI, collegare il terminale HDMI OUT sul retro del lettore al terminale
HDMI IN del ricevitore AV. Vedere le pagine 11.
2. Usando un cavo HDMI, collegare il terminale HDMI OUT del ricevitore AV al terminale
HDMI IN del televisore.
3. Accendere il lettore, il televisore e il ricevitore AV.
4. Con il tasto di selezione ingresso del ricevitore AV e del televisore selezionare l’ingresso
HDMI desiderato per udire il suono e vedere il video dal lettore. Fare riferimento al
manuale utente del ricevitore AV per impostare l’ingresso audio del ricevitore AV.
Caso 2 :
Collegamento a un sistema audio (ricevitore AV con decoder Dolby
Digital o DTS) - buona qualità
1. Usando un cavo ottico, collegare il terminale
posteriore del lettore al terminale
a pagina 11.
2. Utilizzando uno cavo HDMI, collegare i terminali HDMI sul retro del lettore al terminale
HDMI del televisore.
3. Accendere il lettore, il televisore e il ricevitore AV.
4. Premere il tasto di selezione ingresso del ricevitore AV
udire il suono dal lettore. Vedere il manuale utente del
ricevitore AV
audio del
5. Premere il selettore di ingresso sul telecomando del televisore per selezionare la HDMI
sorgente video.
.
DIGITAL AUDIO IN (OPTICAL)
DIGITAL AUDIO OUT (OPTICAL)
per selezionare l’ingresso esterno e
ricevitore AV
del ricevitore AV. Vedere
per impostare l’ingresso
sulla parte
Questo lettore consente di utilizzare servizi di rete quali ad es. Smart Hub e BD-LIVE e di
scaricare aggiornamenti software quando è collegato ad una rete. Si consiglia di utilizzare un
Modem a banda larga (con router integrato) o un router IP per la connessione. Per ulteriori
informazioni sul collegamento del router, vedere il manuale utente del router o contattare il
produttore del router per l’assistenza tecnica.
Rete via cavo
1. Utilizzando il cavo LAN diretto (UTP) CAT 5, collegare il terminale LAN del lettore al
terminale LAN del modem o del router. vedere le pagine 11.
2. Per impostare le opzioni di rete, vedere le pagine 16.
NOTA
✎
▪È possibile che, in base al router utilizzato o alla politica adottata dall’ISP, l’accesso Internet al server di
aggiornamento Samsung non sia permesso. Per ulteriori informazioni, contattare l’ISP (provider di servizi
Internet).
▪Gli utenti DSL devono utilizzare un router per stabilire una connessione alla rete.
▪Per utilizzare la funzione AllShare è necessario collegare il PC alla rete come mostrato nella figura.
La connessione può essere via cavo.
10
Page 95

Collegamento a un televisore
Cavo HDMI
(non incluso)
Rete
Modem a banda larga
Servizio banda
larga
(con router integrato)
Or
Router
Modem a banda larga
Servizio banda
larga
Collegamento a un sistema audio
Caso 1 : Cavo HDMI
(non incluso)
Caso 1 : Cavo HDMI
(non incluso)
Caso 2 : Cavo ottico
(non incluso)
Collegamento con PC per la funzione AllShare
NOTA : Questa unità può essere collegata alla rete solo attraverso una connessione cablata.
✎
11
Page 96

Impostazione
Impostazione iniziale
1. Accendere il televisore dopo aver collegato
il prodotto. Quando il prodotto viene
collegato al televisore per la prima volta,
il prodotto si accende automaticamente
e viene visualizzata la schermata
Impostazione iniziale
Initial Settings I On-Screen Language
Select a language for the on-screen displays.
English
Français
Deutsch
Español
Italiano
Nederlands
2. Premere i tasti ▲▼ per selezionare la
lingua desiderata, quindi premere il tasto
INVIO.
3. Premere il tasto INVIO per selezionare il
pulsante Avvio.
4. Premere i tasti ▲▼ per selezionare il
formato del, quindi premere il tasto INVIO.
5. selezionare Auto, quindi premere il tasto
INVIO. Se non si dispone di una rete
domestica, premere il tasto BLU (D) sul
telecomando. In questo modo si accede
direttamente al menu principale.
6. Il lettore Blu-ray verifica automaticamente
la rete cablata. Al termine della verifica
viene visualizzata la schermata “La rete
funziona correttamente.” quindi premere il
tasto INVIO.
.
>
Move " Select
7. Viene visualizzato il messaggio
“Impostazioni iniziali completate.” e poi la
schermata della pagina iniziale.
Se il lettore Blu-Ray non si collega alla rete o
-
se si desidera effettuare la connessione
manualmente, andare al capitolo
Configurazione della rete a pagina 16.
NOTA
✎
▪Il menu principale non viene visualizzato se non si
configurano le impostazioni iniziali, tranne che nei
casi indicati di seguito.
▪Se si preme il tasto BLU (D) durante la
configurazione della rete, è possibile accedere al
menu principale anche se la configurazione di rete
non è stata ancora completata.
▪Quando si ritorna al menu principale, il modo
schermo intero viene annullato automaticamente.
▪Per visualizzare ancora la schermata Impostazione
iniziale per apportare modifiche, premere il tasto
@
) sul pannello anteriore del prodotto
STOP (
per più di 5 secondi senza nessun disco inserito.
Questa operazione ripristina le impostazioni
predefinite del lettore.
▪Per utilizzare la funzione Anynet+(HDMI-CEC),
seguire le istruzioni in basso.
1) Collegare il lettore ad un televisore Samsung
compatibile Anynet+(HDMI-CEC) utilizzando il
cavo HDMI.
2) Impostare la funzione Anynet+(HDMI-CEC) su
On sia nel televisore che nel lettore.
3) Impostare il televisore sulla procedura di
impostazione iniziale.
▪Se si lascia il lettore in modo di arresto per oltre 5
minuti, sul televisore appare un salvaschermo. Se
il salvaschermo viene lasciato in funzione per oltre
25 minuti, l’unità si spegne automaticamente.
Menu di navigazione
1
2
Tasto HOME : Per passare al menu principale.
1
Tasto RETURN : Per tornare al menu
2
precedente.
Tasto INVIO / DIREZIONE :
Per spostare il cursore o selezionare una voce.
3
Attivare la voce correntemente selezionata.
Confermare un’impostazione.
Tasto EXIT : Premere per uscire dal menu
4
corrente.
• Menu principale
You Tube
Video
1
No disco a Cambia dispos
d
Visual. dispos.
Seleziona Video.
1
Seleziona YouTube.
2
Seleziona Foto.
3
Seleziona Musica.
4
Seleziona Impostazioni.
3
4
5
Visualizza i tasti del telecomando che possono
6
essere usati per accedere alle funzioni.
Accesso al menu Impostazioni
Per accedere al menu Impostazioni e ai
sottomenu, seguire i passi riportati di seguito:
1. Premere il tasto POWER.
Si apre il menu principale.
2. Premere i tasti ◄► per selezionare
Impostazioni, quindi premere il tasto
INVIO.
3. Premere i tasti ▲▼ per selezionare il
sottomenu desiderato, quindi premere il
tasto INVIO.
4. Premere i tasti ▲▼ per selezionare la voce
desiderata, quindi premere il tasto INVIO.
2
5. Premere il tasto EXIT per uscire dal menu.
NOTA
✎
▪I passi da eseguire per accedere possono
variare a seconda del menu selezionato. L’OSD
3
4
5
Conferma
"
6
(On Screen Display) di questo lettore potrebbe
cambiare dopo l’aggiornamento della versione
del software.
12
Page 97

Display
È possibile configurare diverse opzioni per il
display, quali formato, risoluzione, ecc.
Formato TV
Per alcuni tipi di televisore, è possibile che si
desideri regolare l’impostazione delle dimensioni
dello schermo.
• 16:9 originale : Selezionare quando si collega
il lettore a un televisore con schermo 16:9. Il
lettore visualizza tutti i contenuti nel formato
originale.
I contenuti in formato 4:3 verranno visualizzati
con delle barre nere a sinistra e a destra.
• 16:9 Pieno : Selezionare quando si collega
il lettore a un televisore con schermo 16:9. Il
contenuto riempirà l’intero schermo. I contenuti
in formato 4:3 verranno stirati.
• 4:3 Letter Box : Selezionare quando si collega il
lettore a un televisore con schermo 4:3. Il lettore
visualizza tutti i contenuti nel formato originale.
I contenuti in formato 16:9 verranno visualizzati
con delle barre nere in alto e in basso.
• 4:3 Pan-Scan : Selezionare quando si collega
il lettore a un televisore con schermo 4:3. Le
porzioni all’estrema destra e all’estrema sinistra
dei contenuti in 16:9 verranno tagliate.
NOTA
✎
▪A seconda del tipo disco, è possibile che alcuni
formati non siano disponibili.
▪Se si selezionano un formato e un’opzione diversi dal
formato del televisore, l’immagine potrebbe apparire
distorta.
▪Se si seleziona 4:3 Pan-Scan o 4:3 Letter Box, non
è possibile visualizzare l’immagine a schermo intero
premendo il tasto FULL SCREEN del telecomando.
▪Se si seleziona 16:9 Normale, potrebbe essere
visualizzato il formato 4:3 Pillarbox.
In questo caso, non è possibile visualizzare l’immagine
a schermo intero premendo il tasto FULL SCREEN
del telecomando.
BD Wise (solo lettori Samsung)
BD Wise è la funzione di interconnettività Samsung
di ultima generazione.
Quando si collegano tra loro un lettore Samsung e
un televisore Samsung con BD Wise tramite HDMI,
e BD Wise è attivo sia sul lettore che sul televisore,
il lettore trasmette i video con la risoluzione video e
la frequenza di fotogrammi del disco BD/DVD.
• Off : La risoluzione di uscita rimane fissa
alla risoluzione impostata precedentemente
nel menu Risoluzione, indipendentemente
dalla risoluzione del disco. Vedere la sezione
Risoluzione di seguito.
•On : Il lettore trasmette i video con la risoluzione
e la frequenza di fotogrammi originali del disco
BD/DVD.
NOTA
✎
▪Quando BD Wise è attivo, l’impostazione della risoluzione
passa automaticamente alle impostazioni predefinite di
BD Wise e BD Wise appare nel menu Risoluzione.
▪Se il lettore è collegato a un dispositivo che non supporta
BD Wise, non è possibile utilizzare questa funzione.
▪Per un funzionamento corretto di BD Wise, impostare BD
Wise su On nei menu del lettore e del televisore.
Risoluzione
Consente di impostare la risoluzione di uscita
dei segnali video HDMI su Auto, 1080p, 1080i,
720p, o 576p/480p. Il numero indica il numero di
linee del video per fotogramma. “i” e “p” indicano,
rispettivamente, la scansione interlacciata e
progressiva. Maggiore è il numero di linee, maggiore
è la qualità.
• Auto : Imposta automaticamente la risoluzione
di uscita alla risoluzione massima del televisore
collegato.
• BD Wise : Imposta automaticamente la risoluzione
alla risoluzione del disco BD/DVD, se il lettore
è collegato tramite HDMI a un televisore dotato
di BD Wise. (La voce di menu BD Wise viene
visualizzata solo se BD Wise è impostato su On.
Vedere la sezione BD Wise qui sopra).
• 1080p : 1080 linee a scansione progressiva.
• 1080i : 1080 linee a scansione interlacciata.
Risoluzione secondo il modo di uscita
•Riproduzione di dischi Blu-ray/e-Content/Contenuti digitali
Impostazione
(Fotogramma video : On)
Fotogramma video : Auto
• Riproduzione di DVD
Impostazione
• 720p : 720 linee a scansione progressiva.
• 576p/480p : 576/480 linee a scansione
progressiva.
Uscita
Disco Blu-ray E-Content/Contenuti digitali
BD Wise Risoluzione del disco Blu-ray 1080p
Automatico Risoluzione max. dell’ingresso TV Risoluzione max. dell’ingresso TV
1080p@60F
(24Fs)
1080i 1080i 1080i
720p 720p 720p
576p/480p 576p/480p 576p/480p
Uscita
BD Wise 576i/480i
Automatico Risoluzione max. dell’ingresso TV
1080p 1080p
1080i 1080i
720p 720p
576p/480p 576p/480p
1080p@60F 1080p@60F
1080p@24F 1080p@24F
HDMI / collegato
Modo HDMI
HDMI / collegato
Modo HDMI
13
Page 98

NOTA
✎
▪Se il televisore collegato al lettore non supporta
il fotogramma video o la risoluzione selezionata,
appare il messaggio “Se dopo aver selezionato
“Sì” non viene visualizzata nessuna immagine,
attendere 15 secondi per tornare alla risoluz.
preced. Cambiare risoluzione?”
Se si seleziona Sì, lo schermo del televisore rimane
vuoto per 15 secondi, dopodiché la risoluzione verrà
automaticamente riportata alla risoluzione precedente.
▪Se lo schermo rimane vuoto dopo aver cambiato la
risoluzione, rimuovere tutti i dischi, quindi premere
e tenere premuto il tasto
STOP ( @ )
sul pannello
frontale del lettore per più di 5 secondi. Vengono
ripristinate tutte le impostazioni predefinite. Seguire
i passi della pagina precedente per accedere ai
vari modi e selezionare il tipo di impostazione del
display supportato dal televisore.
▪Quando vengono ripristinate le impostazioni predefinite,
tutti i dati BD personalizzati vengono eliminati.
▪Affinché il lettore utilizzi il modo Movie Frame (24Fs)
(Fotogramma video (24Fs)), il disco Blu-ray deve
essere dotato della funzione 24 fotogrammi.
Fotogramma Video(24Fs)
Impostando la funzione Fotogramma video
(24Fs) su Auto, è possibile regolare l’uscita
HDMI del lettore su 24 fotogrammi al secondo,
per migliorare la qualità dell’immagine.
Questa funzione può essere utilizzata soltanto
sui televisori che supportano questa frequenza
di fotogrammi. Fotogramma video può essere
selezionato solo se il lettore è nei modi di
risoluzione 1080i o 1080p dell’uscita HDMI.
• Auto : La funzione Fotogramma video (24Fs)
lavora.
• Off: La funzione Fotogramma video (24Fs) è
disattivata.
Formato colore HDMI
Consente di impostare il formato dello spazio
colore per l’uscita HDMI in base alla capacità del
dispositivo collegato (televisore, monitor, ecc.).
• Auto : Imposta automaticamente per il lettore il
formato ottimale supportato dal dispositivo.
• YCbCr (4:4:4) : Se il televisore supporta lo
spazio colore YCbCr tramite HDMI, selezionare
questa opzione per trasmettere la normale
gamut di colore YCbCr.
• RGB (standard) : Selezionare questa opzione
per trasmettere la normale gamut di colore RGB.
• RGB (avanzato) : Se il lettore è stato collegato
a un dispositivo di visualizzazione DVI, come
un monitor, selezionare questa opzione per
migliorare la gamut di colore RGB.
HDMI Profondità colori
Consente la trasmissione di video dal
connettore HDMI OUT con Profondità colori.
Profondità colori consente una riproduzione più
fedele dei colori, con una maggiore profondità.
• Auto : Il lettore trasmette i video con
Profondità colori a un televisore collegato che
supporta la funzione HDMI Profondità colori.
• Off: L’immagine viene trasmessa senza
Profondità colori.
Modo progressivo
Consente di migliorare la qualità dell’immagine
durante la visualizzazione dei DVD.
• Auto : Selezionare per impostare
automaticamente nel lettore la migliore qualità
dell’immagine per il DVD che si sta riguardando.
• Video : Selezionare per ottenere la qualità
di immagine migliore per DVD di concerti o
spettacoli TV.
Audio
Uscita Digitale
Impostare Uscita Digitale in base alle
caratteristiche del ricevitore AV collegato al
lettore:
• PCM : è l’impostazione predefinita. È
compatibile con la maggior parte dei
televisori e dei ricevitori.
Selezione dell’uscita digitale
Impostazione PCM
Connessione
Streaming
audio su
disco Blu-
ray
Streaming
audio su
DVD
Dolby Digital PCM 2 canali PCM 2 canali Dolby Digital Dolby Digital DTS ricodificato
Dolby Digital
Dolby TrueHD PCM 2 canali PCM 2 canali Dolby TrueHD Dolby Digital DTS ricodificato
DTS-HD HRA PCM 2 canali PCM 2 canali DTS-HD HRA DTS DTS ricodificato
DTS-HD MA PCM 2 canali PCM 2 canali DTS-HD MA DTS DTS ricodificato
Dolby Digital PCM 2 canali PCM 2 canali Dolby Digital Dolby Digital Dolby Digital Dolby Digital
Ricevitore AV
con supporto
HDMI
Fino a 7.1
PCM
Plus
DTS PCM 2 canali PCM 2 canali DTS DTS DTS ricodificato
PCM PCM 2 canali PCM 2 canali PCM 2 canali
DTS PCM 2 canali PCM 2 canali DTS DTS DTS DTS
can
PCM 2 canali PCM 2 canali
Ottica
PCM 2 canali PCM
• Bitstream (non elaborato) : selezionarlo se
si desidera che il ricevitore decodifichi tutti i
segnali audio.
L’audio Bonusview non è disponibile.
• Bitstream (DTS ricodificato) : l’audio
originale viene ricodificato in formato DTS.
• Bitstream (Dolby D Ricodificato) : l’audio
originale viene ricodificato in formato Dolby
Digital.
Per ulteriori dettagli, fare riferimento alla tabella
di selezione delle uscite digitali.
Bitstream
(non elaborato)
Ricevitore
AV con
supporto
HDMI
Dolby Digital
Plus
Bitstream
(DTS
ricodificato)
Ricevitore AV
Ottica
con supporto
HDMI o Ottica
PCM 2
DTS ricodificato
canali
Dolby Digital DTS ricodificato
PCM 2
PCM 2 canali PCM 2 canali
canali
Bitstream
(Dolby D
Ricodificato)
Ricevitore AV
con supporto
HDMI o
Ottica
Dolby Digital
Ricodificato*
Dolby Digital
Ricodificato*
Dolby Digital
Ricodificato*
Dolby Digital
Ricodificato*
Dolby Digital
Ricodificato*
Dolby Digital
Ricodificato*
Dolby Digital
Ricodificato*
14
Page 99

Impostazione PCM
Connessione
Definizione
per disco
Blu-ray
Qualunque
Ricevitore AV
con supporto
nell’audio PCM ed aggiunge
effetti sonori di navigazione.
HDMI
Decodifica il flusso audio
principale e il flusso audio
BONUSVIEW combinandoli
Ottica
Bitstream
(non elaborato)
Ricevitore
AV con
supporto
HDMI
Emette solo il flusso
audio principale in modo
che il ricevitore AV possa
decodificare il bitstream
Non si udiranno l’audio
BONUSVIEW o gli effetti
sonori di navigazione.
Ottica
audio.
Bitstream
ricodificato)
Ricevitore AV
con supporto
HDMI o Ottica
Decodifica il flusso
audio principale
e il flusso audio
BONUSVIEW
combinandoli
nell’audio PCM
ed aggiunge
effetti sonori di
navigazione, quindi
ricodifica l’audio
PCM in bitstream
(DTS
DTS.
Bitstream
(Dolby D
Ricodificato)
Ricevitore AV
con supporto
HDMI o
Ottica
Decodifica il
flusso audio
principale e il
flusso audio
BONUSVIEW
combinandoli
nell’audio PCM
ed aggiunge
effetti sonori
di navigazione,
quindi ricodifica
l’audio PCM in
bitstream Dolby
digital o PCM.
* Se il flusso sorgente è a 2 canali, l’impostazione “Dolby D. Ricodificato” non viene applicata.
L’uscita sarà LPCM 2 canali.
I dischi Blu-ray possono comprendere tre
flussi audio:
- Audio principale: La traccia audio
principale.
- Audio BONUSVIEW: Una traccia audio
aggiuntiva, come i commenti del regista o
degli attori.
- Effetti sonori di navigazione: Durante la
navigazione nei menu è possibile udire
i relativi effetti sonori. Gli effetti sonori di
navigazione sono differenti per ciascun
disco Blu-ray
NOTA
✎
.
▪Assicurarsi di selezionare l’opzione Uscita
▪Se il dispositivo HDMI (ricevitore AV, televisore)
non è compatibile con i formati compressi (Dolby
Digital, DTS), il segnale audio viene trasmesso
come PCM.
▪I normali DVD non dispongono di audio
BONUSVIEW ed effetti sonori di navigazione.
▪Alcuni dischi Blu-ray non dispongono di audio
BONUSVIEW ed effetti sonori di navigazione.
▪Questa Uscita Digitale non influisce sull’uscita
audio HDMI verso il televisore.
Influisce, invece, sull’uscita audio HDMI e ottica
se il lettore è collegato a un ricevitore AV.
▪Se vengono riprodotte tracce audio MPEG,
il segnale audio viene emesso come PCM
indipendentemente dall’uscita digitale
selezionata (PCM o Bitstream).
Digitale corretta, altrimenti la traccia audio
risulterà assente o molto disturbata.
Sottocamp. PCM
Consente di attivare o disattivare il
sottocampionamento PCM a 48 kHz e a 96 kHz.
• Off: Selezionare quando il ricevitore AV collegato
al lettore è compatibile con i segnali 96 kHz.
• On: Selezionare quando il ricevitore AV
collegato al lettore non è compatibile con i
segnali 96 kHz. I segnali 96 kHz vengono
convertiti in 48 kHz.
NOTA
✎
▪Anche quando il sottocampionamento PCM
è impostato su Off, per alcuni dischi viene
emesso solo un audio sottocampionato
attraverso le uscite digitali.
HDMI
• Se il televisore non è compatibile con
i formati multicanale compressi (Dolby
Digital, DTS), il lettore può generare un
audio convertito in PCM a 2 canali anche
se si seleziona Bitstream (ricodificato o non
elaborato) nel menu di configurazione.
• Se il televisore non è compatibile con
frequenze di campionatura PCM superiori
a 48kHz, il lettore può generare audio PCM
con frequenza ridotta a 48 kHz anche se
Sottocampionamento PCM è impostato su Off.
Controllo gamma dinamica
È possibile ascoltare a volumi bassi pur
udendo il dialogo chiaramente.
Questa opzione è attiva solo se il lettore rileva
un segnale Dolby Digital.
• Auto : Controllo gamma dinamica sarà
impostato automaticamente in base alle
informazioni fornite dalla colonna sonora
Dolby TrueHD.
• Off: Consente di riprodurre l’audio con la
gamma dinamica standard.
• On: Quando la traccia audio di un film
viene riprodotta a basso volume o tramite
diffusori più piccoli, il sistema applica la
compressione appropriata per rendere più
chiaro l’audio ed evitare aumenti improvvisi
del volume.
Modalità Downmixing
Selezionare la modalità Downmixing per
l’uscita stereo.
• Stereo Normale: Eseguire il downmix
dell’audio multicanale in stereo normale.
Scegliere questa opzione se l’audio
proviene dal televisore o dall’amplificatore
stereo.
• Compatibile Surround: Eseguire il
downmix dell’audio multicanale in stereo
compatibile con surround. Questa modalità
supporta la funzione di decodifica stereo in
audio surround del ricevitore AV.
15
Page 100

Rete
5. La funzione Auto acquisisce e compila
Contattare l’ISP per sapere se il proprio indirizzo
IP è statico o dinamico. Se è dinamico, come nella
maggior parte dei casi, per configurare la rete
✎
consigliamo di usare la procedura automatica. È
il modo più semplice, e funzionerà nella maggior
parte dei casi.
Se è statico, è necessario utilizzare la procedura di
configurazione manuale.
Per configurare le impostazioni di rete, seguire i
6. Al termine dell’acquisizione dei valori di
7. Selezionare Test rete poi premere
passi indicati di seguito.
✎
NOTA
8. Una volta completato il test di rete,
▪Questa unità può essere collegata alla rete solo
attraverso una connessione cablata.
9. Se i valori della rete non vengono
Configurazione automatica della rete
Per iniziare l’impostazione della connessione di rete
per il lettore, seguire i passi riportati di seguito:
1. Nel menu principale, premere i tasti ◄► per
selezionare Impostazioni, quindi premere il
tasto INVIO.
2. Premere i tasti ▲▼ per selezionare Rete,
quindi premere il tasto INVIO.
3. Premere i tasti ▲▼ per selezionare Cavo
Impostazioni di rete cablata, quindi premere
il tasto INVIO. Viene visualizzata la schermata
Impostazioni rete cablata.
Impostazioni
Impostazioni di rete cablata
Display
Impostazionie IP : Auto
Audio
Indirizzo IP : 0 0 0 0
Rete-
Masch. subnet :
Sistema
Gateway :
Lingua
DNS : Auto
Sicurezza
Server DNS :
Generale
Supporto
>
Sposta " Seleziona ' Ritorna
0 0 0
0
0 0 0
0
0 0 0
0
4. Nel campo Configurazione protocollo
Internet, selezionare Auto, se ancora non
è selezionato (Premere INVIO selezionare
AUTO, quindi premere di nuovo INVIO.)
Configurazione manuale della rete
Prima di avviare la configurazione manuale
della rete, sono necessari i valori delle
impostazioni di rete.
Sulla maggior parte dei computer Windows,
per visualizzare i valori delle impostazioni di
rete, seguire i passi riportati di seguito:
■
Windows XP
1. Fare clic con il tasto destro del mouse
2. Nel menu di scelta rapida, fare clic su
3. Nella finestra che appare, fare clic sulla
4. Sulla scheda Supporto, fare clic sul
automaticamente i valori per l’indirizzo IP,
la Masch. Subnet , ecc.
NOTA
▪Questa unità può essere collegata alla rete solo
attraverso una connessione cablata.
rete, premere il tasto RETURN.
INVIO
per verificare se il lettore si è collegato
alla rete.
premere due volte RETURN per tornare
al menu principale.
acquisiti o se è stato selezionato
Manuale, vedere le istruzioni per la
configurazione manuale.
sull’icona di rete in basso a destra nel
desktop di Windows.
Status.
scheda Supporto.
pulsante Dettagli. Vengono visualizzate le
impostazioni della rete.
■
Windows 7
1. Fare clic sull’icona di rete in basso a
destra nel desktop di Windows.
2. Nel menu di scelta rapida, selezionare
Centro connessioni di rete e condivisione.
3. Nella finestra di dialogo che appare, fare
clic sulla connessione di area locale o la
connessione di rete wireless a seconda
della connessione di rete.
4. Nella scheda Supporto, fare clic sul
tasto Dettagli. Vengono visualizzate le
impostazioni di rete.
Per inserire le impostazioni di rete nel
lettore, seguire i passi riportati di seguito:
1. Nel menu principale, premere i tasti ◄► per
selezionare Impostazioni, quindi premere il
tasto INVIO.
2. Premere i tasti ▲▼ per selezionare Rete,
quindi premere il tasto INVIO.
3. Premere i tasti ▲▼ per selezionare Impostazioni
di rete cablata, quindi premere il tasto INVIO.
Viene visualizzata la schermata Impostazioni
rete cablata
4. Sulla campo Impostazione IP, premere il
tasto INVIO.
5. Premere i tasti ▲▼ per selezionare Manuale,
quindi premere il tasto INVIO.
6. Premere il tasto ▼ per selezionare il primo
campo (Indirizzo IP).
7. Utilizzare i tasti numerici del telecomando per
inserire i numeri.
8. Una volta terminato di completare un campo,
usare il tasto ► per passare al campo
successivo.
È anche possibile utilizzare gli altri tasti con le
frecce per spostarsi in su, in giù e indietro.
9. Inserire i valori per Indirizzo IP, Masch.
subnet e Gateway.
10. Premere il tasto ▼ per passare a DNS.
11. Premere il tasto ▼ per andare al primo
campo DNS.
12. Inserire i numeri come indicato sopra.
13. Premere il tasto RETURN sul telecomando.
14. Eseguire un test di rete per verificare che il
prodotto si sia connesso alla rete.
Test di rete
Usare questo menu per effettuare la
connessione della rete via cavo o per
controllare se la connessione di rete sta o non
sta lavorando.
Stato di rete
Controllare se è stata stabilita una
connessione alla rete e a Internet.
Connessione Internet BD-Live
Consente di permettere o proibire una
connessione Internet quando è in uso il
servizio BD-LIVE.
• Consenti a tutti: La connessione a Internet
è consentita per tutti i contenuti BD-LIVE.
• Consenti solo a valido: La connessione a
Internet è consentita solo per i contenuti BDLIVE che contengono un certificato valido.
• Blocca: Non è consentita nessuna
connessione a Internet per nessun
contenuto BD-LIVE.
NOTA
✎
▪Che cos’è un certificato valido?
Quando il lettore usa BD-LIVE per inviare i dati
del disco e richiedere al server la certificazione
del disco, il server usa i dati trasmessi per
controllare la validità del disco e reinvia al
lettore il certificato.
▪La connessione a Internet potrebbe essere
limitata durante l’utilizzo di contenuti BD-LIVE.
16
 Loading...