

Page 1

AllShare PC S/W HELP
Page 2

2
Contents
What is AllShare?
- Installation environment/List of supported media content
Start AllShare
- Install AllShare
- Screen layout
- Connect device
- Add shared content
- View shared content
- Create playlist
Use my computer’s content
- Play My Computer’s content on another player
- Transfer My Computer’s content to another device
Use connected server’s content
- Play connected server’s content on My Computer
- Play connected server’s content on another device
- Save connected server’s content to My Computer
Use My Computer’s shared content and player on another device
- Set use privileges for My Computer
- Play My Computer’s content on another device
- Play another device’s content on My Computer
Keyboard shortcuts
Beginner’s guide
- Play video on TV
- View photos on camera
- Save file from mobile phone
Frequently Asked Questions
Page 3

3
What is AllShare?
AllShare is Samsung’s content-sharing technology, powered by *DLNA.
The AllShare application makes it possible to share and play media content on *DLNA-ready
devices (computers, TVs, mobile phones, camcorders, digital cameras, etc.) via a local network.
With AllShare, you can:
Play shared media content on your computer or another player
■
Save or transfer shared media content to your computer or other devices
■
Browse or search for shared media content stored on connected devices
■
Browse or play media content stored on your computer using another device
■
Let’s find out more about the AllShare support file and installation.
Installation environment/List of supported media content >>
This manual provides an overview of AllShare computer software.
To learn how to use or configure AllShare for your device, please consult the manual provided
with the device.
DLNA (Digital Living Network Alliance)
A device-to-device sharing method for sharing media content among home appliances and/or
mobile devices over commonly used standard networks (HTTP, UPnP, Wi-Fi, etc).
Computer will not go into sleep mode while AllShare PC S/W in use(playback of content,
transfer, etc).
Page 4
4
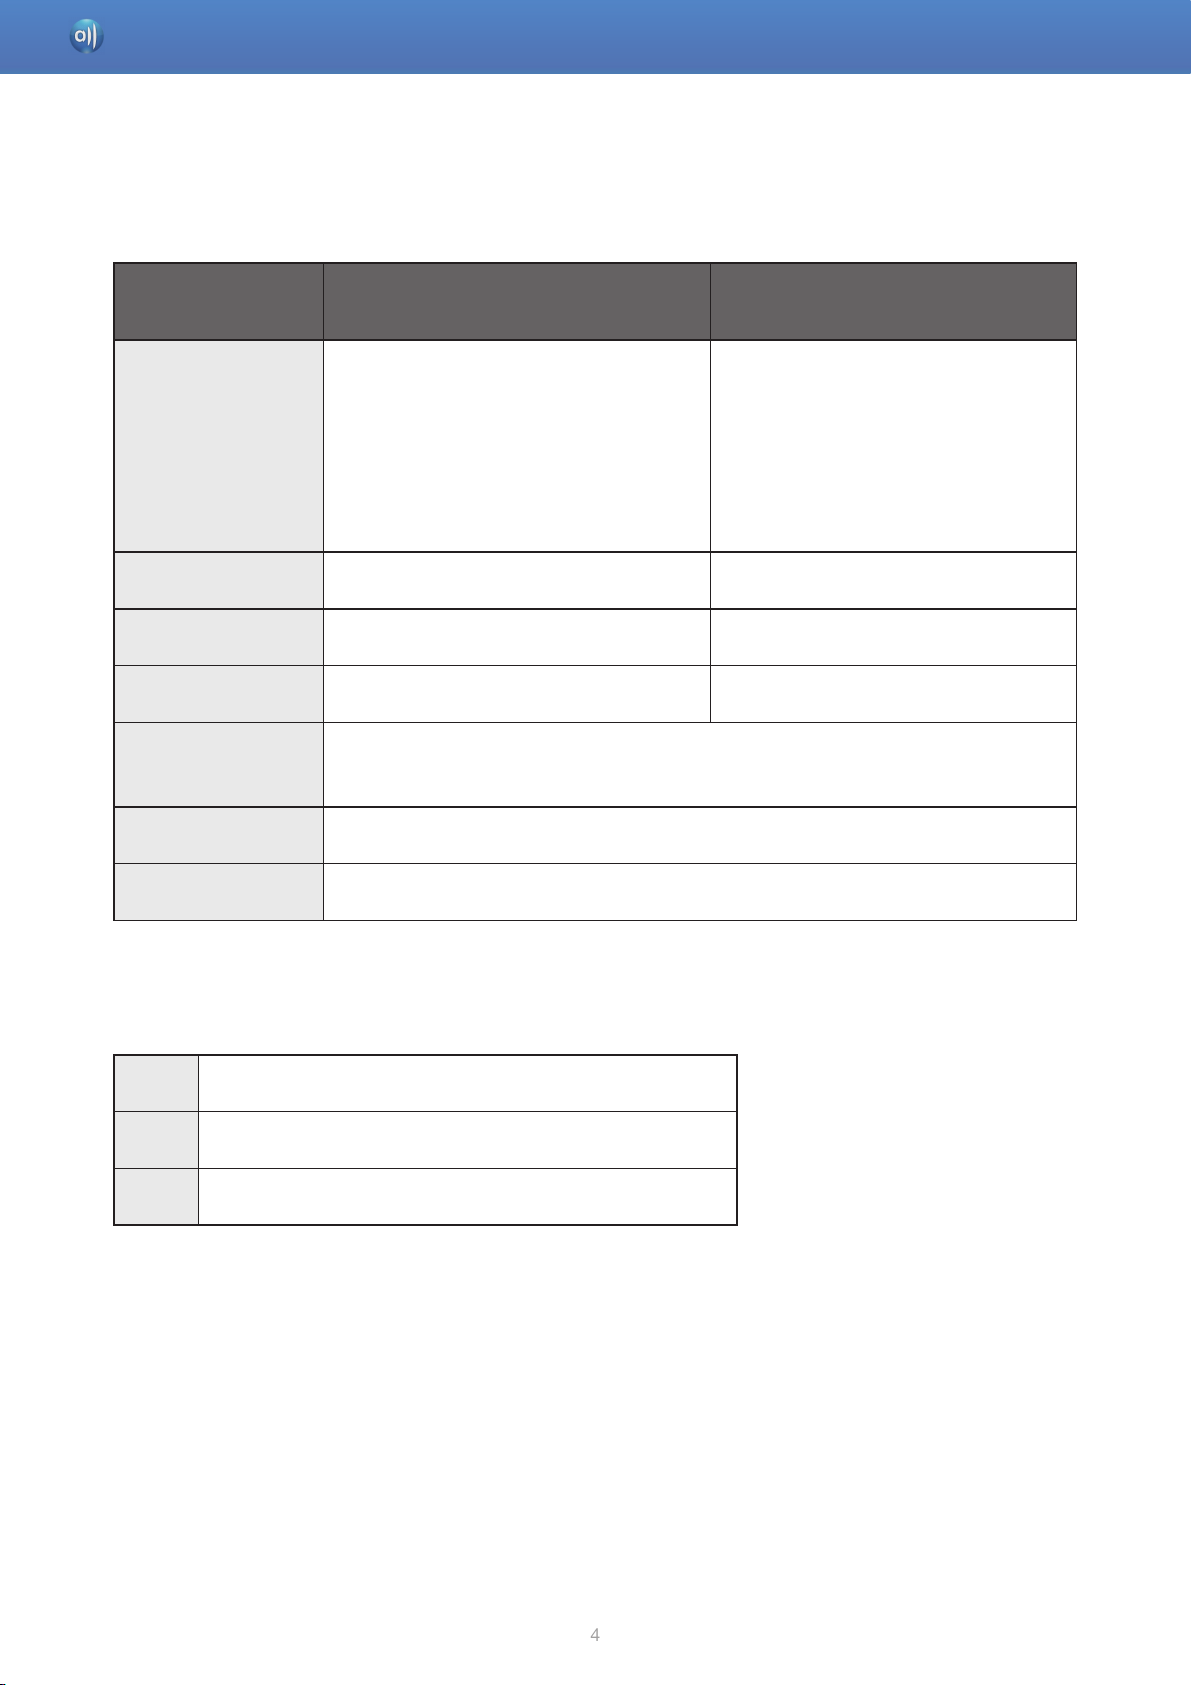
What is AllShare? > Installation environment/List of supported media content
Installation environment
Component
CPU
RAM 2.0 GByte 3.0 GByte
Resolution 900 x 500 1920 x 1080
Wi-Fi network 802.11g/n 802.11n
Minimum installation
space
Supported OS Windows XP SP3 / Vista / Win7
Minimum specification
(for 480p video playback)
Desktop
: Intel Pentium4 2.33GHz processor
or higher
Netbook
: Intel Atom 1.6GHz processor or higher
200MByte
Recommended specification
(for 720p and 1080p video playback)
Desktop
: Intel Core Duo 1.8GHz processor
or higher
Essential software .NET Framework 3.5 SP1 or higher
List of supported media content
Photo JPEG/GIF/PNG/BMP
Music MP3/WMA/AC3/AAC/OGG/WAV/FLAC/APE
Video AVI/WMV/MP4/ASF/MKV/MPG/3GP/F4V/DIVX/MOV/QT
Page 5

5
Start AllShare
Let’s examine AllShare’s screen layout and the essential settings required for getting started.
Install >>
Screen layout >>
Connect device >>
Add shared content >>
View shared content >>
Create playlist >>
Page 6
6
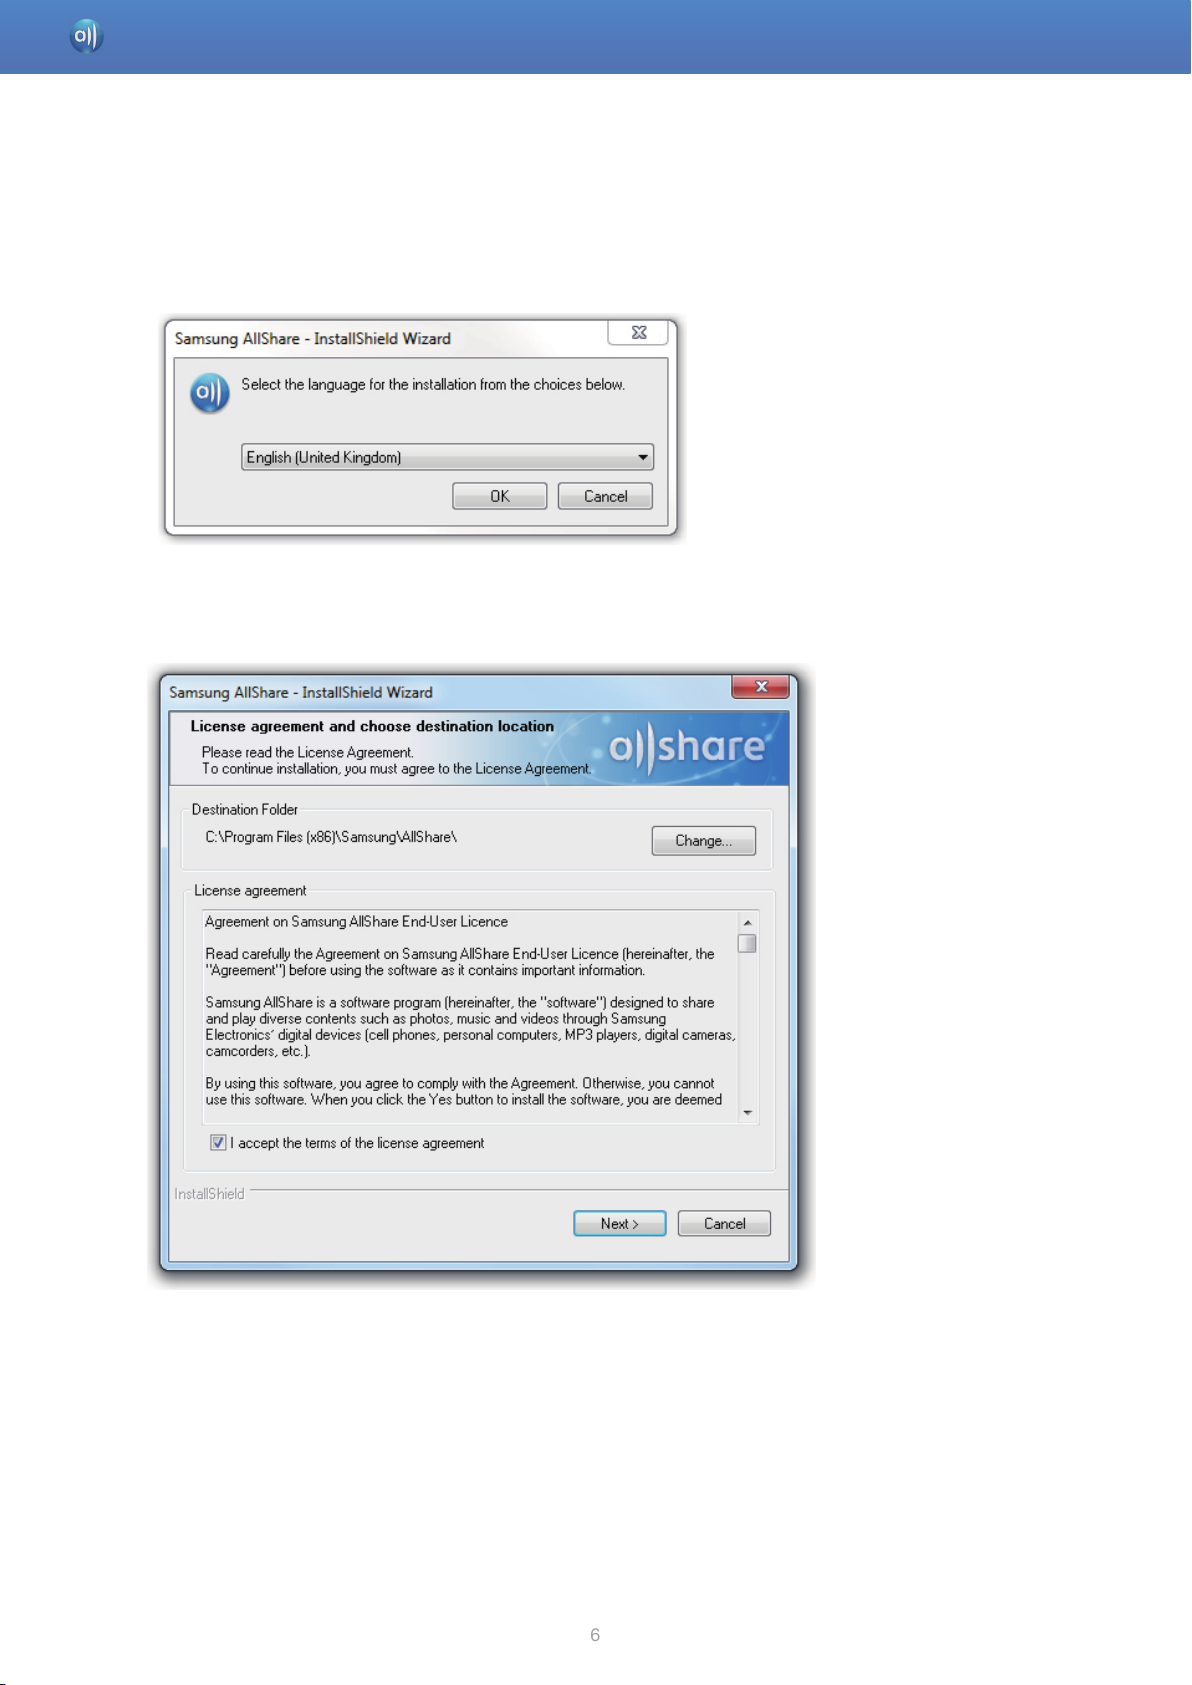
Start AllShare > Install AllShare
Double-click the installation file to launch the installer, and follow the instructions to install AllShare.
1. Select the language you want to use and click ‘OK’.
2. Review the installation location for the software and the licence agreement, select ‘I accept
the terms of the licence agreement’, and click ‘Next’.
Page 7
7
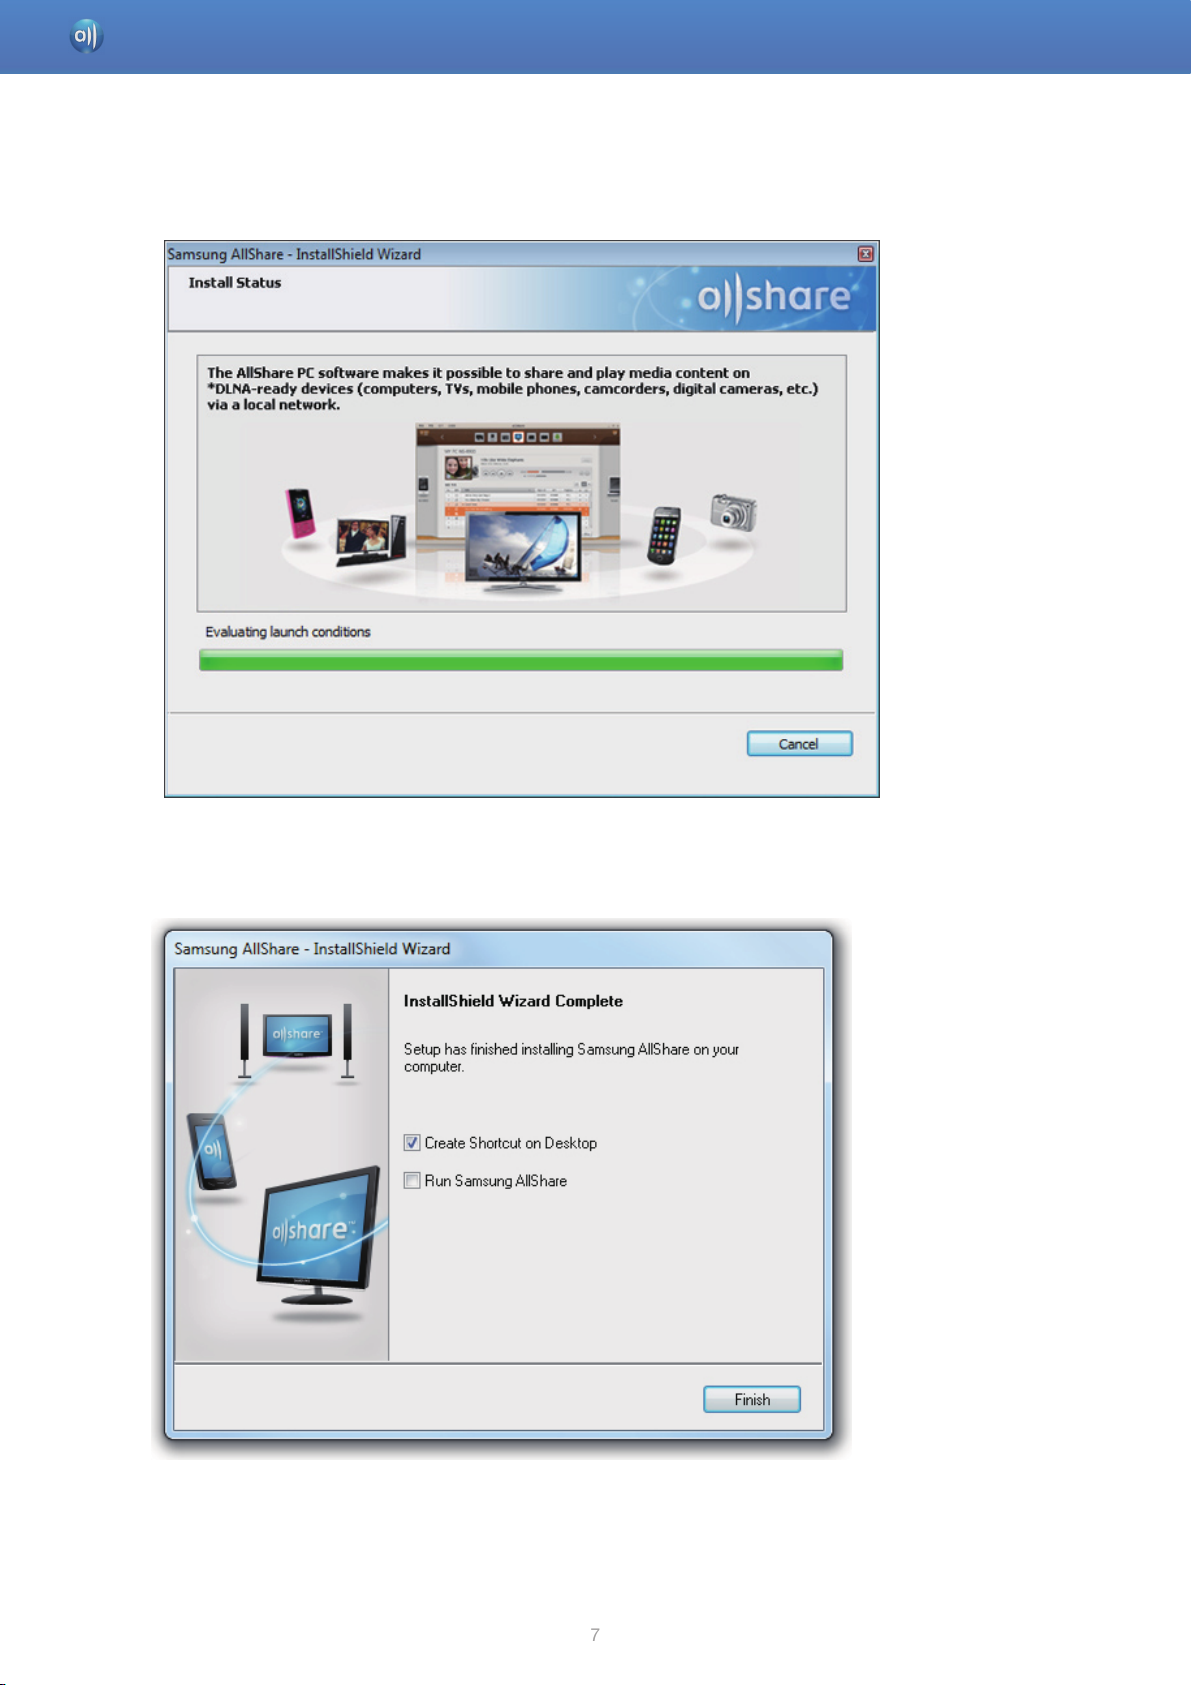
Start AllShare > Install AllShare
3. The files required for running the software will be installed.
4. When the installation is complete and the shortcuts have been created, select whether or
not to launch the software, and click ‘Finish’ to finish installation.
Page 8
8
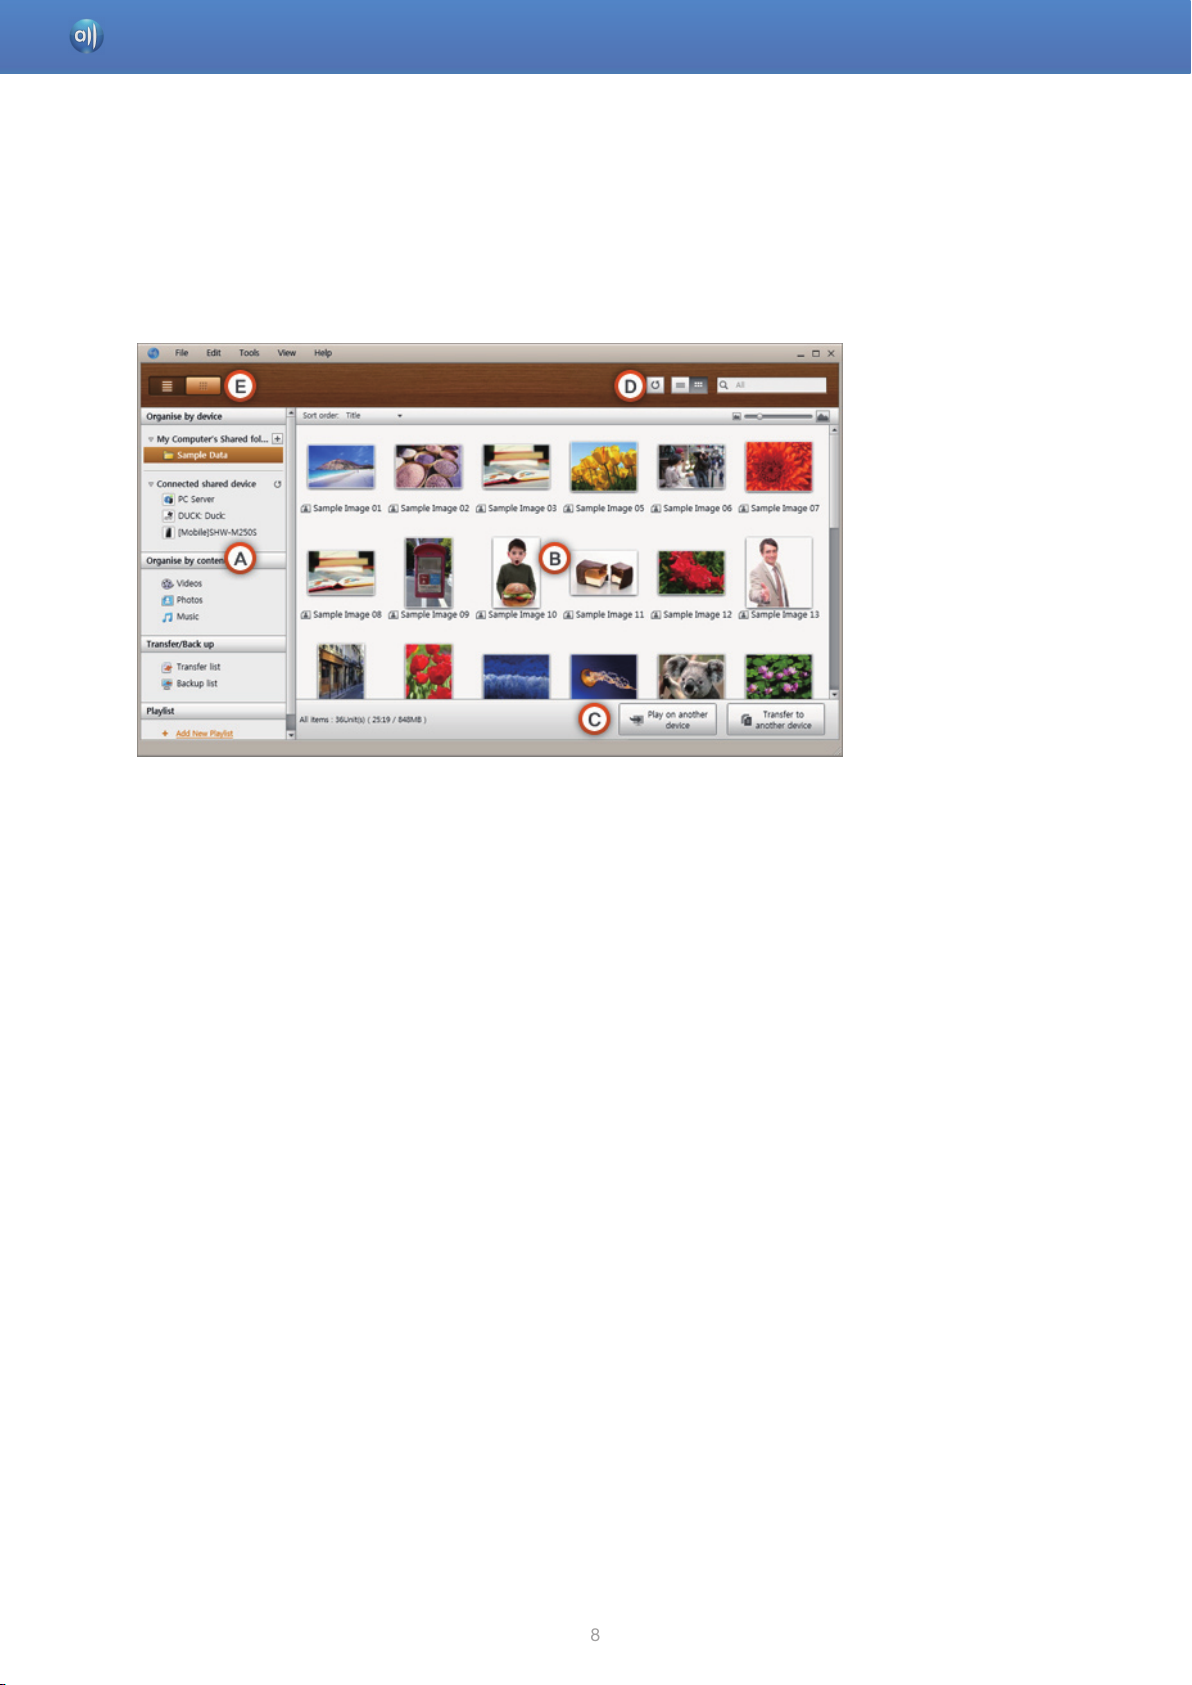
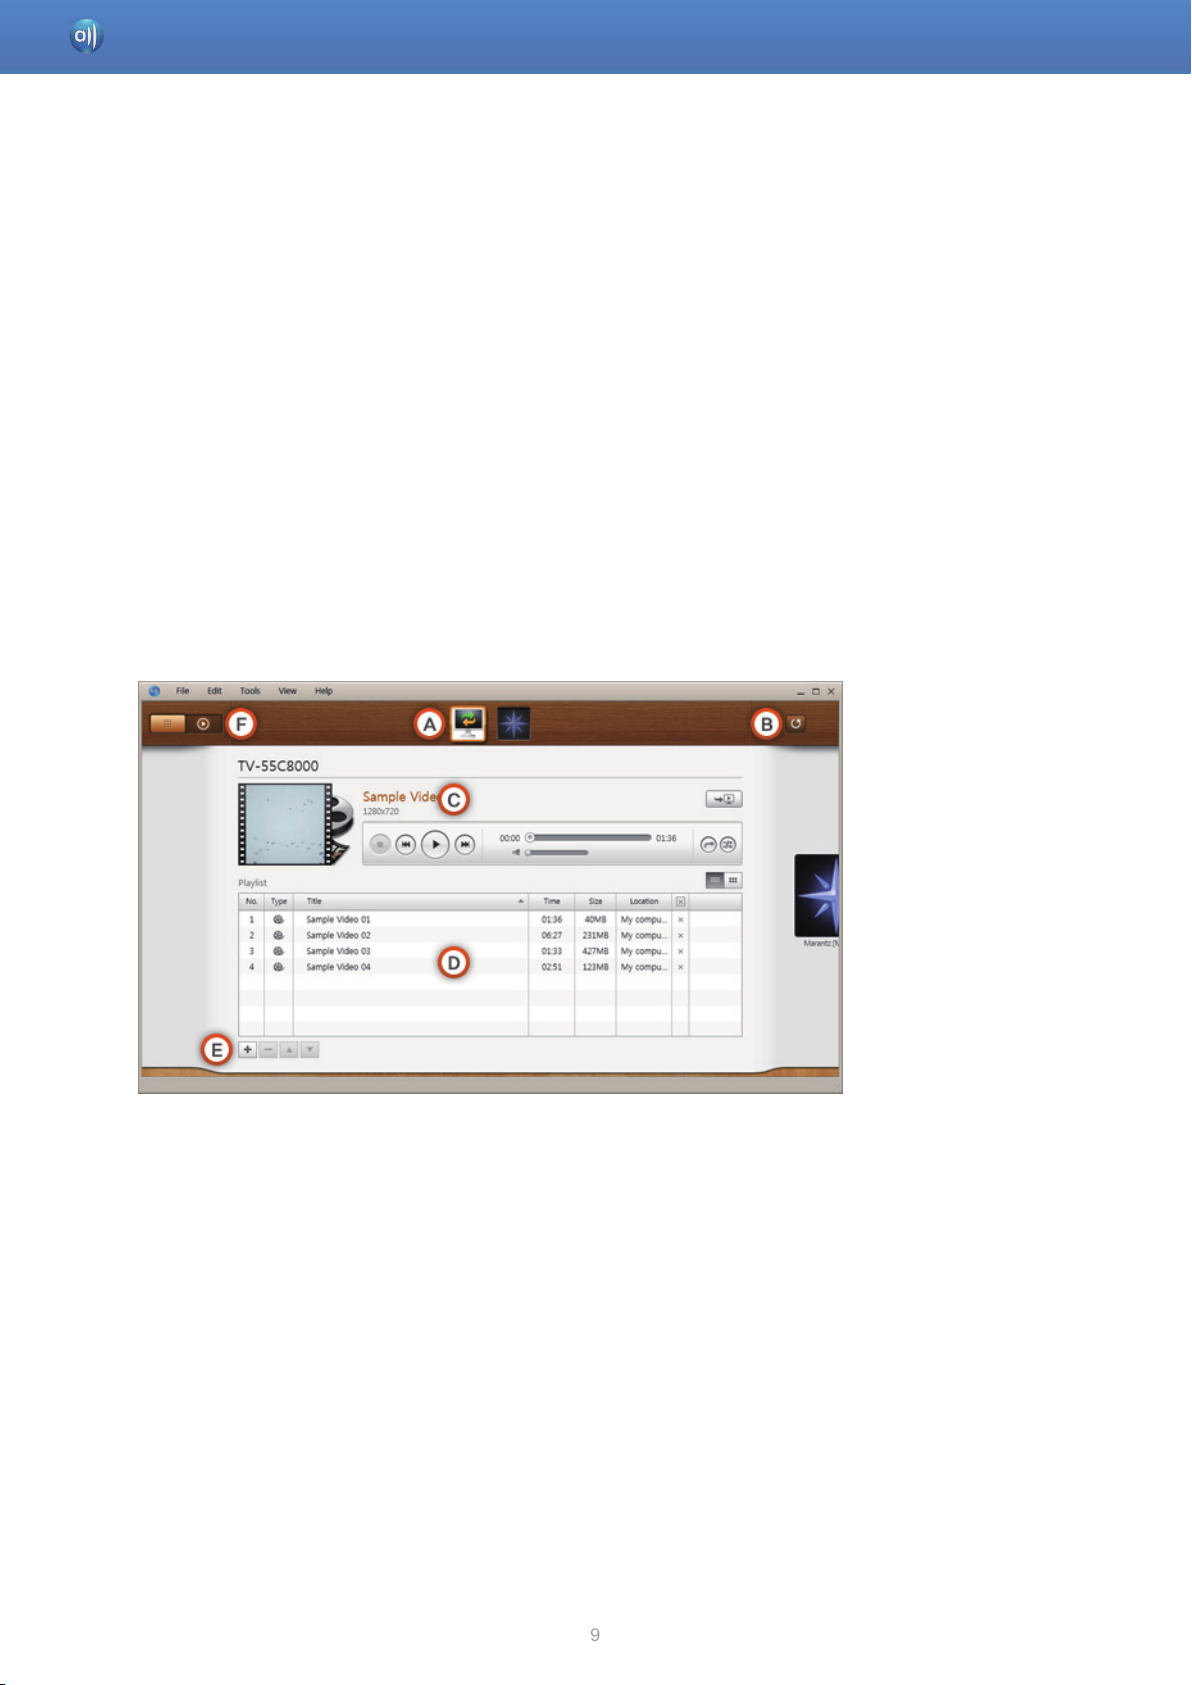
Start AllShare > Screen layout
1. File management screen
To go to the File management screen, either select View > File management screen mode in
top menu or click File management screen mode button.
A. Browsing area
●
Device list: Shows shared content on servers that are connected to My Computer.
●
Content list: Shows content by video/photo/music category.
●
Transfer/Back up list: Shows the progress/completion status for transfer and backup.
●
Playlist: Create and play a customised playlist of songs, photos, or videos that you want.
B. Content list area
Shows the content of the list selected in the browsing area.
C. Play on another device/Transfer to another device/Save to My Computer buttons
●
Play on another device: Brings up the selection screen for the device the selected content
will play on.
●
Transfer to another device: Brings up the selection screen for the device the selected
content will be transferred to.
●
Save to My Computer: Brings up the selection screen for the folder the selected content
will be saved to.
Page 9
9
Start AllShare > Screen layout
D. Additional features
●
Refresh: Refreshes the entire list.
●
List view/Thumbnail view: Click to change list view method.
●
Search: Searches the content within the Content list area.
E. Player control screen mode
Switches to Player control screen mode.
2. Player control screen
To go to Player control screen, either select View > Player control screen mode in top menu or
click Player control screen mode button.
A. Players area
Shows the devices that can play content, which you can click to go to their respective
Control screens.
B. Refresh player
Refreshes the list of players.
Page 10
10
Start AllShare > Screen layout
C. Information display and Player area
Shows the information for the selected player and content; you can use the player to control
playback.
●
Resume watching on another device (
another device.
●
Player button
■
Play (
■
Stop (
■
Previous (
■
Next (
■
Navigation bar (
■
Volume control bar (
■
Repeat
- No repeat (
- Repeat one (
) : Plays the selected content.
) : Stops playing content.
) : Plays the previous file.
) : Plays the next file.
): Lets you explore the playback position for video/music content.
) : Plays the selected content list from start to finish without repeating.
) : Plays one selected file repeatedly.
): Resumes playback of selected content on
): Controls playback volume for video/music content.
- Repeat all (
- Sequential play (
switches between sequential play and shuffle.
D. Playlist area
Shows the shared content list to which the playlist has been added.
E. Manage playlist button
●
Add to playlist (
●
Delete (
●
Move up (
●
Move down (
Brings up the Add content screen.
F. File management screen mode
): Deletes selected content from playlist.
) : Repeatedly plays the selected content list from start to finish.
)/shuffle( ) : Only available only when Repeat all is selected;
): Brings up the Add content screen.
): Moves the selected content up.
): Moves the selected content down.
Switches to File management screen mode.
Page 11
11
Start AllShare > Screen layout
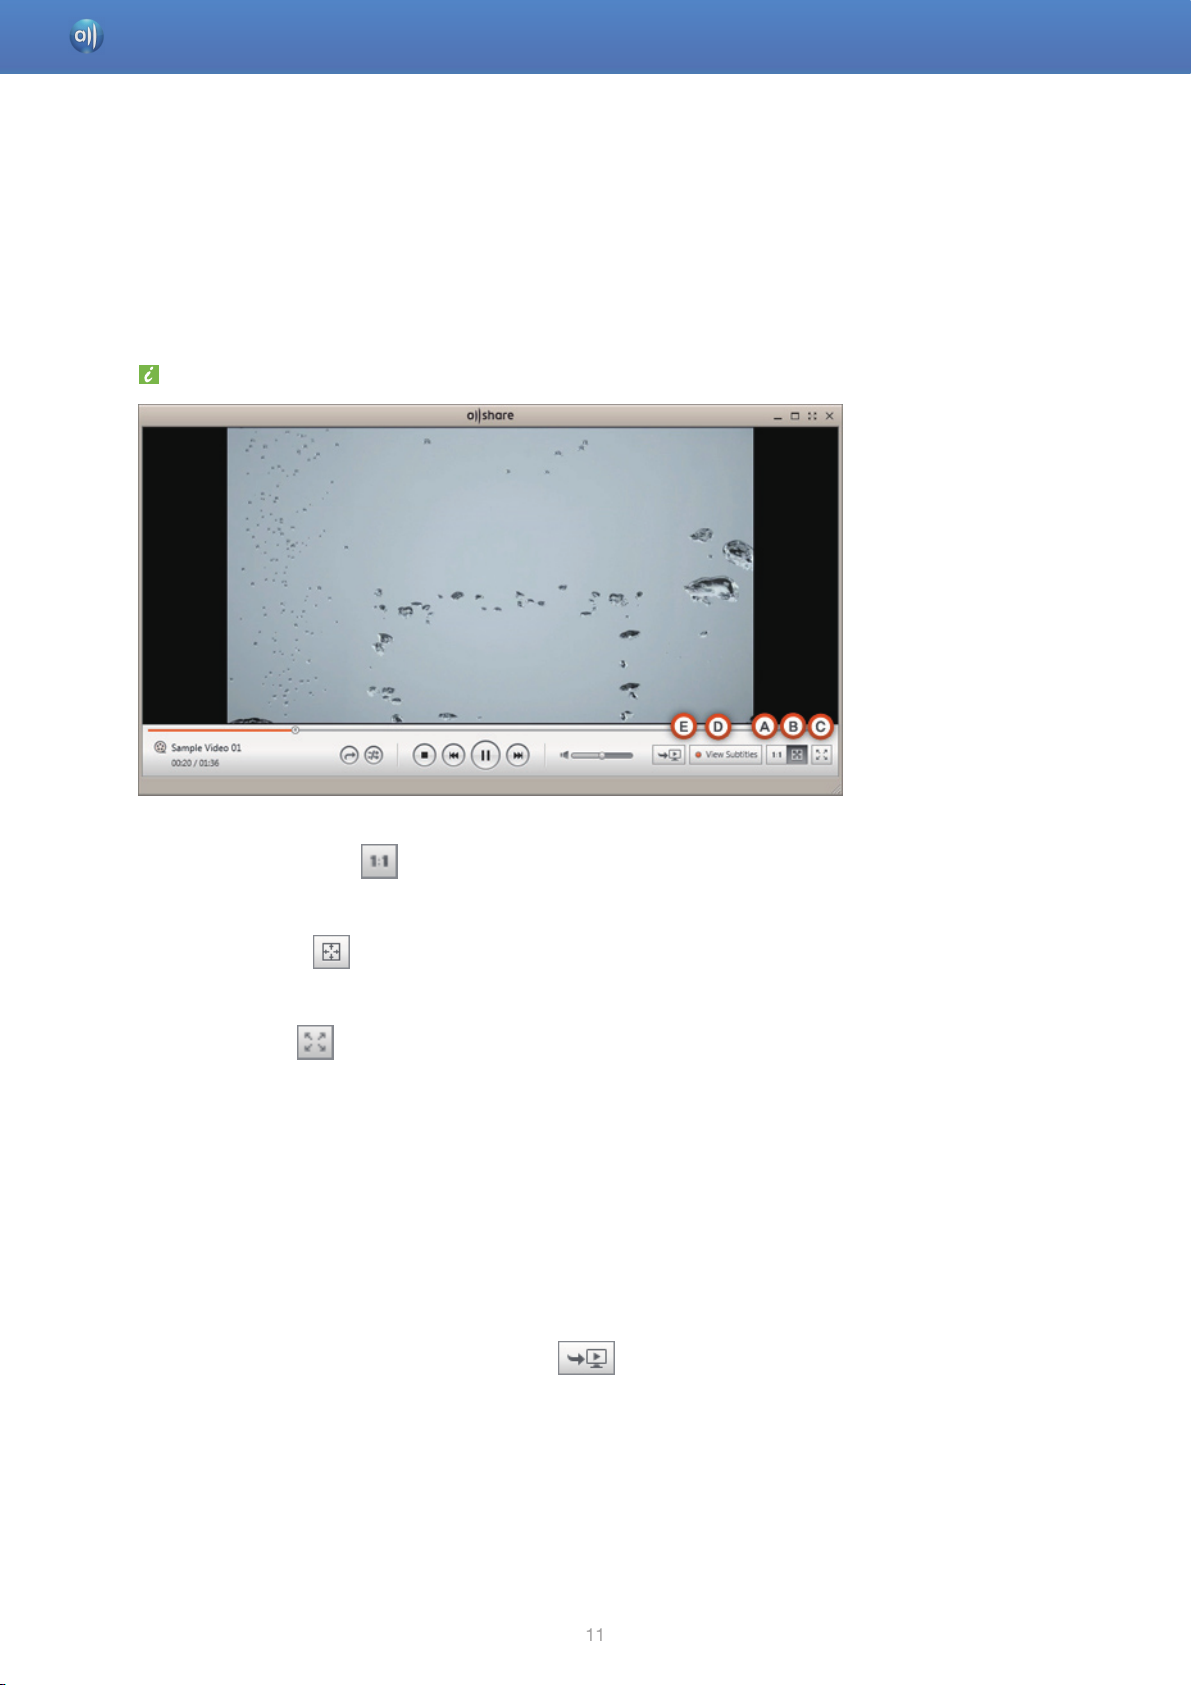
3. Player screen
To view the Player screen, either select View > View player window in top menu or double-click
on a content in content list.
Use the basic buttons the same way you use Player control screen.
A. View original size (
Changes window size to the original size for the video/photo.
B. Fit to screen (
Changes the size of a video/photo so that it fits the window sized by the user.
C. Full screen (
Shows a video/photo in full screen.
D. View subtitles
Turns subtitles on/off.
Set photo display time
Sets photo display time.
(Set time and actual display time would be different depending on network conditions.)
E. Resume watching on another device (
Resumes playback of content on another device.
)
)
)
)
Page 12

12
Start AllShare > Screen layout
Use right-click menu on playback screen to access fine controls.
●
Play/Pause: Starts/pauses playback of content.
●
Stop: Stops playing content.
●
Previous: Moves to previous content.
●
Next: Moves to next content.
●
Volume Controls
●
Volume Controls
■
Increase volume: Increases volume.
■
Decrease volume: Decreases volume.
●
50%: Changes window size to 50% of the content’s original size.
●
100%: Changes window size to the content’s original size.
●
Fit to screen: Plays content by fitting it to the current screen size.
●
Aspect ratio
■
Default - Plays in the video’s default ratio.
■
4:3 - Plays video in 4:3 aspect ratio.
■
16:9 - Plays video in 16:9 aspect ratio.
●
Full screen: Plays content in full screen.
●
Subtitles
■
View subtitles: Turns subtitles on or off.
■
Bold font: Turns bold font on or off for subtitles.
■
Larger font: Increases font size of subtitles.
■
Smaller font: Decreases font size of subtitles.
■
0.5sec faster: Displays subtitles 0.5 seconds faster than current sync.
■
0.5sec slower: Displays subtitles 0.5 seconds slower than current sync.
■
Sync default: Displays subtitles in the original sync.
●
Always on top when playing
●
Close player window
Page 13
13
Start AllShare > Connect device
Check network environment for My Computer
■
Check your local and/or wireless network connection in Tools > Network information.
■
If there is no connection, check your computer’s network connection.
Connect another device using AllShare
■
TV: Connect to your local network via wireless/wired LAN.
■
Mobile phone: Connect to your local network via Wi-Fi and run the AllShare application.
If you need further explanation or if you want to connect a different device, please
consultthe manual for the device
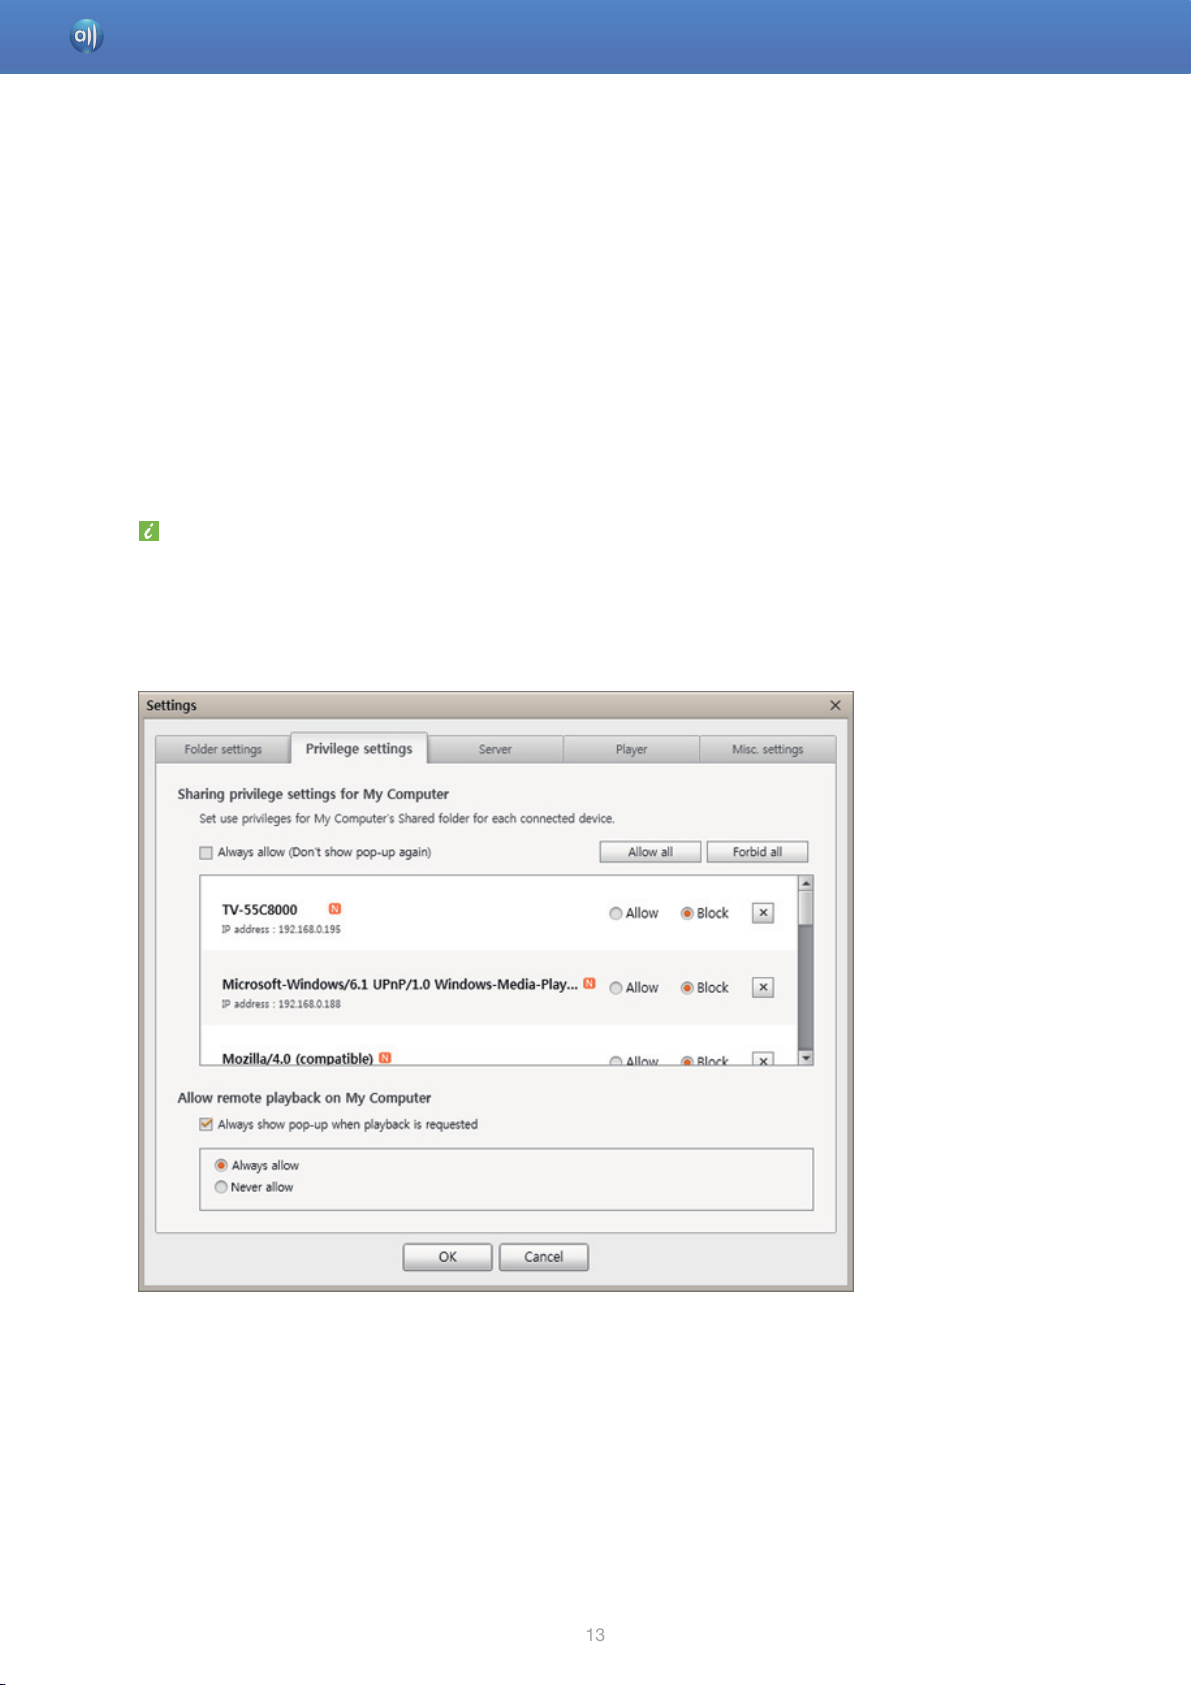
Allowing a connected device access
1. Go to Tools > Settings > Privilege settings tab.
Page 14
14
Start AllShare > Connect device
2. Proceed to Sharing privilege settings for My Computer.
●
If Always allow is selected, the shared content on My Computer can be used without a
pop-up notification when another device requests access for the first time.
●
Allow all/Block all: Allows/forbids access privileges for all currently connected devices.
●
You can set access privileges for each device by selecting allow/block, located next to
the connected device list.
●
To remove a device from the list, click X on the connected device list.
3. Proceed to Allow remote playback on My Computer.
●
‘Always show pop-up when playback is requested’: When selected, this shows playback
requests to My Computer from other devices in a pop-up.
●
Always allow: When another device sends a playback request to My Computer, playback
is granted without a pop-up notification.
●
Never allow: Devices cannot play on My Computer.
Check connected devices
Page 15

15
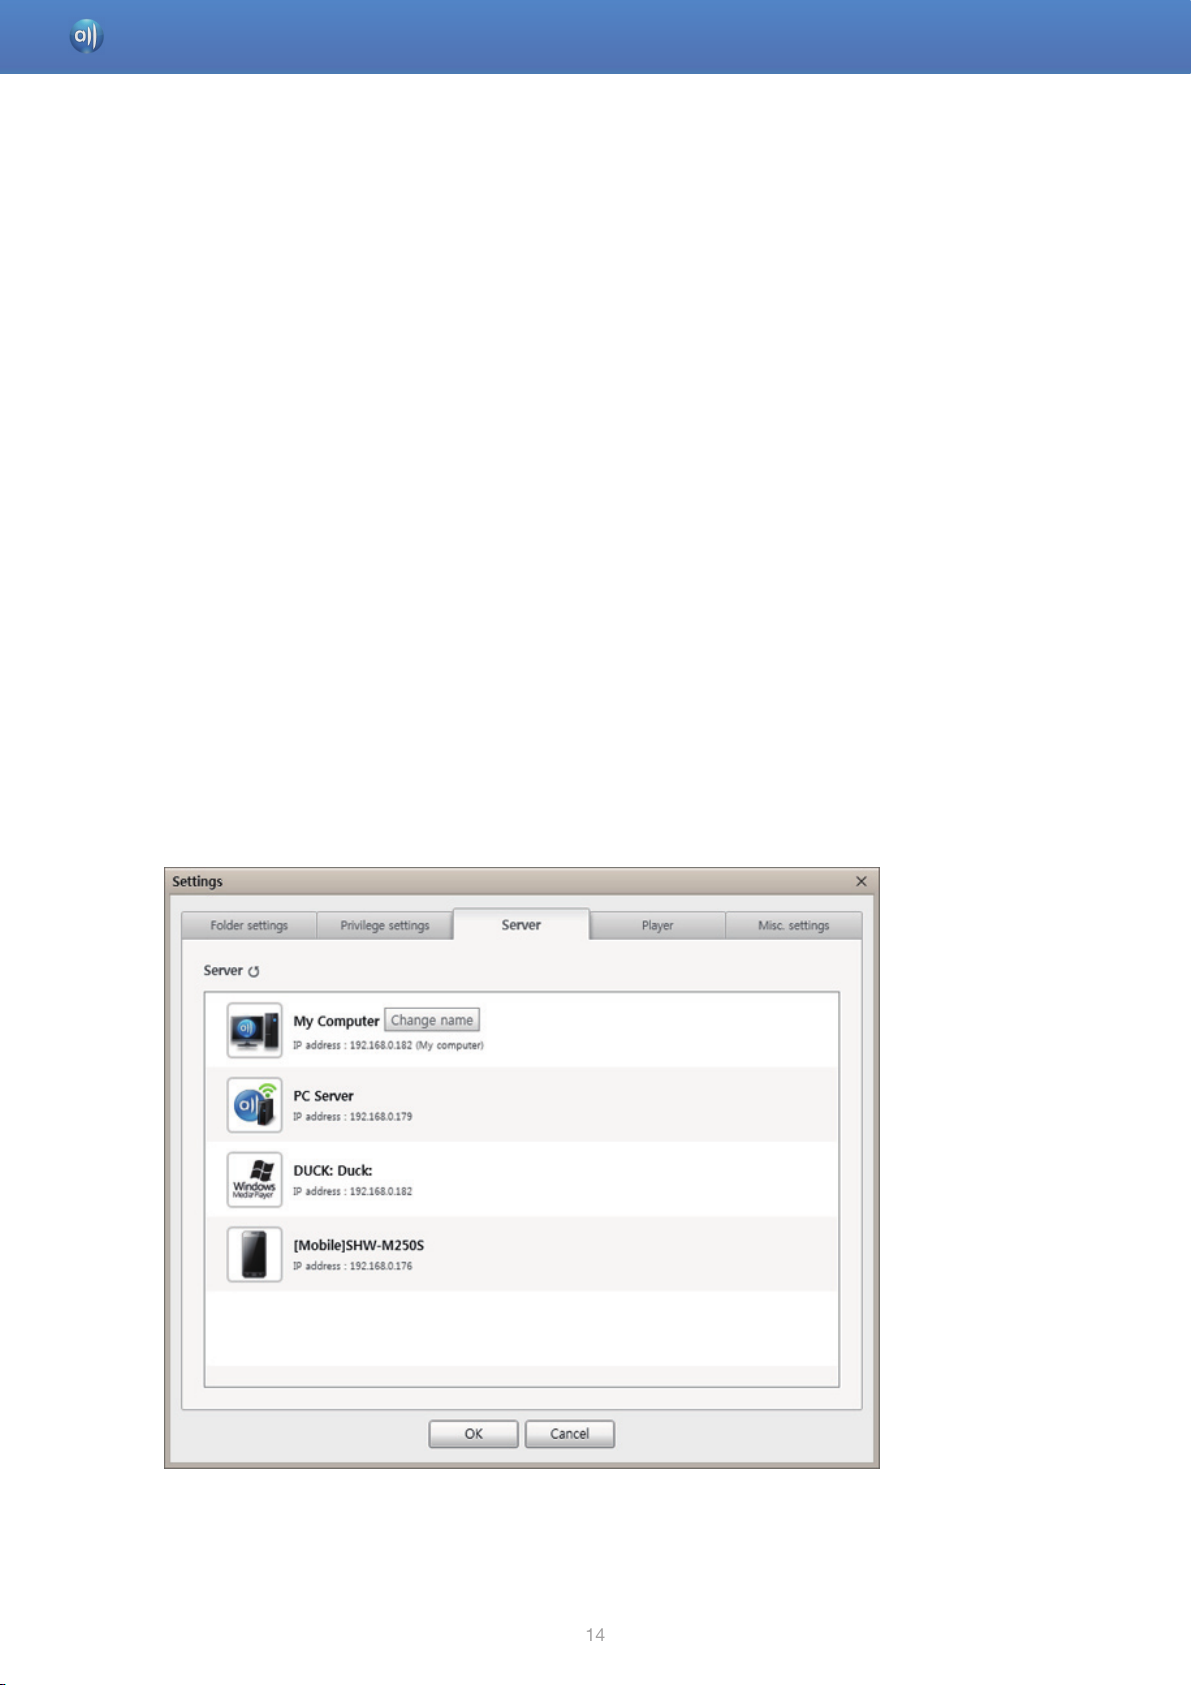
Start AllShare > Connect device
1. Chck list of server
●
You can view the list of connected servers in Tools > Settings > Server tab.
●
You can also view the list of server in ‘Connected server’ in the File management screen.
●
Click Server (
●
Click Change name to change the name shown on the server for My Computer.
2. Check player list
) to refresh the list of servers.
●
You can view the list of connected players in Tools > Settings > Player tab.
●
You can also view the player list in the Players area of the Player control screen.
●
Click Player (
●
Click Change name to change the name shown on the server for My Computer.
Saved items will be maintained when you exit or restart the software.
) to refresh the list of players.
Page 16

16
Start AllShare > Add shared content
Add shared folder
You can add a shared folder by doing one of the following:
■
Click on File management screen > Device list area’s shared folder settings (
select the folder you want to share, and click OK to add the shared folder.
■
Click File > Add shared folder from My Computer to select the folder you want to share, and
click OK to add the shared folder.
■
Click Tools > Settings > Folder settings to select the folder you want to share, and click OK
to add the shared folder.
Add File to My Computer’s shared folder
) button to
You can add a file to a shared folder by doing one of the following:
■
Click on File management screen > Content list area’s Add files to play to the list to select
the content you want to share, and click Open to add the shared content.
■
Click File > Add file to My Computer’s shared folder to select the content you want to share,
and click Open to add the shared content.
Add from Windows Explorer
From Windows Explorer, select the folder/file you want to share and drag it into My Computer’s
shared folder/Content list area on the File management screen to add the shared folder/file.
Page 17

17
Start AllShare > View shared content
Check My Computer’s shared content
■
Select the folder to check in File management screen > Device list > My Computer’s shared
folder, and the folder’s content will be displayed in Content list area.
■
As you enter search keywords in the search window, the search for the text strings will
proceed in real time, and the search results will be displayed in the Content list area.
■
You can click on List view/Thumbnail view at the top of content list to switch between views.
●
In List view, you can click on Type/Title/Date created/Time/Size criteria at the top of the
content list to sort the content list by the criteria in ascending/descending order.
●
In Thumbnail view, you can adjust the size of thumbnail images by using the Thumbnail
size adjustment bar at the top of the list, and selecting Sort order to sort the thumbnails
by the selected criteria in ascending or descending order.
Page 18

18
Start AllShare > View shared content
■
Additional features accessed by right-clicking on content
●
Play: Plays selected content on My Computer.
●
Play on another device: Brings up Select player window for you to select which player to
use to play the selected content.
●
Transfer to another device: Brings up Select transfer device window for you to select
where to save the selected content to.
●
Select all: Selects all content in the current list.
●
Deselect all: Deselects all selected content.
●
View in Windows Explorer: Brings up the shared folder in Explorer.
●
Refresh: Refreshes the content list.
●
Properties: Brings up the properties for the selected content.
Page 19

19
Start AllShare > View shared content
Check content of connected servers
■
Select File management screen > Device list > Connected server > Server to check and click
on the shared folder you want to check in order to display the list in the Content list area.
■
As you enter search keywords in the search window, the search for the text strings will
proceed in real time, and the search results will be displayed in the Content list area.
■
You can click on List view/Thumbnail view at the top of content list to switch between views.
●
In List view, you can click on Type/Title/Date created/Time/Size criteria at the top of the
content list to sort the content list by the criteria in ascending/descending order.
●
In Thumbnail view, you can adjust the size of thumbnail images by using the Thumbnail
size adjustment bar at the top of the list, and selecting Sort order to sort the thumbnails
by the selected criteria in ascending or descending order.
Page 20

20
Start AllShare > View shared content
■
Additional features accessed by right-clicking on content
●
Play: Plays selected content on My Computer.
●
Play on another device: Brings up Select Player Window for you to select which player to
use to play the selected content.
●
Save to My Computer: Saves selected content to My Computer.
●
Select all: Selects all content in the current list.
●
Deselect all: Deselects all selected content.
●
Refresh: Refreshes the content list.
●
Properties: Brings up the properties for the selected content.
Depending on the type of connected device, certain properties may or may not be displayed.
Loading time may be vary depending on the status of the connected device.
Page 21

21
Start AllShare > View shared content
Content category view
■
Click Video/Photo/Music in File management screen > Content list to display that type of
shared content in the Content list area.
■
You can click on List view/Thumbnail view at the top of content list to switch between views.
●
In List view, you can click on Title/Date created/Size/Location criteria at the top of the
content list to sort the content list by the criteria in ascending/descending order.
●
In Thumbnail view, you can adjust the size of thumbnail images by using the Thumbnail
size adjustment bar at the top of the list, and sort the thumbnails by using All/Date/
Month/Year/Location (All/Album/Artist/Genre/Location if music) at the top.
Page 22

22
Start AllShare > View shared content
If you wish to add content from more devices to the Content category view, you can select and
organise the devices you want to add in Tools > Content list settings.
Page 23

23
Start AllShare > Create playlist
■
Add playlist: Click on Add new playlist next to Playlist, and enter a name for the playlist.
■
Play on another device: Right-click on the playlist you want to play, and hold the mouse cursor
over Play on another device to select the device you want to play the playlist on.
■
Rename playlist: Right-click the playlist you want to rename, and click Rename to rename of
the play list.
■
Delete playlist: Right-click the playlist you want to delete, and click Delete to delete the playlist.
■
Add content to playlist: To add content to a playlist, select the list that contains the content
you want to add to playlist In the Navigation area’s Device list/Content list, select the content
from the Content list area, and drag the content to the playlist.
■
Remove content from playlist: Select the playlist that contains the content you want to remove,
select the content to remove in the Content list area, and either right-click the content > click
Delete or press the Delete key to remove the content.
(Removing content from a playlist does not delete it from the Device list or the Content list.)
Page 24

24
Use my computer’s content
Play My Computer’s content on another device >>
Transfer My Computer’s content to another device >>
To learn how to add content, please refer to Start AllShare > Add shared content.
Page 25

25
Use my computer’s content > Play My Computer’s content on another player
File management screen
1. Select the content you want to play in File management screen > the Content list area.
2. Click on Play on another device at the bottom of the list. Right-click on content, and click
Play on another device.
3. Select the device to use for playback, and the device will play.
Player control screen
1. Player control screen lets you select the device you want to use for playback.
2. Click Add to playlist (
3. Select the content you want to play and click OK.
4. In Player control screen > Playlist, select the content you want to play and either click Play
on the player to play or click Play on another player and select a player to play content from
the device.
If a player is requesting playback for the first time, the player may need to be processed for
access privileges for AllShare PC software.
) to bring up the Add content screen.
Page 26

26
Use my computer’s content > Transfer My Computer’s content to another device
1. Select the folder that contains the content you want to save to another device in File
management screen > Device list > My Computer’s shared folder.
2. In the Content list area, select the content you want to save to another device.
3. To transfer the content to device, either click Transfer to another device or right-click the
selected content > Transfer to another device > select the device to transfer to.
You can view the transfer progress/completion list in File management screen > Transfer/Back
up > Transfer list.
Page 27

27
Use connected server’s content
Play connected server’s content on My Computer >>
Play connected server’s content on another device >>
Save connected server’s content to My Computer >>
To learn how to connect a device, please refer to Start AllShare > Connect device.
Page 28

28
Use connected server’s content > Play connected server’s content on My Computer
1. In File management screen > Device list > Connected server, select the server and folder that
contain the content you want to play.
2. Select one of the following processes and proceed:
●
Double-click the content you want to play in the Content list area.
●
Select the content you want to play in the Content list area, right-click the selected content,
and select Play.
●
If the Content list area is in Thumbnail view mode, click on the Play button on the thumbnail image.
Page 29

29
Use connected server’s content > Play connected server’s content on another device
1. In File management screen > Device list > Connected server, select the server and folder that
contain the content you want to play.
2. Select the content you want to play in the Content list area, click Play on another device, and
select the device to use for playback to play the content on the device.
Page 30

30
Use connected server’s content > Save connected server’s content to My Computer
1. In File management screen > Device list > Connected server, select the server and folder that
contain the content you want to save.
2. Select the content you want to save in the Content list area and click Save to My Computer.
Alternatively, select the content, right-click on the selected content, and click Save to My
Computer.
3. Select the folder to save to and click OK to save the content to My Computer.
You can view transfer status in File management screen > Transfer/Back up > Transfer list.
Page 31

31
Use My Computer’s shared content and player on another device
Set use privileges for My Computer >>
Play My Computer’s content on another device >>
Play another device’s content on My Computer >>
To learn how to add content, please refer to Start AllShare > Add shared content.
Page 32

32
Use My Computer’s shared content and player on another device
> Set use privileges for My Computer
Let’s learn about the basic settings for accessing content on My Computer from another device
through AllShare.
1. Go to Tools > Settings > Privilege settings tab.
2. In Sharing privilege settings for My Computer’s device list, change Use privileges for My
Computer’s shared folder to Allow.
3. In Allow remote playback on My Computer, select Always allow.
Page 33

33
Use My Computer’s shared content and player on another device
> Play My Computer’s content on another device
Play on GALAXY S
1. Run the AllShare application on the device.
2. Select Play another device’s File on my phone.
3. In Server list, select the shared name that is set in AllShare on My Computer.
4. Select the content you want to play and click add to playlist to play the content.
This text only covers how to run AllShare on GALAXY S; for instructions on how to use the
software on other devices, please refer to the manual for the product.
Page 34

34
Use My Computer’s shared content and player on another device
> Play another device’s content on My Computer
Play GALAXY S’s content on My Computer
1. Run the AllShare application on the device.
2. Select Play my mobile phone’s files on another device.
3. Select the content you want to play and press Add to playlist.
4. Select [PC] computer name in the Player list, and the content will play on My Computer.
When a playback request is sent to My Computer, you need to have allowed AllShare PC S/W
access to GALAXY S, as shown below:
■
When the Allow access for playback requests pop-up appears, click ‘Yes’.
■
Go to Tools > Settings > Privilege settings tab, and click Allow access.
This text only covers how to run AllShare on GALAXY S; for instructions on how to use the
software on other devices, please refer to the manual for the product.
Page 35

35
Keyboard shotcuts
Use keyboard shortcuts to access AllShare’s features more quickly and easily.
Operation Shortcut
Player control screen playlist
Delete
Play
Select all
Properties
Player
Play/pause
Previous
Next
Stop
Increse volume (video/music)
Decrease volume (video/music)
Full screen
Exit full screen
Subtitles (video)
Bold font
Lager font
Smaller font
0.5 seconds faster
0.5 seconds slower
Sync default
Delete
Enter
Ctrl + A
Ctrl + I
Space
←
(Directional key)
→
(Directional key)
Ctrl + Space
↑
(Directional key)
↓
(Directional key)
Alt + Enter
Alt + Enter, ESC
Ctrl + B
Alt +PageUp
Alt + PageDown
>
<
/
Text input
Cut
Paste
Copy
Rename
Delete
Content list area
Select all
Properties
Delete
Ctrl + X
Ctrl + V
Ctrl + C
F2
Delete
Ctrl + A
Ctrl + I
Delete
Page 36

36
Beginner’s guide
Play video files from My Computer on TV
Do you want to watch a movie on TV with your family, instead of watching it alone on your PC?
Try using AllShare to easily move your content to TV.
Add content or shared folder containing content you want to play
1. Turn on the TV.
2. Run AllShare PC software.
3. If the folder containing the video you want to play is not shared, click the button
computer’s shared folder” to add the shared folder.
If there are a large number of files, recreating the list may take a long time.
next to “My
Page 37

37
Beginner’s guide
Select Device you want to play (TV) and Playing
4. In the Content list, select the video you want to play.
5. Click on the ‘Play on another device’ button.
Page 38

38
Beginner’s guide
6. Select the device you want to play (TV).
7. When video buffering is complete, the video will play on TV.
Page 39

39
Beginner’s guide
View photos from camera on My Computer
Do you always move the photos you took on your travels to the computer by connecting your
camera to it with a cable? Try using AllShare to move them to PC easily and conveniently.
Run AllShare on camera and View on computer
1. Run AllShare on the camera.
* You need to select the Content sharing menu on some cameras.
2. In AllShare PC software, select the camera located below Connected server.
Page 40

40
Beginner’s guide
3. Select the photo folder on your camera.
View on My Computer without saving
4. Either double-click on a photo file or press the Play button to view on My Computer.
Page 41

41
Beginner’s guide
Save music from mobile phone to My Computer
Do you want to save the music file downloaded to your mobile phone to your PC as well?
You can use AllShare to conveniently back up content without having to use cumbersome
cable connection.
Run AllShare on mobile phone
1. Run AllShare on your mobile phone.
2. In AllShare PC software, select the mobile phone located below Connected server.
Page 42

42
Beginner’s guide
3. Select the mobile phone’s music folder.
Select and save music file to PC
4. Select the music file you want to save to My computer.
Page 43

43
Beginner’s guide
5. Click the ‘Save to My Computer’ button.
6. Select the folder you want to save the music file on My Computer.
Page 44

44
Beginner’s guide
7. To view the list of transfer in progress, select ‘Transfer list’ in ‘Transfer/Back up’.
* Transfer may take a while, depending on the size of photo file and your network environment.
8. View the music file in the save folder when transfer is complete.
Page 45

45
FAQ (Frequently Asked Questions)
I use AllShare PC software on My Computer, and
●
When I add a shared folder, nothing shows up in “My computer’s shared folder”.
AllShare shared server may be turned off. Right-click on the AllShare icon in Taskbar, and
select Restart AllShare shared server.
The antivirus program installed on your computer may be preventing the program from
functioning correctly. If you are using an antivirus program, please temporarily disable the
firewall.
●
It takes too long to recreate the content list.
If your shared folder contains too many files, creating a content list may take a long time. It is
recommended that you add content in moderate-sized, well-organised folders.
●
I added music to my shared folder, but it does not show up in the content list.
Either click on the Refresh button at the top of program, click on Refresh in the File/Folder
right-click menu, or press the F5 key on your keyboard to make the change take effect.
●
I added a server, but it does not show up in “Connected shared device” in the program.
Check your network connection to verify that the connected device is connected to the same
network as My Computer.
An antivirus program installed on the computer may be blocking out the device’s connection.
If you are using an antivirus program, please temporarily disable the firewall.
To learn how to connect a server, please refer to Start AllShare > Connect device in Help.
●
I succeeded in connecting a device, but I cannot view the content of the connected device
on My Computer.
If your device is a mobile phone or a tablet, please select the items you want to share in the
device’s AllShare application settings > Media sharing.
If your device is a digital camera, you can view the added content on My Computer by
adding content and then selecting what to share.
Page 46

46
FAQ (Frequently Asked Questions)
When I use My Computer’s AllShare PC software on another device,
●
I don’t see My Computer ([PC] computer name) on the device’s Media Device List.
In AllShare PC software’s Tools > Settings > Privilege settings > Sharing privilege settings for
My Computer, set the device’s sharing folder access privileges to Allow.
Check your network connection to verify that the connected device is connected to the same
network as My Computer.
An antivirus program installed on the computer may be preventing My Computer from
sharing. If you are using an antivirus program, please temporarily disable the firewall.
●
I cannot play videos from another device on My Computer’s player.
If AllShare PC software’s Tools > Settings > Privilege settings > Allow remote playback on My
Computer is set to ‘Never allow’, change it to ‘Always allow’.
An antivirus program installed on the computer may be preventing the content from playing.
If you are using an antivirus program, please temporarily disable the firewall.
An antivirus program installed on the computer may be preventing My Computer from
sharing. If you are using an antivirus program, please temporarily disable the firewall.
 Loading...