

Page 1
SAMSON SPLICING INSTRUCTIONS
Double Braid Class II Eye Splice Modified for TS-II Turbo
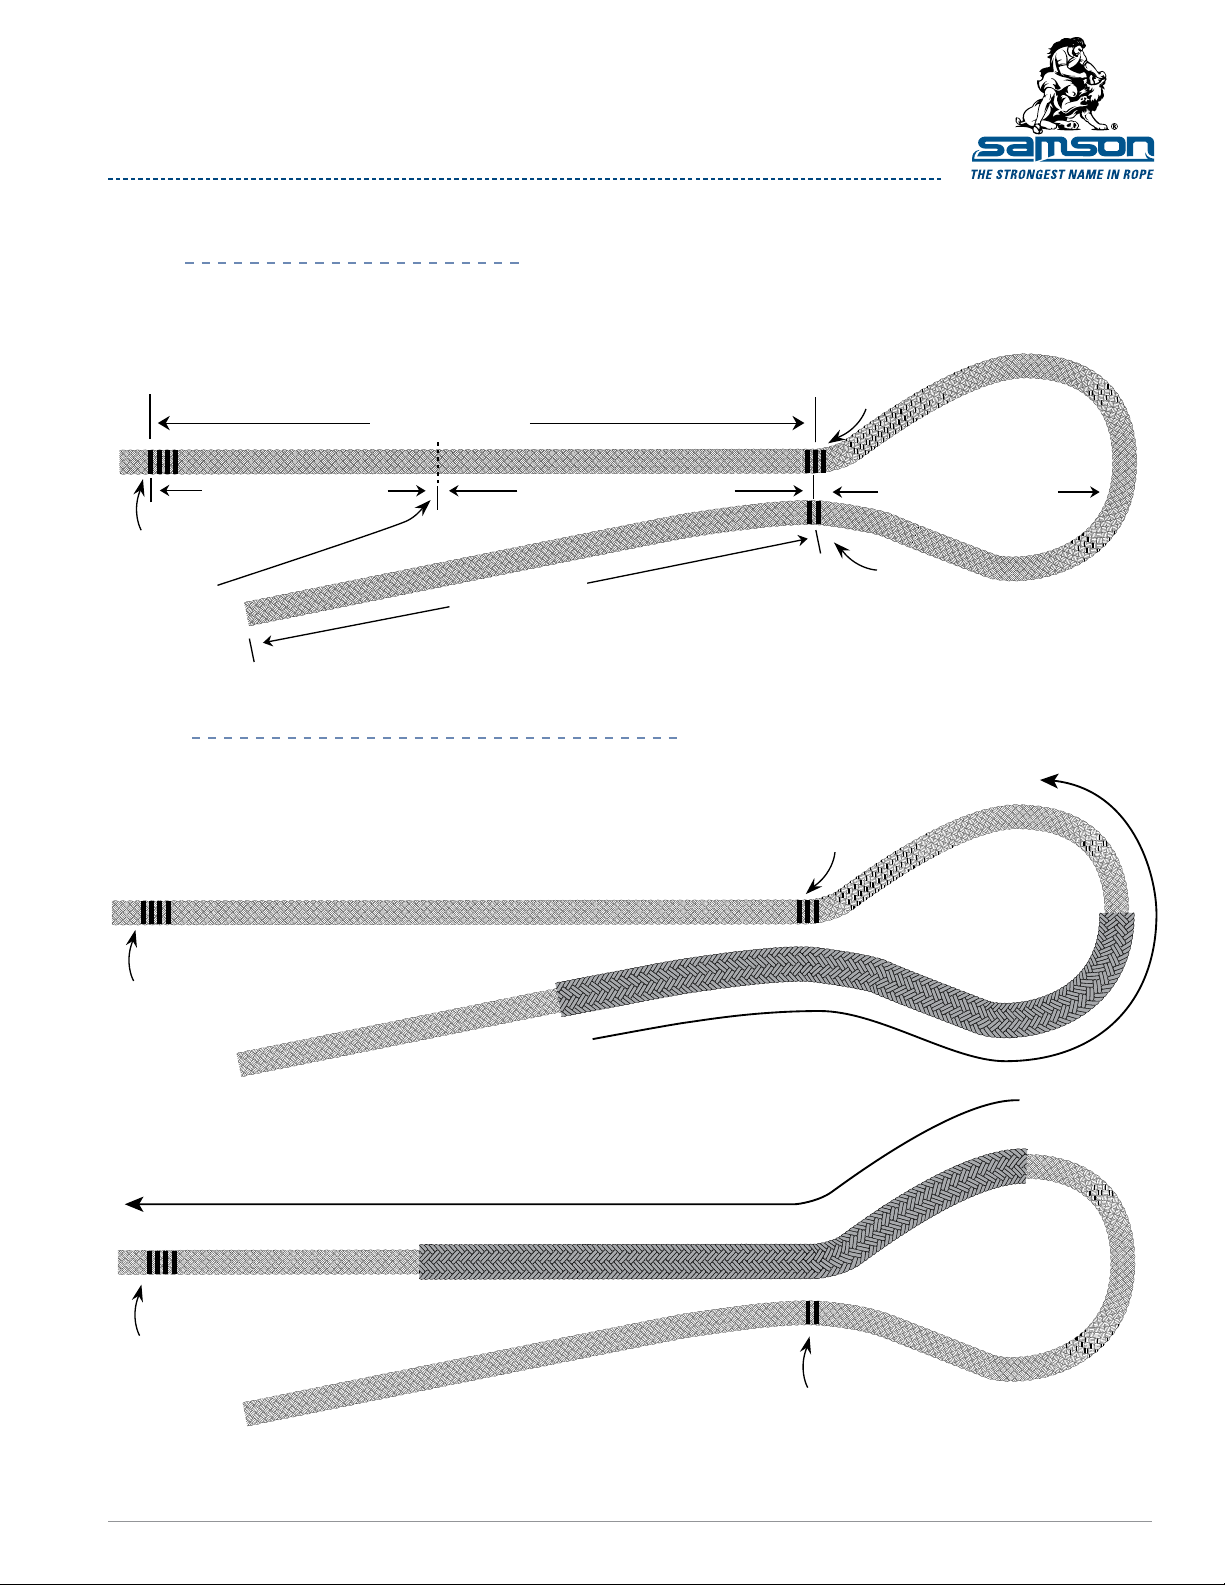
MEASURING AND MARKING
The measurements are the same as those for the direct bury eye splice for
step
1
Class II ropes. Measure 3 d lengths from the end and make Mark 2.
Form the desired size of the eye, and make Mark 3 adjacent to
Mark 2. From Mark 3, measure 3-1/2 d lengths and make Mark 4.
Mark 3
Measure 3-1/2 fids
Mark 4
Cut cover here
step
2
Mark 4
Measure 1-1/2 fid
Measure 3 fids
INSTALLING DC GARD FOR SPLICE AREA
The splice area must be covered with DC Gard at the completion of the
splice. Cut a piece of DC Gard that is 5-1/2 d lengths long (the distance
from Mark 3 to Mark 4 plus 2 d lengths.) Slide the DC Gard onto the
rope and beyond Mark 4*.
Measure 2 fids
DC Gard
Desired size eye
Mark 2
Slide
Mark 3
Slide
Mark 4
SamsonRope.com | Email CustServ@SamsonRope.com | Tel +1.360.384.4669
Mark 2
PAGE 1 OF 8
Page 2
SAMSON SPLICING INSTRUCTIONS
Double Braid Class II Eye Splice Modified for TS-II Turbo
step
3
step
UNBRAIDING COVER
Tape the rope at Marks 2, 3 and 4. From Mark 3, measure 2 d lengths towards Mark 4. Mark this point, then cut
the cover completely around the circumference of the rope. Be careful not to cut any of the core strands or yarns.
Unbraid the cover from the cut towards Mark 4, and from the cut towards Mark 3. The cover is left intact
around the eye, from Mark 2 to Mark 3. With the cover unbraided, transfer Mark 2 and 3 to the core.
Unbraid the cover from the bitter end to Mark 2.
After the cover has been unbraided, measure
1 d length from the bitter end and make Mark 1.
Tape cover at
Marks 2, 3 and 4
Measure 1 fid
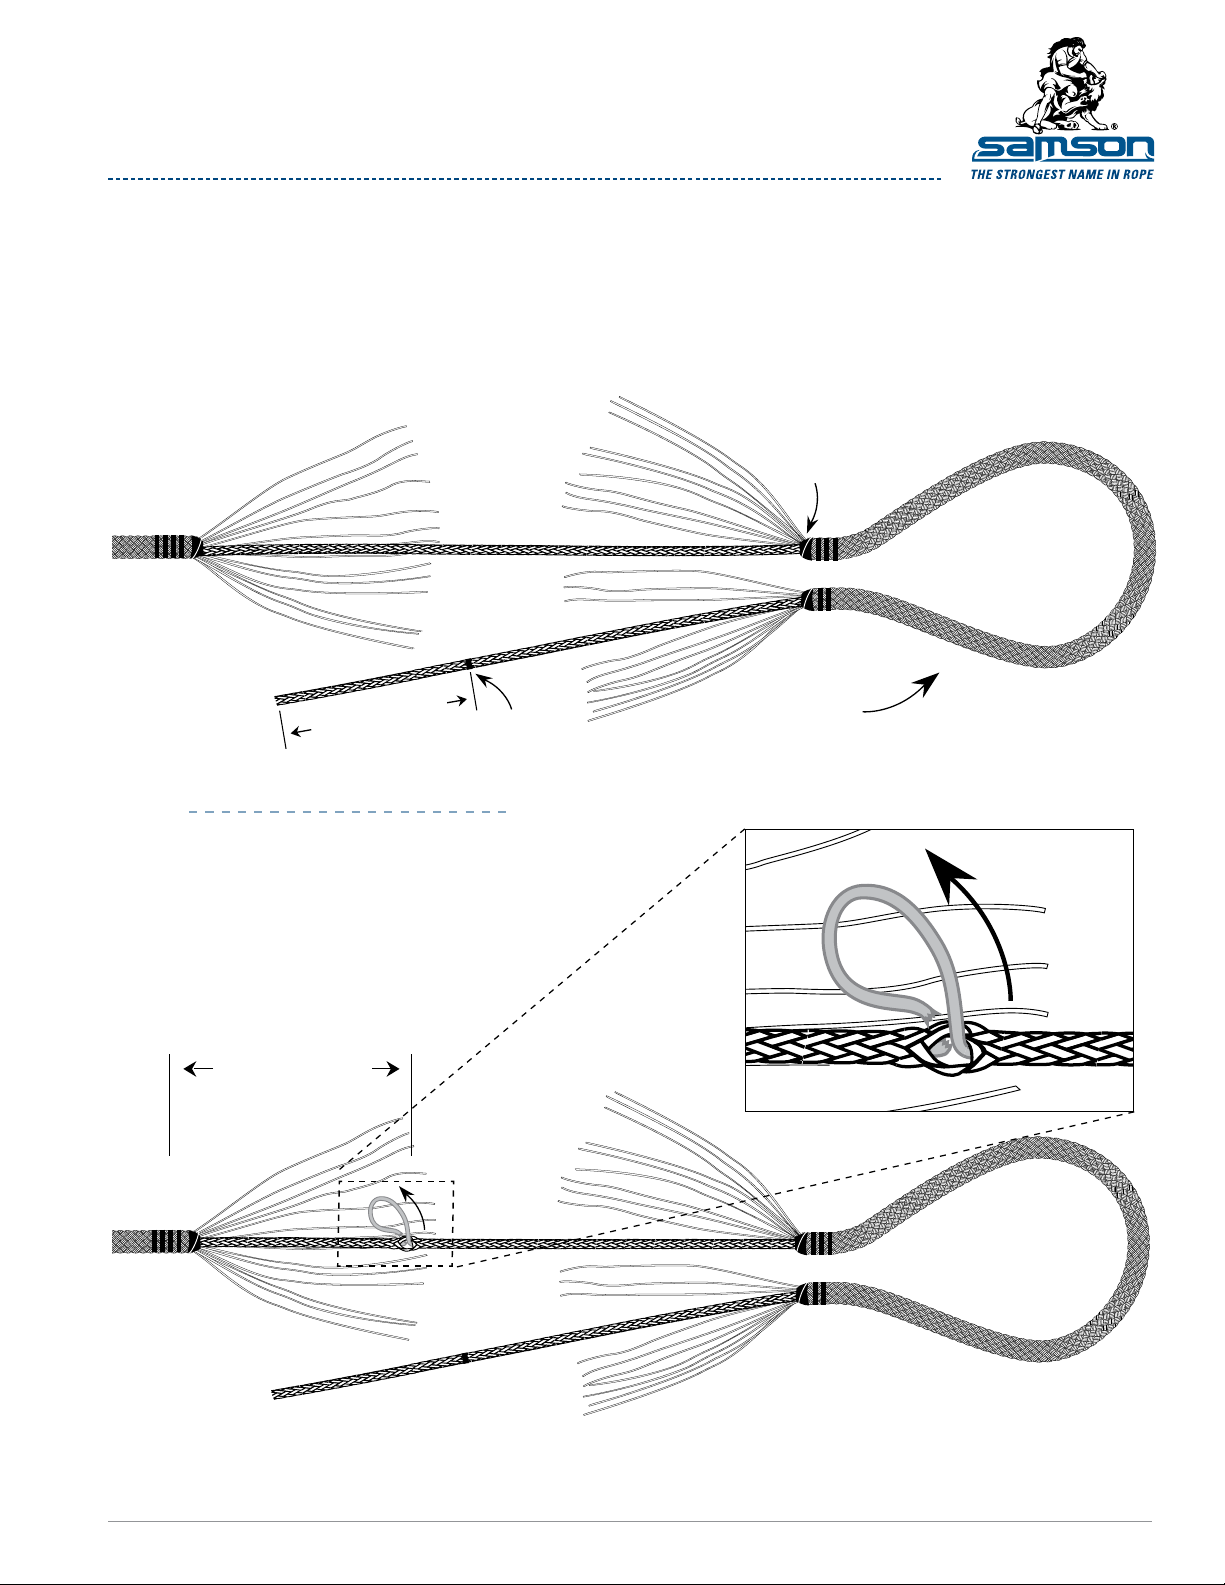
PERFORMING EYE SPLICE
Mark 1
Keep cover on eye
4
REMOVE REINFORCING CORE
4A
Measure 1 d length from Mark 4 towards Mark
3. Open up the strands of the core to expose the
Duravet reinforcing core. Cut the reinforcing core
at this point. Remove the Duravet core from this
point to the bitter end of the rope.
Measure 1 fid
Pull Duravet core
out of eye section
of rope and discard.
Cut Duravett core
SamsonRope.com | Email CustServ@SamsonRope.com | Tel +1.360.384.4669
PAGE 2 OF 8
Page 3
SAMSON SPLICING INSTRUCTIONS
Double Braid Class II Eye Splice Modified for TS-II Turbo
MAKING TAPER
4B
From Mark 1, in the direction of the bitter end of the line, mark every second right and left strand for 3
strands. Cut every marked strand and pull out of line (tape at end can cause resistance and may have
to be removed in order to pull out cut strands.) Tapered end will now have only 6 strands remaining.
Tape tapered tail tightly to keep from unbraiding.
3 pairs of strands, right
and left, pulled out and cut off
Toward eye, loop, and end
Retape end to
stop unbraiding
BURYING TAIL INTO STANDING PART OF LINE
4C
Measure 3-1/2 tubular d
lengths from Mark 3 on the
core and make Mark 4 on the
core. Insert d and tapered
tail at Mark 3 and bring d
out at Mark 4. You may need
to slide the cover back at
Mark 4 slightly. Pull d and
tapered tail out. Don’t let the
line twist. Use care when the
tail passes the cut end of the
Duravet core.
Mark 1
fid
Mark 4
3-1/2
fid lengths
Mark 2
Mark 3
Mark 2
Tapered tail
Push
Mark 1
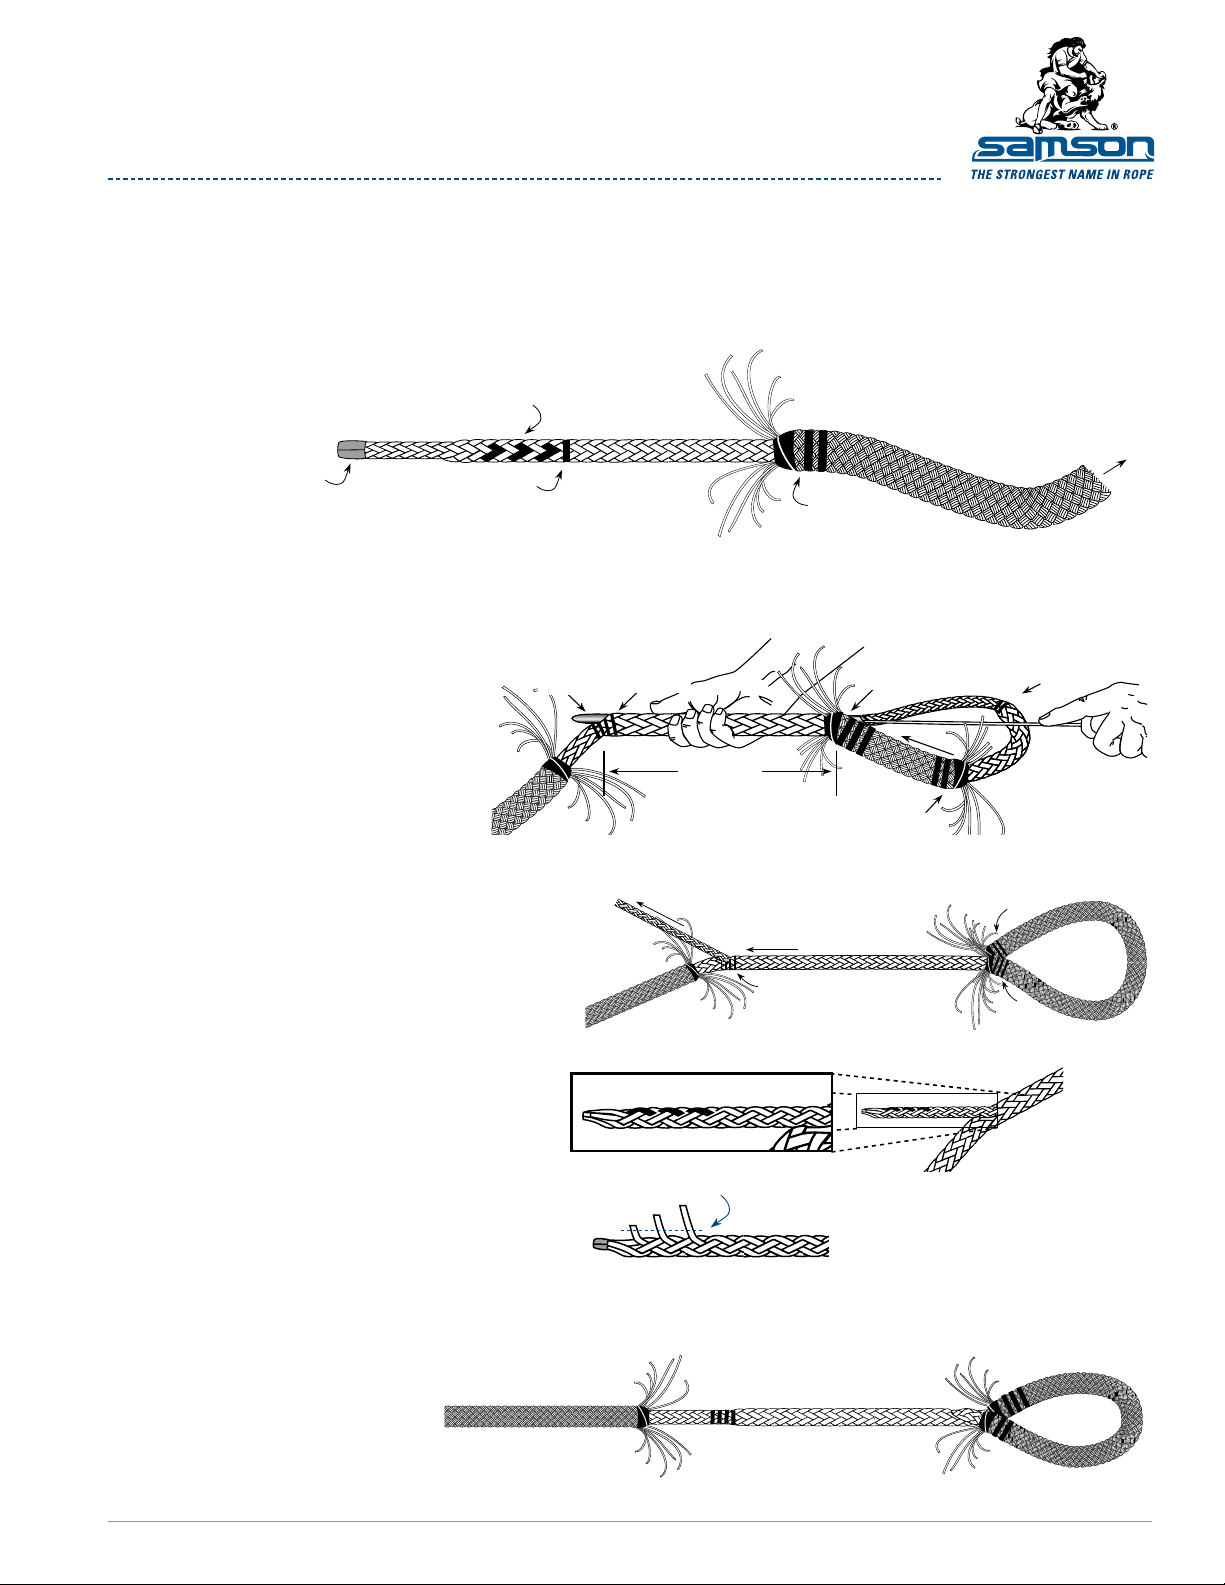
FINISH BURYING TAIL
4D
Pull tail out of the rope to expose the
previously tapered area. Remove the d
and any tape at the end of the tail. From
the end of the tail, mark 3 consecutive
strands, as shown. Pull them out of the
braid and cut off close to the body of the
rope. Now, using both hands and the
weight of your body, smooth the cover
slack from Mark 3 towards Mark 4. The
tail will disappear into the rope, and a
smooth, gradual taper should result.
FINISHING EYE SPLICE
4E
When nished, Mark 2 and Mark 3 should
be at the same point in the vertex of the
eye—which yields eye size desired.
Tapered Tail
Standing part of rope
Mark three consecutive strands
Pull
Mark 2
Smooth
Mark 4
Mark 3
Pull out marked strands and cut off
SamsonRope.com | Email CustServ@SamsonRope.com | Tel +1.360.384.4669
PAGE 3 OF 8
Page 4

SAMSON SPLICING INSTRUCTIONS
Double Braid Class II Eye Splice Modified for TS-II Turbo
GROUPING COVER STRANDS
step
5
At Mark 4, divide the cover strands into 6 equal groups. Tape the ends securely.
At the vertex of the eye, group the cover strands at Mark 3 into 3 equal groups,
and group the strands at Mark 2 into 3 equal groups. Tape the ends of each strand.
6 equal groups
tape ends
6 equal groups
3 each leg
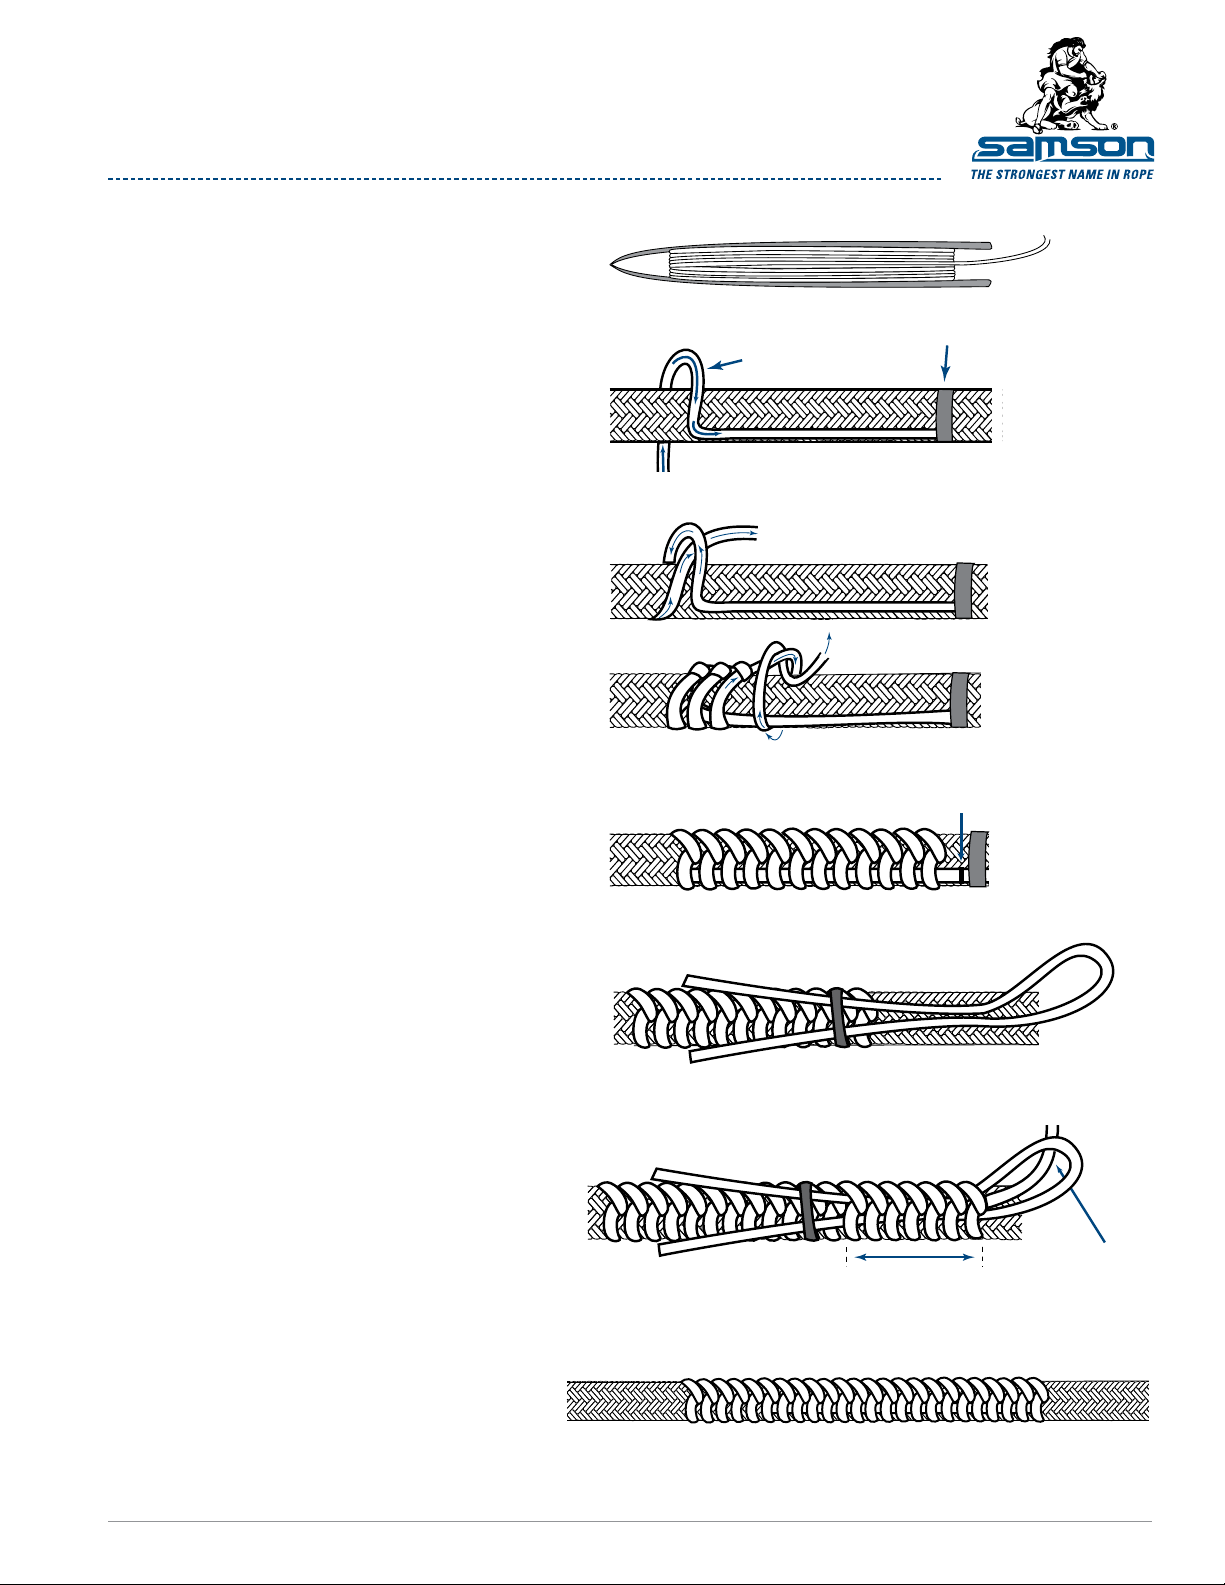
WEAVING COVER GROUPINGS: WORKING END
Now, working from Mark 4 towards Mark 3, make 5 tucks with the cover strands into the core in the following pattern:
6
step
Weave strand groupings
under core picks
under 1 strand, over 4 strands, under 1 strand, over 5 strands, under 1 strand, over 4 strands, under 1 strand, over 5
strands, under 1 strand.
These tucks proceed straight down the axis of the rope. Tuck all 6 strand groups in the same pattern
Finished weave
4 picks4 picks 5 picks
5 picks
Alternate 4
and 5 picks
SamsonRope.com | Email CustServ@SamsonRope.com | Tel +1.360.384.4669
PAGE 4 OF 8
Page 5

SAMSON SPLICING INSTRUCTIONS
Double Braid Class II Eye Splice Modified for TS-II Turbo
step
7
step
8
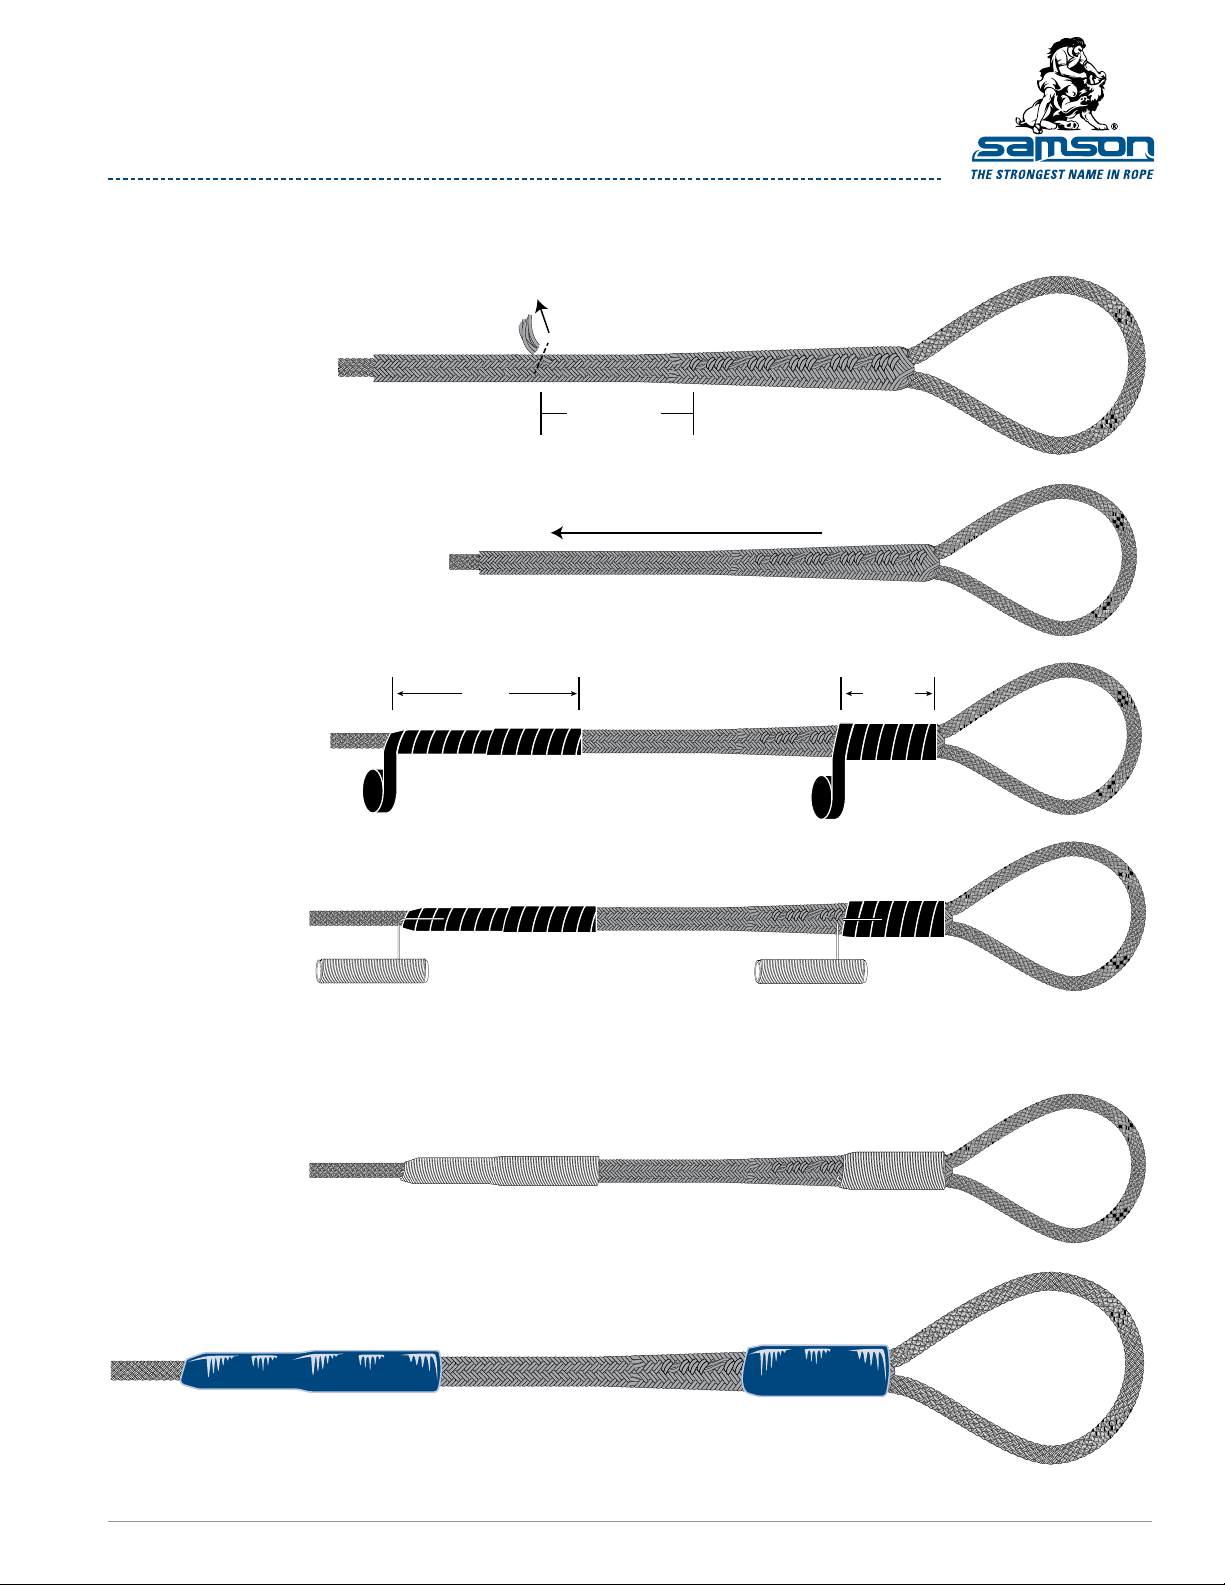
WEAVING COVER GROUPINGS: EYE END
Working from the eye towards Mark 4,
perform 5 tucks of the cover strands in the
same alternating pattern; over 1 and under
4, over 1, under 5. The 2 groups of cover
strands should meet near the point where
the cover was initially cut, 2 d lengths from
Mark 3, and 1-1/2 d lengths from Mark 4.
4 picks 4 picks5 picks
Alternate 4
and 5 Picks
TRIMING BACK TAPED TAILS
Cut back the cover tails leaving a 1/2 d length of tail
exposed and arrange them so they lay as close to the
body of the rope as possible. Tape them down.
Cut back cover tails
Weave strand groupings
under core picks
5 picks
Approximately 1-1/2 fids Approximately 2 fids
step
9
SamsonRope.com | Email CustServ@SamsonRope.com | Tel +1.360.384.4669
TAPING TAILS
Tape over the exposed tails with enough tape to adequately
cover the tails, plus an extra 1/2 d on each side.
Tape with black electrical tape
PAGE 5 OF 8
Page 6

SAMSON SPLICING INSTRUCTIONS
Double Braid Class II Eye Splice Modified for TS-II Turbo
ATTACHING DC GARD COVER
10
step
10A
Slide DC Gard over
splice area.
Slide over
DC Gard
10B
10 C
10D
Unbraid 1 d length of the DC Gard and divide into 4 equal groups
Insert the strand groups on the sides of the splice into a tubular d
pass them between the splice and the DC Gard cover a distance
of 3/4 of a d length and exit through the DC Gard cover. Trim DC
Gard strand group ends ush with DC Gard Cover where they exit.
Trim
3/4 fid length
DC Gard strand group positioned on the bottom of splice is passed
between the legs of the eye and through the inside of DC Gard cover
on opposite side exiting through 3 picks down from the vertex.
10E
SamsonRope.com | Email CustServ@SamsonRope.com | Tel +1.360.384.4669
Remaining DC Gard strand group will pass through the eye in the opposite direction from
the rst group and through the inside of the DC Gard cover on the opposite side exiting 3
picks down from the vertex.
PAGE 6 OF 8
Page 7
SAMSON SPLICING INSTRUCTIONS
12"
Finished seizing
Finished seizing
Double Braid Class II Eye Splice Modified for TS-II Turbo
10F
10G
10H
Begin tucking DC Gard strand groups over 2 strands and under 3 strands (1 tuck) and
complete 4 tucks. Bury the remaining length of strand groups between DC Gard cover and
rope a minimum of 1/2 a d length, trim DC Gard strand group ush with cover. Turn rope over
and repeat for the remaining strand group.
Trim
1/2 fid length
Milk DC Gard cover down from
eye the toward working end.
Tape 6 inches tightly at the throat of splice and 12 inches at base of DC Gard cover.
Milk down
6"
10 I
10 J
Seize twine over taped area.
See page 189 for more information on seizing.
Apply two-part urethane over seized area.
Finished splice
PAGE 7 OF 8
SamsonRope.com | Email CustServ@SamsonRope.com | Tel +1.360.384.4669
Page 8
SAMSON SPLICING INSTRUCTIONS
Seizing Finished Splice
STEP 1
Attach twine to netting needle.
STEP 2
Tape the free end of the twine to the opposite
side of the area to be whipped.
STEP 3
Start seizing. Wrap the needle around
the circumference of the rope 1 complete
turn. Pass the netting needle under the
complete wrap left to right. Pull the loop
tight. Pull the needle up maintaining ten-
sion on the completed half hitch and then
quickly pull back down to lock the half
hitch in place.
tape
twine
STEP 4
Continue with this procedure until the
whipped area is approximately 1/2 of the
desired length, then cut off the taped end
near the last wrap.
STEP 5
Using some spare twine, tape a loop
that covers the length of the intended
whipping distance, letting the 2 free ends
of the looped twine lay over the completed
whipping. Tape the free ends of the loop
past the already whipped area.
STEP 6
Continue whipping for the desired total
length over the top of the looped twine.
After whipping is complete, pass the
exposed whipping twine through the loop.
Remove the tape on the looped twine and
pull the ends to draw the loop under the
whipping. Cut off any excess twine.
STEP 7
Pull the loop through the whipped area.
This should place the remaining whipping
twine under the whipped area.
Cut taped end off
1 2 3 4 5 6 7 8 9 10 11 12
Continue whipping
over top of loop
Pass exposed twine
through loop
DOCUMENT Double_Braid_C2_Eye_Splice_TS-II_Turbo.pdf
SamsonRope.com | Email CustServ@SamsonRope.com | Tel +1.360.384.4669
© 2012 Samson Rope Technologies, Inc. All rights reserved. S/WD #108188 7/2012
PAGE 8 OF 8
 Loading...