

Page 1

Owner's Manual
Page 2

Page 3

v5 ©2011 Samson Technologies Corp.
Page 4

Table of Contents
Introduction. . . . . . . . . . . . . . . . . . . . . . . . . . . . . . . . . . . . . . . . . . . . . . .5
C01U Features . . . . . . . . . . . . . . . . . . . . . . . . . . . . . . . . . . . . . . . . . . . . . 6
Installing the C01U . . . . . . . . . . . . . . . . . . . . . . . . . . . . . . . . . . . . . . . . . . 7
Getting Started with MAC OS X . . . . . . . . . . . . . . . . . . . . . . . . . . . . . . . . . . 8
Getting Started with Windows 7 & Vista . . . . . . . . . . . . . . . . . . . . . . . . . . . . . 9
Getting Started with Windows XP . . . . . . . . . . . . . . . . . . . . . . . . . . . . . . . . 10
Operating the C01U. . . . . . . . . . . . . . . . . . . . . . . . . . . . . . . . . . . . . . . . . 11
Using the Optional SP01 Shock-Mount . . . . . . . . . . . . . . . . . . . . . . . . . . . . 13
C01U Specifications . . . . . . . . . . . . . . . . . . . . . . . . . . . . . . . . . . . . . . . . .14
4
Page 5

C01U · USB Studio Condenser Microphone
Introduction
Congratulations on your purchase of the Samson C01U studio condenser. The C01U
features a large, 19mm ultra thin diaphragm capsule with an onboard high quality
Analog-to-Digital converter and USB output. The C01U is perfect for recording your
music, or any acoustic audio source on your favorite DAW (Digital Audio Workstation).
Just plug in the supplied USB cable, launch your DAW and start recording. The C01U
faithfully reproduces a variety of sound sources including vocals, acoustic instruments
and overhead cymbals, to name a few. The extended frequency and fast transient
response ensures an accurate reproduction with linear characteristics from bottom to
top.
In these pages, you’ll find a detailed description of the features of the C01U Studio
Condenser Microphone, as well as step-by-step instructions for its setup and use, and
full specifications. You’ll also find a warranty card enclosed—please don’t forget to fill
it out and mail it in so that you can receive online technical support and so we can
send you updated information about these and other Samson products in the future.
With proper care and adequate air circulation, your C01U will operate trouble free
for many years. We recommend you record your serial number in the space provided
below for future reference.
Serial number: __________________________
Date of purchase: ________________________
Should your unit ever require servicing, a Return Authorization number (RA) must be
obtained before shipping your unit to Samson. Without this number, the unit will not
be accepted. Please call Samson at 1-800-3SAMSON (1-800-372-6766) for a Return
Authorization number prior to shipping your unit. Please retain the original packing
materials and if possible, return the unit in the original carton and packing materials.
ENGLISH
FRANÇAISDEUTSCHEESPAÑOLITALIANO
5
Page 6
C01U Features
• Professional Large Diaphragm, Studio Condenser USB Microphone
• Compatible with Mac and PC computers; no special drivers or external power
supplies are required
• The extremely detailed sound reproduction makes it ideal for recording vocals,
acoustic instruments and just about any other sound source.
• High Quality AD converter with 16 Bit, 48K sampling rate.
• 19mm Capsule with 3-micron diaphragm.
• Hyper Cardioid pick-up pattern.
• Solid Die Cast construction.
• Swivel Stand Mount and 10 foot USB cable included.
6
Page 7

C01U · USB Studio Condenser Microphone
Installing the C01U
Installing the C01U is a simple procedure that takes just a few minutes. Since the
C01U is USB compliant, you can use either a MAC or PC, connect the included USB
cable and plug and play. You will be able to control your C01U using the standard
audio interface controls in the MAC or Windows operating system. You will find
detailed instructions on setting up with MAC OS and Windows in the following sections of this manual.
Since it is possible to adjust the level of the signal from the operating system preferences, and in your recording software, it's a good idea to be familiar with these controls in the MAC or Windows operating system. Therefore, we recommend that you
follow the section Getting Started with Windows 7 & Vista, Windows XP, or Getting
Started with MAC OS X.
ENGLISH
FRANÇAISDEUTSCHEESPAÑOLITALIANO
7
Page 8
Getting Started with MAC OS X
The following example is for setting up the
C01U in MAC OS X .
1. Plug in microphone. The LED will light
to indicate it is receiving USB power.
The MAC will recognize the USB audio
device and automatically install a
universal driver.
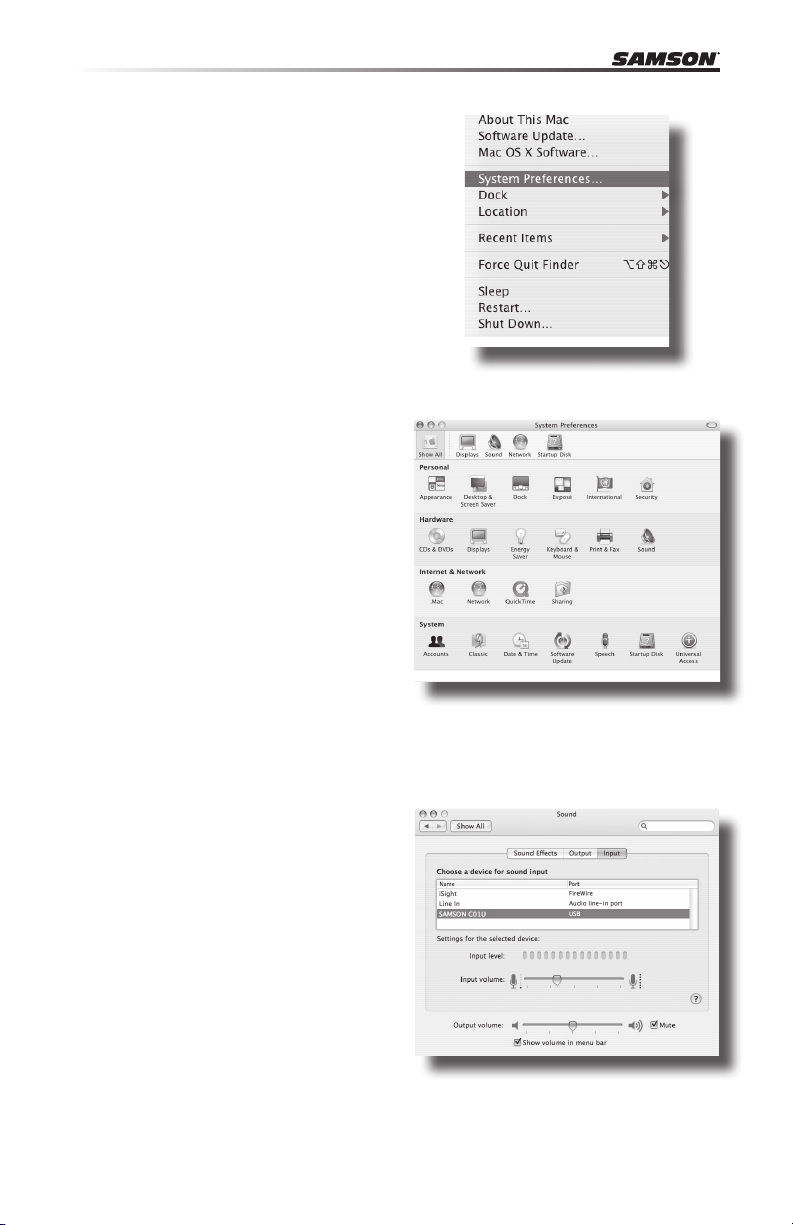
2. To select the C01U as the computers audio input, open the System
Preferences from the dock or the main
Apple Menu (figure 1).
3. Next open the Sound preference
(figure 2).
4. Now, click in the Input tab and select
SAMSON C01U (figure 3).
5. To set the gain of the microphone,
adjust the Input volume slider at the
bottom of the Sound dialog box.
At this point you can begin using your
microphone with most any audio recording software, but you need to select
it as an input device within the DAW.
When selecting the input just look for
and select the SAMSON C01U.
Figure 1
Figure 2
Figure 3
8
Page 9
C01U · USB Studio Condenser Microphone
Getting Started with Windows 7 & Vista
The following example is for setting up the
C01U in Windows 7 and Vista.
1. The rst time you plug the C01U into a
USB port, Windows 7 or Vista will install
the universal drivers for that port. A
balloon will pop up, telling you the
computer has found the C01U.
2. When it is nished installing the drivers,
a balloon pop up will say “Your device is
installed and ready to use.”
Note: This balloon will only pop up when
you rst plug the device into a particular
USB port.
ENGLISH
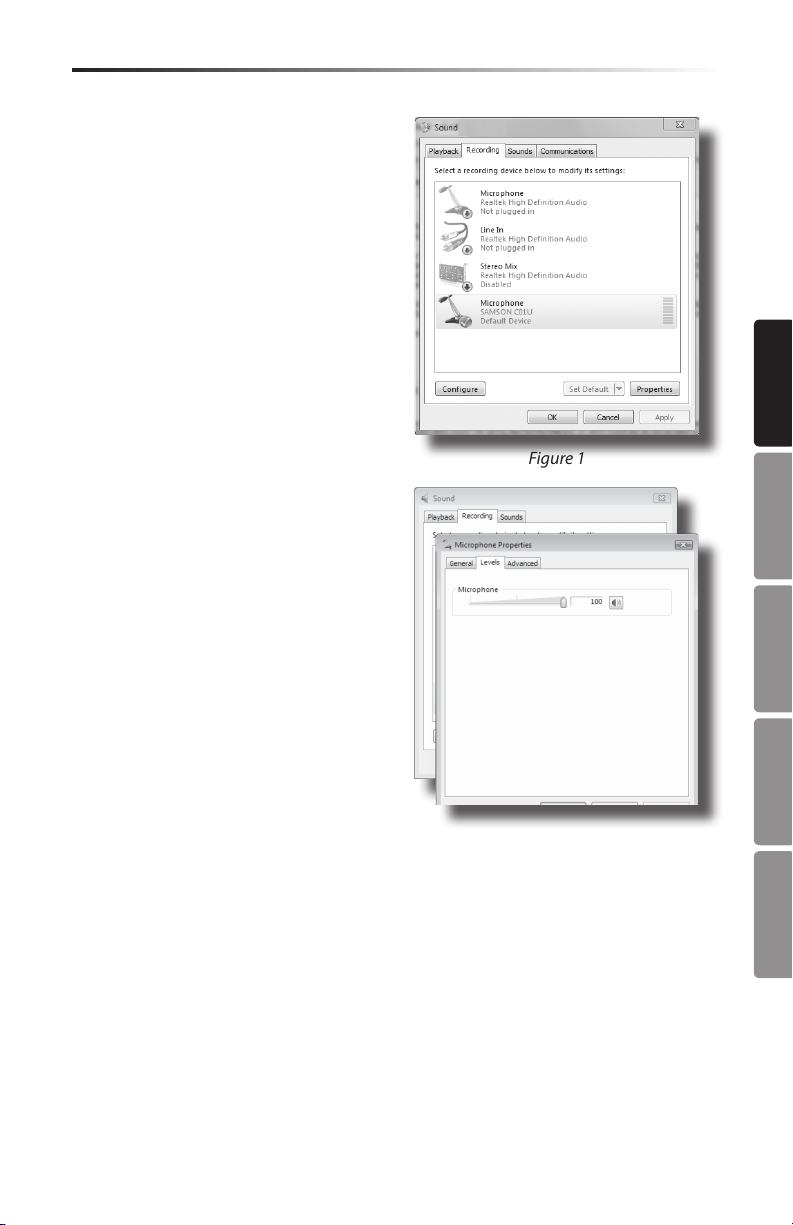
3. To set the C01U as your default device
for recording, or to change its settings,
click the Start button, click Control Panel
and then click Sound. Under the Record-
ing tab, you can select the SAMSON
C01U from the menus and use the Set
Default button to set it as the default
device (gure 1).
4. To set the gain of the microphone, click
the Properties button, and then select
the Levels tab. You can choose to view
the Microphone volume level as either a
percentage or in dB, by right clicking on
the number box (gure 2).
Figure 1
FRANÇAISDEUTSCHEESPAÑOLITALIANO
Figure 2
9
Page 10
Getting Started with Windows XP
The following example is for setting up the
C01U in Windows XP with Service Pack 2.
Other versions may vary slightly.
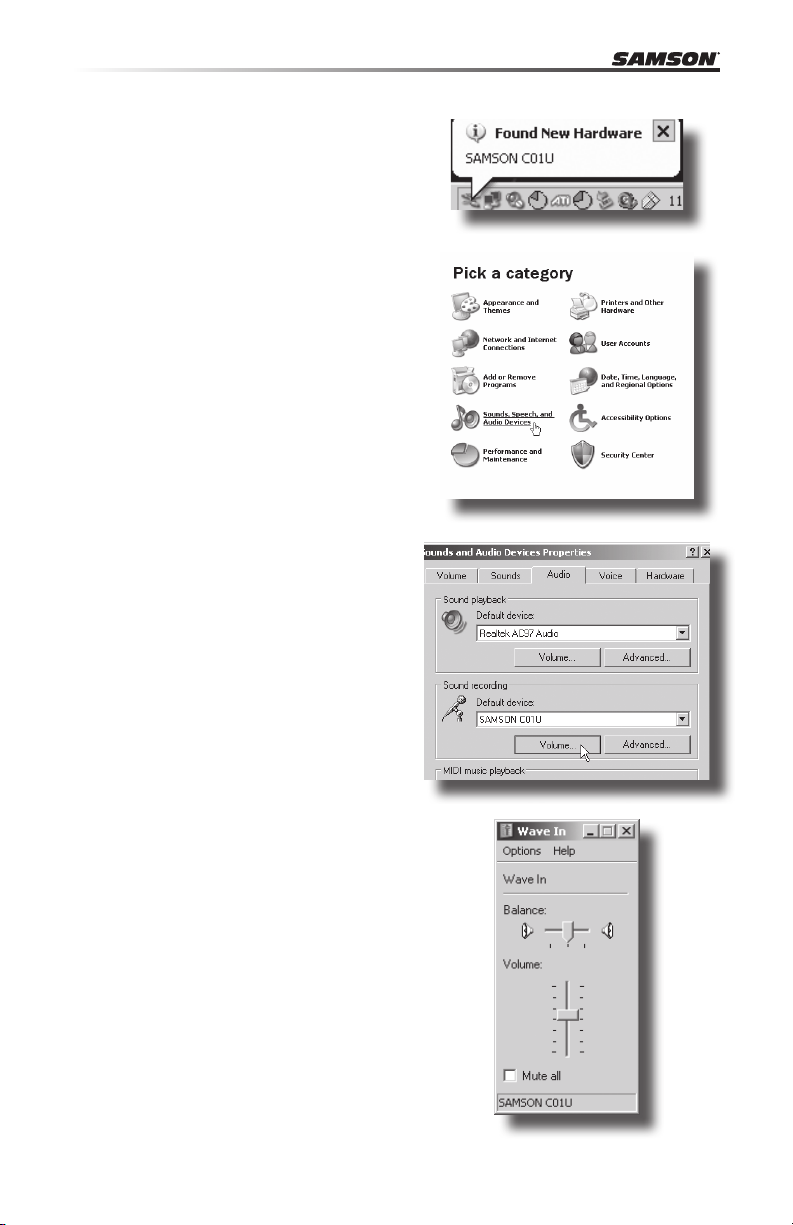
1. Plug in microphone. The LED will light
to indicate it is receiving USB power.
Windows will recognize the USB audio
device and automatically install the
universal drivers (figure 1).
NOTE: This balloon will not appear next
time you plug it in, as the microphone
drivers are already installed.
The C01U is now recognized as a
Windows audio device under the
name Samson C01U. Each additional
C01U will have a number added, such
as Samson C01U (2), and so on. To set
it as the default device and change
computer-controlled gain, access
control panel.
2. Access Sounds and Audio Devices
through Control Panel (figure 2).
3. Select Samson C01U as Sound
recording Default device under the
Audio tab. The default device is used
in simple programs like those for
teleconferencing or Sound Recorder.
In most pro audio programs you can
select which device (or multiple devices) to use within the program itself.
To set computer-controlled gain, click
the Volume button (figure 3).
Figure 1
Figure 2
Figure 3
4. The Wave In window sets the
computer-controlled gain or mutes
the microphone. The gain is from –62
dB to +48 dB (figure 4).
10
Figure 4
Page 11

C01U · USB Studio Condenser Microphone
Operating the C01U
Powering the C01U
The C01U is a condenser microphone, and like all condenser microphones, it has
internal electronics that require an active power supply. Traditional studio condensers
are almost always powered by a Phantom Power supply which is usually derived from
the mixing console. The C01U receives its power from the USB bus. Simply connect
the microphone to the computers USB port and the microphone is ready to operate.
The C01U features a power on LED, which will illuminate when USB power is present.
Polar Pattern
The most important characteristic of any microphone is its directionality or “pick-up
pattern”. There are three basic categories of pick up patterns; omni, bi and unidirectional. Omni mics pick up sound from all directions, bidirectional (figure 8) mics pick
up the sound directly in front and back of the microphone while rejecting the sound
on the left and right sides, and unidirectional (cardioid) mics pick up the sound in
front of the microphone.
While omni and bidirectional microphones are very useful for a variety of applications, the majority of “miking” situations in recording and live sound require unidirectional or cardioid microphones. The unidirectional nature allows for better separation
of instruments in the studio and more control over feedback in live sound reinforcement. The C01U condenser’s pick-up pattern is hyper-cardioid, which offers even
more side-to-side rejection. When positioned correctly the hyper-cardioid pick-up
pattern allows you to pick up more of the sound you want and less of the sound you
don’t want.
ENGLISH
FRANÇAISDEUTSCHEESPAÑOLITALIANO
Microphone Placement
In order to maximize the sound quality, you must pay careful attention to the placement of your C01U and how it is positioned for the instrument or vocalist that you are
miking. All microphones, especially unidirectional or cardioid microphones, exhibit a
phenomenon known as “proximity effect.” Very simply put, proximity effect is a resulting change in the frequency response of a microphone based on the position of the
mic capsule relative to the sound source. Specifically, when you point a cardioid mic
directly at the sound source (on axis) you will get the best frequency response, however when you start pointing the microphone slightly away (off axis) you will notice
the low frequency response dropping off and the microphone will start to sound
thinner.
For most vocal applications you’ll want to position the microphone directly in front
of the artist. The same may be true for miking instruments, however, you can make
some pretty amazing equalization adjustments by slightly changing the angle of
the capsule to the sound source. This can be a very useful technique in capturing
the optimum sound of drum set, acoustic guitar, piano or other instruments in a live
room or sound stage. Experimentation and experience are the best teachers in getting good sounds, so plug in!
11
Page 12

Operating the C01U
Setting Up the Signal Level
In your digital audio workstation (DAW), create a mono audio track, and set it to the
Left channel of the C01U (the Right channel should be ignored). Arm the track for
recording, and adjust the input gain by using the software control in your computer's
operating system and/or digital audio workstation. To set a good level on the mic, set
the C01U up in front of the desired sound source and slowly raise the input trim control until you see the CLIP or Peak indicator in your DAW light up. Then, turn the input
trim control down until the indicator does not light any more.
P-Popping
P-Popping is that annoying pop that you can get when the microphone diaphragm
gets a blast of air from a vocalist pronouncing words with the letter “P” included.
There are a few ways to deal with the problem including using an external pop filter.
Some famous engineers have relied on an old nylon stocking over a bent clothes
hanger, which actually works very well. You can also try placing the microphone
slightly off axis (on a slight angle) from the vocalist. This can often solve the problem
without using an external pop filter.
Stand Mounting the C01U
The C01U can be mounted to a standard microphone stand using the included swivel
mount adapter. If you are using a U.S. 5/8” mic stand, you will need to remove, by
unscrewing, the Euro stand adapter. Simply screw the swivel adapter on to your mic
stand or boom arm. Now, loosen the thumbscrew and adjust the microphone to the
desired angle. Once set, tighten the thumbscrew to secure the microphone in place.
12
Page 13
C01U · USB Studio Condenser Microphone
Using the Optional SP01 Shock-Mount
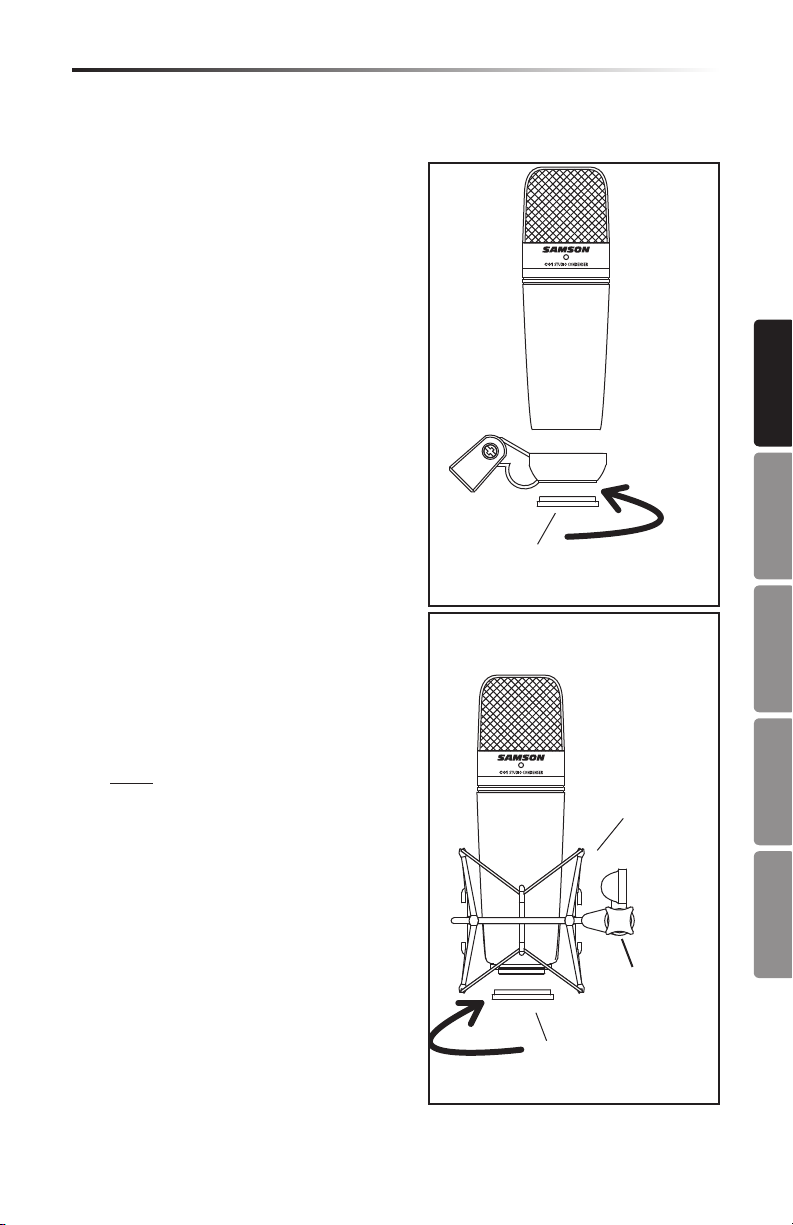
Using the Optional SP01 “Spider” Shock-Mount
For additional isolation the C01U can be
fitted on the optional SP01 “Spider” shock
mount. Follow the steps below the to install
the SP01.
• First, screw the SP01 shock mount onto
your mic stand or boom arm. If you’re
using a US 5/8” mic stand or boom,
remove the Euro adapter.
• Remove the C01U swivel mount by
rotating the threaded collar counterclockwise as shown in figure 1.
• Install the C01U into the SP01 by fitting
the microphone into the center of the
web, positioning the C01U onto the bottom mounting plate.
• Secure the SP01 by reinstalling the
threaded collar, rotating clockwise until
tight. (Figure 2)
• Now, loosen the thumb screw to adjust
the angle of the microphone and position the C01U to the desired location.
Once set, tighten the thumbscrew to
secure the microphone in place.
Note: Be careful not to cross thread
or over tighten the threaded collar or
thumb screw.
1
ENGLISH
THREADED
FRANÇAISDEUTSCHEESPAÑOLITALIANO
COLLAR
2
SP01
SHOCK MOUNT
THREADED
COLLAR
THUMB
SCREW
13
Page 14

+20
0
+20
+10
-10
-20
-30
20 50 100 500200 1K 2K 5K 10K 20K
C01U FREQUENCY RESPONSE
0
180
5
10
15
20
dB
25
45
45
90 90
135 135
180
0
C01U POLAR PATTERN
C01U Specifications
C01U Specifications
Frequency Response 20~18000 HZ
Polar pattern Hyper- cardioid
Element type Back condenser type
Diaphragm thickness 3 microns
Sensitivity -33 dB/Pa
SPL 136 dB
Weight 1.06 lbs. (.48 kg)
Dimensions Height: 7" (180 mm)
Width: 2.125" (54 mm)
Depth: 2.125" (54 mm)
Shipping Weight 2.5 lbs.(1.15 Kg)
Specifications subject to change without notice.
14
Page 15

Page 16

Table des matières
Introduction. . . . . . . . . . . . . . . . . . . . . . . . . . . . . . . . . . . . . . . . . . . . . . 17
C01U — Caractéristiques générales. . . . . . . . . . . . . . . . . . . . . . . . . . . . . . . 18
Installation du C01U . . . . . . . . . . . . . . . . . . . . . . . . . . . . . . . . . . . . . . . . 19
Mise en oeuvre sous MAC OS X . . . . . . . . . . . . . . . . . . . . . . . . . . . . . . . . . 20
Mise en oeuvre avec Windows 7 & Vista . . . . . . . . . . . . . . . . . . . . . . . . . . . . 21
Mise en oeuvre avec Windows XP . . . . . . . . . . . . . . . . . . . . . . . . . . . . . . . . 22
Utilisation du C01U . . . . . . . . . . . . . . . . . . . . . . . . . . . . . . . . . . . . . . . . . 23
Suspension anti-choc SP01 optionnelle . . . . . . . . . . . . . . . . . . . . . . . . . . . . 25
C01U — Caractéristiques techniques. . . . . . . . . . . . . . . . . . . . . . . . . . . . . .26
16
Page 17

C01U · USB Studio Condenser Microphone
Introduction
Merci d'avoir choisi le micro à condensateur de studio Samson C01U. Le C01U est
équipé d'une capsule ultra fine de 19 mm, d'un convertisseur Analogique/Numérique
intégré et d'une sortie USB. Le C01U est parfait pour l'enregistrement de la musique,
ou de toute source audio acoustique avec votre application d'enregistrement sur
ordinateur. Il vous suffit de connecter le cordon USB fourni, de lancer votre ordinateur
avec votre logiciel d'enregistrement pour commencer à enregistrer. Pour disposer de
réglages supplémentaires, installez le logiciel de Driver du Samson C01U : Vous disposez alors d'un réglage de gain programmable, d'un filtre passe-haut, d'un afficheur
de niveau et d'un sélecteur de phase. Le C01U reproduit avec fidélité de nombreuses
sources comme les chants, les instruments acoustiques, les Overheads de cymbales,
etc. Sa réponse en fréquences très étendue et sa réponse ultra rapide aux transitoires
vous garantissent une reproduction précise et linéaire sur la totalité du spectre.
Dans ces pages, vous trouverez une description détaillée des fonctions du micro à
condensateur de studio C01U, des instructions de configuration et d'utilisation pas-àpas et les caractéristiques techniques. Vous trouverez également une carte de garantie — prenez le temps de la remplir et de nous la renvoyer pour bénéficier de notre
assistance technique. Nous vous ferons également parvenir des informations sur les
nouveaux produits Samson.
Avec un entretien adapté, le C01U vous donnera satisfaction pendant de très nombreuses années. Prenez le temps de noter le numéro de série et la date d'achat ci-dessous pour toute utilisation ultérieure.
Numéro de série : __________________________
Date d'achat : ________________________
Si vous devez faire réparer cet appareil, vous devez tout d'abord obtenir un numéro
de retour auprès de nos services. Sans ce numéro, l'appareil ne sera pas accepté.
Appelez Samson au 1-800-3SAMSON (1-800-372-6766) pour obtenir ce numéro.
Utilisez les emballages d'origine pour le retour.
ENGLISH
FRANÇAISDEUTSCHEESPAÑOLITALIANO
17
Page 18

C01U — Caractéristiques générales
• Micro à condensateur professionnel de studio à grand diaphragme, avec sortie
numérique USB
• Compatible avec les systèmes d'enregistrement sur ordinateur Mac et PC ; pas de
pilotes spéciaux requis ou d'alimentation externe
• Son extrême précision de la reproduction en fait le micro idéal pour l'enregistrement des chants, des instruments acoustiques, ou de toute autre source.
• Convertisseur A/N haute qualité en 16 Bits, 48 kHz.
• Capsule de 19 mm à diaphragme de 3 microns.
• Structure polaire hyper cardioïde.
• Construction moulée ultra fiable.
• Support articulé et câble USB de 3 m fournis.
18
Page 19

C01U · USB Studio Condenser Microphone
Installation du C01U
L'installation du C01U est très simple et ne prend que quelques minutes. Étant donné
que le C01U est compatible USB, vous pouvez l'utiliser directement sur un MAC ou sur
un PC, en connectant simplement le câble USB fourni. Vous pouvez contrôler le C01U
avec les réglages audio de vos systèmes d'exploitation MAC ou Windows. Vous trouverez des instructions détaillées sur la configuration avec MAC OS et Windows dans les
sections suivantes de ce mode d'emploi.
Étant donné qu'il est possible de régler le niveau du signal depuis les préférences de
votre système d'exploitation informatique, ainsi que depuis votre logiciel d'enregistrement, vous devez être familier avec ces réglages dans votre environnement MAC ou
Windows. Par conséquent, lisez les sections Mise en oeuvre sous Windows 7 & Vista,
Windows XP, ou Mise en oeuvre sous MAX OS X avant d'installer le pilote du C01U.
ENGLISH
FRANÇAISDEUTSCHEESPAÑOLITALIANO
19
Page 20

Mise en oeuvre sous MAC OS X
Cet exemple vous indique comment installer le C01U avec MAC OS X .
1. Connectez le micro. La led doit
s'allumer pour indiquer qu'il reçoit
l'alimentation USB. Le MAC reconnaît
le périphérique audio USB et installe
automatiquement un pilote universel.
2. Pour sélectionner le C01U comme
étant la source audio de l'ordinateur,
ouvrez les préférences système dans
le Dock ou dans le menu Pomme
principal (figure 1).
3. Ouvrez ensuite les préférences Son
(figure 2).
4. Cliquez maintenant sur l'onglet d'Entrée et sélectionnez le C01U (figure 3).
5. Pour régler le gain du micro, utilisez
le curseur de niveau d'entrée situé en
bas de la fenêtre de réglage du son.
Vous pouvez dès lors utiliser le micro
avec quasiment tous les logiciels
audionumériques, mais vous devez
le sélectionner comme périphérique
d'entrée dans l'application. Sélectionnez
alors le SAMSON C01U.
Figure 1
Figure 2
Figure 3
20
Page 21

C01U · USB Studio Condenser Microphone
Mise en oeuvre avec Windows 7 & Vista
Cet exemple illustre l'utilisation du C01U
avec Windows 7 et Vista.
1. La première fois que vous connectez le
C01U dans un port USB, Windows 7 ou
Vista installe les pilotes universels du
port. Une fenêtre apparaît, vous indiquant que l'ordinateur à trouvé le C01U.
2. Une fois les pilotes installés, une fenêtre
apparaît, vous indiquant “Le périphérique est installé et prêt à l'utilisation ”.
Remarque : Cette fenêtre ne s'ache que
lorsque vous connectez le périphérique à
un port USB pour la première fois.
ENGLISH
3. Pour sélectionner le Samson C01U
comme le périphérique d'enregistrement par défaut, ou pour modier ses
réglages, cliquez sur Démarrer, puis sur
Panneau de conguration, puis sur Son.
Dans l'onglet Enregistrement, sélectionnez le SAMSON C01U dans les menus et
utilisez le bouton Par défaut (gure 1).
4. Pour régler le gain du micro, cliquez sur
Propriétés, puis sélectionnez l'onglet
Niveaux. Vous pouvez acher le niveau
du micro en pourcentage ou en dB,
en cliquant avec le bouton droit de la
souris sur le numéro (gure 2).
Figure 1
FRANÇAISDEUTSCHEESPAÑOLITALIANO
Figure 2
21
Page 22

Mise en oeuvre avec Windows XP
Cet exemple illustre l'utilisation du C01U
avec Windows XP et le Service Pack 2. Les
autres versions peuvent varier.
1. Connectez le micro. La led doit s'allumer pour indiquer qu'il reçoit l'alimentation USB. Windows reconnaît
le périphérique audio USB et installe
automatiquement le Driver (Figure 1).
REMARQUE : Les bulles d'aide contextuelle ne s'affichent que lors de la
première installation.
Le C01U est reconnu comme un périphérique audio Windows dont le nom
est Samson C01U. Pour chaque C01U
supplémentaire installé, un chiffre est
ajouté (par exemple, Samson C01U (2),
etc.). Pour le sélectionner comme le
périphérique par défaut et modifier le
gain réglé par l'ordinateur, affichez le
panneau de configuration.
2. Affichez les périphériques de Son et
Audio depuis le panneau de configuration (figure 2).
3. Sélectionnez le Samson C01U comme
le périphérique d'enregistrement
par défaut dans l'onglet Audio. Le
périphérique par défaut est utilisé par
les programmes simples comme ceux
de téléconférence ou par l'enregistreur de Windows. Dans la plupart des
applications audio pro, vous pouvez
sélectionner le(s) périphérique(s) à utiliser depuis le programme lui-même.
Pour régler le gain depuis l'ordinateur, cliquez sur le bouton Volume
(figure3).
Figure 1
Figure 2
Figure 3
4. La fenêtre Wave In détermine le gain
et coupe le micro. Le gain est réglable
de –62 dB à +48 dB (figure 4).
22
Figure 4
Page 23

C01U · USB Studio Condenser Microphone
Utilisation du C01U
Mise sous tension du C01U
Le C01U est un micro à condensateur, ce qui implique qu’il doit être alimenté par fantôme.
La plupart des consoles de mixage, des préamplificateurs externes et des enregistreurs
D-to-D disposent d’une alimentation de ce type. Une alimentation fantôme externe peut
également être utilisée si nécessaire. Le C01U reçoit son alimentation directement sur le
câble micro le reliant à la console ou à une autre entrée micro offrant ce type d’alimentation. L’alimentation est alors transmise avec le signal par le câble d’entrée micro de façon
inaudible. La majorité des consoles de mixage disposent d’un commutateur permettant
d’activer l’alimentation fantôme ; assurez-vous que celui-ci est bien enclenché. Le C01U
intègre un témoin led bleu, qui s’allume lorsque le micro est sous tension.
Structure polaire
La caractéristique essentielle d’un micro est sa directivité. On distingue ainsi trois catégories : les micros omnidirectionnels, bidirectionnels et unidirectionnels. Les micros
omnidirectionnels captent les sons en provenance de toutes les directions. Les micros
bidirectionnels captent les sons provenant de l’avant et de l’arrière du micro et atténuent
les sons latéraux (gauche, droite). Les micros uni-directionnels (cardioïdes) ne captent que
les sons reçus de face.
Les micros omnidirectionnels et bidirectionnels s’avèrent très pratiques pour bon nombre
d’applications. Les situations de prises de son les plus courantes (scène et enregistrement)
nécessitent néanmoins l’utilisation d’un micro unidirectionnel (ou cardioïde). En effet, le
ciblage du micro unidirectionnel offre une meilleure séparation des instruments en studio
et un meilleur contrôle du Larsen sur scène. Le micro à condensateur C01U est de type
hypercardioïde, afin d’offrir une réjection maximale des sons latéraux. Lorsqu’il est bien
positionné, le micro hypercardioïde vous permet de faire ressortir ce que vous souhaitez
entendre et d’atténuer encore plus efficacement ce que vous ne souhaitez pas entendre.
ENGLISH
FRANÇAISDEUTSCHEESPAÑOLITALIANO
Position du micro
Le positionnement du C01U par rapport à l’instrument ou au chanteur que vous enregistrez influence directement la qualité sonore finale. Tous les micros, et en particulier les
micros unidirectionnels ou cardioïdes, sont très sensibles à un phénomène connu sous le
nom “d’effet de proximité”. En termes simples, l’effet de proximité se caractérise par une
variation de la réponse en fréquence du micro en fonction de la position de la capsule
par rapport à la source sonore. Dans les faits, lorsque vous pointez un micro cardioïde en
direction de la source sonore (dans l’axe), la réponse en fréquence s’améliore ; à l’inverse,
lorsque vous désaxez le micro par rapport à la source, les graves sont plus particulièrement atténués et le son devient plus aigu.
Pour la plupart des applications de chant, on cherchera à placer le micro juste devant
l’artiste. La même règle peut s’appliquer pour la reprise d’instruments, cependant, de
surprenantes nuances d’égalisation peuvent être obtenues en désaxant très légèrement la
capsule par rapport à la source sonore. N’hésitez pas à faire appel à cette technique pour
une prise optimale des sons de batterie, de guitare acoustique, de piano ou d’autres instruments, sur scène ou en studio. Rien ne saurait remplacer l’expérience dans le domaine
de la prise de son, alors passez à la pratique!
23
Page 24

Utilisation du C01U
Réglage du niveau du signal
Dans votre station audionumérique, créez une piste audio mono, et réglez-la sur le
canal gauhe du C01U (ignorez le canal droit). Armez la piste en enregistrement, et
réglez le gain d'entrée de façon logicielle dans le système d'exploitation de votre
ordinateur et/ou dans le logiciel audionumérique. Pour régler correctement le niveau
du micro, placez le C01U en face de la source sonore et montez progressivement le
réglage de niveau d'entrée jusqu'à ce que le témoin CLIP ou le témoin de crête de
l'application audionumérique s'allume. Baissez ensuite le réglage jusqu'à ce que le
témoin s'éteigne.
Bruits de Pop
Les “pops” sont des bruits désagréables produits par le micro lorsque le diaphragme
reçoit le souffle d’un chanteur prononçant un “P”. Il existe différentes solutions permettant de pallier ce problème, dont le recours à un filtre anti-pop externe. Certains
ingénieurs du son parmi les plus prestigieux emploient pour cela un bon vieux bas
nylon enfilé sur un porte-manteau tordu et obtiennent d’excellents résultats. Vous
pouvez également désaxer légèrement le micro par rapport au chanteur ; cette technique, efficace dans bien des cas, offre l’avantage de rendre inutile le recours à un
filtre anti-pop externe.
Installation du C01U sur un pied
Le C01U peut être installé sur un pied standard au moyen de l’adaptateur fourni. Si
vous utilisez un pied à la norme américaine 5/8”, dévissez l’adaptateur pour la norme
européenne. Vissez simplement la base filetée du micro sur votre pied ou votre
perche. Dévissez la vis “rapide” de la rotule pour donner au micro l’axe souhaité. Une
fois l’angle correct obtenu, serrez la vis pour maintenir le micro en place.
24
Page 25

C01U · USB Studio Condenser Microphone
Suspension anti-choc SP01 optionnelle
Utilisation de la suspension anti-choc SP01 optionnelle
Afin de garantir une isolation optimale
du micro, le C01U peut être installé sur la
suspension anti-choc SP01 optionnelle. La
procédure suivante vous indique comment
installer le micro sur sa suspension SP01 :
• Tout d’abord, vissez la suspension SP01
sur le pied ou sur la perche micro. Si
vous utilisez un pied à la norme américaine 5/8”, retirez l'adaptateur à la norme
européenne.
• Retirez la pince de fixation sur pied du
C01U en tournant la bague filetée dans
dans le sens inverse des aiguilles d’une
montre (voir fig. 1).
• Installez le C01U sur la suspension SP01
en plaçant le micro au centre de la toile
et en veillant à le positionner correctement sur la base.
• Assurez la fixation à la suspension SP01
en remontant la bague filetée. Tournezle dans le sens des aiguilles d’une
montre (fig. 22).
• Desserrez la vis rapide de la rotule pour
régler l’angle du micro. Une fois l’angle
approprié obtenu, serrez à nouveau la
vis pour maintenir le micro en place.
Attention : Attention à ne pas abîmer le
filetage ou à trop serrer la bague ou la
vis rapide.
1
ENGLISH
THREADED
FRANÇAISDEUTSCHEESPAÑOLITALIANO
COLLAR
2
SP01
SHOCK MOUNT
THREADED
COLLAR
THUMB
SCREW
25
Page 26

+20
0
+20
+10
-10
-20
-30
20 50 100 500200 1K 2K 5K 10K 20K
C01U FREQUENCY RESPONSE
0
180
5
10
15
20
dB
25
45
45
90 90
135 135
180
0
C01U POLAR PATTERN
C01U — Caractéristiques techniques
C01U — Caractéristiques techniques
Réponse en fréquence 20~18000 Hz
Structure polaire Hypercardioïde
Type de capteur Condensateur arrière
Épaisseur de diaphragme 3 microns
Sensibilité -33 dB/Pa
Niveau SPL max. 136 dB
Poids 480 g
Dimensions Hauteur : 180 mm
Largeur : 54 mm
Profondeur : 54 mm
Poids à l'expédition 21,1 kg
Caractéristiques sujettes à modifications sans préavis
26
Page 27

Page 28

Inhalt
Einleitung . . . . . . . . . . . . . . . . . . . . . . . . . . . . . . . . . . . . . . . . . . . . . . . 29
C01U installieren. . . . . . . . . . . . . . . . . . . . . . . . . . . . . . . . . . . . . . . . . . .30
C01U installieren. . . . . . . . . . . . . . . . . . . . . . . . . . . . . . . . . . . . . . . . . . .31
Erste Schritte mit Mac OS X . . . . . . . . . . . . . . . . . . . . . . . . . . . . . . . . . . . . 32
Erste Schritte mit Windows 7 & Vista . . . . . . . . . . . . . . . . . . . . . . . . . . . . . . 33
Erste Schritte mit Windows XP . . . . . . . . . . . . . . . . . . . . . . . . . . . . . . . . . . 34
C01U betreiben . . . . . . . . . . . . . . . . . . . . . . . . . . . . . . . . . . . . . . . . . . . 35
C01U Technische Daten . . . . . . . . . . . . . . . . . . . . . . . . . . . . . . . . . . . . . . 38
28
Page 29

C01U · USB Studio Condenser Microphone
Einleitung
Herzlichen Glückwunsch zum Kauf des Samson C01U Studiokondensatormikrofons.
Das C01U zeichnet sich aus durch eine große ultra-dünne 19 mm Membrankapsel
mit integriertem, hochwertigem Analog/Digital-Konverter und USB-Ausgang. Das
C01U eignet sich ideal zum Aufnehmen von Musik oder jeder anderen akustischen
Audioquelle mit Ihrer Lieblings-DAW (Digital Audio Workstation). Einfach das mitgelieferte USB-Kabel einstecken, die DAW starten und mit der Aufnahme beginnen. Das
C01U reproduziert mit hoher Klangtreue die verschiedensten Klangquellen, inklusive
Gesang, Akustikinstrumente, Overhead-Becken u.v.m. Der erweiterte Frequenzgang
und die schnelle Transientenansprache garantieren eine präzise Reproduktion mit
linearer Klangcharakteristik über das gesamte Frequenzspektrum.
Auf diesen Seiten finden Sie eine detaillierte Erläuterung der Funktionen des C01U
Studiokondensatormikrofons sowie schrittweise Anleitungen für die Einrichtung und
Anwendung plus umfassende Spezifikationen. Bitte vergessen Sie nicht, die beiliegende Garantiekarte ausgefüllt an uns zurückzusenden, damit Sie online technischen
Support erhalten und wir Ihnen zukünftig aktuelle Informationen über dieses und
andere Samson-Produkte zukommen lassen können.
Bei sorgsamer Behandlung wird Ihr C01U viele Jahre störungsfrei funktionieren. Die
Seriennummer Ihres Geräts sollten Sie vorsorglich in der Zeile unten eintragen.
Seriennummer: __________________________
Kaufdatum: _____________________________
Sollte Ihr Gerät einmal gewartet werden müssen, besorgen Sie sich vor
der Rücksendung an Samson bitte eine Return Authorization Number
(Rücksendeberechtigungs num mer/RA). Ohne diese Nummer wird das Gerät nicht
angenommen. Bitte rufen Sie Samson unter der Nummer 1-800-3SAMSON (1-800372-6766) an, um eine RA-Nummer vor der Rücksendung zu erhalten. Heben Sie
bitte das Original-Verpackungsmaterial auf und schicken Sie das Gerät möglichst im
Originalkarton und mit dem Originalverpackungs material zurück.
ENGLISH
FRANÇAISDEUTSCHEESPAÑOLITALIANO
29
Page 30

C01U installieren
• Professionelles großmembraniges USB-Studiokondensatormikrofon
• Kompatibel mit Mac und PC, keine Spezialtreiber oder externen Netzteile erford-
erlich
• Dank extrem detaillierter Klangreproduktion ist das C01U ideal für das
Aufnehmen von Gesang, Akustikinstrumenten und praktisch jeder anderen
Klangquelle geeignet
• Hochwertiger AD-Wandler mit einer Samplingrate von 16 Bit, 48 kHz
• 19 mm Kapsel mit 3 Mikron dicker Membran
• Hypernieren-Richtcharakteristik
• Solide Spritzgusskonstruktion
• Galgenständer-Halterung und 3 m USB-Kabel inklusive
30
Page 31

C01U installieren
Das C01U lässt sich in wenigen Minuten mühelos installieren. Da das C01U dem
USB-Standard entspricht, können Sie es über das mitgelieferte USB-Kabel an einen
Mac oder PC anschließen und – wie bei Plug&Play üblich – sofort anfangen. Sie können Ihr C01U mit den standard Audio Interface-Reglern des Mac- oder WindowsBetriebssystems steuern. Detaillierte Anleitungen zum Einrichten des Geräts mit Mac
OS und Windows finden Sie in den folgenden Abschnitten dieses Handbuchs.
Da Sie den Signalpegel mit der Systemsteuerung und der Aufnahmesoftware regeln
können, sollten Sie sich mit diesen Reglern im Mac- oder Windows-Betriebssystem
vertraut machen. Lesen Sie am besten zunächst den Abschnitt "Erste Schritte mit
Windows 7 & Vista, Windows XP" oder "Erste Schritte mit Mac OS X", bevor Sie die
C01U Treibersoftware installieren.
Page 32

Erste Schritte mit Mac OS X
Das folgende Beispiel beschreibt das Einrichten des C01U in Mac OS X .
1. Schließen Sie das Mikrofon an. Die LED
leuchtet und das Mikrofon empfängt
USB-Spannung. Der Mac erkennt das
USB- Audiogerät und installiert automatisch einen Universaltreiber.
2. Um das C01U als Audio-Eingang des
Computers zu wählen, öffnen Sie die
Systemeinstellung aus dem Dock oder
dem Apple-Hauptmenü (Abb. 1).
3. Öffnen Sie dann die Sound-Einstellungen (Abb. 2).
4. Klicken Sie auf das Input-Register und
wählen Sie SAMSON C01U (Abb. 3).
5. Um die Mikrofonverstärkung einzustellen, verschieben Sie den Input Volume
Slider am unteren Rand der SoundDialogbox.
Jetzt können Sie Ihr Mikrofon mit fast
jeder Audioaufnahmesoftware benutzen,
nachdem Sie es als Eingabegerät in der
DAW festgelegt haben. Suchen und wählen
Sie einfach SAMSON C01U in den EingabeOptionen.
Abb. 1
Abb. 2
Abb. 3
32
Page 33

C01U · USB Studio Condenser Microphone
Erste Schritte mit Windows 7 & Vista
Das folgende Beispiel beschreibt das Einrichten des C01U in Windows 7 und Vista.
1. Beim ersten Anschließen des C01U an
einen USB-Port installiert Windows 7
oder Vista den Universaltreiber für diesen Port. Es erscheint eine Sprechblase
mit der Meldung, dass der Computer das
C01U gefunden hat.
2. Zum Abschluss der Treiberinstallation
erscheint eine Sprechblase mit der
Meldung "Ihr Gerät ist installiert und
betriebsbereit".
Hinweis: Die Sprechblase erscheint nur
beim erstmaligen Anschließen des Geräts
an einen bestimmten USB-Port.
3. Um das C01U als Standardgerät für
Aufnahmen zu wählen oder dessen
Einstellungen zu ändern, klicken Sie auf
den Start-Button, dann auf die System-
steuerung und anschließend auf Sound.
Im Aufnahme-Register können Sie das
SAMSON C01U aus den Menüs wählen
und mit dem "Als Standard"-Button als
Standardgerät festlegen (Abb. 1).
ENGLISH
Abb. 1
FRANÇAISDEUTSCHEESPAÑOLITALIANO
4. Um die Mikrofonverstärkung einzustellen, klicken Sie auf den EigenschaftenButton und wählen das Pegel-Register.
Sie können sich den Mikrofonpegel
entweder in Prozent oder in dB anzeigen lassen. Zum Wechseln der Anzeige
rechts klicken Sie auf das Zahlenkästchen
(Abb. 2).
Abb. 2
33
Page 34

Erste Schritte mit Windows XP
Das folgende Beispiel beschreibt das
Ein richten des C01U in Windows XP mit
Service Pack 2. Andere Versionen können
geringfügig variieren.
1. Schließen Sie das Mikrofon an. Die LED
leuchtet und das Mikrofon empfängt
USB-Spannung. Windows erkennt das
USB-Audiogerät und installiert automatisch die Universaltreiber (Abb. 1).
HINWEIS: Diese Sprechblase wird beim
nächsten Anschließen des Mikrofons nicht
mehr erscheinen, da die Mikrofontreiber
bereits installiert sind.
Das C01U wurde jetzt als WindowsAudiogerät unter dem Namen "Samson
C01U" erkannt. Jedem weiteren C01U
wird eine Nummer hinzugefügt, z. B.
Samson C01U (2) usw. Um es als Standardgerät zu wählen und die computergesteuerte Verstärkung zu ändern, rufen
Sie die Systemsteuerung auf.
2. Greifen Sie via Systemsteuerung auf
"Sounds und Audiogeräte" zu (Abb. 2).
3. Wählen Sie im Audio-Register das
Samson C01U als "Standardgerät" für die
"Sound-Aufnahme". Das Standardgerät
wird in einfachen Programmen benutzt,
z. B. Teleconferencing oder Sound
Recorder. Bei den meisten professionellen Audioprogrammen können Sie im
Programm selbst wählen, welches Gerät
(oder mehrere Geräte) benutzt werden
soll(en). Um die computergesteuerte
Verstärkung einzustellen, klicken Sie auf
den Volume-Button (Abb. 3).
Abb. 1
Abb. 2
Abb. 3
4.
Das Wave In-Fenster bestimmt die computergesteuerte Verstärkung oder schaltet
das Mikrofon stumm. Der Gain-Bereich
beträgt –62 dB bis +48 dB (Abb. 4).
34
Abb. 4
Page 35

C01U · USB Studio Condenser Microphone
C01U betreiben
C01U mit Spannung versorgen
Das C01U besitzt wie alle anderen Kondensatormikrofone eine interne Elektronik,
die eine aktive Spannungsversorgung benötigt. Herkömmliche Studiokondensatormikrofone werden fast immer über eine Phantomspeisung versorgt, die normalerweise vom Mischpult bezogen wird. Das C01U empfängt seine Spannung über den
USB-Bus. Schließen Sie das Mikrofon einfach an den USB-Port des Com puters an und
schon ist das Mikrofon betriebsbereit. Die Einschalt-LED des C01U leuchtet, sobald
USB-Spannung anliegt.
Richtcharakteristik
Die wichtigste Eigenschaft eines Mikrofons ist seine Richtcharakteristik. Es gibt
drei grundsätzliche Kategorien von Richtcharakteristiken: omni-, bi- und unidirektional. Mikrofone mit Kugelcharakteristik (omnidirektional) nehmen Schall aus
allen Richtungen auf. Bidirektionale Mikrofone (Abb. 8) nehmen Schall direkt von
vorne und hinten auf und unterdrücken seitlich eintreffenden Schall. Mikrofone mit
Nierencharakteristik (unidirektional) nehmen Schall nur von vorne auf.
Während Mikrofone mit omni- und bidirektionaler Charakteristik für verschiedene
Spezialanwendungen sehr nützlich sind, erfordert die Mehrzahl von Mikrofon abnahmen
bei Aufnahmen und Live-Beschallungen unidirektionale oder Nierenmikrofone. Die
unidirektionale Eigenschaft ermöglicht eine bessere Trennung von Instrumenten im
Studio und eine bessere Feedback-Kontrolle bei der Live-Beschallung. Die SupernierenCharakteristik des C01U Kondensatormikrofons bietet eine noch stärkere Unterdrückung
von seitlich auftreffendem Schall. Bei korrekter Positionierung des Mikrofons können Sie
mit der Supernieren-Charakteristik größere Anteile des gewünschten Klangs und geringere Anteile des unerwünschten Klangs aufnehmen.
ENGLISH
FRANÇAISDEUTSCHEESPAÑOLITALIANO
Mikrofonplatzierung
Um die Klangqualität zu maximieren, müssen Sie genau darauf achten, wie Ihr C01U
platziert und bezüglich des abzunehmenden Instruments oder Sängers aufgestellt ist.
Alle Mikrofone und besonders unidirektionale oder Nierenmikrofone zeichnen sich
durch ein Phänomen namens „Nahbesprechungseffekt“ aus. Dieser entsteht durch
die Änderung des Frequenzgangs eines Mikrofons, der wiederum auf der Entfernung
(und Position) zwischen Mikrofonkapsel und Klangquelle basiert. Wenn Sie ein
Nierenmikrofon direkt (achsial) auf die Klangquelle richten, erhalten Sie den besten
Frequenzgang. Wenn Sie das Mikrofon jedoch etwas neben die Klangquelle (neben
die Hörachse) richten, werden Sie feststellen, dass der Bassfrequenzgang nachlässt
und das Mikrofon zunehmend dünner klingt.
Bei den meisten Gesangsanwendungen werden Sie das Mikrofon direkt vor dem
Künstler aufstellen. Das gleiche gilt für die Mikrofonabnahme von Instrumenten,
aber man kann ziemlich erstaunliche Klangeinstellungen vornehmen, indem man
den Winkel zwischen Kapsel und Klangquelle nur leicht ändert. Dies ist eine nützliche Technik, um den optimalen Sound von Drumsets, Akustikgitarren, Pianos oder
anderen Instrumenten in einem akustisch lebendigen Raum oder auf einer Bühne
einzufangen. Experiment und Erfahrung sind die besten Lehrmeister beim Erstellen
guter Sounds – also schließen Sie Ihr Mikrofon an!
35
Page 36

C01U betreiben
Signalpegel einstellen
Erstellen Sie in Ihrer digitalen Audioworkstation (DAW) eine Monospur und stellen Sie sie auf den linken Kanal des C01U ein (ignorieren Sie den rechten Kanal).
Schalten Sie die Spur aufnahmebereit und stellen Sie die Eingangsverstärkung mit
dem Softwareregler des Betriebssystems Ihres Computers und/oder Ihrer digitalen
Audioworkstation ein. Wählen Sie einen guten Pegel für das Mikrofon, indem Sie
das C01U vor der gewünschten Schallquelle platzieren und den Input Trim-Regler
langsam aufdrehen, bis die CLIP- oder Peak-Anzeige in Ihrer DAW aufleuchtet. Drehen
Sie dann den Input Trim-Regler zurück, bis die Anzeige nicht mehr leuchtet.
P-Popping
Dieses störende Poppgeräusch entsteht, wenn die Mikrofonmembran von Luftstößen
getroffen wird, die beim Aussprechen von Wörtern mit dem Konsonanten "P" (und
anderen Explosivlauten) durch den Sänger entstehen. Dieses Problem kann man auf
verschiedene Weise, z. B. mit einem externen Poppfilter, lösen. Manche berühm ten
Tontechniker verlassen sich auf einen alten Nylonstrumpf, den sie über einen zurechtgebogenen Drahtkleiderbügel gezogen haben – was tatsächlich sehr gut funktioniert. Sie können das Mikrofon auch probeweise in einem kleinen Winkel zur Hörachse
auf den Sänger richten. Dies löst häufig das Problem auch ohne externes Poppfilter.
Ständermontage des C01U
Das C01U lässt sich mit dem mitgelieferten, schwenkbaren Montage-Adapter
auf standard Mikrofonständern montieren. Bei einem amerikanischen 5/8”
Mikrofonständer müssen Sie vorher den Euro-Ständeradapter abschrauben.
Schrauben Sie den Schwenkadapter dann einfach auf den Mikrofonständer oder
Galgenständerarm. Lösen Sie die Rändelschraube, um das Mikrofon auf den
gewünschten Winkel einzustellen. Ziehen Sie anschließend die Rändelschraube zur
Sicherung der Mikrofonposition wieder fest.
36
Page 37

C01U · USB Studio Condenser Microphone
Optionalen SP01 Anti-Schock verwenden
Optionalen SP01 “Spider”Anti-Shock verwenden
Zwecks zusätzlicher Isolation können Sie das
C01U auf den optionalen SP01 “Spider” AntiSchock montieren.Gehen Sie hierbei wie folgt
vor:
• SchraubenSiezunächstdenSP01
Anti-SchockaufIhrenMikro-oder
Galgenständer.FallsSieeinenUS
5/8”Mikro-oderGalgenständerverwenden,müssenSiedenEuro-Adapter
entfernen.
• EntfernenSiedieC01U
Schwenkvorrichtung,indemSieden
GewinderingwieinAbb.1nachlinks
drehen.
• InstallierenSiedasC01UimSP01,
indemSiedasMikrofonindieMitte
desNetzeseinsetzenundesaufdem
BodenderMontageplattepositionieren.
• SichernSiedenSP01,indemSieden
GewinderingdurcheineRechtsdre
hungbiszumAnschlagwiedermon
tieren(Abb.2).
• LockernSiejetztdieRändelschraube,
umdenWinkeldesMikrofonseinzu
stellen,undrichtenSiedasC01Uauf
diegewünschtePositionaus.Drehen
SieanschließenddieRändelschraube
wiederfest,umdasMikrofonzufixieren.
1
ENGLISH
GEWINDERING
2
FRANÇAISDEUTSCHEESPAÑOLITALIANO
SP01
ANTI-SCHOCK
Anmerkung:AchtenSiedarauf,
dassSiedenGewinderingunddie
Rändelschraubenichtindiefalsche
Richtungoderzufestdrehen.
RÄNDELSCHRAUBE
GEWINDERING
37
Page 38

+20
0
+20
+10
-10
-20
-30
20 50 100 500 200 1K 2K 5K 10K 20K
C01U FREQUENZGANG
0
180
5
10
15
20
dB
25
45
45
90 90
135 135
180
0
C01U RICHTCHARAKTERISTIK
C01U Technische Daten
C01U Technische Daten
Frequenzgang 20~18000 Hz
Richtcharakteristik Hyperniere
Elementtyp Back-Kondensator
Membrandicke 3 Mikron
Empfindlichkeit -33 dB/Pa
Schalldruck 136 dB
Gewicht 0,48 kg (1,06 lbs)
Abmessungen Höhe: 180 mm (7")
Breite: 54 mm (2,125")
Tiefe: 54 mm (2,125")
Versandgewicht 1,15 kg (2,5 lbs)
Technische Daten können unangekündigt geändert werden.
38
Page 39

DIESES GERÄT ENTSPRICHT PART 15 DER FCC VORSCHRIFTEN
CLASS B. DER BETRIEB UNTERLIEGT FOLGENDEN ZWEI
BEDINGUNGEN: (1) DIESES GERÄT DARF KEINE SCHÄDLICHEN
INTERFERENZEN ERZEUGEN UND (2) DIESES GERÄT MUSS
EMPFANGENE INTERFERENZEN VERKRAFTEN KÖNNEN,
INKLUSIVE STÖRUNGEN, DIE MÖGLICHERWEISE DEN BETRIEB
AUF UNERWÜNSCHTE WEISE BEEINFLUSSEN. GEEIGNET FÜR
DEN EINSATZ IN WOHNGEBIETEN UND BÜROS.
Page 40

Índice
Introducción . . . . . . . . . . . . . . . . . . . . . . . . . . . . . . . . . . . . . . . . . . . . . 41
Características del C01U . . . . . . . . . . . . . . . . . . . . . . . . . . . . . . . . . . . . . . 42
Instalación del C01U . . . . . . . . . . . . . . . . . . . . . . . . . . . . . . . . . . . . . . . . 43
Puesta en marcha con MAC OS X . . . . . . . . . . . . . . . . . . . . . . . . . . . . . . . . 44
Puesta en marcha con Windows 7 & Vista . . . . . . . . . . . . . . . . . . . . . . . . . . . 45
Puesta en marcha con Windows XP . . . . . . . . . . . . . . . . . . . . . . . . . . . . . . . 46
Uso del C01U . . . . . . . . . . . . . . . . . . . . . . . . . . . . . . . . . . . . . . . . . . . . . 47
Uso de la protección opcional "en araña" SP01 . . . . . . . . . . . . . . . . . . . . . . . 49
Especificaciones del C01U . . . . . . . . . . . . . . . . . . . . . . . . . . . . . . . . . . . . . 50
40
Page 41

C01U · USB Studio Condenser Microphone
Introducción
Felicidades y gracias por su compra del micro condensador de estudio Samson C01U.
El C01U dispone de un gran y super fino diafragma de 19 mm con un convertidor
analógico-digital de alta calidad y una salida USB. Este micrófono es perfecto para la
grabación de su música, o de cualquier fuente audio acústico a su DAW (workstation
audio digital) preferido. Simplemente conecte el cable USB incluido, arranque su
DAW e inicie la grabación. El C01U reproduce con absoluta fidelidad una amplia
gama de fuentes de sonido incluyendo voces, instrumentos acústicos y platillos, por
citar unos pocos. La rápida respuesta a transitorios y de frecuencia le aseguran una
reproducción precisa con una características lineales en todo el rango.
En estas páginas encontrará una descripción detallada de todas las características del
micrófono condensador de estudio C01U, así como un recorrido guiado por su panel
de control, instrucciones paso-a-paso para su montaje y uso y una completa tabla
con las especificaciones. También encontrará una tarjeta de garantía—no se olvide
de rellenarla y enviárnosla por correo para que pueda recibir soporte técnico online
y para que podamos enviarle información actualizada sobre este y otros productos
Samson en el futuro.
Con unos cuidados mínimos, su C01U funcionará sin problemas durante muchos
años. Le recomendamos que apunte aquí abajo el número de serie de este aparato
para cualquier consulta en el futuro.
Número de serie: __________________________
Fecha de compra: ________________________
En el improbable caso de que su unidad tenga que ser reparada en algún momento,
necesitará conseguir un número de Autorización de devolución (RA) para poder
enviar su unidad a Samson. Sin este número, ninguna unidad es aceptada en
fábrica. Póngase en contacto con Samson en el teléfono 1-800-3SAMSON (1-800372-6766) para que le facilitemos este número de autorización de devolución antes
de enviarnos la unidad. Le recomendamos que guarde el embalaje original de este
aparato y, si es posible, utilice este embalaje para devolvernos la unidad en caso de
reparación.
ENGLISH
FRANÇAISDEUTSCHEESPAÑOLITALIANO
41
Page 42

Características del C01U
• Micrófono condensador de estudio USB profesional con un gran diafragma
• Compatible con ordenadores Mac y PC; no necesita ningún driver o controlador
o fuentes de alimentación externas
• Una reproducción del sonido extremadamente detallada hace que sea perfecto
para la grabación de voces, instrumentos acústicos y casi cualquier otra fuente
de sonido.
• Convertidor AD de alta calidad con 16 bits y frecuencia de muestreo de 48K.
• Cápsula de 19 mm con diafragma de 3 micras.
• Patrón de captura hipercardioide.
• Construcción sólida y robusta.
• Incluye pinza móvil y cable USB de 3 metros.
42
Page 43

C01U · USB Studio Condenser Microphone
Instalación del C01U
La instalación del C01U es un proceso muy sencillo que solo requerirá unos minutos.
Dado que el C01U es un dispositivo USB, puede usarlo tanto en un MAC como en un
PC, a los que tras conectarles el cable USB cable ya podrá funcionar. Podrá controlar
su C01U usando los controles del interface audio standard del sistema operativo
MAC o Windows. En las siguientes secciones de este manual encontrará instrucciones
concretas acerca de cómo configurar este aparato con MAC OS y Windows.
Dado que es posible ajustar el nivel de la señal en las preferencias del sistema
operativo y en su programa de grabación, es una buena idea que se familiarice con
esos controles en el sistema operativo MAC o Windows. Por ello, le recomendamos
que lea la sección Puesta en marcha con Windows 7 & Vista, Windows XP, o Puesta en
marcha con MAX OS X antes de instalar el software de control C01U.
ENGLISH
FRANÇAISDEUTSCHEESPAÑOLITALIANO
43
Page 44

Puesta en marcha con MAC OS X
A continuación le mostraremos un ejemplo
de la configuración del C01U en MAC OS X.
1. Conecte el micrófono. El piloto se
iluminará para indicarle que está
recibiendo corriente a través de la
conexión USB. El MAC reconocerá el
dispositivo audio USB e instalará de
forma automática un controlador
universal.
2. Para elegir el C01U como la entrada
audio del ordenador, abra las
preferencias del sistema en el dock o
en el menú Apple principal (figura 1).
3. Después abra las preferencias de
sonido (figura 2).
4. Ahora, haga clic en la pestaña de
entrada y elija el C01U (figura 3).
5. Para ajustar la ganancia del micrófono,
ajuste el mando deslizante de
volumen Input en la parte inferior del
recuadro de diálogo Sound.
En este punto ya podrá empezar a
usar su micrófono con prácticamente
cualquier software de grabación
audio, pero deberá elegirlo como un
dispositivo de entrada en el DAW. A la
hora de elegir la entrada, simplemente
localice y elija el SAMSON C01U.
Figura 1
Figura 2
Figura 3
44
Page 45

C01U · USB Studio Condenser Microphone
Puesta en marcha con Windows 7 & Vista
En el ejemplo siguiente puede ver la
configuración del C01U en Windows 7 y
Vista.
1. La primera vez que conecte el C01U
a un puerto USB, Windows 7 o Vista
instalarán los drivers universales para
dicho puerto. Aparecerá un globo
de información indicándole que el
ordenador ha localizado el C01U.
2. Cuando haya terminado la instalación
de los drivers, aparecerá otro globo con
el siguiente mensaje “Su dispositivo
está instalado y listo para su uso”.
Nota: Este globo solo aparecerá la
primera vez que conecte este dispositivo
en un puerto USB concreto.
3. Para congurar el C01U como el
dispositivo por defecto para la
grabación o para cambiar sus ajustes,
haga clic en el botón Inicio, después en
Panel de control y nalmente en Sonido.
En la pestaña Grabación podrá elegir
el SAMSON C01U en los menús y usar
el botón Congurar como dispositivo
predeterminado para ajustarlo como
dispositivo por defecto (gura 1).
ENGLISH
Figura 1
FRANÇAISDEUTSCHEESPAÑOLITALIANO
4. Para ajustar la ganancia del micrófono,
haga clic en el botón Propiedades
y después elija la pestaña Niveles.
Puede elegir entre visualizar el nivel
de volumen del micrófono como un
porcentaje o en dB, simplemente
haciendo clic en el botón derecho del
ratón sobre el recuadro con el valor
numérico (gura 2).
Figura 2
45
Page 46

Puesta en marcha con Windows XP
En el ejemplo siguiente puede ver la
configuración del C01U en Windows
XP con el Service Pack 2. En el caso de
otras versiones, el proceso puede variar
ligeramente.
1. Conecte el micrófono. El piloto se
iluminará para indicarle que el micro
está recibiendo corriente a través de
la conexión USB. Windows reconocerá
el dispositivo de audio USB e
instalará de forma automática los
controladores universales (figura 1).
NOTA: Este globo informativo no
aparecerá la siguiente vez que conecte
el micro, dado que los controladores ya
estarán instalados.
El C01U será reconocido a partir de
ahora como un dispositivo audio
Windows con el nombre Samson
C01U. A cada C01U adicional que
añada se le asignará un número,
del tipo Samson C01U (2), etc. Para
configurarlo como el dispositivo
predeterminado y cambiar la
ganancia controlada por ordenador,
vaya al panel de control.
Figura 1
Figura 2
2.
Vaya después a Dispositivos de sonido y
audio en el panel de control (figura 2).
3. Elija el Samson C01U como
dispositivo de grabación audio
predeterminado dentro de la pestaña
Audio. El dispositivo por defecto
se usa en programa sencillos como
los de teleconferencia o grabación
de sonido. En la mayoría de los
programas audio podrá elegir qué
dispositivos (o cuales si puede
elegir varios) usar con ese programa
concreto. Para ajustar la ganancia
controlada por ordenador, haga clic
en el botón Volumen (figura 3).
4. La ventana Wave In ajusta la ganancia
controlada por el ordenador y permite
la anulación del micrófono. El rango
de ganancia va de –62 a +48 dB
(figura 4).
46
Figura 3
Figura 4
Page 47

C01U · USB Studio Condenser Microphone
Uso del C01U
Encendido del C01U
El C01U es un micro condensador y, al igual que todos los micros condensadores,
dispone de unos circuitos electrónicos internos que requieren una fuente de
alimentación activa. Los micrófonos condensadores tradicionales de estudio casi
siempre reciben el voltaje a través de una fuente de alimentación fantasma, derivada
habitualmente de la mesa de mezclas. El C01U recibe su corriente del bus USB.
Simplemente conecte el micrófono al puerto USB de su ordenador y ya estará listo
para funcionar. El C01U dispone de un piloto de encendido que se iluminará en
cuanto el micro reciba corriente por la conexión USB.
Patrón polar
La característica más importante de cualquier micrófono es su direccionalidad
o “patrón de captura”. Existen tres categorías básicas de patrones de captura;
omnidireccional, bidireccional y unidireccional. Los micrófonos omnidireccionales
captan el sonido en todas direcciones, los bidireccionales (o "forma de 8") captan
el sonido directamente delante y detrás del micrófono y rechazan el sonido de la
derecha y la izquierda, y los unidireccionales (cardioides) captan el sonido delante del
micrófono.
Aunque los micrófonos omnidireccionales y bidireccionales son muy útiles para
muchas aplicaciones, la mayoría de situaciones de “microfonía” para la grabación y
el sonido en vivo requieren micrófonos unidireccionales o cardioides. La naturaleza
unidireccional permite una mejor separación de los instrumentos en el estudio y
un mayor control sobre la realimentación en el reforzamiento del sonido en vivo.
El patrón de captura del micrófono condensador C01U es hipercardioide, con lo
cual ofrece un mayor rechazo del sonido lateral. Cuando se coloca correctamente,
el patrón de captación hipercardioide permite captar una mayor parte del sonido
deseado y una menor parte del sonido no deseado.
Ubicación del micrófono
Para maximizar la calidad del sonido hay que prestar mucha atención a la ubicación
del C01U y a cómo está situado para el instrumento o vocalista que va a captar con
el micrófono. Todos los micrófonos, especialmente los unidireccionales o cardioides,
muestran un fenómeno conocido como “efecto de proximidad.” De forma resumida,
este efecto de proximidad es el cambio resultante en la respuesta de frecuencia de
un micrófono según la posición de su cápsula con relación a la fuente de sonido.
Específicamente, al apuntar un micrófono cardioide directamente hacia la fuente
de sonido (sobre el eje) obtendrá la mejor respuesta de frecuencia, pero si empieza
a desviar ligeramente el micrófono (fuera de eje) observará que la respuesta de
frecuencia baja cae y el micrófono empieza a sonar con una menor densidad.
ENGLISH
FRANÇAISDEUTSCHEESPAÑOLITALIANO
Para la mayoría de las aplicaciones vocales deseará colocar el micrófono delante
del artista. Esto también es así para captar instrumentos, pero pueden realizarse
algunos ajustes de ecualización realmente increíbles cambiando ligeramente el
47
Page 48

Uso del C01U
ángulo de la cápsula con relación a la fuente de sonido. Ésta puede ser una técnica
muy útil para capturar el sonido óptimo de un grupo de instrumentos de percusión,
una guitarra acústica, un piano u otros instrumentos en una sala viva o estudio. La
experimentación y la experiencia son los mejores maestros para conseguir un buen
sonido, o sea que, ¡conéctese!
Ajuste del nivel de la señal
En su workstation audio digital (DAW), cree una pista audio mono y ajústela al
canal izquierdo del C01U (el canal derecho debe ser ignorado). Arme la pista para la
grabación y ajuste la ganancia de entrada usando el software de control del sistema
operativo de su ordenador y/o del workstation audio digital. Para configurar un
buen nivel para el micro, coloque el C01U delante de la fuente de sonido que quiera
y suba lentamente el control de retoque de entrada hasta que se ilumine el piloto
CLIP o PEAK en su DAW. Entonces, baje lentamente el valor del control de retoque de
entrada hasta que el indicador ya no se ilumine.
Petardeos o "p-popping"
Esto es este molesto chasquido que se obtiene cuando el diafragma del micrófono
recibe un golpe de aire de un vocalista que pronuncia palabras que contiene la letra
“P”. Existen algunas manera de solucionar este problema, incluyendo la utilización de
un filtro externo. Algunos famosos técnicos de sonido utilizan una media de nylon
colocada en una percha doblada, cosa que funciona realmente bien. También puede
colocar el micrófono ligeramente fuera de eje (ligeramente desviado) con relación al
vocalista. Con ello normalmente puede solucionarse el problema sin utilizar un filtro
externo.
Instalación del C01U en un soporte
El C01U puede instalarse en un pie de micrófono standard utilizando el adaptador de
clip giratorio incluido. Si utiliza un soporte de micrófono de 5/8” de los EE.UU., deberá
desmontar, desenroscando, el adaptador de clip europeo. Simplemente atornille el
adaptador para clip giratorio en el soporte de micrófono o jirafa. Después afloje el
palomilla y ajuste el micrófono al ángulo deseado. Una vez ajustado, apriete de nuevo
el tornillo para fijar el micrófono en su posición.
48
Page 49

C01U · USB Studio Condenser Microphone
Uso de la protección opcional "en araña" SP01
Uso de la protección opcional "en araña" SP01
Para un mayor aislamiento, puede colocar el
C01U en la protección opcional "en araña"
SP01. Realice los pasos siguientes para
instalar el SP01.
• Primero, atornille la protección SP01
en el soporte de micro o jirafa. Si está
usando un soporte o jirafa de 5/8” de
EE.UU., retire el adaptador Euro.
• Quite la pinza de sujeción del C01U
girando hacia la izquierda el anillo de
tuerca, tal como le mostramos en la
figura 1.
• Coloque el C01U dentro del SP01
insertando el micrófono en el centro de
la red y fijándolo en la placa de montaje
inferior.
• Fije el SP01 volviendo a instalar el anillo
de tuerca y girándolo hacia la derecha
hasta asegurarlo. (Figura 2)
• Ahora, afloje el tornillo de fijación
para ajustar el ángulo del micrófono
y coloque el C01U en su ubicación
final. Una vez fijado, asegure de nuevo
el palomilla para fijar el micro en su
posición.
Nota: No apriete demasiado el anillo
de tuerca o la palomilla para que no se
pasen de rosca.
1
ENGLISH
THREADED
FRANÇAISDEUTSCHEESPAÑOLITALIANO
COLLAR
2
SP01
SHOCK MOUNT
THREADED
COLLAR
THUMB
SCREW
49
Page 50

+20
0
+20
+10
-10
-20
-30
20 50 100 500200 1K 2K 5K 10K 20K
C01U FREQUENCY RESPONSE
0
180
5
10
15
20
dB
25
45
45
90 90
135 135
180
0
C01U POLAR PATTERN
Especificaciones del C01U
Especificaciones del C01U
Respuesta de frecuencia 20~18.000 HZ
Patrón polar Hipercardioide
Tipo de elemento Condensador trasero
Grosor de diafragma 3 micras
Sensibilidad -33 dB/Pa
SPL 136 dB
Peso 0,48 kg (1,06 lbs.)
Dimensiones Altura: 180 mm (7")
Anchura: 54 mm (2,125")
Profundidad: 54 mm (2,125")
Peso con embalaje 1,15 Kg (2,5 lbs.)
Especificaciones sujetas a cambios sin previo aviso.
50
Page 51

Page 52

Indice
Introduzione . . . . . . . . . . . . . . . . . . . . . . . . . . . . . . . . . . . . . . . . . . . . . 54
Caratteristiche del C01U . . . . . . . . . . . . . . . . . . . . . . . . . . . . . . . . . . . . . . 55
Installazione del C01U . . . . . . . . . . . . . . . . . . . . . . . . . . . . . . . . . . . . . . . 56
Guida rapida per Mac OS X . . . . . . . . . . . . . . . . . . . . . . . . . . . . . . . . . . . . 57
Guida rapida per Windows 7 e Vista. . . . . . . . . . . . . . . . . . . . . . . . . . . . . . . 58
Guida rapida per Windows XP . . . . . . . . . . . . . . . . . . . . . . . . . . . . . . . . . . 59
Utilizzo del C01U. . . . . . . . . . . . . . . . . . . . . . . . . . . . . . . . . . . . . . . . . . . 60
Utilizzo del supporto shock-mount SP01 opzionale . . . . . . . . . . . . . . . . . . . . 62
Specifiche del C01U. . . . . . . . . . . . . . . . . . . . . . . . . . . . . . . . . . . . . . . . . 63
52
Page 53

C01U · USB Studio Condenser Microphone
Introduzione
Complimenti per aver acquistato il microfono a condensatore Samson C01U. Il C01U
dispone di diaframma largo (19 mm) ultrasottile, convertitore analogico/digitale di
alta qualità e uscita USB. È perfetto per registrare musica o qualsiasi altra sorgente
audio nella vostra DAW (Digital Audio Workstation) preferita. Basta collegare il cavo
USB fornito, aprire la DAW e iniziare a registrare. Il C01U cattura fedelmente una
grande varietà di sorgenti sonore, tra cui voce, strumenti acustici e piatti in posizione
overhead. La risposta ampia in frequenza e veloce sui transienti assicura una riproduzione con caratteristiche lineari in tutto lo spettro.
Queste pagine forniscono una descrizione dettagliata delle caratteristiche del microfono a condensatore da studio C01U e istruzioni passo passo per il collegamento
e l’uso, nonché le specifiche complete. Troverete anche la garanzia, da compilare e
inviare per posta per poter ricevere supporto tecnico online e informazioni aggiornate su questo e altri prodotti Samson.
Se trattato con cura e adeguatamente ventilato, il vostro C01U funzionerà senza problemi per molti anni. Vi raccomandiamo di annotare qui sotto il numero di serie come
futuro riferimento.
Numero di serie: __________________________
Data d’acquisto: ________________________
Se l’unità necessitasse di riparazione, prima di spedirla a Samson dovrete ottenere un
numero di Autorizzazione Reso. In sua assenza, l’unità non verrà accettata. Vi preghiamo di contattare Samson al numero 1-800-3SAMSON (1-800-372-6766) per richiedere
il numero di autorizzazione prima di procedere alla spedizione. Conservate l’imballaggio originale e, se possibile, utilizzatelo per spedire l’unità.
ENGLISH
FRANÇAISDEUTSCHEESPAÑOLITALIANO
53
Page 54

Caratteristiche del C01U
• Microfono professionale a diaframma largo da studio USB.
• Compatibile con Mac e PC, non richiede driver particolari o alimentatori
di corrente esterni.
• La registrazione estremamente dettagliata del suono lo rende ideale per voci,
strumenti acustici e praticamente ogni sorgente sonora.
• Convertitore A/D di alta qualità con frequenza di campionamento a 48K e 16 bit.
• Capsula da 19 mm con diaframma da 3 micron.
• Diagramma polare di tipo ipercardioide.
• Solida struttura pressofusa.
• Include supporto snodato per asta e cavo USB da 3 metri.
54
Page 55

C01U · USB Studio Condenser Microphone
Installazione del C01U
L’installazione del C01U richiede solo pochi minuti. Visto che il C01U è USB compliant,
potete usare un Mac o un PC, collegare il cavo USB fornito e iniziare subito usarlo.
Potrete regolare il C01U tramite i normali controlli dell’interfaccia audio inclusi nel
sistema operativo Mac o Windows. Troverete istruzioni dettagliate per l’impostazione
con Mac OS o Windows nelle sezioni seguenti del manuale.
Visto che è possibile regolare il livello del segnale dalle preferenze del sistema operativo, oltre che dal software di registrazione, è buona norma familiarizzare con queste
impostazioni di Mac o Windows. Per cui, prima di installare il driver del C01U, vi consigliamo di leggere la sezione “Guida rapida per Windows 7 e Vista”, “Guida rapida per
Windows XP” oppure “Guida rapida per Mac OS X”.
ENGLISH
FRANÇAISDEUTSCHEESPAÑOLITALIANO
55
Page 56

Guida rapida per Mac OS X
L’esempio seguente riguarda l’installazione
del C01U in Mac OS X.
1. Collegate il microfono. Il LED si
accende a indicare che sta ricevendo
l’alimentazione USB. Il Mac riconoscerà il dispositivo audio USB e installerà
automaticamente un driver universale.
2. Per selezionare il C01U come ingresso
audio del computer, aprite le Preferenze di Sistema dal Dock o dal menu
Apple (figura 1).
3. Aprite le preferenze Suono (figura 2).
4. Cliccate sul pannello Ingresso e selezionate SAMSON C01U (figura 3).
5. Per regolare il guadagno del microfono, regolate il cursore del livello di
ingresso, in basso nel pannello Suono.
Ora potete iniziare a usare il microfono
con la maggior parte dei software di
registrazione audio, selezionandolo
come ingresso all’interno dalla DAW.
Scegliendo l’ingresso, cercate e selezionate SAMSON C01U.
Figura 1
Figura 2
Figura 3
56
Page 57

C01U · USB Studio Condenser Microphone
Guida rapida per Windows 7 e Vista
L’esempio seguente riguarda l’installazione
del C01U in Windows 7 e Vista.
1. La prima volta che collegate il C01U a
una porta USB, Windows 7 o Vista installerà il driver universale per quella porta.
Una notica vi avviserà che il computer
ha trovato il C01U.
2. Terminata l’installazione del driver, una
notica vi dirà che il dispositivo è installato e pronto all’uso.
Nota: questa notica compare solo quando si collega il dispositivo per la prima
volta a una determinata porta USB.
ENGLISH
3. Per impostare il C01U come dispositivo
predenito per la registrazione, o per
cambiarne le impostazioni, cliccate su
Start, poi Pannello di controllo e quindi
Suono. Nel pannello Registrazione,
selezionate SAMSON C01U dal menu e
cliccate il pulsante Predenito (gura 1).
4. Per impostare il guadagno del microfo-
no, cliccate il pulsante Proprietà e scegliete il pannello Livelli. Potete visualizzare il livello del volume del microfono
in percentuale o in decibel facendo clic
destro sul campo del numero (gura 2).
Figura 1
FRANÇAISDEUTSCHEESPAÑOLITALIANO
Figura 2
57
Page 58

Guida rapida per Windows XP
L’esempio seguente riguarda l’installazione del C01U in Windows XP con Service
Pack2. Altre versioni possono essere
leggermente diverse.
1. Collegate il microfono. Il LED si
accende a indicare che sta ricevendo l’alimentazione USB. Windows
riconoscerà il dispositivo audio USB
e installerà automaticamente i driver
universali (figura 1).
NOTA: la prossima volta che collegherete il microfono, questa notifica non
comparirà, perché i driver sono già
installati.
Il C01U ora è riconosciuto come dispositivo audio Windows con il nome
Samson C01U. Ogni C01U aggiuntivo
verrà indicato con un numero, per
esempio Samson C01U (2) ecc. Per impostarlo come dispositivo predefinito
e cambiarne il guadagno dal computer, aprite il Pannello di controllo.
2. Ora aprite Suoni e periferiche audio
(figura 2).
3. Nel pannello Audio, selezionate
Samson C01U come periferica predefinita per la registrazione. Il dispositivo
predefinito viene usato nei programmi più semplici, come Registratore di
suoni o i software per teleconferenze.
Nella maggior parte dei software audio professionali potete selezionare il/i
dispositivo/i da usare direttamente dal
programma. Per impostare il guadagno controllato dal computer, cliccate
su Volume (figura 3).
Figura 1
Figura 2
Figura 3
4. La finestra Wave In imposta il guadagno o silenzia il microfono. Il guadagno va da -62 a +48 dB (figura 4).
58
Figura 4
Page 59

C01U · USB Studio Condenser Microphone
Utilizzo del C01U
Alimentazione del C01U
Il C01U è un microfono a condensatore e come tale ha componenti elettronici che
richiedono un’alimentazione attiva. I microfoni a condensatore da studio tradizionali
sono quasi sempre alimentati dalla Phantom Power, fornita solitamente dalla console
di mixaggio. Il C01U riceve l’alimentazione dalla porta USB. Collegate semplicemente
il microfono alla porta USB del computer, e sarà pronto all’uso. Il C01U ha un LED di
accensione che si illumina quando è presente l’alimentazione USB.
Diagramma polare
La caratteristica più importante di ogni microfono è la sua direzionalità o “diagramma
polare”. Ci sono tre categorie principali di diagramma polare: omni-, bi- e unidirezionali. I microfoni omnidirezionali ricevono il suono da tutte le direzioni; i bidirezionali
(figura 8) ricevono il suono diretto al fronte e al retro del microfono, respingendo
quello presente ai lati; i microfoni unidirezionali (cardioide) ricevono il suono frontalmente.
Mentre i microfoni omni- e bidirezionali sono molto utili per determinate applicazioni, la maggior parte delle microfonazioni in studio e live richiede microfoni undirezionali o cardioidi. L’unidirezionalità permette una migliore separazione degli strumenti
nelle registrazioni in studio e un maggiore controllo del feedback nelle situazioni
live. Il diagramma polare del C01U è ipercardioide, con isolamento dai suoni laterali
ancora maggiore. Se il microfono è posizionato correttamente, il diagramma polare
ipercardioide permette di catturare maggiormente i suoni che interessano, tralasciando quelli indesiderati.
ENGLISH
FRANÇAISDEUTSCHEESPAÑOLITALIANO
Posizionare il microfono
Per ottenere la migliore qualità sonora, fate molta attenzione nel posizionare il C01V
e nel rivolgerlo correttamente verso i cantanti o gli strumenti che state microfonando.
Tutti i microfoni, specialmente quelli unidirezionali o cardioidi, sono soggetti a un
fenomeno chiamato “effetto di prossimità”. In pratica l’effetto di prossimità consiste in
un cambio della risposta in frequenza di un microfono, basato sulla posizione della
capsula del microfono rispetto alla sorgente del suono. Più precisamente, quando
si punta un microfono cardioide direttamente verso la sorgente (in asse) si otterrà
la miglior risposta in frequenza; puntandolo progressivamente in un’altra direzione
(fuori asse), si avranno dei cali nella risposta delle basse frequenze, e il microfono inizierà a suonare più “magro”.
Per la maggior parte delle applicazioni di canto, la posizione consigliata è di fronte
all’artista. Lo stesso vale nel caso di microfonazione di strumenti, dove però potete
ottenere interessanti variazioni nell’equalizzazione cambiando l’orientamento della
capsula rispetto alla sorgente sonora. Questa tecnica può risultare molto utile per
catturare il suono ottimale di una batteria, una chitarra acustica, un pianoforte o altri
strumenti su un palco o in un ambiente live. Ma per ottenere i suoni giusti non c’è
nulla di meglio che sperimentare: quindi collegate subito il microfono!
59
Page 60

Utilizzo del C01U
Impostare il livello del segnale
Create una traccia audio mono nella vostra (DAW) e abbinatela al canale sinistro del
C01U (il canale destro è da ignorare). Attivate la traccia per la registrazione e regolate
il guadagno con i controlli software del sistema operativo e/o della DAW. Per ottenere
un buon livello posizionate il C01U di fronte alla sorgente sonora desiderata e alzate
lentamente il controllo del segnale in ingresso fino a far accendere l’indicatore di clip/
di picco nella DAW. Quindi abbassate il controllo del segnale in ingresso finché l’indicatore non si accende più.
P-Popping
Il p-popping è quel suono fastidioso che si sente quando il diaframma del microfono
viene investito da un soffio d’aria quando un cantante pronuncia parole che includono la lettera P. Il problema si può arginare in vari modi, per esempio usando un pop
filter esterno. Alcuni famosi ingegneri del suono lo hanno risolto con successo utilizzando vecchie calze di nylon avvolte ad appendiabiti curvati. Potete anche provare a
spostare leggermente il microfono fuori asse (con una leggera angolazione) rispetto
al cantante. Ciò permette spesso di evitare un pop filter esterno.
Montare il C01U su un’asta
Il C01U può essere montato su un’asta per microfono standard utilizzando l’adattatore snodato incluso. Se usate un’asta standard americana da 1,6 cm dovrete rimuovere,
svitandolo, l’adattatore europeo. Avvitate l’adattatore snodato sull’asta per microfono
o sulla giraffa. Ora allentate la vite e regolate il microfono all’inclinazione desiderata.
Una volta in posizione stringete la vite per bloccare il microfono.
60
Page 61

C01U · USB Studio Condenser Microphone
Utilizzo del supporto shock-mount SP01 opzionale
Utilizzo del supporto shock-mount a ragno SP01 opzionale
Per un ulteriore isolamento il C01U può essere posizionato nel supporto shock-mount a
ragno opzionale SP01. Seguite i passi seguenti per montare l’SP01.
• Prima di tutto avvitate l’SP01 sull’asta
per microfono o sulla giraffa. Se usate
un’asta americana da 1,6 cm, rimuovete
l’adattatore europeo.
• Rimuovete l’adattatore snodato del
C01U ruotando il colletto filettato in
senso antiorario come mostrato nella
figura 1.
• Posizionate il C01U inserendolo al centro
della gabbia dell’SP01 e appoggiandolo
al fondo.
• Bloccate l’SP01 rimontando il colletto
filettato, ruotandolo finché non è ben
stretto (figura 2).
• Ora allentate la vite per regolare l’incli-
nazione del microfono e mettete il C01U
nella posizione desiderata. Una volta in
posizione stringete la vite per bloccare il
microfono.
Nota: fate attenzione a non rovinare la
filettatura e a non stringere troppo il colletto filettato e la vite.
1
ENGLISH
THREADED
FRANÇAISDEUTSCHEESPAÑOLITALIANO
COLLAR
2
SP01
SHOCK MOUNT
THREADED
COLLAR
THUMB
SCREW
61
Page 62

+20
0
+20
+10
-10
-20
-30
20 50 100 500200 1K 2K 5K 10K 20K
C01U FREQUENCY RESPONSE
0
180
5
10
15
20
dB
25
45
45
90 90
135 135
180
0
C01U POLAR PATTERN
Specifiche del C01U
Specifiche del C01U
Risposta in frequenza 20~18000 Hz
Diagramma polare Ipercardioide
Elemento Condensatore posteriore
Spessore diaframma 3 micron
Sensibilità -33 dB/Pa
SPL 136 dB
Peso 0,48 kg
Dimensioni Altezza: 180 mm
Larghezza: 54 mm
Profondità: 54 mm
Peso con imballaggio 1,15 kg
Le specifiche possono variare senza preavviso.
62
Page 63

Page 64

Samson Technologies Corp.
45 Gilpin Avenue
Hauppauge, New York 11788-8816
Phone: 1-800-3-SAMSON (1-800-372-6766)
Fax: 631-784-2201
www.samsontech.com
 Loading...