

Page 1
CM40 Chromatic Tuner Metronome
, , , , , , , ,
Owner’s Manual
CM40 Chromatic Tuner Metronome
LCD Display
samsontech.com
Owner’s Manual
Congratulations on the purchase of your new Samson CM40 chromatic tuner metronome!
Combining precision tuning with a vivid color display, the CM40 makes tuning your
instrument easier than ever. The CM40 features a built-in microphone for tuning acoustic
instruments, as well as ¼” input and output jacks that allow you to use the metronome
inline with your electronic guitar or bass ampliers. For tuning large ensembles, the
CM40 has a TONE mode that plays reference pitches from A2–A6. The built-in metronome
is a perfect addition to your practice routine, and oers ten time signatures with nine
dierent rhythmic variations. The CM40 is the ultimate accessory for every instrument
case, gig bag, or back pocket. We suggest that you take some time to go through these instructions to fully understand how we’ve implemented a number of unique features, and
to get the most out of your Samson CM40 chromatic tuner metronome.
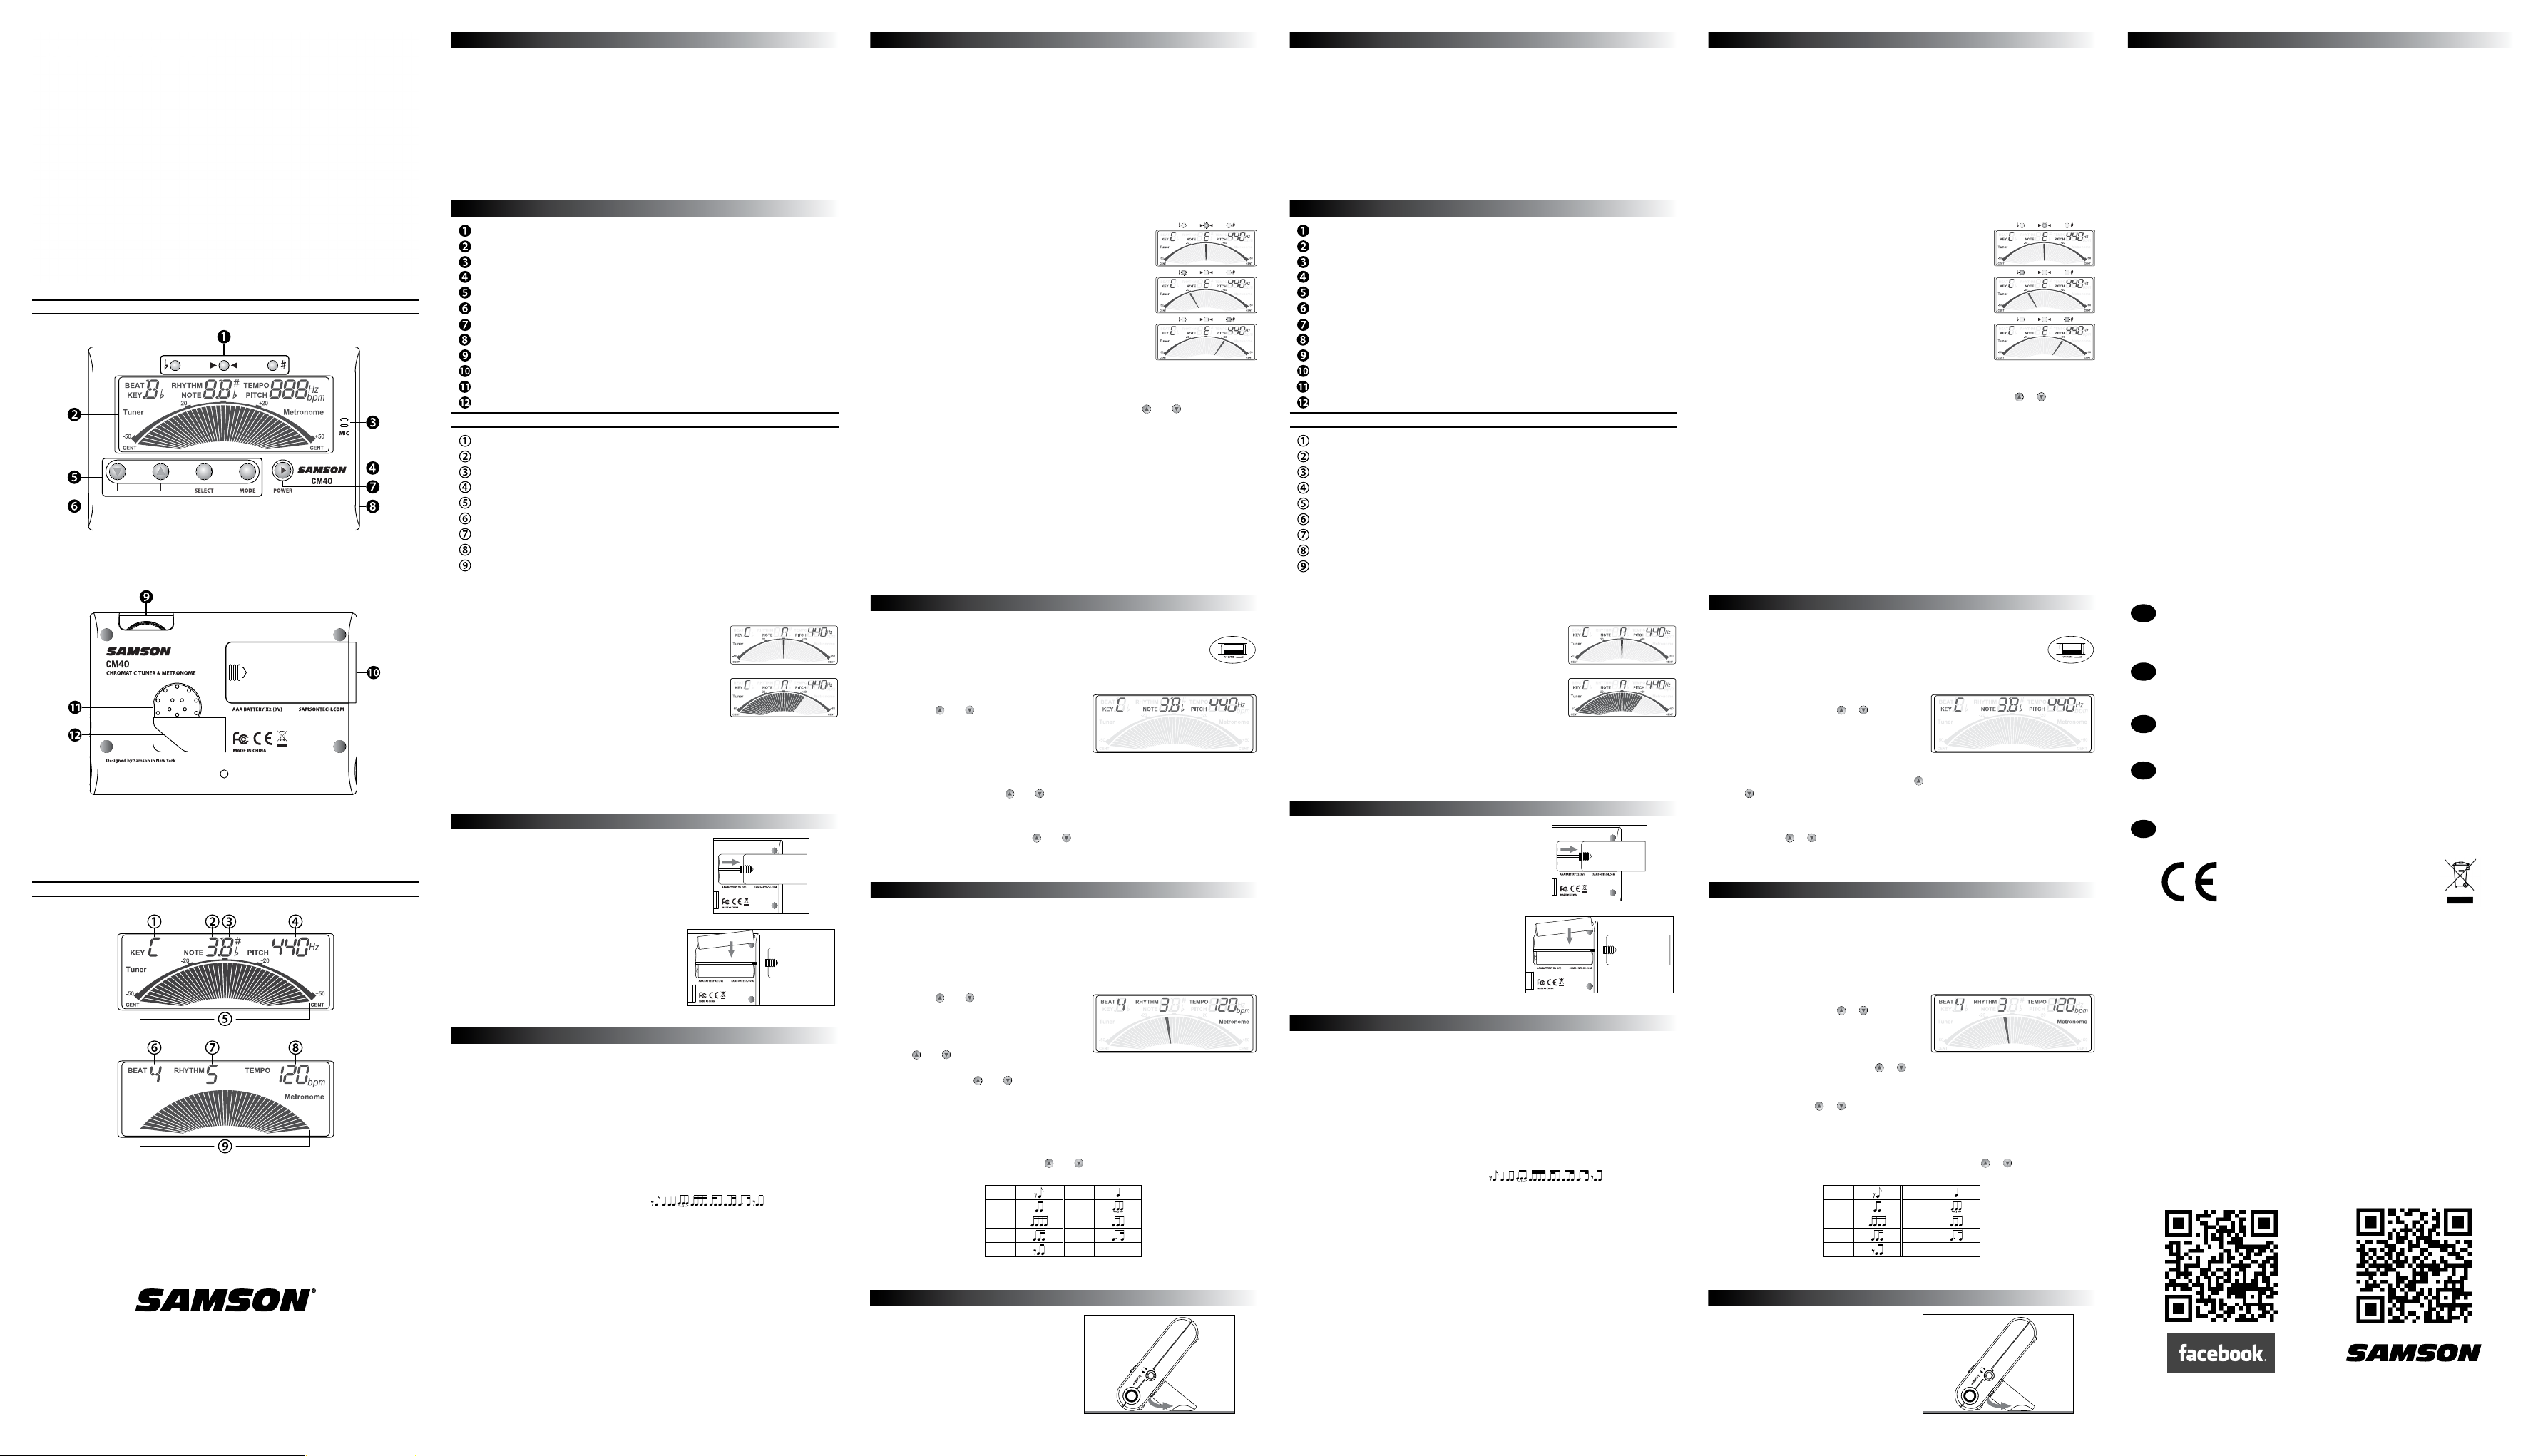
Front and Rear Panel Controls and Features
Indicator Lights
LCD Display
Internal Microphone
” Headphone Jack
MODE, SELECT, Up and Down Adjust Buttons
¼” Output Jack
POWER/PLAY/STOP Button
¼” Input Jack
Speaker/Headphone Volume Control
Battery Door
Internal Speaker
Desktop Stand
LCD Display
Transpose Key (Tuner and Tone Modes)
Note Octave (Tone Mode)
Note Name (Tuner and Tone Modes)
A440 Reference Frequency (Tuner and Tone Modes)
Tuning Meter (Tuner Mode Only)
Beat Indicator 0–9 (Metronome Mode)
Rhythm Indicator 0–8 (Metronome Mode)
Tempo 30–250 bpm (Metronome Mode)
Beat Meter (Metronome Mode)
Adjusting the Display
The CM40 allows you to choose between two meter display modes. Press and hold the
MODE button for three seconds to switch between the two modes:
1. Needle - The display will act like an analog needle, and
will only show the relative position of the note played.
When the note is in tune, only the note name and center
green meter segment will be displayed.
2. Fuel Gauge - The segments of the display will stay lit from
left to right as the note is tuned. When the note is in tune,
all the segments on the left side of the note name will be
lit, along with the central green meter segment.
Energy-saving mode
To conserve battery power, the CM40 will dim the LCD display and switch to energysaving mode, if there is no signal detected after ten seconds in Tuner mode, or if there
is no user input after 20 seconds in Tone mode or 60 seconds in Metronome mode. If no
signal or user input is detected for ve minutes, the tuner will automatically turn o in
any mode.
Installing the Battery
When the color display or back light becomes
consistently dim, the batteries should be replaced
as soon as possible. The CM40 uses two AAA batteries. To install or replace the batteries:
1. Slide the battery door located on the back of
the tuner in the direction of the arrow (gure
1).
2. Insert two AAA batteries, ensuring that the
positive (+) and negative (-) ends are correctly
positioned (gure 2).
3. Replace the battery cover, sliding it back until
it clicks into place.
gure 1
gure 2
Specications
Tuner
Tuning Scale . . . . . . . . . . . . . . . . . . . . . Chromatic
Tuning Mode . . . . . . . . . . . . . . . . . . . . . Tuner Mode (Automatic)
Tuning Range. . . . . . . . . . . . . . . . . . . . . A0 (27.50 Hz) - C8 (4186 Hz)
Tuning Key. . . . . . . . . . . . . . . . . . . . . . . C, F, B
Calibration. . . . . . . . . . . . . . . . . . . . . . . 430–450 Hz (1 Hz Steps)
Sound range . . . . . . . . . . . . . . . . . . . . . 2A ~ 6A
Accuracy . . . . . . . . . . . . . . . . . . . . . . . . 1 cent
Metronome
Tempo Range. . . . . . . . . . . . . . . . . . . . . 30 ~ 250 bpm
Time Signature . . . . . . . . . . . . . . . . . . . . 0–9 beats
Rhythms . . . . . . . . . . . . . . . . . . . . . . . .
Metronome Tolerance . . . . . . . . . . . . . . . < 1%
Accuracy . . . . . . . . . . . . . . . . . . . . . . . . < 1%
Display . . . . . . . . . . . . . . . . . . . . . . . . . 4 color LCD
Input . . . . . . . . . . . . . . . . . . . . . . . . . . Microphone, ¼” Input jack
Output . . . . . . . . . . . . . . . . . . . . . . . . . ¼” Output jack, ” Headphone jack
Precision . . . . . . . . . . . . . . . . . . . . . . . . ±1 cent
Response Time . . . . . . . . . . . . . . . . . . . . 20 ms
Power . . . . . . . . . . . . . . . . . . . . . . . . . Two AAA batteries (3V)
Power Consumption
Tuning Mode . . . . . . . . . . . . . . . . . . < 10 mA
Metronome Mode . . . . . . . . . . . . . . . < 50 mA
Tone Mode . . . . . . . . . . . . . . . . . . . . < 60 mA
Dims . . . . . . . . . . . . . . . . . . . . . . . . . . 3.9” x 0.8” x 2.7”
Weight . . . . . . . . . . . . . . . . . . . . . . . . . 2.5 oz
Specications subject to change without notice
Tone (Manual)
♭
♭
, E
Tuning Your Instrument
1. Connect your instrument to the CM40 ¼” input using a standard instrument cable.
Note: Use the internal microphone for tuning acoustic instruments. When using the internal microphone, do not connect any cables to the ¼” input or ¼” output jacks.
2. When using the CM40 inline with your amplier, connect the ¼” output jack to the
input of your amplier using a standard instrument cable.
Note: To avoid damaging your amplier, turn the volume completely down or power o
your amplier when making any connections.
3. Press and hold the POWER button to turn on the tuner.
4. Press the MODE button until you enter the Tuner mode. The word “Tuner” will light
on the display.
5. Play a single note on your instrument. The display will show the name of the note.
Tune your instrument to the correct pitch so that the desired note name appears.
6. While the note is being played, tune your instrument so
that the meter points to the center (green) position, and the
center (green) Indicator LED lights.
7. If the note is at, the meter will point to the left (yellow) side
of the display, and the left
8. If the note is sharp, the meter will point to the right (red) side
of the display, and the right # (sharp) Indicator LED will light.
9. Tune your instrument to the correct pitch so that the desired
note name appears. Repeat this step for each note or string
to be tuned.
10. To transpose the key of the tuner to work with transposed instruments, such as B
Clarinet or F Horn, press the SELECT button to cycle through the keys (C, F, B
11. To adjust the frequency of the A4 reference pitch, press the
tons to select a frequency between 430–450 Hz.
Note: The reference pitch will be stored even when the power is turned o. If the battery is
removed, the reference pitch will reset to the factory default (440 Hz).
Tips for tuning stringed instruments
For best results when tuning a stringed instrument, use a light to medium plucking
volume. Strings will usually go sharp after the initial attack. Plucking the strings too hard
will emphasize this eect.
Pluck the string with the esh of your thumb. This will produce a note with fewer overtones for the tuner to process than when using your ngernail or a pick.
If the note is not registering, or the display jumps between notes, try muting the other
stings to eliminate any sympathetic vibrations.
It is recommended that you tune up from a atter pitch. This reduces any slack in the
instrument’s tuning pegs. If you go too far, loosen the string tension and tune up again.
♭ (at) Indicator LED will light.
♭
, E♭).
and (Adjust) but-
Using the Tone Mode
1. Press the MODE button to enter Tone Mode.
2. Press the POWER/PLAY/STOP button to start the sound. Use the VOLUME
control to adjust the overall level to the internal speaker and ” headphone
output.
Note: Plugging headphones into the ” headphone output will disconnect the internal
speaker.
3. Press the
chromatically from 2A ~ 6A to select the
desired note.
4. To transpose the key of the tuner to work with
transposed instruments, such as B♭ Clarinet or
F Horn, press the SELECT button until the KEY
value is ashing. Press the
buttons to transpose the tuner.
5. To adjust the frequency of the A4 reference pitch, press the SELECT button until the
PITCH value is ashing. Press the
between 430–450 Hz.
6. Press the POWER/PLAY/STOP button to stop the sound.
and (Adjust) buttons step
and (Adjust)
and (Adjust) buttons to select a frequency
Using the Metronome
1. Press the MODE button until you enter the Metronome screen. The word “Metronome” will light on the LCD display.
2. Press the POWER/PLAY/STOP button to start the Metronome. Use the VOLUME control to adjust the overall level to the internal speaker or ” headphone output.
Note: Plugging headphones into the ” headphone output will disconnect the internal
speaker.
3. Press the
or decrease the tempo from 30–250 BPM.
4. To adjust the time signature, press the SELECT
button until the BEAT value is ashing. Press
the
0–9 beats per measure. When the BEAT value
stops ashing, the
default to tempo adjust. The green Indicator
LED will ash on the down beats, and the red
Indicator lights will ash on the remaining
beats.
5. To choose one of the nine rhythm settings, press the SELECT button until the
RHYTHM value is ashing. Press the
pattern.
and (Adjust) buttons to increase
and (Adjust) buttons to choose from
and (Adjust) buttons
and (Adjust) buttons to select the desired
0
2
4
6
1
3
5
7
8
6. Press the POWER/PLAY/STOP button to stop the metronome.
Using the Desk Stand
The CM40 features a foldout desk stand
for improved viewing angles when using
the tuner on a table or at surface.
Mode d’emploi
Merci d’avoir choisi cet accordeur chromatique/métronome Samson CM40 ! Associant
accordage de précision et achage couleur brillant, le CM40 rend l’accordage de vos instruments plus facile que jamais. Le CM40 est équipé d’un micro intégré pour l’accordage
des instruments acoustiques, et d’une entrée et sortie en Jack 6,35 mm pour utiliser le
métronome en série entre votre guitare/basse et votre amplicateur. Pour l’accordage de
groupes d’instruments, le CM40 dispose d’un mode TONE qui joue des notes de référence
comprises entre le La 2 et le La 6. Le métronome intégré est parfait pour le travail, avec
dix signatures rythmiques et neufs variations rythmiques. Le CM40 trouvera sa place dans
les étuis, sacoches, etc., de tous les instruments. Lisez ces instructions avant d’utiliser cet
accordeur chromatique/métronome Samson CM40 : il dispose de nombreuses fonctions
qui vous aideront dans votre démarche musicale.
Réglages et fonctions de faces avant et arrière
Témoins Led
Écran LCD
Micro interne
Embase casque Mini-Jack 3,5 mm
Touches MODE, SELECT, Haut et Bas
Sortie en Jack 6,35 mm
Touche POWER/PLAY/STOP
Entrée en Jack 6,35 mm
Volume haut-parleur/casque
♭
Porte de compartiment piles
Haut-parleur interne
Pied
Écran LCD
Tonalité (modes accordeur et Tone)
Octave de la note jouée (mode Tone)
Nom de la note (modes accordeur et Tone)
Fréquence de référence La = 440 Hz (modes accordeur et Tone)
Échelle d’accordage (accordeur uniquement)
Nombre de temps de la mesure 0–9 (métronome)
Témoin de rythme 0–8 (métronome)
Tempo 30–250 battements par minute (métronome)
Temps (métronome)
Réglage de l’achage
Le CM40 vous permet de sélectionner parmi deux modes d’achage. Maintenez la
touche MODE enfoncée pendant trois secondes pour sélectionner l’un des deux modes :
1. Aiguille - L’achage représente une aiguille analogique,
et ache la position relative de la note jouée. Lorsque
la note est juste, Seuls le nom de la note et le segment
central vert s’achent.
2. Jauge - Les segments de l’acheur restent allumés, de
gauche à droite. Lorsque la note est juste, tous les segments à gauche du nom de la note s’allument, ainsi que le
segment central vert.
Mode économie d’énergie
Pour économiser les piles, le CM40 tamise l’achage LCD et passe en mode d’économie
d’énergie, en absence de signal détecté après 10 secondes en mode accordeur, ou sans
action de l’utilisateur après 20 secondes en mode Tone ou métronome. En absence de
signal ou d’interaction pendant cinq minutes, l’accordeur se place hors tension.
Installation des piles
Lorsque l’achage perd en intensité, remplacez
les piles. Le CM40 utilise deux piles LR03 (AAA).
Pour installer ou remplacer les piles :
1. Faites glisser la porte du compartiment des
piles à l’arrière dans la direction des èches
(Figure 1).
2. Insérez deux piles, en veillant aux polarités
positives (+) et négatives (-) (Figure 2).
3. Replacez la porte du compartiment des piles
en la faisant glisser (vous devez entendre un
bruit de clic).
Figure 1
Figure 2
Caractéristiques
Accordeur
Gamme d’accordage . . . . . . . . . . . . . . . . Chromatique
Mode d’accordage. . . . . . . . . . . . . . . . . . Automatique, mode Tone : manuel
Plage d’accordage . . . . . . . . . . . . . . . . . . La
Tonalité d’accordage . . . . . . . . . . . . . . . . Do, Fa, Si
Référence d’accordage . . . . . . . . . . . . . . . 430–450 Hz (pas de 1 Hz)
Plage sonore . . . . . . . . . . . . . . . . . . . . . 2 La ~ 6 La
Précision . . . . . . . . . . . . . . . . . . . . . . . . 1 centième
Métronome
Plage de tempo . . . . . . . . . . . . . . . . . . . 30 ~ 250 bpm
Signature rythmique . . . . . . . . . . . . . . . . 0–9 temps
Rythmes . . . . . . . . . . . . . . . . . . . . . . . .
Tolérance métronome . . . . . . . . . . . . . . . < 1 %
Précision . . . . . . . . . . . . . . . . . . . . . . . . < 1 %
Achage. . . . . . . . . . . . . . . . . . . . . . . . LCD 4 couleurs
Entrées . . . . . . . . . . . . . . . . . . . . . . . . . Micro, Jack 6,35 mm
Sorties . . . . . . . . . . . . . . . . . . . . . . . . . Jack 6,35 mm, casque mini-Jack 3,5 mm
Précision . . . . . . . . . . . . . . . . . . . . . . . . ±1 centième
Temps de réponse. . . . . . . . . . . . . . . . . . 20 ms
Alimentation . . . . . . . . . . . . . . . . . . . . . Deux piles LR03 (AAA) (3 V)
Consommation électrique
Mode d’accordage . . . . . . . . . . . . . . . < 10 mA
Mode métronome . . . . . . . . . . . . . . . < 50 mA
Mode Tone . . . . . . . . . . . . . . . . . . . . < 60 mA
Dimensions . . . . . . . . . . . . . . . . . . . . . . 10 cm x 2 cm x 7 cm
Poids . . . . . . . . . . . . . . . . . . . . . . . . . . 76 gr
Caractéristiques sujettes à modications sans préavis
(27,50 Hz) à Do8 (4.186 Hz)
0
♭
♭
, Mi
, , , , , , , ,
Accordage de l’instrument
1. Connectez l’instrument à l’entrée Jack 6,35 mm du CM40 avec un câble instrument.
Remarque : Utilisez le micro intégré pour les instruments acoustiques. Lorsque vous utilisez le micro interne, ne connectez aucun câble aux Jacks d’entrée et de sor tie 6,35 mm.
2. Lorsque vous insérez le CM40 en série entre l’instrument et l’amplicateur, connectez
la sortie Jack 6,35 mm à l’entrée de l’ampli avec un cordon instrument standard.
Remarque : Pour éviter tout dommage à l’ampli, réglez son volume au minimum avant de
réaliser les connexions.
3. Maintenez la touche POWER enfoncée pour placer l’accordeur sous tension.
4. Appuyez sur la touche MODE jusqu’à ce que vous passiez en mode accordeur. Le mot
“Tuner” (accordeur) s’ache alors.
5. Jouez une note à la fois sur l’instrument. L’écran ache le nom de la note. Utilisez
l’instrument jusqu‘à ce que le nom de la note à accorder s’ache .
6. Accordez l’instrument de sorte que l’acheur soit au centre
(position verte), et que la Led centrale verte s’ache.
7. Si la note est trop basse, l’acheur pointe vers la gauche et la
Led gauche
8. Si la note est trop haute, l’acheur pointe vers la droite et la
Led # (dièse) de droite s’allume.
9. Accordez la note sur l’instrument jusqu’à ce que la note
achée soit juste. Répétez ces étapes pour toutes les notes/
cordes de votre instrument.
10. Pour transposer l’accordeur, comme en B
ou le corps, appuyez sur SELECT pour faire déler les tonalités (C, F, B
11. Pour modier la fréquence de référence du La 4, utilisez les touches
et sélectionnez une fréquence comprise entre 430 et 450 Hz.
Remarque : La hauteur de référence reste en mémoire même après la mise hors tension. Si
vous retirez les piles, la hauteur de référence revient à sa valeur par défaut (440 Hz).
Astuces pour l’accordage des instruments à cordes
Pour obtenir les meilleurs résultats possibles avec les instruments à cordes, attaquez les
cordes de façon normale. Les cordes sont trop hautes lorsqu’elles sont attaquées avec
trop de force.
Jouez la corde avec le côté de votre pouce. Ceci produit une note plus pure et plus facile à
analyser par l’accordeur que si vous utilisez un médiator ou vos ongles.
Si la note n’est pas détectée, ou si l‘achage saute d’une note à l’autre, essayez de bloquer les autres notes pour éliminer leur résonance.
Il est conseillé de vous accorder en commençant par une note plus basse que la note
juste. Ceci compense le jeu dans les mécaniques. Si vous allez trop loin, désaccordez et
remontez jusqu’à la note juste.
♭ (bémol) s’ache.
♭
pour la clarinette
♭
, E♭).
et (Adjust)
Mode Tone
1. Appuyez sur la touche MODE pour passer en mode Tone.
2. Appuyez sur la touche POWER/PLAY/STOP pour activer la note sonore. Utilisez le bouton de VOLUME pour régler le volume de la note produite dans le
haut-parleur et dans la sortie casque mini-Jack 3,5 mm.
Remarque : Le fait de connecter une che dans l’embase casque en mini-Jack 3,5 mm
déconnecte le haut-parleur interne.
3. Appuyez sur les touches
sélectionner la note du La 2 au La 6.
4. Pour transposer l’accordeur et travailler avec
des instruments en Si
appuyez sur la touche SELECT jusqu’à ce que la
note KEY clignote. Appuyez sur les touches
(Adjust) pour transposer l’accordeur.
et
5. Pour régler la fréquence du La 4 de référence,
appuyez sur la touche SELECT jusqu’à ce que la valeur PITCH clignote. Appuyez sur
les touches
6. Appuyez sur la touche POWER/PLAY/STOP pour arrêter le son.
et (Adjust) pour sélectionner une fréquence entre 430 et 450 Hz.
et (Adjust) pour
♭
comme la clarinette,
Utilisation du métronome
1. Appuyez sur la touche MODE jusqu’à acher le métronome. Le mot “Metronome”
s’ache à l’écran LCD.
2. Appuyez sur la touche POWER/PLAY/STOP pour lancer le métronome. Utilisez le bouton de VOLUME pour régler le volume dans le haut-parleur ou dans la sortie casque
mini-Jack 3,5 mm.
Remarque : Le fait de connecter une che dans l’embase casque en mini-Jack 3,5 mm
déconnecte le haut-parleur interne.
3. Appuyez sur les touches
régler le tempo de 30 à 250 bpm.
4. Pour modier la signature rythmique, appuyez
sur SELECT jusqu’à ce que la valeur BEAT
clignote. Appuyez sur les touches
(Adjust) pour sélectionner entre 0 et 9 temps
par mesure. Lorsque la valeur BEAT cesse de clignoter, les touches
au réglage de tempo. La Led verte clignote sur
le premier temps, et la Led rouge sur les autres.
5. Pour sélectionner l’un des neuf réglages de rythme, appuyez sur SELECT jusqu’à
ce que la valeur RHYTHM clignote. Appuyez sur les touches
sélectionner la structure souhaitée.
et (Adjust) pour
et
et (Adjust) reviennent
0
2
4
6
1
3
5
7
et (Adjust) pour
8
6. Appuyez sur POWER/PLAY/STOP pour arrêter le métronome.
Utilisation du pied
Le CM40 est équipé d’un pied pliant pour
le poser sur une surface plate.
Precautions
For optimal,trouble-free performance, please observe the following precautions.
• Do not leave the tuner attached to the instrument for long periods of time, as it may
damage or mar the nish of the instrument.
• Do not use the tuner in direct sunlight, extreme temperature, or high humidity.
• Do not use the tuner in excessively dusty conditions, dirty locations, or areas subject
to high levels of vibration or magnetic elds.
• Power o when the unit is not in use.
• To prevent leakage, remove the battery when the unit is not in use for extended
periods of time.
• Do not apply excessive force to the switches or controls.
• To clean, wipe with a clean dry cloth. Do not use liquid cleaners, cleaning com-
pounds, or ammable polishes.
• To avoid damage or electrical shock, do not place liquids on or near the tuner.
• There are no user-serviceable parts, do not open or perform any internal modica-
tions to the unit.
• Do not attempt to repair the unit or to replace any internal parts. Refer all servicing to
your retailer, Samson service center, or authorized Samson distributor.
This equipment has been tested and found to comply with the limits for a class B digital
device, pursuant to Part 15 of the FCC rules. These limits are designed to provide reasonable protection against harmful interference in a residential installation. This equipment
generates, uses and can radiate radio frequency energy and, if not installed and used in
accordance with the instructions, may cause harmful interference to radio communications. However, there is no guarantee that interference will not occur in a particular installation. If this equipment does cause harmful interference to radio or television reception,
which can be determined by turning the equipment o and on, the user is encouraged to
try to correct the interference by one or more of the following measures:
• Reorient or relocate the receiving antenna.
• Increase the separation between the equipment and receiver.
• Connect the equipment to an outlet on a circuit dierent from that to which the
receiver is connected.
• Consult the dealer or an experienced radio/TV technician for help.
Unauthorized changes or modications not expressly approved by the party responsible
for compliance could void the user’s authority to operate the equipment.
This device complies with part 15 of the FCC Rules. Operation is subject to the following
two conditions:
(1) This device may not cause harmful interference, and
(2) this device must accept any interference received, including interference that may
cause undesired operation.
If you want to dispose this product, do not mix it with general household waste.
There is a separate collection system for used electronic products in accordance with
EN
legislation that requires proper treatment, recovery and recycling.
Dieses Produkt darf nicht mit dem normalen Hausmüll entsorgt werden. Es gibt
ein separates Entsorgungssystem für gebrauchte elektronische Produkte, das die
DE
gesetzlichen Vorschriften zur korrekten Behandlung, Verarbeitung und Wiederaufbereitung erfüllt.
A la hora de deshacerse de este aparato, no lo elimine junto con la basura orgánica.
Existe un procedimiento de eliminación de aparatos electrónicos usados que cumple
ES
con la legislación actual sobre tratamiento, recuperación y reciclaje de elementos
electrónicos.
Ce produit ne doit pas être jeté avec les ordures ménagères. Il existe un service de
collecte séparé pour les produits électroniques usés. Ce service respecte les législa-
FR
tions sur le traitement approprié, la récupération et le recyclage.
Se desideri smaltire questo prodotto, occorre separarlo dai normali riuti domestici.
In conformità alla legislazione, esiste un sistema di raccolta separato per i prodotti
IT
elettronici usati, il quale prevede particolari procedure di trattamento, stoccaggio e
riciclo.
Samson Technologies Corp. 45 Gilpin Avenue, Hauppauge, New York 11788-8816
Phone: 1-800-3-SAMSON Fax: 631-784-2201
©2011 v1.2
FCC REGULATION WARNING
This product complies
with the requirements of
EMC directive 2004/108/EC
Page 2
, , , , , , , ,
, , , , , , , ,
Manual de instrucciones
, , , , , , , ,
Felicidades y gracias por su compra del nuevo anador cromático y metrónomo Samson
CM40! Combinando una anación totalmente precisa y una brillante pantalla a color,
el CM40 hace que la anación de su instrumento sea un juego de niños. El CM40
dispone de un micrófono interno para la anación de instrumentos acústicos, así como
conectores de entrada y salida de 6,3 mm que le permiten usar el metrónomo en línea
con sus amplicadores electrónicos de guitarra o bajo. Para la anación de grupos de
instrumentos, el CM40 le ofrece un modo TONE capaz de reproducir tonos de referencia
entre A2–A6. El metrónomo interno es el compañero perfecto para sus ensayos y le ofrece
diez tipos de ritmo y nuevo variaciones rítmicas distintas. El CM40 es el accesorio que
deberá incluir en la bolsa de transporte de cualquier instrumento, o en su propio bolsillo.
Le recomendamos que dedique unos minutos a leer estas instrucciones para conocer
completamente todas las funciones de las que dispone, y así poder sacarle el máximo
partido a su anador cromático y metrónomo Samson CM40.
Controles y funciones del panel frontal y trasero
Pilotos indicadores
Pantalla LCD
Micrófono interno
Clavija de auriculares de 3,5 mm
Botones MODE, SELECT y de ajuste arriba/abajo
Clavija de salida de 6,3 mm
Botón POWER/PLAY/STOP
Clavija de entrada de 6,3 mm
Control de volumen de altavoz/auriculares
Tapa del compartimento de las pilas
Altavoz interno
Soporte para colocación en sobremesa
Pantalla LCD
Clave de trasposición (Modos Tuner y Tone)
Octava de la nota (Modo Tone)
Nombre de la nota (Modos Tuner y Tone)
Frecuencia de referencia A440 (Modos Tuner y Tone)
Medidor de anación (Solo modo Tuner)
Indicador de tiempo musical 0–9 (Modo Metronome)
Indicador rítmico 0–8 (Modo Metronome)
Tempo 30–250 bpm (Modo Metronome)
Medidor de tiempos musicales (Modo Metronome)
Ajuste de la pantalla
El CM40 le permite elegir entre dos modos de medidor. Mantenga pulsado el botón
MODE durante tres segundos para cambiar entre los dos modos:
1. Aguja - La indicación en pantalla actúa como una aguja
analógica y solo le muestra la posición relativa de la nota
tocada. Cuando la nota esté anada, solo aparecerá el
nombre de la nota y el segmento verde central.
2. Depósito de gasolina - Los segmentos de pantalla
quedarán iluminados de izquierda a derecha conforme la
nota sea anada. Cuando lo esté, se iluminarán todos los
segmentos del lado izquierdo del nombre de la nota junto
con el segmento verde central del medidor.
Modo de ahorro de energía
Para ahorrar carga de la pila, el CM40 reducirá el brillo de la pantalla LCD y activará
el modo de ahorro de energía si no se detecta señal tras diez segundos en el modo
Tuner o si no hay entrada por parte del usuario tras 20 segundos en los modos Tone o
Metronome. Si no se detecta actividad alguna tras cinco minutos, la unidad se apagará de
forma automática sea cual sea el modo.
Colocación de la pila
Cuando la pantalla o la retroiluminación de la misma vayan atenuándose, eso le indicará que debe
sustituir la pila tan pronto como le sea posible. El
CM40 usa dos pilas de tipo AAA. Para instalarlas o
sustituirlas:
1. Deslice la tapa del compartimento para pilas
situada en la parte de atrás del anador en el
sentido de la echa (gura 1).
2. Coloque dos pilas de tipo AAA, asegurándose
de seguir correctamente las indicaciones de
polaridad (gura 2).
3. Vuelva a colocar la tapa del compartimento
para pilas, deslizándola hasta que haga clic.
gura 1
gura 2
Especicaciones técnicas
Anador
Escala de anación . . . . . . . . . . . . . . . . . Cromática
Modos de anación . . . . . . . . . . . . . . . . . Modo Tuner (automático)
Rango de anación . . . . . . . . . . . . . . . . . A
Clave de anación . . . . . . . . . . . . . . . . . . C, F, B
Calibración . . . . . . . . . . . . . . . . . . . . . . 430–450 Hz (pasos de 1 Hz)
Rango de sonido . . . . . . . . . . . . . . . . . . . 2A ~ 6A
Precisión . . . . . . . . . . . . . . . . . . . . . . . . 1 cent
Metrónomo
Rango de tempo . . . . . . . . . . . . . . . . . . . 30 ~ 250 bpm
Tipo de ritmos . . . . . . . . . . . . . . . . . . . . 0–9 tiempos musicales
Ritmos . . . . . . . . . . . . . . . . . . . . . . . . .
Tolerancia del metrónomo . . . . . . . . . . . . < 1%
Precisión . . . . . . . . . . . . . . . . . . . . . . . . < 1%
Pantalla. . . . . . . . . . . . . . . . . . . . . . . . . LCD de 4 colores
Entrada . . . . . . . . . . . . . . . . . . . . . . . . . Micrófono, clavija de entrada de 6,3 mm
Salida . . . . . . . . . . . . . . . . . . . . . . . . . . Clavija de salida de 6,3 mm, clavija de
auriculares de 3,5 mm
Precisión . . . . . . . . . . . . . . . . . . . . . . . . ±1 cent
Tiempo de respuesta . . . . . . . . . . . . . . . . 20 ms
Alimentación . . . . . . . . . . . . . . . . . . . . . Dos pilas AAA (3 V)
Consumo
Modo Tuner . . . . . . . . . . . . . . . . . . . < 10 mA
Modo Metronome . . . . . . . . . . . . . . . < 50 mA
Modo Tone. . . . . . . . . . . . . . . . . . . . < 60 mA
Dimensiones . . . . . . . . . . . . . . . . . . . . . 99 x 20 x 57,6 mm (3.9” x 0.8” x 2.7”)
Peso . . . . . . . . . . . . . . . . . . . . . . . . . . . 71 gr (2.5 oz)
Estas especicaciones están sujetas a cambios sin previo aviso
Tone (Manual)
(27.50 Hz) - C8 (4186 Hz)
0
♭
♭
, E
Anación de su instrumento
1. Conecte su instrumento a la entrada de 6,3 mm del CM40 usando un cable de
instrumento standard.
Nota: Use el micrófono interno para anar instrumentos acústicos. Cuando use este
micro no conecte ningún cable a las tomas de entrada o salida de 6,3 mm.
2. Cuando use el CM40 en línea con su amplicador, conecte la clavija de salida de 6,3
mm a la entrada del amplicador usando un cable de instrumento standard.
Nota: Para evitar daños en su amplicador, reduzca al mínimo el volumen o apague su
amplicador antes de realizar ninguna conexión.
3. Mantenga pulsado el botón POWER para encender el anador.
4. Pulse el botón MODE hasta que haya accedido al modo Tuner. En la pantalla
aparecerá la palabra “Tuner” cuando lo haya hecho.
5. Toque una nota suelta en su instrumento. En la pantalla aparecerá el nombre de
dicha nota. Ane su instrumento hasta que aparezca en pantalla el nombre de la nota
que quiera.
6. Mientras sigue tocando la nota, ane su instrumento hasta
que el medidor apunte a la posición central (verde) y el piloto
central (verde) se ilumine.
7. Si la nota está bemolada, el medidor apuntará hacia la parte
izquierda de la pantalla (amarillo) y se iluminará el piloto
indicador izquierdo
8. Si la nota está sostenida, el medidor apuntará hacia el lado
derecho de la pantalla (rojo) y se iluminará el piloto indicador
derecho # (sostenido).
9. Ane su instrumento al tono correcto hasta que en pantalla
aparezca el nombre de la nota que quiera y se ilumine el
piloto verde central. Repita estos pasos para el resto de notas o cuerdas a anar.
10. Para trasponer el tono del anador para usarlo con instrumentos traspuestos, como
un clarinete B
las distintas claves posibles (C, F, B
11. Para ajustar la frecuencia del tono de referencia A4, pulse los botones
para elegir la frecuencia que quiera entre 430–450 Hz.
Nota: Este tono de referencia quedará memorizado incluso cuando apague la unidad. Si
sustituye la pila, el tono de referencia volverá al valor de fábrica (440 Hz).
Consejos para la anación de instrumentos con cuerdas
Para conseguir los mejores resultados al anar instrumentos con cuerdas, use un volumen
de punteo entre ligero y medio. Las cuerdas suelen sonar sostenidas tras el ataque inicial.
El puntear las notas muy fuerte enfatizará este efecto.
Toque la cuerda con la yema de su pulgar. Esto producirá una nota con menos cantidad
de sobretonos para que el anador las procese que al usar la punta del dedo o una púa.
Si la unidad no registra la nota o la pantalla salta entre dos, pruebe a aplicar una sordina al
resto de cuerdas para eliminar posibles vibraciones por simpatía.
Le recomendamos que ane hacia arriba a partir de un tono bemolado. Esto reducirá
tensión en las clavijas de anación. Si se pasa, libere tensión y vuelva a anar arriba.
♭ (bemol).
♭
o una trompa anada en F, pulse el botón SELECT para ir pasando por
♭
, E♭).
y (ajuste)
Uso del modo Tone
1. Pulse el botón MODE para acceder al modo Tone.
2. Pulse el botón POWER/PLAY/STOP para que empiece la reproducción
del sonido. Use el control VOLUME para ajustar el nivel global enviado al
altavoz interno o a la salida de auriculares de 3,5 mm.
Nota: La conexión de unos auriculares en la salida de auriculares de 3,5 mm hará que
quede desconectado el altavoz interno.
3. Pulse los botones
cromáticamente de 2A ~ 6A y elija la nota que
quiera.
4. Para trasponer la clave del anador para
usarlo con instrumentos traspuestos, como un
clarinete B
botón SELECT hasta que parpadee el valor KEY.
Pulse entonces los botones y (ajuste) para
trasponer el anador.
5. Para ajustar la frecuencia del tono de referencia A4, pulse el botón SELECT hasta que
parpadee el valor PITCH. Pulse entonces los botones
frecuencia entre 430–450 Hz.
6. Pulse de nuevo el botón POWER/PLAY/STOP para detener el sonido.
y (ajuste) para pasar
♭
o una trompa anada en F, pulse el
y (ajuste) para elegir una
Uso del metrónomo
1. Pulse el botón MODE hasta acceder a la pantalla del metrónomo. Cuando ocurra eso
se iluminará la palabra “Metronome” en la pantalla LCD.
2. Pulse el botón POWER/PLAY/STOP para poner en marcha el metrónomo. Use el
control VOLUME para ajustar el nivel global enviado al altavoz interno o a la salida de
auriculares de 3,5 mm.
Nota: La conexión de unos auriculares en la salida de auriculares de 3,5 mm hará que
quede desconectado el altavoz interno.
3. Pulse los botones
aumentar o disminuir el tempo en el rango
30–250 BPM.
4. Para ajustar el tipo de ritmo, pulse el botón
SELECT hasta que parpadee el valor BEAT.
Pulse entonces los botones
para elegir entre 0–9 tiempos por compás.
Cuando el valor BEAT deje de parpadear,
podrá usar los botones
ajustar la velocidad del tempo. El piloto verde
parpadeará en el tiempo nal del compás y el
piloto rojo en los otros tiempos.
5. Para elegir uno de los nueve ajustes de ritmo, pulse el botón SELECT hasta que
parpadee el valor RHYTHM. Pulse los botones
que quiera.
y (ajuste) para
y (ajuste)
y (ajuste) para
0
2
4
6
y (ajuste) para elegir el patrón
1
3
5
7
8
6. Pulse de nuevo el botón POWER/PLAY/STOP para detener el metrónomo.
Uso del soporte de sobremesa
El CM40 dispone de un soporte plegable
para mejorar el ángulo de visualización
cuando use el anador sobre una mesa o
supercie plana.
Bedienungsanleitung
Herzlichen Glückwunsch zum Kauf Ihres neuen Samson CM40 Chromatik Tuner / Metronoms! Mit seiner Kombination aus präziser Stimmtechnik und lebhaftem Farbdisplay
wird das Stimmen Ihres Instrument mit dem CM40 einfacher als je zuvor. Der CM40
verfügt sowohl über ein integriertes Mikrofon zum Stimmen von Akustikinstrumenten als
auch über 6,35 mm Ein- und Ausgänge, um das Metronom inline mit Ihrem E-Gitarrenoder E-Bass-Verstärker zu betreiben. Zum Stimmen großer Ensembles bietet der CM40
einen TONE-Modus, in dem sich Referenztonhöhen von A2 – A6 erzeugen lassen. Das
integrierte Metronom ist die perfekte Ergänzung Ihrer Übungssessions und erzeugt zehn
Taktarten mit neun rhythmischen Variationen. Der CM40 ist ein unverzichtbares Zubehör
für Instrumentenkoer, Gigbags oder Hosentaschen. Lesen Sie die folgenden Anleitungen bitte gründlich durch, damit Sie genau verstehen, wie wir ein ganzes Arsenal neuer
Funktionen implementiert haben, und Ihren Samson CM40 Chromatik Tuner / Metronom
optimal nutzen können.
Vorder- und rückseitige Regler und Funktionen
Anzeigeleuchten
LC-Display
Internes Mikrofon
3,5 mm Kopfhörerbuchse
MODE-, SELECT-, Auf- und Ab-Tasten
6,35 mm Ausgangsbuchse
POWER/PLAY/STOP-Taste
6,35 mm Eingangsbuchse
Lautsprecher/Kopfhörer-Pegelregler
Batteriefach
Interner Lautsprecher
Desktop-Ständer
LC-Display
Transponierte Tonart (Tuner- und Tone-Modi)
Oktavlage (Tone-Modus)
Notenname (Tuner- und Tone-Modi)
A440 Referenzfrequenz (Tuner- und Tone-Modi)
Stimmanzeige (nur Tuner-Modus)
Taktanzeige 0 – 9 (Metronome-Modus)
Rhythmusanzeige 0 – 8 (Metronome-Modus)
Tempo 30 – 250 BPM (Metronome-Modus)
Taktanzeige (Metronome-Modus)
Display einstellen
Beim CM40 können Sie zwischen zwei Anzeigemodi des Displays wählen. Halten Sie die
MODE-Taste drei Sekunden gedrückt, um zwischen den beiden Modi umzuschalten:
1. Nadelanzeige - Das Display verhält sich wie eine analoge
Anzeigenadel und zeigt nur die relative Position der
gespielten Note an. Ist die Note korrekt gestimmt, wird
nur der Notenname und das mittlere grüne Anzeigesegment angezeigt.
2. Tankanzeige - Beim Stimmen der Note bleiben die
Display-Segmente von links nach rechts erleuchtet. Ist die
Note korrekt gestimmt, leuchten alle Segmente auf der
linken Seite des Notennamens und das mittlere grüne
Anzeigesegment.
Energiesparmodus
Wenn im Tuner-Modus nach 10 Sekunden kein Signal erkannt wird oder im Tone/Metronome-Modus nach 20 Sekunden keine Eingabe vom Nutzer erfolgt, wird das LC-Display
verdunkelt und der Energiesparmodus aktiviert, um Batteriespannung zu sparen. Wenn
fünf Minuten lang kein Signal und keine Nutzereingabe erkannt wird, schaltet sich der
CM40 in jedem Modus automatisch aus.
Batterie installieren
Wenn sich das Farbdisplay oder die Hintergrundbeleuchtung dauerhaft verdunkelt, sollte man die
Batterien baldmöglichst austauschen. Der CM40
verwendet zwei AAA-Batterien. Um die Batterien
einzulegen oder zu ersetzen:
1. Schieben Sie den rückseitigen Batteriedeckel
in Pfeilrichtung (Abb. 1).
2. Legen Sie zwei AAA-Batterien ein und achten
Sie auf eine korrekte Positionierung der positiven (+) und negativen (-) Enden (Abb. 2).
3. Schieben Sie den Batteriedeckel an seinen
Platz zurück, sodass er mit einem Klick ein-
rastet.
Abb. 1
Abb. 2
Technische Daten
Tuner
Stimmskala . . . . . . . . . . . . . . . . . . . . . . chromatisch
Stimmmodus . . . . . . . . . . . . . . . . . . . . . Tuner-Modus (automatisch)
Stimmbereich. . . . . . . . . . . . . . . . . . . . . A
Stimmtonarten . . . . . . . . . . . . . . . . . . . . C, F, B
Kalibrierung . . . . . . . . . . . . . . . . . . . . . . 430–450 Hz (1 Hz-Schritte)
Tonbereich . . . . . . . . . . . . . . . . . . . . . . 2A ~ 6A
Präzision . . . . . . . . . . . . . . . . . . . . . . . . 1 Cent
Metronom
Tempobereich . . . . . . . . . . . . . . . . . . . . 30 ~ 250 BPM
Taktart . . . . . . . . . . . . . . . . . . . . . . . . . 0 – 9 Taktschläge
Rhythmen . . . . . . . . . . . . . . . . . . . . . . .
Metronomtoleranz . . . . . . . . . . . . . . . . . < 1%
Präzision . . . . . . . . . . . . . . . . . . . . . . . . < 1%
Display . . . . . . . . . . . . . . . . . . . . . . . . . 4-farbiges LCD
Eingang . . . . . . . . . . . . . . . . . . . . . . . . Mikrofon, 6,35 mm Eingangsbuchse
Ausgänge . . . . . . . . . . . . . . . . . . . . . . . 6,35 mm Ausgangsbuchse,
Präzision . . . . . . . . . . . . . . . . . . . . . . . . ±1 Cent
Ansprechzeit . . . . . . . . . . . . . . . . . . . . . 20 ms
Spannungsversorgung . . . . . . . . . . . . . . zwei AAA-Batterien (3V)
Leistungsaufnahme
Tuner-Modus . . . . . . . . . . . . . . . . . . < 10 mA
Metronome-Modus . . . . . . . . . . . . . . < 50 mA
Tone-Modus . . . . . . . . . . . . . . . . . . . < 60 mA
Abmessungen . . . . . . . . . . . . . . . . . . . . 9,9 x 2,0 x 6,9 cm (3,9” x 0,8” x 2,7”)
Gewicht . . . . . . . . . . . . . . . . . . . . . . . . 71g, (2,5 Unzen)
Technische Daten können unangekündigt geändert werden.
Tone-Modus (manuell)
(27,50 Hz) - C8 (4186 Hz)
0
♭
♭
, E
3,5 mm Kopfhörerbuchse
Instrument stimmen
1. Schließen Sie Ihr Instrument über ein standard Instrumentenkabel an den 6,35 mm
Eingang des CM40 an.
Hinweis: Stimmen Sie Akustikintrumente mit dem internen Mikrofon. Schließen Sie hierbei keine Kabel an die 6,35 mm Eingangs- oder Ausgangsbuchsen an.
2. Wenn Sie den CM40 inline mit Ihrem Amp verwenden, verbinden Sie die 6,35 mm
Ausgangsbuchse über ein standard Instrumentenkabel mit dessen Eingang.
Hinweis: Vor dem Herstellen von Kabelverbindungen sollten Sie den Pegelregler Ihres
Amps ganz zurückdrehen oder den Amp ausschalten, um ihn nicht zu beschädigen.
3. Halten Sie die POWER-Taste gedrückt, um den Tuner einzuschalten.
4. Drücken Sie die MODE-Taste, bis der Tuner-Modus gewählt ist. Die Meldung “Tuner”
leuchtet auf dem Display.
5. Spielen Sie auf Ihrem Instrument einen Einzelton. Das Display zeigt den Notennamen
an. Stimmen Sie Ihr Instrument auf die korrekte Tonhöhe, sodass der gewünschte
Notenname erscheint.
6. Während die Note erklingt, stimmen Sie Ihr Instrument so,
dass die Anzeige in die Mitte (grüne Position) zeigt und die
mittlere (grüne) Anzeige-LED leuchtet.
7. Ist die Note zu tief, zeigt die Anzeige auf die linke (gelbe)
Displayseite und die linke
8. Ist die Note zu hoch, zeigt die Anzeige auf die rechte (rote)
Displayseite und die rechte # (zu hoch) Anzeige-LED leuchtet.
9. Stimmen Sie Ihr Instrument auf die korrekte Tonhöhe, sodass
der gewünschte Notenname erscheint. Wiederholen Sie
diesen Schritt für jede zu stimmende Note oder Saite.
10. Um die Tonart des Tuners so zu transponieren, dass er mit
transponierenden Instrumenten, wie B
Hörnern, funktioniert, drücken Sie die SELECT-Taste, um die Tonarten zyklisch durchzugehen (C, F, B
11. Um die Frequenz der A4-Referenztonhöhe einzustellen, drücken Sie die
Einstelltasten und wählen eine Frequenz von 430 – 450 Hz.
Hinweis: Die Referenztonhöhe bleibt auch nach Ausschalten des Tuners gespeichert. Beim
Batteriewechsel wird diese auf die Werksvoreinstellung (440 Hz) zurückgesetzt.
Tipps zum Stimmen von Saiteninstrumenten
Die besten Ergebnisse beim Stimmen von Saiteninstrumenten erzielen Sie mit einer
leichten bis mittleren Anschlagstärke. Normalerweise erklingt die Saite direkt nach dem
Anschlag etwas zu hoch. Zu starkes Anschlagen verstärkt diesen Eekt.
Verwenden Sie für den Saitenanschlag die Haut Ihres Daumens und nicht den Daumennagel oder ein Plektrum, um eine Note mit weniger Obertönen zu erzeugen, die der Tuner
besser verarbeiten kann.
Wenn die Note nicht erkannt wird oder das Display zwischen Noten hin- und herspringt,
dämpfen Sie eventuell mitschwingende Saiten ab.
Sie sollten immer von einer tieferen Tonhöhe nach oben stimmen. Dadurch verringern
Sie ein Nachrutschen der Saiten im Bereich der Stimmmechaniken. Wenn Sie zu hoch
gestimmt haben, lockern Sie die Saiten, um erneut von unten nach oben zu stimmen.
♭ (zu tief) Anzeige-LED leuchtet.
♭
, E♭).
♭
Klarinetten oder F
und
Tone-Modus verwenden
1. Drücken Sie die MODE-Taste, um in den Tone-Modus zu wechseln.
2. Drücken Sie die POWER/PLAY/STOP-Taste, um die Tonerzeugung zu starten.
Stellen Sie mit dem VOLUME-Regler die Lautstärke des internen Lautsprechers und 3,5 mm Kopfhörerausgangs ein.
Hinweis: Beim Anschließen von Kopfhörern an den 3,5 mm Kopfhörerausgang wird der
interne Lautsprecher stummgeschaltet.
3. Drücken Sie die
die Noten von 2A ~ 6A schrittweise chromatisch durchzugehen und die gewünschte Note
zu wählen.
4. Um die Tonart des Tuners für transponierende
Instrumente, wie B
zu transponieren, drücken Sie die SELECT-Taste,
bis der KEY-Wert blinkt. Drücken Sie die
Einstelltasten, um den Tuner zu transpon-
ieren.
5. Um die Frequenz der A4-Referenztonhöhe einzustellen, drücken Sie die SELECT-Taste,
bis der PITCH-Wert blinkt. Drücken Sie die und Einstelltasten, um eine Frequenz
von 430 – 450 Hz zu wählen.
6. Drücken Sie die POWER/PLAY/STOP-Taste, um die Tonerzeugung zu beenden.
und Einstelltasten, um
♭
Klarinetten oder F Hörner,
und
Metronom verwenden
1. Drücken Sie die MODE-Taste, bis der Metronome-Bildschirm erscheint. Die Meldung
“Metronome” leuchtet auf dem LC-Display.
2. Drücken Sie die POWER/PLAY/STOP-Taste, um das Metronom zu starten. Stellen Sie
mit dem VOLUME-Regler die Lautstärke des internen Lautsprechers und des 3,5 mm
Kopfhörerausgangs ein.
Hinweis: Beim Anschließen von Kopfhörern an den 3,5 mm Kopfhörerausgang wird der
interne Lautsprecher stummgeschaltet.
3. Drücken Sie die
das Tempo im Bereich von 30 – 250 BPM zu
erhöhen oder zu verringern.
4. Zum Einstellen der Taktart drücken Sie die
SELECT-Taste, bis der BEAT-Wer t blinkt. Drücken
Sie die
Taktschläge pro Takt zu wählen. Wenn der
BEAT-Wert nicht mehr blinkt, kehren die
Einstelltasten zur Tempoeinstellung
und
zurück. Die grüne Anzeige-LED blinkt bei der
ersten Zählzeit und die rote Anzeige bei den
restlichen Taktschlägen.
5. Zum Wählen einer der neun Rhythmuseinstellungen drücken Sie die SELECT-Taste,
bis der RHYTHM-Wert blinkt. Drücken Sie die
schte Pattern zu wählen.
und Einstelltasten, um
und Einstelltasten, um 0 – 9
0
2
4
6
und Einstelltasten, um das gewün-
1
3
5
7
8
6. Drücken Sie die POWER/PLAY/STOP-Taste, um das Metronom zu stoppen.
Ständer verwenden
Mit dem ausklappbaren Ständer lässt sich
der Blickwinkel auf den CM40 verbessern,
wenn der Tuner auf einem Tisch oder
einer achen Oberäche steht.
Manuale d’Uso
Congratulazioni per l’acquisto del vostro nuovo accordatore e metronomo CM40 Samson!
Combinando un accordatore di precisione con un vivido schermo a colori, il CM40 rende
l’accordatura dello strumento più facile che mai. Il CM40 dispone di un microfono interno,
per l’accordatura degli strumenti acustici, ed è inoltre dotato di prese di ingresso e di uscita
da ¼” che ne permettono l’uso in linea con amplicatori per chitarra o per basso. Per l’accordatura di interi ensemble, il CM40 dispone di un modo “ TONE” che permette di eseguire
note di riferimento da La2 a La6 (da A2 a A6). Il metronomo interno è il complemento
perfetto per le routine di esercizio ed ore 10 tempi in chiave con nove diverse variazioni
ritmiche. Il CM40 è un accessorio irrenunciabile, da tenere a portata di mano nell’astuccio e
nella borsa dello strumento, oppure in tasca. Vi raccomandiamo di leggere con calma queste istruzioni per comprendere appieno come abbiamo implementate una serie di funzioni
del tutto uniche e per ottenere il massimo dal vostra accordatore cromatico e metronomo
CM40 Samson.
Controlli e Funzioni dei Pannelli Frontale e Posteriore
Luci di Indicazione
Schermo LCD
Microfono Interno
Presa per Cuffia da ”
Tasti di Regolazione MODO (MODE), SCEGLI (SELECT), Su e Giù
Presa di Uscita da ¼”
Tasto ACCENSIONE/ESEGUI/FERMA (POWER/PLAY/STOP)
Presa di Ingresso da ¼”
Controllo di Volume Altoparlante/Cua
Sportello della Batteria
Altoparlante Interno
Supporto da Tavolo
Schermo LCD
Tonalità di Trasposizione (Modi Accordatore e Tono)
Ottava della Nota (Modo di Tono)
Nome della Nota (Modi Accordatore e Tono)
Frequenza di Riferimento La = 440 (Modi Accordatore e Tono)
Misura di Accordatura (nel solo Modo dell’Accordatore)
Indicatore del Movimento da 0 a 9 (Modo di Metronomo)
Indicatore del Ritmo da 0 a 8 (Modo di Metronomo)
Tempo, da 30 a 250 bpm (Modo di Metronomo)
Misura del Movimento (Modo di Metronomo)
La Regolazione dello Schermo
Il CM40 permette di scegliere tra due modi di visualizzazione della misura. Premete il tasto
MODE e tenetelo premuto per tre secondi per passare dall’uno all’altro dei due modi.
1. A Lancetta - lo schermo si comporta come una lancetta
analogica e mostra solo la posizione relativa della nota
eseguita. Quando la nota è accordata, compaiono solo il
nome della nota e il segmento di misura centrale verde.
2. A Livello - via via che la nota viene accordata, i segmen-
ti dello schermo, da sinistra a destra, rimangono accesi.
Quando la nota è accordata, tutti i segmenti di sinistra del
nome della nota sono accesi, insieme al segmento di misura centrale verde.
Modo di risparmio dell’energia
Per risparmiare la carica della batteria, se non rileva segnale per dieci secondi nel modo
dell’Accordatore, oppure se non viene usato per 20 secondi nei modi di Tono e del Metronomo, il CM40 si commuta nel modo di risparmio dell’energia e lo schermo LCD si aevolisce. In qualsiasi modo, se non rileva segnale per cinque minuti, l’accordatore si spegne
automaticamente.
Come Installare le Batterie
Quando lo schermo a colori o la retroilluminazione si aevoliscono in modo permanente, bisogna
sostituire al più presto le batterie. Il CM40 usa due
batterie AAA. Ecco come installarle o sostituirle.
1. Fate scivolare lo sportellino della batteria, sul
retro dell’accordatore, in direzione della freccia
(gura 1).
2. Inserite due batterie AAA, facendo in modo
che i due capi, positivo (+) e negativo (-), siano
posizionati correttamente (gura 2).
3. Rimettete a posto lo sportellino della batteria,
facendolo scivolare no a che si blocca con
uno scatto.
gura 1
gura 2
Speciche
Accordatore
Scala di Accordatura . . . . . . . . . . . . . . . . Cromatica
Modo di Accordatura . . . . . . . . . . . . . . . . Modo dell’Accordatore (Automatico)
Intervallo di Accordatura. . . . . . . . . . . . . . da A
Tonalità di Accordatura. . . . . . . . . . . . . . . C, F, B
Calibrazione. . . . . . . . . . . . . . . . . . . . . . da 430 a 450 Hz (per passi di 1 Hz)
Intervallo Timbrico . . . . . . . . . . . . . . . . . da 2A a 6A
Accuratezza . . . . . . . . . . . . . . . . . . . . . . 1 cent
Metronomo
Intervallo di Tempo . . . . . . . . . . . . . . . . . da 30 a 250 bpm
Tempo in Chiave . . . . . . . . . . . . . . . . . . . da 0 a 9 movimenti
Ritmi . . . . . . . . . . . . . . . . . . . . . . . . . .
Tolleranza del Metronomo. . . . . . . . . . . . . < 1%
Accuratezza . . . . . . . . . . . . . . . . . . . . . . < 1%
Schermo . . . . . . . . . . . . . . . . . . . . . . . . LCD a 4 colori
Ingresso . . . . . . . . . . . . . . . . . . . . . . . . Microfono, presa di ingresso da ¼”
Uscita . . . . . . . . . . . . . . . . . . . . . . . . . . Presa di Uscita da ¼” , Presa per Cua da ”
Precisione . . . . . . . . . . . . . . . . . . . . . . . ±1 cent
Tempo di Risposta . . . . . . . . . . . . . . . . . . 20 ms
Alimentazione . . . . . . . . . . . . . . . . . . . . due batterie AAA (3V)
Consumo di Corrente
Modo di Accordatura . . . . . . . . . . . . . < 10 mA
Modo del Metronomo. . . . . . . . . . . . . < 50 mA
Modo di Tono . . . . . . . . . . . . . . . . . . < 60 mA
Dimensioni . . . . . . . . . . . . . . . . . . . . . . 99 x 20 x 69 mm
Peso . . . . . . . . . . . . . . . . . . . . . . . . . . . 71 g
Speciche soggette a variazioni senza preavviso
Tono (Manuale)
(27,50 Hz) a C8 (4186 Hz)
0
♭
♭
, E
L’Accordatura dello Strumento
1. Usando un normale cavo per strumenti, collegate il vostro strumento all’ingresso da
¼” del CM40. Nota: per accordare strumenti acustici, usate il microfono interno. Quando
usate il microfono interno, fate in modo che non ci sia nessun cavo collegato alle prese di
ingresso e di uscita da ¼”.
2. Per usare il CM40 in linea con un amplicatore, adoperate un cavo standard da strumenti per collegarne la presa di uscita da ¼” all’ingresso dell’amplicatore. Nota: per
evitare di danneggiare l’amplicatore, quando eettuate qualsiasi collegamento chiudetene completamente il volume, oppure spegnetelo.
3. Per accendere l’accordatore, premete il tasto POWER (ACCENSIONE) e tenetelo premuto.
4. Premete il tasto MODE no ad attivare il modo dell’Accordatore. Vedrete accendersi
sullo schermo la parola “Tuner” (Accordatore).
5. Eseguite una singola nota sullo strumento. Nello schermo ne comparirà il nome. Accordate lo strumento facendo in modo che sullo schermo compaiano i nomi delle note
desiderate. Nota: ricordate che il CM40 segue la nomenclatura Anglosassone per la quale
La = A, Si =B e così via, no a G = Sol.
6. Durante l’esecuzione della nota, accordate lo strumento facendo in modo che la misura centrale punti in posizione centrale (verde) e che l’Indicatore LED centrale (verde) si accenda.
7. Se la nota è calante, la misura punterà verso il lato sinistro
(giallo) dello schermo e vedrete accendersi l’Indicatore LED di
sinistra
♭ (bemolle).
8. Se la nota è crescente, la misura punterà verso il lato destro
(rosso) dello schermo e vedrete accendersi l’Indicatore LED di
destra # (diesis).
9. Accordate lo strumento all’intonazione corretta, no a veder
comparire il nome della nota desiderata. Ripetete l’operazione no ad aver accordato tutte le corde o le note necessarie.
10. Per trasporre la tonalità dell’accordatore per adattarlo a strumenti trasposti come il
Clarinetto in Si
mente tra le tonalità disponibili (Do = C, Fa = F, Si
11. Per regolare la frequenza del tono di riferimento La4 (A4), premete i tasti (di Regolazione)
di riferimento viene memorizzata e ricordata anche quando l’accordatore viene spento.
Se si toglie la batteria, l’intonazione di riferimento ritorna alla regolazione di base dalla
fabbrica (440 Hz).
Suggerimenti per l’accordatura degli strumenti acustici
Per ottenere i risultati migliori per l’accordatura di strumenti a corda, usate un volume di
esecuzione da leggero a medio. Subito dopo l’attacco iniziale, le corde di solito sono crescenti. Se le pizzicate con troppa forza, questo eetto verrà enfatizzato.
Pizzicate la corda col polpastrello del pollice. Produrrete una nota con meno armoniche da
far rilevare all’accordatore, rispetto all’esecuzione con le unghie o col plettro.
Se la nota non viene rilevata, oppure se vedete che lo schermo salta s varie note, provate a
stoppare le altre corde, in modo da eliminare qualsiasi vibrazione simpatetica.
Vi raccomandiamo di accordare nel verso crescente, partendo da una intonazione calante.
In questo modo ridurrete qualsiasi gioco sul pirolo dello strumento. Se andate troppo oltre, allentate la tensione della corda e ritornate ad accordare facendola crescere.
♭
o il Corno in Fa, premete il tasto SELECT (SCEGLI) per scorrere ciclica-
e , per scegliere la frequenza voluta da 430 a 450 Hz. Nota: l’intonazione
♭
= B♭, Mi♭ = E♭).
L’Uso del Modo di Tono
1. Per entrare nel Modo di Tono, premete il tasto MODE.
2. Per avviare il suono, premete il tasto POWER/PLAY/STOP. Usate il controllo
di VOLUME per regolare il livello globale dell’altoparlante interno e dell’uscita per cua da ”. Nota: quando collegate una cua all’apposita presa di
uscita da ”, l’altoparlante interno viene disattivato.
3. Per scegliere la nota desiderata, premete i tasti
(di Regolazione)
cromatico da La 2 (2A) a La6 (6A).
4. Per trasporre la tonalità dell’accordatore per
adattarlo a strumenti trasposti come il Clarinetto in Si
SELECT (SCEGLI) per scorrere ciclicamente tra le tonalità disponibili (Do = C, Fa = F, Si
♭
, Mi♭ = E♭)
= B
5. Per regolare la frequenza del tono di riferimento La4 (A4), premete il tasto SELECT
(SCEGLI) no a veder lampeggiare il valore dell’INTONAZIONE (PITCH), poi premete i
tasti (di Regolazione)
l’intonazione di riferimento viene memorizzata e ricordata anche quando l’accordatore
viene spento. Se si toglie la batteria, l’intonazione di riferimento ritorna alla regolazione di
base dalla fabbrica (440 Hz).
6. Per fermare l’esecuzione del suono, premete il tasto POWER/PLAY/STOP.
e per passare in modo
♭
o il Corno in Fa, premete il tasto
e , per scegliere la frequenza voluta da 430 a 450 Hz. Nota:
L’Uso del Metronomo
1. Premete il tasto MODE no a raggiungere lo schermo del Metronomo. Vedrete accendersi nello schermo LCD la parola “Metronomo”.
2. Per attivare il Metronomo premete il tasto POWER/PLAY/STOP. Usate il controllo di
VOLUME per regolare il livello globale dell’altoparlante interno e dell’uscita per cua
da ”. Nota: quando collegate una cua all’apposita presa di uscita da ”, l’altoparlante
interno viene disattivato.
3. Premete i tasti (di Regolazione) e per aumentare o diminuire il tempo, da 30 a 250 BPM.
4. Per scegliere il tempo in chiave, premete il tasto SELECT (SCEGLI) no a far lampeggiare il
valore del MOVIMENTO (BEAT ). Premete i tasti
(di Regolazione)
movimenti per battuta. Quando il valore del MOVIMENTO (BEAT ) smette di lampeggiare, i tasti (di Regolazione)
del tempo. L’Indicatore LED verde lampeggia sul movimento principale della battuta,
mentre l’Indicatore rosso lampeggia ad ognuno degli altri movimenti.
5. Per scegliere una tra le nove congurazioni ritmiche disponibili, premete il tasto SELECT (SCEGLI) no a veder lampeggiare il valore di RHYTHM (RITMO). Premete i tasti
(di Regolazione)
e per scegliere da 0 a 9
e tornano ad occuparsi della regolazione del valore
e per scegliere la congurazione ritmica desiderata.
0
2
4
6
1
3
5
7
8
6. Per fermare il Metronomo, premete il tasto POWER/PLAY/STOP.
L’Uso del Supporto da Tavolo
Il CM40 è dotato di un supporto da tavolo ripiegabile che permette di migliorarne l’angolo di visuale, quando lo si usa su di un tavolo o
su di una supercie piatta.
♭
 Loading...