

Page 1

Exclusive Senator
Chess Computer System
Complete with Exclusive Board, Chess Pieces, Senator Module
and LCD Module
Instructions
Bedienungsanleitung
Mode d’emploi
Page 2
QUICK START
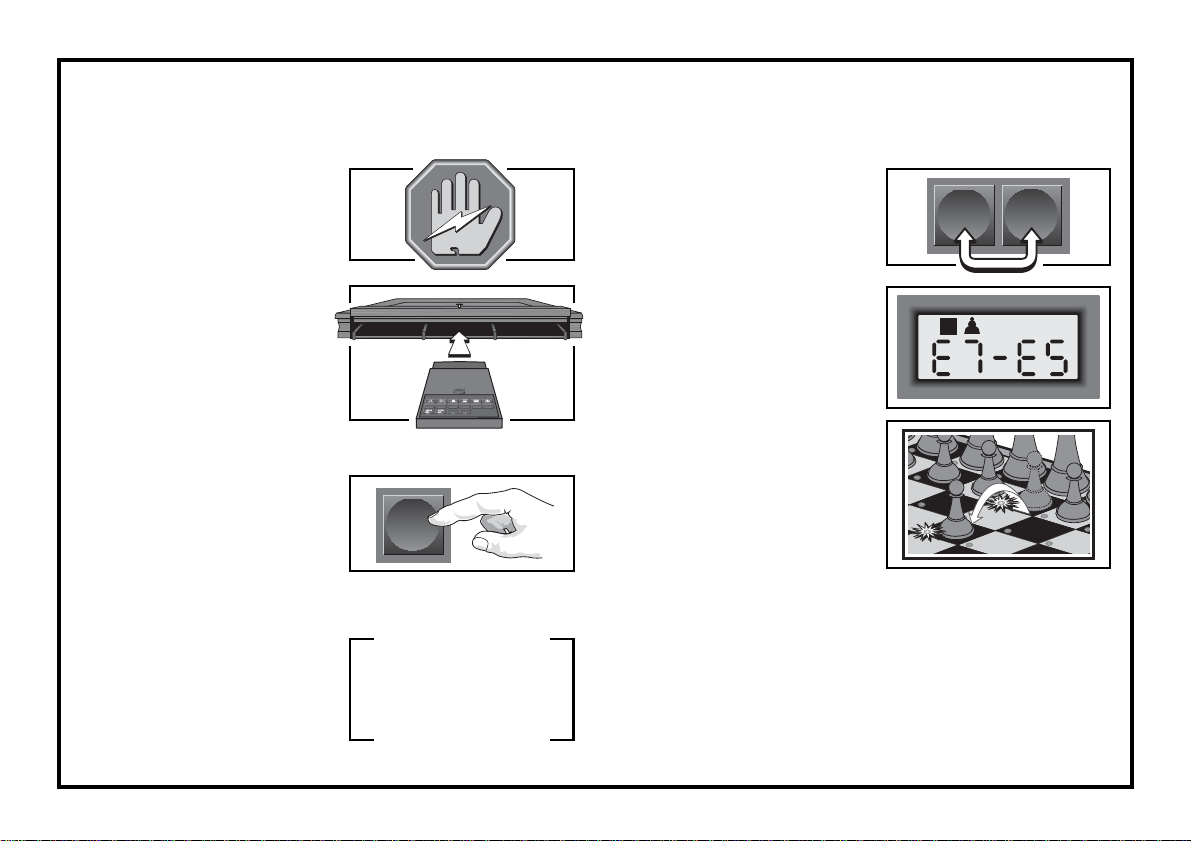
To play a game right away, without reading the entire manual first, simply follow these Quick Start steps!
First, make sure that your
Exclusive Board is turned off.
1
Never insert a module while
the Exclusive Board is on!
Open the drawer in the front
of your Exclusive Board, and
2
swing the handle up. You will
see three slots. Insert the
Senator and LCD Modules
into any of the three slots
available, pushing them until
they are firmly in place.
Turn the Exclusive Board on,
and then press GO/STOP on
3
the Senator Module for at
least one second to turn the
module on. If the computer
doesn’t respond, press GO/
STOP one more time.
Set up the chess pieces in
the initial starting position,
4
with the White pieces closest
to you. Make sure all the
pieces are centered on their
squares!
TAKE
BACK
GO/
STOP
ዛዒዓዔዕዖዘዙዜ
ዑ尷尽尻就尯尹尿尵ዑ
ዐ屁屃屁屃屁屃屁屃ዐ
ዏ巀居巀居巀居巀居ዏ
ዎ居巀居巀居巀居巀ዎ
ው巀居巀居巀居巀居ው
ዌ居巀居巀居巀居巀ዌ
ዋ屄层屄层屄层屄层ዋ
ዊ尶局尺尴尮尼尾尸ዊ
ዝዒዓዔዕዖዘዙዞ
GO/
LEV
OPT
POSINFO
STOP
ENT CL
To reset the module for a
NEW GAME of chess,
5
simultaneously press the
ENT and CL keys.
Enter your moves by simply
making them on the board.
6
When the computer moves,
board lights indicate its
move. If you installed the
LCD Module in Step 2, the
display will show the piece,
the color, and the from and
to squares of the computer’s
move. Here, the computer
wants to move its Black pawn
from E7 to E5. Lift the Black
pawn and make the move on
the board. This completes
the computer’s move, and
now it’s your turn again.
Enjoy your game!
Press GO/STOP at any time to turn the Senator Module off
(before switching off the Exclusive Board). Your current game
(up to 200 individual moves) will be stored in memory.
When you switch back on, you can continue playing right where
you left off.
ENT
CL
Page 3
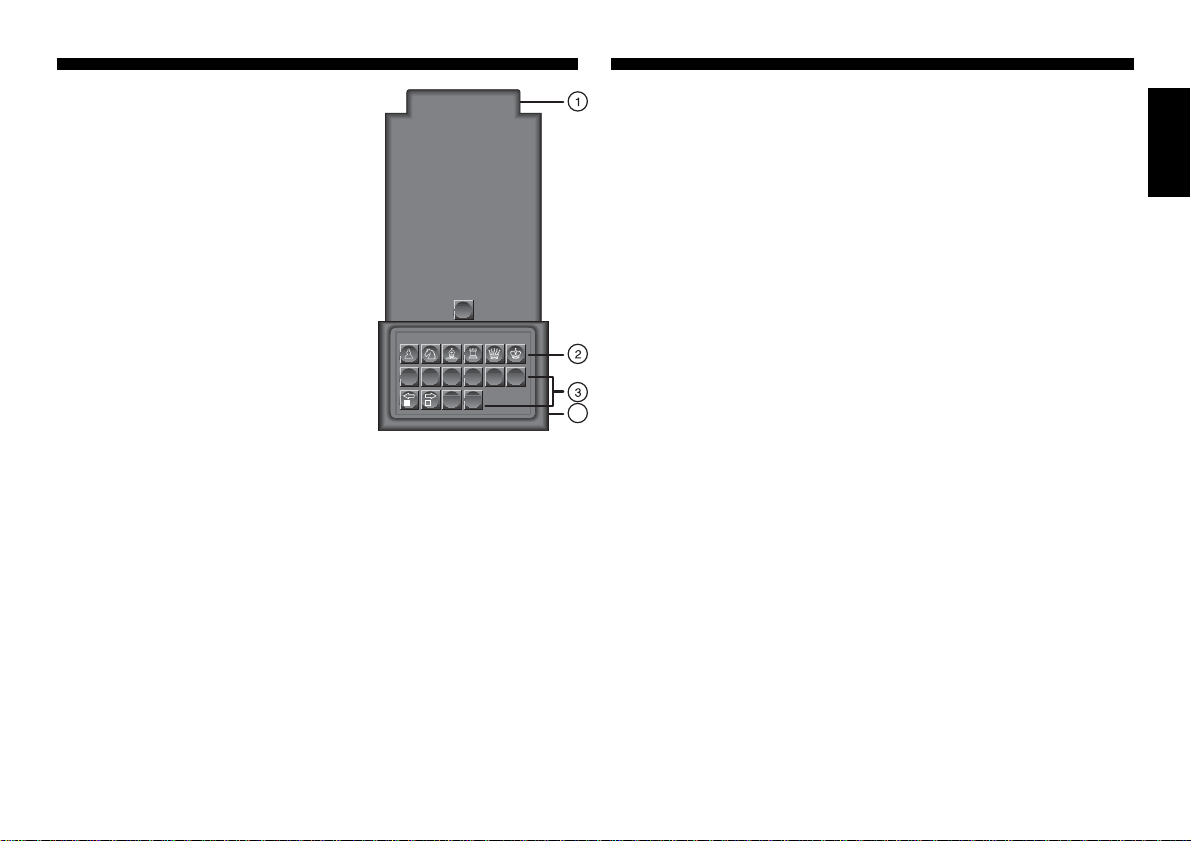
KEYS AND FEATURES
1. CONNECTOR: 40-pin edge connector plugs
the Senator and LCD modules into your
Exclusive Board.
2. PIECE SYMBOL KEYS: Used in Verify and
Position Modes. Also used for pawn promotions.
3. GAME KEYS
• TAKE BACK KEY: Press to enter Take
Back Mode; within Take Back Mode, press
to move forward by 10 moves at a time (or
to the final/initial position in memory). Also
used to enter Two Player Mode.
• OPT KEY (OPTION): Press to enter Option
Mode; within Option Mode, press to cycle
through the main option groups.
• LEV KEY (LEVEL): Press to enter Level
Mode; within Level Mode, press to skip over
eight levels at a time.
• INFO KEY: Press to enter Info Mode; within
Info Mode, press to cycle through the main
info groups. Press during your move to
request a hint.
• POS KEY (POSITION): Press to enter Position Mode.
• GO/STOP KEY: Press to turn the module on/off. Your current game will be
saved in memory (up to 200 individual moves).
• WHITE/< and BLACK/> KEYS: Press to change levels one at a time in
Level Mode, and to cycle through options in Option and Info Modes. Also
used to set the color in Position Mode. Within Take Back Mode, press to move
backward/forward one move at a time.
• ENT KEY (ENTER): Press together with CL to reset for a NEW GAME. Press
to change sides with the computer, and press while the computer is thinking
to force it to move. Press to turn option settings on and off, to select Bronstein Clock settings, and to exit Level Mode with your new level selected.
Press to clear the board in Position Mode, then press again to confirm. Within
Take Back Mode, press to move to the final/initial position in memory.
• CL KEY (CLEAR): Press together with ENT to reset for a NEW GAME.
Press to exit Option, Verify, and Position Modes. Press to exit Take Back
Mode and Two Player Mode. Press to clear Info displays and cancel Clear
Board requests in Position Mode. Press to speed up the computer’s play in
the opening when Auto Play is activated. Press to cancel Level Mode if you
decide not to make changes.
4. ACL: In base of unit; used to eliminate static discharge (see Section 7.1).
TAKE
OPT LEV
BACK
ENT CL
INFO POS
GO/
STOP
TABLE OF CONTENTS
QUICK START
KEYS AND FEATURES
INTRODUCTION
1. GETTING STARTED!
1.1 Power Off? Plug In the Modules
1.2 Power On; Set Up the Pieces
1.3 Ready? Try Out Your New
Opponent!
1.4 Now It’s the Computer’s Turn
1.5 Change Your Mind? Take Back
1.6 Game Over? Why Not Play
Again
1.7 Too Easy/Hard? Change the
Level
2. MORE FEATURES TO EXPLORE
2.1 Whose Move? Check the
4
Display
2.2 Special Chess Moves
2.3 Illegal Moves
2.4 Check, Mate, and Draw
2.5 Interrupting the Computer’s
Search
2.6 Changing Sides with the
Computer
2.7 Two Player Mode
2.8 Playing Black from the Bottom
2.9 Built-In Openings
2.10Thinking on the Opponent’s
Time
2.11Game Memory
3. THE PLAYING LEVELS
Setting a Playing Level
3.1 Normal Playing Levels
3.2 Tournament Levels
3.3 Speed Chess Levels
3.4 Fun Levels
3.5 Infinite Level
3.6 Problem Solving Levels
3.7 Training Levels
4. INFO MODE: WATCH THE
COMPUTER THINK
Using Info Mode
4.1 Principal Variation
4.2 Search Information
4.3 Chess Clock Information
4.4 Move Count/Game Moves
4.5 Want a Hint? Just Ask!
5. OPTIONS FOR FUN AND
VARIETY
Selecting Game Options
5.1 Operation Mode Options
5.2 Playing Mode Options
5.3 Rotating Display Options
6. VERIFYING/SETTING UP
POSITIONS
6.1 Verifying Positions
6.2 Changing and Setting Up
Positions
7. TECHNICAL DETAILS
7.1 The ACL Function
7.2 Care and Maintenance
7.3 Battery Information
7.4 Technical Specifications
TROUBLESHOOTING GUIDE
ENGLISH
3
Page 4

INTRODUCTION
Congratulations on your purchase of the new and exciting Exclusive
Senator Chess Computer System. This unique system, combining the
elegant Exclusive Chessboard with the Senator and LCD Modules, has
been designed to provide you with an extremely powerful chess opponent—as well as one which offers a vast array of special features! Once
the Senator Module is inserted into the Exclusive Board and turned on,
the Senator’s strong chess program takes over. Backed by a powerful
32-bit RISC processor, the Senator will challenge even the most advanced players—yet it also includes many features aimed specifically at
beginners. The companion LCD Module gives you access to a great
variety of additional game options. Working hand-in-hand with the
Senator Module, the LCD Module will allow you to fully explore all of the
Senator’s special features. This Chess Computer System is simply the
perfect chess partner for anyone, and we guarantee that your games
will never again be the same. Just a quick glance through the features
and options described in this manual will give you a good idea of what’s
in store for you!
1. GETTING STARTED
1.1 Power Off? Plug In the Modules
Plug your AC adapter into the back of the Exclusive Board and into
your power supply. Always make sure your chess computer is OFF
before inserting or removing modules.
CAUTION: NEVER INSERT OR REMOVE A MODULE WHILE
THE COMPUTER IS ON. DOING SO COULD DAMAGE YOUR
CHESS COMPUTER!
Open the drawer in the front of your computer, and swing the handle
up. Insert the Senator and LCD Modules into any of the open slots,
pushing them in until they are firmly seated.
1.2 Power On; Set Up the Pieces
Turn the chess computer on, and then activate the Senator Module by
pressing its GO/STOP key for at least 1 second. Set up the pieces in
their starting positions, with the White pieces nearest to you. Once the
computer recognizes that you are setting up the initial position, it
automatically resets itself for a new game! You can also simultaneously
press ENT and CL on the module to reset the computer for a NEW
GAME of chess.
The computer will not play until all pieces are centered on their
squares. If the H8 Rook is off the board, for example, or if it is too far
off-center in its square, the H8 light will remain on until you center the
Rook correctly.
1.3 Ready? Try Out Your New Opponent!
Begin playing chess as you normally would—pick up your piece and
make your move on the board. After you have moved, the computer will
beep and start thinking for Black.
You may notice that the computer often moves instantly at the beginning of a game, instead of taking time to think. This is because it is
playing from memory, using a built-in “book” of opening moves (for more
information, see Section 2.9).
1.4 Now It’s the Computer’s Turn
When the computer makes its move, it beeps and turns on board
lights to indicate its move—the lights in the from and to squares flash
alternately. The computer’s move is also shown in the display window on
LCD module. Check it out—you’ll see the from and to squares of the
computer’s move, along with the color and type of piece it is moving.
Pick up the indicated piece and move it on the board to complete the
computer’s move. And it’s your turn again…
1.5 Change Your Mind? Take Back
When you’re playing against this module, nothing is “set in stone”—
you can change your mind or decide to play a different move whenever
you want! When it’s your turn, simply press TAKE BACK. Then press
WHITE/<, and the display and board lights will indicate the move to
be taken back. Pick up the indicated piece, and move it back to the
square it came from to complete the take-back. Press WHITE/< again
if you want to take back another move. You can take back up to 200
individual moves (100 moves for each side). To resume play at any
point, press CL and make another move.
After taking back a capture, the computer reminds you to put the
captured piece back on the board—the lights for the capture square and
the original location of the captured piece will come on. The LCD also
4
Page 5
shows the capture square, along with the piece and color symbols for
the captured piece. Put the indicated piece back on the board to complete the take-back.
The TAKE BACK feature also offers some “express” options which
allow you to go back and forth in your game rapidly, without having to
take back or replay each individual move. This can come in very handy,
for example, if you want to go back to an earlier position in a game and
play on from there.
See “EXPRESS T AKE-BACK FEATURES” for a chart showing all
your options at a glance.
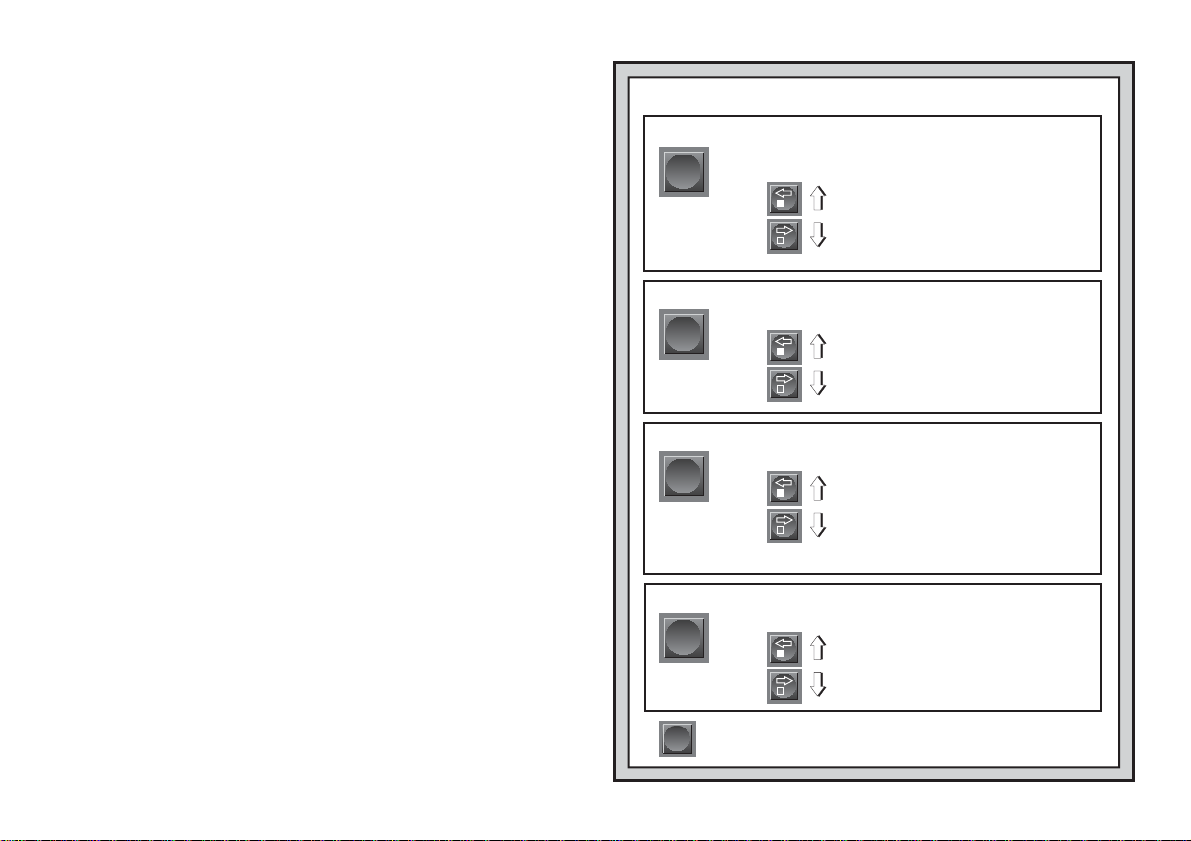
After pressing TAKE BACK, you can do the following:
• Press ENT to jump forward to the final position of a game or back
to the initial position in memory (up to 200 individual moves).
• Press TAKE BACK again to jump forward in 10-move steps (or to
the final/initial position in memory).
• Press WHITE/< or BLACK/> to jump backward or forward one
individual move at a time.
Press CL when you reach your desired position. You can then verify
the board and restore the position (as described in Section 6), and
resume play.
1.6 Game Over? Why Not Play Again
Whenever you finish a game (or if you give up on your current game),
it’s easy to start over again. Reset the Senator Module by pressing ENT
and CL together. The NEW GAME sound signifies that the computer is
ready for another game of chess. The same playing level will be in
effect, but you can change it if you’d like, as explained in Section 3.
IMPORTANT: Pressing ENT and CL together for a NEW GAME
clears your current game from the computer’s memory—be careful not
to press these keys by mistake!
1.7 Too Easy/Hard? Change the Level
When you first turn your computer on, it’s automatically set to Normal
Playing Level 4 (five seconds a move). However, you have 64 different
levels to choose from—you’ll want to try them all out! For descriptions of
the playing levels and how to change levels, see Section 3.
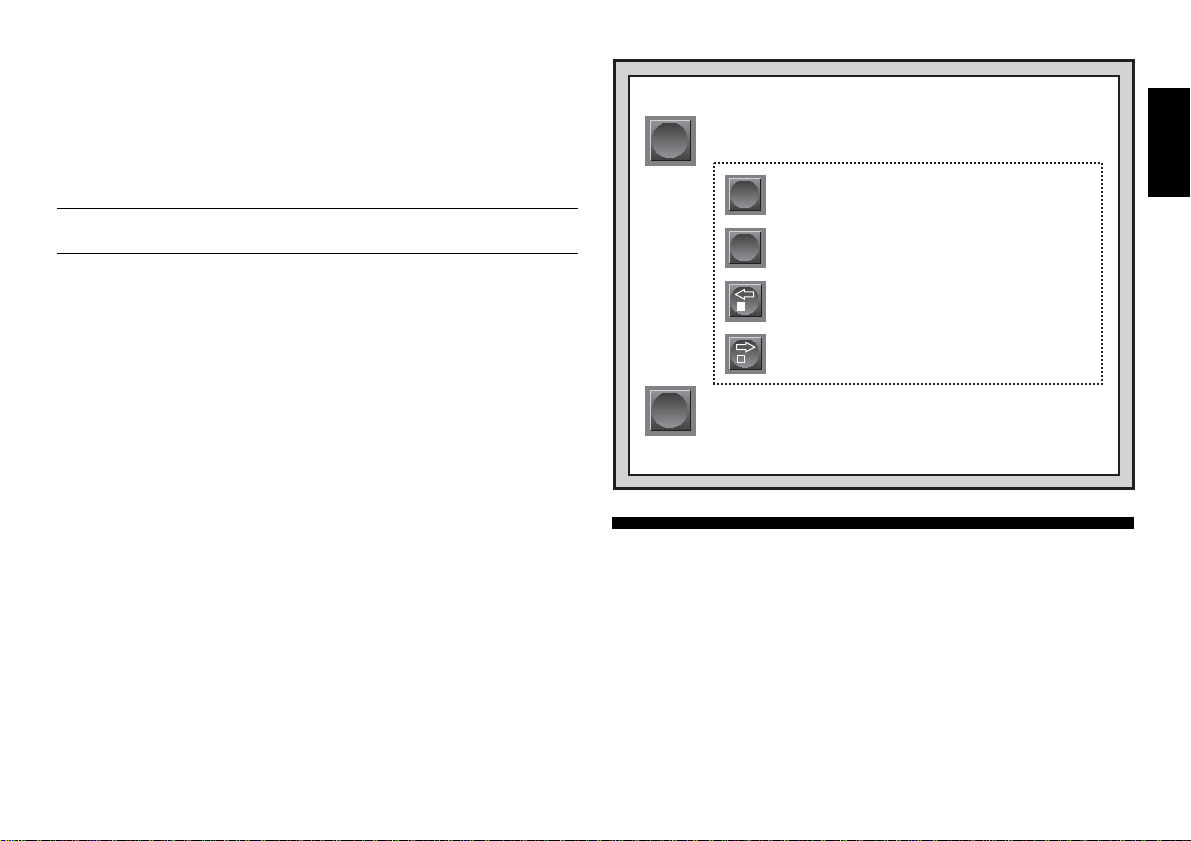
EXPRESS TAKE-BACK FEATURES
1. Press TAKE BACK.
TAKE
BACK
CL
2. MORE FEATURES TO EXPLORE
2.1 Whose Move? Check the Display
When the computer plays Black, the display flashes the black square
(the symbol for Black). After the computer has moved, a white square is
displayed steadily to show that it is now White’s turn to move. You can
tell at a glance if the computer is currently thinking, and which side is to
move.
2.2 Special Chess Moves
Captures: Captures are played on the board exactly as in a normal
game of chess—pick up your piece, take the captured piece off the
board, and put your piece down on the capture square. Captures are
displayed as in E5•F4.
You now have the following options:
• ENT jumps forward to the final position or
ENT
back to the initial position of the game (up
to 200 individual moves).
• TAKE BACK jumps forward by 10 moves
TAKE
BACK
at a time (or to the final/initial position in
memory).
• WHITE/< jumps backward one move at
a time.
• BLACK/> jumps forward one move at a
time.
2. When you reach your desired position, press CL to
return to normal play.
3. Verify and restore the board, as described in Section 6.
For more details, see Section 1.5.
ENGLISH
5
Page 6

En Passant Captures: In this type of capture, the computer reminds
you to remove the captured pawn by lighting that square. As soon as
you remove the pawn, the computer beeps to signify completion of the
move.
Castling: The computer automatically recognizes castling after the
King is moved. After you have moved the King, the board lights remind
you to move the Rook. Note that Kingside castling is displayed as 0-0,
and Queenside castling as 0-0-0.
Pawn Promotions: When your pawn reaches the eighth rank, the
computer beeps to indicate that a promotion is taking place, and it
automatically assumes that you are promoting to a Queen. Simply
replace the pawn with a Queen to complete the promotion. If you wish
to
underpromote
from the board (the display will automatically show the Queen symbol).
Next, press the PIECE SYMBOL KEY on the Senator Module which
corresponds to your desired promotion piece, and that symbol will show
in the display. Put the new piece down on the eighth rank—the computer
immediately recognizes your new piece and begins thinking about its
next move! When the computer’s pawn promotes, first pick up its
pawn as usual. You’ll notice that the display shows both the pawn and
the promoted piece. Put the piece down on the indicated square to
complete the move. Remember to change the piece on the board after a
pawn is promoted!
2.3 Illegal Moves
Your computer will never accept an illegal move. If you try to make
one, you’ll hear a low beep, and the display will simply continue to show
the square the piece came from. Move the piece back to its original
square to cancel the illegal move indication. Now, make another move
to continue the game.
If you move the computer’s piece to an incorrect square, you won’t
hear the normal beep that sounds when a move is completed. Instead,
the computer’s correct to square lights, and the board won’t accept any
other move. If this happens, pick the piece up again, and move the
piece to that square to complete the move. You can check the display for
the correct move, if necessary.
If you pick up a piece, but decide not to move it after all, put the piece
back down on that same square again to cancel; then make a different
move. If you change your mind after entering your whole move, take the
move back as described in Section 1.5.
to a Knight, Bishop, or Rook, first remove the pawn
2.4 Check, Mate, and Draw
When your King is in check, the computer first displays its move as
usual. After the move is made, CHECK flashes in the display for a few
seconds, along with the checking move. The display then goes back to
showing the clock.
If the computer discovers a forced mate against its opponent, it first
displays its move as usual. After the move has been made on the board,
the computer flashes a mate announcement along with the move for
several seconds (e.g., =in2 for a mate in two moves). The display
then goes back to showing the clock.
When a game ends in checkmate, you’ll hear beeps and the display
will flash MATE (along with the mating move) for a short time after the
move is made. The display then goes back to showing the clock.
The computer recognizes draws by stalemate, three-fold repetition,
the 50-move rule and insufficient material. After a draw has occurred,
the display flashes the type of draw: EnD for stalemate or draw by
insufficient materials, EnD:3 for three-fold repetition, and EnD:50 for
a draw by the 50-move rule. The display then goes back to showing the
clock.
2.5 Interrupting the Computer’s Search
Think the computer is taking too long to move? You can interrupt it
any time. Simply press ENT while the computer is thinking, and it will
stop and play the best move it has found so far. This feature can be
handy on the higher levels, where the computer can take a long time to
move, and on the Infinite Level, where the computer thinks indefinitely
unless you stop it.
On the Problem Solving Levels, pressing ENT won’t force the computer to make a move. Instead, the computer will sound an error beep
and display ––––– to indicate that it was interrupted before it found a
mate. To continue play, switch to another level.
2.6 Changing Sides with the Computer
To change sides with the computer, simply press ENT when it’s your
turn—and the computer will make the next move for your side. Change
sides as often as you wish.
2.7 Two Player Mode
Besides taking back moves as described in Section 1.5, the TAKE
BACK key is also used to activate Two Player Mode. Normally, the
6
Page 7

computer automatically answers with a countermove whenever you
enter a move. If you activate Two Player Mode with TAKE BACK,
however, you can enter any number of moves one by one, without
allowing the computer to answer. To exit Two Player Mode at any time,
press CL. If it’s the computer’s turn when you exit Two Player Mode,
press ENT after exiting Two Player Mode and the computer will make
the next move. The following are some great ways to use this feature:
• Play through master games. Press CL then ENT to see what the
computer would do in any position!
•Keep records of your own chess games. When a game is over, play
to any position to see how other moves or different strategies might
have affected the outcome.
• Study opening lines by entering them manually.
• Play against a friend, with the computer acting as referee. It will
monitor your game, checking all moves for legality.
When playing against another person, if either side should need help
from the computer, press INFO to see a suggested move.
2.8 Playing Black from the Bottom
See “PLAYING BLACK FROM THE BOTTOM? HERE’S THE
POSITION” for a diagram showing the correct piece set-up.
Want to depart from the usual standard and let the computer play the
White pieces from the top? Then try out this interesting feature! Set up
the board with the Black pieces closest to you, as shown in the diagram
in this section. Press ENT and CL together to reset for a NEW GAME,
and then press ENT again. The computer will reverse sides—watch as it
makes the first move for White from the top of the board.
When you play Black from the bottom, note that the board notation is
reversed.
2.9 Built-In Openings
At the beginning of a game, the computer will often move instantly on
many levels. This is because the Senator Module is playing from
memory, using its own built-in “book” of opening chess moves. This book
contains thousands of positions, including most major openings and
many positions from grandmaster play. If the current board position is in
its book, the computer plays a response to that position automatically,
instead of having to think about the move!
Also included is a unique user-selectable book feature, which lets you
PLAYING BLACK FROM
THE BOTTOM?
HERE’S THE POSITION
If you play Black from the bottom of the
board, as described in Section 2.8, be
sure to set up the pieces correctly! Notice
that the Kings and Queens are positioned
differently, and the board notation is
reversed.
ዛዙዘዖዕዔዓዒዜ
ዊ尸尾尼尮尴尺局尶ዊ
ዋ层屄层屄层屄层屄ዋ
ዌ巀居巀居巀居巀居ዌ
ው居巀居巀居巀居巀ው
ዎ巀居巀居巀居巀居ዎ
ዏ居巀居巀居巀居巀ዏ
ዐ屃屁屃屁屃屁屃屁ዐ
ዑ尵尿尹尯就尻尽尷ዑ
ዝዙዘዖዕዔዓዒዞ
choose from different types of opening books, or even turn the book off,
if desired. For complete details, see Section 5.2.
2.10 Thinking on the Opponent’s Time
As you play, you may notice that the computer sometimes replies to
your moves immediately, even in the middle of games played on the
higher levels. This is because the computer thinks on your time, using
the time you are taking for your move to think ahead and plan its own
strategies. It tries to guess the move you are likely to make, and then
calculates its responses for that particular move while you are still
thinking. If the computer has guessed right, there’s no reason for it to
keep on thinking—it immediately plays the move it has already found.
You can disable this feature, if you’d like, by turning on the Easy
Mode option. For more information, see Section 5.2.
2.11 Game Memory
Press GO/STOP on the Senator Module at any time to interrupt and
save your game. Play is then suspended, and the module stores your
current game in memory (up to 200 individual moves). When you switch
back on again (by pressing GO/STOP for at least 1 second), you can
continue right where you left off!
Note: If you press GO/STOP while computer is searching, you need
to press CL after switching back on.
IMPORTANT NOTES:
• Always press GO/STOP to turn the Senator Module off
switching off the Exclusive Board. Otherwise, game memory will be
BEFORE
ENGLISH
7
Page 8

lost and you may need to press GO/STOP more than once to start
the module up after switching the Exclusive Board back on.
• Always switch the Exclusive Board on
BEFORE
pressing GO/STOP
to turn the Senator Module on. Otherwise game memory will be lost
and you will have to use the ACL function to reset the computer, as
described in Section 7.1.
• After switching the Exclusive Board off,
wait at least 4 seconds
before unplugging the Senator Module, in order to avoid any
electrical interference.
3. THE PLAYING LEVELS
Your Senator Module offers 64 different playing levels. When you set
the level, keep in mind that when the computer has more time to think
about its moves, it becomes stronger and plays better—just like a
human player! For an overview of all the levels, refer to the Level Chart.
The levels are also described individually in this section.
Setting a Playing Level
See “USE THIS CHART TO SELECT A PLAYING LEVEL” for a
look at how to set levels and an overview of all 64 levels.
Press LEV to enter Level Mode, and the computer displays the
current playing level. When you enter Level Mode the first time, the
module is set on Level 4 (with an average response time of five seconds a move), and the display shows L0:05. Change levels one at a
time by using the BLACK/> and WHITE/< keys. As a shortcut,
press LEV repeatedly to skip over eight levels at a time. When the
display shows your desired level, press ENT to enter your new level into
the computer and exit Level Mode.
If you press LEV to verify the level but you don’t want to actually
change levels, press CL. This lets you exit Level Mode without changing
the level or clock settings, even while the computer is thinking.
Other important points to remember regarding levels:
• Changing the level always resets the chess clocks.
•We don’t recommend changing levels while the computer is thinking, since the clock is reset and the current search is aborted. If you
must do this, first press ENT to abort the computer’s search, and
make its move on the board. Then, take back the computer’s move
and change the level. Finally, press ENT to make the computer start
thinking on the new level.
3.1 Normal Playing Levels
LEVEL TIME PER MOVE DISPLAY
1.....................1 second.................... L 0:01
2.....................2 seconds .................. L 0:02
3.....................3 seconds .................. L 0:03
4.....................5 seconds .................. L 0:05
5...................10 seconds .................. L 0:10
6...................15 seconds .................. L 0:15
7...................20 seconds .................. L 0:20
8...................30 seconds .................. L 0:30
9...................45 seconds .................. L 0:45
10 ....................1 minute .................... L 1:00
11 ....................1.5 minutes ............... L 1:30
12 ....................2 minutes................... L 2:00
13 ....................3 minutes................... L 3:00
14 ....................5 minutes................... L 5:00
15 ..................10 minutes................... L10:00
16 ..................15 minutes................... L15:00
When you choose one of the Normal Playing Levels, you are selecting an average response time for the computer. Note that the times are
averaged over a large number of moves. In the opening and endgame,
the computer tends to play faster, but in complicated middlegame
positions, it may take longer to move.
3.2 Tournament Levels
LEVEL TOTAL TIME / NUMBER OF MOVES DISPLAY
17 ...........1 hr. 30 min. / 40 moves ...................1:30;40
18 ...........1 hr. 45 min. / 35 moves ...................1:45;35
19 ...........1 hr. 45 min. / 40 moves ...................1:45;40
20 ...........1 hr. 30 min. / 35 moves ...................1:30;35
21 ...........2 hrs. / 40 moves .............................. 2:00;40
22 ...........2 hrs. 30 min. / 45 moves ................. 2:30;45
23 ...........2 hrs. / 50 moves .............................. 2:00;50
24 ...........3 hrs. / 40 moves .............................. 3:00;40
The Tournament Levels require you to make a certain number of
moves within a given amount of time. If a player exceeds the allotted
time for a given number of moves, the computer flashes “time” (TImE)
8
Page 9
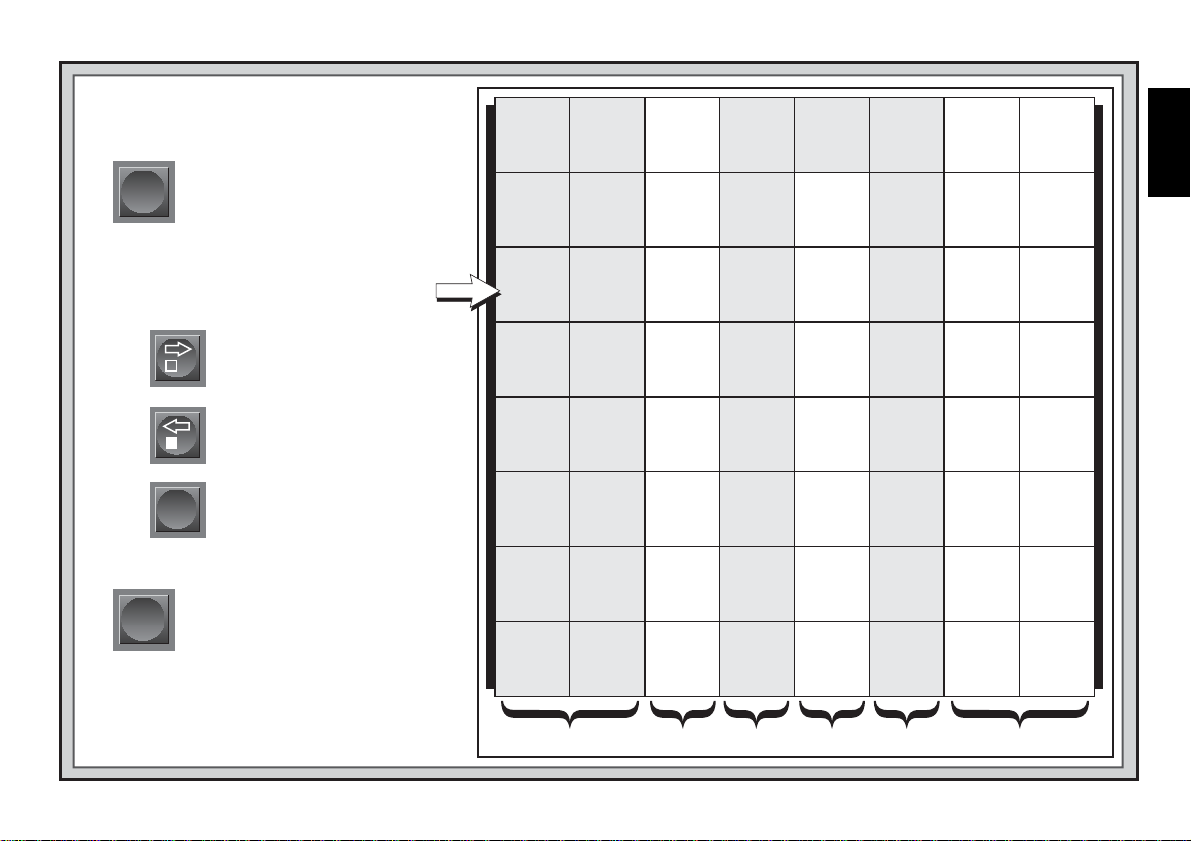
USE THIS CHART TO SELECT
A PLAYING LEVEL
LEV
1.
2.
Next, select your level, using the chart on
the right. Cycle through until your level is
displayed, as follows:
3.
Press LEV to enter Level Mode.
• Press BLACK/> to
increase levels by one.
• Press WHITE/< to
decrease levels by one.
• Press LEV to increase levels
LEV
ENT
by eight.
Finally, press ENT to exit Level
Mode, using your new level!
30 sec.
per move
L 0:30
Level 8
20 sec.
per move
L 0:20
Level 7
15 sec.
per move
L 0:15
Level 6
10 sec.
per move
L 0:10
Level 5
5 sec.
per move
L 0:05
Level 4
3 sec.
per move
L 0:03
Level 3
2 sec.
per move
L 0:02
Level 2
1 sec.
per move
L 0:01
Level 1
15 min.
per move
L15:00
Level 16
10 min.
per move
L10:00
Level 15
5 min.
per move
L 5:00
Level 14
3 min.
per move
L 3:00
Level 13
2 min.
per move
L 2:00
Level 12
1.5 min.
per move
L 1:30
Level 11
1 min.
per move
L 1:00
Level 10
45 sec.
per move
L 0:45
Level 9
40 moves
in 3:00
3:00;40
Level 24
50 moves
in 2:00
2:00;50
Level 23
45 moves
in 2:30
2:30;45
Level 22
40 moves
in 2:00
2:00;40
Level 21
35 moves
in 1:30
1:30;35
Level 20
40 moves
in 1:45
1:45;40
Level 19
35 moves
in 1:45
1:45;35
Level 18
40 moves
in 1:30
1:30;40
Level 17
90 min.
per game
1:30;99
Level 32
60 min.
per game
1:00;99
Level 31
45 min.
per game
0:45;99
Level 30
30 min.
per game
0:30;99
Level 29
20 min.
per game
0:20;99
Level 28
15 min.
per game
0:15;99
Level 27
10 min.
per game
0:10;99
Level 26
5 min.
per game
0:05;99
Level 25
Infinite
Level
9:99;99
Level 40
7 sec.
per move
Fun: 7
Level 39
6 sec.
per move
Fun: 6
Level 38
5 sec.
per move
Fun: 5
Level 37
4 sec.
per move
Fun: 4
Level 36
3 sec.
per move
Fun: 3
Level 35
2 sec.
per move
Fun: 2
Level 34
1 sec.
per move
Fun: 1
Level 33
Mate in
8 moves
=in: 8
Level 48
Mate in
7 moves
=in: 7
Level 47
Mate in
6 moves
=in: 6
Level 46
Mate in
5 moves
=in: 5
Level 45
Mate in
4 moves
=in: 4
Level 44
Mate in
3 moves
=in: 3
Level 43
Mate in
2 moves
=in: 2
Level 42
Mate in
1 move
=in: 1
Level 41
8 ply
search
PLY: 8
Level 56
7 ply
search
PLY: 7
Level 55
6 ply
search
PLY: 6
Level 54
5 ply
search
PLY: 5
Level 53
4 ply
search
PLY: 4
Level 52
3 ply
search
PLY: 3
Level 51
2 ply
search
PLY: 2
Level 50
1 ply
search
PLY: 1
Level 49
16 ply
search
PLY:16
Level 64
15 ply
search
PLY:15
Level 63
14 ply
search
PLY:14
Level 62
13 ply
search
PLY:13
Level 61
12 ply
search
PLY:12
Level 60
11 ply
search
PLY:11
Level 59
10 ply
search
PLY:10
Level 58
9 ply
search
PLY: 9
Level 57
ENGLISH
For more details, see Section 3.
NORMAL
PLAYING LEVELS
TOURNAMENT
LEVELS
SPEED CHESS
LEVELS
FUN LEVELS/
INFINITE LEVEL
PROBLEM
SOLVING LEVELS
TRAINING
LEVELS
9
Page 10

along with the elapsed time, to show that the game is over. If you wish,
you can continue to play even after the time has run out.
If you choose a Tournament Level, you may want to set the clocks to
display countdown time instead of elapsed time (see Section 5.1). When
game time runs out, the countdown clock automatically reverts back to
the normal clock display.
You also have the option of using Bronstein Clock time controls when
playing Tournament games. For details, see Section 5.1.
3.3 Speed Chess Levels
LEVEL TIME PER GAME DISPLAY
25 ....................5 minutes................... 0:05;99
26 ..................10 minutes................... 0:10;99
27 ..................15 minutes................... 0:15;99
28 ..................20 minutes................... 0:20;99
29 ..................30 minutes................... 0:30;99
30 ..................45 minutes................... 0:45;99
31 ..................60 minutes................... 1:00;99
32 ..................90 minutes................... 1:30;99
On the Speed Chess Levels (also called
Blitz
or
Sudden Death
Levels), you set the total time for the whole game. If game time is
exceeded, the computer flashes “time” (TImE) along with the elapsed
time, to show that the game is over.
If you select a Speed Chess Level, you may want to set the chess
clocks to display countdown time instead of elapsed time (see Section
5.1). When game time runs out, the countdown clock automatically
reverts back to the normal clock display.
You also have the option of using Bronstein Clock time controls when
playing Speed Chess games. For details, see Section 5.1.
3.4 Fun Levels
LEVEL TIME PER MOVE DISPLAY
33 .................. 1 second ..................... Fun: 1
34 .................. 2 seconds ................... Fun: 2
35 .................. 3 seconds ................... Fun: 3
36 .................. 4 seconds ................... Fun: 4
37 .................. 5 seconds ................... Fun: 5
38 .................. 6 seconds ................... Fun: 6
39 .................. 7 seconds ................... Fun: 7
Are you a novice or beginning chess player? If so, these levels are
NEED HELP CHOOSING A LEVEL?
SOME TIPS FOR YOU!
• Are you a beginning player?
You have lots of choices!
Check out the Fun Levels or the lower Training Levels. They
restrict the computer’s search depth in different ways, resulting in weaker play and giving you the chance to learn about
the game and maybe even beat the computer.
• Are you an intermediate or more advanced player?
Try the
Normal, Training, or Tournament Levels. The Normal Levels go
from easy up to a difficult 15-minute response time, and the
Tournament Levels are extremely challenging. Don’t forget to
try the Speed Chess Levels for some fast and exciting games!
By the way, for Tour nament and Speed Chess games, you can
activate the Bronstein Clock option, as noted in Section 5.1.
•Want to experiment?
Use the Problem Solving Levels to
solve problems up to mate in eight—try searching from a
position in one of your own games, or set up an actual mate
problem. Or, choose the Infinite Level to have the computer
analyze complicated positions for hours or even days.
meant especially for you! On these unusual playing levels, the Senator
Module causes your computer to be much more “human” than most
chess computers—it gives everyone a chance to win, in a world where
chess machines are typically relentless and often quite difficult to beat.
Even though the general consensus seems to be that computers never
make mistakes, on the Fun Levels, your computer actually will. Various
handicaps are built into the Fun Levels, demonstrating common mistakes made by beginners. Level 33 is the weakest level.
Even after you have mastered the Fun Levels, they can still be a
valuable training tool. You can start a game on a Fun Level, for example,
and, when the computer makes a bad move, you can switch to a normal
level and try to convert your advantage to a win, playing against the
stiffer opposition of a higher level!
10
Page 11

3.5 Infinite Level
LEVEL MOVE TIME DISPLAY
40 ................. No time limit................. 9:99;99
On the Infinite Level, the computer will search indefinitely, until it finds
a forced mate or forced move; until it has fully searched the position to
its maximum depth; or until you press ENT to stop the search. If you
halt the search, the computer makes the move it currently thinks is best.
Try experimenting with this level—set up some interesting board
positions and let the computer analyze them for you. It will think for
hours or even days on end, trying to come up with the best possible
move! And you can even watch the computer as it thinks—take advantage of the unique Rotating Display feature described in Section 5.3.
54 .............. PLY: 6 62............... PLY:14
55 .............. PLY: 7 63............... PLY:15
56 .............. PLY: 8 64............... PLY:16
On the Training Levels, the computer’s search depth is limited to a
certain number of moves, as shown above. As you cycle through the
levels, the computer displays PLY:# for each level. A “ply” is an individual move (a move for either side), and “#” is the number representing
the search depth. For example, on Level 49, the computer searches to a
depth of one ply, and thus looks ahead only one individual move. On
this level, therefore, it will often overlook a mate in one. This produces
weaker play, giving beginners a chance win,
ENGLISH
3.6 Problem Solving Levels
LEVEL PROBLEM DISPLAY
41 .................... Mate in 1...................=in: 1
42 .................... Mate in 2...................=in: 2
43 .................... Mate in 3...................=in: 3
44 .................... Mate in 4...................=in: 4
45 .................... Mate in 5...................=in: 5
46 .................... Mate in 6...................=in: 6
47 .................... Mate in 7...................=in: 7
48 .................... Mate in 8...................=in: 8
Selecting one of these levels activates a special Mate Finder Program. If you have a position where there may be a mate and you would
like the computer to find it, set the computer on one of the Problem
Solving Levels. The Senator Module can solve mates in up to eight
moves. Mates in one to five are usually found quite quickly, whereas
solutions taking six to eight moves may take quite some time. If there is
no mate present or the computer can’t find a mate, it will beep and
display dashes (–––––). You may continue playing, if desired, by
simply switching to another level.
3.7 Training Levels
LEVEL DISPLAY LEVEL DISPLAY
49 .............. PLY: 1 57............... PLY: 9
50 .............. PLY: 2 58............... PLY:10
51 .............. PLY: 3 59............... PLY:11
52 .............. PLY: 4 60............... PLY:12
53 .............. PLY: 5 61............... PLY:13
4. INFO MODE: WATCH THE COMPUTER THINK
Imagine this: You’re playing chess against a friend, and it’s his move.
You’d love to know what move he’s thinking about, and you’d really like
to get his opinion of the board position. But, of course, you won’t ask—
because that’s just not done!
capabilities of your computer with the Senator Module and the LCD
Module, you can ask anything you want,
In fact, with the help of these two modules, you can get an incredible
amount of information about the computer’s thought process. On
request, it will show you the move it’s thinking of, the line of play it
expects after that move, its evaluation of the current board position, how
deeply it’s searching, and more. As you can imagine, studying this
information can help you learn so much more about chess.
Using Info Mode
How do you access all this game information? By using Info Mode at
any time! If you do this while the computer is thinking, you’ll see the
information displays change as the computer considers different moves
and searches deeper.
See “INFO MODE AT A GLANCE” for a chart summarizing all
the Info Mode displays.
Game information is divided into three groups, and pressing INFO
cycles from one group to another. The BLACK/> and WHITE/<
keys can be used to cycle through the displays within each of the
groups. Press CL to exit Info Mode and go back to the normal clock.
11
Well, guess what—when you enhance the
and you’ll get all the answers.
Page 12
After learning about Info Mode, take a look at Section 5.3 for a
description of the Rotating Display. Selecting this feature makes the
computer automatically cycle through the requested information in onesecond intervals every time it thinks about its move—you can actually
watch the computer think out loud!
Whenever requested information is
not available, the display will show dashes (–––––).
4.1 Principal Variation
Press INFO the first time to get information on the principal variation
(the predicted line of play, or the sequence of moves the computer
thinks will be made). The first display you will see is the move the
computer is currently thinking of making. This principal variation is
shown to a maximum depth of six individual moves. Press BLACK/>
repeatedly to scroll forward through all the moves:
•Moves 1 through 6 of the predicted line of play.
Press WHITE/< to scroll backwards and see the previous displays
again. Press CL to return to the normal clock display.
Since the first move of the predicted line of play is the move the
computer assumes you will make, you can also consider this move as a
hint. So—whenever you need help, press INFO on your turn.
4.2 Search Information
Press INFO a second time for information on the computer’s search.
Press BLACK/> repeatedly to scroll forward through these displays:
•Evaluation of the current position (based on a pawn being worth 1.0
points; a positive number indicates White is ahead).
•Two numbers: (a) current search depth (number of individual moves
the computer is looking ahead); and (b) number of moves the
computer has examined so far.
• The move currently being considered.
• The search speed (number of positions or nodes searched every
second).
Press WHITE/< to scroll backwards and see the previous displays
again. Press CL to return to the normal clock display.
4.3 Chess Clock Information
Press INFO a third time for chess clock information. The clocks keep
track of the time for both sides. Press BLACK/> repeatedly to scroll
forward through the clock displays:
• Elapsed time since the last move was made.
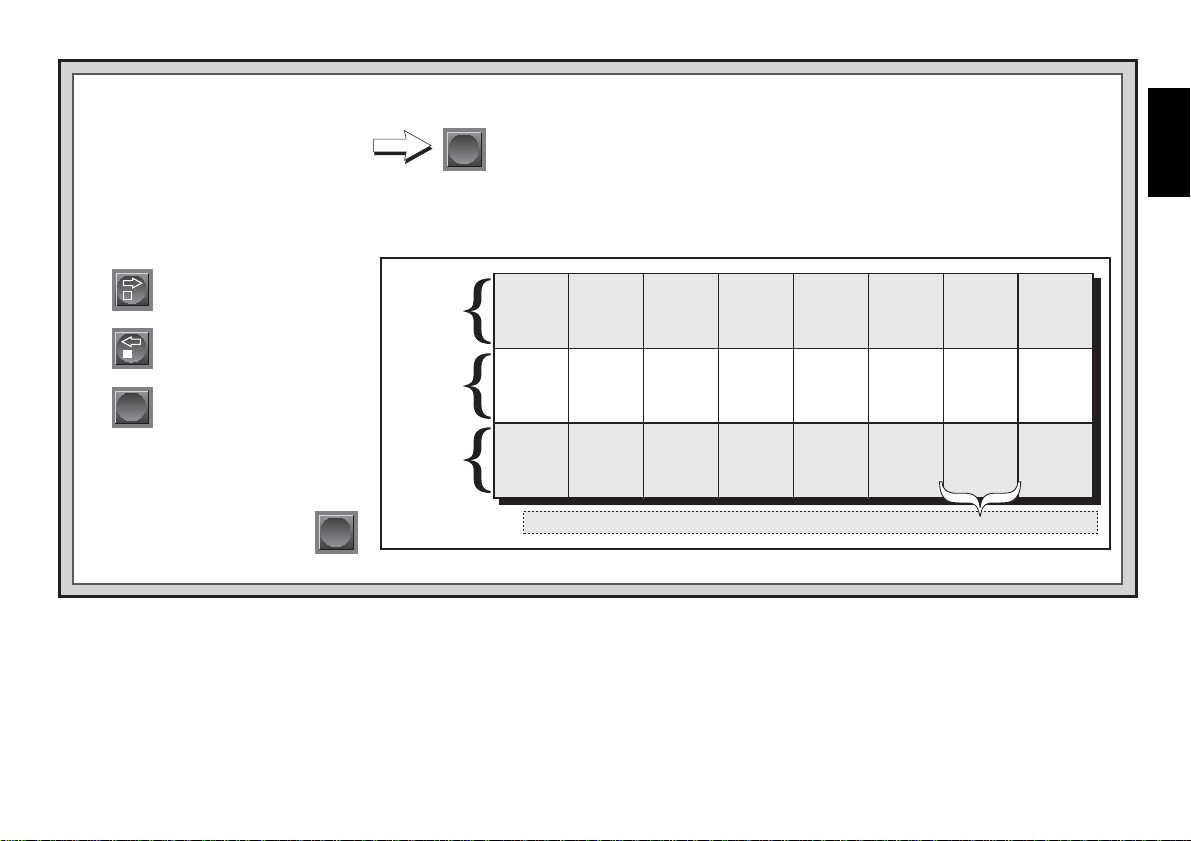
INFO MODE AT A GLANCE
PRINCIPAL VARIATION INFO:
x1
INFO
SEARCH INFO:
INFO
CHESS CLOCK INFO:
INFO
MOVE COUNT INFO:
INFO
CL
Press CL at any time to exit Info Mode.
• Move 1 (predicted line of play)
•Move 2 (predicted line of play)
•Move 3 (predicted line of play)
•Move 4 (predicted line of play)
•Move 5 (predicted line of play)
•Move 6 (predicted line of play)
x2
•Evaluation of current position
•2 numbers: Search depth + number
of moves examined so far
• Current move under consideration
• Positions searched per second
x3
•Elapsed time since last move
•Elapsed time for White
•Elapsed time for Black
• Remaining time for White*
• Remaining time for Black*
• Current move number so far
x4
•Moves of the current game
*Speed Chess/Tournament Levels only
For details, see Section 4.
12
Page 13

•Total elapsed time for White.
•Total elapsed time for Black.
• Remaining time for White
• Remaining time for Black
Press WHITE/< to scroll backwards and see the previous displays
again. Press CL to return to the normal clock display.
The clocks stop when you take back a move, verify levels, select
options, verify a position, or turn the module off with GO/STOP. However, the times are kept in memory, and the clocks resume as soon as
play is continued. When you change levels, board positions, or press
ENT and CL for a new game, the clocks are always reset to 0:00:00.
4.4 Move Count/Game Moves
Press INFO a fourth time to show the move number in the game so
far. Pressing WHITE/< repeatedly will scroll backwards through the
moves of your game (up to 200 individual moves).
• Current move number so far.
•Moves of the current game.
Press BLACK/> to go forward through the moves again at any
point. Press CL to return to the normal clock display.
4.5 Want a Hint? Just Ask!
If you ever need advice on a move, you can always ask for a hint.
Simply press INFO when it’s your turn to move, and the computer will
show a suggested move for your side.
(Speed Chess/Tournament Levels only).
(Speed Chess/Tournament Levels only).
5. OPTIONS FOR FUN AND VARIETY
Your Senator Module offers many other exciting game options, which
are user-selectable at any time. They are described individually in this
section, and summarized in the Option Mode Chart.
Selecting Game Options
See “THE BASICS OF OPTION MODE: HERE’S HOW!” for a
complete overview of this feature.
The game options are divided into three groups:
Playing Mode,
one group to another. Each group contains eight different options, and
and
Rotating Display Mode.
Pressing OPT cycles from
Operation Mode,
the BLACK/> and WHITE/< keys are used to cycle through the
options within each of the groups. For each option (except option for
Bronstein clock), a plus (+) in the display indicates the displayed option
is ON, and a minus (–) means the option is OFF. Press ENT to turn
each option on or off as it is displayed.
For the Bronstein Clock, press ENT to cycle through the time
settings. The clock option you choose to display will be the selected
time control when you exit Option Mode. If you decide not to turn the
Bronstein Clock on, press ENT until the display shows bc 0 again.
After you have made all your option selections from any or all of the
option groups, press CL to return to normal game play.
When the computer is first powered on, certain default options are
set. Options which are ON at the first startup are shown in the chart with
a (+), and options which are OFF are shown with a (–). When you reset
for a new game, most of your selected options are carried over to your
next game. An exception is Auto Play, which is automatically set back to
OFF when you start another game. To return the module to its default
settings, select
tEst
in Option Mode, and then press ENT and CL
simultaneously after the LED and LCD scan tests have been completed.
5.1 Operation Mode Options
Press OPT once to select the Operation Mode Options. Then use
the BLACK/> and WHITE/< keys to select options within this
group, and press ENT to turn options on (+) or off (–). For the Bron-
stein Clock, press ENT to cycle through the time settings.
a. Auto Play
On:+Auto Off:-Auto
In a normal game against the computer, you make your move and the
computer makes its countermove. If you turn Auto Play on, however, you
can actually watch the computer play against itself. This feature can be
very useful for studying the computer’s tactics and strategies. Simply set
the computer on a high level—Level 58, for example, where it searches
to a depth of 10 ply for each move. Then, let the computer play against
itself for hours or even days! When the game ends, you can take back
up to the last 200 individual moves and replay them on the board. This
lets you study the results of the computer’s work at your leisure.
Some notes regarding Auto Play:
•To speed up the computer's play in the opening, press CL while it’s
still playing from its built-in book of openings.
ENGLISH
13
Page 14

•Auto Play will be cancelled if you press ENT during a game to abort
the computer’s search.
•This option will go back to its default setting of OFF whenever you
press ENT and CL together for a NEW GAME.
b. Sound with Keypress
On:+SNd Off:-SNd
This option lets you turn off the sound that accompanies a keypress.
You’ll still hear beeps when the computer moves, when you press GO/
STOP, reset for a NEW GAME, or make an illegal move or keypress.
c. Silent Mode
On:+SIL Off:-SIL
Normally, the computer always beeps when it has found its move. For
completely silent operation, turn on Silent Mode.
d. Coach Mode
On:+Coch Off:-Coch
Selecting +Coch turns on special coaching features that encourage
you to concentrate on your strategic planning. In Coach Mode, the
computer looks over your shoulder while you play, watching what you do
and helping you when you need assistance! Here, the computer will
warn you if you are in danger of losing a piece. If one of your pieces is
threatened by a lesser valued piece, for example, the computer will
sound warning beeps and flash the board light of the threatened piece
for a few seconds. To continue the game, make your next move (or take
back both the computer’s and your last move and make a different one).
With Coach Mode on, the computer will also sound warning beeps if it
thinks you have committed a blunder and your move is about to lead to
an avoidable material loss. It does this by sounding warning beeps and
flashing the move it intends to make. You can either enter the
computer’s move, or take back your own move and make another one.
e. Ticking Clock
On:+tic Off:-tic
When you turn this option on, you activate a ticking sound that makes
the computer’s clock sound like a real chess clock. Just imagine—you
can create the atmosphere of a championship chess tournament in your
own living room!
f. Countdown Clock
On:+c:dn Off:-c:dn
Turning this option on causes the computer to display the countdown
time instead of the elapsed time.
This option can only be used with the
Tournament and Speed Chess Levels.
g. Bronstein Clock
On: bc 2 . bc 5 . bc10 . bc15 . bc 20 . bc 30 . bc 60
Off: bc 0
On the Speed Chess and Tournament Levels, you have a fixed
amount of time for each game, and the time decreases as you think. On
these levels, players often find themselves running out of time towards
the end of the game—struggling to try and make good moves in a hurry,
and often ending up making inferior moves instead. The Bronstein Clock
offers special time controls that help alleviate such problems! This is
done by adding a certain amount of time
time for the whole game is
only
reduced if you go over this fixed time.
after
each move, where the
Here’s an example: Let’s say you’re playing Speed Chess Level 28,
where you have a total of 20 minutes for the whole game. Activating the
bc10 option will give you an extra 10 seconds per move maximum
(added after you make your move). Note that you can’t gain extra time
or increase overall thinking time by playing each move more quickly,
because:
• If you use 7 seconds to make your move, only 7 seconds will be
added to your total time, not 10 seconds.
• If you use 10 seconds or more to make your move, only 10 seconds
will be added to your total time.
When the Bronstein Clock option is displayed, press ENT repeatedly
to select your desired time setting, as described below:
BRONSTEIN CLOCK SETTINGS DISPLAY
Bronstein Clock off........................................... bc 0
2 sec. added after each move....................... bc 2
5 sec. added after each move....................... bc 5
10 sec. added after each move....................... bc 10
15 sec. added after each move....................... bc 15
20 sec. added after each move....................... bc 20
30 sec. added after each move....................... bc 30
60 sec. added after each move....................... bc 60
14
Page 15
1.
Press OPT repeatedly to select a
Mode.
2.
Next, select your option(s), using
the Option Chart below. Cycle
through the options within each
mode:
•Press BLACK/> to cycle
forward.
• Press WHITE/< to cycle
backward.
When your option is
ENT
displayed, press ENT to
toggle it on (+) or off (–).
(For the Bronstein Clock,
press ENT repeatedly to
select a time setting.)
3.
Finally, press CL to exit
Option Mode, using your
new option(s).
THE BASICS OF OPTION MODE: HERE’S HOW!
OPT
x1 = OPERATION MODE (Auto...)
x2 = PLAYING MODE (SEL...)
x3 = ROTATING DISPLAY MODE (rd:1...)
x4 = back to OPERATION MODE...
ROTATING
DISPLAY
OPTIONS
PLAYING
MODE
OPTIONS
OPERATION
MODE
OPTIONS
CL
Variation
to ply 1
-rd:1
Selective
Search
+SEL
Auto
Play
-AuTo
Variation
to ply 2
-rd:2
Easy
Mode
-EASY
Sound with
Keypress
+SNd
bc 2 . bc 5 . bc10 . bc15 . bc20 . bc30 . bc60
Variation
to ply 3
-rd:3
Random
Play
-rand
Silent
Mode
-SIL
Variation
to ply 4
-rd:4
Book
On/Off
+book
Coach
Mode
-Coch
Position
Evaluation
-rd:E
Full
Book
-bk:FL
Ticking
Clock
-tic
Depth &
Moves
-rd:d
Passive
Book
-bk:Pa
Countdown
Clock
-c:dn
Nodes
Searched
-rd:n
Active
Book
-bk:at
Bronstein
Clock
bc 0
For more details, see Section 5.
Time per
Move
-rd:t
Tournament
Book
-bk:tn
System
Test
-tEst
ENGLISH
h. System Test
On:+tESt Off:-tESt
Turning this option on causes the module to run an internal test
program. To stop the test, press ENT and CL together to reset the
module for a NEW GAME.
CAUTION: Selecting
+tESt
will clear your
game from memory. This option is included mainly for technical troubleshooting by an authorized service center in the event of a malfunction.
5.2 Playing Mode Options
Press OPT twice to select the Playing Mode Options. Then use
the BLACK/> and WHITE/< keys to select options within this
group, and press ENT to turn options on (+) or off (–).
a. Selective Search
On:+SEL Off:-SEL
The program in this Senator Module normally uses a
Search algorithm.
This allows the computer to see combinations that
Selective
15
Page 16

would otherwise take much longer to compute. Turning this option off
makes the program switch to a powerful
search method minimizes the risk of an occasional oversight.
Brute Force algorithm.
This
Note that
the Problem Solving Levels always use the Brute Force method.
are played. While the computer would not make these moves on its own,
it needs to know how to respond to them in the best way. Therefore,
when you turn on the Full Book, the computer could potentially play one
of these moves.
b. Easy Mode
On:+EAsy Off:-EASy
Want to beat your computer more often? Try turning on Easy Mode,
which prevents the computer from thinking on your time. This weakens
all the playing levels without affecting the computer’s time controls.
Normally, as described in Section 2.10, the computer thinks on your
time, using the time you are contemplating your next move to think
ahead and plan its strategies. This is part of what makes your computer
such a tough opponent. By using Easy Mode to make all the levels
weaker, you effectively have many more levels to choose from!
c. Random Play
On:+rand Off:-rand
Turn this option on for greater variety of play. Instead of selecting one
single best move, the computer will then choose one of the best moves
to play by consulting its built-in Randomizer.
d. Book On/Off
On:+book Off:-book
If you ever want to completely lock out the computer’s built-in book of
openings, set this option to -book. When the book is off, the computer
is forced to take time to think of its moves from the beginning of the
game, rather than making its moves from memory. For complete details
on openings, see Section 2.9.
If you turn the book completely off, the
other book options (described below) are also automatically disabled.
e. Full Book
On:+bk:FL Off:-bk:FL
Turning on the Full Book option gives the computer the freedom to
choose any move from its built-in book of openings, so you’ll see a
greater variety of opening lines being played.
If this option is selected,
the Passive, Active, and Tournament Book options are disabled.
With this option on, you may see the computer make some questionable moves. This is because its built-in book of openings must contain
responses to certain lines of play (even questionable lines), in case they
f. Passive Book
On:+bk:Pa Off:-bk:Pa
Selecting the Passive Book option forces the computer to give
preference to passive openings and closed positions when deciding
which lines to play.
If this option is selected, the Active and Tournament
Book options are disabled.
g. Active Book
On:+bk:at Off:-bk:at
When this option is activated, the computer will give preference to
active lines and open positions when deciding which lines to play.
If this
option is selected, the Passive and Tournament Book options are
disabled.
h. Tournament Book
On:+bk:tn Off:-bk:tn
When you turn the Tournament Book option on, the computer is
forced to always select the best possible line of play in every opening.
While this results in the best chess play, it also narrows down the
computer’s choice of moves by limiting its available book lines.
If this
option is selected, the Active and Passive Book options are disabled.
5.3 Rotating Display Options
Normally, the LCD Module’s display shows the time for the player to
move. However, the computer can also display other information, as
described in Section 4 (Info Mode). The Rotating Display feature works
hand-in-hand with Info Mode, since it allows you to choose which of the
Info Displays you want to see, and then cycles your choices in onesecond increments. You may turn on any or all of the Rotating Display
options, as desired.
IMPORTANT: The Rotating Display feature is only activated
WHILE THE COMPUTER IS THINKING.
Press OPTION twice to select the Rotating Display Options. Then
use the BLACK/> and WHITE/< keys to select the options you
16
Page 17
want to see rotated in the display. The options are described below and
summarized in the Option Mode Chart in this section. Press ENT to turn
these options on (+) or off (–).
If you think the display information is changing too quickly when it
rotates, press INFO to freeze the display. Successive presses of INFO
and the BLACK/> and WHITE/< keys will allow you to cycle
through the displays manually, as described in Section 4. To start the
display rotation again, press OPT followed by CL. In any event, when
the computer starts thinking about its next move, the display starts
rotating again automatically.
The game information you can see
while the computer is thinking
includes the following:
• rd:1 to rd:4 = predicted line of play (up to four individual
moves)
• rd:E = evaluation of the current position
• rd:d = search depth and number of moves examined so far
• rd:n = number of nodes searched per second
• rd:t = amount of time the move has taken so far
Whenever requested information is not available, the display will show
a series of dashes (–––––).
For complete descriptions of these options and details on how to
interpret the displays, see Section 4.
6. VERIFYING/SETTING UP POSITIONS
6.1 Verifying Positions
See “IT’S EASY TO VERIFY PIECES!” for an example of using
Verify Mode.
If you should knock over the chess pieces or if you think your board
position may be incorrect, you can have the computer verify all the
piece locations for you!
When it’s your turn, press one of the PIECE SYMBOL KEYS (&, %,
$, #, @, or !). The computer will show you where the first piece of that
type is located on the board—the display window shows the piece
symbol, color, and square, and a board light also indicates the square.
Press the same PIECE SYMBOL KEY again to see the location of the
next piece of that same type. All the White pieces are shown first, and
then the Black pieces. When there are no more pieces of that type on
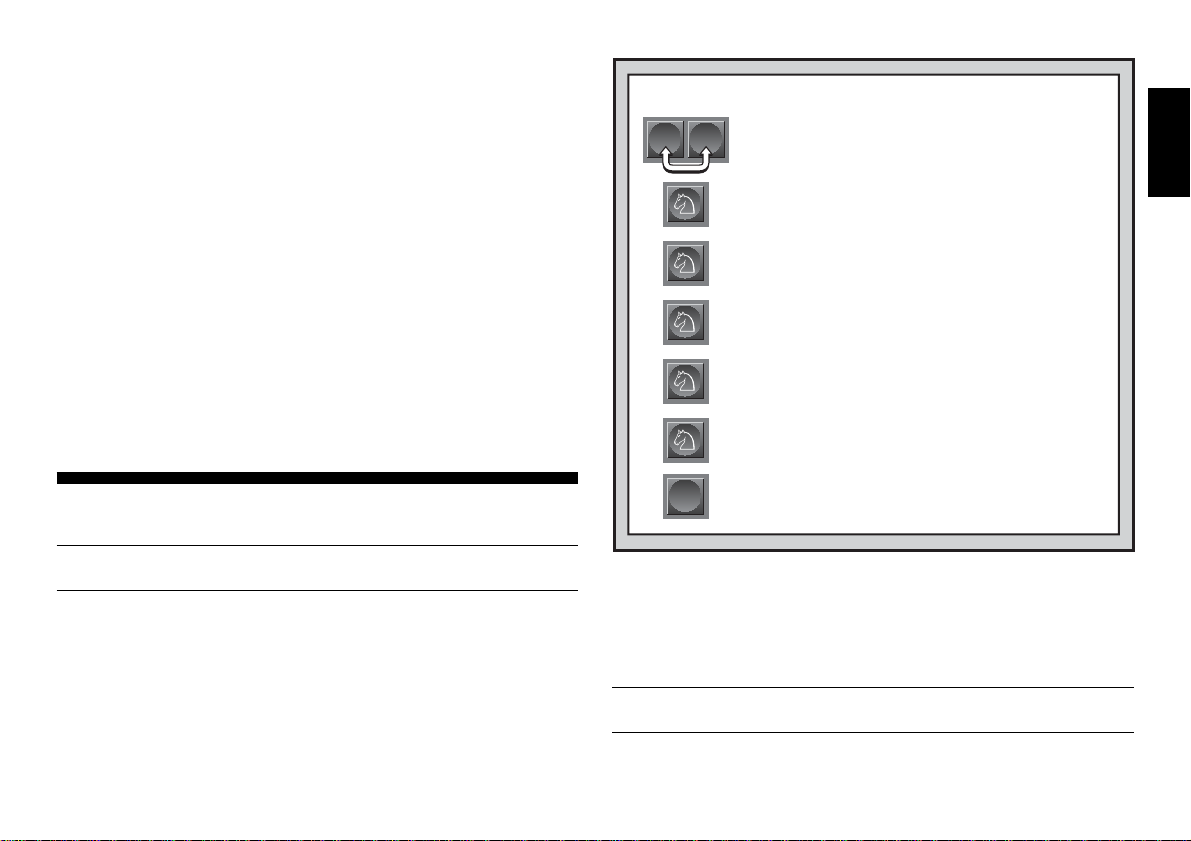
IT’S EASY TO VERIFY PIECES!
ENT
the board, only the piece symbol remains in the display.
Want to verify some more pieces? Simply repeat the above procedure
using the other PIECE SYMBOL KEYS, verifying the entire board if
desired. Press CL at any time to return to nor mal play.
6.2 Changing and Setting Up Positions
See “TRY OUT POSITION MODE” to get an idea of how this
feature works.
Caution: All previous moves in your current game will be erased from
memory if you make any changes to your position during the game!
1. Set up the pieces for a new game, and press ENT
CL
and CL together to reset the module.
Display: [ 0:00:00.
2. Press the KNIGHT Key.
Display: [,@,b1 (the first White Knight).
Board light on: B1.
3. Press KNIGHT again.
Display: [,@,G1 (the second White Knight).
Board light on: G1.
4. Press KNIGHT again.
Display: ],@,b8 (the first Black Knight).
Board light on: B8.
5. Press KNIGHT again.
Display: ],@,g8 (the second Black Knight).
Board light on: G8.
6. Press KNIGHT again.
Display: @ (no more Knights on the board).
7. Repeat to verify any other piece! Press CL to exit
CL
Verify Mode.
For more details, see Section 6.1.
ENGLISH
17
Page 18

Position Mode is a feature which lets you set up special board positions to play from, or problems you would like the computer to solve.
Press POS to enter Position Mode, and -POS- will show in the display.
You can change or set up a position whenever it is your turn to move.
After setting up your new position, press CL to exit Position Mode.
•To remove a piece from the board, simply pick up the piece and
physically remove it from the board.
Notice that the display window
indicates the piece type and color, along with a minus sign (–) and
the square location.
•To move a piece from one square to another, pick up the piece
from its original square, and put it down on the new square.
As you
do this, the display will show a minus sign (–) for the first square,
and a plus sign (+) for the second square.
•To add a piece to the board, first press the PIECE SYMBOL KEY
for that piece (&, %, $, #, @, or !). Make sure the display shows
the correct color symbol for the piece you want to add. If it does not,
press BLACK/> or WHITE/< to change the color. When the
display shows the correct piece type and color, place that piece on
the desired square.
the location for that square.
The display shows a plus sign (+), along with
To add another piece of the same type,
simply put another piece on the board. To add a different piece,
press a different PIECE SYMBOL KEY and follow the same steps
outlined above.
•To clear the board, press ENT while you are in Position Mode. The
display will show _ to symbolize an empty chessboard. Press
ENT once more to confirm that you do want to clear the board.
Then add pieces as described previously. If you decide not to clear
the board, press CL instead of ENT to cancel. This feature can be
handy when you want to set up a position with only a few pieces,
where it would be much easier to start out with an empty board!
• Once you have changed the board position as described
above, make sure the color indicator in the display is showing the
correct color of the side to move. Change the color, if necessary, by
pressing BLACK/> or WHITE/<.
• To exit Position Mode, press CL. This returns you to normal game
play, with your new board position!
Note that any legal position can be set up using the above outlined
procedures. The computer will not allow you to set up an illegal position,
such as one where there are more than the prescribed number of
pieces for a normal game, or one where a King is in check and is not to
TRY OUT POSITION MODE
ENT
POS
E2
E3
D8
H5
move. In such cases, the computer will simply beep when you press CL,
and you will not be allowed to exit Position Mode. Check the position
using the PIECE SYMBOL KEYS, and correct the position (by adding a
piece, removing a piece, or moving an incorrectly placed piece). Then
press CL to exit Position Mode.
1. Set up the pieces for a new game, and press ENT
CL
and CL together to reset the module.
Display: [ 0:00:00.
2. Press POS to enter Position Mode.
Display: -POS-.
3. Pick up the White pawn from Square E2, and
remove it from the board.
Display: [,!,-E2.
4. Put that same pawn down on Square E3 to add it
to the board.
Display: [,!,+E3.
5. Pick up the Black Queen from Square D8, and
remove it from the board.
Display: ],%,-D8.
6. Put the Black Queen down on Square H5 to add
it to the board.
Display: ],%,+H5.
7. Press WHITE/< to change the color to move
next to White.
8. Press CL to return to normal game play.
CL
For more details, see Section 6.2.
18
Page 19

7. TECHNICAL DETAILS
7.1 The ACL Function
Computers sometimes “lock up” due to static discharge or other
electrical disturbances. If this occurs, ensure that the Senator Module
and LCD module are installed and the Exclusive Board is powered on.
Use a pin or another sharp object to press into the hole marked ACL in
the base of unit for at least one second. This resets the computer and
clears its memory.
7.2 Care and Maintenance
Your chess computer and modules are precision electronic devices,
and should never be subjected to rough handling or exposed to extreme
temperatures or moisture. Do not use chemical agents to clean them, as
they can cause damage.
7.3 Battery Information
As described in Section 2.11, your game is retained in memory
whenever you press GO/STOP on the Senator Module. The module has
a 3-Volt Lithium battery installed for this purpose. To prevent possible
loss of your current game information due to a weak battery, we recommend that you replace the battery approximately every 12 months.
7.4 Technical Specifications
Keys: 16
Battery: 1 x 3V Lithium button cell (CR2032)
Connection to board: 40-pin edge connector
Dimensions: 194 x 96 x 25 mm
Weight: .25 kg
Saitek reserves the right to make technical changes without notice in the interest of progress.
CONDITIONS OF WARRANTY
1. Warranty period is 2 years from date of purchase with proof of purchase
submitted.
2. Operating instructions must be followed.
3. Product must not have been damaged as a result of defacement,
misuse, abuse, neglect, accident, destruction or alteration of the serial
number, improper electrical voltages or currents, repair, alteration or
maintenance by any person or party other than our own service facility or
an authorized service center, use or installation of non-Saitek replacement
parts in the product or the modification of this product in any way, or the
incorporation of this product into any other products, or damage to the product caused
by accident, fire, floods, lightning, or acts of God, or any use violative of instructions
furnished by Saitek plc.
4. Obligations of Saitek shall be limited to repair or replacement with the same or similar
unit, at our option. To obtain repairs under this warranty, present the product and proof of
purchase (e.g., bill or invoice) to the authorized Saitek Technical Support Center (listed
on the separate sheet packaged with this product) transportation charges prepaid. Any
requirements that conflict with any state or Federal laws, rules and/or obligations shall
not be enforceable in that particular territory and Saitek will adhere to those laws, rules,
and/or obligations.
5. When returning the product for repair, please pack it very carefully, preferably using the
original packaging materials. Please also include an explanatory note.
6. IMPORTANT: To save yourself unnecessary cost and inconvenience, please check
carefully that you have read and followed the instructions in this manual.
7. This warranty is in Lieu of all other expressed warranties, obligations or liabilities. ANY
IMPLIED WARRANTIES, OBLIGATIONS, OR LIABILITIES, INCLUDING BUT NOT
LIMITED TO THE IMPLIED WARRANTIES OF MERCHANTABILITY AND FITNESS FOR
A PARTICULAR PURPOSE, SHALL BE LIMITED IN DURATION TO THE DURATION OF
THIS WRITTEN LIMITED WARRANTY. Some states do not allow limitations on how long
an implied warranty lasts, so the above limitations may not apply to you. IN NO EVENT
SHALL WE BE LIABLE FOR ANY SPECIAL OR CONSEQUENTIAL DAMAGES FOR
BREACH OF THIS OR ANY OTHER WARRANTY, EXPRESS OR IMPLIED, WHATSOEVER Some states do not allow the exclusion or limitation of special, incidental or
consequential damages, so the above limitation may not apply to you. This warranty
gives you specific legal rights, and you may also have other rights which vary from state
to state.
Information for Customers in the United States:
FCC Compliance and Advisory Statement
Warning: Changes or modifications to this unit not expressly approved by the party respon-
sible for compliance could void the user’s authority to operate the equipment.
This device complies with Part 15 of the FCC Rules. Operation is subject to the following
two conditions:
1. This device may not cause harmful interference, and
2. This device must accept any interference received, including interference that may
cause undesired operation
NOTE: This equipment has been tested and found to comply with the limits for a Class B
digital device, pursuant to Part 15 of the FCC Rules. These limits are designed to provide
reasonable protection against harmful interference in a residential installation. This equipment generates, uses and can radiate radio frequency energy and, if not installed and used
in accordance with the instructions, may cause harmful interference to radio communications. However, there is no guarantee that interference will not occur in a particular installation. If this equipment does cause harmful interference to radio or television reception,
which can be determined by turning the equipment off and on, the user is encouraged to try
to correct the interference by one or more of the following measures:
• Reorient or relocate the receiving antenna.
• Increase the separation between the equipment and receiver.
• Connect the equipment into an outlet on a circuit different from that to which the
receiver is connected.
• Consult the dealer or an experienced radio/TV technician for help.
Saitek Industries, 2295 Jefferson Street, Torrance, CA 90501, USA
Information for Customers in Canada:
Operation is subject to the following two conditions:
This device may not cause interference, and
This device must accept any interference, including interference that may cause undesired
operation of the device.
This Class B digital apparatus complies with Canadian ICES-0003.
Cet appareil numérique de la classe B est conforme à la norme NMB-003 du Canada.
ENGLISH
19
Page 20

TROUBLESHOOTING GUIDE
SYMPTOMS
The module doesn’t function.
The computer doesn’t react,
behaves erratically, or “freezes”
during a game.
The computer won’t make a
move.
The computer won’t accept your
move.
The light in the to square is on,
even after moving the
computer’s piece.
You can’t exit Position Mode by
pressing CL.
The display is showing _.
The computer seems to be
making illegal moves.
The computer is silent.
The computer is making instant
or irrational moves.
Your game and settings are not
retained in memory when the
module is turned off.
POSSIBLE CAUSES
• The module has not been inserted properly.
• Electro static discharge.
• You have pressed GO/STOP to turn on the module while
Exclusive Board is off.
• Wrong or def ective adapter.
• The module has not been inserted properly.
• Electrostatic discharge.
•Two Player Mode may be turned on.
•You may be on a level where the computer thinks for a long
time.
• Is it your turn? Is your King in check? Will your move put
your King into check? Are you trying to castle incorrectly?
• The computer is thinking (its color symbol is flashing).
•You have not entered the computer’s last move correctly
(wrong from or to square).
•You have set up an illegal position. A King may be in check
and is not to move, you may have too many pawns on the
board, etc.
•You are in Position Mode, and have pressed ENT to clear
the board.
• The computer has made a special move, such as castling,
en passant, or a pawn promotion.
•Your position is incorrect—pieces have been moved.
• The Silent Mode option may be activated.
• The computer may be on a level where it moves quickly and
plays weaker because its search depth is limited.
• The module’s battery is weak or bad.
•You have not pressed GO/STOP to switch the module off
before switching off the Exclusive Board.
ACTION T O TAKE
•Power off the computer, and disconnect the module. Plug
the module back in, making sure it is seated correctly.
• Press ACL to reset computer and clear the memory (see
section 7.1).
• Press ACL to reset computer and clear the memory (see
section 7.1).
• Use the HGN 5009 (9V 300mA) adapter.
•Turn the power off, and try reinserting the module.
• Press ACL to reset computer and clear the memory (see
section 7.1).
• The computer only plays automatic responses to your
moves if Two Player Mode is off (see Section 2.7).
•To force the computer to make a move, press ENT.
•Review the chess rules. Verify the position to make sure it is
correct (see Section 6.1).
•To interrupt the computer, press ENT.
• Pick the piece up again, and the computer will light the
correct to square. Put the piece down on the indicated
square. Check the display for the correct move.
• Check your position, and make necessary changes (see
Section 6.2). Press CL again to exit Position Mode.
•To clear the board, press ENT once more; to cancel, press
CL (see Section 6.2).
•Review the chess rules. Verify the position (see Section
6.1).
•Verify the position (see Section 6.1).
• Check the option settings (see Section 5.1).
• Press LEV to see which level is selected (see Section 3).
Change to another level, if desired.
• Replace the 3-Volt Lithium battery every 12 months.
• Press GO/STOP to turn the module off
the Exclusive Board.
before
switching off
20
Page 21

SCHNELLSTART
Versichern Sie sich zunächst,
daß Ihr Schachbrett ausge-
1
schaltet ist.
Module bei eingeschaltetem
Gerät ein!
Öffnen Sie die vordere
Schublade. Dort sehen Sie 3
2
verschiedene Einschübe.
Schieben Sie Ihr Senator und
LCD Modul in eins der freien
Einschübe, bis es fest drinsitzt.
Schalten Sie das ExclusiveBrett (Schalter hinten rechts)
3
an. Dann drücken Sie ca. 1
Sekunde lang den GO/STOP
Schalter. Reagiert das Gerät
nicht, einfach nochmals
drücken.
Stellen Sie die Figuren auf das
Schachbrett. Achten Sie
4
darauf, daß alle Figuren in der
Mitte ihres Feldes stehen. Ist
dies nicht der Fall, leuchtet das
Licht des Feldes bis die Figur
in die Mitte gestellt wird.
Legen Sie niemals
TAKE
BACK
GO/
STOP
ዛዒዓዔዕዖዘዙዜ
ዑ尷尽尻就尯尹尿尵ዑ
ዐ屁屃屁屃屁屃屁屃ዐ
ዏ巀居巀居巀居巀居ዏ
ዎ居巀居巀居巀居巀ዎ
ው巀居巀居巀居巀居ው
ዌ居巀居巀居巀居巀ዌ
ዋ屄层屄层屄层屄层ዋ
ዊ尶局尺尴尮尼尾尸ዊ
ዝዒዓዔዕዖዘዙዞ
GO/
OPT
POSINFO
LEV
STOP
ENT CL
Um den Computer für einen
neue Partie einzustellen,
5
drücken Sie ENT und CL
gleichzeitig.
Zur Eingabe von Zügen,
ziehen Sie die gewünschte
6
Figur zunächst auf ihr
Ausgangs- dann auf ihr
Zielfeld. Der Computer
registriert so automatisch,
welche Figur gezogen wurde.
Sobald der Computer einen
Zug macht, wird dieser im
Display angezeigt. Ziehen
Sie die gewünschte Figur von
ihrem Ausgangs- auf ihr
Zielfeld. Hier im Beispiel
würden Sie den schwarzen
Bauern von auf e7 auf e5
ziehen.
So einfach geht das! Geben
Sie Ihren nächsten Zug auf
die gleiche Weise ein.
Drücken Sie GO/STOP, um den Computer auszuschalten bevor
Sie das Brett ausschalten. Die aktuelle Stellung wird
gespeichert und die Partie kann später fortgeführt werden.
ENT
CL
DEUTSCH
21
Page 22

TASTEN UND FUNKTIONEN
1. ANSCHLUß: Sie können das Modul über
den 40-poligen Anschluß in das ExclusiveBrett stecken.
2. FIGURENSYMBOLE: Wichtig bei
Positionsaufbau und -kontrolle, sowie bei
Bauernumwandlung.
3. SPIELTASTEN
• TAKE BACK: Wird zur Rücknahme von
Zügen eingesetzt. Im Take-Back Modus
können Sie mit dieser Taste in 10er
Schritten blättern. Außerdem können Sie
hierüber eine Partie für 2 Spieler
einstellen.
• OPTION (OPT): Hiermit aktivieren Sie den
Optionsmodus. Innerhalb dieses Modus,
können Sie mit dieser Taste zwischen
einzelnen Gruppen blättern.
• LEVEL (LEV): Hiermit aktivieren Sie die
Spielstufenauswahl. In dieser Auswahl
können Sie mit dieser Taste in 8er
Schritten durchblättern.
• INFO: Hiermit aktivieren Sie den Informationsmodus. Innerhalb dieses
Modus, können Sie mit dieser Taste zwischen einzelnen Gruppen blättern.
Während eines Zuges hilft Ihnen diese Taste, Hinweise abzufragen.
• POSITION (POS): Hiermit aktivieren Sie den Positionsmodus.
• GO/STOP: Hiermit schalten Sie den Computer an oder aus.
• WHITE/< und BLACK/>: Mit diesen Tasten können Sie Spielstufen,
Optionen oder Informationen in Einzelschritten durchblättern. Auch im
Take-Back-Modus können Sie mit diesen Tasten einzelne Züge anwählen.
• ENTER (ENT): Gleichzeitig mit CL gedrückt, wird die Funktion NEW
GAME aktiviert. Als Einzelfunktion gebräuchlich, um mit dem Computer
die Seiten zu tauschen, Suchfunktionen abzubrechen,
Optionseinstellungen zu aktivieren/deaktivieren, eine neue Spielstufe
auszuwählen etc.
• CLEAR (CL): Gleichzeitig mit ENT gedrückt, wird die Funktion NEW
GAME aktiviert. Drücken Sie sie alleine, wird die Funktion „Abbruch”
ausgelöst. So können Sie verschiedene Auswahlmodi verlassen, ohne die
Einstellungen zu ändern (Options-, Info-, Positions- oder Kontrollmodus).
4. ACL (Reset): Auf der Unterseite des Geräts. Wichtig, um statische
Aufladungen vom Computer zu nehmen. Details siehe 7.1.
TAKE
OPT LEV
BACK
ENT CL
INFO POS
GO/
STOP
INHALT
SCHNELLSTART
TASTEN UND FUNKTIONEN
EINLEITUNG
1. LOS GEHT´S!
1.1 Gerät ausgeschaltet? Dann
können Sie die Module
einstecken
1.2 Gerät angeschaltet? Stellen Sie
die Figuren auf
1.3 Fertig? Testen Sie Ihren neuen
Spielpartner!
1.4 Nun ist der Computer am Zug
1.5 Sie haben Ihre Meinung
geändert? Nehmen Sie Züge
zurück
1.6 Spiel zu Ende? Auf ein Neues
1.7 Zu einfach/schwer? Ändern Sie
4
die Spielstufe
2. MEHR FUNKTIONEN ENTDECKEN
2.1 Wer ist am Zug? Prüfen Sie das
Display
2.2 Spezielle Schachzüge
2.3 Ungültige Züge
2.4 Schach, Matt und Remis
2.5 Die Computersuche
unterbrechen
2.6 Seitenwechsel mit dem
Computer
2.7 Partie mit 2 Spielern
2.8 Schwarz von unten Spielen
2.9 Gespeicherte Eröffnungen
2.10Rechenzeit des Gegners nutzen
2.11Spielstandspeicher
3. DIE SPIELSTUFEN
Spielstufen einstellen
3.1 Normale Stufen
3.2 Turnierstufen
3.3 Blitzschach
3.4 Spaßstufen
3.5 Analysestufen
3.6 Mattsuchstufen
3.7 Trainingsstufen
4. INFO-MODUS: BEOBACHTEN
UND LERNEN
Info-Modus anwenden
4.1 Hauptvarianten
4.2 Suchinformationen
4.3 Schachuhr-Informationen
4.4 Zugzähler/Zuganzahl
4.5 Wie wäre es mit einem
Hinweis? Einfach fragen!
5. OPTIONEN FÜR SPIELSPASS
UND VIELFALT
Optionen auswählen
5.1 Computereinstellungen
5.2 Spieleinstellungen
5.3 Rotierende Anzeige
6. POSITIONEN PRÜFEN/
AUFBAUEN
6.1 Positionen prüfen
6.2 Positionen verändern und
aufbauen
7. TECHNISCHE ANGABEN
7.1 Die ACL-Funktion
7.2 Pflege und Wartung
7.3 Batterie-Informationen
7.4 Technische Spezifikation
PROBLEMLÖSUNGSHINWEISE
22
Page 23

EINLEITUNG
Herzlichen Glückwunsch zum Kauf Ihres neuen SchachcomputerSystems! Warten Sie bis Sie die neuen Funktionen Ihres Modules
ausgetestet haben - Sie werden vieles entdecken, daß in den
bisherigen Mephisto Modulen nicht eingebaut war. Die neuen Mephistos
werden über einen 32-Bit Risc-Prozessor gesteuert. Senator wird Sie
herausfordern, wurde jedoch auch mit Funktionen für Einsteiger und
Fortgeschrittene ausgestattet. Sie können die passende Einstellung
vornehmen. Sie finden Herausforderung, aber auch Spielstufen zum
Entspannen und Gewinnen. Senator ist ein Schachpartner, den sich
Fortgeschrittene und Experten wünschen. Zusammen mit dem LCDModul können Sie die Möglichkeiten der neuen Module vollständig
austesten. Die neue komfortable Anzeige informiert Sie über aktuelle
Partie-Informationen, Zugvorschläge, Rechenprozesse und vieles mehr.
Viel Spaß und spannende Partien!
1. LOS GEHT´S!
1.1 Gerät ausgeschaltet? Dann können Sie die Module einstecken
Stecken Sie das Netzteil mit dem einen Ende auf der Rückseite des
Exclusive Schachbrettes und mit dem anderen Ende in die Steckdose
ein. Schalten Sie Ihren Computer aus, bevor Sie die Module
anschließen.
WICHTIG: VERSUCHEN SIE NIEMALS DIE MODULE BEI
ANGESCHAL TETEM SCHACHCOMPUTER ANZUSCHLIESSEN!
Öffnen Sie die Schublade und klappen Sie diese nach oben. Stecken
Sie das Senator-Modul in den mittleren Port. Dann setzen Sie das
Display rechts neben das Modul. Schließen Sie die Schublade wieder.
1.2 Gerät angeschaltet? Stellen Sie die Figuren auf
Schalten Sie Ihren Schachcomputer an und drücken Sie GO/STOP
ca. 1 Sekunde lang. Stellen Sie die Schachfiguren in der Grundposition
auf. Achten Sie darauf, die Figuren in die Mitte des Feldes zu stellen. Ist
eine Figur nicht in der Mitte, bleibt das Licht des Feldes an, bis die Figur
nachgerückt wurde. Drücken Sie CL und ENT gleichzeitig, um eine
neue Partie zu starten.
1.3 Fertig? Testen Sie Ihren neuen Spielpartner!
Spielen Sie ganz normal Schach. Einfach Ihre Figur vom Ausgangsfeld anheben und auf das Zielfeld setzen. Schon fängt der Computer an,
für Schwarz zu rechnen. Sie werden bemerken, daß der Computer zu
Beginn einer Partie sofort antwortet. Er antwortet aus seiner
Eröffnungsbibliothek und muß die Züge nicht berechnen (siehe auch
Abschnitt 2.9).
1.4 Nun ist der Computer am Zug
Zieht der Computer, wird sein Zug signalisiert und angezeigt. Prüfen
Sie das Display - Sie sehen das Ausgangs- und Zielfeld, sowie die
Farbe und das Symbol der gewünschten Figur. Zusätzlich zeigen die
Feld-Leuchten den Computerzug an. Nehmen Sie die gewünschte Figur
und setzen Sie diese vom Ausgangsfeld auf ihr Zielfeld.
1.5 Sie haben Ihre Meinung geändert? Nehmen Sie Züge zurück
Spielen Sie gegen einen Computer, ist nichts „endgültig” - Sie können
Ihre Strategie wechseln oder entscheiden, einen anderen Zug zu
spielen, wann Sie wollen! Sind Sie am Zug, drücken Sie dazu einfach
TAKE BACK. Dann WHITE/< drücken. Das Display und die Feld-
Leuchten zeigen den letzten Zug an. Setzen Sie die angezeigte Figur
zurück. Wollen Sie einen weiteren Zug zurücknehmen? Dann drücken
Sie wieder WHITE/<. Sie wollen weiterspielen? Dann drücken Sie CL.
Nach Rücknahme eines Schlagzuges oder einer Bauernumwandlung,
erinnert Sie der Computer daran, die geschlagene/umgewandelte Figur
wieder zurückzustellen. Er zeigt die Figur und ihr aktuelles Feld an.
Stellen Sie diese wieder auf das richtige Feld. So schließen Sie die
Rücknahme korrekt ab.Nehmen Sie eine Rochade zurück, nehmen Sie
zunächst den Königs- dann den Turmzug zurück.
Die TAKE BACK Funktion ermöglicht es Ihnen, ganze Zugfolgen
zurückzunehmen (dies ist schneller und bequemer als wenn Sie Zug für
Zug durchgehen müßten).
Siehe auch die Abbildung „TAKE BACK-EXPRESS-FUNKTION”.
Nachdem Sie TAKE BACK gedrückt haben, können Sie wie folgt
vorgehen:
•Drücken Sie ENT, um zur letzten Stellung in einer Partie oder an
den Anfang des Spieles (bei Partien mit bis zu 200 Zügen) zu
springen.
DEUTSCH
23
Page 24

•Drücken Sie TAKE BACK, um in 10er Schritten durch die Partie zu
gehen.
•Drücken Sie WHITE/< oder BLACK/>, um in 1er Schritten zu
blättern.
Sind Sie bei der gewünschten Stellung angelangt, drücken Sie CL.
Prüfen Sie dann Ihre Stellung mit Hilfe der Positionskontrolle und setzen
Sie die Figuren auf die passenden Felder (siehe Abschnitt 6).
1.6 Spiel zu Ende? Auf ein Neues
Immer wenn Sie ein Spiel beendet haben (oder die aktuelle Partie
abbrechen wollen), können Sie einfach ein Neues starten! Drücken Sie
CL und ENT gleichzeitig und der Computer signalisiert, daß er für eine
neue Partie bereit ist.
WICHTIG: Durch NEW GAME wird die alte Partie
aus der Memory des Computers gelöscht - achten Sie darauf, diese
Funktion nicht aus Versehen zu aktivieren!
1.7 Zu einfach/schwer? Ändern Sie die Spielstufe
Schalten Sie Ihren Computer an, ist automatisch die Spielstufe 4 (5
sek. pro Zug) aktiviert. Sie haben jedoch insgesamt 64 Stufen zur
Auswahl, die Sie sicherlich ausprobieren möchten. Wie, das sehen Sie
in Abschnitt 3.
2. MEHR FUNKTIONEN ENTDECKEN
2.1 Wer ist am Zug? Prüfen Sie das Display
Spielt der Computer mit Schwarz, blinkt ein schwarzes Quadrat im
Display, während der Zug berechnet wird. Nachdem der Computerzug
gemacht ist, erscheint ein weißes Quadrat - jetzt ist also weiß an der
Reihe. Sie sehen auf einen Blick, ob der Computer momentan rechnet
bzw. welche Seite am Zug ist.
2.2 Spezielle Schachzüge
Schlagzüge: Um zu schlagen, nehmen Sie Ihre Figur vom
Ausgangsfeld, entfernen die geschlagene vom Brett und setzen dann
Ihre Figur auf das Feld der geschlagenen. Schlagzüge werden wie folgt
angezeigt E5•F4.
En Passant: Der Computer zeigt bei diesem Zug solange die
Ausführung im Display an, bis Sie den geschlagenen Bauern von
seinem Feld entfernen.
TAKE BACK-EXPRESS-FUNKTION
1. Drücken Sie TAKE BACK.
TAKE
BACK
CL
Rochade: Wird der Königszug zuerst gemacht, erkennt der Computer die Rochade automatisch. Nachdem Sie den König auf sein
Ausgangs- und Zielfeld gesetzt haben, wird Ihr Zug angezeigt, bis Sie
auch den Turmzug ausgeführt haben. Kurze Rochade wird als 0-0,
lange als 0-0-0 angezeigt.
Bauernumwandlung: Wandeln Sie einen Bauern um, führen Sie
Ihren Zug zunächst wie üblich aus. Dann drücken Sie ein FIGUREN-
SYMBOL, damit der Computer weiß, in welche Figur Sie umwandeln
möchten. Der Computer erkennt dann die Figur und zeigt sie kurz an,
bevor er seinen nächsten Zug berechnet. Vergessen Sie nicht, die Figur
auch auf dem Brett umzutauschen. Wandelt der Computer eine Figur
um, zeigt das Display sowohl den Bauern als auch die Figur, in die er
sich umwandeln soll. Vergessen Sie wiederum nicht, den Bauern auch
auf dem Feld in diese Figur zu tauschen!
Sie haben nun folgende Möglichkeiten:
•Mit ENT springen Sie zur Anfangs- oder
ENT
Endstellung einer Partie (bei Partien bis zu
200 Zügen).
•Mit TAKE BACK blättern Sie durch die
TAKE
BACK
Partie in 10er Schritten.
• Mit WHITE/< blättern Sie in 1er Schritten
rückwärts.
•Mit BLACK/> in 1er Schritten vorwärts.
2. Haben Sie die gewünschte Stellung innerhalb der Partie
erreicht, drücken Sie CL.
3. Prüfen Sie die Position (s. Abschnitt 6) und stellen Sie
die Figuren wieder richtig auf.
Details siehe Abschnitt 1.5.
24
Page 25

2.3 Ungültige Züge
Ihr Computer wird niemals einen ungültigen Zug akzeptieren.
Versuchen Sie, einen auszuführen, hören Sie einen doppelten Signalton
und das Display zeigt das Ausgangsfeld an. Entweder stellen Sie nun
die Figur zurück oder Sie führen einen regelkonformen Zug aus.
Führen Sie den Computerzug nicht korrekt aus, hören Sie wieder den
doppelten Ton. Sie bewegen entweder die falsche Figur oder die richtige
Figur auf ein falsches Feld. Will der Computer seinen Bauern von d7
nach d5 ziehen, und Sie drücken d7 und dann d6, zeigt er Er:d5.
Dann zeigt das Display nochmals den ganzen Zug an (d7-d5), und der
Computer wartet bis Sie den Bauern auf d5 gezogen haben.
Nehmen Sie eine Figur von Ihrem Ausgangsfeld, wünschen jedoch,
den Zug nicht zu machen, können Sie abbrechen, indem Sie die Figur
wieder auf das gleiche setzen. Nun können Sie einen völlig anderen
Zug eingeben. Ändern Sie Ihre Meinung nachdem der Zug schon
eingegeben ist, können Sie die Rücknahme aktivieren (s. Abschnitt 1.5).
2.4 Schach, Matt und Remis
Steht ein König im Schach, zeigt der Computer seinen Zug zunächst
wie gewöhnlich an. Nachdem der Zug gemacht wurde, blinkt CHECK
einige Sekunden im Display. Dann zeigt das Display wieder die Uhr an.
Erkennt der Computer eine Mattführung, zeigt er zunächst den Zug
wie gewöhnlich an. Nachdem der Zug ausgeführt wurde, blinkt dann die
Mattankündigung einige Sekunden im Display (z.B. =in2 bedeutet
Matt in 2 Zügen). Dann zeigt das Display wieder die Uhr an.
Endet eine Partie Schachmatt, blinkt die Meldung MATE im Display.
Dann zeigt das Display wieder die Uhr an. Der Computer erkennt Remis
durch Patt, 3-malige Wiederholung und 50-Züge Regel.
Kam es zum Remis, blinkt End einige Sekunden. Dann zeigt das
Display wieder die Uhr an.
zu machen! Statt dessen zeigt der Computer ––––– an. Dies
bedeutet, daß er unterbrochen wurde, bevor er ein Matt errechnen
konnte. Um weiterzuspielen, wählen Sie eine andere Stufe.
2.6 Seitenwechsel mit dem Computer
Drücken Sie einfach ENT wenn Sie am Zug sind. Der Computer
startet sofort seine Berechnungen für Ihre Seite. Wechseln Sie sooft Sie
wünschen. Sie wollen, daß der Computer den ersten Zug für Weiß am
Anfang der Partie macht? Drücken Sie CL und ENT und dann nochmals
ENT. Sie wollen dem Computer zuschauen, wie er für beide Seiten
spielt? Drücken Sie ENT nach jedem Zug - so sehen Sie die optimale
Zugfolge für beide Seiten. Sie können Strategien und Taktiken lernen!
2.7 Partie mit 2 Spielern
Neben der Zugrücknahme (s. 1.5), können Sie über TAKE BACK
auch die Partie für 2 Spieler einstellen. Diesen Modus können Sie
jederzeit mit CL abbrechen. Ist der Computer jetzt am Zug, drücken Sie
noch zusätzlich ENT und die Partie kann fortgeführt werden.
Sie können diese Option für folgende Situationen nutzen:
• Spielen Sie Großmeister-Partien nach. Unterbrechen Sie den
Modus dann hin und wieder mit CL und drücken Sie ENT, um zu
testen, was der Computer an dieser Stelle gezogen hätte.
• Überprüfen Sie Ihre eigenen Partien. Auch hier können Sie
vorausspielen und dann den Computer zuschalten, um die
Knackpunkte einer Partie auszustesten.
• Spielen Sie Eröffnungen nach und lernen Sie.
• Spielen Sie gegen einen Freund. Der Computer wacht dann als
Schiedsrichter über die Regeln und läßt keine illegalen Züge zu.
Spielen Sie gegen einen Freund, können Sie mit INFO Zugvorschläge
oder sonstige Hilfen abrufen.
DEUTSCH
2.5 Die Computersuche unterbrechen
Sie denken, der Computer rechnet zu lange? Sie können ihn jederzeit
unterbrechen! Drücken Sie einfach ENT während der Computer
nachdenkt. Er wird sofort stoppen und den besten bisher errechneten
Zug spielen. Diese Funktion kann sehr praktisch bei höheren Stufen
sein, wenn der Computer lange rechnen darf. Auch bei der Analysestufe
kann manche Berechnung einfach zu langwierig sein und Sie sollten
auch teilweise stoppen.
Bei den Mattsuchstufen, zwingt ENT den Computer nicht, einen Zug
2.8 Schwarz von Unten spielen
Siehe auch „SCHWARZ VON UNTEN SPIELEN? ACHTEN SIE
AUF DIE GRUNDSTELLUNG”.
Sie wollen das Standard-Spiel verlassen und neue Wege gehen?
Dann ist diese Option etwas für Sie. Stellen Sie die Figuren wie in der
Abbildung gezeigt auf. Drücken Sie ENT und CL gleichzeitig und
anschließend nochmals ENT. Der Computer wechselt intern die Seiten
und spielt mit Weiß den ersten Zug.
25
Page 26

Achtung: Die Notation ist bei dieser Funktion gedreht - das heißt, die
Displayangaben entsprechen nicht der Brettstellung.
2.9 Gespeicherte Eröffnungen
Am Anfang einer Partie, zieht der Computer auf vielen Stufen sofort.
Dies ist möglich, weil er die Züge direkt aus einer Bibliothek holt, sie
also nicht mehr berechnen muß. Diese Bibliothek enthält die wichtigsten
Eröffnungen und viele Positionen aus Großmeisterpartien. Ist die
aktuelle Stellung in seiner Bibliothek, antwortet der Computer
automatisch anstatt zu rechnen!
Zusätzlich haben Sie bei den Modulen die Auswahl aus
verschiedenen Bibliotheken. Natürlich läßt sich die Bibliothek auf
Wunsch auch abschalten. Details finden Sie unter Abschnitt 5.2.
2.10 Rechnen wenn der Gegner am Zug ist
Haben Sie Ihren Zug eingegeben, kommt die Antwort des Computers
manchmal sofort - sogar bei höherer Spielstufe! Dies ist nur möglich,
wenn der Computer Ihrer Denkzeit auch nutzt, um seine Rechnungen
durchzuführen. Er rechnet die Antwortzüge auf Ihre wahrscheinlichste
Strategie durch. Lag er richtig, kann er dann sofort ziehen.
Um diese Funktion auszuschalten, lesen Sie Abschnitt 5.2.
2.11 Spielstandspeicher
Sie können Ihr Spiel jederzeit mit GO/STOP unterbrechen. Das Spiel
wird dann abgebrochen und der Computer speichert Ihre aktuelle Partie
(bis zu 200 Züge). Schalten Sie wieder an, können Sie einfach
weiterspielen.
Achtung: drücken Sie GO/STOP während der Computer rechnet,
müssen Sie nach dem erneuten Anschalten zuerst CL drücken.
Bitte denken Sie auch daran, zuerst GO/STOP zu drücken, bevor Sie
das Exclusive-Brett ausschalten. Nur so wird die Partie auch
gespeichert!
Sollte es notwendig sein, die Module herauszunehmen, warten Sie
bitte mindestens 4 Sekunden, nachdem Sie das Mephisto ExclusiveBrett ausgeschaltet haben. So verhindern Sie elektronische Störungen.
SCHWARZ VON UNTEN
SPIELEN? ACHTEN SIE AUF DIE
GRUNDSTELLUNG
Spielen Sie mit Schwarz von unten, wie
in Abschnitt 2.8 beschrieben, versichern
Sie sich, daß die Figuren gemäß dieser
Abbildung aufgestellt sind. Die Könige
und Damen sind vertauscht; die Notation
ist gedreht.
ዛዙዘዖዕዔዓዒዜ
ዊ尸尾尼尮尴尺局尶ዊ
ዋ层屄层屄层屄层屄ዋ
ዌ巀居巀居巀居巀居ዌ
ው居巀居巀居巀居巀ው
ዎ巀居巀居巀居巀居ዎ
ዏ居巀居巀居巀居巀ዏ
ዐ屃屁屃屁屃屁屃屁ዐ
ዑ尵尿尹尯就尻尽尷ዑ
ዝዙዘዖዕዔዓዒዞ
3. DIE SPIELSTUFEN
Ihr Computer bietet 64 unterschiedliche Spielstufen! Wählen Sie eine
Stufe aus, sollten Sie sich bewußt sein, daß der Computer um so
stärker spielt je länger er rechnen kann - genauso wie ein menschlicher
Spieler! Den Überblick aller Stufen sehen Sie auf der nächsten Seite.
Die Stufen sind auch einzeln in den folgenden Abschnitten erklärt.
Eine Spielstufe einstellen
Siehe auch „NUTZEN SIE DIESE ÜBERSICHT ZUR WAHL
EINER SPIELSTUFE”. Sie sehen so auf einen Blick, welche
Stufe Sie wie aufrufen können.
Drücken Sie LEV, um eine Spielstufe auswählen zu können. Der
Computer ist auf Spielstufe 4 (5 Sek. pro Zug) voreingestellt. Um durch
die Spielstufen zu blättern, verwenden Sie LEV für 8er, WHITE/< und
BLACK/> für 1er Schritte. Zeigt das Display die richtige Spielstufe,
bestätigen Sie mit ENT.
Um eine Spielstufe zu überprüfen, drücken Sie wiederum LEV. Soll
die aktuell gewählte Stufe nicht verändert werden, verlassen Sie den
Spielstufen-Modus mit CL. Weitere Punkte, die Sie beachten sollten:
• Ändern Sie die Spielstufe, wird die Schachuhr immer zurückgesetzt.
• Sie sollten die Spielstufe nicht ändern, während der Computer
rechnet. Sollte dies dennoch notwendig sein, drücken Sie zuerst
26
Page 27

ENT, um das Rechnen abzubrechen und führen Sie den
Computerzug aus. Dann können Sie diesen Zug zurücknehmen und
eine andere Spielstufe wählen. Schließlich sollten Sie ENT drücken,
um die Computerberechnung wieder zu starten.
3.1 Normale Stufen
STUFE ZEIT PRO ZUG ANZEIGE
1.....................1 sekunde.................. L 0:01
2.....................2 sekunden................ L 0:02
3.....................3 sekunden................ L 0:03
4.....................5 sekunden................ L 0:05
5...................10 sekunden ............... L 0:10
6...................15 sekunden ............... L 0:15
7...................20 sekunden ............... L 0:20
8...................30 sekunden ............... L 0:30
9...................45 sekunden ............... L 0:45
10 ....................1 minute .................... L 1:00
11 ....................1.5 minuten ............... L 1:30
12 ....................2 minuten .................. L 2:00
13 ....................3 minuten .................. L 3:00
14 ....................5 minuten .................. L 5:00
15 ..................10 minuten .................. L10:00
16 ..................15 minuten .................. L15:00
Wählen Sie eine der normalen Spielstufen, bestimmen Sie eine
durchschnittliche Rechenzeit pro Zug für den Computer. Achtung: die
angegebene Zeit kann stark variieren! In der Eröffnung und im Endspiel
spielt der Computer schneller, aber in komplizierten Mittelspielen
rechnet er länger.
3.2 T urnierstufen
STUFE ZÜGE/GESAMTZEIT ANZEIGE
17 .............40 Züge in 1 stunde 30 min ............1:30;40
18 .............35 Züge in 1 stunde 45 min ............1:45;35
19 .............40 Züge in 1 stunde 45 min ............1:45;40
20 .............35 Züge in 1 stunde 30 min ............1:30;35
21 .............40 Züge in 2 stunden ......................2:00;40
22 .............45 Züge in 2 stunden 30 min ..........2:30;45
23 .............50 Züge in 2 stunden ......................2:00;50
24 .............40 Züge in 3 stunden ......................3:00;40
In den Turnierstufen müssen Sie innerhalb einer vorgegebenen Zeit
SIE WISSEN NOCH NICHT WELCHE SPIELSTUFE
GEEIGNET IST? HIER SIND EINIGE TIPS!
•
Sind Sie Einsteiger oder Gelegenheitsspieler?
mit den Spaß- oder Trainingsstufen. Diese Stufen schränken die
Suchtiefe des Computers ein. Er spielt schwächer und Sie haben
erhöhte Gewinnchancen! Noch einfacher wird es, wenn Sie
zusätzlich den „einfachen Modus” aktivieren.
•
Sie sind Fortgeschrittener?
Trainings- oder Turnierstufen. Die Normalen Stufen bieten von
kurzer bis zu 10 min Rechenzeit für den Computer einige
Abwechslung. Die Turnierstufen sind dann schon eine große
Herausforderung, während die Trainingsstufen eine Begrenzung
der Computer-Rechenzeit ermöglichen und so mehr Chancen
geben, eine Partie zu gewinnen. Vergessen Sie nicht, die
aufregenden Möglichkeiten mit Blitzschach und Schnellschach
auszuprobieren.
•
Möchten Sie experimentieren?
stufen, um aus einer bestimmten Stellung heraus, die besten
Möglichkeiten zu finden. Die Module schaffen es, Matt 8 Züge im
voraus zu berechnen. Schließlich haben Sie auch noch die
Analysestufe, die jederzeit die beste Zugmöglichkeit errechnen
kann.
Starten Sie mit den normalen,
Verwenden Sie die Mattsuch-
Beginnen Sie
eine bestimmte Anzahl Züge ausführen. Überschreitet ein Spieler das
Zeitlimit, blinkt (TImE) im Display zusammen mit der abgelaufenen Zeit.
Die Partie ist zu Ende. Wenn Sie wollen, können Sie jetzt sogar zu Ende
spielen, um Ihr Können zu testen.
Haben Sie eine Turnierstufe ausgewählt, können Sie wählen, ob die
Zeit als Countdown angezeigt werden soll (anstatt der bisher verstrichenen Zeit). Dazu sollten Sie kurz in Abschnitt 5.1 nachlesen. Ist die Zeit
abgelaufen, endet auch der Countdown und die Uhr wird wieder normal
angezeigt. Zusätzlich können Sie auch die Bronstein-Zeitnahme wählen.
3.3 Blitzschach
STUFE ZEIT PRO SPIEL ANZEIGE
25 ....................5 minuten .................. 0:05;99
26 ..................10 minuten .................. 0:10;99
27 ..................15 minuten .................. 0:15;99
DEUTSCH
27
Page 28

28 ..................20 minuten .................. 0:20;99
29 ..................30 minuten .................. 0:30;99
30 ..................45 minuten .................. 0:45;99
31 ..................60 minuten .................. 1:00;99
32 ..................90 minuten .................. 1:30;99
In den Blitzschachstufen (auch
Schnellschach
genannt), sehen Sie
die Gesamtzeit für eine Partie. Ist diese abgelaufen, blinkt TImE auf
und das Spiel ist zu Ende.
Haben Sie eine Blitzschachstufe ausgewählt, können Sie wählen, ob
die Zeit als Countdown angezeigt werden soll (anstatt der bisher
verstrichenen Zeit). Dazu sollten Sie in Abschnitt 5.1 nachlesen. Ist die
Zeit abgelaufen, endet auch der Countdown und die Uhr wird wieder
normal angezeigt. Auch hier ist die Bronstein-Zeitnahme eine Option.
3.4 Spaßstufen
STUFE ZEIT PRO ZUG ANZEIGE
33 .................. 1 sekunde ................... Fun: 1
34 .................. 2 sekunden ................. Fun: 2
35 .................. 3 sekunden ................. Fun: 3
36 .................. 4 sekunden ................. Fun: 4
37 .................. 5 sekunden ................. Fun: 5
38 .................. 6 sekunden ................. Fun: 6
39 .................. 7 sekunden ................. Fun: 7
Sie sind Einsteiger oder Gelegenheitsspieler? Wenn ja, dann sind
diese Stufen genau für Sie gedacht! Hier beschränkt der Computer
seine Suche und spielt schwächer. Der Vorteil - Ihre Gewinnchancen
steigen und der Spielspaß auch. Sie können die Anforderungen
langsam steigern und Ihr Schachwissen vergrößern. Spielstufe 33 ist
die schwächste Spaßstufe. Hier opfert der Computer noch sehr viel.
Doch schon Stufe 35 ist schwieriger als man annimmt. Einfach
ausprobieren und gewinnen!
3.5 Analysestufe
STUFE ZEIT ANZEIGE
40 ................. kein Zeitlimit ................ 9:99;99
Auf dieser Stufe rechnet der Computer solange bis er ein zwingendes
Matt oder einen zwingenden Zug findet, bis er die Stellung mit maximaler Suchtiefe berechnet hat oder bis er unterbrochen wird, wenn Sie
ENT drücken. Unterbrechen Sie die Suche, führt der Computer den
bislang besten Zug aus. Experimentieren Sie - bauen Sie interessante
Stellungen auf und lassen Sie diese vom Computer analysieren! Er
kann Stunden oder sogar Tage rechnen, um den bestmöglichen Zug zu
finden. Vergessen Sie nicht, dabei das Display zu beobachten (s. 5.3).
3.6 Mattsuchstufen
STUFE MATTSUCHE ANZEIGE
41 .................... Matt in 1.................... =in: 1
42 .................... Matt in 2.................... =in: 2
43 .................... Matt in 3.................... =in: 3
44 .................... Matt in 4.................... =in: 4
45 .................... Matt in 5.................... =in: 5
46 .................... Matt in 6.................... =in: 6
47 .................... Matt in 7.................... =in: 7
48 .................... Matt in 8.................... =in: 8
Haben Sie eine dieser Stufen aktiviert, ist ein Mattsuchprogramm
eingestellt. Haben Sie eine Stellung, wo ein Matt gefunden werden
kann, können Sie den Computer suchen lassen, indem Sie Ihn in eine
dieser Stufen schalten. Die Module lösen Mattprobleme bis zu 8 Züge
im voraus. Matt in 1 bis 5 sind schnell gefunden, die anderen Lösungen
brauchen Zeit. Wird kein Matt gefunden erscheint die Meldung –––––.
Um die Partie fortzusetzen wählen Sie eine andere Spielstufe.
3.7 Trainingsstuf en
STUFE ANZEIGE STUFE ANZEIGE
49 .............. PLY: 1 57............... PLY: 9
50 .............. PLY: 2 58............... PLY:10
51 .............. PLY: 3 59............... PLY:11
52 .............. PLY: 4 60............... PLY:12
53 .............. PLY: 5 61............... PLY:13
54 .............. PLY: 6 62............... PLY:14
55 .............. PLY: 7 63............... PLY:15
56 .............. PLY: 8 64............... PLY:16
In den Trainingsstufen, wird die Suchtiefe des Computers eingeschränkt und durch eine bestimmte Zuganzahl begrenzt. Wenn Sie
durch diese Stufen blättern, erscheint PLY:# im Display. Ein „ply” ist
ein einzelner Zug und „#” steht für die Anzahl Züge der Suchtiefe. Auf
Stufe 49, z.B., begrenzt sich die Suche des Computers auf einen Zug,
den er durchrechnet. Auf dieser Stufe übersieht er garantiert manche
Mattführung. Er spielt schwächer und gibt vor allem Gelegenheitsspielern eine hohe Gewinnchance.
28
Page 29

NUTZEN SIE DIESE ÜBERSICHT
ZUR WAHL EINER SPIELSTUFE
LEV
1.
2.
Wählen Sie nun eine Spielstufe. Blättern
Sie durch die einzelnen Stufen, bis die
gewünschte gezeigt wird:
3.
Drücken Sie LEV, um in den LevelModus zu kommen.
• Drücken Sie BLACK/>, um
in 1er Schritten vorwärts zu
blättern.
• Drücken Sie WHITE/<, um
in 1er Schritten rückwärts zu
blättern.
• Drücken Sie LEV, um in 8er
LEV
ENT
Schritten zu blättern
Bestätigen Sie Ihre Wahl mit ENT.
30 Sek.
pro Zug
L 0:30
Stufe 8
20 Sek.
pro Zug
L 0:20
Stufe 7
15 Sek.
pro Zug
L 0:15
Stufe 6
10 Sek.
pro Zug
L 0:10
Stufe 5
5 Sek.
pro Zug
L 0:05
Stufe 4
3 Sek.
pro Zug
L 0:03
Stufe 3
2 Sek.
pro Zug
L 0:02
Stufe 2
1 Sek.
pro Zug
L 0:01
Stufe 1
15 min.
pro Zug
L15:00
Stufe 16
10 min.
pro Zug
L10:00
Stufe 15
5 min.
pro Zug
L 5:00
Stufe 14
3 min.
pro Zug
L 3:00
Stufe 13
2 min.
pro Zug
L 2:00
Stufe 12
1.5 min.
pro Zug
L 1:30
Stufe 11
1 min.
pro Zug
L 1:00
Stufe 10
45 Sek.
pro Zug
L 0:45
Stufe 9
40 Züge
in 3:00
3:00;40
Stufe 24
50 Züge
in 2:00
2:00;50
Stufe 23
45 Züge
in 2:30
2:30;45
Stufe 22
40 Züge
in 2:00
2:00;40
Stufe 21
35 Züge
in 1:30
1:30;35
Stufe 20
40 Züge
in 1:45
1:45;40
Stufe19
35 Züge
in 1:45
1:45;35
Stufe 18
40 Züge
in 1:30
1:30;40
Stufe 17
90 min.
pro Partie
1:30;99
Stufe 32
60 min.
pro Partie
1:00;99
Stufe 31
45 min.
pro Partie
0:45;99
Stufe 30
30 min.
pro Partie
0:30;99
Stufe 29
20 min.
pro Partie
0:20;99
Stufe 28
15 min.
pro Partie
0:15;99
Stufe 27
10 min.
pro Partie
0:10;99
Stufe 26
5 min.
pro Partie
0:05;99
Stufe 25
Analyse-
Stufe
9:99;99
Stufe 40
7 Sek.
pro Zug
Fun: 7
Stufe 39
6 Sek.
pro Zug
Fun: 6
Stufe 38
5 Sek.
pro Zug
Fun: 5
Stufe 37
4 Sek.
pro Zug
Fun: 4
Stufe 36
3 Sek.
pro Zug
Fun: 3
Stufe 35
2 Sek.
pro Zug
Fun: 2
Stufe 34
1 Sek.
pro Zug
Fun: 1
Stufe 33
Matt in
8 Zügen
=in: 8
Stufe 48
Matt in
7 Zügen
=in: 7
Stufe 47
Matt in
6 Zügen
=in: 6
Stufe 46
Matt in
5 Zügen
=in: 5
Stufe 45
Matt in
4 Zügen
=in: 4
Stufe 44
Matt in
3 Zügen
=in: 3
Stufe 43
Matt in
2 Zügen
=in: 2
Stufe 42
Matt in
1 Zug
=in: 1
Stufe 41
8 Züge
Suchtiefe
PLY: 8
Stufe 56
7 Züge
Suchtiefe
PLY: 7
Stufe 55
6 Züge
Suchtiefe
PLY: 6
Stufe 54
5 Züge
Suchtiefe
PLY: 5
Stufe 53
4 Züge
Suchtiefe
PLY: 4
Stufe 52
3 Züge
Suchtiefe
PLY: 3
Stufe 51
2 Züge
Suchtiefe
PLY: 2
Stufe 50
1 Zug
Suchtiefe
PLY: 1
Stufe 49
16 Züge
Suchtiefe
PLY:16
Stufe 64
15 Züge
Suchtiefe
PLY:15
Stufe 63
14 Züge
Suchtiefe
PLY:14
Stufe 62
13 Züge
Suchtiefe
PLY:13
Stufe 61
12 Züge
Suchtiefe
PLY:12
Stufe 60
11 Züge
Suchtiefe
PLY:11
Stufe 59
10 Züge
Suchtiefe
PLY:10
Stufe 58
9 Züge
Suchtiefe
PLY: 9
Stufe 57
DEUTSCH
Siehe auch Abschnitt 3.
STUFEN
29
TURNIERSTUFENNORMALE
BLITZSTUFEN SPAßSTUFEN+
ANALYSESTUFE
MATTSUCHSTUFEN
TRAININGSSTUFEN
Page 30

4. INFO-MODUS: BEOBACHTEN UND LERNEN
Stellen Sie sich folgendes vor: Sie spielen Schach gegen einen
Freund und er ist am Zug. Sie würden zu gerne wissen, welche Variante
er durchrechnet und was er über die aktuelle Stellung denkt. Aber
natürlich würden Sie niemals fragen - weil dies einfach nicht gemacht
wird!
Tja, mit dem Computer ist dies ganz anders. Sie können alles
fragen, was Ihnen in den Sinn kommt - und die Antwort kommt ganz
sicher. Tatsächlich erhalten Sie jede Menge Informationen über die
Berechnungen des Computers. Auf Anfrage zeigt er Ihnen den Zug,
über den er nachdenkt, die möglichen Antwortzüge, die Bewertung der
aktuellen Stellung, die Rechentiefe und mehr. Sie können sich vorstellen, wie sehr diese Funktionen Ihr eigenes Spiel verbessern werden.
Dabei erfahren Sie weit mehr über Schach und seine Strategien.
Info-Modus anwenden
Wie kommen Sie an all diese Spielinformationen? Indem Sie jederzeit
in den Info-Modus umschalten können. Machen Sie dies während der
Computer denkt, sehen Sie wie er Züge und Antwortzüge durchrechnet.
Siehe auch „INFO-MODUS AUF EINEN BLICK”, wo Sie alle
Möglichkeiten als Übersicht finden.
Spielinformationen sind in 4 Gruppen unterteilt. Durch drücken von
INFO können Sie zu einzelnen Gruppen springen. Mit BLACK/> und
WHITE/< blättern Sie in 1er Schritten. Wollen Sie den Info-Modus
verlassen, drücken Sie einfach CL und die Anzeige springt wieder auf
die normale Schachuhr.
Nachdem Sie nun alles über den Info-Modus wissen, lohnt es sich in
Abschnitt 5.3 die Funktion „rotierende Anzeige” nachzulesen. Ist diese
Funktion aktiviert, wechselt die Anzeige automatisch im 1 Sek.-Takt zu
allen Zugberechnungen - Sie können tatsächlich beobachten, wie der
Computer „laut denkt”!
verfügbar ist, erscheinen Bindestriche im Display (–––––).
4.1 Hauptvarianten
Drücken Sie INFO 1mal, erscheinen Informationen über die
wichtigste Variante (der wahrscheinlichste Zug mit den voraussichtlichen Antwortzügen). In der ersten Anzeige sehen Sie den aktuell
berechneten Zug. Die Hauptvariante wird mit einer Suchtiefe von bis zu
Immer wenn die aufgerufene Funktion nicht
6 Zügen angezeigt. Drücken Sie BLACK/> mehrmals, können Sie
jeden dieser 6 anzeigen lassen:
• Zug 1 - Zug 6 (der Hauptvariante)
Mit WHITE/< können Sie zurückblättern und sich alles nochmals
anschauen. Drücken Sie CL, um zur normalen Anzeige zurückzukehren.
Da der erste Zug der Hauptvariante, der Zug ist, den Sie am wahrscheinlichsten machen, können Sie ihn auch als Tip verwenden. Also
immer wenn Sie Hilfe benötigen - einfach INFO drücken.
4.2 Suchinformationen
Drücken Sie INFO ein zweites Mal, um Informationen zur Suchtiefe
zu erhalten. Mit BLACK/> können Sie dann wieder vorwärts durch 4
Anzeigen blättern:
• Bewertung der aktuellen Stellung (basierend auf einem
Bauernwert = 1.0; positive Zahl bedeutet, daß Weiß im Vorteil ist).
• 2 Zahlen: die erste ist die Suchtiefe bzw. die Anzahl der Züge, die
der Computer im voraus berechnet; die zweite steht für die bisher
berechneten Züge.
• Der aktuell zu rechnende Zug.
• Die Rechengeschwindigkeit bzw. -knoten pro Sekunde.
Mit WHITE/< können Sie auch hier wieder rückwärts blättern, mit
CL den Modus verlassen.
4.3 Schachuhr-Informationen
Drücken Sie INFO ein drittes Mal. Die Schachuhr mißt weiterhin die
Zeiten für beide Seiten. Mit BLACK/> können Sie blättern und treffen
auf folgende Informationen:
• Verstr ichene Zeit seit dem letzten Zug.
• Gesamtzeit für den Computer.
• Gesamtzeit des Menschen.
• Verbleibende Zeit für den Computer
• Verbleibende Zeit für den Menschen
Drücken Sie WHITE/<, um zurückzublättern. Mit CL können Sie
den Modus verlassen.
Die Uhr stoppt, sobald Sie einen Zug zurücknehmen, SpielstufenEinstellungen überprüfen, Optionen auswählen, Positionen aufbauen
bzw kontrollieren oder das Gerät ausschalten. In all diesen Fällen
werden die Zeiten jedoch gespeichert. Immer wenn Sie die Spielstufe
ändern oder CL und ENTER gleichzeitig drücken, springt die Anzeige
zurück auf 0:00:00.
(nur Blitz-oder Turnierschach).
(nur Blitz-oder Turnierschach).
30
Page 31

4.4 Zugzähler/Zuganzahl
Drücken Sie INFO ein viertes Mal, um die Zuganzahl der Partie
abzurufen. Mit WHITE/< können Sie dann alle Züge der Partie
zurückverfolgen (bis zu 30).
• Anzahl der bisher gespielten weißen Züge.
• Zuganzahl der Partie.
Mit BLACK/> können Sie wieder vorwärts blättern; mit CL den
Modus verlassen.
4.5 Wie wäre es mit einem Hinweis? Einfach fragen!
Falls Sie diese Funktion in Abschnitt 4.1 überlesen haben, wollen wir
nochmals darauf aufmerksam machen - benötigen Sie Hilfe, dann
können Sie Ihren Computer fragen. Einfach INFO drücken, wenn Sie am
Zug sind und sofort schlägt der Computer einen Zug für Ihre Seite vor.
5. OPTIONEN FÜR SPIELSP ASS UND VIELFAL T
Zusätzlich zu allen Möglichkeiten, die Sie bisher kennengelernt
haben, bietet Ihnen der Computer zahlreiche andere Spieloptionen. Alle
können jederzeit während einer Partie eingestellt werden. Sie werden
nacheinander im folgenden Abschnitt vorgestellt.
Spieloptionen auswählen
Siehe auch „DAS WICHTIGSTE DES OPTIONS-MODUS: SO
GEHT´S!”
Die Spieloptionen sind in 3 Gruppen unterteilt:
Displayeinstellungen.
zur anderen. Jede Gruppe enthält 8 verschiedene Optionen, die wieder
mit BLACK/> und WHITE/< detailliert aufgerufen werden k önnen.
Jede Option (Ausnahme: Bronstein-Modus) läßt sich mit ENT zu- (+)
bzw. abschalten (–). Mit OPT können Sie zu einzelnen Gruppen
springen - so geht´s schneller und einfacher.
Die Bronstein-Zeitnahme wählen Sie, indem Sie mit ENT durchblättern, bis die gewünschte Funktion im Display erscheint.
Stimmen alle Einstellungen, können Sie mit CL den Options-Modus
verlassen.
Schalten Sie Ihr Gerät zum ersten Mal an, sind einige Einstellungen
vorgegeben. Alle, die im Übersichtschart mit + markiert sind, sind aktiv.
Drücken Sie OPT, blättern Sie von einer Gruppe
Computer-, Spiel- und
INFO-MODUS AUF EINEN BLICK
HAUPTVARIANTE:
•Zug 1 (der Hauptvariante)
INFO
SUCHINFORMATIONEN:
INFO
SCHACHUHR-INFORMATIONEN:
INFO
ZUGZÄHLER:
INFO
CL
x1
•Zug 2 (der Hauptvariante)
•Zug 3 (der Hauptvariante)
•Zug 4 (der Hauptvariante)
•Zug 5 (der Hauptvariante)
•Zug 6 (der Hauptvariante)
• Bewertung der aktuellen Stellung
x2
x3
x4
Drücken Sie CL um den Info-Modus zu verlassen.
•2 Zahlen: die erste ist die Suchtiefe bzw.
die Anzahl der Züge, die der Computer
im voraus berechnet; die zweite steht für
die bisher berechneten Züge
•Der aktuell zu rechnende Zug
•Die Rechengeschwindigkeit bzw. -knoten
pro Sekunde
•Verstrichene Zeit seit dem letzten Zug
•Gesamtzeit für den Computer
•Gesamtzeit des Menschen
•Verbleibende Zeit für Weiß*
•Verbleibende Zeit für Schwarz*
*Nur für Turnier- und Blitzschachstufen
• Anzahl der bisher gespielten weißen Züge
•Zuganzahl der Partie
DEUTSCH
Details siehe Abschnitt 4.
31
Page 32

Immer wenn Sie NEW GAME wählen werden die meisten Ihrer
Einstellungen übernommen. Sinnvolle Ausnahme ist hierbei
„automatische Antwort” (wird automatisch wieder angestellt bei jeder
neuen Partie).
5.1 Computereinstellungen
Drücken Sie OPTION 1mal, um zu den Computereinstellungen zu
gelangen. Nutzen Sie BLACK/> und WHITE/< wieder zum blättern
und ENT, um Optionen an- bzw. auszuschalten. Für den Bronstein-
Modus drücken Sie nur ENT bis die gewünschte Funktion angezeigt
wird. Mit CL können Sie den Modus verlassen.
a. Automatisches Spiel
An:+Auto Aus:-Auto
Normalerweise antwortet der Computer automatisch, sobald Sie den
weißen Zug eingegeben haben. Stellen Sie diese Option jedoch auf
AUS, können Sie den Computer beim Spielen beobachten. Diese
Funktion ist sinnvoll, wenn Sie einen guten Spielaufbau studieren
wollen. Stellen Sie z.B. Spielstufe 58 mit einer Suchtiefe Sie 10 Zügen
ein. Dann lassen Sie dem Computer Zeit. Später können Sie die Partie
Zug für Zug zurücknehmen und sich Notizen machen. Hier noch einige
Hinweise:
• Um den Computer während der Eröffnung zum Zug zu zwingen,
drücken Sie CL.
• Die Funktion kann durch ENT jederzeit ausgeschaltet werden.
• Die Funktion wird automatisch auf AUS gestellt, wenn Sie ein neues
Spiel starten.
b. Sound bei Zugeingabe
An:+SNd Aus:-SNd
Mit dieser Option, können Sie den Sound bei Zugeingabe
ausschalten. Sie werden dann immer noch Signale erhalten - wenn der
Computer antwortet, Sie einen illegalen Zug machen oder eine Taste
drücken.
c. Stille
An:+SIL Aus:-SIL
Wollen Sie absolut ohne Signale spielen? Kein Problem - stellen Sie
diese Option einfach AN und Sie werden keinen Ton mehr hören.
d. T rainingsmodus
An:+Coch Aus:-Coch
Mit +Coch wählen Sie einen Trainer, der Sie immer wieder daran
erinnert, auf Ihre Strategie zu achten. In diesem Modus schaut Ihnen
der Computer über die Schulter während Sie spielen, beobachtet, hilft
und warnt! Er gibt Ihnen Tips, wenn eine Ihrer Figuren in Gefahr ist bzw.
Sie Material verlieren würden. Sie hören einige Signaltöne und sehen
durch die LED-Leuchten, welche Figur gefährdet ist.
In diesem Modus macht Sie der Computer als Trainer auch auf
taktische Fehler aufmerksam und meldet sich bei Zügen, die einen
Nachteil für Sie bedeuten würden. Sie können dann diesen Zug
zurücknehmen und eine bessere Strategie wählen.
e. Uhrticken
An:+tic Aus:-tic
Schalten Sie diese Option an, aktivieren Sie ein Uhrticken, wie es im
tatsächlichen Turnierbedingungen vorkommt. So schaffen Sie die eigene
Turnierwirklichkeit im Wohnzimmer!
f. Countdown Clock
An:+c:dn Aus:-c:dn
Schalten Sie diese Option zu, zeigt der Computer den Countdown der
Zeit an, anstatt der bisher verstrichenen Zeit.
Achtung: diese Option ist nur in Verbindung mit Turnier- oder
Blitzstufen möglich.
g. Bronstein Modus
An: bc 2 . bc 5 . bc10 . bc15 . bc 20 . bc 30 . bc 60
Aus: bc 0
In den Turnier- und Blitzschachstufen verfügen Sie über eine
bestimmte Zeitvorgabe. Vor allem bei Blitzschach stehen Sie als Spieler
unter großem Zeitdruck. Leider führt dies oft zu unüberlegten Zügen,
die dann einen guten Anfang zunichte machen.
Mit der Bronstein Zeitnahme kann man diesen Effekt wirksam
umgehen. Sie erhalten im Bronstein Modus zusätzlich eine Vorgabe für
jeden Zug. Hier ein Beispiel: Nehmen wir an, Sie spielen Blitzstufe 28,
d.h. erhalten eine Zeitvorgabe von 20 min pro Partie. Mit der Bronstein
Option bc10 erhalten Sie zusätzlich für jeden Zug 10 Sekunden
Zeitgutschrift. Diese 10 Sekunden werden addiert, nachdem Sie den
Zug ausgeführt haben. Benötigen Sie weniger als 10 Sekunden (z.B. 7
32
Page 33

DAS WICHTIGSTE DES OPTIONS-MODUS: SO GEHT’S!
1.
Drücken Sie OPT mehrmals, um
einen Modus auszuwählen.
2.
Nun können Sie Ihre Optionen, wie
unten aufgeführt, auswählen.
Blättern Sie sich durch die
Optionen:
• Drücken Sie BLACK/>,
um in 1er Schritten
vorwärts zu blättern.
• Drücken Sie WHITE/<,
um in 1er Schritten
rückwärts zu blättern.
Ist Ihre Option angezeigt,
ENT
können Sie diese mit ENT
an- bzw. ausschalten.
Bronstein-Modus können Sie
mit ENT durchblättern, bis Ihre
Einstellung angezeigt wird.)
3.
Drücken Sie CL, um
den Optionsmodus zu
verlassen.
(Im
CL
ROTIERENDE
ANZEIGE
EINSTELLUNGEN
EINSTELLUNGEN
SPIEL-
COMPUTER-
OPT
x1 = COMPUTEREINSTELLUNGEN (Auto...)
x2 = SPIELEINSTELLUNGEN (SEL...)
x3 = ROTIERENDE ANZEIGE (rd:1...)
x4 = zurück zu COMPUTEREINSTELLUNGEN usw...
Variante
auf Zug 1
-rd:1
Selektive/
Brute Force
Suche
+SEL
Automatische
Antwort
-AuTo
Variante
auf Zug 2
-rd:2
Einfacher
Modus
-EASY
Sound bei
Tastendruck
+SNd
bc 2 . bc 5 . bc10 . bc15 . bc20 . bc30 . bc60
Variante
auf Zug 3
-rd:3
Zufalls-
auswahl
-rand
Stille
-SIL
Variante
auf Zug 4
-rd:4
Bibliothek
An/Aus
+book
Trainings-
Modus
-Coch
Stellungsbewertung
-rd:E
Vollständige
Bibliothek
-bk:FL
Uhrticken
-tic
Suchtiefe
und Züge
-rd:d
Passive
Bibliothek
-bk:Pa
Countdown
Uhr
-c:dn
Rechen-
knoten
-rd:n
Aktive
Bibliothek
-bk:at
Bronstein-
Uhr
bc 0
Details siehe Abschnitt 5.
Zeit pro
Zug
-rd:t
Turnier-
bibliothek
-bk:tn
Systemtest
-tEst
DEUTSCH
Sekunden), werden nur diese 7 Sekunden wieder addiert. Hier ein
Beispiel:
Weiß hat eine Zeitvorgabe von 20 Minuten pro Partie und spielt mit
der Bronstein Option 10 Sekunden pro Zug.
•Weiß überlegt 40 Sekunden für seinen ersten Zug. Die CountdownUhr zählt von 0:20:00 auf 0:19:20 herunter. Nachdem der Zug
ausgeführt ist, werden wieder 10 Sekunden addiert. Die neue Uhr
ist also 0:19:30.
•Weiß macht den zweiten Zug nach 7 Sekunden. Die CountdownUhr zählt von 0:19:20 auf 0:19:13 herunter. Nachdem der Zug
ausgeführt ist, werden wieder 7 Sekunden addiert. Die neue Uhr ist
also 0:19:20.
Drücken Sie 3mal OPT und blättern Sie bis der Bronstein-Modus
angezeigt wird. Drüc ken Sie dann mehrmals ENT, um eine der
Möglichkeiten auszuwählen.
33
Page 34

BRONSTEIN MODUS ANZEIGE
Bronstein Zeitnahme aus................................. bc 0
Maximal 2 sek. pro Zug werden addiert ........ bc 2
Maximal 5 sek. pro Zug werden addiert ........ bc 5
Maximal 10 sek. pro Zug werden addiert ........ bc 10
Maximal 15 sek. pro Zug werden addiert ........ bc 15
Maximal 20 sek. pro Zug werden addiert ........ bc 20
Maximal 30 sek. pro Zug werden addiert ........ bc 30
Maximal 60 sek. pro Zug werden addiert ........ bc 60
h. Systemtest
An:+tESt Aus:-tESt
Der Systemtest ist vor allem als Problemlösungs-Option gedacht. Sie
können den Test aktivieren durch +tESt. Mit CL und ENT gleichzeitig
brechen Sie ihn wieder ab.
ACHTUNG: Sie sollten diese Option nicht
während einer Partie aktivieren, sonst gehen die aktuellen Daten
verloren.
5.2 Spieleinstellungen
Diese Einstellungen beeinflussen die Rechenweise des Comput-
ers. Drücken Sie OPT 2mal, um zu den Spieleinstellungen zu gelangen.
Nutzen Sie BLACK/> und WHITE/< wieder zum Blättern und ENT,
um Optionen an- bzw. auszuschalten. Mit CL können Sie den Modus
verlassen.
a. Selektive Suche
An:+SEL Aus:-SEL
Normalerweise nutzt das Computerprogramm einen selektiven
Suchalgorithmus. Dies hilft ihm, seine Suche wesentlich effektiver zu
gestalten. Schalten Sie diese Suche aus (-SEL), wird die Brute Force
Methode aktiviert, die noch stärkere Ergebnisse liefert.
Mattsuchstufen verwenden automatisch die Brute Force Methode.
b. Einfacher Modus
An:+EAsy Aus:-EASy
Sie wollen mehr Partien gegen den Computer gewinnen? Versuchen
Sie es mit diesem Modus, welcher verhindert, daß der Computer Ihre
Bedenkzeit für seine Rechnungen nutzt. Das schwächt ihn auf allen
Stufen ohne seine Zeitnahme zu beeinflussen. Normalerweise, siehe
auch Abschnitt 2.10, nutzt der Computer Ihre Zeit auch, um zu rechnen
und Strategien zu planen. Deshalb ist er auch ein ziemlich harter
Gegner!
c. Zufallsauswahl
An:+rand Aus:-rand
Schalten Sie diese Option an, um mehr Vielfalt ins Spiel zu bringen.
Anstatt den besten Zug zu nehmen, spielt der Computer einen der
besten Züge. Welchen entscheidet der Zufall.
d. Bibliothek An/Aus
An:+book Aus:-book
Um die Bibliothek auszuschalten, stellen Sie diese Option einfach auf
-bOOk. So wird der Computer gezwungen, seine Eröffnungszüge zu
berechnen anstatt sie sich einfach aus der Bibliothek zu holen. Details
über Eröffnungen finden Sie auch in Abschnitt 2.9.
Alle anderen
Bibliotheken sind dann automatisch ausgeschaltet.
e. Vollständige Bibliothek
An:+bk:FL Aus:-bk:FL
Mit dieser Option schöpft der Computer aus seiner ganzen Eröffnungsbibliothek. So können Sie zahlreiche verschiedene Eröffnungen
beobachten.
Die Turnier-, aktive und passive Bibliothek sind dann
automatisch ausgeschaltet.
Bei dieser Option, kann es sein, daß der Computer fragwürdige Züge
macht. Dies entsteht, weil die Bibliothek auf alle Varianten (auch auf
unsinnige) Antwortzüge gespeichert hat. Obwohl er solche Var ianten nie
spielen würde, muß er doch wissen, wie man darauf antwortet.
f. Passive Bibliothek
An:+bk:Pa Aus:-bk:Pa
Mit dieser Option, steuern Sie den Computer so, daß er sich auf
passive Züge und geschlossene Positionen zurückzieht.
Die T urnier-
und die aktive Bibliothek sind dann automatisch ausgeschaltet.
g. Aktive Bibliothek
An:+bk:at Aus:-bk:at
Ist diese Option aktiv, treffen Sie auf einen offensiven Mitspieler, der
durchaus Risiken eingeht.
Die Turnier- und passive Bibliothek sind dann
automatisch ausgeschaltet.
34
Page 35

h. T urnierbibliothek
An:+bk:tn Aus:-bk:tn
Schalten Sie diese Option an, muß der Computer immer die beste
Variante für jede Eröffnung spielen. Obwohl dies zu den besten
Strategien führt, limitiert die Option doch die Bandbreite der möglichen
Eröffnungen.
Die aktive und passive Bibliothek sind dann automatisch
ausgeschaltet.
5.3 Rotierende Anzeige
Normalerweise zeigt das Display die Schachuhr für den Spieler. Aber
der Computer kann auch Informationen aufzeigen (siehe Abschnitt 4).
Die rotierende Anzeige geht einher mit dem Info-Modus, da diese
Funktion erlaubt, einzelne Informationen einzusehen. Sie können
einzelne oder alle Optionen dieser Funktion nutzen.
WICHTIG: Diese Funktion ist nur aktiv SOLANGE DER COMPUTER RECHNET.
Drücken Sie OPTION 3mal, um „rotierende Anzeige” zu wählen. Mit
BLACK/> und WHITE/< können Sie blättern. Mit ENT oder durch
Drücken von Feldern schließlich, lassen sich die einzelnen Möglichkeiten der Anzeige aktivieren. Denken Sie, daß die Anzeige zu schnell
wechselt, drücken Sie INFO um zu stoppen. Durch anschließendes
Drücken von INFO, BLACK/> und WHITE/< können die Informa-
tionen einzeln abrufen.
Um die „rotierende Anzeige” wieder zu starten, drücken Sie OPT und
dann CL. In jedem Falle spult der Computer dann seine Berech-
nungen vor Ihren Augen ab....
Folgende Informationen ersehen Sie:
• rd:1 - rd:4 = die wahrscheinlichste Variante (bis zu 4 Züge)
• rd:E = eine aktuelle Stellungsbewer tung
• rd:d = die Suchtiefe des Computers und die Anzahl der bisher
untersuchten Züge
• rd:n = die Rechenknoten pro Sekunde
• rd:t = die verstrichene Zeit für diesen Zug
Ist die abgefragte Information nicht verfügbar, werden Bindestriche
angezeigt (–––––).
Genaues über die Displayanzeigen finden Sie in Abschnitt 4.
6. POSITIONEN PRÜFEN/AUFBAUEN
6.1 Positionen prüfen
Siehe auch „ES IST EINFACH, POSITIONEN ZU PRÜFEN!”
Stoßen Sie aus Versehen die Schachfiguren um oder sind der
Meinung, daß irgendetwas nicht stimmt, können Sie den Computer zur
Überprüfung der Stellung hinzuziehen. Sind Sie am Zug, drücken Sie
einfach eine FIGURENTASTE (&, %, $, #, @, oder !). Der Computer
zeigt dann, wo die erste Figur dieser Art auf dem Brett steht - das
Display zeigt den Wert und die Farbe, sowie den Feldnamen. Dr ücken
Sie die FIGURENTASTE erneut für die zweite Figur dieser Ar t etc.
Zuerst werden alle weißen, dann alle schwarzen Figuren gezeigt. Gibt
es keine Figur dieser Art mehr, bleibt nur der Wert in der Anzeige
stehen. Sie wollen mehrere Figuren überprüfen? Wiederholen Sie
einfach den Vorgang mit den anderen FIGURTASTEN. Mit CL können
Sie die Positionskontrolle verlassen.
6.2 Positionen verändern und aufbauen
Siehe auch „TESTEN SIE DEN POSITIONS-MODUS”.
Der Positionsmodus ist eine spannende Funktion, die es Ihnen
ermöglicht verschiedenste Stellungen zur Problemlösung oder Analyse
aufzubauen.
Achtung: Die aktuelle Partie wird gelöscht, wenn Sie die Stellung
verändern oder neu aufbauen.
Drücken Sie POS, um den Positions-Modus zu aktivieren und das
Display zeigt -POS-. Sie können eine Stellung immer ändern, wenn
Sie am Zug sind. Haben Sie die neue Stellung aufgebaut, können Sie
mit CL diesen Modus verlassen.
• Um Figuren vom Brett zu nehmen, nehmen Sie die Figur einfach
vom Brett.
Minuszeichen und das aktuelle Feld.
• Um die Stellung einer Figur zu ändern, nehmen Sie diese vom
ihrem aktuellen Feld und stellen Sie dann auf das neue. Das
Display zeigt das erste Feld mit einem Minuszeichen, das zweite
mit einem Plus.
• Um eine Figur hinzuzufügen, dr ücken Sie zunächst eine
FIGURENTASTE (&, %, $, #, @, oder !). Versichern Sie sich, daß
Das Display zeigt Wert und Farbe der Figur, sowie ein
DEUTSCH
35
Page 36

ES IST EINFACH, POSITIONEN ZU PRÜFEN!
ENT
CL
das Display die richtige Farbe zeigt (wenn nicht BLACK/> bzw.
WHITE/< drücken). Stimmt die Anzeige, setzen Sie die Figur auf
das gewünschte Feld. Das Display zeigt Wert und Farbe der Figur,
sowie ein Pluszeichen und das aktuelle Feld.
Vorgang für weitere Figuren, die Sie hinzufügen möchten.
• Um das Brett zu leeren, drücken Sie ENT im Positions-Modus.
Das Display zeigt _ an, um ein leeres Brett zu symbolisieren.
Drücken Sie erneut ENT, um dies zu bestätigen. Dann können Sie
Figuren, wie zuvor beschrieben, hinzufügen. Wollen Sie das Brett
nicht leeren, drücken Sie CL. Die Funktion ist sehr praktisch, wenn
Sie eine Position mit wenigen Figuren aufbauen möchten.
1. Drücken Sie CL und ENT gleichzeitig, um eine
CL
neue Partie zu starten.
Anzeige: [ 0:00:00.
2. Drücken Sie die Taste für den SPRINGER.
Anzeige: [,@,b1 (der erste weiße Springer).
Feld-Leuchte B1 ist an.
3. Drücken Sie wieder die Taste für den SPRINGER.
Anzeige: [,@,G1 (der zweite weiße Springer).
Feld-Leuchte G1 ist an.
4. Drücken Sie wieder SPRINGER.
Anzeige: ],@,b8 (der erste schwarze Springer).
Feld-Leuchte B8 ist an.
5. Und nochmal die SPRINGERTASTE.
Anzeige: ],@,g8 (der zweite schwarze Springer).
Feld-Leuchte G8 ist an.
6. Drücken Sie noch einmal die SPRINGERTASTE.
Anzeige: @ (es gibt keine weiteren Springer).
7. Wiederholen Sie diesen Vorgang für die anderen
Figuren. Mit CL können Sie den Modus verlassen.
Mehr Details finden Sie unter Abschnitt 6.1.
Wiederholen Sie den
TESTEN SIE DEN POSITIONS-MODUS
ENT
POS
E2
E3
D8
H5
• Haben Sie die Position wie gewünscht aufgebaut, versichern
Sie sich, daß die Farbanzeige korrekt ist. Wenn nicht, können sie
mit BLACK/> und WHITE/< ändern.
• Um den Positions-Modus zu verlassen, drücken Sie CL. Sie
kehren zur normalen Partie zurück.
Jede legale Stellung kann aufgebaut werden. Illegale Stellungen
werden vom Computer nicht zugelassen, z.B. wenn der König im
1. Drücken Sie CL und ENT gleichzeitig, um eine
CL
neue Partie zu starten.
Anzeige: [ 0:00:00.
2. Drücken Sie POS, um in den Positions-Modus zu
gelangen.
Anzeige: -POS-.
3. Nehmen Sie den weißen Bauern vom Feld E2 und
entfernen Sie ihn vom Brett.
Anzeige: [,!,-E2.
4. Stellen Sie denselben Bauern auf das Feld E3.
Anzeige: [,!,+E3.
5. Nehmen Sie die schwarze Dame vom Feld D8.
Anzeige: ],%,-D8.
6. Stellen Sie dieselbe Dame auf das Feld H5.
Anzeige: ],%,+H5.
7. Drücken Sie WHITE/<, um die Farbe für den
nächsten Zug zu bestimmen.
8. Drücken Sie CL, um den Modus zu verlassen und
CL
eine Partie zu spielen.
Details siehe Abschnitt 6.2.
36
Page 37

Schach steht, die Anzahl der Figuren überschritten wird usw. In solchen
Fällen meldet sich der Computer, wenn Sie den Modus mit CL
verlassen möchten und wartet auf eine Veränderung der Stellung.
Prüfen Sie die Position mit Hilfe der FIGURENTASTEN und, wenn nötig,
verändern Sie die Stellung. Drücken Sie dann CL, um den Modus zu
verlassen.
7. TECHNISCHE ANGABEN
7.1 Die ACL-Funktion
Computer hängen sich manchmal auf. Dies ist auf statische
Aufladung oder elektronische Störungen zurückzuführen und kann
einfach behoben werden. Stecken Sie einen spitzen Gegenstand für 1-2
Sek. in die ACL-Vertiefung auf der Unterseite Ihres Geräts. Das setzt
den Computer wieder zurück.
7.2 Pflege und Wartung
Ihr Schachcomputer ist ein präzises, elektronisches Gerät. Setzen Sie
es nicht extremen Temperaturen oder hoher Luftfeuchtigkeit aus. Vor
Reinigen der Einheit, stecken Sie bitte den Adapter aus. Verwenden Sie
keine chemischen Mittel, da diese eventuell schädigen können.
7.3 Batterie-Informationen
Wie in Abschnitt 2.11 beschrieben, wird Ihre Partie gespeichert, wenn
Sie mit GO/STOP unterbrechen. Das Modul hat hierfür eine 3 Volt
Lithium Batterie eingebaut. Wir empfehlen Ihnen, diese Batterie alle 12
Monate zu wechseln, um eventuelle Speicherverluste zu vermeiden.
7.4 Technische Spezifikationen
Tasten: 16
Batterien: 1 x 3V Lithium Knopfzelle (CR2032)
Anschluß: 40-poliger Steckanschluß
Maße: 194 x 96 x 25 mm
Gewicht: 250 g
Leisten Sie einen Beitrag zum Umweltschutz:
-Verbrauche Batterien und Akkumlatoren (Akkus) gehören
nicht in den Hausmüll.
- Sie können sie bei einer Sammelstelle für Altbatterien bzw.
Sondermüll abgeben.
Informieren Sie sich bei lhrer Gemeinde.
Bewahren Sie diese Information unbedingt auf!
Saitek behält sich vor, jederzeit technische Änderungen im Interesse der
Weiterentwicklung vorzunehmen.
DEUTSCH
37
Page 38

PROBLEMLÖSUNGEN
SYMPTOME
Das Modul funktioniert nicht.
Der Computer reagiert nicht oder
stürzt während der Partie ab.
Der Computer macht keinen
Zug.
Der Computer akzeptiert Ihren
Zug nicht.
Die Feld-Leuchte bleibt an,
obwohl Sie einen Zug ausgeführt
haben.
Sie können den Positions-Modus
nicht mit CL verlassen.
Das Display zeigt _.
Der Computer scheint einen
illegalen Zug zu machen.
Der Computer macht sofortige
oder unsinnige Züge.
Der Computer gibt keinen Ton
von sich.
Die Partie wurde nach
Abschalten nicht gespeichert.
MÖGLICHE URSACHEN
• Das Modul wurde nicht richtig installiert.
• Statische Aufladung oder elektronische Störung.
• Sie haben zwar GO/STOP gedrückt, aber das Brett selbst
nicht angeschaltet.
•Falscher oder defekter Adapter.
• Das Modul ist nicht richtig angeschlossen.
• Statische Aufladung oder elektronische Störung.
• Möglicherweise ist die Option „automatische Antwort”
abgeschaltet.
• Sie haben eine Stufe gewählt, in welcher der Computer
lange rechnet.
• Sind Sie am Zug? Ist Ihr König im Schach? Wird der Zug
den König ins Schach setzen? Rochieren Sie falsch?
Ziehen Sie nicht regelkonform?
• Der Computer rechnet (es blinkt das Farbzeichen im
Display).
• Sie haben den letzten Computerzug nicht korrekt
ausgeführt.
• Die aufgebaute Position ist nicht regelkonform.
• Sie sind im Positions-Modus und haben ENT gedrückt, um
das Brett zu leeren.
• Der Zug betrifft eine Sonderregel.
• Die Brettstellung ist verschoben.
• Sie haben eine Spielstufe ausgewählt, wo er sehr schnell
ziehen kann oder schwach spielt (Spaßstufe).
• Die Funktion „Stille” ist angeschaltet.
• Die Batterie des Moduls ist schwach oder leer.
• Sie haben nicht GO/STOP gedrückt, bevor Sie das Brett
ausgeschaltet haben.
LÖSUNGEN
• Schalten Sie den Computer aus und schließen Sie die
Module erneut an.
•Drücken Sie ACL (siehe 7.1).
• Schalten Sie das Brett an.
•Verwenden Sie den Mephisto Universal-Adapter (9V
300mA).
• Schalten Sie den Computer aus und schließen Sie die
Module erneut an.
•Drücken Sie ACL (siehe 7.1).
• Diese Option anschalten (siehe 2.7).
•Drücken Sie ENT, um abzubrechen.
• Schauen Sie sich die Situation genau an und lesen Sie auch
nochmal die Schachregeln nach (siehe 6.1).
•Drücken Sie ENT, um die Suche abzubrechen.
•Prüfen Sie die Anzeige und führen Sie den Zug korrekt aus.
• Bitte prüfen Sie die Position und ändern Sie die Aufstellung.
• Um das Brett zu leeren, drücken Sie nochmals ENT; um
abzubrechen CL (siehe 6.2).
• Lernen Sie nochmals die Sonderregeln.
•Prüfen Sie die Stellung (siehe 6.1).
•Drücken Sie LEV und ändern Sie die Stufe, wenn Sie wollen
(siehe 3).
•Prüfen Sie die Optionseinstellungen (siehe 5.1).
• Ersetzen Sie die Batterie.
• Bitte drücken Sie das nächste Mal GO/STOP zuerst.
38
Page 39

MISE EN ROUTE RAPIDE
Pour débuter une partie d’emblée, et sans avoir à lire d’abord l’entièreté de ce manuel, effectuez les opérations de cette Mise en Route Rapide !
D’abord assurez-vous que
votre ordinateur soit
1
éteint.
N’introduisez
jamais un module quand
votre échiquier est allumé.
Ouvrez le tiroir du module.
Fousset le loquet de
2
plastique vers la droite et
soulevez l’armature
evtouvant les modules.
Vous pouvez maintenant
introduire vos 2 modules –
le Senator et le module
LCD.
Allumez l’échiquier en
appuyant sur GO/STOP
3
pour 1 seconde.
Disposez les pièces sur
leurs cases initiales, avec
4
les Blancs de votre côté.
TAKE
BACK
GO/
STOP
ዛዒዓዔዕዖዘዙዜ
ዑ尷尽尻就尯尹尿尵ዑ
ዐ屁屃屁屃屁屃屁屃ዐ
ዏ巀居巀居巀居巀居ዏ
ዎ居巀居巀居巀居巀ዎ
ው巀居巀居巀居巀居ው
ዌ居巀居巀居巀居巀ዌ
ዋ屄层屄层屄层屄层ዋ
ዊ尶局尺尴尮尼尾尸ዊ
ዝዒዓዔዕዖዘዙዞ
GO/
OPT
POSINFO
LEV
STOP
ENT CL
Pressez ENT et CL en
même temps. L’ordinateur
5
se remet à zero.
Opérez les coups sur
l’échiquier. Les coups de
6
l’ordinateur sont affichés
et une lampe s’allume
pour signaler les
coordonnées de la pièce
à déplacer. Ici, l’ordinateur veut déplacer le pion
noir de la case E7 sur E5.
Prenez simplement cette
pièce et placez-le sur E5.
Amusez-vous bien !
Appuyez sur GO/STOP quand vous voulez éteindre
l’ordinateur. La partie actuelle va être memorisée.
ENT
CL
FRANÇAIS
39
Page 40

TOUCHES ET FONCTIONS
1. CONNEXION : Connexion avec 40 pins
pour brancher le module sur le Exclusive.
2. TOUCHES DE SYMBOLE DES PIECES :
Permet de vérifier les positions sur
l’échiquier, de mettre en place les
nouvelles positions et de promouvoir les
pièces.
3. TOUCHES DE JEU
•TAKE BACK (retour en arrière) : En
mode Take Back, appuyez pour aller 10
coups en avance ou en arrière.
• OPT (Option) : Sert à accéder au mode
Option.
• LEV (Niveau) : Pressez pour appeler le
mode Niveau (Level) et séléctionner le
niveau de jeu souhaité.
• INFO : Sert à accéder au mode Info
(pour afficher l’information sur les
parties et permettre d’obser ver la
reflexion de l’ordinateur).
• POS (Position) : Sert à entrer dans le mode Position (pour mettre en
place ou changer les positions sur l’échiquier).
• GO/STOP : Appuyez pour éteindre l’ordinateur. Quand l’appareil est
éteint, l’ordinateur conserve les positions en mémoire.
•WHITE/< et BLACK/> : Permet de changer de niveau dans le
mode Niveau et de parcourir le cycle des options dans le mode
Option, Take Back et Info. Sert également à séléctionner la couleur
dans le mode Position.
• ENT (Enter) : Pressez pour changer de camp avec l’ordinateur.
Pressez cette touche quand l’ordinateur poursuit sa reflexion afin de
le forcer a effectuer son coup. Sert également à débarasser l’échiquier
en mode Position, à activer ou désactiver les options en mode option
et Info, et à quitter le mode Niveau après avoir changé de niveaux.
• CL (Annuler) : Appuyez avec ENT pour commencer une nouvelle
partie. Pressez pour quitter les modes Option, Position, Niveau, Info
sans changer la séléction actuelle.
4. ACL : Sur la face inférieure de l’appareil. Sert à éliminer les décharges
éléctrostatiques après insertion des piles (voir Section 7.1).
TAKE
OPT LEV
BACK
ENT CL
INFO POS
GO/
STOP
SOMMAIRE
MISE EN ROUTE RAPIDE
TOUCHES ET FONCTIONS
INTRODUCTION
1. POUR COMMENCER :
L’ESSENTIEL
1.1 Eteint ? Introduisez les
modules
1.2 Allumé ? Disposez les pièces
1.3 Prêt ? Faites connaissance
avec votre échiquier !
1.4 Les coups de l’ordinateur
1.5 Les retours en arrière
1.6 Démarrer une nouvelle partie
1.7 Trop facile/difficile ? Changer
le niveau
2. DES FONCTIONS A DECOUVRIR
2.1 Indication du tour
4
2.2 Coups spéciaux
2.3 Coups irréguliers et fautifs
2.4 Echec, mat et nul
2.5 Terminer la recherche de
l’ordinateur
2.6 Changer de camp avec
l’ordinateur
2.7 Mode 2 joueurs
2.8 Jouer avec les Noirs de vôtre
côté
2.9 Les ouvertures répertoriées
2.10Reflexion dans le temps de
l’adversaire
2.11Mémorisation de la partie
3. NIVEAUX DE JEU
3.1 Niveaux de Jeu Classiques
3.2 Niveaux T ournoi
3.3 Niveaux Sudden Death
3.4 Niveaux Fun
3.5 Niveau Infini
3.6 Niveaux Recherche de Mat
3.7 Niveaux Entraînement
4. MODE INFO : REGARDER
LES REFLEXIONS DE
L’ORDINATEUR
4.1 Variante principale
4.2 Information sur la
recherche de l’ordinateur
4.3 L’horloge échiquéenne
4.4 Compteur des coups
4.5 Suggestions des coups
5. LES OPTIONS : FUN ET
DIVERTISSEMENT
5.1 Options de mode de
fonctionnement
5.2 Options de mode de jeu
5.3 Options en affichage
cyclique
6. VERIFICA TION DES
POSITIONS / MISE EN PLACE
DES PIECES
6.1 Vérification des positions
des pièces sur l’échiquier
6.2 Changement et installation
de positions
7. FICHE TECHNIQUE
7.1 La fonction ACL
7.2 Soins et entretien
7.3 Information sur les piles
7.4 Caractéristiques
techniques
GUIDE DE DEPANNAGE
40
Page 41

INTRODUCTION
Nos compliments pour l’acquisition du Mephisto Exlusive Senator, un
ordinateur d’échecs qui offre une grande gamme de fonctions
fascinantes et un très puissant programme d’échecs fondé sur un
processeur RISC 32 bit. Le Exclusive Senator est aussi d’un usage
particulièrement aisé : il enregistre tous les coups automatiquement
grâce à son plateau de luxe à senseur incorporé.
Sa liste impressionnante de fonctions spéciales inclue 64 niveaux de
jeux différents pour débutants jusqu’au niveau club, recherche séléctive
complexe à grande vélocité, observation détaillée du raisonnement de
l’ordinateur, grande bibliothèque d’ouvertures, contrôle et dispose des
positions et des problèmes d’échecs, retour en arrière, recherche de
mat, bibliothèque d’ouvertures et beaucoup plus. Prenez du temps pour
étudier toutes les possibilités de jeu et amusez-vous bien avec votre
échiquier Exclusive Senator !
1. POUR COMMENCER : L’ESSENTIEL
1.1 Eteint ? Introduisez les modules
Connectez l’adaptateur d’alimentation sur votre appareil puis au
secteur. Assurez-vous que votre ordinateur soit éteint avant d’introduire
les modules.
ATTENTION : Introduisez ou enlevez les modules quand votre
ordinateur est éteint ! Sinon vous risquez d’ endommager
votre échiquier.
Ouvrez le tiroir du module. Poussez le loquet de plastique vers la
droite et soulevez l’armature entouvant les modules. Vous pouvez
maintenant introduire vos 2 modules – le Senator et le module LCD.
1.2 Allumé ? Disposez les pièces
Allumez l’échiquier en appuyant sur GO/STOP pour 1 seconde.
Disposez les pièces sur leurs cases initiales, avec les Blancs de votre
côté. Pressez ENT et CL en même temps. L’ordinateur se remet à zero.
L’échiquier ne va pas accepter des coups si les pièces ne sont pas
disposées au centre de leur case.
Si le pion sur E7 n’est pas centré, la lampe de E7 reste allumée
jusqu’à ce que vous mettez le pion au centre de cette case.
1.3 Prêt ? Faites connaissance avec votre échiquier !
Commencez à jouer normalement – prenez votre pièce et déplacez-la
sur la case de votre choix. Maintenant l’ordinateur commence sa
réflexion.
Note : En début de partie, la réponse de l’ordinateur est
généralement instantanée sur de nombreux niveaux, car à ce stade il
joue des ouvertures mémorisées dans sa bibliothèque d’ouvertures
(pour détails, lire Section 2.9).
1.4 Les coups de l’ordinateur
Quand vient son tour de jouer, l’ordinateur émet un bip sonore et
indique son coup sur l’écran d’affichage. Les lampes du plateau
s’allument pour indiquer la case de départ et d’arrivée. Déplacer la
pièce comme indiqué.
1.5 Les retours en arrière
Quand vous jouer contre un ordinateur, vous pouvez toujours
changer votre tactique ou essayer une séquence de coups et retourner
en arrière.
Quand vient votre tour de jouer, pressez TAKE BACK et après
WHITE/< et l’ordinateur affiche le coup pour retourner en arrière. Il
faut simplement déplacer la pièce comme indiqué. Appuyez sur WHITE/
< encore une fois si vous désirez retourner un autre coup. Vous
pouvez retourner jusqu’à 200 coups. Pour quitter le mode TAKE BACK
et continuer la partie, appuyez sur CL.
Note : À l’issue d’un retour en arrière sur une prise, l’ordinateur vous
rappelle de remettre sur l’échiquier la pièce prise : la pièce et sa case
sont affichées, et les lampes du plateau s’allument. Remettez la pièce
sur l’échiquier et appuyez sur la case pour achever le retour en arrière.
Le mode TAKE BACK vous offre aussi quelques options « express »
pour retourner en arrière plus vite.
Voir aussi le tableau « OPTIONS EXPRESS DU MODE TAKE
BACK » pour tous les détails.
Après avoir pressé TAKE BACK, vous pourriez effectuer comme
suivant :
• Pressez ENT pour aller à la position initiale ou finale de la partie.
• Pressez TAKE BACK pour avancer ou retourner 10 coups en une
fois.
• Pressez WHITE/< ou BLACK/> pour avancer ou retourner 1
coup à la fois.
FRANÇAIS
41
Page 42

Pressez CL pour quitter le mode Take Back et continuer à jouer.
1.6 Démarrer une nouvelle partie
Pressez ENT et CL en même temps pour commencer une nouvelle
partie quel que soit le moment. Le bip de nouvelle partie signifie que
l’ordinateur est prêt à commencer cette nouvelle partie en restant au
niveau de jeu en cours.
Notez qu’en appuyant sur ENT et CL en même
temps efface la partie en cours de la mémoire ; prenez grand soin de ne
pas presser ces touches par erreur.
1.7 Trop facile/difficile ? Changez le niveau
Quand l’ordinateur est mis en marche pour la première fois, il est
réglé sur le Niveau 4 (5 secondes par coup). Cependant, vous pouvez
choisir n’importe lequel des 64 niveaux décrits à la section 3.
2. DES FONCTIONS A DECOUVRIR
2.1 Indication du tour
Quand l’ordinateur joue les Noirs, un carré noir clignote à l’affichage
tandis que l’ordinateur réfléchit. Après avoir opéré son coup, un carré
blanc apparaît à l’affichage sans clignoter pour indiquer que le tour est
maintenant aux Blancs. Cette fonction permet de reconnaître au simple
coup d’œil si l’ordinateur est en train de réfléchir, et à quel camp le tour
est venu de jouer.
2.2 Coups spéciaux
Les prises : Pour prendre une pièce, prenez la pièce à déplacer,
retirez la pièce prise de l’échiquier, et posez votre pièce sur la case de
la pièce prise. Les prises sont affichées comme E5•F4.
Les prises de pièce en passant : Dans une prise en passant,
l’ordinateur indique par une lampe la pièce à retirer du plateau. Lorsque
vous la retirez, un bip sonore signifie que le coup est fait.
Le Roque : L’ordinateur reconnaît automatiquement une manœuvre
de Roque après déplacement du Roi. Après avoir retiré le Roi de sa
case départ et posé sur la case arrivée, le Exclusive Senator indique
avec les lampes pour vous rappeler de déplacer la Tour. Deplacez la
Tour comme indiqué. Le Roque sur l’aile du Roi est affiché 0-0, celui
sur l’aile de la Dame est affiché 0-0-0.
La promotion de pion : Quand vous promouvez un pion, mettez-le
d’abord de la case départ sur la case arrivée comme d’habitude.
OPTIONS EXPRESS DU MODE TAKE BACK
1. Pressez TAKE BACK.
TAKE
BACK
L’ordinateur émet un bip sonore et la case d’arrivée reste affichée à
l’écran. Vous devez alors appuyez sur la touche de Symbole de Pièces
pour la pièce souhaitée afin d’enregistrer votre choix. L’ordinateur peut
aussi promouvoir et sous promouvoir une pièce. Lors d’une promotion,
l’ordinateur affiche en même temps le pion et la pièce qui le remplacera.
N’oubliez pas de changer la pièce sur l’échiquier.
2.3 Coups irréguliers et fautifs
Votre échiquier n’accepte jamais les coups non autorisés. Si vous en
tentez un, l’ordinateur fera retentir un double bip de basse tonalité, et
les lampes de plateau et l’affichage indiqueront la case d’où provient la
pièce. Etant donné que l’ordinateur ne permettra pas que vous vous
déplaciez sur une case non autorisée, il refuse d’en considérer
l’éventualité et attendra que lui soit indiqué une case autorisée. Vous
devez soit déplacer cette même pièce sur une autre case, soit de
Vous avez maintenant les options suivantes :
• ENT pour aller à la position initiale ou finale
ENT
de la partie.
TAKE
• TAKE BACK pour avancer ou retourner 10
BACK
coups en une fois.
• WHITE/< pour retourner 1 coup à la fois.
• BLACK/> pour avancer 1 coup à la fois.
2. Pressez CL pour quitter le mode Take Back et continuer
CL
à jouer votre partie.
3. Vérifiez la position (voir Section 6).
Voir Section 1.5 pour plus de détails.
42
Page 43

nouveau sur sa case départ ; et entreprendre le déplacement d’une
autre pièce.
Si vous n’opérez pas correctement un coup de l’ordinateur, vous
entendrez également un bip d’erreur et verrez un message d’erreur.
Cela indique que vous essayez de déplacer une mauvaise pièce, ou
que vous déplacez une pièce du camp de l’ordinateur sur une mauvaise
case.
Si vous prenez une pièce et que, la case départ apparaîssant à
l’affichage, vous décidiez de ne pas effectuer ce coup, il suffit que vous
remettez la pièce. Vous devez à présent opérer un autre coup de votre
choix. Si vous changez d’idée après avoir opéré la totalité de votre
coup, vous devez revenir en arrière comme indiqué à la Section 1.5.
2.4 Echec, mat et nul
Quand un Roi est en échec, l’ordinateur affiche d’abord le coup
comme d’habitude. Après l’accomplissement du coup, le message
CHECK (échec) apparaît sur l’écran en clignotant pendant quelques
secondes, en même temps que le coup de mise en échec. L’affichage
revient ensuite à l’indication du chronométrage.
Si l’ordinateur découvre un mat forcé contre son adversaire, il commence par afficher le coup comme à l’ordinaire. Après que le coup a
l’été effectué sur le plateau, l’ordinatuer clignote l’annonce du mat ainsi
que le coup, cet affichage reste quelques secondes. Il sera par ex.
=in2 pour un mat en 2 coups. L’affichage revient ensuite à l’indication
du chronométrage.
Quand une partie se termine sur un échec et mat, l’ordinateur affiche
le coup comme d’ordinaire, puis indique en clignotement le message
MATE en même temps que le coup de mat pendant un bref instant
après que le mat ait été accompli. L’affichage revient ensuite à
l’indication du chronométrage.
Le Exclusive Senator reconnaît les nuls par pat, par triple répétition et
par la règle des 50 coups sans prise. Après un nul, l’ordinateur affiche
EnD pour nul par pat, EnD:3 pour triple répétition et EnD:50 pour la
règle des 50 coups sans prise. L’affichage revient ensuite à l’indication
du chronométrage.
2.5 Terminer la recherche de l’ordinateur
Pour interrompre l’ordinateur dans sa recherche, appuyez sur ENT.
Cela forcera l’ordinateur à jouer le meilleur coup de tout ceux étudiés
jusqu’à cet instant de sa recherche. Cette fonction peut être très utile
dans les hauts niveaux, notamment dans le niveau Infini, où l’ordinateur
réfléchit à l’infini si on ne l’interrompt pas.
Note : Dans le niveau Recherche de mat, appuyer sur ENT ne provoque pas de coup de la part de
l’ordinateur. La réponse de l’ordinateur sera un bip d’erreur et l’affichage
d’un ––––– indiquant qu’il a été interrompu avant de trouver le mat.
Pour continuer la partie, passez à un autre niveau de jeu.
2.6 Changer de camp avec l’ordinateur
Vous pouvez changer de camp avec l’ordinateur à tout moment en
appuyant simplement sur ENT quand votre tour est venu de jouer. Il
s’ensuivra que l’ordinateur jouera pour votre camp. Vous pouvez ainsi
changer de camp aussi souvent que vous le souhaitez en cours de
partie.
2.7 Mode 2 joueurs
La touche TAKE BACK est nécessaire pour le retour en arrière mais
sert aussi à activer le mode 2 joueurs. Normalement, l’ordinateur
indique son coup automatiquement quand c’est son tour. Dans le mode
2 joueurs, cependant, la réponse automatique est supprimée. Pour
quitter ce mode appuyez CL. Si le tour est à l’ordinateur, appuyez ENT
et Exclusive Senator commence sa reflexion.
Cette fonction peut servir à :
• Jouer des parties de maître. Appuyez CL puis ENT pour ordonner
l’analyse de positions par l’ordinateur.
• Rejouer jusqu’à une certaine position pour en approfondir l’étude.
• Étudier les lignes en bibliothèque en les réper toriant manuellement.
• Jouer contre une autre personne, l’ordinateur vérifiant la régularité
des coups et opérant les chronométrages.
Note : Quand vous jouez contre une autre personne, si l’un ou l’autre
camp requiert l’assistance de l’ordinateur, appuyez sur INFO pour
connaître le coup suggéré.
2.8 Jouer avec les Noirs de vôtre côté
Voir aussi la figure « JOUER AVEC LES NOIRS DE VOTRE
CÔTE ».
Vous pouvez vouloir sortir de l’ordinaire et faire en sorte que
l’ordinateur joue au camp des Blancs. Activez cette fonction en
appuyant NEW GAME et puis ENT. Mettez en place les Noirs de votre
côté de l’échiquier comme indiqué dans la figure.
FRANÇAIS
43
Page 44

Notez que l’affichage est en adversaire et que les Rois et les Dames
occupent des places différentes dans cette disposition.
2.9 Les ouvertures répertoriées
En début de jeu, la réponse de l’ordinateur est généralement
instantanée dans de nombreux niveaux, car le Exclusive Senator joue
des coups répertoriés dans sa bibliothèque d’ouvertures. La
bibliothèque d’ouvertures de l’ordinateur comprend de nombreuses
positions tirées de parties de grand-maîtres. Si la position des pièces en
cours se trouve ainsi répertoriée, l’ordinateur jouera une réponse
directement issue de son répertoire, au lieu d’y consacrer sa reflexion.
La répertoire des ouvertures peut aussi traiter les transpositions. On
appelle transposition une position atteinte par un ensemble de coups
peut aussi être atteinte quand cet ensemble de coups se réalise dans
un enchaînement différent.
Note : Le Exclusive Senator est doté d’une fonction de sélection de
répertoires d’ouvertures dans sa bibliothèque ; il est même possible de
lui fermer l’accès à sa bibliothèque si on le souhaite. Lire section 5.2
pour plus de détails.
2.10 Reflexion dans le temps de l’adversaire
En jouant, vous remarquerez que l’ordinateur parfois répond à votre
coup instantanément, même dans le milieu d’une partie dans les hauts
niveaux de jeu. La raison en est que l’ordinateur raisonne et planifie des
stratégies pendant le temps que vous mettez à jouer votre tour. Il
anticipe vos actions probables et élabore ses réponses au coup que
vous préparez. S’il a deviné juste, il n’y a aucune raison pour qu’il
poursuive sa reflexion : il lui suffit de jouer aussitôt le coup qu’il a prévu.
Note : Vous pouvez désactiver cette fonction en choisissant l’option
Easy Mode, prévue à la section 5.2.
2.11 Mémorisation de la partie
Vous pouvez interrompre une partie à tout mement en appuyant sur
GO/STOP. Le jeu est alors suspendu, et l’ordinateur « se souvient » de
la position en cours et la garde en mémoire. Quand vous remettez en
route ( en appuyant sur GO/STOP pour 1 seconde), l’ordinateur est prêt
à reprendre la partie au point où vous l’avez laissée.
Note : Quand vous éteignez pendant que l’ordinateur recherche, vous
devez appuyez GO/STOP pour 1 seconde et après CL pour continuer la
partie.
JOUER AVEC LES NOIRS
DE VO TRE CÔTE
Quand vous jouez avec les Noirs de
votre côté, assurez-v ous bien de disposer
les pièces correctement - comme illustré
dans la figure. Notez que les Rois et les
Dames ont des cases initiales différentes
et que l’affichage est en adversaire !
ዛዙዘዖዕዔዓዒዜ
ዊ尸尾尼尮尴尺局尶ዊ
ዋ层屄层屄层屄层屄ዋ
ዌ巀居巀居巀居巀居ዌ
ው居巀居巀居巀居巀ው
ዎ巀居巀居巀居巀居ዎ
ዏ居巀居巀居巀居巀ዏ
ዐ屃屁屃屁屃屁屃屁ዐ
ዑ尵尿尹尯就尻尽尷ዑ
ዝዙዘዖዕዔዓዒዞ
IMPORTANT… Vous devez éteindre le module en appuyant GO/
STOP avant qu’éteindre l’échiquier lui même. Sinon vous risquez que la
partie ne soit pas mémorisée et que vous ne pouivez pas continuer à
jouer. Si vous oubliez d’éteindre ou d’allumer dans cet ordre vous devez
activer ACL.
3. NIVEAUX DE JEU
Le Exclusive Senator a 64 niveaux de jeu, dont des niveaux pour
joueurs occasionnels, des niveaux tournoi, des niveaux Sudden Death
et Recherche de mat, et même des niveaux spéciaux débutants. Quand
vous enclenchez un niveau de jeu, ne perdez pas de vue que lorsque
l’ordinateur dispose de plus de temps pour élaborer ses coups, il
devient plus fort et joue mieux, tout comme s’il s’agissait d’un joueur
humain.
Pour choisir un niveau de jeu
Voir la figure « TABLEAU DES NIVEAUX DE JEU » – un guide
pratique pour trouver le niveau de votre choix.
Pressez LEV pour accéder le mode Niveau. Quand l’ordinateur est
mis en marche pour la première fois, il est réglé sur le Niveau 4 (5
secondes par coup), et l’affichage montre L0:05. Changez les niveaux
un après l’autre en utilisant les touches BLACK/> et WHITE/<. Un
44
Page 45

raccourci de cette fonction est possible : pressez la touche LEV de
manière répétée pour franchir les 8 niveaux d’un trait. Quand
l’ordinateur montre le niveau souhaité, pressez ENT pour valider votre
sélection et quitter le mode Niveau.
Si vous utilisez les touches pour vérifier le niveau ou vous vous
trouvez sans vouloir en changer ; il suffit d’appuyer sur CL pour quitter
le mode Niveau.
Note :
• Quand vous changez le niveau, le chronomètrage se met à zero.
• Ne changez pas quand c’est le tour de l’ordinateur. Interrompez la
recherche avec ENT puis opérez le coup sur le plateau. Après,
faites un retour en arrière et changez le niveau.
3.1 Niveaux de Jeu Classiques
NIVEAU CHRONOMÉTRAGE PAR COUP AFFICHAGE
1.....................1 seconde.................. L 0:01
2.....................2 secondes ................ L 0:02
3.....................3 secondes ................ L 0:03
4.....................5 secondes ................ L 0:05
5...................10 secondes ................ L 0:10
6...................15 secondes ................ L 0:15
7...................20 secondes ................ L 0:20
8...................30 secondes ................ L 0:30
9...................45 secondes ................ L 0:45
10 ....................1 minute .................... L 1:00
11 .................1,5 minutes................... L 1:30
12 ....................2 minutes................... L 2:00
13 ....................3 minutes................... L 3:00
14 ....................5 minutes................... L 5:00
15 ..................10 minutes................... L10:00
16 ..................15 minutes................... L15:00
Quand vous choisissez un de ces niveaux, vous sélectionnez un
temps de réponse moyen pour l’ordinateur. Note : Ces chronométrages
représentent des moyennes sur un grand nombre de coups. Dans les
ouvertures et en finale de partie, l’ordinateur tend à jouer plus vite, mais
dans les positions complexes de milieu de partie, il pourra se donner un
temps considérablement plus long.
3.2 Niveaux Tournoi
NIVEAU CHRONOMÉTRAGE / NOMBRE DE COUPS AFFICHAGE
17 ...........1 h 30 min / 40 coups .......................1:30;40
18 ...........1 h 45 min / 35 coups .......................1:45;35
19 ...........1 h 45 min / 40 coups .......................1:45;40
20 ...........1 h 30 min / 35 coups .......................1:30;35
21 ...........2 h / 40 coups ...................................2:00;40
22 ...........2 h 30 min / 45 coups .......................2:30;45
23 ...........2 h / 50 coups ...................................2:00;50
24 ...........3 h / 40 coups ...................................3:00;40
Dans ces niveaux, la règle consiste à exécuter un nombre fixé de
coups dans un laps de temps limité. Si un joueur excède le temps
imparti pour un certain nombre de coups, l’ordinateur émet un bip
sonore et le mot TImE apparaît en clignotement à l’affichage, suivi de
l’indication de la durée écoulée.
Note : Si vous sélectionnez un niveau Tournoi, vous pouvez faire
afficher le chronométrage en compte à rebours au lieu de la durée
écoulée ou vous pouvez aussi choisir le chronométrage Bronstein (voir
Section 5.1).
3.3 Niveaux Sudden Death
NIVEAU CHRONOMÉTRAGE PAR PARTIE AFFICHAGE
25 ....................5 minutes................... 0:05;99
26 ..................10 minutes................... 0:10;99
27 ..................15 minutes................... 0:15;99
28 ..................20 minutes................... 0:20;99
29 ..................30 minutes................... 0:30;99
30 ..................45 minutes................... 0:45;99
31 ..................60 minutes................... 1:00;99
32 ..................90 minutes................... 1:30;99
Dans ces niveaux, la durée totale est réglée pour l’entièreté de la
partie. Si la partie excède la durée de partie, l’ordinateur émet son bip
et clignote son message TImE suivi de l’indication de la durée pour
signaler que la partie est terminée.
Note : Si vous sélectionnez un niveau Tournoi, vous pouvez faire
afficher le chronométrage en compte à rebours au lieu de la durée
écoulée ou vous pouvez aussi choisir le chronométrage Bronstein (voir
Section 5.1).
FRANÇAIS
45
Page 46

3.4 Niveaux Fun
NIVEAU CHRONOMÉTRAGE PAR COUP AFFICHAGE
33 .................. 1 seconde ................... Fun: 1
34 .................. 2 secondes ................. Fun: 2
35 .................. 3 secondes ................. Fun: 3
36 .................. 4 secondes ................. Fun: 4
37 .................. 5 secondes ................. Fun: 5
38 .................. 6 secondes ................. Fun: 6
39 .................. 7 secondes ................. Fun: 7
Etes-vous joueur débutant ? Ces niveaux sont idéales pour améliorez
votre jeu. Ces niveaux restreignent la profondeur de recherche de
l’ordinateur ce qui a pour résultat un jeu affaibli et un adversaire plus
humain. Vous avez l’occasion d’apprendre et peut-être aussi de gagner.
Pour plus de facilité encore, activez l’option Easy Mode pour que
l’ordinateur ne puisse pas penser pendant votre tour.
3.5 Niveau Infini
NIVEAU TEMPS AFFICHAGE
40 ........................Infini....................... 9:99;99
Dans le niveau Infini, l’ordinateur recherche indéfiniment, jusqu’à ce
qu’il trouve un mat forcé ou jusqu’à ce que vous stoppiez la recherche
en pressant ENT. Si la recherche est ainsi interrompue, l’ordinateur
opère le coup qu’il considère le meilleur à ce moment. Une manière
intéressante d’utiliser ce niveau est de lancer l’ordinateur dans l’analyse
de positions hyper-complexes qui l’occupera des heures, voire des jours
entiers.
3.6 Niveaux Recherche de Mat
NIVEAU CHRONOMÉTRAGE PAR PARTIE AFFICHAGE
41 ................ Mat en 1 coup ............... =in: 1
42 ................ Mat en 2 coups ............. =in: 2
43 ................ Mat en 3 coups ............. =in: 3
44 ................ Mat en 4 coups ............. =in: 4
45 ................ Mat en 5 coups ............. =in: 5
46 ................ Mat en 6 coups ............. =in: 6
47 ................ Mat en 7 coups ............. =in: 7
48 ................ Mat en 8 coups ............. =in: 8
Si vous êtes sur une position qui, pensez-vous, doit conduire à un
mat et vous voulez que l’ordinateur vous aide à le trouver, réglez-le sur
un niveau Recherche de Mat. Le Exclusive recherchera la résolution de
CONSEILS SUR LE CHOIX D’UN NIVEAU DE JEU
• Etes-vous joueur débutant ? Commencez par les niveaux Fun et
Entraînement de bas régime. Ces niveaux restreignent la
profondeur de recherche de l’ordinateur, ce qui a pour résultat un
jeu affaibli, et vous donne l’occasion d’apprendre et peut-être aussi
de gagner. Pour plus de facilité encore, associez un de ces niveaux
à l’option Easy Mode, de telle sorte que l’ordinateur ne puisse
penser pendant votre tour. Lisez la section 6.2 pour plus de détails.
• Etes-vous joueur de niveau intermédiaire ou de niveau
supérieur ? Essayez les niveaux Classiques ou Tournoi, ou bien
les niveaux Entraînement supérieurs. Les niveaux Jeux Classiques
s’échelonnent du niveau facile au niveau difficile ou le temps de
reponse est de 10 minutes par coup (niveau 15). Les niveaux
Entraînement permettent de régler votre profondeur de recherche ;
lorsque vous avez conquis un niveau, passez au suivant. Les
niveaux Tournoi sont généralement les plus exigeants.
•Vous avez envie d’expérimenter ? Essayez les niveaux Sudden
Death pour des parties d’échecs rapides passionnantes. Ou bien
passez aux niveaux de Recherche de Mat pour résoudre des
problèmes ardus tels les mats en 8 coups. Vous pouvez lancer la
recherche sur une position réelle de partie, ou sur une figure
complexe que vous montez vous-même.
mat la plus rapide ; il peut résoudre les mats jusqu’en 8 coups. Les mats
de 1 à 5 coups sont généralement obtenus facilement, tandis que ceux
de 6 à 8 coups prennent généralement plus de temps. S’il n’y a pas de
mat possible ou si l’ordinateur ne trouve pas le mat, il fera retenir le bip
d’erreur. Changez de niveau pour revenir au jeu normal.
3.7 Niveaux Entraînement
NIVEAU AFFICHAGE NIVEAU AFFICHAGE
49 .............. PLY: 1 57............... PLY: 9
50 .............. PLY: 2 58............... PLY:10
51 .............. PLY: 3 59............... PLY:11
52 .............. PLY: 4 60............... PLY:12
53 .............. PLY: 5 61............... PLY:13
54 .............. PLY: 6 62............... PLY:14
55 .............. PLY: 7 63............... PLY:15
56 .............. PLY: 8 64............... PLY:16
46
Page 47

TABLEAU
DES NIVEAUX DE JEU
1.
2.
Puis, choisissez votre niveau – regardez
sur le tableau pour trouver le niveau de
votre choix. Cyclez les niveaux jusqu’à ce
que votre préférence soit affichée.
3.
Pressez LEV pour accéder à ce
LEV
mode.
• Appuyez sur BLACK/>
pour cycler en avance.
• Appuyez sur WHITE/<
pour cycler en arrière.
• Pressez LEV pour avancer
LEV
ENT
8 niveaux à une fois.
Finalement, pressez ENT pour
quitter le mode.
30 sec
par coup
L 0:30
Niveau 8
20 sec
par coup
L 0:20
Niveau 7
15 sec
par coup
L 0:15
Niveau 6
10 sec
par coup
L 0:10
Niveau 5
5 sec
par coup
L 0:05
Niveau 4
3 sec
par coup
L 0:03
Niveau 3
2 sec
par coup
L 0:02
Niveau 2
1 sec
par coup
L 0:01
Niveau 1
15 min
par coup
L15:00
Niveau 16
10 min
par coup
L10:00
Niveau 15
5 min
par coup
L 5:00
Niveau 14
3 min
par coup
L 3:00
Niveau 13
2 min
par coup
L 2:00
Niveau 12
1.5 min
par coup
L 1:30
Niveau 11
1 min
par coup
L 1:00
Niveau 10
45 sec
par coup
L 0:45
Niveau 9
40 coups
en 3:00
3:00;40
Niveau 24
50 coups
en 2:00
2:00;50
Niveau 23
45 coups
en 2:30
2:30;45
Niveau 22
40 coups
en 2:00
2:00;40
Niveau 21
35 coups
en 1:30
1:30;35
Niveau 20
40 coups
en 1:45
1:45;40
Niveau 19
35 coups
en 1:45
1:45;35
Niveau 18
40 coups
en 1:30
1:30;40
Niveau 17
90 min
par partie
1:30;99
Niveau 32
60 min
par partie
1:00;99
Niveau 31
45 min
par partie
0:45;99
Niveau 30
30 min
par partie
0:30;99
Niveau 29
20 min
par partie
0:20;99
Niveau 28
15 min
par partie
0:15;99
Niveau 27
10 min
par partie
0:10;99
Niveau 26
5 min
par partie
0:05;99
Niveau 25
Niveau
infini
9:99;99
Niveau 40
7 sec
par coup
Fun: 7
Niveau 39
6 sec
par coup
Fun: 6
Niveau 38
5 sec
par coup
Fun: 5
Niveau 37
4 sec
par coup
Fun: 4
Niveau 36
3 sec
par coup
Fun: 3
Niveau 35
2 sec
par coup
Fun: 2
Niveau 34
1 sec
par coup
Fun: 1
Niveau 33
Mat en
8 coups
=in: 8
Niveau 48
Mat en
7 coups
=in: 7
Niveau 47
Mat en
6 coups
=in: 6
Niveau 46
Mat en
5 coups
=in: 5
Niveau 45
Mat en
4 coups
=in: 4
Niveau 44
Mat en
3 coups
=in: 3
Niveau 43
Mat en
2 coups
=in: 2
Niveau 42
Mat en
1 coup
=in: 1
Niveau 41
Recherche
8 coups
PLY: 8
Niveau 56
Recherche
7 coups
PLY: 7
Niveau 55
Recherche
6 coups
PLY: 6
Niveau 54
Recherche
5 coups
PLY: 5
Niveau 53
Recherche
4 coups
PLY: 4
Niveau 52
Recherche
3 coups
PLY: 3
Niveau 51
Recherche
2 coups
PLY: 2
Niveau 50
Recherche
1 coup
PLY: 1
Niveau 49
Recherche
16 coups
PLY:16
Niveau 64
Recherche
15 coups
PLY:15
Niveau 63
Recherche
14 coups
PLY:14
Niveau 62
Recherche
13 coups
PLY:13
Niveau 61
Recherche
12 coups
PLY:12
Niveau 60
Recherche
11 coups
PLY:11
Niveau 59
Recherche
10 coups
PLY:10
Niveau 58
Recherche
9 coups
PLY: 9
Niveau 57
FRANÇAIS
Pour plus de détails, voir Section 3.
NIVEAUX
CLASSIQUES
47
NIVEAUX
TOURNOI
NIVEAUX
SUDDEN
DEATH
NIVEAUX
FUN/INFINI
NIVEAUX
RECHERCHE
DE MAT
NIVEAUX
ENTRAÎNEMENT
Page 48

Dans les niveaux Entraînement, la profondeur de recherche de
l’ordinateur est limitée au nombre de coups correspondant au niveau en
cours. Lorsque vous passez les niveaux en suivant leur ordre cyclique,
l’ordinateur affiche PLY:# à chacun d’eux. Le mot « ply » désigne le
coup d’un seul joueur, et # représente la profondeur de la recherche.
Par exemple, au Niveau 49, l’ordinateur recherche à la profondeur d’un
ply et ainsi se contente de n’organiser sa reflexion que sur le coup à
venir. A ce niveau donc, il lui arrivera d’ignorer un mat en un coup ; le
jeu s’en trouve affaibli, et donne ainsi au débutant et au joueur moyen
une chance supplémentaire contre l’ordinateur.
4. MODE INFO : REGARDER LES REFLEXIONS DE
L’ORDINATEUR
Dans une partie d’échecs normale, vous ne demanderez jamais à
votre adversaire quel coup il prépare ; vous ne lui demanderez pas non
plus comment il évalue la position en cours. Le Exclusive vous vous le
permet ! En fait, l’ordinateur est prêt à fournir une abondance
d’informations sur son jeu. Il peut montrer le coup qu’il est en train de
préparer, la variante qu’il en attend, l’évaluation de la position en cours,
la profondeur de sa recherche, et plus encore. L’étude de ces informations développera votre habileté aux échecs.
L’usage du mode Info
Comment accéder à ces informations ? En appuyant sur INFO à tout
moment en cours de partie ! Si vous faites cela alors que la reflexion de
l’ordinateur est en cours, vous verrez changer l’affichage de l’information alors que l’ordinateur envisage d’autres coups et approfondit sa
recherche.
Voir la figure « MODE INFO » pour une sommaire de cette
fonction.
Les informations sur la partie en cours se subdivisent en 3
catégories. Il faut appuyer sur la touche INFO pour franchir
cycliquement ces catégories. Les touches à flèches BLACK/> et
WHITE/< permettent de passer d’une catégorie à la suivante comme
expliqué ci-après. Appuyez CL pour quitter ce mode.
Après vous êtes familiarisé avec le mode Info, reportez-vous à la
section 5.3 pour une description de la fonction d’Affichage Cyclique.
Lorsque cette fonction est activée ; l’ordinateur donne automatiquement
toutes les catégories d’information décrites ci-après à intervalle d’une
seconde pendant qu’il réfléchit sur son tour.
Note : Pour toute information non disponible à un moment donné,
l’affichage montrera simplement ––––– .
4.1 Variante principale
Appuyez sur INFO une première fois pour connaître le premier coup
de la variante principale (la ligne de jeu prévue). La variante apparaîtra
dans une profondeur maximale de 6 coups.
Utilisez la touche BLACK/> pour voir la suite des coups :
• Coups 1 à 6 de la ligne de jeu prévue.
Appuyez WHITE/< pour cycler en arrière et CL pour quitter ce
mode.
Note : Le premier coup montré est aussi la meilleure option pour cette
position. Vous pouvez prendre cette information comme suggestion.
Alors, si vous voulez avoir une suggestion, appuyez simplement sur
INFO quand c’est votre tour.
4.2 Information sur la recherche de l’ordinateur
Appuyez deux fois sur INFO pour accéder à l’information portant sur
le contenu de la recherche. Utilisez BLACK/> pour voir :
•Evaluation par l’ordinateur de la position en cours (le nombre est
basé sur la valeur 1.0 du pion : un nombre positif indique que les
Blancs sont en tête).
•2 nombres : a) la profondeur de la recherche en cours, i.e. le
nombre de mouvements de pièces sur lequel table l’ordinateur) et
b) le nombre de coups étudiés jusque là.
• Coup en cours d’étude.
• Nombre de positions que l’ordinateur étudie actuellement par
seconde.
Appuyez WHITE/< pour cycler en arrière et CL pour quitter le
mode.
4.3 L’horloge échiquéenne
Appuyez trois fois sur INFO pour accéder aux chronométrages
échiquéens.
Utilisez BLACK/> pour voir :
•Temps écoulé depuis l’exécution du dernier coup sur l’échiquier
•Temps écoulé pour les Blancs.
48
Page 49

•Temps écoulé pour les Noirs.
•Temps restant pour les Blancs.*
•Temps restant pour les Noirs.*
*N’apparaît que dans les niveaux Sudden Death et Tournoi.
Appuyez WHITE/< pour cycler en arrière et CL pour quitter le
mode. L’horloge s’arrête quand un retour en arrière est effectué, ou
losqu’on change de niveau de jeu, ou qu’on sélectionne les options,
qu’on vérifie les positions ou met en place les pièces, ou qu’on appuie
sur GO/STOP pour éteindre l’appareil. Dans tous ces cas, la mémoire
fait office de garde-temps, et le chronométrage reprend dès que recommence la partie. Chaque fois qu’est pressée la touche ENT et CL pour
New Game, les chronométrages sont tous remis à zéro (0:00:00).
4.4 Compteur des coups
Appuyez quatre fois sur INFO pour faire apparaître le nombre de
coups joués au stade ou l’on se trouve de la partie. Pressez WHITE/<
pour cycler en arrière. Vous voyez :
• Numéro de coup affiché.
• Nombre de coups joués.
Appuyez sur BLACK/> pour cycler en avance ou pressez CL pour
quitter ce mode.
4.5 Suggestions des coups
L’ordinateur vous suggèrera un coup si vous souhaitez recevoir ses
conseils. Pressez INFO quand votre tour est venu de jouer, et
l’ordinateur vous suggèrera alors un déplacement de pièce.
5. LES OPTIONS : FUN ET DIVERTISSEMENT
Outre les fonctions décrites jusqu’ici, le Exclusive Senator possède
un grand nombre d’autre options de jeu. Les options sont
sélectionnables par l’utilisateur à tout moment en cours de partie.
Sélection des options de jeu
Voir la figure « LES OPTIONS : SAVOIR COMMENT !» pour une
sommaire de cette fonction.
Les options de l’ordinateur se subdivisent en 3 groupes : mode
Opérations, mode Jeu et mode Affichage cyclique. Pressez la touche
MODE INFO
VARIANTE PRINCIPALE :
x1
INFO
INFORMATION SUR LA RECHERCHE DE L’ORDINATEUR :
INFO
L’HORLOGE ECHIQUEENNE :
INFO
COMPTEUR DES COUPS :
INFO
CL
• Coup 1 de la ligne de jeu prévue
• Coup 2 de la ligne de jeu prévue
• Coup 3 de la ligne de jeu prévue
• Coup 4 de la ligne de jeu prévue
• Coup 5 de la ligne de jeu prévue
• Coup 6 de la ligne de jeu prévue
x2
•
Evaluation par l’ordinateur de la position en cours
•2 nombres : la profondeur de la
recherche en cours et le nombre de
coups étudiés jusque là
• Coup en cours d’étude
•Nombre de positions que l’ordinateur
étudie actuellement par seconde
x3
Temps écoulé depuis l’exécution du dernier coup
•
sur l’échiquier
•Temps écoulé pour les Blancs
•Temps écoulé pour les Noir
•Temps restant pour les Blancs*
•Temps restant pour les Noirs*
* N’apparaît que dans les niveaux
Sudden Death et Tournoi
x4
• Numéro de coup affiché
• Nombre de coups joués
Appuyez sur CL pour quitter ce mode.
Pour plus de détails, voir Section 4.
FRANÇAIS
49
Page 50

OPT pour passer d’un groupe à un autre. Chaque groupe contient 8
options différentes et les touches BLACK/> et WHITE/< servent à
passer d’une option à l’autre dans chaque groupe. Pour chaque option,
sauf pour le chronométrage Bronstein, un signe plus (+) à l’affichage
indique que l’option est activée et un signe moins (–) qu’elle est
désactivée. Presser ENT pour activer ou désactiver chaque option.
Pour le chronométrage Bronstein, appuyez ENT pour cycler les
options. L’option affichée reste activée quand vous quitter les options. Si
vous décider de jouer sans ce chronométrage cyclez en pressant ENT
jusqu’à bc 0 soit affiché.
Après avoir effectué toutes vos sélections d’options ; pressez la
touche CL pour revenir au niveau de jeu normal.
Quand l’ordinateur est mis en marche pour la premiere fois, certaines
options sont activées d’office. Les options activées automatiquement à
la première mise en marche apparaissent dans le tableau affectées d’un
signe plus (+), celles qui ne sont pas activées sont affectées d’un signe
moins (–). Après avoir effectué New Game, la plupart des options
sélectionnées sont ré-activées. Seule l’option Auto Play (jeu automatique) est désactivée en début d’une nouvelle partie. Pour remettre le
module à zero, sélectionnez
tEst
dans les options, puis pressez ENT
et CL en même temps après la vérification des lampes et de l’écran
LCD.
5.1 Options de mode de fonctionnement
Appuyez sur OPT une fois pour sélectionner ce groupe. Puis
utilisez les touches BLACK/> et WHITE/< pour sélectionner les
options. Pressez ENT pour activer les options (+) ou les désactiver (–).
Pour le chronométrage Bronstein : pressez ENT pour cycler les
options.
a. Jeu automatique
Activé : +Auto Désactivé : -Auto
Normalement, l’ordinateur répond automatiquement par un
déplacement de pièce à chaque coup de l’adversaire. Si vous activer
Jeu automatique, vous pouvez regarder comment l’ordinateur joue pour
les deux camps ! Cette fonction peut servir à regarder et étudier la
strategie et la tactique. Après avoir sélectionné un niveau assez élevé
(par exemple niveau 58) vous pouvez activer le Jeu automatique et
laisser jouer une partie. Quand la partie est terminée vous retournez en
arrière et étudiez les séquences.
Note :
•Pour accélérer le jeu, pressez CL pendant que l’ordinateur se sert
encore de sa bibliothèque incorporée.
•Vous arrêtez cette option en appuyant sur ENT pendant le jeu.
• Cette option sera désactivée en début d’une nouvelle partie.
b. Son
Activé : +SNd Désactivé : -SNd
Cette option permet de désactiver le bip sonore qui accompagne
chaque pression de touche. Vous entendez encore des bips quand vous
activez GO/STOP, NEW GAME ou si vous essayez de faire un coup non
autorisé.
c. Mode silencieux
Activé : +SIL Désactivé : -SIL
Normalement, l’ordinateur émet un bip sonore quand il a trouvé le
coup qu’il devait jouer. Il est possible de supprimer complètement ce bip
sonore en activant le mode silencieux.
d. Mode d’enseignement
Activé : +Coch Désactivé : -Coch
Avec cette option vous pouvez activer votre entraîneur personnel !
L’ordinateur vous guidera pendant la partie. Il va vous avertir si vous
êtes en train de perdre une pièce. Quand une de vos pièces est
menacée par une pièce à valeur inférieure, l’ordinateur émet des bips
sonores et les lampes du plateau commencent à clignoter. Continuez
normalement ou retourner en arrière en activant TAKE BACK.
En plus, l’ordinateur vous averti quand vous avez entré un coup
menant à une perte. Il émet des bips sonores et indique sa réponse.
Vous pouvez continuer ou activer TAKE BACK pour retourner en
arrière.
e. Tic-Tac d’horloge
Activé : +tic Désactivé : -tic
Si vous activez l’option tic-tac d’horloge, vous déclenchez un tic-tac
qui rend l’horloge de l’ordinateur semblable à une horloge à
mouvements, ce qui recrée l’ambiance d’un tournoi international dans
votre salon !
50
Page 51

1.
Pressez OPT plusieurs fois pour
choisir un groupe d’options.
2.
Puis, choisissez des options.
Cyclez dans chaque groupe avec :
LES OPTIONS : SAVOIR COMMENT !
OPT
x1 = OPTIONS DE MODE DE FONCTIONNEMENT (Auto...)
x2 = OPTIONS EN MODE DE JEU (SEL...)
x3 = OPTIONS EN AFFICHAGE CYCLIQUE (rd:1...)
x4 = de retour OPTIONS DE MODE DE FONCTIONNEMENT...
• Pressez BLACK/> pour
cycler en avance.
• Pressez WHITE/< pour
cycler en arrière.
Quand votre option est
ENT
affichée, activez ou
désactivez avec ENT.
le groupe de chronométrage
Bronstein, pressez ENT
plusieurs fois pour choisir une
Dans
OPTIONS EN
AFFICHAGE
CYCLIQUE
OPTIONS DE
MODE DE
JEU
OPTIONS DE
MODE DE
FONCTION-
EMENT
N
Ligne
principale
à coup 1
-rd:1
Recherche
sélective
+SEL
Jeu auto-
matique
-AuTo
option.
3.
Finalement, pressez CL
pour quitter ce mode.
CL
bc 2 . bc 5 . bc10 . bc15 . bc20 . bc30 . bc60
f. Compte à rebours
Activé : +c:dn Désactivé : -c:dn
Activez cette option pour l’affichage de chronométrage à retours des
délais de jeu.
Note : Cette option n’est disponible qu’en association
avec un niveau Tournoi ou Sudden Death.
g. Chronométrage Bronstein
Activé : bc 2 . bc 5 . bc10 . bc15 . bc20 . bc 30 . bc 60
Désactivé : bc 0
Sur un niveau Tournoi ou Sudden Death vous devez jouer avec un
Ligne
principale
à coup 2
-rd:2
Mode Jeu
facile
-EASY
Son
+SNd
Ligne
principale
à coup 3
-rd:3
Mode Jeu
aléatoire
-rand
Mode
silencieux
-SIL
Ligne
principale
à coup 4
-rd:4
Avec/Sans
bibliothèque
+book
Mode
d’enseigne-
ment
-Coch
Evaluation
position
-rd:E
Bibliothèque
complète
-bk:FL
Tic-Tac
d’horloge
-tic
de
Profondeur
de recherche/
nombre de
coups
-rd:d
Livre
passif
-bk:Pa
Compte à
rebours
-c:dn
Nœuds
par
seconde
-rd:n
Livre
actif
-bk:at
Chronométrage
Bronstein
bc 0
Pour plus de détails, voir Section 5.
-rd:t
tournoi
-bk:tn
Programme
-tEst
chronométrage par partie. Souvent, les joueurs sont forcés d’effectuer
n’importe quel coup. Le chronométrage Bronstein aide à éviter ce
problème ! En effet, vous pouvez ajouter du temps après chaque coup.
Un exemple : Le niveau sélectionné est le 28 avec un chronométrage
de 20 minutes pour la partie. L’option bc10 ajoute 10 secondes
supplémentaires par coup. Ex. : Le chronométrage est en Count Down
et chaqu’un a 10 secondes pour effectuer un coup.
• Si vous effectuez un coup en 7 secondes, ces 7 secondes seront
ajoutées au temps total. Si vous effectuez un coup en 10 secondes,
ces 10 secondes seront ajoutées au temps total.
51
Durée
des
coups
Livre
test
FRANÇAIS
Page 52

• Si vous effectuez un coup en plus que 10 secondes, seulement 10
secondes seront ajoutées au temps total.
Appuyez ENT pour cycler les Bronstein options :
CHRONOMÉTRAGE BRONSTEIN AFFICHAGE
Chronométrage Bronstein désactivée ............. bc 0
2 sec ajoutées après chaque coup................bc 2
5 sec ajoutées après chaque coup................bc 5
10 sec ajoutées après chaque coup................ bc 10
15 sec ajoutées après chaque coup................ bc 15
20 sec ajoutées après chaque coup................ bc 20
30 sec ajoutées après chaque coup................ bc 30
60 sec ajoutées après chaque coup................ bc 60
h. Programme test
Activé : +tESt Désactivé : -tESt
Activez cette option pour exécuter un programme de test interne.
Pour stopper le test, pressez ENT et CL simultanément.
Attention : Cette option est incluse principalement pour permettra la
révision technique de l’appareil ou la détection des pannes par les
réparateurs autorisés.
5.2 Options de mode de jeu
Appuyez sur OPT deux fois pour choisir ce groupe-ci d’options. Puis
utilisez les touches BLACK/> et WHITE/< pour sélectionner les
options. Activez ou désactivez avec ENT.
a. Recherche sélective
Activé : +SEL Désactivé : -SEL
Le programme de module Senator utilise normalement un algorithme
de recherche sélective. Cela permet à l’ordinateur de voir des combinaisons qui sans cela seraient trop longues à calculer. En désactivant
cette option, le programme passe à une catégorie d’algorithme de force
brute. Cela minimise le risque d’erreurs par négligence de la part de
l’ordinateur.
Note : Les niveaux de résoltuion de mat utilisent toujours le
mode de force brute.
b. Mode Jeu facile
Activé : +EAsy Désactivé : -EASy
Vous souhaitez gagner plus facilement ? Activez cette option qui
empêche l’ordinateur de réfléchir pendant votre temps de jeu.
Normalement, comme expliqué dans section 2.10, l’ordinateur réfléchit
pendant votre tour, faisant ainsi usage du temps que vous occupez
réfléchir sur le coup suivant pour mettre en œuvre des stratégies. En
vous servant du mode Jeu facile pour affaiblir tous les niveaux, vous
élargissez l’éventail de celles qui vous sont accessibles.
c. Mode Jeu aléatoire
Activé : +rand Désactivé : -rand
L’activation de ce mode oblige l’ordinateur à choisir de manière
aléatoire entre les coups qui dans son évaluation sont sensiblement
équivalents ; cette option offre l’attrait d’une plus grande variété de jeu.
d. Avec/Sans bibliothèque
Activé : +book Désactivé : -book
Si vous voulez désactiver la bibliotheque d’ouvertures complètes de
l’ordinateur, pressez simplement sur ENT et -book s’affiche. Ainsi
l’ordinateur est forcé de réfléchir sur tous les coups. Voir section 2.9
pour les détails sur les ouvertures.
Note : Quand vous désactivez le grand livre vous désactivez aussi
tous les livres décrits dans les paragraphes suivants.
e. Bibliothèque complète
Activé : +bk:FL Désactivé : -bk:FL
Avec cette option activée, l’ordinateur peut accéder à sa bibliothèque
complète et choisir n’importe quel coup et il joue des variantes
différentes.
Note : Quand cette option est activée, les livres passif, actif et Tournoi
sont désactivés. En plus, l’ordinateur est susceptible d’opérer des coups
discutables. Cela parce que sa bibliothèque d’ouvertures doit contenir
des réponses à certaines lignes de jeux discutables mais jouables. Ce
sont des lignes que l’ordinateur ne jouerait pas de lui-même mais
auxquelles il doit savoir répondre du mieux possible. Quand vous
activez la bibliothèque complète, l’ordinateur devient capable de jouer
ces coups.
f. Livre passif
Activé : +bk:Pa Désactivé : -bk:Pa
En choisissant cette option, l’ordinateur est contraint à des
ouvertures passives et des positions fermées de préférence aux autres
lorsqu’il doit choisir.
52
Page 53

g. Livre actif
Activé : +bk:at Désactivé : -bk:at
Quand cette option est activée, l’ordinateur donne la préférence à des
lignes et des gambits actifs de préférence aux autres ouvertures.
h. Livre tournoi
Activé : +bk:tn Désactivé : -bk:tn
Quand vous sélectionnez cette option, l’ordinateur devient obligé de
choisir la meilleure ligne possible de jeu dans toute position d’ouverture
donnée. Cela a pour effet une qualité de jeu accrue, mais limite le choix
des coups de l’ordinateur en réduisant le nombre de ses lignes
répertoriées disponibles.
Note : Avec cette option activée, les livres
passif et actif sont automatiquement désactivés.
5.3 Options en affichage cyclique
Normalement, l’écran de l’ordinateur signale le temps de jeu du
joueur ; mais il peut aussi afficher des informations d’un autre ordre,
comme expliqué dans la section 4 (mode Info). L’Affichage cyclique
fonctionne conjointement avec le mode Info, et permet ainsi de choisir
les affichages d’informations que vous souhaitez voir, il donne la
succession des choix à intervalle d’une seconde. Vous pouvez activer
une ou plusieurs des options de l’affichage cyclique.
Important : Notez que la fonction d’affichage cyclique ne
s’active que lorsque l’ordinateur entreprend sa réflexion.
Pour activer cette option, appuyez trois fois sur OPT pour
sélectionner ce groupe-ci d’options. Puis utilisez les touches à flèche
BLACK/> et WHITE/< pour sélectionner les options que vous
voulez voir affichées cycliquement. Appuyez sur ENT pour activer (+) ou
désactiver (–) la fonction.
S’il apparaît que les catégories d’informations affichées changent trop
vite, appuyez sur INFO pour figer l’affichage. Des pressions répétées
sur INFO, BLACK/> et WHITE/< vous permettront de parcourir
manuellement le cycle des informations, comme expliqué dans la
section 4. Pour revenir au mode cyclique automatique, appuyez sur
OPT puis sur CL. Quoi qu’il en soit, lorsque l’ordinateur commence à
réfléchir à son coup suivant, l’affichage revient au mode cyclique
automatique.
Vous pouvez voir les informations suivantes – quand l’ordinateur fait
ses reflexions :
• rd:1 à rd:4 = ligne principale (jusqu’à 4 coups)
• rd:E = Evaluation de position
• rd:d = Profondeur de recherche – nombre de coups
• rd:n = Nœuds par seconde
• rd:t = Durée des coups
Quand aucune information est disponible,
section 4 pour plus de détails sur ces options.
–––––
n’est affiché. Voir
6. VERIFICATION DES POSITIONS / MISE EN PLACE DES
PIECES
6.1 Vérification des positions des pièces sur l’échiquier
Voir la figure « C’EST SIMPLE DE VERIFIER LES POSITIONS
DES PIECES ! » pour un exemple.
Si vous renversez les pièces par inadvertance ou s’il vous semble
que les positions ne sont pas correctes, l’ordinateur peut contrôler les
positions de chaque pièce.
Quand votre tour est venu de jouer, pressez l’une des touches
symbole des pièces (&, %, $, #, @, ou !). L’ordinateur utilisera les
lampes du plateau et l’écran d’affichage pour vous montrer ou le
premier élément de telle catégorie de pièce se trouve situé. La lampe
de l’échiquier indiquent la case, et l’affichage montre le symbole de la
pièce, l’indication de la couleur et la désignation de la case. Appuyez de
nouveau sur la même touche symbole de la pièce pour voir la situation
de l’élément suivant dans cette catégorie de pièces. Tous les éléments
Blancs d’une même pièce sont d’abord passés en revue, puis vient le
tour des éléments Noirs de la même pièce.
Répétez la procédure en utilisant les autres touches symboles de
pièces. Vous pouvez ainsi vérifier toutes les pièces de l’échiquier si vous
le souhaitez. Pressez CL pour revenir au jeu normal.
6.2 Changement et installation de positions
Voir la figure « LE MODE POSITION » pour une sommaire de
cette fonction.
Important : En utilisant cette fonction vous quitter votre partie en
cours. Vous pouvez plus retourner en arrière avec TAKE BACK.
FRANÇAIS
53
Page 54

C’EST SIMPLE DE VERIFIER LES POSITIONS DES PIECES !
ENT
1. Disposez les pièces sur leurs cases initiales et
CL
appuyez ENT et CL pour New Game.
Affichage : [ 0:00:00.
2. Pressez sur la touche pour Cavalier.
Affichage : [,@,b1 (le premier Cavalier blanc).
Lampe de B1 est allumée.
3. Pressez la touche pour Cavalier encore une fois.
Affichage : [,@,G1 (le deuxième Cavalier blanc).
Lampe de G1 est allumée.
4. Pressez la touche pour Cavalier encore une fois.
Affichage : ],@,b8 (le premier Cavalier noir).
Lampe de B8 est allumée.
5. Pressez la touche pour Cavalier encore une fois.
Affichage : ],@,g8 (le deuxième Cavalier noir).
Lampe de G8 est allumée.
6. Pressez la touche pour Cavalier encore une fois.
Affichage : @ (plus de Cavalier sur l’échiquier).
CL
7. Répétez pour vérifier des autres pièces.
Pressez CL pour quitter le mode.
Pour plus de détails, voir Section 6.1.
ENT
LE MODE POSITION
1. Disposez les pièces sur leurs cases intiales.
CL
POS
E2
E3
D8
H5
Appuyez sur ENT et CL pour New Game.
Affichage : [ 0:00:00.
2. Pressez POS pour accéder au mode Position.
Affichage : -POS-.
3. Retirez le pion blanc de l’échiquier.
Affichage : [,!,-E2.
4. Disposez le même pion sur la case E3.
Affichage : [,!,+E3.
5. Retirez la Dame noir de la case D8.
Affichage : ],%,-D8.
6. Disposez la Dame noir sur la case H5.
Affichage : ],%,+H5.
7. Pressez WHITE/< pour changer la couleur. C’est
le tour de Blancs à jouer.
Cette fonction supérieure vous permet d’installer facilement des
positions échiquéennes spéciales formant des figures à partir
desquelles jouer, ou des problèmes à soumettre à l’ordinateur.
Pressez POS pour accéder à ce mode et l’affichage indiquera -POS-.
Vous pouvez vouloir changer une position échiquéenne à tout moment
en cours de partie, à chaque fois que votre tour est venu de jouer.
Après avoir mis en place la position souhaitée, vous devez appuyer sur
CL pour quitter le mode Position.
• Pour débarrasser l’échiquier, appuyez sur ENT. L’affichage
indiquera –. Appuyez de nouveau sur ENT pour confirmer que vous
voulez débarrasser l’échiquier. Vous pouvez après cela disposer les
pièces comme vous le souhaitez. Cette fonction est
8. Pressez CL pour quitter ce mode.
CL
Pour plus de détails, voir Section 6.2.
particulièrement utile si vous voulez mettre en place une position
particulière ne contenant qu’un petit nombre de pièces. Il devient
alors aisé de les disposer sur l’échiquier vide.
• Pour retirer une pièce de l’échiquier, prenez la pièce et mettez-la
à côté. Notez que l’affichage fait apparaître le type de pièce et sa
couleur, et un signe moins assorti de la situation de la case.
• Pour déplacer une pièce d’une case à une autre, retirez la pièce
54
Page 55

et disposez-la sur la nouvelle case. Cela aura pour effet de faire
apparaître un signe moins affectant la première case, et un plus
affectant la deuxième.
• Pour ajouter une pièce sur l’échiquier, pressez d’abord la touche
symbole de la pièce (&, %, $, #, @, ou !). Vér ifiez que le symbole
de couleur dans l’écran d’affichage montre la couleur correcte pour
la pièce que vous voulez ajouter. Si tel n’est pas le cas, pressez
BLACK/> ou WHITE/< pour changer la couleur. Quand
l’affichage montre la pièce de type et de couleur corrects, déposez
la pièce sur la case souhaitée. Pour ajouter une autre pièce des
mêmes types et couleurs, il suffit de la siposer sur une autre case.
Pour ajouter une pièce différente, pressez une touche de symbole
de pièce différente et suivez la procédure décrite ci-dessus.
• Pour mettre la couleur correcte du camp à jouer, pressez
BLACK/> ou WHITE/< avant de quitter le mode.
• Quittez le mode en appuyant sur CL.
Note : Toute position autorisée peut être mise en place en utilisant la
procédure ci-dessus. L’ordinateur ne permettra pas la mise en place
d’une position irrégulière, où, par exemple, il y aurait un nombre de
pièces plus grand que celui prescrit pour une partie normale, ou bien si
le Roi était en position échec. Dans ces cas, l’ordinateur émet un bip
erreur et ne quitte pas le mode Position. Vérifiez la position en utilisant
les touches de symboles de pièces et corrigez la position. Puis quittez
en pressant CL.
7. FICHE TECHNIQUE
7.1 La fonction ACL
Les ordinateurs se bloquent parfois sous l’effet d’une décharge d’électricité
statique ou d’autres perturbations électriques. Si cela se produit, vous laissez
l’ordinateur allumé vous pressez à l’aide d’une épingle ou d’une pointe acérée
quelconque la touche ACL située sur la face inférieure de l’appareil pendant
une seconde au moins. Cela re-initialise l’appareil et vide sa mémoire.
7.2 Soins et entretien
Votre échiquier est un appareil électronique de précision ; il ne doit jamais
être soumis à des manipulations brusques ou exposé à des températures
extrêmes ou à l’humidité. N’utilisez pas de produits chimiques pour le nettoyer,
car cela pourrait endommager les surfaces.
7.3 Information sur les piles
Comme décrit dans la section 2.11, votre partie est mémorisée quand vous
appuyez GO/STOP. Le module contient une pile 3 Volts Lithium pour assurer
cette fonction. Si vous voulez pas risquer de perdre une partie mémorisée,
nous vous recommendons de remplacer cette pile tous les 12 mois.
7.4 Caratéristiques techniques
Touches : 16
Pile : 1 x 3V Lithium (CR2032)
Connexion module : 40 pins
Dimensions : 194 x 96 x 25 mm
Poids : .25 kg
Saitek se réserve le droit d’apporter toute modification technique susceptible
d’améliorer ses produits sans notification préalable.
FRANÇAIS
55
Page 56

GUIDE DE DEPANNAGE
SYMPTOMES
Le module ne fonctionne pas.
L’ordinateur reste sans réaction, se
comporte de façon étrange ou se
bloque en cours de partie.
L’ordinateur ne joue pas un coup.
L’ordinateur n’accepte pas votre
coup.
La lampe de case d’arrivée reste
allumée après avoir effectué le
coup.
Il est impossible de quitter le mode
Position en pressant sur CL.
L’affichage montre _.
L’ordinateur semble faire des coups
illicites.
L’ordinateur n’émet pas des bips
sonores.
L’ordinateur effectue des coups
irrationnels.
Vos options activées sont
désactivées après avoir éteint
l’appareil.
CAUSES POSSIBLES
• Le module n’est pas installé correctement.
• Une décharge d’éléctricité statique a provoqué un blocage des
fonctions.
• Vous avez pressé GO/STOP pour allumer le module pendant
que le board Exclusive était encore éteint.
• l’adaptateur n’est pas pour cet ordinateur ou est defectueu.
• Le module n’est pas connecté correctement.
• Une décharge d’éléctricité statique a provoqué un blocage des
fonctions.
•Peut-être le mode pour 2 joueurs est activé.
•Vous avez choisi un niveau donnant beaucoup de temps de
reflexion.
• Est-ce que c’est votre tour ? Est–ce que votre Roi est en
échec ? Est-ce que votre coup ne va pas mettre votre Roi en
échec ? N’essayez-vous de roquer dans une position
incorrecte ? Avez-vous pensé à déplacer la Tour en premier
dans votre Roque ?
•L’ordinateur est occupé à réfléchir.
• Le dernier coup de l’ordinateur n’était pas effectué
correctement.
• La position est incorrecte. Est–ce que le Roi est en échec.
•Vous êtes dans le mode Position et vous avez pressé ENT
pour débarrasser l’ordinateur.
•L’ordinateur a effectué un coup spécial ; tel qu’une prise en
passant, un roque ou la promotion (ou sous-promotion) d’un
pion.
• La position des pièces sur l’échiquier n’est pas correcte.
• Le mode silence est activé.
•L’ordinateur est peut-être réglé sur un niveau de jeu Débutant
ou Entraînement, ou il joue très rapidement un jeu plus faible
que dans les autres niveaux.
• La pile du module est faible.
•Vous avez d’abord éteint le board Exclusive avant avoir pressé
sur GO/STOP.
QUE FAIRE
• Eteignez l’ordinateur et débranchez le module. Rebranchez le
module et assurez-vous qu’il est bien connecté.
• Pressez la touche ACL (voir Section 7.1).
• Pressez la touche ACL (voir Section 7.1).
• Utilisez l’adaptateur HGN 5009 (9V 300mA) fourni avec.
• Eteignez et rebranchez le module.
• Pressez la touche ACL (voir Section 7.1).
• Désactivez ce mode (voir Section 2.7).
• Pressez ENT pour interrompre cette reflexion.
• Consultez les règles du jeu d’échecs. Utilisez les touches des
pièces pour vérifier les positions sur l’échiquier (voir Section
6.1).
• Pressez ENT pour interrompre la reflexion de l’ordinateur.
• Retirez la pièce et la lampe de case d’arrivée va clignoter.
Disposez la pièce sur cette case.
•Vérifiez la position et changez-la (voir Section 6.2).
•Pour débarrasser confirmer avec ENT ; pour quitter appuyez
sur CL (voir Section 6.2).
•Vérifiez les règles des échecs. Côntrolez la disposition des
pièces sur l’échiquier comme décrit Section 6.1.
• Côntrolez la disposition des pièces sur l’échiquier comme
décrit Section 6.1.
• Désactivez cette option (voir Section 5.1).
• Pressez la touche LEV pour vérifier quel est le niveau en cours
(voir Section 3.1).
• Remplacez la pile tous les 12 mois.
• Appuyez sur GO/STOP pour éteindre d’abord le module.
56
Page 57

www .saitek.com
©2003 Saitek Ltd. Made and printed in China
All trademarks are the property of their respective owners.
CT08V/U/E 0803 P/N
 Loading...