

Page 1

Instructions
Mode d’emploi
Bedienungsanleitung
Handleiding
Istruzioni d’uso
Instrucciones de Funcionamiento
Page 2
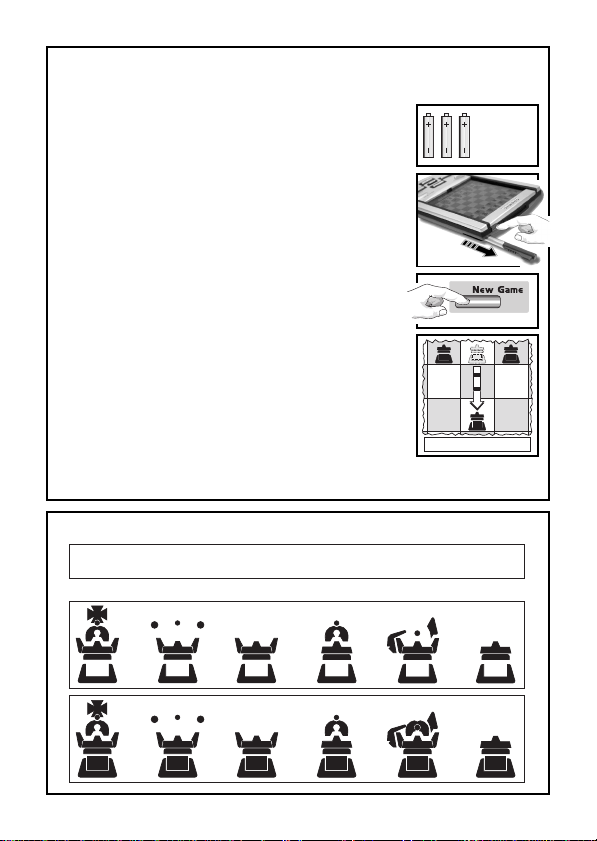
To play a game right away, simply follow these steps!
Open the battery cover and insert three “AAA”
1
(AM4/R03) alkaline batteries, making sure to
observe the correct polarity.
Remove the stylus from the storage area on
2
the right-hand side of the unit, as shown here.
Press GO/STOP, located on the top edge of
3
the unit, to turn the computer on. If you get no
response, reset it as noted in Section 11.1.
Press NEW GAME twice, in quick succession,
4
to reset the computer.
reset for a new game of chess, you’ve taken
too long between keypresses. Just try again!
Enter moves by pressing the stylus gently on
5
the from and to squares for each move.
that you may also use your fingertip.
When the computer displays its move, its piece
6
will flash briefly on the from and to squares,
and the move will then be made on the board.
Now, it’s your turn again!
To turn the unit off, press GO/STOP. When
GO/STOP again to confirm—and your game will be stored in memory!
If the board doesn’t
Note
Stop?
is displayed, press
ıPd7-d5````
GET TO KNOW THE CHESS PIECES!
K` Q` R` B` N` P`
KNIGHTKING QUEEN ROOK BISHOP PAWN
White
QUICK START
3 x
AAA
(AM4/R03)
x2
Black
Page 3

TABLE OF CONTENTS
QUICK START
KEYS AND FEATURES
INTRODUCTION
1. GETTING STARTED: THE BASICS
1.1 Batteries In, Power On
1.2 Ready to Play? Here’s How!
1.3 The Computer Makes its Move
1.4 Game Over? Start a New Game
1.5 Too Easy/Hard? Change Levels!
2. MORE FEATURES TO EXPLORE
2.1 Whose Turn? Check the Display!
2.2 Special Chess Moves
2.3 Illegal/Incorrect Moves
2.4 Check, Mate, and Draw
2.5 Try the Self-Rating System!
2.6 Want a Hint? Just Ask!
2.7 Interrupting the Search
2.8 Changing Sides
2.9 Built-In Openings
2.10Thinking on the Opponent’s Time
2.11Power Down/Game Memory
3. THE MAIN MENU
4. OPTION MODE
Selecting Game Options
4.1 Two Player Mode
4.2 Search Algorithm
4.3 Autobook Mode
4.4 White at Top
4.5 Countdown Clock
4.6 Ticking Sound
4.7 Coach Mode
4.8 Sound On/Off
4.9 LCD Contrast
4.10LCD Speed
4.11Automove Mode
5.LEVEL MODE
Setting a Playing Level
5.1 Fun Levels
5.2 Casual Play Levels
5.3 Tournament Levels
5.4 Speed Chess Levels
5.5 Problem Solving Levels
5.6 Tactical Level
5.7 Infinite Level
6.TAKEBACK MODE
7.INFO MODE
Automatic Info Displays
Manual Info Displays
7.1 Principal Variation
7.2 Search Information
7.3 Chess Clock Information
7.4 Move Count/Game Moves
7.5 Rating Display
8.SETUP MODE
9.STUDY MODE
Selecting Study Positions
Using the Board for Selection
10.NEED HELP? LOOK HERE!
11.TECHNICAL DETAILS
11.1The ACL Function
11.2Care and Maintenance
11.3Technical Specifications
APPENDIX:
STUDY MODE GAMES
ENGLISH
3
Page 4
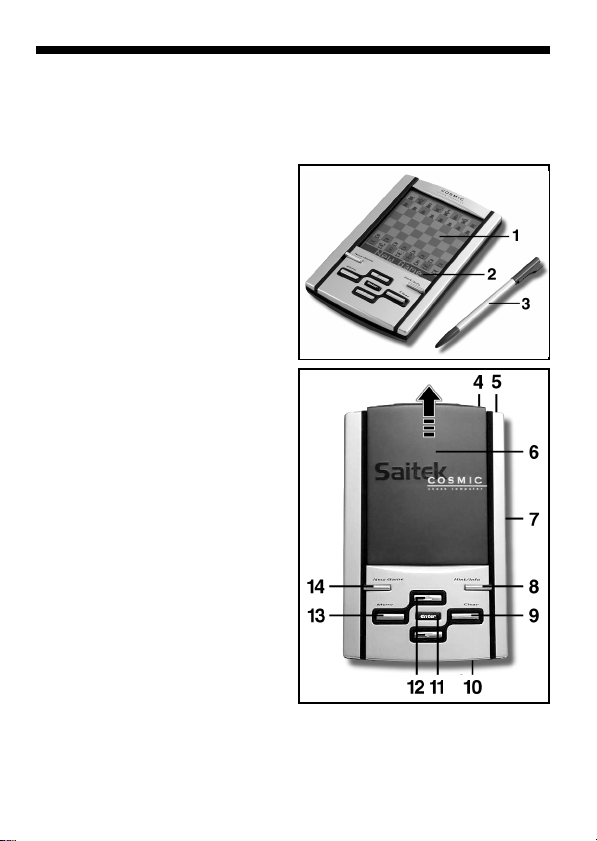
KEYS AND FEATURES
1.TOUCH SCREEN CHESSBOARD: Each square registers piece movement
when pressed gently with stylus or fingertip.
2.INFORMATION LINE: Shows moves, game information, and chess clocks.
Also used when selecting options and levels, setting up positions, and more.
3.STYLUS: Used to make moves on the touch screen; also used to select
settings in the Information Line area.
4.GO/STOP KEY: Press to turn unit
on; press twice to turn off. Press to
pause scrolling display; resume
scrolling with CLEAR.
5.STYLUS STORAGE AREA: Insert
stylus into slot when not in use.
6.LCD COVER: Slides on to protect
display when unit is not in use.
7.ACL (Reset): In base of unit. Used
to eliminate static discharge after
inserting new batteries.
8.HINT/INFO KEY: Press during your
move for a hint. Press repeatedly to
cycle through main Info displays.
9.CLEAR KEY: Press to exit Option/
Info Modes; to cancel Level/Study
Modes with no changes; to clear
Info Mode displays; to remain in
Study Mode after a wrong move; to
clear the board in Setup Mode; to
resume scrolling after a pause; and
to resume play after takebacks.
10.BATTERY COMPARTMENT: In
base of unit. Uses three “AAA”
(AM4/R03) alkaline batteries.
11.ENTER KEY: Press to change sides
with the computer. Press while the
computer is thinking to force it to
move. Press to select Main Menu
items; to select settings and turn
options on/off in Option/Info Modes;
to enter a new level in Level Mode;
to select a Study Position; to exit
Setup Mode with a new position.
12.¯/˘ KEYS: Press to cycle through
Levels/Study Positions one at a time in Level/Study Modes. Press to cycle
through Options/Info displays in Option/Info Modes. Press to take back/
replay moves in Takeback Mode.
13.MENU KEY: Press to enter Menu Mode; press again to exit.
14.NEW GAME KEY: Press twice, in quick succession, to reset the computer.
4
Page 5

INTRODUCTION
Congratulations on your purchase of Saitek’s Cosmic Chess
Computer! Featuring extraordinary chessplaying abilities and a vast
array of special options, this sleek unit offers a touch screen interface
for convenience and ease of play. Portable and always travel-ready, it
will also allow you to enjoy a game of chess anywhere, whether at
home or on the road! Once you familiarize yourself with the basic
operation, go on to explore all the extras this unique computer has to
offer. You’ll soon find that you’re enjoying chess as never before!
1. GETTING STARTED: THE BASICS!
1.1 Batteries In, Power On
Your chess computer runs on three “AAA” (AM4/R03) batteries.
Insert the batteries into the compar tment in the base of the unit,
making sure to observe the correct polarity. We recommend fresh
alkaline batteries for longer battery life!
To turn the computer on, press GO/STOP. If you get no response,
reset the unit by pressing a paper clip or another sharp object down
into the hole marked ACL in the base for at least one second.
To conserve batteries, the computer will automatically turn itself
off if left idle for about 20 minutes.
1.2 Ready to Play? Here’s How!
Follow these steps to start a game:
a.Press GO/STOP to turn the computer on.
b.To reset the computer for a new game of chess, press NEW
GAME twice, in quick succession.
If you take too long between
keypresses, the computer won’t reset itself, and you’ll need to
press the keys again.
As soon as the unit has been reset, you’ll
see New Game displayed briefly, and then the symbol for White
(„) and the chess clock (00:00:00).
c. To make a move, lightly press the stylus on the piece you want
to move until you hear a beep and the piece flashes.
Note that
you can use your fingertip instead of the stylus, if desired.
d.Next, press the stylus on your destination square. You’ll hear a
second beep as the computer confirms your move. Now, it’s the
computer’s turn.
You’ll notice that the computer often moves
instantly at the beginning of a game, instead of taking time to
ENGLISH
5
Page 6

think. This is because it is playing moves which are stored in its
openings library. For details, see Section 2.9.
1.3 The Computer Makes its Move
When the computer moves, it first shows Thinking... briefly.
While the computer considers its move for Black, the display flashes
the symbol for Black (ı), while showing the computer’s clock. Once
the actual move is made, the computer will beep and display its move
(e.g., ıPe7-e5), and the piece will briefly flash back and forth on
the from and to squares. After the move has been made on the
board, the display will go back to showing your clock—and it’s your
turn again.
1.4 Game Over? Start a New Game
Caution: Resetting the computer clears your current game
from the computer’s memory!
Whenever you finish a game (or if you decide to give up on your
current game), it’s easy to start over again! Reset the computer by
pressing NEW GAME twice in a row. New Game will be displayed,
signalling that the computer is ready for another game of chess, using
the currently selected playing level.
Special note regarding the Tournament Levels: If you reset for a
new game before a Tournament Level game is over, you’ll be asked to
confirm the game’s outcome before the computer resets itself. For
details, see Section 2.5.
1.5 Too Easy/Hard? Change Levels!
When the computer is first turned on, it is automatically set to
Playing Level 63, with an average computer response time of five
seconds per move. You can, however, choose from 100 different
levels of play! For descriptions of all the levels, as well as instructions
on how to change the playing levels, see Section 5.
2. MORE FEATURES TO EXPLORE
2.1 Whose Turn? Check the Display!
When the computer thinks for Black, it flashes a Black square (ı).
After the computer moves, the display shows a steady White square
(„), indicating that it’s now your turn to move for White.
6
Page 7
DISPLAY OPTIONS TO KEEP IN MIND!
•To brighten/darken the display: Select a different LCD
Contrast setting, as noted in Section 4.9.
•To slow down/speed up a scrolling display: Select a
different LCD Speed setting, as described in Section 4.10.
•To pause a scrolling display: Press GO/STOP once;
press CLEAR to resume scrolling. Note that this feature is
especially valuable if you have several of the automatic Info
Mode displays activated while the computer is thinking!
2.2 Special Chess Moves
Please note the following, in regard to certain chess moves.
Captures: Captures are shown with an x, as in ıPa7xb6.
En Passant: In this type of capture, displayed with an EP after the
capturing move, the computer reminds you to remove the captured
pawn by flashing it. Press the pawn to remove it from the board.
Castling: After the King has been moved, the Rook will flash.
Make the indicated Rook move on the board to complete the castling
maneuver. Kingside castling is displayed as O-O, and Queenside
castling is displayed as O-O-O.
Pawn Promotion:
• When you promote a pawn, first press the pawn on its from
square, as usual. The display then changes to show the available
promotion pieces (Q R B N). To promote to a Queen, simply press
the to square to complete your move. To underpromote to a Rook,
Bishop, or Knight, press one of the displayed promotion symbols. The
display will confirm briefly (e.g., Prom: rook). Press the to square
to complete the promotion, and the piece will automatically change on
the board.
before pressing the to square, simply press one of the other symbols.
along with the promoted piece, as in ıPh2-h1/Q.
Note: If you change your mind about the promotion piece
• When the computer promotes a pawn, it indicates its move,
ENGLISH
2.3 Illegal/Incorrect Moves
Your computer knows all the rules of chess—and it will never
cheat! If you attempt to make an illegal move, a high-pitched double
beep will alert you to your error. This will occur, for instance, if you
7
Page 8

press an illegal from or to square, an incorrect piece or color, or an
invalid game ke y.
If you press an illegal to square, the display will simply continue to
indicate the square the piece came from. To continue, move your
piece to a legal square. If you press a from square, but decide not to
make that move, press that same square again to cancel the input. If
you change your mind after entering your whole move, retract the
move as described in Section 6.
2.4 Check, Mate, and Draw
Whenever a King is in check, the computer will display Check
briefly after the move is made. If the computer discovers a forced
mate, it will briefly show a mate announcement (e.g., Mate in 3).
When a game ends in checkmate, the computer will either congratulate you or express its condolences, depending on whether you’ve
won or lost. A display of Checkmate! will then end the game.
The computer recognizes draws by stalemate, three-fold repetition,
and the 50-move rule. In each of these cases, the corresponding
display will be shown after the drawing move has been made.
2.5 Try the Self-Rating System!
Whenever you play on any of the Tour nament Levels, the computer
will provide you with an approximate ELO rating after the game has
ended, based on your performance. Not sure what a “rating” is? It’s a
universally recognized method of measuring chess performance or
describing relative playing ability. The international body which
governs chess is called FIDE, or
Échecs,
and FIDE ratings are sometimes referred to as ELO ratings.
Fédération Internationale des
The United States Chess Federation (USCF) uses a similar rating
system. Ratings are usually four-digit numbers, with stronger players
having higher ratings. Towards the upper end of the scale, Masters
rank in at 2200 and above, with International Grandmasters at 2500+.
Want to know where you stand? Here’s your chance! Refer to Section
5.3 for more information on the Tournament Levels.
2.6 Want a Hint? Just Ask!
If you ever need help with a move, the computer will be glad to
oblige! Press HINT/INFO during your turn, and the computer will
display a move suggestion. If the hint happens to be e4xd5, for
example, Ply 1: e4xd5 will be displayed. A “ply” is an individual
move, or a move for either side. The hint can take from one to five
8
Page 9

seconds to show, but it may sometimes take longer. To accept the
hint, make the displayed move on the board. To make a different
move, simply disregard the hint and make a move of your own. You
can also cancel the hint display by pressing CLEAR.
2.7 Interrupting the Search
To interrupt the computer while it’s thinking about a move, press
ENTER. This forces the computer to play the best move it has found
so far. This feature can be extremely useful on the higher levels,
where the computer may take a long time to move, and on the Infinite
and Tactical Levels, where it thinks indefinitely unless you stop it.
On the Problem Solving Levels, pressing ENTER while the computer is thinking will not cause the computer to make a move. Instead,
the computer will display No move found! to indicate that it was
interrupted before finding a mate. To continue, switch to another level.
2.8 Changing Sides
To change sides with the computer, press ENTER on your turn—
and the computer will make the next move for your side. You can
change sides as often as you wish by pressing ENTER repeatedly.
Want the computer to play the first move for White at the start of a
new game? Press NEW GAME twice, and then press ENTER!
Want to see the computer play chess against itself? Press ENTER
after each move—and watch as it plays for both sides of the board,
one move after another. Study its strategies, and you might just
improve your own game!
2.9 Built-In Openings
At the beginning of a game, the computer’s reply is often instantaneous on many levels, because it is playing moves from its
library.
The computer’s library includes most major openings and
openings
many positions from grandmaster play. If the current board position is
in its library, the computer plays a response to that position from
memory, instead of thinking about the move. Note that the openings
library is used on all levels except the Problem Solving Levels.
2.10 Thinking on the Opponent’s Time
As you play, you’ll probably notice that the computer sometimes
replies to your moves immediately, even in the middle of games
played on the higher levels. This is because the computer thinks on
your time, using the time you are contemplating your next move to
ENGLISH
9
Page 10

think ahead and plan its own strategies. It tries to anticipate the move
you are likely to make, and calculates its responses for that move
while you’re still thinking. If the computer has guessed correctly,
there’s no reason for it to keep on calculating—it immediately plays
the move it has already found! Note that the computer does not think
on the opponent’s time on the Fun Levels.
2.11 Power Down/Game Memory
You may interrupt your game and turn the computer off by pressing
GO/STOP. The display will show Stop?, and pressing GO/STOP
once more to confirm will turn the unit off. Play is then suspended,
and the computer will store your game for up to one year. When you
switch back on again, you can continue from where you left off! If you
decide not to turn the computer off after pressing GO/STOP once,
simply press CLEAR to cancel.
If no keypresses or moves are made for 20 minutes, the Auto
Power Down feature will automatically turn your computer off. To
continue, press GO/STOP to turn the computer back on. Note that the
computer will not turn itself off while it is thinking about a move, or
while Stop? is being displayed.
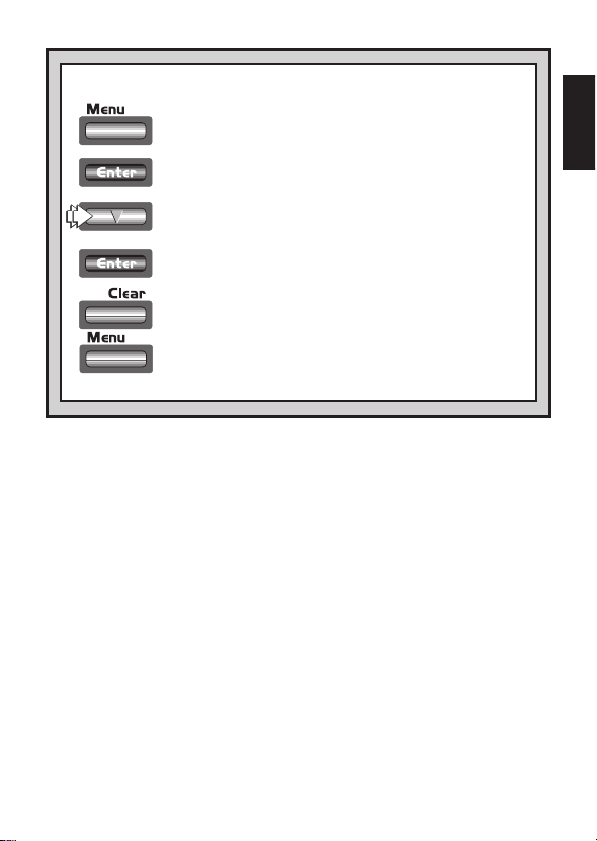
3. THE MAIN MENU: ACCESSING SPECIAL MODES
Cosmic Chess offers many user-selectable modes and options, all
accessed via the integrated Main Menu. Once you press MENU,
you’re taken directly to ¿OPTION, the first of six Main Menu items.
Press ¯ (or ˘) repeatedly to cycle through all the Menu items:
MAIN MENU ITEM....... REFERENCE ............... DISPLAY
Option Mode..................... Section 4 ................... ¿OPTION
Level Mode....................... Section 5 ................... ¿LEVEL
Take Back Mode............... Section 6 ................... ¿TAKEBACK
Info Mode ......................... Section 7 ................... ¿INFO
Setup Mode ...................... Section 8 ................... ¿SETUP
Study Mode ......................Section 9 ................... ¿STUDY
To select one of the Main Menu items, press ENTER. In each case,
you’ll be taken to a sub-menu, where you can make subsequent
selections. Some of the items (e.g., Option Mode) will offer a variety
of different choices and sub-choices, while others (e.g., Setup Mode)
will allow you to activate a particular game feature. Since the instructions for selecting menu items will vary, depending on the item you’ve
chosen, please see the referenced section numbers for full details on
10
Page 11
A QUICK LOOK AT THE MAIN MENU!
• ¿OPTION: Explore a number of exciting game options.
• Two Player Mode • Coach Mode
• Search Algorithm • Sound On/Off
• Autobook Mode • LCD Contrast
• White at Top • LCD Speed
• Countdown Clock • Automove Mode
• Ticking Sound
• ¿LEVEL: Choose from 100 different levels of play.
• ¿TAKEBACK: Take back any or all previous moves.
• ¿INFO: Select various automatic information displays.
• Show Moves • Show Progress
• Show Nodes • Show Evaluation
• Show Time per Move
• ¿SETUP: Set up or change any board position.
• ¿STUDY: Test yourself with 64 unique Study Positions.
accessing each of these major features. After selecting all desired
options and/or changing game settings, press MENU again to exit the
Main Menu and return to game play.
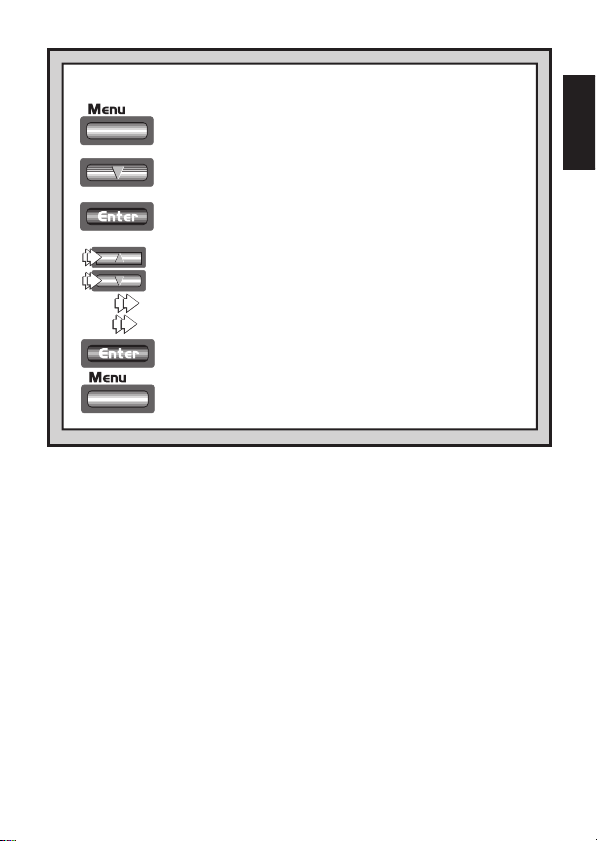
4. OPTION MODE: ADD VARIETY TO YOUR GAMES!
Want to explore all sorts of intriguing game options? Just take a
look at Option Mode! First, learn how to select and activate these
user-selectable options before or during game play, and then go on to
learn about the individual options, as described in this section.
Selecting Game Options
Press MENU to enter the Main Menu, and the display automatically shows ¿OPTION for Option Mode. Press ENTER to enter
Option Mode, and you’ll see the first of 11 options, as shown below.
Press ¯ (or ˘) repeatedly to cycle through all the options:
OPTION...................... REFERENCE ......... DEFAULT DISPLAY
Two Player Mode.......... Section 4.1........... player: P-C
Search Algorithm ......... Section 4.2........... search: select
Autobook Mode ............ Section 4.3........... book: on
ENGLISH
11
Page 12

White at Top ................. Section 4.4........... top: black
Countdown Clock ......... Section 4.5........... clock: up
Ticking Sound .............. Section 4.6........... ticks: off
Coach Mode ................. Section 4.7........... coach: off
Sound On/Off ............... Section 4.8 ........... sound: on
LCD Contrast ............... Section 4.9........... contrast: 3
LCD Speed................... Section 4.10......... LCD speed: 2
Automove Mode ........... Section 4.11......... automove: on
To turn an option on/off or to select option settings (if any), press
ENTER when the option is displayed. Pressing ENTER repeatedly will
cycle through all choices for the displayed option. When your desired
choice is displayed, either press ¯ or ˘ to go on to a different option,
or press CLEAR to return to the Main Menu, and then MENU to
return to normal game play. For details on each of these options, see
the referenced section numbers.
Note: When you reset the computer
for a new game, most of your selected options are carried over to the
next game. The only exception is Two Player Mode, which automatically returns to Player vs. Computer whenever you start a new game.
4.1 Two Player Mode
Options: player: P-C (Player vs. Computer)
Normally, the computer automatically answers with a countermove
after you enter your mov e. If you activate player: P-P, however ,
you can enter any number of moves one by one, without allowing the
computer to answer. This feature can be used in a number of interesting ways:
player: P-P (Player vs. Player)
•Play through master games. Press ENTER to see what the
computer would do in any position!
•Keep records of your own chess games. When a game is over,
play to certain board positions to see how other moves or
different strategies might have affected the outcome.
•Study opening lines by entering them manually.
•Play against a friend, with the computer acting as a referee. The
computer will check all moves for legality and keep track of the
time for both sides!
If you’re playing against another person and you want to see what
the computer would do in your position, press ENTER to have the
computer make your next move. After the computer has moved, Two
Player Mode remains in effect, and you can continue your game. Note
that this option automatically reverts to its default setting of Player vs.
12
Page 13
PRACTICE SETTING AN OPTION!
1. Press MENU to enter the Main Menu. The display
will show ¿OPTION.
2. Press ENTER to enter Option Mode.
example, let’s pick the Ticking Clock Option.
3. Press ¯ five times, until the display shows
ticks: off.
4. Press ENTER to turn this option on, and the
display changes to ticks:on
5. Press CLEAR to exit Option Mode, press MENU
to exit Menu Mode—and the simulated ticking
will start!
Note: To turn this option off again,
repeat the above steps.
For more details, see Section 4.6.
Computer whenever you reset for a new game.
4.2 Search Algorithm
Options: search: select / brute
The program in this chess computer normally uses a
Search algorithm.
concentrates mainly on those moves most likely to be successful,
allowing it to see combinations that might otherwise take much longer
to compute. You can also switch over to the somewhat slower but very
powerful
occasional oversight.
4.3 Autobook Mode
phase of the game—and then gives you the opportunity to practice
those openings which are giving you the most trouble! It’s like having
your own personal “Adaptive Opening Coach”! With the Autobook
option on, the computer will watch your opening moves as you play.
Brute Force algorithm
Options: book: on / off
This unique feature actually monitors your play during the opening
In this particular type of search, the computer
, which can minimize the risk of an
For this
.
Selective
ENGLISH
13
Page 14

The next time you end up with a bad position a few moves after the
end of an opening variation, the computer will “remember” that
particular opening line. In the future, then, the computer will play that
same opening whenever possible. This allows you to try out different
moves and strategies, in an attempt to become more familiar with that
opening, and thereby strengthen your play!
4.4 White at T op
Options: top: black / white
Want to depart from the usual standard and have the computer
play the White pieces from the top of the board? Then try out this
feature by selecting top: white at the beginning of a new game!
Start your game by pressing ENTER, and the computer will make the
first move for White from the top of the board.
Note: When the computer plays White from the top of the board,
you’ll notice that the Kings and Queen are positioned differently, and
the board notation is automatically reversed.
4.5 Countdown Clock
Options: clock: up / down
Normally, the computer defaults to the clock: up option,
displaying the elapsed time. Activating the Countdown Clock option,
however, will display the remaining time instead. Here’s how to
differentiate between the clocks symbols at a glance:
[ / ] Countup Clocks (White/Black)
{ / } Countdown Clocks (White/Black)
Note that the Countdown Clock option is only available in combination with the Tournament and Speed Chess Levels.
4.6 Ticking Sound
Options: ticks: off / on
Turning this option on will activate a ticking sound that simulates a
chess clock. You can create the atmosphere of a championship chess
tournament in your very own living room!
4.7 Coach Mode
Options: coach: off / novice / inter. / adv.
Activating Coach Mode allows the computer to look over your
shoulder while you play, watching what you do and offering help if you
14
Page 15

need it! In this unique capacity, the computer might warn you if you
are in danger of losing a piece, or if it thinks your move is about to
lead to an avoidable material loss. You may see displays like Your
Queen is in jeopardy! or Watch your Knight!. If
you stand to benefit from a particular situation, you might even see
He’s giving you a big chance!. Sometimes, the computer will also ask you to confirm or cancel an obviously illogical
move. If you choose to cancel, your move will be taken back and you
can try another!
To choose one of the Coach options, press ENTER repeatedly until
your desired level is displayed. Once you exit Option Mode and return
to game play, the last displayed Coach option will automatically be in
effect. The following are the available settings.
•coach: off: No coaching features are activated.
•coach: novice: Here, the computer assumes that you are
familiar with many tactical and strategic concepts, so it will only
make you aware of less obvious and more advanced concepts,
such as sacrifices and combinations.
•coach: intermediate: In this case, the computer gives
the amount of assistance it deems appropriate for players who
can see the most obvious points, but who also need to be made
aware of others.
•coach: advanced: This setting will give warnings and
advice whenever the computer feels they’re necessary, such as
when you commit a blunder or if a piece is in jeopardy.
When Coach Mode is activated, the computer will sound intermittent beeps during your turn as White, as a reminder that it’s waiting
for you to make a move.
4.8 Sound On/Off
Options: sound: on / off
Selecting one of these sound settings gives you the option of
playing chess with or without sound effects.
ENGLISH
4.9 LCD Contrast
Options: contrast: 1 / 2 / 3 / 4 / 5
This option allows you to adjust the contrast of the LCD display,
with 1 being the lightest, and 5 the darkest. If you find that the default
setting of 3 is too light or too dark to read comfortably, change it by
pressing ENTER repeatedly, until your desired setting is displayed.
15
Page 16

4.10 LCD Speed
Options: LCD speed: 1 / 2 / 3 / 4
You can control the scrolling speed of the LCD display by setting
this option, with 1 being the slowest, and 4 the fastest. If you find that
the default setting of 2 is too slow or too fast to read comfortably, you
can change it by pressing ENTER repeatedly, until your desired
setting is displayed.
4.11 Automove Mode
Options: automove: on / off
Normally, when the computer makes a move, it briefly flashes its
piece on the from and to squares, and then automatically makes the
move on the board. If you change to automove: off, however,
the computer will announce its moves as usual—but it will be up to
you to move the computer’s pieces on the board. After the computer
has announced its move, it will flash its piece on the from square.
Press the flashing piece, and it will then move to the to square. Press
the to square to complete the computer’s move.
5. LEVEL MODE: CHOOSE FROM 100 LEVELS!
Your chess computer has 100 unique playing levels to choose
from! The levels are divided into two basic groups:
• FUN LEVELS (1-60): These levels offer beginners and average
players a chance to build their chess skills. On many of the Fun
Levels, you’ll see the computer make mistakes on purpose—just
so you can learn from it!
• COMPETITION LEVELS (61-100): These levels are geared
towards intermediate and more advanced players. Included are
levels for casual and tournament play, problem solving, speed
chess, and even special levels for experimentation. As you are
selecting levels, keep in mind that when the computer has more
time to think about its moves, it becomes stronger and plays
better—just like a human chess player!
Setting a Playing Level
Press MENU to enter the Main Menu, and press ¯ until the display
shows ¿LEVEL. Press ENTER to enter Level Mode, and you’ll see
the currently selected level, as in <00:05/move> (the default level
on the first power up). To change the level, press ˘ or ¯ to increase/
decrease the levels by one, or use your stylus to press > or < to
16
Page 17

increase/decrease the levels by ten. Note that pressing and holding
down ˘ or ¯ will automatically increase/decrease the levels one at a
time, until you stop pressing the key. When your desired level is
displayed, press ENTER to enter that level selection into the computer. The display will confirm with Level changed, and you’ll go
back to the Main Menu. Press MENU to return to game play.
If you enter Level Mode to verify the level, but you don’t actually
want to change levels, press CLEAR to go back to the Main Menu.
Once you exit the Main Menu with MENU, you’ll return to your game
without changing the level or clock settings.
Please also note the following regarding level selection:
•The level can be changed whenever it’s your turn to move.
•Changing the level always resets the chess clocks.
•If you change levels while the computer is thinking, the computer
will abort its search and reset the clock.
FUN LEVELS
5.1 Fun Levels
Level Description Display
1....... Fun Level 1 ........................................<Fun Level 1>
2....... Fun Level 2 ........................................<Fun Level 2>
3....... Fun Level 3 ........................................<Fun Level 3>
…all the way up to…
58...... Fun Level 58 ......................................<Fun Level 58>
59...... Fun Level 59 ......................................<Fun Level 59>
60...... Fun Level 60 ......................................<Fun Level 60>
The Fun Levels are meant primarily for beginners and younger
players. On these levels, Cosmic Chess is much more “human” than
most other chess computers—it gives everyone a chance to win, in a
world where chess machines are typically relentless and often quite
difficult to beat. Although the general consensus seems to be that
computers never make mistakes, on some of these levels, this
computer actually does!
Handicaps are built into these levels, demonstrating common
mistakes made by beginners. You may see the computer deliberately
ignore the material worth of pieces, and ignore key concepts such as
pawn structure, centrality, mobility, and King safety. It may overlook or
walk into mates, develop its Queen too early, or make impulsive
captures and checks. Chess books often advise of basic rules, yet
players see their opponents breaking the rules and getting away with
it. The Fun Levels provide a way to practice punishment of these
ENGLISH
17
Page 18

typical mistakes, enabling the beginner to strengthen his game
against the human opponents he’s likely to face! On some of the
weaker Fun Levels, the computer will not only leave pieces unguarded, but it might actually try to lose material. As the levels get
higher, they give away material less consistently. They progressively
start to consider the material worth of pieces more and more, and
eventually only occasionally give pieces away. On the upper Fun
Levels, the computer won’t actually give away material, but it will play
more like a beginner who has learned the basics of the game. You
might still see it make errors such as opening itself up to threats of
check or checkmate. Why not explore all the Fun Levels—and try to
learn from the computer’s mistakes!
COMPETITION LEVELS
5.2 Casual Play Levels
Level Average Time per Move Display
61................1 second per move ....................... <00:01/move>
62................2 seconds per move ..................... <00:02/move>
63................5 seconds per move ..................... <00:05/move>
64..............10 seconds per move ..................... <00:10/move>
65..............15 seconds per move ..................... <00:15/move>
66..............30 seconds per move ..................... <00:30/move>
67..............45 seconds per move ..................... <00:45/move>
68................1 minute per move ........................ <01:00/move>
69................2 minutes per move ...................... <02:00/move>
70................3 minutes per move ...................... <03:00/move>
When you choose one of the above levels, you’re selecting an
average response time for the computer. Note that the response
times are averaged over a large number of moves. In the opening and
the endgame, the computer will tend to play faster, but in complicated
middlegame positions, it may take longer to move.
5.3 Tournament Levels
Level Number Moves/Total Time Display
71............ 40 moves in 1 hour 20 min. ............ < 40 in 1:20 >
72............ 40 moves in 1 hour 30 min. ............ < 40 in 1:30 >
73............ 35 moves in 1 hour 45 min. ............ < 35 in 1:45 >
74............ 40 moves in 1 hour 45 min. ............ < 40 in 1:45 >
75............ 35 moves in 1 hour 30 min. ............ < 35 in 1:30 >
76............ 40 moves in 2 hours ....................... < 40 in 2:00 >
77............ 45 moves in 2 hours 30 min............ < 45 in 2:30 >
18
Page 19
CHANGING THE LEVEL: IT’S EASY!
1. Press MENU to enter the Main Menu. The display
will show ¿OPTION.
2. Press ¯ one time, and the display will show
¿LEVEL.
3. Press ENTER to enter Level Mode, and the
current level is displayed.
necessary, to identify the current level.
4.
Let’s find Speed Chess Level 81.
to increase or decrease the levels by one; press
>`
<`
> or < to increase or decrease the levels by ten.
Watch the display for < 5 min/game >.
5. When you see < 5 min/game >, press
ENTER. Then, press MENU to exit Menu Mode—
and you’re ready to try out your new level!
For more details, see Section 5.
78............ 50 moves in 2 hours. ...................... < 50 in 2:00 >
79............ 40 moves in 2 hours 30 min............ < 40 in 2:30 >
80............ 40 moves in 3 hours ....................... < 40 in 3:00 >
The Tournament Levels require you to make a certain number of
moves within a specific amount of time. If a player exceeds the
allotted time for a given number of moves, the display will indicate
this, and the game is over.
As described previously in Section 2.5, this computer utilizes a
Self-Rating system whenever you play Tournament Level games!
After a Tour nament game has ended and you press NEW GAME
twice to reset the unit, the computer will briefly display your rating
before going on to the new game display. If you miss the rating
display, you can press HINT/INFO five times to see the rating again at
any time. To clear the display, press CLEAR.
If you reset the computer for a new game
game,
before the game has actually ended,
you to dictate the outcome, as follows:
Refer to Section 5, if
Press ˘ or ¯
during
a Tour nament
the computer will allow
ENGLISH
19
Page 20

•Display = Rate as draw?.
If you press ENTER, the rating will be displayed.
If you press ˘:
•Display = Rate as win?.
If you press ENTER, the rating will be displayed.
If you press ˘:
•Display = Machine wins?.
If you press ENTER, the rating will be displayed.
If you press ˘:
The display will cycle back to Rate as draw?.
In order to obtain a rating, you
questions with ENTER! If you
must
do not
answer one of the above
want the game to be rated for
any reason, press CLEAR in answer to any of the above questions.
The computer will confirm by displaying Game not rated.
5.4 Speed Chess Levels
Level Total Time per Game Display
81.............. 5 minutes per game ................... < 5 min/game>
82.............. 7 minutes per game ................... < 7 min/game>
83..............10 minutes per game ................... <10 min/game>
84..............15 minutes per game ................... <15 min/game>
85..............20 minutes per game ................... <20 min/game>
86..............30 minutes per game ................... <30 min/game>
87..............45 minutes per game ................... <45 min/game>
88..............60 minutes per game ................... <60 min/game>
89..............90 minutes per game ................... <90 min/game>
90............100 minutes per game ................... <100 min/game>
On the Speed Chess Levels, you set the total time for the whole
game. If the game time is exceeded, the computer displays which
side has lost on time, as in White time out. For these levels,
you may want to activate the Countdown Clock option to show the
countdown time instead of the elapsed time (see Section 4.5).
5.5 Problem Solving Levels
Level Problem Display
91.................... Mate in 1 move....................... < Mate in 1 >
92.................... Mate in 2 moves..................... < Mate in 2 >
93.................... Mate in 3 moves..................... < Mate in 3 >
94.................... Mate in 4 moves..................... < Mate in 4 >
95.................... Mate in 5 moves..................... < Mate in 5 >
96.................... Mate in 6 moves..................... < Mate in 6 >
20
Page 21

97.................... Mate in 7 moves..................... < Mate in 7 >
98.................... Mate in 8 moves..................... < Mate in 8 >
Selecting one of these levels activates a special mate finder
program. If you have a position where there may be a mate and you
would like the computer to find it, set the computer on one of the
Problem Solving Levels. Your computer can solve mates in up to eight
moves. Mates in one to five are usually found quite quickly, whereas
solutions taking six to eight moves may take quite some time. If there
is no mate present or the computer cannot find a mate, it will briefly
display No move found!. You may continue to play, if desired, by
switching to another level.
5.6 Tactical Level
Level Description Display
99............ Tactical Play (no time limit) .............< Tactical >
On the Tactical Level, the computer’s goal is to find the best tactical
sequence more quickly than it would on a normal playing level. The
computer will search indefinitely until it finds a win of two pawns or
more, or until you stop the search by pressing ENTER. The Tactical
Level is great for experimentation, since it lets the computer concentrate fully on special tactical positions!
5.7 Infinite Level
Level Description Display
100 ................ Infinite (no time limit) .................. < Infinite >
On the Infinite Level, the computer searches indefinitely until it
finds a forced mate, or until you stop the search by pressing ENTER.
If the search is halted, the computer makes the move it currently
thinks is best. Try experimenting with this level—set up special board
positions and let the computer analyze them for you! It will think for
hours and even days on end, trying to find the best possible move.
ENGLISH
6. TAKEBACK MODE: TAKE BACK MOVES
When you’re playing chess against this computer, nothing is ever
“set in stone”—you can change your mind or decide to play a different
move whenever you’d like! When it’s your turn to move, simply press
MENU to enter the Main Menu, and press ¯ repeatedly until the
display shows ¿TAKEBACK. Press ENTER to enter Takeback Mode,
and you’ll see the last move that was made. To take that move back,
press ¯, and the move will be retracted on the board. The display will
21
Page 22

then show the next move to be taken back. You may continue to press
¯ to take back any number of moves, all the way back to the beginning of the game, if desired. If you reach the beginning, the display
will show End takebacks, and you’ll automatically be returned
to the Main Menu. Note that, as long as you don’t go back to the very
start of the game, you can always press ˘ to go forward through the
moves again, if desired. To resume your game at any point with the
current board position, press CLEAR and then MENU.
As a shortcut to entering Takeback Mode, you can also simply
press on the to square of the last move that was made. The display
will briefly show TAKEBACK, and it will then show the last move that
was made. To take the move back, press ¯. As above, repeated
presses of ¯ will take more moves back, if desired. To resume game
play at any point, press CLEAR.
7. INFO MODE: WATCH THE COMPUTER THINK!
Imagine this: You’re playing chess against a friend, and it’s his
move. You’d love to know what move he’s considering and you’d really
like his opinion of the current board position. But, of course, you won’t
ask—because that’s just not done!
against this chess computer, you can ask anything you want,
you’ll get all the answers!
of information about the computer’s thought process, and studying
this information can help you learn so much more about the game!
You may access game information at any time via Info Mode. As
described below, you can call up this information manually by pressing HINT/INFO, or you can select Info Mode options to be displayed
automatically, every time the computer is considering its next move.
Automatic Info Displays
Activating any or all of the following Info Mode options causes the
computer to automatically display that information every time it thinks
about its move—you can actually watch the computer “think out loud”!
In fact, you can obtain an incredible amount
Well, guess what—when you play
and
Important: Info Mode options selected for automatic display
are only activated while the computer is thinking!
Press MENU to enter the Main Menu, and press ¯ repeatedly until
the display shows ¿INFO. Press ENTER to enter Info Mode, and
you’ll see the first of five options, as shown below. Pressing ¯ (or ˘)
repeatedly cycles through these options, as follows:
22
Page 23

•Show Moves: Shows the computer’s predicted line of play, up to
four individual moves. See Section 7.1.
Options:0 / 1 / 2 / 3 / 4 moves
•Show Nodes: Shows the number of nodes (positions) searched
per second. See Section 7.2.
Options:nodes: off / on
•Show Time per Move: Shows the time used so far for the
current move. See Section 7.3.
Options:time/move: off / on
•Show Progress: Shows the computer’s search depth and the
move currently being considered. See Section 7.4.
Options:progress: off / on
•Show Evaluation: Shows the score for the current position. See
Section 7.2.
Options:evaluation: off / on
To turn an option on/off or to select option settings (if any), press
ENTER when the option is displayed. Pressing ENTER repeatedly will
cycle through all choices for the displayed option. When your desired
choice is displayed, either press ¯ or ˘ to go on to a different option,
or press CLEAR to go back to the Main Menu, and then MENU to
return to normal game play. For full details on each of these options,
see the referenced section numbers.
You may turn on any or all of the above Info Mode Options. If you
activate more options than will fit in the display at one time, the
display will scroll continuously while the computer considers its next
move. If the display is scrolling too quickly, change the LCD Speed,
as noted in Section 4.10. You can also press GO/STOP to pause the
display, and then press CLEAR to resume the scrolling. Whenever
requested information is not available, the display will show --x--.
Manual Info Displays
Press HINT/INFO at any time, and the first move of the computer’s
predicted line of play will be shown (as described in Section 7.1).
Game information is divided into several different groups, and pressing HINT/INFO repeatedly cycles from one group to another. The ˘
and ¯ keys can then be used to cycle through the displays within
each group. Note that each of the groups is discussed in detail below.
Press CLEAR to return to the normal clock display.
ENGLISH
7.1 Principal Variation
When you first press HINT/INFO, you’ll see the first move of the
23
Page 24

principal variation (the computer’s predicted line of play), displayed as
in Ply1: b1-c3. A “ply” is an individual move, or a move for either
side, and the computer’s search depth is described in terms of the
number of ply it looks ahead. On a two-ply search, for example, the
computer will look ahead two individual moves (one move for Black
and one for White). Note that this first ply display can also be used as
a hint, since this is the move the computer is expecting you to make.
If you check this display while the computer is thinking, you’ll see
the move the computer is currently considering. If you check it during
your turn, you’ll see the move the computer is expecting you to make
next. In either case, pressing ˘ repeatedly cycles through the rest of
the moves in the predicted line of play, up to four ply:
•Predicted line of play: Move 1
•Predicted line of play: Move 2
•Predicted line of play: Move 3
•Predicted line of play: Move 4
7.2 Search Information
After pressing HINT/INFO to access Info Mode, press it again to
see information about the computer’s search. The initial display will
show the current score; pressing ˘ repeatedly cycles through the rest
of the information:
•The current score: A numerical evaluation of the current position,
based on a pawn being worth 1.0 points; a positive number
indicates that White is ahead. Example: If White is winning by
two pawns, the display will show Score: +2.0. Note that the
score is not valid on the Problem Solving Levels.
•Two-part display: (a) The current search depth, or the number of
individual moves the computer is looking ahead. For example: If
the computer is looking ahead 439 individual moves, you’ll see
d:4 39, with the d: standing for depth. (b) The move being
considered (if the computer is currently thinking).
•Two-part display: (a) The time used so far for the current move.
(b) The number of nodes, or positions, being searched per
second (if the computer is currently thinking).
7.3 Chess Clock Information
After pressing HINT/INFO to access Info Mode, press it two more
times to see chess clock information. The display will show the total
elapsed time for both sides. Notice that the chess clock symbol in the
middle portrays the current side to move and the type of clock in use.
24
Page 25
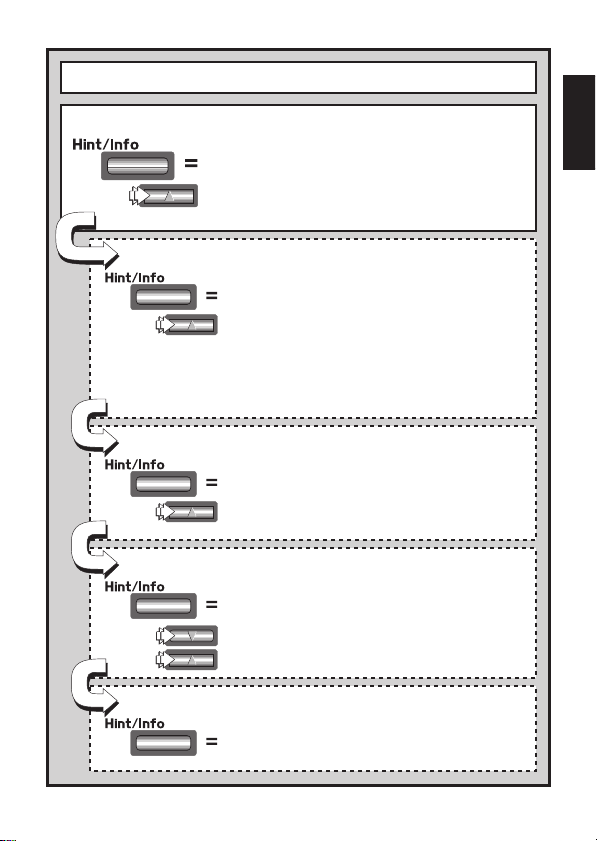
AN OUTLINE OF INFO MODE
PRINCIPAL VARIATION INFORMATION:
• Predicted line of play: Move 1
• Predicted line of play: Move 2
• Predicted line of play: Move 3
• Predicted line of play: Move 4
SEARCH INFORMATION:
• Position evaluation (score)
• Search depth; and
Move currently being considered
(if computer is thinking)
• Elapsed time for current move; and
Number of nodes searched per second
(if computer is thinking)
CHESS CLOCK INFORMATION:
• Elapsed time for both sides
• Remaining time for both sides*
*Speed Chess/Tournament Levels only
MOVE COUNT INFORMATION:
• Current move number + last move made
• Backwards and forwards through moves
of current game
ENGLISH
RATING INFORMATION:
• ELO rating (after a Tournament Level
game has been played)
25
Page 26

Pressing ˘ will cycle through two displays, as shown below:
•Total elapsed time for White/Black (Countup Clock)
White to move [, Black to move ].
•Total remaining time for White/Black (Countdown Clock: Problem Solving/Speed Chess Levels only)
White to move {, Black to move }.
If the Countdown Clock is not currently activated, the second
display will simply show a blank clock (--:--{--:--).
The clocks will stop for various reasons during a game, such as if
you take back a move, check level settings, select options, set up a
position, or turn the computer off. The times are retained in memory,
however, and the clocks resume as soon as play is continued. Whenever you change playing levels or reset the computer for a new game,
the clocks are always set back to zero.
7.4 Move Count/Game Moves
After pressing HINT/INFO to access Info Mode, press it three more
times to see the current move number and the last move made. You
can then press ¯ to cycle back through the moves of your game, if
desired, or press ˘ to go forward again at any point. This gives you
an opportunity to go back and write down the moves of a game that
turns out to be unexpectedly great!
•Current move number and last move made.
•Moves of the current game.
7.5 Rating Display
After pressing HINT/INFO to access Info Mode, press it four more
times to see your current rating. Note that the ratings are based on
Tournament Level play, as described in Section 5.3.
8. SETUP MODE: CHANGE THE BOARD!
Setup Mode allows you to set up special board positions to play
from, or problems you would like the computer to solve!
Caution: All moves in your current game will be erased if you
make changes to the board position during a game.
You may change or set up a board position whenever it’s your turn
to move. Press MENU, and press ¯ repeatedly until the display
shows ¿SETUP. Press ENTER to enter Setup Mode, and you’ll see a
display showing the color and piece symbols („ıKQRBNP).
26
Page 27

•To remove a piece from the board, simply press on the piece
and it will disappear from the board.
•To move a piece from one square to another, press on the
piece, causing it to disappear. Then, press on the new square,
and the piece will appear in that location.
•To add a piece to the board, first press directly on the displayed
color and piece symbol for the piece you want to add, and then
press the square where you’d like to add the piece. To add
another piece of the same type and color, simply press down on
another square. To add a different piece, press another piece
and/or color symbol, and follow the same steps as above.
•To clear the board, press CLEAR while in Setup Mode. The
display will ask for confirmation with Clear board?. Press
ENTER, and the display will show Cleared. You can then add
any number of pieces, as described above. If you decide you
don’t want to clear the board after all, simply press CLEAR again
to cancel, and you’ll see Not cleared. Note that this feature
can be handy for setting up positions with only a few pieces,
where it would be much easier to start out with an empty board!
•Once you have changed the position as described above,
note that the color for the side to move is determined by the color
of the last piece you set up. Change the color, if necessary, by
pressing either ı for Black or „ for White.
•To exit Setup Mode, press ENTER. When the computer asks for
confirmation with New position?, press ENTER to return
to normal play with your new board setup. New position!
confirms this. If you press CLEAR, the display will show Re-
sume, and you’ll remain in Setup Mode.
Note that any legal board position can be set up using the above
procedures. The computer will not permit you to set up an illegal
position, such as one where there are more than the prescribed
number of pieces for a normal game, or one where a King is in check
and is not to move. In such cases, after you press ENTER to exit
Setup Mode, and then ENTER to confirm, the computer will display
Illegal. You will not be allowed to exit Setup Mode until you have
set up a legal board position!
If you enter Setup Mode, but you haven’t yet made any changes to
the board, you can exit by pressing ENTER. The display will confirm
with unchanged, and you’ll be returned to the Main Menu. Press
MENU again to return to normal game play.
ENGLISH
27
Page 28

9. STUDY MODE: TRY TESTING YOURSELF!
Looking for a terrific learning tool? You’ll definitely want to try out
Study Mode! Eight famous games are built right into your computer,
each containing eight critical points—for a total of 64 different Study
Positions. It’s up to you to play through the games and make the
correct moves that were played for the winning side in the original
games! This feature offers great potential for improving your chess
knowledge, while allowing you to learn about making the best move in
a particular position. And, to make this feature even more exciting, the
computer will actually score your performance as you go.
By the way, if you need help solving any of the Study Positions,
simply refer to the Appendix for a complete listing of all the Study
Mode Games. Remember, though, that these games are included as
a reference tool—and you’ll only be cheating yourself if you look at
the solutions before trying to solve the Study Positions on your own!
Selecting Study Positions
Tip: You can also select the Study Positions by pressing certain
board squares, as described later on in this section!
Press MENU to enter the Main Menu, and press ¯ (or ˘) repeatedly until the display shows ¿STUDY. Press ENTER to enter Study
Mode, and you’ll see the first Study Position, < Study1-1 >. To
change the Study Position, press ˘ or ¯ to increase/decrease the
studies by one, or use your stylus to press > or < to increase/decrease the studies by eight. When your desired Study Position is
displayed, press ENTER, and the display will confirm with Start
Study?. Pressing ENTER at this point will start the Study Game, as
described below, or pressing CLEAR will cancel and return you to the
main Study Mode display.
After pressing ENTER, the computer will automatically start
making the moves of the selected Study Game. As soon as the first
Study Position is reached, the display will briefly show Your Move,
and the clock will start. Time for you to guess the move that was
played in that position in the original game! Here’s how it works:
•There is only one “correct” move per Study Position.
•Once the Study Position has been reached, the displayed color
symbol indicates which side is to move.
• If you make the correct move, Well Done will be displayed.
The computer will then make the next moves in the game,
28
Page 29
USE THE BOARD TO SELECT STUDY POSITIONS!
For an easy method of selecting a Study Position, simply enter Study Mode
and press one of the corresponding board squares, as shown below.
8
1-8 2-8 3-8 4-8 5-8 6-8 7-8 8-8
7
1-7 2-7 3-7 4-7 5-7 6-7 7-7 8-7
6
1-6 2-6 3-6 4-6 5-6 6-6 7-6 8-6
5
1-5 2-5 3-5 4-5 5-5 6-5 7-5 8-5
4
1-4 2-4 3-4 4-4 5-4 6-4 7-4 8-4
3
1-3 2-3 3-3 4-3 5-3 6-3 7-3 8-3
2
1-2 2-2 3-2 4-2 5-2 6-2 7-2 8-2
1
1-1 2-1 3-1 4-1 5-1 6-1 7-1 8-1
abcdefgh
eventually stopping at the next Study Position to be solved.
• If you make the wrong move, you’ll see Wrong Move
displayed briefly, and then Quit Study?.
•To remain in Study Mode and try another move, press
CLEAR. Points will be deducted for the incorrect guess, your
piece will go back to its original square, and you can make a
different move.
•To exit Study Mode and continue a normal game using the
move you played, press ENTER. The computer will start
thinking about its next move.
ENGLISH
29
Page 30

• Scoring: Each time you solve a Study Position correctly, points
are added to your score. You’ll get full points if you solve the
Study Position on the first try. For each incorrect move you make
before finding the correct move, your score will be cut in half. If
you reach zero points at any time, however, your score will
remain there, no matter how many more moves you try.
•To check your current score, press HINT/INFO twice. Note that
the first press will show the last move that was made for the
other side. Pressing CLEAR will cancel the score display.
If you solve a Study Game ending in checkmate, Checkmate!
will remain in the display after a series of congratulatory messages.
At this point, you can (a) reset for a new game, (b) use Info Mode to
document the moves by tracing back through them (as described in
Section 7.4), or (c) take back any of the moves and resume a normal
game from any position. If you solve the last Study Position in a
game, but the game has not actually ended, the display will show
End Game, and the computer will automatically start thinking about
the next move, allowing you to continue the game normally.
Using the Board for Selection
Each Study Position can also be activated individually by pressing
the corresponding board square. As shown in the Study Mode Chart,
each of the 64 squares represents one Study Position. Enter Study
Mode by pressing MENU and ¯ (or ˘) until ¿STUDY is displayed,
and then pressing ENTER. Next, refer to the chart and press one of
the board squares to select that Study Position. Press ENTER, and
the display will confirm with Start Study?. Press ENTER again,
and the Study Game will start, as described previously.
10. NEED HELP? LOOK HERE!
For troubleshooting purposes, we’ve compiled the following list of
situations you might encounter, along with some possible solutions.
a. The computer doesn’t react, behaves erratically, or “freezes”
during a game.
•Reinsert the batteries, or replace them with fresh alkalines.
•Static discharge may have caused a lock-up. Press into the
hole marked ACL to reset the unit (see Section 11.1).
b. The display is dim and/or difficult to read.
•Replace the batteries with fresh alkalines.
•Select a different LCD Contrast Option (see Section 4.9).
30
Page 31

c. I’ve activated some automatic Info Displays to watch the
computer think, but the display is scrolling too quickly.
•Select a different LCD Speed option (see Section 4.10).
•Press GO/STOP to pause the scrolling display at any time;
press CLEAR to resume scrolling.
d. The computer won’t make a move.
•The unit only responds automatically if Two Player Mode is set
to player: P-C for Player vs. Computer (see Section 4.1).
•You might be on a level where the computer thinks for a long
time. You can force it to move, if desired, by pressing ENTER.
e. The computer won’t accept my move.
•You’re attempting to make an illegal move. Check the rules.
•Is your King in check? Will your move put your King into check?
Are you castling incorrectly? Review the position.
•Is it your turn? If the color symbol is flashing, the computer is
thinking. Press ENTER to interrupt, if desired.
f. The board notation is reversed when I make moves. Why?
•You have the white: top option activated. Go into Option
Mode and change to black: top (see Section 4.4).
g. I just reset for a new game, but the computer is showing
Rate as draw? instead of resetting itself.
•You’ve interrupted a Tournament Level game, and you need to
tell the computer how you want the game to be rated. For
details, see Section 5.3.
h. The computer has displayed its move, but its piece is flash-
ing and the move hasn’t been made on the board.
•When the Automove Option is turned off, you have to move the
computer’s pieces on the board. To turn Automove back on,
refer to Section 4.11.
i. The computer is displaying No Move Found! instead of
making a move.
•You’re on a Problem Solving Level and the computer hasn’t
found a mate. If you’re not trying to solve a mate problem,
switch to a normal playing level (see Section 5).
j. I’m trying to exit the Main Menu by pressing CLEAR, but I’m
getting an error beep.
•You’re pressing the wrong key! The only way to exit the Main
Menu is by pressing MENU.
k. The computer is beeping intermittently even though it’s my
turn to move.
•When Coach Mode is activated, the computer will sound
ENGLISH
31
Page 32

reminder beeps during your turn.
l. The computer isn’t beeping when it moves.
•Go into Option Mode to tur n the sound on (see Section 4.8).
m.The computer won’t allow me to exit Setup Mode.
•You’ve set up an illegal position (e.g., a King may be in check,
there may be too many pawns on the board, etc.). Change the
board to set up a valid position (see Section 8).
11. TECHNICAL DETAILS
11.1 The ACL Function
Computers sometimes “lock up” due to static discharge or other
electrical disturbances. If this should happen, use a pin or another
sharp object to press into the hole marked ACL in the base of the unit
for at least one second. This resets the computer.
11.2 Care and Maintenance
Your computer is a precision electronic device, and should not be
subjected to rough handling or exposed to extreme temperatures or
moisture. Do not use chemical agents or liquids to clean the unit, as
they may damage the plastic. Be sure to remove the batteries before
cleaning the unit.
Weak batteries should be replaced promptly, since they can leak
and damage the computer. Please also note the following, regarding
the use of batteries.
Caution: Use only alkaline or zinc carbon batteries. Do not mix different types of batteries or new and used batteries.
Do not recharge non-rechargeable batteries. Use only recommended
batteries or equivalent. Be sure to observe the correct polarity when
inserting the batteries. Worn out batteries should be removed from
the unit promptly. Do not short circuit the supply terminals.
11.3 Technical Specifications
Keys: 8
Chessboard: 9x8 contact membrane (touch panel)
LCD Display: 11-character dot matrix, 68 x 79 mm
Batteries: 3 x AAA/AM4/R03
Dimensions: 131 x 83 x 22 mm
Weight: 220 grams
Please retain this information for future reference.
Saitek reserves the right to make technical changes without notice in the interest
of progress.
32
Page 33

Information for Customers in the United States:
FCC Compliance and Advisory Statement
This device complies with Part 15 of the FCC Rules. Operation is
subject to the following two conditions:
1.This device may not cause harmful interference, and
2.This device must accept any interference received, including
interference that may cause undesired operation.
This equipment has been tested and found to comply with the limits
for a Class B digital device, pursuant to Part 15 of the FCC Rules.
These limits are designed to provide reasonable protection against
harmful interference in a residential installation. This equipment
generates, uses and can radiate radio frequency energy and, if not
installed and used in accordance with the instructions, may cause
harmful interference to radio communications. However, there is no
guarantee that interference will not occur in a particular installation. If
this equipment does cause harmful interference to radio or television
reception, which can be determined by turning the equipment off and
on, the user is encouraged to try to correct the interference by one or
more of the following measures:
Reorient or relocate the receiving antenna.
Increase the separation between the equipment and receiver.
Connect the equipment into an outlet on a circuit different from that
to which the receiver is connected.
Consult the dealer or an experienced radio/TV technician for help.
Saitek Industries, 2295 Jefferson Street, Torrance, CA 90501, USA.
ENGLISH
33
Page 34

Pour commencer tout de suite une partie, suivez les étapes suivantes!
Ouvrez le compartiment des piles et insérez trois
1
piles alcalines “AAA” (AM4/R03) en faisant
attention de bien respecter la polarité.
Sortez le stylet de son compartiment situé sur le
2
côté droit de l’ordinateur, comme indiqué ci-contre.
Appuyez sur la touche GO/STOP située en haut et
3
sur le côté pour allumer l’ordinateur. S’il ne répond
pas, réinitialisez-le comme indiqué dans le chapitre
11.1.
Appuyez rapidement et deux fois de suite sur NEW
4
GAME pour réinitialiser l’ordinateur.
n’est pas remis à zéro pour une nouvelle partie
d’échec, vous n’avez pas appuyé assez
rapidement sur la touche. Essayez encore une fois!
Pour déplacer les pièces, appuyez doucement à
5
l’aide du stylet sur la case de départ puis sur la
case d’arrivée.
déplacer du bout des doigts.
Lorsque l’ordinateur déplace une de ses pièces,
6
celle-ci clignote brièvement sur la case de départ
puis sur la case d’arrivée. Le déplacement est
alors effectué et c’est à vous de jouer.
Pour éteindre l’ordinateur, appuyez sur GO/STOP
Lorsque
confirmer–et votre partie sera enregistrée!
Vous pouvez également les
Stop?
est affiché, appuyez à nouveau sur GO/STOP pour
Si l’échiquier
ıPd7-d5````
.
3 x
AAA
(AM4/R03)
x2
FAMILIARISEZ-VOUS AVEC LES PIECES!
K` Q` R` B` N` P`
CAVALIERROI REINE TOUR FOU PION
Blanc
DEMARRAGE RAPIDE
Noir
Page 35

SOMMAIRE
DEMARRAGE RAPIDE
TOUCHES ET CARACTÉRISTIQUES
INTRODUCTION
1. COMMENCER A JOUER: LES
BASES
1.1 Piles insérées, ordinateur allumé
1.2 A vos marques, prêts? Partez!
1.3 L’ordinateur joue son coup
1.4 Partie terminée! Commencez une
nouvelle partie!
1.5 Trop facile/difficile? Changez de
niveau!
2. AUTRES FONCTIONS A DECOUVRIR
2.1 A qui le tour? Vérifiez l’affichage!
2.2 Coups spéciaux
2.3 Coups non autorisés/non
conformes aux règles
2.4 Echec, mat et partie nulle
2.5 Essayez le système d’autoévaluation!
2.6 Besoin d’un conseil? Il suffit de
demander!
2.7 Interrompre une recherche
2.8 Changement de camp
2.9 Ouvertures pré-enregistrées
2.10 Utilisation du temps de l’adversaire
pour réfléchir
2.11 Mise hors tension/mémoire de la
partie
3. LE MENU PRINCIPAL: ACCES AUX
MODES SPECIAUX
4. MODE OPTION
Sélectionner une option de jeu
4.1 Mode Deux joueurs
4.2 Algorithme de recherche
4.3 Mode Autobook
4.4 Blancs en haut
4.5 Horloge de compte à rebours
4.6 Tic-tac de l’horloge
4.7 Mode Coach
35
4.8 Son activé/désactivé
4.9 Contraste LCD
4.10 Vitesse LCD
4.11 Mode Déplacement
automatique
5. MODE NIVEAU
Sélectionner un mode de jeu
5.1 Niveaux de divertissement
5.2 Niveaux Amateur
5.3 Niveaux Tournoi
5.4 Niveaux Partie rapide
5.5 Niveaux Résolution des
problèmes
5.6 Niveau tactique
5.7 Niveau analyse
6. MODE RETOUR EN ARRIERE
7. MODE INFO
Affichage automatique des infos
Affichage manuel d’informations
7.1 Variante principale
7.2 Recherche d’informations
7.3 Informations sur la pendule
d’échecs
7.4 Décompte des coups / des
déplacements
7.5 Affichage du classement
8. MODE MISE EN PLACE
9. MODE ETUDE
Sélectionner des positions
d’étude
Utiliser l’échiquier pour
sélectionner une position
10.BESOIN D’AIDE? C’EST ICI
11.DETAILS TECHNIQUES
11.1 La fonction ACL
11.2 Entretien et maintenance
11.3 Spécifications techniques
ANNEXE:
PARTIES DU MODE ETUDE
FRANÇAIS
Page 36

TOUCHES ET CARACTERISTIQUES
1. ECHIQUIER TACTILE: Chaque case enregistre le déplacement d’une pièce par simple
contact du bout des doigts ou à l’aide du stylet.
2. LIGNE D’INFORMATIONS: Affiche les déplacements, les informations de jeu et les
pendules d’échec. Egalement utile lors de la sélection d’options et de niveaux, la
disposition des pièces sur l’échiquier, etc.
3. STYLET: Sert à déplacer les pièces à l’écran. Sert également à sélectionner des options
figurant sur la ligne d’informations.
4. TOUCHE GO/STOP: Appuyez une fois sur
cette touche pour allumer l’ordinateur,
deux fois pour l’éteindre. Appuyez une fois
pour suspendre le défilement de
l’affichage. Continuez à faire défiler en
appuyant sur CLEAR.
5. COMPARTIMENT DU STYLET: Pour
ranger le stylet lorsque celui-ci n’est pas
utilisé.
6. PROTECTION DE L’ECRAN LCD : Se
coulisse pour protéger l’écran lorsque
l’ordinateur n’est pas utilisé.
7. ACL (Réinitialiser): Sur le socle de
l’ordinateur. Utilisé pour décharger toute
électricité statique formée après
l’installation de nouvelles piles.
8. TOUCHE HINT/INFO: Appuyez sur cette
touche en cours de jeu pour obtenir une
suggestion. Appuyez de façon répétée
pour faire défiler les principales informations.
9. TOUCHE CLEAR: Appuyez sur cette
touche pour quitter les modes Option/Info,
pour annuler les modifications des modes
Niveau/Etude, pour masquer les affichages
du mode Info, pour rester en mode Etude
après un mauvais déplacement, pour
effacer l’échiquier en mode Mise en place
(Setup), pour faire à nouveau défiler une
liste après avoir interrompu le défilement
et pour recommencer à jouer après un
retour en arrière.
10. COMPARTIMENT DES PILES: Sur le
socle de l’ordinateur. Utilisez des piles
alcalines AAA (AM4/R03).
11. TOUCHE ENTER: Appuyez sur cette
touche pour un changement de côté avec
l’ordinateur, pour forcer l’ordinateur à
déplacer une pièce alors qu’il est en train
de réfléchir, pour sélectionner des options
dans le menu principal, pour sélectionner
des paramétrages et activer/désactiver les
options pour les modes Option/Info, pour
sélectionner un nouveau niveau en mode Niveau, une position d’étude ou quitter le mode
Mise en place (Setup) après une nouvelle disposition des pièces.
12. TOUCHES ¯/˘: Appuyez sur ces touches pour faire défiler une par une les Niveaux/
Positions d’étude en mode Niveau/Etude. Appuyez sur cette touche pour faire défiler les
affichages des Options/Infos en mode Options/Info. Appuyez pour revenir en avant/en
arrière parmi vos coups en mode Retour en arrière.
13. TOUCHE MENU: Appuyez sur cette touche pour accéder au mode Menu et appuyez à
nouveau pour quitter ce mode.
14. TOUCHE NEW GAME: Appuyez rapidement deux fois de suite sur cette touche pour
commencer une nouvelle partie.
36
Page 37

INTRODUCTION
Félicitations! Vous venez d’acheter un ordinateur Cosmic Chess!
Avec ses capacités extraordinaires au jeu d’échecs, cet ordinateur
élégant vous offre une interface tactile pratique et facile à utiliser.
Portable et toujours prêt à voyager, il vous permettra d’apprécier une
partie d’échec où que vous soyez, chez vous ou en vacances! Après
vous être familiarisé avec les opérations de base, vous pourrez
découvrir de nouvelles options uniques à cet ordinateur. Une nouvelle
dimension des échecs s’ouvre à vous!
1. COMMENCER A JOUER: LES BASES!
1.1 Piles insérées, ordinateur allumé
Votre ordinateur d’échecs utilise trois piles«AAA» (AM4/R03).
Insérez les piles dans le compartiment prévu à cet effet sur le socle
de l’ordinateur, en faisant attention à bien respecter la polarité. Nous
vous recommandons d’utiliser trois piles alcalines neuves pour une
plus longue durée de vie.
Pour allumer l’ordinateur, appuyez sur GO/STOP. Si l’ordinateur ne
répond pas, réinitialisez-le en insérant pendant au moins une
seconde un trombone ou un objet pointu dans l’orifice indiquant ACL
sur le socle de l’ordinateur.
Pour économiser les piles, l’ordinateur s’éteint automatiquement
s’il est laissé allumé sans être utilisé pendant environ 20 minutes.
1.2 A vos marques, prêts? Partez!
Pour commencer une partie, suivez les étapes suivantes:
a.Appuyez sur GO/STOP pour allumer l’ordinateur.
b.Pour réinitialiser l’ordinateur pour une nouvelle partie, appuyez
rapidement deux fois suite sur NEW GAME.
Si vous n’appuyez
pas assez rapidement, l’ordinateur ne sera pas réinitialisé et
vous devrez recommencer.
Dès que l’ordinateur a été
réinitialisé, New Game s’affiche brièvement, ainsi que le
symbole pour les Blancs („) et la pendule d’échecs
(00:00:00).
c. Pour déplacer une pièce, appuyez doucement à l’aide du stylet
sur la pièce que vous désirez déplacer jusqu’à ce que vous
entendiez un ‘bip’ et que la pièce commence à clignoter.
37
Si vous
FRANÇAIS
Page 38

préférez, vous pouvez appuyer sur la pièce du bout des doigts
au lieu d’utiliser le stylet.
d. Appuyez ensuite à l’aide du stylet sur la case d’arrivée. Vous
entendez alors un deuxième ‘bip’ qui confirme le déplacement.
C’est maintenant à l’ordinateur de jouer.
Vous remarquerez que
l’ordinateur déplace ses pièces instantanément en début de
partie au lieu de mettre un certain temps à réfléchir à un
déplacement. Il accède en effet à plusieurs coups préenregistrés dans sa bibliothèque d’ouvertures. Pour tout
complément d’informations, se référer au chapitre 2.9.
1.3 L’ordinateur déplace une pièce
Lorsque l’ordinateur déplace une pièce, il affiche tout d’abord
brièvement Thinking.... S’il est en train de réfléchir pour
déplacer les Noirs, l’affichage correspondant (ı) clignote et l’horloge
s’affiche. Une fois le déplacement effectué, l’ordinateur émet un ‘bip’
et affiche son déplacement (par ex., ıPe7-e5). La pièce clignote
brièvement en alternance sur les cases de départ et d’arrivée. Une
fois que la pièce a été déplacée sur l’échiquier, l’écran affiche à
nouveau votre horloge et c’est à vous de jouer.
1.4 Partie terminée? Commencer une nouvelle partie
Attention: Si vous réinitialisez l’ordinateur, la dernière partie
est effacée de la mémoire de l’ordinateur!
Lorsque vous terminez une partie (ou si vous décidez
d’abandonner une partie en cours), vous pouvez facilement commencer une nouvelle partie! Réinitialisez l’ordinateur en appuyant
deux fois de suite sur NEW GAME. New Game s’affiche alors,
indiquant que l’ordinateur est prêt à commencer une nouvelle partie
d’échecs au niveau de jeu sélectionné.
Avertissement concernant les niveaux de tournoi: si vous
réinitialisez l’ordinateur avant qu’une partie du niveau tournoi soit
terminée, l’ordinateur vous demandera de confirmer le résultat de la
partie avant de commencer une nouvelle partie. Se référer au
chapitre 2.5.
1.5 Trop facile/difficile? Changez de niveau!
Lorsque vous allumez l’ordinateur pour la première fois, le niveau
de jeu est automatiquement réglé au niveau 63, avec un temps de
réponse de l’ordinateur de cinq secondes en moyenne pour chaque
38
Page 39

OPTIONS D’AFFICHAGE A MEMORISER!
•Pour faire varier la luminosité: sélectionnez un contraste
différent pour l’écran LCD, comme indiqué dans le chapitre
4.9.
•Pour ralentir/accélérer la vitesse de déroulement:
sélectionnez une autre vitesse de déroulement pour l’écran
LCD, comme indiqué dans le chapitre 4.10.
•Pour interrompre le menu déroulant: appuyez une fois
sur la touche GO/STOP; appuyez sur CLEAR pour
réactiver le menu déroulant. Cette fonction est
particulièrement utile si vous avez activé plusieurs
affichages du mode Info automatique lorsque l’ordinateur
est en train de réfléchir.
déplacement. Vous pouvez cependant sélectionner un des 100
niveaux de jeu! Pour une description de tous les niveaux et les
instructions à suivre pour changer le niveau, veuillez vous référer au
chapitre 5.
2. AUTRES FONCTIONS A DECOUVRIR
2.1 A qui le tour? Vérifiez l’affichage!
Lorsque l’ordinateur joue avec les Noirs, un carré noir (ı) clignote
à l’écran. Une fois que l’ordinateur a déplacé une pièce, un carré
blanc non clignotant („) s’affiche à l’écran, indiquant ainsi que c’est
votre tour de jouer avec les Blancs.
2.2 Coups spéciaux
Veuillez noter les coups spéciaux suivants.
Prises: Les prises sont indiquées par une x, comme dans
ıPa7xb6.
Prise en passant: Pour ce type de prise (indiquée par l’affichage
de EP après le déplacement), l’ordinateur vous rappelle de retirer le
pion qui a été pris en le faisant clignoter. Appuyez simplement sur le
pion correspondant pour le retirer de l’échiquier.
Roque: Une fois le Roi déplacé, la Tour clignote. Déplacez la Tour
pour effectuer un Roque. Un Petit roque est affiché comme O-O, un
Grand roque comme O-O-O.
FRANÇAIS
39
Page 40

Promouvoir un pion:
• Lors de la promotion d’un pion, appuyez tout d’abord sur la
case de départ, comme à votre habitude. L’affichage indique alors les
pièces disponibles (Q R B N). Pour choisir une Reine, appuyez
simplement sur la case d’arrivée pour confirmer votre déplacement.
Si vous préférez choisir une Tour (R), un Fou (B) ou un Cavalier (N),
appuyez une fois sur le symbole correspondant. Votre choix sera
brièvement confirmé (par ex. Prom: rook). Appuyez sur la case
d’arrivée pour confirmer votre déplacement et la pièce est
automatiquement modifiée sur l’échiquier.
NB: si vous changez d’avis
sur la pièce à sélectionner avant d’appuyer sur la case d’arrivée,
appuyez simplement sur un des autres symboles.
• Lors de la promotion d’un pion par l’ordinateur, celui-ci
indique son déplacement ainsi que la pièce sélectionnée, par ex.
ıPh2-h1/Q.
2.3 Coups illégaux/non autorisés
Votre ordinateur connaît parfaitement les règles des échecs et il ne
trichera jamais! Si vous essayez de faire un coup non autorisé,
l’ordinateur émet un son aigu pour vous avertir de votre erreur. C’est
le cas, par exemple, si vous appuyez sur une case de départ ou
d’arrivée qui n’est pas autorisée, une pièce ou couleur incorrecte ou
une touche du jeu non valide.
Si vous appuyez sur une case d’arrivée non autorisée, l’affichage
continue simplement à afficher la case de départ de la pièce. Pour
continuer, appuyez sur une case autorisée. Si vous appuyez sur une
case de départ mais que vous décidez de ne plus déplacer cette
pièce, appuyez à nouveau sur la case pour annuler votre sélection. Si
vous changez d’avis après avoir déplacé la pièce, suivez les instructions figurant dans le chapitre 6.
2.4 Echec, mat et partie nulle
Si le Roi est mis en échec, l’ordinateur affiche brièvement Check
avant de déplacer la pièce. Si l’ordinateur découvre un mat forcé, il
annonce brièvement ce mat (par ex. Mate in 3). Lorsqu’une
partie se termine par un échec et mat, l’ordinateur vous félicite ou
vous offre ses condoléances, selon si vous avez gagné ou perdu.
Checkmate! s’affiche alors, indiquant que la partie est terminée.
L’ordinateur annonce que la partie est nulle après un Pat, une
triple répétition de la position ou par la règle des 50 coups. Dans
chacun des cas, le message correspondant est affiché à l’écran.
40
Page 41

2.5 Essayez le système d’auto-évaluation!
Lorsque vous jouez une partie du niveau Tournoi, l’ordinateur vous
donne un classement ELO approximatif à la fin de la partie, en
fonction de vos performances. Ce classement est basé sur une
méthode reconnue dans le monde entier pour évaluer les performances d’un joueur d’échec ou pour décrire la force de jeu relative.
L’organisation inter nationale qui régit le jeu d’échecs est la FIDE ou
Fédération internationale des échecs. Le classement FIDE est
souvent décrit comme un classement ELO. Aux Etats-Unis, la ‘United
States Chess Federation’ (USCF) utilise un système de classement
similaire. Le classement est généralement représenté par un nombre
à quatre chiffres, les joueurs les plus fort ayant un classement plus
élevé. En haut de l’échelle, les Maîtres ont des scores de plus de
2200 points et les Grands Maîtres des tournois internationaux de plus
de 2500 points. Tentez votre chance! Veuillez vous référer au chapitre
5.3 pour un complément d’informations sur les niveaux Tournoi.
2.6 Vous avez besoin d’un conseil? Il suffit de demander!
Si vous voulez qu’on vous conseille un déplacement, il vous suffit
de le demander au Cosmic Chess! Appuyez sur la touche HINT/INFO
lorsque votre tour est venu de jouer. L’ordinateur affiche alors aussitôt
une suggestion de déplacement. Par exemple, si l’ordinateur vous
suggère le déplacement e4xd5, il affichera Ply 1: e4xd5. Un
demi-coup (ou “ply”) est un coup joué par l’un ou l’autre des
adversaires. L’ordinateur peut mettre jusqu’à 5 secondes (ou plus)
pour suggérer un déplacement. Pour accepter la suggestion,
effectuez le déplacement sur l’échiquier. Pour ignorer ce conseil,
effectuez simplement le déplacement de votre choix. Vous pouvez
également masquer l’affichage du conseil en appuyant sur CLEAR.
2.7 Interrompre une recherche
Pour interrompre l’ordinateur alors qu’il est en train de réfléchir à
un déplacement, appuyez sur la touche ENTER. Ceci oblige
l’ordinateur à effectuer le meilleur déplacement qu’il a trouvé jusqu’ici.
Cette fonction est parfois très utile dans les niveaux plus élevés,
lorsque l’ordinateur met trop longtemps avant de jouer ou dans les
niveaux Analyse ou Tactique, pour lesquels l’ordinateur réfléchit
indéfiniment jusqu’à ce que vous l’arrêtiez.
Pour le niveau Résolution de problèmes, l’ordinateur ne déplace
pas de pièce lorsque vous appuyez sur ENTER. A la place,
l’ordinateur affiche No move found! pour indiquer qu’il a été
FRANÇAIS
41
Page 42

interrompu avant de trouver une position de mat. Pour continuer,
passez à un autre niveau.
2.8 Changement de camp
Pour changer de camp avec l’ordinateur, appuyez sur ENTER
pendant votre tour. L’ordinateur effectuera alors le prochain
déplacement à votre place. Vous pouvez changer de camp autant de
fois que vous le souhaitez en appuyant à chaque fois sur ENTER.
Vous voulez que l’ordinateur commence la partie avec les Blancs?
Appuyez deux fois sur NEW GAME, puis sur ENTER.
Vous voulez voir l’ordinateur jouer contre lui-même? Appuyez sur
ENTER après chaque déplacement et regardez l’ordinateur effectuer
l’un après l’autre chacun des déplacements. Etudiez ses mouvements
stratégiques pour améliorer votre propre jeu!
2.9 Ouvertures pré-enregistrées
Au début d’une partie, la réponse de l’ordinateur est souvent
immédiate pour un grand nombre de niveau. Il utilise en effet des
déplacements enregistrés dans sa bibliothèque d’ouvertures. Cette
bibliothèque comprend les plus grandes ouvertures et un grand
nombre de positions tirées des parties de Grand Maîtres. Si la
position des pièces sur l’échiquier est enregistrée dans sa
bibliothèque, l’ordinateur donnera la réponse enregistrée pour cette
partie au lieu de réfléchir au prochain coup. Veuillez noter que la
bibliothèque d’ouvertures est utilisée pour tous les niveaux, sauf le
niveau de résolution de problèmes.
2.10 Utilisation du temps de l’adversaire pour réfléchir
Au cours d’une partie, vous remarquerez que l’ordinateur répond
parfois immédiatement à vos déplacements, même en milieu de
partie ou pour les niveaux plus élevés. Ceci est dû au fait que
l’ordinateur utilise votre temps de réflexion pour préparer son
prochain déplacement et élaborer une stratégie. Il essaye d’anticiper
le déplacement que vous allez effectuer et de préparer une défensive
alors que vous êtes encore en train de réfléchir. Si l’ordinateur a
deviné correctement, il n’y a aucune raison pour lui de continuer à
réfléchir – il effectue donc le déplacement auquel il avait déjà réfléchi!
Veuillez noter que l’ordinateur n’utilise pas votre temps de réflexion
pour les niveaux de Divertissement.
42
Page 43

PETIT RECAPITULATIF DU MENU PRINCIPAL!
• ¿OPTION: Explorez des options de jeu excitantes.
• Mode Deux joueurs • Mode Entraînement
• Algorithme de recherche • Marche/Arrêt du son
• Mode Autobook • Contraste de l’affichage LCD
• Blancs en haut • Vitesse de l’affichage LCD
• Horloge de compte • Mode Déplacement
à rebours automatique
• Tic-tac de l’horloge
• ¿LEVEL: Choisissez un des 100 niveaux de jeu.
• ¿TAKEBACK: Revenez en arrière d’un ou plusieurs coups.
• ¿INFO: Sélectionnez divers affichages automatiques
d’information.
• Afficher les coups • Afficher la progression
• Afficher les nœuds • Afficher l’évaluation
• Afficher le temps par coup
• ¿SETUP: Mettez en place des pièces ou modifiez leur position
sur l’échiquier.
• ¿STUDY: Testez vos capacités à l’aide des 64 positions
d’étude.
2.11 Mise hors tension/Mémoire de la partie
Vous pouvez interrompre une partie en cours et mettre votre
ordinateur hors tension en appuyant sur GO/STOP. L’écran affiche
alors Stop?. Confirmez que vous désirez éteindre votre ordinateur
en appuyant à nouveau sur GO/ST OP. La partie est alors interrompue
et l’ordinateur conserve en mémoire cette partie pendant un an au
maximum. Lorsque vous remettez l’ordinateur sous tension, vous
pourrez recommencer la partie là où vous vous étiez arrêté. Si vous
préférez ne pas éteindre votre ordinateur après avoir appuyé sur GO/
STOP, appuyez sur CLEAR pour annuler v otre sélection.
Si aucun déplacement n’est effectué ou si aucune touche n’est
appuyée pendant plus de 20 minutes, la fonction de Mise hors
tension automatique éteint votre ordinateur. Pour continuer, appuyez
sur GO/STOP pour ré-allumer votre ordinateur. Veuillez noter que
votre ordinateur ne s’éteindra pas automatiquement s’il est en train
de réfléchir à un déplacement ou si le message Stop? est affiché.
FRANÇAIS
43
Page 44

3. LE MENU PRINCIPAL: ACCES AUX MODES SPECIAUX
L’ordinateur Cosmic Chess offre plusieurs modes et options
sélectionnables par l’utilisateur et accessibles à partir du menu
principal intégré. Après avoir appuyé sur la touche MENU, l’objet
¿OPTION s’affiche immédiatement, le premier des six objets du
menu principal. Appuyez plusieurs fois sur ¯ (ou ˘) pour faire défiler
les objets du menu:
OBJET DU MENU PRINCIPAL.............. REFERENCE ............ AFFICHAGE
Mode Option................................. Chapitre 4 .......... ¿OPTION
Mode Niveau ................................ Chapitre 5 ..........¿LEVEL
Mode Retour en arrière................ Chapitre 6 .......... ¿TAKEBACK
Mode Info ..................................... Chapitre 7 .......... ¿INFO
Mode Mise en place (Setup)........ Chapitre 8 .......... ¿SETUP
Mode Etude.................................. Chapitre 9 .......... ¿STUDY
Pour sélectionner un des objets du menu principal, appuyez sur
ENTER. Quel que soit le mode choisi, un sous-menu s’affiche, vous
proposant d’autres choix. Certains modes (par ex. le Mode Option)
offrent un grand nombre de menus et de sous-menus, tandis que
d’autres (par ex. le mode Mise en place) vous permettront d’activer
une fonction particulière d’une partie. Puisque les instructions
dépendent du mode qui a été sélectionné, veuillez vous référer aux
chapitres indiqués pour de plus amples informations concernant leurs
caractéristiques principales. Après avoir sélectionné toutes les
options voulues et/ou modifié les options de jeu, appuyez à nouveau
sur MENU pour quitter le menu principal et retourner à votre partie.
4. MODE OPTION: POUR DES PARTIES PLUS VARIEES!
Vous voulez ajouter du piment à vos parties? Alors explorez les
différentes options de jeu disponibles à partir du mode Option! Tout
d’abord, apprenez à sélectionner et à activer ces options avant de
commencer une partie (ou en cours de partie) puis familiarisez-vous
avec les différentes options décrites dans ce chapitre.
Pour sélectionner les options de jeu
Appuyez sur MENU pour accéder au menu principal et afficher
l’objet ¿OPTION du Mode Option. Appuyez sur ENTER pour
accéder au Mode Option et afficher les premières des 11 options
indiquées ci-dessous. Appuyez plusieurs fois sur ¯ (ou ˘) pour faire
défiler toutes les options:
44
Page 45

ENTRAINEZ-VOUS A SELECTIONNER UNE OPTION!
1. Appuyez sur MENU pour entrer dans le menu
principal. ¿OPTION s’affiche.
2. Appuyez sur ENTER pour entrer dans le mode
Options.
du tic-tac de l’horloge (Ticking Clock).
3. Appuyez cinq fois sur ¯, jusqu’à ce que l’affichage
indique ticks: off.
4. Appuyez sur ENTER pour activer cette option.
L’affichage indique alors ticks:on.
5. Appuyez sur CLEAR pour quitter le mode Options
et sur MENU pour quitter le mode Menu. Le ‘tictac’ de l’horloge se fait maintenant entendre!
NB: pour désactiver cette fonction, répétez les
étapes indiquées ci-dessus.
Pour tout complément d’informations, se référer au chapitre 4.6.
OPTION ................................................. REFERENCE ..... AFFICHAGE PAR DEFAUT
Mode Deux joueurs.................. Chapitre 4.1 ... player: P-C
Algorithme de recherche ......... Chapitre 4.2... search: select
Mode Autobook........................ Chapitre 4.3 ... book: on
Blancs en haut. ........................ Chapitre 4.4... top: black
Horloge de compte à rebours .. Chapitre 4.5 ... clock: up
Tic-tac de l’horloge .................. Chapitre 4.6 ... ticks: off
Mode Entraînement ................. Chapitre 4.7 ... coach: off
Son activé/désactivé................ Chapitre 4.8... sound: on
Contraste LCD ......................... Chapitre 4.9 ... contrast: 3
Vitesse LCD ............................. Chapitre 4.10. LCD speed: 2
Mode Déplacement.................. Chapitre 4.11. automove: on
automatique
Pour activer/désactiver une fonction ou pour sélectionner des
configurations d’options (si cela s’applique), appuyez sur ENTER
lorsque l’option est affichée. Si vous appuyez plusieurs fois sur
ENTER, vous ferez défiler tous les choix disponibles pour l’option
affichée. Lorsque votre choix est affiché, appuyez sur ¯ ou ˘ pour
Pour cet exemple, choisissons l’option
FRANÇAIS
45
Page 46

passer à une autre option ou appuyez sur CLEAR pour retourner au
Menu principal, puis sur MENU pour retourner à la partie en cours.
Pour de plus amples informations sur chacune de ces options,
veuillez consulter les chapitres de référence.
NB: lorsque vous
réinitialisez l’ordinateur pour une nouvelle partie, la plupart des
options sélectionnées sont conservées pour la partie suivante. La
seule exception concerne le mode Deux joueurs qui retourne
automatiquement au mode Joueur contre Ordinateur lorsque vous
commencez une nouvelle partie.
4.1 Mode Deux joueurs
Options: player: P-C (Joueur contre Ordinateur)
L’ordinateur répond généralement automatiquement à l’un de vos
déplacements par un autre déplacement. Cependant, si vous activez
la fonction player: P-P, vous pourrez eff ectuer les déplacements
l’un après l’autre, sans que l’ordinateur ne déplace de pièces. Cette
option peut s’avérer utile dans les cas suivants:
player: P-P (Joueur contre Joueur)
•Suivez une partie de Maître. Appuyez sur ENTER pour voir quel
pièce l’ordinateur déplacerait quelle que soit la position des
pièces!
•Enregistrez vos propres parties d’échecs. Lorsqu’une partie est
terminée, jouez d’autres positions sur l’échiquier pour voir
comment d’autres déplacements auraient pu affecter le résultat
de la partie.
•Etudiez les ouvertures en les entrant manuellement.
•Jouez contre un(e) ami(e), l’ordinateur ayant le rôle d’arbitre.
L’ordinateur vérifiera que les déplacements sont effectués
conformément aux règles et tiendra un décompte du temps
accordé à chaque joueur!
Si vous jouez contre une autre personne et que vous voudriez
savoir quelle pièce l’ordinateur déplacerait s’il était à votre place,
appuyez sur ENTER pour faire jouer l’ordinateur à votre place. Après
cela, le mode Deux Joueurs sera toujours sélectionné et vous
pourrez continuer votre partie. Veuillez noter qu’avec cette option, la
partie retourne automatiquement à sa sélection par défaut (Joueur
contre Ordinateur) lorsque vous ré-initialisez l’ordinateur pour une
nouvelle partie.
4.2 Algorithme de recherche
Options: search: select / brute
46
Page 47

Le programme de cet ordinateur utilise normalement un
Algorithme de recherche sélective
. Pour ce type de recherche,
l’ordinateur se concentre principalement sur les déplacements qui ont
le plus de chances de réussir. Ceci permet d’obtenir des
combinaisons plus rapides. Mais vous pouvez également sélectionner
l’
algorithme de force brute
, plus lent mais beaucoup plus puissant,
qui minimise au maximum les déplacements dangereux.
4.3 Mode Autobook
Options: book: on / off
Cette fonction unique permet de suivre vos déplacements pendant
la phase d’ouverture de la partie – vous permettant de vous entraîner
à réaliser les ouvertures qui vous posent le plus de problèmes! C’est
un peu comme si vous aviez votre propre coach pour vous guider
dans vos ouvertures! Une fois l’option Autobook activée, l’ordinateur
‘surveille’ vos ouvertures alors que vous déplacez vos pièces.
Lorsque, à la fin d’une ouverture, vous vous trouvez dans une
mauvaise position au bout de quelques déplacements, l’ordinateur se
‘souviendra’ de l’ouverture en question. A l’avenir, l’ordinateur
essayera dès que possible de réaliser la même ouverture. Ceci vous
permettra de tester plusieurs déplacements et diverses stratégies
pour mieux vous familiariser avec cette ouverture et ainsi vous
améliorer!
4.4 Blancs en haut
Options: top: black / white
Vous voulez que l’ordinateur joue avec les blancs en haut de
l’échiquier? Alors sélectionnez l’option top: white au début
d’une nouvelle partie! Commencez la partie en appuyant sur ENTER
et l’ordinateur jouera en premier avec les Blancs en haut de l’écran.
NB: Lorsque l’ordinateur joue avec les Blancs en haut de
l’échiquier, vous remarquerez que les Rois et les Reines sont
positionnés différemment et que la notation de l’échiquier est
automatiquement inversée.
FRANÇAIS
4.5 Horloge de compte à rebours
Options: clock: up / down
Normalement, l’ordinateur sélectionne par défaut l’option clock:
up qui permet d’afficher le temps écoulé. Cependant, si vous activez
l’horloge de compte à rebours, vous pourrez afficher le temps restant.
Voici les symboles qui vous permettent de faire rapidement la
47
Page 48

différence entre les deux types d’horloges:
[ / ] Horloge du temps écoulé (Blancs/Noirs)
{ / } Horloge de compte à rebours (Blancs/Noirs)
NB: L’option Horloge de compte à rebours n’est disponible qu’en
combinaison avec les niveaux Tournoi et Partie rapide.
4.6 ‘Tic-tac’ de l’horlog e
Options: ticks: off / on
Si vous activez cette option (‘on’), un ‘tic-tac’ se fait entendre,
simulant ainsi le bruit d’une horloge d’échecs. Vous pourrez ainsi
recréer chez vous les sensations d’un tournoi de championnat
d’échecs!
4.7 Mode Coach
Options: coach: off / novice / inter. / adv.
Activez le mode Coach pour que l’ordinateur vous ‘regarde’ jouer
et vous apporte son aide si vous en avez besoin! Avec cette fonction
unique, l’ordinateur pourra vous avertir si vous risquez de perdre une
pièce ou s’il pense que votre dernier déplacement risque de vous
mettre dans une situation très difficile. Des messages s’afficheront
comme Your Queen is in jeopardy! (votre Reine est en
danger) ou Watch your Knight! (Attention à votre Cavalier!).
Si par contre, l’ordinateur pense que la situation est à votre avantage,
il affichera des messages comme He’s giving you a big
chance! (Il vous fait une fleur!). Parfois, l’ordinateur vous
demandera également de confirmer ou d’annuler un déplacement qui
semble (de façon évidente) illogique. Si vous choisissez d’annuler
votre coup, votre pièce reviendra en arrière et vous pourrez essayer
un autre déplacement!
Pour sélectionner l’une des options Coach, appuyez plusieurs fois
sur ENTER jusqu’à ce que le niveau désiré soit affiché. Lorsque vous
quittez le mode Options et retournez à la partie, la dernière option
Coach affichée est celle qui sera utilisée pour la partie. Les options
Coach suivantes sont disponibles:
•coach: off: Aucune fonction de coach activée.
•coach: novice: Pour cette option, l’ordinateur considère
que vous connaissez un grand nombre des déplacements
tactiques et stratégiques. Il ne vous avertira que pour les concepts les moins évidents, comme les sacrifices ou les
48
Page 49

enchaînements.
•coach: intermediate: Pour cette option, l’ordinateur
vous donne l’aide qu’il considère appropriée pour les joueurs
ayant conscience des points les plus évidents mais qui ont
besoin d’être averti pour les coups plus sophistiqués.
•coach: advanced: Pour cette option, vous serez averti
lorsque l’ordinateur estime que cela est nécessaire, par exemple
lorsque vous faites une erreur ou lorsque l’une de vos pièces est
en danger.
Lorsque le mode Coach est activé, des bips intermittents se font
entendre lorsque c’est votre tour de jouer avec les Blancs.
L’ordinateur vous rappelle ainsi qu’il attend que vous déplaciez une
pièce.
4.8 Son activé/désactivé
Options: sound: on / off
Sélectionnez l’un ou l’autre de ces options pour activer ou
désactiver les sons lors d’une partie d’échecs.
4.9 Contraste LCD
Options: contrast: 1 / 2 / 3 / 4 / 5
Cette option vous permet d’ajuster le contraste de l’écran LCD, 1
étant le plus lumineux et 5 le plus sombre. Si vous trouvez que
l’option par défaut (3) est trop lumineuse ou trop sombre, modifiez-la
en appuyant plusieurs fois sur ENTER jusqu’à ce que l’option désirée
soit affichée.
4.10 Vitesse LCD
Options: LCD speed: 1 / 2 / 3 / 4
Vous pouvez contrôler la vitesse de déroulement de l’affichage
LCD à partir cette option, 1 correspondant à la vitesse la plus lente et
4 la plus rapide. Si vous trouvez que l’option par défaut (2) est trop
lente ou trop rapide, modifiez-la en appuyant plusieurs fois sur
ENTER jusqu’à ce que l’option désirée soit affichée.
FRANÇAIS
4.11 Mode Automove
Options: automove: on / off
Normalement, lorsque l’ordinateur déplace une pièce, il fait
brièvement clignoter les cases de départ et d’arrivée, puis effectue le
déplacement sur l’échiquier. Cependant, si vous sélectionnez l’option
automove: off, l’ordinateur annoncera son déplacement
49
Page 50

comme d’habitude, mais ce sera à vous d’effectuer le déplacement
sur l’échiquier. Lorsque l’ordinateur annonce qu’il est prêt à déplacer
une pièce, il fait clignoter la case de départ. Appuyez sur la pièce qui
clignote: elle sera alors déplacée sur la case d’arrivée. Appuyez sur
cette case d’arrivée pour compléter le déplacement.
5. MODE NIVEAU: UN CHOIX ENTRE 100 NIVEAUX DIFFERENTS!
Votre ordinateur vous permet de choisir entre 100 niveaux de jeu
différents! Les niveaux sont divisés en deux catégories principales:
•NIVEAUX DE DIVERTISSEMENT (1-60): Ces niveaux
permettent aux débutants et aux joueurs moyens d’améliorer
leurs aptitudes aux échecs. Dans un grand nombre de niveaux
de divertissement, vous verrez que l’ordinateur fait
volontairement des erreurs pour que vous puissiez en tirer des
leçons!
•NIVEAUX DE COMPETITION (61-100): Ces niveaux sont
destinés aux joueurs moyens ou expérimentés. Parmi ceux-ci,
vous trouverez des niveaux permettant un jeu en amateur et en
tournoi, la résolution des problèmes, les parties rapides et les
niveaux spéciaux pour enrichir votre expérience de jeu. Lorsque
vous sélectionnez un niveau, gardez à l’esprit que plus
l’ordinateur aura le temps de réfléchir à ses déplacements,
mieux il jouera – tout comme un être humain jouant aux échecs!
Sélectionner un niveau de jeu
Appuyez sur MENU pour accéder au menu principal puis appuyez
sur ¯ jusqu’à ce que l’ordinateur affiche ¿LEVEL. Appuyez sur
ENTER pour accéder au mode Niveau et vous verrez apparaître le
niveau en cours de sélection, comme par ex. <00:05/move> (le
niveau par défaut la première fois que l’ordinateur est allumé). Pour
changer de niveau, appuyez sur ˘ ou ¯ pour augmenter/diminuer
d’un niveau ou utilisez votre stylet pour appuyer sur > ou < pour
augmenter/diminuer de dix niveaux. Veuillez noter qu’en maintenant
les touches ˘ ou ¯ enfoncées, vous augmenterez ou diminuerez
automatiquement les niveaux de ‘un’ à la fois, jusqu’à ce que vous
relâchiez la touche. Lorsque le niveau désiré est affiché, appuyez sur
ENTER pour valider votre sélection. L’ordinateur vous confirmera que
le niveau a été modifié en affichant Level changed et vous
retournerez au menu principal. Appuyez sur MENU pour retourner à
la partie.
50
Page 51

CHANGER DE NIVEAU, C’EST FACILE!
1. Appuyez sur MENU pour accéder au menu
principal. ¿OPTION s’affiche.
2. Appuyez une fois sur ¯ pour afficher ¿LEVEL.
3. Appuyez sur ENTER pour accéder au mode
Niveau. Le niveau en cours est alors affiché.
Veuillez vous référer si nécessaire au chapitre 5
pour identifier le niveau en cours.
Essayons de régler une P artie rapide, niveau 81.
4.
>`
<`
Si vous accédez au mode Niveau simplement pour vérifier le
niveau de jeu (et non pour le modifier), appuyez sur CLEAR pour
retourner au menu principal. Après avoir quitté le menu principal en
appuyant sur MENU, vous retournerez à la partie sans avoir modifié
ni l’horloge ni le niveau de jeu.
Veuillez noter les points suivants concernant la sélection des
niveaux:
•Vous pouvez changer le niveau à chaque fois que c’est votre tour
de jouer.
•Si vous modifiez le niveau, vous remettrez l’horloge d’échecs à
zéro.
•Si vous changez de niveau alors que l’ordinateur est en train de
réfléchir, celui-ci abandonnera sa recherche et remettra l’horloge
à zéro.
Appuyez sur ˘ ou ¯ pour augmenter ou diminuer
les niveaux de ‘un’, appuyez sur > ou < pour
augmenter ou diminuer les niveaux de ‘dix’.
Recherchez à l’écran < 5 min/game >.
5. Lorsque < 5 min/game > est affiché,
appuyez sur ENTER puis appuyez sur MENU
pour quitter le mode Menu. Vous êtes maintenant
prêts à tester votre nouveau niveau!
Pour plus d’informations, voir le chapitre 5.
FRANÇAIS
51
Page 52

NIVEAUX DE DIVERTISSEMENT
5.1 Niveaux de divertissement
Niveau Description Affichage
1....... Niveau de divertissement 1............... <Fun Level 1>
2....... Niveau de divertissement 2............... <Fun Level 2>
3....... Niveau de divertissement 3............... <Fun Level 3>
…jusqu’au…
58...... Niveau de divertissement 58............. <Fun Level 58>
59...... Niveau de divertissement 59............. <Fun Level 59>
60...... Niveau de divertissement 60............. <Fun Level 60>
Les niveaux de divertissement sont principalement réservés aux
débutants et aux joueurs les plus jeunes. Pour ces niveaux,
l’ordinateur Cosmic Chess est beaucoup plus ‘humain’ qu’un grand
nombre d’autres ordinateurs de jeu – offrant ainsi à chaque joueur la
possibilité de gagner dans un monde où les ordinateurs d’échecs
sont réputés être difficiles à battre. On croit généralement que les
ordinateurs ne font pas d’erreurs mais ce n’est pas le cas de cet
ordinateur à certains niveaux!
Les handicaps sont intégrés à ces niveaux afin de montrer aux
joueurs débutants les erreurs les plus courantes. Vous remarquerez
parfois que l’ordinateur ignore délibérément le potentiel de telle ou
telle pièce, ainsi que des concepts clés comme la structure des
pions, la notion de centre fort, de mobilité des pièces ou de sécurité
du Roi. Il pourra se mettre progressivement en échec, utiliser sa
Reine trop tôt ou faire des prises ou des mises en échec impulsives.
Les livres donnent souvent les règles de base des échecs et
pourtant, les joueurs jouent souvent contre des adversaires qui
enfreigne ces règles sans se faire remarquer. Les niveaux de divertissement permettent d’empêcher toutes ces erreurs typiques,
permettant ainsi au débutant de renforcer son jeu contre l’adversaire
humain auquel il devra faire face! Pour certains des niveaux de
divertissement les moins forts, l’ordinateur laissera non seulement
des pièces non protégées, mais il pourra même essayer de perdre
des pièces. Plus les niveaux deviennent élevés, moins l’ordinateur
perd des pièces facilement. La valeur des pièces devient alors de
plus en plus importante et l’ordinateur est moins susceptible de
‘donner’ des pièces. Pour les niveaux de divertissement plus élevés,
l’ordinateur ne donnera pas de pièces mais il jouera comme un
débutant qui a appris les règles de base des échecs. Il pourra encore
faire quelques erreurs, comme s’exposer à une mise en échec ou à
un échec et mat. Essayez plusieurs niveaux de divertissement – et
52
Page 53

essayez de tirer des leçons des erreurs de l’ordinateur!
NIVEAUX COMPETITION
5.2. Niveau Amateur
Niveau Temps moyen par déplacement Affichage
61............1 seconde par déplacement ............ <00:01/move>
62............2 secondes par déplacement........... <00:02/move>
63............5 secondes par déplacement........... <00:05/move>
64..........10 secondes par déplacement........... <00:10/move>
65..........15 secondes par déplacement........... <00:15/move>
66..........30 secondes par déplacement........... <00:30/move>
67..........45 secondes par déplacement........... <00:45/move>
68............1 minute par déplacement ............... <01:00/move>
69............2 minutes par déplacement.............. <02:00/move>
70............3 minutes par déplacement.............. <03:00/move>
Lorsque vous choisissez l’un des niveaux figurant ci-dessus, vous
sélectionnez un temps de réponse moyen pour l’ordinateur. Veuillez
noter que les temps de réponse donnés sont une moyenne effectuée
sur un grand nombre de déplacements. A l’ouverture et en fin de
partie, l’ordinateur jouera plus rapidement mais au milieu d’une
partie, il mettra plus longtemps à réfléchir.
5.3 Niveaux Tournoi
Niveau Nombre déplacements/Durée totale Affichage
71...... 40 déplacements en 1 heure 20 min....< 40 in 1:20 >
72...... 40 déplacements en 1 heure 30 min. .. < 40 in 1:30 >
73...... 35 déplacements en 1 heure 45 min. .. < 35 in 1:45 >
74...... 40 déplacements en 1 heure 45 min. .. < 40 in 1:45 >
75...... 35 déplacements en 1 heure 30 min. .. < 35 in 1:30 >
76...... 40 déplacements en 2 heures.............. < 40 in 2:00 >
77...... 45 déplacements en 2 heures 30 min.. < 45 in 2:30 >
78...... 50 déplacements en 2 heures.............. < 50 in 2:00 >
79...... 40 déplacements en 2 heures 30 min.. < 40 in 2:30 >
80...... 40 déplacements en 3 heures.............. < 40 in 3:00 >
Pour les niveaux ‘Tournoi’, vous devrez effectuer un certain
nombre de déplacements en un temps donné. Si un joueur dépasse
la limite de temps qui lui est impartie pour un nombre donné de
déplacements, ceci est affiché à l’écran et le joueur perd la partie.
Comme décrit ci-dessus dans le chapitre 2.5, l’ordinateur utilise un
système d’auto-évaluation lorsque vous jouez une partie de niveau
Tournoi. A la fin d’une partie à ce niveau et après avoir ré-initialisé
FRANÇAIS
53
Page 54

l’ordinateur en appuyant deux fois sur NEW GAME, l’ordinateur
affiche rapidement votre classement avant de passer à la nouvelle
partie. Si vous n’avez pas eu le temps de voir votre classement, vous
pouvez l’afficher à nouveau à tout moment en appuyant cinq fois de
suite sur HINT/INFO. Pour masquer l’affichage, appuyez sur CLEAR.
Si vous ré-initialisez l’ordinateur pour une nouvelle partie pendant
un jeu au niveau Tournoi et avant la fin de la partie, l’ordinateur vous
permettra de décider de l’issue de la partie, comme indiqué cidessous:
•Affichage = Rate as draw? (match nul?)
Si vous appuyez sur ENTER, ce classement sera affiché.
Si vous appuyez sur ˘:
•Affichage = Rate as win? (partie gagnée?)
Si vous appuyez sur ENTER, ce classement sera affiché.
Si vous appuyez sur ˘:
•Affichage = Machine wins? (l’ordinateur a gagné?)
Si vous appuyez sur ENTER, ce classement sera affiché.
Si vous appuyez sur ˘:
L’affichage indique à nouveau Rate as draw?.
Pour obtenir un classement, vous devez répondre à la question
posée ci-dessus en appuyant sur ENTER! Si, pour une raison ou
pour une autre, vous ne voulez pas que la partie soit prise en
considération, appuyez sur CLEAR en réponse à l’une des questions
posées ci-dessus. L’ordinateur confirmera votre choix en affichant
Game not rated (partie non classée).
5.4 Niveaux Partie rapide
Niveau Temps total par partie Affichage
81.............. 5 minutes par partie .................. < 5 min/game>
82.............. 7 minutes par partie .................. < 7 min/game>
83..............10 minutes par partie .................. <10 min/game>
84..............15 minutes par partie .................. <15 min/game>
85..............20 minutes par partie .................. <20 min/game>
86..............30 minutes par partie .................. <30 min/game>
87..............45 minutes par partie .................. <45 min/game>
88..............60 minutes par partie .................. <60 min/game>
89..............90 minutes par partie .................. <90 min/game>
90............100 minutes par partie .................. <100 min/game>
Pour les niveaux Partie rapide (‘Speed Chess’), vous déterminez la
durée totale de la partie. Si la durée du temps accordé est dépassée,
l’ordinateur indique quel camp a perdu à cause du temps, par ex.
54
Page 55

White time out. Pour ces niveaux, vous préférerez peut-être
activer l’option ‘Horloge de compte à rebours’ pour indiquer le temps
restant au lieu du temps qui s’est écoulé (voir chapitre 4.5).
5.5 Niveau résolution de problèmes
Niveau Problème Affichage
91.................... Mat en 1 coup........................ < Mate in 1 >
92.................... Mat en 2 coups ...................... < Mate in 2 >
93.................... Mat en 3 coups ...................... < Mate in 3 >
94.................... Mat en 4 coups ...................... < Mate in 4 >
95.................... Mat en 5 coups ...................... < Mate in 5 >
96.................... Mat en 6 coups ...................... < Mate in 6 >
97.................... Mat en 7 coups ...................... < Mate in 7 >
98.................... Mat en 8 coups ...................... < Mate in 8 >
En sélectionnant un de ces niveaux, vous activerez un programme
de recherche de mat. Si vous vous trouvez dans une position où un
mat est possible et que vous aimeriez que l’ordinateur trouve la
combinaison, sélectionnez un des niveaux résolution de problèmes.
Votre ordinateur peut résoudre un mat jusqu’à un maximum de huit
coups. Il trouve généralement plus rapidement les mats réalisés en 1
à 5 coups, tandis que les solutions en 6 à 8 coups prennent plus de
temps. Si l’ordinateur ne peut pas trouver de mat ou s’il n’y a aucun
mat possible, l’ordinateur affiche brièvement No move found!.
Vous pouvez continuer à jouer en passant à un autre niveau si vous
le désirez.
5.6 Niveau tactique
Niveau Description Affichage
99.... Jeu tactique (aucune limite de temps)... < Tactical >
Au niveau tactique, le but de l’ordinateur est de trouver la meilleure
séquence tactique. Ceci est également effectué plus rapidement
qu’en niveau de jeu normal. L’ordinateur cherche indéfiniment jusqu’à
ce qu’il trouve une combinaison gagnante ou jusqu’à ce que vous
arrêtiez la recherche en appuyant sur ENTER. Le niveau tactique est
idéal pour enrichir vos connaissances, car il permet à l’ordinateur de
se concentrer sur des positions tactiques!
FRANÇAIS
5.7 Niveau analyse
Niveau Description Affichage
100 ...... Analyse (aucune limite de temps) .......< Infinite >
Au niveau analyse, l’ordinateur cherche indéfiniment jusqu’à ce
55
Page 56

qu’il trouve un mat forcé ou jusqu’à ce que vous arrêtiez la recherche
en appuyant sur ENTER. Si la recherche est interrompue, l’ordinateur
effectue le coup qu’il considère comme étant le meilleur à ce moment. Essayez d’utiliser au maximum les possibilités offertes par ce
niveau - mettez par exemple des pièces en position sur l’échiquier et
laissez l’ordinateur réfléchir aux meilleurs coups possibles! Si vous
laissez l’ordinateur réfléchir, il recherchera le meilleur coup pendant
des heures, voire des jours!
6. MODE RETOUR EN ARRIERE: COMMENT REVENIR EN ARRIERE
Lorsque vous jouez aux échecs contre l’ordinateur, rien n’est
irréparable: vous pouvez changer d’avis ou effectuer un autre coup à
tout moment de la partie! Lorsque c’est votre tour de jouer, appuyez
simplement sur MENU pour accéder au menu principal et appuyez
plusieurs fois sur ¯ jusqu’à ce que l’ordinateur affiche ¿TAKEBACK.
Appuyez sur ENTER pour accéder au mode Retour en arrière. Le
dernier coup effectué s’affiche. Appuyez sur ¯ pour annuler ce coup:
les pièces semblent alors revenir en arrière sur l’échiquier. Le coup
précédent s’affiche alors et vous pouvez à nouveau appuyer sur ¯
pour annuler ce coup, et ce jusqu’au début de la partie si vous le
désirez. Une fois arrivé au début de la partie, l’ordinateur affiche End
takebacks (fin des retours en arrière) et retourne
automatiquement au menu principal. Veuillez noter que, tant que vous
n’êtes pas retourné au tout début de la partie, vous pouvez toujours
appuyer sur ˘ pour sélectionner à nouveau un des coups suivants, si
vous le désirez. Pour reprendre la partie, quelle que soit la position
des pièces sur l’échiquier, appuyez sur CLEAR puis sur MENU.
Pour utiliser un raccourci au mode Retour en arrière, appuyez
simplement sur la case d’arrivée du dernier coup effectué.
L’ordinateur affiche brièvement TAKEBACK ainsi que le dernier coup
effectué. Pour annuler ce dernier coup, appuyez sur ¯. Si nécessaire,
appuyez plusieurs fois de suite sur ¯ pour annuler plusieurs coups,
comme indiqué ci-dessus. Pour reprendre la partie, appuyez sur
CLEAR.
7. MODE INFO: REGARDEZ L’ORDINATEUR REFLECHIR!
Imaginez la situation suivante: Vous jouez aux échecs avec
un(e) ami(e) et c’est son tour de jouer. Vous aimeriez savoir à quel
coup il/elle est en train de réfléchir et ce qu’il/elle pense de la position
56
Page 57

actuelle des pièces sur l’échiquier. Mais bien sûr, vous n’osez pas lui
demander, car cela ne se fait pas! Eh bien maintenant, lorsque vous
jouez contre cet ordinateur, vous pouvez lui demander tout ce que
vous voulez et l’ordinateur vous répondra!
En fait, vous pouvez
obtenir une multitude d’informations sur le processus de réflexion de
l’ordinateur et vous pourrez ainsi utiliser ces informations pour
améliorer votre connaissance des échecs!
Vous pouvez accéder à tout moment à ces informations à partir du
mode Info. Comme indiqué ci-dessous, vous pouvez afficher ces
informations manuellement en appuyant sur HINT/INFO ou les
afficher automatiquement à chaque fois que l’ordinateur réfléchit à
son prochain coup.
Affichage automatique des infos
En activant une ou plusieurs des options du mode Info indiquées
ci-dessous, l’ordinateur affiche automatiquement ces informations à
chaque fois qu’il réfléchit à son prochain coup. Vous pourrez ainsi
quasiment «voir» l’ordinateur réfléchir!
NB: Les options du mode Info sélectionnées pour l’affichage
informatique ne sont activées que lorsque l’ordinateur est en
train de réfléchir!
Appuyez sur MENU pour accéder au menu principal et appuyez
plusieurs fois sur ¯ jusqu’à ce que l’ordinateur affiche ¿INFO.
Appuyez sur ENTER pour accéder au mode Info. La première option
de ce mode s’affiche (parmi les 5 options disponibles, comme indiqué
ci-dessous). Appuyez plusieurs fois sur ¯ ou ˘ pour faire défiler les
options suivantes:
•Show Moves (afficher les coups): Pour afficher les coups que
l’ordinateur prévoit de jouer, jusqu’à un maximum de quatre
coups. Voir le chapitre 7.1.
Options: 0 / 1 / 2 / 3 / 4 moves
•Show Nodes (afficher les nœuds): Pour afficher le nombre de
nœuds (ou positions) recherchés par seconde. Voir le chapitre
7.2.
Options: nodes: off / on
•Show Time per Move (afficher le temps par coup): Pour afficher
le temps utilisé jusqu’ici pour le coup. Voir le chapitre 7.3.
Options: time/move: off / on
•Show Progress (afficher la progression): Pour afficher les
détails de la recherche de l’ordinateur et du coup auquel
FRANÇAIS
57
Page 58

l’ordinateur réfléchit. Voir le chapitre 7.4.
Options: progress: off / on
•Show Evaluation (afficher l’évaluation): Pour afficher le score
pour la position actuelle. Voir le chapitre 7.2.
Options: evaluation: off / on
Pour activer ou désactiver une option (on/off) ou pour sélectionner
un paramétrage d’une option, appuyez sur ENTER lorsque l’option
est affichée. Appuyez plusieurs fois sur ENTER pour faire défiler tous
les choix disponibles pour cette option. Lorsque votre choix est
affiché, appuyez sur ¯ ou ˘ pour passer à une autre option ou sur
CLEAR pour retourner au menu principal, puis sur MENU pour
retourner à la partie en cours. Pour de plus amples informations sur
les différentes options, veuillez vous reporter aux chapitres indiqués
ci-dessus.
Vous pouvez activer une ou plusieurs des options du mode info
indiquées ci-dessus. Si vous activez plus d’option que l’ordinateur ne
peut afficher, il les fera défiler continuellement lorsqu’il est en train de
réfléchir à son prochain coup. Si l’affichage défile trop rapidement,
modifiez la vitesse LCD comme indiqué dans le chapitre 4.10. Vous
pouvez également appuyer sur GO/STOP pour suspendre le
défilement puis sur CLEAR pour reprendre le défilement. Lorsque
des informations requises ne sont pas disponibles, l’ordinateur affiche
--x--.
Affichage manuel d’informations
Appuyez à tout moment sur HINT/INFO pour afficher le premier
coup auquel l’ordinateur a réfléchi pour sa variante prévue (comme
indiqué dans le chapitre 7.1). Les informations de jeu sont divisées en
plusieurs groupes. Appuyez plusieurs fois sur HINT/INFO pour faire
défiler les différents groupes. Les touches ˘ et ¯ servent à faire
défiler les différents affichages de chaque groupe. Veuillez noter que
chaque groupe est décrit ci-dessous plus en détails. Appuyez sur
CLEAR pour retourner à l’affichage normal de l’horloge.
7.1 Variante principale
Lorsque vous appuyez pour la première fois sur HINT/INFO, la
variante principale s’affiche (la variante prévue par l’ordinateur) de la
façon suivante: Ply1: b1-c3. Un ‘demi-coup’ est un déplacement
individuel et le niveau de recherche de l’ordinateur dépend du
nombre de demi-coups auxquels il réfléchit à l’avance. Pour une
recherche en deux demi-coups, par exemple, l’ordinateur réfléchit à
58
Page 59

UN RESUME DU MODE INFO
INFORMATIONS SUR LA VARIANTE PRINCIPALE:
• Variante prévue: coup 1
• Variante prévue: coup 2
• Variante prévue: coup 3
• Variante prévue: coup 4
INFORMATIONS SUR LA RECHERCHE:
• Evaluation de la position (score)
• Profondeur de la recherche et coup
auquel l’ordinateur est en train de réfléchir.
• Temps écoulé pour le coup en cours et
nombre de nœuds recherchés par
seconde (si l’ordinateur est en train de
réfléchir)
INFORMATIONS SUR L’HORLOGE D’ECHECS:
• Temps écoulé pour chaque camp
• Temps restant pour chaque camp*
*Partie rapide/Niveaux Tournoi uniquement
INFORMA TIONS SUR LE DECOMPTE DES COUPS:
• Numéro du coup qui est en train d’être
joué + numéro du dernier coup joué
• Aller en avant ou en arrière dans les
coups d’une partie en cours
INFORMATIONS SUR LE CLASSEMENT:
• Classement ELO (à la fin d’un jeu du
niveau tournoi)
59
FRANÇAIS
Page 60

deux déplacements individuels (un pour les Noirs et un pour les
Blancs). Veuillez noter que l’affichage du premier demi-coup peut
également servir de suggestion, puisque c’est le coup auquel
l’ordinateur s’attend de votre part.
Si vous jetez un coup d’œil à cet affichage lorsque l’ordinateur
réfléchit, vous verrez le déplacement que l’ordinateur est en train
d’analyser. Si vous regardez cet affichage pendant que vous
réfléchissez, vous verrez le coup que l’ordinateur attend de votre part.
Dans chacun des cas, appuyez plusieurs fois sur ˘ pour faire défiler
le reste des coups dans la variante prévue, jusqu’à quatre demicoups:
•
Variante prévue: coup 1
•Variante prévue: coup 2
•Variante prévue: coup 3
•Variante prévue: coup 4
7.2 Recherche d’informations
Appuyez sur la touche HINT/INFO pour accéder au mode Info et
appuyez à nouveau pour afficher des informations relatives aux
recherches de l’ordinateur. L’ordinateur affichera tout d’abord le score
actuel. Appuyez plusieurs fois sur ˘ pour faire défiler le reste des
informations:
•Le score actuel: une évaluation numérique de la position
actuelle, un pion valant 1,0 point et un nombre positif indiquant
que les Blancs sont en tête. Exemple: si les Blancs ont deux
pions d’avance, l’ordinateur affiche Score: +2.0. Veuillez
noter que ce score n’est pas valide pour les niveaux de
résolution des problèmes.
•Affichage en deux parties: (a) La profondeur de la recherche en
cours ou le nombre de déplacements individuels que l’ordinateur
est en train de prévoir. Par exemple, si l’ordinateur réfléchit à 439
coups à l’avance, il affichera d:4 39, où d: représente la
profondeur (ou ‘depth’). (b) Le coup auquel l’ordinateur est en
train de réfléchir (si cela s’applique).
•Affichage en deux parties: (a) Le temps utilisé jusqu’ici pour le
déplacement en cours. (b) Le nombre de nœuds ou de positions
que l’ordinateur est en train de rechercher par seconde (si
l’ordinateur est en train de réfléchir).
7.3 Informations sur la pendule d’échecs
Après avoir appuyé sur HINT/INFO pour accéder au mode Info,
60
Page 61

appuyez encore deux fois sur cette touche pour afficher des informations sur la pendule d’échecs. L’ordinateur affiche le temps total qui
s’est écoulé pour les deux camps. Veuillez noter que le symbole de la
pendule d’échecs au milieu de l’écran indique le camp qui doit jouer
et le type d’horloge utilisé. Appuyez sur ˘ pour faire défiler les deux
affichages suivants:
•
Temps total écoulé pour les Blancs/Noirs (Horloge du temps
écoulé)
Blancs à jouer [, Noirs à jouer ].
•Temps total restant pour les Blancs/Noirs (Horloge de compte à
rebours: niveaux de résolution de problèmes/parties rapides
uniquement)
Blancs à jouer {, Noirs à jouer }.
Si l’horloge de compte à rebours n’est pas activée, le deuxième
affichage est laissé en blanc (--:--{--:--).
Les horloges s’arrêtent pour diverses raisons durant une partie: si
vous retournez en arrière, si vous vérifiez les paramètres des
niveaux, sélectionnez des options, mettez des pièces en position ou
arrêtez l’ordinateur. L’heure est enregistrée dans la mémoire de
l’ordinateur et l’horloge reprendra dès que vous recommencez une
partie. Lorsque vous changez de niveau de jeu ou lorsque vous réinitialisez l’ordinateur pour une nouvelle partie, l’heure est toujours
remise à zéro.
7.4 Décompte des coups / Déplacements
Après avoir appuyé sur HINT/INFO pour accéder au mode informations, appuyez encore trois fois sur cette touche pour afficher le
numéro de votre dernier coup et du déplacement en cours. Vous
pouvez alors appuyer sur ¯ pour revenir en arrière dans le jeu (si
vous le désirez) ou sur ˘ pour revenir en avant. Ceci vous permet de
revenir en arrière et de noter les déplacements d’une partie lorsque
celle-ci s’avère particulièrement intéressante!
•Numéro du déplacement en cours et du dernier coup effectué.
•Déplacements pour la partie en cours.
FRANÇAIS
7.5 Affichage du classement
Après avoir appuyé sur HINT/INFO pour accéder au mode informations, appuyez encore quatre fois sur cette touche pour afficher
votre classement actuel. Veuillez noter que les classements sont
basés sur des parties de niveau tournoi, comme décrit dans le
chapitre 5.3.
61
Page 62

8. MODE MISE EN PLACE: MODIFIEZ L’ECHIQUIER!
Le mode Mise en place (Set-up) vous permet d’installer les pièces
sur l’échiquier pour commencer à jouer ou laisser l’ordinateur
résoudre un problème particulier!
Attention: Tous les coups de la par tie en cours seront effacés
si vous modifiez la position des pièces pendant une partie.
Vous pouvez changer la position des pièces sur l’échiquier
seulement si c’est votre tour de jouer. Appuyez sur MENU et appuyez
plusieurs fois sur ¯ jusqu’à ce que l’ordinateur affiche ¿SETUP.
Appuyez sur ENTER pour accéder au mode Mise en place.
L’ordinateur affiche les symboles correspondant aux pièces et à leur
couleur. („ıKQRBNP).
•Pour retirer une pièce de l’échiquier, appuyez simplement sur
la pièce et elle disparaîtra.
•Pour déplacer une pièce d’une case à une autre, appuyez sur
la pièce pour la faire disparaître, puis sur une nouvelle case pour
la faire apparaître à cette position.
•Pour ajouter une pièce sur l’échiquier, appuyez tout d’abord
sur le symbole de la pièce à ajouter et sur sa couleur puis
appuyez sur la case où vous voulez ajouter la pièce. Pour ajouter
une pièce du même type et de la même couleur, appuyez
simplement sur une autre case. Pour ajouter une pièce
différente, appuyez sur une autre pièce et/ou sur une autre
couleur et procédez comme indiqué ci-dessus.
•Pour vider l’échiquier de toutes ses pièces, appuyez sur
CLEAR en mode Mise en place. L’ordinateur vous demande de
valider votre choix en affichant Clear board?. Appuyez sur
ENTER et l’ordinateur indique que l’échiquier est vide
(Cleared). Vous pouvez maintenant ajouter des pièces,
comme indiqué ci-dessus. Si vous décidez de ne plus vider
l’échiquier, appuyez à nouveau sur CLEAR pour annuler votre
choix. L’ordinateur affiche alors Not cleared. Veuillez noter
que cette fonction est particulièrement utile pour mettre en place
un nombre restreint de pièces – il s’avère alors bien plus facile
de commencer avec un échiquier vide!
•Après avoir placé toutes vos pièces sur l’échiquier comme
décrit ci-dessus, veuillez noter que c’est au tour de la couleur
opposée à celle de la dernière pièce placée sur l’échiquier. Si
nécessaire, changez la couleur en appuyant sur ı pour les Noirs
62
Page 63

ou sur „ pour les Blancs.
•Pour quitter le mode Mise en place, appuyez sur ENTER.
Lorsque l’ordinateur vous demande de confirmer cette nouvelle
disposition des pièces (New position?), appuyez sur
ENTER pour retourner à une partie nor male utilisant cette
nouvelle disposition. L’ordinateur affiche New position!
pour vous le confirmer. Si vous appuyez sur CLEAR, l’affichage
indique Resume et vous resterez au mode Mise en place.
Toute disposition des pièces conforme aux règles est permise en
suivant les étapes indiquées ci-dessus. L’ordinateur ne vous laissera
pas disposer les pièces si les règles ne sont pas respectées, par
exemple si vous utilisez plus de pièces que pour une partie normale
ou si vous mettez un Roi en échec et qu’il ne peut plus bouger. Dans
ces cas-là, après avoir appuyé sur ENTER pour quitter le mode Mise
en place et appuyé sur ENTER pour confirmer, l’ordinateur affiche
Illegal. Vous ne pourrez pas quitter le mode Mise en place tant
que vous n’aurez pas disposé les pièces conformément aux règles!
Si vous accédez au mode Mise en place mais que vous n’avez pas
encore déplacé des pièces sur l’échiquier, vous pouvez quitter ce
mode en appuyant sur ENTER. L’ordinateur affiche alors un-
changed et vous retournez au menu principal. Appuyez à nouveau
sur MENU pour retourner à une partie nor male.
9. MODE ETUDE: ESSAYEZ DE TESTER VOS CAPACITES!
Vous recherchez un outil d’apprentissage efficace? N’hésitez pas
à tester le mode Etude! Huit parties célèbres sont pré-enregistrées,
chacune figurant huit points critiques – pour un total de 64 positions à
étudier. A vous de revivre ces parties en réalisant les mêmes coups
qui ont conduit à la victoire! Cette fonction permet d’améliorer
considérablement votre connaissance des échecs tout en vous
apprenant à réaliser le meilleur coup dans une position donnée. Et
pour rendre cette fonction encore plus excitante, l’ordinateur évaluera
vos performances tout au long de la partie.
Au fait, si vous avez besoin d’aide pour résoudre une des positions
du mode Etude, consultez l’annexe pour une liste complète de toutes
les parties en mode Etude. N’oubliez pas, cependant, que ces parties
sont un outil de référence – rien ne sert donc de tricher en regardant
les solutions sans chercher à résoudre les problèmes posés par les
positions d’étude!
FRANÇAIS
63
Page 64

Sélection des positions d’étude
Conseil: Vous pouvez également sélectionner les positions
d’études en appuyant sur certaines cases de l’échiquier,
comme décrit un peu plus loin dans ce chapitre!
Appuyez sur MENU pour accéder au menu principal et plusieurs
fois sur ¯ (ou ˘) jusqu’à ce que ¿STUDY s’affiche à l’écran.
Appuyez sur ENTER pour accéder au mode Etude et vous verrez
apparaître la première position d’étude, < Study1-1 >. Pour
changer de position d’étude, appuyez sur ˘ ou ¯ pour augmenter ou
diminuer le numéro de la position de ‘un’ ou, à l’aide du stylet,
appuyez sur > ou < pour augmenter ou diminuer ce numéro de ‘huit’.
Lorsque la position d’étude voulue est affichée, appuyez sur ENTER.
L’ordinateur vous demande de confirmer en affichant Start
Study?. Appuyez sur ENTER pour démarrer la partie à étudier,
comme indiqué ci-dessous, ou appuyez sur CLEAR pour annuler et
retourner à l’affichage principal du mode Etude.
Après avoir sélectionné ENTER, l’ordinateur commence
automatiquement à réaliser les coups de la partie d’étude
sélectionnée. Dès qu’il atteint la première position d’étude, il vous
indique que c’est à votre tour de jouer en affichant brièvement Your
Move. L’horloge se met alors en marche. C’est à vous maintenant de
deviner le coup qui a été réalisé lorsque cette partie a été jouée pour
la première fois. En voici les principes:
•Il n’y a qu’une seule position ‘correcte’ par position d’étude.
•Lorsque l’ordinateur arrive à une position d’étude, celui-ci affiche
la couleur du camp pour qui c’est le tour de jouer.
•Si vous déplacez la bonne pièce au bon endroit, l’ordinateur
affiche Well Done (Bien joué!). L’ordinateur réalise alors les
coups suivants, jusqu’à la position d’étude suivante.
•Si vous ne déplacez pas la bonne pièce au bon endroit,
l’ordinateur affiche brièvement Wrong Move et vous demande
si vous voulez quitter le mode Etude (Quit Study?).
•Pour rester en mode étude et essayer un autre coup,
appuyez sur CLEAR. Des points seront déduits pour chaque
déplacement incorrect, votre pièce retournera à sa case de
départ et vous pourrez effectuer un autre déplacement.
•Pour quitter le mode étude et continuer une partie nor male
en utilisant le dernier déplacement que vous avez effectué,
appuyez sur ENTER. L’ordinateur réfléchit à son prochain
64
Page 65

POUR SELECTIONNER DES POSITIONS D’ETUDE!
UTILISEZ L’ECHIQUIER
Pour une méthode permettant de sélectionner facilement une position
d’étude, accédez simplement au mode d’étude et appuyez sur la case
correspondante sur l’échiquier, comme indiqué ci-dessous.
8
1-8 2-8 3-8 4-8 5-8 6-8 7-8 8-8
7
1-7 2-7 3-7 4-7 5-7 6-7 7-7 8-7
6
1-6 2-6 3-6 4-6 5-6 6-6 7-6 8-6
5
1-5 2-5 3-5 4-5 5-5 6-5 7-5 8-5
4
1-4 2-4 3-4 4-4 5-4 6-4 7-4 8-4
3
1-3 2-3 3-3 4-3 5-3 6-3 7-3 8-3
2
1-2 2-2 3-2 4-2 5-2 6-2 7-2 8-2
1
1-1 2-1 3-1 4-1 5-1 6-1 7-1 8-1
abcdefgh
coup.
•
Score: A chaque fois que vous déplacez une pièce correctement
pour une position d’étude, des points sont ajoutés à votre score.
Vous marquerez le maximum de points si vous déplacez la
bonne pièce sur la bonne case dès votre première tentative. A
chaque déplacement incorrect, votre score diminue de moitié.
Cependant, une fois que votre score atteint zéro, celui-ci ne
FRANÇAIS
65
Page 66

diminue plus, même si vous faites d’autres déplacements
incorrects.
•Pour vérifier votre score actuel, appuyez deux fois de suite sur
HINT/INFO. La première fois que vous appuyez sur cette touche,
vous remarquerez que l’ordinateur affiche le dernier
déplacement réalisé par le camp adverse. Appuyez sur CLEAR
pour annuler l’affichage du score.
Si vous réalisez un échec et mat à la fin d’un jeu d’étude,
Checkmate! reste affiché à l’écran après une série de messages
de félicitation. Vous pouvez alors (a) ré-initialiser l’ordinateur pour une
nouvelle partie, (b) utiliser le mode Info pour revoir plus en détail les
déplacements effectués en revenant en arrière (comme indiqué dans
le chapitre 7.4) ou (c) revenir en arrière du nombre de coups choisi
puis recommencer la partie en mode normal. Si vous déplacez la
bonne pièce sur la bonne case pour la dernière position d’étude,
End Game s’affiche et l’ordinateur commence automatiquement à
réfléchir à son prochain coup. Vous pourrez ainsi terminer la partie
normalement.
Utiliser l’échiquier pour sélectionner une position
Chaque position d’étude peut être activée de façon individuelle en
appuyant sur la case correspondante sur l’échiquier. Comme indiqué
dans le tableau du mode étude, chacune des 64 cases représente
une position d’étude. Accédez au mode étude en appuyant sur MENU
et sur ¯ (ou ˘) jusqu’à ce que ¿STUDY soit affiché, puis appuyez
sur ENTER. Consultez alors le tableau et appuyez sur la case de
l’échiquier pour sélectionner la position d’étude correspondante.
Appuyez sur ENTER. L’ordinateur vous demande de confirmer en
affichant Start Study?. Appuyez à nouveau sur ENTER et la
partie d’étude commence alors, comme indiqué précédemment.
10. BESOIN D’AIDE? C’EST ICI!
Pour vous aider à résoudre les problèmes les plus courants, nous
avons établi une liste des situations les plus communément
rencontrées, ainsi que certains solutions possibles à ces problèmes.
a. L’ordinateur ne réagit pas, fait des erreurs ou se fige en
cours de partie.
•Réinstallez les piles ou remplacez-les par des piles alcalines
neuves.
•L’électricité statique est parfois responsable d’un blocage.
66
Page 67

Appuyez à l’intérieur de l’orifice indiquant ACL pour réinitialiser l’ordinateur (voir le chapitre 11.1).
b. L’affichage est trop sombre et/ou difficile à lire.
•Remplacez les piles par des piles alcalines neuves.
•Sélectionnez une option de contraste LCD différente (voir le
chapitre 4.9).
c. J’ai activé cer taines options d’affichage automatique pour
regarder l’ordinateur réfléchir, mais les messages défilent
trop rapidement.
•Sélectionnez une option de vitesse LCD différente (voir le
chapitre 4.10).
•Pour interrompre le menu déroulant: appuyez une fois sur la
touche GO/STOP; appuyez sur CLEAR pour réactiver le menu
déroulant.
d. L’ordinateur ne joue pas.
•L’ordinateur répond automatiquement uniquement si le mode
Deux joueurs est réglé sur player: P-C pour une partie
Joueur contre Ordinateur (voir le chapitre 4.1).
•Vous êtes peut-être à un niveau où l’ordinateur met longtemps
à réfléchir. Si vous le désirez, vous pouvez l’obliger à jouer en
appuyant sur ENTER.
e. L’ordinateur ne veut pas accepter mon coup.
•Vous essayez de déplacez une pièce en enfreignant les règles.
Vérifiez les règles du jeu d’échec.
•Votre Roi est-il en échec? Le coup que vous envisagez
mettrait-il votre Roi en échec? Est-ce que votre roque n’est pas
correct? Vérifiez vos positions.
•Est-ce votre tour de jouer? Si le symbole de la couleur clignote,
l’ordinateur est en train de réfléchir. Appuyez sur ENTER pour
l’interrompre, si nécessaire.
f. Les notations de l’échiquier sont inversées lorsque je
déplace une pièce. Pourquoi?
•L’option white: top est activée (les Blancs en haut).
Accédez au mode Options et changez cette option pour
black: top (voir le chapitre 4.4)
g. Je viens de ré-initialiser l’ordinateur pour commencer une
nouvelle partie mais l’ordinateur affiche Rate as draw?
au lieu de se ré-initialiser.
•Vous avez interrompu une partie de niveau tournoi et vous
devez décider de l’issue de la partie pour l’ordinateur. Pour plus
de détails, voir le chapitre 5.3.
FRANÇAIS
67
Page 68

h. L’ordinateur a affiché son déplacement mais sa pièce
clignote toujours et le déplacement n’a toujours pas été
effectué sur l’échiquier.
•Lorsque l’option Automove (déplacement automatique) est
désactivée, vous devez déplacer vous-même les pièces de
l’ordinateur sur l’échiquier. Pour réactiver l’option Automove,
voir le chapitre 4.11.
i. L’ordinateur affiche No Move Found! au lieu de déplacer
une pièce.
•Vous êtes à un niveau de résolution de problème et l’ordinateur
n’a pas trouvé de mat. Si vous ne cherchez pas à résoudre un
problème de mat, passez à un niveau de jeu normal (voir le
chapitre 5).
j. J’essaye de quitter le menu principal en appuyant sur
CLEAR mais j’obtiens un bip d’erreur.
•Vous appuyez sur la mauvaise touche! La seule façon de
quitter le menu principal consiste à appuyer sur la touche
MENU.
k. L’ordinateur émet un bip de façon intermittente lorsque c’est
mon tour de jouer.
•Lorsque le mode d’entraînement est activé, l’ordinateur émet
un bip lorsque c’est votre tour de jouer.
l. L’ordinateur n’émet pas de bip lorsqu’il effectue un coup.
•Dans le mode Options, activez le son (voir le chapitre 4.8)
m.L’ordinateur ne me laisse pas quitter le mode Mise en place
(Setup).
•Vous avez mis des pièces en place sur l’échiquier sans respecter les règles (par ex. un Roi est en échec, il y a trop de
pions sur l’échiquier, etc.). Modifiez l’échiquier pour mettre en
place une position valide (voir le chapitre 8).
11. DETAILS TECHNIQUES
11.1 La fonction ACL
Les ordinateurs se ‘figent’ parfois en raison d’une décharge
statique ou d’autres perturbations électriques. Si c’est le cas, utilisez
un trombone ou un objet pointu pour appuyer à l’intérieur de l’orifice
indiquant ACL sur le socle de l’ordinateur pendant au moins une
seconde. Ceci permet de ré-initialiser l’ordinateur.
68
Page 69

11.2 Entretien et maintenance
Votre ordinateur est un dispositif électronique très sensible. Pour
cette raison, il devra être manipulé avec précaution et il ne devra pas
être exposé à des températures extrêmes ou à une atmosphère trop
humide. Pour le nettoyer, n’utilisez pas d’agents ou de liquides
chimiques, ceux-ci risquant d’endommager le plastique. Toujours
retirer les piles avant de nettoyer l’ordinateur.
Les piles déchargées doivent être remplacées dans les plus brefs
délais, celles-ci risquant de couler et d’endommager l’unité. Veuillez
également noter les recommandations suivantes concernant les piles
de votre ordinateur.
Attention: n’utilisez que des piles alcalines ou
carbone-zinc. Ne pas mélanger différents types de piles ou des piles
neuves et des piles usagées. Ne pas recharger des piles non
rechargeables. N’utilisez que des piles recommandées ou de qualité
équivalente. Respectez la polarité lorsque vous insérez les piles. Les
piles usagées doivent être retirées de l’ordinateur le plus rapidement
possible. Ne pas court-circuiter le point d’échange.
11.3 Spécifications techniques
Touches: 8
Echiquier: Membrane tactile 9x8 (panneau tactile)
Affichage LCD: Matrice de points 11 caractères, 68 x 79 mm
Piles: 3 x AAA/AM4/R03
Dimensions: 131 x 83 x 22 mm
Poids: 220 grammes
Veuillez conserver ces informations pour référence future.
Saitek se réserve le droit d’apporter sans préavis des modifications techniques
pour améliorer son produit.
FRANÇAIS
69
Page 70

Folgen Sie diesen Schritten, um sofort eine Partie zu starten!
Legen Sie 3 AAA Batterien in das Gerät und
1
beachten Sie dabei die eingezeichnete
Polarität.
Nehmen Sie den Stylus zur Hand.
2
Drücken Sie GO/STOP. Schaltet sich das
3
Gerät nicht an folgen Sie den Schritten in
Abschnitt 11.1.
Drücken Sie 2mal kurz hintereinander NEW
4
GAME.
Geben Sie die Züge mit Hilfe des Stylus ein –
5
einfach kurz auf das Ausgangs- und das
Zielfeld drücken und die Eingabe ist
ausgeführt.
Zeigt der Computer seinen Zug an, wird seine
6
gewünschte Figur kurz blinken und der Zug
wird automatisch ausgeführt.
Drücken Sie GO/STOP, um das Gerät
auszuschalten. Wird
drücken Sie GO/STOP erneut – das Gerät ist
abgeschaltet und unterbrochene Partien werden gespeichert!
Stop?
angezeigt,
ıPd7-d5````
LERNEN SIE DIE SCHACHFIGUREN KENNEN!
K` Q` R` B` N` P`
SPRINGERKÖNIG DAME TURM LÄUFER BAUER
Weiss
SCHNELLSTART
3 x
AAA
(AM4/R03)
x2
Schwarz
Page 71

INHALTSANGABE
SCHNELLSTART
TASTEN UND FUNKTIONEN
EINLEITUNG
1.DIE GRUNDLAGEN
1.1 Batter ien einlegen, Anschalten
1.2 Spielbereit? So funktioniert es!
1.3 Computerzüge ausführen
1.4 Partie zu Ende? Starten Sie neu!
1.5 Zu einfach/schwierig? Änder n
Sie die Spielstufe!
2.WEITERE FUNKTIONEN
2.1 Wer ist am Zug? Prüfen Sie die
Anzeige!
2.2 Schlagzüge und Sonderregeln
2.3 Ungültige Züge
2.4 Schach, Matt und Remis
2.5 Lassen Sie Ihre Spielstär ke
bewerten!
2.6 Sie benötigen Hilfe? Fragen Sie
einfach!
2.7 Die Computersuche
unterbrechen
2.8 Seitenwechsel mit dem Computer
2.9 Eröffunungsbücher
2.10 Die gegner ische Rechenzeit
nutzen
2.11 Ausschalten/Spielstandspeicher
3.DAS HAUPTMENÜ
4.SPIELOPTIONEN
Eine Option auswählen
4.1 2-Spieler-Modus
4.2 Suchalgorythmus
4.3 Eröffnungen
4.4 Weiss von oben spielen
4.5 Countdown-Anzeige
4.6 Uhrticken
4.7 Training
4.8 Sound An/Aus
4.9 LCD-Kontrast
4.10LCD-Geschwindigkeit
4.11Automatik
5.SPIELSTUFEN
Eine Spielstufe einstellen
5.1 Spass-Stufen
5.2 Normale Spielstufen
5.3 Turnierstufen
5.4 Schnellpartien
5.5 Mattsuch-Stufen
5.6 Taktische Stufen
5.7 Analyse-Stufe
6.RÜCKNAHME VON ZÜGEN
7.SPIELINFORMATIONEN
Automatische Anzeigen
Manuell abrufbare Anzeigen
7.1 Grund-Varianten
7.2 Such-Informationen
7.3 Schachuhr-Informationen
7.4 Zugzähler/Spielzüge
7.5 Bewertung
8.POSITIONEN ÄNDERN
ODER AUFBAUEN
9.TRAINING
Lernen anhand von
gespeicherten Stellungen
Stellungen direkt aufrufen
10.SIE BENÖTIGEN HILFE?
SCHAUEN SIE HIER NACH!
11.TECHNISCHE DETAILS
11.1Die ACL-Funktion
11.2Pflege und Wartung
11.3Technische Spezifikation
ANHANG:
GESPEICHERTE PARTIEN
DEUTSCH
71
Page 72

TASTEN UND FUNKTIONEN
1.TOUCH SCREEN SCHACHBRETT: drücken Sie einfach mit einem
Stylus oder manuell auf ein Feld, um Eingaben vorzunehmen.
2.INFORMATIONSANZEIGE: Sie sehen Züge, Spielinformationen und
Schachuhren. Darüber hinaus bietet das LCD Hilfe bei der Einstellung
und Nutzung von Optionen, Spielstufen, Trainingsmodus etc.
3.STYLUS: hiermit führen Sie Züge
aus – drücken Sie einfach mit
Hilfe dieses Stiftes auf die Felder.
4.GO/STOP: hiermit schalten Sie
das Gerät an und aus.
5.STYLUS AUFBEWAHRUNG:
schieben Sie den Stylus nach
Gebrauch einfach in das Gerät.
6.LCD-Abdeckung: schützen Sie
den Bildschirm und decken Sie
ihn nach Nutzung ab.
7.ACL (Reset): befindet sich auf
der Unterseite des Geräts. Wird
gebraucht, um eventuelle
statische Aufladungen vom Gerät
zu nehmen.
8.HINT/INFO: rufen Sie Hinweise
über diese Taste ab! Oder blättern
Sie durch angezeigte
Informationen.
9.CLEAR: hiermit verlassen Sie
Modi zum Einstellen von
Optionen, Informationen,
Spielstufen etc. Wir gehen in der
Anleitung noch genauer auf diese
Taste ein.
10.BATTERIEFACH: befindet sich
auf der Unterseite. Bitte legen Sie
3 alkaline AAA Batterien ein.
11.ENTER: hiermit bestätigen Sie
Einstellungen oder geben Züge
ein.
12.¯/˘ TASTEN: blättern Sie durch
Optionen, Spielstufen,
Informationen oder nutzen Sie
diese Tasten zur Rücknahme von
Zügen.
13.MENU: hiermit gelangen Sie ins Menü bzw. verlassen dieses durch
nochmaliges Drücken.
14.NEW GAME: ACHTUNG! Bitte dieses Taste kurz hintereinander 2mal
drücken, um ein neues Spiel zu starten.
72
Page 73

EINLEITUNG
Herzlichen Glückwunsch zum Erwerb Ihres Cosmic
Schachcomputers! Cosmic wird Sie durch sein schickes Design mit
direkter, schneller Handhabung und einem starken Schachprogramm
nicht nur unterhalten, sondern auch Ihr Schachspiel verbessern und
jederzeit herausfordern. Sie erhalten Tipps in schwierigen
Situationen, können Analysen abfragen oder Ihr Eröffnungs-Spiel
verbessern! Sie werden Schach neu erleben! Wir wünschen Ihnen
viel Spass!
1. DIE GRUNDLAGEN
1.1 Batterien einlegen, Anschalten
Ihr neuer Schachcomputer benötigt 3 AAA (AM4/R03) Batterien.
Legen Sie diese gemäss der eingezeichneten Polarität ein. Wir
empfehlen neue, alkaline Batterien für eine längere Lebensdauer.
Schalten Sie das Gerät an, indem Sie GO/STOP drücken. Reagiert
der Computer nicht, setzen Sie Ihn über die ACL-Funktion zurück.
Drücken Sie mit einer Büroklammer für 3 Sekunden in die Vertiefung
ACL. Dies nimmt die Aufladung vom Computer.
Um Energie zu sparen, schaltet sich das Gerät automatisch ab,
wenn Sie 20 Minuten keine Eingabe machen
1.2 Spielbereit? So funktioniert es!
Folgen Sie diesen Schritten, um zu starten:
a.Drücken Sie GO/STOP, um den Computer anzuschalten.
b. Drücken Sie 2mal NEW GAME, um eine neue Partie zu starten
Drücken Sie nicht zu lange auf die Taste, sondern nur kurze Zeit
Für eine neue Partie zeigt der Computer New Game und dann
das Symbol für Weiss („) sowie die Schachuhr mit 00:00:00
an.
c. Um einen Zug einzugeben, drücken Sie den Stylus auf das
Ausgangsfeld. Der Computer registriert, welche Figur Sie ziehen
möchten.
Sie können auch einfach mit dem Finger auf ein Feld
drücken.
d.Dann drücken Sie mit dem Stylus (oder Finger) auf das Zielfeld.
Sie hören einen Signalton als Bestätigung. Nun ist deer Computer am Zug.
Sie werden bemerken, dass der Computer
manchmal sofort antwortet anstatt zu rechnen. Dies ist der Fall,
DEUTSCH
.
.
73
Page 74

wenn er aus der Eröffnungsbibliothek spielt (s. Abschnitt 2.9).
1.3 Computerzüge ausführen
Ist der Computer am Zug, wird Thinking... angezeigt.
Rechnet der Computer, blinkt das Symbol für Schwarz (ı) im Display
und die Zeit verstreicht. Ist die Rechnung beendet, hören Sie einen
Ton. Sie sehen den Zug im LCD, z.B. ıPe7-e5 und die Figur wird
blinken. Wurde der Zug ausgeführt, sind Sie wieder an der Reihe.
1.4 Partie zu Ende? Starten Sie neu!
Bitte beachten Sie, dass mit NEW GAME eine aktuelle Partie
gelöscht wird!
Sobald Sie eine Partie beendet haben, drücken Sie einfach 2mal
kurz hintereinander NEW GAME, um neu zu starten. Der Computer
wird kurz New Game anzeigen. Die gewählte Spielstufe bleibt aktiv.
Spielten Sie eine Turnierpartie, wird Ihre Spielstärkenbewertung in
angezeigt. Brechen Sie diese Turnierpartie ab, erscheint eine Reihe
von Fragen bezüglich Ihrer Bewertung. Details finden Sie in Abschnitt
2.5.
1.5 Zu einfach/schwierig? Ändern Sie die Spielstufe!
Wird der Computer zum ersten Mal angeschaltet, ist automatisch
Spielstufe 63 eingestellt. Der Computer hat ca. 5 Sekunden
Rechenzeit pro Zug. Sie können jedoch aus 100 Spielstufen
auswählen! In Abschnitt 5 finden Sie alle Details hierfür.
2. WEITERE FUNKTIONEN
2.1 Wer ist am Zug? Prüfen Sie die Anzeige!
Sobald der Computer für Schwarz rechnet, blinkt ein schwarzes
Quadrat in der Anzeige (ı). Wurde der Computerzug ausgeführt,
zeigt die Anzeige ein weisses Quadrat („). Das heisst, Sie sind am
Zug mit den weissen Figuren.
2.2 Schlagzüge und Sonderregeln
Bitte beachten Sie folgende Besonderheiten:
Schlagzüge: werden mit x angezeigt, z.B. ıPa7xb6.
En Passant: Der Computer zeigt bei diesem Zug solange EP im
Display an, bis Sie auf das Feld des geschlagenen Bauern drücken
und er somit vom Brett genommen ist.
74
Page 75

Rochade: Wird der Königszug zuerst gemacht, erkennt der Computer die Rochade automatisch. Nachdem Sie den König auf sein
Ausgangs- und Zielfeld gedrückt haben, wird Ihr Zug angezeigt, bis
Sie auch den Turmzug ausgeführt haben. Kurze Rochade wird als
O-O, lange als O-O-O angezeigt.
Bauernumwandlung: Wandeln Sie einen Bauern um, drücken Sie
diesen zunächst nur auf sein Ausgangsfeld. Das Display zeigt dann
die verfügbaren Figuren zur Umwandlung an (Q R B N). Um in eine
Dame umzuwandeln, komplettieren Sie einfach Ihren Zug (=drücken
Sie den Bauern auf sein Zielfeld). Um in Springer, Läufer oder Turm
umzuwandeln, drücken Sie kurz auf das entsprechende Symbol und
die Anzeige bestätigt Ihre Wahl kurz, z.B. mit Prom: rook.
Drücken Sie erst dann den Bauern auf sein Zielfeld.
Ändern Sie Ihre
Meinung, können Sie den Zug abbrechen, indem Sie einfach
nochmals auf das Ausgangsfeld des Bauern drücken.
Wandelt der Computer um, wird er Ihnen die gewünschte
Umwandlung anzeigen, sobald Sie seinen Bauern auf dessen
Ausgangsfeld gedrückt haben z.B. ıPh2-h1/Q.
2.3 Ungültige Züge
Ihr Computer wird niemals einen ungültigen Zug akzeptieren!
Versuchen Sie, einen auszuführen, hören Sie einen Signalton und
das Display zeigt das Ausgangsfeld an. Um fortzufahren, stellen Sie
die Figur zurück oder Sie führen einen regelkonformen Zug aus.
Führen Sie den Computerzug nicht korrekt aus, hören Sie wieder den
Signalton. Sie bewegen entweder die falsche Figur oder die richtige
Figur auf ein falsches Feld.
Drücken Sie ein Ausgangsfeld, wünschen jedoch, den Zug nicht zu
machen, können Sie abbrechen, indem Sie wieder auf das gleiche
Feld drücken. Nun können Sie einen völlig anderen Zug eingeben.
Ändern Sie Ihre Meinung nachdem der Zug schon eingegeben ist,
können Sie die Rücknahme aktivieren (s. Abschnitt 6).
DEUTSCH
2.4 Schach, Matt und Remis
Steht ein König im Schach, zeigt der Computer seinen Zug
zunächst wie gewöhnlich an. Nachdem der Zug gemacht wurde, zeigt
der Computer das Schach mit Check an. Erkennt der Computer
eine zwingende Mattführung, zeigt er dies mit z.B. Mate in 3 an.
Endet eine Partie Schachmatt, wird Ihnen entweder gratuliert oder
etwas Mitgefühl entgegengebracht. Im Display wird kurz Check-
mate! gezeigt.
75
Page 76

Der Computer erkennt Remis durch Patt, 3-malige Wiederholung
und 50-Züge Regel. Die Anzeige gibt Ihnen den Remis-Grund an.
2.5 Lassen Sie Ihre Spielstärke bewerten!
Spielen Sie eine Partie in der Turnierstufe, gibt Ihnen der Computer eine Bewertung Ihrer Spielstärke, sobald das Spiel beendet ist.
Was ist eine Bewertung? Es gibt eine offizielle Methode, die Leistung
in Schachpartien zu messen. Die internationale Schachunion - FIDE
(Fédération Internationale des Échecs)
- erwähnt manchmal ELOWertungen. Die “United States Chess Federation” (USCF) nutzt ein
ähnliches System. Wertungen sind im Schach 4-stellig. Starke Spieler
haben - logischerweise - hohe Wertungen. Meister rangieren über
2200 Elo oder höher, Internationale Grossmeister liegen bei ca. 2500.
Wenn Sie Ihre Wertung herausfinden wollen, wählen Sie eine
Turnierstufe aus und spielen Sie eine Partie. Der Computer wird Ihre
Leistung bewerten! Informationen finden Sie in Abschnitt 5.3.
2.6 Sie benötigen Hilfe? Fragen Sie einfach!
Ihr Computer verfügt über eine einzigartige Hilfe-Funktion, die
Ihnen jederzeit zur Verfügung steht! Drücken Sie HINT/INFO, um
Tipps abzurufen oder mehr über die Computer-Rechnungen zu
lernen. Ist der Tipp z.B. e4xd5, wird Ply 1: e4xd5 angezeigt.
Akzeptieren Sie den Tipp, führen Sie einfach den Zug aus. Lehnen
Sie ihn ab, drücken Sie einfach CLEAR.
2.7 Die Computersuche unterbrechen
Sie denken, der Computer rechnet zu lange? Sie können ihn
jederzeit unterbrechen! Drücken Sie einfach ENTER während der
Computer nachdenkt. Er wird sofort stoppen und den besten bisher
errechneten Zug spielen. Diese Funktion kann sehr praktisch bei
einigen Stufen sein in denen der Computer lange rechnen darf.
In den Mattsuch-Stufen oder den Taktischen Stufen, erzwingt
ENTER keinen Zug. Statt dessen wird No move found!
angezeigt. Stellen Sie eine andere Spielstufe ein, um fortzufahren.
2.8 Seitenwechsel mit dem Computer
Drücken Sie einfach ENTER wenn Sie am Zug sind. Der Computer
startet sofort seine Berechnungen für Ihre Seite. Wechseln Sie sooft
Sie wünschen!
Sie wollen, daß der Computer den ersten Zug für Weiss am Anfang
der Partie macht? Drücken Sie NEW GAME 2mal kurz hintereinander
76
Page 77

und dann ENTER.
Sie wollen dem Computer zuschauen, wie er für beide Seiten
spielt? Drücken Sie ENTER nach jedem Zug - so sehen Sie die
optimale Zugfolge für beide Seiten. Sie können Strategien und
Taktiken studieren und lernen!
2.9 Eröffnungen
Am Anfang einer Partie, zieht der Computer auf vielen Stufen
sofort. Dies ist möglich, weil er die Züge direkt aus einer Bibliothek
holt, sie also nicht mehr berechnen muss. Diese Bibliothek enthält die
wichtigsten Eröffnungen. Ist die aktuelle Stellung in seiner
Eröffnungen, antwortet der Computer automatisch anstatt zu
rechnen! Die Bibliothek ist auf allen Stufen aktiv - Ausnahme ist die
Mattsuch-Stufe.
2.10 Die gegnerische Rechenzeit nutzen
Sie werden bemerken, dass der Computer seine Züge sofort
ausführt, selbst wenn Sie im Mittelspiel angelangt sind. Dies ist der
Fall, wenn er Ihre Denkzeit für seine Berechnungen nutzt. Er
versucht, Ihren wahrscheinlichen Zug zu finden und kalkuliert
daraufhin seine möglichen Antworten. Führen Sie den erwarteten Zug
aus, kann der Computer natürlich dann seine Berechnung nehmen.
Diese Möglichkeit steht dem Computer in den Spass-Stufen nicht zur
Verfügung.
2.11 Ausschalten/Spielstandspeicher
Sie können Ihre Partie jederzeit unterbrechen, indem Sie GO/
STOP drücken. Das Symbol für Pause Stop? wird daraufhin
angezeigt. Drücken Sie GO/STOP erneut, wird das Gerät
ausgeschaltet. Die Partie ist unterbrochen und der Spielstand
gespeichert. Schalten Sie wieder an, können Sie ganz normal
fortsetzen.
Pausieren Sie wird die Anzeige angehalten, die Berechnungen
werden jedoch fortgesetzt.
DEUTSCH
3. DAS HAUPTMENÜ
Ihr Cosmic Chess bietet viele interessante Einstellungen und
Möglichkeiten, die direkt über das Hauptmenü aufgerufen werden.
Drücken Sie MENU erscheint direkt ¿OPTION im Display. Blättern
Sie mit ¯ und ˘ durch die Optionen. Es stehen folgende zur
77
Page 78

Verfügung:
HAUPTMENÜ ............. ANLEITUNG IN ............. ANZEIGE
Optionsmodus ................ Abschnitt 4.................. ¿OPTION
Spielstufen...................... Abschnitt 5.................. ¿LEVEL
Rücknahmefunktion ....... Abschnitt 6.................. ¿TAKEBACK
Infomodus....................... Abschnitt 7.................. ¿INFO
Positionsmodus.............. Abschnitt 8.................. ¿SETUP
Training ........................... Abschnitt 9.................. ¿STUDY
Um einen dieser Hauptmenü-Punkte aufzurufen, drücken Sie
ENTER. Sie gelangen dann zu Untermenüs, in denen Sie spezifische
Auswahlen treffen können. Einige Submenüs bieten mehrere
Optionen (z.B. Spielstufen), andere sind nur Einstellungen (z.B.
Positionsmodus).
4. OPTIONSMODUS: BRINGEN SIE ABWECHSLUNG INS SPIEL
Nutzen Sie Spieloptionen, um Varianten zu testen oder
interessante Einstellungen zu wählen, um das Schachspiel aus
mehreren Perspektiven kennenzulernen!
Spieloptionen
Drücken Sie MENU, um das Hauptmenü aufzurufen und das
Display zeigt ¿OPTION an. Bestätigen Sie mit ENTER und Sie
sehen die erste von 11 Optionen. Um auszuwählen, blättern Sie mit
¯ oder ˘. Sie sehen folgende Auswahl:
OPTION..................... ANLEITUNG IN ...... ANZEIGE
2-Spieler-Modus........... Abschnitt 4.1 ........ player: P-C
Suchalgorythmus ......... Abschnitt 4.2........ search: select
Eröffnungen.................. Abschnitt 4.3 ........ book: on
Weiss von oben spielen Abschnitt 4.4 ........ top: black
Countdown-Anzeige..... Abschnitt 4.5 ........ clock: up
Uhrticken ...................... Abschnitt 4.6 ........ ticks: off
Training ......................... Abschnitt 4.7........ coach: off
Sound An/Aus .............. Abschnitt 4.8 ........ sound: on
LCD-Kontrast................ Abschnitt 4.9 ........ contrast: 3
LCD-Geschwindigkeit .. Abschnitt 4.10...... LCD speed: 2
Automatik ..................... Abschnitt 4.11...... automove: on
Um eine angezeigte Option zu aktivieren oder zu deaktivieren,
drücken Sie ENTER. Drücken Sie ENTER mehrmals, blättern Sie
durch die verschiedenen Auswahlen. Um zum nächsten Untermenü
zu gelangen, drücken Sie ¯ oder ˘. Mit CLEAR verlassen Sie das
78
Page 79

• ¿OPTION: Entdecken Sie aufregende Spieleinstellungen.
ÜBERSICHT ZUM HAUPTMENÜ!
• 2-Spieler-Modus • Training
• Suchalgorythmus • Sound An/Aus
• Eröffnungen • LCD-Kontrast
• Weiss von oben spielen • LCD-Geschwindigkeit
• Countdown-Anzeige • Automatik
• Uhrticken
• ¿LEVEL: Wählen Sie aus 100 Spielstufen aus!
• ¿TAKEBACK: Nehmen Sie beliebig viele Züge zurück!
• ¿INFO: Wählen Sie verschiedene Informationen aus.
• Züge • Suche
• Rechenknoten • Bewertung
• Zeit pro Zug
• ¿SETUP: Bauen Sie Positionen auf und analysieren Sie
gezielt.
• ¿STUDY: Testen Sie Ihr Wissen und verbessern Sie Ihr
Spiel über die Trainingsfunktion.
Menü – die gewählten Einstellungen sind dann aktiv!
Wichtig: aktivieren Sie NEW GAME, werden alle Optionen weiter
aktiv bleiben. Die Ausnahme ist der 2-Spieler-Modus, der vor jeder
neuen Partie eingestellt werden muss!
4.1 2-Spieler-Modus
Optionen: player: P-C (Spieler gegen Computer)
player: P-P (Spieler gegen Spieler)
Normalerweise rechnet der Computer automatisch sobald Sie
Ihren Zug eingegeben haben. Schalten Sie jedoch diese Option aus,
spielen Sie für beide Seiten. Diese Einstellung ist dann erforderlich
wenn:
•Sie durch Meister partien gehen. Geben Sie die Züge für beide
Seiten ein, aktivieren Sie den Computer bei einer bestimmten
Stellung und lassen Sie den besten Zug errechnen!
•Sie eine eigene Partie nachspielen wollen, um Schwächen und
Stärken zu überprüfen. Wieder können Sie den Computer bei
DEUTSCH
79
Page 80

bestimmten Stellungen zuschalten und rechnen lassen.
•Sie Eröffnungen ler nen wollen.
•Sie gegen einen Freund spielen - mit dem Computer als
Schiedsrichter, der die Regeln überwacht und die Zeit misst.
Drücken Sie NEW GAME wird diese Option automatisch auf den
Modus Spieler gegen Computer gesetzt.
4.2 Suchalgorythmus
Optionen: search: select / brute
Das Programm des Cosmic rechnet normalerweise mit einem
selektiven Algorythmus,
unwahrscheinliche Züge ausschliesst. Es kann natürlich vorkommen,
dass hier etwas übersehen wird. Wollen Sie dies ausschliessen,
sollten Sie auf die Option
rechnet alles und übersieht nichts, ist jedoch etwas langsamer.
4.3 Eröffnungen
Optionen: book: on / off
Diese Funktion ist einzigartig! Sie überwacht Ihren Partie-Einstieg
und gibt Ihnen dann die Möglichkeit, Eröffnungen zu trainieren, die
Ihnen noch Probleme bereiten. Sie haben Ihren idealen
Trainingspartner! Der Computer wird eine Eröffnung mehrmals
spielen. Solange, bis Sie Ihr Spiel verbessern und den idealen
Einstieg gefunden haben.
4.4 Weiss von Oben spielen
Optionen: top: black / white
Wollen Sie vom Standard abweichen oder dem Computer den
ersten Zug überlassen?
Dann testen Sie diese aufregende Option, indem Sie top:
white am Beginn einer neuen Partie auswählen. Drücken Sie dann
ENTER, und der Computer rechnet für Weiss.
Aktivieren Sie diese Option, wird der Computer das Brett drehen.
Dies bedeutet, dass König und Dame vertauscht sind und die
Feldnamen im Display irreführend sind. Es ist etwas schwierig auf
diese Art zu spielen und Sie benötigen einige Gewöhnung. Aber nach
der ersten Eröffnung, sollte es kein Problem mehr darstellen!
der nicht mehr alles kalkuliert, sondern
Brute Force
umstellen. Der Computer
4.5 Countdown
Optionen: clock: up / down
Normalerweise wird Ihre Zeit addiert. Sie können jedoch einen
80
Page 81

EINE OPTION EINSTELLEN!
1. Drücken Sie MENU und es wird ¿OPTION
angezeigt.
2. Bestätigen Sie mit ENTER.
Beispiel „Uhrticken“.
3. Drücken Sie ¯ 5mal bis ticks: off
angezeigt wird.
4. Schalten Sie die Option mit ENTER an. Es
wird ticks:on gezeigt.
5. Drücken Sie CLEAR und dann MENU, um die
Partie – nun begleitet von Uhrticken – zu spielen.
Um die Option wieder auszuschalten,
wiederholen Sie einfach die oberen Schritte.
Countdown einstellen, um nach Zeitvorgaben zu spielen. So
unterscheiden Sie diese Möglichkeiten:
Wir nehmen nun das
Details finden Sie unter 4.6.
[ / ] Zeit wird addiert (Weiss/Schwarz)
{ / } Countdown (Weiss/Schwarz)
Countdown kann nur für Turnierstufen oder Schnellpartien aktiviert
werden!
4.6 Uhrticken
Optionen: ticks: off / on
Hiermit schalten Sie ein Uhrticken zu. Eine aufregende Option, um
wirkliche Tur nieratmosphären zu schaffen!
DEUTSCH
4.7 T raining
Optionen: coach: off / novice / inter. / adv.
Wird die erste Einstellung angezeigt, drücken Sie ENTER
mehrmals bis die gewünschte Option erscheint. Verlassen Sie dann
mit CLEAR den Modus. Die gewählte Trainingsstufe ist aktiviert. Es ist
81
Page 82

eine wirklich ideale Option, um Ihr Spiel zu verbessern. Cosmic wird
Sie sogar mit Kommentaren im Display unterstützen und auf diese
Art, aktiv Warnungen und Hinweise geben.
Wie unterscheiden sich die Trainingseinstellungen? Hier einige
Erklärungen:
•coach: off: Es stehen Ihnen keine Trainingshilfen zur
Verfügung.
•coach: novice: Der Trainer macht Sie auf Kombinationen
oder Opfer aufmerksam. Sinnvoll, um die Inhalte der Taktischen
Lektionen umzusetzen.
•coach: intermediate: Mit dieser Stufe werden die
Ausensichtlichen Warnungen abgestellt. Dafür wird mehr auf
Strategie eingegangen. Ein wichtiger Punkt,um das Mittelspiel
besser zu beherrschen.
•coach: advanced: Diese Einstellung ist ideal für
Einsteiger. Hier werden Warnungen und Tipps gegeben sollten
Figuren gefährdet sein. Ausserdem stehen Zugvorschläge und
Querverweise auf Lektionen zur Verfügung! Sie lernen, Ihre
Partie erfolgreich zu starten.
4.8 Sound An/Aus
Optionen: sound: on / off
Mit dieser Option können Sie den Sound völlig abschalten und
ohne Signale spielen.
4.9 LCD-Kontrast
Optionen: contrast: 1 / 2 / 3 / 4 / 5
Hiermit stellen Sie den Kontrast des LCDs ein. 1 ist die hellste
Einstellung, 5 die dunkelste. 3 ist voreingestellt. Wird diese Option
angezeigt, drücken Sie ENTER mehrmals bis die gewünschte
Einstellung erscheint. Verlassen Sie dann mit CLEAR den Modus.
Der gewählte Kontrast ist aktiviert.
4.10 LCD-Geschwindigkeit
Optionen: LCD speed: 1 / 2 / 3 / 4
Mit dieser Einstellung bestimmen Sie, wie schnell der Text in der
Anzeige ablaufen soll. 1 ist die langsamste Einstellung, 4 die
schnellste. Wird diese Option angezeigt, drücken Sie ENTER
mehrmals bis die gewünschte Einstellung erscheint. Verlassen Sie
dann mit CLEAR den Modus. Die gewählte Geschwindigkeit ist
aktiviert.
82
Page 83

4.11 Automatik
Optionen: automove: on / off
Führt der Computer einen Zug aus, wird normalerweise das
Ausgangs- und Zielfeld kurz blinken und der Zug wird dann
automatisch auf dem Brett ausgeführt. Schalten Sie jedoch die
Option ab, wird automove: off angezeigt. Ist dies aktiv, wird der
Computer seinen Zug anzeigen, jedoch abwarten, bis Sie den
Computerzug eingegeben haben. Der Vorteil ist, dass Sie die Partie
besser verfolgen können und die Geschwindigkeit bestimmen.
5. SPIELSTUFEN
Ihr Computer bietet 100 unterschiedliche Spielstufen! Wählen Sie
eine Stufe aus, sollten Sie sich bewusst sein, dass der Computer um
so stärker spielt je länger er rechnen kann - genauso wie ein
menschlicher Spieler! Die Spielstufen sind wie folgt unterteilt:
•60 SPASS-STUFEN (1-60): Diese Stufen wurden speziell für
Einsteiger und Gelegenheitsspieler entwickelt. Sie beschränken
den Computer in seiner Rechenweise und ermöglichen Ihnen,
schrittweise Ihr Spiel zu verbessern und erste Partien zu
gewinnen!
•40 WETTBEWERBS-STUFEN (61-100): Diese zweite Gruppe
bietet Fortgeschrittenen eine Auswahl unterschiedlicher
Anforderungen! Hier finden Sie normale und Turnierstufen,
Mattsuch- und taktische Stufen.
Eine Spielstufe einstellen
Drücken Sie Menü und blättern Sie mit ¯ bis ¿LEVEL angezeigt
wird. Gehen Sie mit ENTER in diesen Modus. Der Computer zeigt die
aktuelle Stufe an. Ändern Sie die Stufe mit den Tasten ˘ oder ¯ um
in 1er Schritten zu blättern, aktivieren Sie mit dem Stylus > bzw. <,
um in 10er Schritten zu blättern. Während Sie durch die Stufen
gehen, sehen Sie immer die Nummer und die Beschreibung jeder
Stufe. Erscheint die gewünschte, bestätigen Sie mit ENTER und Ihre
Auswahl ist aktiv.
Haben Sie LEVEL gedrückt, um zu sehen, welche Auswahl aktiv
ist, können Sie mit CLEAR einfach den Modus verlassen. Die Stufe
bleibt aktiv. Verlassen Sie die Einstellungen, indem Sie MENU
drücken.
Bitte beachten Sie folgendes:
•Die Stufe kann jederzeit geändert werden, wenn Sie am Zug
DEUTSCH
83
Page 84

sind.
•Sie können nichts ändern, solange der Computer am Zug ist.
•Änder n Sie die Stufe, wird die Uhr zurückgesetzt.
SPASS-STUFEN
5.1 Spass-Stufen
Stufe Beschreibung Anzeige
1............ Spass-Stufe 1 ............................... <Fun Level 1>
2............ Spass-Stufe 2 ............................... <Fun Level 2>
3............ Spass-Stufe 3 ............................... <Fun Level 3>
…und so weiter bis…
58........... Spass-Stufe 58 ............................. <Fun Level 58>
59........... Spass-Stufe 59 ............................. <Fun Level 59>
60........... Spass-Stufe 60 ............................. <Fun Level 60>
Diese einzigartigen Spass-Stufen sind genau richtig, um mit Schritt
für Schritt und viel Motivation, Schach zu lernen. Hier haben Sie die
Möglichkeit, auch gegen den Computer zu gewinnen. Der Computer
sucht nämlich nicht nach dem besten Zug, wie wir es normalerweise
erwarten. Statt dessen beachtet er einiges nicht und schwächt sich
selbst. So spielt er mit menschlichen Fehlern und kann geschlagen
werden.
Die Spaßstufen beginnen leicht und werden dann etwas
anspruchsvoller. Sie können einen Schritt nach dem anderen machen
und jedes Mal dazulernen.
WETTBEWERBS-STUFEN
5.2 Normale Stufen
Stufe Zeit pro Zug (Durchschnitt) Anzeige
61.................. 1 Sek. pro Zug ........................... <00:01/move>
62.................. 2 Sek. pro Zug ........................... <00:02/move>
63.................. 5 Sek. pro Zug ........................... <00:05/move>
64................ 10 Sek. pro Zug ........................... <00:10/move>
65................ 15 Sek. pro Zug ........................... <00:15/move>
66................ 30 Sek. pro Zug ........................... <00:30/move>
67................ 45 Sek. pro Zug ........................... <00:45/move>
68.................. 1 Min. pro Zug ........................... <01:00/move>
69.................. 2 Min. pro Zug ........................... <02:00/move>
70.................. 3 Min. pro Zug ........................... <03:00/move>
Diese 10 Stufen sind für Fortgeschrittene gedacht. Wählen Sie
eine dieser Stufen, aktivieren Sie eine Zeitbeschränkung für die
Computer-Rechnungen. Die Zeitangabe mit Sekunden und Minuten
84
Page 85

ist nur eine ungefähre Angabe - in der Eröffnung wird normalerweise
schneller gezogen, während das Mittelspiel längere Kalkulationen
benötigt.
5.3 Turnier stufen
Stufe Nummer Züge/Gesamtzeit Anzeige
71.............. 40 Züge in 1 hr. 20 Min. ...............< 40 in 1:20 >
72.............. 40 Züge in 1 hr. 30 Min. ...............< 40 in 1:30 >
73.............. 35 Züge in 1 hr. 45 Min. ...............< 35 in 1:45 >
74.............. 40 Züge in 1 hr. 45 Min. ...............< 40 in 1:45 >
75.............. 35 Züge in 1 hr. 30 Min. ...............< 35 in 1:30 >
76.............. 40 Züge in 2 hr. ............................< 40 in 2:00 >
77.............. 45 Züge in 2 hr. 30 Min. ...............< 45 in 2:30 >
78.............. 50 Züge in 2 hr. ............................< 50 in 2:00 >
79.............. 40 Züge in 2 hr. 30 Min. ...............< 40 in 2:30 >
80.............. 40 Züge in 3 hr. ............................< 40 in 3:00 >
In den Turnierstufen geben Sie eine bestimmte Anzahl an Zügen
innerhalb einer vorgegebenen Zeit ein. Überzieht ein Spieler diese
Zeit, verliert er die Partie.
Wie zuvor beschrieben, ist das Bewertungssystem aktiv in diesen
Stufen. Details finden Sie unter Abschnitt 2.5. Ist eine Turnier-Partie
beendet, drücken Sie NEW GAME und der Computer wird kurz die
Wertung anzeigen, bevor eine neue Partie beginnt. Verpassen Sie die
Anzeige, drücken Sie einfach HINT/INFO mehrmals, um die
Wertungen abzurufen. Mit CLEAR verlassen Sie den Modus wieder.
Drücken Sie NEW GAME
Spiel zu Ende ist,
bietet Ihnen der Computer folgendes an:
während
einer Turnier-Partie
bevor das
•Anzeige = Rate as draw? (Als Remis bewerten?)
Drücken Sie ENTER, wird die Wertung angezeigt.
Drücken Sie ˘: erscheint
•Anzeige = Rate as win? (Als Sieg werten?).
Drücken Sie ENTER, wird die Wertung angezeigt.
Drücken Sie ˘: erscheint
•Anzeige = Machine wins? (Computer gewinnt?).
Drücken Sie ENTER, wird die Wertung angezeigt.
Drücken Sie ˘: erscheint
Die Anzeige geht auf die erste Frage zurück.
Um eine Wer tung abzurufen, müssen Sie eine der Fragen mit
ENTER beantworten! Wollen Sie das Spiel nicht bewertet haben,
drücken Sie CLEAR. Der Computer zeigt an, dass die Partie nicht
bewertet wird.
DEUTSCH
85
Page 86

Wählen Sie eine Turnier-Stufe, wollen Sie eventuell Countdown
aktivieren. Oder eventuell ein Uhrticken einstellen, um richtige
Turnieratmosphäre zu erzeugen! Details hierzu finden Sie in
Abschnitt 4.
5.4 Schnellpartien
Stufe Gesamtzeit Anzeige
81................ 5 Min. pro Par tie ..................... < 5 min/game>
82................ 7 Min. pro Partie ..................... < 7 min/game>
83................ 10 Min. pro Partie ..................... <10 min/game>
84................ 15 Min. pro Partie ..................... <15 min/game>
85................ 20 Min. pro Partie ..................... <20 min/game>
86................ 30 Min. pro Partie ..................... <30 min/game>
87................ 45 Min. pro Partie ..................... <45 min/game>
88................ 60 Min. pro Partie ..................... <60 min/game>
89................ 90 Min. pro Partie ..................... <90 min/game>
90.............. 100 Min. pro Partie ..................... <100 min/game>
In diesen Stufen, stellen Sie die Gesamtzeit für die Partie ein. Ist
die Zeit überschritten, zeigt der Computer an, welche Seite verloren
hat. Wählen Sie eine dieser Stufen aus, sollten Sie auch den Countdown aktivieren.
5.5 Mattsuch-Stufen
Stufe Matt in Anzeige
91.................... Finde Matt in 1 Zug ................ < Mate in 1 >
92.................... Finde Matt in 2 Zügen............ < Mate in 2 >
93.................... Finde Matt in 3 Zügen............ < Mate in 3 >
94.................... Finde Matt in 4 Zügen............ < Mate in 4 >
95.................... Finde Matt in 5 Zügen............ < Mate in 5 >
96.................... Finde Matt in 6 Zügen............ < Mate in 6 >
97.................... Finde Matt in 7 Zügen............ < Mate in 7 >
98.................... Finde Matt in 8 Zügen............ < Mate in 8 >
Diese Stufen aktivieren ein spezielles Mattsuch-Programm. Haben
Sie z.B. eine Position eingegeben, die zum Matt führt, können Sie
diese Stufen auswählen, um die Lösung durch den Computer
errechnen zu lassen. Ihr Computer kann Matt bis zu 8 Züge im voraus
errechnen. Matt in 1 bis zu 5 Zügen ist relativ schnell gefunden. Matt
in 6 oder 8 Zügen hingegen ist sehr schwierig und kann lange
Rechenzeiten benötigen. Findet Ihr Computer kein Matt, zeigt er dies
kurz an. Sie können dann einfach die Partie fortsetzen, indem Sie
eine andere Spielstufe einstellen.
86
Page 87

SO EINFACH ÄNDERN SIE DIE SPIELSTUFE!
1. Drücken Sie MENU und es wird ¿OPTION
angezeigt.
2. Drücken Sie ¯ und Sie sehen ¿LEVEL.
3. Bestätigen Sie mit ENTER und die aktuelle Stufe
wird gezeigt.
4.
Nehmen wir an, Sie wollen die Schnellpartie
einstellen, also Stufe 81
¯ in 1er Schritten durch die Stufen oder mit dem
>`
<`
5.6 Taktische Stufe
Stufe Beschreib ung Anzeige
99.....Taktische Stufe (kein zeitliches Limit) ... < Tactical >
Hier versucht der Computer, die beste taktische Zugsequenz zu
finden - und zwar schneller als in normalen Spielstufen. Die
Rechnung dauert an bis ein Eroberungsweg von mindestens 2
Bauern gefunden wurde, oder bis Sie mit ENTER unterbrechen.
Hiermit können Sie experimentieren und ermöglichen dem Computer,
sich voll auf spezielle taktische Var ianten zu konzentrieren.
5.7 Analysestufe
Stufe Beschreibung Anzeige
100 .......... Analyse (kein zeitliches Limit) ......... < Infinite >
Auf dieser Stufe, wird der Computer analysieren bis er mit ENTER
zum Zug gezwungen wird. Ist die Suche gestoppt, zeigt der Computer
den besten bisher gefunden Zug. Diese Stufe ermöglicht Experimente
oder Analysen von bekannten Partien. Sie können stundenlang
Stylus und > oder < in 10er Schritten bis
< 5 min/game > erscheint.
5. Bestätigen Sie mit ENTER. Verlassen Sie dann
den Modus mit MENU. Sie können nun Ihre neue
Spielstufe testen.
Details finden Sie unter Abschnitt 5.
. Blättern Sie mit ˘ oder
DEUTSCH
87
Page 88

berechnen lassen und schwierige Situationen besser beherrschen.
6. RÜCKNAHME VON ZÜGEN
Spielen Sie gegen einen Computer, ist kein Zug endgültig – Sie
können Ihre Strategie jederzeit ändern oder einfach einen schlechten
Zug zurücknehmen. Sind Sie am Zug, drücken Sie einfach MENU und
dann ¯ mehrmals bis ¿TAKEBACK angezeigt wird. Bestätigen Sie
mit ENTER und der zuletzt gemachte Zug wird im Display angezeigt.
Um diesen zurückzunehmen, drücken Sie ¯ und die Rücknahme ist
abgeschlossen. Es wird der vorhergehende Zug angezeigt und Sie
können diesen nun auf die gleiche Weise zurücknehmen. Haben Sie
den Partieanfang erreicht, wird End takebacks angezeigt und
das Menü automatisch verlassen. Solange Sie nicht den Partieanfang
erreicht haben, können Sie vorwärtsblättern mit der Taste ˘ und
somit die Rücknahmen löschen. Um weiterzuspielen, verlassen Sie
den Modus mit CLEAR und dann MENU.
Die kürzere Methode zur Rücknahme von Zügen ist die direkte
Eingabe auf dem Touch Screen-Monitor. Sind Sie am Zug, drücken
Sie einfach mit dem Stylus auf das Zielfeld des zuletzt gemachten
Zuges und drücken ¯. Sie können dies für weitere Züge wiederholen.
Drücken Sie CLEAR, um Ihr Spiel fortzusetzen.
7. SPIELINFORMATIONEN
Stellen Sie sich folgendes vor: Sie spielen gegen einen Freund
und er ist am Zug. Sie würden gerne wissen, was er gerade denkt
und wie er die Stellung einschätzt. Aber natürlich fragen Sie nicht
nach, weil dies einfach nicht gemacht wird!
Ganz anders mit einem
Computer. Sie haben jederzeit Einblick in die Rechenvorgänge und
können nachsehen, wie Ihre Stellung eingeschätzt wird! Nutzen Sie
diesen Vorteil und verbessern Sie Ihr Spiel!
Mit Hilfe dieses Modus können Sie jederzeit Informationen abrufen.
Aktivieren Sie die Option während der Computer rechnet, haben Sie
Einblick in dessen Rechentiefe und Bewertungen. Drücken Sie HINT/
INFO, um den Informations-Modus aufzurufen.
Automatische Anzeigen
Aktivieren Sie eine der folgenden Optionen des
Informationsmodus, können Sie die Computerberechnungen
einsehen und den Cosmic „laut denken sehen“!
88
Page 89

Wichtig: diese automatische Anzeige ist nur aktiv, solange der
Computer rechnet!
Drücken Sie MENU und dann mehrmals ¯ bis im Display ¿INFO
angezeigt wird. Drücken Sie ENTER. Blättern Sie durch die
Untermenüs mit ¯ oder ˘. Sie haben folgende Auswahl:
•Zeige Züge: zeigt die Berechnungen des Computers bis zu 4
Züge im voraus an. Siehe Abschnitt 7.1.
Optionen: 0 / 1 / 2 / 3 / 4 moves
•Zeige Rechenknoten: s. Abschnitt 7.2.
Optionen: nodes: off / on
•Zeige Zeit pro Zug: s. Abschnitt 7.3.
Optionen: time/move: off / on
•Zeige Suchtiefe: s. Abschnitt 7.4.
Optionen: progress: off / on
•Zeige Bewertung: s. Abschnitt 7.2.
Optionen: evaluation: off / on
Um eine Option an- oder auszuschalten, drücken Sie ENTER.
Blättern Sie mit ¯ oder ˘ durch die Optionen. Verlassen Sie den
Modus mit CLEAR und dann MENU.
Sie können alle oder nur einzelne Optionen dieses Info-Modus
zuschalten. Das Display wird den Text für alle Informationen im
Display abrollen. Geht dies zu schnell, können Sie die LCDGeschwindigkeit verändern (s. 4.10). Ist eine Information nicht
verfügbar, wird --x-- angezeigt.
Manuell abrufbare Informationen
Drücken Sie HINT/INFO während der Partie, wird der vom Computer als „wahrscheinlich“ berechnete Zug angezeigt.
Spielinformationen sind in verschiedene Gruppen unterteilt. Mit ˘
und ¯ können Sie durch diese blättern. Sie sehen diese Gruppen in
den folgenden Abschnitten. Drücken Sie CLEAR, um zur normalen
Partie zurückzukehren.
DEUTSCH
7.1 Hauptvariante
Drücken Sie HINT/INFO, um den Informations-Modus aufzurufen.
Sie sehen den ersten Zug der Hauptvariante, z.B. Ply1: b1-c3.
Sie können dies auch als Tipp ansehen und den Vorschlag als Zug
eingeben. Die Rechentiefe eines Computers wird durch die
Zuganzahl angegeben. Ist die Rechentiefe 2, kalkuliert der Computer
die nächsten 2 Züge im voraus.
89
Page 90

Rufen Sie die Information ab, solange der Computer rechnet,
sehen Sie genau, was er gerade kalkuliert. Rufen Sie die Information
ab, wenn Sie am Zug sind, sehen Sie, welchen Zug der Computer
von Ihnen erwartet. Drücken Sie ˘ mehrmals, um die nächsten
Informationen zu sehen:
•Wahrscheinlichste Variante: Zug 1
•Wahrscheinlichste Variante: Zug 2
•Wahrscheinlichste Variante: Zug 3
•Wahrscheinlichste Variante: Zug 4
7.2 Suchinformationen
Drücken Sie 2mal HINT/INFO, um diese Gruppe aufzurufen.
Drücken Sie ˘ mehrmals, um folgende Informationen abzurufen:
•Den aktuellen Stand: gibt eine Bewertung der aktuellen Stellung.
Die Werte der Figuren werden addiert. Ein Bauer ist z.B. 1.0
Punkte wert. Eine positive Zahl zeigt, dass Weiss führt. z.B.:
Weiss gewinnt durch 2 Bauern - es wird Score: +2.0
angezeigt. Diese Wertung ist nicht aktiv in den Mattsuch-Stufen.
•2-teiliges Display: (a) Die aktuelle Suchtiefe oder die Anzahl der
vorausberechneten Züge wird gezeigt. z.B. rechnet der Computer 439 Züge voraus, sehen Sie d:4 39 - d steht für
Suchtiefe (Englisch: depth). (b) Der berechnete Zug (wenn der
Computer am Zug ist).
•2-teiliges Display: (a) Die verstrichene Zeit für den aktuellen Zug.
(b) Die Rechenknoten pro Sekunde (wenn der Computer am Zug
ist).
7.3 Schachuhr-Informationen
Drücken Sie 3mal HINT/INFO, um diese Gruppe aufzurufen. Mit ˘
blättern Sie innerhalb der Gruppe durch folgende Informationen:
•Verstrichene Gesamtzeit für Weiss/Schwarz; Weiss am Zug [,
Schwarz am Zug ].
•Verbleibende Gesamtzeit für Weiss/Schwarz; Weiss am Zug {,
Schwarz am Zug } (nur bei Turnier- oder Blitzschach).
Ist der Countdown nicht aktiviert, erscheint im zweiten Fenster
einfach --:--{--:--.
7.4 Zugzähler/Spielzüge
Drücken Sie 4mal HINT/INFO, um diese Gruppe aufzurufen. Mit ¯
und ˘ blättern Sie zu folgenden Informationen:
•Aktuelle Zugnummer und letzter Zug
90
Page 91

EINE ÜBERSICHT ZUM INFO-MODUS!
INFORMATIONEN ZUR HAUPTVARIANTE:
• Hauptvariante: Zug 1
• Hauptvariante: Zug 2
• Hauptvariante: Zug 3
• Hauptvariante: Zug 4
SUCHINFORMATIONEN:
• Bewertung
• Suchtiefe; und derzeit berrechneter Zug
• Verstrichene Zeit für aktuellen Zug und
Rechenknoten pro Sekunde (falls der
Computer rechnet)
SCHACHUHR-INFORMATIONEN:
• Verstrichene Zeit für beide Seiten
• Verbleibende Zeit für beide Seiten (nur
bei Turnier- und Schnellschachpartien)
INFORMATIONEN ZUR ZUGANZAHL:
• Aktuelle Zugnummer und letzter Zug
• Züge der aktuellen Partie
DEUTSCH
BEWERTUNG:
• ELO-Wertung (wenn Sie eine Partie im
Turniermodus spielen)
91
Page 92

•Züge der aktuellen Partie
7.5 Bewertung
Drücken Sie 3mal HINT/INFO, um diese Gruppe aufzurufen. Diese
steht nur zur Verfügung, wenn Sie eine Partie im Turniermodus
spielen! Details finden Sie in Abschnitt 5.3.
8. POSITIONEN ÄNDERN ODER AUFBAUEN
Diese Funktion ist ideal, um bestimmte Stellungen aufzubauen
oder zu ändern! Sie können Problemaufgaben eingeben oder
Mattsituationen berechnen lassen.
Wichtig: Ihre aktuelle Partie wird gelöscht, falls Sie eine neue
Position aufbauen.
Sie können Positionen aufbauen, sobald Sie am Zug sind. Drücken
Sie die Taste MENU und dann mehrmals ¯ bis ¿SETUP angezeigt
wird. Bestätigen Sie mit ENTER. Im Display werden Farben und
Figurensymbole angezeigt.
•Um die Figur vom Brett zu nehmen, drücken Sie diese einfach
und sie wird automatisch vom Brett entfernt.
•Um eine Figur auf ein anderes Feld zu setzen, drücken Sie
die Figur und setzen sie einfach auf ein neues Feld.
•Um eine Figur hinzuzufügen, dr ücken Sie auf eine Farbe und
ein Figursymbol und drücken dann auf das Zielfeld. Wiederholen
Sie dies für weitere Figuren, wie Sie wünschen.
•Um das Brett zu leeren, drücken Sie CLEAR und Sie werden
gefragt, ob Sie das Brett wirklich löschen wollen. Bestätigen Sie
mit ENTER. Wollen Sie dies rückgängig machen, drücken Sie
einfach nochmals CLEAR und es erscheint die Bestätigung,
dass das Brett nicht geleert wurde.
•Haben Sie Ihre Position eingegeben, drücken Sie ein
Farbsymbol, um zu bestimmen, ob Weiss oder Schwarz am Zug
ist.
•Verlassen Sie den Modus mit ENTER. Fragt der Computer
New position? bestätigen Sie mit ENTER. Drücken Sie
CLEAR wird Resume angezeigt und Sie können eine andere
Position eingeben.
Bauen Sie eine ungültige Stellung auf, können Sie den
Positionsmodus nicht mit ENTER verlassen. Die Position wird nicht
akzeptiert. Geben Sie eine gültige Stellung ein!
92
Page 93

Haben Sie den Poistionsmodus aktiviert, ohne die Stellung zu
ändern, können Sie mit ENTER wieder aus dem Modus gehen.
Drücken Sie dann MENU, um Ihre Partie fortzusetzen.
9. TRAINING
Beabsichtigen Sie, Ihr Spiel zu verbessern, empfehlen wir Ihnen
dieses hervorragende Trainingsmethodik Ihres Cosmic. Ihr Computer
verfügt über 8 gespeicherte Lernstellungen, die jeweils 8 kritische
Situationen enthalten – ingesamt stehen Ihnen 64 Positionen zur
Analyse zur Verfügung! Sie können einiges an Taktik hinzulernen und
sich sogar zum Schluss bewerten lassen!
Benötigen Sie Hilfe bei diesen Aufgaben, empfehlen wir Ihnen, den
Anhang zu lesen.
Lernen anhand von gespeicherten Stellungen
Tipp: Sie können die gespeicherten Stellungen auch über
Felder aufrufen, wie wir in der weiteren Anleitung erklären.
Drücken Sie MENU und dann mehrmals ¯ oder ˘ bis das Display
¿STUDY anzeigt. Bestätigen Sie mit ENTER und jetzt sehen Sie
< Study1-1 >. Blättern Sie mit ˘ oder ¯ durch die gespeicherten
Stellungen in 1er Schritten (oder drücken Sie mit dem Stylus auf >
oder < um in 8er Schritten zu blättern). Rufen Sie die Stellung Ihrer
Wahl mit ENTER auf. Es wird Start Study? gefragt. Bestätigen
Sie erneut mit ENTER. (Sie können jederzeit mit CLEAR abbrechen).
Der Computer wird automatisch die Züge der gespeicherten Partie
ausführen. Ist die erste Lernstellung erreicht, wird das Display Your
Move anzeigen und die Uhr startet. Jetzt ist es an der Zeit, dass Sie
den richtigen und für diese Situation besten Zug eingeben. Beachten
Sie folgendes:
•Es gibt jeweils nur einen „richtigen“ Zug.
•Das Display zeigt an, welche Farbe am Zug ist.
•Haben Sie den richtigen Zug eingegeben, wird Well Done
angezeigt. Der Computer wird dann die nächsten Züge
ausführen bis die folgende Lernstellung erreicht ist.
•Geben Sie den falschen Zug ein, erscheint Wrong Move
und dann Quit Study?.
•Um im Training zu bleiben, drücken Sie CLEAR. Es werden
Ihnen Punkte abgezogen, Sie können jedoch einen weiteren
Versuch ausführen.
DEUTSCH
93
Page 94

•Um das Training zu verlassen, drücken sie ENTER. Sie
sind wieder im normalem Spielmodus.
•Wertung: Lösen Sie die Aufgaben korrekt, erhalten Sie Punkte.
Volle Punktzahl bei Lösung mit dem ersten Versuch und
Minuspunkte für Fehlversuche.
•Um Ihre aktuelle Wertung zu sehen, drücken Sie HINT/INFO
2mal. Verlassen Sie die Anzeige mit CLEAR.
Beenden Sie eine Lernstellung mit Schachmatt wird Check-
mate! angezeigt und es wird Ihnen gratuliert! An dieser Stelle
können Sie wie folgt wählen: (a) eine neue Partie starten, (b) mit Hilfe
des Info-Modus die Züge nochmals anschauen (s. 7.4), oder (c) Züge
zurücknehmen und neue Taktiken testen. Haben Sie die letzte
Lernstellung einer Partie gelöst, erscheint End Game und der
Computer wird automatisch zu einer normalen Partie zurückkehren
Stellungen direkt aufrufen
Sie können jede Lernstellung auch direkt über das Schachbrett
aufrufen. Bitte schauen Sie in der Anleitung auf die Abbildung dieses
Abschnittes. Drücken Sie dann zunächst MENU und blättern mit ¯
oder ˘ bis ¿STUDY angezeigt wird. Bestätigen Sie mit ENTER.
Schauen Sie nun auf die Abbildung und wählen Sie eine Stellung
aus, indem Sie auf das zugehörige Feld drücken. Drücken Sie dann
2mal ENTER, um diese zu starten.
10. SIE BENÖTIGEN HILFE? SCHAUEN SIE HIER NACH!
Hier finden Sie einige Antworten auf häufig gestellte Fragen.
a. Der Computer reagiert nicht oder stürzt ab.
• Ersetzen Sie die Batterien oder legen Sie diese erneut ein.
• Eventuell ist der Computer statisch aufgeladen. Entladen Sie
ihn mit Hilfe der ACL-Funktion (s. 11.1).
b. Das Display ist schlecht lesbar.
• Ersetzen Sie die Batterien.
• Stellen Sie den Kontrast ein (s. 4.9).
c. Sie haben eine Informationen aktiviert, aber der Text läuft zu
schnell ab.
•Stellen Sie die LCD-Geschwindigkeit ein (s. 4.10).
•Drücken Sie GO/STOP um das Display anzuhalten und CLEAR
um fortzufahren.
d. Der Computer führt keinen Zug aus.
• Bitte prüfen Sie, ob 2-Spieler-Modus eingestellt ist (s. 4.1) und
94
Page 95

Sie können jede Lernstellung auch direkt über das Schachbrett aufrufen!
DIE 64 LERNSTELLUNGEN
Wählen Sie eine Stellung aus, indem Sie auf das zugehörige Feld drück en.
8
1-8 2-8 3-8 4-8 5-8 6-8 7-8 8-8
7
1-7 2-7 3-7 4-7 5-7 6-7 7-7 8-7
6
1-6 2-6 3-6 4-6 5-6 6-6 7-6 8-6
5
1-5 2-5 3-5 4-5 5-5 6-5 7-5 8-5
4
1-4 2-4 3-4 4-4 5-4 6-4 7-4 8-4
3
1-3 2-3 3-3 4-3 5-3 6-3 7-3 8-3
2
1-2 2-2 3-2 4-2 5-2 6-2 7-2 8-2
1
1-1 2-1 3-1 4-1 5-1 6-1 7-1 8-1
abcdefgh
stellen Sie diesen ab.
• Eventuell haben Sie eine Spielstufe eingestellt, die zur Analyse
gedacht ist. Brechen Sie die Suche des Computers ab, indem
Sie ENTER drücken.
e. Der Computer akzeptiert Ihren Zug nicht.
• Sie versuchen, einen ungültigen Zug einzugeben. Bitte prüfen
Sie die Regeln.
• Steht Ihr König im Schach? Oder wird Ihr Zug Ihren König ins
Schach stellen?
DEUTSCH
95
Page 96

Führen Sie die Rochade unkorrekt aus? Bitte prüfen Sie die
Stellung!
•Sind Sie am Zug? Blinkt das Farbsymbol, rechnet der Computer und es ist sein Zug.
f. Die Brettstellung ist verdreht. Warum?
• Bitte deaktivieren Sie die Option „Weiss von oben spielen“ (s.
4.4).
g. Der Computer zeigt Rate as draw? obwohl NEW GAME
aktiviert wurde.
•Sie haben eine Partie auf der Turnierstufe unterbrochen und
müssen die Wertung eingeben. Details finden Sie unter 5.3.
h. Der Computer hat seinen Zug angezeigt aber er wurde nicht
ausgeführt.
• Ist die Option „Automatik“ deaktiviert, müssen Sie den Zug
ausführen. Details finden Sie in 4.11.
i. Der Computer zeigt No Move Found! an.
• Sie haben eine Mattsuch-Stufe eingestellt und der Computer
findet kein Matt. Wechseln Sie die Spielstufe und setzen Sie
Ihre Partie fort.
j. Das Menü kann nicht mit CLEAR verlassen werden.
• Bitte beachten Sie, dass Sie mit MENU das Menü verlassen.
k. Der Computer gibt Soundsignale von sich, obwohl Sie am
Zug sind.
• Wurde der Coach-Modus aktiviert, wird Sie der Computer
daran erinnern.
l. Der Computer gibt keine Soundsignale.
•Aktivieren Sie die Sound-Funktion (s. 4.8).
m.Der Computer erlaubt nicht, den Positionsaufbau zu
verlassen.
• Sie haben eine ungültige Stellung eingegeben (z.B. steht
vielleicht ein König im Schach etc.) Bitte korrigieren Sie die
Stellung.
11. TECHNISCHE DETAILS
11.1 Die ACL-Funktion
Computer hängen sich manchmal auf. Dies ist auf statische
Aufladung oder elektronische Störungen zurückzuführen und kann
einfach behoben werden. Stecken Sie einen spitzen Gegenstand für
1-2 Sek. in die ACL-Vertiefung auf der Unterseite Ihres Geräts. Das
setzt den Computer wieder zurück.
96
Page 97

11.2 Pflege und Wartung
Ihr Schachcomputer ist ein präzises, elektronisches Gerät. Setzen
Sie es nicht extremen Temperaturen oder hoher Luftfeuchtigkeit aus.
Vor Reinigen der Einheit, entnehmen Sie bitte die Batterien bzw.
stecken Sie den Adapter aus. Verwenden Sie keine chemischen
Mittel, da diese eventuell schädigen können.
Schwache Batterien müssen sofort ersetzt werden, da sie
auslaufen und den Computer schädigen können. Bitte achten Sie
auch auf folgenden Warnhinweis:
Achtung! Nutzen Sie alkaline oder
Zink Carbon Batterien. Verwenden Sie keine unterschiedlichen Arten
oder neue und alte gleichzeitig! Versuchen Sie nicht, Batterien
aufzuladen, die nicht wiederaufladbar sind. Verwenden Sie nur die
empfohlenen Batterien. Versichern Sie sich, daß die Batterien gemäß
der Polaritätsvorgabe eingelegt sind. Leere Batterien müssen sofort
aus dem Gerät entnommen werden. Schließen Sie die
Anschlußklemmen nicht kurz!
11.3 Technische Spezifikation
T asten: 8
Schachbrett: 9x8 Kontaktmembran (Touch panel)
LCD Display: Punktmatrix 11-stellig, 68 x79 mm
Batterien: 3 x AAA/AM4/R03
Abmessung: 131 x 83 x 22 mm
Gewicht: 220 Gramm
Bitte bewahren Sie diese wichtigen Information auf!
Saitek behält sich das Recht vor ohne vorherige Ankündigung, technische
Änderungen im Interesse eines überarbeiteten Programm durchzuführen.
Leisten Sie einen Beitrag zum Umweltschutz:
•Verbrauchte Batterien und Akkumulatoren (Akkus) gehören nicht
in den Hausmüll.
•Sie können sie bei einer Sammelstelle für Atbatterien bzw.
Sondermüll abgeben.
Informieren Sie sich bei Ihrer Gemeinde.
DEUTSCH
97
Page 98

Om direct te spelen, hoeft u alleen maar de onderstaande stappen te volgen!
Open het batterijvakje en breng drie “AAA” (AM4/
1
R03) alkalinebatterijen in; let op de juiste polariteit.
Verwijder het stilet uit de houder aan de
2
rechterkant zoals aangegeven.
Druk op de knop GO/STOP (START/STOP), aan
3
de rechter bovenkant van het apparaat om de
computer aan te zetten. Als er niets gebeurt, dient
u de computer opnieuw in te stellen (zie Hoofdstuk
11.1).
Druk tweemaal snel achtereen op NEW GAME
4
(NIEUWE PARTIJ) om de computer opnieuw in te
Als u geen nieuwe partij kunt beginnen,
stellen.
heeft u niet snel genoeg gedrukt. Probeer het
nogmaals!
Voer zetten in door voor elke zet voorzichtig met
5
het stilet op de velden van en naar te drukken.
kunt u overigens ook met uw vingertoppen doen.
Als de computer aan zet is, knippert het
6
betreffende stuk kort op de velden van en naar,
waarna de zet op het bord zal worden uitgevoerd.
En daarna is het weer uw beurt!
Druk op GO/STOP (START/STOP) om het apparaat uit
te zetten. Als in het scherm
nogmaals op GO/STOP (START/STOP) om het uitschakelen te bevestigen —
uw partij wordt in het geheugen opgeslagen!
Stop?
verschijnt, drukt u
Dit
ıPd7-d5````
3 x
AAA
(AM4/R03)
x2
DE SCHAAKSTUKKEN!
K` Q` R` B` N` P`
PAARDKONING DAME TOREN LOPER PION
Wit
SNELLE START
Zwart
Page 99

INHOUDSOPGAVE
SNELLE START
TOETSEN EN FUNCTIES
INLEIDING
1.OM TE BEGINNEN: DE
BASISELEMENTEN
1.1 Batterijen inbrengen, stroom
inschakelen
1.2 Klaar om te spelen? Dit zijn de
regels!
1.3 De computer aan zet
1.4 Partij beëindigd? Een nieuwe
partij beginnen
1.5 Te makkelijk/moeilijk? Van
niveau wijzigen!
2.NOG MEER FUNCTIES
2.1 Wie is aan zet? Zie
beeldscherm!
2.2 Speciale schaakzetten
2.3 Onjuiste zetten
2.4 Schaak, schaakmat en remise
2.5 Probeer het
zelfwaarderingssysteem!
2.6 Hint nodig? Gewoon vragen!
2.7 Het zoeken onderbreken
2.8 Van kleur wisselen
2.9 Ingebouwde openingszetten
2.10 Denken in de tijd van de
tegenstander
2.11 Uitschakelen/Spelgeheugen
3.HOOFDMENU
4.OPTIESTAND
Spelopties selecteren
4.1 Twee spelers
4.2 Zoekalgor itme
4.3 Autobook-stand
4.4 Wit boven
4.5 Aftellende klok
4.6 Tikkende klok
4.7 Trainingsstand
4.8 Geluid aan/uit
4.9 LCD-contrast
4.10 LCD-snelheid
4.11 Automove-stand
5.NIVEAUSTAND
Het spelniveau instellen
5.1 Pretniveaus
5.2 Gelegenheidsspelniveaus
5.3 Toernooiniveaus
5.4 Snelschaakniveaus
5.5. Probleemoplossingsniveaus
5.6 Tactisch niveau
5.7 Oneindig niveau
6.TERUGNEEMSTAND
7.INFOSTAND
Automatische informatieschermen
Handmatige informatieschermen
7.1 Hoofdvariant
7.2 Zoekinformatie
7.3 Schaakklokinformatie
7.4 Aantal zetten/spelzetten
7.5 Waarderingsweergave
8.SETUP-STAND
9.ANALYSESTAND
Het selecteren van
analysestellingen
Het bord gebruiken voor selectie
10. HULP NODIG? ZIE HIER!
11. TECHNISCHE GEGEVENS
11.1 De ACL-functie
11.2 Verzorging en onderhoud
11.3 Technische specificaties
APPENDIX:
GEANALYSEERDE PARTIJEN
99
NEDERLANDS
Page 100

TOETSEN EN FUNCTIES
1. TOUCHSCREEN-SCHAAKBORD: Elk veld registreert beweging van een schaakstuk als
er voorzichtig met een stilet of vinger op wordt gedrukt.
2. INFORMATIEREGEL: Geeft zetten, partij-informatie en schaakklok weer. Wordt ook
gebruikt voor het selecteren van opties en niveaus, het opzetten van stellingen en nog
veel meer.
3.`STILET: Wordt gebruikt om zetten op het touch-screen uit te voeren; wordt tevens
gebruikt om instellingen in de
Informatieregel te selecteren.
4. TOETS GO/STOP (START/STOP): Druk
om het apparaat aan te zetten; tweemaal
indrukken om uit te zetten. Indrukken om
het scrollen van het beeldscherm stop te
zetten; scrollen kan worden hervat met
CLEAR (OPHEFFEN).
5. STILETHOUDER: Steek stilet in houder
indien niet in gebruik.
6. LCD-KLEP: Kan over het beeldscherm
worden geschoven het te beschermen als
het apparaat niet wordt gebruikt.
7. ACL (Opnieuw instellen): aan de
onderkant van het apparaat. Wordt
gebruikt om statische lading te
verwijderen na het insteken van nieuwe
batterijen.
8. TOETS HINT/INFO: Druk deze tijdens uw
zet in voor een hint. Meermaals indrukken
om door de belangrijkste
informatieschermen te lopen.
9. TOETS CLEAR (OPHEFFEN): Indrukken
om de stand Opties/Info af te sluiten; om
de stand Niveaus/Analayse te annuleren;
om de informatie in de Infostand te
wissen; om in de Analysestand te blijven
na een verkeerde zet; om het bord in de
Setup-stand te wissen; om het scrollen te
hervaten na een pauze; om de partij te
hervatten na een terugname.
10. BATTERIJVAK: aan de onderkant van het
apparaat. Geschikt voor drie “AAA” (AM4/
R03) alkalinebatterijen.
11. ENTER-TOETS: Indrukken om van kleur
te wisselen met de computer. Indrukken
als de computer aan zet; op die manier
wordt de computer gedwongen een zet uit
te voeren. Indrukken om items in het
Hoofdmenu te selecteren; om instellingen
te selecteren en opties aan/uit te zetten in
de stand Opties/Info; om een nieuw niveau
in te voeren in de stand Niveau; om een
analysestelling te selecteren; om de
Setup-stand met een nieuwe stelling af te
sluiten.
12. ¯/˘-TOETSEN: Indrukken om één voor één door niveaus/analysestellingen te scrollen in
de stand Niveaus/Analyse Indrukken om door de Opties/Info te scrollen in de stand
Opties/Info Indrukken om zetten terug te nemen/opnieuw te spelen in de Terugneemstand
13. MENUTOETS: Indrukken om de Menustand te openen; nogmaals indrukken om deze
stand te verlaten.
14. TOETS NIEUWE PARTIJ: Tweemaal snel achtereen indrukken om de computer opnieuw
in te stellen.
100
 Loading...