

Page 1

SX682 WiMAX
User Guide – User
This device works in a frequency band for which no general licence has been obtained
from your National Authority for Frequency Management. Please contact your service
provider or your National Authority for Frequency Management about licensing before
putting this device into service.
Page 2

Contents
Contents
For your safety . . . . . . . . . . . . . . . . . . . . . . . . . . . . . . . . . . . . 5
Safety precautions . . . . . . . . . . . . . . . . . . . . . . . . . . . . . . . . . . . . . . . . . . . . . . . . . . 5
Cleaning and care . . . . . . . . . . . . . . . . . . . . . . . . . . . . . . . . . . . . . . . . . . . . . . . . 5
Trademarks . . . . . . . . . . . . . . . . . . . . . . . . . . . . . . . . . . . . . . . . . . . . . . . . . . . . . 5
Information on Specific Absorption Rate (SAR) . . . . . . . . . . . . . . . . . . . . . . . . . . . . 6
Information about the optional outdoor antenna . . . . . . . . . . . . . . . . . . . . . . . . . . . . 6
SX682 WiMAX . . . . . . . . . . . . . . . . . . . . . . . . . . . . . . . . . . . . . 9
What is WiMAX? . . . . . . . . . . . . . . . . . . . . . . . . . . . . . . . . . . . . . . . . . . . . . . . . . . . . 9
SX682 WiMAX . . . . . . . . . . . . . . . . . . . . . . . . . . . . . . . . . . . . . . . . . . . . . . . . . . . . . 9
Product features . . . . . . . . . . . . . . . . . . . . . . . . . . . . . . . . . . . . . . . . . . . . . . . . . . . 10
Product overview . . . . . . . . . . . . . . . . . . . . . . . . . . . . . . . . . . . . . . . . . . . . . . . . . . 10
Connectors and LEDs . . . . . . . . . . . . . . . . . . . . . . . . . . . . . . . . . . . . . . . . . . . . 10
Installing the SX682 WiMAX . . . . . . . . . . . . . . . . . . . . . . . . 13
Choosing your location . . . . . . . . . . . . . . . . . . . . . . . . . . . . . . . . . . . . . . . . . . . . . . 13
System requirements . . . . . . . . . . . . . . . . . . . . . . . . . . . . . . . . . . . . . . . . . . . . . . . 15
Connecting the SX682 WiMAX . . . . . . . . . . . . . . . . . . . . . . . . . . . . . . . . . . . . . . . . 16
Connecting the outdoor antenna . . . . . . . . . . . . . . . . . . . . . . . . . . . . . . . . . . . . 16
Connecting the PC . . . . . . . . . . . . . . . . . . . . . . . . . . . . . . . . . . . . . . . . . . . . . . 17
Connecting a telephone, fax machine or answer machine . . . . . . . . . . . . . . . . 18
Switching on the devices . . . . . . . . . . . . . . . . . . . . . . . . . . . . . . . . . . . . . . . . . . 18
Restarting and resetting the SX682 WiMAX . . . . . . . . . . . . . . . . . . . . . . . . . . . . . . 19
Rebooting the SX682 WiMAX . . . . . . . . . . . . . . . . . . . . . . . . . . . . . . . . . . . . . . 19
Returning the SX682 WiMAX to factory settings . . . . . . . . . . . . . . . . . . . . . . . . 20
Configuration with the Web browser . . . . . . . . . . . . . . . . . 21
User interface . . . . . . . . . . . . . . . . . . . . . . . . . . . . . . . . . . . . . . . . . . . . . . . . . . . . . 21
Launching the user interface . . . . . . . . . . . . . . . . . . . . . . . . . . . . . . . . . . . . . . . 21
UI elements . . . . . . . . . . . . . . . . . . . . . . . . . . . . . . . . . . . . . . . . . . . . . . . . . . . . 23
Setting the language . . . . . . . . . . . . . . . . . . . . . . . . . . . . . . . . . . . . . . . . . . . . . 24
Opening online Help . . . . . . . . . . . . . . . . . . . . . . . . . . . . . . . . . . . . . . . . . . . . . 25
Menu structure . . . . . . . . . . . . . . . . . . . . . . . . . . . . . . . . . . . . . . . . . . . . . . . . . 25
The Home page . . . . . . . . . . . . . . . . . . . . . . . . . . . . . . . . . . . . . . . . . . . . . . . . . . . 26
Basic Setup Wizard . . . . . . . . . . . . . . . . . . . . . . . . . . . . . . . 27
Starting the Basic Setup Wizard . . . . . . . . . . . . . . . . . . . . . . . . . . . . . . . . . . . . 27
Entering access data for the WiMAX network . . . . . . . . . . . . . . . . . . . . . . . . . . 27
Setting up Internet access . . . . . . . . . . . . . . . . . . . . . . . . . . . . . . . . . . . . . . . . . 27
Selecting the antenna . . . . . . . . . . . . . . . . . . . . . . . . . . . . . . . . . . . . . . . . . . . . 28
Adjusting the antenna . . . . . . . . . . . . . . . . . . . . . . . . . . . . . . . . . . . . . . . . . . . . 28
Establishing a radio connection to a WiMAX network . . . . . . . . . . . . . . . . . . . . 28
Precisely aligning the antenna . . . . . . . . . . . . . . . . . . . . . . . . . . . . . . . . . . . . . 30
Setting up VoIP access . . . . . . . . . . . . . . . . . . . . . . . . . . . . . . . . . . . . . . . . . . . 32
2
Page 3

Contents
Advanced Settings . . . . . . . . . . . . . . . . . . . . . . . . . . . . . . . . 33
Setting the operating mode . . . . . . . . . . . . . . . . . . . . . . . . . . . . . . . . . . . . . . . . . . . 34
Configuring Internet access . . . . . . . . . . . . . . . . . . . . . . . . . . . . . . . . . . . . . . . . . . 35
Setting up the Internet Connection . . . . . . . . . . . . . . . . . . . . . . . . . . . . . . . . . . 35
Setting up DNS servers . . . . . . . . . . . . . . . . . . . . . . . . . . . . . . . . . . . . . . . . . . . 36
Enabling or disabling the firewall . . . . . . . . . . . . . . . . . . . . . . . . . . . . . . . . . . . . 36
Port Forwarding . . . . . . . . . . . . . . . . . . . . . . . . . . . . . . . . . . . . . . . . . . . . . . . . . . . 37
Opening the firewall for a selected PC (Exposed Host) . . . . . . . . . . . . . . . . . . 38
LAN configuration . . . . . . . . . . . . . . . . . . . . . . . . . . . . . . . . . . . . . . . . . . . . . . . . . . 39
Setting up Internet telephony (VoIP) . . . . . . . . . . . . . . . . . . . . . . . . . . . . . . . . . . . . 40
WiMAX configuration . . . . . . . . . . . . . . . . . . . . . . . . . . . . . . . . . . . . . . . . . . . . . . . 42
Antenna selection . . . . . . . . . . . . . . . . . . . . . . . . . . . . . . . . . . . . . . . . . . . . . . . . . . 42
Administration . . . . . . . . . . . . . . . . . . . . . . . . . . . . . . . . . . . 43
System password . . . . . . . . . . . . . . . . . . . . . . . . . . . . . . . . . . . . . . . . . . . . . . . . . . 43
Restoring factory settings . . . . . . . . . . . . . . . . . . . . . . . . . . . . . . . . . . . . . . . . . . . . 44
Restart . . . . . . . . . . . . . . . . . . . . . . . . . . . . . . . . . . . . . . . . . . . . . . . . . . . . . . . . . . 45
Updating the firmware . . . . . . . . . . . . . . . . . . . . . . . . . . . . . . . . . . . . . . . . . . . . . . . 45
Status . . . . . . . . . . . . . . . . . . . . . . . . . . . . . . . . . . . . . . . . . . . 46
Internet . . . . . . . . . . . . . . . . . . . . . . . . . . . . . . . . . . . . . . . . . . . . . . . . . . . . . . . . . . 47
Local network LAN . . . . . . . . . . . . . . . . . . . . . . . . . . . . . . . . . . . . . . . . . . . . . . . . . 48
Telephony . . . . . . . . . . . . . . . . . . . . . . . . . . . . . . . . . . . . . . . . . . . . . . . . . . . . . . . . 48
Device status . . . . . . . . . . . . . . . . . . . . . . . . . . . . . . . . . . . . . . . . . . . . . . . . . . . . . 49
Radio status . . . . . . . . . . . . . . . . . . . . . . . . . . . . . . . . . . . . . . . . . . . . . . . . . . . . . . 49
Using the SX682 WiMAX . . . . . . . . . . . . . . . . . . . . . . . . . . . 51
Making a phone call or faxing with the SX682 WiMAX . . . . . . . . . . . . . . . . . . . . . . 51
Making calls via VoIP . . . . . . . . . . . . . . . . . . . . . . . . . . . . . . . . . . . . . . . . . . . . 52
Receiving VoIP phone calls . . . . . . . . . . . . . . . . . . . . . . . . . . . . . . . . . . . . . . . . 52
Telephone functions . . . . . . . . . . . . . . . . . . . . . . . . . . . . . . . . . . . . . . . . . . . . . 52
Confirmation tones . . . . . . . . . . . . . . . . . . . . . . . . . . . . . . . . . . . . . . . . . . . . . . . . . 58
Appendix . . . . . . . . . . . . . . . . . . . . . . . . . . . . . . . . . . . . . . . . 59
Troubleshooting . . . . . . . . . . . . . . . . . . . . . . . . . . . . . . . . . . . . . . . . . . . . . . . . . . . 59
Other faults and problems . . . . . . . . . . . . . . . . . . . . . . . . . . . . . . . . . . . . . . . . . 60
Before contacting customer service or your provider . . . . . . . . . . . . . . . . . . . . 61
Checking the connection to the SX682 WiMAX . . . . . . . . . . . . . . . . . . . . . . . . . . . 62
Configuring the Web browser . . . . . . . . . . . . . . . . . . . . . . . . . . . . . . . . . . . . . . . . . 63
Setting up an HTTP proxy . . . . . . . . . . . . . . . . . . . . . . . . . . . . . . . . . . . . . . . . . 63
Allowing pop-up windows . . . . . . . . . . . . . . . . . . . . . . . . . . . . . . . . . . . . . . . . . 64
Specifications . . . . . . . . . . . . . . . . . . . . . . . . . . . . . . . . . . . . . . . . . . . . . . . . . . . . . 65
Outdoor antenna specifications (optional) . . . . . . . . . . . . . . . . . . . . . . . . . . . . . 65
Putting into service . . . . . . . . . . . . . . . . . . . . . . . . . . . . . . . . . . . . . . . . . . . . . . . . . 66
CE declaration . . . . . . . . . . . . . . . . . . . . . . . . . . . . . . . . . . . . . . . . . . . . . . . . . . . . 66
3
Page 4

Contents
Open Source Software used in the product . . . . . . . . . . . . . . . . . . . . . . . . . . . . . . 67
Warranty regarding further use of the Open Source Software . . . . . . . . . . . . . 67
Open Source Software used . . . . . . . . . . . . . . . . . . . . . . . . . . . . . . . . . . . . . . . 68
Acknowledgements . . . . . . . . . . . . . . . . . . . . . . . . . . . . . . . . . . . . . . . . . . . . . . 68
Open Source Software Licenses . . . . . . . . . . . . . . . . . . . . . . . . . . . . . . . . . . . . 69
Glossary . . . . . . . . . . . . . . . . . . . . . . . . . . . . . . . . . . . . . . . . 75
Index . . . . . . . . . . . . . . . . . . . . . . . . . . . . . . . . . . . . . . . . . . . 83
4
Page 5

For your safety
For your safety
Please read the safety instructions carefully before putting into service.
Safety precautions
General safety instructions
If you give the SX682 WiMAX to someone else, make sure you also give them its
documentation.
The SX682 WiMAX must only be used as described in these installation instruc-
tions.
Safety instructions for connection
Only use the mains adapter supplied, as indicated on the underside of the SX682
WiMAX.
Safety precautions for the SX682 WiMAX
The operation of medical appliances may be affected. Be aware of the technical
conditions in your particular environment, e.g. doctor's surgery.
The SX682 WiMAX and the antenna can interfere with the functioning of medical
devices such as pacemakers. Keep at least 20 cm between the devices and the
pacemaker. For more information, consult your doctor.
The device may cause an unpleasant humming noise in hearing aids.
Do not use the devices in environments with a potential explosion hazard, e.g. car
paint shops, or in a humid environment (bathroom etc.).
The Ethernet function (LAN socket, LAN) and the FXS function (analogue phone
port, Phone) are designed exclusively for connection inside a building.
Cleaning and care
Wipe the SX682 WiMAX with a damp cloth (do not use solvent) or an antistatic cloth.
Never use a dry cloth. This can cause static.
Trademarks
Microsoft Windows 2000, Windows XP, Windows Vista and Internet Explorer are
registered trademarks of the Microsoft Corporation.
Mozilla Firefox is a registered trademark of the Mozilla Organization.
5
Page 6
Information on Specific Absorption Rate (SAR)
Information on Specific Absorption Rate (SAR)
This device meets the limits for protecting the health of the public from the effecs of
exposure to electromagnetic fields when it is operated in connection with the designated antenna(s) like described in the user manual.
Your device is a radio transmitter and receiver. It is designed and manufactured not to
exceed the limits for exposure to emission from electromagnetic fields recommended
by international guidelines from the International Commission on Non-Ionizing Radiation Protection (ICNIRP). These limits are part of comprehensive guidelines for the protection of the public and establish permitted levels of exposure to electromagnetic radiation for the population. The guidelines were confirmed by independent scientific
organisations through periodic and thorough evaluation of scientific studies. The limits
include a substantial safety margin designed to assure the safety of all persons, regardless of age and health.
The exposure limit employs a unit of measurement known as the Specific Absorption
Rate, or SAR. The SAR limit stated in the international guidelines is 2.0 W/kg. Tests for
SAR are conducted in all frequency bands with the device transmitting at its highest
power level with minimum possible distance to the body. The actual SAR level of the
device during operation with the designated antenna(s) is below the maximum value
and is additionally decreased by a distance to the device. This is because the device is
designed to operate at multiple power levels so as to use only the power required to
enable seamless network connection.
Information about the optional outdoor antenna
Only one of the antennas listed on page 13 must be used.
The outdoor antenna must be installed and put into service by a qualified
electrician.
Only commence the outdoor work once you have taken all the nec-
essary steps to make the location safe.
Be sure to observe the safety instructions.
Wall duct:
To connect the SX682 WiMAX to the outdoor antenna, the antenna cable must be fed
through the wall to the outside of the building. It must be possible to make a suitable
wall or window duct at or near the location of the SX682 WiMAX.
6
Page 7
Information about the optional outdoor antenna
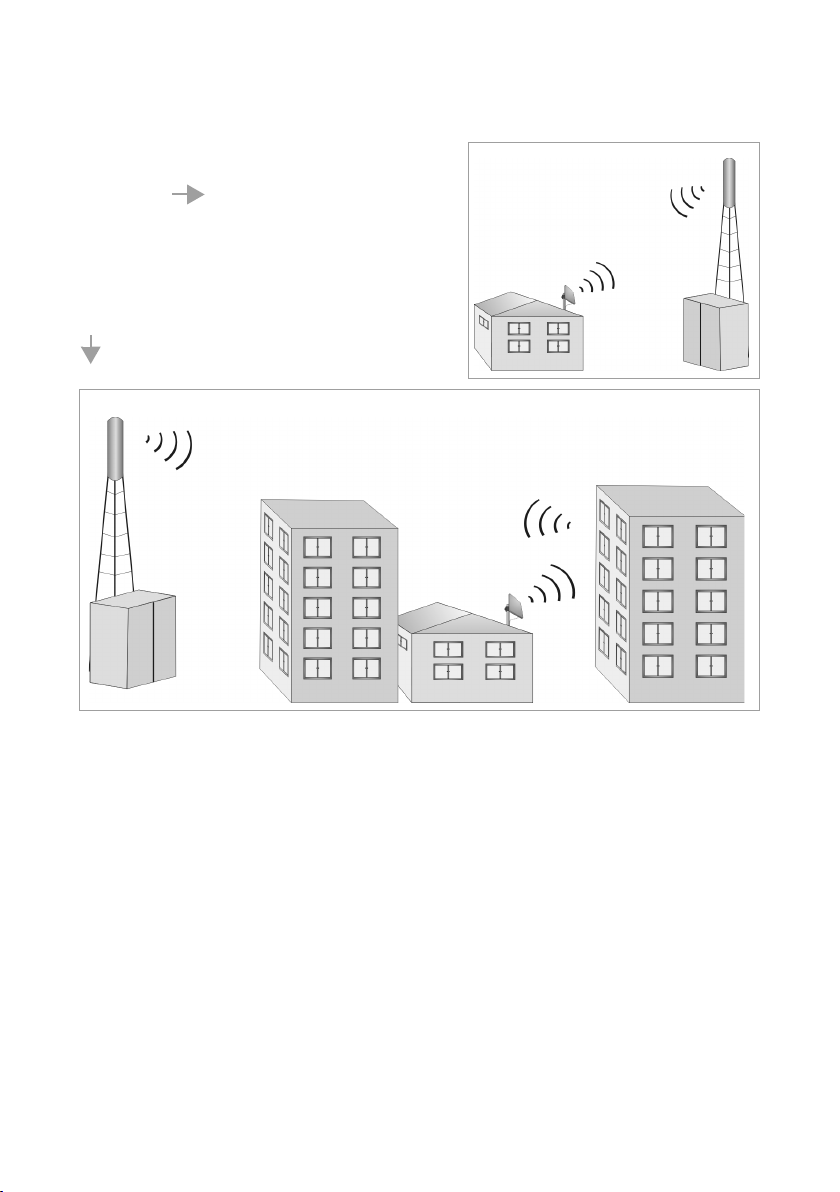
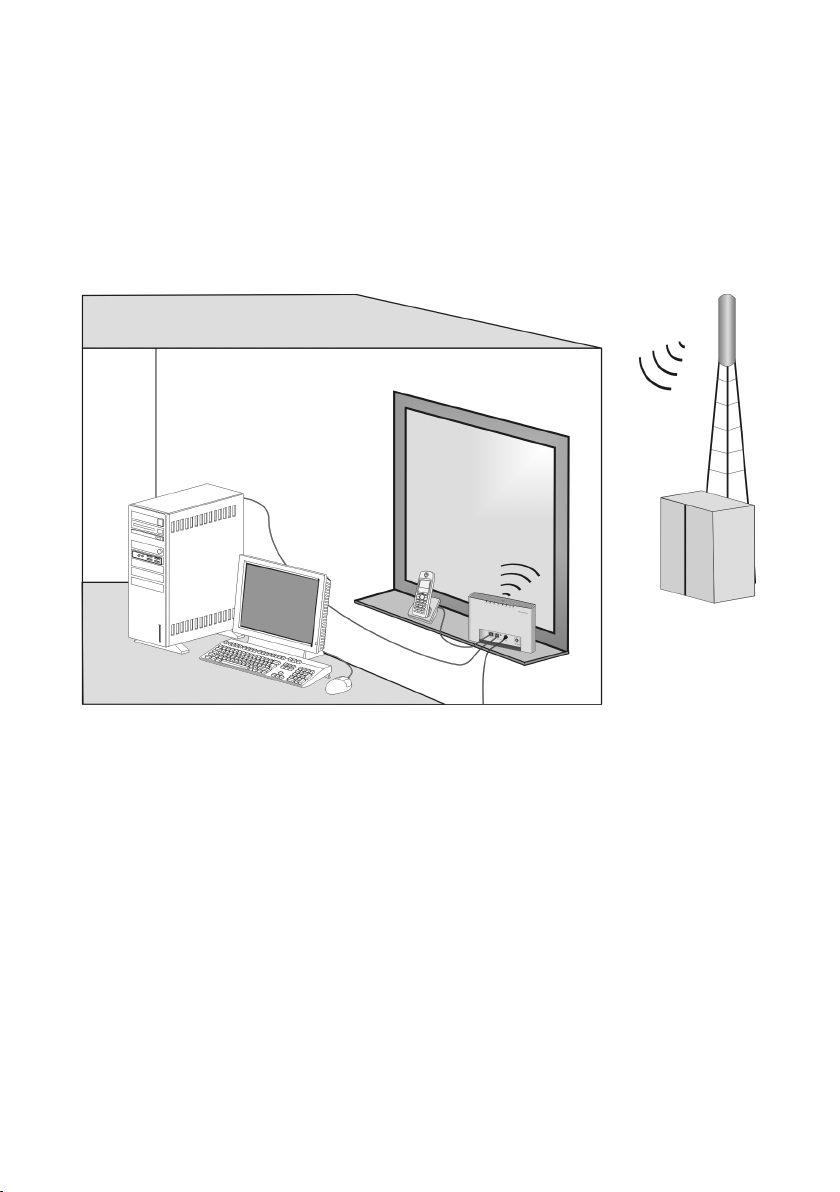
Fig. 1
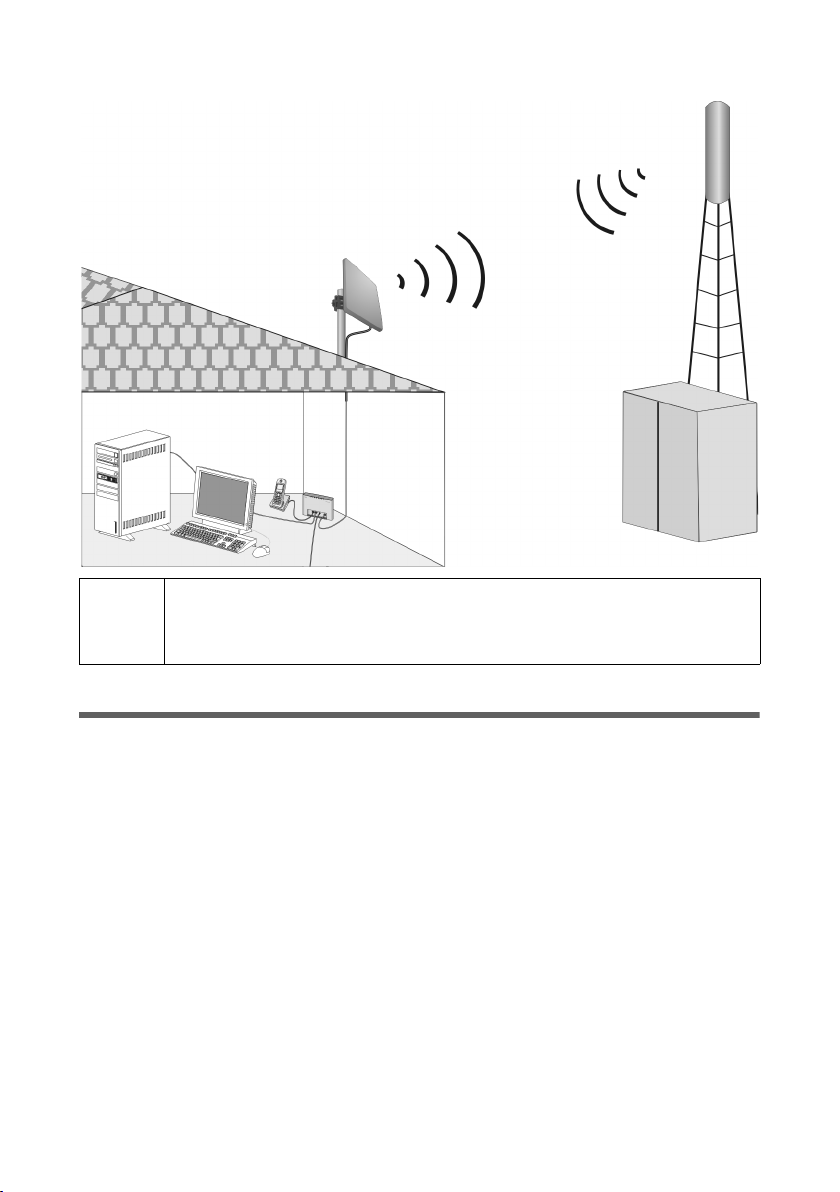
Fig. 2
Setting up the antenna mast:
There should not be any obstructions (walls, trees etc.) in front of the antenna.
The best results will be obtained if the outdoor
antenna is in sight of the WiMAX base station
(cf. Fig. 1).
If a line of sight is not possible, you can reflect the
radio waves off neighbouring buildings. To do
this, direct the antenna at the building it is to
reflect off and not at the base station (cf. Fig. 2).
The antenna mast must be structurally secure. Check how secure the various attachments are.
The antenna mast must be within reach of the cable. Ideally, the antenna cable should
be protected outside (from frost, sun, unauthorised and mechanical influences etc.).
In particular, make sure the antenna mast has sufficient load capacity. If you are mounting the mast on the roof, make sure the roof is fully sealed again afterwards.
Lightning protection
The antenna mast should be positioned near a lightning conductor. A suitable lightning
conductor must be installed where necessary.
The outdoor antenna is not designed to be struck directly by lightning and must be protected accordingly. The antenna must therefore be mounted in areas that are protected
against lightning (Lightning Protection Zone 0B). The corresponding separation distance (IEC 62305) must be complied with.
Earthing and lightning protection work may only be carried out by electricians specifically qualified for such work.
7
Page 8

Information about the optional outdoor antenna
i
The appropriate earthing clamps must be used to create an equipotential bonding
between a cable shield and an equipotential bonding bar that complies with regulations.
Please observe the standard DIN VDE 0855-300 and find out more on the Internet at
http://www.dehn.de
Antenna cable and antenna connection:
It must be possible to connect the outdoor antenna to the SX682 WiMAX by means of
an antenna cable.
Please note that the antenna connection must be protected from the impact of rain and
other weather effects.
Use cable clamps to attach the cable to the mast. Please note that the cable must be
long enough to turn the antenna at a later stage.
Antenna alignment:
When aligning the antenna, we recommend asking a second person to run the Basic
Setup Wizard on the PC and to check the reception quality on the screen; see Chapter
"Basic Setup Wizard" on page 27.
.
Aligning the antenna using acoustic signals
If neither you nor the assistant are able to check the signal strength on
screen while the antenna is being aligned, you can monitor it via a radio
system. To do this you will need, for example, two cordless phones,
mobile phones or radio devices:
Activate Tone on on the configuration PC.
Establish an internal connection between the two handsets and
switch on the loudspeaker on both devices.
Leave one handset next to the configuration PC and carry the other
with you (belt clip).
You will now be informed of the signal strength by means of beeps. The
closer together the sequence of beeps, the better the connection quality.
After installation:
Tighten all screw connections to the torques listed in the installation instructions.
Secure the antenna cable with cable clamps and cable ties. The cable must be protected from exposure to pressure and tension.
8
Page 9

SX682 WiMAX
SX682 WiMAX
What is WiMAX?
WiMAX stands for "Worldwide Interoperability for Microwave Access", a modern wire-
less network technology that enables fast Internet connection even in remote areas.
With WiMAX technology you are no longer dependent on a DSL infrastructure in your
home or place of work. Instead, you connect your PC or network wirelessly to radio
stations operated in your region by your provider. As a result, WiMAX gives you fast,
economical broadband Internet access, even in places that are not connected to the
DSL cable network.
The WiMAX standard IEEE 802.16 generally defines WiMAX technology. Your SX682
WiMAX already meets the latest IEEE 802.16e-2005 standard, a mobile WiMAX standard that offers many extra possibilities.
SX682 WiMAX
With your SX682 WiMAX, you can make use of everything the Internet has to offer:
Downloads
– Even large files download quickly to your PC.
– Complex Website designs are no longer characterised by the time they take to
download – you can enjoy flash animation and high-resolution graphics immediately after clicking a link.
Audio
– Play back audio files straight from the Internet.
– Listen to the radio via the Internet in superb digital quality.
Video
– View short or longer films you find on the Internet without tedious waiting times.
– Watch television via the Internet (IPTV).
– Use "Video on Demand" and order films that are transmitted to you via the
Internet.
Real time
– Take part in video conferences and feel as if you are sitting in the same room as
the people you are talking to.
– Speak to and see your chat partners.
VoI P
– Benefit from the economical telephone rates for Internet telephony (Voice over
IP, VoIP). Your PC does not even need to be switched on.
9
Page 10
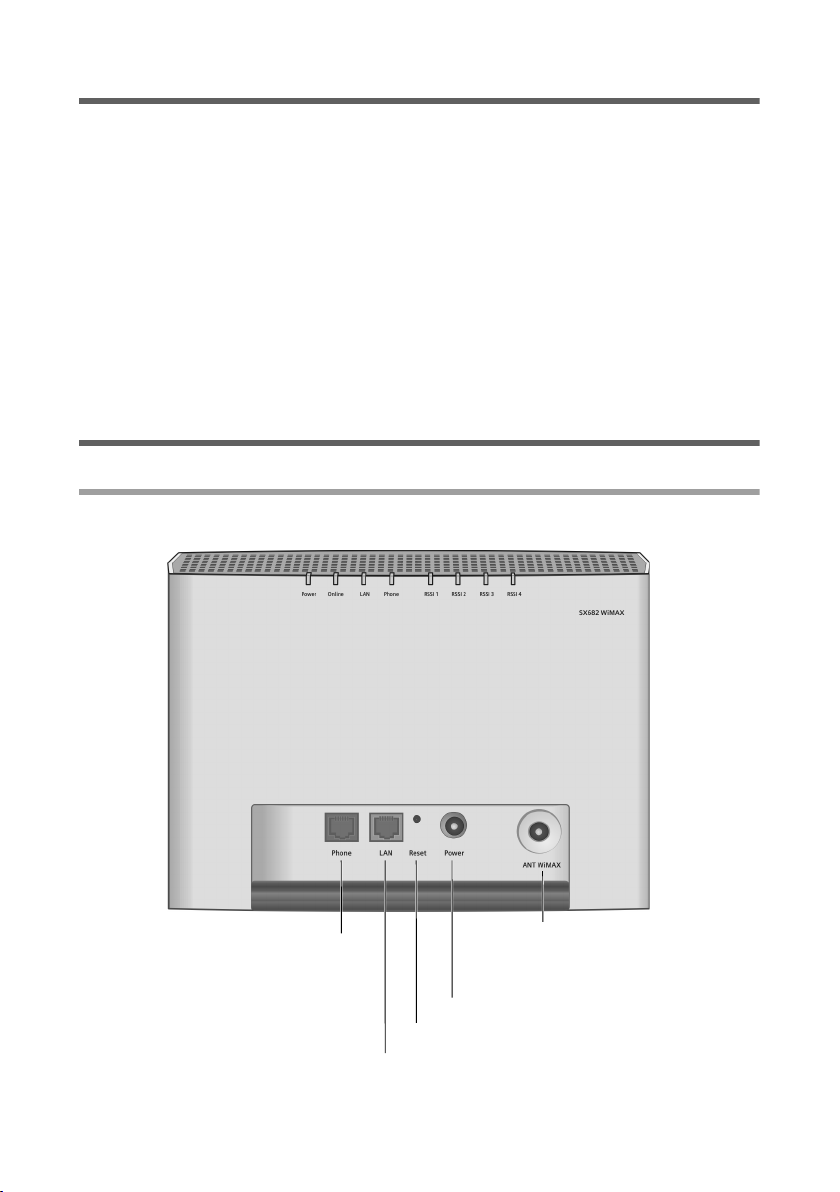
Product features
FXS port for telephone,
fax machine or answer
machine
Reset button
Ethernet port
Mains adapter connector
Antenna connection for external
antenna
Product features
Wireless high-speed Internet access with a transmission rate of up to 20 Mbps
(14 Mbps downlink, 6 Mbps uplink)
Standard compatibility: IEEE 802.16e-2005
Compatible with all current operating systems
Suitable for home and business facilities
Multi-protocol support: TCP/IP, FTP, HTTP and other Internet related protocols
Easy to set up without installing software
Internet and VoIP connection without the hassle of entering access data
DHCP server and routing functions
High performance and quality of service
Optional: outdoor antenna for improved connection quality
Product overview
Connectors and LEDs
Connectors
10
Page 11
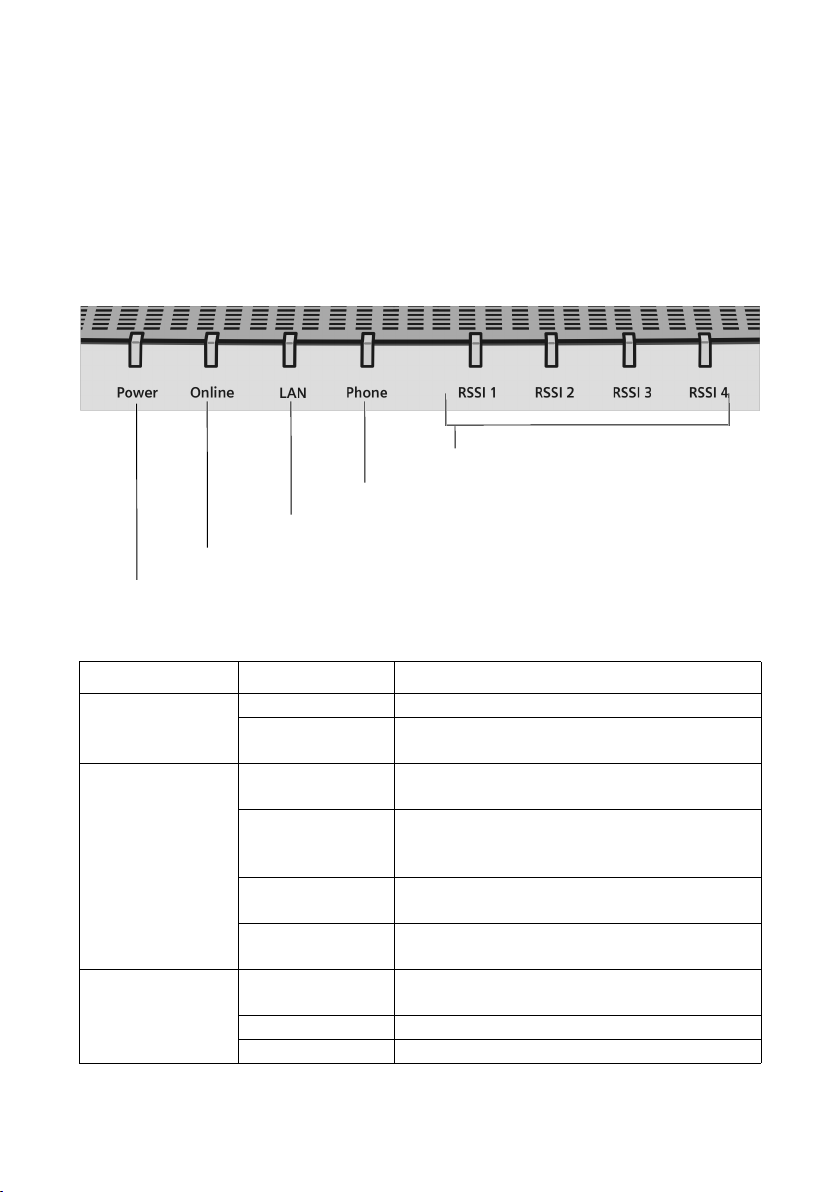
Product overview
RSSI: signal quality
LAN: Ethernet port
Online: active connection
Power: power supply
Phone: telephone (VoIP)
For information about the optional outdoor antenna, please refer to "Connecting the
outdoor antenna" on page 16.
For information on connecting the mains adapter, please refer to "Switching on the
devices" on page 18.
For information on the reset button, please refer to "Restarting and resetting the
SX682 WiMAX" on page 19.
For information on the Ethernet port, please refer to "Connecting the PC" on
page 17.
LEDs
The LEDs indicate the status of the SX682 WiMAX and the current signal strength.
Name LED Meaning
Power: power
supply
Lights up green The SX682 WiMAX is powered correctly.
Does not light up The SX682 WiMAX is not powered correctly
or the power supply has failed.
Online: active
connection
Lights up green The SX682 WiMAX is registered with a
WiMAX network and ready for use.
Does not light up The SX682 WiMAX is not registered with a
WiMAX network; it is not possible to establish an Internet connection.
Flashes green The SX682 WiMAX is establishing a connec-
tion with a WiMAX network.
Lights up red The SX682 WiMAX is not ready. Possible
cause: device is overheating or faulty.
LAN: Ethernet
port
Lights up green Correct cable connection with a powered
connection partner.
Does not light up No or incorrect cable connection.
Flashes green Data transfer via the Ethernet port.
11
Page 12

Product overview
i
Name LED Meaning
Phone: tele-
phone
RSSI:
signal quality
The connection quality can be detected in two different ways:
CINR (Carrier to Interference and Noise Ratio) measures the signal
RSSI (Received Signal Strength Indication) measures the signal
The LEDs indicate either RSSI or CINR values. The used method is preconfigured by your operator. If RSSI is used the RSSI 1 - RSSI 4 LEDs
will show the signal strength.
Lights up green The phone connection is active and regis-
tered with a VoIP provider. You can make
calls via the Internet.
Does not light up The telephone connection is not active or not
registered with a VoIP provider. You cannot
make calls via the Internet.
Flashes green The connected telephone is active: it is being
used to make a call or there is an incoming
call.
0 to 4 LEDs light
up green
All 4 LEDs flash
green
quality.
strength.
The LEDs on the SX682 WiMAX help you to
position the antenna more easily. The LEDs
indicate the signal quality; the more LEDs
that light up, the better the signal reception.
The SX682 WiMAX is being reset to the fac-
tory settings; see "Returning the SX682
WiMAX to factory settings" on page 20.
12
Page 13

Installing the SX682 WiMAX
Installing the SX682 WiMAX
The SX682 WiMAX can only be used with the device's integrated antenna or with one
of the following outdoor antennas:
3.5 GHz 18 dBi WiMAX Antenna Outdoor "Antenna cable 3 m"
2.6 GHz 15 dBi WiMAX Antenna Outdoor "Antenna cable 3 m"
3.5 GHz versions should be used for the European Economic Area.
The following requirements apply:
All the external antennas used for this product must undergo a conformity assessment procedure.
The 3.5 GHz antennas listed here meet the European requirements and
guarantee the functionality of the complete system.
During the conformity assessment procedure it was ensured that the
SAR limits set down in directive 99/519/EC are observed. Verification
was performed using EN 50385.
The outdoor antenna must be installed and put into service by a qualified
electrician.
The notes in the enclosed installation instructions must be followed.
This user guide assumes that installation of the outdoor antenna has been completed.
Choosing your location
Choose a location that enables you to simply set up the following connections with-
out any further work.
– Connect the Ethernet cable for connection to a PC or network.
– Connect the power lead to the mains socket.
Stand the SX682 WiMAX upright on an even, non-slip surface.
Lay the cables in such a way that nobody can tread on or trip over them.
Position the SX682 WiMAX so that you can see the LEDs.
Do not cover the openings in the SX682 WiMAX housing to ensure the heat can cir-
culate; otherwise, the duty cycle of the device will be reduced or the SX682 WiMAX
switched off to avoid overheating.
Do not operate the SX682 WiMAX under the influence of direct heat sources (e.g.
directly in the sun).
13
Page 14
Choosing your location
PC with SX682
WiMAX
WiMAX network
base station
If you use the integrated antenna:
Position the SX682 WiMAX directly in a window, so that the side with the LEDs and
connectors is pointing into the room, towards you. Wherever possible, position the
SX682 WiMAX on one of the upper storeys. Note that obstructions, particularly
doors and wall coverings containing metal can affect data transmission.
Position the SX682 WiMAX as far away as possible from metallic objects and
coated foils.
SX682 WiMAX with integrated antenna
14
Page 15
SX682 WiMAX with outdoor antenna
i
PC with SX682 WiMAX
WiMAX network base
station
When used with the integrated antenna or the outdoor antenna, the
SX682 WiMAX complies with the regulations on limiting the effect of
electromagnetic fields on the general population.
System requirements
System requirements
To use the SX682 WiMAX, the following requirements have to be fulfilled.
You will need a PC that meets the following requirements:
– PC with a free LAN interface 10/100BaseT (network adapter). The network
adapter on the configuration PC must support one of the following modes:
10BaseT Half Duplex, 10BaseT Full Duplex, 100BaseT Half Duplex, 100BaseT
Full Duplex. The TCP/IP protocol has to be set up on the PC (standard installation for Windows XP and Windows Vista; if you are using a different Windows
operating system, read the separate instructions on network configuration, if
necessary).
– A Web browser is installed on the configuration PC (e.g. Internet Explorer or
Mozilla Firefox).
To access the Internet you will need to register your SX682 WiMAX with a WiMAX
Internet provider. To use Internet telephony, your provider will need to register a
VoIP account for your SX682 WiMAX.
15
Page 16
Connecting the SX682 WiMAX
Connecting the SX682 WiMAX
Connect the SX682 WiMAX in the following order:
1. If you use the outdoor antenna, have it installed by a qualified electrician. Connect
the antenna cable from outside to the SX682 WiMAX.
2. Connect the PC to the SX682 WiMAX.
3. Connect an analogue terminal (telephone, fax machine, answer machine).
4. Connect the SX682 WiMAX to the mains power supply and switch all the devices
on.
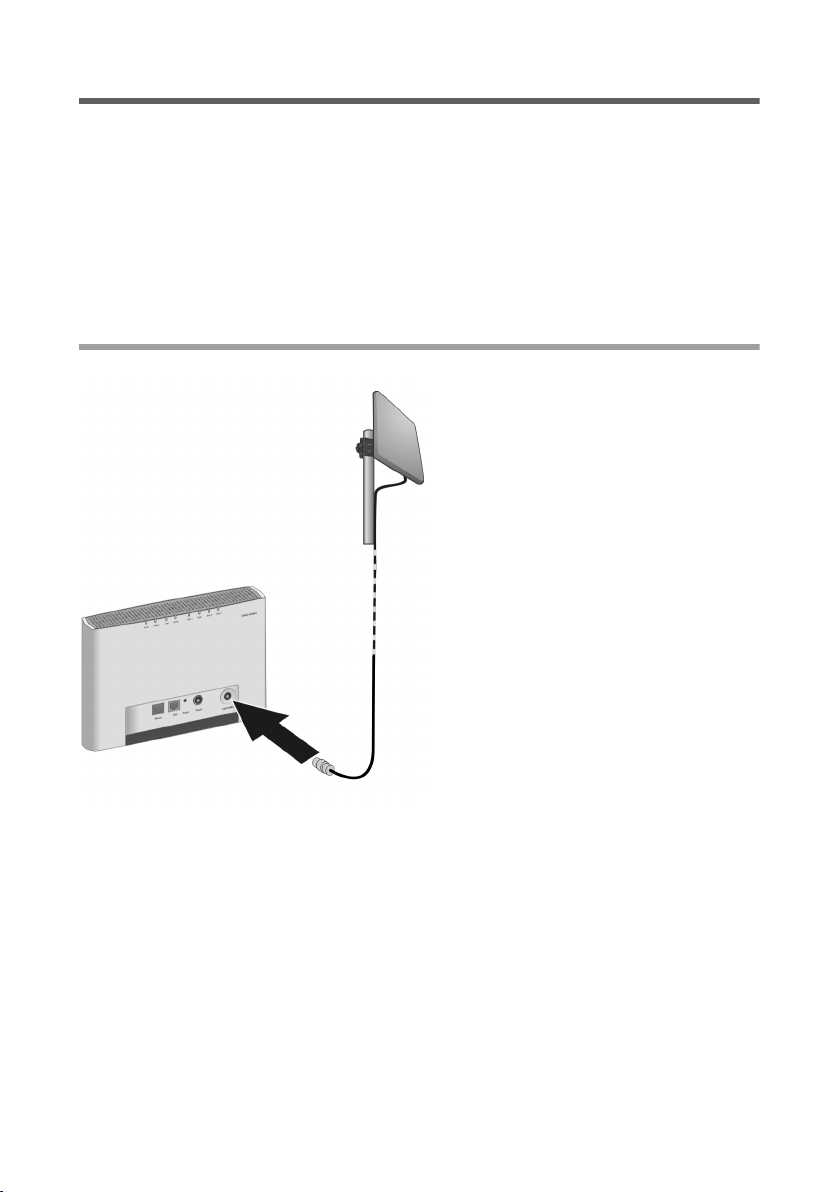
Connecting the outdoor antenna
Screw the connector of the antenna
cable into the ANT WiMAX connector on your SX682 WiMAX. In order to
disconnect the antenna cable from
the connector, open the screw connection.
16
Page 17
Connecting the PC
!
i
Use either the Ethernet cable that is supplied or a standard network cable
(CAT-5) to connect the device to the PC. It is not important whether the
Ethernet cable has straight or crossed wiring.
Always use a shielded Ethernet cable.
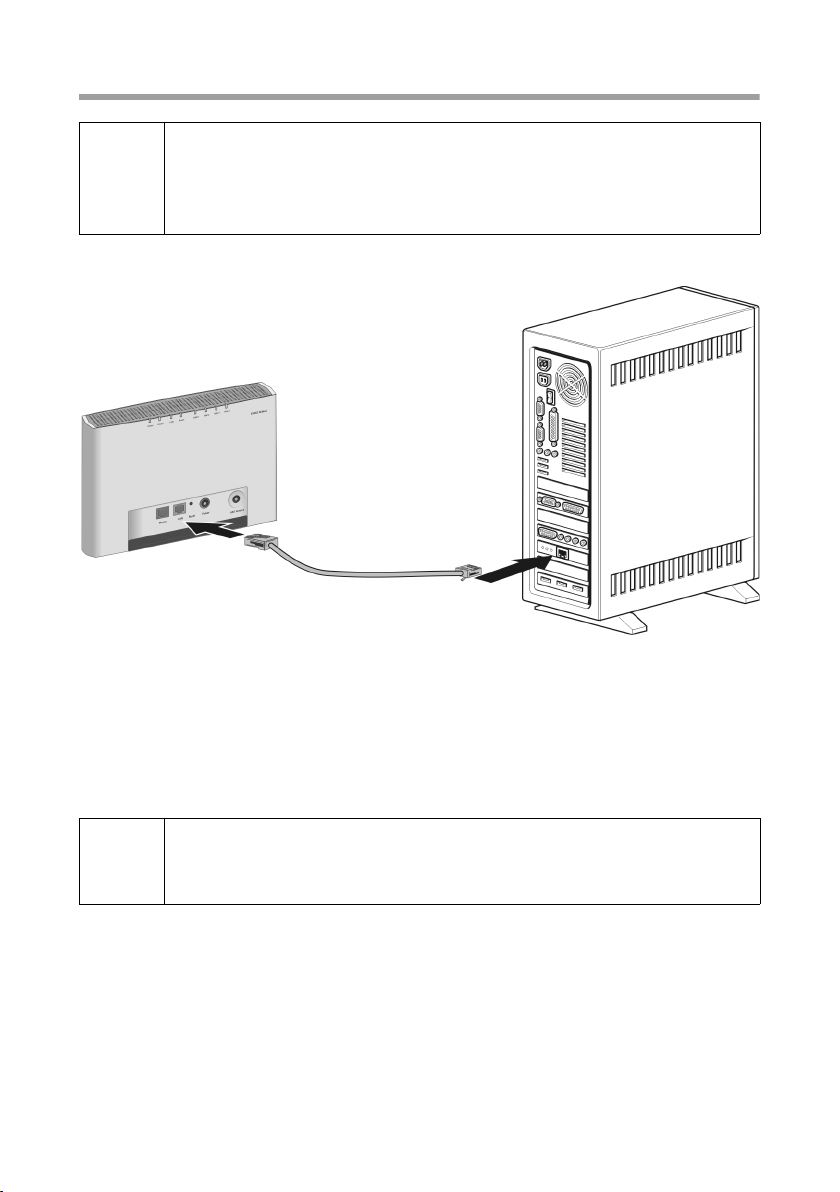
Connecting SX682 WiMAX to the PC
Connecting the SX682 WiMAX
Connect one Ethernet cable plug to the Ethernet port on the SX682 WiMAX.
Connect the other plug of the Ethernet cable to the LAN interface on the PC.
Optional: connecting several terminals
If you wish to connect several terminals (for example a PC and a laptop) and establish
an Internet connection with all the devices, connect a switch or hub to your SX682
WiMAX.
A DHCP server is integrated into your SX682 WiMAX. Please ensure
that a second DHCP server is not activated on your server. For details on
this, read the operating instructions for your switch/hub.
17
Page 18
Connecting the SX682 WiMAX
i
!
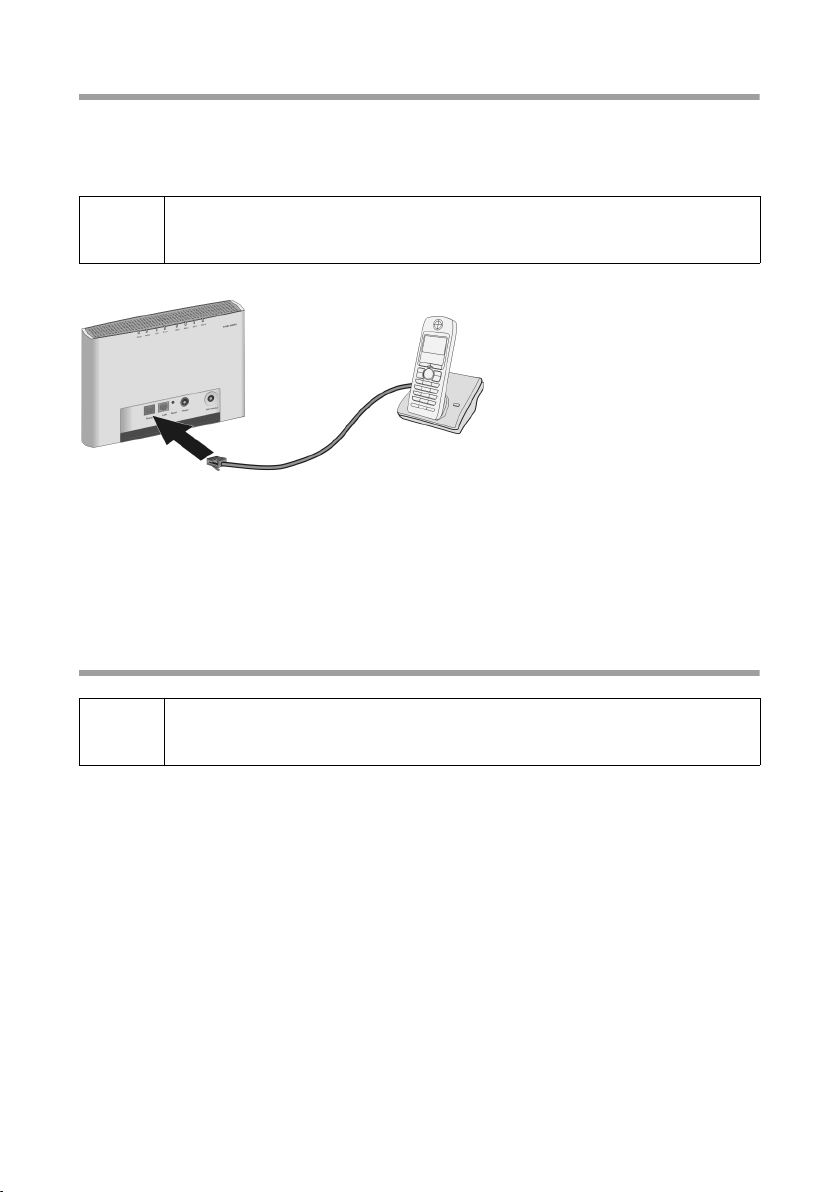
Connecting a telephone, fax machine or answer machine
You can connect an analogue terminal, such as a telephone with cord, cordless telephone, fax machine or answer machine, and operate them via the Internet in future
(Internet telephony/VoIP).
Depending on the connection plug on your analogue terminal, you may
require an additional adapter (TAE socket on the RJ11 plug).
Connect the plug on the ana-
logue terminal to the Phone
connection on the SX682
WiMAX.
If your analogue terminal has a TAE plug, first connect this to the adapter (connect a
telephone to the F-coded socket, a fax machine or answer machine to the N-coded
socket). Then connect the adapter plug to the Phone connection on the SX682
WiMAX.
If necessary connect the telephone, fax machine or answer machine to the mains
power supply.
Switching on the devices
Only use the SX682 WiMAX with the mains adapter supplied.
Connect the mains adapter plug to the SX682 WiMAX socket.
Power up the PC.
Connect the mains adapter to the mains power supply.
The system starts up and performs a self-test. After the self-test, the SX682 WiMAX
continually attempts to register with a WiMAX network. Registration may be successful immediately. If not, registration will take place when the SX682 WiMAX is
being configured.
18
Page 19
Restarting and resetting the SX682 WiMAX
Check the LEDs during startup:
LEDs during startup:
–The Power power supply LED lights up green, and the SX682 WiMAX starts a
self-test. If the LED does not light up, check that the mains adapter is connected
correctly and the power socket is live.
–The LAN Ethernet LED is continuously lit green. If the LED does not light up,
check that the Ethernet cable is connected correctly.
– If registration with a WiMAX network has already been successful, the Online
LED lights up green. If the LED does not light up, register your SX682 WiMAX
during configuration.
Restarting and resetting the SX682 WiMAX
The reset button is located inside the SX682
WiMAX so that it cannot be pressed accidentally.
If you need to restart or reset the SX682 WiMAX,
use a thin object such as an opened up paper
clip.
Rebooting the SX682 WiMAX
Briefly press the reset button (for less than 5 seconds). The configuration settings
will remain, the SX682 WiMAX will be restarted.
You can also restart the SX682 WiMAX via the user interface or by briefly cutting the
power supply.
19
Page 20

Restarting and resetting the SX682 WiMAX
!
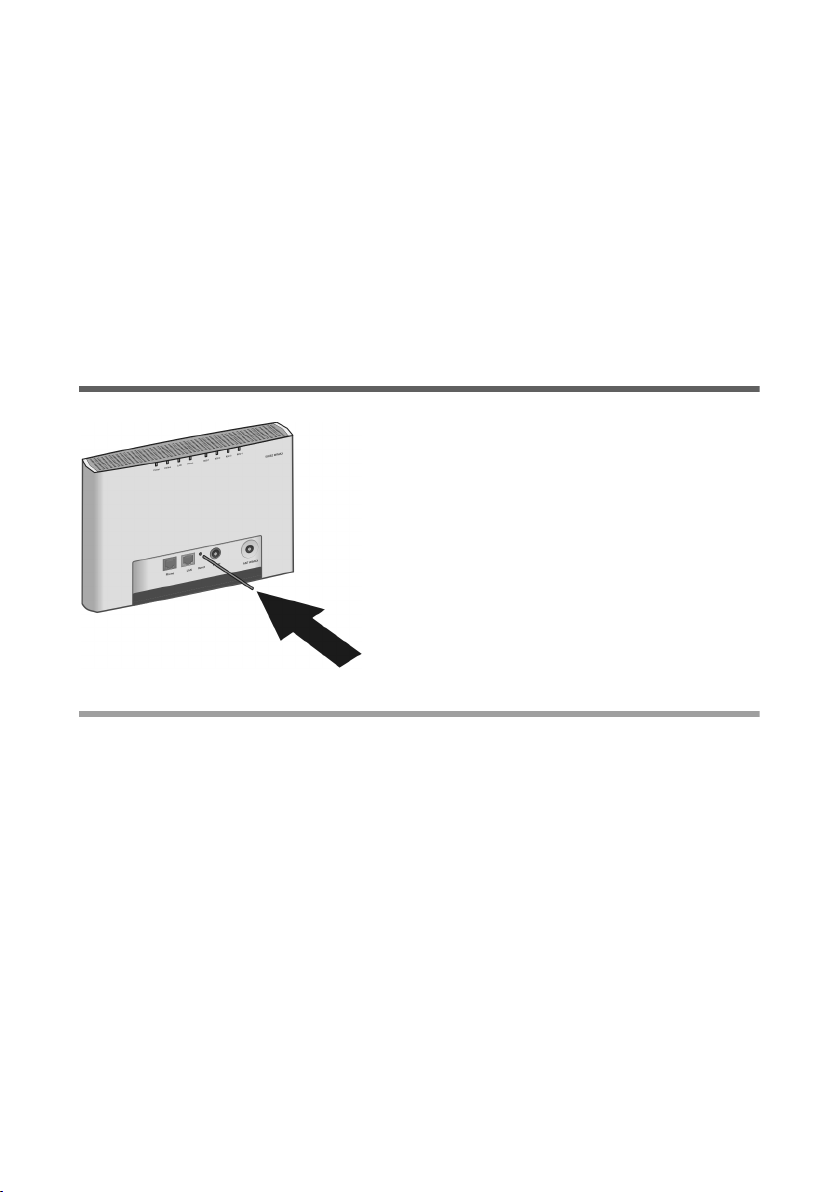
Returning the SX682 WiMAX to factory settings
If you no longer have access to your SX682 WiMAX, you can also restore factory settings with the reset button on the back of the device.
When the factory settings are restored, all personal settings are deleted.
Press and hold the reset button for more than 5 seconds.
The 4 RSSI LEDs will begin to flash green. The configuration settings are returned to
the factory settings and the SX682 WiMAX is restarted. This process takes about
25 seconds. The SX682 WiMAX will then automatically try to set up a connection to a
WiMAX network; depending on the connection quality, 0 to 4 RSSI LEDs will permanently light up green.
Factory settings
After restoring the factory settings, your SX682 WiMAX will be in its original condition:
Proceed as follows to start operating your device again:
Menu Setting
Basic Setup Wizard Execute the Basic Setup Wizard to configure your device
and to establish a connection to the WiMAX network, see
"Basic Setup Wizard" on page 27.
Advanced Settings –
Administration –
System Password
Protect the configuration interface of your device with a
password, see "System password" on page 43.
If the device came from your provider with a preset system password, this will now be valid again. Please check
the documents supplied by your provider.
20
Page 21

Configuration with the Web browser
i
i
User interface
Configuration with the Web browser
You do not need to install any software on your PC to configure your SX682 WiMAX;
the configuration program is stored on the device. Open this software in the same way
as an Internet page in the Web browser and make the required settings. Your settings
are then stored directly on the device.
On startup, the Basic Setup Wizard helps you set up a connection to the WiMAX network and configure your Internet access.
For experienced users:
– IP address: 192.168.2.1
– Subnet mask: 255.255.255.0
Presentation of the configuration program
To configure your SX682 WiMAX, we recommend the Microsoft Internet Explorer version 7.0 or Mozilla Firefox version 2.0 or their higher versions. However, you can also
use most other or older Web browsers.
Number and amount of the functions and settings provided by the configuration program may differ specific to a project.
Launching the user interface
Open your Web browser.
Enter the IP address of your SX682 WiMAX in the address field of your Web
browser:
http://192.168.2.1
Press Enter (Return).
If a system password has been set up on your SX682 WiMAX, the login screen will now
open.
Enter the system password supplied by your provider in the text box and click Ok.
The start page (Home) of the user interface opens, in which you can change the language if necessary (
Change the system password later to one of your own (see "System password" on
page 43).
If no system password has been set up on your SX682 WiMAX, a security warning will
appear first. You should then assign a system password as soon as possible.
Confirm the security warning with Ok.
page 24).
21
Page 22

User interface
The user interface start page opens.
If the login screen does not open:
Check the connections; see "Connecting the SX682 WiMAX" on page 16.
If you use a firewall on the PC, it must allow connection to the SX682 WiMAX. If
applicable, switch off the firewall for a test; if you can then open the login screen,
configure the firewall accordingly. For details, refer to the user guide for your firewall.
If you have changed the standard settings on your PC, you might not be able to open
the configuration pages.
For details on how to find and rectify the fault, see "Fault tracing" on page 59.
Saving the user interface address
You can add the address of the login screen to your favourites/bookmarks so that
you will no longer need to enter the IP address manually in future:
– Internet Explorer: Add to Favorites button
– Firefox: Bookmarks > Add Bookmark
22
Page 23

User interface
Language Logout
Operating Mode
Internet
...
...
...
Antenna selection
Home Advanced SettingsBasic Setup Wizard Status
1
2
3
4
5
6
1
2
3
4
5
6
UI elements
The user interface you open with the Web browser is divided into the following sections:
Tab selection:
Open the Home, Basic Setup Wizard, Advanced Settings or Status tabs to
display the contents of each configuration area.
Language button:
Select your language. This button is only available on the Home screen.
Logout button:
This button is only displayed if a system password is set up.
Log off from your SX682 WiMAX.
Open Help window button:
Open the online Help relating to the menu item currently in the working area.
Menu area:
Click the menu items to display the respective pages of the currently open configuration area or a submenu.
Working area:
Check the settings on your SX682 WiMAX and change them as necessary.
23
Page 24

User interface
Setting the language
The user interface is initially displayed in the language that has been set by your operator. Other languages may be available.
If you wish to change the preset language, click on the Language button at the top
right. This opens the page for setting the language.
Click the arrow next to the selection field to open it and select your language.
Click Ok to change the language.
Buttons
Open online Help.
Click this button if you require information about the screen you currently
have open. The corresponding Help topic is opened.
Logout Button with which you end the connection between the PC and the SX682
WiMAX.
Back Return to the previous screen in the Basic Setup Wizard.
Next Move on to the next screen in the Basic Setup Wizard.
Cancel Changed settings are not applied and you return to the highest level.
Ok Save the settings and return to the highest level.
End Save the settings and exit the Basic Setup Wizard.
You will see other buttons depending on the screen currently open. If you require further
information about these, open the online Help at the appropriate place using the question mark button.
Input fields
On the configuration screens, change the required settings using the following input
fields:
Option buttons:
Two or more buttons, of which one is activated. As soon as you click
another option button, it is activated and the one previously selected is
reset. You will find option buttons wherever there is a choice between
several possibilities, e.g. whether or not you wish to use an external or
the internal antenna.
Text field:
Enter text or digits. Click in the field to activate input mode. You will find
text fields at points where you can specify text or numbers as required,
e.g. a new system password.
24
Page 25

User interface
Opening online Help
There is an online Help for each screen of the configuration program, which you can
open directly on the screen.
Click the question mark button at the top right.
The online Help is shown in the right pane of the configuration program.
If necessary, click Open Help window to open the online Help in a separate
window.
Menu structure
The menu of the user interface on your SX682 WiMAX is split into the following main
areas: Home, Basic Setup Wizard, Advanced Settings and Status. Under these
menu options, you will find the following areas:
Menu Description
Home
Basic Setup Wizard
Advanced Settings
Status
Start page and starting point for all configuration and administration tasks. It also shows the connection status and allows you to
set the language, see "User interface" on page 21.
Establish a connection to the WiMAX network, optimise the
antenna direction and set up your Internet connection and VoIP
access, see "Basic Setup Wizard" on page 27.
Configure your Internet and VoIP access and your local network
and perform administration tasks. For example, you can enter a
system password for access to your SX682 WiMAX or change it,
see "Configuration with the Web browser" on page 21.
Obtain information on the operating status of your SX682 WiMAX
and read off the device and version numbers as well as IP
addresses; see "Status" on page 46.
Internet See "Internet" on page 47.
Local Network See "Local network LAN" on page 48.
Telephony See "Telephony" on page 48.
Device Status See "Device status" on page 49.
Radio Status See "Radio status" on page 49.
25
Page 26

The Home page
The Home page
Once you have logged in successfully to the SX682 WiMAX, you will see the Home
page for the device software. The start screen offers an overview of all areas of the configuration program:
Menu Description
Basic Setup Wizard Perform the basic configuration and set up the radio
connection to the WiMAX network (
Advanced Settings Perform advanced configuration and administration
tasks ( page 33).
Status Obtain information on the status of your SX682 WiMAX
(
page 46).
In the area to the right of the start screen, you will see the connection status of your
SX682 WiMAX:
connected = The SX682 WiMAX has established a radio connection with a WiMAX
network. You will see the connection duration in brackets and in the format
ddd:hh:mm:ss (d=days, h=hours, m=minutes, s=seconds).
disconnected = The SX682 WiMAX is trying to establish a connection with a
WiMAX network.
To configure your SX682 WiMAX, use the Basic Setup Wizard, which will help you
establish a radio connection.
page 27).
Connecting to the Internet manually
Once you have configured your Internet access (see page 27 and page 35), you can
establish a manual connection to the Internet on the start screen if you have selected
Connect on demand as the Connection mode.
To establish or end an Internet connection manually:
Open the start screen of the SX682 WiMAX as described on page 21.
If you have already started the user interface, click the Home tab at the top left of
the window.
Click Connect to establish a connection to the Internet.
Click Disconnect if you no longer require the connection.
26
Page 27

Basic Setup Wizard
i
i
i
Basic Setup Wizard
The Basic Setup Wizard helps you start up your device and guides you step by step
through the configuration process with the most important settings.
The Basic Setup Wizard comprises the following steps:
Entering the access data for the WiMAX network
Configuring the Internet access
Selecting the antenna
Positioning the device
Scanning the frequencies to establish a radio connection with a WiMAX network
Exact alignment of the antenna to optimise the quality of the connection
Configuring VoIP access
You can check all the configuration settings that you make with the Basic
Setup Wizard later via the Advanced Settings menus and, if necessary,
change them, see "Advanced Settings" on page 33.
Depending on the pre-configuration of your device some of the menu
entries and configuration possibilities might be missing in your device.
Starting the Basic Setup Wizard
To start the Basic Setup Wizard, click the Basic Setup Wizard tab.
Click Next.
Entering access data for the WiMAX network
On this page you enter the data for authentication of your device on the WiMAX base
station. You will need the access data supplied by your WiMAX operator for this.
Activate the Authentication option, if this is required by your WiMAX operator.
Enter the access data and click Next.
Setting up Internet access
To allow users in your local network access to the Internet, set up the Internet connection of your device using the information supplied by your Internet provider.
Enter the access data and click Next.
Your SX682 WiMAX can be used as an Internet router or bridge. For
more on this see "Setting the operating mode" on page 34.
27
Page 28

Basic Setup Wizard
i
Selecting the antenna
Select whether you want to operate your SX682 WiMAX with an outdoor antenna
or the integrated one.
– Click the first option button if you want to use the integrated antenna. Your
SX682 WiMAX must be positioned by the window with the cable connections
pointing inwards and must be connected.
– Click the second option button if your SX682 WiMAX came with an outdoor
antenna. This antenna must have been installed and connected by an electrical
specialist.
Click Next.
Adjusting the antenna
If you are using the integrated antenna, adjust your SX682 WiMAX by the window.
If you are using the outdoor antenna, this must already be installed and facing
towards the base station, see "Installing the SX682 WiMAX" on page 13.
Click Next.
Establishing a radio connection to a WiMAX network
The Basic Setup Wizard will now scan the frequencies to establish an initial radio connection to a WiMAX network.
The frequency scan begins automatically. A progress bar indicates how far the scan
has progressed. In addition, you will see in the Remaining time area roughly how
much time is still needed for the complete scan. Depending on how your SX682 WiMAX
has been preconfigured by your provider, the scan can last several minutes before the
first radio connection is established.
During the scan, the SX682 WiMAX or antenna must not be moved; this
is the only way to guarantee a complete scan with the current antenna
alignment.
As soon as a radio connection has been established with a WiMAX network, the scan
will end. The progress bar is fully filled in and the display in the Remaining time area
jumps to 0 seconds.
If the scan has been successful, read on in Chapter "Precisely aligning the antenna"
on page 30.
If the scan was not successful:
Both the integrated antenna and the outdoor antenna are directional antennas; this
means that they must at least be pointing roughly in the direction of a WiMAX network
base station in order to establish a radio connection. The access data must also have
been entered correctly.
If the scan was not successful:
28
Page 29

Basic Setup Wizard
i
First check your access data by going back to the WiMAX configuration page
page 27).
(
If you have entered your access data correctly, adjust the antenna.
If you are using the integrated antenna:
Turn your SX682 WiMAX by approx. 45°.
Correct:
Incorrect:
Click Ok to restart the scan.
You must not move the SX682 WiMAX during the scan. You should
therefore always place the SX682 WiMAX upright and on a level surface
directly by the window.
If the scan has still not been successful with the alignment changed:
Place the SX682 WiMAX by a window that faces a different direction.
If necessary, repeat the scan with all possible locations and alignments.
If necessary, ask your provider for the location of the nearest WiMAX network base
station and select a location for your SX682 WiMAX that points towards this base
station.
The best results will be obtained if the SX682 WiMAX is in sight of a WiMAX network
base station.
29
Page 30

Basic Setup Wizard
i
If a line of sight is not possible, you can reflect the radio waves off neighbouring buildings. To do this, direct the SX682 WiMAX at the building it is to reflecting off and not at
the WiMAX network base station.
If you are using the outdoor antenna:
The qualified electrician turns the antenna through 20° in the vertical axis. Then the
scan is repeated by clicking the Ok button.
If necessary, the scan should be repeated with all possible antenna alignments.
Precisely aligning the antenna
Once you have established a radio connection to a WiMAX network, align your SX682
WiMAX or antenna precisely using the Basic Setup Wizard.
Take extra care to align the SX682 WiMAX or outdoor antenna precisely.
The better the connection quality, the faster your Internet connection will
be in the future.
To obtain precise alignment of the SX682 WiMAX or antenna, turn it a little at a time. If
you use the antenna integrated in the SX682 WiMAX, you can also move the device a
little at a time to optimise the reception quality.
When a connection to a WiMAX network has been established, click Next to make
fine adjustments to the antenna.
30
Page 31

Basic Setup Wizard
i
The quality of the radio connection is represented graphically by the Signal quality bar.
The longer the bar is, the better the radio connection. Try to obtain the best possible
radio connection setting.
If you are using the antenna integrated in the SX682 WiMAX:
Memorise the current location and alignment of your SX682 WiMAX, so that you
can restore it if the connection is broken.
If you are unable to check the display of the signal quality on the screen while align-
ing the antenna:
Activate the Audible feedback option to obtain information about the signal quality
by means of beeps. The closer together the sequence of beeps, the better the connection quality.
Turn or move the SX682 WiMAX or turn the antenna a little at a time and note the
signal quality display. Use this to move the antenna to the position with the best signal quality.
In addition to the beeps and on-screen bar graph you can also determine the quality of
the connection by how many of the 4 LEDs indicating signal quality are lit up on the
device (RSSI 1–RSSI 4). The more LEDs that light up, the better the connection quality.
If you have turned your SX682 WiMAX or the antenna too far, the connection might
break. You should then return to the alignment that provided a connection and repeat
the procedure for establishing a connection to the WiMAX network. Then make any fine
adjustments step by step.
The connection quality can be detected in two different ways:
CINR (Carrier to Interference and Noise Ratio) measures the signal
quality.
RSSI (Received Signal Strength Indication) measures the signal
strength.
The bar indicates either RSSI or CINR values. The used method is preconfigured by your operator. If RSSI is used the bar is labeled Signal
strength.
When your SX682 WiMAX or outdoor antenna is optimally aligned:
Click Next.
Make sure that in future your SX682 WiMAX or outdoor antenna is always in the set
position.
31
Page 32

Basic Setup Wizard
i
Setting up VoIP access
If you have connected an analogue telephone to the Phone port of your device for
Internet telephony, you set up your VoIP account here using the information you
received from your VoIP provider.
Activate the VoIP option to use Internet telephony for your device.
Enter the access data for your VoIP account that you received from your VoIP pro-
vider. You can normally keep the default settings, unless your provider explicitly
requires other values.
You can enable or disable the following options:
Comfort noise generation
In digital voice transmission, CNG (Comfort Noise Generation) ensures that the
listener hears a slight background noise in the pauses between speech, otherwise
they might think the connection has been lost.
Out-of-band DTMF
With analogue phones, DTMF (Dual-Tone Multi-Frequency, a multi-frequency
dialling system) is used to dial a number or transmit digits during a connection.
There are two kinds of DTMF:
Out-of-band: DTMF digits are transmitted in the voice-frequency band (above
G. 711 ).
In-band: DTMF digits are transmitted through RFC 2833 signalling (e.g.
when retrieving an external voicemail).
If you want to clear all the occupied fields on this page, click Clear.
Click End to close the Basic Setup Wizard and apply the settings you have made.
Further features as Call waiting, Call forwarding and Call transfer can
be configured in the Advanced Settings menu on the Telephony page.
For more detailed information on the telephone functions, see section
"Making a phone call or faxing with the SX682 WiMAX" on page 51.
32
Page 33

Advanced Settings
i
Advanced Settings
In the Advanced Settings menu, you can configure all the options for the SX682
WiMAX. If required, you can also change the settings you made using the Basic Setup
Wizard. The following table contains the options available in this menu.
Menu Description
Operating Mode
Internet
Local Network Here you can configure your local network, e.g. change the
Telephony Here you can configure your access for Internet telephony
Administration Here you can do various administration tasks, e.g. assign a
WiMAX configuration Here you can change the access data for your WiMAX
Antenna selection Here you can choose whether to use the internal antenna
Here you can define whether your SX682 WiMAX will be
used as a router or a bridge for the Internet access
(page 35).
Here you can configure your Internet access. This menu
covers all setting options for the Internet (page 35).
private IP address of the SX682 WiMAX or make settings
for the DHCP server (page 39).
(VoIP) (page 40).
system password (page 43) or reset the configuration to the
factory defaults (page 44). You can also load new firmware
(page 45)
access (page 42).
or an outdoor one for your WiMAX access (page 42).
All Advanced Settings pages contain Ok and Cancel buttons.
Click Ok to confirm your entries.
Click Cancel to close a page without applying the changes.
Depending on the pre-configuration of your device some of the menu
entries and configuration possibilities might be missing in your device.
33
Page 34

Setting the operating mode
Setting the operating mode
Via the operating mode, you define the role your SX682 WiMAX will play when establishing and administering Internet connections.
You can run your SX682 WiMAX in the following operating modes:
Router Your SX682 WiMAX serves as an Internet router for the network compo-
nents connected to the LAN port, i.e. it establishes the connection to the
Internet and ensures the transfer of the communication data to and from the
Internet (default).
Bridge The network components initiate and control their Internet connection them-
selves. Your SX682 WiMAX only allows the communication data to and
from the Internet to pass through.
To change the operating mode, open the Advanced Settings tab and select Oper-
ating Mode from the menu.
When you change the operating mode, your device is restarted.
In Bridge mode, the following functions are no longer available:
The DHCP server of the SX682 WiMAX is deactivated ( page 39) because the
network components receive IP addresses in the public network.
If you want to access the configuration program of the SX682 WiMAX via your PC,
you must connect the PC directly to the LAN port. You must also temporarily assign
it a static IP address in the address range of the SX682 WiMAX. If you want to use
the Internet again after this, reset your PC to “automatic IP address”. For details see
the document “Configuring the local area network” on the product CD.
The firewall of your SX682 WiMAX is disabled and cannot be enabled ( page 36).
The NAT function of your SX682 WiMAX is disabled. This means that the functions
Port Forwarding ( page 37) and Exposed Host ( page 38) are not available.
If necessary you may have to protect your network components against unwelcome
access from the Internet by appropriate means (e.g. firewall software).
34
Page 35

Configuring Internet access
i
Configuring Internet access
If you have configured the SX682 WiMAX using the Basic Setup Wizard, you have also
configured your Internet access. You can check or change these settings in the Inter-
net menu.
This menu also offers you a wide range of possibilities for setting up security settings
and limiting access to the Internet as well as for providing your own services on the
Internet.
You can carry out the following via the Internet menu:
Internet Connection Check and edit the Internet connection of the SX682
WiMAX (for further information see below),
DNS Servers Make DNS server settings (
Firewall Protect the network against hacker attacks ( page 36),
Port Forwarding Provide your own services on the Internet (
Exposed Host Opening the firewall for a selected PC (
Setting up the Internet Connection
You can set up or change the configuration of your Internet connection in this screen.
All the settings you make here must coincide with the features your Internet service provider makes available to you. Incorrect information can lead to problems with your Internet connection.
page 36),
page 37),
page 38).
Depending on the pre-configuration of your device some of the following
configuration possibilities might be missing in your device.
Open the Advanced Settings tab and on the Internet menu select Internet Con-
nection.
Enter the data you have been given by your service provider.
Select the Protocol used for Internet access.
–PPPoE
– Static
– Obtain automatically
Apply the default settings for the other parameters unless your service provider has
given you other data.
Connection mode
For a PPPoE connection (Point-to-Point over Ethernet), specify the Connection
mode:
35
Page 36

Configuring Internet access
Always on
This gives the users in your network a constantly active Internet connection.
Only choose this setting if your Internet tariff is not time-dependent.
Choose this option if you use Internet telephony, otherwise you cannot receive
incoming calls.
If necessary you can terminate the Internet connection manually (
page 26).
Connect on demand
The Internet connection is only established if an application, e.g. an Internet
browser or an e-mail program, requests it.
PPPoE pass-through
If you activate the PPPoE pass-through function, a PC in the network can connect to
the Internet via its own connection ID. The router puts this connection through.
Setting up DNS servers
DNS (Domain Name System) is a decentralised database on the Internet which allocates clearly understandable Internet names (domains) to the actual addresses of PCs
and services (e.g. IP addresses). The DNS servers required for access to this database
are normally provided by your provider and do not have to be set up specially. But if
necessary you can change them here.
Open the Advanced Settings tab and on the Internet menu select DNS Servers.
Activate the Use custom DNS servers function and enter the IP addresses for your
Preferred DNS server and the Alternate DNS server.
Enabling or disabling the firewall
Your SX682 WiMAX comes with an integrated firewall, which protects your device and
network against unauthorised access from the Internet. If the firewall is enabled, your
device can identify certain events, e.g. suspicious incoming data packets from the Internet, as attacks and avert them (hacker defence). Your device’s firewall is enabled by
default.
We urgently recommend that you leave the firewall of your SX682
WiMAX enabled, otherwise your network will no longer be protected
against hacker attacks from the Internet.
If you still want to disable the firewall:
Open the Advanced Settings tab and on the Internet menu select Firewall.
Disable the firewall.
36
Page 37

Port Forwarding
i
i
This function is not available in Bridge operating mode, see "Configuring
Internet access" on page 35.
PCs in your network should be protected by a separate firewall. You can
set up protection against DoS (Denial of Service) attacks in Bridge mode
via the local network configuration, see "LAN configuration" on page 39.
Port Forwarding
The SX682 WiMAX comes with the NAT (Network Address Translation) function, which
is always activated in Router operating mode. With address mapping, multiple users in
the local network can access the Internet via the public IP address. All the local IP
addresses are assigned to the router's public IP address by default. All IP addresses
of PCs in the local network are converted to the router's public IP address when
accessing the Internet.
Most Internet applications can be executed behind the NAT firewall without any problems. However, some applications - such as Internet games - require users in the Internet to send requests to users in the local network so that the players can communicate
with each other. Sometimes these applications also require several ports to communicate through. Such applications do not work if NAT is active.
Using port forwarding (the forwarding of requests to particular ports) the router is forced
to send requests from the Internet for a certain service, for example a game, to the
appropriate port(s) on the PC on which the game is running. If you configure Port Forwarding, the SX682 WiMAX outwardly assumes the role of the server. It receives
requests from remote users under its public IP address and automatically redirects
them to local PCs. The private IP addresses of the servers on the local network remain
protected.
Internet services are addressed via defined port numbers. The SX682 WiMAX needs
a mapping table of the port numbers to redirect the service requests to the servers that
actually provide the service. Port Forwarding has to be configured for this purpose.
Open the Advanced Settings tab and on the Internet menu select Port Forward-
ing.
Define the list of services for which you want requests from the Internet to be for-
warded.
Important services are already included in the Predefined applications selection field.
The list can hold up to 16 entries.
The IP addresses of the PCs for which you set up port forwarding must
remain unchanged. If the IP addresses of the PCs are assigned via the
DHCP server of the SX682 WiMAX, you must select the option Never
expires as the Lease time when configuring the DHCP server or assign
static IP addresses to the PCs, see "Configuring the DHCP server" on
page 39.
37
Page 38

Port Forwarding
i
i
i
This function is not available in Bridge operating mode, see "Configuring
Internet access" on page 35.
Opening the firewall for a selected PC (Exposed Host)
You can set up a client in your local network to be a so-called "exposed host". Your
device will then forward all incoming requests from the Internet to this client, with the
exception of requests to the port numbers already defined via port forwarding. You can
then, for example, operate your own Web server on one of the clients in your local network and make it accessible to Internet users.
As the exposed host, the local client is directly visible to the Internet and therefore particularly vulnerable to attacks (e.g. hacker attacks). Only activate this function if it is
absolutely necessary (e.g. to operate a Web server) and other functions (e.g. port forwarding) are not adequate. In this case you should take appropriate measures for the
clients concerned.
Open the Advanced Settings tab and on the Internet menu select Exposed Host.
Define the list of PCs you want to set up as exposed hosts.
Activate a PC which you want to function as the current exposed host. Only one PC
at a time can be selected.
The IP addresses of the PCs you want to set up as exposed hosts must
remain unchanged. If the IP addresses of the PCs are assigned via the
DHCP server of the SX682 WiMAX, you must select the option Never
expires as the Lease time when configuring the DHCP server or assign
static IP addresses to the PCs, see "Configuring the DHCP server" on
page 39.
This function is not available in Bridge operating mode, see "Configuring
Internet access" on page 35.
38
Page 39

LAN configuration
i
LAN configuration
With the help of the LAN configuration you can change the preset values for the computer name and the private IP address for your SX682 WiMAX and configure the integrated DHCP server.
Open the Advanced Settings tab and select Local Network.
The preset IP address is 192.168.2.1. This is the private IP address of the SX682
WiMAX. This is the address under which the device can be reached in the local network. It can be freely assigned from the block of available addresses. The IP address
under which the SX682 WiMAX can be reached from outside is assigned by the Internet service provider. The default Subnet mask for the local network administered by the
SX682 WiMAX is 255.255.255.0.
Please note which subnet mask is set when assigning the IP address. The preset subnet mask defines the first three parts of the IP address which must be identical for all
network components (including routers).
We recommend that you use an address from a block that is reserved for private use.
This address block is 192.168.1.1 to 192.168.255.254.
Configuring the DHCP server
The SX682 WiMAX has a DHCP server for which the factory setting is active. Consequently, the IP addresses of the PCs are automatically assigned by the SX682 WiMAX.
If the DHCP server for the SX682 WiMAX is activated, you can con-
figure the network setting on the PC so that the option Obtain an IP
address automatically is set up.
If you deactivate the DHCP server, you will have to assign a static IP
address for the PCs that use the network settings.
For more information see the document “Configuring the local area network” on the CD.
If the DHCP server is active, you can define a Lease time. The lease time indicates
how long the client may use the allocated IP configuration.
Note:
If you select Never expires, the IP addresses are never changed. Activate this
option if you want to make NAT or firewall settings using the IP addresses of the
PCs; otherwise you have to assign static IP addresses to these PCs.
Define the range of IP addresses the SX682 WiMAX should use to automatically
assign IP addresses to the PCs. Define the Start IP and the End IP.
39
Page 40

Setting up Internet telephony (VoIP)
i
Assigning static IP addresses to individual PCs
Even if you have activated the DHCP server, you can still assign a static IP address to
individual PCs (e.g. when setting up these PCs for NAT functions).
Enter the MAC address of the PC to which you want to assign a static IP address
and the IP address you wish to assign to the PC.
Configuring the local network in Bridge operating mode
In Bridge operating mode (
The network components get their IP addresses from a DHCP server in the public network.
page 35) the SX682 WiMAX DHCP server is deactivated.
Ageing time for
MAC table
Protection
against DoS
attacks
When a PC in the network is accessed, your SX682 WiMAX writes the
MAC address and port number in a MAC table to speed up further
accesses. The entry in the MAC table is deleted after a fixed time. If
necessary you can change this value via the MAC table ageing time
parameter.
DoS (Denial of Service) attacks are attacks on a system in the network to make its services unusable. This is basically done by overloading the system by constantly sending requests. In Bridge mode,
the SX682 WiMAX provides protection against DoS attacks, which
you can enable or disable via the activate DOS protection parameter.
Setting up Internet telephony (VoIP)
The SX682 WiMAX allows you to make phone calls over the Internet with an analogue
telephone. For Internet telephony (VoIP) you need the access authorisation of your provider and the corresponding access data.
You can connect an analogue telephone, a base for mobile components or a fax
machine to the phone port of your SX682 WiMAX.
To be able to make phone calls over the Internet via VoIP, you will need to set up your
VoIP account using the information supplied by your VoIP provider.
If you have executed the Basic Setup Wizard, you will already have entered these
details there. If necessary you can change them here.
For PPPoE Internet connections, do not change the default setting for
the Internet connection mode (= “Always on”) if you use VoIP (page 35).
You can only receive calls via VoIP if this mode is set. Bear in mind, however, that this setting may incur high connection costs if you have a timebased tariff with your Internet provider.
You get the access and configuration data for Internet telephony from your provider.
Open the Advanced Settings tab and select Telephony.
40
Page 41

Setting up Internet telephony (VoIP)
i
i
Enter the access data for your VoIP account that you received from your VoIP pro-
vider. You can normally keep the default settings, unless your provider explicitly
requires other values.
You can enable or disable the following options:
Comfort noise generation
In digital voice transmission, CNG (Comfort Noise Generation) ensures that the
listener hears a slight background noise in the pauses between speech, otherwise
they might think the connection has been lost.
Out-of-band DTMF
With analogue phones, DTMF (Dual-Tone Multi-Frequency, a multi-frequency
dialling system) is used to dial a number or transmit digits during a connection.
There are two kinds of DTMF:
Out-of-band: DTMF digits are transmitted in the voice-frequency band (above
G. 711 ).
In-band: DTMF digits are transmitted through RFC 2833 signalling (e.g.
when retrieving an external voicemail).
Telephone functions
You can also configure the following telephone functions:
Call waiting An incoming call is signalled while you are on the phone (only for
phones on the Phone port).
Call forwarding You can forward incoming calls to another telephone connection.
There are the following possibilities:
Forwarding always: All calls are forwarded at once.
Forwarding on busy: Calls are forwarded if your connection is
busy.
Forwarding on no
response:
Call transfer You can transfer calls to other participants if this feature is available
also for the other participants.
Calls are forwarded if the phone is not
answered
Call waiting and Forwarding on busy cannot both be activated in parallel.
For detailed information on the telephone functions, see section "Making
a phone call or faxing with the SX682 WiMAX" on page 51.
41
Page 42

WiMAX configuration
!
WiMAX configuration
On this page you enter the data for authentication of your device on the WiMAX base
station. You will need the access data supplied by your WiMAX operator for this.
If you have executed the Basic Setup Wizard, you will already have entered these
details there. If necessary you can change them here.
Open the Advanced Settings tab and select WiMAX configuration from the
menu.
Select Authentication, if authentication is required by your WiMAX operator and
enter or change the required access data.
Antenna selection
On this page you select the antenna to be used for your connection.
If you have executed the Basic Setup Wizard, you will already have entered these
details there. If necessary you can change the setting here.
Open the Advanced Settings tab and select Antenna selection from the menu.
To establish an optimum connection to the WiMAX base station, you may
have to adjust the antenna. Go through the Basic Setup Wizard - it will
help you with the exact adjustment of your antenna for optimum reception, see "Establishing a radio connection to a WiMAX network" on
page 28.
42
Page 43

Administration
i
!
Administration
The user interface Administration menu includes several helpful functions for administering your SX682 WiMAX.
System Password Changes the system password (page 43)
Factory Reset Reset the SX682 WiMAX to the factory settings (page 44)
Restart Reboots the device (page 45)
Firmware Update Updates firmware (page 45)
Depending on the pre-configuration of your device some of the menu
entries and configuration possibilities might be missing in your device.
System password
The system password is the password for configuring your SX682 WiMAX and is
requested when you open the configuration pages, see "Launching the user interface"
on page 21.
If the device came from your provider with a preset system password, you can change
this password here.
The system password protects your SX682 WiMAX and your local network from unauthorised access. For this reason, it is important to set up
a password and change the default password.
Open the Advanced Settings tab and on the Administration menu select System
Password.
Features of a secure password
A password should be difficult for unauthorised users to work out. Note the following
points when choosing a password:
The more characters a password has, the more secure it is.
Choose a series of characters that is as varied as possible (not AAAA, 0000) and
alternate between letters and numbers.
Do not use any term that could be found in a dictionary.
Do not use sequential characters (not 123456, abcd) and no recognisable system
(not 1a2b3c).
Never use a password several times for different applications.
Never save a password on the PC. Instead, make a note of it and store it in a secure
place.
Change your passwords regularly.
43
Page 44

Restoring factory settings
!
i
Changing the password
Enter the current password in the Current password field. If no default system
password has been set, leave this field empty.
Enter a new password in the New password field.
– Select any series of characters with a minimum length of 4 and a maximum
length of 20 characters. You can use the following characters: A–Z, a–z, 0–9 as
well as the following special characters: \ ! " $ % & ' / ( ) = ? | + # * ~ , . - ; : _ ^
< > @ [ ] { }.
– Note down your new password on a sheet of paper and store it in secure place.
Enter your new password in the Confirm new password field again. This entry is
case-sensitive.
The new password can only be activated if both entries match. This detects typing
errors when the password is entered.
Finally, click Ok to accept your change and to activate the new password.
The new password is valid immediately for each instance the configuration is called
up.
The configuration of the SX682 WiMAX cannot be accessed if you
do not enter a valid password. In this case, you must restore all the fac-
tory settings of the SX682 WiMAX. To find out how to do this, see chapter
"Returning the SX682 WiMAX to factory settings" on page 20.
Restoring factory settings
You can reset the SX682 WiMAX to the factory settings. You should do this before making the device available to others or exchanging it through the dealer. Otherwise unauthorised users may use the Internet access data at your expense.
Open the Advanced Settings tab and on the Administration menu select Factory
reset.
Click Ok.
A window will appear prompting you to confirm the procedure.
Please remember that when the device is fully reset, all the configu-
ration settings are returned to the factory settings. This means that
you will have to completely reconfigure the SX682 WiMAX.
You can also reset the SX682 WiMAX via the Reset button on the
device itself ( page 20).
44
Page 45

Restart
!
Restart
If the SX682 WiMAX is not operating properly, you can reboot it. It should then be ready
for use again.
Open the Advanced Settings tab and on the Administration menu select
Restart.
Click Ok to reboot the device.
A window will appear prompting you to confirm the procedure.
Updating the firmware
If your WiMAX provider provides a new downloadable firmware version for your SX682
WiMAX with new functions or to fix errors, you can update your device quickly and easily.
First download the relevant firmware file from the Internet and save it on your PC.
Read the information provided carefully.
Only update the firmware if there is a new version of the firmware that is
currently installed on your device on the Internet. The firmware version
currently installed is shown under Active image version.
Open the Advanced Settings tab and on the Administration menu select
Firmware Update.
Enter the path and file name of the firmware file to be installed or click Browse to
select a file on your PC.
Click Ok to start the firmware update.
Do not disconnect your SX682 WiMAX from the PC or the power supply
during the firmware update, as this could damage the device. It may take
up to five minutes before the device is ready for use again.
45
Page 46

Status
i
Status
You can check the status of your SX682 WiMAX with the pages in the Status menu.
The menu is divided into several individual pages opened by clicking the entries in the
menu area. To help with orientation, in the following sections the path is placed first so
that you can quickly find the status messages described.
For example, with the following address you can open the settings of your LAN:
Status > Local Network.
If you have problems, before contacting your provider or customer
service, check the status of your SX682 WiMAX.
When looking for the fault, your provider or customer service will need
some details that you will find on the status pages.
You will find the most important status information summarised on the homepage.
For detailed information, click an entry in the submenu.
Information on the Status homepage
Connection status The status of the radio connection with the WiMAX network is
displayed as follows:
connected = The SX682 WiMAX has established a radio
connection with a WiMAX network. You will see the connection duration in brackets and in the format ddd:hh:mm:ss
(d=days, h=hours, m=minutes, s=seconds).
disconnected = The SX682 WiMAX is trying to establish a
connection with a WiMAX network.
IP address For an existing Internet connection only:
Displays the IP address used by the SX682 WiMAX on the Internet.
IP address IP address used by the SX682 WiMAX in your local network.
DHCP server Displays whether the DHCP server of your SX682 WiMAX is
activated. As DHCP server, your SX682 WiMAX assigns an IP
address to all the PCs in the network. DHCP must be activated
on a PC for the PC to receive an IP address from the DHCP
server. For more information see the document "Configuring the
local area network" on the product CD.
VoIP status Shows whether Internet telephony is set up.
System time Displays the current date and time. The date and time are
transmitted to your SX682 WiMAX from the WiMAX network.
Operating mode Role played by your SX682 WiMAX during connection setup to
the Internet (Router or Bridge).
Firmware version Version number of the currently installed device software. You
will also need to give your provider this number.
46
Page 47

Internet
If necessary, click the Refresh button to refresh the data in the status display.
Internet
Status > Internet
The connection settings for your SX682 WiMAX are displayed in the Internet submenu.
Connection status The status of the radio connection with the WiMAX network
is displayed as follows:
connected = The SX682 WiMAX has established a
radio connection with a WiMAX network. You will see the
connection duration in brackets and in the format
ddd:hh:mm:ss (d=days, h=hours, m=minutes, s=seconds).
disconnected = The SX682 WiMAX is trying to estab-
lish a connection with a WiMAX network.
IP address
Subnet mask
MAC address The MAC address uniquely identifies a network component
Default gateway For an existing Internet connection only:
DHCP server IP address of the DHCP server with which the SX682
Preferred DNS server
Alternate DNS server
Address Translation
(NAT)
If necessary, click the Refresh button to refresh the data in the status display.
For an existing Internet connection only:
Displays the public IP address and subnet mask via which
your SX682 WiMAX establishes the connection with the
Internet.
within a network, in this case the public MAC address of
your SX682 WiMAX within the WiMAX network you use.
Displays the gateway the SX682 WiMAX uses for connecting to the Internet.
WiMAX is connected. While the SX682 WiMAX has not
been assigned an IP address by the WiMAX network, the
field stays empty.
For an existing Internet connection only:
Displays the domain name server the SX682 WiMAX uses
to convert names to IP addresses.
Displays whether NAT mode is activated on your SX682
WiMAX. NAT converts the internal IP addresses of the PCs
in your network to public IP addresses. This maintains the
confidentiality of your internal IP addresses.
47
Page 48

Local network LAN
Local network LAN
Status > Local Network
The configuration of the local network is displayed in the Local Network submenu.
IP address IP address used by the SX682 WiMAX in your local network.
Default: 192.168.2.1
Subnet mask Subnet mask of your local network. Default: 255.255.255.0
MAC address The MAC address uniquely identifies a network component
within a network, in this case the local MAC address of your
SX682 WiMAX within your local network.
DHCP server Displays whether the DHCP server of your SX682 WiMAX is
activated. As DHCP server, your SX682 WiMAX assigns an IP
address to all the PCs in the network. If the DHCP server is
activated, you will see the network subscribers that have
received your IP address from the DHCP server in the DHCP
clients field. DHCP must be activated on a PC for the PC to
receive an IP address from the DHCP server. For more information see the document "Configuring the local area network"
on the product CD.
If necessary, click the Refresh button to refresh the data in the status display.
Telephony
Status > Telephony
The VoIP configuration is displayed in the Telephony submenu.
User name The user name registered with your VoIP provider.
SIP domain The name of your VoIP provider's SIP domain.
Status Current status of your analogue phone connection: You can
see whether your SX682 WiMAX is registered to a server and
whether there is currently an active connection.
If necessary, click the Refresh button to refresh the data in the status display.
48
Page 49

Device status
Device status
Status > Device Status
The device status of your SX682 WiMAX is displayed in the Device Status submenu.
System uptime Operating time of your SX682 WiMAX since it was last
restarted. The operating time is given in the format
ddd:hh:mm:ss (d=days, h=hours, m=minutes, s=seconds).
System time Displays the current date and time. This information is trans-
mitted to your SX682 WiMAX by the WiMAX network.
Operating Mode Role played by your SX682 WiMAX during connection setup to
the Internet (Router or Bridge).
Device temperature Current device temperature inside your SX682 WiMAX. In the
event of overheating, the SX682 WiMAX switches off.
System Log Error protocol in which you will find information about prob-
lems.
If necessary, click the Refresh button to refresh the data in the status display.
Radio status
Status > Radio Status
Information about the radio connection to the WiMAX network is displayed in the Radio
Status submenu.
Connected to a base station
Indicates whether or not your SX682 WiMAX is connected to a base station.
Base station ID
ID number of the base station to which the device is connected.
MAC state
Status of the connection setup to the base station. The information shown here is
only intended for technically experienced users. Under Connected to a base sta-
tion is shown whether a connection to a base station exists.
Authentication
Indicates whether an authentication method is used for the WiMAX connection.
Protocol
Protocol used for authentication.
Received power level
Receive level from the WiMAX base station. Values in the range -70 dBm to 10 dBm are considered optimum. You can ensure this by optimising the antenna
direction.
49
Page 50

Radio status
Transmitted power level
Current transmission power.
Carrier to interference and noise ratio
Measurement of the reception quality of the base station. The higher the value, the
better the quality of the data transfer to the base station.
Centre frequency of current uplink channel
Currently used uplink frequency. The reading changes frequently during the mea-
surement.
Centre frequency of current downlink channel
Currently used downlink frequency.
Current channel bandwidth
Currently used bandwidth.
Radio port uplink current average throughput
Average approximate uplink throughput in one second, moving average
(5 samples).
Radio port downlink current average throughput
Average approximate downlink throughput in one second, moving average
(5 samples).
Current uplink modulation scheme
Currently used uplink modulation type.
Current downlink modulation scheme
Currently used downlink modulation type.
If necessary, click the Refresh button to refresh the data in the status display.
50
Page 51

Using the SX682 WiMAX
i
Using the SX682 WiMAX
When you have finished configuring your SX682 WiMAX, use it to surf the Internet,
send e-mails or make phone calls via the Internet etc.
As soon as you attempt to access the Internet with a PC connected to the SX682
WiMAX (for example, by opening the Web browser and calling up an Internet site, or
by starting your e-mail program and retrieving e-mails), your SX682 WiMAX automatically establishes a connection to the Internet or uses the permanent Internet connection. Whether the connection needs to be established or is permanently available
depends on your provider's default settings.
Making a phone call or faxing with the SX682 WiMAX
You can use your SX682 WiMAX to make calls via the Internet (VoIP) and operate a
fax machine or answer machine without installing any additional software. If you wish,
for example, to make a phone call via the Internet, you do not need to switch on your
PC.
In order to operate an analogue terminal on your SX682 WiMAX, the following preconditions must be satisfied:
You have an analogue terminal (telephone, fax machine or answer machine) con-
nected to your SX682 WiMAX.
Internet telephony (VoIP) is included in your contract with your provider. This is nec-
essary as your provider needs to set up VoIP access for you. You can find out
whether VoIP access is configured in your SX682 WiMAX either from the documentation given to you by your provider or by referring to the relevant status page on
your SX682 WiMAX; see Chapter "Telephony" on page 48.
Your SX682 WiMAX will adjust extremely flexibly to your requirements: if you wish
to make a call via VoIP, the SX682 WiMAX will automatically provide a permanent
bandwidth for the purpose. This enables good voice quality when making a call via
VoIP.
You need a permanent Internet connection if you wish to be permanently accessible
and make calls via VoIP.
Please note that you cannot make phone calls via the Internet in the
event of a power failure.
Ask your provider which emergency numbers are available via the VoIP
connection. It is also possible that service numbers cannot be reached in
the usual way.
Ask your provider about VoIP rates for VoIP connections.
The VoIP features may vary considerably, depending on your provider's VoIP configuration. You should therefore read the documentation given to you by your provider and,
where applicable, visit your provider's Internet site for further options.
51
Page 52

Making a phone call or faxing with the SX682 WiMAX
Making calls via VoIP
Make telephone calls in the same way as on a conventional phone: dial as usual or use
the directory to dial. The Phone LED flashes green.
Receiving VoIP phone calls
Your PC does not need to be switched on for you to receive calls. You only need the
SX682 WiMAX to be ready for operation (Phone LED lights up green).
For you to receive calls via VoIP, let potential callers know your VoIP phone number.
You will find your VoIP phone number in the documentation supplied by your provider.
As soon as a call comes in on your VoIP phone, the Phone LED starts to flash green
and the phone rings. When you lift the receiver or press the connect button, your SX682
WiMAX will provide the appropriate bandwidth for voice transmission. If you are surfing
the Internet at the same time, the data might be transmitted slightly more slowly, similar
to when downloading several large data packets. The call is made in the same way as
via a conventional phone line. When you have ended the call, the Phone LED glows
green again and your SX682 WiMAX makes the entire bandwidth available for data
transfer.
Telephone functions
This section describes the telephone functions available via the phone socket of your
SX682 WiMAX.
Telephoning
You want to call someone.
Key
sequence
Action
Lift the receiver.
Dial the number you want to call.
The call is connected.
Hang up the receiver to end the call.
52
Page 53

Making a phone call or faxing with the SX682 WiMAX
Consultation Call
You are on the phone to subscriber A. During the call you want to call subscriber B with
an enquiry. When you finish talking to subscriber B, you want call A to be restored.
Key
Action
sequence
You are on the phone to subscriber A.
Press the R button.
Subscriber A is put on hold.
You hear the dialling tone for the second call.
Dial the number for subscriber B.
The call is connected and you can talk to subscriber B.
Hang up the receiver to end the call.
You will receive an automatic callback from subscriber A.
Pick up the receiver and resume the call to subscriber A.
If you cannot get through to subscriber B
Key
Action
sequence
If you cannot get through to subscriber B because the line is busy,
you will hear the busy tone.
either
Hang up the receiver to end the call.
You will receive an automatic callback from subscriber A.
Pick up the receiver and resume the call to subscriber A.
or
Press the R button.
Your call to subscriber A will be reconnected.
53
Page 54

Making a phone call or faxing with the SX682 WiMAX
i
Accepting a call waiting
You are on the phone to subscriber A. A call comes in from subscriber B. You want to
accept the call from subscriber B and end the call to subscriber A.
Key
sequence
Alternating between callers (call holding)
You are on the phone to subscriber A. A call comes in from subscriber B. You want to
accept the call from subscriber B without ending the call to subscriber A.
Key
sequence
Action
You are on the phone to subscriber A.
During the call you hear the “call waiting” tone.
Hang up the receiver to end the call to subscriber A.
Pick up the receiver again.
You will be connected to subscriber B.
A waiting call is only signalled on your phone if the Call waiting function
is activated. You can make the desired settings via the configuration pro-
page 40).
gram (
Action
You are on the phone to subscriber A.
During the call you hear the “call waiting” tone.
Press the R button.
Subscriber A is put on hold.
You are connected to subscriber B.
Press the R button.
Subscriber B is put on hold.
You are reconnected to subscriber A.
54
Page 55

Making a phone call or faxing with the SX682 WiMAX
i
Call transfer
You are on the phone to subscriber A and you want to transfer the call to subscriber B.
Key
sequence
Conference calling
You want to make a conference call to two other parties.
Key
sequence
Action
You are on the phone to subscriber A.
Press the R button.
Subscriber A is put on hold.
Dial the number for subscriber B.
The connection to subscriber B is established.
Hang up the receiver.
Subscriber A and subscriber B are connected.
The Call transfer function must be activated via the configuration pro-
page 40) and must be available at the other subscribers.
gram (
Action
Pick up the receiver.
Dial the number for subscriber A.
The call is connected. Subscriber A answers.
Press the R button.
Subscriber A is put on hold.
You hear the dialling tone for a second call.
Dial the number for subscriber B.
The call is connected. Subscriber B answers.
Press the R button.
The conference call between you, subscriber A and subscriber B is
set up.
If you press the R button while the call is being connected to subscriber B, the call setup
is cancelled and you continue with your call to subscriber A.
55
Page 56

Making a phone call or faxing with the SX682 WiMAX
i
Ending a conference call
You want to end the call to subscriber B.
Key
sequence
You want to end the conference call with both parties.
Key
sequence
Subscribers A and B can quit the conference call at any time by hanging up. The connection to the remaining subscriber continues.
Call transfer during conference
You have initialised a conference call with subscriber A and subscriber B and now you
want to back out of the conference call. Subscriber A and Subscriber B should remain
connected.
Key
sequence
Action
Press the R button.
The connection to subscriber B is terminated and you continue with
your call to subscriber A.
Action
Hang up the receiver.
The conference call is terminated.
Action
You are on the phone to subscriber A and subscriber B.
Hang up the receiver.
The conference is terminated for you. Subscriber A and subscriber
B remain connected.
The Call transfer and Call transfer during conference functions must
have been activated using the configuration program ( page 40).
56
Page 57

Making a phone call or faxing with the SX682 WiMAX
i
Call forwarding
You can forward incoming calls to another telephone extension always, on busy or on
no response and define each with different destinations. The destinations for forwarding are set via the configuration program, see "Setting up Internet telephony (VoIP)" on
page 40.
You activate or deactivate the desired function via the configuration program or directly
on the phone.
The key sequences described below are default settings and may be different for your VoIP provider. Please use the appropriate information of
your provider.
Key
sequence
Action: Activating "Forwarding always"
Press the star key and then the keys 2 and 0.
All incoming calls are forwarded to the phone number defined in the
configuration program.
When Forwarding always is active and an incoming call is forwarded, this is signalled by a splash ring (single ring).
If Forwarding always is active and you pick up the phone to make
an outgoing call 3 beep tones are played before the dialtone (Stutterdial Tone).
Action: Deactivating "Forwarding always"
Press the star key and then the keys 2 and 1.
Call forwarding will be deactivated.
Action: Activating "Forwarding on busy"
Press the star key and then the keys 3 and 0.
If your connection is busy, all incoming calls are forwarded to the
phone number defined in the configuration program.
Note: The Forwarding on busy and Call waiting functions cannot
be activated both in parallel.
Action: Deactivating "Forwarding on busy"
Press the star key and then the keys 3 and 1.
Call forwarding on busy will be deactivated.
Action: Activating "Forwarding on no response"
Press the star key and then the keys 4 and 0.
If incoming calls are not answered, they are forwarded to the phone
number defined in the configuration program.
57
Page 58

Confirmation tones
i
Action: Deactivating "Forwarding on no response"
Press the star key and then the keys 4 and 1.
Call forwarding on no response will be deactivated.
Action: Deactivating call forwarding in all cases
Press the star key and then press twice the key 1.
All call forwarding settings will be deactivated.
Confirmation tones
If you execute one of the actions listed in section "Call forwarding" on page 57 you will
hear a confirmation tone. The confirmation tone sounds even if the action doesn’t make
sense, e.g. if you try to activate a feature that is already activated. After a confirmation
tone you must hang up the receiver before you can execute another action or before
you can telephone.
Confirmation tone: Call forwarding is activated and an incoming call is forwarded.
If you are at home this signal will remind you that call forwarding
is activated.
Sutter-dial tone
(short signal tone)
The confirmation tones can be configured by the operator.
Call forwarding is activated and you lift the receiver.
58
Page 59

Appendix
Yes
No
Power LED not lit up: power supply.
Is the mains adapter connected correctly?
Is the power socket live?
The mains adapter might be faulty.
Yes
No
Is the LAN LED
green?
Is the Power
LED green?
Yes
No
LAN LED not lit up: Ethernet connection.
Is the Ethernet cable connected correctly?
Is the PC's network adapter working?
LAN LED flashing green: data is being transmitted. No fault.
Is the Online
LED green?
Online LED not lit up: no registration to a WiMAX network.
Has the antenna been moved out of position or the device's
alignment changed? In this case, restore the original alignment.
Register your SX682 WiMAX with the help of the Basic Setup
Wizard; see page 27.
Online LED flashing green: a connection is being established. No fault.
Online LED is red: the SX682 WiMAX is not ready for use.
The device may be too hot. In this case, the integrated overheating protector prevents the SX682 WiMAX from being
damaged. If the temperature rises, the SX682 WiMAX automatically reduces data transfer to a minimum. When the temperature exceeds the critical value, the SX682 WiMAX
switches itself off.
Wait until the SX682 WiMAX has cooled down.
Fault still not rectified?
Appendix
Troubleshooting
Fault tracing
When troubleshooting, start by checking the LEDs on your SX682 WiMAX. Please
answer the questions on the left-hand side and follow the arrows to the answers and
solutions:
59
Page 60

Troubleshooting
Look for a suitable place to set up your SX682 WiMAX; see
page 13.
Register your SX682 WiMAX with the help of the Basic
Setup Wizard; see page 27.
Check the connection to your SX682 WiMAX; see
page 62.
Can the configuration program be
accessed?
Yes
No
The TCP/IP network is incorrectly configured on the PC; see document "Configuring the local
area network" on product CD.
Is there a connection?
The Web browser (Internet Explorer, Mozilla Firefox) is
incorrectly configured; see page 63.
Yes
No
Other faults and problems
You are using a firewall on the PC that prevents access to the SX682 WiMAX
Test this, if necessary, by briefly switching off the firewall. If access is possible, configure the firewall. For details, refer to the user guide for your firewall.
You have forgotten the system password
If you have assigned your own system password or changed and forgotten it, you need
to return your SX682 WiMAX to the factory settings; see Chapter "Returning the SX682
WiMAX to factory settings" on page 20.
The Online LED is lit up permanently in red and the possibility of the device
overheating can be excluded
The SX682 WiMAX may be faulty. Restart the SX682 WiMAX; see "Rebooting the
SX682 WiMAX" on page 19. If the Online LED remains red after the device has been
restarted and does not go off, please contact your provider/service technician.
60
Page 61

Troubleshooting
Only a few LEDs have lit up to display the signal strength (RSSI) and the Online
LED is green
If you are using the antenna integrated in the SX682 WiMAX, turn the SX682 WiMAX
until more LEDs light up. Try to place the SX682 WiMAX even closer to the window and
check the signal strength bar in the Basic Setup Wizard of the configuration program.
Power failure
No data will be lost.
Before contacting customer service or your provider
First exclude all the faults listed in this section.
Have the documentation supplied by your provider ready.
If you can open the configuration program in the Web browser, click the Status tab.
Note the number in the Firmware version field. This is the number of the currently
installed device software.
Open the Local Network submenu and note the entry consisting of numbers and
letters in the MAC address field. The MAC address is used for the globally unique
identification of your device.
Leave the PC switched on and the configuration program open when you phone
customer service or your provider. They might need still more information, which
you will find on the status pages.
61
Page 62

Checking the connection to the SX682 WiMAX
Checking the connection to the SX682 WiMAX
You can check whether the PC is correctly connected to the SX682 WiMAX. This can
be done as follows:
Open the command prompt on the PC:
– Click Start > Run.
–Enter cmd in the input field and click OK.
The Command prompt window opens.
Check whether the SX682 WiMAX responds with the ping command. Enter
ping 192.168.2.1 and press Enter.
The PC now sends some test packets via this connection and checks whether the connection partner responds. The connection partner may respond in the following ways:
Reply from the IP address of your SX682 WiMAX; statistics about the connection
are presented. If you receive these statistics, the connection to the device is OK.
The request exceeds the time limit; it was not possible either to send or receive
any packets. There is no physical connection between the PC and your SX682
WiMAX. Check the following points:
– Is the Ethernet cable between the SX682 WiMAX and the PC properly con-
nected?
The LAN LED on the SX682 WiMAX must light up.
– Has TCP/IP been properly configured on your PC?
If the SX682 WiMAX has the IP address 192.168.2.1, your PC's IP address must
be between 192.168.2.2 and 192.168.2.254. The subnet mask must be
255.255.255.0.
To find out the IP address of your PC, enter ipconfig in the command prompt.
If the SX682 WiMAX has not responded successfully to the ping command, you need
to adjust the network settings on the PC. To find out how to do this, please read the
document "Configuring the local area network" on the product CD.
If the SX682 WiMAX has responded successfully to the ping command, the network
is configured correctly. If it is not possible to access the configuration program of your
SX682 WiMAX, check and change the settings in your Web browser. To find out how
to do this, please read the next chapter.
62
Page 63

Configuring the Web browser
i
Configuring the Web browser
If you are using a current Web browser but cannot open the configuration program in
it, check the Web browser settings.
We recommend Microsoft Internet Explorer Version 7.0 or Mozilla
Firefox 3.0 as the Web browser.
Do not use an HTTP proxy for accessing your SX682 WiMAX.
Popup windows must be enabled for your SX682 WiMAX.
The following descriptions relate to Internet Explorer Version 7.0 and Mozilla Firefox
Version 3.0.
Setting up an HTTP proxy
An HTTP proxy is a buffer for Internet pages that have been called up. For example,
once called up, a page can continue to be shown even if you are currently offline. However, this buffer would prevent the configuration pages being read again when you call
up the configuration for your SX682 WiMAX; for this reason, your SX682 WiMAX can
only be configured if the HTTP proxy is not being used for local pages.
Check the HTTP proxy in the Web browser you wish to use for the configuration.
Internet Explorer 7.0:
Open Internet Explorer.
Click Tools and then Internet Options.
Open the Connections tab.
Click LAN settings.
If the option Use proxy server for LAN is activated in the Proxy server area, acti-
vate the selection field Circumvent proxy server for local addresses. If the
option Use proxy server for LAN is not activated, you do not need to make any
settings.
Click OK and then OK again to close the Internet Options window.
Firefox 3.0:
Open Firefox.
Click Tools and then Settings.
Click Advanced.
Open the Network tab and click Settings in the Connection area.
Select either No Proxy or Manual proxy configuration. If you have chosen Man-
ual proxy configuration, in the No proxy for: field, enter the IP block in which the
IP address of your SX682 WiMAX is found:
192.168.2.0/24
Click OK and then OK again to close the Settings window.
63
Page 64

Configuring the Web browser
i
Allowing pop-up windows
Pop-up windows are small windows that are opened either as the result of an action or
automatically. The device software for your SX682 WiMAX uses pop-up windows to
display the online Help, for example.
Many Internet sites, however, call up distracting pop-up windows for effective advertisement placement, for example, without detracting from the layout of the site itself. To prevent these pop-up windows from opening, current Web browsers offer pop-up blockers.
If necessary, you can configure the pop-up blocker to display desirable pop-up windows
and to block undesirable windows.
If you are using a different pop-up blocker, configure it to allow pop-up
windows for the IP address 192.168.2.1.
Internet Explorer 7.0:
Open Internet Explorer.
Click Tools and then Pop-up Blocker and choose Pop-up Blocker Settings.
Enter the IP address of your SX682 WiMAX as the Website address:
192.168.2.1
Click the Add button.
Click Close to apply the settings.
Firefox 3.0:
Open Firefox.
Click Tools and then Settings.
Click Content.
If the Block pop-up windows check box is activated, click Exceptions to its right.
Enter the IP address of your SX682 WiMAX as the Website address:
192.168.2.1
Click the Allow button.
Click Close and OK to apply the settings.
64
Page 65

Specifications
Specifications
Model SX682 WiMAX
Dimensions Approx. 230 x 160 x 52 mm
Operating temperature +5°C to +40°C
Network interface 1 Ethernet 10/100BaseT (RJ45) LAN connection
(10BaseT Half Duplex,10BaseT Full Duplex,
100BaseT Half Duplex or 100BaseT Full Duplex)
Telephone interface 1 FXS (RJ11) for connecting an analogue terminal (tel-
ephone, fax machine or answer machine)
Frequency 2.3–2.4 / 2.5–2.7 / 3.4–3.6 GHz
Output power Max. 26 dBm
Power consumption 3–6 W, depending on operating state
Bandwidth Optional 3.5 / 5.0 / 7.0 / 8.75 or 10.0 MHz
Type of transmission TDD
Modulation technique SOFDMA 512/1024
Subcarrier modulation QPSK, 16/64 QAM
Encoding rate 1/2, 2/3, 3/4, 5/6
Antenna socket 50 Ohm reverse SMA
Antenna type 2 internal antennas (2xRX, 1xTX) for MIMO Matrix
A & B; Type DN1 (EN 302 326-3 V1.2.2)
Optional: outdoor antenna
Antenna gain 2.5 GHz: max. 7dBi, 3.5 GHz: max. 10 dBi
(integrated antennas)
Antenna polarisation Send direction vertical,
Receive direction vertical and horizontal /
vertical and vertical
Mains adapter Input: 100–240 V AC
Output: 12 V; 1.0 A DC
Outdoor antenna specifications (optional)
Model Outdoor antenna
Operating temperature –40 °C to +70 °C
Frequency 2.5–2.7 GHz or 3.4–3.6 GHz
Antenna socket 50 Ohm
Antenna gain 3.5 GHz: 18 dBi
2.6 GHz: 15 dBi
Antenna polarisation Vertical or horizontal
65
Page 66

Putting into service
Putting into service
This device is intended for use in the country indicated on the device's label.
The device is operated under a single licence, which is held by your service provider.
Contact your service provider regarding licensing before you put the device into
service.
Please observe the legal provisions and local restrictions when putting the
device into service. Please ask your service provider for further information.
CE declaration
This device is intended for use with WiMAX base stations.
We, Sagemcom Broadband SAS, declare that this device meets the essential requirements and other relevant regulations laid down in Directive 1999/5/EC.
National laws and regulations must be considered before putting the device into service.
A copy of the 1999/5/EC declaration of conformity is available at this Internet address:
http://support.sagemcom.com/
66
Page 67

Open Source Software used in the product
Open Source Software used in the product
The SX682 WiMAX contains, among other things, Open Source Software, licensed
under an Open Source Software License and developed by third parties. These Open
Source Software files are protected by copyright. Your rights to use the Open Source
Software beyond the mere execution of the Sagemcom Broadband SAS program, is
governed by the relevant Open Source Software license conditions.
Your compliance with those license conditions will entitle you to use the Open Source
Software as foreseen in the relevant license. In the event of conflicts between Sagemcom Broadband SAS license conditions and the Open Source Software license conditions, the Open Source Software conditions shall prevail with respect to the Open
Source Software portions of the software. The Open Source Software is licensed royalty-free (i.e., no fees are charged for exercising the licensed rights, whereas fees may
be charged for reimbursement of costs incurred by Sagemcom Broadband SAS).The
license conditions can be found in the following chapters. In addition some of the
license texts can also be downloaded from:
The BSD License is available on the Internet at:
http://www.freebsd.org/copyright/license.html
The OpenSSL license is available on the Internet at:
http://www.openssl.org/source/license.html
The zlib license is available on the Internet at:
http://www.zlib.net/zlib_license.html
Boost Software License
http://www.boost.org/LICENSE_1_0.txt
Warranty regarding further use of the Open Source Software
Sagemcom Broadband SAS provides no warranty for the Open Source Software programs contained in this device, if such programs are used in any manner other than the
program execution intended by Sagemcom Broadband SAS. The licenses listed below
define the warranty, if any, from the authors or licensors of the Open Source Software.
Sagemcom Broadband SAS specifically disclaims any warranties for defects caused
by altering any Open Source Software program or the product's configuration. You
have no warranty claims against Sagemcom Broadband SAS in the event that the
Open Source Software infringes the intellectual property rights of a third party.
67
Page 68

Open Source Software used in the product
Open Source Software used
Open Source Software Component
wpa_supplicant BSD-license
djbdns public domain
zlib Zlib license
boost lib Boost Software License
expat expat license
openSSL OpenSSL License, SSLeay License
sybyx proprietary
AES and combined encryption /
authentication modes
License
proprietary
Acknowledgements
WPA Supplicant:
Copyright (c) 2003-2007, Jouni Malinen <j@w1.fi> and contributors
All Rights Reserved.
OpenSSL:
This product includes software developed by the OpenSSL Project for use in the
OpenSSL Toolkit. (http://www.openssl.org/)
This product includes cryptographic software written by Eric Young
(eay@cryptsoft.com)
Zlib:
This product includes software developed by Jean-loup Gailly and Mark Adler
sybyx:
This product uses Streaming WBXML Parser developed by MediaSite Inc Research
and Development Group.
68
Page 69

Open Source Software used in the product
Open Source Software Licenses
WPA-Supplicant
License: BSD
WPA Supplicant
==============
Copyright (c) 2003-2007, Jouni Malinen <j@w1.fi> and contributors
All Rights Reserved.
Redistribution and use in source and binary forms, with or without modification, are permitted provided that the following conditions are met:
1. Redistributions of source code must retain the above copyright notice, this list of
conditions and the following disclaimer.
2. Redistributions in binary form must reproduce the above copyright notice, this list
of conditions and the following disclaimer in the documentation and/or other materials provided with the distribution.
3. Neither the name(s) of the above-listed copyright holder(s) nor the names of its contributors may be used to endorse or promote products derived from this software
without specific prior written permission.
THIS SOFTWARE IS PROVIDED BY THE COPYRIGHT HOLDERS AND CONTRIBUTORS "AS IS" AND ANY EXPRESS OR IMPLIED WARRANTIES, INCLUDING, BUT
NOT LIMITED TO, THE IMPLIED WARRANTIES OF MERCHANTABILITY AND FITNESS FOR A PARTICULAR PURPOSE ARE DISCLAIMED. IN NO EVENT SHALL
THE COPYRIGHT OWNER OR CONTRIBUTORS BE LIABLE FOR ANY DIRECT,
INDIRECT, INCIDENTAL, SPECIAL, EXEMPLARY, OR CONSEQUENTIAL DAMAGES (INCLUDING, BUT NOT LIMITED TO, PROCUREMENT OF SUBSTITUTE
GOODS OR SERVICES; LOSS OF USE, DATA, OR PROFITS; OR BUSINESS
INTERRUPTION) HOWEVER CAUSED AND ON ANY THEORY OF LIABILITY,
WHETHER IN CONTRACT, STRICT LIABILITY, OR TORT (INCLUDING NEGLIGENCE OR OTHERWISE) ARISING IN ANY WAY OUT OF THE USE OF THIS SOFTWARE, EVEN IF ADVISED OF THE POSSIBILITY OF SUCH DAMAGE.
OpenSSL
This is a copy of the current LICENSE file inside the CVS repository.
LICENSE ISSUES
The OpenSSL toolkit stays under a dual license, i.e. both the conditions of the
OpenSSL License and the original SSLeay license apply to the toolkit.
See below for the actual license texts. Actually both licenses are BSD-style Open
Source licenses. In case of any license issues related to openSSL please contact
openssl-core@openssl.org.
69
Page 70

Open Source Software used in the product
OpenSSL License
Copyright (c) 1998-2005 The OpenSSL Project. All rights reserved.
Redistribution and use in source and binary forms, with or without modification, are permitted provided that the following conditions are met:
1. Redistributions of source code must retain the above copyright notice, this list of
conditions and the following disclaimer.
2. Redistributions in binary form must reproduce the above copyright notice, this list
of conditions and the following disclaimer in the documentation and/or other materials provided with the distribution.
3. All advertising materials mentioning features or use of this software must display
the following acknowledgment: "This product includes software developed by the
OpenSSL Project for use in the OpenSSL Toolkit. (http://www.openssl.org/)"
4. The names "OpenSSL Toolkit" and "OpenSSL Project" must not be used to endorse
or promote products derived from this software without prior written permission. For
written permission, please contact openssl-core@openssl.org.
5. Products derived from this software may not be called "OpenSSL"nor may "OpenSSL" appear in their names without prior written permission of the OpenSSL Project.
6. Redistributions of any form whatsoever must retain the following acknowledgment:
This product includes software developed by the OpenSSL Project for use in the
OpenSSL Toolkit (http://www.openssl.org/)
THIS SOFTWARE IS PROVIDED BY THE OpenSSL PROJECT "AS IS" AND ANY
EXPRESSED OR IMPLIED WARRANTIES, INCLUDING, BUT NOT LIMITED TO,
THE IMPLIED WARRANTIES OF MERCHANTABILITY AND FITNESS FOR A
PARTICULAR PURPOSE ARE DISCLAIMED. IN NO EVENT SHALL THE OpenSSL PROJECT OR ITS CONTRIBUTORS BE LIABLE FOR ANY DIRECT, INDIRECT, INCIDENTAL, SPECIAL, EXEMPLARY, OR CONSEQUENTIAL DAMAGES
(INCLUDING, BUT NOT LIMITED TO, PROCUREMENT OF SUBSTITUTE
GOODS OR SERVICES; LOSS OF USE, DATA, OR PROFITS; OR BUSINESS INTERRUPTION) HOWEVER CAUSED AND ON ANY THEORY OF LIABILITY,
WHETHER IN CONTRACT, STRICT LIABILITY, OR TORT (INCLUDING NEGLIGENCE OR OTHERWISE) ARISING IN ANY WAY OUT OF THE USE OF THIS
SOFTWARE, EVEN IF ADVISED OF THE POSSIBILITY OF SUCH DAMAGE.
================================================================
This product includes cryptographic software written by Eric Young
(eay@cryptsoft.com). This product includes software written by Tim Hudson
(tjh@cryptsoft.com).
Original SSLeay License
Copyright (C) 1995-1998 Eric Young (eay@cryptsoft.com)
All rights reserved.
This package is an SSL implementation written by Eric Young (eay@cryptsoft.com).
The implementation was written so as to conform with Netscapes SSL.
70
Page 71

Open Source Software used in the product
This library is free for commercial and non-commercial use as long as the following
conditions are aheared to. The following conditions apply to all code found in this distribution, be it the RC4, RSA, lhash, DES, etc., code; not just the SSL code. The SSL
documentation included with this distribution is covered by the same copyright terms
except that the holder is Tim Hudson (tjh@cryptsoft.com).
Copyright remains Eric Young's, and as such any Copyright notices in the code are not
to be removed. If this package is used in a product, Eric Young should be given attribution as the author of the parts of the library used. This can be in the form of a textual
message at program startup or in documentation (online or textual) provided with the
package.
Redistribution and use in source and binary forms, with or without modification, are permitted provided that the following conditions are met:
1. Redistributions of source code must retain the copyright notice, this list of conditions and the following disclaimer.
2. Redistributions in binary form must reproduce the above copyright notice, this list
of conditions and the following disclaimer in the documentation and/or other materials provided with the distribution.
3. All advertising materials mentioning features or use of this software must display
the following acknowledgement: "This product includes cryptographic software written by Eric Young (eay@cryptsoft.com)" The word 'cryptographic' can be left out if
the rouines from the library being used are not cryptographic related :-).
4. If you include any Windows specific code (or a derivative thereof) from the apps directory (application code) you must include an acknowledgement: "This product includes software written by Tim Hudson (tjh@cryptsoft.com)"
THIS SOFTWARE IS PROVIDED BY ERIC YOUNG "AS IS" AND ANY EXPRESS OR
IMPLIED WARRANTIES, INCLUDING, BUT NOT LIMITED TO, THE IMPLIED WARRANTIES OF MERCHANTABILITY AND FITNESS FOR A PARTICULAR PURPOSE
ARE DISCLAIMED. IN NO EVENT SHALL THE AUTHOR OR CONTRIBUTORS BE
LIABLE FOR ANY DIRECT, INDIRECT, INCIDENTAL, SPECIAL, EXEMPLARY, OR
CONSEQUENTIAL DAMAGES (INCLUDING, BUT NOT LIMITED TO, PROCUREMENT OF SUBSTITUTE GOODS OR SERVICES; LOSS OF USE, DATA, OR PROFITS; OR BUSINESS INTERRUPTION) HOWEVER CAUSED AND ON ANY THEORY
OF LIABILITY, WHETHER IN CONTRACT, STRICT LIABILITY, OR TORT (INCLUDING NEGLIGENCE OR OTHERWISE) ARISING IN ANY WAY OUT OF THE USE OF
THIS SOFTWARE, EVEN IF ADVISED OF THE POSSIBILITY OF SUCH DAMAGE.
The licence and distribution terms for any publically available version or derivative of
this code cannot be changed. i.e. this code cannot simply be copied and put under
another distribution licence [including the GNU Public Licence.]
Zlib:
'zlib' general purpose compression library version 1.1.4, March 11th, 2002
Copyright (C) 1995-2002 Jean-loup Gailly and Mark Adler
This software is provided 'as-is', without any express or implied warranty. In no event
will the authors be held liable for any damages arising from the use of this software.
71
Page 72

Open Source Software used in the product
Permission is granted to anyone to use this software for any purpose, including commercial applications, and to alter it and redistribute it freely, subject to the following
restrictions:
1. The origin of this software must not be misrepresented ; you must not claim that you
wrote the original software. If you use this software in a product, an acknowledgment in the product documentation would be appreciated but is not required.
2. Altered source versions must be plainly marked as such, and must not be misrepresented as being the original software.
3. This notice may not be removed or altered from any source distribution.
Jean-loup Gailly
jloup@gzip.org
Mark Adler
madler@alumni.caltech.edu
The data format used by the zlib library is described by RFCs (Request for Comments)
1950 to 1952 in the files ftp://ds.internic.net/rfc/rfc1950.txt (zlib format), rfc1951.txt
(deflate format) and rfc1952.txt (gzip format).
This manual is converted from zlib.h by piaip
Visit http://ftp.cdrom.com/pub/infozip/zlib/ for the official zlib web page.
Boost lib
Boost Software License - Version 1.0 - August 17th, 2003
Permission is hereby granted, free of charge, to any person or organization obtaining
a copy of the software and accompanying documentation covered by this license (the
"Software") to use, reproduce, display, distribute,execute, and transmit the Software,
and to prepare derivative works of theSoftware, and to permit third-parties to whom the
Software is furnished todo so, all subject to the following:
The copyright notices in the Software and this entire statement, including the above
license grant, this restriction and the following disclaimer, must be included in all copies
of the Software, in whole or in part, and all derivative works of the Software, unless such
copies or derivative works are solely in the form of machine-executable object code
generated by a source language processor.
THE SOFTWARE IS PROVIDED "AS IS", WITHOUT WARRANTY OF ANY KIND,
EXPRESS OR IMPLIED, INCLUDING BUT NOT LIMITED TO THE WARRANTIES OF
MERCHANTABILITY, FITNESS FOR A PARTICULAR PURPOSE, TITLE AND NONINFRINGEMENT. IN NO EVENT SHALL THE COPYRIGHT HOLDERS OR ANYONE
DISTRIBUTING THE SOFTWARE BE LIABLE FOR ANY DAMAGES OR OTHER LIABILITY, WHETHER IN CONTRACT, TORT OR OTHERWISE, ARISING FROM, OUT
OF OR IN CONNECTION WITH THE SOFTWARE OR THE USE OR OTHER DEALINGS IN THE SOFTWARE.
72
Page 73

Open Source Software used in the product
expat
Copyright (c) 1998, 1999, 2000 Thai Open Source Software Center Ltd and Clark
Cooper
Copyright (c) 2001, 2002, 2003, 2004, 2005, 2006 Expat maintainers.
Permission is hereby granted, free of charge, to any person obtaining a copy of this
software and associated documentation files (the "Software"), to deal in the Software
without restriction, including without limitation the rights to use, copy, modify, merge,
publish, distribute, sublicense, and/or sell copies of the Software, and to permit persons
to whom the Software is furnished to do so, subject to the following conditions:
The above copyright notice and this permission notice shall be included in all copies or
substantial portions of the Software.
THE SOFTWARE IS PROVIDED "AS IS", WITHOUT WARRANTY OF ANY KIND,
EXPRESS OR IMPLIED, INCLUDING BUT NOT LIMITED TO THE WARRANTIES OF
MERCHANTABILITY, FITNESS FOR A PARTICULAR PURPOSE AND ONINFRINGEMENT. IN NO EVENT SHALL THE AUTHORS OR COPYRIGHT HOLDERS BE LIABLE FOR ANY CLAIM, DAMAGES OR OTHER LIABILITY, WHETHER IN AN ACTION
OF CONTRACT, TORT OR OTHERWISE, ARISING FROM, OUT OF OR IN CONNECTION WITH THE SOFTWARE OR THE USE OR OTHER DEALINGS IN THE
SOFTWARE.
sybyx
http://sourceforge.net/projects/sybyx/
Copyright (c) 2001 MediaSite Inc Research and Development Group.
All rights reserved.
Copyright (c) 2002 Interactive Intelligence, Inc.
All rights reserved.
Redistribution and use in source and binary forms, with or without modification, are permitted provided that the following conditions are met:
1. Redistributions of source code must retain the above copyright notice, this list of
conditions and the following disclaimer.
2. Redistributions in binary form must reproduce the above copyright notice, this list
of conditions and the following disclaimer in the documentation and/or other materials provided with the distribution.
3. The end-user documentation included with the redistribution, if any, must include
the following acknowledgment:
"This product uses Streaming WBXML Parser developed by MediaSite Inc Research and Development Group"
Alternately, this acknowledgment may appear in the software itself, if and wherever
such third-party acknowledgments normally appear.
THIS SOFTWARE IS PROVIDED "AS IS"' AND ANY EXPRESSED OR IMPLIED
WARRANTIES, INCLUDING, BUT NOT LIMITED TO, THE IMPLIED WARRANTIES
OF MERCHANTABILITY AND FITNESS FOR A PARTICULAR PURPOSE ARE DISCLAIMED. IN NO EVENT SHALL MEDIASITE INC OR ITS CONTRIBUTORS BE
LIABLE FOR ANY DIRECT, INDIRECT, INCIDENTAL, SPECIAL, EXEMPLARY, OR
73
Page 74

Open Source Software used in the product
CONSEQUENTIAL DAMAGES (INCLUDING, BUT NOT LIMITED TO, PROCUREMENT OF SUBSTITUTE GOODS OR SERVICES; LOSS OF USE, DATA, OR PROFITS; OR BUSINESS INTERRUPTION) HOWEVER CAUSED AND ON ANY THEORY
OF LIABILITY, WHETHER IN CONTRACT, STRICT LIABILITY, OR TORT (INCLUDING NEGLIGENCE OR OTHERWISE) ARISING IN ANY WAY OUT OF THE USE OF
THIS SOFTWARE, EVEN IF ADVISED OF THE POSSIBILITY OF SUCH DAMAGE.
================================================================
Created by: Dima Skvortsov
Modified by: Chris Hubbard
AES and Combined Encryption/Authentication Modes
(http://gladman.plushost.co.uk/oldsite/AES/index.php
http://gladman.plushost.co.uk/oldsite/AES/aes-src-29-04-09.zip
http://gladman.plushost.co.uk/oldsite/AES/aes-modes-src-23-07-09.zip
-----------------------------------------------------------------------------------------------------------------
Copyright (c) 1998-2008, Brian Gladman, Worcester, UK. All rights reserved.
LICENSE TERMS
The redistribution and use of this software (with or without changes) is allowed without
the payment of fees or royalties provided that:
1. source code distributions include the above copyright notice, this list of conditions
and the following disclaimer;
2. binary distributions include the above copyright notice, this list of conditions and the
following disclaimer in their documentation;
3. the name of the copyright holder is not used to endorse products built using this
software without specific written permission.
DISCLAIMER
This software is provided 'as is' with no explicit or implied warranties in respect of its
properties, including, but not limited to, correctness and/or fitness for purpose.
-----------------------------------------------------------------------------------------------------------------
Issue Date: 21/07/2009
)
74
Page 75

Glossary
Glossary
Address Translation (NAT)
Network Address Translation. NAT is a method for converting IP addresses (mainly pri-
vate IP addresses) in a network to one or more public IP addresses on the Internet.
With NAT, several network components in a LAN can share a public IP address to connect to the Internet. The network components of the local network are hidden behind
the IP address registered on the Internet. NAT is often used as part of the firewall in a
network because of this security function.
Bridge
A bridge connects several network segments to form a joint network, e.g. to make a
TCP/IP network. The segments can have different physical characteristics, e.g. differ-
ent linking such as Ethernet and wireless LANs. Local networks can be expanded by
linking individual segments via bridges.
dB
Decibel (a tenth of a Bel). Logarithmic unit of measurement for ratios between two cur-
rents, voltages, sound levels or powers. In order to depict large value differences
clearly and graphically, these are given in dB; e.g. 60 dB corresponds to the factor 1000
relative to the voltage drops.
dBm
Decibel milliwatt. Power level in decibels relative to 1 milliwatt.
DHCP
Dynamic Host Configuration Protocol. DHCP handles the automatic assignment of IP
addresses to network components.
DHCP was developed because in large networks – especially the Internet – the defining of IP addresses is very complex as subscribers frequently move, drop out or new
ones join. A DHCP server automatically assigns the connected network components
(DHCP clients) dynamic IP addresses from a defined IP pool range, thus saving a great
deal of configuration work. In addition, the address blocks can be used more effectively:
since not all subscribers are on the network at the same time, the same IP address can
be assigned to different network components in succession as and when required.
DHCP server
There is a DHCP integrated into the SX682 WiMAX that automatically assigns IP
addresses to PCs in the local network.
75
Page 76

Glossary
DNS
Domain Name System. DNS permits the assignment of IP addresses to PC or domain
names that are easier to remember. A DNS server must administer this information for
each local network with an Internet connection. As soon as a page on the Internet is
called up, the Web browser obtains the corresponding IP address from the DNS server
so that it can establish the connection.
On the Internet, the assignment of domain names to IP addresses follows a hierarchical
system. A local PC only knows the address of the local name server. This in turn knows
all the addresses of the PCs in the local network and the superordinated name servers,
which again know addresses and the next superordinated name servers.
Domain name
The domain name is the reference to one or more web servers on the Internet. The
domain name is mapped via the DNS service to the corresponding IP address.
Downlink
Files that your SX682 WiMAX receives and forwards to your local network.
DSL
Digital Subscriber Line. DSL is a technique whereby data is transmitted via the conven-
tional phone line. To do this, you require suitable phone lines and special technology to
be set up by a Provider. As these preconditions are not satisfied in all areas, it is not
possible to use DSL in all locations. In order to make use of high-performance Internet
access in these areas as well, technologies such as WiMAX, Wi-Fi or satellite connections are implemented.
Ethernet
Ethernet is a network technology for local networks (LANs) defined by the IEEE as
standard IEEE 802.3. Depending on the network adapter used, the transmission speed
on the Ethernet varies between 10 Mbps and 1 Gbps.
Firewall
Firewalls are used by network operators as protection against unauthorised external
access. This involves a whole bundle of hardware and software actions and technologies that monitor and control the data flow between the private network to be protected
and an unprotected network such as the Internet.
Firmware
Device software. To correct errors or update the device, a new firmware version can be
loaded onto the device's memory (firmware update).
Flat rate
Flat rate is a particular billing system for Internet connections. The Provider charges a
set monthly fee for a certain service package.
76
Page 77

Glossary
FTP
File Transfer Protocol. Protocol for exchanging files via the Internet. FTP is used, for
example, to make files available for download or to receive files from other users.
Full duplex
Data transmission operating mode in which data can be sent and received at the same
time.
FXS
Foreign Exchange Station. Phone port to which an analogue terminal (phone, fax or
answer machine) can be connected.
Gateway
A gateway connects networks with one another. In contrast to a Router, a gateway is
not dependent on protocol, i.e. it is also able to establish connections between networks with a different architecture (protocols, application interfaces etc.).
Half duplex
Operating mode for data transfer. Only one party can receive or send data at a time.
HTTP
Hypertext Transfer Protocol. Network protocol for the transmission of data, which is
mainly used for transmitting and displaying Internet content.
HTTP proxy
An HTTP proxy is a server that network components use for their Internet traffic. All
requests are sent via the proxy.
Hub
A hub is a central distribution point in a network, to which PCs and other network
devices are connected. The hub forwards received data to all connected PCs. For this
reason, in large networks, a Switch is recommended to ensure that data is only sent to
the PC requesting it.
IEEE
Institute of Electrical and Electronics Engineers. The IEEE is an international body for
defining network standards, especially for standardising LAN technologies, transmission protocols and speeds, and wiring.
77
Page 78

Glossary
IEEE 802.16
Standard defined by the IEEE for WiMAX. Similarly to other standards in the 802 series
(e.g. 802.3 Ethernet, 802.11 WLAN), the WiMAX standard is one of the standards for
networks. The standard has progressed in accordance with new developments; there
are currently two main versions:
IEEE 802.16-2004: WiMAX, which specifies the secure location for connection part-
ners.
IEEE 802.16e-2005: Mobile WiMAX, which enables wireless cells to be exchanged
during data transmission.
Internet telephony (VoIP)
Voice transmission via the Internet (Voice over IP).
IP
Internet Protocol. The protocol is responsible for addressing of subscribers in a network
using IP addresses, and routes data from the sender to the recipient. In doing so, it
decides on the way in which data packets will be forwarded between sender and recipient.
IP address
An IP address is the unique network-wide address of a network component in a network based on the TCP/IP protocol (e.g. in a local network or on the Internet). The IP
address consists of four parts (each of up to three-figure strings of digits from 0–255)
that are separated from one another by full stops (e.g. 192.168.2.1). The IP address is
made up of the network number and the number of the network component. Depending
on the Subnet mask, one, two or three parts form the network number, the remainder
form the network component number. You can find out the IP address of your PC using
the ipconfig command.
There are two different types of IP address:
Private IP address:
IP address of a network component within a local network.
Public IP address:
IP address that uses a network component for accessing the Internet.
IP addresses can be assigned manually or automatically:
Static IP address:
The IP address is manually assigned to a network component and never changes.
Dynamic IP address:
The IP address is assigned to the network component by a DHCP server. The IP
address of this network component can change each time it registers with a network
or at specific time intervals.
On the Internet, domain names are normally used instead of the IP addresses. DNS is
used to assign domain names to IP addresses.
78
Page 79

Glossary
IPTV
Internet Protocol Television. You receive your provider's television service via the DSL
connection. To do this, you require an IPTV-capable set-top box and the configuration
data of your IPTV provider.
ISP
Internet Service Provider. See Provider.
LAN
Local Area Network, local network. A local network links network components so that
they can exchange data and share resources. The physical range is restricted to a particular area (a site). A local network can be connected to other local networks or a widearea network (WAN) such as the Internet.
LED
Light Emitting Diode. An LED is an electronic component (semi-conductor) that gener-
ates light at low power consumption. LEDs are often used as signal lights for display
and UI elements.
Login
Access to a PC or a service, password e.g. for access to the Internet.
MAC address
Media Access Control. The MAC address is used for the globally unique identification
of a network adapter. It comprises six parts (hexadecimal numbers), e.g. 00-90-96-3400-1A. The MAC address is assigned by the network adapter manufacturer and cannot
be changed.
Mbps
Million bits per second. Specification of the transmission speed in a network.
Network
A network is a group of devices connected in wired or wireless mode so that they can
share resources such as data and peripherals. A general distinction is made between
local networks (LANs) and wide-area networks (WANs).
Network adapter
The network adapter is the hardware device that creates the connection between a network component and a local network. The connection can be wired or wireless. An Ethernet network card is an example of a wired network adapter. A network adapter has a
unique address, the MAC address.
79
Page 80

Glossary
Network protocol
The network protocol is the standard via which different PCs exchange data in a network. A connection can only be established between PCs in a network if they all use
the same protocol. The TCP/IP network protocol is the most extensive network protocol, which is also used for connections to the Internet. This must be set up on each PC
from which a network connection is to be established.
Port
Data is exchanged between two applications in a network across a port. The port
number addresses an application within a network component. The combination of IP
address/port number uniquely identifies the recipient or sender of a data packet within
a network. Some applications (e.g. Internet services such as HTTP or FTP) work with
fixed port numbers; others are allocated a free port number whenever they need one.
Port forwarding
In port forwarding, the SX682 WiMAX directs data packets from the Internet that are
addressed to a particular Port to the corresponding port of the appropriate network
component. This enables servers within the local network to offer services on the Internet without them needing a public IP address. See also: Virtual server
Protocol
A protocol describes the agreements for communicating on a network. It contains rules
for opening, administering and closing a connection, as well as about data formats,
time frames and handling possible errors. Communications between two applications
require different protocols at various levels, e.g. the TCP/IP protocols for the Internet.
Provider
A provider (Internet Service Provider) offers access to the Internet for a fee.
QoS
Quality of Service. QoS allows network traffic to be sorted according to priorities. This
makes it possible to grant Internet telephony (VoIP) priority over other data traffic. This
is a precondition for problem-free calls.
RJ
Registered Jack. Standardised connection, also known as a modular jack.
Router
A router directs data packets from one local area network (LAN) to another via the fastest route. A router enables the connection between networks of different network technologies and this is performed on the basis of a common protocol. For example, it can
link a local network with WiMAX technology to the Internet.
RSSI
Received Signal Strength Indication. Characteristic value for the signal strength of
radio connections, used by communication devices for the automatic selection of a suitable channel.
80
Page 81

Glossary
Server
A server makes services available to other network components (clients). The term
"server" is often used to refer to a PC. However it can also mean an application that
provides a particular service such as DNS, DHCP or a Web service.
SIP
Session Initiation Protocol. SIP is a standard for data transfer in Internet telephony
(VoIP). It describes how a call is carried over the data network and which components,
which transport and signalling protocols are involved.
SMTP
Simple Mail Transfer Protocol. The SMTP protocol is a TCP/IP protocol and regulates
the exchange of electronic post on the Internet. Your Provider provides you with access
to an SMTP server.
Subnet
A subnet divides a network into smaller units.
Subnet mask
The subnet mask determines how many parts of the IP addresses of a network represent the network number and how many parts represent the network component
number.
If the subnet mask in a network is 255.255.255.0, for example, this means that the first
three parts of the IP address make up the network number and only the last part can
be used to assign network component numbers. The first three parts of the IP address
of all network components are in this case always the same.
Switch
A switch is a central distributor in a wired network, which, unlike a hub, provides intelligent distribution of data transfer. The switch only ever forwards a data packet to the
subnet or network component the data packet is intended for. Unnecessary transfer of
data in the network thus avoided.
TAE
Telecommunications connecting unit (German: Telekommunikations-Anschlussein-
heit). Connector for connecting analogue telecommunications devices. F for phone, N
for additional devices such as fax or answer machines.
TCP
Transmission Control Protocol. TCP is part of the TCP/IP protocol family. TCP handles
data transport between communication partners (applications). TCP is a sessionbased transmission protocol, i.e. it sets up, monitors and terminates a connection for
transporting data.
81
Page 82

Glossary
TCP/IP
Transmission Control Protocol/Internet Protocol. Protocol family on which the Internet
is based. IP forms the basis of each PC to PC connection. TCP provides applications
with a reliable transmission link in the form of a continuous data stream. TCP/IP is the
basis on which services such as WWW, Mail and News are built. There are other protocols as well. In order to access the Internet from a PC, TCP/IP must be set up on the
PC.
UDP
User Datagram Protocol. UDP is a Protocol of the TCP/IP protocol family that handles
data transport between two communication partners (applications). Unlike TCP, UDP
is a non-session based protocol. It does not establish a fixed connection. The recipient
is responsible for making sure the data is received. The sender is not notified about
whether it is received or not.
Uplink
Data that your SX682 WiMAX forwards from your PC or local network to external sites
(e.g. to the Internet).
URL
Universal Resource Locator. Globally unique address of a domain on the Internet, e.g.
http://www.sagemcom.com.
Virtual server
A virtual Server provides a service on the Internet that runs not on itself, but on another
network component. The SX682 WiMAX can be configured as a virtual server. It will
then direct incoming calls for a service via Port forwarding directly to the appropriate
Port of the network component in question.
VoIP
Voice over Internet Protocol; voice transmission via the Internet (Internet telephony).
WAN
Wide Area Network. A WAN is a network that is not restricted to one particular area,
such as the Internet. A WAN is run by one or more public providers to enable private
access. You access the Internet via a Provider.
WiMAX
Worldwide Interoperability for Microwave Access. WiMAX is a modern wireless net-
work technology that enables fast Internet connection even in remote areas where no
other connection possibility (e. g. DSL) is available.
82
Page 83

Index
Index
A
Address Translation . . . . . . . . . . . . . 75
Administration. . . . . . . . . . . . . . . . . . 43
system password. . . . . . . . . . . . . . 43
Advanced Settings
features
Antenna
adjusting
aligning precisely. . . . . . . . . . . . . . 30
integrated . . . . . . . . . . . . . . . . . . . 14
outdoor antenna
Appendix . . . . . . . . . . . . . . . . . . . . . 59
CE declaration. . . . . . . . . . . . . . . . 66
putting into service
specifications . . . . . . . . . . . . . . . . 65
troubleshooting
. . . . . . . . . . . . . . . . . . . . . 33
. . . . . . . . . . . . . . . . . . . . 28
. . . . . . . . . . . . . . 15
. . . . . . . . . . . . 66
. . . . . . . . . . . . . . . 59
B
Base station ID . . . . . . . . . . . . . . . . . 49
Basic settings . . . . . . . . . . . . . . . . . . 27
setting up Internet access
starting . . . . . . . . . . . . . . . . . . . . . 27
Basic Setup Wizard . . . . . . . . . . . . . 27
establishing a radio connection
starting . . . . . . . . . . . . . . . . . . . . . 27
Bridge . . . . . . . . . . . . . . . . . . . . . . . 75
. . . . . . . 27
. . . 28
C
Call forwarding
activating/deactivating on the phone 57
Call holding . . . . . . . . . . . . . . . . . . . 54
Call transfer
during conference . . . . . . . . . . . . . 56
Care. . . . . . . . . . . . . . . . . . . . . . . . . . 5
Checking connection
Cleaning. . . . . . . . . . . . . . . . . . . . . . . 5
Conference call . . . . . . . . . . . . . . . . 55
call transfer
end . . . . . . . . . . . . . . . . . . . . . . . . 56
Configuration . . . . . . . . . . . . . . . . . . 21
administration
aligning antenna precisely . . . . . . . 30
basic settings . . . . . . . . . . . . . . . . 27
. . . . . . . . . . . . . . . . . . . 55
. . . . . . . . . . . . 62
. . . . . . . . . . . . . . . . . . 56
. . . . . . . . . . . . . . . . 43
Configuration
menu structure . . . . . . . . . . . . . . . . 25
opening online Help
resetting to factory setting. . . . . . . . 44
setting the language . . . . . . . . . . . . 24
. . . . . . . . . . . . . . . . . . . . . . . 46
status
Confirmation tone
positive . . . . . . . . . . . . . . . . . . . . . 58
Connecting
answer machine . . . . . . . . . . . . . . . 18
fax machine . . . . . . . . . . . . . . . . . . 18
outdoor antenna
PC . . . . . . . . . . . . . . . . . . . . . . . . . 17
telephone. . . . . . . . . . . . . . . . . . . . 18
Connection mode
Connectors . . . . . . . . . . . . . . . . . . . . 10
. . . . . . . . . . . . . . . . . . . . 16
. . . . . . . . . . . . 25
. . . . . . . . . . . . . . . 16
. . . . . . . . . . . . . . . 35
D
dB. . . . . . . . . . . . . . . . . . . . . . . . . . . 75
dBm . . . . . . . . . . . . . . . . . . . . . . . . . 75
Device status. . . . . . . . . . . . . . . . . . . 49
. . . . . . . . . . . . . . . . . . . . . . . . 75
DHCP
DHCP server . . . . . . . . . . . . . . . . 39, 75
Disposal . . . . . . . . . . . . . . . . . . . . . . . 6
Disposal (Switzerland)
DNS . . . . . . . . . . . . . . . . . . . . . . . . . 76
DNS (Domain Name System) . . . . . . 36
DNS server
Domain name . . . . . . . . . . . . . . . . . . 76
DoS (Denial of Service) . . . . . . . . . . . 40
Downlink
DSL . . . . . . . . . . . . . . . . . . . . . . . . .76
. . . . . . . . . . . . . . . . . . . . 36
. . . . . . . . . . . . . . . . . . . . . . 76
. . . . . . . . . . . . .5
E
Enquiry . . . . . . . . . . . . . . . . . . . . . . . 53
Establishing a radio connection
Ethernet . . . . . . . . . . . . . . . . . . . . . . 76
Exposed host . . . . . . . . . . . . . . . . . .38
. . . . . 28
F
Factory settings. . . . . . . . . . . . . . . . . 20
Faxing. . . . . . . . . . . . . . . . . . . . . . . . 51
Firewall . . . . . . . . . . . . . . . . . . . . 36, 76
83
Page 84

Index
Firmware . . . . . . . . . . . . . . . . . . . . . 76
Firmware update
Flat rate . . . . . . . . . . . . . . . . . . . . . . 76
Forwarding
always
on busy . . . . . . . . . . . . . . . . . . . . . 57
on no response . . . . . . . . . . . . . . . 57
. . . . . . . . . . . . . . . . . . . . . . . . . 77
FTP
Full duplex . . . . . . . . . . . . . . . . . . . . 77
FXS . . . . . . . . . . . . . . . . . . . . . . . . . 77
. . . . . . . . . . . . . . . . 45
. . . . . . . . . . . . . . . . . . . . . 57
G
Gateway. . . . . . . . . . . . . . . . . . . . . . 77
H
Hacker defence . . . . . . . . . . . . . . . . 36
Half duplex . . . . . . . . . . . . . . . . . . . . 77
. . . . . . . . . . . . . . . . . . . . . . . . 77
HTTP
HTTP proxy . . . . . . . . . . . . . . . . . . . 77
. . . . . . . . . . . . . . . . . . . . . 63
Firefox
Internet Explorer . . . . . . . . . . . . . . 63
setting up . . . . . . . . . . . . . . . . . . . 63
. . . . . . . . . . . . . . . . . . . . . . . . . 77
Hub
I
IEEE . . . . . . . . . . . . . . . . . . . . . . . . 77
IEEE 802.16 . . . . . . . . . . . . . . . . . . . 78
Installation
connecting
location . . . . . . . . . . . . . . . . . . . . . 13
. . . . . . . . . . . . . . . . . . . . . . . . 17
PC
resetting . . . . . . . . . . . . . . . . . . . . 19
restarting. . . . . . . . . . . . . . . . . . . . 19
switching on
system requirements . . . . . . . . . . . 15
Installing. . . . . . . . . . . . . . . . . . . . . . 13
Internet
connection mode . . . . . . . . . . . . . . 35
menu . . . . . . . . . . . . . . . . . . . . . . 35
protocol
Internet access
setting up . . . . . . . . . . . . . . . . . . . 27
Internet connection
changing configuration
closing manually . . . . . . . . . . . . . . 26
opening manually
setting up . . . . . . . . . . . . . . . . . . . 35
. . . . . . . . . . . . . . . . . . 16
. . . . . . . . . . . . . . . . . 18
. . . . . . . . . . . . . . . . . . . . . . . 35
. . . . . . . . . . . . . . . . . . . . . 35
. . . . . . . . . . 35
. . . . . . . . . . . . . 26
Internet telephony
analogue telephone
setting up . . . . . . . . . . . . . . . . . . . . 40
VoIP settings . . . . . . . . . . . . . . . . . 40
. . . . . . . . . . . . . . . . . . . . . . . . . . . 78
IP
IP address. . . . . . . . . . . . . . . . . . 21, 78
assigning automatically. . . . . . . . . .39
assigning static
dynamic . . . . . . . . . . . . . . . . . . . . . 78
private . . . . . . . . . . . . . . . . . . . 39, 78
. . . . . . . . . . . . . . . . . . . . . . . 78
public
static . . . . . . . . . . . . . . . . . . . . . . . 78
IP address block for DHCP . . . . . . . . 39
. . . . . . . . . . . . . . . . . . . . . . . . . 79
IPTV
ISP . . . . . . . . . . . . . . . . . . . . . . . . . . 79
. . . . . . . . . . . . . . . 78
. . . . . . . . . . . . 40
. . . . . . . . . . . . 39, 40
L
LAN . . . . . . . . . . . . . . . . . . . . . . . . .79
configuration . . . . . . . . . . . . . . . . .39
Lease time . . . . . . . . . . . . . . . . . . . .39
. . . . . . . . . . . . . . . . . . . . . . . . . 79
LED
LEDs
overview . . . . . . . . . . . . . . . . . . . . 11
startup
Location . . . . . . . . . . . . . . . . . . . . . . 13
Login. . . . . . . . . . . . . . . . . . . . . . . . . 79
. . . . . . . . . . . . . . . . . . . . . . 19
M
MAC address . . . . . . . . . . . . . . . . . .79
MAC table . . . . . . . . . . . . . . . . . . . . . 40
ageing time . . . . . . . . . . . . . . . . . . 40
Making calls
calling . . . . . . . . . . . . . . . . . . . . . . 52
receiving calls . . . . . . . . . . . . . . . .52
Mbps
Menu structure . . . . . . . . . . . . . . . . . 25
. . . . . . . . . . . . . . . . . . . 51
. . . . . . . . . . . . . . . . . . . . . . . . . 79
N
NAT . . . . . . . . . . . . . . . . . . . . . . 37, 75
port forwarding
Network . . . . . . . . . . . . . . . . . . . . . . 79
Network adapter . . . . . . . . . . . . . . . . 79
Network Address Translation
Network protocol . . . . . . . . . . . . . . . .80
. . . . . . . . . . . . . . . . 37
. . . . . . . 37
84
Page 85

O
Opening online Help . . . . . . . . . . . . . 25
Operating mode
. . . . . . . . . . . . . . . . . . . . . . 34
Bridge
Router. . . . . . . . . . . . . . . . . . . . . . 34
Outdoor antenna. . . . . . . . . . . . . . . . 15
P
Password
forgotten . . . . . . . . . . . . . . . . . . . . 60
ping command . . . . . . . . . . . . . . . . . 62
Pop-up blocker
. . . . . . . . . . . . . . . . . . . . . 64
Firefox
Internet Explorer . . . . . . . . . . . . . . 64
Pop-up window
Firefox . . . . . . . . . . . . . . . . . . . . . 64
Internet Explorer . . . . . . . . . . . . . . 64
. . . . . . . . . . . . . . . . . . . . . . . . . 80
Port
Port forwarding . . . . . . . . . . . . . . 37, 80
setting up
Port number . . . . . . . . . . . . . . . . . . . 80
illustration . . . . . . . . . . . . . . . . . . . 37
Positive confirmation tone
PPPoE pass-through . . . . . . . . . . . . 36
Product features . . . . . . . . . . . . . . . . 10
Product overview
Protocol . . . . . . . . . . . . . . . . . . . . . . 80
Provider . . . . . . . . . . . . . . . . . . . . . . 80
Putting into service
. . . . . . . . . . . . . . . . . 64
. . . . . . . . . . . . . . . . . . . 37
. . . . . . . . . 58
. . . . . . . . . . . . . . . 10
. . . . . . . . . . . . . . 51
Q
QoS . . . . . . . . . . . . . . . . . . . . . . . . . 80
R
Radio status . . . . . . . . . . . . . . . . . . . 49
Reboot
Resetting . . . . . . . . . . . . . . . . . . 19, 44
Restarting. . . . . . . . . . . . . . . . . . . . . 19
RJ
Router . . . . . . . . . . . . . . . . . . . . . . . 80
RSSI . . . . . . . . . . . . . . . . . . . . . . . . 80
. . . . . . . . . . . . . . . . . . . . . . . 45
. . . . . . . . . . . . . . . . . . . . . . . . . . 80
S
Safety . . . . . . . . . . . . . . . . . . . . . . . . 5
disposal (Switzerland) . . . . . . . . . . . 5
Safety precautions . . . . . . . . . . . . . . . 5
Index
. . . . . . . . . . . . . . . . . . . . . . . . . 28
Scan
Security
disposal
safety precautions . . . . . . . . . . . . . . 5
Server
virtual. . . . . . . . . . . . . . . . . . . . . . . 82
Setting the language . . . . . . . . . . . . . 24
Setting up Internet access
SIP . . . . . . . . . . . . . . . . . . . . . . . . . . 81
SMTP . . . . . . . . . . . . . . . . . . . . . . . . 81
Specifications
Status . . . . . . . . . . . . . . . . . . . . . . . . 46
device . . . . . . . . . . . . . . . . . . . . . . 49
Internet
LAN . . . . . . . . . . . . . . . . . . . . . . . . 48
local network . . . . . . . . . . . . . . . . . 48
radio status
telephony . . . . . . . . . . . . . . . . . . . . 48
Subnet
Subnet mask . . . . . . . . . . . . . . . . . . . 81
Switch. . . . . . . . . . . . . . . . . . . . . . . . 81
Switching on
System password . . . . . . . . . . . . . . . 43
forgotten . . . . . . . . . . . . . . . . . . . .60
System requirements
. . . . . . . . . . . . . . . . . . . . . .6
. . . . . . . . . . . . . . . . . . . . . . . . 81
. . . . . . . . . 27
. . . . . . . . . . . . . . . . . . 65
. . . . . . . . . . . . . . . . . . . . . 47
. . . . . . . . . . . . . . . . . . 49
. . . . . . . . . . . . . . . . . . . . . . . 81
. . . . . . . . . . . . . . . . . . . 18
. . . . . . . . . . . . . 15
T
TAE . . . . . . . . . . . . . . . . . . . . . . . . . .81
TCP . . . . . . . . . . . . . . . . . . . . . . . . . 81
. . . . . . . . . . . . . . . . . . . . . . . 82
TCP/IP
Telephone
analogue . . . . . . . . . . . . . . . . . . . . 40
Telephoning
function keys . . . . . . . . . . . . . . . . . 52
Trademarks. . . . . . . . . . . . . . . . . . . . . 5
Troubleshooting
customer service . . . . . . . . . . . . . . 61
fault tracing . . . . . . . . . . . . . . . . . . 59
other faults
. . . . . . . . . . . . . . . . . . . . 52
. . . . . . . . . . . . . . . . . 59
. . . . . . . . . . . . . . . . . . . 60
U
UDP . . . . . . . . . . . . . . . . . . . . . . . . . 82
Updating firmware . . . . . . . . . . . . . . . 45
Upgrading firmware
Uplink . . . . . . . . . . . . . . . . . . . . . . . . 82
URL . . . . . . . . . . . . . . . . . . . . . . . . . 82
User Datagram Protocol see UDP
. . . . . . . . . . . . . . 45
85
Page 86

Index
User interface. . . . . . . . . . . . . . . . . . 23
Basic Setup Wizard
menu structure . . . . . . . . . . . . . . . 25
opening online Help. . . . . . . . . . . . 25
setting the language
. . . . . . . . . . . . 27
. . . . . . . . . . . 24
V
Virtual server . . . . . . . . . . . . . . . . . . 82
VoIP . . . . . . . . . . . . . . . . . . . . . . 51, 82
W
WAN . . . . . . . . . . . . . . . . . . . . . . . . 82
Web browser
configuring
HTTP proxy . . . . . . . . . . . . . . . . . . 63
launching user interface . . . . . . . . . 21
menu structure
pop-up window. . . . . . . . . . . . . . . . 64
user interface . . . . . . . . . . . . . . . . . 23
WiMAX
WiMAX network
access data . . . . . . . . . . . . . . . . . . 27
establishing a connection
scan. . . . . . . . . . . . . . . . . . . . . . . . 28
. . . . . . . . . . . . . . . . . . . 63
. . . . . . . . . . . . . . . . 25
. . . . . . . . . . . . . . . . . . . . . 9, 82
. . . . . . . . 28
86
Page 87

Issued by Sagemcom Broadband SAS
Sagemcom Broadband SAS
250, route de l'Empereur - 92500 RUEIL MALMAISON
© Sagemcom Broadband SAS 2011
All rights reserved. Subject to availability.
Rights of modification reserved.
www.sagemcom.com
05.2011
 Loading...