

SAGEMCOM BROANDS PPX3610 User Manual

Android 30
9 Android
Your Pocket Projector uses the Android operating system.
Calling Android
1 Switch the device on using the on/off switch on the
side.
2 After the initial screen the main menu appears.
3 Use the navigation keys to select Android.
4 Confirm with à.
Exiting Android
Press the | key to return to the main menu.
Software Reset
Resetting Android
If your Pocket Projector does not work properly, a
reset to factory defaults may solve the problem in many
cases.
All Settings and Data Will be Deleted!
This procedure erases all your settings and
data that is stored on the device.
Apps need to be reinstalled.
YOZO Office
By resetting Android YOZO Office will be
deleted. The reinstallation of YOZO Office
will start automatically when connecting the
device to the internet via WiFi.
Installing Android-Apps
Trusted Sources!
Apps from third party sources may be malicious. Only use installation packets from
trusted sources.
You can install other apps. Use the APK installation
packets.
Compatibility
The manufacturer does not guarantee the
compatibility of third party apps.
Volume
In some apps, the volume may only be controlled via the remote control.
Youtube
You need to install the latest version of the
Adobe Flash Player in order to play Youtube
videos (see also Install Adobe Flash Player,
page 31).
Calendar
There is no calendar pre-installed on the
Pocket Projector.
DANGER!
Notice
CAUTION!
Notice
Notice
Notice
Notice
31 Philips · PPX3610
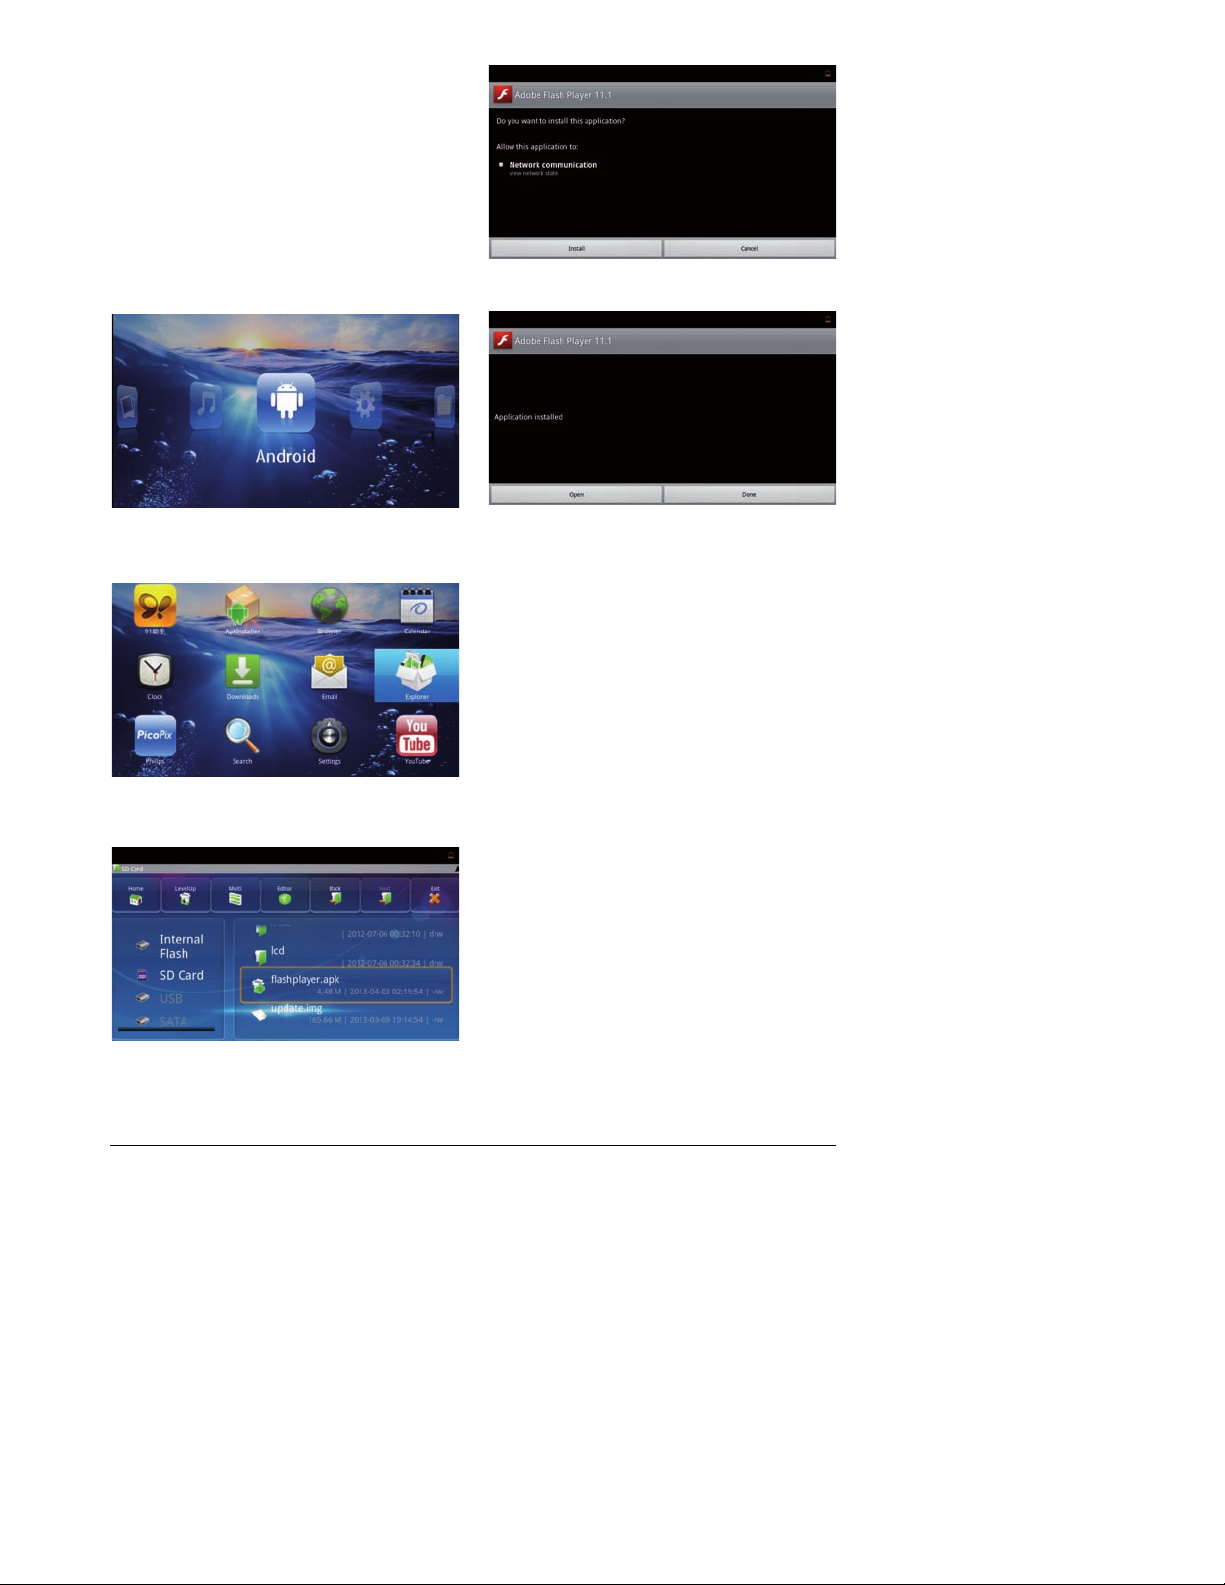
Install Adobe Flash Player
You need to install the latest version of the Adobe Flash
Player in order to play Youtube videos.
1 Download the latest version of Adobe Flash Player
installation package (flashplayer.apk) for Android.
For further information visit www.philips.com/support.
2 Save the package onto a memory card.
3 Insert the memory card into the device (see also
Inserting a Memory Card, page 18).
4 Switch the device on using the on/off switch on the
side.
5 After the initial screen the main menu appears.
6 Use the navigation keys to select Android.
7 Confirm with à.
8 Use the navigation keys to select Explorer.
9 Confirm with à.
10 Navigate to the memory card and select flash-
player.apk.
11 Press à to execute the installation package.
12 Use the navigation keys to select Install.
13 Press à to start the installation.
14 Use the navigation keys to select Done.
15 Confirm with à.
16 The latest version of Adobe Flash Player is installed.
Android 32
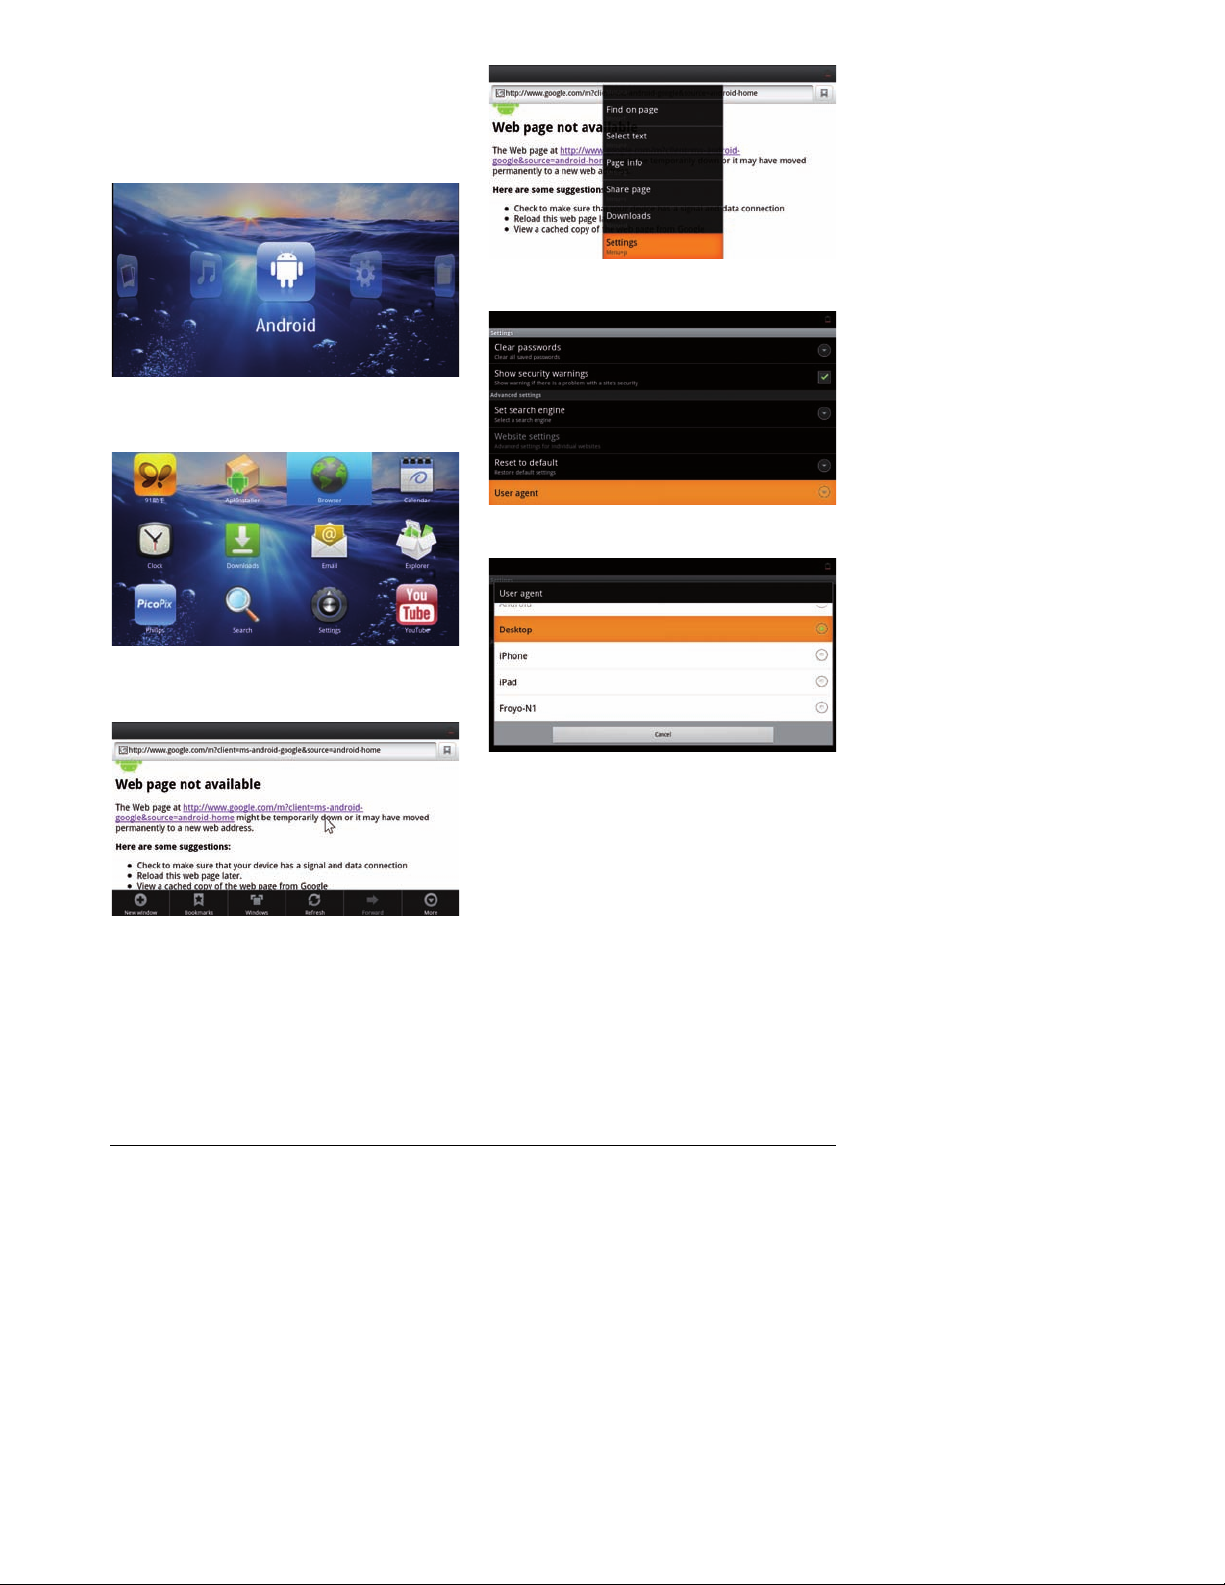
Adjust Browser Mode
Change the browser mode to display websites containing flash elements.
1 Switch the device on using the on/off switch on the
side.
2 After the initial screen the main menu appears.
3 Use the navigation keys to select Android.
4 Confirm with à.
5 Use the navigation keys to select Browser.
6 Confirm with à.
7 Press the menu key t to call the menu.
8 Use the navigation keys to select More.
9 Confirm with à.
10 Use the navigation keys to select Settings.
11 Confirm with à.
12 Use the navigation keys to select User agent.
13 Confirm with à.
14 Use the navigation keys to select Desktop.
15 Confirm with à.
16 Websites containing flash elements can be displayed.
33 Philips · PPX3610
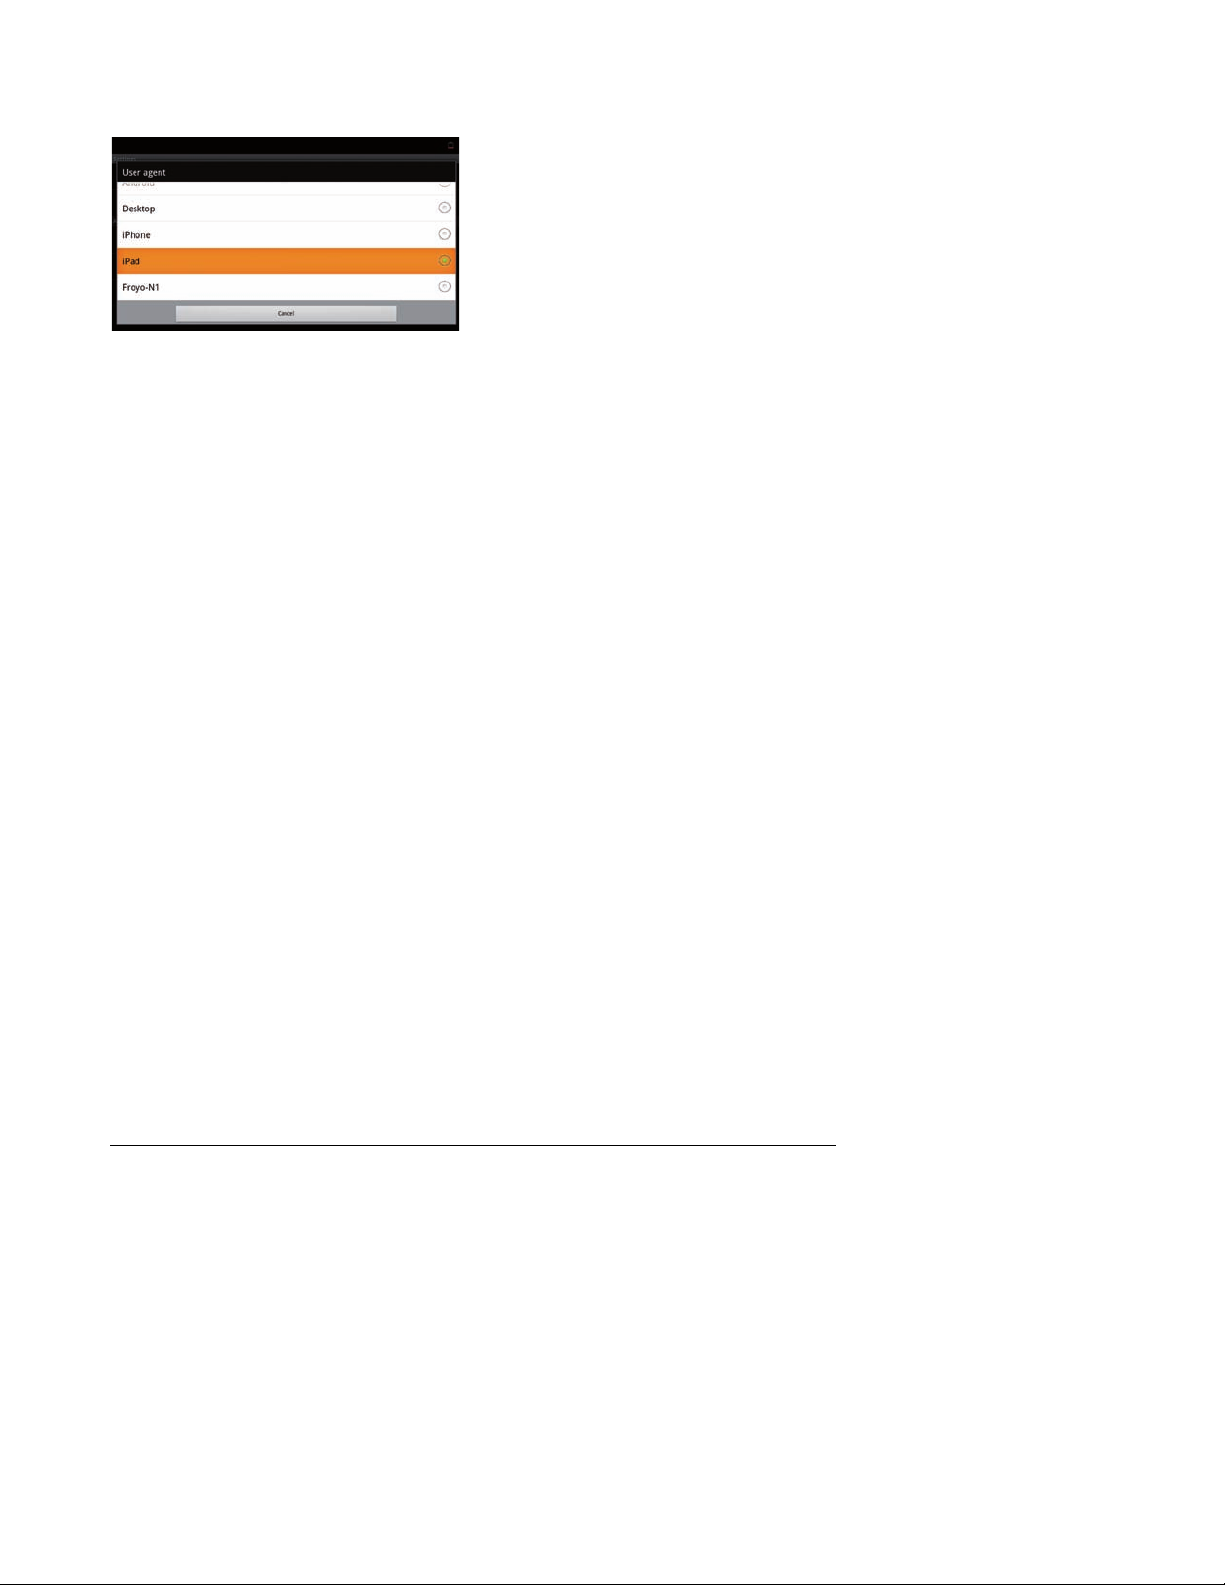
Reset Browser Mode
1 Proceed as described in the adjust browser mode
chapter (see also Adjust Browser Mode, page 32).
2 Use the navigation keys to select iPad.
3 Confirm with à.

Settings 34
10 Settings
1 Switch the device on using the on/off switch on the
side.
2 After the initial screen the main menu appears.
3 Use the navigation keys to select Settings.
4 Confirm with à.
5 Use ¡/¢ to select from the following settings.
6 Confirm with à.
7 Modify the settings using à, ¡/¢,
8 Confirm with à.
The ¿ key takes you one step back in the menu.
Overview of the Menu
Functions
WIFI & DLNA
WIFI Network – switching the wireless network
(WLAN) off and on
Network Selection – select the wireless network with
which the device is to connect
DLNA Sharing – switching DLNA off and on
WIFI Hot Spot – activate and deactivate WLAN teth-
ering
Image settings
Wall paper – Select background images
Fit Screen – Convert videos and images to 4:3 resolu-
tion
Projection mode
Front – Normal projection; the device is located in
front of the projection surface/screen
Rear – Rear projection; the device is located behind
the projection surface; the image is reflected horizontally.
Ceiling – The device is hanging from the ceiling in an
upside-down position; the image is rotated through
180 degrees.
Rear ceiling – The device is located behind the projection surface, hanging from the ceiling in an upsidedown position; the image is rotated through 180
degrees and reflected horizontally.
Wall color correction – Colour correction of the projected image to adjust to coloured projection surfaces
Smart Settings – Select predefined settings for brightness / contrast / colour saturation. If you modify these
settings, the setting is switched to Manual.
Brightness – Adjust brightness
Contrast – Adjust contrast
Sound Settings:
Volume – Adjust the volume
Bass – Set the playback of the low frequencies
Treble – Set the playback of the high frequencies
Key beep – Turn key tones on and off
Video settings
View –
Display all videos in a list or a corresponding
folder structure on the drive.
Repeat – Set the repeat type for video files: Repeat
deactivated (Off), repeat all videos in a directory
(Directory), repeat only the current video (Movie),
repeat all videos (All).
Resume play – If this function is activated, playback will
continue at the position it was last stopped. If deactivated, playback will always start at the beginning of the
video.
Fit Screen – Convert videos to 4:3 resolution
Music settings
View – S
how all tracks in a list or a corresponding folder
structure on the drive.
Screen – Activate or deactivate the projection during
playback.
Repeat – Set the repeat type for music files: Repeat
deactivated (Off), repeat all songs in a directory (Direc-
tory), repeat only the current song (Song), repeat all
songs (All).
Shuffle – Activate this function for random playback.
Otherwise, playback will take place in sequence.
 Loading...