

Page 1
Couv1_4.fm Page 1 Dimanche, 2. septembre 2012 10:18 10
USER GUIDE
D680C
N
Page 2

Recommendations and safety instructions
www.sagemcom.com
Sagemcom Broadband SAS
MU 25XXXXXX-A_D680C_US.book Page 1 Dimanche, 2. septembre 2012 9:51 09
You have just purchase a D680C and we thank you for your purchase.
This product follows a strategy of continuous development. We reserve the right to make
changes without notice, modifications and improvements to the products described in
this user manual.
To operate the device safely and easily, basic safety precautions should always be
followed to reduce the risk of fire, electric shock and injury to persons, please read
carefully the paragraph “R
”, page 2.
The declaration of compliance may be looked up on the w
section «Support», or can be obtained from the following address:
250, route de l'Empereur
92848 Rueil-Malmaison Cedex - France
Sagemcom USA LLC
14651 North Dallas Parkway
Suite 900
Dallas, TX 75254
1
website
Page 3
MU 25XXXXXX-A_D680C_US.book Page 2 Dimanche, 2. septembre 2012 9:51 09
Recommendations and
safety instructions
For safety reasons, never put the handset in the base station without the
battery inser ted or without the lid on the battery compartment as this
could cause an electric shock.
To avoid damaging your handset/base, only use cer tified rechargeable
batteries NiMH 1.2 V 750 mAh, never use non rechargeable batteries.
Insert the batteries in the handset/base batter y compartment respecting
polarity, do not dispose of batteries in fire, they may explode, if the
handset will not be used for an extended period of time, unplug the
battery and remove it from the handset to prevent possible leakage,
keep batteries out of the reach of children
Only use the power unit supplied and connect it to the electricity mains
in accordance with the installation instructions in this user manual and
the details on the sticker regarding voltage, electrical current and
frequency. As a precaution if there is a risk of danger, the power plug can
be pulled out to disconnect the 120V power supply. Therefore the
sockets should be near the device and easily accessible.
Do not install your DECT telephone D680C in a damp environment, such
as a bathroom, washroom, kitchen etc, and not within 1.50 feet of a
source of water or outside. This device is designed for use in
temperatures of between 5 Celsius degree and 40 Celsius degree. Do
not expose the product to extreme temperatures such as areas near a
hot radiator, stove or in a hot car.
In zones where there is a risk of frequent thunder storms, we
recommend that you protect your telephone line using an electric power
surge protection device.
Avoid using the telephone during an electrical storm, there may be a
remote risk of electric shock from lightning.
Do not attempt to remove screws or open the appliance. It does not
contain any user-replaceable parts.
2
Page 4
MU 25XXXXXX-A_D680C_US.book Page 3 Dimanche, 2. septembre 2012 9:51 09
Your DECT telephone has a range of approx. 50 feet indoors and up to
300 feet outdoors. The range can be affected by the proximity of metal
objects, such as a television and electrical devices.
Areas without reception may appear due to elements in the building. This
can cause brief interruptions in the conversation, caused by faulty
transmission.
Certain medical equipment and highly-sensitive machines or security
systems may be affected by the transmission power of the telephone. In
these cases we recommend adhering to the safety infor mation.
The used battery must be disposed of in line with the recycling
regulations in this user manual.
Check with local codes for possible special disposal instructions.
Do not use the telephone to repor t a gas leak in the vicinity of the leak.
The base is for indoor use only, do not place or install in an outdoor
location.
Unplug this product from the wall outlet before cleaning, don't use liquid
cleaners or aerosol cleaners.
3
Page 5
FCC ID: VW3D680C
1
2
Important note:
MU 25XXXXXX-A_D680C_US.book Page 4 Dimanche, 2. septembre 2012 9:51 09
D680C
FCC Caution
Any Changes or modifications not expressly approved by the party responsible for
compliance could void the user's -authority to operate the equipment.
F
This device complies with part 15 of the FCC Rules. Operation is subject to
the following two conditions:
this device may not cause harmful interference, and
this device must accept any interference received, including interference
that may cause undesired operation.
Privacy of communications may not be ensured when using this phone.
Note: This equipment has been tested and found to comply with the limits for a Class B
digital device, pursuant to part 15 of the FCC Rules. These limits are designed to provide
reasonable protection against harmful interference in a residential installation. This
equipment generates, uses and can radiate radio frequency energy and, if not installed
and used in accordance with the instructions, may cause harmful interference to radio
communications.
However, there is no guarantee that interference will not occur in a particular installation.
If this equipment does cause harmful interference to radio or television reception, which
can be determined by turning the equipment off and on, the user is encouraged to try to
correct the interference by one or more of the following measures:
• Reorient or relocate the receiving antenna.
• Increase the separation between the equipment and receiver.
• Connect the equipment into an outlet on a circuit different from that to which the
receiver is connected.
• Consult the dealer or an experienced radio/TV technician for help.
• Privacy of communications may not be ensured when using this telephone!
• This product complies with FCC radiation exposure limits set forth for an uncontrolled
environment.
• To comply with FCC RF exposure requirements, the base unit must be installed and
operated 20 cm (8 inches) or more between the product and all person's body
(excluding extremities of hands, wrist and feet).
• This product may not be collocated or operated in conjunction with any other antenna
or transmitter
• The handset may be carried and operated with only the specific provided belt-clip.
Other non-tested belt-clips or similar body-worn accessories may not comply and
must be avoided
4
Page 6

Customer Information
1
bottom
US:AAAEQ##TXXXX
2
RJ11C
3
4
US:AAAEQ##TXXXX
5
6
7
MU 25XXXXXX-A_D680C_US.book Page 5 Dimanche, 2. septembre 2012 9:51 09
D680C
C
This equipment complies with Part 68 of the FCC rules and the requirements adopted
by the ACTA. On the b
information, a product identifier in the format
number must be provided to the telephone company.
An applicable certification jacks Universal Service Order Codes (USOC) for the
equipment is provided (i.e., R
terminal equipment.
A plug and jack used to connect this equipment to the premises wiring and telephone
network must comply with the applicable FCC Part 68 rules and requirements
adopted by the ACTA. A compliant telephone cord and modular plug is provided with
this product. It is designed to be connected to a compatible modular jack that is also
compliant. See installation instructions for details.
The REN is used to determine the number of devices that may be connected to a
telephone line. Excessive RENs on a telephone line may result in the devices not
ringing in response to an incoming call. In most but not all areas, the sum of RENs
should not exceed five (5.0). To be certain of the number of devices that may be
connected to a line, as determined by the total RENs, contact the local telephone
company. [For products approved after July 23, 2001, the REN for this product is part
of the product identifier that has the format
represented by ## are the REN without a decimal point (e.g., 03 is a REN of 0.3). For
earlier products, the REN is separately shown on the label.]
If this equipment [US:
telephone company will notify you in advance that temporary discontinuance of
service may be required. But if advance notice isn't practical, the telephone company
will notify the customer as soon as possible. Also, you will be advised of your right to
file a complaint with the FCC if you believe it is necessary.
The telephone company may make changes in its facilities, equipment, operations or
procedures that could affect the operation of the equipment. If this happens the
telephone company will provide advance notice in order for you to make necessary
modifications to maintain uninterrupted service.
Should you experience trouble with this equipment, please contact [US: NS3W400BD680C
for repair or warranty information, Service can be facilitated through our office at:
U.S. Agent Company name:
14651 N.Dallas Parkway,Suite 900 DALLAS TEXAS 75254 US
Address:
+1-972-674-4100
Tel:
of this equipment is a label that contains, among other
NS3W400BD680C
Sagemcom USA LLC
) in the packaging with each piece of approved
causes harm to the telephone network, the
. If requested, this
. The digits
5
Page 7
8
9
10
11
12
13
FCC ID: VW3D680C
US: NS3W400BD680C
REN: 0.0B
MU 25XXXXXX-A_D680C_US.book Page 6 Dimanche, 2. septembre 2012 9:51 09
D680C
If the equipment is causing harm to the telephone network, the telephone company
may request that you disconnect the equipment until the problem is resolved.
8
Please follow instructions for repairing if any (e.g. battery replacement section);
otherwise do not alternate or repair any parts of device except specified.
Connection to party line service is subject to state tariffs. Contact the state public
utility commission, public service commission or corporation commission for
information.
If your home has specially wired alarm equipment connected to the telephone line,
ensure the installation of this [equipment ID] does not disable your alarm equipment.
If you have questions about what will disable alarm equipment, consult your
telephone company or a qualified installer.
If the telephone company requests information on what equipment is connected to
their lines, inform them of:
a) The ringer equivalence number [0.0B]
b) The USOC jack required [RJ11C]
c) Facility Interface Codes ("FIC") [02LS2]
d) Service Order Codes ("SOC 9.0Y
e) The FCC Registration Number [US: NS3W400BD680C
The REN is used to determine the number of devices that may be connected to a
telephone line. Excessive RENs on a telephone line may result in the devices not
ringing in response to an incoming call. In most but not all areas, the sum of RENs
should not exceed five (5.0). To be certain of the number of devices that may be
connected to a line, as determined by the total RENs, contact the local telephone
company. The REN for this product is part of the product identifier that has the format
US:AAAEQ##TXXXX. The digits represented by ## are the REN without a decimal
point. For this product the FCC Registration number is [US: XXXXXXXXX] indicates the
REN would be XX.
If this product is equipped with a corded or cordless handset, it is hearing aid
compatible.
6
Page 8

MU 25XXXXXX-A_D680C_US.book Page 7 Dimanche, 2. septembre 2012 9:51 09
D680C
Contents
Discover........................................................... 10
Your phone ......................................................................... 10
Unpacking............................................................................................................................................ 10
Installing the belt clip........................................................................................................................ 11
The handset ......................................................................................................................................... 12
The base ............................................................................................................................................... 13
Connecting the base......................................................................................................................... 14
Browser................................................................................................................................................. 15
Menu browsing ................................................................................................................................... 15
The screen ........................................................................................................................................... 18
Charging............................................................................. 19
Handset set-up.................................................................... 19
Replacing the batteries ....................................................... 21
Menu tree structure ........................................................................................................................... 22
Call... ............................................................... 24
Managing calls .................................................................... 24
Making a call........................................................................................................................................ 24
Ending a call.................................................................................................................. ...................... 25
Receiving a call .................................................................................................................................. 25
Choose your line................................................................................................................................. 25
Managing several calls........................................................ 26
Receiving a second call ................................................................................................................... 26
Switching from one call to the other ............................................................................................. 26
Ending one of the calls in progress .............................................................................................. 27
Talking with two contacts at the same time (3-way conference) ......................................... 27
Making a second call ........................................................................................................................ 28
Transferring calls ............................................................................................................................... 29
Options during a call ........................................................... 30
Enable/Disable loudspeaker (hands-free mode) ...................................................................... 30
Adjusting volume................................................................................................................................ 30
7
Page 9

MU 25XXXXXX-A_D680C_US.book Page 8 Dimanche, 2. septembre 2012 9:51 09
D680C
Enable the mute mode...................................................................................................................... 31
Using additional handsets ................................................... 32
Calling another handset (intercom) .............................................................................................. 32
Intrusion ................................................................................................................................................ 32
Manage your contacts... ................................... 33
Use the phonebook ............................................................. 33
Create an entry ................................................................................................................................... 33
Call the contact from phonebook .................................................................................................. 34
Changing an entry ............................................................................................................................. 34
Deleting an entry ................................................................................................................................ 34
Search for an entry ............................................................................................................................ 34
Delete all the entries.......................................................................................................................... 35
Speed dialing ...................................................................................................................................... 35
Voice mail Service............................................36
Modifying the Voice mail number .................................................................................................. 36
Audio adjustment... .......................................... 37
Changing the ringing tone...................................................................................................... ......... 37
Enabling/Disabling the silent mode .............................................................................................. 37
Enabling/Disabling audio alerts ..................................................................................................... 38
Setting up.........................................................39
The phone........................................................................... 39
Setting the date and the time.......................................................................................................... 39
Picking up and hanging up calls automatically......................................................................... 40
Changing the display language ..................................................................................................... 40
Adjust the brightness ........................................................................................................................ 41
Change the screen background .................................................................................................... 41
The handset ........................................................................ 42
Associating a new handset ............................................................................................................. 42
Customizing the handset’s registration ....................................................................................... 43
Defining the main base for your handset .................................................................................... 43
Modifying the country ....................................................................................................................... 44
Handset version.................................................................................................................................. 44
Resetting the handset....................................................................................................................... 44
The base ............................................................................. 45
Changing the base code.................................................................................................................. 45
8
Page 10

MU 25XXXXXX-A_D680C_US.book Page 9 Dimanche, 2. septembre 2012 9:51 09
D680C
Resetting the base............................................................................................................................. 45
Base version................................................................................................................... ..................... 46
The line ............................................................................... 47
Change the line name ....................................................................................................................... 47
Pair the handset with a line ............................................................................................................. 47
Allow three-way communication (Intrusion) ............................................................................... 48
Changing the flash duration............................................................................................................ 48
Managing your calls .......................................................................................................................... 49
The list of handsets ............................................................. 50
Manage handsets............................................................................................................................... 50
Accessories... ..................................................51
The alarm............................................................................ 51
Programming the alarm.................................................................................................................... 51
The timer ............................................................................ 52
Program the timer .............................................................................................................................. 52
Tracking your calls........................................... 53
Call logs.............................................................................. 53
Displaying the list of all calls........................................................................................................... 53
Viewing the received or dialed call log........................................................................................ 54
Consulting the missed call log ....................................................................................................... 55
Managing incoming or outgoing calls .......................................................................................... 56
The events log..................................................................... 57
Checking new events........................................................................................................................ 57
Environment..................................................... 58
Guarantee ........................................................ 59
Limited warranty................................................................................................................................. 59
Other limitations.................................................................................................................................. 61
9
Page 11
Discover...
1
ATTENTION The D680C phone is only compatible with Gateway US.
A base
MU 25XXXXXX-A_D680C_US.book Page 10 Dimanche, 2. septembre 2012 9:51 09
D680C
D
Discover...
Your phone
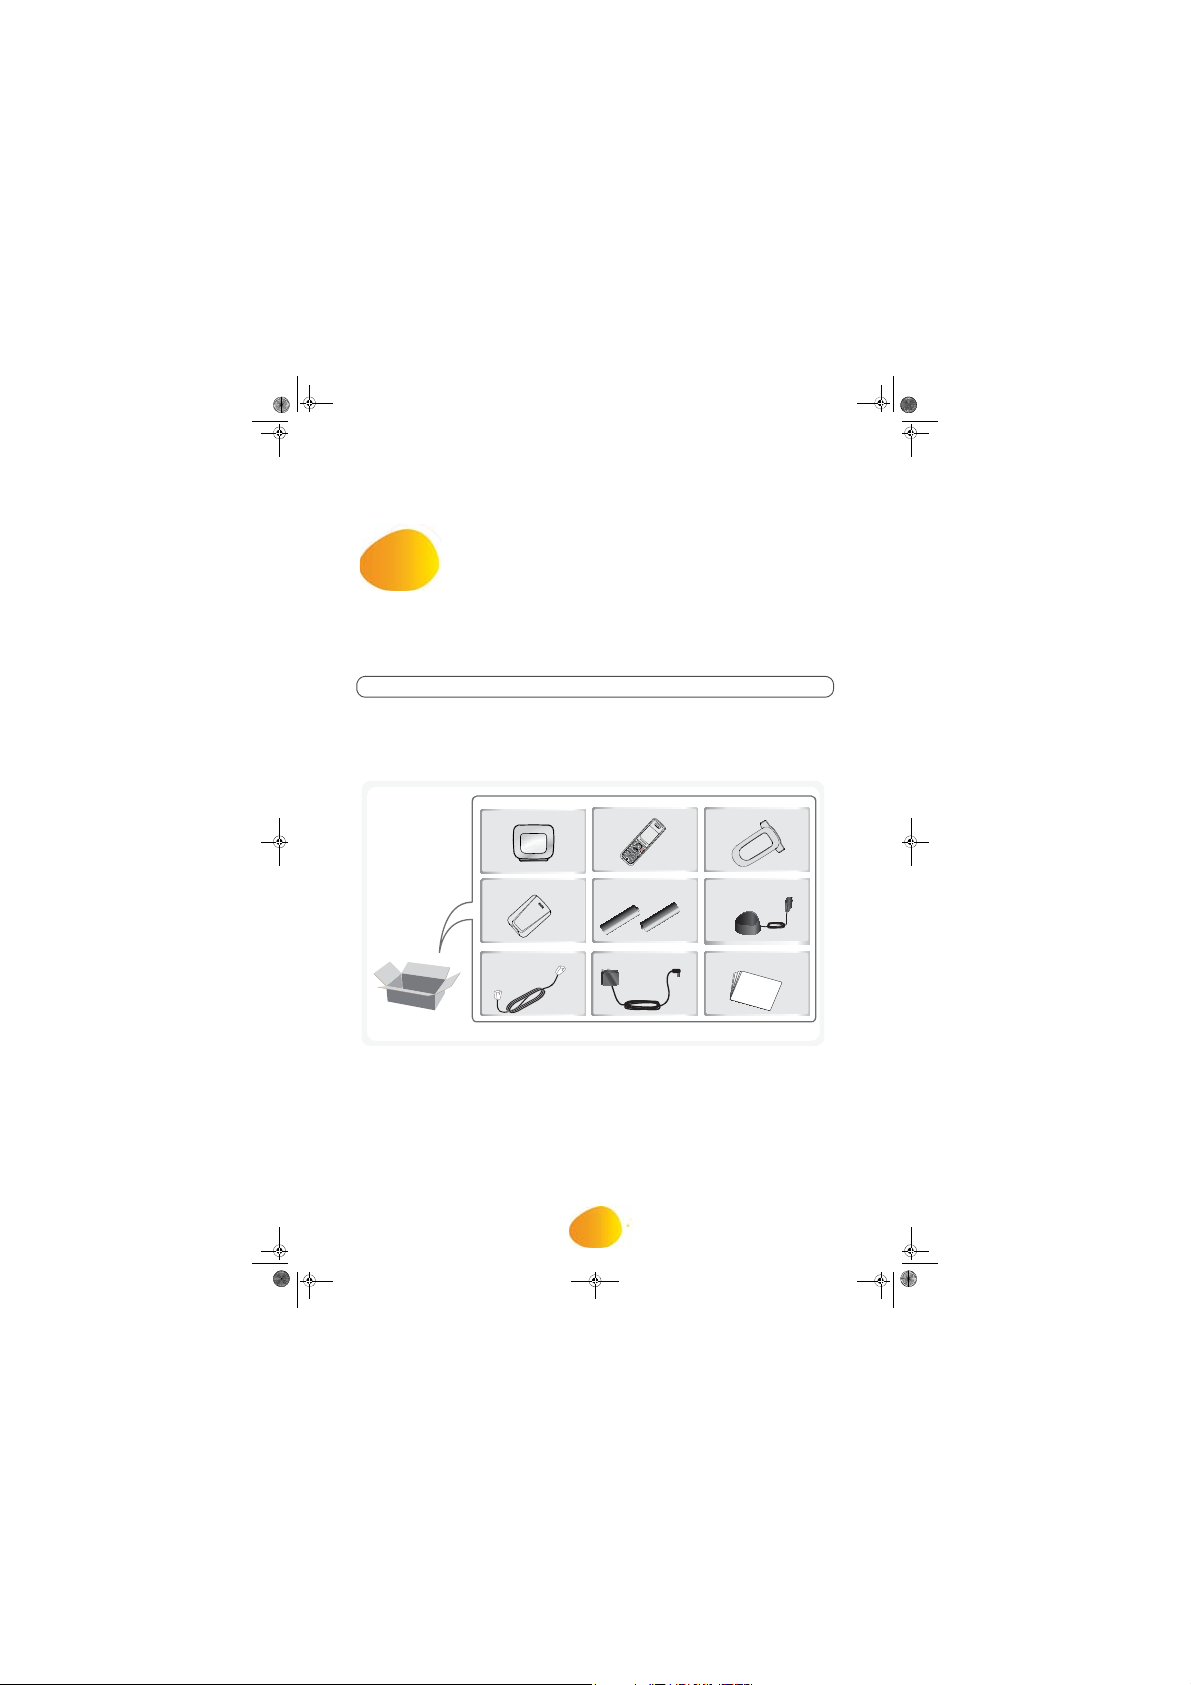
Unpacking
Open the box and make sure it contains the following items:
A belt clip
Un chargeur équipé de
Un chargeur équipé de
Un chargeur équipé de
son bloc
son bloc
son bloc
d’alimentation
d’alimentation
d’alimentation
A handset charger
Un chargeur équipé de
Un chargeur équipé de
Un chargeur équipé de
Un chargeur équipé de
Un chargeur équipé de
Un chargeur équipé de
Un chargeur équipé de
Un chargeur équipé de
Un chargeur équipé de
Un chargeur équipé de
Un chargeur équipé de
Un chargeur équipé de
Un chargeur équipé de
Un chargeur équipé de
Un chargeur équipé de
Un chargeur équipé de
Un chargeur équipé de
Un chargeur équipé de
Un chargeur équipé de
Un chargeur équipé de
Un chargeur équipé de
Un chargeur équipé de
Un chargeur équipé de
Un chargeur équipé de
Un chargeur équipé de
Un chargeur équipé de
Un chargeur équipé de
Un chargeur équipé de
Un chargeur équipé de
Un chargeur équipé de
Un chargeur équipé de
Un chargeur équipé de
Un chargeur équipé de
Un chargeur équipé de
Un chargeur équipé de
Un chargeur équipé de
Un chargeur équipé de
Un chargeur équipé de
Un chargeur équipé de
Un chargeur équipé de
Un chargeur équipé de
Un chargeur équipé de
Un chargeur équipé de
Un chargeur équipé de
Un chargeur équipé de
Un chargeur équipé de
Un chargeur équipé de
Un chargeur équipé de
Un chargeur équipé de
Un chargeur équipé de
Un chargeur équipé de
Un chargeur équipé de
Un chargeur équipé de
Un chargeur équipé de
Un chargeur équipé de
Un chargeur équipé de
Un chargeur équipé de
Un chargeur équipé de
Un chargeur équipé de
Un chargeur équipé de
Un chargeur équipé de
Un chargeur équipé de
Un chargeur équipé de
Un chargeur équipé de
Un chargeur équipé de
son bloc
son bloc
son bloc
son bloc
son bloc
son bloc
son bloc
son bloc
son bloc
son bloc
son bloc
son bloc
son bloc
son bloc
son bloc
son bloc
son bloc
son bloc
son bloc
son bloc
son bloc
son bloc
son bloc
son bloc
son bloc
son bloc
son bloc
son bloc
son bloc
son bloc
son bloc
son bloc
son bloc
son bloc
son bloc
son bloc
son bloc
son bloc
son bloc
son bloc
son bloc
son bloc
son bloc
son bloc
son bloc
son bloc
son bloc
son bloc
son bloc
son bloc
son bloc
son bloc
son bloc
son bloc
son bloc
son bloc
son bloc
son bloc
son bloc
son bloc
son bloc
son bloc
son bloc
son bloc
son bloc
_
d’alimentation
d’alimentation
d’alimentation
d’alimentation
d’alimentation
d’alimentation
d’alimentation
d’alimentation
d’alimentation
d’alimentation
d’alimentation
d’alimentation
d’alimentation
d’alimentation
d’alimentation
d’alimentation
d’alimentation
d’alimentation
d’alimentation
d’alimentation
d’alimentation
d’alimentation
d’alimentation
d’alimentation
d’alimentation
d’alimentation
d’alimentation
d’alimentation
d’alimentation
d’alimentation
d’alimentation
d’alimentation
d’alimentation
d’alimentation
d’alimentation
d’alimentation
d’alimentation
d’alimentation
d’alimentation
d’alimentation
d’alimentation
d’alimentation
d’alimentation
d’alimentation
d’alimentation
d’alimentation
d’alimentation
d’alimentation
d’alimentation
d’alimentation
d’alimentation
d’alimentation
d’alimentation
d’alimentation
d’alimentation
d’alimentation
d’alimentation
d’alimentation
d’alimentation
d’alimentation
d’alimentation
d’alimentation
d’alimentation
d’alimentation
d’alimentation
Un manuel utilisateurUn manuel utilisateurUn manuel utilisateurUn manuel utilisateurUn manuel utilisateurUn manuel utilisateurA user guide
One battery compartment
cover
A telephone line cord
A handset
Two rechargeable
batteries
+
+
_
Un manuel utilisateurUn manuel utilisateurUn manuel utilisateurUn manuel utilisateurUn manuel utilisateurUn manuel utilisateurA base power adaptor
10
Page 12

Discover...
To install the belt clip:
1
2
To remove the belt clip:
MU 25XXXXXX-A_D680C_US.book Page 11 Dimanche, 2. septembre 2012 9:51 09
Installing the belt clip
First insert one side of the clip into the dedicated slot (A).
A
Gently press on the other side of the clip until the pin snaps into the other slot. The
"TIC" sound indicates that the belt clip is in the locked position.
Lift the clip by one of the sides (B) and then pull off.
1
TIC
2
D680C
D
11
B
Page 13
Discover...
1.
2.
3.
4.
5.
1
2
5
4
10
6
8
11
12
13
3
9
7
7.
8.
9.
10.
11.
12.
13.
MU 25XXXXXX-A_D680C_US.book Page 12 Dimanche, 2. septembre 2012 9:51 09
D680C
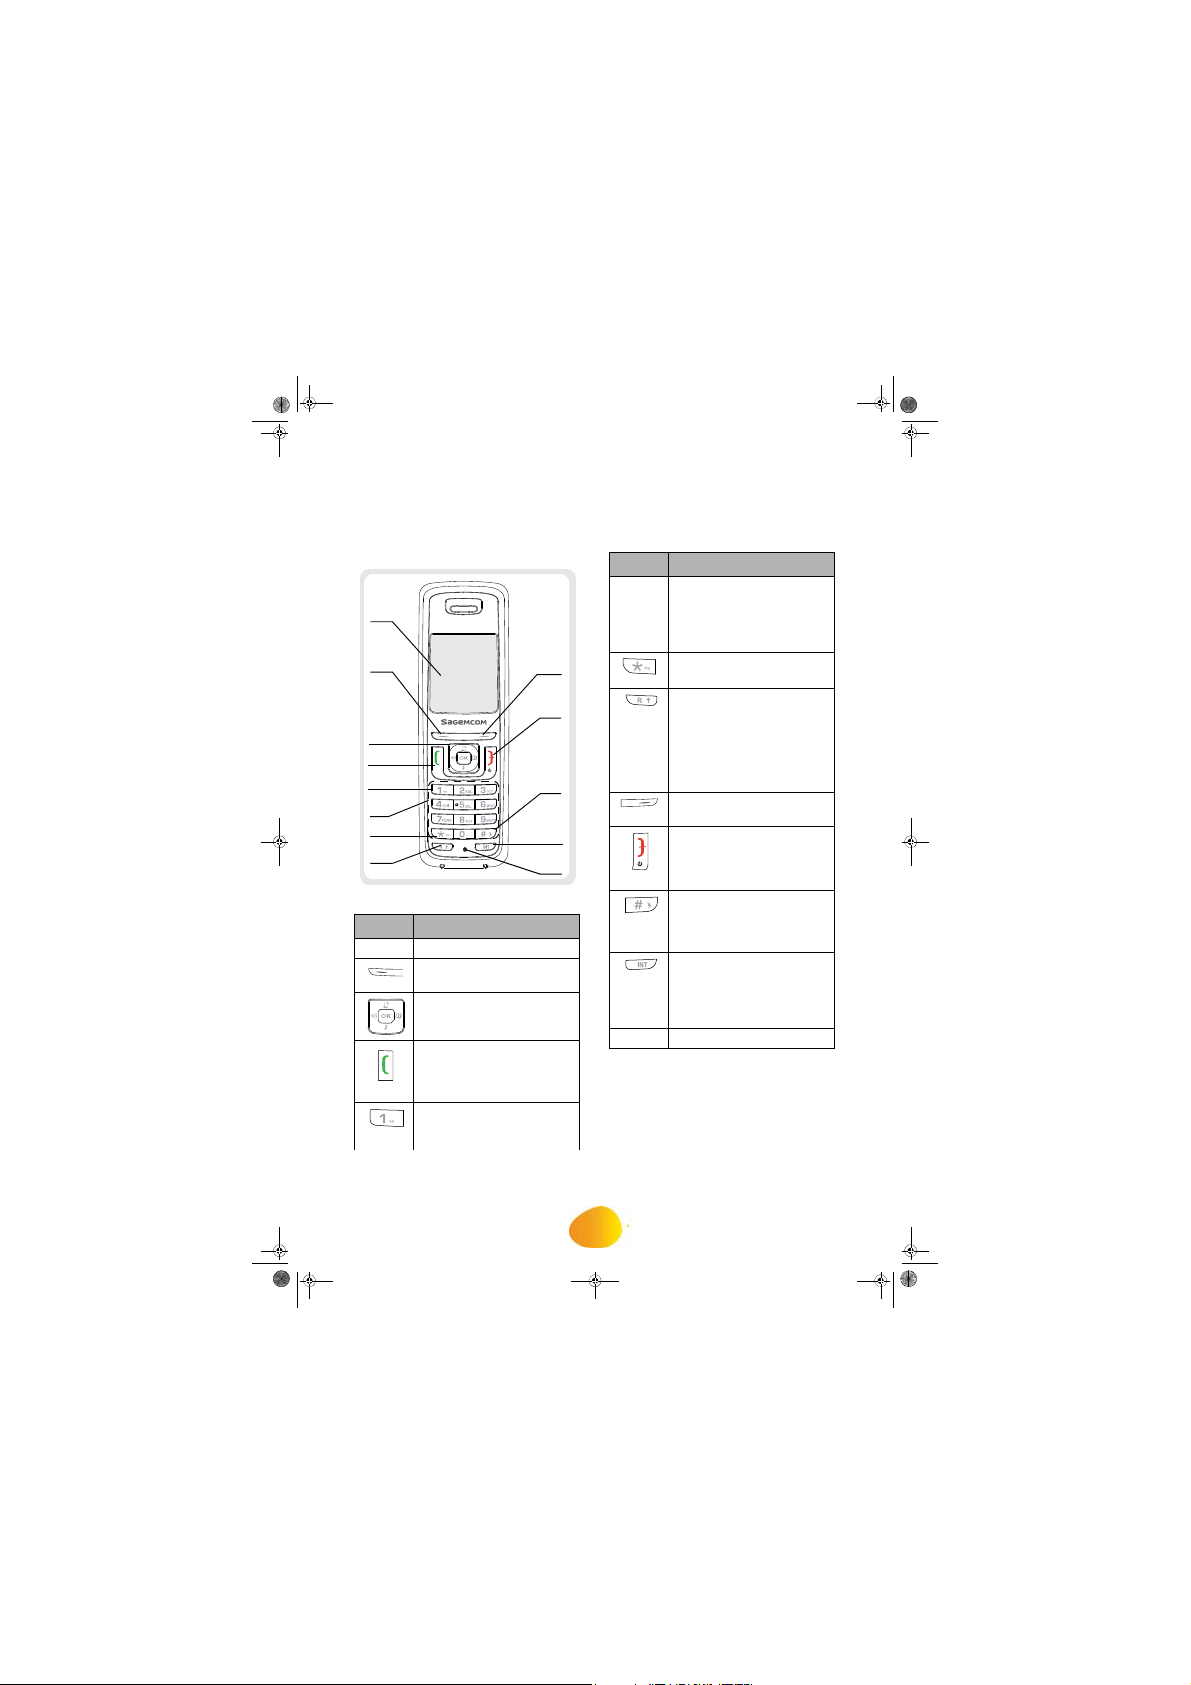
The handset
1
Key Description
Screen
Access to the main menu
/ Validation key.
Browser (See "Browser"
section for details).
"Answer" key or to get
dial tone (short press) /
Access to " All calls " log
(long press).
Access to voice mail
(long press in standby
mode).
Key Description
66.Alphanumeric keyboard:
long press the numeric
buttons to initiate calls to
pre-programmed
numbers.
Star key: lock / unlock
keypad (long press).
R key: allows you to put a
conversation on hold by
pressing the R key or
disconnect the call in
process, by pressing the
R key followed by 7 for a
double call.
Cancel key / return to
previous menu.
Hang up key (short
press) / Turn off/on the
handset (long press).
Sharp key:
activate/deactivate mute
mode (long press during
a call).
" INT " key intercom
function. Allows you to
call other handsets which
are paired to the same
base.
Microphone.
12
Page 14
Discover...
1
2
3
4
Note
MU 25XXXXXX-A_D680C_US.book Page 13 Dimanche, 2. septembre 2012 9:51 09
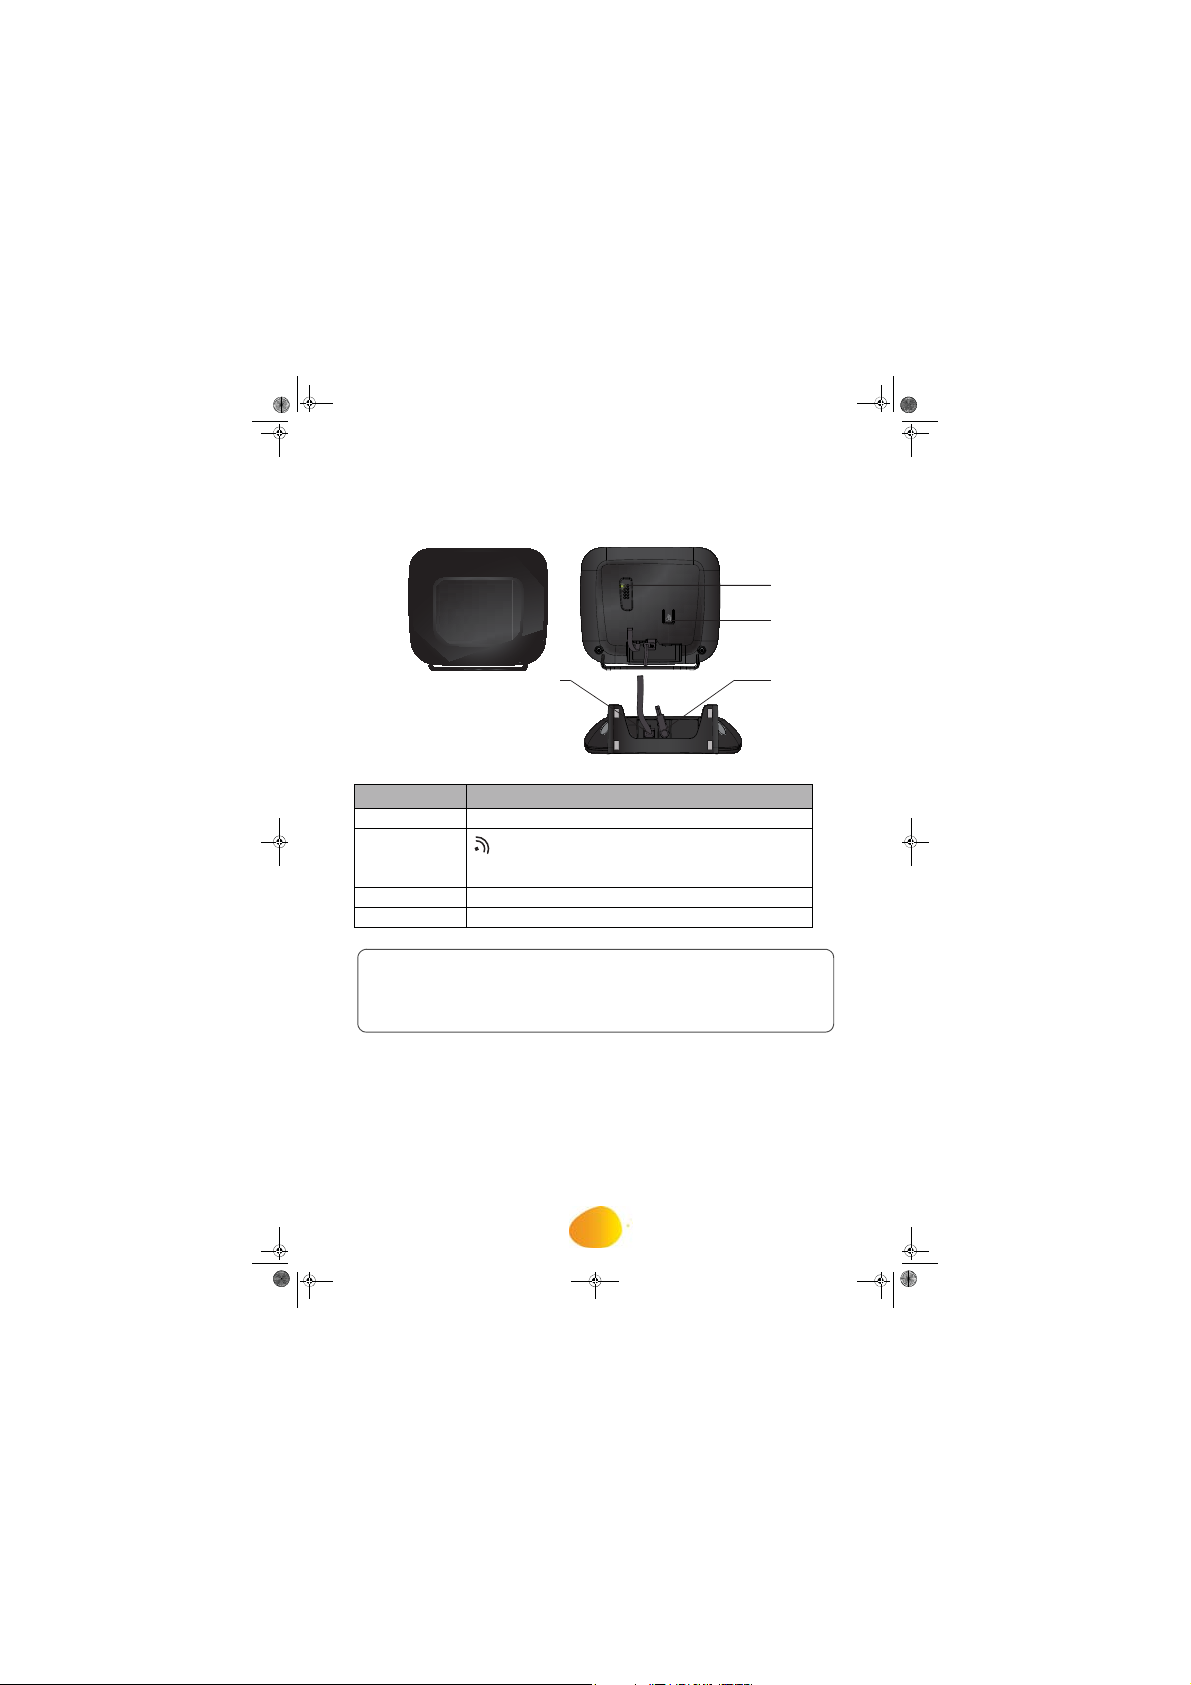
The base
Caption Description
Indicator light
button Paging/Pairing:
• Short press: paging of handsets
• Long press: pairing of handsets
Power so cket
Telephone socket
D680C
1
2
34
N
Indicator light operation:
- Fixed: base startup.
- Fast flashing: the base is in pairing mode.
- Medium Flashing: searching for handsets paired on the base.
- Slow flashing: call in progress.
13
Page 15
Discover...
1
2
3
4
MU 25XXXXXX-A_D680C_US.book Page 14 Dimanche, 2. septembre 2012 9:51 09
D680C
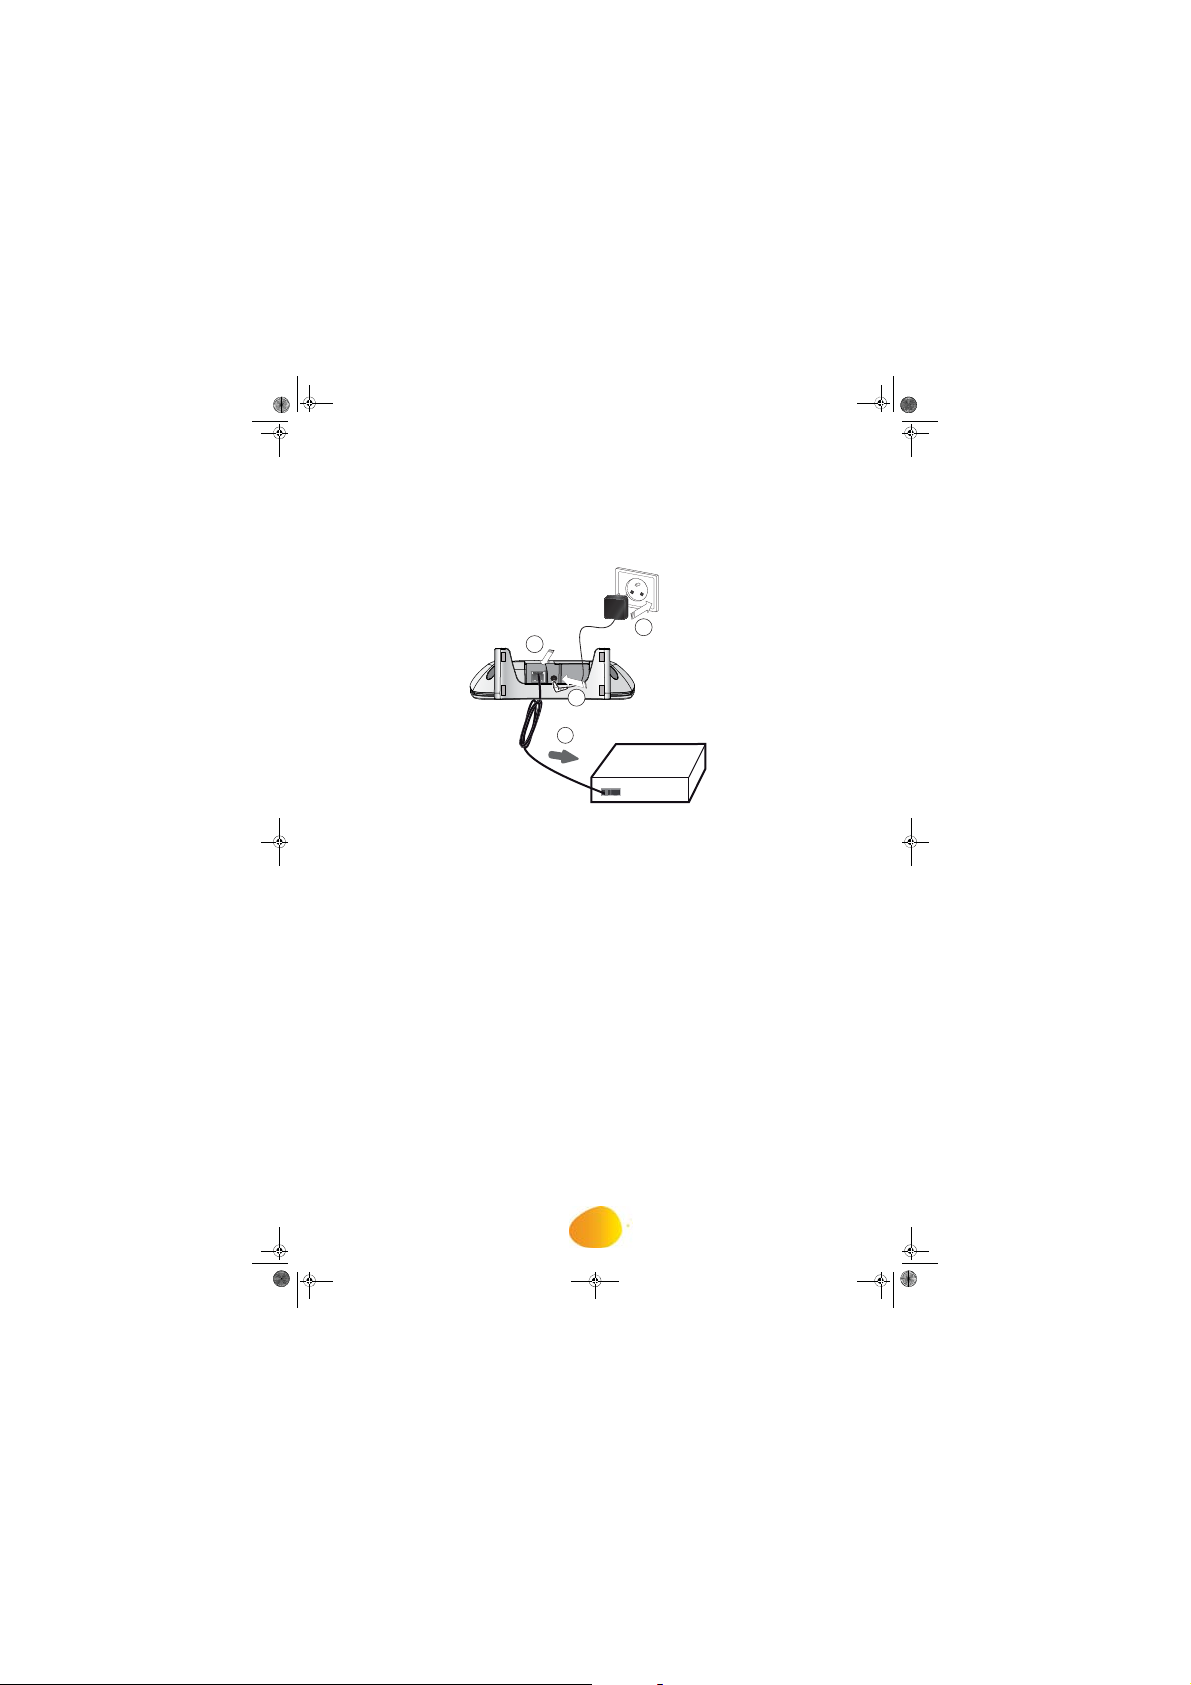
Connecting the base
1
3
2
4
@
Phone
Gateway
Take the base and turn it over.
Plug the telephone cord into the socket.
Connect the other end of the cord to the Gateway.
Take the power adapter. Connect the power adapter cord to the underside of the
base.
Connect the power adapter to an electrical outlet.
14
Page 16
Discover...
1
2
3
4
5
MU 25XXXXXX-A_D680C_US.book Page 15 Dimanche, 2. septembre 2012 9:51 09
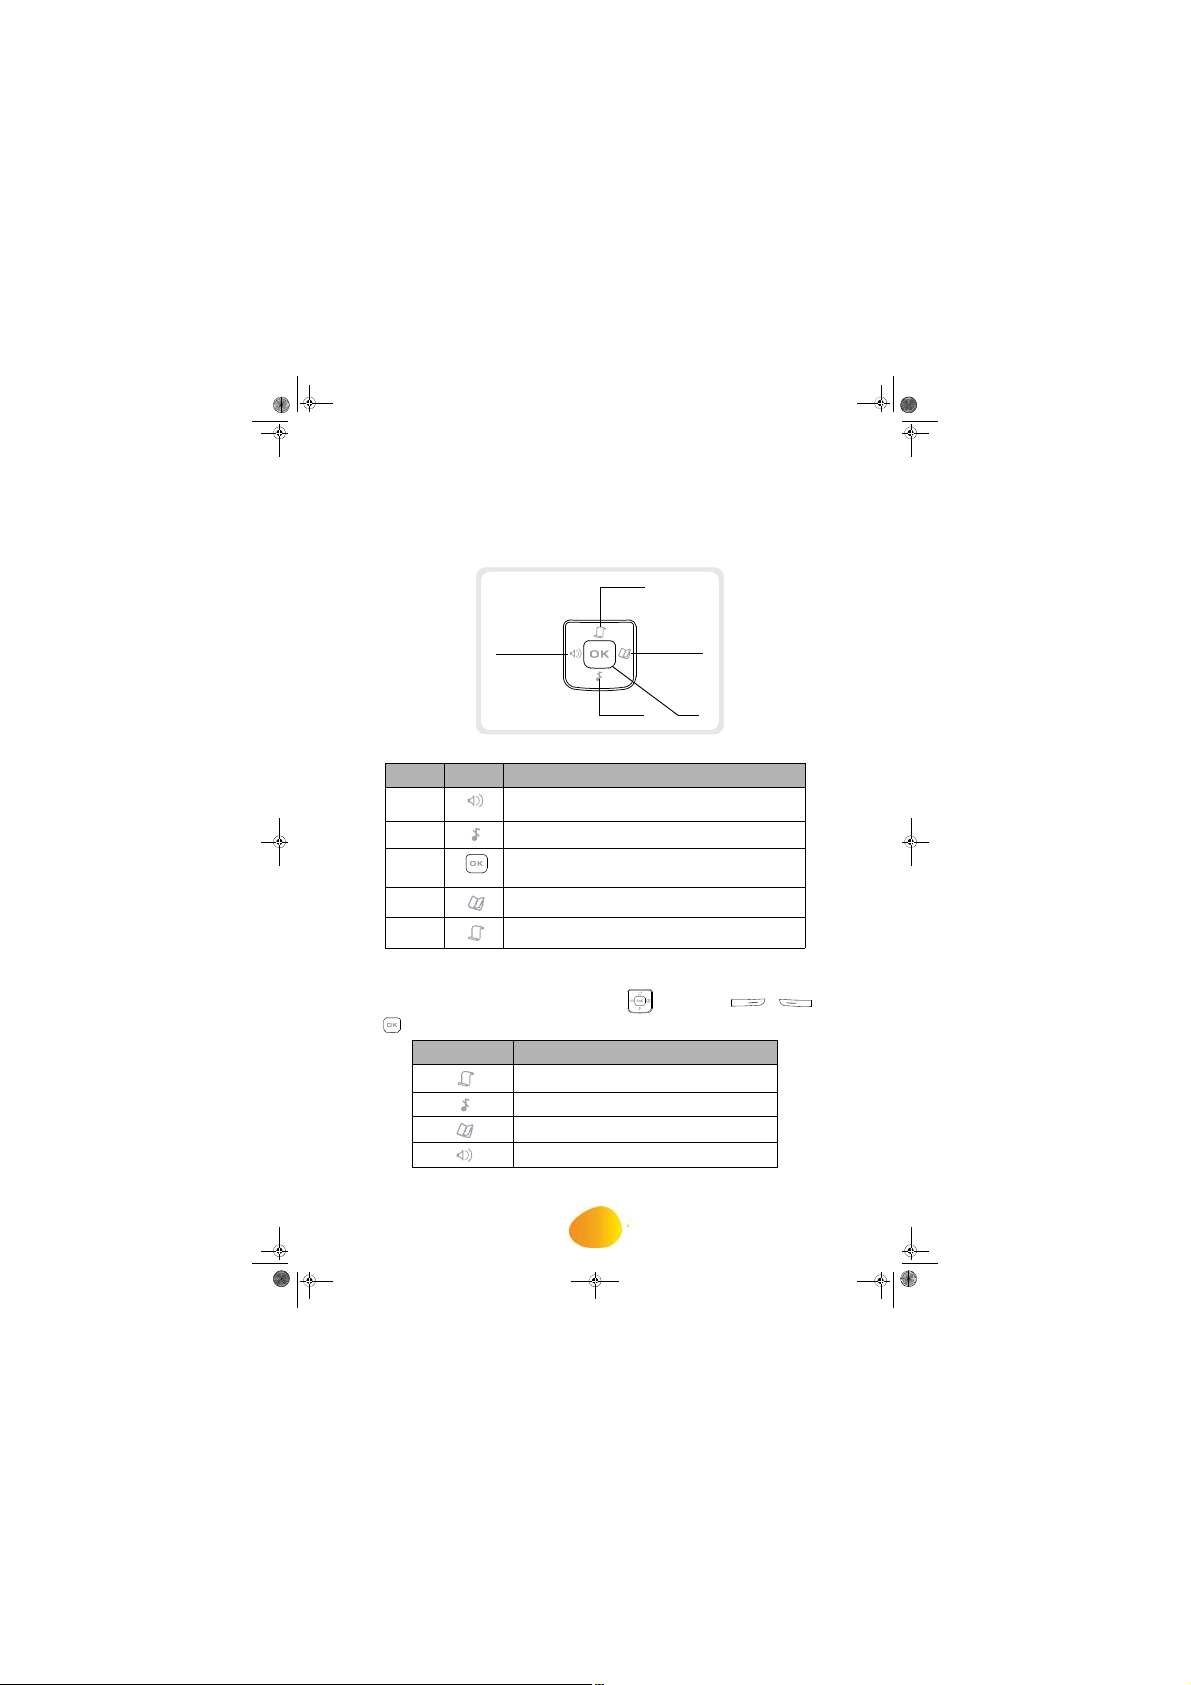
Browser
D680C
5
1
Legend Item Description
Loudspeaker (switch to hands-free mode)/disable
(switch to handset mode).
Enable/disable the silent mode.
Select key / Main menu access key.
Phonebook access key.
All log access key.
4
3
2
Menu browsing
To browse through menus, use the browser keys and the keys ,
and .
Key Corresponds to... (throughout the manual)
Up
Down
Right
Left
15
Page 17
Discover...
DETAILED BROWSER EXAMPLE: ACCESS TO THE COMMUNICATION MENU
1
Options
Second call
2
3
Menu
1
2
3
Select
4
MU 25XXXXXX-A_D680C_US.book Page 16 Dimanche, 2. septembre 2012 9:51 09
D680C
Pressing the corresponding sub-menu number (from 1 to 6).
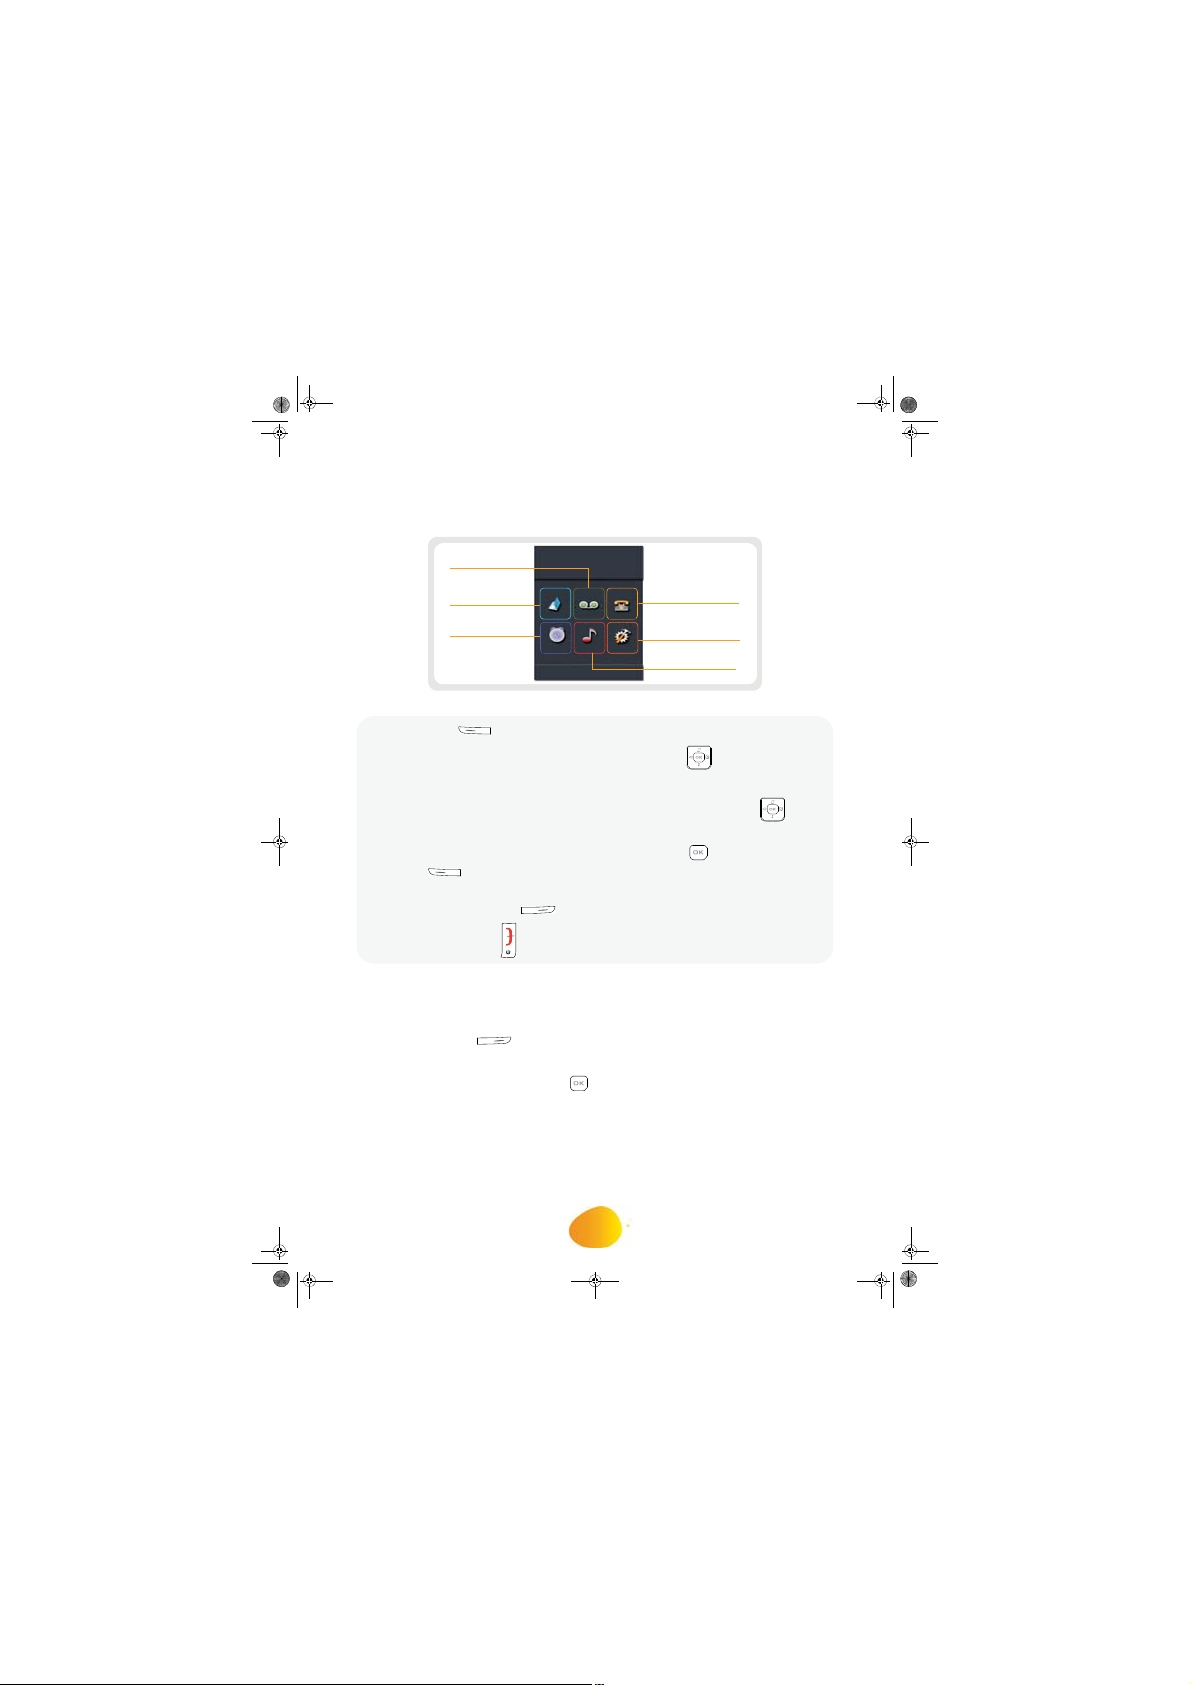
Menu 2: Voicemail
Menu
Back
Menu 3: Calls
Menu 6: Settings
Menu 5: Melodies
Menu 1: Phonebook
Menu 4: Accessories
Select
11Press M
Press the top or the bottom of the navigation key .
.
The main menu is displayed on the screen.
Press the top or the bottom or (on the or ) of the browser key to
access the desired function.
Select your choice / Enter the menu by pressing the (OOK) or via the key
.
Cancel your choice / Exit the displayed menu:
- either by pressing the key: return to previous menu.
- or by pressing the key: the home screen is displayed.
During a call:
Press the O
Scroll through the options using the top or the bottom .
Select your choice by pressing the key.
key, S
is displayed.
16
Page 18

Discover...
DETAILED BROWSER EXAMPLE: CHANGING THE RI NG TONE OF EXTERNAL CALLS
1
Menu
1
2
Melodies
3
External ringtone
4
5
OK
MU 25XXXXXX-A_D680C_US.book Page 17 Dimanche, 2. septembre 2012 9:51 09
D680C
Press M
The main menu is displayed on the screen.
Press the () key then press the () key.
Enter the M
Select E
Select the ring tone of your choice using the keys or .
Adjust the ring tone volume using the keys or and press the key. The screen
displays the message "O
(or key).
menu by pressing the (OOK) key.
using the or key. Press .
".
17
Page 19
Discover...
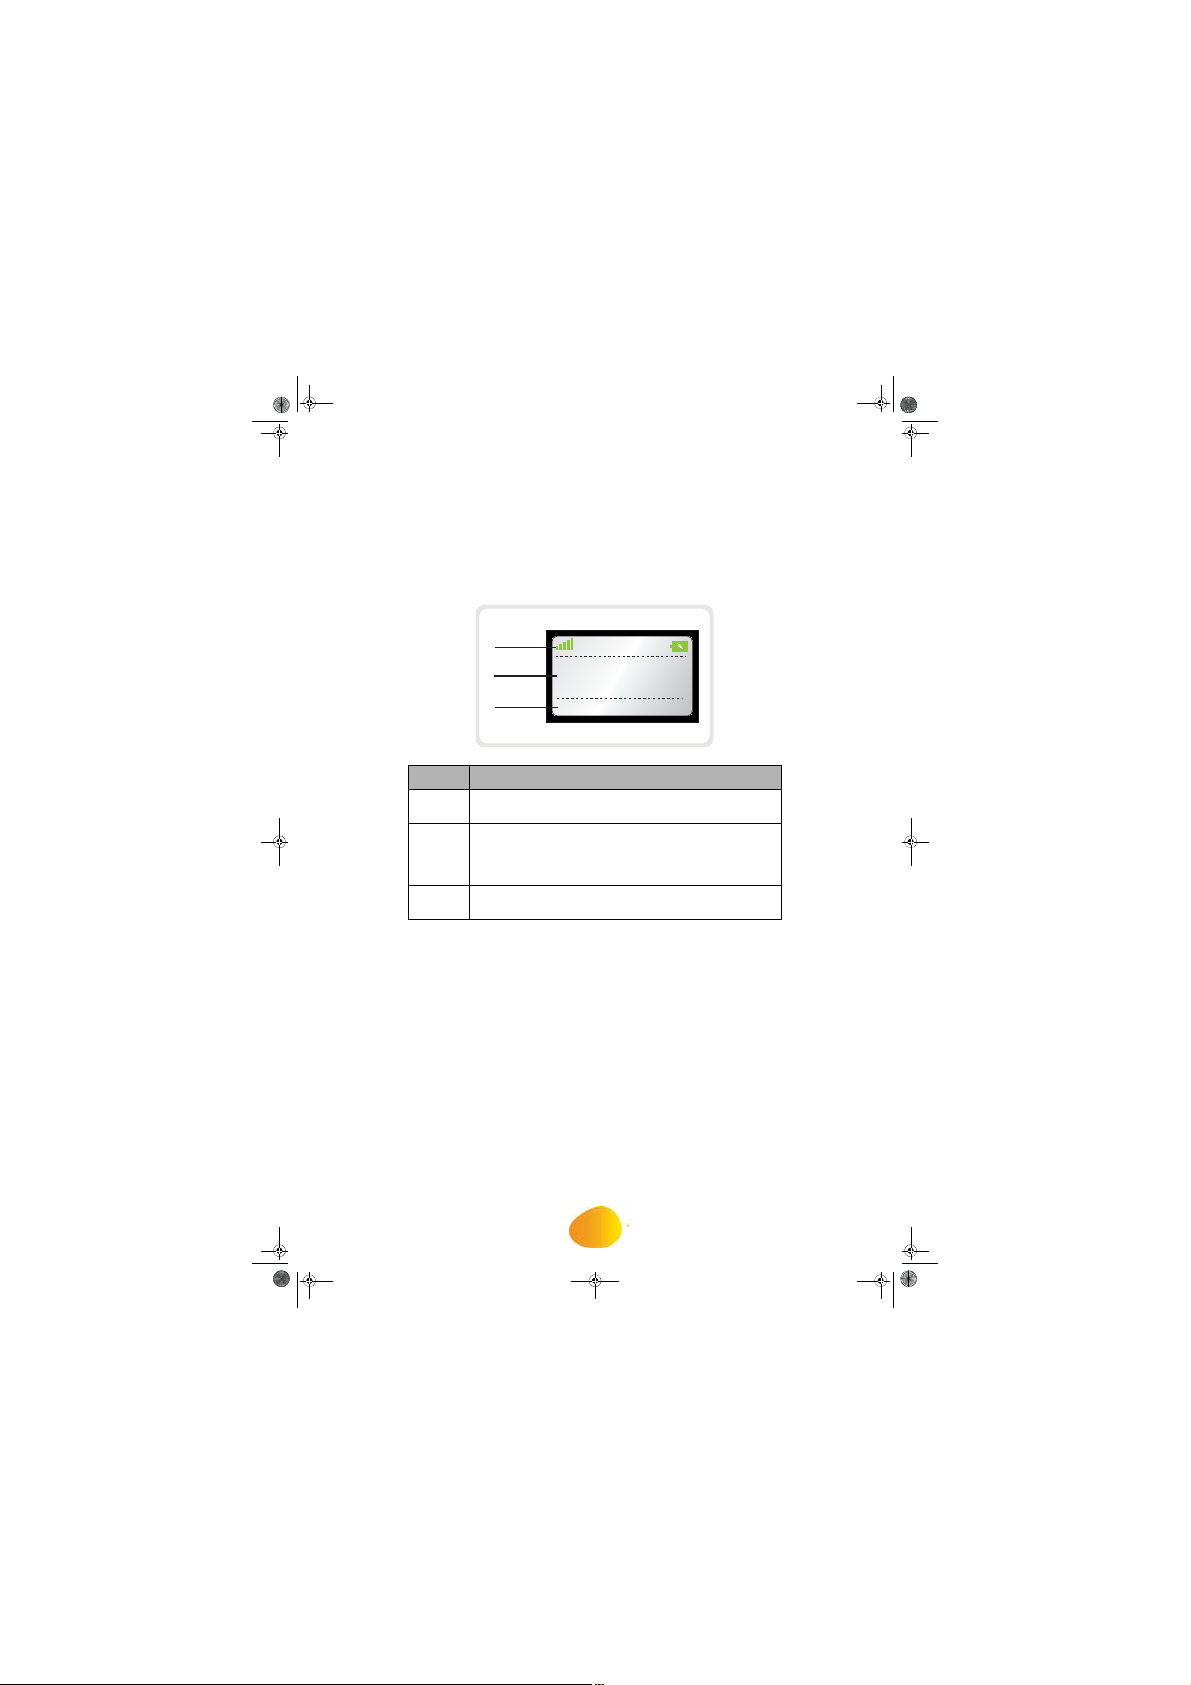
THE ICONS DISPLAYED
1 Status icons
2 Information field
3 Action icons
MU 25XXXXXX-A_D680C_US.book Page 18 Dimanche, 2. septembre 2012 9:51 09
D680C
The screen
In standby mode or during use, your phone screen communicates your phone’s current
state through icons, and in particular:
1
2
3
Legend Description
indicates your phone's current state.
the current date MM/DD/YYYY and time HH:MM
(pm or am),
the handset's name and number.
menus associated with programmable keys.
10:00 pm
01/31/2013
DECT X
Menu Phonebook
:
:
:
18
Page 20

Discover...
1
2
3
4
Language
5
6
Country
Note
Note
15 hours
MU 25XXXXXX-A_D680C_US.book Page 19 Dimanche, 2. septembre 2012 9:51 09
D680C
Charging
To charge your telephone, place the handset on its charger and make sure the charger
is connected to the power supply.
The battery charging icon moves to inform you that charging is in progress.
The icon display stops moving when the batteries are charged.
The Handset operating time:
- Talk time: 10 hours.
- Standbay time: 180 hours.
Statut Description
Batteries charged.
Batteries moderately charged.
Battery charge low.
Battery charge very low.
Batteries completely discharged.
To ensure optimum charging, leave the handset on the base for at
least 1
charging, the batteries may heat up. This is normal and perfectly safe.
When the batteries are low, the handset emits a beep.
when using the phone for the first time. During
Handset set-up
On the back of the handset.
Install the new batteries one by one, noting the polarity of the batteries, and replace
the battery cover.
The message " SAGEMCOM " is displayed on the screen for a few seconds.
The L
Select your language using the or keys and select using the key.
The C
menu is displayed.
menu is displayed.
19
Page 21

Discover...
7
8
9
10
SWITCH THE HANDSET OFF AND THEN ON AGAIN
Power off ?
Yes
Note
Please Register
Long press
Long press
p
p
MU 25XXXXXX-A_D680C_US.book Page 20 Dimanche, 2. septembre 2012 9:51 09
D680C
Select the country using the or keys and select using the key.
The date and time setting menu is displayed.
Enter the right date. Press the key ,and enter the time.
Press the key . The action is confirmed by the indication "OOK".
N
If the message "P
handset”, page 38.
" appears, refer to “Associating a new
To turn off the handset, hold down the red
key , the "P
displayed on the screen.
Press Y
To turn on your handset, press the red
key , the "SAGEMCOM" message is
displayed on the screen.
to conf irm.
" message is
Power o ?
Yes
S
agemcom
No
20
Page 22

Discover...
1
2
3
4
Note
Recommendations and safety
instructions
ATTENTION To avoid damaging your handset, only use certified
rechargeable AAA batteries NiMH 1.2 V 750
mAH, never use non
rechargeable batteries.
MU 25XXXXXX-A_D680C_US.book Page 21 Dimanche, 2. septembre 2012 9:51 09
Replacing the batteries
Turn off the handset. Turn it around so th at the battery
compartment is accessible.
Remove the battery compartment cover.
Remove the old batteries, insert the new batteries,
noting the polarity of the batteries.
Replace the battery compartment cover.
D680C
Worn out batteries must be discarded, in accordance with the
recycling instructions in chapter “R
”, page 2.
21
Page 23

Discover...
Phonebook
Voicemail
List
Search
Add
Delete all
Speed Dialing
All calls
Incoming calls
Outgoings calls
Missed ca
lls
Events
Tree structure continued on next page
Options
Second call
Intercom
Calls
Phonebook
Selec. call line
Mute
During a call
Melodies
External ringtone
Internal ringtone
Beeps
Silent
Accessories
Alarm
Timer
Calls
MU 25XXXXXX-A_D680C_US.book Page 22 Dimanche, 2. septembre 2012 9:51 09
D680C
Menu tree structure
* Scrolling message
22
Page 24

Discover...
Settings
Set handset **
Change code
Reset base
Base Version
Set base
Line name
Handset list **
Attached HS
Configuration
Selec. call line
Advanced settings
*
Settings
Date/time
Auto hang/pick up
Language
Display
Registration
Person.registr
Base priority
Handset Version
Reset handset
Set line
Flash time
Country
MU 25XXXXXX-A_D680C_US.book Page 23 Dimanche, 2. septembre 2012 9:51 09
D680C
*
* Scrolling message
23
Page 25

Call...
2
Note
Please wait
Please wait
METHOD 1 (PRE-DIALING)
1
2
METHOD 2 (POST-DIALING)
1
2
MU 25XXXXXX-A_D680C_US.book Page 24 Dimanche, 2. septembre 2012 9:51 09
D680C
Call...
If the handset is being synchronized with the base, the "P
message is displayed on the screen.
It is not possible to make or receive calls until the "P
message has disappeared from the screen.
Managing calls
Making a call
Dial your contact’s number.
Press the key .
Press on the green key for 3 or more
seconds.
Dial your contact’s number.
123456
01:30
Mute Options
"
"
24
Page 26

Call...
Accept
2
Note
Dismiss
1
Options
2
Selec. call line
3
4
MU 25XXXXXX-A_D680C_US.book Page 25 Dimanche, 2. septembre 2012 9:51 09
Ending a call
At the end of the call, press the handset key and put the handset back on its
charger. A sound signal is emitted.
End of call
Receiving a call
11To answer a call press the key or simply pick the handset up from its base
if the automatic pick up option is activated. You can also press A
At the end of the call, press the handset key and put the handset back on
its charger. A sound signal is emitted.
N
To stop the handset ringing when an incoming call is received,
press D
.
D680C
.
Choose your line
This menu allows you to select the line on which you want to make a second
outgoing call (subject to service availability).
1
During a call, press O
Select S
Select your line using the keys or .
Press OOK. The action is confirmed by the indication "OOK".
and press OOK.
.
25
Page 27

Call...
Case 1:
OK
Replace
Cas 2:
OK
Release
Note
Release
Case 1:
Options
Switch
Case 2:
Switch
MU 25XXXXXX-A_D680C_US.book Page 26 Dimanche, 2. septembre 2012 9:51 09
D680C
Managing several calls
Your phone allows you to take and manage several calls (subject to service availability)
when you are already on a call.(*)
Receiving a second call
During a call, a beep indicates the arrival of a second call.
The contact details of the second caller are displayed on the screen.
answer the new call and put the current call on hold.
Press O
.
Select R
- OR -
Press the key.
The first caller is put on hold, and you can speak with the new caller.
Press O
Select R
The call with your first caller is ended. You can speak with the new caller.
Switching from one call to the other
• During a conversation press O
• Select the options S
• During a conversation press S
• The current call is put on hold in order to take the call that was previously on hold.
and press OOK.
answer the new call and end the current call.
.
and press OOK.
To reject a second call, press R
, press OOK.
.
.
.
(*) You must have first enable "Concurrent calls".
26
Page 28

Call...
Options
Release
Note
Options
3-part conference
3-part conference
MU 25XXXXXX-A_D680C_US.book Page 27 Dimanche, 2. septembre 2012 9:51 09
Ending one of the calls in progress
• During a conversation press O
• Choose the option R
The current call is ended and you resume the previous call.
.
using the or keys. Press OOK.
D680C
During the call you can hang up both calls by pressing the
key for a long time.
A short press on the red key ends the current call.
Talking with two contacts at the same time
(3-way conference)
• During a double call, press O
• Choose the option 3
• You can then talk with the 2 contacts at the same time and " 3
is displayed on the screen.
• To end the conference call, press the key.
.
using the or keys. Press OOK.
"
27
Page 29

Call...
Options
Second call
OK
A
B
C
Note
Use the phonebook
MU 25XXXXXX-A_D680C_US.book Page 28 Dimanche, 2. septembre 2012 9:51 09
D680C
Making a second call
• During a conversation press O
• Choose the option S
• Select the number for the person you want to call in the address book by
pressing , and then O
- OR -
• Dial the number using the keypad and select.
• The second called number appears on the screen.
: The order of the current call / double call.
: The call time.
: The number and/or name of the person
called.
You can also select the number of the person you are calling
from your address book by pressing . For more details please
refer to section “U
You can also make a second call by pressing on the key.
.
using the or keys. Press OOK.
.
A
num 2
B
Switch
”, page 33.
num 1
01:30
C
HD
Options
28
Page 30

Call...
Options
Intercom.
OK
UNANNOUNCED TRANSFER
ANNOUNCED TRANSFER
Transfer
Transfer
NNote At the 5th step you can cancel the transfer of the call.
To do this, select CCancel and then select.
MU 25XXXXXX-A_D680C_US.book Page 29 Dimanche, 2. septembre 2012 9:51 09
Transferring calls
During a call, you can transfer it to another handset. This function can be used as
long as two handsets have been registered to the same base.
• During a conversation press O
• Choose the option I
This function allows you to transfer the current call directly to another device.
Steps Calling handset Called handset
1 Press OOK.
2 Select the handset (or all handsets)
to call.
3 Press OOK.
4 Rings: internal call.
5 Press
6 Rings: external call. Take the call.
7 Hangs up automatically.
This function allows you to transfer the current call to another device once it has
been picked up.
Steps Calling handset Called handset
1 Press OOK.
2 Select the handset (or all handsets)
to call.
3 Press OOK.
4 Rings: internal call.
5
6 The external call is put on hold.
7 Press T
8 Hangs up automatically.
The external call is transferred.
9 Call with the external caller.
Press
.
.
.
.
Press the key to accept the
internal call.
D680C
29
Page 31

Call...
Enable/Disable loudspeaker (hands-free mode)
HANDSET LOUDSPEAKER
During the call you can activate the
hands-free mode by pressing the
key.
The icon is displayed on the
screen.
To disable the hands-free mode, press
the key again.
The icon disappears.
Mute Options
Mute Options
3021547
01:24
3021547
01:24
Note
FROM THE HANDSET
MU 25XXXXXX-A_D680C_US.book Page 30 Dimanche, 2. septembre 2012 9:51 09
D680C
Options during a call
You can use the following options during a call:
When your battery charging icon displays the minimum, the
handsfree mode is unavailable until the next charging cycle. The
handsfree mode is optimized for speaking at 50 inches from the
handset.
Adjusting volume
During a call you can increase or lower
the volume of the handset by pressing
the or keys on the browser.
A bar graph makes it possible to adjust
the volume according to 5 levels.
30
Volume :
Mute Options
Volume :
Mute Options
Page 32

Call...
TO ENABLE THE MUTE MODE:
Options
Mute,
Select
TO DISABLE THE MUTE MODE:
Options
Unmute,
Select
KEYBOARD SHORTCUT:
Mute
Options
Note
Mute /
Unmute
MU 25XXXXXX-A_D680C_US.book Page 31 Dimanche, 2. septembre 2012 9:51 09
Enable the mute mode
During a call, you can switch to mute mode and your handset's microphone will be
muted and your contact will no longer hear you.
• During a conversation, press O
• Select M
screen.
press S
. The icon is displayed at the top of the
.
D680C
555-555-555
• Press O
• Select U
N
.
press S
You can also enable/disable the mute mode by pressing M
10:12
. Your contact will hear you again.
during a call.
During a conversation, press and hold the key to enable/disable the mute
mode.
31
Page 33

Call...
Note You first have to pair the handsets with the base.
For further details, refer to the section “AAssociating a new handset”,
page 42.
OK
MU 25XXXXXX-A_D680C_US.book Page 32 Dimanche, 2. septembre 2012 9:51 09
D680C
Using additional handsets
You can associate additional handsets with your phone. You can then make and receive
outside calls or calls between these handsets.
Calling another handset (intercom)
• Press .
• Select the handset (or all handsets) you want to
call.
• Press O
• Take the call from the handset by pressing .
• End the call by pressing .
.
The selected handset rings.
Intrusion
This function allows another paired handset to join a call in progress on another
handset.
• You have a call in progress.
• Press and hold the green key from another paired handset.
Your handset will beep once and you can talk to all the contacts taking calls.
Menu
Handset List
DECT1
DECT2
All handsets
Call Back
32
Page 34

Manage your contacts...
3
Menu
Phonebook
Add
Family name
First name
OK
Note
MU 25XXXXXX-A_D680C_US.book Page 33 Dimanche, 2. septembre 2012 9:51 09
Manage your
Use the phonebook
Your phonebook is common to all the DECT handsets recorded on the same
base.
You can also directly access the list of phonebook entries using the key.
When browsing through the phonebook, the handset displays the number of
the current entry and the total number of available entries.
You can save up to 100 entries (24 digits and 12 characters) in the
phonebook.
Create an entry
• Press M
• Select P
• Select A
• Specify the required information by confirming at ea ch step:
-
-
- Enter the phone number(s) in the corresponding box (Home, Mobile and
Work).
- Select from one of the 7 available ring tones using the keys or to iniquely
identify this contact.
• Press O
N
contacts...
.
, press OOK.
using the or keys. Press OOK.
: enter your contact's last name,
: enter your contact's first name,
to confirm.
To enter a text, press and hold the required key until the letter is
displayed on the screen.
D680C
33
Page 35

Manage your contacts...
Menu
Phonebook
List
Search
Call
Menu
Phonebook
List
Search
Edit
OK
Menu
Phonebook
List
Search
Delete
Delete ?
OK
Menu
Phonebook
Search
Family name
OK
MU 25XXXXXX-A_D680C_US.book Page 34 Dimanche, 2. septembre 2012 9:51 09
D680C
Call the contact from phonebook
• Press M
• Select P
• Select an entry using L
• Select C
Changing an entry
• Press M
• Select P
• Select an entry using L
• Select E
• Change the last name, first name and/or phone number by deleting characters
using the key and/or the ring tone and press OOK.
The action is confirmed by the "O
Deleting an entry
• Press M
• Select P
• Select an entry using L
• Select D
• For the question D
.
, press OOK.
or S
or S
or S
, press O
and press OOK.
and press OOK.
" indication.
and press OOK.
and press OOK.
.
, press OOK.
and press OOK.
.
, press OOK.
using the or keys and press OOK.
to confirm the deletion of the entry.
Search for an entry
• Press M
• Select P
• Select S
• For the request F
part of the name and press O
• Once the list is displayed, you can also directly enter the first few letters of the
name sought.
.
, press OOK.
using the or keys and press OOK.
, enter the first letter of the name, the entire name, or
.
34
Page 36

Manage your contacts...
Menu
Phonebook
Delete all
Delete all?
Warning
Menu
Phonebook
Speed Dialing
Edit
Phonebook
OK
Back
Note
MU 25XXXXXX-A_D680C_US.book Page 35 Dimanche, 2. septembre 2012 9:51 09
Delete all the entries
• Press M
• Select P
• Select D
• For the question D
W
Speed dialing
This function allows you to assign a keyboard shortcut to a contact in your
phonebook.
.
, press OOK.
using the or keys. Press OOK.
This operation will erase all the files in your base. Once this is
done, you will have an empty phonebook on all the handsets
registered to the base.
, press OOK to confirm the deletion of all entries.
D680C
• Press M
• Select P
• Select S
• Select, using the key or , the number of the keyboard key you want to assign
to your contact (0~9).
• Press E
• Press P
shortcut. Press O
• You can also directly enter the number of your choice. Once the number is
entered, press OOK. To exit the menu, press B
To call your contact, press and hold the key assigned to the
number and the number is automatically dialed.
.
, press OOK.
using the or keys. Press OOK.
.
, select the contact you want to assign a keypad
.
3 times in succession.
35
Page 37

Voice mail Service...
4
Note
Menu
Voicemail
OK
OK
Note
MU 25XXXXXX-A_D680C_US.book Page 36 Dimanche, 2. septembre 2012 9:51 09
D680C
Voice mail
Service...
The default voice mail number is *99.
Modifying the Voice mail number
This function allows you to set your voice mail number on line.
Incoming calls in your absence are redirected to your telephone line's voice mail.
• Press M
• Select V
• The pre-stored number is displayed, and can be edited.
• Enter the voice mail number and press O
indication "O
N
.
, press OOK.
. The action is confirmed by the
".
To indicate that a new message has been received the icon
is displayed on the screen.
36
Page 38

Audio adjustment...
5
Menu
Melodies
External ringtone
Internal ringtone
OK
OK
Menu
Melodies
Silent
Activate silent mode ?
Yes
No
Note
MU 25XXXXXX-A_D680C_US.book Page 37 Dimanche, 2. septembre 2012 9:51 09
Audio
D680C
adjustment...
Changing the ringing tone
You can change the ringing tone of:
- outside calls,
- calls between handsets (intercom).
• Press M
• Select M
• Select E
- OR -
• Select I
• Scroll through the pre-recorded ringing tones and press O
• Adjust the ring tone volume and press O
.
, press OOK.
to change the ringing tone for external calls.
to change the ringing tone for internal calls.
.
.
Enabling/Disabling the silent mode
In silent mode, the telephone ringer and keypad beeps are muted.
• Press M
• Select M
• Select S
• The message "A
- Press Y
- Press N
The browser key can also be used to enable/disable the silent
mode.
When you have activated silent mode, your handset is silent for
all functions of the alarm clock and timer type.
If the silent mode is active the icon is displayed.
.
, press OOK.
to change the silent mode, then press OOK.
to confirm the enabling of the silent mode.
to cancel the enabling of the silent mode.
" is displayed on the screen.
37
Page 39

Audio adjustment...
Enabling/Disabling audio alerts
Audio alerts refer to:
• pressing the keypad keys,
• putting the handset on the charger,
• low battery alert,
• others (error alerts).
• Press MMenu .
• Select MMelodies, press OOK.
• Select BBeeps to change the audio alerts, then press OOK.
• Select KKeypad and press the keys or enable or disable the keypad beeps.
- OR -
• Select CCharger and press the keys or to enable or disable the beep when the
handset is placed on the charger.
- OR -
• Select BBattery low and press the keys or to enable or disable the low battery
warning.
- OR -
• Select OOthers and press the keys
or to enable or disable the alert of action
not permitted.
Note
MU 25XXXXXX-A_D680C_US.book Page 38 Dimanche, 2. septembre 2012 9:51 09
D680C
The enabled function is marked by the symbol .
38
Page 40

Setting up...
6
Menu
Settings
Settings
Date/time
Edit
OK
Note
Note
MU 25XXXXXX-A_D680C_US.book Page 39 Dimanche, 2. septembre 2012 9:51 09
D680C
Setting up...
The phone
Setting the date and the time
• Press M
• Select S
• Select S
• Select D
• The date and time setting screen is displayed, press E
• Set the clock mode (automatic or manual) with keys or.
• Press the key and then enter the date in MM/DD/YY format.
• Press the key and then enter the time in HH:MM format.
• Confirm your entry by pressing O
screen.
N
The time format is 12 hours, use thekey to set am or pm.
.
, press OOK.
using the or keys and press OOK.
using the or keys and press OOK.
. The message "OOK" is displayed on the
If the automatic clock mode is enabled, it is not possible to
change the date and time displayed on the handset.
.
39
Page 41

Setting up...
Menu
Settings
Settings
Auto hang/pick up
Auto hangup
Auto pickup
OK
Menu
Settings
Settings
Language
OK
OK
MU 25XXXXXX-A_D680C_US.book Page 40 Dimanche, 2. septembre 2012 9:51 09
D680C
Picking up and hanging up calls automatically
This function allows you to take and end a call by simply taking the handset off or
placing it back on its charger.
• Press M
• Select S
• Select S
• Select A
• Select
• Set the status (enabled or disabled) with the keys or.
• Confirm by pressing O
Changing the display language
• Press M
• Select S
• Select S
• Select L
• Select the language to be used with the keys or and press O
• The action is confirmed by the "O
English.
.
, press OOK.
using the or keys and press OOK.
.
using the or keys and press OOK.
or A
. The action is confirmed by the "OOK" indication.
, press OOK.
using the or keys and press OOK.
using the or keys and press OOK.
using the or keys.
" indication if the choice of language is
.
40
Page 42

Setting up...
Menu
Settings
Settings
Display
Brightness
OK
Menu
Settings
Settings
Display
Wallpaper
OK
OK
MU 25XXXXXX-A_D680C_US.book Page 41 Dimanche, 2. septembre 2012 9:51 09
Adjust the brightness
• Press M
• Select S
• Select S
• Select D
• Select B
• A bar graph is used to adjust the brightness according to 8 levels.
• Select the level you want using the keys or .
The brightness is directly visible on the screen.
• Press O
.
, press OOK.
using the or keys and press OOK.
using the or keys and press OOK.
using the or keys and press OOK.
. The action is confirmed by the "OOK" indication.
Change the screen background
This menu allows you to change your handset screen background image.
• Press M
• Select S
• Select S
• Select D
• Select W
• Select one of the images using the keys or .
The image is displayed on the screen.
• Press O
The action is confirmed by the "O
.
, press OOK.
using the or keys and press OOK.
using the or keys and press OOK.
using the or keys and press OOK.
to keep this image as a screen background.
" indication.
D680C
41
Page 43

Setting up...
FROM THE BASE:
FROM THE HANDSET:
Case 1:
Please Register
OK
Put the base in registration & press OK
Case 2:
Menu
Settings
Advanced settings
Set handset
Registration
Put the base in registration & press OK
OK
Search
OK
Registration in progress
Registered
Note
Enter code
Registration Fail
MU 25XXXXXX-A_D680C_US.book Page 42 Dimanche, 2. septembre 2012 9:51 09
D680C
The handset
Associating a new handset
The base allows you to pair other handsets with the base. You then have to pair
them so that they are recognized.
To enable the pairing mode, press and hold (on the bottom of the base).
The handset displays "P
• Press O
• The handset displays: " P
• Press M
• Select S
• Select A
• Select S
• Select R
• The handset displays: " P
• Place your base in pairing mode (see previous paragraph).
• On the handset, press O
• The message "S
• Once the base is detected, its name is displayed on the handset screen.
• Press O
• The message "R
• The message "R
• You then automatically exit the pairing mode.
N
.
.
, press OOK.
to confirm.
The standard pairing of a new handset is automatic if the default
pin number (0000) has not been changed.
Otherwise a message E
PIN number.
If an error occurs, the message R
prompting you to repeat the whole procedure.
using the or keys and press OOK.
using the or keys and press OOK.
then press OOK.
.
" is displayed.
" is displayed.
" is displayed.
".
prompts you to enter the new
".
".
is displayed
42
Page 44

Setting up...
Menu
Settings
Advanced settings
Set handset
Handset Version
Person.registr
FROM THE HANDSET:
1
2
3
FROM THE BASE:
4
5
OK
Menu
Settings
Advanced settings
Set handset
Base priority
OK
Note
Note
MU 25XXXXXX-A_D680C_US.book Page 43 Dimanche, 2. septembre 2012 9:51 09
Customizing the handset’s registration
This function allows you to pair your handset with a phone base (if you have more
than one).
• Press M
• Select S
• Select A
• Select S
• Select H
• Select P
.
, press OOK.
using the or keys and press OOK.
using the or keys and press OOK.
using the or keys and press OOK.
using the or keys and press OOK.
Select the base number and confirm.
Enter the new base name and confirm.
Enter the base code.
To enable the pairing mode, press and hold (on the bottom of the base).
Once the handset is registered, a screen asks you to specify which position you
would attribute to the registred handset. Use keys or and press O
The pairing mode is automatically exited.
Defining the main base for your handset
This function allows you to specify the priority base to be used for making calls.
D680C
.
• Press M
• Select S
• Select A
• Select S
• Select B
• Select the base using the or keys that the handset should use first .
Press O
Only if you have paired the same handset on several bases.
.
, press OOK.
.
In automatic mode your handset will automatically select the
most suitable base..
using the or keys and press OOK.
using the or keys and press OOK.
using the or keys and press OOK.
43
Page 45

Setting up...
Menu
Settings
Advanced settings
Set handset
Country
OK
Menu
Settings
Advanced settings
Set handset
Handset Version
Menu
Settings
Advanced settings
Set handset
Reset handset
Reset handset ?
Yes
Handset reset
OK
OK
OK
OK
MU 25XXXXXX-A_D680C_US.book Page 44 Dimanche, 2. septembre 2012 9:51 09
D680C
Modifying the country
This menu allows you to select the country where you are using the telephone
• Press M
• Select S
• Select A
• Select S
• Select C
• Select the country using the or keys and press O
Handset version
• Press M
• Select S
• Select A
• Select S
• Select H
The software and EEPROM version of the D680C handset is displayed on the
screen.
Resetting the handset
When you reset your handset, all the settings are returned to their initial values
(factory settings), except for the phonebook.
• Press M
• Select S
• Select A
• Select S
• Select R
• On a confirmation request "R
• The action is confirmed by the "H
• A list of language is displayed.
• Select the language to be used using the or keys and validate by
pressing O
• A list of country is displayed.
• Select the country using the or keys and validate by pressing O
• The date and time setting menu is displayed.
• Enter the right date. Press the key ,and enter the time. Press O
• The action is validated by the "O
.
, press OOK.
.
.
.
using the or keys and press OOK.
using the or keys and press OOK.
using the or keys and press OOK.
, press OOK.
using the or keys and press OOK.
using the or keys and press OOK.
using the or keys and press OOK.
, press OOK.
using the or keys and press OOK.
using the or keys and press OOK.
using the or keys and press OOK.
" indication
", press Y
" indication.
.
.
.
.
44
Page 46

Setting up...
Menu
Settings
Advanced settings
Set base
Change code
Old code
OK
New code
OK
Confirm code
OK
OK
Resetting the base
When you reset your base, all the settings are returned to their initial values (factory
settings), except for the phonebook.
• Press M
Menu .
• Select SSettings, press OOK.
• Select AAdvanced settings using the or keys and press OOK.
• Select SSet base using the or keys and press OOK.
• Select RReset base using the or keys and press OOK.
• On a confirmation request "BBase reset ?", press OOK
.
• The action is confirmed by the "OOK" indication.
MU 25XXXXXX-A_D680C_US.book Page 45 Dimanche, 2. septembre 2012 9:51 09
The base
Changing the base code
The base code (PIN number) is 0000 by default, but can be changed to 4 other
numbers. You will be prompted to enter it, for example, when registering a new
handset.
• Press M
• Select S
• Select A
• Select S
• Select C
• At the "O
pressing O
• At the "N
pressing O
• At the "C
pressing O
• The action is confirmed by the "O
.
, press OOK.
.
.
.
using the or keys and press OOK.
using the or keys and press OOK.
using the or keys and press OOK.
" prompt, enter the old 4-digit code and then confirm by
" prompt, enter the new 4-digit code and then confirm by
" prompt, enter the new code again and then confirm by
" indication.
D680C
45
Page 47

Setting up...
Base version
• Press MMenu .
• Select SSettings, press OOK.
• Select AAdvanced settings using the or keys and press OOK.
• Select SSet base using the or keys and press OOK.
• Select BBase Version using the or keys and press OOK.
• The following information is displayed:
- base software version,
- EEPROM version,
- base hardware version.
MU 25XXXXXX-A_D680C_US.book Page 46 Dimanche, 2. septembre 2012 9:51 09
D680C
46
Page 48

Setting up...
We do not recommend that you change line settings without first
contacting your operator, as this may
result in your phone line being
disconnected.
Menu
Settings
Advanced settings
Set line
Line name
Edit
Menu
Settings
Advanced settings
Set line
Attached HS
OK
OK
Note
MU 25XXXXXX-A_D680C_US.book Page 47 Dimanche, 2. septembre 2012 9:51 09
The line
This menu allows you to change the settings of the lines on the base.
Important
Change the line name
• Press M
• Select S
• Select A
• Select S
• Select L
• Press E
• Enter your line name by successively pressing the corresponding keys,
Pair the handset with a line
This menu allows you to display the list of handsets paired with the line used.
.
, press OOK.
using the or keys and press OOK.
to change the line name using the alphanumeric keys.
press OOK.
using the or keys and press OOK.
using the or keys and press OOK.
D680C
• Press M
• Select S
• Select A
• Select S
• Select A
• Enter the base code and press O
• The list of paired handsets is displayed on the screen.
• Select the desired handset using the or keys.
• Press the keys or to pair/unpair the handset with/from the line used (the
paired handset is then unpaired and vice versa).
• Press O
The enabled function is marked by the symbol .
.
, press OOK.
using the or keys and press OOK.
. The action is confirmed by the "OOK" indication.
using the or keys and press OOK.
using the or keys and press OOK.
.
47
Page 49

Setting up...
Allow three-way communication (Intrusion)
This intrusion function allows or prohibits a second handset registered on the same
base to share an ongoing conversation. If the intrusion mode is enabled, you will
then be able to share a call in process with another handset.
• Press MMenu .
• Select SSettings, press OOK.
• Select AAdvanced settings using the or keys and press OOK.
• Select SSet line using the or keys and press OOK.
• Select CConfiguration using the or keys and press OOK.
• Select IIntrusi
on using the or keys and press OOK.
• Change the status using the keys orand press OOK.
The action is confirmed by the indication "OOK".
NNote The intrusion is inactive if the simultaneous function is enabled.
Changing the flash duration
You can configure the flash duration if you use your phone abroad or on private
PABX network, you may need to modify the flash duration in order to use your
telephone correctly with regard to the following functionalities: outgoing 2nd call,
incoming 2nd call, 3 way calling.
Please contact your service provider to obtain the correct flash duration and then
modify it by doing the following.
• Press M
Menu .
• Select SSettings, press OOK.
• Select AAdvanced settings using the or keys and press OOK.
• Select SSet line using the or keys and press OOK.
• Select FFlash time using the or keys and press OOK.
• Select EEdit using the or keys and press OOK.
• Select the appropriate flash duration using the
or key and press OOK.
The action is confirmed by the indication "OOK".
MU 25XXXXXX-A_D680C_US.book Page 48 Dimanche, 2. septembre 2012 9:51 09
D680C
48
Page 50

Setting up...
Menu
Settings
Advanced settings
Selec. call line
OK
OK
MU 25XXXXXX-A_D680C_US.book Page 49 Dimanche, 2. septembre 2012 9:51 09
D680C
Call management
This menu allows you to select the line on which you want t o make your first outgoing call.
Managing your calls
• Press M
• Select S
• Select A
• Select S
• The list of lines available is displayed on the screen.
• Select your line using the keys or and press O
The action is confirmed by the indication "O
.
, press OOK.
using the or keys and press OOK.
using the or keys and press OOK.
.
".
49
Page 51

Setting up...
Menu
Settings
Advanced settings
Handset list
OK.
OK.
Change the handset name:
Clear
OK
Call the handset:
Remove the handset: "
Delete handset?
OK
Intercept the handset:
Enter code
OK
On
Off
OK
MU 25XXXXXX-A_D680C_US.book Page 50 Dimanche, 2. septembre 2012 9:51 09
D680C
The list of handsets
This menu displays the list of handsets registered on the same base.
Manage handsets
• Press M
• Select S
• Select A
• Select H
• The list of handsets registered on the base is displayed on the screen.
• Select the desired handset using the keys or and press O
• You can perform the following actions:
Change the handset name using the alphanumeric keys. Press C
delete unwanted characters. Press O
Call the selected handset.
Remove the handset's registration.
At the confirmation prompt "D
the indication "O
Allow the handset to intercept a call.
The message "E
press O
Then select O
The action is confirmed by the indication "O
.
, press OOK.
".
.
or O
using the or keys and press OOK.
using the or keys and press O
" Edit "
.
" Call "
Delete
"
" press OOK. The action is confirmed by
"Interception"
" is displayed. Enter the base PIN code (0000 by default),
and press OOK.
".
to
50
Page 52

Accessories...
7
Note
Programming the alarm
In silent mode, phone the ring tone and the beeps are deactivated.
• Press MMenu .
• Select AAccessories, press OOK.
• Select AAlarm using the or keys then press OOK.
• The alarm clock setting screen is displayed, press EEdit .
• Set the alarm clock status using the keys or.
• Press the key and set the alarm clock:
- wake-up time,
- ring tone,
- ringer volume.
• Press OOK key. The action is confirmed by the "OOK" indication.
MU 25XXXXXX-A_D680C_US.book Page 51 Dimanche, 2. septembre 2012 9:51 09
D680C
The alarm
The alarm clock function arranges your handset to ring each day at a
specified time.
Once a time is programmed, the selected ring tone rings for 60
seconds through the handset loudspeaker and a warning screen is
displayed. To stop the warning, press any key on the handset.
Accessories...
51
Page 53

Accessories...
Note
Menu
Accessories
Timer
Edit
OK
MU 25XXXXXX-A_D680C_US.book Page 52 Dimanche, 2. septembre 2012 9:51 09
D680C
The timer
Program the timer
• Press M
• Select A
• Select T
• The timer setting screen is displayed, press E
• Set the timer status using the key or.
• Press the key to enable or disable the timer display.
• Press the key and adjust the timer settings:
• Press O
The timer function enables the handset to ring after a programmed
time. You can view the time countdown in minutes on the screen.
.
- wake-up time,
- ring tone,
- ringer volume.
, press OOK.
using the or keysand press OOK.
key. The action is validated by the "OOK" indication.
.
52
Page 54

Tracking your calls...
8
Menu
Calls
All calls
OK
Back
Note
MU 25XXXXXX-A_D680C_US.book Page 53 Dimanche, 2. septembre 2012 9:51 09
D680C
Tracking your calls...
Call logs
Logs are lists of numbers or events received or sent by your phone. Depending on your
phone company and the options of your contract, the following information may be
accessed in the call logs:
• the date and time of the call.
• the contact's name and/or number.
Displaying the list of all calls
• Press M
• Select C
• Select A
• The last call is displayed with its date and time, its status (incoming, outgoing,
missed), name and/or number.
• Scroll through the numbers stored in the list using the or keys.
• Select the call you wish to view and press O
• The following information is displayed:
- the call status (incoming/outgoing/missed),
- the contact's name,
- the contact's number,
- the call date,
- the call time.
• Press B
The numbers stored in the call log are prefixed by a symbol:
: List of incoming calls,
: List of outgoing calls,
: List of missed calls,
: List of events (missed calls, operator messages).
.
, press OOK.
using or keys, then press OOK.
.
to return to the previous menu.
53
Page 55

Tracking your calls...
Menu
Calls
Incoming calls
Outgoings calls
OK
Note
Note
MU 25XXXXXX-A_D680C_US.book Page 54 Dimanche, 2. septembre 2012 9:51 09
D680C
Viewing the received or dialed call log
Unknown calls are not included in the received call log.
• Press M
• Select C
• Select I
• The last received call (or dialed number) is then displayed.
• The other calls are displayed using the keys or .
• Scroll through the numbers stored in the list using the or keys.
• Select the call you wish to view and press O
• The following information is displayed:
.
, press OOK.
- the call status (incoming/outgoing/missed),
- the contact's name,
- the contact's number,
- the call date,
- the call time.
, (or O
The last call is only displayed at the top of the list on the first
viewing of the list after the call.
) using or keys then press OOK.
.
54
Page 56

Tracking your calls...
Menu
Calls
Missed calls
OK
Back
Note
MU 25XXXXXX-A_D680C_US.book Page 55 Dimanche, 2. septembre 2012 9:51 09
Consulting the missed call log
The icon is displayed if there are one or more new missed call and no viewed
calls.
D680C
• Press M
• Select C
• Select M
• The latest missed call is displayed.
• The other calls are displayed using the arrows.
• Scroll through the numbers stored in the list using the or keys.
• Select the call you wish to view and press on O
• The following information is displayed:
- the call status (received/sent/missed),
- the contact's name,
- the contact's number,
- the call date,
- the call time.
- the number of missed calls.
• Press B
Once the missed call log has been viewed, the icon disappears
from all handsets.
.
, press OOK.
using the or keys, then press OOK.
to return to the previous menu.
.
55
Page 57

Tracking your calls...
Menu
Calls
All calls
Outgoings calls
Incoming calls
Missed calls
OK
OK,
Options
Call
Delete
Store
Delete all
Menu
Calls
MU 25XXXXXX-A_D680C_US.book Page 56 Dimanche, 2. septembre 2012 9:51 09
D680C
Managing incoming or outgoing calls
> C
• Press M
• Select C
• Select A
• The list of calls (incoming/outgoing/missed) is displayed.
• Select the desired call and press O
• The following information is displayed:
• Press O
.
, press OOK.
or O
press O
.
- the call status (incoming, outgoing, missed),
- the contact's name,
- the contact's number,
- the call date,
- the call time.
- the number of missed calls.
: call the displayed number,
-
-
: delete the stored number,
-
: save the number in your phonebook,
-
for the actions you can perform:
: delete all the numbers in the list.
or I
to view details.
or M
then
56
Page 58

Tracking your calls...
Note
OK
Events
Missed
Voicemail
Menu
Calls
MU 25XXXXXX-A_D680C_US.book Page 57 Dimanche, 2. septembre 2012 9:51 09
The events log
D680C
The icon is displayed if there is one or more voice mail
messages.
Checking new events
A summary screen for the number of events that occurred in your absence is
displayed:
- number of missed calls,
- operator messages.
DECT X
Missed calls: XX
> C
• Press O
• Select E
• Select M
.
then press OOK.
or
appears on the screen.
Voicemail
OK
using the keys or and press OOK. The event
Dismiss
57
Page 59

Environment
Battery Safety Instructions
CAUTION
MU 25XXXXXX-A_D680C_US.book Page 58 Dimanche, 2. septembre 2012 9:51 09
D680C
Environment
Environmental protection and sustainable development is an important priority for
Sagemcom. Sagemcom has a policy of using environmentally- friendly systems and
makes environmental protection an essential part of the life-cycle of its products – from
the manufacturing, to the installation, operation and disposal.
Packaging
The Cardboard used for the packaging is recyclable. Please follow the local sorting
regulations for this type of waste in order to improve recycling.
Batteries
The used batteries must be disposed of in line with the local recycling regulations.
Do not burn, disassemble, mutilate, or puncture the battery. The battery contains toxic
materials that could be released, resulting in injury.
There is a risk of explosion if you replace the battery with an incorrect battery type. Use
only the battery pack that came with your phone or an authorized replacement
recommended by the manufacturer.
• Keep battery packs out of the reach of children.
• Remove battery packs if storing over 30 days.
• Do not dispose of battery packs in fire, which could result in explosion.
• The rechargeable battery packs that power this product must be disposed of properly
and may need to be recycled. Refer to your battery's label for battery type.
Contact your local recycling center for proper disposal methods.
The product
The crossed out dustbin displayed on the product signifies that it belongs to the
electrical and electronic equipment group. T he regulations request you to carry
out your own selective recycling collection at:
• the sales outlet when you buy a similar new device.
• the collection points available in your area (recycling centres, sorting points,
etc).
This means you participate in the recycling and validation of used electric and electronic
goods which would otherwise have a negative impact on the environment and health.
58
Page 60

Guarantee
What does this limited warranty cover?
How long is the limited warranty period?
MU 25XXXXXX-A_D680C_US.book Page 59 Dimanche, 2. septembre 2012 9:51 09
D680C
Guarantee
Limited warranty
Sagemcom warrants to the holder of a valid proof of purchase (“Consum er” or “you”) that
the Product and all accessories provided in the sales package (“Product”) are free from
defects in material and workmanship, pursuant to the following terms and conditions,
when installed and used normally and in accordance with the Product operating
instructions. This limited warranty extends only to the Consumer for Products purchased
and used in the United States of America.
What will Sagemcom do if the Product is not free from defects in materials and
workmanship during the limited warranty period (“Materially Defective Product”)?
During the limited warranty period, Sagemcom’s authorized service representative will
repair or replace at Sagemcom’s option, without charge, a Materially Defective Product.
If we repair the Product, we may use new or refurbished replacement parts. If we choose
to replace the Product, we may replace it with a new or refurbished Product of the same
or similar design. We will retain defective parts, modules, or equipment. Repair or
replacement of the Product, at Sagemcom’s option, is your exclusive remedy. Sagemcom
will return the repaired or replacement Products to you in working condition. You should
expect the repair or replacement to take approximately 30 days.
The limited warranty period for the Product extends for ONE (1) YEAR from the date of
purchase. If Sagemcom repairs or replaces a Materially Defective Product under the
terms of this limited warranty, this limited warranty also applies to the repaired or
replacement Product for a period of either (a) 90 days from the date the repaired or
replacement Product is shipped to you or (b) the time remaining on the original one-year
warranty; whichever is longer.
59
Page 61

Guarantee
What is not covered by this limited warranty?
1
2
3
4
5
6
7
8
How do you get warranty service?
NOTE
MU 25XXXXXX-A_D680C_US.book Page 60 Dimanche, 2. septembre 2012 9:51 09
D680C
This limited warranty does not cover:
Product that has been subjected to misuse, accident, shipping or other physical
damage, improper installation, abnormal operation or handling, neglect, inundation,
fire, water or other liquid intrusion; or
Product that has been damaged due to repair, alteration or modification by anyone
other than an authorized service representative of Sagemcom; or
Product to the extent that the problem experienced is caused by signal conditions,
network reliability, or cable or antenna systems; or
Product to the extent that the problem is caused by use with non-Sagemcom
accessories; or
Product whose warranty/quality stickers, product serial number plates or electronic
serial numbers have been removed, altered or rendered illegible; or
Product purchased, used, serviced, or shipped for repair from outside the United
States of America or Canada, or used for commercial or institutional purposes
(including but not limited to Products used for rental purposes); or
Product returned without a valid proof of purchase (see item 2 below); or
Charges for installation or set up, adjustment of customer controls, and installation or
repair of systems outside the unit.
To obtain warranty service in the USA, please visit our website at www.sagemcom.com.
: Before calling for service, please review the user’s manual - a check of the
Product’s controls and features may save you a service call.
Except as provided by applicable law, you assume the risk of loss or damage during
transit and transportation and are responsible for delivery or handling charges incurred
in the transport of the Product(s) to the service location. Sagemcom will return repaired
or replaced Product under this limited warranty. Transportation, delivery or handling
charges are prepaid. Sagemcom assumes no risk for damage or loss of the Product in
transit. If the Product failure is not covered by this limited warranty, or proof of purchase
does not meet the terms of this limited warranty, Sagemcom will notify you and will
request that you authorize the cost of repair prior to any further repair activity. You must
pay for the cost of repair and return shipping costs for the repair of Products t hat are not
covered by this limited warranty.
60
Page 62

Guarantee
What must you return with the Product to get warranty service?
1
2
3
Limitations:
MU 25XXXXXX-A_D680C_US.book Page 61 Dimanche, 2. septembre 2012 9:51 09
D680C
Return the entire original package and contents including the Product to the
Sagemcom service location along with a description of the malfunction or difficulty;
and
Include a “valid proof of purchase” (sales receipt) identifying the Product purchased
(Product model) and the date of purchase or receipt; and
Provide your name, complete and correct mailing address, and telephone number.
Other limitations
This warranty is the complete and exclusive agreement between you and Sagemcom. It
supersedes all other written or oral communicat ions related to this Product. Sagemcom
provides no other warranties for this Product. The warranty exclusively describes all of
Sagemcom’s responsibilities regarding the Product. There are no other express
warranties. No one is authorized to make modifications to this limited warranty and you
should not rely on any such modification.
State/Provincial Law Rights: This warranty gives you specific legal rights, and you may
also have other rights, which vary from state to state or province to province.
merchantability (an unwritten warranty that the Product is fit for ordinary use) are limited
to one year from the date of purchase. Some states/provinces do not allow limitations on
how long an implied warranty lasts, so the above limitation may not apply to you. In no
event shall Sagemcom be liable for any indirect, special, incidental, consequential, or
similar damages (including, but not limited to lost profits or revenue, inability to use the
Product or other associated equipment, the cost of substitute equipment, and claims by
third parties) resulting from the use of this Product. Some states/provinces do not allow
the exclusion or limitation of incidental or consequential damages, so the above limitation
or exclusion may not apply to you.
• Reorient or relocate the receiving antenna.
• Increase the separation between the equipment and receiver.
• Connect the equipment into an outlet on a circuit different from that to which the
• Consult the dealer or an experienced radio/TV technician for help.
Privacy of communications may not be ensured when using this telephone!
Implied warranties, including those of fitness for a particular purpose and
receiver is connected.
61
Page 63

MU 25XXXXXX-A_D680C_US.book Page 1 Dimanche, 2. septembre 2012 9:51 09
Page 64

MU 25XXXXXX-A_D680C_US.book Page 2 Dimanche, 2. septembre 2012 9:51 09
Sagemcom Broadband SAS
250, route de l'Empereur - 92848 Rueil-Malmaison - France
253546047A - 09/13
Tél. +33(0)1 57 61 10 00 - Fax : +33(0)1 57 61 10 01
www.sagemcom.com
 Loading...