


 Loading...
F@st 5260
User Guide
v2.0 (March 2014)
2532584659-B

Sagemcom F@st 5260
Table of Contents |
|
Chapter 1: Product Overview .............................................. |
3 |
Package Contents ............................................................... |
3 |
Hardware Overview ............................................................. |
4 |
Front view ........................................................................ |
4 |
Back view......................................................................... |
5 |
Side View......................................................................... |
6 |
Label................................................................................ |
6 |
Router Positioning ............................................................... |
7 |
Wall Mounting (optional) ...................................................... |
7 |
Chapter 2: Getting Started.................................................... |
8 |
Before you begin ................................................................. |
8 |
System Requirements...................................................... |
8 |
Router and Account Information....................................... |
8 |
Install your Wireless Router................................................. |
9 |
Configure your Wireless Router......................................... |
10 |
Login to the Web GUI .................................................... |
10 |
A tour of your Web GUI Dashboard................................ |
11 |
A Tour of your Web GUI (Mobile Edition) ....................... |
12 |
Change your Local Access Password ............................ |
12 |
Change your Wireless Network Name and Password .... |
13 |
Configuring your WiFi Network....................................... |
13 |
Enabling WPS Push Button pairing ................................ |
15 |
|
Contents |
Change your time zone ................................................. |
15 |
Customize your Device List ........................................... |
16 |
How to set up Parental Controls .................................... |
17 |
How to set up your guest network.................................. |
18 |
Chapter 3: USB Sharing ..................................................... |
19 |
USB Storage..................................................................... |
19 |
Connecting a Storage Device ........................................ |
19 |
Enabling File Sharing .................................................... |
19 |
Media Sharing ............................................................... |
20 |
Safely Disconnecting a Storage Device ......................... |
20 |
Deleting a Device .......................................................... |
21 |
Accessing Shared Files..................................................... |
21 |
For Windows: ................................................................ |
22 |
For Mac: ........................................................................ |
22 |
Printer Sharing .................................................................. |
22 |
Connecting a Printer...................................................... |
22 |
Configuring a Printer (PC) ............................................. |
23 |
Configuring a Printer (MAC) .......................................... |
26 |
Chapter 4: Administration................................................. |
28 |
Rebooting your router ....................................................... |
28 |
Back Up and Restore Router Configuration ...................... |
28 |
Upgrade Router's Firmware .............................................. |
29 |
Restore Factory Defaults .................................................. |
29 |
Chapter 5: Troubleshooting............................................... |
31 |
Problem 1: Indicator lights are not turning on. .................. |
31 |
i

Sagemcom F@st 5260 |
Contents |
|
|
Problem 2: The Internet stopped working. ........................ |
32 |
Problem 3: The Internet is slow. ....................................... |
33 |
Problem 4: The WiFi signal drops..................................... |
33 |
Problem 5: Cannot connect wireless device to router. ...... |
33 |
Problem 6: Locked out of the Web GUI. ........................... |
33 |
Appendices ......................................................................... |
34 |
Appendix A: Technical Specifications ............................... |
34 |
Sagemcom F@st 5260 Specifications............................ |
34 |
Sagemcom F@st 5260 Physical Characteristics ............ |
34 |
Appendix B: Notification of Compliance ............................ |
35 |
ii

Sagemcom F@st 5260 |
Chapter 1: Product Overview |
|
|
Chapter 1: Product Overview
Thank you for choosing Sagemcom. The F@st 5260 router is built with a host of features to deliver maximum speed and performance:
Wireless-AC technology. Using the latest 802.11 ac wireless technology, the router provides you with maximum speed and range without the hassle of cumbersome wires.
Double your bandwidth. The dual-band feature supports next-generation technology while providing compatibility for legacy devices. Designed to avoid wireless interference, the router ensures high WiFi speeds and smooth, reliable connections for gaming, HD video streaming and file transfers.
Security. Protect your network from intruders using WPA2 encryption and an SPI firewall.
Customizable to your needs. Sagemcom's Web GUI allows you to easily tailor your router settings and manage your devices.
Parental controls. The F@st 5260 router enables you to easily control access to the Internet.
Built-in USB ports and DLNA media server. Easily plug-in your USB storage devices or printer and share them throughout your network.
Gigabit Connections. Transfer files at blazing fast speeds with Gigabit Ethernet technology.
IPv6 enabled. Built with IPv6 technology, the F@st 5260 supports next-generation networks.
This chapter will quickly familiarize you with your hardware and review important information which you will need to install your router.
Package Contents
F@st 5260 router (referred throughout the guide as F5260).
a power adapter
an Ethernet cable
WiFi configuration stickers
Quick Install Guide
Safety Sheet
3
Sagemcom F@st 5260
Hardware Overview
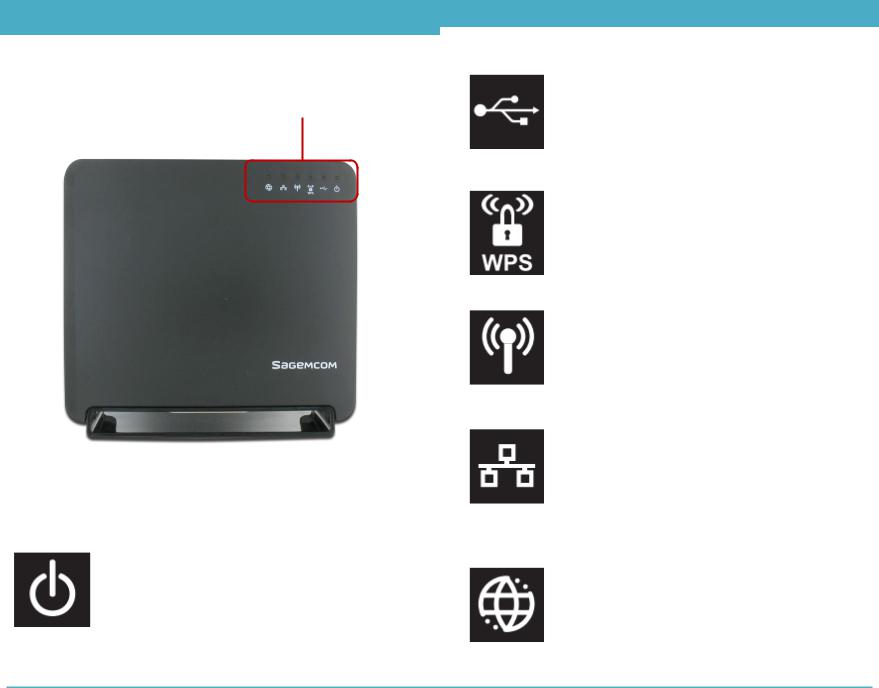
Front view |
Indicator lights |
|
There are 6 indicator lights located at the top right-hand corner of your router. See the icon descriptions below to understand what each light indicates.
Power
Solid Green. Router is powered on.Solid Red. Firmware is upgrading.
Off. Device is powered off or factory reset button was held down for more than 15s.
Chapter 1: Product Overview
|
|
|
|
|
USB |
Solid Green. Storage or printer device is |
|
|
|||
|
|
||
|
|
connected by USB. |
|
|
|
Flashing Green. USB storage device is in |
|
|
|
use. |
|
|
|
Off. No devices are connected by USB. |
|
|
WPS |
Solid Green. WPS (WiFi Protected Setup) is |
|
|
|
enabled and ready for use. |
|
|
|
Flashing Green. WPS Push Button pairing is |
|
|
|
in progress. |
|
|
|
Off. WPS (WiFi Protected Setup) is disabled. |
|
|
|
(Default. To enable, login to Web GUI). |
|
|
Wireless |
Solid Green. Wireless network is ready. |
|
|
|
||
|
|
Flashing Green. Transmitting or receiving |
|
|
|
wireless data. |
|
|
|
Off. Wireless network is disabled. |
|
|
LAN |
Solid Green. Connected to least one LAN |
|
|
|
(Local Area Network) Ethernet link. |
|
|
|
Flashing Green. Transmitting or receiving |
|
|
|
data over LAN Ethernet. |
|
|
|
Off. No LAN Ethernet links. |
|
|
|
Solid Green. Device has a WAN Internet IP |
|
|
Internet/WAN |
address and is ready to use. |
|
|
|
Solid Red. Device has a Wide Area Network |
|
|
|
(WAN) Ethernet link, but no WAN IP address. |
|
|
|
Flashing Green. Transmitting or receiving |
|
|
|
data over WAN Ethernet link. |
|
|
|
Off. Device has no WAN Ethernet link. |
|
|
|
|
|
4
Sagemcom F@st 5260 |
Chapter 1: Product Overview |
|
|
|
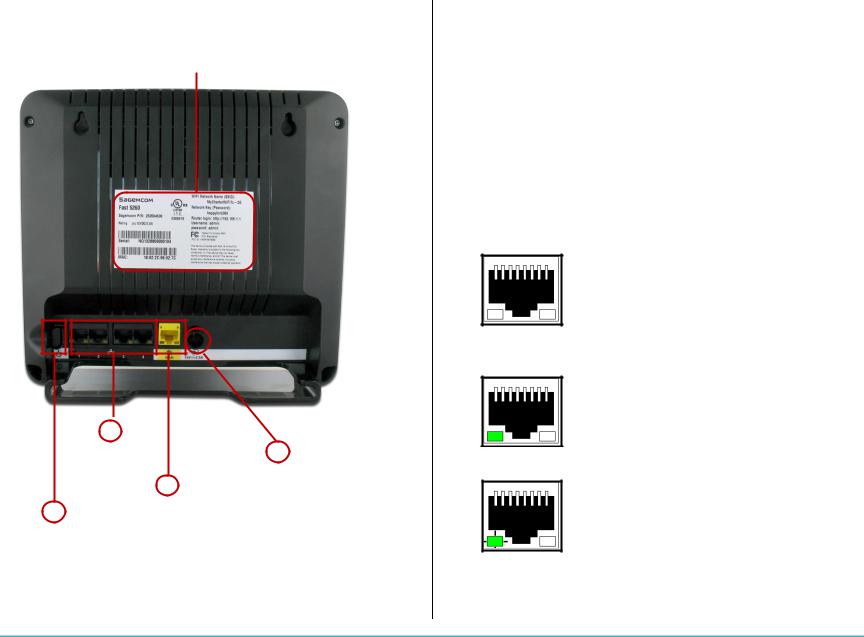
2. |
LAN Network Ports. Connects to your devices using |
|
Back view |
|
|
network cables (aka Ethernet cables). |
|
3. |
Internet port (or WAN Network port). Connects to the |
|
|
Label |
||
|
|
modem using the provided Ethernet cable. |
|
|
|
|
|
|
4. |
Power Input. Connects to the provided power |
|
|
|
|
adapter. |
Each network port is flanked with a pair of indicator lights. See the descriptions below to understand what each type of light indicates.
Off. No Ethernet link present.
|
Solid Green LED. Ethernet link |
|
|
present. |
|
|
2 |
|
|
4 |
|
|
3 |
|
1 |
Flashing Green LED. Passing Ethernet |
|
traffic. |
||
|
The back side of your router contains a number of items:
1. Power Switch. Turns your router on or off completely.
5

Sagemcom F@st 5260 |
Chapter 1: Product Overview |
|
|
Solid Orange LED. Gigabit Ethernet link present.
Solid Orange LED with Flashing Green LED. Gigabit Ethernet link present with and passing Ethernet traffic.
Side View
USB Port: |
Connects to your |
|
storage and printing |
|
devices. |
Reset Button: |
Press and release to |
|
reboot. |
|
Press and hold for |
|
15 seconds or more |
|
for factory reset. |
WPS Button: |
Press and hold for 5 |
|
seconds until WPS |
|
light flashes to enable |
|
WPS push-button |
|
pairing mode. |
NOTE:
WPS push-button pairing mode must be enabled through the Web UI before use.
The WPS button applies to both 2.4 GHz and 5 GHz according to which is enabled.
Label
The label is located on the back of your router. It contains important information such as your SSID and router login username and password as well your MAC address which you will need to set up your router.
Preset WiFi SSIDs and Password
WAN MAC Address
Router Web GUI
Serial Number Access
information
6
Sagemcom F@st 5260 |
Chapter 1: Product Overview |
|
|
Router Positioning
The F5260 router provides network access from anywhere within range of your wireless (WiFi) network. However, WiFi signal strength diminishes over distance and as it passes through the construction material of your home (e.g. walls, metal and water).
For best results, follow the guidelines below.
Improve range by positioning your router at a central location and minimizing the number of walls or ceilings between your router and network devices.
Ensure optimum reception by positioning your device so that the signal moves straight through drywall or open doorways instead of at an angle.
Maintain wireless signal strength by positioning your router away from glass, metal, water, mirrors, brick and concrete.
Avoid signal interference by keeping your router away from electrical devices (e.g. microwaves, baby monitors and wireless headsets).
Keep your router and its cables accessible by placing it in an open area near a power outlet.
Wall Mounting (optional)
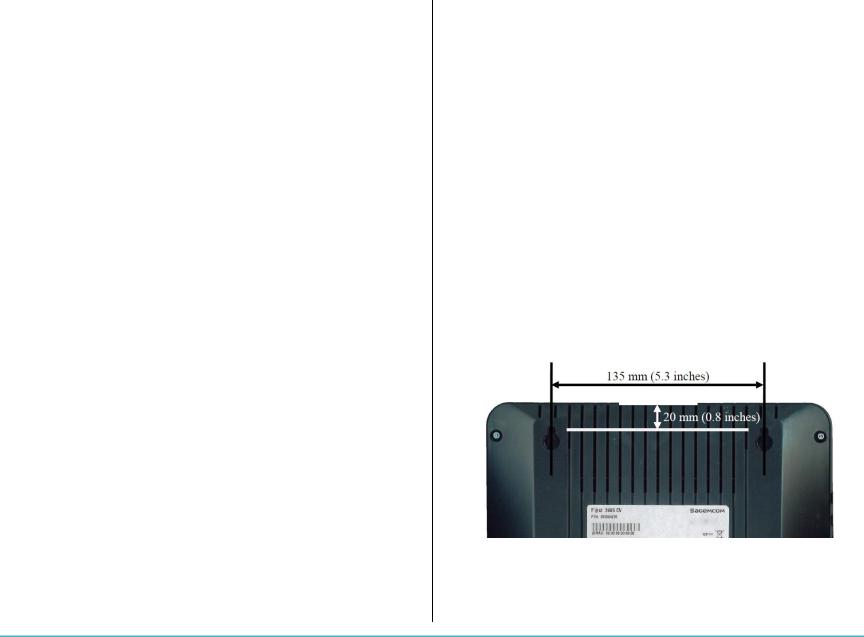
The F5260 router can be optionally mounted on the wall. Before you mount the unit on the wall, write down the required information from the label.
1.The unit is mounted with the top of the unit facing up. Ensure that the wall you use is smooth, flat, dry, and sturdy.
2.The unit is mounted using two M3x20 or equivalent compact head screws (20mm length and 3mm in diameter).
3.Install the two screws 5 1/4 inches (135 mm) apart approximately 3/4 inches (20 mm) below the desired top of the unit per the following figure.
4.Adjust the screws in the wall leaving their heads extending approximately 1/8 inch to 3/16 inch (3.5 mm - 4 mm) from the wall surface.
5.Carefully align the screw heads in the keyholes on the back of the unit and gently push it onto the wall moving it downward to secure it in the narrow portion of the keyhole slots.
7
Sagemcom F@st 5260
Chapter 2: Getting Started
Before you begin
This chapter will outline the procedures required for installing and configuring your router.
Installing your router is comprised of two parts:
installing the hardware; and
configuring the router through the Web GUI.
Before you begin, please review the system requirements outlined below and write down the router information located on the router's label.
NOTE:
Some Internet Service Providers (ISP) require that you login to their web portal to enable your Internet connection. Should you require more information, please contact your ISP.
System Requirements
Wireless Network Requirements:
WPA or WPA2 security enabled device
Web-based Graphic User Interface Requirements:
Computers with:
Chapter 2: Getting Started
Windows®, Macintosh or Linux-based operating system
Supported browsers:
Internet Explorer 8 and higher
Mozilla Firefox 26 and higher
Safari 6 and higher
Chrome 32 and higher
For mobile:
Safari on IOS5 and higher
Google Chrome 32 and higher
Router and Account Information
For future use, print this page and write your router information below.
Network Name (SSID):
Network Password:
Guest Network Name:
Guest Network Password: 
Web GUI Address:
Web GUI Username:
Web GUI Password:
8

Sagemcom F@st 5260 |
Chapter 2: Getting Started |
|
|
Install your Wireless Router
NOTE:
If there is an Ethernet cable currently connecting your modem to another device, disconnect the Ethernet cable from the device before you install your router.
1.Unplug your modem.
2.Re-plug your modem. Wait approximately 2 minutes until your modem turns on.
3.Connect one end of the Ethernet cable to your modem. Connect the other end to the yellow Internet port on your router.
4.Connect the power adapter to the power input of your router, then plug it in. Press the power switch.
5.The router is ready to use when the following indicator lights are solid green:
6.After installing the hardware, you can now connect to the Internet.
a.On your device (PC, laptop, phone, tablet, etc.) open the software utility that manages WiFi connections.
b.Find the Network Name (SSID) as listed on the label of your router.
NOTE:
When searching on your device, 2 network names that may appear:
MyCharterWiFixx-2G
MyCharterWiFixx-5G
(where xx is specific to your router)
If you see the name ending in ‘5G’, your device is 5GHz-capable. Connecting to the ‘5G’ network may provide a better experience.
c.Enter the password listed on the label of your router. You should now be connected to the Internet.
9
Sagemcom F@st 5260 |
Chapter 2: Getting Started |
|
|
If you wish to customize your router settings further, see the instructions below.
Configure your Wireless Router
The F5260 can be easily configured to meet your wireless needs. This section provides instructions on how to:
Connect to the Web GUI
Change your network name and password
Configuring your WiFi
Enabling WPS
Change your local access password
Change your time zone
Customize your device lists
Set up parental controls
Set up a guest network
Configuration of your router begins with logging into your Web GUI.
Login to the Web GUI
1.Open your web browser. Go to http://192.168.1.1
2.Enter the router login username and password listed on the back of your router (you can change this later).
The default username and password are as follows: Username: Admin
Password: admin
3.Your router’s home page (or dashboard) should now appear.
10
Loading...