

Page 1

Guide d'installation
Installation guide
Installationhandbuch
Guía de instalación
Guida di installazione
Page 2

Page 3

TABLE DES MATIÈRES
BIENVENUE 2
ECOMMANDATIONS ET CONSIGNES DE SÉCURITÉ 3
R
C
ONTENU DE LA BOITE 4
AVÉ DE CONTRÔLE 4
P
ANNEAU ARRIÈRE 5
P
F
ONCTIONS DE LA TÉLÉCOMMANDE 6
ONFIGURATION EN MODE CLIENT SANS FIL 7
C
PREMIÈRE UTILISATION DE L'APPAREIL, SANS BRANCHEMENT
AU MOYEN D'UN CÂBLE ETHERNET 7
C
ONFIGURATION MANUELLE EN MODE CLIENT SANS FIL: 8
CONFIGURATION EN MODE CLIENT FILAIRE 10
PREMIÈRE UTILISATION DE L'APPAREIL, AVEC BRANCHEMENT
AU MOYEN D'UN CÂBLE ETHERNET 10
ONFIGURATION MANUELLE EN MODE CLIENT FILAIRE 11
C
CONFIGURATION EN POINT D'ACCÈS SANS FIL (PA) 12
CONFIGURATION MANUELLE EN MODE POINT D'ACCÈS SANS FIL 12
LECTEUR WINDOWS MEDIA 11 (WMP11) : INSTALLATION ET CONNEXION 14
ÉGLAGES DE L’HEURE 17
R
RÉGLAGE DE L’HORLOGE 18
ORMAT DE L’HEURE 19
F
RÉGLAGES DE L'ALARME 19
ETTOYAGE ET ENTRETIEN 20
N
I
NCIDENTS 21
1
Français
Page 4

BIENVENUE
Cher client,
Vous venez d'acquérir une Radio Wi-Fi IP SAGEM et nous vous remercions de la confiance
que vous nous accordez.
Ce produit a été fabriqué avec le plus grand soin. Si toutefois vous rencontrez la moindre
difficulté lors de son utilisation, nous vous conseillons de consulter ce manuel de l'utilisateur.
Vous trouverez également des informations sur le site :
http://www.sagem.com/faq
Le matériel neuf est garanti (pièces et main-d'oeuvre) par Sagem Communications dans les
conditions et selon les modalités définies sur le site www.sagem.com rubrique support.
En cas de problème technique, nous vous invitons à consulter le tableau situé à la fin de ce
guide d'installation qui fournit une liste d'incidents et la facon d'y remédier. Le site SAGEM
(www.sagem.com rubrique support) vous fournira aussi des informations sur le
fonctionnement de votre Radio Wi-Fi IP SAGEM et la résolution des problèmes que vous
pourriez rencontrer. Vous pourrez aussi y contacter notre service support par courrier
électronique. Si votre problème persiste, vous devrez impérativement téléphoner à notre
centre d'appel (voir le tableau ci-dessous) qui expertisera votre matériel à distance et
déterminera la nature de la panne ainsi que le type de réparation nécessaire.
Pays Numéro de téléphone Tarif/Minute
Sagem Fance 0892 230425 0,34 €
Sagem Austria 0820 550540 0,145 €
Sagem Germany 0180 5308930 0,14 €
Sagem Belgium 070 350 016 0,17 €
Sagem Netherlands 0900 0400478 0,18 €
Sagem UK 0871 07 50 712 0,10 £
Sagem Italy 899 484 810 0,28 €
Sagem Spain 807 088 303 0,41 €
Sagem Sweden 08 501 11 805 appel local
Sagem Norway 23 680115 appel local
Pour votre confort et votre sécurité, nous vous invitons à lire attentivement le paragraphe cidessous sur les recommandations et consignes de sécurité.
2
Page 5
RECOMMANDATIONS ET CONSIGNES DE SÉCURITÉ
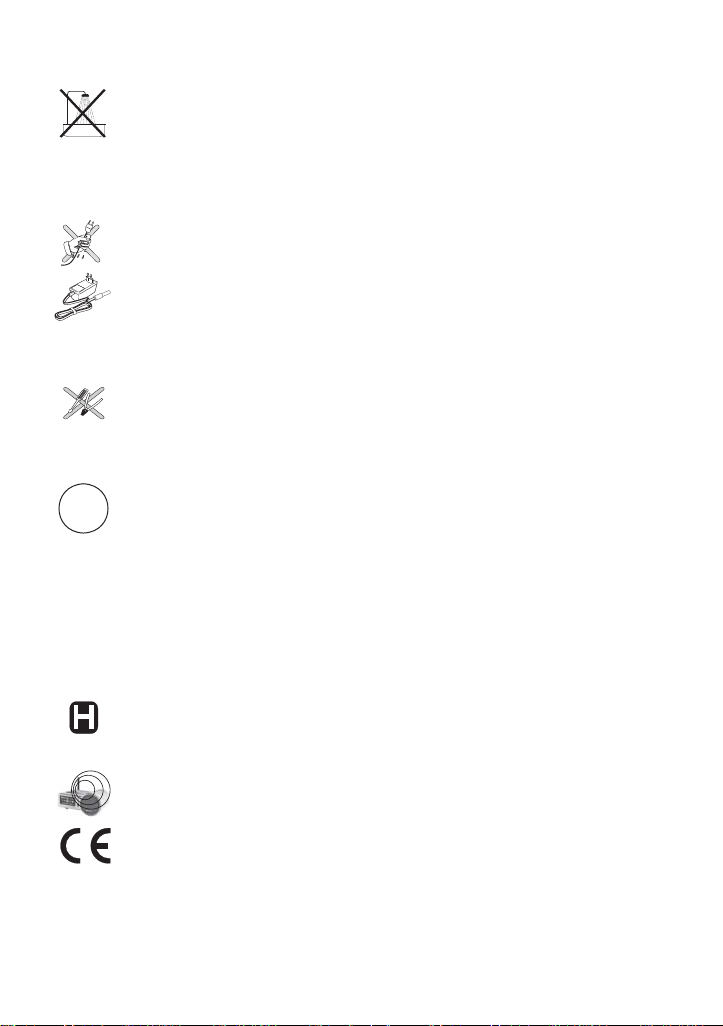
N'installez pas votre Radio Wi-Fi IP ni dans une pièce humide (salle d'eau, salle de bains,
buanderie, cuisine, etc..) à moins de 1,50 m d'un point d'eau, ni en extérieur. Pour bénéficier
d'une qualité audio optimale, votre radio Wi-Fi IP doit être utilisée à une température comprise
entre 15 °C et 35 °C.
N'installez pas votre Radio Wi-Fi IP dans un endroit où il y aurait des poussières en suspentation
dans l'air susceptibles de dégrader la qualité audio de votre appareil.
Vous ne devez ni insérer d'objets, ni déverser de liquides dans l'appareil.
Débranchez le cordon d'alimentation si l'appareil n'est pas utilisé pendant une longue période.
Ne manipulez pas le cordon d'alimentation secteur avec les mains mouillées. Si vous renversez
un liquide sur votre appareil, débranchez immédiatement l'appareil et contactez votre revendeur
pour obtenir des instructions sur son nettoyage.
Utilisez exclusivement le bloc secteur fourni avec votre Radio Wi-Fi IP. Raccordez celui-ci sur
le secteur conformément aux instructions d'installation fournies dans ce manuel et aux
indications portées sur l'étiquette d'identification apposée sur celui-ci (tension, courant,
fréquence du réseau électrique). Par précaution, en cas de danger, les adaptateurs secteur
servent de dispositif de sectionnement de l'alimentation 230 V. Ils doivent être situés à proximité
de l'appareil et être aisément accessibles.
N'essayez pas de retirer des vis ou d'ouvrir l'appareil. Il ne contient aucune pièce remplaçable
par l'utilisateur.
La longueur des cables ethernet et USB utilisés avec ce produit ne doivent pas excéder 3m.
Ne pas utiliser sur un réseau Ethernet sortant du bâtiment ! Utiliser uniquement sur une
connexion Ethernet interne au bâtiment.
Ce terminal a été conçu pour une utilisation privée à l'intérieur d'un bâtiment (CPE customer
premises equipment) au sein de l'union Européenne et de l'Association Européenne de LibreÉchange (AELE) European Free Trade association (EFTA).
Il a été soumis aux tests suivants les dispositions techniques pour les équipements radio
!
(EN 300328).
Les bandes de fréquence radio autorisées pour la transmission Wireless dépendent des
réglementations nationales.
L'installation de ce terminal opérant dans la bande 2.4 GHz est couvert par la réglementation
européenne "recommendation ERC 70-03".
Avant toute utilisation, veuillez vérifier que la passerelle (Gateway) sur laquelle vous établissez
une connexion sans fil depuis votre terminal est paramétrée en accord avec cette
réglementation et avec la réglementation nationale du lieu d'utilisation.
Sagem Communications dégage toute responsabilité en cas de non respect des
réglementations en vigueur sur le lieu d'installation.
L'utilisateur doit utiliser les antennes fournies dans la boite et aucunement d'autres antennes.
Certains équipements médicaux, sensibles ou sécuritaires peuvent être perturbés par les
transmissions radio de votre appareil ; dans tous les cas, nous vous invitons à respecter les
recommandations de sécurité.
Par mesure de précaution, le produit ne doit pas etre placé ou utilisé de facon permanente à
moins de 20cm du corps humain.
Le marquage CE atteste de la conformité du produit aux exigences essentielles de la directive
1999 / 5 / CE du Parlement et du Conseil Européen concernant les équipements hertziens et les
équipements terminaux de télécommunication, pour la sécurité et la santé des usagers, pour les
perturbations électromagnétiques. En complément, il utilise efficacement le spectre de
fréquences attribué aux communications terrestres et spatiales pour éviter les interférences
dommageables.
Vous pouvez consulter la déclaration de conformité sur le site www.sagem.com rubrique
"support" ou la demander à l'adresse suivante :
Sagem Communications - Service Relations Clientèle
4 rue du petit albi - 95800 Cergy Saint-Christophe -France
3
Page 6
CONTENU DE LA BOITE
L'emballage du produit comprend les éléments suivants :
• Appareil radio IP x1,
• Antenne WiFi x 1,
• Antenne FM x 1,
• Bloc secteur x 1,
• Télécommande x 1,
• Batteries AAA x 2,
• CD x 1,
• Guide d’installation x 1.
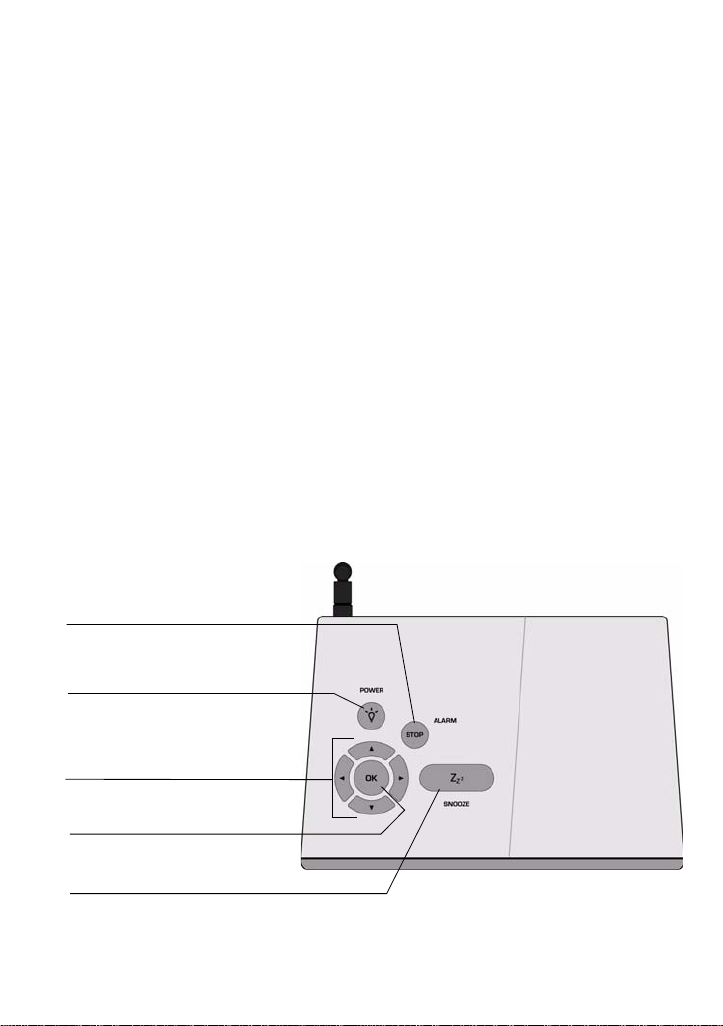
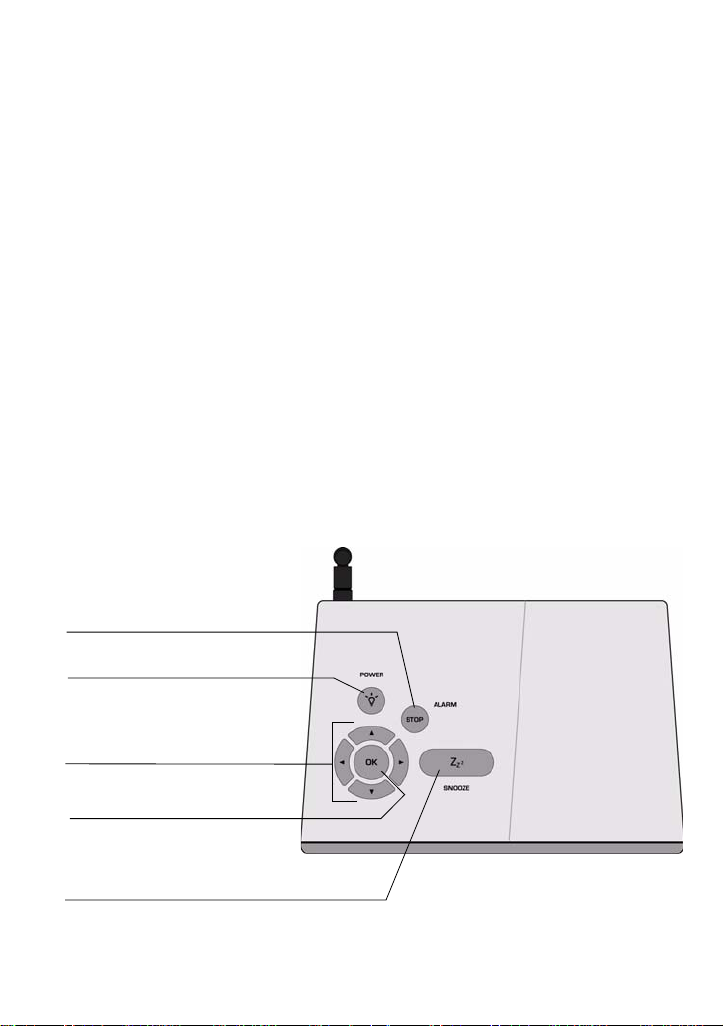
PAVÉ DE CONTRÔLE
STOP (Arrêt de la lecture /
Arrêt alarme)
- Appui court: LCD On / Off
- Appui long: On / Off
Navigateur 4 directions
Valider
SNOOZE (rappel d'alarme)
Fonction Sommeil
4
Page 7

PANNEAU ARRIÈRE
Interrupteur secteur
Connecteur d'alimentation
secteur
Bouton de réinitialisation
Connecteur pour
antenne WiFi
Port RJ45
Témoin trafic WiFI
Connecteurs de sortie
RCA
Connecteur jack
pour écouteurs
Connecteur pour
antenne FM
5
Page 8
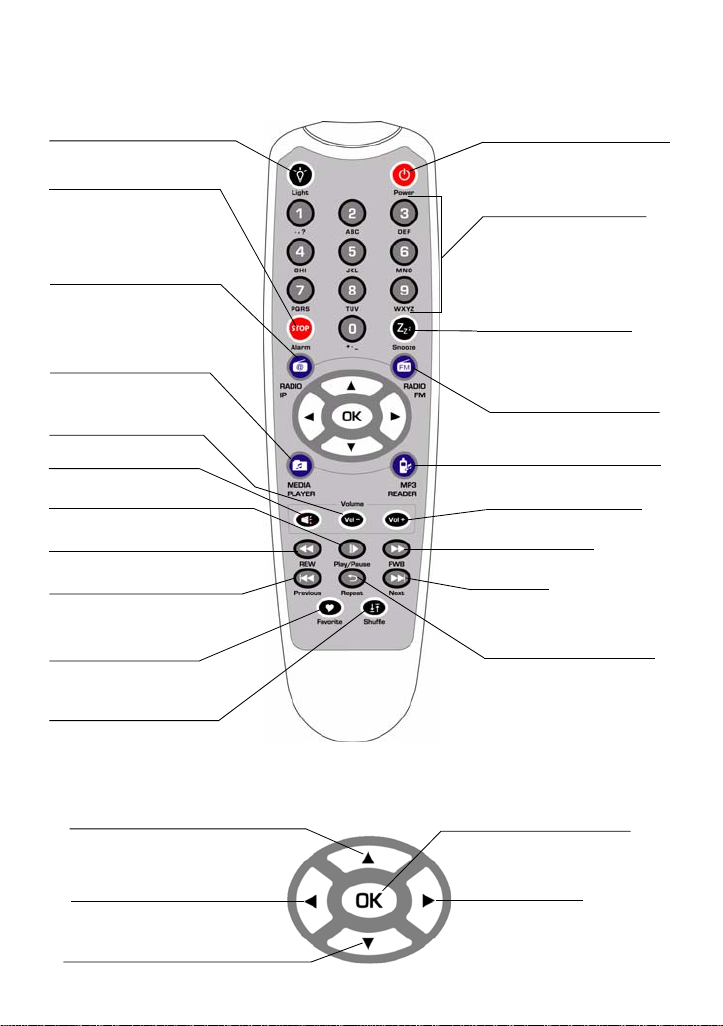
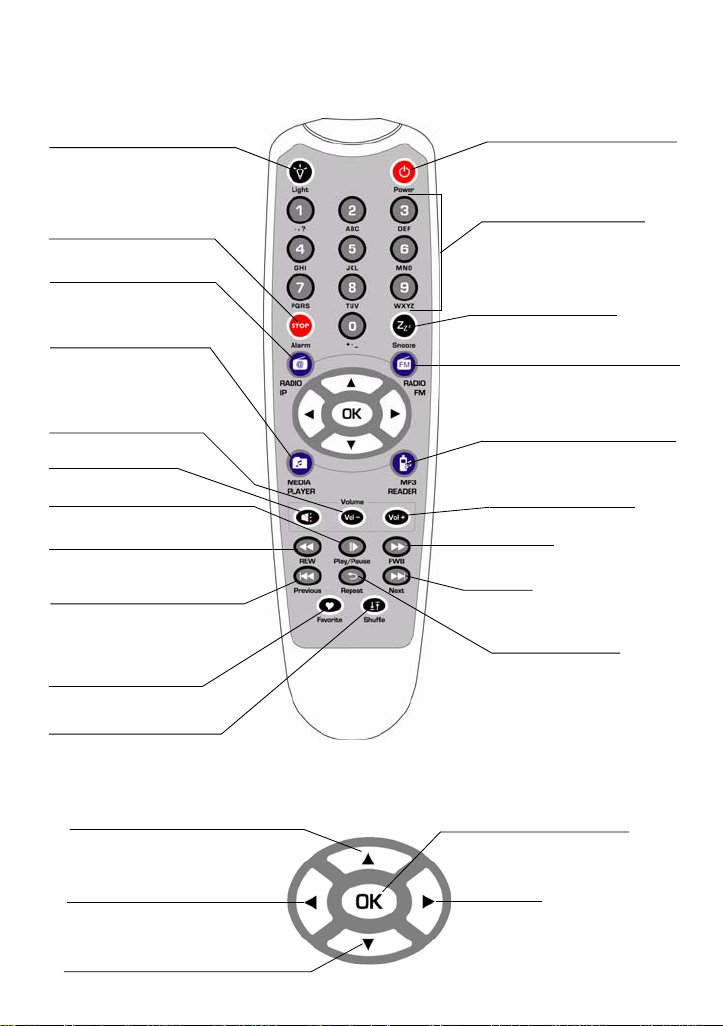
FONCTIONS DE LA TÉLÉCOMMANDE
Activer / désactiver le
rétroéclairage de l'écran
Arrêter la musique et
revenir au menu
principal /
Arrêter l’alarme
Accéder directement au
menu Radio Internet
Accéder directement
au menu Media server
Réduire le volume
Couper le son (Muet)
Lecture / Pause
Retour rapide
Précédent / Effacer
caractère précédent
Ajout / Suppression
de la liste des favoris
Mettre l'appareil en mode
veille (standby).
Pavé alphanumérique
Fonction Sommeil /
Report Alarme
Acceder directement au
menu Radio FM
Acceder directement au
menu Lecteur MP3
Augmenter le volume
Avance rapide
Suivant
Répéter la chanson
ou la liste de chansons
Lecture aléatoire
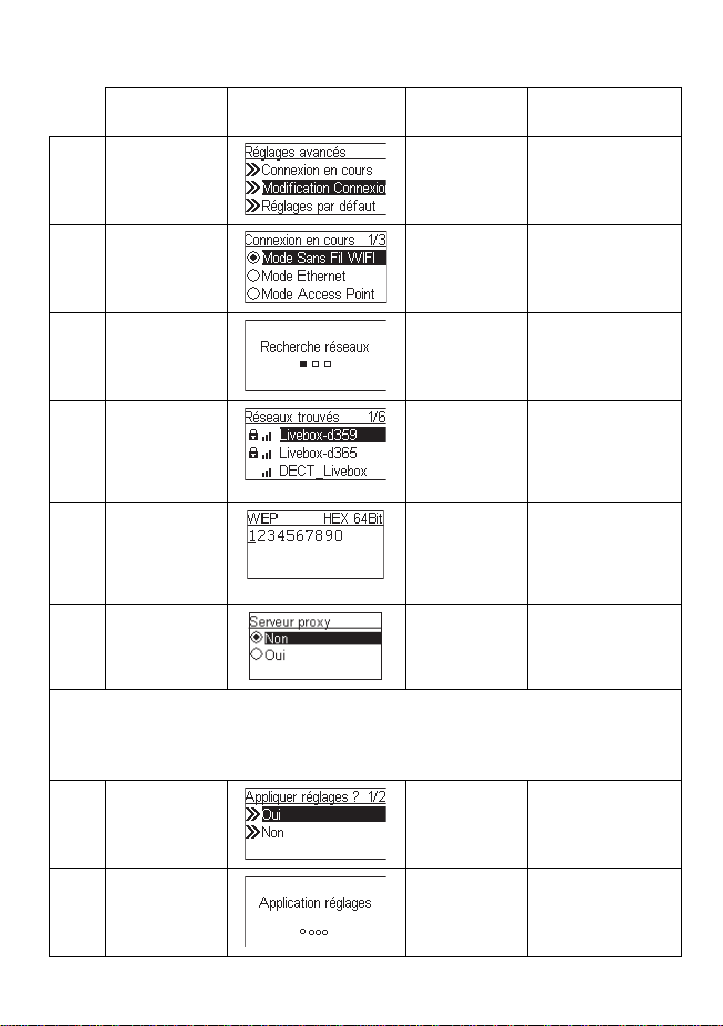
Le navigateur de la télécommande est un outil de sélec tion rapide.
Atteindre l'élément précédent
Menu précédent
Atteindre l'élément suivant
6
Sélectionner la fonction
Sélectionner
Page 9

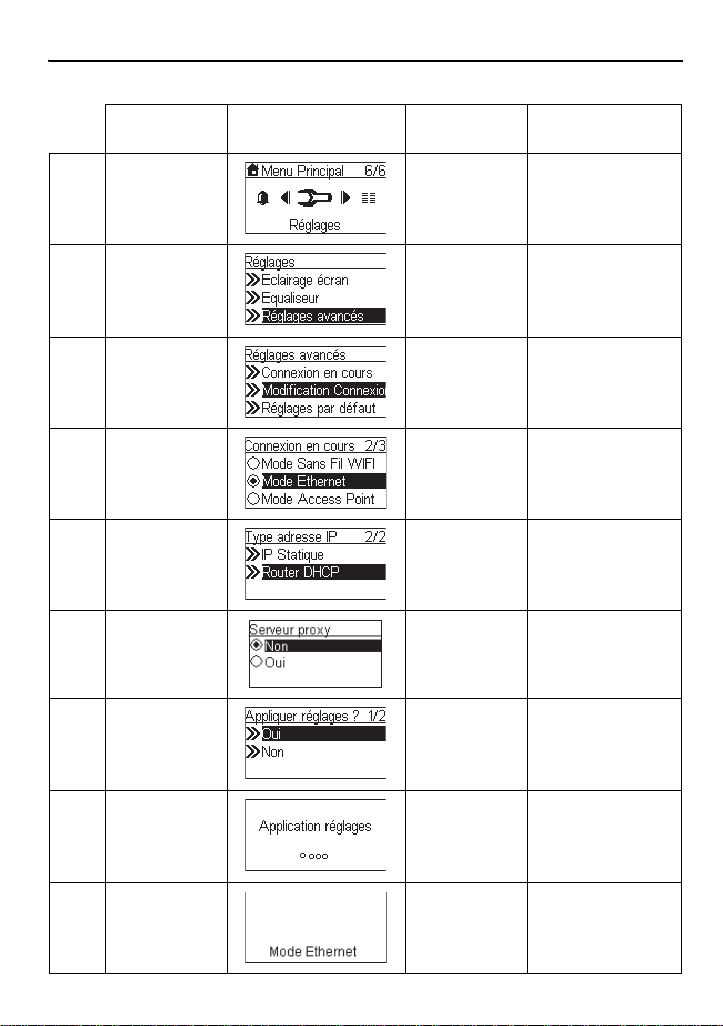
CONFIGURATION EN MODE CLIENT SANS FIL
PREMIÈRE UTILISATION DE L'APPAREIL, SANS BRANCHEMENT AU MOYEN
D'UN CÂBLE ETHERNET
Écran sur
la droite
1 Écran d'accueil.
Capture d'écran Écran suivant Commentaire
2 L'appareil est
3 Bouton "OK" Sélectionnez la
4 Bouton "OK" Sélectionnez la
5 Recherche des
6 Bouton ""
(une fois)
7 Touches
numériques
8 Bouton "OK"
Bouton ""
ou "OK"
Bouton "OK" Saisissez la clé de
configuré en mode
client sans fil.
langue de
l'interface
multimédia.
langue du menu
radio Internet.
points d'accès
disponibles.
Sélectionnez le
point d'accès sur
lequel vous
souhaitez vous
connecter.
protection de votre
fournisseur d’accès
si le point d'accès
est protégé.
7
Page 10

Première utilisation de l'appareil, sans branchement au moyen d'un câble Ethernet
Écran sur
la droite
Capture d'écran Écran suivant Commentaire
(Suite)
! En fonction de votre configur ation pays, vous pourr ez avoir l’ option d e vous connecte r à
Internet par l’intermédiaire d’un serveur proxy. Si vous êtes connectés à Internet
directement, sélectionnez «NON». Sinon, activez cette option et saisissez l’adresse IP et
le port de votre serveur proxy.
9 Bouton "OK" Confirmez les
réglages ci-dessus.
10 Application des
nouveaux
réglages.
! Si la connection échoue, vérifiez que votre point d'accès ne nécessite pas une
procédure spécifique d'appairage. Certains points d'accès nécessitent, par
exemple, l'appui sur un bouton spécifique d'appairage pendant l'étape 9 cidessus.
11 L'appareil est à
12 L'appareil est déjà
présent en mode
client sans fil.
connecté à votre
réseau.
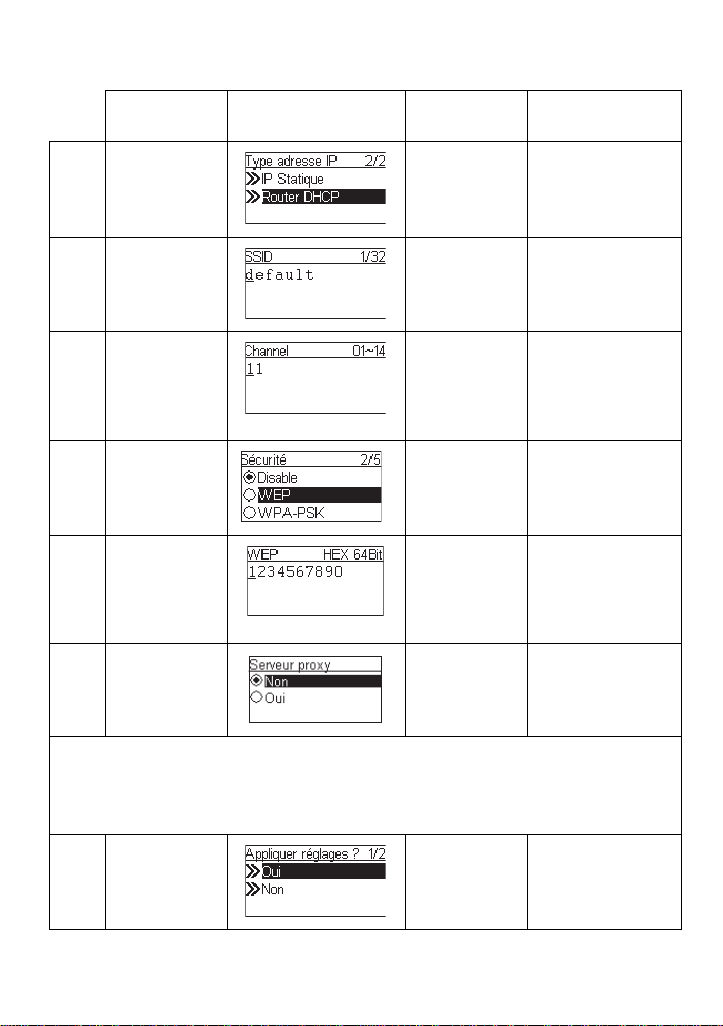
CONFIGURATION MANUELLE EN MODE CLIENT SANS FIL:
Écran sur la
droite
1 Bouton "OK" Écran d'accueil
2 Bouton ""
(4 fois)
Capture d'écran Écran suivant Commentaire
Bouton ""
ou "OK"
8
Page 11
Écran sur
la droite
3 Bouton ""
(une fois)
Configuration manuelle en mode client sans fil
(Suite)
Capture d'écran Écran suivant Commentaire
Bouton ""
ou "OK"
4 Bouton ""
(une fois)
5 Recherche des
6 Bouton ""
(une fois)
7 Touches
numériques
8 Bouton "OK"
Bouton ""
ou "OK"
Bouton ""
ou "OK"
Bouton "OK" Saisissez la clé de
Sélection manuelle
du mode client
sans fil.
points d'accès
disponibles.
Sélectionnez le
point d'accès que
vous souhaitez
connecter à votre
routeur.
protection de votre
fournisseur d’accès
si le point d'accès
est protégé.
! En fonction de votre configur ation pays, vous pourr ez avoir l’ option d e vous connecte r à
Internet par l’intermédiaire d’un serveur proxy. Si vous êtes connectés à Internet
directement, sélectionnez «NON». Sinon, activez cette option et saisissez l’adresse IP et
le port de votre serveur proxy.
9 Bouton "OK" Confirmez les
réglages ci-dessus.
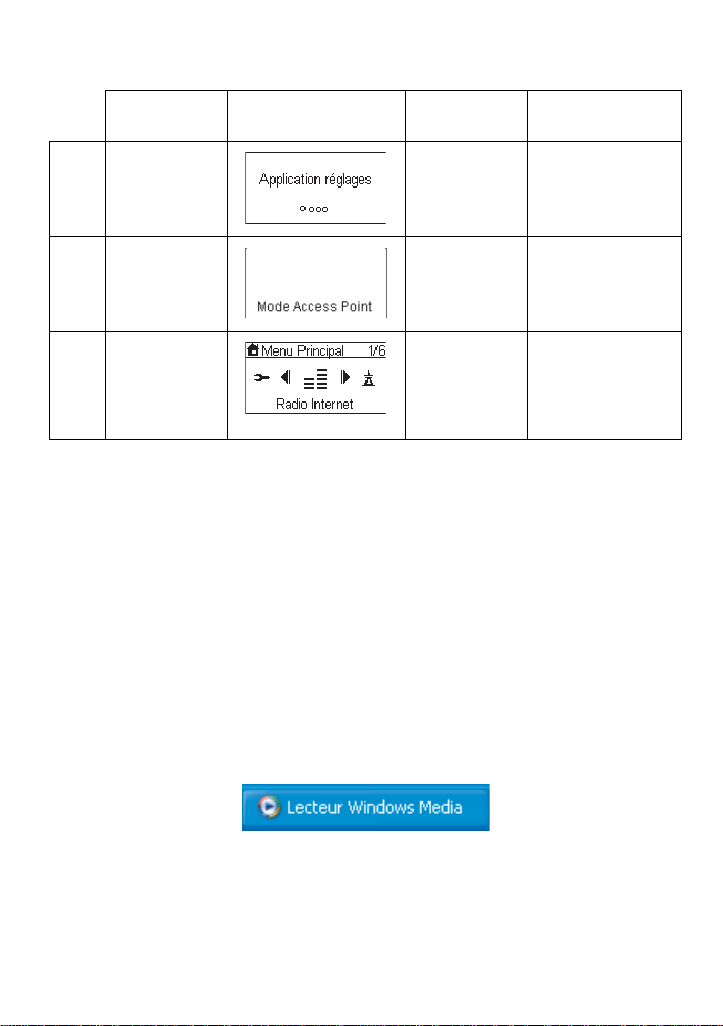
10 Application des
9
nouveaux
réglages.
Page 12

Écran sur
la droite
Configuration manuelle en mode client sans fil
Capture d'écran Écran suivant Commentaire
(Suite)
! Si la connection échoue, vérifiez que votre point d'accès ne nécessite pas une
procédure spécifique d'appairage. Certains points d'accès nécessitent, par
exemple, l'appui sur un bouton spécifique d'appairage pendant l'étape 9 cidessus.
12 L'appareil est déjà
connecté à votre
réseau.
CONFIGURATION EN MODE CLIENT FILAIRE
PREMIÈRE UTILISATION DE L'APPAREIL, AVEC BRANCHEMENT AU MOYEN
D'UN CÂBLE ETHERNET
Écran sur la
droite
1 Écran d'accueil.
2 L'appareil est
3 Bouton ""
4 Bouton ""
5 L'appareil est à
Capture d'écran Écran suivant Commentaire
configuré en mode
client filaire.
ou "OK"
ou "OK"
10
Sélectionnez la
langue de
l'interface
multimédia.
Sélectionnez la
langue du menu
Radio Internet.
présent en mode
client filaire.
Il est déjà connecté
à votre réseau.
Page 13
CONFIGURATION MANUELLE EN MODE CLIENT FILAIRE
Écran sur la
droite
1 Bouton "OK" Écran d'accueil.
2 Bouton ""
(4 fois)
3 Bouton ""
(une fois)
4 Bouton ""
(une fois)
5 Bouton ""
(une fois)
Capture d'écran
Écran suivant Commentaire
Bouton ""
ou "OK"
Bouton ""
ou "OK"
Bouton ""
ou "OK"
Bouton ""
ou "OK"
Bouton "OK"
Sélection manuelle
du mode client
filaire.
Sélection du DHCP
pour les adresses
IP configurées
automatiquement.
6 Bouton "OK" Confirmez
7 Application des
8 L'appareil est à
11
les réglages
ci-dessus.
nouveaux
réglages.
présent en mode
client filaire.
Page 14

Configuration manuelle en mode client filaire
Écran sur
la droite
9 L'appareil est déjà
Capture d'écran Écran suivant Commentaire
(Suite)
connecté à votre
réseau.
CONFIGURATION EN POINT D'ACCÈS SANS FIL (PA)
La radio IP peut également être configurée en point d'accès sans fil. Grâce à cette fonction,
vous pouvez facilement étendre la couverture de vot re rés ea u san s fi l san s be so in d' ac het er
un nouveau point d'accès.
CONFIGURATION MANUELLE EN MODE POINT D'ACCÈS SANS FIL
Écran sur la
droite
1 Bouton "OK" Écran d'accueil
2 Bouton ""
(4 fois)
3 Bouton ""
(une fois)
4 Bouton ""
(2 fois)
Capture d'écran Écran suivant Commentaire
Bouton ""
ou "OK"
Bouton ""
ou "OK"
Bouton ""
ou "OK"
12
Sélection manuelle
du mode point
d'accès.
Page 15
Configuration manuelle en mode point d'accès sans fil
Écran sur
la droite
5 Bouton ""
(une fois)
(Suite)
Capture d'écran Écran suivant Commentaire
Bouton ""
ou "OK"
Sélection du DHCP
pour les adresses
IP configurées
automatiquement.
6 Touches nu-
mériques
7 Touches
numériques
8 Bouton ""
(une fois)
9 Touches
numériques
10 Bouton "OK"
Bouton "OK" Saisissez
l'identifiant (nom)
de ce point d'accès.
Bouton "OK" Sélectionnez le
canal sans fil que
vous souhaitez
attribuer à ce point
d'accès.
Bouton "OK" Sélectionnez l'une
des fonctions de
sécurité.
Bouton "OK" Saisissez votre
propre clé de
protection si le
point d'accès est
protégé.
! En fonction de votre configur ation pays, vous pourr ez avoir l’ option d e vous connecte r à
Internet par l’intermédiaire d’un serveur proxy. Si vous êtes connectés à Internet
directement, sélectionnez «NON». Sinon, activez cette option et saisissez l’adresse IP et
le port de votre serveur proxy.
11 Bouton "OK" Confirmez les
réglages ci-dessus.
13
Page 16
Configuration manuelle en mode point d'accès sans fil
Écran sur
la droite
12 Application des
Capture d'écran Écran suivant Commentaire
(Suite)
nouveaux
réglages.
13 L'appareil est en
14 L'appareil est déjà
mode point d'accès
sans fil.
connecté à votre
réseau et peut
maintenant
fonctionner.
LECTEUR WINDOWS MEDIA 11 (WMP11) :
I
NSTALLATION ET CONNEXION
Veuillez procéder comme suit :
Étape 1: Téléchargez le Lecteur Windows Media 11.
Étape 2 : Activez le Lecteur Media.
Téléchargez le fichier d'installation du Lecteur Windows Media 11 (WMP11), par
exemple, wmp11-windowsxp-x86-enu.exe, depuis le site Internet de Microsoft.
Installez le fichier wmp11-windowsxp-x86-enu.exe sans effectuer aucune
modification. Cliquez sur "Suivant" pour finaliser l'installation.
Étape 3 : Basculez de "Lecture en cours" à "Bibliothèque" en cliquant sur l'onglet
Étape 4 : Ajoutez des fichiers multimédias à la bibliothèque du Lecteur Windows Media 11.
"Bibliothèque" afin d'organiser vos fichiers multimédias et de les partager.
Cliquez à nouveau sur l'onglet "Bibliothèque" afin d'accéder au menu déroulant.
Pour ajouter vos fichiers multimédias à la bibliothè que du Lec teur Windows Media
11, cliquez sur "Ajouter à la bibliothèque…".
14
Page 17

Cliquez sur le bouton Ajouter, sélectionnez le dossier contenant vos fichiers
multimédias dans votre ordinateur, puis cliquez sur le bouton OK.
Vous pouvez placer tous vos fichiers musicaux dans le répe rtoi re E:\A mu si c afin
d'ajouter ce dernier à la liste des fichiers à partager.
Vous constaterez que le dossier spécifié a été ajouté à la liste des dossiers
analysés du Lecteur Windows Media. Cliquez sur le bouton OK. Une fenêtre
contextuelle s'affiche afin de vous indiquer que le Lecteur Windows Media 11
recherche les fichiers multimédias. Une fois la recherche terminée, cliquez sur le
bouton "Fermer".
Vous pouvez désormais parcourir et org anise r vos fi chie rs mul timéd ias à l' aide du
gestionnaire Lecteur Wi ndows Media 11.
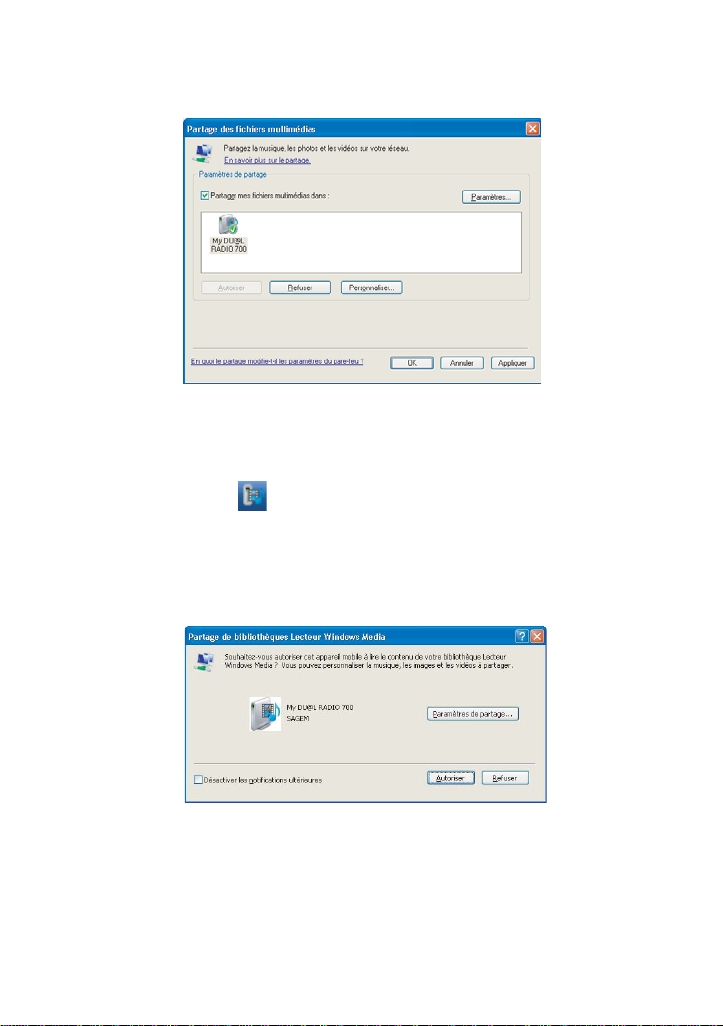
Étape 5: Partagez la bibliothèque multimédia du Lecteur Windows Media 11.
Comme dans l'Étape 4, cliquez à nouveau sur l 'onglet "Bibliothèque " afin d'accéder
au menu déroulant. Cliquez sur "Partager mes fichiers multimédias" pour activer la
fonction de partage des fichiers.
La boite de dialogue suivante s'affiche :
Sélectionnez la case "Partager mes fichi ers multimédias" puis cliquez sur le bo uton
"OK".
Le Lecteur Windows Media 11 détecte les périphériques disponibles connectés sur
votre réseau local.
Une fenêtre indique qu'aucun périphérique n'a été détecté.
Si la Radio IP est deja connectée sur votre résea u domestique, un écran s'affichera
afin de vous indiquer que le Lecteur Wi ndows Media 11 a dét ecté un pé riphéri que
sur le réseau nommé "My DU@L RADIO 700".
Étape 6: Configurez les réglages du partage des fichiers multimédias.
Cliquez sur le bouton "Paramètres" et spécifiez le nom du serveur WMP11 que
vous souhaitez afficher sur votre Radio IP.
Cliquez ensuite sur OK pour quitter l'écran.
Étape 7: Autorisez l'accès depuis votre Radio IP.
Les paramètres de contrôle d'accès du Lecteur Windows Media 11 sont simples.
Lorsque le Lecteur Windows Media 11 détecte un nouveau périphérique sur le
réseau (tel qu'indiqué dans le dernier écran de l'Étape 5), vous devez choisir
d'accorder ou de refuser les requêtes qu'il émet.
15
Page 18
Sélectionnez l'icône du périphérique et cliquez sur "Autoriser" pour autoriser les
requêtes de transmission en continu émises par ce périphérique.
L'icône de l'état du périphérique changera en conséquence.
Ensuite, cliquez sur le bouton OK pour que ces paramètres prennent effet.
Il existe une autre façon de gére r l es au torisa tions d'ac cès p our v os pé riphéri ques
réseau.
Une petite icône apparaît dans la barre d'état de Windows XP pour vous
informer que le Lecteur Windows media 11 a détecté de nouveaux périphériques
réseau.
Faites un double clic sur cette icône pour gérer les droits d'accès de ces
périphériques
Cliquez sur le bouton "Autoriser".
16
Page 19

Étape 8 : Établissez la connexion entre la Radio IP et le serveur WMP11.
Sur la Radio IP Radio, sélectionnez la fonction "Serveur Média" à partir du menu
principal (ou appuyez sur la touche de raccourci "Lecteur Média" sur la
télécommande). La Radio IP commence alors le processus de détection du
serveur. Au bout de quelques secondes, il détectera un serveur et affichera
"PC_Hostname : Server Name".
Il s'agit du serveur WPM11 que vous avez installé.
Cliquez sur le bouton "OK" pour essayer de vous connecter à ce serveur.
L'écran de la Radio IP Radio affichera "Connexion en cours….", puis indiquera la
liste suivante:
Vous pouvez parcourir la liste "Music" et écouter le morceau de votre choix.
RÉGLAGES DE L’HEURE
Avant de régler l'alarme, vous devez régler l'horloge de la Radio IP.
Tout d'abord, sélectionnez la fonction Réglages dans le menu principal.
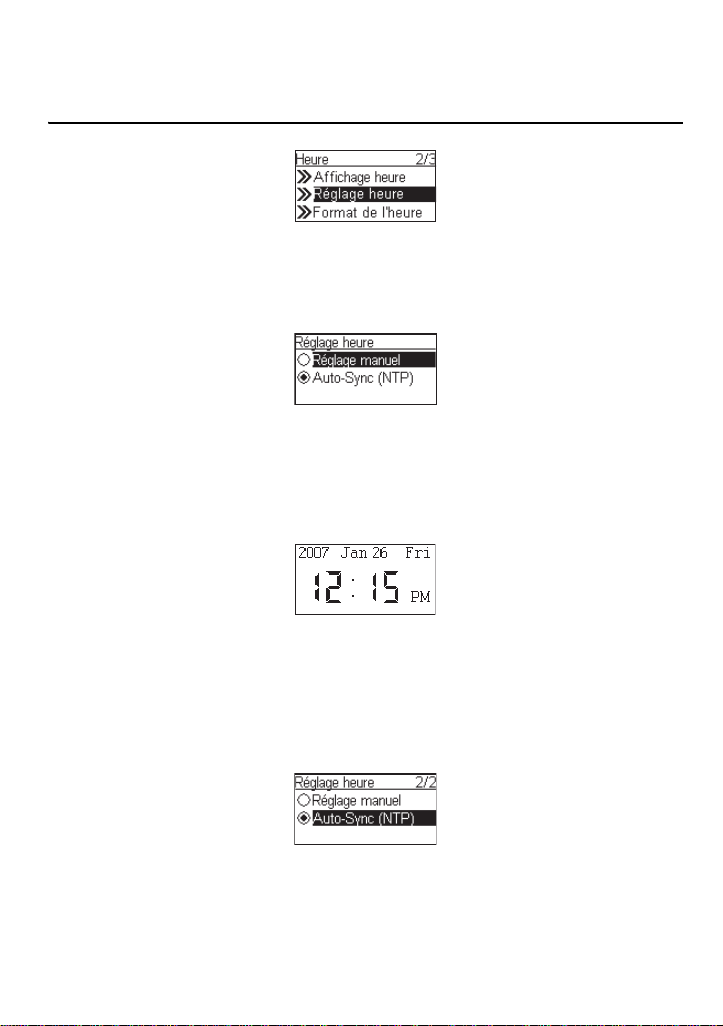
Dans le menu des réglages, le premier paramètre, "Heure", est utilisé pour régler la date et
l'heure. Appuyez sur le bouton "OK" ou "" pour mettre l'horloge à l'heure.
Le menu de l'horloge est composé de 3 éléments. Le premier affiche la date et l'heure
actuelles, le deuxième est utilisé pour régler la date et l'heure et le troisième est la fonction
"Format de l’heure" (pour définir le format de l’affichage de l’heure: 12 ou 24 heures).
17
Page 20
L'appareil étant également pourvu d'une batterie, l'horloge continue de fonctionner même
lorsque l'appareil est éteint. Cela si gnifie que v ous ne deve z régler l 'horloge qu' une seule fo is.
RÉGLAGE DE L’HORLOGE
Appuyer sur le bouton "OK" ou "" pour accéder aux sous-menus du réglage de l'heure.
1. RÉGLAGE MANUEL DE L'HORLOGE
Appuyez sur le bouton "OK" ou "" pour accéder aux menus du "Réglages heure".
Si vous souhaitez régler l'horloge manuellement, appuyez sur le bouton "OK" ou "" pour
accéder à l'écran de la date et de l'heure. Vous pouvez régler l'heure au moyen des quatre
boutons directionnels et du bouton OK.
a. Utilisez les boutons "" et "" pour passer d'un élément à modifier à un autre.
L'élément sélectionné clignote.
b. Utilisez les boutons "" et "" pour modifier la valeur sélectionnée.
c. Appuyez sur le bouton "OK" pour confirmer.
2. RÉGLAGE AUTOMATIQUE DE L'HORLOGE
Si vous souhaitez régler l'heure automatiquement, accédez au menu "Auto-sync (NTP)" et
sélectionner votre fuse au horaire. Vous pouvez aussi sélectionner la prise en compte
automatique du changement d'heure (heure d'hiver/heure d'été ). L'a ppareil modifie alors
la date et l'heure automatiquement.
18
Page 21

L'écran suivant indique un exemple d'écran de fuseau horai r e.
FORMAT DE L’HEURE
Si vous souhaitez définir le format de l’heure, accédez au menu "Format de l’heure" et
sélectionnez le format désiré (12 ou 24 heures).
RÉGLAGES DE L'ALARME
Écran sur la
droite
1 Bouton "OK" Écran d'accueil
2"" bouton
3""Bouton
(une fois)
Capture d'écran Écran suivant Commentaire
ou "OK"
"" bouton
ou "OK"
19
Activer l'Alarme 1.
Page 22

Réglages de l'alarme
(Suite)
Écran sur
la droite
4 Bouton "OK" Utilisez les
5"" bouton
Capture d'écran Écran suivant Commentaire
4 boutons
directionnels pour
régler l'heure.
ou "OK"
Définir une radio
sur Internet comme
source de l'alarme.
6 Bouton "OK" Sélectionnez la
7 Sélectionnez le
8 Informations
9 L'alarme est réglée.
station à partir de
votre liste
des favorites.
(Consultez le
chapitre 3.1).
niveau de l’alarme
sonore.
concernant l'alarme
(s'affichent pendant
3~5 secondes)
NETTOYAGE ET ENTRETIEN
Éteignez votre Radio IP. Utilisez un chi ffon dou x lég èreme nt hum ide po ur l'es suye r. N'util isez
pas de chiffon sec, de détergents liquid es puissants, de dil uants, d'alcool ou tout autre type de
solvant pour nettoyer votre appareil. Ces produits risquent d'endommager votre Radio IP.
20
Page 23

INCIDENTS
Consultez le tableau ci-après en cas d’anomalies de fonctionnement:
Incidents Remèdes
La télécommande ne
fonctionne pas.
L'écran est éteint. Vérifiez que :
La station sélectionnée n'est
pas audible.
Le son est parasité ou la netteté
amoindrie.
Accès refusé à la Radio
Internet.
Accès refusé à la Radio lorsque
vous utilisez un ordinateur
personnel comme point d'accès
(Serveur Média).
L'alarme ne sonne pas. Vérifiez que la source de l'alarme est configurée correctement (par exemple :
Problème de connexion entre la
radio et vTuner.
Problème de connexion entre la
radio et vTuner.
La Radio IP se lance
normalement mais n'obtient
aucune adresse IP.
• Vé rifiez que les batteries sont insérées correctement.
• Vé rifiez que vous n'êtes pas trop éloigné de la Radio (7 mètres
maximum conseillé) et que le capteur infrarouge n'est pas bloqué.
• Assurez-vous que la télécommande est correctement dirigée vers le
capteur lorsque vous manipulez la Radio.
• le bloc secteur est correctement relié à une prise secteur,
• le connecteur secteur est correctement branché sur la Radio,
• votre fusible et disjoncteur sont en état de marche et la prise de courant
est alimentée.
• Po ur écouter la station, vous devez confirmer votre sélection en
appuyant sur le bouton OK.
• Assurez-vous que le son de la Radio n'est pas coupé (mode MUET).
• Vérifiez le niveau du volume sonore.
• Vérifiez la configuration du réseau.
La fréquence FM est perturbée par des para sites. Déployez l'antenne FM
jusqu'à l'obtention d'un signal élevé.
Si vous utilisez des écouteurs, vérifiez leur bon fonctionnement.
Vérifiez votre routeur Wi-Fi, modem ou la ligne.
Vérifiez que votre Radio n'est pas codée.
Si c'est le cas, vous devez posséder la clé d'encodage pour y accéder.
le lecteur MP3 peut être débranché, etc.).
• Le serve ur DNS ne répond pas. Veuillez effectuer un ping sur l'adresse
IP du serveur DNS pour confirmer l'échec de connexion.
• Le serveur DNS n'a pas d'entrée pour le serveur vTuner ou la station de
radio auxquels vous essayez de vous connecter.
• Accès Internet surchargé. Veuillez essayer plus tard.
• Le serveur vTuner est inaccessible ou trop surchargé pour répondre à
temps.
• Echec d'autorisation. Le serveur vTuner rejette la demande d'accès.
• Le se rvice de transmission de la station de radio est indisponible
ou surchargé.
• La Radio IP n'est pas compatible avec le type de service de la station de
radio.
• Problème de mise en mémoire tampon sur Internet. La bande passante
disponible n'est pas assez performante pour offrir une transmission
stable de la station de radio.
• Au cun Serveur DHCP actif. Veuillez vérifier la configuration de votre
routeur.
• La clé de cryptage WiFi saisie est incorrecte. Veuillez confirmer de
nouveau la clé et recommencez la procédure.
• L'interface réseau rencontre des problèmes.
21
Page 24
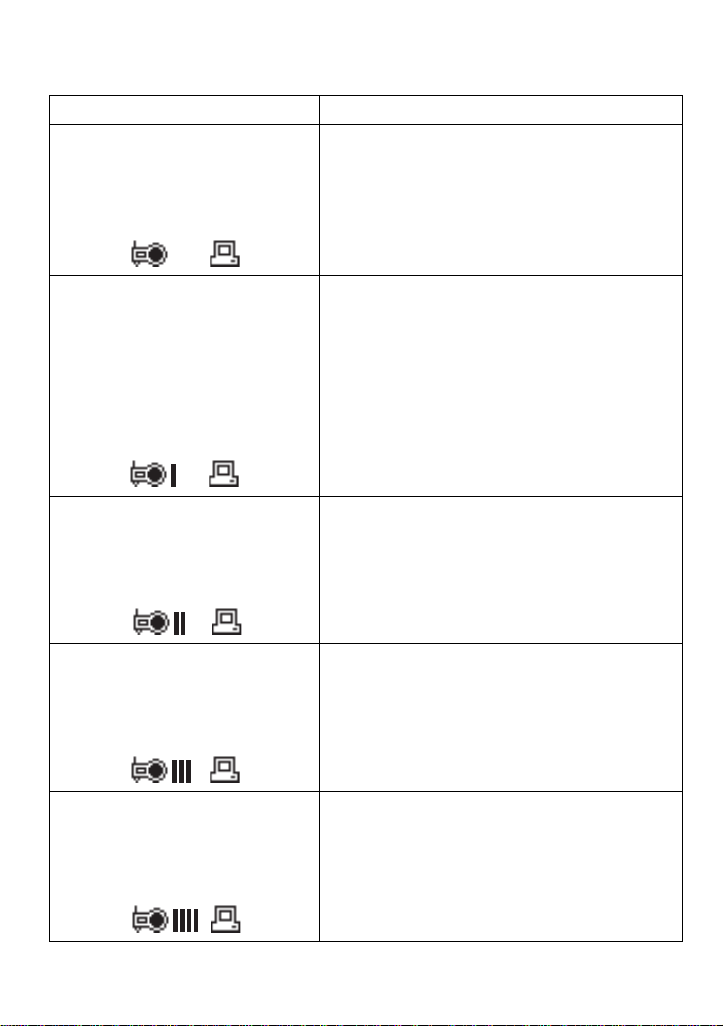
En cas de non reception d'une station radio sur Internet, le tableau ci-dessous vous en
indiquera la cause probable.
Ce qui fonctionne Quelle serait la cause de l'indisponibilité?
La Radio IP se lance normalement.
MAIS
Le logo de la station de radio n'affiche
aucune barre (logo à 5 barres).
Aucune adresse IP n'est attribuée à la Radio IP.
1. Aucun Serveur DHCP actif. Veuillez vérifier la configuration de votre routeur.
2. La clé de cryptage WiFi saisie est incorrecte.
Veuillez confirmer de nouveau la clé et
recommencez la procédure.
3. L'interface réseau rencontre des problèmes.
1. L'interface réseau de la Radio IP
fonctionne correctement.
2. La connexion entre la Radio IP et le
routeur est établie.
3. La Radio IP a bien une adresse IP
attribuée.
MAIS
Le logo de la station de radio n'affiche
qu'une barre.
La connexion entre la Radio IP et le
serveur vTuner est établie.
MAIS
Le logo de la station de radio n'affiche
que deux barres.
La connexion est établie entre la Radio
IP et la station de radio.
MAIS
Le logo de la station de radio n'affiche
que trois barres.
La connexion est établie entre la Radio
IP et la station de radio.
MAIS
Le logo de la station de radio n'affiche
que quatre barres.
1. Impossibilité d'accéder au serve ur vTuner.
2. Le serveur DNS n'a pas réussi à résoudre l'adresse
IP de la station de radio.
3. Impossibilité d'accéder au routeur ou à Internet.
1. Impossibilité d'accéder à la station de radio.
2. La station de radio a rejeté la demande de
connexion.
1. Le service de transmission de la station de radio est
indisponible ou surchargé.
2. La Radio IP n'est pas compatible avec le type de
service de la station de radio.
Problème de mise en mémoire tampon sur Internet. La
bande passante disponible n'est pas assez performante
pour offrir une transmission stable de la station de radio.
22
Page 25

CONTENTS
WELCOME 2
ECOMMENDATIONS AND SAFETY INSTRUCTIONS 3
R
U
NPACKING 4
EYPAD AREA 4
K
EAR PANEL 5
R
R
EMOTE CONTROL FUNCTIONS 6
ONFIGURATION AS A WIRELESS CLIENT 7
C
USING THE DEVICE FOR THE FIRST TIME, WITHOUT AN ETHERNET CABLE
CONNECTION 7
M
ANUALLY SET TO THE WIRELESS CLIENT MODE 9
CONFIGURATION AS A WIRED CLIENT 10
USING THE DEVICE FOR THE FIRST TIME, WITH AN ETHERNET CABLE
CONNECTION 10
ANUALLY SET TO THE WIRED CLIENT MODE 11
M
CONFIGURATION AS A WIRELESS ACCESS POINT 13
MANUALLY SET TO THE WIRELESSAP MODE 13
WINDOWS MEDIA PLAYER 11: INSTALLATION AND CONNECTION 15
LOCK SETTINGS 18
C
SETTING THE CLOCK 18
ETTING THE TIME DISPLAY FORMAT 19
S
ALARM SETTINGS 19
ARE AND MAINTENANCE 20
C
P
ROBLEMS 21
1
English
Page 26

WELCOME
Dear customer,
Thank you for purchasing a SAGEM Wi-Fi IP Radio; we appreciate your trust in us.
This product was manufactured with the upmost care, should you encounter any difficulties
during its use, we recommend that you refer to this installation guide. You can also find
information on the following site:
http://www.sagem.com/faq
The new material is guaranteed (parts and labour) by Sagem Communications under the
conditions and according to procedures' defined on the site www.sagem.com heading
support.
In the event of a technical problem, please refer to the table at the end of this user guide for a
list of incidents and the way to solve them. The SAGEM site (www.sagem.com assistance
section) also provides information on how your Radio Wi-Fi IP SAGEM works and how to solve
any problems you may encounter. You can also contact our assistance service by E-mail. If
the problem persists, you should contact our call centre (see the table below). They will offer
an expert appraisal of your material remotely to determine the cause as well as the type of
repair required.
Country Phone numbers Tariff/Minute
Sagem Fance 0892 230425 0,34 €
Sagem Austria 0820 550540 0,145 €
Sagem Germany 0180 5308930 0,14 €
Sagem Belgium 070 350 016 0,17 €
Sagem Netherlands 0900 0400478 0,18 €
Sagem UK 0871 07 50 712 0,10 £
Sagem Italy 899 484 810 0,28 €
Sagem Spain 807 088 303 0,41 €
Sagem Sweden 08 501 11 805 appel local
Sagem Norway 23 680115 appel local
For your comfort and safety, please carefully read the paragraph below on safety
recommendations and instructions.
2
Page 27
RECOMMENDATIONS AND SAFETY INSTRUCTIONS
Do not install your Wi-Fi IP Radio in a humid room (bathroom, laundry, kitchen, etc.), or within
1.50 m of a tap or water source, or outside. Your Wi-Fi IP Radio should be used at an ambient
temperature of between 15 °C and 35 °C for optimum sound results.
Do not set up your Wi-Fi IP Radio in a dusty environment as dust deposits might adversely
affect the sound quality.
Avoid objects or liquids getting into the unit.
Unplug the power lead if the unit will not be used for a long period.
Do not handle your AC cord with wet hands. if liquid spills on your product, unplug immediatel y
and contact your dealer for cleaning instructions.
Only the power supply provided with the Wi-Fi IP Radio should be used. Connect this to the
mains in accordance with the instal lation i nstructions in this user guide an d the inf ormation on
the identification label affixed to the power supply (voltage, current, mains frequency). As a
precaution, in case of danger, the mains adapters act as a disconnecting mechanism for the
230 V power supply. They should be placed near the dev ice and shoul d be easil y acce ssible.
Do not attempt to remove any screws or open the unit. No user serviceable parts are inside.
The length of the ethernet and USB cables used on this product shall not exceed 3m.
Do not connect your Wi-Fi IP radio to an Ethernet N etwork leading outside your buil ding. TThis
device must only be connected to an Ethernet Network inside your building.
This terminal was designed for private use inside a building (CPE customer premises
equipment) in the European Free Trade association (EFTA). It has been tested i n accordance
with the technical provisions for radio equipment (EN 300328).
The radio frequency bands authorized for Wireless transmission depend on national
!
regulations.
The installation of this terminal operating in the 2.4 GHz band is covered by the European
recommendation ERC 70-03.
Before use, make sure that the gateway with which you establish a wireless connection from
your terminal is set up in accordance with this regulation and with the national regulations
where it is used.
Sagem Communications acc epts no liabil ity if the re gulations in force on th e installati on site
are not complied with.
Only the antennas provided with the Wi-Fi IP radio should be used.
Some sensitive medical equipment and safety equipment may be affected by the radiofrequency transmissions of your radio. In all cases, we ask that you respect the safety
recommendations.
The device shall not permanently be installed or used closer than 20cm from the human body.
The CE marking certifies that the product meet s the essenti al requirements of Directive 1 999/
5/CE of the European Parliament and of the Council pertaining to mi crowave radio equipmen t
and telecommunication terminal equipment, for the safety and health of users, for
electromagnetic interference. Furthermore, it efficiently uses the frequency spectrum
attributed to ground and spatial communication to prevent damaging inte rference.
The declaration of compliance may be looked up on the www.sagem.com site, section
"support" or can be obtained from the following address:
Sagem Communications - Customer relations department
4 rue du petit albi - 95800 Cergy Saint-Christophe -France
3
Page 28
UNPACKING
The product package includes the following items:
• 1 x IP Radio device,
• 1 x WiFi antenna,
• 1 x FM antenna,
• 1 x power adapter,
• 1 x remote control,
• 2 x AAA batteries,
• 1 x CD,
• 1 x Installation Guide.
KEYPAD AREA
STOP (Stop music / alarm)
- Short press : LCD on/off
- Long press : on/off
4-direction control
Select
Snooze / Sleep mode
4
Page 29

REAR PANEL
Power switch
DC power jack
Reset button
WiFi antenna connector
RJ45 port
Wi-fi activity indicator
RCA jacks for line out
Headset connector
FM antenna jack
5
Page 30
REMOTE CONTROL FUNCTIONS
Switch on/off the screen
backlight
Stop the music and go
back to the main menu/
Stop the alarm
Direct access to
Internet Radio menu
Direct access to Media
Server menu
Reduce the volume
Mute
Play / Pause
Rewind
Previous / Delete
the last character
Add/Remove from
the list of favourites
Put the device in Standby
mode.
Alphanumeric Keypad
Snooze function /
Sleep mode
Direct access to FM Radio
menu
Direct access to MP3
Player menu
Increase the volume
Forward
Next
Repeat the song
or the song list
Random reading
The navigator of the remote control is a rapid selection tool.
Move to the previous
Previous menu
Move to the next
6
To select the function
Select
Page 31

CONFIGURATION AS A WIRELESS CLIENT
USING THE DEVICE FOR THE FIRST TIME, WITHOUT AN ETHERNET CABLE
CONNECTION
Screen on the
right
1 Initial screen
2 "" button
3 "OK" button Select the MMI
4 "OK" button Select the Internet
5 Scanning for
6 "" button
(Once)
Screen shot Next screen Comment
Device run as a
or "OK" button
"" button
or "OK" button
Wireless Client.
language.
radio menu
language.
available APs.
Select the access
point on wich you
want to connect the
Wi-Fi IP radio.
7 Numeric key
pads
"OK" button Enter the
encryption key if
the access point is
protected.
7
Page 32

Using the device for the first time, without an Ethernet cable connection
(continued)
Screen on the
right
8 "OK" button
Screen shot Next screen Comment
! Depending on your country configuration, you could have the option to connect to the
internet through a proxy server. If you are connected directly to the internet, select «No».
Otherwise, activate this option and enter the IP address and the port of your proxy server.
9 "OK" button Confirm the
settings above.
10 Apply new settings.
! If the connection fails, check that your access point does not require a specific
registration procedure. Some access points require, for example, that you press a
specific button during the step 9 above.
11 The device is now
in wireless client
mode.
12 The device is
already connected
to your network.
8
Page 33

MANUALLY SET TO THE WIRELESS CLIENT MODE
Screen on the
right
1 "OK" button Initial screen
2 "" button
(4 times)
3 "" button
(Once)
4 "" button
(Once)
5 Scanning for
6 "" button
(Once)
Screen shot Next screen Comment
"" button
or "OK" button
"" button
or "OK" button
"" button
or "OK" button
"" button
or "OK" button
Manually select the
wireless client
mode.
available APs.
Select the AP that
you can connect to
your router device.
7 Numeric key
pad
8 "OK" button
"OK" button Enter the
encryption key if
the access point is
protected.
! Depending on your country configuration, you could have the option to connect to the
internet through a proxy server. If you are connected directly to the internet, select «No».
Otherwise, activate this option and enter the IP address and the port of your proxy server.
9
Page 34

Manually set to the Wireless Client Mode
(continued)
Screen on the
right
9 "OK" button Confirm the
10 Apply new settings.
Screen shot Next screen Comment
settings above.
! If the connection fails, check that your access point does not require a specific
registration procedure. Some access points require, for example, that you press a
specific button during the step 9 above.
11 The device is now
in wireless client
mode.
12 The device is
already connected
to your network.
CONFIGURATION AS A WIRED CLIENT
USING THE DEVICE FOR THE FIRST TIME, WITH AN ETHERNET CABLE
CONNECTION
Screen on the
right
1 Initial screen
2 Device run as a
Screen shot Next screen Comment
Wired Client.
10
Page 35

Using the device for the first time, with an ethernet cable connection
(continued)
Screen on the
right
3 "" button
Screen shot Next screen Comment
or "OK" button
Select the MMI
language.
4 "" button
or "OK" button
5 The device is now
Select the Internet
radio menu
language.
in wired client
mode.
It is already
connected to your
network.
MANUALLY SET TO THE WIRED CLIENT MODE
Screen on the
right
1 "OK" button Initial screen
2 "" button
(4 times)
3 "" button
(Once)
Screen shot Next screen Comment
"" button
or "OK" button
"" button
or "OK" button
4 "" button
(Once)
11
"" button
or "OK" button
Manually select the
wired client mode.
Page 36

Manually set to the Wired Client Mode
(continued)
Screen on the
right
5 "" button
(Once)
6 "OK" button
Screen shot Next screen Comment
"" button
or "OK" button
Select the DHCP
for auto configured
IP address.
! Depending on your country configuration, you could have the option to connect to the
internet through a proxy server. If you are connected directly to the internet, select «No».
Otherwise, activate this option and enter the IP address and the port of your proxy server.
7 "OK" button Confirm the
settings above.
8 Apply new settings.
9 The device is now
in wired client
mode.
10 The device is
already connected
to your network
12
Page 37

CONFIGURATION AS A WIRELESS ACCESS POINT
The IP Radio device can be configured as a wireless AP. With this feature, you can easily
extend your wireless coverage without having to purchase another AP.
MANUALLY SET TO THE WIRELESSAP MODE
Screen on the
right
1 "OK" button Initial screen
2 "" button
(4 times)
3 "" button
(Once)
4 "" button
(2 times)
5 "" button
(Once)
6 Numeric key
pad
Screen shot Next screen Comment
"" button
or "OK" button
"" button
or "OK" button
"" button
or "OK" button
"" button
or "OK" button
"OK" button Enter the Identifier
Manually select the
AP mode.
Select the DHCP
for auto configured
IP address.
(name) for this AP.
7 Numeric key
pad
8 "" button
(Once)
"OK" button Select the wireless
channel to be
allocated to this AP.
"OK" button Select one of the
security functions.
13
Page 38

Manually set to the wirelessap mode
(continued)
Screen on the
right
9 Numeric key
pad
10 "OK" button
Screen shot Next screen Comment
"OK" button Enter the
encryption key if
the access point is
protected.
! Depending on your country configuration, you could have the option to connect to the
internet through a proxy server. If you are connected directly to the internet, select «No».
Otherwise, activate this option and enter the IP address and the port of your proxy server.
11 "OK" button Confirm the
settings above.
12 Apply new settings.
13 The device is in
wireless AP mode
now.
14 The device is
already connected
to your network and
can now operate.
14
Page 39

WINDOWS MEDIA PLAYER 11:
I
NSTALLATION AND CONNECTION
Please follow the instructions below:
Step 1: Download the Windows Media Player 11 (WMP11) installati on file, e.g., wmp11-
windowsxp-x86-enu.exe, from the Microsoft web site.
Install the wmp11-windowsxp-x86-enu.exe without making any modifications.
Step 2: Activate the Media Player.
Step 3: Switch from "Now Playing" to "Library" by c licking on the L ibrary Tab to man age
the content and share your media.
Step 4: Add your Media content to the WMP11 media library.
Click on the "Library" tab again to access the pull-down menu.
To add your media files to the WMP11 m edia library , click on "A dd to Library…"
The following screen will be displayed:
Click on the Add button , select the media folder in your co mputer, and then click
on the OK button.
You can put all of the music files in the D:\Music director y to be ab le to add the
folder to the share list.
You will see that the specified folder will have been added to the WMP11
monitor folder list. Click on the OK button. A pop-up window will be displayed,
showing you that the WMP11 is searching for the media files . Once comple ted,
click on the "Close" button.
You can now browse and manage your media co ntent using the WMP11 Library
manager.
Step 5: Share the WMP11 media library.
As in to Step 4, click on the "Libra ry" ta b again to a ccess th e pul l-down m enu.
Click on "Media Sharing" to activate the media sharing function.
The following dialog windows will be displayed.
15
Page 40

Select the "Share my media" box and click on the "OK" button.
The WMP11 will detect the available network devices in your LAN.
The following window shows that no devices have been detected.
If the IP Radio device is already connected to your home network, a screen
similar to the following may be displayed, showing yo u that the WMP11 has
detected a network device named "My DU@L RADIO 700".
Step 6: Manage the media sharing settings.
Click on the "Settings" button, and speci fy the name of th e WMP11 serv er to be
displayed on your IP Radio device.
Next, press OK to exit.
Step 7: Authorize access from your IP Radio device.
The WMP11 access control settings are simple. When the WMP11 detects a
new network device (as shown on the final screen in Step 5), you need to decide
whether you want to allow or deny the requests from that device.
Select the device icon and then click on the "Allow" button to allow further
streaming requests from that device.
The device state icon will change accordingly.
Next, press the OK button to activate the settings.
There is an alternative means of acces s management for your network devices .
A small icon will be added to the Windows XP status bar to inform you that
the WMP11 has detected network devices.
Double-click on it to manage the access for the devices.
16
Page 41

Click on the "Allow" button.
Step 8: Establish the connection between the IP Radio device and the WMP11 server.
On the IP Radio device, select the "Media Server" function in the main menu
(or press the "Media Player" hot key on the remote controller). The IP Radio
device will then initiate the server detecti on pr ocess. Aft er a few sec onds, it will
detect a server and display "PC_Hostname: Server Name".
This is the WPM11 server that you installed.
Press the 'OK' button to try to connect to the server.
The IP Radio screen will read "Connecting…." and will then display the following
list:
You can browse the "Music" list and play the music of your choice.
For further details, please refer to Section 3.3, Listening to the music in your
computer.
17
Page 42

CLOCK SETTINGS
Before setting the alarm, you need to set the clock on the Wi-Fi IP Radio device.
First, select the Setup function in the Main Menu.
In the setup menu, the first item, "Clock", is used to set the date and time. Press the "OK"
or "" button to set the clock.
There are 3 items in the clock menu. The first displays the current date and time; the second
is used to set the date and time, and the third function is the "Tim e Display Format" (to set the
time format : 12 or 24 hours).
There is also a battery in the device, so even when you switch the device OFF, the clock will
keep ticking. This means you only need to set the clock once.
SETTING THE CLOCK
Press the "OK" or "" button to access the sub-menu to set-up the time.
1. MANUAL SETTING OF THE CLOCK
If you decide to set the clock manually, press the "OK" or the "" button to access the date
and time screen. You can use the four directional buttons and the OK button to set the time.
a. Use the "" and "" buttons to switch between the items to be altered. The
selected item will flash.
18
Page 43

b. Use the "" and "" buttons to alter the value selected.
c. Press the "OK" button to confirm.
2. AUTOMATIC SETTING OF THE CLOCK
If you want to set the clock automatically, select the menu "Auto-Sync (NTP)" and choose your
time zone. You can also choose to activate the automatic handling of daylight saving
time. The clock is then set automatically.
The following screen shows an exemple of time zone selection screen.
SETTING THE TIME DISPLAY FORMAT
If you would set the time format, access to the menu "Time Display Format" then select the
format (12 or 24 hours).
ALARM SETTINGS
Screen on the
right
1 "OK" button Initial screen.
2 "" button
Screen shot Next screen Comment
or "OK" button
19
Page 44

Alarm settings
(continued)
Screen on the
right
3 "" button
(Once)
4 "OK" button Use the
5 "" button
6 "OK" button Select the station
7 Select the alarm
8 Alarm information,
Screen shot Next screen Comment
"" button
or "OK" button
or "OK" button
Enable alarm 1.
4 directional
buttons to set the
time;
Set Internet radio
as alarm source.
from your
Favorites.
(Refer to Sec. 3.1)
volume level.
displayed for 3~5
seconds.
9 The alarm is set.
CARE AND MAINTENANCE
Switch off your Radio IP. Use a smooth and dry cloth to wipe it. Do not use a rough cloth,
powerful liquid cleaners, thinner pain ting, alcohol nor other so lvents to clean it. These products
can damage your IP Radio.
20
Page 45

PROBLEMS
Refer to the table presented below in case of an operational malfunction:
Problems Remedies
The remote control does not
work.
The screen is switched off. Make sure that :
The choosen station can not
be played.
Audio parasites or clearness
less.
Access denied to the Internet
Radio.
Access denied to the Radio
from a personal computer as
an access point (Media
Server).
The alarm does not ring. Check that the alarm source is configurated well (sample: the mp3 player
The connection between the
radio and the vTuner is not
OK.
The connection between the
radio and the vTuner is not
OK.
The IP Radio is booted
normally but it doesn't get an
IP address.
• Check that the batteries are correctly introduced.
• Check that you are not too far from the Radio (7 meters are the
maximum recommended) and that the infra-red sensor is not
blocked.
• Make sure that the remote control is well pointed towards the sensor,
when manipulating the Radio.
• the power adapter is properly connected to a power socket.
• the power connector is properly plugged into the Radio.
• your fuse and circuit-breaker are in working order and that the power
socket is powered.
• To hear the station, you must confirm your selection by pressing OK
button.
• Make sure that your Radio is not set to MUTE mode.
• Check the volume level.
• Check the network configuration.
The frequency FM is disturbed by parasites. Deploy the FM antenna jack
until obtaining a high signal.
If you use ear-phones, check that they function well.
Check your wi-fi router, modem or the line.
Check that your Radio is not encoded.
else you must have the encoding key to access.
is disconnected,...).
• DNS no response. Please ping the IP address of the DNS to check if
it is the case.
• DNS doesn't have the record of the vTuner server or radio station that
you are trying to connect.
• Traffic jam for the internet access. Please try later.
• vTuner server is out of service or heavy loaded to reply in time.
• The authorization process is failed. VTuner server reject the access
request.
• The streaming service of the radio station is unavailable or heavy
loaded.
• The IP Radio doesn't support the service type of the radio station.
• There is some buffering trouble on the internet. The available
bandwidth is not good enough to have the stable streams from the
radio station.
• No DHCP server enabled. Please check the setting of your router.
• Wrong WiFi encryption key is entered. Please double confirm the key
and re-enter via the remote controller.
• The network interface has trouble.
21
Page 46

In case of non receiving on Internet, refer to the table here under.
What has been done with succes What could be the trouble ?
The IP Radio is booted normally.
BUT
NO BAR IN THE RADIO STATION LOGO*
(the logo with 5 bars between a radio and a
computer).
The IP Radio doesn't get an IP address.
3. No DHCP server enabled. Please check the setting of
your router.
4. Wrong WiFi encryption key is entered. Please double
confirm the key and re-enter via the remote controller.
5. The network interface has trouble.
1. The network interface of the IP radio is
good.
2. The connection between IP Radio and
router was OK.
3. The IP Radio already got an IP
address.
BUT
ONLY ON E BAR IN THE RADIO STATION
LOGO
Connection between IP Radio and vTuner
server is OK.
BUT
ONLY TW O BAR S IN THE RADIO
STATION LOGO
Connection between IP Radio and radio
station is OK.
BUT
ONLY THR EE BARS IN THE RADIO
STATION LOGO
The connection between IP radio and the
radio station was OK.
BUT
ONLY FOU R BAR S IN THE RADIO
STATION LOGO
1. Can't access to the vTuner server.
2. The DNS lookup for the IP address of the radio station
failed.
3. Can't access to the router or internet.
1. Can't access to the radio station.
2. The radio station rejected the connection request.
1. The streaming service of the radio station is unavailable
or heavy loaded.
2. The IP Radio doesn't support the service type of the
radio station.
There is some buffering trouble on the internet. The
available bandwidth is not good enough to have the stable
streams from the radi o station.
22
Page 47

INHALTSVERZEICHNIS
WILLKOMMEN 2
MPFEHLUNGEN UND SICHERHEITSHINWEISE 3
E
L
IEFERUMFANG 4
ASTENBEREICH 4
T
ANEL AUF DER RÜCKSEITE 5
P
F
UNKTIONEN DER FERNBEDIENUNG 6
ONFIGURATION ALS WLAN-CLIENT 7
K
ERSTEINRICHTUNG DES GERÄTS OHNE KABELVERBINDUNG 7
M
ANUELLE AUSWAHL DES WLAN-CLIENTMODUS 9
KONFIGURATION ALS ETHERNETCLIENT 10
ERSTEINRICHTUNG DES GERÄTS MIT KABELVERBINDUNG 10
ANUELLE AUSWAHL DES ETHERNETCLIENTMODUS 11
M
KONFIGURATION ALS ACCESSPOINT 13
MANUELLE AUSWAHL DES ACCESSPOINTMODUS 13
WINDOWS MEDIA PLAYER 11:
I
NSTALLATION UND HERSTELLEN DER VERBINDUNG 15
INSTELLUNG DER UHR 18
E
STELLEN DER UHR 18
E
INSTELLEN DES UHRZEITFORMATS 19
ALARMEINSTELLUNG 19
W
ARTUNG UND PFLEGE 20
ROBLEME 21
P
1
Deutsch
Page 48

WILLKOMMEN
Sehr geehrter Kunde,
vielen Dank, dass Sie sich bei Ihrem Kauf für ein WLAN-IP-Radio von SAGEM entschieden
haben. Wir sind sicher, dass Sie mit diesem Gerät höchst zufrieden sein werden.
Dieses Produkt wurde mit größtmöglicher Sorgfalt hergestellt. Sollten Sie Fragen in
Zusammenhang mit dem Betrieb haben, empfehlen wir, in diesem Installationshandbuch
nachzuschlagen. Sie werden sicherlich die Lösung zu Ihrem Problem finden. Darüber hinaus
können Sie weitere Informationen auch über die folgende Website einsehen:
Die Garantiebedingungen für das Neugerät (bezüglich der Bauteile und der Korrektheit des
Zusammenbaus) finden Sie im Internet auf der SAGEM-Website unter www.sagem.com
unter Support.
Sollten Sie ein technisches Probl em feststellen, möchten wir Sie b itten, die Tabell e im Anhang
des vorliegenden Installationshandbuchs zu konsultieren, in der Sie eine Aufstellung von
möglichen Problemen mit der zugehörigen Lösung fi nden. Auf der Website von SAGEM finden
Sie unter Support darüber hinaus Informationen zur Funktionsweise und zum Betrieb Ihres
SAGEM WLAN-IP-Radios und weitere Hinweise zur Behandlung ggf. auftretender Probleme.
Über die Website erhalten Sie auch die Möglichkeit, sich per E-Mail an unseren
Supportservice zu wenden. Können Sie ein Problem nicht unter Verwendung der
angegebenen Lösungsmethoden behandeln, möchten wir Sie bitten, sich telefonisch an
unseren Kundendienst zu wenden (bitte entnehmen Sie die Rufnummern der Tabelle unten),
die die Komponenten einer Remotediagnose unterziehen wird, um zu ermitteln, welcher Art
die Beschädigung ist, und welche Schritte ggf. zur Wiederinstandsetzung erforderlich sind.
Land Rufnummern Tarif (pro Minute)
Sagem France 0892 230425 0,34 €
Sagem Österreich 0820 550540 0,145 €
Sagem Deutschland 0180 5308930 0,14 €
Sagem Belgien 070 350 016 0,17 €
Sagem Niederlande 0900 0400478 0,18 €
Sagem Großbritannien 0871 07 50 712 0,10 £
Sagem Italien 899 484 810 0,28 €
Sagem Spanien 807 088 303 0,41 €
Sagem Schweden 08 501 11 805 Lokaler Anruf
Sagem Norwegen 23 680115 Lokaler Anruf
http://www.sagem.com/faq
Wir möchten Sie bitten, zur Vereinfachung und aus Gründen Ihrer eigenen Sicherheit, den
folgenden Absatz mit Empfehlungen zu Vorgehensweisen und zu Sicherheitsmaßnahmen
genau durchzulesen und zu beachten.
2
Page 49

EMPFEHLUNGEN UND SICHERHEITSHINWEISE
Stellen Sie das WLAN-IP-Radio nicht in feuchten Räumen (Badezimmer, Waschküche, Küche usw.)
auf. Achten Sie beim Aufstellen darauf, dass das Gerät mehr als 1,50 m von Armaturen oder
Wasserquellen entfernt ist. Stellen Sie es nicht im Freien auf. Achten Sie beim Betrieb Ihres WLANIP-Radios darauf, dass die Umgebungstemperatur 15 °C nicht unterschreitet und 35 °C nicht
überschreitet, um einen optimalen Sound zu ermöglichen.
Beachten Sie auch, dass die akustische Qualität Ihres WLAN-IP-Radios in verschmutzten
Umgebungen durch Ablagerungen beeinträchtigt werden kann.
Achten Sie darauf, dass weder Kleinteile noch Flüssigkeiten in das Innere der Einheit gelangen.
Wenn das Gerät eine Zeit lang nicht benutzt wird, sollten Sie auch den Netzstecker vom Stromnetz
trennen.
Fassen Sie das Stromzufuhrkabel des Geräts nicht mit nassen Händen an. Sollte versehentlich
Flüssigkeit in das Gerät eindringen, ziehen Sie nach Möglichkeit sofort den Netzstecker ab, und
wenden Sie sich an Ihren Händler, um weitere Informationen zur Reinigung zu erhalten.
Verwenden Sie für die Stromzufuhr ausschließlich den Adapter, der im Lieferumfang Ihres WLANIP-Radios enthalten ist. Stecken Sie das Kabel ausschließlich in Steckdosen, die den in diesem
Installationshandbuch angegebenen Aufstellungsanweisungen und den Spezifikationen zu
Spannung, Stromstärke und Frequenz auf dem an dem Kabel befestigten Etikett entsprechen. Im
Falle einer Gefahr dient der Netzstromadapter als Hauptschalter für die 230 V-Stromzufuhr. Er sollte
nicht zu weit von dem Gerät entfernt und leicht zugänglich sein.
Versuchen Sie nicht, das Gerät zu öffnen oder die Gehäuseschrauben zu entfernen. Im Inneren des
Geräts befinden sich keine Teile, die vom Endbenutzer gewartet werden könnten.
Die Länge des Ethernet- bzw. USB-Kabels für das Gerät sollte 3 m nicht überschreiten.
Schließen Sie Ihr WLAN-IP-Radio nicht an Ethernetnetzwerke im Freien an. Das Gerät sollte nur an
Netzwerke angeschlossen werden, die sich ausschließlich im Gebäudeinneren befinden.
Das Gerät wurde für die private Nutzung in Innenräumen, also als Kundenendgerät im Sinne der
Europäische Freihandelszone entworfen. Es wurde entsprechend den technischen Richtlinien für
Radiogeräte im Sinne der europäischen Norm 300328 geprüft.
Die für die WLAN-Übertragung zulässigen Radiofrequenzbänder unterliegen jeweils nationalen
!
Regulierungen.
Die Verwendung des 2,4 GHz-Bandes für dieses Endgerät entspricht der Empfehlung ERC 70-03
der EG.
Stellen Sie vor dem Betrieb des Geräts sicher, dass das für die Herstellung der WLAN-Verbindung
verwendete Gateway dieser Regulierung und ggf. auch anderen, landesweit geltenden
Regulierungen entspricht.
Sagem Communications kann nicht haftbar gemacht werden, falls die gelten Regulierungen am
Betriebsstandort nicht eingehalten werden.
Verwenden Sie für die Stromzufuhr ausschließlich das Kabel, das im Lieferumfang Ihres WLAN-IPRadios enthalten ist.
Durch die Radiofrequenzen, die zur Datenübertragung verwendet werden, kann der
ordnungsgemäße Betrieb bestimmter medizinischer Ausrüstungen und bestimmter
Sicherheitsanlagen beeinträchtigt werden. Wir empfehlen in allen diesen Fällen dringend, die
Sicherheitsbestimmungen zu berücksichtigen.
Das Gerät sollte auch nicht dauerhaft am Körper getragen bzw. in einem geringeren Abstand als
20 cm vom Körper befestigt sein.
Mit dem CE-Siegel haben Sie die Gewissheit, dass das Gerät den wesentlichen Anforderungen der
Direktive 1999/5/CE des Europäischen Parlaments und des Europarates zu MikrowellenRadiogeräten und Telekommunikationsendgeräten bezüglich der Sicherheit und der Gesundheit
von Personen in Zusammenhang mit elektromagnetischen Interferenzen genügt. Darüber hinaus
nutzt das Gerät das für Boden- und Luftkommunikation freigegebene Frequenzspektrum effizient,
und trägt auf diese Weise zu einer Vermeidung schädlicher Interferenzen bei.
Sie können den Wortlaut der Konformitätserklärung im Internet unter www.sagem.com (unter
Support) nachschlagen, oder über die folgende Adresse anfordern:
Sagem Communications - Customer Relations Department
4 rue du petit albi - 95800 Cergy Saint-Christophe -Frankreich
3
Page 50

LIEFERUMFANG
In der Produktverpackung sind die folgenden Teile enthalten:
• 1 x IP-Radiogerät,
• 1 x WLAN-Antenne,
• 1 x FM-Antenne,
• 1 x Netzstromadapter,
• 1 x Fernbedienung,
• 2 x AAA-Batterien,
• 1 x CD,
• 1 x Installationhandbuch.
TASTENBEREICH
STOPP (Musikwiedergabe/
Alarm anhalten)
- Kurz drücken: LCD ein/aus
- Lang drücken: Gerät ein/aus
Jog-Taste
Auswahl
Schlummer-/Schlafmodus
4
Page 51

PANEL AUF DER RÜCKSEITE
Netzschalter
Gleichstromeingang
Rücksetztaste
WLAN-Antennenbuchse
RJ45-Ethernetanschluss
WLAN-Aktivitätsanzeige
RCA-Anschluss (Line out)
Kopfhörerbuchse
FM-Antennenbuchse
5
Page 52

FUNKTIONEN DER FERNBEDIENUNG
LCDHintergrundbeleuchtung
ein-/ausschalten
Musikwiedergabe
beenden/Zurück zum
Hauptmenü/Alarm
beenden
Gerät in den
Standbymodus versetzen
Alphanumerische Tastatur
Direktzugriff auf das
Internetradiomenü
Direktzugriff auf das
Medienservermenü
Lautstärke verringern
Stummschaltung
Wiedergabe/Pause
Zurückspulen
Vorheriger Titel/
Letztes eingegebenes
Zeichen löschen
Zu Favoritenliste
hinzufügen / Aus
Favoritenliste
entfernen
Titel zufällig auswählen
Die Jog-Taste auf der Fernbedienung dient der schnell en Ausw ahl von Fun kti one n.
Vorangehendes
Element auswählen
Schlummerfunktion/
Schlafmodus
Direktzugriff auf das FMRadiomenü
Direktzugriff auf das MP3Playermenü
Lautstärke erhöhen
Vorspulen
Nächster Titel
Titel oder Playlist
wiederholen
Funktion auswählen
Vorheriges Menü
Nächstes Element auswählen
Auswahl
6
Page 53

KONFIGURATION ALS WLAN-CLIENT
ERSTEINRICHTUNG DES GERÄTS OHNE KABELVERBINDUNG
Bildschirm
(rechte Seite)
1 Erster Bildschirm
2 ""-
3 "OK"-Taste Sprachauswahl für
4 "OK"-Taste Sprachauswahl für
5 Nach
6 ""- Taste
(einmal)
Bildschirm Nächster
Bildschirm
oder "OK"Taste
""oder "OK"Taste
Kommentar
Betrieb des Geräts
als WLAN-Client
Menüsteuerung
das
Internetradiomenü
verfügbaren Acces
spoints suchen
Accesspoint für
WLAN-IP-Radio
auswählen
7 Zahlenblock "OK"-Taste Schlüssel
eingeben, falls der
Accesspoint dies
erfordert
7
Page 54

Ersteinrichtung des Geräts ohne Kabelverbindung
(Forts.)
Bildschirm
(rechte Seite)
8 "OK"-Taste
Bildschirm Nächster
Bildschirm
Kommentar
! In Abhängigkeit von der Regionalkonfiguration kann das Gerät auch eine Verbindung
unter Verwendung eines Proxyservers herstellen. Wählen Sie "Nein", wenn Sie über eine
direkte Internetverbindung verfügen. Aktivieren Sie andernfalls diese Option, und geben
Sie die IP-Adresse und die Anschlussnummer des verwendeten Proxyservers ein.
9 "OK"-Taste Die gewählten
Einstellungen
bestätigen
10 Neue Einstellungen
übernehmen
! Überprüfen Sie, ob für den Accesspoint eine besondere Regis trierung erforderlic h
ist, falls keine Verbindung hergestellt werden kann. Bei einigen Acce ssp oint s ist e s
beispielsweise erforderlich, bei Schritt 9 oben eine bestimmte Taste zu drücken.
11 Das Gerät befindet
sich nun im WLANClientmodus
12 Das Gerät hat
bereits eine
Verbindung zum
Netzwerk
hergestellt
8
Page 55

MANUELLE AUSWAHL DES WLAN-CLIENTMODUS
Bildschirm
(rechte Seite)
1 "OK"-Taste Erster Bildschirm
2 ""- Taste
(4 mal)
3 ""Taste
(einmal)
4 ""Taste
(einmal)
5 Nach
6 ""Taste
(einmal)
7 Zahlenblock "OK"-Taste Schlüssel
8 "OK"-Taste
Bildschirm Nächster
Bildschirm
""oder "OK"Taste
""oder "OK"Taste
""oder "OK"Taste
""oder "OK"Taste
Kommentar
Manuelle Auswahl
des WLANClientmodus
verfügbaren Acces
spoints suchen
Accesspoint für die
Verbindung mit
dem Router
auswählen
eingeben, falls der
Accesspoint dies
erfordert
! In Abhängigkeit von der Regionalkonfiguration kann das Gerät auch eine Verbindung
unter Verwendung eines Proxyservers herstellen. Wählen Sie "Nein", wenn Sie über eine
direkte Internetverbindung verfügen. Aktivieren Sie andernfalls diese Option, und geben
Sie die IP-Adresse und die Anschlussnummer des verwendeten Proxyservers ein.
9
Page 56

Manuelle Auswahl des WLAN-Clientmodus
(Forts.)
Bildschirm
(rechte Seite)
9 "OK"-Taste Die gewählten
10 Neue Einstellungen
Bildschirm Nächster
Bildschirm
Kommentar
Einstellungen
bestätigen
übernehmen
! Überprüfen Sie, ob für den Accesspoint eine besondere Regis trierung erforderlic h
ist, falls keine Verbindung hergestellt werden kann. Bei einigen Acce ssp oint s ist e s
beispielsweise erforderlich, bei Schritt 9 oben eine bestimmte Taste zu drücken.
11 Das Gerät befindet
sich nun im WLANClientmodus
12 Das Gerät hat
bereits eine
Verbindung zum
Netzwerk
hergestellt
KONFIGURATION ALS ETHERNETCLIENT
ERSTEINRICHTUNG DES GERÄTS MIT KABELVERBINDUNG
Bildschirm
(rechte Seite)
1 Erster Bildschirm
2 Betrieb des Geräts
Bildschirm Nächster
Bildschirm
10
Kommentar
als Ethernetclient
Page 57

Ersteinrichtung des Geräts mit Kabelverbindung
(Forts.)
Bildschirm
(rechte Seite)
3 ""-
4 ""-
5 Das Gerät befindet
Bildschirm Nächster
Bildschirm
oder "OK"Taste
oder "OK"Taste
Kommentar
Sprachauswahl für
Menüsteuerung
Sprachauswahl für
das
Internetradiomenü
sich nun im
Ethernetclientmodus
Das Gerät hat bereits
eine Verbindung zum
Netzwerk hergestellt
MANUELLE AUSWAHL DES ETHERNETCLIENTMODUS
Bildschirm
(rechte Seite)
1 "OK"-Taste Erster Bildschirm
Bildschirm Nächster
Bildschirm
Kommentar
2 ""Taste
(4 mal)
3 ""Taste
(einmal)
""oder "OK"Taste
""oder "OK"Taste
11
Page 58

Manuelle Auswahl des Ethernetclientmodus
(Forts.)
Bildschirm
(rechte Seite)
4 ""Taste
(einmal)
5 ""Taste
(einmal)
6 "OK"-Taste
Bildschirm Nächster
Bildschirm
""oder "OK"Taste
""oder "OK"Taste
Kommentar
Manuelle Auswahl
des
Ethernetclientmodus
DHCP-Server für
automatische IPKonfiguration
auswählen
! In Abhängigkeit von der Regionalkonfiguration kann das Gerät auch eine Verbindung
unter Verwendung eines Proxyservers herstellen. Wählen Sie "Nein", wenn Sie über eine
direkte Internetverbindung verfügen. Aktivieren Sie andernfalls diese Option, und geben
Sie die IP-Adresse und die Anschlussnummer des verwendeten Proxyservers ein.
7 "OK"-Taste Die gewählten
Einstellungen
bestätigen
8 Neue Einstellungen
übernehmen
9 Das Gerät befindet
sich nun im
Ethernetclientmodus
10 Das Gerät hat
bereits eine
Verbindung zum
Netzwerk hergestellt
12
Page 59

KONFIGURATION ALS ACCESSPOINT
Das WLAN-IP-Radio kann als Accesspoint konfiguriert werden. Mit dieser Funktionalität
können Sie die Reichweite Ihres WLANs vergrößern, ohne dass Sie einen zusätzlichen
Accesspoint erwerben müssten.
MANUELLE AUSWAHL DES ACCESSPOINTMODUS
Bildschirm
(rechte Seite)
1 "OK"-Taste Erster Bildschirm
2 ""Taste
(4 mal)
3 ""Taste
(einmal)
4 ""Taste
(2 mal)
5 ""Taste
(einmal)
6 Zahlenblock "OK"-Taste Name für den
Bildschirm Nächster
Bildschirm
""oder "OK"Taste
""oder "OK"Taste
""oder "OK"Taste
""oder "OK"Taste
Kommentar
Manuelle Auswahl
des
Accesspointmodus
DHCP-Server für
automatische IPKonfiguration
auswählen
Accesspoint
eingeben
7 Zahlenblock "OK"-Taste Auswahl des
WLAN-Kanals für
diesen Accesspoint
13
Page 60

Manuelle Auswahl des Accesspointmodus
(Forts.)
Bildschirm
(rechte Seite)
8 ""Taste
(einmal)
9 Zahlenblock "OK"-Taste Schlüssel
10 "OK"-Taste
Bildschirm Nächster
Bildschirm
"OK"-Taste Auswahl der
Kommentar
Sicherheitsoption
eingeben, falls der
Accesspoint dies
erfordert
! In Abhängigkeit von der Regionalkonfiguration kann das Gerät auch eine Verbindung
unter Verwendung eines Proxyservers herstellen. Wählen Sie "Nein", wenn Sie über eine
direkte Internetverbindung verfügen. Aktivieren Sie andernfalls diese Option, und geben
Sie die IP-Adresse und die Anschlussnummer des verwendeten Proxyservers ein.
11 "OK"-Taste Die gewählten
Einstellungen
bestätigen
12 Neue Einstellungen
übernehmen
13 Das Gerät befindet
sich nun im
Accesspointmodus
14 Das Gerät hat
bereits eine
Verbindung zum
Netzwerk
hergestellt und ist
betriebsbereit
14
Page 61

WINDOWS MEDIA PLAYER 11:
I
NSTALLATION UND HERSTELLEN DER VERBINDUNG
Bitte folgen Sie den nachstehenden Anweisungen:
Schritt 1: Downloaden Sie die Installationsdatei für Windows Media Player 11 (WMP11),
beispielsweise "wmp11-windowsxp-x86-deu.exe" von der Microsoft-Website.
Führen Sie die Datei "wmp11-windowsxp-x86-deu.exe" aus, um die
Anwendung zu installieren. Verwenden Sie bei der Installation die
Standardeinstellungen.
Schritt 2: Aktivieren Sie Media Player.
Schritt 3: Wechseln Sie in Media Player von der aktuellen Wiedergabe zur
Medienbibliothek, indem Sie au f d ie Reg is terk arte "Bibliothek" klicken, um Titel
zu verwalten und freizugeben.
Schritt 4: Fügen Sie der WMP11-Medienbibliothek die gewünschten Titel hinzu.
Klicken Sie erneut auf die Registerkarte "Bibli othek", um auf das Pulldo wnmenü
zuzugreifen.
Klicken Sie auf "Zur Bibliothek hinz ufügen", um die Med iendateien der WMP11 Medienbibliothek hinzuzufügen.
Es wird der folgende Bildschirm angezeigt:
Klicken Sie auf die Scha ltfläche "Hinzufügen" , wählen Sie den Medieno rdner
auf dem Computer aus, und klicken Sie dann auf die Schaltfläche "OK".
Wenn Sie den Ordner zur Liste der freigegebenen Titel hinzufügen möchten,
speichern Sie alle Musik dateien im Verzeichnis "D:\Music".
Sie werden feststellen, dass der angegebene Ordner der WMP11Überwachungsordnerliste hinzugefügt wurde. Klicken Sie auf die Schaltfläche
"OK". Während WMP11 nach Mediendateien su cht, wird ein Dialogfel d mit dem
aktuellen Status der Suche angezeigt. Klicken Sie nach Abschluss der Suche
auf die Schaltfläche "Schließen".
Sie können nun die in der Bibliothek enthaltenen Titel unter Verwendung des
Bibliotheksmanagers von WMP11 durchsuchen und verwalten.
Schritt 5: Geben Sie die WMP11-Medienbibliothek frei.
Klicken Sie (wie in Schritt 4) erneut auf die Registerkarte "Bibliothek", um auf
das Pulldownmenü zuzugreifen. Klicken Sie auf "Medienfreigabe", um die
Freigabe für Medien zu aktivieren.
15
Page 62

Es wird das folgende Dialogfeld angezeigt:
Wählen Sie die Option "Meine Medien freigeben", und klicken Sie auf die
Schaltfläche "OK".
WMP11 durchsucht Ihr LAN nach verfügbaren Netzwerkgeräten.
Wenn keine Geräte gefunden wurden, wird das folgende Dialogfeld angezeig t.
Wenn das WLAN-IP-Radio bereits eine Verbindung zu Ihrem LAN hergestellt
hat, wird das Dialogfeld wie folgt angezeigt. In diesem Bei sp iel hat WMP1 1 ein
Netzwerkgerät mit dem Namen "My DU@L RADIO 700" erkannt.
Schritt 6: Konfigurieren Sie die Einstellungen für die Medienfreigabe.
Klicken Sie auf die Schaltfläche "Einst ellungen", und geb en Sie den Namen des
WMP11-Servers an, der auf dem WLAN-IP-Radio wiederge geb en werde n so ll .
Klicken Sie dann auf "OK", um den Vorgang abzuschließen.
Schritt 7: Autorisieren Sie den Zugriff von Ihrem WLAN-IP-Radio.
Die WMP11-Einstellungen für die Steuerung des Zugriffs können problemlos
konfiguriert werden. Wenn WMP11 ein neues Netzw erkgerät erkennt (wie im
letzten Bildschirm in Schritt 5 dargeste llt), müssen Sie lediglich entsc heiden, ob
Anfragen von diesem Gerät erlaubt oder zurückgewiesen werden sollen.
Wählen Sie das Gerätesymbol, und klicken Sie dann auf die Schaltfläche
"Erlauben", um fortan Streaminganfragen von dem Gerät zuzulassen.
Das Zustandssymbol für das Gerät wird entsprechend aktualisiert.
16
Page 63

Klicken Sie dann auf "OK", um die Einstellungen zu aktivieren.
Es besteht eine alternative Möglichkeit, den Zugriff auf Ihre Netzwerkgeräte zu
verwalten.
In der Statusleiste von Windows XP wird ein kleines Symbol eingeblendet,
um anzuzeigen, dass WMP11 Netzwerkgeräte erkannt hat.
Doppelklicken Sie auf das Symbol , um de n Zug riff auf d ie Gerät e zu verwal ten.
Klicken Sie auf die Schaltfläche "Erlauben".
Schritt 8: Stellen Sie eine Verbindung zwischen dem WLAN-IP-Radio und dem WMP11-
Server her.
Wählen Sie im Hauptmenü des WLAN-IP-Radios die Medienserverfunktion
(oder drücken Sie auf der Fernbedienung die "Media Player"Direktzugriffstaste). Anschließend beginnt das WLAN-IP-Radio mit der Suche
nach Servern. Wird ein Server erkannt, wird dieser im Form at "Computername :
Servername" angezeigt.
Dieser Server ist der in den vorangehenden Schritten installierte WPM11Server.
Drücken Sie die Taste "OK", um eine Verbindu ng zu dem Se rve r he rzu st ell en.
Auf dem Bildschirm des WLAN-IP-Radios wird die Meldung "Verbinden"
angezeigt. Ist die Verbindung hergestellt, wird die folgende Liste angezeigt:
Sie können die Musikliste durchsuche n, und di e gewü nschten Ti tel aus wähl en.
Weitergehende Informationen erhalt en Sie in Abschn itt 3.3 zur Wie dergabe von
Musik auf Ihrem Computer.
17
Page 64

EINSTELLUNG DER UHR
Wenn Sie die Alarmfunktion verwenden möchten, müssen Sie zunächst die Uhr auf dem
WLAN-IP-Radio stellen.
Wählen Sie dazu zunächst die Einrichtungsfunktion im Hauptmenü.
Der erste Menübefehl des Einrichtungsmenüs ("Uhr") ermöglicht die Einstellung von Datum
und Uhrzeit. Drücken Sie die Taste "OK" oder"", um die Uhr zu stellen.
Das Uhrmenü enthält drei Befehle. Mit dem ersten Befehl wird das aktuelle Datum und die
Uhrzeit angezeigt. Mit dem zweiten Befehl wird das aktuelle Datum festgelegt und die Uhr
gestellt. Mit dem dritten Befehl wird das Format für die Uhrzeit festgelegt (12- oder 24Stundenformat).
Das Gerät verfügt über eine Batterie, damit die Uhrzeit nicht verloren geht, wenn Sie es
ausschalten. Sie brauchen daher die Uhr auch nur einmal zu stellen.
STELLEN DER UHR
Drücken Sie die Taste "OK" oder "", um auf das Untermenü zuzugreifen, über das die Uhr
gestellt wird.
1. MANUELLES STELLEN DER UHR
Wenn Sie die Uhr manuell stellen möchten, drücken Sie die Taste "OK" oder "", um den
Bildschirm für Datum und Uhrzeit anzuzeigen. Verwenden Sie zum Stellen der Uhr die vier
Richtungstasten.
a. Verwenden Sie die Tasten "" und "", um zwischen den zu stellenden
Elementen zu wechseln. Das ausgewählte Element beginnt zu blinken.
18
Page 65

b. Verwenden Sie die Tasten "" und "", um den Wert für d as ausgewählte Element
zu erhöhen oder zu verringern.
c. Drücken Sie zur Bestätigung die Taste "OK".
2. AUTOMATISCHES STELLEN DER UHR
Wenn Sie die Uhr automatisch stellen möchten, wählen Sie das Auto-Sync (NTP)-Menü, und
wählen Sie Ihre Zeitzone aus. Sie können auch festlegen, dass die Umstellung zwischen
Sommer- und Winterzeit automatisch durchgeführt wird. Die Uhr wird nun automatisch
gestellt.
Der folgende Bildschirm zeigt beispielhaft die Auswahl einer Zeitzone.
EINSTELLEN DES UHRZEITFORMATS
Wenn Sie das Uhrzeitformat festlegen möchten, öffnen Sie das Menü für das
Zeitanzeigeformat, und wählen Sie dann das gewünschte Format aus (12 oder 24 Stunden).
ALARMEINSTELLUNG
Bildschirm
(rechte Seite)
1 "OK"-Taste Erster Bildschirm
2 ""-
Bildschirm Nächster
Bildschirm
oder "OK"Taste
19
Kommentar
Page 66

Alarmeinstellung
(Forts.)
Bildschirm
(rechte Seite)
3 ""Taste
(einmal)
4 "OK"-Taste Die
5 ""-
6 "OK"-Taste Auswahl der
7 Auswahl der
8 Alarminformatione
9 Der Wecker ist
Bildschirm Nächster
Bildschirm
""oder "OK"Taste
oder "OK"Taste
Kommentar
Alarm 1 einstellen
4 Richtungstasten
zum Stellen des
Weckers
verwenden
Internetradio als
Weckton festlegen
Station aus der
Favoritenliste
(Siehe Abschnitt
3.1)
Lautstärke für den
Wecker
n, werden 3-5
Sekunden lang
angezeigt
gestellt
WARTUNG UND PFLEGE
Schalten Sie Ihr WLAN-IP-Radio aus. Verwenden Sie zur Reinigung ein weiches und
trockenes Tuch. Verwenden Sie zur Reinigung we der e in raue s T uch , no ch sc ha rfe Reiniger,
Verdünner, Alkohol oder andere Lösungsmittel. Diese Substanzen könnten Ihr WLAN-IPRadio beschädigen.
20
Page 67

PROBLEME
In der folgenden Tabelle finden Sie Hinweise zum Betriebsstörungen:
Probleme Maßnahmen
Die Fernbedienung
funktioniert nicht.
Der Bildschirm ist
ausgeschaltet.
Die ausgewählte Station wird
nicht wiedergegeben.
Nebengeräusche oder
verzerrter Klang.
Kein Zugriff auf das
Internetradio möglich.
Kein Zugriff auf einen
Computer möglich, der als
Accesspoint für einen
Medienserver eingerichtet
wurde.
Die Alarmfunktion funktioniert
nicht.
Die Verbindung zwischen dem
Radio und dem vTuner ist
nicht einwandfrei.
Die Verbindung zwischen dem
Radio und dem vTuner ist
nicht einwandfrei.
• Überprüfen Sie, ob die Batterien ordnungsgemäß eingelegt sind.
• Überprüfen Sie, ob Sie nicht zu weit von dem WLAN-IP-Radio
entfernt sind (die maximale empf ohlene Ent fer nung beträgt 7 m), und
stellen Sie sicher, dass der Infrarotsensor nicht verdeckt ist.
• Vergewissern Sie sich, dass Sie mit der Fernbedienung genau auf
den Sensor zeigen, wenn Sie damit das Radio bedienen.
Überprüfen Sie Folgendes:
• Der Netzstromadapter muss ordnungsgemäß mit einer Steckdose
verbunden sein.
• Der Adapterstecker muss ordnungsgemäß mit dem Radio verbunden
sein.
• Die Sicherung und der Hauptschalter müssen betriebsbereit sein.
Stellen Sie sicher, dass die Steckdose Strom führt.
• Sie müssen die Auswahl durch Drücken der Taste OK bestätigen,
damit sie wiedergegeben werden kann.
• Stellen Sie sicher, dass das Radio nicht stummgeschaltet ist.
• Überprüfen Sie die Einstellung für die Lautstärke.
• Überprüfen Sie die Netzwerkkonfiguration.
Die FM-Frequenz wird durch Nebensignale gestört. Stellen Sie sicher,
dass die Antenne richtig mit dem Radio verbunden ist.
Wenn Sie Ohrhörer verwenden, überprüfen Sie deren Klangqualität.
Überprüfen Sie den Router, das Modem und die Telefon- bzw. DSLLeitung.
Überprüfen Sie, ob für den Zugriff auf den Accesspoint ein Schlüssel
benötigt wird.
Geben Sie ggf. den Schlüssel ein.
Überprüfen Sie, ob die Quelle für den Weckklang ordnungsgemäß
konfiguriert ist. Möglicherweise kann der MP3-Player keine Verbindung
herstellen.
• DNS ohne Antwort. Setzen Sie zur Überprüfung einen ping-Befehl für
die IP-Adresse des DNS ab.
• DNS verfügt über keinen Datensatz für den vTuner-Server oder die
Radiostation, zu der eine Verbindung hergestellt werden soll.
• Zu hohe Auslastung des Internetanschlusses. Wiederholen Sie den
Verbindungsversuch zu einem anderen Zeitpunkt.
• vTuner-Server ist nicht betriebsbereit oder überlastet, und kann n icht
schnell genug antworten.
• Unzureichende Autorisierung. Der vTuner-Server hat die
Zugriffsanfrage abgelehnt.
• Der Streamingdienst der Radiostation ist nicht verfügbar oder stark
ausgelastet.
• Das WLAN-IP-Radio unterstützt nicht den Diensttyp der Radiostation.
• Probleme in Zusammenhang mit der Pufferung der Daten aus dem
Internet. Die verfügbare Bandbreite reicht für stabiles Streaming von
Daten seitens der Radiostation nicht aus.
21
Page 68

Das WLAN-IP-Radio wurde
normal gestartet, erhält jedoch
keine IP-Adresse.
• Es ist kein DHCP-Server verfügbar. Bitte überprüfen Sie die DHCPEinstellung Ihres Routers.
• Es wurde ein falscher WLAN-Schlüssel eingegeben. Bitte überprüfen
Sie den eingegebenen Schlüssel, und geben Sie ihn über die
Fernbedienung erneut ein.
• Probleme in Zusammenhang mit der Netzwerkanbindung.
Sollten Probleme in Zusammenhang mit dem Empfang über das Internet auftreten,
schlagen Sie in der folgenden Tabelle nach.
Erfolgreich durchgeführte
Hinweise auf die Ursache des Problems
Schritte
Das WLAN-IP-Radio wurde normal
gestartet.
ABER
KEIN BALKEN AUF DEM
RADIOSTATIONSLOGO* (das Logo mit
den 5 Balken zwischen Radio und
Computer).
Das WLAN-IP-Radio erhält keine IP-Adresse.
3. Es ist kein DHCP-Server verfügbar. Bitte überprüfen Sie
die DHCP-Einstellung Ihres Routers.
4. Es wurde ein falscher WLAN-Schlüssel eingegeben.
Bitte überprüfen Sie den eingegebenen Schlüssel, und
geben Sie ihn über die Fernbedienung erneut ein.
5. Probleme in Zusammenhang mit der
Netzwerkanbindung.
1. Die Netzwerkanbindung des WLAN-IPRadios funktioniert.
2. Die Verbindung zwischen dem WLANIP-Radio und dem Router funktioniert.
3. Das WLAN-IP-Radio hat bereits eine
IP-Adresse erhalten.
ABER
NUR EIN BALKEN AUF DEM
RADIOSTATIONSLOGO
Die Verbindung zwischen dem WLAN-IPRadio und dem vTuner-Server funktioniert.
ABER
NUR ZWEI BALKEN AUF DEM
RADIOSTATIONSLOGO
Die Verbindung zwischen dem WLAN-IPRadio und der Radiostation funktioniert.
ABER
NUR DREI BALKEN AUF DEM
RADIOSTATIONSLOGO
Die Verbindung zwischen dem WLAN-IPRadio und der Radiostation funktioniert.
ABER
NUR VIER BALKEN AUF DEM
RADIOSTATIONSLOGO
1. Kein Zugriff auf das vTuner-Server möglich.
2. Bei dem DNS-Abruf für die IP-Adresse der Radiostation
ist ein Fehler aufgetreten.
3. Kein Zugriff auf den Router bzw. das Internet möglich.
1. Kein Zugriff auf die Radiostation möglich.
2. Die Radiostation hat die Verbindungsanfrage
zurückgewiesen.
1. Der Streamingdienst der Radiostation ist nicht verfügbar
oder stark ausgelastet.
2. Das WLAN-IP-Radio unterstützt nicht den Diensttyp der
Radiostation.
Probleme in Zusammenhang mit der Pufferung der Daten
aus dem Internet. Die verfügbare Bandbreite reicht für
stabiles Streamin g vo n D ate n seitens der Radiostation nicht
aus.
22
Page 69

ÍNDICE TEMÁTICO
BIENVENIDO 2
ECOMENDACIONES E INSTRUCCIONES DE SEGURIDAD 3
R
D
ESEMPAQUETADO 4
ONA DEL TECLADO 4
Z
ANEL TRASERO 5
P
F
UNCIONES DEL MANDO A DISTANCIA 6
ONFIGURACIÓN INALÁMBRICO 7
C
USO DEL DISPOSITIVO POR PRIMERA VEZ, SIN CONEXIÓN
POR CABLE ETHERNET 7
ONFIGURE MANUALMENTE EL MODO INALÁMBRICO 9
C
CONFIGURACIÓN POR CABLE 10
USO DEL DISPOSITIVO POR PRIMERA VEZ, CON UNA CONEXIÓN
POR CABLE ETHERNET 10
ONFIGURE MANUALMENTE EL MODO DE CONEXION POR CABLE 11
C
CONFIGURACIÓN COMO PUNTO DE ACCESO INALÁMBRICO 13
CONFIGURE MANUALMENTE EL MODO DE PUNTO DE ACCESO INALÁMBRICO 13
REPRODUCTOR WINDOWS MEDIA 11: INSTALACIÓN Y CONEXIÓN 15
ARÁMETROS DEL RELOJ 18
P
CONFIGURAR EL RELOJ 18
ONFIGURAR EL FORMATO DE LA HORA 19
C
CONFIGURACIÓN DE LA ALARMA 19
UIDADO Y MANTENIMIENTO 20
C
P
ROBLEMAS 21
1
Español
Page 70

BIENVENIDO
Estimado cliente,
Gracias por su compra de una Radio IP Wi-Fi, le agradece mos la confianza que ha depositado
en nosotros.
EL producto ha sido fabricado c on el mayor cuid ado, así que si encontrase cua lquier dificultad
durante su uso, le aconsejamos que acuda a la presente guía de instalación. Del mismo
modo, podrá encontrar información en la siguiente dirección de Internet:
http://www.sagem.com/faq
El material nuevo está garantizado (piezas y mano de obra) por Sagem Communications en
las condiciones y de conformidad con las modalidades definidas en nuestra página web
www.sagem.com, en la sección de asistencia.
En caso de problema técnico, le invi tamos a consultar el cu adro ubicado al final d e la presente
guía de instalación que ofrece una lista de incidentes y la forma de solucionarlos. La página
web de SAGEM (www.sagem.com, en si sección de asistencia) también le ofrecerá
información acerca del funcionamiento de su Radio Wi-Fi IP SAGEM y la resolución de los
problemas a los que se podrá enfrentar. Del mismo modo, podrá ponerse en contacto con
nuestro servicio de asistencia por correo electrónico. Si su problema continúa, deberá llamar
inmediatamente por teléfono a nuestro centro de llamadas (véase el cuadro indicado
anteriormente) que analizará su problema a distancia y determinará el m otivo de la av ería así
como el tipo de reparación necesaria.
País Números de teléfono Tarifa/Minuto
Sagem Francia 0892 230425 0,34 €
Sagem Austria 0820 550540 0,145 €
Sagem Alemania 0180 5308930 0,14 €
Sagem Bélgica 070 350 016 0,17 €
Sagem Holanda 0900 0400478 0,18 €
Sagem Reino Unido 0871 07 50 712 0,10 £
Sagem Italia 899 484 810 0,28 €
Sagem España 807 088 303 0,41 €
Sagem Suecia 08 501 11 805 llamada local
Sagem Noruega 23 680115 llamada local
Para su comodidad y su seguridad, le invitamos a leer detenidamente el párrafo indicado
anteriormente acerca de las recomendaciones y las instrucciones de seguridad.
2
Page 71

RECOMENDACIONES E INSTRUCCIONES DE SEGURIDAD
No instale su Radio IP Wi-Fi en una habitación húmeda (cuarto de baño, lavadero, cocina, etc.), ni
a una distancia de 1,50 m con respecto a un gri fo o a una fuente de agua, ni fuera de la misma. Su
Radio IP Wi-Fi deberá utilizarse a una temp eratura ambiental compr endida entre 15º C y 35º C para
lograr buenos resultados de sonido.
No instale su Radio Wi-Fi en un entorno polvoriento ya que los depósitos de polvo podrán afectar
negativamente en la calidad del sonido.
Evite que se introduzcan objetos o líquidos en la unidad.
Desconecte la toma de alimentación si la unidad no va a utilizarse durante un largo periodo de
tiempo.
No coja su cable de CA con las manos húmedas. Si entra líquido en su producto, desconéctelo de
inmediato y póngase en contacto con su proveedor para obtener las instrucciones de limpieza.
Tan sólo deberá utilizar el cable de alimentación suministra do con la Ra dio IP Wi-Fi. C onéctelo a la
red de conformidad con las instrucciones de instalación indicadas en la presente guía de usuario y
con la información señalada en las e tiquetas de identificación pegadas en el cabl e d e alimentación
(voltaje, corriente, frecuencia de red). Como medida de precaución, en caso de peligro, los
adaptadores de red actúan como un mecanismo de desconexión de la red de 230 V. Deberán
ubicarse junto al dispositivo y deberá tenerlos a mano.
No intente sacar los tornillos ni abrir la unidad. En su interior no existe nin guna pieza que pued a ser
reparada por el usuario.
La longitud de los cables USB y Ethernet utilizados en este producto no deberá superar los 3 m.
No conecte su radio IP Wi-Fi a una red Ethernet que s e di rija ha cia fuer a de s u edific io. El pres ente
dispositivo tan sólo deberá conectarse a una red Ethernet ubicada dentro de su edificio.
Este terminal ha sido diseñado para recibir un uso privado dentro de un edificio (equipo para una
instalación cliente, CPE por sus siglas en inglés) de conformidad con la Asociación Europea de
Libre Comercio (AELC). Ha sido probado conforme a las disposiciones técnicas de los equipos de
radio (EN 300328).
!
Las bandas de frecuencia autorizadas para l a transm isión inalá mbrica depe nden de las norma tivas
nacionales.
La instalación del presente terminal que opera en la banda de 2,4 GHz está cubierta por la
recomendación europea ERC 70-03.
Antes de utilizarlo, asegúrese de que la puerta de enlace con la que establece la conexión
inalámbrica desde su terminal está configurada de conformidad con dicha normativa y con las
normas nacionales aplicables.
Sagem Communications rechaza cualquier tipo de responsabilidad si las normativas aplicables en
el lugar de la instalación no han sido respetadas.
Tan sólo deberá utilizar las antenas suministradas con la Radio IP Wi-Fi.
Algunos equipos médicos y de seguridad sensibles podrán verse afectados por las transmisiones
de radiofrecuencias de su radio. En cualquier caso, le rogamos que respete las recomendaciones
de seguridad.
El dispositivo no deberá estar permanentemente instalado ni ser constantemente utilizado a una
distancia inferior a 20 cm. con respecto al cuerpo humano.
El marcado de la CE certifica que el producto cumple con los requisitos esenciales de la Directiva
1999/5/CE del Parlamento Europeo y del Consejo acerca de l os equipos d e radios mic roondas y de
los equipos terminales de telecomunicac iones, para la salu d y la seguridad de los usuarios, ante las
interferencias electromagnéticas. Además, utiliza eficazmente el espectro de frecuencias atribuido
a la comunicación por tierra y espacial para evitar interferencias dañinas.
Podrá observar la declaración de conformidad en el portal www.sagem.com, en la sección
"asistencia" u obtenerla a partir de la sig uiente dirección:
Sagem Communications - Departamento de relación con el cliente
4 rue du petit albi - 95800 Cergy Saint-Christophe -Francia
3
Page 72

DESEMPAQUETADO
El paquete del producto incluye los siguientes artículos:
• 1 Dispositivo de radio IP,
• 1 antena WiFi,
• 1 antena FM,
• 1 adaptador de alimentación,
• 1 mando a distancia,
• 2 pilas de tipo AAA,
• 1 CD,
• 1 Guía de instalación.
ZONA DEL TECLADO
STOP (Interrumpir música/
alarma)
-Pulsación breve: Encendido/
Apagado de la pantalla LCD
-Pulsación larga: Encendido/
Apagado
4-control de dirección
Seleccionar
Repetición de alarma/ Modo
apagado
4
Page 73

PANEL TRASERO
Interruptor de encendido
Toma de corriente
eléctrica
Botón de reinicio
Conector de la antena
WiFi
Puerto RJ45
Indicador de actividad
Wi-Fi
Tomas RCA para
línea de salida
Conector de auriculares
Toma de la antena FM
5
Page 74

FUNCIONES DEL MANDO A DISTANCIA
Encendido/Apagado de la
luz de fondo de la pantalla
Interrumpir la música y
volver al menú
principal/ Interrumpir la
alarma
Ponga el dispositivo en
modo en espera.
Teclado alfanumérico
Acceso directo al
menú de radio por
Internet
Acceso directo al
menú del servidor
multimedia
Bajar el volumen
Silencio
Reproducir / Pausa
Retroceso
Anterior / Borrar el
último carácter
Añadir/ Eliminar de
la lista de favoritos
Lectura aleatoria
El navegador del mando a distancia es una herramienta de selección rápida.
Desplazarse al anterior
Función de repetición de
alarma/Modo apagado
Acceso directo al menú de
radio FM
Acceso directo al menú del
reproductor MP3
Subir el volumen
Avance
Siguiente
Repetir la canción
o la lista de
canciones
Seleccionar la función
Menú anterior
Desplazarse al siguiente
Seleccionar
6
Page 75

CONFIGURACIÓN INALÁMBRICO
USO DEL DISPOSITIVO POR PRIMERA VEZ, SIN CONEXIÓN POR CABLE
ETHERNET
Ventana
derecha
1 Ventana inicial
2 "Botón "" o
3 Botón "OK" Seleccione el
4 Botón "OK" Seleccione el
5 Búsqueda de
6 "Botón ""
(Una vez)
Captura de imagen Siguiente
ventana
botón "OK"
"Botón "" o
botón "OK"
Comentario
El dispositivo
funciona como un
cliente inalámbrico.
idioma de la
interfaz multimodal
(MMI).
idioma del menú de
la radio de
Internet.
puntos de acceso
disponibles.
Seleccione el punto
de acceso al que
desea conectar la
radio IP Wi-Fi.
7 Teclado
numérico
Botón "OK" Indique el código
de encriptado si el
punto de acceso
está protegido.
7
Page 76

Uso del dispositivo por primera vez, sin conexión por cable Ethernet
(continuación)
Ventana
derecha
8 Botón "OK"
Captura de imagen Siguiente
ventana
Comentario
! En función de la configuración de su país, podrá tener la oportunidad de conectarse a
Internet a través de un servidor Proxy. Si está conectado directamente a Internet,
seleccione "No". De lo contrario, a ctive esta opci ón e i ndiqu e la direcc ión I P y el pu erto d e
su servidor Proxy.
9 Botón "OK" Confirme los
parámetros
indicados
anteriormente.
10 Aplique los nuevos
parámetros.
! Si la conexión registra fallos, compruebe que su punto de acceso no requiere un
proceso de registro específico. Algunos puntos de acceso podrán necesitar, por
ejemplo, que pulse un determinado botón durante la etapa 9 indicada anteriormente.
11 El dispositivo se
encuentra ahora en
modo uso
inalámbrico.
12 El dispositivo ya
está conectado a
su red.
8
Page 77

CONFIGURE MANUALMENTE EL MODO INALÁMBRICO
Ventana
derecha
1 Botón "OK" Ventana inicial
2 "Botón ""
(4 veces)
3 "Botón ""
(Una vez)
4 "Botón ""
(Una vez)
5 Búsqueda de
6 "Botón ""
(Una vez)
7 Teclado
numérico
8 Botón "OK"
Captura de imagen Siguiente
ventana
"Botón "" o
botón "OK"
"Botón "" o
botón "OK"
"Botón "" o
botón "OK"
"Botón ""o
botón "OK"
Botón "OK" Indique el código
Comentario
Configure
manualmente el
modo inalámbrico.
puntos de acceso
disponibles.
Seleccione el punto
de acceso que
podrá conectar a su
dispositivo del
enrutador.
de encriptado si el
punto de acceso
está protegido.
! En función de la configuración de su país, podrá tener la oportunidad de conectarse a
Internet a través de un servidor Proxy. Si está conectado directamente a Internet,
seleccione "No". De lo contrario, a ctive esta opci ón e i ndiqu e la direcc ión I P y el pu erto d e
su servidor Proxy.
9
Page 78

Configure manualmente el modo inalámbrico
(continuación)
Ventana
derecha
9 Botón "OK" Confirme los
10 Aplique los nuevos
Captura de imagen Siguiente
ventana
Comentario
parámetro
indicados
anteriormente.
parámetros.
! Si la conexión registra fallos, compruebe que su punto de acceso no requiere un
proceso de registro específico. Algunos puntos de acceso podrán necesitar, por
ejemplo, que pulse un determinado botón durante la etapa 9 indicada anteriormente.
11 El dispositivo se
encuentra ahora en
modo inalámbrico.
12 El dispositivo ya
está conectado a
su red.
CONFIGURACIÓN POR CABLE
USO DEL DISPOSITIVO POR PRIMERA VEZ, CON UNA CONEXIÓN POR CABLE
ETHERNET
Ventana
derecha
1 Ventana inicial
2 El dispositivo
Captura de imagen Siguiente
ventana
10
Comentario
funciona como un
cliente por cable.
Page 79

Uso del dispositivo por primera vez, con una conexión por cable Ethernet
(continuación)
Ventana
derecha
3 Botón "" o
4 Botón "" o
5 El dispositivo se
Captura de imagen Siguiente
ventana
botón "OK"
botón "OK"
Comentario
Seleccione el
idioma de la
interfaz multimodal
(MMI).
Seleccione el
idioma del menú de
la radio de Internet.
encuentra ahora en
modo de cliente por
cable.
Ya está conectado
a su red.
CONFIGURE MANUALMENTE EL MODO DE CONEXION POR CABLE
Ventana
derecha
1 Botón "OK" Ventana inicial
2 Botón ""
(4 veces)
3 Botón ""
(Una vez)
4 Botón ""
(Una vez)
Captura de imagen Siguiente
ventana
Botón "" o
botón "OK"
Botón "" o
botón "OK"
Botón "" o
botón "OK"
11
Comentario
Seleccione
manualmente el
modo de conexión
por cable.
Page 80

Configure manualmente el modo de conexión por cable
(continuación)
Ventana
derecha
5 Botón ""
(Una vez)
6 Botón "OK"
Captura de imagen Siguiente
ventana
Botón "" o
botón "OK"
Comentario
Seleccione el
DHCP para
obtener la dirección
IP configurada
automáticamente.
! En función de la configuración de su país, podrá tener la oportunidad de conectarse a
Internet a través de un servidor Proxy. Si está conectado directamente a Internet,
seleccione "No". De lo contrario, a ctive esta opci ón e i ndiqu e la direcc ión I P y el pu erto d e
su servidor Proxy.
7 Botón "OK" Confirme los
parámetros
indicados
anteriormente.
8 Aplique los nuevos
parámetros.
9 El dispositivo se
encuentra ahora en
modo de conexión
por cable.
10 El dispositivo ya
está conectado a
su red
12
Page 81

CONFIGURACIÓN COMO PUNTO DE ACCESO INALÁMBRICO
El dispositivo de radio IP puede configurars e como u n punto de acceso in alámbrico. Con esta
función, podrá ampliar fácilmente su cobertura inalámbrica sin tener que comprar otro punto
de acceso.
CONFIGURE MANUALMENTE EL MODO DE PUNTO DE ACCESO INALÁMBRICO
Ventana
derecha
1 Botón "OK" Ventana inicial
2 Botón ""
(4 veces)
3 Botón ""
(Una vez)
4 Botón ""
(2 veces)
5 Botón ""
(Una vez)
6 Teclado
numérico
7 Teclado
numérico
Captura de imagen Siguiente
ventana
Botón "" o
botón "OK"
Botón "" o
botón "OK"
Botón "" o
botón "OK"
Botón "" o
botón "OK"
Botón "OK" Introduzca el
Botón "OK" Seleccione el canal
Comentario
Seleccione
manualmente el
modo del punto de
acceso.
Seleccione el
DHCP para
obtener la dirección
IP configurada
automáticamente.
identificador
(nombre) para este
punto de acceso.
inalámbrico que
será atribuido a
este punto de
acceso.
13
Page 82

Configure manualmente el modo de punto de acceso inalámbrico
(continuación)
Ventana
derecha
8 Botón ""
(Una vez)
9 Teclado
numérico
10 Botón "OK"
Captura de imagen Siguiente
ventana
Botón "OK" Seleccione una de
Botón "OK" Indique el código
Comentario
las funciones de
seguridad.
de encriptado si el
punto de acceso
está protegido.
! En función de la configuración de su país, podrá tener la oportunidad de conectarse a
Internet a través de un servidor Proxy. Si está conectado directamente a Internet,
seleccione "No". De lo contrario, a ctive esta opci ón e i ndiqu e la direcc ión I P y el pu erto d e
su servidor Proxy.
11 Botón "OK" Confirme los
parámetros
indicados
anteriormente.
12 Aplique los nuevos
parámetros.
13 El dispositivo se
encuentra en modo
de punto de acceso
inalámbrico.
14 El dispositivo ya
está conectado a
su red y ahora
puede funcionar.
14
Page 83

REPRODUCTOR WINDOWS MEDIA 11:
INSTALACIÓN Y CONEXIÓN
Por favor, siga las instrucciones indicadas a continuac ió n:
Etapa 1: Descargar el archivo de instalación del reproductor Windows Media 11
(WMP11), es decir, wmp11-windowsxp-x8 6-enu.e xe, a partir de la pá gina Web
de Microsoft.
Instale el archivo wmp11-windowsxp-x86-enu.exe sin realizar ninguna
modificación.
Etapa 2: Active el reproductor multimedia.
Etapa 3: Cambie de "Reproducción actual" a "Biblioteca" pulsando la pestaña de la
biblioteca para gestionar el contenido y compartir sus archivos multimedia.
Etapa 4: Añada su contenido multimedia a la biblioteca multimedia de WMP11.
Pulse en la pestaña "Biblioteca" de nuevo para acceder al menú desplegable.
Para añadir sus archivos multimedia a la biblioteca multimedia WMP11, haga
clic en "Añadir a Biblioteca..."
Aparecerá la siguiente ventana en pantalla:
Pulse en el botón Añadir, seleccione la carpeta multimedia en su ordenador, y
a continuación, pulse el botón OK.
Podrá poner todos los archivos de música en el directorio D:\Mú sica para poder
añadir la carpeta a la lista a compartir.
Verá que la carpeta indicada habrá sido añadida a la lista de la carpeta del
monitor WMP11. Pulse en el botón OK. Aparecerá una ventana en pantalla,
indicándole que el WMP11 está buscando los archivos multimedia. Una vez
que haya terminado, pulse el botón "Cerrar".
Ahora podrá navegar y gestionar su contenido multimedia utilizando el gestor
de biblioteca WMP11.
Etapa 5: Compartir la biblioteca multimedia WMP11.
Al igual que en la etapa 4, pulse en la pestaña "Biblioteca" de nuevo para
acceder al menú desplegable. Haga clic en "Compartir multimedi a" para activar
la función de compartir archivos multimedia.
15
Page 84

Aparecerá la siguiente ventana de diálogo en pantalla.
Seleccione el cuadro "Compartir mis archivos multimedia" y haga clic en el
botón "OK".
El WMP11 detectará los dispositivos de red disponibles en su LAN.
La siguiente ventana muestra que no se ha detectado ningún dispositivo.
Si el dispositivo de radio IP ya está conectado a la red de su hogar, una ventana
parecida a la siguiente aparecerá en pantalla, indicándole que el WMP11 ha
detectado un dispositivo de red llamado "Mi DU@L RADIO 700".
Etapa 6: Gestione los parámetros para compartir archivos multimedia.
Haga clic en el botón "Configuración" e indique el nom bre del servidor WM P11
que aparecerá en su dispositivo de radio IP.
A continuación, pulse OK para salir.
Etapa 7: Autorice el acceso a partir de su dispositivo de radio IP.
La configuración del control del acceso de WMP11 es sencilla. Cuando el
WMP11 detecte un nuevo disposit ivo de red (tal y co mo a parece en la vent ana
final de la Etapa 5), deberá decidir si desea permitir o rechazar la solicitud de
acceso de dicho dispositi v o.
Seleccione el icono del dispositivo y a continuación, haga clic en el botón
"Permitir" para autorizar las soli ci tud es de tra ns mi si ón de sd e dicho dispositivo.
El icono de estado del dispositivo cambiará consecuentemente.
16
Page 85

A continuación, pulse el botón OK para activar la configuración.
Existe un medio alternativo para gestio nar el acceso de sus dispositivos de red .
Se añadirá un pequeño icono a la barra de estado de Windows XP para
informarle de que el WMP11 ha detectado dispositivos de red.
Haga doble clic en dicho icono para gestionar el acceso de los dispositivos.
Pulse en el botón "Permitir".
Etapa 8: Establecer la conexión entre el dispositivo de radio IP y el servidor WMP11.
En el dispositivo de radio IP, seleccione la función del "Servidor mult imedia" en
el menú principal (o pulse la tecla de acceso directo del "Reproductor
multimedia" del mando a distancia). El dispositivo de radio IP iniciará a
continuación el proceso de detección del servidor. Tras varios segundos,
detectará un servidor y mostrará "PC_Nombre de la central: Nombre del
servidor".
Este es el servidor WPM11 que Vd. ha instalado.
Pulse el botón "OK" para intentar conectarse al servidor.
La ventana de radio IP mostrará el mensaje de "Conexión..." y a continuación,
indicará la siguiente lista:
Podrá navegar por la lista de "Música" y reproducir la música que Vd. elija.
Para más detalles, por fa vor, acuda a la sección 3.3., Escu char músic a en su
ordenador.
17
Page 86

PARÁMETROS DEL RELOJ
Antes de fijar la alarma, deberá poner en hora el reloj en el dispositivo de radio IP Wi-Fi.
Primeramente, seleccione la función de Configuración en el Menú Principal.
En el menú de configuración, el primer artículo "Reloj" se utiliza para fijar la fecha y la hora.
Pulse el botón "OK" o "" para configurar el reloj.
Existen 3 artículos en el menú del reloj. El primero muestra la fecha y la hora actual; el
segundo se utiliza para fijar la fecha y la hora y la tercera función es la del "Formato de
muestra de la hora" (para fijar el formato de la hora : 12 o 24 horas).
También existe una batería en el dispositivo, así que a pesar de que DESCONECTE el
dispositivo, el reloj seguirá funcionando. Esto significa que tan sólo tendrá que configurar el
reloj una vez.
CONFIGURAR EL RELOJ
Pulse el botón "OK" o "" para acceder al submenú para configurar la hora.
1. CONFIGURACIÓN MANUAL DEL RELOJ
Si decide configurar el reloj manualme nte, pu lse el botón "OK" o el botó n "" para acce der a
la ventana de la fecha y la h ora. Podrá utilizar los cuatro boton es d irec c ion al es y e l bot ón OK
para configurar la hora.
a. Ut ilice los botones " " y "" para ca mbiar entre los artíc ulos que d esea modi ficar.
El artículo seleccionado pestañeará.
18
Page 87

b. Utilice los botones "" y "" para cambiar el valor seleccionado.
c. Pulse el botón "OK" para confirmar.
2. CONFIGURACIÓN AUTOMÁTICA DEL RELOJ
Si desea configurar el reloj automática mente, se leccio ne el menú "Sincr. auto m (NTP)" y elija
su zona horaria. También podrá elegir activar la gestión automática del cambio de hora.
El reloj se configura a continuación de forma automática.
La siguiente ventana indica un ejemplo de la ventana de selección de la zona horaria.
CONFIGURAR EL FORMATO DE LA HORA
Si desea configurar el formato de la hora, acceda al menú "Formato de la hora" y a
continuación, seleccione el formato deseado (12 o 24 horas).
CONFIGURACIÓN DE LA ALARMA
Ventana
derecha
1 Botón "OK" Ventana inicial.
2 Botón "" o
Captura de imagen Siguiente
ventana
botón "OK"
19
Comentario
Page 88

Configuración de la alarma
(continuación)
Ventana
derecha
3 Botón ""
(Una vez)
4 Botón "OK" Utilice los
5 Botón "" o
6 Botón "OK" Seleccione la
7 Seleccione el nivel
8 Información de la
9 La alarma está
Captura de imagen Siguiente
ventana
Botón "" o
botón "OK"
botón "OK"
Comentario
Activar alarma 1.
4 botones
direccionales para
configurar la hora;
Configurar la radio
de Internet como
fuente para la
alarma.
emisora desde sus
Favoritos.
(Véase la sección
3.1)
de volumen de la
alarma.
alarma, mostrada
durante 3-5
segundos.
configurada.
CUIDADO Y MANTENIMIENTO
Apague su radio IP. Utilice un paño seco y suave para limpiarla. No utilice paños ásperos,
limpiadores líquidos potentes, disolvente para pinturas, alcohol ni otros solventes para
limpiarla. Estos productos podrán dañar su Radio IP.
20
Page 89

PROBLEMAS
Véase el cuadro indicado a continuación en caso de registrar fallos de funcionamiento:
Problemas Soluciones
El mando a distancia no
funciona.
La pantalla está apagada. Asegúrese de que:
La emisora elegida no
puede reproducirse.
Obstáculos sonoros o falta
de claridad.
Acceso rechazado a la radio
por Internet.
Acceso rechazado a la radio
desde un ordenador
personal como punto de
acceso (Servidor
multimedia).
La alarma no suena. Compruebe que la fuente de la alarma está configurada correctamente
La conexión entre la radio y
el vTuner no es correcta.
La conexión entre la radio y
el vTuner no es correcta.
• Compruebe que las pilas han sido colocadas correctamente.
• Compruebe que no se encuentre demasiado lejos de la radio (la
distancia máxima recomendada es de 7 metros) y que el sensor
infrarrojo no esté bloqueado.
• Compruebe que el mando a distancia está correctamente orientado
hacia el sensor, cuando manipule la radio.
• El adaptador de alimentación está correctamente conectado a una
toma de alimentación.
• El conector de alimentación está correctamente conectado a la radio.
• Su fusible y su interruptor diferencial están en modo operativo y que la
base de alimentación recibe corriente.
• Para oír la emisora, deberá confirmar su selección pulsando el botón
OK.
• Asegúrese de que su Radio no está fijada en el modo SILENCIO.
• Compruebe el nivel del volumen.
• Compruebe la configuración de red.
La frecuencia FM está distorsionada por obstáculos. Alargue la toma de la
antena FM hasta que obtenga una señal alta.
Si utiliza auriculares, compruebe que funcionan correctamente.
Compruebe su enrutador wi-fi, el módem o la línea.
Compruebe que su radio no está codificada.
De lo contrario, deberá indicar la clave para acceder.
(ejemplo: el reproductor mp3 está desconectado,...).
• El DNS no responde. Por favor, compruebe la dirección IP del DNS
para verificar si se trata de la causa.
• El DNS carece del registro del servidor vTuner o de la emisora de radio
a la que está intentando conectarse.
• Atasco para el acceso a Internet. Por favor, inténtelo de nuevo más
tarde.
• El servidor vTuner está fuera de servicio o está muy cargado para
reproducir a tiempo.
• El proceso de autorización ha fallado. El servidor vTuner rechaza la
solicitud de acceso.
• El servicio de transmisión de la emisora de radio se encuentra
indisponible o está muy cargado.
• La radio IP no soporta el tipo de servicio de la emisora de radio.
• Existe algún problema de la memoria intermedia en Internet. La banda
ancha disponible no es lo suficientemente buena para lograr una
transmisión estable desde la emisora de radio.
21
Page 90

La radio IP se ha iniciado
con normalidad pero no ha
obtenido una dirección IP.
• No se ha activado ningún servidor DHCP. Por favor, compruebe la
configuración de su enrutador.
• Se ha introducido una clave WiFi errónea. Por favor, vuelva a confirmar
la clave y a introducirla mediante el mando a distancia.
• La interfaz de red tiene problemas.
En caso de fallo de recepción por Internet, acuda al cuadro indicado más abajo.
Qué se ha realizado correctamente ¿Cuál podría ser el problema?
La radio IP se ha iniciado normalmente.
PERO
NO EXISTE NINGUNA BARRA EN EL
LOGOTIPO DE LA EMISORA DE RADIO* (el
logotipo incluye 5 barras entre una radio y un
ordenador).
La radio IP no obtiene una dirección IP.
1. No se ha activado ningún servidor DHCP. Por favor,
compruebe la configuración de su enrutador.
2. Se ha introducido una clave WiFi errónea. Por favor,
vuelva a confirmar la clave y a introduci rla mediante el
mando a distancia.
3. La interfaz de red tiene problemas.
1. La interfaz de red de la radio IP es
correcta.
2. La conexión entre la radio IP y el
enrutador se realizó correctamente.
3. La radio IP ya obtuvo una dirección IP.
PERO
TAN SÓLO SE MUESTRA UNA BARRA EN
EL LOGOTIPO DE LA EMISORA DE RADIO
La conexión entre la radio IP y el servidor
vTuner es correcta.
PERO
TAN SÓLO SE MUESTRAN DOS BARRAS
EN EL LOGOTIPO DE LA EMISORA DE
RADIO
La conexión entre la radio IP y la emisora de
radio es correcta.
PERO
TAN SÓLO SE MU ESTRAN T RES BARRAS
EN EL LOGOTIPO DE LA EMISORA DE
RADIO
La conexión entre la radio IP y la emisora de
radio se realizó correctamente.
PERO
TAN SÓLO SE MUESTRAN CUATRO
BARRAS EN EL LOGOTIPO DE LA
EMISORA DE RADIO
1. No puedo acceder al servidor vTuner.
2. El DNS busca la dirección IP de la emisora de radio
con fallos.
3. No puedo acceder al enrutador o a Internet.
1. No puedo acceder a la emisora de radio.
2. La emisora de radio ha rechazado la solicitud de
conexión.
1. El servicio de transmisión de la emisora de radio se
encuentra indisponible o está muy cargado.
2. La radio IP no soporta el tipo de servicio de la emisora
de radio.
Existe algún problema de la memoria intermedia en
Internet. La banda ancha disponible no es lo
suficientemente buena para lograr una transmisión
estable desde la emisora de radio.
22
Page 91

SOMMARIO
PREMESSA 2
VVERTENZE DI SICUREZZA 3
A
L
A CONFEZIONE 4
ANNELLO SUPERIORE 4
P
ANNELLO POSTERIORE 5
P
T
ELECOMANDO 6
ONFIGURAZIONE IN MODALITÀ WIRELESS 7
C
CONFIGURAZIONE GUIDATA 7
ONFIGURAZIONE MANUALE 9
C
CONFIGURAZIONE CON CAVO DI RETE 10
CONFIGURAZIONE GUIDATA 10
ONFIGURAZIONE MANUALE 11
C
CONFIGURAZIONE IN MODALITÀ ACCESS POINT WIRELESS 13
CONFIGURAZIONE MANUALE 13
WINDOWS MEDIA PLAYER 11: INSTALLAZIONE E CONNESSIONE 15
ROLOGIO 18
O
IMPOSTAZIONI 18
ORMATO DI VISUALIZZAZIONE DELL'ORA 19
F
SVEGLIA 19
URA E MANUTENZIONE 20
C
P
ROBLEMI & SOLUZIONI 21
1
Italiano
Page 92

PREMESSA
Gentile cliente,
La ringraziamo per l'acquisto di radio Wi-Fi IP Sagem e le siamo grati per la fiducia che ci ha
voluto accordare.
Questo prodotto è stato fabbricato con la massima attenzione. Nel caso in cui dovesse
riscontrare una qualsiasi difficoltà durante utilizzo, le suggeriamo di consultare questo
manuale d'uso. Ulteriori informazioni sono disponibili anche sul seguente sito:
http://www.sagem.com/it
Il prodotto nuovo è garantito (parti di ricamb io e manodopera) d a Sagem Communication s alle
condizioni e secondo le modalità definite sul sito www.sagem.com/it nella sezione
assistenza.
In caso di problema tecnico, la invitiamo a consultare la tavola posta alla fine di questa guida
di installazione che presenta un elenco di problemi e relative soluzioni. Il sito SAGEM
(www.sagem.com/it rubrica assistenza) offrirà inoltre informazioni sul funzionamento della
Radio Wi-Fi IP SAGEM e sulla soluzione dei proble mi riscontrati. Inoltre, è possibile contattare
il servizio assistenza via email. Se il problema persiste, potete rivolgervi telefonicamente al
nostro centro assistenza (si veda la tabella sotto riportata) che effettuerà una perizia a
distanza del materiale determinandone la natura del problema e il tipo di riparazione
necessaria conseguente.
Paese Numeri telefonici Tariffa/minuto
Sagem France 0892 230425 0,34 €
Sagem Austria 0820 550540 0,145 €
Sagem Germany 0180 5308930 0,14 €
Sagem Belgium 070 350 016 0,17 €
Sagem Netherlands 0900 0400478 0,18 €
Sagem UK 0871 07 50 712 0,10 £
Sagem Italy 899 484 810 0,28 €
Sagem Spain 807 088 303 0,41 €
Sagem Sweden 08 501 11 805 chiamata locale
Sagem Norway 23 680115 chiamata locale
Per la sua comodità e sicurezza, la invitiamo a leggere attentamente il paragra fo se gue nte.
2
Page 93

AVVERTENZE DI SICUREZZA
Non porre la Radio Wi-Fi IP in una stanza umida (bagno, c ucina, lavanderia, e cc.), o a 1.50m
da un lavandino o una sorgente d'acqua, oppure all''esterno. Per una qualità di suono
ottimale, la propria radio Wi-Fi IP dovrebbe essere usata ad una temperatura ambiente tra i
15 °C e 35 °C.
Non collocare la radio Wi-Fi IP in un ambiente polveroso perché i depositi di polvere
potrebbero ledere alla qualità del suono.
Evitare di lasciar cadere sull'unità oggetti o liquidi.
Staccare il cavo di alimentazione se non utilizzato per un lungo periodo.
Non maneggiare il cavo di alimentazione con le mani bagna te. Nel caso in cui si verifi chi una
contaminazione da liquido , staccare immediatamente l'alimentato re e contattare il proprio
rivenditore per le necessarie istruzioni di pulizia.
Utilizzare esclusivamente l'alimentatore in dotazione con la radio Wi-Fi e collegarla alla rete
elettrica come descritto nelle istruzioni. L'installazione del presente manuale d'uso e secondo
le istruzioni disponibili riportate sull'etichetta identificativa posta sull'alimentatore (voltaggio,
corrente, frequenza principale). In caso di pericolo, le spine d'alimentazione possono venire
estratte precauzionalmente, interrompendo così l'alimentazi one elettric a a 230 V. Le prese di
corrente devono quindi trovarsi vicino al l'apparecchio ed essere facilmente acce ssibili.
Non provare a rimuovere delle viti o aprire l'unità. Nessuna parte riparabile dall'utente è
interna al prodotto.
La lunghezza dei cavi ethernet e USB usati da questo prodotto non devono eccedere i 3 m.
Non collegare la propria radio Wi-Fi IP ad un Network Ethernet che conduca all'esterno del
proprio immobile. Questo dispositivo deve essere collegato esclusivamente ad una rete
ethernet interna all'im mobile.
Questo terminale è stato progettato per un utilizzo privato interno (CPE apparecchiatura
installata presso l'utente) dell'European Free Trade Association (EFTA). Testata secondo le
disposizioni tecniche per le apparecchiature radio (EN 300328).
Le bande di frequenza radio autorizzate per la trasmissione Wireless dipendono dalle
!
regolamentazioni nazionali.
L'installazione di questo terminale che funziona in una banda di 2.4 GHz è prevista dalla
norma europea ERC 70-03.
Prima dell'uso, assicurarsi che il gateway con il quale si stabilirà la connessione wireless del
proprio terminale sia configurato in conformità a questa direttiva e alle direttive nazionali del
paese nel quale viene utilizzato.
Sagem Communications no n si considera responsabile ne l caso in cui le normative in vigore
non siano rispettate.
Si devono utilizzare esclusivamente le antenne fornite con la radio Wi-Fi IP.
Alcune apparecchiature mediche o di sicurezza potrebbero interferire con la frequenza di
trasmissione della propria radio. In t utti i casi, chiediam o di rispet tare le ra ccomandaz ioni di
sicurezza.
Il dispositivo non deve essere usato di continuo o trovarsi a più di 20cm dal corpo umano.
Il simbolo CE certifica che il prodotto risponde ai requisiti essenzia li del la direttiva 1999/5/CE
del Parlamento della comunità Europea che in materia di apparecc hiature radio, micro onde e
impianti di telecomunicazione, per la sicurezza degli utenti e per evitare i disturbi
elettromagnetici. Inoltre, utilizza in modo efficiente lo spettro delle frequenze attribuite per le
comunicazioni terrestri e spaziali per prevenire interferenze dannose.
La dichiarazione di conformità è consultabile sul sito www.sagem.com/it, alla sezione
"assistenza" o potrà essere richiesta al seguente indirizzo:
Sagem Communications - Dipartimento relazioni clienti
4 rue du petit albi - 95800 Cergy Saint-Christophe -France
3
Page 94

LA CONFEZIONE
La confezione del prodotto contiene:
• 1 apparecchiatura Radio IP
• 1 antenna WiFI
• 1 antenna FM
• 1 adattatore per l'alimentazione
• 1 telecomando
• 2 batterie tipo AAA
•1 CD
• 1 Guida di installazione
PANNELLO SUPERIORE
STOP (Stop musica / allarme)
- Pressione rapida: LCD on/off
- Pressione lunga: Radio on/off
Frecce direzionali
Conferma
Modalità Ripetizione/ Sospensione
4
Page 95

PANNELLO POSTERIORE
Interruttore
Presa di
alimentazione DC
Tasto Reset
Connettore antenna Wi-Fi
Porta RJ45
Indicatore attività WiFI
Uscita audio RCA
Presa cuffia
Presa antenna FM
5
Page 96

TELECOMANDO
Accensione/Spegnimento
luci di sfondo dello schermo
Interruzione della
musica e tornare al
menu principale/
Interruzione dell'allarme
Accesso diretto al
menu internet della
radio
Accesso diretto al
menu server dei Media
Riduzione del volume
Muto
Avvia / Pausa
Indietro
Precedente / Cancellare
l'ultimo carattere
Aggiungere/
Rimuovere dall'elenco
dei preferiti
Mettere l'apparecchiatura
in modalità Standby
Tastiera alfanumerica
Funzione ripetizione /
Modalità Sospensione
Accesso diretto al menu
delle radio FM
Accesso diretto al menu
MP3 Player
Aumento del volume
Avanti
Successivo
Ripetizione del
brano o di un
elenco brani
Lettura casuale
Il navigatore del telecomando è uno strumento di selezione rapida.
su
Selezionare la funzione
Menu precedente
Giu
6
Menu sucessivo
Page 97

CONFIGURAZIONE IN MODALITÀ WIRELESS
CONFIGURAZIONE GUIDATA
Comando Display Comando Commento
1 Avvio
2 "" tasto o il
tasto "OK"
3 Tasto "OK" Selezionare
4 Tasto "OK" Selezionare dal
5 Scansione degli
6 "" tasto (una
volta)
7 Tastiere
numeriche
"" tasto o il
tasto "OK"
Tasto "OK" Inserire la chiave
L'apparecchiatura
funziona in
modalità wireless
linguaggio MMI
menu la lingua
della radio Internet.
access point
disponibili.
Selezionare
l'Access point sul
quale si vuole
collegare la radio IP
WiFI.
cifrata se l'access
point è protetto.
7
Page 98

Configurazione guidata
(continua)
Comando Display Comando Commento
8 Tasto "OK"
! A seconda della configurazione del proprio paese, esiste l'opzione per collegarsi a
internet attraverso un server Proxy. Se si è connessi direttamente a internet, selezionare
«No». Altrimenti, attivare questa opzione e inserire l 'indirizzo IP e la porta del proprio server
Proxy.
9 Tasto "OK" Confermare la
configurazione
sopra indicata.
10 Applicare le nuove
impostazioni
! Se la connessione cade, verificare che il proprio access point non richieda una
particolare procedura di registrazione. Alcuni access point richiedono, ad esempio,
che si prema un tasto specifico durante la fase 9 sopra indicata.
11 L'apparecchiatura
adesso è nella
modalità cliente
wireless.
12 L'apparecchiatura
è già collegata alla
propria rete.
8
Page 99

CONFIGURAZIONE MANUALE
Comando Display Comando Commento
1 Tasto "OK" Avvio
2 ""tasto
(4 volte)
3 "" tasto (una
volta)
4 "" tasto (una
volta)
5 Scansione degli
6 "" tasto (una
volta)
7 Tastiere
numeriche
8 Tasto "OK"
"" tasto o il
tasto "OK"
"" tasto o il
tasto "OK"
"" tasto o il
tasto "OK"
"" tasto o il
tasto "OK"
Tasto "OK" Inserire la chiave
Selezionare
manualmente la
modalità wireless.
access point
disponibili.
Selezionare
l'Access Point che
è possibile
collegare al proprio
router.
crittografica se
l'access point è
protetto.
! A seconda della configurazione del proprio paese, esiste l'opzione per collegarsi a
internet attraverso un server Proxy. Se si è connessi direttamente a internet, selezionare
«No». Altrimenti, attivare questa opzione e inserire l 'indirizzo IP e la porta del proprio server
Proxy.
9
Page 100

Configurazione manuale
(continua)
Schermo
sulla destra
9 Tasto "OK" Confermare la
10 Applicare le nuove
Cattura schermo Schermo
successivo
Commento
configurazione
sopraccitata.
impostazioni
! Se la connessione cade, verificare che il proprio access point non richieda una
particolare procedura di registrazione. Alcuni access point richiedono, ad esempio,
che si prema un tasto specifico durante la fase 9 sopraccitata.
11 L'apparecchiatura
adesso è nella
modalità wireless.
12 L'apparecchiatura
è già collegata alla
propria rete.
CONFIGURAZIONE CON CAVO DI RETE
CONFIGURAZIONE GUIDATA
Comando Display Comando Commento
1 Schermo iniziale
2 L'apparecchiatura
funziona come
"Client" collegato
via cavo ethernet
10
 Loading...