

Page 1

User Manual
AS 1300 / AS 1300 Pro
Page 2

© 2009. All rights are reserved. No portion of this document may be reproduced without
permission. All trademarks and brand names mentioned in this publication are property of
their respective owners.
While all efforts have been made to ensure the accuracy of all contents in this manual,
we assume no liability for errors or omissions or by statements of any kind in this manual,
whether such errors are omissions or statements resulting from negligence, accidents, or
any other cause. The contents of this manual are subject to change without notice.
The scanning of certain documents, for example checks, bank notes, I.D. cards,
government bonds, or public documents, may be prohibited by law and/or subject to
criminal prosecution. We recommend you to be responsible and respectful of the
copyrights laws when you are scanning books, magazines, journals and other materials.
The product is designed and produced to achieve sustainable environmental
improvement. We strive to produce products in compliance with global environmental
standards. Please consult your local authorities for proper disposal. The product
packaging can be recycled.
Attention to recycling (For EU country only)
Protect your environment! This product should not be thrown into the household waste
container. Please give it to the free collecting center in your community.
The screen shots in this guide were made with Windows 2000. If you are using Windows
XP or Vista, your screens will look somewhat different but function the same.
Page 3

Table of Contents
INTRODUCTION ........................................................................... ......................... 1
How to Use This Guide ............................................................................................... 1
Conventions of This Guide ................................................................................................... 1
A Note about Icons ............................................................................................................... 2
Safety Precautions ...................................................................................................... 2
System Requirements ................................................................................................ 3
Box Contents .............................................................................................................. 4
The Scanner’s Features ............................................................................................. 5
Product Information .................................................................................................... 5
C
HAPTER I. INSTALLING THE SCANNER .................................................................... 6
Software Installation Requirements ............................................................................ 6
Hardware Requirements ............................................................................................. 6
Installing and Setting up the Scanner ......................................................................... 7
Step 1. Connecting the Scanner to Your Computer ............................................................. 7
Step 2. Installing the Software .............................................................................................. 8
Step 3. Testing the Scanner ................................................................................................. 9
Software Setup Troubleshooting .............................................................................. 10
Installing Additional Software .................................................................................... 10
C
HAPTER II. USAGE AND MAINTENANCE ............................................................... 11
Operating the Scanner .............................................................................................. 11
DigiScan ................................................................................................................... 12
Configure SCAN Settings ................................................................................................... 13
Configure CUSTOM Settings ............................................................................................. 15
Using the Scanner Buttons ....................................................................................... 20
Scan Button ........................................................................................................................ 20
Custom Button .................................................................................................................... 21
Functions Features ................................................................................................... 22
Scan tab .............................................................................................................................. 22
Custom tab ......................................................................................................................... 25
Scanning Tips ........................................................................................................... 28
Scanning documents with the protective cover ........................................................ 28
Status Indicator ......................................................................................................... 30
Scanner Connection ................................................................................................. 30
Maintenance ............................................................................................................. 32
Calibrating the Scanner ...................................................................................................... 32
Cleaning the Scanner ......................................................................................................... 32
Usage & Maintenance Tips ....................................................................................... 33
Storage of the Scanner ............................................................................................. 34
Using the Base Stand ......................................................................................................... 34
A
PPENDIX A: TROUBLESHOOTING ........................................................................ 35
Scanning Problems ................................................................................................... 35
Common -How-to- Questions ................................................................................... 38
A
PPENDIX B: SPECIFICATIONS ........................................................................... 40
Page 4

Introduction
Welcome to the world of AgfaPhoto scanners – the ultimate in computer imaging.
Your new scanner will improve the professionalism of your day-to-day computing tasks
by allowing you to input images and electronic text into your computer system.
Like all of our products, your new scanner is thoroughly tested and backed by our
reputation for unsurpassed dependability and customer satisfaction.
Thank you for choosing us as your scanner supplier. We hope you will continue to
turn to us for additional quality products as your computing needs and interests grow.
How to Use This Guide
This User’s Guide provides instructions and illustrations on how to install and
operate your scanner. This guide assumes the user is familiar with Microsoft Windows
XP, 2000 and Vista. If this is not the case, we suggest you learn more about Microsoft
Windows by referring to your Microsoft Windows manual before using your scanner.
The Introduction section of this manual describes the box contents and minimum
computer requirements to use this scanner. Before you start installing your scanner,
check the box contents to make sure all parts are included. If any items are damaged
or missing, please contact the vendor where you purchased your scanner or our
customer service directly.
Chapter I describes how to install scanner’s software and connect the scanner to
your computer. Note: The scanner connects to your computer through the Universal
Serial Bus (USB). If your computer does not support USB technology, you will need to
purchase a USB interface card to add USB capabilities to your computer, or buy and
install USB connectors if your motherboard has USB capabilities. This guide assumes
that your computer is USB-ready and has a free USB port.
Chapter II describes how to use, maintain and clean your scanner.
Appendix A contains technical support information that can help you solve simple
problems. Before calling for help, please read through Appendix A: Troubleshooting.
Appendix B contains the Specifications of the scanner you purchased.
CCoonnvveennttiioonnss ooff TThhiiss GGuuiiddee
Bold — Important note or first use of an important term in a chapter.
“XXX”— Represents commands or contents on your computer screen.
1
Page 5

AA NNoottee aabboouutt IIccoonnss
This guide uses the following icons to point out information that deserves special
attention.
Danger
Caution
Attention
A procedure that must be followed carefully to prevent injury, or
accidents.
Information that, if not followed, may result in data loss or
damage to the product.
Instructions that are important to remember and may prevent
mistakes.
Safety Precautions
Before using this device, please read the following important information to
eliminate or reduce any possibility of causing damage and personal injury.
1. Moisture condensation may occur inside this device and cause malfunction at
these conditions:
• when this device is moved directly from a cold to a warm location;
• after a cold room is heated;
• when this device is placed in a damp room.
To avoid the moisture condensation, you are recommended to follow the
procedure:
i. Seal this device in a plastic bag for it to adapt to room conditions.
ii. Wait for 1-2 hours before removing this device from the bag.
2. Do use the USB cable provided with the scanner. Use of other cable may lead to
malfunction.
3. Avoid using the scanner in a dusty environment. Dust particles and other foreign
objects may damage the unit. If you will not use the scanner for some time, please
place it in the travel pouch.
4. Do not subject the scanner to excessive vibration. It may damage the internal
components.
5. Unplug this device if you don’t need to use for a certain period of time, such as,
during night or long weekend, to avoid any risks of causing fire.
2
Page 6

6. Do not attempt to disassemble the scanner. There is danger of an electrical shock
and opening your scanner will void your warranty.
System Requirements1
Windows/Intel Compatible Personal Computer
Pentium CPU or above
CD-ROM Drive
64 MB RAM (128 MB Recommended)
400 MB Free Hard Disk Space (450 MB Recommended)
USB Port
Microsoft Windows 2000 Professional/ XP/ Vista compatible
NOTE: Windows NT 4.0 does not support Universal Serial Bus (USB) connectivity.
Video card that supports 16-bit color or greater
1
Higher requirements might be needed when scanning or editing a large quantity of image data.
The system requirements here are only a guideline, as in general the better the computer
(motherboard, processor, hard disk, RAM, video graphic card), the better the results.
3
Page 7
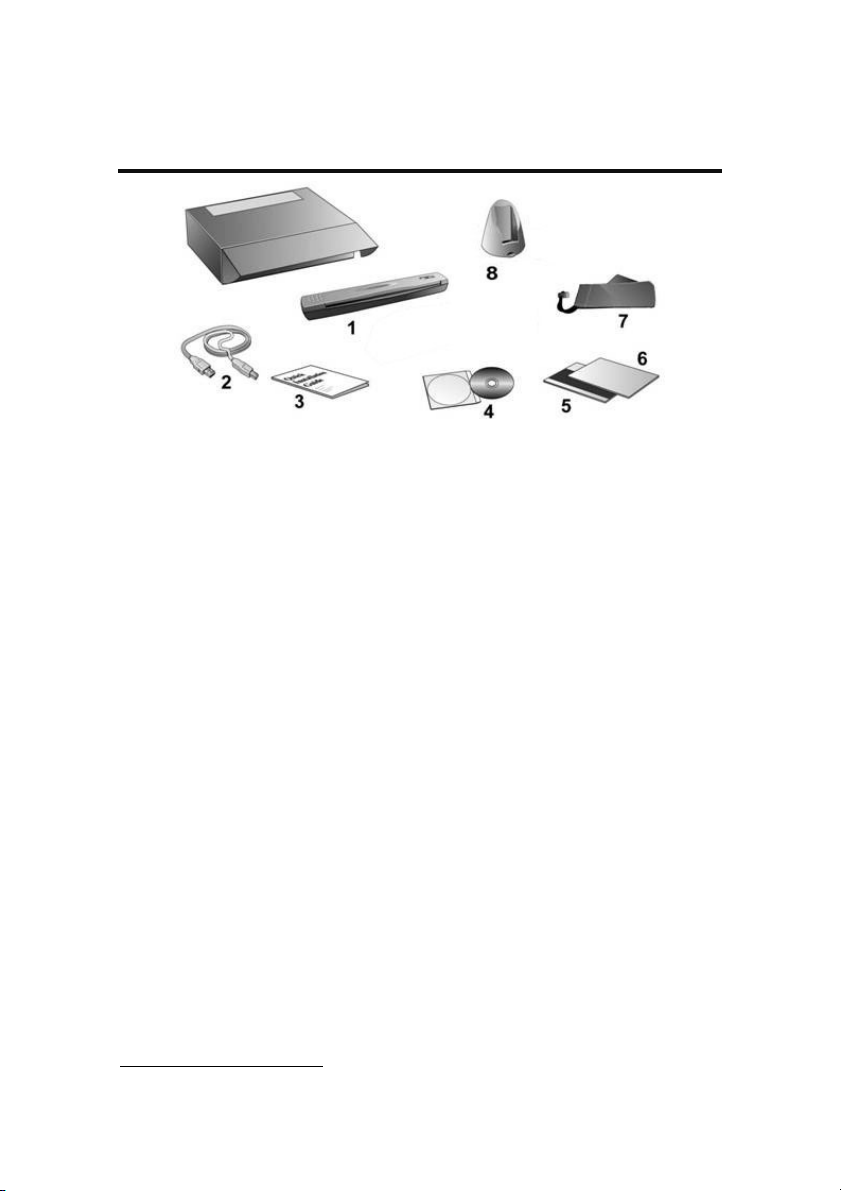
Box Contents2
1. Scanner
2. USB Cable
3. Quick Guide
4. Setup / Application CD-ROM
5. Calibration Sheet
6. Cleaning paper
7. Travel Pouch
8. Base Stand (also serves as a Cable Container)
2
Save the box and packing materials in case you need to transport this scanner in the future.
The product packaging can be recycled.
4
Page 8

The Scanner’s Features
1. USB port: It connects the scanner to a USB port on your computer by the included
USB cable.
2. Alignment arrow: Always align the edges of your documents to this arrow sign.
3. Page feed slot: Feed the document into the scanner from this direction. You can
feel the document being grabbed by the scanner.
4. SCAN button: Press this button to start scanning and processing an assigned
task: saving the scanned image(s) to your hard disk, sending to E-mail program,
printer or other image editing software.
5. LED indicator: It indicates the scanner’s current status.
6. CUSTOM button: Press this button to convert your document into text file.
Product Information
Please fill in the following information for your own records. You will need it when
you contact your dealer or our service center in the future.
Serial Number:
Date of Purchase:
5
(Located at the bottom of the scanner)
- -
Page 9

Chapter I. Installing the Scanner
Before installing your scanner, please verify that you have all of the proper
components. A list of the package contents is provided in the Box Contents section of
this guide.
Software Installation Requirements
Your scanner comes with the image-editing software, OCR software, document
management software, the scanner’s driver, and the DigiScan software. All of these
software applications use approximately 400 megabytes of hard disk space after they
are installed into your computer. To ensure ample room for the installation, as well as
for scanning and saving images, a minimum of 450 megabytes of hard disk space is
recommended.
The USB scanner can only operate under the Windows 2000 Professional/ XP/
Vista operating system.
Please do not use multiple USB scanners in Windows XP
simultaneously! For more information, please refer to the following
Attention
URL...http://www.microsoft.com
Hardware Requirements
This scanner connects to your computer through the Universal Serial Bus (USB),
which supports hot Plug and Play. To determine whether your computer is USBcapable, you must check the rear of your PC to locate a USB jack that looks the same
as the one pictured below. Note that on some computers, the USB port at the rear of
the computer may be occupied and additional ports may be found on the monitor or
keyboard. If you are having trouble in locating the USB port on your computer, please
refer to the hardware manual that came with your computer.
6
Page 10
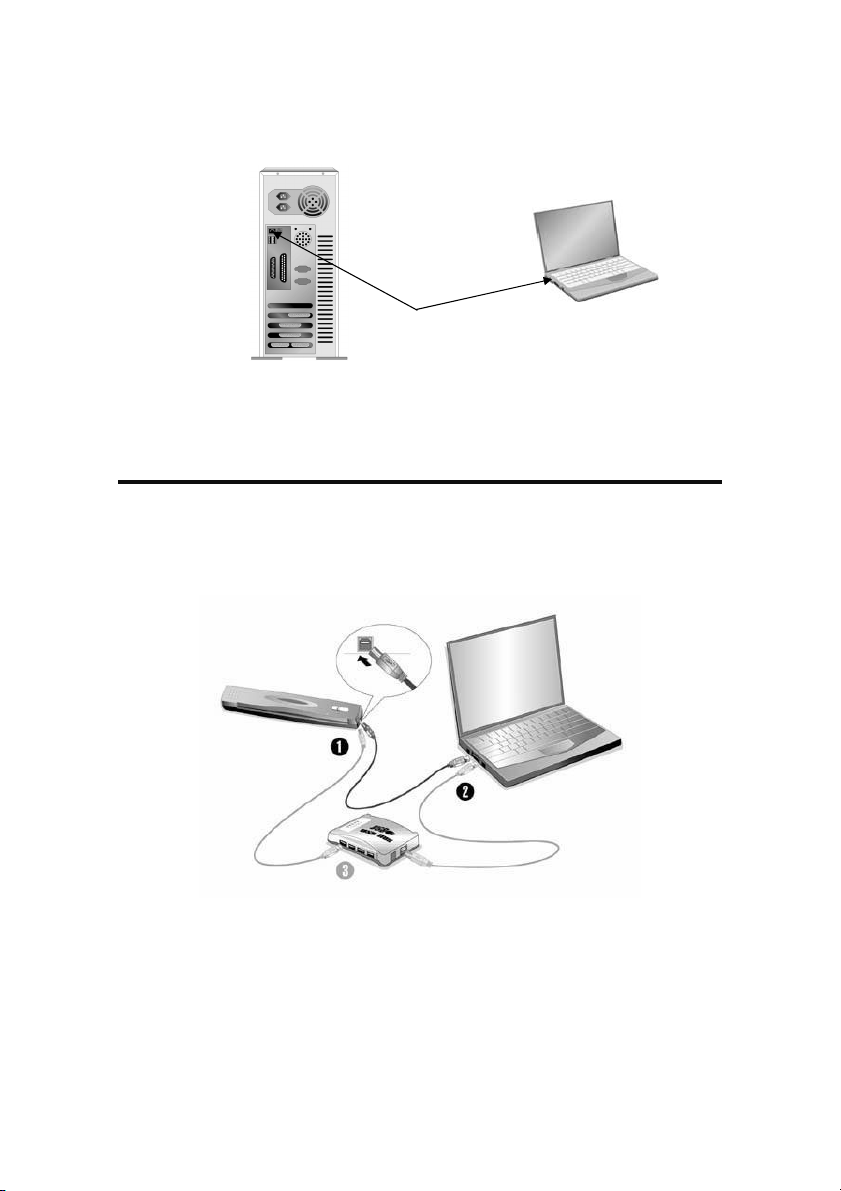
Upon examination, you should find one or two rectangular USB ports, which
usually appear as shown below.
USB Connector(s)
If you don’t find such USB ports on your computer, then you need to purchase a
certified USB interface card to add USB capabilities to your computer.
Installing and Setting up the Scanner
Please follow the step-by-step procedures described below to install the
AgfaPhoto scanner.
SStteepp 11.. CCoonnnneeccttiinngg tthhee SSccaannnneerr ttoo YYoouurr CCoommppuutteerr
1. Plug the square end of the included USB cable to the USB port of the scanner.
2. Plug the rectangular end of the USB cable to the USB port on the back of your
computer.
Note: If there is another USB device connected to the computer, connect the
scanner to an available USB port.
7
Page 11

3. If you plan to connect your scanner to a USB hub3, make sure that the hub is
connected to the USB port in your computer. Next, connect the scanner to the
USB hub.
Note: If you do not have a USB port available, you might need to buy a USB port.
SStteepp 22.. IInnssttaalllliinngg tthhee SSooffttwwaarree
1. If the USB components on your computer are functioning correctly, they will
automatically detect the scanner causing the “Add New Hardware Wizard” or
“Found New Hardware Wizard” to be launched. Note: If your computer was off
when you connected the scanner, the “Add New Hardware Wizard” message will
be displayed when you turn the computer on and when Windows starts.
2. For Windows 2000
a. Click on the ”Next” button when the “Add New Hardware Wizard” window is
displayed.
b. Select “Search For The Best Driver For Your Device [Recommended]” and
click on the “Next” button.
c. The next window will ask you where to search to find the drive. Select “CD-
ROM drive”, and deselect “Floppy disk drives” if it is checked.
d. Insert the Setup/Application CD-ROM, included with your scanner, into your
CD-ROM drive and then click on the “Next” button.
e. Click on the “Next” button in the window that appears.
f. During the process of the installation, a message “Digital Signature required”
might be prompted. Please ignore it, and click on “Yes” to continue the
installation without any misgiving at your scanner functioning. Afterwards,
please skip to Step 5.
3. For Windows XP
a. Insert the Setup/Application CD-ROM, included with your scanner, into your
CD-ROM drive.
b. Select “Install The Software Automatically [Recommended]” and click on the
“Next” button.
c. Click on the “Next” button in the window that appears. Afterwards, please skip
to Step 5.
3
The USB hub is not included with the scanner. If using a hub, you are recommended to use a
hub with its own external power adapter.
8
Page 12
4. For Windows Vista
a. Select “Locate and install driver software (recommended)” when the “Found
New Hardware” window is displayed.
b. Click on the [Continue] button when the “User Account Control” dialog pops up.
c. Insert the Setup/Application CD-ROM, included with your scanner, into your
CD-ROM drive when the system prompts you “Insert the disc that came with
your USB Scanner”, and click on the [Next] button.
d. During the process of the installation, a message “Windows can’t verify the
publisher of this driver software” might be prompted. Please ignore it, and click
on [Install this driver software anyway] to continue the installation without any
misgiving at your scanner functioning.
5. When the system completes the installation, click on the “Finish” button.
6. Follow the on-screen instructions to install all software that your new USB scanner
requires.
7. After the software is installed, close all open applications and click on the “Finish”
button to restart your computer.
8. After the computer is restarted, you will be prompted to perform the scanner
calibration.
9. Insert the special calibration sheet, included with the scanner, face down into the
page feed of the scanner.
10. Follow the on-screen instructions to complete the scanner calibration.
If the scanner installation is not started and displayed automatically on
the screen, click “START”, select “Run” and type in “D:\Install” (where
Attention
SStteepp 33.. TTeessttiinngg tthhee SSccaannnneerr
The following test procedure checks to see if the scanner is properly functioning
with your computer and the scanning software. Before testing your scanner, double
check to make sure that all connections are securely fastened.
To properly test your scanner, please perform the following steps:
D: is the drive letter assigned to the CD-ROM drive of your computer.)
9
Page 13
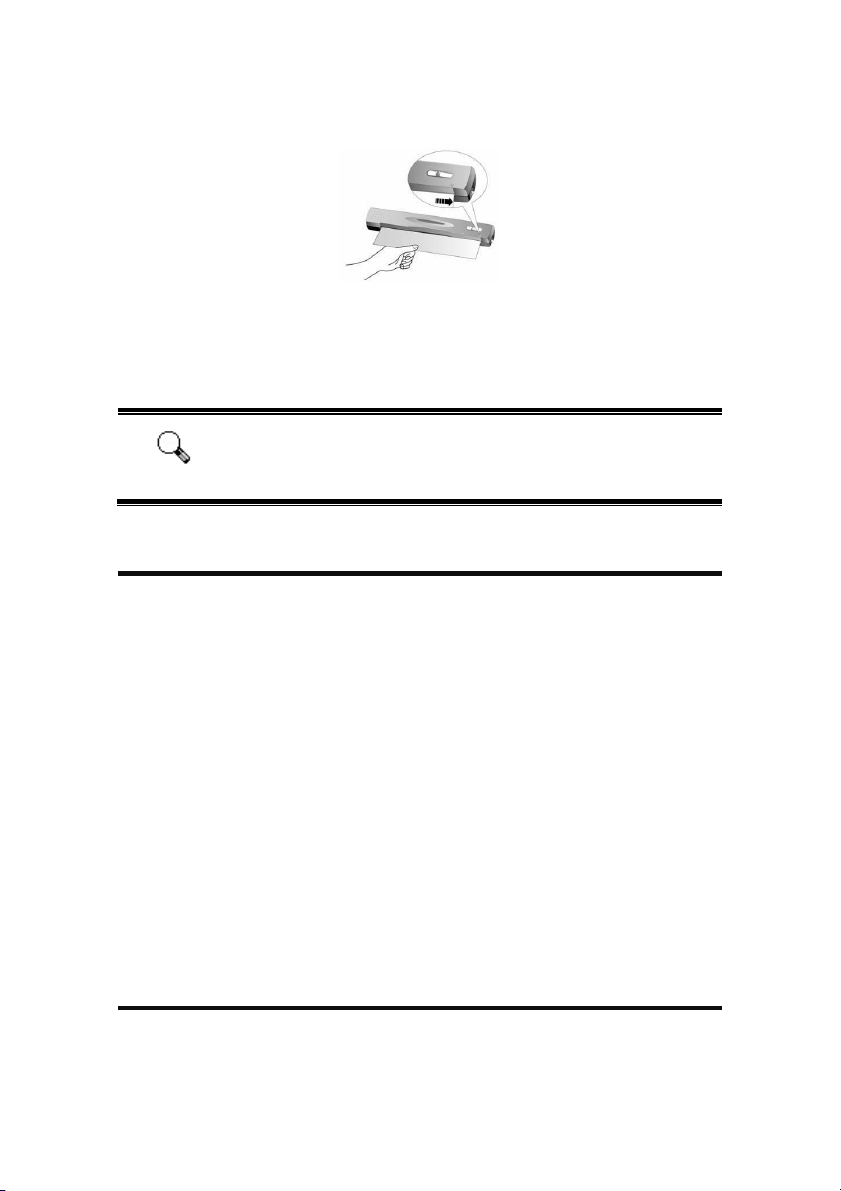
1. Insert the document face down into the scanner. Align the document to the
arrow sign on the right of the scanner.
2. Press the SCAN button on the scanner. The scanning starts immediately.
3. When the scan completes, click My Document folder on your desktop to find a
folder named as DigiScan.
4. If an image is saved in the DigiScan folder, your scanner is working properly.
If the test failed in any way, please refer to “Appendix A:
Troubleshooting” section of this manual and follow the instructions
Attention
therein.
Software Setup Troubleshooting
Carefully review the steps outlined in this guide and the Quick Guide that
accompanied your scanner.
If you are still having problems, please check that:
You have 450 MB of free space on your hard disk drive.
The scanner is plugged in and has power.
You are using the USB cable supplied with the scanner.
The square end of the USB cable is plugged into the rear of the scanner.
The rectangular end of the USB cable is plugged into the back of your
computer.
If you deviated from the installation procedures defined in this manual, please
unplug the USB cable from the scanner and reinstall the software from the CD-ROM.
To reinstall your scanner’s software, click “Start”, “Run”, then type “D:\Install (where D
represents the letter of your CD-ROM drive)”. Carefully follow all the installation
instructions presented in the Setup Wizard. Reboot your computer when prompted,
and plug the USB cable back into the scanner while your computer is still turned on.
Installing Additional Software
Your scanner is TWAIN compliant and functions with virtually all available TWAIN
compatible software. If you purchase additional software to be used with your scanner,
please make sure that it conforms to the TWAIN standard.
10
Page 14

Chapter II.
Usage and Maintenance
Operating the Scanner
Your scanner accepts documents as small as business cards and as large as
Legal size documents. However, some software programs have limitations as to the
information they can handle. The capacity of the computer’s memory and free space
on your hard drive can also limit the physical size of the document that you scan.
There are two different ways to operate the scanner:
1. From within an image-editing program that can acquire images from the
scanner.
2. By pressing either of the two action buttons on the scanner. You may
configure the button settings individually to your personal needs within the
DigiScan program that is automatically installed as your scanner software.
Your scanner needs to be driven by some type of software program. Since all
documents or images (whether text or pictures) that are acquired from the scanner are
treated by your computer as images, most scanning will probably be done from an
image-editing program where you can view, edit, save and output the scanned images.
An image-editing program has been bundled with your scanner on the included
Setup/Application CD-ROM. It will allow you to alter and correct any scanned images
by using a variety of filters, tools and effects.
What about scanning text documents and editing them in a word processor? This
is the role of Optical Character Recognition (OCR) software. OCR software converts
the image files that are created from scanning text documents into text files that can be
viewed, edited and saved by word processors. An OCR program has also been
bundled on the included Setup/Application CD-ROM, and if you wish to use the
scanner in this way you should install the OCR software that is included.
What about scanning business cards and managing them in a more convenient
way? This is the role of BCR (Business Card Recognition) function that can scan
various business cards to BCR Database. BCR software can index the scanned
images into business cards album, recognize and convert respective personal
information contained in the scanned images into an address database for your further
management. This function may or may not be available depending on the scanner
model you purchase.
DigiScan is a program that allows you to conveniently scan images and text
without the need to work directly within any image-editing application (i.e. Presto!
11
Page 15

ImageFolio). DigiScan also includes features to allow you to use your scanner as a
copy machine
4
and to scan documents or photos for e-mail.
DigiScan
You may configure the scanning properties for each individual scanner button
within the DigiScan window.
There are two ways to access the DigiScan window:
1. Double-click the DigiScan
2. Single-click or right-click the DigiScan
then choose Properties in the pop-up menu that opens.
The DigiScan program comprises several scanner button functions. More than
that, if you have installed the bundled software (e.g. PageManager) to your system, the
DigiScan program may enable more functions. All functions are designed to two
accessible tabs: SCAN and CUSTOM. (Refer to the section of “Using the Scanner
Button”.)
icon in the Windows system tray.
icon in the Windows system tray, and
Changes you make in the DigiScan window are automatically saved
immediately after you close the DigiScan window. Afterwards, with a
Attention
4
A printer is required for the copy function.
single touch of the button, you can have the scanner complete your
scanning jobs by the settings you configured within the DigiScan
window. If you decide to quit DigiScan program entirely, the same
settings can be enabled for your quick access next time you open the
DigiScan window.
12
Page 16

CCoonnffiigguurree SSCCAANN SSeettttiinnggss
There are several functions available in the SCAN tab. You may configure them,
as you like to shape the settings for later scanning.
• Save to File
• E-mail
• Copy
• Other Image Editing Functions (e.g. Presto! PageManager)
Select SCAN tab to from the opened DigiScan window to start the configuration
according to your desired. The configuration steps of the functions are largely identical
but with minor differences. So, we’ll give you a typical example for your reference:
Configure Copy Function
1. Select the Copy (Save to File, E-mail or Image Processing) from the
Purpose drop-down menu.
2. Specify a destination file path by clicking the Browse button at the right end of
the Save option, enter a File Name Prefix and select a File Format
accordingly.
3. Check the boxes of Auto Crop, Auto Deskew and/or Descreen, if desired.
13
Page 17

4. Adjust the Scanning Attributes (Size, Mode, Resolution, Brightness,
Contrast and Gamma).
5. Select a printer from the Printer drop-down menu; drag the Scaling Slider Bar,
check the Fit-in box or check Center on Page box, if appropriate.
Note: The Printer menu is enabled only for the Copy function. If you select
other functions, please skip to the step7.
6. Click the Default button if you desire to return to the default settings.
7. Click the Close button to save the final settings and exit the DigiScan window.
Add Other Image Editing Software
To add more image editing functions for the SCAN button, follow the steps
described below:
1. Click the button
2. Click Add button in the prompted out window to select an existing application
from your system.
at the far right end of the Purpose drop-down menu.
3. The program name you have chosen displays in the list.
Note: You are allowed to add at most 3 image editing software in this list.
4. Click Edit button to rename the displayed name of the application, if desired.
5. Click Remove button to remove the option you have created, if necessary.
6. Click Close to accept the changes and close the window.
14
Page 18

CCoonnffiigguurree CCUUSSTTOOMM SSeettttiinnggss
There are various file formats for your choice, which could be supported by
different BCR and OCR. The scanned image(s) may be transferred into the following
file format.
• Acrobat PDF-image (*.pdf)
• Acrobat Searchable PDF (*.pdf) (Only for AS1300 Pro)
• Microsoft Word (*.doc)
• Microsoft Excel (*.xls)
• HTML (*.htm)
• Plain Text (*.txt)
• Rich Text Format (*.rtf)
The availability of the programs and data formats may vary depending
on the scanner model you purchase.
Attention
Select CUSTOM tab from the opened DigiScan window to begin your
configuration as your need. The principle to configure each option within Custom tab is
basically identical with a few differences. We’ll introduce two ways to you to select your
preferable to shape the settings for later scanning.
15
Page 19

Example: (Only available for Advanced Model)
Select Readiris From the Purpose drop-down menu:
1. Select the Acrobat PDF-image (Acrobat Searchable PDF, Microsoft Word,
Rich Text Format or HTML) from the File format drop-down menu.
2. Select the Save each page as a separate file or Save all pages to one file
according to your scanning needs.
3. Specify a destination file path by clicking the Browse button at the right end of
the Save option.
4. Enter the file name in File Name Prefix section.
5. Select Open after saving to review the result or Save to File to save the
result or Send by e-mail to send out the result as attachment.
Note: The Send by e-mail option is unavailable when you select the
FineReader from the Purpose menu.
6. Adjust the Scanning Attributes (Mode, Resolution, Brightness, Contrast and
Gamma).
7. Select proper settings in OCR Setting section (Create Bookmarks, and
Deskew page).
16
Page 20

8. Click Advanced button to set more settings for Graphics in the coming out
window.
9. Click Language Option button to set detailed language properties in the
coming out window.
10. Click the Default button if you desire to return to the default settings.
11. Click the Close button to save the final settings and exit the DigiScan window.
Example:
Select FineReader from the Purpose drop-down menu:
1. Select the Microsoft Excel (Rich Text Format or Plain Text) from the File
Format drop-down menu.
2. The configuration steps 2 to 6 please refer to the steps of the “Select Readiris
from the Purpose drop-down menu”.
3. Select the needed language in Select Document Language.
4. Click the Default button if you desire to return to the default settings.
5. Click the Close button to save the final settings and exit the DigiScan window.
Example: (Only available for Advanced Model)
17
Page 21

Select BCR by HotCard from the Purpose drop-down menu:
1. Select MS Outlook Express, MS Outlook, HotCard BizCard Finder or As a
csv file from the Data Export drop-down menu.
2. Select the needed language in Language.
3. Adjust the Scanning Attributes (Mode, Resolution, Brightness, Contrast and
Gamma).
4. Click the Default button if you desire to return to the default settings.
5. Click the Close button to save the final settings and exit the DigiScan window.
18
Page 22

Select BCR by Cardiris from the Purpose drop-down menu:
1. Adjust the Scanning Attributes (Mode, Resolution, Brightness, Contrast and
Gamma).
2. Click the Default button if you desire to return to the default settings.
3. Click the Close button to save the final settings and exit the DigiScan window.
19
Page 23

Using the Scanner Buttons
Your scanner is equipped with two function buttons designed to make your
scanning experience more convenient and efficient. With simply one touch of the
button, you can scan to file, copy, OCR or e-mail.
1. Custom Button
2. SCAN Button
Each button launches a specialized utility. Default button settings are optimized
for most frequently scanning jobs, such as size, mode, resolution, ... You may,
however, change the settings as the methods described ibid to tailor your every scan
by accessing the DigiScan window.
To use the buttons, ensure you have installed the relevant software
(e.g., the printer driver is required for using the copy function)
Attention
beforehand.
SSccaann BBuuttttoonn
The SCAN button can automate a scanning and proceed saving the scanned
image(s) to a destination file path, sending to a MAPI based E-mail programs (which
currently include Microsoft Outlook, Eudora, etc.), a printer or an image editing
software, depending on the settings you have defined for the SCAN button in the
DigiScan window.
To use the SCAN button, please follow the steps:
1. Make desired adjustment in Scan tab for the scanning purpose that the SCAN
button will execute later. (Please refer to the “DigiScan” section for more
information on adjustments.)
2. Insert the document, image or card face down into the scanner. Align the
paper or card to the arrow sign on the right of the scanner.
20
Page 24

3. Press the SCAN button on the scanner. The scanning starts immediately.
4. If you have the "Continuous Scan" option checked, select E-mail or Copy from
the Purpose drop-down menu, and insert another document or image until you
have scanned all.
5. When the scan completes, the scanned images will be save to the defined file
path as separate image files and sent to the assigned post-processing
software (e.g. Save to File, E-mail, Copy, or other image editing software).
CCuussttoomm BBuuttttoonn
The CUSTOM button provides a solution for converting your printed document into
texts searchable electronic document, such as *.pdf, *.doc, *.rtf, *.htm or other text
formats supported by the bundled Readiris or FineReader software.
To use the Custom button, please follow the steps:
1. Select the desired OCR or BCR firstly, and then make desired adjustments in
Custom tab for the scanning purpose that the Custom button will execute later.
(Please refer the “DigiScan” section for more information on adjustments.)
2. Insert the document, image or card face down into the scanner. Align the
paper or card to the arrow sign on the right of the scanner.
3. Press the CUSTOM button on the scanner. The scanning starts immediately.
4. If you have the “Continuous Scan” option checked, follow the on-screen
instructions to insert another document or image until you have scanned all.
5. When the scan completes, the scanned image(s) will be sent to the OCR or
BCR software you select for recognition or conversion.
6. The processed file will be saved to the file path as a single file.
21
Page 25

Functions Features
The section introduces all of the options on the DigiScan window. We will still
describe them according to the SCAN tab and CUSTOM tab separately.
SSccaann ttaabb
Purpose
This menu include Save to File, E-mail, Copy, Imaging Processing functions,
which allows you to determine which software you would like to use for the postprocessing of the scanned image(s).
• Save to File: The “Save to File” function enables you to conveniently
scan documents or images, save them automatically to the destination
file path with specified file name prefix and file format.
• E-mail: The E-mail function lets you scan documents and images directly
to your MAPI-based E-mail programs (which currently include Microsoft
Outlook, Eudora, etc.) that have already been installed on your computer.
Note: If you like to change to the MAPI-based E-mail system, please go
to IE>Tools>Internet Options…>Programs tab>E-mail drop-down
menu to choose destination E-mail program.
• Copy: The Copy function allows you to scan images directly to the printer
without saving them to your hard disk, making it ideal for getting a quick
copy of a document or image.
Note: The scanner and printer must be installed correctly in Windows for
the Copy button to work properly.
• Imaging Processing: The Imaging Processing Function allows you to
scan the image directly to the image editing application you have defined.
Note: You are recommended to add image editing software to achieve
scanning efficiency and assure the DigiScan program work properly.
How the post-processing works will depend on the application you have
assigned for the new function, you may refer to the guide of more
instructions.
Save Setting
Save - This setting is for saving the scanned image(s) to a specified folder for
further management. Clicking the Browse button to choose a destination folder,
you may view, edit, or manage the scanned images later in a more efficient way.
File Name Prefix - The file name of the scanned images will be a combination of
your own defined file name prefix and the four digits number issued by the system.
22
Page 26

File Format - Choose which file format you want the scanned image to be. The
following file formats are available from the drop-down menu:
• JPG (JPEG) - (Joint Photographic Experts Group) JPEG (pronounced
"jay-peg) is a format that is commonly used for color images displayed on
the Internet. JPEG reduces the file size of an image by discarding some
of the non-critical data of the image. JPEG retains all of the color
information of an image and offers varying degrees of compression.
• TIF (Aldus Tiff) - (Tagged Image File Format) is a widely-used
bitmapped graphics file format developed by Aldus and Microsoft that
handles monochrome, gray scale, and 8/24-bit color.
• PCX (Paintbrush) - PCX is a popular bitmapped graphics file format that
handles monochrome, and 2-, 4-, 8-, and 24-bit color. PCX uses Run
Length Encoding (RLE) to achieve compression ratios of approximately
1.1:1 to 1.5:1. RLE is best used with images that have large blocks of
solid colors.
• BMP (Windows Bitmap) - (Bitmap file - also known as a "bump" file) is a
Windows and OS/2 bitmapped graphics file format. BMP is the Windows
native bitmap format. BMP files provide formats for 2, 16, 256 or 16
million colors (1-, 4-, 8-, and 24-bit color).
Auto Processings
Auto Crop - Alternatively you may check the Auto Crop option to have the
scanner program automatically identify the dimensions of the image you scanned
and crop around the edges. The crop shape will be a square or rectangle and it
will not trace the edges of oddly-shaped images. This command can be useful
when scanning smaller images such as photographs.
Auto Deskew - You'll find this option useful when you find the scanned image
slanted. Tick the box of this option and rescan the image; the DigiScan program
will automatically straighten the skewed image(s).
Descreen - applies filtering to images that contain moiré patterns (or
herringbone). A moiré pattern is created from scanning pictures in magazines, or
printed material that use color dithering. The descreen filter is not needed when
scanning original photographs or black and white images and text, but is
recommended when scanning any printed color graphics, such as a page from a
magazine, in order to remove the unsightly interference patterns which may occur.
Scanning Attributes
Size - enables you to alter the scan area. It is preferable to scan the exact area of
the document or image so the file size is the smallest possible and there are no
large blank areas on the page.
23
Page 27

Mode – tells the scanner the type of document you are scanning. There are three
settings to choose from:
• Color – scans the document in 24-bit, RGB color. This mode takes the
longest time and uses the most memory but results in the highest quality
images.
• Grayscale – scans images in black and white and can simulate 256
different shades of gray using dithering. This mode is best used when
color isn’t necessary for the scanned image since color images take so
much time to scan and process, or when no color printer is available.
Using this mode, even to scan color images, will result in high-quality black,
white, and gray output (the color will automatically be converted to gray).
• Text – is preferable when scanning text documents. It results in clear black
and white documents suitable for printing and faxing.
Resolution – is measures in dots per inch (dpi). The higher the resolution, the
more detailed the image, and the more memory and drive space the image will
use.
Brightness – This is amount of light that is concentrated onto a document while it
is being scanned. Raising the brightness increases the amount of white in an
image, making it appear more washed out. Lowering the brightness may help you
read light or faint text.
Contrast – adjusts the tonal range of an image by lowering mid-tone values and
increasing values for high and low tones. The higher the contrast, the sharper the
image will be. The lower the contrast, the blurrier an image will be.
Gamma – Use the slider to adjust the image gamma for the scanned image.
Gamma values are primarily a measure for the color brightness. The larger the
gamma value, the brighter the color becomes. Changing the image’s gamma
value allows you to change the brightness of the colors IN THE IMAGE ITSELF.
Printer
This pull-down menu contains all the printers the have been installed in Windows.
Simply click on the down-arrow at the right of the box and choose the printer you
wish to use. (Only if you select the Copy from the Purpose drop-down menu, will
the option be enabled.)
If the printer you wish to use does not appear in the pull-down list pf printers, then
it is not installed in Windows. To install a printer, click on the Windows START
button; choose Settings and then Printers. In the window that opens, double-click
on the Add New Printer icon and follow the instructions carefully.
Scaling and Position
The slider bar is used to reduce or enlarge the scanned image on the printed page.
The reduce/enlarge value is displayed in a box to the right of the slider bar and denotes
the percentage which the image will be resized. Thus, a value of 200 (%) will cause the
24
Page 28

scanned image to the printed twice as large as its size when scanned. A value of 50
will reduce the size of the printed image by half, and so on. The slider bar can be
moved by using the mouse or by using the arrow keys on your keyboard.
Fit-in – This option is used to reduce or enlarge the scanned document or image
to fit on the printer paper. Smaller images will be enlarged to fill the entire printed
page and larger documents will be reduced to fit on the printed page. This option
is most often used when scanning an A4-sized document and printing it on letter-
sized paper (or vice-versa).
Center on Page – This function centers the scanned image on the printed page.
Default
Clicking this button resets the values of all settings of this function to their default
values. The values of settings for the other scanning functions are not influenced.
CCuussttoomm ttaabb
Output Setting
Purpose – list the OCR(s) and BCR that the scanner supports.
File Format – stands for the file style you prefer the scanned image(s) to be after
transfer processing, and is supported by the software you have installed in your
system. For example, you have to install Microsoft Word in your system before
selecting *.doc file format.
• Acrobat Searchable PDF (Only for AS1300 Pro): enables the page
analysis (defining zones of graphics, tables, texts, artwork, space, etc. in
the scanned document), OCR process and PDF conversion, and then
outputs the transferred result in texts searchable PDF document.
Different from Acrobat PDF Image Function, this function can also
produce a PDF converted image on the top of the searchable texts.
When you document contains images and texts, you are recommended
to choose this file format to get better transferred result.
Note: PDF stands for Portable Document Format.
• Acrobat PDF-image: Text is not searchable in this searchable in this
PDF file type. The entire page is saved as a picture, and OCR (Optical
character recognition) has not been executed.
• Rich Text Format: When this file format is chosen, the scan result may
be output into *.rtf file after OCR process. You may review and edit the
result in the word processor Microsoft Word.
• Note: Rich Text Format (RTF) is a file format that lets you exchange text
files between different word processors in different operating systems.
25
Page 29

• Microsoft Word: When this file is chosen, the scan result may be output
into *.doc file after OCR process. You may review and edit the result in
the word processor Microsoft Word.
• Note: Word document (.doc) is a common word processing application,
for creating and editing texts document.
• HTML: Choosing this file format may output the transfer result as *.htm
file for your browsing in the Web browser, Microsoft’s Internet Explorer or
Netscape’s Navigator.
Save - Clicking the Browse button to locate a destination folder for the scan or
transfer results, and the file path will be shown in the Save section.
Open after saving - Save the result to the pointed file path and open with
relevant software.
Save to File - Save the result to the pointed file path.
Send by e-mail - Send the result to a MAPI-based e-mail program (i.e. Outlook,
Eudora...etc) as attachment.
Data Export - Export the BCR results as a record in the address book of MS
Outlook Express, a piece of data in a user defined database in HotCard BizCard
Finder, or a CSV file. (This option will be functioned under BCR by HotCard.)
Language - This option allows you to set an appropriate language for the
business card recognition. The language options include English/Chinese,
European, Japanese and English. (This option will be functioned under BCR by
HotCard.)
OCR setting
This option will not be functioned unless the OCR by Readiris.
Create Bookmarks: This feature may create bookmarks for the text windows,
graphics and tables in Adobe Acrobat PDF files.
Include Graphics: This feature may include the graphics in "auto formatted" text
files.
Retain colors of text: This feature may maintain the original colors of the text
across the recognition.
Deskew page: If this checkbox is ticked, the DigiScan program will automatically
straighten the skewed page(s) after scan.
Merge lines into paragraphs: This feature enables the automatic paragraph
detection. (This option is unavailable for Adobe Acrobat files: PDF files always
store text line by line.)
26
Page 30

Advance…
Retain scan resolution: Use the resolution you have set for scanning the
originals.
Reduce resolution to: Reduce the resolution of the graphics included in the
originals to a pointed value, but won't reduce that of the texts.
JPEG Quality: The better the quality is, the larger the file will be.
Language Option
In the Language Option section, you may turn on the “Numeric symbols
recognition” function to scan tables with no texts or select an appropriate “Primary
Language” for the originals.
Numeric symbols recognition: Tick this function to recognize tables of figures
which contain no text. When you limit recognition to the numeric character set, the
symbols 0" to "9", "+", "*", "/", "%", ","", ".", "(", ")", "-", "=", "$", "£", "¥" and the "€"
will be recognized.
Primary Language: This option allows you to set an appropriate primary
language for the document recognition. Those language options cover all
American and European languages.
Secondary Language: You may select up to 4 secondary languages to support
the primary language you have selected. The secondary languages have to be the
same language group with the primary language.
Note: For more information about the supported languages recognition, please
refer to relevant description in the Readiris on line help.
Select Document Language
This option will be functioned under OCR by Abbyy FineReader.
Primary Language: This option allows you to set an appropriate primary
language for the document recognition. Those language options cover all
American and European languages.
27
Page 31

Scanning Tips
Reducing the File Size of An Images:
z Change the scan mode. Color mode collects the most amount of information
and therefore requires more memory than grayscale or black and white.
z Reduce the resolution.
z Reduce the scan area.
Determining the Correct Amount of Resolution:
z More is not always best: Determine what your final application will be
BEFORE you scan. In many cases a high resolution image will do nothing
more but dramatically increase the file size, take up more disk space, and
slow down the process.
z Internet Applications: For e-mailing color photos or pasting images on Web
sites, a resolution of 100 dpi is the best choice. This is because the actual
viewable resolution of the average monitor is 72 dpi. Additionally, download
times are dramatically reduced.
z Printing to Ink Jet Printers: Check your printer documentation for
recommended printer resolution settings. We recommend ranges between
75-300 dpi in general. Only use a higher scanning resolution (300 dpi and
above) for smaller images when detail must be captured in a small area
because it will be enlarged later.
z Laser and Commercial Printers: When printing an image to a laser printer or
commercial printing press, it is important to understand the process in terms
of line screen (a.k.a., LPI). Line screens are the number of screen lines per
inch when an image is half toned. Half toning is the process of breaking the
image down into a series of dots to reproduce continuous-tone art when
printing on a press. A general rule when printing in one of these two manners
is to scan one and a half to two-times the amount of the line screen. Laser
printers that have resolution ranges of 300 and 600 dpi will have line screens
between 50 and 100. Typical commercial printing is done at an average line
screen of about 150. Therefore, an optimal scanning resolution would be 200
or 300 dpi.
Scanning documents with the protective cover
Documents can be scanned using the protective cover, this avoids paper jams
and protects the document from damage, scratches or creases. You can also insert
smaller documents into the protective cover, for instance passport photos.
28
Page 32

1. Open the protective cover and insert the document text side up and the top of
the page up to the black line on the protective cover.
2. Insert the protective cover into the document feeder with the writing side down
and the black stripe first.
29
Page 33

Status Indicator
The green LED indicator (located between the Scan and Custom buttons)
indicates the status of the scanner, as described below:
Light Status
On The scanner is connected with the computer, ready to scan images.
Flashing The scanner is busy scanning.
Off The scanner is off, either because of disconnection with the
computer, or because the computer being turned off.
Scanner Connection
The first step to take when troubleshooting connection problems with your
scanner is to check all physical connections. The DigiScan icon
Windows system tray, indicates if the scanner software is properly launched and the
scanner and computer are communicating with each other.
Appearance Status
The DigiScan program has been successfully launched and the
scanner is connected with the computer, ready to scan mages.
The scanner is not connected with the computer.
No Display
If the Windows system starts and detects the scanner unconnected, the following
message will appear to remind you (The scanner illustration(s) may appear different
than from the actual scanner itself.):
You have chosen to terminate the DigiScan program, no matter
the scanner is connected or disconnected with the computer.
, located on the
30
Page 34

If you prefer not to see this reminder message again, you may:
Check the box of “Do not show this message again” within this message
window, and then click “OK” button.
Click on the DigiScan icon
Uncheck “Enable Warning” from the menu that pops up. Click the “No” button
in the message box that appears.
If you prefer to see this reminder message again, you may:
Uncheck the box of “Do not show this message again ” within this message
window, and then click “OK” button.
Click on the DigiScan icon
“Enable Warning” from the menu that pops up. Click the “Yes” button in the
message box that appears.
located on the Windows system tray.
located on the Windows system tray. Check
31
Page 35

Maintenance
CCaalliibbrraattiinngg tthhee SSccaannnneerr
Calibrate the scanner if colors appear in areas that should be white, or colors of
the scanned image and the original vary a lot. This allows you to adjust and
compensate for variations that can occur in the optical component over time by its
nature.
The following describes how to calibrate the scanner:
1. Insert the special calibration sheet face down into the page feed slot of the
scanner.
Please insert the special calibration sheet included with the scanner.
Alternatively you may also use any plain white sheet of paper sized
Attention
2. Click on the DigiScan icon located on the Windows system tray.
3. Click “Calibrate” from the menu that pops up.
4. The scanner pulls the calibration sheet through the scanner, which completes
this scanner calibration.
in A4 (210 by 297 mm) instead; however, the calibration effect may
be less good than the special calibration sheet.
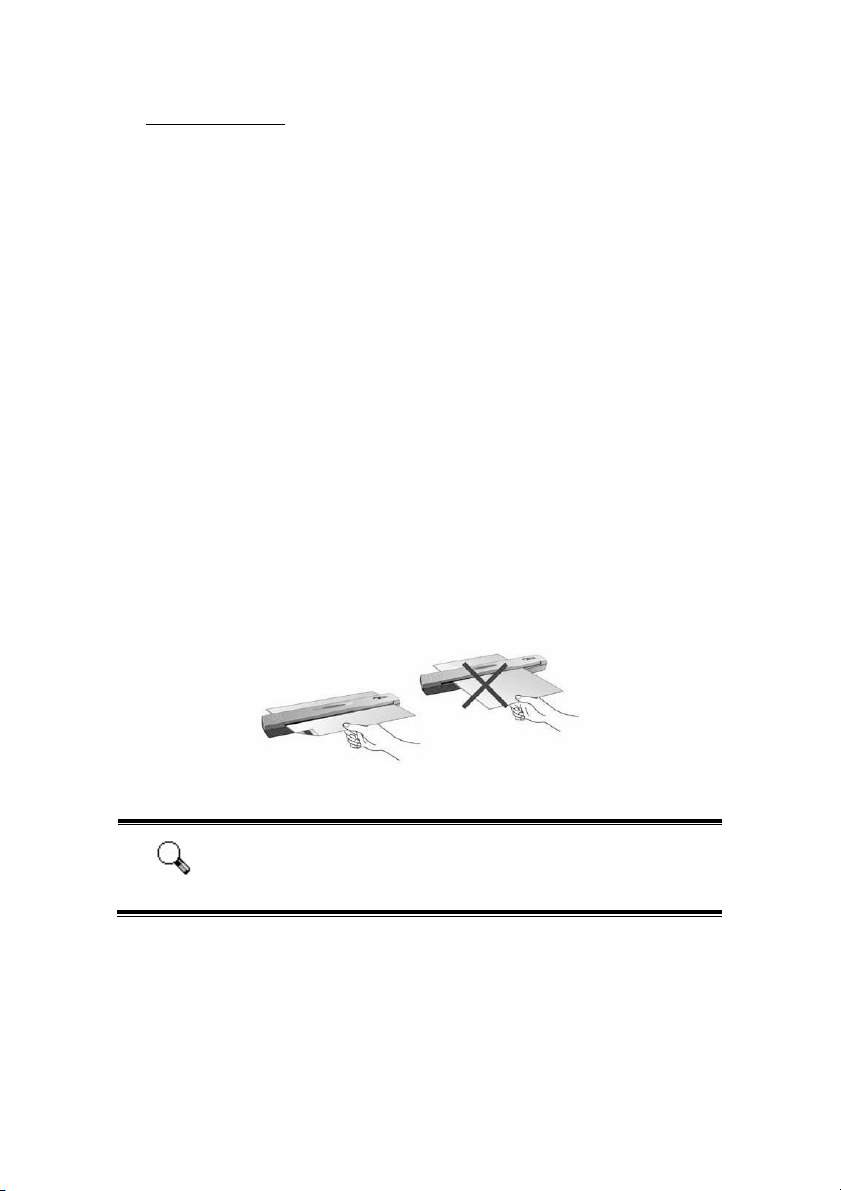
Incorrect Paper Direction Correct Paper Direction
CClleeaanniinngg tthhee SSccaannnneerr
When you use this scanner for the very first time after installation, you are
suggested to clean the scanner before use.
If unusual dots or lines are found in your scanned image, it is very likely that dust
particles or other foreign objects have been brought inside the scanner. You may
clean the scanner to rectify the problem.
32
Page 36

The following describes how to clean the scanner:
1. Insert the special cleaning paper into the page feed slot of the scanner.
• Do use the cleaning paper included in our package box.
Remember to replace the cleaning paper in a safe and
clean place when you finish using it.
Caution
2. Click on the DigiScan icon located on the Windows system tray.
3. Click “Clean” from the menu that pops up.
4. The scanner pulls the cleaning paper through the scanner, which completes
this scanner cleaning.
• Do not use anything other than our cleaning paper to clean
your scanner. Using other sheet will influence the scan
quality or even lead to scanner malfunction.
Usage & Maintenance Tips
To keep your scanner working smoothly, take a moment to review
the following usage & maintenance tips.
Caution
Do not insert any document into the scanner with small objects such as
paper clips, pins, staples or any other fasteners attached.
Do not insert damp, curled or wrinkled documents into the scanner for
scanning. These documents can cause paper jams and possibly damage the
unit.
Your scanner operates best in temperatures between 10° C and 40° C (50° F
to 104° F).
33
Page 37

Storage of the Scanner
UUssiinngg tthhee BBaassee SSttaanndd
1. Open the bottom plate of the base stand. Place the USB cable inside the base
stand and then close the bottom plate.
2. Place the base stand on the desk.
3. Place the scanner onto the base stand, with the USB port facing up.
Do place the base stand and the scanner on STABLE
surfaces to prevent them from falling.
Caution
.
34
Page 38

Appendix A: Troubleshooting
Scanning Problems
Most problems are easily solved, and some of the most common questions and
their recommended solutions are listed below.
Symptom: After following the installation instructions, my computer cannot
find the scanner.
Cause 1: Your software may have not been successfully installed.
Solution 1: Please insert the CD-ROM and reinstall the scanner software. Follow the
on-screen instructions carefully when installing the software.
Cause 2: Some aspect of your computer system does not support USB.
Solution 2: Download and execute the file USBREADY.EXE at
http://www.usb.org/home to determine the level of your computer’s
USB support.
Cause 3: USB is not enabled in your BIOS settings.
Solution 3: Enable the USB controller in your BIOS settings. This is typically done
by pressing a key
BIOS Settings screen that appears, find the option for USB and enable
it. Exit and Save the changes you made. Your computer is rebooted
automatically. Please consult your computer vendor before attempting
to do this change.
Cause 4: The USB controller was improperly installed on your computer.
Solution 4: To reinstall the USB controller, click on the Start button, choose Settings
and select Control Panel. In the window that opens, double-click on the
Add New Hardware icon. Carefully follow the instructions that appear on
your screen.
Symptom: The scanned image looks grainy on the screen.
Cause: Your video mode is not set to show more than 256 colors.
Solution: We recommend that you set your video mode to 16 bits per pixel (65536
colors) or higher. Please consult your video card, computer or Windows
documentation to change the video mode.
Symptom: The scanner scans very slowly.
Cause 1: You are running other applications in the background.
Solution1: Close all the other applications that are running in the background.
5
Please consult your computer manual on how to modify your BIOS/CMOS settings.
35
5
(usually <del>, <F1> or <F10>) during startup. In the
Page 39

Cause 2: You are scanning at a high resolution (DPI).
Solution 2: Reduce the resolution.
Symptom: The scanned document comes out as strange characters on the
screen after the OCR process is completed.
Cause 1: Text page was scanned upside down.
Solution 1: Reverse the page and scan again.
Cause 2: The OCR software is limited to certain types of documents, fonts and
formats. You might be trying to scan a form, spread sheet, a hand
written letter or a document with color text or color page.
Solution 2: Scan a clean document that contains, preferably, one column and has
black text on a white page.
Symptom: The scanner is not in the list of supported scanners in other
commercial software.
Solution: Select TWAIN as the scanner.
Symptom: Unable to scan from other software other than the one that came
with the scanner.
Solution: Enter the Scanner Setup within the program, Select TWAIN and you will
see your scanner listed.
Symptom: Unable to save to a floppy diskette.
Cause 1: The floppy disk might be writing protected.
Solution 1: Move the write protection tab, located in the back of the diskette, to the
closed position.
Cause 2: Your disk might not be formatted.
Solution 2: Format the diskette.
Cause 3: There is not enough space available in the disk to save the document.
Solution 3: Delete any files that you do not need from the floppy disk.
Cause 4: You might be scanning your document at a high resolution. Documents
scanned using higher resolution modes will take a considerable amount
of disk space.
Solution 4: Reduce the resolution.
Symptom: The image looks good in the software that came with the scanner
but it does not look good when I export the image to another
program.
Cause: Different imaging programs use different Monitor Gamma settings.
36
Page 40

Solution: Change the Monitor Gamma settings in either of the programs so that
they match. Please consult the help files for each program to find out
how to adjust the Monitor Gamma.
Symptom: The image looks good in the screen but is very dark when printed.
Cause1: The Monitor Gamma Settings or the scanner brightness settings are not
set properly.
Solution 1: 1) Change the Monitor Gamma to a value between 1.0 and 1.5.
Please consult your help file for information on how to adjust the
Monitor Gamma.
2) Adjust the brightness control in the TWAIN window before scanning.
Cause2: The printer brightness setting is not set properly.
Solution 2: Adjust the brightness in the printer. Some printers allow you to change
the brightness settings. Please consult your printer documentation.
Symptom: The scanned image takes too long to be sent with an email
message.
Cause1: The image was scanned at a high resolution or is physically large.
Solution1: Scan at a lower resolution (DPI).
Cause 2: The Internet might be congested.
Solution 2: Try sending the message at a later time.
Symptom: The image that I sent through email looks good in my computer but
it looks dark in the recipient computer.
Solution: The Monitor gamma settings should be approximately the same in your
and the recipient computer.
Symptom: A. -Disk is full- error is displayed when I click on the scan button.
Cause: Your computer is running low in resources. Your computer hard disk
drive does not have enough space to process the image. This may be
because you are scanning at too high of a resolution.
Solution: Obtain a larger hard disk or rescan at a lower resolution.
Symptom: A -Disk I/O error- message is displayed.
Cause 1: This error is caused if the hard disk drive does not have enough space
available to process the image.
Solution 1: Make some space available in the hard disk drive by deleting any
programs or files that you do not need.
Cause 2: Your hard disk drive might be heavily fragmented or it might contain
some bad sectors.
37
Page 41

Solution 2: Run the Scan Disk utility that came with your Windows computer.
Please consult your computer documentation or the Windows help files
on how to run the Scan Disk Utility.
Symptom: The error “Scanner not Found” that is displayed.
Cause 1: The USB cables are not connected properly.
Solution 1: Make sure that the cables are connected tightly and to the proper port.
Cause 2: The USB cable might be too long.
Solution 2: Please use the USB cable that comes with your scanner.
Cause 3: The scanner’s power cord is not connected properly.
Solution 3: Make sure that the AC adapter is connected to an outlet. If the scanner
is connected to a Surge Protector, make sure that the Surge Protector is
turned on.
Symptom: The document or photo has been inserted into the scanner but is
not fed through the scanner.
Cause 1: The document or photo was not correctly inserted into the scanner.
Solution 1: Make sure the document or photo is properly inserted into the page feed
of the scanner.
Solution 2: The paper may be too think or too thick.
Cause 2: The thickness of the paper is out of scanner specifications.
Symptom: The document or photo got jammed while getting fed into the
scanner.
Cause: The document or photo was not correctly inserted into the scanner.
Solution: Grab ahold of the jammed paper and pull it through the scanner. Try to
avoid creasing, wrinkling or tearing the paper.
Common -How-to- Questions
Symptom: How do I save the scanned image in JPG format?
Solution: 1) In the Image-editor, click on [File] and then [Save As].
2) Select the folder where you want to save your image.
3) Select JPEG or JPG under Save as type:
4) Type the name of the file name for your image.
Symptom: How do I cut an image and paste in another program?
Solution: 1) Select the area that you want to cut.
2) Click on [Edit].
3) Click on [Cut].
38
Page 42

4) Start the program and open the document where you want to paste
your image.
5) Click on [Edit].
6) Click on [Paste].
Please consult your program documentation on how to Cut and Paste if
you have any more questions.
Symptom: How do I place a scanned image into my word processor?
Solution: 1) Find out what formats are supported by your word processor.
2) Write the name and the location of the file before you save it.
3) Save in a format supported by your word processor.
4) Depending on your word processor, select [Insert] or [Import] from
your menu, then select [Image] or [Picture].
Consult your Word Processor documentation for more information on
how to import images.
Symptom: How do I send a scanned image using my email program?
Solution: Save your scanned image in a format that is supported by your email
program (JPG, GIF or PNG are recommended). Once your picture is
saved, consult the documentation of your email program on how to
attach a file to a message.
39
Page 43

Appendix B:
Specifications6
Hardware Specification
Physical
dimensions
Weight 0.33Kgs (0.73 Lbs)
Operating
Temperature
Scan Area
Scan Method Single -Pass
Scan Modes
Resolution Optical 600 dpi (1200dpi software interpolated)
Scanning
Materials
Protocols TWAIN Compliant
Connection USB Port
Light Source Three-color RGB LEDs
Power
Requirement
Power
Consumption
EMI FCC Class B
Environment
Requirement
274mm x 47mm x 33.8 mm (10.79” x 1.85” x 1.33”)
10° C to 40° C (50° F to 104° F)
Maximum 216 mm x 356 mm (8.5” x 14”)
Minimum 47mm x 30 mm
Color: Input 48-it; Output 24/48-bit
Grayscale: Input 16-bit; Output 8/16-bit
Black & White: 1-bit
Reflective color or black-and-white originals
Paper Thickness: from 0.08 mm to 0.4 mm
Powered through USB port. No AC power adaptor is required.
Operation: 2.5 watts maximum
Idle: 1.2 watts
RoHS/WEEE
AgfaPhoto is used under license of Agfa-Gevaert NV & Co. KG or AgfaGevaert NV. Neither Agfa-Gevaert NV & Co KG nor Agfa-Gevaert NV manufacture
this product or provide any product warranty or support.
For service, support and warranty information, contact the distributor or
manufacturer.
Contact: AgfaPhoto Holding GmbH, www.agfaphoto.com
Manufacturer: Sagem Communications, www.sagem-communications.com
6
Hardware specifications may change at any time without prior notice.
40
Page 44

41
Page 45

Internet
AgfaPhoto is used under license of Agfa-Gevaert NV & Co. KG or
Agfa-Gevaert NV. Neither Agfa-Gevaert NV & Co. KG nor AgfaGevaert NV manufacture this product or provide any product
warranty or support. For service, support and warranty
information, contact the distributor or manufacturer.
AS 1300 · AS1300 Pro
EN
-C
 Loading...