

Page 1
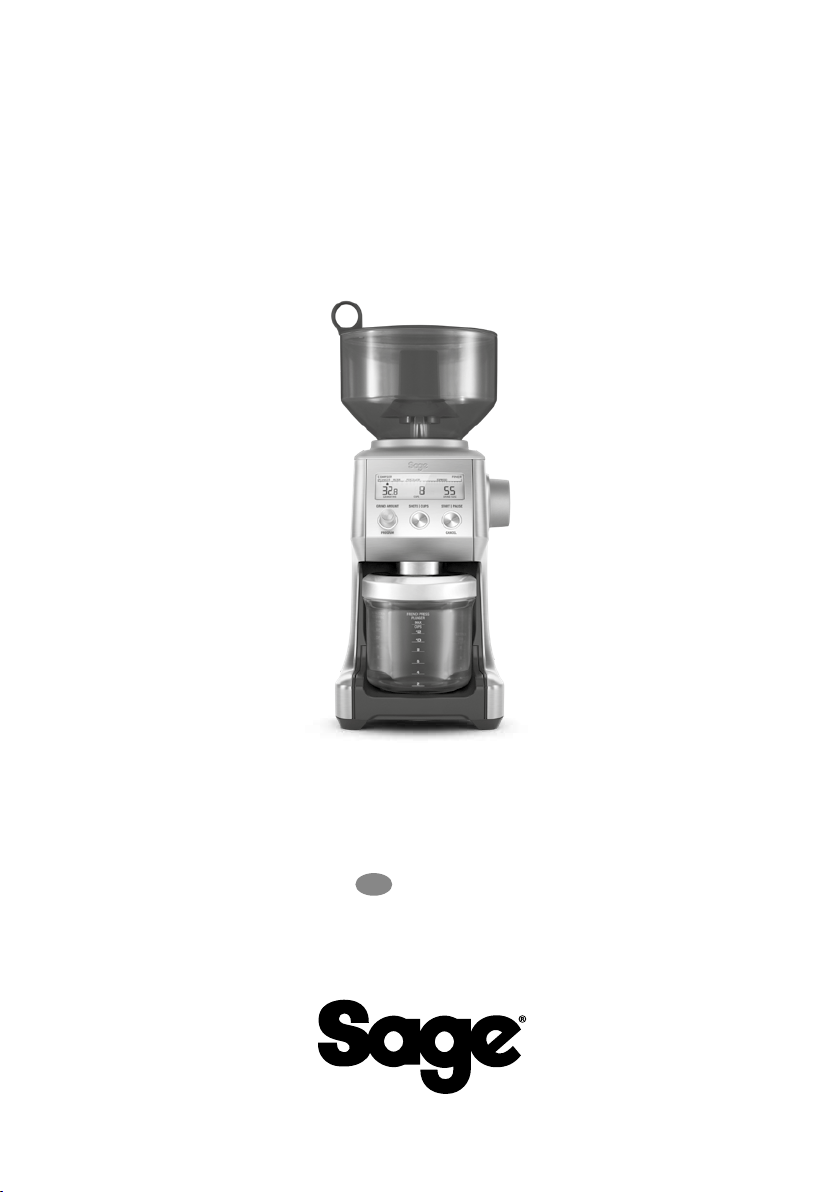
the User Guide
B###### / S######
the Smart Grinder
BCG820 / SCG820
™
Pro
EN QUICK GUIDE
Page 2

CONTENTS
2 Sage® Recommend Safety First
5 Getting To Know Your New Appliance
6 Operating Your New Appliance
11 Care, Cleaning & Storage
12 Troubleshooting
13 Guarantee
SAGE®
RECOMMENDS
SAFETY FIRST
At Sage® we are very safety
conscious. We design and
manufacture appliances with
your safety foremost in mind.
In addition, we ask that you
exercise a degree of care
when using any electrical
appliance and adhere to the
following precautions.
IMPORTANT
SAFEGUARDS
READ ALL INSTRUCTIONS
BEFORE USE AND SAVE
FOR FUTURE REFERENCE
• A downloadable version of this
document is also available at
sageappliances.com
• Before using the rst time
ensure your electricity supply
is the same as shown on
the label on the underside of
the appliance.
• Remove and safely discard
any packaging materials
before rst use.
• To eliminate a choking hazard
for young children, safely
discard the protective cover
tted to the power plug.
• This appliance is for household
use only. Do not use the
appliance for anything other
than its intended use. Do not
use in moving vehicles or boats.
Do not use outdoors. Misuse
may cause injury.
• Fully unwind the power cord
before operating.
• Position the appliance on a
stable, heat resistant, level, dry
surface away from the edge and
do not operate on or near a heat
source such as a hot plate, oven
or gas hob.
• Do not let the power cord hang
over the edge of a bench or
table, touch hot surfaces or
become knotted.
• Do not leave the appliance
unattended when in use.
• Always ensure the appliance
is turned OFF, unplugged at
the power outlet and has been
2
Page 3

WE RECOMMEND SAFETY FIRST
EN
allowed to cool before cleaning,
attempting to move or storing.
• Always turn the appliance to
the OFF position, switch o at
the power outlet and unplug
at the power outlet when the
appliance is not in use.
• Do not use the appliance if the
power cord, plug, or appliance
becomes damaged in any way.
If damaged and maintenance
other than cleaning is
required please contact Sage
Customer Service or go to
sageappliances.com
• Any maintenance other than
cleaning should be performed
by an authorised Sage
®
service centre.
• Children should not play with
the appliance.
• Cleaning of the appliance
should not be carried out by
children unless they are 8 years
or older and supervised.
• The appliance and its cord
should be kept out of reach
of children aged 8 years
and younger.
• The installation of a residual
current safety switch is
recommended to provide
additional safety when using
all electrical appliances.
Safety switches with a rated
operating current not more
than 30mA are recommended.
Consult an electrician for
professional advice.
• Do not use attachments
other than those provided
with the appliances.
• Do not attempt to operate
the appliance by any method
other than those described
in this booklet.
• Do not move the appliance
whilst in operation.
• Do not touch hot surfaces.
Allow the appliance to cool
down before moving or
cleaning any parts.
• This appliance shall not be
used by children. Keep the
appliance and its cord out
of reach of children.
• This appliance can be used by
persons with reduced physical,
sensory or mental capabilities
or a lack of experience and
knowledge, only if they have
been given supervision or
instruction concerning use
of the appliance in a safe
way and understand the
hazards involved.
• Do not operate the grinder
without the hopper lid in
position. Keep ngers,
hands, hair, clothing and
utensils away from the
hopper during operation.
3
Page 4
WE RECOMMEND SAFETY FIRST
The symbol shown
indicates that this appliance
should not be disposed of
in normal household waste.
It should be taken to a local
authority waste collection centre
designated for this purpose or to
a dealer providing this service.
For more information, please
contact your local council oce.
To protect against electric
shock, do not immerse the
power plug, cord or appliance in
water or any liquid.
FOR HOUSEHOLD USE ONLY
SAVE THESE INSTRUCTIONS
4
Page 5
GETTING TO KNOW YOUR NEW APPLIANCE
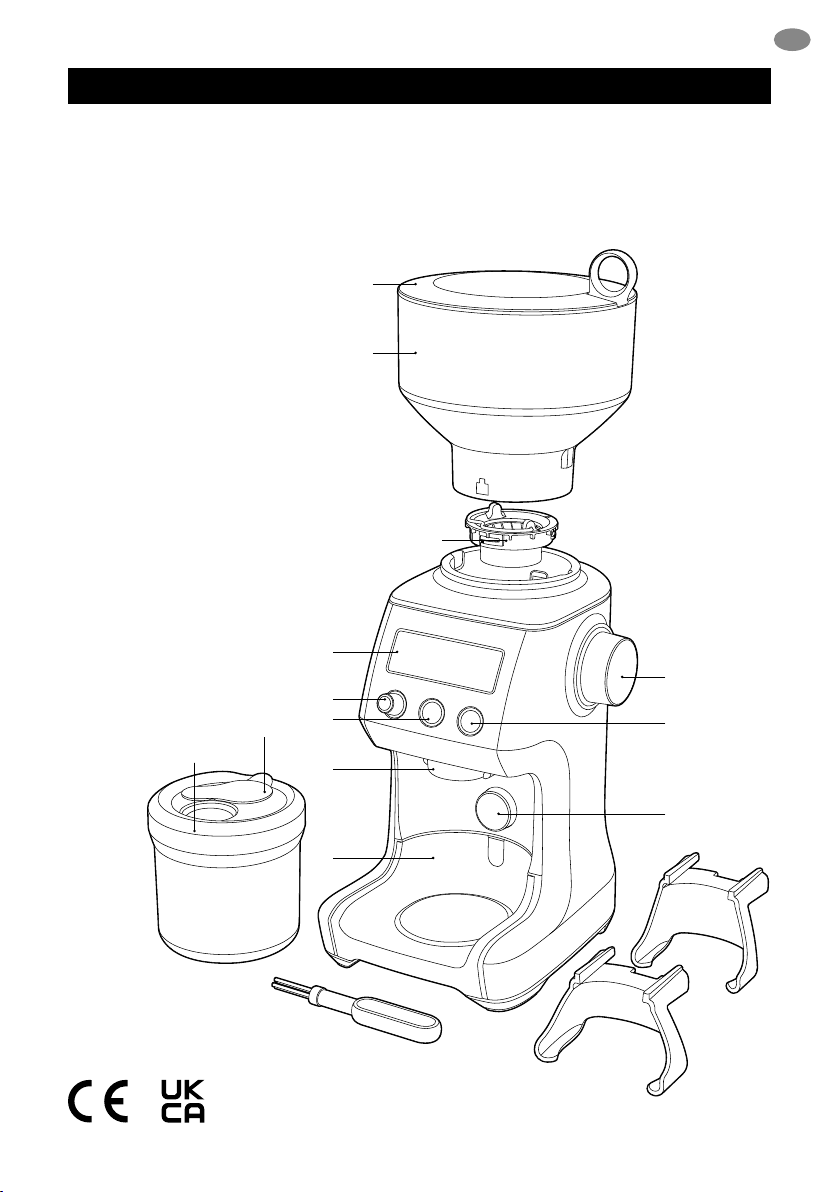
A. Bean Hopper Lid
B. Bean Hopper
C. Hardened Stainless Steel Conical Burrs
D. Backlit LCD Screen
E. GRIND AMOUNT / PROGRAM Dial
F. SHOTS / CUPS Button
G. Grind Outlet
H. Grind Tray
I. Grind Size Dial
J. START / PAUSE / CANCEL Button
K. Portalter Activation Switch
A
B
ACCESSORIES
L. Portalter Cradle 50–54mm
M. Portalter Cradle 58mm
N. Conical Burr Cleaning Brush
O. Grinds Container
Oi - Container Cap
Oii - Container Lid
C
EN
D
E
Oi
Oii
O
F
G
H
N
Rating Information
220–240V ~ 50-60Hz 165W
I
J
K
L
M
5
Page 6
OPERATING YOUR NEW APPLIANCE
BEFORE FIRST USE
Remove and safely discard all promotional
labels and packing materials attached to
your Sage® product.
Wash hopper, cradles, grind container, container
lid and cleaning brush in warm soapy water and
dry thoroughly. Wipe exterior of grinder with a
soft damp cloth and dry thoroughly. Place grinder
on at level surface and plug power cord into
220–240V outlet and switch Power ‘ON’.
ENERGY SAVING FEATURE
The grinder will automatically switch o if not
used after 5 minutes.
ASSEMBLING YOUR SAGE SMART
GRINDER™ PRO
Bean Hopper
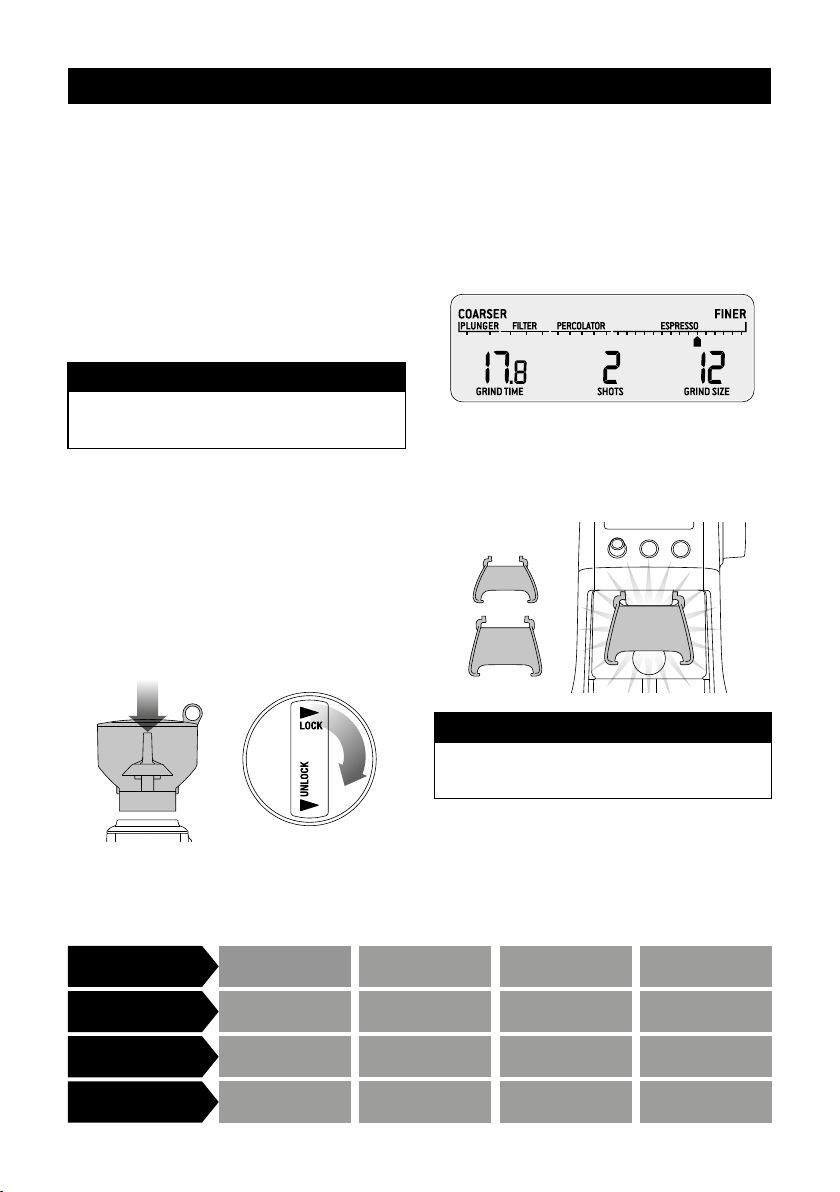
Align tabs on the base of the bean hopper
and insert hopper into position. Turn the
bean hopper dial 90° to lock into position.
Fill with fresh coee beans and secure lid
on top of bean hopper.
GRINDING FOR ESPRESSO
COFFEE
Use single wall lter baskets when grinding fresh
coee beans. Use the ner 1–30 settings in the
ESPRESSO range.
STEP 1:
Insert the appropriate portalter cradle size. Insert
your portalter into the cradle.
CRADLES
50-54 mm
58mm
PUSH
COFFEE CHART
BREW METHOD
GRIND SETTING
GRIND SIZE
AMOUNT
6
NOTE
Maximum number of shots with the cradle
inserted is 2.
ESPRESSO DRIP FILTER
FINE
1-30
1 UP TO 8 SHOTS
PERCOLATOR
MEDIUM
31-45
1 UP TO 12 CUPS
MEDIUM COARSE
46-54
1 UP TO 12 CUPS
PLUNGER
COARSE
55-60
1 UP TO 12 CUPS
Page 7
OPERATING YOUR NEW APPLIANCE
EN
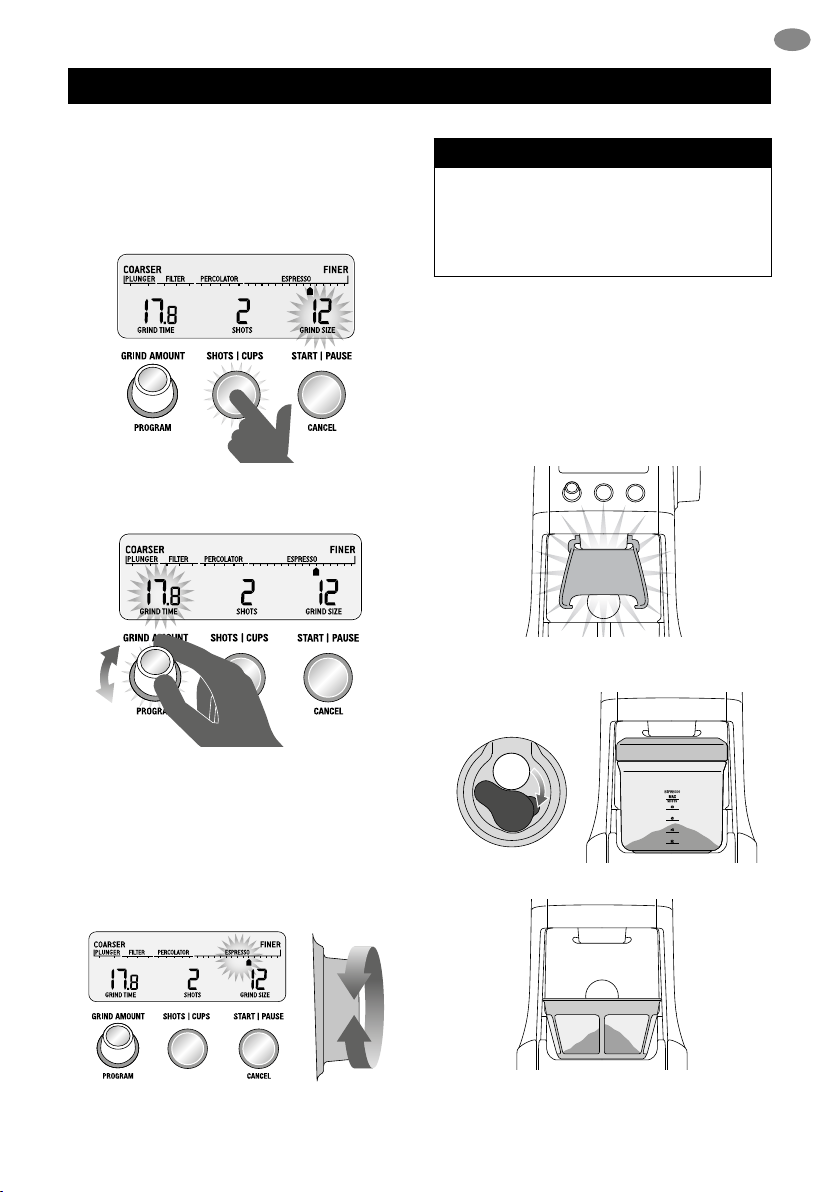
STEP 2:
Selecting your SHOTS / CUPS
Select the desired amount of ground coee
required by pressing the SHOTS / CUPS button.
Rotate the Grind Amount Dial to adjust the grinding
time to achieve the correct amount of coee.
NOTE
If the Grind Size Dial is tight, run the grinder
by pressing the START / PAUSE / CANCEL
button while turning the Grind Size Dial. This
will release coee grounds caught between
the burrs.
GRINDING INTO GRINDS
CONTAINER OR COFFEE FILTER
STEP 1:
Remove cradle by sliding out from under the
grind outlet.
PULL
Slide in grinds container with cap open or coee
lter directly under grind outlet.
STEP 3:
Select your grind size
For espresso, we recommend selecting Grind Size
setting 12 as a starting point and moving the Grind
Size dial Coarser or Finer to adjust the ow of
espresso as required.
7
Page 8
OPERATING YOUR NEW APPLIANCE
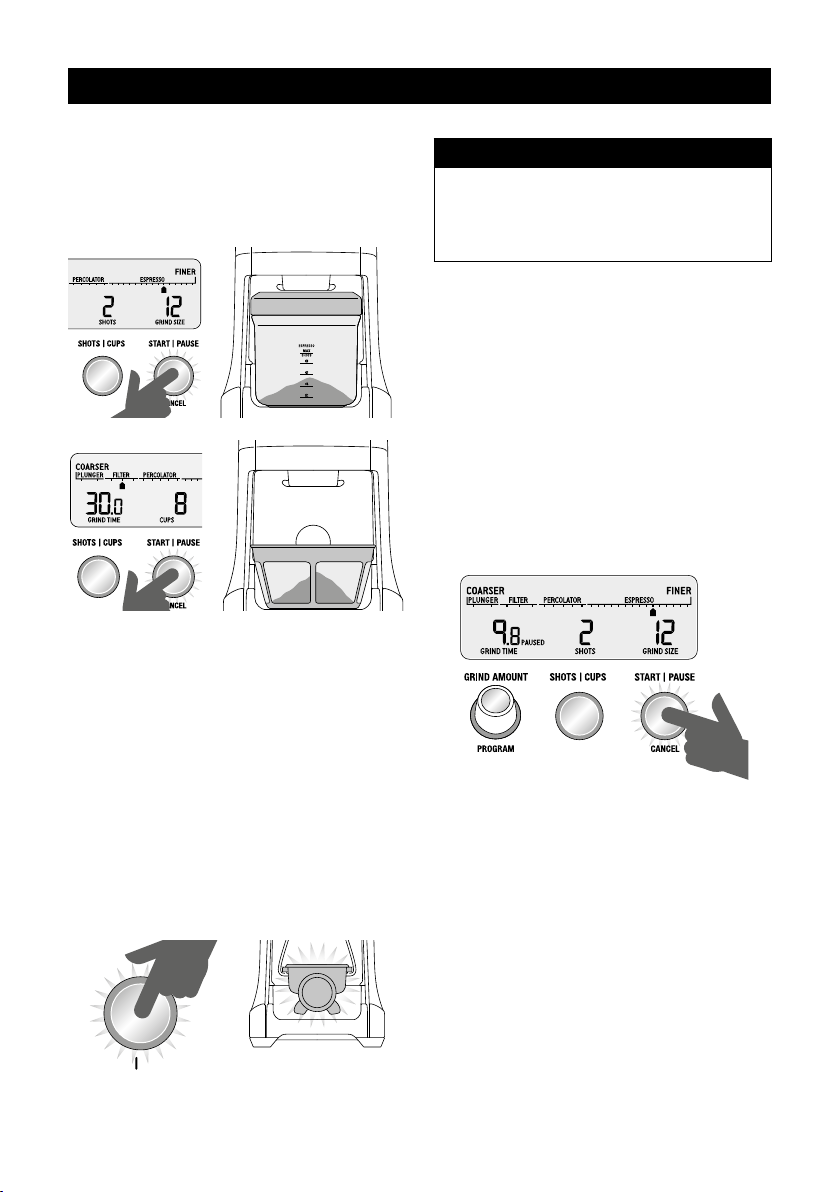
PRESS & RELEASE
• Select the required amount of ground coee
by pressing the SHOTS / CUPS button.
• Press the START / PAUSE / CANCEL button
to start grinding operation.
FEATURES OF YOUR SAGE
SMART GRINDER™ PRO
NOTE
Programming a custom grind amount/time
only sets it for that particular brew method.
This will not change the other Shots or
Cups settings.
Pause Function
You can pause the grinder during operation
allowing you to collapse or settle the coee
in the portalter.
• Press and release the
START / PAUSE / CANCEL button to start the
grinding operation.
• During grinding, press the
START / PAUSE / CANCEL button again
to pause the operation for 10 seconds.
• Press again within this time to resume grinding
the remaining dose.
Automatic Grinding
Grinding automatically allows you to grind
hands-free.
• Press and release either the
START / PAUSE / CANCEL button or push
the handle of your portalter once. This will
activate the PORTAFILTER SWITCH.
• Grinding will automatically stop when the
preset amount is dispensed.
PUSH
OR
START PAUSE PORTAFILTER SWITCH
8
Page 9
OPERATING YOUR NEW APPLIANCE
EN
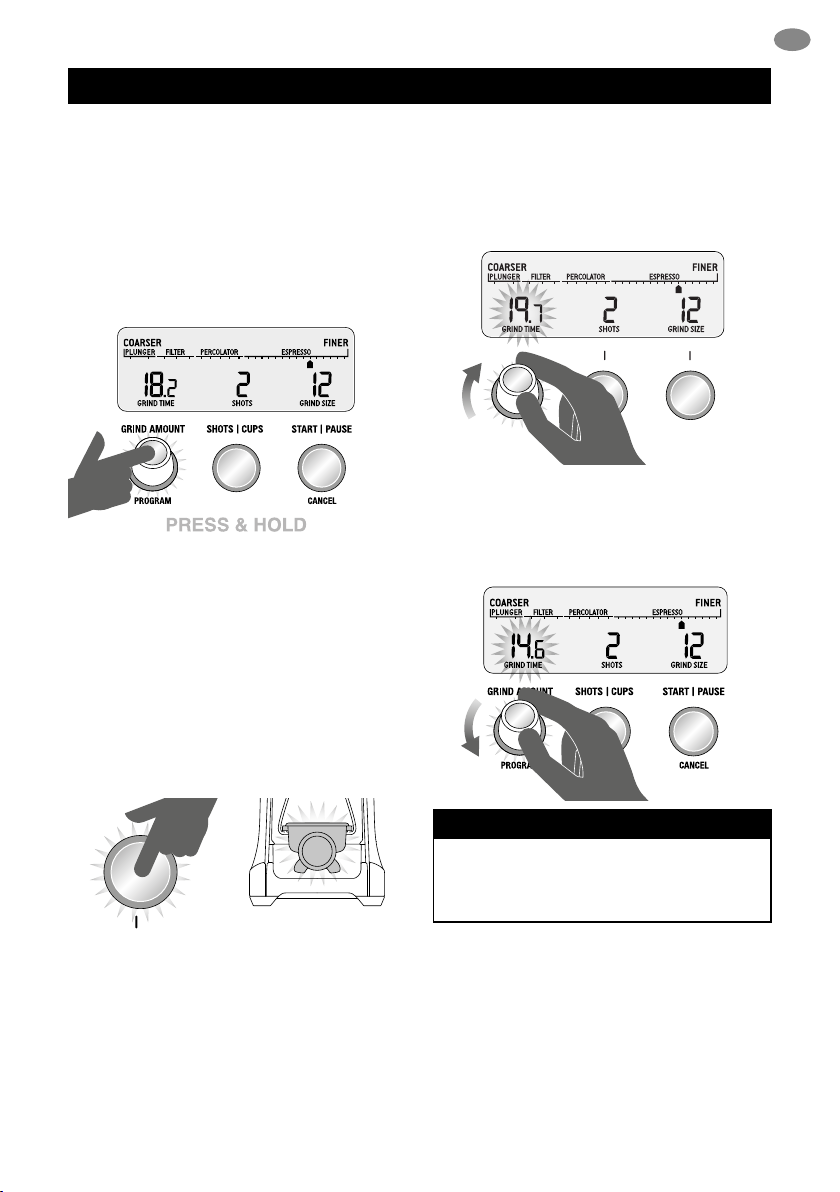
Program Function
Once you have set your required dose,
you can program this time into the number
of shot(s) currently displayed on the LCD.
Press and hold the PROGRAM button,
grinder will beep twice to conrm. Only
the shot displayed will be programmed,
all other shots will remain unchanged.
Manual Grinding
Grinding manually allows you to have complete
control over how much coee is dispensed.
• Press and hold either the START / PAUSE /
CANCEL button or push the handle of your
portalter to activate the PORTAFILTER
SWITCH for as long as you require.
• Release START / PAUSE / CANCEL button or
PORTAFILTER SWITCH and grinding will stop.
ADJUSTING YOUR GRIND AMOUNT
Increasing the Grind Amount
To increase the grind amount selected, turn the
GRIND AMOUNT dial to the right.
GRIND AMOUNT SHOTS CUPS
Decreasing the Grind Amount
To decrease grind amount selected, turn the
Grind Amount Dial to the left.
START PAUSE
CANCELPROGRAM
PUSH
OR
START PAUSE PORTAFILTER SWITCH
PRESS, HOLD & RELEASE
NOTE
To RESET the grind amount/time to the default
settings, press and hold the SHOTS / CUPS
button until a long beep sounds.
9
Page 10
OPERATING YOUR NEW APPLIANCE
1 2 3 4 5
6
AIR TIGHT
CONTAINER
F
I
N
E
C
O
A
R
S
E
F
I
N
E
C
O
A
R
S
E
F
I
N
E
C
O
A
R
S
E
F
I
N
E
C
O
A
R
S
E
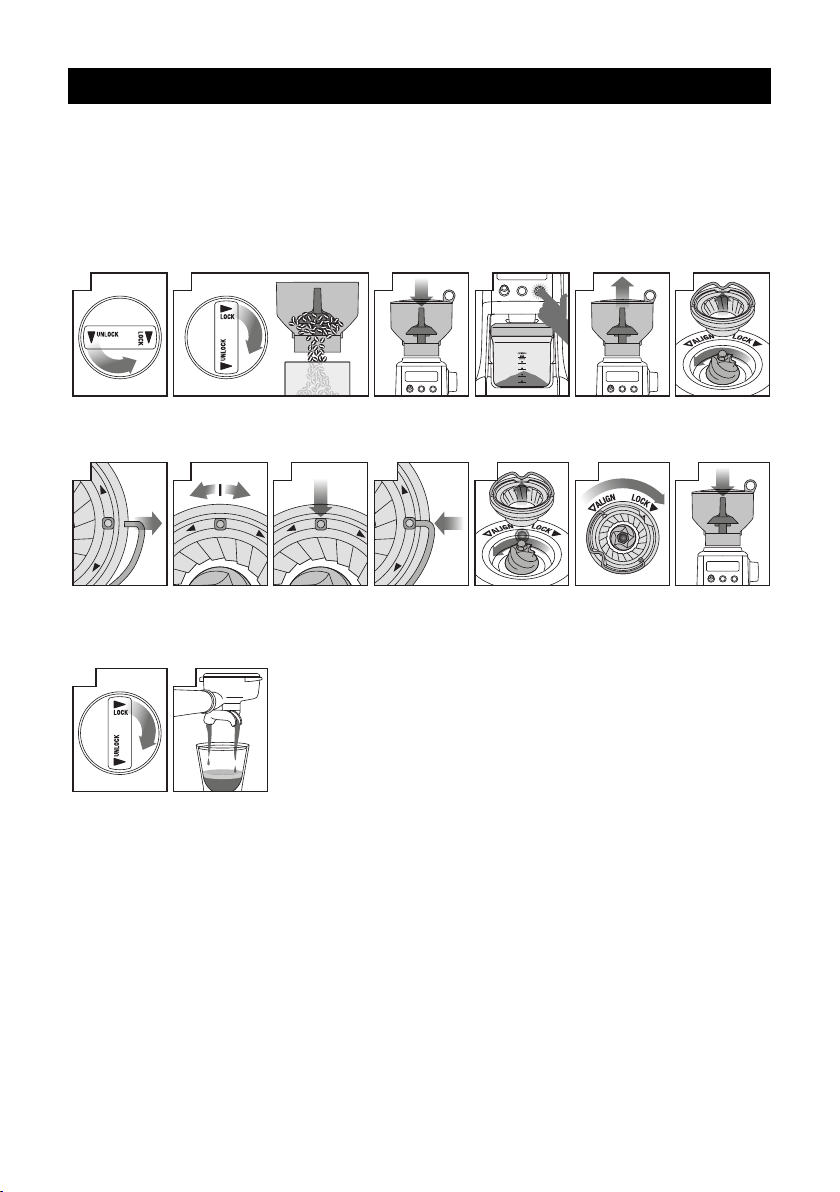
ADJUSTING CONICAL BURRS
Some types of coee may require a wider grind range to achieve an ideal extraction or brew.
A feature of your Smart Grinder™ Pro is the ability to extend this range with an adjustable upper burr.
We recommend making only one adjustment at a time.
Hold hopper over container & turn
dial to release beans into container
8877 9
5
4
Remove wire
handle from both
sides of the burr
Move adjustable
top burr, 1 number,
coarser or finer
Align the number
with the handle
opening
6
7
Align hopper
into position
10
8
Insert wire
handle from both
sides of the burr
Run grinder
until empty
11
Push upper burr
firmly into
position
14
Lock hopper15Check your
extraction
Remove hopperUnlock hopper
12
Lock upper burr
Remove upper
burr
13
Align hopper
into position
10
Page 11
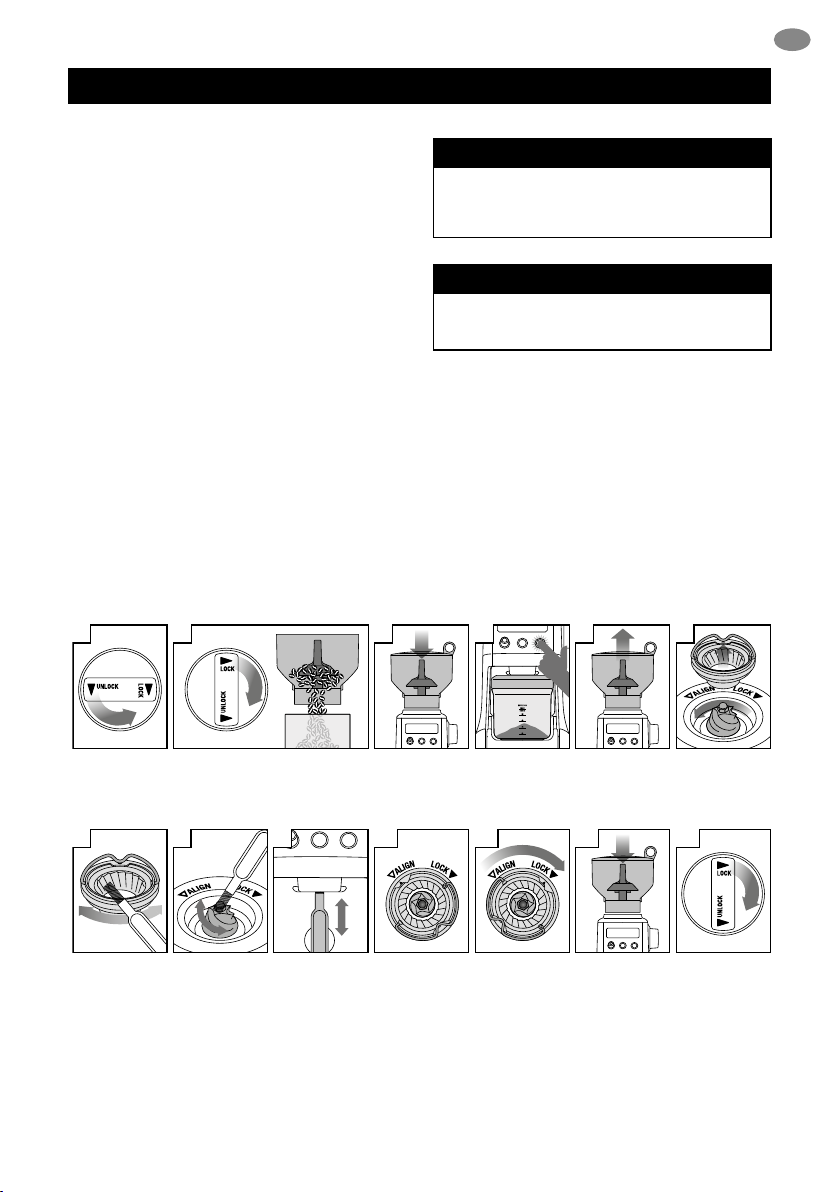
CARE, CLEANING & STORAGE
Un
1 2 3 4 5
Clea
burr
c
6
AIR TIGHT
CONTAINER
EN
CARE, CLEANING & STORAGE
1. Empty beans from the hopper
and grind out any excess beans
(see below).
NOTE
Do not use alkaline or abrasive cleaning
agents, steel wool or scouring pads, as
these can damage the surface.
2. Unplug power cord from power outlet
before cleaning.
3. Wash the grind container and lid, bean
hopper and lid in warm soapy water, rinse
and dry thoroughly.
NOTE
Please do not clean any grinder parts or
accessories in the dishwasher.
4. Wipe and polish exterior of appliance with
a soft damp cloth.
CLEANING CONICAL BURRS
Regular cleaning helps the burrs achieve consistent grinding results which is especially important when
grinding for espresso coee.
lock hopper
Hold hopper over container & turn
dial to release beans into container
Align hopper
into position
Run grinder
until empty
n upper
with
leaning brush
8877 9
Clean lower
burr with
cleaning brush
Clean grind
outlet with
brush
10
Push upper
burr firmly into
position
Lock upper burr11Align hopper
Remove hopper
12
into position
Remove upper
burr
13
Lock hopper
11
Page 12
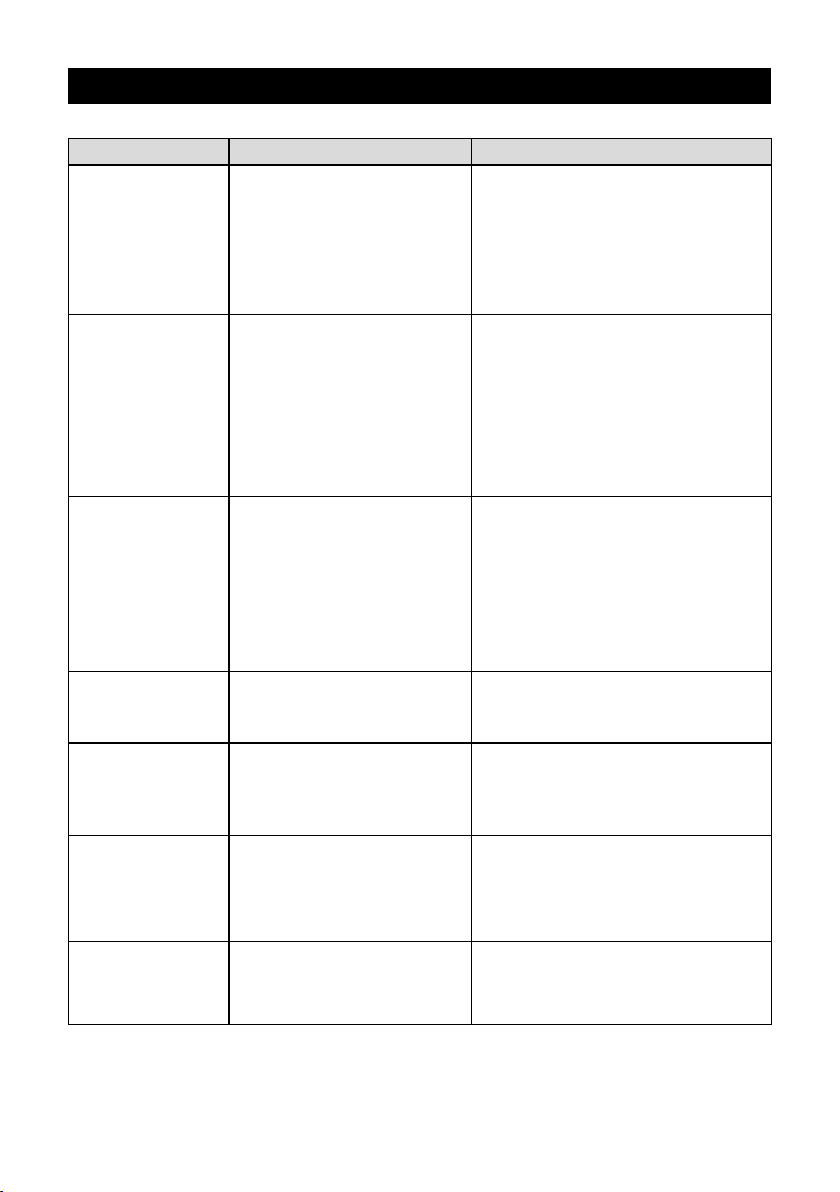
TROUBLESHOOTING
Grinder does
Motor starts but
• Incorrect button pressed.
• Press START / PAUSE / CANCEL
Motor starts but
• Grinder is blocked with
• Remove bean hopper, inspect burrs
to dry.
Not enough/
• Grind amount requires
• Press SHOTS / CUPS button to change
the amount ‘more’ or ‘less’.
Portalter overlls
the volume of tamped coee.
Emergency stop?
PROBLEM POSSIBLE CAUSE WHAT TO DO
not start after
pressing START /
PAUSE / CANCEL
button
• Grinder not plugged in.
• Grinder has overheated.
• Bean hopper not attached
correctly. ‘PLEASE LOCK
HOPPER’ will be displayed
on LCD screen.
• Plug power cord into power outlet.
• Remove power plug from power outlet.
Leave for 20 minutes to cool down
before using again.
• Lock bean hopper into position.
no ground coee
coming from
grind outlet
operates with a
loud ‘racket’ noise
Unable to lock
bean hopper into
position
too much
coee grind
• No coee beans in bean
hopper.
• Grinder/bean hopper
is blocked.
foreign item or chute
is blocked.
• Moisture clogging grinder.
• Coee beans obstructing bean
hopper locking device.
adjustment.
or PORTAFILTER SWITCH
to activate.
• Fill bean hopper with fresh
coee beans.
• Remove bean hopper. Inspect bean
hopper and burrs for blockage.
Replace parts and try again.
and remove any foreign body.
• Clean burrs and chute (refer to Care
& Cleaning on page page 11).
• Leave burrs to dry thoroughly before
re-assembling. You can use a hair dryer
to blow air into grinder inlet (lower burr)
• Remove bean hopper. Clear coee
beans from top of burrs. Re-lock hopper
into position & try again.
grind amount.
• Use Grind Amount Dial to ne tune
• It is normal for the correct amount
of coee to appear overlled in
your portalter. Untamped coee
has approximately three times
12
• Press START / PAUSE / CANCEL
button to stop operation.
• Unplug power cord from power outlet.
Page 13

GUARANTEE
2 YEAR LIMITED GUARANTEE
Sage Appliances guarantees this product for
domestic use in specied territories for 2 years
from the date of purchase against defects caused
by faulty workmanship and materials. During
this guarantee period Sage Appliances will repair,
replace, or refund any defective product
(at the sole discretion of Sage Appliances).
All legal warranty rights under applicable national
legislation will be respected and will not be
impaired by our guarantee. For full terms and
conditions on the guarantee, as well as instructions
on how to make a claim, please visit
www.sageappliances.com.
EN
13
Page 14

NOTE
14
Page 15

NOTE
EN
UG8 EN – D21
15
Page 16
GBR
BRG Appliances Limited
Unit 3.2, Power Road Studios,
114 Power Road, London, W4 5PY
Freephone (UK Landline): 0808 178 1650
Mobile Calls (National Rate): 0333 0142 970
DEU AUT
Sage Appliances GmbH
Campus Fichtenhain 48, 47807 Krefeld,
Deutschland
Deutschland: 0800 505 3104
Österreich: 0800 80 2551
FRA
Sage Appliances France SAS
Siège social: 66 avenue des Champs
Elysées – 75008 Paris
879 449 866 RCS Paris
France: 0800 903 235
NLD
Netherlands
0800 020 1741
ITA
Italy
800 909 773
ESP
Spain
0900 838 534
PTR
Portugal
0800 180 243
POL
Poland
00800 121 8713
CHE
Switzerland
0800 009 933
LUX
Luxembourg
0800 880 72
DNK
Denmark
80 820 827
SWE
Sweden
0200 123 797
FIN
Finland
0800 412 143
IRE
Ireland
1800 932 369
BEL
Belgium
0800 54 155
NOR
Norway
80 024 976
www.sageappliances.com
Registered in England & Wales No. 8223512
Registered in Germany No. HRB 81309 (AG Düsseldorf)
Registered in France No. 879 449 866 RCS
EN Due to continued product improvement, the products illustrated or photographed in this document may vary slightly from the actual product.
DE Aufgrund unserer kontinuierlichen Produktverbesserungen kann die hier gezeigte Abbildung geringfügig vom tatsächlichen Produkt abweichen.
FR En raison de leur amélioration continue, les produits représentés ou photographiés dans le présent document peuvent différer légèrement du produit réel.
NL Vanwege voortdurende productverbeteringen, kunnen de afgebeelde producten in dit document licht afwijken van het eigenlijke product.
IT A causa del continuo miglioramento dei prodotti, il prodotto descritto o illustrato in questo documento può variare leggermente rispetto al prodotto reale.
ES Perfeccionamos nuestros productos continuamente, por lo que el artículo podría diferir ligeramente de la ilustración o la fotografía en este documento.
PT Devido à melhoria contínua dos produtos, os produtos ilustrados ou fotografados neste documento podem variar ligeiramente do produto real.
PL Ze względu na stale przeprowadzane ulepszenia, produkty przedstawione na ilustracjach lub zdjęciach w tym dokumencie mogą różnić się od używanego produktu.
DA På grund af løbende produktudvikling kan de illustrerede eller fotograferede produkter i dette dokument variere en smule fra det faktiske produkt.
SV På grund av kontinuerlig produktförbättring kan produkterna som visas i illustrationerna och fotografierna i detta dokument skilja sig något från den faktiska produkten.
FI Jatkuvan tuotekehittelyn seurauksena kuvituksen tuotteet eivät välttämättä ole täysin samanlaisia kuin varsinainen tuote.
NO På grunn av kontinuerlig produktutvikling kan produktene som er vist eller avfotografert i dette dokumentet, variere noe fra det faktiske produktet.
Copyright BRG Appliances 2022
BCG820 / SCG820 UG1 – B22
 Loading...