

Page 1
the Nutri Juicer
BJE410
®
EN QUICK GUIDE DE KURZANLEITUNG
FR GUIDE RAPIDE NL SNELSTARTGIDS
ES GUÍA RÁPIDA
Page 2

CONTENTS
2 Important Safeguards
5 Components
6 Assembly
8 Operation
9 Care & Cleaning
11 Troubleshooting
13 Guarantee
SAGE®
RECOMMENDS
SAFETY FIRST
At Sage® we are very safety
conscious. We design and
manufacture consumer
products with the safety of
you, our valued customer,
foremost in mind. In
addition we ask that you
exercise a degree of care
when using any electrical
appliance and adhere to
the following precautions.
IMPORTANT
SAFEGUARDS
READ ALL INSTRUCTIONS
BEFORE USE AND SAVE
FOR FUTURE REFERENCE
• A downloadable version of this
document is also available at
sageappliances.com
• Before using for the rst
time ensure your electricity
supply is the same as shown
on the label on the underside
of the appliance.
• Remove and safely discard
any packaging materials
before rst use.
• To eliminate a choking hazard
for young children, safely
discard the protective cover
tted to the power plug.
• This appliance is for household
use only. Do not use the
appliance for anything other
than its intended use. Do not
use in moving vehicles or boats.
Do not use outdoors. Misuse
may cause injury.
• Fully unwind the power cord
before operating.
• Position the appliance on
a stable, heat resistant, level,
dry surface away from the edge
and do not operate on or near
a heat source such as a hot
plate, oven or gas hob.
• Vibration during operation may
cause the appliance to move.
• Do not let the power cord hang
over the edge of a bench or
table, touch hot surfaces or
become knotted.
• Always ensure the appliance
is turned OFF, unplugged at
the power outlet and has been
allowed to cool before cleaning,
attempting to move or storing.
• Always turn the appliance to
the OFF position, switch o at
the power outlet and unplug
at the power outlet when the
appliance is not in use.
2
Page 3

WE RECOMMEND SAFETY FIRST
EN
• Do not use the appliance if the
power cord, plug, or appliance
becomes damaged in any way.
If damaged or maintenance
other than cleaning is
required, please contact Sage
Customer Service or go to
sageappliances.com
• Any maintenance other than
cleaning should be performed
®
by an authorised Sage
service centre.
• Children should not play with
the appliance.
• Cleaning of the appliance
should not be carried out by
children unless they are 8 years
or older and supervised.
• The appliance and its cord
should be kept out of reach
of children aged 8 years
and younger.
• The installation of a residual
current safety switch is
recommended to provide
additional safety when using
all electrical appliances.
Safety switches with a rated
operating current not more
than 30mA are recommended.
Consult an electrician for
professional advice.
• Always ensure the appliance is
properly assembled before use.
The appliance will not operate
unless properly assembled.
• Do not use the appliance
on a sink drain board.
• Keep hands, ngers, hair,
clothing as well as spatulas and
other utensils away from moving
or rotating parts during operation.
• Do not use the appliance
for anything other than food
and/or beverage preparation.
• In order to avoid the possible
hazard of the appliance starting by
itself due to inadvertent resetting
of the overload protection, do
not attach an external switching
device (such as a timer) or
connect the appliance to a
circuit that can regularly switch
the appliance on and o.
• Carefully read all instructions
before operation and save for
future reference.
• The appliance can be used by
persons with reduced physical
or mental capabilities or a lack
of experience and knowledge,
only if they have been given
supervision or instruction
concerning use of the appliance
in a safe way and understand
the hazards involved.
• This appliance shall not be
used by children.
• Do not leave the appliance
unattended when in use.
• Do not push food into the feed
chute with your ngers or other
utensils. Always use the food
pusher provided. Do not place
hand or ngers into the food
chute when it is attached to
the appliance.
3
Page 4

WE RECOMMEND SAFETY FIRST
• Do not juice stone fruit unless
seeds and/or stones have
been removed.
• Do not operate the juice
extractor without the pulp
and juice container in place.
• Make sure the stainless steel
lter basket has stopped
rotating and the motor has
completely stopped before
releasing the safety locking
arm and/or attempting to
move the appliance, when
the juicer is not in use, and
before disassembling,
cleaning and storing.
• Any signicant spillage onto
the surface under or around the
appliance, or onto the appliance
itself, should be cleaned and
dried before continuing to use
the appliance.
• Be careful when handling the
stainless steel lter basket as
the small cutting blades at the
base of the lter basket are
very sharp. Mishandling may
cause injury.
• Remove rind from all citrus
fruit before juicing.
• Do not use the appliance
if the rotating sieve (lter
basket) or lid is damaged.
• Always make sure juicer cover
is clamped securely in place
before motor is turned on.
Do not unfasten interlock arm
while juicer is in operation.
The symbol shown
indicates that this appliance
should not be disposed of
in normal household waste.
It should be taken to a local
authority waste collection centre
designated for this purpose or to
a dealer providing this service.
For more information, please
contact your local council oce.
To protect against electric
shock, do not immerse
the power plug, cord or
appliance in water or any liquid.
SAVE THESE INSTRUCTIONS
4
Page 5

COMPONENTS
A
B
C
EN
H
I
D
E
F
G
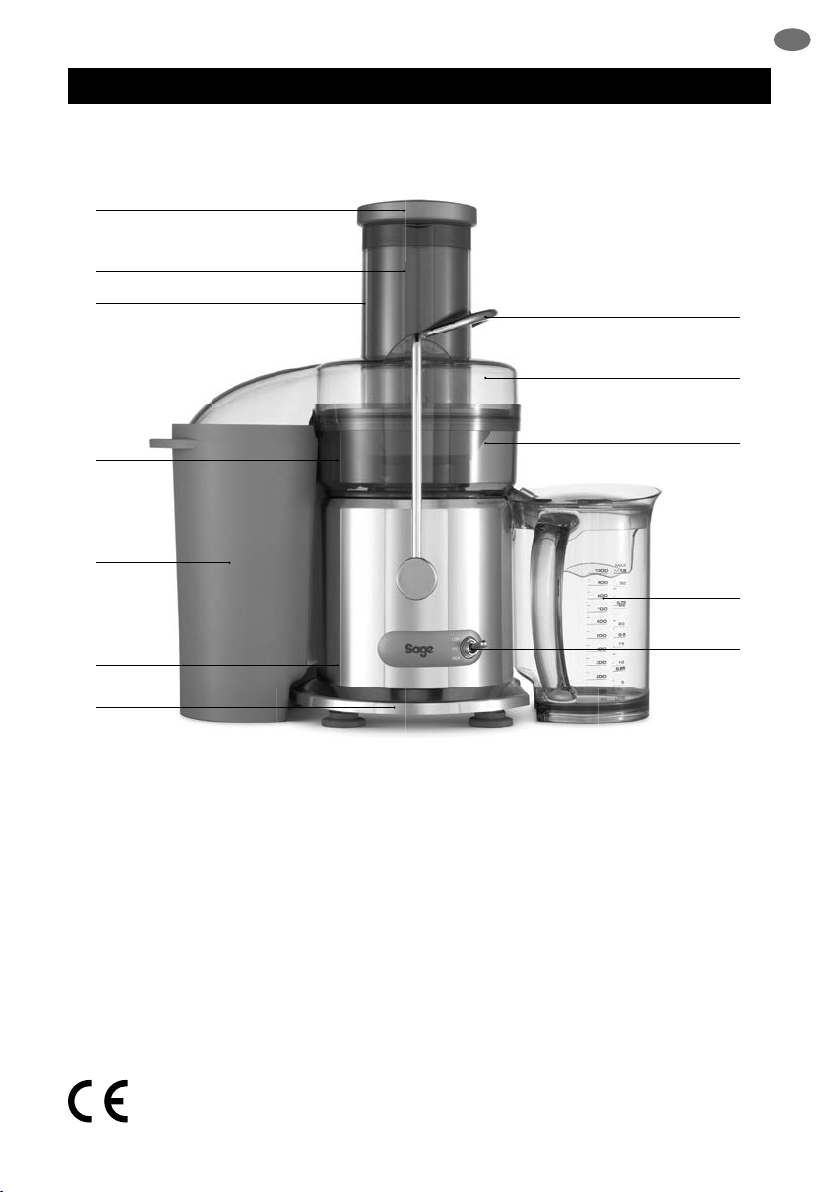
A. Food pusher
B. Unique Direct Central Feed System
C. Extra wide 84mm feed chute
D. Stainless steel titanium reinforced
micro mesh lter basket
E. Large capacity pulp container
(dishwasher safe).
F. Heavy duty 1200 watt motor
G. Cord storage
J
K
L
H. Interlocking safety arm
I. Juicer cover
(not dishwasher safe).
J. Filter bowl surround
(dishwasher safe).
K. 1 litre juice jug and lid
(dishwasher safe).
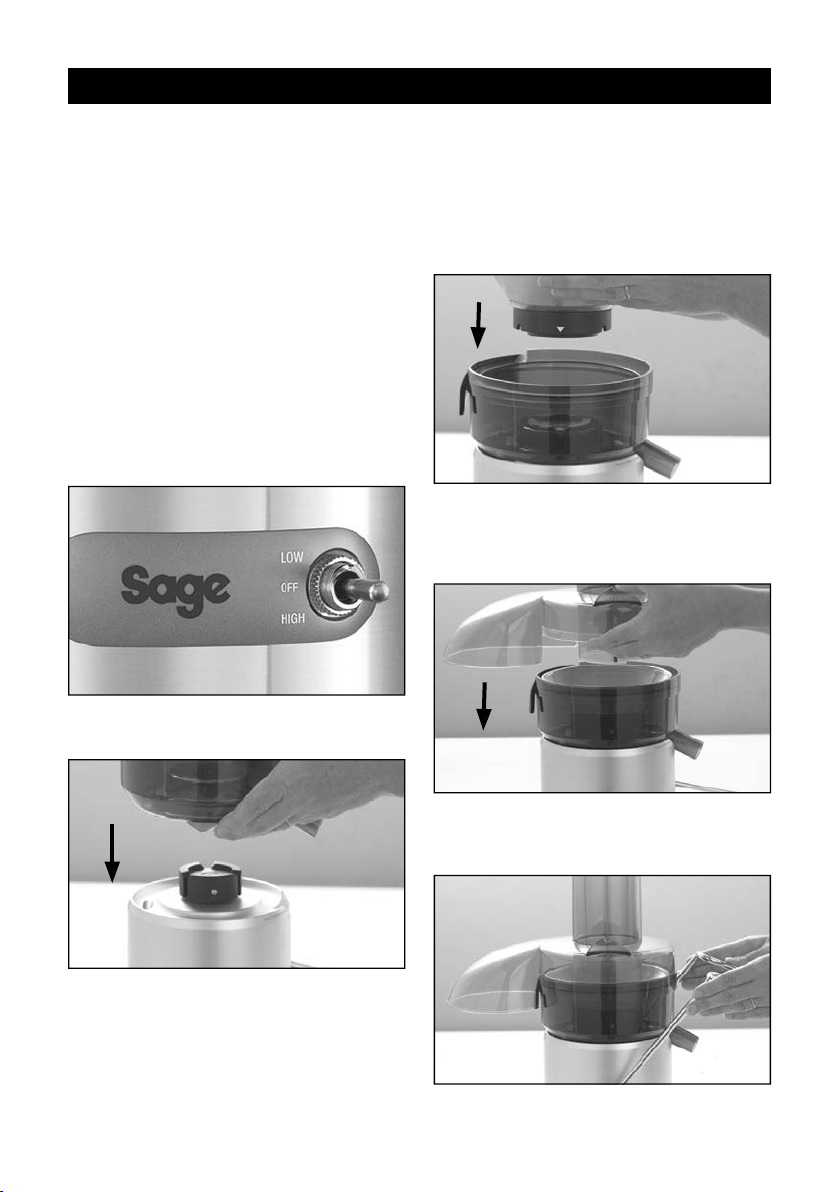
L. 2 speed electronic control
ON / OFF switch
Rating Information
220–240V~ 50/60Hz 1050–1250W
5
Page 6
ASSEMBLY
BEFORE FIRST USE
Before using your juicer for the rst time, remove
and safely discard any packaging materials and
promotional stickers and labels.
Ensure the appliance is switched o at the power
outlet and the power cord is unplugged.
Wash the lter bowl surround, lter basket,
juicer cover, food pusher, pulp container and
juice jug and lid in warm, soapy water with a soft
cloth. Rinse and dry thoroughly. The motor base
can be wiped with a damp cloth. Dry thoroughly.
1. Place motor base on a at, dry surface
such as a bench top. Ensure that the
motor base is switched OFF at the
control panel, then switch the appliance
o at the power outlet and unplug the
power cord.
2. Place lter bowl surround on top of the
motor base.
3. Align the arrows at the base of the
stainless steel lter basket with the
arrows on the motor drive coupling
and push down until it clicks into place.
Ensure the stainless steel lter basket
is tted securely inside the lter bowl
surround and onto the motor base.
4. Place the juicer cover over the lter bowl
surround, positioning the feed chute over
the stainless steel lter basket and lower
into position.
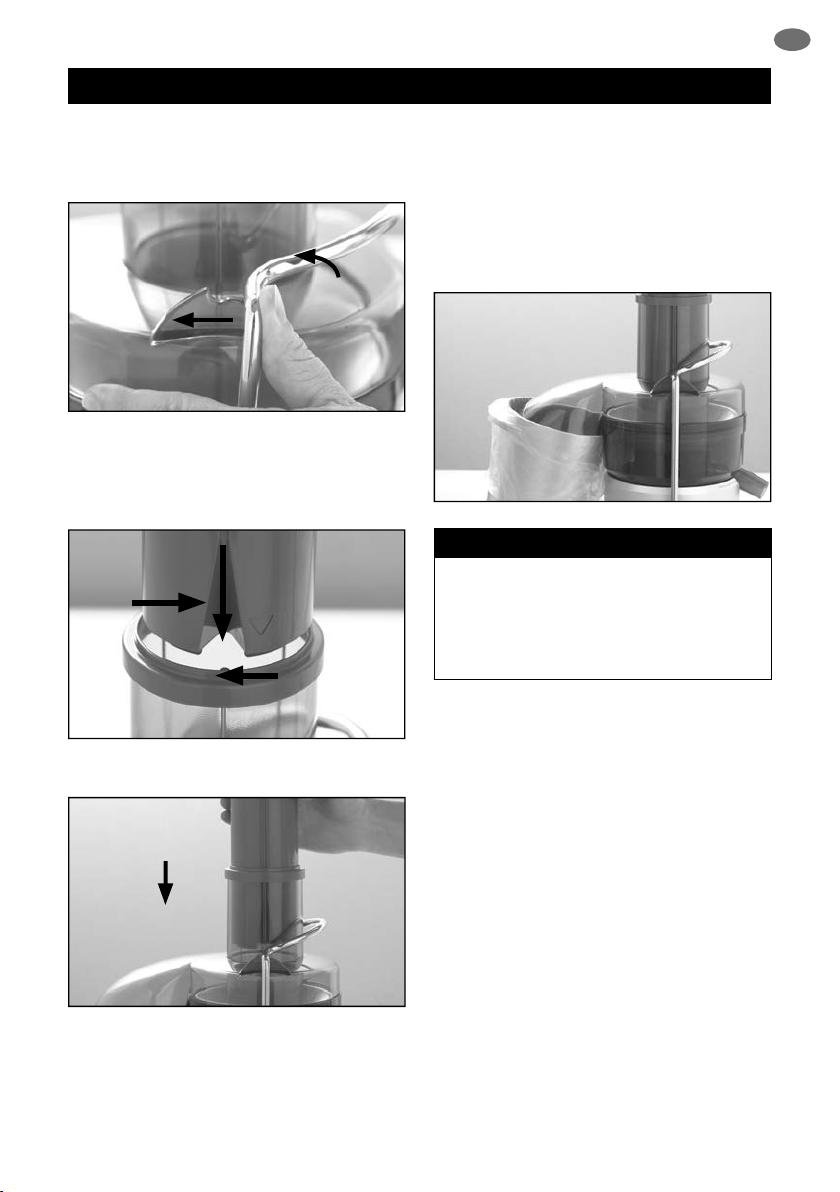
5. Raise the safety locking arm up and
locate into the two grooves on either side
of the juice cover.
6
Page 7

ASSEMBLY
EN
The safety locking arm should now be in a
vertical position and locked into place on top
of the juice cover.
6. Slide the food pusher down the food
chute by aligning the groove in the food
pusher, with the small protrusion on the
inside of the top of the feed tube.
Food
Pusher
Groove
Protrusion
Inside Feed
Small
Tub e
7. Place the pulp container into position by
tilting the motor base slightly to the right.
Insert the pulp container under the juicer
cover on the left hand side ensuring
it is supported by the juicer cover and
motor base.
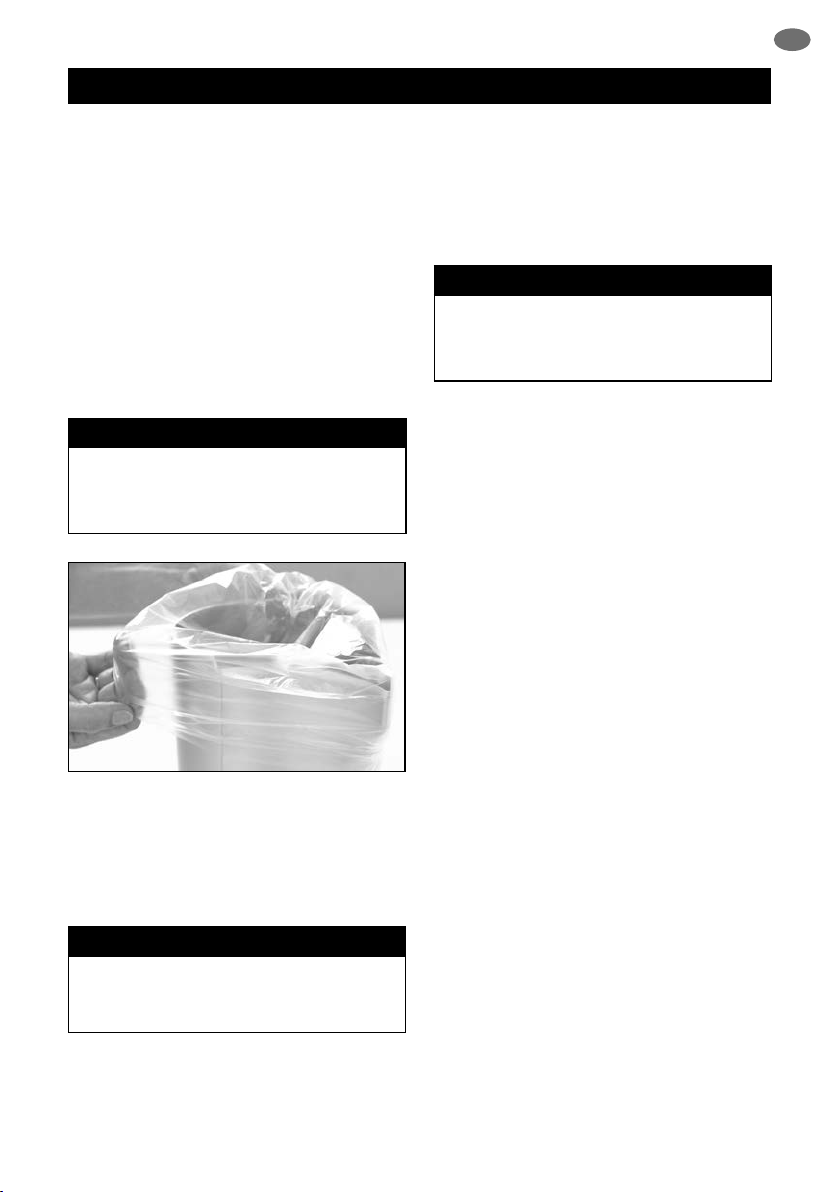
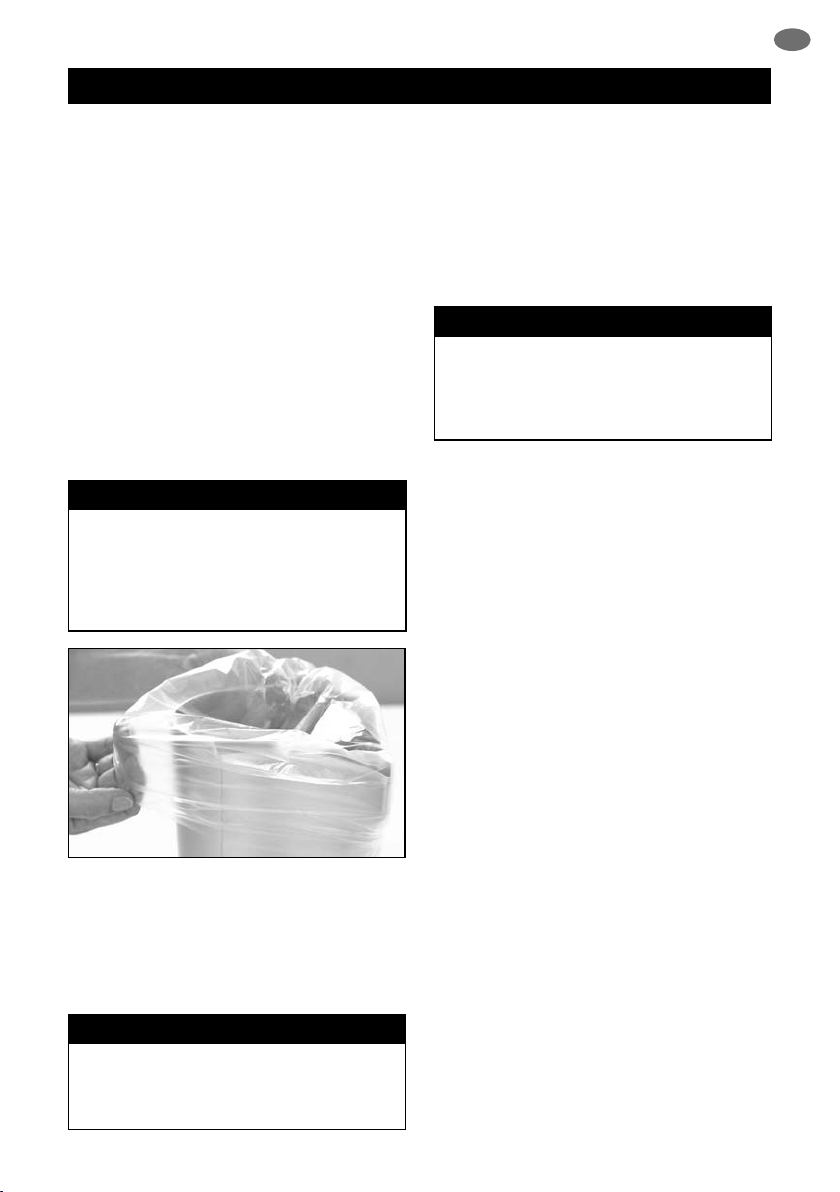
NOTE
To minimise cleaning, line the pulp container
with a plastic freezer bag to collect the pulp.
Pulp can be used in other dishes, or as a
compost for the garden or discarded.
8. Place the juicer jug under the juice
spout on the right hand side of the juicer.
The juice jug lid can be used to avoid
any splatter.
Continue to slide the food pusher down on
the feed chute.
7
Page 8
OPERATION
1. Wash your selection of fruit and
vegetables to be juiced.
2. Ensure the juicer is correctly assembled.
Refer to Assembling your Sage
Ensure the juicer jug is placed under
the juice spout and pulp container is in
position before commencing juicing.
3. Plug the power cord into a 220–240V
power outlet. Turn the power ON at the
power outlet. Adjust the speed to the
desired setting. Push the two speed
switch either up for low speed or down
for high speed depending on the type
of fruit or vegetable being juiced. Use
the speed selector as a guide for juicing
dierent fruits and vegetables.
SPEED SELECTOR TABLE
Apples High
Apricots (stone removed) Low
Beetroot (trimmed) High
Blueberries Low
Broccoli Low
Brussels sprouts (trimmed) High
Cabbage Low
Carrots High
Cauliower Low
Celery High
Cucumber (peeled) Low
Cucumber, soft skinned High
Fennel High
Grapes (seedless) Low
Kiwi Fruit (peeled) Low
Mangoes (peeled, stone
removed)
Low
®
juicer.
SPEED SELECTOR TABLE
Peaches (stone removed) Low
Pears (stalks removed) High for hard
Pineapple (peeled) High
Plums (stone removed) Low
Raspberries Low
Tomatoes Low
Watermelon (peeled) Low
4. With the motor running, place food into
the feed chute and use the food pusher
to gently guide food down. To extract the
maximum amount of juice, always push
the food pusher down slowly.
or Low for soft
NOTE
The motor must be running prior to loading
the feed chute.
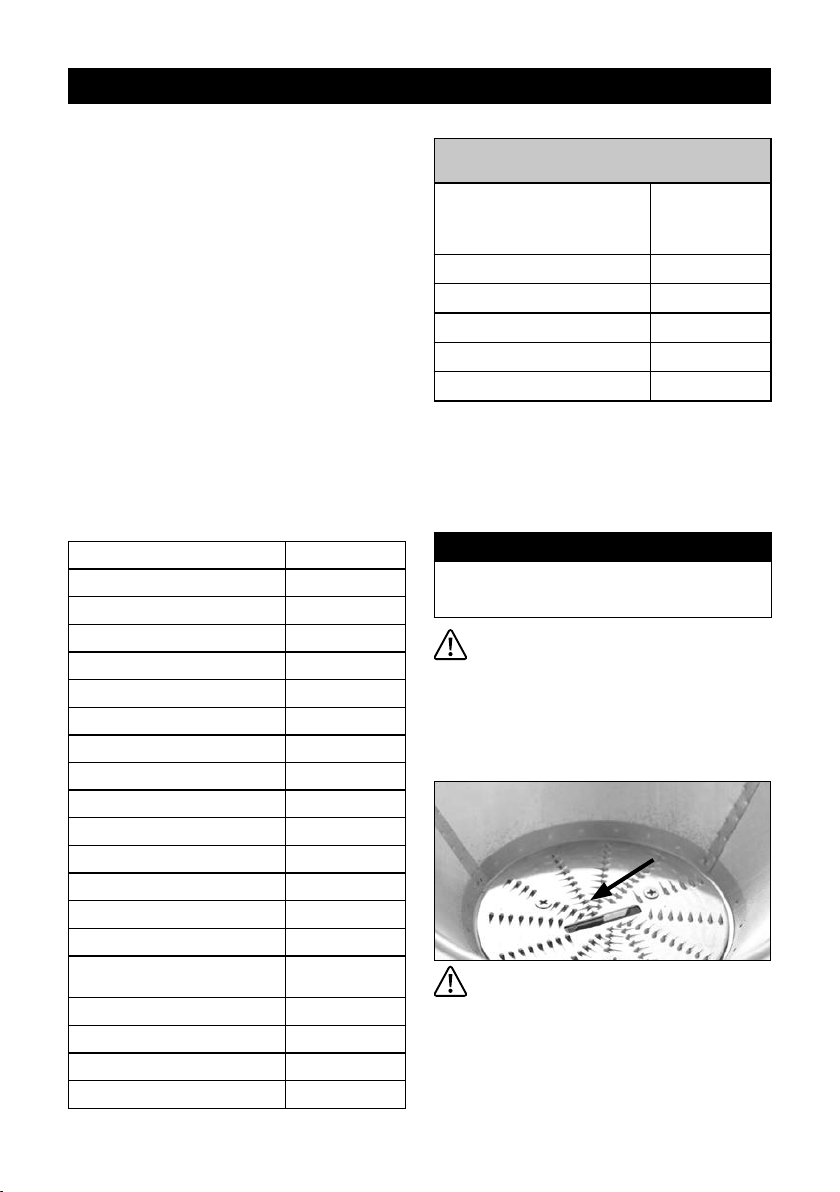
WARNING
Never use ngers to push food down
the feed chute or to clear the feed chute.
Always use the food pusher provided.
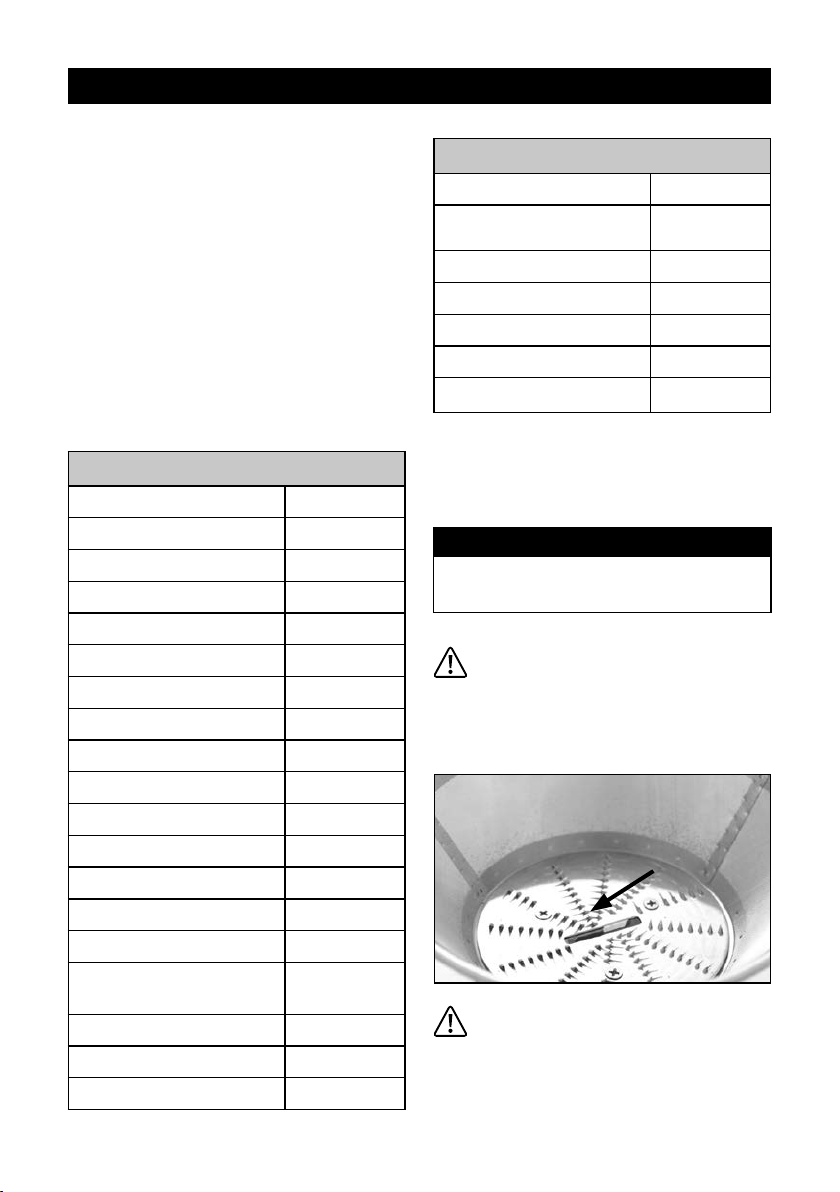
Filter
Basket
Caution:
Sharp Blades
Melons (peeled) Low
Nectarines (stone removed) Low
Oranges (peeled) High or Low
8
WARNING
The stainless steel lter basket contains
small sharp blades to cut and process
fruit and vegetables. Avoid touching the
blades when handling the lter basket.
Page 9
CARE & CLEANING
EN
Ensure the juicer is turned o by switching the
ON / OFF button on the control panel to OFF.
Then switch the appliance o at the power outlet
and unplug the power cord.
Ensure the juicer
Refer to Disassembling your new appliance.
is correctly disassembled.
FOR EASIER CLEANING:
• Clean as you go and avoid dried on juice
or pulp residue.
• Immediately after each use, rinse removable
parts in hot water to remove wet pulp. Allow
parts to air dry.
NOTE
To minimise cleaning, line the pulp container
with a plastic freezer bag to collect the pulp.
Pulp can then be used for other dishes, or
as compost for the garden or discarded.
CLEANING THE MOTOR BASE
• Wipe the motor base with a soft, damp cloth
then dry thoroughly.
• Wipe any excess food particles from the
power cord.
CLEANING THE FILTER BOWL
SURROUND, JUICER COVER,
FOOD PUSHER, PULP CONTAINER
Wash all parts in warm soapy water with
a soft cloth. Rinse and dry thoroughly.
NOTE
The lter bowl surround, juicing jug and
lid, food pusher and pulp container, are
dishwasher safe (top shelf only). The juice
cover is not dishwasher safe.
CLEANING THE FILTER BASKET
• For consistent juicing results always
ensure that the stainless steel lter basket
is thoroughly cleaned using the supplied
cleaning brush. It is important to do this
immediately after use.
• Soak the stainless steel lter basket in hot
soapy water for approximately 10 minutes
immediately after juicing is completed. If pulp
is left to dry on the lter it may clog the ne
pores of the lter mesh thereby lessening the
eectiveness of the juicer.
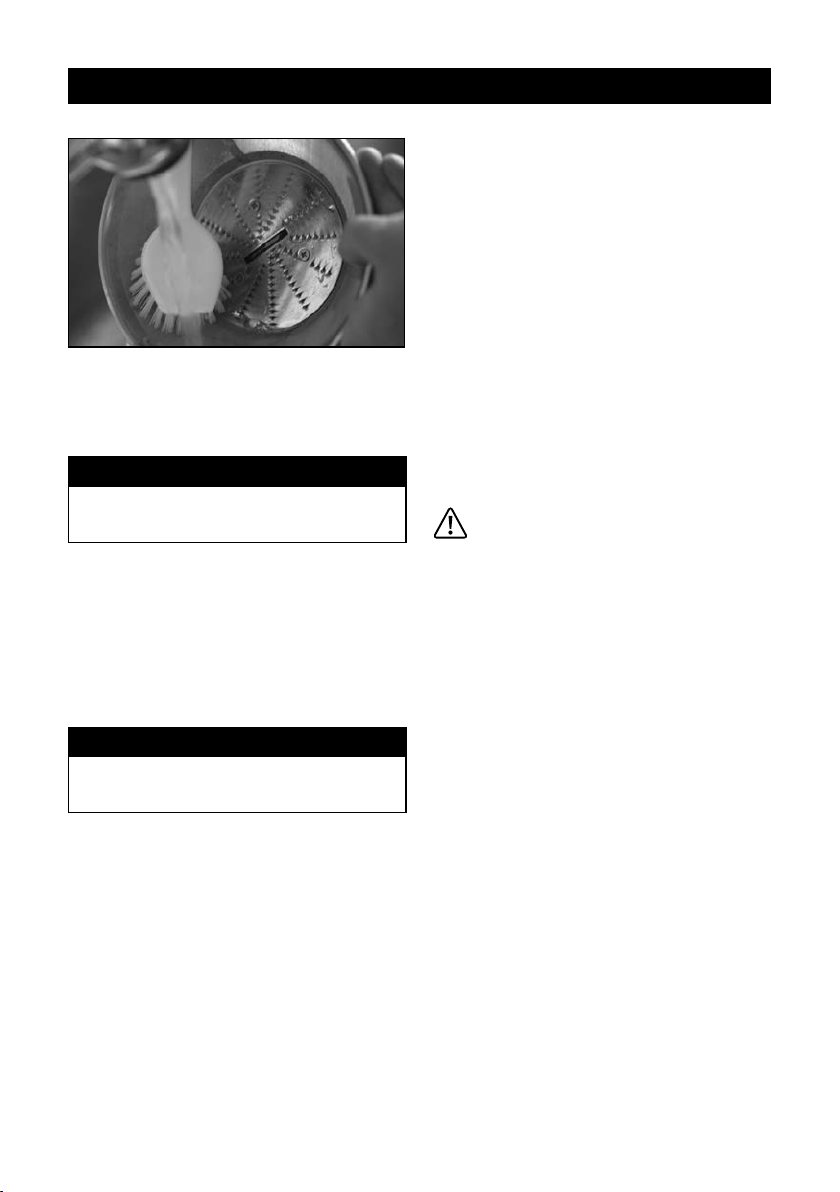
• Using the cleaning brush, hold the lter
basket under running water and brush from
the inside of the basket to the outer rim.
Avoid touching the small sharp blades in
the centre of the lter basket. Repeat this
process on the outside of the basket. After
cleaning the lter basket, hold it up towards
a light to ensure the ne mesh holes are not
blocked. If the holes are blocked, soak the
lter basket in hot water with 10% lemon
juice to loosen the blocked holes. Repeat the
cleaning process using the cleaning brush.
Alternatively, wash the lter basket in the
dishwasher.
NOTE
Do not use abrasive scouring pads or
cleaners when cleaning the parts or motor
base as they may scratch the surface.
9
Page 10
CARE & CLEANING
Do not soak the stainless steel lter basket in
bleach or other abrasive cleansers.
Always treat the lter basket with care as it can
be easily damaged.
NOTE
The stainless steel lter basket is
dishwasher safe (top shelf only).
CLEANING THE JUICE JUG
• Rinse the juice jug and lid with froth
attachment under running water.
• Wash both parts in warm soapy
water with a soft cloth. Rinse and
dry thoroughly.
REMOVING STUBBORN
OR STRONG FOOD STAINS
AND ODOURS
Discolouration of the plastic may occur with
strongly coloured fruit and vegetables. To help
prevent this, wash parts immediately after use.
If discolouration does occur, the plastic parts can
be soaked in water with 10% lemon juice or they
can be cleaned with a non abrasive cleaner.
The juicer
1200 watt motor. So heavy duty, we have
given the motor a 5–year guarantee against
faulty materials or manufacture. This warranty
is an extension of the 12–month replacement
guarantee and covers the motor only. The
warranty does not cover damage caused by
accident, misuse, or being used in a manner
not stated in the instruction book.
is constructed with a heavy duty
WARNING
Do not immerse the motor base in
water or any other liquid. The centre of
the lter basket and feed chute contains
small sharp blades to process fruit and
vegetables during the juicing function.
Do not touch blades when handling
the lter basket or feed chute.
NOTE
The juice jug and lid are dishwasher safe
(top shelf only).
10
Page 11

TROUBLESHOOTING
POSSIBLE PROBLEM EASY SOLUTION
Machine will not work
when switched ON
• The safety locking arm may not be correctly engaged in the vertical
operating position with the locking arm located into the two grooves
on either side of the juicer cover.
EN
Motor appears to stall
when juicing
Excess pulp building
up in the stainless steel
lter basket
• Wet pulp can build up under the juicer cover if the juicing action is
too vigorous. Try slower juicing action by pushing the food pusher
down more slowly. Follow Disassembling and Cleaning instructions
and clean the lter bowl surround, the stainless steel lter basket
and the juicer cover.
• The juicer will automatically stop operating if the motor is stalled for
more than 10 seconds. Either too much food is being processed at
one time or the pieces are not small enough. Try trimming the food
or cutting into smaller pieces of even size and processing a smaller
amount per batch. To continue juicing, reset the juicer by pressing
the ON / OFF switch on the control panel back to OFF then turn the
appliance back on by pressing ON / OFF switch to ON.
• Hard fruit and vegetables will put excess strain onto the motor if a
low speed is selected. Please refer to the juicing guide to determine
the correct speed for the fruit and vegetables selected for juicing.
Please ensure the motor is running prior to loading the chute.
• Stop the juicing process and follow Disassembling instructions.
Remove the juicer cover, scrape o pulp, reassemble and begin
juicing again. Try alternating (soft and hard) vegetables and fruit
varieties.
11
Page 12

TROUBLESHOOTING
POSSIBLE PROBLEM EASY SOLUTION
Pulp too wet and
reduced extracted juice
• Try a slower juicing action. Remove the stainless steel lter basket
and thoroughly clean mesh walls with a cleaning brush. Rinse the
lter basket under hot water. If the ne mesh holes are blocked,
soak the basket in a solution of hot water with 10% lemon juice to
unlock the holes or wash in the dishwasher. This will remove excess
bre build up (from fruit and vegetables) which could be inhibiting
the ow.
Juice leaks between the
rim of the Juicer and the
juicer cover
Juice sprays out
from spout
Overheating with
excessive loads.
• Try a slower juicing speed and push the food pusher down the feed
chute more slowly.
• Ensure all parts are securely pieced together, with the interlocking
arm in place.
• The juice is being extracted too fast: try a slower juicing speed and
push the food pusher down the feed chute more slowly.
• The juicer is tted with a safety device which safeguards against
overheating with excessive loads. If overheating occurs, the juicer
will automatically activate the overload protection device and the
unit will switch itself o. When the overload protection is activated,
unplug the Juicer from the power outlet for at least 15 minutes to
allow the unit to cool. Then plug the juicer into the power outlet and
use as normal.
• It is important to ensure the juicer is turned on and the motor is
running prior to loading the chute. Do not put excessive loads in the
feed chute and ensure the lter basket is totally clear of any food
build up, on the blades and mesh, as this can result in unnecessary
resistance against the motor resulting in overheating.
12
Page 13

GUARANTEE
2 YEAR LIMITED GUARANTEE
AND 5 YEAR LIMITED MOTOR GUARANTEE
Sage Appliances guarantees this product for
domestic use in specied territories for 2 years
for all parts of the product and 5 years for the
product’s motor from the date of purchase
against defects caused by faulty workmanship
and materials. During this guarantee period
Sage Appliances will repair, replace, or refund
any defective product (at the sole discretion of
Sage Appliances).
All legal warranty rights under applicable
national legislation will be respected and will
not be impaired by our guarantee. For full terms
and conditions on the guarantee, as well as
instructions on how to make a claim, please
visit www.sageappliances.com.
EN
13
Page 14

INHALT
14 Wichtige Sicherheitshinweise
17 Einzelteile
18 Montage
20 Anwendung
21 Pege & Reinigung
23 Fehlerbehebung
25 Garantie
SAGE® EMPFIEHLT:
SICHERHEIT
GEHT VOR
Wir bei Sage® sind sehr
sicherheitsbewusst.
Beim Design und bei der
Herstellung unserer Geräte
denken wir zu allererst an
Ihre Sicherheit. Darüber
hinaus bitten wir Sie, bei
der Verwendung jedes
Elektrogeräts angemessene
Sorgfalt anzuwenden und
sich an die folgenden
Vorsichtsmaßnahmen
zu halten.
WICHTIGE
SICHERHEITS
HINWEISE
BITTE ALLE ANWEISUNGEN
VOR DEM GEBRAUCH
LESEN UND ZUR
SPÄTEREN BEZUGNAHME
AUFBEWAHREN.
14
• Die komplette
Informationsbroschüre ist unter
sageappliances.com verfügbar.
• Vor dem ersten Gebrauch
prüfen, dass Ihre Netzspannung
mit der auf dem Etikett an
der Unterseite des Geräts
übereinstimmt.
• Vor dem ersten Gebrauch
alle Verpackungsmaterialien
abnehmen und sicher
entsorgen.
• Schutzhülle am Netzstecker
sicher entsorgen, da
sie für Kleinkinder eine
Erstickungsgefahr
darstellen könnte.
• Dieses Gerät ist nur für den
Haushaltsgebrauch bestimmt.
Gerät nur bestimmungsgemäß
verwenden. Nicht in fahrenden
Fahrzeugen oder Booten
verwenden. Nicht im Freien
verwenden. Missbrauch kann
Verletzungen nach sich ziehen.
• Netzkabel vor dem Gebrauch
vollständig entrollen.
• Gerät in sicherem Abstand
von Kanten auf eine stabile,
hitzebeständige, ebene und
trockene Fläche stellen.
Nicht auf oder neben einer
Wärmequelle wie einem Gasoder Elektroherd oder einem
heißen Ofen betreiben.
• Das Gerät kann während
des Betriebs aufgrund von
Vibrationen verrutschen.
• Netzkabel nicht über
Arbeitsplatten oder Tischkanten
hängen lassen, von heißen
Page 15

WIR EMPFEHLEN: SICHERHEIT GEHT VOR
DE
Oberächen fern halten,
Kabelgewirr vermeiden.
• Gerät immer ausschalten,
Netzstecker ziehen und
abkühlen lassen, ehe Sie es
bewegen, reinigen oder lagern.
• Gerät immer ausschalten,
sofern möglich auch an der
Steckdose, und Netzstecker
ziehen, wenn es nicht in
Gebrauch ist.
• Gerät nicht verwenden,
wenn das Netzkabel, der
Netzstecker oder das Gerät
selbst in irgendeiner Weise
beschädigt ist. Wenden Sie
sich bei Schäden oder zur
Wartung (außer Reinigung) bitte
an den Sage-Kundendienst
oder besuchen Sie
sageappliances.com
• Alle Wartungsarbeiten außer
Reinigung nur von autorisierten
®
Sage
-Kundendienststellen
vornehmen lassen.
• Kinder nicht mit dem Gerät
spielen lassen.
• Reinigung des Geräts nicht
von Kindern unter 8 Jahren
und nur unter Aufsicht
vornehmen lassen.
• Gerät und Netzkabel für Kinder
bis zu 8 Jahren unzugänglich
aufbewahren.
• Die Installation eines Schutzoder Sicherheitsschalters
wird bei der Verwendung
von Elektrogeräten als
zusätzliche Schutzmaßnahme
empfohlen. Es wird ein
Sicherheitsschalter mit
maximal 30 mA Nennleistung
empfohlen. Fachgerechte
Beratung erhalten Sie von
Ihrem Elektriker.
• Gerät nur nutzen, wenn es
richtig zusammengesetzt ist.
Das Gerät funktioniert nur, wenn
es richtig zusammengesetzt ist.
• Gerät nicht auf der
Abtropäche Ihrer Spüle
verwenden.
• Hände, Finger, Haare und
Bekleidung, Schaber und
andere Utensilien während des
Betriebs von beweglichen oder
rotierenden Teilen fern halten.
• Gerät nur bestimmungsgemäß
zur Zubereitung von Speisen
und/oder Getränken
verwenden.
• Zur Vermeidung des
Risikos, dass sich das
Gerät aufgrund einer
unbeabsichtigt zurückgesetzten
Überlastsicherung selbst in
Betrieb setzt, keine externen
Schalter (z. B. eine Zeituhr)
anschließen und das Gerät
nicht an einen Stromkreis
anschließen, der das
Gerät regelmäßig aus- und
einschalten kann.
• Alle Anweisungen vor dem
Gebrauch sorgfältig lesen und
zur späteren Bezugnahme
aufbewahren.
• Dieses Gerät kann von
Personen mit eingeschränkten
körperlichen, sensorischen
oder geistigen Fähigkeiten
15
Page 16

WIR EMPFEHLEN: SICHERHEIT GEHT VOR
oder mit mangelnder Erfahrung
und fehlenden Kenntnissen
genutzt werden, sofern sie
beaufsichtigt werden oder in
den sicheren Gebrauch des
Geräts eingewiesen wurden
und sich der entsprechenden
Risiken bewusst sind.
• Gerät nicht von Kindern
bedienen lassen.
• Gerät während des Betriebs
nicht unbeaufsichtigt lassen.
• Motor nach jedem Betrieb
1 Minute lang ruhen lassen.
• Zutaten nie mit den Fingern
oder anderen Utensilien als
dem mitgelieferten Stopfer in
den Einfüllschacht pressen.
Hand oder Finger nie in den
Einfüllschacht stecken, wenn
dieser am Gerät angebracht ist.
• Steinobst nur entsteint
entsaften.
• Vor der Freigabe des
Sicherheitsriegels und/oder vor
jedem Transport des Geräts, bei
Nichtgebrauch sowie vor dem
Auseinandernehmen, Reinigen
und Lagern stets sicherstellen,
dass sich der EdelstahlSiebkorb nicht mehr dreht und
der Motor völlig zum Stillstand
gekommen ist.
• Auf, unter oder neben
das Gerät verschüttete
größere Flüssigkeitsmengen
sollten aufgewischt und die
Oberächen getrocknet
werden, ehe das Gerät weiter
benutzt wird.
• Edelstahl-Siebkorb vorsichtig
handhaben, da die kleinen
Messer unten am Siebkorb sehr
scharf sind. Eine Fehlbedienung
kann Verletzungen nach
sich ziehen.
• Zitrusfrüchte vor dem Entsaften
stets schälen.
• Gerät nicht mit beschädigtem
Drehsieb (Siebkorb) oder
Deckel betreiben.
• Vor dem Einschalten des
Motors stets sicherstellen,
dass der Entsafterdeckel sicher
eingerastet ist. Sperrriegel
während des Entsaftens
nicht önen.
Dieses Symbol zeigt,
dass das Gerät nicht im
normalen Hausmüll
entsorgt werden sollte.
Es sollte stattdessen bei einem
entsprechenden kommunalen
Wertstohof oder Fachhändler
zur Entsorgung abgegeben
werden. Weitere Einzelheiten
erfahren Sie von Ihrer
Kommunalbehörde.
Zum Schutz gegen
Stromschlag Netzstecker,
Netzkabel oder Gerät
nicht in Wasser oder sonstige
Flüssigkeiten tauchen.
ANWEISUNGEN BITTE AUFBEWAHREN
16
Page 17
EINZELTEILE
A
B
C
DE
H
I
D
E
F
G
A. Stopfer
B. Einzigartiges, zentrales
Direktzuführsystem
C. 84mm extra weiter Einfüllschacht
D. Titanium-verstärkter Edelstahl-
Filtersiebkorb mit MikroFiltergewebe
E. Großer Tresterbehälter
(spülmaschinenfest).
F. 1200 Watt Hochleistungsmotor
G. Kabelaufbewahrung
J
K
L
H. Sicherheitsverriegelungsbügel
I. Entsafterabdeckung
(nicht spülmaschinenfest).
J. Saft lterschale
(spülmaschinenfest).
K. 1 Liter Saftkrug und Deckel
(spülmaschinenfest).
L. Elektronischer Schalter für
2 Geschwindigkeiten ON / OFF
(EIN / AUS) Schalter
Leistungsangaben
220–240V~ 50Hz 1050–1250W
17
Page 18

MONTAGE
VOR DEM ERSTEN GEBRAUCH
Bevor Sie den Entsafter zum ersten Mal
benutzen, entfernen Sie und entsorgen Sie das
gesamte Verpackungsmaterial, Werbeaufkleber
und Etiketten. Vergewissern Sie sich, dass das
Gerät ggf. an der Steckdose ausgeschaltet
und der Netzstecker abgezogen ist. Waschen
Sie die Saft lterschale, Filtersiebkorb,
Entsafterabdeckung, Stopfer, Tresterbehälter,
Saftkrug und Deckel mit einem weichen Tuch
in warmem Seifenwasser. Spülen und trocknen
Sie alles gründlich. Der Motorsockel kann
mit einem feuchten Tuch abgewischt werden.
Gründlich trocknen.
1. Stellen Sie den Motorsockel auf eine
ebene, trockene Ober äche wie z.B.
eine Küchenarbeits äche. Stellen Sie
sicher, dass der Motorsockel auf dem
Bedienfeld auf AUS (Schalterstellung
OFF) geschaltet ist, dann schalten Sie
das Gerät ggf. an der Steckdose aus und
ziehen Sie den Netzstecker ab.
3. Richten Sie die Pfeile auf der Basis des
Edelstahl-Filtersiebkorbs an den Pfeilen
auf der Motorantriebskupplung aus und
drücken Sie nach unten, bis er einrastet.
Stellen Sie sicher, dass der Edelstahl-
Filtersiebkorb fest in der Saft lterschale
und auf dem Motorsockel aufsitzt.
4. Platzieren Sie die Entsafterabdeckung
über die Saft lterschale mit dem
Einfüllschacht über dem EdelstahlFiltersiebkorb und bringen Sie ihn dann
nach unten in Position.
2. Stellen Sie die Saft lterschale oben auf
den Motorsockel.
18
5. Heben Sie den
Sicherheitsverriegelungsbügel an und
klemmen Sie ihn in die zwei Rillen auf
beiden Seiten der Entsafterabdeckung.
Page 19
MONTAGE
DE
Der Verriegelungsbügel sollte nun senkrecht
stehen und oben auf der Abdeckung des
Entsafters eingerastet sein.
6. Stecken Sie den Stopfer in den
Einfüllschacht indem Sie dabei die
Rille an dem Stopfer mit der kleinen
Anhebung an der oberen Innenseite des
Einfüllschachts ausrichten.
Rille
am
Stopfer
Erhebung
auf der
Innenseite des
Einfüllschachts
Lassen Sie dann den Stopfer in den
Einfüllschacht weiter hinuntergleiten.
Kleine
7. Bringen Sie den Tresterbehälter in
Position, indem Sie den Motorsockel
ein wenig nach rechts kippen. Schieben
Sie den Tresterbehälter links unter
die Entsafterabdeckung und stellen
Sie dabei sicher, dass er sich mit
der Entsafterabdeckung und dem
Motorsockel zusammenfügt.
HINWEIS
Um den Reinigungsaufwand zu verringern,
können Sie einen Kunststo gefrierbeutel
in den Tresterbehälter einlegen, um den
Trester zu sammeln. Der Trester kann dann
in anderen Speisen oder als Kompost im
Garten eingesetzt oder entsorgt werden.
8. Stellen Sie den Saftkrug unter die
Ausgusstülle auf der rechten Seite des
Entsafters. Der Deckel des Saftkrugs
verhindert, dass der Saft herausspritzt.
19
Page 20
ANWENDUNG
1. Waschen Sie das zum Entsaften vorgesehene
Obst und Gemüse.
2. Stellen Sie sicher, dass der Entsafter richtig
zusammengesetzt ist. Beachten Sie dazu die
Anleitungen zum Zusammensetzen des Sage
®
juicer. Stellen Sie sicher, dass der Saftkrug unter
der Safttülle steht und dass der Tresterbehälter
angeschlossen ist, bevor Sie mit dem
Entsaften beginnen.
3. Schließen Sie den Netzstecker an eine 220-240V
Steckdose. Schalten Sie den Strom ggf. an
der Steckdose an. Stellen Sie die gewünschte
Geschwindigkeit ein. Drücken Sie den
2-Geschwindigkeitsschalter entweder nach
oben für eine niedrige Geschwindigkeit (LOW)
oder nach unten für eine hohe Geschwindigkeit
(HIGH), je nachdem, welche Sorten Früchte
oder Gemüse entsaftet werden sollen. Benutzen
Sie die Geschwindigkeitstabelle als Richtlinie
für das Entsaften verschiedener Früchte
und Gemüse.
Äpfel High (hoch)
Aprikosen (Kern entfernt) Low (niedrig)
Rote Beete (zurechtgeschnitten) High (hoch)
Heidelbeeren Low (niedrig)
Brokkoli Low (niedrig)
Rosenkohl (zurecht geschnitten) High (hoch)
Kohl Low (niedrig)
Karotten High (hoch)
Blumenkohl Low (niedrig)
Sellerie High (hoch)
Gurken (geschält) Low (niedrig)
Gurken (mit weicher Schale) High (hoch)
Fenchel High (hoch)
Trauben (kernlos) Low (niedrig)
Kiwi (geschält) Low (niedrig)
Mangos (geschält,
Kern entfernt)
Melonen (geschält) Low (niedrig)
Nektarinen (Kern entfernt) Low (niedrig)
Orangen (geschält) High oder Low
Prsiche (Kern entfernt) Low (niedrig)
Low (niedrig)
TABELLE FÜR DIE WAHL DER
GESCHWINDIGKEIT
Birnen (Stängel entfernt) High (hoch) für
Ananas (geschält) High (hoch)
Paumen (Kern entfernt) Low (niedrig)
Himbeeren Low (niedrig)
Tomaten Low (niedrig)
Wassermelone (geschält) Low (niedrig)
harte oder Low
(niedrig) für
weiche Birnen
4. Bei laufendem Motor stecken Sie Früchte/
Gemüse in den Einfüllschacht und benutzen
Sie den Stopfer, um diese sanft nach unten zu
drücken. Um den größtmöglichen Saftanteil
zu erhalten, drücken Sie die Früchte/Gemüse
langsam nach unten.
HINWEIS
Der Motor muss bereits laufen, bevor Sie
etwas in den Einfüllschacht füllen
WARNUNG
Benutzen Sie niemals Ihre Finger um
Früchte/Gemüse im Einfüllschacht nach
unten zu drücken oder sie aus dem
Einfüllschacht herauszuholen. Benutzen
Sie immer den mitgelieferten Stopfer.
Filtersiebkorb
Vorsicht: Scharfe
Klingen
WARNUNG
Der Edelstahl-Filtersiebkorb hat kleine,
scharfe Klingen, mit denen Früchte
und Gemüse geschnitten und verarbeitet
werden. Vermeiden Sie es, diese
Klingen zu berühren, wenn Sie mit
dem Filtersaftkorb hantieren.
20
Page 21
PFLEGE & REINIGUNG
DE
Vergewissern Sie sich, dass der Entsafter
ausgeschaltet ist, in dem Sie den ON / OFF Schalter
auf dem Schaltfeld auf OFF (AUS) stellen. Schalten
Sie dann das Gerät ggf. an der Steckdose ab und
ziehen Sie das Netzkabel ab. Stellen Sie sicher,
dass der Entsafter richtig auseinandergebaut
ist. Halten Sie sich an die Anleitung zum
Auseinandernehmen Ihres neuen Geräts.
FÜR EINFACHERERE REINIGUNG:
• Reinigen Sie laufend um zu verhindern,
dass Saft oder Tresterreste antrocknen.
• Spülen Sie unmittelbar nach jedem
Gebrauch die abnehmbaren Teile
unter heißem Wasser, um feuchte
Tresterrückstände zu entfernen. Lassen
Sie die Teile dann an der Luft trocknen.
HINWEIS
Um den Reinigungsaufwand zu verringern,
können Sie einen Kunststo-Gefrierbeutel
in den Tresterbehälter einlegen, um den
Trester zu sammeln. Der Trester kann dann
in anderen Speisen oder als Kompost im
Garten eingesetzt oder entsorgt werden.
REINIGUNG DES MOTORSOCKELS
• Reinigen Sie den Motorsockel mit einem
weichen, feuchten Tuch und trocknen
Sie ihn dann sorgfältig.
• Wischen Sie mögliche Tresterteilchen
von dem Stromkabel.
HINWEIS
Benutzen Sie keine Scheuerschwämme
oder scharfe Reinigungsmittel bei der
Reinigung des Stromsockels, da diese die
Oberäche zerkratzen könnten.
REINIGUNG VON
SAFTFILTERSCHALE,
ENTSAFTERABDECKUNG,
STOPFER, TRESTERBEHÄLTER
Reinigen Sie alle Teile in warmem, seigem
Wasser mit einem weichen Tuch. Dann gründlich
spülen und trocknen.
HINWEIS
Saftlterschale, Saftkrug mit Deckel, Stopfer
und Tresterbehälter sind spülmaschinenfest
(nur in das oberste Spülmaschinenfach
stellen) Die Entsafterabdeckung ist nicht
spülmaschinenfest.
REINIGUNG DES FILTERSIEBKORBS
• Für beständige Resultate beim
Entsaften sorgen Sie dafür, dass der
Edelstahl-Filtersiebkorb immer gründlich
gereinigt ist, indem Sie die mitgelieferte
Reinigungsbürste benutzen. Es ist
wichtig, dies unmittelbar nach dem
Gebrauch zu tun.
• Weichen Sie den Edelstahl-
Filtersiebkorb in heißem, seigem
Wasser unmittelbar nachdem Sie mit
dem Entsaften fertig sind, für rund
10 Minuten ein. Wenn der Trester auf
dem Filtersieb antrocknet, kann er
die feinen Poren des Filtergewebes
verstopfen und dadurch die Ezienz
des Entsafters reduzieren.
• Unter Benutzung der Bürste halten Sie
den Filtersiebkorb unter ießendes
Wasser und bürsten Sie von der
Innenseite des Korbes zum äußeren
Rand hin. Vermeiden Sie, die kleinen
scharfen Messer in der Mitte des
Filtersiebkorbs zu berühren. Wiederholen
Sie diesen Vorgang an der Außenseite
des Filtersiebkorbs. Nach dem Sie
den Filtersiebkorb gereinigt haben,
halten Sie ihn gegen eine Lichtquelle,
um sich davon zu überzeugen, dass
die feinen Poren des Filtergewebes
21
Page 22

PFLEGE & REINIGUNG
nicht verstopft sind. Sollten die Poren
verstopft sein, weichen Sie den
Filtersiebkorb in heißem Wasser mit
10% Zitronensaft ein, um die verstopften
Poren aufzuweichen. Wiederholen Sie
den Reinigungsvorgang mit der Bürste.
Alternativ können Sie den Filtersiebkorb
in der Spülmaschine reinigen.
Weichen Sie den Edelstahl-Filtersiebkorb nicht
in Bleichmitteln oder anderen scharfen
Reinigern ein.
Behandeln Sie den Filtersiebkorb immer mit
Vorsicht, da er einfach zu beschädigen ist.
HINWEIS
Der Edelstahl-Filtersiebkorb ist
spülmaschinenfest (nur in das oberste
Spülmaschinenfach stellen).
REINIGUNG DES SAFTKRUGS
• Spülen Sie den Saftkrug und den Deckel
mit dem Schaumabscheider unter
ießendem Wasser
• Waschen Sie beide Teile in warmem,
seigem Wasser. Spülen und trocknen
Sie diese gründlich.
ENTFERNEN VON HARTNÄCKIGEN
ODER STARKEN VERFÄRBUNGEN
UND GERÜCHEN
Verfärbung des Kunststos kann durch Obst
und Gemüse mit starken Farbstoen verursacht
werden. Um dabei zu helfen, dies zu verhindern,
waschen Sie diese Teile unmittelbar nach dem
Gebrauch. Wenn dennoch eine Verfärbung
auftritt, können Sie die Kunststoteile in Wasser
mit 10% Zitronensaft einweichen oder mit einem
nicht scheuernden Reinigungsmittel reinigen.
Der Entsafter ist mit einem 1200 Watt
Hochleistungsmotor ausgerüstet. Dieser ist
so hochleistungsfähig, dass wir ihm eine
5-Jahre Garantie gegen Materialmängel oder
Herstellungsfehler gegeben haben. Diese
Garantie ist eine Erweiterung der 12-Monate
Ersatzgewährleistung und deckt nur den Motor
ab. Diese Garantie deckt keine Schäden ab, die
durch Unfälle, falschen Gebrauch oder nicht
wie in der Anleitung vorgesehenen Gebrauch
verursacht werden.
WARNUNG
Tauchen Sie den Motorsockel nicht in
Wasser oder eine andere Flüssigkeit
ein. Im Zentrum des Filtersiebkorbs
und an dem Einfüllschacht benden
sich kleine scharfe Klingen zur
Verarbeitung von Früchten und
Gemüse während des Entsaftens.
Berühren Sie diese Klingen nicht,
wenn Sie mit dem Filtersiebkorb
oder dem Einfüllschacht hantieren.
HINWEIS
Der Saftkrug und der Deckel sind
spülmaschinenfest (nur in das oberste
Spülmaschinenfach stellen).
22
Page 23

FEHLERBEHEBUNG
DE
MÖGLICHES
PROBLEM
Das Gerät arbeitet
nicht, wenn es auf ON
eingeschaltet ist
Der Motor scheint beim
Entsaften stecken zu
bleiben
EINFACHE LÖSUNG
• Der Verriegelungsbügel könnte nicht ordentlich in seiner
senkrechten Arbeitsposition in die beiden Rillen auf beiden
Seiten der Entsafterabdeckung eingerastet sein.
• Feuchter Trester kann sich unter der Entsafterabdeckung
ansammeln, wenn Sie beim Entsaften zu heftig vorgehen.
Versuchen Sie, langsamer zu entsaften, indem Sie den
Stopfer langsamer nach unten drücken. Reinigen Sie
die Saftlterschale, den Edelstahl-Filtersiebkorb und die
Entsafterabdeckung unter Beachtung der Reinigungsund Monageanleitung.
• Der Entsafter schaltet sich automatisch ab, wenn der Motor
für länger als 10 Sekunden stecken bleibt. Entweder wird
zu viel Obst/Gemüse auf einmal verarbeitet oder die Stücke
sind nicht klein genug. Schneiden Sie das Obst/Gemüse in
kleinere, gleich große Stücke und verarbeiten Sie weniger
davon in einem Durchgang. Um weiter entsaften zu können,
stellen Sie das Gerät aus, indem Sie den ON / OFF Schalter
auf der Bedienäche auf OFF (AUS) drücken und dann das
Gerät wieder anschalten, indem Sie den ON / OFF Schalter
auf ON (AN) stellen.
• Harte Früchte und Gemüse belasten den Motor bei
niedriger Geschwindigkeit zusätzlich. Bitte halten Sie
sich an die Richtlinien für das Entsaften, um die richtige
Geschwindigkeit für das Obst und Gemüse zu nden,
das Sie entsaften wollen. Bitte stellen Sie sicher, dass
der Motor bereits läuft, bevor Sie Obst/Gemüse in den
Einfüllschacht füllen.
Überschüssiger Trester
sammelt sich in dem
Edelstahl-Filtersiebkorb
• Halten Sie das Entsaften an und folgen Sie den
Anleitungen zum Auseinanderbauen. Nehmen Sie die
Entsafterabdeckung ab, lösen Sie das Fruchteisch ab,
setzen Sie das Gerät wieder zusammen und beginnen Sie
neuerlich mit dem Entsaften. Versuchen Sie, alternierend
(weiche und harte) Gemüse- und Obstsorten zu verwenden.
23
Page 24

FEHLERBEHEBUNG
MÖGLICHES
PROBLEM
Der Trester ist zu feucht
und Sie erhalten zu
wenig Saft
Der Saft quillt unter
dem Rand der
Entsafterabdeckung
hervor
Der Saft spritzt von
der Safttülle
Überhitzt bei zu großer
Beladung
EINFACHE LÖSUNG
• Versuchen Sie, langsamer zu entsaften. Nehmen Sie
den Edelstahl-Filtersiebkorb heraus und reinigen Sie
das Filtersieb gründlich mit einer Bürste. Spülen Sie den
Filtersiebkorb unter heißem Wasser. Sollten die feinen Poren
des Siebs verstopft sein, weichen Sie den Filtersiebkorb
in heißem Wasser mit 10% Zitronensaft ein, um die
verstopften Poren aufzuweichen oder reinigen Sie ihn in der
Spülmaschine. Dadurch wird übermäßige Anlagerung von
Fasern (von Früchten und Gemüse) abgebaut, die den Fluss
des Saftes behindern kann.
• Versuchen Sie eine geringere Entsafter-Geschwindigkeit
und drücken Sie den Stopfer langsamer in den
Einfüllschacht.
• Stellen Sie sicher, dass alles richtig zusammengefügt und
der Sicherheitsverriegelungsbügel eingerastet ist.
• Es wird zu schnell entsaftet: Versuchen Sie eine geringere
Entsafter-Geschwindigkeit und drücken Sie den Stopfer
langsamer in den Einfüllschacht.
• Der Entsafter ist mit einer Sicherheitsvorrichtung versehen,
die ihn vor Überhitzung bei Überladung schützt. Wenn es zu
Überhitzung kommt, aktiviert der Entsafter automatisch den
Überlastungsschutz und schaltet sich selbst aus. Wenn der
Überlastungsschutz aktiviert ist, ziehen Sie den Netzstecker
für mindestens 15 Minuten aus der Steckdose, um das
Gerät abkühlen zu lassen. Stecken Sie den Netzstecker
anschließend wieder in die Steckdose und setzen Sie den
Entsaftungsvorgang ganz normal fort.
• Es ist wichtig, dass der Entsafter eingeschaltet ist und
der Motor bereits läuft, bevor Sie Obst/Gemüse in dem
Einfüllschacht platzieren. Vermeiden Sie den Einfüllschacht
zu überladen und stellen Sie sicher, dass sowohl die Klingen
als auch das Filtersieb im Filterkorb vollkommen von Obst-/
Gemüserückständen befreit sind, da dies dem Motor
unnötigen Widerstand entgegensetzen kann,
was zu Überhitzung führen könnte.
24
Page 25

GARANTIE
2 JAHRE BESCHRÄNKTE
GARANTIE UND 5 JAHRE
BESCHRÄNKTE MOTORGARANTIE
Sage Appliances gibt auf dieses Produkt
für den häuslichen Gebrauch in bestimmten
Gebieten eine Garantie über 2 Jahre für alle
Bestandteile des Produkts und 5 Jahre für den
Produktmotor ab Kaufdatum für Mängel, die
durch fehlerhafte Verarbeitung und Materialien
verursacht wurden.Während dieser Garantiezeit
wird Sage Appliances jedes fehlerhafte
Produkt reparieren, ersetzen oder das Geld
zurückerstatten (nach eigenem Ermessen von
Sage Appliances).
Alle gesetzlichen Gewährleistungsrechte nach
geltendem nationalem Recht werden beachtet
und durch unsere Garantie nicht beeinträchtigt.
Die vollständigen Garantiebestimmungen
und -bedingungen sowie Hinweise zur
Geltendmachung von Ansprüchen nden Sie
unter www.sageappliances.com.
DE
25
Page 26

NOTES / NOTIZEN
26
Page 27

FR
the Nutri Juicer
BJE410
®
FR
GUIDE RAPIDE
Page 28

TABLE DES MATIÈRES
2 Mesures importantes de sécurité
5 Composants
6 Assemblage
8 Fonctionnement
9 Entretien et nettoyage
11 Dépannage
14 Garantie
SAGE®
RECOMMANDE
LA SÉCURITÉ
EN PREMIER
Chez Sage®, la sécurité
est une priorité.
Nous concevons et
fabriquons des produits
consommateurs en mettant
la sécurité de nos clients
importants, c’est-à-dire
vous, au premier plan. Nous
vous demandons également
de faire attention lorsque
vous utilisez un appareil
électrique et de respecter
les consignes suivantes.
MESURES
IMPORTANTES
DE SÉCURITÉ
LISEZ TOUTES LES
INSTRUCTIONS AVANT
UTILISATION ET CONSERVEZLES POUR RÉFÉRENCE
ULTÉRIEURE
• Une version téléchargeable de
ce document est également
disponible sur
sageappliances.com
• Avant une première utilisation,
assurez-vous que l’alimentation
électrique est identique à celle
illustrée sur l’étiquette située en
dessous de l’appareil.
• Retirez tout emballage avant la
première utilisation et éliminezle de façon sûre.
• Pour éviter tout risque
d’étouement pour les jeunes
enfants, éliminez de manière
sûre le couvercle de protection
sur la prise d’alimentation.
• Cet appareil est destiné à un
usage domestique uniquement.
N’utilisez pas l’appareil pour
toute autre n que son utilisation
prévue. Ne l’utilisez pas sur un
bateau ou dans des véhicules
en mouvement. Ne l’utilisez
pas en plein air. Une mauvaise
utilisation peut engendrer des
blessures.
• Déroulez entièrement le cordon
d’alimentation avant utilisation.
• Placez l’appareil sur une
surface stable, résistante à la
chaleur, plane et sèche, loin
du bord. Ne l’utilisez pas sur
ou à proximité d’une source de
chaleur (plaque chauante, four
ou cuisinière au gaz).
2
Page 29

NOUS RECOMMANDONS LA SÉCURITÉ EN PREMIER
FR
• Des vibrations pendant
l’utilisation peuvent provoquer le
déplacement de l’appareil.
• Ne laissez pas le cordon
d’alimentation suspendu au
bord d’un banc ou d’une table,
toucher des surfaces chaudes
ou se nouer.
• Assurez-vous toujours que
l’appareil est hors tension,
débranché de la prise électrique
et qu’il a refroidi avant de le
nettoyer, de le déplacer ou de
le ranger.
• Assurez-vous toujours que
l’appareil est HORS TENSION,
éteint et débranché au niveau
de la prise électrique lorsqu’il
n’est pas utilisé.
• N’utilisez pas l’appareil si le
cordon d’alimentation, la prise
ou l’appareil sont endommagés
de quelque manière que ce soit.
En cas de dommages ou si un
entretien autre que le nettoyage
est nécessaire, contactez le
service client Sage
ou consultez le site
sageappliances.com
• Tout entretien autre que le
nettoyage doit être réalisé
par un centre de services
®
Sage
agréé.
• Les enfants ne doivent pas
jouer avec l’appareil.
• Le nettoyage de l’appareil ne
doit pas être eectué par des
enfants à moins qu’ils aient
8 ans ou plus, et ce, sous la
surveillance d’un adulte.
• L’appareil et son cordon
doivent être conservés hors
de la portée des enfants de
8 ans et moins.
• L’installation d’un commutateur
de sécurité de courant résiduel
est recommandée pour fournir
une sécurité supplémentaire
lors de l’utilisation de tous
les appareils électriques. Les
commutateurs de sécurité avec
un courant de fonctionnement
nominal maximal de 30 mA
sont recommandés. Consultez
un électricien pour obtenir des
conseils professionnels.
• Assurez-vous toujours que
l’appareil est correctement
assemblé avant utilisation.
L’appareil ne fonctionne
pas s’il n’est pas
correctement assemblé.
• N’utilisez pas l’appareil sur
l’égouttoir d’un évier.
• Conservez vos mains, doigts,
cheveux, vêtements, mais
aussi les spatules et autres
ustensiles éloignés des pièces
amovibles ou rotatives lors du
fonctionnement.
3
Page 30

NOUS RECOMMANDONS LA SÉCURITÉ EN PREMIER
• N’utilisez pas l’appareil
pour toute autre n qu’une
préparation alimentaire ou
de boissons.
• An d’éviter le danger potentiel
que l’appareil démarre tout seul
à cause de la remise en marche
involontaire de la protection
contre les surcharges, ne
connectez pas de dispositif de
commutation supplémentaire
externe (comme un minuteur).
Veillez à ne pas brancher
l’appareil à un circuit pouvant
régulièrement mettre l’appareil
sous tension et hors tension.
• Lisez soigneusement toutes les
instructions avant utilisation et
conservez-les pour référence
ultérieure.
• L’appareil peut être utilisé par
des personnes aux capacités
mentales ou physiques réduites,
ou ayant peu d’expérience et
de connaissances uniquement
sous supervision ou si elles
ont reçu des instructions
sur l’utilisation sécuritaire
de l’appareil et qu’elles
comprennent les risques
impliqués.
• Cet appareil ne doit pas être
utilisé par des enfants.
• Ne laissez pas l’appareil
sans surveillance lorsqu’il est
en marche.
• Ne poussez pas les aliments
dans le goulot d’alimentation
avec vos doigts ou d’autres
ustensiles. Utilisez toujours
le poussoir de l’extracteur.
Ne placez pas votre main
ou vos doigts dans le goulot
d’alimentation lorsqu’il est xé
sur l’appareil.
• Ne pressez pas les fruits à
noyau tant que vous n’avez
pas enlevé les graines ou
les noyaux.
• Assurez-vous que le panier-ltre
en acier inoxydable s’est arrêté
de tourner, et que le moteur
est entièrement arrêté avant
de libérer l’arceau de blocage
de sûreté ou avant de déplacer
l’appareil, lorsque l’extracteur
n’est pas utilisé, et avant le
démontage, le nettoyage et
l’entreposage.
• Nettoyez et séchez toute fuite
importante sur la surface en
dessous ou autour de l’appareil,
ou sur l’appareil lui-même avant
de continuer de l’utiliser.
• Faites attention lorsque vous
manipulez le panier-ltre en
acier inoxydable, car les petites
lames de coupe à la base du
panier sont très tranchantes.
Une mauvaise manipulation
peut engendrer des blessures.
4
Page 31

NOUS RECOMMANDONS LA SÉCURITÉ EN PREMIER
• Enlevez les zestes de tous les
agrumes avant de les presser.
• N’utilisez pas l’appareil si le
tamis rotatif (panier-ltre) ou le
couvercle est endommagé.
• Vériez toujours que le
couvercle de l’extracteur est
bien en place avant de mettre
en route le moteur. Ne détachez
pas l’arceau de verrouillage
lorsque l’extracteur est
en marche.
Le symbole illustré indique
que cet appareil ne doit pas
être jeté dans les ordures
ménagères. Il doit être
amené dans un centre de collecte
de déchets des autorités locales
désigné à cette n ou à un
revendeur proposant ce service.
Pour en savoir plus, veuillez
contacter le bureau de votre
municipalité.
FR
À des ns de protection
contre les décharges
électriques, ne plongez pas
la prise électrique, le cordon ou
l’appareil dans de l’eau ou dans
un liquide.
CONSERVEZ CES INSTRUCTIONS
5
Page 32

COMPOSANTS
A
B
C
H
I
D
E
F
G
A. Poussoir
B. Système d’alimentation unique
direct et central
C. Goulot d’alimentation à très grande
ouverture de 84 mm
D. Panier- ltre en acier inoxydable à
micro ltre renforcé de titane
E. Récipient à pulpe grande capacité
(lavable au lave-vaisselle).
F. Moteur robuste 1 200 W
J
K
L
G. Rangement du cordon
H. Arceau de verrouillage de sûreté
I. Couvercle de l’extracteur de jus
(non lavable au lave-vaisselle).
J. Contenant du ltre
(lavable au lave-vaisselle).
K. Pichet à jus de 1 litre avec
couvercle
(lavable au lave-vaisselle).
L. Commutateur de marche/arrêt
du contrôle électronique
à 2 vitesses
Informations sur la tension nominale
220 à 240 V~ 50/60 Hz 1 050 à 1 250 W
6
Page 33

ASSEMBLAGE
FR
AVANT LA PREMIÈRE UTILISATION
Avant d’utiliser votre extracteur de jus pour la
première fois, retirez et jetez en lieu sûr les
emballages et les étiquettes promotionnelles.
Assurez-vous toujours que l’appareil est éteint
au niveau de la prise électrique et que le cordon
d’alimentation est débranché.
Lavez le contenant du ltre, le panier- ltre,
le couvercle de l’extracteur, le poussoir, le
récipient à pulpe, le pichet à jus et le couvercle
avec de l’eau tiède savonneuse et un chi on
doux. Rincez et séchez soigneusement. Vous
pouvez essuyer la base du moteur avec un
chi on doux et humide. Séchez soigneusement.
1. Placez la base du moteur sur une
surface plate et sèche, comme une
paillasse. Assurez-vous que la base du
moteur est éteinte au niveau du panneau
des commandes, puis éteignez l’appareil
au niveau de la prise électrique et
débranchez le cordon d’alimentation.
3. Alignez les èches à la base du panier-
ltre en acier inoxydable avec celles du
couplage de la commande du moteur et
poussez vers le bas jusqu’à ce que vous
entendiez un déclic. Veillez à ce que
le panier- ltre en acier inoxydable soit
fermement xé à l’intérieur du contenant
du ltre et sur la base du moteur.
4. Placez le couvercle de l’extracteur sur le
contenant du ltre, en plaçant le goulot
d’alimentation sur le panier- ltre en acier
inoxydable et abaissez-le.
2. Placez le contenant du ltre au-dessus
de la base du moteur.
5. Relevez l’arceau de blocage de sûreté
et placez-le dans les deux encoches
situées de part et d’autre du couvercle.
7
Page 34

ASSEMBLAGE
L’arceau de blocage de sûreté devrait
maintenant être en position verticale et
verrouillé sur le couvercle de l’extracteur.
6. Faites glisser le poussoir dans le goulot
d’alimentation en alignant la fente du
poussoir sur la petite saillie à l’intérieur
du rebord du tube d’alimentation.
Fente du
poussoir
Petite saillie
à l’intérieur
du tube
d’alimentation
Continuez de faire glisser le poussoir dans le
goulot d’alimentation.
7. Mettez en place le récipient à pulpe
en inclinant légèrement la base du
moteur vers la droite. Placez à gauche
le récipient à pulpe sous le couvercle de
l’extracteur en veillant à ce qu’il repose
bien sur le couvercle et la base du
moteur.
REMARQUE
Pour minimiser le nettoyage, doublez
le récipient à pulpe avec un sac de
congélation en plastique pour recueillir la
pulpe. La pulpe peut alors être utilisée dans
d’autres plats ou peut servir de compost
pour le jardin. Vous pouvez également la
jeter.
8. Placez le pichet sous le bec verseur du
côté droit de l’extracteur. Vous pouvez
utiliser le couvercle du pichet pour éviter
les éclaboussures.
8
Page 35

FONCTIONNEMENT
FR
1. Lavez les fruits et les légumes que vous avez
choisis pour préparer le jus.
2. Assurez-vous que l’extracteur de jus est
correctement assemblé. Reportez-vous à
la section Assembler votre extracteur de
jus Sage®. Assurez-vous que le pichet de
l’extracteur se trouve bien en dessous du bec
verseur, et que le récipient à pulpe est en
place avant de commencer l’extraction.
3. Branchez le cordon d’alimentation à une prise
de courant de 220 à 240 V. Branchez la prise
de courant pour allumer l’appareil. Réglez à
la vitesse souhaitée. Poussez le commutateur
à double vitesse vers le haut pour un
fonctionnement à vitesse basse ou vers le
bas pour un fonctionnement à vitesse élevée
en fonction du type de fruit ou de légume que
vous pressez. Servez-vous de la sélection de
vitesses comme guide pour préparer des jus
avec plusieurs fruits et légumes.
TABLEAU DE LA SÉLECTION DE VITESSE
Pommes Élevée
Abricots (noyaux retirés) Basse
Betterave (coupée) Élevée
Myrtilles Basse
Brocoli Basse
Choux de Bruxelles (coupés) Élevée
Chou Basse
Carottes Élevée
Chou-eur Basse
Céleri Élevée
Concombre (épluché) Basse
Concombre, pelure ne Élevée
Fenouil Élevée
Raisins (sans pépins) Basse
Kiwi (épluché) Basse
Mangues (épluchées, noyaux
retirés)
Melons (épluchés) Basse
Nectarines (noyaux retirés) Basse
Oranges (épluchées) Élevée ou basse
Pêches (noyaux retirés) Basse
Basse
TABLEAU DE LA SÉLECTION DE VITESSE
Poires (pédoncules retirés) Élevée pour les
Ananas (épluché) Élevée
Prunes (noyaux retirés) Basse
Framboises Basse
Tomates Basse
Pastèque (épluchée) Basse
variétés dures
ou basse pour
les variétés
tendres
4. Lorsque le moteur est en marche, placez les
aliments dans le goulot d’alimentation. À l’aide
du poussoir, guidez doucement les aliments
vers le bas. Pour extraire la quantité maximale
de jus, poussez toujours lentement le poussoir
vers le bas.
REMARQUE
Mettez en marche le moteur avant de charger le
goulot d’alimentation.
AVERTISSEMENT
Ne vous servez jamais de vos doigts
pour pousser les aliments dans le
goulot d’alimentation ou pour le
dégager. Utilisez toujours le poussoir
de l’extracteur.
Panier-ltre
Attention :
lames
tranchantes
AVERTISSEMENT
Le panier-ltre en acier inoxydable
contient de petites lames tranchantes
pour couper et mixer les fruits et
légumes. Évitez de toucher les lames
lorsque vous manipulez le panier-ltre.
9
Page 36

ENTRETIEN ET NETTOYAGE
Éteignez l’extracteur en mettant le bouton de
marche/arrêt du panneau de commande sur
OFF. Puis éteignez l’appareil au niveau de
la prise électrique et débranchez le cordon
d’alimentation.
Assurez-vous que l’extracteur de jus
correctement démonté. Reportez-vous à la
section Démonter votre nouvel appareil.
est
POUR FACILITER LE NETTOYAGE :
• Nettoyez l’appareil au fur et à mesure que
vous l’utilisez et évitez d’accumuler de la
pulpe ou des résidus de jus séchés.
• Juste après chaque utilisation, rincez les
pièces amovibles dans de l’eau chaude pour
enlever la pulpe humide. Laissez les pièces
sécher à l’air.
REMARQUE
Pour minimiser le nettoyage, doublez le
récipient à pulpe avec un sac de congélation
en plastique pour recueillir la pulpe. La pulpe
peut alors être utilisée dans d’autres plats ou
peut servir de compost pour le jardin. Vous
pouvez également la jeter.
NETTOYAGE DE LA BASE DU
MOTEUR
• Essuyez la base du moteur avec un chion
doux et humide et séchez soigneusement.
• Essuyez tout excès de particules
alimentaires du cordon d’alimentation.
REMARQUE
N’utilisez pas de tampons ou de nettoyants
abrasifs lorsque vous nettoyez les pièces
ou la base du moteur, car ils pourraient
rayer la surface.
NETTOYAGE DU CONTENANT
DU FILTRE, DU COUVERCLE DE
L’EXTRACTEUR, DU POUSSOIR,
DU RÉCIPIENT À PULPE
Lavez toutes les pièces avec de l’eau
savonneuse tiède et un chion doux.
Rincez et séchez soigneusement.
REMARQUE
Le contenant du ltre, le pichet et le
couvercle de l’extracteur, le poussoir et le
récipient à pulpe sont lavables au lavevaisselle (étage supérieur uniquement).
Le couvercle de l’extracteur de jus n’est pas
lavable au lave-vaisselle.
10
NETTOYAGE DU PANIERFILTRE
• Pour une extraction homogène, nettoyez
toujours soigneusement le panier-ltre en
acier inoxydable avec la brosse de nettoyage
fournie. Il est indispensable de le faire
immédiatement après utilisation.
• Faites tremper le panier-ltre en acier
inoxydable dans de l’eau chaude
savonneuse pendant environ 10 minutes,
immédiatement après la n de l’extraction.
Lorsque la pulpe sèche sur le ltre, elle
peut boucher les petits pores du ltre et
par conséquent, réduire l’ecacité de
l’extracteur.
Page 37

ENTRETIEN ET NETTOYAGE
FR
• Avec la brosse de nettoyage, placez le
panier-ltre sous l’eau du robinet et brossez-
le de l’intérieur vers l’extérieur. Évitez de
toucher les petites lames tranchantes qui
sont au milieu du panier-ltre. Répétez
cette opération sur la face externe du
panier. Après le nettoyage du panier-ltre,
examinez-le à la lumière pour vérier que
les petits pores ne sont pas bouchés. Si les
pores sont bouchés, faites tremper le panier-
ltre dans de l’eau chaude contenant 10 %
de jus de citron pour les dégager. Répétez
le processus de nettoyage avec la brosse de
nettoyage. Vous pouvez également laver le
panier-ltre au lave-vaisselle.
Ne trempez pas le panier-ltre en acier
inoxydable dans de l’eau de javel ou autres
nettoyants abrasifs.
Manipulez toujours avec soin le panier-ltre,
car il peut être facilement endommagé.
REMARQUE
Le ltre en acier inoxydable est lavable au
lave-vaisselle (étage supérieur uniquement).
NETTOYAGE DU PICHET À JUS
• Rincez le pichet à jus et son couvercle muni
de l’accessoire à écume sous l’eau
du robinet.
• Lavez les deux pièces avec de l’eau
savonneuse tiède avec un chion doux.
Rincez et séchez soigneusement.
REMARQUE
Le pichet à jus et le couvercle sont
lavables au lave-vaisselle (étage supérieur
uniquement).
ÉLIMINATION DES ODEURS ET
TÂCHES D’ALIMENTS TENACES
Certains fruits et légumes très colorés peuvent
causer une certaine décoloration du plastique.
Pour éviter cela, lavez les pièces immédiatement
après utilisation. En cas de décoloration, les
pièces en plastique peuvent être trempées dans
de l’eau contenant 10 % de jus de citron ou être
nettoyées avec un produit nettoyant non abrasif.
L’extracteur de jus
robuste de 1 200 W ; ce dernier est accompagné
d’une garantie de 5 ans contre un défaut de
matériel ou de fabrication. Cette garantie est une
prolongation de la garantie de remplacement de
12 mois et ne couvre que le moteur. La garantie
ne couvre pas les dommages liés aux accidents,
à la mauvaise utilisation, ou à une utilisation non
conforme aux instructions.
est équipé d’un moteur
AVERTISSEMENT
Ne plongez pas la base du moteur dans
de l’eau ou tout autre liquide. Le milieu
du panier-ltre en acier inoxydable et
le goulot d’alimentation contiennent
de petites lames tranchantes pour
mixer les fruits et légumes pendant
l’extraction. Ne touchez pas les lames
lorsque vous manipulez le panier-ltre
ou le goulot d’alimentation.
11
Page 38

DÉPANNAGE
PROBLÈME
POSSIBLE
La machine ne
fonctionne pas
lorsqu’elle est allumée
Le moteur semble caler
pendant l’extraction
SOLUTION FACILE
• L’arceau de blocage de sûreté n’est peut-être pas
correctement engagé en position de fonctionnement
verticale lorsque l’arceau se trouve dans les deux encoches
situées de part et d’autre du couvercle de l’extracteur.
• De la pulpe humide peut s’accumuler sous le couvercle
lorsque l’extraction est trop vigoureuse. Essayez une
extraction moins rapide en enfonçant plus lentement le
poussoir. Suivez les instructions de démontage et de
nettoyage, puis nettoyez le contenant du ltre, le panier-ltre
en acier inoxydable, ainsi que le couvercle de l’extracteur.
• L’appareil s’arrête automatiquement lorsque le moteur cale
pendant plus de 10 secondes. Il y a trop d’aliments mixés
simultanément ou les morceaux ne sont pas assez petits.
Essayez de couper les aliments en plus petits morceaux
uniformes, et mixez une petite quantité d’aliments à la
fois. Pour poursuivre l’extraction, redémarrez l’appareil
en appuyant sur le bouton ON / OFF sur le panneau de
commande. Éteignez puis rallumez l’extracteur avec le
bouton ON / OFF.
• L’extraction des fruits et des légumes durs fait subir une
tension trop forte au moteur si vous choisissez une vitesse
faible. Référez-vous au guide d’extraction de jus pour
connaître la vitesse adéquate pour les fruits et légumes à
extraire. Assurez-vous de mettre en marche le moteur avant
de charger le goulot.
12
Page 39

DÉPANNAGE
FR
PROBLÈME
POSSIBLE
Accumulation excessive
de pulpe dans le panier-
ltre en acier inoxydable
La pulpe est trop humide
et le débit de jus est
faible
Le jus fuit entre le bord
de l’extracteur et son
couvercle
Le jus jaillit du bec
Surchaue due à des
charges excessives.
SOLUTION FACILE
• Arrêtez l’extraction et suivez les instructions de démontage.
Enlevez le couvercle de l’extracteur, retirez la pulpe,
réassemblez l’appareil et reprenez l’extraction. Essayez
d’alterner les fruits et les légumes selon leur consistance
(durs et tendres).
• Essayez de ralentir le rythme d’extraction. Enlevez le panier-
ltre en acier inoxydable et nettoyez soigneusement les
parois avec une brosse de nettoyage. Rincez le panier-ltre
à l’eau chaude. Si les petits pores du ltre sont bouchés,
faites tremper le panier dans une solution composée d’eau
chaude et de 10 % de jus de citron pour les déboucher, ou
lavez-le au lave-vaisselle. Cela enlèvera l’excès de bres (de
fruits ou de légumes) qui pourrait bloquer le passage du jus.
• Essayez de ralentir le rythme d’extraction et enfoncez plus
lentement le poussoir dans le goulot.
• Vériez que toutes les pièces sont correctement
rassemblées, et que l’arceau de verrouillage est bien en
place.
• L’extraction du jus se fait trop rapidement, essayez de ralentir
le rythme d’extraction et enfoncez plus lentement le poussoir
dans le goulot.
• L’extracteur de jus est équipé d’un dispositif de sécurité qui
protège contre la surchaue due à des charges excessives.
En cas de surchaue, l’extracteur active automatiquement
le dispositif de protection contre la surcharge et l’appareil
s’éteint tout seul. Lorsque vous activez la protection contre
la surcharge, débranchez l’extracteur de la prise de courant
pendant au moins 15 minutes pour laisser l’appareil refroidir.
Puis rebranchez-le dans la prise et utilisez-le normalement.
• Vous devez mettre en marche l’extracteur et le moteur
avant de charger le goulot. Ne chargez pas trop le
goulot d’alimentation, et veillez à ce qu’il n’y ait aucune
accumulation d’aliments dans le panier-ltre, sur les lames
et les mailles, car cela peut entraîner une résistance inutile
contre le moteur et conduire à une surchaue.
13
Page 40

GARANTIE
GARANTIE LIMITÉE 2 ANS ET
GARANTIE LIMITÉE 5 ANS DES
MOTEURS
Sage Appliances garantit ce produit pour un
usage domestique sur les territoires spéciés
pendant 2 ans pour toutes les pièces du produit
et pendant 5 ans pour le moteur, à compter de
la date d’achat, contre les défauts de fabrication
et de matériaux. Au cours de cette période
de garantie, Sage Appliances s’engage à
réparer, remplacer ou rembourser tout produit
défectueux (à sa seule discrétion).
Tous les droits de garantie légaux en vertu
de la législation nationale applicable seront
respectés et ne seront pas compromis par
notre garantie. Pour connaître les conditions
générales complètes relatives à la garantie ou
pour obtenir des instructions sur la manière
de déposer une réclamation, rendez-vous sur
www.sageappliances.com.
14
Page 41

NL
the Nutri Juicer
BJE410
®
NL
SNELSTARTGIDS
Page 42

INHOUD
2 Belangrijke veiligheidsmaatregelen
5 Onderdelen
6 Montage
8 Bediening
9 Onderhoud en reiniging
11 Problemen oplossen
14 Garantie
SAGE® STELT
VEILIGHEID
VOOROP
Bij Sage® gaan we zeer
veiligheidsbewust te
werk. Bij het ontwerpen
en produceren van onze
consumentenproducten
staat de veiligheid van
onze gewaardeerde klanten
voorop. Daarnaast vragen
wij u voorzichtig om te
gaan met elektrische
apparaten en de volgende
voorzorgsmaatregelen in
acht te nemen.
BELANGRIJKE
VEILIGHEIDS
MAATREGELEN
LEES ALLE INSTRUCTIES
VÓÓR GEBRUIK EN BEWAAR
DEZE VOOR TOEKOMSTIGE
NASLAG
• Een downloadbare
versie van dit document
is ook beschikbaar op
sageappliances.com
• Controleer voor het
eerste gebruik of uw
elektriciteitsvoorziening
dezelfde is als die op het
label aan de onderkant van
het apparaat.
• Verwijder voor het
eerste gebruik het
verpakkingsmateriaal en gooi
het op een veilige manier weg.
• Gooi het beschermkapje op de
stekker op een veilige manier
weg om verstikkingsgevaar bij
jonge kinderen te voorkomen.
• Dit apparaat is alleen voor
huishoudelijk gebruik. Gebruik
het apparaat alleen voor het
beoogde gebruik. Gebruik het
niet in bewegende voertuigen of
boten. Gebruik het niet buitenshuis. Verkeerd gebruik kan tot
letsel leiden.
• Wikkel het netsnoer volledig af
voordat u het apparaat gebruikt.
• Plaats het apparaat op een
stabiele, hittebestendige,
vlakke, droge ondergrond,
weg van de rand, en gebruik
het niet op of in de buurt van
een warmtebron zoals een
kookplaat, oven of gasfornuis.
• Door trillingen tijdens het
gebruik kan het apparaat
worden verplaatst.
2
Page 43

WE STELLEN VEILIGHEID VOOROP
NL
• Zorg dat het netsnoer niet over
de rand van een aanrecht of
tafel hangt, in aanraking komt
met hete oppervlakken of in de
knoop raakt.
• Zorg er altijd voor dat het
apparaat UIT staat, de stekker
uit het stopcontact is gehaald
en het apparaat is afgekoeld
voordat u het schoonmaakt,
probeert te verplaatsen
of opbergt.
• Zet het apparaat altijd UIT
en trek de stekker uit het
stopcontact wanneer het
apparaat niet in gebruik is.
• Gebruik het apparaat niet als
het netsnoer, de stekker of het
apparaat op enigerlei wijze
beschadigd is. Neem contact op
met de klantenservice van Sage
of ga naar sageappliances.com
als er sprake is van schade of er
ander onderhoud dan reiniging
is vereist.
• Onderhoud anders
dan reiniging moet
worden uitgevoerd
door een geautoriseerd
®
Sage
-servicecentrum.
• Kinderen mogen niet met het
apparaat spelen.
• Reiniging van het apparaat
mag niet door kinderen worden
uitgevoerd, tenzij ze ten
minste 8 jaar oud zijn en onder
toezicht staan.
• Het apparaat en het snoer
moeten buiten het bereik van
kinderen jonger dan 8 jaar
worden gehouden.
• Het wordt aanbevolen
een aardlekschakelaar
te installeren voor extra
veiligheid bij het gebruik van
alle elektrische apparaten.
Veiligheidsschakelaars met
een nominale bedrijfsstroom
van niet meer dan 30 mA
worden aanbevolen.
Raadpleeg een elektricien voor
professioneel advies.
• Controleer vóór gebruik altijd of
het apparaat op de juiste manier
in elkaar is gezet. Het apparaat
werkt alleen als het op de juiste
manier in elkaar is gezet.
• Gebruik het apparaat niet op
het afdruipgedeelte van een
gootsteen.
• Houd handen, vingers, haar,
kleding, maar ook spatels en
ander keukengerei tijdens
gebruik uit de buurt van
bewegende of draaiende
onderdelen.
• Gebruik het apparaat alleen
voor het bereiden van eten en/
of drinken.
3
Page 44

WE STELLEN VEILIGHEID VOOROP
• Sluit geen extern
schakelapparaat aan (zoals
een timer) en sluit het apparaat
niet aan op een circuit dat het
apparaat regelmatig aan en uit
kan zetten om te voorkomen
dat het apparaat vanzelf wordt
aangezet als gevolg van het
onbedoeld resetten van de
overbelastingsbeveiliging.
• Lees alle instructies vóór
gebruik en bewaar deze voor
toekomstige raadpleging.
• Het apparaat kan worden
gebruikt door personen met
beperkte fysieke of mentale
capaciteiten of een gebrek aan
ervaring en kennis, alleen als zij
worden begeleid of instructies
hebben gekregen over het
veilige gebruik van het apparaat
en als zij de gevaren ervan
begrijpen.
• Dit apparaat mag niet door
kinderen worden gebruikt.
• Laat het apparaat niet
onbeheerd achter
tijdens gebruik.
• Gebruik nooit uw vingers of
keukengerei om ingrediënten
door de vultrechter te duwen.
Gebruik altijd de meegeleverde
fruit- en groentedrukker. Steek
uw handen of vingers niet in de
vultrechter wanneer deze op het
apparaat zit.
• Pers geen steenvruchten tenzij
de pitten en/of stenen zijn
verwijderd.
• Zorg dat de ltermand van
roestvrij staal is gestopt met
draaien en dat de motor volledig
tot stilstand is gekomen voordat
u de vergrendelingshendel
ontgrendelt en/of het apparaat
probeert te verplaatsen
wanneer het niet in gebruik is,
en voordat u het uit elkaar haalt,
schoonmaakt of opbergt.
• Als er aanzienlijk veel op het
oppervlak onder of rond het
apparaat of op het apparaat zelf
is gemorst, moet het worden
schoongemaakt en afgedroogd
voordat u het weer gebruikt.
• Wees voorzichtig bij het
hanteren van de ltermand van
roestvrij staal. De kleine mesjes
onderaan de ltermand zijn
namelijk erg scherp. Verkeerd
gebruik kan tot letsel leiden.
• Verwijder de schil van
citrusvruchten voordat
u ze perst.
• Gebruik het apparaat niet als de
roterende zeef (ltermand) of
het deksel is beschadigd.
• Zorg dat het deksel van de
sapcentrifuge steeds goed
vast zit voordat de motor
wordt ingeschakeld. Maak
de vergrendelingshendel niet
los terwijl de sapcentrifuge in
werking is.
4
Page 45

WE STELLEN VEILIGHEID VOOROP
Het weergegeven symbool
geeft aan dat dit apparaat
niet met het normale
huishoudelijk afval mag
worden weggegooid. Het moet
naar een geschikt plaatselijk
afvalverwerkings-centrum worden
gebracht of naar een provider die
deze service biedt. Neem voor
meer informatie contact op met
uw gemeente.
Dompel de stekker, het
snoer of het apparaat niet
onder in water of een andere
vloeistof om elektrische schokken
te voorkomen.
NL
BEWAAR DEZE INSTRUCTIES
5
Page 46

ONDERDELEN
A
B
C
H
I
D
E
F
G
A. Fruit- en groentedrukker
B. Uniek, direct invoersysteem in het
midden
C. Extra brede vultrechter van 84 mm
D. Filtermand van roestvrij staal met
microzeef (verstevigd met titanium)
E. Grote opvangbak voor pulp
(vaatwasserbestendig).
F. Krachtige motor van 1200 watt
G. Snoeropbergruimte
J
K
L
H. Vergrendelbare veiligheidshendel
I. Deksel van sapcentrifuge
(niet vaatwasserbestendig).
J. Behuizing van lterkom
(vaatwasserbestendig).
K. Sapkan van 1 liter en deksel
(vaatwasserbestendig).
L. Elektronische bediening met
2 snelheden ON/OFF-schakelaar
Classi catiegegevens
220 - 240 V ~ 50 / 60 Hz 1050 - 1250 W
6
Page 47

MONTAGE
NL
VOOR HET EERSTE GEBRUIK
Voordat u uw sapcentrifuge voor het eerst
gebruikt, verwijdert u het verpakkingsmateriaal
en de promotiestickers en -labels en gooit
u deze op een veilige manier weg.
Zorg dat het apparaat is uitgeschakeld en dat
de stekker uit het stopcontact is getrokken.
Was de behuizing van de lterkom, ltermand,
het deksel van de sapcentrifuge, de fruit- en
groentedrukker, opvangbak voor pulp en sapkan
en het deksel af in warm zeepsop met een
zachte doek. Spoel en droog alles goed af.
De motorbasis kan schoon worden geveegd
met een vochtige doek. Droog deze grondig af.
1. Plaats de motorbasis op een vlak, droog
oppervlak zoals een aanrecht. Zorg dat
de motorbasis op het bedieningspaneel
is uitgeschakeld en trek de stekker uit
het stopcontact.
3. Zorg dat de pijltjes op de onderkant van
de ltermand zijn uitgelijnd met de pijltjes
op de koppeling van de motoraandrijving,
en duw de ltermand omlaag totdat deze
vastklikt. Zorg dat de ltermand van roestvrij
staal stevig in de lterkombehuizing en op
de motorbasis vastzit.
4. Plaats het deksel van de sapcentrifuge
over de behuizing van de lterkom.
Schuif de vultrechter over de ltermand
van roestvrij staal en laat het deksel op
zijn plaats zakken.
2. Plaats de behuizing van de lterkom op
de motorbasis.
5. Til de vergrendelingshendel omhoog
en plaats deze in de twee groeven aan
weerszijden van het deksel van de
sapcentrifuge.
7
Page 48

MONTAGE
De vergrendelingshendel staat nu in de
verticale positie en is bovenop het deksel
van de sapcentrifuge vergrendeld.
6. Schuif de fruit- en groentedrukker in de
vultrechter. Zorg hierbij dat de groef in
de drukker is uitgelijnd met de kleine
uitstulping aan de binnenkant bovenaan
de vultrechter.
Groef in
fruit- en
groentedrukker
Kleine
uitstulping in
vultrechter
Blijf de fruit- en groentedrukker omlaag
duwen in de vultrechter.
7. Zet de opvangbak voor de pulp op
zijn plaats door de motorbasis een
beetje naar rechts te kantelen. Plaats
de opvangbak voor de pulp onder het
deksel van de sapcentrifuge aan de
linkerkant en zorg ervoor dat deze wordt
ondersteund door het deksel van de
sapcentrifuge en de motorbasis.
OPMERKING
Gebruik een plastic diepvrieszak in de
opvangbak voor de pulp om het reinigen te
minimaliseren. U kunt de verzamelde pulp
dan in andere gerechten of als tuincompost
gebruiken, of weggooien.
8. Plaats de sapkan onder de tuit aan
de rechterkant van de sapcentrifuge.
Gebruik het deksel van de sapkan om
opspattend sap tegen te houden.
8
Page 49

BEDIENING
NL
1. Was de vruchten en groenten die u wilt
persen.
2. Zorg dat de sapcentrifuge goed in elkaar is
gezet. Raadpleeg de sectie Uw Sage
sapcentrifuge in elkaar zetten. Zorg dat de
sapkan onder de saptuit staat en dat de
opvangbak voor de pulp op zijn plaats zit
voordat u begint met persen.
3. Sluit het netsnoer aan op een stopcontact
van 220 - 240 V. Zet het apparaat aan.
Kies de gewenste snelheid. Zet de
tweevoudige snelheidsschakelaar omhoog
voor langzaam of omlaag voor snel,
afhankelijk van het type fruit of groenten
dat u wilt persen. Gebruik de tabel voor
snelheidskeuze als richtlijn voor het persen
van verschillende soorten groenten en fruit.
TABEL VOOR SNELHEIDSKEUZE
Appels Snel
Abrikozen (zonder pit) Langzaam
Rode biet (bijgesneden) Snel
Bosbessen Langzaam
Broccoli Langzaam
Spruitjes (bijgesneden) Snel
Kool Langzaam
Wortels Snel
Bloemkool Langzaam
Selderij Snel
Komkommer (geschild) Langzaam
Komkommer, zachte schil Snel
Venkel Snel
Druiven (pitloos) Langzaam
Kiwi (geschild) Langzaam
Mango's (geschild, pit
verwijderd)
Meloenen (geschild) Langzaam
Nectarines (zonder pit) Langzaam
Sinaasappelen (gepeld)
Perziken (zonder pit) Langzaam
®
-
Langzaam
Snel of
langzaam
TABEL VOOR SNELHEIDSKEUZE
Peren (zonder steeltjes)
Ananas (geschild) Snel
Pruimen (zonder pit) Langzaam
Frambozen Langzaam
Tomaten Langzaam
Watermeloen (geschild) Langzaam
4. Terwijl de motor draait, plaatst u de
ingrediënten in de vultrechter en gebruikt
u de fruit- en groentedrukker om de
ingrediënten voorzichtig naar beneden te
duwen. Duw de fruit- en groentedrukker
altijd langzaam naar beneden om zoveel
mogelijk sap te persen.
Snel voor hard
of Langzaam
voor zacht
OPMERKING
De motor moet draaien voordat u
ingrediënten in de vultrechter doet.
WAARSCHUWING
Gebruik nooit uw vingers om
ingrediënten door de vultrechter te
duwen of om de vultrechter leeg te
maken. Gebruik altijd de meegeleverde
fruit- en groentedrukker.
Filtermand
Scherpe mesjes
Let op:
WAARSCHUWING
De ltermand van roestvrij staal
heeft kleine, scherpe mesjes om fruit
en groenten jn te hakken. Raak de
messen niet aan bij het hanteren van
de ltermand.
9
Page 50

ONDERHOUD EN REINIGING
Zorg dat de sapcentrifuge is uitgeschakeld door
de ON/OFF-knop op het bedieningspaneel op
OFF te zetten. Trek vervolgens de stekker uit het
stopcontact.
Zorg dat u de sapcentrifuge
uit elkaar haalt. Raadpleeg de sectie Uw nieuwe
apparaat uit elkaar halen.
op de juiste manier
VOOR EENVOUDIGER
SCHOONMAKEN:
• Reinig het apparaat na elk gebruik en vermijd
gedroogde sap- of pulpresten.
• Spoel de losse onderdelen onmiddellijk na
elk gebruik af met warm water om vochtige
pulp te verwijderen. Laat de onderdelen aan
de lucht drogen.
OPMERKING
Gebruik een plastic diepvrieszak in de
opvangbak voor de pulp om het reinigen te
minimaliseren. U kunt de pulp dan in andere
gerechten of als tuincompost gebruiken, of
weggooien.
DE MOTORBASIS REINIGEN
• Veeg de motorbasis schoon met een zachte,
vochtige doek en droog de basis grondig af.
• Veeg eventuele etensresten van het netsnoer.
OPMERKING
Gebruik geen schuursponsjes of
schuurmiddelen voor het reinigen van
de onderdelen of de motorbasis, omdat
deze krassen op het oppervlak kunnen
veroorzaken.
FILTERKOMBEHUIZING, DEKSEL
VAN DE SAPCENTRIFUGE,
FRUIT EN GROENTEDRUKKER
EN OPVANGBAK VOOR PULP
REINIGEN
Was alle onderdelen af in warm zeepsop met
een zachte doek. Spoel en droog alles goed af.
OPMERKING
De behuizing van de lterkom, de sapkan
en het deksel, de fruit- en groentedrukker
en de opvangbalk voor de pulp zijn
vaatwasserbestendig (alleen bovenste
lade). Het deksel van de sapcentrifuge is
niet vaatwasserbestendig.
DE FILTERMAND REINIGEN
• Zorg dat de ltermand van roestvrij staal
steeds grondig wordt schoongemaakt met
de meegeleverde reinigingsborstel voor
consistente resultaten. Het is belangrijk om
dit onmiddellijk na elk gebruik te doen.
• Laat de ltermand meteen nadat u klaar
bent met persen ongeveer 10 minuten
in warm zeepsop staan. Als pulp op de
ltermand aankoekt, kunnen de jne gaatjes
in de lterzeef verstopt raken waardoor de
sapcentrifuge minder eectief werkt.
• Houd de ltermand onder stromend water
en gebruik de reinigingsborstel om de mand
van de binnenkant naar de buitenste rand
schoon te vegen. Raak de kleine, scherpe
mesjes in het midden van de ltermand niet
aan. Herhaal dit proces aan de buitenkant
van de ltermand. Houd de ltermand na
het reinigen tegen het licht om er zeker van
te zijn dat de kleine gaatjes in de zeef niet
verstopt zijn. Als de gaatjes wel verstopt zijn,
laat u de ltermand in heet water met 10%
citroensap weken om de verstopte gaatjes
vrij te maken. Herhaal het reinigingsproces
met de reinigingsborstel. U kunt de
ltermand ook in de vaatwasser reinigen.
10
Page 51

ONDERHOUD EN REINIGING
Laat de ltermand van roestvrij staal niet in
bleekmiddel of schurende reinigingsmiddelen
weken.
Ga altijd voorzichtig om met de ltermand
aangezien deze gemakkelijk beschadigd kan
raken.
OPMERKING
De lter van roestvrij staal is
vaatwasserbestendig (enkel bovenste lade).
DE SAPKAN REINIGEN
• Spoel de sapkan en het deksel met
schuimopzetstuk schoon onder stromend
water.
• Was beide onderdelen af in warm zeepsop
met een zachte doek. Spoel en droog alles
goed af.
HARDNEKKIGE VLEKKEN OF
STERKE GEUREN VERWIJDEREN
Het plastic materiaal kan verkleuren door
felgekleurde groenten en fruit. Was de
onderdelen onmiddellijk na gebruik af om dit
te voorkomen. Als het materiaal toch verkleurt,
laat u de plastic onderdelen in water met 10%
citroensap weken, of reinigt u ze met een nietschurend reinigingsmiddel.
De sapcentrifuge
motor van 1200 watt. De motor is zo krachtig dat
we een garantie van 5 jaar bieden tegen defecte
materialen of productiefouten. Deze garantie is
een uitbreiding van de vervangingsgarantie van
12 maanden en dekt alleen de motor.
De garantie dekt geen schade als gevolg van
ongelukken, verkeerd gebruik of gebruik op een
manier die niet in de handleiding is beschreven.
beschikt over een krachtige
WAARSCHUWING
Dompel de motorbasis niet onder in
water of een andere vloeistof.
In het midden van de ltermand en
vultrechter zitten kleine, scherpe
mesjes om fruit en groenten tijdens het
persen jn te hakken. Raak de mesjes
niet aan bij het hanteren van
de ltermand of vultrechter.
NL
OPMERKING
De sapkan en het deksel zijn
vaatwasserbestendig (enkel bovenste lade).
11
Page 52

PROBLEMEN OPLOSSEN
MOGELIJK
PROBLEEM
Het apparaat werkt
niet wanneer het is
ingeschakeld
Motor lijkt af te slaan
tijdens het gebruik
EENVOUDIGE OPLOSSING
• De vergrendelingshendel staat mogelijk niet goed in
de verticale positie met de vergrendelingshendel in de
twee groeven aan weerszijden van het deksel van de
sapcentrifuge.
• Vochtige pulp kan zich onder het deksel van de
sapcentrifuge ophopen als de sapverwerking te krachtig
is. Verlaag de snelheid door de fruit- en groentedrukker
langzamer omlaag te bewegen. Volg de instructies om de
sapcentrifuge uit elkaar te halen en te reinigen, en maak de
behuizing van de ltermand, ltermand van roestvrij staal en
het deksel van de sapcentrifuge schoon.
• De sapcentrifuge stopt automatisch met werken als de
motor langer dan 10 seconden is afgeslagen. Er worden
te veel ingrediënten tegelijk geperst of de stukken zijn
niet klein genoeg. Snijd de ingrediënten bij of snijd ze
in kleinere stukjes van gelijke grootte, en pers minder
ingrediënten per keer. Om daarna verder te gaan, moet
u de sapcentrifuge resetten door de ON/OFF-schakelaar
op het bedieningspaneel op OFF te zetten en het apparaat
vervolgens weer aan te zetten (met de ON/OFF-schakelaar
op ON).
• Harde groenten en fruit leiden tot overbelasting van de
motor als een lage snelheid is geselecteerd. Raadpleeg de
handleiding van de sapcentrifuge om de juiste snelheid te
kiezen voor de ingrediënten die u wilt persen. Zorg dat de
motor draait voordat u de ingrediënten in de vultrechter doet.
Overtollige pulp hoopt
zich op in de ltermand
van roestvrij staal
Pulp is te vochtig en er is
weinig sap
12
• Stop met persen en volg de instructies om het apparaat uit
elkaar te halen. Verwijder het deksel van de sapcentrifuge,
schraap de pulp weg, zet het apparaat weer in elkaar en
begin weer met persen. Voeg afwisselend (zachte en harde)
groenten en fruit toe.
• Verlaag de perssnelheid. Verwijder de ltermand van
roestvrij staal en maak de zeef grondig schoon met een
reinigingsborstel. Spoel de ltermand af onder heet water.
Als de gaatjes in de zeef verstopt zijn, laat u de mand in
een oplossing van heet water met 10% citroensap weken
om de gaatjes vrij te maken. U kunt de ltermand ook in
de vaatwasser reinigen. Zo verwijdert u de ophoping van
overtollige vezels (van fruit en groenten) die de doorstroming
mogelijk afremmen.
Page 53

PROBLEMEN OPLOSSEN
NL
MOGELIJK
PROBLEEM
Sap lekt tussen de rand
van de sapcentrifuge en
het deksel
Het sap sproeit uit de tuit
Oververhitting bij te
zware belasting.
EENVOUDIGE OPLOSSING
• Gebruik een lagere snelheid en duw de fruit- en
groentedrukker langzamer door de vultrechter.
• Zorg dat alle onderdelen goed in elkaar zijn gezet, met de
vergrendelingshendel op zijn plaats.
• Het sap wordt te snel geperst: gebruik een lagere snelheid
en duw de fruit- en groentedrukker langzamer door de
vultrechter.
• De sapcentrifuge is voorzien van een veiligheidssysteem
dat beschermt tegen oververhitting bij een te zware
belasting. Als het apparaat oververhit raakt, wordt de
overbelastingsbeveiliging van de sapcentrifuge automatisch
geactiveerd en schakelt het apparaat zichzelf uit. Wanneer
de overbelastingsbeveiliging is geactiveerd, haalt u de
stekker van de sapcentrifuge uit het stopcontact en laat
u het apparaat minimaal 15 minuten afkoelen. Sluit de
sapcentrifuge vervolgens aan op het stopcontact en gebruik
het apparaat zoals normaal.
• Het is belangrijk om ervoor te zorgen dat de sapcentrifuge
aanstaat en dat de motor draait voordat u ingrediënten
in de vultrechter doet. Doe niet te veel ingrediënten in de
vultrechter en zorg dat er geen opgehoopte etensresten op
de messen of zeef van de ltermand zitten. Dit kan namelijk
voor onnodige weerstand tegen de motor zorgen waardoor
deze oververhit raakt.
13
Page 54

GARANTIE
BEPERKTE GARANTIE VAN 2 JAAR
EN BEPERKTE GARANTIE OP DE
MOTOR VAN 5 JAAR
Sage Appliances biedt een garantie op dit
product voor huishoudelijk gebruik in genoemde
gebieden gedurende 2 jaar op alle
productonderdelen en 5 jaar op de motor van
het product vanaf de datum van aankoop tegen
defecten veroorzaakt door gebrekkige afwerking
en materialen. Gedurende deze garantieperiode
zal Sage Appliances defecte producten
repareren, vervangen of terugbetalen (naar
eigen goeddunken van Sage Appliances).
Alle wettelijke garantierechten onder de
toepasselijke nationale wetgeving worden
gerespecteerd en onze garantie doet geen
afbreuk aan deze rechten. Voor de algemene
voorwaarden van de garantie, evenals
instructies over hoe u aanspraak maakt op de
garantie, gaat u naar www.sageappliances.com.
14
Page 55

the Nutri Juicer
BJE410
™
ES
GUÍA RÁPIDA
Page 56

ÍNDICE
2 Sage® recomienda seguridad ante todo
5 Componentes
6 Ensamblaje
8 Funcionamiento
9 Cuidado y limpieza
11 Resolución de problemas
13 Garantía
SAGE®
RECOMIENDA
SEGURIDAD
ANTE TODO
En Sage® nos preocupa
enormemente la seguridad.
Para el diseño y la
fabricación de nuestros
productos de consumo
tenemos en cuenta antes
que nada la seguridad de
nuestros clientes, como tú.
También te rogamos que
actúes cuidadosamente
al usar cualquier
electrodoméstico y que
tomes las precauciones
siguientes.
MEDIDAS DE
SEGURIDAD
IMPORTANTES
LEE LAS INSTRUCCIONES
EN SU TOTALIDAD ANTES
DE USAR EL PRODUCTO Y
GUÁRDALAS PARA FUTURAS
REFERENCIAS
• Hay una versión de este
documento disponible en
sageappliances.com para
descargar.
• Antes de usar el producto por
primera vez, asegúrate de que
la tensión eléctrica de la toma
de corriente coincida con la que
gura en la etiqueta en la base
del electrodoméstico.
• Retira y desecha de forma
apropiada los materiales de
embalaje antes del primer uso.
• Para evitar riesgos de asxia
de niños pequeños, desecha
correctamente la cubierta
protectora del enchufe.
• Este aparato es solo para uso
doméstico. No se debe utilizar
para nes distintos de su uso
previsto. No se debe utilizar en
vehículos o embarcaciones en
movimiento. No se debe utilizar
al aire libre. El uso inapropiado
podría causar lesiones.
• Desenrolla completamente el
cable de alimentación antes de
usar el aparato.
• Coloca el aparato sobre una
supercie estable, resistente
al calor, nivelada y seca. No lo
pongas muy cerca del borde
ni cerca de una fuente de calor
(por ejemplo, una placa de
cocina eléctrica, un quemador
de gas o un horno).
• La vibración durante el
funcionamiento podría hacer
que el aparato se mueva.
2
Page 57

RECOMENDAMOS LA SEGURIDAD ANTE TODO
ES
• Evita que el cable de
alimentación sobresalga del
borde de una encimera o
una mesa, entre en contacto
con supercies calientes o
se enrede.
• Antes de limpiar, mover o
guardar el electrodoméstico,
asegúrate siempre de que esté
apagado y desenchufado de la
toma de corriente, y de que se
haya enfriado tras el uso.
• Cuando no utilices el
electrodoméstico, debe estar
apagado (en la posición OFF)
y desenchufado de la toma de
corriente.
• No lo utilices si el cable de
alimentación, el enchufe o el
aparato propiamente dicho
están dañados. Si existe algún
daño o se requiere algún tipo
de mantenimiento (que no sea
la limpieza), ponte en contacto
con el servicio de atención
al cliente de Sage o visita
sageappliances.com
• Cualquier tarea de
mantenimiento que no sea
de limpieza debe realizarla
un centro de servicio Sage
®
autorizado.
• Este aparato no se debe usar
como un juguete.
• La limpieza del
electrodoméstico no debe ser
realizada por niños menores de
8 años, ni por niños mayores sin
la supervisión de un adulto.
• El aparato y el cable deben
mantenerse fuera del alcance
de los niños menores de 8 años.
• Se recomienda la instalación de
un interruptor diferencial para
ofrecer seguridad adicional
al usar todos los aparatos
eléctricos. Se recomienda usar
interruptores de seguridad con
una corriente de funcionamiento
nominal de no más de 30 mA.
Solicita asesoramiento
profesional a un electricista.
• Asegúrate siempre de que el
aparato esté correctamente
ensamblado antes de usarlo.
El aparato no funcionará a
menos que esté correctamente
ensamblado.
• No utilices el aparato sobre el
escurridor del fregadero.
• Mantén las manos, los dedos,
el pelo, la ropa y utensilios como
espátulas y otros alejados de
las partes móviles o giratorias
durante el uso.
• No utilices el aparato para nes
que no sean la preparación de
alimentos y/o bebidas.
• Para evitar el riesgo de que
el aparato se ponga en
funcionamiento por sí solo
debido a un restablecimiento
involuntario de la protección de
sobrecarga, no acoples ningún
dispositivo de conmutación
externo (por ejemplo, un
temporizador) ni conectes el
aparato a un circuito capaz
de encenderlo/apagarlo en
cualquier circunstancia.
• Lee atentamente todas las
instrucciones antes del uso
y guárdalas para consultas
posteriores.
3
Page 58

RECOMENDAMOS LA SEGURIDAD ANTE TODO
• El aparato puede ser
utilizado por personas con
discapacidades físicas o
mentales, o sin experiencia ni
conocimientos de uso, siempre
y cuando reciban supervisión o
instrucciones para el uso seguro
del dispositivo y comprendan
los riesgos de ese uso.
• Este aparato no debe ser
utilizado por niños.
• Supervisa el aparato en todo
momento mientras esté en
funcionamiento.
• No introduzcas alimentos en
la abertura para alimentos con
los dedos u otros utensilios.
Utiliza siempre el empujador de
alimentos proporcionado. No
coloques las manos o los dedos
en la abertura para alimentos
cuando esté conectado al
electrodoméstico.
• No exprimas frutas con hueso a
menos que hayas quitado antes
las pepitas o los huesos.
• Asegúrate de que el ltro de
acero inoxidable haya dejado
de rotar y de que el motor esté
completamente parado antes
de liberar el brazo de bloqueo
de seguridad o intentar mover
el aparato, cuando la licuadora
no esté en uso, y antes de
desmontarla, limpiarla y
almacenarla.
• Cualquier derrame signicativo
sobre la supercie de debajo o
alrededor del aparato,
o sobre el propio aparato, debe
limpiarse y secarse antes de
continuar utilizándolo.
• Ten cuidado al manipular el ltro
de acero inoxidable, ya que
las pequeñas cuchillas de la
base del ltro son muy aladas.
El mal manejo puede causar
lesiones.
• Retira la piel de todos los
cítricos antes de hacer zumo.
• No uses el aparato si el colador
giratorio (ltro) o la tapa están
dañados.
• Asegúrate siempre de que
la tapa de la licuadora esté
bien jada en su sitio antes
de encender el motor. No
aojes el brazo de bloqueo
mientras la licuadora esté en
funcionamiento.
Este símbolo indica que el
aparato no debe
desecharse con la basura
doméstica normal. Debe
llevarse a un centro de
recogida de residuos designado
por las autoridades locales para
ese n o a una empresa que
preste ese servicio. Para obtener
más información, ponte en
contacto con los servicios
municipales.
Para evitar descargas
eléctricas, no sumerjas el
enchufe, el cable de
alimentación ni el electrodoméstico
en agua ni otros líquidos.
GUARDA ESTAS INSTRUCCIONES
4
Page 59

COMPONENTES
A
B
C
ES
H
I
D
E
F
G
A. Empujador de alimentos
B. Sistema único de alimentación central
directa
C. Abertura para alimentos extraancha
de 84 mm
D. Filtro de micromalla en acero inoxidable
reforzado con titanio
E. Depósito de pulpa de gran capacidad
(apto para lavavajillas).
F. Motor de 1200 W de gran potencia
G. Compartimento para cable
J
K
L
H. Brazo con bloqueo de seguridad
I. Tapa de la licuadora
(no apta para lavavajillas).
J. Cubeta del recipiente de ltrado
(apta para lavavajillas).
K. Jarra para 1 litro de zumo con tapa
(apta para lavavajillas).
L. Interruptor ON/OFF (encendido/
apagado) de control electrónico
de 2 velocidades
Datos técnicos
220–240 V~ 50/60 Hz 1050–1250 W
5
Page 60

ENSAMBLAJE
ANTES DEL PRIMER USO
Antes de usar la licuadora por primera vez,
retira y desecha de forma apropiada cualquier
material de embalaje, así como etiquetas y
pegatinas promocionales.
Asegúrate de que el aparato no esté conectado
a la toma de corriente y el cable de alimentación
esté desenchufado.
Lava la cubeta del recipiente de ltrado, el
ltro, la tapa de la licuadora, el empujador de
alimentos, el depósito de pulpa y la jarra de
zumo con tapa con agua tibia y jabón con un
paño suave. Enjuaga y seca bien todo.
La base del motor puede limpiarse con un paño
húmedo. Seca bien todo.
1. Coloca la base del motor sobre una
super cie plana y seca, como una mesa.
Asegúrate de que la base del motor esté
apagada en el panel de control, luego
apaga el aparato de la toma de corriente
y desenchufa el cable de alimentación.
3. Alinea las echas de la base del ltro
de acero inoxidable con las echas
del acoplamiento del motor y empuja
hacia abajo hasta que encaje en su
sitio. Asegúrate de que el ltro de acero
inoxidable esté bien colocado dentro de
la cubeta del recipiente de ltrado y en la
base del motor.
4. Coloca la tapa de la licuadora sobre
la cubeta del recipiente de ltrado,
poniendo la abertura para alimentos
sobre el ltro de acero inoxidable y
bajándola hasta su sitio.
2. Coloca la cubeta del recipiente de
ltrado sobre la base del motor.
6
5. Levanta el brazo de bloqueo de
seguridad y ponlo en las dos ranuras a
cada lado de la tapa de la licuadora.
Page 61

ENSAMBLAJE
ES
El brazo de bloqueo de seguridad debe estar
ahora en posición vertical y jo en su sitio en
la parte superior de la tapa de la licuadora.
6. Desliza el empujador de alimentos por
la abertura para alimentos alineando
la ranura del empujador de alimentos
con la pequeña protuberancia en el
interior de la parte superior del tubo de
alimentación.
Ranura del
empujador
de alimentos
Protuberancia
pequeña dentro
del tubo de
alimentación
7. Coloca el depósito de pulpa en su sitio
inclinando ligeramente la base del
motor hacia la derecha. Introduce el
depósito de pulpa debajo de la tapa
de la licuadora en el lado izquierdo,
asegurándote de que se apoye en la
tapa de la licuadora y la base del motor.
NOTA
Para minimizar la limpieza, cubre el
depósito de pulpa con una bolsa de plástico
de congelar para recoger la pulpa. La pulpa
se puede usar en otros platos, como abono
para el jardín o se puede echar a la basura.
8. Coloca la jarra de la licuadora debajo de
la boquilla de zumo en el lado derecho
de la licuadora. La tapa de la jarra
de zumo se puede utilizar para evitar
salpicaduras.
Sigue deslizando el empujador de alimentos
hacia abajo por la abertura para alimentos.
7
Page 62

FUNCIONAMIENTO
1. Lava la selección de frutas y verduras con
las que quieres hacer zumo.
2. Asegúrate de que la licuadora esté
correctamente montada. Consulta Montaje
de tu licuadora Sage
la jarra de la licuadora esté colocada
debajo de la boquilla de zumo y de que el
depósito de pulpa esté en su sitio antes de
comenzar a hacer el zumo.
3. Enchufa el cable de alimentación a una
toma de corriente de 220-240 V. Enciende
el aparato mientras esté conectado a la
toma de corriente. Ajusta la velocidad al
ajuste deseado. Pulsa el interruptor de dos
velocidades hacia arriba para velocidad
lenta o hacia abajo para velocidad alta,
dependiendo del tipo de fruta o verdura
que se esté licuando. Utiliza el selector de
velocidad como guía para licuar diferentes
frutas y verduras.
TABLA DE SELECCIÓN DE VELOCIDAD
Manzanas High (Alta)
Albaricoques (sin hueso) Low (Baja)
Remolacha (cortada) High (Alta)
Arándanos Low (Baja)
Brócoli Low (Baja)
Coles de Bruselas (cortadas) High (Alta)
Repollo Low (Baja)
Zanahorias High (Alta)
Colior Low (Baja)
Apio High (Alta)
Pepino (pelado) Low (Baja)
Pepino, piel suave High (Alta)
Hinojo High (Alta)
Uvas (sin pepitas) Low (Baja)
Kiwi (pelado) Low (Baja)
Mangos (pelados, sin hueso) Low (Baja)
Melones (pelados) Low (Baja)
Nectarinas (sin hueso) Low (Baja)
Naranjas (peladas)
®
. Asegúrate de que
High (Alta) o Low
(Baja)
TABLA DE SELECCIÓN DE VELOCIDAD
Melocotones (sin hueso) Low (Baja)
Peras (sin el pedúnculo)
Piña (pelada) High (Alta)
Ciruelas (sin hueso) Low (Baja)
Frambuesas Low (Baja)
Tomates Low (Baja)
Sandía (pelada) Low (Baja)
4. Con el motor en marcha, coloca los
alimentos en la abertura para alimentos
y usa el empujador de alimentos para
guiarlos suavemente hacia abajo.
Para extraer la máxima cantidad de
zumo, siempre mueve el empujador de
alimentos hacia abajo lentamente.
Alta para las duras
o baja para las
blandas
NOTA
El motor debe estar en funcionamiento
antes de cargar la abertura para alimentos.
ADVERTENCIA
No uses nunca los dedos para
empujar los alimentos hacia abajo
en la abertura para alimentos ni para
limpiarla. Utiliza siempre el empujador
de alimentos proporcionado.
Filtro
Precaución:
Cuchillas
aladas
ADVERTENCIA
El ltro de acero inoxidable contiene
pequeñas cuchillas aladas para
cortar y procesar frutas y verduras.
Evita tocar las cuchillas cuando
manipules el ltro.
8
Page 63

CUIDADO Y LIMPIEZA
ES
Asegúrate de que la licuadora está apagada
poniendo el botón ON/OFF (encendido/
apagado) del panel de control en OFF.
A continuación, apaga el aparato de la toma de
corriente y desenchufa el cable de alimentación.
Asegúrate de que la licuadora esté
correctamente desmontada. Consulta las
instrucciones de cuidado y limpieza.
PARA FACILITAR LA LIMPIEZA:
• Limpia sobre la marcha y evita el zumo seco
o los restos de pulpa.
• Inmediatamente después de cada uso,
enjuaga las piezas extraíbles en agua caliente
para eliminar la pulpa húmeda.
Deja que las piezas se sequen al aire.
NOTA
Para minimizar la limpieza, cubre el
depósito de pulpa con una bolsa de plástico
de congelar para recoger la pulpa. La pulpa
se puede usar en otros platos, como abono
para el jardín o se puede echar a la basura.
LIMPIEZA DE LA BASE DEL MOTOR
• Limpia la base del motor con un paño suave
y húmedo y sécala bien.
• Limpia cualquier exceso de partículas de
alimentos del cable de alimentación.
NOTA
No uses estropajos o limpiadores abrasivos
cuando limpies las piezas o la base del
motor, ya que pueden rayar la supercie.
LIMPIEZA DE LA CUBETA DEL
RECIPIENTE DE FILTRADO,
LA TAPA DE LA LICUADORA,
EL EMPUJADOR DE ALIMENTOS
Y EL DEPÓSITO DE PULPA
Lava todas las piezas con agua jabonosa tibia y
un paño suave. Enjuaga y seca bien todo.
NOTA
La cubeta del recipiente de ltrado, la
jarra de zumo con tapa, el empujador de
alimentos y el depósito de pulpa son aptos
para lavavajillas (solo bandeja superior).
La tapa de la licuadora no es apta para
lavavajillas.
LIMPIEZA DEL FILTRO
• Para obtener resultados uniformes en la
extracción de zumo, asegúrate siempre de
limpiar a fondo el ltro de acero inoxidable con
el cepillo de limpieza suministrado.
Es importante hacerlo inmediatamente
después del uso.
• Pon en remojo el ltro de acero inoxidable
en agua jabonosa caliente durante unos
10 minutos inmediatamente después de
completar el proceso de extracción de zumo.
Si se deja secar la pulpa en el ltro, podría
obstruir los nos poros del ltro de malla, lo
que disminuiría la efectividad de la licuadora.
• Con el cepillo de limpieza, mantén el ltro
bajo el chorro de agua y cepilla del interior del
ltro al borde exterior. Evita tocar las cuchillas
pequeñas y aladas del centro del ltro. Repite
este proceso en el exterior del ltro. Tras limpiar
el ltro, sostenlo a contraluz para asegurarte
de que los agujeros de la malla na no estén
bloqueados. Si los agujeros están atascados,
pon en remojo el ltro en agua caliente con un
10 % de zumo de limón para desatascarlos.
Repite el proceso de limpieza con el cepillo
de limpieza. Otra opción es lavar el ltro en el
lavavajillas.
9
Page 64

CUIDADO Y LIMPIEZA
No pongas a remojo el ltro de acero inoxidable
en lejía u otros limpiadores abrasivos.
Trata siempre el ltro con cuidado, ya que
puede dañarse fácilmente.
NOTA
El ltro de acero inoxidable es apto para
lavavajillas (solo bandeja superior).
ELIMINACIÓN DE MANCHAS
Y OLORES PERSISTENTES O
FUERTES DE LOS ALIMENTOS
Puede que el plástico se decolore a causa de
las frutas y verduras de colores fuertes. Para
ayudar a evitarlo, lava las piezas inmediatamente
después del uso. Si se decoloran, las piezas de
plástico se pueden poner a remojo en agua con
un 10 % de zumo de limón o pueden limpiarse
con un limpiador no abrasivo.
La licuadora
potencia. Para un trabajo tan pesado, hemos
otorgado al motor una garantía de 5 años contra
materiales defectuosos o fabricación. Esta
garantía es una ampliación de la garantía de
sustitución de 12 meses y cubre solo el motor.
La garantía no cubre los daños causados por
accidente, mal uso o uso de una manera no
indicada en el libro de instrucciones.
tiene un motor de 1200 W de gran
LIMPIEZA DE LA JARRA DE ZUMO
• Enjuaga la jarra de zumo con tapa con el
accesorio para espuma bajo el chorro de
agua.
• Lava las dos piezas con agua jabonosa tibia
y un paño suave. Enjuaga y seca bien todo.
NOTA
La jarra de zumo con tapa es apta para
lavavajillas (solo bandeja superior).
ADVERTENCIA
No sumerjas en agua ni en ningún otro
líquido la base del motor. El centro
del ltro y la abertura para alimentos
contienen pequeñas cuchillas aladas
para procesar frutas y verduras durante
el proceso de preparación del zumo. No
toques las cuchillas cuando manipules
el ltro o la abertura para alimentos.
10
Page 65

RESOLUCIÓN DE PROBLEMAS
POSIBLE PROBLEMA SOLUCIÓN FÁCIL
La máquina no funciona
cuando está encendida
• Puede que el brazo de bloqueo de seguridad no esté
correctamente colocado en la posición de operación vertical con el
brazo de bloqueo situado en las dos ranuras a cada lado de la tapa
de la licuadora.
ES
El motor parece
detenerse cuando se
extrae zumo
Exceso de pulpa
acumulada en el ltro de
acero inoxidable
Pulpa demasiado
húmeda y menor
cantidad de zumo
• La pulpa húmeda puede acumularse bajo la tapa de la licuadora
si la acción de licuado es demasiado fuerte. Prueba una acción de
licuado más lenta presionando el empujador de alimentos hacia
abajo más despacio. Sigue las instrucciones de desensamblaje y
limpieza y limpia la cubeta del recipiente de ltrado, el ltro de acero
inoxidable y la tapa de la licuadora.
• La licuadora dejará de funcionar automáticamente si el motor se
detiene durante más de 10 segundos. Quizá se esté procesando
demasiada comida al mismo tiempo o los trozos no son lo
sucientemente pequeños. Intenta cortar los alimentos o dividirlos
en trozos más pequeños del mismo tamaño y procesar una
cantidad más pequeña por lote. Para continuar la extracción de
zumo, reinicia la licuadora presionando el interruptor de ON/OFF
(encendido/apagado) del panel de control a OFF y después vuelve
a encenderla poniéndolo en ON.
• Si se selecciona una velocidad baja, las frutas y verduras duras
supondrán un exceso de esfuerzo para el motor. Consulta la guía
de zumo para determinar la velocidad correcta para las frutas
y verduras que has escogido. Asegúrate de que el motor esté
funcionando antes de cargar la abertura.
• Detén el proceso de extracción de zumo y sigue las instrucciones
de desensamblaje. Retira la tapa de la licuadora, raspa la pulpa,
vuelve a montarla y sigue licuando. Prueba a alternar variedades de
frutas y verduras (blandas y duras).
• Prueba una acción de licuado más lenta. Retira el ltro de acero
inoxidable y limpia bien las paredes de malla con un cepillo de
limpieza. Enjuaga el ltro con agua caliente. Si los agujeros de la
malla na están atascados, pon en remojo el ltro en una solución
de agua caliente con un 10 % de zumo de limón para desatascar
los agujeros o lávalo en el lavavajillas. Esto eliminará el exceso de
acumulación de bra (de las frutas y verduras) que podría estar
bloqueando el ujo.
11
Page 66

RESOLUCIÓN DE PROBLEMAS
POSIBLE PROBLEMA SOLUCIÓN FÁCIL
El zumo se sale entre el
borde de la licuadora y
la tapa de la licuadora
• Prueba una velocidad de licuado más lenta y baja el empujador de
alimentos por la abertura para alimentos más lentamente.
• Asegúrate de que todas las piezas estén ensambladas de manera
segura, con el brazo con bloqueo en su sitio.
El zumo sale a chorro de
la boquilla
Sobrecalentamiento con
cargas excesivas
• El zumo se está licuando demasiado rápido: prueba una velocidad
de licuado más lenta y baja el empujador de alimentos por la
abertura para alimentos más lentamente.
• La licuadora está equipada con un dispositivo de seguridad que
protege contra el sobrecalentamiento con cargas excesivas. Si se
sobrecalienta, la licuadora activará automáticamente el dispositivo
de protección contra sobrecargas y la unidad se apagará. Cuando
se active la protección contra sobrecargas, desenchufa la licuadora
de la toma de corriente durante al menos 15 minutos para que la
unidad se enfríe. A continuación, conecta la licuadora a la toma de
corriente y úsala con normalidad.
• Es importante asegurarse de que la licuadora esté encendida y
de que el motor esté funcionando antes de cargar la abertura. No
pongas cargas excesivas en la abertura para alimentos y asegúrate
de que el ltro no tenga ninguna acumulación de alimentos, en
las cuchillas y la malla, ya que esto podría generar una resistencia
innecesaria para el motor y provocar que se sobrecaliente.
12
Page 67

GARANTÍA
GARANTÍA LIMITADA DE 2 AÑOS
Y GARANTÍA MOTORA LIMITADA
DE 5 AÑOS
La garantía de Sage Appliances cubre este
producto para uso doméstico en territorios
especícos durante 2 años para todas las
piezas del producto y 5 años para el motor,
a partir de la fecha de compra, contra fallos
causados por mano de obra y materiales
defectuosos. Durante el plazo de la garantía,
Sage Appliances reparará o sustituirá productos
defectuosos (a criterio de Sage Appliances).
Todos los derechos de garantía en virtud
de la legislación nacional vigente serán
respetados y no se verán afectados por
nuestra garantía. Para consultar los términos
y condiciones completos de la garantía, así
como instrucciones sobre cómo hacer una
reclamación, visite www.sageappliances.com.
ES
13
Page 68

CHE
Switzerland
+41 (0)800 009 933
DEU AUT
Sage Appliances GmbH
Campus Fichtenhain 48, 47807 Krefeld, Deutschland
Deutschland: +49 (0)8005053104
Österreich: +43 (0)800 80 2551
BEL
Belgium
+32 (0)800 54 155
LUX
Luxembourg
+352 (0)800 880 72
ESP
Spain
+34 (0)900 838 534
www.sageappliances.com
Registered in Germany No. HRB 81309 (AG Düsseldorf).
• Aufgrund kontinuierlicher Produktverbesserungen kann das auf dieser Verpackung dargestellte Produkt leicht vom tatsächlichen Produkt abweichen.
• Due to continued product improvement, the products illustrated or photographed in this document may vary slightly from the actual product.
• En raison de son amélioration continue, le produit représenté sur cet emballage peut di érer légèrement du produit réel.
• A causa del continuo miglioramento dei prodotti, il prodotto illustrato su questa confezione può variare leggermente rispetto al prodotto reale.
• Perfeccionamos nuestros productos continuamente, por lo que el artículo podría diferir ligeramente de la ilustración o imagen en este documento.
Registered in England & Wales No. 8223512.
Copyright BRG Appliances 2019.
SJE410 UG3 A19
 Loading...