

Page 1

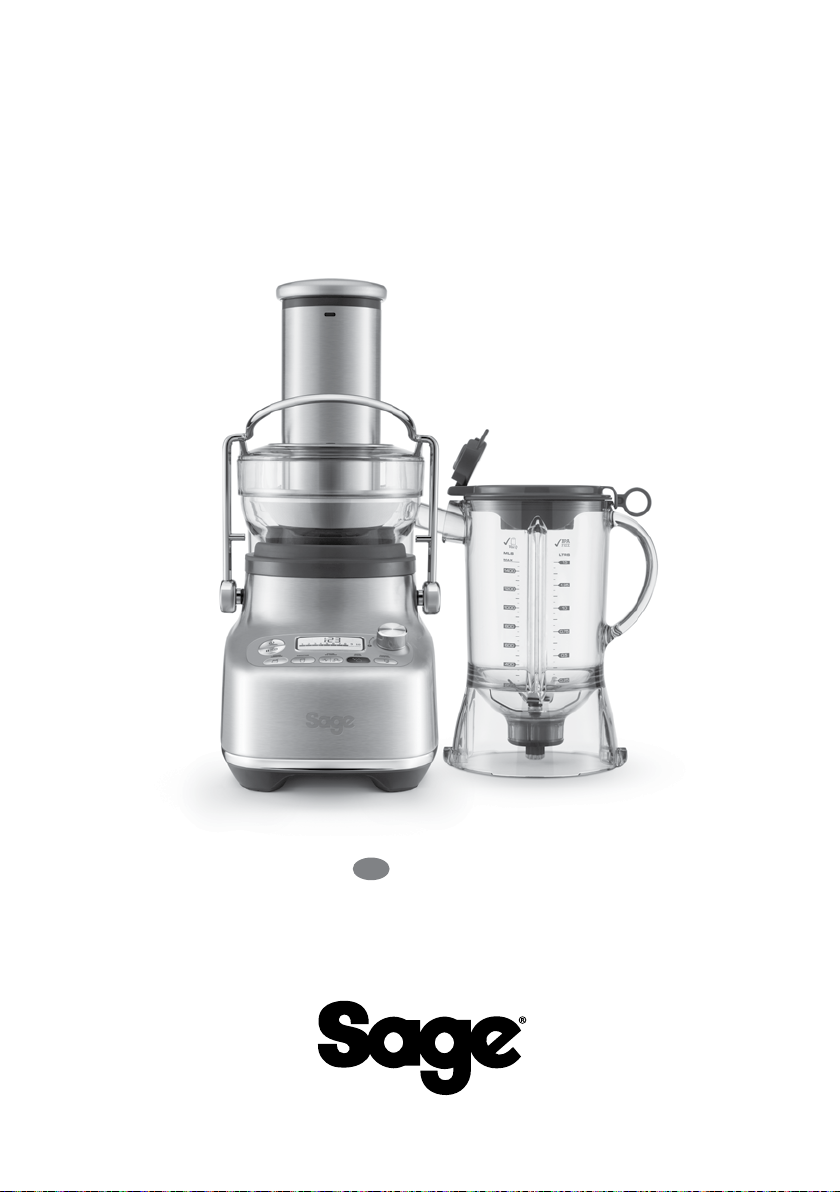
the 3X Bluicer Pro
BJB815/SJB815
™
EN
QUICK GUIDE
FR
GUIDE RAPIDE
IT
GUIDA RAPIDA
PT
MANUAL RÁPIDO
DE
KURZANLEITUNG
NL
SNELSTARTGIDS
ES
GUÍA RÁPIDA
Page 2

Contents
2 Sage® Recommends Safety First
6 Components
7 Assembly
10 Functions
12 Care & Cleaning
14 Troubleshooting
SAGE®
RECOMMENDS
SAFETY FIRST
At Sage® we are very safety
conscious. We design and
manufacture consumer
products with the safety of
you, our valued customer,
foremost in mind. In addition
we ask that you exercise a
degree of care when using
any electrical appliance
and adhere to the following
precautions.
IMPORTANT
SAFEGUARDS
READ ALL INSTRUCTIONS
BEFORE USE AND SAVE FOR
FUTURE REFERENCE
• Before using the rst time ensure
your electricity supply is the
same as shown on the label on
the underside of the appliance.
This appliance is equipped with
a power cord having a grounding
wire with a grounding plug. The
appliance must be grounded
using a properly grounded outlet.
In the event of an electrical
fault, grounding reduces the
risk of electrical shock.
• Do not, under any
circumstances, cut or remove
the third (ground) prong from the
power cord or use an adapter.
• Consult a qualied electrician if
the grounding instructions are
not completely understood, or
if doubt exists as to whether the
appliance is properly grounded.
• The installation of a residual
current safety switch is
recommended to provide
additional safety when using
all electrical appliances.
Safety switches with a rated
operating current not more
than 30mA are recommended.
Consult an electrician for
professional advice.
• Remove and discard
any packaging materials
safely, before rst use.
• To eliminate a choking hazard
for young children, discard
the protective cover tted
to the power plug safely.
• Always ensure the appliance
is properly assembled, as per
2
Page 3

EN
instructions, before use. Using
the appliance without being
properly assembled may cause
product malfunction, product
damage or pose safety risk
including personal injury.
• This appliance is for household
use only. Do not use the
appliance for anything other
than its intended purpose. Do
not use in moving vehicles or
boats. Do not use outdoors.
Misuse may cause injury.
• Position the appliance on a
stable, heat resistant, level, dry
surface away from the counter
edge, and do not operate on
or near a heat source such as
a hot plate, oven or gas hob.
• Fully unwind the power
cord before operating.
• Do not let the power cord
hang over the edge of a
counter or table. Do not let
the power cord touch hot
surfaces or become knotted.
• Do not leave the appliance
unattended when in use.
• If the appliance is to be left
unattended, cleaned, moved,
assembled or stored, always
switch o the appliance by
pressing the ON | OFF button
to OFF. Switch o and unplug
from the power outlet.
• Turn the appliance OFF, then
unplug from the outlet when not
in use, before assembling or
disassembling parts and before
cleaning. To unplug, grasp the
plug and pull from the outlet.
Never pull from the power cord.
• Regularly inspect the power
cord, plug and actual appliance
for any damage. If found to
be damaged in any way,
immediately cease use of
the appliance and return the
entire appliance to the nearest
authorised Sage Service
Centre for examination,
replacement or repair.
• Keep the appliance and
accessories clean. Follow
the cleaning instructions
provided in this book. Any
procedure not listed in this
instruction booklet should be
performed at an authorised
®
Sage
Service Centre.
• This appliance is not intended
for use by children or by persons
with reduced physical, sensory,
or mental capabilities, or lack
of experience and knowledge.
Close supervision is necessary
when any appliance is used near
children. Children should be
supervised to ensure that they
do not play with the appliance.
• Children should not play
with the appliance.
• Cleaning of the appliance should
not be carried out by children.
• The appliance power cord, and
3
Page 4

any components, attachments
or accessories should be
kept out of reach of children
aged 8 years and younger.
• Never use attachments or
accessories that are not supplied
with this product or authorised
by Sage
®
to be used on this
product. Failing to follow this
instruction may cause product
malfunction, product damage
or even pose safety risk.
• Do not attempt to operate
the appliance by any
method other than those
described in this booklet.
• Do not move the appliance
while in operation.
• Do not operate the appliance
on an inclined surface.
• Do not push food into the
feed chute with your ngers
or other utensils. Always use
the food pusher provided.
Do not place hand or ngers
into the food chute when it is
attached to the appliance.
• Do not juice stone fruit
unless seeds and/or stones
have been removed.
• Make sure the product is turned
OFF and the
stainless-steel lter basket has
stopped rotating and the motor
has completely stopped before
releasing the safety locking arm
and/or attempting to move the
appliance, when the unit is not in
use, and before disassembling,
cleaning and storing.
• Any signicant spillage onto
the surface under or around
the appliance, or onto the
appliance itself, should be
cleaned and dried before
continuing to use the appliance.
• Be careful when handling
the stainless-steel lter
basket as the small cutting
blades at the base of the
lter basket are very sharp.
Mishandling may cause injury.
• Blender blades are sharp,
take care when handling,
emptying and cleaning the
blender jug.Remove rind from
all citrus fruit before juicing.
• Do not use the appliance
if the rotating sieve (lter
basket) or lid is damaged.
• Always make sure chute cover
is clamped securely in place
before motor is turned on.
• Do not operate without the
pulp container in place.
• Do not unfasten interlock arm
while unit is in operation.
• A representative example of the
heaviest loading anticipated for
use with this appliance is 450g
of frozen banana pieces and
1000g of milk blended on the
highest speed for 30 seconds.
• Do not juice more than 3kg
4
Page 5
EN
(approximately 6 pounds)
of carrot at a time.
• Avoid putting the blender
jug on the motor base while
the motor is still spinning.
• Do not operate without any
ingredients in the jug.
• Never attempt to operate
with damaged blades, or
with utensils, or any foreign
objects inside the jug.
• Do not put the jug in extremes
of heat or cold, for example
placing a cold jug into hot
water, or vice versa.
• Lid must be rmly secured
to the jug before operation to
ensure internal contents do not
escape, spray or overow.
• Do not remove the jug
from the motor base while
blender is in use.
• Do not use blender while
OVERLOAD PROTECTION
is ashing on the LCD. If this
occurs, unplug the blender
and wait for 30 minutes until
the motor has cooled. Once
cooled, you will be able to use
the blender as usual again.
• Do not process hot or boiling
liquids. Allow to cool before
placing into the blender jug.
• To protect against electric
shock, do not immerse the
power plug, cord or appliance
in water or any liquid.
• Do not use the appliance if the
power cord, power plug, or
appliance becomes damaged
in any way. If damaged and
maintenance other than
cleaning is required please
contact Sage Customer Service
or go to sageappliances.com
The symbol shown
indicates that this appliance
should not be disposed of
in normal household waste.
It should be taken to a local
authority waste collection centre
designated for this purpose or to
a dealer providing this service.
For more information, please
contact your local council oce.
To protect against electric
shock, do not immerse the,
power base, power cord or power
plug in water or allow moisture to
come in contact with these parts.
Avoid spilling water onto the
power base’s connector. Do not
immerse the power base
for cleaning.
FOR HOUSEHOLD USE ONLY
SAVE THESE INSTRUCTIONS
5
Page 6
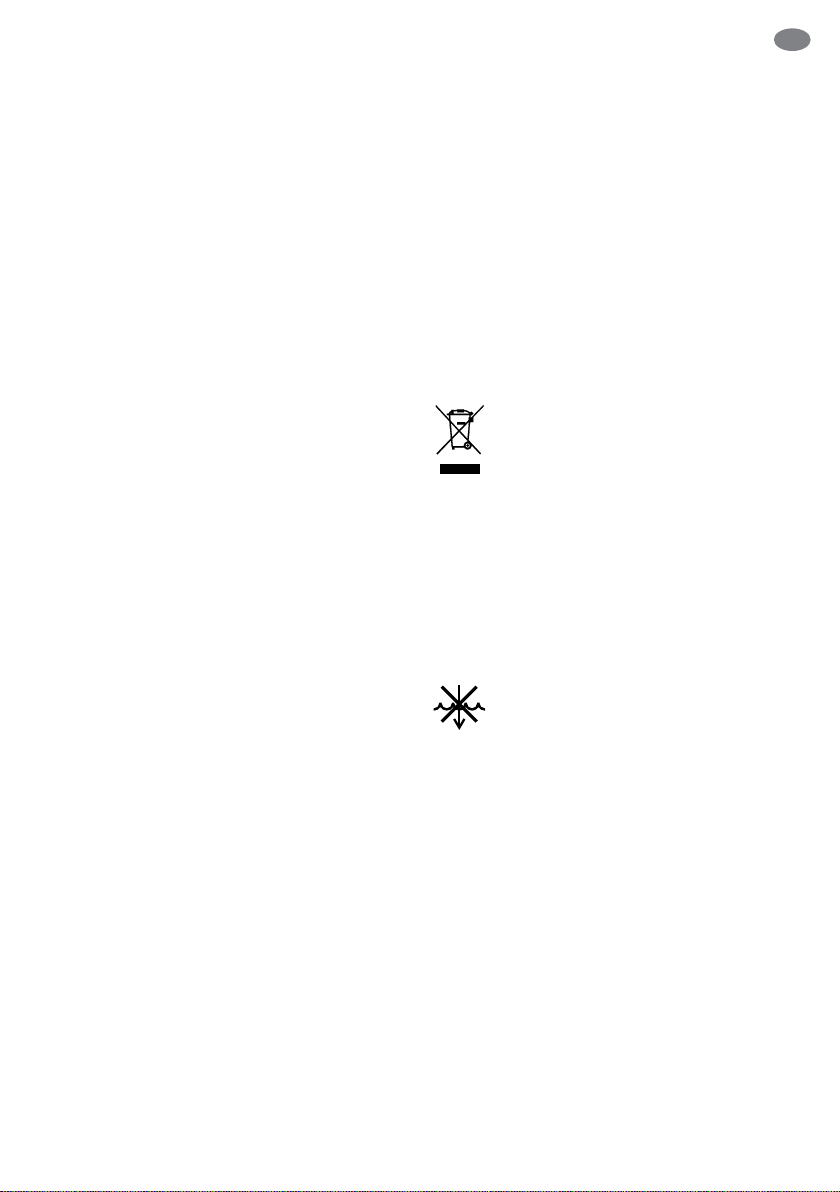
Components
H
A
B
C
D
E
F
G
A. Food pusher (not dishwasher safe)
B. Juicer cover (dishwasher safe)
C. Stainless steel lter basket (dishwasher safe)
D. Filter bowl surround (dishwasher safe)
E. Interlocking safety arm
Stops motor base operating without
cover locked into place.
F. Control panel
G. Stainless steel motor base
I
J
K
L
M
H. Inner measuring cup (dishwasher safe)
I. 1.5 litre blending jug & lid (dishwasher safe)
J. Juicing nozzle (dishwasher safe)
Can be placed over spout to juice
directly into a cup.
K. Drip stop plug
L. Pulp container (dishwasher safe)
M. Cleaning brush
For use on stainless steel lter basket.
Rating Information
220–240V~ 50Hz 1350W
6
Page 7
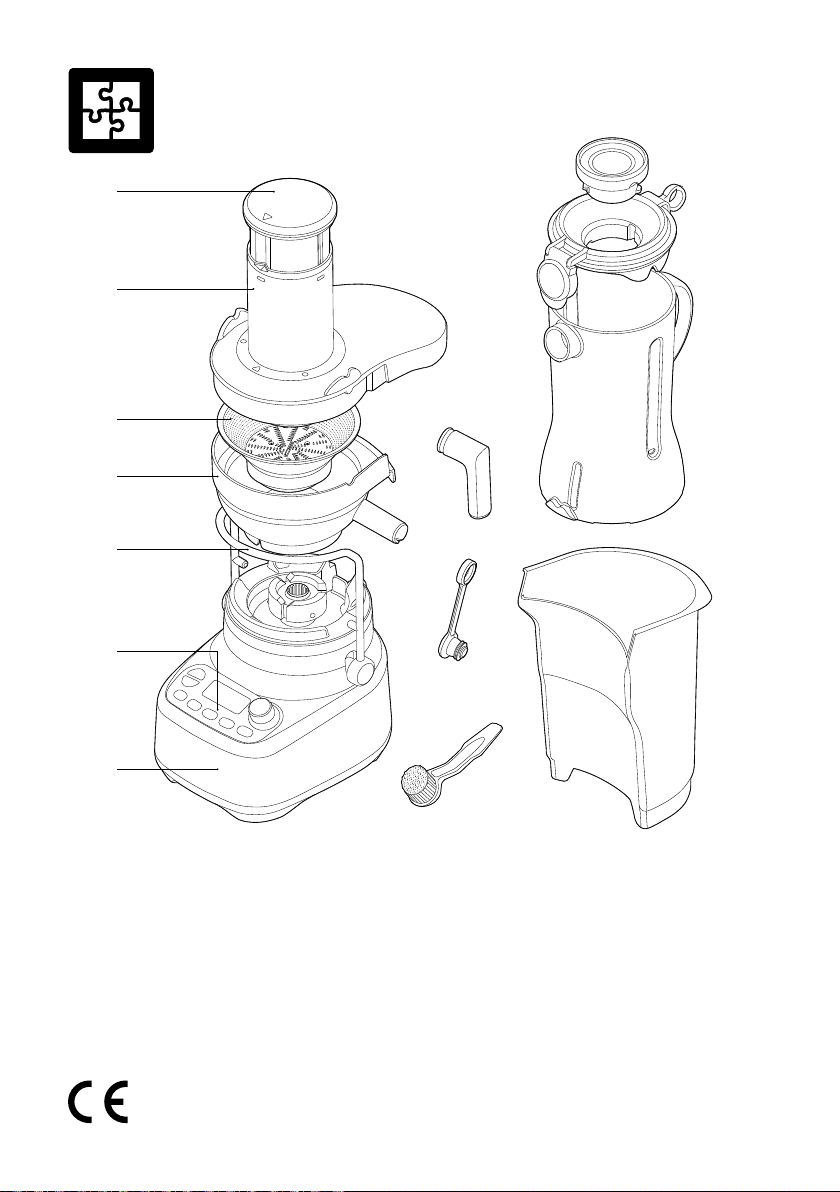
Assembly
EN
BEFORE FIRST USE
Wash the lid, inner measuring cup, jug,
the lter bowl surround, lter basket, juicer
cover, food pusher and pulp container in
warm, soapy water with a soft cloth. Rinse
and dry thoroughly.
Place motor base on a at, dry surface
such as a countertop. Ensure that the
appliance is switched to OFF at the motor
base and the power cord is unplugged.
JUICING
1. Place lter bowl surround on
top of the motor base.
2. Align the arrows at the base of the
stainless-steel lter basket with the
arrows on the motor drive coupling and
push down until it clicks into place to
create a secure t with the motor base.
3. Place the juicer cover over the lter bowl
surround, positioning the lower part of
the feed chute over the stainless steel
lter basket.
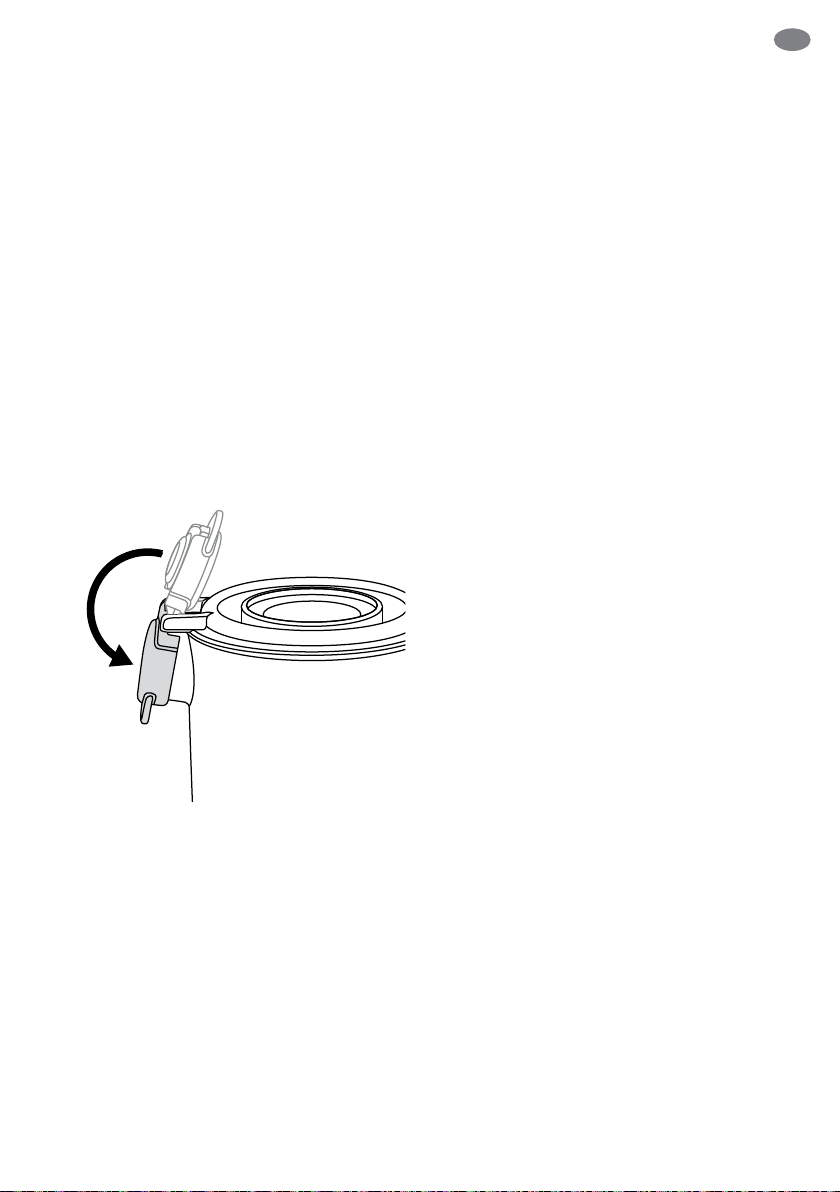
4. Raise the safety locking arm up and
locate into the two grooves on either
side of the juicer cover.
7
Page 8
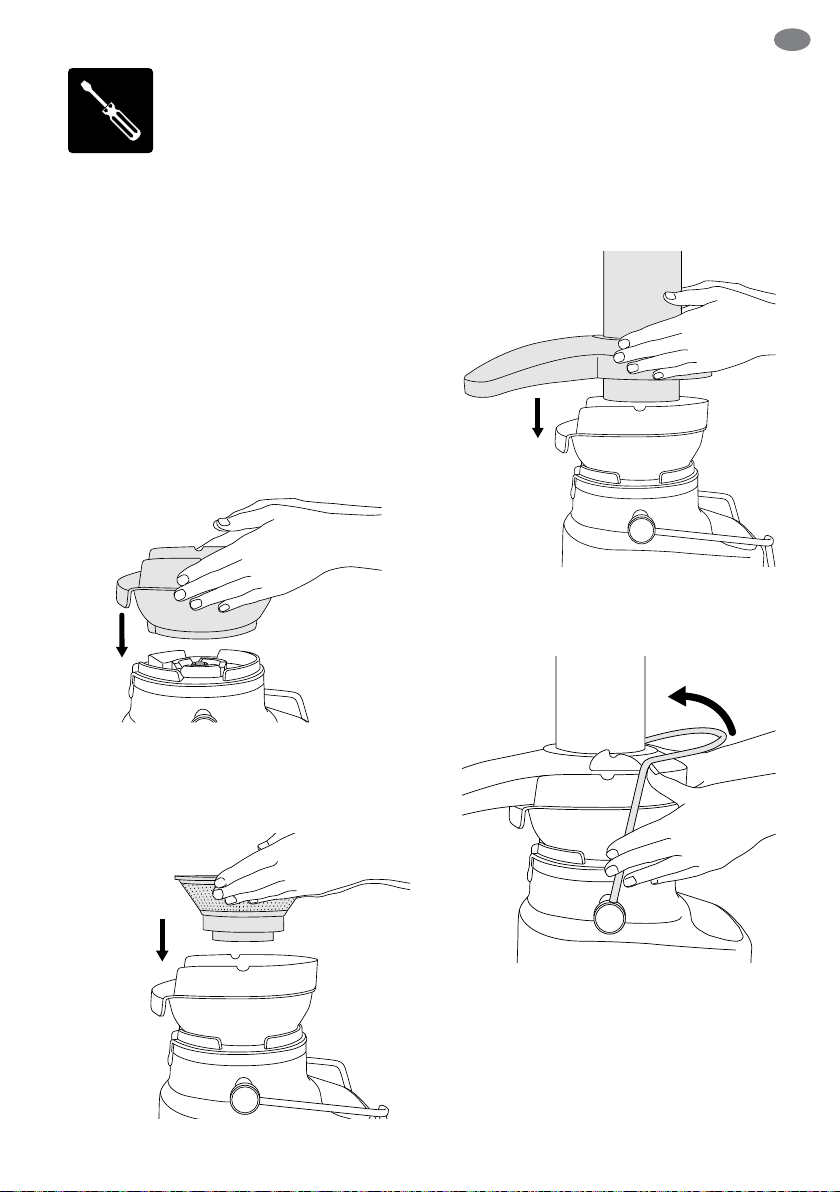
5. The safety locking arm should now be in a
vertical position and locked into place on
top of the juicer cover.
8. Drip stop plug can be tted over juice
outlet nozzle. It then allows the outlet to
be plugged to prevent dripping
after juicing.
6. Slide the food pusher down the food
chute by aligning the groove in the food
pusher, with the small protrusion on the
inside of the top of the feed tube.
Food
pusher
groove
Small
protrusion
inside
feed tube
7. Place the pulp container into position by
tilting and lifting the motor base slightly.
Insert the pulp container under the juicer
cover on the back ensuring the front edge
is tucked under the back lip of the lter
bowl surround and the bottom edge is
clipped into the bottom of the motor base.
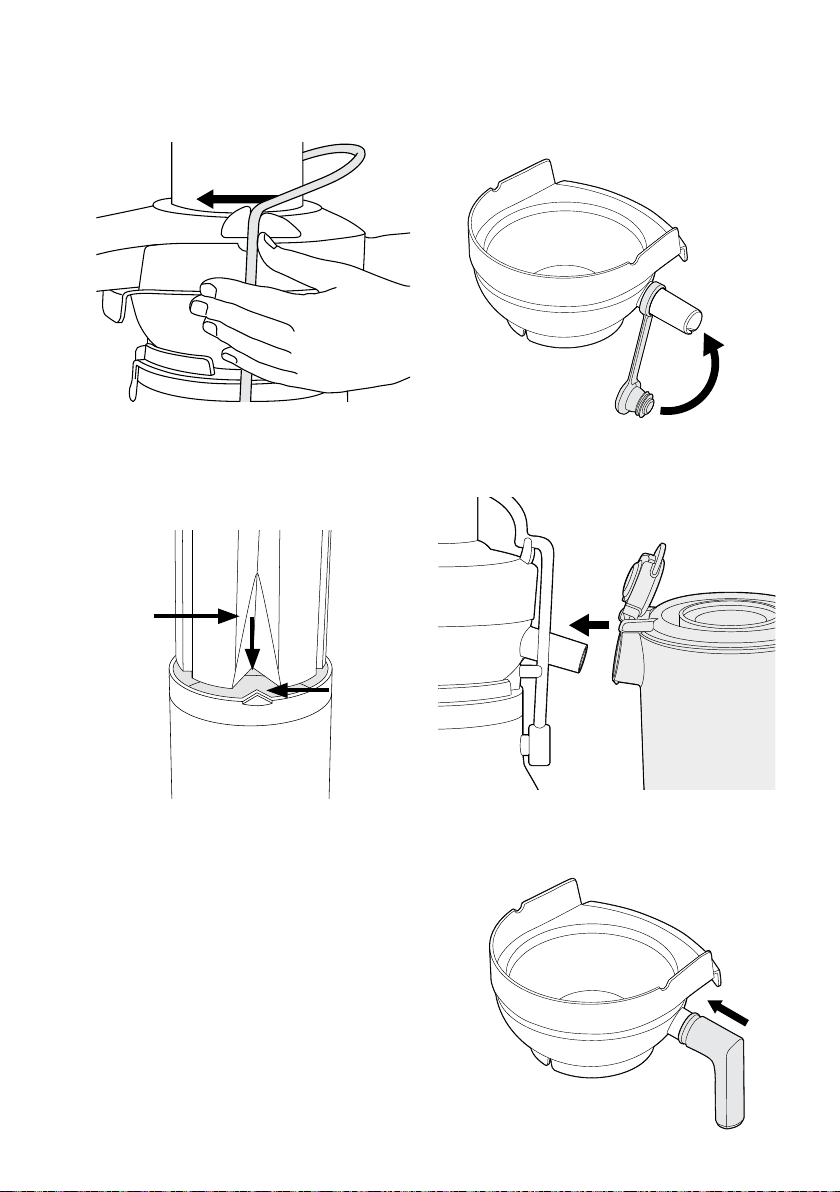
9. Fit the lid to the blender jug and position jug
under juice spout.
10. Optional: For juicing into a cup the
Juicing Nozzle can be tted onto the
juice outlet nozzle.
8
Page 9

EN
BLENDING
1. With the blender jug in the upright position
place it on the motor base. The handle
of the blender can be positioned to the
left or right-hand side of the appliance.
2. Raise the safety locking arm up
and locate into the two grooves
on either side of the blender.
4. Ensure the spout cover of the
blender lid is clipped into place and
closed. The ring pull design allows
the user to easily remove the lid
with a simple leverage action.
After appliance is assembled into blender
or juicer conguration, plug power cord
into a 220–240V power outlet and turn on.
Press the ON / OFF button to turn the
appliance on. The ON / OFF button will
illuminate. The LCD timer screen will
illuminate with ‘0:00’ displayed.
3. Add food or liquid into the blender jug
ensuring not to exceed the ‘MAX’ mark.
Place the blender lid rmly into position
on the top of the blender jug. Insert
the clear, inner measuring lid into the
blender lid and turn clockwise to lock
into position. The jug features a Sage
Assist™ Lid. This allows the lid to t
tightly onto the blender jug, avoiding
displacement during operation.
®
9
Page 10
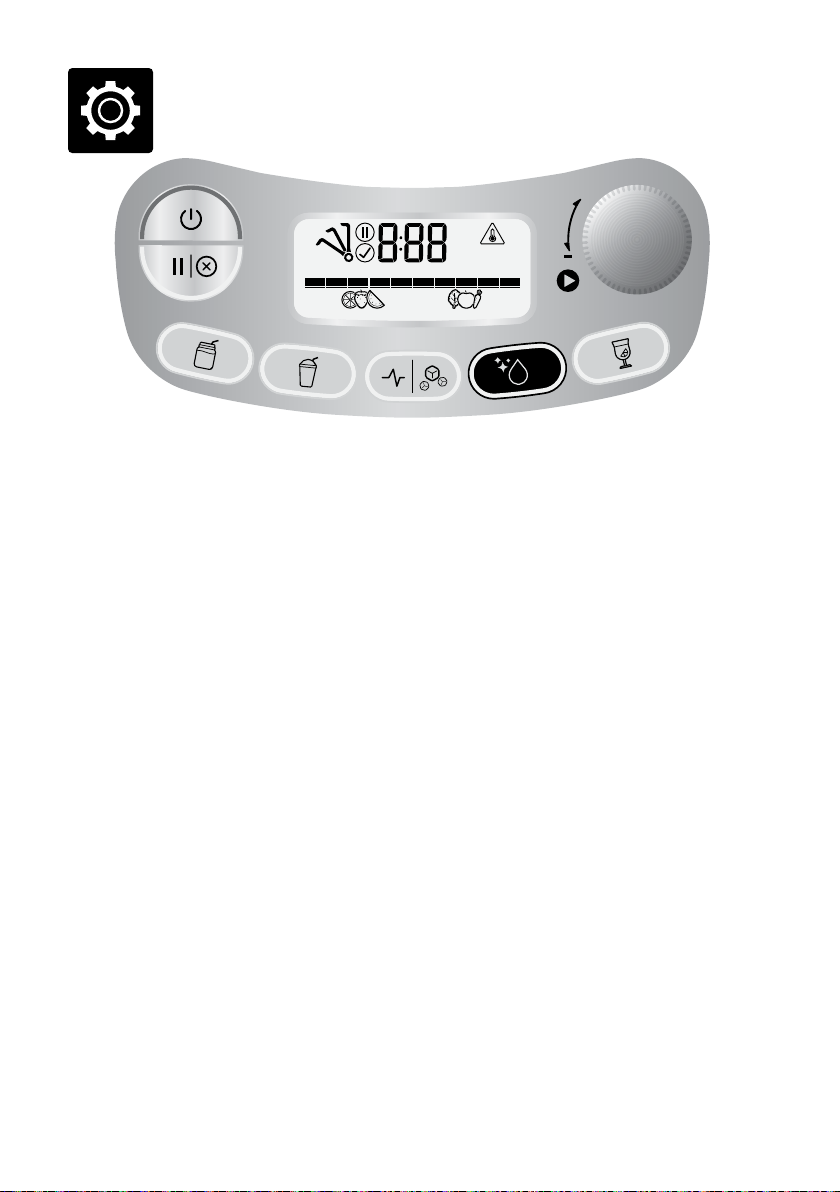
Functions
G
R
E
E
N
S
M
O
O
T
H
I
E
S
OVERLOAD
1 2 3 4 5
PROTECTION
6 7 8 9 10
SOFT HARD
P
U
L
S
M
O
O
T
H
I
E
E
I
C
E
C
H
R
S
U
+
N
E
Z
O
R
F
L
I
A
T
K
C
O
O
T
U
A
N
A
E
L
C
C
GETTING STARTED
The ON / OFF button powers the unit into
READY mode.
PRESET PROGRAMS
BLENDING
The appliance has 5 preset functions:
Smoothie, Green Smoothie, Pulse/
Ice Crush, Auto Clean and Frozen
Cocktail. These pre-programmed cycles
automatically adjust the blending time and
speeds to optimise blending results. These
programs are only activated when your
appliance is in blender set up. They can't
be used when your appliance is set up in
juicing conguration.
Select the required function by pressing
the corresponding function button. The
unit will start to operate, and the selected
function button will illuminate. The timer
will start to count down and program will
end automatically when it reaches '0:00'.
The program and timer can be paused by
pressing the pause button. Resume by
pressing program button again, or cancel
by pressing pause again.
The program can also be canceled at any
time by pressing the ON|OFF button.
10
Turning the speed dial will interrupt the
program, placing the blender in manual
mode starting from Speed 1.
Smoothie
For dairy-based smoothies a combination
of speeds and pulses are designed to
combine and aerate ingredients into a
smooth and creamy texture.
Green Smoothie
For blending whole fruits/vegetables into
a smooth beverage. A combination of highspeed proles breaks down tough bres
into very ne particles.
Frozen Cocktail
For creating ice-based cocktails and drinks
like Margaritas, Daiquiris and Slushies.
An ice crush program followed by a short
blend.
Pulse / Ice Crush
A program of continuous pulsing designed
to chop food into an even consistency or
crush ice cubes. Use the PULSE button
when the food that is being processed
is too thick or coarse to circulate within
the blender jug. The pulse program can
automatically detect when ice has been
fully crushed and ends the program early,
indicated by a series of longer pulses.
Page 11

EN
The maximum amount of ice cubes
the blender can blend without liquid
in the jug at any one time is 1 standard
ice tray or 250g.
Auto Clean
Use to remove most of the ingredients
o the blender walls and blades. Add
2 cups warm soapy water and press the
clean button. For harder to clean, sticky
or thick ingredients, add ½ teaspoon of
dishwashing detergent for extra cleaning
power. For best results, clean the blender
jug this way immediately after use. The
Auto Clean function only cleans the
blender jug. It doesn't clean the juicer.
MANUAL OPERATION
SPEED CONTROL DIAL
Blending
Turn the Speed Control Dial clockwise
to select one of 10 speed settings
from a slow STIR through to a very
fast PULVERIZE. The timer will start
to count up, and blending will stop
when it reaches '2:00'.
Blending can be paused by pressing
pause button. Press pause button again
to cancel, or turn dial to resume blending
from Speed 1.
To stop blending, turn the Speed Control
Dial anticlockwise back to READY or press
ON|OFF button.
JUICING
Wash your selection of fruit and vegetables
to be juiced. Most fruit and vegetables
such as apples, carrots and cucumbers
will not need to be cut or trimmed to size
as these will t whole into the feed chute.
Ensure vegetables such as beets, carrots
etc. have all soil removed, are washed well
and trimmed of leaves before using.
1. Plug the power cord into your
220–240V power outlet.
IMPORTANT
Do not load feed chute with produce
before the Juicer has reached the
selected speed.
2. Turning the Juicer On
Turn dial to desired speed setting.
Use lower numbers (1–5) for soft fruits
and vegetables and higher numbers
(6–10) for hard fruits and vegetables.
See Speed Selector Guide table on the
next page to match speed and produce
type for maximum yield. "Low" range,
while it may not maximise yield of some
produce, allows you to extract juice
at a signicantly lower noise level.
3. With the motor running, place food into
the feed chute and use the food pusher
to gently guide food down. To extract
the maximum amount of juice, always
push the food pusher down slowly.
4. Full Blender Jug
You can keep juicing until the jug
is lled to max. level.
WARNING
Never use ngers, hands or utensils to
push food down the feed chute or to clear
the feed chute. Always use the food pusher
provided.
CAUTION:
sharp blades
The stainless steel lter basket contains
small sharp blades to cut and process fruit
and vegetables. Avoid touching the blades
when handling the lter basket.
11
Page 12

SPEED SELECTOR GUIDE
Food Type Speed
APPLES
BABY SPINACH
BEETROOT
BLUEBERRIES
BROCCOLI
CABBAGE
CAPSICUM
CARROT
CELERY
CITRUS FRUITS (peeled)
CUCUMBER
GINGER
GRAPES (seedless)
HONEYDEW MELON (peeled)
KALE
KIWI (peeled)
MANGO (peeled, pit removed)
MINT 9
PEACH (pit removed) 5
PEARS 6
PINEAPPLE (peeled) 7
RHUBARB 8
SQUASH 9
10
9
10
5
7
9
9
10
4
1
4
8
2
3
9
5
5
Care & Cleaning
Ensure the motor base is turned o by
by pressing the ON / OFF button. Then
unplug the power cord.
CLEANING
1. Remove Blender Jug.
2. Disengage Locking Bar, pull
up entire Juice Collector
Assembly and take to sink.
3. Remove Pulp Container.
Empty as much pulp as possible into
bin/compost. Rinse all parts after use
(except the motor base) under running
water to clear away the majority of juice
and pulp. Wash in warm soapy water
with a soft cloth.
To avoid food drying on to the blades,
mesh or transparent parts, rinse and
wash as soon as possible after use.
PULP CONTAINER
To minimize cleaning, you can line the
pulp container with a biodegradable bag
to collect the pulp.
MOTOR BASE
Wipe down with a soft damp cloth. Do
not immerse the motor base in liquids.
CLEANING AGENTS
Do not use abrasive scouring pads or
cleaners on either the motor base or the
jug, as they may scratch the surface. Use
only warm soapy water with a soft cloth
STRAWBERRIES 4
TOMATOES 4
WATERMELON (peeled) 3
ZUCCHINI 6
12
Page 13

EN
JUG AND LID
In order to keep your jug clean and
avoid food drying on the blades and
jug, follow the below steps as soon as
possible after use.
Rinse most of the ingredients o the
jug and lid.
Fill the jug with 500ml of warm water, t
the lid and press the AUTO CLEAN button.
If thick or sticky ingredients require extra
cleaning power add a few drops of dish
liquid detergent.
Rinse the jug and lid again and/or wash
separately in warm soapy water with
a soft cloth or bottle brush.
It is most eective to clean the jug
immediately after use.
FILTER BASKET
To ensure consistent juicing results,
always clean the lter basket thoroughly
immediately after use, using the included
brush.
If pulp is left to dry, it may clog the ne
pores of the lter mesh, which can aect
juicing performance. The lter basket can
be soaked in hot soapy water for
10 minutes, if necessary.
STUBBORN FOOD STAINS
Strong smelling foods such as garlic, sh
and some vegetables such as carrots may
leave an odour or stain on the blender
jug and lid. To remove, soak blender jug
and lid for 5 minutes in warm soapy water.
Then wash with a mild detergent and warm
water, rinse well and dry thoroughly. Store
jug with the lid o.
STORAGE
Store the appliance upright with the
blender jug assembled on the motor base,
or beside it. Do not place anything on top.
To allow air to circulate, keep the lid o.
WARNING
Oils in citrus rind can damage the
material of your blender jug if exposed
to it for a longer period. Always clean your
blender jug immediately after processing
citrus rind.
DISHWASHER
All parts except for the motor base and
food pusher are dishwasher safe. The
blender jug can be placed on the bottom
shelf of the dishwasher. The lid and inner
measuring cap should be washed on the
top shelf only. However, washing parts
on a regular basis in the dishwasher can
shorten the life of them due to prolonged
exposure to harsh detergents, hot water
and pressure.
Cleaning the parts in the dishwasher also
may cause parts to deteriorate so inspect
the parts regularly and stop using the
product if any signs of damage is noticed.
13
Page 14
Troubleshooting
LCD screen turns on
but appliance doesn't
respond to controls.
Food is unevenly
chopped
Food is chopped
too ne or is watery
Excess pulp
building up in the
stainless-steel
lter basket
Pulp too wet
and reduced
extracted juice
• The safety locking arm may not be correctly engaged in the vertical
operating position. In this case, the LCD screen will show an animated
prompt
is located rmly into the two grooves on either side of the juicer cover or
blender jug.
. Check the top cover is properly aligned and the locking arm
• This can happen when too much food is being added at one time.
Try a smaller amount, and work in batches if necessary.
• Try blending for shorter period of time. Use the PULSE function for
better control.
• Turn the appliance o. Disassemble to scoop excess pulp o the juicer
cover.
• Reassemble and continue juicing. Alternating soft and hard ingredients
may help avoid this.
• The cleaner the lter, the better the juice yield, and dryer the pulp. Be sure
to thoroughly clean the juicer as soon as possible after each use. Remove
the stainless-steel lter basket and thoroughly clean mesh walls with a
cleaning brush. Rinse the lter basket under hot water. If the ne mesh
holes are blocked, soak the basket in a solution of hot water with 10%
lemon juice to unblock the holes or wash in the dishwasher (top shelf).
This will remove excess ber build up which could be inhibiting the ow.
• Pusher force could reduce yield because it slows the motor down.
Avoid putting pressure on the food pusher when pushing ingredients
down the feed chute.
• If juicing large amounts of brous ingredients like rhubarb and pineapple,
cleaning the lter basket in between might be required.
Juice leaks between
the lter bowl
surround and
the juicer cover
Juice sprays
out from spout
Juice in lter
bowl is left after
juicer stopped
14
• Try a slower juicing speed and push the food pusher down the feed chute
more slowly.
• Ensure there is no build up in the lter basket.
• The juice is being extracted too fast; try a slower juicing speed (if possible)
and push the food pusher down the feed chute more slowly.
• Turn the speed dial up to highest speed setting and operate for 5 seconds.
That can help moving the remaining juice into the jug.
Page 15

EN
Motor appears to
stall during juicing
All control panel
lights ash and
Overload Protection
displayed on
LCD screen
• Wet pulp can build up under the juicer cover and stall the appliance if the
appliance is used excessively without cleaning. If this occurs, disassemble
and follow the cleaning instructions to clean the lter bowl surround, the
stainless-steel lter basket and the juicer cover. The appliance can also
stall if excessive force is used to push produce down the feed chute.
If this occurs, ensure that a gentler pressure is used to push produce
down the chute.
• Turn on the appliance before putting ingredients in the chute. Pressing
ingredients down before the motor reaches full speed can cause it to
stall or overload. Use gentle to moderate pressure on the pusher.
Lower pressure produces a better juice yield.
• Hard fruit and vegetables will put excess strain onto the motor if a low
speed is selected. Refer to the reference guide to determine the correct
speed for the fruit and vegetables selected for juicing.
• This indicates motor overload protection is activated due to motor
overheating or stalling.
• To reset the protector, unplug from the power supply, then plug back in
and turn on.
• If overload protection is still displayed, unplug the appliance and leave
to cool for at least 30 minutes, then try again. The appliance must be
unplugged while cooling in order to reset properly.
• If the issue persists after allowing to cool, this indicates an internal problem.
Contact Sage Customer Service or go to www.sageappliances.com.
• Note that triggering the overload protection indicates abnormal use of
the appliance, such as too much load in the blender jug, excessive push
force when juicing or extended continuous use. Please take note of the
conditions and refer to all of the information in these instructions to avoid
this occurrence and extend the life of the appliance.
15
Page 16

Guarantee
2 YEAR LIMITED GUARANTEE
Sage Appliances guarantees this product for
domestic use in specied territories for 2 years
from the date of purchase against defects caused
by faulty workmanship and materials. During this
guarantee period Sage Appliances will repair,
replace, or refund any defective product (at the
sole discretion of Sage Appliances).
All legal warranty rights under applicable national
legislation will be respected and will not be
impaired by our guarantee. For full terms and
conditions on the guarantee, as well as instructions
on how to make a claim, please visit
www.sageappliances.com.
16
Page 17
the 3X Bluicer Pro™
KURZANLEITUNG
DE
Page 18

Inhalt
2 Bei Sage® steht Sicherheit an erster
Stelle
7 Komponenten
8 Montage
12 Funktionen
15 Pege und Reinigung
17 Störungsbehebung
BEI SAGE®
STEHT SICHER
HEIT AN ERSTER
STELLE
Wir bei Sage® sind sehr
sicherheitsbewusst.
Beim Design und bei
der Herstellung denken
wir zuallererst an Ihre
Sicherheit. Wir bitten Sie,
bei der Verwendung aller
Elektrogeräte angemessene
Sorgfalt walten zu lassen
und sich an die folgenden
Vorsichtsmaßnahmen zu
halten.
HINWEISE ZUR
SICHERHEIT
BITTE ALLE ANWEISUNGEN
VOR GEBRAUCH LESEN
UND ZUM SPÄTEREN NACH
SCHLAGEN AUFBEWAHREN
• Vergewissern Sie sich vor dem
ersten Gebrauch, dass die
Netzspannung der Angabe
auf der Unterseite des Geräts
entspricht. Dieses Gerät
ist mit einem Netzkabel mit
Erdungskabel und einem
Erdungsstecker ausgestattet.
Das Gerät muss über eine
richtig geerdete Steckdose
geerdet werden. Im Falle
einer elektrischen Störung
reduziert Erdung das Risiko
eines elektrischen Schlages.
• Unter keinen Umständen darf
der dritte Stift des Steckers
(der Erdungsstift) gekürzt oder
entfernt werden, noch darf ein
Adapter verwendet werden.
• Wenden Sie sich an einen
qualizierten Elektriker, falls
Sie die Erdungsanweisungen
nicht vollständig verstanden
oder Zweifel haben, ob das
Gerät richtig geerdet ist.
• Als zusätzliche Schutzmaß-
nahme bei der Verwendung
von Elektrogeräten wird die
Installation eines Schutz- oder
Sicherheitsschalters empfohlen.
Ideal sind Sicherheitsschalter
mit einer Nennleistung von
maximal 30 mA. Wenden
Sie sich an einen Elektriker
für fachgerechte Beratung.
• Entfernen und entsorgen Sie
alle Verpackungsmaterialien
sorgfältig, bevor Sie das
Gerät zum ersten Mal
in Gebrauch nehmen.
2
Page 19

DE
• Entsorgen Sie die Schutzhülle
des Netzsteckers, da diese
eine Erstickungsgefahr für
Kleinkinder darstellt.
• Vergewissern Sie sich vor dem
Gebrauch, dass das Gerät
gemäß der Anleitung richtig
zusammengesetzt wurde.
Wird das Gerät gebraucht,
obwohl es nicht ordnungsgemäß
zusammengesetzt wurde,
kann dies zu einer Fehlfunktion
des Geräts, Schäden am
Gerät oder Sicherheitsrisiken
sowie Verletzungen führen.
• Dieses Gerät ist nur für den
Hausgebrauch bestimmt.
Verwenden Sie das Gerät
ausschließlich zu seinem
Bestimmungszweck. Verwenden
Sie das Gerät nicht in fahrenden
Fahrzeugen oder Booten.
Verwenden Sie das Gerät
nicht im Freien. Fehlgebrauch
kann zu Verletzungen führen.
• Stellen Sie das Gerät auf eine
stabile, hitzebeständige, ebene,
und trockene Fläche in einem
sicheren Abstand zur Kante
und betreiben Sie es nicht
in der Nähe einer Hitzequelle,
wie beispielsweise Kochplatten,
Backöfen oder Gaskochfelder.
• Rollen Sie das Kabel vor
Inbetriebnahme ganz aus.
• Lassen Sie das Kabel nicht über
die Kante einer Arbeitsäche
oder eines Tisches hängen.
Das Netzkabel darf nicht
mit heißen Oberächen in
Berührung kommen oder
sich verknoten.
• Lassen Sie das Gerät
während des Gebrauchs
nicht unbeaufsichtigt.
• Wenn Sie das Gerät
unbeaufsichtigt stehen
lassen, reinigen, umstellen,
zusammenbauen oder
aufbewahren möchten,
müssen Sie es zuvor
ausschalten, indem Sie auf
der „ON | OFF“-Taste „OFF“
einstellen. Schalten Sie
das Gerät aus und ziehen
Sie den Netzstecker.
• Schalten Sie das Gerät
aus und ziehen Sie bei
Nichtgebrauch den Stecker,
bevor Sie Teile an-/abmontieren
oder reinigen. Um den
Stecker zu ziehen, greifen
Sie den Stecker und ziehen
Sie ihn aus der Steckdose.
Ziehen Sie zum Ausstecken
niemals am Netzkabel.
• Überprüfen Sie das
Netzkabel, den Stecker
und das Gerät regelmäßig
auf Schäden. Wenn das
Gerät in irgendeiner Weise
beschädigt ist, verwenden
Sie es nicht und senden Sie
es an das nächstgelegene
®
Sage
Service Center zur
Überprüfung, Reparatur oder
um einen Ersatz zu erhalten.
3
Page 20

• Halten Sie das Gerät und das
Zubehör sauber. Befolgen Sie
die Reinigungsanweisungen
in dieser Broschüre. Alle nicht
in dieser Bedienungsanleitung
beschriebenen Vorgänge sind
in einem autorisierten Sage
®
Service Center durchzuführen.
• Dieses Gerät ist nicht für die
Verwendung von Kindern oder
Menschen mit körperlichen,
sensorischen oder geistigen
Einschränkungen sowie
unerfahrenen oder ungeübten
Menschen geeignet. Strenge
Beaufsichtigung ist notwendig,
wenn das Gerät in der Nähe
von Kindern verwendet wird.
Um sicherzustellen, dass Kinder
nicht mit dem Gerät spielen,
sollten diese stets beaufsichtigt
werden.
• Das Gerät ist kein Spielzeug
für Kinder.
• Das Gerät sollte nicht von
Kindern gereinigt werden.
• Das Netzkabel und alle
anderen Gerätekomponenten,
Zubehörteile und Zusatzgeräte
müssen außerhalb der
Reichweite von Kindern unter
8 Jahren aufbewahrt werden.
• Verwenden Sie keine
Zubehörteile oder Zusatzgeräte,
die nicht mit dem Produkt
mitgeliefert werden oder von
®
Sage
für den Gebrauch mit
diesem Produkt freigegeben
sind. Nichtbefolgung dieser
Anweisung kann zu einer
Fehlfunktion des Geräts,
Schäden am Gerät oder gar
zu Sicherheitsrisiken führen.
• Versuchen Sie nicht,
das Gerät auf andere Weise
als der in dieser Anleitung
beschriebenen zu betreiben.
• Bewegen Sie das Gerät nicht,
während es in Betrieb ist.
• Betreiben Sie das Gerät nicht
auf einer geneigten Fläche.
• Füllen Sie den Einfüllschacht
nicht mit bloßen Fingern
oder anderen Hilfsmitteln.
Verwenden Sie dazu
immer den mitgelieferten
Speiseschieber. Greifen Sie
nicht mit Händen oder Fingern
in den Einfüllschacht, wenn
dieser am Gerät befestigt ist.
• Entsaften Sie Kernobst nur,
wenn die Samen und Kerne
zuvor entfernt wurden.
• Vergewissern Sie sich bei
Nichtgebrauch und vor dem
Auseinanderbauen, Reinigen
und Verstauen des Geräts,
dass es ausgeschaltet ist,
der Siebeinsatz aus Edelstahl
sich nicht mehr dreht und der
Motor nicht mehr läuft, bevor
Sie den Schutzriegel lösen
und/oder das Gerät bewegen.
• Wenn eine erhebliche Menge
an Flüssigkeit unter das Gerät
läuft oder sich um das Gerät
herum ausbreitet, muss die
Fläche vor dem weiteren
4
Page 21

DE
Gebrauch des Geräts gereinigt
und getrocknet werden.
• Lassen Sie beim Umgang
mit dem Siebeinsatz aus
Edelstahl Vorsicht walten,
da die kleinen Schneideklingen
am Boden sehr scharf sind.
Ein unsachgemäßer Umgang
kann zu Verletzungen führen.
• Geben Sie beim Reinigen,
Ausleeren und Gebrauch des
Mixerkruges auf die scharfen
Klingen acht. Schälen Sie alle
Zitrusfrüchte vor dem Entsaften.
• Verwenden Sie das Gerät nicht,
wenn das rotierende Sieb
(Siebeinsatz) oder der
Deckel Schäden aufweisen.
• Der Deckel des Einfüllschachts
muss vor Einschalten des
Motors stets fest sitzen.
• Verwenden Sie das Gerät
nicht ohne Tresterbehälter.
• Lösen Sie die Verriegelungs-
klinke nicht, während das Gerät
in Betrieb ist.
• Ein repräsentatives Beispiel für
das schwerste Füllgewicht, das
für dieses Gerät angenommen
wird: 450 g gefrorene, zerteilte
Bananen und 1000 g Milch,
bei höchster Geschwindigkeit
30 Sekunden lang püriert.
• Entsaften Sie nicht mehr als
3 kg Karotten gleichzeitig.
• Setzen Sie den Mixerkrug nicht
auf den Motorsockel, während
der Motor sich noch dreht.
• Verwenden Sie das Gerät nur,
wenn Zutaten im Mixerkrug sind.
• Das Gerät darf nicht in Betrieb
genommen werden, wenn
eine der Klingen beschädigt
ist oder sich Zubehör oder
andere Fremdgegenstände
im Krug benden.
• Setzen Sie den Krug keinen
hohen Temperaturunter-
schieden aus. Stellen Sie also
zum Beispiel den kalten Krug
nie in heißes Wasser oder
umgekehrt.
• Vor Gebrauch muss der
Deckel sicher auf dem Krug
befestigt werden, damit der
Inhalt des Kruges nicht austritt,
herausspritzt oder überläuft.
• Nehmen Sie den Krug
nicht vom Motorsockel,
während der Mixer läuft.
• Verwenden Sie den Mixer nicht,
wenn auf dem LCD-Display
„OVERLOAD PROTECTION“
(Überlastschutz) angezeigt
wird. Ziehen Sie in diesem Fall
den Stecker des Geräts und
warten Sie 30 Minuten, bis der
Motor abgekühlt ist. Danach
können Sie den Mixer wieder
wie gewohnt verwenden.
• Dieses Gerät ist nicht für die
Verarbeitung von heißen oder
kochenden Flüssigkeiten
geeignet. Lassen Sie diese
vor dem Einfüllen in den
Mixerkrug abkühlen.
5
Page 22

• Um sich vor Stromschlägen
zu schützen, tauchen Sie den
Netzstecker, das Netzkabel
oder das Gerät nicht in Wasser
oder eine andere Flüssigkeit ein.
• Benutzen Sie das Gerät nicht,
wenn das Stromkabel,
der Netzstecker oder das
Gerät selbst in irgendeiner
Weise beschädigt ist.
Im Falle von Schäden
oder Wartungsarbeiten,
die über die gewöhnliche
Reinigung hinausgehen,
kontaktieren Sie bitte den Sage
Kundendienst oder besuchen
Sie sageappliances.com
Dieses Symbol bedeutet,
dass das Gerät nicht mit
dem gewöhnlichen
Haushaltsmüll entsorgt
werden darf. Stattdessen muss
es zu einer für diesen Zweck
eingerichteten behördlichen
Sammelstelle oder zu einem
Händler gebracht werden,
der Entsorgung anbietet. Weitere
Informationen dazu erhalten Sie
bei Ihrem Gemeindeamt.
Um sich vor Stromschlägen
zu schützen, tauchen Sie
niemals den Motorsockel, das
Stromkabel oder den Netzstecker
in Wasser ein und achten Sie
darauf, dass diese Teile nicht
feucht werden. Achten Sie darauf,
dass keine Wasserspritzer mit
dem Motorsockel in Berührung
kommen. Tauchen Sie den
Motorsockel beim Reinigen nicht
in Wasser ein.
NUR FÜR DEN HAUSGEBRAUCH
BESTIMMT
ANLEITUNG BITTE AUFBEWAHREN
6
Page 23

DE
Komponenten
H
A
B
C
D
E
F
G
A. Speiseschieber (nicht spülmaschinenfest)
B. Deckel des Entsafters (spülmaschinenfest)
C. Siebeinsatz aus Edelstahl (spülmaschinenfest)
D. Einfassung des Siebeinsatzes
(spülmaschinenfest)
E. Schutzriegel
Verhindert, dass der Motorsockel in Betrieb
genommen wird, solange der Deckel nicht
fest aufsitzt.
F. Bedienfeld
G. Motorsockel aus Edelstahl
I
J
K
L
M
H. Interner Messbecher (spülmaschinenfest)
I. 1,5 Liter Mixerkrug mit Deckel
(spülmaschinenfest)
J. Ausgießer (spülmaschinenfest)
Kann am Ausguss befestigt werden, um den
fertigen Saft direkt in ein Glas laufen zu lassen.
K. Tropfschutz-Stopfen
L. Tresterbehälter (spülmaschinenfest)
M. Reinigungsbürste
Zur Reinigung des Siebeinsatzes aus
Edelstahl.
Leistungsdaten
220–240 V ~ 50 Hz 1350 W
7
Page 24

Montage
VOR DEM ERSTEN GEBRAUCH
Reinigen Sie Deckel, interne Messbecher,
Krug, Einfassung des Siebeinsatzes,
Siebeinsatz, Entsafter-Deckel,
Speiseschieber und Tresterbehälter mit
warmem Seifenwasser und einem weichen
Tuch. Spülen und trocknen Sie die Teile
danach gründlich ab.
Stellen Sie den Motorsockel auf eine ebene,
trockene Fläche, z. B. eine Arbeitsplatte.
Vergewissern Sie sich, dass der Motorsockel
des Geräts ausgeschaltet und der Stecker
ausgesteckt ist.
ENTSAFTEN
1. Platzieren Sie die Einfassung des
Siebeinsatzes auf dem Motorsockel.
2. Richten Sie die Pfeile an der Unterseite
des Siebeinsatzes mit den Pfeilen an der
Antriebskupplung des Motorsockels aus
und drücken Sie den Einsatz nach unten,
bis er einrastet, um ihn sicher mit dem
Motorsockel zu verbinden.
3. Setzen Sie den Deckel des Entsafters
auf die Einfassung des Siebeinsatzes
und positionieren Sie den unteren Teil
des Einfüllschachts so, dass er auf dem
Siebeinsatz aus Edelstahl aufsitzt.
8
Page 25

DE
4. Heben Sie den Schutzriegel an und
schieben Sie ihn in die Rillen zu beiden
Seiten des Entsafter-Deckels.
5. Der Schutzriegel sollte nun in aufrechter
Position auf dem Entsafter-Deckel
auiegen und fest eingerastet sein.
6. Schieben Sie den Speiseschieber in den
Füllschacht, indem Sie die Rille des
Speiseschiebers auf eine Linie mit dem
vorstehenden Dreieck innen an der
Oberkante des Einfüllschachts bringen.
Rille am
Speise-
schieber
Vorstehendes
Dreieck
an der
Innenseite des
Einfüllschachts
7. Bringen Sie den Tresterbehälter durch
leichtes Kippen und Anheben des
Motorsockels in Position. Setzen Sie den
Tresterbehälter unter dem Deckel des
Entsafters auf der Rückseite ein und
vergewissern Sie sich, dass die vordere
Kante unter der hinteren Kante der
Einfassung des Siebeinsatzes befestigt
ist. Die untere Kante der Einfassung
muss im Motorsockel eingerastet sein.
8. Der Tropfschutz-Stopfen kann auf
dem Saftausguss befestigt werden.
Dadurch wird der Ausguss mit dem
Stopfen verschlossen, sodass das
Gerät nach dem Entsaften nicht tropft.
9
Page 26

9. Richten Sie den Deckel mit dem
Mixerkrug aus und platzieren Sie den
Krug unter dem Saftauslauf.
10. Optional: Um den Saft direkt in ein Glas
laufen zu lassen, kann der Ausgießer auf
dem Ausguss angebracht werden.
MIXEN
1. Stellen Sie den Mixerkrug in aufrechter
Position auf den Motorsockel. Der Gri
des Mixers kann auf der linken oder
rechten Seite des Geräts sein.
2. Heben Sie den Schutzriegel an und
schieben Sie ihn in die Rillen zu beiden
Seiten des Mixers.
10
Page 27
3. Füllen Sie den Mixerkrug mit
Lebensmitteln oder Flüssigkeiten,
ohne dabei die „MAX“-Markierung
zu überschreiten. Befestigen Sie den
Deckel des Mixers sicher auf der
Oberseite des Mixerkruges. Setzen Sie
den durchsichtigen Deckel des inneren
Messbechers in den Deckel des Mixers
ein und drehen Sie ihn im Uhrzeigersinn,
bis er einrastet. Der Krug ist mit einem
®
Assist™-Deckel ausgestattet.
Sage
Dadurch sitzt der Deckel fest auf dem
Mixerkrug und verhindert, dass sich Teile
während des Gebrauchs verschieben.
4. Vergewissern Sie sich, dass die
Ausgussabdeckung des Mixerdeckels
sicher befestigt und geschlossen ist.
Durch den Zugring kann der Deckel
mit einer einfachen Hebelbewegung
ganz leicht entfernt werden.
DE
Nachdem das Gerät zum Entsaften oder
Mixen aufgebaut wurde, stecken Sie
den Stecker in eine Steckdose mit einer
Spannung von 220-240 V ein und schalten
Sie es an.
Drücken Sie die „ON | OFF“-Taste, um das
Gerät einzuschalten. Dadurch leuchtet
die Taste auf. Auf dem LCD-Display
wird „0:00“ angezeigt.
11
Page 28

Funktionen
G
R
E
E
N
S
M
O
O
T
H
I
E
SOFT HARD
S
M
O
O
1 2 3 4 5
T
H
I
E
6 7 8 9 10
P
U
L
S
E
I
C
E
C
H
R
S
U
OVERLOAD
PROTECTION
A
C
+
N
E
Z
O
R
F
L
I
A
T
K
C
O
O
T
U
N
A
E
L
C
ERSTE SCHRITTE
Mit der „ON | OFF“-Taste wird das Gerät
in den Bereitschaftsmodus („READY“)
versetzt.
VOREINGESTELLTE PROGRAMME
MIXEN
Das Gerät verfügt über 5 voreingestellte
Funktionen: Smoothie, Green Smoothie,
Pulse / Ice Crush (Pulse-Funktion /
Eis zerkleinern), Auto Clean (Automatische
Reinigung) und Frozen Cocktail
(Gefrorene Cocktails). Diese voreingestellten
Programme passen die Mixdauer und
-geschwindigkeit für perfekte Ergebnisse
automatisch an. Diese Programme werden
nur aktiviert, wenn Ihr Gerät als Mixer
eingerichtet ist. Wenn Ihr Gerät als Entsafter
eingerichtet ist, können die Programme nicht
verwendet werden.
Um eine Funktion auszuwählen, drücken Sie
die entsprechende Taste. Dadurch beginnt
das Gerät mit der Verarbeitung der Zutaten
und die ausgewählte Funktionstaste leuchtet
auf. Der Timer beginnt nun einen Countdown.
Das Programm endet automatisch, wenn der
Timer abgelaufen ist.
Das Programm und der Timer können
durch Drücken der Pause-Taste angehalten
werden. Durch erneutes Drücken der
Funktionstaste wird das Programm wieder
aufgenommen, ein weiteres Drücken der
Pause-Taste bricht das Programm ab.
Das Programm kann auch jederzeit durch
Drücken der „ON | OFF“-Taste abgebrochen
werden.
Durch Drehen des Geschwindigkeitsdrehreglers wird das Programm unterbrochen
und der manuelle Modus mit einer
Geschwindigkeit von 1 aktiviert.
Smoothie
Diese Funktion bietet eine Kombination
verschiedener Geschwindigkeiten und PulseAktivierungen, die speziell für Smoothies auf
Milchbasis entwickelt wurden. Die Zutaten
werden dadurch locker und luftig vermischt
und das Getränk wird sämig und cremig.
Green Smoothie
Mit diesem Programm werden ganze Früchte
oder Gemüse zu einem sämigen Getränk
verarbeitet. Eine Kombination verschiedener
hoher Geschwindigkeiten zerkleinert harte
Zutaten und verwandelt sie in extrem feine
Stückchen.
12
Page 29

DE
Frozen Cocktail (Gefrorene Cocktails)
Für Getränke und Cocktails mit zerkleinertem
Eis, z.B. Margaritas, Daiquiris und Slushies.
Dabei wird zunächst das Eis zerkleinert und
danach kurz mit den Zutaten gemixt.
Pulse / Ice Crush (Pulse / Eis zerkleinern)
Ein Programm mit durchgehenden
Pulse-Intervallen, durch die Lebensmittel
oder Eiswürfel gleichmäßig zerkleinert
werden. Verwenden Sie diese Taste, wenn
Lebensmittel zu dick oder zu groß sind,
um sich im Mixerkrug zu bewegen.
Dieses Programm erkennt automatisch,
sobald Eiswürfel vollständig zerkleinert
wurden und beendet das Programm
vorzeitigt. Dies wird durch einige längere
Pulse-Aktivierungen angezeigt.
Ohne Flüssigkeit im Mixerkrug kann
das Gerät maximal den Inhalt eines
standardmäßigen Eiswürfelbehälters bzw.
250 g Eiswürfel zerkleinern.
Auto Clean (Automatische Reinigung)
Verwenden Sie diese Funktion, um einen
Großteil der Zutaten von der Innenseite
und den Klingen des Mixers zu entfernen.
Gießen Sie dafür 2 Tassen warmes
Seifenwasser in den Krug und drücken Sie
die „Auto Clean“-Taste. Für eingetrocknete,
klebrige oder besonders dicküssige Zutaten
geben Sie einen halben Teelöel Spülmittel
dazu. Für ein optimales Mixererlebnis
reinigen Sie den Mixerkrug sofort nach
jedem Gebrauch auf diese Art. Die Auto
Clean-Funktion reinigt nur den Mixerkrug.
Der Entsafter wird dadurch nicht gereinigt.
MANUELLER MODUS
GESCHWINDIGKEITSREGLER
Mixen
Drehen Sie den Geschwindigkeitsdrehregler
im Uhrzeigersinn, um eine von
10 Geschwindigkeitsstufen auszuwählen,
vom langsamen STIR (umrühren) zum
sehr schnellen PULVERIZE (zermahlen).
Der Timer beginnt nun zählen; wenn dieser
„2:00“ erreicht, wird der Mixvorgang beendet.
Das Drücken der Pause-Taste unterbricht
den Mixvorgang. Drücken Sie erneut auf die
Pause-Taste, um den Mixvorgang vollständig
abzubrechen, oder drehen Sie den Drehregler,
um auf Geschwindigkeitsstufe 1 mit dem
Mixen fortzufahren.
Um den Mixvorgang abzubrechen, drehen
Sie den Drehregler gegen den Uhrzeigersinn,
bis das Display erneut „READY“ anzeigt,
oder drücken Sie die „ON | OFF“-Taste.
ENTSAFTEN
Waschen Sie das Obst und Gemüse,
das Sie entsaften möchten. Die meisten
Obst- und Gemüsesorten wie Äpfel, Karotten
und Gurken müssen nicht geschnitten
oder zerkleinert werden, da sie ganz in den
Einfüllschacht passen. Gemüsesorten wie
Rüben, große Karotten usw. müssen vor der
Verwendung vollständig von Erdrückständen
und Blättern befreit und gut gewaschen
werden.
1. Schließen Sie das Netzkabel an eine
Steckdose mit einer Spannung
von 220-240 V an.
WICHTIG
Warten Sie vor dem Befüllen des
Einfüllschachts, bis der Entsafter die
eingestellte Geschwindigkeit erreicht hat.
13
Page 30

2. Einschalten des Entsafters
Stellen Sie am Drehregler die gewünschte
Geschwindigkeitsstufe ein. Die unteren
Geschwindigkeitsstufen (1-5) sind für
weiches Obst und Gemüse geeignet,
die höheren (6-10) für hartes Obst und
Gemüse. Informationen zur richtigen
Geschwindigkeitsstufe für unterschiedliche
Obst- und Gemüsesorten nden
Sie in der nebenstehenden Tabelle.
Auf den niedrigen Stufen verursacht
der Entsaftungsvorgang deutlich
weniger Lärm, doch je nach Obst- oder
Gemüsesorte kann damit nicht die
maximale Saftmenge gewonnen werden.
3. Befüllen Sie den Einfüllschacht bei
laufendem Motor und drücken Sie
den Inhalt mit dem Speiseschieber
vorsichtig nach unten. Drücken Sie
den Speiseschieber für eine maximale
Saftmenge stets langsam nach unten.
4. Maximaler Füllstand des Mixerkrugs
Sie können bis zum maximalen Füllstand
des Krugs mit dem Entsaften fortfahren.
LEITFADEN FÜR GESCHWINDIGKEITSSTUFEN
Obst- / Gemüsesorte Stufe
ÄPFEL 10
BLATTSPINAT 9
ROTE BEETE 10
HEIDELBEEREN 5
BROKKOLI 7
KOHL 9
PAPRIKA 9
KAROTTEN 10
SELLERIE 4
ZITRUSFRÜCHTE (geschält) 1
GURKEN 4
INGWER 8
TRAUBEN (entkernt) 2
WARNUNG
Verwenden Sie niemals Ihre Finger, Hände
oder andere Hilfsmittel, um den Einfüllschacht
zu befüllen oder zu entleeren. Verwenden Sie
dazu immer den mitgelie ferten Speiseschieber.
ACHTUNG:
scharfe Klingen
Der Siebeinsatz aus Edelstahl ist mit kleinen
scharfen Klingen zum Schneiden und Verarbeiten von Obst und Gemüse versehen. Stellen
Sie sicher, dass Sie bei der Handhabung des
Siebeinsatzes die Klingen nicht direkt berühren.
14
HONIGMELONE (geschält) 3
GRÜNKOHL 9
KIWI (geschält) 5
MANGO (geschält, entkernt) 5
MINZE 9
PFIRSICHE (entkernt) 5
BIRNEN 6
ANANAS (geschält) 7
RHABARBER 8
KÜRBIS 9
ERDBEEREN 4
TOMATEN 4
WASSERMELONE (geschält) 3
ZUCCHINI 6
Page 31

Pege und
Reinigung
DE
Vergewissern Sie sich, dass der
Motorsockel ausgeschaltet ist, indem Sie
die „ON | OFF“-Taste drücken. Ziehen Sie
dann das Stromkabel aus der Steckdose.
REINIGUNG
1. Entfernen Sie den Mixerkrug.
2. Lockern Sie den Schutzriegel, entnehmen
Sie die gesamte Saftauangeinheit und
tragen Sie diese zum Spülbecken.
3. Entfernen Sie den Tresterbehälter.
Leeren Sie so viel Fruchteisch wie möglich
in Ihren Biomüll- oder Kompostbehälter.
Spülen Sie alle Teile (außer den Motorsockel)
nach Gebrauch unter ießendem Wasser ab,
um grobe Saft- und Fruchteischrückstände
zu entfernen. Reiben Sie alles in warmem
Seifenwasser mit einem weichen Lappen ab.
Das Abspülen und Abreiben sollte schnellstmöglich nach dem Gebrach erfolgen,
um zu verhindern, dass Rückstände an den
Schneideklingen, Sieben und transparenten
Teilen antrocknen.
TRESTERBEHÄLTER
Sie können den Tresterbehälter mit einem
kompostierbaren Bio-Müllbeutel auslegen,
um den Reinigungsaufwand zu minimieren.
MOTORSOCKEL
Wischen Sie den Sockel mit einem
weichen, feuchten Tuch ab. Tauchen Sie
den Motorsockel in keine Flüssigkeit ein.
KRUG UND DECKEL
Um Ihren Krug möglichst sauber zu halten
und angetrocknete Lebensmittelreste
auf der Innenseite und den Mixerklingen
zu vermeiden, sollten Sie die folgenden
Schritte so schnell wie möglich nach dem
Mixvorgang durchführen.
Spülen Sie einen Großteil der Rückstände
von Krug und Deckel mit Wasser ab.
Füllen Sie den Krug mit 500 ml warmem
Wasser, setzen Sie den Deckel auf
und drücken Sie auf „Auto Clean“.
Für dicküssige oder klebrige Rückstände
können Sie ein paar Tropfen Spülmittel
hinzufügen.
Spülen Sie Krug und Deckel erneut mit
klarem Wasser ab oder reinigen Sie sie
separat in warmem Seifenwasser mit einem
weichen Lappen oder einer Flaschenbürste.
Die Reinigung ist direkt nach dem
Mixvorgang am eektivsten.
SIEBEINSATZ
Reinigen Sie den Siebeinsatz unmittelbar
nach dem Gebrauch gründlich mit der
mitgelieferten Bürste, um konstante
Entsaftungsqualität zu gewährleisten.
Angetrocknete Fruchteischrückstände
könnten andernfalls die feinen Poren des
Siebs verstopfen und die Leistung des
Entsafters beeinträchtigen. Der Siebeinsatz
kann bei Bedarf 10 Minuten lang in heißem
Seifenwasser eingeweicht werden.
REINIGUNGSMITTEL
Verwenden Sie keine Scheuerschwämme
oder Scheuermittel zur Reinigung des
Motorsockels oder Krugs, da dies Kratzer
verursachen kann. Reiben Sie diese
Komponenten stattdessen in warmem
Seifenwasser mit einem weichen Lappen ab.
15
Page 32

GESCHIRRSPÜLER
Alle Teile mit Ausnahme des Motorsockels
und des Speiseschiebers sind spülmaschinenfest. Der Mixerkrug kann im unteren
Fach der Spülmaschine gereinigt werden.
Der Deckel und der interne Messbecher
sollten nur im obersten Fach gespült werden.
Bei regelmäßiger Reinigung im Geschirrspüler kann sich jedoch die Lebensdauer
der Teile verkürzen, da sie dort ständig
aggressiven Reinigungsmitteln, Heißwasser
und Druck ausgesetzt sind.
Außerdem kann sich der Zustand der Teile
durch die Reinigung im Geschirrspüler
verschlechtern. Halten Sie daher regelmäßig
nach Anzeichen von Schäden Ausschau und
stellen Sie den Gebrauch bei Beschädigung
ein.
HARTNÄCKIGE LEBENSMITTEL
FLECKEN
Lebensmittel mit kräftigem Geruch wie
z.B. Knoblauch, Fisch und manche
Gemüsesorten wie Karotten können
Gerüche oder Flecken im Mixerkrug oder
auf dem Deckel hinterlassen. Um diese
zu entfernen, lassen Sie Krug und Deckel
5 Minuten in warmem Seifenwasser
einweichen. Reinigen Sie sie dann mit
einem milden Reinigungsmittel und warmem
Wasser, spülen Sie mit klarem Wasser nach
und trocknen Sie beide Teile gründlich ab.
Bewahren Sie Krug und Deckel separat auf.
AUFBEWAHRUNG
Das Gerät muss aufrecht aufbewahrt werden,
mit dem Mixerkrug im Motorsockel oder
daneben. Stellen Sie keine Gegenstände auf
das Gerät. Damit Luft zirkulieren kann, setzen
Sie den Deckel während der Aufbewahrung
nicht auf das Gerät.
WARNUNG
Die Schalen von Zitrusfrüchten enthalten
Öle, die das Material Ihres Mixerkrugs nach
einer Weile beschädigen können. Reinigen
Sie denn Krug daher sofort nachdem Sie
die Schalen von Zitrusfrüchten verarbeitet
haben.
16
Page 33

Störungsbehebung
DE
Das LCD-Display
lässt sich einschalten,
aber das Gerät
reagiert nicht
auf Befehle
Das Essen wird
ungleichmäßig
zerkleinert
Das Essen wird
zu fein zerkleinert
oder ist wässrig
Fruchteischrückstände sammeln
sich im Siebeinsatz
aus Edelstahl
Zu feuchtes
Fruchteisch und
geringe Saftmenge
• Möglicherweise ist der Schutzriegel nicht richtig in der aufrechten
Betriebsstellung eingerastet. In diesem Fall wird auf dem LCD-Display eine
kleine Animation
ausgerichtet ist und der Schutzriegel sicher in den Rillen auf beiden Seiten
des Entsafter-Deckels bzw. des Kruges positioniert ist.
eingeblendet. Überprüfen Sie, ob der Deckel richtig
• Dies kann vorkommen, wenn zu viele Lebensmittel auf einmal eingefüllt
werden. Probieren Sie es mit einer kleineren Menge erneut und teilen Sie
die Zutaten gegebenenfalls in mehrere Portionen auf.
• Probieren Sie, die Zutaten weniger lang zu mixen. Mit der PULSE-Funktion
können Sie die Mixdauer besser steuern.
• Schalten Sie das Gerät aus. Zerlegen Sie es anschließend, um die
Fruchteischrückstände vom Entsafter-Deckel entfernen zu können.
• Setzen Sie das Gerät wieder zusammen und fahren Sie mit dem Entsaften
fort. Durch abwechselndes Entsaften von weichen und harten Zutaten
können Sie diesem Problem eventuell vorbeugen.
• Je sauberer das Sieb, desto mehr Saft kann extrahiert werden und desto
trockener sind folglich die Fruchteischrückstände. Daher sollten Sie
den Entsafter nach jedem Gebrauch so schnell wie möglich gründlich
reinigen. Entfernen Sie den Siebeinsatz aus Edelstahl und reinigen Sie das
Siebgitter gründlich mit der Bürste. Spülen Sie den Siebeinsatz mit heißem
Wasser ab. Wenn die feinen Poren verstopft sind, weichen Sie ihn in einer
Lösung aus heißem Wasser und 10 % Zitronensaft ein, um die Verstopfung
zu lösen, oder waschen Sie ihn im Geschirrspüler (oberes Fach).
Dadurch werden Faserrückstände entfernt, die möglicherweise den
Saftuss behindern.
• Wenn die Zutaten zu kräftig in den Einfüllschacht geschoben werden, kann
dies die Saftmenge reduzieren, da sich dadurch der Motor verlangsamt.
Üben Sie daher nicht zu viel Druck auf den Speiseschieber aus, wenn Sie
Zutaten im Einfüllschacht nach unten schieben.
• Wenn Sie große Mengen faseriger Zutaten wie z.B. Rhabarber oder
Ananas entsaften, kann es sein, dass der Siebeinsatz zwischendurch
gereinigt werden muss.
Zwischen der
Einfassung des
Siebeinsatzes
und dem EntsafterDeckel tritt Saft aus
Saft spritzt aus
dem Ausguss
• Stellen Sie eine niedrigere Geschwindigkeitsstufe ein und drücken Sie die
Zutaten im Einfüllschacht langsamer mit dem Speiseschieber nach unten.
• Vergewissern Sie sich, dass sich im Siebeinsatz keine Rückstande bilden.
• Der Saft wird mit zu hoher Geschwindigkeit extrahiert. Stellen Sie
(falls möglich) eine niedrigere Geschwindigkeitsstufe ein und drücken Sie
die Zutaten im Einfüllschacht langsamer mit dem Speiseschieber nach
unten.
17
Page 34

Nach dem Entsaften
bleibt Saft im
Siebeinsatz zurück
• Drehen Sie den Geschwindigkeitsdrehregler auf die höchste Geschwin-
digkeitsstufe und lassen Sie das Gerät 5 Sekunden lang laufen. Dies kann
dabei helfen, den restlichen Saft vom Siebeinsatz in den Krug zu bewegen.
Beim Entsaften
scheint der Motor
anzuhalten
Alle Bedienfelder
leuchten auf und auf
dem LCD-Display
wird „Overload
Protection“
(Überlastschutz)
angezeigt
• Feuchte Fruchteischrückstände können sich bei übermäßigem Gebrauch
des Geräts ohne anschließende Reinigung unter dem Deckel ansammeln
und das Gerät verstopfen. Nehmen Sie in diesem Fall das Gerät auseinander und befolgen Sie die Reinigungsanweisungen, um die Einfassung
des Siebeinsatzes, den Siebeinsatz aus Edelstahl und den Deckel des
Entsafters zu reinigen. Das Gerät kann auch verstopfen, wenn der Inhalt
des Einfüllschachts mit übermäßiger Kraft nach unten gedrückt wird.
Wenn dieses Problem auftritt, verringern Sie den Druck beim Füllen des
Einfüllschachts.
• Schalten Sie das Gerät ein, bevor Sie Zutaten in den Einfüllschacht geben.
Wenn Sie Zutaten in den Schacht drücken, bevor der Motor seine volle
Drehzahl erreicht hat, kann dies zu Stillstand oder Überlastung führen.
Üben Sie leichten bis moderaten Druck auf den Speiseschieber aus.
Bei niedrigerem Druck kann mehr Saft gewonnen werden.
• Auf niedrigen Geschwindigkeitsstufen überlastet die Verarbeitung
harter Obst- und Gemüsesorten den Motor. Informationen zur richtigen
Geschwindigkeitsstufe für unterschiedliche Obst- und Gemüsesorten
nden Sie in der Anleitung.
• Dies zeigt an, dass der Motorüberlastschutz aktiviert wurde, weil der Motor
überhitzt oder verstopft ist.
• Um den Überlastschutz zurückzusetzen, müssen Sie das Gerät aus-
und wieder einstecken und einschalten.
• Wenn der Überlastschutz weiterhin angezeigt wird, stecken Sie das Gerät
aus und lassen Sie es mindestens 30 Minuten abkühlen, bevor Sie es
erneut versuchen. Damit der Überlastschutz eektiv zurückgesetzt wird,
muss das Gerät vom Stromkreis getrennt werden, während es abkühlt.
• Wenn das Problem nach dem Abkühlen weiterhin besteht, weist dies auf
eine interne Fehlfunktion hin. Kontaktieren Sie den Sage Kundendienst
oder besuchen Sie www.sageappliances.com.
• Bitte nehmen Sie zur Kenntnis, dass eine Aktivierung des Überlastschutzes
darauf hinweist, dass das Gerät nicht ordnungsgemäß verwendet wurde,
also beispielsweise zu viele Zutaten in den Mixerkrug gefüllt wurden
oder das Gerät durch zu viel Druck beim Entsaften oder häugen langen
Gebrauch überlastet wurde. Wir bitten Sie, diese Hinweise zu beachten
und sich nach den Informationen in dieser Anleitung zu richten, um dieses
Problem zu vermeiden und die Lebensdauer des Gerätes zu verlängern.
18
Page 35

Garantie
2 JAHRE BESCHRÄNKTE
GARANTIE
Sage Appliances gibt auf dieses Produkt für den
häuslichen Gebrauch in bestimmten Gebieten eine
Garantie über 2 Jahre ab Kaufdatum für Mängel,
die durch fehlerhafte Verarbeitung und Materialien
verursacht wurden. Während dieser Garantiezeit
wird Sage Appliances jedes fehlerhafte Produkt
reparieren, ersetzen oder das Geld zurückerstatten
(nach eigenem Ermessen von Sage Appliances).
Alle gesetzlichen Gewährleistungsrechte nach
geltendem nationalem Recht werden beachtet
und durch unsere Garantie nicht beeinträchtigt.
Die vollständigen Garantiebestimmungen
und -bedingungen sowie Hinweise zur
Geltendmachung von Ansprüchen nden Sie unter
www.sageappliances.com.
DE
19
Page 36

Notizen
20
Page 37

the 3X Bluicer Pro™
GUIDE RAPIDE
FR
Page 38

Table des
CONSIGNES
matières
2 Sage® recommande la sécurité avant
tout
7 Composants
8 Assemblage
12 Fonctions
15 Entretien et nettoyage
17 Dépannage
SAGE®
RECOMMANDE
LA SÉCURITÉ
AVANT TOUT
Chez Sage®, la sécurité est
une priorité. Nous concevons et fabriquons des
produits consommateurs
en mettant la sécurité
de nos précieux clients,
c'est-à-dire vous, au premier
plan. Nous vous demandons
également de faire attention lorsque vous utilisez
un appareil électrique et
de respecter les consignes
suivantes.
DE SÉCURITÉ
IMPORTANTES
LISEZ TOUTES LES
INSTRUCTIONS AVANT
UTILISATION ET
CONSERVEZLES POUR
RÉFÉRENCE ULTÉRIEURE
• Avant une première utilisation,
assurez-vous que l'alimenta-
tion électrique est identique
à celle illustrée sur l'étiquette
sous l'appareil. Cet appareil est
équipé d'un cordon d'alimentation muni d'un l de mise
à la terre et d'une che de mise
à la terre. L'appareil doit être mis
à la terre à l'aide d'une prise
de courant correctement reliée
à la terre. En cas de défaut élec-
trique, la mise à la terre réduit
le risque de choc électrique.
• Ne coupez ou n'enlevez en
aucun cas la troisième broche
(de mise à la terre) du cordon
d'alimentation ou utilisez
un adaptateur.
• Consultez un électricien qua-
lié si les instructions de mise
à la terre ne sont pas entièrement comprises ou s'il existe
un doute quant à la mise
à la terre correcte de l'appareil.
2
Page 39

FR
• L'installation d'un commutateur
de sécurité de courant résiduel
est recommandée pour fournir
une sécurité supplémentaire
lors de l'utilisation de tous
les appareils électriques. Les
interrupteurs diérentiels avec
un courant de fonctionnement
nominal maximal de 30 mA
sont recommandés. Consultez
un électricien pour obtenir
des conseils professionnels.
• Retirez et éliminez de façon
sûre tout emballage avant
la première utilisation.
• Pour éviter tout risque d'étouffement pour les jeunes enfants,
éliminez de manière sûre
le capot de protection sur
la prise d'alimentation.
• Assurez-vous toujours que
l'appareil est correctement
assemblé conformément aux
instructions avant utilisation.
L'utilisation de l'appareil sans
qu'il soit correctement assemblé
peut provoquer un dysfonctionnement du produit, des dommages
au produit ou engendrer un
risque de sécurité, notamment
une blessure corporelle.
• Cet appareil est destiné à un
usage domestique uniquement.
N'utilisez pas l'appareil pour
toute autre n que son utilisation prévue. Ne l'utilisez pas sur
un bateau ou dans des
véhicules en mouvement.
Ne l'utilisez pas en plein air.
Une mauvaise utilisation peut
engendrer des blessures.
• Placez l'appareil sur une surface
stable, résistante à la chaleur,
plane et sèche, loin du bord.
Ne l'utilisez pas sur ou à proximité d'une source de chaleur
(plaque chauante, four
ou cuisinière au gaz).
• Déroulez entièrement le cordon
d'alimentation avant utilisation.
• Ne laissez pas le cordon
d'alimentation suspendu
au bord d'un plan de travail
ou d'une table. Ne laissez pas
le cordon d'alimentation entrer
en contact avec des surfaces
chaudes ou se nouer.
• Ne laissez pas l'appareil sans
surveillance lorsqu'il est
en marche.
• Si l'appareil doit être laissé sans
surveillance, nettoyé, déplacé,
assemblé ou rangé, éteignez
toujours l'appareil en appuyant
sur le bouton d'alimentation
ON | OFF. Débranchez-le
ensuite de la prise de courant.
• Mettez l'appareil hors tension,
puis débranchez-le de la prise
lorsqu'il n'est pas utilisé, avant
d'assembler ou de désassembler des pièces et avant de
le nettoyer. Pour débrancher,
saisissez la che et retirez-la
de la prise de courant. Ne tirez
jamais sur le cordon
d'alimentation.
3
Page 40

• Inspectez régulièrement le
cordon d'alimentation, la che
et l'appareil et vériez qu'ils
ne sont pas endommagés. S'ils
sont endommagés de quelque
façon que ce soit, cessez
immédiatement d'utiliser
l'appareil et renvoyez-le
au centre de réparation Sage
agréé le plus proche pour qu'il
soit vérié, remplacé ou réparé.
• Nettoyez régulièrement l'appareil et ses accessoires. Suivez
les instructions de nettoyage
indiquées dans ce livret. Toute
procédure ne gurant pas dans
ce livret d'instructions doit être
réalisée par un centre
de services Sage
®
agréé.
• Cet appareil n'est pas destiné
à être utilisé par des enfants
ou des personnes aux capacités mentales, sensorielles
ou physiques réduites, ou ayant
peu d'expérience et de connaissances. Une surveillance étroite
doit être exercée lorsque
l'appareil est utilisé à proximité
d'enfants. Les enfants doivent
être surveillés pour s'assurer
qu'ils ne jouent pas avec
l'appareil.
• Les enfants ne doivent pas
jouer avec l'appareil.
• Le nettoyage de l'appareil
ne doit pas être eectué par
des enfants.
• Le cordon d'alimentation
de l'appareil, ainsi que tout
composant ou accessoire,
doivent être conservés
hors de la portée des en-
fants de moins de 8 ans.
• N'utilisez jamais d'autres accessoires que ceux fournis avec ce
®
produit ou autorisés par Sage
Le non-respect de cette
consigne peut entraîner
un dysfonctionnement de
l'appareil, une détérioration
de l'appareil ou même des
risques pour la sécurité.
• N'essayez pas de faire fonc-
tionner l'appareil par une
méthode autre que celles
décrites dans ce livret.
• Ne déplacez pas l'appareil
en cours de fonctionnement.
• N'utilisez pas l'appareil sur
une surface inclinée.
• Ne poussez pas les aliments
dans le goulot d'alimentation
avec vos doigts ou d'autres
ustensiles. Utilisez toujours
le poussoir de l'extracteur.
Ne placez pas votre main
ou vos doigts dans le goulot
d'alimentation lorsqu'il est xé
sur l'appareil.
• Ne pressez pas les fruits
à noyau tant que vous n'avez
pas enlevé les graines
ou les noyaux.
®
.
4
Page 41

FR
• Assurez-vous que le produit
est hors tension, que le panier-
ltre en acier inoxydable s'est
arrêté de tourner et que
le moteur est entièrement arrêté avant de libérer l'arceau
de blocage de sûreté ou avant
de déplacer l'appareil, lorsque
l'unité n'est pas utilisée, et avant
le démontage, le nettoyage
et l'entreposage.
• Nettoyez et séchez toute fuite
importante sur la surface en
dessous ou autour de l'appareil,
ou sur l'appareil lui-même avant
de continuer de l'utiliser.
• Faites attention lorsque vous
manipulez le panier-ltre en
acier inoxydable, car les petites
lames de coupe à la base
du panier sont très tranchantes.
Une mauvaise manipulation
peut engendrer des blessures.
• Les lames du blender étant
tranchantes, procédez avec
précaution lors de la manipulation, du vidage et du
nettoyage du pichet. Enlevez
les zestes de tous les agrumes
avant de les presser.
• N'utilisez pas l'appareil si le tamis
rotatif (panier-ltre) ou le couvercle est endommagé.
• Vériez toujours que le couvercle du goulot d'alimentation
est bien en place avant de
mettre en route le moteur.
• Ne faites pas fonctionner
l'appareil si le récipient à pulpe
n'est pas en place.
• Ne détachez pas l'arceau
de verrouillage lorsque l'unité
est en marche.
• Un exemple représentatif de
la charge la plus lourde prévue
pour cet appareil est 450 g
de morceaux de bananes
congelés et 1 000 g de lait
mélangés à la vitesse la plus
élevée pendant 30 secondes.
• Ne pressez pas plus de 3 kg
de carottes à la fois.
• Évitez de placer le pichet sur
la base du moteur lorsque
le moteur tourne toujours.
• Ne l'utilisez pas sans ingré-
dient dans le pichet.
• N'essayez jamais de l'utiliser
avec des lames endommagées,
ou avec des ustensiles ou tout
autre objet étranger dans
le pichet.
• Ne soumettez pas le pichet
à des conditions de chaleur ou
de froid extrêmes, par exemple
en le plaçant froid dans de l'eau
chaude, ou inversement.
• Le couvercle doit être fermement xé au pichet avant
l'utilisation pour assurer que
le contenu interne ne fuit pas,
ne se pulvérise pas ou
ne déborde pas.
• Ne retirez pas le pichet
de la base du moteur lorsque
le blender est en cours d'uti-
lisation.
5
Page 42

• N'utilisez pas le blender lorsque
la PROTECTION CONTRE
LES SURCHARGES clignote
sur l'écran LCD. Si cela se
produit, débranchez le blender
et attendez pendant 30 minutes
que le moteur refroidisse.
Une fois refroidi, vous pourrez
à nouveau utiliser le blender
normalement.
• N'insérez pas de liquides
chauds ou bouillants. Laissez
refroidir avant de les placer
dans le pichet du blender.
• À des ns de protection contre
les décharges électriques,
ne plongez pas la prise électrique, le cordon ou l'appareil
dans de l'eau ou dans un liquide.
• N'utilisez pas l'appareil si le
cordon d'alimentation, la prise
ou l'appareil sont endommagés
de quelque manière que ce soit.
En cas de dommages ou
si un entretien autre que
le nettoyage est nécessaire,
contactez le service client
Sage ou consultez le site
sageappliances.com.
Le symbole illustré indique
que cet appareil ne doit
pas être jeté aux ordures
ménagères habituelles.
Il doit être amené dans un centre
de collecte de déchets des
autorités locales désigné à cette
n ou à un revendeur proposant
ce service. Pour en savoir plus,
veuillez contacter le bureau
de votre municipalité.
Pour vous protéger contre
les chocs électriques,
n'immergez jamais la base,
le cordon d'alimentation ou
la prise électrique dans l'eau,
et ne laissez pas l'humidité entrer
en contact avec ces pièces.
Évitez de renverser de l'eau sur
le connecteur de la base d'alimentation. N'immergez pas la base
d'alimentation lors du nettoyage.
USAGE DOMESTIQUE UNIQUEMENT
CONSERVEZ CES INSTRUCTIONS
6
Page 43

FR
Composants
H
A
B
C
D
E
F
G
A. Poussoir (non adapté au lave-vaisselle)
B. Couvercle de l'extracteur de jus
(adapté au lave-vaisselle)
C. Panier-ltre en acier inoxydable
(adapté au lave-vaisselle)
D. Contenant du ltre (adapté au lave-vaisselle)
E. Arceau de blocage de sûreté
Arrête le fonctionnement de la base du moteur
lorsque le couvercle n'est pas en place.
F. Panneau de commande
G. Base du moteur en acier inoxydable
I
J
K
L
M
H. Bouchon doseur interne
(adapté au lave-vaisselle)
I. Couvercle et pichet du blender 1,5 L
(adapté au lave-vaisselle)
J. Buse d'extraction (adaptée au lave-vaisselle)
Peut être placée au-dessus du bec verseur
pour extraire directement dans une tasse.
K. Bouchon anti-goutte
L. Récipient à pulpe (adapté au lave-vaisselle)
M. Brosse de nettoyage
À utiliser sur le panier-ltre en acier inoxydable.
Informations sur la tension nominale
220 à 240 Volts ~ 50 Hz 1350 Watts
7
Page 44

Assemblage
AVANT LA PREMIÈRE UTILISATION
Lavez le couvercle, le bouchon doseur
intérieur, le pichet, le contenant du ltre,
le panier-ltre, le couvercle de l'extracteur,
le poussoir et le récipient à pulpe à l'eau
chaude savonneuse avec un chion doux.
Rincez et séchez soigneusement.
Placez la base du moteur sur une surface
plane et sèche, comme un plan de travail.
Assurez-vous que le bouton situé sur la base
du moteur est sur OFF et que le cordon
d'alimentation est débranché.
EXTRACTION DE JUS
1. Placez le contenant du ltre au-dessus
de la base du moteur.
2. Alignez les èches à la base du panierltre en acier inoxydable avec celles du
couplage de la commande du moteur et
poussez vers le bas jusqu'à ce que vous
entendiez un déclic, an que le tout soit
bien xé sur la base du moteur.
3. Placez le couvercle de l'extracteur sur
le contenant du ltre, en plaçant la partie
basse du goulot d'alimentation sur
le panier-ltre en acier inoxydable.
8
Page 45

FR
4. Relevez l'arceau de blocage de sûreté
et placez-le dans les deux encoches
situées de part et d'autre du couvercle.
5. L'arceau de blocage de sûreté devrait
maintenant être en position verticale et
verrouillé sur le couvercle de l'extracteur.
6. Faites glisser le poussoir dans le goulot
d'alimentation en alignant la fente du
poussoir sur la petite saillie à l'intérieur
du rebord du tube d'alimentation.
Rainure
du poussoir
Petite saillie
à l'intérieur
du tube d'alimentation
7. Mettez en place le récipient à pulpe
en inclinant et soulevant légèrement
la base du moteur. Insérez le récipient
à pulpe sous le couvercle de l'extracteur
à l'arrière, en vous assurant que le bord
avant est inséré sous le rebord arrière
du contenant du ltre et que le bord arrière
est clipsé dans le fond de la base
du moteur.
8. Le bouchon anti-goutte peut être placé
sur la buse de sortie du jus. Il permet ainsi
d'empêcher que du jus ne s'écoule une
fois l'extraction terminée.
9
Page 46

9. Placez le couvercle sur le pichet et
placez ce dernier sous le bec verseur.
10. En option : pour réaliser une extraction
dans un verre, vous pouvez placer la buse
d'extraction sur la buse de sortie du jus.
MIXAGE
1. Avec le pichet du blender en position
droite, placez-le sur la base du moteur. La
poignée du blender peut être positionnée
à gauche ou à droite de l'appareil.
2. Relevez l'arceau de blocage de sûreté
et placez-le dans les deux encoches
situées de part et d'autre du blender.
10
Page 47

3. Tout aliment ou liquide inséré dans le
pichet du blender ne doit pas dépasser
le repère « MAX ». Placez le couvercle
du blender fermement en position en haut
du pichet du blender. Insérez le bouchon
doseur interne propre dans le couvercle
du blender et tournez-le dans le sens
des aiguilles d'une montre pour le xer
en position. Le pichet est doté d'un couvercle Sage
®
Assist™. Cela permet au
couvercle d'être ajusté fermement dans
le pichet du blender, évitant ainsi les
déplacements lors du fonctionnement.
4. Assurez-vous que le bouchon du bec
verseur situé sur le couvercle du blender
est clipsé et fermé. L'ouverture facile
permet à l'utilisateur de facilement retirer
le couvercle avec un simple eet de levier.
FR
Une fois l'appareil assemblé en blender
ou en extracteur de jus, branchez le cordon
d'alimentation à une prise de courant
220 - 240 Volts et mettez-le sous tension.
Appuyez sur le bouton ON / OFF pour mettre
l'appareil sous tension. Le bouton ON / OFF
s'allume. L'écran minuteur LCD s'allume
et ache « 0:00 ».
11
Page 48

Fonctions
G
R
E
E
N
S
M
O
O
T
H
I
E
S
OVERLOAD
1 2 3 4 5
PROTECTION
6 7 8 9 10
SOFT HARD
P
U
L
S
M
O
O
T
H
I
E
E
I
C
E
C
H
R
S
U
+
N
E
Z
O
R
F
L
I
A
T
K
C
O
O
T
U
A
N
A
E
L
C
C
COMMENCER
Le bouton ON / OFF allume l'unité en mode
READY (Prêt).
PROGRAMMES PRÉCONFIGURÉS
MIXAGE
L'appareil est doté de 5 fonctions préréglées :
Smoothie, Green Smoothie (smoothie vert),
Pulse/Ice Crush (Battement/Glace pilée),
Auto Clean (nettoyage automatique)
et Frozen Cocktail (cocktail glacé). Ces cycles
pré-programmés règlent automatiquement
la durée de mixage et les vitesses pour
optimiser les résultats de mixage. Ces programmes ne sont activés que lorsque votre
appareil est en mode blender. Ils ne peuvent
pas être utilisés lorsque votre appareil est
conguré en extracteur de jus.
Sélectionnez la fonction souhaitée en
appuyant sur le bouton de la fonction correspondant. L'unité commence à fonctionner
et le bouton de la fonction sélectionnée
s'allume. Le minuteur démarre et le
programme se termine automatiquement
lorsqu'il atteint « 0:00 ».
12
Le programme et le minuteur peuvent être
mis en pause en appuyant sur le bouton
pause. Relancez le programme en appuyant
de nouveau sur le bouton correspondant,
ou annulez en appuyant une nouvelle fois
sur le bouton pause.
Le programme peut également être annulé
à tout moment en appuyant sur le bouton
ON/OFF.
En tournant la molette de vitesse, vous
interrompez le programme et placez le
blender en mode manuel, en vitesse 1.
Smoothie
Pour réaliser des smoothies à base de lait,
l'association de vitesses et battements
permet de combiner et d'aérer les ingrédients
en une texture onctueuse et crémeuse.
Green Smoothie (Smoothie vert)
Pour mixer des fruits/légumes entiers en
boisson onctueuse. Association de prols
haute vitesse qui divise les bres en particules très nes.
Frozen Cocktail (Cocktail glacé)
Pour créer des cocktails et des boissons
contenant de la glace, comme une margarita, un daïquiri ou un slushie. Il s'agit d'un
programme de broyage de la glace, suivi
par un court mélange.
Page 49

FR
Pulse/Ice Crush (Battement/glace pilée)
Programme de battement continu conçu
pour hacher les aliments dans une consistance homogène ou en glace pilée. Utilisez
le bouton PULSE (Battement) lorsque
l'aliment inséré est trop épais ou gros
pour circuler dans le pichet du blender.
Le programme de battement peut détecter
automatiquement lorsque la glace a été
complètement broyée et termine le programme plus tôt, ce qui est indiqué par
une série de battements plus longs.
La quantité maximale de glaçons que
le blender peut mixer simultanément sans
liquide dans le pichet est d'une plaque
standard de glaçons, ou 250 g.
Auto Clean (Nettoyage automatique)
Utilisez cette fonction pour retirer la plupart
des ingrédients des parois et lames du
blender. Ajoutez deux verres d'eau savonneuse tiède, puis appuyez sur le bouton
de nettoyage. Pour les ingrédients collants,
épais ou diciles à nettoyer, ajouter
1/2 cuillère à café de liquide vaisselle pour
obtenir un eet nettoyant supplémentaire.
Pour de meilleurs résultats, nettoyez de
cette manière le pichet du blender immédiatement après utilisation. La fonction
Auto Clean nettoie uniquement le pichet
du blender. Elle ne permet pas de nettoyer
l'extracteur de jus.
FONCTIONNEMENT MANUEL
BOUTON DE CONTRÔLE
DE LA VITESSE
Mixage
Faites tourner le bouton de contrôle de la
vitesse dans le sens horaire pour sélectionner l'un des 10 paramètres de vitesse,
de REMUER lentement à PULVÉRISER
très rapidement. Le minuteur démarre et le
mixage se termine lorsqu'il atteint « 2:00 ».
Le mixage peut être mis en pause en
appuyant sur le bouton correspondant.
Appuyez de nouveau sur le bouton pause
pour annuler ou tournez la molette pour
reprendre le mixage à partir de la vitesse 1.
Pour arrêter le mixage, tournez le bouton
de contrôle de la vitesse dans le sens
anti-horaire pour retourner sur READY
ou appuyez sur le bouton ON|OFF.
EXTRACTION DE JUS
Lavez les fruits et les légumes que vous
avez choisis pour préparer le jus. La
plupart des fruits et légumes comme les
pommes, les carottes et les concombres
n'ont pas besoin d'être coupés, car ils
pourront être insérés entièrement dans
le goulot d'alimentation. Assurez-vous
que les légumes comme les betteraves,
les carottes, etc. ont été bien lavés et
débarrassés de leurs feuilles avant
utilisation.
1. Branchez le cordon d'alimentation à une
prise de courant de 220 – 240 Volts.
IMPORTANT
Ne remplissez pas le goulot d'alimentation
avant que l'extracteur ait atteint la vitesse
sélectionnée.
2. Mise en marche de l'extracteur de jus
Tournez le bouton sur le réglage de
vitesse souhaité. Utilisez les chires
les plus faibles (1 à 5) pour les fruits et
légumes mous et les chires les plus
élevés (6 à 10) pour les fruits et légumes
durs. Voir le tableau « Guide de sélection
de la vitesse » à la page suivante pour
faire correspondre la vitesse et le type
de produit an d'obtenir le rendement
maximal. La vitesse faible, bien qu'elle
n'ore pas le meilleur rendement
de certains produits, vous permet une
extraction de jus nettement moins
bruyante.
3. Lorsque le moteur est en marche, placez
les aliments dans le goulot d'alimentation.
À l'aide du poussoir, guidez doucement
les aliments vers le bas. Pour extraire la
quantité maximale de jus, poussez toujours lentement le poussoir vers le bas.
13
Page 50

4. Pichet du blender plein
Vous pouvez continuer à extraire le jus
jusqu'à ce que le pichet soit rempli
au niveau max.
AVERTISSEMENT
Ne vous servez jamais de vos doigts,
de vos mains ou d'ustensiles pour pousser
les aliments dans le goulot d'alimentation
ou pour le dégager. Utilisez toujours
le poussoir de l'extracteur.
ATTENTION :
lames tranchantes
GUIDE DE SÉLECTION
DE LA VITESSE
CÉLERI
AGRUMES (épluchés)
CONCOMBRE
GINGEMBRE
RAISINS (sans pépins)
MELON VERT (épluché)
CHOU KALE
KIWI (épluché)
MANGUE (épluchée,
dénoyautée)
MENTHE 9
4
1
4
8
2
3
9
5
5
Le panier-ltre en acier inoxydable contient
de petites lames tranchantes pour couper
et mixer les fruits et légumes. Évitez de
toucher les lames lorsque vous manipulez
le panier-ltre.
GUIDE DE SÉLECTION
DE LA VITESSE
Type d'aliment Vitesse
POMMES
PETITS ÉPINARDS
BETTERAVE
MYRTILLES
BROCOLI
CHOU
POIVRON
CAROTTE
10
9
10
5
7
9
9
10
PÊCHE (épluchée,
dénoyautée)
POIRES 6
ANANAS (épluché) 7
RHUBARBE 8
COURGE 9
FRAISES 4
TOMATES 4
PASTÈQUE (épluchée) 3
COURGETTE 6
5
14
Page 51

Entretien
et nettoyage
FR
Assurez-vous que la base du moteur est
hors tension en appuyant sur le bouton
ON/OFF. Débranchez ensuite le cordon
d'alimentation.
NETTOYAGE
1. Retirez le pichet du blender.
2. Déverrouillez la barre de verrouillage,
soulevez le bloc du récupérateur de pulpe
et placez-le dans l'évier.
3. Retirez le récipient à pulpe.
Videz autant de pulpe que possible dans
la poubelle/le bac à compost. Rincez toutes
les pièces après utilisation (sauf la base
du moteur) à l'eau courante pour éliminer
la majorité du jus et de la pulpe. Lavez avec
de l'eau tiède savonneuse et un chion doux.
Pour empêcher les aliments de sécher sur
les lames, les mailles du ltre ou les éléments
transparents, rincez et lavez-les dès que
possible après utilisation.
RÉCIPIENT À PULPE
Pour réduire le nettoyage, vous pouvez
doubler le récipient à pulpe avec un sac
biodégradable pour recueillir la pulpe.
BASE DU MOTEUR
Essuyez avec un chion doux et humide.
Ne plongez pas la base du moteur dans
un liquide.
AGENTS DE NETTOYAGE
N'utilisez pas d'éponges ou nettoyants
abrasifs sur la base du moteur ou le pichet,
car ils pourraient rayer la surface. Utilisez
uniquement de l'eau savonneuse tiède avec
un chion doux.
PICHET ET COUVERCLE
Pour conserver votre pichet propre et empêcher les aliments de sécher sur les lames
et le pichet, suivez les étapes ci-dessous
dès que possible après utilisation.
Rincez la plupart des ingrédients du pichet
et du couvercle.
Remplissez le pichet avec 500 ml d'eau tiède,
xez le couvercle et appuyez sur le bouton
AUTO CLEAN (Nettoyage automatique).
Si des ingrédients épais ou collants néces-
sitent un eort nettoyant supplémentaire,
ajoutez quelques gouttes de liquide vaisselle.
Rincez le pichet et le couvercle à nouveau,
ou lavez-les séparément dans de l'eau
savonneuse tiède avec un chion doux
ou un goupillon.
Il est plus ecace de nettoyer le pichet
immédiatement après utilisation.
PANIERFILTRE
Pour une extraction homogène, nettoyez
toujours soigneusement le panier-ltre juste
après utilisation à l'aide de la brosse incluse.
Lorsque la pulpe sèche, elle peut boucher
les petits pores du ltre, ce qui peut réduire
l'ecacité de l'extracteur. Le panier-ltre
peut être trempé dans de l'eau tiède savonneuse pendant 10 minutes, si nécessaire.
LAVEVAISSELLE
Toutes les pièces sont adaptées au
lave-vaisselle, sauf la base du moteur
et le poussoir. Le pichet peut être placé
sur l'étagère inférieure du lave-vaisselle.
Le couvercle et le bouchon doseur interne
doivent être uniquement nettoyés sur
l'étagère supérieure. Toutefois, nettoyer les
pièces régulièrement dans un lave-vaisselle
peut réduire leur durée de vie en raison d'une
exposition prolongée à des détergents durs,
à l'eau chaude et à de la pression.
15
Page 52

Le nettoyage des pièces au lave-vaisselle
peut également détériorer les pièces, aussi
inspectez-les régulièrement et cessez
d'utiliser le produit si vous remarquez qu'il
est endommagé.
TÂCHES D'ALIMENTS TENACES
Les aliments à forte odeur comme l'ail,
le poisson et certains légumes (carottes)
peuvent laisser une odeur ou des tâches
sur le couvercle et le pichet du blender.
Pour les retirer, faites tremper le couvercle
et le pichet du blender pendant 5 minutes
dans de l'eau savonneuse tiède. Nettoyez
ensuite avec un détergent doux et de l'eau
tiède, rincez bien et séchez soigneusement.
Entreposez le pichet sans le couvercle
dessus.
RANGEMENT
Entreposez votre appareil dans une position
droite, avec le pichet du blender assemblé
sur la base du moteur, ou à côté. Ne déposez
rien sur le dessus. Pour laisser l'air circuler,
ne laissez pas le couvercle sur le pichet.
AVERTISSEMENT
Les huiles des zestes d'agrumes peuvent
endommager le matériel si le pichet de votre
blender y est exposé pendant une longue
période. Nettoyez toujours le pichet de votre
blender immédiatement après avoir utilisé
des zestes d'agrumes.
16
Page 53

Dépannage
FR
L'écran LCD s'allume
mais l'appareil
ne répond pas
Les aliments ne
sont pas hachés
uniformément
Les ingrédients
sont hachés trop
nement ou sont
aqueux
Accumulation
excessive de pulpe
dans le panier-ltre
en acier inoxydable
La pulpe est trop
humide et le débit
de jus est faible
Le jus fuit entre
le contenant du ltre
et le couvercle
de l'extracteur
Le jus jaillit du bec
verseur
Il reste du jus dans
le contenant du
ltre après l'arrêt
de l'extracteur
• Il se peut que l'arceau de blocage de sûreté ne soit pas correctement
engagé en position de fonctionnement verticale. Dans ce cas, l'écran
LCD ache une invite animée . Vériez que le couvercle supérieur
est correctement aligné et que l'arceau de blocage de sûreté est bien
placé dans les deux encoches situées de part et d'autre du couvercle
de l'extracteur ou du pichet du blender.
• Cela peut se produire lorsque trop d'aliments sont ajoutés simultanément.
Essayez avec une plus petite quantité, et faites plusieurs paquets
si nécessaire.
• Essayez de mixer sur des périodes plus courtes. Utilisez la fonction PULSE
(Battement) pour un meilleur contrôle.
• Mettez l'appareil hors tension. Démontez l'appareil pour vider l'excès
de pulpe du couvercle de l'extracteur.
• Remontez l'appareil et continuez l'extraction. L'alternance d'ingrédients
mous et durs peut aider à éviter cela.
• Un ltre propre améliore le rendement du jus et permet d'obtenir une pulpe
plus sèche. Veillez à bien nettoyer l'extracteur de jus le plus tôt possible
après chaque utilisation. Enlevez le panier-ltre en acier inoxydable
et nettoyez soigneusement les parois avec une brosse de nettoyage.
Rincez le panier-ltre à l'eau chaude. Si les petits pores du ltre sont
bouchés, faites tremper le panier dans une solution composée d'eau
chaude et de 10 % de jus de citron pour les déboucher, ou lavez-le
au lave-vaisselle (panier supérieur). Cela enlèvera l'excès de bres qui
pourrait bloquer le passage du jus.
• La force du poussoir pourrait réduire le rendement car elle ralentit le moteur.
Évitez d'appliquer une trop forte pression sur le poussoir lorsque vous
insérez les ingrédients dans le goulot d'alimentation.
• Si vous extrayez de grandes quantités d'ingrédients breux comme
la rhubarbe et l'ananas, il peut être nécessaire de nettoyer le panier-ltre
entre deux extractions.
• Essayez de ralentir le rythme d'extraction et enfoncez plus lentement
le poussoir dans le goulot.
• Assurez-vous qu'il n'y a aucun dépôt dans le panier-ltre.
• Le jus est extrait à une vitesse trop élevée. Essayez de ralentir le rythme
d'extraction (si possible) et enfoncez plus lentement le poussoir dans le
goulot.
• Tournez la molette de vitesse sur la vitesse la plus élevée et laissez
fonctionner pendant 5 secondes. Cela peut aider à déplacer le jus restant
dans le pichet.
17
Page 54

Le moteur semble
caler pendant
l'extraction
Tous les voyants
du panneau de commande clignotent
et la protection contre
les surcharges
s'ache sur
l'écran LCD
• De la pulpe humide peut s'accumuler sous le couvercle et bloquer l'appareil
si celui-ci est utilisé de façon excessive sans nettoyage. Si cela se produit,
démontez l'appareil et suivez les instructions de nettoyage pour nettoyer
le contenant du ltre, le panier-ltre en acier inoxydable et le couvercle
de l'extracteur. L'appareil peut également se bloquer si une force excessive
est exercée pour pousser le produit dans le goulot d'alimentation.
Si cela se produit, veillez à exercer une pression plus douce pour pousser
le produit dans le goulot.
• Allumez l'appareil avant de mettre les ingrédients dans le goulot. Presser
les ingrédients avant que le moteur n'atteigne sa vitesse maximale peut
entraîner son blocage ou sa surcharge. Exercez une pression légère
à modérée sur le poussoir. Une pression réduite garantit un meilleur
rendement du jus.
• L'extraction des fruits et des légumes durs fait subir une tension trop forte
au moteur si vous choisissez une vitesse faible. Reportez-vous au guide
de référence pour connaître la vitesse adéquate pour les fruits et légumes
à extraire.
• Cela signie que la protection contre les surcharges du moteur est activée
en raison d'une surchaue d'un calage du moteur.
• Pour réinitialiser le protecteur, débranchez l'appareil de la prise, puis
rebranchez-le et mettez-le sur tension.
• Si la protection contre les surcharges s'ache toujours, débranchez
l'appareil et laissez refroidir pendant au moins 30 minutes, puis réessayez.
L'appareil doit être débranché pendant le refroidissement an d'être
réinitialisé correctement.
• Si le problème persiste après avoir laissé refroidir, il peut être dû à un
problème interne. Contactez le Service client Sage ou rendez-vous sur
www.sageappliances.com.
• Notez que le déclenchement de la protection contre les surcharges indique
une utilisation anormale de l'appareil, comme une charge trop importante
dans le pichet du blender, une force de poussée excessive lors de l'extraction
du jus ou une utilisation continue prolongée. Veuillez noter les conditions
et vous référer à toutes les informations contenues dans ces instructions
pour éviter cet incident et prolonger la durée de vie de l'appareil.
18
Page 55

Garantie
GARANTIE LIMITÉE 2 ANS
Sage Appliances garantit ce produit pour un usage
domestique sur les territoires spéciés pendant
2 ans à compter de la date d’achat, contre les
défauts de fabrication et de matériaux. Au cours
de cette période de garantie, Sage Appliances
s’engage à réparer, remplacer ou rembourser tout
produit défectueux (à sa seule discrétion).
Tous les droits de garantie légaux en vertu
de la législation nationale applicable seront
respectés et ne seront pas compromis par notre
garantie. Pour connaître les conditions générales
complètes relatives à la garantie ou pour obtenir
des instructions sur la manière de déposer une
réclamation, rendez-vous sur
www.sageappliances.com.
FR
19
Page 56

Remarques
20
Page 57

the 3X Bluicer Pro™
SNELSTARTGIDS
NL
Page 58

Inhoud
2 Sage® stelt veiligheid voorop
7 Onderdelen
8 Montage
12 Functies
15 Onderhoud en reiniging
17 Probleemoplossing
SAGE® STELT
VEILIGHEID
VOOROP
Bij Sage® gaan we zeer
veiligheidsbewust te werk.
Bij het ontwerpen en
produceren van onze
consumentenproducten
staat de veiligheid van
onze gewaardeerde klanten
voorop. Daarnaast vragen
wij u voorzichtig om te
gaan met elektrische
apparaten en de volgende
voorzorgsmaatregelen
in acht te nemen.
BELANGRIJKE
VEILIGHEIDS
MAATREGELEN
LEES ALLE INSTRUCTIES
VÓÓR GEBRUIK EN BEWAAR
DEZE VOOR TOEKOMSTIGE
NASLAG
• Controleer vóór het eerste
gebruik of uw elektriciteitsvoorziening dezelfde is als die
op het label aan de onderkant
van het apparaat. Dit apparaat
beschikt over een netsnoer
met aardingsdraad en geaarde
stekker. Het apparaat moet
worden geaard via een goed
geaard stopcontact. In het geval
van een elektrische storing
vermindert aarding het risico
op elektrische schokken.
• Knip of verwijder in geen geval
de derde (aardings)pin van het
netsnoer en gebruik geen
adapter.
• Raadpleeg een gekwaliceerde
elektricien als u de aardings-
instructies niet volledig begrijpt,
of twijfelt of het apparaat correct
geaard is.
• Het wordt aanbevolen een
aardlekschakelaar te installeren
voor extra veiligheid bij het
gebruik van alle elektrische
apparaten. Veiligheids-
schakelaars met een nominale
bedrijfsstroom van niet meer
dan 30 mA worden aanbevolen.
2
Page 59

NL
Raadpleeg een elektricien
voor professioneel advies.
• Voer verpakkingsmateriaal
veilig af vóór het eerste gebruik.
• Gooi het beschermkapje op de
stekker op een veilige manier
weg om verstikkingsgevaar bij
jonge kinderen te voorkomen.
• Controleer vóór gebruik altijd of
het apparaat op de juiste manier
in elkaar is gezet. Als u een
apparaat gebruikt dat niet juist in
elkaar is gezet, kan dit leiden tot
product storingen, productschade
of veiligheidsrisico's, waaronder
lichamelijk letsel.
• Dit apparaat is alleen voor
huishoudelijk gebruik. Gebruik
het apparaat alleen voor het
beoogde gebruik. Gebruik het
niet in bewegende voertuigen
of boten. Gebruik het niet
buitenshuis. Verkeerd gebruik
kan tot letsel leiden.
• Plaats het apparaat op een
stabiele, hittebestendige, vlakke,
droge ondergrond, uit de buurt
van de rand van het aanrecht
en werk niet op of in de buurt
van een warmtebron zoals een
kookplaat, oven of gaskookplaat.
• Wikkel het netsnoer volledig af
voordat u het apparaat gebruikt.
• Zorg dat het netsnoer niet
over de rand van een aanrecht
of tafel hangt. Zorg dat het
netsnoer niet in aanraking
komt met hete oppervlakken
of in de knoop raakt.
• Laat het apparaat niet onbe-
heerd achter tijdens gebruik.
• Als het apparaat moet worden
achtergelaten, gereinigd,
verplaatst, gemonteerd of
opgeborgen, schakel het dan
altijd uit met de ON/OFF-knop.
Schakel het apparaat uit en haal
de stekker uit het stopcontact.
• Schakel het apparaat uit en trek
de stekker uit het stopcontact
wanneer het apparaat niet in
gebruik is. Daarna kunt u het
in elkaar zetten, uit elkaar
halen of schoonmaken.
Houd het netsnoer altijd bij de
stekker vast wanneer u het
uit het stopcontact haalt. Trek
nooit aan het snoer zelf.
• Controleer het netsnoer,
de stekker en het apparaat
regelmatig op eventuele
schade. Als het apparaat
op enige wijze is beschadigd,
stop dan onmiddellijk met het
gebruik van het apparaat en
breng het in zijn geheel naar
het dichtstbijzijnde bevoegde
®
Sage
-servicecentrum
voor onderzoek,
vervanging of reparatie.
• Houd het apparaat en de
accessoires schoon. Volg de
reinigingsinstructies in deze
gids. Elke handeling die niet
in dit instructieboekje staat
vermeld, moet worden uitgevoerd door een geautoriseerd
®
Sage
-servicecentrum.
3
Page 60

• Dit apparaat is niet bedoeld
voor gebruik door kinderen
of mensen met beperkte
fysieke, zintuiglijke of mentale
capaciteiten, of gebrek aan
ervaring en kennis. Wanneer
het apparaat door kinderen
of in de buurt van kinderen
wordt gebruikt, is nauwlettend
toezicht vereist. Laat kinderen
niet met het apparaat spelen.
• Laat kinderen niet met het
apparaat spelen.
• Laat kinderen het apparaat
niet reinigen.
• Het netsnoer, de onderdelen,
opzetstukken of accessoires
van het apparaat moeten buiten
het bereik van kinderen jonger
dan 8 jaar worden gehouden.
• Gebruik nooit opzetstukken
of accessoires die niet bij
dit product zijn geleverd
of die niet door Sage
®
zijn
goedgekeurd voor gebruik
met dit product. Als u deze
instructie niet volgt, kan dit
leiden tot productstoringen,
productschade of zelfs
veiligheidsrisico's.
• Probeer het apparaat niet
op een andere manier te
gebruiken dan beschreven
in deze handleiding.
• Verplaats het apparaat niet
terwijl het in werking is.
• Gebruik het apparaat niet
op een schuin oppervlak.
• Gebruik nooit uw vingers of
keukengerei om ingrediënten
door de vultrechter te duwen.
Gebruik altijd de meegeleverde
fruit- en groentedrukker. Steek
uw handen of vingers niet in de
vultrechter wanneer deze op
het apparaat zit.
• Pers geen steenvruchten tenzij
de pitten zijn verwijderd.
• Zorg dat het product UIT staat,
de ltermand van roestvrij
staal is gestopt met draaien
en de motor volledig tot
stilstand is gekomen voordat
u de vergrendelingshendel
ontgrendelt en/of het apparaat
probeert te verplaatsen
wanneer het niet in gebruik
is, en voordat u het uit elkaar
haalt, schoonmaakt of opbergt.
• Als er aanzienlijk veel op het
oppervlak onder of rond het
apparaat of op het apparaat zelf
is gemorst, moet het worden
schoongemaakt en afgedroogd
voordat u het weer gebruikt.
• Wees voorzichtig bij het
hanteren van de ltermand van
roestvrij staal. De kleine mesjes
onderaan de ltermand zijn
namelijk erg scherp. Verkeerd
gebruik kan tot letsel leiden.
• De blendermessen zijn scherp,
wees voorzichtig wanneer
u de blenderkan hanteert,
leegmaakt en reinigt. Verwijder
de schil van citrusvruchten
voordat u ze perst.
4
Page 61

NL
• Gebruik het apparaat niet als
de roterende zeef (ltermand)
of het deksel is beschadigd.
• Zorg dat het deksel van de
vultrechter steeds goed vast
zit voordat de motor wordt
ingeschakeld.
• Gebruik het apparaat niet
zonder dat de opvangbak
voor pulp op zijn plaats zit.
• Maak de vergrendelingshendel
niet los terwijl het apparaat in
werking is.
• Een representatief voorbeeld
van de zwaarste belasting
die voor gebruik met dit
apparaat wordt verwacht,
is 450 gram bevroren banaan
en 1 liter melk die gedurende
30 seconden op de hoogste
snelheid worden gemixt.
• Pers niet meer dan 3 kilo
wortels per keer.
• Plaats de blenderkan niet
op de motorbasis terwijl
de motor nog draait.
• Gebruik het apparaat niet
zonder ingrediënten in de kan.
• Gebruik het apparaat nooit
met beschadigde messen of
met keukengerei of vreemde
voorwerpen in de kan.
• Onderwerp de kan niet
aan extreem hoge of lage
temperaturen, bijvoorbeeld door
een koude kan in heet water
of andersom te dompelen.
• Het deksel van de blenderkan
moet voor gebruik stevig
worden bevestigd om te zorgen
dat de inhoud niet kan
ontsnappen, wegspuiten
of overlopen.
• Verwijder de kan niet
van de motorbasis terwijl
de blender in gebruik is.
• Gebruik de blender niet terwijl
OVERLOAD PROTECTION
(overbelastingsbeveiliging)
op het lcd-scherm knippert.
In dit geval haalt u de stekker
uit het stopcontact en wacht
u 30 minuten tot de motor is
afgekoeld. Nadat de blender
is afgekoeld, kunt u deze
weer als normaal gebruiken.
• Gebruik geen hete of kokende
vloeistoen. Laat ze afkoelen
voordat u ze in de blenderkan
giet.
• Dompel de stekker, het snoer of
het apparaat niet onder in water
of een andere vloeistof om
elektrische schokken te
voorkomen.
• Gebruik het apparaat niet als
het netsnoer, de stekker of het
apparaat op enigerlei wijze
beschadigd is. Neem contact op
met de klantenservice van Sage
of ga naar sageappliances.com
als er sprake is van schade
en er ander onderhoud
dan reiniging is vereist.
5
Page 62

Het weergegeven symbool
geeft aan dat dit apparaat
niet met het normale
huishoudelijke afval mag
worden weggegooid. Het moet
naar een geschikt plaatselijk
afvalverwerkingscentrum worden
gebracht of naar een dealer die
deze service biedt. Neem voor
meer informatie contact op met
uw gemeente.
Vermijd elektrische
schokken: dompel de
motorbasis, het netsnoer of de
stekker niet onder in water en
zorg dat er geen vocht in contact
komt met deze onderdelen.
Zorg dat u geen water morst
op de connector van de basis.
Dompel de basis niet onder
tijdens het reinigen.
ALLEEN VOOR HUISHOUDELIJK
GEBRUIK
BEWAAR DEZE INSTRUCTIES
6
Page 63

NL
Onderdelen
H
A
B
C
D
E
F
G
A. Fruit- en groentedrukker
(niet vaatwasserbestendig)
B. Deksel van sapcentrifuge (vaatwasserbestendig)
C. Filtermand van roestvrij staal
(vaatwasserbestendig)
D. Behuizing van lterkom (vaatwasserbestendig)
E. Vergrendelbare veiligheidshendel
Zorgt dat de motorbasis niet werkt zonder
dat het deksel op zijn plaats zit.
F. Bedieningspaneel
G. Motorbasis van roestvrij staal
I
J
K
L
M
H. Maatbekerdop (vaatwasserbestendig)
I. Blenderkan van 1,5 liter met deksel
(vaatwasserbestendig)
J. Schenkstuk (vaatwasserbestendig)
Kan over de tuit worden geplaatst om het
sap direct in een glas te persen.
K. Druppelstop
L. Opvangbak voor pulp (vaatwasserbestendig)
M. Reinigingsborstel
Voor gebruik met de ltermand van roestvrij
staal.
Classicatiegegevens
220 – 240 V ~ 50 Hz 1350 W
7
Page 64

Montage
VÓÓR HET EERSTE GEBRUIK
Was het deksel, de maatbekerdop, kan,
behuizing van de lterkom, ltermand,
het deksel van de sapcentrifuge, de fruit- en
groentedrukker en pulpopvangbak af in warm
zeepsop met een zachte doek. Spoel en
droog alles goed af.
Plaats de motorbasis op een vlak, droog
oppervlak, zoals een aanrecht. Zorg dat het
apparaat via de OFF-knop op de motorbasis
is uitgeschakeld en dat het snoer niet op het
stopcontact is aangesloten.
SAP PERSEN
1. Plaats de behuizing van de lterkom
op de motorbasis.
2. Zorg dat de pijltjes op de basis van de
ltermand zijn uitgelijnd met de pijltjes
op de koppeling van de motoraandrijving,
en duw de ltermand omlaag totdat deze
vastklikt en stevig op de motorbasis is
bevestigd.
3. Plaats het deksel van de sapcentrifuge
over de behuizing van de lterkom. Schuif
de onderkant van de vultrechter over de
ltermand van roestvrij staal.
8
Page 65

NL
4. Til de vergrendelingshendel omhoog
en schuif deze in de twee groeven aan
weerszijden van het deksel van de
sapcentrifuge.
5. De vergrendelingshendel staat nu in de
verticale positie en is bovenop het deksel
van de sapcentrifuge vergrendeld.
6. Schuif de fruit- en groentedrukker in de
vultrechter. Zorg hierbij dat de groef in
de drukker is uitgelijnd met de kleine
uitstulping aan de binnenkant bovenaan
de vultrechter.
Groef
in fruiten groentedrukker
Kleine
uitstulping
in vul-
trech ter
7. Zet de opvangbak voor pulp op zijn
plaats door de motorbasis een beetje
op te tillen en te kantelen. Zet de
opvangbak voor pulp onder het deksel
van de sapcentrifuge aan de achterkant.
Zorg dat de voorkant onder de achterste
rand van de lterkombehuizing zit en
dat de onderste rand in de onderkant
van de motorbasis is geklikt.
8. De saptuit kan worden afgesloten met
de druppelstop. Zo voorkomt u dat er
na het persen sap uit de tuit druipt.
9
Page 66

9. Zet het deksel op de blenderkan
en plaats de kan onder de saptuit.
10. Optioneel: Het schenkstuk kan op
de saptuit worden bevestigd om
rechtstreeks in een glas te persen.
MIXEN
1. Plaats de blenderkan rechtop op de
motorbasis. Het handvat van de blender
kan zowel aan de linker- als de rechterkant van het apparaat worden geplaatst.
2. Til de vergrendelingshendel omhoog
en schuif deze in de twee groeven aan
weerszijden van het deksel van de
blender.
10
Page 67

3. Voeg voedsel of vloeistof toe aan
de blenderkan. Vul deze niet verder
dan het MAX-streepje. Plaats het
blenderdeksel stevig op de blenderkan.
Steek de doorzichtige maatbekerdop
in het blenderdeksel en draai deze
met de klok mee om hem vast te
zetten. De kan beschikt over het Sage
Assist™-deksel. Hierdoor blijft het
deksel stevig op de blenderkan zitten
zodat dit tijdens gebruik niet loskomt.
4. Zorg dat het tuitklepje van het
blenderdeksel op zijn plaats zit en
gesloten is. Dankzij de ring op het deksel
kan de gebruiker het met een eenvoudige
beweging moeiteloos verwijderen.
NL
®
Nadat het apparaat in elkaar is gezet in
de sap- of blenderconguratie, sluit u het
netsnoer aan op een stopcontact van
220 – 240 V. Zet het apparaat vervolgens
aan.
Druk op de ON/OFF-knop om het apparaat
aan te zetten. De ON/OFF-knop licht op.
De lcd-timerdisplay licht op en geeft '0:00'
weer.
11
Page 68

Functies
G
R
E
E
N
S
M
O
O
T
H
I
E
OVERLOAD
1 2 3 4 5
PROTECTION
6 7 8 9 10
SOFT HARD
S
M
O
O
T
H
I
E
P
U
L
S
E
I
C
E
C
H
R
S
U
+
N
E
Z
O
R
F
L
I
A
T
K
C
O
O
T
U
A
N
A
E
L
C
C
AAN DE SLAG
Met de knop ON/OFF (AAN/UIT) zet u het
apparaat aan voor gebruik.
VOORAF INGESTELDE
PROGRAMMA'S
MIXEN
Het apparaat heeft 5 vooraf ingestelde
functies: Smoothie, groene smoothie,
pulseren/ijs malen, automatisch reinigen
en ijscocktail. Deze voorgeprogrammeerde
cycli passen de mengtijd en snelheid
automatisch aan voor een optimaal
resultaat. Deze programma's worden
alleen geactiveerd als uw apparaat in de
blenderconguratie staat. Ze kunnen niet
worden gebruikt in de sapconguratie.
Selecteer de gewenste functie door op de
overeenkomstige functieknop te drukken.
Het apparaat begint te mixen en de
geselecteerde functieknop licht op. De timer
begint af te tellen en het programma wordt
automatisch beëindigd wanneer de timer
'0:00' bereikt.
Het programma en de timer kunnen worden
gepauzeerd door op de pauzeknop te
drukken. Hervat het programma door de
programmaknop opnieuw in te drukken
of annuleer het programma door nog eens
op pauze te drukken.
Het programma kan ook op elk moment
worden geannuleerd met de ON/OFF-knop.
Door aan de snelheidsknop te draaien,
wordt het programma onderbroken en gaat
de blender in de handmatige modus vanaf
snelheid 1.
Smoothie
Voor smoothies op basis van zuivel
is een combinatie van snelheden en
pulseerstanden ontworpen om ingrediënten
te vermengen en beluchten tot een zachte,
smeuïge textuur.
Groene smoothie
Voor het mixen van hele vruchten/groenten
tot een zijdezacht drankje. Een combinatie
van hogesnelheidsproelen breekt taaie
vezels af tot zeer jne deeltjes.
12
Page 69

NL
IJscocktail
Voor cocktails en drankjes op basis van
ijs zoals margarita's, daiquiri's en slushy's.
Een programma voor het vermalen van ijs
gevolgd door kort mixen.
Pulseren/IJs vermalen
Een programma van continu pulseren
bedoeld om ingrediënten met een
gelijkmatige consistentie jn te hakken
of ijsblokjes te vermalen. Gebruik de knop
PULSE (pulseren) wanneer het voedsel te
dik of te grof is om in de blenderkan rond te
bewegen. Het pulseerprogramma detecteert
automatisch wanneer het ijs volledig is
vermalen. Het programma wordt dan
vroegtijdig beëindigd, wat wordt aangegeven
door een reeks langere pulseeracties.
De maximale hoeveelheid ijsblokjes
die de blender tegelijk kan vermalen
zonder toegevoegde vloeistof in de kan,
is 1 standaard ijsblokvorm of 250 gram.
Automatisch reinigen
Gebruik de functie voor automatisch reinigen
om de meeste etensresten van de zijkant
van de kan en de messen te verwijderen.
Voeg 2 kopjes warm zeepsop toe en druk op
de reinigingsknop. Voor moeilijk te reinigen,
kleverige of dikke etensresten voegt u een
halve theelepel vloeibaar afwasmiddel
toe voor extra reinigingskracht. Maak de
blenderkan onmiddellijk na gebruik schoon
op de beschreven manier voor het beste
resultaat. De functie voor automatisch
reinigen maakt alleen de blenderkan schoon.
Niet de sapcentrifuge zelf.
HANDMATIGE BEDIENING
DRAAIKNOP VOOR
SNELHEIDSREGELING
Mixen
Draai de knop voor snelheidsregeling
met de klok mee om een van de
10 snelheidsinstellingen te selecteren,
van een langzame STIR (roeren) tot een zeer
snelle PULVERIZE (verpulveren). De timer
begint te tellen en het mixen wordt beëindigd
wanneer de timer '2:00' bereikt.
Het mixen kan worden gepauzeerd door
op de pauzeknop te drukken. Druk opnieuw
op de pauzeknop om het programma te
annuleren of draai aan de knop om weer
vanaf snelheid 1 te beginnen mixen.
Om het mixen te stoppen, draait u de
snelheidsknop tegen de klok in naar READY
(gereed) of drukt u op de ON/OFF-knop.
SAP PERSEN
Was de vruchten en groenten die u wilt
persen. De meeste groenten en het meeste
fruit zoals appels, wortels en komkommers
hoeven niet in stukjes te worden gesneden
of bijgesneden omdat ze zo in de vultrechter
passen. Maak groenten zoals bieten, wortels
enz. altijd grondig schoon, was ze en snijd de
bladeren eraf voordat u ze gebruikt.
1. Sluit het netsnoer aan op een
stopcontact van 220 - 240 V.
BELANGRIJK
Stop pas ingrediënten in de vultrechter
wanneer de sapcentrifuge de geselecteerde
snelheid heeft bereikt.
13
Page 70

2. De sapcentrifuge inschakelen
Draai de knop naar de gewenste
snelheidsinstelling. Gebruik de lagere
standen (1-5) voor zachte groenten en
fruit en de hogere standen (6-10) voor
harde groenten en fruit. Raadpleeg
de tabel voor snelheidskeuze op de
volgende pagina om de juiste snelheid
voor een ingrediënt te bepalen en zoveel
mogelijk sap te verkrijgen. Hoewel
een lage snelheid misschien niet de
maximale hoeveelheid sap uit sommige
ingrediënten oplevert, is het apparaat
wel veel stiller tijdens het persen.
3. Terwijl de motor draait, plaatst u de
ingrediënten in de vultrechter en gebruikt
u de fruit- en groentedrukker om de
ingrediënten voorzichtig naar beneden te
duwen. Duw de fruit- en groentedrukker
altijd langzaam naar beneden om
zoveel mogelijk sap te persen.
4. Volle blenderkan
U kunt sap blijven persen totdat de kan
tot het maximumniveau is gevuld.
WAARSCHUWING
Gebruik nooit uw vingers, handen of keukengerei om ingrediënten in de vultrechter te
duwen of om de vultrechter leeg te maken.
Gebruik altijd de meegeleverde fruit-
en groentedrukker.
VOORZICHTIG:
scherpe messen
TABEL VOOR SNELHEIDSKEUZE
Ingrediënttype Snelheid
APPELS 10
SPINAZIE 9
RODE BIET 10
BOSBESSEN 5
BROCCOLI 7
RODE KOOL 9
PAPRIKA 9
WORTEL 10
SELDERIJ 4
CITRUSVRUCHTEN (gepeld) 1
KOMKOMMER 4
GEMBER 8
DRUIVEN (pitloos) 2
HONINGMELOEN (geschild) 3
BOERENKOOL 9
KIWI (geschild) 5
MANGO (geschild, zonder pit) 5
MUNT 9
PERZIK (zonder pit) 5
PEREN 6
De ltermand van roestvrij staal heeft kleine,
scherpe mesjes om fruit en groenten jn te
snijden. Raak de messen niet aan bij het
hanteren van de ltermand.
14
ANANAS (geschild) 7
RABARBER 8
POMPOEN 9
AARDBEIEN 4
TOMATEN 4
WATERMELOEN (geschild) 3
COURGETTE 6
Page 71

Onderhoud
en reiniging
NL
Zet de motorbasis uit door op de ON/OFFknop te drukken. Trek vervolgens de stekker
uit het stopcontact.
REINIGEN
1. Verwijder de blenderkan.
2. Ontgrendel de vergrendelingshendel,
trek het deel met de sapkan omhoog
en breng het naar de gootsteen.
3. Verwijder de opvangbak voor pulp.
Doe zoveel mogelijk pulp in de vuilnisbak/
compostbak. Spoel alle onderdelen (behalve
de motorbasis) na gebruik af onder stromend
water om het sap en de pulp grotendeels
weg te spoelen. Was ze af in warm zeepsop
met een zachte doek.
Spoel en was alles zo snel mogelijk na
gebruik af om te voorkomen dat etensresten
aankoeken op de messen, zeef of
transparante delen.
OPVANGBAK VOOR PULP
Gebruik een biologisch afbreekbare
diepvrieszak in de opvangbak om de pulp
op te vangen.
MOTORBASIS
Veeg naar beneden schoon met een zachte,
vochtige doek. Dompel de motorbasis niet
onder in vloeistoen.
KAN EN DEKSEL
Volg de onderstaande stappen zo snel
mogelijk na gebruik om uw kan schoon te
houden en te voorkomen dat etensresten op
de messen, kan en het deksel aankoeken.
Spoel de kan en het deksel zoveel mogelijk
schoon.
Vul de kan met 500 ml warm water, zet het
deksel erop en druk op de AUTO CLEAN-
knop (automatisch reinigen). Als dikke of
plakkerige ingrediënten extra reinigingskracht
vereisen, voegt u een paar druppels
vloeibaar afwasmiddel toe.
Spoel de kan en het deksel opnieuw af en/of
maak ze apart schoon in warm zeepsop met
een zachte doek of essenborstel.
De eectiefste manier is om de kan
onmiddellijk na gebruik schoon te maken.
FILTERMAND
Maak de ltermand altijd onmiddellijk
na gebruik grondig schoon met de
meegeleverde borstel voor consistente
resultaten.
Als u de pulp laat aankoeken, kunnen de
jne gaatjes in de lterzeef verstopt raken,
wat mogelijk van invloed is op de prestaties
van het apparaat. U kunt de ltermand zo
nodig 10 minuten in warm zeepsop laten
weken.
REINIGINGSMIDDELEN
Gebruik geen schuursponsjes of
schuurmiddelen op de motorbasis of kan,
omdat deze krassen op het oppervlak
kunnen veroorzaken. Gebruik alleen warm
zeepsop met een zachte doek
15
Page 72

VAATWASSER
Alle onderdelen behalve de motorbasis
en de fruit- en groentedrukker zijn
vaatwasserbestendig. De blenderkan mag in
de onderste lade van de vaatwasser worden
afgewassen. Het deksel en de maatbekerdop
mogen alleen in de bovenste lade worden
geplaatst. Als u onderdelen regelmatig in
de vaatwasser reinigt, kan dit de levensduur
verkorten wegens langdurige blootstelling
aan agressieve schoonmaakmiddelen,
heet water en druk.
Als u onderdelen in de vaatwasser reinigt,
raken ze mogelijk beschadigd. Controleer
de onderdelen regelmatig en stop gebruik
van het product als u schade opmerkt.
HARDNEKKIGE VOEDSELVLEKKEN
Sterk ruikende ingrediënten zoals
knoook, vis en sommige groenten,
zoals wortels, kunnen een geur of vlekken
op de blenderkan en het deksel achterlaten.
Laat de kan en het deksel 5 minuten in warm
zeepsop weken om de geur en vlekken te
verwijderen. Was ze dan af met een zacht
afwasmiddel en warm water. Vervolgens
goed afspoelen en afdrogen. Berg de kan
op zonder het deksel erop.
OPBERGEN
Berg uw apparaat rechtop op met de
blenderkan op of naast de motorbasis. Plaats
er niets bovenop. Laat het deksel eraf zodat
lucht kan circuleren.
WAARSCHUWING
Olie in citrusschillen kan het materiaal van
uw blenderkan beschadigen als de kan hier
langere tijd aan wordt blootgesteld. Was uw
blenderkan altijd onmiddellijk af nadat
u citrusschillen heeft gebruikt.
16
Page 73

Probleemoplossing
NL
Het lcd-scherm
gaat aan maar het
apparaat reageert
niet op de bedieningselementen.
Ingrediënten zijn
ongelijkmatig gehakt
Voedsel wordt te jn
gehakt of is waterig
Overtollige pulp
hoopt zich op in
de ltermand van
roestvrij staal
Pulp is te vochtig
en er is weinig sap
• De vergrendelingshendel staat mogelijk niet goed in de verticale positie.
In dat geval geeft het lcd-scherm een animatie weer
bovenste deksel goed is uitgelijnd en dat de vergrendelingshendel stevig
in de groeven aan weerszijden van het deksel van de sapcentrifuge of de
blenderkan vastzit.
. Controleer of het
• Dit kan gebeuren wanneer er te veel ingrediënten tegelijk worden
toegevoegd. Mix een kleinere hoeveelheid en mix de ingrediënten indien
nodig in gedeeltes.
• Verkort de mengduur. Gebruik de pulseerfunctie voor meer controle.
• Schakel het apparaat uit. Haal het apparaat uit elkaar om overtollige pulp
te verwijderen van het deksel van de sapcentrifuge.
• Zet het weer in elkaar en ga verder met persen. U kunt dit ook voorkomen
door zachte en harde ingrediënten af te wisselen.
• Hoe schoner de ltermand, hoe meer sap wordt geperst en hoe droger
de pulp. Maak de sapcentrifuge zo snel mogelijk na elk gebruik schoon.
Verwijder de ltermand van roestvrij staal en maak de zeef grondig schoon
met een reinigingsborstel. Spoel de ltermand af onder heet water. Als de
gaatjes in de zeef verstopt zijn, laat u de mand in een oplossing van heet
water met 10% citroensap weken om de gaatjes vrij te maken. U kunt de
ltermand ook in de vaatwasser reinigen in de bovenste lade.
Zo verwijdert u de ophoping van overtollige vezels die de doorstroming
mogelijk afremmen.
• De kracht van de fruit- en groentedrukker kan de hoeveelheid sap
verminderen omdat deze de motor afremt. Oefen niet te veel kracht uit op
de fruit- en groentedrukker wanneer u ingrediënten in de vultrechter duwt.
• Als u grote hoeveelheden vezelachtige ingrediënten perst, zoals rabarber
en ananas, moet u de ltermand mogelijk tussendoor schoonmaken.
Sap lekt tussen de
lterkombehuizing
en het deksel van
de sapcentrifuge
Het sap sproeit
uit de tuit
Er blijft sap achter
in de lterkom nadat
de sapcentrifuge
is gestopt
• Gebruik een lagere snelheid en duw de fruit- en groentedrukker langzamer
in de vultrechter.
• Zorg dat er geen ophoping ontstaat in de ltermand.
• Het sap wordt te snel geperst: gebruik (indien mogelijk) een lagere
snelheid en duw de fruit- en groentedrukker langzamer in de vultrechter.
• Zet de snelheidsknop op de hoogste snelheid en laat het apparaat
5 seconden draaien. Dat kan ervoor zorgen dat het resterende sap in de
kan terechtkomt.
17
Page 74

De motor lijkt af
te slaan tijdens
het persen
• Vochtige pulp kan zich onder het deksel van de sapcentrifuge ophopen en
ervoor zorgen dat de motor afslaat als het apparaat te veel wordt gebruikt
zonder dat het wordt gereinigd. In dit geval haalt u het apparaat uit elkaar
en volgt u de reinigingsinstructies om de behuizing van de lterkom,
de ltermand van roestvrij staal en het deksel van de sapcentrifuge schoon
te maken. Het apparaat kan ook afslaan als ingrediënten met overmatige
kracht door de vultrechter worden geduwd. Als dit gebeurt, duwt u de
ingrediënten met minder druk door de vultrechter.
• Zet de sapcentrifuge aan voordat u ingrediënten in de vultrechter doet.
Als u ingrediënten naar beneden duwt voordat de sapcentrifuge op volle
snelheid is, kan de motor afslaan of overbelast raken. Gebruik de fruiten groentedrukker met lichte tot matige druk. Een lichte druk zorgt voor
meer sap.
• Harde groenten en fruit leiden tot overbelasting van de motor als een
lage snelheid is geselecteerd. Raadpleeg de referentiegids om de juiste
snelheid te kiezen voor de ingrediënten die u wilt persen.
Alle lampjes op het
bedieningspaneel
branden en het
lcd-scherm geeft
Overload Protection
(Overbelastingsbeveiliging) weer
• Dit geeft aan dat de beveiliging voor motoroverbelasting is geactiveerd
vanwege oververhitting of afslaan van de motor.
• Om de beveiliging te resetten, haalt u de stekker uit het stopcontact,
sluit u het apparaat vervolgens weer aan en schakelt u het in.
• Als de waarschuwing voor overbelasting nog steeds wordt weergegeven,
ontkoppelt u het apparaat en laat u het ten minste 30 minuten afkoelen
voordat u het opnieuw probeert. Het apparaat moet tijdens het afkoelen
zijn losgekoppeld om naar behoren te resetten.
• Als het probleem aanhoudt nadat het apparaat is afgekoeld, duidt dit op
een intern probleem. Neem contact op met de klantenservice van Sage
of ga naar www.sageappliances.com.
• De overbelastingsbeveiliging duidt op abnormaal gebruik van het apparaat,
zoals een te zware belasting in de blenderkan, overmatige drukkracht
tijdens het persen of langdurig continu gebruik. Houd rekening met
deze voorwaarden en raadpleeg de informatie in deze instructies om dit
probleem te voorkomen en de levensduur van het apparaat te verlengen.
18
Page 75

Garantie
BEPERKTE GARANTIE VAN 2 JAAR
Sage Appliances biedt een garantie op dit product
voor huishoudelijk gebruik in genoemde gebieden
gedurende 2 jaar vanaf de datum van aankoop
tegen defecten veroorzaakt door gebrekkige
afwerking en materialen. Gedurende deze
garantieperiode zal Sage Appliances defecte
producten repareren, vervangen of terugbetalen
(naar eigen goeddunken van Sage Appliances).
Alle wettelijke garantierechten onder de
toepasselijke nationale wetgeving worden
gerespecteerd en onze garantie doet geen afbreuk
aan deze rechten. Voor de algemene voorwaarden
van de garantie, evenals instructies over hoe u
aanspraak maakt op de garantie, gaat u naar
www.sageappliances.com.
NL
19
Page 76

Opmerkingen
20
Page 77

the 3X Bluicer Pro™
GUIDA RAPIDA
IT
Page 78

Sommario
2 Sage® consiglia: la sicurezza prima
di tutto
7 Componenti
8 Montaggio
12 Funzioni
15 Manutenzione e pulizia
17 Risoluzione dei problemi
SAGE®
CONSIGLIA:
LA SICUREZZA
PRIMA DI TUTTO
In Sage® abbiamo molto
a cuore la sicurezza.
Creiamo e commercializziamo prodotti di consumo
tenendo sempre presente
la sicurezza dei nostri clienti.
Inoltre, invitiamo i clienti
a prestare molta attenzione
durante l'utilizzo degli apparecchi elettrici e a osservare
le seguenti precauzioni.
NORME
DI SICUREZZA
IMPORTANTI
LEGGERE TUTTE LE
ISTRUZIONI PRIMA
DELL'USO E CONSERVARLE
PER CONSULTARLE
IN FUTURO
• Prima di usare l'apparecchio
per la prima volta, vericare
che la tensione della rete
corrisponda a quella indicata
sull'etichetta posta sotto il dispositivo. Questo apparecchio
è dotato di un cavo di alimentazione provvisto di lo e spina
con messa a terra. L'apparecchio deve essere collegato
a terra utilizzando una presa con
messa a terra. In caso di guasto
elettrico, la messa a terra riduce
il rischio di scosse elettriche.
• Non tagliare o rimuovere,
per nessun motivo, il terzo
polo della spina del cavo
di alimentazione e non
utilizzare un adattatore.
• Consultare un elettricista quali-
cato se le istruzioni riguardanti
la messa a terra non sono
completamente chiare o in caso
di dubbio rispetto alla corretta
messa a terra dell'apparecchio.
2
Page 79

IT
• Si consiglia l'installazione di
un interruttore salvavita per una
maggiore sicurezza durante
l'utilizzo di tutti i dispositivi
elettrici. Si consiglia l'uso
di un salvavita con corrente
operativa nominale non
superiore a 30 mA. Rivolgersi
a un elettricista per un parere
professionale.
• Rimuovere e smaltire in
sicurezza tutti i materiali
di imballaggio prima di
utilizzare l'apparecchio per
la prima volta.
• Per eliminare il rischio di
soocamento per i bambini,
smaltire in sicurezza la copertura protettiva della spina.
• Prima dell'uso vericare sempre
che l'elettrodomestico sia
montato in base alle istruzioni.
Se l'elettrodomestico viene
utilizzato senza essere stato
montato correttamente possono
vericarsi problemi di funzionamento, danni al prodotto
o rischi per la sicurezza,
tra cui lesioni personali.
• Questo apparecchio è destinato
esclusivamente all'uso domestico. Non utilizzare per usi
diversi da quello previsto. Non
utilizzare su veicoli in movimento o barche. Non utilizzare
all'aperto. L'uso non corretto
potrebbe provocare lesioni.
• Posizionare l'elettrodomestico
su una supercie stabile,
resistente al calore, piana
e asciutta, lontano dal bordo
del piano di lavoro. Utilizzare
l'apparecchio lontano da fonti
di calore come piastre elettriche,
fornelli a gas o forni.
• Svolgere completamente
il cavo prima dell'uso.
• Evitare che il cavo di alimentazione rimanga sospeso oltre
il bordo di un tavolo o del piano
cucina. Evitare che il cavo
di alimentazione tocchi
superci calde o formi nodi.
• Non lasciare l'elettrodomestico
incustodito durante il funzionamento.
• Se l'apparecchio deve essere
lasciato incustodito, pulito,
spostato, montato o riposto,
spegnerlo sempre premendo
il pulsante ON | OFF e impostandolo su OFF. Spegnere
e scollegare l'apparecchio
dalla presa di corrente.
• Spegnere l'apparecchio (OFF),
quindi scollegarlo sempre
dalla presa di alimentazione
quando non è in uso, prima
di montarlo o smontarlo e prima
di pulirlo. Per scollegarlo,
impugnare la spina ed estrarla
dalla presa. Non tirare mai
il cavo di alimentazione.
3
Page 80

• Ispezionare regolarmente il cavo
di alimentazione e l'apparecchio
stesso per vericare la presenza
di eventuali danni. Se vengono
rilevati danni di qualsiasi tipo,
smettere immediatamente di
usare l'apparecchio e portarlo
con tutti i componenti al centro
assistenza Sage® autorizzato
più vicino anché venga esaminato, sostituito o riparato.
• Mantenere puliti l'apparecchio
e gli accessori. Seguire le istru-
zioni di pulizia fornite in questo
libretto. Qualsiasi procedura
non elencata in questo libretto
di istruzioni deve essere eseguita da un centro assistenza
®
Sage
autorizzato.
• Questo apparecchio non
è destinato all'uso da parte
di bambini, di persone con
capacità siche, sensoriali
o mentali ridotte o di persone
prive di esperienza e familiarità
con questo tipo di apparecchi.
È necessaria una stretta
supervisione quando qualsiasi
elettrodomestico è utilizzato in
prossimità dei bambini. I bambini devono essere sorvegliati
per assicurarsi che non giochino
con l'elettrodomestico.
• Non lasciare che i bambini
giochino con l'elettrodomestico.
• La pulizia dell'elettrodomestico
non deve essere eettuata
da bambini.
• Il cavo e qualsiasi altro
componente o accessorio
dell'elettrodomestico vanno
tenuti fuori dalla portata dei
bambini di età pari o inferiore
agli 8 anni.
• Non utilizzare mai prolunghe
o accessori non forniti con
il prodotto o non autorizzati da
®
Sage
per l'utilizzo con questo
prodotto. La mancata osservazione di questa istruzione può
causare problemi di funzionamento, danni al prodotto
o persino rischi per la sicurezza.
• Attenersi scrupolosamente
alle istruzioni riportate in questo
libretto per utilizzare l'elettrodomestico.
• Non spostare l'elettrodomestico
quando è in funzione.
• Non utilizzare l'elettrodomestico
su una supercie inclinata.
• Non spingere gli ingredienti
nell'imbuto con le dita o con altri
utensili. Utilizzare sempre
l'apposito spingitore fornito
in dotazione. Non introdurre
la mano o le dita nell'imbuto
quando è montato sull'elettrodomestico.
• Non spremere frutta a nocciolo
a meno che semi e/o noccioli
non siano stati rimossi.
• Vericare sempre che l'apparecchio sia spento (OFF) e che
il cestello ltrante in acciaio
4
Page 81

IT
inossidabile e il motore siano
completamente fermi prima
di rilasciare la leva del blocco
di sicurezza e/o prima di
spostare l'apparecchio, quando
non è in uso, e prima di smon-
tarlo, pulirlo e riporlo.
• Pulire e asciugare eventuali
liquidi rovesciati sulla supercie
sottostante o circostante l'elettrodomestico o sull'apparecchio
stesso prima di continuare
a utilizzarlo.
• Fare attenzione nel manipolare
il cestello ltrante in acciaio
inossidabile poiché le piccole
lame alla base del cestello sono
molto alate. L'uso non corretto
potrebbe provocare lesioni.
• Le lame del frullatore sono
alate. Prestare la dovuta
attenzione quando si manipola,
si svuota o si pulisce il boccale
del frullatore. Rimuovere
la buccia da tutti gli agrumi
prima della spremitura.
• Non utilizzare l'elettrodomestico
se il componente rotante
(cestello ltrante) o il coperchio
sono danneggiati.
• Assicurarsi sempre che il coper-
chio dell'imbuto sia ben ssato
prima di accendere il motore.
• Non mettere in funzione
l'apparecchio senza aver
posizionato correttamente
il contenitore raccogli-polpa.
• Non sbloccare la leva di sicu-
rezza mentre l'apparecchio
è in funzione.
• Un esempio rappresentativo
del carico massivo previsto per
questo apparecchio è di 450 g
di pezzi di banana congelati
e 1000 g di latte miscelati
alla massima velocità per
30 secondi.
• Non spremere più di 3 kg
di carote alla volta.
• Evitare di porre il boccale
del frullatore sopra la base
del motore mentre il motore
sta ancora girando.
• Evitare di far funzionare
l'elettrodomestico senza
ingredienti nel boccale.
• Non tentare mai di far funzionare l'elettrodomestico
con lame danneggiate o con
utensili o altri corpi estranei
all'interno del boccale.
• Evitare di sottoporre il boccale
a estremi di temperatura, ad
esempio evitare di immergere
un boccale freddo in acqua
bollente e viceversa.
• Prima di avviare l'elettrodomestico, vericare che il coperchio
del boccale sia ssato
correttamente per evitare
la fuoriuscita del contenuto.
• Non rimuovere il boccale
dalla base motore mentre
il frullatore è in uso.
5
Page 82

• Non utilizzare il frullatore
quando sul display LCD lam-
peggia la scritta OVERLOAD
PROTECTION (protezione
sovraccarico). In questo caso
scollegare il frullatore dalla
rete e attendere 30 minuti,
nché il motore non si è rareddato. Una volta rareddato,
è possibile tornare a utilizzare
il frullatore come di consueto.
• Non sottoporre a lavorazione
liquidi molto caldi o bollenti.
Lasciarli rareddare prima
di versarli nel boccale
del frullatore.
• Per proteggersi dalle scariche
elettriche, non immergere la
spina, il cavo di alimentazione
o l'elettrodomestico in acqua
o in qualsiasi altro liquido.
• Non utilizzare l'elettrodomestico
se il cavo di alimentazione,
la presa o l'elettrodomestico
stesso subiscono qualsiasi tipo
di danneggiamento. Se l'elettrodomestico è danneggiato
o richiede un intervento
di manutenzione diverso dalla
pulizia, contattare il Servizio
clienti Sage o visitare il sito
Web sageappliances.com.
Questo simbolo indica che
l'apparecchio non può
essere smaltito con i riuti
domestici comuni. Deve
essere conferito presso un centro
di smaltimento locale specializzato o presso un rivenditore che
fornisce questo servizio. Per
ulteriori informazioni, contattare
l'ucio comunale locale.
Per proteggersi da scosse
elettriche, non immergere
la base di alimentazione, il cavo
di alimentazione o la spina di
alimentazione in acqua ed evitare
che l'umidità entri in contatto con
queste parti. Evitare di versare
acqua sul connettore della base
di alimentazione. Durante la
pulizia, non immergere la base
di alimentazione in acqua.
SOLO PER USO DOMESTICO
CONSERVARE QUESTE ISTRUZIONI
6
Page 83

IT
Componenti
H
A
B
C
D
E
F
G
A. Spingitore (non lavabile in lavastoviglie)
B. Coperchio dello spremitore (lavabile in lavastoviglie)
C. Cestello ltrante in acciaio inossidabile
(lavabile in lavastoviglie)
D. Copertura del ltro (lavabile in lavastoviglie)
E. Leva del blocco di sicurezza
Impedisce il funzionamento della base del motore
se il coperchio non è bloccato in posizione.
F. Pannello di controllo
G. Base del motore in acciaio inossidabile
H. Tappo misuratore interno (lavabile in lavastoviglie)
I
J
K
L
M
I. Boccale da 1,5 litri e coperchio
(lavabile in lavastoviglie)
J. Bocchetta di uscita (lavabile in lavastoviglie)
Può essere posizionata sul beccuccio di uscita
per raccogliere il succo direttamente in un
bicchiere.
K. Tappo del sistema antigoccia
L. Contenitore raccogli-polpa (lavabile in lavastoviglie)
M. Spazzola di pulizia
Da utilizzare per il cestello ltrante in acciaio
inossidabile.
Informazioni sui valori nominali
220-240V~ 50 Hz 1350 W
7
Page 84

Montaggio
PREPARAZIONE AL PRIMO UTILIZZO
Lavare il coperchio, il tappo misuratore interno,
il boccale, la copertura del ltro, il cestello
ltrante, il coperchio dello spremitore,
lo spingitore e il contenitore raccogli-polpa
con acqua tiepida e sapone, usando un
panno morbido. Sciacquare e asciugare
completamente.
Posizionare la base del motore su una
supercie piana e asciutta, ad esempio
il piano cucina. Assicurarsi sempre che
la manopola sulla base del motore sia impostata su OFF e che il cavo sia scollegato
dalla presa.
SPREMITURA
1. Posizionare la copertura del ltro sulla
base del motore.
2. Allineare le frecce alla base del cestello
ltrante in acciaio inossidabile con le
frecce sul raccordo della base del motore
e spingere verso il basso no a udire
uno scatto, per garantire l'aderenza
alla base del motore.
3. Allineare il coperchio dello spremitore
con la copertura del ltro, posizionando la parte inferiore dell'imbuto sopra il
cestello ltrante in acciaio inossidabile.
8
Page 85

IT
4. Sollevare la leva del blocco di sicurezza e accomodarla nei due solchi sui
lati del coperchio dello spremitore.
5. La leva del blocco di sicurezza dovrebbe
adesso trovarsi in posizione verticale
ed essere ssata alla parte superiore del coperchio dello spremitore.
6. Far scorrere lo spingitore verso il
basso nell'imbuto allineando il solco
dello spingitore con la piccola spor-
genza presente nella parte interna
dell'imboccatura dell'imbuto.
Solco dello
spingitore
Piccola
sporgenza
all'interno
dell'imbuto
7. Mettere il contenitore raccogli-polpa
in posizione inclinando e sollevando
leggermente la base del motore. Inserire
il contenitore raccogli-polpa sotto
il coperchio dello spremitore sul retro,
vericando che il bordo anteriore si trovi
sotto il bordo posteriore della copertura
del ltro e che il bordo inferiore sia innestato sul fondo della base del motore.
8. Se lo si desidera, montare il tappo
antigoccia sopra la bocchetta di
uscita del succo. Sarà così possibile
evitare gocciolamenti dalla bocchetta di uscita dopo la spremitura.
v
9
Page 86

9. Mettere il coperchio sul boccale
del frullatore e posizionare il boccale sotto il beccuccio di uscita.
10. Facoltativo: per la spremitura in una
tazza, è possibile adattare la bocchetta
per succo sulla bocchetta di uscita.
MISCELAZIONE
1. Posizionare il frullatore sulla base del
motore, con il boccale in posizione
verticale. La maniglia del frullatore
può essere posizionata sul lato
sinistro o destro dell'apparecchio.
2. Sollevare la leva del blocco di sicurezza e posizionarla nei due solchi
sui lati del frullatore.
10
Page 87

3. Aggiungere alimenti o liquidi nel boccale
del frullatore, sempre senza superare
il segno del livello "MAX". Chiudere bene
il coperchio sopra il boccale del frullatore.
Inserire il coperchio di misurazione interno
trasparente nel coperchio del frullatore
e ruotare in senso orario per bloccarlo
in posizione. Il boccale dispone di un
coperchio Sage
®
Assist™. Questa carat-
teristica consente di ssare saldamente
il coperchio al boccale del frullatore,
evitando che si sposti durante il funzionamento.
4. Assicurarsi che il tappo del beccuccio
di uscita del coperchio del frullatore sia
ssato in posizione e chiuso. Grazie
al design con anello di estrazione, è
possibile rimuovere facilmente il coperchio con una semplice azione di leva.
IT
Una volta che l'apparecchio è assemblato
con la congurazione frullatore o spremitore,
collegare il cavo di alimentazione a una presa
di corrente da 220-240 V.
Premere il pulsante ON/OFF per accendere
l'apparecchio. Il pulsante ON/OFF si illumina.
Il display LCD si illumina e mostra "0:00".
11
Page 88

Funzioni
G
R
E
E
N
S
M
O
O
T
H
I
E
OVERLOAD
1 2 3 4 5
PROTECTION
6 7 8 9 10
SOFT HARD
S
M
O
O
T
H
I
E
P
U
L
S
E
I
C
E
C
H
R
S
U
+
N
E
Z
O
R
F
L
I
A
T
K
C
O
O
T
U
A
N
A
E
L
C
C
GUIDA INTRODUTTIVA
Il pulsante ON/OFF imposta la modalità
READY (PRONTO).
PROGRAMMI PREIMPOSTATI
MISCELAZIONE
L'apparecchio ha 5 funzioni preimpostate:
Smoothie (Frullato), Green Smoothie
(Frullato verde), Pulse/Ice Crush (Impulsi/
Tritaghiaccio), Auto Clean (Pulizia automatica) e Frozen Cocktail (Cocktail ghiacciato).
Questi cicli pre-programmati regolano
automaticamente il tempo e la velocità per
ottimizzare i risultati della miscelazione.
Questi programmi vengono attivati solo
quando l'apparecchio è in modalità frullatore. Non possono essere utilizzati quando
l'apparecchio è in modalità spremitore.
Selezionare la funzione desiderata premendo
il pulsante funzione corrispondente. L'unità
inizia a funzionare e il pulsante della funzione
selezionata si illumina. Il timer inizia il conto
alla rovescia e il programma termina automaticamente quando il timer raggiunge "0:00".
È possibile mettere in pausa il programma
e il timer premendo il pulsante di pausa.
Per riprendere l'esecuzione, premere
di nuovo il pulsante del programma.
Per annullare, premere di nuovo il pulsante
di messa in pausa.
12
È anche possibile annullare il programma
in qualsiasi momento premendo il pulsante
ON|OFF.
Se si ruota la manopola di controllo velocità,
il programma viene interrotto e il frullatore
viene impostato sulla modalità manuale
con velocità iniziale 1.
Smoothie (Frullato)
Per frullati con prodotti a base di latte,
una combinazione di velocità e impulsi
a intermittenza favorisce la miscelazione
e l'aerazione degli ingredienti, in modo
da ottenere una consistenza cremosa.
Green Smoothie (Frullato verde)
Per miscelare frutta/verdura a pezzi no
a ottenere una bevanda dalla consistenza
uniforme. Una combinazione di velocità
elevate scompone le bre resistenti in particelle molto ni.
Frozen Cocktail (Cocktail ghiacciato)
Per creare cocktail e drink a base di ghiaccio come Margarita, Daiquiri e Slushie.
Programma di frantumazione del ghiaccio
seguito da una breve miscelazione.
Page 89

IT
Pulse/Ice Crush (Impulsi/Tritaghiaccio)
Programma di funzionamento con impulsi
a intermittenza, utile per frullare gli alimenti
no a una consistenza uniforme o per triturare
cubetti di ghiaccio. Utilizzare il pulsante
PULSE (Impulsi) quando i pezzi da frullare
sono troppo duri o grandi e non circolano
facilmente nel boccale del frullatore. Il programma a impulsi rileva automaticamente
quando il ghiaccio è stato completamente
tritato e termina in anticipo, con una serie
di impulsi più lunghi.
La quantità massima di cubetti di ghiaccio
da inserire senza liquidi nel boccale
del frullatore è pari a 250 g (equivalente
a un vassoio da ghiaccio standard).
Auto Clean (Pulizia automatica)
Utilizzare questa funzione per rimuovere
la maggior parte degli ingredienti dalle pareti
e dalle lame del frullatore. Versare 2 tazze
d'acqua calda con sapone e premere il
pulsante Clean (pulizia). In caso di ingredienti
appiccicosi, densi o più dicili da rimuovere,
aggiungere mezzo cucchiaino di detergente
liquido per piatti per pulire a fondo. Per
risultati ottimali, pulire il boccale del frullatore con queste modalità subito dopo l'uso.
La funzione Auto Clean (Pulizia automatica)
pulisce solo il boccale del frullatore.
Non pulisce lo spremitore.
FUNZIONAMENTO MANUALE
MANOPOLA DI CONTROLLO
DELLA VELOCITÀ
Miscelazione
Ruotare la manopola di controllo della
velocità in senso orario per selezionare
una delle 10 impostazioni di velocità, dalla
più lenta (STIR, Mescola) alla più veloce
(PULVERIZE, Polverizza). Il timer inizia
il conteggio del tempo e la miscelazione
termina automaticamente quando il timer
raggiunge "2:00".
È possibile mettere in pausa la miscelazione premendo il pulsante di pausa. Premere
di nuovo il pulsante di pausa per annullare
l'operazione o ruotare la manopola per
riprendere la miscelazione dalla velocità 1.
Per interrompere la miscelazione, ruotare
la manopola di controllo della velocità in senso
antiorario su READY (Pronto) o premere
il pulsante ON|OFF.
SPREMITURA
Lavare la frutta o gli ortaggi da utilizzare
nell'apparecchio. Non sarà necessario tagliare
in pezzi su misura la maggior parte della frutta
e degli ortaggi come mele, carote e cetrioli,
in quanto possono essere inseriti interi
nell'imbuto. Per ortaggi come barbabietole,
carote, ecc., assicurarsi di eliminare tutto il
terriccio, lavare con cura e rimuovere le foglie
prima dell'uso.
1. Collegare il cavo di alimentazione
a una presa di corrente da 220-240 V.
IMPORTANTE
Non inserire gli ingredienti nell'imbuto prima
che lo spremitore abbia raggiunto la velocità selezionata.
2. Accensione dello spremitore
Ruotare la manopola per impostare la
velocità desiderata. Ruota la manopola
su valori bassi (1-5) per frutta e verdura
di consistenza tenera e su valori più alti
(6-10) per frutta e verdura di consistenza
dura. Consultare la Tabella di selezione
della velocità nella pagina successiva
per scegliere la velocità adeguata al tipo
di ingrediente e ottenere la massima resa.
L'intervallo "Low" (Bassa) non garantisce la massima resa per alcuni prodotti,
ma consente di estrarre il succo producendo un rumore signicativamente
più basso.
3. Mentre l'elettrodomestico è in funzione,
introdurre gli ingredienti nell'imbuto
e utilizzare lo spingitore per guidarli con
delicatezza verso il basso. Per estrarre
la massima quantità di succo, esercitare
sempre lentamente la pressione sullo
spingitore.
4. Boccale raccogli-succo pieno
È possibile continuare a spremere no
a raggiungere il livello massimo indicato sul boccale raccogli-succo.
13
Page 90

ATTENZIONE
Non utilizzare in nessun caso le dita, le mani
o utensili per spingere gli ingredienti dentro
l'imbuto o per pulire l'imbuto. Utilizzare
sempre l'apposito spingitore in dotazione.
ATTENZIONE:
lame alate
Il cestello ltrante in acciaio inossidabile
contiene piccole lame alate per tagliare
e aettare frutta e ortaggi. Evitare di toccare
le lame nel maneggiare il cestello ltrante.
TABELLA DI SELEZIONE
DELLA VELOCITÀ
Tipo di alimenti Velocità
MELE
SPINACINI
BARBABIETOLE
MIRTILLI
BROCCOLI
CAVOLO
PEPERONI
CAROTE
SEDANO
AGRUMI (senza buccia)
CETRIOLO
ZENZERO
UVA (senza semi)
MELONE VERDE (senza buccia) 3
CAVOLO RICCIO 9
10
9
10
5
7
9
9
10
4
1
4
8
2
14
KIWI (senza buccia) 5
MANGO (senza buccia,
senza nocciolo)
MENTA 9
PESCHE (senza buccia,
senza nocciolo)
PERE 6
ANANAS (senza buccia) 7
RABARBARO 8
ZUCCA 9
FRAGOLE 4
POMODORI 4
ANGURIA (senza buccia) 3
ZUCCHINE 6
5
5
Page 91

Manutenzione
e pulizia
IT
Vericare sempre che il motore sia spento
premendo il pulsante ON/OFF. Quindi
scollegare il cavo.
PULIZIA
1. Rimuovere il boccale del frullatore.
2. Sbloccare la leva di sicurezza, sollevare
tutto l'apparato di raccolta del succo
e posizionarlo nel lavello.
3. Rimuovere il contenitore raccogli-polpa.
Smaltire quanta più polpa possibile nella
spazzatura/compost. Sciacquare tutti
i componenti dopo l'uso (eccetto la base
del motore) sotto l'acqua corrente per
rimuovere la maggior parte dei residui
di succo e polpa. Lavare con acqua tiepida
e sapone, usando un panno morbido.
Per evitare che gli alimenti si asciughino
sulla supercie delle lame, del ltro o dei
componenti trasparenti, sciacquare e lavare
subito dopo l'uso.
CONTENITORE RACCOGLIPOLPA
Per facilitare la pulizia, rivestire l'interno del
contenitore raccogli-polpa con un sacchetto
biodegradabile per raccogliere la polpa.
BASE DEL MOTORE
Pulire con un panno morbido umido. Non
immergere la base del motore in sostanze
liquide.
BOCCALE E COPERCHIO
Per mantenere pulito il boccale ed evitare
che gli alimenti si asciughino sulla supercie delle lame e del boccale, eseguire la
procedura seguente subito dopo l'uso.
Sciacquare e rimuovere la massima quantità possibile di alimenti dal boccale e dal
coperchio.
Riempire il boccale con 500 ml di acqua
calda, montare il coperchio e premere il
pulsante AUTO CLEAN (Pulizia automatica).
Se ingredienti densi o appiccicosi richiedono
una pulizia più a fondo, aggiungere qualche
goccia di detergente liquido per piatti.
Sciacquare di nuovo il boccale e il coperchio
e/o lavarli separatamente in acqua saponata tiepida, utilizzando un panno morbido
o uno scovolino.
La miglior pulizia del boccale si ottiene
immediatamente dopo l'uso.
CESTELLO FILTRANTE
Per garantire risultati ottimali, pulire sempre
a fondo il cestello ltrante subito dopo l'uso
utilizzando la spazzola in dotazione.
Se i residui di polpa si seccano sul ltro,
possono causare l'ostruzione delle nissime
maglie del ltro e ridurre l'ecienza dello
spremitore. Se necessario, è possibile
immergere il cestello ltrante in acqua calda
saponata per 10 minuti.
PRODOTTI PER LA PULIZIA
Non utilizzare spugnette abrasive o detergenti
con particelle abrasive sulla base del motore
poiché tali prodotti possono rigare le superci.
Utilizzare solo acqua tiepida con sapone
e un panno morbido.
LAVASTOVIGLIE
Tutti i componenti eccetto la base del motore
e lo spingitore sono lavabili in lavastoviglie.
Il boccale del frullatore può essere posto sul
ripiano inferiore della lavastoviglie. Il coperchio e il tappo di misurazione interno devono
essere lavati solo sul ripiano superiore.
Tuttavia il lavaggio ripetuto dei componenti
in lavastoviglie può usurarli, a causa
dell'esposizione a detergenti aggressivi,
acqua calda e pressione.
15
Page 92

Il lavaggio in lavastoviglie potrebbe inoltre
causare il deterioramento dei componenti.
Ispezionare regolarmente i componenti
e smettere di utilizzare il prodotto se si
rilevano tracce di danni.
MACCHIE PERSISTENTI
Gli alimenti con odori forti quali l'aglio,
il pesce e alcune verdure quali le carote
possono lasciare odori o macchie residue
sul boccale e sul coperchio del frullatore.
Per rimuoverle, immergere il boccale
e il coperchio del frullatore per 5 minuti in
acqua calda e sapone. Quindi lavare con un
detergente delicato e acqua calda, risciac-
quare bene e asciugare a fondo. Riporre il
boccale senza coprirlo con il coperchio.
CONSERVAZIONE
Riporre l'apparecchio in posizione verticale,
con il boccale assemblato sulla base
del motore o accanto alla base stessa.
Non posizionare alcun oggetto sull'elettrodomestico. Non coprire il boccale con
il coperchio, per favorire l'aerazione.
ATTENZIONE
Gli oli contenuti nella scorza degli agrumi
possono danneggiare il boccale del frullatore
se lasciati a lungo a contatto con la sua
supercie. Dopo la lavorazione di scorze
di agrumi, pulire sempre immediatamente
il boccale del frullatore.
16
Page 93

Risoluzione
dei problemi
IT
Il display LCD
si accende ma
l'apparecchio non
risponde ai comandi
Gli alimenti non
vengono triturati
in modo uniforme
Il risultato è troppo
ne o acquoso
Si accumula una
quantità eccessiva
di polpa nel cestello
ltrante in acciaio
inossidabile
Polpa troppo
bagnata e poco
succo
• La leva del blocco di sicurezza potrebbe non essere ssata correttamente
in posizione verticale. In questo caso il display LCD mostra l'animazione .
Controllare che la copertura superiore sia allineata correttamente e che
la leva del blocco di sicurezza sia ssata nei due solchi sui lati del coperchio
dello spremitore o del boccale del frullatore.
• Questa situazione può vericarsi quando si aggiunge una quantità
eccessiva di ingredienti in un'unica soluzione. Introdurre una quantità
inferiore e, se necessario, lavorare in più fasi.
• Provare a frullare per periodi di tempo inferiori. Per controllare meglio
la lavorazione, utilizzare la funzione PULSE (Impulsi).
• Spegnere l'apparecchio. Smontarlo e rimuovere la polpa in eccesso
dal coperchio dello spremitore.
• Rimontare l'elettrodomestico e continuare a estrarre il succo. Alternare
ingredienti dalla consistenza morbida e dura può contribuire a evitare
questo problema.
• Più il ltro è pulito, maggiore sarà la quantità di succo estratta e la polpa
prodotta sarà più secca. Assicurarsi di pulire a fondo lo spremitore subito
dopo ogni utilizzo. Rimuovere il cestello ltrante in acciaio inossidabile
e pulire a fondo le pareti del cestello con uno spazzolino. Sciacquare
il ltro in acqua calda. Se le maglie sono ostruite, immergere il cestello
in una soluzione di acqua calda con il 10% di succo di limone per ammorbidirle, o lavare in lavastoviglie (ripiano superiore). Questa operazione
rimuoverà l'accumulo di bre in eccesso, che potrebbe essere la causa
del problema.
• Una pressione eccessiva sullo spingitore può rallentare il motore e ridurre
la resa. Evitare di esercitare una pressione eccessiva sullo spingitore
quando si inseriscono gli ingredienti nell'imbuto.
• Se si spremono grandi quantità di ingredienti brosi, come rabarbaro
o ananas, potrebbe essere necessario pulire il cestello ltrante.
Il succo si inltra
fra il bordo della
copertura del ltro
e il coperchio dello
spremitore
Il succo schizza
fuori dal beccuccio
di uscita
Rimane del succo
nella copertura del
ltro dopo l'arresto
dello spremitore
• Impostare una velocità più bassa e spingere gli ingredienti più lentamente
nell'imbuto.
• Assicurarsi che non si siano accumulati residui nel cestello ltrante.
• Il succo viene estratto troppo velocemente: impostare una velocità più
bassa e far scorrere lo spingitore più lentamente nell'imbuto.
• Ruotare la manopola impostando la velocità massima e azionare per
5 secondi. Questa operazione aiuterà a far scendere il succo rimanente
nel boccale.
17
Page 94

Il motore sembra
fermarsi durante
il funzionamento
• La polpa bagnata può accumularsi sotto il coperchio dello spremitore
e provocare un blocco se lo spremitore viene usato in modo continuativo
senza pulirlo. Se ciò si verica, smontare l'elettrodomestico e seguire
le istruzioni per la pulizia della copertura del ltro, del cestello ltrante
in acciaio inossidabile e del coperchio dello spremitore. L'apparecchio
può anche arrestarsi se viene esercitata una pressione eccessiva quando
si spingono gli ingredienti nell'imbuto. In questo caso, esercitare meno
pressione quando si spingono gli alimenti nell'imbuto.
• Accendere l'apparecchio prima di introdurre gli ingredienti nell'imbuto.
Se si spingono gli ingredienti nell'imbuto prima che il motore abbia
raggiunto la massima velocità può vericarsi l'arresto del motore o un
sovraccarico. Esercitare una pressione da lieve a moderata sullo spingitore.
Esercitando una pressione minore è possibile estrarre maggiori quantità
di succo.
• Se si seleziona la velocità bassa, frutta e ortaggi di consistenza dura
sottoporranno il motore a uno sforzo eccessivo. Consultare la guida di
riferimento per determinare la velocità corretta per la frutta o gli ortaggi
selezionati.
Tutte le spie del
pannello di controllo
lampeggiano
e il display LCD
visualizza Overload
Protection (Protezione
da sovraccarico)
• Questo indica che il dispositivo di protezione da sovraccarico è attivo
a causa del riscaldamento o del blocco del motore.
• Per ripristinare la protezione, scollegare la presa di alimentazione,
quindi ricollegarla e accendere l'apparecchio.
• Se il messaggio di protezione da sovraccarico è ancora visibile sul display,
scollegare l'apparecchio e lasciarlo rareddare per almeno 30 minuti,
quindi riprovare. Per essere reimpostato correttamente, l'apparecchio
deve essere scollegato dalla presa di alimentazione durante il
rareddamento.
• Se dopo il rareddamento il problema persiste, l'apparecchio presenta
un problema interno. Contattare il Servizio clienti Sage o visitare il sito
Web www.sageappliances.com.
• Notare che l'attivazione della protezione da sovraccarico indica un uso
anomalo dell'apparecchio, ad esempio un carico eccessivo nel boccale,
una spinta eccessiva durante la spremitura o un uso continuato eccessivo.
Per evitare i sovraccarichi e prolungare la vita dell'apparecchio, leggere
con attenzione le istruzioni per l'uso e tutte le informazioni correlate.
18
Page 95

Garanzia
GARANZIA LIMITATA DI 2 ANNI
Sage Appliances ore una garanzia per l’utilizzo
domestico di questo prodotto in speciche aree
geograche, per 2 anni dalla data di acquisto. La
garanzia copre eventuali malfunzionamenti causati
da difetti di fabbricazione o dei materiali. Durante il
periodo coperto dalla garanzia,
Sage Appliances sarà tenuta a riparare, sostituire o
rimborsare l’importo corrispondente ai
prodotti difettosi (a sola discrezione di Sage
Appliances).
Tutti i diritti di garanzia previsti dalla legislazione
nazionale applicabile verranno rispettati e non
possono essere annullati dalla presente garanzia.
Per i termini e le condizioni complete della garanzia
e per istruzioni su come inviare una richiesta di
risarcimento, visitare il sito
www.sageappliances.com.
IT
19
Page 96

Note
20
Page 97

the 3X Bluicer Pro™
ES
GUÍA RÁPIDA
Page 98

Índice
2 Sage® recomienda seguridad
ante todo
7 Componentes
8 Ensamblaje
12 Funciones
15 Cuidado y limpieza
17 Resolución de problemas
SAGE®
RECOMIENDA
SEGURIDAD
ANTE TODO
En Sage® nos preocupa
mucho la seguridad.
Para el diseño y la
fabricación de nuestros
productos de consumo
tenemos en cuenta antes
que nada la seguridad de
nuestros clientes, como tú.
También te rogamos que
actúes cuidadosamente
al usar cualquier aparato
y que tomes las
precauciones siguientes.
MEDIDAS
DE SEGURIDAD
IMPORTANTES
LEE TODAS LAS
INSTRUCCIONES ANTES
DEL USO Y GUÁRDALAS
• Antes de usar el producto por
primera vez, asegúrate de que
la tensión eléctrica de la toma
de corriente coincida con la
que gura en la etiqueta en la
base del aparato. Este aparato
está equipado con un cable
de alimentación que tiene un
conductor de conexión a tierra
con su respectiva clavija.
El aparato debe conectarse
a tierra utilizando una toma
de corriente apropiada.
En el caso de una falla eléctrica,
la conexión a tierra reduce
el riesgo de descarga eléctrica.
• Jamás debes cortar o extraer
la tercera clavija (con conexión
a tierra) del cable de alimentación ni usar un adaptador.
• Ante cualquier duda con
respecto a las instrucciones
sobre conexión a tierra o si
no sabes si el aparato está
correctamente puesto, consulta
con un electricista calicado.
• Se recomienda la instalación
de un interruptor diferencial
para ofrecer seguridad adicional
al usar todos los aparatos
eléctricos. Se recomienda usar
2
Page 99

ES
interruptores de seguridad con
una corriente de funcionamiento
nominal de no más de 30 mA.
Solicita asesoramiento
profesional a un electricista.
• Retira y desecha cualquier
material de embalaje de forma
segura, antes del primer uso.
• Para evitar riesgos de asxia
de niños pequeños, desecha
correctamente la cubierta
protectora del enchufe.
• Asegúrate siempre de que
el aparato esté correctamente
ensamblado según las
instrucciones antes de usarlo.
El uso del aparato sin
haber sido ensamblado
correctamente puede causar
un mal funcionamiento del
producto, daños en el mismo
o riesgos para la seguridad,
incluidas lesiones personales.
• Este aparato es solo para uso
doméstico. No utilices el aparato
para propósitos distintos del
establecido. No se debe utilizar
en vehículos o embarcaciones
en movimiento. No se debe
utilizar al aire libre. El uso
inapro piado podría causar
lesiones.
• Coloca el aparato sobre una
supercie estable, resistente
al calor, nivelada y seca.
No lo pongas muy cerca del
borde de la encimera ni cerca
de una fuente de calor
(por ejemplo, una placa
de cocina eléctrica,
un quemador o un horno).
• Desenrolla completamente
el cable de alimentación antes
de usar el aparato.
• Evita que el cable de alimen-
tación sobresalga del borde de
una encimera o de una mesa.
No permitas que el cable de
alimentación toque supercies
calientes ni que se anude
o enrede.
• Supervisa el aparato en todo
momento mientras esté
en funcionamiento.
• Siempre debes apagar
el aparato usando el botón
ON | OFF antes de limpiarlo,
dejarlo sin supervisión, moverlo,
ensamblarlo o guardarlo.
Apaga y desenchufa de la toma
de corriente.
• Siempre apaga el aparato
usando el botón ON | OFF
y desenchúfalo cuando no
lo estés usando, antes de
desmontarlo, para ensamblar
piezas y antes de limpiarlo.
Para desenchufarlo, sujeta
el enchufe y tira de él para
extraerlo de la toma de corriente.
Nunca tires del cable.
• Inspecciona regularmente
el cable de alimentación,
el enchufe y el aparato para
detectar cualquier daño.
Si descubres cualquier daño,
deja de usar la máquina
inmediatamente y devuélvela
3
Page 100

al Centro de servicio autorizado
de Sage
®
más cercano para
que la examinen, reemplacen
o reparen.
• Mantén el aparato y los
accesorios limpios. Sigue
las instrucciones de limpieza
indicadas en este manual.
Cualquier procedimiento
que no esté incluido en este
manual de instrucciones debe
realizarse en un centro de
servicio autorizado de Sage
®
.
• El aparato no está diseñado
para ser usado por niños ni
personas con discapacidades
físicas o mentales, o sin
experiencia ni conocimientos
de uso. Es necesaria una
supervisión minuciosa cuando
cualquier aparato se usa
cerca de niños. Los niños
deben ser supervisados
para asegurarse de que
no jueguen con el aparato.
• No permitas que los niños
jueguen con este aparato.
• La limpieza del aparato no debe
ser realizada por niños.
• El aparato, el cable de
alimentación y todos los
componentes y accesorios
deben mantenerse fuera
del alcance de los niños
menores de 8 años.
• Nunca utilices accesorios
que no se suministran con
este producto o que no estén
autorizados por Sage
®
para
su uso en este producto.
El incumplimiento de esta
instrucción puede causar
un mal funcionamiento del
producto, daños en el mismo
o riesgos para la seguridad.
• No intentes hacer funcionar
el aparato con un método que
no sea el descrito en esta
publicación.
• No muevas el aparato mientras
esté en funcionamiento.
• No utilices el aparato sobre
una supercie inclinada.
• No introduzcas alimentos en
la abertura para alimentos con
los dedos u otros utensilios.
Utiliza siempre el empujador
de alimentos proporcionado.
No coloques las manos
o los dedos en la abertura
para alimentos cuando esté
conectado al aparato.
• No exprimas frutas con hueso
a menos que hayas quitado
antes las pepitas o los huesos.
• Asegúrate de que el producto
esté apagado, de que el ltro de
acero inoxidable haya dejado
de girar y de que el motor se
haya detenido completamente
antes de liberar el bloqueo de
seguridad o mover el aparato,
así como cuando no esté en
uso, y antes de desmontarlo,
limpiarlo y almacenarlo.
• Cualquier derrame signicativo
sobre la supercie de debajo
o alrededor del aparato,
4
 Loading...