

Page 1

MANUEL D’UTILISATION- BEDIENUNGSANLEITUNG- MANUALEDIUTILIZZAZIONE - USER MANUAL
MANUAL DE UTILIZACIÓN - GEBRUIKSAANWIJZING - BRUKSANVISNING
BETJENINGSVEJLEDNING -FOLHETODE UTILIZAÇÃO- Ο∆ΗΓΙΕ ΧΡΗΣΕΩ
M 3610G
Page 2
Recommendations and Precautions
1.Operation
Please read the following instructions carefully and follow them closely, they concern your personal safety and
can affect the operation of your equipment.
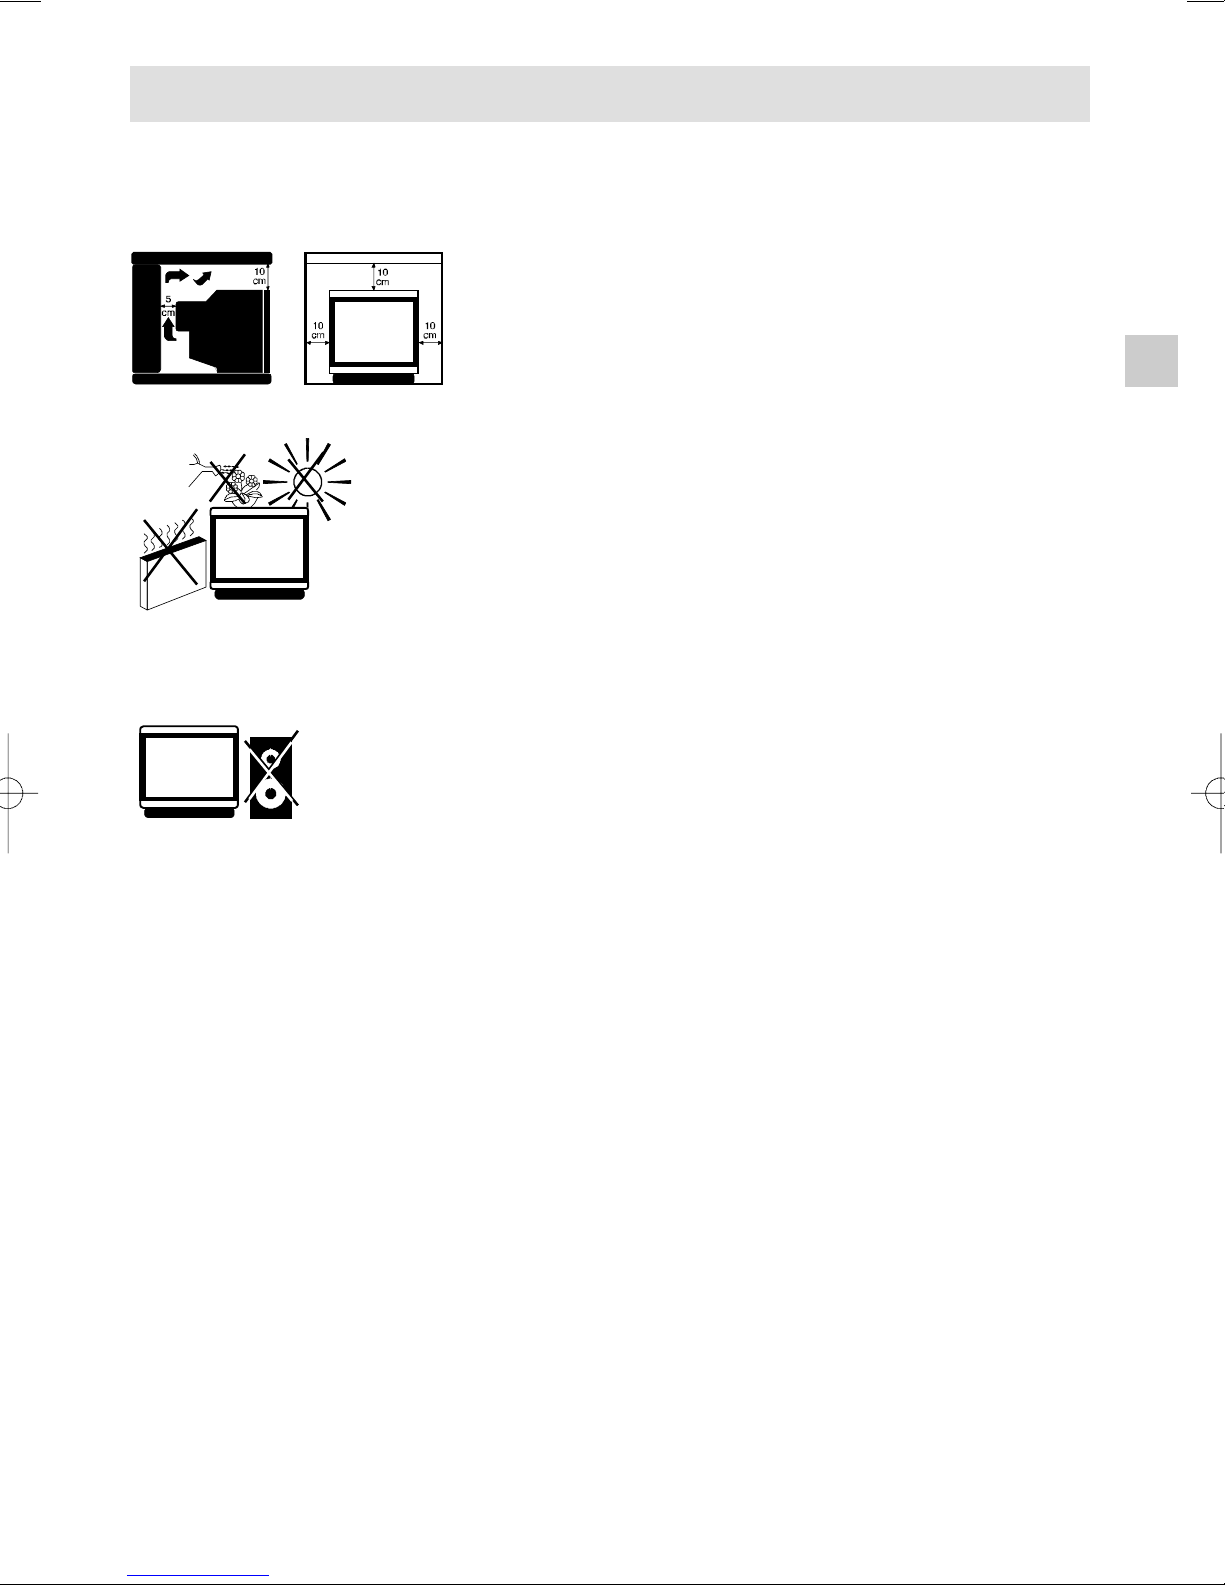
Television sets require ventilation to avoid overheating which can
damagecomponents. Makesure thattherearventilation openings are
not covered up by curtains, cloths, newspapers, etc. There must be
enoughroominside built–inunits toallow coolingair to circulatefreely.
Do not install the set next to heating.
Theapplianceis designedto operateina dry room.Shouldyou,forany
special reason, wish to use it outdoors (e.g. balcony, veranda, tent,
etc.), always make sure it is properly protected against any form of
DO NOT OBSTRUCT VENTILATION OPE-
NINGS.
AVOID WATER,
HEAT,
DIRECT SUNLIGHT.
Do not place audio loudspeakers next to
your TV set as the magnets in the speakers may cause coloured patches on the
screen.
moisture (dew, rain, splashing).
Before turning on a cold set in a warm room, wait until any
condensation on the screen has evaporated. Never open up the rear
panel of the television set. Haveyour aerial installedby an authorised
dealer or specialist.
At the end of the evening TV programme or in the event of prolonged
absence, you should switch off your set using the ON/OFF button.
Even if the ON/OFF switch is in the OFF position, the set is not
completely disconnected from the mains. To disconnect the set
completely, pull out the mains plug.
Remove the mains plug from the wall outlet in the following cases:
1. During thunderstorms. It is wise to disconnect the aerial plug too in
thiscase.
2. If you notice any odour or smoke coming from your set.
Additional information:
Your TV set is adequately shielded to prevent X–ray emission.
Acceleration voltage does not exceed the maximum value of 26 kV.
Work by unqualified technicians, modification of the high–voltage
setting or replacement of the tube with a model that does not comply
with the manufacturer’s specifications can lead to a considerable
increase in X–ray emission.
A set changed in any of the above ways no longer complies with the
manufacturer’s specifications and should not beput back into service.
GB
2. Cleaning
The screen should be cleaned using liquid window cleaner.
· Never use abrasive cleaners.
· Clean the front and cabinet using a soft cloth dipped in mild detergent. The use of solvents such as white spirit or
alcohol–based products may damage your set.
· Make sure to clean the vents at the rear of your set regularly.
3. Demagnetisation
The earth’s magnetic field may affect your television set, causing coloured patches to appear on the screen.
If this happens:
· Switch off the set using the ON/OFF button.
· Wait about an hour and then switch on again using the ON/OFF button.
This operation demagnetises the screen automatically. If coloured patches are still visible, repeat the procedure.
1
Page 3
GB
Connections
220-240V~50Hz
2
Page 4
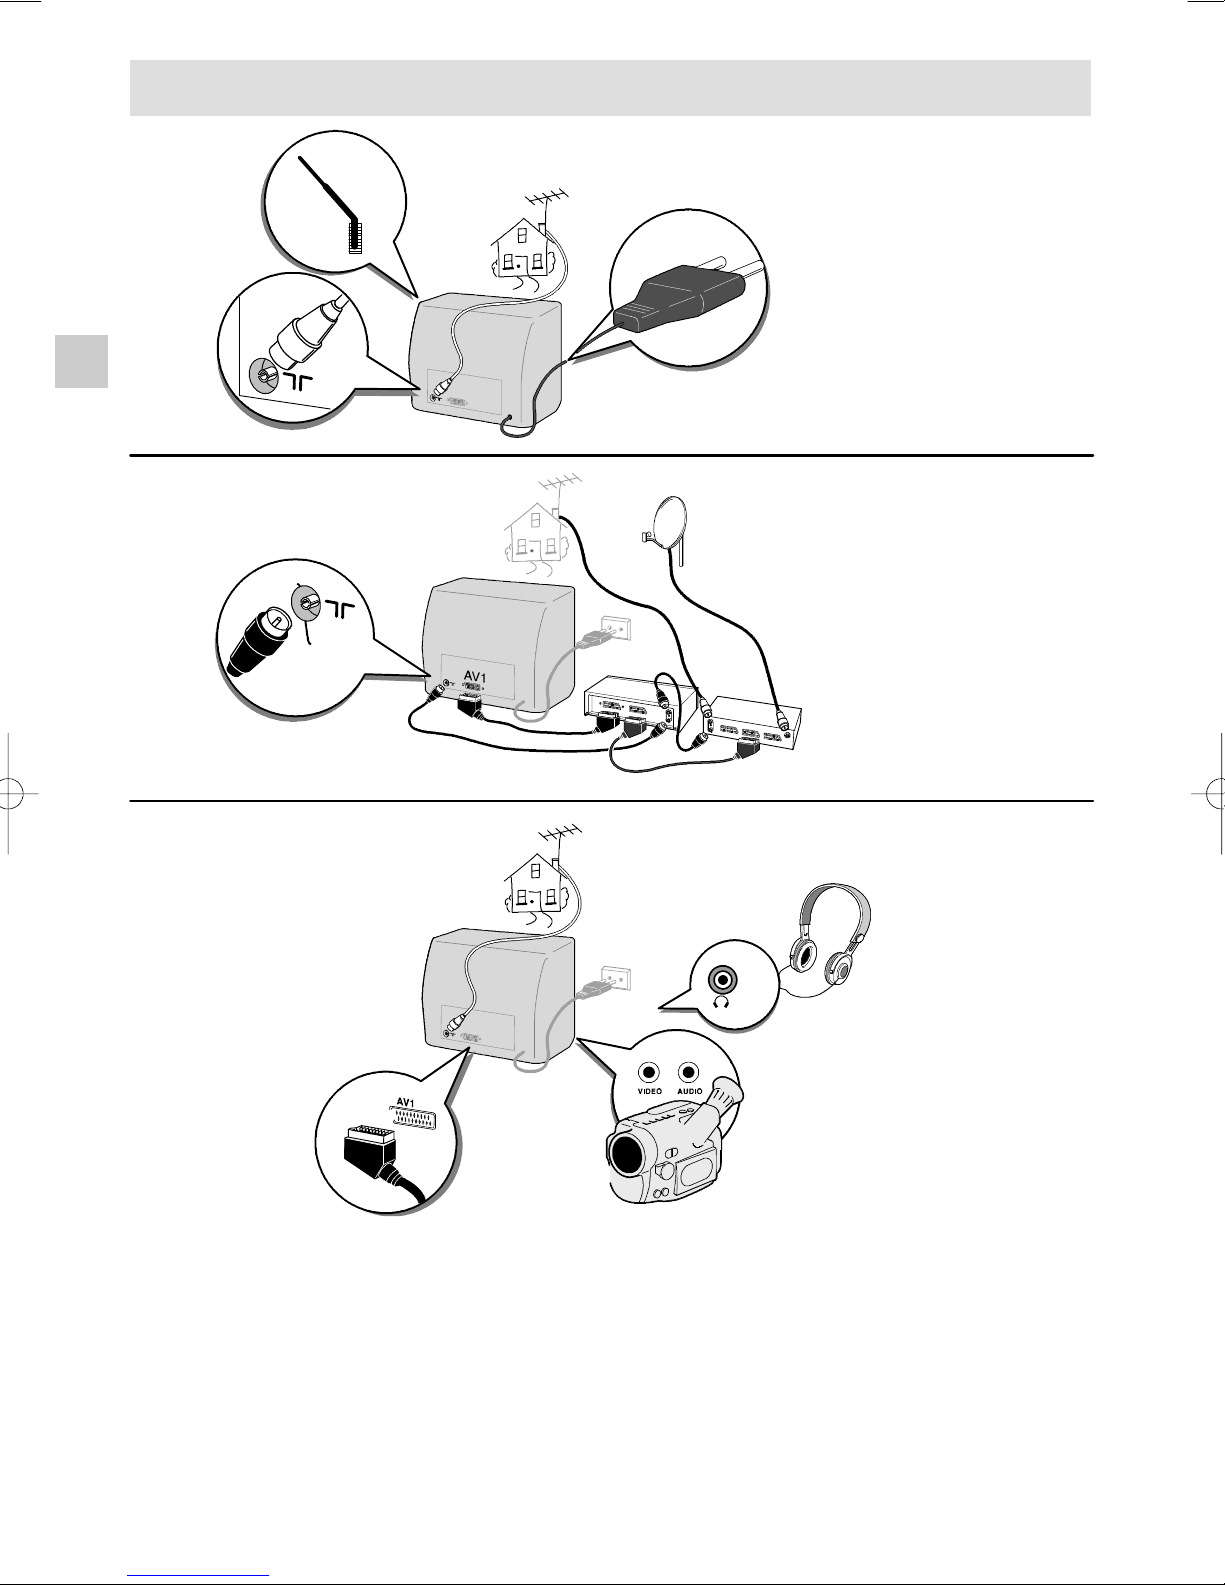
1. Aerial Socket
Enables connection of the aerial and, if required, a video reco rder (see manual for latter).
To tune the channel rese rved for your video recorder, start up the recorder then carry out
MANUAL CHANNEL SETTING operations.
Store at any prog ramm e ending with a 9 (9,19,29, etc.)
Each time you use the video recorder , switch to the channel assigned to it.
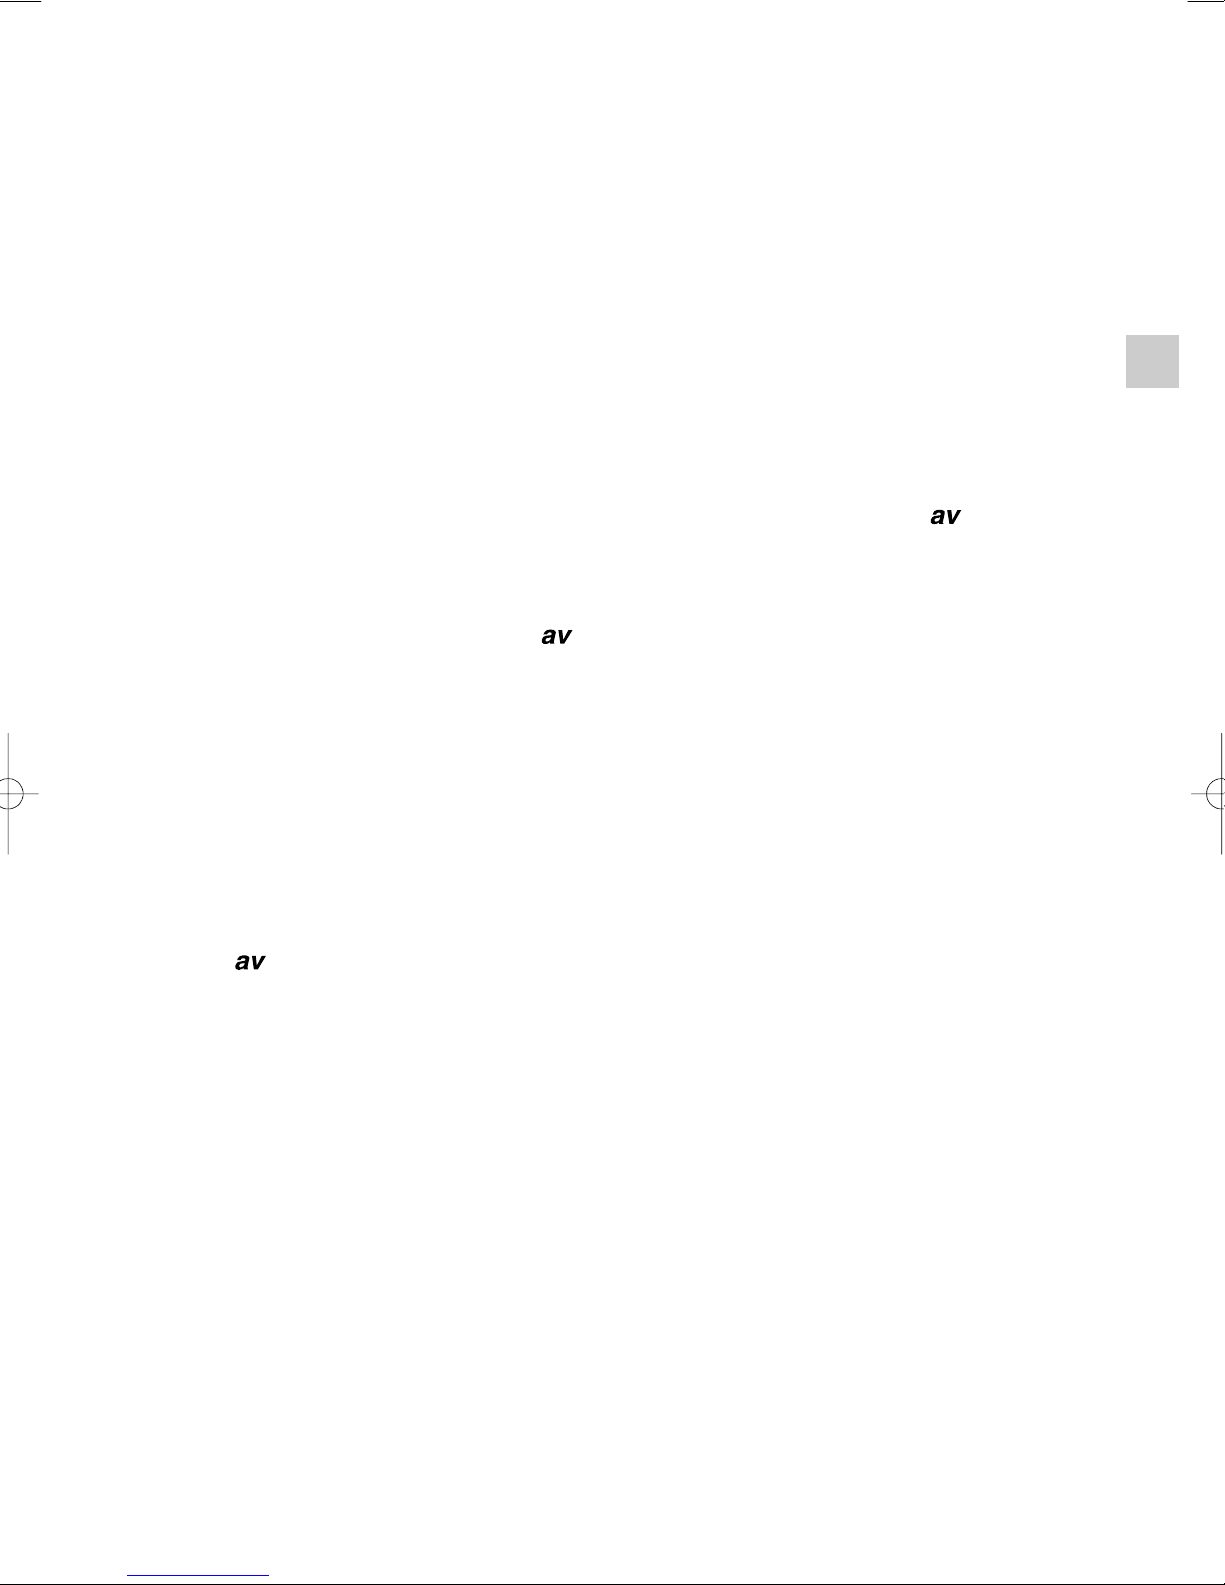
2. SCART Socket
This is used to connect:
– a VHS, 8 MM, S–VHS or Hi–8 video recorder or camcorder ,
– a PAY TV decoder,
– a video games console.
To use the connected device, select the audiovisual programme by pressing the
This selection is automatic f or some de vices.
A V is displa yed at the bottom o f the screen.
IfyouhaveanS-VIDEOdevice,pressthe
of the screen for a few seconds.
When you switch off the de vice and if you have not changed channel during pla y, the TV set
automatically returns to the previous channel.
If the TV set has been switched on by th e video recorder , it will be place d on stand–by when the
video recorder is switched off.
buttonagain. S-VIDEO is then displayedat the bottom
button.
3. Audio / Video CINCH Sockets
These are used to connect a VHS o r 8 mm camcorder.
GB
Press the
When you switch off th e connected de vice, the TV set remains in audio visual (AV) mode.
Call up the channel you wish to watch using the numerical keypad on the re mote control.
In order to maintain theoptimum sound and picture qualityof your TV set, avoidconnecting 2 devices
to the SCART socket and the AUDIO/VIDEO sockets simu ltaneously.
button to select the audiovisual programme to view your recordings.
3
Page 5

Remote Control
GB
Display programme No.
and sleep timer
Display Timer Menu
(Green button)
Call up personal
adjustments
(Red button)
Confirmanactionor
validate a menu
Toleaveamenu
V olume level
(Yellow
button)
option
Stand-by
Inactive
Inactive
Adjustment: move to
Right/Left in menus and
select one of the proposed
options
To go to Picture and
Channel Adjustment
menus
Move Up and Down in
the menus
To change programme
Sound mute
To switch to connected
equipment
(e.g.: video recorder)
8
Direct access to
programmes and entering
numerical values in
menus
Batteries: Remove the lid at the back of the remote control a nd insert two 1.5
V, LR06 batteries.
”Please respect the en vironment! Before throwing any batteries away, consult
your distributor who may be able to tak e them back for specific recycling..”
4
Page 6

Automatic Channel Setting
This set is equi pped with an automatic search system which wi l l search for and store all
channels avail able in your region. To help identif y the programmes, we suggest that you have to
hand a TV guide or daily newspaper.
Ensure that the aerial lead is connected to the TV set.
Check that any equipment connected only via the aerial (video recorder or satellite equipment)is
operati ng.
Switch off any equipment connected vi a the SCART socket.
Installation
Press the ON/OFF button, the indicator lamp lights up.
If the television set remains on stand–by, press one of
the buttons on the remote control numerical keypad.
When the television set is turned on for the f irst time, the
Instal l at i on menu appears automaticall y.
If this is not the case , you can call it up by:
AUTO INSTALL.
EURO
GB
– pressing the
button on the r em ot e control three
times.
Press
to confirm.
A new menu appears. Automati c search begins. The cursor moves from left to right on the VL line, then on the VH
line and then on the U line. The channels found are stored
in memory in order starting from programme PR 01.
You can stop the aut om at i c search at any time by pressing
the
butt on.
The search stops automatically at the end of the U band
or when 99 channels have been found.
The Programme Organizer menu then appears automatically.
The channel st ored on programme PR 01 is selected (see next page).
AUTO INSTALL.
EURO
VL
PR01
5
Page 7

GB
Changing a Programme Number
Select the channel number t o be changed usi ng the
butt on.
Using the numerical keypad on the remote control, enter the
new programme number.
You can also use the
butt ons on the remote control.
AUTO INSTALL.
EURO
VL
PR01
Press the
butt on to confirm the change.
The programmes stored under the ol d and new numbers are then swapped.
Repeat this operation to change ot her programme numbers.
Erasing a Programme
Select the programme to be er ased using the button.
Enter 0 or 00 on the numerical keypad of t he remot e control .
Press
Check t hat all the programmes ar e in the required or der using t he
to confirm. The progr am me is erased.
to leave the menu.
butt on, then pr ess
6
Page 8

Manual Channel Setting
Press the button twice to call up t he channel setting menu.
1. Channel Search
Select the 2nd l i ne of the menu usi ng the butt on.
Start the search by pr essi ng:
– the butt on for a forward search,
– the butt on for a bac kw ard search.
EURO
GB
VL
The search fully covers the VL, VH and U bands starting
PR
from the channel on the screen. The cursor moves and
as soon as a channel is found, the picture appears on
the screen.
Wait for the menu to go to the bottom of the screen for optimum reception.
If the picture corresponds to the channel required, go to the 4th line (PR),otherwise
continue the search.
If you wish to stop the automatic search, press the butt on.
2. Programme Number and Storing in Memory
Select the 4th line of t he menu using the button.
If fine tuning is necessary, see Fine Tuning
Enter a programme number using the numerical buttons of the
remote control.
You can also use the
butt ons
.
Store the programme number you have allocated to the channel by pressing the butt on.
The 2nd line of the menu is then selected again.
EURO
VL
PR
Restartthe search using
the butt ons
.
7
Page 9

3. Fine Tuning
Only necessary in the event of interference
If fine tuning is necessary, select the 3rd l ine of the menu
GB
using the
If necessary, adjust the picture using the
Select the 4th line (PR)usingthe
button.
EURO
VL
buttons.
PR
button to al locate a programme number to the channel
and store it in mem ory (see Programme Number and Storing in Memory)
If a channel has required fine tuning, it will be stored in memory with the AFC (Automatic
Frequency Control) deactivated.
Press the button to l eave the menu.
8
Page 10

Picture Adjustments
Press the butt on to call up the Picture Menu.
=
Select the function to be adj ust ed using the
The tint function is only active in NTSC mode .
Adjust as required using the
butt ons.
=
SHARPNESSCONTRASTCOLOURBRIGHTNESS TINT
butt ons.
Storing Personal Adjustments
You can store the adjustments you have just made and call
them up at a later stage . Caution: these personal adjustments
will replace and delete the standard settings made at the
factory.
With the Picture Menu display ed, press t he red
Press the
button to leave the menu.
butt on.
Sleep Timer
==
=
GB
Press the green butt on to call up t he Stand–by
Menu.
Set the stand–by time in 10–minute steps (up to 4 hours) using
the
Press the
The television set is child locked when the programmed time
period has el apsed. The stand–b y indicat or will flash (see Day to
Day Operation).
To cancel the sl eep time function:
–pressthegreen
–pressthe
When the display indicates –:––, the sleep t i m er function is deactivated.
The sleep t imer function is also deactivated when the t elevisi on set is switched to stand–by from
themainON/OFFswitch.
butt ons
button to leave the menu
:
button to call up t he menu.
butt on once or several times to return to: –:––
The televisi on is then child locked and the stand–by indi cat or flashes (see Day to Day
Operation).
9
Page 11

Day to Day Operation
Switching On - Selecting Programmes
Switch on the t el evision set using the main ON/OFF switch if the indicator is off.
If it is on, enter the desi r ed program me number.
For program mes 1 to 9:
Press the corresponding number on the remot e control .
GB
For program mes 10 to 99 (e . g. 24) :
Press and hol d the decimal (tens) number (2): 2-
then press the uni ts (4) number briefly: 24
Volume Adjustment - Sound Mute
Press the b ut t ons to turn the sound up or down.
Press the
The sound returns if the b ut ton is pressed again.
butt on to turn the sound off.
Zapping
Press the buttons to scroll through the programmes stored in memory.
Personal Adjustments
Press the red b ut t on to call up your personal adjustments (See Picture Adjustments).
Display
Press the yellow butt on to display the programme number and stand–by time (if sleep
timer command is activated).
If the channel has been fine tuned, the
This informat i on disappears automati cally after a few seconds. Press the yellow
again to delete this information.
symbol is also di spl ayed.
button
Stand-by - Sleep Timer
Press the butt on to switch the tele vi si on set to stand–by mode. The Stand–by light turns r ed.
The televisi on set will automati cal l y swi t ch to Stand–by after a few minutes if there is no si gnal
on the channel being watched.
Child Lock
You can prevent the use of your tele vi si on set using the keypad.
To do this, s wi t ch off the television by pressing and holdi ng down the stand–by button of the
remote control for more than 4 seconds.
The TV set is also child locked:
- after the sleep timer function
- if it has been swit ched to stand–by or switched off when the sl eep tim er function has been
programmed.
The stand–by light flashes to indicate that the child l ock is activ at ed. The set can only be
swit ched on again using t he numerical keys of the remote control.
10
Page 12

THOMSON multimedia
46/47 Quai A. Le Gallo 92648 Boulogne Cedex France
RCS Nanterre B 3 22019464
208 546 60
 Loading...