

Page 1
SHORT INSTRUCTION MANUAL
Data Loggers for Humidity and Temperature
General Description
Congratulations on your new ROTRONIC HL-1D (humidity and temperature) / TL-1D (temperature) data logger. Please read these short instructions carefully before using the device.
These short instructions are limited to a description of the main functions and installation
of the device.
The HL-1D data logger can log up to 16,000 pairs of measured values (relative humidity and
temperature) in a range from 0 to 100 %RH and -20 to 70 °C.
The TL-1D data logger can log up to 32,000 temperature measured values in a range from
-20 to 70 °C.
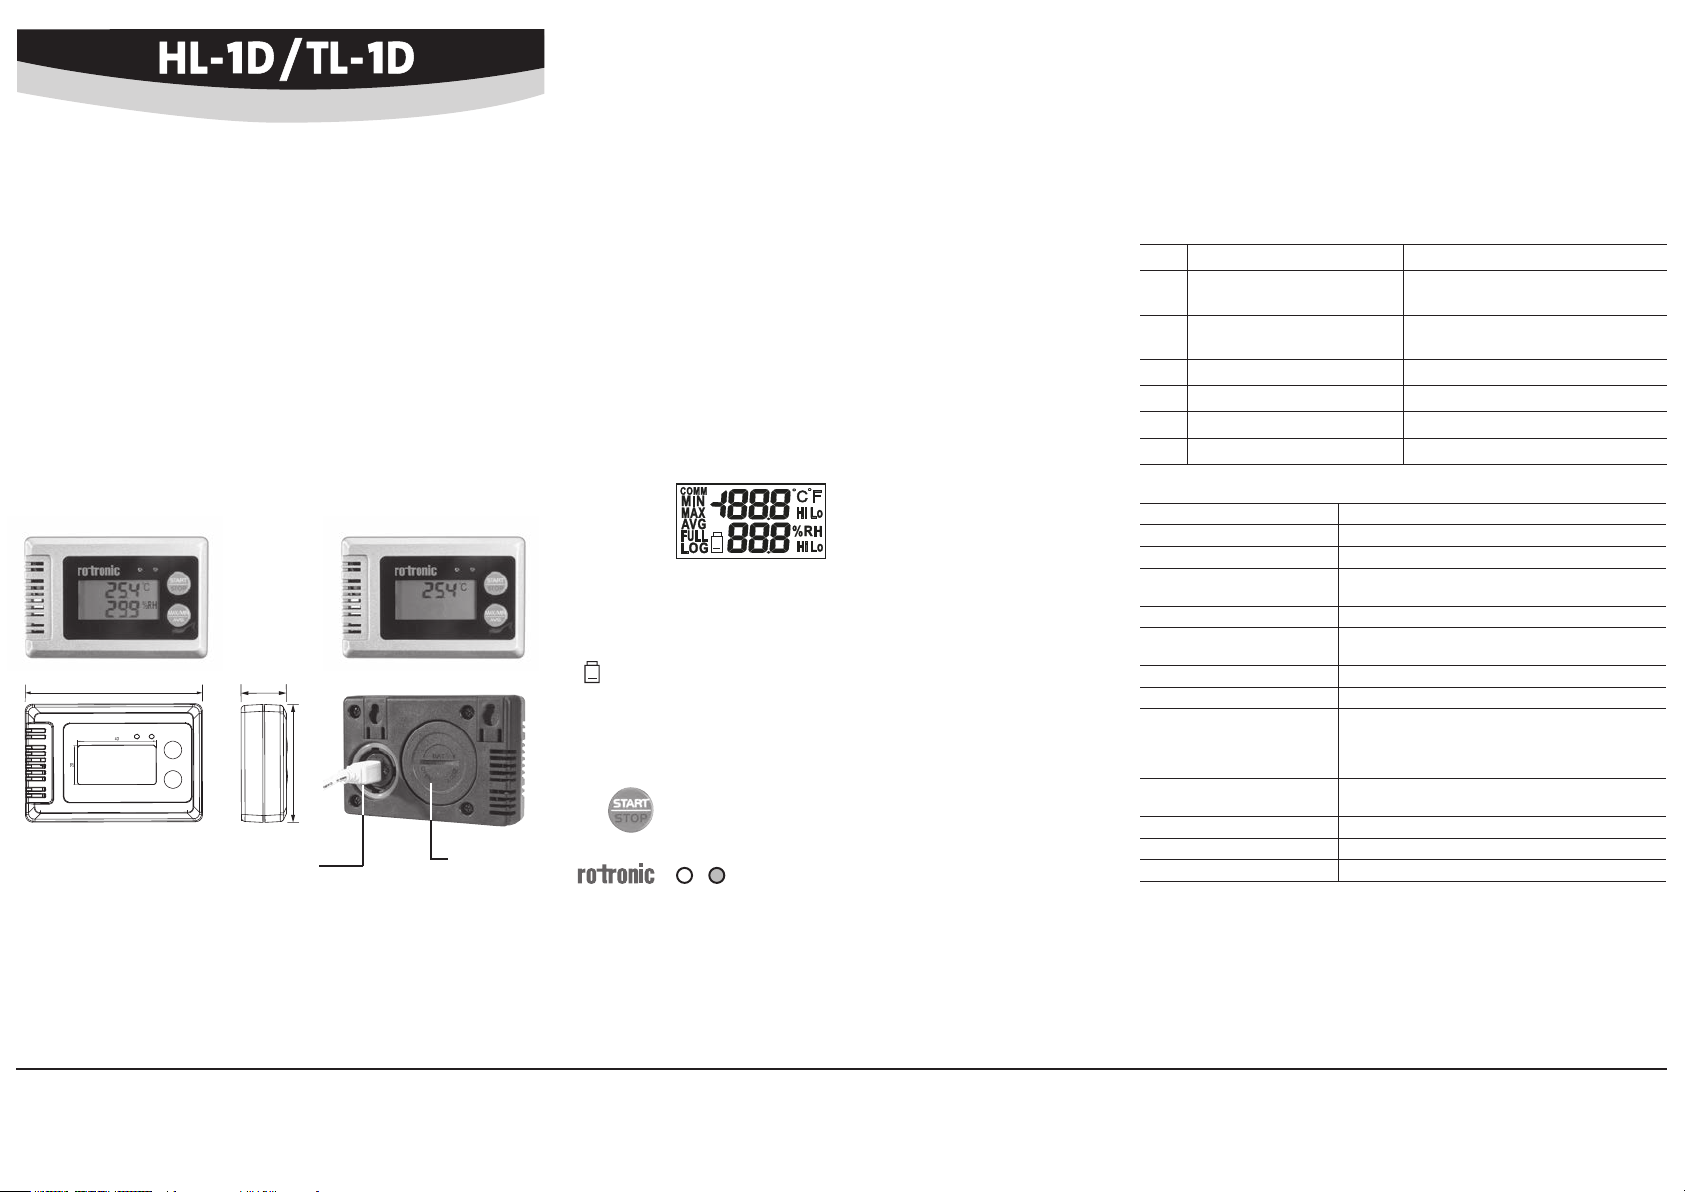
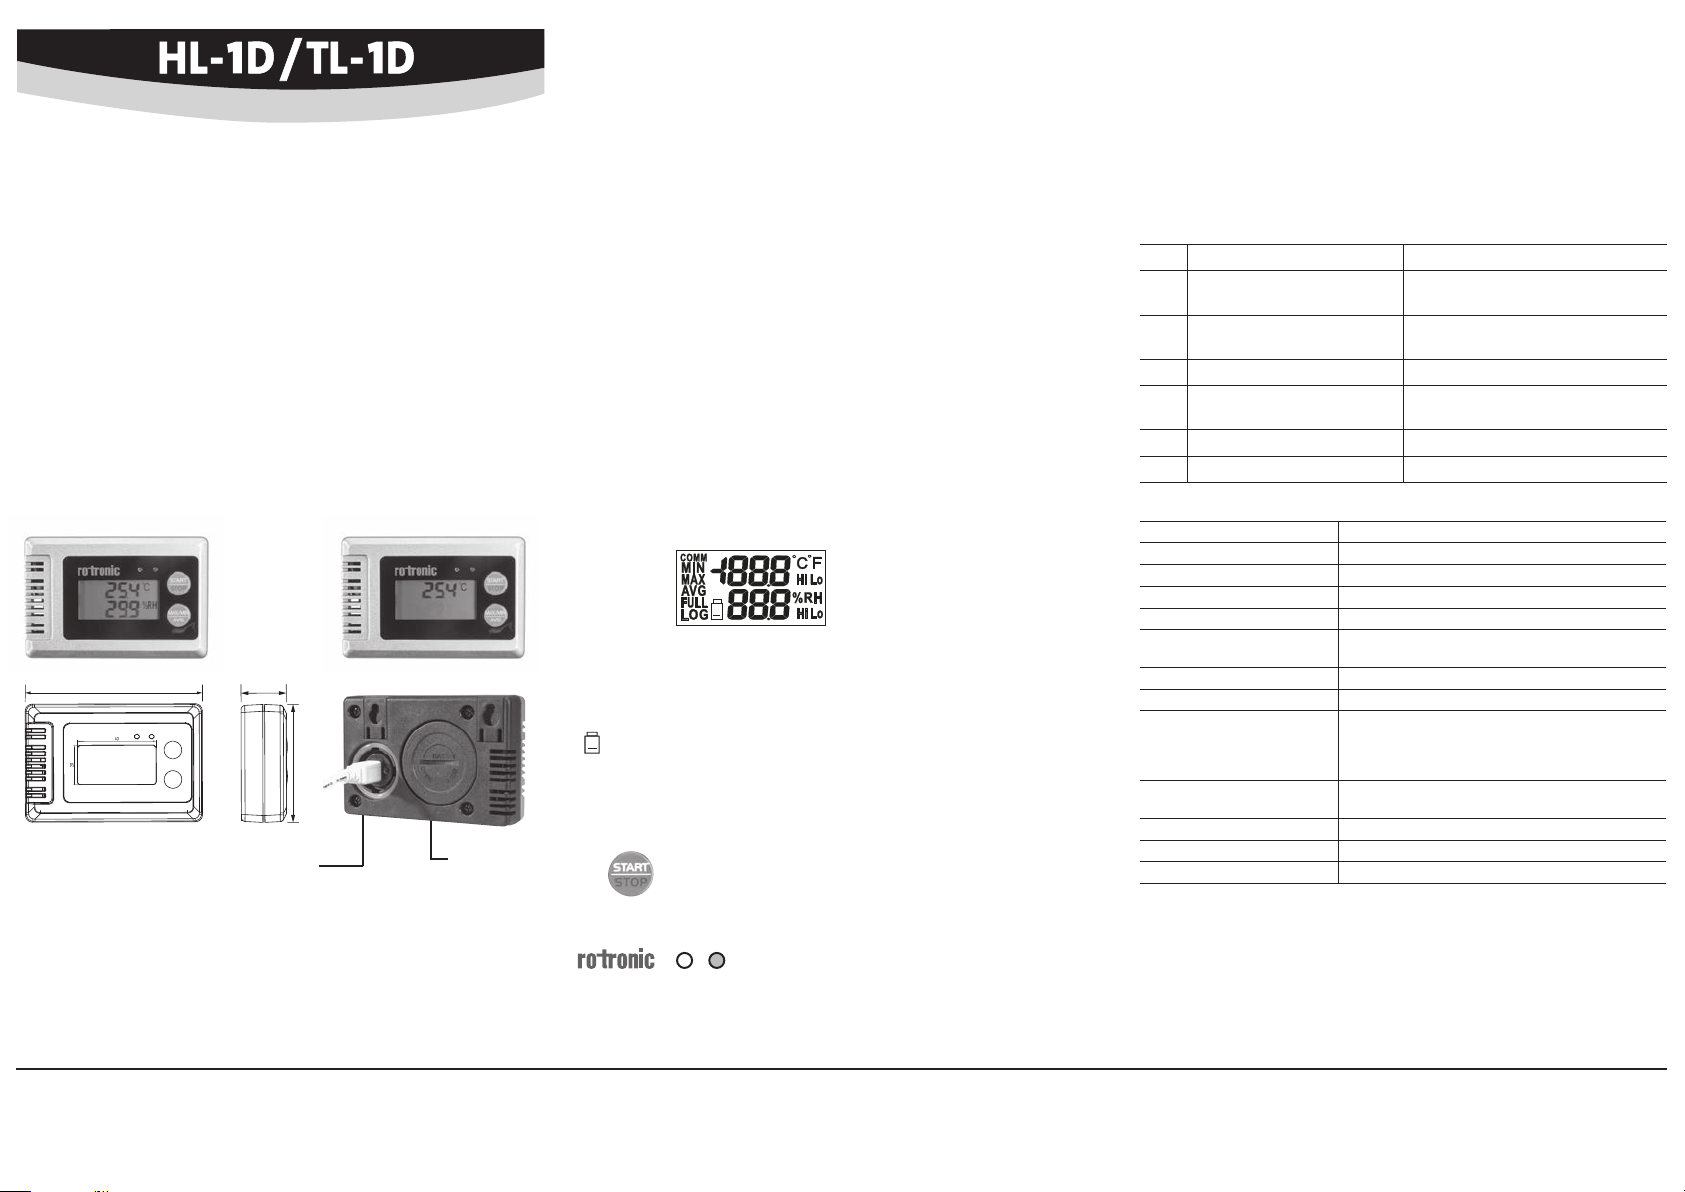
Dimensions / Connections
Type TL-1DType HL-1D
90
(settings and data download)
23
60
USB-Mini port
Battery
compartment
(BAT.)
Inserting / Replacing the Battery
ROTRONIC HL-1D/TL-1D data loggers are powered by a CR2 battery.
To insert/replace the battery, open the BAT lid with a coin and insert the battery with the right
polarity (+/-). When closing the lid, make sure that the O-ring seal is positioned correctly.
Mechanical Installation / General Recommendations
Relative humidity is very temperature-dependent. The installation site can therefore have a
signifi cant infl uence on the performance of the device.
Follow the guidelines below to ensure optimum performance:
a) Select a representative installation site: install the device at a point where the humidity,
temperature and pressure conditions are representative of the environment that is to be
measured.
b) Ensure there is suffi cient air movement at the device: an air velocity of at least 1 meter
per second accelerates and facilitates adaptation of the probe to changing temperatures.
c) Avoid: (1) placing the device too close to heating elements, cooling coils, cold or hot walls,
in direct sunlight, etc. (2) placing the probe too close to steam injectors, humidifi ers,
in direct precipitation. (3) unstable pressure conditions with high air turbulence. (4)
accumulation of condensation at the contact wires of the sensor.
Mounting the Data Logger
The device can be placed at any point or mounted on a wall. Wall mounting: pull out the
two wall holders at the back of the device. Drill two holes and screw in screws. Then hang
the device on the screws.
Display
COMM : Appears when the device is connected to a computer
MIN/MAX/AVG: Press button briefl y to show MIN/MAX/AVG of the stored
measured values (only works in LOG mode)
FULL: Appears when the memory is full
LOG : Appears when the logging function is active
: Appears when the battery is low
°C/°F, %RH: Temperature and humidity unit
Hi, Lo: Appears when the temperature or humidity is above the High Alarm
setting or below the Low Alarm setting
On/Off / Data Logging
Press button briefl y to switch the device on/off
(the device cannot be switched off when in logging mode).
To start or stop data logging, press the START/STOP button for a few seconds.
The right LED fl ashes green every fi ve seconds during data logging.
The left LED fl ashes red every fi ve seconds when values exceed/drop below the alarm settings
or when the battery is low.
Settings / Viewing Recorded Data
A PC running the free ROTRONIC software HW4-lite (software code: included / HW4: download:
www.rotronic.com) is needed to make settings and download/view the recorded data. The
device and PC are connected to each other with a normal USB to USB-Mini cable (AC003).
The cover of the USB port on the device can be opened with a coin.
See the document E-M-HW4v3-F2-022_10 for a description of settings in the HW4 software.
Troubleshooting
Error Problem Solution
E02 Measured temperature value
is too low
E03 Measured temperature value
is too high
E31 Temperature sensor damaged Send the device in for repair
E04 Temperature measurement error Place the device in a normal environment
E11 RH calibration error Repeat humidity calibration
E33 Circuit damaged Send the device in for repair
Technical Data
Type of battery 1 x CR2
Battery life 3 years (at logging interval of 5 minutes)
Battery charge indicator Yes (HW4 software and display / LED indicator)
Range of measurement /
0…100 %RH / -20...70 °C
application
Accuracy at 23 °C ±5 °C ±3.0 %RH / ±0.3 °C
Storage capacity HL-1D: 16,000 data points (%RH + °C)
TL-1D: 32,000 data points (°C)
Logging interval 30 s to 24 h
Display LCD, 2 lines, resolution of 1 decimal
LED indicator 2 LED’s
Right LED fl ashes green during data logging
Left LED fl ashes red when limits broken
or low battery
Housing protection grade HL-1D: IP 67 (electronics)
TL-1D: IP67
Weight 85 g
FDA/GAMP compatibility Conformity
Dimensions 90 x 60 x 23 mm
Place the device in a normal environment
Place the device in a normal environment
ROTRONIC AG, CH-8303 Bassersdorf
Tel. +41 44 838 11 44, www.rotronic.com
ROTRONIC Messgeräte GmbH, D-76275 Ettlingen
Tel. +49 7243 383 250, www.rotronic.de
ROTRONIC SARL, 56, F - 77183 Croissy Beaubourg
Tél. +33 1 60 95 07 10, www.rotronic.fr
ROTRONIC Italia srl, I- 20157 Milano
Tel. +39 2 39 00 71 90, www.rotronic.it
ROTRONIC Instruments (UK) Ltd, West Sussex RH10 9EE
Phone +44 1293 571000, www.rotronic.co.uk
ROTRONIC Instrument Corp, NY 11788, USA
Phone +1 631 427-3898, www.rotronic-usa.com
ROTRONIC Instruments Pte Ltd, Singapore 159836
Phone +65 6376 2107 www.rotronic.sg
ROTRONIC Shanghai Rep. Offi ce, Shanghai 200233, China
Phone +86 40 08162018, www.rotronic.cn
Page 2
KURZBEDIENUNGSANLEITUNG
Datenlogger für Feuchte- und Temperatur:
Allgemeine Beschreibung
Herzlichen Glückwunsch zum Kauf eines neuen ROTRONIC HL-1D (Feucht und Temperatur),
TL-1D (Temperatur) Datenlogger. Bitte lesen Sie diese Kurzbedienungsanleitung genau durch,
bevor Sie das Gerät in Betrieb nehmen. Diese Kurzbedienungsanleitung beschränkt sich auf
die Beschreibung der wichtigsten Funktionen und der Installation des Gerätes.
Der HL-1D Datenlogger kann bis zu 16‘000 Messwertpaare, relative Feuchte und Temperatur,
in einem Bereich von 0 bis 100 %rF und -20 bis 70 °C aufzeichnen.
Der TL-1D Datenlogger kann bis zu 32‘000 Temperatur Messwerte in einem Bereich von
-20 bis 70 °C aufzeichnen.
Abmessungen / Anschlüsse
Typ TL-1DTyp HL-1D
90
USB-Mini Anschluss
(Einstellungen und Datendownload)
23
60
Batteriefach
(BAT.)
Einsetzen oder Austauschen der Batterie
Die ROTRONIC HL-1D/TL-1D Datenlogger werden mit einer CR2 Batterie betrieben.
Beim Einsetzen oder Austauschen der Batterie, den BAT-Deckel mit einer Münze öffnen und
die Batterie mit der richtigen Polarität (+/-) einsetzen. Beim Schliessen darauf achten, dass
der Dichtungs-O-Ring korrekt eingesetzt ist.
Mechanische Installation / Allgemeine Empfehlung
Die relative Feuchte ist sehr temperaturabhängig. Daher kann der gewählte Installationsort
einen bedeutenden Einfl uss auf die Leistung des Gerätes haben.
Die Einhaltung der folgenden Richtlinien garantiert Ihnen eine optimale Leistung des Gerätes:
a) Wählen Sie einen repräsentativen Installationsort: Installieren Sie das Gerät an einem
Ort, an welchem die Feuchte- Temperatur- und Druckverhältnisse für die zu messende
Umgebung repräsentativ sind.
b) Stellen Sie genügend Luftbewegung am Gerät sicher: Eine Luftgeschwindigkeit von
mindestens 1 Meter/Sekunde beschleunigt und erleichtert die Anpassung des Fühlers
an wechselnde Temperaturen.
c) Zu vermeiden sind: (1)Gerät zu nahe an Heizelement, Kühlschlange, kalter oder warmer
Wand, direkte Sonneneinstrahlung etc. (2) Fühler zu nahe an Dampf-Injektor, Befeuchter,
oder direkter Niederschlag. (3) Unstabile Druckverhältnisse bei grossen Luftturbulenzen.
(4) Vermeiden Sie die Ansammlung von Kondensat an den Kontaktdrähten des Sensors.
Montage des Datenloggers
Das Gerät kann entweder an einem beliebigen Ort platziert oder an eine Wand gehängt
werden. Wandmontage: Ziehen sie die zwei Wandhalterungen an der Rückseite des Geräts
heraus. Bohren Sie zwei Löcher und drehen sie Schrauben ein. Daran kann das Gerät nun
aufgehängt werden.
Display
COMM : erscheint, wenn das Gerät mit einem Computer verbunden ist
MIN/MAX/AVG: Taste kurz drücken um MIN/MAX/AVG der gespeicherten Messwerte
anzuzeigen (Funktioniert nur im LOG-Modus).
FULL: erscheint, wenn der Speicher voll ist
LOG : erscheint, wenn die Aufzeichnungs- Funktion aktiv ist
: erscheint, wenn die Batterie schwach ist
°C/°F, %RH: Einheit der Temperatur und Feuchte
Hi, Lo: erscheint, wenn die Temperatur oder Feuchte über der High Alarm
oder Low Alarm Schwelle ist
Ein- Ausschalten / Datenaufzeichnung
Taste kurz drücken um das Gerät ein- auszuschalten
(im Aufzeichnungs- Modus kann das Gerät nicht ausgeschaltet werden).
Um eine Datenaufzeichnung zu starten oder stoppen, drücken Sie für einige Sekunden die
START/STOP Taste.
Während dem Aufzeichnen der Daten blinkt die rechte LED alle
5 Sekunden grün.
Beim Über- unterschreiten der Alarmschwelle und bei schwacher Batterie blinkt die linke
LED alle 5 Sekunden rot.
Einstellungen / Anzeigen der Aufgezeichneten Daten
Einstellungen und das Herunterladen bzw. Anzeigen der aufgezeichneten Daten erfordert
einen PC, auf dem die ROTRONIC gratis Software HW4-lite installiert ist (Softwarecode:
Lieferumfang / HW4: Download www.rotronic.com) Die Verbindung zwischen Gerät und PC
wird mit einem Handelsüblichen USB zu USB mini Kabel (AC0003) hergestellt. Der Deckel
des USB Anschlusses am Gerät kann mit einer Münze geöffnet werden.
Einstellungen in der HW4 Software werden im Dokument E-M-HW4v3-F2-022_10 genauer
beschrieben.
Problembehandlung
Fehler Problem Lösung
E02 Temperatur-Messwert ist zu
niedrig
Platzieren Sie das Messgerät
in einer normalen Umgebung
E03 Temperatur-Messwert ist zu hoch Platzieren Sie das Messgerät
in einer normalen Umgebung
E31 Temperatur-Sensor beschädigt Gerät zurück zur Reparatur
E04 Fehler in der Temperatur-Messung Platzieren Sie das Messgerät
in einer normalen Umgebung
E11 RH Kalibrierungs-Fehler Wiederholen Sie die Feuchte Kalibration
E33 Schaltung beschädigt Gerät zurück zur Reparatur
Technische Daten
Batterie-Typ 1 x CR2
Batterielebensdauer 3 Jahre (bei 5 min Log Intervall
Betteriezustands-Anzeige Ja (HW4-Software und Display / LED Anzeige)
Mess- und Einsatzbereich 0…100 %rF / -20...70 °C
Genauigkeit bei 23°C ±5 °C ±3.0% rF / ±0.3 °C
Speicherkapazität HL-1D: 16‘000 Messwertpaare (%rF + °C)
TL-1D: 32‘000 Messwerte (°C)
Log Intervall 30 s bis 24 h
Display LCD 2 Zeilen, Aufl ösung von 1er Dezimalstelle
LED Anzeige 2 LED’s
LED rechts blinkt grün bei Datenaufzeichnung
LED links blinkt rot bei Grenzwerten oder schwacher
Batterie
Schutzgrad des Gehäuses HL-1D: IP 67 (Elektronik)
TL-1D: IP67
Gewicht 85 g
FDA- / GAMP-Kompatibilität Konform
Abmessungen 90 x 60 x 23 mm
ROTRONIC AG, CH-8303 Bassersdorf
Tel. +41 44 838 11 44, www.rotronic.com
ROTRONIC Messgeräte GmbH, D-76275 Ettlingen
Tel. +49 7243 383 250, www.rotronic.de
ROTRONIC SARL, 56, F - 77183 Croissy Beaubourg
Tél. +33 1 60 95 07 10, www.rotronic.fr
ROTRONIC Italia srl, I- 20157 Milano
Tel. +39 2 39 00 71 90, www.rotronic.it
ROTRONIC Instruments (UK) Ltd, West Sussex RH10 9EE
Phone +44 1293 571000, www.rotronic.co.uk
ROTRONIC Instrument Corp, NY 11788, USA
Phone +1 631 427-3898, www.rotronic-usa.com
ROTRONIC Instruments Pte Ltd, Singapore 159836
Phone +65 6376 2107 www.rotronic.sg
ROTRONIC Shanghai Rep. Offi ce, Shanghai 200233, China
Phone +86 40 08162018, www.rotronic.cn
Page 3

MODE D'EMPLOI ABRÉGÉ
sur lequel le logiciel gratuit ROTRONIC HW4-lite est installé (code logiciel: fournitures / HW4:
câble courant USB vers mini USB (AC0003). Le couvercle du raccordement USB sur l’appareil
Loggers de données pour l’humidité et la température:
Généralités
Tous nos remerciements pour l’achat d’un des nouveaux loggers de données ROTRONIC
HL-1D (humidité et température), TL-1D (température). Veuillez lire avec attention ce manuel
d’utilisation abrégé, avant de mettre l’appareil en service. Ce mode d’emploi abrégé se limite
à la description des fonctions essentielles et à l’installation de cet appareil.
Le logger de données HL-1D peut enregistrer jusqu’à 16'000 paires de valeurs de mesure
d’humidité et de température dans des gammes de 0 à 100 %HR et -20 à 70 °C.
Le logger de données TL-1D peut enregistrer jusqu’à 32'000 valeurs de mesure de température
dans la gamme de -20 à 70 °C.
Dimensions / raccordements
Type TL-1DType HL-1D
90
Raccordement mini USB
(Paramètres et téléchargement
23
60
des données)
Compartiment
des piles
(BAT.)
Installation ou changement des piles
Les loggers de données HygroLog HL-1D/TL-1D sont alimentés par 1 pile CR2.
Pour installer ou changer la pile, ouvrir le couvercle BAT avec une pièce de monnaie et poser
la pile en respectant la polarité (+/-). Contrôler lors de la fermeture que le joint torique est
correctement installé.
Installation mécanique / Recommandations et conseils
L’humidité relative dépend très fortement de la température. Le site d’installation choisi
peut ainsi avoir une infl uence décisive sur les performances de l’appareil.
Le respect des directives suivantes vous garantit des performances optimales de l’appareil :
a) Choisissez un endroit représentatif pour l’installation: installez l’appareil à un endroit dont
les conditions d’humidité, de température et de pression correspondent aux conditions
environnementales à mesurer.
b) Assurez-vous que l’aération est suffi sante autour de l’appareil: une vitesse d’air d’1 mètre/
seconde accélère et facilite l’adaptation du capteur aux changements de température.
c) Les facteurs à éviter sont: (1) Proximité de l’appareil avec un élément de chauffage, circuit
de refroidissement, mur chaud ou froid, rayonnement solaire direct, etc. (2) Capteur trop
proche d’un injecteur de vapeur, humidifi cateur ou directement exposé aux précipita-
tions. (3) Conditions de pression instable avec de fortes turbulences de l’air. (4) Évitez
l’accumulation de condensé sur les câbles de contact de l’élément sensible.
Montage du logger de données
L’appareil peut être posé à un endroit quelconque ou monté sur un mur. Montage mural:
extraire les supports de montage au dos de l’appareil. Percer deux trous dans la paroi et y
placer deux vis. L’appareil peut alors être suspendu.
Affi chage
COMM : Apparaît lorsque l’appareil est relié à un ordinateur
MIN/MAX/AVG: Presser brièvement cette touche pour afficher les valeurs de mesure
enregistrées MIN/MAX/AVG (uniquement en mode LOG).
FULL: Apparaît lorsque la mémoire est pleine
LOG : Apparaît lorsque la fonction d’enregistrement est activée
: Apparaît lorsque la pile est faible
°C/°F, %RH: Unités de mesure de température et d’humidité
Hi, Lo: Apparaît lorsque la température ou l’humidité dépasse ou est
en dessous du seuil d’alarme supérieur ou inférieur
Activation, désactivation / Enregistrement de données
Presser brièvement cette touche pour mettre l’appareil en/hors service
(l’appareil ne peut pas être mis hors service en mode d’enregistrement).
Pressez pendant quelques secondes la touche START/STOP pour démarrer ou arrêter
l’enregistrement des données.
Pendant l’enregistrement des données, la LED de droite clignote
en vert toutes les 5 secondes.
La LED de gauche clignote en rouge toutes les 5 secondes lorsque le seuil d’alarme inférieur
ou supérieur et dépassé ou lorsque la batterie est faible.
Paramètres / Affi chage des données enregistrées
Le paramétrage et le téléchargement ou l’affi chage des données nécessitent un ordinateur
téléchargement www.rotronic.com). La liaison entre l’appareil et le PC est effectuée avec un
peut être ouvert à l’aide d’une pièce de monnaie. Les paramètres dans le logiciel HW4 sont
décrits en détail dans le document E-M-HW4v3-F2-022_10.
Résolution des problèmes
Erreurs Problème Solution
E02 La valeur de température est
trop basse
E03 La valeur de température est
trop haute
E31 L’élément sensible de tempéra-
ture est endommagé
E04 Erreur de mesure de température Placer l’appareil de mesure
E11 RH Erreur d’étalonnage Répéter l’étalonnage d’humidité
E33 Circuit endommagé Faire réparer l’appareil
Caractéristiques techniques
Type de pile 1 x CR2
Longévité de la pile 3 ans (avec intervalle d’enregistrement de 5 min)
Affi chage de l’état des
Oui (logiciel HW4 et affi chage / Affi chage LED)
piles
Gammes de mesure et
0…100 %HR / -20...70 °C
d’utilisation
Précision à 23 °C ±5 °C ±3,0% HR / ±0,3 °C
Capacité mémoire HL-1D: 16'000 paires de valeurs de mesure (%HR + °C)
TL-1D: 32'000 valeurs de mesure (°C)
Intervalle d’enregistrement 30 s à 24 h
Affi chage LCD 2 lignes, résolution 1 décimale
Affi chage LED 2 LED
LED droite clignote en vert pendant l’enregistremen
des données
LED gauche clignote en rouge lors du dépassement
des valeurs seuils ou de pile faible
Degré de protection
du boîtier
HL-1D: IP 67 (électronique)
TL-1D: IP67
Poids 85 g
Compatibilité FDA/GAMP Conforme
Dimensions 90 x 60 x 23 mm
Placer l’appareil de mesure
dans un environnement normal
Placer l’appareil de mesure
dans un environnement normal
Faire réparer l’appareil
dans un environnement normal
ROTRONIC AG, CH-8303 Bassersdorf
Tel. +41 44 838 11 44, www.rotronic.com
ROTRONIC Messgeräte GmbH, D-76275 Ettlingen
Tel. +49 7243 383 250, www.rotronic.de
ROTRONIC SARL, 56, F - 77183 Croissy Beaubourg
Tél. +33 1 60 95 07 10, www.rotronic.fr
ROTRONIC Italia srl, I- 20157 Milano
Tel. +39 2 39 00 71 90, www.rotronic.it
ROTRONIC Instruments (UK) Ltd, West Sussex RH10 9EE
Phone +44 1293 571000, www.rotronic.co.uk
ROTRONIC Instrument Corp, NY 11788, USA
Phone +1 631 427-3898, www.rotronic-usa.com
ROTRONIC Instruments Pte Ltd, Singapore 159836
Phone +65 6376 2107 www.rotronic.sg
ROTRONIC Shanghai Rep. Offi ce, Shanghai 200233, China
Phone +86 40 08162018, www.rotronic.cn
Page 4

MANUALE D'ISTRUZIONI BREVE
quale sia installato il software gratuito HW4-lite di ROTRONIC (codice del software: dotazione
Data logger per umidità e temperatura:
Descrizione generale
Ci congratuliamo per l'acquisto di un nuovo data logger ROTRONIC HL-1D (umidità e tempera-
tura), TL-1D (temperatura). Prima di mettere in funzione lo strumento, si prega di leggere
il presente manuale d'istruzioni breve. Il presente manuale d'istruzioni breve si limita a
descrivere le funzioni principali dello strumento e la sua installazione.
Il data logger HL-1D è in grado di registrare fi no a un massimo di 16.000 coppie di valori di
misura, l'umidità relativa e la temperatura, all'interno di campi compresi tra 0 e 100%ur e
tra -20 e 70 °C.
Il data logger TL-1D è in grado di registrare fi no a un massimo di 32.000 valori di misura di
temperatura all'interno di un campo compreso tra -20 e 70 °C.
Dimensioni / connessioni
Tipo TL-1DTipo HL-1D
90
Mini connessione USB
(impostazioni e download dati)
23
60
Vano batteria
(BAT.)
Inserimento o sostituzione della batteria
I data logger ROTRONIC HL-1D/TL-1D funzionano con una batteria CR2.
Se si inserisce o si sostituisce la batteria, aprire il coperchio BAT con una moneta ed inserire
la batteria rispettando la corretta polarità (+/-). Alla chiusura prestare attenzione al corretto
inserimento dell'O-ring di guarnizione.
Installazione meccanica / Raccomandazione generale
L’umidità relativa dipende moltissimo dalla temperatura. Pertanto la sede di installazione
scelta ha un ruolo decisivo per il rendimento dello strumento.
Per ottenere un rendimento ottimale dello strumento si devono assolutamente rispettare
le seguenti prescrizioni:
a) Selezionare un luogo di installazione rappresentativo per le misurazioni: installare lo
strumento in un punto in cui le condizioni di umidità, temperatura e pressione siano
rappresentative dell’ambiente che si intende misurare.
b) Garantire che lo strumento sia suffi cientemente ventilato: una velocità dell’aria di
almeno 1 metro/secondo accelera e facilita l'adattamento della sonda alle oscillazioni
di temperatura.
c) Evitare: (1) l'eccessiva vicinanza dello strumento ad elementi riscaldanti, serpentine di
raffreddamento, pareti fredde o calde; l'esposizione diretta ai raggi solari ecc.;
(2) l'eccessiva vicinanza della sonda a iniettori, umidifi catori o precipitazioni dirette;.
(3) rapporti di pressione instabili con eccessive turbolenze dell’aria; (4) la formazione di
condensa sui fi li di contatto del sensore.
Montaggio del data logger
Lo strumento può essere collocato in un punto qualsiasi oppure appeso ad una parete. Mon-
taggio a parete: estrarre i due supporti a parete posti sul lato posteriore dello strumento. Pra-
ticare due fori ed avvitarvi le viti. A questo punto lo strumento può essere appeso alla parete.
Display
COMM : compare se lo strumento è collegato ad un computer
MIN/MAX/AVG: premere brevemente il tasto per visualizzare i valori di misura MIN/MAX/AVG
memorizzati (funziona solo in modalità LOG).
FULL: compare se la memoria è piena
LOG : compare se la funzione di registrazione è attiva
: compare se la batteria è prossima all'esaurimento
°C / °F, %ur: unità di temperatura ed umidità
Hi, Lo: compare se il valore di temperatura o di umidità è superiore o inferiore
alla soglia di livello massimo o di livello minimo
Accensione e spegnimento / Registrazione dei dati
Premere brevemente il tasto per accendere o spegnere lo strumento
(in modalità di registrazione lo strumento non si può spegnere).
Per avviare o interrompere una registrazione dei dati, premere il tasto START/STOP per
alcuni secondi.
Durante la registrazione dei dati il LED a destra presenta ogni
5 secondi una luce lampeggiante verde.
Se si supera o si resta al di sotto della soglia di allarme e in caso di batteria prossima
all'esaurimento, il LED a sinistra presenta ogni 5 secondi una luce lampeggiante rossa.
Impostazioni / Visualizzazioni dei dati registrati
Le impostazioni e il download o la visualizzazione dei dati registrati richiedono un PC, nel
/ HW4: download www.rotronic.com). Il collegamento fra strumento e PC viene realizzato
con una porta USB normalmente disponibile in commercio e un mini-cavo USB (AC0003).
Il coperchio del connettore USB sullo strumento si può aprire con una moneta. Le impostazioni
nel software HW4 sono descritte dettagliatamente nel documentoE-M-HW4v3-F2-022_10.
Gestione problemi
Errore Problema Soluzione
E02 Il valore misurato di temperatura
è troppo basso
E03 Il valore misurato di temperatura
è troppo alto
E31 Sensore di temperatura
danneggiato
E04 Errore nella misurazione
di temperatura
E11 Errore di calibrazione UR Ripetere la calibrazione dell'umidità
E33 Circuito danneggiato Lo strumento deve essere inviato al reparto
Dati tecnici
Tipo di batteria 1 x CR2
Durata delle batterie 3 anni (con un intervallo Log di 5 min)
Indicatore di stato della
batteria
Campo di misura e di lavoro 0…100 %ur / -20...70 °C
Precisione a 23 °C ±5 °C ±3,0 %ur / ±0,3 °C
Capacità di memoria HL-1D: 16.000 coppie di valori di misura (%ur + °C)
Intervallo log da 30 s a 24 h
Display LCD a 2 righe, risoluzione alla prima cifra decimale
Indicatore LED 2 LED
Grado di protezione
dell'alloggiamento
Peso 85 g
Compatibilità
con norme FDA / GAMP
Dimensioni 90 x 60 x 23 mm
Collocare lo strumento di misura
in un ambiente normale
Collocare lo strumento di misura
in un ambiente normale
Lo strumento deve essere inviato al reparto
Riparazioni
Collocare lo strumento di misura
in un ambiente normale
Riparazioni
Sì (software HW4 e display / indicatore LED)
TL-1D: 32.000 valori di misura (°C)
Il LED ha una luce lampeggiante verde durante
la registrazione dei dati
Il LED a sinistra ha una luce lampeggiante rossa
in caso di valori limite o di batteria prossima
all'esaurimento
HL-1D: IP 67 (elettronica)
TL-1D: IP67
conforme
ROTRONIC AG, CH-8303 Bassersdorf
Tel. +41 44 838 11 44, www.rotronic.com
ROTRONIC Messgeräte GmbH, D-76275 Ettlingen
Tel. +49 7243 383 250, www.rotronic.de
ROTRONIC SARL, 56, F - 77183 Croissy Beaubourg
Tél. +33 1 60 95 07 10, www.rotronic.fr
ROTRONIC Italia srl, I- 20157 Milano
Tel. +39 2 39 00 71 90, www.rotronic.it
ROTRONIC Instruments (UK) Ltd, West Sussex RH10 9EE
Phone +44 1293 571000, www.rotronic.co.uk
ROTRONIC Instrument Corp, NY 11788, USA
Phone +1 631 427-3898, www.rotronic-usa.com
ROTRONIC Instruments Pte Ltd, Singapore 159836
Phone +65 6376 2107 www.rotronic.sg
ROTRONIC Shanghai Rep. Offi ce, Shanghai 200233, China
Phone +86 40 08162018, www.rotronic.cn
 Loading...