

Page 1
AUD
SATCDTV
TAPE
VCR
AUX
CBL
POWER
MUTE
SURROUND + ON SCREEN
GUIDE
TRACK – TRACK +
UP DOWN
RECALL
OPN/CLS SUR-DELAY
1 2 3
DISC 1 DISC 2 DISC 3 PROG
4 5 6
DISC 4 DISC 5 DISC 6 TIME [REVIEW]
7 8 9
10 0 ENTER
CD TUNER AUX 1
M 1 M 2 M 3
[SHIFT]
BAND
T / V
SEARCH –
DYNAMIC
PAUSE
C. DELAY
PLAY
SEL
STOP
VIDEO 1
LIGHT
VOL
CH
MENU
SEARCH +
PRE
CH
MOVIE FILT
5.1 CH
SELECT
CLEAR [SCAN]
BACK
RANDOM [REPEAT]>10
PHONO/ LD
AUX 2
VIDEO 2 VIDEO 3TAPE 1 TAPE 2
M 4
RR-939
RR-939
Remote Control
Owner’s Manual
Page 2
REMOTE CONTROL RR-939
○○○○○○○○○○○○○○○○○○○○○○○
RR-939
Introduction
Thank you for purchasing the RR-939 Universal Remote
Control. It is designed to operate all current Rotel products as well as a wide range of popular audio and video
components from other manufacturers. You will find
that the RR-939 Remote Control is a significant improvement over conventional remotes in overall convenience
AUD
TAPE
AUX
1
SATCDTV
POWER
BAND
MUTE
T / V
SURROUND + ON SCREEN
GUIDE
TRACK – TRACK +
UP DOWN
2
OPN/CLS SUR-DELAY
SEARCH –
RECALL
1 2 3
DISC 1 DISC 2 DISC 3 PROG
4 5 6
DISC 4 DISC 5 DISC 6 TIME [REVIEW]
7 8 9
10 0 ENTER
PAUSE
C. DELAY
PLAY
SEL
STOP
DYNAMIC
VOL
VCR
CBL
CH
MENU
SEARCH +
PRE
MOVIE FILT
5.1 CH
SELECT
CLEAR [SCAN]
BACK
RANDOM [REPEAT]>10
CH
and ease of operation.
Please take a few moments to read this user guide.
You’ll find the time well spent as it will significantly
shorten your search for remote control sanity.
Some Preliminary Precautions
• The RR-939 is surprisingly rugged but it is not
indestructible. So please don’t drop it — particularly
not on a concrete floor! With normal care, the
RR-939’s low maintenance design will let you enjoy its
convenience for years to come.
• When the RR-939 needs a bit of cleaning, use a soft,
lint-free damp cloth.
• Above all, don’t try to take the RR-939 apart. There
isn’t anything inside you can fix anyway and disassembly will void the warranty.
Battery Installation
Remove the RR-939 and the package of 4 AAA batteries
from the packing material. Turn the RR-939 over and lift
the cover off the battery compartment by compressing
the release tab and lifting up.
CD TUNER AUX 1
AUX 2
PHONO/ LD
Place the four AAA batteries inside (follow the polarity
drawing on the bottom of the compartment) and replace
the cover. MAKE SURE you install the batteries cor-
VIDEO 1
VIDEO 2 VIDEO 3TAPE 1 TAPE 2
3
4
M 1 M 2 M 3
[SHIFT]
LIGHT
M 4
RR-939
rectly!
○○○○○○○○○○○○○○○○○○○○○○○
Using the RR-939
The RR-939 can replace up to eight different remote
controls. Stored in memory are control codes to operate your specific audio/video components, selected
from hundreds of models in the RR-939’s extensive database. Programming the RR-939 to operate your components takes just minutes and need only be done once.
See the PROGRAMMING section of this manual for
easy to follow instructions.
1
2
Page 3
REMOTE CONTROL RR-939
RR-939
Once the programming is complete, you select a component with the press of a button and turn the RR-939 into
the remote control for your Rotel CD player or your Sony
TV set or your Panasonic video recorder. Then, you simply
press command buttons that duplicate the functions on
the remote that came with your component.
To get started, look at the layout of the RR-939 and the following operating instructions:
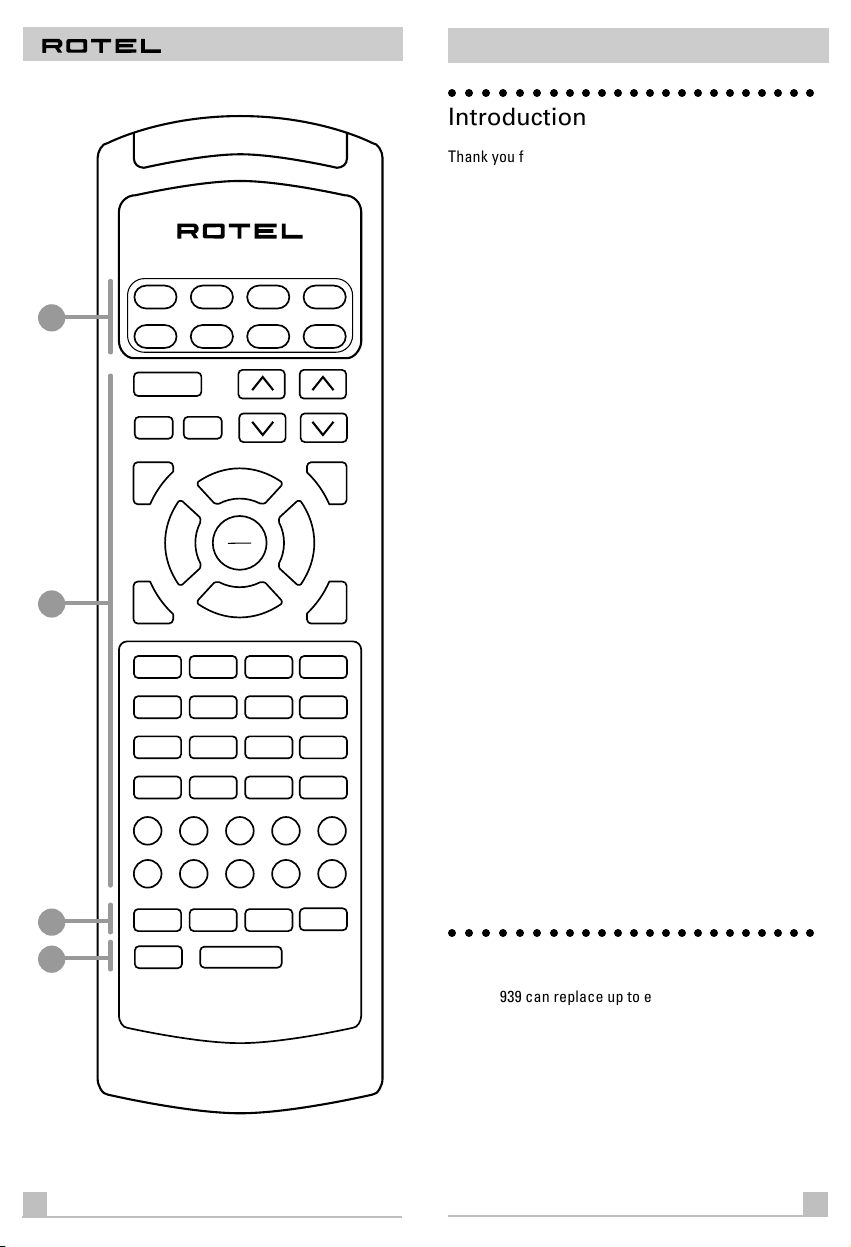
Device Buttons
1
Eight buttons at the top of the RR-939 determine which set
of commands is currently active. For example, if you press
the AUDIO button (labeled AUD), the RR-939 becomes the
remote control for your Rotel Surround Sound Processor.
If you press the TV button, the RR-939 becomes the remote control for your TV set.
These buttons are also used in programming the RR-939.
See the PROGRAMMING section below for details.
Command Buttons
2
This large group of buttons duplicates the functions on
the remote controls for your audio/video components. A
general description of these functions follows. Detailed
information on the specific function of each button can be
found in the CONTROL COMMANDS tables at the back of
this manual.
At the top of this group of buttons are basic controls such
as Power, Volume, Channel Selection, etc.
To operate the RR-939:
Step One: Press a DEVICE button to activate the commands for the desired component. This command set will
remain active until you press a different DEVICE button.
Step Two: Press COMMAND buttons to operate the component you have selected.
Remember that the COMMAND buttons duplicate many
controls on many different types of audio/video components and their function may vary depending on the type
of component selected. For example, the PLAY/SELECT
button engages the play mode on a CD Player, but it duplicates the SELECT function on a cable TV converter.
Note: The RR-939 tells you which command set is active.
Each time you press a COMMAND button, the active DEVICE key blinks red to tell you which component you are
controlling. If the COMMAND button that you press has
no function in the active command set (for example, the
numeric keys in VCR mode), no DEVICE button will blink,
indicating that the COMMAND button is inactive.
The COMMAND buttons are labelled, often with multiple
labels if the button serves different purposes for different
kinds of components. As long as you remember that
pressing a DEVICE button turns the RR-939 into, for example, a CD player remote control or a VCR remote control, the functions of each button should be intuitive.
Tables listing the function of each button for each type of
component can be found in the back of this manual.
Below these is a group of buttons that duplicate the
transport functions on a tape recorder or VCR (Stop, Play,
Pause, etc.) as well as the Up and Down commands that
might be found on a cable or satellite TV receiver.
The next group of buttons duplicates the numeric keypad
buttons such as might be used for direct track selection
on a CD Player or direct channel selection on a TV set.
Included in this section are special command buttons
providing functions found on various components.
At the bottom of this group of buttons are ten round
source selection buttons labelled CD, TUNER, TAPE, etc.
These duplicate the source input selection buttons on a
receiver, preamplifier, or surround sound processor. The
function of these buttons is not the same as the DEVICE
buttons at the top of the remote control. The DEVICE buttons determine which command set is active on the
RR-939. The source select COMMAND buttons switch inputs on the audio/video component being controlled.
3
A few buttons have a second function, activated by
pressing and releasing the SHIFT button before pressing
the COMMAND button, as described below.
Macro Buttons
3
A macro is a series of individual commands triggered by
pressing one button. Macros make operating a complex
home entertainment system much easier. For example,
think of playing a videotape: You turn on the TV, turn on
the VCR, select the TV input connected to the VCR, and,
finally, put the VCR into Play mode. That’s four separate
commands — and it may take you as many as six pushes
on various buttons to execute them. A macro makes this
simpler by executing all the needed commands with just
one push of a button.
There are five MACRO buttons on the RR-939 – the four
buttons labeled M1, M2, M3, and M4, along with the
POWER button. A sequence of up to eight different com-
4
Page 4
REMOTE CONTROL RR-939
RR-939
mands can be memorized to be replayed automatically
with the press of a MACRO button. See the section, PROGRAMMING MACROS, for more detailed information.
Note: Macro buttons are available only in the AUD, SAT,
and CBL modes. However, you can include switching to a
different DEVICE mode as part of a macro, in order to operate other components.
To replay a MACRO, first activate one of the DEVICE
modes (AUD, SAT, and CBL only). Then, press the desired
MACRO button. If a macro has been programmed for that
button, the RR-939 will replay the memorized sequence of
commands and the DEVICE button will blink red for each
command. If no macro has been programmed, or if macros are not available in that DEVICE mode, nothing will
happen and no DEVICE buttons will blink.
Special Buttons
There are two special function buttons at the bottom of
the RR-939 remote.
The LIGHT button turns on backlighting so you can see
the buttons in a dark room. The lights stay on for 7 seconds and will stay on for an additional 7 seconds each
time another button is pressed.
The SHIFT button activates additional commands for
some buttons. These functions are shown in italics on the
illustrations and in the command tables at the back of this
manual. To activate one of these commands, press and
release the SHIFT button and then press the desired
COMMAND button.
4
The easiest way to proceed is to find your components
and corresponding three-digit codes from the list of
codes at the end of this manual. If your component is not
listed, there is an alternative auto-search method for finding the right command set.
Three Digit Code Programming
Find your audio/video component in the list at the end of
this manual and note the 3-digit code(s):
Step One: Turn on the component you wish to memorize.
Step Two: Press the corresponding DEVICE button (for ex-
ample, if you are memorizing the command set for a CD
player, press the CD DEVICE button at the top of the
RR-939). While pressing the DEVICE button, simultaneously press the MUTE button and hold both for at least
one second. The DEVICE key will light in red for 20 seconds, indicating that you have entered the program mode.
The next step must be done within this 20 second period,
or the RR-939 will revert to its standard operating mode.
Step Three: Point the RR-939 at the audio/video component and enter the 3-digit code, using the numeric buttons. The DEVICE key will flash each time you enter a
digit. If you have entered the correct code, the component will turn off. If there is more than one 3-digit code for
your brand of source component, continue entering additional 3-digit codes from the list until the component turns
off, indicating that you have found the right one.
Step Four: Store the code number by pressing the corresponding DEVICE button again. The button will blink twice
to confirm the storage of the code in memory.
○○○○○○○○○○○○○○○○○○○○○○○○
Programming
The RR-939 can replace up to ten different remote controls, one for each of the eight DEVICE buttons. Before
you use it, you must program the RR-939, i.e. tell it which
audio/video components you wish it to control.
The RR-939 contains hundreds of command sets for various A/V components. Programming the remote involves
selecting the command sets that correspond to the components in your system, and assigning them to the eight
DEVICE buttons by entering a three digit code. This need
only be done once during initial set-up of the RR-939.
5
Step Five: Test the COMMAND buttons, using the tables
at the back of this manual as a reference for the available
functions. If the functions do not work correctly, repeat
the above steps, with the next available 3-digit code from
the list for your brand of component.
Repeat the steps above for each of up to eight components, assigning each one to the appropriate DEVICE key.
6
Page 5

REMOTE CONTROL RR-939
RR-939
Auto-Search Programming
If the code table does not provide a 3-digit code or if none
of the code numbers assigned to your brand of component work, use the following auto-search method to find a
code number that will operate your components.
Step One: Turn on the component you wish to operate.
Step Two: Press the corresponding DEVICE button and
the MUTE button, simultaneously for one second or more.
The LED will light for 20 seconds.
Step Three: Press and hold the CH UP or CH DOWN button. This sends a succession of Power ON/OFF code signals that are stored in memory. Stop pressing the CH
button as soon as the component turns off, signifying that
you have found a code set that operates that component.
Step Four: Press the DEVICE button to store the code set
you have found. The button will blink twice to confirm that
you have stored the code.
Step Five: Test the remote control functions. If any do not
work properly, repeat the preceding steps until you find
the right code.
Displaying a Code Number
To find out which 3-digit code is currently stored on a DEVICE button:
Step One: Press the DEVICE button and the MUTE button
simultaneously for one second or more. The DEVICE button will light red for 20 seconds.
Step Two: Press the RECALL button. The DEVICE button
will blink a number of times, indicating the first digit in the
code, followed by a one second interval with the light off,
followed by a number of blinks indicating the second digit,
followed by another interval, followed by blinks indicating
the third digit. For example, one blink, three blinks, and
eight blinks, with one second intervals in between, represents the 3-digit code number 138.
Note: The number ZERO in a 3-digit code is represented
by 10 blinks.
○○○○○○○○○○○○○○○○○○○○○○○○
Macro Programming
There are five MACRO buttons – the four labeled M1, M2,
M3, and M4 plus the POWER button. When the RR-939 is
in the AUDIO, SAT, or CABLE mode, the macro buttons
can store and replay a sequence of up to 8 commands.
To memorize a macro sequence:
Step One: Press a DEVICE button (AUD, SAT, or CBL only)
and the MUTE button simultaneously for at least one second. The DEVICE button will light red for 20 seconds.
Step Two: Press the MACRO button you wish to program.
Step Three: Press a sequence of commands (up to 8) that
you wish to store. Pressing a DEVICE button to change
modes during the sequence counts as one command.
Step Four: Press the CH UP button to store the macro sequence. The DEVICE button will blink twice to confirm.
Note: Because the POWER button can be used as a
MACRO button, the normal Power On/Off commands are
temporarily stored on the MUTE button during the macro
learning sequence. To include a power on/off command in
a macro, simply press the MUTE button.
To erase a previously stored macro sequence, follow the
above steps, skipping Step 3 without entering any commands, i.e. memorize a blank macro.
○○○○○○○○○○○○○○○○○○○○○○○○
Volume Punch Through
It may be desirable to have the AUDIO or TV volume commands available at all times. For example, when using the
RR-939 to control your CD player, you might want the VOLUME buttons (which would normally be inactive in CD
mode) to change the volume of your preamp or surround
sound processor. This feature, called Volume Punch
Through, can be used to make the volume commands
from either the AUDIO or TV device mode available in
other device modes.
7
8
Page 6

REMOTE CONTROL RR-939
RR-939
To set-up the Volume Punch Through feature:
Step One: Press the DEVICE button (the device you wish
to transfer the volume function to) and the MUTE button
simultaneously for at least one second.
Step Two: Press the VOLUME UP button.
Step Three: Press the AUDIO or TV DEVICE button (the
device you wish to transfer the volume function from).
The DEVICE button will blink twice to confirm.
Example: To have the AUDIO volume command prevail in
the VCR mode, press the VCR DEVICE button in Step One
and the AUDIO DEVICE button in Step 3.
○○○○○○○○○○○○○○○○○○○○○○○○
Mapping a Component to
Another Device Button
In some systems, you may need to program one command
set to another DEVICE button. For example, if you have
two CD players, you may wish to use the SAT DEVICE button to store and activate commands for a second CD
player. To reassign device codes to another button:
Step One: Press the new DEVICE button where you wish
to store the command set and the MUTE button simultaneously for at least one second.
Step Two: Press the DEVICE button corresponding to the
command set you wish to transfer in order to access the
command sets for that type of component.
Step Three: Enter the 3-digit code for the audio/video
component you wish to transfer.
○○○○○○○○○○○○○○○○○○○○○○○○
3-Digit Code List
Audio Codes
Rotel RSP975 001
Rotel RTC975 001
Rotel RSX965 001
Rotel RA985 001
Rotel RC995 001
Rotel RC972 001
Rotel RSP985 002
Rotel RSP980 002
Rotel RTC970 002
Rotel RT940 002
Rotel RTC940 003
Rotel RTC950 003
Rotel RX950 003
Rotel RMZ955 004
CD Codes
Rotel RCD931 001
Rotel RCD951 001
Rotel RCD971 001
Rotel RCD991 001
Rotel RCD950 001
Rotel RCC945 001
Rotel RCC955 001
Rotel RCD970 002
Rotel RCD975 002
Rotel RCD855 002
Rotel RCD865 002
Rotel RCD955 002
Rotel RCD965 002
Rotel RCD945 002
Rotel RCC935 003
Rotel RCC940 003
Rotel RCD990 004
Rotel RMZ955 005
TAPE Codes
Rotel RD960 001
Rotel RMZ955 003
Denon 011 012
Pioneer 004 007 008
Pioneer (LD) 002
Yamaha 005 006 009
DVD Codes
Denon 001
LG 010
Mitsubishi 002
Panasonic 003
Pioneer 004
Proscan 005
RCA 006
Samsung 011
Sony 007
Toshiba 008
Yamaha 009
SAT Codes
GE 001
Alphastar 007
Echostar 006
Hitachi 011 012
Hughes 003
Panasonic 013
Primestar 002 005
RCA 001
Sony 004
Toshiba 008
Uniden 009 010
CABLE Codes
Pioneer 001 002 003
Americast 005
Jerrold 006 007
Scientific-Atlanta004
Tocom 010
Zenith 008 009
Step Four: Press the DEVICE button where you wish to
store the command set. It will blink twice to confirm.
Example:
To store CD commands on the SAT DEVICE button, press the SAT DEVICE button in Steps One and Four.
Press the CD DEVICE button in Step Two.
9
10
Page 7

REMOTE CONTROL RR-939
RR-939
TV Codes
A Mark 112
Admiral 072 081 161
Akai 001 146
Ampro 073 167
Anam 043 054 055 056
AOC 001 004 058 112
Candle 001 002 003 004
Capehart 058
Cetronic 043
Citizen 001 002 003 004
Classic 043
Concerto 004
Contec 043 051
Coronado 143
Craig 054
Crown 143
Curtis Mathes 001 004 101 143
CXC 043
Daewoo 004 055 103 111
Daytron 004 143
Dynasty 043
Dynatech 062
Electrohome 024 143
Emerson 001 004 005 028
Fisher 007 057
Funai 028 043
Futuretech 043
GE 004 008 009 034
Goldstar 004 106 110 112
Grundig 203 204 205 207
Hallmark 004
Hitachi 004 007 010 011
Infinity 164
Inkel 129
JBL 164
JCP 001
JCPenny 004 008 024 030
Jensen 013
JVC 034 038 070 083
Kenwood 001 070
Kloss 002 059
KTV 043 143 154
Lodgenet 072
Logik 072
Luxman 004
LXI 007 015 052 081
Magnavox 001 003 004 022
Marantz 001 164
Matsui 164
080 104 108 112
118 121
101 143
114 127 143
043 047 048 051
096 143 151 153
154 155
056 073 074 091
130 144 155 160
161
113 119 127 143
209
012 023 075 143
158 163
065 101 143 160
160 164
059 060 061 063
064 127 164
Memorex 004 007 072
Metz 088
MGA 001 004 024 042
Minerva 088
Mitsubishi 004 024 040 042
MTC 001 004 062 101
NAD 015 025
NEC 001 019 024 040
Nikei 043
Onking 043
Onwa 043
Optonica 019 081
Panasonic 034 056 080 164
Philco 001 003 004 024
Philips 001 003 004 005
Pioneer 004 018 023 025
Portland 004 143
Proscan 144 160 161 167
Proton 004 058 143 171
Quasar 034 056
Radio Shack 004 019 047 127
RCA 001 004 023 024
Realistic 007 019 047
Runco 072 169
Sampo 001 004 058
Samsung 004 101 127 133
Sanyo 007 020 021 033
Scott 004 028 043 048
Sears 004 007 015 028
Sharp 004 014 019 022
Signature 072
Sony 070 085 126 139
Soundesign 003 004 028 043
Spectricon 112
SSS 004 043
Supre Macy 002
Sylvania 001 003 059 060
Symphonics 052
Tandy 081
Tatung 056 062
Technics 034 080
Techwood 004
Teknika 002 003 004 024
Telerent 072
Tera 172
Thomson 194 195 196 197
109 146
056 130 134
056 059 060 063
064 127 143 164
038 059 093 164
180 181 182 183
184 185 186 187
188 189 190 192
135 176
173
143
056 065 074 144
152 156 160 161
143 160
053 057 082
143
030 057 082 094
143 160
028 143 175
063 064 127 160
164
028 043 072 101
143
198 199 200 201
TMK 004
Toshiba 015 030 040 062
Totevision 143
Universal 008 009
Video Concepts 146
Vidikron 174
Vidtech 004
Wards 004 008 009 019
Yamaha 004
York 004
Yupiteru 043
Zenith 072 073 095 103
Zonda 112
101
028 060 061 063
064 072 074 164
VCR Codes
Aiwa 034
Akai 043 046 124 142
Ampro 072
Anam 031 103
Audio Dynamics 012 023 043
Broksonic 035 037 129
Canon 028 031
Capehart 108
Craig 001 040 135
Curtis Mathes 031 041
Daewoo 007 010 017 065
Daytron 108
DBX 012 023 043
Dynatech 034 053
Electrohome 059
Emerson 006 017 025 027
Fisher 001 008 009 010
Funai 034
GE 031 063 072 107
Go Video 132 136
Goldstar 004 012 020 101
Harman Kardon 012 045
Hitachi 018 026 034 043
Instant Replay 031
JCL 031
JCPenny 004 012 040 101
Jensen 043
JVC 012 031 043 048
Kenwood 014 034 048
Lloyd 034
LXI 001 004 009 017
Magin 040
Magnavox 031 034 041 067
Marantz 012 031 067 069
Marta 101
Matsui 027 030
MEI 031
Memorex 001 010 014 031
146
108 111
029 031 034 035
036 037 046 101
129 131 138 153
109 144 147
063 137 150
055 060 130 150
152
034
068
034 040 053 072
101 134 139
MGA 045 046 059
Minolta 004 020
Mitsubishi 004 020 046 051
MTC 034 040
Multitech 024 034
NEC 012 023 043 048
Nordmende 043
Optonica 053 054
Panasonic 070 133 140
Pentax 004 020 031 063
Philco 031 034 067
Philips 031 034 054 067
Pilot 101
Pioneer 004 021 048
Portland 108
Pulsar 072
Quartz 014
RCA 004 020 034 040
Realistic 001 008 010 014
Ricoh 058
Runco 072
Salora 014
Samsung 017 040 107 109
Sansui 043 048 135
Sanyo 001 007 010 014
Scott 017 037 129 131
Sears 001 004 008 009
Sharp 031 054
Shintom 024
Sony 001 009 031 052
Soundesign 034
STS 004
Sylvania 031 034 059 067
Symphonic 034
Tandy 010 034
Tatung 043
Teac 034 043
Technics 031 070
Teknika 031 034 101
Thomas 034
Thomson 177 178
TMK 006
Toshiba 004 008 017 059
Totevision 040 101
Unitech 040
Vector Research 012
Victor 048
Video Concepts 012 034 046 141
Videosonic 040
Wards 001 004 017 024
Yamaha 012 034 043
Zenith 034 048 056 058
059 061 142
101 162 166 167
168 169 170 171
041 107 109 140
144 147
031 034 040 053
054 101
113 115 124
040 134
010 014 017 020
081 101
056 057 058
082 131
031 034 040 053
054 131
072 080 101
11
12
Page 8

REMOTE CONTROL RR-939
○○○○○○○○○○○○○○○○○○○○○○○○
Rotel Control Commands
Remote
Control
Button
POWER
VOL+
VOL –
MUTE
PLAY
STOP
SEARCH –
SEARCH +
PAUSE
RECALL
GUIDE
MENU
PRE CH
T/V
CH +
CH –
O
1
2
3
4
5
6
7
8
9
10
ENTER
MOVIE FILT
5.1 CH
SELECT
BACK
TUNER
CD
TAPE 1
TAPE 2
PHONO/LD
VIDEO 1
VIDEO 2
VIDEO 3
AUX 1
AUX 2
SHIFT
M1
M2
M3
M4
DEVICE
13
RTC975/RSP975
RSX965/RA985
RC995/972
AUDIO 001
Power
Volume +
Volume –
Mute
RSP985
RSP980
RT940/RTC970
AUDIO 002
Power
Volume +
Volume –
Mute
Dynamic
–
+
C. Delay
Recall
Surround +
On Screen
Sur. Delay
Band
Tuning +
Tuning –
O
1
2
3
4
5
6
7
8
9
Up
Surround +
Menu
Down
Band
Tuning +
Tuning –
O
1
2
3
4
5
6
7
8
9
10
Out. Balance
Enter
Movie Filter
5.1 Channel
Input Select
Bal. Check
Tuner
CD
Tape 1
Tape 2
Phono/Ld
Video 1
Video 2
Video 3
Aux 1
Aux 2
* RTC970 requires [Shift] function for 5.1 CH input
5.1 Channel *
Center Focus
Back
Tuner
CD
Tape Monitor
Tape 2
Phono/LD
Video 1
Video 2
Video 3
Aux 1
Aux 2
RTC940/950
AUDIO 003
Power
Volume +
Volume –
Mute
Band
Tuning +
Tuning –
1
2
3
4
5
6
7
8
Plus 8
Tuner
CD
Tape 1
Tape 2
Aux 1
Note: [SHIFT] button functions shown in italics
Remote
Control
Button
POWER
VOL+
VOL –
MUTE
PLAY
STOP
SEARCH –
SEARCH +
PAUSE
RECALL
GUIDE
MENU
RMZ955
AUDIO 004
Standby
Volume +
Volume –
Mute
Play
Stop
Rewind
Fast Forward
RCD991/971
RCD950/951/931
RCC945/955
CD 001
Play
Stop
Search –
Search +
Pause
Open/Close
Track –
Track +
RCD975/970/965
RCD955/945
CD 002
Play
Stop
Search –
Search +
Pause
Track –
Track +
PRE CH
T/V
CH +
CH –
O
1
2
3
4
5
6
7
8
9
10
ENTER
MOVIE FILT
5.1 CH
SELECT
BACK
TUNER
CD
TAPE 1
Fav. Station
Preset +
Preset –
Select
Back
Tuner
CD
Tape/SAT
10
1
[Disc 1]
2
[Disc 2]
3
[Disc 3]
4
[Disc 4]
5
[Disc 5]
6
[Disc 6]
7
8
9
Plus 10
Disc Select
Program
Time
[Review]
Clear
[Scan]
Random
[Rep]
A – B
0
1
2
3
4
5
6
7
8
9
Disc Select
Program
Time
Clear
Random
TAPE 2
PHONO/LD
VIDEO 1
VIDEO 2
Video/CD
X
VIDEO 3
AUX 1
AUX 2
[SHIFT]
M1
M2
M3
M4
DEVICE
RR-939
[Review]
[Scan]
[Rep]
14
Page 9

REMOTE CONTROL RR-939
○○○○○○○○○○○○○○○○○○○○○○○○
Rotel Control Commands
RR-939
Note: [SHIFT] button functions shown in italics
Remote
Control
Button
POWER
VOL+
VOL –
MUTE
PLAY
STOP
SEARCH –
SEARCH +
PAUSE
RECALL
GUIDE
MENU
PRE CH
T/V
CH +
CH –
O
1
2
3
4
5
6
7
8
9
10
ENTER
MOVIE FILT
5.1 CH
SELECT
BACK
TUNER
CD
TAPE 1
TAPE 2
PHONO/LD
VIDEO 1
VIDEO 2
VIDEO 3
AUX 1
AUX 2
[SHIFT]
M1
M2
M3
M4
RCC935
RCC940
CD 003
Play
Stop
Search –
Search +
Pause
Track –
Track +
0
1
[Disc 1]
2
[Disc 2]
3
[Disc 3]
4
[Disc 4]
5
[Disc 5]
6
[
7
8
9
Disc Select
Program
Time
[Review]
Clear
[Scan]
Random
[Rep]
RCD990
CD 004
Play
Stop
Search –
Search +
Pause
Open/Close
Track –
Track +
0
1
2
3
4
5
6
7
8
9
Program
Time
[Review]
Random
[Rep]
RMZ955
CD 005
Play
Stop
Skip –
Disc
Random
Remote
Control
Button
POWER
VOL+
VOL –
MUTE
PLAY
STOP
SEARCH –
SEARCH +
PAUSE
RECALL
GUIDE
MENU
PRE CH
T/V
CH +
CH –
O
1
2
3
4
5
6
7
8
9
10
ENTER
MOVIE FILT
5.1 CH
SELECT
BACK
TUNER
CD
TAPE 1
TAPE 2
PHONO/LD
VIDEO 1
VIDEO 2
VIDEO 3
AUX 1
AUX 2
[SHIFT]
M1
M2
M3
M4
RD960
TAPE 001
Play
Stop
Rewind
Fast Forward
Pause
Record
Pioneer LD
TAPE 002
Power
Play
Stop
Rewind
Fast Forward
Pause
Open/Close
Skip +
Skip –
RMZ955
TAPE 003
Power
Play
Stop
Rewind
Fast Forward
15
16
Page 10

REMOTE CONTROL RR-939
○○○○○○○○○○○○○○○○○○○○○○○○
Other Control Commands
RR-939
Note: [SHIFT] button functions shown in italics
Remote
Control
Button
POWER
VOL+
VOL –
MUTE
PLAY
STOP
SEARCH –
SEARCH +
PAUSE
RECALL
GUIDE
MENU
PRE CH
T/V
CH +
CH –
O
1
2
3
4
5
6
7
8
9
10
ENTER
MOVIE FILT
5.1 CH
SELECT
BACK
TUNER
CD
TAPE 1
TAPE 2
PHONO/LD
VIDEO 1
VIDEO 2
VIDEO 3
AUX 1
AUX 2
[SHIFT]
M1
M2
M3
M4
TV
Power
Volume +
Volume –
Mute
Select
Down
Left
Right
Up
Clear/Std.
Display/Rec.
Menu
Prev. Channel
TV/VCR
Channel +
Channel –
0
1
2
3
4
5
6
7
8
9
Enter
Sleep Timer
VCR
Power
Play
Stop
Rewind
Fast Forward
Pause
Record
TV/VCR
Channel +
Channel –
CABLE
Power
Volume +
Volume –
Mute
Select
Down
Left
Right
Up
Exit
Guide
Menu
Prev. Channel
Switch
Channel +
Channel –
0
1
2
3
4
5
6
7
8
9
Pay Per View
Enter
Fav. Station
Info
Bypass
Music
Page +
Day +
Day –
Page –
Remote
Control
Button
POWER
VOL+
VOL –
MUTE
PLAY
STOP
SEARCH –
SEARCH +
PAUSE
RECALL
GUIDE
MENU
PRE CH
T/V
CH +
CH –
O
1
2
3
4
5
6
7
8
9
10
ENTER
MOVIE FILT
5.1 CH
SELECT
BACK
TUNER
CD
TAPE 1
TAPE 2
PHONO/LD
VIDEO 1
VIDEO 2
VIDEO 3
AUX 1
AUX 2
[SHIFT]
M1
M2
M3
M4
DVD
Power
Volume +
Volume –
Mute
Play
Stop
Search –
Search +
Pause
Open/Close
Guide
Menu
Return
Skip +
Skip –
Up
Left
Right
Down
Enter
Sub. On/Off
Display
Clear
SAT
Power
Volume +
Volume –
Mute
Select
Down
Left
Right
Up
Exit
Guide
Menu
Prev. Channel
Switch
Channel +
Channel –
0
1
2
3
4
5
6
7
8
9
Enter
Fav. Station
Info
Next
Alt
17
18
Page 11

RR-939
REMOTE CONTROL
The Rotel Co., Ltd.
10-10 Shinsen-Cho
Shibuya-Ku
Tokyo 150-0045
Japan
Phone: +81-3-5458-5325
Fax: +81-3-5458-5310
Rotel of America
54 Concord Street
North Reading, MA 01864-2699
USA
Phone: 978-664-3820
Fax: 978-664-4109
Rotel Europe
Meadow Road
Worthing, West Sussex BN11 2RX
England
Phone: +44 (0)1903 524 813
Fax: +44 (0)1903 524 831
Rotel Deutschland
Kleine Heide 12
D-33790 Halle/Westf.
Germany
Phone: 05201-87170
Fax: 05201-73370
082 OMRR-939 071298
 Loading...