

Page 1

Rollei Giro 70, Giro 90, Giro 105
Owner´s Manual
GB
! Shutter release
" Zoom buttons Tele/Wide
§ LC display
$ Rewind-button
$
!
"
/
)
§
(
&
= Flash mode button (flash)
Q Exposure mode button (mode)
W Master switch (on/off)
E Autofocus-LED, green
%
/
Q
=
W
R
E
T
Z
% Flash unit
& Lens
/ Autofocus window
( Exposure sensor
) Red-eye reduction LED
+ Self-timer LED
R Viewfinder
T Film-type window
Z Back release
Page 2
Congratulations on your new
Rollei Giro! Please read these
instructions carefully before using the camera so you will be
able to make full use of all its
functions.
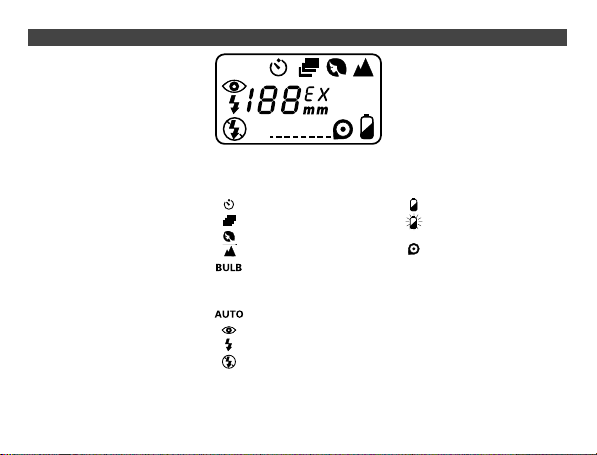
LIQUID-CRYSTAL DISPLAY / ICONS
AUTO
BULB
Please note
The camera’s shutter release
locks in the following cases:
No battery loaded or battery
›
empty.
Camera switched off.
›
Lens cover closed.
›
During zooming or film rewind.
›
When rewound film is left in
›
camera.
While flash is charging.
›
Shooting modes
Self-timer
Continuous shooting
Portrait zoom
Infinity setting
Time exposure
Flash modes
Autoflash
Red-eye reduction
Fill flash
Flash off
Additional icons
Battery low
Battery empty
Battery ok – no display
Film loaded
Page 3

VIEWFINDER
!
"
$
§
Viewfinder informations
! Frame area
" Parallax marks for close-ups
§ Autofocus area
$ Green AF LED
Switch camera off.
›
Open battery compartment.
›
Load fresh battery (use
›
exclusively CR2 lithium
battery), checking for proper
polarity.
Click compartment cover
›
shut.
Checking battery power
Check battery icon in LCD for
›
power level.
LOADING FILM LOADING THE BATTERY
¤
Sensor
Release back lock, open back
›
and load film cartridge.
Pull out film leader as shown.
›
The film should be flat on its
guides, its bottom perforation
about 1 cm in front of the sensor.
Close camera back until it
›
clicks shut.
The camera automatically ad-
›
vances the film up to frame
No. 1.
The LCD will display frame 1
›
or, if the film is loaded incorrectly, E for ERROR.
The camera automatically de-
›
tects the speed of DX-coded
films.
Page 4

REWINDING FILM
At the end of the roll, the film is
›
automatically rewound.
The film and camera-back
›
icons blink when rewinding is
complete.
To rewind a partially exposed
›
roll, press the rewind button.
Do not turn camera off during
›
rewinding.
BRIEF INSTRUCTIONS
To switch camera on, press
›
master switch on/off. The lens
cover opens, and the LCD
comes to life.
To switch camera off, press
›
master switch again.
Your Rollei Giro will switch off
›
automatically if it is left unused
for over three minutes.
Compose your subject in view-
›
finder, pressing the corresponding zoom button, if necessary. T = Tele/
W = wide-angle.
During zooming, focal-length
›
settings are displayed in the
viewfinder as follows:
38 – 45 – 50 – 60 – 65 – 70 –
(Giro 70) – 75 – 80 – 90 (Giro
90) – 105 (Giro 105).
Place AF area on main sub-
›
ject.
Press shutter release halfway.
›
Proper focus is set when the
green LED lights.
Press the shutter release fully
›
to take your picture, taking
care not to shake the camera.
At subject distances of less
›
than 0.8 m the green AF LED
flashes, and the shutter release remains locked.
The focusing range of your
›
Rollei Giro is from 0.8 m to
infinity.
The flash will fire automatically
›
in low light.
Flash range
›
(for ISO 100/21° film)
38 mm: 0.8 – 4.5 m
70 mm: 0.9 – 2.8 m
90 mm: 0.9 – 2.3 m
105 mm: 0.9 – 2.0 m
Page 5
mode
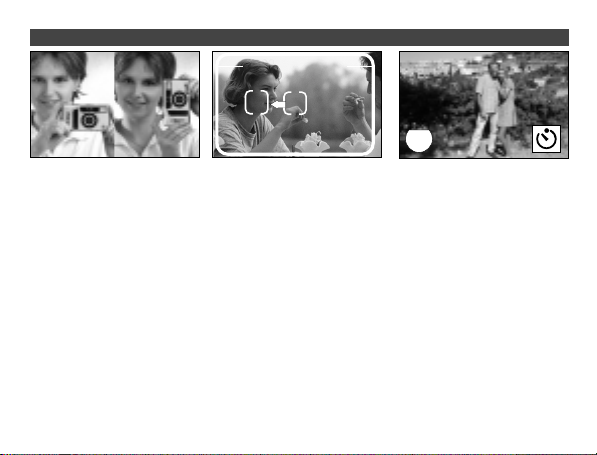
HOLDING YOUR CAMERA FOCUS LOCK
SELF-TIMER
Hold your Rollei Giro firmly
›
with two hands. At subject
distances of less than 0.8 m,
the green AF LED flashes and
the shutter release remains
locked.
To shoot, press the shutter
›
release softly to avoid camera
shake.
Be sure not to obstruct the
›
lens, flash and sensors with
your hand, the wrist strap etc.
AB
If you keep the shutter release
›
depressed halfway, you can
focus on off-center subjects
and then recompose.
1.Place AF area on main subject
(B).
2.Press shutter release halfway
(green LED lights).
3.Keep shutter release pressed
halfway and recompose (A).
Hold camera steady and press
shutter release fully for your
picture.
1x
This lets you get into the picture
yourself.
Press mode button once,
›
then press shutter release.
The self-timer delay is 10 s.
›
The self-timer lamp lights for 7
s and blinks for the remaining
3 s before the picture is taken.
Use a tripod or other firm sup-
›
port.
Page 6

mode
CONTINUOUS SHOOTING
2x
mode
PORTRAIT ZOOM INFINITY SETTING
mode
3x
4x
This mode is useful for shooting
moving subjects or action.
Press mode button twice.
›
The camera will fire as long as
›
you keep the shutter release
pressed.
Keep AF area in coincidence
›
with main subject. The camera will refocus before each
exposure.
In this mode, the camera automatically zooms to show all your
portraits at the same size even if
you take them from different
distances.
Press mode button three
›
times.
Place AF area on main sub-
›
ject and press shutter release
halfway.
The lens automatically zooms
›
to the focal length required for
your subject distance.
Press the shutter release fully
›
for exposure.
This mode is well-suited for distant or featureless subjects such
as clouds, fire or smoke and for
shooting through window panes
or iron bars.
To activate, press mode but-
›
ton four times.
The flash is inoperative in the
›
infinity setting.
In low light and above all when
›
using a tele focal length, use a
tripod or firm support.
Page 7

TIME EXPOSURES RED-EYE REDUCTIONAUTOFLASH
mode
5x
In the BULB setting, the shutter
remains open as long as you
keep the shutter release pressed
(max. 60 s), e.g. for night scenes
or fireworks.
To activate, press mode but-
›
ton five times.
Be sure to use a tripod to
›
avoid camera shake.
BULB
This mode automatically ensures properly exposed photos, inside or out.
Switching the camera on ac-
›
tivates autoflash.
AUTO appears in the LCD.
›
1x
flash
“Red eyes” occur above all in
portraits shot in very low light.
Press flash button once.
›
The anti-red-eye preflash
›
causes your subject’s pupils
to contract before the main
flash is fired. Be sure not to
move the camera between
preflash and main flash.
Page 8

FILL FLASH FLASH OFF
2x
flash
When your main subject is in the
shade and the ambient light too
bright for the camera’s flash to
fire automatically, you can fill-in
shadows and obtain balanced
exposure using this function.
Press flash button twice.
›
In this mode, the flash will
›
always fire regardless of subject and background brightness.
3x
flash
This mode suppresses automatic firing of the flash and thus
is suitable for available-light photography such as sunsets, outdoor shots at night, interiors or
situations in which flash is either
unwelcome or not allowed.
Press flash button three times.
›
Rest camera on a firm sup-
›
port or use a tripod to avoid
camera shake.
DATE IMPRINTING
(only DB model)
Use the mode button on the
data back to activate date imprinting.
Choosing a date format
Press mode button to select
›
the desired date format. Bars
-- -- -- stand for “no imprint”.
Select desired digit pressing
›
the select button, then set it
with the set button.
Holding the set button down
›
causes the digits to cycle rapidly.
During imprinting, the corre-
›
sponding icon in the data window blinks for two to three
seconds.
Use a pen or your fingernail to
›
press the buttons.
Page 9

TROUBLESHOOTING
Should a problem be encountered, be sure to check the
following first:
Shutter cannot be triggered
Is lens cover fully open?
›
Press master switch once more.
»
Has battery been properly loaded?
›
Check for proper polarity.
»
Has camera been left unused for prolonged period?
›
Change battery.
»
Pictures are blurred
Was AF area properly superimposed on main subject?
›
Read VIEWFINDER section again.
»
Were autofocus windows obstructed during exposure?
›
Be sure not to obstruct autofocus windows with fingers, hair
»
or wrist strap.
Framing discrepancy
Did you observe parallax marks in viewfinder?
›
Read VIEWFINDER section once more.
»
SPECIFICATIONS
Type: Fully automatic 35mm
leaf-shutter camera
Film: 35mm film (135), DXcoded, negative size 24 mm x
36 mm
Lens: Power zoom 38mm f/5.0
– 70 mm f/8.7 – 90 mm f/11 –
105 mm f/12.75; six elements in
five components
Shutter: Programmed leaf shutter with speeds from 1/250 s to
1/3 s plus bulb /1/2 s – 60 s)
Focusing: Active IR spot-AF
system with focus lock; range:
0.8 m - 8
Exposure control: Programmed AE;
Metering range (ISO 100/21°)
Wide-angle (38 mm): EV 6 - 16
Tele (105 mm) EV 7 – 17
Viewfinder: Real-image zoom
finder with autofocus area
Page 10

SPECIFICATIONS
Viewfinder coverage: 83%,
magnification 0.4x/38 mm –
0.76x/70 mm – 1.1x/105 mm
Film-speed setting: Automatic
by DX code from ISO 50/18° to
3200/36°
Film advance and rewinding:
Automatic; mid-roll rewinding
possible
Flash: Built-in, flash range
(ISO 100/21°)
Wide-angle 38 mm: 0.8 – 4.5 m
Tele 70 mm: 0.86 – 2.8 m
90 mm: 0.89 – 2.3 m
105 mm: 0.9 – 2.0 m
Recycling time: approx. 5 s
Flash modes: Autoflash, redeye reduction by powerful LED,
fill flash, flash off
Shooting functions: Portrait
zoom, continuous shooting, time
exposure (bulb), infinity setting
Self-timer: Single self-timer with
LED display: lit 7 s, blinking 3 s =
10 s
Automatic cutout: Three minutes
after use.
Optional data back: Automatic
quartz clock with calendar for imprinting of date or time.
Power source: 1 x 3-volt lithium
battery (CR 2)
Dimensions (mm/wxhxd): 112,2
x 64 x 42
Weight: 200 g (without battery)
Subject to change without
notice. All data according
to Rollei test standards.
Rollei Fototechnic GmbH
Postfach / P.O Box 3245
D-38022 Braunschweig
http://www.rollei.de
Rollei Giro 70/90/105
8003.00.260
GB, 01-2000
 Loading...