

Page 1
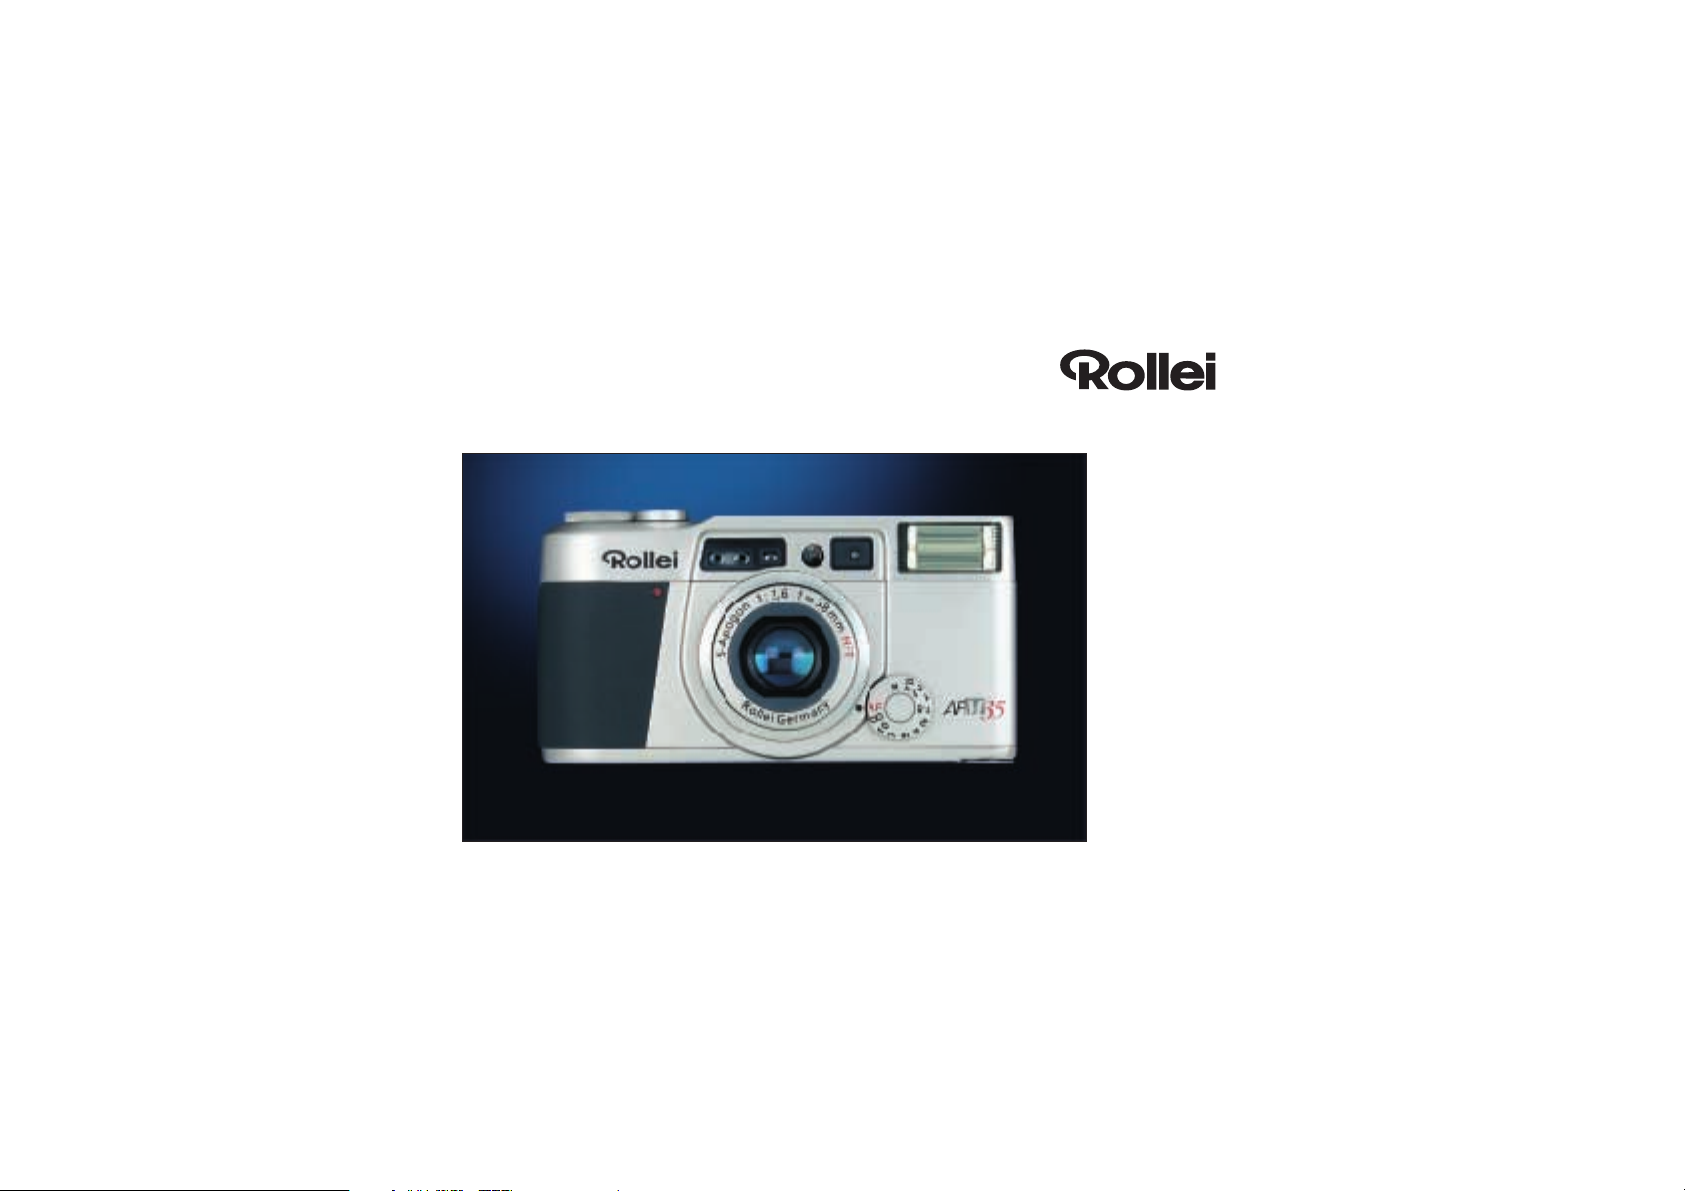
Rollei AFM 35
Operating Instructions
1
Page 2

GENERAL
Congratulations on your sophisticated new
35 mm camera!
Please read these instructions carefully before
using your camera, so you will be able to make
optimum use of its many features.
2
Precautions
Do not tamper with the camera’s internal compo-
›
nents. High-voltage circuits may pose a health
hazard.
Also, tampering will invalidate your warranty.
Should the camera be damaged, do not touch any
›
internal components to avoid an electric shock.
Should the camera get wet, remove the battery for
›
the same reason.
Battery notes
The camera will work only with a battery properly
›
loaded.
Load the battery with the proper polarity.
›
Batteries must not be recharged,
›
short-circuited or opened,
thrown into a fire,
exposed to humidity or liquids,
disposed of with household garbage.
Keep batteries away from children!
Page 3

GENERAL
The shutter of your camera will not release, if …
no battery is loaded or the battery is exhausted;
›
the lens cover is closed (camera OFF);
›
the film is being rewound.
›
Your camera is electronically controlled by a
microprocessor. In rare cases, strong electrical or
magnetic fields may give rise to malfunctions. In this
case remove the battery for 2 – 3 minutes. The camera
should again function normally after reloading the
battery.
Preventive police recommendation:
Marking your valuables, photographing and cataloging
them will make it more difficult for thieves to sell them
and may save you a lot of trouble.
3
Page 4

CONTENTS
Getting ready
Controls
Description of parts
LCD panel
Viewfinder frame
Loading the battery
Testing the battery
Preparing your camera for shooting
Loading film
Removing the film
Mid-roll rewind
Picture taking
Switching the camera on/off
Holding the camera
Shooting on full auto
Purpose of viewfinder LEDs
When autofocus might fail
Releasing the shutter
Focus lock
Depth of field
Aperture-priority AE
Purpose of viewfinder LEDs
Flash range
4
Flash modes
Autoflash
5
›
Red-eye reduction
6
›
Flash off
8
›
Fill flash
9
›
Backlight compensation
10
›
Slow sync (night flash)
11
›
Self-timer
12
›
Bulb exposures
13
›
Setting a bulb exposure
14
›
Automatic exposure bracketing (AEB)/
14
›
exposure compensation
Retaining your bracketing amount
Manual focusing
15
›
Selecting the date format
16
›
Setting the date
17
›
17
Miscellaneous
›
18
Camera care and storage
›
18
Troubleshooting
›
19
›
Specifications
20
›
AE program diagram
21
›
Aperture-priority AE diagram
22
›
Lens cross section
24
›
Depth-of-field table
25
›
25
›
26
›
27
›
27
›
28
›
29
›
30
›
31
›
31
›
32
›
35
›
35
›
36
›
37
›
38
›
40
›
43
›
45
›
46
›
47
›
50
›
Page 5

CONTROLS
Primary functions of components
Control Purpose
Main dial Master switch (see p. 15)
Programmed AE (see p. 17)
Aperture-priority AE (see p. 21)
Focusing dial Autofocus (p. 17)/manual focus selector (p. 35)
Button (7) Flash-mode selector (see p. 25)
[AEB/±] button Bracketing selector (see p. 32)
Exposure-compensation selector (p. 31)
( /BULB) button
Activating the self-timer (see p. 30)
or a bulb exposure (see p. 31)
SET button Setting the date (see p. 37) and the date format (see p. 36),
SEL-Taste respectively
Button (21) Mid-roll rewind (see p. 14)
5
Page 6
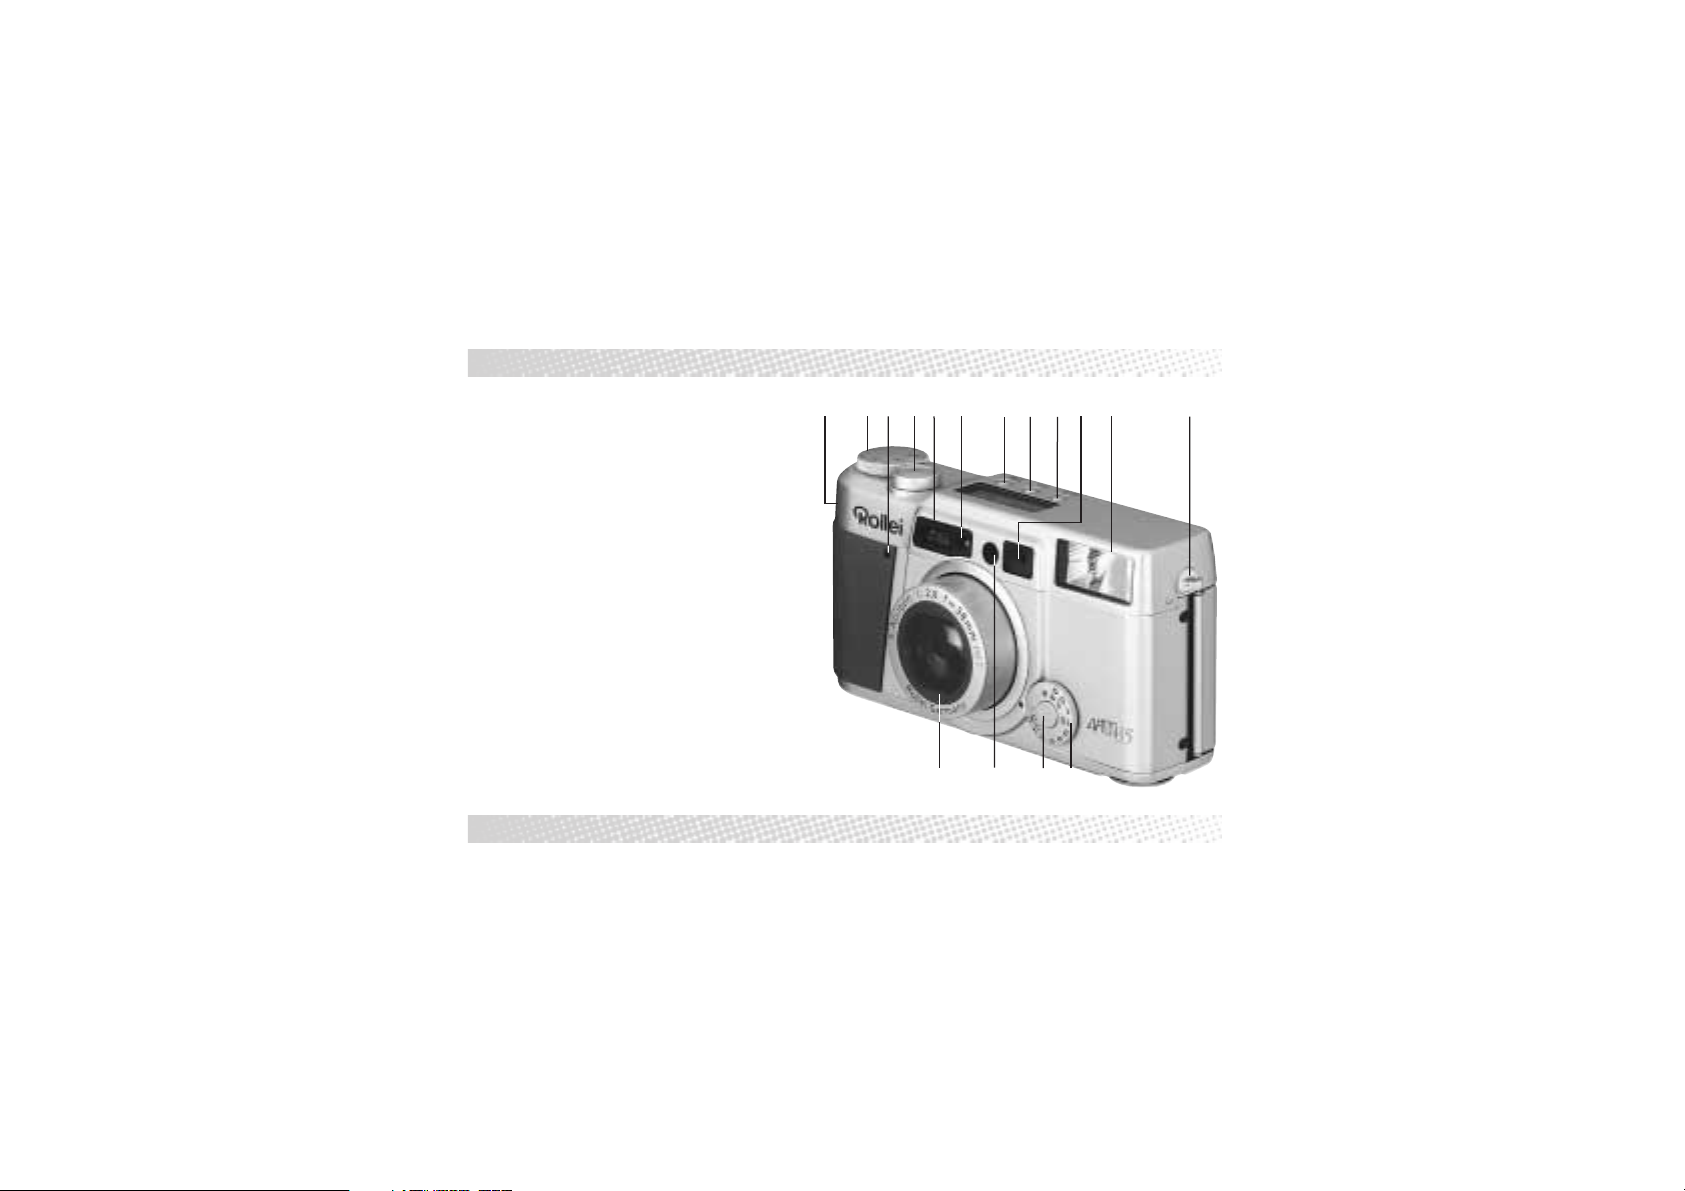
DESCRIPTION OF PARTS
1 Strap lug
2 Main dial (ON/OFF, programmed and
aperture-priority AE)
3 Self-timer lamp
4 Shutter release
5 Autofocus window
6 Exposure-meter window
7 Flash button
8 Bracketing/
exposure-compensation button (AEB/±)
9 Self-timer/
bulb-exposure button (BULB)
10 Viewfinder window
11 Flash unit
12 Focusing dial
13 Focusing-dial release
14 AF-LED
15 Automatically retracting lens
6
3
2
1
6
5
4
15
14
7
8
13
11
10
9
(1)
12
Page 7
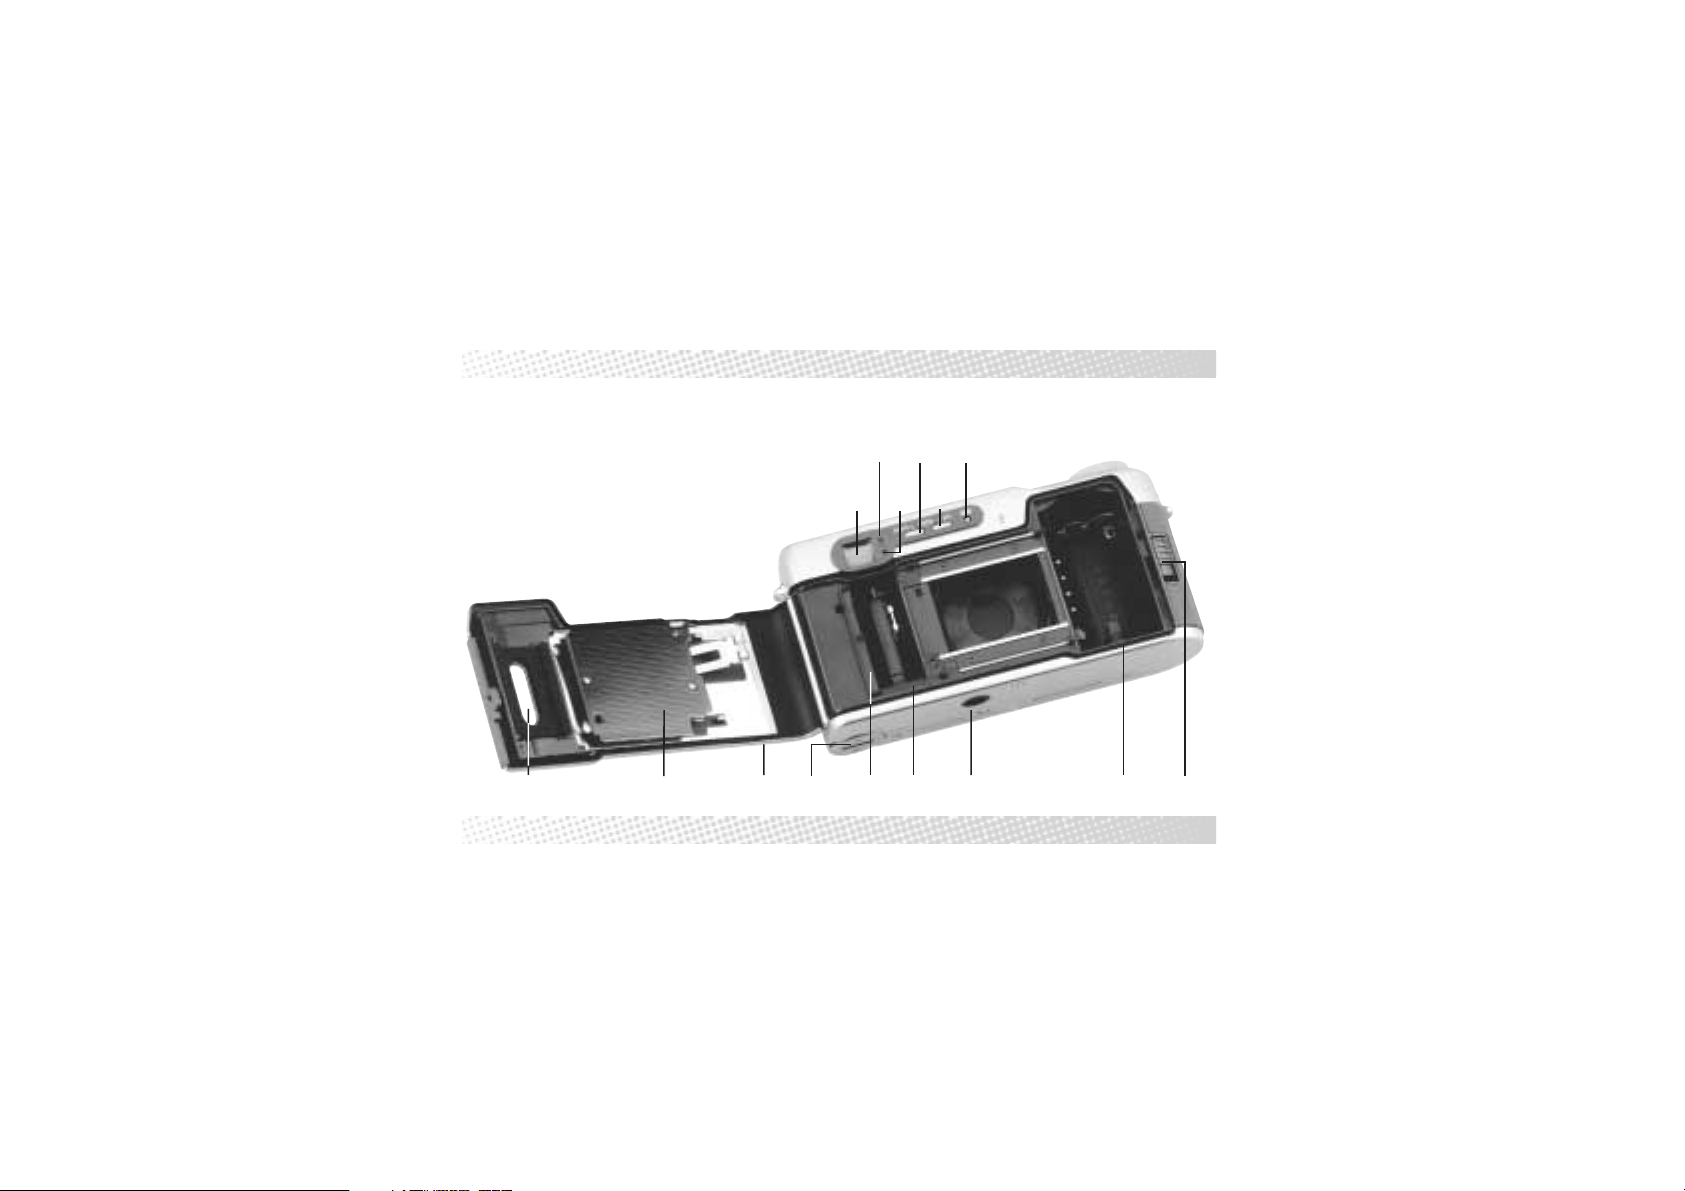
DESCRIPTION OF PARTS
16 Viewfinder eyepiece
17 Focus indicator
18 Red warning LED
19 Date select button (SEL)
20 Date set button (SET)
21 Mid-roll rewind button
22 Camera-back release
23 Film-cartridge compartment
24 1/4" tripod socket
30
29
25 Take-up spool
26 Film-leader mark
27 Battery-compartment cover
28 Camera back
29 Pressure plate
30 Film type window
27
28
16
17
18
26
19
25
20
21
24
23
22
7
Page 8
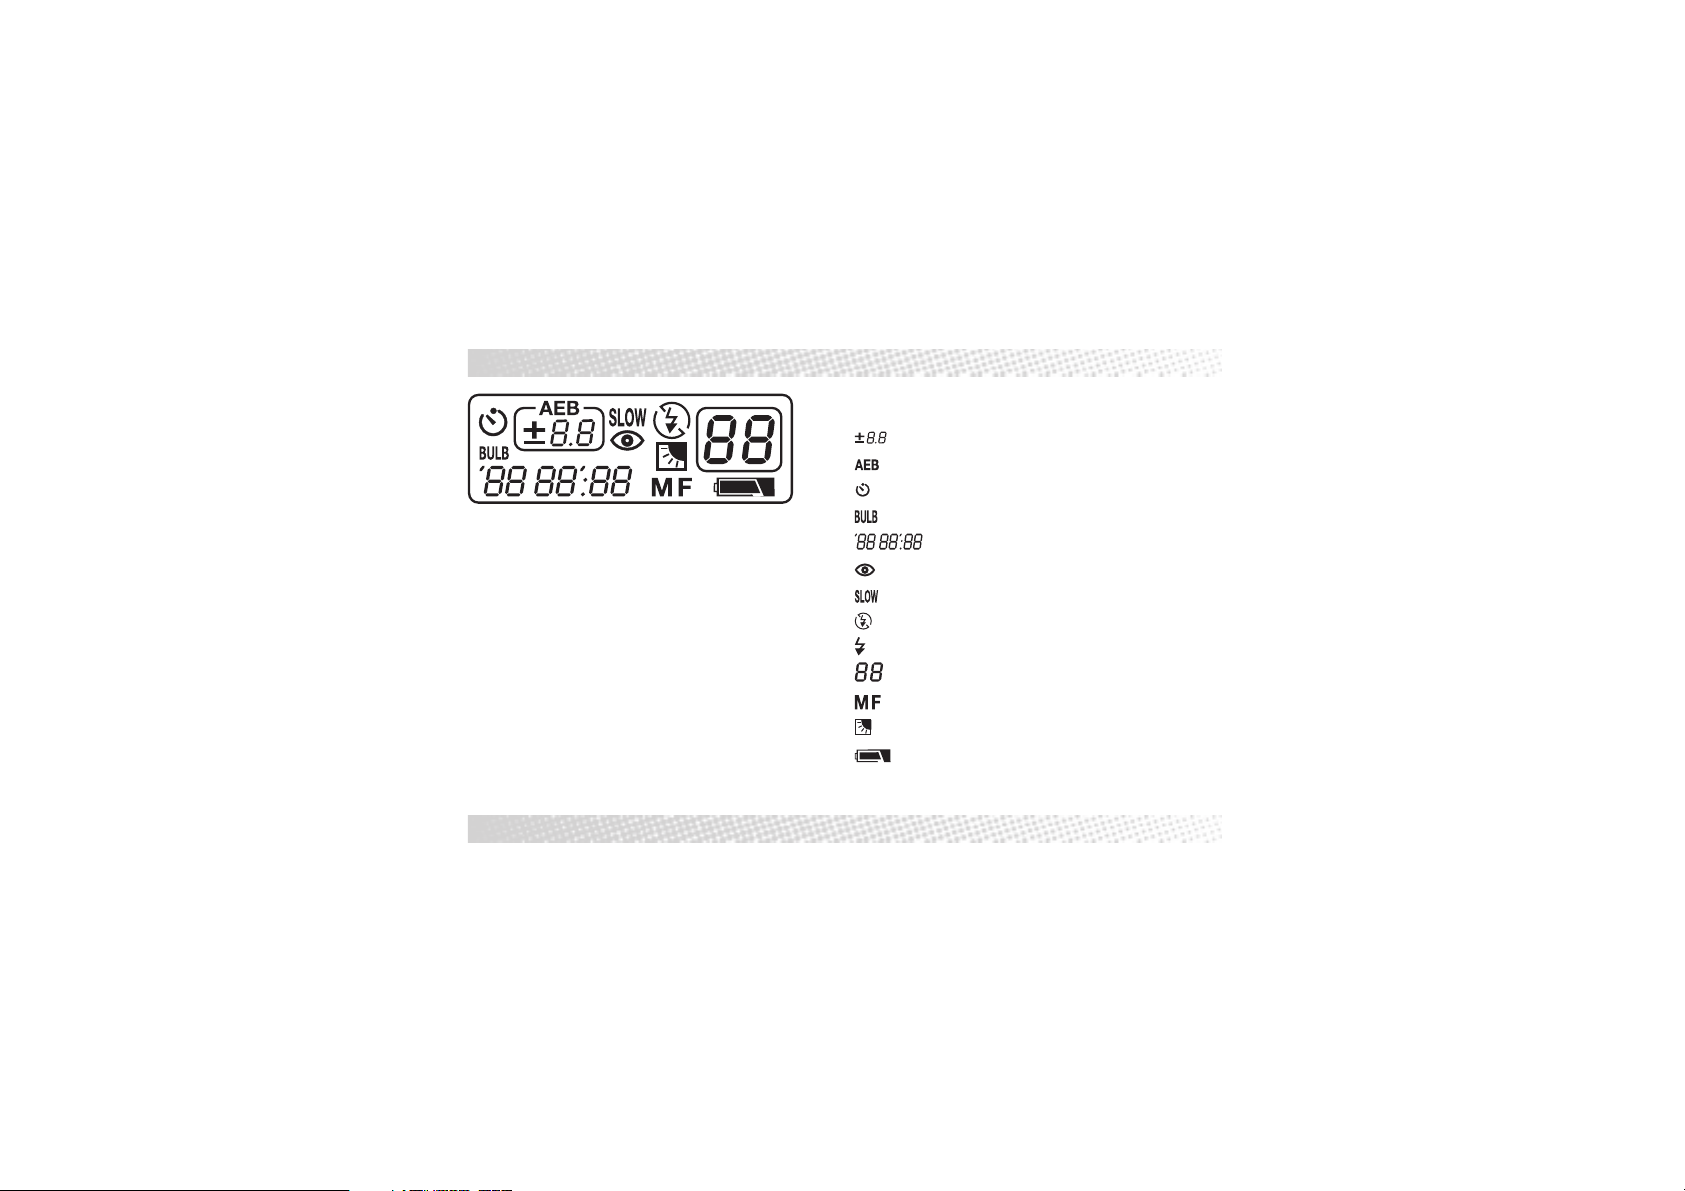
LCD PANEL
8
LCD panel
AEB compensation in EV
AEB mode
Self-timer
Bulb exposure
Date imprint
Anti-red-eye mode
Slow sync
Flash OFF
Flash ON
Frame counter
Manual focusing
Backlight compensation
Battery status
Page 9

VIEWFINDER FRAME
2
1
AEB MF
3
The viewfinder
This is your guide to what will be recorded on film.
1 Autofocus frame
The camera will automatically focus on the subject
detail covered by this frame.
2 Parallax marks
These mark the upper and left frame lines of your
picture at distances between 0.4 m and 0.9 m.
3 AEB (automatic exposure bracketing)
This appears in the AEB mode as you press the
shutter release halfway.
4
4 MF (manual focusing)
This appears when you press the shutter release
halfway with autofocusing disabled.
The minimum focusing distance is 0.4 m.
Please note that at distances between 0.4 and 0.9 m
so-called parallax will cause the viewfinder to show a
slightly different frame from the one recorded on film.
This is why parallax marks serve as upper and lefthand frame lines at this distance. In other words, the
actual frame will shift to the bottom and right. Be sure
to make allowance for this effect.
9
Page 10

LOADING THE BATTERY
Loading the battery
Your camera is designed for use of a type CR2 or CR2/
DL 3V lithium battery with an average capacity of
around 360 exposures.
Please do NOT load any film as long as there is no
battery in the camera.
Before shooting, be sure to check the battery status
(see p. 11).
The date and hour have to be reset after loading a new
battery (see p.37).
When traveling and shooting at low temperatures, it is
advisable to carry a spare battery.
10
Open the battery-compartment cover with a coin.
›
Load the battery with due regard to the polarity
›
marks (+) and (-).
Align the symbols, and tighten the cover with the aid
›
of a coin.
Page 11

TESTING THE BATTERY
Battery notes
Should the battery fail during rewinding, load a new
›
one and repeat rewinding by pressing button (21).
In this case, it is possible that a figure will be blinking
in the frame counter instead of “E” after rewinding.
However, you may open the camera back as soon
as the figure in the frame counter starts blinking.
Note:
Battery power drops at low temperatures. It is therefore
advisable to carry a spare battery when shooting in
cold climate.
1
Testing the battery
When you switch the camera on, a battery icon will
appear on the LCD. The different icons have the
following meaning:
1 Sufficient power
2 Low power. Change battery.
3 Blinking: Battery exhausted; shutter cannot be
released.
Note:
Be sure to test your battery before shooting.
You can easily change the battery with a film in the
camera. You will only have to reset the date and hour
thereafter.
2
3
11
Page 12
PREPARING YOUR CAMERA FOR SHOOTING
Attaching the wrist strap
Thread the thin end of the strap through the camera’s
›
strap lug and pull the long end through the loop.
12
Loading film
Your camera has been designed for the use of DXcoded 35mm film (size 135). These films allow the
camera to set the film speed automatically.
Suitable film speeds:
ISO 50/18°, 100/21°, 200/24°, 400/27°, 800/30°,
1600/33°, 3200/36°.
When you load a non-DX-coded film or one whose
speed varies from the values given above, the camera
will default to ISO 100/21°.
Page 13

LOADING FILM
Push the camera-back release as shown, and open
›
the back.
A battery must be loaded BEFORE you load a film.
›
Be sure NOT to open the camera back as long as
›
there is a film in the camera that has not been
rewound.
Be absolutely sure to avoid force when opening or
›
closing the camera back.
Normally, the shutter cannot be released when the
›
camera back is open. However, should this become
indispensable, the shutter can be released if the
camera-back release is pressed down at the same
time.
Load a film cartridge.
›
Pull the film leader out until it reaches the
›
corresponding mark at the opposite side of the
camera.
Close the camera back. The film will now be
›
automatically wound up to the first frame.
Please make sure that the cartridge lip makes
›
contact with the film guides before closing the
camera back.
Should the film leader reach beyond the mark on the
›
left-hand side of the camera, remove the cartridge
and rewind the film slightly by hand.
With the camera back closed, you may read the
›
type and speed of the film loaded through the
corresponding window in the back.
Switch the camera on and check the frame-counter
›
reading.
Remember that the shutter cannot be released as
›
long as the frame counter does not read “1” because
the film has not been properly wound up to the first
frame. In this case, open the camera back and load
the film again.
Notes:
Never change films in direct sunlight.
If you exceed the nominal number of exposures per
roll, the last frame may be cut off during processing, or
the date may not be properly imprinted.
13
Page 14

REMOVING THE FILM/MID-ROLL REWIND
Removing the film
After the last frame, the camera will rewind the film
automatically. The frame counter then reads “E” (for
“empty”).
Before opening the camera back, make sure that
›
there is no more rewinding sound and that the frame
counter reads “E”. Premature opening of the camera
back may damage the camera and expose at least
part of your film.
Push the camera-back release in the direction of the
›
arrow and open the camera.
Remove the film cartridge.
›
Should you switch your camera off without removing
›
the rewound film, the lens will not retract. This is why
you should always remove the film immediately after
rewinding.
14
Mid-roll rewind
Press button (21) if you wish to rewind a film that is only
partially exposed.
After rewinding, the frame counter will read “E”.
›
Page 15
SWITCHING THE CAMERA ON/OFF
Switching the camera on
Turn the main dial to “P”. The lens cover will open.
›
If you do not use any of the camera’s functions for
›
five minutes, it will switch off automatically. To
switch it on again, simply press the shutter release
halfway. Alternatively, you may turn the main dial to
OFF and back to the desired setting.
Switching the camera off
Turn the main dial to OFF. The lens cover will close,
›
and the liquid-crystal display will go dead.
15
Page 16

HOLDING THE CAMERA
Holding your camera properly
Grasp your camera firmly with both hands to avoid
›
camera shake.
If possible, brace your elbows against your body.
›
Keep the camera close to your eye so you can see
›
the entire viewfinder frame.
The camera will focus automatically over a range of
›
0.4 m to infinity (∞).
Press the shutter release SOFTLY, without jerking.
›
16
Please note
Do not obstruct the lens, autofocus and exposure-
›
meter windows and the flash with your fingers, hair
or the wrist strap.
For shots in vertical format, make sure that the flash
›
unit is on top to obtain natural illumination.
Frame your subject so that the AF area is on top of
›
the most important detail of your picture.
Page 17

SHOOTING ON FULL AUTO/PURPOSE OF VIEWFINDER LEDS
Shooting on full auto
Your picture will be focused automatically (AF).
›
Exposure will be controlled automatically.
›
Flash will likewise be controlled automatically.
›
In other words, the camera will do all the “work”,
leaving you to frame your subject and press the shutter
release.
Turn the main dial to “P”, and switch the camera on.
›
Be sure to engage your focusing dial on “AF”.
›
Purpose of viewfinder LEDs in full-auto mode
(with shutter release pressed halfway)
Display Information
Green lit Camera has focused
focus indicator on subject
LED
blinking Subject too close
Red warning LED blinking Outside metering range
lit Flash being charged
* Releasing the shutter while the flash is being charged will
result in underexposure.
Focusing impossible.
See “When Autofocus
might fail”
Wait till LED goes out
(Recycling time is about
four seconds)
17
Page 18

WHEN AUTOFOCUS MIGHT FAIL/RELEASING THE SHUTTER
When autofocus might fail
The autofocus system has its natural limits, and in
some cases it may be advisable to use focus lock (see
p. 19). Alternatively, you may focus manually (see p.
35). Difficult subjects for autofocus are, among others,
the following:
A bright light source, for instance the sun or a strong
›
reflection from a water surface, car paint, etc. near
your main subject.
A mirror or another highly glossy surface near the
›
center of your picture.
A background that is noticeably brighter than your
›
main subject.
Exclusively vertical patterns within the AF area.
›
Fast subject motion.
›
18
Releasing the shutter
Press the shutter release halfway.
›
The camera will focus automatically, and the green
›
focus indicator will light.
The red warning LED should NOT be lit.
›
Softly press the shutter release all the way.
›
In low light, the flash will fire automatically.
›
After each exposure, the frame counter will advance
›
by one step.
Page 19

FOCUS LOCK
1 2 33
Focus lock
In the left-hand photo above, the AF area is on the
background. As a result, the camera would focus on
the latter.
To do better, sight one of the persons with the AF
›
area.
With the camera in this position, press the shutter
›
release halfway. Your focus will be locked in for as
long as you keep the shutter release in this position.
Exposure is locked in together with focus.
›
Keeping the shutter release depressed halfway,
›
recompose and press the shutter release softly all
the way.
Focus lock is canceled as soon as you let go of the
›
shutter release. You can thus repeat focusing on
different subjects as many times as you wish before
you finally trigger the exposure.
19
Page 20

DEPTH OF FIELD
What is depth of field?
Any optical system can actually focus on only one
›
distance. However, the size of the lens aperture (fstop) has a decisive effect on the depth range which
the eye will still accept as “sharp”. The following
optical laws apply:
A large aperture results in shallow depth of field, a
›
small one in great depth of field.
The longer the focusing distance, the greater the
›
depth of field. The shorter the distance, the shallower
the depth of field.
Depth of field is shallower in front of the plane of best
›
focus than behind it.
See also the depth-of-field table on p. 50.
20
Turn the main dial to the desired aperture and make
›
sure it engages one of its click stops. Note that
proper exposure is not guaranteed in any
intermediate position.
Press the shutter release halfway, making sure that
›
the green focus indicator lights (not so the red
warning LED!), and press the shutter release softly
all the way.
Page 21

APERTURE-PRIORITY AE
Aperture-Priority AE
If you select the aperture, the camera will automatically
set a suitable shutter speed for appropriate exposure.
Which aperture you select will have the following effect
on your pictures:
Choosing a larger aperture (smaller f-number)
Depth of field will be shallow. In other words, details in
front of and behind the plane of best focus will be
increasingly blurred – an effect that is very desirable,
for example, in portraiture.
Choosing a smaller aperture (higher f-number)
Depth of field will be deep. In other words, you will
capture great depth in sharp focus. This is very
desirable, for example, when shooting scenery.
21
Page 22

PURPOSE OF VIEWFINDER LEDS IN PROGRAMMED AND APERTURE-PRIORITY AE
Purpose of viewfinder LEDs (with shutter release pressed halfway)
Display Information
Green lit Focus has been set
focus indicator
blinking Subject too close
Automatic focusing impossible
Use focus lock or focus manually (see pages 19 and 25)
Red warning lamp blinking Programmed AE Risk of underexposure in low light:
Aperture-priority AE Risk of overexposure in bright light.
lit Flash being recharged. Wait until lamp goes out.
(Recycling time about four seconds)
When using AEB in programmed AE, reduce exposure compensation
When using AEB in aperture-priority AE, vary f-stop setting
* The shutter cannot be released
Use flash
Outside metering range
Use a larger aperture or fill flash
22
Page 23

PURPOSE OF VIEWFINDER LEDS IN PROGRAMMED AND APERTURE-PRIORITY AE MODES
The red warning LED will also blink in cases other
›
than those described above if a shutter speed
slower than 1/45 s will be used with the flash
switched off or in the slow-sync (night-flash) mode.
In this case, mount your camera on a tripod to avoid
camera shake. (The warning LED will keep blinking.)
Should you trigger an exposure while the flash is still
›
being charged, your picture will be underexposed.
23
Page 24

FLASH RANGE
Flash range
Flash range varies as a function of film speed and – in
aperture-priority AE – of the f-stop selected. The
following ranges apply to programmed AE:
ISO film speed Flash range
50/18° 0.4 – 3.0 m
100/21° 0.4 – 4.2 m
200/24° 0.5 – 6.0 m
400/27° 0.7 – 8.5 m
800/30° 1.0 – 12.0 m
1600/33° 1.4 – 17.0 m
Note:
The above ranges apply to color reversal (slide) film.
Due to its greater exposure latitude, color negative film
gives wider ranges.
24
Flash range for aperture-priority AE can be determined
by dividing the guide number by the f-stop used. The
following guide numbers apply to different film speeds:
ISO film speed Guide number
50/18° 5.5
100/21° 11
200/24° 15.5
400/27° 22
800/30° 31
1600/33° 44
Example:
Film speed: ISO 200/24°
Guide number: 15.5
F-stop chosen: f/5.6
Flash range =
Guide number =15.5
F-stop 5.6
= 2.7 m
Any change in subject distance has to be accompanied
by a change in the aperture chosen.
Page 25

SELECTING A FLASH MODE / AUTOFLASH
Choosing a flash mode
The camera has seven flash modes that cover a wide
range of applications.
To choose a flash mode, press the flash button.
The flash mode selected will stay active even after
›
an exposure and will be canceled only when the
camera is switched off.
For the purpose of the viewfinder LEDs during flash
›
photography, see page 22.
Autoflash
This is the standard flash mode in which the flash will
›
fire automatically as soon as subject brightness
drops to a certain threshold value.
There is no icon for this mode on the LCD panel.
›
25
Page 26

RED-EYE REDUCTION
The phenomenon of red eyes
In low light, the pupils of people and animals tend to
dilate. The flash entering the eye through the wide
pupils strikes the (red) retina which thus stands out in
your pictures.
To reduce this phenomenon as far as possible, the
camera will fire four preflashes.
When using this mode,
ask your subject(s) to look straight into the camera;
›
fire from a relatively close distance (but not directly
›
in front of people’s eyes!).
26
Red-eye reduction
In this mode, the camera will fire four preflashes.
To switch to red-eye reduction, press button (7)
›
until the corresponding icon is displayed.
Page 27

FLASH OFF/FILL FLASH
Flash OFF
For available-light photography or shooting at distances
beyond the flash range – for example, in a theater or
stadium – switch the flash off. However, this will result
in relatively slow shutter speeds carrying the risk of
camera shake. It is therefore advisable to use a tripod.
To switch the flash off, press button (7) until the
›
corresponding icon disappears from the display.
Fill flash
This mode serves to fill in deep foreground shadow
›
in daylight pictures and when shooting against the
light – for example, if a person is standing in front of
a window or in the shade against a very bright
background. Fill flash will balance foreground and
background exposure.
To activate fill flash, press button (7) until the
›
corresponding icon is displayed.
27
Page 28

BACKLIGHT COMPENSATION
Backlight compensation
This mode avoids underexposure of your main subject
in strong backlight. It is intended for subjects that are
too far away for flash. The camera will automatically
compensate exposure by +2 EV.
To activate backlight compensation, press button
›
(7), until the corresponding icon is displayed.
28
Without backlight compensation With backlight compensation
Note:
If the light from a strong light source strikes the lens
directly, flare spots may appear in your picture.
If at all possible, try to find a viewpoint leaving the lens
in the shade to avoid flare from degrading image
contrast.
Page 29

SLOW SYNC (NIGHT FLASH)
Slow sync
This is a combination of flash to light your foreground
and a slower shutter speed to coax out atmospheric
illumination in the background of night or dusk shots.
To activate this mode, press button (7) until the
›
corresponding icon is displayed.
Preferably use a tripod to avoid camera shake.
›
Slow sync with red-eye reduction
Use this mode if there are people in the foreground of
night shots with atmospheric background. The camera
will fire four low-intensity flash bursts to reduce the
pupil diameter of your subjects and thus the risk of red
eye.
In view of the relatively slow shutter speed used, your
subjects should not move directly after the flash but
keep still slightly longer.
29
Page 30

SELF-TIMER
Self-timer
To activate the self-timer, press button (9) until the
›
corresponding icon is displayed.
Place the AF area over your main subject and frame
›
your picture, if necessary locking focus (see p. 19).
Both the focus and the exposure setting will be
locked in as you press the shutter release halfway.
Do not stand in front of the camera when triggering
›
the exposure, since this would result in blur and
faulty exposure.
Press the shutter release fully to start the countdown.
›
The self-timer LED will stay lit for about seven
›
seconds and blink for the remaining three seconds
before exposure.
30
The mode is automatically disabled after exposure
›
or when the camera is switched off.
To abort the countdown, simply press the self-timer
›
button (9).
Page 31

BULB EXPOSURES/CHOOSING THE EXPOSURE TIME
Bulb exposures
In this mode, the shutter will stay open for as long as
you keep the shutter release depressed. It is thus ideal
for night photography or fireworks. The flash is normally
disabled in the bulb mode, but autoflash and red-eye
reduction can be activated via button (7).
To activate the bulb mode, press button (9) until the
›
corresponding icon is displayed.
Be sure to mount your camera on a tripod to avoid
›
camera shake and blur.
The mode will be canceled automatically after the
›
exposure.
Exposure time in the bulb mode
The following exposure times can be set in this
›
mode:
1 s, 2 s, 4 s, 8 s, 15 s, 30 s and 60 s.
Press button (9) until BULB is displayed, and hold it.
›
Select the desired exposure time by pressing button
›
(7).
Let go of button (9), and the desired time is displayed.
›
Press the shutter release fully.
›
The exposure time will be counted down on the LCD
›
panel. The shutter will close automatically when the
selected time has elapsed.
The mode will automatically be canceled after the
›
exposure.
31
Page 32

AUTOMATIC EXPOSURE BRACKETING (AEB)/EXPOSURE COMPENSATION
0,5
Automatic exposure bracketing (AEB)/
Exposure compensation
In this mode, the camera will take three successive
pictures with different exposure: as metered,
underexposed and overexposed. Exposure compensation may be limited to one or two shots.
Exposure bracketing is particularly useful with slide
film and in difficult lighting situations.
32
Page 33

EXPOSURE BRACKETING
To activate the AEB mode, press button (8).
›
The mode and the compensation selected will appear
›
on the LCD panel.
The flash will be disabled automatically because it is
›
incompatible with this mode.
Press the shutter release halfway. AEB will light up
›
in the viewfinder to confirm your setting.
If the resulting exposure is unrealistic, the red warning
›
LED will light, AEB and the compensation value will
blink on the LCD panel, and the shutter cannot be
released.
If this happens in programmed AE, reduce the
›
compensation set; in aperture-priority AE select
another f-stop.
If you then hold down the shutter release, the three
›
successive shots will be taken automatically.
The AEB mode is not canceled automatically.
›
To disable the mode, press button (8).
›
You may keep bracketing until less than three
›
frames are left on your film.
Note:
Switching directly from backlight compensation to
AEB is not possible. In this case, first select another
flash mode by pressing button (7), then press button
(8).
Separately triggered bracketing exposures
You may also trigger each of the three exposures
›
separately.
The focus setting of the first shot will be retained for
›
the remaining two. After the series, focus and
exposure settings will be canceled.
33
Page 34

EXPOSURE BRACKETING
Exposure compensation with one or two shots
Press button (8) until the desired compensation
›
(e.g. ±0.5 or ±1.0) is displayed. Hold the button
down and select the desired combination by pressing
the flash button (7). Release button (8) as soon as
this combination is displayed.
Press the shutter release halfway. AEB will light up
›
in the viewfinder.
If your exposure setting is unrealistic, the red warning
›
LED will light, AEB and the compensation will blink
on the LCD panel, and the shutter cannot be
released.
In programmed AE, you will then have to reduce the
›
compensation set, in aperture-priority AE you will
have to choose another f-stop.
The AEB mode is not automatically disabled after
›
the series. To cancel it, press button (8).
34
Possible combinations (with ±0.5)
LCD panel First shot Second shot
0 -5 as metered -0.5 EV
0 5 as metered +0.5 EV
-5 5 -0.5 EV +0.5 EV
-5 -0.5 EV 5 +0.5 EV -
Possible combinations (with ±1.0)
LCD panel First shot Second shot
0 -1 as metered -1.0 EV
0 1 as metered +1.0 EV
-1 1 -1.0 EV +1.0 EV
-1 -1.0 EV 1 +1.0 EV -
Page 35

RETAINING YOUR BRACKETING AMOUNG/MANUAL FOCUSING
Retaining the bracketing amount selected
Repeated series with the same bracketing amount are
possible if the exposure compensation is set in the
following manner:
Press button (8) until the bracketing amount (±0.5 or
›
±1.0) is displayed. Holding down the button, select
the desired combination by pressing flash button
(7), keeping this down for two seconds.
The combination selected will blink to signal that it
›
has been put in memory.
To delete the combination from memory, press
›
button (8).
Manual focusing
Should automatic focusing be impossible, you can
easily focus manually.
Press the focus-dial release and turn the dial to the
›
desired distance.
“MF” will appear on the LCD panel.
›
As you depress the shutter release halfway, MF will
›
light up in the viewfinder.
Press the shutter release down fully for exposure.
›
It is advisable to return the dial to its AF setting after
›
the exposure.
Remember that the focus dial works only in its click-
›
stop positions. Intermediate settings do not
guarantee proper focusing.
The dial is locked only in its AF setting.
›
35
Page 36

SELECTING THE DATE FORMAT
Selecting the date format
The date (Year-Month-Day/Hour-Minute) is imprinted
in the lower right-hand corner of the horizontal frame.
Please keep in mind that a bright background might
cover up the date.
Y: Year M: Month D: Day T: Hour
36
Switch the camera on and select the desired date
format by pressing the SEL button. Each depression
of the button will change the format as shown.
No imprinting will be made if you set (------).
Note:
After setting the date and hour, the camera will switch
back to “YMD”. This is why you should select the date
format only after setting the date.
Page 37

SETTING THE DATE
Setting the date
(Year-Month-Day/Hour-Minute)
Your camera allows the date or the hour to be
›
imprinted in your pictures.
To set the date, switch the camera on, then hold the
›
SEL button down for at least two seconds until the
date display starts blinking.
To change the blinking digits, press the SET button.
›
If you hold the button down, the settings will change
rapidly.
The following settings are possible:
›
Year: ’01 bis ’40 (2001 bis 2040)
Month: 1 bis 12
Day: 1 bis 31
Hour: 0 bis 23
Minute: 00 bis 59
Renewed depression of the SEL button will put your
›
setting in memory, and the next digits will start
blinking.
After setting the minutes, press the SEL button until
›
none of the digits is blinking.
Year, month and day will change as a function of
›
hour and minute.
37
Page 38

CAMERA CARE AND STORAGE
Camera care
Your camera is a precision instrument and merits
proper care.
1. Cleaning the camera body
Be sure never to use organic solvents, such as
›
thinner or alcohol, for cleaning.
Use a soft, fluffless cloth to clean the camera body.
›
Dust deposits in the film compartment may cause
›
scratches. This is why you should also clean the
interior of the camera with a blower brush.
2. Cleaning glass surfaces
Scratches on the front lens will degrade the
›
sharpness of your pictures. If your pictures appear
to have low contrast and seem be slightly blurred,
scratches on the lens may be the culprits. Clean the
front lens regularly as follows:
Clean dust using a blower brush.
›
To remove obstinate marks, apply a few drops of a
›
lens-cleaning fluid to lens tissue and carefully wipe
the lens outwards in concentric circles.
38
After humid cleaning, wipe the lens outwards in
›
concentric circles with dry lens tissue.
NEVER try to clean a dirty front lens by breathing on
›
it and wiping with a silicone cloth. This would
inevitably scratch the surface.
Clean the AF and viewfinder windows as described
›
above for the front lens. Scratches on the AF
windows may affect focusing accuracy. Dust and
smudges on the viewfinder window will reduce the
clarity of your viewfinder image.
3. The LCD panel
The LCD panel will darken at temperatures above
›
approx. 60°C, but return to its normal condition at
room temperature.
At low temperatures, LCD panels tend to respond
›
more slowly. However, this is normal.
Page 39

CAMERA CARE AND STORAGE
4. Batteries
The output of any battery will drop at low
›
temperatures. However, it will return to normal at
room temperature. Always use fresh batteries when
shooting at low temperatures. Keep spare batteries
warm in an inside pocket of your clothing and
periodically exchange them for the one in the camera.
At very low temperatures, battery power may go
down sufficiently to make further shooting
impossible.
5. Operating temperature
Your camera has been designed for operation at
›
temperatures from –10°C to +40°C.
6. Storage
Never leave your camera for prolonged periods in
›
hot places, such as a vehicle parked in the sun. This
also holds for very humid places.
Always store your camera in a dry, cool and dustfree
›
place.
39
Page 40

TROUBLESHOOTING
Problem Possible cause Remedy
Shutter cannot be released. Battery icon blinking. Replace battery
Frame counter does No battery loaded. Load battery before loading film.
not read “1” with film
loaded and camera
switched on.
Focusing impossible Subject too close? Observe minimum focusing distance of 0.4 m.
(green focus Subject unsuitable for Lock focus or focus manually.
indicator blinking during AF). autofocusing? Camera defective.
Camera switched off. Switch camera on
Is “0” blinking in frame counter? Pull out film leader to mark on opposite side of
“E” displayed in frame counter. Remove exposed film and load new film
Is self-timer counting down? Deactivate self-timer by pressing button (9).
AEB blinking on LCD panel? Reduce bracketing amount.
camera and load film properly.
In aperture-priority AE, set different f-stop
or switch to P.
Cancel AEB mode by pressing button (8)
Display not uniform. Turn it over to Customer Service
without removing film.
40
Page 41

TROUBLESHOOTING
Problem Possible cause Remedy
Picture blurred. Did you obstruct AF windows Hold camera so that AF windows
with your fingers? are not obstructed by
Are you sure the AF area was on Always make sure that the AF area is on your
your main subject? main subject.
Is the front lens dirty? Clean front lens.
Did you shake the camera during Hold camera absolutely steady
exposure? and press shutter release without jerking.
Did you use manual focusing Set proper distance.
and set the proper distance?
Did you overlook blinking of the Use focus lock or focus manually.
green focus indicator?
your fingers.
With slower shutter speeds, use a tripod.
41
Page 42

TROUBLESHOOTING
Problem Possible cause Remedy
Pictures too dark. Did you overlook red warning Always make sure before shooting
Pictures too light. Did you overlook red warning lamp In aperture-priority AE select different f-stop
Wrong date imprinted. Date was not set after replacing Set date properly after replacing battery.
No date visible in picture. Did you set “- - - - - -“? Set proper date format.
lamp during exposure? that your flash has stopped charging.
Subject too far away for flash. Observe flash range.
Did you obstruct flash reflector Never cover up flash with your finger.
with your finger?
Was your subject standing in front Switch to fill flash or backlight compensation.
of or beside a window?
during exposure? or switch to P.
Was camera set to backlight Select another mode.
compensation?
battery.
Has date been imprinted over Frame your subject so that the date is
light background imprinted against a dark background.
(white, yellow, orange?)
In aperture-priority AE select a different
f-stop or switch to P.
Switch to fill flash.
Too close to subject.
Step back until warning lamp stops blinking.
42
Page 43

SPECIFICATIONS
Camera type: Fully automatic 35mm camera; nega-
tive size 24 mm x 36 mm on size 135 film
Lens: S-Apogon 38 mm f/2.6 HFT (four elements in
three components); field of view: 59.3°
Shutter: Programmed electronic shutter (for
programmed and aperture-priority AE)
Shutter-speed range: B (with settings from 1 s to
60 s), 1/2 s – 1/290 s (at f/2.6) – 1/1000 s (at f/16)
Self-timer: Electronically controlled, approx. 10 s
delay, with LED
Exposure metering: CdS cell, measuring range 4 –
16 EV (ISO 100/21°)
Exposure control: Programmed AE, aperture-priority
AE, exposure bracketing (AEB)/backlight compensation
Exposure compensation: ±0.5 and 1.0 EV. Backlight
compensation +2 EV
Focusing: Passive AF system focusing from 0.4 m to ∞;
manual focusing in 10 steps, focusing dial locked in AF
setting
Viewfinder: Real-image finder, magnification 0.48x,
coverage 85% at ∞, with parallax marks
Internal viewfinder display: AEB (automatic
exposure bracketing), MF (manual focusing)
External viewfinder display:
Green focus indicator – lit: Focus set; blinking: Out of
range
Red warning lamp – lit: Focusing impossible; blinking:
Over/underexposure warning
Film-speed setting: Automatic with DX-coded film
from ISO 50/18° - 3200/33°
Film loading and advance: Automatic loading to
frame 1. Automatic advance and rewinding. Mid-roll
rewinding possible.
43
Page 44

SPECIFICATIONS
Flash unit:
– Built-in electronic flash unit
– Recycling time approx. 4 s
– Guide number 11 (ISO 100/21°)
– Autoflash
– Red-eye reduction
– Fill flash
– Flash OFF
– Slow sync
– Slow sync with red-eye reduction
LCD panel:
- Frame counter
- Flash mode
- Self-timer
- Bulb exposure
- Exposure bracketing
- Manual focusing
- Date imprinting
- Battery status
44
Miscellaneous: Metal body (aluminum-magnesium
alloy), 1/4" tripod socket
Power source:
Type CR2/DL or CR2 3V lithium battery
Dimensions (mm): 123 x 63 x 33.5
Weight: 250 g (without battery)
Subject to change without notice.
Page 45

AE PROGRAM DIAGRAM
AE program diagram
* The flash will fire regardless of film speed as soon as
shutter speed is slower than 1/45 s.
EV5
EV6
EV7
EV8
(F)
2.6
4
5.6
8
11
16
1 2 4 8 15 30 60 125 250 500 1000 (1/T)
EV4
EV9
EV10
Example:
ISO 100/21° film, subject brightness less than EV 9.5.
EV11
EV12
EV13
EV14
EV15
EV16
EV17
EV18
45
Page 46

APERTURE-PRIORITY AE DIAGRAM
Aperture-priority AE diagram
* The flash will fire regardless of film speed as soon as
shutter speed is slower than 1/45 s.
4
V
V
E
(F)
2.6
4
5.6
8
11
16
1 2 4 8 15 30 60 125 250 500 1000 (1/T)
E
V
V
E
E
V
V
E
V
E
E
1/290
1/400
9
8
7
6
5
46
Example:
ISO 100/21° film, subject brightness less than EV 9.5.
1
0
1
1
V
E
1/550
1/650
1/850
1/1000
3
2
1
1
V
V
E
E
4
1
V
E
5
1
V
E
6
1
V
E
7
1
V
E
8
1
V
E
Page 47

LENS CROSS SECTION
47
Page 48

MTF DIAGRAM F 2.6
1.0
0.9
0.8
0.7
0.6
0.5
0.4
0.3
0.2
0.1
0.0
0.0 5.00 10.00 15.00 18.00
48
20 LP/MM (sagittal)
20 LP/MM (tangential)
20.00 25.00
Page 49

MTF DIAGRAM F 8
1.0
0.9
0.8
0.7
0.6
0.5
0.4
0.3
0.2
0.1
0.0
0.0 5.00 10.00 15.00 18.00
20 LP/MM (sagittal)
20 LP/MM (tangential)
20.00 25.00
49
Page 50

DEPTH-OF-FIELD TABLE
0.4 m 0.7 m 1.0 m 1.5 m 2.0 m 3.0 m 5.0 m 7.0 m 10.0 m ∞
F 2.6 0.39~0.41 0.68~0.73 0.95~1.06 1.39~1.64 1.80~2.25 2.56~3.62 3.88~7.05 4.97~11.9 6.31~24.3 16.9~∞
F 4 0.39~0.41 0.67~0.74 0.93~1.09 1.33~1.72 1.71~2.42 2.38~4.08 3.46~9.06 4.30~19.0 5.26~107 11.0~∞
F 5.6 0.39~0.42 0.65~0.76 0.90~1.13 1.28~1.83 1.61~2.64 2.20~4.77 3.08~13.4 3.73~61.0 4.43~∞ 7.85~∞
F 8 0.38~0.42 0.63~0.79 0.86~1.19 1.20~2.01 1.49~3.06 1.97~6.39 2.65~49.5 3.11~∞ 3.58~∞ 5.51~∞
F 11 0.37~0.43 0.61~0.82 0.82~1.29 1.12~2.31 1.36~3.83 1.75~11.2 2.26~∞ 2.58~∞ 2.89~∞ 4.02~∞
F 16 0.36~0.45 0.58~0.89 0.76~1.49 1.00~3.08 1.19~6.63 1.47~∞ 1.81~∞ 2.01~∞ 2.19~∞ 2.78~∞
50
(m)
Page 51

NOTES
51
Page 52

52
Rollei Fototechnic GmbH
P.O. Box 3245
D-38022 Braunschweig
www.rollei.de
Germany
80214.75.901• AFM 35
•
GB
PA / HPS / 08-01
 Loading...