

Page 1
WAZA AMP HEAD 75
75 W output
BOSS WAZA AMP
Boss Waza Craftsmanship Evolves Into The Creation Of An Ultimate Rock Sound Amp
In the early 1960s, the evolution of the electric guitar and its components began inuencing
art. The sweet overdrive sound of what came to be known as the “sound of rock” was made
possible by an impressive line of tube guitar amps. The evolution of these amps, reecting
the passion of master builders in search of an enhanced musical expression, gave birth to the
legendary “brown sound.” This same passion is what inspired BOSS engineers in their pursuit of
the ideal rock sound. While the basic circuit block designs of amps have not changed all that
much, engineers over the years have painstakingly contributed to the evolution of the rock
sound through many phases of inherited craftsmanship and tuning. Fast forward to today: the
BOSS Waza Craftsmanship team, through their proven expertise, has given birth to the new
BOSS Waza Amp. The BOSS Waza Amp has contributed to that evolutionary process through
Waza Craftsmanship with the ideal brown sound for today’s passionate artists.
Owner’s Manual
Guitar Amplier
The Wisdom Of The Past Dictates The Future
The vintage Marshall JTM 45 amplier circuitry was based on the popular 1959 Fender “Tweed”
Bassman 5F6A circuit. Today, both are legendary ampliers, each providing their own unique
tone. As the rst-generation ampliers evolved, component and cosmetic changes often took
place; therefore there are a few dierent variations of these early ampliers. The Marshall amp
had evolved to 100-watt amp heads such as the “Plexi.” The power tube is 6L6 for the Fender,
but for the Marshall, four EL34s with a parallel push-pull design are used to meet the demand
of musicians for more output. As a result, the EL34 sound has been established as the rock
sound. Almost all stack amps have been tuned based on the basic circuitry of the early stack
amp, including the new BOSS Waza Amp, which promises to carry on the legacy.
The Ideal Rock Sound Continues To Evolve
The representative hard rock sound of the ‘70s and ‘80s is known as the “brown sound.” What
then, is the “Waza Brown Sound?” In developing the new Waza Amp, BOSS has been able to
achieve the chewy sustain of the rich tube distortion, while at the same time achieving high
clarity with a dynamic response to the picking nuances of the player. In addition, a chunky
clean sound can be achieved just by turning down the guitar volume. The sustain of the lead
sound is sweet, and the elastic rhythm sound has such high clarity that each note of a chord
can be heard. The dynamic sound change reected by a player’s picking emotion emphasizes
the sound presence in a band ensemble. To produce the Waza Brown Sound, BOSS engineers
devoted much time and eort in nding the perfect setting combinations, such as tweaking
the AC power voltage and experimenting with various congurations while driving speaker
and custom load boxes.
Persistent Ingenuity For Greater Expression
Through their circuitry tuning innovations and expertise, BOSS engineers have made
specialized ne adjustments to achieve the ideal brown sound. Historically, there have been
many masterpiece stack amps with complex overtone changes created by adding dierent
distortions in each stage of serially connected multiple tubes. By adjusting the balance of each
stage, the basic distortion is created. However, the basic sound is not expressive enough. Fine
adjustments with the interaction of each stage of distortion and many other factors are very
important. Not only that, by adjusting how much the interactive factors respond to a picking
attack, and by controlling how the distortions of each stage vary as the sound sustains, a truly
expressive sound can be created. Based on the accumulated expertise of BOSS regarding
distortion and Roland with in Tube Logic, the “Waza Brown Sound” not only means the sound is
“brown,” but that the expressiveness is also “brown.”
Page 2
USING THE UNIT SAFELY
Before using this unit, carefully read the sections entitled “IMPORTANT SAFETY INSTRUCTIONS” (inside front cover), “USING THE UNIT SAFELY” (p. 2), and “IMPORTANT NOTES” (p. 3). These sections
provide important information concerning the proper operation of the unit. Additionally, in order to feel assured that you have gained a good grasp of every feature of your new unit, read Owner’s
Manual in its entirety. This manual should be saved and kept on hand as a convenient reference.
Copyright © 2017 ROLAND CORPORATION
WARNING
About WARNING and CAUTION Notices
Used for instructions intended to alert the
user to the risk of death or severe injury
should the unit be used improperly.
Used for instructions intended to alert the
user to the risk of injury or material
damage should the unit be used
improperly.
* Material damage refers to damage or
other adverse effects caused with
respect to the home and all its
furnishings, as well to domestic animals
or pets.
ALWAYS OBSERVE THE FOLLOWING
WARNING
Make sure that the power cord is grounded
Connect mains plug of this model to a
mains socket outlet with a protective
earthing connection.
To completely turn o power to the unit, pull out
the plug from the outlet
Even with the power switch turned o, this
unit is not completely separated from its
main source of power. When the power
needs to be completely turned o, turn
o the power switch on the unit, then
pull out the plug from the outlet. For this reason, the
outlet into which you choose to connect the power
cord’s plug should be one that is within easy reach and
readily accessible.
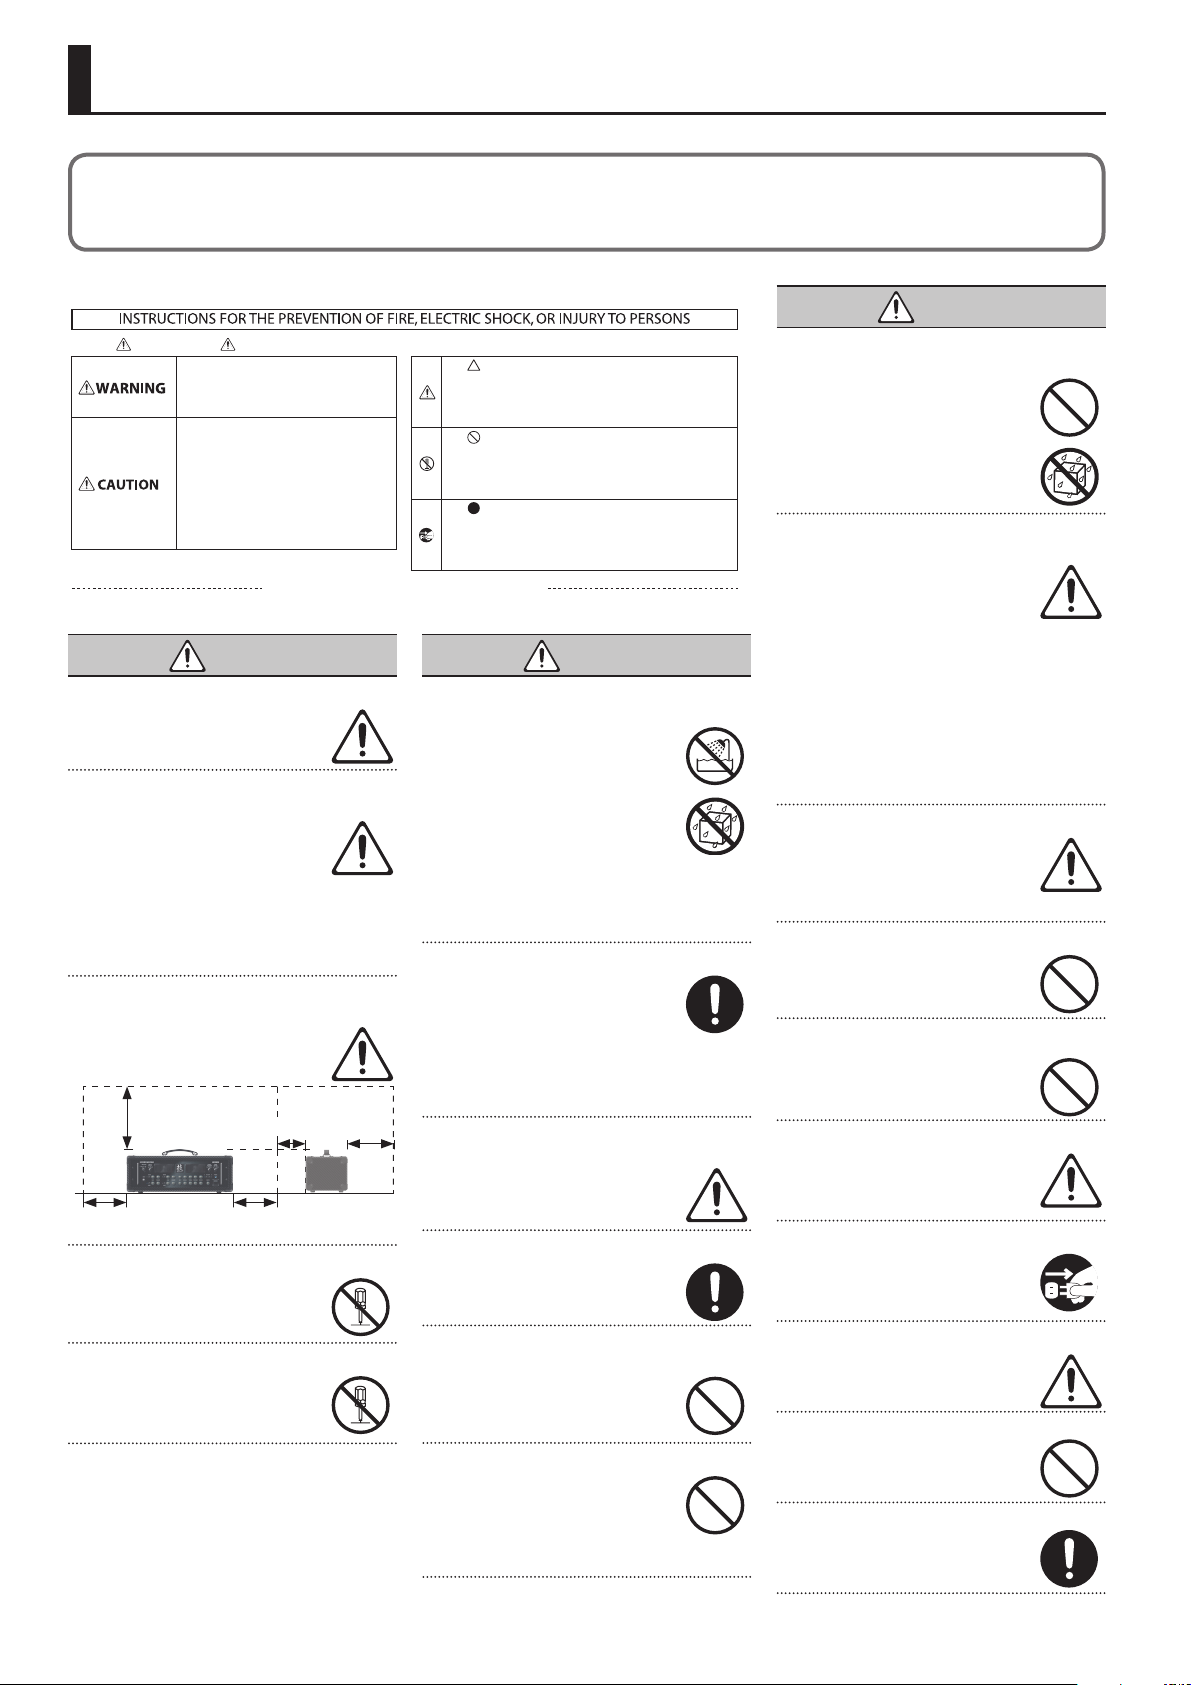
Secure a sucient amount of space at the setup
location
Since this unit normally emits a slight
amount of heat, make sure to secure
sucient space around it, as shown below.
Front Side
20 cm (8 in.)
or greater
30 cm (12 in.)
or greater
5 cm (2 in.)
or greater
20 cm (8 in.)
or greater
Do not disassemble or modify by yourself
Do not carry out anything unless you are
instructed to do so in the owner’s manual.
Otherwise, you risk causing malfunction.
Do not repair or replace parts by yourself
Refer all servicing to your retailer, the
nearest Roland Service Center, or an
authorized Roland distributor, as listed on
the “Information.”
15 cm (6 in.)
or greater
About the Symbols
The symbol alerts the user to important instructions or
warnings.The specific meaning of the symbol is
determined by the design contained within the triangle. In
the case of the symbol at left, it is used for general
cautions, warnings, or aler ts to danger.
The symbol alerts the user to items that must never be
carried out (are forbidden). The specific thing that must
not be done is indicated by the design contained within
the circle. In the case of the symbol at left, it means that
the unit must never be disassembled.
The symbol alerts the user to things that must be
carried out. The specific thing that must be done is
indicated by the design contained within the circle. In the
case of the symbol at left, it means that the power-cord
plug must be unplugged from the outlet.
WARNING
Do not use or store in the following types of
locations
• Subject to temperature extremes (e.g.,
direct sunlight in an enclosed vehicle, near
a heating duct, on top of heat-generating
equipment); or are
• Damp (e.g., baths, washrooms, on wet
oors); or are
• Exposed to steam or smoke; or are
• Subject to salt exposure; or are
• Exposed to rain; or are
• Dusty or sandy; or are
• Subject to high levels of vibration and shakiness; or are
• Placed in a poorly ventilated location.
Do not place in a location that is unstable
When using the unit with a speaker
cabinet or a rack recommended by Roland,
the stand must be carefully placed so it is
level and sure to remain stable. If not using
a stand, you still need to make sure that
any location you choose for placing the unit provides
a level surface that will properly support the unit, and
keep it from wobbling.
Connect the power cord to an outlet of the correct
voltage
The unit should be connected to a power
supply only of the type described as
marked on the rear side of unit.
Use only the supplied power cord
Use only the attached power cord. Also,
the supplied power cord must not be used
with any other device.
Do not bend the power cord or place heavy objects
on it
Otherwise, re or electric shock may result.
Avoid extended use at high volume
Use of the unit at high volume for
extended periods of time may cause
hearing loss. If you ever experience any
hearing loss or ringing in the ears, you
should immediately stop using the unit
and consult a specialized physician.
Do not allow foreign objects or liquids to enter
unit; never place containers with liquid on unit
Do not place containers containing liquid
(e.g., ower vases) on this product. Never
allow foreign objects (e.g., ammable
objects, coins, wires) or liquids (e.g., water
or juice) to enter this product. Doing so
may cause short circuits, faulty operation,
or other malfunctions.
Turn o the unit if an abnormality or malfunction
occurs
Immediately turn the unit o, remove the
power cord from the outlet, and request
servicing by your retailer, the nearest
Roland Service Center, or an authorized
Roland distributor, as listed on the
“Information” when:
• The power cord has been damaged; or
• If smoke or unusual odor occurs; or
• Objects have fallen into, or liquid has been spilled onto
the unit; or
• The unit has been exposed to rain (or otherwise has
become wet); or
• The unit does not appear to operate normally or exhibits
a marked change in performance.
Be cautious to protect children from injury
Always make sure that an adult is on hand
to provide supervision and guidance when
using the unit in places where children
are present, or when a child will be using
the unit.
Do not drop or subject to strong impact
Otherwise, you risk causing damage or
malfunction.
Do not share an outlet with an unreasonable
number of other devices
Otherwise, you risk overheating or re.
Do not use overseas
Before using the unit in overseas, consult
with your retailer, the nearest Roland
Service Center, or an authorized Roland
distributor, as listed on the “Information.”
Turn the unit o before installing the Tone Capsule
Before installing the Tone Capsule, you
must rst always turn o the
WAZA AMP HEAD 75 and unplug its power
cord.
Don’t block ventilation openings
Don’t allow the unit’s ventilation openings
to be blocked by a newspaper, tablecloth,
curtains, or similar objects.
Don’t place burning objects on the unit
Don’t place any burning object
(such as a candle) on the unit.
Be aware of weather conditions
Use the apparatus in moderate climates.
2
Page 3
IMPORTANT NOTES
CAUTION
When disconnecting the power cord, grasp it by the
plug
To prevent conductor damage, always
grasp the power cord by its plug when
disconnecting it from this unit or from a
power outlet.
Periodically clean the power plug
An accumulation of dust or foreign objects
between the power plug and the power
outlet can lead to re or electric shock.
At regular intervals, be sure to pull out
the power plug, and using a dry cloth,
wipe away any dust or foreign objects that may have
accumulated.
Disconnect the power plug whenever the unit will
not be used for an extended period of time
Fire may result in the unlikely event that a
breakdown occurs.
Route all power cords and cables in such a way as
to prevent them from getting entangled
Injury could result if someone were to
trip on a cable and cause the unit to fall
or topple.
CAUTION
Avoid climbing on top of the unit, or placing heavy
objects on it
Otherwise, you risk injury as the result of
the unit toppling over or dropping down.
Never connect/disconnect a power plug if your
hands are wet
Otherwise, you could receive an electric
shock.
Disconnect all cords/cables before moving the unit
Before moving the unit, disconnect the
power plug from the outlet, and pull out all
cords from external devices.
Before cleaning the unit, disconnect the power
plug from the outlet
If the power plug is not removed from the
outlet, you risk receiving an electric shock.
Whenever there is a threat of lightning, disconnect
the power plug from the outlet
If the power plug is not removed from the
outlet, you risk causing malfunction or
receiving an electric shock.
CAUTION
Install only specied Tone Capsule
Install only the specied Tone Capsule
(WAZA Amp compatible). Remove only the
specied screws (p. 6).
Keep small items out of the reach of children
To prevent accidental ingestion of the
parts listed below, always keep them out of
the reach of small children.
• Removable Parts
Thumb screws (p. 6)
Screws (p. 7)
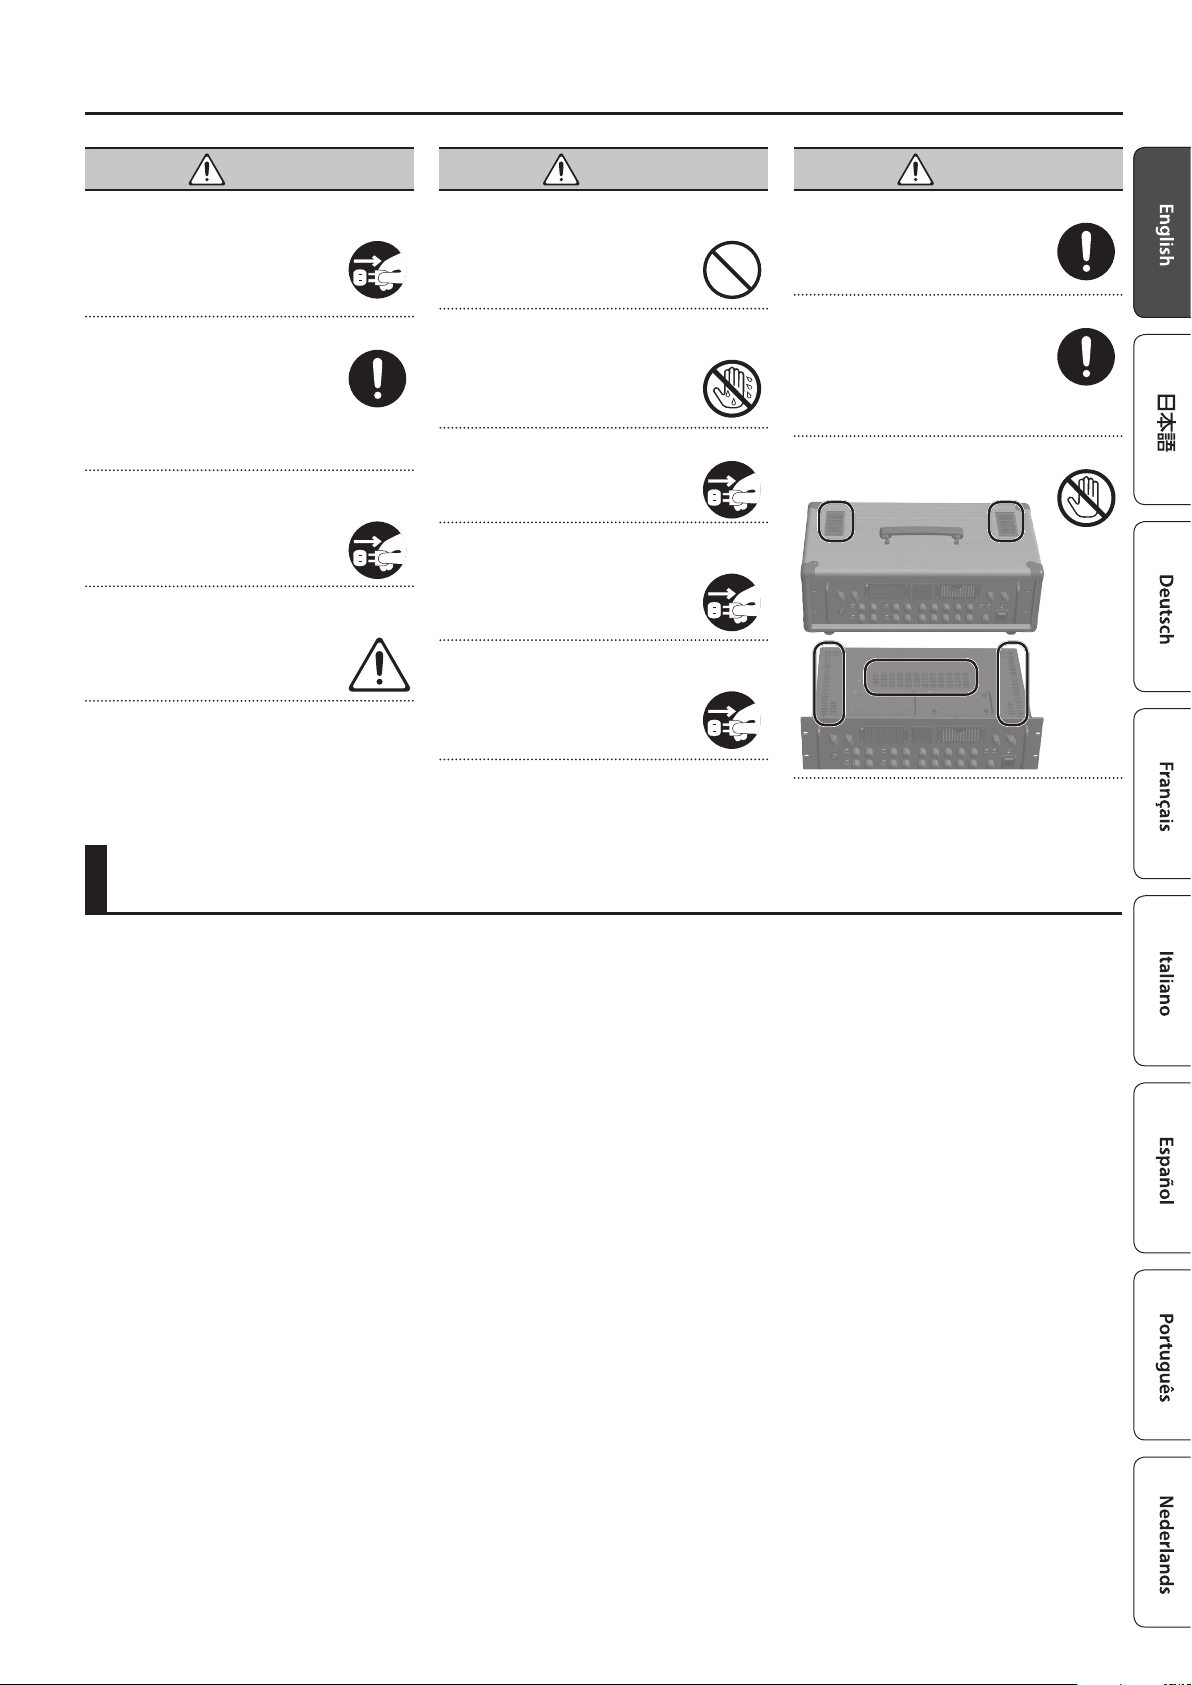
Take care not to get burned
The area shown in the illustration may
become hot, so take care to avoid burns.
IMPORTANT NOTES
Power Supply
• Do not connect this unit to same electrical outlet that is
being used by an electrical appliance that is controlled
by an inverter or a motor (such as a refrigerator,
washing machine, microwave oven, or air conditioner).
Depending on the way in which the electrical appliance
is used, power supply noise may cause this unit to
malfunction or may produce audible noise. If it is not
practical to use a separate electrical outlet, connect
a power supply noise lter between this unit and the
electrical outlet.
Placement
• Using the unit near power ampliers (or other
equipment containing large power transformers) may
induce hum. To alleviate the problem, change the
orientation of this unit; or move it farther away from the
source of interference.
• This unit may interfere with radio and television
reception. Do not use this unit in the vicinity of such
receivers.
• Noise may be produced if wireless communications
devices, such as cell phones, are operated in the vicinity
of this unit. Such noise could occur when receiving
or initiating a call, or while conversing. Should you
experience such problems, you should relocate such
wireless devices so they are at a greater distance from
this unit, or switch them o.
• When moved from one location to another where the
temperature and/or humidity is very dierent, water
droplets (condensation) may form inside the unit.
Damage or malfunction may result if you attempt to use
the unit in this condition. Therefore, before using the
unit, you must allow it to stand for several hours, until
the condensation has completely evaporated.
• Depending on the material and temperature of the
surface on which you place the unit, its rubber feet may
discolor or mar the surface.
• Do not place containers or anything else containing
liquid on top of this unit. Also, whenever any liquid
has been spilled on the surface of this unit, be sure to
promptly wipe it away using a soft, dry cloth.
Maintenance
• Never use benzine, thinners, alcohol or solvents of any
kind, to avoid the possibility of discoloration and/or
deformation.
Additional Precautions
• Use a reasonable amount of care when using the unit’s
buttons, sliders, or other controls; and when using
its jacks and connectors. Rough handling can lead to
malfunctions.
• When disconnecting all cables, grasp the connector
itself—never pull on the cable. This way you will avoid
causing shorts, or damage to the cable’s internal
elements.
• Heat will radiate from the unit during normal operation.
• To avoid disturbing others nearby, try to keep the unit’s
volume at reasonable levels.
Intellectual Property Right
• Roland and BOSS are either registered trademarks or
trademarks of Roland Corporation in the United States
and/or other countries.
• MMP (Moore Microprocessor Portfolio) refers to a patent
portfolio concerned with microprocessor architecture,
which was developed by Technology Properties Limited
(TPL). Roland has licensed this technology from the TPL
Group.
• ASIO is a trademark and software of Steinberg Media
Technologies GmbH.
• This product contains eParts integrated software
platform of eSOL Co.,Ltd. eParts is a trademark of eSOL
Co., Ltd. in Japan.
• Company names and product names appearing in this
document are registered trademarks or trademarks of
their respective owners.
3
Page 4

Panel Descriptions
Front Panel
10 11 12 13
1
Rear Panel
14 15 1917 20
Front Panel
1 INPUT jack
Connect your electric guitar here.
2 Channel select
Selects the channel.
Channel Explanation
CLEAN
CRUNCH
LEAD 1
LEAD 2 Sound with the most high-gain and sustain.
3 [GAIN] knobs / [VOLUME] knobs
[GAIN] knobs
Adjusts the gain (amount of distortion) of the channel.
[VOLUME] knobs
Adjusts the volume of the channel.
4 [BASS] / [MIDDLE] / [TREBLE] knobs
Adjust the volume of the low-, mid-, and high-frequency ranges
respectively.
5 [PRESENCE] knob
Adds lustrous outline to the mid- and high-frequency range. This is
eective when you want to improve the denition of the sound.
6 [REVERB] knob
Adjusts the reverb depth.
MEMO
7 [EFX LOOP A / EFX LOOP B] buttons
Switches on/o an external eect that is connected to the EFX
LOOP A / EFX LOOP B jacks.
4
Clean sound. Raising the volume produces a crunch sound with distortion
in the power amp.
Crunch sound distorted in the preamp. Raising the volume also produces
a crunch sound with distortion in the power amp.
Sound that can cover the range from crunch to high-gain, depending on
the gain.
The upper row of [BASS] / [MIDDLE] / [TREBLE] / [PRESENCE] /
[REVERB] knobs are common to the CLEAN/CRUNCH channels,
and the lower row is common to the LEAD 1/LEAD 2 channels.
42 5 6 98
16 18 21
8 [MASTER] knob
Adjusts the overall volume.
9 [POWER] switch
Turns the power of the WAZA AMP HEAD 75 on/o. When the
power is on, the indicator above this switch is lit.
10 [AMPLIFIER] switch
Switches the type of amp.
Value Explanation
INTERNAL
A
B
The internal sound which is based on the EL34, providing a standard amp
sound.
The WAZA Brown Sound. When shipped from the factory, the included
Tone Capsule is already installed. The Tone Capsule installed in slot A is lit
(p. 6). You can also inser t a separately sold tone capsule.
The Tone Capsule installed in slot B is lit (p. 6). You can also insert a
separately sold tone capsule.
* When shipped from the factory, a Tone Capsule is not installed.
11 [LINE OUT AIR FEEL] switch
Species the sound of the LINE OUT/PHONES/USB Post Out (p. 7).
Value Explanation
REC A distantly-miked sound for recording.
LIVE A close-miked sound for live.
BLEND
A sound providing a good blend of closed-miked and distantly-miked
sound that can be broadly used for live or recording.
12 [CABINET RESONANCE] switch
Adds the resonance of a connected speaker cabinet.
Value Explanation
VINTAGE The warm and sweet sound of a vintage cabinet.
MODERN A modern cabinet sound notable for a tight low-end.
DEEP Sound with powerful low-end as well as a distinctive edge.
13 [POWER CONTROL] switch
Lets you switch the output level of the power amp according to
your location or needs. The MAX setting selects the maximum
output (75 W).
73
Page 5

Panel Descriptions
Rear Panel
14 AC IN jack
Connect the included power cord.
* Use only the power cord that was included with the unit.
15 FOOT CONTROL jack
Refer to “Using the Foot Controller” (p. 6).
16 SPEAKER OUT jacks
Connect a speaker box (separately sold; e.g., the WAZA Amp
Cabinet412, the WAZA Amp Cabinet212).
Jack usage
* Only use speaker cable to connect the speaker. Do not use any
shielded cable designed for use with guitars.
* To prevent malfunction and equipment failure, always turn
down the volume, and turn o all the units before making any
connections.
17 LINE OUT jacks
Connect this to your PA system or recorder. You can obtain powerful
guitar amp sound just as if you were playing through the speaker.
You can use this in conjunction with an external PA system, or to
record your performance via direct line while monitoring the sound
from the connected speaker cabinet.
Adjust the output level using the [VOLUME] knob of each channel.
* The WAZA AMP HEAD 75 is equipped with a balanced (XLR) type
jack. Wiring diagrams for the jack is shown below. Make
connections after rst checking the
wiring diagrams of other equipment
you intend to connect.
[GND LIFT] switch
Loop hum noise may occur when other
external devices are connected to the
WAZA AMP HEAD 75. In such instances, you may be able to mitigate
the problem by switching the position of the [GND LIFT] switch. The
[GND LIFT] switch should be normally set to OFF.
Switch Description
ON Pin 1 is disconnected from the WAZA AMP HEAD 75’s ground.
OFF Pin 1 connects to the WAZA AMP HEAD 75’s ground.
8Ω (If this jack is used, 16ΩA/16ΩB cannot be used.)
Either 16ΩA or 16ΩB
Both 16ΩA and 16ΩB
1: GND 2: HOT
3: COLD
20 EFX LOOP A/B, SEND/RETURN jacks
Connect an external eect device (mono).
Connect the SEND jack to the input of your external eect device,
and connect the output of your external eect device to the
RETURN jack.
[LOOP] switch
Value Explanation
PARALLEL The external eects sound and the direct sound are mixed.
SERIES Only the external eects sound is played.
* When SERIES is set, if the volume of the external eects unit
is turned down completely, or the power is not turned on, no
sound will be heard.
21 REC OUT
You can use a commercially available USB 2.0 cable to record the
sound of the WAZA AMP HEAD 75 into your computer.
You must install the USB driver when connecting the unit to
your computer.
Download the USB driver from the BOSS website. For details, refer
to Readme.htm which is included in the download.
www.boss.info
O
port
Turning the Power On/O
Once everything is properly connected, be sure to follow the
procedure below to turn on their power. If you turn on equipment
in the wrong order, you risk causing malfunction or equipment
failure.
1. Make sure that the WAZA AMP HEAD 75’s [MASTER] knob
and the volume of the devices connected to the
WAZA AMP HEAD 75 are set to 0.
* Before connecting your instrument to the WAZA AMP HEAD 75’s
INPUT jacks, set the [VOLUME] knob to the minimum setting
(far left).
18 MIDI IN connector
You can control the WAZA AMP HEAD 75 from a multi-eect unit or
a MIDI foot controller.
How the MIDI receive channel is specied
Receive channel Operation
CH 1 Hold down the [CLEAN] button while turning the power on.
CH 2 Hold down the [CRUNCH] button while turning the power on.
CH 3 Hold down the [LEAD 1] button while turning the power on.
CH 4 Hold down the [LEAD 2] button while turning the power on.
For the MIDI messages that can be received, refer to “WAZA AMP
MIDI IN” at the end of this manual.
* The receive channel setting is remembered even when the
power is turned o.
19 PHONES jack
Connect headphones here. You can obtain powerful guitar sounds
just as if you were playing through the speaker. To adjust the
volume, use the [VOLUME] knob of each channel, along with the
[MASTER] knob.
* If a plug is inserted in this jack, no sound will be output from the
connected speaker cabinet. This is convenient if you don’t want
loud sound to be produced from the speaker, such as when
you’re practicing at night.
* The output of the PHONES jack is mono.
2. Turn on the WAZA AMP HEAD 75.
* Before turning the unit on/o, always be sure to
turn the volume down. Even with the volume
turned down, you might hear some sound
when switching the unit on/o. However, this is
normal and does not indicate a malfunction.
* This unit is equipped with a protection circuit.
A brief interval (a few seconds) after turning
the unit on is required before it will operate
normally.
* This unit is equipped with a cooling fan in order to prevent
internal overheating. When you turn on the power, the fan will
spin briey to verify that it is operating correctly.
3. Turn on the power of the connected devices.
4. Adjust the volume levels for the devices.
Before switching o the power, lower the volume on each of the
devices in your system and then TURN OFF the devices in the
reverse order to which they were switched on.
* If you need to turn o the power completely, rst turn o the
unit, then unplug the power cord from the power outlet. Refer
to “To completely turn o power to the unit, pull out the plug
from the outlet” (p. 2).
5
Page 6

Using the Foot Controller
You can connect the included Foot Controller to switch channels
and turn eects on/o.
Connecting the foot controller
Connect a stereo cable to the FOOT CONTROL jack.
* Always use a stereo cable.
* Use cables that do not contain resistors.
Using the foot controller
You can use the foot controller to switch between CLEAN, CRUNCH,
LEAD 1, and LEAD 2. You can also switch EFX LOOP A/B on/o.
Using the expression pedals
By connecting expression pedals (Roland EV-5, BOSS FV-500L, BOSS
FV-500H; sold separately), you can change the volume and master
volume by pedal.
Foot Controller
Expression Pedal
Jack Explanation
VOLUME Adjusts the volume of each channel.
MASTER
Setting minimum volume of an expression pedal
With the minimum volume
knob of an expression pedal,
you can set the value for when
the pedal is lifted up all the way
(lowest value).
* Use only the specied expression pedal (Roland EV-5, BOSS FV-
500L, BOSS FV-500H; sold separately). By connecting any other
expression pedals, you risk causing malfunction and/or damage
to the unit.
Adjusts the master volume. This lets you use volume changes as a
performance technique, or to mute your instrument.
* The master volume that is controlled by the expression pedal
connected to this jack is dierent than that of the [MASTER]
knob on the panel.
Minimum
volume knob
Installing a Tone Capsule
A Tone Capsule is a dedicated capsule that can be installed
in this unit to add or expand new amp sounds. The WAZA AMP HEAD 75
has two slots (A/B). A separately sold Tone Capsule created
specically for the WAZA amp can be installed in each slot.
* When the unit is shipped from the factory, the included capsule
is already installed in slot A.
1. Remove the unit from its case.
See “Removing the Unit from Its Case” (p. 7).
2. Remove the slot cover.
Loosen the thumb screws (four locations on each slot) and remove
the cover.
Slot A Slot B
3. Align the pins of the Tone Capsule with the pin sockets in
the slot, and insert the Tone Capsule.
Bottom of the Tone Capsule Socket in the slot
Turn the unit o before installing the Tone Capsule
Before installing the Tone Capsule, you must rst always turn o the
WAZA AMP HEAD 75 and unplug its power cord.
Install only specied Tone Capsule
Install only the specied Tone Capsule (WAZA Amp compatible). Remove
only the specied screws.
To avoid the risk of damage to internal components that can be caused
by static electricity, please avoid touching the connectors whenever you
handle the Tone Capsule.
Tone Capsule illumination
The Tone Capsules installed in slots A/B are illuminated
dierently depending on the setting of the [AMPLIFIER]
switch (p. 4). By holding down the [EFX LOOP B] button while
you turn the power on, you can switch between the following
three modes.
5 The Tone Capsule selected by the switch is brightly lit, and
the one that is not selected is dimly lit (factory settings).
5 Only the selected Tone Capsule is lit.
5 The Tone Capsules are not lit at all, regardless of the
setting of the [AMPLIFIER] switch.
6
Page 7

Removing the Unit from Its Case
You can remove the WAZA AMP HEAD 75 unit from its dedicated
case. This lets you use screws at four locations on the front panel to
mount the unit in a general-purpose 19-inch rack.
1. Remove screws from four locations on the front panel and
from two locations on the bottom of the dedicated case.
2. Grasp both handles and pull the unit out of the case.
Mounting in a general-purpose rack
You can remove the WAZA AMP HEAD 75 from its dedicated case
and mount it in a general-purpose 19-inch rack.
* If you are mounting other equipment in the same rack with this
unit, leave at least 1U of unoccupied space above and below this
unit. Also, do not place any object with in 15 cm (6 inches) from
the rear panel.
* When mounting the unit on a rack, be careful so as to protect
the buttons and knobs from damage. Also, handle the unit
carefully; do not drop it.
* When removing or installing the unit, take care that protrusions
such as the rubber feet on the bottom or the thumb screws of
the Tone Capsule slots do not contact the inside of the case.
Block Diagram
USB
-PRE (Windows)
-Input/Output 3, 4 (Mac)
INPUT
FX LOOP B FX LOOP A
AMPLIFIER
CLEAN/CRUNCH/
LEAD1/LEAD2
SEND
SEND
LOOP SERIES PARALLEL
RETURN
RETURN
USB
-POST (Windows)
-Input 1, 2/Stereo Out(1, 2) (Mac)
AIR FEEL
LINE OUT
PHONES
SPEAKER OUT
MASTER
8Ω
POWER
AMP
FOOT CONTROL MASTERFOOT CONTROL VOLUME
* No sound will be output from the speaker when a plug is connected to the PHONES jack.
* If the 8Ω jack is used, 16ΩA/16ΩB cannot be used.
POWER CONTROL
16Ω
16Ω
7
Page 8

Main Specications
BOSS WAZA AMP HEAD 75 (WAZA-HD75): Guitar Amplier
Rated Power Output 75 W
Nominal Input Level
Controls
Indicators
Connectors
Power Consumption 70 W
Dimensions
Weight
Accessories
Options (sold separately)
INPUT: -10 dBu (1 M Ω)
EFX LOOP A RETURN: -10 dBu
EFX LOOP B RETURN: -10 dBu
[POWER] switch
[CLEAN CH SELECT] switch
[CRUNCH CH SELECT] switch
[LEAD 1 CH SELECT] switch
[LEAD 2 CH SELECT] switch
[AMPLIFIER] switch: INTERNAL, A, B
[LOOP] switch: SERIES, PARALLEL
<CLEAN channel>
[GAIN] knob
[VOLUME] knob
<CRUNCH channel>
[GAIN] knob
[VOLUME] knob
<CLEAN/CRUNCH channel EQUALIZER>
[BASS] knob
[MIDDLE] knob
[TREBLE] knob
[PRESENCE] knob
<LEAD 1 channel>
[GAIN] knob
[VOLUME] knob
<LEAD 2 channel>
[GAIN] knob
[VOLUME] knob
<LEAD 1/LEAD 2 channel EQUALIZER>
[BASS] knob
[MIDDLE] knob
[TREBLE] knob
[PRESENCE] knob
<EFFECT>
[EFX LOOP A] button
[EFX LOOP B] button
CLEAN/CRUNCH channel [REVERB] knob
LEAD 1/LEAD 2 channel [REVERB] knob
<MASTER>
[MASTER] knob
[LINE OUT AIR FEEL] switch: REC, LIVE, BLEND
[CABINET RESONANCE] switch: VINTAGE, MODERN, DEEP
[POWER CONTROL] switch: 1 W, 15 W, 50 W, MAX
<LINE OUT>
[GND LIFT] switch
CLEAN CHANNEL
CRUNCH CHANNEL
LEAD 1 CHANNEL
LEAD 2 CHANNEL
EFX LOOP A
EFX LOOP B
POWER
INPUT jack: 1/4-inch phone type
LINE OUT jack: 1/4-inch phone type
LINE OUT jack: XLR type
PHONES jack: Stereo 1/4-inch phone type
FOOT CONTROL jack: 1/4-inch TRS phone type
EFX LOOP A SEND jack: 1/4-inch phone type
EFX LOOP A RETURN jack: 1/4-inch phone type
EFX LOOP B SEND jack: 1/4-inch phone type
EFX LOOP B RETURN jack: 1/4-inch phone type
REC OUT O port: USB type B
MIDI IN jack
SPEAKER OUT 16 Ω A jack: 1/4-inch phone type
SPEAKER OUT 16 Ω B jack: 1/4-inch phone type
SPEAKER OUT 8 Ω jack: 1/4-inch phone type
AC IN jack
529 (W) x 302 (D) x 225 (H) mm (incl. Handle and Foot)
20-7/8 (W) x 11-15/16 (D) x 8-7/8 (H) inches
15 kg
33 lbs 2 oz
Tone Capsule (Pre-installed)
Owner’s manual
Power cord
Speaker Connection Cable
Foot Controller
Foot Controller Connection Cable: Stereo
WAZA Amp Cabinet212 (WAZA-212)
WAZA Amp Cabinet412 (WAZA-412)
* 0 dBu = 0.775 Vrms
* This document explains the specications of the product at the
time that the document was issued. For the latest information,
refer to the Roland website.
8
 Loading...