

Roland VT-4 Owner’s Manual
Panel Descriptions
Owner’s Manual
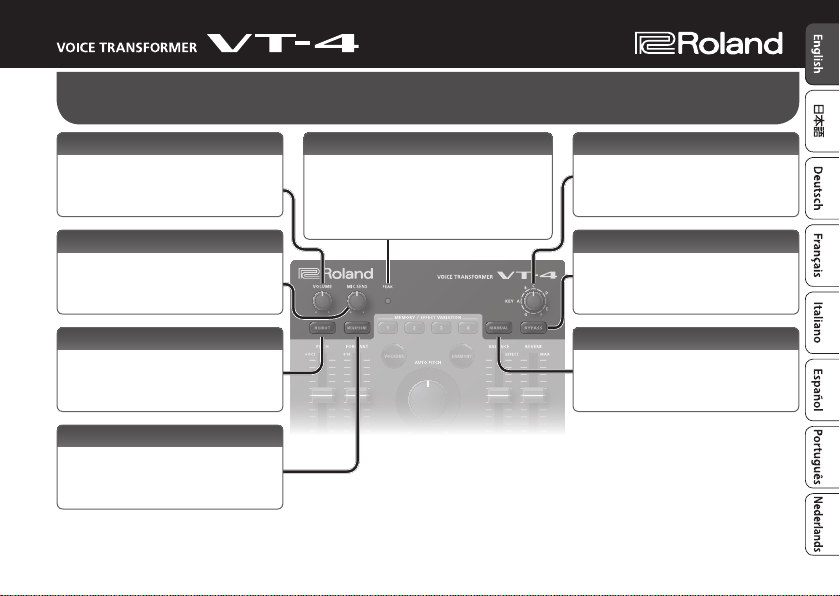
[VOLUME] knob
Adjusts the volume of the LINE OUT jacks
and the PHONES jack.
[MIC SENS] knob
Adjusts the input sensitivity of the mic
connected to the MIC IN jacks (front/rear).
[ROBOT] button
Transforms your voice into that of a robot,
with a xed pitch and an expressionless
character.
PEAK indicator
Lights if the mic input level is excessive.
Use the [MIC SENS] knob to adjust the
sensitivity so that this indicator lights
occasionally.
[KEY] knob
Species the key used when applying the
eect of the [ROBOT] button or the [AUTO
PITCH] knob (p. 5).
[BYPASS] button
Disables the eects (including reverb).
[MANUAL] button
Applies the current settings of the sliders
and the [AUTO PITCH] knob to the sound.
[MEGAPHONE] button
Gives your voice a distorted character as if
you were speaking through a megaphone.
Before using this unit, carefully read the leaet “USING THE UNIT SAFELY” and “IMPORTANT NOTES.” After reading, keep the document(s) where it will
be available for immediate reference.
© 2018 Roland Corporation
1
Panel Descriptions
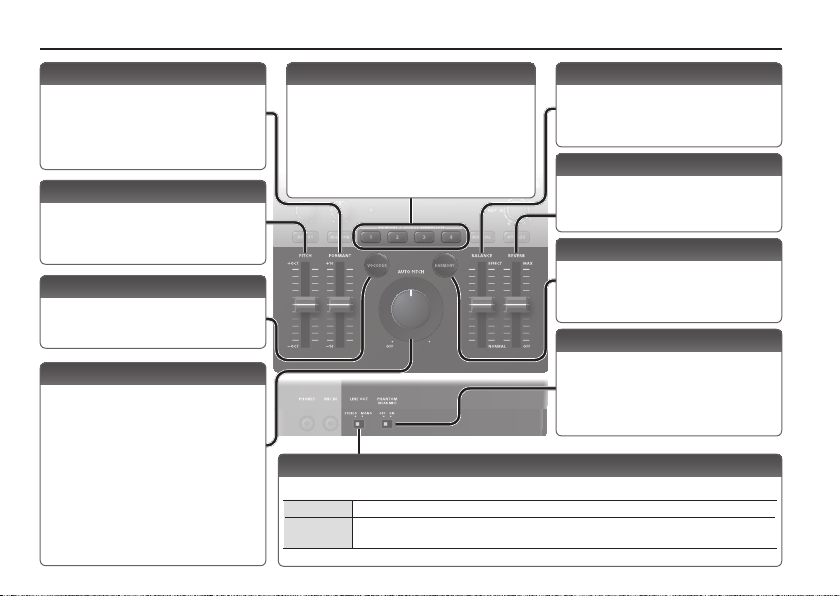
[FORMANT] slider
Adjusts the formant.
Negative (“-”) settings produce a masculine
character; positive (“+”) produce a
feminine character.
[PITCH] slider
Adjusts the pitch of the voice.
You can adjust this in a range of 1 octave
up or down.
[VOCODER] button
Transforms the sound into a vocoder voice.
[AUTO PITCH] knob
Corrects the pitch.
This lets you constrain your vocal to the
key specied by the [KEY] knob, creating
a warbling pitch change that is typical of
dance music.
The amount of correction increases as you
turn the knob toward the right.
If this is “OFF,” correction is not applied.
2
Scene memory [1]–[4] buttons
Recall eect settings (scenes).
The button of the “recalled” scene memory is lit.
You can store up to eight scenes.
&
“Recalling Eect Settings (Scene Memories)”
(p. 6)
[LINE OUT] switch
Switches the audio that is output from the LINE OUT jacks.
STEREO Stereo audio will be output.
MONO
The processed sound (L/MONO) and the unprocessed sound (R/BYPASS) will be
output separately.
[BALANCE] slider
Adjusts the balance between the
unprocessed voice (NORMAL) and the
eect-processed voice (EFFECT).
[REVERB] slider
Adjusts the amount of reverberation.
[HARMONY] button
Adds harmony to your voice.
[PHANTOM] switch
Turn this “ON” if you want phantom power
to be supplied to the MIC IN jack (rear).
* Phantom power is not supplied to the
TRS phone plug.
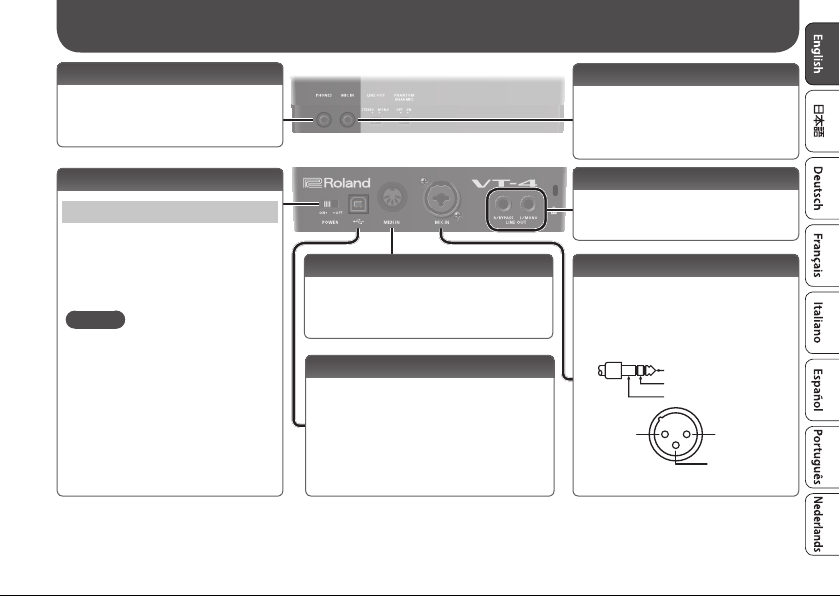
Connecting Your Equipment
PHONES jack
Connect headphones (sold separately)
here.
[POWER] switch
Turning the Power On/O
After you’ve made connections correctly,
turn on the power in the order of this
unit0connected devices.
When turning the power o, do so in the
order of the connected devices0this unit.
MEMO
This unit can operate on USB bus power
or on batteries.
If you want to use it on batteries, install
batteries beforehand (p. 11).
* To prevent malfunction and equipment failure, always turn down the volume, and turn o all the units before making any connections.
* Before turning the unit on/o, always be sure to turn the volume down. Even with the volume turned down, you might hear some sound when
switching the unit on/o. However, this is normal and does not indicate a malfunction.
Front panel
Rear panel
MIDI IN connector
Connect a MIDI device.
You can use incoming MIDI note messages to
play the robot voice, etc. (p. 5).
USB (O) port
If this port is connected to your computer via a
commercially available USB 2.0 cable, you can
use the VT-4 as a USB audio interface.
* If USB bus power is supplied, the unit
operates on USB bus power.
MIC IN jack (front)
Connect a mic that is compatible with
plug-in power (sold separately).
* This is only for use with a mic that is
compatible with plug-in power.
LINE OUT jacks
Connect these jacks to your amp or
monitor speakers.
MIC IN jack (rear)
Connect a mic (sold separately) here.
If a condenser mic is connected to the
XLR connector, phantom power can be
supplied (p. 2).
* Pin assignment of MIC IN jack (rear)
TIP: HOT
RING: COLD
SLEEVE: GND
1: GND2: HOT
3: COLD
3
Transforming Your Voice
Applying an Eect
1. Connect your mic to the MIC IN jack (front or rear).
* If you connect a condenser mic to the MIC IN jack (rear) via an XLR
connector, turn the [PHANTOM] switch on.
2. Turn the [BYPASS] button on.
3. While vocalizing into the mic, use the [MIC SENS] knob to
adjust the input sensitivity.
Adjust the sensitivity so that the PEAK indicator lights occasionally.
* Adjust the input sensitivity accurately. If the mic input level is too
low or too high, the eect won’t work correctly.
4. Press a scene memory button to recall a scene (p. 6).
5. Turn the [BYPASS] button o.
6. Vocalize into the mic.
Your voice processed by the eect is output.
* When inputting voice into the mic, input the voice of only one
person. If multiple voices are input, the eect won’t work correctly.
* Take care that sound from the speaker does not enter the mic.
MEMO
If feedback occurs, set the noise gate (p. 7).
4
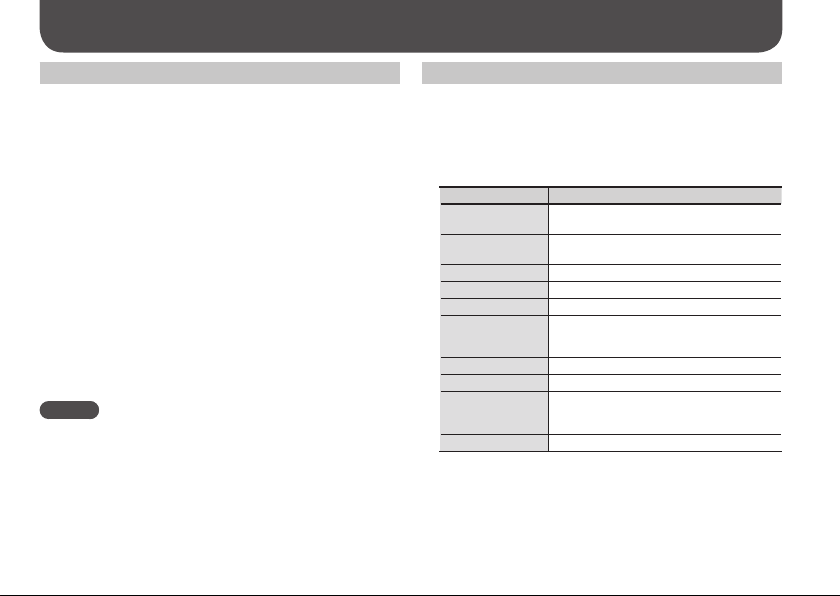
Editing the Eect
1. Press the [MANUAL] button.
You can press a scene memory button to recall a saved eect, and
then edit those eect settings (p. 6).
2. Use the controllers (buttons, knobs, sliders) to edit the
eect settings.
Controller Explanation
[ROBOT]*1
[MEGAPHONE]*1
[VOCODER]*1 Produces a vocoder voice.
[HARMONY]*1 Lets you add harmony to the sound.
[AUTO PITCH] Pitch-corrects your voice.
[KEY]
[PITCH] Adjusts the pitch of the voice.
[FORMANT] Adjusts the formants of the sound.
[BALANCE]
[REVERB]*1 Adjusts the amount of reverb (reverberation).
*1 To select an eect variation, hold down an eect button and press a
scene memory button.
&
“Eect Variation List” (p. 11)
3. As necessary, save the eect settings in a scene memory
button (p. 6).
Produces an expressionless voice with a xed
pitch, evocative of a robot.
Produces a distorted voice, as though you
were using a megaphone.
Species the key that is used when applying
an eect with the [ROBOT] button or the
[AUTO PITCH] knob (p. 5).
Adjusts the balance between the normal
voice (NORMAL) and the eect-processed
voice (EFFECT).
 Loading...