

Roland VT-3 Owner’s Manual
Owner’s Manual
3: COLD
1: GND 2: HOT
3: COLD
English
Before using this unit, carefully read the leaet “USING THE UNIT SAFELY.” The leaet provides important information concerning the
proper operation of the unit. Additionally, in order to feel assured that you have gained a good grasp of every feature of your new
unit, read Owner’s Manual in its entirety. This manual should be saved and kept on hand as a convenient reference.
Copyright © 2014 ROLAND CORPORATION
All rights reserved. No part of this publication may be reproduced in any form without the written permission of ROLAND
CORPORATION.
Panel Descriptions
2 3 64 5
1
7
98 10 11 12
1
[VOLUME] knob
Adjusts the output volume of the OUT jacks and the PHONES jack.
* This does not aect the volume of USB audio.
2
[MIC SENS] knob
Adjusts the input sensitivity of the mic connected to the MIC IN jacks (front/rear).
3
PEAK indicator
Lights if the mic input level is excessive.
Use the [MIC SENS] knob (
2
) to adjust the sensitivity so that this indicator lights occasionally.
If it lights frequently, lower the sensitivity.
4
[MANUAL] button
If you turn this on to make the button light, the current settings of the sliders (
9 10 11 12
) are
applied to the sound.
5
Scene Memory buttons [1]–[3]
Instantly recall the settings (scenes) of the [ROBOT] button (7), character knob (8) and the
9 10 11 12
sliders (
).
The scene memory button that you recall is lit. You can store up to three scenes.
Refer to “Scene Memory”
6
[BYPASS] button
If you turn this on to make the button light, the eects (including reverb) will be bypassed.
* I f you use the footswitch to bypass, reverb will still be applied.
7
[ROBOT] button
If you turn this on to make the button light, produces an expressionless robotic voice at a xed
pitch.
Refer to “Adjusting the Voice”
8
Character knob
Selects the vocal character.
The LED of the selected character is lit.
Refer to “Adjusting the Voice”
9
[PITCH] slider
Adjusts the pitch of the voice.
You can adjust this in a range of 1 octave up or down.
10
[FORMANT] slider
Adjusts the formant.
Negative (“-”) settings produce a masculine character; positive (“+”) produce a feminine
character.
11
[MIX BALANCE] slider
Adjusts the balance between the unprocessed voice (NORMAL) and the eect-processed voice
(EFFECT).
12
[REVERB] slider
Adjusts the amount of reverberation.
Main Specications Roland VT-3: VOICE TRANSFORMER
Power Supply AC adaptor, or obtained via USB port (USB bus power)
Current Draw 380mA
Dimensions 210 (W) x 175 (D) x 57 (H) mm 8-5/16 (W) x 6-15/16 (D) x 2-1/4 (H) inches
Weight 690g 1 lbs 9 oz
Accessories AC adaptor, Owner’s manual, Leaet “USING THE UNIT SAFELY”
Options
(sold separately)
* I n the interest of product improvement, the specications and/or appearance of this unit are subject to
change without prior notice.
Footswitch: BOSS FS-5L, FS-5U
Pedal Switch: DP-2
Connecting Your Equipment
* To prevent malfunction and equipment failure, always turn down the volume, and turn o all the units
before making any connections.
A
PHONES jack (stereo miniature phone type)
Connect headphones (sold separately) here.
This outputs the same sound as the OUT jacks (
B
MIC IN jack (front) (miniature phone type)
I J
).
Front panel
Connect a mic that is compatible with plug-in power
(sold separately).
* This is only for use with a mic that is compatible with
plug-in power. Do not connect any other type of mic.
C
USB( ) port
Rear panel
C D EJKF
L
A B
G H
I
Use a commercially available USB 2.0 cable to connect this to your computer.
Refer to “USB Audio Interface”
D
DC IN jack
Connect the included AC adaptor here. Use only the supplied AC adaptor.
Using any other adaptor may cause overheating and malfunctions.
* When connected via USB, power is supplied from the USB connection, so the AC adaptor does not need to
be connected.
E
[SELECT] switch
Switches the audio that is output from the OUT jacks (
Switch Explanation
R-L Stereo audio will be output.
BYPASS-MONO
F
[PHANTOM] switch
The unprocessed sound (BYPASS) and the processed sound (MONO) will be output
separately.
I J
).
Turn this “ON” if you want phantom power to be supplied to the MIC IN jack (rear) (G).
* Phantom power is not supplied to the TRS phone plug.
G
MIC IN jack (rear) (1/4” TRS phone type/XLR type)
Connect a mic (sold separately) here. If a condenser mic is connected to the XLR connector,
phantom power can be supplied.
H
Security slot ( )
http://www.kensington.com/
I J
OUT jacks
Connect these jacks to your amp or monitor speakers.
If the [SELECT] switch (E) is set to “BYPASS-MONO,” The unprocessed sound (BYPASS) and the
processed sound (MONO) will be output separately.
K
PEDAL jack
Connect a footswitch (sold separately). The footswitch can turn BYPASS on/o.
* If you bypass using the footswitch, reverb will still be applied.
Turning the Power On/O
L
[POWER] switch
Turn the power of the VT-3 on/o.
* After you’ve made connections correctly, be sure to turn on the power in the order of the VT-3 rst, and
then the connected system. Powering-on in the incorrect order may cause malfunctions or damage.
When turning the power o, power-o the connected system rst, and then the VT-3.
* This unit is equipped with a protection circuit. A brief interval (a few seconds) after turning the unit on is
required before it will operate normally.
* Before turning the unit on/o, always be sure to turn the volume down. Even with the volume turned down,
you might hear some sound when switching the unit on/o. However, this is normal and does not indicate
a malfunction.
* This instrument is equipped with balanced (XLR/TRS) t ype jacks. Wiring diagrams for these jacks are shown
below. Make connections after rst checking the wiring diagrams of other equipment you intend to
connect.
TIP: HOT
RING: COLD
SLEEVE: GND
1: GND2: HOT
Modifying Your Voice
Here’s how to apply an eect that modies your voice.
1. Connect your mic to the MIC IN jack (front or rear).
If you’ve connected a condenser mic to the XLR connector of the MIC IN jack (rear), turn the
[PHANTOM] switch on.
2. Turn the [BYPASS] button on.
3. While vocalizing into the mic, adjust the input sensitivity with the [MIC SENS] knob.
Adjust this so that the PEAK indicator lights occasionally.
4. Press one of the scene memory buttons [1]–[3].
5. Turn the [BYPASS] button o.
6. Vocalize into the mic.
The eect-processed voice will be output.
MEMO
• Adjust the input sensitivity accurately. The eect will not work correctly if the mic input level
is too low or too high.
• When vocalizing into the mic, the voice of only one person should be input. The eect will
not work correctly if multiple voices are being input.
• Make sure that the sound from the speaker does not enter the mic.
* Acoustic feedback could be produced depending on the location of microphones relative to speakers. This
can be remedied by:
• Changing the orientation of the microphone(s).
• Relocating microphone(s) at a greater distance from speakers.
• Lowering volume levels with the [VOLUME] knob.
Adjusting the Voice
Here’s how to use the character knob and the sliders to adjust the voice.
1. Press the [MANUAL] button.
Alternatively, you can press a scene memory button and make adjustments to that saved
scene.
2. Use the character knob to select the character you want.
You can choose a character from the following list.
3. Choose [ROBOT] button on or o.
If you turn this on, produces an expressionless robotic voice at a xed pitch.
4. Use the sliders to adjust settings such as PITCH and FORMANT.
Character Explanation
DIRECT Turns o the character eect.
AUTO PITCH 1 A pitch-corrected voice.
AUTO PITCH 2 An electronic pitch-corrected voice.
VOCODER A classic vocoder voice.
SYNTH The pitch of the input voice is detected and used to play a synth sound.
LEAD The pitch of the input voice is detected and used to play a synth sound.
BASS The pitch of the input voice is detected and used to play a bass sound.
MEGAPHONE Produces a distorted voice as when using a megaphone.
RADIO Produces a voice as heard from the radio.
SCATTER Repeats the input voice at eective intervals.
Scene Memory
Recalling
Press the scene memory button [1]–[3] that you want to recall.
1.
The button lights, and the [ROBOT] button, character knob and slider settings (the scene) are
recalled instantly.
* When you recall a scene, the current positions of the sliders will not match the actual sound.
* I f you operate the sliders after recalling a scene, the slider settings will be reected in the sound. In this case,
the scene memory button will blink.
Saving
Here’s how to save the settings of the [ROBOT] button, the character knob and the sliders to a
scene memory button [1]–[3].
1. Press and hold the scene memory button [1]–[3] in which you want to save the settings.
When all of the scene memory buttons [1]–[3] blink, the settings have been saved.
Copying
Here’s how to copy a scene to another number.
1. Press the scene memory button that you want to copy; it is recalled.
2. Press and hold the copy-destination scene memory button.
When all of the scene memory buttons [1]–[3] blink, the copy has been completed.
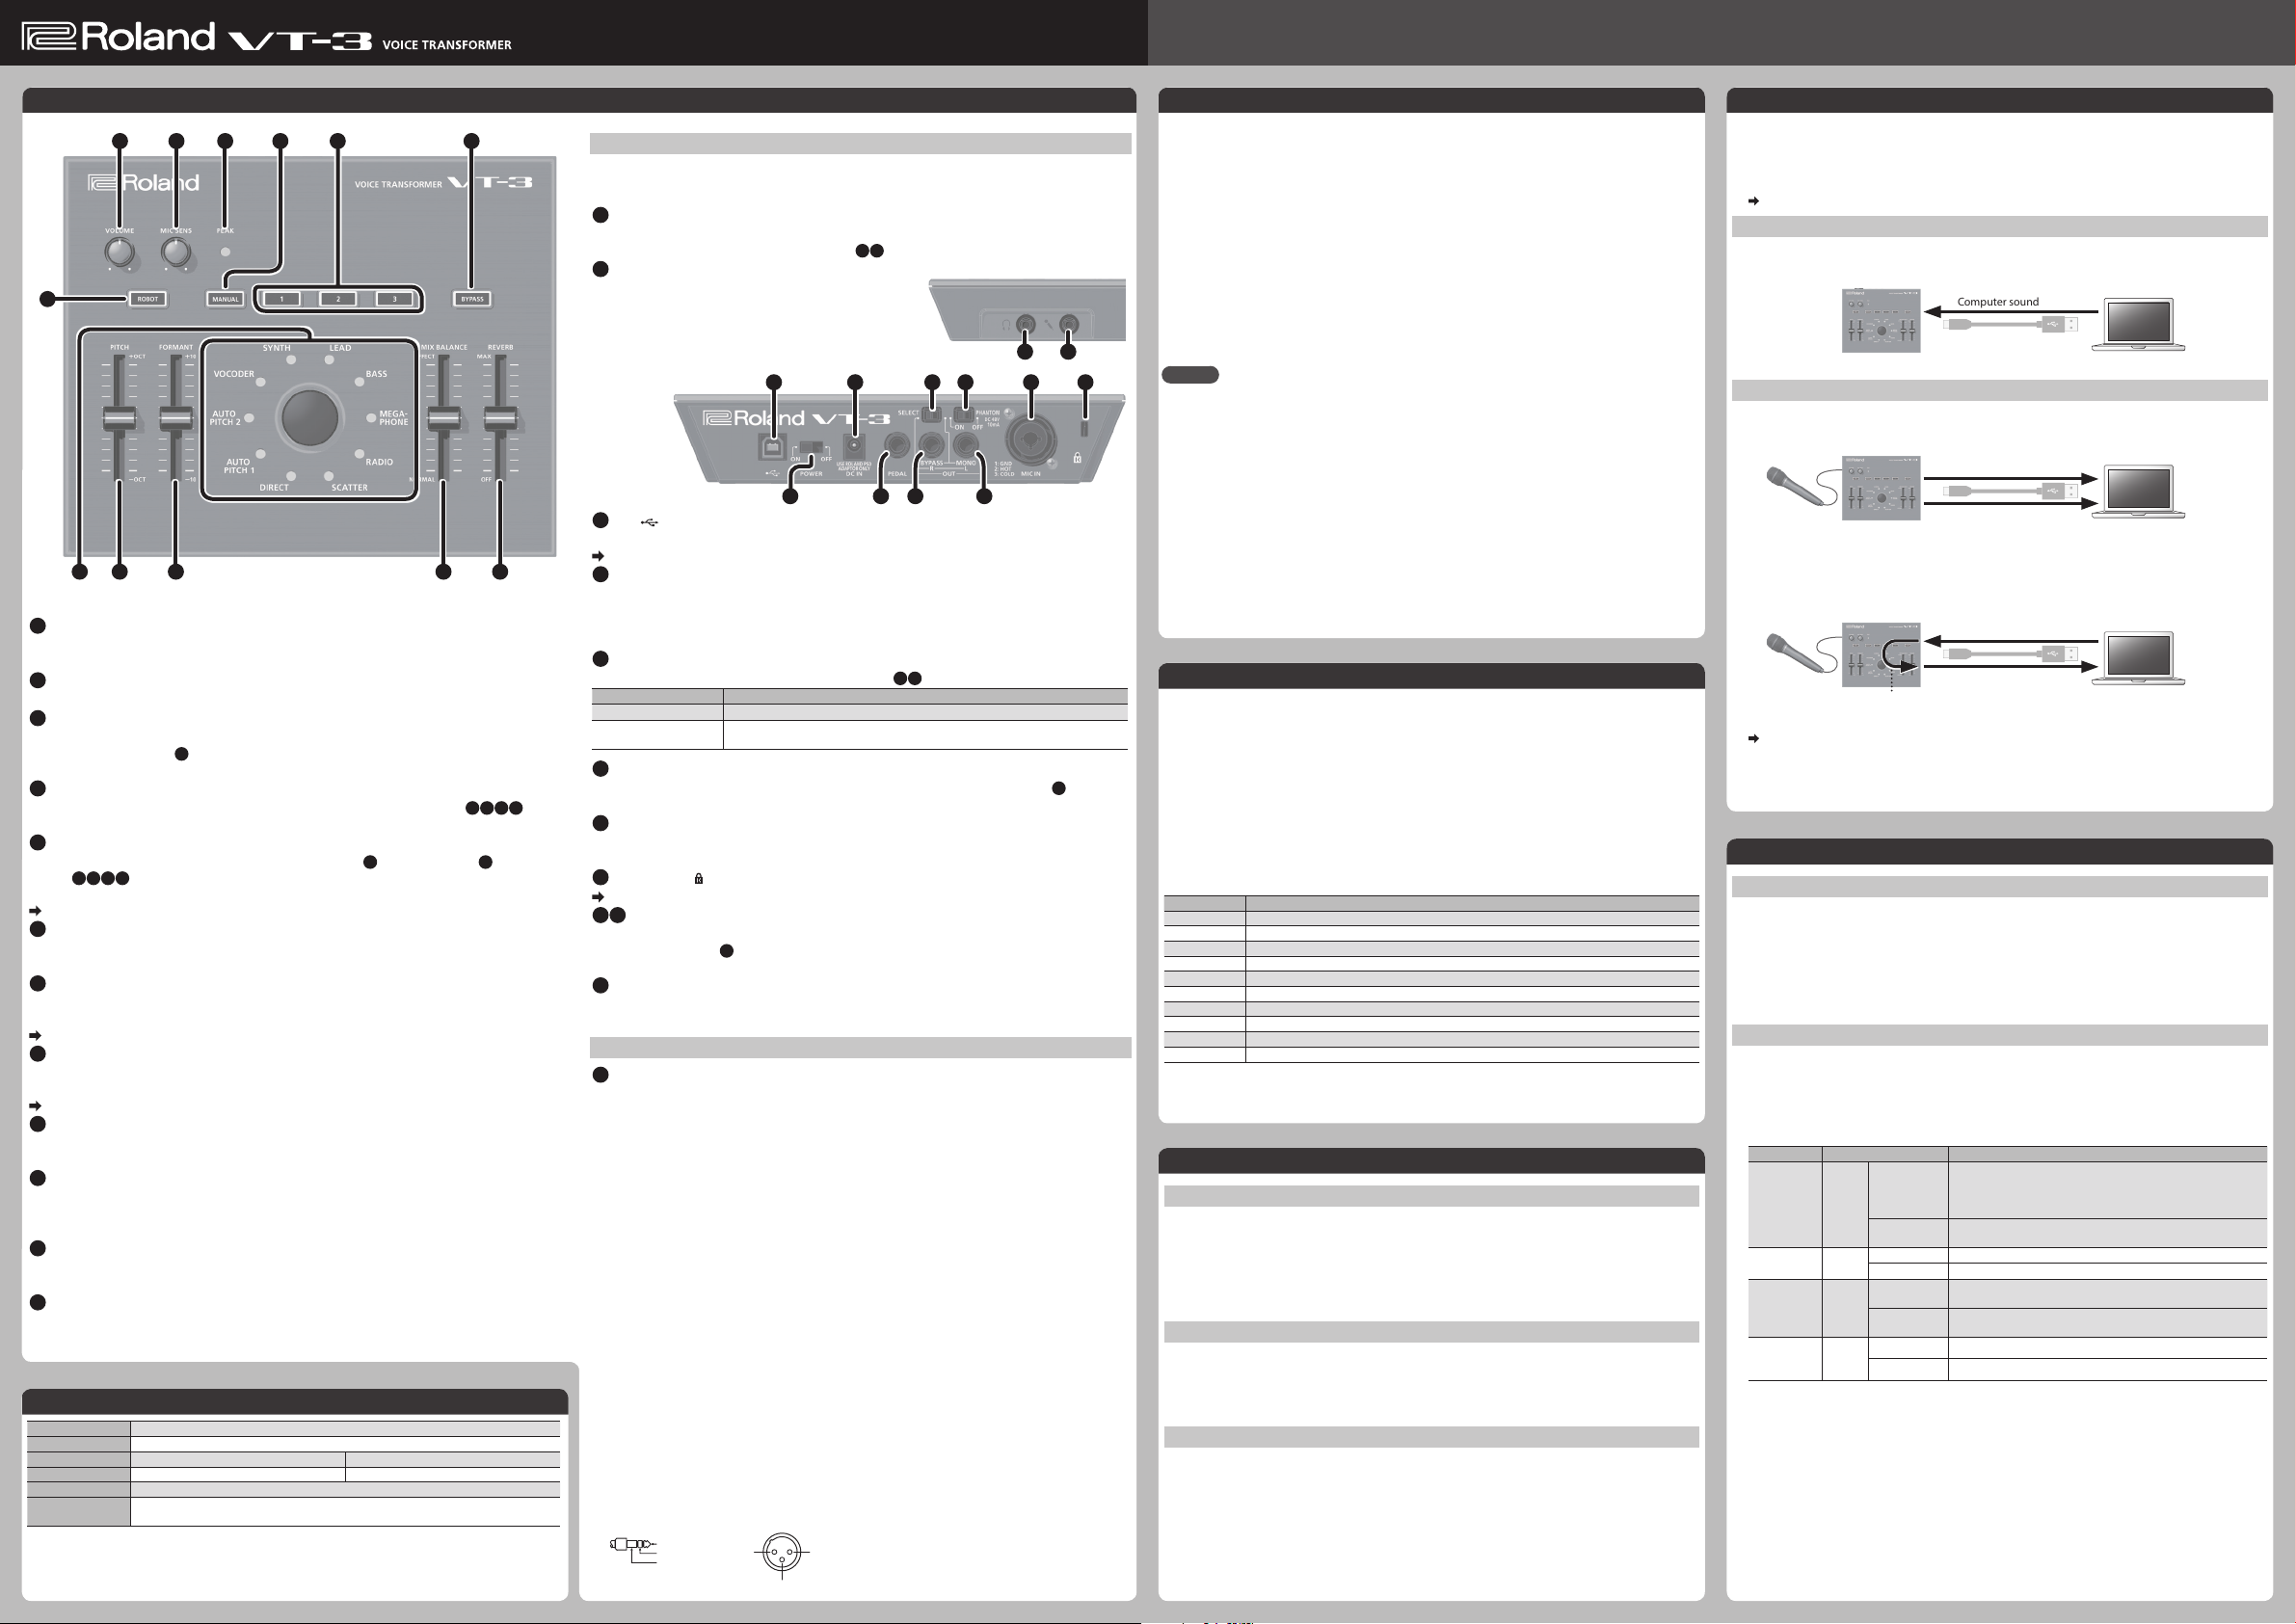
USB Audio Interface
By using a commercially available USB 2.0 cable to connect the VT-3 to your computer, you can
use the VT-3 as a USB audio interface.
* You must install the USB driver before connecting the VT-3 to your computer.
Download the USB driver from the Roland website.
For details, refer to Readme.htm which is included in the download.
http://www.roland.com/support/
Playback
You can use the VT-3 to listen to the sound that’s played by your computer.
The sound will be output from the VT-3’s OUT jacks and from the PHONES jack.
Computer sound
Recording
The mic sound processed by the VT-3 can be recorded on your computer.
The VT-3 will output the eect-processed sound and the unprocessed sound (bypass).
Mic sound
Eect
Bypass
Loop-back
The sound that’s played by your computer can be mixed on the VT-3 with the mic sound and
sent back to the computer.
Computer sound
Mic sound
+
Loop-back
* You can also change the settings so that loop-back will not occur.
Refer to “Various Settings”
Computer sound
Various Settings
Restoring the Factory Settings (Factory Reset)
Here’s how to return the VT-3 to its factory-set state.
1. While holding down the [BYPASS] button, turn on the power.
The [MANUAL] button blinks.
If you decide to cancel the factory reset, turn o the power.
2. Press the [MANUAL] button to execute the factory reset.
3. When all buttons are lit, turn the VT-3’s power o, then on again.
Loop-Back and Footswitch Settings
While holding down the [MANUAL] button, turn on the power.
1.
All of the character knob LEDs are lit, and the [BYPASS] button is blinking.
If you decide not to change the settings, turn o the power.
2. Use scene memory buttons [1], [2], and [3] and the [ROBOT] button to make settings.
Parameter Button Explanation
USB audio
loop-back
Footswitch
polarity
Footswitch
type
BYPASS
button
function
Lit (on)
[1]
Unlit (o)
Lit (normal) Normally you’ll leave this “lit.” (default)
[2]
Unlit (inverse) If the footswitch polarity is reversed, choose the “unlit” setting.
Lit
(latch)
[3]
Unlit
(unlatch)
Lit (mute)
ROBOT
Unlit (bypass)
3. Press the [BYPASS] button to save the settings.
The settings are saved, and the VT-3 restarts.
The sound played back by your computer is mixed on the VT-3
with the sound of the mic, and returned to the computer. The
sound is also output from the VT-3’s OUT jacks and PHONES jack.
(default)
The sound played back by your computer is output from the
VT-3’s OUT jacks and PHONES jack.
Choose the “lit” setting if you’ve connected a latch-type
footswitch (BOSS FS-5L). (default)
Choose the “unlit” setting if you’ve connected an unlatch-type
footswitch (BOSS FS-5U, Roland DP-2).
Press the [BYPASS] button to mute.
Press the [BYPASS] button to disable the eect.
 Loading...