

Page 1
Owner’s Manual
Bedienungsanleitung
Mode d’emploi
Manuale d’uso
Manual del usuario
Before using this unit, carefully read the sections entitled: “USING
THE UNIT SAFELY” (p. 2–3) and “IMPORTANT NOTES” ( p. 4).
These sections provide important information concerning the proper
operation of the unit. Additionally, in order to feel assured that you
have gained a good grasp of every feature provided by your new unit,
Getting Started should be read in its entirety. The manual should be
saved and kept on hand as a convenient reference.
This Owner's Manual applies to both the UM-1X and the UM1SX. The manual uses the term “UM-1X” to indicate both
models. If you have the UM-1SX, please read “UM-1X” as
“UM-1SX.”
Copyright © 2003 ROLAND CORPORATION
All rights reserved. No part of this publication may be reproduced in any
form without the written permission of ROLAND CORPORATION.
Page 2
USING THE UNIT SAFELY
Used for instructions intended to alert
the user to the risk of death or severe
injury should the unit be used
improperly.
Used for instructions intended to alert
the user to the risk of injury or material
damage should the unit be used
improperly.
* Material damage refers to damage or
other adverse effects caused with
respect to the home and all its
furnishings, as well to domestic
animals or pets.
001
• Before using this unit, make sure to
read the instructions below, and the
Owner’s Manual.
..................................................................................................
002a
• Do not open or perform any internal
modifications on the unit.
..................................................................................................
004
• Never use or store the unit in places
that are:
• Subject to temperature extremes
(e.g., direct sunlight in an enclosed
vehicle, near a heating duct, on top
of heat-generating equipment); or
are
• Damp (e.g., baths, washrooms, on
wet floors); or are
• Humid; or are
• Exposed to rain; or are
• Dusty; or are
• Subject to high levels of vibration.
..................................................................................................
007
• Make sure you always have the unit
placed so it is level and sure to remain
stable. Never place it on stands that
could wobble, or on inclined surfaces.
..................................................................................................
The symbol alerts the user to important instructions
or warnings.The specific meaning of the symbol is
determined by the design contained within the
triangle. In the case of the symbol at left, it is used for
general cautions, warnings, or alerts to danger.
The symbol alerts the user to items that must never
be carried out (are forbidden). The specific thing that
must not be done is indicated by the design contained
within the circle. In the case of the symbol at left, it
means that the unit must never be disassembled.
The ● symbol alerts the user to things that must be
carried out. The specific thing that must be done is
indicated by the design contained within the circle. In
the case of the symbol at left, it means that the powercord plug must be unplugged from the outlet.
003
• Do not attempt to repair the unit, or
replace parts within it (except when
this manual provides specific instructions directing you to do so). Refer all
servicing to your retailer, the nearest
EDIROL/ROLAND Service Center, or
an authorized Roland distributor, as
listed on the “Information” page.
..................................................................................................
011
• Do not allow any objects (e.g.,
flammable material, coins, pins); or
liquids of any kind (water, soft drinks,
etc.) to penetrate the unit.
..................................................................................................
012d
• Immediately turn the power off, and
request servicing by your retailer, the
nearest Roland Service Center, or an
authorized EDIROL/ROLAND
distributor, as listed on the
“Information” page when:
• If smoke or unusual odor occurs
• Objects have fallen into, or liquid
has been spilled onto the unit; or
• The unit has been exposed to rain
(or otherwise has become wet); or
• The unit does not appear to operate
normally or exhibits a marked change in
performance.
..................................................................................................
2
Page 3
013
• In households with small children, an
adult should provide supervision until
the child is capable of following all the
rules essential for the safe operation of
the unit.
..................................................................................................
014
• Protect the unit from strong impact.
(Do not drop it!)
..................................................................................................
023
• DO NOT play a CD-ROM disc on a
conventional audio CD player. The
resulting sound may be of a level that
could cause permanent hearing loss.
Damage to speakers or other system
components may result.
..................................................................................................
104
• Try to prevent cords and cables from
becoming entangled. Also, all cords
and cables should be placed so they
are out of the reach of children.
..................................................................................................
106
• Never climb on top of, nor place heavy
objects on the unit.
..................................................................................................
108c
• Disconnect all cords coming from
external devices before moving the
unit.
..................................................................................................
204
* Microsoft and Windows are registered trade-
marks of Microsoft Corporation.
206e
* Screen shots in this documents are reprinted
with permission from Microsoft Corporation.
206j
* Windows® is known officially as:
“Microsoft® Windows® operating system.”
207
* Apple and Macintosh are registered
trademark of Apple Computer, Inc.
209
* MacOS is a trademark of Apple Computer,
Inc.
220
* All product names mentioned in this
document are trademarks or registered trademarks of their respective owners.
231
* OMS is a registered trademark of Opcode
Systems, Inc.
232
* FreeMIDI is a trademark of Mark of the
Unicorn, Inc.
3
Page 4

IMPORTANT NOTES
291a
In addition to the items listed under “USING THE UNIT SAFELY” on page 2–3, please read and observe the
following:
Power Supply
307
• Before connecting this unit to other devices, turn off
the power to all units. This will help prevent
malfunctions and/or damage to speakers or other
devices.
Placement
352a
• This device may interfere with radio and television
reception. Do not use this device in the vicinity of
such receivers.
352b
• Noise may be produced if wireless communications
devices, such as cell phones, are operated in the
vicinity of this unit. Such noise could occur when
receiving or initiating a call, or while conversing.
Should you experience such problems, you should
relocate such wireless devices so they are at a
greater distance from this unit, or switch them off.
354a
• Do not expose the unit to direct sunlight, place it
near devices that radiate heat, leave it inside an
enclosed vehicle, or otherwise subject it to temperature extremes. Excessive heat can deform or
discolor the unit.
355b
• When moved from one location to another where
the temperature and/or humidity is very different,
water droplets (condensation) may form inside the
unit. Damage or malfunction may result if you
attempt to use the unit in this condition. Therefore,
before using the unit, you must allow it to stand for
several hours, until the condensation has completely
evaporated.
Maintenance
401a
• For everyday cleaning wipe the unit with a soft, dry
cloth or one that has been slightly dampened with
water. To remove stubborn dirt, use a cloth impregnated with a mild, non-abrasive detergent. Afterwards, be sure to wipe the unit thoroughly with a
soft, dry cloth.
402
• Never use benzine, thinners, alcohol or solvents of
any kind, to avoid the possibility of discoloration
and/or deformation.
Handling CD-ROMs
801
• Avoid touching or scratching the shiny underside
(encoded surface) of the disc. Damaged or dirty CDROM discs may not be read properly. Keep your
discs clean using a commercially available CD
cleaner.
Additional Precautions
552
• Unfortunately, it may be impossible to restore the
contents of data that was stored hard disk once it
has been lost. Roland Corporation assumes no
liability concerning such loss of data.
553
• Use a reasonable amount of care when using the
unit’s buttons, sliders, or other controls; and when
using its jacks and connectors. Rough handling can
lead to malfunctions.
556
• When connecting / disconnecting all cables, grasp
the connector itself—never pull on the cable. This
way you will avoid causing shorts, or damage to the
cable’s internal elements.
558b
• To avoid disturbing your neighbors, try to keep the
unit’s volume at reasonable levels (especially when
it is late at night).
559a
• When you need to transport the unit, package it in
the box (including padding) that it came in, if
possible. Otherwise, you will need to use equivalent
packaging materials.
563
• Unauthorized duplication, reproduction, hiring, and
lending prohibited.
986
• Roland has tested the UM-1X/UM-1SX with typical
computers that meet the system requirements, but
cannot guarantee that a given computer can be used
satisfactorily with the UM-1X/UM-1SX based solely
on the fact that it meets the requirements. This is
because there are too many other variables that may
influence the processing environment, including
differences in motherboard design and the
particular combination of other devices involved.
4
Page 5

Contents
English
Check the Contents of the Package ..................................................... 6
Front and Rear Panel ............................................................................. 7
Getting Connected and Installing Drivers (Windows)......................... 8
Getting Connected and Installing Drivers (Macintosh)..................... 22
Troubleshooting ................................................................................... 32
Deutsch
Inhalt der Verpackung.......................................................................... 37
Namen und Funktionen........................................................................ 38
Installieren und Einrichten des Treibers............................................ 39
Fehlerbehebung.................................................................................... 49
Français
Contenu du paquet............................................................................... 56
Description de l'appareil...................................................................... 57
Installation et configuration du pilote ................................................ 58
Dépannage ............................................................................................ 68
Italiano
Contenuto della confezione................................................................. 75
Nomi e funzioni..................................................................................... 76
Installazione e configurazione del driver ........................................... 77
Ricerca e soluzione dei problemi........................................................ 87
Español
Contenido del paquete......................................................................... 94
Nombres y funciones........................................................................... 95
Instalación y configuración del controlador...................................... 96
Resolución de problemas.................................................................. 106
Specifications ..................................................................................... 113
5
Page 6
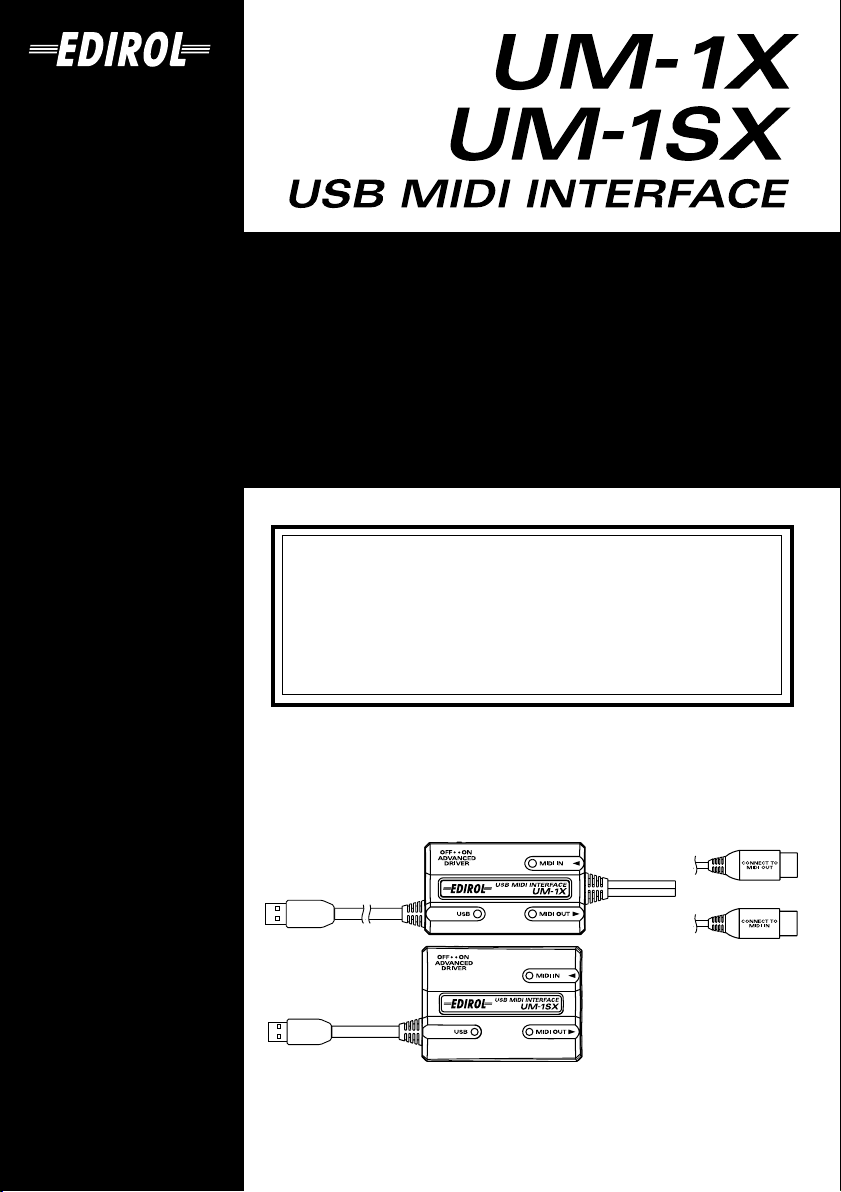
Check the Contents of the Package
The UM-1X includes the following items. When you open the package, first make
sure that all items are included. If any are missing, contact the dealer where you
purchased the UM-1X.
●
USB MIDI Interface UM-1X/UM-1SX
fig.UM-1X fig.UM-1SX
●
UM-1X/UM-1SX CD-ROM (one disk)
Be sure to read the README_E.TXT file that is found in the UM-1X Driver CDROM.
* Do not touch the silver recording surface of the disc, or scratch it. Doing so may make it
impossible for data to be read correctly. If the disc becomes soiled, use a commercially
available CD cleaner to clean it.
* Do not play back the CD-ROM on a conventional audio CD player. Doing so will produce
a high volume that may damage your ears or speakers.
●
Owner’s Manual (this document)
This is the document you are reading. Keep it at hand for reference when needed.
6
Page 7
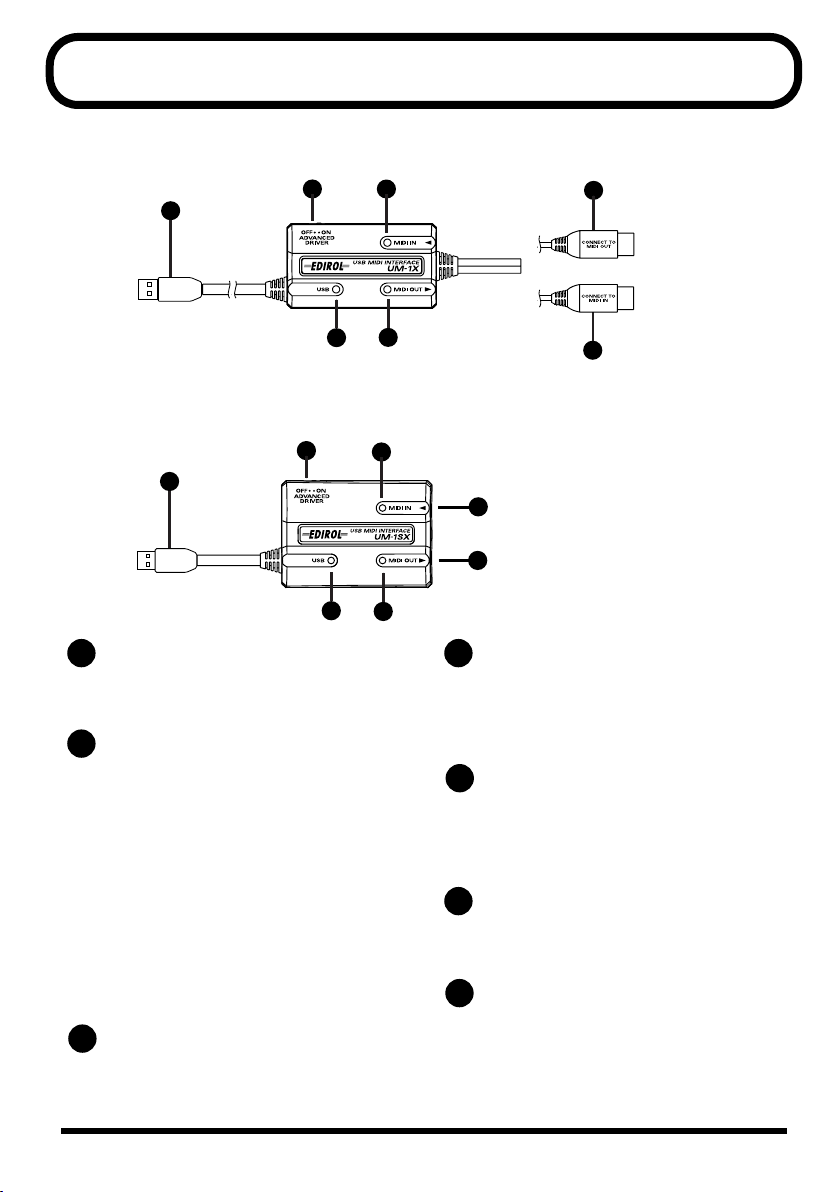
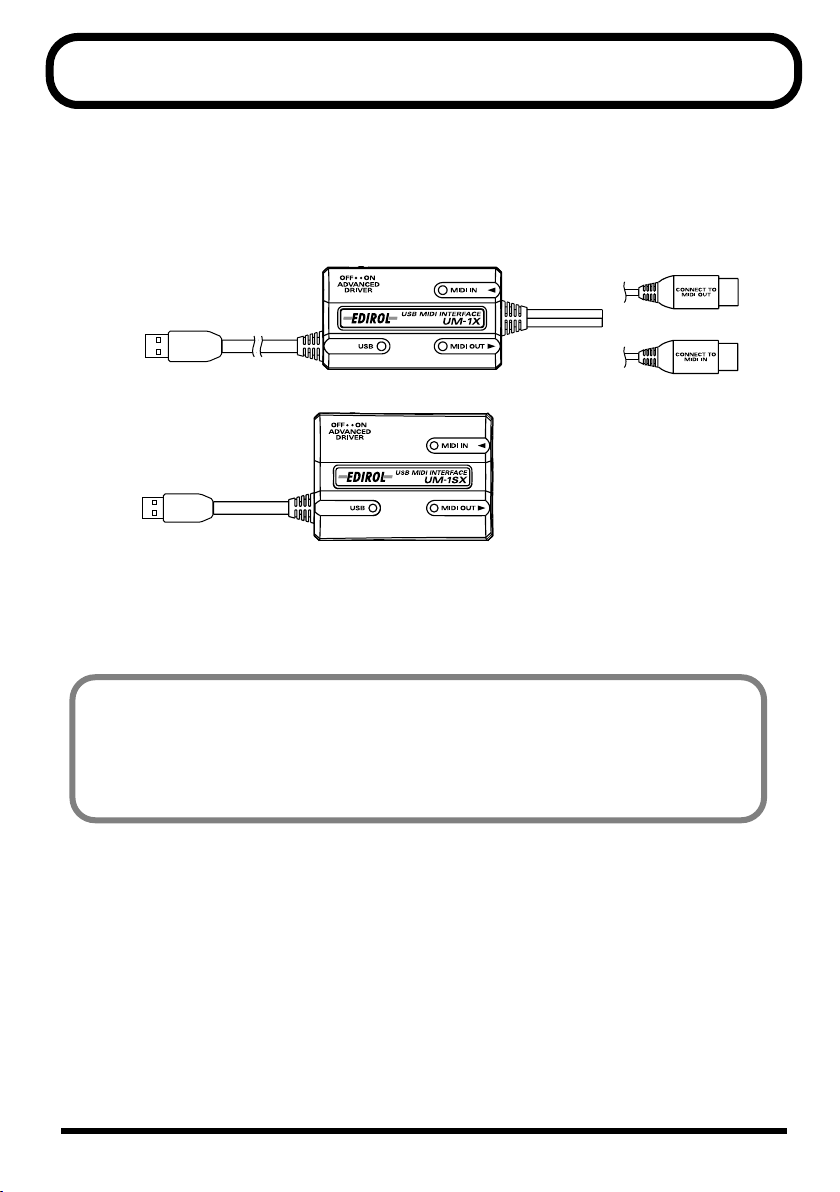
Front and Rear Panel
■
UM-1X
fig.UM-1X
2
1
■
UM-1SX
fig.UM-1SX_panel
2
1
1
USB Cable
Connect this cable to the USB connector of
your computer.
ADVANCED DRIVER (mode select)
2
switch
This switches the operating mode.
ON (Advanced mode):
FPT technology is used to allow high-speed
MIDI transfer.
Normally, you should use this mode.
* FPT → Fast Processing Technology of MIDI
Transmission
OFF (Standard Driver mode):
Use this if you are using the default MIDI
driver provided by your operating system.
3
MIDI IN Indicator
This will light when a MIDI message is
received.
3
6
7
3
7
6
4
5
4
5
MIDI IN Connector
4
(CONNECT TO MIDI OUT Connector)
Connect this to the MIDI OUT connector of
the keyboard or other devices that will
transmit MIDI messages to your computer.
MIDI OUT Connector
5
(CONNECT TO MIDI IN Connector)
Connect this to the MIDI IN connector of
the sound modules or other devices that
you wish to play from your computer.
6
MIDI OUT Indicator
This will light when a MIDI message is
transmitted.
7
USB Indicator
This indicator will light when the unit is
connected to your computer and is ready to
operate.
7
Page 8
Getting Connected and Installing Drivers (Windows)
What is a driver?
A “driver” is software that transfers data between the UM-1X and application
software running on your computer, when your computer and the UM-1X are
connected by a USB cable. The driver sends data from your application to the UM1X, and from the UM-1X to your application.
Installing the Driver
The installation procedure will differ depending on your system.
Please proceed to one of the following sections, depending on the system you use.
• Windows XP users............................................(p. 8)
• Windows 2000 users.........................................(p. 13)
• Windows Me/98 users.....................................(p. 17)
■
Windows XP Users
1
With the UM-1X disconnected, start up Windows.
Disconnect all USB cables except for a USB keyboard and USB
mouse (if used).
If you are using a virus checker or similar software, be sure to
exit as well.
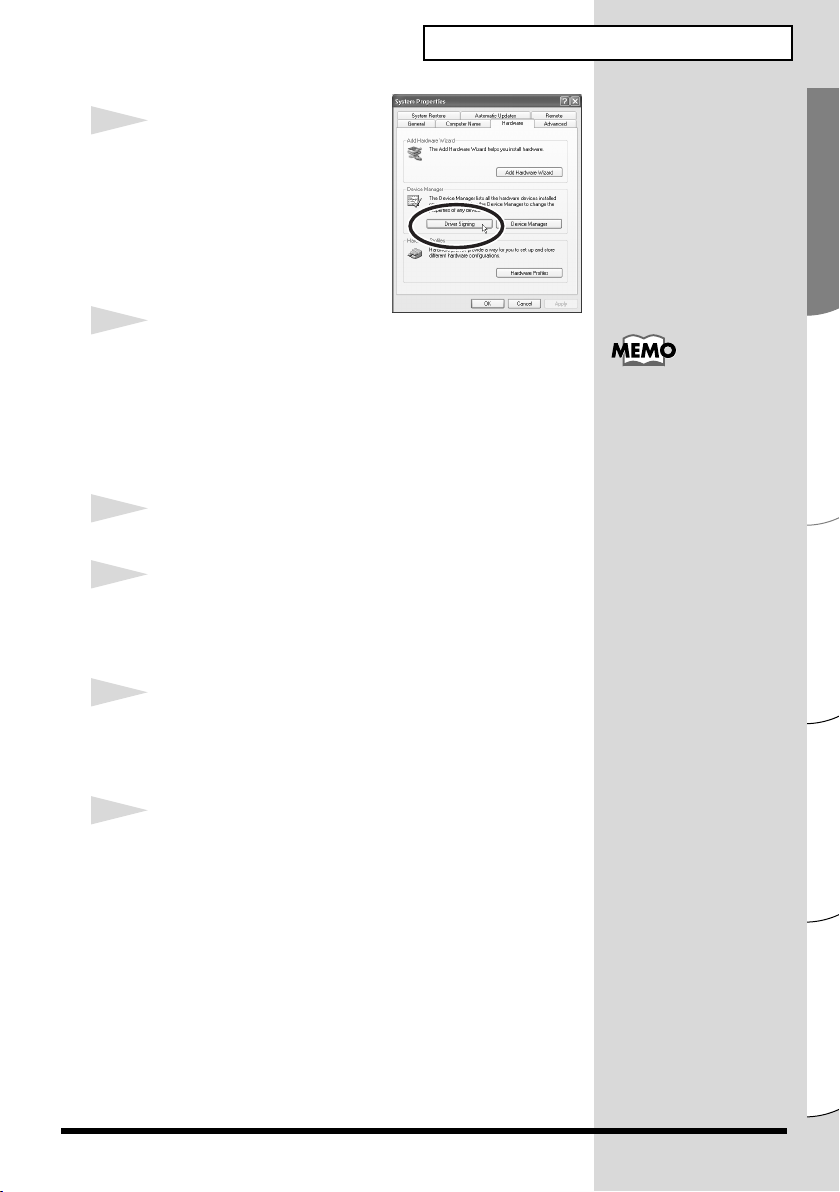
2
Open the
1.
2.
3.
System Properties
Click the Windows
select
Control Panel
In
“Pick a category”
Maintenance.”
In
“or pick a Control Panel icon”
icon.
start
menu, and from the menu,
.
, click
dialog box.
“Performance and
, click the
System
If you are using Windows XP
Professional, you must log on
using a user name with an
administrative account type
(e.g., Administrator). For
details on user accounts,
please consult the system
administrator of your
computer.
Depending on how your
system is set up, the System
icon may be displayed directly
in the Control Panel (the
Classic view). In this case,
double-click the System icon.
8
Page 9
Getting Connected and Installing Drivers (Windows)
fig.2-1e
3
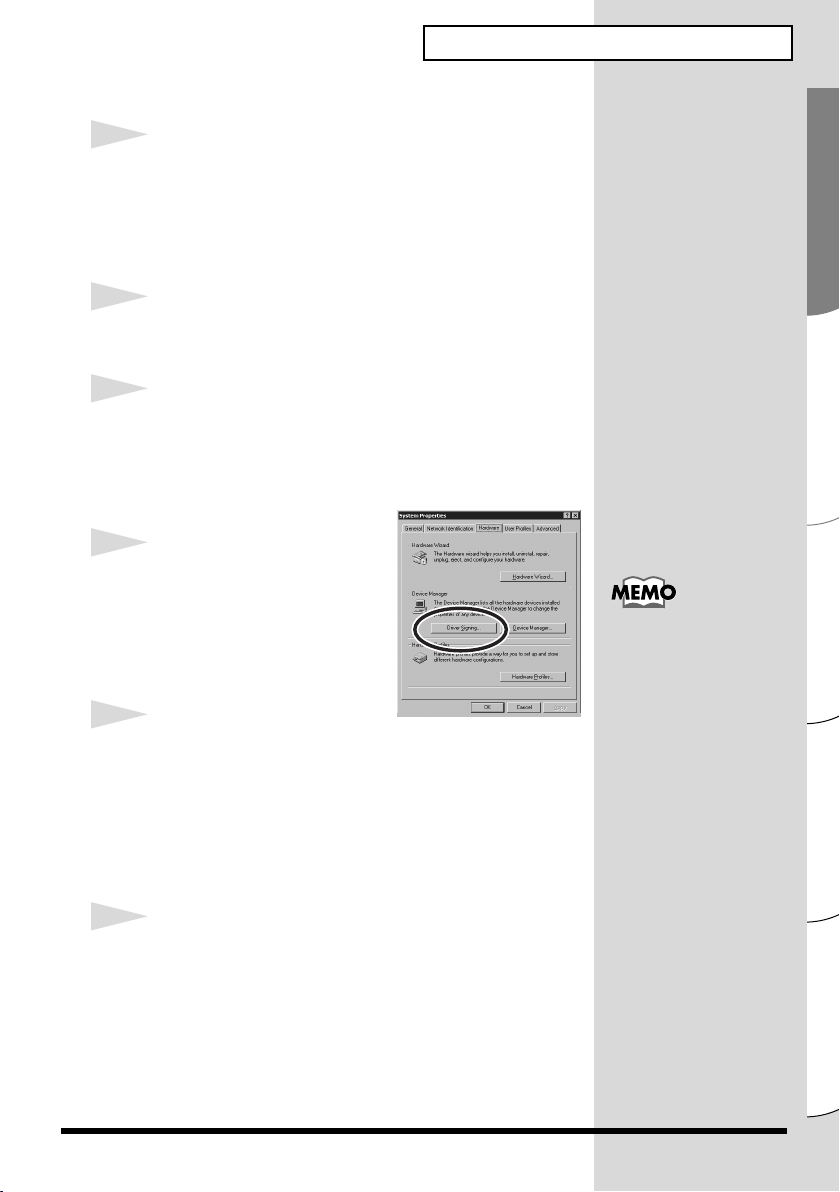
Click the
then click
Open the
Options
Hardware
tab, and
[Driver Signing]
Driver Signing
dialog box.
.
4
Make sure that
to take?”
If it is set to
If it is not set to
(“Warn” or “Block”). Then change the setting to
click
[OK]
“What action do you want Windows
is set to
“Ignore”
.
“Ignore.”
, simply click
“Ignore”
[OK]
.
, make a note of the current setting
5
Click
[OK]
to
close the
System Properties
6
Exit all currently running software (applications).
Also close any open windows. If you are using virus checking
or similar software, be sure to exit it as well.
“Ignore”
and
dialog box.
If you changed “What action
do you want Windows to
take?” in step 4, you must
restore the previous setting
after you have installed the
➝ If you changed
driver. (
“What action do you want
Windows to take?” (p. 12))
7
Prepare the CD-ROM.
Insert the CD-ROM into the CD-ROM drive of your
computer.
8
Click the Windows
appears, select
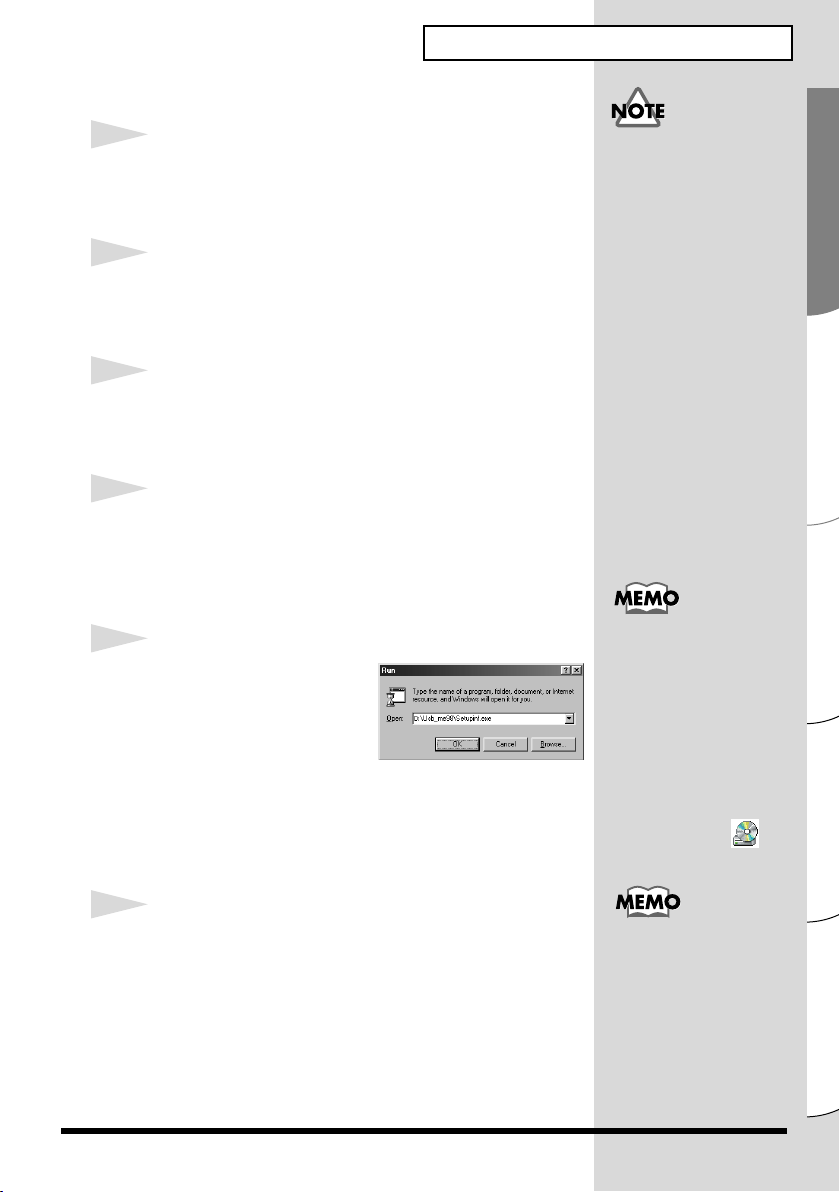
Open the
“Run...”
start
“Run...”
dialog box.
button. From the menu that
Español Italiano Français Deutsch English
9
Page 10

Getting Connected and Installing Drivers (Windows)
If a dialog box other than
“Ready to install the driver”
appears, follow the
instructions shown in the
dialog box.
To prevent malfunction and/
or damage to speakers or other
devices, always turn down the
volume, and turn off the
power on all devices before
making any connections.
fig.2-3e_30
9
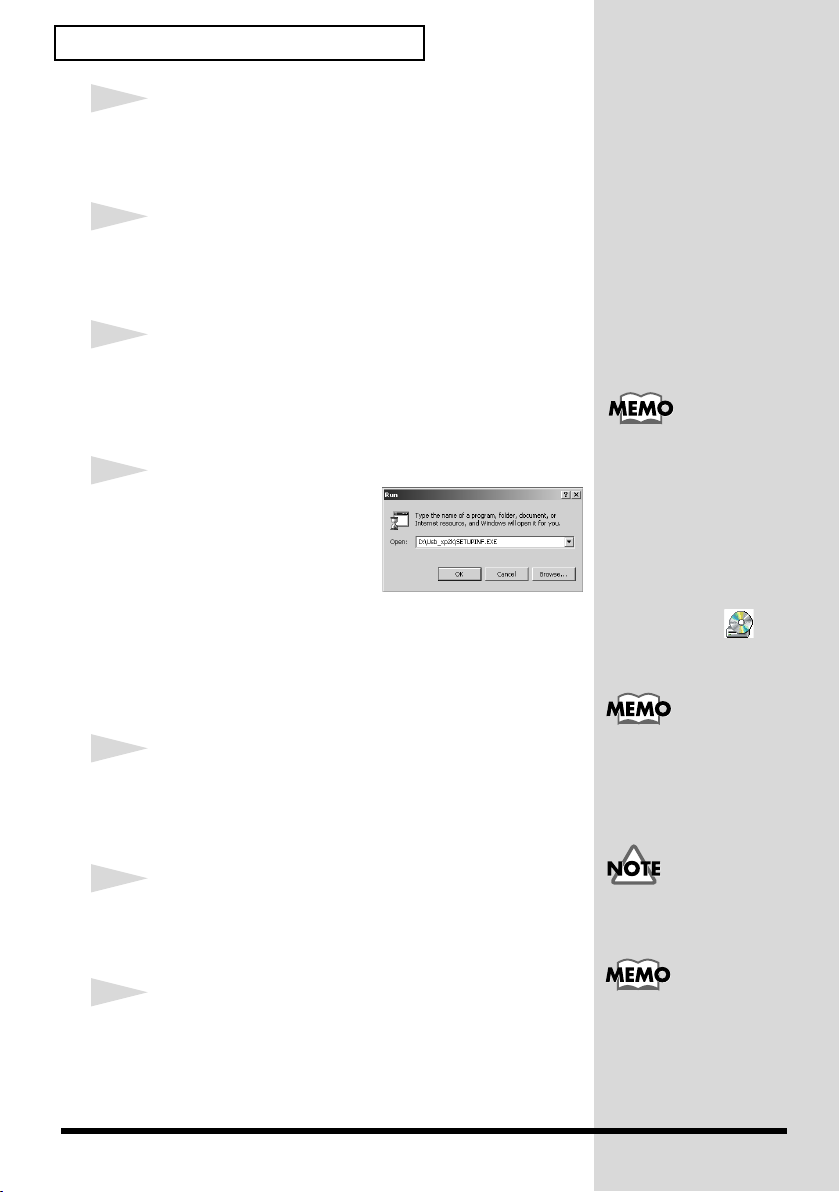
In the dialog box that
appears, input the
following into the
field, and click
D:\Usb_xp2k\SETUPINF.EXE
* The drive name
drive name of your CD-ROM drive.
“Open”
[OK]
“D:”
may be different for your system. Specify the
.
10
The
SetupInf
You are now ready to install the driver.
dialog box will appear.
11
Set the UM-1X’s
the ON position.
* Installation cannot proceed as described below if the switch is
turned OFF.
ADVANCED DRIVER switch
12
Connect the USB cable of the UM-1X to your
computer.
Near the task bar, your computer will indicate
Hardware.”
Please wait.
Checking the drive name
Click the Start button, and
from the menu that appears,
choose My Computer. In the
window that appears, note the
drive name of the CD-ROM
drive in which you inserted
the CD-ROM in step 7.
The (D:) or (E:) displayed by
the CD-ROM drive is the
drive name.
to
“Found New
13
The
Make sure that the screen indicates
Driver”
(Advanced)”
fig.2-7e
14
The screen will
indicate
choose your search
and installation
10
options.”
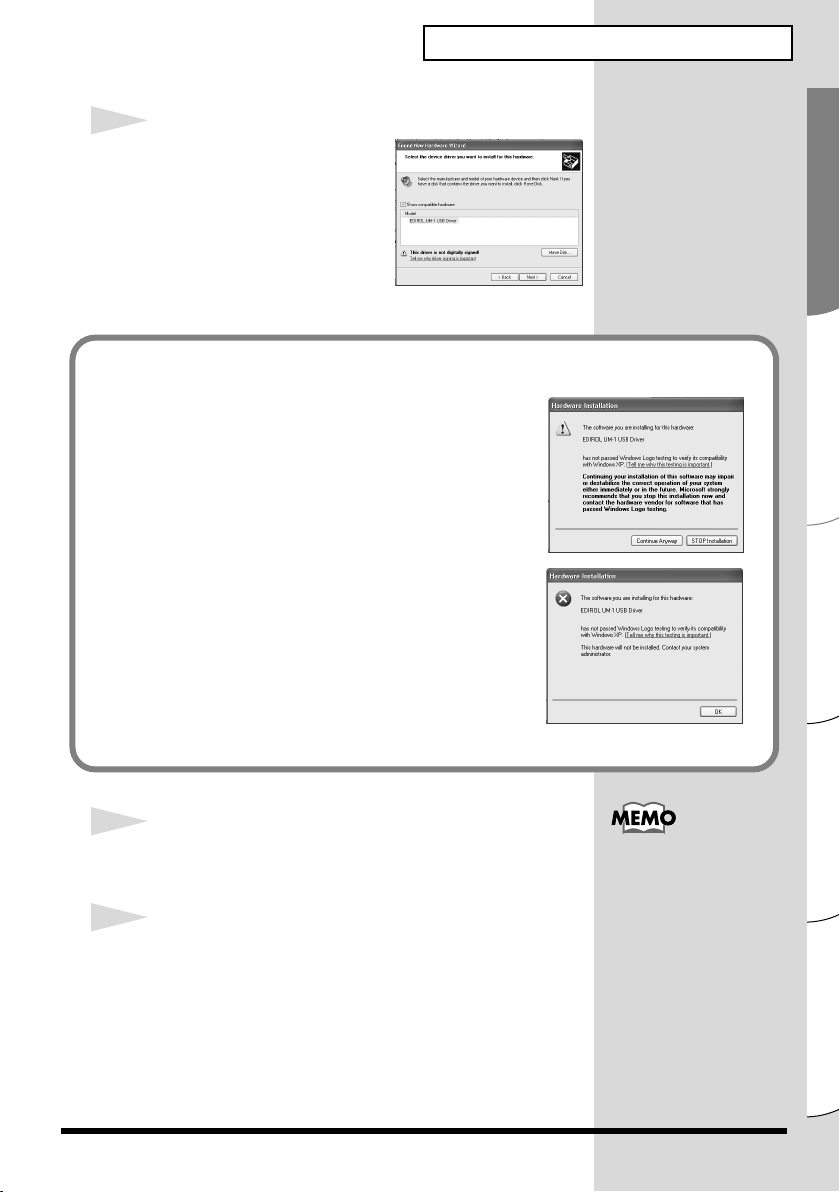
Select
will choose the driver to
install”
Found New Hardware Wizard
“EDIROL UM-1 USB
, select
“Install from a list or specific location
, and click
[Next]
.
“Please
“Don’t search. I
, and click
[Next]
.
will appear.
Page 11
Getting Connected and Installing Drivers (Windows)
The Insert Disk dialog may
not appear. In that case,
proceed to step 17.
fig.2-8_20
15
Make sure that the
field indicates
UM-1 USB Driver”
click
[Next]
installation will begin.
If the “What action do you want Windows to take?” setting was not set
to “Ignore”, a “Hardware Installation” dialog box will appear.
If “What action do you want Windows to take?”
is set to “Warn,”
1. Click [Continue Anyway].
2. Continue the installation.
If “What action do you want Windows to take?”
is set to “Block”
1. Click [OK].
2. When the “Found New Hardware Wizard”
appears, click [Finish].
3. Restart Windows, and then install the driver
once again from step 1 (p. 8).
“EDIROL
. Driver
“Model”
, and
16
The
Click
17
The
following into the
[OK]
D:\Usb_xp2k
* The drive name
drive name of your CD-ROM drive.
Insert Disk
[OK]
dialog box will appear.
.
Files Needed
.
“D:”
dialog box will appear. Input the
“Copy files from”
may be different for your system. Specify the
field, and click
Español Italiano Français Deutsch English
11
Page 12
Getting Connected and Installing Drivers (Windows)
18
The
Found New Hardware Wizard
will appear.
Verify that
click
Wait until
“EDIROL UM-1 USB Driver”
[Finish]
.
“Found New Hardware”
is displayed, and
appears near the taskbar.
19
When driver installation has been completed, the
System Settings Change
Click
[Yes]
. Windows will restart automatically.
If you changed “What action do you want Windows to take?”
If you changed the What action do you want Windows to take? setting,
restore the original setting after Windows restarts.
1. If you are using Windows XP Professional, log on to Windows using
the user name of an administrative account (e.g., Administrator).
2. Click the Windows start menu, and from the menu, select Control
Panel.
3. In “Pick a category”, click “Performance and Maintenance.”
* Depending on how your system is set up, the System icon may be displayed
directly in the Control Panel (classic view). In this case, double-click the
System icon.
4. In “or pick a Control Panel icon”, click the System icon. The System
Properties dialog box will appear.
5. Click the Hardware tab, and then click [Driver Signing]. The Driver
Signing Options dialog box will appear.
6. Return the What action do you want Windows to take? setting to the
original setting (either “Warn” or “Block”), and click [OK].
7. Click [OK]. The System properties dialog box will close.
dialog box will appear.
12
Next, you need to make the driver settings.
(➝ Settings and Checking (p. 19))
Page 13
■
Windows 2000 Users
1
With the UM-1X disconnected, start up Windows.
Disconnect all USB cables except for a USB keyboard and USB
mouse (if used).
If you are using a virus checker or similar software, be sure to
exit as well.
2
Log on to Windows as a user with administrative
privileges (such as Administrator).
3
Open the
Click the Windows
appears, select
double-click the
fig.05-2e
System Properties
Settings | Control Panel
4
Click the
then click
Open the
Options
Hardware
[Driver Singing]
Driver Singing
dialog box.
5
Make sure that
signature verification”
If it is set to
If it is not set to
(“Warn” or “Block”). Then change the setting to
click
[OK]
“Ignore”
.
Start
System
tab, and
“File
, simply click
“Ignore”
Getting Connected and Installing Drivers (Windows)
dialog box.
button, and from the menu that
. In
Control Panel
icon.
.
is set to
, make a note of the current setting
“Ignore.”
[OK]
.
“Ignore”
and
,
If you changed “File
signature verification”, you
must restore the previous
setting after you have installed
the driver. (→ If you changed
“File signature verification”
(p. 16))
6
Click
[OK]
to close the
System Properties
dialog box.
Español Italiano Français Deutsch English
13
Page 14
Getting Connected and Installing Drivers (Windows)
Checking the drive name
Click the Start button, and
from the menu that appears,
choose My Computer. In the
window that appears, note the
drive name of the CD-ROM
drive in which you inserted
the CD-ROM in step 8.
The (D:) or (E:) displayed by
the CD-ROM drive is the
drive name.
If a dialog box other than
“Ready to install the driver”
appears, follow the
instructions shown in the
dialog box.
Installation will not occur
correctly if the switch is turned
OFF.
7
Exit all currently running software (applications).
Also close any open windows. If you are using virus checking
or similar software, be sure to exit it as well.
8
Insert the CD-ROM.
Insert the CD-ROM into the CD-ROM drive of your
computer.
9
Click the Windows
appears, select
Open the
fig.05-5e_30
“Run...”
Start
“Run...”
dialog box.
button. From the menu that
10
In the dialog box that
appears, input the
following into the
“Open”
[OK]
field, and click
.
D:\Usb_xp2k\SETUPINF.EXE
* The drive name
drive name of your CD-ROM drive.
11
The
You are now ready to install the driver.
12
Set the UM-1X’s
ON
position.
13
Use the USB cable to connect the UM-1X to your
computer.
14
SetupInf
“D:”
may be different for your system. Specify the
dialog box will appear.
ADVANCED DRIVER switch
to the
To prevent malfunction and/
or damage to speakers or other
devices, always turn down the
volume, and turn off the
power on all devices before
making any connections.
Page 15
Getting Connected and Installing Drivers (Windows)
If the “File signature verification” setting was not set to “Ignore”, a
“Digital Signature Not Found” dialog box will appear.
If “File signature verification” is set to “Warn,”
1. Click [Yes].
2. Continue the installation.
If “File signature verification” is set to “Block”
1. Click [OK].
2. When the “Found New Hardware Wizard”
appears, click [Finish].
3. Restart Windows, and then install the driver once again from
step 1 (p. 13).
14
The
Insert Disk
Click
[OK]
dialog box will appear.
.
The Insert Disk dialog may
not appear. In that case,
proceed to step 15.
15
The
Files Needed
In the
Copy files from
shown in the dialog box, and click
D:\Usb_xp2k\
* The drive name
drive name of your CD-ROM drive.
dialog box will appear.
“D:”
may be different for your system. Specify the
16
The
“Find New Hardware Wizard”
Verify that
click
“EDIROL UM-1 USB Driver”
[Finish]
.
17
The
System Settings Change
appear.
Click
[Yes]
. Windows will restart automatically.
If the
System Settings Change
restart Windows from the Start menu.
field, type the folder name that is
[OK]
.
may be displayed.
is displayed, and
dialog box may
dialog box does not appear,
Español Italiano Français Deutsch English
15
Page 16
Getting Connected and Installing Drivers (Windows)
If you changed “File signature verification”
If you changed the “File signature verification” setting in step 5, restore the
original setting after Windows restarts.
1. After Windows restarts, log in to Windows as a user with administrative
privileges, (such as Administrator).
2. In the Windows desktop, right-click the My Computer icon, and from the
menu that appears, select Properties. The System Properties dialog box will
appear.
3. Click the Hardware tab, and then click [Driver signature]. The Driver
Signing Options dialog box will appear.
4. Return the “File signature verification” setting to the original setting (either
“Warn” or “Block”), and click [OK].
5. Click [OK]. The System Properties dialog box will close.
Next, you need to make the driver settings.
(➝ Settings and Checking (p. 19))
16
Page 17
■
Checking the drive name
Click the Start button, and
from the menu that appears,
choose My Computer. In
the window that appears,
note the drive name of the
CD-ROM drive in which
you inserted the CD-ROM
in step 3.
The (D:) or (E:) displayed by
the CD-ROM drive is
the drive name.
Windows Me/98 Users
Getting Connected and Installing Drivers (Windows)
1
With the UM-1X disconnected, start up Windows.
Disconnect all USB cables other than those for a USB
keyboard or USB mouse.
2
Exit all currently running software (applications).
Also, close any open windows. If you are using a virus
checker or similar software, be sure to exit this as well.
3
Prepare the CD-ROM.
Insert the CD-ROM into the CD-ROM drive of your
computer.
4
Click the Windows
appears, select
Open the
fig.05-13e_30
Run...
Start
Run...
.
dialog box.
button. From the menu that
5
In the dialog box that
appears, input the
following into the
“Open”
[OK]
D:\Usb_me98\SETUPINF.EXE
* The drive name
Type the name of your CD-ROM drive.
field, and click
.
“D:”
may be different depending on your system.
If the UM-1X is already
connected to your computer
and a message of “Add New
Hardware Wizard” is
displayed, go to the CD-ROM
folder named USB_me98,
open the file
README_E.HTM, and read
the “Troubleshooting”
section entitled “You
attempted to install using
the above procedure, but
were not able to.”
6
Open the
You are now ready to install the driver.
SetupInf
dialog box.
If a dialog box other than
“Ready to install the driver”
appears, follow the
instructions shown in the
dialog box.
Español Italiano Français Deutsch English
17
Page 18
Getting Connected and Installing Drivers (Windows)
Installation will not occur
correctly if the switch is turned
OFF.
7
Set the UM-1X’s
ON
position.
ADVANCED DRIVER switch
8
Connect the USB cable of the UM-1X to your
computer.
9
The driver will be installed automatically.
10
In the
SetupInf
dialog box will close.
* If a message recommends that you restart Windows, restart
Windows as directed.
Next, you need to make the driver settings.
(➝ Settings and Checking (p. 19))
dialog box, click
[OK]
. The
to the
SetupInf
To prevent malfunction and/
or damage to speakers or other
devices, always turn down the
volume, and turn off the
power on all devices before
making any connections.
18
Page 19
Settings and Checking
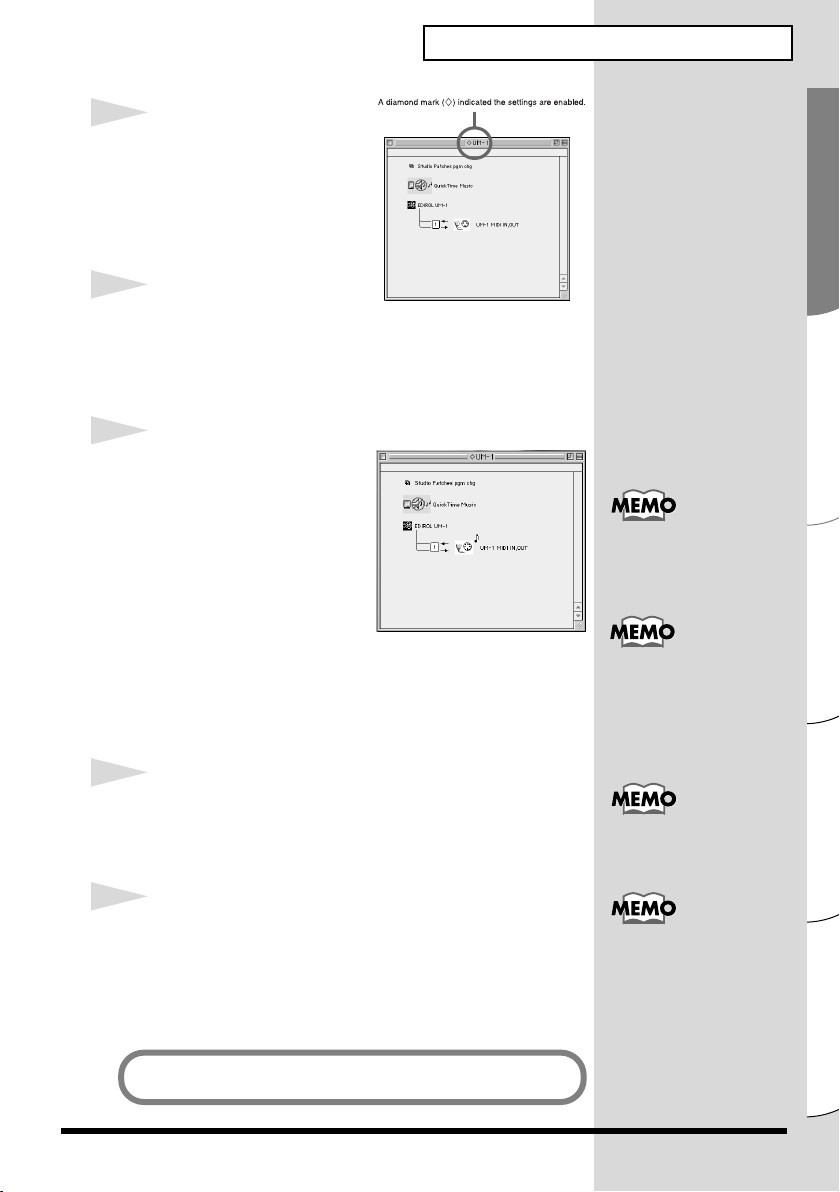
b
■
Specifying the MIDI Input/Output Destination
Windows XP/2000/Me Users
1
Open
Control Panel
Click the Windows
appears, select
Windows XP
Click the Windows
appears, select
.
Start
button, and from the menu that
Settings | Control Panel
start
button, and from the menu that
Control Panel
.
2
Open the
dialog box (or in Windows 2000/Me,
Multimedia Properties
Windows XP
In
Devices.”
Sounds and Audio Devices
Sounds and Audio Devices Properties
).
“Pick a category”
Next, in
click
“Sound, Speech, and Audio
“or pick a Control Panel icon”
icon.
Getting Connected and Installing Drivers (Windows)
.
Depending on how your
system is set up, the Sounds
and Audio Devices icon may
e displayed directly in the
Control Panel (the Classic
Sounds and
, click the
view). In this case, doubleclick the Sounds and Audio
Devices icon.
Windows 2000/Me
In
icon to open the
dialog box.
3
Click the
Control Panel
Audio
, double-click the
“Sounds and Multimedia Properties”
Sounds and Multimedia
tab.
If the Sound and Multimedia
icon is not displayed, click
“Show all control panel
options” in the frame at the
left.
Español Italiano Français Deutsch English
19
Page 20
Getting Connected and Installing Drivers (Windows)
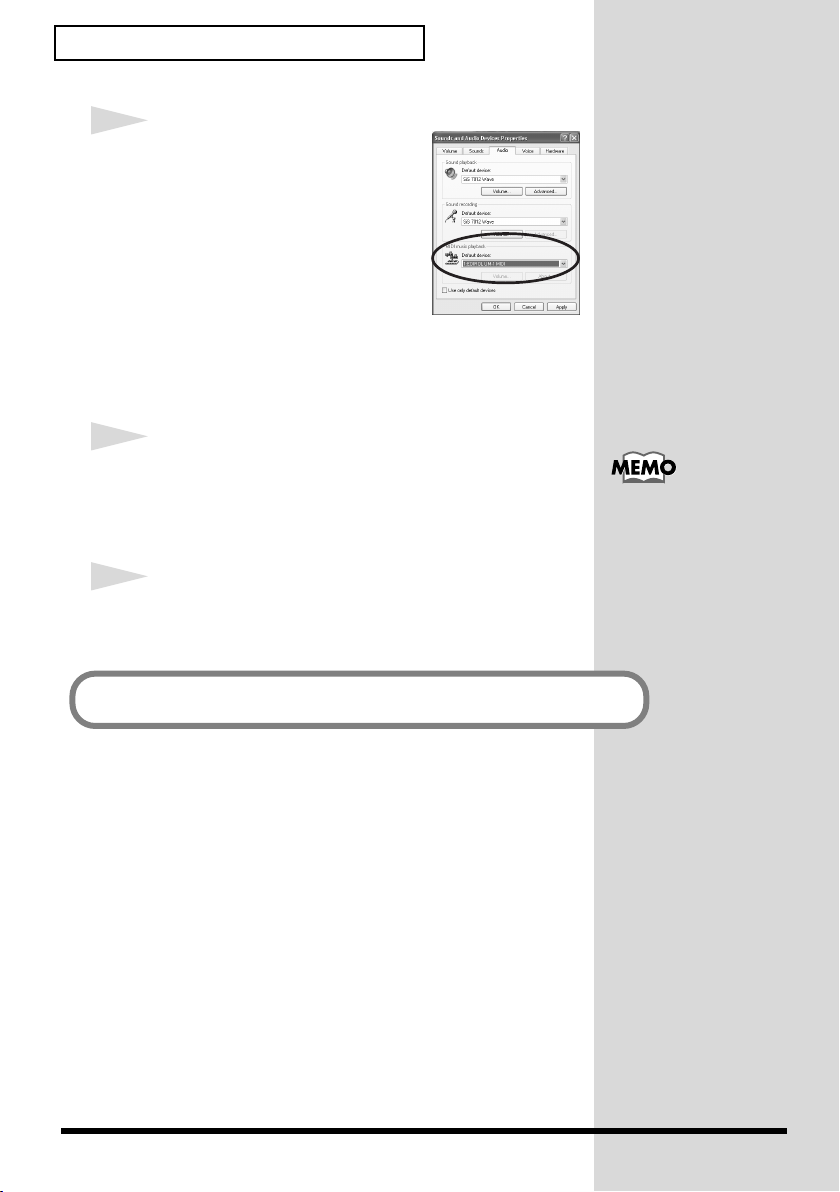
fig.2-28e_30
4
For
MIDI music playback
the ▼ located at the right of
[Default device]
Windows 2000/Me,
device]
following from the list that
appears.
If you want to use Media Player
to play a sound module connected to the UM-1X's
MIDI OUT connector, select
), and select the
(or in
, click
[Preferred
EDIROL UM-1 MIDI.
5
Close the
dialog box.
Click OK.
Sounds and Audio Devices Properties
6
Make MIDI device settings on your sequencer
software.
For details on MIDI device
settings, refer to the owner's
manual for the software you
are using.
20
This completes MIDI Input/Output destination settings.
Page 21
Windows 98 Users
1
Open
Control Panel
Click the Windows
appears, select
Start
Settings | Control Panel
2
Open the
In
the
Multimedia Properties
Control Panel
“Multimedia Properties”
, double-click the
3
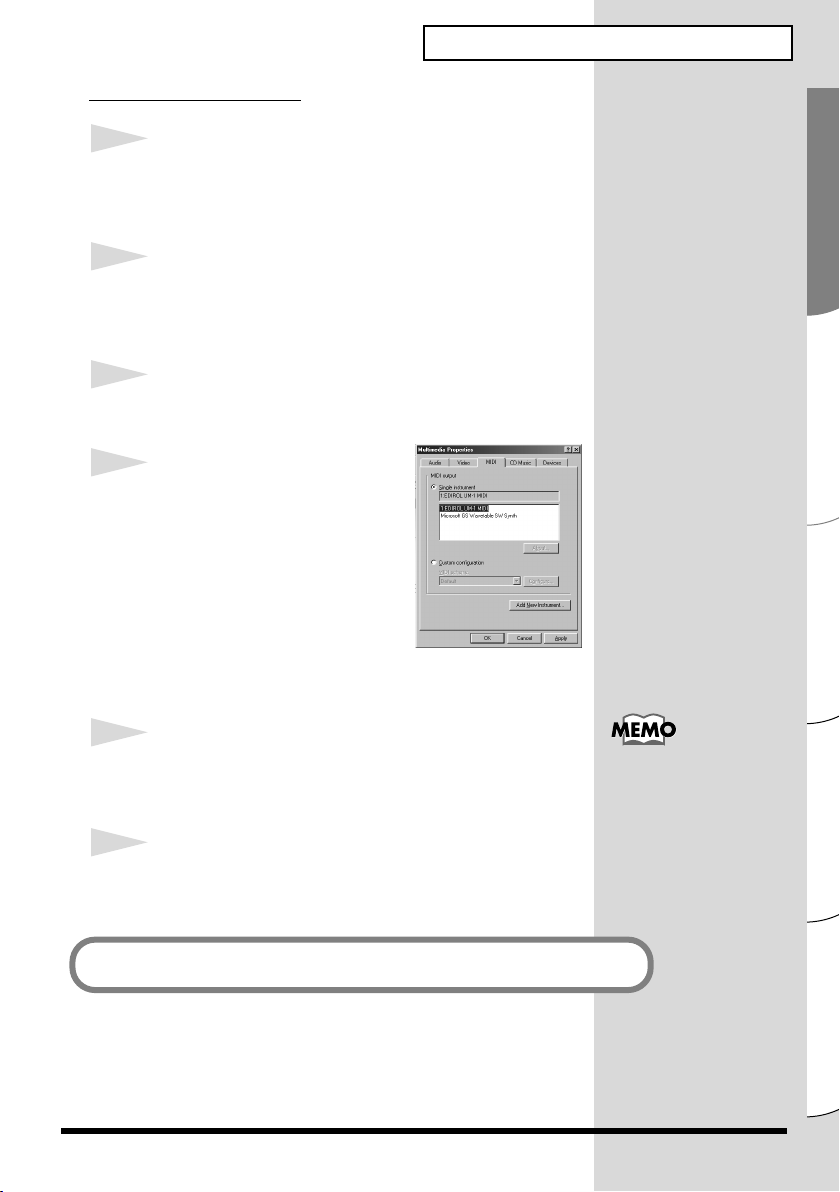
Click the
fig.2-29_30
MIDI
tab.
4
Set
“MIDI output.”
Select
[Single instrument]
select the MIDI device from the
list that appears.
If you want to use Media Player
to play a sound module
connected to the UM-1X's MIDI
OUT connector, select
Getting Connected and Installing Drivers (Windows)
.
button, and from the menu that
.
dialog box.
Multimedia
dialog box.
, and
EDIROL UM-1 MIDI.
icon to open
5
Close the
Click
Multimedia Properties
[OK]
to complete the settings.
dialog box.
6
Make MIDI device settings on your sequencer
software.
This completes MIDI Input/Output destination settings.
For details on MIDI device
settings, refer to the owner's
manual for the software you
are using.
Español Italiano Français Deutsch English
21
Page 22

Getting Connected and Installing
The UM-1X will not work in
the Classic environment of
Mac OS X. Use the UM-1X
when the Classic environment
is not running.
Drivers (Macintosh)
What is a driver?
A “driver” is software that transfers data between the UM-1X and application
software running on your computer, when your computer and the UM-1X are
connected by a USB cable. The driver sends data from your application to the
UM-1X, and from the UM-1X to your application.
The installation procedure will differ depending on your system.
Please proceed to one of the following sections, depending on the system you use.
• Mac OS X Users.................................................(p. 22)
• Mac OS 9/8 Users.............................................(p. 25)
Mac OS X Users
■
Installing the Driver
1
Disconnect all USB cables other than those for your
keyboard and mouse, and restart your Macintosh.
2
Prepare the CD-ROM.
Insert the CD-ROM into the CD-ROM drive of your
computer.
3
In the
double-click
In
Mac OS X v10.1.5
authentication.
4
In the
password and click [OK].
5
22
The display will indicate
UM-1 USB Driver Installer.”
Click
Driver (Mac OS X)
UM-1USBDriver.pkg
, click the lock symbol for
authentication
[Continue]
dialog box, input the
.
folder of the CD-ROM,
.
“Welcome to the EDIROL
Page 23
6
Select the Startup Disk as the
drive.
The display will indicate
Getting Connected and Installing Drivers (Macintosh)
“Important Information.”
Read the contents and click
[Continue]
7
The display will indicate
Click the drive in which the operating system is
installed to select it, and then click
“Select a Destination.”
[Continue]
8
The display will indicate
Click
Install
or
Upgrade
“Easy Install.”
.
9
The display will indicate
requires you to restart your computer when the
installation is done. Are you sure you want to
install the software now?”
Click
[Continue Installation]
“Installing this software
.
10
The display will indicate
successfully installed.”
Click
[Restart]
This completes installation of the UM-1X driver.
to restart your computer.
“The software was
.
.
Cautions when using the UM-1X
Before you use your sequencer software, please note the following points.
* Connect the UM-1X to your computer via a USB cable before you start up your
sequencer or other software.
* Do not disconnect the UM-1X's USB cable while your sequencer or other software is
running.
* Exit your sequencer software before you unplug the UM-1X's USB cable.
* Leave the Sleep function of your Macintosh turned off.
* The UM-1X will not work in the Classic environment of Mac OS X. Use the UM-1X
when the Classic environment is not running.
Español Italiano Français Deutsch English
23
Page 24
Getting Connected and Installing Drivers (Macintosh)
To prevent malfunction and/
or damage to speakers or other
devices, always turn down the
volume, and turn off the
power on all devices before
making any connections.
For details on MIDI device
settings, refer to the owner's
manual for the software you
are using.
For information on the MIDI
equipment you connect to the
UM-1X, please contact the
manufacturer of your MIDI
equipment.
■
Setting the Driver
1
Set the UM-1X’s
ON
position.
* Installation cannot proceed as described below if the switch is
turned OFF.
ADVANCED DRIVER switch
2
Connect the USB cable of the UM-1X to your
computer.
3
Make MIDI device settings on your sequencer
software.
This completes installation of the driver.
to the
24
Page 25
Mac OS 9/8 Users
You cannot use the UM-1X in
the Mac OS X Classic
environment.
Start up Mac OS 9/8 before
you install the driver.
■
Installing the Driver
Use either OMS or FreeMIDI as the MIDI driver.
Getting Connected and Installing Drivers (Macintosh)
The included
using the UM-1X with OMS and FreeMIDI.
* Either
appropriate for the sequencer software you are using.
* Disconnect the UM-1X from the Macintosh before you perform the
installation.
* If you have the latest version of OMS or FreeMIDI, please use the
latest version.
Before installing the driver, a message like the following will appear when the
Macintosh is started up. Perform the steps described below as appropriate for the
message that is displayed.
If the screen indicates:
“Driver required for USB device ‘unknown device’ is not available. Search for
driver on the Internet?”
If the screen indicates:
“Software required for using device ‘unknown device’ cannot be found.
Please refer to the manual included with the device, and install the necessary
software.”
EDIROL UM-1 driver
OMS
or
FreeMIDI
is an add-on module for
must be installed in your Macintosh, as
➝ click [Cancel].
➝ click [OK].
OMS can be found in the OMS
(Mac OS 9, 8) folder within
the OMS 2.3.8E folder of the
CD-ROM.
If you would like to learn more
about OMS, refer to
OMS_2.0_Mac.pdf in the
OMS (Mac OS 9. 8) folder
within the OMS 2.3.3E folder
of the CD-ROM.
Español Italiano Français Deutsch English
25
Page 26
Getting Connected and Installing Drivers (Macintosh)
Use the following procedure to install the UM-1X driver.
1
Exit all currently running software (applications).
If you are using a virus checker or similar software, be sure to
exit this as well.
2
Prepare the CD-ROM.
Insert the CD-ROM into the CD-ROM drive.
3
Double-click the
in the
Driver E (Mac OS 9, 8)
to start up the installer.
UM-1 Driver-E Installer
folder of the CD-ROM)
4
Verify the
fig.05-20e
Install Location
, and click
5
If a message like
the following is
displayed, click
[Continue]
The other currently
running applications will exit, and installation will continue.
.
icon (found
[Install]
.
The indication for the
installation location will differ
depending on your system.
Make sure that the startup disk
for the system you are using is
selected.
26
6
A dialog box will indicate
Click
[Restart]
Installation completed
to restart your Macintosh.
.
Page 27
■
Installation will not occur
correctly if the switch is turned
OFF.
Setting the Driver
If you are using FreeMIDI, proceed to
(p. 30).
OMS Settings
1
Set the UM-1X’s
ON
position.
2
Connect the USB cable of the UM-1X to your
computer.
fig.3-3
3
From the CD-ROM, drag the
Driver E (Mac OS 9, 8) – OMS
Setting
OMS Applications
hard disk of your Macintosh to
copy it there.
fig.3-4
folder into the
Getting Connected and Installing Drivers (Macintosh)
FreeMIDI Settings
ADVANCED DRIVER switch
Opcode–
folder on the
to the
To prevent malfunction and/
or damage to speakers or other
devices, always turn down the
volume, and turn off the
power on all devices before
making any connections.
4
In the
folder where you installed OMS,
double-click
up.
fig.3-5e
5
If a dialog box like
the one shown here
appears, click
It Off]
A confirmation
dialog box will then
appear, so click
Opcode-OMS Applications
OMS Setup
[Turn
.
[OK]
to start it
.
Español Italiano Français Deutsch English
27
Page 28
Getting Connected and Installing Drivers (Macintosh)
We recommend that you turn
off AppleTalk, by selecting
Chooser from the Apple
menu.
fig.3-6e
6
The
Create a New Studio
Setup
dialog box will
appear.
Click
[Cancel]
accidentally clicked OK, click
[Cancel]
fig.3-8e
. If you
in the next screen.
7
Choose
menu.
From the
you copied in
UM-1
A screen like the one shown here
will appear.
fig.3-9e
“Open”
OMS Setting
step 3
file, and click
from the
folder that
, select the
[Open]
.
File
8
From the
OMS MIDI Setup
In the
box that appears, check
MIDI in background
[OK]
Edit
menu, select
OMS MIDI Setup
.
.
dialog
Run
, and click
28
Page 29
Getting Connected and Installing Drivers (Macintosh)
fig.3-10e
9
From the
choose
If you are unable to select
Make Current
been applied, and you may
continue to the next step.
File
menu,
Make Current
, it has already
.
10
Verify that MIDI
transmission and reception can be performed
correctly.
From the
fig.3-12
Studio
menu, choose
Test Studio
11
If you have connected a
MIDI sound module to the
UM-1X's MIDI OUT
connector, click the MIDI
connector icon shown in
the diagram at right. If
sound is heard from the
sound module, the
settings are correct.
When you move the mouse
cursor near the sound generator icon, the cursor will change
to a shape.
.
There will be no sound if you
have not connected a MIDI
sound module to the UM-1X.
For details on connecting your
MIDI sound module, refer to
the owner's manual of your
MIDI sound module.
12
Exit
OMS Setup
From the
confirmation
dialog box.
File
.
menu, choose
dialog box appears, click
[Quit]
. If the
AppleTalk
[OK]
13
Make MIDI device settings on your sequencer
software.
In the MIDI input/output settings of your sequencer
software, select the UM-1X's Port 1.
This completes connections for the UM-1X and Macintosh,
and installation of the MIDI driver.
to close the
For details on MIDI device
settings, refer to the owner's
manual of your software.
For information on the MIDI
equipment you connect to the
UM-1X, please contact the
manufacturer of your MIDI
equipment.
Español Italiano Français Deutsch English
29
Page 30
Getting Connected and Installing Drivers (Macintosh)
Installation will not occur
correctly if the switch is turned
OFF.
To prevent malfunction and/
or damage to speakers or other
devices, always turn down the
volume, and turn off the
power on all devices before
making any connections.
FreeMIDI Settings
1
Set the UM-1X’s
ON
position.
ADVANCED DRIVER switch
2
Connect the USB cable of the UM-1X to your
computer.
3
From the CD-ROM, drag the
FreeMIDI Setting
Applications
folder into the
folder on the hard disk of your
Macintosh to copy it there.
Driver E (Mac OS 9, 8) –
4
Open the
location into which you installed FreeMIDI, and
double-click the
FreeMIDI Applications
FreeMIDI Setup
to the
FreeMIDI
folder from the
icon to start it up.
5
The first time you start up, use the following
procedure.
1.
2.
3.
6
From the
7
Select
copied in
30
A dialog box saying
appear. Click
When the
click
[Cancel]
When the
[Cancel]
UM-1X USB
[Continue]
FreeMIDI Preferences
.
About Quick Setup
.
File
menu, choose
from the
step 3
, and click
“Welcome to FreeMIDI!”
.
dialog box appears,
dialog box appears, click
Open
.
Settings
[Open]
folder you
.
When “OMS is installed on
this computer...” appears,
click [FreeMIDI].
will
If you are unable to select
Open, make settings as
follows.
1. From the File menu, choose
FreeMIDI Preferences.
2. Uncheck “Use OMS when
available.”
3. Exit FreeMIDI.
4. Return to step 4 and
continue the procedure.
Page 31

8
Verify that MIDI transmission and reception occur
correctly.
From the
fig.3-13
MIDI
menu, choose
Check Connections
Getting Connected and Installing Drivers (Macintosh)
.
9
If you have connected a
MIDI sound module to the
UM-1X's MIDI OUT
connector, click the MIDI
connector icon shown in the
diagram at right. If you
hear sound from your
sound module, the settings are correct.
10
Once again choose the
Connections
to end the test.
MIDI
menu command
11
From the
Setup
File
.
menu, choose
Quit
12
Make MIDI device settings on your sequencer
software.
In the MIDI input/output settings of your sequencer
software, select the UM-1X's Port 1.
This completes connections for the UM-1X and
Macintosh, and installation of the MIDI driver.
to exit
There will be no sound if you
have not connected a MIDI
sound module to the UM-1X.
For details on connecting your
MIDI sound module, refer to
the owner's manual of your
MIDI sound module.
Check
FreeMIDI
For details on MIDI device
settings, refer to the owner's
manual for the software you
are using.
For information on the MIDI
equipment you connect to the
UM-1X, please contact the
manufacturer of your MIDI
equipment.
31
Español Italiano Français Deutsch English
Page 32

Troubleshooting
* Please read the “README_E.TXT” file in the UM-1X Driver CD-
ROM. You can get any additional information not written in the
owner’s manual from the “README_E.TXT” file.
Windows users → P.32
Macintosh users → P.35
Windows Users
Case 1: USB connections cannot be made correctly
◆
Has the UM-1X been recognized?
Disconnect the USB cables, and then re-connect them.
It is possible that the computer has failed to recognize or
initialize the UM-1X. Either disconnect and then reconnect
the USB cable, or restart Windows with the UM-1X left
connected. If connection still does not occur, exit Windows,
and turn off the power of your computer. Then turn on the
power of your computer and start Windows.
◆
Are your computer or USB hub (*) supplying sufficient
current?
If insufficient current is being supplied to the UM-1X,
connection is not possible.
• Use a USB hub which contains its own power supply.
• The power conservation mode settings of your computer
may be limiting the current supplied to the USB, so check
these settings.
For details on the electrical
current that can be supplied by
your computer or USB hub
refer to the owner’s manual for
your equipment. If you have
questions, please contact the
manufacturer or dealer for
your computer or USB hub.
The UM-1X cannot be used
with a hub that contains no
power supply.
32
What is USB hub?
A “USB hub” is a device that expands the number of USB
connectors. Broadly speaking, there are two types of
USB hubs.
Self-powered hubs (USB hubs containing a power
supply): The USB hub itself has an AC adapter, which
supplies power (normally 500 mA) to the added USB
connectors.
Bus-powered hubs (USB hubs not containing a
power supply): The hub does not contain a power
supply. The power supply of the connected computer is
re-distributed to the added USB connectors.
Page 33

Case 2: Cannot install the UM-1X driver
b
b
◆
Could the UM-1X's ADVANCED DRIVER switch be OFF?
Turn the UM-1X's ADVANCED DRIVER switch ON, restart
Windows, and reinstall the driver.
Case 3: Cannot shift to Standby (Suspend)
◆
Is an application which uses the UM-1X running?
Exit the application which is using the UM-1X.
The computer cannot shift to Standby (Suspend) mode if an
application such as a sequencer is using the UM-1X.
What is Standby (Suspend)?
This is a function which minimizes power
consumption by shutting down the internal
circuitry of the computer and the peripheral
devices while the power remains supplied to the
computer.
Case 4: The UM-1X does not resume correctly from
standby (suspend) state
◆
Could the UM-1X have remained connected via USB
while the computer was in standby (suspend) state?
Disconnect the USB cable, and then re-connect it.
On some computers when Windows resumes from the
suspended state, the UM-1X may fail to resume. In this case,
disconnect the USB cable that connects the UM-1X to the
computer, then reconnect it.
Troubleshooting
When a USB device is connected
to a computer, the USB device
tells the computer how much
electrical current it uses. If this
value exceeds the current that
the computer is able to provide
(maximum 500 mA), the device
cannot be connected. The UM1X will request 70 mA of current
when it is connected to a
computer. Most computers or
self-powered USB hubs will
have no problem with this
current capacity. If you are
using a dual-mode USB hub
(self-powered / bus-powered),
e sure to connect its power
supply (AC adapter etc.) and
use it as a self-powered USB
hub.
Case 5: When resuming from standby (suspend)
state, Windows hangs up (freezes)
Disconnect the USB cable that connects the UM-1X to the
computer before you put your computer in standby
(suspend) mode.
On some computers when Windows resumes from the
suspended state, it may hang up (freeze). In this case,
disconnect the UM-1X's USB cable before you put your
computer in standby mode.
When you want to use the UM-1X again, verify that your
computer has recovered successfully from standby (suspend)
mode, and then connect the UM-1X's USB cable.
If your computer has a switch
that puts it into standby
(suspend) mode, disconnect
the UM-1X's USB cable from
the computer before you press
that switch.
If you are using a notebook
computer, it may, depending
on its settings, go into standby
(suspend) mode when you
close the lid (the LCD screen),
so disconnect the UM-1X's
USB cable from the computer
efore you close the lid.
33
Page 34

Troubleshooting
Case 6: No sound
◆
Are the USB cable, MIDI cables and audio cables
connected correctly?
Connect the cables correctly.
◆
Are the volume controls of your sound module, audio
system, and application raised?
Check each of the volume controls.
◆
Are the sound module settings correct?
Set the Computer switch of your sound module to the “MIDI”
.
position
Case 7: Does not work with Windows 95.
It will not operate on Windows 95.
Case 8: My computer hangs up when I open a MIDI file.
This problem can occur if the USB waveform of your
computer does not sufficiently meet the standards. In this
case, the problem may be solved if you connect the UM-1X via
a USB hub (USB hub containing a power supply).
Windows XP / 2000 users
The latest information is provided in the “Troubleshooting” section of the file
README_E.HTM, located in the Usb_xp2k folder of the UM-1X Driver CD-ROM.
Please refer to the appropriate section.
•Cannot install/uninstall/use the driver
•Cannot select the UM-1 device
•Cannot playback/record
•Part of the playback is wrong: e.g., notes are broken off prematurely, or some
notes are lost
•The “Digital Signature Not Found” or “Hardware Installation” dialog box
appears
•You are asked for the driver file even thought it has already been installed
•Other
Before changing the setting of
the computer switch of your
MIDI sound module, be sure
to turn off the power.
34
Windows 98 / Me users
The latest information is provided in the “Troubleshooting” section of the file
README_E.HTM, located in the Usb_me98 folder of the UM-1X Driver CDROM. Please refer to the appropriate section.
•Cannot install/uninstall/use the driver
•Cannot select the UM-1 device
•Cannot playback/record
•Part of the playback is wrong: e.g., notes are broken off prematurely, or some
notes are lost
Page 35

Macintosh Users
Case 1: An error dialog box is displayed
◆
Is the UM-1X driver installed?
An error dialog box will be displayed if the UM-1X is
connected to your computer before the UM-1X driver is
installed. If the display indicates
use the USB device “Unknown Device” cannot be found.
Please refer to the device documentation to install the
necessary software,”
If the display indicates
click
“Software needed for the USB
device “Unnamed Device” is not available. Would you
like to look for the software on the Internet?,”
“Cancel.”
After closing the dialog box, follow the procedure for
Settings
(p. 27)” or
“FreeMIDI Settings
UM-1 driver.
Case 2: Cannot install the UM-1X driver
◆
Could the UM-1X's ADVANCED DRIVER switch be OFF?
Disconnect the USB cable that connects the UM-1X to the
computer. Turn the UM-1X's ADVANCED DRIVER switch
ON, restart your Macintosh, and reinstall the driver.
Case 3: Cannot make USB connections correctly
◆
Was the UM-1X recognized?
• Disconnect the USB cable, and then re-connect it.
• If another USB device is connected, try connecting only
the UM-1X.
• It is possible that the computer did not correctly recognize
or initialize the UM-1X. Leave the UM-1X connected and
restart your Macintosh. If the connection is still not
achieved, exit your Macintosh and turn off the power of
the computer. Then turn on the power of the computer
once again, and start up your Macintosh.
• The computer cannot recognize the UM-1X when the USB
connector of Macintosh’s keyboard is used. Re-connect the
USB cable to the USB connector of the main body.
◆
Are your computer or USB hub (*) supplying sufficient
current?
If insufficient current is being supplied to the UM-1X,
connection is not possible.
• Use a USB hub which contains its own power supply.
• The power conservation mode settings of your computer
may be limiting the current supplied to the USB, so check
these settings.
“The software needed to
“OK.”
(p. 30)” to install the
Troubleshooting
click
“OMS
For details on the electrical
current that can be supplied by
your computer or USB hub
refer to the owner’s manual for
your equipment. If you have
questions, please contact the
manufacturer or dealer for
your computer or USB hub.
When a USB device is
connected to a computer, the
USB device tells the computer
how much electrical current it
uses. If this value exceeds the
current that the computer is
able to provide (maximum 500
mA), the device cannot be
connected. The UM-1X will
request 70 mA of current when
it is connected to a computer.
Most computers or selfpowered USB hubs will have
no problem with this current
capacity. If you are using a
dual-mode USB hub (selfpowered / bus-powered), be
sure to connect its power
supply (AC adapter etc.) and
use it as a self-powered USB
hub.
35
Page 36

Troubleshooting
What is USB hub?
A “USB hub” is a device that expands the number of
USB connectors. Broadly speaking, there are two types
of USB hubs.
Self-powered hubs (USB hubs containing a power
supply): The USB hub itself has an AC adapter, which
supplies power (normally 500 mA) to the added USB
connectors.
Bus-powered hubs (USB hubs not containing a
power supply): The hub does not contain a power
supply. The power supply of the connected computer is
re-distributed to the added USB connectors.
Case 4: No sound
◆
Are the USB cable, MIDI cables and audio cables
connected correctly?
Connect the cables correctly.
◆
Are the volume controls of your sound module, audio
system, and application raised?
Check each of the volume controls.
◆
Are the sound module settings correct?
Set the Computer switch of your sound module to the
“MIDI”
◆
If you are using OMS, is “Run MIDI in background”
checked? (p. 28)
position.
Case 5: Notes are sounded twice (Notes are
recorded double)
Refer to the owner’s manual for the sequencer program that
you are using. If the
MIDI input port setting, cancel this selection (un-check it),
and select (check) only the port (UM-1 Port 1–2) to which the
MIDI device you wish to record is connected.
* When you select
Port1, 2”
“UM-1 Port 1–2”
duplicate.
will be selected. However if
“EDIROL UM-1 Driver”
“EDIROL UM-1 Driver,”
“EDIROL UM-1 Driver”
are selected, the selected port will be sounded in
is selected in the
both of the items
Case 6: The UM-1X does not recover correctly from
sleep mode.
After your Macintosh has been in sleep mode, exit the
software and re-start it.
* We recommend that you make
Control panel
so that your computer does not enter sleep mode.
Energy saving
settings in the
The UM-1X cannot be used
with a hub that contains no
power supply.
Before changing the setting of
the computer switch of your
MIDI sound module, be sure
to turn off the power.
“UM-1
and
36
Page 37

Inhalt der Verpackung
●
UM-1X/UM-1SX USB MIDI Interface
fig.UM-1X fig.UM-1SX
●
UM-1X/UM-1SX Driver CD-ROM (1 CD-ROM)
●
UM-1X/UM-1SX Benutzerhandbuch (dieses Dokument)
37
Español Italiano Français Deutsch English
Page 38

Namen und Funktionen
■
UM-1X
fig.UM-1X
2
1
3
■
UM-1SX
fig.UM-1SX_panel
2
1
1
USB-Kabel
Verbinden Sie dieses Kabel zu der USB Schnittstelle an Ihrem Computer.
2
ADVANCED DRIVER (Moduswahl)-Schalter
Schaltet die Betriebsart um.
ON (Erweiterter Modus):
FPT-Technologie wird verwendet, um schnelle MIDI-Übertragung zu bieten.
Normalerweise sollten Sie diesen Modus verwenden.
* FPT → Schnelle Verarbeitungstechnologie ("Fast Processing Technology") für MIDI-Übertragung
OFF (Standard-Treiber-Modus):
Verwenden Sie diese Einstellung, wenn Sie den Vorgabe-MIDI-Treiber Ihres
Betriebssystems verwenden wollen.
5
3
4
5
4
3
MIDI IN-Anschluss
4
MIDI OUT-Anschluss
5
USB-Anschluss
38
Page 39

Installieren und Einrichten des Treibers
Was ist der UM-1-Treiber?
Der UM-1X-Treiber ist Software, die Daten zwischen dem UM-1X und der Anwendung
(Sequenzer-Software etc.) überträgt, die auf dem mit der USB-Schnittstelle
verbundenen Computer ausgeführt wird.
Der UM-1X-Treiber sendet die Daten der Anwendung an das UM-1X und überträgt die
Daten des UM-1X an die Anwendung.
Treiberinstallation
Die Vorgehensweise bei der Installation hängt von Ihrem System ab.
Bitte lesen Sie abhängig von dem von Ihnen verwendeten System in einem der
folgenden Abschnitte weiter.
• Windows XP/2000-Anwender .......................(S. 39)
• Windows Me/98-Anwender...........................(S. 43)
• Mac OS X users .................................................(S. 44)
• Mac OS 9/8 users..............................................(S. 45)
■
Windows XP/2000-Anwender
1.
Starten Sie Windows, wobei das UM-1X ausgesteckt ist.
Stecken Sie alle USB-Kabel außer der USB-Tastatur und der USB-Maus aus (falls
vorhanden).
* Wenn Sie Windows XP Professional verwenden, müssen Sie sich mit einem Benutzernamen
vom Typ Administrationskonto (zum Beispiel Admi-nistrator) anmelden. Einzelheiten zu
Benutzerkonten erfahren Sie vom Systemadmi-nistrator Ihres Computers.
2.
Öffnen Sie das Dialogfeld
1.
Klicken Sie auf die Windows-Schaltfläche
daraufhin angezeigten Menü
2.
Klicken Sie in
3.
Klicken Sie in
Symbol
System
* Abhängig von der Konfiguration Ihres Systems kann es vorkom-men, dass das Symbol
System
nicht sofort in der
wird. Doppelklicken Sie in diesem Fall auf das
3.
Klicken Sie auf die Registerkarte
[Treibersignierung]
Öffnen Sie das Dialogfeld
Systemeigenschaften
Systemsteuerung
“Wählen Sie eine Kategorie”
“oder wählen Sie ein Systemsteuerungssymbol”
.
Systemsteuerung
Hardware
.
Treibersignaturoptionen
.
[Start]
und wählen Sie im
.
auf
“Leistung und Wartung”
(in der klassischen Anzeige) angezeigt
System
-Symbol.
und klicken Sie anschließend auf
.
.
auf das
Español Italiano Français Deutsch English
39
Page 40

Installieren und Einrichten des Treibers
4.
Prüfen Sie, ob
Wenn
Wenn
(“Warnen” oder “Sperren”). Anschließend ändern Sie die Einstellung auf
“Ignorieren”
* Wenn Sie
vorherigen Einstellungen wieder herstellen, nachdem Sie den Treiber installiert haben.
(
➝ Wenn Sie die Einstellung für “Wie soll Windows vorgehen?” geändert
haben
5.
Klicken Sie auf
6.
Beenden Sie alle aktuell ausgeführten Programme (Anwendungen).
Schließen Sie außerdem alle noch geöffneten Programmfenster. Wenn Sie ein
Virenschutzprogramm oder ähnliche Software verwenden, müssen Sie diese
ebenfalls beenden.
7.
Halten Sie die CD-ROM bereit.
Legen Sie die CD-ROM in das CD-ROM-Laufwerk Ihres Computers ein.
8.
Klicken Sie auf die Windows-Schaltfläche
angezeigten Menü die Option
Öffnen Sie das Dialogfeld
9.
Geben Sie im angezeigten Dialogfeld Folgendes in das Feld
klicken Sie auf
D:\Usb_xp2k\SETUPINF.EXE
* Der Laufwerknamen “D:”
Laufwerknamen Ihres CD-ROM-Laufwerks an.
10.
Das Dialogfeld
Jetzt kann der Treiber installiert werden.
* Wenn ein anderes Dialogfeld als Bereit zur Treiberinstallation erscheint, folgen Sie en
Anweisungen im Dialogfeld.
11.
Stellen Sie den
* DIe Installation kann nicht fortfahren, wie unten beschrieben, wenn der Schalter auf OFF
gestellt ist.
12.
Schließen Sie das USB-Kabel des UM-1X an Ihren Computer an.
Der Computer zeigt neben der Task-Leiste folgende Meldung an:
gefunden”
13.
Der
Assistent für das Suchen neuer Hardware
Prüfen Sie, ob der Bildschirm
“Software von einer Liste oder bestimmten Quelle installieren (für
fortgeschrittene Benutzer)”
“Wie soll Windows vorgehen?”
“Ignorieren”
“Ignorieren”
“Wie soll Windows vorgehen?”
(S. 42))
. Bitte warten Sie.
eingestellt ist, klicken Sie einfach auf
nicht eingestellt ist, notieren Sie sich die aktuelle Einstellung
und klicken auf
[OK]
, um das Dialogfeld
[OK]
.
SetupInf
Scalter ADVANCED DRIVER
auf
“Ignorieren”
[OK]
.
in
Schritt 4
Systemeigenschaften
Start
“Ausführen...”
Ausführen...
kann auf Ihrem System anders lauten. Geben Sie statt dessen den
wird angezeigt.
“EDIROL UM-1 USB Driver”
und klicken Sie auf
.
am UM-1X auf ON.
geändert haben, müssen Sie die
. Wählen Sie im daraufhin
.
erscheint.
[Weiter]
eingestellt ist.
[OK]
.
zu schließen.
“Öffnen”
anzeigt, wählen Sie
.
ein und
“Neue Hardware
40
Page 41

Installieren und Einrichten des Treibers
14.
Im Bildschirm wird folgende Meldung angezeigt:
Installationsoptionen”
Wählen Sie
wählen”
15.
Prüfen Sie, ob das Feld
klicken Sie auf
Wenn die Einstellung für “Wie soll Windows vorgehen?” nicht “Ignorieren” lautet,
wird das Dialogfeld “Hardware-Installation” angezeigt.
Wenn für Wie soll Windows vorgehen? “Warnen” aktiviert wurde,
1. klicken Sie auf [Trotzdem fortsetzen].
2. Setzen Sie die Installation fort.
Wenn für “Wie soll Windows vorgehen?” “Sperren” aktiviert wurde,
1. Klicken Sie auf [OK].
2. Wenn der Assistent für das Suchen neuer Hardware erscheint, klicken Sie auf
3. Wechseln Sie zurück zu Schritt 1 (S. 39) und installieren Sie den Treiber
16.
Das Dialogfeld
Klicken Sie auf
* Das Dialogfeld
Fall mit
17.
Das Dialogfeld
Geben Sie im angezeigten Dialogfeld Folgendes in das Feld
von”
D:\Usb_xp2k\
* Der Laufwerknamen “D:”
Laufwerknamen Ihres CD-ROM-Laufwerks an.
18.
Der
Prüfen Sie, ob
[Beenden]
Warten Sie, bis die Meldung
Leiste angezeigt wird.
19.
Nachdem der Treiber installiert wurde, wird das Dialogfeld
Systemeinstellungen
Klicken Sie auf
“Nicht suchen. sondern den zu installierenden Treiber selbst
, und klicken Sie auf
[Weiter]
[Beenden].
beginnend mit dem ersten Schritt erneut.
Diskette einlegen
[OK]
Diskette einlegen
Schritt 17
Benötigte Dateien
ein und klicken Sie auf
Assistent für das Suchen neuer Hardware
EDIROL UM-1 USB Driver
.
[Ja]
.
[Weiter]
.
“Modell” “EDIROL UM-1 USB Driver”
. Die Installation des Treibers beginnt.
wird angezeigt.
.
wird eventuell nicht angezeigt. Arbeiten Sie in diesem
weiter.
wird angezeigt.
[OK]
.
kann auf Ihrem System anders lauten. Geben Sie statt dessen den
“Neue Hardware gefunden”
angezeigt.
. Windows startet anschließend automatisch neu.
“Wählen Sie die Such- und
anzeigt und
“Dateien kopieren
erscheint.
angezeigt wird, und klicken Sie auf
in der Nähe der Task-
Geänderte
Español Italiano Français Deutsch English
41
Page 42

Installieren und Einrichten des Treibers
Wenn Sie die Einstellung für “Wie soll Windows vorgehen?”
geändert haben
Wenn Sie die Einstellung “Wie soll Windows vorgehen?” geändert haben, müssen Sie
die ursprüngliche Einstellung nach dem Neustart von Windows wiederherstellen.
1. Wenn Sie Windows XP Professional verwenden, melden Sie sich in Windows
mit dem Benutzernamen eines Administrationskontos an (z.B. Administrator).
2. Klicken Sie auf die Windows-Schaltfläche [Start] und wählen Sie im daraufhin
angezeigten Menü Systemsteuerung.
3. Klicken Sie in “Wählen Sie eine Kategorie” auf “Leistung und Wartung”.
4. Klicken Sie in “oder wählen Sie ein Systemsteuerungssymbol” auf das
Symbol System. Daraufhin werden die Systemeigenschaften angezeigt.
* Abhängig von der Konfiguration Ihres Systems kann es vorkommen, dass das Symbol
System nicht sofort in der Systemsteuerung (in der klassischen Anzeige) angezeigt
wird. Doppelklicken Sie in diesem Fall auf das Symbol System.
5. Klicken Sie auf die Registerkarte Hardware und klicken Sie anschließend auf
[Treibersignierung]. Daraufhin werden die Treibersignaturoptionen angezeigt.
6. Stellen Sie die ursprünglichen Einstellungen für “Wie soll Windows vorgehen?”
wieder her (entweder “Warnen” oder “Sperren”) und klicken Sie auf “OK”.
7. Klicken Sie auf [OK]. Das Dialogfeld Systemeigenschaften wird geschlossen.
42
Page 43

■
Windows Me/98-Anwender
1.
Starten Sie Windows, wobei das UM-1X ausgesteckt ist.
Stecken Sie alle USB-Kabel außer der USB-Tastatur und der USB-Maus aus (falls vorhanden).
*
Wenn das UM-1X bereits mit Ihrem Computer verbunden ist und die Meldung
Hardware gefunden"
(UM-1X-Treiber CD) mit dem Namen
lesen den Abschnitt
install using the above procedure, but were not able to."
mit oben beschriebenem Verfahren ist fehlgeschlagen)
2.
Beenden Sie alle aktuell ausgeführten Programme (Anwendungen).
Schließen Sie außerdem alle noch geöffneten Programmfenster. Wenn Sie ein
Virenschutzprogramm oder ähnliche Software verwenden, müssen Sie diese
ebenfalls beenden.
3.
Halten Sie die CD-ROM bereit.
Legen Sie die CD-ROM in das CD-ROM-Laufwerk Ihres Computers ein.
4.
Klicken Sie auf die Windows-Schaltfläche
angezeigten Menü die Option
Öffnen Sie das Dialogfeld
5.
Geben Sie im angezeigten Dialogfeld Folgendes in das Feld
klicken Sie auf
D:\Usb_me98\SETUPINF.EXE
* Der Laufwerknamen “D:”
Laufwerknamen Ihres CD-ROM-Laufwerks an.
6.
Das Dialogfeld
Jetzt kann der Treiber installiert werden.
* Wenn ein anderes Dialogfeld als Bereit zur Treiberinstallation erscheint, folgen Sie en
Anweisungen im Dialogfeld.
7.
Stellen Sie den
* Die Installation wird nicht richtig ausgeführt, wenn der Schalter auf Aus gestellt ist.
8.
Bringen Sie den
9.
Der Treiber wird automatisch installiert werden.
10.
Klicken Sie im Dialogfeld auf
* Wenn Sie eine Meldung erhalten, die Ihnen empfiehlt, Windows neu zu starten, starten Sie
Windows neu.
angezeigt wird, wechseln Sie in den Ordner
"Troubleshooting"
[OK]
.
kann auf Ihrem System anders lauten. Geben Sie statt dessen den
SetupInf
Scalter ADVANCED DRIVER
Netzschalter
USB_me98
(Fehlerbehebung) mit dem Titel
“Ausführen...”
Ausführen...
wird angezeigt.
des UM-1X in die Position ON.
[OK]
.
, öffnen die Datei
Start
. Wählen Sie im daraufhin
.
.
am UM-1X auf ON.
Installieren und Einrichten des Treibers
"Neue
UM-1X Driver CD-ROM
README_E.HTM
"You attempted to
(Ein Installationsversuch
“Öffnen”
ein und
und
43
Español Italiano Français Deutsch English
Page 44

Installieren und Einrichten des Treibers
Mac OS X-Benutzer
■
Installation des Treibers
1.
Stecken Sie alle USB-Kabel außer der Tastatur und der Maus aus, und starten Sie
den Macintosh neu.
2.
Halten Sie die CD-ROM bereit.
Legen Sie die CD-ROM in das CD-ROM-Laufwerk Ihres Computers ein.
3.
Doppelklicken Sie im Ordner
Klicken Sie unter Mac OS X v10.1.5 auf das Schlüsselsymbol für die Authentifizierung.
4.
Geben Sie in das Dialogfeld
5.
In der Anzeige wird
Klicken Sie auf
6.
In der Anzeige erscheint die Meldung
Lesen Sie diese Informationen und klicken Sie auf
7.
In der Anzeige erscheint anschließend
Klicken Sie auf das Laufwerk, auf dem das Betriebssystem installiert ist, um es
auszuwählen, und klicken Sie anschließend auf
* Wählen Sie die Startup-Disk als Laufwerk.
8.
In dieser Anzeige erscheint anschließend
Klicken Sie auf
9.
In der Anzeige erscheint anschließend:
must restart your computer after the installation is complete”
Installation ist ein Neustart erforderlich)
Klicken Sie anschließend auf
10.
In der Anzeige erscheint Folgendes:
(Das Programm wurde erfolgreich installiert).
Klicken Sie auf
“Welcome to EDIROL UM-1 USB Driver Installer”
[Continue]
Install
oder
[Restart]
, um Ihren Computer neu zu starten.
Driver (Mac OS X)
Authentication
.
Upgrade
[Continue installation]
Ihr Kennwort ein und klicken Sie auf [OK].
“Important Information”
“Select a Destination”
“Easy Install”
.
“When you install this software, you
“The software was successfully installed”
auf der CD-ROM auf
.
[Continue]
[Continue]
.
.
.
.
(Nach
.
UM-1USBDriver.pkg
angezeigt.
.
44
Vorsichtsmaßnahmen bei der Verwendung des UM-1X
Bevor Sie Ihr Sequenzerprogramm verwenden, beachten Sie bitte Folgendes.
* Verwenden Sie das USB-Kabel, um das UM-1X mit Ihrem Computer zu verbinden, bevor
Sie Ihren Sequenzer oder Ihre Software starten.
* Trennen Sie das USB-Kabel nicht vom UM-1X, während Ihr Sequenzer oder andere
Software ausgeführt wird.
* Stecken Sie das USB-Kabel erst aus dem UM-1X aus, nachdem Sie Ihren Sequenzer oder
andere Software beendet haben.
* Lassen Sie die Ruhezustandsfunktion Ihres Macintosh deaktiviert.
* Das UM-1X funktioniert nicht in der Classic-Umgebung von Mac OS X. Verwenden Sie
das UM-1X, wenn die Classic-Umgebung nicht ausgeführt wird.
Page 45

■
Konfiguration des Treibers
1.
Stellen Sie den
* DIe Installation kann nicht fortfahren, wie unten beschrieben, wenn der Schalter auf OFF
gestellt ist.
2.
Schließen Sie das USB-Kabel des UM-1X an Ihren Computer an.
3.
Nehmen Sie in Ihrem Sequenzerprogramm die Einstellungen für MIDI-Geräte vor.
* Einzelheiten über MIDI-Geräteeinstellungen siehe Dokumentation der verwendeten Software.
* Für Einzelheiten des MIDI-Geräts, dass Sie an UM-1X anschließen, wenden Sie sich an den
Hersteller des MIDI-Geräts.
Scalter ADVANCED DRIVER
Mac OS 9/8-Benutzer
■
Installation des Treibers
Verwenden Sie entweder OMS oder FreeMIDI als MIDI-Treiber.
Der
UM-1X OMS-Treiber
Verwendung des UM-1X mit OMS oder FreeMIDI.
* Entsprechend der von Ihnen verwendeten Sequenzer-Software muss auf Ihrem Macintosh
entweder
* Installieren Sie den UM-1X-Treiber wie anschließend beschrieben.
* Wenn Sie die neueste Version von OMS oder FreeMIDI haben, verwenden Sie bitte die
neueste Version.
*
OMS
Wenn Sie mehr über OMS erfahren möchten, lesen Sie bitte die Datei
(Online-Handbuch) im Ordner
* Sie können den UM-1X nicht in der Mac OS X Classic-Umgebung verwenden. Starten Sie
Mac OS 9/8, bevor Sie den Treiber installieren.
OMS
oder
befindet sich im Ordner
im Lieferumfang ist ein Add-On-Modul für die
FreeMIDI
installiert sein.
OMS 2.3.8 E
OMS2.3.8E
, der sich im Ordner
, der sich im Ordner
Installieren und Einrichten des Treibers
am UM-1X auf ON.
OMS
der CD-ROM befindet.
OMS_2.3_Mac.pdf
OMS
der CD-ROM befindet.
Vor der Installation des Treibers erscheint eine Meldung wie die folgende, wenn
der Macintosh gestartet wird. Führen Sie die unten beschriebenen Schritte aus,
entsprechend der angezeigten Meldung.
Wenn die Meldung lautet:
“Driver required for USB device ‘unknown device’ is not available. Search
for driver on the Internet?” ➔klicken Sie auf “Cancel”.
Wenn die Meldung lautet:
“Software required for using device ‘unknown device’ cannot be found.
Please refer to the manual included with the device, and install the
necessary software” ➔ klicken Sie auf [OK].
Español Italiano Français Deutsch English
45
Page 46

Installieren und Einrichten des Treibers
1.
Beenden Sie alle aktuell ausgeführten Programme (Anwendungen).
Wenn Sie ein Virenschutzprogramm oder ähnliche Software verwenden, müssen
Sie diese ebenfalls beenden.
2.
Halten Sie die CD-ROM bereit.
Legen Sie die CD-ROM in das CD-ROM-Laufwerk ein.
3.
Doppelklicken Sie auf das Symbol
Driver E (Mac OS 9, 8) -OMS
Installationsprogramm zu starten.
4.
Prüfen Sie den
* Die Anzeige für den Installationsort unterscheidet sich je nach System. Stellen Sie sicher,
dass die Startup-Disk für das verwendete System gewählt ist.
5.
Falls eine Meldung wie abgebildet angezeigt wird, klicken Sie auf
Alle anderen aktuell ausgeführten Anwendungen werden anschließend beendet
und die Installation wird fortgesetzt.
6.
Ein Dialogfeld zeigt Folgendes an:
Klicken Sie auf
■
Einstellungen
Installationsort
[Restart]
OMS-Einstellungen
1.
Stellen Sie den
* Die Installation wird nicht richtig ausgeführt, wenn der Schalter auf Aus gestellt ist.
2.
Schließen Sie das USB-Kabel des UM-1X an Ihren Computer an.
3.
Ziehen Sie den Ordner
auf die Festplatte Ihres Macintosh, um ihn zu kopieren.
4.
Doppelklicken Sie im Ordner
installiert haben, auf
5.
Wenn ein Dialogfeld ähnlich dem abgebildeten Dialogfeld angezeigt wird, klicken
Sie auf
angezeigt. Klicken Sie hier auf
* Wir empfehlen Ihnen,
auswählen.
6.
Das Dialogfeld
Wenn Sie versehentlich auf
auf
[Cancel]
7.
Wählen Sie
Wählen Sie im Ordner
und klicken Sie auf
Ein Dialogfeld ähnlich dem hier gezeigten Dialogfeld wird angezeigt.
Scalter ADVANCED DRIVER
OMS Setup
[Turn It Off]
. Anschließend wird ein Dialogfeld für die Bestätigung
AppleTalk
Create a New Studio Setup
.
“Open”
im Menü
[Open]
UM-1 Driver-E Installer
auf der CD-ROM befindet), um das
und klicken Sie auf
Installation completed
, um den Macintosh neu zu starten.
Driver E (Mac OS 9, 8) - OMS Setting
Opcode-OMS Application
, um die Installation zu starten.
[OK]
.
zu deaktivieren, indem Sie im Apfelmenü den
[OK]
geklickt haben, klicken Sie im nächsten Bildschirm
File
.
Setting
, den Sie in
.
Schritt 3
[Install]
am UM-1X auf ON.
, in dem Sie OMS
wird angezeigt. Klicken Sie auf
kopiert haben, die Datei
(das sich im Ordner
[Continue]
.
auf der CD-ROM
Chooser
[Cancel]
UM-1
.
.
,
46
Page 47

Installieren und Einrichten des Treibers
8.
Wählen Sie im Menü
Aktivieren Sie im daraufhin angezeigten Dialogfeld
Run MIDI in background
9.
Wählen Sie im Menü
Wenn Sie die Option
angewendet und Sie können mit dem nächsten Schritt weiterarbeiten.
10.
Prüfen Sie, ob die MIDI-Übertragung und der MIDI-Empfang fehlerfrei
funktionieren. Wählen Sie im Menü
11.
Wenn Sie ein MIDI-Tonmodul an die Buchse MIDI OUT am UM-1X angeschlossen
haben, klicken Sie auf das MIDI-Anschlussymbol, wie in der Abbildung rechts
gezeigt. Wenn Ton vom Tonmodul kommt, sind die Einstellungen richtig.
Der Mauszeiger nimmt die Form einer Note wenn er in der Nähe des MIDI
Connector Symbols gehalten wird.
Bei Anschluß eines MIDI Soundmoduls über den MIDI OUT des UM-1X sollte bei
Klicken des Midi Symbols ein Ton erklingen.
* Es kommt kein Ton, wenn Sie nicht ein MIDI-Tonmodul an den UM-1X angeschlossen
haben.
* Einzelheiten zum Anschließen Ihres MIDI-Tonmoduls siehe Bedienungsanleitung Ihres
MIDI-Tonmoduls.
12.
Beenden Sie
Wählen Sie im Menü
Confirmation
13.
Nehmen Sie die MIDI-Geräteeinstellungen an Ihrer Sequenzer-Software vor.
In den MIDI Eingang/Ausgang-Einstellungen Ihrer Sequenzer-Software wählen
Sie Port 1 des UM-1X.
* Einzelheiten über MIDI-Geräteeinstellungen siehe Dokumentation der verwendeten
Software.
* Für Einzelheiten des MIDI-Geräts, dass Sie an UM-1X anschließen, wenden Sie sich an den
Hersteller des MIDI-Geräts.
OMS Setup
auf
[OK]
Edit
die Option
und klicken Sie auf
File
die Option
Make Current
.
File
die Option
, um das Dialogfeld zu schließen.
OMS MIDI Setup
[OK]
Make Current
nicht auswählen können, wurde sie bereits
Studio
die Option
[Exit]
. Klicken Sie im Dialogfeld
.
OMS MIDI Setup
.
.
Test Studio
die Option
.
AppleTalk
47
Español Italiano Français Deutsch English
Page 48

Installieren und Einrichten des Treibers
Einstellungen für FreeMIDI
1.
Stellen Sie den
2.
Schließen Sie das USB-Kabel des UM-1X an Ihren Computer an.
3.
Ziehen Sie den Ordner
auf die Festplatte Ihres Macintosh, um ihn zu kopieren.
4.
Öffnen Sie den Ordner
installiert haben, und doppelklicken Sie auf das Symbol
Installation zu starten.
5.
Beim ersten Start verfahren Sie wie folgt.
* Wenn
“OMS is installed on this computer...”
1.
Wenn die Software zum ersten Mal ausgeführt wird, wird das Dialogfeld
“Welcome to FreeMIDI!”
2.
Wenn das Dialogfeld
3.
Wenn das Dialogfeld
6.
Wählen Sie im Menü
* Wenn Sie nicht Öffnen wählen können, nehmen Sie die Einstellungen wie folgt vor.
1.
Aus dem
2.
Geben Sie “
3.
Beenden Sie FreeMIDI.
4.
Gehen Sie zu Schritt 4 zurück uns setzen Sie das Verfahren fort.
7.
Wählen Sie im Ordner
Datei
UM-1X USB
8.
Bestätigen Sie, dass MIDI-Übertragung und der Empfang korrekt abgelaufen sind.
Aus dem MIDI-Menü wählen Sie Verbindungen prüfen.
9.
Wenn Sie ein MIDI-Tonmodul an die Buchse MIDI OUT am UM-1X angeschlossen
haben, klicken Sie auf das MIDI-Anschlussymbol, wie in der Abbildung rechts
gezeigt. Wenn Sie Ton von Ihrem Tonmodul hören, sind die Einstellungen richtig.
10.
Bei Anschluß eines MIDI Soundmoduls über den MIDI OUT des UM-1X sollte bei
Klicken des Midi Symbols ein Ton erklingen.
11.
Wählen Sie im Menü
beenden.
12.
Wählen Sie im Menü
In den MIDI Eingang/Ausgang-Einstellungen Ihrer Sequenzer-Software wählen
Sie Port 1 des UM-1X.
* Einzelheiten über MIDI-Geräteeinstellungen siehe Dokumentation der verwendeten
Software.
* Für Einzelheiten des MIDI-Geräts, dass Sie an UM-1X anschließen, wenden Sie sich an den
Hersteller des MIDI-Geräts.
Scalter ADVANCED DRIVER
File
Datei
-Menü wählen Sie
OMS verwenden wenn verfügbar
, und klicken Sie auf
MIDI
File
am UM-1X auf ON.
Driver E (Mac OS 9, 8) - FreeMIDI Setting
FreeMIDI Applications
angezeigt. Klicken Sie auf
FreeMIDI Preferences
About Quick Setup
die Option
FreeMIDI Setting
erneut den Befehl
die Option
Open
FreeMIDI Eigenschaften
Quit
an dem Ort, an dem Sie FreeMIDI
FreeMIDI Setup
angezeigt wird, klicken Sie auf
[Continue]
angezeigt wird, klicken Sie auf
angezeigt wird, klicken Sie auf
.
.
”.
, den Sie in
[Open]
, um
Schritt 3
.
Check Connections
FreeMIDI Setup
kopiert haben, die
zu beenden.
auf der CD-ROM
, um die
[FreeMIDI]
.
[Cancel]
, um den Test zu
.
[Cancel]
.
.
48
Page 49

Fehlerbehebung
b
* Bitte lesen Sie die Datei "Readme-E.txt" auf der UM-1- Driver
CD-ROM. Die Datei "Readme-E.txt" enthält zusätzliche
Informationen, die im Benutzerhandbuch nicht erwähnt werden.
Windows-Anwender→ p. 49
Macintosh-Anwender→ p. 53
Windows-Anwender
Fall 1: USB-Verbindung kann nicht fehlerfrei
hergestellt werden
◆
Wird das UM-1X erkannt?
Stecken Sie die USB-Kabel aus und anschließend wieder ein.
Es ist möglich, dass der Computer das UM-1X nicht erkennt
oder nicht initialisieren kann. Starten Sie Windows mit
eingestecktem USB-Kabel neu. Wenn danach immer noch
keine Verbindung hergestellt werden kann, beenden Sie
Windows und schalten den Computer aus. Schalten Sie Ihren
Computer anschließend wieder ein und starten Sie Windows.
◆
Verfügt Ihr Computer oder USB-Hub (*) über
ausreichende Stromversorgungskapazität?
Das UM-1X kann nicht angeschlossen werden, wenn es nicht
mit ausreichend Spannung versorgt wird.
• Verwenden Sie einen USB-Hub, der eine eigene
Stromversorgung besitzt.
• Der Stromsparmodus Ihres Computers reduziert
eventuell die Spannung, mit der der USB-Anschluss
versorgt wird. Sie sollten daher diese Einstellung
überprüfen.
Detaillierte Informationen zur
Versorgung mit elektrischer
Spannung durch Ihren
Computer oder durch Ihr USBHub finden Sie in den
Benutzerhandbüchern dieser
Geräte. Wenn Sie weitere
Fragen haben, nehmen Sie
itte mit dem Hersteller oder
Händler Ihres Computers oder
USB-Hubs Kontakt auf.
Das UM-1X kann mit einem
Hub ohne eigene
Stromversorgung nicht
verwendet werden.
Español Italiano Français Deutsch English
49
Page 50

Fehlerbehebung
b
Was ist ein USB-Hub?
Ein "USB-Hub" ist ein Gerät, das die Anzahl der USBAnschlüsse erweitert. Allgemein gesprochen gibt es
zwei Arten von USB-Hubs.
Hubs mit eigener Stromversorgung (USB-Hubs, die
eine Spannungsquelle enthalten): Der USB-Hub
selbst verfügt über einen AC-Adapter, der die
installierten USB-Anschlüsse mit Spannung
(normalerweise 500 mA) versorgt.
Bus-betriebene Hubs (USB-Hubs, die keine
Spannungsquelle enthalten): In den Hub ist keine
Stromversorgung integriert. Die Spannung, die mit
dem angeschlossenen Computer zur Verfügung steht,
wird an die hinzugefügten USB-Anschlüsse umverteilt.
Fall 2: Installation des UM-1X-Treibers unmöglich
◆
Ist der Schalter ADVANCED DRIVER am UM-1X auf OFF
gestellt?
Stellen Sie den Schalter ADVANCED DRIVER am UM-1X auf
ON, starten Sie Windows, und installieren Sie den Treiber neu.
Fall 3: Der Wechsel in den Standby-Modus ist nicht
möglich (*)
◆
Wird eine Anwendung ausgeführt, die das UM-1X
verwendet?
Beenden Sie die Anwendung, die das UM-1X verwendet.
Der Computer kann nicht in den Standby-Modus wechseln,
wenn eine Anwendung, wie z.B. ein Sequenzer, das UM-1X
verwendet.
Was ist der Standby-Modus?
Diese Funktion minimiert den Stromverbrauch, indem
der interne Stromkreis des Computers und der
Peripheriegeräte unterbrochen wird, während der
Computer weiterhin mit Spannung versorgt wird.
50
Wenn ein USB-Gerät an einen
Computer angeschlossen wird,
wird der Computer durch das
USB-Gerät darüber informiert,
wie groß der Stromverbrauch
ist. Wenn dieser Wert die durch
den Computer lieferbare
Spannung übersteigt (maximal
500 mA), kann das Gerät nicht
angeschlossen werden. Das
UM-1X benötigt beim
Anschluss an einen Computer
eine Spannung von 150 mA. Die
meisten Computer oder USBHubs mit eigener
Stromversorgung haben mit
dieser Stromkapazität kein
Problem. Wenn Sie einen USBHub im Dual-Modus
verwenden (mit eigener
Stromversorgung /
usbetrieben), sollten Sie die
Spannungsquelle anschließen
(AC-Adapter etc.) und den Hub
als USB-Hub mit eigener
Stromversorgung einsetzen.
Page 51

Fall 4: UM-1X kann nach dem Standby nicht
fehlerfrei aufgeweckt werden.
◆
War das UM-1X während des Standby-Betriebs via USBKabel angeschlossen?
Stecken Sie die USB-Kabel aus und anschließend wieder ein.
Auf einigen Computern kann es vorkommen, dass der
Betriebszustand des UM-1X nach dem Standby-Modus nicht
mehr fehlerfrei wiederhergestellt werden kann. Wenn das der
Fall ist, sollte das USB-Kabel, das an das UM-1X angeschlossen
ist, ausgesteckt und anschließend wieder eingesteckt werden.
Fall 5: Windows stürzt ab (friert ein), wenn der
Standby-Betrieb beendet wird.
Stecken Sie das USB-Kabel des UM-1X vor der Aktivierung
des Standby-Betriebs aus.
Auf einigen Computern kann es vorkommen, dass Windows
bei der Wiederaufnahme des normalen Betriebs nach dem
Standby abstürzt (einfriert). Wenn das der Fall ist, sollte das
USB-Kabel, das an das UM-1X angeschlossen ist, vor der
Aktivierung des Standby-Betriebs ausgesteckt werden.
Wenn Sie das UM-1X anschließend erneut verwenden
möchten, sollten Sie sicherstellen, dass der Computer aus
dem Standby-Betrieb fehlerfrei aufgewacht ist und
anschließend das USB-Kabel mit dem UM-1X verbinden.
Fall 6: Kein Sound
◆
Sind die USB-Kabel, MIDI-Kabel und Audio-Kabel
korrekt angeschlossen?
Schließen Sie die Kabel korrekt an.
◆
Wurden die Lautstärkeregler Ihres Soundmoduls,
Audiosystems und Ihrer Anwendung nach oben gestellt?
Prüfen Sie die einzelnen Lautstärkeregler.
◆
Wurde das Soundmodul vorschriftsmäßig konfiguriert?
Bringen Sie den PC-Schalter Ihres Soundmoduls in Position "MIDI".
Fehlerbehebung
Wenn der Computer selbst
einen Standby-Schalter besitzt,
sollte das USB-Kabel, das an
das UM-1X angeschlossen ist,
ausgesteckt werden, bevor Sie
diesen Schalter drücken.
Bei einem Notebookcomputer
können die Einstellungen des
Computers dazu führen, dass
der Standby-Modus
automatisch eingestellt wird,
wenn das Notebook (d.h. die
LCD-Anzeige) geschlossen
wird. Daher sollte das USBKabel, das mit dem UM-1X
verbunden ist, ausgesteckt
werden, bevor das Notebook
geschlossen wird.
Fall 7: UM-1X funktioniert nicht unter Windows 95.
Das Gerät kann unter Windows 95 nicht betrieben werden.
Fall 8: Mein Computer stürzt ab, wenn ich eine MIDIDatei öffne.
Dieses Problem kann auftreten, wenn die USB-Wellenform
Ihres Computers nicht 100%ig dem Standard entspricht. In
diesem Fall kann das Problem gelöst werden, wenn Sie das
UM-1X via USB-Hub anschließen (USB-Hub mit einer
Stromversorgung).
Vergessen Sie nicht, das Gerät
auszuschalten, bevor Sie die
Einstellungen des PC-Schalters
für Ihr MIDI-Soundmodul
verändern.
Español Italiano Français Deutsch English
51
Page 52

Fehlerbehebung
Windows XP/2000-Anwender
Sie erhalten aktuelle Informationen im Abschnitt
"Troubleshooting" (Fehlerbehebung) der Datei
README_E.HTM, die sich im Ordner Win2000 der
UM-1 Driver CD-ROM befindet. Bitte lesen Sie die
entsprechenden Abschnitte.
• Treiber kann nicht installiert/deinstalliert/
verwendet werden
• Das Gerät UM-1 kann nicht ausgewählt werden
• Wiedergabe/Aufnahme ist nicht möglich
• Teile der Wiedergabe sind verfälscht: Noten werden
z.B. vorzeitig abgebrochen oder Noten gehen
verloren
• Das Dialogfeld "Digitalsignatur" wird angezeigt
• Sie werden gebeten, die Treiberdatei anzugeben,
obwohl Sie dachten, dass diese Datei bereits
installiert wurde
• Gleichzeitige Verwendung von zwei oder mehreren
Geräten ist nicht möglich
• Andere
52
Windows 98-/Me-Anwender
Sie erhalten aktuelle Informationen im Abschnitt
"Troubleshooting" (Fehlerbehebung) der Datei
README_E.HTM, die sich im Ordner Win98_Me der
UM-1 Driver CD-ROM befindet. Bitte lesen Sie die
entsprechenden Abschnitte.
• Treiber kann nicht installiert/deinstalliert/
verwendet werden
• Das Gerät UM-1 kann nicht ausgewählt werden
• Wiedergabe/Aufnahme ist nicht möglich
• Teile der Wiedergabe sind verfälscht: Noten werden
z.B. vorzeitig abgebrochen oder Noten gehen
verloren
Page 53

Macintosh-Anwender
b
Fall 1: Ein Dialogfeld mit einer Fehlermeldung wird
angezeigt
◆
Wurde der UM-1-Treiber installiert?
Wenn das UM-1X an Ihren Computer angeschlossen wird,
bevor der UM-1-Treiber installiert wird, wird ein
Fehlerdialogfeld angezeigt.
Wenn folgende Meldung angezeigt wird: “The software
needed to use the USB device” 'Unknown Device' cannot
be found. Please refer to the device documentation to
install the necessary software”, klicken Sie auf “OK.
Wenn diese Meldung angezeigt wird: “Software needed for
the USB device 'Unnamed Device' is not available. Would
you like to look for the software on the Internet?”, klicken
Sie auf “Cancel.
Nachdem Sie das Dialogfeld geschlossen haben, gehen Sie
wie in
“OMS-Einstellungen”
für FreeMIDI”
zu installieren.
Fall 2: Installation des UM-1X-Treibers unmöglich
◆
Ist der Schalter ADVANCED DRIVER am UM-1X auf OFF
gestellt?
Trennen Sie das USB-Kabel ab, das den UM-1X mit dem
Computer verbindet. Stellen Sie den Schalter ADVANCED
DRIVER am UM-1X auf ON, starten Sie Ihren Macintosh, und
installieren Sie den Treiber neu.
”
(S. 46) oder in
(S. 48) beschrieben vor, um den UM-1-Treiber
“Einstellungen
Fehlerbehebung
”
Detaillierte Informationen zur
Versorgung mit elektrischem
Strom durch Ihren Computer
oder durch Ihr USB-Hub
finden Sie in den
Benutzerhandbüchern dieser
Geräte. Wenn Sie weitere
Fragen haben, nehmen Sie
itte mit dem Hersteller oder
Händler Ihres Computers oder
USB-Hubs Kontakt auf.
Español Italiano Français Deutsch English
53
Page 54

Fehlerbehebung
b
b
Fall 3: USB-Anschlüsse können nicht fehlerfrei
vorgenommen werden
◆
Wurde das UM-1X erkannt?
Stecken Sie die USB-Kabel aus und anschließend wieder ein.
Wenn ein weiteres USB-Gerät angeschlossen ist, stecken Sie
dieses Gerät aus und versuchen Sie, nur das UM-1X mit dem
Anschluss zu verbinden.
Es ist möglich, dass der Computer das UM-1X nicht korrekt
erkennt oder nicht initialisieren kann. Starten Sie den
Macintosh mit eingestecktem USB-Kabel neu. Wenn
anschließend immer noch keine Verbindung hergestellt
werden kann, fahren Sie den Macintosh herunter und
schalten den Computer aus. Schalten Sie Ihren Computer
anschließend wieder ein und fahren Sie den Macintosh hoch.
Das UM-1X kann vom Computer nicht erkannt werden,
wenn der Anschluss an den USB-Anschluss für die
Macintosh-Tastatur erfolgt. Schließen Sie das USB-Kabel statt
dessen an den USB-Anschluss des Computergehäuses an.
◆
Verfügt Ihr Computer oder USB-Hub (*) über
ausreichende Stromversorgungskapazität?
Das UM-1X kann nicht angeschlossen werden, wenn es nicht
mit ausreichend Spannung versorgt wird.
• Verwenden Sie einen USB-Hub, der eine eigene
Stromversorgung besitzt.
• Der Stromsparmodus Ihres Computers reduziert
eventuell die Spannung, mit der der USB-Anschluss
versorgt wird. Sie sollten daher diese Einstellung
überprüfen.
Wenn ein USB-Gerät an einen
Computer angeschlossen wird,
wird der Computer durch das
USB-Gerät darüber informiert,
wie groß der
Spannungsverbrauch ist.
Wenn dieser Wert die Leistung
des Computers übersteigt
(maximal 500 mA), kann das
Gerät nicht angeschlossen
werden. Das UM-1X benötigt
eim Anschluss an einen
Computer eine Stromstärke
von 150 mA. Die meisten
Computer oder USB-Hubs mit
eigener Stromversorgung
haben mit dieser
Stromkapazität kein Problem.
Wenn Sie einen USB-Hub im
Dual-Modus verwenden (mit
eigener Stromversorgung /
usbetrieben), sollten Sie die
Spannungsquelle anschließen
(AC-Adapter etc.) und den
Hub als USB-Hub mit eigener
Stromversorgung einsetzen.
Was ist ein USB-Hub?
Ein "USB-Hub" ist ein Gerät, das die Anzahl der USBAnschlüsse erweitert. Allgemein gesprochen gibt es
zwei Arten von USB-Hubs.
Hubs mit eigener Spannungsversorgung (USBHubs, die eine Spannungsquelle enthalten): Der
USB-Hub selbst verfügt über einen AC-Adapter, der die
hinzugefügten USB-Anschlüsse mit Spannung
(normalerweise 500 mA) versorgt.
Bus-betriebene Hubs (USB-Hubs, die keine
Spannungsquelle enthalten): Der Hub enthält keine
Stromversorgung. Die Spannung, die mit dem
angeschlossenen Computer zur Verfügung steht, wird
an die installierten USB-Anschlüsse umverteilt.
54
Page 55

Fall 4: Kein Sound
◆
Sind die USB-Kabel, MIDI-Kabel und Audio-Kabel
korrekt angeschlossen?
Schließen Sie die Kabel korrekt an.
◆
Wurden die Lautstärkeregler Ihres Soundmoduls,
Audiosystems und Ihrer Anwendung nach oben
gestellt?
Prüfen Sie die einzelnen Lautstärkeregler.
◆
Wurde das Soundmodul vorschriftsmäßig konfiguriert?
Bringen Sie den PC-Schalter Ihres Soundmoduls in Position
"MIDI"
.
Fall 5: Noten werden doppelt ausgegeben (Noten
werden doppelt aufgenommen)
Einzelheiten finden Sie im Benutzerhandbuch für das von
Ihnen verwendete Sequenzer-Programm. Wenn als
Einstellung für den MIDI Input-Port
wurde, machen Sie diese Einstellung rückgängig (entfernen
Sie das Häkchen) und wählen Sie nur (aktivieren Sie nur) den
Anschluss (UM-1 Port 1-2), mit dem das für die Aufnahme
gewünschte MIDI-Gerät verbunden ist.
* Wenn Sie
aktiviert,
"UM-1 Port 1–2"
ausgewählten Port zweifach.
"UM-1 Driver"
"UM-1 Port1, 2"
auswählen, erfolgt die Ausgabe an den
aktivieren, werden beide Optionen
. Wenn Sie jedoch
"UM-1 Driver"
"UM-1 Driver"
gewählt
Fehlerbehebung
Vergessen Sie nicht, das Gerät
auszuschalten, bevor Sie die
Einstellungen des PC-Schalters
für Ihr MIDI-Soundmodul
verändern.
und
Fall 6: Das UM-1X wacht aus dem Ruhemodus nicht
korrekt auf.
Nachdem sich der Macintosh im Ruhemodus befand,
beenden Sie die Software und starten Sie ihn neu.
* Wir empfehlen Ihnen, die Einstellungen für das
in der
Systemsteuerung
nicht in den Ruhemodus versetzt wird.
so vorzunehmen, dass Ihr Computer
Energiesparen
Español Italiano Français Deutsch English
55
Page 56

Contenu du paquet
●
Interface MIDI USB UM-1X/UM-1SX
fig.UM-1X fig.UM-1SX
●
CD-ROM du pilote UM-1X/UM-1SX (un disque)
●
Manuel d'utilisation d'UM-1X/UM-1SX (ce document)
56
Page 57

Description de l'appareil
■
UM-1X
fig.UM-1X
2
1
3
5
■
UM-1SX
fig.UM-1SX_panel
2
1
5
1
Câble USB
Reliez ce câble au connecteur USB de votre ordinateur. (600 mm de longueur)
2
Commutateur de sélecteur de mode, ADVANCED DRIVER
Ce commutateur change le mode d’exploitation.
ON (mode évolué):
La technologie FPT est employée pour permettre le transfert MIDI à grande vitesse.
Normalement, vous devez utiliser ce mode.
* FPT → Technologie de traitement rapide (Fast Processing Technology) de transmission MIDI
OFF (mode standard du pilote):
Laissez dans cette position si vous utilisez le pilote MIDI par défaut inclus dans votre
système d’exploitation.
4
3
4
3
Connecteur MIDI IN
4
Connecteur MIDI OUT
5
Connecteur USB
Español Italiano Français Deutsch English
57
Page 58

Installation et configuration du pilote
Qu'est-ce qu'un pilote UM-1?
Le pilote UM-1 est un logiciel chargé de gérer la transmission des données entre
l'UM-1X et les applications (séquenceur, etc.) qui tournent sur l'ordinateur connecté par
USB. Le pilote UM-1X transmet les données de l'application à l'UM-1X et vice-versa.
Installation du pilote
La procédure d’installation dépend de votre système d’exploitation.
Veuillez lire la section qui vous concerne.
• Windows XP/2000 ...........................................(p. 58)
• Windows Me/98 ...............................................(p. 62)
• Mac OS X users .................................................(p. 63)
• Mac OS 9/8 users..............................................(p. 64)
■
Windows XP/2000
1.
Le UM-1X étant débranché, démarrez Windows.
Débranchez tous les câbles USB, à l’exception de ceux du clavier et de la souris (le
cas échéant).
* Si vous utilisez Windows XP Professional, vous devez ouvrir une session avec un nom
d’utilisateur disposant des droits d’administrateur. Pour plus de détails sur les comptes
utilisateur, veuillez prendre contact avec l’administrateur système de votre ordinateur.
2.
Ouvrez la boîte de dialogue
1.
Cliquez sur le menu
choisissez
2.
Dans
et maintenance”
3.
Dans
l’icône
* Selon la configuration de votre ordinateur, l’icône
Panneau de configuration
Système
3.
Cliquez sur l’onglet
Ouvrez la boîte de dialogue
Panneau de configuration
“Choisissez une catégorie”
“ou choisissez une icône du Panneau de configuration”
Système
.
Propriétés Système
Démarrer
.
.
Matériel
de Windows, puis, dans le menu qui s’affiche,
, cliquez sur
(Vue classique). Dans ce cas, cliquez deux fois sur l’icône
, puis cliquez sur
Options de signature du pilote
.
.
“Performances
Système
[Signature du pilote]
s’affiche peut-être dans le
.
, cliquez sur
.
58
Page 59

Installation et configuration du pilote
4.
Vérifiez que le paramètre
Si ce paramètre est réglé sur
Si elle n’est pas définie sur
“Bloquer”). Choisissez ensuite
* Si vous avez modifié
réglage précédent après installation du pilote. (
vous faire ?”
5.
Cliquez sur
6.
Quittez tous les logiciels (applications) actifs.
Fermez également toutes les fenêtres éventuellement ouvertes. Si vous utilisez un
anti-virus, quittez-le également.
7.
Munissez-vous du CD-ROM.
Introduisez-le dans le lecteur de CD de votre ordinateur.
8.
Cliquez sur le bouton
sélectionnez
Ouvrez la boîte de dialogue
9.
Dans la boîte de dialogue qui s’affiche, tapez ce qui suit dans le champ
puis cliquez sur
D:\Usb_xp2k\SETUPINF.EXE
(S. 61))
[OK]
pour fermer la boîte de dialogue
“Exécuter...”
[OK]
“Que voulez- vous faire ?”
“Ignorer”
“Ignorer”
“Que voulez-vous faire ?”
Démarrer
.
“Exécuter...”
.
, cliquez sur
, notez le paramètre indiqué (“Avertir” ou
“Ignorer”
de Windows. Dans le menu qui s’affiche,
et cliquez sur
➝ Si vous avez modifié “Que voulez-
(voir ci-dessous).
est défini sur
[OK].
[OK]
.
à l’
étape 4
, vous devez restaurer le
Propriétés système
“Ignorer”
.
“Ouvrir”
.
,
* La lettre du lecteur
au lecteur de CD de votre ordinateur (par exemple, E: ou F:).
10.
La boîte de dialogue
Vous êtes maintenant prêt à installer le pilote.
* Si une autre boîte de dialogue que «
instructions qui apparaissent dans la boîte de dialogue.
11.
Mettez en position ON le commutateur
* L’installation ne se fera pas telle que décrite plus loin si le commutateur est en position OFF.
12.
Connectez le câble USB de l’UM-1X à votre ordinateur.
Près de la barre des tâches, votre ordinateur indique
Veuillez patienter.
13.
La boîte de dialogue
Vérifiez que l’écran indique
partir d’une liste ou d’un emplacement spécifique (Avancé)
sur
[Suivant]
14.
L’écran indiquera
Sélectionnez
cliquez sur
“D:”
n’est pas forcément celle de votre ordinateur. Tapez la lettre affectée
SetupInf
Assistant ajout de nouveau matériel
.
“Veuillez choisir vos options de recherche et d’installation”
“Ne pas rechercher. Je vais choisir le pilote à installer”
[Suivant]
.
s'affiche.
Ready to install the driver
ADVANCED DRIVER
“Nouveau matériel détecté”
EDIROL UM-1 USB Driver
» apparaît, suivez les
de l’UM-1X.
s'affiche.
, sélectionnez
, puis cliquez
Installer à
, puis
.
.
Español Italiano Français Deutsch English
59
Page 60

Installation et configuration du pilote
15.
Vérifiez que le champ
sur
[Suivant]
Si le paramètre “Que voulez-vous faire ?” n'est pas défini sur “Ignorer”, la boîte
de dialogue “Installation du matériel” s'affiche.
Si “Que voulez-vous faire ?” est définie sur “Avertir”
1. Cliquez sur [Continuer].
2. Poursuivez l’installation.
Si “Que voulez-vous faire ?” est définie sur “Bloc”
1. Cliquez sur [OK].
2. Lorsque l’“Assistant ajout de nouveau matériel” s’affiche, cliquez sur
[Terminer].
3. Revenez à l’ étape 1 (p. 58) et réinstallez le pilote en reprenant toute la procédure.
16.
La boîte de dialogue
Cliquez sur
* La boîte de dialogue
17.
La boîte de dialogue
Tapez ce qui suit dans le champ
[OK]
.
D:\Usb_xp2k\
* La lettre du lecteur
affectée au lecteur de CD de votre ordinateur (par exemple, E: ou F:).
18.
La boîte de dialogue
Vérifiez que l’écran indique
[Terminer]
Attendez que
19.
Une fois l’installation du pilote terminée, la boîte de dialogue
paramètres système
Cliquez sur
. L’installation du pilote commence.
[OK]
.
Insérez le disque
“D:”
.
“Nouveau matériel détecté”
[Oui]
. Windows redémarre automatiquement.
Modèle
indique
Insérez le disque
Fichiers nécessaires
n’est pas forcément celle de votre ordinateur. Tapez la lettre
Assistant ajout de nouveau matériel
EDIROL UM-1 USB Driver
s’affiche.
EDIROL UM-1 USB Driver
s'affiche.
ne s'affiche pas. Dans ce cas, passez à l’
s'affiche.
“Copier les fichiers depuis”
s’affiche près de la barre des tâches.
, puis cliquez sur
s'affiche.
, puis cliquez sur
Modification des
, puis cliquez
étape 17
.
60
Page 61

Installation et configuration du pilote
Si vous avez modifié “Que voulez-vous faire ?”
Si vous avez modifié “Que voulez-vous faire ?” restaurez le paramètre d’origine
après le redémarrage de Windows.
1. Si vous utilisez Windows XP Professional, vous devez ouvrir une session
avec un nom d’utilisateur disposant des droits d’administrateur.
2. Cliquez sur le menu Démarrer de Windows, puis dans le menu qui s’affiche,
choisissez Panneau de configuration.
3. Dans “Choisissez une catégorie”, cliquez sur “Performances et
maintenance”.
4. Dans “ou choisissez une icône du Panneau de configuration”, cliquez
sur l’icône Système. La boîte de dialogue “Propriétés système” s'affiche.
* Selon la configuration de votre ordinateur, l’icône Système s’affiche peut-être dans le
Panneau de configuration (Vue classique). Dans ce cas, cliquez deux fois sur
l’icône Système.
5. Cliquez sur l’onglet Matériel, puis cliquez sur [Signature du pilote]. La boîte
de dialogue Options de signature du pilote s'affiche.
6. Restaurez le paramètre “Que voulez-vous faire ?” (“Avertir” ou “Bloquer”),
puis cliquez sur [OK].
7. Cliquez sur [OK]. La boîte de dialogue Propriétés Système se ferme.
61
Español Italiano Français Deutsch English
Page 62

Installation et configuration du pilote
■
Windows Me/98
1.
Le UM-1X étant débranché, démarrez Windows.
Débranchez tous les câbles USB, à l’exception de ceux du clavier et de la souris (le
cas échéant).
* Si l'UM-1X est déjà connecté à votre ordinateur et que le message suivant
ajout de nouveau matériel »
appelé
USB_me98
« Dépannage » « Vous avez suivi la procédure ci-dessus pour l'installation,
mais n'avez pas pu la réaliser. »
2.
Quittez tous les logiciels (applications) actifs.
Fermez également toutes les fenêtres éventuellement ouvertes. Si vous utilisez un
anti-virus, quittez-le également.
3.
Munissez-vous du CD-ROM.
Introduisez-le dans le lecteur de CD de votre ordinateur.
4.
Cliquez sur le bouton
sélectionnez
Ouvrez la boîte de dialogue
5.
Dans la boîte de dialogue qui s’affiche, tapez ce qui suit dans le champ
puis cliquez sur
D:\Usb_me98\SETUPINF.EXE
, ouvrez le fichier
“Exécuter...”
[OK]
apparaît, accédez au dossier
README_E.HTM
Démarrer
.
de Windows. Dans le menu qui s’affiche,
.
“Exécuter...”
CD-ROM du pilote UM-1X
, et lisez la section
(voir ci-dessous).
« Assistant
“Ouvrir”
,
62
* La lettre du lecteur
affectée au lecteur de CD de votre ordinateur (par exemple, E: ou F:).
6.
La boîte de dialogue
Vous êtes maintenant prêt à installer le pilote.
* Si une autre boîte de dialogue que «
instructions qui apparaissent dans la boîte de dialogue.
7.
Mettez en position ON le commutateur
* L’installation ne s’effectuera pas correctement si l’interrupteur d’alimentation est sur OFF.
8.
Placez l’
interrupteur d’alimentation
9.
Le pilote s'installe automatiquement.
10.
Dans la boîte de dialogue, cliquez sur [OK].
* Si un message vous recommande de relancer Windows, faites-le.
“D:”
n’est pas forcément celle de votre ordinateur. Tapez la lettre
SetupInf
s'affiche.
Ready to install the driver
ADVANCED DRIVER
du UM-1X sur ON.
» apparaît, suivez les
de l’UM-1X.
Page 63

Utilisateurs Mac OS X
■
Installation du pilote
1.
Déconnectez tous les câbles USB à l’exception de ceux de votre clavier et de votre
souris, et redémarrez votre Macintosh.
2.
Munissez-vous du CD-ROM.
Introduisez-le dans le lecteur de CD de votre ordinateur.
3.
Dans le dossier
UM-1USBDriver.pkg
Dans Mac OS X v10.1.5, cliquez sur le symbole du verrou pour vous identifier.
4.
Dans la boîte de dialogue d'
5.
L’indication
Cliquez sur
6.
“Important Information”
Lisez les informations, puis cliquez sur
7.
“Select a Destination”
Cliquez sur le lecteur dans lequel le système est installé pour le sélectionner, puis
cliquez sur
* Sélectionnez le disque de démarrage comme lecteur.
8.
“Easy Install”
Cliquez sur
9.
Le message
after the installation is complete”
ordinateur une fois l’installation terminée”).
Cliquez sur
10.
“The software was successfully installed”
avec succès”).
Cliquez sur
Driver (Mac OS X)
.
identification
“Welcome to the EDIROL UM-1 USB Driver Installer”
[Continue]
[Continue]
s'affiche.
[Install]
“When you install this software, you must restart your computer
[Continue installation]
[Restart]
.
s'affiche.
s’affiche.
.
ou sur
[Upgrade]
pour redémarrer votre ordinateur.
Installation et configuration du pilote
du CD-ROM, cliquez deux fois sur
, entrez le mot de passe et cliquez sur
s'affiche.
[Continue]
.
s’affiche (“Vous devez redémarrer votre
.
.
s'affiche (“Le logiciel a été installé
[OK]
.
Précautions à prendre lors de l’utilisation de UM-1X
Avant d’utiliser votre logiciel séquenceur, tenez compte des points suivants.
* Branchez le UM-1X à votre ordinateur avec un câble USB avant de lancer tout logiciel audio.
* Ne débranchez pas le câble USB du UM-1X pendant que le logiciel est actif.
* Débranchez le câble USB du UM-1X uniquement après avoir quitté votre logiciel.
* Laissez la fonction Veille de votre Macintosh désactivée.
* Le UM-1X ne fonctionne pas dans l’environnement Classic de Mac OS X. Utilisez le UM-1X
lorsque cet environnement est inactif.
Español Italiano Français Deutsch English
63
Page 64

Installation et configuration du pilote
■
Réglage du pilote
1.
Mettez en position ON le commutateur
* L’installation ne se fera pas telle que décrite plus loin si le commutateur est en position OFF.
2.
Connectez le câble USB de l’UM-1X à votre ordinateur.
3.
Procédez aux réglages MIDI du périphérique dans votre séquenceur logiciel.
* Pour plus de détails sur les réglages du périphérique MIDI, reportez-vous au mode d'emploi
du logiciel utilisé.
* Pour toute information sur le périphérique MIDI raccordé au UM-1X, veuillez contacter le
fabricant de ce périphérique.
Utilisateurs Mac OS 9/8
■
Installation du pilotes
Utilisation d’OMS ou de FreeMIDI comme pilote MIDI.
Le
pilote UM-1X
fonctionner le UM-1X avec OMS ou FreeMIDI.
*
OMS
ou
utilisé.
* Procédez comme suit pour installer le pilote UM-1X.
* Si vous avez la toute dernière version de OMS ou Free MIDI, veuillez l’utiliser.
*
OMS
se trouve dans le dossier
d'information sur OMS, veuillez lire le document
Acrobat) situé dans le dossier
* Vous ne pouvez utiliser l’UM-1X dans un environnement Mac OS X Classic.
Démarrez Mac OS 9/8 avant d’installer le pilote.
est un module supplémentaire fourni pour pouvoir faire
FreeMIDI
doit être installé sur votre Macintosh, selon le logiciel séquenceur
OMS 2.3.8 E
OMS Driver
ADVANCED DRIVER
du dossier
du dossier
OMS
sur le CD-ROM. Pour plus
OMS_2.3_Mac.pdf
OMS
sur le CD-ROM.
de l’UM-1X.
(manuel au format
64
Avant l’installation du pilote, un message similaire à ce qui suit apparaîtra lorsque
le Macintosh démarre. Exécuter les étapes décrites plus loin conformément au
message affiché.
Si l'écran affiche :
“Driver required for USB device ‘unknown device’ is not available. Search
for driver on the Internet?” ➔ Cliquez sur [Cancel].
Si l'écran affiche :
“Software required for using device ‘unknown device’ cannot be found.
Please refer to the manual included with the device, and install the
necessary software” ➔ Cliquez sur [OK].
Page 65

1.
Quittez tous les logiciels (applications) actifs.
Si vous utilisez un anti-virus, quittez-le également.
2.
Munissez-vous du CD-ROM.
Insérez le CD-ROM dans le lecteur de CD-ROM.
3.
Cliquez deux fois sur l'icône
(Mac OS 9, 8) - OMS
4.
Vérifiez l’
* L’emplacement d’installation indiqué dépend du système d’exploitation.
Le disque de démarrage du système d’exploitation utilisé doit être sélectionné.
5.
Si un message du type suivant s’affiche, cliquez sur
Les autres applications actives se ferment et l’installation continue.
6.
Une boîte de dialogue s’affiche :
Cliquez sur
■
Paramètres
Paramètres OMS
1.
Mettez en position ON le commutateur
* L’installation ne s’effectuera pas correctement si l’interrupteur d’alimentation est sur OFF.
2.
Connectez le câble USB de l’UM-1X à votre ordinateur.
3.
Depuis le CD-ROM, faites glisser le dossier
Driver E (Mac OS 9, 8) - OMS Setting
copier.
4.
Dans le dossier
deux fois sur
5.
Si une boîte de dialogue similaire à celle présentée ici s'affiche, cliquez sur
[Turn It Off]
* Nous vous reommandons de désactiver
Apple.
6.
La boîte de dialogue
Si vous avez cliqué sur
7.
Choisissez
Dans le dossier
puis cliquez sur
Un écran similaire à celui présenté ici s'affiche.
8.
Dans le menu
Dans la boîte de dialogue
background
UM-1 Driver-E Installer
du CD-ROM) pour lancer l'installeur.
emplacement de l’installation
Installation completed
[Redémarrer]
Opcode-OMS Application
OMS Setup
. Une boîte de confirmation s'affiche, cliquez sur
“Open”
Setting
[Open]
Edit
(Lancer MIDI en tâche de fond), puis cliquez sur
pour redémarrer le Macintosh.
pour le lancer.
Create a New Studio setup
[OK]
par erreur, cliquez sur
dans le menu
que vous avez copié à l'
.
, sélectionnez
OMS MIDI Setup
OMS MIDI Setup
et cliquez sur
ADVANCED DRIVER
vers le disque dur du Macintosh pour le
où vous avez installé OMS, cliquez
AppleTalk
File
.
qui s'affiche, sélectionnez
(dans le dossier
[Continuer]
, en activant le
s'affiche. Cliquez sur
[Annuler]
étape 3
.
Installation et configuration du pilote
Driver E
[Install]
.
.
.
de l’UM-1X.
[OK]
.
Sélecteur
, sélectionnez le fichier
dans le menu
[Annuler]
dans la boîte suivante.
Run MIDI in
[OK]
.
.
UM-1
,
Español Italiano Français Deutsch English
65
Page 66

Installation et configuration du pilote
9.
Dans le menu
File
, sélectionnez
Si vous ne pouvez pas sélectionner
est déjà activé et que vous pouvez passer à l'étape suivante.
10.
Vérifiez que l'envoi et la réception MIDI fonctionnent correctement. Dans le menu
Studio
, sélectionnez
11.
Si vous avez connecté un module de son MIDI à la sortie MIDI OUT de l’UM-1X,
cliquez sur l’icône du connecteur MIDI illustré dans le schéma à droite. Si vous
entendez le son du module de son, les réglages sont bons.
Lorsque vous déplacez le curseur de la souris sur l'icône représentant une prise
MIDI, le curseur se transforme en note de musique.
Si un module de sons est branché en sortie MIDI OUT du UM-1X, cliquer sur l'icône
de prise MIDI du schéma de droite produira un son: les réglages sont alors corrects.
* Aucun son ne sera reproduit si un module de sons MIDI est raccordé au UM-1X.
* Pour plus de détails sur la connexion du module de sons MIDI, reportez-vous au mode
d'emploi de ce module.
12.
Quittez
OMS Setup
Dans le menu
confirmation
13.
Sur le logiciel du séquenceur effectuez les réglages pour le périphérique MIDI.
Dans les réglages d’entrée et de sortie de votre logiciel de séquenceur MIDI,
sélectionnez le port 1 de l’UM-1X.
* Pour plus de détails sur les réglages du périphérique MIDI, reportez-vous au mode d'emploi
du logiciel utilisé.
* Pour toute information sur le périphérique MIDI raccordé au UM-1X, veuillez contacter le
fabricant de ce périphérique.
File
, choisissez
s'affiche, cliquez sur
Make Current
.
[Exit]
Make Current
(Rendre actif).
Make Current
(Rendre actif).
. Si la boîte de dialogue
[OK]
pour la fermer.
, cela signifie qu'il
AppleTalk
66
Page 67

Installation et configuration du pilote
Paramètres FreeMIDI
1.
Mettez en position ON le commutateur
2.
Connectez le câble USB de l’UM-1X à votre ordinateur.
3.
Depuis le CD-ROM, copiez le dossier
sur le disque dur du Macintosh.
4.
Ouvrez le dossier
FreeMIDI, puis cliquez deux fois sur l'icône
la configuratio
5.
Pour le premier démarrage, procédez de la façon suivante.
* Quand le message suivant apparaît :
sur
[FreeMIDI]
1.
Au premier lancement de FreeMIDI, une boîte de dialogue
to FreeMIDI!”
2.
Quand la boîte de dialogue
3.
Quand la boîte de dialogue
6.
Dans le menu
* Si vous ne pouvez pas sélectionner
1.
Sur le menu
2.
Enlevez la coche de «
3.
Sortez de
4.
Retournez à l’étape 4 et continuez.
7.
Sélectionnez
à l’
étape 3
8.
Vérifiez si la transmission et la réception MIDI s’effectuent correctement.
Sur le menu
9.
Vérifiez que l'envoi et la réception MIDI fonctionnent correctement. Dans le menu
MIDI
, choisissez
10.
Si vous avez connecté un module de son MIDI à la sortie MIDI OUT de l’UM-1X,
cliquez sur l’icône du connecteur MIDI du schéma à droite. Si vous entendez le son
du module de son, les réglages sont bons.
11.
Choisissez à nouveau la commande
12.
Dans le menu
Dans les réglages d’entrée et de sortie de votre logiciel de séquenceur MIDI,
sélectionnez le port 1 de l’UM-1X.
* Pour plus de détails sur les réglages du périphérique MIDI, reportez-vous au mode d'emploi
du logiciel utilisé.
* Pour toute information sur le périphérique MIDI raccordé au UM-1X, veuillez contacter le
fabricant de ce périphérique.
FreeMIDI Applications
.
s’affiche. Cliquez sur
File
, sélectionnez
File
, sélectionnez
Use OMS when available
FreeMIDI
UM-1X USB
, puis cliquez sur
MIDI
.
dans le dossier
, sélectionnez
Check Connections
File
, choisissez
FreeMIDI Preferences
[Open]
Quit pour quitter FreeMIDI Setup.
ADVANCED DRIVER
Driver E (Mac OS 9, 8) – FreeMIDI Setting
à l'emplacement où vous avez installé
FreeMIDI Setup
“OMS is installed on this computer...”
[Continue]
About Quick Setup
Open
.
Open
, faites les réglages suivants.
FreeMIDIPpreferences
FreeMIDI Settings
.
Check Connections
.
MIDI Check Connections
.
s'affiche, cliquez sur
. »
.
de l’UM-1X.
pour démarrer
“Welcome
s'affiche, cliquez sur
.
que vous avez copié
pour terminer le test.
, cliquez
[Cancel]
[Cancel]
.
.
Español Italiano Français Deutsch English
67
Page 68

Dépannage
* Veuillez lire le fichier « Readme-E.txt » se trouvant sur le CD-
ROM du pilote UM-1. Vous y trouverez toutes les informations
complémentaires qui n'apparaissent pas dans le manuel
d'utilisation.
Utilisateurs de Windows → p. 68
Utilisateurs de Macintosh → p. 72
Utilisateurs de Windows
1er cas : Impossible d'établir les connexions USB
correctement
◆
L'UM-1X a-t-il été reconnu ?
Déconnectez les câbles USB, puis reconnectez-les.
Il se peut que l'ordinateur n'ait pas réussi à reconnaître ou
initialiser l'UM-1X. Laissez le câble USB connecté à l'UM-1X
et redémarrez Windows. Si la connexion ne fonctionne
toujours pas, quittez Windows et mettez votre ordinateur
hors tension. Puis remettez votre ordinateur sous tension et
démarrez Windows.
◆
Votre ordinateur ou concentrateur USB (*) est-il
suffisamment alimenté ?
Si l'UM-1X n'est pas suffisamment alimenté, la connexion ne
peut pas fonctionner.
• Utilisez un concentrateur USB qui possède sa propre
alimentation.
• Les paramètres du mode d'économie d'énergie de votre
ordinateur peuvent limiter l'alimentation fournie à l'USB,
vérifiez donc ces paramètres.
Pour plus de détails sur le
courant électrique délivré par
votre ordinateur ou
concentrateur USB, consultez
le manuel d'utilisation de votre
appareil. Si vous avez des
questions, contactez le
constructeur ou le revendeur
de votre ordinateur ou
concentrateur USB.
L'UM-1X ne fonctionne pas
avec un concentrateur qui ne
possède pas sa propre
alimentation.
68
Page 69

Dépannage
b
Qu’est-ce qu'un concentrateur USB ?
Un « concentrateur USB » est un périphérique qui permet
d'utiliser plusieurs connecteurs USB. D'une façon générale, il
existe deux types de concentrateurs USB.
Concentrateurs auto-alimentés (concentrateurs USB
possédant leur propre alimentation) : Le concentrateur USB
possède un adaptateur secteur qui alimente (généralement
500 mA) les connecteurs USB ajoutés.
Concentrateurs alimentés par un bus (concentrateurs
USB ne possédant pas d'alimentation propre) : Le
concentrateur ne possède pas d'alimentation propre. Le
courant qui alimente l'ordinateur connecté est redistribué aux
connecteurs USB ajoutés.
2ième cas : Impossible d’installer le pilote UM-1X
◆
Se pourrait-il que le commutateur ADVANCED DRIVER
de l’UM-1X soit en position OFF?
Mettre en position ON le commutateur ADVANCED
DRIVER de l’ UM-1X. Redémarrer Windows et réinstaller le
pilote.
3ième cas : Impossible de mettre l'ordinateur en
mode Veille (*)
◆
L' application qui utilise l'UM-1X est-elle ouverte ?
Quittez l'application qui utilise l'UM-1X.
Le mode Veille de l'ordinateur ne fonctionne pas lorsqu'une
application telle qu'un séquenceur utilise l'UM-1X.
Que signifie Mettre en veille ?
Fonction qui réduit la consommation de courant en
éteignant les circuits internes de l'ordinateur ainsi que
les périphériques tout en continuant à l'alimenter.
Lorsqu'un périphérique USB
est connecté à un ordinateur, il
lui indique sa consommation
en énergie. Si cette valeur
dépasse la quantité de courant
que l'ordinateur est capable de
fournir (500 mA maximum), la
connexion avec le
périphérique échoue. L'UM-1X
consomme 150 mA lorsqu'il est
connecté à un ordinateur. Pour
la plupart des ordinateurs et
des concentrateurs USB autoalimentés, cette quantité ne
constitue pas un problème. Si
vous utilisez un concentrateur
USB à deux modes (autoalimenté / alimenté par un
us), n'oubliez pas de brancher
son alimentation (adaptateur
secteur, etc.) et utilisez-le
uniquement en mode autoalimenté.
Español Italiano Français Deutsch English
69
Page 70

Dépannage
4ième cas : La reprise de l'UM-1X ne s'effectue pas
correctement lorsque le système est en veille
◆
Lors de sa mise en veille, l'UM-1X était-il encore
connecté via le câble USB ?
Déconnectez le câble USB, puis reconnectez-le.
Il arrive que la reprise de l'UM-1X échoue sur certains
ordinateurs, lorsque Windows reprend après une mise en
veille. Dans ce cas, le câble USB relié à l'UM-1X doit être
déconnecté puis reconnecté.
5ième cas : Windows se bloque (gèle) lors de sa
reprise après une mise en veille
Déconnectez le câble USB de l'UM-1X avant de le mettre en
veille.
La reprise de Windows après une mise en veille peut
entraîner un blocage (gèle) sur certains ordinateurs. Dans ce
cas, le câble USB relié à l'UM-1X doit être déconnecté puis
reconnecté avant la mise en veille.
Pour utiliser à nouveau l'UM-1X, assurez-vous que la reprise
de l'ordinateur s'est correctement déroulée, puis connectez le
câble USB à l'UM-1X.
6ième cas : Absence de son
◆
Les câbles USB, MIDI et Audio sont-ils correctement
connectés ?
Connectez les câbles correctement.
◆
Le volume de votre module sonore, système audio et de
votre application est-il monté ?
Contrôlez le volume de chacun.
◆
Les paramètres du module sonore sont-ils corrects ?
Positionnez le commutateur d'ordinateur de votre module sonore sur
« MIDI ».
7ième cas : Ne fonctionne pas avec Windows 95.
Le système ne fonctionne pas sur Windows 95.
Si l'ordinateur possède un
interrupteur de mise en veille,
déconnectez le câble USB relié
à l'UM-1X avant d'appuyer sur
cet interrupteur.
En ce qui concerne les
ordinateurs portables, certains
paramètres peuvent
provoquer la mise en veille
automatique de l'ordinateur
lorsqu'il est refermé (Affichage
LCD) ; par conséquent, il est
conseillé de déconnecter le
câble USB relié à l'UM-1X
avant de rabattre l'écran.
Avant de modifier les
paramètres du commutateur
d'ordinateur de votre module
sonore MIDI, mettez
l'ordinateur hors tension.
8ième cas : Mon ordinateur se bloque lorsque j'ouvre
un fichier MIDI.
Ceci peut arriver lorsque la forme d'onde USB de votre
ordinateur diffère trop de la norme. Dans ce cas, connectez
l'UM-1X via un concentrateur USB qui possède sa propre
alimentation.
70
Page 71

Utilisateurs de Windows XP/2000
Vous trouverez les dernières informations dans la
section « Dépannage » du fichier README_E.HTM,
dans le dossier Win2000 du CD-ROM du pilote UM-1.
Veuillez vous reporter à la section correspondante.
• Impossible d’installer/désinstaller/utiliser le pilote
• Impossible de sélectionner le périphérique UM-1
• Impossible de lire/enregistrer les données
• Lecture partielle d'un morceau : due, par exemple, à
l'arrêt prématuré de la musique ou à la perte de
certaines notes
• La boîte de dialogue « Signature numérique
introuvable » apparaît
• Vous êtes invité à indiquer le fichier du pilote même
si ce dernier a déjà été installé
• Impossible d'utiliser plusieurs unités simultanément
• Autres cas
Utilisateurs de Windows 98 / Me
Vous trouverez les dernières informations dans la
section « Dépannage » du fichier README_E.HTM,
dans le dossier Win98_Me du CD-ROM du pilote UM-1.
Veuillez vous reporter à la section correspondante.
• Impossible d’installer/désinstaller/utiliser le pilote
• Impossible de sélectionner le périphérique UM-1
• Impossible de lire/enregistrer les données
• Lecture partielle d'un morceau : due, par exemple, à
un arrêt prématuré de la musique ou à la perte de
certaines notes
Dépannage
71
Español Italiano Français Deutsch English
Page 72

Dépannage
Utilisateurs de Macintosh
1er cas : Un message d’erreur apparaît
◆
Le pilote UM-1 est-il installé ?
Un message d'erreur apparaît si l'UM-1X est connecté à votre
ordinateur avant que le pilote correspondant ne soit installé.
Si l'affichage indique
USB device ‘Unknown Device’ cannot be found. Please
refer to the device documentation to install the necessary
software »,
Si l'affichage indique
device ‘Unnamed Device’ is not available. Would you like
to look for the software on the Internet? »,
« Cancel »
Lorsque le message n'apparaît plus sur l'écran, suivez la
procédure "
FreeMIDI" (P.67)
cliquez sur
.
Paramètres OMS" (P.65)
2ième cas : Impossible d’installer le pilote UM-1X
◆
Se pourrait-il que le commutateur ADVANCED DRIVER
de l’UM-1X soit en position OFF?
Déconnecter le câble USB entre l’ordinateur et le UM-1X.
Mettre en position ON le commutateur ADVANCED
DRIVER de l’ UM-1X. Redémarrer votre Macintosh et
réinstaller le pilote.
3ième cas : Impossible d'établir les connexions
USB correctement
◆
L'UM-1X a-t-il été reconnu ?
Déconnectez le câble USB, puis reconnectez-le.
Si un autre périphérique USB est connecté, essayez de ne
connecter que l'UM-1X.
Il se peut que l'ordinateur n'ait pas réussi à reconnaître ou
initialiser l'UM-1X. Laissez le câble USB connecté à l'UM-1X
et redémarrez votre Macintosh. Si la connexion ne fonctionne
toujours pas, quittez votre système Macintosh et mettez
l'ordinateur hors tension. Puis, mettez à nouveau votre
ordinateur sous tension et redémarrez votre Macintosh.
L'ordinateur ne parvient pas à reconnaître l'UM-1X lorsque
vous utilisez le connecteur USB du clavier Macintosh.
Reconnectez le câble USB au connecteur correspondant de
l'unité principale.
« The software needed to use the
« OK »
.
« Software needed for the USB
cliquez sur
ou "
Paramètres
pour installer le pilote UM-1X.
Pour plus de détails sur le
courant électrique délivré par
votre ordinateur ou
concentrateur USB, consultez
le manuel d'utilisation de votre
appareil. Si vous avez des
questions, contactez le
constructeur ou le revendeur
de votre ordinateur ou
concentrateur USB.
72
Page 73

◆
b
Votre ordinateur ou concentrateur USB (*) est-il
suffisamment alimenté ?
Si l'UM-1X n'est pas suffisamment alimenté, la connexion ne
peut pas fonctionner.
• Utilisez un concentrateur USB qui possède sa propre
alimentation.
• Les paramètres du mode d'économie d'énergie de votre
ordinateur peuvent limiter l'alimentation fournie à l'USB,
vérifiez donc ces paramètres.
Qu’est-ce qu'un concentrateur USB ?
Un « concentrateur USB » est un périphérique qui
permet d'utiliser plusieurs connecteurs USB. D'une
façon générale, il existe deux types de concentrateurs
USB.
Concentrateurs auto-alimentés (concentrateurs
USB possédant leur propre alimentation) : Le
concentrateur USB possède un adaptateur secteur qui
alimente (généralement 500 mA) les connecteurs USB
ajoutés.
Concentrateurs alimentés par un bus
(concentrateurs USB ne possédant pas
d'alimentation propre) : Le concentrateur ne possède
pas d'alimentation propre. Le courant qui alimente
l'ordinateur connecté est redistribué aux connecteurs
USB ajoutés.
Dépannage
Lorsqu'un périphérique USB
est connecté à un ordinateur, il
lui indique sa consommation
en énergie. Si cette valeur
dépasse la quantité de courant
que l'ordinateur est capable de
fournir (500 mA maximum), la
connexion avec le
périphérique échoue. L'UM-1X
consomme 150 mA lorsqu'il est
connecté à un ordinateur. Pour
la plupart des ordinateurs et
des concentrateurs USB autoalimentés, cette quantité ne
constitue pas un problème. Si
vous utilisez un concentrateur
USB à deux modes (autoalimenté / alimenté par un
us), n'oubliez pas de brancher
son alimentation (adaptateur
secteur, etc.) et utilisez-le
uniquement en mode autoalimenté.
4ième cas : Absence de son
◆
Les câbles USB, MIDI et Audio sont-ils correctement
connectés ?
Connectez les câbles correctement.
◆
Le volume de votre module sonore, système audio et de
votre application est-il monté ?
Contrôlez le volume de chacun.
◆
Les paramètres du module sonore sont-ils corrects ?
Positionnez le commutateur d'ordinateur de votre module
sonore sur
« MIDI »
.
Avant de modifier les
paramètres du commutateur
d'ordinateur de votre module
sonore MIDI, mettez
Español Italiano Français Deutsch English
73
Page 74

Dépannage
5ième cas : Les notes ont un écho (Les notes sont
enregistrées en double)
Consultez le manuel d'utilisation concernant le programme
de séquençage utilisé. Si
le paramètre du port d'entrée MIDI, annulez la sélection
(décochez-le) et sélectionnez (cochez) uniquement le port
(UM-1 Port 1–2) auquel le périphérique MIDI (sur lequel vous
souhaitez effectuer l'enregistrement) est connecté.
* Lorsque vous sélectionnez
éléments
« UM-1 Port1, 2 »
Cependant, si les cases
sont cochées, le port sélectionné émettra un son en double.
« UM-1 Driver »
« UM-1 Driver »,
sont automatiquement sélectionnés.
« UM-1 Driver »
est sélectionné dans
les deux
et
« UM-1 Port 1–2 »
6ième cas : La reprise d'UM-1X ne s'effectue pas
correctement lorsqu'il est en mode veille
Quand le Macintosh sort d'une période de veille, quittez le
logiciel, puis redémarrez-le.
* Nous vous recommandons définir les paramètres d'
d'énergie
mette en mode veille.
dans
Control panel
pour éviter que votre ordinateur se
économie
74
Page 75

Contenuto della confezione
●
UM-1X/UM-1SX Interfaccia MIDI USB
fig.UM-1X fig.UM-1SX
●
UM-1X/UM-1SX Driver CD-ROM (un disco)
●
Manuale utente UM-1X/UM-1SX (la presente documentazione)
75
Español Italiano Français Deutsch English
Page 76

Nomi e funzioni
■
UM-1X
fig.UM-1X
2
1
3
5
■
UM-1SX
fig.UM-1SX_panel
2
1
5
1
Cavo USB
Collegare questo cavo al connettore USB del computer. (lunghezza: 600 mm)
2
Interruttore (seleziona modalità) DRIVER AVANZATO
Questo interruttore inserisce la modalità operativa
ON (Modalità avanzata):
La tecnologia FPT viene utilizzata per permettere il trasferimento MIDI ad alta velocità.
Normalmente si dovrebbe utilizzare questa modalità.
* FPT → Fast Processing Technology (Tecnologia di Elaborazione Veloce) della trasmissione MIDI
OFF (Modalità Driver Standard):
Utilizzare questa modalità se si utilizza il driver MIDI predefinito fornito dal vostro sistema
operativo.
4
3
4
3
connettore MIDI IN
4
connettore MIDI OUT
5
connettore USB
76
Page 77

Installazione e configurazione del driver
Definizione del driver UM-1
Il driver UM-1X è il programma che trasmette i dati tra l’UM-1X e l’applicazione
(software sequencer o altro) in esecuzione sul computer collegato tramite la porta USB.
Il driver UM-1X trasmette i dati dall’applicazione all’UM-1X e viceversa.
Installazione del driver
La procedura d’installazione dipenderà dal sistema utilizzato.
Passare ad una delle sezioni seguenti a seconda del sistema utilizzato.
•
Utenti Windows XP/2000..........................(pag. 77)
• Utenti Windows Me/98 .............................(pag. 81)
• Mac OS X users ..............................................(pag. 82)
• Mac OS 9/8 users..........................................(pag. 83)
■
Utenti Windows XP/2000
1.
Dopo aver scollegato il UM-1X , avviare Windows.
Scollegare tutti i cavi USB, ad eccezione della tastiera e del mouse USB, se utilizzati.
* Se si utilizza Windows XP Professional, è necessario collegarsi come un nome utente dotato
di privilegi amministrativi, ad esempio come Administrator. Per maggiori informazioni
sugli account degli utenti, contattare l’amministratore del sistema.
2.
Aprire la finestra di dialogo
1.
In Windows, fare clic sul pulsante
controllo
2.
In
3.
In
*A seconda di come il sistema è configurato, l’icona
direttamente nel
clic sull'icona
3.
Fare clic sulla scheda
Aprire la finestra di dialogo
.
“Scegliere una categoria”
“o un’icona del Pannello di controllo”
Pannello di controllo
Sistema
Proprietà del sistema
, fare clic su
.
Hardware
e poi sul pulsante
Opzioni firma driver
.
Start
e nel menu selezionare
“Prestazioni e manutenzione”
, fare clic sull’icona
Sistema
potrebbe essere visualizzata
(visualizza-zione classica). In tal caso fare doppio
[Firma driver]
.
Pannello di
Sistema
.
.
.
77
Español Italiano Français Deutsch English
Page 78

Installazione e configurazione del driver
4.
Accertarsi che
Se è attivata l’opzione
“Scegliere una delle seguenti opzioni”
“Ignora”
Se non è impostata su
(di avviso o di blocco). Modificare quindi l’impostazione su
fare clic su
* Se al
modificato, dopo aver installato il driver è necessario ripristinare l’impostazione d’origine.
(
➝ Se è stato modificato il parametro “Scegliere una delle seguenti opzioni”
(S. 80))
5.
Fare clic su
6.
Chiudere tutti i programmi in corso di esecuzione.
Chiudere anche le altre finestre aperte. Se si utilizza un programma antivirus o
simile, accertarsi che sia anch’esso chiuso.
7.
Preparare il CD-ROM.
Inserire il CD nell’unità CD-ROM del computer.
8.
Fare clic sul pulsante
“Esegui”
Aprire la finestra di dialogo
9.
Nella finestra di dialogo che appare, immettere quanto segue nel campo
fare clic su
D:\Usb_xp2k\SETUPINF.EXE
* L’identificativo dell’unità
questo caso specificare il nome dell’unità CD-ROM utilizzata.
10.
Appare la finestra di dialogo
È ora possibile installare il driver.
* Se appare una finestra di dialogo diversa da Pronto per installare unità, seguire le istruzioni
mostrate nella finestra di dialogo.
11.
Impostare l’interruttore
* L’installazione non può procedere come descritto di seguito se l’interruttore è nella posizione
OFF.
12.
Collegare il cavo USB dell’UM-1X al vostro computer.
Nella barra delle applicazioni verrà visualizzato il messaggio
hardware”
13.
Verrà visualizzata la
Accertarsi che sullo schermo compaia
“Installa da un elenco o percorso specifico (per utenti esperti)”
[Avanti]
[OK]
passo 4
il parametro
[OK]
per chiudere la finestra di dialogo
Start
.
[OK]
.
. Attendere qualche minuto.
finestra di dialogo Installazione guidata nuovo hardware
.
sia impostato su
fare clic su
“Ignora”
[OK]
.
prendere nota dell’impostazione corrente
“Ignora”
“Scegliere una delle seguenti impostazioni”
Proprietà del sistema
di Windows. Nel menu visualizzato, selezionare
“Esegui...”
“D:”
potrebbe essere diverso da quello del sistema utilizzato. In
SetupInf
DRIVER AVANZATO
.
.
di UM-1X sulla posizione ON.
“Trovato nuovo
“EDIROL UM-1 USB Driver”
, selezionare
e fare clic su
“Ignora”
e
è stato
.
“Apri”
e
.
78
Page 79

Installazione e configurazione del driver
14.
La finestra visualizzerà il seguente messaggio
e di installazione”
Selezionare
effettuata manualmente”
15.
Accertarsi che il campo
clic su
[Avanti]
Se l’impostazione “Scegliere una delle seguenti opzioni” non è stata impostata
su “Ignora” comparirà il messaggio “Installazione guidata hardware”.
Se “Scegliere una delle seguenti opzioni” è impostato su “Avvisa”
1. Fare clic su [Continuare].
2. Continuare l’installazione.
Se “Scegliere una delle seguenti opzioni” è impostato su “Blocca”
1. Fare clic su [OK].
2. Quando appare la finestra “Installazione guidata nuovo hardware”, fare
clic su [Fine].
3. Tornare al passo 1 (pag. 77) e reinstallare il driver dall'inizio della procedura.
16.
Viene visualizzata la finestra di dialogo
Fare clic su
* Viene visualizzata la finestra di dialogo
17.
Viene visualizzata la finestra di dialogo
Immettere quanto segue nel campo
D:\Usb_xp2k\
* L’identificativo dell’unità
questo caso specificare il nome dell’unità CD-ROM utilizzata.
18.
Verrà visualizzata la
Accertarsi che sullo schermo sia visualizzato
clic su
[Fine]
Attendere fino a quando nella barra delle applicazioni non appare il messaggio
“Trovato nuovo hardware”
19.
Alla fine dell’installazione del driver, comparirà la finestra di dialogo
impostazioni di sistema
Fare clic su
.
“Non effettuare la ricerca. La scelta del driver da installare verrà
, e fare clic su
“Modello”
. La procedura di installazione del driver verrà avviata.
[OK]
.
“D:”
finestra di dialogo Installazione guidata nuovo hardware
.
.
[Sì]
. Windows verrà riavviato automaticamente.
visualizzi
Inserire il disco
“Copia file da”
potrebbe essere diverso da quello del sistema utilizzato. In
.
“Selezionare le opzioni di ricerca
[Avanti]
Inserisci disco
Richiesta file
.
“EDIROL UM-1 USB Driver”
. In questo caso passare al
e fare clic su
“EDIROL UM-1 USB Driver”
[OK]
e fare
passo 17
.
, e fare
Modifica
.
.
79
Español Italiano Français Deutsch English
Page 80

Installazione e configurazione del driver
Se è stato modificato il parametro “Scegliere una delle seguenti opzioni”
Se l’impostazione Scegliere una delle seguenti opzioni è stata modificata,
ripristinare il parametro d’origine dopo aver riavviato Windows.
1. Se si utilizza Windows XP Professional, collegarsi con un nome utente
dotato di privilegi di tipo amministrativo (ad esempio Administrator).
2. In Windows, fare clic sul menu Start e nel menu selezionare Pannello di
controllo.
3. In “Scegliere una categoria”, fare clic su “Prestazioni e manutenzione”.
4. In “o un’icona del Pannello di controllo”, fare clic sull’icona Sistema.
Viene visualizzata la finestra di dialogo Proprietà del sistema.
*A seconda di come il sistema è configurato, l’icona Sistema potrebbe essere
visualizzata direttamente nel Pannello di controllo (visualizzazione classica). In tal
caso fare doppio clic sull'icona Sistema.
5. Fare clic sulla scheda Hardware e poi sul pulsante [Firma driver]. Verrà
visualizzata la finestra di dialogo Opzioni firma driver.
6. Ripristinare l’impostazione Scegliere una delle seguenti opzioni al valore
d’origine (di avviso o di blocco) e fare clic su [OK].
7. Fare clic su [OK]. La finestra di dialogo Proprietà di sistema si chiude.
80
Page 81

■
Utenti Windows Me/98
1.
Dopo aver scollegato il UM-1X , avviare Windows.
Scollegare tutti i cavi USB, ad eccezione della tastiera e del mouse USB, se utilizzati.
* Se l’UM-1X è già collegato al computer e appare il messaggio
nuovo hardware"
USB_me98
intitolata
able to".
2.
Chiudere tutti i programmi in corso di esecuzione.
Chiudere anche le altre finestre aperte. Se si utilizza un programma antivirus o
simile, accertarsi che sia anch’esso chiuso.
3.
Preparare il CD-ROM.
Inserire il CD nell’unità CD-ROM del computer.
4.
Fare clic sul pulsante
“Esegui”
Aprire la finestra di dialogo
5.
Nella finestra di dialogo che appare, immettere quanto segue nel campo
fare clic su
D:\Usb_me98\SETUPINF.EXE
* L’identificativo dell’unità
questo caso specificare il nome dell’unità CD-ROM utilizzata.
6.
Appare la finestra di dialogo
È ora possibile installare il driver.
* Se appare una finestra di dialogo diversa da Pronto per installare unità, seguire le istruzioni
mostrate nella finestra di dialogo.
7.
Impostare l’interruttore
* L’installazione non verrà fatta correttamente se l’interruttore è nella posizione OFF.
8.
Spostare l’
9.
Il driver verrà installato automaticamente.
10.
Nella finestra di dialogo, fare clic su [OK].
* Se appare un messaggio che invita a riavviare Windows, riavviarlo come consigliato.
, aprire il file
“You attempted to install using the above procedure, but were not
.
[OK]
.
interruttore di alimentazione
Installazione e configurazione del driver
“Installazione guidata
, aprire sul CD-ROM
README_E.HTM
Start
di Windows. Nel menu visualizzato, selezionare
“Esegui...”
“D:”
potrebbe essere diverso da quello del sistema utilizzato. In
SetupInf
DRIVER AVANZATO
UM-1X Driver CD-ROM
, e leggere la sezione
.
.
di UM-1X sulla posizione ON.
del UM-1X in posizione ON.
la cartella denominata
“Troubleshooting"
“Apri”
e
81
Español Italiano Français Deutsch English
Page 82

Installazione e configurazione del driver
Utenti Mac OS X
■
Installazione del driver
1.
Scollegare tutti i cavi USB a parte quelli della tastiera e del mouse e riavviare il
Macintosh.
2.
Preparare il CD-ROM.
Inserire il CD nell’unità CD-ROM del computer.
3.
Nella cartella
In Mac OS X v10.1.5, fare clic sul simbolo del lucchetto per l'autentificazione.
4.
Nella finestra di dialogo
5.
Sullo schermo comparirà il seguente messaggio
USB Driver Installer”
Fare clic su
6.
Verrà visualizzato il seguente messaggio
Controllare il contenuto della finestra e fare clic su
7.
Sullo schermo comparirà il messaggio
Selezionare l'unità dove è installato il sistema e fare clic su
* Selezionare il disco di avvio come unità.
8.
Verrà visualizzato il seguente messaggio
Fare clic su
9.
Sullo schermo comparirà il seguente messaggio
you must restart your computer after the installation is complete”
Fare clic su
10.
Verrà visualizzato il seguente messaggio
installed”
Fare clic su
Driver (Mac OS X)
.
[Continue]
Install
[Continue installation]
.
[Restart]
.
o
Upgrade
per riavviare il Macintosh.
del CD-ROM, fare doppio clic su
authentication
.
, immettere la password e fare clic su [OK].
“Welcome to the EDIROL UM-1
“Important Information”
“Select a Destination”
“Easy Install”
“When you install this software,
.
“The software was successfully
[Continue]
[Continue]
.
UM-1USBDriver.pkg
.
.
.
.
.
.
82
Precauzioni da rispettare quando si utilizza la tastiera UM-1X
Prima di utilizzare il software sequencer, tenere presente i seguenti punti.
* Collegare la tastiera UM-1X al computer mediante il cavo USB prima di avviare il software
sequencer o altri programmi.
* Non scollegare il cavo USB dalla tastiera UM-1X mentre è in esecuzione il software sequencer
o un altro programma.
* Scollegare il cavo USB dalla tastiera UM-1X solo dopo aver chiuso il sequencer o qualsiasi altro
programma utilizzato.
* Non attivare la funzione Sleep del Macintosh.
* La tastiera UM-1X non funziona nella configurazione Classic di Mac OS X. Utilizzare la
tastiera UM-1X quando la configurazione Classic non è in esecuzione.
Page 83

■
Configurazione del driver
1.
Impostare l’interruttore
* L’installazione non può procedere come descritto di seguito se l’interruttore è nella posizione OFF.
2.
Collegare il cavo USB dell’UM-1X al vostro computer.
3.
Configurare la periferica MIDI sul sofware sequencer.
* Per dettagli sulle impostazioni del MIDI, consultare il manuale dell’utente per il software
che si sta utilizzando.
* Per informazioni sull’attrezzatura MIDI che si collega all’UM-1X, contattare il produttore
della vostra attrezzatura MIDI.
DRIVER AVANZATO
Utenti Mac OS 9/8
■
Installazione del driver
Utilizzare come driver MIDI OMS o FreeMIDI.
Il
driver UM-1X
OM0 o FreeMIDI.
* Sul Macintosh deve essere stato installato
software sequencer utilizzato.
* Seguire la procedura sotto indicata per installare il driver UM-1X.
* Se si ha l’ultima versione di OMS o Free Midi, si prega di utilizzare l’ultima versione.
* L’applicazione
CD-ROM. Per avere maggiori informazioni sul software
OMS_2.3_Mac.pdf
della cartella OMS sul CD-ROM.
* Non si può utilizzare UM-1X in ambiente Mac OS X Classic.
Avviare Mac OS 9/8 prima di installare il driver.
è un modulo aggiuntivo che permette di utilizzare l’SD-80 con
OMS
si trova nella cartella
(manuale in linea) che si trova nella cartella
Installazione e configurazione del driver
di UM-1X sulla posizione ON.
OMS
o
FreeMIDI
OMS 2.3.8 E
all’interno della cartella
OMS
, consultare il file
OMS 2.3.8E
a seconda del
OMS
all’interno
del
Prima di installare il driver, apparirà un messaggio come quello di seguito quando
all’avvio del Macintosh. Seguire i punti descritti di seguito a seconda del messaggio
che viene visualizzato.
Se appare il seguente messaggio:
“Driver required for USB device ‘unknown device’ is not available. Search
for driver on the Internet?” ➔ fare clic su [Cancel].
Se appare il seguente messaggio:
“Software required for using device ‘unknown device’ cannot be found.
Please refer to the manual included with the device, and install the
necessary software” ➔ fare clic su [OK].
Español Italiano Français Deutsch English
83
Page 84

Installazione e configurazione del driver
1.
Chiudere tutti i programmi in corso di esecuzione.
Se si utilizza un programma antivirus o simili, accertarsi che sia anch’esso chiuso.
2.
Preparare il CD-ROM.
Inserire il CD-ROM nell’unità CD-ROM.
3.
Fare doppio clic sull’icona
Driver E (Mac OS 9, 8)
* L’indicazione per la posizione dell’installazione sarà diversa a seconda del vostro sistema.
Assicurarsi che il disco di avvio per il sistema che si sta utilizzando sia selezionato.
4.
Controllare la
5.
Se appare un messaggio come quello sotto indicato, fare clic su
Le applicazioni in corso di esecuzione verranno chiuse e l’installazione proseguirà.
6.
Verrà visualizzata una finestra di dialogo indicante
Fare clic su
■
Impostazioni
destinazione dell'installazione
[Restart]
per riavviare il Macintosh.
Impostazioni OMS
1.
Impostare l’interruttore
* L’installazione non verrà fatta correttamente se l’interruttore è nella posizione OFF.
2.
Collegare il cavo USB dell’UM-1X al vostro computer.
3.
Dal CD-ROM, selezionare e trascinare la cartella
Driver E (Mac OS 9, 8) - OMS Setting
copiarvela.
4.
Nella cartella
clic su
5.
Se compare una finestra di dialogo come quella illustrata, fare clic su
Verrà visualizzata una finestra di dialogo di conferma; fare clic su
* Si consiglia di disattivare
6.
Verrà visualizzata la finestra di dialogo
su
[Cancel]
Se è stato selezionato accidentalmente il pulsante
finestra successiva.
7.
Selezionare
Nella cartella
[Open]
Verrà visualizzata una finestra di dialogo simile a quella illustrata.
8.
Nel menu
Nella finestra di dialogo
background
Opcode-OMS Application
OMS Setup
.
per avviarlo.
.
“Open”
Settings
Edit
selezionare
e fare clic su
nel menu
copiata al
UM-1 Driver-E Installer
del CD-ROM, per avviare il programma d’installazione.
DRIVER AVANZATO
sul disco fisso del Macintosh per
dove è stato installato OMS, fare doppio
AppleTalk
OMS MIDI Setup
selezionando
“Create a New Studio Setup”
File
.
passo 3
OMS MIDI Setup
[OK]
.
, selezionare il file
visualizzata, selezionare
, che si trova nella cartella
e fare clic su
di UM-1X sulla posizione ON.
Chooser
[OK]
.
[Install]
.
[Continue]
Installation completed
[Turn It Off]
[OK]
.
nel menu Apple.
. Fare clic
, fare clic su
UM-1
e fare clic su
[Cancel]
Run MIDI in
.
.
nella
.
84
Page 85

Installazione e configurazione del driver
9.
Nel menu
Se non è possibile selezionare
può quindi passare all’operazione successiva.
10.
Accertarsi che la trasmissione e la ricezione MIDI siano corrette. Nel menu
selezionare
11.
Se si è collegato un modulo sonoro MIDI al connettore MIDI OUT di UM-1X, fare
clic sull’icona del connettore MIDI nel diagramma a destra. Se si sente del suono
dal modulo sonoro, le impostazioni sono corrette.
Spostando il cursore del mouse vicino all’icona del connettore MIDI, il puntatore
cambierà forma in quella di una nota musicale.
Se un modulo sonoro MIDI è collegato alla presa MIDI OUT della tastiera UM-1X,
fai click sull’icona del connettore MIDI che appare nel diagramma a destra. Se viene
generato un suono, le impostazioni sono state eseguite correttamente.
* Se non si è collegato il modulo sonoro MIDI all’UM-1X non si sentirà suono.
* Per maggiori dettagli sul collegamento del vostro modulo sonoro MIDI, fare riferimento al
manuale del vostro modulo sonoro MIDI.
12.
Chiudere
Nel menu
AppleTalk confirmation
13.
Impostare il sistema MIDI sui sequenziatori del vostro software.
Nelle impostazioni input/output di MIDI del vostro software sequencer,
selezionare la Porta 1 di UM-1X.
* Per dettagli sulle impostazioni del MIDI, consultare il manuale dell’utente per il software
che si sta utilizzando.
* Per informazioni sull’attrezzatura MIDI che si collega all’UM-1X, contattare il produttore
della vostra attrezzatura MIDI.
File
selezionare
Test Studio
OMS Setup
File
selezionare
Make Current
.
.
[Exit]
, fare clic su
.
Make Current
. Se appare la finestra di dialogo di conferma
, vuol dire che è stata già attivata e si
[OK]
per chiuderla.
Studio
85
Español Italiano Français Deutsch English
Page 86

Installazione e configurazione del driver
Impostazioni FreeMIDI
1.
Impostare l’interruttore
2.
Collegare il cavo USB dell’UM-1X al vostro computer.
3.
Dal CD-ROM, copiare la cartella
disco fisso del Macintosh.
4.
Aprire la cartella
FreeMIDI e fare doppio clic sull’icona
5.
Al primo avvio seguire la procedura sotto indicata.
* Quando appare il messaggio
[FreeMIDI]
1.
Al primo avvio di FreeMIDI, comparirà la finestra di dialogo
to FreeMIDI!”
2.
Nella finestra di dialogo
3.
Nella finestra di dialogo
6.
Nel menu
* Se è impossibile selezionare
File, selezionare FreeMIDI Preference, deselezionare “
chiudere
FreeMIDI
7.
Selezionare
clic su
[Open]
8.
Controllare che l'finvio e la ricezione MIDI siano corrette.
Nel menu
9.
Controllare che l’invio e la ricezione MIDI siano corrette.
Nel menu
10.
Se si è collegati un modulo sonoro MIDI al connettore MIDI OUT di UM-1X, fare
clic sull’icona del connettore MIDI mostrata nel diagramma a destra. Se si sente del
suono dal modulo sonoro, le impostazioni sono corrette.
11.
Scegliere di nuovo il comando
il test.
12.
Nel menu
Nelle impostazioni input/output di MIDI del vostro software sequencer,
selezionare la Porta 1 di UM-1X.
* Per dettagli sulle impostazioni del MIDI, consultare il manuale dell’utente per il software
che si sta utilizzando.
* Per informazioni sull’attrezzatura MIDI che si collega all’UM-1X, contattare il produttore
della vostra attrezzatura MIDI.
FreeMIDI Applications
.
. Fare clic su
File
selezionare
. Tornare quindi al passo 4 e continuare la procedura.
UM-1 USB
.
MIDI
MIDI
File
, scegliere
nella cartella
selezionare
selezionare
DRIVER AVANZATO
Driver E (Mac OS 9, 8) – FreeMIDI Setting
“OMS is installed on this computer...”
[Continue]
FreeMIDI Preferences
About Quick Setup
Open
.
Open
, effettuare le seguenti impostazioni. Nel menu
FreeMIDI Setting
Check Connections
Check Connections
Check Connections
Quit
per uscire da
di UM-1X sulla posizione ON.
dove è stata eseguita l’installazione
FreeMIDI Setup
.
FreeMIDI Setup
per avviare l’applicazione.
, fare clic su
, fare clic su
Use OMS when available
copiata al
.
.
nel menu
.
, fare clic su
“Welcome
[Cancel]
[Cancel]
passo 3
MIDI
per concludere
sul
.
.
”, e
e fare
86
Page 87

Ricerca e soluzione dei problemi
* Accertarsi di leggere il file "Readme-E.txt" sul CD-ROM del driver
UM-1. Le eventuali informazioni aggiuntive non comprese nel
manuale utente sono scritte nel file "Readme-E.txt".
Utenti Windows → p. 87
Utenti Macintosh → p. 91
Utenti Windows
Caso 1: i collegamenti USB non vengono eseguiti
correttamente
◆
L'UM-1X è stato riconosciuto?
Scollegare i cavi USB e ricollegarli.
E' possibile che il computer non sia riuscito a riconoscere o a
inizializzare l'UM-1X. Lasciare collegato il cavo USB all'UM-
1X e riavviare Windows. Se il collegamento risulta ancora
impossibile, uscire da Windows e spegnere il computer. Poi,
accendere il computer e avviare Windows.
◆
Il computer o l’hub USB (*) è in grado di fornire la
capacità di alimentazione sufficiente?
Se la corrente fornita all'UM-1X è insufficiente, il
collegamento non può essere possibile.
• Utilizzare un hub USB con una fonte di
alimentazione propria.
• La modalità di gestione dell’alimentazione del
computer utilizzato potrebbe limitare l’energia
fornita all’USB: controllare le impostazioni relative.
Per maggiori informazioni
sulla corrente elettrica che può
essere gestita dal computer o
sull'hub USB, consultare il
manuale utente del sistema
utilizzato. Per qualsiasi
domanda, contattare il
fabbricante o il rivenditore del
computer utilizzato o dell'hub
USB.
L'UM-1X non può essere
utilizzato con un hub privo di
fonte di alimentazione.
87
Español Italiano Français Deutsch English
Page 88

Ricerca e soluzione dei problemi
Quando si collega al computer
una periferica USB, questa
informa il computer sulla
quantità di corrente elettrica
utilizzata. Se questo valore è
superiore alla corrente che il
computer è in grado di fornire
(500 mA al massimo), la
periferica non può essere
collegata. L'UM-1X richiede
una corrente di 150 mA
quando è collegato al
computer. La maggior parte
dei computer o degli hub USB
alimentati in modo autonomo
non avrà problemi con una
corrente di questo tipo. Se si
utilizza un hub USB a doppia
modalità (alimentato in modo
autonomo/alimentato dal
bus), assicurarsi di collegare la
fonte di alimentazione relativa
(adattatore AC, ecc.) e di
utilizzarla allo stesso modo di
un hub USB alimentato in
modo autonomo.
Cosa si intende per hub USB?
Un “hub USB” è un dispositivo che permette di ampliare
il numero di connettori USB. In generale, esistono due tipi
di hub USB.
Hub alimentati in modo autonomo (hub USB provvisti
di fonte di alimentazione): L'hub USB stesso è provvisto
di un adattatore AC che fornisce la corrente (solitamente a
500 mA) ai connettori aggiuntivi USB.
Hub alimentati dal bus (hub USB privi di fonte di
alimentazione): L'hub è sprovvisto di una fonte di
alimentazione. La fonte di alimentazione del computer
collegato viene ridistribuita ai connettori aggiuntivi USB.
Caso 2: Impossibile installare il driver UM-1X
◆
L’interruttore DRIVER AVANZATO di UM-1X potrebbe
essere nella posizione OFF.
Spostare l’interruttore del DRIVER AVANZATO nella
posizione ON, riavviare Windows, e reinstallare il driver.
Caso 3: Impossibile spostarsi sullo stato di
Sospensione (*)
◆
E' in corso di esecuzione un'applicazione che utilizza
l'UM-1X?
88
Chiudere l'applicazione che utilizza l'UM-1X.
Il computer non riesce a spostarsi sullo stato di Sospensione
se un'applicazione (ad esempio, un sequencer) sta utilizzando
l'UM-1X.
Cosa si intende per Sospensione?
Si tratta di una funzione che riduce il consumo di
energia disattivando i circuiti interni del computer e le
periferiche, continuando a fornire la corrente al
computer.
Page 89

Caso 4: L'UM-1X non ritorna correttamente allo
stato normale dopo la modalità di sospensione
◆
Durante lo stato di sospensione, l'UM-1X era ancora
collegato per mezzo del cavo USB?
Scollegare il cavo USB e ricollegarlo.
Su alcuni computer, quando Windows ritorna allo stato
normale in seguito alla modalità di sospensione, l'UM-1X non
riesce a tornale alla normale modalità. In questo caso,
scollegare e ricollegare il cavo USB collegato all'UM-1X.
Caso 5: Windows si blocca (si arresta) quando
deve tornare allo stato normale in seguito alla
modalità di sospensione
Scollegare il cavo USB dell'UM-1X prima di procedere alla
sospensione.
Alcuni computer, quando Windows cerca di ritornare allo
stato normale in seguito alla modalità di sospensione,
possono bloccarsi (arrestarsi). In questo caso, scollegare il
cavo USB collegato all'UM-1X prima di procedere alla
sospensione.
Quando si desidera utilizzare nuovamente l'UM-1X,
assicurarsi che il computer sia tornato allo stato normale in
maniera corretta in seguito alla modalità di sospensione, poi
collegare il cavo USB all'UM-1X.
Caso 6: L'audio non viene riprodotto
◆
Il cavo USB, i cavi MIDI e i cavi audio sono collegati
correttamente?
Collegare correttamente i cavi.
◆
Il volume del modulo sonoro, del sistema audio e
dell'applicazione è alzato?
Controllare il volume.
◆
Le impostazioni del modulo sonoro sono corrette?
Regolare l'interruttore Computer del modulo sonoro nella posizione
"MIDI".
Caso 7: Mancato funzionamento con Windows 95.
Non funziona con Windows 95.
Ricerca e soluzione dei problemi
Se il computer è provvisto di
un interruttore di sospensione,
scollegare il cavo USB
collegato all'UM-1X prima di
premere l'interruttore.
Nei computer portatili, alcune
impostazioni possono causare
l'entrata automatica nella
modalità di sospensione
quando si chiude il display a
cristalli liquidi: scollegare il
cavo USB collegato all'UM-1X
prima di chiudere il display.
Prima di modificare la
regolazione dell'interruttore
computer del modulo sonoro
MIDI, assicurarsi di spegnere il
computer.
Caso 8:
Il computer si blocca quando si apre un file MIDI.
Questo problema può verificarsi se il profilo d'onda USB del
computer utilizzato non corrisponde totalmente ai requisiti.
In questo caso, per risolvere il problema, provare a collegare
l'UM-1X per mezzo di un hub USB provvisto di una fonte di
alimentazione.
Español Italiano Français Deutsch English
89
Page 90

Ricerca e soluzione dei problemi
Utenti Windows XP/2000
Le informazioni più recenti sono fornite nella sezione
"Troubleshooting" ("Ricerca e soluzione dei
problemi") del file README_E.HTM, posto nella
cartella Win2000 del CD-ROM del driver UM-1. Fare
riferimento alla sezione relativa.
• Impossibile installare/disinstallare/utilizzare
il driver
• Impossibile selezionare la periferica UM-1
• Impossibile riprodurre/registrare
• Una parte della riproduzione è sbagliata: ad
es., le note vengono interrotte
prematuramente, oppure alcune note vengono
disperse
• Viene visualizzata la finestra di dialogo "Firma
digitale non individuata"
• Viene richiesto il file del driver anche se è già
stato installato
• Impossibile utilizzare una o più unità
contemporaneamente
• Altre
Utenti Windows 98/Me
Le informazioni più recenti sono fornite nella sezione
"Troubleshooting" ("Ricerca e soluzione dei problemi")
del file README_E.HTM, posto nella cartella Win98_Me del
CD-ROM del driver UM-1. Fare riferimento alla sezione
relativa.
• Impossibile installare/disinstallare/utilizzare il
• Impossibile selezionare la periferica UM-1
• Impossibile riprodurre/registrare
• Una parte della riproduzione è sbagliata: ad es., le
90
driver
note vengono interrotte prematuramente, oppure
alcune note vengono disperse
Page 91

Utenti Macintosh
Per maggiori informazioni
sulla corrente elettrica che può
essere gestita dal computer o
sull'hub USB, consultare il
manuale utente del sistema
utilizzato. Per qualsiasi
domanda, contattare il
fabbricante o il rivenditore del
computer utilizzato o dell'hub
USB.
Caso 1: Appare un messaggio di errore
◆
Il driver UM-1 è installato?
Viene visualizzato un messaggio di errore se l'UM-1X viene
collegato al computer prima d'installare il driver dell'UM-1.
Se appare il messaggio
USB device 'Unknown Device' cannot be found. Please
refer to the device documentation to install the necessary
software.":
Se appare il messaggio
device 'Unnamed Device' is not available. Would you like
to look for these drivers over the Internet?"
"Cancel."
Dopo aver chiuso la finestra di dialogo, seguire la procedura
per
FreeMIDI" (Pag.86)
, fare clic su
"Impostazioni OMS" (Pag.84)
Caso 2: impossibile installare il driver UM-1X
◆
L’interruttore DRIVER AVANZATO di UM-1X potrebbe
essere nella posizione OFF.
Scollegare il cavo USB che collega UM-1X al computer.
Spostare l’interruttore del DRIVER AVANZATO di UM-1X
nella posizione ON, riavviare il Macintosh, e reinstallare il
driver.
"The software needed to use the
"OK."
"Software needed for the USB
o
"Impostazioni
per installare il driver UM-1X.
Ricerca e soluzione dei problemi
, fare clic su
Español Italiano Français Deutsch English
91
Page 92

Ricerca e soluzione dei problemi
Caso 3: Impossibile eseguire gli appropriati
collegamenti USB
◆
L'UM-1X è stato riconosciuto?
Scollegare il cavo USB e ricollegarlo.
Se è collegata un'altra periferica USB, cercare di collegare solo
l'UM-1X.
E' possibile che il computer non abbia riconosciuto o
inizializzato correttamente l'UM-1X. Lasciare collegato il
cavo USB all'UM-1X e riavviare il Macintosh. Se il
collegamento risulta ancora impossibile, uscire da Macintosh
e spegnere il computer. Poi, riaccendere il computer e avviare
Macintosh.
Il computer non riesce a riconoscere l'UM-1X quando si
utilizza il connettore USB della tastiera del Macintosh.
Ricollegare il cavo USB del connettore USB del corpo
principale.
◆
Il computer o l’hub USB (*) è in grado di fornire la
capacità di alimentazione sufficiente?
Se la corrente fornita all'UM-1X è insufficiente, il
collegamento non può essere possibile.
• Utilizzare un hub USB con una fonte di
alimentazione propria.
• La modalità di gestione dell’alimentazione del
computer utilizzato potrebbe limitare l’energia
fornita all’USB: controllare le impostazioni relative.
Quando si collega al computer
una periferica USB, questa
informa il computer sulla
quantità di corrente elettrica
utilizzata. Se questo valore è
superiore alla corrente che il
computer è in grado di fornire
(500 mA al massimo), la
periferica non può essere
collegata. L'UM-1X richiede
una corrente di 150 mA quando
è collegato al computer. La
maggior parte dei computer o
degli hub USB alimentati in
modo autonomo non avrà
problemi con una corrente di
questo tipo. Se si utilizza un
hub USB a doppia modalità
(alimentato in modo
autonomo / alimentato dal
bus), assicurarsi di collegare la
fonte di alimentazione relativa
(adattatore AC, ecc.) e di
utilizzarla allo stesso modo di
un hub USB alimentato in
modo autonomo.
92
Cosa si intende per hub USB?
Un “hub USB” è un dispositivo che permette di
ampliare il numero di connettori USB. In generale,
esistono due tipi di hub USB.
Hub alimentati in modo autonomo (hub USB
provvisti di fonte di alimentazione): L'hub USB stesso
è provvisto di un adattatore AC che fornisce la corrente
(solitamente a 500 mA) ai connettori aggiuntivi USB.
Hub alimentati dal bus (hub USB privi di fonte di
alimentazione): L'hub è sprovvisto di una fonte di
alimentazione. La fonte di alimentazione del computer
collegato viene ridistribuita ai connettori aggiuntivi
USB.
Page 93

Caso 4: L'audio non viene riprodotto
Prima di modificare la
regolazione dell'interruttore
computer del modulo sonoro
MIDI, assicurarsi di spegnere il
computer.
◆
Il cavo USB, i cavi MIDI e i cavi audio sono collegati
correttamente?
Collegare correttamente i cavi.
◆
Il volume del modulo sonoro, del sistema audio e
dell'applicazione è alzato?
Controllare il volume.
◆
Le impostazioni del modulo sonoro sono corrette?
Regolare l'interruttore Computer del modulo sonoro nella
posizione
"MIDI".
Caso 5: Le note vengono riprodotte due volte (Le
note vengono registrate due volte)
Consultare il manuale utente del programma del sequencer
utilizzato. Se il driver dell'UM-1
nell'impostazione della porta d'ingresso MIDI, annullare tale
selezione (deselezionarla), e selezionare solo la porta (UM-1
Port 1–2) a cui è collegato il dispositivo MIDI che si desidera
registrare.
* Quando si seleziona
entrambe le voci
“UM-1 Port 1–2”
una riproduzione doppia.
“UM-1 Driver,”
“UM-1 Port1, 2”
sono selezionati, la porta selezionata emetterà
“UM-1 Driver”
verranno selezionate
. Tuttavia, se
“UM-1 Driver”
è selezionato
Ricerca e soluzione dei problemi
e
Caso 6: L'UM-1X non ritorna al normale stato
operativo dalla modalità sospensione.
Dopo che il computer è entrato in modalità sospensione,
uscire dal programma e riavviarlo.
* Si consiglia di impostare i parametri di
Pannello di controllo
modalità sospensione.
risparmio energia
per evitare che il computer entri in
nel
Español Italiano Français Deutsch English
93
Page 94

Contenido del paquete
●
Interfaz MIDI USB UM-1X/UM-1SX
fig.UM-1X fig.UM-1SX
●
CD-ROM del controlador UM-1X/UM-1SX (un CD)
●
Manual del usuario de UM-1X/UM-1SX (el presente documento)
94
Page 95

Nombres y funciones
■
UM-1X
fig.UM-1X
2
1
3
5
■
UM-1SX
fig.UM-1SX_panel
2
1
3
4
5
1
Cable USB
Conecte este cable al conector USB de su PC. (600 mm de longitud)
2
Interruptor de CONTROLADOR AVANZADO (selecciûn de modo)
Esto conmuta el modo operativo.
ENCENDIDO (modo Avanzado):
La tecnologÌa FPT se usa para permitir la transferencia MIDI de alta velocidad.
Normalmente, debe usar este modo.
* FPT → TecnologÌa de Procesamiento R·pido de Transmisi
APAGADO (modo de Controlador Est·ndar):
Use esto si usa el controlador MIDI predeterminado incluido con su sistema operativo.
4
3
Conector MIDI IN
4
Conector MIDI OUT
5
Conector USB
Español Italiano Français Deutsch English
95
Page 96

Instalación y configuración del controlador
¿Qué es el controlador del UM-1?
El controlador del UM-1X es software que envía datos entre el UM-1X y la aplicación
(software secuenciador, etc.) que se está ejecutando en el PC conectado a USB.
El controlador del UM-1X envía los datos de la aplicación al UM-1X y pasa los datos
del UM-1X a la aplicación.
Instalación del controlador
El procedimiento de instalación variará en función del sistema.
Pase a uno de los siguientes apartados, en función del sistema que utilice.
• Usuarios de Windows XP/2000 ............................(pág. 96)
• Usuarios de Windows Me/98................................(pág. 100)
• Mac OS X users ........................................................(pág. 101)
• Mac OS 9/8 users.....................................................(pág. 102)
■
Usuarios de Windows XP/2000
1.
Con la unidad UM-1X desconectada, inicie Windows.
Desconecte todos los cables USB excepto el del teclado USB y el ratón USB (si se
utilizan).
* Si es usuario de Windows XP Professional, deberá iniciar la sesión con un nombre de
usuario con algún tipo de cuenta de administración (por ejemplo, Administrador). Para
obtener información detallada acerca de las cuentas de usuario, consulte al administrador de
sistemas de su PC.
2.
Abra el cuadro de diálogo
1.
Haga clic en el menú
2.
En
“Elija una categoría”
3.
“o elija un icono del Panel de control”
En
* En función de cómo tenga configurado el sistema, puede que el icono
directamente en el
el icono
Sistema
3.
Haga clic en la ficha
Abra el cuadro de diálogo
Panel de control
.
Propiedades del sistema
Inicio
de Windows y seleccione
, haga clic en
(en la vista Clásica). En ese caso, haga doble clic en
Hardware
y, a continuación, en
Opciones de firma del controlador
“Rendimiento y mantenimiento”
, haga clic en el icono
.
Panel de control
Sistema
Sistema
aparezca
[Firma del controlador]
.
.
.
.
.
96
Page 97

Instalación y configuración del controlador
4.
Asegúrese de que
en
“Omitir”
Si ya está establecido en
Si no está en “
continuación, cambie la configuración a
* Se al
passo 4
modificato, dopo aver installato il driver è necessario ripristinare l’impostazione d’origine.
(
➝ Si ha modificado “¿Qué acción desea que realice Windows?”
5.
Haga clic en
6.
Salga de todo el software que se esté ejecutando (aplicaciones).
Cierre cualquier ventana que esté abierta. Si utiliza un programa antivirus
o software similar, también deberá cerrarlo.
7.
Prepare el CD-ROM.
Inserte el CD-ROM en la unidad de CD-ROM del PC.
8.
Haga clic en el botón
“Ejecutar...”
Abra el cuadro de diálogo
9.
En el cuadro de diálogo que aparece, escriba lo siguiente en el campo
haga clic en
D:\Usb_xp2k\SETUPINF.EXE
* El nombre de la unidad
su unidad de CD-ROM.
10.
Aparecerá el cuadro de diálogo
“¿Qué acción desea que realice Windows?”
.
Omitir
”, anótese la configuración actual (“Avisar” o “Bloquear”). A
il parametro
[Aceptar]
.
[Aceptar]
“Omitir”,
para cerrar el cuadro de diálogo
Inicio
.
“D:”
haga clic en
“Scegliere una delle seguenti impostazioni”
de Windows. En el menú que aparecerá, seleccione
“Ejecutar...”
puede ser diferente para su sistema. Especifique el nombre de
SetupInf
“Omitir”
.
.
[Aceptar]
y haga clic en
esté establecido
.
[Aceptar]
Propiedades del sistema
Ahora puede instalar el controlador.
* Si aparece un cuadro de diálogo diferente a Listo para instalar el controlador, siga las
instrucciones que se muestran en el cuadro de diálogo.
11.
Configure el interruptor de
posiciûn de ENCENDIDO.
* La instalaciûn no puede proceder como se describe abajo si el interruptor se APAGA
12.
Conecte el cable USB del UM-1X a su ordenador.
Cerca de la barra de tareas, el PC indicará
por favor.
CONTROLADOR AVANZADO
“Nuevo hardware encontrado”
del UM-1X’ a la
.
è stato
(S. 99))
“Abrir”
. Espere,
.
y
97
Español Italiano Français Deutsch English
Page 98

Instalación y configuración del controlador
13.
Aparecerá el
Asegúrese de que la pantalla indique
“Instalar desde una lista o ubicación específica (avanzado)”
[Siguiente]
14.
La pantalla indicará
Seleccione
clic en
15.
Asegúrese de que el campo
haga clic en
Si el valor de “¿Qué acción desea que realice Windows?” no se ha establecido
en “Omitir”, aparecerá el cuadro de diálogo “Instalación de hardware”.
Si la opción “¿Qué acción desea que realice Windows?”
está establecida en “Avisar”:
1. Haga clic en [Continuar].
2. Prosiga con la instalación.
Si la opción “¿Qué acción desea que realice Windows?”
está establecida en “Avisar”:
1. Haga clic en [Aceptar].
2. Cuando aparezca “Asistente para hardware nuevo encontrado”, haga clic
3. Retroceda hasta el paso 1 (pág. 96) y reinstale el controlador desde el
Asistente para hardware nuevo encontrado
.
“Elija sus opciones de búsqueda e instalación”
“No buscar. Seleccionaré el controlador que se va a instalar”
[Siguiente]
en [Finalizar].
principio del proceso.
.
[Siguiente]
. Entonces empezará la instalación del controlador.
“Modelo”
.
“EDIROL UM-1 USB Driver”
y haga clic en
indique
“EDIROL UM-1 USB Driver”
, seleccione
.
y haga
, y
98
16.
Aparecerá el cuadro de diálogo
Haga clic en
* Puede que el cuadro de diálogo
17.
Aparecerá el cuadro de diálogo
Especifique lo siguiente en el campo
en
[Aceptar]
D:\Usb_xp2k\
* El nombre de la unidad
la unidad de CD-ROM.
18.
Aparecerá el
Asegúrese de que la pantalla indica
[Finalizar]
Espere hasta que aparezca
tareas.
[Aceptar]
.
Asistente para hardware nuevo encontrado
.
.
“D:”
Insertar disco
Insertar disco
Archivos necesarios
“Copiar archivos de”
puede ser diferente para su sistema. Especifique el nombre de
“EDIROL UM-1 USB Driver”
“Nuevo hardware encontrado”
.
no aparezca. En ese caso, vaya al
.
y haga clic
.
y haga clic en
cerca de la barra de
paso 17
.
Page 99

Instalación y configuración del controlador
19.
Una vez finalizada la instalación del controlador, aparecerá el cuadro de diálogo
Cambio de configuración del sistema
Haga clic en
[Sí]
. Windows se reiniciará automáticamente.
.
Si ha modificado “¿Qué acción desea que realice Windows?”
Si ha modificado el valor para “¿Qué acción desea que realice Windows?”
restaure la configuración original después de reiniciar Windows.
1. Si es usuario de Windows XP Professional, debe iniciar la sesión de
Windows utilizando un nombre de usuario con algún tipo de cuenta de
administración (Administrador, por ejemplo).
2. Haga clic en el menú Inicio de Windows y seleccione Panel de control.
3. En “Elija una categoría”, haga clic en “Rendimiento y mantenimiento”.
4. En “o elija un icono del Panel de control”, haga clic en el icono Sistema.
Aparecerá el cuadro de diálogo Propiedades del sistema.
* En función de cómo tenga configurado el sistema, puede que el icono Sistema
aparezca directamente en el Panel de control (en la vista Clásica). En ese caso, haga
doble clic en el icono Sistema.
5. Haga clic en la ficha Hardware y, a continuación, en [Firma del controlador].
Aparecerá el cuadro de diálogo Opciones de firma del controlador.
6. Restablezca el valor de ¿Qué acción desea que realice Windows? al valor
original (“Advertir” o “Bloquear”) y haga clic en [Aceptar].
7. Haga clic en [Aceptar]. El cuadro de diálogo Propiedades del sistema se
cerrará.
99
Español Italiano Français Deutsch English
Page 100

Instalación y configuración del controlador
■
Usuarios de Windows Me/98
1.
Con la unidad UM-1X desconectada, inicie Windows.
Desconecte todos los cables USB excepto el del teclado USB y el ratón USB (si se utilizan).
* Si el UM-1X ya está conectado a su PC y aparece un mensaje de
nuevo hardware”
controlador del UM-1X)
y lea en
“Troubleshooting” (Resolución de problemas)
attempted to install using the above procedure, but were not able to” (“Ha
intentado instalar utilizando el procedimiento de arriba pero no ha podido”).
2.
Salga de todo el software que se esté ejecutando (aplicaciones).
Cierre cualquier ventana que esté abierta. Si utiliza un programa antivirus
o software similar, también deberá cerrarlo.
3.
Prepare el CD-ROM.
Inserte el CD-ROM en la unidad de CD-ROM del PC.
4.
Haga clic en el botón
“Ejecutar...”
Abra el cuadro de diálogo
5.
En el cuadro de diálogo que aparecerá, escriba lo siguiente en el campo
haga clic en
D:\Usb_me98\SETUPINF.EXE
* El nombre de la unidad
la unidad de CD-ROM.
6.
Aparecerá el cuadro de diálogo
Ahora puede instalar el controlador.
* Si aparece un cuadro de diálogo diferente a Listo para instalar el controlador, siga las
instrucciones que se muestran en el cuadro de diálogo.
7.
Configure el interruptor de
posiciûn de ENCENDIDO.
* La instalación no ocurrirá correctamente si el interruptor se APAGA.
8.
Coloque el
(encendido).
9.
El controlador se instalará automáticamente.
10.
En el cuadro de diálogo, haga clic en [Aceptar].
* Si aparece un mensaje que le recomienda que reinicie Windows, reinicie el sistema operativo
como se le indica.
, vaya a la carpeta
denominada
Inicio
de Windows. En el menú que aparecerá, seleccione
“Ejecutar...”
[Aceptar]
interruptor de alimentación
.
“D:”
puede ser diferente para su sistema. Especifique el nombre de
UM-1X Driver CD-ROM (CD-ROM del
USB_me98
.
SetupInf
CONTROLADOR AVANZADO
, abra el archivo
.
de la unidad UM-1X en la posición ON
“Asistente para agregar
README_E.HTM
el apartado titulado
del UM-1X’ a la
“You
“Abrir”
y
100
 Loading...