

Page 1
For the following languages, a PDF version of the Owner’s Manual can be found on the CD-ROM.
Deutsch, Français, Italiano, Español, Português, Nederlands
Page 2
Flowchart for recording with the TRI-CAPTURE
Install the driver (p. 14).
Do you have a DAW?
Yes.
DAW (Digital Audio
Workstation) is the
generic term used for
music creation software,
such as SONAR, etc.
No.
For details, refer
to the installation
guide of the
SONAR LE.
Windows
Install the included
SONAR LE.
Register SONAR LE.
Set the input/output audio device on the DAW (p. 21).
Connect a guitar or microphone to the TRI-CAPTURE (p. 24).
Set the REC MODE function to “GUITAR/MIC” (p. 24).
Mac OS X
Prepare the DAW software,
such as GarageBand, Logic,
etc.
Recording
Page 3
USING THE UNIT SAFETY
Before using this unit, carefully read the sections entitled: “USING THE UNIT SAFELY” and “IMPORTANT NOTES” (p. 3;
p. 5). These sections provide important information concerning proper operation of the unit. Additionally, in order
to feel assured that you have gained a good grasp of every feature provided by your new unit, the Owner’s Manual
should be read in its entirety. The manual should be saved and kept on hand as a convenient reference.
About WARNING and CAUTION Notices
Used for instructions intended to alert the
user to the risk of death or severe injury
should the unit be used improperly.
Used for instructions intended to alert the
user to the risk of injury or material
damage should the unit be used
improperly.
* Material damage refers to damage or
other adverse effects caused with
respect to the home and all its
furnishings, as well to domestic animals
or pets.
ALWAYS OBSERVE THE FOLLOWING
Do not open or perform any internal
modications on the unit.
Do not attempt to repair the unit, or replace
parts within it (except when this manual
provides specic instructions directing you
to do so). Refer all servicing to your retailer,
the nearest Roland Service Center, or an
authorized Roland distributor, as listed on the
“Information” page.
About the Symbols
The symbol alerts the user to important instructions or
warnings.The specific meaning of the symbol is
determined by the design contained within the triangle. In
the case of the symbol at left, it is used for general
cautions, warnings, or alerts to danger.
The symbol alerts the user to items that must never be
carried out (are forbidden). The specific thing that must
not be done is indicated by the design contained within
the circle. In the case of the symbol at left, it means that
the unit must never be disassembled.
The symbol alerts the user to things that must be
carried out. The specific thing that must be done is
indicated by the design contained within the circle. In the
case of the symbol at left, it means that the power-cord
plug must be unplugged from the outlet.
Never install the unit in any of the following
locations.
• Subject to temperature extremes (e.g.,
direct sunlight in an enclosed vehicle, near
a heating duct, on top of heat-generating
equipment); or are
• Damp (e.g., baths, washrooms, on wet
oors); or are
• Exposed to steam or smoke; or are
• Subject to salt exposure; or are
• Humid; or are
• Exposed to rain; or are
• Dusty or sandy; or are
• Subject to high levels of vibration and
shakiness.
Make sure you always have the unit placed
so it is level and sure to remain stable. Never
place it on stands that could wobble, or on
inclined surfaces.
3
Page 4
USING THE UNIT SAFETY
This unit, either alone or in combination with
an amplier and headphones or speakers,
may be capable of producing sound levels
that could cause permanent hearing loss.
Do not operate for a long period of time
at a high volume level, or at a level that
is uncomfortable. If you experience any
hearing loss or ringing in the ears, you should
immediately stop using the unit, and consult
an audiologist.
Do not place containers containing liquid on
this product. Never allow foreign objects (e.g.,
ammable objects, coins, wires) or liquids
(e.g., water or juice) to enter this product.
Doing so may cause short circuits, faulty
operation, or other malfunctions.
Immediately disconnect the USB cable,
and request servicing by your retailer,
the nearest Roland Service Center, or an
authorized Roland distributor, as listed on the
“Information” page when:
• Objects have fallen into, or liquid has been
spilled onto the unit; or
• If smoke or unusual odor occurs
• The unit has been exposed to rain (or
otherwise has become wet); or
• The unit does not appear to operate
normally or exhibits a marked change in
performance.
In households with small children, an adult
should provide supervision until the child is
capable of following all the rules essential for
the safe operation of the unit.
Protect the unit from strong impact.
(Do not drop it!)
Try to prevent cords and cables from
becoming entangled. Also, all cords and
cables should be placed so they are out of the
reach of children.
Never climb on top of, nor place heavy objects
on the unit.
Disconnect all cords coming from external
devices before moving the unit.
Always turn the phantom power o when
connecting any device other than condenser
microphones that require phantom power.
You risk causing damage if you mistakenly
supply phantom power to dynamic
microphones, audio playback devices, or other
devices that don’t require such power. Be sure
to check the specications of any microphone
you intend to use by referring to the manual
that came with it.
(This instrument’s phantom power: 48 V DC, 10 mA Max)
DO NOT play a CD-ROM disc on a conventional
audio CD player. The resulting sound may be
of a level that could cause permanent hearing
loss. Damage to speakers or other system
components may result.
4
Page 5

IMPORTANT NOTES
Power Supply
• Before connecting this unit to other devices, turn o the
power to all units. This will help prevent malfunctions
and/or damage to speakers or other devices.
Placement
• Using the unit near power ampliers (or other
equipment containing large power transformers) may
induce hum. To alleviate the problem, change the
orientation of this unit; or move it farther away from the
source of interference.
• This device may interfere with radio and television
reception. Do not use this device in the vicinity of such
receivers.
• Noise may be produced if wireless communications
devices, such as cell phones, are operated in the vicinity
of this unit. Such noise could occur when receiving
or initiating a call, or while conversing. Should you
experience such problems, you should relocate such
wireless devices so they are at a greater distance from
this unit, or switch them o.
• Do not expose the unit to direct sunlight, place it near
devices that radiate heat, leave it inside an enclosed
vehicle, or otherwise subject it to temperature extremes.
Excessive heat can deform or discolor the unit.
• When moved from one location to another where the
temperature and/or humidity is very dierent, water
droplets (condensation) may form inside the unit.
Damage or malfunction may result if you attempt to use
the unit in this condition. Therefore, before using the
unit, you must allow it to stand for several hours, until
the condensation has completely evaporated.
• Depending on the material and temperature of the
surface on which you place the unit, its rubber feet may
discolor or mar the surface.
You can place a piece of felt or cloth under the rubber
feet to prevent this from happening. If you do so,
please make sure that the unit will not slip or move
accidentally.
• Do not put anything that contains water (e.g., ower
vases) on this unit. Also, avoid the use of insecticides,
perfumes, alcohol, nail polish, spray cans, etc., near the
unit. Swiftly wipe away any liquid that spills on the unit
using a dry, soft cloth.
Maintenance
• For everyday cleaning wipe the unit with a soft, dry
cloth or one that has been slightly dampened with
water. To remove stubborn dirt, use a cloth impregnated
with a mild, non-abrasive detergent. Afterwards, be sure
to wipe the unit thoroughly with a soft, dry cloth.
• Never use benzine, thinners, alcohol or solvents of any
kind, to avoid the possibility of discoloration and/or
deformation.
Additional Precautions
• Use a reasonable amount of care when using the unit’s
buttons, sliders, or other controls; and when using
its jacks and connectors. Rough handling can lead to
malfunctions.
• When connecting / disconnecting all cables, grasp the
connector itself—never pull on the cable. This way
you will avoid causing shorts, or damage to the cable’s
internal elements.
• To avoid disturbing your neighbors, try to keep the
unit’s volume at reasonable levels. You may prefer to use
headphones, so you do not need to be concerned about
those around you.
• When you need to transport the unit, package it in the
box (including padding) that it came in, if possible.
Otherwise, you will need to use equivalent packaging
materials.
• Some connection cables contain resistors. Do not use
cables that incorporate resistors for connecting to this
unit. The use of such cables can cause the sound level to
be extremely low, or impossible to hear. For information
on cable specications, contact the manufacturer of
the cable.
Handling CDs
• Avoid touching or scratching the shiny underside
(encoded surface) of the disc. Damaged or dirty CD discs
may not be read properly. Keep your discs clean using a
commercially available CD cleaner.
5
Page 6

IMPORTANT NOTES
* Microsoft, Windows and Windows Vista are either
registered trademarks or trademarks of Microsoft
Corporation.
* Windows® is known ocially as: “Microsoft® Windows®
operating system.”
* The screen shots in this document are used in
compliance with the guidelines of the Microsoft
Corporation.
* Macintosh, Mac OS are either registered trademarks or
trademarks of Apple Inc.
* Cakewalk is a registered trademark of Cakewalk, Inc. in
the United States.
* SONAR LE is a trademark of Cakewalk, Inc.
* ASIO is a trademark of Steinberg Media Technologies
GmbH.
* Company names and product names appearing in this
document are registered trademarks or trademarks of
their respective owners.
* MMP (Moore Microprocessor Portfolio) refers to a
patent portfolio concerned with microprocessor
architecture, which was developed by Technology
Properties Limited (TPL). Roland has licensed this
technology from the TPL Group.
Copyright © 2011 ROLAND CORPORATION
All rights reserved. No part of this publication may be reproduced in any form without the written
permission of ROLAND CORPORATION.
Roland is a registered trademark of Roland Corporation in the United States and/or other countries.
6
Page 7

Contents
USING THE UNIT SAFETY .......................................................................................................................3
IMPORTANT NOTES .................................................................................................................................5
Contents of the Package ........................................................................................................................8
Panel Descriptions ............................................................................................................................... 10
Top Panel .....................................................................................................................................................................................10
Rear Panel .................................................................................................................................................................................... 12
Bottom Panel .............................................................................................................................................................................. 13
Driver Installation ................................................................................................................................ 14
Conrm that Sound can be Heard ...................................................................................................................................... 19
How to Use ............................................................................................................................................ 21
Input/Output Device Settings .............................................................................................................................................. 21
Playing Back ................................................................................................................................................................................ 22
Recording ....................................................................................................................................................................................23
Recording Microphone or Guitar Sound (MIC/GUITAR) ................................................................................24
Recording Microphone or Guitar Sound Along with Audio Device Sound (ALL INPUTS) ................ 26
Record Microphone or Guitar Sound While Mixing it with Audio Data Played on a Computer
(LOOP BACK) .................................................................................................................................................................
Troubleshooting ................................................................................................................................... 30
Problems When Installing the Driver .................................................................................................................................30
Problems When Using the TRI-CAPTURE .......................................................................................................................... 31
Changing Computer Settings to Avoid Problems ........................................................................................................36
Driver Signing Options Setting (Windows XP) .................................................................................................36
Power Management Settings ................................................................................................................................. 37
System “Performance” Settings (Windows) .......................................................................................................38
Setting the System Volume ..................................................................................................................................... 39
Voice Communication Software Settings (Windows 7) ................................................................................40
Monitoring Function Settings (Windows 7) ......................................................................................................40
Reinstalling the Driver ............................................................................................................................................................41
Deleting the Driver ..................................................................................................................................................... 41
Advanced Driver Settings ...................................................................................................................................................... 43
28
Main Specications .............................................................................................................................. 45
Index ....................................................................................................................................................... 47
Block Diagrams for REC MODE .......................................................................................................... 48
MIC/GUITAR ................................................................................................................................................................................48
ALL INPUTS ..................................................................................................................................................................................48
LOOP BACK ..................................................................................................................................................................................49
7
Page 8

Contents of the Package
After you open the package, please check that all items are present.
(If any accessories are missing, please contact the place of purchase.)
TRI-CAPTURE
Owner’s Manual
This is the document you’re reading. Keep it at hand for reference when needed.
TRI-CAPTURE Driver CD-ROM
This CD-ROM contains the TRI-CAPTURE drivers and demo songs.
Cakewalk SONAR LE DVD-ROM (Windows)
DAW software allows you to record or play audio data on a computer.
For details on using SONAR LE, user registration, and obtaining a registration code, refer to the
installation guide (included on the DVD-ROM), or to the Help function of the software.
* Avoid touching or scratching the shiny underside (encoded surface) of a disc. Damaged or dirty
discs may not be read properly. Use a commercially available CD-ROM/DVD-ROM cleaner to keep
your disc clean.
* You need DAW software for Mac OS X.
USB cable
Use this cable to connect the TRI-CAPTURE to the USB connector of your computer.
* Please use only the included USB cable. If you require a replacement due to loss or damage,
please contact the nearest Roland Service center, or an authorized Roland distributor, as listed
on the “Information” page.
8
Page 9

Contents of the Package
You’ll need to provide the following items
• External amplier, speakers, headphones, etc., for listening to the sound that is output via the
TRI-CAPTURE
• Microphone, guitar, etc., for inputting audio to the TRI-CAPTURE
9
Page 10
Panel Descriptions
Note
Do not connect the TRI-CAPTURE to the computer until the driver has been installed (p. 14).
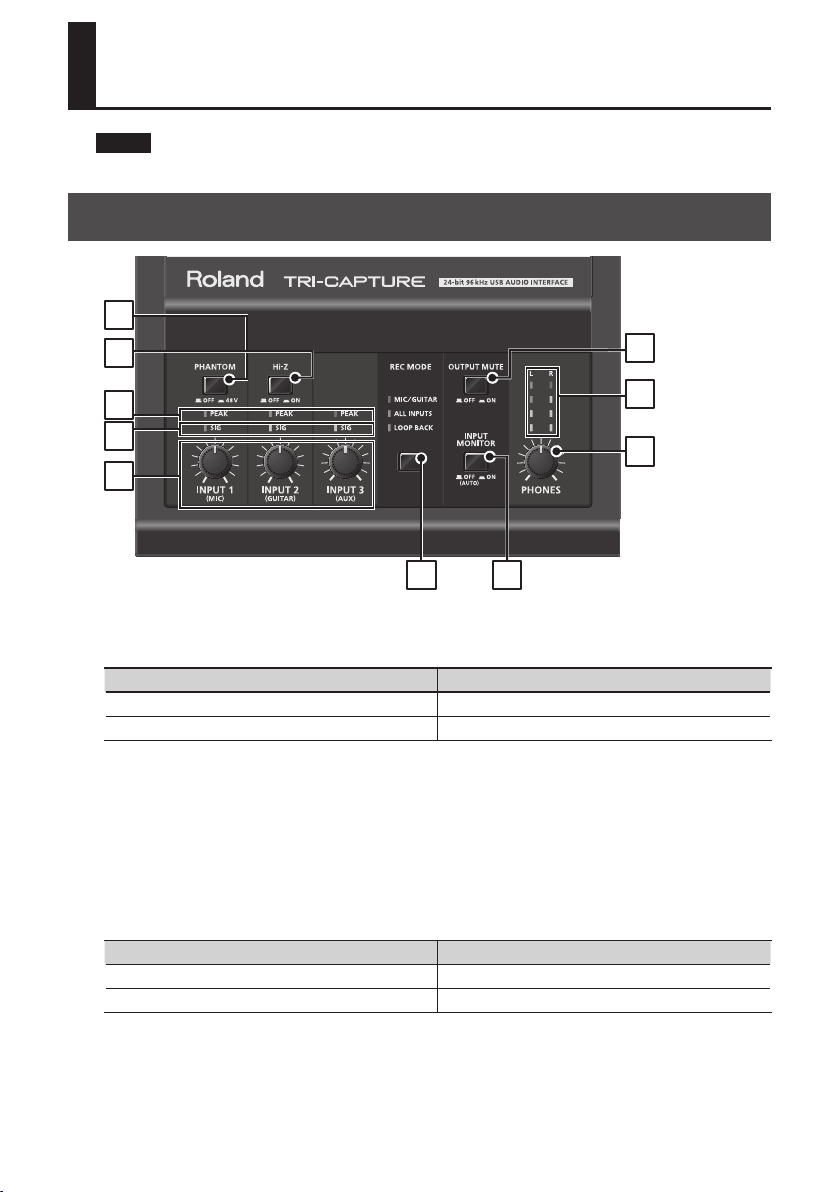
Top Panel
1
2
8
3
4
5
6
7
9
10
1. [PHANTOM] button
Switches on or o the supply of phantom power to the XLR type jacks of the INPUT 1 (MIC) jack.
Connected equipment [PHANTOM] button
Condenser microphone 48V
Other equipment OFF
You must leave the [PHANTOM] button set to “OFF” unless condenser microphones requiring
phantom power are connected to the XLR type jacks. Supplying phantom power to a dynamic
microphone or to an audio playback device may cause malfunctions. For details on the requirements
of your microphone, refer to its owner’s manual.
TRI-CAPTURE’s phantom power supply: DC 48 V, 10 mA maximum
2. [Hi-Z] button
Switches the impedance of the INPUT 2 (GUITAR) jack. You can select high impedance (Hi-Z) or low
impedance (Lo-Z) as appropriate for the connected equipment.
Connected equipment [Hi-Z] button
Guitar or bass ON (High impedance)
Other equipment OFF (Lo impedance)
10
Page 11
Panel Descriptions
3. PEAK indicators
Light up when level of the input signal is too high. Use the [INPUT 1 (MIC)], [INPUT 2 (GUITAR)], and
[INPUT 3 (AUX)] knobs to adjust the input level so that a PEAK indicator does not light.
4. SIG indicators
The corresponding indicator lights up when an audio signal is input via the INPUT 1 (MIC), INPUT 2
(GUITAR), or INPUT 3 (AUX) jack.
5. [INPUT 1 (MIC)] knob, [INPUT 2 (GUITAR)] knob, [INPUT 3 (AUX)] knob
Adjust the volume of the audio signal input via the INPUT 1 (MIC), INPUT 2 (GUITAR), or INPUT 3
(AUX) jack(s).
The input volume will not be set to zero even if the [INPUT 1 (MIC)] knob is turned fully to the left.
The input volume is set to zero if the [INPUT 2 (GUITAR)] or [INPUT 3 (AUX)] knob is turned fully to the
left.
6. [REC MODE] button
The TRI-CAPTURE has three recording modes. You can change the recording mode by pressing this
button (p. 23).
7. [INPUT MONITOR] button
Sets whether to directly output the
input signal.
When the [INPUT MONITOR] button
is set to “ON,” you can listen to the
instrument’s output directly without
passing the audio signal through the
computer.
When the [INPUT MONITOR] button
is set to “OFF,” the instrument’s audio
signal passes through the computer,
therefore the sound may be delayed.
When ASIO 2.0-compatible software is
used, the ASIO Direct Monitor setting
determines this setting.
8. [OUTPUT MUTE] button
Switches on or o output of the audio signal from the OUTPUT jack.
The audio signal is output from the PHONES jack regardless of the [OUTPUT MUTE] button setting.
9. Output level indicators
Indicate the output volume. The output level indicators work regardless of the [OUTPUT MUTE]
button’s setting.
INPUT 1 (MIC)
INPUT 2 (GUITAR)
INPUT 3 (AUX)
ON
+
OFF
[INPUT MONITOR] button
+
OUTPUT
PHONES
11
Page 12
Panel Descriptions
10. [PHONES] knob
Adjusts the volume of the audio signal that is output from the PHONES jack.
* The volume of the signals output from the OUTPUT jacks cannot be adjusted on the TRI-
CAPTURE itself.
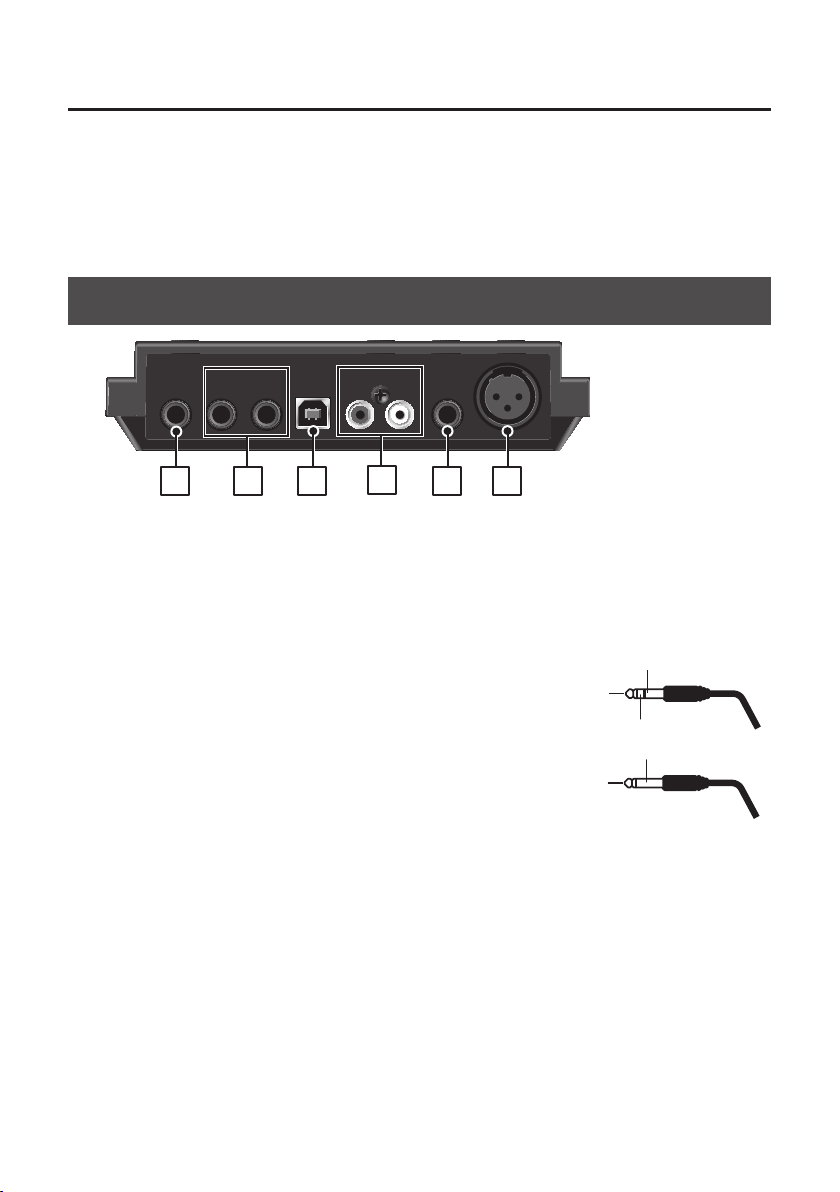
Rear Panel
11 12
13
14
15 16
11. PHONES jack
Used to connect headphones. The audio signal is output from the PHONES jack regardless of the
[OUTPUT MUTE] button’s setting.
12. OUTPUT jack (combined balanced TRS/unbalanced TS)
Outputs the analog audio signal.
* Wiring diagrams for the balanced TRS type jack are
shown in the illustration. Make connections only after
rst checking the pin outs of the other equipment you
intend to connect.
An unbalanced TS type jack can also be connected.
GND (SLEEVE)
HOT (TIP)
COLD (RING)
GND (SLEEVE)
HOT (TIP)
13. USB connector
Used to connect to a computer.
Before connecting, you must install the driver (p. 14).
14. INPUT 3 (AUX) jacks
Used to connect an audio device.
Adjust the volume of the audio input signal by using the [INPUT 3 (AUX)] knob.
15. INPUT 2 (GUITAR) jack
Used to connect a guitar or bass.
Adjust the volume of the audio input signal by using the [INPUT 2 (GUITAR)] knob.
12
Page 13
Panel Descriptions
16. INPUT 1 (MIC) jack
This is an analog audio input jack. Rated input level: -60– -30 dBu
This jack can provide 48 V phantom power, allowing you to connect a phantom-powered condenser
microphone. In this case, set the [PHANTOM] button to “48V.”
* This instrument is equipped with balanced (XLR, TRS) type
jacks. Wiring diagrams for these jacks are shown in the
illustration.Make connections after rst checking the wiring
diagrams of other equipment you intend to connect.
3: COLD
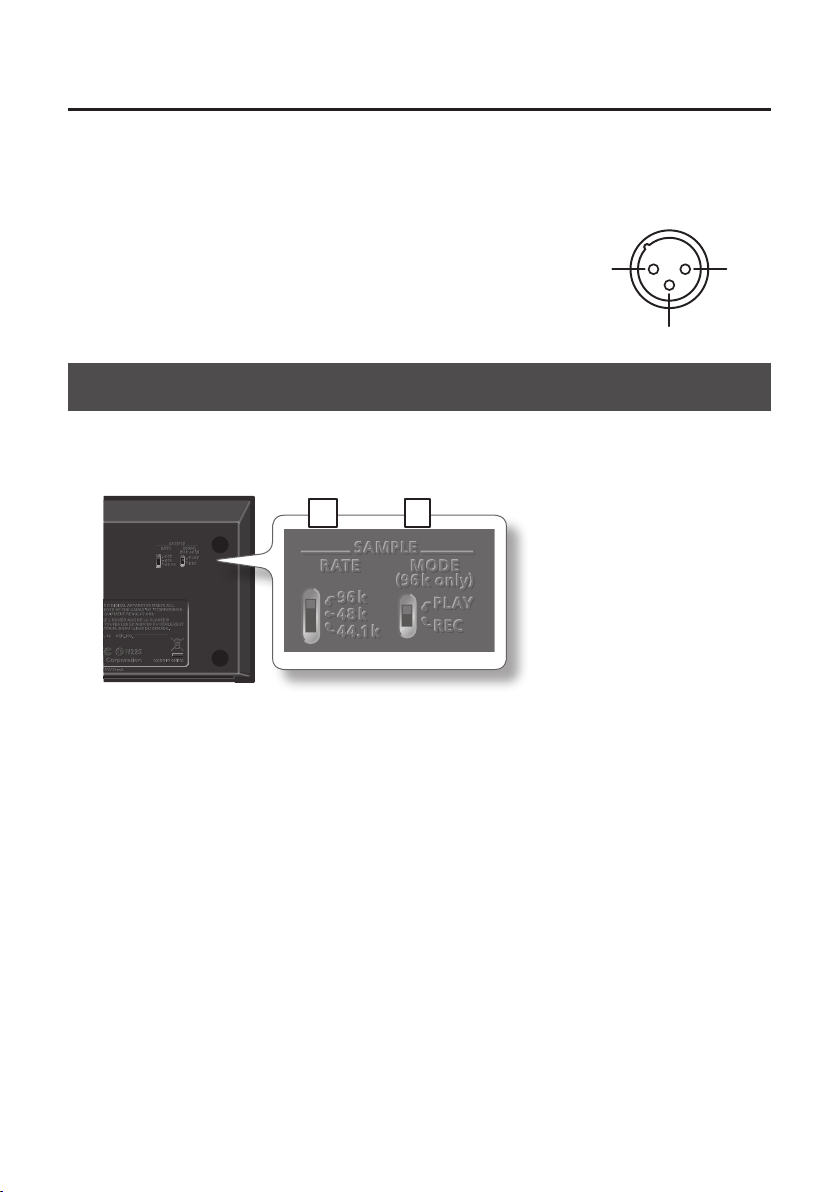
Bottom Panel
* When turning the unit upside-down, get a bunch of newspapers or magazines, and place them
under the four corners or at both ends to prevent damage to the buttons and controls. Also, you
should try to orient the unit so no buttons or controls get damaged.
17 18
1: GND2: HOT
17. [SAMPLE RATE] switch
Sets the sampling rate for the audio signal to be recorded or played.
When you switch the sampling rate, disconnect the USB cable that connects the TRI-CAPTURE and
computer, then reconnect it.
18. [MODE] switch
Selects recording mode or playback mode when the [SAMPLE RATE] switch is set to “96k.”
When the [SAMPLE RATE] switch is set to “96k,” the TRI-CAPTURE cannot record and play audio data
simultaneously. For recording, set the [MODE] switch to “REC,” and for playback, set the [MODE]
switch to “PLAY.”
13
Page 14
Driver Installation
Windows
Note
Do not connect the TRI-CAPTURE to the computer until you are directed to do so.
A “driver” is software that transfers data between the TRI-CAPTURE and application software
running on your computer when your computer and the TRI-CAPTURE are connected.
1. Start up the computer without the TRI-CAPTURE connected.
Disconnect all USB cables other than those for a USB keyboard and/or USB mouse (if used).
Windows
Log on to the computer with a user account that has administrator privileges.
2. Exit all applications that are running.
3. Insert the included CD-ROM into the CD-ROM drive.
Windows
If the AutoPlay dialog box appears, click [Open folder to view les].
4. Of the following, double-click the relevant le on the included CD-ROM to start
the installer.
Operating System File
Windows [Setup] in the [WinDriver] folder
Mac OS X [TriCapture_USBDriver.mpkg] in the [MacDriver] folder
Refer to the Roland website for information about drivers and compatibility with the latest
operating system versions.
http://www.roland.com/
Mac OS X
14
Windows
Mac OS X
users: continue to p. 15
users: continue to p. 18
Page 15
Driver Installation
Windows
5. When a conrmation screen regarding user account control appears, click [Yes]
or [Continue].
6. When “The TRI-CAPTURE Driver will be installed on your computer.” appears,
click [Next].
7. Click [Next] again.
Windows 7/Windows Vista
If a dialog box regarding Windows security appears, click [Install].
Windows XP
If the “Software Installation” dialog box appears, click [Continue] to proceed with the
installation.
If you cannot proceed, click [OK] to cancel the installation. Change the settings as
described in “Driver Signing Options Setting (Windows XP)” (p. 36) and try installing again.
8. When “Ready to install the driver.” appears,
connect the TRI-CAPTURE to the computer
using the USB cable.
* Turn down the volume on any peripheral devices
before connecting the USB cable.
* This unit is equipped with a protection circuit. A
brief interval (a few seconds) after power up is
required before the unit will operate normally.
* Before switching the power on/o, always be sure to
turn the volume down. Even with the volume turned
down, you might hear some sound when switching the power on/o. However, this is
normal and does not indicate a malfunction.
* It may take several minutes for the driver to be installed.
Windows 7/Windows Vista
If other messages appear, follow the instructions on the screen. The driver will be installed
automatically.
Windows XP
“Found new hardware” will appear in the lower-right corner of the screen.
Windows 7/Windows Vista users: continue to p. 16
Windows XP users: continue to p. 17
15
Page 16
Driver Installation
Windows 7/Windows Vista
9. When “Installation has been completed.” appears, click [Close].
If the “System Settings Change” dialog box appears, click [Yes] to restart Windows.
10. Open the “Control Panel,” click [Hardware and Sound], and then click [Sound].
If you have selected Icon view or Classic view, double-click [Sound].
11. Click the [Playback] tab, select the TRI-CAPTURE’s [OUT], and then click [Set
Default].
12. Click [OK].
Proceed to p. 19
If you cannot select the TRI-CAPTURE, refer to “Problems When Using the TRI-CAPTURE” (p. 31).
If the TRI-CAPTURE is selected as the output device, the computer’s audio alerts will be played
using the TRI-CAPTURE; they will not be heard from the computer’s speakers.
16
Page 17

Driver Installation
Windows XP
9. If a dialog box that asks whether you want
to connect to Windows Update appears,
select [No, not this time] and click [Next].
10. Select [Install the software automatically
(Recommended)] and click [Next].
11. If the “Hardware Installation” dialog box appears,
click [Continue Anyway] to proceed with the
installation.
12. When “Completing the Found New Hardware
Wizard” appears, click [Finish].
13. When “Installation has been completed.” appears,
click [Close].
If the “Change System Settings” dialog box appears, click [Yes] to restart Windows.
14. Open the “Control Panel,” click [Sounds, Speech, and Audio Devices], and
then click [Sounds and Audio Devices].
If you have selected Classic view, double-click [Sounds and Audio Devices].
15. Click the [Audio] tab and select [OUT (TRI-CAPTURE)].
16. Click [OK].
Proceed to p. 19
If you cannot select the TRI-CAPTURE, refer to “Problems When Using the TRI-CAPTURE” (p. 31).
If the TRI-CAPTURE is selected as the output device, the computer’s audio alerts will be
played using the TRI-CAPTURE; they will not be heard from the computer’s speakers.
17
Page 18

Driver Installation
Mac OS X
If the “Authenticate” or “Installer requires that you type your password” dialog box appears
during the installation, enter an administrator password and click [OK] or [Install Software].
5. When “Welcome to the TRI-CAPTURE Driver installer” appears, click [Continue].
6. If the screen for selecting the installation destination appears, select the startup
disk and click [Continue].
7. When the installation type appears, click [Install] or [Upgrade].
8. Click [Continue Installation].
9. When installation has nished, click [Restart] to restart the computer.
It may take some time for the computer to restart.
10. After the computer restarts, connect the
TRI-CAPTURE to the computer using the USB
cable.
* Turn down the volume on any peripheral devices
before connecting the USB cable.
* This unit is equipped with a protection circuit. A
brief interval (a few seconds) after power up is
required before the unit will operate normally.
* Before switching the power on/o, always be sure to turn the volume down. Even with
the volume turned down, you might hear some sound when switching the power on/o.
However, this is normal and does not indicate a malfunction.
11. Open “System Preferences” and click [Sound].
12. Click the [Output] tab and select [TRI-CAPTURE].
13. When you have nished making these settings, quit “System Preferences.”
Proceed to p. 19
If you cannot select the TRI-CAPTURE, refer to “Problems When Using the TRI-CAPTURE” (p. 31).
If the TRI-CAPTURE is selected as the output device, the computer’s audio alerts will be
played using the TRI-CAPTURE; they will not be heard from the computer’s speakers.
18
Page 19

Conrm that Sound can be Heard
Driver Installation
Windows
1. Connect the headphones or amplied speakers as shown in the gure.
Amplied speakersHeadphones
* To prevent malfunction and/or damage to speakers or other devices, always turn down the
volume, and disconnect the USB cable on all devices before making any connections.
2. Open the folder named [Sample] on the included CD-ROM, and copy the le
“TTears” (.mp3) to the desktop.
3. Double-click the le “TTears” (.mp3) that has been copied to the desktop.
Windows
Windows Media Player starts.
Mac OS X
iTunes starts.
Click the playback button to play the sample le.
The software that starts and is used to play the sample le may vary depending on your
computer environment. If dierent software starts, play the sample le as described in the
owner’s manual for the software you are using.
Mac OS X
* The copyright of content in this product (the sound waveform data, style data,
accompaniment patterns, phrase data, audio loops and image data) is reserved by Roland
Corporation and/or Atelier Vision Corporation.
19
Page 20

Driver Installation
4. Adjust the volume.
Use the TRI-CAPTURE’s [PHONES] knob to adjust the volume.
* The volume of the signals output from the OUTPUT jacks cannot be adjusted on the
TRI-CAPTURE itself.
If the sample le can be heard, the computer and TRI-CAPTURE are connected properly and the
driver has been successfully installed.
If you cannot hear the sample le, refer to “Problems When Using the TRI-CAPTURE” (p. 31).
20
Page 21

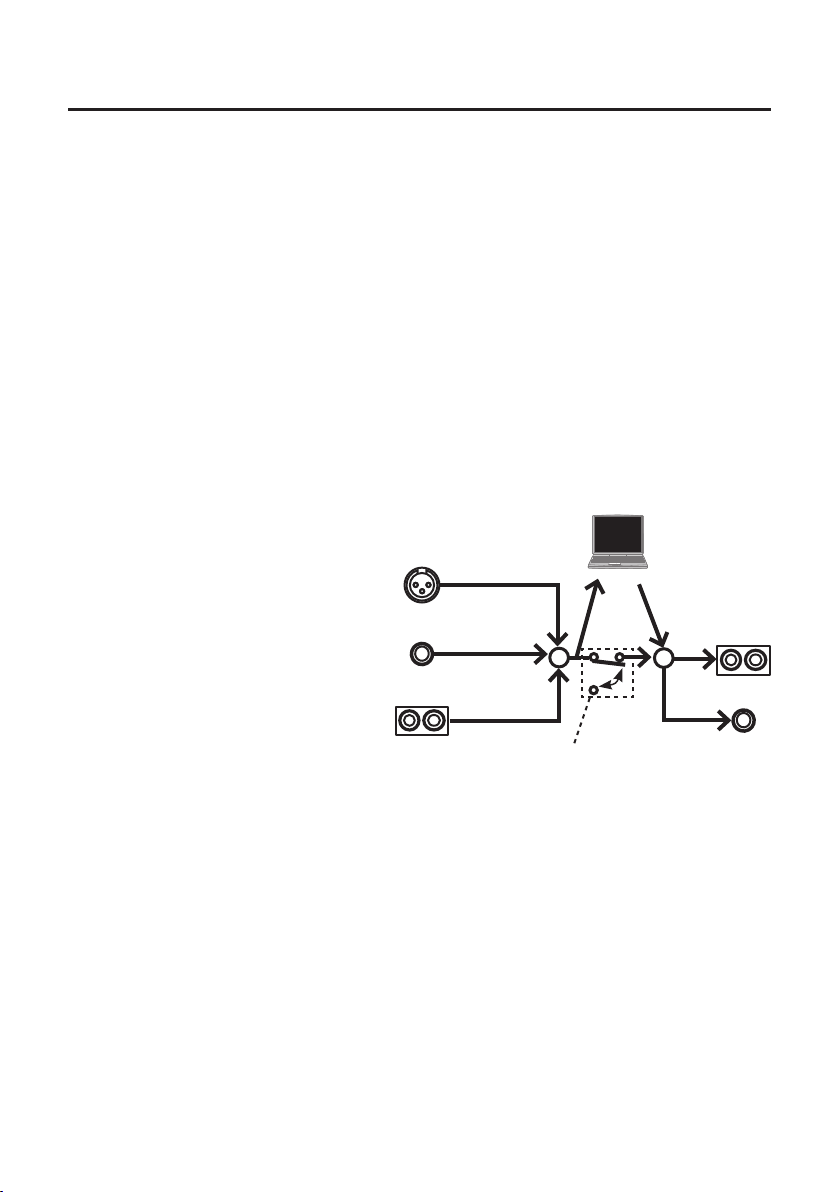
How to Use
This section explains the basic connections and settings for the TRI-CAPTURE.
Refer also to the block diagrams (p. 48).
Precautions Concerning the Use of Software
Before using any software, please note the following points.
• Connect the TRI-CAPTURE to the computer before starting the software.
• Do not disconnect the TRI-CAPTURE from the computer while the software is running. After
exiting the software, disconnect the TRI-CAPTURE.
• Select the TRI-CAPTURE for your software’s audio device setting.
• Match the sampling rate of the software to the setting of the [SAMPLE RATE] switch on the
bottom panel.
• The TRI-CAPTURE will not operate in the Mac OS X Classic environment. Use the TRI-CAPTURE
when the Classic environment is not running.
Input/Output Device Settings
To play and record audio data on your software, select the TRI-CAPTURE as the audio input/output
device. For details about settings, refer to the documentation for your software.
Audio Output Device
Device name MME, WDM/KS ASIO Core Audio
TRI-CAPTURE OUT (TRI-CAPTURE) OUT 1-2 1, 2
Audio Input Device
Device name MME, WDM/KS ASIO Core Audio
TRI-CAPTURE IN (TRI-CAPTURE) IN 1-2 1, 2
21
Page 22

How to Use
Playing Back
Connect the TRI-CAPTURE to a computer using the USB cable. Audio data is transferred in both
directions between the TRI-CAPTURE and computer via the USB cable.
By connecting headphones or amplied speakers as shown in the illustration, you can monitor
playback from your DAW software or the sound from an instrument or audio device connected to
the TRI-CAPTURE.
Amplied speakersHeadphones
Audio output device of
software: TRI-CAPTURE
Computer
Rear panel
Front panel
Set the [OUTPUT
MUTE] button
to ”ON” to
not output
sound from the
speakers.
* To carry out playback at a sampling rate of 96 kHz, set the [SAMPLE RATE] switch on the bottom
panel to “96k,” and set the [MODE] switch on the bottom panel to “PLAY.”
22
Use the
[PHONES] knob
to adjust the
volume of the
headphones.
Page 23

How to Use
Recording
Using your software, you can record sound input via the INPUT 1–3 jacks. You can also record sound
input to the TRI-CAPTURE while combining it with audio data played on the computer.
The TRI-CAPTURE has three recording modes. Select the mode that is appropriate for the purpose
you have in mind.
Front panel
MIC/GUITAR
Record microphone or guitar
sound (p. 24).
ALL INPUTS
Record microphone or guitar
sound along with audio device
sound (p. 26).
LOOP BACK
Record microphone or guitar
sound while mixing it with audio
data played on the computer
(p. 28).
Precautions Concerning the Use of an External Audio Device
• To play an input audio signal without latency (a short period of delay between the
performance and the playback), set the [INPUT MONITOR] button to ”ON.”
• Howling could be produced depending on the location of microphones relative to speakers.
This can be remedied by:
1. Changing the orientation of the microphone(s).
2. Relocating microphone(s) at a greater distance from speakers.
3. Lowering the volume levels.
4. Setting the [OUTPUT MUTE] button to “ON.”
Mute the sound output from the speakers. Use headphones.
* To record at a sampling rate of 96 kHz, set the [SAMPLE RATE] switch on the bottom panel to
“96k,” and set the [MODE] switch on the bottom panel to “REC.”
23
Page 24

How to Use
Recording Microphone or Guitar Sound (MIC/GUITAR)
When you set the recording mode to “MIC/GUITAR,” you can record microphone and guitar sounds
on each track individually.
Set the input port for the track in the software.
When using SONAR, set as follows:
Amplied speakersHeadphones
When recording the microphone sound: Left IN
(TRI-CAPTURE)
When recording the guitar sound: Right IN (TRICAPTURE)
Computer
Rear panel
When connecting a guitar or
bass, set the [Hi-Z] button to
“ON” (p. 10).
Use the [INPUT 1 (MIC)] and [INPUT 2 (GUITAR)] knobs to adjust the input level so that the PEAK
indicator does not light.
24
When connecting
a condenser
microphone, set the
[PHANTOM] button to
“48V.”
Make sure that the
[PHANTOM] button
is set to “OFF” when
connecting a dynamic
microphone that does
not require phantom
power (p. 10).
Page 25

How to Use
Features of the “MIC/GUITAR” Mode
• You can separately edit audio data recorded from a microphone and guitar.
By setting the input port of the track to monaural in the software, the microphone sound will be
recorded on the left channel (L), and the guitar sound will be recorded on the right channel (R).
• You cannot record or monitor sound input via the INPUT 3 (AUX) jacks.
When recording sound input via the INPUT 3 (AUX) jacks, set the [REC MODE] button to “ALL INPUTS”
or “LOOP BACK.”
• In “MIC/GUITAR” mode, you cannot record audio data played on the computer.
To record audio data played on the computer, set the [REC MODE] button to “LOOP BACK.”
Examples of How to Use the ”MIC/GUITAR” Mode
• Recording microphone and guitar sound simultaneously on the DAW software, and editing
the recorded audio data separately
25
Page 26

How to Use
Recording Microphone or Guitar Sound Along with Audio Device Sound (ALL INPUTS)
When you set the recording mode to “ALL INPUT,” you can record microphone and/or guitar sound in
combination with the stereo sound of an audio device.
Select the “ALL INPUT” mode when recording microphone or guitar sound with the stereo playback
of the audio device.
Amplied speakersHeadphones
Set the input port for the track in the software.
When using SONAR, set to “Stereo IN (TRI-CAPTURE).”
Computer
Rear panel
26
When connecting
a condenser
microphone, set the
[PHANTOM] button to
“48V.”
Audio device
Make sure that the
[PHANTOM] button
is set to “OFF” when
connecting a dynamic
microphone that does
not require phantom
power (p. 10).
When
connecting a
guitar or bass, set
the [Hi-Z] button
to “ON” (p. 10).
Page 27

How to Use
Use the corresponding knob ([INPUT 1 (MIC)], [INPUT 2 (GUITAR)], or [INPUT 3 (AUX)]) to adjust the
volume of the microphone, guitar, or audio device so its PEAK indicator does not light.
Features of the “ALL INPUT” Mode
• Microphone or guitar sound is localized at the center.
• If you record audio device sound only, do not connect any equipment to the INPUT 1 (MIC) or INPUT
2 (GUITAR) jack, and turn the [INPUT 1 (MIC)] and [INPUT 2 (GUITAR)] knobs fully to the left.
• In “ALL INPUT” mode, you cannot record audio data played on the computer.
To record audio data played on the computer, set the [REC MODE] button to “LOOP BACK.”
• When recording, sound from the microphone, guitar, and audio device is mixed together. You
cannot edit the recorded audio data separately.
Examples of How to Use the ”ALL INPUT” Mode
• Recording the guitar sound while playing a Minus One CD
• Singing with the karaoke sound of an audio device, and recording the vocal and karaoke
sound
• Recording vocal or guitar sound with a synthesizer
• Recording voice-over for a TV or video game, using a microphone
27
Page 28

How to Use
Record Microphone or Guitar Sound While Mixing it with Audio Data Played on a Computer (LOOP BACK)
When you set the recording mode to “LOOP BACK,” you can record microphone, guitar, and/or audio
device sound on another software by combining audio data played on the computer.
Rear panel
Amplied speakersHeadphones
Set the input port in the software.
When using SONAR, set to “Stereo IN (TRI-CAPTURE),”
and set “Driver mode” to [MME] or [ASIO].
Computer
When connecting
a condenser
microphone, set the
[PHANTOM] button to
“48V.”
Audio device
Make sure that the
[PHANTOM] button
is set to “OFF” when
connecting a dynamic
microphone that does
not require phantom
power (p. 10).
28
When
connecting a
guitar or bass, set
the [Hi-Z] button
to “ON” (p. 10).
Page 29

How to Use
Use the corresponding knob ([INPUT 1 (MIC)], [INPUT 2 (GUITAR)], or [INPUT 3 (AUX)]) to adjust the
volume of the microphone, guitar, or audio device so its PEAK indicator does not light.
Features of the “LOOP BACK” Mode
• Microphone or guitar sound is localized at the center.
• If you want to record only the sound played by your computer, do not connect any equipment to
the INPUT 1 (MIC), INPUT 2 (GUITAR), and INPUT 3 (AUX) jacks, and turn the [INPUT 1 (MIC)], [INPUT 2
(GUITAR)], and [INPUT 3 (AUX)] knobs fully to the left.
• If you set the [SAMPLE RATE] switch to “96k,” you cannot set the [REC MODE] button to “LOOP BACK.”
Set the [SAMPLE RATE] switch to “44.1k” or “48k.”
• When recording, sound played by the computer and sound from the microphone, guitar, and audio
device are mixed together. You cannot edit the recorded audio data separately.
Usage Examples for the ”LOOP BACK” Mode
• Singing with the karaoke sound that is played on a web browser or Windows Media Player,
and recording the vocal and karaoke sound on the DAW software
• Inputting personal computer game sound into your software for streaming media delivery
• Using some other software package to record an Internet radio program you are listening to
using a web browser
29
Page 30

Troubleshooting
If you experience problems, read this chapter rst. It contains tips for solving most problems. If this
chapter cannot help you solve a problem, please refer to the support section of our website. If the
problem is not resolved, refer to the contact information listed at the end of this document.
Roland support website: http://www.roland.com/
Problems When Installing the Driver
Problem Conrmation Resolution
Installer does not
start
Cannot install
Warning or error
appears during
installation
(Windows)
Installer does not
exit
“Found New
Hardware Wizard”
appears again
after driver
was installed
(Windows XP)
Numeral such as
“2-” appears at
the beginning of
a device name
(Windows)
Are you attempting to install from a
networked DVD-ROM drive?
Are you logged on with a user account
that does not have administrator
privileges?
Is the “Driver Signing Options” setting set
to [Block]? (Windows XP)
Are other programs or resident programs
(such as antivirus programs) running?
In the “Device Manager,” do you see
“Other device,” “Unknown device,” or a
device for which “?,” “!,” or “x” is displayed?
Is your computer running on battery
power?
Other than a mouse and keyboard, are
any USB devices connected?
Is the TRI-CAPTURE connected to a USB
hub that is not connected to a power
supply?
Did you connect the TRI-CAPTURE to a
dierent USB connector than the one
you used when installing the driver?
Did you connect the TRI-CAPTURE to a
dierent USB connector than the one
you used when installing the driver?
You cannot install from a networked DVD-ROM
drive.
Log on to the computer with a user account that
has administrator privileges.
For details, consult the administrator for your
computer system.
Change the “Driver Signing Options” setting (p. 36).
Be sure to exit all other programs before
installation.
Reinstall the TRI-CAPTURE driver (p. 41).
Connect the power cord to the computer.
Make sure that there are no USB devices connected
to the computer (other than a mouse and
keyboard) during installation.
Use a USB hub that connects to a power supply.
If you change the USB connector to which the TRICAPTURE is connected, the “Found New Hardware
Wizard” may appear again even if the driver has
already been installed on the computer.
Follow step 9 of the driver installation procedure (p.
17) and install the driver.
If you connect the TRI-CAPTURE to a dierent USB
connector than the one you used when installing
the driver, a numeral may appear with the device
name.
To have the device name appear without the
numeral, connect the TRI-CAPTURE to the same
USB connector used during installation, or reinstall
the driver (p. 41).
30
Page 31

Problems When Using the TRI-CAPTURE
Problem Conrmation Resolution
Is the driver installed? Install the driver (p. 14).
Make sure that the TRI-CAPTURE is connected to
the computer correctly.
If the problem is not resolved, reinstall the driver
(p. 41).
Exit all programs that are using the TRI-CAPTURE,
disconnect the TRI-CAPTURE’s USB cable, and then
reconnect it.
If the problem is not resolved, reinstall the driver
(p. 41).
Exit all programs that are using the TRI-CAPTURE,
disconnect the TRI-CAPTURE’s USB cable, and then
reconnect it.
If the problem is not resolved, reinstall the driver
(p. 41).
Exit all programs that are using the TRI-CAPTURE,
disconnect the TRI-CAPTURE’s USB cable, and then
reconnect it.
If the problem is not resolved, restart the computer.
Exit all programs that are using the TRI-CAPTURE,
disconnect the TRI-CAPTURE’s USB cable, and then
reconnect it.
If the problem is not resolved, restart the computer.
Connect the TRI-CAPTURE after the computer has
started up.
With some computers, the TRI-CAPTURE cannot be
used if it is connected to the computer while the
computer is starting up.
Disable the monitoring function (p. 40).
Set the [SAMPLE RATE] switch to “44.1k” or “48k.”
When the [SAMPLE RATE] switch is set to “96k,” you
cannot select “LOOP BACK” by pressing the [REC
MODE] button.
When using the TRI-CAPTURE, no sound is heard
from the computer’s speakers.
Connect headphones or audio playback system
(external monitors) to the TRI-CAPTURE.
Set the [OUTPUT MUTE] button to “OFF.”
Cannot select or
use TRI-CAPTURE
device
Cannot change
driver settings
(Windows 7)
Cannot select
“LOOP BACK” by
pressing the [REC
MODE] button
No sound from
computer’s
speakers
No sound from
the speakers
connected to the
TRI-CAPTURE
Is the REC MODE indicator o?
Is the TRI-CAPTURE’s device name
displayed?
Is another program using the
TRI-CAPTURE?
Did the computer enter standby
(suspend) mode, hibernate mode, or
sleep mode while the TRI-CAPTURE was
connected?
Did you disconnect and reconnect the
USB cable while using the TRI-CAPTURE?
Was the TRI-CAPTURE connected to
the computer while the computer was
starting up?
Is the monitoring function of Windows
enabled?
Is the [SAMPLE RATE] switch set to “96k”?
This is not a malfunction.
Is the [OUTPUT MUTE] button set to
“ON”?
Troubleshooting
31
Page 32

Troubleshooting
Problem Conrmation Resolution
If you can hear sound through headphones
connected to the PHONES jack, check that you have
correctly connected your audio playback system
(external monitors), and adjust the volume of your
equipment.
If the sound in your headphones is inaudible or too
soft, check the other troubleshooting items.
Use the TRI-CAPTURE’s [PHONES] knob to adjust
the volume.
Adjust the computer’s volume setting (p. 39).
Disable automatic volume adjustment (p. 40).
Sound played by
your computer is
inaudible or too
soft
Can you hear sound by connecting
headphones?
Is the [PHONES] knob of the TRICAPTURE turned down?
Is the computer’s volume setting turned
down?
Are you using voice communication
software? (Windows 7)
Is the driver’s audio buer size too small? Increase the buer size (p. 43).
Computer
playback sound is
“doubled”
Insucient
volume from your
microphone
Insucient
volume from your
guitar
The volume level
of the instrument
connected to
input connector is
too low
Is the [REC MODE] button set to “LOOP
BACK”?
Are you using the correct connector?
Does the sensitivity of the microphone
match the nominal input level of the
TRI-CAPTURE?
Also check the contents of “The volume
level of the instrument connected to
input connector is too low.” (p. 32)
Are you using the correct connector?
Is the [Hi-Z] button set to “OFF”? Set the [Hi-Z] button to “ON” (p. 10).
Is the input level too low?
Could you be using a connection cable
that contains a resistor?
Also check the contents of “The volume
level of the instrument connected to
input connector is too low.” (p. 32).
Is the input level too low?
Could you be using a connection cable
that contains a resistor?
Set the [REC MODE] button to “MIC/GUITAR” or “ALL
INPUTS.”
Connect your microphone with an XLR type plug to
the XLR type connector (INPUT 1 (MIC) jack) (p. 13)
The TRI-CAPTURE’s microphone nominal input level
is -60 dBu. If the sensitivity of the microphone is
low, the level will be low.
Connect your guitar to the INPUT 2 (GUITAR) jack
(p. 12).
Use the [INPUT 2 (GUITAR)] knob to adjust the input
level (p. 11).
Use a connection cable that does not contain a
resistor.
Turn the [INPUT 1 (MIC)], [INPUT 2 (GUITAR)], or
[INPUT 3 (AUX)] knob toward the right to increase
the input level (p. 11)
Use a connection cable that does not contain a
resistor.
32
Page 33

Problem Conrmation Resolution
Distorted sound
from a device
connected to the
input jack
Playback of
an instrument
connected to the
input jack of the
TRI-CAPTURE is
“doubled”
Howling occurs Is the microphone near the speakers?
Is the PEAK indicator lighting up?
Is the [INPUT MONITOR] button set to
“ON”?
Are multiple programs running? Exit programs that are not in use.
Turn the [INPUT 1 (MIC)], [INPUT 2 (GUITAR)], or
[INPUT 3 (AUX)] knob toward the left to reduce the
input level (p. 11).
Set the [INPUT MONITOR] button to “OFF.”
Or, set the direct monitor function of the software
to o.
Relocate the microphone away from the speakers.
If howling still occurs, set the [OUTPUT MUTE]
button to “OFF,” and listen to the sound by using the
headphones.
Troubleshooting
Sound is
interrupted
during playback
or recording,
sound drops out
Is the software’s audio buer size set
correctly?
Is the driver’s audio buer size set
correctly?
Is the “Recording Margin” setting
appropriate? (Mac OS X)
Is the system software up to date?
Have you used Mac OS X Software
Update?
Are the drivers for the computer’s
internal chipset and graphics card up
to date?
Are the drivers for the computer’s LAN
hardware (wired and wireless) up to
date?
Is the computer’s power management
setting set to economy mode?
Is the system’s “Performance” setting
correct? (Windows)
Is the TRI-CAPTURE connected to a USB
hub?
Are you using the included USB cable?
If the software allows you to adjust the audio buer
size, change the buer size.
Refer to the documentation for your software.
Increase the driver’s audio buer size (p. 43).
If audio drops out or if noise is heard even if you
have adjusted the audio buer size, increase the
“Recording Margin” setting (p. 44).
Run Windows Update or Microsoft Update and
make sure the system software is up to date.
Run Software Update and make sure the system
software is up to date.
Update to the latest drivers, as necessary.
Install the latest LAN hardware drivers.
If the problem is not resolved, disable the LAN.
Check the power management setting and make
the appropriate setting (p. 37).
Change the system’s “Performance” settings (p. 38).
Connect the TRI-CAPTURE directly to one of the
computer’s USB connectors.
You must use the included USB cable.
Some commercially available USB cables do not
meet the requirements of the USB standard, and
this may prevent the TRI-CAPTURE from operating
correctly.
33
Page 34

Troubleshooting
Problem Conrmation Resolution
Sound is
interrupted
during playback
or recording,
sound drops out
Noise or
distortion occurs
elsewhere than in
the playback from
your computer
Recorded sound
is too loud or too
soft
Is the monitoring function of Windows
enabled? (Windows 7)
Did you try to play back or record
immediately after the computer started
up or after it woke up from sleep mode?
Is a guitar connected?
Could you have left an unused
microphone, guitar, or audio device
connected?
Do you have a MIDI sound module and
the TRI-CAPTURE connected to your
computer with the USB cables, and have
the output of the MIDI sound module
connected to the input jack of the
TRI-CAPTURE?
Have you connected the ground
terminal?
Is the input level appropriate?
Does the sensitivity of the microphone
match the input level of the
TRI-CAPTURE?
Disable the monitoring function (p. 40).
Wait a while before attempting playback or
recording.
Move as far away from the computer as possible.
If the noise decreases when you lower your guitar’s
volume, it may be that your guitar’s pickups are
being aected by noise from your computer or
display.
Disconnect the unused microphone, guitar, or
audio device, and then turn the corresponding
knob ([INPUT 1 (MIC)], [INPUT 2 (GUITAR)], or [INPUT
3 (AUX)]) to the left fully.
Connect the MIDI sound module and the
TRI-CAPTURE to a self-powered USB hub (a USB hub
that uses an AC plug).
You may be able to solve the problem by
grounding a metal component of your computer or
the ground pin of your computer’s AC adaptor.
Also check whether there might be a device nearby
that is emitting a strong electromagnetic eld, such
as a television or microwave oven.
Use the [INPUT 1 (MIC)], [INPUT 2 (GUITAR)], or
[INPUT 3 (AUX)] knob to adjust the input level. If
your software has an input level adjustment, check
the input level setting.
The TRI-CAPTURE’s microphone input level is -60
dBu. If the sensitivity of the microphone is low, the
level will be low.
Cannot play back
or record
34
Is the driver installed? Install the driver (p. 14).
Are the software’s input device and
output device congured?
Is the TRI-CAPTURE’s REC MODE
indicator o?
Select the TRI-CAPTURE as the input and output
device (p. 21).
Make sure that the TRI-CAPTURE is connected to
the computer correctly.
If the problem is not resolved, reinstall the driver
(p. 41).
Page 35

Problem Conrmation Resolution
When the [SAMPLE RATE] switch is set to “96k,”
the TRI-CAPTURE cannot record and play audio
data simultaneously. For playback, set the [MODE]
switch to “PLAY,” and for recording, set the [MODE]
switch to “REC.”
Or, set the [SAMPLE RATE] switch to “44.1k” or “48k.”
Exit all programs that are using the TRI-CAPTURE,
disconnect the TRI-CAPTURE’s USB cable, and then
reconnect it.
If the problem is not resolved, reinstall the driver
(p. 41).
Exit all programs that are using the TRI-CAPTURE,
disconnect the TRI-CAPTURE’s USB cable, and then
reconnect it.
If the problem is not resolved, restart the computer.
Exit all programs that are using the TRI-CAPTURE,
disconnect the TRI-CAPTURE’s USB cable, and then
reconnect it.
If the problem is not resolved, restart the computer.
Adjust the computer’s volume setting (p. 39).
Disable automatic volume adjustment (p. 40).
Connect the TRI-CAPTURE after the computer has
started up.
With some computers, the TRI-CAPTURE cannot be
used if it is connected to the computer while the
computer is starting up.
Cannot play back
or record
Is the [SAMPLE RATE] switch set to “96k”?
Is there another program using the
TRI-CAPTURE?
Did the computer enter standby
(suspend) mode, hibernate mode, or
sleep mode while the TRI-CAPTURE was
connected?
Did you disconnect and reconnect the
USB cable while using the TRI-CAPTURE?
Is the computer’s volume setting turned
down?
Are you using voice communication
software? (Windows 7)
Was the TRI-CAPTURE connected to
the computer while the computer was
starting up?
Troubleshooting
Cannot play or
record 24-bit
audio data
Is the driver’s audio buer size too small? Increase the buer size (p. 43).
Stop playback or recording, and then try playing
Did the computer perform a processorintensive task while you were using the
TRI-CAPTURE?
Does your software support 24-bit audio
data?
Is the software set correctly?
back or recording again.
If the problem is not resolved, exit all programs
that are using the TRI-CAPTURE, disconnect the
TRI-CAPTURE’s USB cable, and then reconnect it.
Check whether your software supports playback
and recording of 24-bit audio data.
Make sure that your software is set to play and
record 24-bit audio data.
35
Page 36

Troubleshooting
Changing Computer Settings to Avoid Problems
Changing these computer settings can help you avoid the problems described in “Problems When
Installing the Driver” (p. 30) and “Problems When Using the TRI-CAPTURE” (p. 31).
Driver Signing Options Setting (Windows XP)
If the “Driver Signing Options” setting is set to [Block], you cannot install the driver. Congure as
follows.
1. Open the “Control Panel,” click [Performance and Maintenance], and then click the
[System] icon.
If you have selected Classic view, double-click [System].
2. Click the [Hardware] tab, and then click [Driver Signing].
The “Driver Signing Options” dialog box will open.
3. In the “Driver Signing Options” dialog box, select [Warn] or [Ignore], and then click
[OK].
4. Click [OK] to close the “System Properties” dialog box.
5. Install the driver as described in “Driver Installation” (p. 14).
When you have completed the installation, return the “Driver Signing Options” setting to its original
setting.
36
Page 37

Troubleshooting
Power Management Settings
If the sound is interrupted during a performance or if sounds are missing, you may be able to resolve
the problem by changing the computer’s power management settings.
Windows 7/Windows Vista
1. Open the “Control Panel,” click [System and Security] or [System and Maintenance],
and then click [Power Options].
• If you have selected Icon view in Windows 7, double-click the [Power Options] icon.
• If you have selected Classic view in Windows Vista, double-click the [Power Options] icon.
2. When “Select a power plan” appears, select [High performance].
3. Click [Change plan settings] next to [High performance].
If “High performance” is not displayed in Windows 7, click [Show additional plans].
4. Click [Change advanced power settings].
5. In the [Advanced settings] tab of the “Power Options” control panel, click the [+] mark
next to “Hard disk,” and then click the [+] mark next to “Turn o hard disk after.”
6. Click [Setting], click the down arrow, and then select [Never].
7. Click [OK] to close the “Power Options” window.
8. Close the “Edit plan settings” screen.
Windows XP
1. Open the “Control Panel,” click [Performance and Maintenance], and then click [Power
Options].
If you have selected Classic view, double-click [Power Options].
2. Click the [Power Schemes] tab, and set “Power schemes” to [Always On].
3. Click [OK] to close “Power Options Properties.”
Mac OS X
This setting is not available on certain versions of Mac OS X.
1. Open “System Preferences” and click [Energy Saver].
2. Click [Options].
3. Set “Processor Performance” to [Highest].
37
Page 38

Troubleshooting
System “Performance” Settings (Windows)
If the sound is interrupted during a performance or if sounds are missing, you may be able to solve
the problem by changing the “Performance” setting of the system as described below.
Windows 7/Windows Vista
1. Open the “Control Panel,” click [System and Security] or [System and Maintenance],
and then click [System].
• If you have selected Icon view in Windows 7, double-click the [System] icon.
• If you have selected Classic view in Windows Vista, double-click the [System] icon.
2. Click [Advanced system settings] at the left.
3. When a User Account Control dialog box appears, click [Yes] or [Continue].
If you’re asked to enter an administrator password, log on to the computer with a user account that
has administrator privileges, and make the setting again.
4. Click [Settings] in “Performance,” and click the [Advanced] tab.
5. Select [Background services] and click [OK].
6. Click [OK] to close “System Properties.”
Windows XP
1. Open the “Control Panel,” click [Performance and Maintenance], and click [System].
If you have selected Classic view, double-click [System].
2. Click the [Advanced] tab, and click [Settings] in “Performance.”
3. Click the [Advanced] tab.
4. Select [Background services], and click [OK].
5. Click [OK] to close “System Properties.”
38
Page 39

Troubleshooting
Setting the System Volume
If the playback volume is too loud or too quiet, try adjusting the system volume.
Windows 7
1. Open the “Control Panel” and set the display mode to “Category.”
2. Click [Hardware and Sound], and then click [Adjust system volume].
3. After the volume mixer appears, select the TRI-CAPTURE’s [OUT] from the “Device”
pull-down menu and adjust the volume.
Windows Vista
1. Open the “Control Panel” and click [Hardware and Sound].
If you have selected Classic view, click [Control Panel Home] to exit Classic view.
2. Click [Adjust system volume] in “Sound.”
3. After the volume mixer appears, select the TRI-CAPTURE’s [OUT] from the “Device”
menu and adjust the volume.
If [Mute] is set to “On,” click [Mute] to set it to “O.”
Windows XP
1. Open the “Control Panel,” click [Sounds, Speech, and Audio Devices], and then click
[Sounds and Audio Devices].
If you have selected Classic view, double-click [Sounds and Audio Devices].
2. Click the [Audio] tab.
3. In the “Sound playback” area, make sure that [OUT (TRI-CAPTURE)] is selected as the
“Default device,” and click [Volume].
4. When the volume control appears, adjust the “Wave” volume.
If the mute check box is selected, clear the check box.
Mac OS X
1. Open “System Preferences” and click [Sound].
2. Click the [Output] tab.
3. In the “Select a device for sound output” area, make sure that [TRI-CAPTURE] is
selected and use the “Output volume” slider to adjust the volume.
If the mute check box is selected, clear the check box.
39
Page 40

Troubleshooting
Voice Communication Software Settings (Windows 7)
If you are using voice communication software, the volume of the audio device can be adjusted
automatically to suit the conversation.
Use the following procedure to disable automatic volume adjustment.
1. Open the “Control Panel,” click [Hardware and Sound], and then click [Sound].
If you have selected Icon view, click [Sound].
2. In the [Communications] tab, set “When Windows detects communications activity” to
[Do nothing].
3. Click [OK] to close “Sound.”
Monitoring Function Settings (Windows 7)
If the monitoring function of Windows is enabled, the input sound may be doubled (each sound is
echoed) or feedback may be heard.
Use the following procedure to disable the monitoring function of Windows.
1. Open the “Control Panel,” click [Hardware and Sound], and then click [Sound].
If you have selected Icon view, click [Sound].
2. In the “Recording” area, click the TRI-CAPTURE’s [IN], and then click [Properties].
3. Click the “Listen” tab and clear the [Listen to this device] check box.
4. Click [OK] to close “Properties.”
5. Click [OK] to close “Sound.”
40
Page 41

Troubleshooting
Reinstalling the Driver
If you experience problems installing the driver, use the following procedure and reinstall the driver.
1. Delete the TRI-CAPTURE’s driver.
2. Install the driver again as described in “Driver Installation” (p. 14).
Deleting the Driver
If the computer does not detect the TRI-CAPTURE correctly, use the following procedure to delete
the driver, and then install the driver again as described in “Driver Installation” (p. 14).
Windows
1. Start up the computer without the TRI-CAPTURE connected.
Disconnect all USB cables other than those for a USB keyboard and/or USB mouse (if used).
2. Log on to the computer with a user account that has administrator privileges.
3. Insert the included CD-ROM into the computer’s DVD-ROM drive.
4. Double-click the [Uninstal] icon in the [WinDriver] folder on the included CD-ROM.
5. When a conrmation screen regarding user account control appears, click [Yes] or
[Continue].
6. When “The installed TRI-CAPTURE driver will be uninstalled.” appears, click [OK].
If other messages appear, follow the instructions on the screen.
7. When “Uninstallation was completed.” appears, click [OK] to restart the computer.
41
Page 42

Troubleshooting
Mac OS X
1. Start up the computer without the TRI-CAPTURE connected.
Disconnect all USB cables other than those for a USB keyboard and/or USB mouse (if used).
2. Insert the included CD-ROM into the computer’s DVD-ROM drive.
3. Double-click [Uninstaller] in the [MacDriver] folder on the included CD-ROM.
4. When “This uninstalls TRI-CAPTURE driver from this Macintosh.” appears, click
[Uninstall].
If other messages appear, follow the instructions on the screen.
5. When “Are you sure you want to uninstall the driver?” appears, click [OK].
The authentication dialog box or the message “Uninstaller requires that you type your password” will
appear.
6. Enter the password and click [OK].
7. When “Uninstallation is completed.” appears, click [Restart] to restart the computer.
It may take some time for the computer to restart.
42
Page 43

Advanced Driver Settings
You can set the input and output audio buer size and ASIO-related settings.
Windows
When using Windows 7, driver settings cannot be changed while the monitoring function of
Windows is enabled. Disable the monitoring function (p. 40).
1. Exit all programs that are using the TRI-CAPTURE.
2. Open the “Control Panel” and set the display mode as follows.
• Windows 7: Icon view
• Windows Vista/Windows XP: Classic view
3. Double-click the [TRI-CAPTURE] icon.
4. From the “Driver” menu, select [Driver Settings].
The “TRI-CAPTURE Driver Settings” dialog box will appear.
Setting Description
You can adjust the input and output audio buer size.
Audio Buer Size
[Use ASIO Direct
Monitor] check box
[Show “README”] You can display the online manual for the driver.
Decrease the buer size to decrease latency. Increase the buer size if audio drops out.
* After adjusting the buer size, make sure to restart all programs that are using the
TRI-CAPTURE. If using software that has an “audio device test” function, run the test
function.
To use the ASIO Direct Monitor function of ASIO-compatible software, select this check
box.
Troubleshooting
43
Page 44

Troubleshooting
Mac OS X
1. Open “System Preferences” and click “TRI-CAPTURE.”
The “Driver Settings” panel appears.
Setting Description
You can adjust the driver’s input and output audio buer size.
Audio Buer Size
Recording Margin
Recording Timing
Decrease the buer size to decrease latency. Increase the buer size if audio drops out.
* After adjusting the buer size, make sure to restart all programs that are using the
TRI-CAPTURE. If using software that has an “audio device test” function, run the test
function.
If audio drops out or if noise is heard, even if you have adjusted the buer size setting
in the software and adjusted the “Audio Buer Size” as explained above, increase the
recording margin setting.
Adjust this setting if the recorded audio data is not in time.
* If the audio software is running, the new setting will not be applied immediately
when [Apply] is clicked. Quit all audio software; The new setting will be applied the
next time you start the software.
44
Page 45

Main Specications
USB Audio Interface: Roland TRI-CAPTURE UA-33
Number of Audio Record/
Playback Channels
Signal Processing 24 bits (linear)
Sampling Frequency 96 kHz, 48 kHz, 44.1 kHz
Nominal Input Level
Nominal Output Level OUTPUT jacks +4 dBu (Balance)
Residual Noise Level
Dynamic Range 100 dB typ.
Interface USB
Rec Mode
Controller
Indicator
Connectors
Power Supply Supplied from the computer via USB
Current Draw 450 mA
Record
Playback
INPUT1 (MIC) jack -60 to -30 dBu
INPUT2 (GUITAR) jack -25 dBu
INPUT3 (AUX) jacks -10 dBu
-93 dBu typ.
(input terminated with 1 k ohms, Input Monitor: OFF, IHF-A, typ.)
MIC/GUITAR
ALL INPUTS
LOOP BACK (Except 96 kHz)
[INPUT1 (MIC)], [INPUT2 (GUITAR)], [INPUT3 (AUX)] knob
[PHONES] knob
[PHANTOM] button
[Hi-Z] button
[REC MODE] button
[OUTPUT MUTE] button
[INPUT MONITOR] button
[SAMPLE RATE] switch
[MODE] switch
PEAK indicators
SIG indicators
INPUT1 (MIC) Jack (XLR type, balanced, phantom power DC 48 V, 10 mA)
* 1/4-inch phone type and plug-in powered microphone cannot connected
INPUT2 (GUITAR) jack (1/4-inch phone type)
INPUT3 (AUX) jacks(L, R) (RCA phono type)
OUTPUT jacks (L, R) (1/4-inch TRS phone type (balanced))
PHONES jack (stereo 1/4-inch phone type)
USB connector (USB Type B)
1 pair of stereo
* All inputs are mixed to 1 pair stereo on ALL
INPUTS and LOOP BACK mode.
1 pair of stereo
Full duplex (Except 96 kHz)
45
Page 46

Main Specications
Dimensions
Weight 320 g / 12 oz. (TRI-CAPTURE unit only)
Accessories
171 (W) x 134 (D) x 40 (H) mm
6-3/4 (W) x 5-5/16 (D) x 1-5/8 (H) inches
Owner’s Manual
CD-ROM
USB cable
Cakewalk SONAR LE DVD-ROM (for Windows)
(0 dBu = 0.775 Vrms)
* In the interest of product improvement, the specications, and/or appearance of this unit are
subject to change without prior notice.
46
Page 47

Index
A
ALL INPUTS . . . . . . . . . . . . . . . . . . . . . . . . . . . . . . . . . . . . . 26, 48
Audio input device . . . . . . . . . . . . . . . . . . . . . . . . . . . . . . . . . 21
Audio output device . . . . . . . . . . . . . . . . . . . . . . . . . . . . . . . 21
B
Bass . . . . . . . . . . . . . . . . . . . . . . . . . . . . . . . . . . . . . . . . . . . . . . . 10
C
Cakewalk SONAR LE . . . . . . . . . . . . . . . . . . . . . . . . . . . . . . . . . . 8
Condenser microphone . . . . . . . . . . . . . . . . . 10, 24, 26, 28
D
Driver
Advanced settings . . . . . . . . . . . . . . . . . . . . . . . . . . . 43
Delete . . . . . . . . . . . . . . . . . . . . . . . . . . . . . . . . . . . . . . . 41
Install. . . . . . . . . . . . . . . . . . . . . . . . . . . . . . . . . . . . . . . . 14
Reinstall . . . . . . . . . . . . . . . . . . . . . . . . . . . . . . . . . . . . . 41
Dynamic microphone . . . . . . . . . . . . . . . . . . . 10, 24, 26, 28
G
Guitar . . . . . . . . . . . . . . . . . . . . . . . . . . . . . . . . . . . . . . . . . . . . . 10
H
[Hi-Z] button . . . . . . . . . . . . . . . . . . . . . . . . . . . . . . . . . . . . . . . 10
I
INPUT 1 (MIC) jack . . . . . . . . . . . . . . . . . . . . . . . . . . . . . . . . . 13
[INPUT 1 (MIC)] knob . . . . . . . . . . . . . . . . . . . . . . . . . . . . . . . 11
INPUT 2 (GUITAR) jack . . . . . . . . . . . . . . . . . . . . . . . . . . . . . . 12
[INPUT 2 (GUITAR)] knob . . . . . . . . . . . . . . . . . . . . . . . . . . . 11
INPUT 3 (AUX) jacks . . . . . . . . . . . . . . . . . . . . . . . . . . . . . . . . 12
[INPUT 3 (AUX)] knob. . . . . . . . . . . . . . . . . . . . . . . . . . . . . . . 11
[INPUT MONITOR] button . . . . . . . . . . . . . . . . . . . . . . . . . . 11
Input/output device . . . . . . . . . . . . . . . . . . . . . . . . . . . . . . . 21
Install
Driver . . . . . . . . . . . . . . . . . . . . . . . . . . . . . . . . . . . . . . . 14
L
LOOP BACK . . . . . . . . . . . . . . . . . . . . . . . . . . . . . . . . . . . . . 28, 49
M
MIC/GUITAR . . . . . . . . . . . . . . . . . . . . . . . . . . . . . . . . . . . . 24, 48
[MODE] switch . . . . . . . . . . . . . . . . . . . . . . . . . . . . . . . . . . . . . 13
O
OUTPUT jack . . . . . . . . . . . . . . . . . . . . . . . . . . . . . . . . . . . . . . . 12
Output level indicators . . . . . . . . . . . . . . . . . . . . . . . . . . . . . 11
[OUTPUT MUTE] button . . . . . . . . . . . . . . . . . . . . . . . . . . . . 11
P
PEAK indicators . . . . . . . . . . . . . . . . . . . . . . . . . . . . . . . . . . . . 11
[PHANTOM] button . . . . . . . . . . . . . . . . . . . . . . . . . . . . . . . . 10
Phantom power . . . . . . . . . . . . . . . . . . . . . . . . . . . . . . . . . 10, 13
PHONES jack . . . . . . . . . . . . . . . . . . . . . . . . . . . . . . . . . . . . . . . 12
[PHONES] knob . . . . . . . . . . . . . . . . . . . . . . . . . . . . . . . . . . . . 12
Playing Back . . . . . . . . . . . . . . . . . . . . . . . . . . . . . . . . . . . . . . . 22
R
REC MODE . . . . . . . . . . . . . . . . . . . . . . . . . . . . . . . . . . . . . . . . . 23
ALL INPUTS . . . . . . . . . . . . . . . . . . . . . . . . . . . . . . . 26, 48
LOOP BACK . . . . . . . . . . . . . . . . . . . . . . . . . . . . . . . 28, 49
MIC/GUITAR . . . . . . . . . . . . . . . . . . . . . . . . . . . . . . 24, 48
[REC MODE] button . . . . . . . . . . . . . . . . . . . . . . . . . . . . . . . . 11
Recording
Audio device . . . . . . . . . . . . . . . . . . . . . . . . . . . . . 26, 28
Computer . . . . . . . . . . . . . . . . . . . . . . . . . . . . . . . . . . . 28
Microphone or guitar . . . . . . . . . . . . . . . . . 24, 26, 28
S
[SAMPLE RATE] switch . . . . . . . . . . . . . . . . . . . . . . . . . . . . . . 13
SIG indicators . . . . . . . . . . . . . . . . . . . . . . . . . . . . . . . . . . . . . . 11
U
USB connector . . . . . . . . . . . . . . . . . . . . . . . . . . . . . . . . . . . . . 12
47
Page 48

Block Diagrams for REC MODE
+48V
+48V
For details about the REC MODE function, refer to “Recording” (p. 23).
MIC/GUITAR
INPUT 1
(MIC)
INPUT 2
(GUITAR)
INPUT 3
(AUX)
ALL INPUTS
INPUT 1
(MIC)
INPUT 2
(GUITAR)
INPUT 3
(AUX)
Hi-Z
Hi-Z
PEAK/SIG
PEAK/SIG
PEAK/SIG
PEAK/SIG
PEAK/SIG
A/D
A/D
A/D
A/D
STEREO
MONO
OUTPUT
+
USB
AUDIO
IN OUT
INPUT
MONITOR
+
USB
AUDIO
IN OUT
+
+
+
OUTPUT
MUTE
OUTPUT
MUTE
D/A
PHONES
D/A
STEREO
MONO
OUTPUT
D/A
PHONES
D/A
48
PEAK/SIG
+
INPUT
MONITOR
Page 49

LOOP BACK
+48V
Block Diagrams for REC MODE
INPUT 1
(MIC)
INPUT 2
(GUITAR)
INPUT 3
(AUX)
Hi-Z
PEAK/SIG
PEAK/SIG
PEAK/SIG
A/D
A/D
STEREO
MONO
OUTPUT
+
USB
AUDIO
IN OUT
+
+
+
INPUT
MONITOR
+
OUTPUT
MUTE
D/A
PHONES
D/A
49
Page 50

For EU Countries
For China
50
Page 51

For the USA
DECLARATION OF CONFORMITY
Compliance Information Statement
Model Name :
Type of Equipment :
Responsible Party :
Telephone :
UA-33
USB Audio Interface
Roland Corporation U.S.
Address :
5100 S. Eastern Avenue, Los Angeles, CA 90040-2938
(323) 890-3700
This product complies with the requirements of EMC Directive 2004/108/EC.
For EU Countries
For the USA
FEDERAL COMMUNICATIONS COMMISSION
RADIO FREQUENCY INTERFERENCE STATEMENT
This equipment has been tested and found to comply with the limits for a Class B digital device, pursuant to Part 15 of the
FCC Rules. These limi ts are designed to provide reasonable protection against harmful interference in a residential
installation. This equipment generates, uses, and can radiate radio frequency energy and, if not installed and used in
accordance with the instructions, may cause harmful interference to radio communications. However, there is no guarantee
that interference will not occur in a particular installation. If this equipment does cause harmful interference to radio or
television reception, which can be determined by turning the equipment off and on, the user is encouraged to try to correct the
interference by one or more of the following measures:
– Reorient or relocate the receiving antenna.
– Increase the separation between the equipment and receiver.
– Connect the equipment into an outlet on a circuit different from that to which the receiver is connected.
– Consult the dealer or an experienced radio/TV technician for help.
This device complies with Part 15 of the FCC Rules. Operation is subject to the following two conditions:
(1) this device may not cause harmful interference, and
(2) this device must accept any interference received, including interference that may cause undesired operation.
Unauthorized changes or modification to this system can void the users authority to operate this equipment.
This equipment requires shielded interface cables in order to meet FCC class B Limit.
For Canada
NOTICE
This Class B digital apparatus meets all requirements of the Canadian Interference-Causing Equipment Regulations.
AVIS
Cet appareil numérique de la classe B respecte toutes les exigences du Règlement sur le matériel brouilleur du Canada.
For C.A. US (Proposition 65
WARNING
This product contains chemicals known to cause cancer, birth defects and other reproductive harm, including lead.
)
51
Page 52

* 5 1 0 0 0 1 9 2 0 5 - 0 4 *
 Loading...