

Owner’s Manual page 5
Bedienungsanleitung page 26
Mode d’emploi page 47
Manual del usuario page 68
Manuale d’uso page 89
201a
Before using this unit, carefully read the sections entitled:
“USING THE UNIT SAFELY” and “IMPORTANT NOTES” (p. 2, p.
4). These sections provide important information concerning the
proper operation of the unit. Additionally, in order to feel assured
that you have gained a good grasp of every feature provided by
your new unit, Getting Started manual should be read in its
entirety. The manual should be saved and kept on hand as a
convenient reference.
Copyright © 2001 ROLAND CORPORATION
All rights reserved. No part of this publication may be reproduced in any form
without the written permission of ROLAND CORPORATION.
USING THE UNIT SAFELY
Used for instructions intended to alert
the user to the risk of death or severe
injury should the unit be used
improperly.
Used for instructions intended to alert
the user to the risk of injury or material
damage should the unit be used
improperly.
* Material damage refers to damage or
other adverse effects caused with
respect to the home and all its
furnishings, as well to domestic
animals or pets.
001
• Before using this unit, make sure to read the
instructions below, and the Owner’s Manual.
................................................................................................
002a
• Do not open or perform any internal modifications on the unit.
................................................................................................
003
• Do not attempt to repair the unit, or replace
parts within it (except when this manual
provides specific instructions directing you
to do so). Refer all servicing to your retailer,
the nearest Roland Service Center, or an
authorized Roland distributor, as listed on
the "Information" page.
................................................................................................
004
• Never use or store the unit in places that are:
• Subject to temperature extremes (e.g.,
direct sunlight in an enclosed vehicle, near
a heating duct, on top of heat-generating
equipment); or are
• Damp (e.g., baths, washrooms, on wet
floors); or are
• Humid; or are
• Exposed to rain; or are
• Dusty; or are
• Subject to high levels of vibration.
................................................................................................
007
• Make sure you always have the unit placed
so it is level and sure to remain stable. Never
place it on stands that could wobble, or on
inclined surfaces.
................................................................................................
The symbol alerts the user to important instructions
or warnings.The specific meaning of the symbol is
determined by the design contained within the
triangle. In the case of the symbol at left, it is used for
general cautions, warnings, or alerts to danger.
The symbol alerts the user to items that must never
be carried out (are forbidden). The specific thing that
must not be done is indicated by the design contained
within the circle. In the case of the symbol at left, it
means that the unit must never be disassembled.
The ● symbol alerts the user to things that must be
carried out. The specific thing that must be done is
indicated by the design contained within the circle. In
the case of the symbol at left, it means that the powercord plug must be unplugged from the outlet.
010
• This unit, either alone or in combination with
an amplifier and headphones or speakers,
may be capable of producing sound levels
that could cause permanent hearing loss. Do
not operate for a long period of time at a high
volume level, or at a level that is uncomfortable. If you experience any hearing loss or
ringing in the ears, you should immediately
stop using the unit, and consult an audiologist.
................................................................................................
011
• Do not allow any objects (e.g., flammable
material, coins, pins); or liquids of any kind
(water, soft drinks, etc.) to penetrate the unit.
................................................................................................
012d
• Immediately turn the power off, and request
servicing by your retailer, the nearest Roland
Service Center, or an authorized Roland
distributor, as listed on the "Information"
page when:
• Objects have fallen into, or liquid has been
spilled onto the unit; or
• The unit has been exposed to rain (or
otherwise has become wet); or
• The unit does not appear to operate
normally or exhibits a marked change in
performance.
................................................................................................
013
• In households with small children, an adult
should provide supervision until the child is
capable of following all the rules essential for
the safe operation of the unit.
................................................................................................
2
014
• Protect the unit from strong impact.
(Do not drop it!)
................................................................................................
023
• DO NOT play a CD-ROM disc on a conventional audio CD player. The resulting sound
may be of a level that could cause permanent
hearing loss. Damage to speakers or other
system components may result.
................................................................................................
104
• Try to prevent cords and cables from
becoming entangled. Also, all cords and
cables should be placed so they are out of the
reach of children.
................................................................................................
106
• Never climb on top of, nor place heavy
objects on the unit.
................................................................................................
108c
• Disconnect all cords coming from external
devices before moving the unit.
................................................................................................
118
• Should you remove the optical connector
caps, make sure to put them in a safe place
out of children's reach, so there is no chance
of them being swallowed accidentally.
................................................................................................
204
* Microsoft and MS-DOS are registered trademarks of
Microsoft Corporation.
205
* Microsoft, Windows, and Windows NT are regis-
tered trademarks of Microsoft Corporation.
206b
* Windows® 95 is known officially as: “Microsoft®
Windows® 95 operating system.”
206c
* Windows® 98 is known officially as: “Microsoft®
Windows® 98 operating system.”
206d
* Windows NT® is known officially as: “Microsoft®
Windows NT® operating system.”
???
* Windows Me® is known officially as: “Microsoft®
Windows ® Millennium version operating system.”
206e
* Screen shots reprinted with permission from
Microsoft Corporation.
206f
* Windows® 2000 is known officially as: “Microsoft®
Windows® 2000 operating system.”
207
* Apple is a registered trademark of Apple Computer,
Inc.
208
* Macintosh is a registered trademark of Apple
Computer, Inc.
209
* MacOS is a trademark of Apple Computer, Inc.
213
* Pentium is a registered trademark of Intel Corpo-
ration.
214
* MMX is a trademark of Intel Corporation.
220
* All product names mentioned in this document are
trademarks or registered trademarks of their
respective owners.
985
• The explanations in this manual include illustrations
that depict what should typically be shown by the
display. Note, however, that your unit may incorporate a newer, enhanced version of the system (e.g.,
includes newer sounds), so what you actually see in
the display may not always match what appears in
the manual.
3

IMPORTANT NOTES
In addition to the items listed under “USING THE UNIT
SAFELY” on page 2, please read and observe the following:
Power Supply
• Before connecting this unit to other devices, turn off the
power to all units. This will help prevent malfunctions and/
or damage to speakers or other devices. (It is not necessary
to turn off the power of your computer.)
Placement
• Using the unit near power amplifiers (or other equipment
containing large power transformers) may induce hum. To
alleviate the problem, change the orientation of this unit; or
move it farther away from the source of interference.
• This device may interfere with radio and television reception. Do not use this device in the vicinity of such receivers.
• Do not expose the unit to direct sunlight, place it near
devices that radiate heat, leave it inside an enclosed vehicle, or otherwise subject it to temperature extremes. Excessive heat can deform or discolor the unit.
• To avoid possible breakdown, do not use the unit in a wet
area, such as an area exposed to rain or other moisture.
Maintenance
Additional Precautions
• Use a reasonable amount of care when using the unit’s buttons, sliders, or other controls; and when using its jacks and
connectors. Rough handling can lead to malfunctions.
• When connecting / disconnecting all cables, grasp the connector itself—never pull on the cable. This way you will
avoid causing shorts, or damage to the cable’s internal elements.
• To avoid disturbing your neighbors, try to keep the unit’s
volume at reasonable levels. You may prefer to use headphones, so you do not need to be concerned about those
around you (especially when it is late at night).
• When you need to transport the unit, package it in the box
(including padding) that it came in, if possible. Otherwise,
you will need to use equivalent packaging materials.
• Use a cable from Roland to make the connection. If using
some other make of connection cable, please note the following precautions.
• Some connection cables contain resistors. Do not use
cables that incorporate resistors for connecting to this
unit. The use of such cables can cause the sound level to
be extremely low, or impossible to hear. For information
on cable specifications, contact the manufacturer of the
cable.
• Before you open the included CD-ROM, you must read the
“license agreement." Opening the CD-ROM will be taken
to mean your acceptance of the license agreement.
• For everyday cleaning wipe the unit with a soft, dry cloth
or one that has been slightly dampened with water. To
remove stubborn dirt, use a cloth impregnated with a mild,
non-abrasive detergent. Afterwards, be sure to wipe the unit
thoroughly with a soft, dry cloth.
• Never use benzine, thinners, alcohol or solvents of any
kind, to avoid the possibility of discoloration and/or deformation.
Handling CD-ROMs
• Avoid touching or scratching the shiny underside (encoded
surface) of the disc. Damaged or dirty CD-ROM discs may
not be read properly. Keep your discs clean using a commercially available CD cleaner.
4
You must read this before you use digital recording
Unauthorized recording, distribution, sale, lending, public performance, broadcasting, or the like, in whole or
in part, of a work (musical composition, video, broadcast, public performance, or the like) whose copyright is
held by a third party is prohibited by law.
When exchanging audio signals through a digital connection with an external instrument, this unit can perform
recording without being subjected to some of the restrictions of the Serial Copy Management System (SCMS).
This is because the unit is intended solely for musical production, and is designed not to be subject to restrictions
as long as it is used to record works (such as your own compositions) that do not infringe on the copyrights of
others. (SCMS is a feature that prohibits second-generation and later copying through a digital connection. It
is built into MD recorders and other consumer digital-audio equipment as a copyright-protection feature.)
On the UA-3
The UA-3 will function with partial SCMS support only for a digital input signal from an external device. When
data containing SCMS flags is input, for example from a MD that was digitally copied from a commercial music
CD, the UA-3 will function as follows.
If input from the UA-3’s digital input connector:
• The UA-3 cannot record this data to your computer
• The audio will be output from the analog outputs (line output jacks, headphone jack) and digital output connector.
If input from the UA-3’s analog inputs (line input jacks):
• Recording can occur normally
Regardless of the presence or absence of the SCMS flag, data that is received at the digital input
connector of the UA-3 will be output directly from the digital output connector.
Do not use this unit for purposes that could infringe on a copyright held by a third party. Roland assumes no
responsibility whatsoever with regard to any infringements of third-party copyrights arising through your use
of this unit.
This device does not support digital audio signals that are formatted for broadcast studio digital audio devices.
The UA-3 operates according to SCMS only for digital input signals from an external device.
SCMS flags are not added to the digital audio signals that are output from the UA-3.
DEUTSCHFRANÇAISESPAÑOLITALIANO ENGLISH
UA-3 5
Introduction
Introduction
Check the contents of the package
The UA-3 includes the following items. When you open the package, first make sure that all items are included. If any
are missing, contact the dealer where you purchased the UA-3.
UA-3
USB cable
Use this to connect the UA-3 to the USB connector of your computer. For details on connections, refer to Connections and driver installation (Windows p. 8, Macintosh p. 17).
Use only the included USB cable.
AUDIO Capture CD-ROM
This contains software that you will need in order to use the UA-3.
* Be sure to read the Readme_E.txt file found in the AUDIO Capture CD-ROM. Any updated information will be provided in
the Readme_E.txt file.
• Before opening the included CD-ROM, you must read the separate license agreement.
• Do not touch the silver recording surface of the disc, or scratch it. Doing so may make it impossible for data to be
read correctly. If the disc becomes soiled, use a commercially available CD cleaner to clean it.
• Do not play back the CD-ROM on a conventional audio CD player. Doing so will produce a high volume that
may damage your ears or speakers.
Getting Started
This is the document you are reading. Keep it at hand for reference when needed.
License agreement
This contract describes the terms under which Roland Corporation allows you to use the software. You must read this
before opening the CD-ROM package.
You will need to provide these items yourself
External amp, speakers, headphones, and mic are not included
External amp, speakers, or headphones necessary for listening to the sound output via the UA-3 are not included. Nor
is a mic included for inputting sound to the UA-3. You will need to provide these items yourself.
Digital input/output cables for connecting the MD or DAT recorder are not included
Although you can use an MD or DAT digital recorder to perform digital recording, the cables for connecting the recorder to the UA-3 are not included. You will need to provide these separately.
6
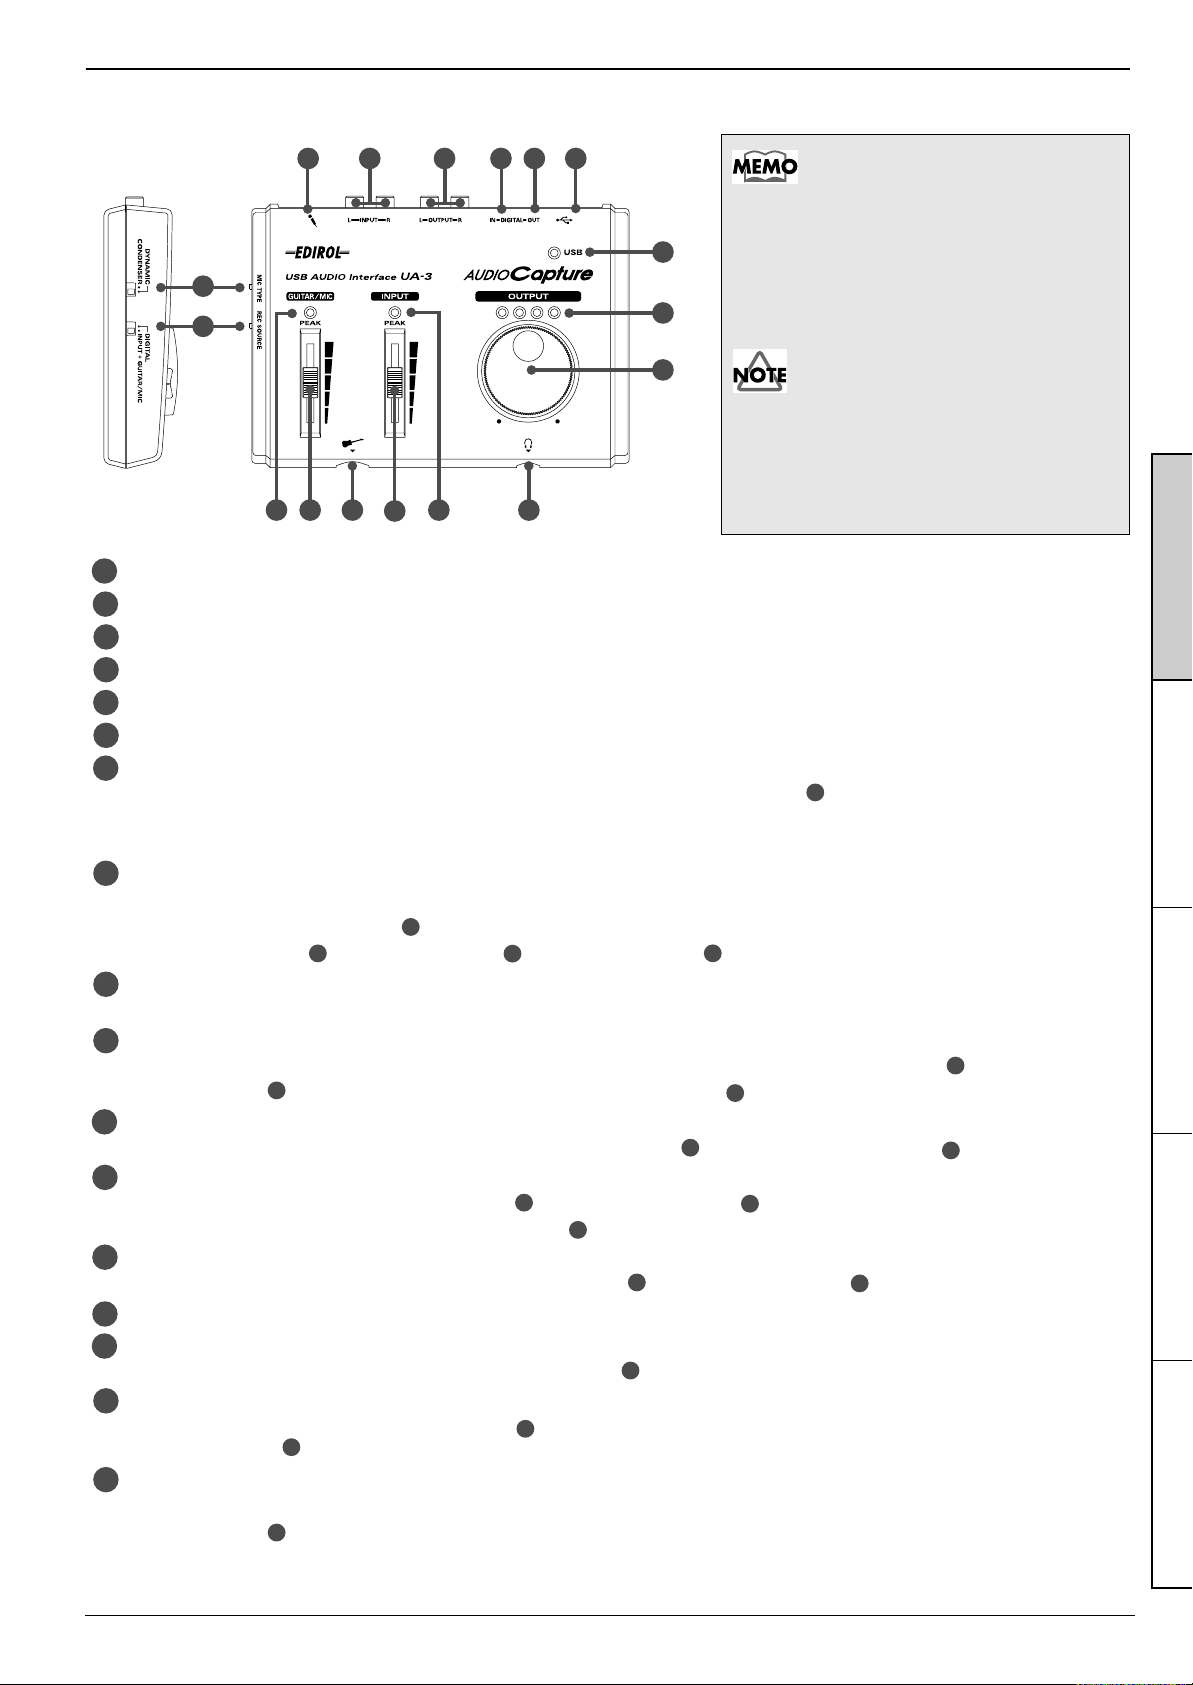
Parts of the UA-3 and their function
14
14
2
Introduction
15
3
45 6
10
11
• Condenser Mic
The UA-3 supports small multimedia microphones
9
used for adding narration, and is compatible with plugin powered monaural microphones.
• If you are recording only from the line inputs, dis-
connect the cables from the Guitar input jack and
the Mic input jack.
• The UA-3 is not compatible with the phantom-powered, condenser microphones typically used for music.
It is also incompatible with the stereo microphones
sometimes supplied with MDs.
• You cannot play back computer audio data when
DIGITAL is selected.
1
1
7
8
12
13 14 1716
1
Mic input jack
2
Line input jacks
3
Line output jacks
4
Digital input connector (optical)
5
Digital output connector (optical)
6
USB connector
7
Mic type select switch
2
Set this switch according to a type of mic that is connected to the Mic input jack .
When connecting a dynamic mic: “DYNAMIC”
When connecting a condenser mic: “CONDENSER”
8
Recording input select switch
This selects the input that will be used for recording.
Digital input connectors : “DIGITAL”
Mic input jack / Line input jacks / Guitar input jack :“INPUT + GUITAR/MIC”
9
USB indicator
1 2
4
This will light when the UA-3 is connected and recognized to the computer.
10
Output level indicator
The number of LED’s that light changes according to the output level from the Headphone jack and the Line
output jacks . If the red LED lights, use the Line output volume to lower the volume.
11
Line output volume
This adjusts the volume that is output from the Headphone jack and the Line output jacks .
12
Guitar/Mic input peak indicator
If the input level from the Guitar input jack and the Mic input jack is excessive, it will light red. If it lights
red, use the Guitar/Mic input adjustment slider to lower the input level.
13
Guitar/Mic input adjustment slider
This slider adjusts the input level of the Guitar input jack and the Mic input jack .
14
Guitar input jack
15
Line input adjustment slider
3
14
13
11
17
1
1
17
3
This slider adjusts the input level of the Line input jacks .
16
Line input peak indicator
If the input level from the Line input jacks is excessive, it will light red.
justment slider to lower the input level.
17
Headphone jack
15
2
If it lights red, use the Line input ad-
A set of headphones can be connected here. Even if headphones are connected, sound will still be output from the Line
output jacks .
* For details on how each control and connector are actually used, refer to UA-3 Application Guide (p. 110).
3
DEUTSCHFRANÇAISESPAÑOLITALIANO ENGLISH
UA-3 7
Connections and driver installation (Windows)
Connections and driver installation (Windows)
* If you are a Macintosh user, refer to p. 17.
In order to use the UA-3, you must first install the USB Composite Device driver, the USB Human Interface
driver, and the USB Audio Device driver consecutively. These drivers are included with Windows. If you are using
Windows 98, this driver is provided in the Microsoft Windows CD-ROM, so you will need to have the Microsoft
Windows CD-ROM ready. If you are using Windows Me or 2000, the CD-ROM is not necessary.
What is a driver?
A driver is software that allows an application program running on your computer to transfer data to and from the UA3 when it is connected to your computer via a USB cable. The driver passes data from the application to the UA-3, and
passes data from the UA-3 to the application.
Before installing the driver
Application
Computer
USB
Driver
USB port
USB cable
UA-3
• The UA-3 cannot be used with Windows 95 or Windows NT.
• If other Windows programs are running, exit all of them
before you continue.
• If you will be simultaneously connecting multiple Roland USB
devices (for example; the UA-3 and other USB devices such as the
UA-100G) to your computer, disconnect the UA-100G or other
devices from the USB connector before installing the driver. If you
install the driver when the UA-100G or other devices are connected, installation may not occur correctly.
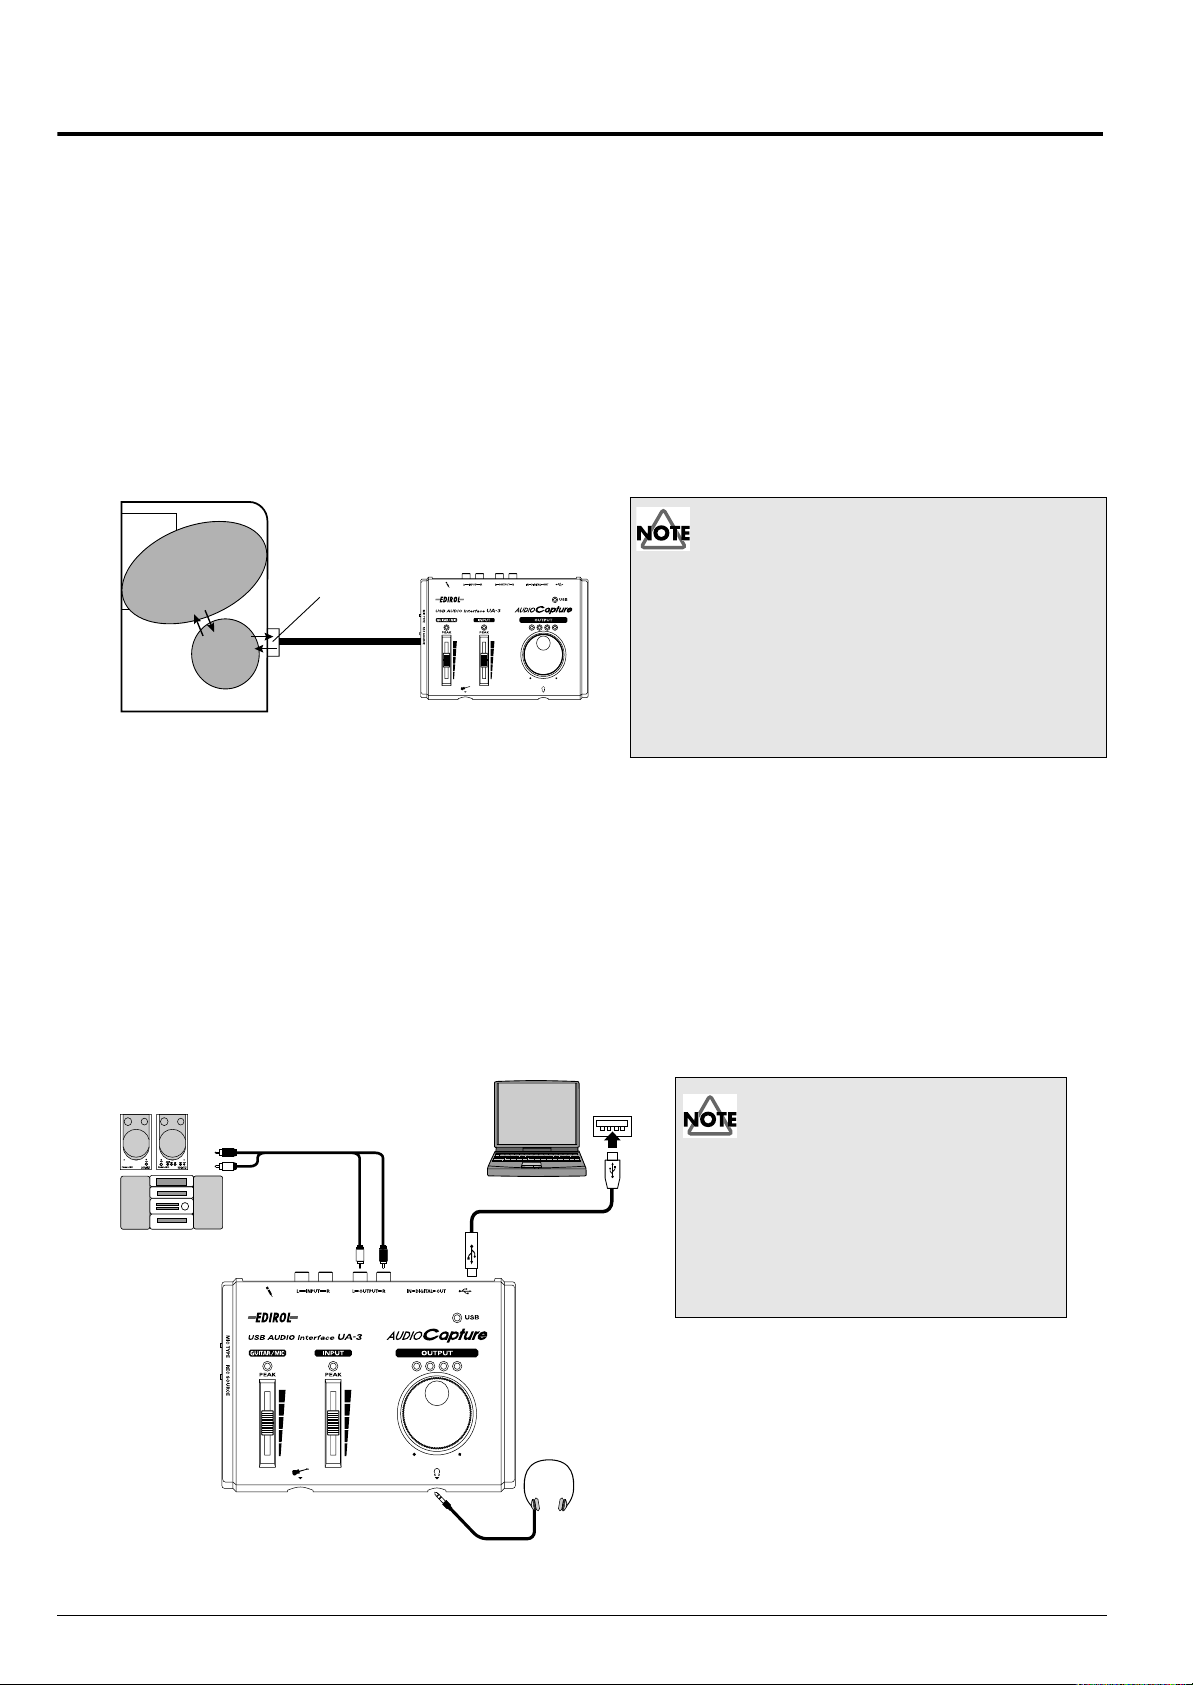
Making connections and installing the driver
■ Making connections
Always make sure to have the volume level turned down before connecting the UA-3. Even with the volume all the
way down, you may still hear some sound when the power is switched on, but this is normal, and does not indicate a
malfunction.
To prevent malfunction and/or damage to speakers or other devices, always turn down the volume, and turn off the
power of all devices before making any connections. (It is not necessary to turn off the power of your computer.) Use
a USB cable to connect the UA-3 to your computer before turning on the power of your audio equipment.
Stereo Set
Powered Speaker etc.
LINE IN, AUX IN
Audio
cable
LINE OUT
Computer
USB cable
* Connect after starting
up the computer
USB
port
USB
port
• Before disconnecting the USB cable or restarting
Windows, please close all applications. You should
also turn down the volume of any audio or amp system that is connected.
• This unit is equipped with a protection circuit. A
brief interval (a few seconds) after connecting a
USB connector is required before the unit will
operate normally.
Stereo
Headphones
UA-3
8

Connections and driver installation (Windows)
■ Installing the driver (Windows Me)
* If you are using a Windows 2000 machine, refer to p. 9, if Windows 98, refer to p. 9.
1. Turn on the power of your computer and start up Windows, and use a USB cable to connect the UA-3 to your
computer.
2. When Windows detects the UA-3 and the Add New Hardware Wiz-
ard dialog box appears, make sure “Automatic search for a better
driver (Recommended)” is selected, then click [Next].
Some time may be required until this dialog box appears
3. The search for the driver starts.
4. When the correct driver is found, driver installation starts.
5. When a dialog box informing you that driver installation has finished
appears, click [Finish], and restart Windows.
After installing the driver, refer to Specifying the audio input/output device (p. 12) and select the device Windows uses.
* Depending on your computing setup, there may be a short wait after the driver is installed until the
device is recognized.
■ Installing the driver (Windows 2000)
* If you are using a Windows Me machine, refer to p. 9, if Windows 98, refer to p. 9.
1. Turn on the power of your computer and start up Windows.
2. Use a USB cable to connect the UA-3 to your computer.
The UA-3 is recognized to the computer and the driver is installed all automatically.
3. After installing the driver, restart Windows.
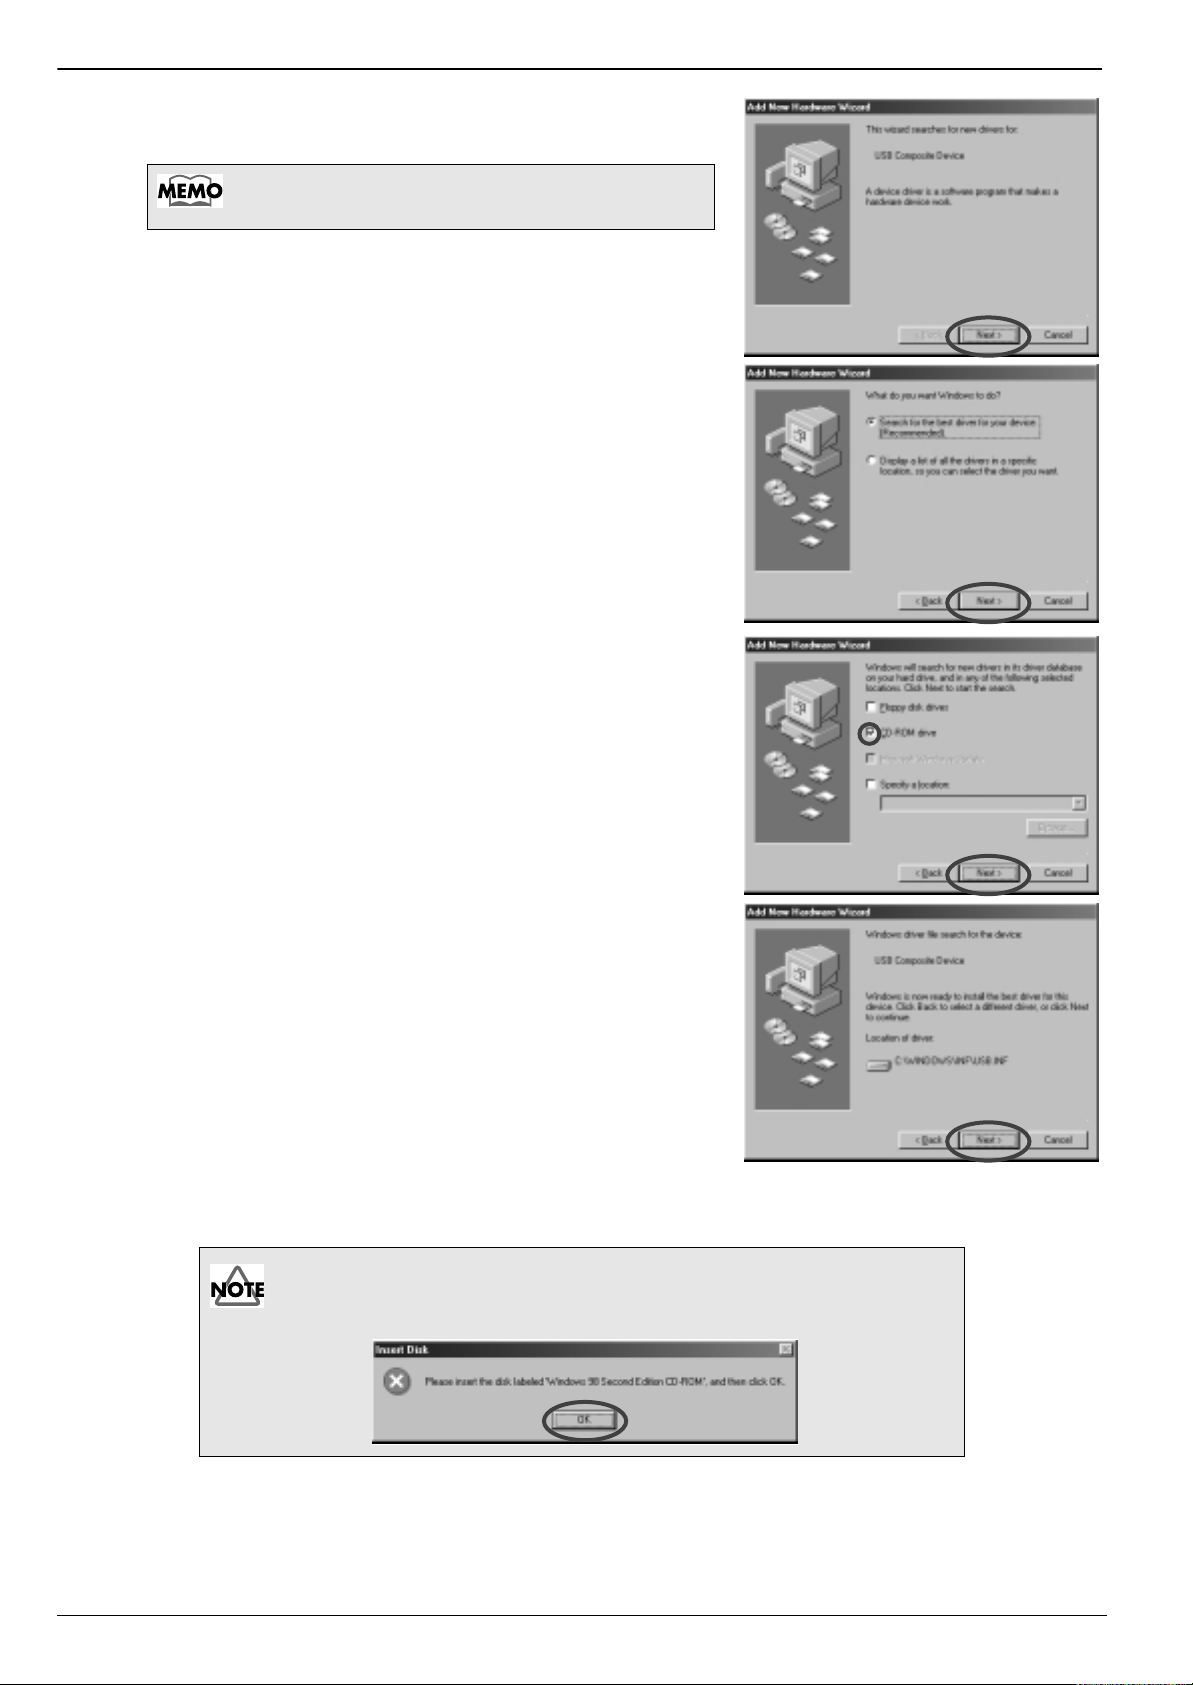
■ Installing the driver (Windows 98)
* If you are using a Windows Me machine, refer to p. 9, if Windows 2000, refer to p. 9.
Installation must be performed in the order of the USB Composite Device driver, USB Human Interface Device driver, and then the USB Audio Device driver. Use the following procedure to perform the installation.
1. Turn on the power of your computer and start up Windows. Insert the Micr osoft Windows CD-ROM into your
CD-ROM drive, and use a USB cable to connect the UA-3 to your computer (p. 8).
Since some computers are sold with the contents of the Microsoft Windows CD-ROM already
in the hard disk, a Microsoft Windows CD-ROM may not have been included. If this is the case,
you will be able to install the driver without the Microsoft Windows CD-ROM
DEUTSCHFRANÇAISESPAÑOLITALIANO ENGLISH
UA-3 9
Connections and driver installation (Windows)
A USB Composite Device will be detected automatically, and the Add
New Hardware Wizard dialog box will appear. Click [Next].
If this dialog box does not appear, refer to Problems related to the
USB driver (p. 21)
2. When the display asks “What do you want Windows to do?”,
select “Search for the best driver for your device. (Recom-
mended).” and click [Next].
3. The following dialog box will appear . Check CD-R OM drive, and
click [Next].
4. The following dialog box will appear. Click [Next].
*
Depending on your system, the
illustration, but this is not a problem.
Location of driver
may differ from the above
5. Copying of the file (Driver) will begin.
10
If the Microsoft Windows CD-ROM is not inserted in the CD-ROM drive, the following dialog
box may appear. If this occurs, insert the Microsoft Windows CD-ROM into the CD-ROM
drive, and click [OK].
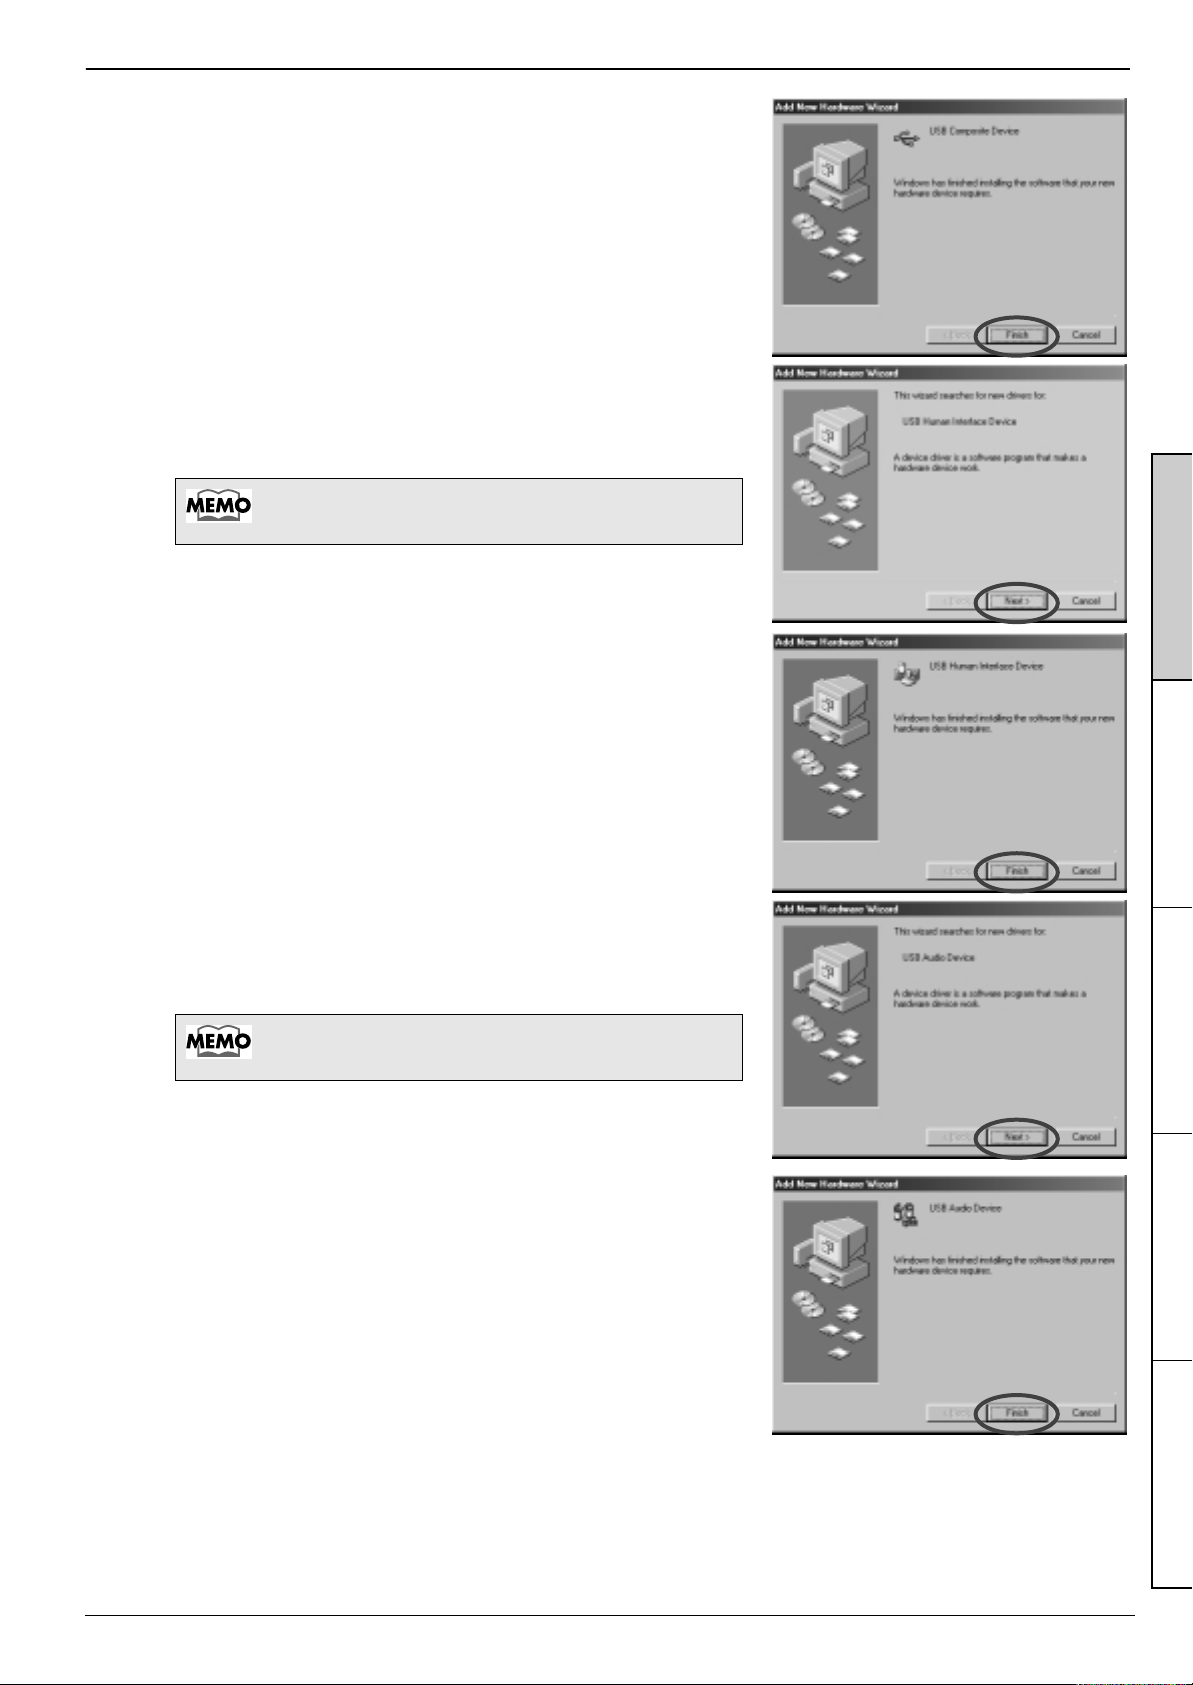
6. When installation of the USB Composite Device driver is fin-
ished, the following dialog box will appear. Click [Finish].
7. Then, the USB Human Interface Device will automatically be
detected, and the Add New Hardware Wizard dialog box will
appear. Click [Next], and continue the installation using the very
same procedure as steps 2-5 (p. 10-10).
In step 4, the screen will indicate “Windows driver file search for
the device : USB Human Interface Device.”
Connections and driver installation (Windows)
8. When installation of the USB Human Interface Device driver is
finished, the following dialog box will appear. Click [Finish].
9. Next, a USB Audio Device will be detected automatically, and
the Add New Hardware Wizard dialog box will appear. Click
[Next], and continue the installation using the very same procedure as in steps 2-5 (p.10-10).
In step 4, the screen will indicate “Windows driver file search for
the device : USB Audio Device.”
10.When installation of the USB Audio Device driver is finished,
the following dialog box will appear. Click [Finish].
DEUTSCHFRANÇAISESPAÑOLITALIANO ENGLISH
This completes installation of the USB Composite Device driver, the USB Human Interface Device driver, and
the USB Audio Device driver. Restart Windows.
After installing the driver, refer to Specifying the audio input/output device (p. 12) and select the device Windows uses.
UA-3 11
Connections and driver installation (Windows)
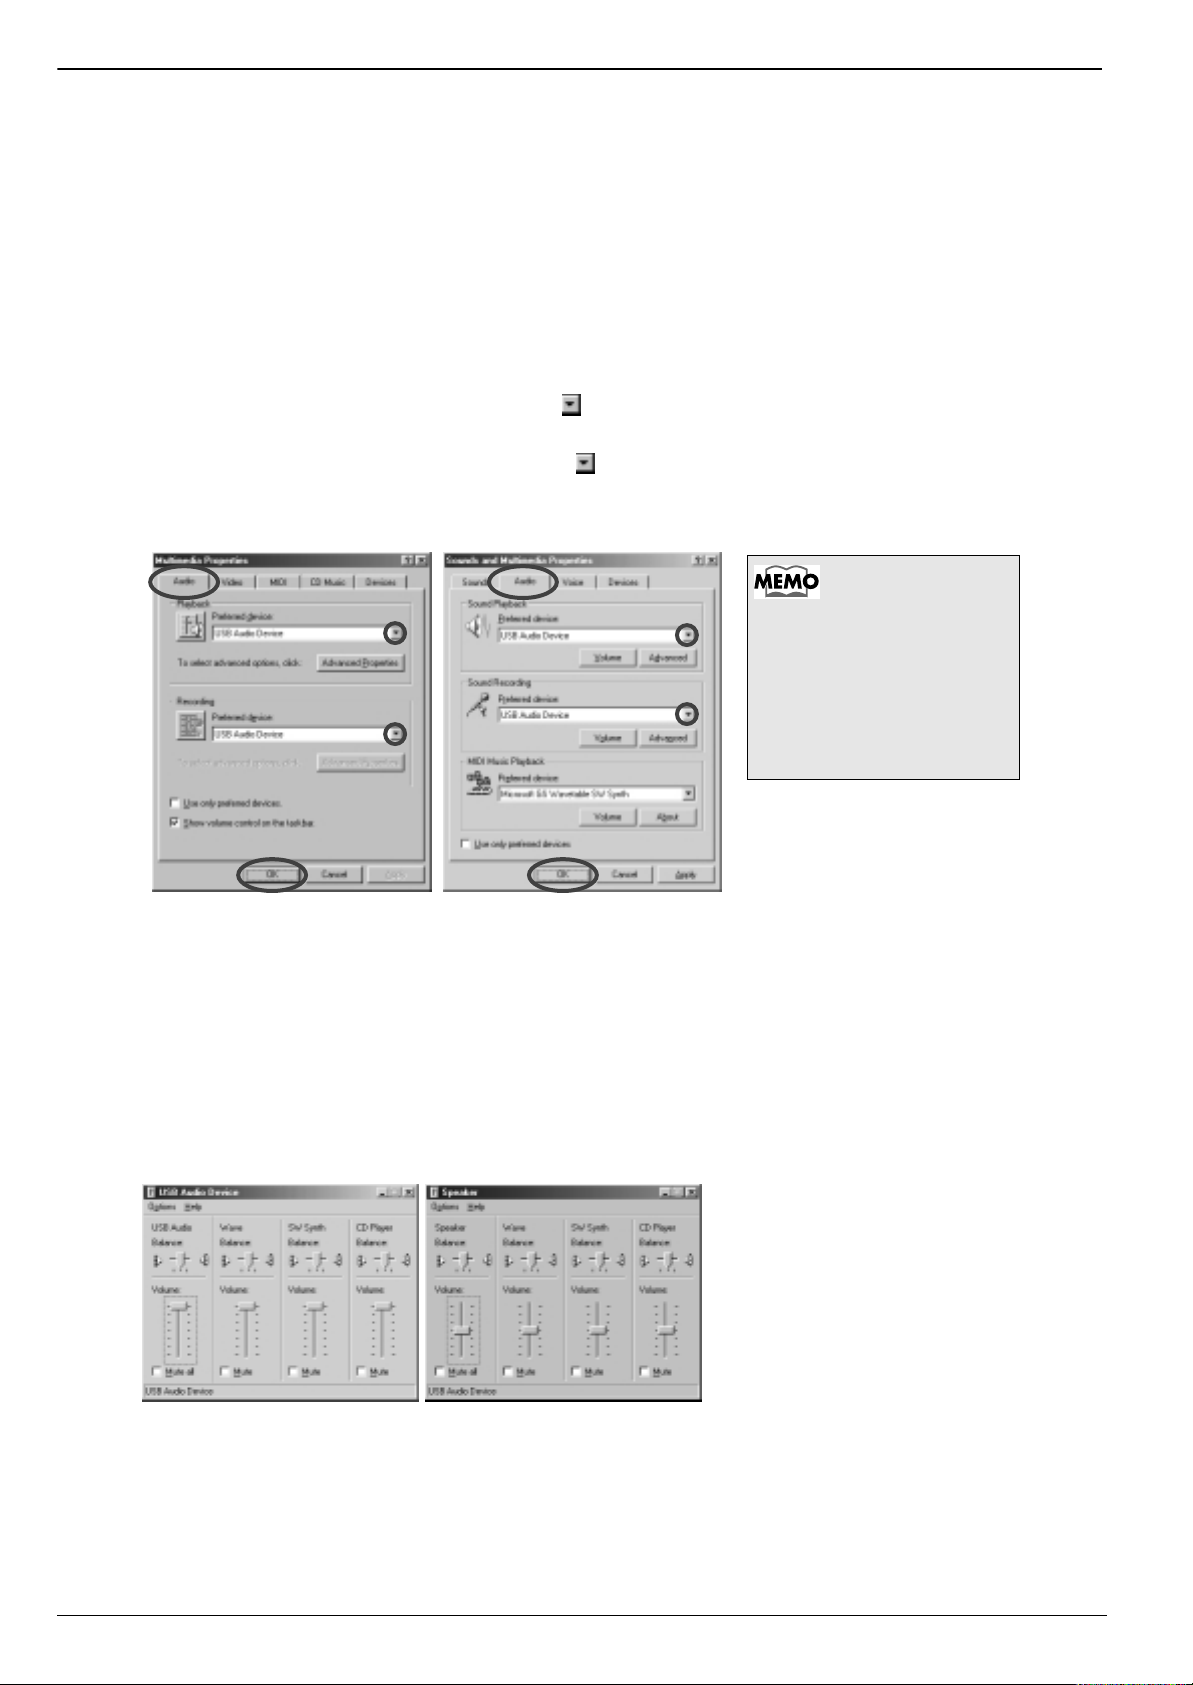
■ Specifying the audio input/output device
1. Click the Windows [Start] button, and select [Settings] - [Control Panel].
2. Win 98 / Win 98SE
In Control Panel, double-click the [Multimedia] icon to open the Multimedia Properties dialog box.
Win 2000 / Me
In Control Panel, double-click the [Sounds and Multimedia] icon to open the Sounds and Multimedia
Properties dialog box.
* If you don’t find a [Sounds and Multimedia] icon, then in Control Panel, click [view all Control
Panel options].
3. Click the [Audio] tab.
4. For the Playback item Preferred device, click . In the list that appears, click [USB Audio Device] to
select it.
5. For the Recording item Preferred device, click . In the list that appears, click [USB Audio Device]
to select it.
Windows 98 / Windows 98SE
Windows 2000 /Windows Me
• Depending on your system, “USB
Audio Device” will be shown a
number added, ex. “USB Audio
Device (1).”
• It will not be possible to press
the “Advanced Properties”
button for “Recording.”
6. Click [OK] to complete the settings.
Volume Control settings
The output volume of the UA-3 can be controlled by the Windows Volume Control.
1. Click the Windows [Start] button, and select [Programs] - [Accessories] - [Entertainment] - [V olume
Control] to start it up.
Windows Me Windows 2000/
Windows 98/Windows 98SE
12
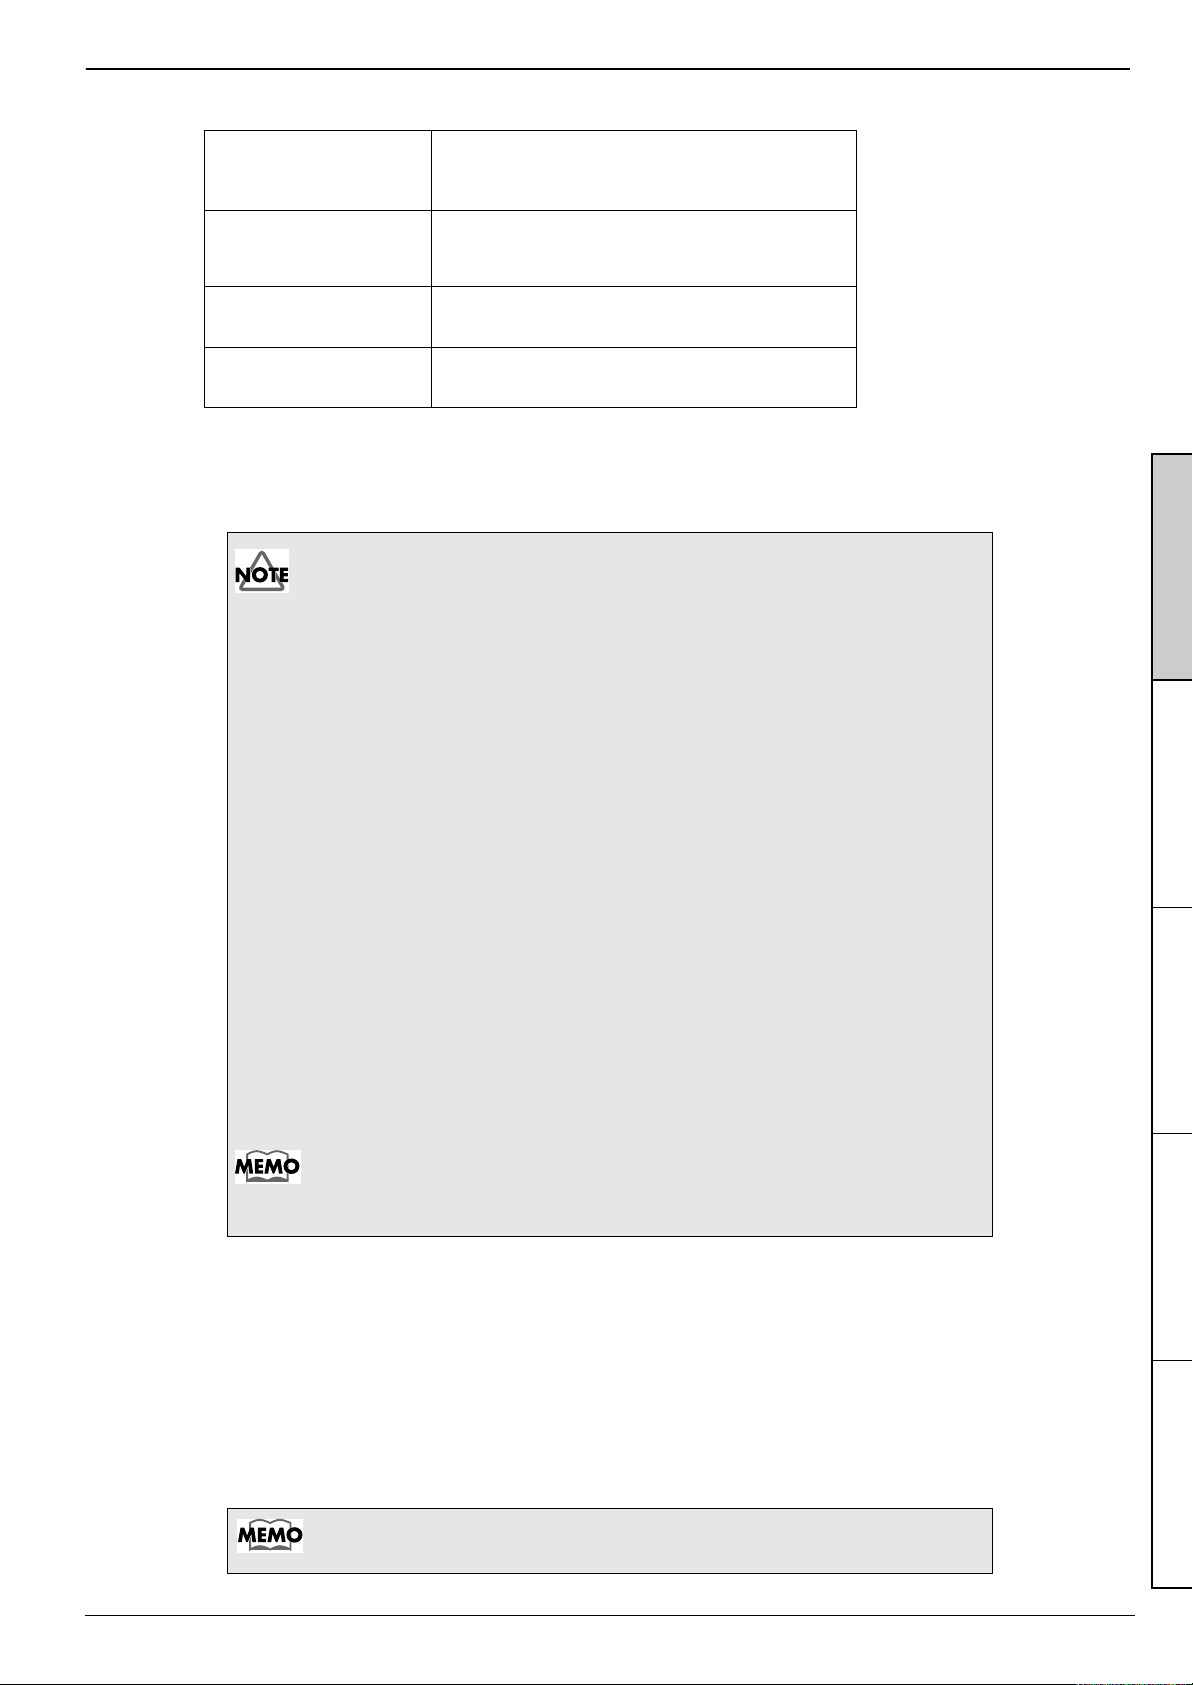
Connections and driver installation (Windows)
2. You can raise or lower the slider to adjust the volume of the UA-3. The following items can be set.
USB Audio (Speaker) Adjust the volume of the analog outputs (line output
and headphone output). The digital output will not
1
change.
WAVE Adjust the volume that is output from the audio output
SW Synth Adjust the volume of the software synthesizer built into
CD Player Adjust the “CD Music” volume for the CD-ROM drive
device “USB Audio Device.” The digital output and
analog output will change.
Windows.
of your computer.
2
1. Depending on the version of Windows, this may be displayed as “Analog connector”.
2. If the playback of the CD does not change when you adjust this volume, change
the WAVE volume.
• If Volume Control is not installed on your computer, use Add/ Remove Applications in the Control
Panel to install it. For details on installation, refer to the Windows owner’s manual or Help.
• If Mute is checked, or if the slider is in the lowest position, no sound will be output from the UA-3.
• If you are using Windows 2000 and “CD Player” does not appear, check the [Digital CD playback] item “Enable
digital CD audio for this CD-ROM device,” as described in the following note.
• When using your computer’s CD-ROM drive to play an audio CD, or when playing background music for games
with the UA-3
If using Windows Me:
Select [Start]-[Settings]-[Control Panel]. In the [Control Panel], double-click the [System] icon to
access the System Properties dialog box. Click the [Device Manager] tab, and double-click the
[CDROM] icon. Below it, double-click the CD-ROM drive that you are using and open its Properties.
Click the [Properties] tab, and select the check box located beside the Digital CD playback item
“Enable digital CD audio for this CD-ROM device.”
If using Windows 2000
In the same way as for Windows Me, open the System Properties dialog box. Click the [Hardware tab],
and click the [Device Manager] button to open the Device Manager. From the CD-ROM drives, doubleclick the CD-ROM drive that you are using to open its Properties. Click the [Properties] tab, and select
the check box located beside the Digital CD playback item “Enable digital CD audio for this CD-ROM
device.”
If using Windows 98 or Windows 98 SE:
Select [Start] - [Settings] - [Control Panel] - [Multimedia], then click on the [CD Music] tab, then check
“Enable CD digital audio for this CD-ROM device.”
Depending on your computing environment, playback of these CDs may still be impossible. For details,
refer to information provided by your computer’s manufacturer. If you are using a PC-card (PCMCIA)
type CD-ROM drive, playing back WAVE data or an audio CD on the CD-ROM drive may cause the
sound to be interrupted, or no sound may be heard at all.
DEUTSCHFRANÇAISESPAÑOLITALIANO ENGLISH
• The audio quality of the UA-3 will be better if you raise the Volume Control levels.
Checking for sound output
After the connections have been made correctly, you can play back the sample data to check your setup.
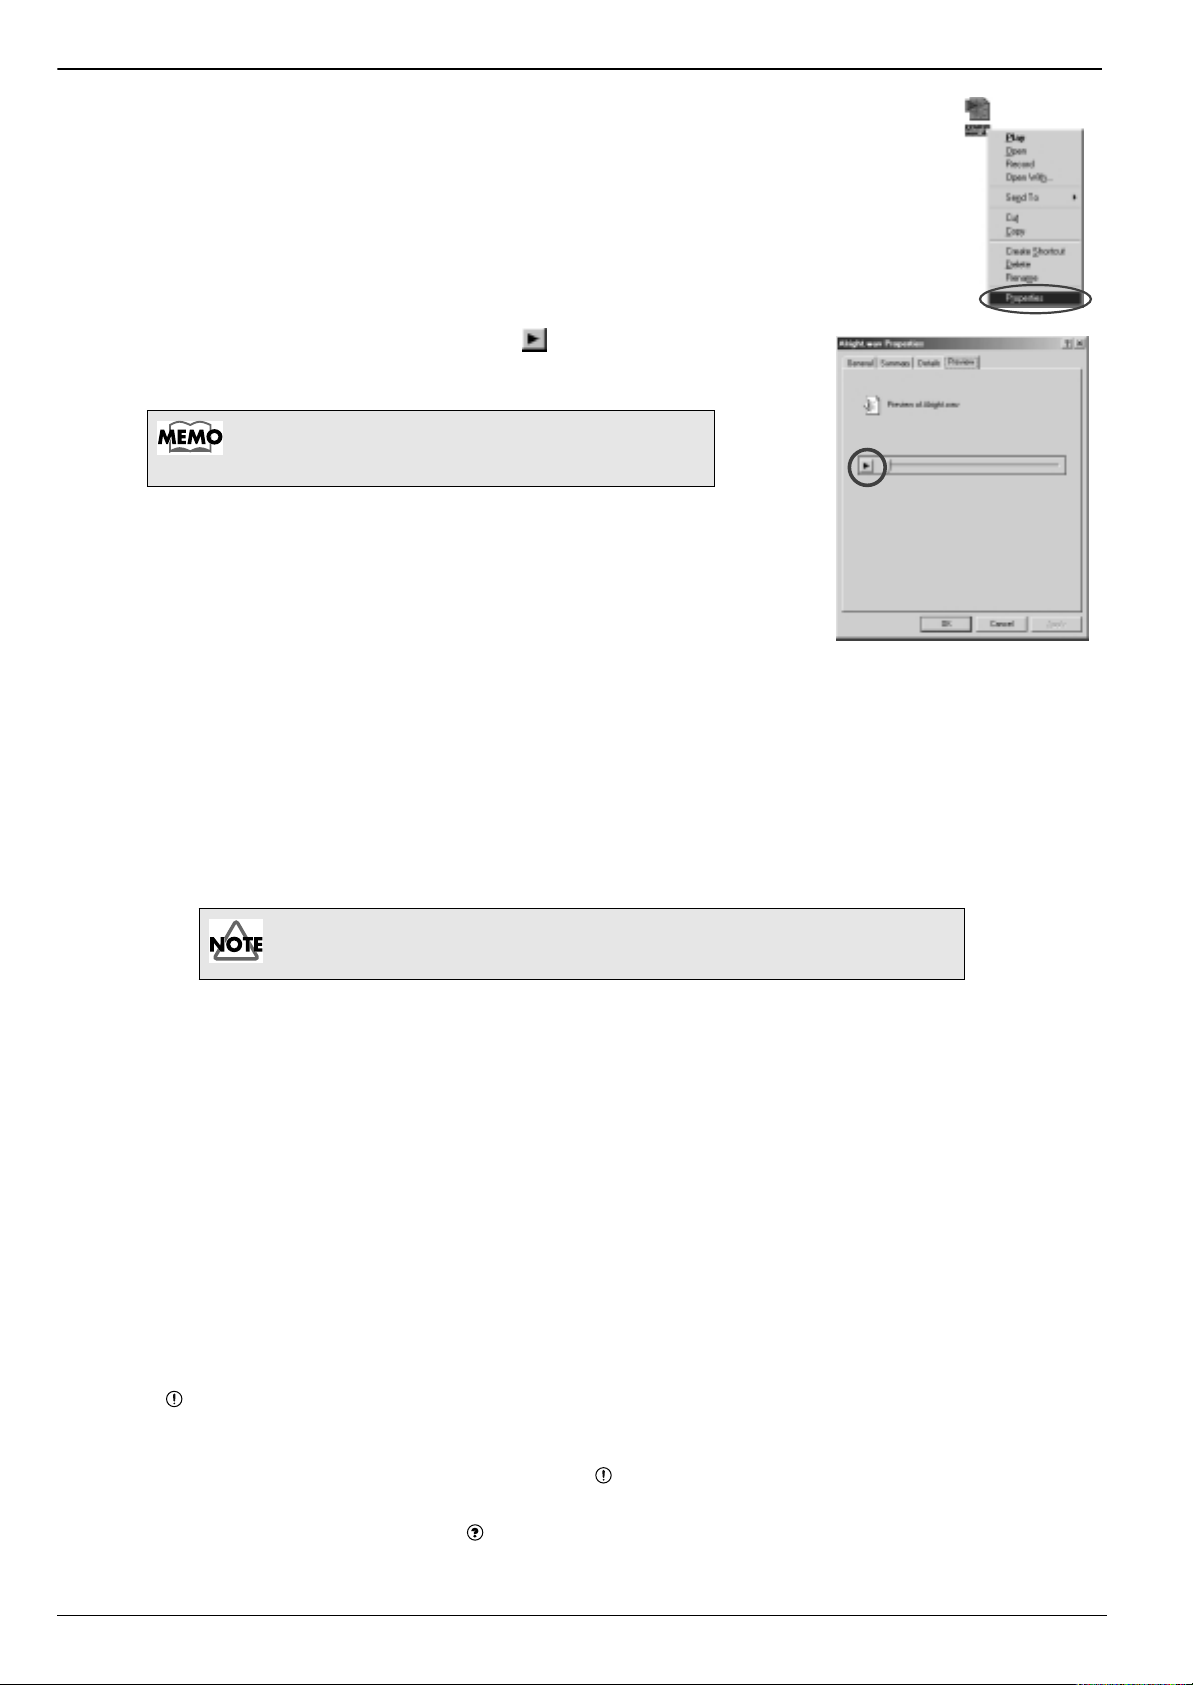
■ Playing the sample data
Here we will use standard Windows functionality to play the sample data. The sample data is found in the AUDIO
Capture CD-ROM. Insert the CD-ROM into the CD-ROM drive of your computer.
1. Copy “Alright(.wav)” to the desktop by dragging it from the “Sample_Data” folder of the CD-ROM.
In order to listen to the sample data, you will need approximately 30MB of free space on the
hard disk where Windows installed.
UA-3 13
Connections and driver installation (Windows)
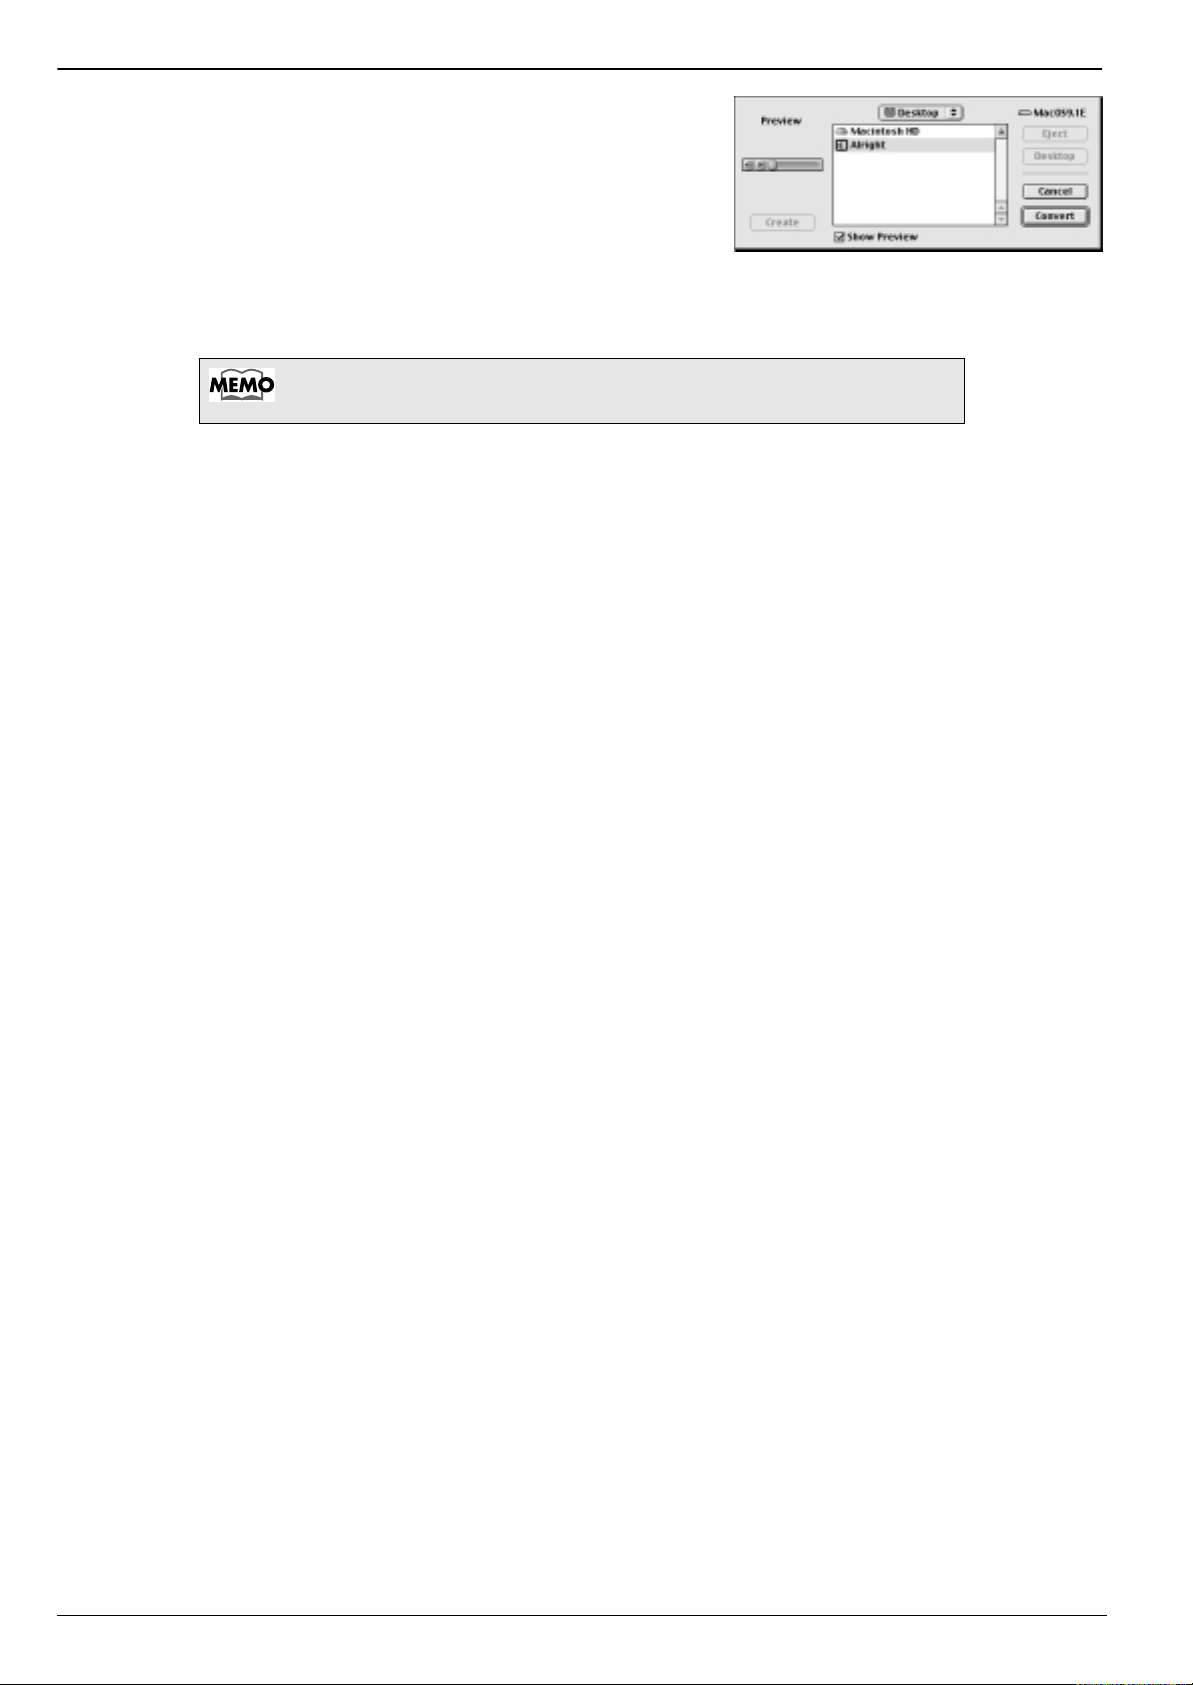
2. Right-click the copied file “Alright(.wav)”, and select [Play] or [Properties] from the menu
that appears.
3. Click the [Preview] tab, and then click the button.
The sample data will begin playing.
When the Recording input select switch is set to DIGITAL, it is
not possible to play back audio data from your computer. Set the
switch to INPUT + GUITAR/MIC.
Did you hear the sample data?
If the sample data played correctly, your computer and the UA-3 are connected correctly, and the drivers have been
installed correctly. If the data did not play correctly, refer to Troubleshooting (p. 21). Troubleshooting contains material to help you find and correct such problems.
This completes all connections and driver installation for the UA-3.
Deleting the USB Audio Device driver
The explanation provided here is for an average Windows system. Depending on your computer, some of the folder names may be different.
■ If re-installing the USB Audio Device driver
■ If installation of the USB Audio Device driver was terminated before completion
Use the following procedure to delete the driver that is already installed.
1. Use a USB cable to connect the UA-3 to your computer.
2. Click the Windows [Start] button, and select [Settings] - [Control Panel].
3. In
[Control Panel]
4. Click the [Device Manager] tab.
5. Double-click [Sound, video and game controllers] to see a list of the devices.
6. From the list, select USB Audio Device, and click [Remove]. In the Confirm Device Removal dialog box,
click [OK]. If USB Audio Device is not displayed, proceed to step 8.
7. Make sure that USB Audio Device is not in the Sound, video and game controllers list, and click
[Close] to close the System Properties dialog.
8. Follow the steps 1. – 4. again, and double-click [Universal Serial Bus controllers] to display the list of
devices.
If is displayed for the USB-compatible device icon:
Select the [USB Composite Device] icon, and click [Remove]. In the Confirm Device Removal dialog
box, click [OK]. As in the step 7., close System Properties.
If there is no USB-compatible device icon, or if is not displayed:
Simply close System Properties.
If you are using Windows Me and is displayed:
Simply close System Properties.
, double-click [System] to open the System Properties dialog.
14
Connections and driver installation (Windows)
9. Disconnect the USB cable from your computer, and restart Windows.
If a dialog box suggesting that you restart Windows appears at this point, follow the suggestion and restart your computer.
Basic operation of the D-Out Smoother
■ What is the D-Out Smoother?
When audio is played back to a digital device such as MD or DAT connected to the digital output of the UA-3, a certain
amount of time is required for the audio output to be locked immediately after audio playback, so that there may be no
sound for one or two seconds, or the pitch or tempo may become incorrect. The D-Out Smoother is software that allows
the audio to be played smoothly in such situations.
■ Installing the D-Out Smoother
In this explanation we are assuming that your CD-ROM drive is drive E:, but the drive name
may be different depending on your computer. If the drive name is different on your computer, input the appropriate drive name. You can check the drive name of your CD-ROM
drive by double-clicking the My Computer icon.
1. Insert the AUDIO Capture CD-ROM into your CD-ROM drive.
2. Click the Windows [Start] button, and select [Run...].
3. In the Open: text box, input “E:\UA_Util\Setup.exe” and click [OK]. Alternatively, click [Browse], select the
file [Setup(.exe)] located in the UA_Util folder of the CD-ROM drive, and click [Open].
4. The installer will start up, and the Choose Setup Language dialog box will appear. Specify whether you are
using the “English (United States)” or “Japanese” version of Windows, and click [OK].
5. Perform the remainder of the installation as directed by the instructions that appear on-screen.
6. When installation is completed, the Setup Complete dialog box will appear. Click [Finish].
This completes installation of the D-Out Smoother.
■ Starting the D-Out Smoother
The Setting dialog box will appear at the first time when you start up. Make sure that the
Wave-Out Device shows “USB Audio Device,” and click [OK]. If two or more USB audio
devices are displayed, refer to Using the D-Out Smoother (p. 15), and specify the correct device.
1. Connect the UA-3 to the USB connector of your computer.
2. Click the Windows [Start] button, and in the [Programs] menu, click [D-Out Smoother].
3. The D-Out Smoother will start up.
In some cases it may display“Cannot find USB Audio Device. Check USB cable or select USB
Audio Device again.” when starting. If this occurs, the computer has not correctly detected the UA 3. It
is possible that the UA-3 is not connected correctly, or that the driver has not been installed correctly.
Refer to Connections and driver installation (Windows) (p. 8) and check these points.
DEUTSCHFRANÇAISESPAÑOLITALIANO ENGLISH
■ Using the D-Out Smoother
The D-Out Smoother has an “ON/OFF” switch and a “TEST” button.
“ON/OFF” switch
Normally, you will leave this “ON” when using the digital output of the UA-3.
Turn this “OFF” when connecting or disconnecting the UA-3.
“TEST” button
Click the [TEST] button. If the test audio is heard, the D-Out Smoother is operating for that device.
When using two or more USB Audio Devices such as the UA-3 or MA-150U, use this button to select the UA-3
for which the D-Out Smoother will operate.
Use the following procedure to make your selection.
UA-3 15
Connections and driver installation (Windows)
1. From the D-Out Smoother [Control] menu, select [Setting] to access the Setting dialog box. (This dialog box
will appear automatically the first time the software is started up.)
2. From the pull-down menu, select “USB Audio Device” and click [OK].
3. Click the [TEST] button, and check whether or not the test audio is heard.
If the audio is heard, the D-Out Smoother is operating for that device. If the audio is not heard, select a different
USB Audio Device in step 2, and repeat steps 1 through 3.
Convenient Features
• When [Register to STARTUP] is checked in the Setting dialog, D-Out Smoother will automatically start up
when you start up the computer.
• When [Minimize window when starting up] is checked in the Setting dialog, D-Out Smoother will mini-
mize itself immediately after it starts up, allowing you to use your computer’s screen more effectively.
■ Deleting (uninstalling) the D-Out Smoother
The D-Out Smoother supports the Windows Add/Remove Programs Properties function. You can use the following procedure to remove the program if it becomes unnecessary.
If you uninstall D-Out Smoother, you should firstly uncheck the [Register to STARTUP] in the
Setting dialog. You can go to the Setting dialog by selecting [Control] - [Setting]. (p. 25)
1. Click the Windows [Start] button, and select [Settings] - [Control Panel].
2. In
[Control Panel]
ties dialog box.
3. Click the [Install/Uninstall] tab.
4. From the list in the dialog box, click the name of the application that you wish to delete.
5. Click [Add/Remove].
The application you specified in step 4 will be deleted.
, double-click [Add/Remove Programs] to open the Add/Remove Programs Proper-
16

Connections and driver installation (Macintosh)
Connections and driver installation (Macintosh)
* If you are a Windows user, refer to p. 8.
In order to use the UA-3, you must first install a driver. UA-3 uses a driver included with Mac OS.
What is a driver?
-> p. 8
Making connections and installing the driver
■ Making connections
(943)
Always make sure to have the volume level turned down before connecting the UA-3. Even with the volume all the
way down, you may still hear some sound when the power is switched on, but this is normal, and does not indicate a
malfunction.
(921)
To prevent malfunction and/or damage to speakers or other devices, always turn down the volume, and turn off the
power of all devices before making any connections. (It is not necessary to turn off the power of your computer.) Use
a USB cable to connect the UA-3 to your computer before turning on the power of your audio equipment.
Stereo Set
Powered Speaker etc.
LINE IN, AUX IN
Audio
cable
LINE OUT
Computer
USB cable
* Connect after starting
up the computer
USB
port
USB
port
• Before disconnecting the USB cable or restarting Macintosh, please close all applications. You should also
turn down the volume of any audio or amp system
that is connected.
• This unit is equipped with a protection circuit. A brief
interval (a few seconds) after connecting a USB connector
is required before the unit will operate normally.
DEUTSCHFRANÇAISESPAÑOLITALIANO ENGLISH
Stereo
Headphones
UA-3
■ Getting the unit to be recognized
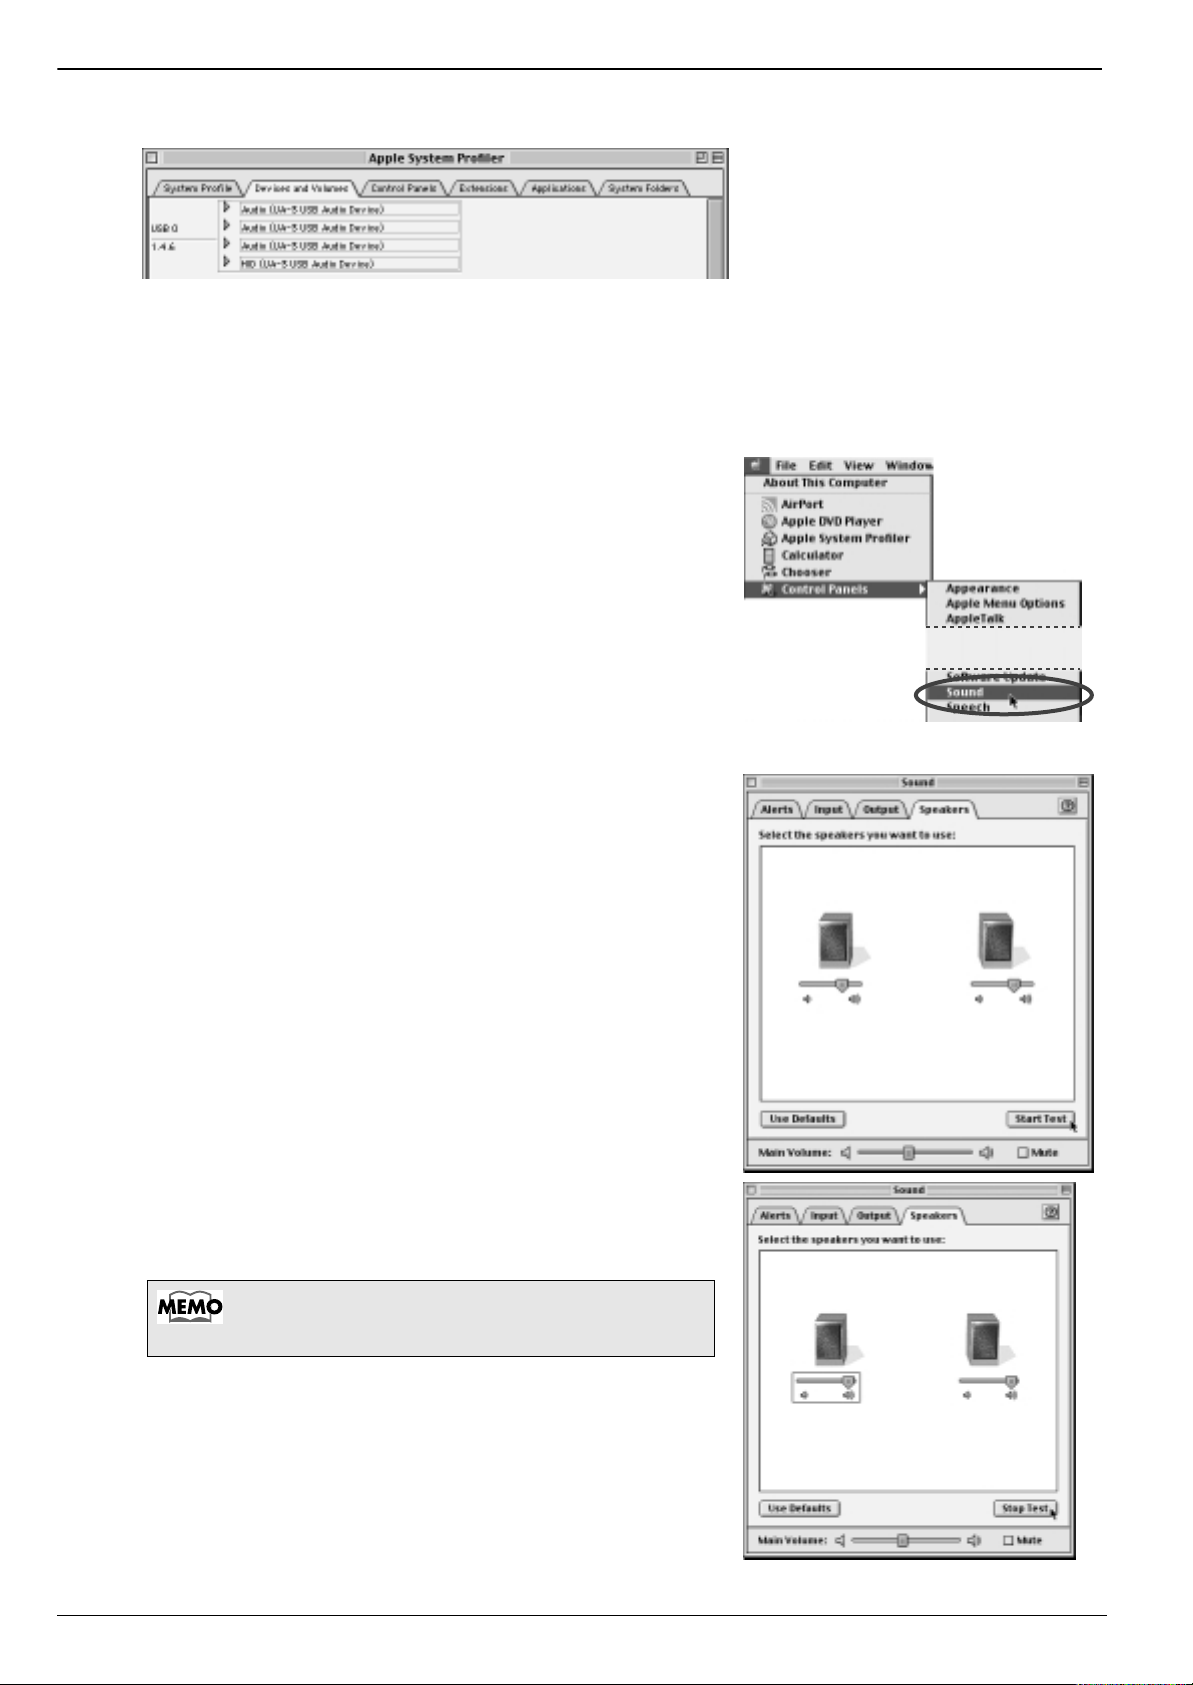
1. Turn on the power of your computer and start up Mac OS.
2. From the Apple menu, select the [Apple System Profiler].
• To prevent damage to your speakers, turn down the volume on this unit, and on
any audio devices you may have connected.
• Make sure to quit all applications that may be running before you make
the connection.
3. Click the [Devices and Volumes] tab control.
4. Use a USB cable to connect the UA-3 to your computer.
UA-3 17
Connections and driver installation (Macintosh)
5. T o mak e sure it is successfully recognized, select [Update all inf ormation] from the [Commands] menu. You should
see the following three audio devices in the USB section, as shown below:
If the indication is correct, the installation of the UA-3 driver is successful. Select [Quit] from the [File] menu to
close the Apple System Profiler dialog, then make the sound settings explained below.
If the indication is incorrect, you should try disconnecting the UA-3 from the USB port, and waiting about ten
seconds. Then, do the procedure over again, starting from the step 4.
■ Making the sound settings
6. From the Apple menu, select [Control Panels] - [Sound] to open
the Sound dialog.
7. Click the [Speakers] tab.
8. Turn do wn the volume on the UA-3, and on your audio equipment, then
click [Start Test].
9. T est sounds are output from left to right, along with what appears on the
screen; adjust the volume using the [Main V olume] bar. When you are
finished, click [Stop Test].
If the Recording input select switch is set to DIGITAL, it is not possible to play back audio data from your computer. Set the switch
to INPUT + GUITAR/MIC.
18
Depend on the your OS version, there is no [Main V olume] bar. In that
case, use the [Volume] bar in the [Output] to adjust the volume.
Connections and driver installation (Macintosh)
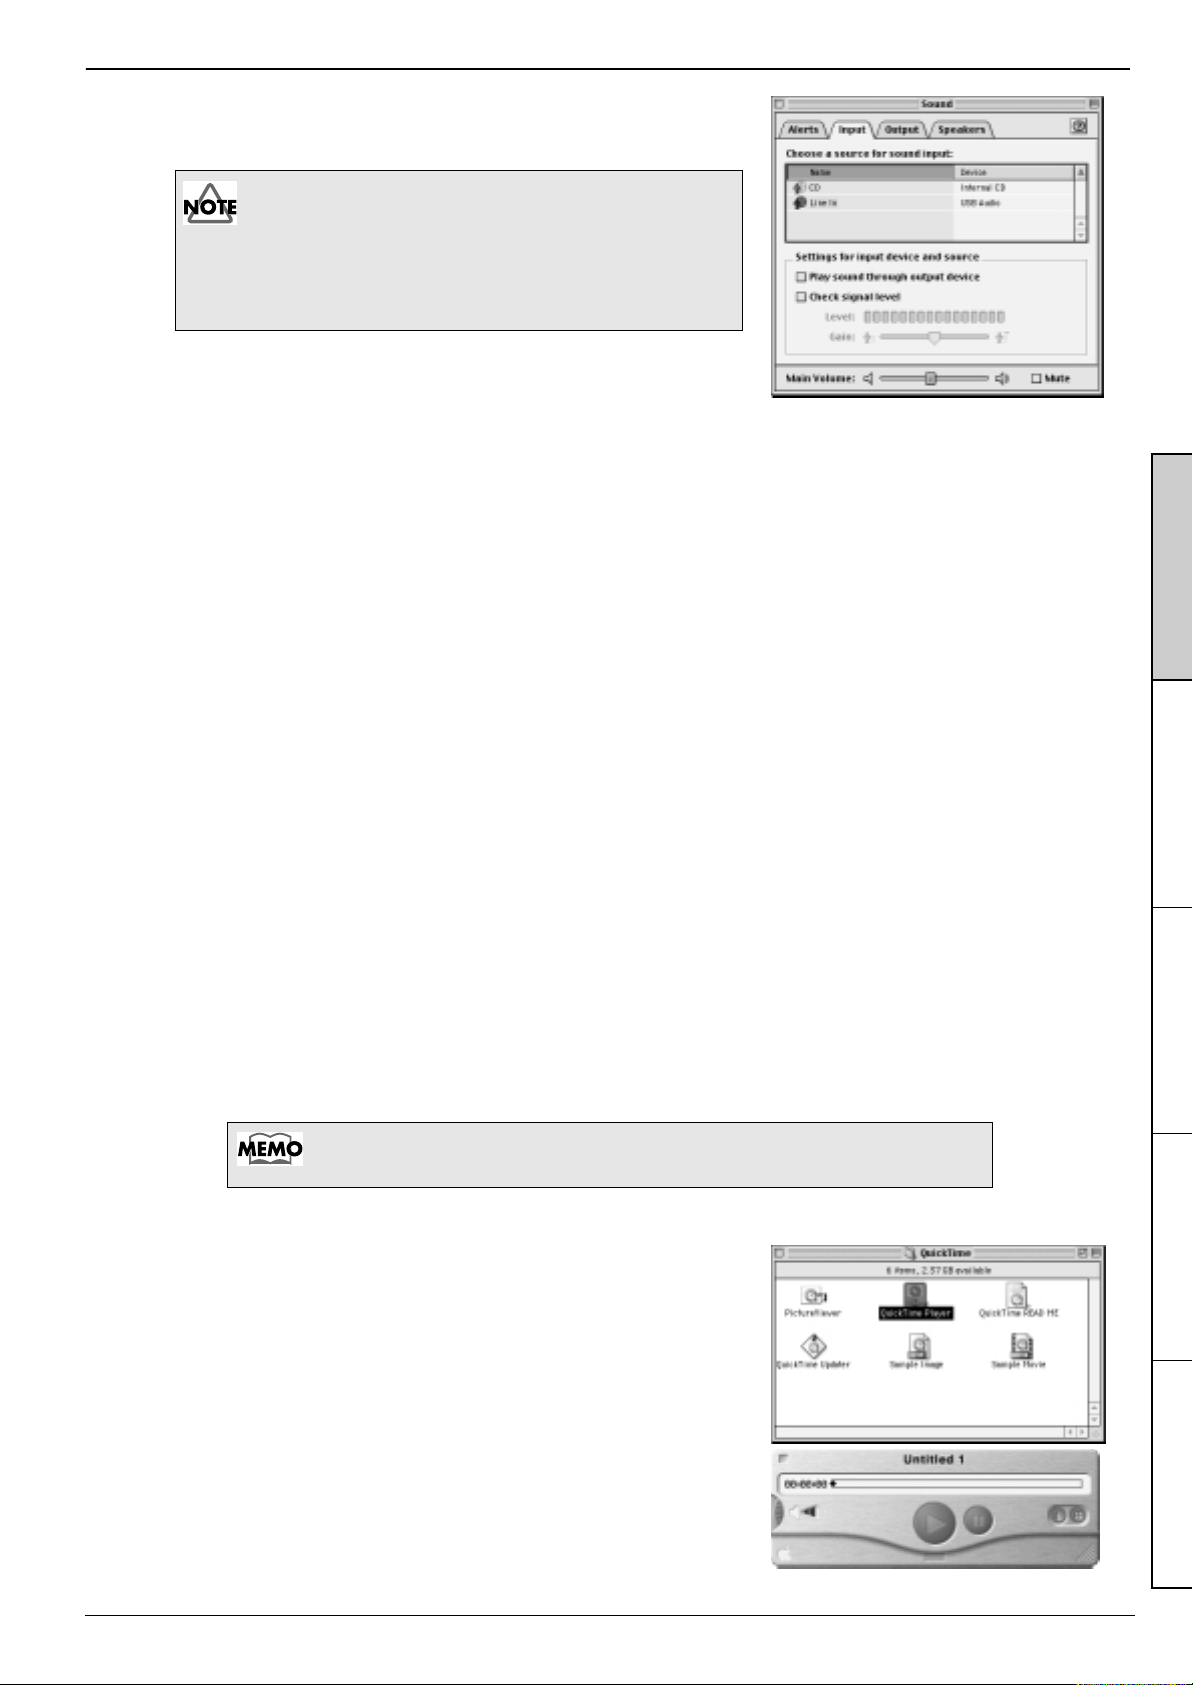
10.Select [Input] from the Sound dialog. Then, in Choose a source
for sound input:, choose USB Audio.
• If you don’t see USB Audio, you should close the Sound dialog. Then, discon-
nect the UA-3, and wait about ten seconds. Then, try doing the procedure over
again, starting at number 2.
• Do not check [Play sound through output device].
11.When you have finished making settings, select [Quit] from the [File] menu to close the Sound dialog.
Known issues: UA-3
• Some applications such as Cakewalk’s Metro Series and TC Work’s Spark Series cannot record/playback at 48
kHz. Please use the UA-3 at 44.1 kHz.
• While the audio application is recording or playing, do not connect/disconnect the USB cable, or move the
Recording input select switch.
Doing so may cause the application to freeze.
• You may hear sound hopping and/or noise when you record and play back at the same time due to high load on the
CPU. However, the noise should not be in the recording itself. Such noise should only be found in the playback
signal.
• If you are going to use the Virtual Sound Canvas 3, you will need to select [Performance] from the [Setting]
menu, and set the Expression Mode to Response Priority.
• The standard driver that comes with Mac OS is not ASIO compatible.
• When you start up your computer with the UA-3 connected, the computer may become unstable. If this occurs,
start up your computer before connecting the UA-3, and connect the UA-3 after start-up.
DEUTSCHFRANÇAISESPAÑOLITALIANO ENGLISH
Checking for sound output
After the connections have been made correctly, you can play back the sample data to check your setup.
■ Playing the sample data
Here we will use standard Macintosh functionality to play the sample data. The sample data is found in the AUDIO
Capture CD-ROM. Insert the CD-ROM into the CD-ROM drive of your computer.
In order to listen to the sample data, you will need approximately 30MB of free space on the
hard disk that contains your system.
1. Copy “Alright” to the desktop by dragging it from the “Sample_Data” folder of the CD-ROM.
2. Launch QuickTime Player, which is provided with the Mac OS. The
QuickTime Player is normally located in the QuickTime folder within
the Applications folder of your hard disk.
UA-3 19
Connections and driver installation (Macintosh)
3. From the [File] menu, select [Open Movie], select the copied file
“Alright,” and click [Convert] to open it.
4. Click the playback button.
The sample data will begin playing.
If the Recording input select switch is set to DIGITAL, it is not possible to play back audio
data from your computer. Set the switch to INPUT + GUITAR/MIC.
Did you hear the sample data?
If the sample data played correctly, your computer and the UA-3 are connected correctly, and the drivers have been
installed correctly. If the data did not play correctly, refer to Troubleshooting (p. 21). Troubleshooting contains material to help you find and correct such problems.
This completes all connections and driver installation for the UA-3.
20
Troubleshooting
If an unexpected problem occurs while using the UA-3, please read this chapter first. It provides numerous hints that will help you solve
problems.
The problems covered in the troubleshooting section are organized according to the operating system on which the problem might be encountered. Use the icon shown at the left of the title to find the information you need.
Problems common to both Windows and Macintosh
Problems that occur only on Windows
Problems that occur only on Macintosh
If you are using computer for the first time, or do not understand the explanation of a procedure, refer to the owner’s manuals for your
computer or for OS.
If the UA-3 does not operate as you expect, check the following points.
Problems related to the USB driver
“Add New Hardware Wizard” does not start up automatically
Troubleshooting
“Add New Hardware Wizard” terminates before completion
• When the USB cable is connected or disconnected, appr oximately 15 seconds (or more) may be required for the U A-3 to be recognized.
• Is the USB cable connected correctly?
Make sure that the UA-3 and computer are connected correctly by the USB cable.
• Can USB be used on your computer?
Refer to the owner’s manual for your computer, and make sure that it is able to use USB.
• Does your computer or USB hub have sufficient power supply capacity?
The UA-3 cannot be connected if insufficient power is supplied to it. Check whether one of the following cases apply.
If you are using the UA-3 with a notebook computer that is running on its battery, operation may be unreliable with some models of computer. If this is the case, connect the AC adaptor to your notebook computer.
The power conservation mode of your computer may limit the power that is supplied to USB. Check the settings of your computer.
In some cases, the UA-3 cannot be used with a bus-powered hub (a hub that does not contain a power supply). Please use a self-powered
hub (a hub that contains a power supply).
• Does your computer meet the USB specifications?
If you are using a computer that does not meet the USB specifications (such as a homemade computer), operation may be unstable. In
such cases, you may be able to solve the problem by connecting a USB hub that contains a power supply.
• Is “Unknown Device” displayed for “Other devices” or “Universal Serial Bus controllers”?
Use the following procedure to delete “Unknown Device” from “Other devices” (Universal serial bus controller), and re-start your
computer.
In order to check whether or not the “Unknown Device” is the UA-3, disconnect the USB cable
of the UA-3, and verify that “Unknown Device” has disappeared. Then connect the UA-3 once
again, and delete “Unknown Device.”
1. In the Windows Control Panel, double-click [System] to open the System Properties dialog box.
2. Click the [Device Manager] tab.
3. Double-click [Other devices] (Universal Serial Bus controllers) to see the list of devices.
4. In the list, select Unknown Device and click [Remove].
5. In the Confirm Device Removal dialog box, click [OK].
6. Make sure that the list does not show Other devices or Unknown Device, and click [Close] to close the dialog box.
DEUTSCHFRANÇAISESPAÑOLITALIANO ENGLISH
The “Add New Hardware Wizard” dialog box appears even though you
installed the drivers
If your computer or USB hub has two or more USB connectors, connecting the UA-3 to a USB connector to which the UA-3 has never
before been connected may cause the Add New Hardware Wizard dialog box will appear even though the drivers have already been
installed. Install the drivers once again as described in Connections and driver installation (Windows) (p. 8). This is not a malfunction.
UA-3 21
Troubleshooting
Drivers are not installed correctly
Use the procedure described in Deleting the USB Audio Device driver (p. 14) to delete the USB Audio Device driver installed in your computer, and install the UA-3 drivers once again as described in Connections and driver installation (Windows) (p. 8). Check whether there
is an item named “Unknown Device” in “Other devices” or in “Universal Serial Bus controllers.”
If you find “Unknown Device,” delete it.
A dialog box saying “Unknown Device found” appears, and I can’t install the
driver
Depending on your computer, not all of the Windows 98 files required to support audio over USB may have been installed when the computer was shipped.
Please check with the manufacturer of your computer.
Problems when using the UA-3
OS becomes unstable
• Starting up a computer when the UA-3 is already connected may cause the computer to become unstable.
If this occurs, start up the computer with the UA-3 disconnected, and then connect the UA-3.
■ No sound
• Is the UA-3’s Recording input select switch set to “INPUT + GUITAR/MIC”?
When the Recording input select switch is set to “DIGITAL,” the audio signals input to the digital Input connector are output. The
computer’s audio data is not output.
• Is a digital device such as an MD connected to the digital output of the UA-3?
Depending on your application, playing audio with a digital device such as an MD connected to the digital output of the UA-3 may cause
a certain amount of time to be required for the digital audio output to be locked immediately after playback, so that there will be no sound
for one or two seconds. If this occurs, you can use the D-Out Smoother software from the included CD-ROM to make audio play
smoothly. For details, refer to Basic operation of the D-Out Smoother (p. 15).
• Are you attempting to use the CD player of your computer to play an audio CD?
If you wish to play an audio CD on the CD-ROM drive of your computer, refer to When using your computer’s CD-ROM drive to play an
audio CD, or when playing background music for games with the UA-3 (p. 13).
• Are you running multiple applications?
If multiple applications are running simultaneously, an error message may appear. If this occurs, click [OK], and close the other applications.
Even if an application window is closed, it is still running if it remains in the taskbar, so be sure to quit any unneeded applications shown
in the taskbar.
• Have you specified the audio data output destination for OS?
The audio data output destination for a computer must be set to UA-3. For details on this setting, refer to Specifying the audio input/
output device (Windows p. 12) or Making the sound settings (Macintosh p. 18).
• Have you specified the audio data output destination for your playback software?
For some software such as Cool Edit Pro LE, you must set the audio data output destination as UA-3. For details on this setting, refer to
the owner’s manual for the software.
• Have the drivers been installed correctly?
In order to playback audio data using the UA-3, the USB Audio Device dri ver must be installed. For details on installation and settings,
refer to Connections and driver installation (Windows p. 8, Macintosh p. 17).
• Are the various Volume Control faders raised?
Adjust the volume of each fader as described in Volume Control settings (Windows p. 12) or Making the sound settings (Macin-
tosh p. 18).
■ Sound is distorted
• Does the peak indicator light red?
If you are inputting sound from the line input jacks, use the Line input adjustment slider of the UA-3 to reduce the input level. If you
are inputting sound from the Guitar or Mic input jacks, use the Guitar/Mic input adjustment slider to reduce the input level. Also, the
number of LED’s in the output level indicator will change according to the output level of the UA-3. If the red LED lights, use the line
output volume to lower the volume.
The volume level of the instrument connected to LINE IN is too low.
• Could you be using a connection cable that contains a resistor?
Use a connection cable that does not contain a resistor.
• Is the Line Input adjustment slider (p. 7) raised appropriately?
■ Noise is heard when playing back audio
• Is a mic still connected?
If a mic is connected to the UA-3, use the Guitar/Mic input adjustment slider to lower the input level.
22
•
The graphic accelerator of your computer may cause noise to occur during audio playback.
Use the following procedure to set graphic acceleration to “None.”
1. In the Windows Control Panel, double-click [Display] to open the Display Properties dialog box, and click the [Settings] tab.
2. Click [Advanced] to open properties, and click the [Performance] tab.
3. In Graphics, move the Hardware acceleration: slider to None, and click [OK].
4. In the Display Properties dialog box, click [OK] to close the dialog box.
Then restart your computer.
• Noise is heard in the line input or mic input
If a MIDI sound module and the UA-3 are connected via USB to the same computer, and the output of the MIDI sound module is connected to the line input jacks of the UA-3, noise from the computer may enter via the MIDI sound module and be heard from the UA-3. In
such cases, use a self-powered hub to connect the MIDI sound module and the UA-3 in parallel, or connect the MIDI sound module via
the serial interface or MIDI interface.
• Noise may be heard if you record and play back simultaneously.
If you record and play back simultaneously, the playback may be interrupted depending on the performance of the system, and this may
be heard as noise. However since priority is given to recording, the recorded data will not be lost.
• This problem may be solved by properly grounding the chassis of your computer, or the ground prong of the plug on the AC
power cord that was supplied with your computer. Also, make sure that there are no devices nearby that emit a strong magnetic
field, such as a television or a microwave oven.
• Are a large number of audio devices connected?
If a large number of audio devices are connected, noise may occur. Do not connect audio devices that you are not using.
■ Sound is interrupted during audio playback
• Try increasing the memory
You can increase the processing power of your computer by adding more memory. For details on adding memory, refer to the owner’s
manual for your computer.
• Does your computer fulfill the USB specifications?
The audio may be interrupted if you are using a computer that does not electrically meet the USB specifications. In this case, the problem
may be solved if you connect a USB hub that contains its own power supply.
• Are numerous applications running?
If you use numerous applications during playback, or start up another application, the playback may be interrupted depending on your
computer system. Exit all unneeded applications, and try again. If this does not solve the problem, try restarting a computer.
• Try making the following changes to the disk drive settings.
* The following settings may not exist on your computer.
1. In the Windows Control Panel, double-click [System] to open the System Properties dialog box, and click the [Device Man-
ager] tab.
2. Double-click [Disk drives] to see the list of devices.
3. From the list, select GENERIC IDE DISK TYPExx, and click [Properties] to access the GENERIC IDE DISK TYPExx Prop-
erties dialog box.
* The “xx” in GENERIC IDE DISK TYPExx will be a number that will differ depending on your
system.
4. Click the [Settings] tab, check the [DMA] check box in the Options, and click [OK] to close the dialog box.
* Depending on your system, a dialog box for DMA settings may appear. After checking the contents,
click OK or Cancel.
5. In the System Properties dialog box, click [OK] to close the dialog box.
Restart your computer so that the above settings will take effect.
Troubleshooting
DEUTSCHFRANÇAISESPAÑOLITALIANO ENGLISH
■ Audio playback stops
• On some computers, the Power Management settings in the Control Panel may cause audio playback to stop.
The Power Management Properties that are displayed when you double-click Power Management will differ depending on your computer
system. One example is given below, but you should consult the owner’s manual for your computer as well. Some computers may not
have the following settings.
1. In the Windows Control Panel, double-click [System] to open the System Properties dialog box, and click the [Device Man-
ager] tab.
2. Double-click [System devices] to see the list of devices.
3. From the list, select [Advanced Power Management support], and click [Properties] to access the Advanced Po wer Man-
agement support properties dialog box.
4. Click the [Settings] tab, and in Troubleshooting, check the [Disable power status polling] check box. Then click [OK].
5. In the System Properties dialog box, click [OK] to close the dialog box.
6. Restart Windows.
UA-3 23
Troubleshooting
Digitally recorded sound is distorted, pitch changes or contains noise
• If you are using a long digital cable, noise may occur or the sound may be distorted when it is connected. Use digital cables that
are one meter (about a yard) or shorter.
• Does the sampling frequency setting in the application match the sampling frequency of the digital device connected to the digital
input connector?
• When using digital recording, it is not possible to record in monaural. Set your recording software to the “stereo” setting.
Noise is present in the recorded sound
• It has been found that noise tends to be introduced in sound recorded on the iMac series models, which were released after the
summer of 2000.
• In the SimpleSound application that is included with MacOS, noise will be heard in the sound if it is played back immediately
after being digitally recorded. Save the sound first, then try playing it back.
• Update the USB Audio driver to 1.0.5f4.
If the USB Audio driver, which is provided with the Mac OS, is under 1.0.4, update it to 1.0.5f4.
You can download the driver from the URL below:
http://asu.info.apple.com/swupdates.nsf/artnum/n11703
Checking the USB audio driver’s version
1. Connect the UA-3 to the computer.
2. From the Apple menu, select [Apple System Profiler].
3. Click the [Devices and Volumes] tab.
4. In the USB section, the screen will indicate “Audio (UA-3 USB Audio Device).” Click the arrow at the left of this text.
5. The number displayed to the right of “Driver version” is the version of the USB audio driver.
■ A blank (silent) file is created when you record
• Try setting the bit rate to “16bit.”
If you are using Windows98 Second Edition, and your recording software is set to a bit rate of 8 bits, a blank file may be created, so that
you may not be able to record effectively. If this occurs, you will be able to record correctly by setting the bit rate to “16 bit”.
• Data that contains the SCMS flag cannot be recorded digitally.
The UA-3 supports SCMS (p. 5), so that if SCMS-flagged data (such as data from an MD that was digitally copied from a commercial
music CD) is input to the digital connector, the UA-3 will not be able to record this on the computer. (The sound will be output from the
line output jacks and the headphone jack.)
Cannot record digitally
• Is the Recording input select switch set to “DIGITAL”?
• Is the application set to the same sampling frequency as that of the digital device connected to the digital input connector?
• Recording will no longer be possible if you switch the sampling frequency (for example, between digital broadcast A mode and B
mode) of a device while it remains connected to the digital input connectors.
When switching the sampling frequency, you need to disconnect, then reconnect the digital cable.
• It is not possible to record digital data of a format other than consumer digital audio device format.
Cannot Record Music CD
• The UA-3 cannot record music CDs in the computer’s CD-ROM drive with CoolEdit Pro LE or other programs.
To record music CDs in the computer’s CD-ROM drive, you need to first select your computer’s sound card as the audio device (Waveform Record) that is to be used for recording by CoolEdit Pro LE (or the application you are using), then you can proceed with recording.
When recording a music CD with a sound card, uncheck “Enable digital CD audio for this CD-ROM device” you checked in When
using your computer’s CD-ROM drive to play an audio CD, or when playing background music for games with the UA-3 (p. 13).
The volume changed when you resumed from Suspend or Hibernation status
• When Windows 2000 resumes from Suspend or Hibernation, the output volume setting is changed due to a problem of Windows.
Start up the Mixer application as described in Volume Control settings (p. 12), and adjust the USB Audio (Speaker) slider.
Game background music does not sound
• Does the game use an audio CD for background music?
If an audio CD is used to provide background music for the game, refer to When using your computer’s CD-ROM drive to play an audio
CD, or when playing background music for games with the UA-3 (p. 13).
Problems common to software in general
Can’t install
• Is the included CD-ROM inserted into the CD-ROM drive of your computer?
• During installation, were the CD-ROM drive name and the installation file name input correctly?
• Is there sufficient space on your hard disk?
24
Troubleshooting
Increase the free space on your hard disk. Delete unneeded files (move them to the Recycle Bin), and then right-click on the Recycle Bin
and select Empty Recycle Bin.
Alternatively, you can add another hard disk to your system.
For details on installing a hard disk, refer to the owner’s manuals for your computer and for
Windows.
• Were other applications running when you performed the installation?
Exit all applications, and perform the installation again.
Can’t start up an application
• Are numerous applications running?
It may be that there is not enough memory to start up another application. Close all unneeded applications, and then start up the new application. If an error is still displayed, try restarting your computer.
An error is displayed when you start up an application
• If multiple applications are started up simultaneously, an error message may appear.
If this occurs, click [OK], and close all unnecessary applications.
Even if an application window has been closed, the application is still running if it remains in the taskbar. Be sure to close any unnecessary application that appears in the taskbar.
• If you are using Cakewalk Pro Audio, you must be sure that the sampling frequency of Cakewalk Pro Audio is set to 44.1kHz.
On Cakewalk ProAudio 7, 8, and 9, the sampling frequency can be set as follows.
[Tools] - [Audio options] - [Settings] - [Default sampling rate]
An Application hangs up
When using digital music software for digital recording with the UA-3’s recording input switch set to DIGITAL, be absolutely sure that a
digital device is connected.
Although in certain applications, Windows limitations may render the operation of the mouse or other such devices inactive until a digital
device is connected, this does not indicate any malfunction.
If no action results from the use of the mouse or other such devices, then reconnect the digital device.
• Confirm occurrence of the above with the following applications
(current as of January, 2001).
•Logic Audio 3.0 or 4.0 During Recording
•Cubase VST 3.7 During Startup/Recording/Playback
•Cubase ASIO Multimedia Setup During Testing
Confirm that the events or conditions above do not occur with the following applications.
•Cakewalk Pro Audio 7, 8, and 9
•CoolEditProLE
•SoundRecorder (Bundled with Windows98)
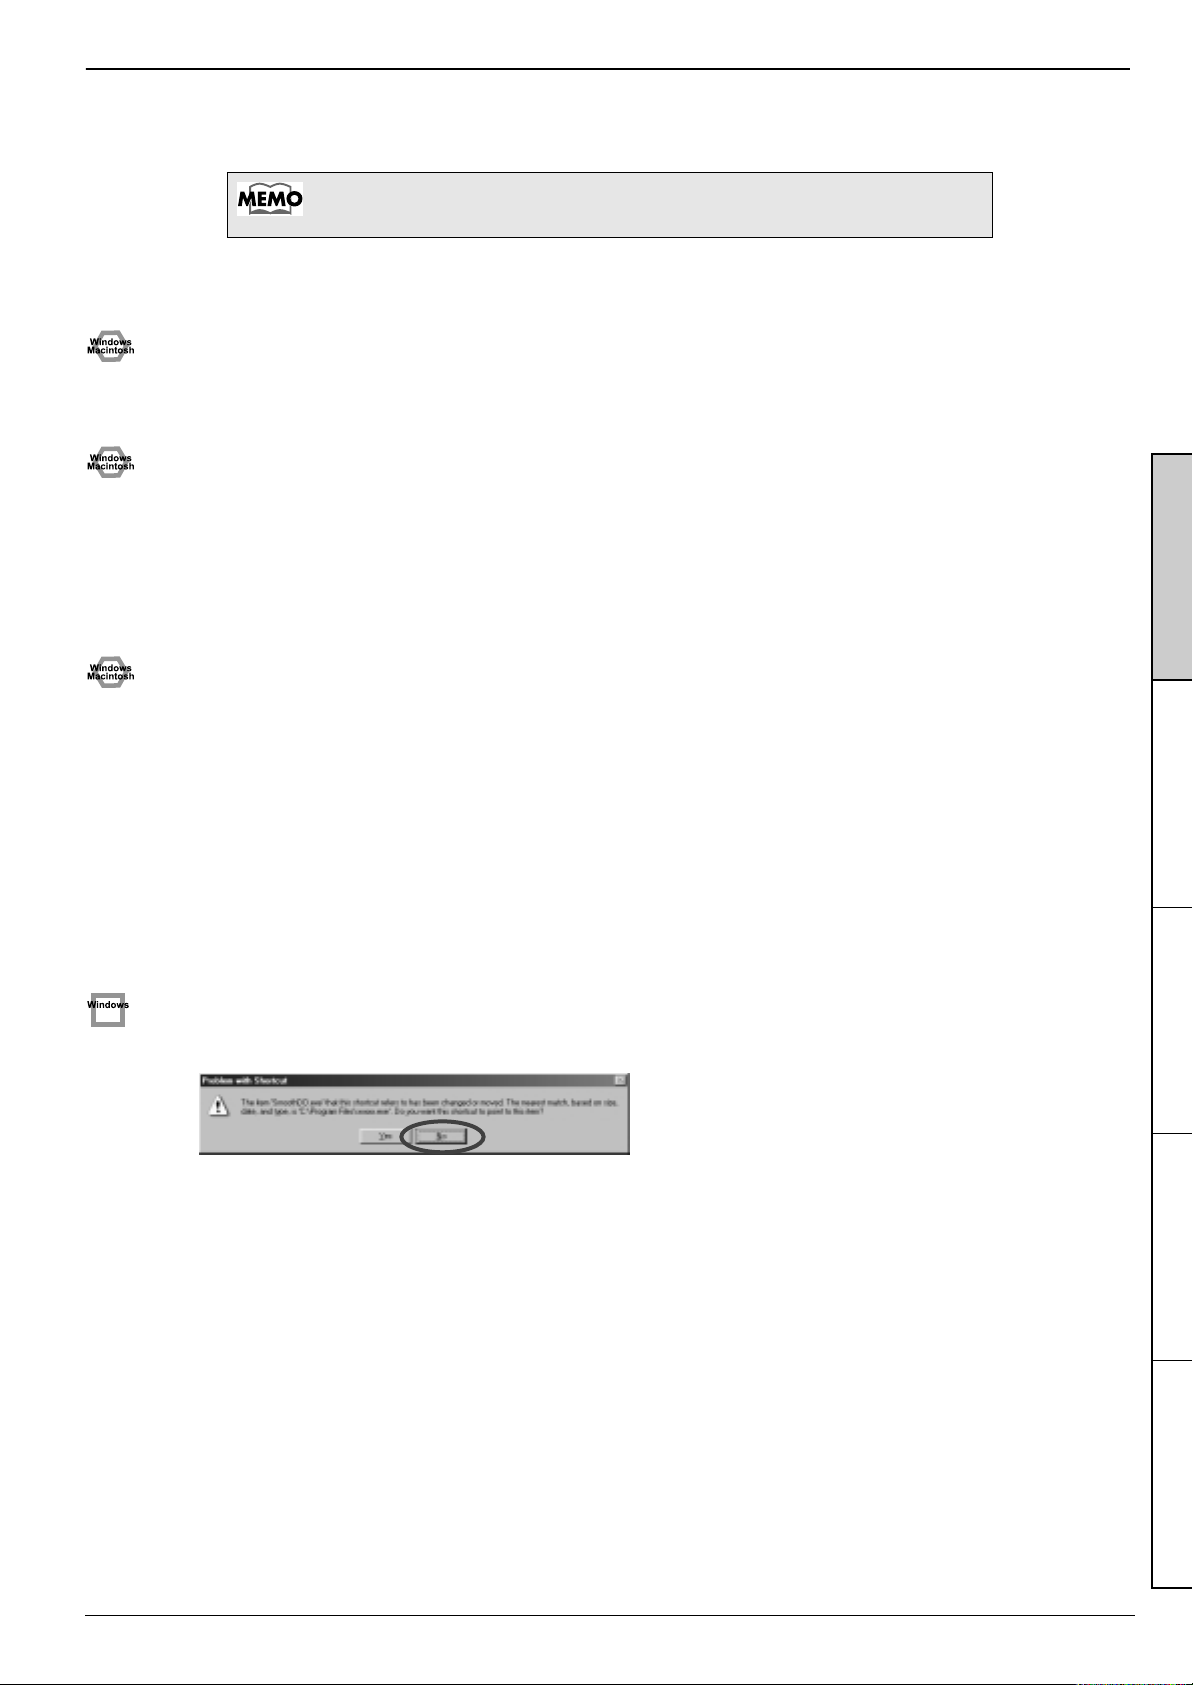
A shortcut error appears when starting up Windows
If you uninstall the D-Out Smoother with the Register to STARTUP checked (p. 16), the following error message will appear when you
start up Windows. In this case, click [NO] to close the message.
Use the following procedure to delete this message.
1. Click the Windows [Start] button, and select [Settings] - [Taskbar & Start Menu].
2. Click the [Start Menu Programs] tab, then click [Remove].
3. Select [Programs] - [StartUp] - [SmoothDo], and click [Remove].
DEUTSCHFRANÇAISESPAÑOLITALIANO ENGLISH
UA-3 25
Sie müssen diesen Abschnitt lesen, bevor Sie
Digitalaufnahmen erstellen
Unberechtigte Aufzeichnung, Vertrieb, Verkauf, Verleih, öffentliche Aufführung, Ausstrahlung oder Sendung
o. ä. (musikalische Komposition, Video-Aufzeichnungen, Ausstrahlung, öffentliche Aufführung oder ähnliches)
ganz oder in Teilen eines Werks, dessen Urheberrechte bei Dritten liegen, ist gesetzlich verboten.
Beim Austausch von Audiosignalen über einen digitalen Anschluss mit einem externen Instrument kann dieses
Gerät Aufnahmen vornehmen, die den Beschränkungen des Serial Copy Management System (SCMS) teilweise
nicht unterliegen. Der Grund hierfür ist, dass das Gerät ausschließlich für die Musikproduktion vorgesehen ist
und so entwickelt wurde, dass es keinen Beschränkungen unterliegt, sofern es für die Aufnahme von Werken
(wie z.B. Ihre eigenen Kompositionen) verwendet wird, die die Urheberrechte Dritter nicht verletzen. (SCMS
ist ein Merkmal, das das Kopieren in der zweiten Generation und später über einen digitalen Anschluss
verhindert). Dieses Merkmal wird in MD-Recorder und andere Digitalaudio-Consumer-Geräte als
Urheberschutzvorrichtung integriert.
Über das UA-3
Die teilweise SCMS-Unterstützung des UA-3 funktioniert nur bei digitalen Signalen, die aus externen Geräten
eingespeist werden. Wenn z.B. von einem MD-Gerät Daten mit SCMS-Attributen eingespeist werden, die von
einer kommerziellen Musik-CD kopiert wurden, funktioniert das UA-3 wie folgt:
Wenn die Einspeisung via Digitaleingabe-Anschluss des UA-3 erfolgt:
• Das UA-3 kann diese Daten nicht auf Ihrem Computer aufnehmen.
• Der Sound wird aus den analogen Ausgängen (Line-Ausgangsbuchsen, Kopfhörerbuchse) sowie aus dem
Digitalausgabe-Anschluss ausgegeben.
Wenn die Einspeisung via Analogeingänge des UA-3 (Line-Eingangsbuchsen) erfolgt:
• Normale Aufnahme ist möglich
Unabhängig davon, ob das SCMS-Attribut vorhanden ist, die Daten, die am DigitaleingabeAnschluss des UA-3 empfangen werden, werden stets direkt aus dem Digitalausgabe-Anschluss
ausgegeben.
Verwenden Sie dieses Gerät nicht für Zwecke, die die Urheberrechte eines Dritten verletzen könnten. Roland
übernimmt keinerlei Verantwortung für etwaige Verletzungen der Urheberrechte Dritter, die infolge der
Benutzung dieses Geräts entstehen könnten.
Dieses Gerät unterstützt keine Digitalaudio-Signale, die für Funkstation-Digitalaudio-Geräte formatiert
wurden.
Das UA-3 funktioniert nur entsprechend SCMS, wenn die digitalen Signale von einem externen
Gerät eingespeist werden. Den Digitalaudio-Signalen, die vom UA-3 ausgegeben werden, werden
keine SCMS-Flags hinzugefügt.
26
Einführung
Überprüfen Sie den Verpackungsinhalt
Das UA-3 enthält folgende Artikel. Wenn Sie die Verpackung öffnen, stellen Sie zuerst sicher, dass alle Artikel
vorhanden sind. Wenn Teile fehlen, nehmen Sie mit dem Händler Kontakt auf, bei dem Sie das UA-3 erworben haben.
UA-3
USB-Kabel
Mit diesem Kabel schließen Sie das UA-3 an den USB-Anschluss Ihres Computers an. Einzelheiten zur Herstellung
der Anschlüsse erhalten Sie unter Anschlüsse und Treiberinstallation (Windows S. 29, Macintosh S. 38).
Verwenden Sie ausschließlich das beiliegende USB-Kabel.
AUDIO Capture CD-ROM
Diese CD-ROM enthält die für den Einsatz der UA-3 benötigte Software.
* Lesen Sie unbedingt die Datei Readme_E.txt, die sich auf der AUDIO Capture CD-ROM befindet. Alle aktualisierten
Informationen sind in dieser Datei enthalten.
Einführung
• Bevor Sie die V erpackung der beiliegenden CD-ROM öffnen, müssen Sie die separate Lizenzvereinbarung lesen.
• Fassen Sie die silbrige Aufnahmeoberfläche der CD-ROM nicht an und verkratzen Sie sie nicht. Wenn das
geschieht, können die Daten nicht mehr korrekt gelesen werden. Wenn die CD-ROM verschmutzt ist, verwenden
Sie einen im Handel erhältlichen CD-Reiniger für die Reinigung.
• Spielen Sie die CD-ROM nicht auf einem konventionellen Audio-CD-Spieler ab. Dies führt zu einer hohen
Lautstärke, die Ihre Ohren oder die Lautsprecher beschädigen könnten.
Erste Schritte
Dabei handelt es sich um das Dokument, das Sie gerade lesen. Halten Sie es bereit, um gegebenenfalls nachschlagen
zu können.
Lizenzvereinbarung
Dieser Vertrag beschreibt die Bedingungen, unter denen Roland Corporation Ihnen die Verwendung der Software
erlaubt. Sie müssen die Lizenzvereinbarung lesen, bevor Sie die CD-ROM-Verpackung öffnen.
Folgende Komponenten müssen Sie selbst bereitstellen
Externer Verstärker, Lautsprecher, Kopfhörer und Mikrofon sind nicht im Lieferumfang enthalten
Externer Verstärker, Lautsprecher oder Kopfhörer, die für das Anhören der Soundausgabe via UA-3 benötigt werden,
sind nicht im Lieferumfang enthalten. Ebenso fehlt ein Mikrofon für die Soundeingabe in das UA-3. Sie werden diese
Komponenten selbst bereitstellen müssen.
Kabel für die Digitaleingabe/Ausgabe zum Anschluss der MD- oder DAT-Recorder sind nicht im Lieferumfang
enthalten
Sie können für die Digitalaufnahme auch einen MD- oder DAT-Digitalrecorder verwenden, aber die Kabel für den
Anschluss des Recorders an das UA-3 werden nicht mitgeliefert. Sie müssen diese Kabel selbst separat bereitstellen.
DEUTSCHFRANÇAISESPAÑOLITALIANO ENGLISH
UA-3 27
Einführung
2
Teile des UA-3 und ihre Funktion
15
3
45 6
10
11
• Kondensator-Mikrofon
Das UA-3 unterstützt kleine Multimedia-Mikrofone für
9
das Hinzufügen von gesprochenen Kommentaren und
ist mit monauralen Plug-In-Mikrofonen kompatibel.
• Wenn Sie ausschließlich von den Line-Eingängen
aus aufnehmen, entfernen Sie die Kabel von der
Guitar-Eingangsbuchse und der Mic-Eingangsbuchse.
• Das UA-3 ist nicht mit den phantom-gespeisten
Kondensator-Mikrofonen kompatibel, die typischerweise für Musik verwendet werden. Ebenso ist das
UA-3 inkompatibel mit den Stereo-Mikrofonen, die
manchmal mit MD-Geräten geliefert werden.
• Sie können keine Computer-Audiodaten wieder-
geben, wenn DIGITAL ausgewählt ist.
1
7
8
12
13 14 1716
1
Mic-Eingangsbuchse
2
Line-Eingangsbuchsen
3
Line-Ausgangsbuchsen
4
Anschluss Digitaleingabe (optisch)
5
Anschluss Digitalausgabe (optisch)
6
USB-Anschluss
7
Mic Type-Auswahlschalter
2
Setzen Sie diesen Schalter entsprechend dem Mikrofontyp, der mit der Mic-Eingangsbuchse verbunden ist .
Beim Anschluss eines dynamischen Mikrofons: “DYNAMIC”
Beim Anschluss eines Kondensator-Mikrophons: “CONDENSER”
8
Recording Input-Auswahlschalter
Wählt den Input aus, der für die Aufnahme verwendet werden wird.
Digitaleingabe-Anschlüsse : “DIGITAL”
Mic-Eingangsbuchse / Line Input-Buchse / Guitar-Eingangsbuchse :“INPUT + GUITAR/MIC”
9
USB-Anzeige
1
4
2
14
Leuchtet auf, wenn das UA-3 angeschlossen ist und vom Computer erkannt wird.
10
Output-Pegel-Anzeige
Die Anzahl der LEDs, die aufleuchten, ändert sich entsprechend dem Ausgabepegel der Kopfhörerbuchse
sowie der Line-Ausgangsbuchsen . Wenn die rote LED leuchtet, verwenden Sie die Line Output-
Lautstärke , um die Lautstärke zu reduzieren.
11
Line Output-Lautstärke
11
Passt die Lautstärke an, die aus der Kopfhörer-Buchse und den Line-Ausgangsbuchsen ausgegeben wird .
12
Guitar/Mic-Input Peak-Anzeige
Wenn die Eingangslautstärke aus der Guitar-Eingangsbuchse und der Mic-Eingangsbuchse zu hoch ist,
3
17
14
1
leuchtet die Anzeige rot. Wenn die Anzeige rot leuchtet, verwenden Sie den Guitar/Mic-Input Schieberegler ,
um die Eingangslautstärke zu reduzieren.
13
Guitar/Mic-Input Schieberegler
Dieser Schieberegeler passt die Eingangslautstärke der Guitar-Eingangsbuchse und der Mic-Eingangsbuchse an.
14
Guitar-Eingangsbuchse
15
Line-Input Schieberegler
1
Dieser Schieberegler passt die Eingangslautstärke der Line-Eingangsbuchsen an.
16
Line Input Peak-Anzeige
Wenn die Eingangslautstärke der Line-Eingangsbuchsen zu hoch ist, leuchtet diese Anzeige rot.
Anzeige rot leuchtet, verwenden Sie den
17
Kopfhörer-Buchse
Line Input-Schieberegler
15
, um die Eingangslautstärke zu reduzieren.
14
2
An dieser Stelle können Kopfhörer angeschlossen werden. Auch bei angeschlossenen Kopfhörern wird Sound aus den
Line-Ausgangsbuchsen ausgegeben .
* Einzelheiten zur Verwendung jedes Steuerelements und Anschlusses finden Sie im UA-3 Application Guide (S. 110).
3
1
17
3
13
Wenn die
28
Anschlüsse und Treiberinstallation (Windows)
s
Anschlüsse und Treiberinstallation (Windows)
* Wenn Sie ein Macintosh-Anwender sind, lesen Sie bitte S. 38.
Bevor Sie das UA-3 benutzen können, müssen Sie nacheinander die Treiber USB Composite Device (USBGerät), USB Human Interface sowie USB Audio Device (USB-Audiogerät) installieren. Diese Treiber sind
in Windows enthalten. Wenn Sie Windows 98 verwenden, befinden sich diese Treiber auf der Microsoft Windows
CD-ROM, Sie sollten daher die Microsoft Windows CD-ROM bereithalten. Wenn Sie Windows Me oder 2000
einsetzen, ist die CD-ROM nicht erforderlich.
Was ist ein Treiber?
Ein Treiber ist Software, die es einem Anwendungsprogramm, das auf Ihrem Computer installiert ist, erlaubt, Daten
zum/vom UA-3 zu übertragen, wenn das Gerät an Ihren Computer via USB-Kabel angeschlossen ist. Der Treiber
überträgt die Daten der Anwendung an das UA-3 sowie die Daten vom UA-3 an die Anwendung.
Vor der Installation des Treibers
Anwendung
USBTreiber
Computer
USB-Anschluss
USB-Kabel
UA-3
• Das UA-3 kann unter Windows 95 oder Windows NT nicht verwendet werden.
• Wenn noch andere Windows-Programme ausgeführt wer-den,
sollten Sie diese beenden, bevor Sie Ihre Arbeit fortsetzen.
• Wenn Sie mehrere Roland USB-Geräte gleichzeitig an Ihren Computer
anschließen (z.B. das UA-3 und andere USB-Geräte, wie z.B. das UA100G), trennen Sie das UA-100G oder andere Geräte vom USBAnschluss, bevor Sie den Treiber installieren. Wenn Sie den Treiber
installieren, während das UA-100G oder andere Geräte angeschlossen
sind, wird die Installation eventuell nicht korrekt ausgeführt.
Anschlüsse und Treiberinstallation
■ Anschluss der Geräte
Achten Sie stets darauf, die Lautstärke zu reduzieren, bevor Sie das UA-3 anschließen. Selbst wenn die Lautstärke
ganz zurückgedreht wurde, hören Sie eventuell Sound beim Einschalten der Geräte, aber dies ist normal und kein
Hinweis auf eine Fehlfunktion.
Um Fehlfunktionen und/oder Schäden an Lautsprechern oder anderen Geräten zu verhindern, reduzieren Sie stets die
Lautstärke und schalten alle Geräte ab, bevor Sie die Verbindungen einrichten. (Es ist nicht erforderlich, den
Computer vom Stromnetz zu trennen.) Verwenden Sie ein USB-Kabel, um das UA-3 an Ihren Computer
anzuschließen, bevor Sie Ihre Audiogeräte einschalten.
Stereoanlage
Lautsprecher etc.
LINE IN, AUX IN
AudioKabel
LINE OUT
Computer
USBAnschlus
USB-Kabel
* Nach dem Start
des Computers anschließen
USBAnschluss
• Bevor Sie das USB-Kabel entfernen oder Windows
neu starten, beenden Sie bitte alle Anwendungen. Sie
sollten auch die Lautstärke aller angeschlossenen
Audio- oder Verstärker-Systeme reduzieren.
• Dieses Gerät ist mit einem Schutzschaltkreis
ausgestattet. Nach dem Anschluss eines USBSteckers benötigt das Gerät eine kurze Zeitspanne (einige Sekunden), bis es den normalen
Betrieb aufnimmt.
DEUTSCHFRANÇAISESPAÑOLITALIANO ENGLISH
StereoKopfhörer
UA-3
UA-3 29
Anschlüsse und Treiberinstallation (Windows)
■ Installation des Treibers (Windows Me)
* Wenn Sie Windows 2000 verwenden, lesen Sie bitte S. 30, wenn Sie Windows 98 verwenden, lesen Sie
bitte S. 30.
1. Schalten Sie Ihren Computer ein und starten Sie Windows. Verwenden Sie ein USB-Kabel, um das UA-3 mit
Ihrem Computer zu verbinden.
2. Wenn Windows das UA-3 erkennt und der Assistent Neue Hardware
hinzufügen erscheint, achten Sie darauf, dass ”Automatisch nach
dem besten Treiber suchen (Empfohlen)” ausgewählt ist und
klicken anschließend auf [Weiter].
Es kann einige Zeit dauern, bis dieses Dialogfeld erscheint
3. Die Suche nach dem Treiber beginnt.
4. Sobald der richtige Treiber gefunden wurde, startet der Prozess der Treiberinstallation.
5. Wenn ein Dialogfeld erscheint, das Sie darüber informiert, dass die
Treiberinstallation abgeschlossen ist, klicken Sie auf [Finish]
(Beenden) und starten Windows neu.
Nach der Treiberinstallation lesen Sie bitte Angabe des Audioeingabe/Ausgabegeräts (S. 33) und wählen das Gerät
aus, das von Windows verwendet wird.
* Abhängig von Ihrer Computerinstallation kann es etwas dauern, bis das Gerät erkannt wird, nachdem
der Treiber installiert wurde.
■ Installation des Treibers (Windows 2000)
* Wenn Sie Windows Me verwenden, lesen Sie bitte S. 30, wenn Sie Windows 98 verwenden, lesen Sie
bitte S. 30.
1. Schalten Sie Ihren Computer ein und starten Sie Windows.
2. Schließen Sie das UA-3 an Ihren Computer mit einem USB-Kabel an.
Das UA-3 wird vom Computer erkannt und der Treiber wird automatisch installiert.
3. Starten sie Windows neu, nachdem Sie den Treiber installiert haben.
■ Installation des Treibers (Windows 98)
* Wenn Sie Windows Me verwenden, lesen Sie bitte S. 30, wenn Sie Windows 2000 verwenden, lesen
Sie bitte S. 30.
Die Installation muss in der Reihenfolge USB Composite Device (USB-Verbundgerät), USB Human
Interface Device und USB Audio Device (USB-Audiogerät) erfolgen. Gehen Sie bei der Installation wie
anschließend beschrieben vor.
1. Schalten Sie Ihren Computer ein und starten Sie Windows. Legen Sie die Microsoft Windows CD-ROM in Ihr CDROM-Laufwerk ein und v erwenden Sie ein USB-Kabel, um das UA-3 an Ihren Computer anzuschließen (S. 29).
30
Da einige Computer beim Kauf bereits den Inhalt der Microsoft Windows CD-ROM auf der
Festplatte speichern, befindet sich die Microsoft Windows CD-ROM eventuell nicht im
Lieferumfang. Wenn das der Fall ist, benötigen Sie für die Installation des Treibers keine
Microsoft Windows CD-ROM.
 Loading...