

Roland UA-1EX User Manual
Owner’s Manual
Thank you, and congratulations on your choice of the UA-1EX USB Audio Interface.
201a
Before using this unit, carefully read the sections entitled: “USING THE UNIT
SAFELY” and “IMPORTANT NOTES” (p. 2; p. 4). These sections provide
important information concerning the proper operation of the unit. Additionally,
in order to feel assured that you have gained a good grasp of every feature
provided by your new unit, Owner’s manual should be read in its entirety. The
manual should be saved and kept on hand as a convenient reference.
202
Copyright © 2005 ROLAND CORPORATION
All rights reserved. No part of this publication may be reproduced in any form
without the written permission of ROLAND CORPORATION.

USING THE UNIT SAFELY
Used for instructions intended to alert
the user to the risk of death or severe
injury should the unit be used
improperly.
Used for instructions intended to alert
the user to the risk of injury or material
damage should the unit be used
improperly.
* Material damage refers to damage or
other adverse effects caused with
respect to the home and all its
furnishings, as well to domestic
animals or pets.
001
• Before using this unit, make sure to read
the instructions below, and the Owner’s
Manual.
...............................................................................................
002a
• Do not open or perform any internal
modifications on the unit.
...............................................................................................
003
• Do not attempt to repair the unit, or replace
parts within it (except when this manual
provides specific instructions directing you
to do so). Refer all servicing to your
retailer, the nearest Roland Service Center,
or an authorized Roland distributor, as
listed on the “Information” page.
...............................................................................................
2
The symbol alerts the user to important instructions
or warnings.The specific meaning of the symbol is
determined by the design contained within the
triangle. In the case of the symbol at left, it is used for
general cautions, warnings, or alerts to danger.
The symbol alerts the user to items that must never
be carried out (are forbidden). The specific thing that
must not be done is indicated by the design contained
within the circle. In the case of the symbol at left, it
means that the unit must never be disassembled.
The ● symbol alerts the user to things that must be
carried out. The specific thing that must be done is
indicated by the design contained within the circle. In
the case of the symbol at left, it means that the powercord plug must be unplugged from the outlet.
004
• Never use or store the unit in places that
are:
• Subject to temperature extremes (e.g.,
direct sunlight in an enclosed vehicle,
near a heating duct, on top of heatgenerating equipment); or are
• Damp (e.g., baths, washrooms, on wet
floors); or are
• Humid; or are
• Exposed to rain; or are
• Dusty; or are
• Subject to high levels of vibration.
...............................................................................................
007
• Make sure you always have the unit placed
so it is level and sure to remain stable.
Never place it on stands that could wobble,
or on inclined surfaces.
...............................................................................................
010
• This unit, either alone or in combination
with an amplifier and headphones or
speakers, may be capable of producing
sound levels that could cause permanent
hearing loss. Do not operate for a long
period of time at a high volume level, or at
a level that is uncomfortable. If you
experience any hearing loss or ringing in
the ears, you should immediately stop
using the unit, and consult an audiologist.
...............................................................................................
011
• Do not allow any objects (e.g., flammable
material, coins, pins); or liquids of any kind
(water, soft drinks, etc.) to penetrate the
unit.
...............................................................................................
012a
• Immediately disconnect the USB cable, and
request servicing by your retailer, the
nearest Roland Service Center, or an authorized Roland distributor, as listed on the
“Information” page when:
• If smoke or unusual odor occurs
• Objects have fallen into, or liquid has
been spilled onto the unit; or
• The unit has been exposed to rain (or
otherwise has become wet); or
• The unit does not appear to operate
normally or exhibits a marked change in
performance.
...............................................................................................
013
• In households with small children, an adult
should provide supervision until the child
is capable of following all the rules
essential for the safe operation of the unit.
...............................................................................................
014
• Protect the unit from strong impact.
(Do not drop it!)
...............................................................................................
023
• DO NOT play a CD-ROM disc on a conventional audio CD player. The resulting
sound may be of a level that could cause
permanent hearing loss. Damage to
speakers or other system components may
result.
...............................................................................................
104
• Try to prevent cords and cables from
becoming entangled. Also, all cords and
cables should be placed so they are out of
the reach of children.
...............................................................................................
106
• Never climb on top of, nor place heavy
objects on the unit.
...............................................................................................
108c
• Disconnect all cords coming from external
devices before moving the unit.
...............................................................................................
3

IMPORTANT NOTES
291a
In addition to the items listed under “USING THE UNIT SAFELY” on pages 2 and 3, please read and
observe the following:
Placement
351
• Using the unit near power amplifiers (or other
equipment containing large power transformers)
may induce hum. To alleviate the problem, change
the orientation of this unit; or move it farther away
from the source of interference.
352a
• This device may interfere with radio and television
reception. Do not use this device in the vicinity of
such receivers.
352b
• Noise may be produced if wireless communications
devices, such as cell phones, are operated in the
vicinity of this unit. Such noise could occur when
receiving or initiating a call, or while conversing.
Should you experience such problems, you should
relocate such wireless devices so they are at a
greater distance from this unit, or switch them off.
354a
• Do not expose the unit to direct sunlight, place it
near devices that radiate heat, leave it inside an
enclosed vehicle, or otherwise subject it to temperature extremes. Excessive heat can deform or
discolor the unit.
355b
• When moved from one location to another where
the temperature and/or humidity is very different,
water droplets (condensation) may form inside the
unit. Damage or malfunction may result if you
attempt to use the unit in this condition. Therefore,
before using the unit, you must allow it to stand for
several hours, until the condensation has
completely evaporated.
Maintenance
401a
• For everyday cleaning wipe the unit with a soft, dry
cloth or one that has been slightly dampened with
water. To remove stubborn dirt, use a cloth impregnated with a mild, non-abrasive detergent. Afterwards, be sure to wipe the unit thoroughly with a
soft, dry cloth.
402
• Never use benzine, thinners, alcohol or solvents of
any kind, to avoid the possibility of discoloration
and/or deformation.
Additional Precautions
553
• Use a reasonable amount of care when using the
unit’s buttons, sliders, or other controls; and when
using its jacks and connectors. Rough handling can
lead to malfunctions.
556
• When connecting / disconnecting all cables, grasp
the connector itself—never pull on the cable. This
way you will avoid causing shorts, or damage to
the cable’s internal elements.
558a
• To avoid disturbing your neighbors, try to keep the
unit’s volume at reasonable levels. You may prefer
to use headphones, so you do not need to be
concerned about those around you (especially
when it is late at night).
559a (Modified)
• When you need to transport the unit, package it in
the case that it came in, if possible. Otherwise, you
will need to use equivalent packaging materials.
4

562
• Use a cable from Roland to make the connection. If
using some other make of connection cable, please
note the following precautions.
• Some connection cables contain resistors. Do not
use cables that incorporate resistors for
connecting to this unit. The use of such cables
can cause the sound level to be extremely low,
or impossible to hear. For information on cable
specifications, contact the manufacturer of the
cable.
Handling CD-ROMs
801
• Avoid touching or scratching the shiny underside
(encoded surface) of the disc. Damaged or dirty
CD-ROM discs may not be read properly. Keep
your discs clean using a commercially available CD
cleaner.
204
* Microsoft and Windows are registered trademarks of
Microsoft Corporation.
206e
* The screen shots in this document are used in compliance
with the guidelines of the Microsoft Corporation.
206j
* Windows® is known officially as: “Microsoft®
Windows® operating system.”
207
* Apple and Macintosh are registered trademarks of Apple
Computer, Inc.
209
* Mac OS is a trademark of Apple Computer, Inc.
220
* All product names mentioned in this document are
trademarks or registered trademarks of their respective
owners.
5

Contents
Contents of the Package...................................................................................8
Names of Things and What They Do .............................................................10
Getting Connected and Installing Drivers (Windows).................................. 14
About the Driver Modes ...........................................................................................................14
Installing the Driver...................................................................................................................15
Windows XP/2000 users .............................................................................................................................. 15
Windows Me/98 users.................................................................................................................................. 20
Driver Settings ............................................................................................................................21
About the input and output devices ........................................................................................................... 21
Input/output device setting......................................................................................................................... 22
Sequencer software settings ......................................................................................................................... 23
Checking that you hear sound..................................................................................................................... 24
Getting Connected and Installing Drivers (Macintosh)................................ 26
About the Driver Modes............................................................................................................................... 26
Mac OS X Users ..........................................................................................................................27
Installing the driver ....................................................................................................................................... 27
Input/output device settings ....................................................................................................................... 28
Mac OS 9 Users ...........................................................................................................................29
Installing the UA-1EX driver........................................................................................................................ 29
Installing the ASIO driver ............................................................................................................................ 29
Checking that you hear sound..................................................................................................................... 31
Basic use ..........................................................................................................33
Listening to Sound from Your Computer...............................................................................33
Recording a Cassette Tape or LP into Your Computer.........................................................34
Recording Sound from Your Computer onto MD or DAT ..................................................36
Recording the Digital Output from a CD/MD/DAT into Your Computer......................37
Recording a Mic..........................................................................................................................38
Adjusting the Audio Latency ...................................................................................................40
Decreasing the ASIO Buffer Size (Windows).........................................................................41
Using ASIO Direct Monitor (Windows/Mac OS 9) ..............................................................42
Appendices ......................................................................................................44
6

Installing the OS-Standard Driver ...........................................................................................44
Windows XP/2000 users .............................................................................................................................. 44
Windows Me users ........................................................................................................................................ 45
Windows 98 users.......................................................................................................................................... 46
Input/output device setting......................................................................................................................... 48
Mac OS X users............................................................................................................................................... 52
Mac OS 9 users ............................................................................................................................................... 53
Troubleshooting ..............................................................................................54
UA-1EX Block Diagram ...................................................................................66
Main Specifications .........................................................................................67
Index .................................................................................................................70
7
Contents of the Package
The UA-1EX includes the following items. When you open the package, first make sure that
all items are included. If any are missing, contact the dealer where you purchased the UA1EX.
USB Audio Interface UA-1EX
CD-ROM
This contains drivers for using the UA-1EX in Advanced mode.
* Be careful not to touch or scratch the recorded surface (unprinted surface) of the disc. Doing so may
render the disc unreadable. If the disc gets dirty, use a commercially available CD cleaner to clean it.
* Do not play back the CD-ROM in a conventional audio CD player. Doing so may produce
high-volume sound that can damage your hearing and/or speakers.
Owner’s Manual
This is the manual you are reading. Please keep it on hand for reference.
8

■ You’ll need to provide the following items
An external amp, speakers, headphones, microphone, and MD or DAT recorder are not included.
The external amp, speakers, or headphones you’ll need in order to hear the sound that is output
by the UA-1EX are not included. Also not included are a microphone or an MD or DAT
recorder, which you’ll need in order to input sound to the UA-1EX. You will need to provide
these items separately.
Audio cables for line input/output and digital input/output cables are not included.
The cables you will need to connect the UA-1EX to your audio equipment are not included. You
will need to provide these separately.
9
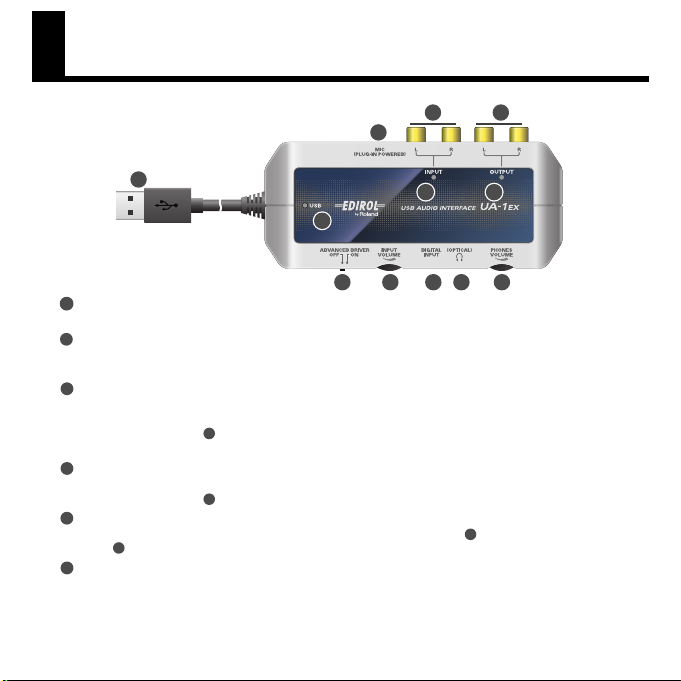
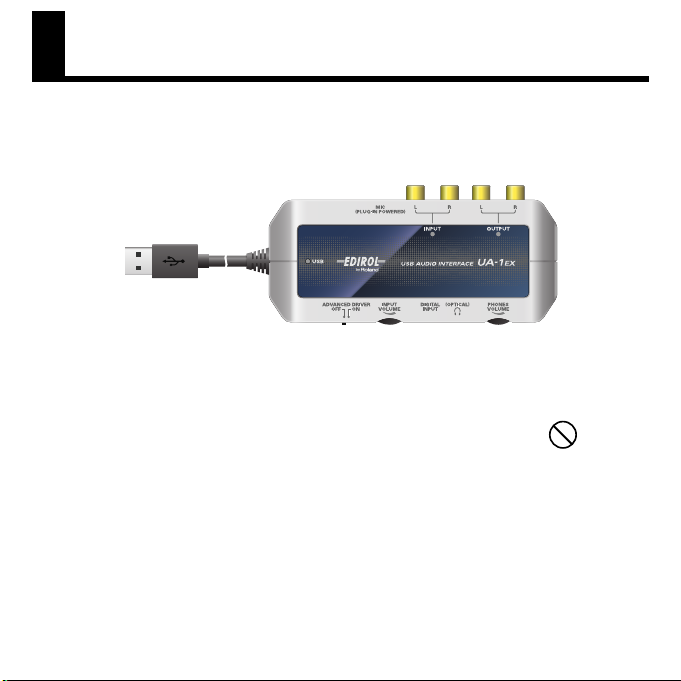
Names of Things and What They Do
3
64
7
12111098
1
USB cable
3
1
2
5
Connect this to your computer so that audio signals can be transferred.
2
USB Indicator
After the UA-1EX is connected to your computer and your computer has recognized the UA-1EX,
this indicator will light.
3
Mic input jack (plug-in powered mic)
Connect a miniature condenser microphone that is designed for connection to a computer or other
device that will supply power to the microphone. This jack provides a 3.3 V power supply.
Use the
Input volume
9
to adjust the volume.
* You must use a monaural microphone that is designed for plug-in power.
4
Line input jacks
Connect these when you want to input audio from an audio device or MIDI sound module.
Use the
Input volume
5
Input indicator
This will light when an audio signal is received from the
4
jacks
6
* The volume of the audio output from these jacks cannot be adjusted on the UA-1EX itself. Volume adjustments
.
Line output jacks
Connect these jacks to your audio system, such as amplified speakers or a stereo set.
must be made on the audio device to which the UA-1EX is connected.
9
to adjust the volume.
mic input jack
or the
line input
10
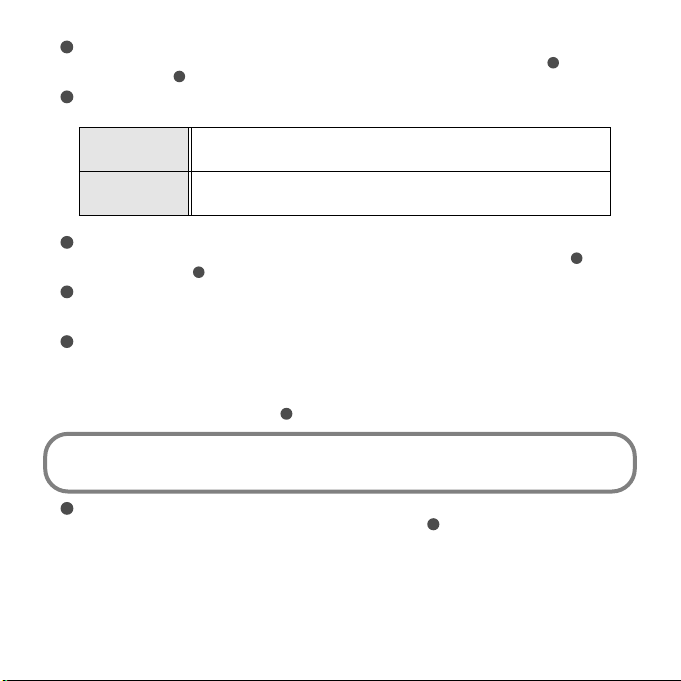
7
Output indicator
This will light when an audio signal (sound) is being output from the
headphone jack
8
ADVANCED (mode select) switch
This switches the driver mode.
ON
(Advanced mode)
OFF
(Standard driver
mode)
11
.
Normally, you should leave this ON
This mode uses a dedicated audio driver created specifically for the UA-1EX.
Use this mode when you want to use your sequencer software or audio editing
software to record, play, or edit audio with high quality and stable timing.
This mode uses the standard audio driver provided by the operating system.
Use this mode when you want to use software that utilizes the functionality
specific to your operating system.
line output jacks
.
6
* If you change this setting, you must disconnect the UA-1EX from the computer and then reconnect it.
9
Input volume
This adjusts the volume of the audio signal (sound) that is being input to the
and
line input jacks
10
Digital input connector (optical)
Connect this when you want to input digital audio from an audio device such as a CD/MD/DAT.
Use an optical digital cable for connection.
11
Digital output connector (optical) / Headphone jack
The same jacks serves as both the headphone jack and digital output connector.
• You can connect an optical cable here, and output an audio signal in digital form to an MD
recorder or other digital audio device.
• You can connect headphones here. Even if headphones are connected, sound will still be
output from the
Optical
These are digital input/output jacks for connecting optical cables. Digital input/output jacks for
connecting coaxial cables are labeled Coaxial.
12
Headphones volume
This adjusts the volume that is output from the
* You can’t adjust the volume that is output from the
4
.
Line output jacks
6
Headphone jack
digital output connector
11
.
and
mic input jack
line output jacks
or the
3
.
11
13
13
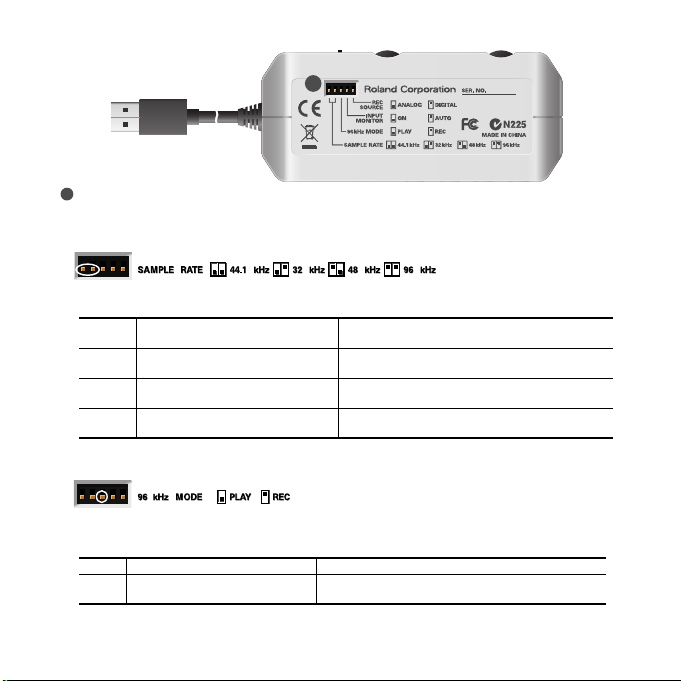
Setting select switches
These are miniature switches that you can slide up or down to make various settings.
●
Sampling frequency select switch
BA
This selects the sampling frequency for recording/playing audio data.
* If you’ve changed the sampling frequency, disconnect the UA-1EX, and then reconnect it.
Switch A set to the lower position
44.1kHz
Switch B set to the lower position
Switch A set to the lower position
32kHz
Switch B set to the upper position
Switch A set to the upper position
48kHz
Switch B set to the lower position
Switch A set to the upper position
96kHz
Switch B set to the upper position
●
96 kHz play/record select switch
If the sampling frequency is set to 96 kHz, you can either record or play back (not both). Set this
switch to choose either recording or playback.
Record/play at 44.1 kHz
Record/play at 32 kHz
Record/play at 48 kHz
Record or play at 96 kHz
* If you’ve changed setting, disconnect the UA-1EX, and then reconnect it.
PLAY
Switch set to the lower position Playback is selected.
REC
Switch set to the upper position
●
Input monitor switch
Recording is selected.
*You won’t be able to play back sound from the computer.
12
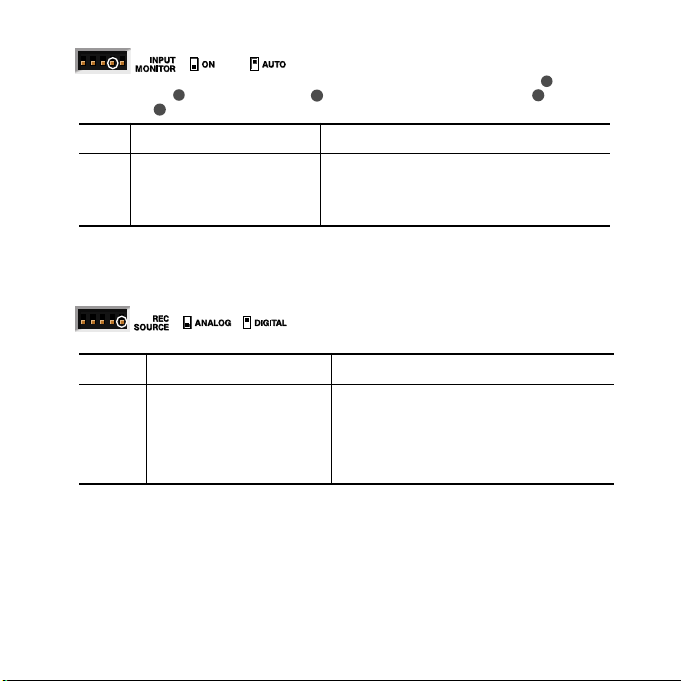
This selects whether or not the audio signals that are input through the
input connector
output jacks
ON
AUTO
(OFF)
* If the recording source select switch is set to DIGITAL, input monitoring will always be ON regardless of the
setting of this switch.
●
Recording source select switch
10
, and
.
Line input jacks
6
Switch set to the lower position
Switch set to the upper position
4
will be output to the
The audio signal being received will be output to the
Headphone jack and the Line output jacks.
Input monitoring will be switched on/off from your
ASIO2.0 compatible sequencer software.(➔“Using
ASIO Direct Monitor (Windows/Mac OS 9)”
* The input signal will not be output if you’re not using
the ASIO driver.
mic input jack, digital
headphone jack
3
11
and
Line
(p. 42))
This selects the input signal that will be sent via USB to your computer as the recording source.
ANALOG
DIGITAL
* If the recording source select switch is set to DIGITAL and a digital signal is being input to the Digital input
connector, audio data from the computer cannot be played back.
Switch set to the lower position
Switch set to the upper position
The analog audio signal from the mic input jack or
line input jacks will be sent to your computer.
The sound from the digital input connector will be
sent to the computer.
* If the DIGITAL position is selected, and no input
signal is being sent to the digital input connector, the
audio signal (sound) being output from the computer
via USB will pass through the UA-1EX and then
return to the computer.
13

Getting Connected and Installing Drivers (Windows)
About the Driver Modes
What is a driver?
A
“driver”
is software that transfers data between the UA-1EX and application software running
on your computer, when your computer and the UA-1EX are connected. The driver sends data
from your application to the UA-1EX, and from the UA-1EX to your application.
About the driver modes
The UA-1EX has two operating modes,
different driver is used by each mode.
This mode uses a dedicated audio driver created specifically for the UA-1EX.
When this dedicated driver is used, you can record/play/edit audio with high quality
and stable timing.
ON
(Advanced
mode)
OFF
(Standard
driver
mode)
Normally, you should use Advanced Mode.
In
Advanced mode
computer at a resolution of
Choose
Advanced mode
24-bit audio, such as the Cakewalk series; or ASIO-compatible sequencer software
that can record, play, and edit high-quality audio, such as Cubase VST or Logic.
(➔“Installing the Driver”
This mode uses the standard USB audio driver provided by Windows.
You can use this mode without installing the dedicated driver.
In
Standard driver mode
computer at a resolution of
Choose this mode if you are using sequencer software that uses Window’s own functionality, such as sequencer software that uses the CD-ROM drive of your computer
to play CD audio, or that uses the software synthesizer included with Windows.
(➔“Installing the OS-Standard Driver”
* The driver included with Windows does not support ASIO.
* Standard driver mode does not support 96 kHz or 24-bit. If you want to use 96 kHz or 24-
bit audio, turn the ADVANCED (mode select) switch ON.
Advanced mode
, audio signals can be transferred between the UA-1EX and the
16/24 bits
if you are using sequencer software that supports 96 kHz or
(p. 15)).
, audio signals are transferred between the UA-1EX and the
16 bits
and
Standard driver mode
and sampling frequencies of
and sampling frequencies of
(p. 44)).
, and a
32/44.1/48/96 kHz
32/44.1/48 kHz
.
.
14

Installing the Driver
Operation of the UA-1EX
The installation procedure will differ depending on your system.
Please proceed to one of the following sections, depending on the system you use.
• Windows XP/2000 users................................................................................ (p. 15)
• Windows Me/98 users ................................................................................... (p. 20)
Steps to be performed on the UA-1EX itself are marked by a symbol.
Windows XP/2000 users
1.
With the UA-1EX left unconnected, start up Windows.
Do not connect the UA-1EX to the computer until you reach Step 13 (p. 17).
* Disconnect all USB cables except for a USB keyboard and USB mouse (if used).
* Log onto Windows using a user name that has administrative privileges (such as Administrator).
2.
Open the
System Properties
Windows XP users
1.
Click the Windows
2.
In
“Pick a category,”
3.
In
“or pick a Control Panel icon,”
Depending on your setup, the
view). If so, double-click the
Windows 2000 users
1.
Click the Windows
Panel
.
2.
In
Control Panel
3.
Click the
Hardware
The
Driver Signing Options
4.
In the
Driver Signing Options
If the current setting is “Warn” or “Block,” change this to
installing the driver, change it back to the original setting.
dialog box.
start
menu, and from the menu, select
click
“Performance and Maintenance.”
click the
System
System
Start
menu, and from the menu that appears, select
, double-click the
tab, then click
[Driver Signing]
dialog box will open.
dialog box, select
System
icon may appear directly in the
icon.
System
icon.
.
“Ignore,”
icon.
then click
“Ignore.”
Control Panel
Control Panel
Settings
[OK]
.
Then, when you’ve finished
.
(Classic
|
Control
15

5.
Click
[OK]
6.
7.
8.
9.
10.
11.
12. Set the UA-1EX’s ADVANCED (mode select) switch to ON.
* The driver cannot be installed by means of the following procedure if the switch is set to OFF.
to close the
Exit all currently running software (applications).
Also close any currently open windows. If you are using virus checking or similar software, you
must exit all of these programs as well.
Prepare the CD-ROM.
Insert the CD-ROM into your computer’s CD-ROM drive.
If the message
a device with this kind of file”
From the Windows
The
“Run...”
In the
Open
D: \Driver\XP2k\setup.exe
* The drive name is
name for your CD-ROM drive.
The
Driver Setup
Click
[Next]
To begin the installation, click
Windows XP users
If
“Driver Signing Options”
an
“!”
or
Anyway]
the driver installation from step 1.
Windows 2000 users
If
“Driver Signing Options”
indicating “Digital Signature Not Found” will appear. If a [Yes] button is displayed, click
[Yes] to proceed with the installation. If you are unable to continue, click [OK] and repeat the
driver installation from step 1.
The “Setup is now ready to install the drivers” dialog box will appear.
Operation of the UA-1EX
System Properties
“Windows can perform the same action each time you insert a disk or connect
start
dialog box will appear.
field of the
.
“x”
to proceed with the installation. If you are unable to continue, click
menu, choose
Run
dialog box, type the following and click
“D:”
in the example shown here, but may be different on your system. Use the drive
dialog box will appear.
[Next]
symbol will appear. If a [Continue Anyway] button is displayed, click
dialog box.
appears,
[Cancel]
.
Run...
.
once again. Installation will begin.
in step 4 is set to anything other than
in step 4 is set to anything other than
[OK]
.
“Ignore,”
a dialog box with
[OK]
“Ignore,” a dialog box
[Continue
and repeat
16

Operation of the UA-1EX
13.
A message of
* This unit is equipped with a protection circuit. A brief interval (a few seconds) after connecting the UA-
1EX is required before the unit will operate normally.
Windows XP users
1.
The
Found New Hardware Wizard
If the message
and then click
2.
Make sure that
automatically (Recommended)”
If
“Driver Signing Options”
an
“!”
Windows 2000 users
If
“Driver Signing Options”
indicating
installation.
14.
The
Completing the Found New Hardware Wizard
Click
[Finish]
15.
In the
Driver Setup
This completes driver installation.
If the
Change System Settings
automatically.
* If you changed the
Windows has restarted.
Next, in order to ensure that audio processing occurs smoothly, you need to make settings so that
Background Services is given priority.
(➔
“Giving priority to Background Services”
Connect the UA-1EX to your computer.
“Found New Hardware”
“Connect to Windows Update to search for software?”
[Next]
.
“EDIROL UA-1EX”
symbol will appear. Click
“Digital Signature Not Found”
.
dialog box, click
“Driver Signing Options”
will appear. Please wait.
dialog box will appear.
is indicated. Then, choose
and click
[Next]
in step 4 is set to anything other than
[Continue Anyway]
in step 4 is set to anything other than
[Close]
dialog box appears, click
.
to proceed with the installation.
will appear. Click
dialog box will appear.
.
setting in step 4, restore the original settings after
(p. 18))
“Install the software
“Ignore,”
“Ignore,”
[Yes]
to proceed with the
[Yes]
. Windows will restart
appears, choose
a dialog box with
a dialog box
“No”
17
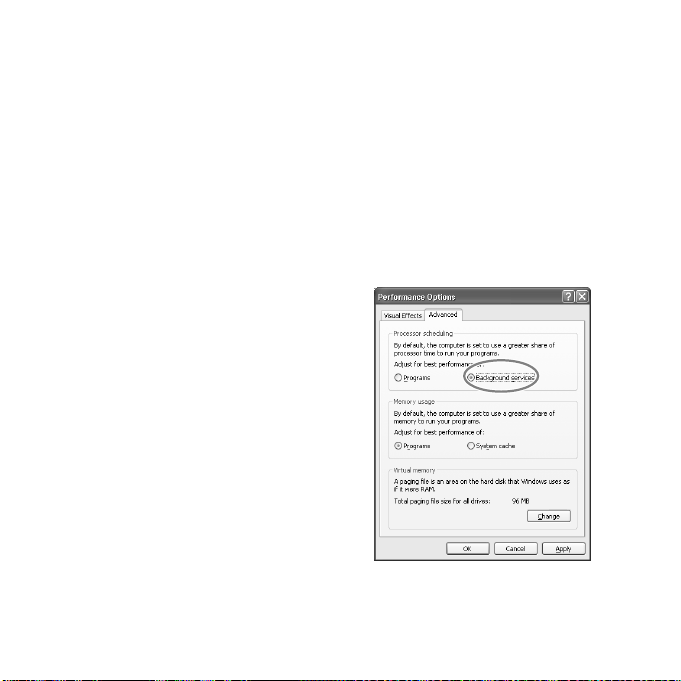
Giving priority to Background Services
■
If you don’t make this setting, you may experience problems such as clicks or pops in the sound.
To ensure that audio data is handled smoothly, proceed as follows to make this setting.
Windows XP users
1.
Open the
System Properties
1.
From the Windows
2.
In
“Pick a category,”
3.
In
“or Pick a Control Panel icon,”
Depending on your setup, the
view). If so, double-click the
2.
Click the
3.
4.
5.
6.
Advanced
In the right side of the
The
Performance Options
Click the
Advanced
In the
Processor Scheduling
“Background services,”
In the
System Properties
The
System Properties
Next, you’ll make the driver settings. (➔
dialog box.
start
menu, choose
click
“Performance and Maintenance.”
click the
System
icon may appear directly in the
System
tab.
Performance
dialog box will open.
tab.
and click
dialog box, click
dialog box will close.
icon.
area, click
area, choose
[OK]
.
“Driver Settings”
Control Panel
System
[Settings]
[OK]
.
.
icon.
.
Control Panel
(p. 21))
(Classic
18
Windows 2000 users
1.
Click the Windows
2.
In
Control Panel
3.
Click the
4.
Click
[Performance Options]
The
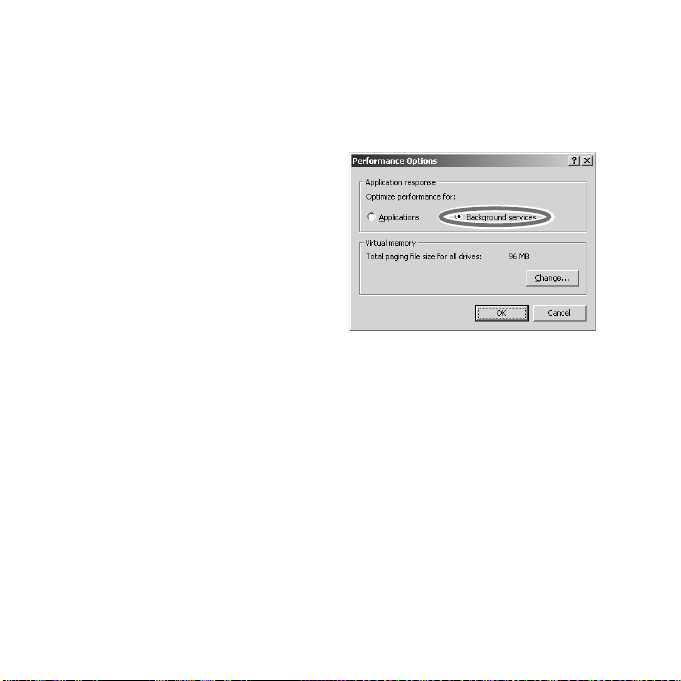
Performance Options
fig.back2000
5.
Choose
“Background services”
[OK]
.
6.
Click
[OK]
The
System Properties
Next, you’ll make the driver settings. (➔“Driver Settings”
Advanced
to close the
Start
menu, and from the menu that appears, select
, double-click the
tab.
System Properties
dialog box will close.
System
icon.
.
dialog box will appear.
and click
dialog box.
(p. 21))
Settings
|
Control Panel
.
19

Windows Me/98 users
1.
With the UA-1EX left unconnected, start up Windows.
Do not connect the UA-1EX to the computer until you reach Step 9.
2.
Exit all currently running software.
Also close any open windows. If you are using virus checking or similar software, be sure to exit it
as well.
3.
Prepare the CD-ROM.
Insert the CD-ROM into the CD-ROM drive of your computer.
4.
Click the Windows
The
“Run...”
5.
In the dialog box that appears, input the following into the
D: \Driver\Me98\setup.exe
* The drive name is
name for your CD-ROM drive.
6.
The
Driver Setup
7.
To begin the installation, click
The
“Setup is now ready to install the drivers”
Operation of the UA-1EX
8.
* The driver cannot be installed by means of the following procedure if the switch is set to OFF.
Operation of the UA-1EX
9.
A message of
* This unit is equipped with a protection circuit. A brief interval (a few seconds) after connecting the UA-
1EX is required before the unit will operate normally.
10.
In the
Driver Setup
Next, you’ll make the driver settings. (➔“Driver Settings”
Start
dialog box will appear.
menu. From the menu that appears, select
“D:”
in the example shown here, but may be different on your system. Use the drive
dialog box will appear. Click
“Found New Hardware”
[Next]
Set the UA-1EX’s
Connect the UA-1EX to your computer.
dialog box, click
[Next]
once again. Installation will begin.
ADVANCED (mode select) switch
will appear. Please wait.
[Close]
.
dialog box will appear.
.
“Open”
(p. 21))
Run...
field, and click
.
[OK]
to the ON position.
.
20

Driver Settings
In order to get the best performance from the software you are using, you must choose the correct
device settings.
About the input and output devices
Output device
EDIROL UA-1EX
This sends the audio signal from the computer to the UA-1EX. This is what you will normally use, for example when using the UA-1EX with an sequencer software such as Media
Player. You will also use this when using an sequencer software such as SONAR in WDM
driver mode, or when using a DirectSound software.
Input device
EDIROL UA-1EX
This receives the audio signal that is sent from the UA-1EX itself to the computer. This is
what you will normally use, for example when using the UA-1EX with an sequencer software such as Media Player. You will also use this when using an sequencer software such
as SONAR in WDM driver mode.
ASIO device
EDIROL UA-1EX
Use this if you are using the UA-1EX with an ASIO-compatible sequencer software such
as Cubase. In the ASIO settings of your sequencer software, choose “EDIROL UA-1EX.”
* To prevent audio loop feedback or double monitoring, turn monitoring off in your sequencer
software, or set your sequencer software to use ASIO Direct Monitor.
21

Input/output device setting
Windows XP users
1.
Open the
Sound, Speech, and Audio Devices Properties
1.
From the Windows
2.
In
“Pick a category,”
3.
In
“or Pick a Control Panel icon,”
2.
Click the
3.
4.
Windows 2000/Me users
1.
2.
3. For Sound Playback (or in Windows Me, Playback) and Sound Recording, click the ▼ located at
4. Click [OK] to complete the settings.
Windows 98 users
1. Open the Multimedia Properties dialog box.
2. Click the Audio tab.
3. For Playback field and Recording, click the ▼ located at the right of [Preferred device], and select
4. Click [OK] to complete the settings.
Audio
For
Sound playback
select
EDIROL UA-1EX
Click
[OK]
to complete the settings.
Open the
Sounds and Multimedia Properties
1.
Click the Windows
2.
In
Control Panel
If the
Sound and Multimedia
frame at the left.
Click the
Audio
the right of [Preferred device], and select EDIROL UA-1EX.
1. Click the Windows Start button, and from the menu that appears, select Settings | Control Panel.
2. In Control Panel, double-click the Multimedia icon.
EDIROL UA-1EX.
This completes the audio input/output settings.
Proceed to “Checking that you hear sound” (p. 24).
start
click
tab.
and
.
Start
, double-click the
tab.
menu, choose
Sound, Speech, and Audio Devices
Sound recording,
button, and from the menu that appears, select
Control Panel
click the
click the ▼
dialog box
Sounds and Multimedia
icon is not displayed, click
dialog box.
.
Sounds and Audio Devices
located at the right of
.
icon.
“Show all control panel options”
icon.
[Default device]
Settings | Control Panel
, and
.
in the
22
 Loading...