

Page 1
1 (E)
2 (B)
3 (G)
4 (D)
5 (A)
6 (E)
1 (G)
2 (D)
3 (A)
4 (E)
GUITAR
BASS
English
Owner’s Manual
Before using this unit, carefully read “USING THE UNIT SAFELY” and “IMPORTANT NOTES” (supplied on a separate sheet). After reading, keep the document(s) where it will be available for immediate
reference.
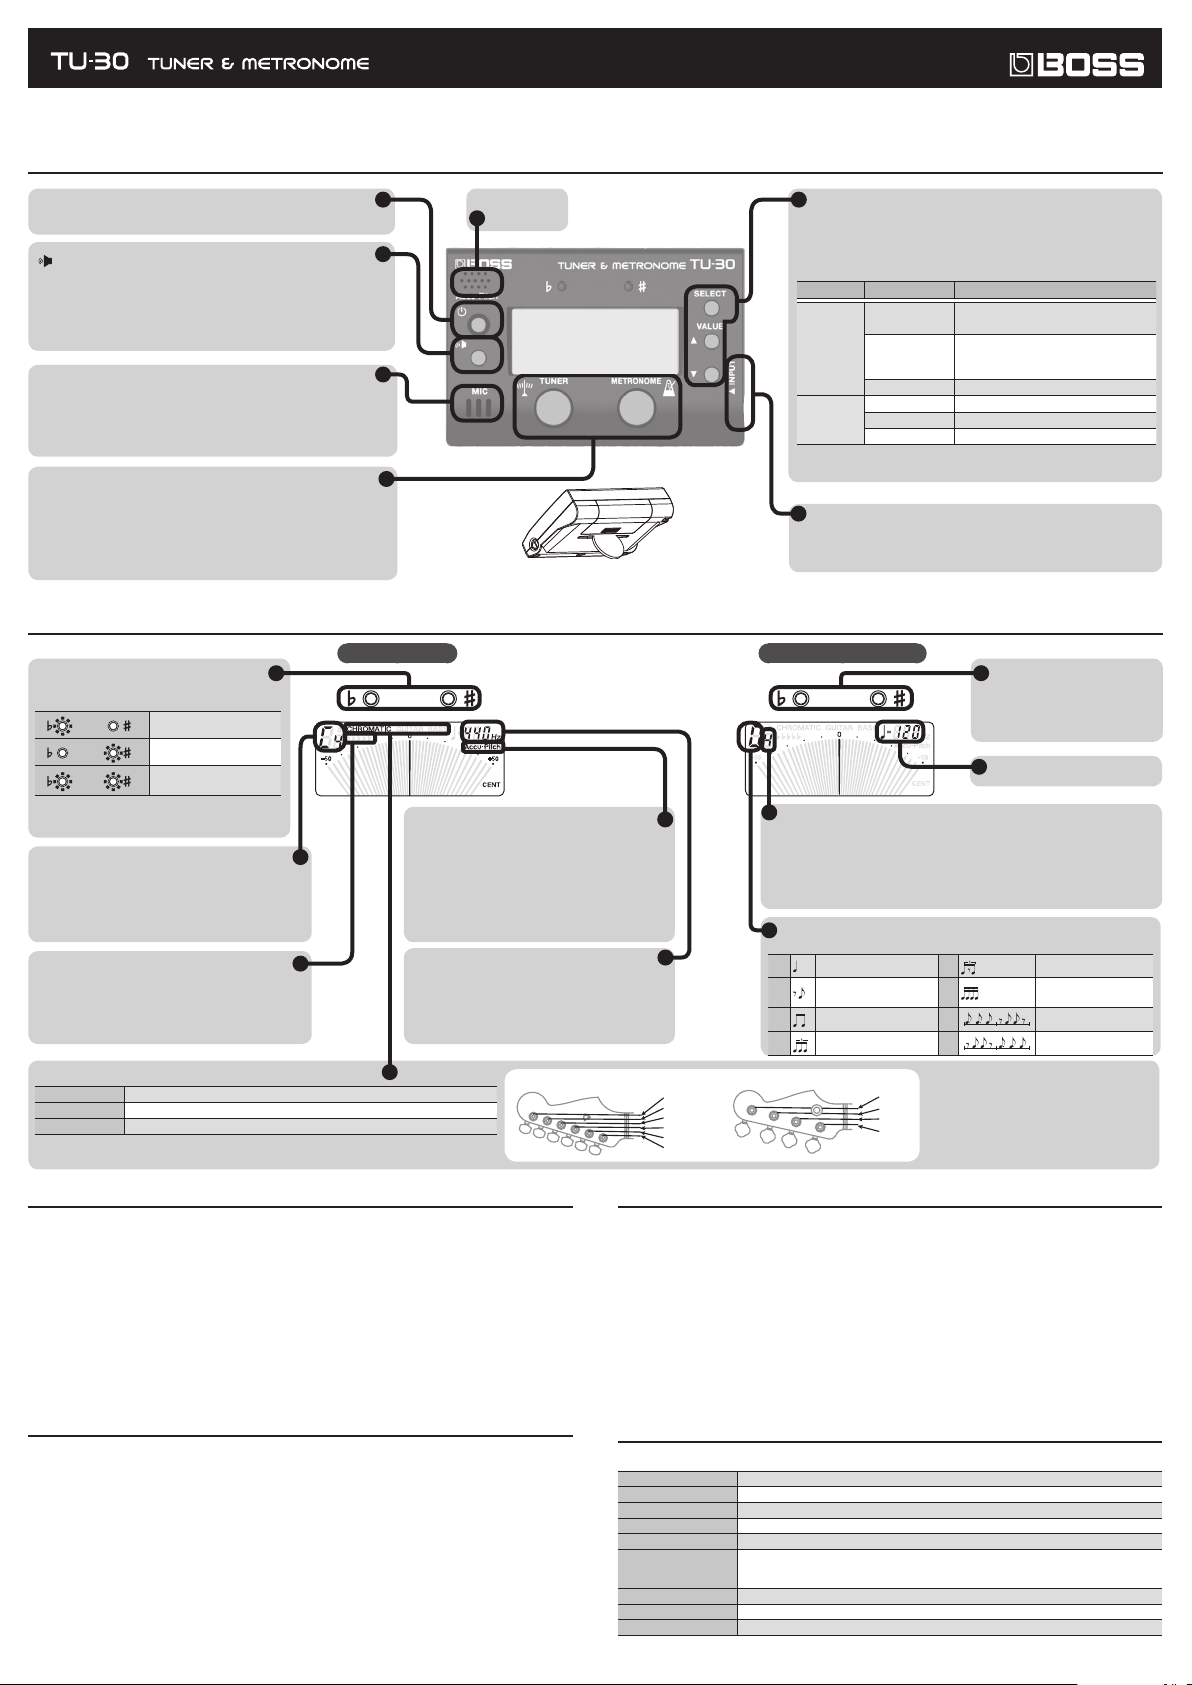
Panel Description
[L] (POWER) button
Switches the power on and o.
] (SOUND) button
[
Turns the sound of the TU-30 on/o.
When using the tuner, this sounds a reference pitch.
Use the VALUE [=][?] buttons to select a note name or string number.
When using the metronome, this sounds the metronome.
* The volume is not adjustable.
Mic
Use this when you’re tuning an acoustic instrument. Position the mic
as close as possible to your instrument.
* If you’re using the mic, don’t connect anything to the INPUT jack.
[TUNER] button
Switches to the tuner.
[METRONOME] button
Switches to the metronome screen and starts the metronome. When
the metronome screen is displayed, this operates as the start/stop
button.
Display
Guide Indicators
These light to show how close you are to the
target pitch.
The pitch is at (low).
The pitch is sharp (high).
The pitch is in tune (±3
cents).
Note Name/String Number Indicator
In CHROMATIC mode, this indicates the “note name”
and “octave”; in GUITAR/BASS mode, it indicates the
“string number” and “note name.”
Flat Tuning Indicator
This lowers the actual pitch of all notes below the
regular tuning (from one to ve semitones, or two
and a half steps), and can be accomplished simply
without changing the regular display.
Tuning Mode Indicator
CHROMATIC Allows tuning any of the twelve pitches in the chromatic scale.
GUITAR Allows tuning by guitar string number.
BASS Allows tuning by bass string number.
Tuner Screen Metronome Screen
Built-in speaker
You can insert a coin in the slit on the bottom of
the unit and use the coin as a stand.
Accu-Pitch On/O Indicator
By turning the power on while you hold down
the [TUNER] button, you can turn the Accu-Pitch
function on (indicator displayed) or o (not
displayed).
When the Accu-Pitch function is on, you’ll hear
a “beep-beep” sound when the pitch is correct,
indicating that tuning is completed.
Reference Pitch Indicator
The frequency of the A4 pitch (the middle A
on a piano keyboard) that is used in tuning for
performances is called the “reference pitch.”
[SELECT] button
The parameter to be set switches each time this is pressed (The value of
the parameter blinks).
VALUE [=][?] buttons
Change the value of the parameter selected by the [SELECT] button.
Parameter Value
Tuning Mode CHROMATIC, GUITAR, BASS
²²²
Tuner
Metronome
* The sound of the instrument that’s being input is not output from
Beat Indicator
This indicates the beat setting when ¸ is equivalent to one beat. The rst beat
in the setting is played as the down beat.
* The down beat is not heard if the time beat is set to 0.
* When the rhythm style is set to “6” or “7” (when set to claves), this sets the
number of times the basic pattern is repeated.
Rhythm Style Indicator
Select the rhythm styles (the way the metronome sounds).
0 Quarter note 4 Triplet with center rest
1
2
3
Flat tuning
Reference pitch A4 = 435–446 Hz (default: 440 Hz)
Rhythm style Refer to “Rhythm Style Indicator.”
Beat 0–9
Tempo
INPUT jack
Connect the guitar or bass to be tuned here.
the speaker.
Eighth rest and eighth
note
Eighth note 6 Clave 3-2
Triplet 7 Clave 2-3
Regular (²²/
semitone down)–
down)
¸
=30–250
5 Sixteenth note
blink alternately), ² (1
²²²²²
(5 semitones
Guide Indicators
The “²” for the selected beat
lights up on the down beats; the “¾”
lights up on the o beats.
Tempo Indicator
Using the Tuner
1. Connect the instrument to be tuned to the INPUT jack.
The built-in mic is used for tuning acoustic instruments. When using the mic, make sure that nothing is
connected to the INPUT jack, and place the TU-30 near the instrument.
2. Press the [L] (POWER) button to switch the power on.
3. Press the [TUNER] button to switch the tuner mode.
4. Tune the instrument.
With the intended note name/string number appearing in the display, tune the instrument so that both
“²” and “¾” of the Tuning Guide are lit, and the meter needle points to 0 (center position). As necessary,
use the [SELECT] button and VALUE [=][?] buttons to make tuner settings.
Using the Metronome
1. Press the [L] (POWER) button to switch the power on.
2. Press the [METRONOME] button to start the metronome.
The metronome alternately starts and stops each time you press the [METRONOME] button. As
necessary, use the [SELECT] button and VALUE [=][?] buttons to make metronome settings.
If you continue holding down the VALUE [?] or [=] button, the tempo value changes rapidly.
* If you turned o the power while using metronome, the metronome starts immediately after you turn
on the power.
© 2016 Roland Corporation
Batteries
When replacing the batteries, insert two AAA batteries, making sure that the batteries are oriented correctly.
* The display and LED indicators dim when the batteries begin to run down. Replace the batteries as soon
as possible.
* Once batteries are installed in the TU-30, settings for the tuner and the metronome can be stored in
memory, where they’ll be preserved even while the power is turned o. Removing the batteries returns
the TU-30 to its original factory settings.
* If no button is pressed for approximately 10 minutes after the power is turned on, the power will
automatically turn o. If you don’t want the power to turn o automatically, hold down the VALUE [=]
[?] buttons and press the [L] (POWER) button to turn the power on. The next time the power is on,
Auto O function will once again activated.
* If you handle batteries improperly, you risk explosion and uid leakage. Make sure that you carefully
observe all of the items related to batteries that are listed in “USING THE UNIT SAFELY” and “IMPORTANT
NOTES” (supplied on a separate sheet).
Specications
TU-30 Tuner & Metronome
Tuning Range E0 (20.6 Hz)–C8 (4,186 Hz)
Tuning Accuracy ±1 cent
Input Impedance 680 kΩ
Power Supply AAA x 2
Current Draw 15 mA (Metronome mode), 8 mA (Tuner mode and A4 = 440 Hz input)
Expected battery life
under continuous use
Dimensions 90 (W) x 60 (D) x 25 (H) mm / 3-9/16 ( W) x 2-3/8 (D) x 1 (H) inches
Weight 90 g / 4 oz (including battery)
Accessories Dr y Battery (R03 (AAA) Type) x 2, Owner’s Manual, Leaet “USING THE UNIT SAFELY”
Carbon = approx 50 hours (A4 = 440 Hz continuous input)
* These gures will vary depending on the actual conditions of use.
 Loading...